page 2 | video insight © 2016 - ip server · ip server v6.2 introduction video insight is a...
TRANSCRIPT


IP Server v6.2
Contents
Introduction
System Overview
Planning
Server
IP Server Sample Configurations
20 H.264 cameras streaming 1.5Mbps
40 H.264 cameras streaming 1.5Mbps
120 H.264 cameras streaming 1.5Mbps
240 H.264 cameras streaming 1.5Mbps
Failover Server
Network
Factors affecting performance
VI Monitor
Web Client
Cameras
Camera Audio
Licensing
Router configuration
How to configure your Video Insight server and router for remote access:
Storage considerations
Database considerations
Page 2 | Video Insight © 2016

IP Server v6.2
Software installation
IP Server
Installation without an existing SQL installation
Installation with an existing SQL installation
Initialization
Activate Using Demo Mode
VI Monitor Client
Adding servers manually
Add Server Automatically
IP Server Manager
Accessing IPSM
Configuring IP Server
IPSM: Options
Check the Enable Analog Video Bandwidth Timeout box.
Select the timeout in seconds.
Click OK.
IPSM: System Log
IPSM: Network Options
IPSM: Diagnostics
IPSM: No Cameras
IPSM: Update Activation
Security
Configuring Active Directory
Active Directory Prerequisites
Page 3 | Video Insight © 2016

IP Server v6.2
Adding users or groups
Removing users or groups
Viewing user permissions
LDAP (Lightweight Directory Access Protocol)
CheckSum
Enabling CheckSum Watermark
Verifying a CheckSum Watermark
Troubleshooting
Frequently Asked Questions
Online Resources
Remote Support
Contact Us
Appendices
Appendix A: IP Server port list
Appendix B: Current Customers Examples
Appendix C: Commonly Used Camera Credentials
Appendix D: Configuring a CNB camera
Appendix E: Configuring Sentry FS1000 and FS2000 cameras
Appendix F: Configuring an IQEye Camera using Optional Controls
Appendix G: The Independent JPEG Group’s JPEG Software Notice
Appendix G: The Independent JPEG Group’s JPEG Software Notice
Page 4 | Video Insight © 2016
IP Server v6.2
Introduction
Video Insight is a leading developer of enterprise-class video management software. Our vision
is to provide powerful, user-friendly software that will run on "off-the-shelf" hardware based
on IP technology. We have developed our solution from the ground-up, making us one of the
few pure-play IP video management software providers.
Video Insight’s suite of products was created to protect clients by providing intelligent, easy to
use IP security solutions. Our extensive effort has resulted in products that are flexible and
powerful enough for any situation, yet still very cost effective. Our software boasts the largest
number of camera integrations available on the market. Users can access their Video Insight
surveillance systems on mobile devices, through the web and on Microsoft Windows clients
over internal networks or the Internet.
Video Insight v6.2 can intelligently and efficiently monitor security throughout your
organization. Key advantages of this version are:
● Easy to Use Updated User Interface
● Support for over 3,000 cameras
● Alarm Monitoring
● Facility Maps
● Synchronized Playback
The Video Insight IP Server Administrator Guide includes everything you need to install and
configure IP Server with best practices and a troubleshooting guide. This document is intended
for use by advanced users and system administrators.
Page 5 | Video Insight © 2016
IP Server v6.2
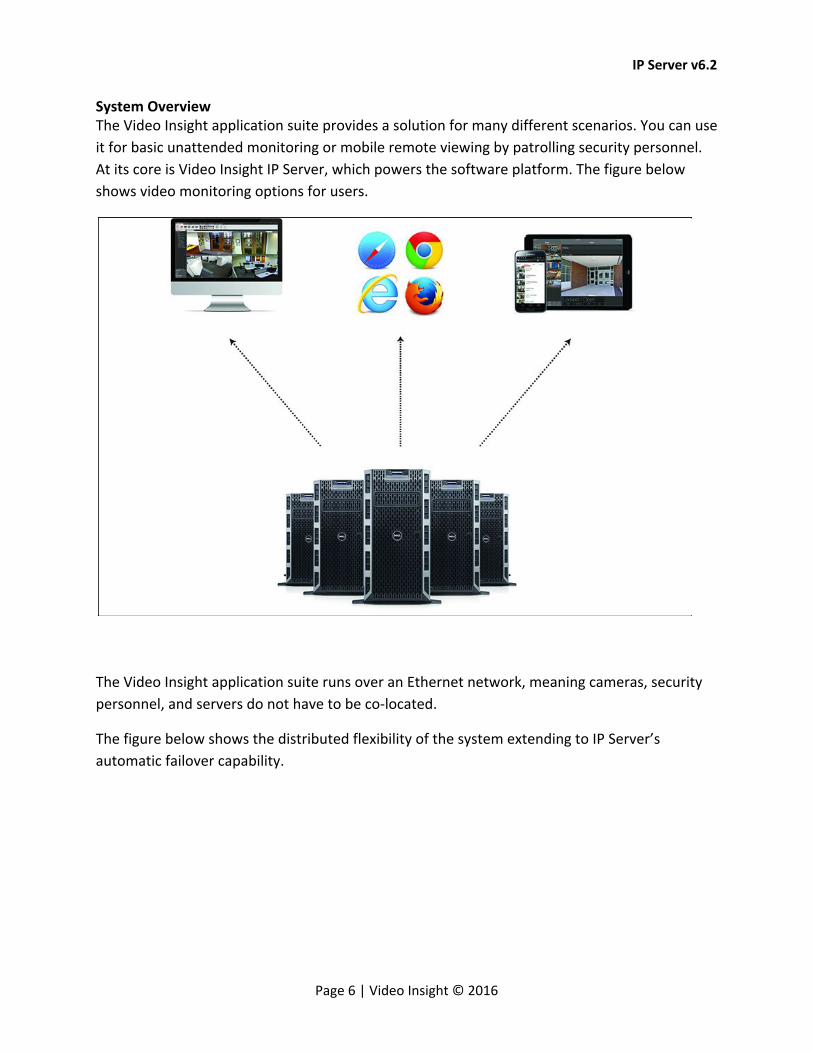
System Overview The Video Insight application suite provides a solution for many different scenarios. You can use
it for basic unattended monitoring or mobile remote viewing by patrolling security personnel.
At its core is Video Insight IP Server, which powers the software platform. The figure below
shows video monitoring options for users.
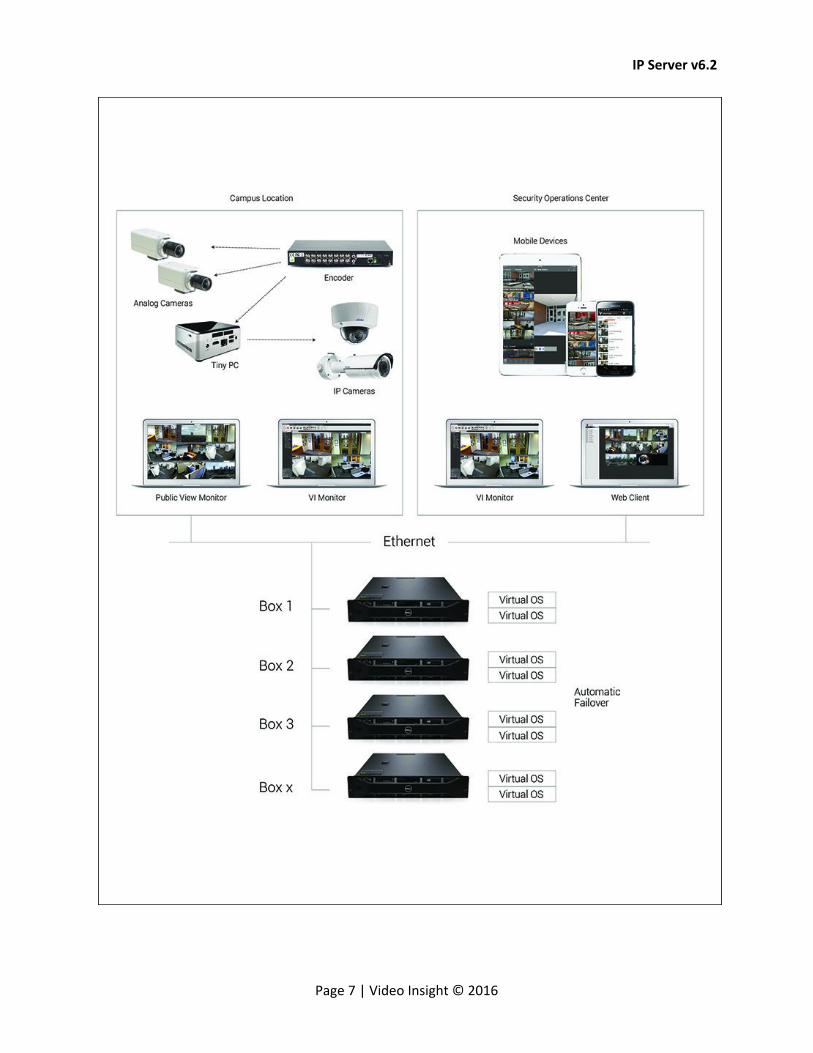
The Video Insight application suite runs over an Ethernet network, meaning cameras, security
personnel, and servers do not have to be co-located.
The figure below shows the distributed flexibility of the system extending to IP Server’s
automatic failover capability.
Page 6 | Video Insight © 2016
IP Server v6.2
Page 7 | Video Insight © 2016
IP Server v6.2
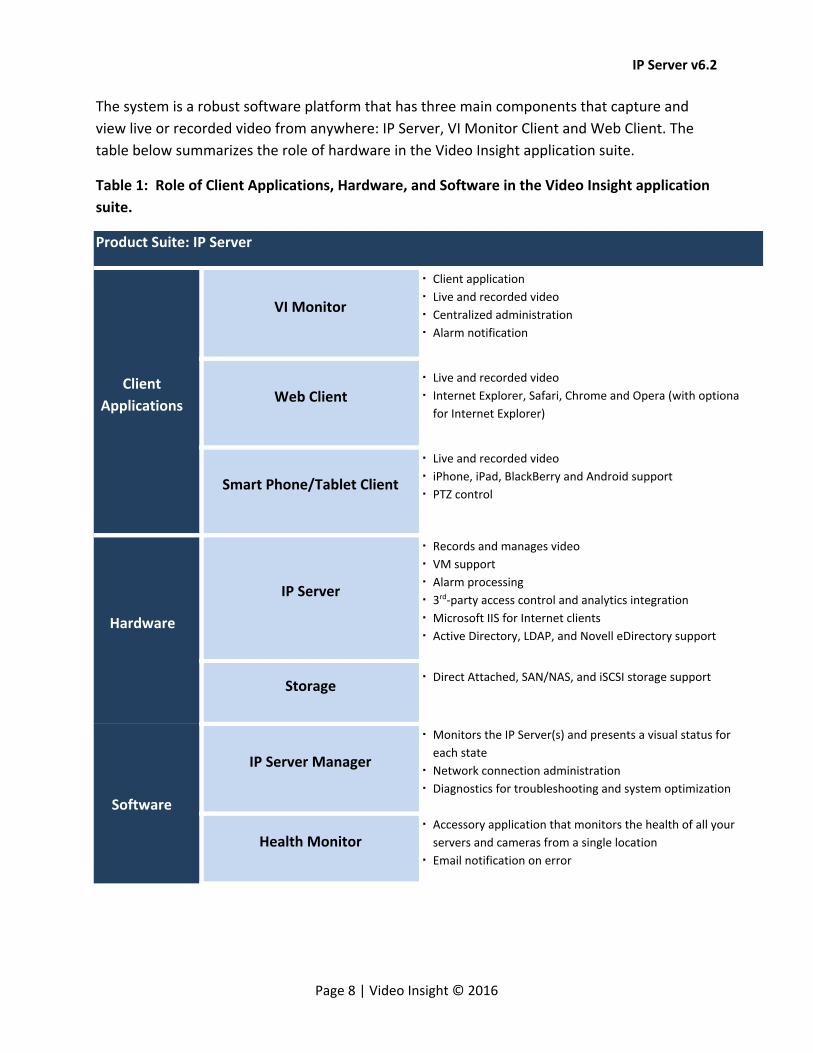
The system is a robust software platform that has three main components that capture and
view live or recorded video from anywhere: IP Server, VI Monitor Client and Web Client. The
table below summarizes the role of hardware in the Video Insight application suite.
Table 1: Role of Client Applications, Hardware, and Software in the Video Insight application
suite.
Product Suite: IP Server
Client
Applications
VI Monitor
▪Client application
▪Live and recorded video
▪Centralized administration
▪Alarm notification
Web Client ▪Live and recorded video
▪Internet Explorer, Safari, Chrome and Opera (with optional ActiveX plug-in support
for Internet Explorer)
Smart Phone/Tablet Client
▪Live and recorded video
▪iPhone, iPad, BlackBerry and Android support
▪PTZ control
Hardware
IP Server
▪Records and manages video
▪VM support
▪Alarm processing
▪3rd-party access control and analytics integration
▪Microsoft IIS for Internet clients
▪Active Directory, LDAP, and Novell eDirectory support
Storage ▪Direct Attached, SAN/NAS, and iSCSI storage support
Software
IP Server Manager
▪Monitors the IP Server(s) and presents a visual status for
each state
▪Network connection administration
▪Diagnostics for troubleshooting and system optimization
Health Monitor ▪Accessory application that monitors the health of all your
servers and cameras from a single location
▪Email notification on error
Page 8 | Video Insight © 2016
IP Server v6.2
Planning Getting the most out of your hardware and our software requires planning. Understanding your
needs will help you size your solution. Evaluate and plan the integrations you will need to make.
Server
IP Server is at the heart of the Video Insight platform. It runs on industry-standard hardware
and works with 32- and 64-bit versions of these Microsoft operating systems.
● Windows Server 2008 R2
● Windows Server 2008 Enterprise, Standard and Web editions
● Windows 7 Pro and Enterprise editions
● Windows Server 2012 (All Versions)
● Windows 8 Pro and Enterprise editions
● Windows 10 Pro, Enterprise and Education editions
IP Server also requires Microsoft .NET Framework 4.0+ and Microsoft Internet Information
Services (IIS) with “static content” enabled. The operating system must be current with updates
because Video Insight hardware and software integrates with the latest updates.
The hardware required for installation of IP Server is determined by a variety of factors
including the number of cameras, the resolution of those cameras, the number of frames per
second, as well as the number of days of required video storage.
Page 9 | Video Insight © 2016
IP Server v6.2
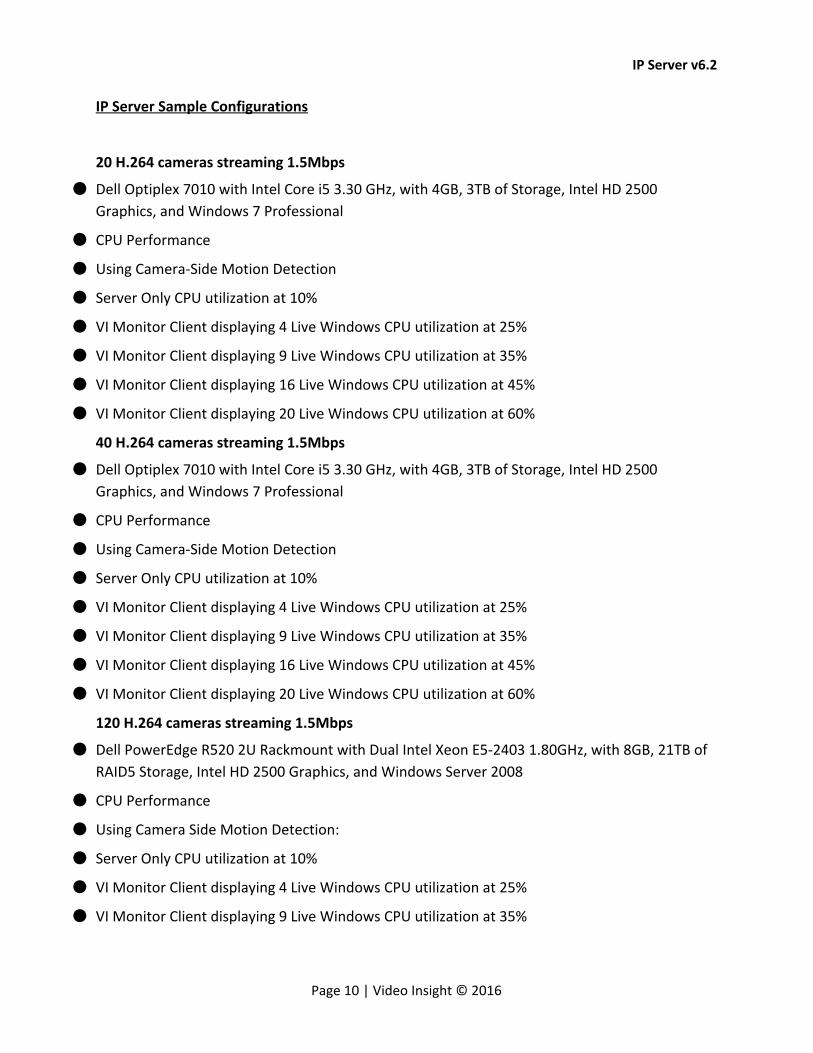
IP Server Sample Configurations
20 H.264 cameras streaming 1.5Mbps
● Dell Optiplex 7010 with Intel Core i5 3.30 GHz, with 4GB, 3TB of Storage, Intel HD 2500
Graphics, and Windows 7 Professional
● CPU Performance
● Using Camera-Side Motion Detection
● Server Only CPU utilization at 10%
● VI Monitor Client displaying 4 Live Windows CPU utilization at 25%
● VI Monitor Client displaying 9 Live Windows CPU utilization at 35%
● VI Monitor Client displaying 16 Live Windows CPU utilization at 45%
● VI Monitor Client displaying 20 Live Windows CPU utilization at 60%
40 H.264 cameras streaming 1.5Mbps
● Dell Optiplex 7010 with Intel Core i5 3.30 GHz, with 4GB, 3TB of Storage, Intel HD 2500
Graphics, and Windows 7 Professional
● CPU Performance
● Using Camera-Side Motion Detection
● Server Only CPU utilization at 10%
● VI Monitor Client displaying 4 Live Windows CPU utilization at 25%
● VI Monitor Client displaying 9 Live Windows CPU utilization at 35%
● VI Monitor Client displaying 16 Live Windows CPU utilization at 45%
● VI Monitor Client displaying 20 Live Windows CPU utilization at 60%
120 H.264 cameras streaming 1.5Mbps
● Dell PowerEdge R520 2U Rackmount with Dual Intel Xeon E5-2403 1.80GHz, with 8GB, 21TB of
RAID5 Storage, Intel HD 2500 Graphics, and Windows Server 2008
● CPU Performance
● Using Camera Side Motion Detection:
● Server Only CPU utilization at 10%
● VI Monitor Client displaying 4 Live Windows CPU utilization at 25%
● VI Monitor Client displaying 9 Live Windows CPU utilization at 35%
Page 10 | Video Insight © 2016

IP Server v6.2
● VI Monitor Client displaying 16 Live Windows CPU utilization at 45%
● VI Monitor Client displaying 20 Live Windows CPU utilization at 60%
240 H.264 cameras streaming 1.5Mbps
● Dell PowerEdge R720xd 2U Rackmount with Dual Intel Xeon E5-2403 1.80GHz, with 8GB, 42TB
of RAID5 Storage, Intel HD 2500 Graphics, and Windows Server 2008
● CPU Performance
● Using Camera-Side Motion Detection
● Server Only CPU utilization at 10%
● VI Monitor Client displaying 4 Live Windows CPU utilization at 25%
● VI Monitor Client displaying 9 Live Windows CPU utilization at 35%
● VI Monitor Client displaying 16 Live Windows CPU utilization at 45%
● VI Monitor Client displaying 20 Live Windows CPU utilization at 60%
Failover Server In the event a network outage or hardware failure prevents a server from recording camera
video, the IP Server Failover Server feature will enable another server to take over the
recording capabilities of the offline server. When configured with a shared SQL Database as
part of a cluster, the Failover Server feature eliminates video loss and enables continuous live
streaming video.
To use the Failover Server feature you must:
● Have at least two servers with the same hardware configuration.
● Have a Shared Database installation; see IP Server installation with an existing SQL
installation.
● Have at least one license and a serial number or activation key for each server.
Network Network configuration is extremely important when implementing an IP video solution. IP
cameras use considerable bandwidth to deliver information between the camera and the
server. Different cameras will require different amounts of bandwidth based on resolution and
frame rate. Accessing video from VI Monitor, Web Client, mobile device client and Video Wall
increases the needed bandwidth.
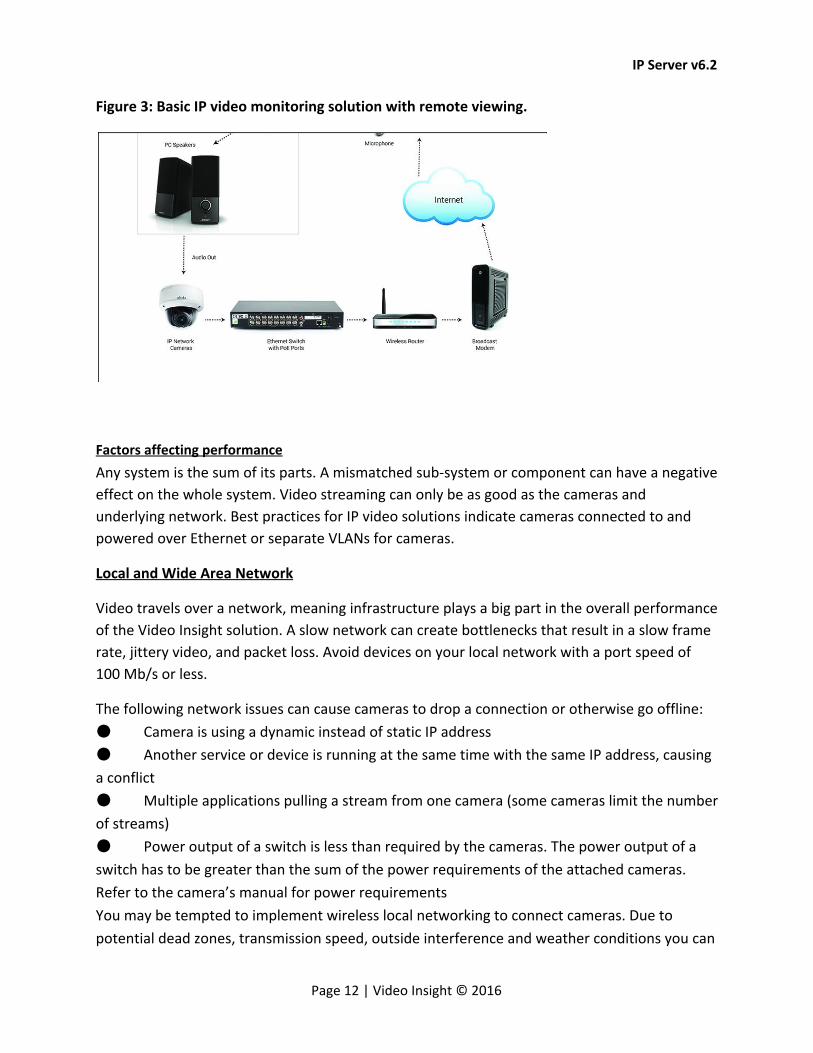
Figure 3 illustrates a very basic, isolated network comprising of one switch, one camera, and
one router.
Page 11 | Video Insight © 2016
IP Server v6.2
Figure 3: Basic IP video monitoring solution with remote viewing.
Factors affecting performance
Any system is the sum of its parts. A mismatched sub-system or component can have a negative
effect on the whole system. Video streaming can only be as good as the cameras and
underlying network. Best practices for IP video solutions indicate cameras connected to and
powered over Ethernet or separate VLANs for cameras.
Local and Wide Area Network
Video travels over a network, meaning infrastructure plays a big part in the overall performance
of the Video Insight solution. A slow network can create bottlenecks that result in a slow frame
rate, jittery video, and packet loss. Avoid devices on your local network with a port speed of
100 Mb/s or less.
The following network issues can cause cameras to drop a connection or otherwise go offline:
● Camera is using a dynamic instead of static IP address
● Another service or device is running at the same time with the same IP address, causing
a conflict
● Multiple applications pulling a stream from one camera (some cameras limit the number
of streams)
● Power output of a switch is less than required by the cameras. The power output of a
switch has to be greater than the sum of the power requirements of the attached cameras.
Refer to the camera’s manual for power requirements
You may be tempted to implement wireless local networking to connect cameras. Due to
potential dead zones, transmission speed, outside interference and weather conditions you can
Page 12 | Video Insight © 2016
IP Server v6.2
expect subpar performance and dropped connections. We do not recommend using wireless
networking to connect your cameras.
If your organization has more than one site you will likely be relying on an Internet provider for
connectivity. The performance you get from the provider will depend on their network
infrastructure, customer utilization of that network and what you can afford. Streaming video
remotely to a desktop client requires basic broadband. Streaming to a mobile device requires
4G service.
Cameras
The following factors can affect camera imaging:
● Bit Rate – a higher bit rate usually gives better picture quality
● Resolution – a higher resolution usually gives better picture quality
● Format – some picture formats incorporate better algorithms that more accurately
represent the subject
● Firmware – outdated firmware can impair camera functionality
● Location – unless intended for such use, placement in dark or obstructed locations, or in
places affected by adverse weather, will not result in useful pictures
● Number of cameras connected to server – the higher the number of connected
cameras, the greater the load on server resources
VI Monitor
VI Monitor, the Video Insight thick client, allows users full access to all cameras and provides
centralized administration for the system. It is used to watch live and recorded video.
VI Monitor runs on industry-standard hardware and works with 32- and 64-bit versions of Microsoft
Windows XP or later. Microsoft Direct Show 9 or higher is required. The operating system must be
current with updates because Video Insight hardware and software integrates with the latest updates.
VI Monitor requests video from the server in the camera’s native format. Transferring video in the
camera’s native format is a file server operation that does not burden the IP Server CPU as a video
decompression operation would. Because video decompression is performed on the client and not
the server, the hardware requirements for VI Monitor are different from those of IP Server. Table 4
shows the hardware requirements for VI Monitor Client.
Page 13 | Video Insight © 2016

IP Server v6.2
Table 4: VI Monitor Client hardware requirements
Component Minimum Recommended
Processor 1 2.0 GHz dual-core 1 2.4 GHz quad-core
Memory 4 GB 8 GB+
Video 256 MB 1 GB
Network 100 Mb/s 1 Gb/s+
Display Resolution 1600 X 900 1920 X 1080 or higher
Note The video subsystem must support Microsoft DirectShow.
VI Monitor will require additional system memory, video memory and processor if more
cameras are viewed and processor-intensive compression protocols are used. The greater the
number of compressed images viewed at once, the greater the load on the processor. Dual
streaming (model specific) on the client is also available for the ability to monitor more cameras
at once.
Web Client
Web Client, the Video Insight thin client, allows users remote access to cameras. Web Client is
distinct from the Video Insight mobile device application. Web Client utilizes Microsoft IIS
services hosted on the same server as IP Server. To support cross-platform compatibility, IP
Server sends MJPEG images to clients that are unable to decompress MPEG4 or H.264 streams.
These images are normally provided as a dual stream from the camera. IP Server can create an
MJPEG but this increases the load on the CPU. Web Client connects directly to the cameras to
view live video, unlike VI Monitor Client. Web Client currently supports Internet Explorer 11+ or
Chrome ( for low speed only).
Microsoft IIS 5.1 or higher must be installed and configured prior to the installation of IP Server.
Page 14 | Video Insight © 2016

IP Server v6.2
Cameras Video Insight supports a vast array of cameras from a large number of manufacturers.
Additional camera support is included with every software release Refer to our website for the
latest list of supported cameras.
Video Insight supports the Open Network Video Interface Forum (ONVIF) standard. We support
version 1.03.
Camera Audio
IP Server is capable of recording audio along with the capturing of video recording when used
with the appropriate and desired peripherals. While configuring audio recording is a possibility,
it is often over-looked that necessary and desired changes be made on the camera itself in
order for audio recording to function within IP Server’s video recording process.
The following codecs are found to work well with IP Server and are most commonly used by
known camera manufacturers:
● L8 @ 8K (Uncompressed 8-bit audio) ● L16 @ 16K (Uncompressed 16-bit audio)
● G711 ULAW and ALAW @ 8K and 16K ● G726 40/32/24/16
● AAC Low Complexity (*) Bitrate is 128kbps or less ● AMR Audio
Licensing Our licensing structure is simple: one camera requires one license. Our floating licenses means
there is no need to tie a licensing seat, IP address or MAC address to a particular camera.
Cameras offering multiple camera views only require one license. Separate video streams from
the same camera do not require a separate license. Video Insight offers encoders, such as the
VP16, that allow up to 16 analog cameras with only one license. Please contact us for more
information on specific licensing requirements.
Note Some cameras include a license for use with our software.
Page 15 | Video Insight © 2016
IP Server v6.2
Router configuration
We recommend using some type of router if your computer is connected to the internet. Small
Office/Home Office (SOHO) routers provide a simple hardware firewall that protects your
computer. SOHO routers connect to your DSL or cable modem and you connect to your server
through them. The SOHO router prevents all inbound traffic from accessing your network and
computers except for the traffic that you specifically allow through.
How to configure your Video Insight server and router for remote access: 1. Assign a static IP address to IP Server. SOHO routers typically use DHCP to assign an IP
address from a range of addresses to devices connected to the router. Choose an address
outside of this range but within the subnet to assign to the server. For help on assigning a static
IP address, review your SOHO router user guide or consult with your network administrator.
2. Configure your SOHO router to forward ports 80 and 4011 to IP Server.
a. For help on forwarding ports, review your router manual or consult with your network
administrator.
b. www.portfoward.com provides information on how to configure most SOHO routers.
Video Insight does not endorse this information.
3. Test your configuration by trying to access the Web Client externally.
a. Start your Internet browser.
b. Enter: http://<external IP>/videoinsight into the address bar of your Internet browser.
c. Note, many SOHO routers will not allow you to connect to your external IP address
when you are behind the firewall. You will need to be outside your network.
d. You can use a third-party website such as canyouseeme.org to get your external IP
address and to verify if the correct ports are being forwarded.
Storage considerations The amount of storage required for recordings depends on the number of cameras, the CODEC, Frames per Second (FPS), resolution of the images and the percentage of pixel change. The Video Insight solution gives you flexibility of per camera storage options: ● Record Always – requires significantly more storage space because video is constantly
recorded.
● Record On Motion Only – requires less storage space than Record Always because the
video is recorded only when motion occurs in the camera’s field of view.
IP Server supports the following types of storage:
RAID 5, RAID 6, RAID 10 and JBOD* (*with custom camera configuration, per camera) NAS SAN
Page 16 | Video Insight © 2016
IP Server v6.2
Long Term Storage Application (LTS)
You can specify which cameras to copy, how many days to keep before copying and what time
of the day to execute the copy. The copied files can be viewed using Video Insight software or
Microsoft Windows Media Player.
File Manipulation Rule
A feature that allows users to backup their files to other locations such as standard file servers,
NAS or SAN using the Rules manager. This feature takes the task of remembering to backup
important video recordings on the local server and automates it. File Manipulation can also
move or delete videos.
Database considerations IP Server saves configuration settings, user names, camera information and event logs in a
Microsoft SQL database. When IP Server starts, it reads its settings directly from the assigned
database. When VI Monitor Client connects to IP Server it saves all recordings to its local hard
drive so recordings are still accessible in the case of database failure.
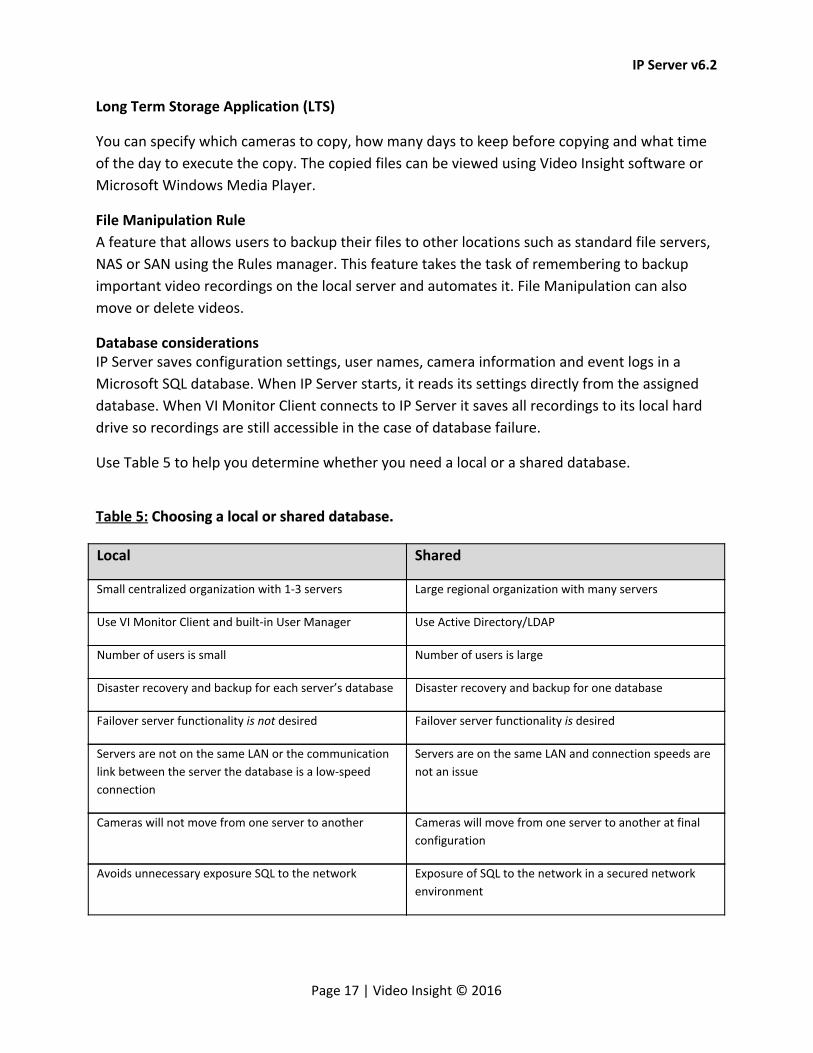
Use Table 5 to help you determine whether you need a local or a shared database.
Table 5: Choosing a local or shared database. Local Shared
Small centralized organization with 1-3 servers Large regional organization with many servers
Use VI Monitor Client and built-in User Manager Use Active Directory/LDAP
Number of users is small Number of users is large
Disaster recovery and backup for each server’s database Disaster recovery and backup for one database
Failover server functionality is not desired Failover server functionality is desired
Servers are not on the same LAN or the communication
link between the server the database is a low-speed
connection
Servers are on the same LAN and connection speeds are
not an issue
Cameras will not move from one server to another Cameras will move from one server to another at final
configuration
Avoids unnecessary exposure SQL to the network Exposure of SQL to the network in a secured network
environment
Page 17 | Video Insight © 2016

IP Server v6.2
Software installation
Video Insight software supports both 32- and 64-bit operating systems. Download and install the correct installation for your version. Review the following list prior to beginning the installation process: 1. Storage Considerations 2. SQL Considerations 3. Network Considerations 4. Online Calculator: www.video-insight.com/Support/Tools/Configuration-Calculator.aspx 5. Administrator-level access on server is required IP Server If Microsoft SQL Server is not already present in your environment you can choose to install the package. It includes Microsoft SQL Server 2008 R2 for both 32-bit and 64-bit operating systems. If your environment already has Microsoft SQL Server 2008 installed and you only need the Video Insight database and are not required to install SQL Server installation package.
Installation without an existing SQL installation
Use the following steps to install IP Server with Microsoft SQL Server for the first time. This option will also install VI Monitor and Web Client:
Launch the executable located on DownloadVI.com. Click I Agree to agree to the terms and continue the installation. If you do not agree or do not want to continue the installation, click Cancel.
Page 18 | Video Insight © 2016

IP Server v6.2
Select all the components that you would like to install, click Next.
To accept the default destination folder, click Install. To choose another destination, enter the destination path or click Browse to search.
Page 19 | Video Insight © 2016

IP Server v6.2
Select the start menu folder that you would like the installation to be created, click Next.
The default credentials are
entered for the SQL installation. If
you would like to change the
credentials please enter them
now and click Install.
IP Server is installed. To initialize
and configure it, see Initialization.
Page 20 | Video Insight © 2016

IP Server v6.2
Installation with an existing SQL installation
Use the following steps to install IP Server for the first time in an environment with Microsoft SQL Server. This option will also install VI Monitor Client and Web Client.
Launch the executable from DownloadVI.com. Click I Agree to agree to the terms and continue the installation. If you do not agree or do not want to continue the installation, click Cancel.
Select all the components that
you would like to install, click
Next. The install SQL selection
should not be checked.
Page 21 | Video Insight © 2016
IP Server v6.2
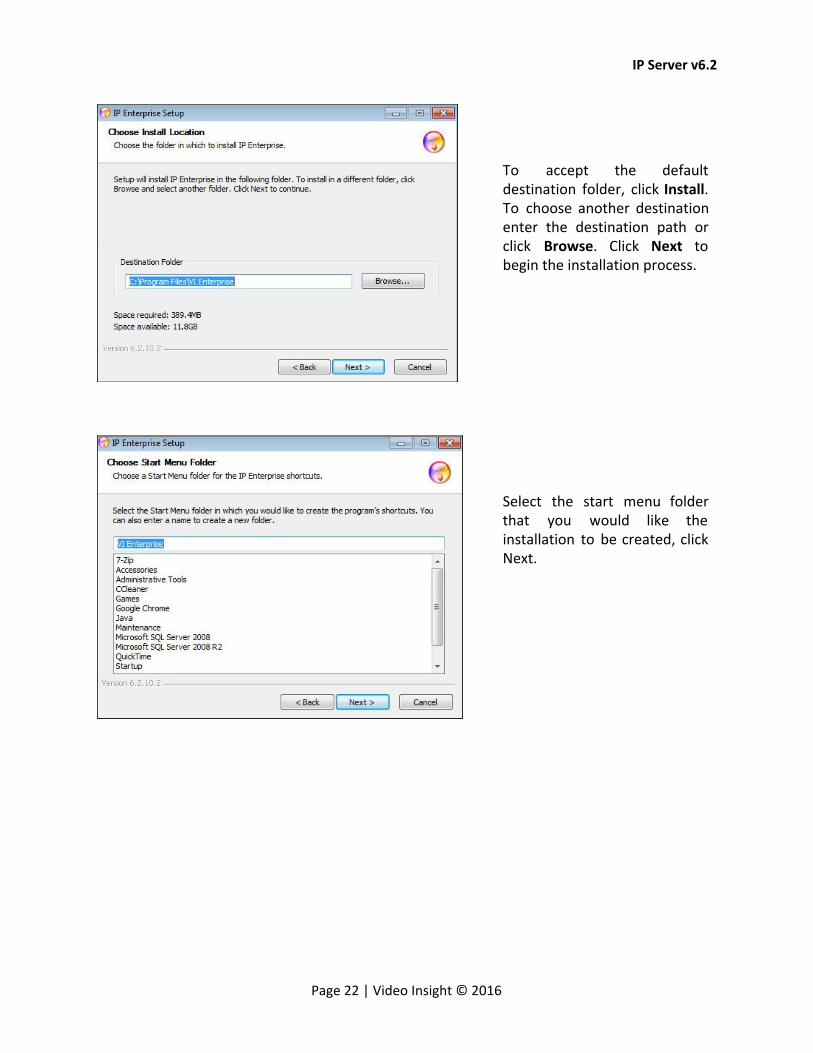
To accept the default destination folder, click Install. To choose another destination enter the destination path or click Browse. Click Next to begin the installation process.
Select the start menu folder that you would like the installation to be created, click Next.
Page 22 | Video Insight © 2016
IP Server v6.2
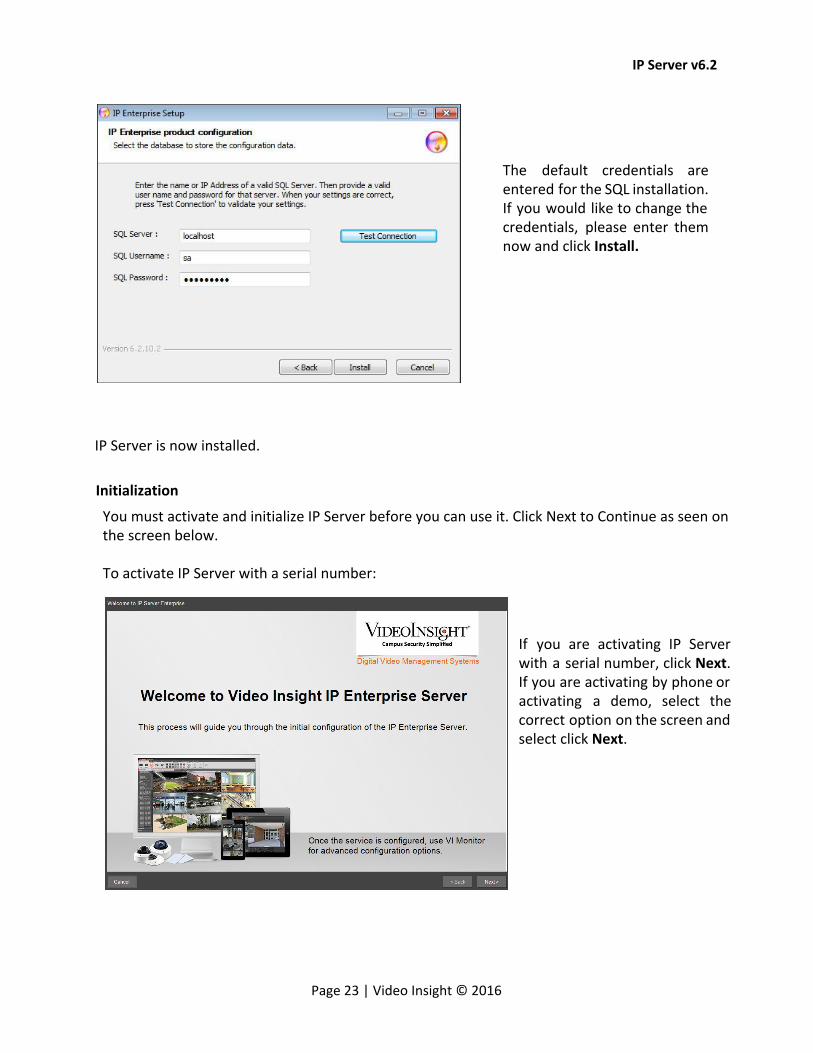
The default credentials are entered for the SQL installation. If you would like to change the credentials, please enter them now and click Install.
IP Server is now installed.
Initialization
You must activate and initialize IP Server before you can use it. Click Next to Continue as seen on the screen below. To activate IP Server with a serial number:
If you are activating IP Server with a serial number, click Next. If you are activating by phone or activating a demo, select the correct option on the screen and select click Next.
Page 23 | Video Insight © 2016
IP Server v6.2
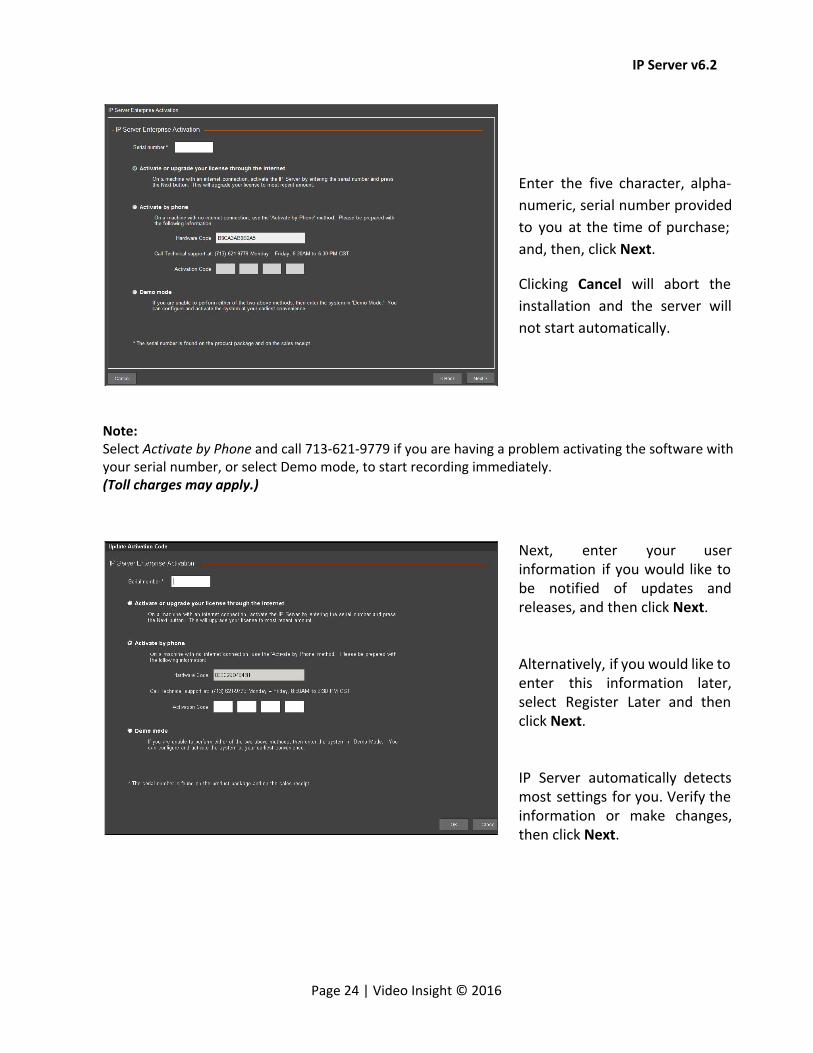
Enter the five character, alpha-
numeric, serial number provided
to you at the time of purchase;
and, then, click Next.
Clicking Cancel will abort the
installation and the server will
not start automatically.
Note: Select Activate by Phone and call 713-621-9779 if you are having a problem activating the software with your serial number, or select Demo mode, to start recording immediately. (Toll charges may apply.)
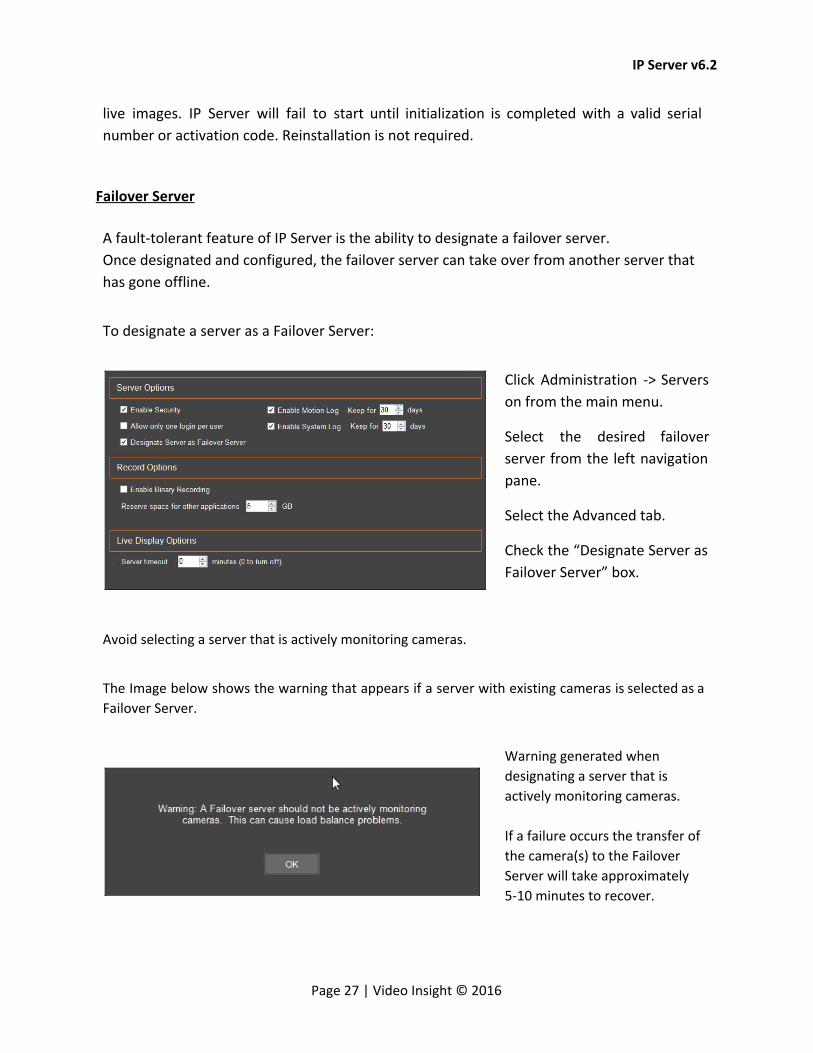
Next, enter your user information if you would like to be notified of updates and releases, and then click Next. Alternatively, if you would like to enter this information later, select Register Later and then click Next. IP Server automatically detects most settings for you. Verify the information or make changes, then click Next.
Page 24 | Video Insight © 2016

IP Server v6.2
Note: Recording to a shared location requires a user with write permission to that share or recordings will not be saved.
Server Name: The default is “IP Server –“ and the detected IP address of this server. You can change this to a more friendly or meaningful name. Do not use special characters.
IP Address: This is the selected server’s IP address and should not be changed.
Version: The current version of the software.
For additional settings click Advanced. The Default Port is 4010 and the Command Port is 4011. Do not change these values unless the ports are already in use by another program.
SQL Server Location: This is the location or IP address of the database server. ‘Localhost’ indicates that the database and Microsoft SQL server are local to the host computer. An IP address in this field indicates the Microsoft SQL Server is located on another computer.
To test the connection click Test DB. Click Advanced to modify the database connection string values: Database Name, IP Address, SQL Server User ID and Password
Page 25 | Video Insight © 2016

IP Server v6.2
Video Data Storage Path: This is the location where all the recorded video will be saved. The
default is the local OS drive (i.e., C). The video folder is created automatically once server
configuration is completed. You can choose to save video to several different locations:
Local server drive: For example, C:\video
Alternate local drive: For example, D:\video
Shared drive: For example, \\vShareHost\vshare\HHSvideo
Add cameras using Auto
Discovery, Manual or Add/
Remove as needed. See
Adding Cameras for more
information on adding
cameras. Click Finish.
Click OK.
Then, click Yes to restart the
computer.
Use one of the following steps to activate IP Server.
Select Activate by phone.
Call the phone number displayed. Give the representative your serial number. If you do not
have one, the representative will ask you for a hardware code. If the account is in good
standing you will be given a 16 digit activation code. Enter the activation code and then click
Next.
Activate Using Demo Mode
Selecting Demo mode will allow IP Server to operate normally for up to 30 days using up to
99 cameras. Once the 30-day period has expired the software will no longer record or display
Page 26 | Video Insight © 2016
IP Server v6.2
live images. IP Server will fail to start until initialization is completed with a valid serial
number or activation code. Reinstallation is not required.
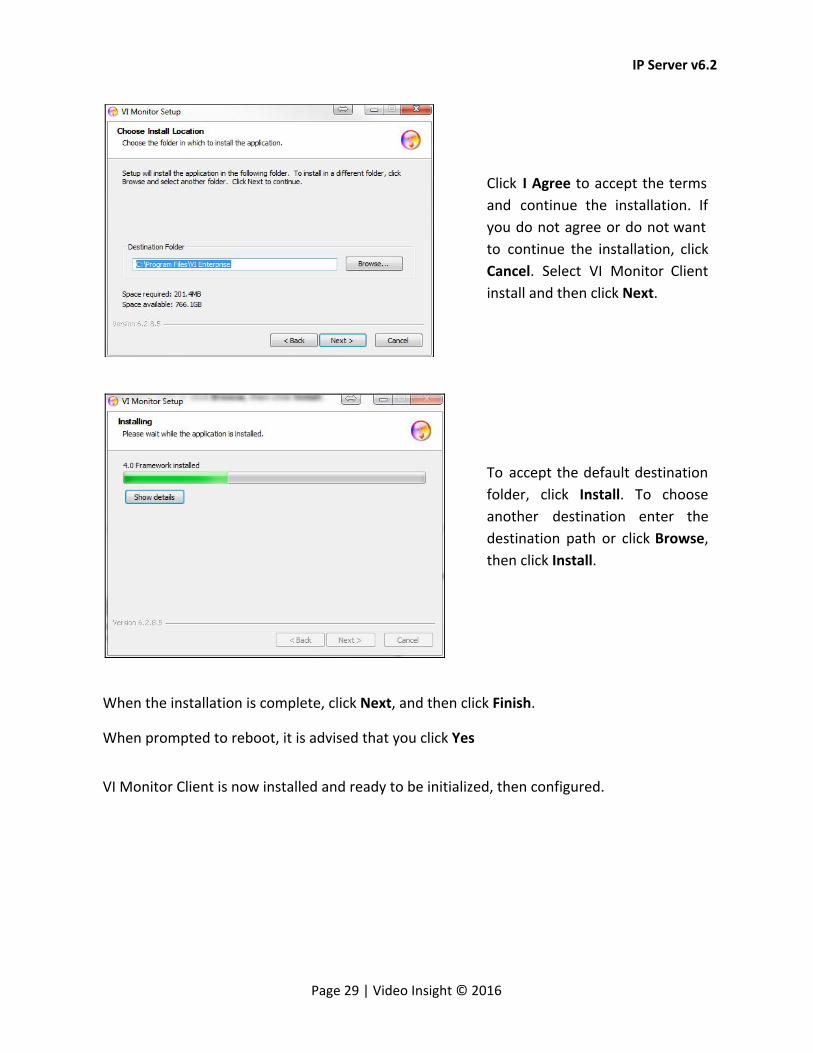
Failover Server
A fault-tolerant feature of IP Server is the ability to designate a failover server.
Once designated and configured, the failover server can take over from another server that
has gone offline.
To designate a server as a Failover Server:
Click Administration -> Servers
on from the main menu.
Select the desired failover
server from the left navigation
pane.
Select the Advanced tab.
Check the “Designate Server as
Failover Server” box.
Avoid selecting a server that is actively monitoring cameras.
The Image below shows the warning that appears if a server with existing cameras is selected as a
Failover Server.
Warning generated when
designating a server that is
actively monitoring cameras.
If a failure occurs the transfer of
the camera(s) to the Failover
Server will take approximately
5-10 minutes to recover.
Page 27 | Video Insight © 2016

IP Server v6.2
During that time, the VI Monitor Client on the Failover Server will show all cameras and images
from the offline server and all recorded video will be recorded to the Failover Server or a previously
configured shared location.
Note You can also access Server Properties by right-clicking the server name in the left navigation and selecting Properties, selecting the Advanced tab and then selecting Configuring a Failover Server.
VI Monitor Client
The VI Monitor client is installed automatically with either IP Server install or IP Server
installation with an existing SQL installation so a client is easily accessible from the server. In
some cases, a client-only install is needed for active visitor monitoring personnel.
To perform a client-only installation:
Double-click the Setup executable
applicable to your system type:
32- or 64-bit OS.
Page 28 | Video Insight © 2016
IP Server v6.2
Click I Agree to accept the terms
and continue the installation. If
you do not agree or do not want
to continue the installation, click
Cancel. Select VI Monitor Client
install and then click Next.
To accept the default destination
folder, click Install. To choose
another destination enter the
destination path or click Browse,
then click Install.
When the installation is complete, click Next, and then click Finish.
When prompted to reboot, it is advised that you click Yes
VI Monitor Client is now installed and ready to be initialized, then configured.
Page 29 | Video Insight © 2016

IP Server v6.2
Open VI Monitor Client by
double-clicking the icon on your
desktop.
Enter login credentials or accept
the default login, and click OK to
continue.
At least one server must be entered into the Server Setup prior to using VI Monitor client.
You can enter server information
one server at a time, or add
servers automatically.
Page 30 | Video Insight © 2016

IP Server v6.2
Manually Adding Servers
To add a server manually, in the
Server-Setup dialog-box click
Add New.
Enter the IP address or name of
the server to connect to, and the
port if different from the default.
Click Test to initiate a connection.
There are three possible outcomes testing a connection to an IP Server..
1) Login Error: The server is found but security is on. The server attempted to authenticate the login with the initial credentials used to
login to VI Monitor. The server default login is Administrator/blank for the password). You can still add the server. Then logout of VI Monitor login again with the correct
credentials.
2) No Server Found: Either the IP address, server name, server port or both are
incorrect. Enter the correct values and then click Test again.
3) Server Found: The server is found and a successful connection was made using the
current credentials (Administrator/blank). The server’s name is displayed in the Status
field.
Assuming that the IP Server was found, follow these remaining few steps:
1. Click Add. 2. Repeat steps 1-5 for additional servers if needed.
3. Click Apply and then OK.
Page 31 | Video Insight © 2016
IP Server v6.2
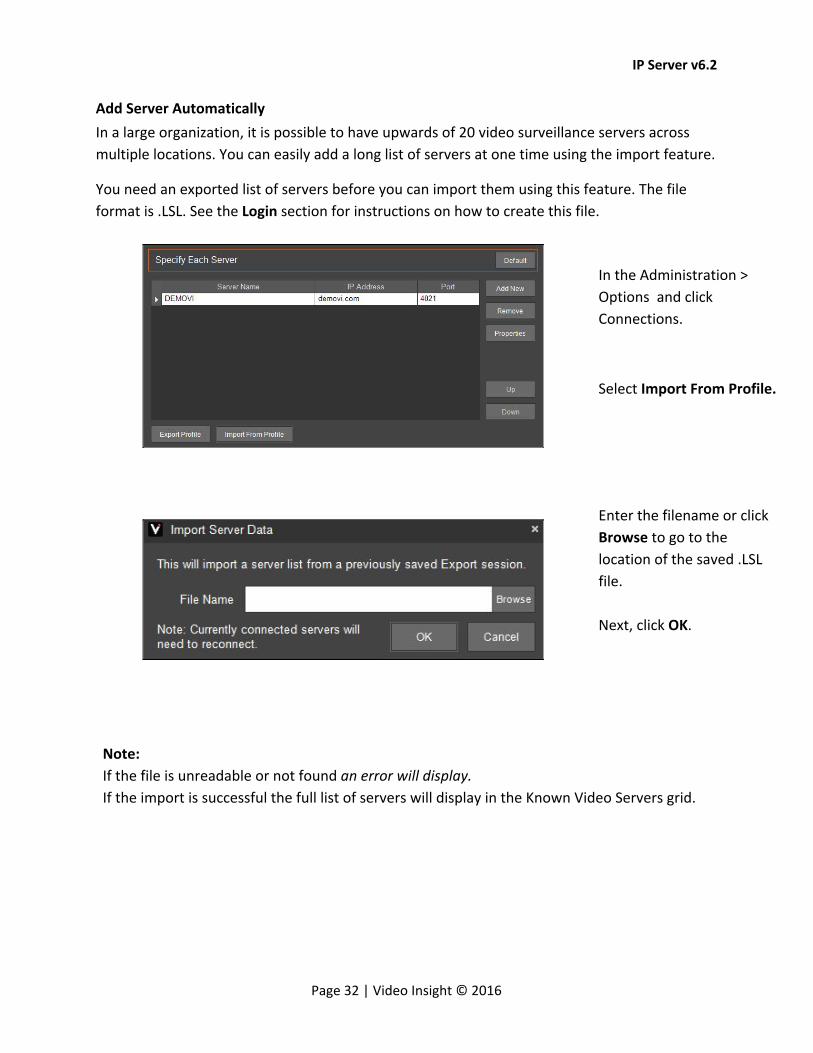
Add Server Automatically
In a large organization, it is possible to have upwards of 20 video surveillance servers across
multiple locations. You can easily add a long list of servers at one time using the import feature.
You need an exported list of servers before you can import them using this feature. The file
format is .LSL. See the Login section for instructions on how to create this file.
In the Administration >
Options and click
Connections.
Select Import From Profile.
Enter the filename or click
Browse to go to the
location of the saved .LSL
file.
Next, click OK.
Note:
If the file is unreadable or not found an error will display.
If the import is successful the full list of servers will display in the Known Video Servers grid.
Page 32 | Video Insight © 2016
IP Server v6.2
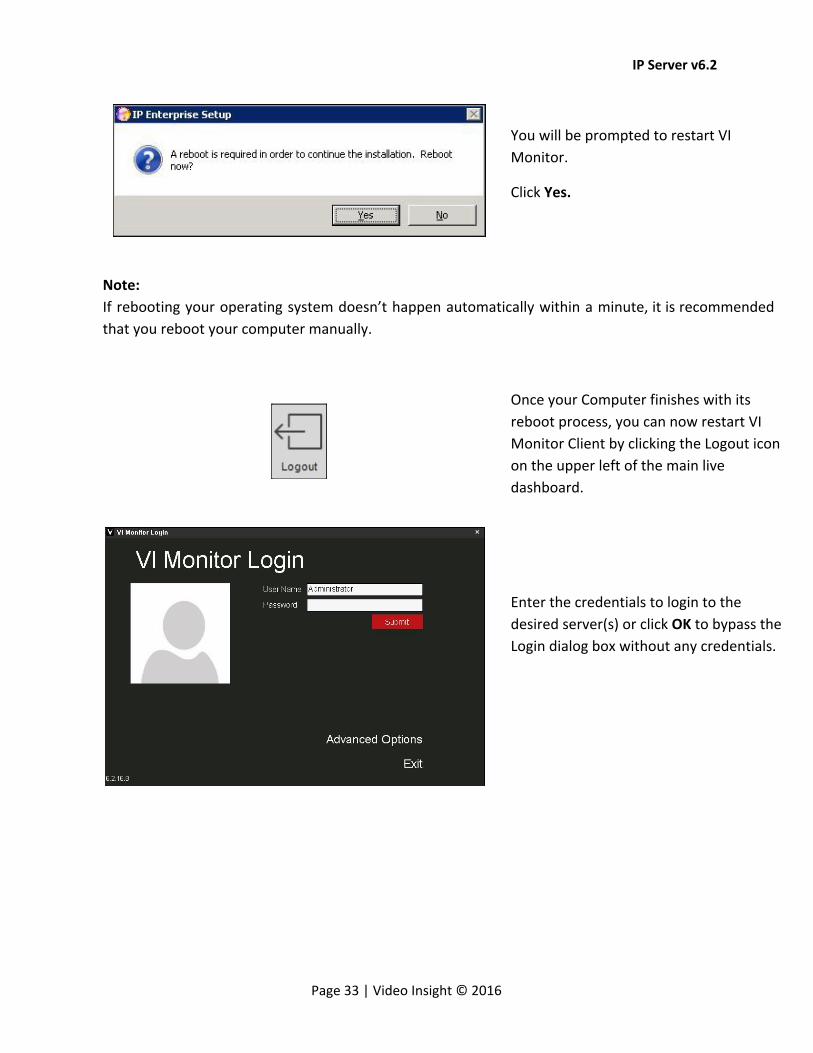
You will be prompted to restart VI
Monitor.
Click Yes.
Note:
If rebooting your operating system doesn’t happen automatically within a minute, it is recommended
that you reboot your computer manually.
Once your Computer finishes with its
reboot process, you can now restart VI
Monitor Client by clicking the Logout icon
on the upper left of the main live
dashboard.
Enter the credentials to login to the
desired server(s) or click OK to bypass the
Login dialog box without any credentials.
Page 33 | Video Insight © 2016

IP Server v6.2
IP Server Manager The IP Server Manager (IPSM) application is used to manage and troubleshoot advanced server
settings. It is installed at the same time as IP Server.
The IPSM:
Monitors the IP Server and presents visual status cues for each server
Provides a Diagnostics version of the IP Server Manager for troubleshooting and system optimization
Manages IP Server network connections
Manages licensing and registration
Manages Lightweight Directory Access Protocol (LDAP) and Active Directory configuration
Options available in IPSM vary slightly depending on the installation type. See Installation for
more information on installation types.
Accessing IPSM
The IPSM icon resides in the Windows System Tray. It has two possible states:
Server is functioning properly; streaming video to clients, recording video and reporting to Health Monitor, if applicable.
Server is stopped and is NOT streaming or recording video.
You can configure IP Server, manage the IP Server service, exit the application and see information about Video Insight by right-clicking on the IPSM icon.
Page 34 | Video Insight © 2016
IP Server v6.2
Select Server Configuration to manage the IP Server service, configure IP Server and terminate
the IPSM application.
Select Start IP Server, Stop IP Server or Restart IP Server to start, stop or restart the IP Server
service.
Select Exit IP Server Manager to terminate the IPSM application and remove the icon from the
Windows System Tray. Terminating the application prevents clients from remotely restarting
the IP Server service. Select About Video Insight to display version information, technical
support information, and legal terms.
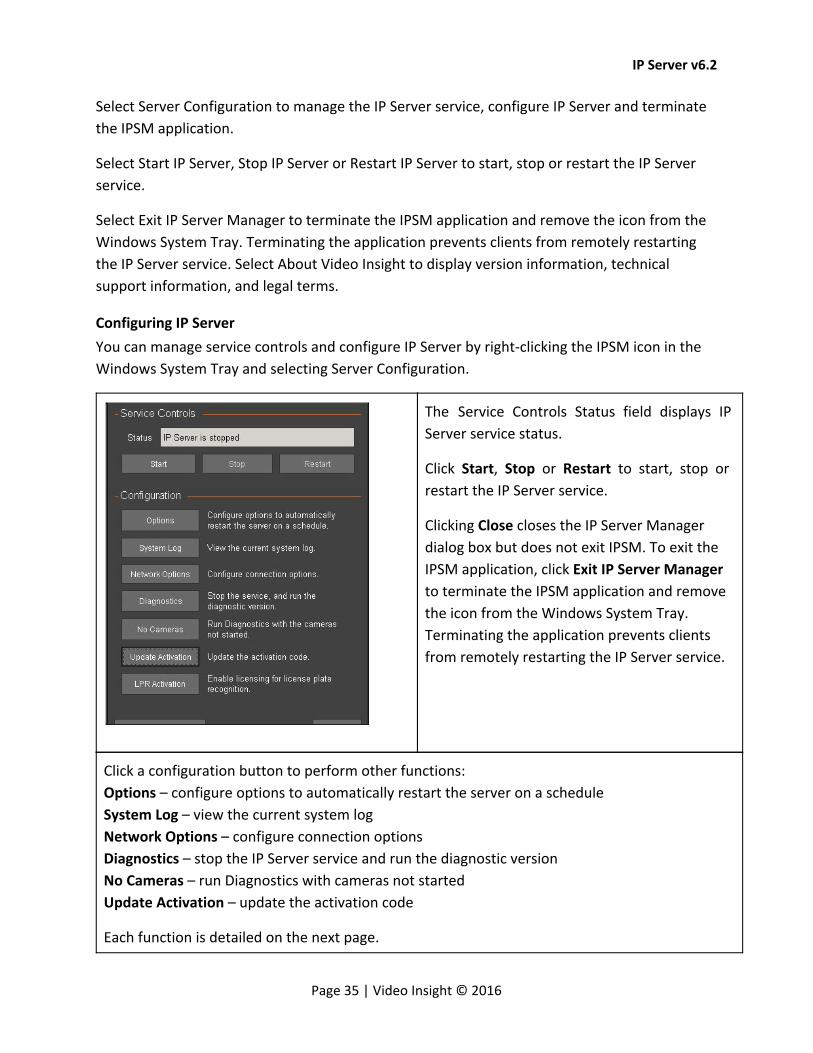
Configuring IP Server
You can manage service controls and configure IP Server by right-clicking the IPSM icon in the
Windows System Tray and selecting Server Configuration.
The Service Controls Status field displays IP
Server service status.
Click Start, Stop or Restart to start, stop or
restart the IP Server service.
Clicking Close closes the IP Server Manager
dialog box but does not exit IPSM. To exit the
IPSM application, click Exit IP Server Manager
to terminate the IPSM application and remove
the icon from the Windows System Tray.
Terminating the application prevents clients
from remotely restarting the IP Server service.
Click a configuration button to perform other functions:
Options – configure options to automatically restart the server on a schedule
System Log – view the current system log
Network Options – configure connection options
Diagnostics – stop the IP Server service and run the diagnostic version
No Cameras – run Diagnostics with cameras not started
Update Activation – update the activation code
Each function is detailed on the next page.
Page 35 | Video Insight © 2016
IP Server v6.2
IPSM: Options
Clicking Options brings up the Auto Restart Options dialog box. This dialog box offers several
settings aimed at mitigating some organizational and server environment settings that could
interfere with the IP Server service.
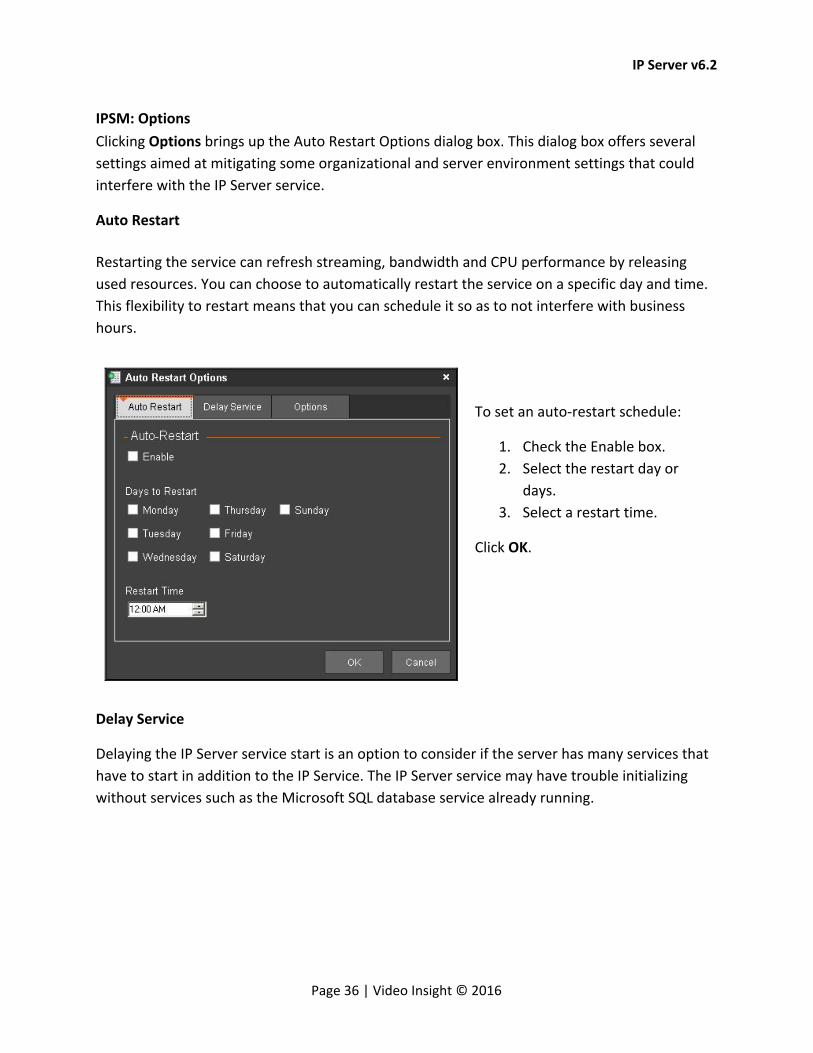
Auto Restart
Restarting the service can refresh streaming, bandwidth and CPU performance by releasing
used resources. You can choose to automatically restart the service on a specific day and time.
This flexibility to restart means that you can schedule it so as to not interfere with business
hours.
To set an auto-restart schedule:
1. Check the Enable box.
2. Select the restart day or
days.
3. Select a restart time.
Click OK.
Delay Service
Delaying the IP Server service start is an option to consider if the server has many services that
have to start in addition to the IP Service. The IP Server service may have trouble initializing
without services such as the Microsoft SQL database service already running.
Page 36 | Video Insight © 2016
IP Server v6.2
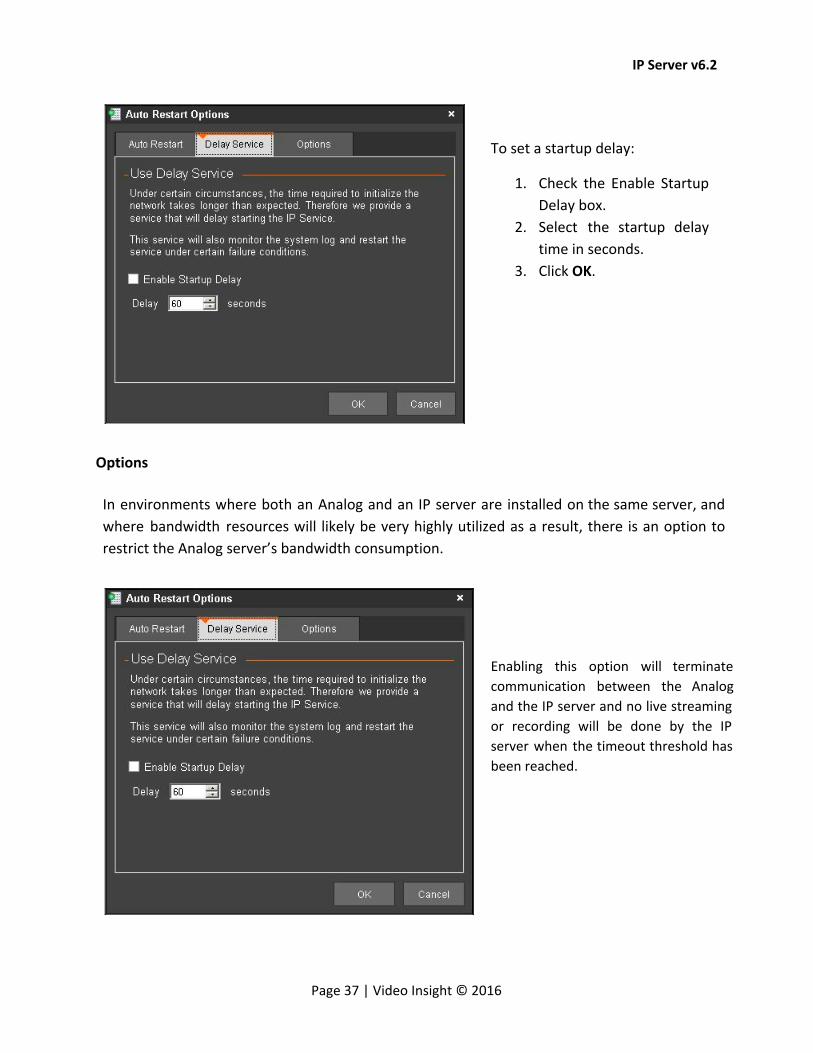
To set a startup delay:
1. Check the Enable Startup
Delay box.
2. Select the startup delay
time in seconds.
3. Click OK.
Options
In environments where both an Analog and an IP server are installed on the same server, and
where bandwidth resources will likely be very highly utilized as a result, there is an option to
restrict the Analog server’s bandwidth consumption.
Enabling this option will terminate
communication between the Analog
and the IP server and no live streaming
or recording will be done by the IP
server when the timeout threshold has
been reached.
Page 37 | Video Insight © 2016

IP Server v6.2
For example, in a scenario with the timeout enabled and set to 30 seconds, there is a VI Monitor Client
layout comprised of both analog and IP camera images. For 30 seconds, both streaming and recording is
managed by the IP Server. When 30 seconds have passed the analog cameras will stop streaming and
recording due to this feature. Changing the layout will restart streaming and recording for all cameras
until the timeout is reached again.
To set an analog video timeout:
1) Check the Enable Analog Video Bandwidth Timeout box. 2) Select the timeout in seconds. 3) Click OK.
IPSM: System Log
Clicking System Log will bring up the System Log dialog box. The System Log documents
warnings, errors, security and informational messages related to various system functions. Each
message may or may not appear depending on the configuration and whether Security is
enabled on the server.
Page 38 | Video Insight © 2016
IP Server v6.2
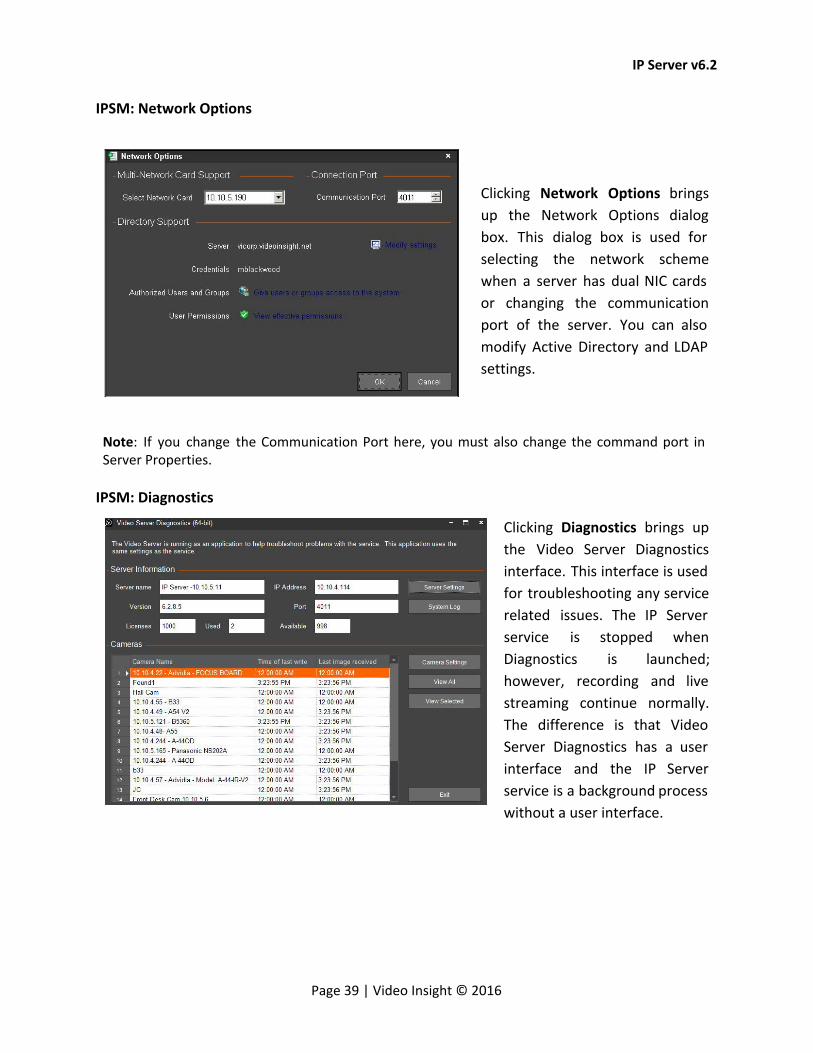
IPSM: Network Options
Clicking Network Options brings
up the Network Options dialog
box. This dialog box is used for
selecting the network scheme
when a server has dual NIC cards
or changing the communication
port of the server. You can also
modify Active Directory and LDAP
settings.
Note: If you change the Communication Port here, you must also change the command port in Server Properties.
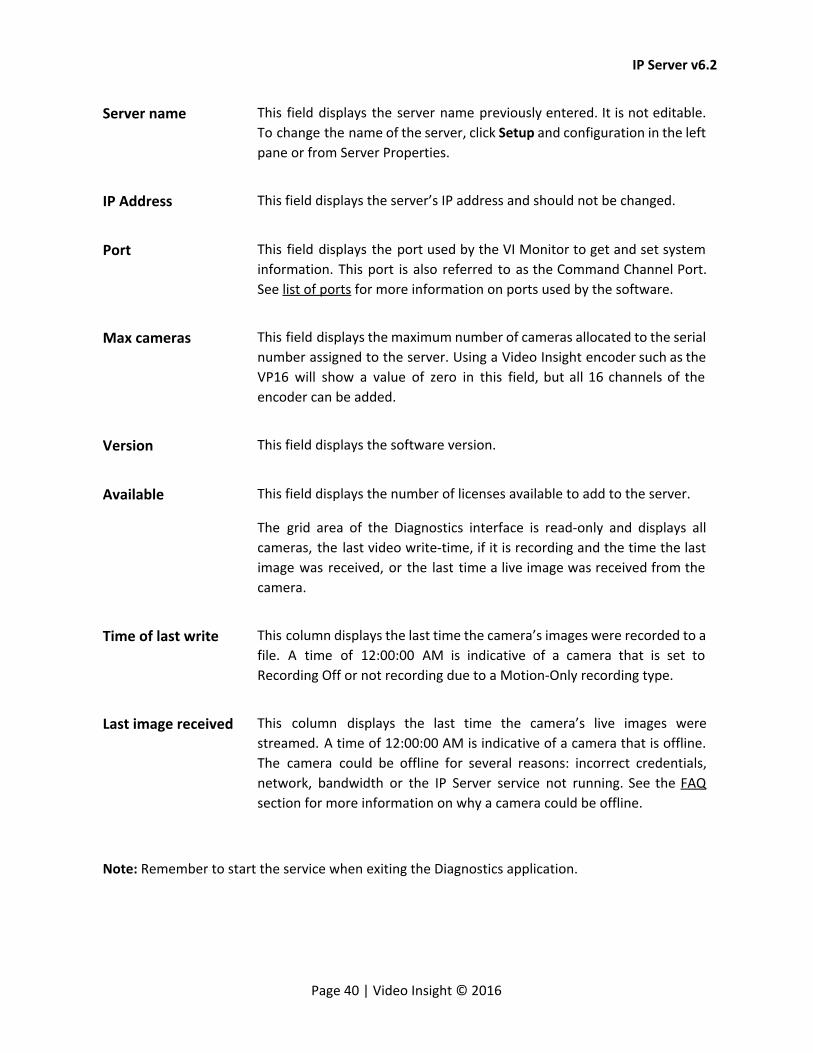
IPSM: Diagnostics
Clicking Diagnostics brings up
the Video Server Diagnostics
interface. This interface is used
for troubleshooting any service
related issues. The IP Server
service is stopped when
Diagnostics is launched;
however, recording and live
streaming continue normally.
The difference is that Video
Server Diagnostics has a user
interface and the IP Server
service is a background process
without a user interface.
Page 39 | Video Insight © 2016
IP Server v6.2
Server name This field displays the server name previously entered. It is not editable.
To change the name of the server, click Setup and configuration in the left
pane or from Server Properties.
IP Address This field displays the server’s IP address and should not be changed.
Port This field displays the port used by the VI Monitor to get and set system
information. This port is also referred to as the Command Channel Port.
See list of ports for more information on ports used by the software.
Max cameras This field displays the maximum number of cameras allocated to the serial
number assigned to the server. Using a Video Insight encoder such as the
VP16 will show a value of zero in this field, but all 16 channels of the
encoder can be added.
Version This field displays the software version.
Available This field displays the number of licenses available to add to the server.
The grid area of the Diagnostics interface is read-only and displays all
cameras, the last video write-time, if it is recording and the time the last
image was received, or the last time a live image was received from the
camera.
Time of last write This column displays the last time the camera’s images were recorded to a
file. A time of 12:00:00 AM is indicative of a camera that is set to
Recording Off or not recording due to a Motion-Only recording type.
Last image received This column displays the last time the camera’s live images were
streamed. A time of 12:00:00 AM is indicative of a camera that is offline.
The camera could be offline for several reasons: incorrect credentials,
network, bandwidth or the IP Server service not running. See the FAQ
section for more information on why a camera could be offline.
Note: Remember to start the service when exiting the Diagnostics application.
Page 40 | Video Insight © 2016

IP Server v6.2
Two additional features for troubleshooting are available that are not available in VI Monitor
Client, by highlighting the server node in the left pane: Test DB and Advanced.
Click Test DB to test connectivity to the database. The database test will pass when the server
makes a successful connection to the database. If it does not, the test will display: “Error:
Database version is not correct. Either the database did not respond, nor has an outdated
version.” There are several reasons why the database test failed. See FAQs for possible reasons
for and potential solutions to the failure.
Incorrect database information may be one
cause of test failure. To update or confirm
the information click Advanced.
Database: Enter the database name. The default database name is InsightEnt.
IP Address: Enter either the IP address or the hostname of the database server.
Page 41 | Video Insight © 2016

IP Server v6.2
User ID: The default user ID for the InsightEnt database is sa.
Password: The default password for the InsightEnt database is V4in$ight. You can change this
at anytime after the installation to match the security needs of your environment.
You can view the System Log by clicking the node in the left pane. See System Log for more
information on the system log.
IPSM: No Cameras
Another troubleshooting option is a diagnostics version that can run the application without
starting any cameras. This version does not consume any bandwidth.
This version functions the same as the other version, with the exception that camera-related
features and information such as Live View and Time of last write are not available after this
diagnostics version is started. See IPSM Diagnostics for more information on running
diagnostics.
IPSM: Update Activation
The Update Activation option is used to update the Activation type (e.g., transitioning from
Demo to purchased licensing scheme) or when the serial number used is upgraded with
additional licenses.
See Installation for more information on changing the activation type. Click OK to confirm the
number of licenses currently available.
Page 42 | Video Insight © 2016
IP Server v6.2
Camera Status tab
The Camera Status tab displays the camera name, the last received communication from the
server, the resolution being used, the number of frames per second, the bandwidth, frame size
and the format.
Security
Video surveillance is a pillar of overall security. To secure our products we have implemented
secure access to the software, watermarking of recorded video and the ability to quickly know
when someone has modified something by using the logs.
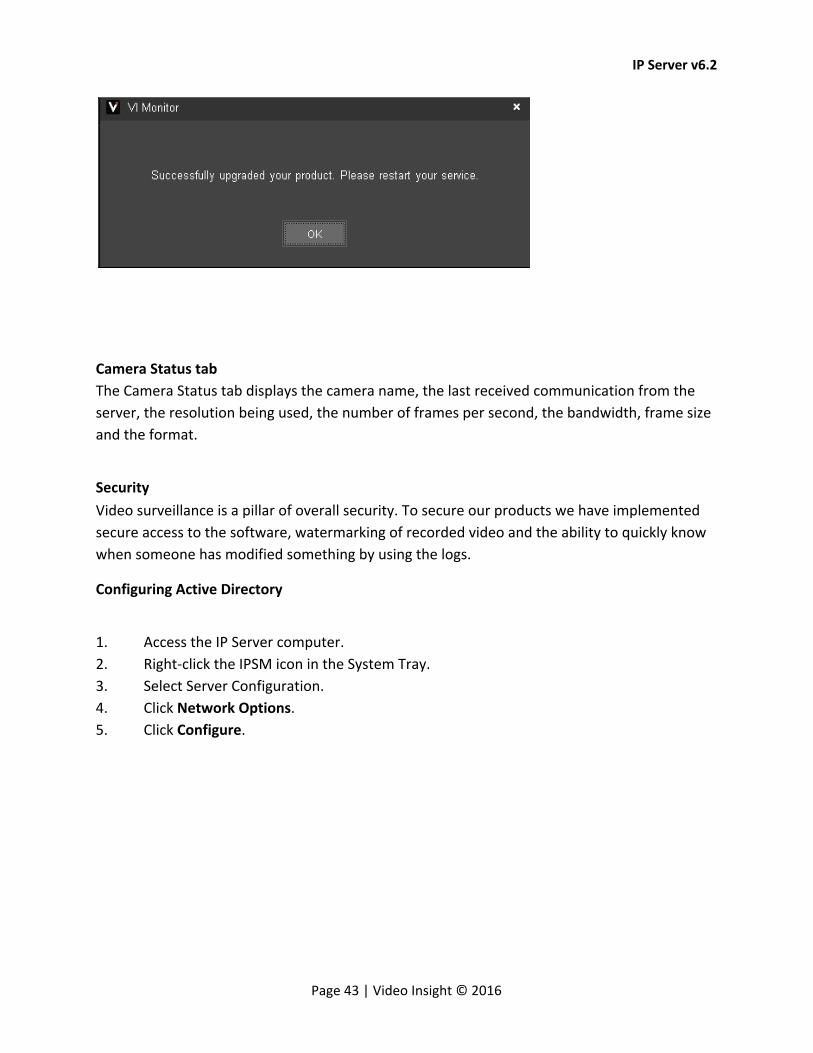
Configuring Active Directory
1. Access the IP Server computer.
2. Right-click the IPSM icon in the System Tray.
3. Select Server Configuration.
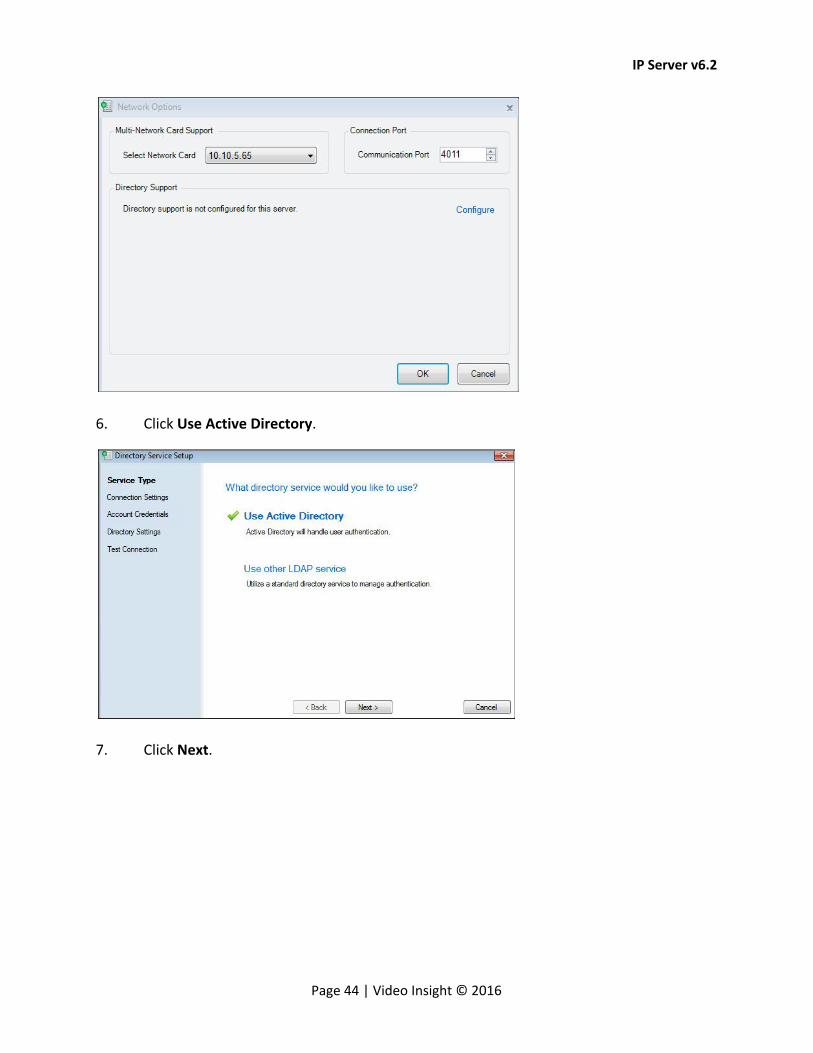
4. Click Network Options. 5. Click Configure.
Page 43 | Video Insight © 2016
IP Server v6.2
6. Click Use Active Directory.
7. Click Next.
Page 44 | Video Insight © 2016
IP Server v6.2
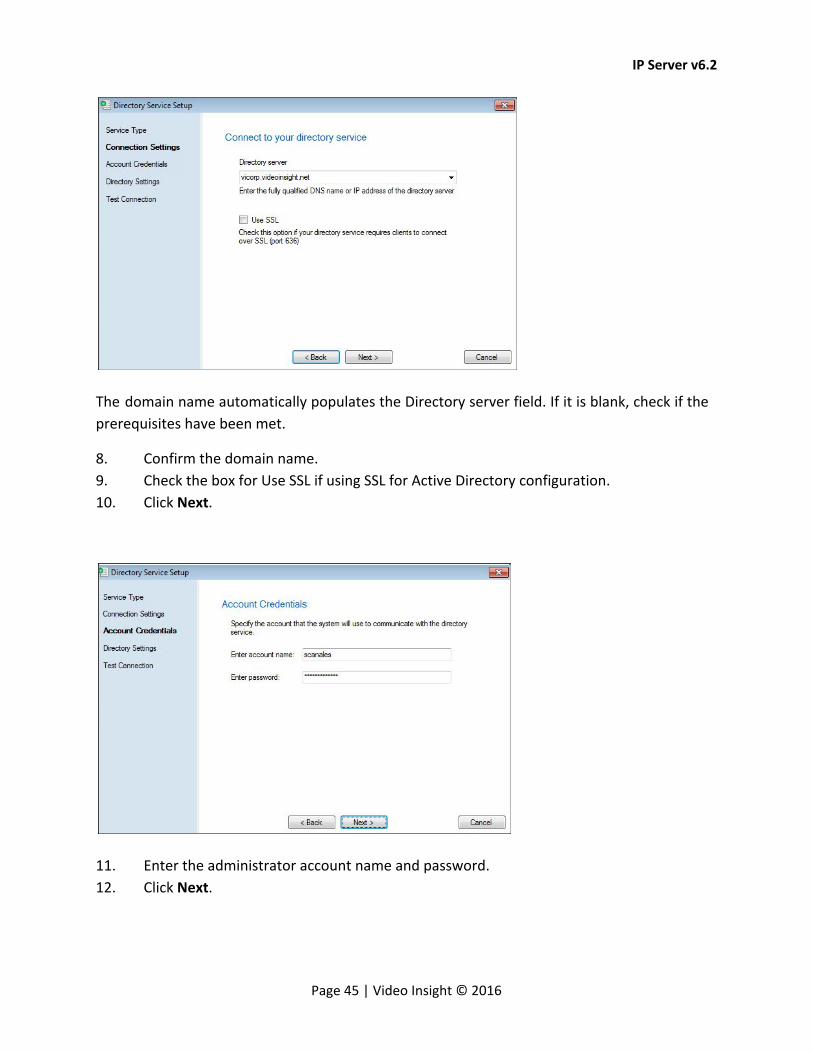
The domain name automatically populates the Directory server field. If it is blank, check if the
prerequisites have been met.
8. Confirm the domain name.
9. Check the box for Use SSL if using SSL for Active Directory configuration.
10. Click Next.
11. Enter the administrator account name and password.
12. Click Next.
Page 45 | Video Insight © 2016
IP Server v6.2
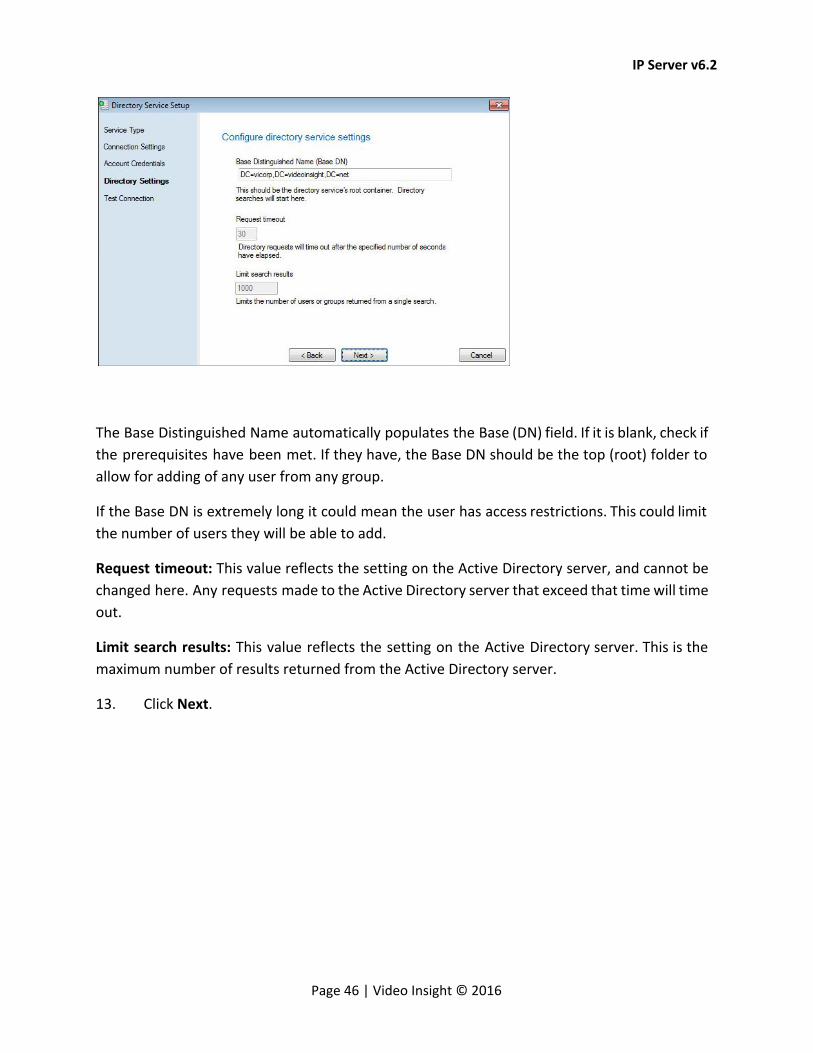
The Base Distinguished Name automatically populates the Base (DN) field. If it is blank, check if
the prerequisites have been met. If they have, the Base DN should be the top (root) folder to
allow for adding of any user from any group.
If the Base DN is extremely long it could mean the user has access restrictions. This could limit
the number of users they will be able to add.
Request timeout: This value reflects the setting on the Active Directory server, and cannot be
changed here. Any requests made to the Active Directory server that exceed that time will time
out.
Limit search results: This value reflects the setting on the Active Directory server. This is the
maximum number of results returned from the Active Directory server.
13. Click Next.
Page 46 | Video Insight © 2016
IP Server v6.2
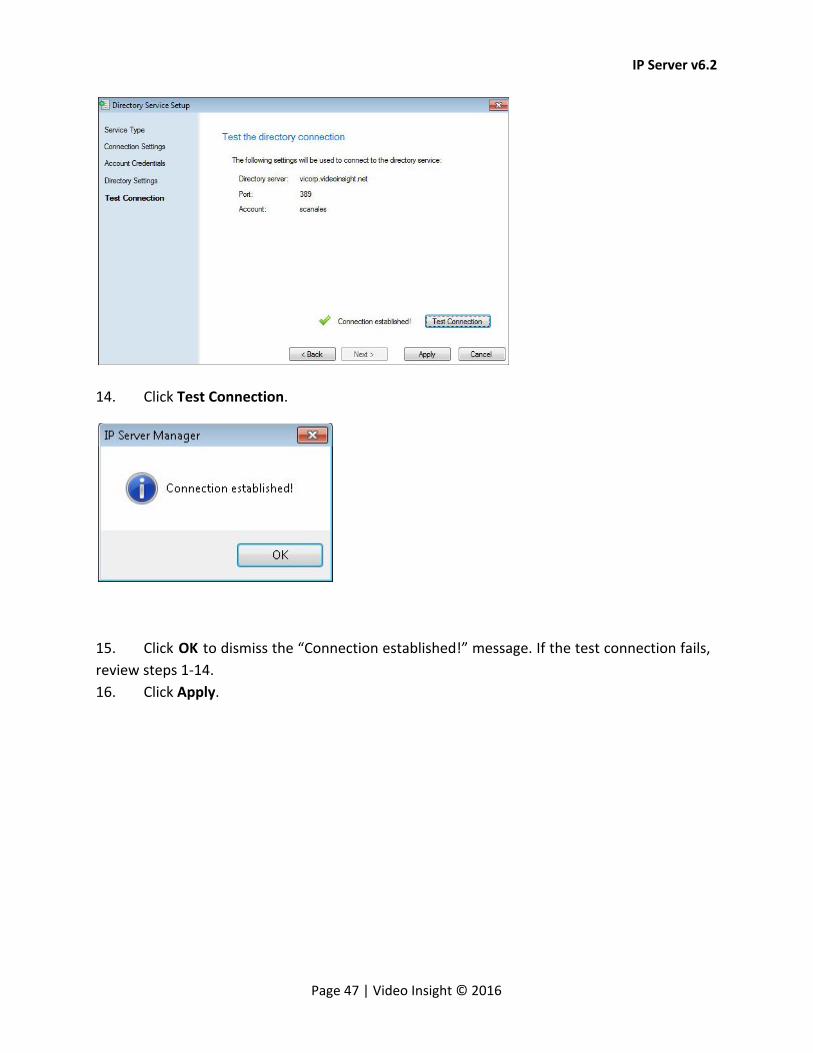
14. Click Test Connection.
15. Click OK to dismiss the “Connection established!” message. If the test connection fails,
review steps 1-14.
16. Click Apply.
Page 47 | Video Insight © 2016
IP Server v6.2
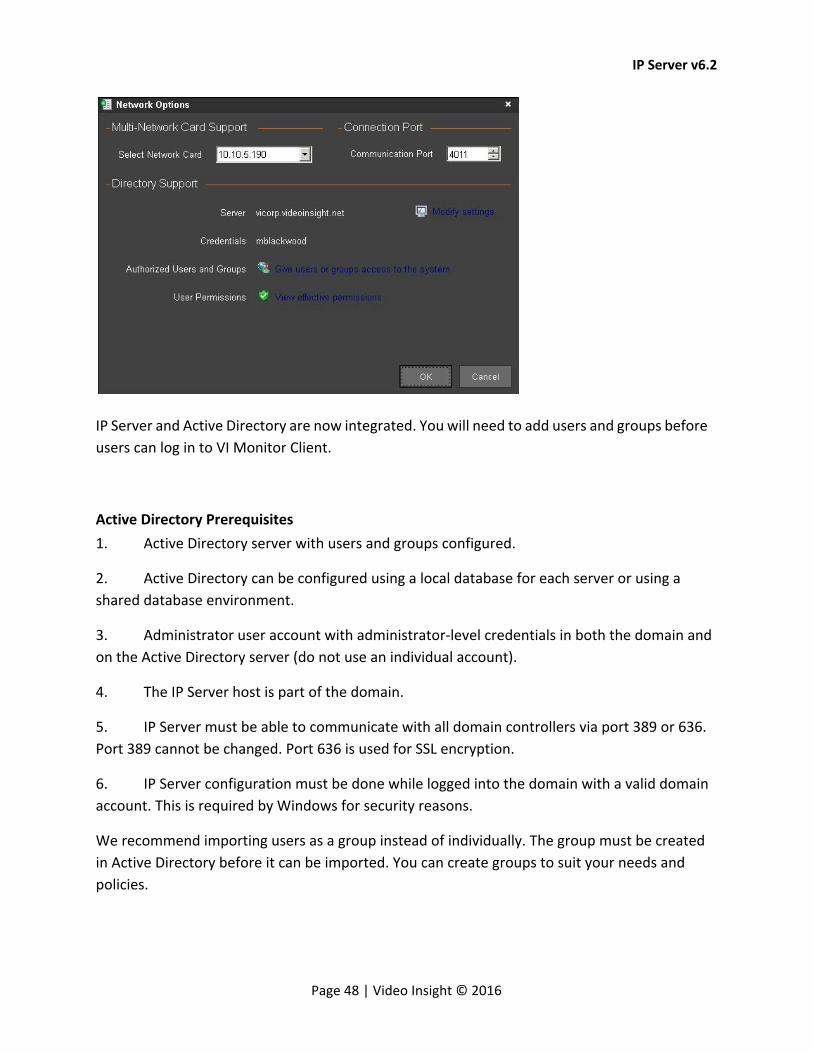
IP Server and Active Directory are now integrated. You will need to add users and groups before
users can log in to VI Monitor Client.
Active Directory Prerequisites
1. Active Directory server with users and groups configured.
2. Active Directory can be configured using a local database for each server or using a
shared database environment.
3. Administrator user account with administrator-level credentials in both the domain and
on the Active Directory server (do not use an individual account).
4. The IP Server host is part of the domain.
5. IP Server must be able to communicate with all domain controllers via port 389 or 636.
Port 389 cannot be changed. Port 636 is used for SSL encryption.
6. IP Server configuration must be done while logged into the domain with a valid domain
account. This is required by Windows for security reasons.
We recommend importing users as a group instead of individually. The group must be created
in Active Directory before it can be imported. You can create groups to suit your needs and
policies.
Page 48 | Video Insight © 2016

IP Server v6.2
To configure the IP Video Enterprise service to run as an Active Directory account:
1. Click the Start button.
2. Enter services.msc and then press Enter.
3. Locate the IP Video Enterprise service.
4. Right-click and select Stop.
5. Right-click and select Properties.
6. Select the Logon tab.
7. Select the second option for the account.
8. Provide an Active Directory account with minimal rights. A basic domain user account should be sufficient.
9. Click the General tab and then select Start.
10. Click OK.
11. Restart the IIS Admin service if using Web Client.
Page 49 | Video Insight © 2016

IP Server v6.2
Adding users or groups
To add Active Directory users and groups:
On the Network Options screen click Give users or groups access to the system.
Click Add.
Page 50 | Video Insight © 2016

IP Server v6.2
Enter the user or group name exactly as it appears in Active Directory and then click OK.
Click Browse to select a user or group from the list.
Page 51 | Video Insight © 2016
IP Server v6.2
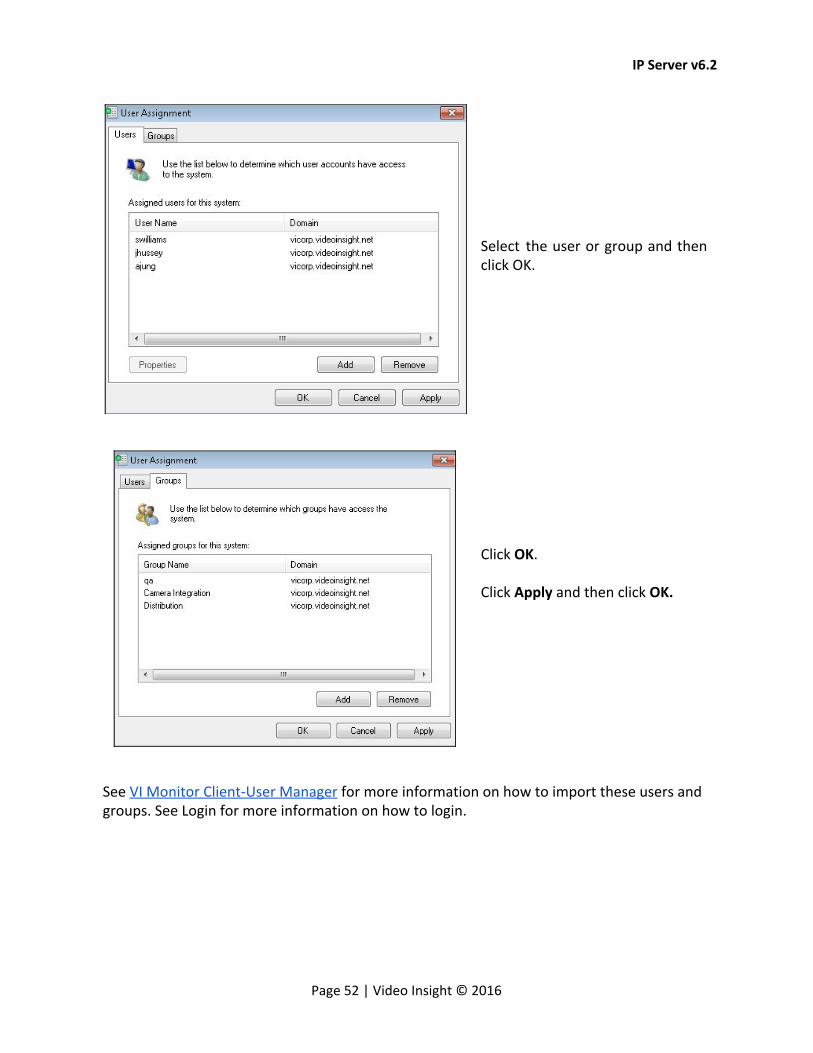
Select the user or group and then click OK.
Click OK. Click Apply and then click OK.
See VI Monitor Client-User Manager for more information on how to import these users and groups. See Login for more information on how to login.
Page 52 | Video Insight © 2016

IP Server v6.2
Entering an invalid user or group name displays an error message as shown.
Removing users or groups
To remove Active Directory users
and groups:
On the Network Options screen
click Give users or groups access
to the system.
Select the user or users to
remove and then click Remove.
Click Apply.
Click OK.
Page 53 | Video Insight © 2016
IP Server v6.2
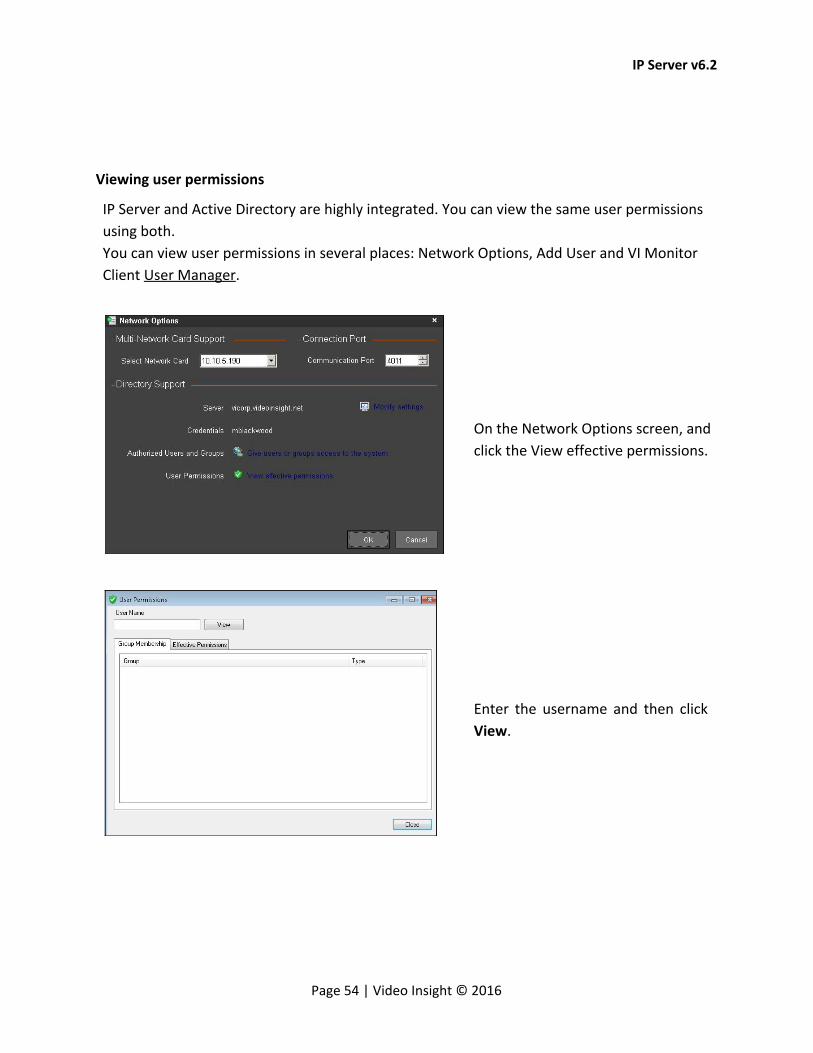
Viewing user permissions
IP Server and Active Directory are highly integrated. You can view the same user permissions
using both.
You can view user permissions in several places: Network Options, Add User and VI Monitor
Client User Manager.
On the Network Options screen, and
click the View effective permissions.
Enter the username and then click
View.
Page 54 | Video Insight © 2016

IP Server v6.2
The Group Membership tab displays all Active Directory groups the user belongs to. You cannot make any changes on this tab.
The Effective Permissions tab displays all IP Server items the user has access to. You cannot make any changes on this tab. See User Manager for more information on modifying user permissions in VI Monitor Client.
Name: Lists the object names the user has access to.
Type: Lists the object type the user has access to.
Source: Lists the source of the permission; in this example, the user was created individually and granted permissions exclusively, not as part of a group.
To view permissions from the User Assignment screen:
Page 55 | Video Insight © 2016
IP Server v6.2
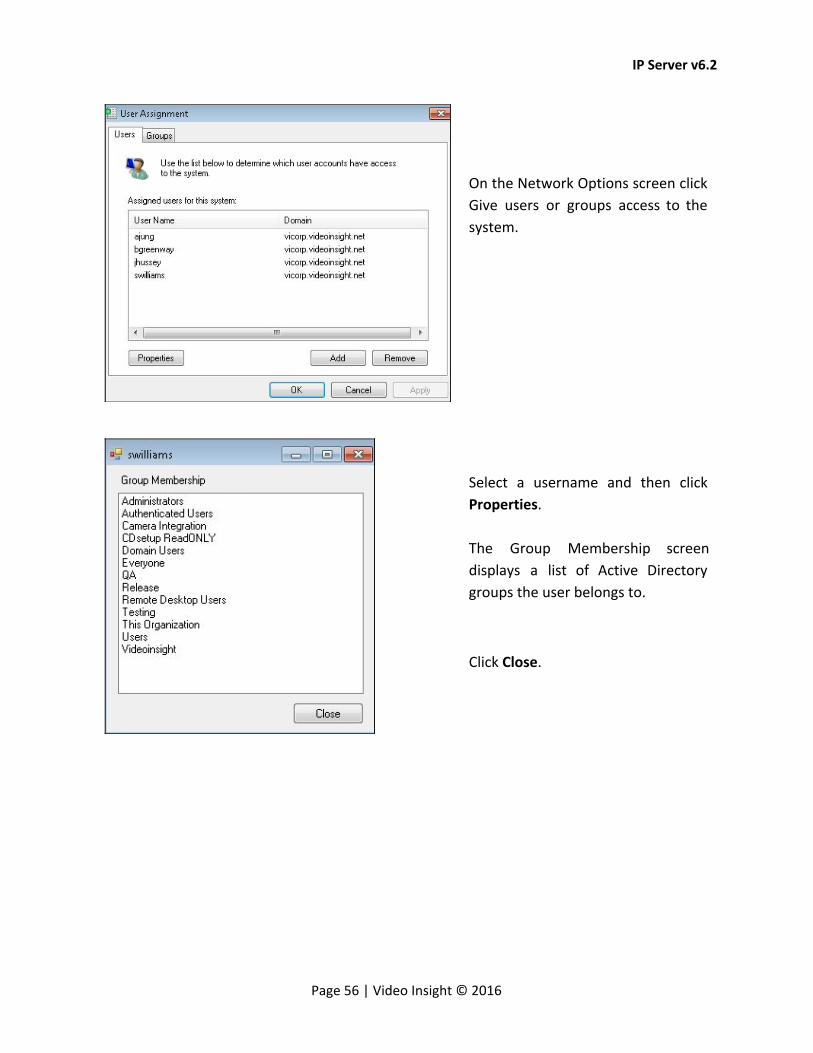
On the Network Options screen click
Give users or groups access to the
system.
Select a username and then click
Properties.
The Group Membership screen
displays a list of Active Directory
groups the user belongs to.
Click Close.
Page 56 | Video Insight © 2016

IP Server v6.2
LDAP (Lightweight Directory Access Protocol) LDAP is the information technology standard way of accessing a directory service over a TCP/IP network. Active Directory is Microsoft’s directory service. Some other directory services are Novell eDirectory and OpenLDAP. Directory services store, organize and provide access to information in a directory containing information about users, computers, and permissions.
LDAP uses Distinguished Name (DN) as the syntax to identify objects in the directory. The DN is composed of four discrete name parts:
● CN – Common Name – For example, Jane Doe ● OU – Organizational Unit – For example, Sales ● DC – Domain component – For example, my.domain.net ● Domain component – For example, net
The DN reads from left to right, from the most specific part of the node to the least specific node on the right. The root of the DN is actually the last two parts (for example, my.domain.net).
See Active Directory for more information on managing users using LDAP. The process to manage users in both systems is the same.
CheckSum The checksum logic incorporated into Video Insight software prevents modification to recordings that can be made using other software. This feature guarantees the authenticity of the recording and ensures the delivered recording has not been tampered with. This is important when using recordings as evidence in legal proceedings. Video Insight uses MD5 checksum logic.
Enabling this feature is processor intensive because the server decompresses and re-compresses each image to interlace the watermark. You can interlace the watermark into clips or full recordings. The watermark is invisible to the naked eye and can only be verified using our Standalone Player utility.
Page 57 | Video Insight © 2016
IP Server v6.2
Enabling CheckSum Watermark
1) Start VI Monitor Client.
2) Select a camera from the left navigation tree.
3) Right-click the camera node and select
Properties.
4) Click the Record tab.
5) Click the Advanced tab.
6) Check the box to Insert Watermark on all raw
video files at capture.
7) Click Save.
You can verify a video has not been tampered with by using the Standalone Player utility provided in the full DVD download for your operating system type.
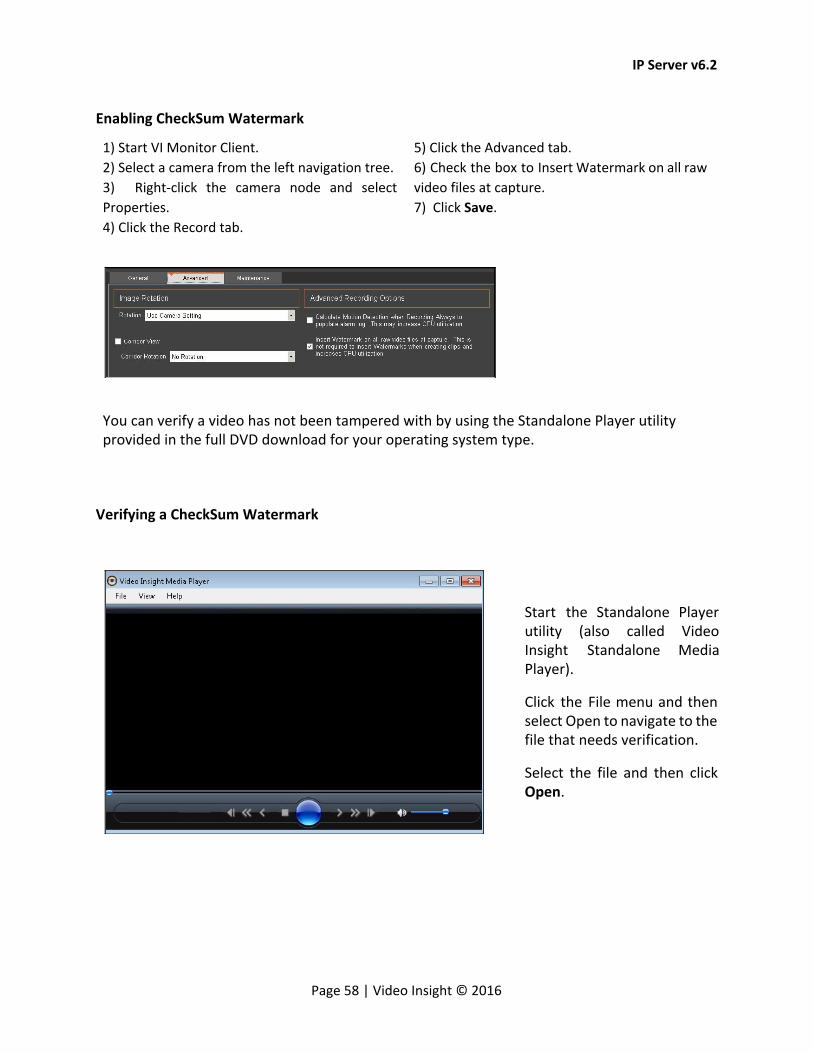
Verifying a CheckSum Watermark
Start the Standalone Player utility (also called Video Insight Standalone Media Player).
Click the File menu and then select Open to navigate to the file that needs verification.
Select the file and then click Open.
Page 58 | Video Insight © 2016

IP Server v6.2
Click the File menu and
then select Check Water
Mark.
The player will check the file and if the video is watermarked and has not been tampered with, it will display a verification message as in to the left.
Click OK.
The player displays a different message if the file does not have a watermark or has been tampered with.
Page 59 | Video Insight © 2016
IP Server v6.2
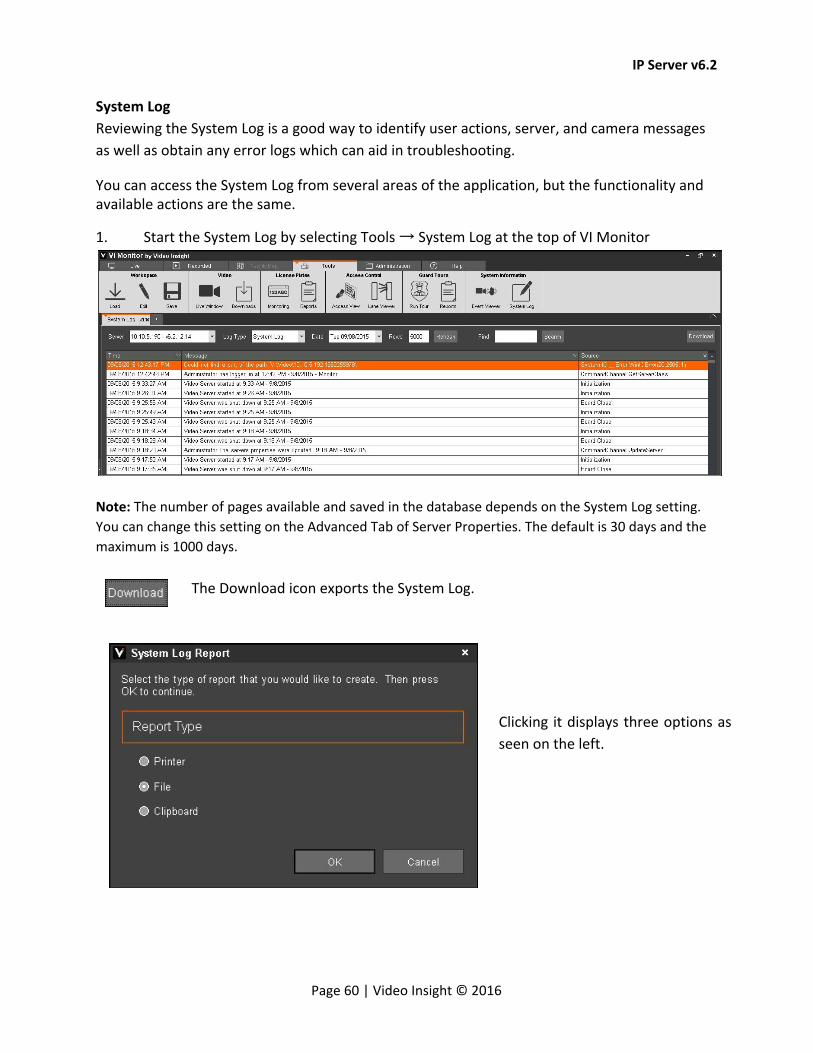
System Log
Reviewing the System Log is a good way to identify user actions, server, and camera messages
as well as obtain any error logs which can aid in troubleshooting.
You can access the System Log from several areas of the application, but the functionality and available actions are the same.
1. Start the System Log by selecting Tools → System Log at the top of VI Monitor
Note: The number of pages available and saved in the database depends on the System Log setting.
You can change this setting on the Advanced Tab of Server Properties. The default is 30 days and the
maximum is 1000 days.
The Download icon exports the System Log.
Clicking it displays three options as
seen on the left.
Page 60 | Video Insight © 2016

IP Server v6.2
Refresh The Refresh icon refreshes the System
Log.
Server
This drop down menu selects the server. All servers added to VI Monitor Client with a status of Connected display here. However, if you are using the IPSM Diagnostics System Log all servers in a shared database will appear, regardless of their connection status.
Log Type This drop-down menu selects the type of log to view. System Log is the default.
Find Option The field next to this icon allows you to search for a specific string.
Date The calendar control selects the “through” date of the logs. For example, when 12/31/2011 is selected all logs available up to and including 12/31/2011 display.
Page 61 | Video Insight © 2016

IP Server v6.2
Troubleshooting
Your registered Video Insight product includes one year of software maintenance and a technical support plan that begins on your purchase date. This is verified by the serial number used to activate the software. The one year of software maintenance entitles users to one full year of free software upgrades and unlimited technical support. Video Insight recommends renewing your maintenance before it expires to avoid a lapse in upgrades and support.
Our technical support team is highly skilled in our software and in the world of IP cameras, as well as networking and access control systems. Video Insight technical support works to make sure your issue is resolved as quickly and completely as possible.
Frequently Asked Questions Answers to the most commonly asked questions and troubleshooting hints can be found on our website, under the FAQ section.
You can also access this section by clicking the following link: http://www.video-insight.com/support/FAQ/
Online Resources Youtube Tutorials: http://www.youtube.com/user/videoinsighttv
Downloads and Updates: http://downloadvi.com
Remote Support If you require personal assistance from one of our Technical Support representatives, please contact us using one of our contact methods. Install the Teamviewer client application prior to requesting remote support.
To install Team Viewer:
1. Browse to http://www.downloadvi.com 2. C ick the VI Remote Support QS button. 3. Click Run at the prompt. 4. Click Run again. 5. Call us at Technical Support at 713-621-9779. 6. Give the representative your ID. Your ID is randomly generated every time you request remote support. The representative will log on to your computer and show you how to correct the issue or fix it for you.
Page 62 | Video Insight © 2016

IP Server v6.2
Contact Us
In person:
3 Riverway, Suite 700
Houston, Texas 77056
Hours of Operation:
9:00 AM - 6:00 PM CST, Monday – Friday
By Phone: 713-621-9779
800-513-5417
By Fax: 713-621-7281
Sales Department:
713-621-9779
Technical Support Hours: 8:00 AM - 6:00 PM CST, Monday – Friday
For Saturdays and Holidays: 10:00 AM - 2:00 PM
Please call our Answering Service at 877-743-2403 and the support engineer on-call will be
paged to assist you.
By Email: [email protected]
Feature Request http://www.questionpro.com/akira/TakeSurvey?id=1028953
Page 63 | Video Insight © 2016
IP Server v6.2
Appendices
Appendix A: IP Server port list
Appendix B: Current Customers Examples
Appendix C: Commonly Used Camera Credentials
Appendix D: Configuring a CNB camera
Appendix E: Configuring Sentry FS1000 and FS2000 cameras
Appendix F: Configuring an IQEye Camera using Optional Controls
Appendix G: The Independent JPEG Group’s JPEG Software Notice
Page 64 | Video Insight © 2016
IP Server v6.2
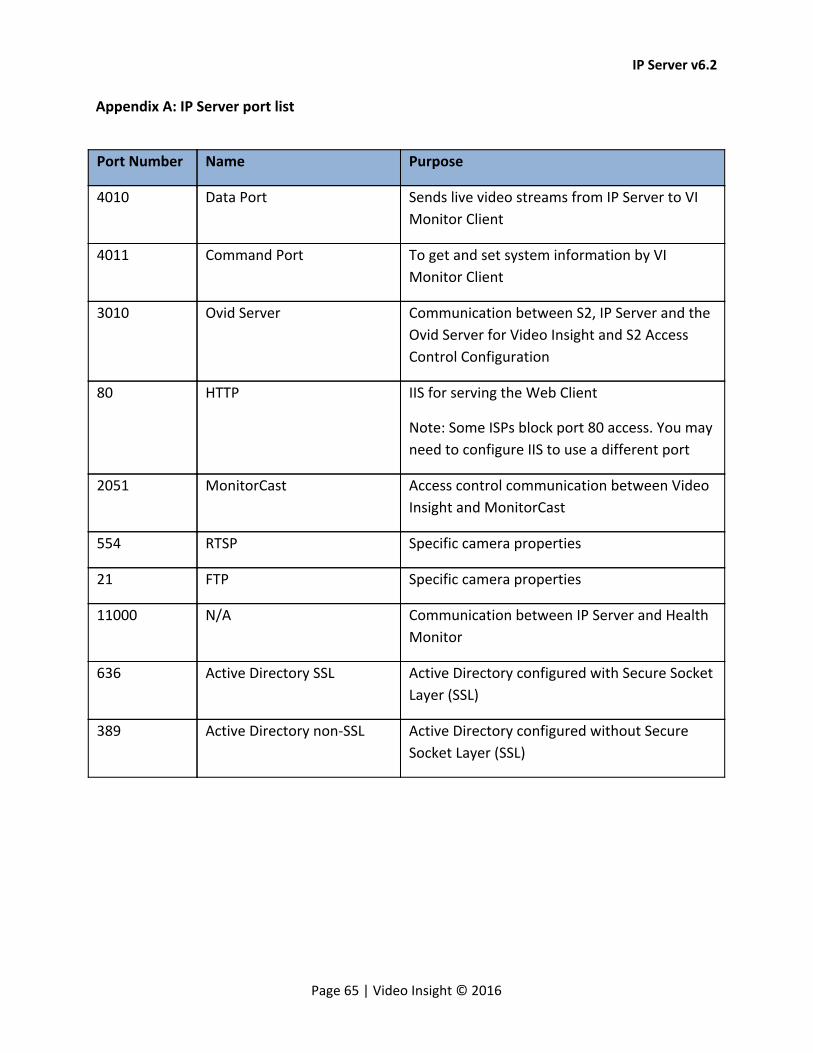
Appendix A: IP Server port list
Port Number Name Purpose
4010 Data Port Sends live video streams from IP Server to VI
Monitor Client
4011 Command Port To get and set system information by VI
Monitor Client
3010 Ovid Server Communication between S2, IP Server and the
Ovid Server for Video Insight and S2 Access
Control Configuration
80 HTTP IIS for serving the Web Client
Note: Some ISPs block port 80 access. You may
need to configure IIS to use a different port
2051 MonitorCast Access control communication between Video
Insight and MonitorCast
554 RTSP Specific camera properties
21 FTP Specific camera properties
11000 N/A Communication between IP Server and Health
Monitor
636 Active Directory SSL Active Directory configured with Secure Socket
Layer (SSL)
389 Active Directory non-SSL Active Directory configured without Secure
Socket Layer (SSL)
Page 65 | Video Insight © 2016
IP Server v6.2
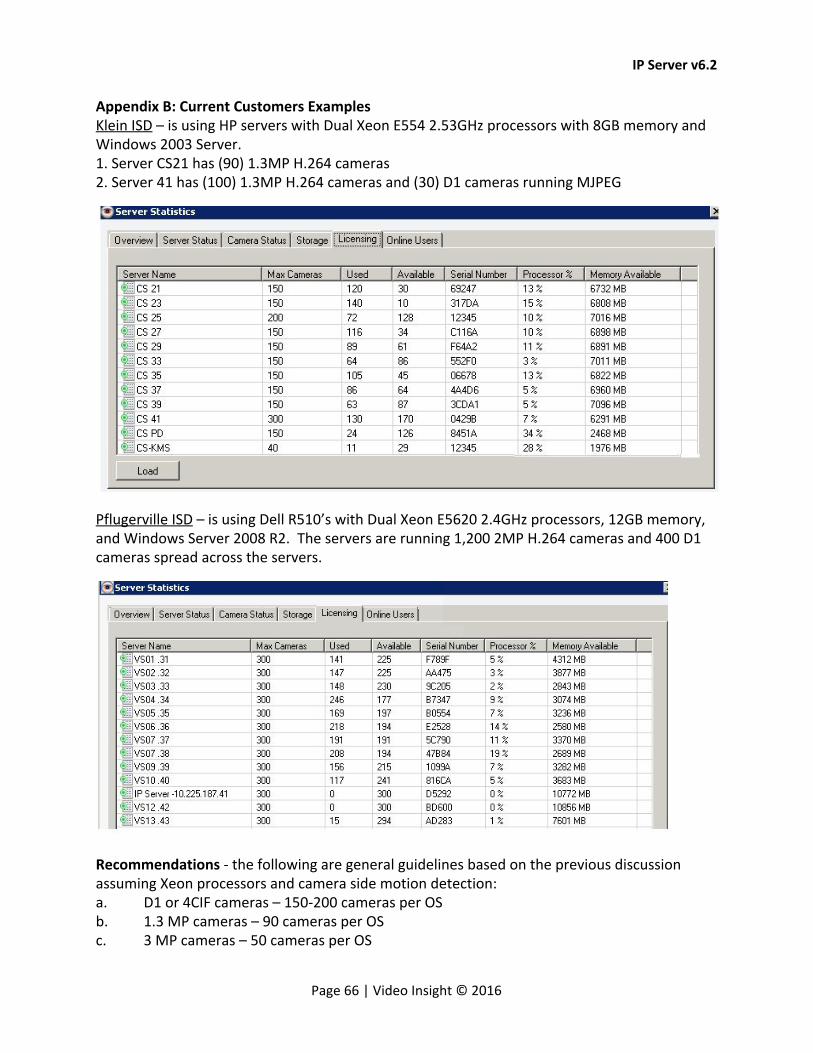
Appendix B: Current Customers Examples Klein ISD – is using HP servers with Dual Xeon E554 2.53GHz processors with 8GB memory and Windows 2003 Server. 1. Server CS21 has (90) 1.3MP H.264 cameras 2. Server 41 has (100) 1.3MP H.264 cameras and (30) D1 cameras running MJPEG
Pflugerville ISD – is using Dell R510’s with Dual Xeon E5620 2.4GHz processors, 12GB memory, and Windows Server 2008 R2. The servers are running 1,200 2MP H.264 cameras and 400 D1 cameras spread across the servers.
Recommendations - the following are general guidelines based on the previous discussion assuming Xeon processors and camera side motion detection: a. D1 or 4CIF cameras – 150-200 cameras per OS b. 1.3 MP cameras – 90 cameras per OS c. 3 MP cameras – 50 cameras per OS
Page 66 | Video Insight © 2016

IP Server v6.2
Appendix C: Commonly Used Camera Credentials Here is a list of the default usernames/passwords for a few of the supported IP camera
manufacturers. Should your camera model not appear here please refer to the manual included
with your camera.
Brand UserName Password Notes
3S root root
Acti Admin 123456 or 'admin' with a lowercase “a”
Arecont Vision No credentials needed
Avigilon admin admin
Axis
root
blank or pass You will be asked to create a
root password the first time
you go into the cameras
interface.
Basler admin admin
Bosch Dinion No credentials needed
Brickcom admin admin
Cisco
You will be asked to create a
root password the first time
you go into the cameras
interface.
Dlink root blank
Grandstream admin admin
Hikvision admin 12345
Honeywell Administrator 1234
Huviron Admin admin To change settings
Huviron root root To view images
Infinova infinova INFINOVA
IPX-DDK root admin Also try 'Admin'
Page 67 | Video Insight © 2016

IP Server v6.2
IQeye root system
IQinVision root system
Mobotix admin meinsm
Panasonic admin 12345
Pelco Sarix admin admin
Pixord admin admin
Samsung Electronics root root or admin/4321
Samsung Techwin
(new) admin
4321
Samsung Techwin
(old) admin
1111111
Sanyo admin admin
Scallop admin password
Sony admin admin
Stardot admin admin
Starvedia admin leave blank
Toshiba root ikwb
Toshiba root ikwd
Trendnet admin admin
Ubiquiti ubnt ubnt
VideoIQ supervisor supervisor
Vivotek root leave blank
VP16 admin 12345
VP16-A Admin 12345
Page 68 | Video Insight © 2016

IP Server v6.2
Appendix D: Configuring a CNB camera Due to the nature of the CNB camera integration and the capabilities of the camera will turn on
Motion detection inside the camera, but we cannot draw zones inside the Motion Detection
page, all zones must be created inside the CNB web page under Motion Detection as shown
below.
Access the camera’s Web page
Click the Motion Detection option
With the CNB cameras the best way for Motion Detection to work is to draw at least two
zones; the camera will not detect motion anywhere there is not a zone and allows you to
draw up to three zones.
Page 69 | Video Insight © 2016

IP Server v6.2
The Sensitivity adjusts the threshold for the amount of motion that needs to occur. The lower
the number, the less amount of motion that needs to occur to trigger a motion event, setting
the Sensitivity to 10 turns off Motion Detection in that area.
Motion Zones can overlap and it appears the zone with the lower sensitivity takes
precedence over the other zone.
The window is dynamic once you save the changes you have made, but as you can see from
the picture, it does not tell you the amount of motion, just that motion has occurred and in
which zone.
While testing, we discovered that a zone with sensitivity between 3 and 5 work the best, but
it will depend on the size of the zone drawn as well. The bigger the zone, the lower the
number will need to be.
Page 70 | Video Insight © 2016
IP Server v6.2
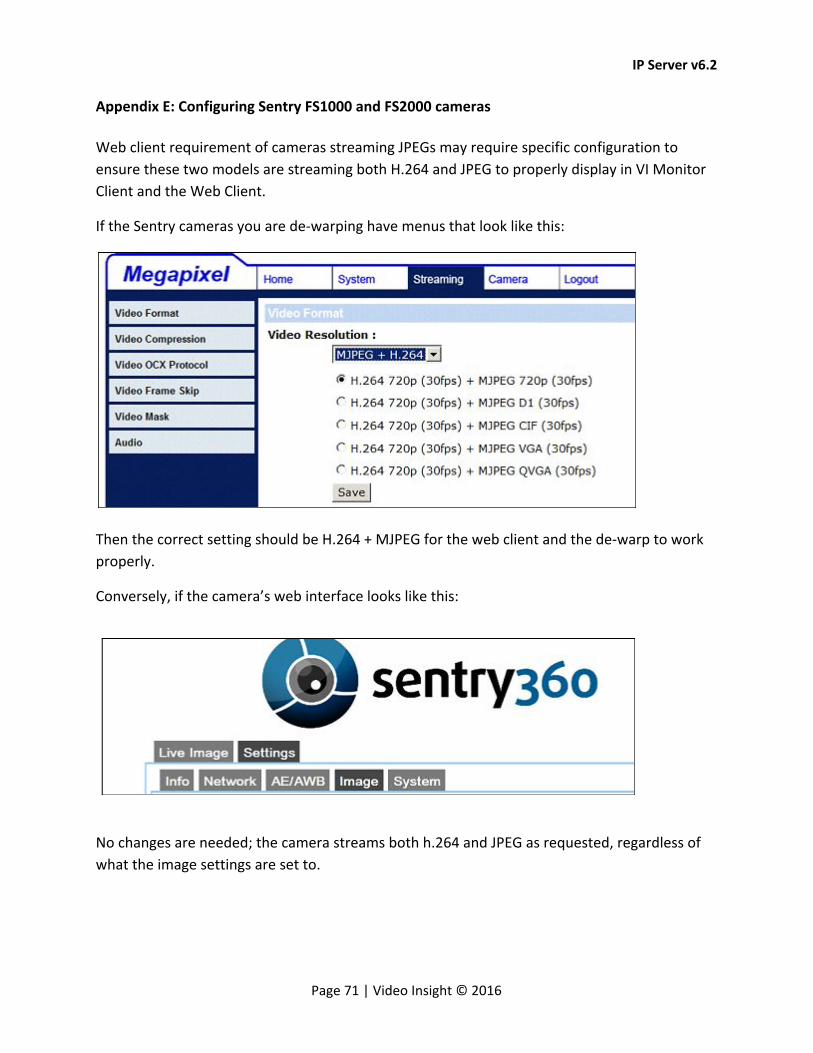
Appendix E: Configuring Sentry FS1000 and FS2000 cameras
Web client requirement of cameras streaming JPEGs may require specific configuration to
ensure these two models are streaming both H.264 and JPEG to properly display in VI Monitor
Client and the Web Client.
If the Sentry cameras you are de-warping have menus that look like this:
Then the correct setting should be H.264 + MJPEG for the web client and the de-warp to work
properly.
Conversely, if the camera’s web interface looks like this:
No changes are needed; the camera streams both h.264 and JPEG as requested, regardless of
what the image settings are set to.
Page 71 | Video Insight © 2016
IP Server v6.2
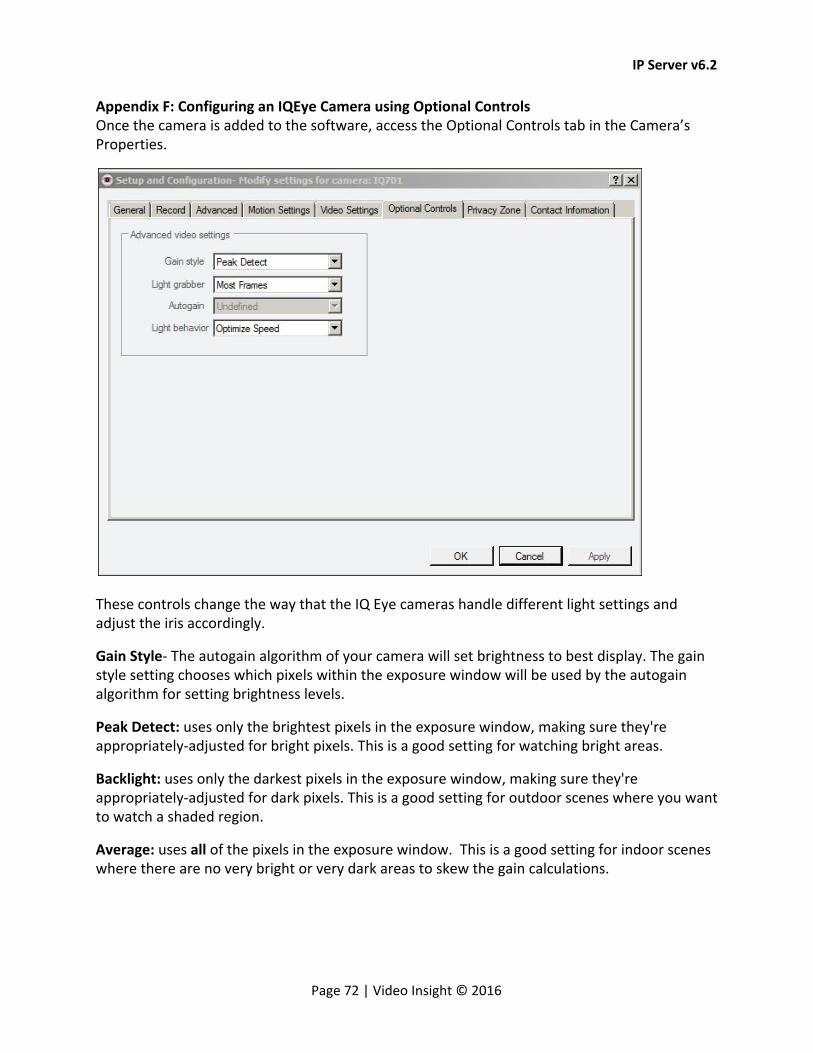
Appendix F: Configuring an IQEye Camera using Optional Controls Once the camera is added to the software, access the Optional Controls tab in the Camera’s Properties.
These controls change the way that the IQ Eye cameras handle different light settings and adjust the iris accordingly.
Gain Style- The autogain algorithm of your camera will set brightness to best display. The gain style setting chooses which pixels within the exposure window will be used by the autogain algorithm for setting brightness levels.
Peak Detect: uses only the brightest pixels in the exposure window, making sure they're appropriately-adjusted for bright pixels. This is a good setting for watching bright areas.
Backlight: uses only the darkest pixels in the exposure window, making sure they're appropriately-adjusted for dark pixels. This is a good setting for outdoor scenes where you want to watch a shaded region.
Average: uses all of the pixels in the exposure window. This is a good setting for indoor scenes where there are no very bright or very dark areas to skew the gain calculations.
Page 72 | Video Insight © 2016

IP Server v6.2
Clip Average: uses all pixels except for the very darkest and brightest pixels. This is a good setting for outdoor scenes where you want to ignore both sky and shadows and to watch a region of intermediate brightness levels. This is also a good setting for interior scenes.
Undefined- This setting turns off Gain Style
Light Graber- Enables or disables special processing for low-light images. These values can be seen at the camera’s web page under Image tab.
Most Frames- Sets the Light Grabber value to 4x, which specifies “integration” of four frames, twice the low-light correction as the 2x setting which specifies the integration of two frames.
Medium- Sets the Light Grabber value to 2x.
Undefined- Sets the Light Grabber value to 4x
Disabled- Turns Light Grabber off at the camera.
Light Behavior- This setting adjusts the electronic shutter values for the IQeye camera
Optimize speed: Use this setting for fast moving subjects. This setting may cause images to appear grainy in low light conditions.
Optimize quality: Use this setting for high-quality images. This setting may cause images to blur in low light conditions.
Auto: This setting is ideal when there is adequate light and objects are not moving too fast.
The other values set a fixed exposure. This is useful for tuning a camera to minimally changing conditions or to capture objects moving at predictable speeds. The list of available exposures may change based on other settings like frame rate, Light Grabber and resolution.
Page 73 | Video Insight © 2016
IP Server v6.2
Appendix G: The Independent JPEG Group’s JPEG Software Notice ========================================== README for release 6b of 27-Mar-1998 ====================================
This distribution contains the sixth public release of the Independent JPEG Group's free JPEG software. You are welcome to redistribute this software and to use it for any purpose, subject to the conditions under LEGAL ISSUES, below.
Serious users of this software (particularly those incorporating it into larger programs) should contact IJG at [email protected] to be added to our electronic mailing list. Mailing list members are notified of updates and have a chance to participate in technical discussions, etc.
This software is the work of Tom Lane, Philip Gladstone, Jim Boucher, Lee Crocker, Julian Minguillon, Luis Ortiz, George Phillips, Davide Rossi, Guido Vollbeding, Ge' Weijers, and other members of the Independent JPEG Group.
IJG is not affiliated with the official ISO JPEG standards committee.
DOCUMENTATION ROADMAP =====================
This file contains the following sections:
OVERVIEW General description of JPEG and the IJG software. LEGAL ISSUES Copyright, lack of warranty, terms of distribution. REFERENCES Where to learn more about JPEG. ARCHIVE LOCATIONS Where to find newer versions of this software. RELATED SOFTWARE Other stuff you should get. FILE FORMAT WARS Software *not* to get. TO DO Plans for future IJG releases.
Other documentation files in the distribution are:
User documentation:
install.doc How to configure and install the IJG software. usage.doc Usage instructions for cjpeg, djpeg, jpegtran, rdjpgcom, and wrjpgcom. *.1 Unix-style man pages for programs (same info as usage.doc). wizard.doc Advanced usage instructions for JPEG wizards only. change.log Version-to-version change highlights.
Programmer and internal documentation: libjpeg.doc How to use the JPEG library in your own programs. example.c Sample code for calling the JPEG library. structure.doc Overview of the JPEG library's internal structure.
Page 74 | Video Insight © 2016

IP Server v6.2
filelist.doc Road map of IJG files. coderules.doc Coding style rules --- please read if you contribute code.
Please read at least the files install.doc and usage.doc. Useful information can also be found in the JPEG FAQ (Frequently Asked Questions) article. See ARCHIVE LOCATIONS below to find out where to obtain the FAQ article.
If you want to understand how the JPEG code works, we suggest reading one or more of the REFERENCES, then looking at the documentation files (in roughly the order listed) before diving into the code.
OVERVIEW ========
This package contains C software to implement JPEG image compression and decompression. JPEG (pronounced "jay-peg") is a standardized compression method for full-color and gray-scale images. JPEG is intended for compressing "real-world" scenes; line drawings, cartoons and other non-realistic images are not its strong suit. JPEG is lossy, meaning that the output image is not exactly identical to the input image. Hence you must not use JPEG if you have to have identical output bits. However, on typical photographic images, very good compression levels can be obtained with no visible change, and remarkably high compression levels are possible if you can tolerate a low-quality image. For more details, see the references, or just experiment with various compression settings.
This software implements JPEG baseline, extended-sequential, and progressive compression processes. Provision is made for supporting all variants of these processes, although some uncommon parameter settings aren't implemented yet. For legal reasons, we are not distributing code for the arithmetic-coding variants of JPEG; see LEGAL ISSUES. We have made no provision for supporting the hierarchical or lossless processes defined in the standard.
We provide a set of library routines for reading and writing JPEG image files, plus two sample applications "cjpeg" and "djpeg", which use the library to perform conversion between JPEG and some other popular image file formats. The library is intended to be reused in other applications.
In order to support file conversion and viewing software, we have included considerable functionality beyond the bare JPEG coding/decoding capability; for example, the color quantization modules are not strictly part of JPEG decoding, but they are essential for output to colormapped file formats or colormapped displays. These extra functions can be compiled out of the library if not required for a particular application. We have also included "jpegtran", a utility for lossless transcoding between different JPEG processes, and "rdjpgcom" and "wrjpgcom", two simple applications for inserting and extracting textual comments in JFIF files.
The emphasis in designing this software has been on achieving portability and flexibility, while also making it fast enough to be useful. In particular, the software is not intended to be read as a tutorial on JPEG. (See the REFERENCES section for introductory material.) Rather, it is
Page 75 | Video Insight © 2016

IP Server v6.2
intended to be reliable, portable, industrial-strength code. We do not claim to have achieved that goal in every aspect of the software, but we strive for it.
We welcome the use of this software as a component of commercial products. No royalty is required, but we do ask for an acknowledgement in product documentation, as described under LEGAL ISSUES.
LEGAL ISSUES ============
In plain English:
1. We don't promise that this software works. (But if you find any bugs, please let us know!) 2. You can use this software for whatever you want. You don't have to pay us. 3. You may not pretend that you wrote this software. If you use it in a program, you must acknowledge somewhere in your documentation that you've used the IJG code.
In legalese:
The authors make NO WARRANTY or representation, either express or implied, with respect to this software, its quality, accuracy, merchantability, or fitness for a particular purpose. This software is provided "AS IS", and you, its user, assume the entire risk as to its quality and accuracy.
This software is copyright (C) 1991-1998, Thomas G. Lane. All Rights Reserved except as specified below.
Permission is hereby granted to use, copy, modify, and distribute this software (or portions thereof) for any purpose, without fee, subject to these conditions:
(1) If any part of the source code for this software is distributed, then this README file must be included, with this copyright and no-warranty notice unaltered; and any additions, deletions, or changes to the original files must be clearly indicated in accompanying documentation.
(2) If only executable code is distributed, then the accompanying documentation must state that "this software is based in part on the work of the Independent JPEG Group".
(3) Permission for use of this software is granted only if the user accepts full responsibility for any undesirable consequences; the authors accept NO LIABILITY for damages of any kind.
These conditions apply to any software derived from or based on the IJG code, not just to the unmodified library. If you use our work, you ought to acknowledge us.
Permission is NOT granted for the use of any IJG author's name or company name in advertising or publicity relating to this software or products derived from it. This software may be referred to only as "the Independent JPEG Group's software".
Page 76 | Video Insight © 2016
IP Server v6.2
We specifically permit and encourage the use of this software as the basis of commercial products, provided that all warranty or liability claims are assumed by the product vendor.
ansi2knr.c is included in this distribution by permission of L. Peter Deutsch, sole proprietor of its copyright holder, Aladdin Enterprises of Menlo Park, CA. ansi2knr.c is NOT covered by the above copyright and conditions, but instead by the usual distribution terms of the Free Software Foundation; principally, that you must include source code if you redistribute it. (See the file ansi2knr.c for full details.) However, since ansi2knr.c is not needed as part of any program generated from the IJG code, this does not limit you more than the foregoing paragraphs do.
The Unix configuration script "configure" was produced with GNU Autoconf. It is copyright by the Free Software Foundation but is freely distributable. The same holds for its supporting scripts (config.guess, config.sub, ltconfig, ltmain.sh). Another support script, install-sh, is copyright by M.I.T. but is also freely distributable.
It appears that the arithmetic coding option of the JPEG spec is covered by patents owned by IBM, AT&T, and Mitsubishi. Hence arithmetic coding cannot legally be used without obtaining one or more licenses. For this reason, support for arithmetic coding has been removed from the free JPEG software. (Since arithmetic coding provides only a marginal gain over the unpatented Huffman mode, it is unlikely that very many implementations will support it.)
So far as we are aware, there are no patent restrictions on the remaining code.
The IJG distribution formerly included code to read and write GIF files. To avoid entanglement with the Unisys LZW patent, GIF reading support has been removed altogether, and the GIF writer has been simplified to produce "uncompressed GIFs". This technique does not use the LZW algorithm; the resulting GIF files are larger than usual, but are readable by all standard GIF decoders.
We are required to state that "The Graphics Interchange Format(c) is the Copyright property of CompuServe Incorporated. GIF(sm) is a Service Mark property of CompuServe Incorporated."
REFERENCES ==========
We highly recommend reading one or more of these references before trying to understand the innards of the JPEG software.
The best short technical introduction to the JPEG compression algorithm is Wallace, Gregory K. "The JPEG Still Picture Compression Standard", Communications of the ACM, April 1991 (vol. 34 no. 4), pp. 30-44.
(Adjacent articles in that issue discuss MPEG motion picture compression, applications of JPEG, and related topics.) If you don't have the CACM issue handy, a PostScript file containing a revised version of Wallace's article is available at ftp://ftp.uu.net/graphics/jpeg/wallace.ps.gz. The file (actually a preprint for an article that appeared in IEEE Trans. Consumer Electronics) omits the sample images that appeared in CACM, but it includes corrections and some added
Page 77 | Video Insight © 2016

IP Server v6.2
material. Note: the Wallace article is copyright ACM and IEEE, and it may not be used for commercial purposes.
A somewhat less technical, more leisurely introduction to JPEG can be found in "The Data Compression Book" by Mark Nelson and Jean-loup Gailly, published by M&T Books (New York), 2nd ed. 1996, ISBN 1-55851-434-1. This book provides good explanations and example C code for a multitude of compression methods including JPEG. It is an excellent source if you are comfortable reading C code but don't know much about data compression in general. The book's JPEG sample code is far from industrial-strength, but when you are ready to look at a full implementation, you've got one here...
The best full description of JPEG is the textbook "JPEG Still Image Data Compression Standard" by William B. Pennebaker and Joan L. Mitchell, published by Van Nostrand Reinhold, 1993, ISBN 0-442-01272-1. Price US$59.95, 638 pp. The book includes the complete text of the ISO JPEG standards (DIS 10918-1 and draft DIS 10918-2.. This is by far the most complete exposition of JPEG in existence, and we highly recommend it.
The JPEG standard itself is not available electronically; you must order a paper copy through ISO or ITU. (Unless you feel a need to own a certified official copy, we recommend buying the Pennebaker and Mitchell book instead; it's much cheaper and includes a great deal of useful explanatory material.) In the USA, copies of the standard may be ordered from ANSI Sales at (212. 642-4900, or from Global Engineering Documents at (800) 854-7179. (ANSI doesn't take credit card orders, but Global does.) It's not cheap: as of 1992, ANSI was charging $95 for Part 1 and $47 for Part 2, plus 7% shipping/handling. The standard is divided into two parts, Part 1 being the actual specification, while Part 2 covers compliance testing methods. Part 1 is titled "Digital Compression and Coding of Continuous-tone Still Images, Part 1: Requirements and guidelines" and has document numbers ISO/IEC IS 10918-1, ITU-T T.81. Part 2 is titled "Digital Compression and Coding of Continuous-tone Still Images, Part 2: Compliance testing" and has document numbers ISO/IEC IS 10918-2, ITU-T T.83.
Some extensions to the original JPEG standard are defined in JPEG Part 3, a newer ISO standard numbered ISO/IEC IS 10918-3 and ITU-T T.84. IJG currently does not support any Part 3 extensions.
The JPEG standard does not specify all details of an interchangeable file format. For the omitted details we follow the "JFIF" conventions, revision 1.02. A copy of the JFIF spec is available from:
Literature Department C-Cube Microsystems, Inc. 1778 McCarthy Blvd. Milpitas, CA 95035 phone (408) 944-6300, fax (408) 944-6314
Page 78 | Video Insight © 2016
IP Server v6.2
A PostScript version of this document is available by FTP at ftp://ftp.uu.net/graphics/jpeg/jfif.ps.gz. There is also a plain text version at ftp://ftp.uu.net/graphics/jpeg/jfif.txt.gz, but it is missing the figures.
The TIFF 6.0 file format specification can be obtained by FTP from ftp://ftp.sgi.com/graphics/tiff/TIFF6.ps.gz. The JPEG incorporation scheme found in the TIFF 6.0 spec of 3-June-92 has a number of serious problems.
IJG does not recommend use of the TIFF 6.0 design (TIFF Compression tag 6). Instead, we recommend the JPEG design proposed by TIFF Technical Note #2 (Compression tag 7). Copies of this Note can be obtained from ftp.sgi.com or from ftp://ftp.uu.net/graphics/jpeg/. It is expected that the next revision of the TIFF spec will replace the 6.0 JPEG design with the Note's design. Although IJG's own code does not support TIFF/JPEG, the free libtiff library uses our library to implement TIFF/JPEG per the Note. libtiff is available from ftp://ftp.sgi.com/graphics/tiff/.
ARCHIVE LOCATIONS =================
The "official" archive site for this software is ftp.uu.net (Internet address 192.48.96.9). The most recent released version can always be found there in directory graphics/jpeg. This particular version will be archived as ftp://ftp.uu.net/graphics/jpeg/jpegsrc.v6b.tar.gz. If you don't have direct Internet access, UUNET's archives are also available via UUCP; contact [email protected] for information on retrieving files that way.
Numerous Internet sites maintain copies of the UUNET files. However, only ftp.uu.net is guaranteed to have the latest official version.
You can also obtain this software in DOS-compatible "zip" archive format from the SimTel archives (ftp://ftp.simtel.net/pub/simtelnet/msdos/graphics/), or on CompuServe in the Graphics Support forum (GO CIS:GRAPHSUP), library 12 "JPEG Tools". Again, these versions may sometimes lag behind the ftp.uu.net release.
The JPEG FAQ (Frequently Asked Questions) article is a useful source of general information about JPEG. It is updated constantly and therefore is not included in this distribution. The FAQ is posted every two weeks to Usenet newsgroups comp.graphics.misc, news.answers, and other groups. It is available on the World Wide Web at http://www.faqs.org/faqs/jpeg-faq/ and other news.answers archive sites, including the official news.answers archive at rtfm.mit.edu: ftp://rtfm.mit.edu/pub/usenet/news.answers/jpeg-faq/.
If you don't have Web or FTP access, send e-mail to [email protected] with body send usenet/news.answers/jpeg-faq/part1 send usenet/news.answers/jpeg-faq/part2
RELATED SOFTWARE ================
Page 79 | Video Insight © 2016
IP Server v6.2
Numerous viewing and image manipulation programs now support JPEG. (Quite a few of them use this library to do so.) The JPEG FAQ described above lists some of the more popular free and shareware viewers, and tells where to obtain them on Internet.
If you are on a Unix machine, we highly recommend Jef Poskanzer's free PBMPLUS software, which provides many useful operations on PPM-format image files. In particular, it can convert PPM images to and from a wide range of other formats, thus making cjpeg/djpeg considerably more useful. The latest version is distributed by the NetPBM group, and is available from numerous sites, notably ftp://wuarchive.wustl.edu/graphics/graphics/packages/NetPBM/.
Unfortunately PBMPLUS/NETPBM is not nearly as portable as the IJG software is; you are likely to have difficulty making it work on any non-Unix machine.
A different free JPEG implementation, written by the PVRG group at Stanford, is available from ftp://havefun.stanford.edu/pub/jpeg/. This program is designed for research and experimentation rather than production use; it is slower, harder to use, and less portable than the IJG code, but it is easier to read and modify. Also, the PVRG code supports lossless JPEG, which we do not. (On the other hand, it doesn't do progressive JPEG.)
FILE FORMAT WARS ================
Some JPEG programs produce files that are not compatible with our library. The root of the problem is that the ISO JPEG committee failed to specify a concrete file format. Some vendors "filled in the blanks" on their own, creating proprietary formats that no one else could read. (For example, none of the early commercial JPEG implementations for the Macintosh were able to exchange compressed files.)
The file format we have adopted is called JFIF (see REFERENCES). This format has been agreed to by a number of major commercial JPEG vendors, and it has become the de facto standard. JFIF is a minimal or "low end" representation. We recommend the use of TIFF/JPEG (TIFF revision 6.0 as modified by TIFF Technical Note #2. for "high end" applications that need to record a lot of additional data about an image. TIFF/JPEG is fairly new and not yet widely supported, unfortunately.
The upcoming JPEG Part 3 standard defines a file format called SPIFF. SPIFF is interoperable with JFIF, in the sense that most JFIF decoders should be able to read the most common variant of SPIFF. SPIFF has some technical advantages over JFIF, but its major claim to fame is simply that it is an official standard rather than an informal one. At this point it is unclear whether SPIFF will supersede JFIF or whether JFIF will remain the de-facto standard. IJG intends to support SPIFF once the standard is frozen, but we have not decided whether it should become our default output format or not. (In any case, our decoder will remain capable of reading JFIF indefinitely.) Various proprietary file formats incorporating JPEG compression also exist.
Page 80 | Video Insight © 2016

IP Server v6.2
We have little or no sympathy for the existence of these formats. Indeed, one of the original reasons for developing this free software was to help force convergence on common, open format standards for JPEG files. Don't use a proprietary file format!
TO DO ===== The major thrust for v7 will probably be improvement of visual quality.
The current method for scaling the quantization tables is known not to be very good at low Q values. We also intend to investigate block boundary smoothing, "poor man's variable quantization", and other means of improving quality-vs-file-size performance without sacrificing compatibility.
In future versions, we are considering supporting some of the upcoming JPEG Part 3 extensions --- principally, variable quantization and the SPIFF file format. As always, speeding things up is of great interest. Please send bug reports, offers of help, etc. to [email protected].
Page 81 | Video Insight © 2016