painting a ba-64 - migjimenez.com · este es el tipo de piezas que me encanta montar y pintar, ......
TRANSCRIPT
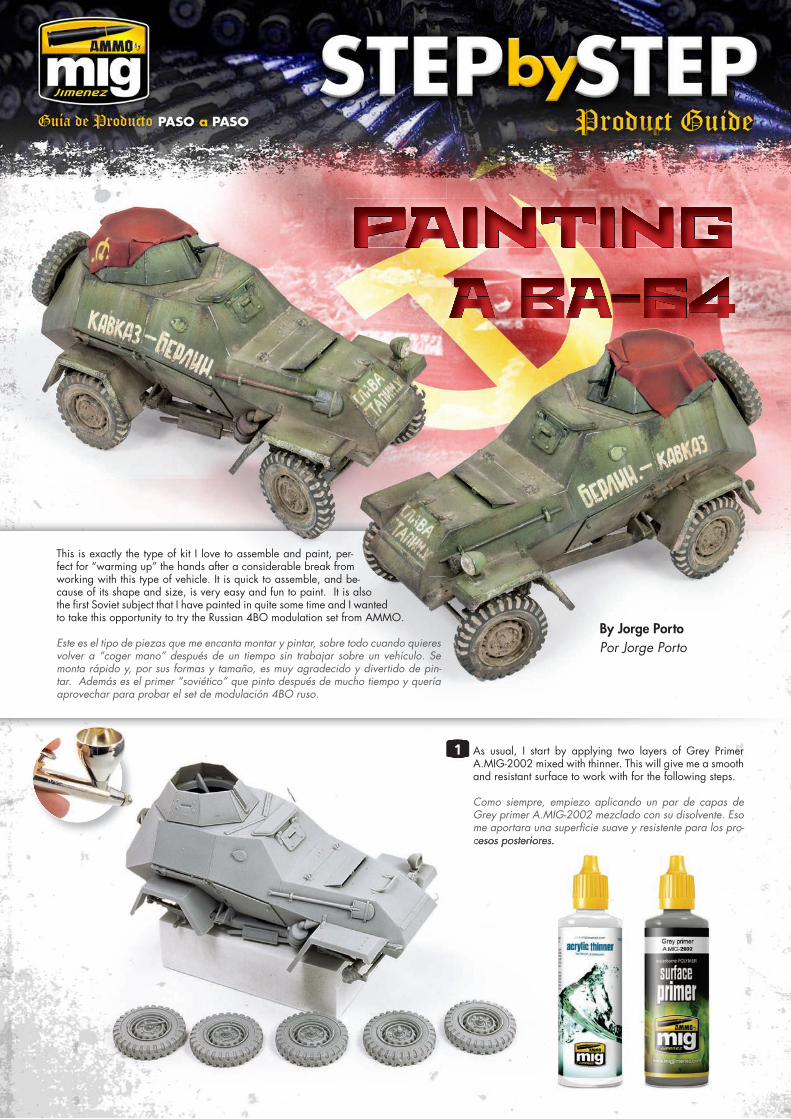
As usual, I start by applying two layers of Grey Primer A.MIG-2002 mixed with thinner. This will give me a smooth and resistant surface to work with for the following steps.
Como siempre, empiezo aplicando un par de capas de Grey primer A.MIG-2002 mezclado con su disolvente. Eso me aportara una super�cie suave y resistente para los pro-cesos posteriores.
PAINTINGA BA-64
PAINTINGPAINTINGA BA-64A BA-64
PAINTING PAINTING PAINTING PAINTING PAINTING PAINTING PAINTINGPAINTING PAINTINGPAINTING PAINTINGPAINTING PAINTINGPAINTINGPAINTING PAINTINGPAINTING PAINTINGPAINTING PAINTINGA BA-64A BA-64A BA-64A BA-64A BA-64A BA-64A BA-64A BA-64A BA-64A BA-64A BA-64A BA-64A BA-64A BA-64A BA-64A BA-64A BA-64A BA-64A BA-64A BA-64
1
This is exactly the type of kit I love to assemble and paint, per-fect for “warming up” the hands after a considerable break from working with this type of vehicle. It is quick to assemble, and be-cause of its shape and size, is very easy and fun to paint. It is also the �rst Soviet subject that I have painted in quite some time and I wanted to take this opportunity to try the Russian 4BO modulation set from AMMO.
Este es el tipo de piezas que me encanta montar y pintar, sobre todo cuando quieres volver a “coger mano” después de un tiempo sin trabajar sobre un vehículo. Se monta rápido y, por sus formas y tamaño, es muy agradecido y divertido de pin-tar. Además es el primer “soviético” que pinto después de mucho tiempo y quería aprovechar para probar el set de modulación 4BO ruso.
By Jorge PortoPor Jorge Porto
cesos posteriores.

Next, using A.MIG-0932 Russian Base, I delineate zones where I begin to create highlights. At the same time, the colour let me de�ne the darker shadow zones. To facilitate the smooth transitions to the highlights, I mixed Russian Base with A.MIG-2017 Transparator in a 60% / 40% ratio and then added a drop of thinner, while reducing airbrush pressure to 1 Bar.
A continuación con el A.MIG-932 Russian Base empiezo a delimitar las áreas donde empezar a generar las luces en el carro. Asimis-mo el color aplicado previamente me permite determinar, sin prob-lemas, las áreas con las sombras más profundas. Para favorecer las sutiles transiciones de subidas de luz, mezclo el Russian Base con A.MIG-2017 Transparator en una proporción de 60% de pintura y 40% de Transparator y una pequeña gota de Disolvente, y reducien-do la presión del aerógrafo a 1 Bar de presión.
A �nal layer with A.MIG-0934 Russian High Lights creates the ex-treme light highpoints that give volume to the vehicle. For this step I altered the mixing ratio to 50% colour to 50% Transparator while lowering the air pressure to 0.8 Bar. At this stage the vehicle exhib-its extremely high contrasts, DON’T worry! This is perfect because in the following weathering steps this contrast will be gradually re-duced, faded and blended.
Una última capa, esta vez con el A.MIG-934 Russian High Lights aporta la luz extrema que da volumen al carro. En este paso, para poder trabajar con más comodidad modi�co un poco las mezclas uni�cando el porcentaje de mezcla a 50/50% y bajando un poco mas la presión del aerógrafo (0.8 Bares). En este paso el vehículo presenta unos contrastes exagerados. ¡No pasa NADA! Es perfecto ya que en los procesos posteriores de weathering se irán apagando poco a poco.
I continue by applying highlights to the vehicle by using A.MIG-0933 Russian Light Base, always using the same mixing ratios and air pressure used for the previous steps. As I apply the lightest tones, I’m restricting the brightest areas of light towards the upper edges. What makes this vehicle ideal for this technique is that its angular shapes and plates lend themselves to the effect. Masking for the highlights was done with a small piece of cardboard with a straight edge.
Sigo aplicando luces al carro, en este caso con el A.MIG-933 Rus-sian Light Base, siempre con las mismas mezclas del paso anterior. Según voy aplicando luces, voy acotando las zonas de luz hacia los bordes superiores. Lo que hace bueno a este vehículo es que sus formas simpli�can mucho este proceso, sobre todo si utilizamos una pequeña cartulina como máscara.
3
54
As I mentioned before, I chose to use A.MIG-7004 Russian 4BO Modulation Set to test if and check if it is as quick and easy to use as some friends had suggested. The truth is that I was impressed with the range of base colour and ease of use. Following the instructions, I applied 2 layers of A.MIG-0931 Russian Dark Base mixed with thinner in ratio of 80% paint to 20% thinner. This colour will provide a darker toned base, perfect for pre-shading the whole model.
Como comente al principio, tenía muchas ganas de usar el A.MIG-7004 Set de Modulación 4BO Ruso, y comprobar si es tan rápido y sencillo, y la verdad es que no me decepcionó. Siguien-do sus indicaciones aplico un par de capas de A.MIG-931 Rus-sian Dark Base mezclado con su Disolvente en una proporción de 80/20% de pintura / disolvente. Esta color aportará un tono mas oscuro, perfecto para pre-sombrear toda la pieza.
2
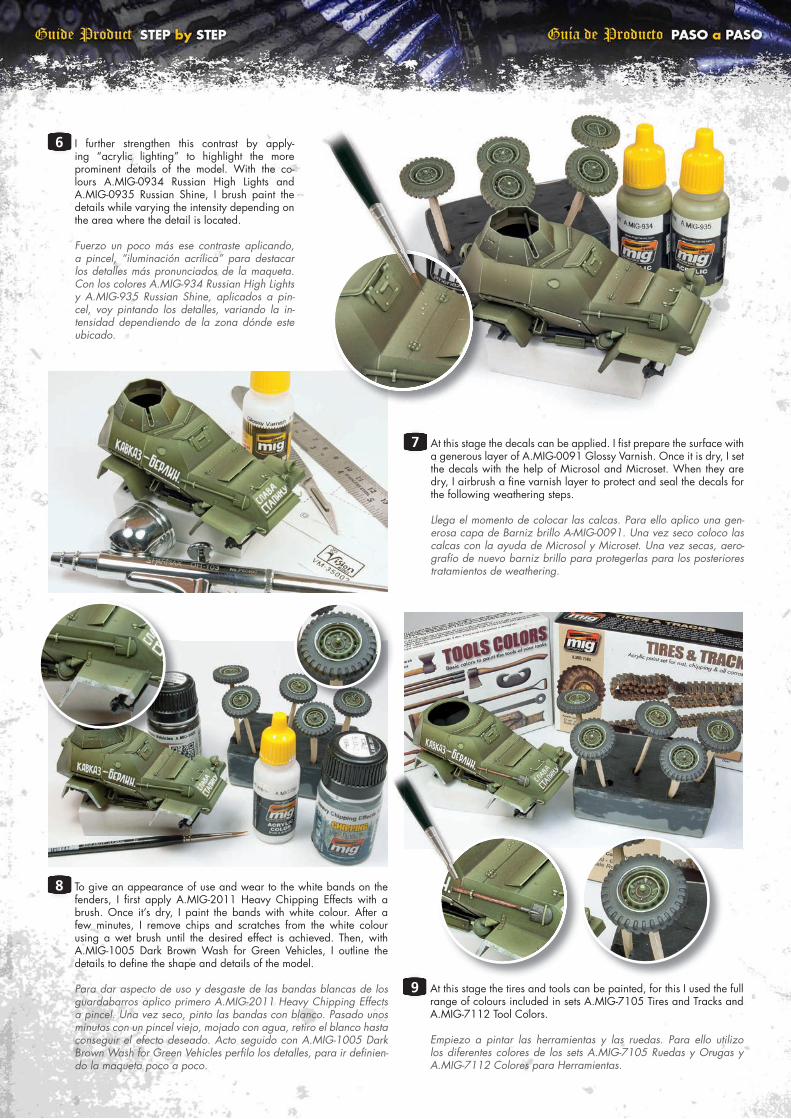
At this stage the decals can be applied. I �st prepare the surface with a generous layer of A.MIG-0091 Glossy Varnish. Once it is dry, I set the decals with the help of Microsol and Microset. When they are dry, I airbrush a �ne varnish layer to protect and seal the decals for the following weathering steps.
Llega el momento de colocar las calcas. Para ello aplico una gen-erosa capa de Barniz brillo A-MIG-0091. Una vez seco coloco las calcas con la ayuda de Microsol y Microset. Una vez secas, aero-grafío de nuevo barniz brillo para protegerlas para los posteriores tratamientos de weathering.
7
I further strengthen this contrast by apply-ing “acrylic lighting” to highlight the more prominent details of the model. With the co-lours A.MIG-0934 Russian High Lights and A.MIG-0935 Russian Shine, I brush paint the details while varying the intensity depending on the area where the detail is located.
Fuerzo un poco más ese contraste aplicando, a pincel, “iluminación acrílica” para destacar los detalles más pronunciados de la maqueta. Con los colores A.MIG-934 Russian High Lights y A.MIG-935 Russian Shine, aplicados a pin-cel, voy pintando los detalles, variando la in-tensidad dependiendo de la zona dónde este ubicado.
6
To give an appearance of use and wear to the white bands on the fenders, I �rst apply A.MIG-2011 Heavy Chipping Effects with a brush. Once it’s dry, I paint the bands with white colour. After a few minutes, I remove chips and scratches from the white colour using a wet brush until the desired effect is achieved. Then, with A.MIG-1005 Dark Brown Wash for Green Vehicles, I outline the details to de�ne the shape and details of the model.
Para dar aspecto de uso y desgaste de las bandas blancas de los guardabarros aplico primero A.MIG-2011 Heavy Chipping Effects a pincel. Una vez seco, pinto las bandas con blanco. Pasado unos minutos con un pincel viejo, mojado con agua, retiro el blanco hasta conseguir el efecto deseado. Acto seguido con A.MIG-1005 Dark Brown Wash for Green Vehicles per�lo los detalles, para ir de�nien-do la maqueta poco a poco.
8
At this stage the tires and tools can be painted, for this I used the full range of colours included in sets A.MIG-7105 Tires and Tracks and A.MIG-7112 Tool Colors.
Empiezo a pintar las herramientas y las ruedas. Para ello utilizo los diferentes colores de los sets A.MIG-7105 Ruedas y Orugas y A.MIG-7112 Colores para Herramientas.
9

After applying the �lter A.MIG-1508 Green for Grey Green to unify colours, it is the time to create chipping. This step starts by apply-ing the colour A.MIG-0044 Chipping with a sponge, making small areas of wear that are in scale and logically placed. The effect is enhanced using a brush to create the larger chips by connecting the smaller chips. The �nal step is to create a 3D effect to the chipping by applying A.MIG-0934 Russian High Lights on some of the edges to make them feel more super�cial.
Tras un �ltro de A.MIG-1508 Green for Grey Green para uni�car colores, llega el momento de los desconchones. Aplicamos prime-ro el color A.MIG.044 Chipping, con esponja, creando pequeños desconchones. Después, a pincel se completan para crear los más grandes a base de ir uniendo los más pequeños. Posteriormente y para crear un efecto 3D aplicamos A.MIG-934 Russian High Lights sobre algunos bordes de los primeros desconchones para dar la sensación de desconchones super�ciales
Once �nished with the acrylic chipping, we switch to oils, working on each zone one at a time. I moisten each zone with A.MIG-2019 Thinner and a �at brush, then apply oils “dots” of various colours using the Oilbrushers convenient brush. I apply the lighter oils to the upper zones and the darker tones are applied to the lower areas. After a few minutes, I mix the oils to create different shades that will provide excellent chromatic richness, and at the same time provide different tones that will help impart a deteriorated appearance to the paint.
Llega el turno de los óleo, que voy trabajando por zonas. Humedez-co con A.MIG-2019 Thinner y un pincel plano para posteriormente, aprovechando el nuevo aplicador de los Oilbrushes, aplico “pica-duras” de oleos de distintos colores. Yo coloco los oleos mas claros en las parte superior y los oscuros en la inferior. Pasados unos minu-tos mezclo los oleos para generar matices distintos que aportarán riqueza cromática, y a la vez se sacan distintos tonos que ayudan a obtener una apariencia degradada en la pintura.
To create the effects of wear on the exhaust pipe, I start with the colour A. MIG-0043 Shadow Rust to which I add varying amounts of A. MIG-0040 Medium Rust and A. MIG-0039 Light Rust. At the same time, I mix different rust and black pigments into the surface, taking advantage of the acrylic while it is wet.
Para crear efecto de desgaste en el tubo de es-cape, parto de un A.MIG-0043 Shadow Rust al que voy añadiendo en fresco distintas cantidades de A.MIG-0040 Medium Rust y A.MIG-0039 Light Rust. Al mismo ti-empo, y aprovechando la humedad de la pintura, voy mezclando distintos pig-mentos de óxido y negro.
After applying the �lter A.MIG-1508 Green for Grey Green to unify 10 11
12
To make rust or grime streaking I use A.MIG-1204 Streaking Rust Ef-fects and A.MIG-1203 Streaking Grime. I “draw/sketch” the vertical stroke with a brush and let it dry for a few minutes. Next, I soften the edges with a brush moistened in clean A.MIG-2019 Enamel Odour-less Thinner.
Para hacer escurridos de óxido o suciedad, uso A.MIG-1204 Streak-ing Rust Effects y A.MIG-1203 Streaking Grime, “Dibujo” el trazo a pincel y dejo secar unos minutos. Después suavizo los bordes con el pincel humedecido en A.MIG-2019 Thinner limpio.
13

Separately applied or intermixed, we lay down a layer of dust on details and hor-izontal surfaces, such as the fenders and the upper parts of the vehicle. Then I let the pigments dry to check the result, repeat-ing the process if necessary. On the oth-er hand, if we want to lighten or remove some of the effect, we can gently use a �at brush moistened in Thinner to remove some of the product.
Aplicados por separado o mezclados en-tre si se depositan alrededor de algunos detalles y en las partes más horizontales, como los guardabarros y la parte superi-or del vehículo. Luego dejo que se seque para comprobar el resultado. Si necesito acentuar el efecto, repito el proceso. Si quiero atenuarlo, paso un pincel plano, humedecido con thinner, por la zona y poco a poco voy retirando el efecto.
16
To create the more intense dust accumulations, I use 5 different pigments which give me a wide variety of tones and textures. In a separate cup, each pigment is mixed with a small amount of Thinner until I get as a consistency like dense paste.
Para el proceso de acumulaciones de polvo más intensas parto de 5 tipos distintos de pigmentos que me aportarán una gran variedad de tonos y texturas distintas. Mezclo, en pocillos distintos, cada pigmento con una pequeña cantidad de Thinner hasta crear una masa más o menos densa.
15
A foundation of pre-dust work is added to the lower parts of the vehicle, airbrushing �rst A.MIG-0070 Medium Brown and then with A.MIG-0105 Washable Dust. To cre-ate transparent layers and avoid obscur-ing the previously applied affects, I mix the paint with Transparator in a 60% to 40% ratio and add small drop of Thinner while reducing the air pressure to 1 Bar.
Realizo un pre empolvado de los bajos del vehículo, aerogra�ando A.MIG-0070 Medium Brown primero y A.MIG-0105 Washable Dust después. Para poder crear capas transparentes y no tapar el trabajo anterior mezclo la pintura con Transpara-tor (60%/40%) y una pequeña gota de Disolvente, y reduciendo la presión del aerógrafo a 1 Bar de presión.
A foundation of pre-dust work is added to 14
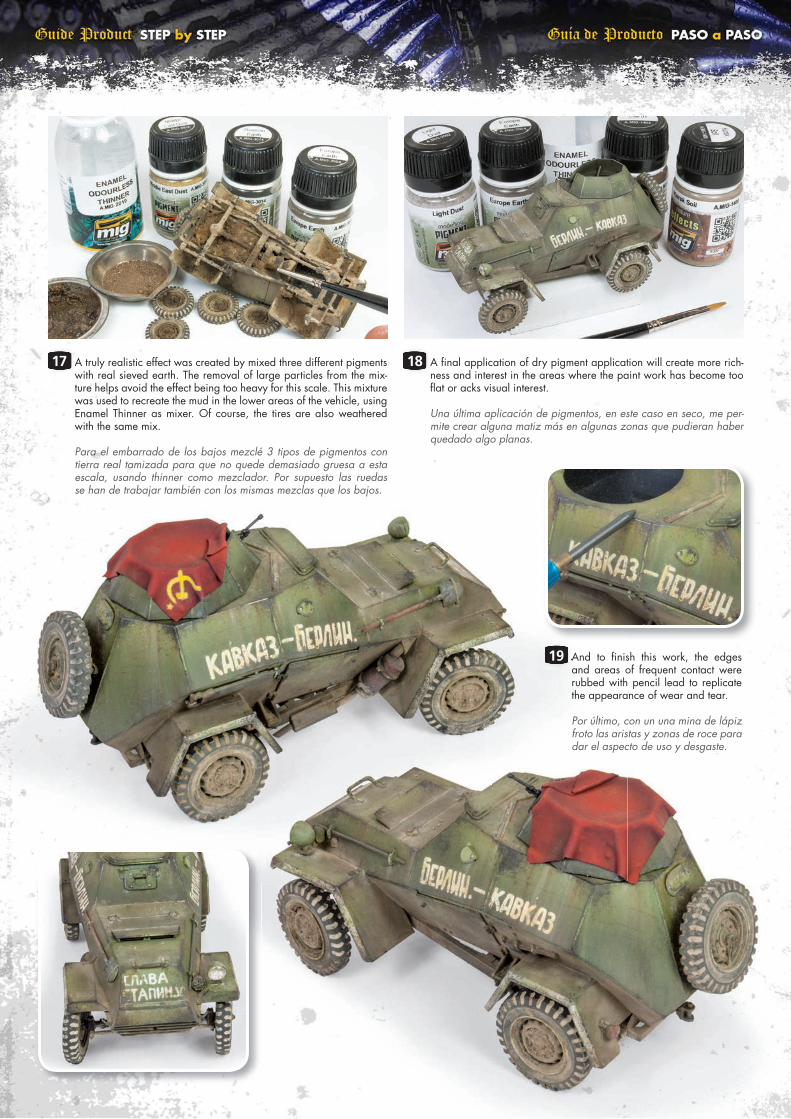
A truly realistic effect was created by mixed three different pigments with real sieved earth. The removal of large particles from the mix-ture helps avoid the effect being too heavy for this scale. This mixture was used to recreate the mud in the lower areas of the vehicle, using Enamel Thinner as mixer. Of course, the tires are also weathered with the same mix.
Para el embarrado de los bajos mezclé 3 tipos de pigmentos con tierra real tamizada para que no quede demasiado gruesa a esta escala, usando thinner como mezclador. Por supuesto las ruedas se han de trabajar también con los mismas mezclas que los bajos.
17
And to �nish this work, the edges and areas of frequent contact were rubbed with pencil lead to replicate the appearance of wear and tear.
Por último, con un una mina de lápiz froto las aristas y zonas de roce para dar el aspecto de uso y desgaste.
And to �nish this work, the edges 19
A �nal application of dry pigment application will create more rich-ness and interest in the areas where the paint work has become too �at or acks visual interest.
Una última aplicación de pigmentos, en este caso en seco, me per-mite crear alguna matiz más en algunas zonas que pudieran haber quedado algo planas.
A �nal application of dry pigment application will create more rich18