panasonic - operating instructions model no. kx …...shut. • after installing the battery, set...
TRANSCRIPT

Prep
aration
Usefu
l Info
rmatio
nA
dvan
ced O
peratio
nB
asic Op
eration
PLEASE READ BEFORE USE AND SAVE.
For assistance, please call 1-800-561-5505 or visit us at www.panasonic.ca
Charge the battery for about 6 hours before initial use.
KX-TG2216CS
Call Display Compatible
2.4 GHz Digital Cordless Phone
Operating Instructions
Model No.
KX-TG2216CSKX-TG2216CW
Pulse-or-tone dialing capability

2
Thank you for purchasing your new Panasonic cordless telephone.
Accessories
(included)
Call Display, Call Waiting and Voice Mail Service, where available, are telephone company services. After subscribing to Call Display this phone will display a caller’s name and phone number. Visual Call Waiting/Call Waiting Deluxe, which displays a second caller’s name and phone number while the user is on another call, requires a subscription to both Call Display and Call Waiting. After subscribing to Voice Mail Service, this phone’s message waiting lamp will flash when there are messages in the mailbox.
AC Adaptor (p. 8)
one
Telephone Line Cord (p. 8)
one
Battery (p. 9)
one
Wall Mounting Adaptor (p. 40)
one
Belt Clip (p. 42)
one

3
For Best Performance
Battery Charge
A rechargeable Nickel-Metal Hydride (Ni-MH) battery powers the handset. Install the battery in the handset (p. 9) and charge the battery for about
6 hours
before initial use (p. 10).
Base Unit Location/Noise
Calls are transmitted between the base unit and the handset using wireless radio waves.
For maximum distance and noise-free operation,
the recommended base unit location is:
Note:
• If you use the handset near a microwave oven which is being used, noise may be heard from the receiver or the speaker. Move away from the microwave oven and closer to the base unit.
• If you use the handset near another cordless phone, noise may be heard. Move away from the other cordless phone and closer to your base unit.
Away from electrical appliances such as a TV, personal computer or another cordless phone.
In a HIGH and CENTRAL location with no obstructions such as walls.
Raise the antenna.

4
Contents
Location of Controls . . . . . . . . . . . . . . . . . . . . . . . . . . . . . . . . . . . . . 6Settings . . . . . . . . . . . . . . . . . . . . . . . . . . . . . . . . . . . . . . . . . . . . . . . . 8
Connections . . . . . . . . . . . . . . . . . . . . . . . . . . . . . . . . . . . . . . . . . . . 8Installing the Battery in the Handset . . . . . . . . . . . . . . . . . . . . . . . . . 9Selecting the Display Language . . . . . . . . . . . . . . . . . . . . . . . . . . . 10Battery Charge . . . . . . . . . . . . . . . . . . . . . . . . . . . . . . . . . . . . . . . . 10
Programmable Functions . . . . . . . . . . . . . . . . . . . . . . . . . . . . . . . . 12
Programming Guidelines . . . . . . . . . . . . . . . . . . . . . . . . . . . . . . . . 12Function Menu Table . . . . . . . . . . . . . . . . . . . . . . . . . . . . . . . . . . . 13Dialing Mode . . . . . . . . . . . . . . . . . . . . . . . . . . . . . . . . . . . . . . . . . . 14Line Mode . . . . . . . . . . . . . . . . . . . . . . . . . . . . . . . . . . . . . . . . . . . . 14Voice Enhancer Technology . . . . . . . . . . . . . . . . . . . . . . . . . . . . . . 15Auto Talk . . . . . . . . . . . . . . . . . . . . . . . . . . . . . . . . . . . . . . . . . . . . 16LCD Contrast . . . . . . . . . . . . . . . . . . . . . . . . . . . . . . . . . . . . . . . . . 16Ringer Volume . . . . . . . . . . . . . . . . . . . . . . . . . . . . . . . . . . . . . . . . 17Ringer Tone . . . . . . . . . . . . . . . . . . . . . . . . . . . . . . . . . . . . . . . . . . 17
Making Calls . . . . . . . . . . . . . . . . . . . . . . . . . . . . . . . . . . . . . . . . . . . 18Answering Calls . . . . . . . . . . . . . . . . . . . . . . . . . . . . . . . . . . . . . . . . 20Call Display Service . . . . . . . . . . . . . . . . . . . . . . . . . . . . . . . . . . . . . 21Using the Caller List . . . . . . . . . . . . . . . . . . . . . . . . . . . . . . . . . . . . 22
Viewing the Caller List . . . . . . . . . . . . . . . . . . . . . . . . . . . . . . . . . . 22Calling Back from the Caller List . . . . . . . . . . . . . . . . . . . . . . . . . . . 23Editing the Caller’s Phone Number . . . . . . . . . . . . . . . . . . . . . . . . . 24Storing Caller Information in the Phone Book . . . . . . . . . . . . . . . . 25Erasing Caller Information . . . . . . . . . . . . . . . . . . . . . . . . . . . . . . . 26
Preparation
Basic Operation
PQQX13775ZATOC.fm 4 ページ 2003年10月2日 木曜日 午後1時26分

P
reparatio
nU
seful In
form
ation
Ad
vanced
Op
eration
Basic O
peratio
n
Contents
5
Phone Book . . . . . . . . . . . . . . . . . . . . . . . . . . . . . . . . . . . . . . . . . . . 27
Storing Names and Numbers . . . . . . . . . . . . . . . . . . . . . . . . . . . . . 27Dialing from the Phone Book . . . . . . . . . . . . . . . . . . . . . . . . . . . . . 29Editing an Item in the Phone Book . . . . . . . . . . . . . . . . . . . . . . . . . 30Erasing an Item in the Phone Book . . . . . . . . . . . . . . . . . . . . . . . . . 30
Voice Mail Service . . . . . . . . . . . . . . . . . . . . . . . . . . . . . . . . . . . . . . 31
Storing a Voice Mail Access Number . . . . . . . . . . . . . . . . . . . . . . . 31Setting Voice Mail (VM) Tone Detection . . . . . . . . . . . . . . . . . . . . . 32Listening to Voice Mail Messages . . . . . . . . . . . . . . . . . . . . . . . . . . 33
Special Features . . . . . . . . . . . . . . . . . . . . . . . . . . . . . . . . . . . . . . . . 34
Automatic Security Code Setting . . . . . . . . . . . . . . . . . . . . . . . . . . 34Handset Locator . . . . . . . . . . . . . . . . . . . . . . . . . . . . . . . . . . . . . . . 34Temporary Tone Dialing
(For Rotary or Pulse Service Users) . . . . . . . . . . . . . . . . . . . . . . 34Muting Your Conversation . . . . . . . . . . . . . . . . . . . . . . . . . . . . . . . . 34Using the PAUSE Key
(For PBX Line/Long Distance Calls) . . . . . . . . . . . . . . . . . . . . . . 35For Call Waiting Service Users . . . . . . . . . . . . . . . . . . . . . . . . . . . . 35Call Waiting Deluxe Service . . . . . . . . . . . . . . . . . . . . . . . . . . . . . . 36FLASH Button . . . . . . . . . . . . . . . . . . . . . . . . . . . . . . . . . . . . . . . . . 39
Wall Mounting . . . . . . . . . . . . . . . . . . . . . . . . . . . . . . . . . . . . . . . . . . 40Belt Clip . . . . . . . . . . . . . . . . . . . . . . . . . . . . . . . . . . . . . . . . . . . . . . . 42Optional Headset . . . . . . . . . . . . . . . . . . . . . . . . . . . . . . . . . . . . . . . 42Direct Commands . . . . . . . . . . . . . . . . . . . . . . . . . . . . . . . . . . . . . . . 43Troubleshooting . . . . . . . . . . . . . . . . . . . . . . . . . . . . . . . . . . . . . . . . 44Important Information . . . . . . . . . . . . . . . . . . . . . . . . . . . . . . . . . . . 47Safety Instructions . . . . . . . . . . . . . . . . . . . . . . . . . . . . . . . . . . . . . . 48Specifications . . . . . . . . . . . . . . . . . . . . . . . . . . . . . . . . . . . . . . . . . . 50Warranty . . . . . . . . . . . . . . . . . . . . . . . . . . . . . . . . . . . . . . . . . . . . . . 51
Advanced Operation
Useful Information
PQQX13775ZATOC.fm 5 ページ 2003年10月2日 木曜日 午後1時26分

6
Location of Controls
Base unit
Charge Contacts (p. 11)
[HANDSET LOCATOR] (p. 34)
Antenna (p. 3)IN USE/CHARGE Indicator (p. 10, 20, 34)
VM (Voice Mail) Indicator (p. 31)
X13775ZA_2.fm 6 ページ 2003年10月2日 木曜日 午後1時27分

P
reparatio
n
Location of Controls
7
Handset
How to use the soft keys/navigator key
Soft keys:
Two soft keys are used to select functions displayed directly above the keys. Functions displayed above the keys will change depending on the state of use.
For example, to operate “
Hold
”, press the right soft key.
• When a function does not appear above a soft key, the soft key will not work.
Navigator key:
Scrolls through the function menu, the Caller List and the phone book (works as a scroll key).Adjusts the handset ringer and receiver/speaker volumes (works as a volume key).
Throughout these Operating Instructions: • The soft keys are indicated with the display above the keys.
e.g. “Press
Hold
.” indicates “Press the soft key below
Hold
”.• The navigator key is indicated by the arrows
[ ]
or
[ ]
.
Antenna
Display
Receiver
Soft Keys (see below)
[OFF] (p. 12, 18)
[MENU] (p. 12)
[MUTE] (p. 34)
Back side
Speaker
Headset Jack (p. 42)
[ ] (TALK/Channel) (p. 18, 19)
[ ] (Speakerphone/Channel) (p. 18, 19)
[ ] (TONE) (p. 34)
[FLASH/CALL WAIT] (p. 35, 39)
[REDIAL] (p. 19)
Charge Contact (p. 11)
Navigator Key([ ], [ ]) (see below)
> >
Microphone (p. 18)
Charge Contact (p. 11)
1
Talk00-00-32
(VE) Hold
2
VOL.
> >
X13775ZA_2.fm 7 ページ 2003年10月2日 木曜日 午後1時27分

8
Settings
Connections
• USE ONLY WITH Panasonic AC ADAPTOR PQLV19.• The AC adaptor must remain connected at all times. (It is normal for the adaptor to
feel warm during use.)• If your unit is connected to a PBX which does not support Call Display, you cannot
access Call Display services.• The unit will not work during a power failure. If you want to connect a standard
telephone on the same line, use a T-adaptor.
Fasten the AC adaptor cord.
Hooks
Single-Line Telephone Jack (CA11A)
Telephone Line Cord
Power Outlet(AC 120 V, 60 Hz)
AC Adaptor
Raise the antenna.
X13775ZA_2.fm 8 ページ 2003年10月2日 木曜日 午後1時27分

P
reparatio
n
Settings
9
Installing the Battery in the Handset
1
Pull down the latch ( ), and remove the cover ( ).
2
Insert the battery ( ), and press it down until it snaps into the compartment ( ).
3
Close the cover ( and ).
4
Push the latch upward until it snaps shut.
• After installing the battery, set the display language. (See page 10.)
To replace the battery:
Pull down the latch, and remove the cover. Replace the old battery with a new one (p. 11). Close the cover and charge the battery for about 6 hours.
1
2
Latch
12
3 43
4
5
6
5 6
X13775ZA_2.fm 9 ページ 2003年10月2日 木曜日 午後1時27分

Settings
10
Selecting the Display Language
After installing the battery in the handset, the handset display will prompt you to set the display language to English or French.
To change the display language
Battery Charge
Place the handset on the base unit and charge for about
6 hours
before initial use.Repeat charging will require approximately the same amount of charging time (6 hours) if the battery is depleted completely.
• The IN USE/CHARGE indicator lights and the unit beeps once.
• It is normal for the back of the handset to feel warm during battery charge.
If you do not set a display language, the following functions will not work properly:
— the
[MENU]
button— storing or viewing the phone book items— viewing the caller list items
1
Press
English
or
Franç.
2
Press
Save
or
Sauv.
• You can also select a language by pressing
[ ]
or
[ ]
before pressing
Save
or
Sauv.
1
Press
[MENU]
.
2
Scroll to “
Initial setting
” by pressing
[ ]
or
[ ]
, then press
Select
.
3
Scroll to “
Change language
” by pressing
[ ]
or
[ ]
, then press
Select
.
4
Select the language by pressing
Franç.
or
English
.
5
Press
Sauv.
or
Save
, then press
[OFF].
Select language
Franç. English
>
> Select language :EnglishFranç. Save
e.g. English was pressed.
>
> Initial settingExit Select
>
>
>
> Change languageBack Select
>
>
Change language :EnglishFranç. Save
IN USE/CHARGE Indicator
X13775ZA_2.fm 10 ページ 2003年10月2日 木曜日 午後1時27分

P
reparatio
n
Settings
11
Battery strength
Recharge
Recharge the battery when:
—“
Recharge battery
” is displayed on the handset,—“ ” flashes, or—the handset beeps intermittently while it is in use.
• If you DO NOT recharge the handset battery for more than 15 minutes, the display will continually indicate “
Recharge battery
” and/or “ ” will flash when the handset is lifted off the base unit.
A nickel metal hydride battery that is recyclable powers the product you have purchased. Please call 1-800-8-BATTERY for information on how to recycle this battery.
Battery information
• The battery operating time may be shortened depending on usage conditions and ambient temperature.
•
Clean the charge contacts of the handset and the base unit with a soft, dry cloth once a month. Clean more often if the unit is subject to grease, dust or high humidity.
Otherwise the battery may not charge properly.• If the battery is fully charged, you do not have to place the handset on the base
unit until “
Recharge battery
” is displayed and/or “ ” flashes. This will maximize the battery life.
• The battery cannot be overcharged.
You can check the battery strength on the handset display. The battery strength is as shown in the chart on the right.
Display prompt Battery strength
Fully charged
Medium
Low
(flashing) Needs to be recharged.
Battery replacement:
If you cleaned the charge contacts and fully charged the battery, but after a few telephone calls, “
Recharge battery
” is displayed and/or “ ” continues to flash, the battery needs to be replaced. Use a new Panasonic HHR-P513 battery. To replace the battery, see page 9.
After your Panasonic battery is fully charged:
Operation Operating time
While in use (TALK) Up to 5 hours
While not in use (Standby) Up to 11 days
Recharge battery
X13775ZA_2.fm 11 ページ 2003年10月2日 木曜日 午後1時27分

12
Programmable Functions
Programming Guidelines
This unit has programmable functions. They are selected from the function menu on the display (p. 13).
Buttons/Keys
How to select a function item from the menu
Make sure the unit is not being used and the handset is lifted off the base unit before programming.
Operation Display
1
Press
[MENU]
to enter menu mode.
• The main menu is displayed (p. 13).
2
Scroll to the desired item by pressing
[ ]
or
[ ]
.
•
How to use the
Exit
key:
Press
Exit
to exit programming mode.
3
Press
Select
at your desired menu.
4
If your selected menu has a sub-menu, it will be displayed. Repeat steps 2 and 3 until your desired menu is displayed.
5
Select your desired setting by pressing
[ ]
or
[ ]
.
•
How to use the
Back
key:
Press
Back
to go back to the previous menu.
6
Press
Save
to save your setting.
• A confirmation tone will be heard and the setting will be saved.
7
Press
[OFF]
to exit programming mode.
VOL. [MENU] : allows you to enter the menu by pressing while the handset is not being used.
When “ ” or “ ” is displayed, you can use the navigator key [ ] or [ ] as a scroll key.
>
>
>
>[OFF] :allows you to exit programming mode at any time.
Soft keys :work as function keys when a function is displayed above a soft key.
>
> Initial settingExit Select
>
>
Exit Select
>
> Back Save
X13775ZA_2.fm 12 ページ 2003年10月2日 木曜日 午後1時27分

P
reparatio
n
Programmable Functions
13
Useful information:
• If
Select
is pressed while “
---(Go back)---
” is displayed, the unit will go back to the previous menu mode. If you press the key in the main menu, the unit will exit programming mode.
• After programming is complete, the display will return to the main menu or the sub-menu depending on which menu the selected item is located. (See the menu table below.)
• You can exit programming mode at any time by pressing
[OFF]
.• If you do not press any buttons for 60 seconds, the handset will exit programming
mode.• If the handset has lost communication with the base unit, the handset beeps
3 times and “
No link to base. Place on cradle and try again.
” is displayed.
• If
[ ]
,
[ ]
or any other buttons except
[MUTE]
and
[OFF]
is pressed while the handset is on the base unit, the handset beeps 3 times and “
Please lift up and try again.
” is displayed. Lift the handset and press the button again.
Function Menu Table
You can use the following functions to customize your unit. See the corresponding pages for function details.
• After pressing
[MENU]
, you can also program menu items by direct commands (
[0]
to
[9]
) instead of using the soft keys (p. 43).
Set flash time
Set line mode
Main menu Sub-menu I Sub-menu II
Ringer setting
V.M. access
Initial setting LCD contrast
Auto talk
Voice enhancer
Store VM access#
VM tone detect
Set tel line
Voice Mail
Change language
Set dial mode
Ringer volume
Ringer tone
C.WTG options
p. 14
p. 39
p. 14
p. 32
p. 15
p. 33
p. 17
p. 17
p. 16
p. 16
p. 10
p. 31
p. 36
X13775ZA_2.fm 13 ページ 2003年10月2日 木曜日 午後1時27分

Programmable Functions
14
Dialing Mode
If you have touch tone service, set to “Tone”. If rotary or pulse service is used, set dialing mode to “Pulse”. The factory preset is “Tone”.
Line Mode
The line mode is preset at the factory to “B”. Generally leave the line mode “B”. If a change of the line mode setting is suggested by our customer call centre or service person, change the line mode to “A”.
1
Press
[MENU]
.
2
Scroll to “
Initial setting
” by pressing
[ ]
or
[ ]
, then press
Select
.
3
Scroll to “
Set tel line
” by pressing
[ ]
or
[ ]
, then press
Select
.
4
Press
Select
at “
Set dial mode
”.
5
Select “
Pulse
” or “
Tone
” by pressing
[ ]
or
[ ]
.
6
Press
Save
, then press
[OFF]
.
1
Press
[MENU]
.
2
Scroll to “
Initial setting
” by pressing
[ ]
or
[ ]
, then press
Select
.
3 Scroll to “Set tel line” by pressing [ ] or [ ], then press Select.
4 Scroll to “Set line mode” by pressing [ ] or [ ], then press Select.
5 Select “A” or “B” by pressing [ ] or [ ].
6 Press Save, then press [OFF].
>
> Initial settingExit Select
>
>
>
> Set tel lineBack Select
>
>
Set dial modeBack Select
>
>
>
>
Set dial mode :ToneBack Save
>
>
>
> Initial settingExit Select
>
>
>
> Set tel lineBack Select
>
>
>
> Set line modeBack Select
>
>
>> Set line mode
:BBack Save
>
>
X13775ZA_2.fm 14 ページ 2003年10月2日 木曜日 午後1時27分
P
reparatio
n
Programmable Functions
15
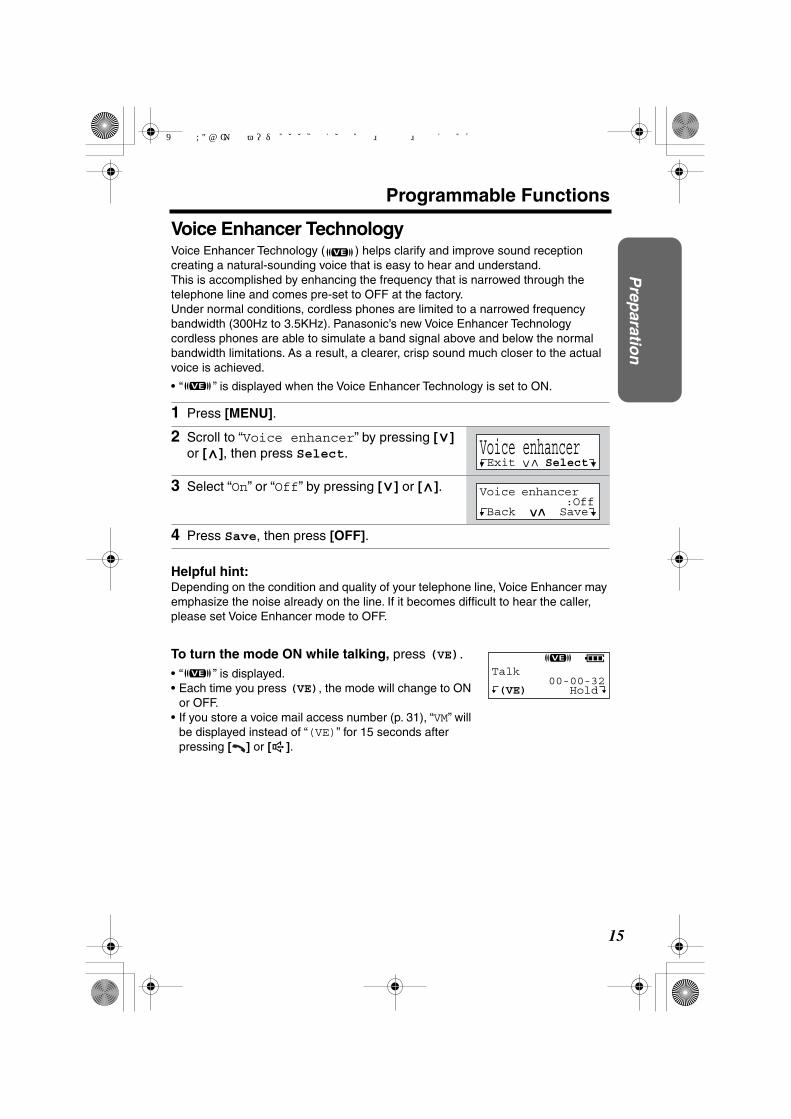
Voice Enhancer Technology
Voice Enhancer Technology ( ) helps clarify and improve sound reception creating a natural-sounding voice that is easy to hear and understand. This is accomplished by enhancing the frequency that is narrowed through the telephone line and comes pre-set to OFF at the factory.Under normal conditions, cordless phones are limited to a narrowed frequency bandwidth (300Hz to 3.5KHz). Panasonic’s new Voice Enhancer Technology cordless phones are able to simulate a band signal above and below the normal bandwidth limitations. As a result, a clearer, crisp sound much closer to the actual voice is achieved.
• “ ” is displayed when the Voice Enhancer Technology is set to ON.
Helpful hint:
Depending on the condition and quality of your telephone line, Voice Enhancer may emphasize the noise already on the line. If it becomes difficult to hear the caller, please set Voice Enhancer mode to OFF.
To turn the mode ON while talking,
press
(
VE
)
.
• “ ” is displayed.• Each time you press
(VE)
, the mode will change to ON or OFF.
• If you store a voice mail access number (p. 31), “
VM
” will be displayed instead of “
(VE)
” for 15 seconds after pressing
[ ]
or
[ ]
.
1
Press
[MENU]
.
2
Scroll to “
Voice enhancer
” by pressing
[ ]
or
[ ]
, then press
Select
.
3
Select “
On
” or “
Off
” by pressing
[ ]
or
[ ]
.
4
Press
Save
, then press
[OFF]
.
>
> Voice enhancerExit Select
>
>
>
> Voice enhancer :OffBack Save
>
>
Talk00-00-32
(VE) Hold
X13775ZA_2.fm 15 ページ 2003年10月2日 木曜日 午後1時27分

Programmable Functions
16
Auto Talk
The Auto Talk feature allows you to answer a call by lifting the handset off the base unit without pressing
[ ]
or
[ ]
. To use this feature, turn the feature ON. The factory preset is OFF.
• In order to view Caller information after you lift up the handset to answer a call, leave the Auto Talk feature OFF.
LCD Contrast
You can select the handset LCD contrast (5 levels). The factory preset is level 3.
1
Press
[MENU]
.
2
Scroll to “
Initial setting
” by pressing
[ ]
or
[ ]
, then press
Select
.
3
Scroll to “
Auto talk
” by pressing
[ ]
or
[ ]
, then press
Select
.
4
Select “
On
” or “
Off
” by pressing
[ ]
or
[ ]
.
5
Press
Save
, then press
[OFF]
.
1
Press
[MENU]
.
2
Scroll to “
Initial setting
” by pressing
[ ]
or
[ ]
, then press
Select
.
3
Press
Select at “LCD contrast”.
4 Select the desired contrast by pressing [ ] or [ ].• Each time you press [ ] or [ ], the LCD contrast
will change.
5 Press Save, then press [OFF].
>
> Initial settingExit Select
>
>
>
> Auto talkBack Select
>
>
>
> Auto talk :OffBack Save
>
>
>
> Initial settingExit Select
>
>
LCD contrastBack Select
>
>
>
> >
>
LCD contrast Low HighBack Save
>
>
X13775ZA_2.fm 16 ページ 2003年10月2日 木曜日 午後1時27分

P
reparatio
n
Programmable Functions
17
Ringer Volume
You can select the handset ringer volume HIGH, MEDIUM, LOW or OFF. The factory preset is HIGH. If set to OFF, the handset will not ring.
• If set to OFF, the handset displays “
Ringer off
” while not in use. But if there are missed calls and the handset is off the base unit, the handset will not display “
Ringer off
”.• You can select the ringer volume while an external call is being received. Press
[ ]
or
[ ]
while the unit is just ringing. To set to OFF, press and hold
[ ]
. “
Ringer off
” is displayed.
Ringer Tone
You can select one of 6 ringer tones for external calls on the handset. The factory preset is 1.
1
Press
[MENU]
.
2
Press
Select
at “
Ringer setting
”.
3
Press
Select
at “
Ringer volume
”.
4
Select the desired volume level by pressing
[ ]
or
[ ]
.
• The volume will change and ring.• The number of steps indicates the volume level.•
To turn the ringer OFF,
press
[ ]
repeatedly until “
Ringer off
” is displayed.
5
Press
Save
, then press
[OFF]
.
1
Press
[MENU]
.
2
Press
Select
at “
Ringer setting
”.
3
Scroll to “
Ringer tone” by pressing [ ] or [ ], then press Select.
4 Select the desired tone by pressing [ ] or [ ].• If the handset ringer volume has been set to OFF,
the unit will not ring (see above).• You can also select a ringer tone by pressing
dialing buttons [1] to [6].
5 Press Save, then press [OFF].
Ringer settingExit Select
>
>
Ringer volumeBack Select
>
>
>
>
>Ringer volume Low HighBack Save
>
>
e.g. HIGH
>
>>
Ringer settingExit Select
>
>
>
> Ringer toneBack Select
>
>
>
> Ringer tone :1Back Save
>
>
X13775ZA_2.fm 17 ページ 2003年10月2日 木曜日 午後1時27分

18
Making Calls
To have a hands-free phone conversation
• If the handset has lost communication with the base unit, the handset beeps 3 times and “
No link to base. Place on cradle and try again.
” is displayed.
• If
[ ]
,
[ ]
or any other buttons except
[MUTE]
and
[OFF]
is pressed while the handset is on the base unit, the handset beeps 3 times and “
Please lift up and try again.
” is displayed. Lift the handset and press the button again.
1
Press
[ ]
.
• “
Talk
” is displayed.
2
Dial a phone number.
• The dialed number is displayed.• After a few seconds, the display will
show the length of the call.
3
To hang up, press
[OFF]
or place the handset on the base unit.
1
Press
[ ]
.
• “
SP-phone
” is displayed.
2
Dial a phone number.
• The dialed number is displayed.• After a few seconds, the display will show the length of the call.
3
When the other party answers, speak into the microphone.
4
To hang up, press
[OFF]
or place the handset on the base unit.
Hands-free Digital Duplex Speakerphone
For best performance, please note the following:
• Speak alternately with the other party in a quiet room.
• If you or the other party has hearing difficulty, press
[ ]
to decrease the speaker volume.
• While talking using
[ ]
, you can switch to the hands-free phone conversation by pressing
[ ]
. To switch back to the receiver, press
[ ]
.
Display
[ ], [ ]
> >
[ ][ ]
[REDIAL]
Microphone
[OFF]
Soft Keys
>
X13775ZA_3.fm 18 ページ 2003年10月2日 木曜日 午後1時28分

B
asic Op
eration
Making Calls
19
To dial after confirming the entered number
If noise interferes with the conversation
Have the unit select a clearer channel by doing one of the following:Press
[ ]
(Channel) if talking using
[ ]
,press
[ ]
(Channel) if talking using
[ ]
, orpress
CH
, which is displayed when you adjust receiver or speaker volume (p. 20).ORWalk closer to the base unit.
To redial the last number dialed
To redial using the redial list (Memory Redial)
The last 5 phone numbers dialed with the handset are stored in the redial list.
•
To erase an item,
scroll to the desired item then press
Erase
.• If “
No items stored
” is displayed, the list is empty.
To put a call on hold
To return to the call,
press
[ ]
or
[ ]
.
• If another phone is connected on the same line, you can also return to the call by lifting its handset.
• If a call is kept holding for 6 minutes, an alarm tone will start to sound. After 4 additional minutes on hold, the call will be disconnected.
• The alarm volume corresponds to the ringer volume level (p. 17). If the ringer is OFF, the alarm will sound at the LOW level.
1
Enter a phone number.
• If you misdial, press
Clear
. Enter the correct number.
• If a pause is required for dialing, press
Pause
where needed (p. 35).
• To cancel, press
[OFF]
.
2
Press
[ ]
or
[ ]
.
3
To hang up, press
[OFF]
or place the handset on the base unit.
Press
[ ]
or
[ ]
, then press
[REDIAL]
.
3334444Clear Pause
1
Press
[REDIAL]
.
• The last number dialed is displayed.
2
Scroll to the desired number by pressing
[ ]
or
[ ]
.
• You can also scroll through the list by pressing
[REDIAL]
.• To exit the list, press
[OFF]
or
Exit.
3 Press [ ] or [ ].
Press Hold during a conversation.
• “Hold” is displayed.
333-4444Exit Erase
>
>
>
>
Talk 00-00-08(VE) Hold
X13775ZA_3.fm 19 ページ 2003年10月2日 木曜日 午後1時28分

20
Making Calls
To adjust the receiver/speaker volume while talking
3 levels (HIGH, MEDIUM and LOW) are available for the receiver and 6 levels for the speaker.
To increase volume, press
[ ]
. To decrease volume, press
[ ]
.
• The display shows the current volume setting.• If you try to increase/decrease volume when it is at
the maximum/minimum level, the handset will beep 3 times.
Backlit LCD display
The lighted display of the handset will stay on for a few seconds after pressing a button or lifting the handset off the base unit.
Lighted handset keypad
The handset dialing buttons will light when you press a button or lift the handset off the base unit. The light will go out after a few seconds.
Answering Calls
When a call is received, the unit rings and “
Incoming call
” is displayed, and the IN USE/CHARGE indicator on the base unit flashes rapidly. If you subscribe to a Call Display service, see page 21.
• When the ringer volume is set to OFF, the unit will not ring (p. 17).
1
Press
[ ]
or
[ ]
.
• You can also answer a call by pressing any button except
[ ]
,
[ ]
and
[OFF]
.
2
To hang up, press
[OFF]
or place the handset on the base unit.
Auto Talk:
If you set the Auto Talk feature to ON (p. 16), you can answer a call by lifting the handset off the base unit.
e.g. Receiver volume: HIGHSpeaker volume: level 6
Volume Low HighCH Hold
>>
> >
[OFF]
[ ]
[ ]
X13775ZA_3.fm 20 ページ 2003年10月2日 木曜日 午後1時28分

B
asic Op
eration
21
Call Display Service
This unit is compatible with Call Display services offered by your telephone company. If you subscribe to Call Display service, the caller’s name and phone number will be displayed and recorded in the Caller List.
How caller information is displayed when a call is received
When a call comes in, the unit will ring and the caller information will be received. Once the caller information is received, the handset display shows the caller’s information.
• After you answer the call, the display will show the length of the call.
• If the unit does not receive caller information, one of the following will be displayed:
*
This display is shown while viewing the caller list (p. 22).• If your unit is connected to a PBX which does not support Call Display services,
you cannot access Call Display service.• The name display service may not be available in some areas. For further
information, please contact your telephone company.• If you subscribe to both Call Display and Visual Call Waiting services, when talking
on the phone as another call comes in, the second caller’s name and phone number will be displayed (p. 35).
Display Meaning
Unavailable Name & No.
OR
Unavailable*
The caller dialed from an area which does not provide Call Display service.
Private caller
The caller requested not to send his/her information.
Long distance
The caller made a long distance call.
ROBINSON,TINA555-222-3333
Example
X13775ZA_3.fm 21 ページ 2003年10月2日 木曜日 午後1時28分

22
Using the Caller List
The unit can record information for up to 30 different callers and store this information in the Caller List. Caller information is sorted by the most recent call to the oldest. When the 31
st
call is received, the information from the 1
st
call is deleted.
The unit will also tell you how many calls you missed while you were out or unavailable to answer the phone.
Viewing the Caller List
• If there is no name information of a caller, the display will only show the phone number.
• If you do not press any buttons for 60 seconds, the unit will exit the Caller List.
The display will show the number of calls you missed.
• After viewing the missed call entries, “
missed calls
” will disappear from the display.• When your voice mail box has received
message(s); —When the handset is off the base unit,
“
Voice Mail
” will be displayed in place of missed calls display.
—When the handset is on the base unit, “
Voice Mail
” will be also displayed on the first line.
Press
Rcvd calls
to review other calls logged in the Caller List.
• If there are no items in the Caller List, “
Rcvd calls
” will not be displayed.
1
Press
Rcvd calls
to enter the Caller List.
• You can also enter by pressing
[ ]
or
[ ]
.
2
To search from the most recent call, press
[ ]
. To search from the oldest call, press
[ ]
.
• The caller’s name, number and the time and date received are displayed. Name and phone number are alternately displayed as shown on the right.
3
To exit the list, press
[OFF]
.
Handset off the base unit
Handset on the base unit
2 missed calls
2 missed calls Rcvd Phonecalls book
1
1
2
1
2
>>
2 missed calls Rcvd Phonecalls book
2 missed calls =Scroll list
>
>
>
> SMITH,JACK 3:10P JAN.29Erase Select
555-333-4444 3:10P JAN.29Erase Select
Example
X13775ZA_3.fm 22 ページ 2003年10月2日 木曜日 午後1時28分

Using the Caller List
B
asic Op
eration
23
What “
√
” means
“
√
” indicates you have already viewed this calling information, answered the call or called back the caller. If the same caller calls again, the call entry with “
√
” will be replaced with the new call entry.
If a caller calls more than once
The number of times the same caller called is displayed (“
X2
” to “
X9
”). The date and time of the most recent call will be recorded. After viewing a caller’s information, “
X2
” to “
X9
” will be replaced with “
√
”.
Calling Back from the Caller List
• In some cases, you may have to edit the number before dialing (p. 24). (e.g. You may have to add “1” for long distance calls.)
• If a phone number is not displayed in the caller information, you cannot call back that caller from the Caller List.
1
Press
Rcvd calls
to enter the Caller List.
• You can also enter by pressing
[ ]
or
[ ]
.
2
Scroll to the desired caller by pressing
[ ]
or
[ ]
.
3
Press
[ ]
or
[ ]
.
• The phone number is dialed.
SMITH,JACK 3:10P JAN.29 √
TURNER,CINDY11:20A JAN.12 X2
>>
>
>
X13775ZA_3.fm 23 ページ 2003年10月2日 木曜日 午後1時28分

Using the Caller List
24
Editing the Caller’s Phone Number
You can edit a phone number in the Caller List to call it back or store it in the phone book.
• The number edited in step 4 will not be maintained in the Caller List.
1
Press
Rcvd calls
to enter the Caller List.
• You can also enter by pressing
[ ]
or
[ ]
.
2
Scroll to the desired caller by pressing
[ ]
or
[ ]
.
• Name and phone number are alternately displayed as shown on the right.
3
Press
Select
.
4
Press
Edit
.
• Each time you press
Edit
, the number is rearranged into one of 3 patterns.
1– – –
• The order in which patterns – are displayed depends on how the telephone number is displayed in step 2.
5
To continue with making a call from the Caller List, press
[ ]
or
[ ]
.To continue with storing the number in the phone book, press
Save
.
• If there is no name information, see page 25.
>>
2 missed calls Rcvd Phonecalls book
2 missed calls =Scroll list
>
>
>
>
PARKER,FRED11:20A JAN.12Erase Select
555-321-555511:20A JAN.12Erase Select
a Area code Phone no.
b Phone no.
c Area code Phone no.
a c
555-321-5555Edit Save
a
c
b
1-555-321-5555Edit Save
321-5555Edit Save
X13775ZA_3.fm 24 ページ 2003年10月2日 木曜日 午後1時28分
Using the Caller List
B
asic Op
eration
25
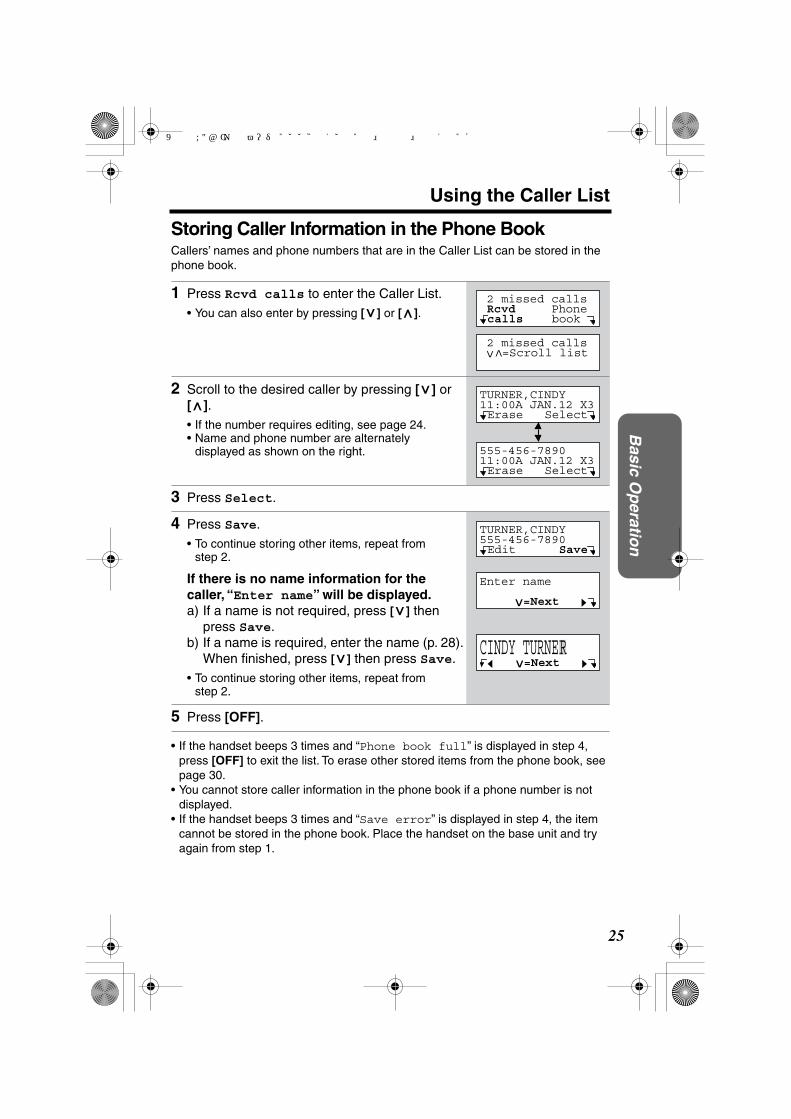
Storing Caller Information in the Phone Book
Callers’ names and phone numbers that are in the Caller List can be stored in the phone book.
• If the handset beeps 3 times and “
Phone book full
” is displayed in step 4, press
[OFF]
to exit the list. To erase other stored items from the phone book, see page 30.
• You cannot store caller information in the phone book if a phone number is not displayed.
• If the handset beeps 3 times and “
Save error
” is displayed in step 4, the item cannot be stored in the phone book. Place the handset on the base unit and try again from step 1.
1
Press
Rcvd calls
to enter the Caller List.
• You can also enter by pressing
[ ]
or
[ ]
.
2
Scroll to the desired caller by pressing
[ ]
or
[ ]
.
• If the number requires editing, see page 24.• Name and phone number are alternately
displayed as shown on the right.
3
Press
Select
.
4
Press
Save
.
• To continue storing other items, repeat from step 2.
If there is no name information for the caller, “
Enter name
” will be displayed.
a) If a name is not required, press
[ ]
then press
Save
.b) If a name is required, enter the name (p. 28).
When finished, press
[ ]
then press
Save
.
• To continue storing other items, repeat from step 2.
5
Press
[OFF]
.
>>
2 missed calls Rcvd Phonecalls book
2 missed calls =Scroll list
>
>
>
>
TURNER,CINDY11:00A JAN.12 X3Erase Select
555-456-789011:00A JAN.12 X3Erase Select
>
>
TURNER,CINDY555-456-7890Edit Save
Enter name
=Next
> �
CINDY TURNER =Next �
> �
R
X13775ZA_3.fm 25 ページ 2003年10月2日 木曜日 午後1時28分

Using the Caller List
26
Erasing Caller Information
To erase a specific caller
To erase all entries
If the display shows that you have “missed calls”, you cannot erase all Caller List entries. Before erasing all entries, make sure that you have viewed all missed calls.
• To cancel erasing, press
No
after step 2.
1
Press
Rcvd calls
to enter the Caller List.
• You can also enter by pressing
[ ]
or
[ ]
.
2
Scroll to the desired caller by pressing
[ ]
or
[ ]
, then press
Erase
.
• To erase other items, repeat step 2.• To exit the Caller List, press
[OFF]
.
1
Press
Rcvd calls
to enter the Caller List.
• You can also enter by pressing
[ ]
or
[ ]
.
2
Press
All erase
.
3
Press
Yes
.
• A beep sounds and all entries in your Caller List are erased.
>>
2 missed calls Rcvd Phonecalls book
2 missed calls =Scroll list
>
>
>
>
REAGAN,TOM12:20A JAN.12Erase Select
Erased
>> Rcvd Phone
calls book
0 missed call =Scroll listAll erase
>
>
All erase? No Yes
All erased
X13775ZA_3.fm 26 ページ 2003年10月2日 木曜日 午後1時28分

Ad
vanced
Op
eration
27
Phone Book
You can store up to 50 names and phone numbers in the handset phone book. All phone book items are sorted alphabetically. You can make a call by selecting a name on the handset display.
Storing Names and Numbers
• If the handset beeps 3 times when you press
Save
, the item cannot be stored in the phone book. Place the handset on the base unit and try again from step 1.
1
Press
Phone book
.
2
Press
Add
.
• When 50 items are stored in the phone book, “
Add
” is not displayed. To erase an item, see page 30.
3
Enter a name, up to 15 characters with the dialing buttons (
[0]
to
[9]
) (p. 28), then press
[ ]
.
• If a name is not required, press
[ ]
then go to step 4.
4
Enter a phone number, up to 32 digits.
• Each time you press , a digit is erased. To erase all of the digits, press and hold .
• If a pause is required for dialing, press
P
. A pause is stored in a phone number as one digit (p. 35).
5
Press
[ ]
.
• If you want to change the name, press
Edit
then change it.
• If you want to change the number, press
[ ]
then change it.
6
Press
Save
.
• To continue storing other items, repeat from step 2.
• When you store the 50th item, “
Phone book full
” is displayed.
7
Press
[OFF]
.
Rcvd Phonecalls book
Phone book 7 itemsAdd Search
>
>
Enter name
=Next
> �
Tom =Next �
> �
Example
m
�
�
Enter phone no.
P
0987654321
=Next P�
>
Example
>
>
Tom098-765-4321Edit Save
X13775ZA_4.fm 27 ページ 2003年10月2日 木曜日 午後1時28分

Phone Book
28
Selecting characters to enter names
Enter names using the dialing buttons. Press each button until the desired character is displayed.
• Pressing each button selects a character in the order shown below.
For example, to enter “Tom”:
If you make a mistake when entering a name or number
Use to erase the incorrect character. Each time you press , a character is erased. Then re-enter the correct character.To erase all characters, press and hold .
Keys
Characters
Keys
Characters
[1]
# & ’ ( ) , – . / 1
[6]
m n o M N O 6
[2]
a b c A B C 2
[7]
p q r s P Q R S 7
[3]
d e f D E F 3
[8]
t u v T U V 8
[4]
g h i G H I 4
[9]
w x y z W X Y Z 9
[5]
j k l J K L 5
[0]
0 Space
Erases the character to the left.
Moves the cursor to the right. (To enter another character using the same number key, move the cursor to the next space.)
1
Press
[8]
four times.
2
Press
[6]
three times, then press to move the cursor.
3
Press
[6]
.
VOL.
�
�TT
�
To
Tomm
� �
�
X13775ZA_4.fm 28 ページ 2003年10月2日 木曜日 午後1時28分

Phone Book
A
dvan
ced O
peratio
n
29
Dialing from the Phone Book
• To exit the phone book list, press
[OFF]
.• If “
No items stored
” is displayed in step 2, the phone book is empty.• To view a phone number over 16 digits, repeat steps 1 to 3, then press
Select
,
Edit
and then
[ ]
. When finished, press
[OFF]
.
To search for a name by initial
1. Repeat the steps 1 and 2 above.
2. Press the dialing button for the first letter of the desired name until any name with the same initial is displayed (see the Index table below).
e.g. To find “Frank”, press
[3]
repeatedly until the first item under “F” is displayed.• If there are no items in the index you selected, the first entry in the next
alphabetical index will be displayed.
3. Press
[ ]
repeatedly until the desired name is displayed.
Index table
1
Press
Phone book
to enter the phone book.
2
Press
Search
.
3
Scroll to the desired item. To scroll down, press
[ ]
. To scroll up, press
[ ]
.
4
Press
Call
,
[ ]
or
[ ]
.
• The displayed phone number is dialed.
5
To hang up, press
[OFF]
or place the handset on the base unit.
Keys Index Keys Index
[1]
Other symbols, 1
[6]
M, N, O, 6
[2]
A, B, C, 2
[7]
P, Q, R, S, 7
[3]
D, E, F, 3
[8]
T, U, V, 8
[4]
G, H, I, 4
[9]
W, X, Y, Z, 9
[5]
J, K, L, 5
[0]
0, Space
Phone book 7 itemsAdd Search
>
>
Phone book items are sorted in the following order:
1 Alphabet letters (Alphabetical)
2 Space & ’ ( ) , – . /
3 Numbers 0 to 9
4 #
5 Telephone numbers (If no name is stored)
0-9=Name search =Scroll list
>
>Frank444-5555Call Select
>
>
X13775ZA_4.fm 29 ページ 2003年10月2日 木曜日 午後1時28分

Phone Book
30
Editing an Item in the Phone Book
Erasing an Item in the Phone Book
• To cancel erasing, press
No
after step 4.
1
Press
Phone book
to enter the phone book.
2
Press
Search
.
3
Scroll to the desired item by pressing
[ ]
or
[ ]
, then press
Select
.
• To search for the item by initial, see page 29.
4
Press
Edit
.
5
Edit the name (p. 28), then press
[ ]
.
• If you do not need to change the name, press
[ ]
then go to step 6.
6
Edit the phone number, then press
[ ]
.
• If you do not need to change the number, press
[ ]
then go to step 7.• If a pause is required for dialing, press
P
. A pause is stored in a phone number as one digit (p. 35).
7
Press
Save
.
• To continue editing other items, repeat from step 2.
8
Press
[OFF]
.
1
Press
Phone book
to enter the phone book.
2
Press
Search
.
3
Scroll to the desired item by pressing
[ ]
or
[ ]
, then press
Select.• To search for the item by initial, see page 29.
4 Press Erase.
5 Press Yes.• A beep sounds and the item is erased.• To erase other items, repeat from step 3.
6 Press [OFF].
>
>
Jane345-6789Call Select
Jane345-6789Erase Edit
>
> Jane Walker =Next �
> �
r
>
>
5553456789
=Next P�
>
>
>
Helen666-777-8888Call Select
Helen666-777-8888Erase Edit
Erase? No Yes
X13775ZA_4.fm 30 ページ 2003年10月2日 木曜日 午後1時28分

A
dvan
ced O
peratio
n
31
Voice Mail Service
Voice mail service is an electronic on-line answering system offered by your telephone company. After subscribing, the voice mail system can answer calls automatically for you when your line is busy or if calls are not answered, and callers can leave their messages in your voice mail box virtually located at the telephone company. After the voice mail box has received messages, “
Voice Mail
” will be displayed on the handset and the VM (Voice Mail) indicator on the base unit will flash.To use this feature, you must first store your voice mail access number.
Storing a Voice Mail Access Number
To erase a stored voice mail access number
Repeat steps 1 to 4, then press and hold until all of the digits are erased.Press
[MENU]
, then press
[OFF]
.
1
Press
[MENU]
.
2
Scroll to “
Initial setting
” by pressing
[ ]
or
[ ]
, then press
Select
.
3
Scroll to “
Voice Mail
” by pressing
[ ]
or
[ ]
, then press
Select
.
4
Press
Select
at “
Store VM access#
”.
5
Enter your access number, up to 32 digits.
• Each time you press , a digit is erased.To erase all of the digits, press and hold .
• If a pause is required for dialing, press
P
*.
6
Press
[MENU]
to save your setting, then press
[OFF]
.
*For quick access to your voice mail box, you may add pauses between your voice mail box access number and your mail box password in step 5.
e.g. 222-333-4444 PPPP 8888
Pressing
P
once creates a 3.5 second delay and counts as one digit. The delay time depends on your telephone company.
>
> Initial settingExit Select
>
>
>
> Voice MailBack Select
>
>Store VM access#Back Select
>
>
�
�
1234567PPP890
MENU=Save P�
Example
PausesYour mail box passwordYour voice mail box access number
�
X13775ZA_4.fm 31 ページ 2003年10月2日 木曜日 午後1時28分

Voice Mail Service
32
Setting Voice Mail (VM) Tone Detection
Your telephone company sends special signals (Voice mail tones) to activate the VM indicator.Press
[ ]
or
[ ]
to listen to the dial tone. If you hear a pulsating tone followed by a continuous dial tone, this is an indication that a new message was recorded. Your phone does not come set to detect these tones (set to OFF). After you hang up or the phone stops ringing, your unit will seize the phone line and check if a message has been recorded. If a new message was recorded at your telephone company, “
Voice Mail
” will be displayed on the handset and the VM indicator on the base unit will flash.
Set this programming to OFF when:—you do not subscribe to a voice mail service,—your telephone company does not send a pulsating tone, followed by a
continuous dial tone, or —your unit is connected to a business or office telephone system (PBX).
If you are not sure which setting is required, consult your local telephone company or contact the Panasonic Customer Call Centre.
1
Press
[MENU]
.
2
Scroll to “
Initial setting
” by pressing
[ ]
or
[ ]
, then press
Select
.
3
Scroll to “
Voice Mail
” by pressing
[ ]
or
[ ]
, then press
Select
.
4
Scroll to “
VM tone detect
” by pressing
[ ]
or
[ ]
, then press
Select
.
5
Select “
On
” or “
Off
” by pressing
[ ]
or
[ ]
.
6
Press
Save
, then press
[OFF]
.
>
> Initial settingExit Select
>
>
>
> Voice MailBack Select
>
>
>
> VM tone detectBack Select
>
>
>
> VM tone detect :OffBack Save
>
>
X13775ZA_4.fm 32 ページ 2003年10月2日 木曜日 午後1時28分
Voice Mail Service
A
dvan
ced O
peratio
n
33
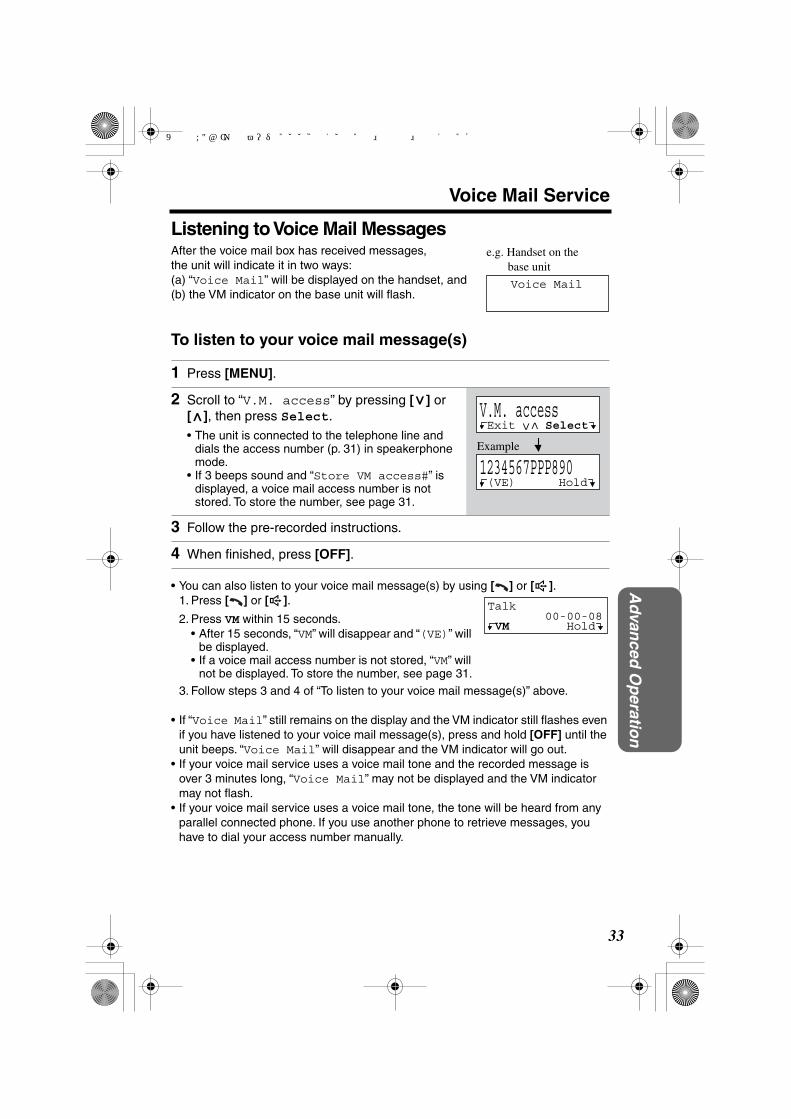
Listening to Voice Mail Messages
After the voice mail box has received messages, the unit will indicate it in two ways:(a) “
Voice Mail
” will be displayed on the handset, and (b) the VM indicator on the base unit will flash.
To listen to your voice mail message(s)
• You can also listen to your voice mail message(s) by using
[ ]
or
[ ]
.1. Press
[ ]
or
[ ]
.
2. Press
VM
within 15 seconds.• After 15 seconds, “
VM
” will disappear and “
(VE)
” will be displayed.
• If a voice mail access number is not stored, “
VM
” will not be displayed. To store the number, see page 31.
3. Follow steps 3 and 4 of “To listen to your voice mail message(s)” above.
• If “
Voice Mail
” still remains on the display and the VM indicator still flashes even if you have listened to your voice mail message(s), press and hold
[OFF]
until the unit beeps. “
Voice Mail
” will disappear and the VM indicator will go out.• If your voice mail service uses a voice mail tone and the recorded message is
over 3 minutes long, “
Voice Mail
” may not be displayed and the VM indicator may not flash.
• If your voice mail service uses a voice mail tone, the tone will be heard from any parallel connected phone. If you use another phone to retrieve messages, you have to dial your access number manually.
1
Press
[MENU]
.
2
Scroll to “
V.M. access
” by pressing
[ ]
or
[ ]
, then press
Select
.
• The unit is connected to the telephone line and dials the access number (p. 31) in speakerphone mode.
• If 3 beeps sound and “
Store VM access#
” is displayed, a voice mail access number is not stored. To store the number, see page 31.
3
Follow the pre-recorded instructions.
4
When finished, press
[OFF]
.
Voice Mail
e.g. Handset on the base unit
>
> V.M. accessExit Select
>
>
1234567PPP890(VE) Hold
Example
Talk 00-00-08VM Hold
X13775ZA_4.fm 33 ページ 2003年10月2日 木曜日 午後1時28分

34
Special Features
Automatic Security Code Setting
Each time you place the handset on the base unit, the unit automatically selects one of a million security codes. These codes help prevent the unauthorized use of your telephone line by another cordless telephone user.
Handset Locator
You can locate the handset or page the handset user with beep tones from the base unit.
Temporary Tone Dialing
(For Rotary or Pulse Service Users)
Press
[ ]
(TONE) before entering access numbers which require tone dialing.
• The dialing mode changes to tone. You can enter numbers to access an answering service, electronic banking service, etc. When you hang up, the dialing mode will return to pulse.
Muting Your Conversation
During a call, you can mute your phone so the other party cannot listen to you. When muting your conversation, you can hear the other party.
Press
[MUTE]
.
• “
<Mute>
” will flash.
•
To release the mute,
press
[MUTE]
,
[ ]
or
[ ]
.
1
Press
[HANDSET LOCATOR]
.
• The IN USE/CHARGE indicator flashes. The handset beeps for 1 minute and displays “
Paging
”.
2
To stop paging, press
[HANDSET LOCATOR]
again or press
[OFF]
on the handset.
Talk<Mute> 00-00-30(VE) Hold
X13775ZA_4.fm 34 ページ 2003年10月2日 木曜日 午後1時28分

Special Features
A
dvan
ced O
peratio
n
35
Using the PAUSE Key
(For PBX Line/Long Distance Calls)
We recommend that you press
Pause
or
P
if a pause is required to dial with a PBX or to make a long distance call.
e.g. Line access number
[9]
(PBX)
[9]
Pause
or
P
• Pressing
Pause
or
P
once creates a 3.5 second pause. This prevents misdialing when you dial after confirming the entered number (p. 19) or dial a stored number (p. 29).
• Pressing
Pause
or
P
more than once increases the length of the pause between numbers.
For Call Waiting Service Users
Press
[FLASH/CALL WAIT]
if you hear a call-waiting tone while talking.
• The first call is put on hold and you can answer the second call.• To return to the first caller, press
[FLASH/CALL WAIT]
again.• Call waiting service cannot be used when:
— the first call is placed on hold, or— a parallel connected telephone is in use.
• If this function does not operate properly, consult your telephone company for details.
Visual Call Waiting Service
If you subscribe to both Call Display and Visual Call Waiting services, when talking on the phone as another call comes in, the second caller’s name and phone number will be displayed. After you hear a call-waiting tone while talking, the display shows the caller’s name with the phone number and “
----Waiting-----
”.
• The second caller’s information will not be displayed when a parallel connected telephone is in use.
• Contact your telephone company for details and availability in your area.
9P15556667777Clear Pause
9P1234567890
=Next P�
>
OR
Example
Phone number
BROWN,NANCY555-666-7777----Waiting-----
X13775ZA_4.fm 35 ページ 2003年10月2日 木曜日 午後1時28分

Special Features
36
Call Waiting Deluxe Service
This unit is compatible with a Call Waiting Deluxe Service offered by your telephone company.After subscribing, Call Waiting Deluxe Service not only allows your handset to display the second caller’s information, but also offers you a variety of ways to deal with the second call (p. 37).Before using Call Waiting Deluxe Service, turn the “C.WTG (Call Waiting) options” mode on by programming.
• Please contact your telephone company for details and availability in your area.
To turn the “C.WTG (Call Waiting) options” mode on
To turn the “C.WTG (Call Waiting) options” mode off,
select “
Off
” by pressing
[ ]
or
[ ]
in step 5.
1
Press
[MENU]
.
2
Scroll to “
Initial setting
” by pressing
[ ]
or
[ ]
, then press
Select
.
3
Scroll to “
Set tel line
” by pressing
[ ]
or
[ ]
, then press
Select
.
4
Scroll to “
C.WTG options
” by pressing
[ ]
or
[ ]
, then press
Select
.
5
Select “
On
” by pressing
[ ]
or
[ ]
.
6
Press
Save
, then press
[OFF]
.
>
> Initial settingExit Select
>
>
>
> Set tel lineBack Select
>
>
>
> C.WTG optionsBack Select
>
>
>
> C.WTG options :OffBack Save
>
>>
>
X13775ZA_4.fm 36 ページ 2003年10月2日 木曜日 午後1時28分

Special Features
A
dvan
ced O
peratio
n
37
To use Call Waiting Deluxe Service
You can choose from the options on the display as shown below.
Display Signification
Ans
(Answer) Answers the second call, while keeping the first call on hold.
Hold
Plays the pre-recorded hold message from the telephone company for the second caller and the second call is put on hold.
Annc
(Announcement)Plays the pre-recorded busy message from the telephone company for the second caller (e.g. “We are not available now.”) and hangs up the second call.
Fwd
(Forward) Forwards the second call to your voice mail if you subscribe to a voice mail service (p. 31).
Drop
Hangs up the current call and answers the waiting call.
Conf
(Conference)Answers the second call and combines it with the first call to make a conference call.
During a conference call,
you can choose either“
Drop caller1
” or “
Drop caller2
” to hang up the first or second call.
Return
Returns to the waiting caller while keeping the current call on hold.
1
When you hear a call-waiting tone while talking, the second caller’s information is displayed. Press
[FLASH/CALL WAIT]
.
• The option menu is displayed.
2
Enter a displayed option number (1 to 6) to select the desired option.
• The length of the call is displayed.
BROWN,NANCY 555-666-7777----Waiting-----
1:Ans 4:Fwd2:Hold 5:Drop3:Annc 6:Conf
X13775ZA_4.fm 37 ページ 2003年10月2日 木曜日 午後1時28分

Special Features
38
After selecting “
Ans
” (Answer) or “
Hold
”:
You can choose one of the following options: “
Return
”—to return to the waiting call. “
Drop
”—to hang up the current call and answer the waiting call.“
Conference
”—to make a conference call.
Press
[FLASH/CALL WAIT]
to display the option menu. Enter a displayed option number (1 to 3) to select the desired option.
• If “
Return
” is selected, you can choose an option in the same option menu again. Press
[FLASH/CALL WAIT]
.
After selecting “
Conf
” (Conference):
You can choose one of the following options: “
Drop caller1
”—to hang up the first call. “
Drop caller2
”—to hang up the second call.
Press
[FLASH/CALL WAIT]
to display the option menu. Enter a displayed option number (1 or 2) to select the desired option.
• In step 2, you can also select the desired option by pressing
[ ]
or
[ ]
until the option flashes, then pressing
[FLASH/CALL WAIT]
.• To cancel the option menu, wait for 20 seconds. The handset display will return to
the length of the call.• The call waiting service cannot be used when a parallel connected telephone is in
use.• If this function does not operate properly, consult your telephone company for
details.
1:Return2:Drop3:Conference
1:Drop caller12:Drop caller2
>
>
X13775ZA_4.fm 38 ページ 2003年10月2日 木曜日 午後1時28分

Special Features
A
dvan
ced O
peratio
n
39
FLASH Button
Pressing
[FLASH/CALL WAIT]
allows you to use special features of your host PBX such as transferring an extension call, or access optional telephone services such as Call Waiting.
• Pressing
[FLASH/CALL WAIT]
cancels following operations:— temporary tone dialing, or— muting your conversation.
Selecting the flash time
The flash time required depends on your telephone exchange or host PBX. You can select the following flash times: “700, 600, 400, 300, 250, 110, 100 or 90 ms (milliseconds)”. The factory preset is “700 ms”.
• If PBX functions do not work correctly, consult your PBX supplier for the correct settings.
1
Press
[MENU]
.
2
Scroll to “
Initial setting
” by pressing
[ ]
or
[ ]
, then press
Select
.
3
Scroll to “
Set tel line
” by pressing
[ ]
or
[ ]
, then press
Select
.
4
Scroll to “
Set flash time
” by pressing
[ ]
or
[ ]
, then press
Select
.
5
Select the desired time by pressing
[ ]
or
[ ]
.
6
Press
Save
, then press
[OFF]
.
>
> Initial settingExit Select
>
>
>
> Set tel lineBack Select
>
>
>
> Set flash timeBack Select
>
>
>
> Set flash time :700msBack Save
>
>
X13775ZA_4.fm 39 ページ 2003年10月2日 木曜日 午後1時28分

40
Wall Mounting
This unit can be mounted on a wall phone plate.
1
Feed the AC adaptor cord through the wall mounting adaptor. Connect the AC adaptor.
2
Tuck the telephone line cord inside the wall mounting adaptor ( ). Connect the telephone line cord ( ) to the unit.
3
Insert (
A
) and (
B
) hooks on the wall mounting adaptor into the holes on the base unit.
To Power Outlet
12
1
2
A B
X13775ZA_5.fm 40 ページ 2003年10月2日 木曜日 午後1時32分
Wall Mounting
U
seful In
form
ation
41
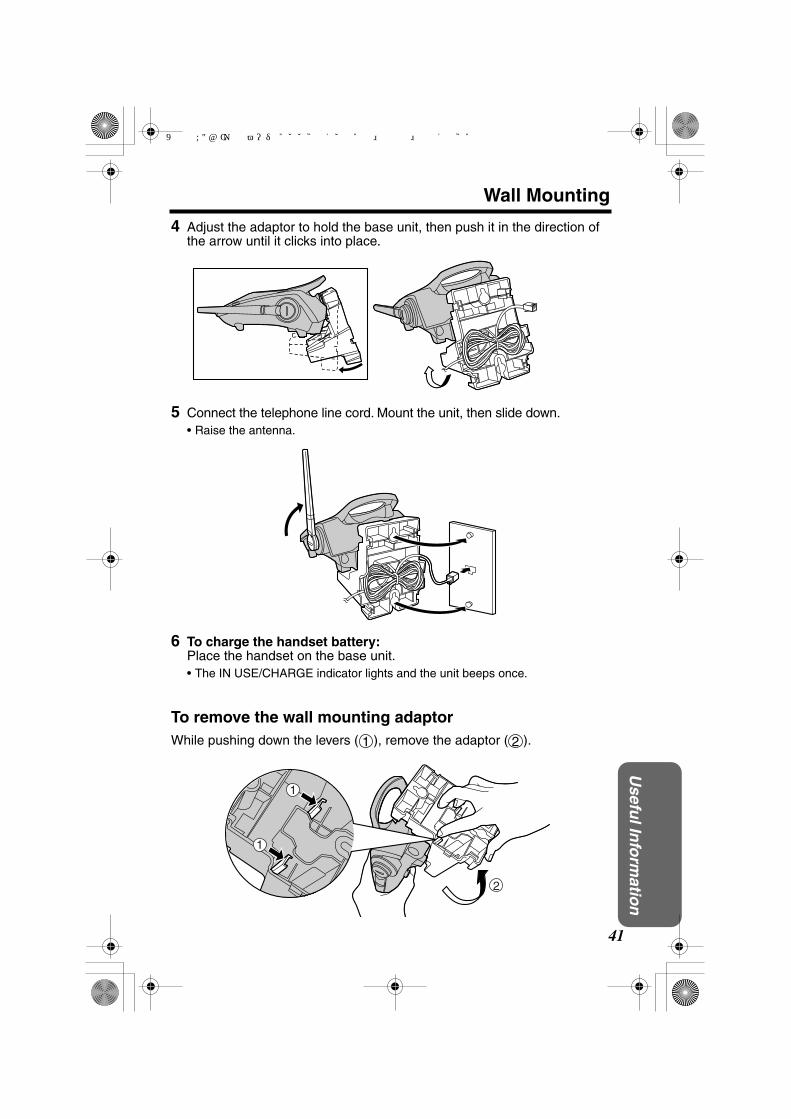
4
Adjust the adaptor to hold the base unit, then push it in the direction of the arrow until it clicks into place.
5
Connect the telephone line cord. Mount the unit, then slide down.
• Raise the antenna.
6
To charge the handset battery:
Place the handset on the base unit.
• The IN USE/CHARGE indicator lights and the unit beeps once.
To remove the wall mounting adaptor
While pushing down the levers ( ), remove the adaptor ( ).1 2
2
1
1
X13775ZA_5.fm 41 ページ 2003年10月2日 木曜日 午後1時32分

42
Belt Clip
You can hang the handset on your belt or pocket using the included belt clip.
To attach the belt clip To remove the belt clip
Optional Headset
Connecting an optional headset to the handset allows a hands-free phone conversation. Use only a Panasonic KX-TCA86, KX-TCA88C, KX-TCA91, orKX-TCA92 headset.
Connecting an optional headset to the handset
Open the headset jack cover, and insert the headset plug into the headset jack as shown below.
To switch to the speakerphone while using the headset:
Press
[ ]
. To return to the headset, press
[ ]
.
Headset Jack
• Headset sold separately. Model shown here is KX-TCA88C.
X13775ZA_5.fm 42 ページ 2003年10月2日 木曜日 午後1時32分

U
seful In
form
ation
43
Direct Commands
After pressing
[MENU]
, you can also program menu items by direct commands (
[0]
to
[9]
) instead of using the soft keys.
LCD contrast[1]
Auto talk[3]
Set tel line[5]
Voice Mail[6]
Ringer setting[1]
Ringer volume[1]
Ringer tone[2]
V.M. access[2]
Voice enhancer[5]
Initial setting[0]
Change language[8][1] : English [2] : French
[1] : On [0] : Off
[1] : On [0] : Off
Set dial mode[1]
Set flash time[2]
Set line mode[3]
[1] : Pulse [2] : Tone
[1] : 700ms [2] : 600ms [3] : 400ms [4] : 300ms [5] : 250ms [6] : 110ms [7] : 100ms [8] : 90ms
[1] : A [2] : B
Store VM access#[1]
VM tone detect[2]
[1]
[1] : On [0] : Off
[0] : Off [1] : Low [2] : Medium [3] : High
[0][1][2][3]
[2][1]– [6 : Tone pattern 1–6[1] [6]
[3]
[5][1][0]
[0]
[1][1] – [5 : level 1–5[1] [5]
[3][1][0]
[5]
[1][1][2]
[2][1][3][5][7]
[3][1][2]
[7]
[1]
[2][1][0]
[8][1][2]
[2][4][6][8]
C.WTG options[4][1] : On [0] : Off
[4][1][0]
p. 17
p. 17
p. 33
p. 15
p. 16
p. 16
p. 14
p. 14
p. 39
p. 36
p. 31
p. 32
p. 10
During programming:
To save the setting, press the right soft key (Save).
To exit the programming, press [OFF].
• If you press the direct command incorrectly, exit the programming. Then re-enter the programming by pressing [MENU].
• For function details, see the corresponding pages.
X13775ZA_5.fm 43 ページ 2003年10月2日 木曜日 午後1時32分
44
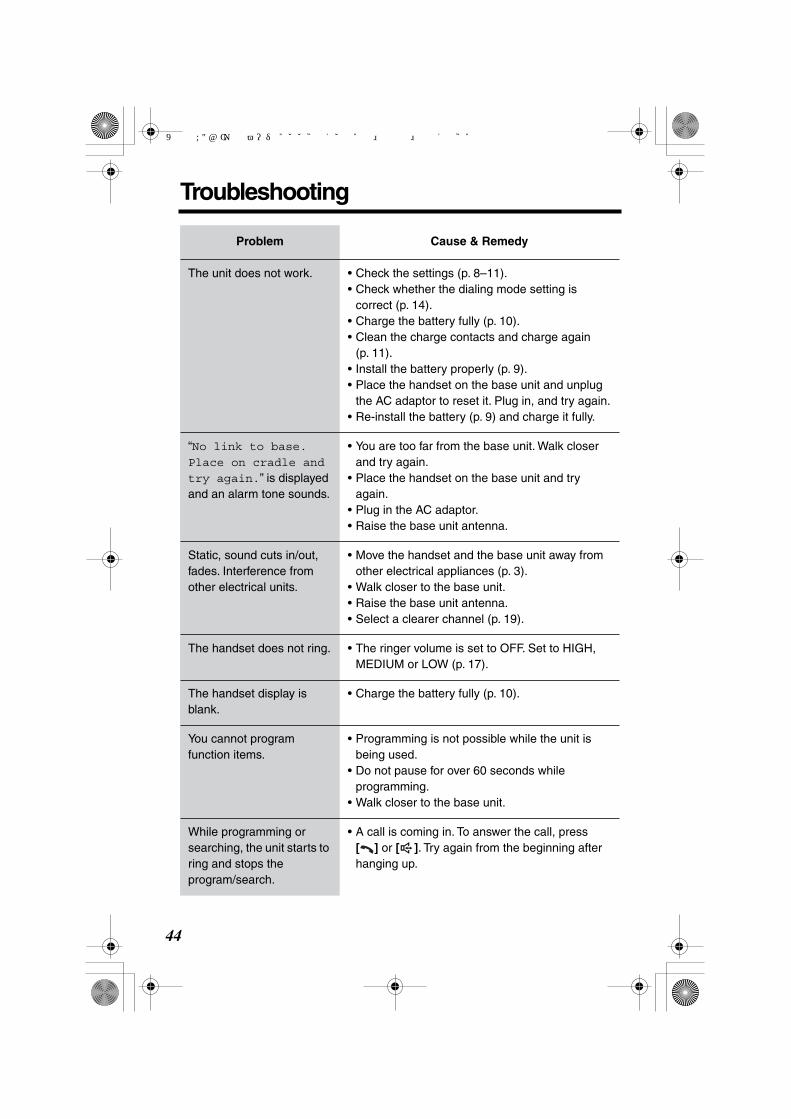
Troubleshooting
Problem Cause & Remedy
The unit does not work. • Check the settings (p. 8–11).• Check whether the dialing mode setting is
correct (p. 14).• Charge the battery fully (p. 10).• Clean the charge contacts and charge again
(p. 11).• Install the battery properly (p. 9).• Place the handset on the base unit and unplug
the AC adaptor to reset it. Plug in, and try again.• Re-install the battery (p. 9) and charge it fully.
“
No link to base.
Place on cradle and
try again.
” is displayed and an alarm tone sounds.
• You are too far from the base unit. Walk closer and try again.
• Place the handset on the base unit and try again.
• Plug in the AC adaptor.• Raise the base unit antenna.
Static, sound cuts in/out, fades. Interference from other electrical units.
• Move the handset and the base unit away from other electrical appliances (p. 3).
• Walk closer to the base unit.• Raise the base unit antenna.• Select a clearer channel (p. 19).
The handset does not ring. • The ringer volume is set to OFF. Set to HIGH, MEDIUM or LOW (p. 17).
The handset display is blank.
• Charge the battery fully (p. 10).
You cannot program function items.
• Programming is not possible while the unit is being used.
• Do not pause for over 60 seconds while programming.
• Walk closer to the base unit.
While programming or searching, the unit starts to ring and stops the program/search.
• A call is coming in. To answer the call, press
[ ]
or
[ ]
. Try again from the beginning after hanging up.
X13775ZA_5.fm 44 ページ 2003年10月2日 木曜日 午後1時32分

Troubleshooting
U
seful In
form
ation
45
Previously programmed information is erased.
• If a power failure occurs, programmed information may be erased. Reprogram if necessary.
The unit does not display the caller’s name and/or phone number.
• You need to subscribe to a Call Display service.• Other telephone equipment may be interfering
with your phone. Disconnect it and try again.• Other electrical appliances connected to the
same outlet may be interfering with Call Display.• Telephone line noise may be affecting Call
Display.• The caller requested not to send his/her
information (p. 21).• If a Call Display box is connected between the
unit and the telephone wall jack, disconnect the Call Display box or plug the unit directly into the wall jack.
The handset display exits the Caller List or phone book.
• Do not pause for over 60 seconds while searching.
You cannot page the handset.
• The handset is too far from the base unit.• The handset user is making an outside call or
viewing the Caller List/phone book. Wait until the IN USE/CHARGE indicator light goes out.
• The handset is in use. Try again later.
You cannot redial. • If the last number dialed was more than 32 digits long, the number will not be redialed correctly.
“
Recharge battery
” is displayed, “ ” flashes or the unit beeps intermittently.
• Charge the battery fully (p. 10).
You charged the battery fully, but “
Recharge
battery
” is still displayed and/or “ ” continues to flash.
• Clean the charge contacts and charge again (p. 11).
• Install a new battery (p. 9).
Problem Cause & Remedy
X13775ZA_5.fm 45 ページ 2003年10月2日 木曜日 午後1時32分

Troubleshooting
46
The IN USE/CHARGE indicator light does not go out after the battery has been charged.
• This is normal.
You cannot have a conversation using the headset.
• Make sure the optional headset is connected properly (p. 42).
• If “
SP-phone
” is displayed on the handset, press
[ ]
to switch to the headset.
Problem Cause & Remedy
X13775ZA_5.fm 46 ページ 2003年10月2日 木曜日 午後1時32分

U
seful In
form
ation
47
Important Information
NOTICE:
This equipment meets the applicable Industry Canada Terminal Equipment Technical Specifications. This is confirmed by the registration number. The abbreviation, “IC:”, before the registration number signifies that registration was performed based on a Declaration of Conformity indicating that Industry Canada technical specifications were met. It does not imply that Industry Canada approved the equipment.And, the term “IC:” signifies that Industry Canada radio technical specifications were met.Before installing this equipment, users should ensure that it is permissible to be connected to the facilities of the local telecommunications company. The equipment must also be installed using an acceptable method of connection. The customer should be aware that compliance with the above conditions may not prevent degradation of service in some situations.Repairs to certified equipment should be coordinated by a representative designated by the supplier. Any repairs or alterations made by the user to this equipment, or equipment malfunctions, may give the telecommunications company cause to request the user to disconnect the equipment.Users should ensure, for their own protection, that the electrical ground connections of the power utility, telephone lines and internal metallic water pipe system, if present, are connected together. This precaution may be particularly important in rural areas.
Caution:
Users should not attempt to make such connections themselves, but should contact the appropriate electric inspection authority, or electrician, as appropriate.
NOTICE:
The
Ringer Equivalence Number
(REN) assigned to each terminal device provides an indication of the maximum number of terminals allowed to be connected to a telephone interface. The termination on an interface may consist of any combination of devices subject only to the requirement that the sum of the Ringer Equivalence Numbers of all the devices does not exceed 5.
The Ringer Equivalence Number (REN) of This Unit:(found on the bottom of the unit).
NOTICE:
Operation is subject to the following two conditions: (1) this device may not cause interference, and (2) this device must accept any interference, including interference that may cause undesired operation of the device.
Privacy of communications may not be ensured when using this telephone.
Some cordless telephones operate at frequencies that may cause interference to nearby TVs and VCRs. To minimize or prevent such interference, the base of the cordless telephone should not be placed near, or on top of, a TV or VCR. If interference is experienced, move the cordless telephone further away from the TV or VCR. This will often reduce, or eliminate, interference.
Operating near 2.4 GHz electrical appliances may cause interference. Move away from the electrical appliances and/or press the TALK or SP-PHONE button, or CH (Channel) key.
X13775ZA_5.fm 47 ページ 2003年10月2日 木曜日 午後1時32分

48
Safety Instructions
Take special care to follow the safety suggestions listed below.
Safety
1) The unit should be connected to a power supply only of the type described in the operating instructions or as marked on the unit.
2) When left unused for a long period of time, the base unit should be unplugged from the household AC outlet.
Installations Environment
1) Do not use this unit near water— for example, near a bathtub, washbowl, sink, etc. Damp basements should also be avoided.
2) The unit should be kept away from heat sources such as radiators, kitchen ranges, etc. It also should not be placed in rooms where the temperature is less than 5°C (41°F) or greater than 40°C (104°F).
3) The AC adaptor is used as the main power source. Ensure that the AC outlet is located/installed near the unit and is easily accessible.
Placement
1) Do not place heavy objects on top of this unit.2) Care should be taken so that objects do not fall onto, and liquids are not spilled
into, the unit. Do not subject this unit to excessive smoke, dust, mechanical vibration or shock.
3) Place the unit on a flat surface.
For best performance
1) If noise prevents the conversation from being understood at the handset, approach the base unit to lessen the noise.
2) The handset should be used at the HIGH volume setting when the reception tone is difficult to hear.
3) The handset should be fully recharged on the base unit when “
Recharge battery
” is displayed and/or “ ” flashes on the display.4) The handset antenna should not be touched during use because of its high
sensitivity.5) The maximum calling distance may be shortened when the unit is used in the
following places: Near obstacles such as hills, tunnels, undergrounds, near metal objects such as wire fences, etc.
Medical
Consult the manufacturer of any personal medical devices, such as pacemakers or hearing aids, to determine if they are adequately shielded from external RF (radio frequency) energy. (The unit operates in the frequency range of 2402 MHz to 2480 MHz, and the power output level is 0.01 W.) Do not use the unit in health care facilities if any regulations posted in the area instruct you not to do so. Hospitals or health care facilities may be using equipment that could be sensitive to external RF (radio frequency) energy.
X13775ZA_5.fm 48 ページ 2003年10月2日 木曜日 午後1時32分

U
seful In
form
ation
49
Safety Instructions
WARNING:
TO PREVENT FIRE OR SHOCK HAZARD, DO NOT EXPOSE THE BASE UNIT TO RAIN OR ANY TYPE OF MOISTURE. ONLY THE HANDSET IS SHOCK AND SPLASH RESISTANT.
• If there is any trouble, disconnect the unit from the telephone line and connect a known working phone. If the known working phone operates properly, have your unit repaired by one of the specified authorized Panasonic Factory Servicentres. If the known working phone does not operate properly, consult your telephone company.
Splash-Resistant (HANDSET ONLY)
The handset is designed to be splash resistant. You can use the handset with wet hands.
CAUTION:• Do not immerse in water or leave under running water.
• Keep the handset away from salt water.• Avoid exposure to prolonged high humidity.• Since water in the headset jack may cause damage, close the headset jack cover
when the optional headset is not in use. When the optional headset is connected, do not use the handset with wet hands.
• If the handset is wet, wipe with a soft dry cloth.• The base unit is not designed to be splash resistant. Do not place the wet handset
on the base unit.
Shock-Resistant (HANDSET ONLY)
Although the handset is designed to be shock resistant, do not throw or step on the handset.
X13775ZA_5.fm 49 ページ 2003年10月2日 木曜日 午後1時32分

50
Specifications
�
Base unitPower Supply:
AC Adaptor (120 V AC, 60 Hz)
Power Consumption:
Standby: Approx. 2.6 WMaximum: Approx. 3.9 W
Frequency:
2.402 GHz – 2.480 GHz
Dimensions (H x W x D):
Approx. 91 mm x 136 mm x 184 mm(3
19
⁄
32
" x 5
11
⁄
32
" x 7
1
⁄
4
")
Mass (Weight):
Approx. 290
g
(0.64 lb.)
�
HandsetPower Supply:
Ni-MH battery (2.4 V, 1,500 mAh)
Frequency:
2.402 GHz – 2.480 GHz
Dimensions (H x W x D):
Approx. 246 mm x 54 mm x 39 mm(9
11
⁄
16
" x 2
1
⁄
8
" x 1
17
⁄
32
")
Mass (Weight):
Approx. 230
g
(0.51 lb.)
Security Codes:
1,000,000
�
Dialing Mode:
Tone (DTMF)/Pulse
�
Operating Environment:
5 °C – 40 °C (41 °F – 104 °F)
Specifications are subject to change without notice.
X13775ZA_5.fm 50 ページ 2003年10月2日 木曜日 午後1時32分

51
Warranty
Panasonic Canada Inc.
5770 Ambler Drive, Mississauga, Ontario L4W 2T3
PANASONIC PRODUCT—LIMITED WARRANTY
Panasonic Canada Inc. warrants this product to be free from defects in material and workmanship and agrees to remedy any such defect for a period as stated below from the date of original purchase.
Telephone Accessory/Product —One (1) year, parts and labourFRS (Family Radio Service) Product —One (1) year, parts and labour
LIMITATIONS AND EXCLUSIONS
This warranty does not apply to products purchased outside Canada or to any product which has been improperly installed, subjected to usage for which the product was not designed, misused or abused, damaged during shipping, or which has been altered or repaired in any way that affects the reliability or detracts from the performance, nor does it cover any product which is used commercially. Dry cell batteries are also excluded from coverage under this warranty. Rechargeable batteries are warranted for ninety (90) days from date of original purchase.This warranty is extended to the original end user purchaser only. A purchase receipt or other proof of date of original purchase is required before warranty service is performed.
THIS EXPRESS, LIMITED WARRANTY IS IN LIEU OF ALL OTHER WARRANTIES, EXPRESS OR IMPLIED, EXCLUDING ANY IMPLIED WARRANTIES OF MERCHANTABILITY OR FITNESS FOR A PARTICULAR PURPOSE.IN NO EVENT WILL PANASONIC CANADA INC. BE LIABLE FOR ANY SPECIAL, INDIRECT OR CONSEQUENTIAL DAMAGES.
In certain instances, some jurisdictions do not allow the exclusion or limitation of incidental or consequential damages, or the exclusion of implied warranties, so the above limitations and exclusions may not be applicable.
WARRANTY SERVICE
For product operation and information assistance,
please contact your Dealer or our Customer Care Centre at:Telephone #: (905) 624-5505 Fax #: (905) 238-2360 Web: www.panasonic.ca
For product repairs,
please contact one of the following:• Your Dealer who will inform you of an authorized Servicentre nearest you.• Our Customer Care Centre at (905) 624-5505 or www.panasonic.ca• A Panasonic Factory Servicentre listed below:
Richmond, British Columbia Calgary, AlbertaPanasonic Canada Inc. Panasonic Canada Inc.12111 Riverside Way 6835-8
th
St. N. E.Richmond, BC V6W 1K8 Calgary, AB T2E 7H7Tel: (604) 278-4211 Tel: (403) 295-3955Fax: (604) 278-5627 Fax: (403) 274-5493
Mississauga, Ontario Lachine, QuébecPanasonic Canada Inc. Panasonic Canada Inc.5770 Ambler Dr. 3075, rue Louis A. AmosMississauga, ON L4W 2T3 Lachine, QC H8T 1C4Tel: (905) 624-8447 Tel: (514) 633-8684Fax: (905) 238-2418 Fax: (514) 633-8020
IF YOU SHIP THE PRODUCT TO A SERVICENTRE
Carefully pack and send prepaid, adequately insured and preferably in the original carton. Include details of the defect claimed, and proof of date of original purchase.
X13775ZA_5.fm 51 ページ 2003年10月2日 木曜日 午後1時32分

Panasonic Canada Inc.
5770 Ambler Drive, Mississauga, Ontario L4W 2T3
PQQX13775ZA
F0503-0 D
BackCover.fm 52 ページ 2003年10月2日 木曜日 午後1時32分