panel rear wing mbotstatic.education.makeblock.com/panel-rear-wing-mbot.pdf · panel rear wing mbot...
TRANSCRIPT

Panel Rear Wing mBot
When turning on the mbot, the LED dot-matrix screen displays a smiling face, and then displays the distance from an obstacle when the ultrasonic sensor has detected the obstacle.
Point of knowledge learned:Principle and Application of LED Dot-matrix Screen.
Learn more:Me LED Matrix: https://www.makeblock.com/project/me-led-matrix-8x16
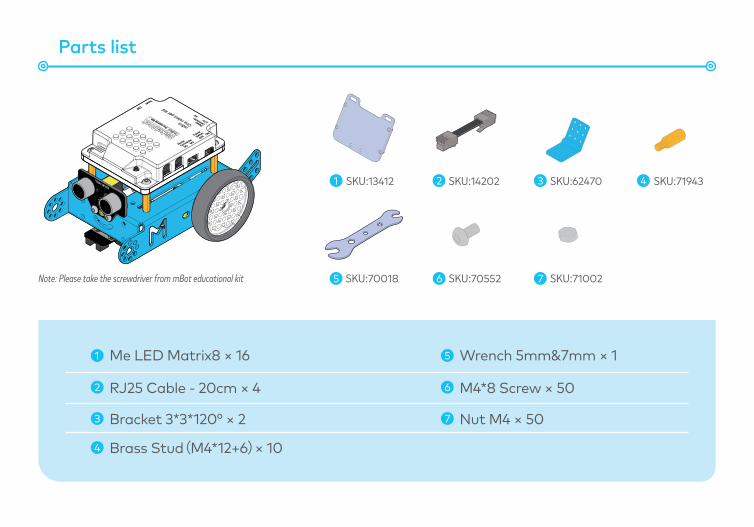
Parts list
Wrench 5mm&7mm × 1
M4*8 Screw × 50
Nut M4 × 50
Me LED Matrix8 × 16
RJ25 Cable - 20cm × 4
Bracket 3*3*120° × 2
Brass Stud(M4*12+6)× 10
1
2
3
4
5
6
7
1 SKU:13412
5 SKU:70018 6 SKU:70552 7 SKU:71002
2 SKU:14202 3 SKU:62470 4 SKU:71943
Note: Please take the screwdriver from mBot educational kit

Construction Steps
Remove the mBot main control board with a screwdriver first.
Screw two brass studs into the rear threaded holes of mBot.
Step 1 Step 2
Note: Adult supervision is required when the screwdriver is used

Construction Steps
Take out the LED dot-matrix screen and 120° bracket to fasten the dot-matrix screen and bracket together
Step 3Fix the fastened dot-matrix screen on the previous brass stud.
Step 4

Construction Steps
Install the main control board back and screw the screws.Step 5

Wiring diagram
LED dot-matrix screen 8*16
Ultrasonic sensor
Line sensor

Project program

LED Lamp Smart mBot Panel Rear Wing mBot Temperature and Humidity Detector mBot
Voice-controlled mBot Mini-gripper mBot Smart Night Lamp mBot
Makeblock Co., LtdPhone: +86 (0)755-26392228
Address: 3rd Floor, Building C3, Nanshan iPark, No.1001 Xueyuan Avenue,Nanshan District, Shenzhen, Guangdong Province, China