panera bread/saint louis bread llc celebration 3 - … pastry.pdfpanera bread/saint louis bread llc...
TRANSCRIPT
Panera Bread/Saint Louis Bread LLC Celebration 3 - 2014
BAKERY MANUAL TABLE OF CONTENTS - Book 2
(Some products may not be available at all locations)
Section One – Sweet Doughs
1. Bear Claw 2. Cinnamon Roll
3. Pecan Roll 4. Pastry Ring
Section Two – Artisan Pastry Dough and Butter Croissant
1. Cheese Pastry 2. Cherry Pastry 3. Chocolate Pastry 4. Pecan Braid Pastry 5. Fresh Fruit Pastry
6. Four Cheese Egg Soufflé 7. Spinach & Artichoke Egg Soufflé 8. Spinach & Bacon Egg Soufflé 9. Sausage & Gouda Egg Soufflé 10. Roasted Tomato & Feta Egg Soufflé 11. Butter Croissant
Section Three – Muffins/Brownies/Cupcakes
1. Wild Blueberry Muffin 2. Apple Crunch Muffin 3. Peach Pecan Crunch Muffin 4. Chocolate Chip Muffie 5. Cranberry Orange Muffin 6. Pumpkin Muffie 7. Pumpkin Muffin 8. Strawberry Rhubarb Mini Cake
9. White Chocolate Raspberry Mini Cake 10. Carrot Cake With Walnuts 11. Cornbread Muffie 12. Double Fudge Brownie 13. Chocolate Cupcake 14. Vanilla Cupcake 15. Red Velvet Cupcake
Section Four – Cookies and Scones
1. Petite Cookies (Chipper, Duet, Oatmeal) 2. Petite Cookies (Shortbread) 3. Chocolate Chipper 4. Oatmeal Raisin 5. Shortbread Cookie 6. Candy Cookie 7. Chocolate Duet with Walnuts 8. Toffee Nut Chip 9. Peanut Butter Cookie
10. Mint Crinkle 11. Red Velvet Cookie 12. Easter Egg Cookie 13. Flower Cookie 14. Mother’s Day Cookie 15. Sun Cookie 16. Pumpkin / Jack-O-Lantern 17. Christmas Tree Cookie 18. Heartbeat Valentine Cookie
Proof
Panera Bread/Saint Louis Bread LLC Celebration 3 - 2014
Section Four (Continued) – Cookies and Scones
19. Crosshatch Valentine Cookie 20. Plaid Valentine Cookie 21. Baseball Cookie 22. Flip Flop Cookie 23. White Chocolate Macadamia Nut Cookie 24. Cinnamon Crunch Scone 25. Orange Scone 26. Wild Blueberry Scone
27. Strawberries & Cream Scone 28. Strawberries & Cream Mini Scone 29. Orange Mini Scone 30. Wild Blueberry Mini Scone 31. Dry Jack Cheese Biscuit 32. Triple Berry Scone 33. Triple Berry Mini Scone
Section Five – Reference
1. Sweets – Spec Modifications for Move the Bake
2. Cleaning Schedule / Cookie Size Chart 3. Cheese & Cherry / Choc Pastry size chart
4. Pan Up Charts / Baker Scoops 5. Pastry Bag Handling Procedure 6. Panera Egg Wash
Section Six – Quality Control Guides
1. Fresh Fruit Pastry 2. Egg Soufflé 3. Butter Croissant 4. Peach Pecan Crunch Muffin
5. Strawberry Rhubarb Mini Cake 6. Cupcakes 7. Pumpkin & Jack-O-Lantern Cookie 8. Christmas Tree Cookie
Look for the Panera Issued Color Chart set separately
1. Baguettes (Top/Bottom) 2. Sourdough/Pecan Braid 3. Bagels/Whole Grain Miche 4. Ciabatta/Asiago Bread 5. Soft Dough Rolls (Top/Bottom) 6. Holiday Bread (Top/Bottom) 7. Focaccia / Asiago Focaccia 8. New England Roll (Top/Bottom)
9. Egg Souffle (Top/Bottom) 10. Babka “Chocolate Varieties” (Top/Side) 11. Cinnamon Raisin Swirl Bread (Side/Bottom) 12. Cobblestone (Top/Side) 13. Cinnamon Roll (Top/Bottom) 14. Artisan Pastries (Top/Bottom) 15. Cookies (Top/Bottom) 16. Iced Cookies (Top/Bottom) 17. Flatbread (Docking/Bottom)
Look for the Panera Issued Size Templates set separately 1. Ciabatta (proof/bake sizes) 2. Bagel (pan up/proof/bake sizes) 3. Soft Roll (pan up/proof/bake sizes) 4. Pecan Braid (pan up/proof/bake sizes)
5. Bear Claw (pan up/proof/bake sizes) 6. Cinnamon Roll (proof/bake sizes) 7. Flatbread (pressed/raw/baked sizes) 8. Baguette Docking
Proof

Sweet Dough
Proof

Proof
Proof
Bear Claw 01.28.2013
96 CASE 4.0 oz (+/- .25 oz)FREEZER 4.5 oz (+/- .25 oz)60 DAYS 5.5" x 2.5" x 1.0" (+/- .25")1 DAY 7.5" x 4.5" x 1.0" (+/- .25")
PAN UP UTENSILS NEEDEDPan: Sheet PanAmount: 10Prep: Pan Liner
PAN UP PREPPull Bear Claws from freezer and place up to 10 (2x5) on a lined sheet pan (Fig. 1)Allow approximately 20 minutes to thaw under a covered rackUse a bench scraper to cut the unfilled portion of the Bear Claw Make 6 evenly spaced cuts that produce 7 "toes" (Fig. 2)Note: The cuts should not be too deep, to the point where the filling is showingGently curve each Bear Claw to separate all 7 toes individually (Fig. 3)Note: Use the Bear Claw Size Template to check for proper size and shape Fig. 2Place on a covered rack in the cooler with the rest of the pan up
PRE PROOF PREP - N/A
PROOFThe next day, pull out of cooler and floor proof for 45 minutes under a covered rackRemove the rack cover and proof in the proof box for 10 - 15 minutesRemove from the proof box, cover and continue to floor proof for 10 - 15 minutesNote: Use the Bear Claw Size Template to check for proper proof size and shape Fig. 3
PROOF SPECS - N/A
PRE BAKE PREP Lightly and evenly egg wash the entire product (Fig. 4) Using 1 Orchid (#40) scoop, measure 0.3 oz of almonds and evenly distribute over the crownportion of each Bear Claw (Fig. 5)Note: The "toes" should not be topped with almonds
BAKETemp: 340°
Vent: ClosedSteam: N/ATime: 11 - 15 minutesNote: Bake times may vary at each bakery-cafe
FINISH Fig. 5Allow to cool for 8 - 10 minutesStripe with white icing in the same direction as the toes are facing (Fig. 6)Refer to the back side of this page for ideal product appearance
QUALITY CHARACTERISTICSMade from Danish dough (without the cinnamon sugar) filled with almond paste, topped with slicealmonds and topped with All-Natural white icing.
Fig. 6
QUALITY ASSURANCE1. Do not use pan spray on the pan liner2. When cutting the toes, be careful not to cut too deep and expose the filling.3. Do not shape product when frozen - it will break when trying to bend. ESTIMATED HANDS-ON TIME4. Do not shape product when left on floor too long. Place product in the cooler until it cools, then shape.
BEAR CLAWRAW WEIGHT NO TOPPINGBAKED WEIGHT WITH TOPPING
PRODUCT SPECIFICATION AND INFORMATION SHEETPACKAGESTORAGE
DIMENSIONS RAWDIMENSIONS BAKED (LxWxH)
SHELF LIFE FROZENSHELF LIFE THAWED
Fig. 1
5 minutes for 10 Bear Claws
Fig. 4Proof
Proof
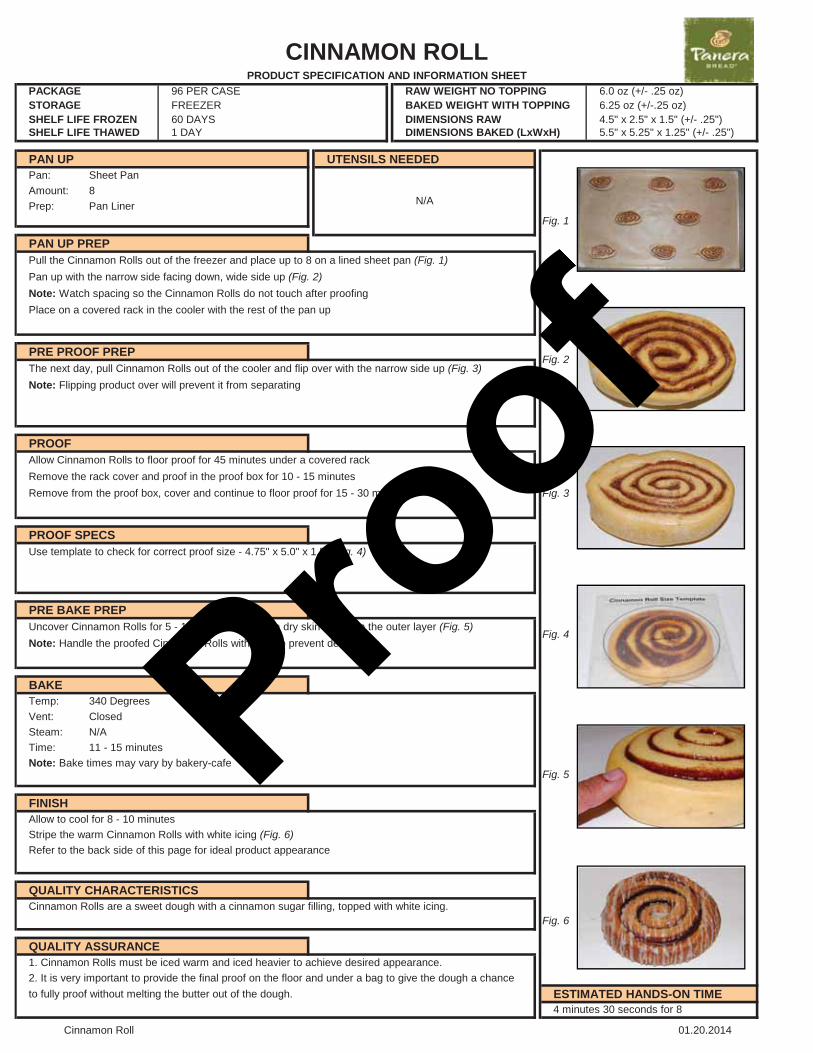
96 PER CASE 6.0 oz (+/- .25 oz)FREEZER 6.25 oz (+/-.25 oz)60 DAYS 4.5" x 2.5" x 1.5" (+/- .25")1 DAY 5.5" x 5.25" x 1.25" (+/- .25")
PAN UP UTENSILS NEEDEDPan: Sheet Pan Amount: 8Prep: Pan Liner
PAN UP PREPPull the Cinnamon Rolls out of the freezer and place up to 8 on a lined sheet pan (Fig. 1)Pan up with the narrow side facing down, wide side up (Fig. 2)Note: Watch spacing so the Cinnamon Rolls do not touch after proofingPlace on a covered rack in the cooler with the rest of the pan up
PRE PROOF PREP The next day, pull Cinnamon Rolls out of the cooler and flip over with the narrow side up (Fig. 3)Note: Flipping product over will prevent it from separating
PROOFAllow Cinnamon Rolls to floor proof for 45 minutes under a covered rack Remove the rack cover and proof in the proof box for 10 - 15 minutesRemove from the proof box, cover and continue to floor proof for 15 - 30 minutes Fig. 3
PROOF SPECS Use template to check for correct proof size - 4.75" x 5.0" x 1.5" (Fig. 4)
PRE BAKE PREP Uncover Cinnamon Rolls for 5 - 10 minutes, or until a dry skin forms on the outer layer (Fig. 5)Note: Handle the proofed Cinnamon Rolls with care to prevent de-gassing
BAKETemp: 340 DegreesVent: ClosedSteam: N/ATime: 11 - 15 minutesNote: Bake times may vary by bakery-cafe
FINISHAllow to cool for 8 - 10 minutesStripe the warm Cinnamon Rolls with white icing (Fig. 6)Refer to the back side of this page for ideal product appearance
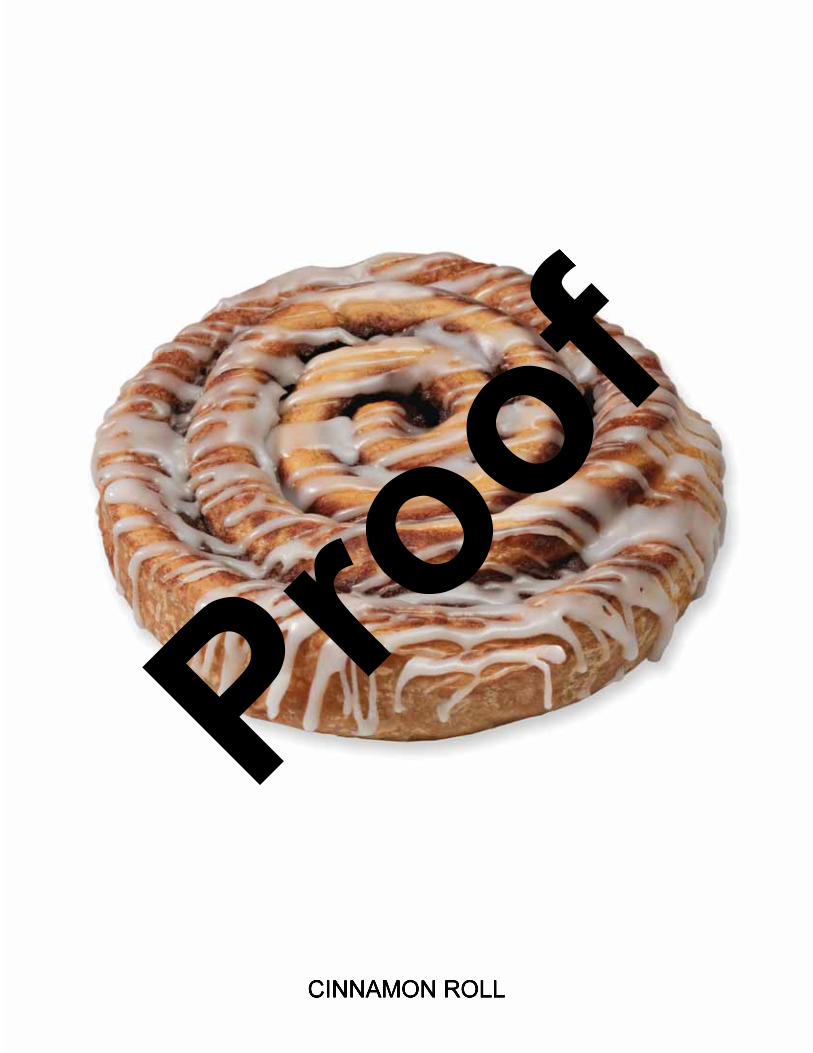
QUALITY CHARACTERISTICSCinnamon Rolls are a sweet dough with a cinnamon sugar filling, topped with white icing.
Fig. 6
QUALITY ASSURANCE1. Cinnamon Rolls must be iced warm and iced heavier to achieve desired appearance.2. It is very important to provide the final proof on the floor and under a bag to give the dough a chanceto fully proof without melting the butter out of the dough. ESTIMATED HANDS-ON TIME
4 minutes 30 seconds for 8
N/A
Fig. 4
DIMENSIONS RAWDIMENSIONS BAKED (LxWxH)
SHELF LIFE FROZENSHELF LIFE THAWED
Fig. 1
Fig. 2
Fig. 5
CINNAMON ROLLRAW WEIGHT NO TOPPINGBAKED WEIGHT WITH TOPPING
PRODUCT SPECIFICATION AND INFORMATION SHEETPACKAGESTORAGE
Cinnamon Roll 01.20.2014
Proof
Proof
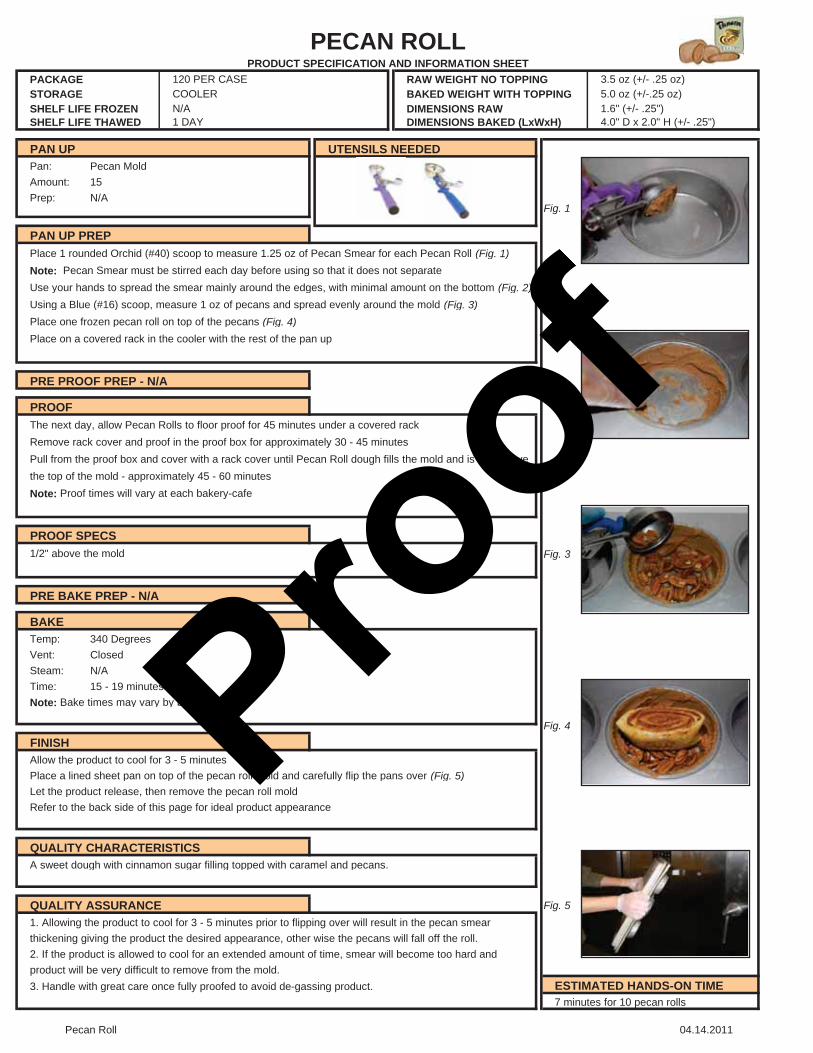
120 PER CASE 3.5 oz (+/- .25 oz)COOLER 5.0 oz (+/-.25 oz)N/A 1.6" (+/- .25")1 DAY 4.0" D x 2.0" H (+/- .25")
PAN UP UTENSILS NEEDEDPan: Pecan MoldAmount: 15Prep: N/A
PAN UP PREPPlace 1 rounded Orchid (#40) scoop to measure 1.25 oz of Pecan Smear for each Pecan Roll (Fig. 1)Note: Pecan Smear must be stirred each day before using so that it does not separateUse your hands to spread the smear mainly around the edges, with minimal amount on the bottom (Fig. 2)Using a Blue (#16) scoop, measure 1 oz of pecans and spread evenly around the mold (Fig. 3)Place one frozen pecan roll on top of the pecans (Fig. 4)Place on a covered rack in the cooler with the rest of the pan up
PRE PROOF PREP - N/A
PROOFThe next day, allow Pecan Rolls to floor proof for 45 minutes under a covered rackRemove rack cover and proof in the proof box for approximately 30 - 45 minutesPull from the proof box and cover with a rack cover until Pecan Roll dough fills the mold and is 1/2" abovethe top of the mold - approximately 45 - 60 minutesNote: Proof times will vary at each bakery-cafe
PROOF SPECS 1/2" above the mold Fig. 3
PRE BAKE PREP - N/A
BAKETemp: 340 DegreesVent: ClosedSteam: N/ATime: 15 - 19 minutesNote: Bake times may vary by bakery-cafe
FINISHAllow the product to cool for 3 - 5 minutesPlace a lined sheet pan on top of the pecan roll mold and carefully flip the pans over (Fig. 5)Let the product release, then remove the pecan roll moldRefer to the back side of this page for ideal product appearance
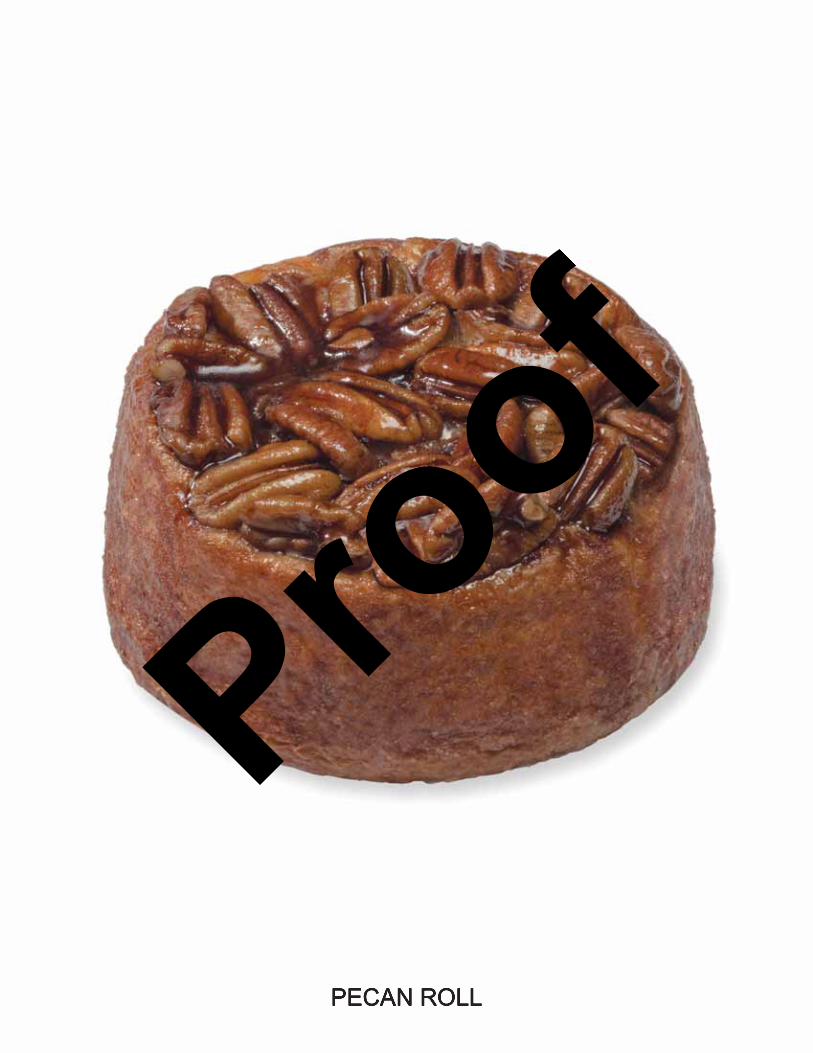
QUALITY CHARACTERISTICSA sweet dough with cinnamon sugar filling topped with caramel and pecans.
QUALITY ASSURANCE Fig. 51. Allowing the product to cool for 3 - 5 minutes prior to flipping over will result in the pecan smear thickening giving the product the desired appearance, other wise the pecans will fall off the roll.2. If the product is allowed to cool for an extended amount of time, smear will become too hard and product will be very difficult to remove from the mold.3. Handle with great care once fully proofed to avoid de-gassing product. ESTIMATED HANDS-ON TIME
Fig. 1
Fig. 4
Fig. 2
7 minutes for 10 pecan rolls
DIMENSIONS RAWDIMENSIONS BAKED (LxWxH)
SHELF LIFE FROZENSHELF LIFE THAWED
PECAN ROLLRAW WEIGHT NO TOPPINGBAKED WEIGHT WITH TOPPING
PRODUCT SPECIFICATION AND INFORMATION SHEETPACKAGESTORAGE
Pecan Roll 04.14.2011
Proof
Proof
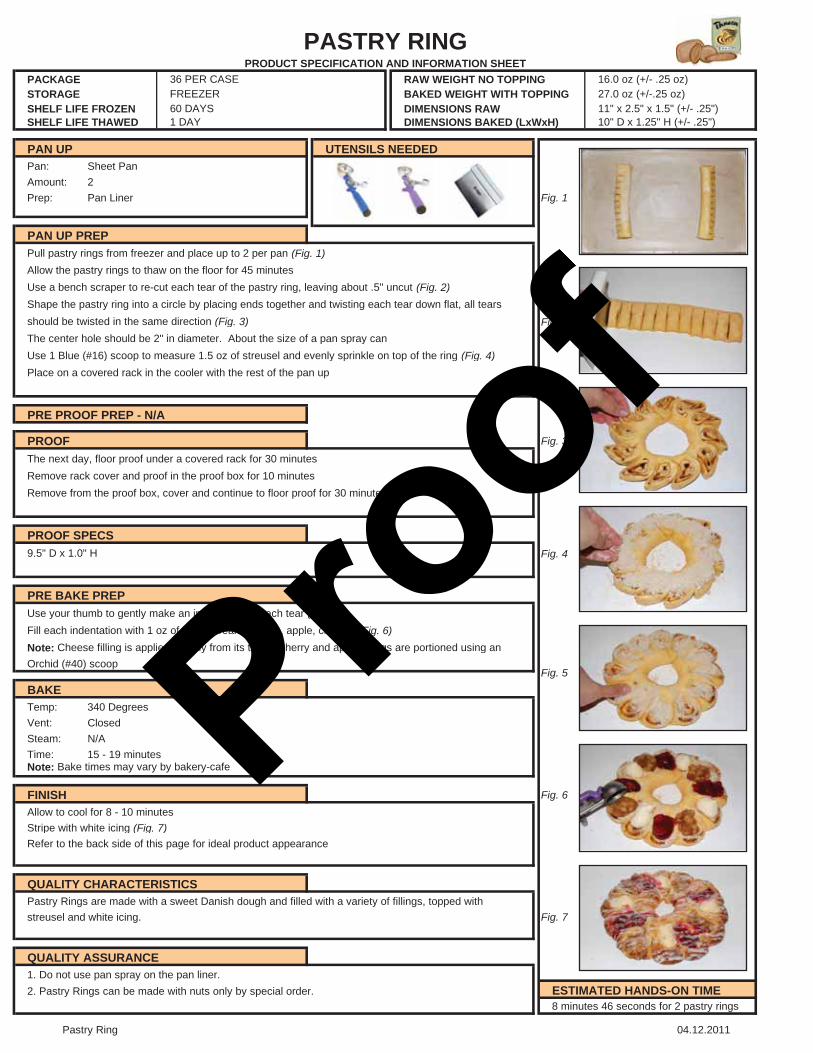
36 PER CASE 16.0 oz (+/- .25 oz)FREEZER 27.0 oz (+/-.25 oz)60 DAYS 11" x 2.5" x 1.5" (+/- .25")1 DAY 10" D x 1.25" H (+/- .25")
PAN UP UTENSILS NEEDEDPan: Sheet PanAmount: 2Prep: Pan Liner Fig. 1
PAN UP PREPPull pastry rings from freezer and place up to 2 per pan (Fig. 1)Allow the pastry rings to thaw on the floor for 45 minutesUse a bench scraper to re-cut each tear of the pastry ring, leaving about .5" uncut (Fig. 2)Shape the pastry ring into a circle by placing ends together and twisting each tear down flat, all tearsshould be twisted in the same direction (Fig. 3) Fig. 2The center hole should be 2" in diameter. About the size of a pan spray canUse 1 Blue (#16) scoop to measure 1.5 oz of streusel and evenly sprinkle on top of the ring (Fig. 4)Place on a covered rack in the cooler with the rest of the pan up
PRE PROOF PREP - N/A
PROOF Fig. 3
The next day, floor proof under a covered rack for 30 minutes Remove rack cover and proof in the proof box for 10 minutesRemove from the proof box, cover and continue to floor proof for 30 minutes
PROOF SPECS 9.5" D x 1.0" H Fig. 4
PRE BAKE PREP Use your thumb to gently make an indentation in each tear (Fig. 5)Fill each indentation with 1 oz of filling (cream cheese, apple, cherry) (Fig. 6)Note: Cheese filling is applied directly from its tube. Cherry and apple fillings are portioned using anOrchid (#40) scoop
BAKETemp: 340 DegreesVent: ClosedSteam: N/ATime: 15 - 19 minutesNote: Bake times may vary by bakery-cafe
FINISH Fig. 6Allow to cool for 8 - 10 minutesStripe with white icing (Fig. 7)Refer to the back side of this page for ideal product appearance
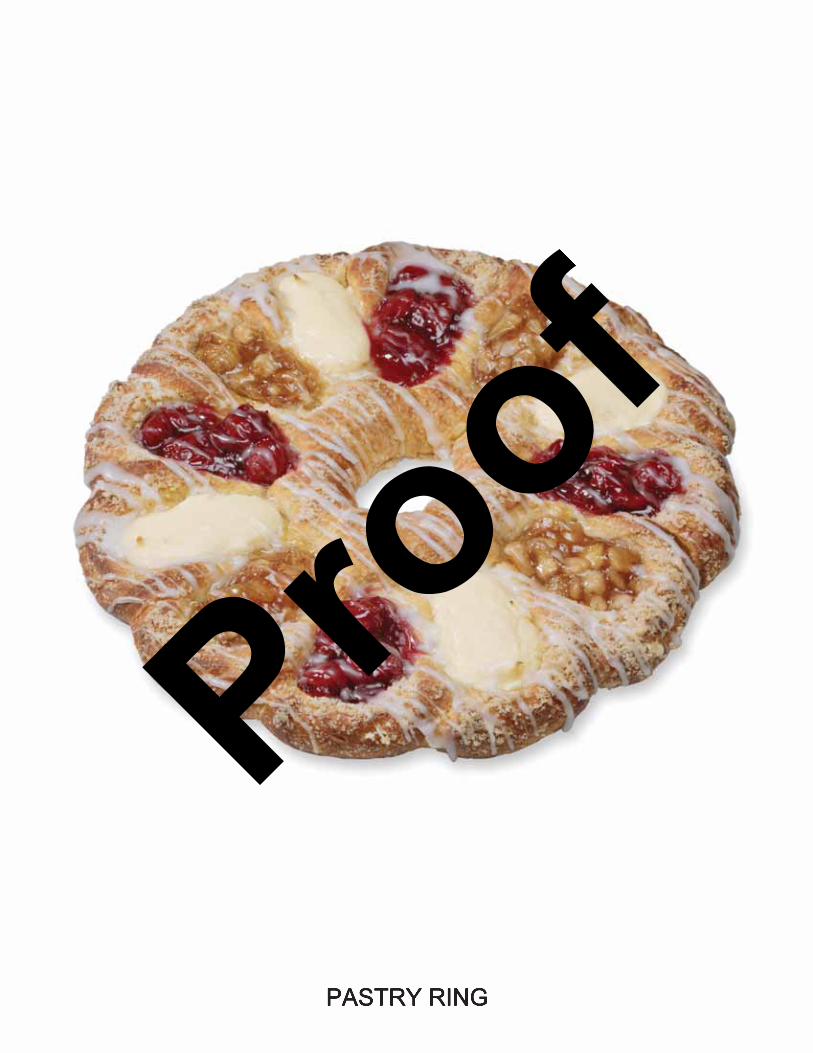
QUALITY CHARACTERISTICSPastry Rings are made with a sweet Danish dough and filled with a variety of fillings, topped with streusel and white icing. Fig. 7
QUALITY ASSURANCE1. Do not use pan spray on the pan liner.2. Pastry Rings can be made with nuts only by special order. ESTIMATED HANDS-ON TIME
PASTRY RINGRAW WEIGHT NO TOPPINGBAKED WEIGHT WITH TOPPING
PRODUCT SPECIFICATION AND INFORMATION SHEETPACKAGESTORAGE
DIMENSIONS RAWDIMENSIONS BAKED (LxWxH)
SHELF LIFE FROZENSHELF LIFE THAWED
Fig. 5
8 minutes 46 seconds for 2 pastry rings
Pastry Ring 04.12.2011
Proof

Artisan Pastry Dough and
Butter Croissant
Proof

Proof
Proof
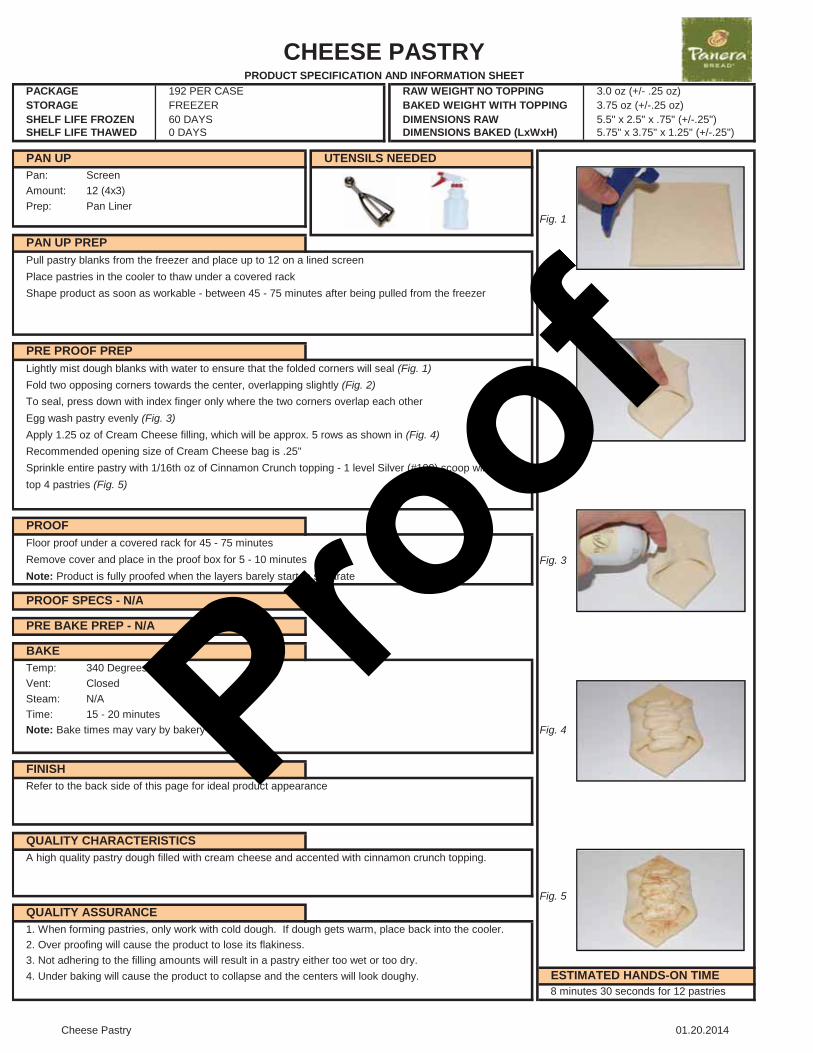
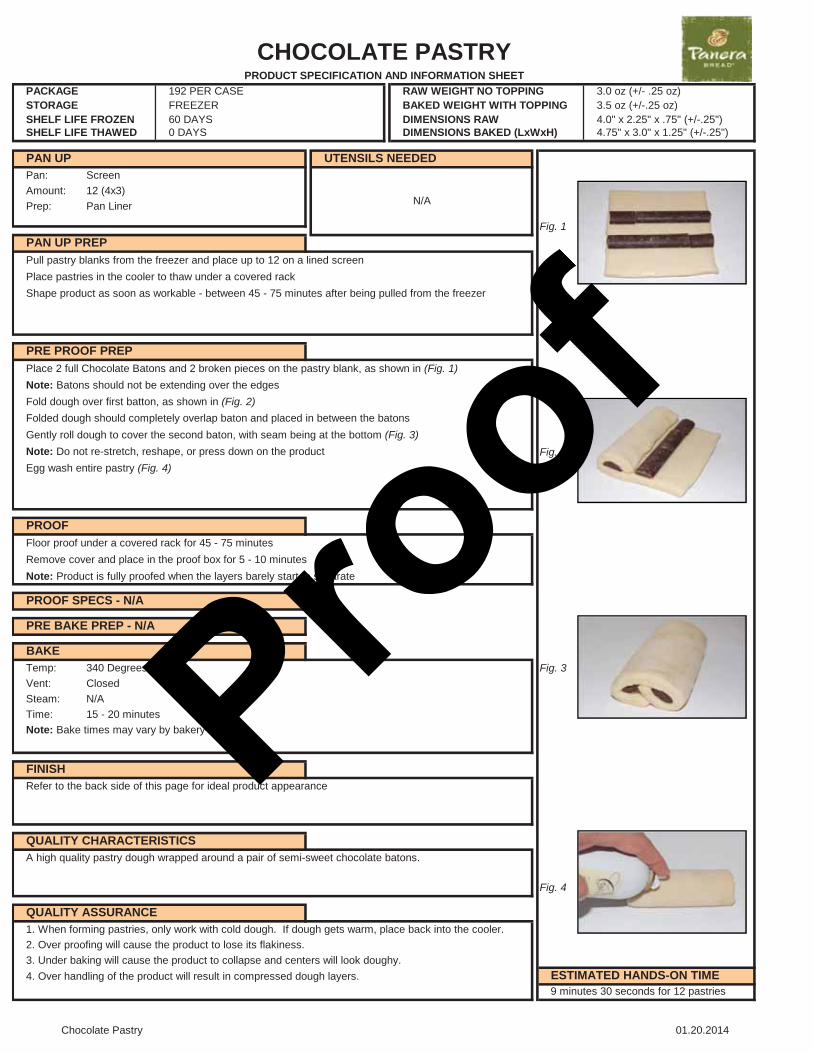
192 PER CASE 3.0 oz (+/- .25 oz)FREEZER 3.75 oz (+/-.25 oz)60 DAYS 5.5" x 2.5" x .75" (+/-.25")0 DAYS 5.75" x 3.75" x 1.25" (+/-.25")
PAN UP UTENSILS NEEDEDPan: ScreenAmount: 12 (4x3)Prep: Pan Liner
PAN UP PREPPull pastry blanks from the freezer and place up to 12 on a lined screenPlace pastries in the cooler to thaw under a covered rackShape product as soon as workable - between 45 - 75 minutes after being pulled from the freezer
PRE PROOF PREP Lightly mist dough blanks with water to ensure that the folded corners will seal (Fig. 1)Fold two opposing corners towards the center, overlapping slightly (Fig. 2) Fig. 2To seal, press down with index finger only where the two corners overlap each otherEgg wash pastry evenly (Fig. 3)Apply 1.25 oz of Cream Cheese filling, which will be approx. 5 rows as shown in (Fig. 4)Recommended opening size of Cream Cheese bag is .25"Sprinkle entire pastry with 1/16th oz of Cinnamon Crunch topping - 1 level Silver (#100) scoop will top 4 pastries (Fig. 5)
PROOFFloor proof under a covered rack for 45 - 75 minutesRemove cover and place in the proof box for 5 - 10 minutes Fig. 3Note: Product is fully proofed when the layers barely start to separate
PROOF SPECS - N/A
PRE BAKE PREP - N/A
BAKETemp: 340 DegreesVent: ClosedSteam: N/ATime: 15 - 20 minutesNote: Bake times may vary by bakery-cafe
FINISHRefer to the back side of this page for ideal product appearance
QUALITY CHARACTERISTICSA high quality pastry dough filled with cream cheese and accented with cinnamon crunch topping.
QUALITY ASSURANCE1. When forming pastries, only work with cold dough. If dough gets warm, place back into the cooler.2. Over proofing will cause the product to lose its flakiness.3. Not adhering to the filling amounts will result in a pastry either too wet or too dry.4. Under baking will cause the product to collapse and the centers will look doughy. ESTIMATED HANDS-ON TIME
8 minutes 30 seconds for 12 pastries
Fig. 5
DIMENSIONS RAWDIMENSIONS BAKED (LxWxH)
SHELF LIFE FROZENSHELF LIFE THAWED
Fig. 4
Fig. 1
CHEESE PASTRYRAW WEIGHT NO TOPPINGBAKED WEIGHT WITH TOPPING
PRODUCT SPECIFICATION AND INFORMATION SHEETPACKAGESTORAGE
Cheese Pastry 01.20.2014
Proof
Proof

192 PER CASE 3.0 oz (+/- .25 oz)FREEZER 4.5 oz (+/-.25 oz)60 DAYS 5.5" x 2.5" x .75" (+/-.25")0 DAYS 5.75" x 3.75" x 1.25" (+/-.25")
PAN UP UTENSILS NEEDEDPan: ScreenAmount: 12 (4x3)Prep: Pan Liner
PAN UP PREPPull pastry blanks from the freezer and place up to 12 on a lined screenPlace pastries in the cooler to thaw under a covered rackShape product as soon as workable - between 45 - 75 minutes after being pulled from the freezer Fig. 2
PRE PROOF PREP Lightly mist dough blanks with water to ensure that the folded corners will seal (Fig. 1)Fold two opposing corners towards the center, overlapping slightly and press down with index fingerwhere the two corners overlap each other (Fig. 2) Fig. 3Egg wash pastry evenly (Fig. 3)Squeeze .75 oz of Dawn Pastry Cream into an Orchid (#40) scoop (Fig. 4)Place 1 Orchid (#40) scoop of pastry cream in the center of the pastry (Fig. 5)Spread pastry cream approximately 3", lengthwise with spatula - pastry cream should be spread down the center of the pastry (Fig. 6)
PROOFFloor proof under a covered rack for 45 - 75 minutesRemove cover and place in the proof box for 5 - 10 minutes Note: Product is fully proofed when the layers barely start to separate
PROOF SPECS - N/A
PRE BAKE PREP - N/A
BAKETemp: 340 DegreesVent: ClosedSteam: N/ATime: 15 - 20 minutesNote: Bake times may vary by bakery-cafe
FINISHAllow to cool for 30 minutes Fig. 7Place 1.0 oz Cherry filling - 1 Orchid (#40) scoop in the center of the pastry (Fig. 7)Spread the filling over pastry cream, leaving a thin line of pastry cream visible around the edges (Fig. 8)Stripe with white icing, at an angle, as shown in (Fig. 9)Refer to the back side of this page for ideal product appearance
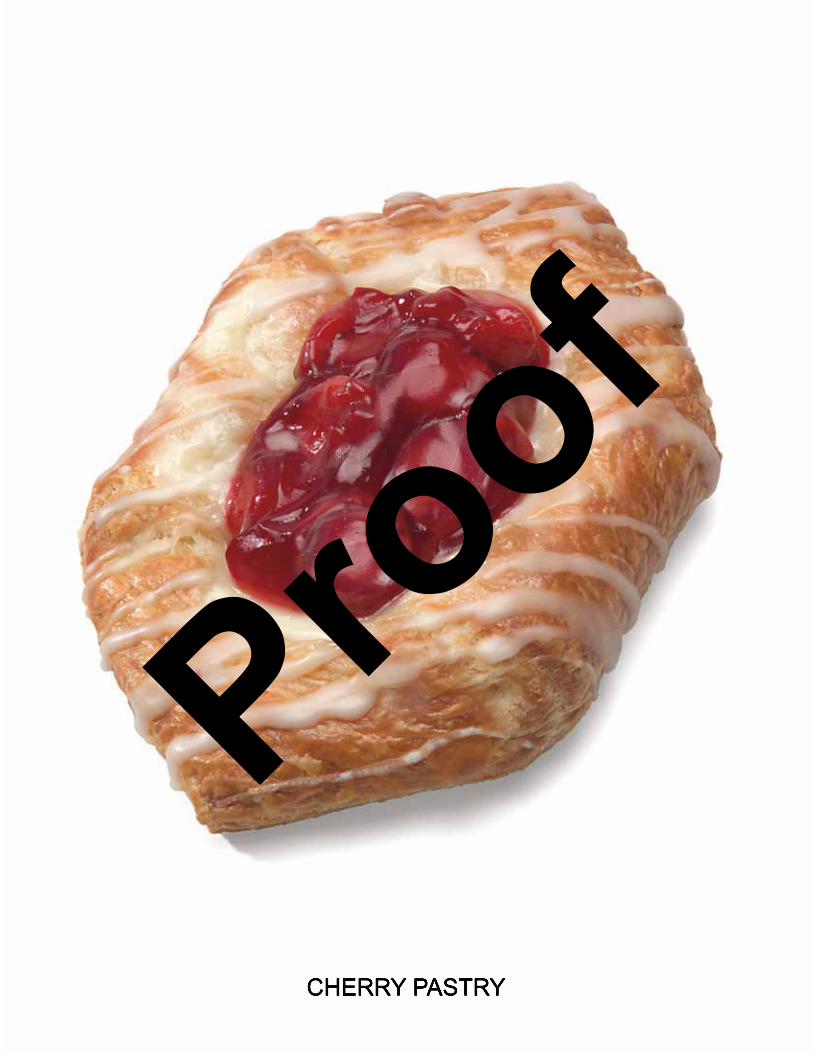
QUALITY CHARACTERISTICSA high quality pastry dough filled with a vanilla pastry cream and topped with a premium cherry topping, then striped with white icing.
QUALITY ASSURANCE1. Follow the Shelf Life Matrix for proper storage of Dawn Pastry Cream. Fig. 92. When forming pastries, only work with cold dough. If dough gets warm, place back into the cooler.3. Over proofing will cause the product to lose its flakiness.4. Not adhering to the filling amounts will result in a pastry either too wet or too dry. ESTIMATED HANDS-ON TIME5. Under baking will cause the product to collapse and the centers will look doughy.
Fig. 6
Fig. 8
CHERRY PASTRYRAW WEIGHT NO TOPPINGBAKED WEIGHT WITH TOPPING
PRODUCT SPECIFICATION AND INFORMATION SHEETPACKAGESTORAGE
DIMENSIONS RAWDIMENSIONS BAKED (LxWxH)
SHELF LIFE FROZENSHELF LIFE THAWED
Fig. 1
Fig. 4
10 minutes for 12 pastries
Fig. 5
Cherry Pastry 01.20.2014
Proof
Proof
192 PER CASE 3.0 oz (+/- .25 oz)FREEZER 3.5 oz (+/-.25 oz)60 DAYS 4.0" x 2.25" x .75" (+/-.25")0 DAYS 4.75" x 3.0" x 1.25" (+/-.25")
PAN UP UTENSILS NEEDEDPan: ScreenAmount: 12 (4x3)Prep: Pan Liner
PAN UP PREPPull pastry blanks from the freezer and place up to 12 on a lined screenPlace pastries in the cooler to thaw under a covered rackShape product as soon as workable - between 45 - 75 minutes after being pulled from the freezer
PRE PROOF PREP Place 2 full Chocolate Batons and 2 broken pieces on the pastry blank, as shown in (Fig. 1)Note: Batons should not be extending over the edgesFold dough over first batton, as shown in (Fig. 2) Folded dough should completely overlap baton and placed in between the batons Gently roll dough to cover the second baton, with seam being at the bottom (Fig. 3)Note: Do not re-stretch, reshape, or press down on the product Fig. 2Egg wash entire pastry (Fig. 4)
PROOFFloor proof under a covered rack for 45 - 75 minutesRemove cover and place in the proof box for 5 - 10 minutes Note: Product is fully proofed when the layers barely start to separate
PROOF SPECS - N/A
PRE BAKE PREP - N/A
BAKETemp: 340 Degrees Fig. 3Vent: ClosedSteam: N/ATime: 15 - 20 minutesNote: Bake times may vary by bakery-cafe
FINISHRefer to the back side of this page for ideal product appearance
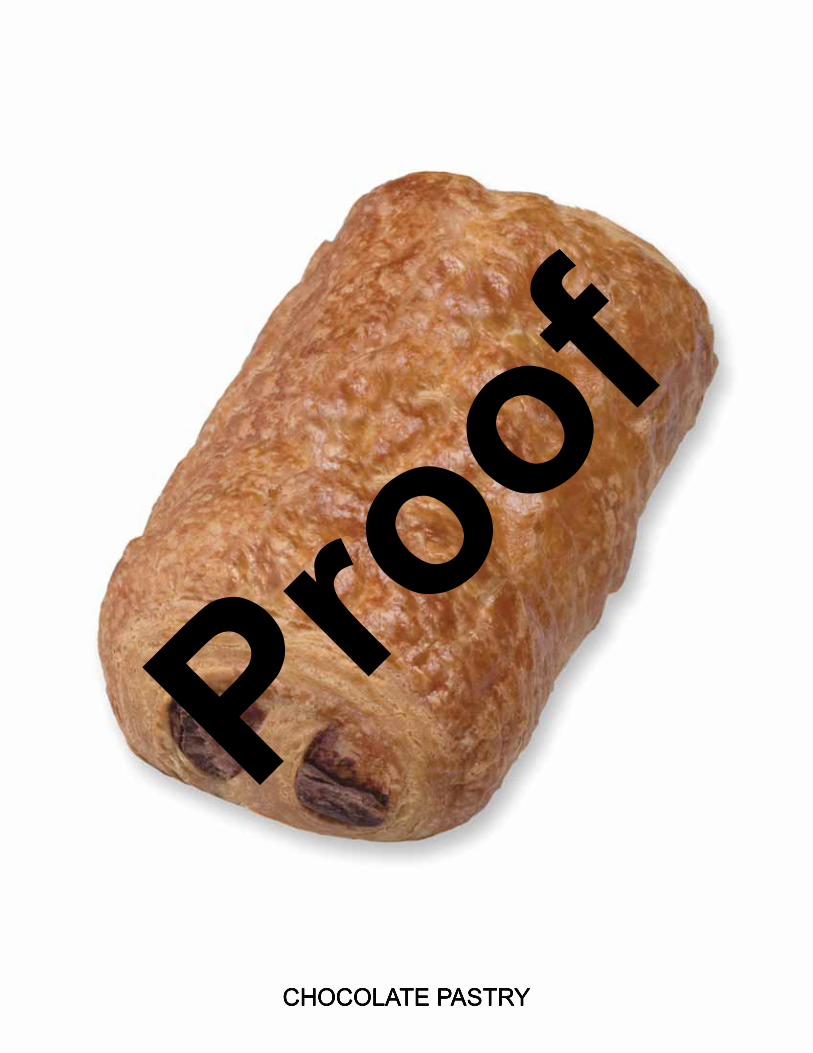
QUALITY CHARACTERISTICSA high quality pastry dough wrapped around a pair of semi-sweet chocolate batons.
Fig. 4
QUALITY ASSURANCE1. When forming pastries, only work with cold dough. If dough gets warm, place back into the cooler.2. Over proofing will cause the product to lose its flakiness.3. Under baking will cause the product to collapse and centers will look doughy.4. Over handling of the product will result in compressed dough layers. ESTIMATED HANDS-ON TIME
9 minutes 30 seconds for 12 pastries
N/A
Fig. 1
DIMENSIONS RAWDIMENSIONS BAKED (LxWxH)
SHELF LIFE FROZENSHELF LIFE THAWED
CHOCOLATE PASTRYRAW WEIGHT NO TOPPINGBAKED WEIGHT WITH TOPPING
PRODUCT SPECIFICATION AND INFORMATION SHEETPACKAGESTORAGE
Chocolate Pastry 01.20.2014
Proof
Proof
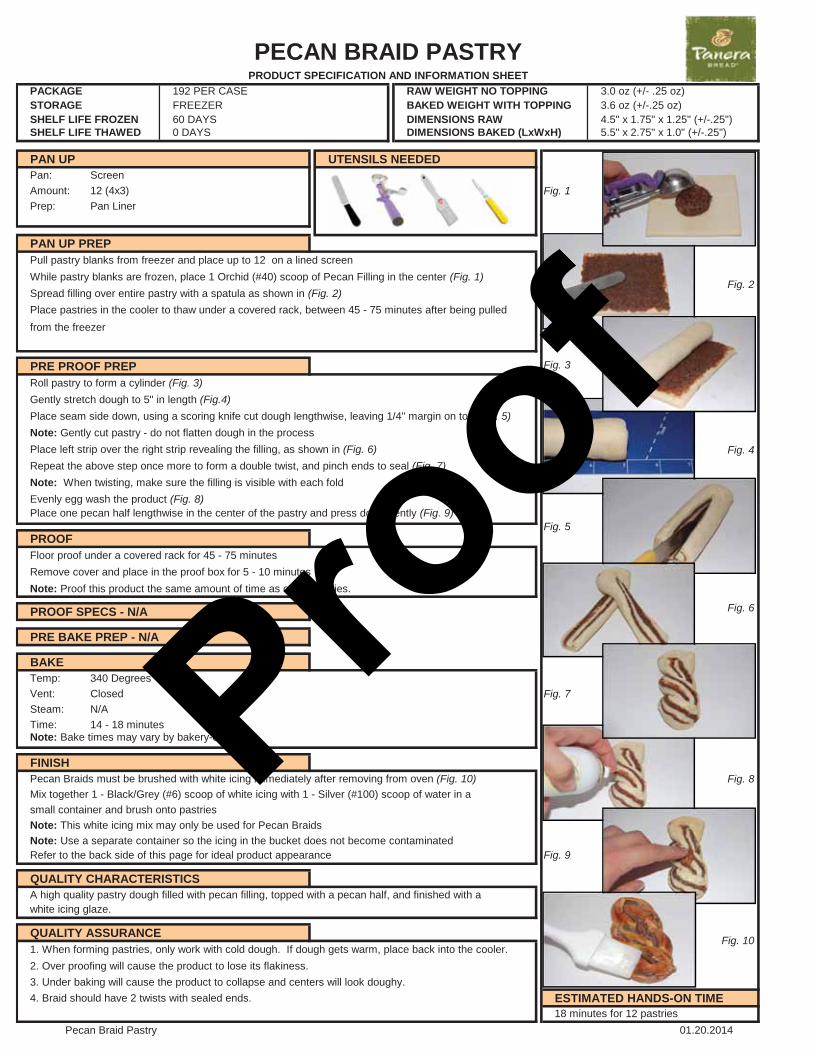
192 PER CASE 3.0 oz (+/- .25 oz)FREEZER 3.6 oz (+/-.25 oz)60 DAYS 4.5" x 1.75" x 1.25" (+/-.25")0 DAYS 5.5" x 2.75" x 1.0" (+/-.25")
PAN UP UTENSILS NEEDEDPan: ScreenAmount: 12 (4x3) Fig. 1Prep: Pan Liner
PAN UP PREPPull pastry blanks from freezer and place up to 12 on a lined screenWhile pastry blanks are frozen, place 1 Orchid (#40) scoop of Pecan Filling in the center (Fig. 1)Spread filling over entire pastry with a spatula as shown in (Fig. 2)Place pastries in the cooler to thaw under a covered rack, between 45 - 75 minutes after being pulledfrom the freezer
PRE PROOF PREP Roll pastry to form a cylinder (Fig. 3)Gently stretch dough to 5" in length (Fig.4)Place seam side down, using a scoring knife cut dough lengthwise, leaving 1/4" margin on top (Fig. 5)Note: Gently cut pastry - do not flatten dough in the processPlace left strip over the right strip revealing the filling, as shown in (Fig. 6) Fig. 4Repeat the above step once more to form a double twist, and pinch ends to seal (Fig. 7)Note: When twisting, make sure the filling is visible with each foldEvenly egg wash the product (Fig. 8)Place one pecan half lengthwise in the center of the pastry and press down gently (Fig. 9)
PROOFFloor proof under a covered rack for 45 - 75 minutesRemove cover and place in the proof box for 5 - 10 minutes Note: Proof this product the same amount of time as other pastries.
PROOF SPECS - N/A
PRE BAKE PREP - N/A
BAKETemp: 340 DegreesVent: Closed Fig. 7Steam: N/ATime: 14 - 18 minutesNote: Bake times may vary by bakery-cafe
FINISHPecan Braids must be brushed with white icing immediately after removing from oven (Fig. 10) Fig. 8Mix together 1 - Black/Grey (#6) scoop of white icing with 1 - Silver (#100) scoop of water in a small container and brush onto pastriesNote: This white icing mix may only be used for Pecan BraidsNote: Use a separate container so the icing in the bucket does not become contaminatedRefer to the back side of this page for ideal product appearance Fig. 9
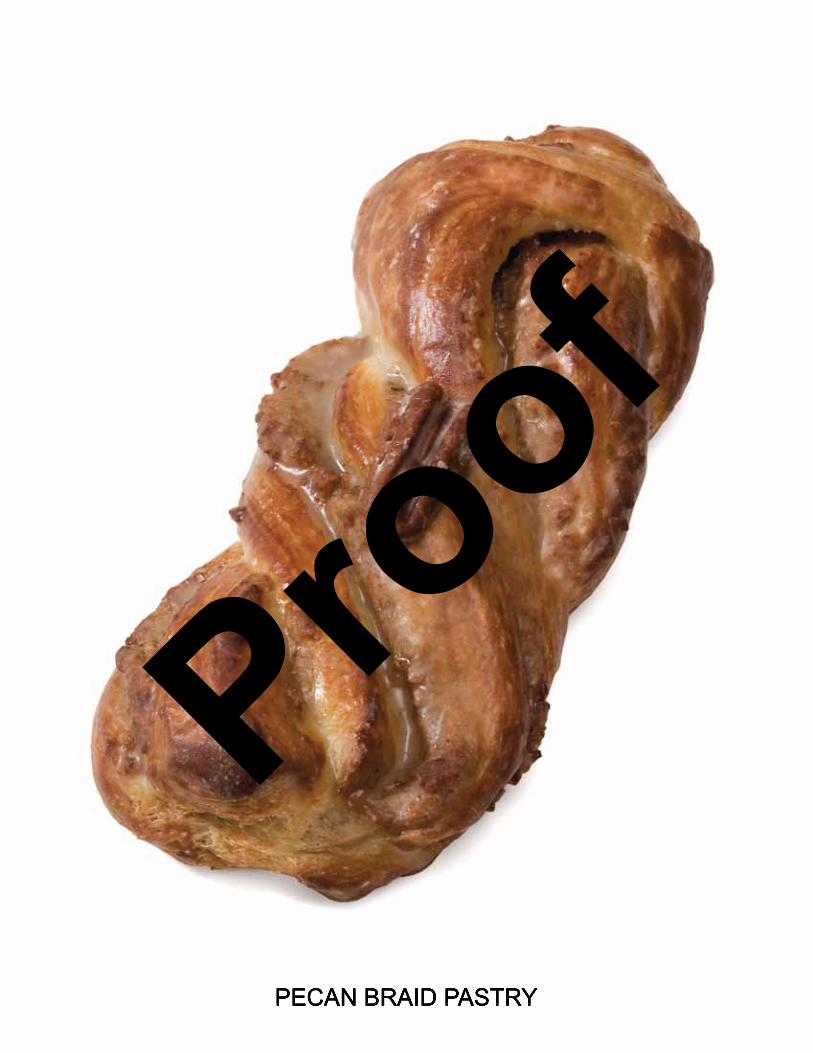
QUALITY CHARACTERISTICSA high quality pastry dough filled with pecan filling, topped with a pecan half, and finished with a white icing glaze.
QUALITY ASSURANCE1. When forming pastries, only work with cold dough. If dough gets warm, place back into the cooler.2. Over proofing will cause the product to lose its flakiness.3. Under baking will cause the product to collapse and centers will look doughy.4. Braid should have 2 twists with sealed ends. ESTIMATED HANDS-ON TIME
PECAN BRAID PASTRYRAW WEIGHT NO TOPPINGBAKED WEIGHT WITH TOPPING
PRODUCT SPECIFICATION AND INFORMATION SHEETPACKAGESTORAGE
DIMENSIONS RAWDIMENSIONS BAKED (LxWxH)
SHELF LIFE FROZENSHELF LIFE THAWED
Fig. 10
Fig. 3
18 minutes for 12 pastries
Fig. 6
Fig. 2
Fig. 5
Pecan Braid Pastry 01.20.2014
Proof
Proof
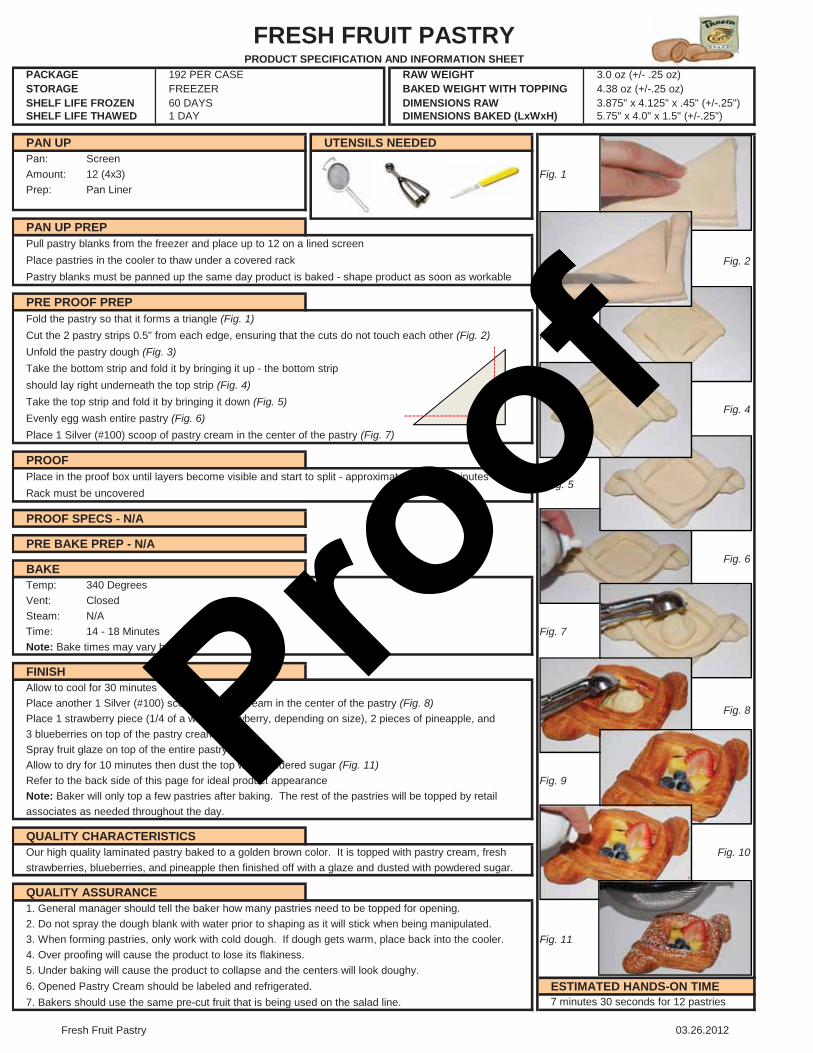
192 PER CASE 3.0 oz (+/- .25 oz)FREEZER 4.38 oz (+/-.25 oz)60 DAYS 3.875" x 4.125" x .45" (+/-.25")1 DAY 5.75" x 4.0" x 1.5" (+/-.25")
PAN UP UTENSILS NEEDEDPan: ScreenAmount: 12 (4x3) Fig. 1Prep: Pan Liner
PAN UP PREPPull pastry blanks from the freezer and place up to 12 on a lined screenPlace pastries in the cooler to thaw under a covered rack Fig. 2Pastry blanks must be panned up the same day product is baked - shape product as soon as workable
PRE PROOF PREP Fold the pastry so that it forms a triangle (Fig. 1)Cut the 2 pastry strips 0.5" from each edge, ensuring that the cuts do not touch each other (Fig. 2) Fig. 3Unfold the pastry dough (Fig. 3)Take the bottom strip and fold it by bringing it up - the bottom stripshould lay right underneath the top strip (Fig. 4)Take the top strip and fold it by bringing it down (Fig. 5)Evenly egg wash entire pastry (Fig. 6)Place 1 Silver (#100) scoop of pastry cream in the center of the pastry (Fig. 7)
PROOFPlace in the proof box until layers become visible and start to split - approximately 20 - 25 minutes Rack must be uncovered
PROOF SPECS - N/A
PRE BAKE PREP - N/A
BAKE Fig. 5Temp: 340 DegreesVent: ClosedSteam: N/ATime: 14 - 18 Minutes Fig. 7Note: Bake times may vary by cafe
FINISHAllow to cool for 30 minutesPlace another 1 Silver (#100) scoop of pastry cream in the center of the pastry (Fig. 8)Place 1 strawberry piece (1/4 of a whole strawberry, depending on size), 2 pieces of pineapple, and3 blueberries on top of the pastry cream (Fig. 9)Spray fruit glaze on top of the entire pastry (Fig. 10)Allow to dry for 10 minutes then dust the top with powdered sugar (Fig. 11)Refer to the back side of this page for ideal product appearance Fig. 9Note: Baker will only top a few pastries after baking. The rest of the pastries will be topped by retailassociates as needed throughout the day.
QUALITY CHARACTERISTICSOur high quality laminated pastry baked to a golden brown color. It is topped with pastry cream, fresh Fig. 10strawberries, blueberries, and pineapple then finished off with a glaze and dusted with powdered sugar.
QUALITY ASSURANCE1. General manager should tell the baker how many pastries need to be topped for opening.2. Do not spray the dough blank with water prior to shaping as it will stick when being manipulated.3. When forming pastries, only work with cold dough. If dough gets warm, place back into the cooler. Fig. 114. Over proofing will cause the product to lose its flakiness.5. Under baking will cause the product to collapse and the centers will look doughy. 6. Opened Pastry Cream should be labeled and refrigerated. ESTIMATED HANDS-ON TIME7. Bakers should use the same pre-cut fruit that is being used on the salad line.
Fig. 8
7 minutes 30 seconds for 12 pastries
Fig. 4
DIMENSIONS RAWDIMENSIONS BAKED (LxWxH)
SHELF LIFE FROZENSHELF LIFE THAWED
Fig. 6
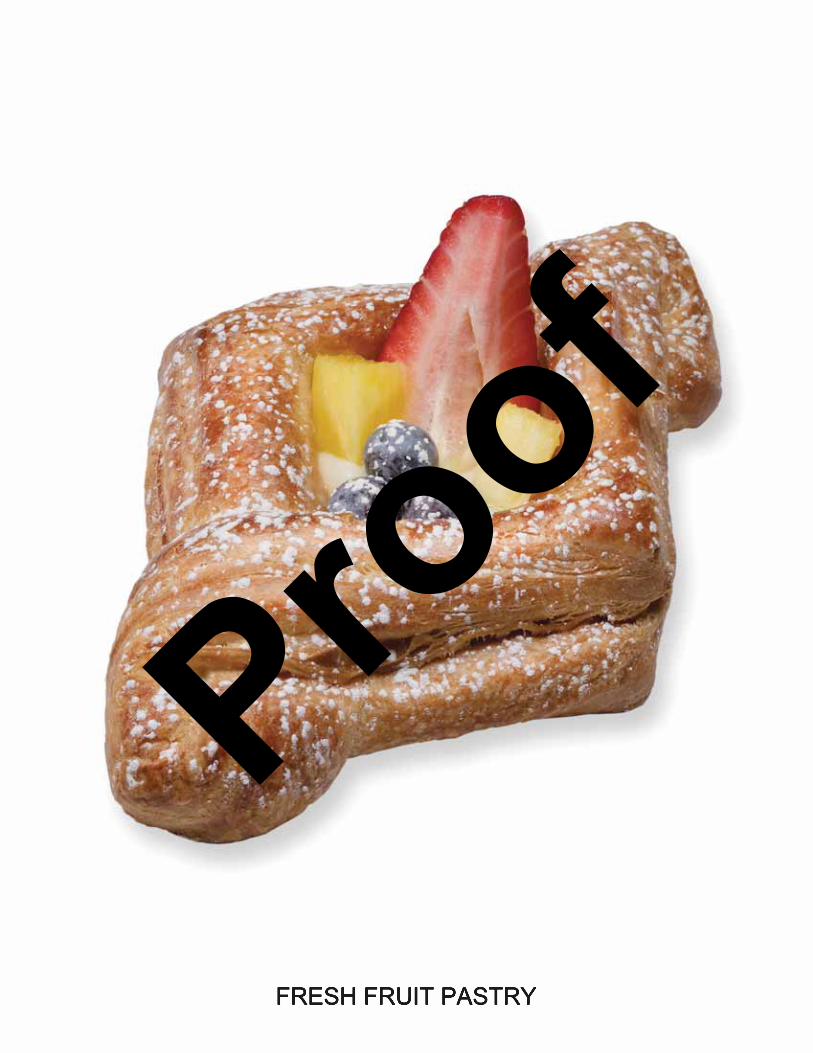
FRESH FRUIT PASTRYRAW WEIGHTBAKED WEIGHT WITH TOPPING
PRODUCT SPECIFICATION AND INFORMATION SHEETPACKAGESTORAGE
Fig. 5
Fresh Fruit Pastry 03.26.2012
Proof
Proof
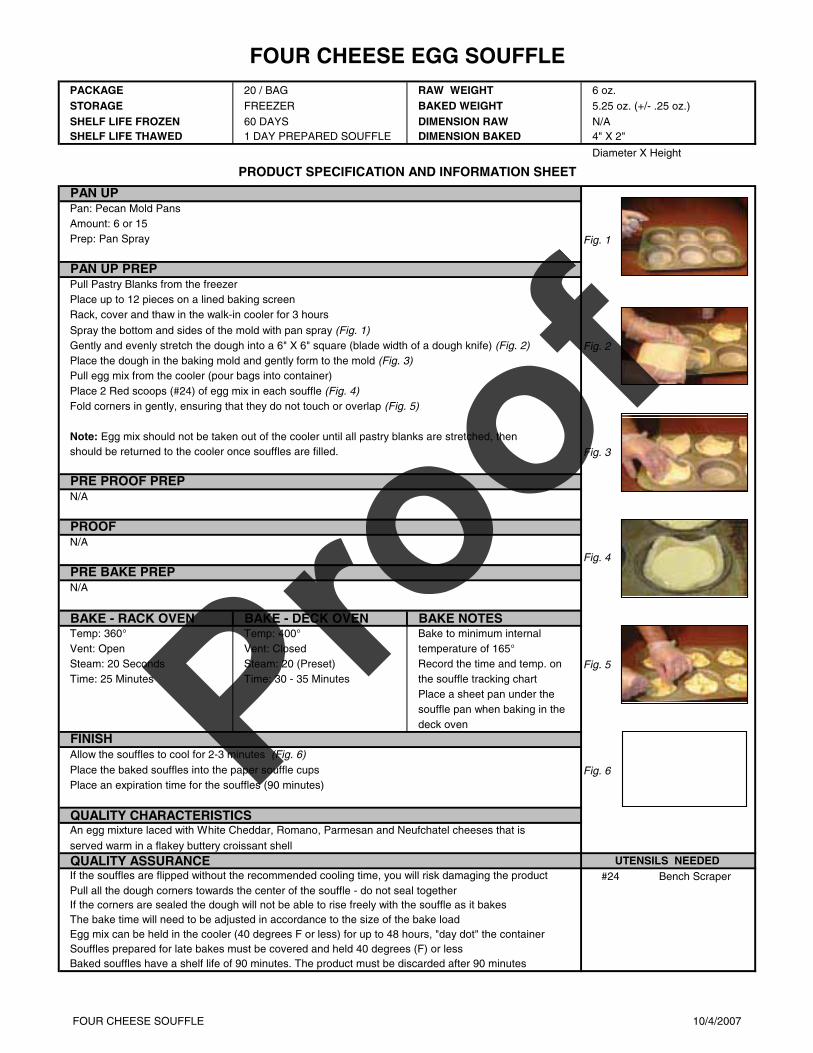
PACKAGE 20 / BAG RAW WEIGHT 6 oz.STORAGE FREEZER BAKED WEIGHT 5.25 oz. (+/- .25 oz.)SHELF LIFE FROZEN 60 DAYS DIMENSION RAW N/ASHELF LIFE THAWED 1 DAY PREPARED SOUFFLE DIMENSION BAKED 4" X 2"
Diameter X Height
Fig. 1
Spray the bottom and sides of the mold with pan spray (Fig. 1)Gently and evenly stretch the dough into a 6" X 6" square (blade width of a dough knife) (Fig. 2) Fig. 2Place the dough in the baking mold and gently form to the mold (Fig. 3)Pull egg mix from the cooler (pour bags into container) Place 2 Red scoops (#24) of egg mix in each souffle (Fig. 4)Fold corners in gently, ensuring that they do not touch or overlap (Fig. 5)
Note: Egg mix should not be taken out of the cooler until all pastry blanks are stretched, then should be returned to the cooler once souffles are filled. Fig. 3
Fig. 4
BAKE - RACK OVEN BAKE - DECK OVEN BAKE NOTESTemp: 360° Temp: 400° Bake to minimum internalVent: Open Vent: Closed temperature of 165°Steam: 20 Seconds Steam: 20 (Preset) Record the time and temp. on Fig. 5Time: 25 Minutes Time: 30 - 35 Minutes the souffle tracking chart
Place a sheet pan under thesouffle pan when baking in thedeck oven
Place the baked souffles into the paper souffle cups Fig. 6Place an expiration time for the souffles (90 minutes)
QUALITY CHARACTERISTICS
served warm in a flakey buttery croissant shell
QUALITY ASSURANCE UTENSILS NEEDED #24 Bench Scraper
Pull all the dough corners towards the center of the souffle - do not seal together
Baked souffles have a shelf life of 90 minutes. The product must be discarded after 90 minutes
PRE PROOF PREP
N/APRE BAKE PREP
N/A
N/A
PROOF
Rack, cover and thaw in the walk-in cooler for 3 hours
PRODUCT SPECIFICATION AND INFORMATION SHEET
PAN UP PREP
PAN UP Pan: Pecan Mold Pans
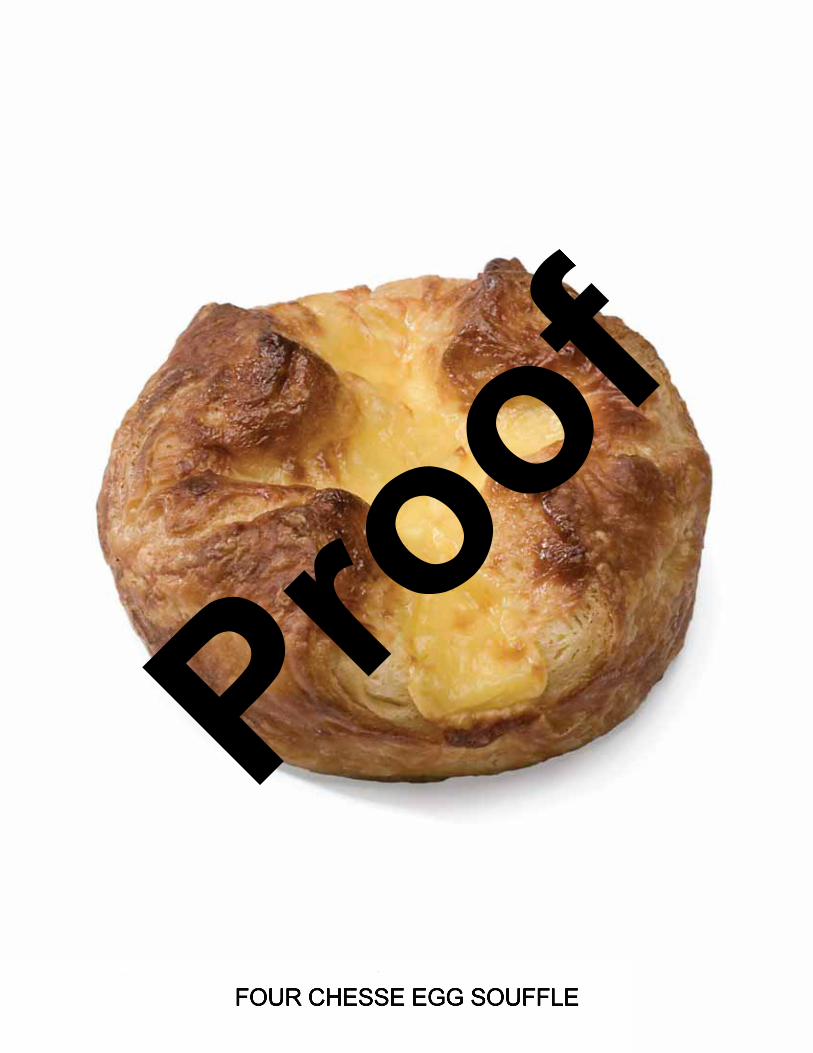
FOUR CHEESE EGG SOUFFLE
Pull Pastry Blanks from the freezerPlace up to 12 pieces on a lined baking screen
Prep: Pan SprayAmount: 6 or 15
Allow the souffles to cool for 2-3 minutes (Fig. 6)FINISH
The bake time will need to be adjusted in accordance to the size of the bake loadEgg mix can be held in the cooler (40 degrees F or less) for up to 48 hours, "day dot" the container
An egg mixture laced with White Cheddar, Romano, Parmesan and Neufchatel cheeses that is
Souffles prepared for late bakes must be covered and held 40 degrees (F) or less
If the souffles are flipped without the recommended cooling time, you will risk damaging the product
If the corners are sealed the dough will not be able to rise freely with the souffle as it bakes
FOUR CHEESE SOUFFLE 10/4/2007
Proof

Proof
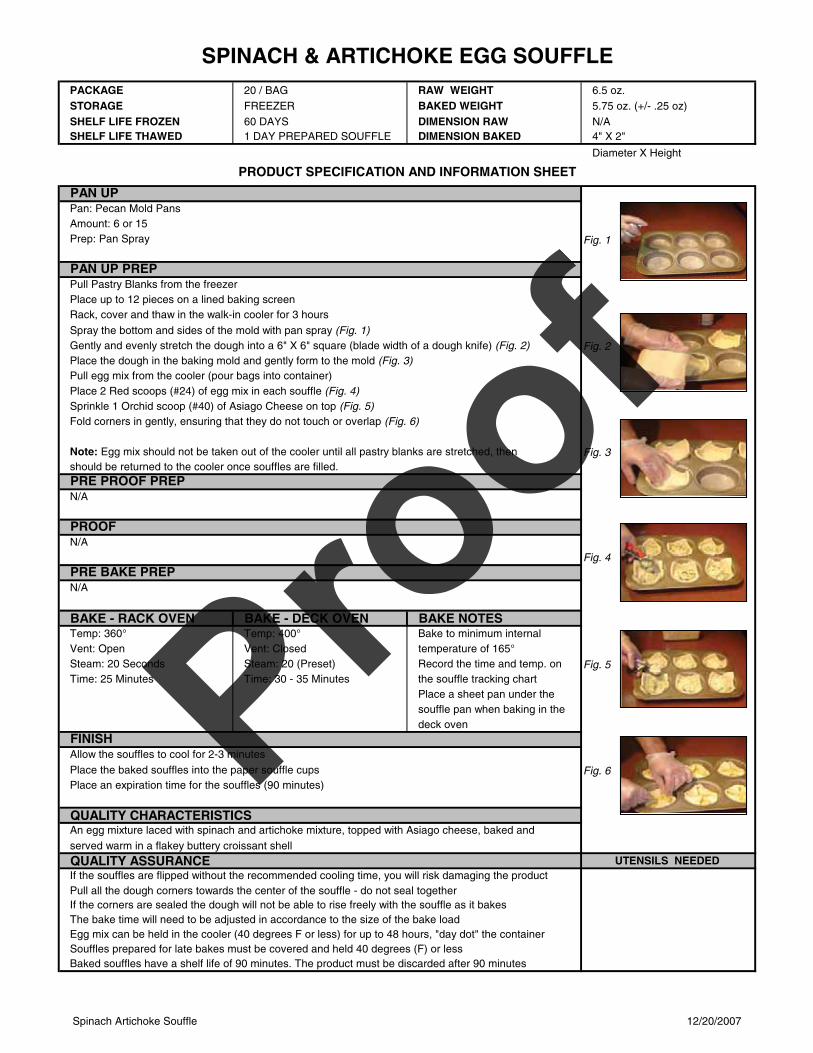
PACKAGE 20 / BAG RAW WEIGHT 6.5 oz.STORAGE FREEZER BAKED WEIGHT 5.75 oz. (+/- .25 oz)SHELF LIFE FROZEN 60 DAYS DIMENSION RAW N/ASHELF LIFE THAWED 1 DAY PREPARED SOUFFLE DIMENSION BAKED 4" X 2"
Diameter X Height
Fig. 1
Spray the bottom and sides of the mold with pan spray (Fig. 1)Gently and evenly stretch the dough into a 6" X 6" square (blade width of a dough knife) (Fig. 2) Fig. 2Place the dough in the baking mold and gently form to the mold (Fig. 3)Pull egg mix from the cooler (pour bags into container) Place 2 Red scoops (#24) of egg mix in each souffle (Fig. 4)Sprinkle 1 Orchid scoop (#40) of Asiago Cheese on top (Fig. 5)Fold corners in gently, ensuring that they do not touch or overlap (Fig. 6)
Note: Egg mix should not be taken out of the cooler until all pastry blanks are stretched, then Fig. 3should be returned to the cooler once souffles are filled.
Fig. 4
BAKE - RACK OVEN BAKE - DECK OVEN BAKE NOTESTemp: 360° Temp: 400° Bake to minimum internalVent: Open Vent: Closed temperature of 165°Steam: 20 Seconds Steam: 20 (Preset) Record the time and temp. on Fig. 5Time: 25 Minutes Time: 30 - 35 Minutes the souffle tracking chart
Place a sheet pan under thesouffle pan when baking in thedeck oven
Place the baked souffles into the paper souffle cups Fig. 6Place an expiration time for the souffles (90 minutes)
QUALITY CHARACTERISTICS
served warm in a flakey buttery croissant shell
QUALITY ASSURANCE UTENSILS NEEDED
Pull all the dough corners towards the center of the souffle - do not seal together
Baked souffles have a shelf life of 90 minutes. The product must be discarded after 90 minutes
PRE PROOF PREP
N/APRE BAKE PREP
N/A
N/A
PROOF
Rack, cover and thaw in the walk-in cooler for 3 hours
PRODUCT SPECIFICATION AND INFORMATION SHEET
PAN UP PREP
PAN UP Pan: Pecan Mold Pans
SPINACH & ARTICHOKE EGG SOUFFLE
Pull Pastry Blanks from the freezerPlace up to 12 pieces on a lined baking screen
Prep: Pan SprayAmount: 6 or 15
Allow the souffles to cool for 2-3 minutes FINISH
The bake time will need to be adjusted in accordance to the size of the bake loadEgg mix can be held in the cooler (40 degrees F or less) for up to 48 hours, "day dot" the container
An egg mixture laced with spinach and artichoke mixture, topped with Asiago cheese, baked and
Souffles prepared for late bakes must be covered and held 40 degrees (F) or less
If the souffles are flipped without the recommended cooling time, you will risk damaging the product
If the corners are sealed the dough will not be able to rise freely with the souffle as it bakes
Spinach Artichoke Souffle 12/20/2007
Proof
Proof
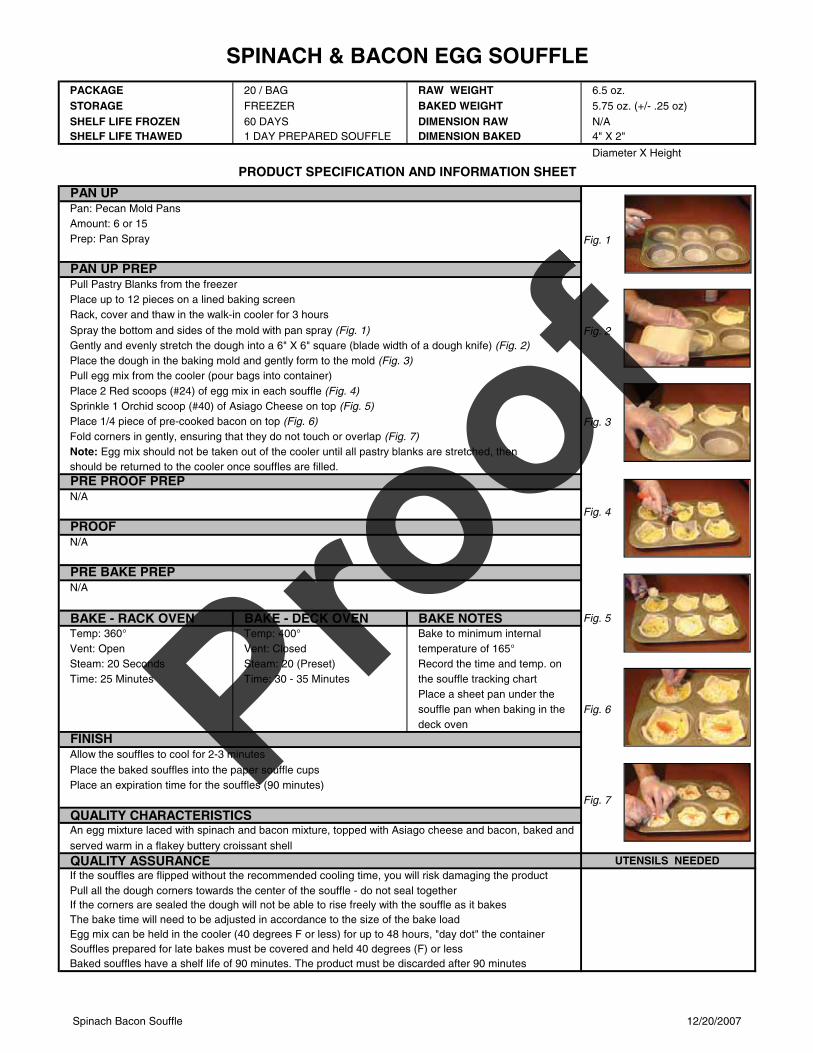
PACKAGE 20 / BAG RAW WEIGHT 6.5 oz.STORAGE FREEZER BAKED WEIGHT 5.75 oz. (+/- .25 oz)SHELF LIFE FROZEN 60 DAYS DIMENSION RAW N/ASHELF LIFE THAWED 1 DAY PREPARED SOUFFLE DIMENSION BAKED 4" X 2"
Diameter X Height
Fig. 1
Spray the bottom and sides of the mold with pan spray (Fig. 1) Fig. 2Gently and evenly stretch the dough into a 6" X 6" square (blade width of a dough knife) (Fig. 2)Place the dough in the baking mold and gently form to the mold (Fig. 3)Pull egg mix from the cooler (pour bags into container) Place 2 Red scoops (#24) of egg mix in each souffle (Fig. 4)Sprinkle 1 Orchid scoop (#40) of Asiago Cheese on top (Fig. 5)Place 1/4 piece of pre-cooked bacon on top (Fig. 6) Fig. 3Fold corners in gently, ensuring that they do not touch or overlap (Fig. 7)Note: Egg mix should not be taken out of the cooler until all pastry blanks are stretched, then should be returned to the cooler once souffles are filled.
Fig. 4
BAKE - RACK OVEN BAKE - DECK OVEN BAKE NOTES Fig. 5Temp: 360° Temp: 400° Bake to minimum internalVent: Open Vent: Closed temperature of 165°Steam: 20 Seconds Steam: 20 (Preset) Record the time and temp. on Time: 25 Minutes Time: 30 - 35 Minutes the souffle tracking chart
Place a sheet pan under thesouffle pan when baking in the Fig. 6deck oven
Place the baked souffles into the paper souffle cupsPlace an expiration time for the souffles (90 minutes)
Fig. 7
QUALITY CHARACTERISTICS
served warm in a flakey buttery croissant shell
QUALITY ASSURANCE UTENSILS NEEDED
Pull all the dough corners towards the center of the souffle - do not seal together
Baked souffles have a shelf life of 90 minutes. The product must be discarded after 90 minutes
Allow the souffles to cool for 2-3 minutes FINISH
The bake time will need to be adjusted in accordance to the size of the bake loadEgg mix can be held in the cooler (40 degrees F or less) for up to 48 hours, "day dot" the container
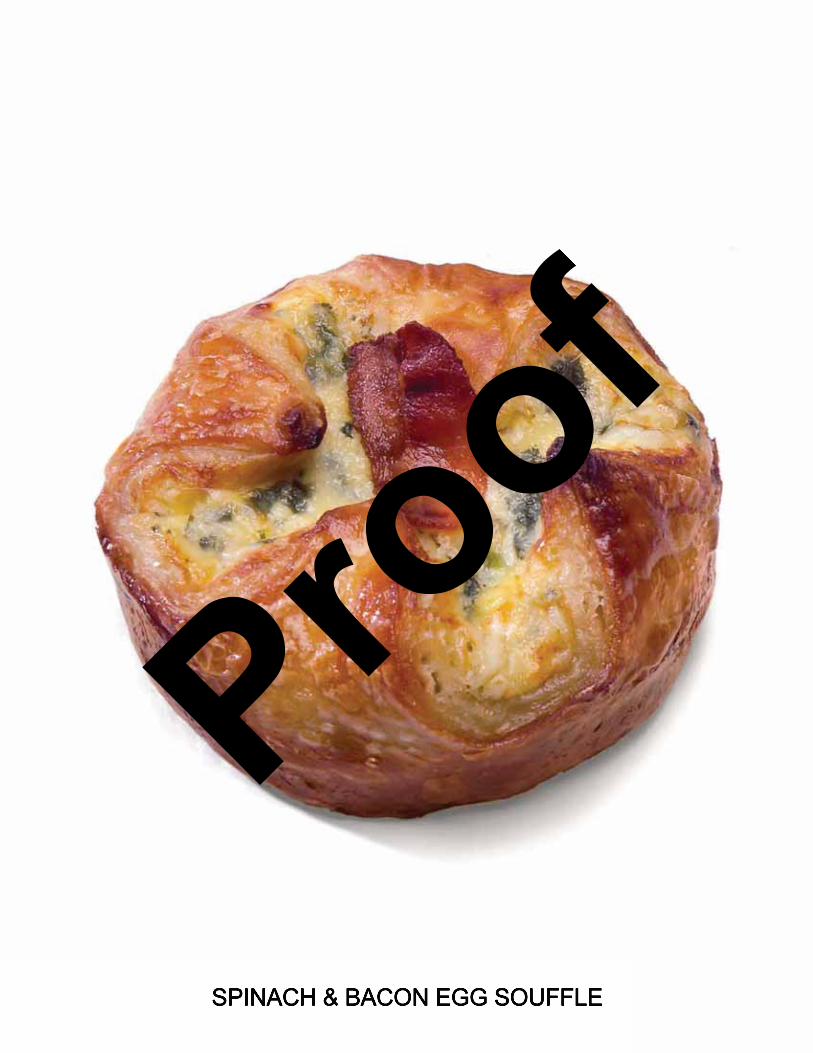
An egg mixture laced with spinach and bacon mixture, topped with Asiago cheese and bacon, baked and
Souffles prepared for late bakes must be covered and held 40 degrees (F) or less
If the souffles are flipped without the recommended cooling time, you will risk damaging the product
If the corners are sealed the dough will not be able to rise freely with the souffle as it bakes
Prep: Pan SprayAmount: 6 or 15
SPINACH & BACON EGG SOUFFLE
Pull Pastry Blanks from the freezerPlace up to 12 pieces on a lined baking screenRack, cover and thaw in the walk-in cooler for 3 hours
PRODUCT SPECIFICATION AND INFORMATION SHEET
PAN UP PREP
PAN UP Pan: Pecan Mold Pans
PRE PROOF PREP
N/APRE BAKE PREP
N/A
N/A
PROOF
Spinach Bacon Souffle 12/20/2007
Proof
Proof

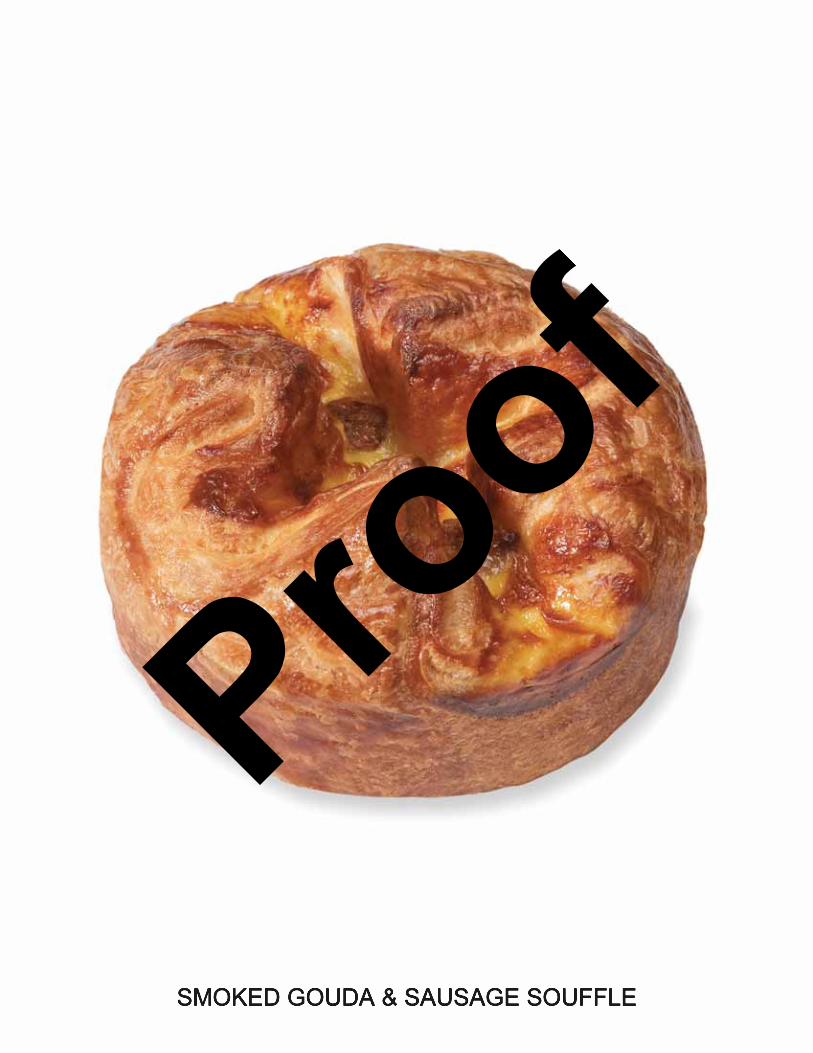
PACKAGE 192/CASE RAW WEIGHT 6.5 oz (+/- .25 oz)STORAGE FREEZER BAKED WEIGHT W/TOPPING 6.0 oz (+/- .25 oz)SHELF LIFE FROZEN 60 DAYS DIMENSIONS RAW N/ASHELF LIFE THAWED 1 DAY DIMENSIONS BAKED 4.0" X 2.0" (+/- .25")
PAN UP TOOLS NEEDED
Fig. 1
PAN UP PREPPull pastry blanks from the freezer
Fig. 2Spray the bottom and sides of the mold with pan sprayGently and evenly stretch the dough into a 6" x 6" square (blade width of a bench scraper)Place the dough in the baking mold and gently form to the mold (Fig. 1)Note: When using a knife, always wear a cut resistant glove on the hand that is not holding the knifeand always cut on the cutting boardCut sausage patties 5 times horizontally and 5 times vertically, as shown in (Figs. 2&3) Fig. 3Note: Allow frozen sausage patties to thaw for 5 minutes prior to cutting - 1 sausage patty fills 2 soufflesPlace 1 Red (#24) scoop of sausage pieces in the dough blank (Fig. 4)Place 3 Orchid (#40) scoops (2.25 oz.) of the egg souffle mix on top of the sausage (Fig. 5)Return souffle mix to the cooler immediately after useCut Gouda cheese slices into 8 equal sized triangles as shown in (Fig. 6)Place 3 Gouda cheese triangles on top of the egg mixture (Fig. 7) Fig. 4Pull the corners of the dough over the mixture, but do not make a seal with the dough (Fig. 8)Garnish each souffle with 3 cut pieces of sausage (Fig. 9)
PRE PROOF PREP - N/A
PROOF - N/A
PROOF SPECS - N/A
PRE BAKE PREP - N/A
BAKERACK OVEN DECK OVEN BAKE NOTES
Temp: 360 Degrees 400 Degrees Bake to minimum internalVent: Open Closed temperature of 165 degrees Fig. 6Steam: 20 Seconds 20 Seconds (preset) Record the time and temp.Time: 25 Minutes 30 - 35 Minutes in the Temp Log Book
Place an inverted sheet panunder the souffle pan
FINISH
Allow to cool for 2 - 3 minutesUsing a spatula, remove souffles and place into souffle cups - mark with an expiration time for 90 minutesRefer to the back side of this page for ideal product appearance
QUALITY CHARACTERISTICS
pastry shell
QUALITY ASSURANCE
Fig. 9
5. Egg mixture can be held in the cooler for up to 72 hours (24 hours to thaw plus 48 hours opened).ESTIMATED HANDS-ON TIME6 minutes 20 seconds for 6 souffles
4. The bake time will need to be adjusted in accordance to the size of the bake load.
An egg mixture laced with sausage and smoked Gouda cheese, baked and served warm in a flaky buttery
6. Egg mixture container must be labeled with name and expiration date.
1. If the souffles are removed without the recommended cooling time, you will risk damaging the product.2. Pull all the dough corners towards the center of the souffle - do not seal together.3. If the corners are sealed the dough will not be able to rise freely with the souffle as it bakes.
Pan: Souffle or Pecan Roll pansAmount: 6 or 15Prep: Pan Spray
Place dough blanks on a lined sheet pan
While in the oven, using a thermometer take the temperature of the souffle. It must be a minimum of 165°
7. Souffles prepared for late/day bakes must be covered and held at 40° or less.
Fig. 5
SMOKED GOUDA & SAUSAGE SOUFFLEPRODUCT SPECIFICATION AND INFORMATION SHEET
Place on a rack, cover and thaw in the walk-in cooler for 3 hours
Fig. 8
Fig. 7
Smoked Gouda & Sausage Souffle 08.03.2012
Proof
Proof
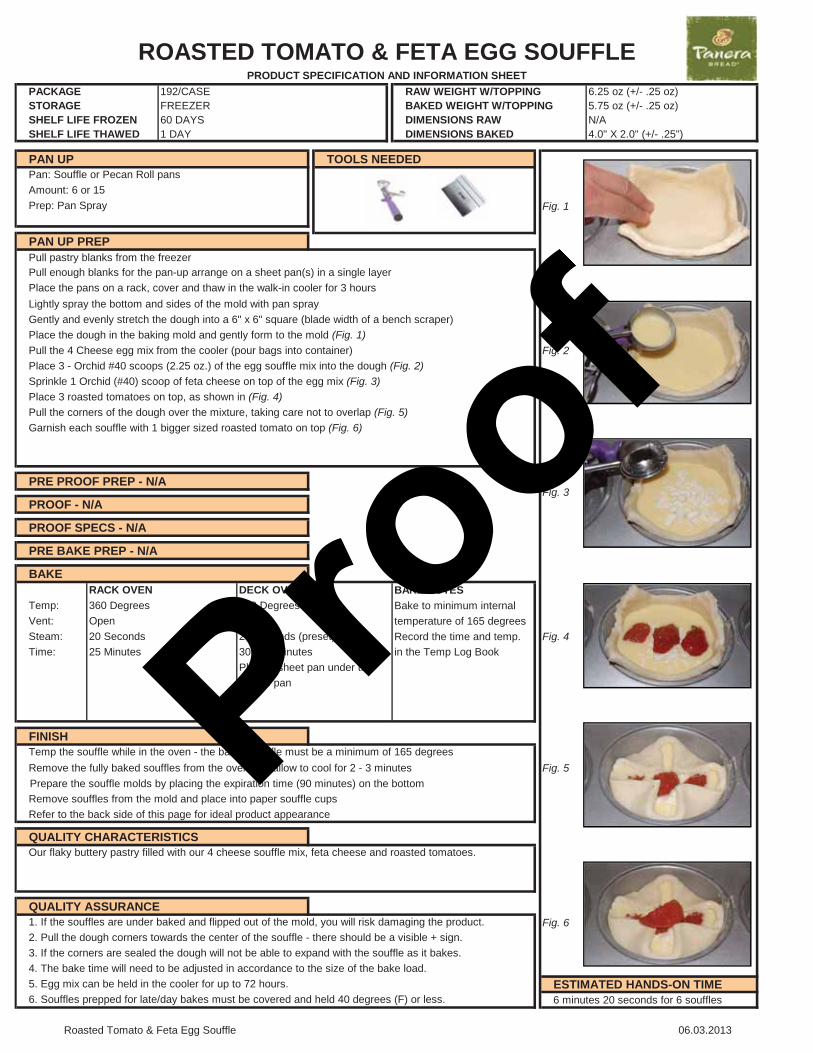
PACKAGE 192/CASE RAW WEIGHT W/TOPPING 6.25 oz (+/- .25 oz)STORAGE FREEZER BAKED WEIGHT W/TOPPING 5.75 oz (+/- .25 oz)SHELF LIFE FROZEN 60 DAYS DIMENSIONS RAW N/ASHELF LIFE THAWED 1 DAY DIMENSIONS BAKED 4.0" X 2.0" (+/- .25")
PAN UP TOOLS NEEDED
Fig. 1
PAN UP PREPPull pastry blanks from the freezer
Lightly spray the bottom and sides of the mold with pan sprayGently and evenly stretch the dough into a 6" x 6" square (blade width of a bench scraper)Place the dough in the baking mold and gently form to the mold (Fig. 1)Pull the 4 Cheese egg mix from the cooler (pour bags into container) Fig. 2Place 3 - Orchid #40 scoops (2.25 oz.) of the egg souffle mix into the dough (Fig. 2)Sprinkle 1 Orchid (#40) scoop of feta cheese on top of the egg mix (Fig. 3)Place 3 roasted tomatoes on top, as shown in (Fig. 4)Pull the corners of the dough over the mixture, taking care not to overlap (Fig. 5)Garnish each souffle with 1 bigger sized roasted tomato on top (Fig. 6)
PRE PROOF PREP - N/A
PROOF - N/A
PROOF SPECS - N/A
PRE BAKE PREP - N/A
BAKERACK OVEN DECK OVEN BAKE NOTES
Temp: 360 Degrees 400 Degrees Bake to minimum internalVent: Open Closed temperature of 165 degreesSteam: 20 Seconds 20 Seconds (preset) Record the time and temp. Fig. 4Time: 25 Minutes 30 - 35 Minutes in the Temp Log Book
Place a sheet pan under thesouffle pan
FINISH
Remove the fully baked souffles from the oven and allow to cool for 2 - 3 minutes Fig. 5 Prepare the souffle molds by placing the expiration time (90 minutes) on the bottom
Remove souffles from the mold and place into paper souffle cupsRefer to the back side of this page for ideal product appearance
QUALITY CHARACTERISTICS
QUALITY ASSURANCEFig. 6
ESTIMATED HANDS-ON TIME6 minutes 20 seconds for 6 souffles
4. The bake time will need to be adjusted in accordance to the size of the bake load.
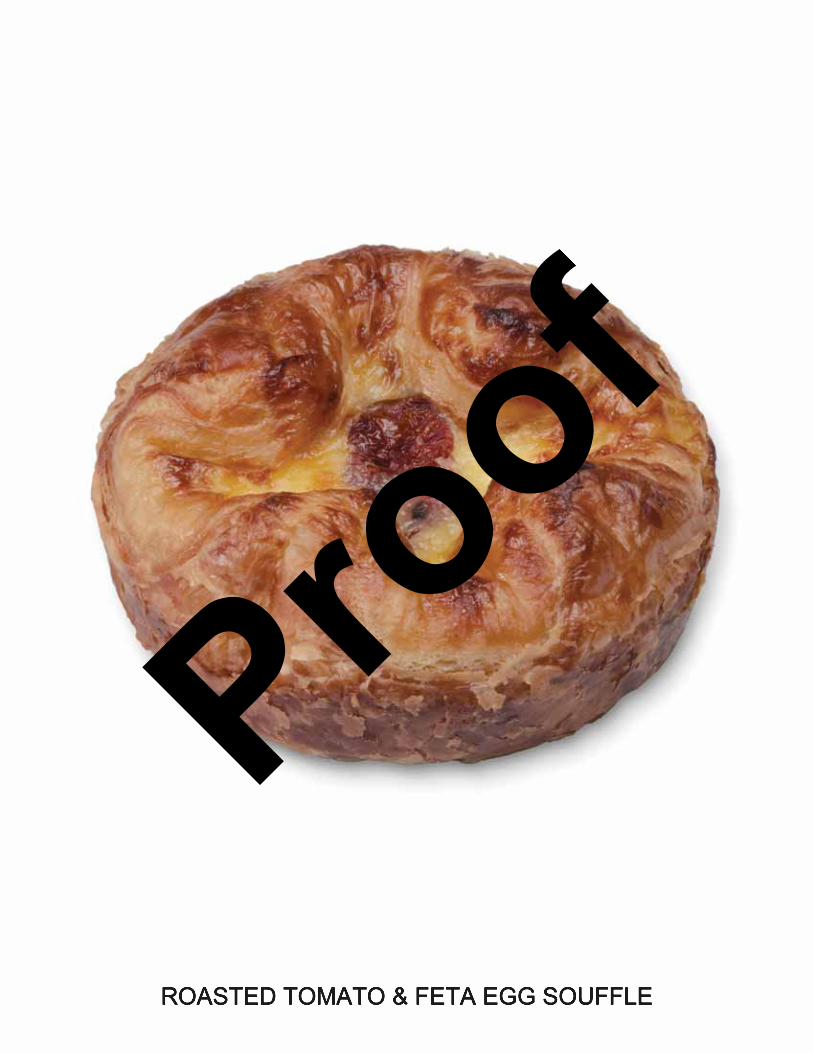
Our flaky buttery pastry filled with our 4 cheese souffle mix, feta cheese and roasted tomatoes.
5. Egg mix can be held in the cooler for up to 72 hours.
1. If the souffles are under baked and flipped out of the mold, you will risk damaging the product.2. Pull the dough corners towards the center of the souffle - there should be a visible + sign. 3. If the corners are sealed the dough will not be able to expand with the souffle as it bakes.
Pan: Souffle or Pecan Roll pansAmount: 6 or 15Prep: Pan Spray
Pull enough blanks for the pan-up arrange on a sheet pan(s) in a single layer
Temp the souffle while in the oven - the baked souffle must be a minimum of 165 degrees
6. Souffles prepped for late/day bakes must be covered and held 40 degrees (F) or less.
ROASTED TOMATO & FETA EGG SOUFFLEPRODUCT SPECIFICATION AND INFORMATION SHEET
Place the pans on a rack, cover and thaw in the walk-in cooler for 3 hours
Fig. 3
Roasted Tomato & Feta Egg Souffle 06.03.2013
Proof
Proof
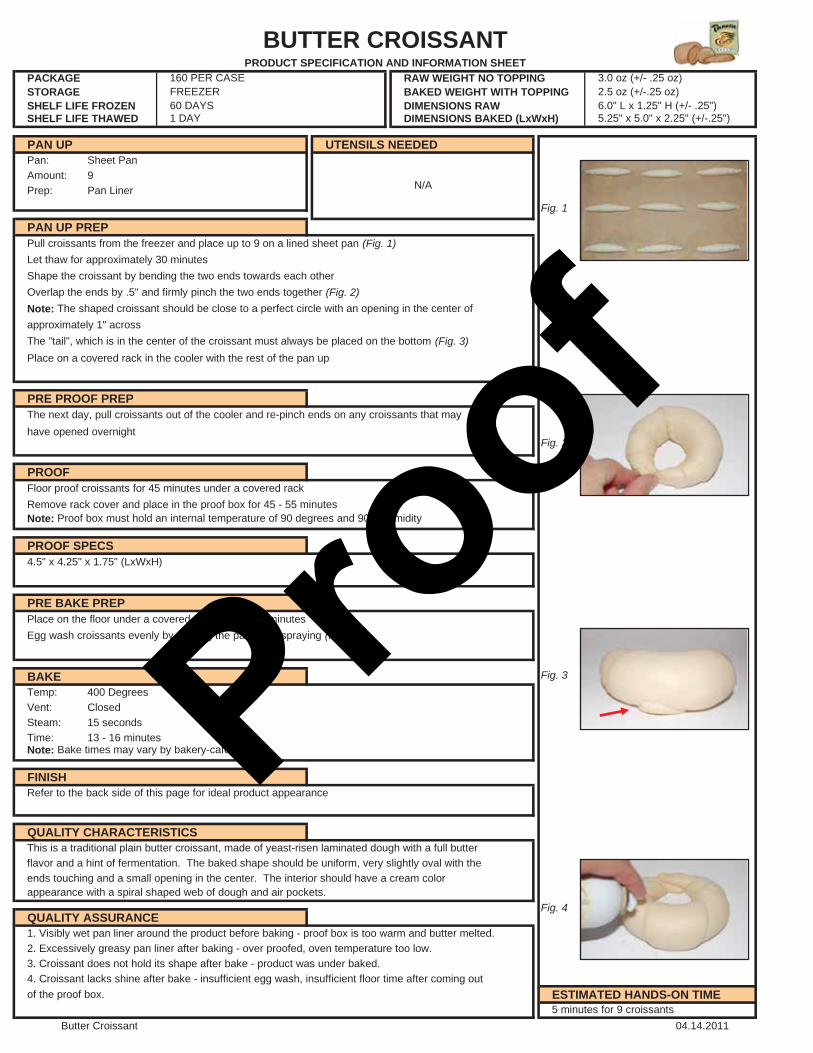
160 PER CASE 3.0 oz (+/- .25 oz)FREEZER 2.5 oz (+/-.25 oz)60 DAYS 6.0" L x 1.25" H (+/- .25")1 DAY 5.25" x 5.0" x 2.25" (+/-.25")
PAN UP UTENSILS NEEDEDPan: Sheet PanAmount: 9Prep: Pan Liner
PAN UP PREPPull croissants from the freezer and place up to 9 on a lined sheet pan (Fig. 1)Let thaw for approximately 30 minutesShape the croissant by bending the two ends towards each otherOverlap the ends by .5" and firmly pinch the two ends together (Fig. 2)Note: The shaped croissant should be close to a perfect circle with an opening in the center of approximately 1" acrossThe "tail", which is in the center of the croissant must always be placed on the bottom (Fig. 3)Place on a covered rack in the cooler with the rest of the pan up
PRE PROOF PREP The next day, pull croissants out of the cooler and re-pinch ends on any croissants that may have opened overnight
PROOFFloor proof croissants for 45 minutes under a covered rackRemove rack cover and place in the proof box for 45 - 55 minutesNote: Proof box must hold an internal temperature of 90 degrees and 90% humidity
PROOF SPECS 4.5" x 4.25" x 1.75" (LxWxH)
PRE BAKE PREP Place on the floor under a covered rack for 20 - 30 minutesEgg wash croissants evenly by rotating the pan while spraying (Fig. 4)
BAKETemp: 400 DegreesVent: ClosedSteam: 15 secondsTime: 13 - 16 minutesNote: Bake times may vary by bakery-cafe
FINISHRefer to the back side of this page for ideal product appearance
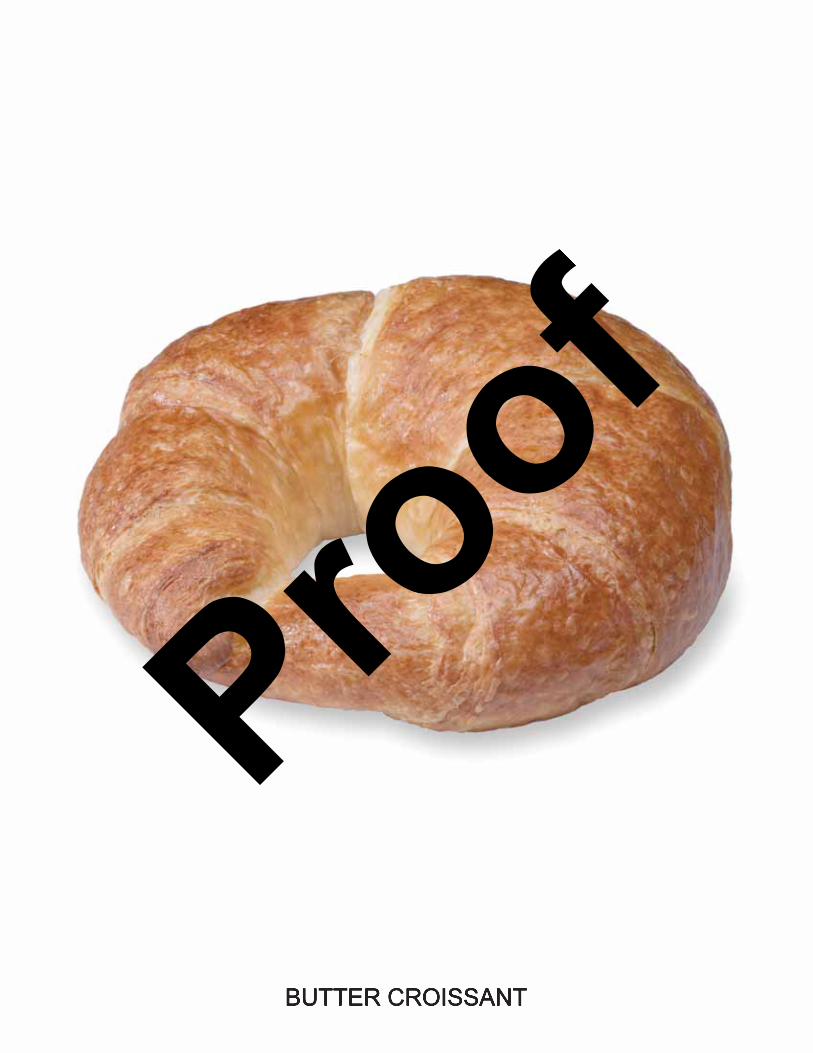
QUALITY CHARACTERISTICSThis is a traditional plain butter croissant, made of yeast-risen laminated dough with a full butter flavor and a hint of fermentation. The baked shape should be uniform, very slightly oval with the ends touching and a small opening in the center. The interior should have a cream color appearance with a spiral shaped web of dough and air pockets.
QUALITY ASSURANCE1. Visibly wet pan liner around the product before baking - proof box is too warm and butter melted.2. Excessively greasy pan liner after baking - over proofed, oven temperature too low.3. Croissant does not hold its shape after bake - product was under baked.4. Croissant lacks shine after bake - insufficient egg wash, insufficient floor time after coming outof the proof box. ESTIMATED HANDS-ON TIME
BUTTER CROISSANTRAW WEIGHT NO TOPPINGBAKED WEIGHT WITH TOPPING
PRODUCT SPECIFICATION AND INFORMATION SHEETPACKAGESTORAGE
Fig. 2
DIMENSIONS RAWDIMENSIONS BAKED (LxWxH)
SHELF LIFE FROZENSHELF LIFE THAWED
Fig. 3
Fig. 4
5 minutes for 9 croissants
N/A
Fig. 1
Butter Croissant 04.14.2011
Proof