paradise®plus reagent system
TRANSCRIPT
PARADISE®PLUS REAGENT SYSTEM
User Guide
Part of the Arcturus Systemsfor Microgenomics
MDS Analytical TechnologiesParadise®Plus Reagent System User Guide
Copyright
© Copyright 2008, MDS Analytical Technologies. All rights reserved. No part of this publication may be reproduced, transmitted, transcribed, stored in a retrieval system, or translated into any language or computer language, in any form or by any means, electronic, mechanical, magnetic, optical, chemical, manual, or otherwise, without the prior written permission of MDS Analytical Technologies, 1311 Orleans Drive, Sunnyvale, California, 94089, United States of America.
This product is licensed for sale only for research use. It is NOT licensed for any other use. There is no implied license hereunder for any commercial use. Commercial use is any use other than internal life sciences research and development, including: the sale, lease, license or other transfer of the material, or any material derived or produced from it to any third party; the sale, lease, license or other grant of rights to a third party to use this material or any material derived or produced from it; and the use of this material to perform services for a fee for third parties. If you require a license to use this material for commercial uses and do not have one, please return this material, unopened to MDS Analytical Technologies and any money paid for the material will be refunded.
Trademarks
ARCTURUS, HISTOGENE, RIBOAMP, SYSTEMS FOR MICROGENOMICS, PICOPURE, AUTOPIX, CAPSURE, PIXCELL, PARADISE, GENEPIX, and ACUITY are registered trademarks, and ARCTURUSXT, TURBO LABELING, VERITAS, EXTRACSURE, MIRACOL are trademarks of MDS Analytical Technologies. Other trademarks used in this manual are the property of their respective owners. The PCR process is covered by patents owned by Hoffmann-La Roche Inc. and F. Hoffman-La Roche Ltd. Some uses of the Paradise Plus Reagent System may require licenses from third parties. Purchase of the Paradise Plus Reagent System does not include any right or license to use, develop or otherwise exploit the product commercially. Any commercial use, development, or exploitation of the Paradise Plus Reagent System or development using the product without the express written authorization of MDS Analytical Technologies is strictly prohibited.
This RNA Amplification product and/or its use may be covered by one or more U.S. Patent numbers 5,716,785, 5,891,636,and 5,958,688, which are licensed exclusively to Incyte Corporation. The purchase of this product conveys to the buyer the limited, non-exclusive, non-transferable right under these patents to use this product for laboratory use, as a General Purpose Reagent, as an Analyte Specific Reagent or to provide gene expression services. The purchase of this product does not include or carry any right or license to use the product in a clinical diagnostic test for which the FDA Premarket Approval (PMA) and/or Premarket Notification under section 510(k) of the FFDCA is obtained or required. The buyer of this product acquires no rights to resell or repackage for resale the product or components thereof. No other license is granted to the buyer whether expressly, by implication, by estoppel or otherwise.
Disclaimer
MDS Analytical Technologies reserves the right to change its products and services at any time to incorporate technological developments. This manual is subject to change without notice. Although this manual has been prepared with every precaution to ensure accuracy, MDS Analytical Technologies assumes no liability for any errors or omissions, nor for any damages resulting from the application or use of this information.
Paradise®Plus Reagent System User Guide — 12872-00 Rev. C
Warranty
MDS Analytical Technologies warrants that the products described in this manual meet the performance standards described in literature published by the company. If a product fails to meet these performance standards, MDS Analytical Technologies will replace the product or issue credit for the full purchase price, including delivery charges. MDS Analytical Technologies provides no other warranties of any kind, expressed or implied. MDS Analytical Technologies’ warranty liability shall not exceed the purchase price of the product and shall not extend to direct, indirect, consequential or incidental damages arising from the use, results of use, or improper use of its products. The Paradise Plus Reagent System is intended for laboratory use.
Related Documents
When using the Paradise Plus Reagent System User Guide, the following user guides may be helpful references:
ArcturusXT, Veritas, AutoPix, or PixCell LCM System User Guide
Turbo Labeling kit user guide
CapSure HS Caps User Guide
Quality Control
MDS Analytical Technologies performs functional testing on all components of the Paradise Plus Reagent System. The information sheet provided with the system highlights the tests performed.
Staining. MDS Analytical Technologies performs functional testing on the Paradise Plus Reagent System staining components to confirm the absence of nucleic acids and nuclease activity. The staining components are functionally tested using LCM to ensure proper dehydration and that good quality RNA is recoverable.
Extraction/Isolation. MDS Analytical Technologies performs functional testing on the Paradise Plus Reagent System RNA Extraction/Isolation using all components. MiraCol Purification Columns are tested by lot to confirm the absence of nucleic acids and nuclease activity. Column nucleic acid binding and recovery performance must meet quality standards.
Amplification. Functional Testing MDS Analytical Technologies performs functional testing on each lot of materials using the amplification protocol described in this manual.
Reagent Testing. MDS Analytical Technologies tests each lot of enzymes to confirm activity. Buffer components must perform correctly under reaction or nucleic acid purification conditions.
Purification Column Testing. Purification columns are tested by lot to confirm the absence of nucleic acids and nuclease activity. Column nucleic acid binding and recovery performance must meet quality standards.
Visual Inspection Finished kits are inspected for proper assembly.
Challenges of FFPE Tissue. MDS Analytical Technologies strongly recommends performing quality assessment of FFPE samples. Tissue that has degraded RNA prior to fixation will not yield good results, nor will samples that have been over-fixed. If the quality of the source tissue is unknown, then performing a quality assessment of the tissue block prior to spending the time and expense of Laser Capture and amplification is imperative.
The amplification process generates product from the 3’ end of the mRNA. For best results use qRT-PCR primer sets designed within the first 300 bases from the poly A tail.
Expiration. All reagents included with the system should be used within six (6) months of receipt.
Paradise®Plus Reagent System User Guide — 12872-00 Rev. C

Questions?Phone: +1-800-635-5577
+1-408-747-1700Fax: +1-408-747-3603Web: www.moleculardevices.com
For additional offices, please see the contact information on the back cover of this User Guide.
Paradise®Plus Reagent System User Guide — 12872-00 Rev. C

Contents
1. IntroductionBackground. . . . . . . . . . . . . . . . . . . . . . . . . . . . . . . . . . . . . . . . . . . . . . . . . . . . . . . . . 1Performance Specifications . . . . . . . . . . . . . . . . . . . . . . . . . . . . . . . . . . . . . . . . . . . . . 2Master-mixes . . . . . . . . . . . . . . . . . . . . . . . . . . . . . . . . . . . . . . . . . . . . . . . . . . . . . . . . 2RNA Input Requirements . . . . . . . . . . . . . . . . . . . . . . . . . . . . . . . . . . . . . . . . . . . . . . 2Storage and Stability . . . . . . . . . . . . . . . . . . . . . . . . . . . . . . . . . . . . . . . . . . . . . . . . . . 3Material Safety and Data Sheet (MSDS) . . . . . . . . . . . . . . . . . . . . . . . . . . . . . . . . . . . 3Related Arcturus Products . . . . . . . . . . . . . . . . . . . . . . . . . . . . . . . . . . . . . . . . . . . . . . 4Additional Equipment and Materials Required . . . . . . . . . . . . . . . . . . . . . . . . . . . . . . 5Recommendations for Nuclease-free Technique. . . . . . . . . . . . . . . . . . . . . . . . . . . . . . 7
2. ConfigurationsKit Components . . . . . . . . . . . . . . . . . . . . . . . . . . . . . . . . . . . . . . . . . . . . . . . . . . . . . 9
3. Sample Preparation and StainingComponents . . . . . . . . . . . . . . . . . . . . . . . . . . . . . . . . . . . . . . . . . . . . . . . . . . . . . . . 13
Reagents and Supplies . . . . . . . . . . . . . . . . . . . . . . . . . . . . . . . . . . . . . . . . . . . . . 13Preliminary Steps. . . . . . . . . . . . . . . . . . . . . . . . . . . . . . . . . . . . . . . . . . . . . . . . . . . . 13
Material and Protocol Review . . . . . . . . . . . . . . . . . . . . . . . . . . . . . . . . . . . . . . . 13Protocol. . . . . . . . . . . . . . . . . . . . . . . . . . . . . . . . . . . . . . . . . . . . . . . . . . . . . . . . . . . 14
Slide Preparation . . . . . . . . . . . . . . . . . . . . . . . . . . . . . . . . . . . . . . . . . . . . . . . . . 14Deparaffinization, Staining and Dehydration. . . . . . . . . . . . . . . . . . . . . . . . . . . . 15
4. RNA Extraction/IsolationComponents . . . . . . . . . . . . . . . . . . . . . . . . . . . . . . . . . . . . . . . . . . . . . . . . . . . . . . . 17
Reagents and Supplies . . . . . . . . . . . . . . . . . . . . . . . . . . . . . . . . . . . . . . . . . . . . . 17Preliminary Steps. . . . . . . . . . . . . . . . . . . . . . . . . . . . . . . . . . . . . . . . . . . . . . . . . . . . 18
Material and Protocol Review . . . . . . . . . . . . . . . . . . . . . . . . . . . . . . . . . . . . . . . 18Protocol. . . . . . . . . . . . . . . . . . . . . . . . . . . . . . . . . . . . . . . . . . . . . . . . . . . . . . . . . . . 18
Protocol For Use with Capsure Macro LCM Caps. . . . . . . . . . . . . . . . . . . . . . . . 18Protocol For Use with Capsure HS LCM Caps . . . . . . . . . . . . . . . . . . . . . . . . . . 21Tissue Scrape Protocol . . . . . . . . . . . . . . . . . . . . . . . . . . . . . . . . . . . . . . . . . . . . . 25
Paradise®Plus Reagent System User Guide — 12872-00 Rev. C i
ii
5. RNA AmplificationComponents . . . . . . . . . . . . . . . . . . . . . . . . . . . . . . . . . . . . . . . . . . . . . . . . . . . . . . . 29
Reagents and Supplies . . . . . . . . . . . . . . . . . . . . . . . . . . . . . . . . . . . . . . . . . . . . . 29Preliminary Steps. . . . . . . . . . . . . . . . . . . . . . . . . . . . . . . . . . . . . . . . . . . . . . . . . . . . 31
Material and Protocol Review . . . . . . . . . . . . . . . . . . . . . . . . . . . . . . . . . . . . . . . 31Overview . . . . . . . . . . . . . . . . . . . . . . . . . . . . . . . . . . . . . . . . . . . . . . . . . . . . . . . 31Thermal Cycler Programming . . . . . . . . . . . . . . . . . . . . . . . . . . . . . . . . . . . . . . . 32Time Requirements . . . . . . . . . . . . . . . . . . . . . . . . . . . . . . . . . . . . . . . . . . . . . . . 34Protocol Notes . . . . . . . . . . . . . . . . . . . . . . . . . . . . . . . . . . . . . . . . . . . . . . . . . . . 35Sample and Reagents Preparation. . . . . . . . . . . . . . . . . . . . . . . . . . . . . . . . . . . . . 36Nucleic Acid Elution Using Spin Columns . . . . . . . . . . . . . . . . . . . . . . . . . . . . . 36Control Amplifications . . . . . . . . . . . . . . . . . . . . . . . . . . . . . . . . . . . . . . . . . . . . 37Work Space Recommendations . . . . . . . . . . . . . . . . . . . . . . . . . . . . . . . . . . . . . . 37Important Additional Considerations. . . . . . . . . . . . . . . . . . . . . . . . . . . . . . . . . . 37
Protocol. . . . . . . . . . . . . . . . . . . . . . . . . . . . . . . . . . . . . . . . . . . . . . . . . . . . . . . . . . . 38Paradise Plus Round One: 1st Strand cDNA Synthesis . . . . . . . . . . . . . . . . . . . . . 38Paradise Plus Round One: 2nd Strand cDNA Synthesis . . . . . . . . . . . . . . . . . . . . 40Paradise Plus Round One: cDNA purification. . . . . . . . . . . . . . . . . . . . . . . . . . . . 41Paradise Plus Round One: In Vitro Transcription . . . . . . . . . . . . . . . . . . . . . . . . . 43Paradise Plus Round One: aRNA Purification . . . . . . . . . . . . . . . . . . . . . . . . . . . . 45Paradise Plus Round Two: 1st Strand cDNA Synthesis . . . . . . . . . . . . . . . . . . . . . 47Paradise Plus Round Two: 2nd Strand cDNA Synthesis . . . . . . . . . . . . . . . . . . . . 48Paradise Plus Round Two: cDNA Purification . . . . . . . . . . . . . . . . . . . . . . . . . . . 50Paradise Plus Round Two: In Vitro Transcription. . . . . . . . . . . . . . . . . . . . . . . . . 51Paradise Plus Round Two: aRNA Purification. . . . . . . . . . . . . . . . . . . . . . . . . . . . 53
A. Applications of aRNADirect aRNA Labeling with Turbo Labeling Kit . . . . . . . . . . . . . . . . . . . . . . . . . . . . 57Direct cDNA Fluorescent Labeling . . . . . . . . . . . . . . . . . . . . . . . . . . . . . . . . . . . . . . 57Generation of Template for QRT-PCR . . . . . . . . . . . . . . . . . . . . . . . . . . . . . . . . . . . 59
B. Sample Assessment Protocol
C. Amino-Allyl aRNA Labeling
D. aRNA AnalysisRNA QuantitationUsing Spectramax Microplate Readers with Absorbance Mode and Pathcheck Sensor . . . . . . . . . . . . . . . . . . . . . . . . . . . . . . . . . . 75aRNA Yield and Purity Determination . . . . . . . . . . . . . . . . . . . . . . . . . . . . . . . . . . . 76
Paradise®Plus Reagent System User Guide — 12872-00 Rev. C
Assessment of Rna Quality Using the Agilent Bioanalyzer . . . . . . . . . . . . . . . . . . . . . 76Analysis of aRNA by Agarose Gel Electrophoresis . . . . . . . . . . . . . . . . . . . . . . . . . . . 77
E. Generation of Labeled aRNA Using Alternative IVT Kits
F. Cleaning the Staining Jars
G. Centrifuge Information
H. TroubleshootingStaining. . . . . . . . . . . . . . . . . . . . . . . . . . . . . . . . . . . . . . . . . . . . . . . . . . . . . . . . . . . 87Extraction and Isolation . . . . . . . . . . . . . . . . . . . . . . . . . . . . . . . . . . . . . . . . . . . . . . 88Amplification . . . . . . . . . . . . . . . . . . . . . . . . . . . . . . . . . . . . . . . . . . . . . . . . . . . . . . 89Quality Assessment Protocol . . . . . . . . . . . . . . . . . . . . . . . . . . . . . . . . . . . . . . . . . . . 91
Paradise®Plus Reagent System User Guide — 12872-00 Rev. C iii

iv
Paradise®Plus Reagent System User Guide — 12872-00 Rev. C
1. Introduction1.1. BACKGROUND
The Paradise®Plus Reagent System provides an integrated system enabling gene expression studies using Formalin-Fixed Paraffin-Embedded tissue (FFPE).
Components provided include:
> Sample preparation and staining reagents
> RNA extraction and isolation reagents
> RNA amplification reagents
The ParadisePlus components have been optimized to work together as a system. Alternative components have not been tested and may lead sub optimal results.
This user guide is divided into sections describing the steps involved using staining, extraction/isolation and amplification separately. To get the most out of the ParadisePlus Reagent System, please examine the components and read each section of the user guide carefully. A principal application of this kit is use in conjunction with Laser Capture Microdissection (LCM). LCM experiments often involve the analysis of gene expression patterns in cells captured from specimens. Obtaining accurate results from gene expression analysis experiments, including microarray hybridization and quantitative PCR, depends on careful preservation of intact RNA molecules in captured cells.
StainingThe ParadisePlus Reagent System Staining components are part of a series of LCM-certified LCM analysis products for preparing and staining tissues while preserving intact nucleic acid and protein species from captured cell populations. The staining components work with the additional modules provided in this reagent system. ParadisePlus extraction and isolation reagents and RNA amplification reagents provide a complete solution for studying RNA from cells isolated by LCM. The reagents and protocol have been optimized for use with Formalin-Fixed Paraffin-Embedded (FFPE) samples.
Extraction/isolationThe ParadisePlus Reagent System RNA Extraction/Isolation reagents enable researchers to recover total cellular RNA from formalin fixed paraffin embedded samples. They are optimized for use with cells acquired using Laser Capture Microdissection (LCM) on CapSure® LCM Caps. Total cellular RNA isolated using the ParadisePlus Reagent System RNA Extraction/ Isolation reagents produces RNA in a small volume of low ionic
Paradise®Plus Reagent System User Guide — 12872-00 Rev. C 1
1. Introduction
2
strength buffer, ready for use in linear amplification using the Paradise Plus Reagent System RNA amplification reagents. The Paradise Plus Reagent System RNA Extraction/Isolation Kit contains RNA extraction and purification reagents and MiraCol™ Purification Columns.
AmplificationThe ParadisePlus Reagent System RNA Amplification reagents enable the production of large quantities of amplified antisense RNA (aRNA) from small quantities of total cellular RNA. This process for linear amplification provides efficient, reproducible results through protocols, reagents, and nucleic acid purification technology using MDS Analytical Technologies’ MiraCol Purification Columns. The ParadisePlus RNA Amplification reagents can amplify total cellular RNA to generate sufficient aRNA, ready for use in microarray, quantitative real-time PCR or other applications.
1.2. PERFORMANCE SPECIFICATIONS The ParadisePlus kits should yield enough amplified RNA (aRNA) to complete multiple microarray experiments when starting with the recommended amount of starting material from a tissue block which contains good quality RNA.
1.3. MASTER-MIXES The ParadisePlus kits are designed with the assumption that master-mixes will be made when using three or more samples, and will not be used for two or less samples. The kits have been designed with a 10% overage for 3 samples. Exceeding 10% overage for master-mixes may result in insufficient material to complete all reactions. A suggested master mix size for six samples is included where appropriate.
1.4. RNA INPUT REQUIREMENTSThe ParadisePlus kits are designed and optimized for use with Formalin-Fixed Paraffin Embedded tissue samples. The amplification kit is designed to for use with an expected total RNA input amount of 5-40 ng. The amount of total RNA found in a cell varies by cell type, length of fixation, age of the sample block and quality of the material prior to fixation. Different sources of total RNA contain varying amounts of mRNA; consequently, the total RNA input needed to obtain microgram quantities of aRNA depends on the total RNA source. For example, RNA from rapidly dividing cells may be relatively mRNA-rich and thus may result in higher output of aRNA. In general one can expect anywhere from 1 - 10 pg of total RNA per cell based on factors mentioned above. We recommend brining in a minimum of 5 ng of total RNA into the Paradise Plus system amplification reaction.
1.5. STORAGE AND STABILITY MDS Analytical Technologies makes recommendations for storage temperatures throughout this document. Realizing that not ever laboratory has a freezers set at these
Paradise®Plus Reagent System User Guide — 12872-00 Rev. C

1.6. Material Safety and Data Sheet (MSDS)
temperatures, we have defined the acceptable temperature ranges for our recommendations.
Acceptable ranges for storage:
> -70°C = -65°C to -80°C
> -20°C = -15°C to -30°C
> 4°C = 2°C to 8°C
> Room Temperature = 10°C to 30°C
StainingInspect all kit components upon receipt. Ethanol and xylene are flammable and should be unpacked and stored at room temperature in a fireproof storage cabinet or fume hood with adequate ventilation. Cap bottles tightly between uses. Store remaining kit supplies at room temperature in a clean, dust-free environment.
Extraction and IsolationStore the ParadisePlus Reagent System RNA Extraction/Isolation components at room temperature. Store the DNase I solution and DNase Buffer at –70ºC until use. Once the reagents are used, storage at –20ºC is recommended.
AmplificationThe ParadisePlus amplification kits have both room temperature and frozen components. The room temperature components should be stored at normal room temperature. The frozen components are shipped on dry ice and should be stored at -70°C until initial use. After initial use -20°C is recommended to prevent unnecessary freeze-thaws of the enzymes. The control RNA and any RNA generated from ParadisePlus kits should always be stored at –70°C.
The Control RNA vial should be stored at –70°C or below immediately upon arrival to ensure maximum stability. For optimal results, using the reagents as soon as possible after receipt is recommended.
ExpirationAll reagents included with the system should be used within six (6) months of receipt.
1.6. MATERIAL SAFETY AND DATA SHEET (MSDS) Material Safety and Data Sheets (MSDS) for kit chemical components are available from the MDS Analytical Technologies web site at www.moleculardevices.com. They may also be acquired by calling MDS Analytical Technologies Technical Services 1-800-635-5577 or +1-408-747-1700, or send an email inquiry to [email protected].
Paradise®Plus Reagent System User Guide — 12872-00 Rev. C 3
1. Introduction
4
1.7. RELATED ARCTURUS PRODUCTSMost common part numbers provided. Additional configurations available depending on individual need.
HistoGene® LCM Frozen Section Staining Kit The HistoGene® LCM Frozen Section Staining Kit is used to process tissue sections for LCM that maximizes the quality and yield of RNA from LCM cells. The kit comes with all dehydration and staining reagents, disposable staining jars, specially treated slides, and detailed protocol and troubleshooting guide.
KIT0401 – 72 slides
HistoGene® LCM Immunofluorescence Staining Kit The HistoGene LCM Immunofluorescence Staining Kit is the only kit designed to enable retrieval of high-quality RNA from immunofluorescently stained frozen tissue. It enables convenient and reliable staining, dehydration and LCM of tissue sections with protocols streamlined and optimized both for optimal LCM captures and maintaining RNA quality for downstream applications that require intact RNA, like microarray analysis and RT-PCR.
KIT0420 – 32 slides
PicoPure® RNA Isolation Kit For extraction and isolation of total RNA from small samples, particularly Laser Capture Microdissected (LCM) cells. The PicoPure® RNA Kit comes with optimized buffers, MiraCol Purification Columns and an easy-to-use protocol to maximize recovery of high-quality total cellular RNA ready for amplification with the RiboAmp® Plus RNA Amplification Kits.
KIT0204 – 40 isolations
PicoPure® DNA Extraction Kit The PicoPure DNA Extraction Kit is optimized to maximize the recovery of genomic DNA from 10 or more cells captured by LCM. The kit comes with reagents and protocol tested to ensure complete extraction of DNA from LCM samples prepared with any standard tissue preparation procedure. DNA prepared using the kit is PCR-ready and needs no additional purification to perform amplification.
KIT0103 – 150 HS cap or 30 Macro cap extractions
RiboAmp® Plus RNA Amplification KitThe RiboAmp Plus RNA Amplification Kit enables the production of microgram quantities of antisense RNA (aRNA) from as little as picogram quantities of total cellular RNA. Amplified RNA produced using the kit is suitable for labeling and use for probing expression microarrays. The kit achieves amplifications of 1,000-3,000-fold in one round of amplification, and amplifications of up to 1,000,000-fold in two rounds. The kits include microarray labeling options such as biotin, fluorescent dyes and amino allyl. Kits
Paradise®Plus Reagent System User Guide — 12872-00 Rev. C

1.8. Additional Equipment and Materials Required
are available in two sensitivity options, RiboAmp Plus (5-40 ng) and a high sensitivity version RiboAmp HS Plus (0.1-5 ng).
KIT0521 RiboAmp Plus – (12) 1-round amplifications or (6) 2-round amplifications
KIT0525 RiboAmp HS Plus – (6) 2-round amplifications
Paradise® Plus Whole Transcript Reverse Transcription (WT-RT) Reagent SystemThe Paradise PLUS WT-RT reagent system was developed specifically to overcome obstacles such as chemical modification and fragmentation often associated with formalin-fixed tissue. The kit provides RNA isolation and reverse transcription reagents optimized for use with archived ffpe samples at small sample input amounts and delivers unparalleled yield, fidelity and representation. the kit effectively designed with exon-spanning primers at varying distances from the 3' end of the transcript and allow the study splice variants in archived or degraded samples. the Paradise WT-RT system also allows the use of gene-specific primers for RT to suit specific assay requirements.
KIT0315 – 12 Samples
Turbo Labeling™ KitsThe TURBO Labeling™ Kits provide a proprietary, non-enzymatic technology for labeling of unmodified aRNA for Gene Expression profiling. The unmodified aRNA is labeled post-amplification, thereby avoiding the need to incorporate modified nucleotides. The use of natural nucleotides in the amplification step results in unmodified aRNA with higher yields and longer aRNA fragments, thus providing better representation of the mRNA transcript for downstream analysis.
KIT0608 – Biotin – 12 samples
KIT0609 – Cy3 – 12 samples
KIT0610 – Cy5 – 12 samples
1.8. ADDITIONAL EQUIPMENT AND MATERIALS REQUIRED Ensure that you have ready access to the following laboratory equipment and materials before you begin. These items are not included with the Paradise Plus Reagent System
StainingEquipment
> Rotary Microtome
> Fume hood
> –70°C freezer
> Tweezers
> Cover glass forceps
Paradise®Plus Reagent System User Guide — 12872-00 Rev. C 5

1. Introduction
6
> Microslide box – plastic (VWR Cat. # 48444-004)
> Tissue Flotation Water Bath
> Oven
> 20 – 200 μL pipettor
Materials > Disposable gloves
> Detergent (Fisher Scientific, Cat. # 04-355
> RNase AWAY (Life Technologies, Cat. # 10328-011)
> 100% ethanol
> Kimwipes or similar lint-free towels
> Disposable microtome blades
> Microslides
> Pipette tips, nuclease free
Extraction/IsolationEquipment> Microcentrifuge (Eppendorf 5415D or similar)
> 2–20 μL pipettor
> 20–200 μL pipettor
> Incubation oven (50°C)
Materials> Nuclease-free pipette tips
> 0.5 ml extraction tubes (Applied BioSystems #N8010611 or USA Scientific, Inc, #1605-0000)
AmplificationEquipment> Thermal cycler with heated lid
> Microcentrifuge for 1.5 mL and 0.5 mL tubes (Eppendorf 5414D or similar)
> 0.5 – 10 μL pipettor
> 20 μL pipettor
> 200 μL pipettor
> 1000 μL pipettor
> Ice bath or cold block (4*C)
> Vortex mixer (optional)
Paradise®Plus Reagent System User Guide — 12872-00 Rev. C

1.9. Recommendations for Nuclease-free Technique
Materials> 0.5 mL or 0.2 mL RNase-free microcentrifuge tubes
> 2 mL lidless tube for centrifuge (PGC Scientific, Cat # 16-8101-06)
> Nuclease-free pipette tips
Reagents > SuperScript III Reverse Transcriptase, 200 U/μL (Enzyme only) Invitrogen part
number: 18080-093, 18080-044 or 18080-085
1.9. RECOMMENDATIONS FOR NUCLEASE-FREE TECHNIQUEStainingRNase contamination will cause experimental failure. Minimize RNase contamination by adhering to the following recommendations throughout your experiment:
> Wear disposable gloves and change them frequently.
> Use RNase-free solutions, glassware and plasticware.
> Do not re-purify Paradise Plus Reagent System Section Staining Kit components. They are certified Nuclease Free.
> Wash scalpels, tweezers and forceps with detergent and bake at 210°C for four hours before use.
> Use RNase AWAY (Life Technologies) according to the manufacturer’s instructions on the horizontal staining rack and any other surfaces that may come in contact with the sample.
> Use Kimwipe soaked in RNase Away to wipe down and clean the interior of tissue flo-tation water bath.
Extraction and IsolationRNase contamination will cause experimental failure. Minimize RNase contamination by adhering to the following recommendations throughout your experiment:
> Always handle RNA in a manner that avoids introduction of RNases.
> Wear disposable gloves and change them frequently to prevent the introduction of RNases from skin surfaces.
> After putting on gloves, avoid touching surfaces that may introduce RNases onto glove surfaces.
> Do not use reagents not supplied with the Paradise Plus Reagent System. Substitution of reagents or Kit components may adversely affect yields or introduce RNases.
> Use only new plasticware that is certified nucleic acid-free.
Paradise®Plus Reagent System User Guide — 12872-00 Rev. C 7

1. Introduction
8
> Use only new, sterile, RNase-free pipette tips and microcentrifuge tubes.
> Clean work surfaces with commercially available RNase decontamination solutions prior to performing reactions.
AmplificationRNase contamination will cause experimental failure. Minimize RNase contamination by adhering to the following recommendations throughout your experiment:
> Wear disposable gloves and change them frequently.
> After putting on gloves, avoid touching surfaces that may introduce RNases onto the glove surface.
> Do not use reagents not supplied. Substitutions of reagents or components may adversely affect yields or introduce RNases.
> Use only new, sterile RNase-free pipette tips and microcentrifuge tubes.
> Work surfaces should cleaned with commercially available RNase decontamination solutions prior to performing reactions.
Amplified aRNA Contamination Stray amplified aRNA and cDNA in work area can contaminate precious samples if the work area is routinely used for performing amplifications. To ensure a work area free of amplified aRNA, please do the following:
1 Irradiate the work area/hood with UV overnight every three to four days.
2 Clean surfaces and devices (pipettors, racks, centrifuge, etc.) with commercially available decontamination solutions everyday or more frequently depending on use.
Paradise®Plus Reagent System User Guide — 12872-00 Rev. C

2. Configurations2.1. KIT COMPONENTS
Table 2.1: Paradise® Plus Kit Configuration with Catalog Numbers.
Paradise® Plus Kit Configurations with Catalog
Numbers
Solvents / Stain Extraction /
Isolation
Amplification IVT Turbo
Label
Description Catalog
Number
# of
Samples
Room
temp
Room
temp
Frozen Room
temp
Frozen Room
temp
Frozen Room
temp
Arcturus Paradise Plus 1.5
Round (12 reactions)
KIT0311 12 1x
RA7013
1x
RA7014
1x
RA7007
1x
RA7001
2x
RA7018
2x
RA7011
2x
RA7008
x x
Arcturus Paradise Plus 1.5
Round (12 ext/iso, 6 amp)
KIT0321 6 1x
RA7013
1x
RA7014
1x
RA7007
1x
RA7001
1x
RA7018
1x
RA7011
1x
RA7008
x x
Arcturus Paradise Plus 1.5
Round (6 Amplification only)
KIT0321-A 6 x x x x 1x
RA7018
1x
RA7011
1x
RA7008
x x
Arcturus Paradise Plus 1.5
Round (12 extractions only)
KIT0312-I 12 x x 1x
RA7007
1x
RA7001
x x x x x
Arcturus Paradise Plus staining
components (24 samples)
KIT0312-S 12 1x
RA7013
1x
RA7014
x x x x x x x
Arcturus Paradise Plus stain,
slide jars & slides (24 samples)
KIT0312-J 24 x 1x
RA7014
x x x x x x x
Arcturus Paradise Plus 1.5
Round (12 reactions) - No
solvents
KIT0311-NS 12 x 1x
RA7014
1x
RA7007
1x
RA7001
2x
RA7018
2x
RA7011
2x
RA7008
x x
Arcturus Paradise Plus 1.5
Round (12 ext/iso, 6 amp) - No
solvents
KIT0321-NS 6 x 1x
RA7014
1x
RA7007
1x
RA7001
1x
RA7018
1x
RA7011
1x
RA7008
x x
Arcturus Paradise Plus 1.5
Round (Bulk, 48 reactions)
KIT0301* 48 2x
RA7013
4x
RA7014
4x
RA7007
4x
RA7001
8x
RA7018
8x
RA7011
8x
RA7008
x x
Arcturus Paradise Plus 2 round
(12 reactions)
KIT0312 12 1x
RA7013
1x
RA7014
1x
RA7007
1x
RA7001
2x
RA7018
2x
RA7011
2x
RA7009
x x
Arcturus Paradise Plus 2 Round
with Biotin Labeling (12
reactions)
KIT0312B 12 1x
RA7013
1x
RA7014
1x
RA7007
1x
RA7001
2x
RA7018
2x
RA7011
2x
RA7009
x 1x
KIT0608
Arcturus Paradise Plus 2 Round
with Cy3 Labeling (12 reactions)
KIT0312C 12 1x
RA7013
1x
RA7014
1x
RA7007
1x
RA7001
2x
RA7018
2x
RA7011
2x
RA7009
x 1x
KIT0609
Arcturus Paradise Plus 2 Round
with Cy5 Labeling (12 reactions)
KIT0312D 12 1x
RA7013
1x
RA7014
1x
RA7007
1x
RA7001
2x
RA7018
2x
RA7011
2x
RA7009
x 1x
KIT0610
Arcturus Paradise Plus 2 Round
(12 ext/iso, 6 amp)
KIT0322 6 1x
RA7013
1x
RA7014
1x
RA7007
1x
RA7001
1x
RA7018
1x
RA7011
1x
RA7009
x x
Paradise®Plus Reagent System User Guide — 12872-00 Rev. C 9

2. Configurations
10
Arcturus Paradise Plus 2 Round
(6 Amplification only)
KIT0322-A 6 x x x x 1x
RA7018
1x
RA7011
1x
RA7009
x x
Arcturus Paradise Plus 2 Round
(12 reactions) - No solvents
KIT0312-NS 12 x 1x
RA7014
1x
RA7007
1x
RA7001
2x
RA7018
2x
RA7011
2x
RA7009
x x
Arcturus Paradise Plus 2 Round
(12 ext/iso, 6 amp) - No solvents
KIT0322-NS 6 x 1x
RA7014
1x
RA7007
1x
RA7001
1x
RA7018
1x
RA7011
1x
RA7009
x x
Arcturus Paradise Plus 2 Round
with Biotin Labeling (12
reactions) - No solvents
KIT0312B-
NS
12 x 1x
RA7014
1x
RA7007
1x
RA7001
2x
RA7018
2x
RA7011
2x
RA7009
x 1x
KIT0608
Arcturus Paradise Plus 2 Round
with Cy3 Labeling (12 reactions)
- No solvents
KIT0312C-
NS
12 x 1x
RA7014
1x
RA7007
1x
RA7001
2x
RA7018
2x
RA7011
2x
RA7009
x 1x
KIT0609
Arcturus Paradise Plus 2 Round
with Cy5 Labeling (12 reactions)
- No solvents
KIT0312D-
NS
12 x 1x
RA7014
1x
RA7007
1x
RA7001
2x
RA7018
2x
RA7011
2x
RA7009
x 1x
KIT0610
Arcturus Paradise Plus 2 round -
Amino Allyl (12 reactions)
KIT0314 12 1x
RA7013
1x
RA7014
1x
RA7007
1x
RA7001
2x
RA7018
2x
RA7011
2x
RA7010
2x
RA7012
x
Arcturus Paradise Plus 2 Round -
Amino Allyl (12 ext/iso, 6 amp)
KIT0324 6 1x
RA7013
1x
RA7014
1x
RA7007
1x
RA7001
1x
RA7018
1x
RA7011
1x
RA7010
1x
RA7012
x
Arcturus Paradise Plus 2 Round -
Amino Allyl (6 Amplification
only)
KIT0324-A 6 x x x x 1x
RA7018
1x
RA7011
1x
RA7010
1x
RA7012
x
Arcturus Paradise Plus 2 Round -
Amino Allyl (12 reactions) - No
solvents
KIT0314-NS 12 x 1x
RA7014
1x
RA7007
1x
RA7001
2x
RA7018
2x
RA7011
2x
RA7010
2x
RA7012
x
Arcturus Paradise Plus 2 Round -
Amino Allyl (12 ext/iso, 6 amp) -
No solvents
KIT0324-NS 6 x 1x
RA7014
1x
RA7007
1x
RA7001
1x
RA7018
1x
RA7011
1x
RA7010
1x
RA7012
x
Arcturus Paradise Plus 2 round
(Bulk, 48 reactions)
KIT0302 48 2x
RA7013
2x
RA7014
4x
RA7007
4x
RA7001
8x
RA7018
8x
RA7011
8x
RA7009
x x
Arcturus Paradise Plus 2 round
(Bulk, 48 reactions)
KIT0304 48 2x
RA7013
1x
RA7014
4x
RA7007
4x
RA7001
8x
RA7018
8x
RA7011
8x
RA7010
8x
RA7012
x
Arcturus Paradise Plus qrtPCR kit
(12 reactions)
KIT0310 12 1x
RA7013
1x
RA7014
1x
RA7007
1x
RA7001
2x
RA7018
1x
RA7011
2x
RA7008
x x
Arcturus Paradise Plus qrtPCR kit
(12 reactions) - No Solvents
KIT0310-NS 12 x 1x
RA7014
1x
RA7007
1x
RA7001
2x
RA7018
1x
RA7011
2x
RA7008
x x
Arcturus Paradise Plus qrtPCR kit
(Bulk, 48 reactions)
KIT0300 48 2x
RA7013
1x
RA7014
4x
RA7007
4x
RA7001
8x
RA7018
4x
RA7011
8x
RA7008
x x
Arcturus Paradise Plus qrtPCR kit
(Bulk, 48 reactions) - No
solvents
KIT0300-NS 48 x 1x
RA7014
4x
RA7007
4x
RA7001
8x
RA7018
4x
RA7011
8x
RA7008
x x
Arcturus Paradise Plus QC Kit
(12 reactions)
KIT0313 12 x x 1x
RA7007
1x
RA7001
1x
RA7018
x x x x
Paradise® Plus Kit Configurations with Catalog
Numbers
Solvents / Stain Extraction /
Isolation
Amplification IVT Turbo
Label
Description Catalog
Number
# of
Samples
Room
temp
Room
temp
Frozen Room
temp
Frozen Room
temp
Frozen Room
temp
Paradise®Plus Reagent System User Guide — 12872-00 Rev. C
2.1. Kit Components
* NOTE: Customers who order KIT0313 should follow the sample assessment protocol otuline in Appendix B.
Paradise®Plus Reagent System User Guide — 12872-00 Rev. C 11

2. Configurations
12
Paradise®Plus Reagent System User Guide — 12872-00 Rev. C
3. Sample Preparation andStaining
3.1. COMPONENTS 3.1.1. REAGENTS AND SUPPLIES
The Paradise® Plus Reagent System Staining components include:
Table 3.1: Staining Solvents RA7013
Table 3.2: Staining Components RA7014
3.2. PRELIMINARY STEPS3.2.1. MATERIAL AND PROTOCOL REVIEW
To get the most from your staining reagents, take a few moments to examine the components of the kit and read the information in the following sections.
Component Size
100% Ethanol 0.5 L
95% Ethanol 0.5 L
75% Ethanol 1 L
Nuclease-free Water 1 L
Xylene 0.5 L
Component Size
Paradise Plus Stain 6 ml
Slide jars 10x
Paradise®Plus Reagent System User Guide — 12872-00 Rev. C 13

3. Sample Preparation and Staining
14
3.3. PROTOCOL3.3.1. SLIDE PREPARATION
NOTE: Wear clean disposable gloves throughout the Slide Preparation procedure. Use clean RNase-free instruments.
NOTE: Depending on humidity in the environment, drying may take longer for the sections to dry. The section must be dry before proceeding. Do not allow sections to air dry for longer than 3 hours.
1 Prior to starting slide preparation, minimize RNase contamination of the equipment by cleaning as follows:
a Rotary Microtome: Remove and discard old disposable microtome blade. Use a Kimwipe soaked with RNase Away to wipe down the knife holder. Dry holder with a clean Kimwipe. Install a new disposable microtome blade into holder.
b Tissue Floatation Bath: Use a Kimwipe soaked with RNase Away to wipe down and clean the interior of the water bath. Rinse the interior with Milli-Q or RNase free water. Fill the water bath with Milli-Q or RNase free water. Heat water to appropriate temperature for the paraffin used in your laboratory, typically 41°C–43°C. Do not add any adhesives to the water bath.
2 Set cutting thickness to 7 μm on the microtome.
3 Place paraffin block into specimen holder. Trim off any excess paraffin from the block face. Cut and discard the first five sections after trimming.
4 From the fresh surface, cut 7 μm sections from your specimen. If you are cutting more than one specimen, move to a new section of the blade, use gauze soaked in RNase Away to clean blade, or use a new disposable blade for each one to avoid cross contamination.
5 Remove section(s) from microtome and float them onto heated water bath. Allow section(s) to flatten. Minimize time in water bath to no longer than 2 minutes. Mount each section on a room-temperature slide.
6 Prop slide on end in a vertical, not horizontal, position to allow water to drain away from section. Air-dry the slide for a minimum of 30 minutes at room temperature. Discard any slides that have wrinkles or folds in the section.
7 Proceed immediately to the Deparaffinization, Staining and Dehydration segment of the protocol or store slides at –70°C in a microslide box for up to two weeks.
8 After completion of the slide preparation process, remove any paraffin debris from the microtome. Clean surfaces with a Kimwipe soaked with RNase Away and dry all surfaces. Discard water from water bath and clean the interior with RNase Away and dry all surfaces.
Paradise®Plus Reagent System User Guide — 12872-00 Rev. C
3.3. Protocol
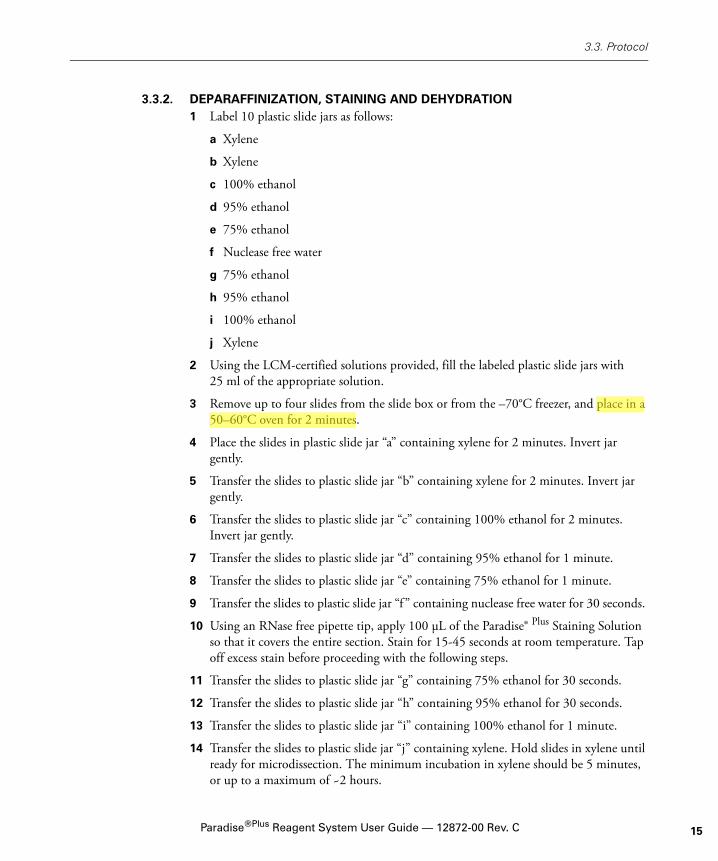
3.3.2. DEPARAFFINIZATION, STAINING AND DEHYDRATION 1 Label 10 plastic slide jars as follows:
a Xylene
b Xylene
c 100% ethanol
d 95% ethanol
e 75% ethanol
f Nuclease free water
g 75% ethanol
h 95% ethanol
i 100% ethanol
j Xylene
2 Using the LCM-certified solutions provided, fill the labeled plastic slide jars with 25 ml of the appropriate solution.
3 Remove up to four slides from the slide box or from the –70°C freezer, and place in a 50–60°C oven for 2 minutes.
4 Place the slides in plastic slide jar “a” containing xylene for 2 minutes. Invert jar gently.
5 Transfer the slides to plastic slide jar “b” containing xylene for 2 minutes. Invert jar gently.
6 Transfer the slides to plastic slide jar “c” containing 100% ethanol for 2 minutes. Invert jar gently.
7 Transfer the slides to plastic slide jar “d” containing 95% ethanol for 1 minute.
8 Transfer the slides to plastic slide jar “e” containing 75% ethanol for 1 minute.
9 Transfer the slides to plastic slide jar “f ” containing nuclease free water for 30 seconds.
10 Using an RNase free pipette tip, apply 100 μL of the Paradise® Plus Staining Solution so that it covers the entire section. Stain for 15-45 seconds at room temperature. Tap off excess stain before proceeding with the following steps.
11 Transfer the slides to plastic slide jar “g” containing 75% ethanol for 30 seconds.
12 Transfer the slides to plastic slide jar “h” containing 95% ethanol for 30 seconds.
13 Transfer the slides to plastic slide jar “i” containing 100% ethanol for 1 minute.
14 Transfer the slides to plastic slide jar “j” containing xylene. Hold slides in xylene until ready for microdissection. The minimum incubation in xylene should be 5 minutes, or up to a maximum of ~2 hours.
Paradise®Plus Reagent System User Guide — 12872-00 Rev. C 15

3. Sample Preparation and Staining
16
15 Place the slides on a Kimwipe to dry in the hood for five to ten minutes prior to LCM. LCM should be performed within 2 hours after removal from xylene.
16 Discard all used staining and dehydration solutions according to standard procedures.
NOTE: Carry out the Staining and Dehydration segment of the protocol in a fume hood. Wear clean disposable gloves.
NOTE: Xylene jar “a” must be changed after processing up to a maximum of 4 slides.
NOTE: 75% Ethanol jar “e” must be changed after processing up to a maximum of 4 slides. Staining times may vary depending on tissue types.
Performing Laser Capture Microdissection (LCM) NOTE: Please consult the User Guide for the instrument you will use for detailed instructions.
Paradise®Plus Reagent System User Guide — 12872-00 Rev. C

4. RNA Extraction/Isolation4.1. COMPONENTS
4.1.1. REAGENTS AND SUPPLIES The Paradise® Plus Reagent System RNA Extraction/Isolation components include the following items:
Table 4.1: Paradise® Extraction - Room Temperature RA7001
Table 4.2: Paradise® Extraction - Frozen RA7007
Component Vial Color Vial Label
Extraction Conditioning Buffer Blue CB
Extraction Ethanol Solution Blue EtOH
Extraction Wash Buffer 1 Blue W1
Extraction Wash Buffer 2 Blue W2
Extraction Elution Buffer Blue EB
Extraction Binding Buffer Blue BB
Pro-k Reconstitution Buffer Pro K
0.5 mL Microcentrifuge Tubes
Purification columns
Component Vial Color Vial Label
DNase Buffer Blue DNB
DNase Mix Blue DNase
Paradise®Plus Reagent System User Guide — 12872-00 Rev. C 17

4. RNA Extraction/Isolation
18
4.2. PRELIMINARY STEPS4.2.1. MATERIAL AND PROTOCOL REVIEW
To get the most from your extraction reagents, take a few moments to examine the components of the kit and read the information in the following sections.
Overview Separate protocols are provided for extraction/isolation of RNA from:
> Microdissected samples using CapSure® LCM Macro caps,
> Microdissected samples using CapSure LCM HS caps or
> Tissue scrapes (0.5 cm x 0.5 cm)
The flow chart illustrates the Paradise Plus Reagent System RNA Extraction/Isolation procedure:
1 Extract RNA from a CapSure LCM Cap or tissue scrape.
2 Mix and load cell extract onto a preconditioned purification column.
3 Spin the extract through the column to capture RNA on the purification column membrane.
4 Wash.
5 DNase treat, and wash again.
6 Wash the column twice with wash buffer, and
7 Elute the RNA in low ionic strength buffer.
The entire isolation process, including incubations, can be completed in less than an hour, and the isolated total cellular RNA is ready for use in downstream applications. The Paradise Plus Reagent System RNA Extraction/Isolation reagents are capable of isolating small amounts of RNA. It is important not to introduce nucleic acid contamination.
4.3. PROTOCOL4.3.1. PROTOCOL FOR USE WITH CAPSURE®
MACRO LCM CAPS RNA Extraction 1 Dispense Pro K Mix and incubate as follows:
a Capture cells using the CapSure Macro Cap. Refer to the instrument User Guide for complete instructions.
Figure 4.1: Paradise®Plus Reagent System RNA Extraction/Isolation
procedure
Paradise®Plus Reagent System User Guide — 12872-00 Rev. C

4.3. Protocol
b Add 300 μL of Reconstitution Buffer to vial of dried Pro K Mix (600 μg/tube). Dissolve completely by gently vortexing the tube to mix the reagents and place the tube on ice immediately. Excessive mixing may denature Proteinase K. One vial of Pro K Mix is adequate for 12 extractions. All mixed proteinase K solution should be used within one workday (up to 12 hours). Discard any mixed Proteinase K solution that is not used within one day.
2 Pipette 50μL of mixed Proteinase K Extraction Solution into a 0.5 ml extraction tube (not provided).
Figure 4.2: Proteinase K Extraction Solution
3 Insert the CapSure Macro LCM Cap with LCM captured cells into the microcentrifuge tube using the LCM Cap Insertion Tool.
4 Invert the extraction tube with the inserted CapSure Macro LCM Cap and shake down the 50 μL volume of Proteinase K Extraction solution until it completely covers the inside surface of the CapSure Macro LCM Cap.
5 Incubate at 37°C for the correct time period according to the following table:
Table 4.3: RNA Incubation Times
* For complete extraction this time can be increased to 16 hours.
NOTE: If multiple LCM captures are performed, it is recommended that each cap be incubated in Pro K Mix immediately after collection. Caps may be incubated up to 24 hours.
Samples Age Incubation Time
Samples >3 years old 16 hours
Samples <3 years old 5 hours*
Paradise®Plus Reagent System User Guide — 12872-00 Rev. C 19

4. RNA Extraction/Isolation
20
6 After incubation, remove the tubes from the incubator, place them in a microcentrifuge and centrifuge for one minute at 800x g.
7 Remove the CapSure Macro LCM Cap. Close the microcentrifuge tube containing the extract.
8 Proceed with RNA isolation protocol or freeze cell extract at –70°C.
It is okay to stop at this point in the protocol.
RNA Isolation 1 Pre-condition the MiraCol® Purification Column as follows:
a Pipette 200 μL Conditioning Buffer (CB) onto the purification column filter membrane.
b Incubate the purification column with Conditioning Buffer for 5 minutes at room temperature.
c Centrifuge the purification column in the provided collection tube at 16,000 x g for one minute.
2 Pipette 53 μL of Paradise Plus Reagent System Binding Buffer (BB) into the cell extract from Part 1 (RNA Extraction). Mix well by pipetting up and down. DO NOT CENTRIFUGE. Pipette 103 μL of Ethanol Solution (EtOH) into tube and mix well.
3 The cell extract mixture will have a combined volume of approximately 206 μL.
4 To bind RNA, centrifuge for 2 minutes at 100 x g, immediately followed by a centrifugation at 16,000 x g for 1 minute.
5 Pipette 100 μL Wash Buffer 1 (W1) into column and centrifuge for 1 minute at 8000 x g.
6 Mix 2 μL DNase Mix (DNase) with 18 μL of DNase buffer (DNB). Add 20 μL mixture to the column and incubate at room temperature for 20 minutes.
7 Pipette 40 μL Wash Buffer 1 (W1) into the purification column and centrifuge for one minute at 8000 x g.
8 Pipette 100 μL Wash Buffer 2 (W2) into the purification column and centrifuge for one minute at 8000 x g.
9 Pipette another 100 μL Wash Buffer 2 (W2) into the purification column and centrifuge for two minutes at 16,000 x g.
NOTE: Check the purification column for any residual wash buffer. If wash buffer remains, re-centrifuge at 16,000 x g for one minute.
10 Transfer the purification column to a new 0.5 mL microcentrifuge tube provided.
Paradise®Plus Reagent System User Guide — 12872-00 Rev. C
4.3. Protocol
11 Pipette 12 μL Elution Buffer (EB) directly onto the membrane of the purification column (Gently touch the tip of the pipette to the surface of the membrane while dispensing the elution buffer to ensure maximum absorption of EB into the membrane).
12 Incubate the column for one minute at room temperature.
13 Place each column tube assembly into the 2 ml support tube in the rotor with the 0.5 ml tube cap trailing the tube.
14 Centrifuge the column for one minute at 1,000 x g to distribute EB in the column, and then spin for one minute at 16,000 x g to elute RNA. The entire sample may be used immediately or stored at –70°C.
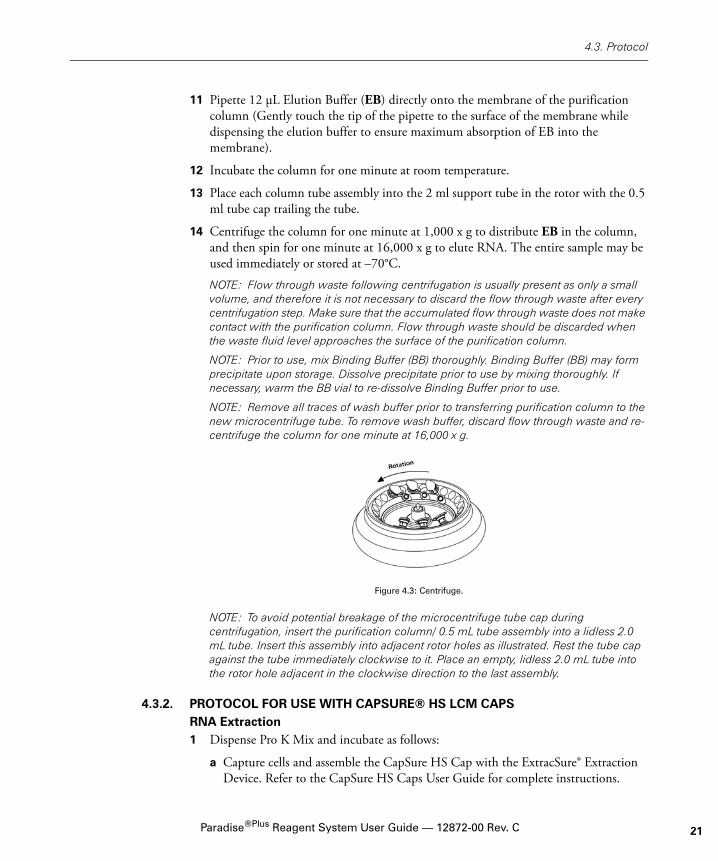
NOTE: Flow through waste following centrifugation is usually present as only a small volume, and therefore it is not necessary to discard the flow through waste after every centrifugation step. Make sure that the accumulated flow through waste does not make contact with the purification column. Flow through waste should be discarded when the waste fluid level approaches the surface of the purification column.
NOTE: Prior to use, mix Binding Buffer (BB) thoroughly. Binding Buffer (BB) may form precipitate upon storage. Dissolve precipitate prior to use by mixing thoroughly. If necessary, warm the BB vial to re-dissolve Binding Buffer prior to use.
NOTE: Remove all traces of wash buffer prior to transferring purification column to the new microcentrifuge tube. To remove wash buffer, discard flow through waste and re-centrifuge the column for one minute at 16,000 x g.
Figure 4.3: Centrifuge.
NOTE: To avoid potential breakage of the microcentrifuge tube cap during centrifugation, insert the purification column/ 0.5 mL tube assembly into a lidless 2.0 mL tube. Insert this assembly into adjacent rotor holes as illustrated. Rest the tube cap against the tube immediately clockwise to it. Place an empty, lidless 2.0 mL tube into the rotor hole adjacent in the clockwise direction to the last assembly.
4.3.2. PROTOCOL FOR USE WITH CAPSURE® HS LCM CAPS RNA Extraction 1 Dispense Pro K Mix and incubate as follows:
a Capture cells and assemble the CapSure HS Cap with the ExtracSure® Extraction Device. Refer to the CapSure HS Caps User Guide for complete instructions.
Paradise®Plus Reagent System User Guide — 12872-00 Rev. C 21

4. RNA Extraction/Isolation
22
b Add 300 μL of Reconstitution Buffer to vial of dried Pro K Mix (600 μg/tube). Dissolve completely by gently vortexing the tube to mix the reagents and place the tube on ice immediately. Excessive mixing may denature Proteinase K. One vial of Pro K Mix is adequate for 60 extractions. All mixed proteinase K solution should be used within one work day (up to 12 hours). The remaining unmixed Reconstitution Buffer should be stored at -20°C. Discard any mixed Proteinase K solution that is not used within one day.
2 Place the CapSure–ExtracSure assembly in a CapSure HS Alignment Tray and pipette 10 μL Pro K Mix solution into the buffer well. Place pipette tip down to the film surface to avoid trapping a bubble.
Figure 4.4: CapSure® HS Alignment Tray
3 Place a new 0.5 ml extraction tube (not provided) onto the CapSure–ExtracSure assembly (see CapSure® HS Caps User Guide for more details about assembly).
4 Cover with Incubation Block.
Figure 4.5: Incubation Block
5 Incubate at 37°C for the correct time period according to the following table:
Pipettor Tip
ExtracSure®
SampleExtractionDevice
Paradise®Plus Reagent System User Guide — 12872-00 Rev. C
4.3. Protocol
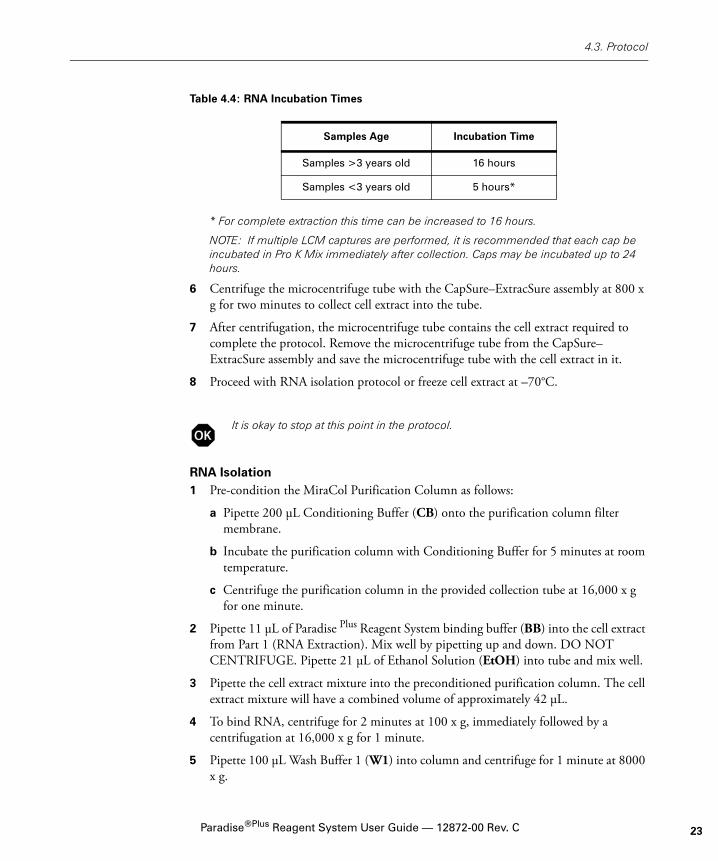
Table 4.4: RNA Incubation Times
* For complete extraction this time can be increased to 16 hours.
NOTE: If multiple LCM captures are performed, it is recommended that each cap be incubated in Pro K Mix immediately after collection. Caps may be incubated up to 24 hours.
6 Centrifuge the microcentrifuge tube with the CapSure–ExtracSure assembly at 800 x g for two minutes to collect cell extract into the tube.
7 After centrifugation, the microcentrifuge tube contains the cell extract required to complete the protocol. Remove the microcentrifuge tube from the CapSure–ExtracSure assembly and save the microcentrifuge tube with the cell extract in it.
8 Proceed with RNA isolation protocol or freeze cell extract at –70°C.
It is okay to stop at this point in the protocol.
RNA Isolation 1 Pre-condition the MiraCol Purification Column as follows:
a Pipette 200 μL Conditioning Buffer (CB) onto the purification column filter membrane.
b Incubate the purification column with Conditioning Buffer for 5 minutes at room temperature.
c Centrifuge the purification column in the provided collection tube at 16,000 x g for one minute.
2 Pipette 11 μL of Paradise Plus Reagent System binding buffer (BB) into the cell extract from Part 1 (RNA Extraction). Mix well by pipetting up and down. DO NOT CENTRIFUGE. Pipette 21 μL of Ethanol Solution (EtOH) into tube and mix well.
3 Pipette the cell extract mixture into the preconditioned purification column. The cell extract mixture will have a combined volume of approximately 42 μL.
4 To bind RNA, centrifuge for 2 minutes at 100 x g, immediately followed by a centrifugation at 16,000 x g for 1 minute.
5 Pipette 100 μL Wash Buffer 1 (W1) into column and centrifuge for 1 minute at 8000 x g.
Samples Age Incubation Time
Samples >3 years old 16 hours
Samples <3 years old 5 hours*
Paradise®Plus Reagent System User Guide — 12872-00 Rev. C 23

4. RNA Extraction/Isolation
24
6 Mix 2 μL DNase Mix (DNase) with 18 μL of DNase buffer (DNB). Add 20 μL mixture to the column and incubate at room temperature for 20 minutes.
7 Pipette 40 μL Wash Buffer 1 (W1) into the purification column and centrifuge for one minute at 8000 x g.
8 Pipette 100 μL Wash Buffer 2 (W2) into the purification column and centrifuge for one minute at 8000 x g.
9 Pipette another 100 μL Wash Buffer 2 (W2) into the purification column and centrifuge for two minutes at 16,000 x g. Check the purification column for any residual wash buffer. If wash buffer remains, at 16,000 x g for one minute.
10 Transfer the purification column to a new 0.5 mL microcentrifuge tube provided.
11 Pipette 12 μL Elution Buffer (EB) directly onto the membrane of the purification column (Gently touch the tip of the pipette to the surface of the membrane while dispensing the elution buffer to ensure maximum absorption of EB into the membrane).
12 Incubate the column for one minute at room temperature.
13 Place each column tube assembly into the 2 ml support tube in the rotor with the 0.5 ml tube cap trailing the tube.
14 Centrifuge the column for one minute at 1,000 x g to distribute EB in the column, and then spin for one minute at 16,000 x g to elute RNA. The entire sample may be used immediately or stored at –70°C or below.
NOTE: Flow through waste following centrifugation is usually present as only a small volume, and therefore it is not necessary to discard the flow through waste after every centrifugation step. Make sure that the accumulated flow through waste does not make contact with the purification column. Flow through waste should be discarded when the waste fluid level approaches the surface of the purification column.
NOTE: Prior to use, mix Binding Buffer (BB) thoroughly. Binding Buffer (BB) may form precipitate upon storage. Dissolve precipitate prior to use by mixing thoroughly. If necessary, warm the BB vial to re-dissolve Binding Buffer prior to use.
NOTE: Remove all traces of wash buffer prior to transferring purification column to the new microcentrifuge tube. To remove wash buffer, discard flow through waste and re-centrifuge the column for one minute at 16,000 x g.
Figure 4.6: Centrifuge.
Paradise®Plus Reagent System User Guide — 12872-00 Rev. C
4.3. Protocol
NOTE: To avoid potential breakage of the microcentrifuge tube cap during centrifugation, insert the purification column/ 0.5 mL tube assembly into a lidless 2.0 mL tube. Insert this assembly into adjacent rotor holes as illustrated. Rest the tube cap against the tube immediately clockwise to it. Place an empty, lidless 2.0 mL tube into the rotor hole adjacent in the clockwise direction to the last assembly.
4.3.3. TISSUE SCRAPE PROTOCOL NOTE: One vial of proteinase K is adequate for 3 tissue scrape samples.
NOTE: Use a new scalpel blade for each sample to avoid cross-contamination.
NOTE: Discard flow through waste when the waste fluid level approaches the bottom surface of the purification column.
Slide preparationFollow slide prep protocol, Section 3.3.1.
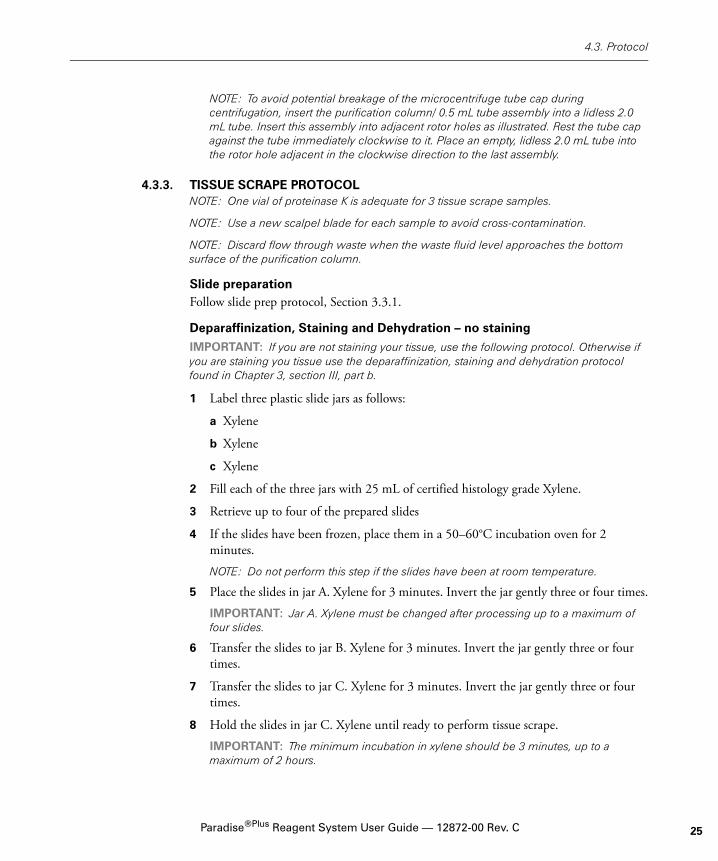
Deparaffinization, Staining and Dehydration – no stainingIMPORTANT: If you are not staining your tissue, use the following protocol. Otherwise if you are staining you tissue use the deparaffinization, staining and dehydration protocol found in Chapter 3, section III, part b.
1 Label three plastic slide jars as follows:
a Xylene
b Xylene
c Xylene
2 Fill each of the three jars with 25 mL of certified histology grade Xylene.
3 Retrieve up to four of the prepared slides
4 If the slides have been frozen, place them in a 50–60°C incubation oven for 2 minutes.
NOTE: Do not perform this step if the slides have been at room temperature.
5 Place the slides in jar A. Xylene for 3 minutes. Invert the jar gently three or four times.
IMPORTANT: Jar A. Xylene must be changed after processing up to a maximum of four slides.
6 Transfer the slides to jar B. Xylene for 3 minutes. Invert the jar gently three or four times.
7 Transfer the slides to jar C. Xylene for 3 minutes. Invert the jar gently three or four times.
8 Hold the slides in jar C. Xylene until ready to perform tissue scrape.
IMPORTANT: The minimum incubation in xylene should be 3 minutes, up to a maximum of 2 hours.
Paradise®Plus Reagent System User Guide — 12872-00 Rev. C 25

4. RNA Extraction/Isolation
26
9 When ready to perform tissue scrape, remove the slides from the xylene, then dry in a fume hood for 5–10 minutes.
IMPORTANT: Perform RNA extraction and isolation within 2 hours after removing the slides from the xylene.
10 Repeat steps 3 through 9 for any remaining slides.
11 Discard the used xylene according to standard procedures, and then clean the jars following the procedure, Appendix F. “Cleaning the Staining Jars”.
12 Proceed to RNA extraction and isolation.
Scrape and RNA Extraction 1 Add 300 μL of Reconstitution Buffer to vial of dried Pro K Mix (600 μg/tube).
Dissolve completely by gently vortexing the tube to mix the reagents and place the tube on ice immediately. Excessive mixing may denature Proteinase K.
2 Pipette enough Pro K solution to cover entire tissue section (25 μL, 50 μL, 75 μL, 100 μL or 150 μL) into a 0.5 ml extraction tube (not provided).
3 Using a clean, sterile scalpel blade, take the dried slide and scrape off the tissue section and place the scrape into the microcentrifuge tube containing the Proteinase K solution.
4 Vortex slightly. Visually inspect to ensure that the tissue scrape is in the Pro K solution and not stuck to the side of the microcentrifuge tube.
5 Incubate at 37°C for the correct time period according to the following table:
Table 4.5: RNA Incubation Times
* For complete extraction this time can be increased to 16 hours.
6 Proceed to RNA isolation or store at –70°C or below.
RNA Isolation 1 Pre-condition the MiraCol Purification Column as follows:
a Pipette 200 μL Conditioning Buffer (CB) onto the purification column filter membrane.
b Incubate the purification column with Conditioning Buffer for 5 minutes at room temperature.
c Centrifuge the purification column in the provided collection tube at 16,000 x g for one minute.
Samples Age Incubation Time
Samples >3 years old 16 hours
Samples <3 years old 5 hours*
Paradise®Plus Reagent System User Guide — 12872-00 Rev. C

4.3. Protocol
2 Using the amounts indicated in the table below:
a Pipette the Binding Buffer (BB) into the cell extract, then mix well by pipetting up and down.
b Pipette the Ethanol Solution (EtOH) into the cell extract, then mix well by pipetting up and down.
Table 4.6: Binding solutions chart
c The volume of Binding Buffer is 1.06 × the volume of cell extract/PK solution.
d The volume of Ethanol Solution is 2.06 × the volume of cell extract/PK solution, rounded up.
3 Pipette up to 210 μL of the cell extract mixture onto the preconditioned purification column.
IMPORTANT: Do not load more than 210 μL of the cell extract mixture onto the purification column at one time.
4 Centrifuge the purification column for 2 minutes at 100 x g to bind the RNA on the column membrane.
5 Repeat steps c and d until all of the cell extract mixture has been loaded and bound to the purification column.
6 Once all of the cell extract mixture has been bound onto the purification column, centrifuge the column for 1 minute at 16,000 x g to pellet the debris.
7 Repeat step d until all of sample mixture has been loaded and centrifuged.
8 Pipette 100 μL Wash Buffer 1 (W1) into column and centrifuge at 16,000 x g for 1 minute.
9 Mix 2 μL DNase Mix (DNase) with 18 μL of DNase buffer (DNB). Add 20 μL mixture to the column and incubate at room temperature for 20 minutes.
10 Pipette 40 μL Wash Buffer 1 (W1) into the purification column and centrifuge for one minute at 8000 x g.
11 Pipette 100 μL Wash Buffer 2 (W2) into column and centrifuge at 16,000 x g for 1 minute.
12 Pipette 100 μL Wash Buffer 2 (W2) into column and centrifuge at 16,000 x g for 2 minutes.
Solution Volume (μL)
Cell extract/PK Solution 25 50 75 100 150
Binding Buffera 27 53 80 106 159
Ethanol Solutionb 52 103 155 206 309
Paradise®Plus Reagent System User Guide — 12872-00 Rev. C 27

4. RNA Extraction/Isolation
28
13 Transfer column to a 0.5ml microcentrifuge tube provided in the Kit.
14 Pipette 12 μL of Elution Buffer (EB) direction onto the membrane of the purification column.
NOTE: Gently touch the tip of the pipette to the surface of the membrane while dispensing the elution buffer to ensure maximum absorption of EB to the membrane.
15 Incubate for 1 minute at room temperature.
16 Centrifuge at 1,000 x g for 1 minute and then at 16,000 x g for 1 minute.
The sample maybe used immediately or stored at –70°C or below.
Paradise®Plus Reagent System User Guide — 12872-00 Rev. C

5. RNA Amplification5.1. COMPONENTS
5.1.1. REAGENTS AND SUPPLIES
Table 5.1: Paradise® Plus cDNA kit - RA7018
*Also requires SuperScript III enzyme, not included
In Vitro Transcription (IVT)
Table 5.2: In Vitro Transcription (IVT) 1-round – RA7008
Component Vial Color Vial Label
1st Strand Master Mix Red 1
1st Strand Enzyme Mix* Red 2
Enhancer Yellow E
1st Strand Nuclease Mix Gold
2nd Strand Master Mix White 1
2nd Strand Enzyme Mix White 2
Primer 1 Grey 1
Primer 2 Grey 2
Primer 3 Grey 3
Control RNA White C
Component Vial Color Vial Label
IVT Buffer Blue 1
IVT Master Mix Blue 2
IVT Enzyme Mix Blue 3
DNase Mix Blue 4
Paradise®Plus Reagent System User Guide — 12872-00 Rev. C 29

5. RNA Amplification
30
Table 5.3: In Vitro Transcription (IVT) 2-round – RA7009
Table 5.4: Amino-Allyl IVT – RA7010
Table 5.5: aRNA Purification – RA7011
Component Vial Color Vial Label
IVT Buffer Blue 1
IVT Master Mix Blue 2
IVT Enzyme Mix Blue 3
DNase Mix Blue 4
Component Vial Color Vial Label
IVT Buffer Blue 1
IVT Master Mix Blue 2
IVT Enzyme Mix Blue 3
DNase Mix Blue 4
Amino-allyl IVT Master Mix Light Blue AA
Labeling Buffer Light Blue LB
DMSO Light Blue DMSO
Component Vial Color Vial Label
DNA Binding Buffer Red DB
DNA Wash Buffer Red DW
DNA Elution Buffer Red DE
RNA Binding Buffer Blue RB
RNA Wash Buffer Blue RW
RNA Elution Buffer Blue RE
0.5 mL Microcentrifuge Tubes
Purification columns
Paradise®Plus Reagent System User Guide — 12872-00 Rev. C

5.2. Preliminary Steps
Table 5.6: Amino-allyl aRNA Purification – RA7012
NOTE: Please read this entire protocol prior to performing amplifications.
NOTE: MDS Analytical Technologies recommends using quantitative real-time PCR for the most accurate measurement of RNA quantity of FFPE samples.
NOTE: For maximum stability, store the frozen reagents at –70ºC or below until used. After use, storage at -20ºC is recommended.
5.2. PRELIMINARY STEPS5.2.1. MATERIAL AND PROTOCOL REVIEW
To get the most from your amplification reagents, take a few moments to examine the components of the kit and read the information in the following sections.
5.2.2. OVERVIEW The Paradise® Plus Reagent System RNA Amplification reagents are optimized to amplify formalin fixed RNA. The reagents utilize two rounds of a five-step process for linear amplification of the mRNA fraction of total cellular RNA:
a first-strand synthesis reaction that yields cDNA incorporating a T7 promoter sequence;
b second-strand synthesis reaction utilizing exogenous primers that yields double-stranded cDNA;
c cDNA purification using specially designed MiraCol™ Purification Columns;
d in vitro transcription (IVT) utilizing T7 RNA polymerase yields antisense RNA (aRNA); and
e aRNA isolation with the MiraCol Purification Columns.
To save time, in vitro transcription may be performed overnight with the proper thermal cycler programming.
Component Vial Color Vial Label
RNA Binding Buffer Blue RB
RNA Wash Buffer Blue RW
RNA Elution Buffer Blue RE
0.5 mL Microcentrifuge Tubes
Purification columns
Paradise®Plus Reagent System User Guide — 12872-00 Rev. C 31

5. RNA Amplification
32
Figure 5.1: Paradise® Amplification Schematic
NOTE: Using a thermal cycler with a heated lid is important. The heated lid ensures proper temperature distribution within the reaction tube and prevents evaporative condensation that alters the reaction mixture concentrations.
5.2.3. THERMAL CYCLER PROGRAMMING Thermal cyclers provide a convenient and reproducible method of incubating reactions according to specified temperatures and times in the protocol. A thermal cycler program for use appears on page 3-12. The program is not intended for automatic progression from one time and temperature set to another. The program lists a 4°C hold after each incubation or incubation cycle when it is necessary to remove the reactions from the thermal cycler to add reagents. After the addition of reagents, place the sample back into the thermal cycler and resume the program.
Paradise®Plus Reagent System User Guide — 12872-00 Rev. C

5.2. Preliminary Steps
Table 5.7: Paradise® Plus Thermal Cycler Program – Round 1
°C Time
1st Strand Synthesis 70 1 hour
4 hold
42 1.5 hour
4 hold
37 30 minutes
95 5 minutes
4 hold
2nd Strand Synthesis 95 2 minutes
4 hold
25 10 minutes
37 30 minutes
70 5 minutes
4 hold
IVT 42 8 hours
4 hold (optional overnight hold)
37 15 minutes
4 hold
Paradise®Plus Reagent System User Guide — 12872-00 Rev. C 33

5. RNA Amplification
34
Table 5.8: Paradise® Plus Thermal Cycler Program – Round 2
NOTE: Using a thermal cycler with a heated lid is important. The heated lid ensures proper temperature distribution within the reaction tube and prevents evaporative condensation that alters the reaction mixture concentrations.
5.2.4. TIME REQUIREMENTSThe table below presents typical time requirements for completion of the protocol. Times reflect total handling and reaction times of each step. Note that there are safe stopping points for pausing the amplification process, and the times presented reflect a continuous, uninterrupted process.
°C Time
1st Strand Synthesis 70 5 minutes
4 Hold
25 10 minutes
37 1.5 hour
4 Hold
2nd Strand Synthesis 95 5 minutes
4 Hold
37 30 minutes
70 5 minutes
4 Hold
IVT 42 8 hours
4 hold (optional overnight hold)
37 15 minutes
4 Hold
Paradise®Plus Reagent System User Guide — 12872-00 Rev. C
5.2. Preliminary Steps
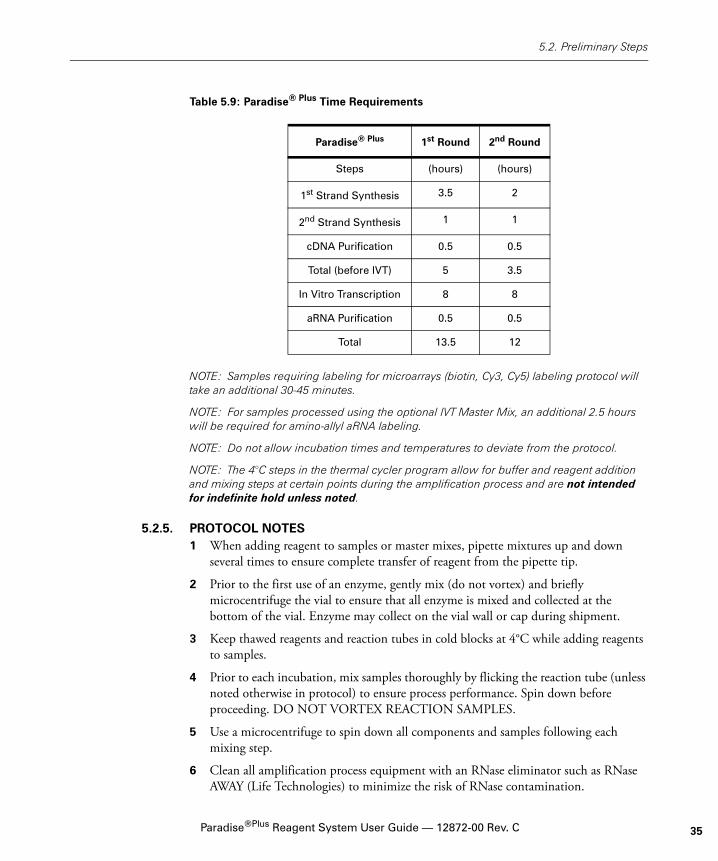
Table 5.9: Paradise® Plus Time Requirements
NOTE: Samples requiring labeling for microarrays (biotin, Cy3, Cy5) labeling protocol will take an additional 30-45 minutes.
NOTE: For samples processed using the optional IVT Master Mix, an additional 2.5 hours will be required for amino-allyl aRNA labeling.
NOTE: Do not allow incubation times and temperatures to deviate from the protocol.
NOTE: The 4°C steps in the thermal cycler program allow for buffer and reagent addition and mixing steps at certain points during the amplification process and are not intended for indefinite hold unless noted.
5.2.5. PROTOCOL NOTES 1 When adding reagent to samples or master mixes, pipette mixtures up and down
several times to ensure complete transfer of reagent from the pipette tip.
2 Prior to the first use of an enzyme, gently mix (do not vortex) and briefly microcentrifuge the vial to ensure that all enzyme is mixed and collected at the bottom of the vial. Enzyme may collect on the vial wall or cap during shipment.
3 Keep thawed reagents and reaction tubes in cold blocks at 4°C while adding reagents to samples.
4 Prior to each incubation, mix samples thoroughly by flicking the reaction tube (unless noted otherwise in protocol) to ensure process performance. Spin down before proceeding. DO NOT VORTEX REACTION SAMPLES.
5 Use a microcentrifuge to spin down all components and samples following each mixing step.
6 Clean all amplification process equipment with an RNase eliminator such as RNase AWAY (Life Technologies) to minimize the risk of RNase contamination.
Paradise® Plus 1st Round 2nd Round
Steps (hours) (hours)
1st Strand Synthesis 3.5 2
2nd Strand Synthesis 1 1
cDNA Purification 0.5 0.5
Total (before IVT) 5 3.5
In Vitro Transcription 8 8
aRNA Purification 0.5 0.5
Total 13.5 12
Paradise®Plus Reagent System User Guide — 12872-00 Rev. C 35

5. RNA Amplification
36
7 During enzyme and buffer dispensing, keep the reaction tube with sample on ice or chilled in a 4°C cold block. Do not freeze samples unless it is indicated to be safe to do so in the protocol.
5.2.6. SAMPLE AND REAGENTS PREPARATION 1 Thaw frozen kit components, as needed, and mix with gentle vortexing or by
inverting the tubes several times, spin down, and place on ice. When enzyme mixtures must be removed from –20°C storage for use, always keep them in a cold block or in an ice bucket at the lab bench.
2 Allow In Vitro Transcription (IVT) Buffer (Blue-labeled Vial 1), Master Mix (Blue-labeled Vial 2) and Enhancer (Yellow-labeled Vial) to assume room temperature (22–25°C), and mix by inverting or flicking the tube. Spin down if necessary. Dissolve all visible solids prior to use.
3 The Paradise Plus Reagent System RNA Amplification reagents are optimized for the input of formalin modified total cellular RNA.
4 Although excess enzyme and reagents are provided in all vials, there is insufficient volume to prepare extra reactions.
5 Two IVT Master Mix reagents are provided with kits designed for amino-allyl incorporation. The amino-allyl nucleotide mix should only be used in the second round IVT mix.
NOTE: When making master mixes, use only 10% overage per sample to avoid running out of reagent.
5.2.7. NUCLEIC ACID ELUTION USING SPIN COLUMNS Spin columns and 0.5 ml microcentrifuge tubes are provided for nucleic acid elution. Improper orientation of tubes during centrifugation may result in cap breakage or sample loss.
To correctly use the column-tube assembly, insert a spin column into the 0.5 ml tube, aligning the two cap hinges as illustrated. Load Elution Buffer onto the column and incubate as directed. Place the column-tube assembly into a 2 ml lidless support tube (PGC Scientific, Catalog #16-8101-06 or similar) in the centrifuge rotor; alternately, retain and reuse the 2 ml lidless collection tubes provided. (Some varieties of 2 ml tubes will not provide enough support. Contact MDS Analytical Technologies Technical Support for other alternatives). Skip one rotor position between assemblies and position assemblies with the 0.5 ml tube cap trailing the tube during centrifugation as shown. (Check for a mark on the centrifuge indicating rotation direction.) Centrifuge as directed in the protocol.
Paradise®Plus Reagent System User Guide — 12872-00 Rev. C
5.2. Preliminary Steps
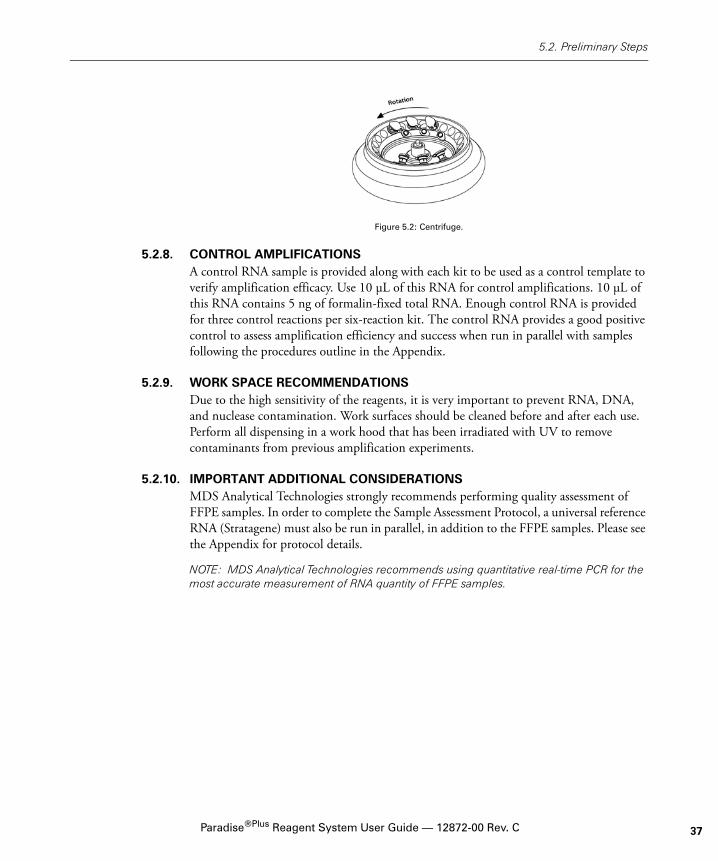
Figure 5.2: Centrifuge.
5.2.8. CONTROL AMPLIFICATIONS A control RNA sample is provided along with each kit to be used as a control template to verify amplification efficacy. Use 10 μL of this RNA for control amplifications. 10 μL of this RNA contains 5 ng of formalin-fixed total RNA. Enough control RNA is provided for three control reactions per six-reaction kit. The control RNA provides a good positive control to assess amplification efficiency and success when run in parallel with samples following the procedures outline in the Appendix.
5.2.9. WORK SPACE RECOMMENDATIONS Due to the high sensitivity of the reagents, it is very important to prevent RNA, DNA, and nuclease contamination. Work surfaces should be cleaned before and after each use. Perform all dispensing in a work hood that has been irradiated with UV to remove contaminants from previous amplification experiments.
5.2.10. IMPORTANT ADDITIONAL CONSIDERATIONS MDS Analytical Technologies strongly recommends performing quality assessment of FFPE samples. In order to complete the Sample Assessment Protocol, a universal reference RNA (Stratagene) must also be run in parallel, in addition to the FFPE samples. Please see the Appendix for protocol details.
NOTE: MDS Analytical Technologies recommends using quantitative real-time PCR for the most accurate measurement of RNA quantity of FFPE samples.
Paradise®Plus Reagent System User Guide — 12872-00 Rev. C 37

5. RNA Amplification
38
5.3. PROTOCOL5.3.1. PARADISE® PLUS ROUND ONE: 1ST STRAND cDNA SYNTHESIS
NOTE: Read all Detailed Protocol notes on the previous pages prior to beginning.
1 Prepare RNA sample in a total volume of 10 – 11 μL in a 0.5 mL or 0.2 mL RNase-free microcentrifuge tube and place on 4-8°C block.
2 Thaw Primer 1 (Gray-1), thoroughly mix, and spin down.
Figure 5.3: Gray 1
3 Add 1.0 μL of Primer 1, mix thoroughly by flicking the tube and spin down.
4 Incubate at 70°C for 1 hour then chill the samples to 4-8°C for at least one minute. Spin down the contents and place on 4-8°C block before proceeding to the next step.
5 Place 1st Strand Synthesis components (Red) at 4-8°C (cold block). 1st Strand Master Mix (Red-1) and Enhancer (Yellow) must be thawed, thoroughly mixed with all solids dissolved, and maintained at 4-8°C until used. 1st Strand Enzyme Mix (Red-2) and SuperScript III enzyme do not require thawing and can be placed directly at 4-8°C. Mix enzyme thoroughly by inverting several times. Spin briefly.
Figure 5.4: Red 1, Red 2, Yellow E and SuperScript III
6 Add 1st Strand Synthesis components in the order listed in the following table. If you are performing several amplifications, you may wish to prepare a Complete 1st Strand Synthesis Mix based on the following table, and add 9.0 μL Complete 1st Strand Synthesis Mix to each sample. Mix thoroughly by flicking the tube and spin down. DO NOT VORTEX.
Paradise®Plus Reagent System User Guide — 12872-00 Rev. C

5.3. Protocol
Table 5.10: Complete 1st Strand Synthesis Mix
* Not included in the kit
NOTE: Place components back onto the cold block or refreeze immediately after dispensing the reagent. Do not leave reagents at room temperature.
7 Incubate at 42°C for 1.5 hours then chill the sample to 4-8°C for at least one minute. Do not hold samples at this step for a prolonged period of time. Keep samples at 4-8°C until next incubation.
8 (Optional) You may remove a 2.0 μL sample at this point in the protocol to assess the integrity of the starting mRNA by Quantitative Real-Time PCR (qRT-PCR.)
NOTE: This may reduce your final yield.
IMPORTANT: QC Kit Customers (KIT0313): STOP HERE and continue to appendix section II
9 Thoroughly mix and spin down 1st Strand Nuclease Mix. Place on ice.
10 Add 2.0 μL of 1st Strand Nuclease Mix (Gold) to the sample, mix thoroughly by flicking the tube and spin down.
Figure 5.5: 1st Strand Nuclease Mix (Gold)
ComponentAmount
(μL)Vial #
6 reaction Master Mix
with 10% overage (μL)
Enhancer 2 Yellow E 13.2
1st Strand Master Mix 5 Red 1 33.0
1st Strand Enzyme Mix 1 Red 2 6.6
SuperScriptTM III Enzyme* 1 6.6
Total per sample 9 59.4
Paradise®Plus Reagent System User Guide — 12872-00 Rev. C 39

5. RNA Amplification
40
11 Incubate the sample at 37°C for 30 minutes followed by 95°C for five minutes.
12 Chill the sample to 4-8°C for at least one minute.
It is okay to stop at this point in the protocol. Sample may be stored at –20°C overnight.
NOTE: Removal for qrtPCR confirmation may not be suitable for low RNA inputs.
5.3.2. PARADISE® PLUS ROUND ONE: 2ND STRAND CDNA SYNTHESIS1 Place sample on 4-8°C block and allow to thaw if frozen (at 4-8°C).
2 Thaw Primer 2 (Gray-2), thoroughly mix, and spin down.
Figure 5.6: Gray 2
3 Add 1.0 μL of Primer 2. Mix thoroughly by flicking the tube and spin down.
4 Incubate sample at 95°C for 2 minutes, then chill and maintain the sample at 4-8°C for at least 2 minutes.
5 Thaw 2nd Strand Master Mix at 4-8°C (cold block) (White-1). Thoroughly mix and spin 2nd Strand Master Mix. 2nd Strand Enzyme Mix (White-2) does not require thawing. Mix enzyme thoroughly by inverting several times, spin briefly and place at 4-8°C.
Figure 5.7: White 1 and White 2
Paradise®Plus Reagent System User Guide — 12872-00 Rev. C

5.3. Protocol
6 Add 2nd Strand Synthesis components separately in the order listed in the following table. If you are performing several amplifications, you may wish to prepare a Complete 2nd Strand Synthesis Mix based on the following table, and add 30 μL Complete 2nd Strand Synthesis Mix to each sample. Mix thoroughly by flicking the tube and spin down.
Table 5.11: Complete 2nd Strand Synthesis Mix
*Store at 4°C until use
7 Incubate the sample as follows:
• 25°C 10 minutes
• 37°C 30 minutes
• 70°C 5 minutes
• 4-8°C Hold until ready to proceed (up to a maximum of 30 minutes)
NOTE: Place components back onto the cold block or refreeze immediately after dispensing the reagent. Do not leave reagents at room temperature for any extended period of time.
5.3.3. PARADISE® PLUS ROUND ONE: cDNA PURIFICATION1 Add 250 μL of DNA Binding Buffer (DB) to a DNA/RNA Purification Column
seated in the collection tube provided. Hold for five minutes at room temperature. Centrifuge at 16,000 x g for one minute.
Figure 5.8: Binding Buffer DB
Component Amount (μL) Vial #6 reaction Master Mix with
10% overage (μL)
2nd Strand Master Mix 29 White 1 191.4
2nd Strand Enzyme Mix 1 White 2 6.6
Total per sample 30 198.0
Paradise®Plus Reagent System User Guide — 12872-00 Rev. C 41
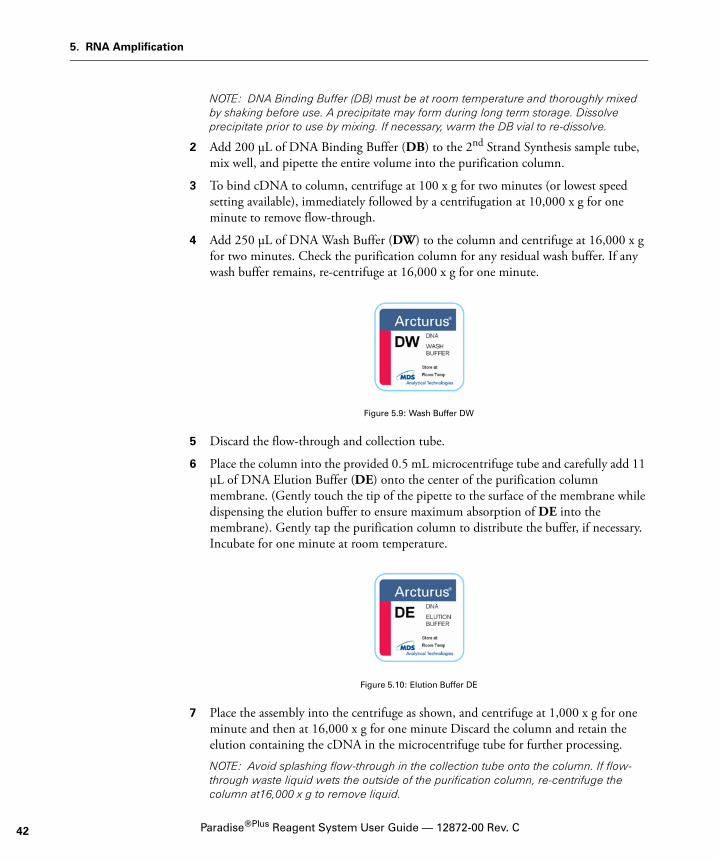
5. RNA Amplification
42
NOTE: DNA Binding Buffer (DB) must be at room temperature and thoroughly mixed by shaking before use. A precipitate may form during long term storage. Dissolve precipitate prior to use by mixing. If necessary, warm the DB vial to re-dissolve.
2 Add 200 μL of DNA Binding Buffer (DB) to the 2nd Strand Synthesis sample tube, mix well, and pipette the entire volume into the purification column.
3 To bind cDNA to column, centrifuge at 100 x g for two minutes (or lowest speed setting available), immediately followed by a centrifugation at 10,000 x g for one minute to remove flow-through.
4 Add 250 μL of DNA Wash Buffer (DW) to the column and centrifuge at 16,000 x g for two minutes. Check the purification column for any residual wash buffer. If any wash buffer remains, re-centrifuge at 16,000 x g for one minute.
Figure 5.9: Wash Buffer DW
5 Discard the flow-through and collection tube.
6 Place the column into the provided 0.5 mL microcentrifuge tube and carefully add 11 μL of DNA Elution Buffer (DE) onto the center of the purification column membrane. (Gently touch the tip of the pipette to the surface of the membrane while dispensing the elution buffer to ensure maximum absorption of DE into the membrane). Gently tap the purification column to distribute the buffer, if necessary. Incubate for one minute at room temperature.
Figure 5.10: Elution Buffer DE
7 Place the assembly into the centrifuge as shown, and centrifuge at 1,000 x g for one minute and then at 16,000 x g for one minute Discard the column and retain the elution containing the cDNA in the microcentrifuge tube for further processing.
NOTE: Avoid splashing flow-through in the collection tube onto the column. If flow-through waste liquid wets the outside of the purification column, re-centrifuge the column at16,000 x g to remove liquid.
Paradise®Plus Reagent System User Guide — 12872-00 Rev. C

5.3. Protocol
Figure 5.11: Centrifuge.
NOTE: To avoid potential breakage of the microcentrifuge tube cap during centrifugation, insert the purification tube/0.5 mL tube assembly into a lidless 1.7/2.0 mL tube. Insert this assembly into adjacent rotor holes as illustrated. Rest the tube cap against the tube immediately clockwise to it. Place an empty, lidless 1.7/2.0 mL tube into the rotor hole adjacent in the clockwise direction to the last assembly.
It is safe to stop at this point in the protocol. You may store the sample overnight at –20°C.
5.3.4. PARADISE® PLUS ROUND ONE: IN VITRO TRANSCRIPTION1 Thaw IVT Buffer (Blue-1), Master Mix (Blue-2) and Enhancer (Yellow) to room
temperature and thoroughly mix to dissolve all solids. IVT Enzyme Mix (Blue-3) does not require thawing and can be put directly 4-8°C. Mix enzyme thoroughly by inverting several times. Spin briefly.
Figure 5.12: Blue 1, Blue 2, Blue 3 and Yellow E
NOTE: IVT reaction components must be thawed thoroughly mixed with all solids dissolved, and brought to room temperature just before use.
2 Add IVT components in the order listed in the following table. If you are performing several amplifications, you may wish to prepare a Complete IVT Reaction Mix according to the following table, and add 12 μL Complete IVT Reaction Mix to each sample. Mix thoroughly by flicking the tube and spin down.
Paradise®Plus Reagent System User Guide — 12872-00 Rev. C 43

5. RNA Amplification
44
Table 5.12: Complete IVT Reaction Mix
3 Incubate at 42°C for 8 hours. Chill the sample(s) to 4-8°C.
At this point in the protocol, you may hold the reaction mixture at 4-8°C in the thermal cycler overnight.
4 Move the samples directly to a 4-8°C block.
5 Add 1 μL DNase Mix (Blue-4). Mix thoroughly and spin down. Incubate at 37°C for 15 minutes. Chill the sample(s) to 4-8°C. Proceed immediately to aRNA purification.
Figure 5.13: Blue 4
Component Amount (μL) Vial #6 reaction Master Mix with
10% overage (μL)
IVT Buffer 2 Blue 1 13.2
IVT Master Mix 6 Blue 2 39.6
IVT Enzyme Mix 2 Blue 3 13.2
Enhancer 2 Yellow E 13.2
Total per sample 12 79.2
Paradise®Plus Reagent System User Guide — 12872-00 Rev. C
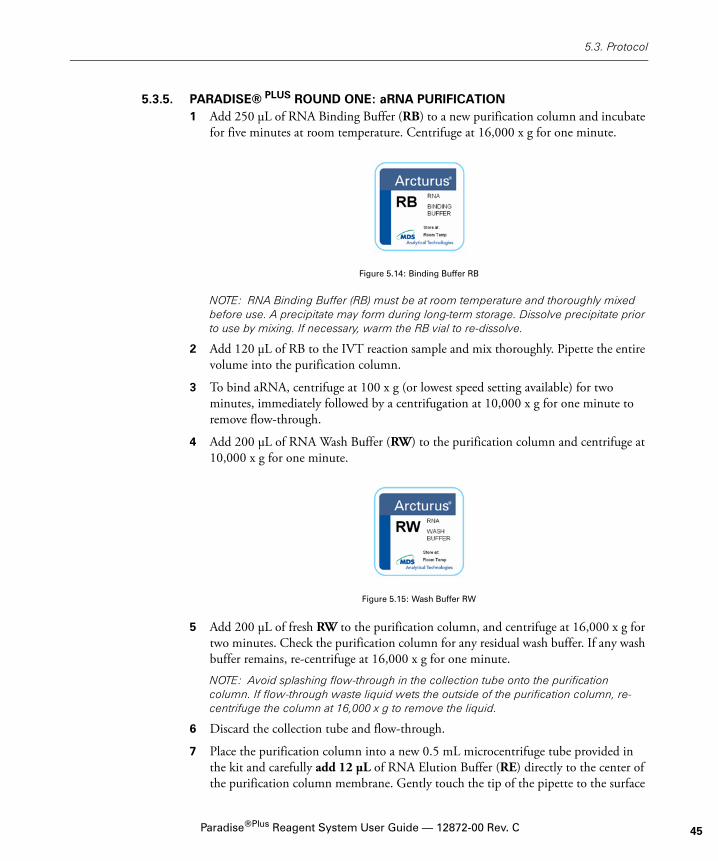
5.3. Protocol
5.3.5. PARADISE® PLUS ROUND ONE: aRNA PURIFICATION1 Add 250 μL of RNA Binding Buffer (RB) to a new purification column and incubate
for five minutes at room temperature. Centrifuge at 16,000 x g for one minute.
Figure 5.14: Binding Buffer RB
NOTE: RNA Binding Buffer (RB) must be at room temperature and thoroughly mixed before use. A precipitate may form during long-term storage. Dissolve precipitate prior to use by mixing. If necessary, warm the RB vial to re-dissolve.
2 Add 120 μL of RB to the IVT reaction sample and mix thoroughly. Pipette the entire volume into the purification column.
3 To bind aRNA, centrifuge at 100 x g (or lowest speed setting available) for two minutes, immediately followed by a centrifugation at 10,000 x g for one minute to remove flow-through.
4 Add 200 μL of RNA Wash Buffer (RW) to the purification column and centrifuge at 10,000 x g for one minute.
Figure 5.15: Wash Buffer RW
5 Add 200 μL of fresh RW to the purification column, and centrifuge at 16,000 x g for two minutes. Check the purification column for any residual wash buffer. If any wash buffer remains, re-centrifuge at 16,000 x g for one minute.
NOTE: Avoid splashing flow-through in the collection tube onto the purification column. If flow-through waste liquid wets the outside of the purification column, re-centrifuge the column at 16,000 x g to remove the liquid.
6 Discard the collection tube and flow-through.
7 Place the purification column into a new 0.5 mL microcentrifuge tube provided in the kit and carefully add 12 μL of RNA Elution Buffer (RE) directly to the center of the purification column membrane. Gently touch the tip of the pipette to the surface
Paradise®Plus Reagent System User Guide — 12872-00 Rev. C 45

5. RNA Amplification
46
of the membrane while dispensing RE to ensure maximum absorption of RE into the membrane. Gently tap the purification column to distribute the buffer, if necessary.
Figure 5.16: Elution Buffer RE
8 Incubate at room temperature for one minute.
9 Place each column-tube assembly into the centrifuge rotor with the 0.5 mL tube cap trailing the tube.
10 Centrifuge at 1,000 x g for one minute, immediately followed by 16,000 x g for one minute. Discard the purification column and retain the elution containing the aRNA.
NOTE: Tubes must be properly oriented in the rotor during elution. See Section 5.2.7.
Figure 5.17: Centrifuge.
NOTE: To avoid potential breakage of the microcentrifuge tube cap during centrifugation, insert the purification tube/0.5 mL tube assembly into a lidless 1.7/2.0 mL tube. Insert this assembly into adjacent rotor holes as illustrated. Rest the tube cap against the tube immediately clockwise to it. Place an empty, lidless 1.7/2.0 mL tube into the rotor hole adjacent in the clockwise direction to the last assembly.
11 Immediately proceed to Round Two or store the purified aRNA at –70°C overnight.
END OF ROUND 1.=
Paradise®Plus Reagent System User Guide — 12872-00 Rev. C

5.3. Protocol
5.3.6. PARADISE® PLUS ROUND TWO: 1ST STRAND cDNA SYNTHESIS1 Thaw samples at 4-8°C if necessary. Place samples on a 4-8°C block.
2 Thaw Primer 2 (Gray-2), thoroughly mix, spin down and place on a 4-8°C block.
Figure 5.18: Gray 2
3 Into eluted aRNA product from Round One, add 1.0 μL of Primer 2, mix thoroughly by flicking the tube and spin down.
4 Incubate the microcentrifuge tube at 70°C for 5 minutes then chill the samples to 4-8°C for one minute. Spin down the contents and place on 4-8°C block before proceeding to next step.
5 Place 1st Strand Synthesis components (Red) at 4-8°C. 1st Strand Master Mix and Enhancer (Yellow) must be thawed, thoroughly mixed with all solids dissolved, and maintained at 4-8°C until used. 1st Strand Enzyme Mix does not require thawing and can be placed directly at 4-8°C. Mix enzyme thoroughly by inverting several times. Spin briefly.
Figure 5.19: Red 1, Red 2, Yellow Enhancer and SuperScript III Enzyme
6 Add 1st Strand Synthesis components in the order listed in the following table. If you are performing several amplifications, you may wish to prepare a Complete 1st Strand Synthesis Mix based on the following table, and add 9.0 μL Complete 1st Strand Synthesis Mix to each sample. Mix thoroughly by flicking the tube and spin down. DO NOT VORTEX.
Paradise®Plus Reagent System User Guide — 12872-00 Rev. C 47
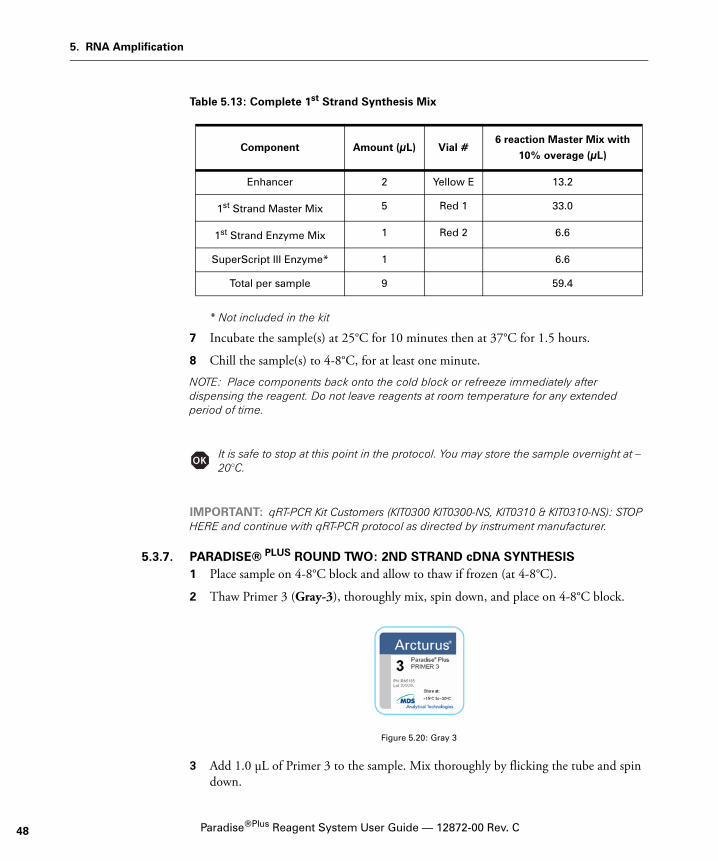
5. RNA Amplification
48
Table 5.13: Complete 1st Strand Synthesis Mix
* Not included in the kit
7 Incubate the sample(s) at 25°C for 10 minutes then at 37°C for 1.5 hours.
8 Chill the sample(s) to 4-8°C, for at least one minute.
NOTE: Place components back onto the cold block or refreeze immediately after dispensing the reagent. Do not leave reagents at room temperature for any extended period of time.
It is safe to stop at this point in the protocol. You may store the sample overnight at –20°C.
IMPORTANT: qRT-PCR Kit Customers (KIT0300 KIT0300-NS, KIT0310 & KIT0310-NS): STOP HERE and continue with qRT-PCR protocol as directed by instrument manufacturer.
5.3.7. PARADISE® PLUS ROUND TWO: 2ND STRAND cDNA SYNTHESIS 1 Place sample on 4-8°C block and allow to thaw if frozen (at 4-8°C).
2 Thaw Primer 3 (Gray-3), thoroughly mix, spin down, and place on 4-8°C block.
Figure 5.20: Gray 3
3 Add 1.0 μL of Primer 3 to the sample. Mix thoroughly by flicking the tube and spin down.
Component Amount (μL) Vial #6 reaction Master Mix with
10% overage (μL)
Enhancer 2 Yellow E 13.2
1st Strand Master Mix 5 Red 1 33.0
1st Strand Enzyme Mix 1 Red 2 6.6
SuperScript III Enzyme* 1 6.6
Total per sample 9 59.4
Paradise®Plus Reagent System User Guide — 12872-00 Rev. C
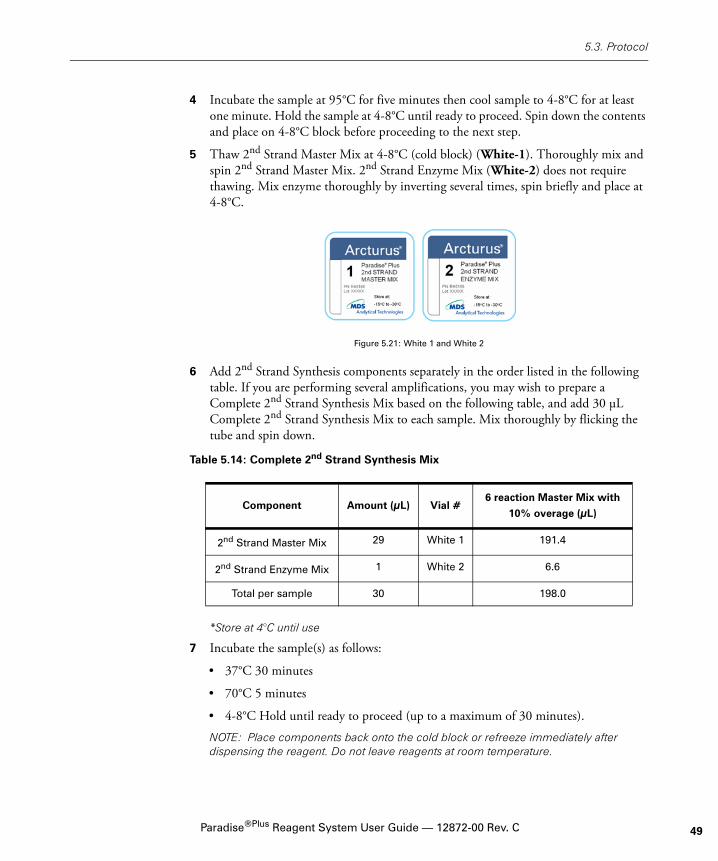
5.3. Protocol
4 Incubate the sample at 95°C for five minutes then cool sample to 4-8°C for at least one minute. Hold the sample at 4-8°C until ready to proceed. Spin down the contents and place on 4-8°C block before proceeding to the next step.
5 Thaw 2nd Strand Master Mix at 4-8°C (cold block) (White-1). Thoroughly mix and spin 2nd Strand Master Mix. 2nd Strand Enzyme Mix (White-2) does not require thawing. Mix enzyme thoroughly by inverting several times, spin briefly and place at 4-8°C.
Figure 5.21: White 1 and White 2
6 Add 2nd Strand Synthesis components separately in the order listed in the following table. If you are performing several amplifications, you may wish to prepare a Complete 2nd Strand Synthesis Mix based on the following table, and add 30 μL Complete 2nd Strand Synthesis Mix to each sample. Mix thoroughly by flicking the tube and spin down.
Table 5.14: Complete 2nd Strand Synthesis Mix
*Store at 4°C until use
7 Incubate the sample(s) as follows:
• 37°C 30 minutes
• 70°C 5 minutes
• 4-8°C Hold until ready to proceed (up to a maximum of 30 minutes).
NOTE: Place components back onto the cold block or refreeze immediately after dispensing the reagent. Do not leave reagents at room temperature.
Component Amount (μL) Vial #6 reaction Master Mix with
10% overage (μL)
2nd Strand Master Mix 29 White 1 191.4
2nd Strand Enzyme Mix 1 White 2 6.6
Total per sample 30 198.0
Paradise®Plus Reagent System User Guide — 12872-00 Rev. C 49

5. RNA Amplification
50
5.3.8. PARADISE® PLUS ROUND TWO: cDNA PURIFICATION1 Add 250 μL of DNA Binding Buffer (DB) to a new purification column seated in the
collection tube provided. Incubate for five minutes at room temperature. Centrifuge at 16,000 x g for one minute.
Figure 5.22: Binding Buffer DB
NOTE: DNA Binding Buffer (DB) must be at room temperature and thoroughly mixed before use. A precipitate may form during long-term storage. Dissolve precipitate by mixing. If necessary, warm the DB vial to re-dissolve
2 Add 200 μL of DB to the 2nd Strand Synthesis sample tube, mix well, and pipette the entire volume into the purification column.
3 To bind cDNA, centrifuge at 100 x g (or lowest speed setting available) for two minutes, immediately followed by a centrifugation at 10,000 x g for 1 minute to remove flow-through.
4 Add 250 μL of DNA Wash Buffer (DW) to the column and centrifuge at 16,000 x g for two minutes. Check the purification column for any residual wash buffer. If any wash buffer remains, re-centrifuge at 16,000 x g for one minute.
Figure 5.23: Wash Buffer DW
NOTE: Avoid splashing flow-through in the collection tube onto the column. If flow-through waste liquid wets the outside of the purification column, re-centrifuge the column at16,000 x g to remove liquid.
5 Discard the collection tube and flow-through.
6 Place the column into the provided 0.5 mL microcentrifuge tube and carefully add 11 μL of DNA Elution Buffer (DE) onto the center of the purification column membrane. Gently touch the tip of the pipette to the surface of the membrane while dispensing DE to ensure maximum absorption of DE into the membrane. Gently tap the purification column to distribute the buffer, if necessary.
Paradise®Plus Reagent System User Guide — 12872-00 Rev. C

5.3. Protocol
Figure 5.24: Elution Buffer DE
7 Incubate for one minute at room temperature.
8 Place each column-tube assembly into the 2 mL support tube in the rotor with the 0.5 mL tube cap trailing the tube.
9 Centrifuge at 1000 x g for one minute, followed immediately by 16,000 x g for one minute. Discard the column and retain the elution containing the cDNA.
Figure 5.25: Centrifuge.
NOTE: To avoid potential breakage of the microcentrifuge tube cap during centrifugation, insert the purification tube/0.5 mL tube assembly into a lidless 1.7/2.0 mL tube. Insert this assembly into adjacent rotor holes as illustrated. Rest the tube cap against the tube immediately clockwise to it. Place an empty, lidless 1.7/2.0 mL tube into the rotor hole adjacent in the clockwise direction to the last assembly.
It is safe to stop at this point in the protocol. You may store the sample overnight at –20°C.
IMPORTANT: 1.5 Round Customer (KIT 0301, KIT0301-NS KIT0311, & KIT0311-NS): STOP HERE and proceed to Appendix G.3., “Generation of Labeled aRNA Using Alternative IVT Kits”.
5.3.9. PARADISE® PLUS ROUND TWO: IN VITRO TRANSCRIPTION 1 Thaw IVT Buffer (Blue-1), Master Mix (Blue-2) and Enhancer (Yellow) to room
temperature and thoroughly mix to dissolve all solids. IVT Enzyme Mix does not require thawing and can be put directly 4-8°C. Mix enzyme thoroughly by inverting several times. Spin briefly.
Paradise®Plus Reagent System User Guide — 12872-00 Rev. C 51

5. RNA Amplification
52
NOTE: IVT reaction components must be thawed thoroughly mixed with all solids dissolved, and brought to room temperature just before use.
Figure 5.26: Normal IVT Blue-1, Blue-2, Blue-3, and Yellow E.
or
Figure 5.27: Amino-Allyl incorporation IVT: Blue-1, Light Blue AA Blue-3, and Yellow E.
2 Add IVT components in the order listed in the following table. If you are performing several amplifications, you may wish to prepare a Complete IVT Reaction Mix according to the following table, and add 12 μL Complete IVT Reaction Mix to each sample. Mix thoroughly by flicking the tube and spin down.
NOTE: IVT reaction components must be thawed thoroughly mixed with all solids dissolved, and brought to room temperature just before use.
Table 5.15: Complete IVT Reaction Mix
*If doing Amino-Allyl incorporation, substitute Amino-Allyl IVT Master Mix (light blue AA) here
Component Amount (μL) Vial #6 reaction Master Mix with
10% overage (μL)
IVT Buffer 2 Blue 1 13.2
IVT Master Mix* 6 Blue 2* 39.6
IVT Enzyme Mix 2 Blue 3 13.2
Enhancer 2 Yellow E 13.2
Total per sample 12 79.2
Paradise®Plus Reagent System User Guide — 12872-00 Rev. C

5.3. Protocol
3 Incubate at 42°C for 8 hours. Chill the sample(s) to 4-8°C.
At this point in the protocol, you may hold the reaction mixture at 4-8°C in the thermal cycler overnight.
4 Move the samples directly to a 4-8°C block.
Figure 5.28: Blue 4
5 Add 1 μL DNase Mix (Blue-4). Mix thoroughly and spin down. Incubate at 37°C for 15 minutes. Chill the sample(s) to 4-8°C. Proceed immediately to aRNA purification.
5.3.10. PARADISE® PLUS ROUND TWO: aRNA PURIFICATION1 Add 250 μL of RNA Binding Buffer (RB) to a new purification column seated in the
collection tube provided. Incubate for five minutes at room temperature. Centrifuge at 16,000 x g for one minute.
Figure 5.29: RNA Binding Buffer
Note: RNA Binding Buffer (RB) must be at room temperature and thoroughly mixed before use. A precipitate may form during long-term storage. Dissolve precipitate prior to use by mixing. If necessary, warm the RB vial to re-dissolve.
2 Add 120 μL of RB to the IVT reaction sample and mix thoroughly. Pipette the entire volume into the purification column.
3 To bind aRNA, centrifuge at 100 x g (or lowest speed setting available) for two minutes, immediately followed by a centrifugation at 10,000 x g for 1 minute.
4 Add 200 μL of RNA Wash Buffer (RW) to the purification column and centrifuge at 10,000 x g for one minute.
Paradise®Plus Reagent System User Guide — 12872-00 Rev. C 53
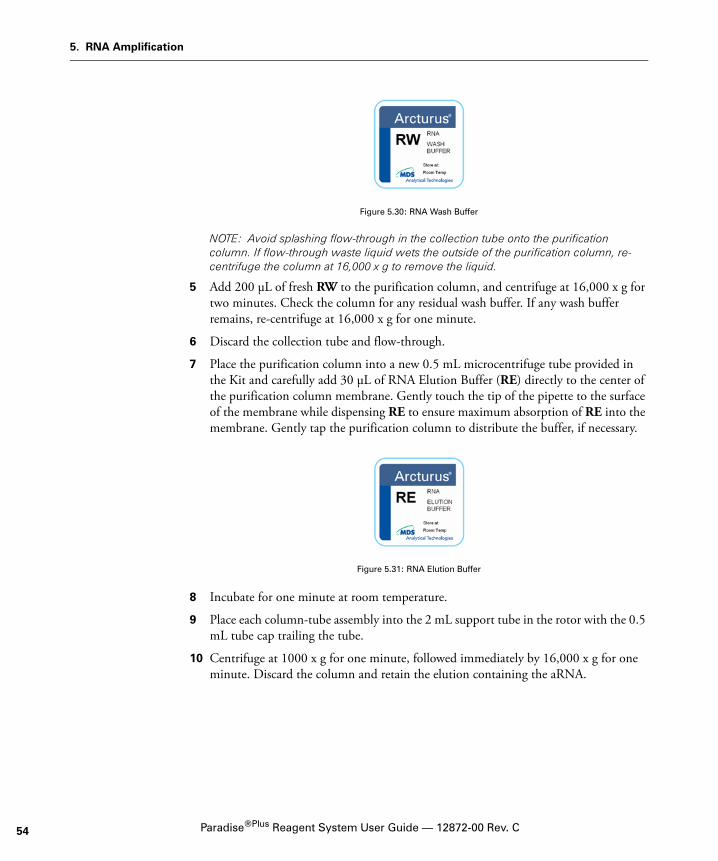
5. RNA Amplification
54
Figure 5.30: RNA Wash Buffer
NOTE: Avoid splashing flow-through in the collection tube onto the purification column. If flow-through waste liquid wets the outside of the purification column, re-centrifuge the column at 16,000 x g to remove the liquid.
5 Add 200 μL of fresh RW to the purification column, and centrifuge at 16,000 x g for two minutes. Check the column for any residual wash buffer. If any wash buffer remains, re-centrifuge at 16,000 x g for one minute.
6 Discard the collection tube and flow-through.
7 Place the purification column into a new 0.5 mL microcentrifuge tube provided in the Kit and carefully add 30 μL of RNA Elution Buffer (RE) directly to the center of the purification column membrane. Gently touch the tip of the pipette to the surface of the membrane while dispensing RE to ensure maximum absorption of RE into the membrane. Gently tap the purification column to distribute the buffer, if necessary.
Figure 5.31: RNA Elution Buffer
8 Incubate for one minute at room temperature.
9 Place each column-tube assembly into the 2 mL support tube in the rotor with the 0.5 mL tube cap trailing the tube.
10 Centrifuge at 1000 x g for one minute, followed immediately by 16,000 x g for one minute. Discard the column and retain the elution containing the aRNA.
Paradise®Plus Reagent System User Guide — 12872-00 Rev. C

5.3. Protocol
Figure 5.32: Centrifuge.
NOTE: To avoid potential breakage of the microcentrifuge tube cap during centrifugation, insert the purification tube/0.5 mL tube assembly into a lidless 1.7/2.0 mL tube. Insert this assembly into adjacent rotor holes as illustrated. Rest the tube cap against the tube immediately clockwise to it. Place an empty, lidless 1.7/2.0 mL tube into the rotor hole adjacent in the clockwise direction to the last assembly.
11 Measure the O.D. of the product at A260 and A280
12 Analyze the aRNA using the Agilent Bioanalyzer or by gel electrophoresis.
13 The purified aRNA is ready for use in a labeling reaction with the TURBO Labeling™ microarray kit (see Appendix A.1, Application 1) or in a reverse transcription application with the Paradise cDNA kit (see Section 1.7., “Related Arcturus Products”, or www.molecualrdevices.com for more information)
END OF ROUND 2.=
Paradise®Plus Reagent System User Guide — 12872-00 Rev. C 55

5. RNA Amplification
56
Paradise®Plus Reagent System User Guide — 12872-00 Rev. C
A. Applications of aRNAThe Paradise® Plus Reagent System can be used to yield a suitable labeled RNA sample for hybridization to nucleic acid in a variety of formats. The RNA sample may be labeled in a number of different ways, including those listed below.
A.1. DIRECT aRNA LABELING WITH TURBO LABELING KIT After analysis of the aRNA with the Agilent Bioanalyzer (see Section G.1., “Assessment of Rna Quality Using the Agilent Bioanalyzer”) or by gel electrophoresis (see Section G.2., “Analysis of aRNA by Agarose Gel Electrophoresis”) as described in Round Two: Antisense RNA (aRNA) Purification, aRNA may be directly labeled with a biotin or a fluorescent marker. Direct mRNA labeling can be accomplished using the Turbo Labeling™ kits:
KIT0608 Turbo Labeling – Biotin, 12 reactions
KIT0609 Turbo Labeling – Cy3, 12 reactions
KIT0610 Turbo Labeling – Cy5, 12 reactions
For more information go to www.moleculardevices.com/turbo.
A.2. DIRECT cDNA FLUORESCENT LABELING For use with complete 2 round kits
The protocol described here may be used to prepare Cy3- or Cy5-labeled cDNA from aRNA generated using the Paradise Plus Reagent System RNA Amplification Kit for hybridization to cDNA microarrays. This protocol provides labeled probe of sense orientation from 5-10 micrograms of aRNA, a sufficient quantity for replicate hybridizations on cDNA microarrays. However, such probes are typically not used for oligonucleotide arrays, since the targets on such arrays are also generally in the sense orientation.
Paradise®Plus Reagent System User Guide — 12872-00 Rev. C 57

A. Applications of aRNA
58
Table A.1: Suppliers
Protocol1 Take 5-10 μg of amplified aRNA and adjust the volume to 22 μL with nuclease-free
water.
NOTE: Adjust to 22 μL using a vacuum concentrator, paying attention to not completely dry down the aRNA sample.
2 Add 2 μL of 5 mg/ml random hexamer.
3 Mix well by flicking, then briefly spin down by centrifugation.
4 Heat the tube to 70°C for 10 minutes, then 4OC for 2 minutes in the thermal cycler.
5 During incubation, prepare the first-strand master mix as described below.
Table A.2: First Strand Master Mix - 1x
Reagents Used Maker Catalog#
RNase AWAY Invitrogen 10328-011
Cy3 labeled dUTP Amersham PA53022
Cy5 labeled dUTP Amersham PA55022
RNAsin Ribonuclease Inhibitor Promega N2515
SuperScript III RT and Buffer Invitrogen 18080-044
Nuclease Free Water Invitrogen 10977-023
Rnase H Invitrogen 18021-071
Random Hexamer Operon custom-made
QiaQuick PCR Purification Kit Qiagen 28106
First Strand Buffer 10 μL
0.1 M DTT 5 μL
25 mM dNTP 1 μL
1 mM dUTP-Cy3 or Cy5 2 μL
1 mM dTTP 2 μL
RNAsin 2 μL
SuperScript II RT 4 μL
Total 26 μL
Paradise®Plus Reagent System User Guide — 12872-00 Rev. C
A.3. Generation of Template for QRT-PCR
6 When incubation is complete, mix the tube well by flicking, and then briefly spin down by centrifugation.
7 Add 26 μL of the above first stand master mix to each reaction tube.
8 Mix well by flicking, and then briefly spin down by centrifugation.
9 Incubate at 27°C for 10 minutes, followed by 37°C for 2 hours in the thermal cycler.
10 Treat with 2 units of RNase H for 20 minutes at 37°C in the thermal cycler.
11 Immediately proceed to PCR product purification using QiaQuick PCR Purification Kit. Pre-treat the columns placed in collection tube by incubating 100 μL of QiaQuick PB buffer for 5 minutes, and then centrifuge at 13200 rpm (or full speed on a 5415C Eppendorf Centrifuge) for 1 minute.
12 Add 260 μL of QiaQuick PB buffer to the sample tube.
13 Mix well by flicking, and then briefly spin down by centrifugation.
14 Load the sample onto the pre-treated columns. Centrifuge at 6000 rpm for 1 minute.
15 Discard flow through. Place the column into the same collection tube.
16 Wash with 750 μL of QiaQuick PE buffer. Centrifuge at 13200 rpm for 1 minute.
17 Discard flow through. Place the column back into the same collection tube.
18 Centrifuge at 13200 rpm for an additional 2 minutes to remove residual wash solution.
19 Place the column into a clean 2 ml microcentrifuge tube.
20 Add 50 μL of nuclease-free water, pH 8.5, directly onto the column membrane. Incubate for 3–5 minutes, and then centrifuge at maximum speed for 1 minute.
21 If the column still shows residual probe, add another 30 μL of nuclease free water, pH 8.5, directly onto the column membrane, incubate for 1minute, and centrifuge at maximum speed for 1 minute.
NOTE: After centrifuging, make sure that the entire sample has passed through the column, and that the column is completely dry. If not, centrifuge for an additional 1 minute at 6000 rpm. When dry, the column will be visibly pink (Cy3) or blue (Cy5) if the reaction was successful.
NOTE: If the labeling reaction was successful, the eluate should be visibly pink (Cy3) or blue (Cy5) in color.
A.3. GENERATION OF TEMPLATE FOR QRT-PCR The aRNA generated using the Paradise Plus Reagent System RNA Amplification reagents can be used in reactions measuring relative gene expression using quantitative PCR methods.
Paradise®Plus Reagent System User Guide — 12872-00 Rev. C 59

A. Applications of aRNA
60
The amplification process generates product from the 3’ end of the mRNA. For best results use qRT-PCR primer sets designed within the first 300 bases from the poly A tail.
The following protocol may serve as a guide for qRT-PCR experiments using aRNA converted to cDNA as a template.
ProtocolReverse Transcription
1 MDS Analytical Technologies recommends an aliquot of 100 ng of amplified RNA from each sample in a volume of 10 μL.
2 Add 1 μL of 5 mg/ml random hexamer.
3 Mix well by flicking, and then briefly spin down by centrifugation for 2 minutes in thermal cycler.
4 Incubate samples at 70ºC for 10 minutes. Chill sample to 4ºC.
5 Assemble a master mix with the following components: (components listed are for one reaction)
Table A.3: Master Mix Components
6 When incubation (Step 4) is complete, mix the tube well by flicking, and then briefly spin down by centrifugation.
7 Add 9 μL of the First Strand Master Mix to each reaction tube.
8 Incubate at 27°C for 10 minutes, followed by 37°C for 1.5 hours in the thermal cycler.
9 The sample is now ready for Q-PCR.
qRT-PCR Please consult the protocol from the system manufacturer.
Item Volume (μL) Vendor Catalog #
First Strand Buffer 4 Invitrogen 18080-044
0.1M DTT 2 Invitrogen 18064-044
10 mM dNTP 1 Amersham US77212-500μL
Rnasin 1 Promega N2511
Superscript III 1 Invitrogen 18064-044
Total 9
Paradise®Plus Reagent System User Guide — 12872-00 Rev. C

B. Sample AssessmentProtocol
MDS Analytical Technologies recommends performing this simple, in process, protocol to assess the quality of RNA in FFPE tissue blocks. This protocol will enable estimation of RNA quantity and quality using a quantitative real-time PCR assay with primers designed to ß-acting.
The assumption is that the ß-actin mRNA in the sample represents the average status of other RNA molecules in the same sample. The total estimated RNA amount in a given sample is expressed as an equivalent of universal RNA that contains the same amount of ß-actin mRNA.
The protocol measures the average ß-actin cDNA length by quantification of the PCR product yield from the 3’ end (primer 1650-1717) and another relative 5’ sequence (primer 1355-1472). If all cDNA contains both the 3’ and 5’ sequence target, the ratio of the PCR product for 3’/5’ would be 1. As the RNA from FFPE samples tends to exhibit some degradation, the 3’/5’ ratio is usually greater than one. Depending on the ratio, an estimation of the quality of the RNA can be made.
It is recommended to perform the reverse transcription steps with 100-200 ng of total RNA. Be sure to determine the yield of the total RNA following isolation and make the appropriate dilutions to ensure your samples are within this concentration range. Perform necessary dilutions of total RNA in 10 ng/μL Poly-I.
In parallel to the testing sample, a control of 10 ng/ μL uRNA (100 ng in 10 μL) (Stratagene 740000) needs to be carried through the complete analysis as the quantitation standard for EVERY experiment. Dilution factor may vary for aRNA generated after one round of amplification.
NOTE: MDS Analytical Technologies recommends this protocol to customers who are starting a new set of FFPE samples or new type of FFPE samples. Experiments should be done on scraped sections.
The RNA quantity derived from the 3’ primer set (1650-1717) should be used as the quantity measurement of the RNA in the FFPE sample. The ratio of the RNA yield obtained from both sets of PCR primers is the 3’/5’ used as an indication of RNA quality.
Paradise®Plus Reagent System User Guide — 12872-00 Rev. C 61

B. Sample Assessment Protocol
62
Materials Needed
Table B.1: Materials needed
Table B.2: Primer sequences:
* Stock concentration
Table B.3: Materials needed for qrtPCR
Component Vendor Catalog #
RNase free water Invitrogen 18054-015
Universal Human Reference RNA Stratagene 740000
Poly-I Sigma P4154
Uracil-DNA Glycosylase Roche 1444646
Thermal cycler MLS --
HBAC1650 TCCCCCAACTTGAGATGTATGAAG 50 μM*
HBAC1717 AACTGGTCTCAAGTCAGTGTACAGG 50 μM*
HBAC1355 ATCCCCCAAAGTTCACAATG 50 μM*
HBAC1472 GTGGCTTTTAGGATGGCAAG 50 μM*
Component Vendor Catalog #
For ABI PRISM 7900HT:
QuantiTect SYBR Green PCR Master Mix Qiagen 204143
ABI optical Reaction Plate ABI 4314320
Optical Adhesive covers ABI 4311971
Splash Free Support Base for 96well plate ABI 4312063
Microseal F foil MJ Research MSF 1001
For Roche Light Cycler:
LightCycler DNA SYBR Green kit Roche 2158817
BD Taqstart Antibody BD-Clontech 639251
Paradise®Plus Reagent System User Guide — 12872-00 Rev. C
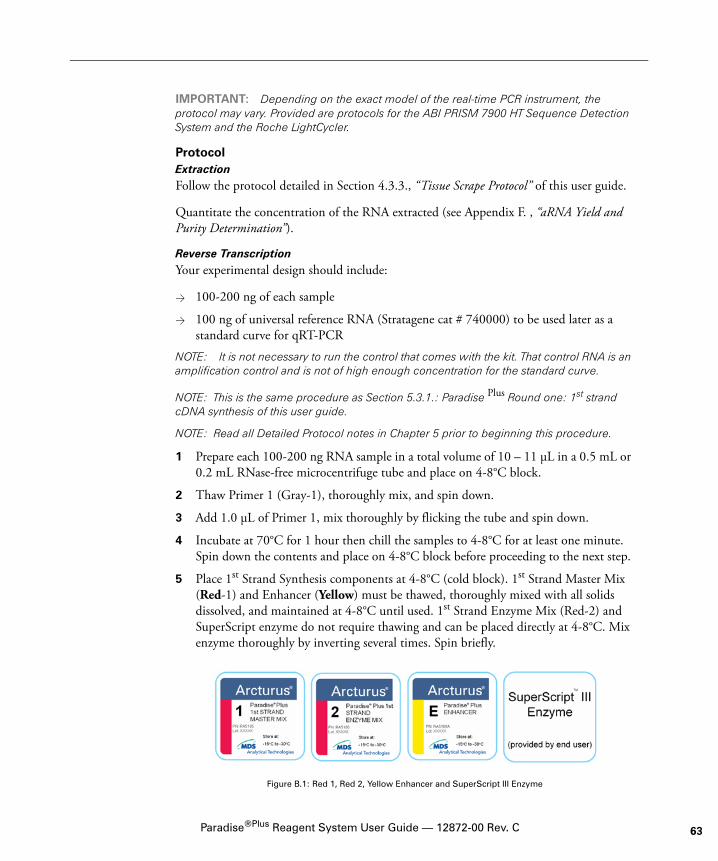
IMPORTANT: Depending on the exact model of the real-time PCR instrument, the protocol may vary. Provided are protocols for the ABI PRISM 7900 HT Sequence Detection System and the Roche LightCycler.
ProtocolExtractionFollow the protocol detailed in Section 4.3.3., “Tissue Scrape Protocol” of this user guide.
Quantitate the concentration of the RNA extracted (see Appendix F. , “aRNA Yield and Purity Determination”).
Reverse TranscriptionYour experimental design should include:
> 100-200 ng of each sample
> 100 ng of universal reference RNA (Stratagene cat # 740000) to be used later as a standard curve for qRT-PCR
NOTE: It is not necessary to run the control that comes with the kit. That control RNA is an amplification control and is not of high enough concentration for the standard curve.
NOTE: This is the same procedure as Section 5.3.1.: Paradise Plus Round one: 1st strand cDNA synthesis of this user guide.
NOTE: Read all Detailed Protocol notes in Chapter 5 prior to beginning this procedure.
1 Prepare each 100-200 ng RNA sample in a total volume of 10 – 11 μL in a 0.5 mL or 0.2 mL RNase-free microcentrifuge tube and place on 4-8°C block.
2 Thaw Primer 1 (Gray-1), thoroughly mix, and spin down.
3 Add 1.0 μL of Primer 1, mix thoroughly by flicking the tube and spin down.
4 Incubate at 70°C for 1 hour then chill the samples to 4-8°C for at least one minute. Spin down the contents and place on 4-8°C block before proceeding to the next step.
5 Place 1st Strand Synthesis components at 4-8°C (cold block). 1st Strand Master Mix (Red-1) and Enhancer (Yellow) must be thawed, thoroughly mixed with all solids dissolved, and maintained at 4-8°C until used. 1st Strand Enzyme Mix (Red-2) and SuperScript enzyme do not require thawing and can be placed directly at 4-8°C. Mix enzyme thoroughly by inverting several times. Spin briefly.
Figure B.1: Red 1, Red 2, Yellow Enhancer and SuperScript III Enzyme
Paradise®Plus Reagent System User Guide — 12872-00 Rev. C 63
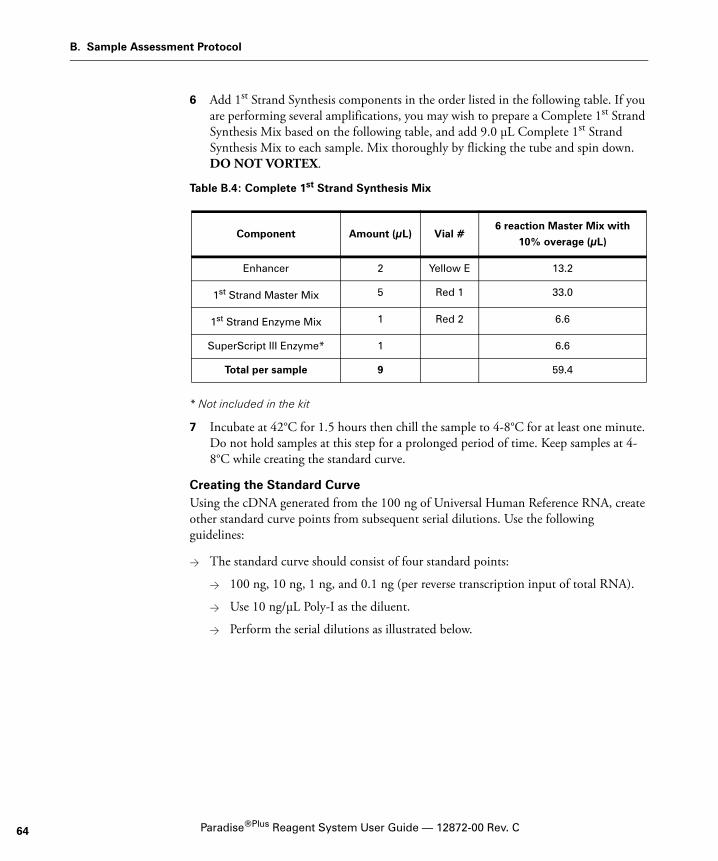
B. Sample Assessment Protocol
64
6 Add 1st Strand Synthesis components in the order listed in the following table. If you are performing several amplifications, you may wish to prepare a Complete 1st Strand Synthesis Mix based on the following table, and add 9.0 μL Complete 1st Strand Synthesis Mix to each sample. Mix thoroughly by flicking the tube and spin down. DO NOT VORTEX.
Table B.4: Complete 1st Strand Synthesis Mix
* Not included in the kit
7 Incubate at 42°C for 1.5 hours then chill the sample to 4-8°C for at least one minute. Do not hold samples at this step for a prolonged period of time. Keep samples at 4-8°C while creating the standard curve.
Creating the Standard CurveUsing the cDNA generated from the 100 ng of Universal Human Reference RNA, create other standard curve points from subsequent serial dilutions. Use the following guidelines:
> The standard curve should consist of four standard points:
> 100 ng, 10 ng, 1 ng, and 0.1 ng (per reverse transcription input of total RNA).
> Use 10 ng/μL Poly-I as the diluent.
> Perform the serial dilutions as illustrated below.
Component Amount (μL) Vial #6 reaction Master Mix with
10% overage (μL)
Enhancer 2 Yellow E 13.2
1st Strand Master Mix 5 Red 1 33.0
1st Strand Enzyme Mix 1 Red 2 6.6
SuperScript III Enzyme* 1 6.6
Total per sample 9 59.4
Paradise®Plus Reagent System User Guide — 12872-00 Rev. C

Figure B.2: cDNA dilutions for Real-Time PCR Standard Curve
> Store the unused volume of 100-ng cDNA at –65 to –80°C for use in creating subsequent standard curves.
NOTE: Set up one RT reaction for each testing samples, one for the blank, and one for the uRNA standard.
NOTE: Use 10.0 μL of testing samples, 10.0 μl of water for a blank tube and 10.0 μL of the uRNA standard.
NOTE: Many real-time PCR instrument systems utilize similar technology. We provide protocols for the ABI PRISM 7900HT and the Light Cycler. Modification to these protocols for other real-time platforms can be made according to the manufacturers’ recommendations.
Protocol1 Following the RT reaction serially dilute the uRNA control for use as a standard
curve. The cDNA generated from the 100 ng of Universal Human Reference RNA (Stratagene, PN 740000; see above) is used as the highest template mass point for the standard curve. Therefore, the 100-ng sample represents 100% of the reverse transcription product.
2 Set up the PCR reactions following the steps below for the instrument you are using:
• ABI PRISM 7900HT
• Roche Light Cycler
For ABI PRISM 7900HT: 1 Prepare the PCR reactions per the table below, combine the PCR master mix
components in a clean, nuclease-free microcentrifuge tube. To determine the total amount of PCR master mix required, multiply the amount of each component by the number of reactions you are performing (n), plus one: n + 1
Paradise®Plus Reagent System User Guide — 12872-00 Rev. C 65

B. Sample Assessment Protocol
66
Table B.5: For the 3' ß-actin Primers
Table B.6: For the 5' ß-actin Primers
aThe volumes listed above are specific to the Applied Biosystems 7900HT Fast Real-Time PCR System. Other real-time PCR instruments may require adjustments to these volumes. Please consult your instrument’s user manual.
2 Mix thoroughly by inverting, then spin quickly to collect the master mix at the bottom of the tube.
3 Proceed to “Running the ABI PCR Reactions” on page 67.
Preparing the reaction plate1 Assemble the reactions in an optical tube or optical reaction plate:
a Dispense 12 μL of the 3' Primer Set into the appropriate wells or tubes.
b Dispense 12 μL of the 5' Primer Set into the appropriate wells or tubes.
c Add 8 μL of the diluted cDNA into the appropriate wells or tubes.
d Add 8 μL of the nuclease-free water into the appropriate NTC wells or tubes.
Component
Amount for Each Reaction
Volume (μL)a Final Conc.
SYBR Green PCR Master Mix 10 —
Uracil-DNA Glycosylase 0.5 —
3’ ß-actin Forward Primer, 50 μM 0.25 625 nM
3’ ß-actin Reverse Primer, 50 μM 0.25 625 nM
Water, nuclease-free 1 —
Component
Amount for Each Reaction
Volume (μL)a Final Conc.
SYBR Green PCR Master Mix 10 —
Uracil-DNA Glycosylase 0.5 —
5’ ß-actin Forward Primer, 50 μM 0.25 625 nM
5’ ß-actin Reverse Primer, 50 μM 0.25 625 nM
Water, nuclease-free 1 —
Paradise®Plus Reagent System User Guide — 12872-00 Rev. C

NOTE: For both the 3' and 5' Primer Sets, include the RNA samples, positive control, diluted control for a standard curve, and the blank (NTC) in the sample layout.
2 Seal the tube or reaction plate with an optical cap or optical adhesive cover.
3 Vortex the tube or reaction plate for 20 seconds, then spin quickly to collect the reactions at the bottom of the tube or wells.
4 Proceed to “Running the ABI PCR Reactions” on page 67.
Running the ABI PCR Reactions1 Place the tube or reaction plate in your real-time PCR instrument.
2 Program the thermal cycling conditions as follows:
Table B.7: Thermal Cycling Conditions
IMPORTANT: The thermal cycling conditions listed above have been optimized for use on the Applied Biosystems 7900HT Fast Real-Time PCR System.
3 Optional. If your instrument has the ability, include a dissociation curve.
4 When the run is completed, export the results into Microsoft Excel software.
5 Proceed to “Interpreting the Results” on page 69
For Roche Light Cycler Preparing the PCR reactions:
1 Prepare the PCR reaction mix according to the table below:
StepTemperature
(°C)Time
1 Hold 50 2 minutes
2 Hold 95 15 minutes
3 PCR
(40 cycles)
95 15 seconds
58 30 seconds
72 32 seconds
Paradise®Plus Reagent System User Guide — 12872-00 Rev. C 67

B. Sample Assessment Protocol
68
Table B.8: For the 3' ß-actin Primers
Table B.9: For the 5' ß-actin Primers
2 For each reaction, add 18 μL of the PCR mix into a LightCycler capillary.
3 Add 2 μL of the cDNA.
4 Spin the capillaries at 500g for 5 second in their adaptor. Load the capillaries into LightCycler.
ComponentAmount for Each Reaction
Volume (μL)a Final Conc.
SYBR Green PCR Master Mix 2 —
BD Taqstart Antibody 0.16
25 mM MgCl2 2.4 —
Uracil-DNA Glycosylase 1.0 —
3’ ß-actin Forward Primer, 50 μM 0.25 625 nM
3’ ß-actin Reverse Primer, 50 μM 0.25 625 nM
Water, nuclease-free 11.94 —
ComponentAmount for Each Reaction
Volume (μL)a Final Conc.
SYBR Green PCR Master Mix 2 —
BD Taqstart Antibody 0.16
25 mM MgCl2 2.4 —
Uracil-DNA Glycosylase 1.0 —
5’ ß-actin Forward Primer, 50 μM 0.25 625 nM
5’ ß-actin Reverse Primer, 50 μM 0.25 625 nM
Water, nuclease-free 11.94 —
Paradise®Plus Reagent System User Guide — 12872-00 Rev. C

5 Run the LightCycler following programs as listed below (set temperature transition rate to 20):
6 Obtain Ct1650, Ct 1355 for the testing sample and the uRNA dilutions.
7 Quantify the input RNA:
a Plot the standard curve of log uRNA amount vs. Ct. For each pair of primers, one standard curve is generated.
b Obtain the uRNA equivalent of the testing sample from the corresponding standard curve (Standard curve 1650, Standard curve 1355).
c Use the uRNA equivalent from 1650 primer set to estimate the RNA quantity, use the ratio of RNA 1650/RNA 1355 to estimate the RNA quality.
Interpreting the ResultsThe RNA concentration using the 3' Primer Set is the quantity of the sample RNA. The ratio of 3'/5' is obtained for each sample using the corresponding RNA concentration.
Table B.10: Example of results
NOTE: The 3'/5' ratio is the ratio of the quantities of each Primer Set. For example, in Sample 1 the ratio is equal to 30.12; this is derived from 2.56/0.085.
Step Target temp Time Acquisition
1 Denaturation 95 1 min none
2 Amplification
(35 cycles)
95 0 sec none
58 5 sec none
72 10 sec single
3 Melting 95 0 sec none
65 10 sec none
99 0 sec cont
4 Cooling 40 1 min none
Primer Ct Quantity Primer Ct Quantity 3'/5' Ratio
1355/1472 28.70 0.09 1650/1717 23.80 2.56 30.12
1355/1472 27.80 0.16 1650/1717 23.90 2.32 14.50
1355/1472 23.60 3.50 1650/1717 20.10 35.37 10.11
1355/1472 21.00 22.50 1650/1717 19.50 57.70 2.56
Paradise®Plus Reagent System User Guide — 12872-00 Rev. C 69
B. Sample Assessment Protocol
70
Explanation of resultsThe 3'/5' ratio evaluates the abundance of the average ß-actin cDNA from the 3' end (primer 1650-1717) compared to the abundance of a relatively 5' sequence (primer 1355-1472) using the quantified PCR yields of each amplicon. If most of the cDNA contains both the 3' and 5' sequence target, the ratio of the PCR product for 3'/5' is close to 1. As the RNA from FFPE samples starts exhibiting some level of degradation, the 3'/5' ratio tends to become greater than 1. Depending on the ratio, an estimation of the RNA quality can be made.
For studies in which a known set of genes is being evaluated, ratios that are in a higher range (20 to 40) can be tolerated. In cases where the FFPE samples are being used to discover gene sets, to maximize the success and enable discovery of the maximum number of genes, samples with lower ratios (=20) are optimal.
NOTE: MDS Analytical Technologies does not have a strict cut-off for ratios from which no data will be obtained. As individual studies will have different tolerance levels, MDS Analytical Technologies recommends running a few samples with a variety of ratios to determine where the cut-off should be for a specific study.
It is also important to remember that in addition to the ratio, the overall quantity reported for the 3' Primer Set can be helpful in determining the quality of the sample. If a ratio of <10 is reported, but the quantity for that sample is <5 pg, there is likely not enough RNA in the sample to produce a quality result in a subsequent assay. The quantity reported can serve as a guide for determining how much of the original sample should be used to meet the input requirements for further sample processing.
Paradise®Plus Reagent System User Guide — 12872-00 Rev. C
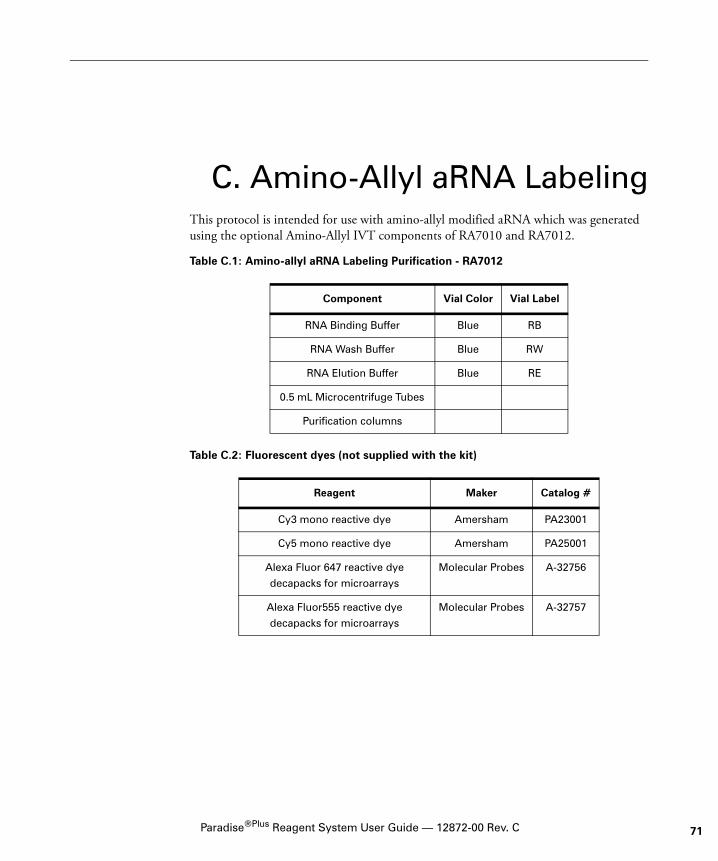
C. Amino-Allyl aRNA LabelingThis protocol is intended for use with amino-allyl modified aRNA which was generated using the optional Amino-Allyl IVT components of RA7010 and RA7012.
Table C.1: Amino-allyl aRNA Labeling Purification - RA7012
Table C.2: Fluorescent dyes (not supplied with the kit)
Component Vial Color Vial Label
RNA Binding Buffer Blue RB
RNA Wash Buffer Blue RW
RNA Elution Buffer Blue RE
0.5 mL Microcentrifuge Tubes
Purification columns
Reagent Maker Catalog #
Cy3 mono reactive dye Amersham PA23001
Cy5 mono reactive dye Amersham PA25001
Alexa Fluor 647 reactive dye
decapacks for microarrays
Molecular Probes A-32756
Alexa Fluor555 reactive dye
decapacks for microarrays
Molecular Probes A-32757
Paradise®Plus Reagent System User Guide — 12872-00 Rev. C 71

C. Amino-Allyl aRNA Labeling
72
Protocol Labeling Reaction:Re-suspend 1mg monoreactive dye in 51 μL of DMSO. Save unused vials in the dark at 2–6ºC.
Figure C.1: DMSO
1 Take 15 μg of amino-allyl aRNA in 7.5 μL of nuclease free water.
NOTE: Sample should be maintained on a cold block.
2 Add 2.5 μL of Labeling Buffer (LB) to the sample.
Figure C.2: Labeling Buffer
3 Add 10 μL of the re-suspended dye into 10 μL of the sample.
4 Mix thoroughly by flicking the tube. Spin down briefly.
5 Incubate at room temperature in the dark for 1 hour.
6 Proceed directly to purification of labeled aRNA.
aRNA Purification:1 Pre-treat column by adding 250 μL of RNA Binding Buffer (RB) to a new
purification column. Incubate the column at room temperature for 5 minutes. Centrifuge at 16,000 x g for one minute.
2 Add 225 μL of RB to the transcript labeling reaction sample and mix thoroughly. Pipette the entire sample volume into the purification column.
Paradise®Plus Reagent System User Guide — 12872-00 Rev. C

Figure C.3: RNA Binding Buffer
3 Centrifuge at 100 x g (or lowest speed setting available) for 2 minutes, immediately followed by a centrifugation at 10,000 x g for 1 minute.
NOTE: Do not use re-suspended dye that is over 2 days old. DMSO is hygroscopic. Store tightly capped.
NOTE: To obtain 15 μg of aRNA in 7.5μL, you may dry down 15μg of aRNA and re-suspend in 7.5 μL of nuclease free water, or concentrate the aRNA to 2 μg /μL and use 7.5 μL of the sample.
NOTE: Do not allow the samples to incubate longer than 1 hour. Use reagents supplied in the Labeling Purification Reagents box.
4 Discard flow-through. Place the column into the same collection tube.
5 Add 250 μL of RNA Wash Buffer (RW) to the purification column and centrifuge at 10,000 x g for 1 minute.
Figure C.4: RNA Wash Buffer
6 Repeat Step 5.
7 Add 250 μL of fresh RW to the column and centrifuge at 16,000 x g (full speed) for 2 minutes. Check the purification column for any residual wash buffer. If any wash buffer remains, re-centrifuge at 16,000 x g for one minute.
8 Discard the collection tube and flow-through.
Paradise®Plus Reagent System User Guide — 12872-00 Rev. C 73

C. Amino-Allyl aRNA Labeling
74
9 Place the purification column into a new 0.5 mL microcentrifuge tube provided in the kit and carefully add 50 μL of RNA Elution Buffer (RE) directly onto the center of the purification column membrane. Gently touch the tip of the pipette to the surface of the membrane while dispensing RE to ensure maximum absorption of RE into the membrane. Gently tap the purification column to distribute the buffer if necessary.
Figure C.5: RNA Elution Buffer
10 Incubate at room temperature for one minute.
11 Place the assembly into the 2 mL support tube in the rotor with the 0.5 mL tube cap trailing the tube.
12 Centrifuge at 1000 x g for one minute, immediately followed by 16,000 x g for one minute. Discard the purification column and retain the elution containing the labeled aRNA.
Figure C.6: Centrifuge.
13 Measure the O.D. of the product at A260, A280, and A550/A650 to determine the yield and frequency of incorporation (FOI) by making a dilution of 1:10 (5 μL sample + 45 μL nuclease free water).
14 Store any remaining samples at –70ºC until ready for hybridization.
Paradise®Plus Reagent System User Guide — 12872-00 Rev. C

D. aRNA AnalysisD.1. RNA QUANTITATION USING SPECTRAMAX®
MICROPLATE READERS WITH ABSORBANCE MODE AND PATHCHECK® SENSORIntroductionThis protocol describes how to measure RNA concentration using a 96-well, UV-clear microplate (e.g., Corning P/N 3635) and SpectraMax® microplate reader featuring the PathCheck® sensor. The PathCheck sensor measures the pathlength in each well of the microplate and normalizes absorbance values to a 1 cm pathlength so that they are the same as values obtained in a 1 cm cuvette. Please note that some SpectraMax microplate readers are equipped with a cuvette port. See the user guide for your instrument for details on use of the cuvette port.
MethodDilute RNA in RNase-free water. A total of 200 μL/well of diluted RNA will be used for quantitation, and diluting the sample more than 1:100 is not recommended. Prepare additional diluted sample if multiple wells are desired for analysis. Reading samples in triplicate is recommended. Pipette samples into a 96-well UV-transparent microplate; include a set of wells containing 200 μL of RNase-free water as blanks. Assuming that all well volumes are identical, and that all samples are blanked with the same solution (water), use the following method to subtract background OD due to the microplate itself:
1 In the template editor, select three or more wells in the microplate to contain the blanking solution (typically water). Assign the appropriate wells as 'Blank'. Designate the appropriate wells as 'Samples', and enter the dilution factor.
2 In the instrument settings dialogue box, make sure that the box for PathCheck is checked, the Water Constant button is on, and the box for Plate Background Constant is not checked.
3 Pipette blanks and RNA samples into the appropriate wells of the microplate.
4 Read the plate.
When the plate is read as indicated, SoftMax Pro automatically applies PathCheck to all samples and blanks and also subtracts the average of the blanks from each well of the microplate. Provided that all sample and blank path lengths are identical, potential error from applying path length normalization to ODmicroplate is cancelled out.
Paradise®Plus Reagent System User Guide — 12872-00 Rev. C 75
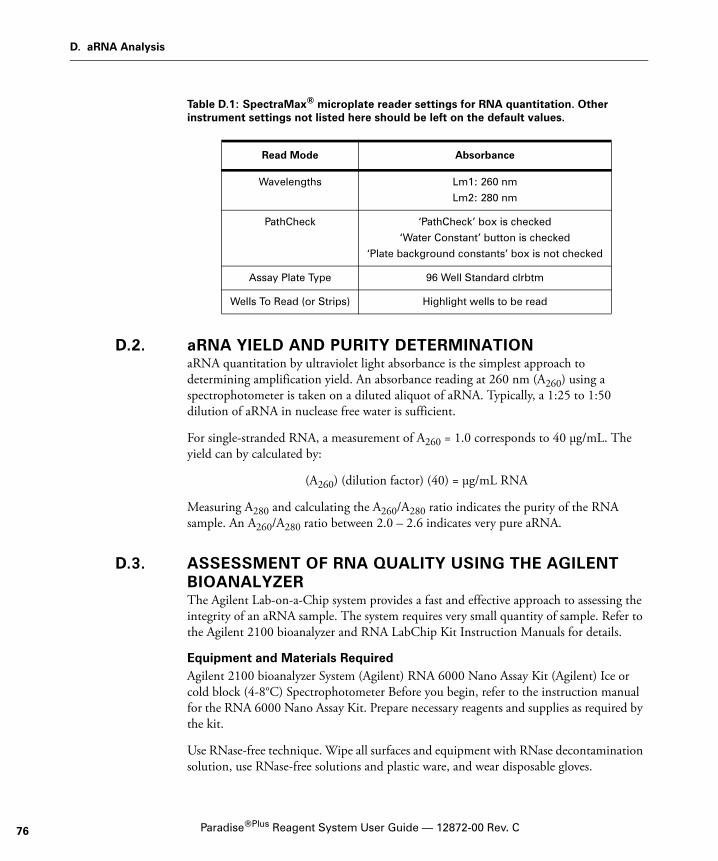
D. aRNA Analysis
76
Table D.1: SpectraMax® microplate reader settings for RNA quantitation. Other instrument settings not listed here should be left on the default values.
D.2. aRNA YIELD AND PURITY DETERMINATION aRNA quantitation by ultraviolet light absorbance is the simplest approach to determining amplification yield. An absorbance reading at 260 nm (A260) using a spectrophotometer is taken on a diluted aliquot of aRNA. Typically, a 1:25 to 1:50 dilution of aRNA in nuclease free water is sufficient.
For single-stranded RNA, a measurement of A260 = 1.0 corresponds to 40 μg/mL. The yield can by calculated by:
(A260) (dilution factor) (40) = μg/mL RNA
Measuring A280 and calculating the A260/A280 ratio indicates the purity of the RNA sample. An A260/A280 ratio between 2.0 – 2.6 indicates very pure aRNA.
D.3. ASSESSMENT OF RNA QUALITY USING THE AGILENT BIOANALYZERThe Agilent Lab-on-a-Chip system provides a fast and effective approach to assessing the integrity of an aRNA sample. The system requires very small quantity of sample. Refer to the Agilent 2100 bioanalyzer and RNA LabChip Kit Instruction Manuals for details.
Equipment and Materials Required Agilent 2100 bioanalyzer System (Agilent) RNA 6000 Nano Assay Kit (Agilent) Ice or cold block (4-8°C) Spectrophotometer Before you begin, refer to the instruction manual for the RNA 6000 Nano Assay Kit. Prepare necessary reagents and supplies as required by the kit.
Use RNase-free technique. Wipe all surfaces and equipment with RNase decontamination solution, use RNase-free solutions and plastic ware, and wear disposable gloves.
Read Mode Absorbance
Wavelengths Lm1: 260 nm
Lm2: 280 nm
PathCheck ‘PathCheck’ box is checked
‘Water Constant’ button is checked
‘Plate background constants’ box is not checked
Assay Plate Type 96 Well Standard clrbtm
Wells To Read (or Strips) Highlight wells to be read
Paradise®Plus Reagent System User Guide — 12872-00 Rev. C

D.4. Analysis of aRNA by Agarose Gel Electrophoresis
Protocol 1 Determine the concentration of the aRNA generated through Paradise Plus by UV
spectrophotometry.
2 Based on the optical density reading, prepare a dilution of the sample to a concentration of 200 – 300 ng/μL.
3 Store the sample on ice or in a cold block until ready to load on to the RNA chip.
4 Follow the RNA 6000 Nano Assay Kit protocol, loading 1 μL of the prepared sample dilution (from step 2).
For details of data interpretation refer to the bioanalyzer instruction manual. The aRNA appears on the bioanalyzer as a single, broad peak. The size of the aRNA ranges in length from 200 to 2000 bases.
D.4. ANALYSIS OF aRNA BY AGAROSE GEL ELECTROPHORESIS Analysis of aRNA using agarose gel electrophoresis is one method to visualize the RNA profile and relative quantity after amplification. Standard protocols for agarose gel electrophoresis can be used. The following is a suggested protocol using commercially available reagents.
Materials > 1.25% Agarose Portrait Gel or 1.25 Agarose Medium Gel
> (EmbiTec cat. # GE-6010 or GE-6030)
> 10X RNA MOPS Running Buffer
> (EmbiTec cat. # EC-1020) 2X Gel Loading Buffer (various) RNA Ladder (various) SYBR Gold Nucleic Acid Gel Stain (Molecular Probes cat. # S-11494) or Ethidium Bromide Stain
> Nuclease-free Water
Protocol1 Determine the concentration of the aRNA by UV absorbance with a
spectrophotometer. (Refer to Appendix A.)
2 Dilute the aRNA sample(s) with nuclease-free water. Each gel well can be loaded with 1 – 3 μg of aRNA.
3 Prepare aRNA gel sample by mixing 6 μL of diluted aRNA with 6 μL of 2X Gel Loading Buffer.
4 Incubate for 3 – 5 minutes at 65°C. Cool on ice.
5 Prepare 1X RNA MOPS Running Buffer and fill gel electrophoresis unit. Place agarose gel into the unit.
Paradise®Plus Reagent System User Guide — 12872-00 Rev. C 77
D. aRNA Analysis
78
6 Load 12 μL of sample per well of the agarose gel. Include RNA Ladder in one or more lanes.
7 Electrophorese at 5 – 7 volts per centimeter for 30 minutes.
8 Stain the gel with SYBR Gold Nucleic Acid Gel Stain for 30 minutes or according to the protocol supplied with the reagent. Alternatively, stain with Ethidium Bromide (0.5 – 1.0 μg/mL).
9 Visualize the gel on a UV transilluminator. The size of the aRNA ranges from 200 to 2000 bases in length.
Paradise®Plus Reagent System User Guide — 12872-00 Rev. C

E. Generation of Labeled aRNAUsing Alternative IVT Kits
The Paradise Plus Kits can be used with alternative IVT labeling (such as Affymetrix labeling kit 900449) to yield suitable RNA sample for hybridizing to GeneChip Probe Arrays as described below. These kit reagents and protocol are substituted during the second IVT reaction of the Paradise Plus Kit protocol. Labeled aRNA is subsequently purified with the Paradise Plus Kit and MiraCol Purification Columns as described below.
1 Perform Round One of amplification according to the Paradise Plus Amplification Kit protocol starting from the recommended input for the kit. It is not recommended to use the minimum input amounts when using an alternative labeling kit due to IVT efficiency.
2 Perform Round Two of amplification through cDNA Purification according to the Kit protocol. (Stop at the end of Chapter 5, Section 3, Step H – “Round Two: cDNA Purification)
3 Perform RNA transcript labeling according to the protocol of the IVT labeling kit using the sample (from step #2 above) as the cDNA template. Adjust the final volume of the cDNA sample, as necessary.
Antisense RNA Purification: NOTE: Use the remaining components from RA7011 used during the amplification process.
1 Add 250 μL of RNA Binding Buffer (RB) to a new purification column and incubate for five minutes at room temperature. Centrifuge at 16,000 x g for one minute.
Figure E.1: RNA Binding Buffer
Paradise®Plus Reagent System User Guide — 12872-00 Rev. C 79

E. Generation of Labeled aRNA Using Alternative IVT Kits
80
2 Add 200 μL of RB to the Transcript Labeling Reaction sample and mix thoroughly. Pipette the entire sample volume into the purification column.
3 Centrifuge at 100 x g (or lowest speed setting available) for two minutes, immediately followed by a centrifugation at 10,000 x g for 1 minute.
4 Add 200 μL of RNA Wash Buffer (RW) to the purification column and centrifuge at 10,000 x g for one minute.
Figure E.2: Figure A.10: RNA Wash Buffer
NOTE: RNA Binding Buffer (RB) must be at room temperature and thoroughly mixed before use. A precipitate may form during long-term storage. Dissolve precipitate by mixing. If necessary, warm the RB vial to re-dissolve.
5 Add 200 μL of fresh RW to the column and centrifuge at 16,000 x g for two minutes. Check the purification column for any residual wash buffer. If any wash buffer remains, re-centrifuge at 16,000 x g for one minute.
6 Discard the collection tube and flow-through.
7 Place the purification column into a new 0.5 mL microcentrifuge tube provided in the kit and carefully add 30 μL of RNA Elution Buffer (RE) directly onto the center of the purification column membrane. Gently touch the tip of the pipette to the surface of the membrane while dispensing RE to ensure maximum absorption of RE into the membrane. Gently tap the purification column to distribute the buffer, if necessary.
Figure E.3: Figure A.11: RNA Elution Buffer
8 Incubate at room temperature for one minute.
Paradise®Plus Reagent System User Guide — 12872-00 Rev. C
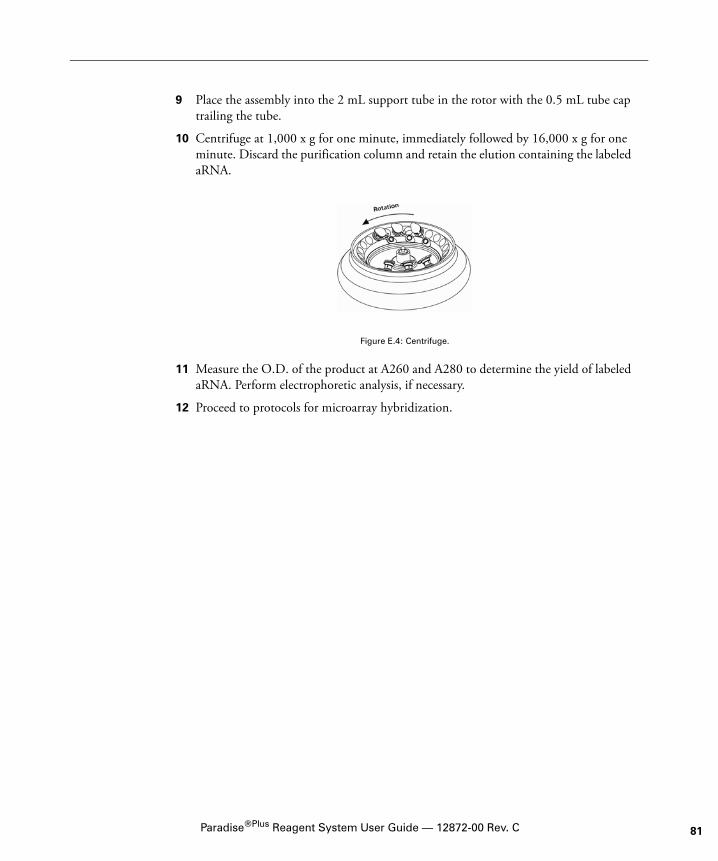
9 Place the assembly into the 2 mL support tube in the rotor with the 0.5 mL tube cap trailing the tube.
10 Centrifuge at 1,000 x g for one minute, immediately followed by 16,000 x g for one minute. Discard the purification column and retain the elution containing the labeled aRNA.
Figure E.4: Centrifuge.
11 Measure the O.D. of the product at A260 and A280 to determine the yield of labeled aRNA. Perform electrophoretic analysis, if necessary.
12 Proceed to protocols for microarray hybridization.
Paradise®Plus Reagent System User Guide — 12872-00 Rev. C 81
E. Generation of Labeled aRNA Using Alternative IVT Kits
82
Paradise®Plus Reagent System User Guide — 12872-00 Rev. C
F. Cleaning the Staining JarsThe staining jars can be reused, but must be cleaned. Rinse jars with 100% ethanol, followed by distilled water, then treat with RNase AWAY according to the manufacturer’s protocol. Rinse jars thoroughly with nuclease-free water and allow to dry completely in the hood. Do not use reservoirs to store solutions.
Paradise®Plus Reagent System User Guide — 12872-00 Rev. C 83

F. Cleaning the Staining Jars
84
Paradise®Plus Reagent System User Guide — 12872-00 Rev. C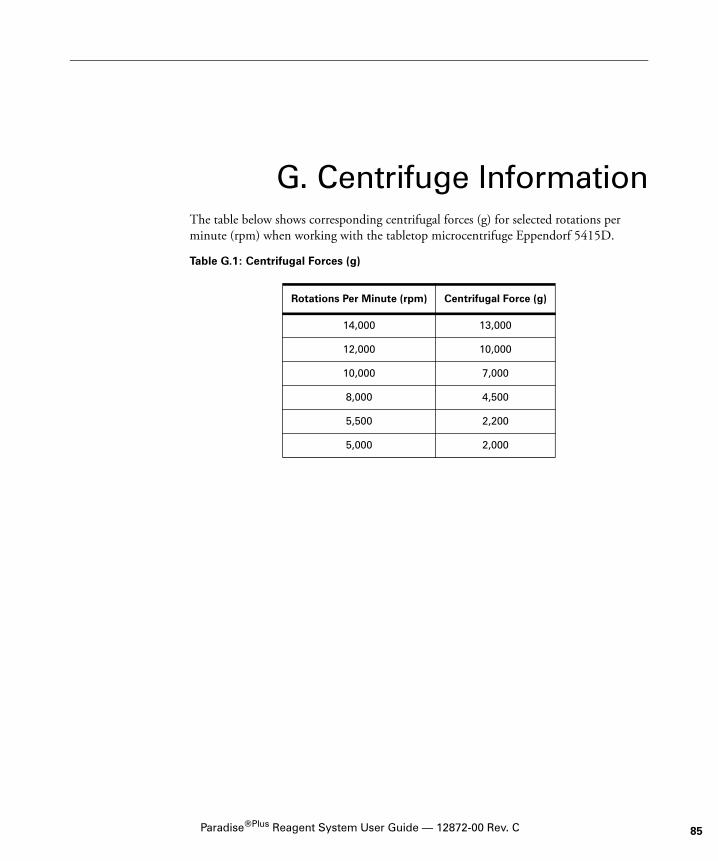
G. Centrifuge InformationThe table below shows corresponding centrifugal forces (g) for selected rotations per minute (rpm) when working with the tabletop microcentrifuge Eppendorf 5415D.
Table G.1: Centrifugal Forces (g)
Rotations Per Minute (rpm) Centrifugal Force (g)
14,000 13,000
12,000 10,000
10,000 7,000
8,000 4,500
5,500 2,200
5,000 2,000
Paradise®Plus Reagent System User Guide — 12872-00 Rev. C 85

G. Centrifuge Information
86
Paradise®Plus Reagent System User Guide — 12872-00 Rev. C
H. TroubleshootingH.1. STAINING
Symptom Cause Suggestion
Targeted cells do not
lift from the slide
during LCM
The sample may contain
residual water.
Ensure that the ethanol solutions
are fresh. Ethanol is hygroscopic.
Keep the ethanol bottles tightly
capped, and do not pour ethanol
solutions until you are ready to use
them. If you suspect that the 100%
ethanol solution has absorbed
water, discard and use a new bottle.
The sample may have
dried in between protocol
steps.
Carry out the Staining and
Dehydration segment of the
protocol at a steady pace.
RNA cannot be
recovered from the
sample
The sample starting
material may contain
poor quality RNA.
Run a quality control assesmnet
(detailed in this protocol) on the
tissue block to ensure it contains
useable quality RNA.
RNA may become
degraded during RNA
isolation.
Wear gloves; use RNase-free
technique and RNase-free
instruments and reagents.
RNA may not be fully
extracted and isolated
from cells on the LCM
cap.
Perform RNA extraction
immediately after LCM to ensure
complete extraction and optimum
recovery of RNA.
Amount of starting
material may be
insufficient.
Capture more cells. Amount of RNA
in each cell may vary depending on
cell type, RNA quality and length of
fixation. For troubleshooting
purposes, try starting with ~40,000
cells.
Paradise®Plus Reagent System User Guide — 12872-00 Rev. C 87
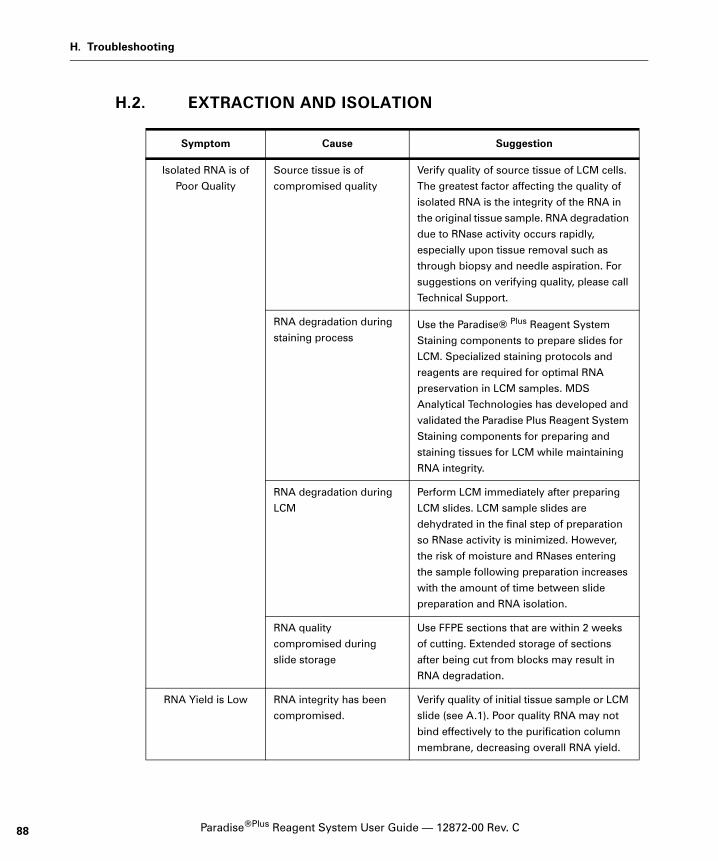
H. Troubleshooting
88
H.2. EXTRACTION AND ISOLATION
Symptom Cause Suggestion
Isolated RNA is of
Poor Quality
Source tissue is of
compromised quality
Verify quality of source tissue of LCM cells.
The greatest factor affecting the quality of
isolated RNA is the integrity of the RNA in
the original tissue sample. RNA degradation
due to RNase activity occurs rapidly,
especially upon tissue removal such as
through biopsy and needle aspiration. For
suggestions on verifying quality, please call
Technical Support.
RNA degradation during
staining processUse the Paradise® Plus Reagent System
Staining components to prepare slides for
LCM. Specialized staining protocols and
reagents are required for optimal RNA
preservation in LCM samples. MDS
Analytical Technologies has developed and
validated the Paradise Plus Reagent System
Staining components for preparing and
staining tissues for LCM while maintaining
RNA integrity.
RNA degradation during
LCM
Perform LCM immediately after preparing
LCM slides. LCM sample slides are
dehydrated in the final step of preparation
so RNase activity is minimized. However,
the risk of moisture and RNases entering
the sample following preparation increases
with the amount of time between slide
preparation and RNA isolation.
RNA quality
compromised during
slide storage
Use FFPE sections that are within 2 weeks
of cutting. Extended storage of sections
after being cut from blocks may result in
RNA degradation.
RNA Yield is Low RNA integrity has been
compromised.
Verify quality of initial tissue sample or LCM
slide (see A.1). Poor quality RNA may not
bind effectively to the purification column
membrane, decreasing overall RNA yield.
Paradise®Plus Reagent System User Guide — 12872-00 Rev. C

H.3. Amplification
H.3. AMPLIFICATION
Symptom Cause Suggestion
Amplification yield is Poor
Starting RNA sample quality varies
If you observe low yields with different RNA samples, run an amplification control using the Control RNA provided in the Paradise® Plus Kit to verify kit functionality.
Starting RNA sample quality has been compromised.
The greatest factor affecting amplification efficiency is the integrity of the RNA used in the Paradise Plus amplification process. Suspend RNA in nuclease-free water prior to amplification. Avoid using organic solvents such as phenol in RNA isolation protocols.
There is no RNA in the input sample.
Run a control RNA sample with a known quantity of RNA to ensure that amplification is successful.
Reagent concentrations in reaction mixtures are incorrect due to inadequate thawing or mixing.
Ensure all reagents are completely thawed, mixed, and all solids dissolved prior to use.
Reagent concentrations in the reaction mixtures are incorrect due to inadequate reaction volume collection in the reaction tube.
Thoroughly thaw and mix all reagents prior to dispensing. Ensure all reagents are dispensed at proper volumes. Briefly spin down the reaction mix prior to incubation to ensure all reagents are collected in the reaction volume and the reaction mix has the proper concentrations of reagents.
Reagent concentrations in reaction mixtures are incorrect due to evaporative condensation onto the wall of the reaction tube during incubation.
Briefly spin down the sample following incubation steps to maintain proper volumes and concentrations of reagents and ensure that all nucleic acid templates are mixed with reaction components. Use a thermal cycler with a heated lid.
Incubation temperatures are incorrect.
Verify the accuracy of all incubation temperatures. If you are using a thermal cycler, make sure that the programmed temperatures read correctly and the instrument has been calibrated to establish and maintain accurate temperature settings.
RNA yield is diminished during column purification.
Verify centrifugal force used during nucleic acid purification. Improper binding, washing, and elution centrifugal forces can decrease the recovery of nucleic acid from the purification column. Microcentrifuges should be calibrated to deliver the correct centrifugal force.
Message content is low within the total RNA being used in your study.
Check amplification efficiency using control RNA. Use higher RNA inputs to compensate for lower message content.
Paradise®Plus Reagent System User Guide — 12872-00 Rev. C 89
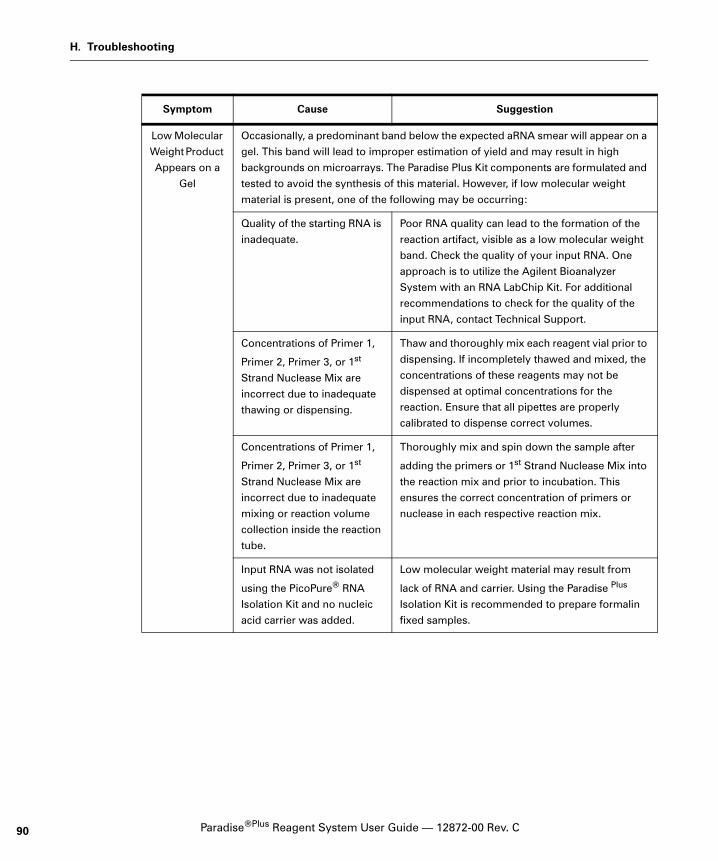
H. Troubleshooting
90
Low Molecular
Weight Product
Appears on a
Gel
Occasionally, a predominant band below the expected aRNA smear will appear on a
gel. This band will lead to improper estimation of yield and may result in high
backgrounds on microarrays. The Paradise Plus Kit components are formulated and
tested to avoid the synthesis of this material. However, if low molecular weight
material is present, one of the following may be occurring:
Quality of the starting RNA is
inadequate.
Poor RNA quality can lead to the formation of the
reaction artifact, visible as a low molecular weight
band. Check the quality of your input RNA. One
approach is to utilize the Agilent Bioanalyzer
System with an RNA LabChip Kit. For additional
recommendations to check for the quality of the
input RNA, contact Technical Support.
Concentrations of Primer 1,
Primer 2, Primer 3, or 1st
Strand Nuclease Mix are
incorrect due to inadequate
thawing or dispensing.
Thaw and thoroughly mix each reagent vial prior to
dispensing. If incompletely thawed and mixed, the
concentrations of these reagents may not be
dispensed at optimal concentrations for the
reaction. Ensure that all pipettes are properly
calibrated to dispense correct volumes.
Concentrations of Primer 1,
Primer 2, Primer 3, or 1st
Strand Nuclease Mix are
incorrect due to inadequate
mixing or reaction volume
collection inside the reaction
tube.
Thoroughly mix and spin down the sample after
adding the primers or 1st Strand Nuclease Mix into
the reaction mix and prior to incubation. This
ensures the correct concentration of primers or
nuclease in each respective reaction mix.
Input RNA was not isolated
using the PicoPure® RNA
Isolation Kit and no nucleic
acid carrier was added.
Low molecular weight material may result from
lack of RNA and carrier. Using the Paradise Plus
Isolation Kit is recommended to prepare formalin
fixed samples.
Symptom Cause Suggestion
Paradise®Plus Reagent System User Guide — 12872-00 Rev. C

H.4. Quality Assessment Protocol
H.4. QUALITY ASSESSMENT PROTOCOL
Symptom Cause Suggestion
Tissue homogenate is viscous and
difficult to pipet, resulting in low RNA
yield
There was insufficient disruption or lysis of cells.
Limit the extraction to 1 mm2 of tissue scrape per 1 μL of PK solution:
• Use a minimum of 25 mm2 of tissue area in 25 μL of PK solution per extraction.
• Do not use over 150 μL of PK solution per sample for isolation.
• For >150 μL of PK solution, perform multiple isolations.
Rn = No template Control Rn, and there
is no amplification plot
Inappropriate reaction conditions.
Optimize QRT-PCR with positive controls to monitor the QRT-PCR performance.
Poor quality PCR mastermix.
Contact the vendor/supplier of the PCR master mix.
Incorrect dye components were chosen.
Check dye component prior to data analysis.
The reaction component was omitted.
Check that all the correct reagents were added.
Incorrect primer or probe sequence.
Verify primer and probe sequences. If necessary, re-synthesize with the appropriate sequence.
PCR is not optimized. Optimize PCR with cDNA standard curves to obtain a slope of –3.1 to –3.7 when plotting CT against the concentration of cDNA.
Degraded template or no template added.
Repeat the extraction and RT reaction with fresh template.
Reaction inhibitor present.
Repeat with purified template.
Rn = No Template Control Rn, and both
reactions show an amplification plot
Contamination of reagents or work area.
Check technique and equipment to confine contamination. Repeat the reaction with fresh reagents. Run negative controls along with the samples to monitor template contamination.
Paradise®Plus Reagent System User Guide — 12872-00 Rev. C 91
H. Troubleshooting
92
Paradise®Plus Reagent System User Guide — 12872-00 Rev. C