parallels plesk control paneldownload1.swsoft.com/plesk/plesk8.4/doc/en-us/... · ip addresses,...
TRANSCRIPT

Parallels® Plesk Control Panel

Contents
Preface 5
Documentation Conventions ......................................................................................................... 5 Typographical Conventions ........................................................................................................... 5 Feedback ....................................................................................................................................... 6 About This Guide ........................................................................................................................... 7 Who Should Read This Guide ....................................................................................................... 8 How This Guide Is Organized ....................................................................................................... 9
Introduction 11
When To Use Plesk Advanced Features 12
Administering Security Settings on Windows Objects 13
Plesk Security Policies ................................................................................................................ 14 Windows Accounts Used by Plesk to Manage Windows Objects ............................................... 14
Default User Permissions for Disks................................................................................... 14 Windows Accounts Used by Plesk to Manage Hosted Windows Objects .................................. 17 Administering Object Security on Plesk Server ........................................................................... 19
Initial Windows Security Configuration During Plesk Installation or Hosting Account Creation .......................................................................................................................................... 20 Browsing Object Security Settings Through Plesk GUI .................................................... 21 Customizing Object Security Settings in Plesk ................................................................. 22 General Security Metadata Structure ................................................................................ 35
Programming Event Handlers to Execute Custom Scripts on Plesk Server 40
Plesk Control Panel Events ......................................................................................................... 40 Creating Event Handlers ............................................................................................................. 45 Removing Event Handlers ........................................................................................................... 46 Composing Event Handler Command ......................................................................................... 46
Event Handler Command Syntax ...................................................................................... 46 Environment Variables in Event Handler Commands ....................................................... 47 Event Handler Command Example ................................................................................... 48 Event Parameters Passed by Event Handlers .................................................................. 50
Script Writing Rules ..................................................................................................................... 79
Installing and Upgrading Plesk Components 80
Plesk Component Installation and Upgrade Overview ................................................................ 81 Third-Party Application Installation as Plesk Component ................................................. 81 Plesk Component Upgrade ............................................................................................... 84
Third-Party Applications Supported by Plesk .............................................................................. 85 Third-Party Applications not Supported by Plesk ........................................................................ 87 Installing and Upgrading Plesk Components .............................................................................. 88
General Integration Procedure .......................................................................................... 89 Installing and Upgrading Mail Components ...................................................................... 90

Preface 3
Installing and Upgrading Antivirus Components ............................................................. 101 Installing and Upgrading DNS Servers ........................................................................... 108 Installing and Upgrading FTP Servers ............................................................................ 112 Installing and Upgrading Web Statistics Applications ..................................................... 118 Installing and Upgrading Server-Side Web Scripting Engines ........................................ 122 Installing and Upgrading Web Administration Tools ....................................................... 137 Installing and Upgrading Database Servers ................................................................... 142 Installing and Upgrading Web Mail Solutions ................................................................. 146 Installing SpamAssassin Spam Filter .............................................................................. 152 Installing stunnel ............................................................................................................. 153
Using Plesk Reconfigurator 154
Getting Started With Plesk Reconfigurator ............................................................................... 155 Changing IP Addresses on Plesk Server .................................................................................. 156 Changing Virtual Hosts Location ............................................................................................... 157 Changing Plesk Backup Data Location ..................................................................................... 157 Changing Plesk Mail Data Location .......................................................................................... 158 Repairing Plesk Installation ....................................................................................................... 159 Restoring Disk User Permissions .............................................................................................. 162 Switching Plesk Database Server Engine ................................................................................. 163
Using GUI to Switch Between Database Servers ........................................................... 164 Using Command-Line Interface to Switch Between Database Servers.......................... 165
Checking Component and Folder Permissions ......................................................................... 167 Changing Web Server Used for Accessing Control Panel ........................................................ 168
Managing Tomcat Service 169
Changing Tomcat Java Connector Ports .................................................................................. 169
Monitoring Server Status with Plesk Services Monitor 170
Changing Your Server’s Host Name 171
Customizing Plesk Title Bar Text 172
Customizing Link to Plesk Support 173
Creating Link to Support Form on Your Site ............................................................................. 175 Creating Link to Compose E-mail Message .............................................................................. 177
Changing DNS Zone Serial Number Format 178
Restoring Mail Configuration 179
Automating Plesk Management Tasks by Using Command-Line Interface 181
Configuring MSDE Network Access 182

Preface 4
Plesk Autoupdates by vztmplupsvc Service Using Virtuozzo Update Templates 183
Rules for User Names and Passwords of Plesk Users 184
Customizing Statistics Calculation 185
Switching PHP Handler Type to FastCGI 186
Glossary 189

Preface 5
In this section:
Documentation Conventions ............................................................................. 5 Typographical Conventions ............................................................................... 5 Feedback .......................................................................................................... 6 About This Guide ............................................................................................... 7 Who Should Read This Guide ........................................................................... 8 How This Guide Is Organized ............................................................................ 9
Documentation Conventions
Before you start using this guide, it is important to understand the documentation conventions used in it.
Typographical Conventions
Before you start using this guide, it is important to understand the documentation conventions used in it.
The following kinds of formatting in the text identify special information.
Formatting convention
Type of Information Example
Special Bold Items you must select, such as menu options, command buttons, or items in a list.
Go to the System tab.
Titles of chapters, sections, and subsections.
Read the Basic Administration chapter.
Italics Used to emphasize the importance of a point, to introduce a term or to designate a command line placeholder, which is to be replaced with a real name or value.
The system supports the so called wildcard character search.
Preface
6 Preface
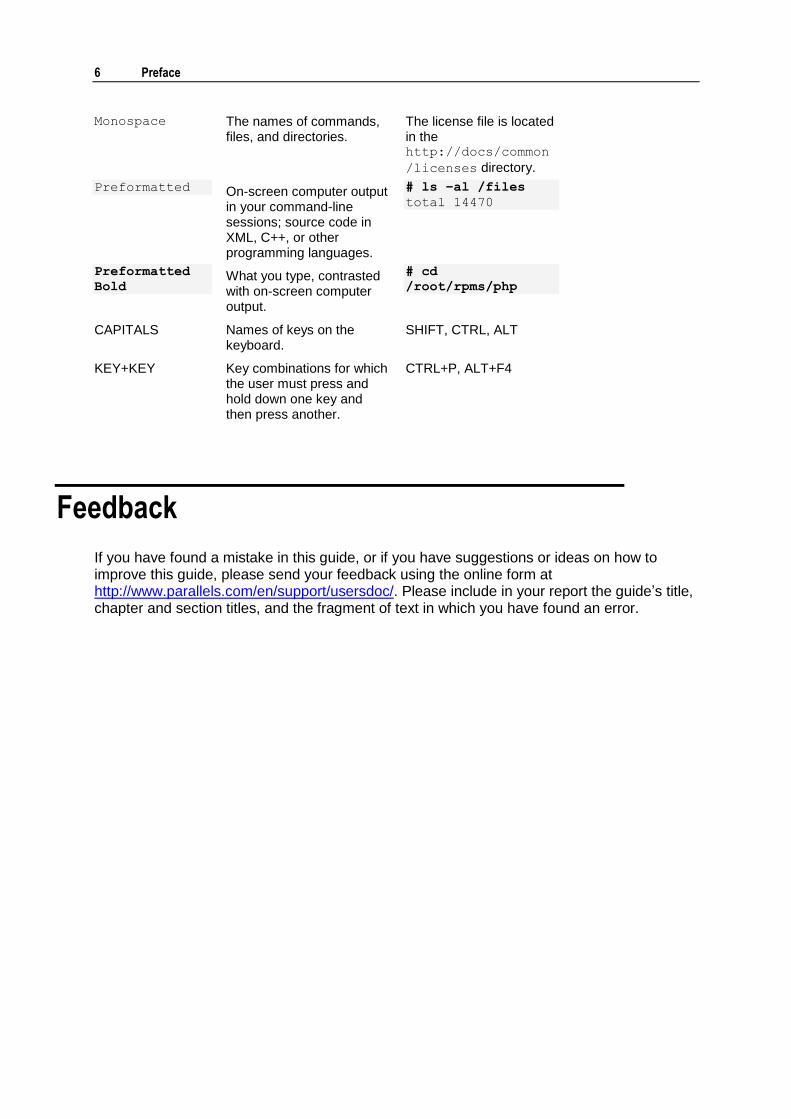
Monospace The names of commands, files, and directories.
The license file is located in the http://docs/common
/licenses directory.
Preformatted On-screen computer output in your command-line sessions; source code in XML, C++, or other programming languages.
# ls –al /files
total 14470
Preformatted
Bold What you type, contrasted with on-screen computer output.
# cd
/root/rpms/php
CAPITALS Names of keys on the keyboard.
SHIFT, CTRL, ALT
KEY+KEY Key combinations for which the user must press and hold down one key and then press another.
CTRL+P, ALT+F4
Feedback
If you have found a mistake in this guide, or if you have suggestions or ideas on how to improve this guide, please send your feedback using the online form at http://www.parallels.com/en/support/usersdoc/. Please include in your report the guide‟s title, chapter and section titles, and the fragment of text in which you have found an error.

Preface 7
About This Guide
The Plesk for Windows Advanced Features Administrator’s Guide is a companion guide for Plesk for Windows Administrator’s guide. The guide provides step-by-step instructions to perform Plesk management tasks that require use of Plesk functionality other than the GUI and GUI-only tasks that Plesk administrators may need to perform only in rear specific situations. The need to perform these tasks is likely to arise only when Plesk server is running in a non-standard configuration.

8 Preface
Who Should Read This Guide
This book is intended for Plesk server administrators whose responsibilities include maintaining Plesk servers and troubleshooting server software problems. The administrators who use Plesk in a non-standard configuration, that is, configuration that includes components other than those provided in original Plesk distribution package, are encouraged to familiarize themselves with the contents of this guide.

Preface 9
How This Guide Is Organized
The following table describes the chapters in this guide:
Chapter Name Chapter Description
Chapter 2, Introduction (on page 11)
Briefly describes the user tasks that can be accomplished by using the Plesk advanced features.
Chapter 3, When to Use Plesk Advanced Features (on page 12)
Describes user cases when use of the Plesk advanced features rather than features implemented through the GUI is warranted.
Chapter 4, Administering Security Settings on Windows Objects (on page 13)
Describes the process of applying Plesk security rules to Windows objects and provides step-by-step instructions for customizing both disk and hosting security on Plesk servers. Presents examples of commonly used security rules with explanations.
Chapter 5, Programming Event Handlers to Execute Custom Scripts on Plesk Server (on page 40)
Describes the event handler procedure, event handler command syntax, rules for writing custom scripts to be used in the event handler commands.
Chapter 6, Installing and Upgrading Third-Party Plesk Components (on page 88)
Describes supported third-party software application (Plesk component) installation and upgrade procedures emphasizing the extra steps that must be taken to successfully install or upgrade each supported application.
Chapter 7, Using Plesk Reconfigurator (on page 154)
Describes the use of the application to reconfigure Plesk server IP addresses, moving large volumes of hosted Web or mail content hosted on Plesk server to another location on a file system.
Chapter 8, Managing Tomcat Service (on page 169)
Describes changing Tomcat connector port numbers by using SQL queries to the Plesk database.
Chapter 9, Monitoring Server Status with Plesk Services Monitor (on page 170)
Describes monitoring services‟ statuses of Plesk server without logging in to Plesk (by accessing the server operating system).
Chapter 10, Changing Your Server‟s Host Name (on page 171)
Describes changing Plesk server‟s host name.
Chapter 11, Customizing Plesk Title Bar Text (on page 172)
Describes setting or changing Plesk Title bar text by using SQL queries to the Plesk database.
Chapter 12, Customizing Link to Plesk Support (see page 173)
Describes setting the link to Plesk support so that it leads to your support team instead of Parallels support.
Chapter 13, Changing DNS Zone Serial Number Format (on page 178)
Describes changing changing DNS zone serial number format by using SQL queries to the Plesk database.

10 Preface
Chapter Name Chapter Description
Chapter 14, Restoring Mail Server Configuration (on page 179)
Describes restoring mail server configuration and synchronizing the configuration with the Plesk database.
Chapter 15, Automating Plesk Management Tasks by Using Plesk Command-Line Interface (on page 181)
Introduces the Plesk command-line utilities and provides information about accessing the command-line utilities user documentation.
Chapter 16, Configuring MSDE Network Access (on page 182)
Describes the network transport protocol requirements for access MSDE from network.
Chapter 17, Plesk Autoupdates by vztmplupsvc Service Using Virtuozzo Update Templates (on page 183)
Provides information about Plesk autoupdates implementation for Plesks installed on VPSs by using Virtuozzo application templates.
Chapter 18, Rules for User Names and Passwords of Plesk Users (see page 184)
Describes the symbol usage rules for creating user names and passwords in Plesk.

Although Plesk‟s GUI affords the administrators complete control of the routine server hosting configuration needs, the hosting management capabilities provided by Plesk are not limited to Plesk functionality available to users through its GUI. Plesk administrators can use several additional tools that are supplied in the standard Plesk distribution package to add customized automation tasks, optimize Plesk server performance, and repair Plesk components and system settings. The tools include a number of standalone Windows applications, Plesk public API, utility programs, and the ability to integrate custom scripting with Plesk. (To learn about additional Plesk capabilities afforded by public API and creation utilities, Plesk administrators are advised to consult Plesk SDK documentation.) The tools together with the Plesk‟s ability to manage various third-party components allow administrators to customize their Plesk installations in an unlimited number of ways. However, the more complex a system becomes, the more potential is there for incongruities and conflicts between its components. Plesk GUI cannot possibly provide means to address all potential problems arising because of this. But that does not mean that the problems are not solvable. The Plesk tools provide effective means to diagnose and troubleshoot problems on Plesk servers.
The purpose of this guide is not to describe all possible uses of the tools, but rather describe advanced user tasks that administrators may need to perform when troubleshooting problems on Plesk servers running in a non-standard configuration.
C H A P T E R 1
Introduction

Plesk advanced features should only be used when GUI-based remedies have been attempted but have not achieved your objective. Before using advanced administration features, you should first diagnose the problem correctly. You may need to use Plesk advanced features to correct the following problems:
A third-party component integration with Plesk fails repeatedly after installation or upgrade;
A new custom event handler needs to be created in Plesk;
Plesk server or one or more of its components or services malfunction due to misconfigurations.
C H A P T E R 2
When To Use Plesk Advanced Features

Plesk has a built-in mechanism for customizing security settings for Windows objects on the server disks. You can specify security rules and then have Plesk automatically apply the rules to Windows object security settings. The security files are easily accessible, and once you understand the logic of their use, you can readily customize security settings on any folder or file found on a Plesk server.
Incorrect security settings on Windows objects found on Plesk servers may result is a number of server problems including but not limited to unavailability of site application and services. We recommend that you become acquainted with this section before attempting to modify security settings on folders and files found on Plesk server.
Plesk creates different Windows user accounts to manage servers and to serve Internet requests by IIS. Plesk has to assign the user accounts necessary permissions to access and manage Windows objects on managed servers. When assigning user account permissions, Plesk exercises two different security policies towards Windows objects - Disk security and Hosting security. Security settings for all Windows objects on a Plesk server are initially configured according to the policies during Plesk installation. Server compliance with the policies ensures the maximum security of the Plesk server without compromising server performance. The Windows objects security settings can be further customized. To manage object security settings, Plesk has implemented a flexible system based on Plesk‟s own security metadata files and the DACL inheritance mechanisms implemented in Windows. Security settings can be customized by using the Plesk security metadata files and Plesk creation utilities that are distributed with Plesk.
Warning: Before making any changes to the security metadata, make a backup copy of the metadata file that you want to modify. For information why backing up security metadata files before modifying them is a good idea, see “Customizing Disk Security” (on page 25) and “Customizing Hosting Security” (on page 26) sections.
In this chapter:
Plesk Security Policies ...................................................................................... 14 Windows Accounts Used by Plesk to Manage Windows Objects ....................... 14 Windows Accounts Used by Plesk to Manage Hosted Windows Objects .......... 17 Administering Object Security on Plesk Server .................................................. 19
C H A P T E R 3
Administering Security Settings on Windows Objects

14 Administering Security Settings on Windows Objects
Plesk Security Policies
Plesk exercises two different security policies towards Windows objects: disk security and hosting security. The difference between the policies is dictated by the different security requirements for hosted content as opposed to the rest of the server disks. Both policies are defined by security rules specified in corresponding Plesk security metadata files. The disk security policy is defined by the disk security metadata file and is applied to all Plesk server
disks except for the contents of the %plesk_vhosts% directory, where all hosted content is
located. For more information about the disk security metadata file, see “Disk Security Metadata File” (on page 23). All hosting directories are governed by security policies defined by corresponding hosting security metadata files. Hosting security metadata files are automatically generated from hosting security metadata file templates. For more information about security metadata file templates, see “Hosting Security Metadata File Templates” (on page 24).
Windows Accounts Used by Plesk to Manage Windows Objects
The following table describes Windows user accounts and groups used by Plesk to manage Windows objects on server disks.
Account Description
psaadm Used by Plesk control panel to log on to the system and accesses files and folders.
psacln All users created by Plesk are members of this group.
psaserv Some auxiliary Internet users are members of this group.
In this section:
Default User Permissions for Disks ................................................................... 14
Default User Permissions for Disks
Path Account Default Permissions * Comment
Disk root Everyone Read & Execute for this object only
psaadm Deny Full Control

Administering Security Settings on Windows Objects 15
Path Account Default Permissions * Comment
psacln
Program
Files
psacln Deny Full Control except Read Attributes
Program
Files\Commo
n Files
psaadm Read & Execute
psacln
psaserv
NETWORK SERVICE
Documents
and
Settings
Windows default permissions.
Default user permissions are left intact because it is necessary to allow users to log on to the system.
RECYCLER psaadm Deny Read & Execute for this object only
psacln
Windows Windows default permissions.
Default user permissions are left intact because it is necessary to allow users to access system components.
Windows\TEM
P
psaadm Read & Execute for folders; Read for files
psacln
psaserv
NETWORK SERVICE
%plesk_dir% psaadm Read & Execute Permissions are not inherited from parent
psacln Deny Full Control
psaserv
NETWORK SERVICE
%plesk_bin%
psaadm Read & Execute
psacln Read Attributes for this object only; Read & Execute for files
%plesk_vhos
ts%
psacln Deny Full Control except Read Attributes for this object only
psaadm Deny Full Control for this object only
psaserv
NETWORK SERVICE

16 Administering Security Settings on Windows Objects
Actual permissions set on Windows objects may differ from the default permissions listed in this table because some of them may result from a combination of several security rules. For more information about security rules, see “Customizing Object Security Settings in Plesk” (on page 22).

Administering Security Settings on Windows Objects 17
Windows Accounts Used by Plesk to Manage Hosted Windows Objects
Plesk administers the server on which it is installed by using a number of Windows user accounts. The user accounts are used by Plesk or remote users logging in to the Plesk server. The following table lists several Windows user accounts and groups that are used by Plesk or remote users specifically to access and manage content hosted on domains,
subdomains, and Web user accounts. The default permissions on a domain‟s \httpdocs
folder for each account are also described.
Account Description Default Permissions for \httpdocs folder
ftp_subaccounts A Windows user group. Additional ftp user accounts created on domains or subdomains are assigned membership in this user group.
Deny Delete for this object.
<Domain FTP user>
A Windows user account. It is created for domain content management purposes at the time of domain creation. For each domain, a separate Domain FTP user account is created. Remote users can access domain content by logging in to the server by using the domain FTP user credentials. The account is also used by Plesk to manage hosted domain content.
FileNonRemovable (on page 37) for this object and Full Control for subfolders and files.
<IIS user> A Windows user account. It is used for serving incoming HTTP requests. The account is automatically created during domain creation. For each domain a separate account is created. For security reasons, the user account should not be granted full access rights.
Read for files, Read & Execute for folders.
<Parent domain FTP user>
A Windows user account. It is created during domain creation for managing content hosted on subdomains or Web user folders that belong to the domain. The account is used by Plesk when the subdomain‟s or Web user‟s content is managed by Plesk users who are logged in to Plesk as domain owners. Note that a separate domain FTP user account can be enabled for a subdomain to manage its content.
FileNonRemovable (on page 37) for this object and Full Control for subfolders and files.

18 Administering Security Settings on Windows Objects
Account Description Default Permissions for
\httpdocs folder
<Parent domain IIS user>
A Windows user account. It is created during domain creation for serving HTTP requests for subdomains and subdomain Web users. The account is used when the content is requested as part of the domain hosting structure.
Read for files, Read & Execute for folders.
<IIS Application Pool user>
A Windows user account created specifically to use IIS Application Pool. The use of separate user accounts corresponding to dedicated IIS Application Pools ensures the maximum degree of domain isolation. For each domain a separate account can be created. For security reasons, the user account should not be granted full access rights.
Read for files, Read & Execute for folders.
Administering Security Settings on Windows Objects 19
Administering Object Security on Plesk Server
The initial security configuration of all disks on a Plesk server is performed during Plesk installation. Plesk applies its own security settings to all existing Windows objects on the server according to the disk and hosting security policies.
Once security has been configured, you have several options to manage security settings for Windows objects. We recommend that you use Plesk security metadata files to set and edit security settings for Windows objects on Plesk servers. The changes made in the files can
be then applied to Windows objects by running the ApplySecurity.exe and
HostingSecurity.exe creation utilities.
You can also modify the security settings for each object individually either through Plesk GUI or directly by going to Security tab in the object‟s Properties. However, neither of these options is recommended. The main reason is that the changes made in the security settings by using these options may be overwritten by security settings applied by
ApplySecurity.exe, HostingSecurity.exe, or Reconfigurator.exe creation
utilities .
The following advantages are afforded by using the security metadata files to configure security settings for Windows objects:
the ability to apply security rules to multiple objects at once
easy track of security settings changes
easy portability of customized security settings between domains and servers
In this section:
Initial Windows Security Configuration During Plesk Installation or Hosting Account Creation ............................................................................................................ 20 Browsing Object Security Settings Through Plesk GUI ...................................... 21 Customizing Object Security Settings in Plesk .................................................. 22 General Security Metadata Structure ................................................................. 35

20 Administering Security Settings on Windows Objects
Initial Windows Security Configuration During Plesk Installation or Hosting Account Creation
The initial security configuration of Windows objects is performed automatically by Plesk during Plesk installation. Plesk creates a number of default accounts and sets user permissions on all Windows objects found on the freshly installed Plesk server. All pre-existing security settings are erased and new security settings are applied according to the security rules found in the default disk security metadata file (on page 23).
Subsequently, each time a new hosting account is created, the created default hosted objects are assigned user account permissions based on the security rules found in the corresponding hosting security metadata file (on page 24) instantiated from a current hosting security metadata file template (on page 24).
If a folder or a file is created, for which no security rule is set in the security metadata, the object will automatically inherit security settings of their respective parent containers.

Administering Security Settings on Windows Objects 21
Browsing Object Security Settings Through Plesk GUI
Plesk provides GUI access to the current security settings of Windows objects that it manages. You can browse and modify hosted objects security settings through Plesk GUI. User account permissions on hosted objects can be viewed and edited by any Plesk user authorized to access hosted objects through Plesk control panel.
Note: Security settings for some critical folders on hosting accounts are not allowed to be changed through Plesk GUI to prevent potential security problems or Web site malfunction that may be caused by inadvertant user interference with the security settings.
For example, to browse the user permissions for the /httpdocs directory on domain
example.com, follow these steps:
1 Log in to Plesk as the client who owns domain example.com.
2 Click the Domains link under General in the Navigation pane. The list of domains on the client account is displayed.
3 Click the example.com entry in the domain list. The domain management window
opens.
4 Click File Manager under Hosting. The list of files and directories located in the domain root directory is displayed.
5 Click on the Lock icon corresponding to the /httpdocs directory. The list of Windows
user accounts is displayed on the left under Group or user names. By default, the upper entry in the user account list is highlighted. On the right, the access permissions for the highlighted user account are displayed.
6 Click on the user account or user group name in the list to view the assigned permissions.
Note: To view the advanced security settings, click Advanced.

22 Administering Security Settings on Windows Objects
Figure 1: Browsing User Account Access Permissions for Windows Objects Managed by Plesk
Customizing Object Security Settings in Plesk
The preferred way to customize Windows object security settings is by adding new or
modifying existing Entry elements in a disk security metadata file (for disk security) or in a
hosting security metadata file instance corresponding to the hosting account that is authorized to access and manage the hosted objects (for hosting security). To learn why other customization options are not recommended, see “Administering Object Security on
Plesk Server” (on page 19). For detailed description of the Entry element contents, see
“General Security Metadata Structure” (on page 35). For step-by-step instructions on modifying the disk security metadata file, see “Customizing Disk Security” (on page 25). For step-by-step instructions on modifying the hosting security metadata files, see “Customizing Hosting Security” (on page 26).
Warning: Before making any changes to the security metadata, make a backup copy of the metadata file that you want to modify. For information why backing up security metadata files before modifying them is a good idea, see “Customizing Disk Security” (on page 25) and “Customizing Hosting Security” (on page 26) sections.
In this section:
Security Metadata Files and Templates ............................................................. 23 Customizing Disk Security ................................................................................. 25 Customizing Hosting Security ............................................................................ 26

Administering Security Settings on Windows Objects 23
Security Metadata Files and Templates
Plesk security rules for managed objects on hosted domains, subdomains, and web user folders are stored in security metadata files. Because Plesk has two different security policies applied to Windows objects, it uses two different types of security metadata files: disk security metadata file (on page 23) and hosting security metadata files (on page 24).
The disk security metadata file defines security rules for Windows objects on Plesk server
disks except for the contents of the %plesk_vhosts% directory, which contains hosted
content for Plesk hosting accounts and is governed by a different security policy.
Security rules for Windows objects in the %plesk_vhosts% directory are defined by hosting
security metadata files. Separate instances of hosting security metadata files are automatically created for each hosting account (domain, subdomain, or Web user) from the corresponding template files during hosting account creation in Plesk.
You can manually modify security rules by editing corresponding security metadata files or templates. For detailed information about modifying Plesk security rules, see “Customizing Disk Security” (on page 25) and “Customizing Hosting Security” (on page 26) sections.
In this section:
Disk Security Metadata File ............................................................................... 23 Hosting Security Metadata File Templates ........................................................ 24 Hosting Security Metadata Files ........................................................................ 24
Disk Security Metadata File
The disk security metadata file is named DiskSecurity.xml. The file defines security rules
for all disks on a Plesk server except for the %plesk_vhosts% folder where hosted domain
folders are located. The file is located in the %plesk_dir%\etc\DiskSecurity directory,
where %plesk_dir% is the Windows environment variable designating the Plesk installation
directory.
Warning: Exercise caution when changing disk security rules by editing the
DiskSecurity.xml file. Follow recommendations in the “Customizing Disk Security” (on
page 25) section to avoid potential problems in administering disk security policy in Plesk.

24 Administering Security Settings on Windows Objects
Hosting Security Metadata File Templates
Plesk hosting security metadata template files are XML files that contain default security rules to be included in separate instances of security metadata files (on page 24) for each Plesk hosting account. Separate security template files exist for the following types of Plesk hosting accounts - domains, subdomains, and Web users. When a new hosting account is created, the security metadata file template corresponding to the account‟s type is used to create a separate instance of a security metadata file for the account. At the time of account creation, the metadata file contains the default security configuration for all hosted objects manageable by the account. The file is stored in the root folder of the file system segment that the account is authorized to access and manage. For example, the security metadata file
for domain example.com will be located in the %plesk_vhosts%/example.com directory.
The following Plesk security settings template files are used to create security metadata files when instantiating new hosting accounts:
%plesk_dir%\etc\hosting_template.xml (for domain administrator accounts)
%plesk_dir%\etc\subdomain_template.xml (subdomain user accounts)
%plesk_dir%\etc\webuser_template.xml (web user accounts)
Note: Other hosting security metadata template files, for example
hosting_write_template.xml, are also located in the directory and can be used to
create or modify instances of hosting security metadata files. The additional templates are used when corresponding options are selected in the Plesk GUI. You can also define your
own templates and use them to apply security rules by using the HostingSecurity.exe
utility.
Hosting Security Metadata Files
Separate instances of security metadata files exist for all hosting accounts created in Plesk - domain, subdomain, and Web user hosting accounts. The files are located in the root folders of corresponding hosting accounts and contain security rules for all objects manageable by the authorized hosting account.
The following security metadata files are used by Plesk to administer security of hosted content for different Plesk hosting accounts:
%plesk_vhosts%\<domain root path>\.security (domains)
%plesk_vhosts%\<subdomain root path>\.security (subdomains)
%plesk_vhosts%\<domain root path>\.Web.<Web user name>.security
(Web users)
Warning: Exercise caution when changing hosting security rules by editing security metadata files. Follow recommendations in the “Customizing Hosting Security” (on page 26) section to avoid potential problems in administering hosting security policy in Plesk.

Administering Security Settings on Windows Objects 25
Customizing Disk Security
Custom changes to disk security metadata should not be applied to the
DiskSecurity.xml file itself. The disk security metadata can be contained in multiple files.
All disk security metadata do not have to be contained only in the DiskSecurity.xml file.
You can create any number of additional disk security metadata files. To customize disk
security, you should create an additional file with the xml extension in the
%plesk_dir%\etc\DiskSecurity directory and specify additional security rules in the
file. This will enable you to track changes and manipulate sets of security metadata easily.
To customize disk security rules in Plesk, follow these steps:
1 Log in to a Plesk-managed Windows-based server as administrator.
2 Determine what Windows objects you would like to set new security rules for.
3 Open the %plesk_dir%\etc\DiskSecurity folder.
4 In the folder, create a new file with the xml extension.
You can name this file anything you want.
5 Open and edit the file by using your favorite XML file editor to create security rule entries.
Disk security rule entries have the same format as hosting security rule entries. For help in completing this step, see “Adding New Security Rule to Hosting Security Metadata File Template” (on page 27). See also an explanatory example of a security rule entry following this procedure. For entry attribute descriptions and possible values, see “General Security Metadata Structure” (on page 35).
6 Save and close the file.
Once you have made necessary modifications to the security metadata file, run the
ApplySecurity.exe utility to apply the security rules to Windows objects. For
information about using the ApplySecurity.exe utility, consult Plesk for Windows
Creation Utilities Administrator’s Guide.
This is an example of a security rule that sets access rights to the disk root folder for the Plesk administrator account.
Example:
<Entry AccounType=”1” Account=”Psaadm” Path=”/” AceFlags=”ThisFolderSubfoldersAndFiles” AccessMask=”FullAccess” EntryFlags=”0x9” />
Explanation:
Because name Psaadm is not a standard Windows system account, it has to be resolved
in the system (hence, AccounType=”1”). Path=”/” specifies that the security rule will
be applied to the disk root folder. AceFlags=”ThisFolderSubfoldersAndFiles”
specifies that, according to this rule, an ACE with permission defined by
AccessMask=”FullAccess” will be created for the disk root folder and all of its
subfolders and files. EntryFlags=”0x9” (derived by combining 0x1 and 0x8 entry
flags) set the ACE‟s type to Deny and enables Plesk to proceed with applying other
security rules to other objects even if an error occurs while applying the security rule defined by this rule.

26 Administering Security Settings on Windows Objects
Customizing Hosting Security
Custom changes in hosting security rules can be made both at the level of the security metadata template files and at the level of the security metadata file instances on individual hosting accounts. However, direct modification of security metadata file instances is not recommended. The preferred way of customizing hosting security is through creation of additional security metadata template files.
Note: If you do decide to modify a security metadata file instance directly, be sure to make a backup copy of the file before modifying it.
Once a template file with additional security rules is created, the security rules can be added
into or removed from hosting security metadata files by using the HostingSecurity.exe
utility. For information about using the HostingSecurity.exe utility to modify security
rules in security metadata files, consult Plesk for Windows Creation Utilities Administrator’s Guide.
To customize hosting security rules for Windows objects in Plesk, follow these steps:
1 Log in to a Plesk-managed Windows-based server as administrator.
2 Determine what Windows objects you would like to set new security rules for.
3 Create a new hosting security metadata template file or open an existing one by using your favorite XML file editor.
For information about locating the appropriate template file, see “Hosting Security Metadata File Templates” (on page 24).
4 Add or modify security rule entries in the file as needed.
For help in completing this step, see the “Adding New Security Rule to Security Metadata File Template” (on page 27) section. For entry attribute descriptions and possible values, see “General Security Metadata Structure” (on page 35). For entry examples with explanations, see “Common Security Rule Entry Examples” (on page 29).
5 Save and close the file.
6 Apply the changes to hosting accounts that you want to change object security rules for
by running the HostingSecurity.exe utility.
In this section:
Adding New Security Rule to Hosting Security Metadata File Template ............ 27 Common Security Rule Examples ..................................................................... 29

Administering Security Settings on Windows Objects 27
Adding New Security Rule to Hosting Security Metadata File Template
A security rule is an access permission for a Windows user account or group that will be added to a Windows object once the rule is applied to it. A single rule may be applied to more than one object depending on the attribute values specified. To add a new security
rule, you need to create a new Entry element in a security metadata file template and
include in it the necessary information by using the available declaration options for the element‟s attributes. For detailed description of the attributes and information about values that can be assigned to the attributes, see “General Security Metadata Structure” (on page 35).
To add a new security rule, follow these steps:
1 Identify the Windows object that you want to create a new security rule for.
The example used here assumes that you want to add a new security rule for the
error_docs folder located in the domain root folder directory.
2 Identify the Windows object to which the rule is to apply by specifying the Path and, if
applicable, the SubPath attribute in the new Entry element.
Consult “General Security Metadata Structure” (on page 35) for applicable declaration options.
For example,
<Entry AccounType=”” Account=”” Path=”[HTTPD_VHOSTS_D]”
SubPath=”error_docs” AceFlags=”” AccessMask=”” EntryFlags=”” Tag=”” Tag2=”” />
3 Specify the Windows user account that you want to assign the security rule for.
For example, to specify a domain FTP user account, make the following declarations:
<Entry AccounType=”0” Account=”Null” Path=”” SubPath=”” AceFlags=””
AccessMask=”” EntryFlags=”” Tag=”DomainUser” Tag2=”” />
Note: The name Null will be replaced by an actual domain FTP user account name in
metadata security files instantiated from the the template file. You can also include a
SidStr attribute if a SID for a particular Windows account is known. For more
information about the SidStr attribute, see “General Security Metadata Structure” (on
page 35).
4 Define the type of the rule (Allow or Deny, just like you would for an ACE) and how the
rule is to be propagated to child objects by specifying the EntryFlags element.
For help in completing this step, see “Possible EntryFlags Attribute Values” (on page 37). For example, to enable application of the security rule only to files contained in the
specified error_docs folder, but not to the folder itself you need to use the 0x80 flag.
The rule is set to the Allow type by default (the 0x0 flag) unless the 0x1 flag (Deny) is
included.
<Entry AccounType=”” Account=”” Path=”” SubPath=”error_docs\*.*”
AceFlags=”” AccessMask=”” EntryFlags=”0x80” Tag=”” Tag2=”” />

28 Administering Security Settings on Windows Objects
Note: When you use the 0x80 flag, a file mask must be included in the Path or SubPath
attribute, whichever is applicable. In this example the . mask must be used. You can use
other entry flags to further fine-tune the application of the rule to Windows objects.
5 Set the permissions for the user account on Windows objects to which the rule is going to
apply by specifying the AccessMask attribute. For help in completing this step, see
“Possible AccessMask Attribute Values” (on page 37).
For example, to grant the Read and Write permissions for the Windows user account,
specify ReadWrite:
<Entry AccounType=”” Account=”” Path=”” SubPath=”” AceFlags=””
AccessMask=”ReadWrite” EntryFlags=”” Tag=”” Tag2=”” />
6 Define if ACEs must be created for the Windows object and its child objects based on this
security rule by specifying the AceFlags attribute. For help in completing this step, see
“Possible AceFlags Attribute Values” (on page 36). For example, to create ACEs only for
the error_docs folder and all files contained within that folder use
AceFlags=”FilesOnly”.
This is the resulting security rule entry:
<Entry AccounType=”0” Account=”Null” Path=”[HTTPD_VHOSTS_D]” SubPath=”error_docs\*.*” AceFlags=”FilesOnly” AccessMask=”ReadWrite” EntryFlags=”0x80” Tag=”DomainUser” Tag2=”” />
Rule Description
Because the name Null is a standard system account name, it does not have to be resolved
in the system (hence, AccounType=”0”).(The name Null will be replaced by an actual
domain FTP user account name in metadata security files instantiated from the the template
file). The optional Domain and SidStr attributes do not need to be defined for the same
reason. The HTTPD_VHOSTS_D component path in the Path attribute specifies the path to
the domain root folder where the error_docs folder is located. The SubPath attribute sets
the mask for all files in the error_docs folder to which the rule will be applied.
AceFlags=”FilesOnly” specifies that, according to this rule, an ACE with permission
defined by AccessMask=”ReadWrite” will be created only for the error_docs folder and
all files contained within that folder. However, EntryFlags=”0x80” further restricts the
ACE creation only to the files within the folder, excluding the error_docs folder from this
rule. Tag=”DomainUser” designates the security rule as pertaining to a Plesk domain
hosting account and is used by Plesk to properly organize the processing of security metadata.
Note: When entry flag 0x80 is included in a security rule entry, the path to the objects
defined by the Path and SubPath attributes must include a file mask. This example uses file
mask ..

Administering Security Settings on Windows Objects 29
Common Security Rule Examples
This section describes several security rule entry examples commonly found in security metadata files and templates.
In this section:
Example of Security Rule Entry in Security Metadata File ................................. 29 Setting File Access Rights Different From Parent Container‟s ........................... 30 Prohibiting Container Deletion When Deletion of its Parent Container Contents Is Disabled ............................................................................................................ 31 Prohibiting Container Deletion When Deletion of its Parent Container Contents Is Allowed ............................................................................................................. 33
Example of Security Rule Entry in Security Metadata File
The following security rule sets access rights to objects that belong to domain example.com
for the Windows user account named domainuser1.
Security rule entry
<Entry AccounType=”1” Account=”domainuser1” SidStr=”S-1-5-21-
821798554-1223697094-3523996037-1043” Path=”[HTTPD_VHOSTS_D]”
SubPath=”example.com” AceFlags=”FilesOnly” AccessMask=”Read”
EntryFlags=”0x140” Tag=”DomainUser” Tag2=”” />
Explanation
Because the name domainuser1 is not a standard system account name, it has to be
resolved in the system (hence, AccounType=”1”). The optional SidStr attribute is defined
to improve Plesk stability. The HTTPD_VHOSTS_D component path in the Path attribute
specifies the common part of the path to the domain root folder where the example.com
folder is located. The SubPath attribute sets the specific domain root folder to which the rule
will be applied. AceFlags=”FilesOnly” specifies that, according to this rule, an ACE with
permission defined by AccessMask=”Read” will be created and added only to the
example.com folder and all files contained within that folder. EntryFlags=”0x140”
enables (i) creation of the domain root folder (which is necessary during domain creation)
and (ii) strict enforcement of the access permissions defined by the AccessMask=”Read”
permission mask. Tag=”DomainUser” designates the security rule as pertaining to a Plesk
domain hosting account and is used by Plesk to properly organize the processing of security metadata.

30 Administering Security Settings on Windows Objects
Setting File Access Rights Different From Parent Container’s
The following rule sets access rights to files in the error_docs folder on domain
example.com for the Windows user account named domainuser1.
Security rule entry
<Entry AccounType=”1” Account=”domainuser1” SidStr=”S-1-5-21-
821798554-1223697094-3523996037-1043” Path=”[HTTPD_VHOSTS_D]”
SubPath=”example.com\error_docs\*.*” AceFlags=”FilesOnly”
AccessMask=”ReadWrite” EntryFlags=”0x80” Tag=”DomainUser” Tag2=”” />
Note: When entry flag 0x80 is included in a security rule entry, the path to the objects
defined by the SubPath attribute must include a file mask. This example uses file mask ..
Explanation
Because the name domainuser1 is not a standard system account name, it has to be
resolved in the system (hence, AccounType=”1”). The optional SidStr attribute is defined
to improve Plesk stability. The HTTPD_VHOSTS_D component path in the Path attribute
specifies the common part of the path to the domain root folder where the example.com
folder is located. The SubPath attribute completes the path to the error_docs folder to
which the rule will be applied. AceFlags=”FilesOnly” specifies that, according to this
rule, an ACE with permission defined by AccessMask=”ReadWrite” will be created and
added only to the error_docs folder and all files contained within that folder. However,
EntryFlags=”0x80” further restricts the ACE creation only to the files within the folder,
excluding the error_docs folder from this rule. Tag=”DomainUser” designates the
security rule as pertaining to a Plesk domain hosting account and is used by Plesk to properly organize the processing of security metadata.

Administering Security Settings on Windows Objects 31
Prohibiting Container Deletion When Deletion of its Parent Container Contents Is Disabled
The following two security rules set different sets of access rights for a parent object (in this
example, the httpdocs folder on domain example.com) and its child objects - subfolders and
files contained in the folder. The resulting security configuration will prohibit deletion of the parent container by a domain user but will allow the user full control for files and folders
contained in the httpdocs folder.
Security rule entry 1
The following rule sets access rights to files in the httpdocs folder on domain example.com
for the Windows user account named domainuser1, prohibiting deletion of the folder.
<Entry AccounType=”1” Account=”domainuser1” SidStr=”S-1-5-21-2767697126-
2621801917-3613110436-1022” Path=”[HTTPD_VHOSTS_D]” SubPath=”example.com\httpdocs” AceFlags=”ThisObjectOnly” AccessMask=”FileNonRemovable” EntryFlags=”0x140” Tag=”DomainUser” Tag2=”” />
Explanation
Because the name domainuser1 is not a standard system account name, it has to be
resolved in the system (hence, AccounType=”1”). The optional SidStr attribute is defined to
improve Plesk stability. The HTTPD_VHOSTS_D component path in the Path attribute specifies
the common part of the path to the domain root folder where the example.com folder is
located. The SubPath attribute completes the path to the httpdocs folder to which the rule
will be applied. AceFlags=”ThisObjectOnly” specifies that, according to this rule, an ACE
with permission defined by AccessMask=”FileNonRemovable” will be created and added
only to the httpdocs folder on domain example.com. EntryFlags=”0x140” enables (i)
creation of the folder (which is necessary during domain creation), (ii) strict enforcement of
the access permissions defined by the AccessMask=”FileNonRemovable” permission mask,
and (iii) sets the ACE type to Allow Access. Tag=”DomainUser” designates the security rule
as pertaining to a Plesk domain hosting account and is used by Plesk to properly organize the processing of security metadata.
Security rule entry 2
The rule sets full control rights to the httpdocs folder, its subfolders and files on domain
example.com for the Windows user account named domainuser1.
<Entry AccounType=”1” Account=”domainuser1” SidStr=”S-1-5-21-2767697126-
2621801917-3613110436-1022” Path=”[HTTPD_VHOSTS_D]” SubPath=”example.com\httpdocs” AceFlags=”SubfoldersAndFilesOnly” AccessMask=”FullAccess” EntryFlags=”0x140” Tag=”DomainUser” Tag2=”” />
Explanation

32 Administering Security Settings on Windows Objects
Because the name domainuser1 is not a standard system account name, it has to be
resolved in the system (hence, AccounType=”1”). The optional SidStr attribute is defined to
improve Plesk stability. The HTTPD_VHOSTS_D component path in the Path attribute specifies
the common part of the path to the domain root folder where the example.com folder is
located. The SubPath attribute completes the path to the httpdocs folder to which the rule
will be applied. AceFlags=”SubfoldersAndFilesOnly” specifies that, according to this rule,
an ACE with permission defined by AccessMask=”FullAccess” will be created and added to
the httpdocs folder and all of its subfolders and files on domain example.com.
EntryFlags=”0x140” enables (i) creation of the folder (which is necessary during domain
creation) and (ii) strict enforcement of the access permissions defined by the
AccessMask=”FullAccess” permission mask. Tag=”DomainUser” designates the security
rule as pertaining to a Plesk domain hosting account and is used by Plesk to properly organize the processing of security metadata.

Administering Security Settings on Windows Objects 33
Prohibiting Container Deletion When Deletion of its Parent Container Contents Is Allowed
The following two security rules set different sets of access rights for a parent object (in this
example, the picture_library folder on domain example.com) and its child objects -
subfolders and files contained in the folder. The resulting security configuration will prohibit deletion of the parent container by a domain user but will allow the user full control for files
and folders contained in the picture_library folder.
Security rule entry 1
The following rule sets access rights to files in the httpdocs\picture_library folder on
domain example.com for the Windows user account named domainuser1, prohibiting
deletion of the folder.
<Entry AccounType=”1” Account=”domainuser1” SidStr=”S-1-5-21-821798554-
1223697094-3523996037-1043” Path=”[HTTPD_VHOSTS_D]”
SubPath=”example.com\httpdocs\picture_library” AceFlags=”ThisObjectOnly”
AccessMask=”FileRemovable” EntryFlags=”0x141” Tag=”DomainUser” Tag2=”” />
Explanation
Because the name domainuser1 is not a standard system account name, it has to be
resolved in the system (hence, AccounType=”1”). The optional SidStr attribute is defined to
improve Plesk stability. The HTTPD_VHOSTS_D component path in the Path attribute specifies
the common part of the path to the domain root folder where the example.com folder is
located. The SubPath attribute completes the path to the httpdocs\picture_library folder
to which the rule will be applied. AceFlags=”ThisObjectOnly” specifies that, according to
this rule, an ACE with permission defined by AccessMask=”FileRemovable” will be created
and added only to the httpdocs\picture_library folder on domain example.com.
EntryFlags=”0x141” enables (i) creation of the folder (which is necessary during domain
creation), (ii) strict enforcement of the access permissions defined by the
AccessMask=”FileRemovable” permission mask, and (iii) sets the ACE type to Deny
Access. Tag=”DomainUser” designates the security rule as pertaining to a Plesk domain
hosting account and is used by Plesk to properly organize the processing of security metadata.
Security rule entry 2
The rule sets full control rights to the httpdocs\picture_library folder, its subfolders and
files on domain example.com for the Windows user account named domainuser1.
<Entry AccounType=”1” Account=”domainuser1” SidStr=”S-1-5-21-821798554-
1223697094-3523996037-1043” Path=”[HTTPD_VHOSTS_D]”
SubPath=”example.com\httpdocs\picture_library”
AceFlags=”ThisFolderSubfoldersAndFiles” AccessMask=”FullAccess”
EntryFlags=”0x140” Tag=”DomainUser” Tag2=”” />

34 Administering Security Settings on Windows Objects
Explanation
Because the name domainuser1 is not a standard system account name, it has to be
resolved in the system (hence, AccounType=”1”). The optional SidStr attribute is defined to
improve Plesk stability. The HTTPD_VHOSTS_D component path in the Path attribute specifies
the common part of the path to the domain root folder where the example.com folder is
located. The SubPath attribute completes the path to the httpdocs\picture_library folder
to which the rule will be applied. AceFlags=”ThisFolderSubfoldersAndFiles” specifies
that, according to this rule, an ACE with permission defined by AccessMask=”FullAccess”
will be created and added to the httpdocs\picture_library folder and all of its subfolders
and files on domain example.com. EntryFlags=”0x140” enables (i) creation of the folder
(which is necessary during domain creation) and (ii) strict enforcement of the access
permissions defined by the AccessMask=”FullAccess” permission mask.
Tag=”DomainUser” designates the security rule as pertaining to a Plesk domain hosting
account and is used by Plesk to properly organize the processing of security metadata.

Administering Security Settings on Windows Objects 35
General Security Metadata Structure
A security metadata template or file contains security rule entries for Windows objects. Each
such entry consist of a single Entry element that has multiple attributes specifying a security
rule and the identity of one or more Windows objects to which the rule applies. In addition,
each Entry element declares entry flags specifying how existing DACL security settings
associated with Windows objects and Plesk security rules are combined and inherited by Windows objects. The element can also have optional tags that are used by Plesk to organize processing of security metadata.
Plesk follows Windows security processing rules when translating the security rule entries stored in the metadata files into ACEs.
The following security rule entry definition format is adopted for the files:
<Entry AccounType=”” Account=”” Path=”” AceFlags=”” AccessMask=”” EntryFlags=”” Tag=”” Tag2=”” />
When applying security rules listed in the metadata files to Windows objects, Plesk can write new, modify old, or erase existing ACEs in object DACLs, depending on what entry tags are
specified by the corresponding Entry element.
The following table describes the attributes that are used in the Entry element and provides
mappings to DACL‟s ACEs components where applicable.
Attributes and Their Mappings to ACE Components
Attribute ACE component Required Comment
Account Name (the user part)
Yes Symbolic Windows user account name for which the security rule is created.
Domain Name (the domain part)
No Symbolic Windows domain name to which the Windows user account belongs.
SidStr Name‟s SID No Windows user account SID corresponding to the Windows user account name specified by
the Account attribute.
AceFlags Apply to flags Yes ACE control flag symbolic name or actual flag bits setting ACE inheritance rules that are applied to ACEs in object DACLs. See also “Possible AceFlags Attribute Values” (on page 36).
AccessMask Permission Yes Access mask that defines specific permissions for ACEs created from the security rule. See also “Possible AccessMask Attribute Values” (on page 37).

36 Administering Security Settings on Windows Objects
Attribute ACE component Required Comment
EntryFlags Type Yes ACE type and other flags that define rules for combining DACL security settings with the security rule defined by the Entry element. Several flags can be combined together. See also “Possible EntryFlags Attribute Values” (on page 37).
AccounType none Yes Windows user account type. This attribute specifies if the account has a well-known SID
(AccountType=0) or must be resolved in the
system (AccountType=1) by using the
symbolic name specified by the Account
attribute.
Path none Yes A Plesk component path or environment variable that sets a standard path for standard hosted objects. The list of Plesk component
paths is invoked by the packagemng.exe
utility. See also “Possible Path Attribute Values”. For information about the
packagemng.exe utility, consult Plesk for
Windows Creation Utilities Administrator’s Guide.
SubPath none No Remaining part of the object path if the path is
not fully defined by the Path attribute.
Tag none No Tags used by Plesk for processing the security rules defined in a security metadata file. See also “Possible Tag Attribute Values” (on page 38).
Tag2 none No
In this section:
Possible AceFlags Values ................................................................................. 36 Possible AccessMask Values ............................................................................ 37 Possible EntryFlag Attribute Values................................................................... 37 Possible Path Attribute Values .......................................................................... 38 Possible Tag Attribute Values ............................................................................ 38
Possible AceFlags Values
AceFlags Value Description
ThisObjectOnly The ACE created based on this rule will be assigned to this object only.
ThisFolderAndFi
les
The ACE created based on this rule will be assigned to this folder and files contained in the folder.
FilesOnly The ACE created based on this rule will be assigned only to files in the specified folder and the folder itself.

Administering Security Settings on Windows Objects 37
AceFlags Value Description
ThisFolderAndSu
bfolders
The ACE created based on this rule will be assigned to the specified folder and its subfolders only.
ThisFolderSubfo
ldersAndFiles
The ACE created based on this rule will be assigned to the specified folder and its subfolders and files only.
SubfoldersAndFi
lesOnly
The ACE created based on this rule will be assigned only to subfolders and files of the specified folder.
Possible AccessMask Values
AccessMask Value Corresponding Permissions
NoAccess None
Read Generic read
ReadAndExecute Generic execute
ReadAndDelete Generic delete
ReadWrite Generic write
Modify Generic write, execute, and delete
FullAccess Full control
FileRemovable Write extended attributes, delete and write to DACL, write owner, delete subfolders and files.
FileNonRemovable Full control excluding write attributes for files, write extended attributes for files, delete and write to DACL, write owner, and delete subfolders and files.
FtpSubaccountsNo
nRemovable
Write extended attributes, add file, create directory, write attributes, and delete subfolders and files.
Possible EntryFlag Attribute Values
Note: several flags can be combined together.
EntryFlags value Description
0x0 Allow access for the user account. This is the default value.
0x1 Deny access for the user account.
0x2 Applies the security rule to all parent containers in the object‟s path.
0x4 Breaks DACL inheritance from parent containers, erases existing ACEs, and creates new ACEs in the object‟s DACL based on the security rules found in the security metadata files.
38 Administering Security Settings on Windows Objects
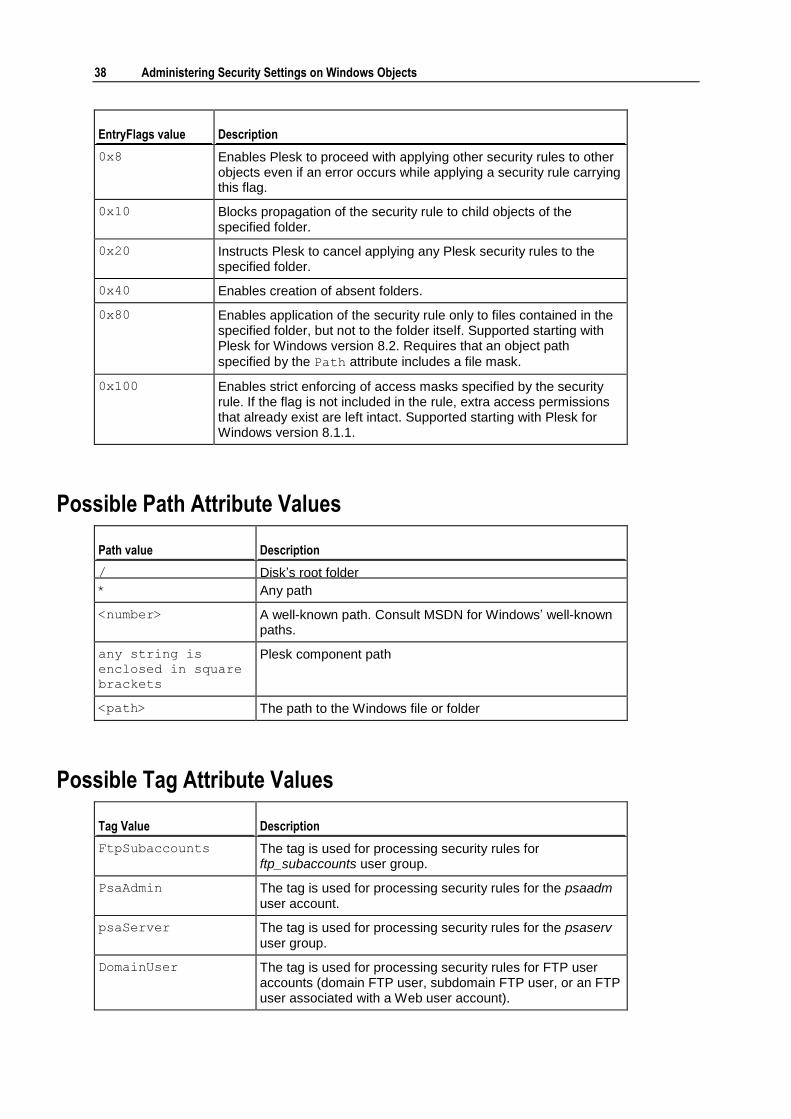
EntryFlags value Description
0x8 Enables Plesk to proceed with applying other security rules to other objects even if an error occurs while applying a security rule carrying this flag.
0x10 Blocks propagation of the security rule to child objects of the specified folder.
0x20 Instructs Plesk to cancel applying any Plesk security rules to the specified folder.
0x40 Enables creation of absent folders.
0x80 Enables application of the security rule only to files contained in the specified folder, but not to the folder itself. Supported starting with Plesk for Windows version 8.2. Requires that an object path
specified by the Path attribute includes a file mask.
0x100 Enables strict enforcing of access masks specified by the security rule. If the flag is not included in the rule, extra access permissions that already exist are left intact. Supported starting with Plesk for Windows version 8.1.1.
Possible Path Attribute Values
Path value Description
/ Disk‟s root folder
* Any path
<number> A well-known path. Consult MSDN for Windows‟ well-known paths.
any string is
enclosed in square
brackets
Plesk component path
<path> The path to the Windows file or folder
Possible Tag Attribute Values
Tag Value Description
FtpSubaccounts The tag is used for processing security rules for ftp_subaccounts user group.
PsaAdmin The tag is used for processing security rules for the psaadm user account.
psaServer The tag is used for processing security rules for the psaserv user group.
DomainUser The tag is used for processing security rules for FTP user accounts (domain FTP user, subdomain FTP user, or an FTP user associated with a Web user account).

Administering Security Settings on Windows Objects 39
Tag Value Description
AnonymousDomainUser The tag is used for processing security rules for anonymous Internet user accounts (IIS users).
ParentUser The tag is used for processing security rules for domain FTP user accounts created to access subdomains or Web user folders.
AnonymousParentUser The tag is used for processing security rules for anonymous Internet user accounts (IIS users) created to access files on subdomains or Web user folders.

Plesk administrators can assign handlers to certain control panel events in Plesk and configure the event handlers to execute commands, for example custom scripts.
Plesk administrators have the ability to monitor Plesk user actions by programming Plesk to automatically execute commands in response to specific control panel events. A control panel event is a successfully completed operation performed on a Plesk object. For the list of Plesk events that can trigger event handlers, see “Plesk Control Panel Events” (on page 40).
To create an event handler and configure it to execute a command, for example a custom script, use Event Manager in Plesk. For each event type, Plesk can pass a set of environmental variables. You have the ability to specify the specific environmental variables to be passed on to event handler commands each time an event handler is activated. For more information on the specific sets of environment variables passed on to event handler commands for different event types, see “Event Parameters Passed by Event Handlers” (on page 50).
This section provides background information about and complete instructions on creating and configuring Plesk event handlers by Plesk administrators.
In this chapter:
Plesk Control Panel Events ............................................................................... 40 Creating Event Handlers ................................................................................... 45 Removing Event Handlers ................................................................................. 46 Composing Event Handler Command ............................................................... 46 Script Writing Rules ........................................................................................... 79
Plesk Control Panel Events
The following table describes the Plesk control panel events for which event handlers can be created.
Event (action) name Description
admin_update (on page 52) Administrator information updated
service_stop (on page 52) Service stopped
C H A P T E R 4
Programming Event Handlers to Execute Custom Scripts on Plesk Server

Programming Event Handlers to Execute Custom Scripts on Plesk Server 41
Event (action) name Description
service_start (on page 52) Service started
service_restart (on page 52) Service restarted
dl_user_update (on page 53) Domain administrator account updated
ip_address_create (on page
53) IP address created
ip_address_update (on page
53) IP address updated
ip_address_delete (on page
53) IP address deleted
session_preferences_update (on
page 54) Login settings updated
client_create (on page 55) Client account created
client_update (on page 55) Client account updated
client_delete (on page 55) Client account deleted
client_status_update (on
page 55) Client account status updated
client_guid (on page 56) Client GUID updated
client_limits_update (on
page 56) Client limits updated
client_limit_traffic_reached
(on page 57) Traffic limit for client account reached
client_limit_size_reached
(on page 58) Disk space limit for client reached
client_permissions_update
(on page 58) Client permissions updated
client_preferences_update
(on page 59) Client interface preferences updated
client_ip_pool_update (on
page 59) Client IP pool updated
client_siteapp_added (on
page 60) Client application package added
client_siteapp_removed (on
page 60) Client application package removed
dashboard_preset_create (on
page 60) Desktop preset created
dashboard_preset_update (on
page 60) Desktop preset updated
dashboard_preset_delete (on
page 60) Desktop preset deleted
domain_create (on page 61) Domain created
domain_update (on page 61) Domain properties updated
domain_delete (on page 61) Domain deleted

42 Programming Event Handlers to Execute Custom Scripts on Plesk Server
Event (action) name Description
domain_status_update (on
page 61) Domain status updated
domain_guid (on page 61) Domain GUID updated
domain_dns_update (on page
62) Domain DNS zone status updated
subdomain_create (on page
62) Subdomain created
subdomain_update (on page
62) Subdomain properties updated
subdomain_delete (on page
62) Subdomain deleted
domain_alias_create (on page
63) Domain alias created
domain_alias_update (on page
63) Domain alias updated
domain_alias_delete (on page
63) Domain alias deleted
domain_alias_dns_update (on
page 64) Domain alias DNS zone status updated
admin_alias_create (on page
64) Additional administrator account created
admin_alias_update (on page
64) Additional administrator account updated
admin_alias_delete (on page
64) Additional administrator account deleted
domain_limits_update (on
page 65) Domain limits updated
domain_limit_traffic_reached
(on page 66) Traffic limit for domain reached
domain_limit_size_reached
(on page 67) Disk space limit for domain reached
cp_user_login (on page 67) User logged in to control panel
cp_user_logout (on page 67) User logged out of control panel
mailname_create (on page 68) Mail account created
mailname_update (on page 68) Mail account updated
mailname_delete (on page 68) Mail account deleted
maillist_create (on page 69) Mailing list created
maillist_update (on page 69) Mailing list updated
maillist_delete (on page 69) Mailing list deleted
phys_hosting_create (on page
69) Physical hosting created

Programming Event Handlers to Execute Custom Scripts on Plesk Server 43
Event (action) name Description
phys_hosting_update (on page
69)
Physical hosting account updated, domain performance or log rotation settings changed
phys_hosting_delete (on page
69) Physical hosting account deleted
forwarding_create (on page
71) Standard or frame forwarding created
forwarding_update (on page
71) Standard or frame forwarding updated
forwarding_delete (on page
71) Standard or frame forwarding deleted
webuser_create (on page 72) Web user created
webuser_update (on page 72) Web user properties updated
webuser_delete (on page 72) Web user account deleted
siteapp_install (on page 73) Site application installed
siteapp_reconfigure (on page
73) Site application reconfigured
siteapp_uninstall (on page
73) Site application uninstalled
siteapppkg_install (on page
73) Site application package installed
siteapppkg_uninstall (on
page 73) Site application package uninstalled
license_update (on page 74) License key updated
license_expired (on page 74) Plesk license has expired
database_server_create (on
page 75) Connection to database server created
database_server_update (on
page 75) Connection to database server updated
database_server_delete (on
page 75) Connection to database server deleted
database_create (on page 75) Database created
database_delete (on page 75) Database deleted
database_user_create (on
page 76) Database user account created
database_user_update (on
page 76) Database user account preferences updated
database_user_delete (on
page 76) Database user account deleted
remote_dns_status_update (on
page 76) Remote DNS status updated
ftpuser_create (on page 77) FTP account created
ftpuser_update (on page 77) FTP account updated
44 Programming Event Handlers to Execute Custom Scripts on Plesk Server
Event (action) name Description
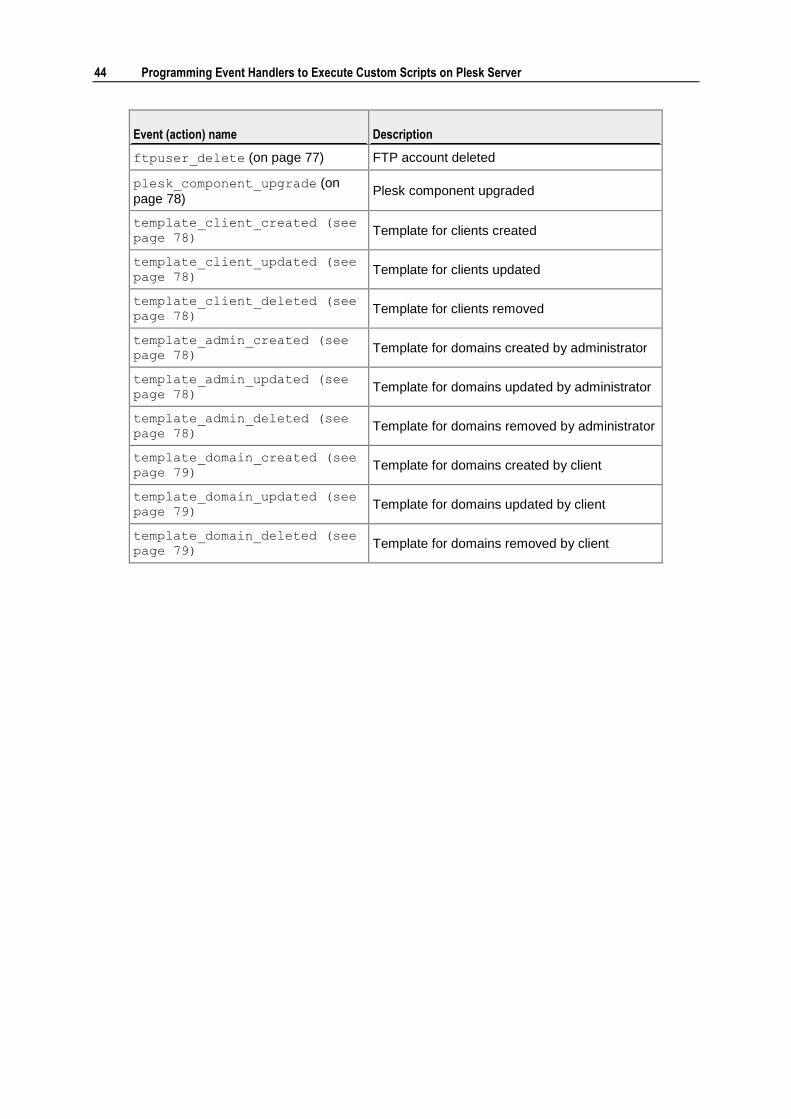
ftpuser_delete (on page 77) FTP account deleted
plesk_component_upgrade (on
page 78) Plesk component upgraded
template_client_created (see
page 78) Template for clients created
template_client_updated (see
page 78) Template for clients updated
template_client_deleted (see
page 78) Template for clients removed
template_admin_created (see
page 78) Template for domains created by administrator
template_admin_updated (see
page 78) Template for domains updated by administrator
template_admin_deleted (see
page 78) Template for domains removed by administrator
template_domain_created (see
page 79) Template for domains created by client
template_domain_updated (see
page 79) Template for domains updated by client
template_domain_deleted (see
page 79) Template for domains removed by client

Programming Event Handlers to Execute Custom Scripts on Plesk Server 45
Creating Event Handlers
This section describes the procedure for creating a new event handler in Plesk.
To add an event handler, follow these steps 1 Click the Server shortcut in the navigation pane.
2 Click Event Manager under Control Panel.
3 Click Add New Event Handler. The event handler setup page appears:
4 Select the event you want to assign a handler to in the Event drop-down box.
5 Select a preset priority value for the execution of the handler, or specify a custom value by using the Priority field.
When assigning several handlers to a single event you can specify the handler execution sequence, setting different priorities (higher value corresponds to a higher priority).
6 Select the system user, on whose behalf the handler will be executed.
7 In the Command text box, type a command to be executed.
For example, command
―c:\program files\parallels\plesk\scripts\test-handler.bat‖
<new_contact_name> <new_login_name>
will start script test-handler.bat located in the c:\program
files\parallels\plesk\scripts\ directory and pass the
new_contact_name and new_login_name command line parameters on to the
script.
See “Composing Event Handler Command” for help in completing this step.
Note: Paths that contains spaces must be enclosed in quotes.
8 Click OK.
The list of current event handlers is displayed. The newly created event handler appears in the list.
46 Programming Event Handlers to Execute Custom Scripts on Plesk Server
Removing Event Handlers
To remove one or more event handlers, follow these steps:
1 Click the Server shortcut in the navigation pane.
2 Click Event Manager under Control Panel.
3 Select one or more event handlers by using check boxes and click Remove selected.
The selected event handlers disappear from the list of available handlers.
Composing Event Handler Command
Each event handler must have a command assigned to it that will be executed upon the event occurrence.To specify an event handler command you need to type in the Command text box. A command must include a full path to an executable file or script file. If one or more environment variables must be passed on to the script by Plesk, the variables names must be included in the command line, too.
This section describes the command syntax and relevant background on using environment variables in event handler commands.
In this section:
Event Handler Command Syntax ...................................................................... 46 Environment Variables in Event Handler Commands ........................................ 47 Event Handler Command Example ................................................................... 48 Event Parameters Passed by Event Handlers ................................................... 50
Event Handler Command Syntax
An event handler command has the following syntax:
<command> [<parameter 1> <parameter 2> ... <parameter N>]
The parameters in the command line shown in the angle brackets are environment variables that will be passed on to the command when it is executed. For more information about using environment variables in event handler commands, see “Environment Variables in Event Handler Commands (on page 47)”.

Programming Event Handlers to Execute Custom Scripts on Plesk Server 47
Environment Variables in Event Handler Commands
For each control panel event, there is a specific set of environment variables that can be passed on to a script. For the list of control panel events, see “Plesk Control Panel Events” (on page 40). For descriptions of environment variables corresponding to specific control panel events, see “Event Parameters Passed by Event Handlers” (on page 50). Only variables listed for the particular event type may be used in event handler command. In the command line,the environment variables must be listed in the order corresponding to the numbering order of the variables placeholders in the script
body (the placeholders have the %<number> format; for more information on
placeholders, see “Script Writing Rules” (on page 79)). The placeholder number parts must form an uninterrupted sequence of consecutive whole numbers starting with 1 -
%1, %2, %3 and so on.

48 Programming Event Handlers to Execute Custom Scripts on Plesk Server
Event Handler Command Example
The following is the example of a valid command for a client creation event handler and the body of a script file called by it that writes information about a new client creation event in to a log file. The example includes declaration of parameters to be passed onto the script file.
Command line:
―c:\program files\parallels\plesk\scripts\test-handler.bat‖
<new_contact_name> <new_login_name>
The body of the test-handler.bat script file:
echo “--------------“ >> c:\windows\temp\event_handler.log
rem information on the event date and time
date /T >> c:\windows\temp\event_handler.log
rem information on the created client account
echo “client created” >> c:\windows\temp\event_handler.log
rem client‟s name
echo “name: %1” >> c:\windows\temp\event_handler.log
rem client‟s login
echo “login: %2” >> c:\windows\temp\event_handler.log
echo “--------------“ >> c:\windows\temp\event_handler.log
Explanation:
.
Placeholders %1 and %2 in the body of the script will be replaced with values of the
new_contact_name and new_login_name environment variables, respectively,
because the new_contact_name variable is listed first and the new_login_name
variable is listed second in the command. The script will write the following chunk of
text into the c:\windows\temp\event_handler.log file:
Sat Jun 26 21:46:34 NOVT 2004
client created
name: <new_contact_name>
login: <new_login_name>

Programming Event Handlers to Execute Custom Scripts on Plesk Server 49
Note: For object removal events, environment variables starting with “new_” contain
empty strings. For object creation events, environment variables starting with “old_”
contain empty strings.

50 Programming Event Handlers to Execute Custom Scripts on Plesk Server
Event Parameters Passed by Event Handlers
Each control panel event is associated with a Plesk object. An event occurs when an object is changed in a certain way. A single object can be associated with more than one control panel event. Subsections in this section are named after Plesk objects. Each subsection lists parameters that can be passed to commands used by handlers
of events associated with a particular Plesk object. For example, the “ip_address
events” subsection lists parameters for the three different events associated with the ip_address object:
IP address created
IP address updated
IP address deleted
The “Plesk Control Panel Events” (on page 40) section provides the list of all Plesk events for which handlers can be created.

Programming Event Handlers to Execute Custom Scripts on Plesk Server 51
In this section:
admin event....................................................................................................... 52 service event ..................................................................................................... 52 dl_user event ..................................................................................................... 53 ip_address events ............................................................................................. 53 session_preferences event ................................................................................ 54 client events ...................................................................................................... 55 client_status event............................................................................................. 55 client_guid event ............................................................................................... 56 client_limits event .............................................................................................. 56 client_limit_traffic event ..................................................................................... 57 client_limit_size event ....................................................................................... 58 client_permissions event ................................................................................... 58 client_preferences event ................................................................................... 59 client_ip_pool event ........................................................................................... 59 client_siteapp events ......................................................................................... 60 dashboard_preset events .................................................................................. 60 domain events ................................................................................................... 61 domain_status event ......................................................................................... 61 domain guid event ............................................................................................. 61 domain_dns event ............................................................................................. 62 subdomain events ............................................................................................. 62 domain_alias events .......................................................................................... 63 domain_alias_dns event .................................................................................... 64 admin_alias events............................................................................................ 64 domain_limits event ........................................................................................... 65 domain_limit_traffic event .................................................................................. 66 domain_limit_size event .................................................................................... 67 cp_user events .................................................................................................. 67 mailname events ............................................................................................... 68 maillist events .................................................................................................... 69 phosting events ................................................................................................. 69 forwarding events .............................................................................................. 71 webuser events ................................................................................................. 72 siteapp events ................................................................................................... 73 siteapppkg events ............................................................................................. 73 license events ................................................................................................... 74 db_server event ................................................................................................ 75 db event ............................................................................................................ 75 db_user events .................................................................................................. 76 remote_dns_status event .................................................................................. 76 ftpuser events .................................................................................................... 77 component event ............................................................................................... 78 template_client event ........................................................................................ 78 template_admin event ....................................................................................... 78 template_domain event ..................................................................................... 79

52 Programming Event Handlers to Execute Custom Scripts on Plesk Server
admin event
Parameters for event:
Event
Administrator information updated
Component name/description
Command line parameter
Notes
Old component value New component value
Login Name old_login_name new_login_name required
Contact Name old_contact_name new_contact_name required
Company Name old_company_name new_company_name
Phone old_phone new_phone
Fax old_fax new_fax
E-mail old_email new_email
Address old_address new_address
City old_city new_city
State/Province old_state_province new_state_province
Postal/ZIP Code old_postal_zip_code new_postal_zip_code
Country old_country new_country
service event
Parameters for events:
Event
Service started
Service stopped
Service restarted
Component name/description
Command line parameter
Notes
Old component value New component value
Service name old_service new_service required

Programming Event Handlers to Execute Custom Scripts on Plesk Server 53
dl_user event
Parameters for events:
Event
Domain administrator properties updated
Component name/description
Command line parameter
Notes
Old component value New component value
Allow domain user access
old_allow_domain_us
er_access
new_allow_domain_us
er_access
Login Name old_login_name new_login_name required
Password old_password new_password required
Domain name old_domain_name new_domain_name required
Contact Name old_contact_name new_contact_name
Company Name old_company_name new_company_name
Phone old_phone new_phone
Fax old_fax new_fax
E-mail old_email new_email
Address old_address old_address
City old_city old_city
Sate/Province old_state_province old_state_province
Postal/ZIP code old_postal_zip_code old_postal_zip_code
Country old_country new_country
ip_address events
Parameters for events:
Event
IP address created

54 Programming Event Handlers to Execute Custom Scripts on Plesk Server
IP address updated
Component name/description
Command line parameter
Notes
Old component value New component value
IP address old_ip_address new_ip_address required
Network mask old_ip_mask new_ip_mask
Network interface old_interface new_interface
IP address type old_ip_type new_ip_type
Parameters for events:
Event
IP address deleted
Component name/description
Command line parameter
Notes
Old component value New component value
IP address old_ip_address new_ip_address required
session_preferences event
Parameters for event:
Event
Login settings updated
Component name/description
Command line parameter
Notes
Old component value New component value
Session idle time old_session_idle_ti
me
new_session_idle_ti
me

Programming Event Handlers to Execute Custom Scripts on Plesk Server 55
client events
Parameters for events:
Event
Client account created
Client account updated
Client account removed
Component name/description
Command line parameter
Notes
Old component value New component value
Login Name old_login_name new_login_name required
Password old_password new_password
Contact Name old_contact_name new_contact_name required
Company Name old_company_name new_company_name
Phone old_phone new_phone
Fax old_fax new_fax
E-mail old_email new_email
Address old_address new_address
City old_city new_city
State/Province old_state_province new_state_province
Postal/ZIP Code old_postal_zip_code new_postal_zip_code
Country old_country new_country
client_status event
Parameters for event:
Event
Client account status updated

56 Programming Event Handlers to Execute Custom Scripts on Plesk Server
Component name/description
Command line parameter
Notes
Old component value New component value
Contact Name old_contact_name new_contact_name required
Login Name old_login_name new_login_name required
Status old_status new_status
client_guid event
Parameters for events:
Event
Client GUID updated
Component name/description
Command line parameter
Notes
Old component value New component value
Client login name old_login_name new_login_name required
Client GUID old_guid new_guid
client_limits event
Parameters for event:
Event
Client limits updated
Component name/description
Command line parameter
Notes
Old component value New component value
Client Login Name old_login_name new_login_name required
Maximum Number of Domains
old_maximum_domains new_maximum_domains
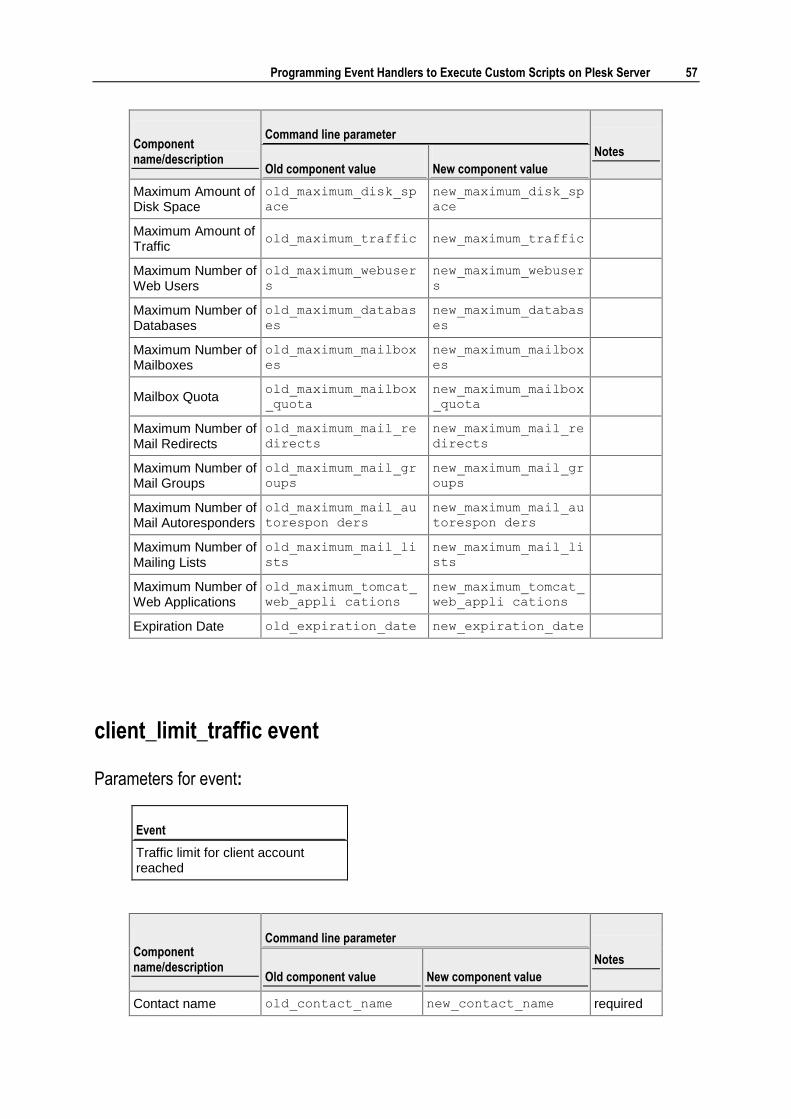
Programming Event Handlers to Execute Custom Scripts on Plesk Server 57
Component name/description
Command line parameter
Notes
Old component value New component value
Maximum Amount of Disk Space
old_maximum_disk_sp
ace
new_maximum_disk_sp
ace
Maximum Amount of Traffic
old_maximum_traffic new_maximum_traffic
Maximum Number of Web Users
old_maximum_webuser
s
new_maximum_webuser
s
Maximum Number of Databases
old_maximum_databas
es
new_maximum_databas
es
Maximum Number of Mailboxes
old_maximum_mailbox
es
new_maximum_mailbox
es
Mailbox Quota old_maximum_mailbox
_quota
new_maximum_mailbox
_quota
Maximum Number of Mail Redirects
old_maximum_mail_re
directs
new_maximum_mail_re
directs
Maximum Number of Mail Groups
old_maximum_mail_gr
oups
new_maximum_mail_gr
oups
Maximum Number of Mail Autoresponders
old_maximum_mail_au
torespon ders
new_maximum_mail_au
torespon ders
Maximum Number of Mailing Lists
old_maximum_mail_li
sts
new_maximum_mail_li
sts
Maximum Number of Web Applications
old_maximum_tomcat_
web_appli cations
new_maximum_tomcat_
web_appli cations
Expiration Date old_expiration_date new_expiration_date
client_limit_traffic event
Parameters for event:
Event
Traffic limit for client account reached
Component name/description
Command line parameter
Notes
Old component value New component value
Contact name old_contact_name new_contact_name required
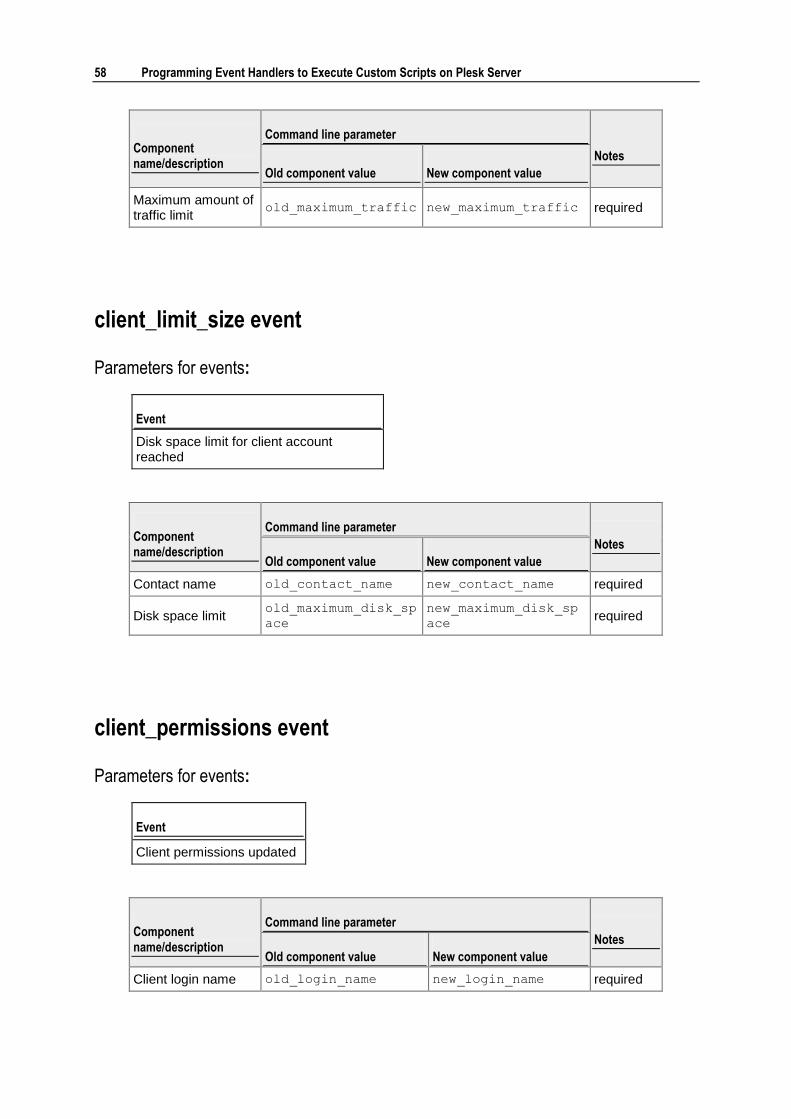
58 Programming Event Handlers to Execute Custom Scripts on Plesk Server
Component name/description
Command line parameter
Notes
Old component value New component value
Maximum amount of traffic limit
old_maximum_traffic new_maximum_traffic required
client_limit_size event
Parameters for events:
Event
Disk space limit for client account reached
Component name/description
Command line parameter
Notes
Old component value New component value
Contact name old_contact_name new_contact_name required
Disk space limit old_maximum_disk_sp
ace
new_maximum_disk_sp
ace required
client_permissions event
Parameters for events:
Event
Client permissions updated
Component name/description
Command line parameter
Notes
Old component value New component value
Client login name old_login_name new_login_name required

Programming Event Handlers to Execute Custom Scripts on Plesk Server 59
client_preferences event
Parameters for event:
Event
Client interface preferences updated
Component name/description
Command line parameter
Notes
Old component value New component value
Contact Name old_contact_name new_contact_name required
Login Name old_login_name new_login_name required
Allow multiple sessions
old_allow_multiple_
sessions
new_allow_multiple_
sessions
Interface language old_interface_langu
age
new_interface_langu
age
Interface skin old_interface_skin new_interface_skin
client_ip_pool event
Parameters for event:
Event
Client IP pool updated
Component name/description
Command line parameter
Notes
Old component value New component value
Login name old_login_name new_login_name required
IP address old_ip_address new_ip_address required
Status old_status new_status

60 Programming Event Handlers to Execute Custom Scripts on Plesk Server
client_siteapp events
Parameters for events:
Event
Client application package added
Client application package removed
Component name/description
Command line parameter
Notes
Old component value New component value
Login name old_login_name new_login_name required
Package name old_package_name new_package_name required
dashboard_preset events
Parameters for events:
Event
Desktop preset created
Desktop preset deleted
Desktop preset updated
Component name/description
Command line parameter
Notes
Old component value New component value
Desktop preset ID old_desktop_preset_
id
new_desktop_preset_
id required
Desktop preset type old_desktop_preset_
type
new_desktop_preset_
type
Desktop preset name
old_desktop_preset_
name
new_desktop_preset_
name

Programming Event Handlers to Execute Custom Scripts on Plesk Server 61
domain events
Parameters for events:
Event
Domain created
Domain updated
Domain deleted
Component name/description
Command line parameter
Notes
Old component value New component value
Domain Name old_domain_name new_domain_name required
domain_status event
Event
Domain status updated
Component name/description
Command line parameter
Notes
Old component value New component value
Domain name old_domain_name new_domain_name required
Domain status old_status new_status
domain guid event
Parameters for events:
Event
Domain GUID updated

62 Programming Event Handlers to Execute Custom Scripts on Plesk Server
Component name/description
Command line parameter
Notes
Old component value New component value
Domain name old_domain_name new_domain_name required
Domain GUID old_guid new_guid
domain_dns event
Parameters for events:
Event
Domain DNS zone updated
Component name/description
Command line parameter
Notes
Old component value New component value
Domain name old_domain_name new_domain_name required
subdomain events
Parameters for events:
Event
Subdomain created
Subdomain updated
Subdomain deleted
Component name/description
Command line parameter
Notes
Old component value New component value
Subdomain Name old_subdomain_name new_subdomain_name required
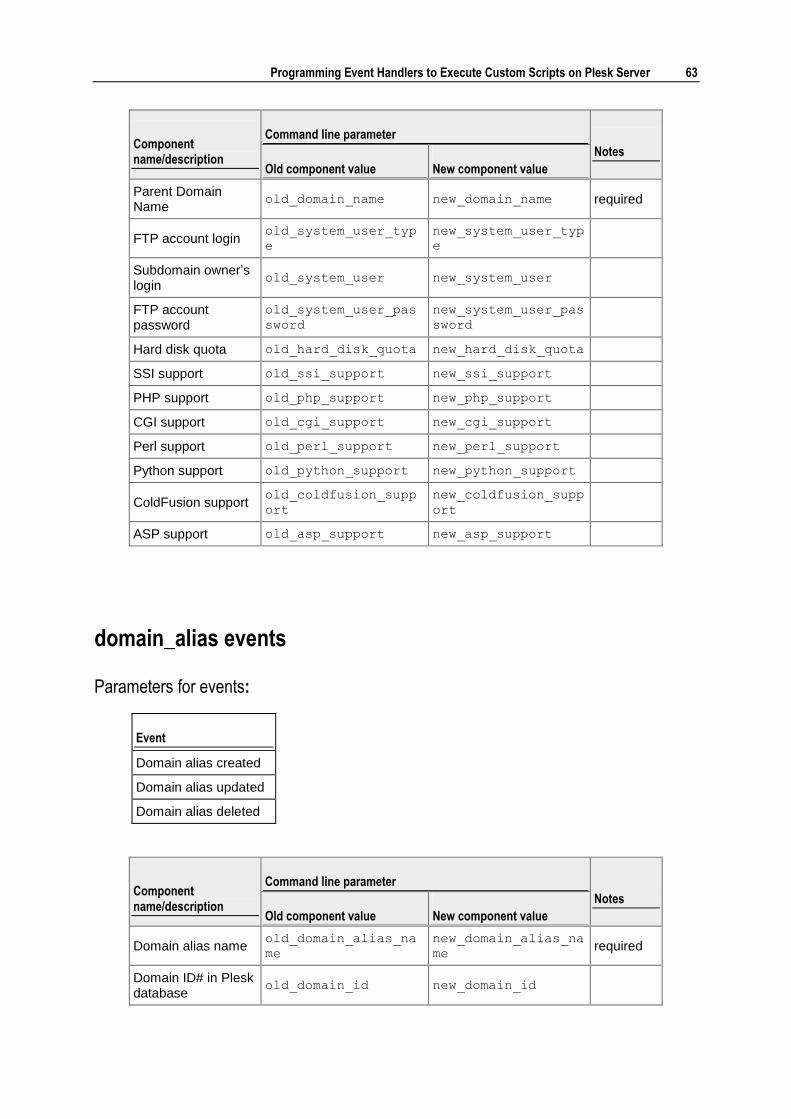
Programming Event Handlers to Execute Custom Scripts on Plesk Server 63
Component name/description
Command line parameter
Notes
Old component value New component value
Parent Domain Name
old_domain_name new_domain_name required
FTP account login old_system_user_typ
e
new_system_user_typ
e
Subdomain owner‟s login
old_system_user new_system_user
FTP account password
old_system_user_pas
sword
new_system_user_pas
sword
Hard disk quota old_hard_disk_quota new_hard_disk_quota
SSI support old_ssi_support new_ssi_support
PHP support old_php_support new_php_support
CGI support old_cgi_support new_cgi_support
Perl support old_perl_support new_perl_support
Python support old_python_support new_python_support
ColdFusion support old_coldfusion_supp
ort
new_coldfusion_supp
ort
ASP support old_asp_support new_asp_support
domain_alias events
Parameters for events:
Event
Domain alias created
Domain alias updated
Domain alias deleted
Component name/description
Command line parameter
Notes
Old component value New component value
Domain alias name old_domain_alias_na
me
new_domain_alias_na
me required
Domain ID# in Plesk database
old_domain_id new_domain_id
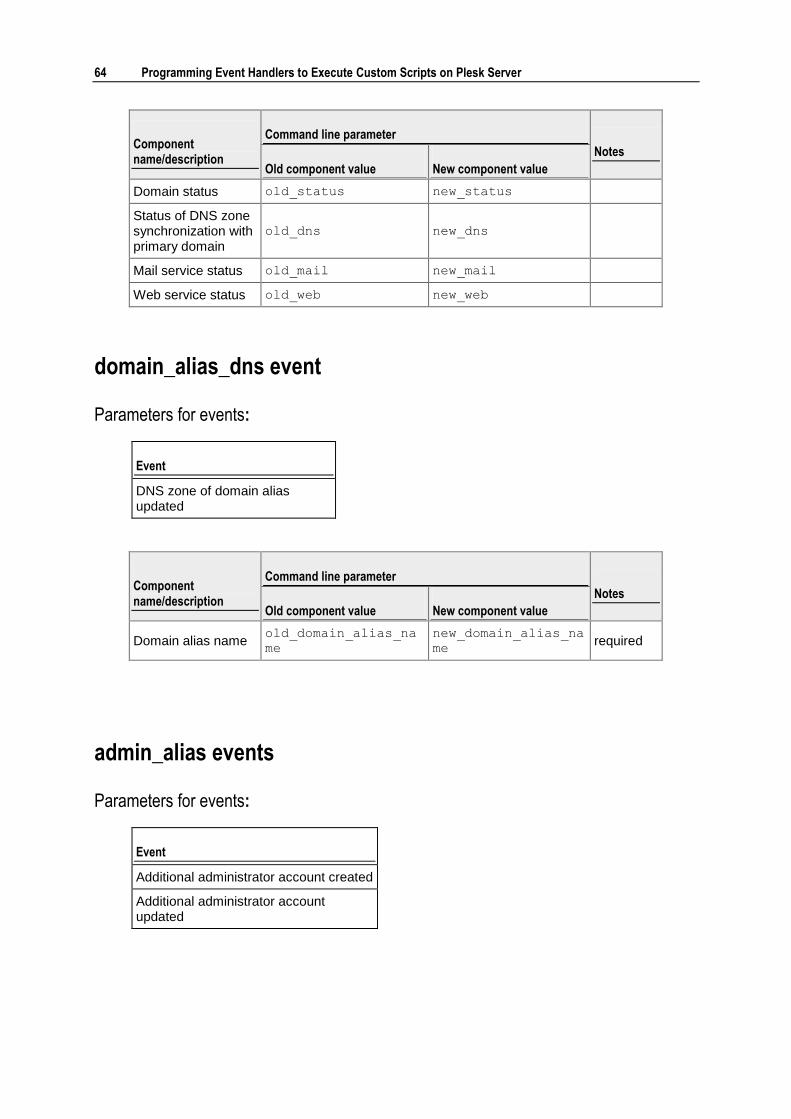
64 Programming Event Handlers to Execute Custom Scripts on Plesk Server
Component name/description
Command line parameter
Notes
Old component value New component value
Domain status old_status new_status
Status of DNS zone synchronization with primary domain
old_dns new_dns
Mail service status old_mail new_mail
Web service status old_web new_web
domain_alias_dns event
Parameters for events:
Event
DNS zone of domain alias updated
Component name/description
Command line parameter
Notes
Old component value New component value
Domain alias name old_domain_alias_na
me
new_domain_alias_na
me required
admin_alias events
Parameters for events:
Event
Additional administrator account created
Additional administrator account updated

Programming Event Handlers to Execute Custom Scripts on Plesk Server 65
Component name/description
Command line parameter
Notes
Old component value New component value
Login Name old_login_name new_login_name required
Contact Name old_contact_name new_contact_name
Password old_password new_password
Account status old_status new_status
E-mail old_email new_email
Parameters for events:
Event
Additional administrator account deleted
Component name/description
Command line parameter
Notes
Old component value New component value
Login Name old_login_name new_login_name required
Contact Name old_contact_name new_contact_name
Password old_password new_password
Account status old_status new_status
E-mail old_email new_email
domain_limits event
Parameters for events:
Event
Domain limits updated
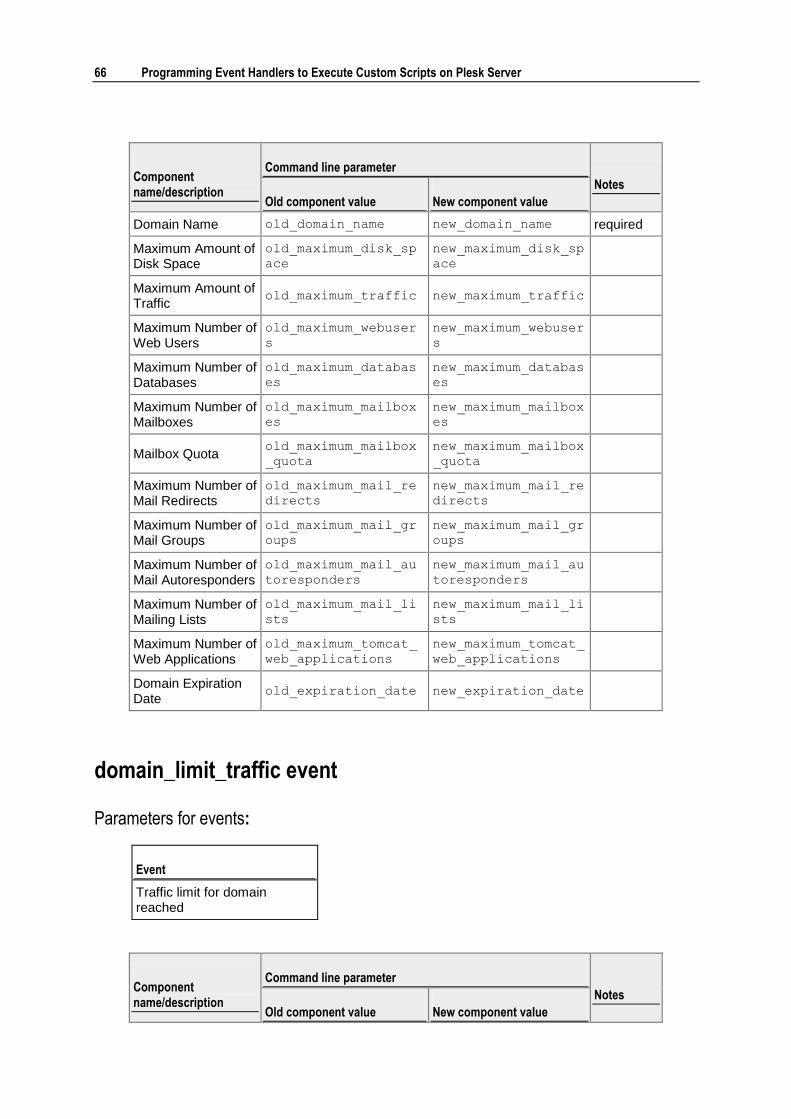
66 Programming Event Handlers to Execute Custom Scripts on Plesk Server
Component name/description
Command line parameter
Notes
Old component value New component value
Domain Name old_domain_name new_domain_name required
Maximum Amount of Disk Space
old_maximum_disk_sp
ace
new_maximum_disk_sp
ace
Maximum Amount of Traffic
old_maximum_traffic new_maximum_traffic
Maximum Number of Web Users
old_maximum_webuser
s
new_maximum_webuser
s
Maximum Number of Databases
old_maximum_databas
es
new_maximum_databas
es
Maximum Number of Mailboxes
old_maximum_mailbox
es
new_maximum_mailbox
es
Mailbox Quota old_maximum_mailbox
_quota
new_maximum_mailbox
_quota
Maximum Number of Mail Redirects
old_maximum_mail_re
directs
new_maximum_mail_re
directs
Maximum Number of Mail Groups
old_maximum_mail_gr
oups
new_maximum_mail_gr
oups
Maximum Number of Mail Autoresponders
old_maximum_mail_au
toresponders
new_maximum_mail_au
toresponders
Maximum Number of Mailing Lists
old_maximum_mail_li
sts
new_maximum_mail_li
sts
Maximum Number of Web Applications
old_maximum_tomcat_
web_applications
new_maximum_tomcat_
web_applications
Domain Expiration Date
old_expiration_date new_expiration_date
domain_limit_traffic event
Parameters for events:
Event
Traffic limit for domain reached
Component name/description
Command line parameter
Notes
Old component value New component value

Programming Event Handlers to Execute Custom Scripts on Plesk Server 67
Component name/description
Command line parameter
Notes
Old component value New component value
Domain name old_domain_name new_domain_name required
Maximum amount of traffic limit
old_maximum_disk_sp
ace
new_maximum_disk_sp
ace required
domain_limit_size event
Parameters for events:
Event
Disk space limit for domain reached
Component name/description
Command line parameter
Notes
Old component value New component value
Domain name old_domain_name new_domain_name required
Disk space limit old_maximum_traffic new_maximum_traffic required
cp_user events
Parameters for events:
Event
Control panel user logged in
Control panel user logged out
Component name/description
Command line parameter
Notes
Old component value New component value
Contact Name old_contact_name new_contact_name

68 Programming Event Handlers to Execute Custom Scripts on Plesk Server
mailname events
Parameters for events:
Event
Mail account created
Mail account deleted
Component name/description
Command line parameter
Notes
Old component value New component value
Mail account old_mailname new_mailname
required (in the format mailnam
e@domai
n)
Parameters for events:
Event
Mail account updated
Component name/description
Command line parameter
Notes
Old component value New component value
Mail account old_mailname new_mailname
required (in the format mailnam
e@domai
n)
Mailbox old_mailbox new_mailbox
Password old_password new_password
Mailbox Quota old_mailbox_quota new_mailbox_quota
Redirect old_redirect new_redirect
Redirect Address old_redirect_addres
s
new_redirect_addres
s
Mail Group old_mail_group new_mail_group

Programming Event Handlers to Execute Custom Scripts on Plesk Server 69
Component name/description
Command line parameter
Notes
Old component value New component value
Autoresponders old_autoresponders new_autoresponders
maillist events
Parameters for events:
Event
Mailing list created
Mailing list updated
Mailing list deleted
Component name/description
Command line parameter
Notes
Old component value New component value
Domain Name old_domain_name new_domain_name required
Mailing list name old_mail_list_name new_mail_list_name required
Mailing list switched on
old_mail_list_enabl
ed
new_mail_list_enabl
ed
phosting events
Parameters for events:
Event
Physical hosting created
Physical hosting updated, domain performance or log rotation settings changed
Component name/description
Command line parameter
Notes
Old component value New component value
Domain Name old_domain_name new_domain_name required

70 Programming Event Handlers to Execute Custom Scripts on Plesk Server
Component name/description
Command line parameter
Notes
Old component value New component value
IP Address old_ip_address new_ip_address
IP Type old_ip_type new_ip_type
Domain Administrator login
old_system_user new_system_user
Domain Administrator password
old_system_user_pas
sword
new_system_user_pas
sword
Access to system old_system_shell new_system_shell
MS FrontPage Support
old_fp_support new_fp_support
MS FrontPage over SSL Support
old_fpssl_support new_fpssl_support
MS FrontPage Authoring
old_fp_authoring new_fp_authoring
MS FrontPage Admin Login
old_fp_admin_login new_fp_admin_login
MS FrontPage Admin Password
old_fp_admin_passwo
rd
new_fp_admin_passwo
rd
SSI Support old_ssi_support new_ssi_support
PHP Support old_php_support new_php_support
CGI Support old_cgi_support new_cgi_support
Perl Support old_perl_support new_perl_support
Python support old_python_support new_python_support
ColdFusion support old_coldfusion_supp
ort
new_coldfusion_supp
ort
ASP Support old_asp_support new_asp_support
SSL Support old_ssl_support new_ssl_support
Custom Error Documents
old_custom_error_do
cuments
new_custom_error_do
cuments
Web Statistics old_web_statistics new_web_statistics
Hard Disk Quota old_hard_disk_quota new_hard_disk_quota
Parameters for events:
Event
Physical hosting deleted

Programming Event Handlers to Execute Custom Scripts on Plesk Server 71
Component name/description
Command line parameter
Notes
Old component value New component value
Domain Administrator login
old_system_user new_system_user
Domain Name old_domain_name new_domain_name required
forwarding events
Parameters for events:
Event
Standard or frame forwarding hosting created
Standard or frame forwarding hosting updated
Component name/description
Command line parameter
Notes
Old component value New component value
Domain name old_domain_name new_domain_name required
IP address old_ip_address new_ip_address
Forwarding type old_forwarding_type new_forwarding_type
URL old_url new_url
Parameters for events:
Event
Standard or frame forwarding hosting deleted
Component name/description
Command line parameter
Notes
Old component value New component value
Domain name old_domain_name new_domain_name required

72 Programming Event Handlers to Execute Custom Scripts on Plesk Server
Component name/description
Command line parameter
Notes
Old component value New component value
Forwarding type old_forwarding_type new_forwarding_type
webuser events
Parameters for events:
Event
Web user created
Web user updated
Component name/description
Command line parameter
Notes
Old component value New component value
Domain Name old_domain_name new_domain_name required
Web User Name old_webuser_name new_webuser_name required
Web User Password old_webuser_passwor
d
new_webuser_passwor
d
SSI Support old_ssi_support new_ssi_support
PHP Support old_php_support new_php_support
CGI Support old_cgi_support new_cgi_support
Perl Support old_perl_support new_perl_support
Python Support old_python_support new_python_support
ColdFusion support old_coldfusion_supp
ort
new_coldfusion_supp
ort
ASP Support old_asp_support new_asp_support
Hard Disk Quota old_hard_disk_quota new_hard_disk_quota
Parameters for events:
Event
Web user deleted
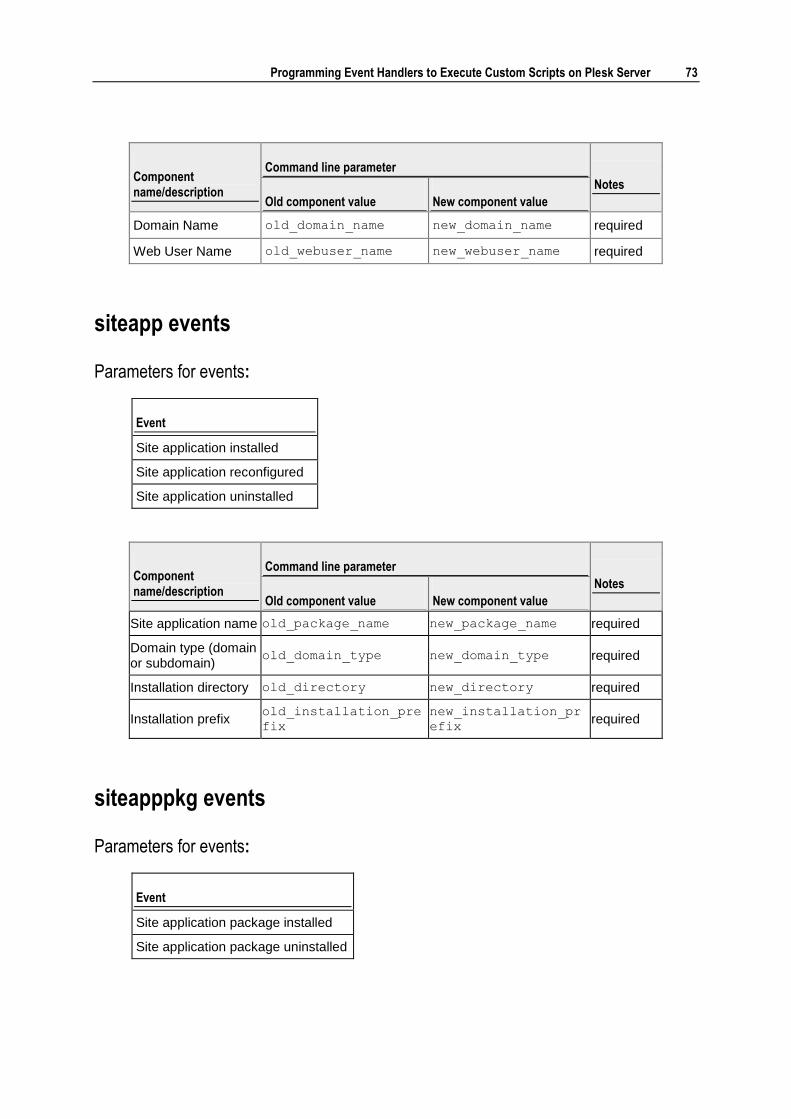
Programming Event Handlers to Execute Custom Scripts on Plesk Server 73
Component name/description
Command line parameter
Notes
Old component value New component value
Domain Name old_domain_name new_domain_name required
Web User Name old_webuser_name new_webuser_name required
siteapp events
Parameters for events:
Event
Site application installed
Site application reconfigured
Site application uninstalled
Component name/description
Command line parameter
Notes
Old component value New component value
Site application name old_package_name new_package_name required
Domain type (domain or subdomain)
old_domain_type new_domain_type required
Installation directory old_directory new_directory required
Installation prefix old_installation_pre
fix
new_installation_pr
efix required
siteapppkg events
Parameters for events:
Event
Site application package installed
Site application package uninstalled

74 Programming Event Handlers to Execute Custom Scripts on Plesk Server
Component name/description
Command line parameter
Notes
Old component value New component value
Site application package name
old_site_applicatio
n_package_ name
new_site_applicatio
n_package_ name required
license events
Parameters for events:
Event
License key updated
Component name/description
Command line parameter
Notes
Old component value New component value
License old_license new_license required
License type old_license_type new_license_type required
License name old_license_name new_license_name required
Parameters for events:
Event
Plesk license has expired
Component name/description
Command line parameter
Notes
Old component value New component value
License old_license new_license required

Programming Event Handlers to Execute Custom Scripts on Plesk Server 75
db_server event
Parameters for events:
Event
Connection to database server created
Connection to database server updated
Connection to database server deleted
Component name/description
Command line parameter
Notes
Old component value New component value
Database server old_database_server new_database_server required
db event
Parameters for events:
Event
Database created
Database removed
Component name/description
Command line parameter
Notes
Old component value New component value
Database server old_database_server new_database_server required
Database old_database_name new_database_name required

76 Programming Event Handlers to Execute Custom Scripts on Plesk Server
db_user events
Parameters for events:
Event
Database user account created
Database user account preferences updated
Database user account removed
Component name/description
Command line parameter
Notes
Old component value New component value
Database server old_database_server new_database_server required
Database ID old_database_id new_database_id required
Database user name old_database_user_na
me
new_database_user_n
ame required
remote_dns_status event
Parameters for events:
Event
Remote DNS status updated
Component name/description
Command line parameter
Notes
Old component value New component value
Remote DNS status old_remote_dns_statu
s
new_remote_dns_stat
us required

Programming Event Handlers to Execute Custom Scripts on Plesk Server 77
ftpuser events
Parameters for events:
Event
FTP account created
FTP account updated
Component name/description
Command line parameter
Notes
Old component value New component value
Domain Name old_domain_name new_domain_name required
FTP account name old_system_user new_system_user required
FTP account password
old_system_user_pas
sword
new_system_user_pas
sword
Hard Disk Quota old_hard_disk_quota new_hard_disk_quota
Home Directory old_home_directory new_home_directory
Read Permission old_read_permission new_read_permission
Write Permission old_write_permissio
n
new_write_permissio
n
Parameters for events:
Event
FTP account deleted
Component name/description
Command line parameter
Notes
Old component value New component value
FTP account name old_system_user new_system_user required
Domain Name old_domain_name new_domain_name required

78 Programming Event Handlers to Execute Custom Scripts on Plesk Server
component event
Parameters for events:
Event
Plesk component upgraded
Component name/description
Command line parameter
Notes
Old component value New component value
Plesk component name
old_plesk_component_
name
new_plesk_component
_name required
template_client event
Parameters for events:
Event
Template for clients created
Template for clients updated
Template for clients removed
Component name/description
Command line parameter
Notes
Old component value New component value
Client template ID old_template_id new_template_id required
template_admin event
Parameters for events:
Event
Template for domains created by administrator
Administrator‟s template for domains updated

Programming Event Handlers to Execute Custom Scripts on Plesk Server 79
Administrator‟s template for domains removed
Component name/description
Command line parameter
Notes
Old component value New component value
Domain template ID old_template_id new_template_id required
template_domain event
Parameters for events:
Event
Template for domains created by client
Client‟s template for domains updated
Client‟s template for domains removed
Component name/description
Command line parameter
Notes
Old component value New component value
Domain template ID old_template_id new_template_id required
Script Writing Rules
When writing executable scripts that will be assigned to Plesk event handlers, you should follow the rules for designating environment variable placeholders in the body of
a script file. The placeholder has the %<number> format. The number parts of the
placeholders used in a particular script file must form an uninterrupted sequence of
consecutive whole numbers starting with 1 - %1, %2, %3 and so on. The numbering
scheme is important because the numbers refer to the positions of the environment variables listed in command line. In the command line, the environment variables must be listed in the order corresponding to the numbering order of the variables placeholders in the script body. For an example of a valid event handler command and script body, see “Event Handler Command Syntax” (on page 46).

To enable basic hosting services and functions on a Plesk server, Plesk distribution package includes several third-party software applications, also referred to as third-party Plesk components (Plesk components), that need to be installed along with Plesk. Plesk components are ultimately responsible for providing various hosting services such as DNS, e-mail, FTP, and others.
Hosting providers can also install and manage through Plesk many other third-party applications that are not included in the Plesk distribution package. For the complete list of third-party applications currently supported by Plesk, see “Third-Party Applications Supported by Plesk” (on page 85).
Plesk supports management of Plesk components by control panel administrators by integrating with the applications and providing GUI tools to perform routine application management tasks. A Plesk-supported third-party application installed on a Plesk server is said to be integrated with Plesk if Plesk can access and manage the application.
This chapter provides necessary background information and complete instructions for installing and upgrading Plesk components.
In this chapter:
Plesk Component Installation and Upgrade Overview ....................................... 81 Third-Party Applications Supported by Plesk ..................................................... 85 Third-Party Applications not Supported by Plesk ............................................... 87 Installing and Upgrading Plesk Components ..................................................... 88
C H A P T E R 5
Installing and Upgrading Plesk Components

Installing and Upgrading Plesk Components 81
Plesk Component Installation and Upgrade Overview
This section describes possible ways of installing and upgrading Plesk components.
In this section:
Third-Party Application Installation as Plesk Component ................................... 81 Plesk Component Upgrade ............................................................................... 84
Third-Party Application Installation as Plesk Component
To work as a Plesk component, an installed third-party application must meet the following conditions:
it must be supported by Plesk
it must be installed on the Plesk server
an installed application must be integrated with Plesk
For a list of third-party applications supported by Plesk, see “Third-Party Software Supported by Plesk” (on page 85).
If a supported third-party application has already been installed on a server prior to Plesk installation, during Plesk installation on the server it will be automatically detected by the Plesk installer program and integrated with Plesk. For more information, see “Automatic Integration of Pre-Installed Third-Party Applications as Plesk Components” (on page 83).
Supported third-party application installed or upgraded manually on an existing Plesk server must be integrated with Plesk to work as Plesk component.
In this section:
Automatic Installation of Plesk Components ...................................................... 82 Automatic Integration of Pre-Installed Third-Party Applications as Plesk Components .......................................................................................................................... 83 Manual Installation of Plesk Components on Existing Plesk Servers ................. 83

82 Installing and Upgrading Plesk Components
Automatic Installation of Plesk Components
Only Plesk components included in the Plesk distribution package can be installed automatically.
Automatic installation of Plesk components is performed by using one of the following two methods:
By selecting components to install during Plesk installation setup and then running the installation program.
By selecting the Complete installation option, all components included in the package will be installed. See the Plesk for Windows Installation Guide for instructions on configuring Plesk autoinstaller to install select Plesk components.
By using the Windows‟ Add or Remove Programs feature.
See the Plesk for Windows Installation Guide for instructions on installing Plesk components by modifying the current Plesk installation by means of the Add or Remove Programs feature.
The following components are included in Plesk 8.4 for Windows distribution package:
Note: See your Plesk version release notes for the up-to-date list of included components.
DrWeb 4.44.0.10170
Kaspersky AV 5.0.0.49
Acronis True Image Enterprise Server version 9.1 (build 3939)
Microsoft SQL Server 8.00.194
Microsoft SQL Server 9.00.3042
MySQL 5.0.45
BIND DNS Server 9.4.1
JDK 1.5
Apache 2.0.59
Apache Tomcat 5.5.4
MailEnable Standard 1.986
Plesk Agent 1.5.2.0
Perl v5.8.8 built for MSWin32-x86-multi-thread
PHP 4.4.8
PHP 5.2.5
Python 2.5.0.0
FastCGI 6.1.36.1
Microsoft .NET Framework 1.1 Service Pack 1
SiteBuilder for Windows 4.1
SpamAssassin 3.2.3
ASP.NET Enterprise Manager 0.1.3
myLittleAdmin 2000 2.0 lite r.096

Installing and Upgrading Plesk Components 83
myLittleAdmin 2000 2.7 r.126
myLittleAdmin 2005 3.2a r.0037
phpMyAdmin 2.10.1
AWStats 6.6 (build 1.887)
Webalizer V2.01-10-RB02 (Windows NT 5.2 ) English
stunnel 4.07
Horde IMP H3 (4.1.6)
Automatic Integration of Pre-Installed Third-Party Applications as Plesk Components
Supported third-party applications that have already been installed on a server prior to Plesk installation will be automatically detected during Plesk installation by the Plesk autoinstaller program and integrated as Plesk components.
Note: Third-party applications that require additional Plesk configuration to complete installation as Plesk components will not be activated upon automatic integration until required application information is entered in Plesk. To activate such a component, you will need to enter the required application information in Plesk.
Manual Installation of Plesk Components on Existing Plesk Servers
Plesk component can be installed manually by using a manufacturer-supplied application package.
To install a Plesk component on a Plesk server by using a manufacturer-supplied software package, follow these steps:
1 Upload the package to the Plesk server and then run the package installation program or, when applicable, follow the manufacturer‟s installation instructions.
2 Complete Plesk component installation by integrating the newly installed third-party application instance with Plesk by following the general integration procedure (on page 89).
Note: For some applications, you will need to additionally configure system or the application for Plesk component installation to be successful. For detailed instructions on installing individual Plesk components, see the corresponding subsections in the “Installing Plesk Components” (on page 88) section.

84 Installing and Upgrading Plesk Components
Plesk Component Upgrade
Installed Plesk components can be upgraded in one of the following ways:
By applying a Plesk component upgrade included in the Plesk distribution package.
Plesk components installed by using Plesk distribution package can be upgraded automatically by using a Plesk installation package that includes a newer version of a third-party application already installed as a Plesk component. For this, run the Plesk autoinstaller program selecting the Upgrade option and then selecting one or more components that you want to upgrade.
By applying an application upgrade package supplied by the application manufacturer.
Plesk components can be upgraded manually by using manufacturer-supplied upgrade packages. Manually upgraded Plesk components must be re-integrated with Plesk by following the general integration procedure (on page 89).
Note: Generally it is not a good idea to manually upgrade a Plesk component that has been installed automatically. The main reason for this is that the application builds included in a Plesk distribution package are often custom-tailored to work specifically with the Plesk version. Upgrading such applications by using manufacturer-supplied upgrade packages may have unpredictable consequences with regard to the upgraded application performance and also may impact performance of other Plesk components and Plesk itself.

Installing and Upgrading Plesk Components 85
Third-Party Applications Supported by Plesk
The following third-party software is supported by Plesk for Windows. The up-to-date list of supported software for each Plesk version is available in the Release Notes for that version distribution package.
Mail servers
MailEnable Standard 1.986
MailEnable Professional 3.14
MailEnable Enterprise 3.14
Merak 9.2.1
SmarterMail 5.0.2999
MDaemon 9.6.4
hMailServer 4.4.1
CommuniGate Pro 5.2
Antiviruses
DrWeb 4.44.0.10170
Kaspersky AV 5.0.0.49
ClamWin 0.92
Merak Antivirus 9.2.1
DNS servers
Microsoft DNS Server 6.0.6001.18000
BIND DNS Server 9.4.1
Simple DNS Plus 5.0
FTP servers
Microsoft FTP Publishing Service 7.0
Microsoft FTP service 7.0
Gene6 FTP Server 3.10.0.2
Serv-U FTP Server 6.4.0.6
Web Statistics
Webalizer V2.01-10-RB02
AWStats 6.6
SmarterStats 3.3
Urchin 5.7.0.3
Web Scripting
ASP 6.0.3790.0, 7.0.6001.18000
ASP.NET 1.1.4322.0

86 Installing and Upgrading Plesk Components
ASP.NET 2.0.50727.0
Miva Empresa 5.0.6
Perl 5.8.8
PHP 4.4.7
PHP 5.2.5
Python 2.5.0.0
SSI 6.0.3790.0, 7.0.6001.18000
Apache Tomcat 5.5.4
ColdFusion 5.0
ColdFusion MX 6.1
ColdFusion MX 7.0
ColdFusion 8.0 (x86 only)
Microsoft FrontPage 5.0.2.5012
FastCGI Support 7.0.6001.18000
Web Administration Tools
phpMyAdmin 2.10.1
ASP.NET Enterprise Manager 0.1.3
myLittleAdmin 2000 2.0 lite r.096
myLittleAdmin 2000 2.7 r.126
myLittleAdmin 2005 3.2a r.0037
Database servers
Microsoft SQL Server 2000
Microsoft SQL Server 2005
Microsoft SQL Server 2005 Express
MySQL 4.1.22
MySQL 5.0.45
Web Mail Solutions
Horde IMP H3 (4.1.6)
MailEnable 3.14 Web Client
IceWarp Web Mail Pro 1.2.0.1
SmarterMail 5.0.2999 Web Client
CommuniGate Pro 5.2 Web Client
Spam Filters
SpamAssassin 3.2.3
Merak 9.2.1
SmarterMail SpamAssassin 5.0.2999
Other

Installing and Upgrading Plesk Components 87
stunnel 4.07
Third-Party Applications not Supported by Plesk
On your Plesk server you might want to use not only Plesk components (see page 81) or third-party applications supported by Plesk (see page 85). If you need, you can also use other third-party applications.
In accordance with Plesk security policies, Plesk sets permissions for all its partitions to restrict users‟ access to each other and to third-party applications which are unknown to Plesk. This is why to provide proper operation of third-party applications not supported by Plesk, you need to set required permissions in Plesk. For more information about Plesk security policies, see the “Administering Security Settings on Windows Objects” chapter (see page 13).
To enable a third-party application not supported by Plesk on the Plesk server:
Allow the psacln and psaserv groups the required access level to required directories
of the application.
Note: Generally this action is enough for proper operation of third-party applications not supported by Plesk. Though some special cases may need special investigation and pertinent actions.

88 Installing and Upgrading Plesk Components
Installing and Upgrading Plesk Components
Plesk components can be installed either automatically or manually.
Only third-party applications included in the Plesk distribution package can be installed automatically. For overview of installation methods, see “Third-Party Application Installation as Plesk Component” (on page 81).
Supported third-party applications not included in Plesk distribution can be installed as Plesk component manually by using manufacturer-supplied installation packages. After running an installer program, the newly installed third-party application must be integrated with Plesk by following the integration procedure (on page 89).
For some third-party applications installed by using manufacturer-supplied application packages, you need to additionally configure the application or system for the integration procedure to be successful.
Because many Plesk components are run by Windows as services, before switching Plesk to a new component, you may need to stop the currently running Plesk service to ensure that the component registers itself correctly in the system during installation. You can stop the old service by using the Plesk Services monitor (on page 170). However, if you do install your new component and switch Plesk to it with the service running in the background, potential integration problems can be solved by simply restarting the newly installed service.
This section describes installation procedures for third-party applications supported by Plesk.
In this section:
General Integration Procedure .......................................................................... 89 Installing and Upgrading Mail Components ....................................................... 90 Installing and Upgrading Antivirus Components ................................................ 101 Installing and Upgrading DNS Servers .............................................................. 108 Installing and Upgrading FTP Servers ............................................................... 112 Installing and Upgrading Web Statistics Applications ........................................ 118 Installing and Upgrading Server-Side Web Scripting Engines............................ 122 Installing and Upgrading Web Administration Tools ........................................... 137 Installing and Upgrading Database Servers ....................................................... 142 Installing and Upgrading Web Mail Solutions ..................................................... 146 Installing SpamAssassin Spam Filter ................................................................. 152 Installing stunnel................................................................................................ 153

Installing and Upgrading Plesk Components 89
General Integration Procedure
A freshly installed third party application must be integrated with Plesk to be registered as Plesk component.
A freshly upgraded Plesk component must be re-integrated with Plesk.
To integrate a newly installed or re-integrate a newly upgraded Plesk component, follow these steps:
1 Log in to the Plesk control panel as administrator.
2 Go to Server >Plesk Components Management. The list of the currently registered Plesk components is displayed.
3 Click Refresh under Tools. The list of registered Plesk components is refreshed. The integrated component entry appears in the list.

90 Installing and Upgrading Plesk Components
Installing and Upgrading Mail Components
Only MailEnable Standard mail server is included in the Plesk distribution package.
All other supported mail servers can be installed as Plesk components by using manufacturer-supplied installation packages. After running an installer program, the newly installed mail server application must be integrated with Plesk by following the integration procedure (on page 89).
For some mail server applications, you need to additionally configure the application or system for the integration procedure to be successful.
Make sure that during installation and integration of the new mail server application the current Plesk mail service is stopped. You can stop it by using the Plesk Services monitor (on page 170). This is necessary to ensure that the newly installed mail component registers itself correctly in the system.
However, if you do install your new mail component and switch Plesk to it with the old mail service running in the background, potential integration problems can be solved by restarting the newly installed mail service.
This section describes installation and upgrade procedures for mail servers supported by Plesk.
In this section:
Installing and Upgrading MailEnable Mail Server............................................... 91 Installing and Upgrading Merak Mail Server ...................................................... 93 Installing and Upgrading SmarterMail Mail Server ............................................. 95 Installing and Upgrading MDaemon Mail Server ................................................ 97 Installing and Upgrading hMailServer Mail Server ............................................. 99 Installing and Upgrading CommuniGate Pro Mail Server ................................... 100

Installing and Upgrading Plesk Components 91
Installing and Upgrading MailEnable Mail Server
MailEnable Standard is included in the Plesk distribution package and can be automatically installed or upgraded by one of the automatic installation methods. For more information about the automatic installation methods, see “Automatic Installation of Plesk Components” (on page 82). For more information about upgrade methods, see “Plesk Component Upgrade” (on page 84).
Supported application configurations
MailEnable Standard
MailEnable Professional
MailEnable Enterprise
Supported versions
For the latest supported MailEnable application version, see your Plesk version release notes or the “Third-Party Software Supported by Plesk” (on page 85) section in this guide.
Manual Installation
To install MailEnable mail server manually as Plesk component, follow these steps:
1 Log in to the Plesk server as administrator by using Remote Desktop.
2 Stop the old Plesk mail service.
This is necessary for the MailEnable mail server that is being installed to properly register itself in the system.
3 Obtain a MailEnable mail server distribution package and install the application on the Plesk server by running the package installer.
Note: No additional configuration steps are required after running a manufacturer-supplied application installation package.
4 Complete the installation of MailEnable server as Plesk component by following the general integration procedure (on page 89). The MailEnable mail server entry appears in the Plesk components list.
Manual Upgrade
To upgrade MailEnable mail component manually as Plesk component, follow these steps:
1 Log in to the Plesk server as administrator by using Remote Desktop.
2 Obtain a MailEnable mail server upgrade package and apply the upgrade to the existing installation.

92 Installing and Upgrading Plesk Components
3 Complete the upgrade of MailEnable mail component by following the general integration procedure (on page 89). The upgraded MailEnable mail component entry appears in the Plesk components list.
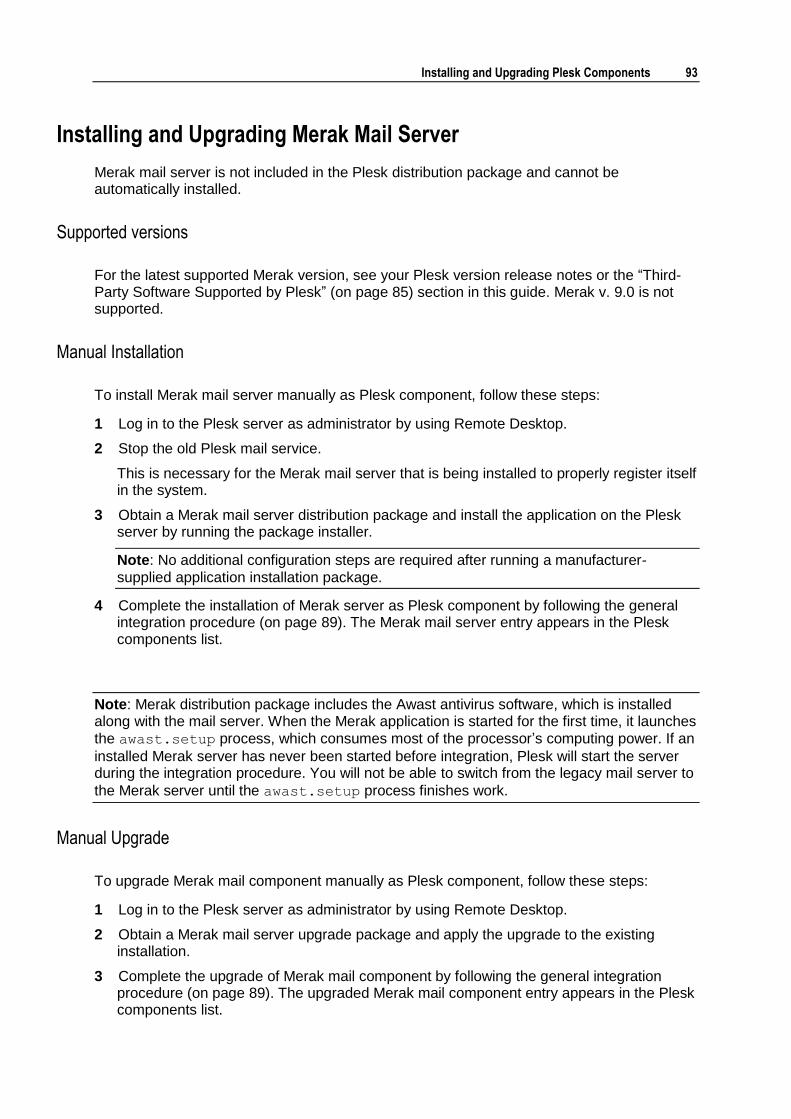
Installing and Upgrading Plesk Components 93
Installing and Upgrading Merak Mail Server
Merak mail server is not included in the Plesk distribution package and cannot be automatically installed.
Supported versions
For the latest supported Merak version, see your Plesk version release notes or the “Third-Party Software Supported by Plesk” (on page 85) section in this guide. Merak v. 9.0 is not supported.
Manual Installation
To install Merak mail server manually as Plesk component, follow these steps:
1 Log in to the Plesk server as administrator by using Remote Desktop.
2 Stop the old Plesk mail service.
This is necessary for the Merak mail server that is being installed to properly register itself in the system.
3 Obtain a Merak mail server distribution package and install the application on the Plesk server by running the package installer.
Note: No additional configuration steps are required after running a manufacturer-
supplied application installation package.
4 Complete the installation of Merak server as Plesk component by following the general integration procedure (on page 89). The Merak mail server entry appears in the Plesk components list.
Note: Merak distribution package includes the Awast antivirus software, which is installed along with the mail server. When the Merak application is started for the first time, it launches
the awast.setup process, which consumes most of the processor‟s computing power. If an
installed Merak server has never been started before integration, Plesk will start the server during the integration procedure. You will not be able to switch from the legacy mail server to
the Merak server until the awast.setup process finishes work.
Manual Upgrade
To upgrade Merak mail component manually as Plesk component, follow these steps:
1 Log in to the Plesk server as administrator by using Remote Desktop.
2 Obtain a Merak mail server upgrade package and apply the upgrade to the existing installation.
3 Complete the upgrade of Merak mail component by following the general integration procedure (on page 89). The upgraded Merak mail component entry appears in the Plesk components list.

94 Installing and Upgrading Plesk Components

Installing and Upgrading Plesk Components 95
Installing and Upgrading SmarterMail Mail Server
SmarterMail mail server is not included in the Plesk distribution package and cannot be installed automatically.
Note: By default, SmarterMail will install a basic web server that allows you to start using SmarterMail immediately after installation. However, it is recommended that you move SmarterMail to a more robust and secure web server, such as Microsoft‟s Internet Information Server (IIS). For information about configuring SmarterMail to run under IIS 5.0 or higher, consult the “Running Web Interface Under IIS” topic in the knowledge base at the manufacturer‟s Web site smartertools.com.
Supported versions
For the latest supported SmarterMail version, see your Plesk release notes or the “Third-Party Software Supported by Plesk” (on page 85) section in this guide.
Manual Installation
To install SmarterMail mail server manually as Plesk component, follow these steps:
1 Log in to the Plesk server as administrator by using Remote Desktop.
2 Stop the old Plesk mail service.
This is necessary for the SmarterMail mail server that is being installed to properly register itself in the system.
3 Obtain a SmarterMail mail server distribution package and install the application on the Plesk server by running the package installer.
4 Start the newly installed SmarterMail mail server application.
5 Follow the initial configuration wizard.
For the integration to succeed, in the wizard you need to specify the port number, administrator login name, and administrator password for the mail server.
6 Complete the installation of SmarterMail server as Plesk component by following the general integration procedure (on page 89). The newly installed SmarterMail component entry appears inactive in the Plesk components list.
7 Activate SmarterMail mail component by clicking the entry and entering the port number, administrator login name, and administrator password for the SmarterMail server specified at the previous step.
The SmarterMail mail server entry appears in the Plesk components list.

96 Installing and Upgrading Plesk Components
Note: When switching Plesk to the SmarterMail mail server that appears inactive in the components list, you will need to enter a valid port number, the administrator login name, and administrator password for the entry before the switch can be made. If you attempt to switch to SmarterMail that appears inactive in the components list, you will be requested to enter the information.
Manual Upgrade
To upgrade SmarterMail mail component manually as Plesk component, follow these steps:
1 Log in to the Plesk server as administrator by using Remote Desktop.
2 Obtain a SmarterMail mail server upgrade package and apply the upgrade to the existing installation.
3 Complete the upgrade of SmarterMail mail component by following the general integration procedure (on page 89). The upgraded SmarterMail mail component entry appears in the Plesk components list.
Installing and Upgrading Plesk Components 97
Installing and Upgrading MDaemon Mail Server
MDaemon mail server is not included in the Plesk distribution package and cannot be automatically installed.
Warning: MDaemon mail server is not compatible with the Windows‟ Data Execution Prevention (DEP) feature.
Warning: Plesk can work only with MDaemon started as a system service on all supported Windows platforms. Please do not start also MDaemon GUI (by clicking All Programs -> Start MDaemon shortcut), it may lead to the crash of both MDaemon system service and MDaemon GUI.
Note: When MDaemon is started as a system service on Windows Server 2008, the MDaemon management icon would not appear in the system tray. Please use MDaemon Web Admin to manage MDaemon with Plesk on Windows Server 2008.
Supported versions
For the latest supported MDaemon version, see your Plesk release notes or the “Third-Party Software Supported by Plesk” (on page 85) section in this guide.
Manual Installation
To install MDaemon mail server manually as Plesk component, follow these steps:
1 Log in to the Plesk server as administrator by using Remote Desktop.
2 Stop the old Plesk mail service.
This is necessary for the MDaemon mail server that is being installed to properly register itself in the system.
3 Obtain a MDaemon mail server distribution package and install it on the Plesk server by running the package installer.
MDaemon must be configured to run as a system service to be installed as a Plesk component. By default, MDaemon is registered in the system as a service.
Tip: If MDaemon was installed as an application, configure it to run as a system service: 1. Open the MDaemon interface. 2. Click the Setup menu at the top. 3. Select System Service. 4. Click the Install Service button.
4 Complete the installation of MDaemon server as Plesk component by following the general integration procedure (on page 89). The MDaemon mail server entry appears in the Plesk components list.

98 Installing and Upgrading Plesk Components
Manual Upgrade
To upgrade MDaemon mail component manually as Plesk component, follow these steps:
1 Log in to the Plesk server as administrator by using Remote Desktop.
2 Obtain a MDaemon mail server upgrade package and apply the upgrade to the existing installation.
3 Complete the upgrade of MDaemon mail component by following the general integration procedure (on page 89). The upgraded MDaemon mail component entry appears in the Plesk components list.

Installing and Upgrading Plesk Components 99
Installing and Upgrading hMailServer Mail Server
hMailServer mail server is not included in the Plesk distribution package and cannot be automatically installed.
Supported versions
For the latest supported hMailServer version, see your Plesk version release notes or the “Third-Party Software Supported by Plesk” (on page 85) section in this guide.
Note: The use of hMailServer with Windows Server 2008 is not recommended, while Windows Server 2008 is not in the list of operating systems supported by hMailServer (http://www.hmailserver.com/documentation/?page=system_requirements).
Manual Installation
To install hMailServer mail server manually as Plesk component, follow these steps:
1 Log in to the Plesk server as administrator by using Remote Desktop.
2 Stop the old Plesk mail service.
This is necessary for the hMailServer mail server that is being installed to properly register itself in the system.
3 Obtain a hMailServer mail server distribution package and install the application on the Plesk server by running the package installer.
Note: No additional configuration steps are required after running a manufacturer-supplied application installation package.
4 Complete the installation of hMailServer server as Plesk component by following the general integration procedure (on page 89). The hMailServer mail server entry appears in the Plesk components list.
Manual Upgrade
To upgrade hMailServer mail component manually as Plesk component, follow these steps:
1 Log in to the Plesk server as administrator by using Remote Desktop.
2 Obtain a hMailServer mail server upgrade package and apply the upgrade to the existing installation.
3 Complete the upgrade of hMailServer mail component by following the general integration procedure (on page 89). The upgraded hMailServer mail component entry appears in the Plesk components list.

100 Installing and Upgrading Plesk Components
Installing and Upgrading CommuniGate Pro Mail Server
CommuniGate Pro mail server is not included in the Plesk distribution package and cannot be automatically installed.
Supported versions
For the latest supported CommuniGate Pro version, see your Plesk release notes or the “Third-Party Software Supported by Plesk” (on page 85) section in this guide.
Manual Installation
To install CommuniGate Pro mail server manually as Plesk component, follow these steps:
1 Log in to the Plesk server as administrator by using Remote Desktop.
2 Stop the old Plesk mail service.
This is necessary for the CommuniGate Pro mail server that is being installed to properly register itself in the system.
3 Obtain a CommuniGate Pro mail server distribution package and install the application on the Plesk server by running the package installer.
4 Start the newly installed CommuniGate Pro mail server application.
5 Log in to the mail server by using the server‟s own Web interface and configure the mail server‟s port number and administrator login credentials.
6 Complete the installation of CommuniGate Pro server as Plesk component by following the general integration procedure (on page 89). The newly installed CommuniGate Pro component entry appears inactive in the Plesk components list.
7 Activate CommuniGate Pro mail component by clicking the entry and entering the port number, administrator login name, and administrator password for the CommuniGate Pro server specified at the previous step.
The CommuniGate Pro mail server entry appears in the Plesk components list.
Note: When switching Plesk to the CommuniGate Pro mail server that appears inactive in the components list, you will need to enter a valid port number, the administrator login name, and administrator password for the entry before the switch can be made. If you attempt to switch to CommuniGate Pro that appears inactive in the components list, you will be requested to enter the information.
Manual Upgrade
To upgrade CommuniGate Pro mail component manually as Plesk component, follow these steps:
1 Log in to the Plesk server as administrator by using Remote Desktop.

Installing and Upgrading Plesk Components 101
2 Obtain a CommuniGate Pro mail server upgrade package and apply the upgrade to the existing installation.
3 Complete the upgrade of CommuniGate Pro mail component by following the general integration procedure (on page 89). The upgraded CommuniGate Pro mail component entry appears in the Plesk components list.
Installing and Upgrading Antivirus Components
Only DrWeb and Kaspersky AV antivirus software are included in the Plesk distribution package.
All other supported antiviruses can be installed as Plesk components by using manufacturer-supplied installation packages. After running an installer program, the newly installed antivirus application must be integrated with Plesk by following the integration procedure (on page 89).
For some antivirus applications, you need to additionally configure the application or system for the integration procedure to be successful.
This section describes installation and upgrade procedures for antivirus software supported by Plesk.
In this section:
Installing and Upgrading DrWeb Antivirus ......................................................... 102 Installing and Upgrading Kaspersky Antivirus .................................................... 103 Installing and Upgrading ClamWin Antivirus ...................................................... 104 Installing and Upgrading ClamAV Antivirus ....................................................... 105 Installing and Upgrading Merak Antivirus .......................................................... 107

102 Installing and Upgrading Plesk Components
Installing and Upgrading DrWeb Antivirus
DrWeb antivirus is included in the Plesk distribution package and can be automatically installed by one of the automatic installation methods. For more information about the automatic installation methods, see “Automatic Installation of Plesk Components” (on page 83). For more information about upgrade methods, see “Plesk Component Upgrade” (on page 84).
Supported versions
For the latest supported DrWeb antivirus version, see your Plesk version release notes or the “Third-Party Software Supported by Plesk” (on page 85) section in this guide.
Manual Installation
To install DrWeb antivirus manually as Plesk component, follow these steps:
1 Log in to the Plesk server as administrator by using Remote Desktop.
2 Obtain a DrWeb antivirus distribution package and install the application on the Plesk server by running the package installer.
Note: No additional configuration steps are required after running a manufacturer-supplied application installation package.
3 Complete the installation of DrWeb antivirus as Plesk component by following the general integration procedure (on page 89). The DrWeb antivirus entry appears in the Plesk components list.
Manual Upgrade
To upgrade the DrWeb antivirus component manually, follow these steps:
1 Log in to the Plesk server as administrator by using Remote Desktop.
2 Obtain a DrWeb antivirus upgrade package and apply the upgrade to the existing installation.
3 Complete the upgrade of DrWeb antivirus component by following the general integration procedure (on page 89). The upgraded DrWeb antivirus component entry appears in the Plesk components list.

Installing and Upgrading Plesk Components 103
Installing and Upgrading Kaspersky Antivirus
Kaspersky antivirus is included in the Plesk distribution package and can be automatically installed by one of the automatic installation methods. For more information about the automatic installation methods, see “Automatic Installation of Plesk Components” (on page 82). For more information about upgrade methods, see “Plesk Component Upgrade” (on page 84).
Supported versions
For the latest supported Kaspersky antivirus version, see your Plesk version release notes or the “Third-Party Software Supported by Plesk” (on page 85) section in this guide.
Manual Installation
To install Kaspersky antivirus manually as Plesk component, follow these steps:
1 Log in to the Plesk server as administrator by using Remote Desktop.
2 Obtain a Kaspersky antivirus distribution package and install the application on the Plesk server by running the package installer.
Note: No additional configuration steps are required after running a manufacturer-supplied application installation package.
3 Complete the installation of Kaspersky antivirus as Plesk component by following the general integration procedure (on page 89). The Kaspersky antivirus entry appears in the Plesk components list.
Manual Upgrade
To upgrade the Kaspersky antivirus component manually, follow these steps:
1 Log in to the Plesk server as administrator by using Remote Desktop.
2 Obtain a Kaspersky antivirus upgrade package and apply the upgrade to the existing installation.
3 Complete the upgrade of Kaspersky antivirus component by following the general integration procedure (on page 89). The upgraded Kaspersky antivirus component entry appears in the Plesk components list.

104 Installing and Upgrading Plesk Components
Installing and Upgrading ClamWin Antivirus
ClamWin antivirus is included in the Plesk distribution package and can be automatically installed by one of the automatic installation methods. For more information about the automatic installation methods, see “Automatic Installation of Plesk Components” (on page 82). For more information about upgrade methods, see “Plesk Component Upgrade (on page 84)”.
Supported versions
For the latest supported ClamWin antivirus version, see your Plesk version release notes or the “Third-Party Software Supported by Plesk” (on page 85) section in this guide.
Manual Installation
To install ClamWin antivirus manually as Plesk component, follow these steps:
1 Log in to the Plesk server as administrator by using Remote Desktop.
2 Obtain a ClamWin antivirus distribution package and install the application on the Plesk server by running the package installer.
Note: No additional configuration steps are required after running a manufacturer-supplied application installation package.
3 Complete the installation of the ClamWin antivirus component by following the general integration procedure (on page 89). The ClamWin antivirus entry appears in the Plesk components list.
Manual Upgrade
To upgrade the ClamWin antivirus component manually, follow these steps:
1 Log in to the Plesk server as administrator by using Remote Desktop.
2 Obtain a ClamWin antivirus upgrade package and apply the upgrade to the existing installation.
3 Complete the upgrade of ClamWin antivirus component by following the general integration procedure (on page 89). The upgraded ClamWin antivirus component entry appears in the Plesk components list.
Installing and Upgrading Plesk Components 105
Installing and Upgrading ClamAV Antivirus
The ClamAV antivirus is not included in the Plesk distribution package and cannot be installed automatically.
Supported versions
For the latest supported ClamAV version, see your Plesk release notes or the “Third-Party Software Supported by Plesk” (on page 85) section in this guide.
Manual Installation
To install ClamAV antivirus manually as Plesk component, follow these steps:
1 Log in to the Plesk server as administrator by using Remote Desktop.
2 Obtain a ClamAV antivirus distribution package and install the application on the Plesk server by running the package installer.
3 Check and, if necessary, correct the path records for ClamAV folders and files found in the following configuration files:
<ClamAV install folder>\conf\freshclam.conf
<ClamAV install folder>\conf\clamd.conf
where <ClamAV install folder> is the path to the ClamAV installation folder.
Note: In recent ClamAV for Windows versions, upon installation the configuration files may contain incorrect path references to ClamAV files and folders, which prevents Plesk from integrating with the installed antivirus.
You can perform the general integration procedure (on page 89) at this point. If the integration is successful, the ClamAV antivirus entry will appear in the components list. However, you likely also need to perform the next step before ClamAV component installation can be completed.
4 Check and, if necessary, correct the following registry key to contain the proper ClamAV installation folder path:
HKEY_LOCAL_MACHINE\SOFTWARE\Wow6432Node\PLESK\PSA
Config\Config\ClamAVPath (for 64bit Windows)
or
HKEY_LOCAL_MACHINE\SOFTWARE\PLESK\PSA Config\Config\ClamAVPath
(for 32bit Windows)
106 Installing and Upgrading Plesk Components
4. Wait for at least two minutes for the cache to automatically renew and then complete the component installation by performing the general integration procedure (on page 89).
If you do not want to wait for the automatic cache renewal, you can force the cache renewal by restarting the Plesk Management service by using the Plesk Services Monitor. For information about using Plesk Services Monitor, see “Monitoring Server Status with Plesk Services Monitor” (on page 170).
Manual Upgrade
To upgrade the ClamAV antivirus component manually, follow these steps:
1 Log in to the Plesk server as administrator by using Remote Desktop.
2 Obtain a ClamAV antivirus upgrade package and apply the upgrade to the existing installation.
3 Complete the upgrade of ClamAV antivirus component by following the general integration procedure (on page 89). The upgraded ClamAV antivirus component entry appears in the Plesk components list.

Installing and Upgrading Plesk Components 107
Installing and Upgrading Merak Antivirus
Plesk supports Merak antivirus that is installed as part of the Merak mail server. The Merak antivirus component cannot be installed or upgraded apart from the Merak mail component. For information about installing and upgrading the Merak mail component, see “Installing and Upgrading Merak Mail Server” (on page 93).
You can switch Plesk to the Merak antivirus only if the Merak mail server is selected as the current Plesk mail component. When the Merak mail server is installed as a Plesk component, the Merak antivirus option is displayed in the list of antivirus components at Server > Plesk Components Management > Antivirus under Antivirus. The option is available only if the Merak mail server is selected as the current Plesk mail component. The option becomes unavailable when mail component other than Merak is selected.
Note: The antivirus will be automatically disabled when Plesk is switched from Merak mail server to other supported mail component and no antivirus component will be automatically enabled in its place. You need to enable another antivirus component to perform antivirus surveillance tasks on your Plesk server.
Supported versions
For the latest supported Merak antivirus version, see your Plesk release notes or the “Third-Party Software Supported by Plesk” (on page 85) section in this guide.
To enable Merak antivirus component on a Plesk server, follow these steps:
1 Login to Plesk control panel as administrator.
2 Go to Server > Plesk Components Management. The list of available Plesk components is displayed.
3 Make sure that the Merak mail component is enabled.
4 Click Antivirus. The list of available antivirus components is displayed.
5 Select the Merak antivirus option and click OK. The list of available Plesk components is displayed. The Merak antivirus entry is displayed as the currently active component (accompanied by the Running icon).
108 Installing and Upgrading Plesk Components
Installing and Upgrading DNS Servers
BIND DNS server is included in the Plesk distribution package.
Other supported DNS servers can be installed as Plesk components by using manufacturer-supplied installation packages. After running an installer program, the newly installed DNS server must be integrated with Plesk by following the integration procedure (on page 89).
For some DNS server applications, you need to additionally configure the application or system for the integration procedure to be successful.
Make sure that during installation and integration of a new DNS server application the current Plesk DNS service is stopped. You can stop it by using the Plesk Services monitor (on page 170). This is necessary to ensure that the newly installed DNS component registers itself correctly in the system during installation.
However, if you do install your new DNS component and switch Plesk to it with the old DNS service running in the background, potential integration problems can be solved by restarting the newly installed DNS service.
This section describes installation and upgrade procedures for DNS servers supported by Plesk.
In this section:
Installing and Upgrading BIND DNS Server ....................................................... 109 Installing and Upgrading Microsoft DNS Server ................................................. 110 Installing and Upgrading Simple DNS Plus Server ............................................ 111

Installing and Upgrading Plesk Components 109
Installing and Upgrading BIND DNS Server
The BIND DNS server is included in the Plesk distribution package and can be automatically installed by one of the automatic installation methods. For more information about the automatic installation methods, see “Automatic Installation of Plesk Components” (on page 82). For more information about upgrade methods, see “Plesk Component Upgrade” (on page 84).
Supported versions
For the latest supported BIND DNS server version, see your Plesk version release notes or the “Third-Party Software Supported by Plesk” (on page 85) section in this guide.
Installing or upgrading the BIND DNS server manually is not recommended. The build included in the Plesk distribution package is made by Parallels and is thoroughly tested for functional performance and compatibility with Plesk. If you install BIND from an installation package produced by others or apply an upgrade package produced by others to BIND that has been installed automatically by Plesk, the BIND server performance or its integration with Plesk may be compromised.
If you want to upgrade to a later BIND version, do it by applying a Plesk upgrade package that includes the newer version of BIND.

110 Installing and Upgrading Plesk Components
Installing and Upgrading Microsoft DNS Server
Microsoft DNS server is a Windows component and cannot be installed automatically.
Supported versions
For the latest supported Microsoft DNS server application version, see your Plesk version release notes or the “Third-Party Software Supported by Plesk” (on page 85) section in this guide.
Manual Installation
To install Microsoft DNS manually as Plesk component, follow these steps:
1 Log in to the Plesk server as administrator by using Remote Desktop.
2 Stop the old Plesk DNS service.
This is necessary for the Microsoft DNS server that is being installed to properly register itself in the system.
3 Obtain a Microsoft DNS server distribution package and install the application on the Plesk server by running the package installer.
Note: No additional configuration steps are required after running a manufacturer-supplied application installation package.
4 Complete the installation of Microsoft DNS server as Plesk component by following the general integration procedure (on page 89). The Microsoft DNS server entry appears in the Plesk components list.
Manual Upgrade
To upgrade the Microsoft DNS component manually, follow these steps:
1 Log in to the Plesk server as administrator by using Remote Desktop.
2 Obtain a Microsoft DNS upgrade package and apply the upgrade to the existing installation.
3 Complete the upgrade of Microsoft DNS component by following the general integration procedure (on page 89). The upgraded Microsoft DNS component entry appears in the Plesk components list.

Installing and Upgrading Plesk Components 111
Installing and Upgrading Simple DNS Plus Server
The Simple DNS Plus server is not included in the Plesk distribution package and cannot be installed automatically.
Supported versions
For the latest supported Simple DNS Plus server application version, see your Plesk version release notes or the “Third-Party Software Supported by Plesk” (on page 85) section in this guide.
Manual Installation
To install Simple DNS Plus manually as Plesk component, follow these steps:
1 Log in to the Plesk server as administrator by using Remote Desktop.
2 Stop the old Plesk DNS service.
This is necessary for the Simple DNS Plus server that is being installed to properly register itself in the system.
3 Obtain a Simple DNS Plus server distribution package and install the application on the Plesk server by running the package installer.
4 Select the HTTP API option of the Simple DNS Plus server, set the server address to
127.0.0.1, specify the connection parameters (port and administrator password).
5 Complete the installation of Simple DNS Plus server as Plesk component by following the general integration procedure (on page 89). The Simple DNS Plus server entry appears in the Plesk components list.
6 In the Plesk control panel, go to Server > Components Management > DNS Server > Simple DNS Plus and specify the same connection parameters (port and password) as you did on the Simple DNS Plus server.
Important: When you have installed Simple DNS Plus 5.0, make sure to enter the valid license key prior to using the server. Otherwise (with an outdated trial key or a key from another server) some operations cannot be performed and the server cannot work properly.
Manual Upgrade
To upgrade the Simple DNS Plus component manually, follow these steps:
1 Log in to the Plesk server as administrator by using Remote Desktop.
2 Obtain a Simple DNS Plus upgrade package and apply the upgrade to the existing installation.
3 Complete the upgrade of Simple DNS Plus component by following the general integration procedure (on page 89). The upgraded Simple DNS Plus component entry appears in the Plesk components list.
112 Installing and Upgrading Plesk Components
Installing and Upgrading FTP Servers
No FTP server is included in the Plesk distribution package.
All supported FTP servers can be installed as Plesk components by using manufacturer-supplied installation packages. After running an installer program, the newly installed FTP server application must be integrated with Plesk by following the integration procedure (on page 89).
For some FTP server applications, you need to additionally configure the application or system for the integration procedure to be successful.
Make sure that during installation and integration of the new FTP server application the current Plesk FTP service is stopped. You can stop it by using the Plesk Services monitor (on page 170). This is necessary to ensure that the newly installed FTP component registers itself correctly in the system.
However, if you do install your new FTP component and switch Plesk to it with the old FTP service running in the background, potential integration problems can be solved by restarting the newly installed FTP service.
This section describes installation and upgrade procedures for FTP servers supported by Plesk.
In this section:
Installing and Upgrading Microsoft FTP Publishing Service 6.0 ......................... 113 Installing and Upgrading Microsoft FTP Service 7.0 for Windows 2008 ............. 114 Installing and Upgrading Gene6 FTP Server ..................................................... 116 Installing and Upgrading Serv-U FTP Server ..................................................... 117
Installing and Upgrading Plesk Components 113
Installing and Upgrading Microsoft FTP Publishing Service 6.0
Microsoft FTP Publishing service is a Windows component and cannot be installed automatically.
Supported versions
For the latest supported Microsoft FTP Publishing service application version, see your Plesk version release notes or the “Third-Party Software Supported by Plesk” (on page 85) section in this guide.
Manual Installation
To install Microsoft FTP manually as Plesk component, follow these steps:
1 Log in to the Plesk server as administrator by using Remote Desktop.
2 Stop the old Plesk FTP service.
This is necessary for the Microsoft FTP Publishing service that is being installed to properly register itself in the system.
3 Obtain a Microsoft FTP Publishing service distribution package and install the application on the Plesk server by running the package installer.
Note: No additional configuration steps are required after running a manufacturer-
supplied application installation package.
4 Complete the installation of Microsoft FTP Publishing service as Plesk component by following the general integration procedure (on page 89). The Microsoft FTP Publishing service entry appears in the Plesk components list.
Manual Upgrade
To upgrade the Microsoft FTP component manually, follow these steps:
1 Log in to the Plesk server as administrator by using Remote Desktop.
2 Obtain a Microsoft FTP Publishing service upgrade package and apply the upgrade to the existing installation.
3 Complete the upgrade of Microsoft FTP Publishing service component by following the general integration procedure (on page 89). The upgraded component entry appears in the Plesk components list.

114 Installing and Upgrading Plesk Components
Installing and Upgrading Microsoft FTP Service 7.0 for Windows 2008
Two different versions of Microsoft FTP Service 7.0 exist. The default one is included in the Windows Server 2008 distribution package. It is essentially the older Microsoft FTP Publishing Service 6.0 that has been adapted to Windows 2008. The other Microsoft FTP Service 7.0 is not included in the Windows Server 2008 distribution. You need to download the FTP server distribution package from the Microsoft site in order to install it. This downloadable Microsoft FTP Service 7.0 has many new features that you may want to use on your server.
If you feel confused about the differences between the default and downloadable versions, do not be. Microsoft has an excellent explanatory article about Microsoft FTP Service 7.0. Follow this link to read the article.
Microsoft FTP Service is a Windows component and cannot be installed automatically.
Supported versions
For the latest supported Microsoft FTP service application version, see your Plesk version release notes or the “Third-Party Software Supported by Plesk” (on page 85) section in this guide.
Manual Installation
To manually install the default version of Microsoft FTP Service 7.0 that is included in the Windows 2008 distribution package follow the instructions on installing Microsoft FTP server 6.0 (on page 113).
To manually install the downloadable Microsoft FTP service as Plesk component, follow these steps:
1 Log in to the Plesk server as administrator by using Remote Desktop.
2 Make sure that the default Microsoft FTP service is not installed on the Plesk server.
If the default Microsoft FTP service is installed, uninstall it by using the Role Services Manager of IIS 7.0. This is necessary for the Microsoft FTP service to be able to install.
3 Obtain a Microsoft FTP service 7.0 distribution package and install the application on the Plesk server by running the package installer.
Note: No additional configuration steps are required after running a manufacturer-supplied application installation package.
4 Complete the installation of Microsoft FTP server as Plesk component by running the
defpackagemng.exe utility in Plesk.
For this, change directory to the %plesk_bin% directory. (By default, it is C:\Program
Files\Parallels\Plesk\admin\bin.) If Plesk is installed in a different folder, all
utilities are located at %plesk_dir%\admin\bin. And then run the following command:
defpackagemng.exe—fix—type=ftpserver

Installing and Upgrading Plesk Components 115
The Microsoft FTP service entry appears in the Plesk components list.
Manual Upgrade
To upgrade the Microsoft FTP service component manually, follow these steps:
1 Log in to the Plesk server as administrator by using Remote Desktop.
2 Obtain a Microsoft FTP upgrade package and apply the upgrade to the existing installation.
3 Complete the upgrade of Microsoft FTP service component by following the general integration procedure (on page 89). The upgraded Microsoft FTP service component entry appears in the Plesk components list.

116 Installing and Upgrading Plesk Components
Installing and Upgrading Gene6 FTP Server
The Gene6 FTP server is not included in the Plesk distribution package and cannot be installed automatically.
Supported versions
For the latest supported Gene6 FTP server application version, see your Plesk version release notes or the “Third-Party Software Supported by Plesk” (on page 85) section in this guide.
Manual Installation
To install Gene6 FTP manually as Plesk component, follow these steps:
1 Log in to the Plesk server as administrator by using Remote Desktop.
2 Stop the old Plesk FTP service.
This is necessary for the Gene6 FTP server that is being installed to properly register itself in the system.
3 Obtain a Gene6 FTP server distribution package and install the application on the Plesk server by running the package installer.
Note: No additional configuration steps are required after running a manufacturer-
supplied application installation package.
4 Complete the installation of Gene6 FTP server as Plesk component by following the general integration procedure (on page 89). The Gene6 FTP server entry appears in the Plesk components list.
Manual Upgrade
To upgrade the Gene6 FTP component manually, follow these steps:
1 Log in to the Plesk server as administrator by using Remote Desktop.
2 Obtain a Gene6 FTP upgrade package and apply the upgrade to the existing installation.
3 Complete the upgrade of Gene6 FTP component by following the general integration procedure (on page 89). The upgraded Gene6 FTP component entry appears in the Plesk components list.

Installing and Upgrading Plesk Components 117
Installing and Upgrading Serv-U FTP Server
The Serv-U FTP server is not included in the Plesk distribution package and cannot be installed automatically.
Supported versions
For the latest supported Serv-U FTP server application version, see your Plesk version release notes or the “Third-Party Software Supported by Plesk” (on page 85) section in this guide.
Manual Installation
To install Serv-U FTP manually as Plesk component, follow these steps:
1 Log in to the Plesk server as administrator by using Remote Desktop.
2 Stop the old Plesk FTP service.
This is necessary for the Serv-U FTP server that is being installed to properly register itself in the system.
3 Obtain a Serv-U FTP server distribution package and install the application on the Plesk server by running the package installer.
4 Start the newly installed Serv-U FTP server application.
5 Configure the server to run as a Windows service by selecting the Run as Windows service option.
By default, the server does register as a service.
6 Complete the installation of Serv-U FTP server as Plesk component by following the general integration procedure (on page 89). The Serv-U FTP server entry appears in the Plesk components list.
Manual Upgrade
To upgrade the Serv-U FTP component manually, follow these steps:
1 Log in to the Plesk server as administrator by using Remote Desktop.
2 Obtain a Serv-U FTP upgrade package and apply the upgrade to the existing installation.
3 Complete the upgrade of Serv-U FTP component by following the general integration procedure (on page 89). The upgraded Serv-U FTP component entry appears in the Plesk components list.

118 Installing and Upgrading Plesk Components
Installing and Upgrading Web Statistics Applications
Only AWStats and Webalizer Web statistics application packages are included in the Plesk distribution package.
All other supported Web statistics applications can be installed as Plesk components by using manufacturer-supplied installation packages. After running an installer program, the newly installed Web statistics application must be integrated with Plesk by following the integration procedure (on page 89).
For some Web statistics applications, you need to additionally configure the application or system for the integration procedure to be successful.
This section describes installation and upgrade procedures for Web statistics applications supported by Plesk.
In this section:
Installing and Upgrading Webalizer ................................................................... 118 Installing and Upgrading AWStats ..................................................................... 119 Installing and Upgrading SmarterStats .............................................................. 120 Installing and Upgrading Urchin ......................................................................... 121
Installing and Upgrading Webalizer
The Webalizer Web statistics application is included in the Plesk distribution package and can be automatically installed by one of the automatic installation methods. For more information about the automatic installation methods, see “Automatic Installation of Plesk Components” (on page 82). For more information about upgrade methods, see “Plesk Component Upgrade” (on page 84).
Supported versions
For the latest supported Webalizer version, see your Plesk version release notes or the “Third-Party Software Supported by Plesk” (on page 85) section in this guide.
Installing or upgrading Webalizer manually is not recommended. The build included in the Plesk distribution package cannot be upgraded. If you install Webalizer from an installation package produced by others or apply an upgrade package produced by others to Webalizer that has been installed automatically by Plesk, the Webalizer server performance or its integration with Plesk may be compromised.
If you want to upgrade to a later Webalizer version, do it by applying a Plesk upgrade package that includes the newer version of Webalizer.

Installing and Upgrading Plesk Components 119
Installing and Upgrading AWStats
The SWStats Web statistics application is included in the Plesk distribution package and can be automatically installed by one of the automatic installation methods. For more information about the automatic installation methods, see “Automatic Installation of Plesk Components” (on page 82). For more information about upgrade methods, see “Plesk Component Upgrade” (on page 84).
Supported versions
For the latest supported SWStats version, see your Plesk version release notes or the “Third-Party Software Supported by Plesk” (on page 85) section in this guide.
Installing or upgrading SWStats manually is not recommended. Whether the build included in the Plesk distribution package can be manually upgraded by using the manufacturer-supplied software packages has not been tested. If you install AWStats from a manufacturer-supplied installation package or apply a manufacturer-supplied upgrade package to AWStats that has been installed automatically by Plesk, the application performance or its integration with Plesk may be compromised.
If you want to upgrade to a later AWStats version, do it by applying a Plesk upgrade package that includes the newer version of AWStats.

120 Installing and Upgrading Plesk Components
Installing and Upgrading SmarterStats
The SmarterStats Web statistics application is not included in the Plesk distribution package and cannot be installed automatically.
Supported versions
For the latest supported SmarterStats Web statistics application version, see your Plesk version release notes or the “Third-Party Software Supported by Plesk” (on page 85) section in this guide.
Manual Installation
To install SmarterStats manually as Plesk component, follow these steps:
1 Log in to the Plesk server as administrator by using Remote Desktop.
2 Obtain a SmarterStats server distribution package and install the application on the Plesk server by running the package installer.
3 Configure the newly installed SmarterStats application: specify the administrator login name, password and port number.
4 Complete the installation of the SmarterStats application as Plesk component by following the general integration procedure (on page 89). The newly installed SmarterMail component entry appears inactive in the Plesk components list.
5 Activate the SmarterStats Web statistics component by clicking the entry and entering the port number, administrator login name, and administrator password for the SmarterStats application specified at the previous step.
The SmarterStats Web statistics component entry appears in the Plesk components list.
Note: When switching Plesk to the SmarterStats Web statistics component that appears inactive in the components list, you will need to enter a valid port number, the administrator login name, and administrator password for the entry before the switch can be made. If you attempt to switch to SmarterStats that appears inactive in the components list, you will be requested to enter the information.
Manual Upgrade
To upgrade the SmarterStats component manually, follow these steps:
1 Log in to the Plesk server as administrator by using Remote Desktop.
2 Obtain a SmarterStats upgrade package and apply the upgrade to the existing installation.
3 Complete the upgrade of SmarterStats component by following the general integration procedure (on page 89). The upgraded SmarterStats component entry appears in the Plesk components list.
Installing and Upgrading Plesk Components 121
Installing and Upgrading Urchin
The Urchin Web statistics application is not included in the Plesk distribution package and cannot be installed automatically.
Supported versions
For the latest supported Urchin Web statistics application version, see your Plesk version release notes or the “Third-Party Software Supported by Plesk” (on page 85) section in this guide.
Manual Installation
To install the Urchin Web statistics application manually as Plesk component, follow these steps:
1 Log in to the Plesk server as administrator by using Remote Desktop.
2 Obtain an Urchin distribution package and install the application on the Plesk server by running the package installer.
Note: No additional configuration steps are required after running a manufacturer-supplied application installation package.
3 Complete the installation of the Urchin Web statistics application as Plesk component by following the general integration procedure (on page 89). The Urchin Web statistics component entry appears in the Plesk components list.
Manual Upgrade
To upgrade the Urchin component manually, follow these steps:
1 Log in to the Plesk server as administrator by using Remote Desktop.
2 Obtain a Urchin upgrade package and apply the upgrade to the existing installation.
3 Complete the upgrade of Urchin component by following the general integration procedure (on page 89). The upgraded Urchin component entry appears in the Plesk components list.

122 Installing and Upgrading Plesk Components
Installing and Upgrading Server-Side Web Scripting Engines
Perl, PHP 4, PHP 5, and Python scripting engine packages are included in the Plesk distribution package. Other supported scripting engines can be installed as Plesk components by using manufacturer-supplied installation packages. After running an installer program, the newly installed scripting engine must be integrated with Plesk by following the integration procedure (on page 89).
For some scripting engines, you need to additionally configure the engine or system for the integration procedure to be successful.
This section describes installation and upgrade procedures for server-side Web scripting engines supported by Plesk.
In this section:
Installing and Upgrading Microsoft ASP ............................................................ 123 Installing and Upgrading ASP.NET 1.1 .............................................................. 124 Installing and Upgrading ASP.NET 2.0 .............................................................. 125 Installing and Upgrading Miva Merchant Empresa ............................................. 126 Installing and Upgrading Perl............................................................................. 127 Installing and Upgrading PHP ............................................................................ 128 Installing and Upgrading Python ........................................................................ 131 Installing and Upgrading SSI ............................................................................. 132 Installing and Upgrading Apache Tomcat .......................................................... 133 Installing and Upgrading ColdFusion ................................................................. 134 Installing and Upgrading Microsoft FrontPage Server Extensions ..................... 136

Installing and Upgrading Plesk Components 123
Installing and Upgrading Microsoft ASP
The Microsoft ASP technology engine is a Windows component and cannot be installed automatically.
Supported versions
For the latest supported Microsoft ASP version, see your Plesk version release notes or the “Third-Party Software Supported by Plesk” (on page 85) section in this guide.
Manual Installation
To install Microsoft ASP manually as Plesk component, follow these steps:
1 Log in to the Plesk server as administrator by using Remote Desktop.
2 Obtain a Microsoft ASP distribution package and install the application on the Plesk server by running the package installer.
Note: No additional configuration steps are required after running a manufacturer-supplied application installation package.
3 Complete the installation of Microsoft ASP technology engine as Plesk component by following the general integration procedure (on page 89). The Microsoft ASP component appears in the Plesk components list.
Manual Upgrade
To upgrade the Microsoft ASP component manually, follow these steps:
1 Log in to the Plesk server as administrator by using Remote Desktop.
2 Obtain a Microsoft ASP upgrade package and apply the upgrade to the existing installation.
3 Complete the upgrade of Microsoft ASP component by following the general integration procedure (on page 89). The upgraded Microsoft ASP component entry appears in the Plesk components list.
Note: When installed ASP component is upgraded automatically by Windows, no re-
integration with Plesk is required.

124 Installing and Upgrading Plesk Components
Installing and Upgrading ASP.NET 1.1
The Microsoft ASP.NET 1.1 technology engine is a Windows component and cannot be installed automatically.
Supported versions
For the latest supported Microsoft ASP.NET 1.1 version, see your Plesk version release notes or the “Third-Party Software Supported by Plesk” (on page 85) section in this guide.
Manual Installation
To install Microsoft ASP.NET 1.1 manually as Plesk component, follow these steps:
1 Log in to the Plesk server as administrator by using Remote Desktop.
2 Obtain a Microsoft ASP.NET 1.1 distribution package and install the application on the Plesk server by running the package installer.
Note: No additional configuration steps are required after running a manufacturer-supplied application installation package.
3 Complete the installation of Microsoft ASP.NET 1.1 technology engine as Plesk component by following the general integration procedure (on page 89). The Microsoft ASP.NET 1.1 component entry appears in the Plesk components list.
Manual Upgrade
To upgrade the Microsoft ASP.NET 1.1 component manually, follow these steps:
1 Log in to the Plesk server as administrator by using Remote Desktop.
2 Obtain a Microsoft ASP.NET 1.1 upgrade package and apply the upgrade to the existing installation.
3 Complete the upgrade of Microsoft ASP.NET 1.1 component by following the general integration procedure (on page 89). The upgraded Microsoft ASP.NET 1.1 component entry appears in the Plesk components list.
Note: When installed ASP.NET 1.1 component is upgraded automatically by Windows, no
re-integration with Plesk is required.

Installing and Upgrading Plesk Components 125
Installing and Upgrading ASP.NET 2.0
The Microsoft ASP.NET 2.0 technology engine is a Windows component and cannot be installed automatically.
Supported versions
For the latest supported Microsoft ASP.NET 2.0 version, see your Plesk version release notes or the “Third-Party Software Supported by Plesk” (on page 85) section in this guide.
Manual Installation
To install Microsoft ASP.NET 2.0 manually as Plesk component, follow these steps:
1 Log in to the Plesk server as administrator by using Remote Desktop.
2 Obtain a Microsoft ASP.NET 2.0 distribution package and install the application on the Plesk server by running the package installer.
Note: No additional configuration steps are required after running a manufacturer-supplied application installation package.
3 Complete the installation of Microsoft ASP.NET 2.0 technology engine as Plesk component by following the general integration procedure (on page 89). The Microsoft ASP.NET 2.0 component appears in the Plesk components list.
Manual Upgrade
To upgrade the Microsoft .NET 2.0 component manually, follow these steps:
1 Log in to the Plesk server as administrator by using Remote Desktop.
2 Obtain a Microsoft .NET 2.0 upgrade package and apply the upgrade to the existing installation.
3 Complete the upgrade of Microsoft .NET 2.0 component by following the general integration procedure (on page 89). The upgraded Microsoft .NET 2.0 component entry appears in the Plesk components list.
Note: When installed .NET 2.0 component is upgraded automatically by Windows, no re-
integration with Plesk is required.

126 Installing and Upgrading Plesk Components
Installing and Upgrading Miva Merchant Empresa
The Miva Merchant Empresa engine is not included in the Plesk distribution package and cannot be installed automatically.
Supported versions
For the latest supported Miva Merchant Empresa version, see your Plesk release notes or the “Third-Party Software Supported by Plesk” (on page 85) section in this guide.
To install Miva Merchant Empresa manually as Plesk component, follow these steps:
1 Log in to the Plesk server as administrator by using Remote Desktop.
2 Obtain a Miva Merchant Empresa distribution package and install the application on the Plesk server by running the package installer.
3 Start Plesk Reconfigurator and use the Correct disk permissions option to automatically set correct user permissions on the Miva Merchant Empresa installation folders and files.
For help in completing this step, see “Using Plesk Reconfigurator” (on page 154).
Note: The security settings on the Miva Merchant Empresa installation folder and files must be configured to allow script execution on behalf of IIS user accounts. For more information about IIS user account permissions, see “Windows Accounts Used by Plesk to Manage Hosted Windows Objects” (on page 17).
4 Complete the installation of Miva Merchant Empresa engine as Plesk component by following the general integration procedure (on page 89). The newly installed Miva Merchant Empresa component entry appears in the Plesk components list.
Manual Upgrade
To upgrade the Miva Merchant Empresa component manually, follow these steps:
1 Log in to the Plesk server as administrator by using Remote Desktop.
2 Obtain a Miva Merchant Empresa upgrade package and apply the upgrade to the existing installation.
3 Complete the upgrade of Miva Merchant Empresa component by following the general integration procedure (on page 89). The upgraded Miva Merchant Empresa component entry appears in the Plesk components list.

Installing and Upgrading Plesk Components 127
Installing and Upgrading Perl
The Perl engine is included in the Plesk distribution package and can be automatically installed by one of the automatic installation methods. For more information about the automatic installation methods, see “Automatic Installation of Plesk Components” (on page 83). For more information about upgrade methods, see “Plesk Component Upgrade” (on page 84).
Supported versions
For the latest supported Perl version, see your Plesk version release notes or the “Third-Party Software Supported by Plesk” (on page 85) section in this guide.
Manual Installation
To install Perl manually as Plesk component, follow these steps:
1 Log in to the Plesk server as administrator by using Remote Desktop.
2 Obtain a Perl distribution package and install the application on the Plesk server by running the package installer.
Note: No additional configuration steps are required after running a manufacturer-supplied application installation package.
3 Complete the installation of Perl engine as Plesk component by following the general integration procedure (on page 89). The Perl component entry appears in the Plesk components list.
Manual Upgrade
Caution: Several Plesk components are Perl applications. When upgrading to a newer version of Perl, ensure that the currently installed Plesk components that depend on Perl engine are compatible with the Perl version.
To upgrade the Perl component manually, follow these steps:
1 Log in to the Plesk server as administrator by using Remote Desktop.
2 Obtain a Perl upgrade package and apply the upgrade to the existing installation.
3 Complete the upgrade of the Perl component by following the general integration procedure (on page 89). The upgraded Perl component entry appears in the Plesk components list.
128 Installing and Upgrading Plesk Components
Installing and Upgrading PHP
Multiple different PHP version installations can exist simultaneously on a single Plesk server. We recommend installing PHP by unpacking a PHP engine package distributed as a ZIP file. Installation folders for all PHP versions should be located in the
%plesk_dir%\Additional folder, where %plesk_dir% is the Plesk installation folder (for
example, C:\Program Files\Parallels\Plesk).
In this section:
Installing and Upgrading PHP 4 ......................................................................... 129 Installing and Upgrading PHP 5 ......................................................................... 130

Installing and Upgrading Plesk Components 129
Installing and Upgrading PHP 4
PHP 4 is included in the Plesk distribution package and can be automatically installed by one of the automatic installation methods. For more information about the automatic installation methods, see “Automatic Installation of Plesk Components” (on page 83). For more information about upgrade methods, see “Plesk Component Upgrade” (on page 84).
Supported versions
For the latest supported PHP 4 engine version, see your Plesk release notes or the “Third-Party Software Supported by Plesk” (on page 85) section in this guide.
Manual Installation
To install PHP 4 manually as Plesk component, follow these steps:
1 Log in to the Plesk server as the administrator by using Remote Desktop.
2 Obtain a PHP 4 distribution package and install the application on a Plesk server by running the package installer.
The PHP 4 installation folder must be located in the %plesk_dir%\Additional folder,
where %plesk_dir% is the Plesk installation folder.
3 Locate and copy the php.ini file located in the PHP 4 installation folder (for example,
C:\Program Files\Parallels\Plesk\Additional\PleskPHP4\php.ini) to
the C:\WINDOWS folders on the system disk.
4 Ensure that the extension_dir directive in the php.ini file contain a valid full path to
folder where the loadable PHP extensions (modules) reside.
5 Complete the installation of PHP 4 engine as Plesk component by following the general integration procedure (on page 89). The newly installed PHP 4 component entry appears in the Plesk components list.
Manual Upgrade
To upgrade the PHP4 component manually, follow these steps:
1 Log in to the Plesk server as administrator by using Remote Desktop.
2 Obtain a PHP4 upgrade package and apply the upgrade to the existing installation.
3 Complete the upgrade of PHP4 component by following the general integration procedure (on page 89). The upgraded PHP4 component entry appears in the Plesk components list.

130 Installing and Upgrading Plesk Components
Installing and Upgrading PHP 5
PHP 5 is included in the Plesk distribution package and can be automatically installed by one of the automatic installation methods. For more information about the automatic installation methods, see “Automatic Installation of Plesk Components” (on page 83). For more information about upgrade methods, see “Plesk Component Upgrade” (on page 84).
Supported versions
For the latest supported PHP 5 engine version, see your Plesk release notes or the “Third-Party Software Supported by Plesk” (on page 85) section in this guide.
Manual Installation
To install PHP 5 manually as Plesk component, follow these steps:
1 Log in to the Plesk server as the administrator by using Remote Desktop.
2 Obtain a PHP 5 distribution package and install the application on a Plesk server by running the package installer.
The PHP 5 installation folder must be located in the %plesk_dir%\Additional folder,
where %plesk_dir% is the Plesk installation folder.
3 Start registry editor.
4 Ensure that the HKEY_LOCAL_MACHINE\SOFTWARE\PHP\5 registry key has the
InFilePath value set to to the full path to the PHP version installation folder (for
example, C:\Program Files\Parallels\Plesk\Additional\PleskPHP5).
5 Locate the php.ini file located in the PHP 5 installation folder (for example,
C:\Program Files\Parallels\Plesk\Additional\PleskPHP5\php.ini).
6 Ensure that the extension_dir directive in the php.ini file contain a valid full path to
folder where the loadable PHP extensions (modules) reside.
7 Complete the installation of PHP 5 engine as Plesk component by following the general integration procedure (on page 89). The newly installed PHP 5 component entry appears in the Plesk components list.
Manual Upgrade
To upgrade the PHP5 component manually, follow these steps:
1 Log in to the Plesk server as administrator by using Remote Desktop.
2 Obtain a PHP5 upgrade package and apply the upgrade to the existing installation.
3 Complete the upgrade of PHP5 component by following the general integration procedure (on page 89). The upgraded PHP5 component entry appears in the Plesk components list.

Installing and Upgrading Plesk Components 131
Installing and Upgrading Python
The Python Web statistics application is included in the Plesk distribution package and can be automatically installed by one of the automatic installation methods. For more information about the automatic installation methods, see “Automatic Installation of Plesk Components” (on page 83). For more information about upgrade methods, see “Plesk Component Upgrade” (on page 84).
Supported versions
For the latest supported Python version, see your Plesk version release notes or the “Third-Party Software Supported by Plesk” (on page 85) section in this guide.
Installing or upgrading Python manually is not recommended. The build included in the Plesk distribution package cannot be upgraded. If you install Python from an installation package produced by others or apply an upgrade package produced by others to Python that has been installed automatically by Plesk, the Python server performance or its integration with Plesk may be compromised.
If you want to upgrade to a later Python version, do it by applying a Plesk upgrade package that includes the newer version of Python.

132 Installing and Upgrading Plesk Components
Installing and Upgrading SSI
The SSI engine is a Windows component and cannot be installed automatically.
Supported versions
For the latest supported Microsoft SSI version, see your Plesk version release notes or the “Third-Party Software Supported by Plesk” (on page 85) section in this guide.
Manual Installation
To install Microsoft SSI manually as Plesk component, follow these steps:
1 Log in to the Plesk server as administrator by using Remote Desktop.
2 Obtain a Microsoft SSI distribution package and install the application on the Plesk server by running the package installer.
Note: No additional configuration steps are required after running a manufacturer-
supplied application installation package.
3 Complete the installation of Microsoft SSI technology engine as Plesk component by following the general integration procedure (on page 89). The Microsoft SSI component appears in the Plesk components list.
Manual Upgrade
To upgrade the SSI component manually, follow these steps:
1 Log in to the Plesk server as administrator by using Remote Desktop.
2 Obtain a SSI upgrade package and apply the upgrade to the existing installation.
3 Complete the upgrade of SSI component by following the general integration procedure (on page 89). The upgraded SSI component entry appears in the Plesk components list.
Note: When SSI is upgraded automatically by Windows, no re-integration with Plesk is required.
Installing and Upgrading Plesk Components 133
Installing and Upgrading Apache Tomcat
The Apache Tomcat module is included in the Plesk distribution package and can be automatically installed by one of the automatic installation methods. For more information about the automatic installation methods, see “Automatic Installation of Plesk Components” (on page 83). For more information about upgrade methods, see “Plesk Component Upgrade” (on page 84).
Supported versions
For the latest supported Apache Tomcat version, see your Plesk version release notes or the “Third-Party Software Supported by Plesk” (on page 85) section in this guide.
Installing or upgrading Apache Tomcat manually is not recommended. The build included in the Plesk distribution package cannot be upgraded. If you install Apache Tomcat from an installation package produced by others or apply an upgrade package produced by others to Apache Tomcat that has been installed automatically by Plesk, the Apache Tomcat server performance or its integration with Plesk may be compromised.
If you want to upgrade to a later Apache Tomcat version, do it by applying a Plesk upgrade package that includes the newer version of Apache Tomcat.

134 Installing and Upgrading Plesk Components
Installing and Upgrading ColdFusion
The ColdFusion engine is not included in the Plesk distribution package and cannot be installed automatically.
Warning: Please note that using ColdFusion engine might seriously compromise the Plesk server security. To increase safety of your Plesk Control Panel and the server in whole, enable ColdFusion Sandbox Security feature. For more information about Sandbox Security, refer to ColdFusion documentation (http://livedocs.adobe.com/coldfusion/8/htmldocs/help.html?content=splash.html).
Supported versions
For the latest supported ColdFusion version, see your Plesk release notes or the “Third-Party Software Supported by Plesk” (on page 85) section in this guide.
Manual Installation
To install ColdFusion manually as Plesk component, follow these steps:
1 Log in to the Plesk server as administrator by using Remote Desktop.
2 Obtain a ColdFusion distribution package and install the application on the Plesk server by running the package installer.
When selecting Web servers and/or Web sites to configure for use with ColdFusion, enter
Internet Information Server (IIS) for Web server and Default Web Site
for IIS Web Site.
3 Log in to the ColdFusion Administrator and configure the ColdFusion server by following the ColdFusion Configuration Wizard.
4 Start Plesk Reconfigurator and use the Correct disk permissions option to automatically set correct user permissions on the ColdFusion installation folders and files.
For help in completing this step, see “Using Plesk Reconfigurator” (on page 154).
Note: The security settings on the ColdFusion installation folder and files must be configured to allow script execution on behalf of IIS user accounts. For more information about IIS user account permissions, see “Windows Accounts Used by Plesk to Manage Hosted Windows Objects” (on page 17).
5 Complete the installation of ColdFusion engine as Plesk component by following the general integration procedure (on page 89). The newly installed ColdFusion component entry appears in the Plesk components list.
Manual Upgrade
To upgrade the ColdFusion component manually, follow these steps:
1 Log in to the Plesk server as administrator by using Remote Desktop.

Installing and Upgrading Plesk Components 135
2 Obtain a ColdFusion upgrade package and apply the upgrade to the existing installation.
3 Complete the upgrade of ColdFusion component by following the general integration procedure (on page 89). The upgraded ColdFusion component entry appears in the Plesk components list.

136 Installing and Upgrading Plesk Components
Installing and Upgrading Microsoft FrontPage Server Extensions
Microsoft FrontPage Server Extensions is a Windows component and cannot be installed automatically.
Supported versions
For the latest supported Microsoft FrontPage Server Extensions version, see your Plesk version release notes or the “Third-Party Software Supported by Plesk” (on page 85) section in this guide.
Manual Installation
To install Microsoft FrontPage Server Extensions manually as Plesk component, follow these steps:
1 Log in to the Plesk server as administrator by using Remote Desktop.
2 Obtain a Microsoft FrontPage Server Extensions distribution package and install the application on the Plesk server by running the package installer.
Note: No additional configuration steps are required after running a manufacturer-supplied application installation package.
3 Complete the installation of Microsoft FrontPage Server Extensions as Plesk component by following the general integration procedure (on page 89). Microsoft FrontPage Server Extensions component appears in the Plesk components list.
Manual Upgrade
To upgrade the Microsoft FrontPage Server Extensions component manually, follow these steps:
1 Log in to the Plesk server as administrator by using Remote Desktop.
2 Obtain a Microsoft FrontPage Server Extensions upgrade package and apply the upgrade to the existing installation.
3 Complete the upgrade of Microsoft FrontPage Server Extensions component by following the general integration procedure (on page 89). The upgraded Microsoft FrontPage Server Extensions component entry appears in the Plesk components list.
Note: When Microsoft FrontPage Server Extensions is upgraded automatically by Windows,
no re-integration with Plesk is required.

Installing and Upgrading Plesk Components 137
Installing and Upgrading Web Administration Tools
Several Web administration tool packages are included in the Plesk distribution package.
Installation of Web administration tools as Plesk components by using manufacturer-supplied installation packages is not recommended.
This section describes installation and upgrade procedures for Web administration tools supported by Plesk.
In this section:
Installing and Upgrading phpMyAdmin .............................................................. 137 Installing and Upgrading ASP.NET Enterprise Manager .................................... 138 Installing and Upgrading myLittleAdmin 2000 Lite ............................................. 139 Installing and Upgrading myLittleAdmin 2000 Full ............................................. 140 Installing and Upgrading myLittleAdmin 2005 .................................................... 141
Installing and Upgrading phpMyAdmin
The phpMyAdmin Web administration tool is included in the Plesk distribution package and can be automatically installed by one of the automatic installation methods. For more information about the automatic installation methods, see “Automatic Installation of Plesk Components” (on page 82). For more information about upgrade methods, see “Plesk Component Upgrade” (on page 84).
Supported versions
For the latest supported phpMyAdmin version, see your Plesk version release notes or the “Third-Party Software Supported by Plesk” (on page 85) section in this guide.
Installing or upgrading phpMyAdmin manually is not recommended. The build included in the Plesk distribution package is modified by Parallels and is thoroughly tested for functional performance and compatibility with Plesk. If you install phpMyAdmin from an installation package produced by others, or if you apply an upgrade package produced by others to phpMyAdmin that has been installed automatically by Plesk, the phpMyAdmin performance or its integration with Plesk may be compromised.
If you want to upgrade to a later phpMyAdmin version, do it by applying a Plesk upgrade package that includes the newer version of phpMyAdmin.
Note: If you must upgrade to a phpMyAdmin package that is not included in Plesk distribution package, contact Plesk technical support for assistance with the upgrade procedure.

138 Installing and Upgrading Plesk Components
Installing and Upgrading ASP.NET Enterprise Manager
The ASP.NET Enterprise manager is included in the Plesk distribution package and can be automatically installed by one of the automatic installation methods.For more information about the automatic installation methods, see “Automatic Installation of Plesk Components” (on page 82).
Supported versions
For the latest supported ASP.NET Enterprise manager version, see your Plesk version release notes or the “Third-Party Software Supported by Plesk” (on page 85) section in this guide.
ASP.NET Enterprise manager can only be installed from the Plesk distribution package and cannot be upgraded. For more information about installing and integrating Plesk components included in Plesk distribution package, see “Installing Plesk Components Automatically After Plesk Has Been Installed”.
Installing and Upgrading Plesk Components 139
Installing and Upgrading myLittleAdmin 2000 Lite
myLittleAdmin 2000 Lite is included in the Plesk distribution package and can be automatically installed by using one of the automatic installation methods. For more information about the automatic installation methods, see “Automatic Installation of Plesk Components” (on page 82). For more information about upgrade methods, see “Plesk Component Upgrade” (on page 84).
Supported versions
For the latest supported myLittleAdmin 2000 Lite version, see your Plesk version release notes or the “Third-Party Software Supported by Plesk” (on page 85) section in this guide.
Manually installing myLittleAdmin 2000 Lite is not recommended. myLittleAdmin should only be installed automatically from the package included in the Plesk distribution.
Manually upgrading myLittleAdmin 2000 Lite is not recommended. If you want to upgrade to a later myLittleAdmin 2000 Lite version, do it by applying a Plesk upgrade package that includes the newer version of myLittleAdmin 2000 Lite. For more information about upgrading Plesk components included in Plesk distribution package, see “Upgrading Plesk Components”.
If you must upgrade to a version of myLittleAdmin 2000 Lite that is not included in a Plesk distribution package, follow these steps:
1 Obtain a ZIP distribution package for the desired myLittleAdmin 2000 Lite version.
2 Log in to the Plesk server as administrator by using Remote Desktop.
3 Unzip the package into a directory on the server.
For example unzip the package into C:\MLA_TEMP.
4 Make sure that myLittleAdmin 2000 Lite version included in Plesk distribution package is installed on the server.
If the installation is absent, install it by following instructions in the “Installing Plesk Components Automatically on Running Plesk Servers” section.
5 Go to the C:\Inetpub\vhosts\sqladmin\myLittleAdmin\2000 directory and
delete the directory contents.
6 Move the contents of the C:\MLA_TEMP directory (in which you unzipped the newer
myLittleAdmin version installation files) to the
C:\Inetpub\vhosts\sqladmin\myLittleAdmin\2000 directory.
7 Complete the upgrade of the component by following the general integration procedure (on page 89). The upgraded myLittleAdmin 2000 Lite component entry appears in the Plesk components list.

140 Installing and Upgrading Plesk Components
Installing and Upgrading myLittleAdmin 2000 Full
myLittleAdmin 2000 Full is included in the Plesk distribution package and can be automatically installed by using one of the automatic installation methods. For more information about the automatic installation methods, see “Automatic Installation of Plesk Components” (on page 82). For more information about upgrade methods, see “Plesk Component Upgrade” (on page 84).
Supported versions
For the latest supported myLittleAdmin 2000 Full version, see your Plesk version release notes or the “Third-Party Software Supported by Plesk” (on page 85) section in this guide.
Manually installing myLittleAdmin 2000 Full is not recommended. myLittleAdmin should only be installed automatically from the package included in the Plesk distribution.
Manually upgrading myLittleAdmin 2000 Full is not recommended. If you want to upgrade to a later myLittleAdmin 2000 Full version, do it by applying a Plesk upgrade package that includes the newer version of myLittleAdmin 2000 Full. For more information about upgrading Plesk components included in Plesk distribution package, see “Upgrading Plesk Components”.
If you must upgrade to a version of myLittleAdmin 2000 Full that is not included in a Plesk distribution package, follow these steps:
1 Obtain a ZIP distribution package for the desired myLittleAdmin 2000 Full version.
2 Log in to the Plesk server as administrator by using Remote Desktop.
3 Unzip the package into a directory on the server.
For example unzip the package into C:\MLA_TEMP.
4 Make sure that myLittleAdmin 2000 Full version included in Plesk distribution package is installed on the server.
If the installation is absent, install it by following instructions in the “Installing Plesk Components Automatically on Running Plesk Servers” section.
5 Go to the C:\Inetpub\vhosts\sqladmin\myLittleAdmin\2000Full directory
and delete the directory contents.
6 Move the contents of the C:\MLA_TEMP directory (in which you unzipped the newer
myLittleAdmin version installation files) to the
C:\Inetpub\vhosts\sqladmin\myLittleAdmin\2000Full directory.
7 Complete the upgrade of the component by following the general integration procedure (on page 89). The upgraded myLittleAdmin 2000 Full component entry appears in the Plesk components list.

Installing and Upgrading Plesk Components 141
Installing and Upgrading myLittleAdmin 2005
myLittleAdmin 2005 is included in the Plesk distribution package and can be automatically installed by using one of the automatic installation methods. For more information about the automatic installation methods, see “Automatic Installation of Plesk Components” (on page 82). For more information about upgrade methods, see “Plesk Component Upgrade” (on page 84).
Supported versions
For the latest supported myLittleAdmin 2005 version, see your Plesk version release notes or the “Third-Party Software Supported by Plesk” (on page 85) section in this guide.
Manually installing myLittleAdmin 2005 is not recommended. myLittleAdmin should only be installed automatically from the package included in the Plesk distribution.
Manually upgrading myLittleAdmin 2005 is not recommended. If you want to upgrade to a later myLittleAdmin 2005 version, do it by applying a Plesk upgrade package that includes the newer version of myLittleAdmin 2005. For more information about upgrading Plesk components included in Plesk distribution package, see “Upgrading Plesk Components”.
If you must upgrade to a version of myLittleAdmin 2005 that is not included in a Plesk distribution package, follow these steps:
1 Obtain a ZIP distribution package for the desired myLittleAdmin 2005 version.
2 Log in to the Plesk server as administrator by using Remote Desktop.
3 Unzip the package into a directory on the server.
For example unzip the package into C:\MLA_TEMP.
4 Make sure that myLittleAdmin 2005 version included in Plesk distribution package is installed on the server.
If the installation is absent, install it by following instructions in the “Installing Plesk Components Automatically on Running Plesk Servers” section.
5 Go to the C:\Inetpub\vhosts\sqladmin\myLittleAdmin\2005 directory and
delete the directory contents.
6 Move the contents of the C:\MLA_TEMP directory (in which you unzipped the newer
myLittleAdmin version installation files) to the
C:\Inetpub\vhosts\sqladmin\myLittleAdmin\2005 directory.
7 Complete the upgrade of the component by following the general integration procedure (on page 89). The upgraded myLittleAdmin 2005 component entry appears in the Plesk components list.
142 Installing and Upgrading Plesk Components
Installing and Upgrading Database Servers
MySQL and Microsoft SQL database server packages are included in the Plesk distribution package.
The database servers can also be installed as Plesk components by using manufacturer-supplied installation packages. After running an installer program, the newly installed database server server application must be integrated with Plesk by following the integration procedure (on page 89).
This section describes installation and upgrade procedures for database servers supported by Plesk.
In this section:
Installing and Upgrading Microsoft SQL Servers ............................................... 143 Installing and Upgrading MySQL Server ............................................................ 145

Installing and Upgrading Plesk Components 143
Installing and Upgrading Microsoft SQL Servers
Microsoft SQL Server is included in the Plesk distribution package and can be automatically installed by one of the automatic installation methods. For more information about the automatic installation methods, see “Automatic Installation of Plesk Components” (on page 82). For more information about upgrade methods, see “Plesk Component Upgrade” (on page 84).
Supported versions
Microsoft Data Engine (MSDE)
Microsoft SQL Server 2000
Microsoft SQL Server 2005
For the latest supported Microsoft SQL Server versions, see your Plesk version release notes or the “Third-Party Software Supported by Plesk” (on page 85) section in this guide.
Manual Installation
To install Microsoft SQL Server manually as Plesk component, follow these steps:
1 Log in to the Plesk server as administrator by using Remote Desktop.
2 Obtain a Microsoft SQL Server distribution package and install the application on the Plesk server by running the package installer.
Note: No additional configuration steps are required after running a manufacturer-supplied application installation package.
3 Complete the installation of Microsoft SQL Server as Plesk component by following the general integration procedure (on page 89). The Microsoft SQL Server entry appears in the Plesk components list.
Manual Upgrade
To upgrade the Microsoft SQL Server component manually, follow these steps:
1 Log in to the Plesk server as administrator by using Remote Desktop.
2 Obtain a Microsoft SQL Server upgrade package and apply the upgrade to the existing installation.
3 Complete the upgrade of Microsoft SQL Server component by following the general integration procedure (on page 89). The upgraded Microsoft SQL Server component entry appears in the Plesk components list.

144 Installing and Upgrading Plesk Components
Warning: Manually upgrading from one Microsoft SQL server version to another (for example, from MSDE to MS SQL 2000) is not recommended. The different versions of MS SQL server have different database structures. The databases that existed on the legacy server will not be compatible with the upgraded version.

Installing and Upgrading Plesk Components 145
Installing and Upgrading MySQL Server
MySQL database server is included in the Plesk distribution package and can be automatically installed by one of the automatic installation methods. For more information about the automatic installation methods, see “Automatic Installation of Plesk Components”. For more information about upgrade methods, see “Plesk Component Upgrade”.
Supported versions
For the latest supported MySQL database server version, see your Plesk version release notes or the “Third-Party Software Supported by Plesk” (on page 85) section in this guide.
Warning: MySQL server up to v. 4.0 cannot be upgraded to v. 5.0 or later because the MySQL server v.5.0 or later versions do not fully support backward compatibility with v. 4.0 and earlier versions.
Manual Installation
To install MySQL database server manually as Plesk component, follow these steps:
1 Log in to the Plesk server as administrator by using Remote Desktop.
2 Obtain a MySQL database server distribution package and install the application on the Plesk server by running the package installer.
Note: No additional configuration steps are required after running a manufacturer-supplied application installation package.
3 Complete the installation of MySQL database server as Plesk component by following the general integration procedure (on page 89). The MySQL component entry appears in the Plesk components list.
Manual Upgrade
To upgrade the MySQL database server component manually, follow these steps:
1 Log in to the Plesk server as administrator by using Remote Desktop.
2 Obtain a MySQL database server upgrade package and apply the upgrade to the existing installation.
3 Complete the upgrade of MySQL database server component by following the general integration procedure (on page 89). The upgraded MySQL database server component entry appears in the Plesk components list.

146 Installing and Upgrading Plesk Components
Installing and Upgrading Web Mail Solutions
Only Horde IMP Web mail solution is included in the Plesk distribution package.
All other supported Web mail solutions can be installed as Plesk components by using manufacturer-supplied installation packages. After running an installer program, the newly installed mail server application must be integrated with Plesk by following the integration procedure (on page 89).
For some Web mail solutions, you need to additionally configure the application or system for the integration procedure to be successful.
The MailEnable, SmarterMail, and CommuniGate Web mail components that come as parts of the corresponding mail server distribution packages are installed along with the mail components. You can switch Plesk to one of these Web mail components only if the corresponding mail server is selected as the current Plesk mail component. Such Web mail component is automatically disabled when Plesk is switched to other mail component.
For example, If you have SmarterMail Web mail component enabled on your Plesk server when switching to a mail component other than SmarterMail, the Web mail component will be disabled after the switching and no Web mail component will be automatically enabled in its place. You need to enable another Web mail component to access mail on Plesk server through a Web-based interface.
This section describes installation and upgrade procedures for Web mail software supported by Plesk.
In this section:
Installing and Upgrading Horde IMP .................................................................. 147 Installing and Upgrading MailEnable Web Client ............................................... 148 Installing and Upgrading SmarterMail Web Client .............................................. 149 Installing and Upgrading IceWarp Web Mail Client ............................................ 150 Installing and Upgrading CommuniGate Pro Web Client ................................... 151

Installing and Upgrading Plesk Components 147
Installing and Upgrading Horde IMP
The Horde IMP Web mail solution is included in the Plesk distribution package and can be automatically installed by one of the automatic installation methods. For more information about the automatic installation methods, see “Automatic Installation of Plesk Components” (on page 82). For more information about upgrade methods, see “Plesk Component Upgrade” (on page 84).
Supported versions
For the latest supported Horde IMP version, see your Plesk version release notes or the “Third-Party Software Supported by Plesk” (on page 85) section in this guide.
Installing or upgrading Horde IMP manually is not recommended. The build included in the Plesk distribution package cannot be upgraded. If you install Horde IMP from an installation package produced by others or apply an upgrade package produced by others to Horde IMP that has been installed automatically by Plesk, the Horde IMP performance or its integration with Plesk may be compromised.
If you want to upgrade to a later Horde IMP version, do it by applying a Plesk upgrade package that includes the newer version of Horde IMP.

148 Installing and Upgrading Plesk Components
Installing and Upgrading MailEnable Web Client
Plesk supports MailEnable Web Client that is installed as part of the MailEnable Professional or MailEnable Enterprise mail components. The MailEnable Web Client component cannot be installed apart from the mail components. For information about installing the MailEnable Professional or MailEnable Enterprise mail components, see “Installing and Upgrading MailEnable Mail Server” (on page 91).
When the MailEnable Professional or MailEnable Enterprise mail component is installed, the MailEnable Web Client option is displayed in the list of Web mail components at Server > Plesk Components Management > Web Mail under Web Mail. The option is available only if MailEnable Professional or MailEnable Enterprise mail server is selected as the current Plesk mail component. The option becomes unavailable when mail server other than MailEnable Professional or MailEnable Enterprise is selected.
The MailEnable Web Client will be automatically disabled when Plesk is switched from MailEnable to other supported mail server.
Supported versions
For the latest supported MailEnable Web Client version, see your Plesk release notes or the “Third-Party Software Supported by Plesk” (on page 85) section in this guide.
To enable MailEnable Web Client component on a Plesk server, follow these steps:
1 Login to Plesk control panel as administrator.
2 Go to Server > Plesk Components Management. The list of available Plesk components is displayed.
3 Make sure that a MailEnable Professional or MailEnable Enterprise mail server is enabled.
4 Click Web mail. The list of available Web mail components is displayed.
5 Select the MailEnable Web Client check box and click OK. The list of available Plesk components is displayed. The MailEnable Web Client entry is displayed in the list as the currently active Web mail component.
Installing and Upgrading Plesk Components 149
Installing and Upgrading SmarterMail Web Client
Plesk supports SmarterMail Web Client that is installed as part of the SmarterMail mail component. The SmarterMail Web Client component cannot be installed apart from the SmarterMail mail component. For information about installing the SmarterMail mail component, see “Installing and Upgrading SmarterMail Mail Server” (on page 95).
When the SmarterMail mail component is installed, the SmarterMail Web Client option is displayed in the list of Web mail components at Server > Plesk Components Management > Web Mail under Web Mail. The option is available only if the SmarterMail mail server is selected as the current Plesk mail component. The option becomes unavailable when mail server other than SmarterMail is selected.
The SmarterMail Web Client will be automatically disabled when Plesk is switched from SmarterMail to other supported mail server.
Supported versions
For the latest supported SmarterMail Web Client version, see your Plesk release notes or the “Third-Party Software Supported by Plesk” (on page 85) section in this guide.
To enable SmarterMail Web Client on a Plesk server, follow these steps:
1 Login to Plesk control panel as administrator.
2 Go to Server > Plesk Components Management. The list of available Plesk components is displayed.
3 Make sure that the SmarterMail mail component is enabled.
4 Click Web mail. The list of available Web mail components is displayed.
5 Select the SmarterMail Web Client check box and click OK. The list of available Plesk components is displayed. The SmarterMail Web Client entry is displayed in the list as the currently active Web mail component.

150 Installing and Upgrading Plesk Components
Installing and Upgrading IceWarp Web Mail Client
Plesk supports IceWarp Web Client that is installed as part of the Merak mail component. The IceWarp Web Client component cannot be installed apart from the Merak mail component. For information about installing the Merak mail component, see “Installing and Upgrading Merak Mail Server” (on page 93).
When the Merak mail component is installed, the IceWarp Web Client option is displayed in the list of Web mail components at Server > Plesk Components Management > Web Mail under Web Mail. The option is available only if the Merak mail server is selected as the current Plesk mail component. The option becomes unavailable when mail server other than Merak is selected.
The IceWarp Web Client will be automatically disabled when Plesk is switched from Merak to other supported mail server.
Supported versions
For the latest supported IceWarp Web Client version, see your Plesk release notes or the “Third-Party Software Supported by Plesk” (on page 85) section in this guide.
To enable the IceWarp Web Client component on a Plesk server, follow these steps:
1 Login to Plesk control panel as administrator.
2 Go to Server > Plesk Components Management. The list of available Plesk components is displayed.
3 Make sure that the Merak mail component is enabled.
4 Click Web mail. The list of available Web mail components is displayed.
5 Select the IceWarp Web Client check box and click OK. The list of available Plesk components is displayed. The IceWarp Web Client entry is displayed in the list as the currently active Web mail component.
Installing and Upgrading Plesk Components 151
Installing and Upgrading CommuniGate Pro Web Client
Plesk supports CommuniGate Pro Web Client that is installed as part of the CommuniGate Pro mail component. The CommuniGate Pro Web Client component cannot be installed apart from the CommuniGate Pro mail component. For information about installing the CommuniGate Pro mail component, see “Installing and Upgrading CommuniGate Pro Mail Server” (on page 100).
When the CommuniGate Pro mail component is installed, the CommuniGate Pro Web Client option is displayed in the list of Web mail components at Server > Plesk Components Management > Web Mail under Web Mail. The option is available only if the CommuniGate Pro mail server is selected as the current Plesk mail component. The option becomes unavailable when mail server other than CommuniGate Pro is selected.
The CommuniGate Pro Web Client will be automatically disabled when Plesk is switched from CommuniGate Pro to other supported mail server.
Supported versions
For the latest supported CommuniGate Pro Web Client version, see your Plesk release notes or the “Third-Party Software Supported by Plesk” (on page 85) section in this guide.
To enable CommuniGate Pro Web Client component on a Plesk server, follow these steps:
1 Login to Plesk control panel as administrator.
2 Go to Server > Plesk Components Management. The list of available Plesk components is displayed.
3 Make sure that the CommuniGate Pro mail component is enabled.
4 Click Web mail. The list of available Web mail components is displayed.
5 Select the CommuniGate Pro Web Client check box and click OK. The list of available Plesk components is displayed. The CommuniGate Pro Web Client entry is displayed in the list as the currently active Web mail component.

152 Installing and Upgrading Plesk Components
Installing SpamAssassin Spam Filter
The SpamAssassin spam filter is included in the Plesk distribution package and can be automatically installed by one of the automatic installation methods. For more information about the automatic installation methods, see “Automatic Installation of Plesk Components” (on page 82). For more information about upgrade methods, see “Plesk Component Upgrade” (on page 84).
Supported versions
For the latest supported SpamAssassin spam filter version, see your Plesk version release notes or the “Third-Party Software Supported by Plesk” (on page 85) section in this guide.
Installing or upgrading SpamAssassin manually is not recommended because of potential inter-module inconsistencies between SpamAssassin‟s and Perl‟s modules.
If you want to upgrade to a later version of SpamAssassin, do it by applying a Plesk upgrade package that includes the newer version of SpamAssassin.
Installing and Upgrading Plesk Components 153
Installing stunnel
The stunnel application is included in the Plesk distribution package and can be automatically installed by one of the automatic installation methods. For more information about the automatic installation methods, see “Automatic Installation of Plesk Components” (on page 82). For more information about upgrade methods, see “Plesk Component Upgrade” (on page 84).
Supported versions
For the latest supported stunnel application version, see your Plesk version release notes or the “Third-Party Software Supported by Plesk” (on page 85) section in this guide.
Manual Installation
To install the stunnel application manually as a Plesk component, follow these steps:
1 Log in to the Plesk server as administrator by using Remote Desktop.
2 Obtain the stunnel distribution package and install the application on the Plesk server by running the package installer.
Note: No additional configuration steps are required after running a manufacturer-supplied application installation package.
3 Complete the installation of stunnel as Plesk component by following the general integration procedure (on page 89). The stunnel component entry appears in the components list in Plesk.
Manual Upgrade
To upgrade the stunnel component manually, follow these steps:
1 Log in to the Plesk server as administrator by using Remote Desktop.
2 Obtain a stunnel upgrade package and apply the upgrade to the existing installation.
3 Complete the upgrade of the stunnel component by following the general integration procedure (on page 89). The upgraded stunnel component entry appears in the Plesk components list.

Plesk Reconfigurator is a stand-alone Windows application included in the Plesk distribution package. Plesk Reconfigurator is used to automatically perform multiple coordinate changes in Plesk server configuration. For example, when you move large chunks of hosted content from one disk to another, configuration settings for different software, domains, folders and files may have to be reset to conform to the changes. Similarly, when you change Plesk server IP addresses, you need to make sure that configuration of all affected domains and software is appropriately changed.
By using Plesk Reconfigurator you can perform the following tasks:
Changing Plesk server IP addresses. You may need to use this feature when, for instance, you are moving your Plesk server to a new datacenter, and need to reconfigure the Plesk server to run on new IP addresses.
Moving the directory where virtual hosts reside to another location on the same or another partition. You can use this feature to move the virtual hosts to a new, larger volume when disk space on the current partition is running out.
Moving the directory where Plesk backup files are stored to another location on the same or another partition. You can use this feature when, for instance, there is insufficient disk space on the current partition to house new backup files, and you want to move them all to a new, larger volume.
Moving the directories that house mail content to another location on the same or another partition. You can use this feature when there is insufficient amount of disk space on the current partition to serve a larger amount of mailboxes, and you wish to move them all to a new larger volume.
Repairing Plesk installation. This feature can be used to correct various problems caused by misconfiguration of the Plesk server, one of its services, or file and folder security settings. For example, you can correct mail delivery issues caused by the changes made to DNS server addresses or restore system accounts used by Plesk to manage the server.
Correcting disk user permissions. This feature can be used to reset security settings on files and folders on Plesk server disks when a security misconfiguration occurs that causes security vulnerability or software malfunction.
Switching the database server engine used by Plesk.
Check component and folder permissions. This feature can be used to check and fix permissions on files and folders while installing and configuring third-party applications (such as ColdFusion, MIVA, etc.) in Plesk.
Changing the Web server engine used by your server.
The following sections describe typical user tasks performed by using the Plesk Reconfigurator.
C H A P T E R 6
Using Plesk Reconfigurator

Using Plesk Reconfigurator 155
In this chapter:
Getting Started With Plesk Reconfigurator ........................................................ 155 Changing IP Addresses on Plesk Server ........................................................... 156 Changing Virtual Hosts Location ....................................................................... 157 Changing Plesk Backup Data Location.............................................................. 157 Changing Plesk Mail Data Location ................................................................... 158 Repairing Plesk Installation ............................................................................... 159 Restoring Disk User Permissions ...................................................................... 162 Switching Plesk Database Server Engine .......................................................... 163 Checking Component and Folder Permissions .................................................. 167 Changing Web Server Used for Accessing Control Panel ................................. 168
Getting Started With Plesk Reconfigurator
Plesk reconfiguration is a stand-alone application. It is included in the Plesk distribution package and is installed along with Plesk.
To start using Plesk Reconfigurator follow these steps:
Log in Plesk server as a user with administrator rights by using Remote Desktop.
In the Windows‟ Start menu, select the Programs > Parallels > Plesk > Plesk Reconfigurator. The Plesk Reconfigurator application window opens.
Click the feature you want to use.

156 Using Plesk Reconfigurator
Changing IP Addresses on Plesk Server
You can switch from an existing IP address on your Plesk server to a newly created IP address or to another existing address.
During life-time of a Plesk server, you may need to replace IP addresses used for hosting with other IP addresses. Replacing all old IP addresses with new ones may be necessary when moving a Plesk server onto a new network. More often, you may need to introduce more subtle changes in your server‟s IP address pool. For example, you may need to free up one or more IP addresses currently used for hosting on the Plesk server. This will allow you to use the addresses for other purposes or to eliminate them from the server‟s IP pool altogether.
Every time you replace an IP address with a new one on a Plesk server, you need to reconfigure Plesk control panel and various Plesk services to use the new IP address instead of the replaced one.
You can switch from one IP address on a Plesk server to another and automatically reconfigure the control panel and all hosting services on the Plesk server to use the new address by using the Change Server IP Addresses feature.
Note: By using this feature, you can only replace one IP address with another. You cannot migrate a group of select domains from one or more IP addresses to a new IP address.
To change from one IP address on a Plesk server to another, follow these steps:
1 Start Plesk Reconfigurator and select the Change Server IP Addresses option. The IP Addresses Reconfiguring window opens.
2 Under Select the IP addresses to be changed, select by using check boxes one or more IP addresses that you want to change to other IP addresses.
To view the list of domains hosted on particular IP address, click the IP address entry to highlight it. The list of hosted domains using the highlighted IP address is displayed in a window to the right.
3 Map each selected to an IP address of your choice.
1. To map a selected address, click on the selected address entry. The entry is highlighted.
2. Select the address to map to:
To map to an existing IP address, select Existing Address option and then select an existing address entry. The entry information is displayed in the Mapping Information column for the selected IP address entry under Select the IP addresses to be changed.
To map to a new IP address that will be created during mapping, select Create New IP address option and then enter the IP address, network mask, and network interface name. The entry information is displayed in the Mapping Information column for the selected IP address entry under Select the IP addresses to be changed.

Using Plesk Reconfigurator 157
4 Click Next. Plesk control panel and the Plesk server are reconfigured to use the newly specified IP addresses in place of the old ones. All relevant records in the Plesk database are updated, network adapters settings are changed accordingly (the old IP addresses are removed), FTP and Web servers are reconfigured accordingly, DNS records are updated accordingly.
Note: If changing IP address fails during execution, all changes are rolled back. When connected to the server through the remote desktop connection, a change of your server‟s IP address will terminate your session.
Changing Virtual Hosts Location
This option allows moving the directory where virtual hosts reside to another location on the same or another partition. Use this feature when disk space is insufficient on the current partition to house new virtual hosts, and you want to move them all to a new, larger volume.
To move the virtual hosts directory to a new location, follow these steps:
1 Start Plesk Reconfigurator.
2 Select the Change Virtual Hosts location option.
3 Specify the destination directory name. If the directory does not exist, it will be created.
4 Click Next.
During this operation all Plesk services will be restarted.
Changing Plesk Backup Data Location
By using Plesk Reconfigurator you can move the Plesk backup files storage directory to another location on the same or another partition. Use this feature when disk space is insufficient on the current partition to house new backup files, and you want to move them all to a new, larger volume.
To change location of the backup files directory, follow these steps:
1 Run Plesk Reconfigurator and select the Change Plesk Backup Data location option.
2 Specify the destination directory name. If the directory does not exist, it will be created.
3 Click Next. During this operation all Plesk services will be restarted.

158 Using Plesk Reconfigurator
Changing Plesk Mail Data Location
You can move the directories that store mail content to another location on the same or another partition. Use this option when disk space is insufficient on the current partition to serve larger data volume or amount of mailboxes and you want to move all mail content to a new, larger volume.
To move the mail content directories to another location, follow these steps:
1 Run Plesk Reconfigurator and select the Change Plesk Mail Data location option.
2 Specify the destination directory name. If the directory does not exist, it will be created.
3 Click Next. During this operation Plesk mail and control panel services will be restarted.
Using Plesk Reconfigurator 159
Repairing Plesk Installation
By using Plesk Reconfigurator you can check and repair Plesk installation that is malfunctioning due to misconfiguration of one or more of its components.
The following problems can be identified and corrected by using the Repair Plesk Installation option:
problems with mail delivery caused by user-made changes in DNS server addresses
misconfigurations of system user accounts or groups used by Plesk to access system objects
Plesk services malfunctions
misconfigurations in user access permissions for files and folders on Plesk disks and hosting folders
miscalculations of discspace usage by individual domains and subdomains
To check and repair Plesk installation, follow these steps:
1 Run Plesk Reconfigurator and select the Repair Plesk installation option.
2 Select repair actions that you want to perform by using check boxes. See the following table for explanation of each check and repair option.
3 Click Check. Plesk Reconfigurator automatically performs the following tasks:
corrects the problems with mail delivery caused by the changes made to DNS server addresses
restores system accounts used by Plesk to manage server
checks and corrects Plesk settings and system account used to run and manage various Plesk services
resets security settings for files and folders
checks and corrects ownership of files and folders and recalculates disc space usage by individual domains and subdomains accordingly
Check & Repair options
Option Description
Plesk Mail Server DNS settings from network adapters are applied to Plesk mail server;
network name localhost is added to the relay list.

160 Using Plesk Reconfigurator
User Accounts Used by Plesk
During the full repair, Plesk Reconfigurator performs the following tasks:
checks if Windows user accounts psaadm, tomcat4, ASPNET, and
groups psacln, and psaserv exist and creates them if they do
not exist.
Restores members of the psaserv group but not the members of
the psacln group.
checks if the psaserv group includes the accounts: ASPNET,
LOCAL SERVICE, NETWORK SERVICE, and IUSR_<computer
name> (Internet Guest Account) and restores and adds them to the group if they are not.
checks Plesk‟s system accounts (including Internet accounts for anonymous access to domains) and IIS settings for anonymous domain access.
Plesk File Security Plesk Reconfigurator checks security settings on the following folders:
%plesk_dir%
%SystemRoot%\temp
%plesk_vhosts%
%plesk_vhosts%\default
%plesk_vhosts%\sqladmin
%plesk_vhosts%\webmail
%plesk_vhosts%\.skel
checks security settings for subfolders and files found in the following directories
%plesk_dir%
%SystemRoot%\temp
Plesk Services For each Plesk service Reconfigurator performs the following tasks:
checks and, if necessary, corrects the paths to the service binary file
check and, if necesary, corrects the user account that is used to start the service
registers with the correct paths all unregistered services registered
starts all inactive services and changes their startup types to Automatic
If the Bind service is disabled via Plesk control panel and is not
registered in the system, it is not registered by Reconfigurator. If
Reconfigurator finds the Bind service running on the server., it stops it
and changes its startup type to Disabled. It also ensures that the Plesk
control panel service uses the psaadm account to log on to the system.

Using Plesk Reconfigurator 161
Plesk Virtual Hosts Security
For each object, Reconfigurator first checks if the object‟s DACL corresponds to the object‟s security rules contained in Plesk security files. (For detailed information about security rules, see “Security Metadata Files and Templates” (on page 23).) If Reconfigurator cannot resolve a SID, it removes all ACEs corresponding to the SID from the DACL. If one or more SIDs specified by the security rules are missing in the DACL or specific access rights in the ACEs do not match those determined by the security rules, Reconfigurator updates the existing DACL.To enable this, Reconfigurator recreates all missing user accounts for which ACEs must be added to the DACL. Depending on the object type, Reconfigurator uses different access rights matching criteria and DACL update methods.
For domain and subdomain root folders, after all unresolved SIDs‟ ACEs are removed from a DACL, Reconfigurator check if access rights defined in the existing DACL exactly match those defined by the security rules. If a mismatch is found (DACL contains SIDs that are not found in the security rules, required SIDs are missing, or SID‟s access rights are different), Reconfigurator compiles a new DACL based on the current Plesk security rules and completely overwrites the existing DACL.
For objects other than domain and subdomain root folders, after all unresolved SIDs‟ ACEs are removed from a DACL, Reconfigurator only checks if all access rights defined by the security rules are found in the DACL. If some access rights are missing from the DACL, Reconfigurator merges the ACEs remaining in the existing DACL with the ACEs defined based on the security rules.
Plesk Database Reconfigurator cleans up the Repository table of the Plesk internal database and checks application vaults‟ state.
Plesk Quotas Plesk Reconfigurator checks that folders and files in a domain folder have proper ownership - are owned by to the corresponding domain or subdomain user account or a web user of the corresponding domain. (If they are owned by other accounts, Plesk may report wrong disk space usage by the corresponding hosing accounts).

162 Using Plesk Reconfigurator
Restoring Disk User Permissions
Maintaining proper user permissions on Windows objects on Plesk disks is necessary to ensure the maximum security of Plesk servers while enabling full functionality of hosted content. Misconfiguration of object security settings on Plesk server disks may result in hosted content malfunction.
By using Plesk reconfigurator, you can restore disk security settings based on the
security rules specified in the DiskSecurity.xml file and other xml files found in the
%plesk_dir%\etc\DiskSecurity directory.
Note: You can change the disk security rules in the xml files found in the
%plesk_dir%\etc\DiskSecurity directory as desired before running the
Reconfigurator. For more information about Plesk security policies and configuring security on Plesk servers, see “Administering Security Settings on Windows Objects” (on page 19).
To restore the disk user permissions according to the Plesk security metadata files, follow these steps:
1 Run Plesk Reconfigurator and select the Correct disk permissions option.
2 Using check boxes in the Volume column, select the drives for which you want to restore the user permissions.
3 Click Set to set the correct permissions for the selected drives. This operation may take some time.
For information about the default user permissions on Plesk server disks, see “Default User Permissions on Disks” (on page 14).

Using Plesk Reconfigurator 163
Switching Plesk Database Server Engine
Plesk can use several different database engines to access the Plesk internal database. At any time you can change the database location and select to use different database engine to access the database. In order to switch from one database server to another you need to migrate the database to a new database server and configure Plesk to connect to the server to access the database. The following database servers are supported by Plesk:
MySQL
Microsoft Jet
Microsoft SQL
You can use the Switch Database Provider option in Reconfigurator to switch between database servers to access Plesk internal database. Reconfigurator will migrate the Plesk internal database to a new database server and configure Plesk to access the database by means of the new database server.
Two methods exist for switching between database servers: by using the Reconfigurator GUI (on page 164) and by using the command-line interface (on page 165). This chapter describes both of these methods.
In this section:
Using GUI to Switch Between Database Servers .............................................. 164 Using Command-Line Interface to Switch Between Database Servers .............. 165

164 Using Plesk Reconfigurator
Using GUI to Switch Between Database Servers
You can migrate Plesk internal database to new database engine and configure Plesk to access the database at the database server.
To switch between database servers through Reconfigurator GUI, follow these steps:
1 Run Plesk Reconfigurator.
2 Select the Switch DB provider option.
3 Enter the supported database server engine type in the Server type field.
4 Enter the server address (IP address or host name) and, if different from default, port number in the corresponding fields.
(The field are available only if MySQL or MSSQL server type is entered.)
5 Enter the new server administrator‟s login and password.
6 Under Create a new database to locate data in, enter information about the new Plesk database that the data will be migrated to:
1. In the Database field, enter the new database name.
For Jet databases, you need to specify the name of the database file. For example,
psa_new.mdb
The new database will be created in the %plesk_dir%\admin\db
directory, where the Plesk installation directory.
For MySQL and MSSQL databases, you need to specify only the database name on the server. For example:
psa_new
2. In the Database user name field, enter user name to be used by Plesk to access the migrated database.
3. In the Password and Confirm password fields, type the database user password.
Warning! By changing the database user password, you also change Plesk administrator‟s password for accessing Plesk Control Panel. Plesk administrator‟s password and Plesk database user password are always the same (although user login names can be different).

Using Plesk Reconfigurator 165
Using Command-Line Interface to Switch Between Database Servers
You can migrate Plesk internal database to a new database server and configure Plesk to access the database at the database server.
The command for switching the Plesk database servers has the following syntax:
reconfigurator—switch-plesk-database—new-provider=<provider name> --
host=<host name> --db=<database name> --login=<database user login> --
password=<database user password> [--password=<port number>] [--admin-
login=<administrator login>] [--admin-password=<administrator
password>]
See the following table for the command options descriptions.
Options
Option Parameter Description Comment
--new-provider Jet | MSSQL | MySQL
The new database server type
--db <database name>
name of the Plesk database on the new database server
For Jet databases, you need to specify full path to a new database to be created. To ensure that proper user permissions are assigned to the database file, create the file in the the %plesk_dir%\admin\db
directory, where %plesk_dir% is
the Plesk installation directory.
For example,
“—db=c:\Program
Files\Parallels\Plesk\adm
in\db\psa_new.mdb”
For MySQL and MSSQL databases, you need to specify only the database name on the server. For example:
“—db=psa_new”
--host <host name> database server IP address or host name
Jet databases are always local.
--login <user login name>
Plesk database user name used by Plesk

166 Using Plesk Reconfigurator
Option Parameter Description Comment
--password <user password>
Plesk database user name used by Plesk
--port <port number> New database server port number. This parameter is optional.
define port number if the new database server uses a non-default port number
--admin-login <administrator login name>
Database server administrator login name. This parameter is optional.
Define the server administrator credentials if you want a new database user created with the user login name and password
specified by the—login and—
password options. If the
options are omitted from the command, Plesk will be configured to use the database user credentials specified by
the --login and—password
options, no new user will be created for the database.
--admin-
password
<administrator password>
Database server administrator password. This parameter is optional.
To switch between database servers through command-line interface, follow these steps:
1 Log in Plesk server as a user with administrator rights by using Remote Desktop.
2 Start cmd.exe.
3 Change directory to the %plesk_dir%\admin\bin\ folder (where %plesk_dir%
is the system variable defining the folder where Plesk is installed).
4 Execute the server switch command.
For example, to migrate the Plesk internal database to a new location accessible at
c:\Program Files\Parallels\Plesk\admin\db\psa3.mdb, make it
accessible through the Jet database engine installed on the Plesk server (local
host), and instruct Plesk to use an existing user credentials (login name dbadmin
and password dbadminpass) to access the database, use the following command:
reconfigurator—switch-plesk-database—new-provider=Jet—host=localhost
―—db=c:\Program Files\Parallels\Plesk\admin\db\psa3.mdb‖—
login=dbadmin—password=dbadminpass
Warning! By changing the database user password, you also change Plesk administrator‟s password for accessing Plesk Control Panel. Plesk administrator‟s password and Plesk database user password are always the same (although user login names can be different).

Using Plesk Reconfigurator 167
Checking Component and Folder Permissions
Plesk sets permissions to all server partitions to prevent users from penetrating each other or accessing unknown third-party software. Due to this Plesk components or third-party applications used with Plesk can have insufficient permissions for proper operation. The Check component and folder permissions option can be used to check and fix permissions on files and folders after installing third-party applications on the Plesk server. With this option, you do not have to scan the whole disk, but you can check and fix permissions just for one or several applications, or for a selected partition or directory.
To check and fix permissions for third-party applications, follow these steps:
1 Start Plesk Reconfigurator and select the Check component and folder permissions option.
2 Select one or several Plesk components from the list or select the partition where the third-party application is installed in the Path to check field.
3 Click Check.
View the progress at the bottom of the form. As soon as the check is complete and the permissions are fixed, you are taken back to the main window of Plesk Reconfigurator.

168 Using Plesk Reconfigurator
Changing Web Server Used for Accessing Control Panel
You can enable Plesk to use either the Internet Information Server (IIS) server or the Apache for Windows Web server to provide Internet access to the control panel.
By default, latest Plesk versions use the IIS Web server to provide access to the control panel. However, earlier Plesk versions used Apache for this purpose. Upgrading Plesk will not automatically switch the control panel to IIS. If you want the control panel access to be served by IIS after Plesk upgrade, you can switch Plesk control panel to IIS manually. Ability to use different Web servers for providing access to control panel gives Plesk administrators more flexibility in managing Plesk servers and helps to optimize server performance.
You can change a Web server engine used by Plesk by using the Changing Web Server Engine feature in Plesk Reconfigurator.
You can select either Apache for Windows Web Server or IIS Web server to provide access to Plesk control panel.
To provide access to Plesk control panel through a different Web server, follow these steps:
1 Log in to the Plesk server as administrator by using Remote Desktop.
2 Switch to the %plesk_dir%\admin\bin\ folder (where %plesk_dir% is the
Windows‟ system variable specifying the folder where Plesk is installed).
This folder contains Plesk command-line utilities. For more information on Plesk for Windows command-line utilities, see Plesk Command-Line Interface Reference.
3 Run one of the following commands to change a Web server used by Plesk control panel:
To switch Plesk control panel to Apache:
reconfigurator.exe—switch-plesk-web-server—new-
provider=apache
To switch Plesk to IIS:
reconfigurator.exe—switch-plesk-web-server—new-provider=iis

Plesk provides only limited tools to manage a Tomcat server from the GUI. This section describes additional Tomcat server management tasks that may have to be executed to restore proper Tomcat functioning.
In this chapter:
Changing Tomcat Java Connector Ports ........................................................... 169
Changing Tomcat Java Connector Ports
The default port numbers for Coyote and Warp connectors in Plesk are 9080 and 9008.
If you want Tomcat Java to work on other ports (e.g. 8090 and 8009), you should connect to Plesk database and add two parameters to the database as in the following SQL query example:
insert into misc (param,val) values (‗coyote_connector_port‘, ‗8090‘);
insert into misc (param,val) values (‗warp_connector_port‘, ‗8009‘);
Alternatively, you can use the dbclient.exe utility to add the information to the Plesk
database. For information about using the dbclient.exe utility, consult Plesk for
Windows Command Line Interface Reference.
Note: It is recommended that you change the Tomcat Java ports right after Plesk is
installed on server, or prior to enabling the Tomcat Java service for your domains.
C H A P T E R 7
Managing Tomcat Service

You can monitor the status of your Plesk server without logging in to Plesk control panel. In order to do this, you need to access your server‟s OS desktop either directly or by using the Remote Desktop feature.
Plesk Services Monitor is loaded automatically every time Plesk starts. To manage the status of Plesk services, open the Plesk Services Monitor by double clicking its icon in the system tray. The look of the icon depends on the state of crucial Plesk services: the
icon means that all crucial Plesk services are functioning, and the icon means that some crucial Plesk services are stopped or not working correctly.
Once you open the Plesk Services Monitor, you can see the status of all vital Plesk
services. The icon shows that a corresponding service is working correctly, and the
icon shows that the corresponding service is stopped or is not working correctly.
To stop a service, select the service by using the corresponding check box and click Stop.
To restart a service, select the service by using the corresponding check box and click Restart.
To start a service, select the service by using the corresponding check box and click Start.
Note. You can use Select All and Clear All buttons to select or clear all available check boxes.
To refresh the list of services and their respective statuses, click Refresh.
To remove all information about control panel sessions from Plesk database and disconnect all users from control panel, click Delete Sessions. This is useful when you need to restart Plesk, but some users are still connected to it, and you want to avoid possible data loss or files corruption.
Note. You can also start, stop, restart services and delete sessions by right-clicking the Plesk Services Monitor icon and selecting the required option from the menu.
To hide the Plesk Services Monitor back in the system tray, click Hide.
C H A P T E R 8
Monitoring Server Status with Plesk Services Monitor

You specify your server‟s host name during your very first login to Plesk. If you want to change the host name later, you can do it through Control Panel.
Note. Specifying an invalid host name will result in unpredictable control panel behavior and server malfunction.
To change your server‟s host name, follow these steps:
1 Log in to Plesk control panel.
2 Click the Server shortcut in the navigation pane.
3 Click System Preferences.
4 Enter the new host name in the Full hostname field.
5 This should be a fully qualified host name, but without an ending dot (for example,
host.example.com).
6 Click OK.
C H A P T E R 9
Changing Your Server’s Host Name

To create custom Plesk title bar text, follow these steps:
1 Connect to the Plesk database (psa).
2 Run the following query:
insert into misc(param, val) values(‗custom_title‘, ‗My Custom Title‘)
Where „My Custom Title‟ is the Plesk custom title bar text you want to set.
To change custom Plesk title bar text, follow these steps:
1 Connect to the Plesk database (psa).
2 Run the following query:
update misc set val = ‗New My Custom Title‘ where param=‘custom_title‘
Where „My Custom Title‟ is the Plesk custom title bar text you want to set.
To delete custom Plesk title bar text, follow these steps:
1 Connect to the Plesk database (psa).
2 Run the following query:
delete from misc where param=‘custom_title‘
Note: You can use the dbclient.exe utility to add the information to the Plesk
database. For information about using the dbclient.exe utility, consult Plesk for
Windows Command Line Interface Reference.
C H A P T E R 1 0
Customizing Plesk Title Bar Text

The link to Parallels support in your customer‟s Plesk administrator‟s panel can be customized so that your customer‟s support requests are sent to you instead of Parallels support.
If you act as a reseller, you might provide a whole Plesk server to your customer so that your customer acquires access to the Plesk server administrator‟s panel. In this case you might want your customers contact you, not Parallels, for support. By default, when a Plesk server administrator clicks Server > Support button, they are redirected to the Plesk Online Server Support form at the Parallels Web site, with a number of parameters automatically collected and filled in, such as the Plesk administrator‟s name, company, e-mail, phone, product key number, operating system details, Plesk version, and Plesk build. You can customize the link to the Plesk support form, so that your customers‟ support requests with the same automatically pre-collected parameters could be sent to you instead of the Parallels support team.
The Plesk support form link location is defined by the support_url parameter in the
psa.misc table of the Plesk database. If the support_url parameter is absent or
empty, the customer upon clicking the Server > Support button is redirected to Parallels support through the following URL:
„https://register.parallels.com/support/form.php?sv=‟ .
urlencode(serialize($val))
where $val is an associative PHP array containing the following parameters:
firstName, the Plesk administrator‟s contact name;
company, the Plesk administrator‟s company name;
email, the Plesk administrator‟s e-mail address;
phone, the Plesk administrator‟s phone number;
keyNumber, the Plesk license number used on the server;
operatingSystem, the operating system installed on the server;
PSAVersion, the version number of the Plesk software;
PSABuild, the build number of the Plesk software;
PSAInstType, the type of Plesk software installation.
By modifying the support_url parameter in the psa.misc table of the Plesk
database, you can perform the following tasks:
Configuring the Support button of your customer‟s Plesk control panel to open the support form page on your web site with the above listed parameters pre-collected (see page 175);
C H A P T E R 1 1
Customizing Link to Plesk Support

174 Customizing Link to Plesk Support
Configuring the Support button of your customer‟s Plesk control panel to open the compose e-mail form of your customer‟s mail client with your support e-mail address specified in the address line and the above listed parameters pre-collected (see page 177).
In this chapter:
Creating Link to Support Form on Your Site ...................................................... 175 Creating Link to Compose E-mail Message ....................................................... 177

Customizing Link to Plesk Support 175
Creating Link to Support Form on Your Site
This option allows you to modify the link to Plesk support, so that by clicking the Server > Support button in the Plesk administrator‟s panel your customers are taken to the Plesk support form on your web site. The customer‟s contact details and Plesk server information will be automatically collected and filled into the form. Make sure your Plesk support page is properly configured to accept these pre-collected parameters.
You can customize the link to Plesk support by specifying the URL of the Plesk support
form on your web site in the support_url parameter of the psa.misc table of the
Plesk database. The pre-collected information about your customer‟s Plesk server will be added to the specified URL in the following way:
„sv=‟ . urlencode(serialize($val))
where $val is an associative array of the following parameters:
firstName, the Plesk administrator‟s contact name;
company, the Plesk administrator‟s company name;
email, the Plesk administrator‟s e-mail address;
phone, the Plesk administrator‟s phone number;
keyNumber, the Plesk license number used on the server;
operatingSystem, the operating system installed on the server;
PSAVersion, the version number of the Plesk software;
PSABuild, the build number of the Plesk software;
PSAInstType, the type of Plesk software installation.
To ensure the Plesk support page of your site is configured properly, consider the following:
Your Plesk support page will accept the sv variable through the GET method. The
value of this variable is a serialized associative array of pre-collected parameters.
You can get the array of parameters on your web site page in the following way: $params = unserialize($_GET[‘sv‘]);
You can address any parameter of this array in the following way: $params[‘firstName‘]
$params[‘company‘]
...

176 Customizing Link to Plesk Support
To make the Support button of the Plesk administrator‟s panel open the Plesk support form on your web site, follow these steps:
1 Connect to the Plesk database (psa).
2 Run the following query:
If the support_url parameter is absent, run:
insert into misc(param, val) values(‗support_url‘,
‗https://example.com/support‘)
Where „https://example.com/support‟ is the URL of the Plesk support page on your web site.
If the support_url parameter already exists, run:
update misc set val = ‗https://example.com/support‘ where param =
‗support_url‘
Where „https://example.com/support‟ is the URL of the Plesk support page on your web site.
Note: You can use the dbclient.exe utility to add the information to the Plesk
database. For information about using the dbclient.exe utility, consult Plesk for
Windows Command Line Interface Reference.

Customizing Link to Plesk Support 177
Creating Link to Compose E-mail Message
This option allows you to modify the link to Plesk support, so that by clicking the Server > Support button in the Plesk administrator‟s panel your customers are offered to compose an e-mail with your support address already specified in the address line. The customer‟s contact details and Plesk server information will be automatically collected and included in the message body.
You can customize the link to Plesk support by specifying your e-mail address in the
support_url parameter of the psa.misc table of the Plesk database.
To make the Support button of the Plesk administrator‟s panel open the compose e-mail page with your support e-mail address, follow these steps:
1 Connect to the Plesk database (psa).
2 Run the following query:
If the support_url parameter is absent, run:
insert into misc(param, val) values(‗support_url‘,
‗mailto:[email protected]‘)
Where „[email protected]‟ is the e-mail address where you want your customers‟ support requests to be sent.
If the support_url parameter already exists, run:
update misc set val = ‗mailto:[email protected]‘ where param =
‗support_url‘
Where „[email protected]‟ is the e-mail address where you want your customers‟ support requests to be sent.
Note: You can use the dbclient.exe utility to add the information to the Plesk
database. For information about using the dbclient.exe utility, consult Plesk for
Windows Command Line Interface Reference.

RIPE recommends using YYYYMMDDNN format, where YYYY is year (four digits), MM is month (two digits), DD is day of month (two digits) and nn is version per day (two digits).
To change DNS zone serial number format, follow these steps:
1 Connect to the Plesk database (psa).
2 Run the following query:
insert into misc(param, val) values(‗SOA_SERIAL_MODE‘, ‗YYYYMMDDnn‘)
To revert back to old DNS zone serial number format, follow these steps:
1 Connect to the Plesk database (psa).
2 Run the following query:
delete from misc where param=‘SOA_SERIAL_MODE‘
Note: you can use the dbclient.exe utility to add the information to the Plesk
database. For information about using the dbclient.exe utility, consult Plesk for
Windows Command Line Interface Reference.
C H A P T E R 1 2
Changing DNS Zone Serial Number Format

You can restore your mail server functionality in cases when errors appear concerning the mail server misconfiguration or its mismatching with the Plesk internal database.
This purpose is served by an internal Plesk utility mchk.exe residing at
%plesk_dir%admin\bin\. The utility restores the mail server configuration using
the Plesk database data.
Note: The utility restores only configuration of the mail server selected as default in Server > Components Management.
In general, mchk.exe matches the mail server configuration with Plesk database. In
case when you execute mchk.exe—all—fix-all, the utility resets forcedly the mail
server configuration the following way: it deletes all existing configuration files of the mail server (leaving its content) and then creates them accordingly to Plesk database.
Warning: Use—fix-all option only if the mail server‟s configuration files are so
much corrupt that the mail server itself cannot work with them properly and executing mchk.exe with other options does not solve the problem.
Usage: mchk.exe [options]
Available options
Option Parameter Action Example
--all
Checks and restores server-wide mail settings and mail settings for all domains
mchk.exe—all
--fix-all Resets forcedly server-wide and domain‟s mail settings
mchk.exe—all—fix-
all
--domain --domain-name Checks and restores mail settings for a specified domain
mchk.exe—domain—
domain-
name=example.com
--all-domains Checks and restores mail settings for all domains
mchk.exe—all-
domains
--global- Checks and mchk.exe—global-
C H A P T E R 1 3
Restoring Mail Configuration

180 Restoring Mail Configuration
settings
restores only server-wide mail settings
settings
Note: This utility does not have any help reference, and executing it with arguments
like /? will simply start restoring of mail configuration.

Plesk command-line utilities are designed to facilitate the processes of creating various entities in Plesk bypassing the Plesk GUI. Command-line utilities are executed via
command prompt opened in the %plesk_dir%admin\bin\ folder (where
%plesk_dir% is a system variable containing the Plesk installation directory). You can
see the list of available commands and options by running an utility with—help or -h
command. For more information about command line utilities usage refer to Plesk for Windows Command Line Interface Reference.
C H A P T E R 1 4
Automating Plesk Management Tasks by Using Command-Line Interface
Microsoft SQL Server Desktop Engine (MSDE) is a database platform, a toned down version of Microsoft SQL Server 2000 which is free for non-commercial use as well as certain limited commercial use.
To access MSDE over a network, the database engine must be configured to use specific network transports supported by SQL. The following network transports used by SQL can be used by MSDE for network connections:
Named Pipes
TCP/IP
Multiprotocol
NWLink IPX/SPX
ApppleTalk
Banyan VINES
Use the Regkey method to enable one or more network transports to be used for MSDE connections:
Warning: Serious problems might occur if you modify the registry incorrectly by using Registry Editor or by using another method. These problems might require that you reinstall your operating system. Modify the registry at your own risk.
For example, to enable use of the Named Pipes and TCP/IP protocols by using the Regkey method, follow these steps:
1 Login to the Windows Server as administrator.
2 Click Start, and then click Run.
3 In the Run dialog box, type regedit, and then click OK. This will start Registry
Editor.
4 Locate the HKEY_LOCAL_MACHINE\SOFTWARE\Microsoft\MSSQLSERVER\
MSSQLSERVER\SuperSocketNetLib\ProtocolList registry key. This key will
house the network transport names MSDE is configured to use. Specify the following value string for the key:
np, tcp
5 Quit Registry Editor.
C H A P T E R 1 5
Configuring MSDE Network Access
Plesk can be configured to automatically download and install Plesk updates. For detailed information about configuring Plesk to enable autoupdates, see the “Configuring Automatic Updates of Your Control Panel” section in the Plesk for Windows Administrator’s guide.
Plesk autoupdater will automatically connect to the Plesk update server, check for available updates, download new updates, and either install them automatically or display them in the list of available updates. You can view the list of available updates and select which updates to install if autoupdates are not enabled. If you do enable autoupdates, you can also set the desired periodicity of the autoupdater run sessions and configure notifications to be sent automatically to an e-mail address of your choice.
However, all these autoupdater features are only available in Plesks that have been installed by using a Plesk distribution package. The autoupdater feature implementation in a Plesk installed by using a Virtuozzo application template on a virtual private server (VPS) differs from the feature implementation in a Plesk installed from a distribution package by running an installer program.
As far as autoupdates are concerned, in an application template-installed Plesk you can only have them enabled or disabled. No other autoupdate control is available. You can neither configure periodicity of the updates nor view a list of available updates. This is because Plesks installed from Virtuozzo application templates are only found on Virtuozzo-generated VPSs running on hardware nodes housing multiple other VPSs. Because of potentially large number of VPSs running on a single hardware node, the Plesk user ability to customize Plesk autoupdates on each VPS individually has to be greatly reduced to ensure that the total update-related workload on the hardware node is properly balanced over time. In particular, concurrent occurrence of update processes on several VPSs residing on a single hardware node must be prevented.
This goal is realized by using the vztmplupsvc service to manage autoupdates of
application-template installed Plesks on VPSs running on Virtuozzo hardware nodes.
C H A P T E R 1 6
Plesk Autoupdates by vztmplupsvc Service Using Virtuozzo Update Templates
184 Rules for User Names and Passwords of Plesk Users
The vztmplupsvc package is included in the Plesk application template and the
service is installed by Virtuozzo on a hardware node concurrently with Plesk installation on a VPS by using the application template. The service is installed by Virtuozzo only once when the template is first used to install Plesk on a VPS running on the hardware
node. The vztmplupsvc service uses Virtuozzo Plesk application update templates
rather than Plesk update packages to update Plesks installed from application templates. The service periodically checks the Plesk updates server for new update templates, downloads and installs them on the hardware node. The service then polls each template-installed Plesk found on a hardware node‟s VPSs for their autoupdater statuses and then applies the newly downloaded update templates to Plesks that have autoupdates enabled one-by-one.
User names and passwords of Plesk users should comply with the following rules of user names and passwords creation:
User names of Plesk users should comply with the following rules:
A user name can include printed characters: letters, numbers, underscores („_‟), dots („.‟), and dashes („-„).
A user name must start with a letter or a number.
A user name must be more than 1 character long.
A user name length must not exceed 15 characters.
Passwords of Plesk users should comply with the following rules:
A password can include only printed characters.
A password must not directly contain the user name.
A password length must not exceed 14 characters.
Minimal password length is 4 characters by default. This value can be changed
in the PLESK_MIN_PASSWORD_LENGTH parameter of the
[HKLM\SOFTWARE\PLESK\PSA Config\Config] key.
User names and passwords of mail users in Plesk should comply with the rules of user names and passwords creation described above as well as with the rules of the mail server.
Rules for User Names and Passwords of Plesk Users

Customizing Statistics Calculation 185
During installation of Plesk several scheduled tasks are automatically created. One of
such tasks, statistics, generates statistics on the limits imposed on domains, such
as inbound and outbound traffic, the disk space occupied by web content, log files, databases, mailboxes, web applications, mailing list archives, and backup files.
You can vary which data the statistics task should count, thus making the task
work faster. To do this, run the statistics task with a necessary combination of
options specifying the parts of statistics you want to collect.
To run the statistics task with required options, follow these steps:
1 Log in the Plesk server as a user with administrator rights by using Remote Desktop.
2 Start cmd.exe.
3 Change directory to %plesk_dir%\admin\bin (where %plesk_dir% is the
system variable defining the folder where Plesk is installed).
4 Run the statistics.exe task with required options. See the list of options and
their descriptions in the tables below.
For example, to count statistics in the mode that will skip all FTP logs, you can use the following command:
statistics.exe—http-traffic—disk-usage—mailbox-usage—mail-
traffic—notify—update-actions
Main options
Each main option defines the part of statistics to be calculated. When only main options are used, the specified statistics will be collected for all domains.
Option Description
--mailbox-usage Disk usage will be calculated for all mail boxes.
--disk-usage Disk usage for domains and all mail boxes will be calculated.
--http-traffic HTTP traffic will be calculated.
--ftp-traffic FTP traffic will be calculated.
--mail-traffic Mail traffic will be calculated.
--notify Clients traffic will be updates and expiration notifications will be sent.
Customizing Statistics Calculation
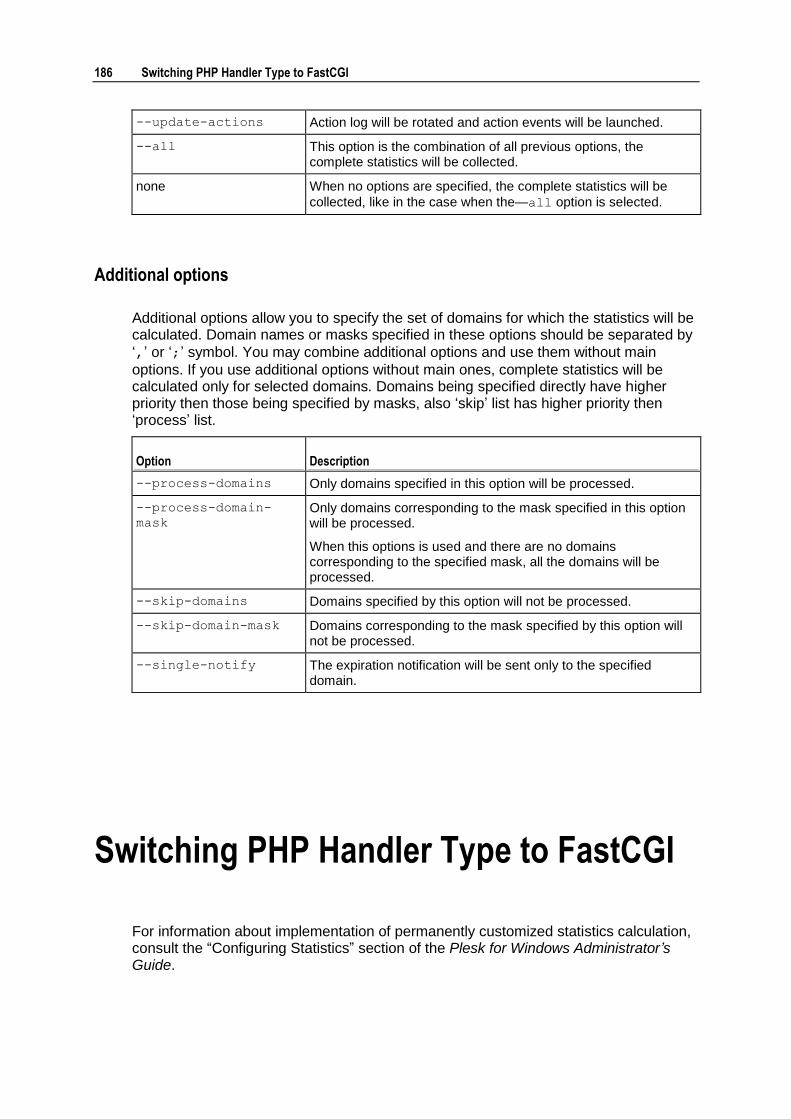
186 Switching PHP Handler Type to FastCGI
--update-actions Action log will be rotated and action events will be launched.
--all This option is the combination of all previous options, the complete statistics will be collected.
none When no options are specified, the complete statistics will be
collected, like in the case when the—all option is selected.
Additional options
Additional options allow you to specify the set of domains for which the statistics will be calculated. Domain names or masks specified in these options should be separated by
„,‟ or „;‟ symbol. You may combine additional options and use them without main
options. If you use additional options without main ones, complete statistics will be calculated only for selected domains. Domains being specified directly have higher priority then those being specified by masks, also „skip‟ list has higher priority then „process‟ list.
Option Description
--process-domains Only domains specified in this option will be processed.
--process-domain-
mask
Only domains corresponding to the mask specified in this option will be processed.
When this options is used and there are no domains corresponding to the specified mask, all the domains will be processed.
--skip-domains Domains specified by this option will not be processed.
--skip-domain-mask Domains corresponding to the mask specified by this option will not be processed.
--single-notify The expiration notification will be sent only to the specified domain.
For information about implementation of permanently customized statistics calculation, consult the “Configuring Statistics” section of the Plesk for Windows Administrator’s Guide.
Switching PHP Handler Type to FastCGI

Switching PHP Handler Type to FastCGI 187
By default, in IIS Plesk Control Panel uses ISAPI to run PHP applications. You can also use CGI or FastCGI. For better performance it is recommended to switch the PHP handler type in IIS to FastCGI. The type of PHP handler is defined by the
“PLESKCP_PHP_MODE” value of the HKEY_LOCAL_MACHINE\SOFTWARE\PLESK\PSA
Config\Config key of Windows registry (isapi, cgi, or fastcgi).
To set FastCGI as PHP handler type, follow these steps:
1 Log in to the Plesk server as the administrator using Remote Desktop.
2 Make sure FastCGI component is installed on the Plesk server. For details refer to “Automatic Installation of Plesk Components” (see page 82) section.
3 Start Windows registry editor.
4 In the HKEY_LOCAL_MACHINE\SOFTWARE\PLESK\PSA Config\Config key,
set the “fastcgi” value for the “PLESKCP_PHP_MODE” parameter.
Note: If the “PLESKCP_PHP_MODE” parameter is absent or set to “isapi”, ISAPI is
used as the PHP handler. If the “PLESKCP_PHP_MODE” parameters value is “cgi”,
CGI is used.
5 Start Plesk Reconfigurator and select the Repair Plesk Installation option. The Check & Repair window opens.
6 Select Plesk Services in the list and click Check.
To switch between PHP handler types, use Plesk Reconfigurator in one of the following ways:
1. Log in to the Plesk server as the administrator by using Remote Desktop.
2. Set the “PLESKCP_PHP_MODE” value in the
HKEY_LOCAL_MACHINE\SOFTWARE\PLESK\PSA Config\Config key of
Windows registry (isapi, cgi, or fastcgi).
3. Select the Repair Plesk Installation option of the Plesk Reconfigurator.
4. Select Plesk Services in the list and click Check.
or
1. Log in to the Plesk server as the administrator by using Remote Desktop.
2. Set the “PLESKCP_PHP_MODE” value in the
HKEY_LOCAL_MACHINE\SOFTWARE\PLESK\PSA Config\Config key of
Windows registry (isapi, cgi, or fastcgi).
3. Start cmd.exe and change directory to the %plesk_dir%\admin\bin\ folder
(where %plesk_dir% is the Windows‟ system variable specifying the folder
where Plesk is installed).
4. Run the following command:
Reconfigurator.exe /check=Services

188 Switching PHP Handler Type to FastCGI
or
1. Log in to the Plesk server as the administrator by using Remote Desktop.
2. Start cmd.exe and change directory to the %plesk_dir%\admin\bin\ folder
(where %plesk_dir% is the Windows‟ system variable specifying the folder
where Plesk is installed).
3. Run the following command:
Reconfigurator.exe—switch-plesk-web-server—new-
provider=iis—php-handler-type=<isapi | fastcgi | cgi> --
force

Glossary 189
DACL (Discretionary Access Control List)
Part of the security descriptor for an object. The DACL can be applied to a newly created object in order to restrict access to the object.
ACE (Access Control Entry)
An individual entry in an access control list (ACL). An access control entry (ACE) contains an SID and describes the access rights to a system resource by a specific user or group of users. Each object has a set of all ACEs, which is used to determine whether an access request to the object is granted.
SID (Security Identifier)
A value, unique across time and space, that identifies a process in the security system. SIDs can either identify an individual process, usually containing a user‟s logon identifier, or a group of processes.
ACL (Access Control List)
An ordered list of access control entries (ACEs).
ACCESS RIGHT
A permission granted to a process to manipulate a specified object in a particular way (by calling a system service). Different system object types support different access rights, which are stored in an object‟s access control list (ACL).
SECURITY DESCRIPTOR
A data structure used to hold per-object security information, including the object‟s owner, group, protection attributes, and audit information.
Glossary