parent guide new student form enrollment online · enrollment online parent manualdata systems...
TRANSCRIPT
Enrollment Online Parent Manual Data Systems Department Updated: 7/16/2015
Enrollment OnlineNew Student Form
Parent Guide
North Wasco County School District2015‐2016
Enrollment Online Parent Manual Data Systems Department Updated: 7/16/2015
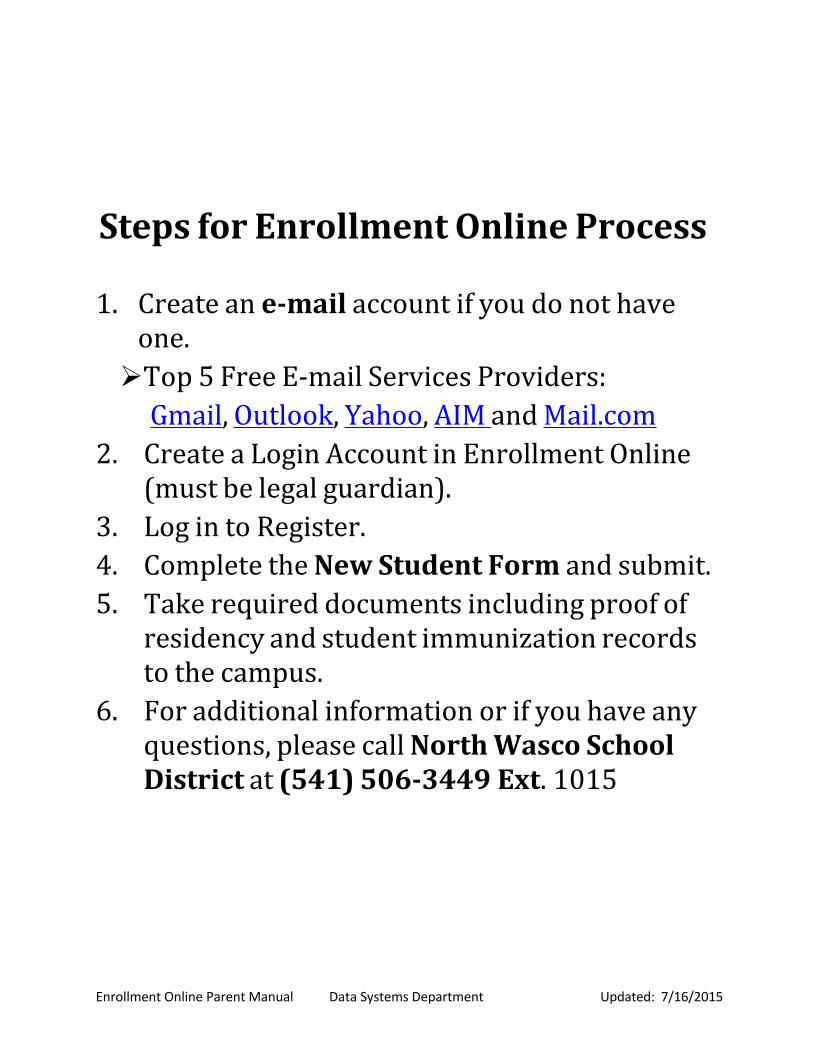
Steps for Enrollment Online Process
1. Create an e-mail account if you do not have one.Top 5 Free E‐mail Services Providers: Gmail, Outlook, Yahoo, AIM and Mail.com
2. Create a Login Account in Enrollment Online (must be legal guardian).
3. Log in to Register.4. Complete the New Student Form and submit.5. Take required documents including proof of
residency and student immunization records to the campus.
6. For additional information or if you have any questions, please call North Wasco School District at (541) 506-3449 Ext. 1015
Enrollment Online Parent Manual Data Systems Department Updated: 7/16/2015
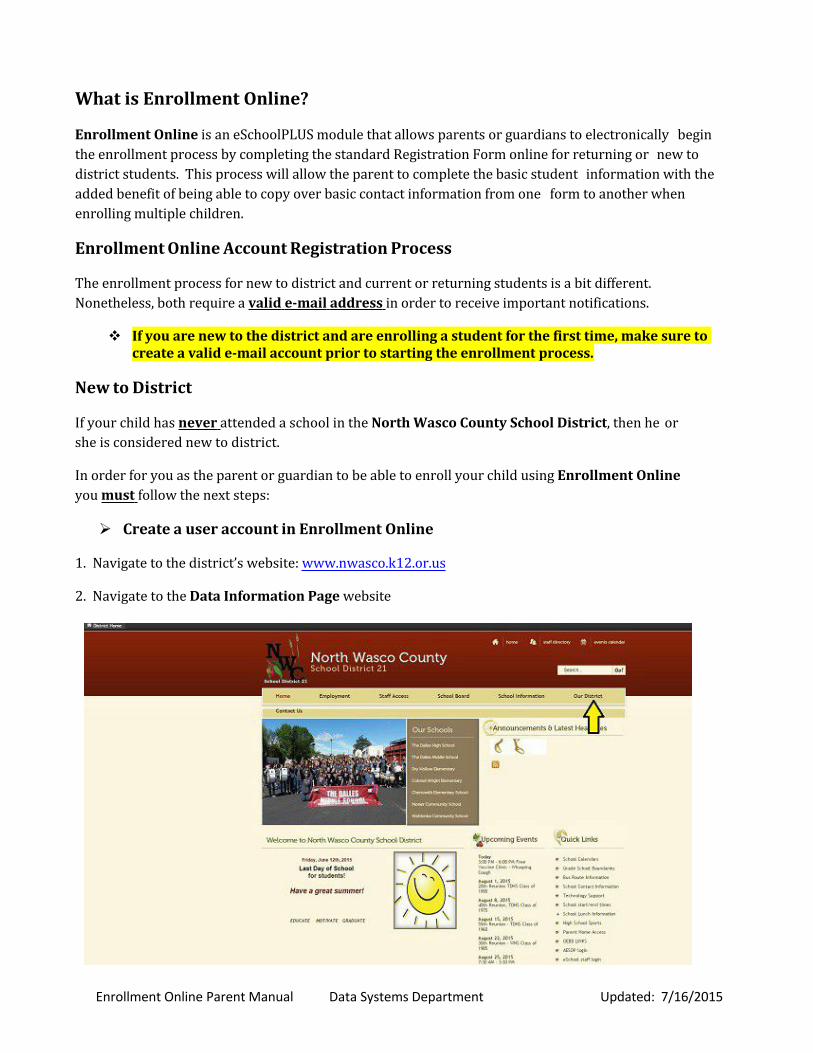
What is Enrollment Online?
Enrollment Online is an eSchoolPLUS module that allows parents or guardians to electronically begin the enrollment process by completing the standard Registration Form online for returning or new to district students. This process will allow the parent to complete the basic student information with the added benefit of being able to copy over basic contact information from one form to another when enrolling multiple children.
Enrollment Online Account Registration Process
The enrollment process for new to district and current or returning students is a bit different. Nonetheless, both require a valid e-mail address in order to receive important notifications.
If you are new to the district and are enrolling a student for the first time, make sure to create a valid e-mail account prior to starting the enrollment process.
New to District
If your child has never attended a school in the North Wasco County School District, then he or she is considered new to district.
In order for you as the parent or guardian to be able to enroll your child using Enrollment Onlineyou must follow the next steps:
Create a user account in Enrollment Online
1. Navigate to the district’s website: www.nwasco.k12.or.us
2. Navigate to the Data Information Page website
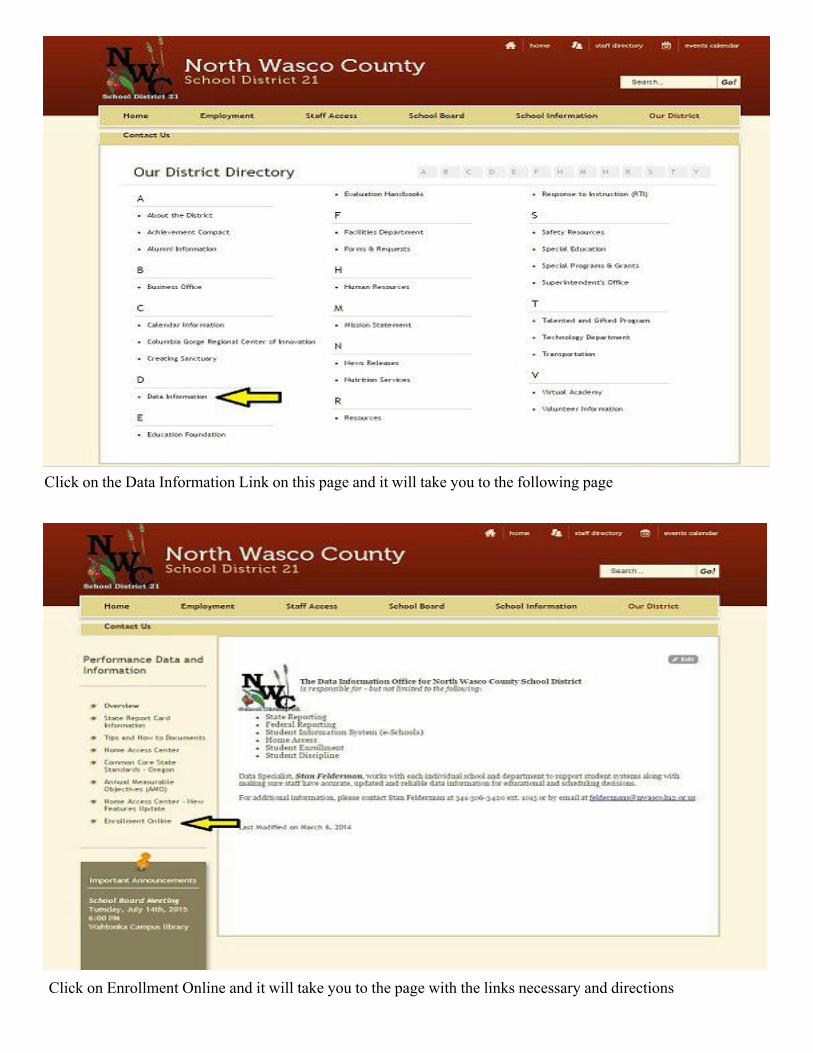
Click on the Data Information Link on this page and it will take you to the following page
Click on Enrollment Online and it will take you to the page with the links necessary and directions
Enrollment Online Parent Manual Data Systems Department Updated: 7/16/2015
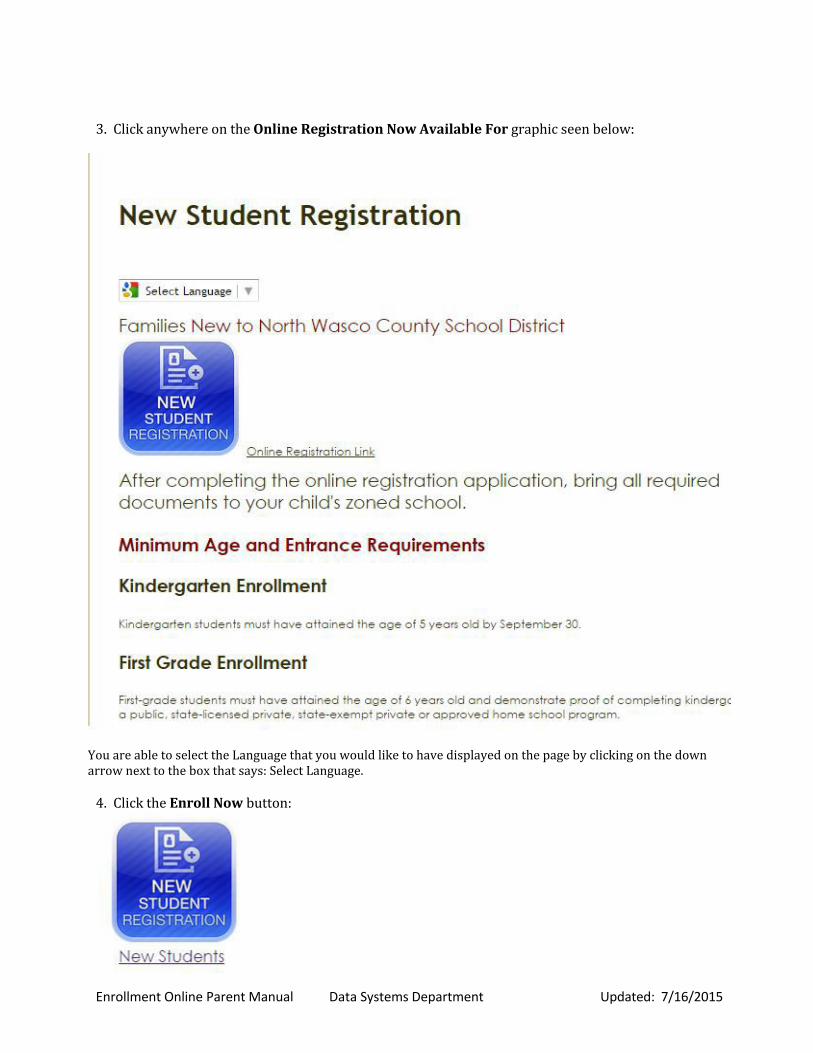
3. Click anywhere on the Online Registration Now Available For graphic seen below:
You are able to select the Language that you would like to have displayed on the page by clicking on the down arrow next to the box that says: Select Language.
4. Click the Enroll Now button:

Enrollment Online Parent Manual Data Systems Department Updated: 7/16/2015
Enrollment Online Parent Manual Data Systems Department Updated: 7/16/2015
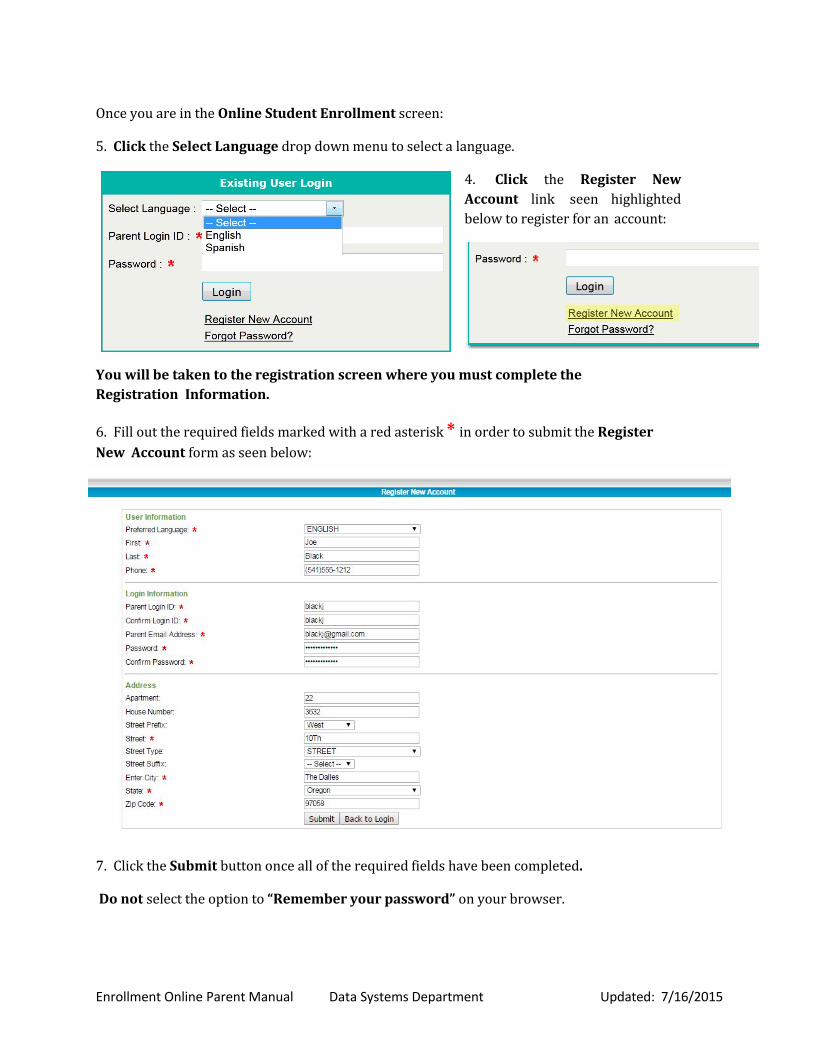
Once you are in the Online Student Enrollment screen:
5. Click the Select Language drop down menu to select a language.
4. Click the Register New Account link seen highlighted below to register for an account:
You will be taken to the registration screen where you must complete the Registration Information.
6. Fill out the required fields marked with a red asterisk * in order to submit the Register New Account form as seen below:
7. Click the Submit button once all of the required fields have been completed.
Do not select the option to “Remember your password” on your browser.

Enrollment Online Parent Manual Data Systems Department Updated: 7/16/2015
Note: If the Parent Login ID you’ve selected already exists in the system, you will receive the following warning:
Choose another Parent Login ID, fill out the Password fields and click Submit once again.
You will receive a confirmation message that your account has been created via e‐mail (the e‐mail address you entered in the Parent E-mail Address field).
If you do see it in your inbox, please check your SPAM or JUNK box.
Once the account registration process has been completed, you will be taken to the Enrollment Online screen.
Enrollment Online Parent Manual Data Systems Department Updated: 7/16/2015
Create a New Enrollment Online Application
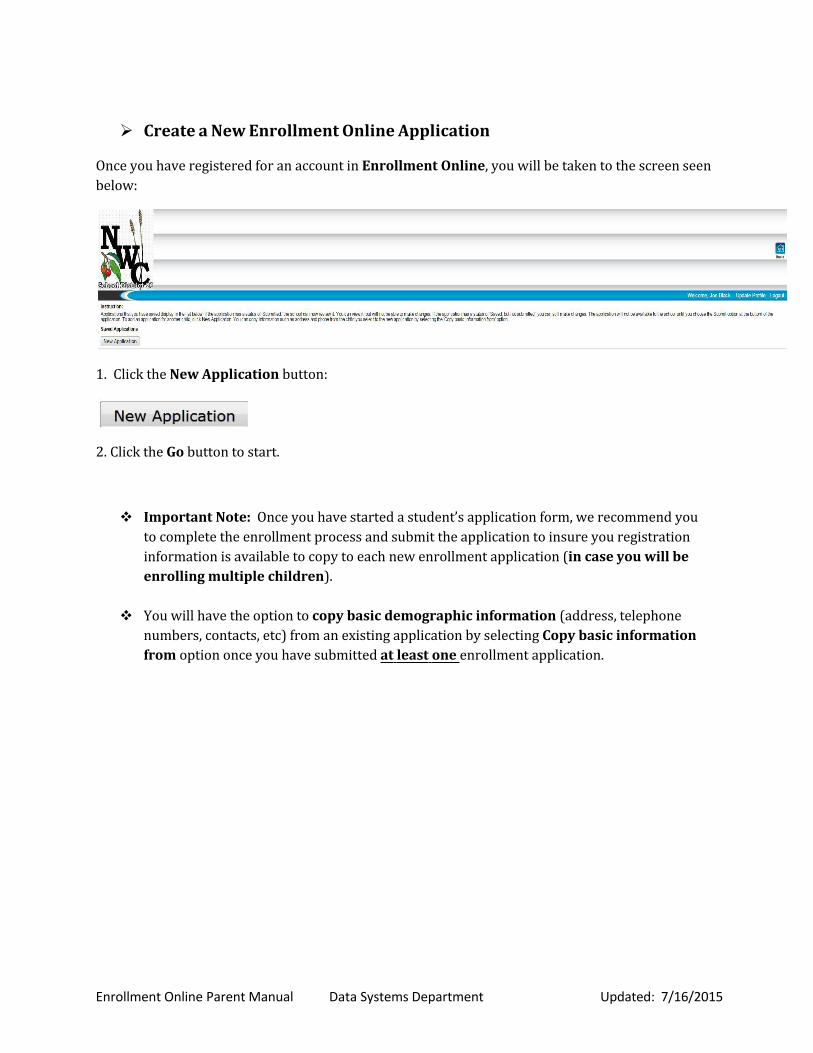
Once you have registered for an account in Enrollment Online, you will be taken to the screen seen below:
1. Click the New Application button:
2. Click the Go button to start.
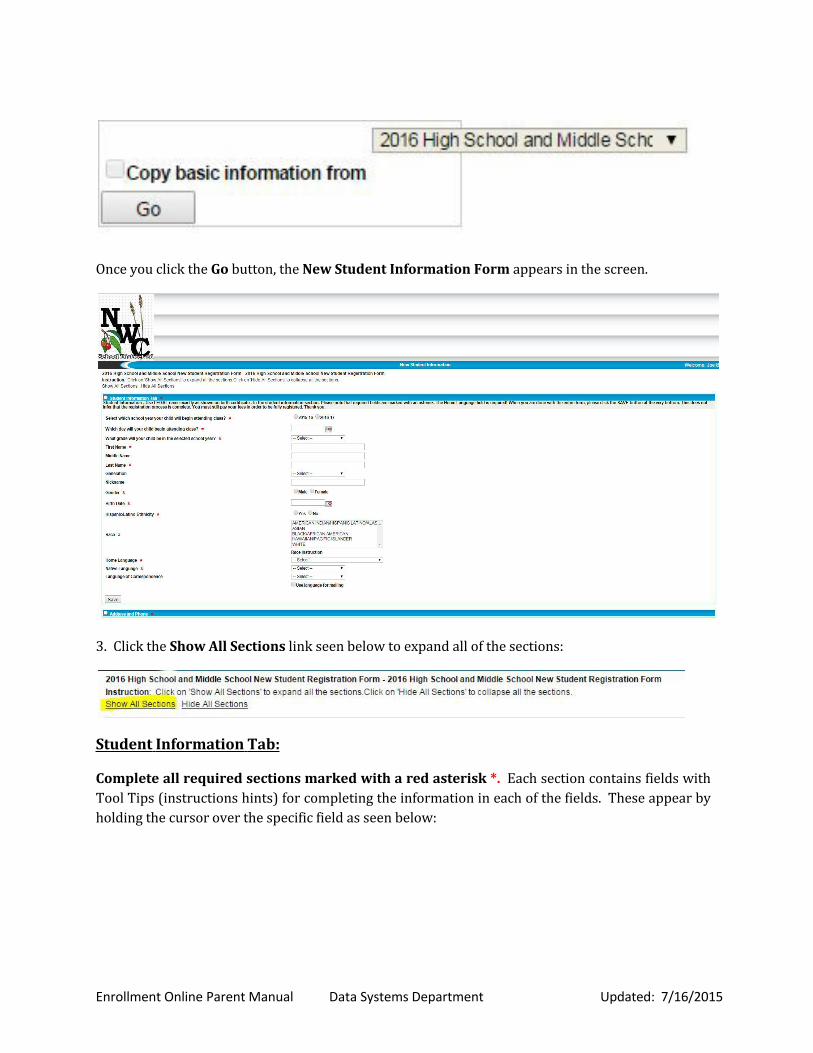
Important Note: Once you have started a student’s application form, we recommend you to complete the enrollment process and submit the application to insure you registration information is available to copy to each new enrollment application (in case you will be enrolling multiple children).
You will have the option to copy basic demographic information (address, telephone numbers, contacts, etc) from an existing application by selecting Copy basic information from option once you have submitted at least one enrollment application.
Enrollment Online Parent Manual Data Systems Department Updated: 7/16/2015
Once you click the Go button, the New Student Information Form appears in the screen.
3. Click the Show All Sections link seen below to expand all of the sections:
Student Information Tab:
Complete all required sections marked with a red asterisk *. Each section contains fields with Tool Tips (instructions hints) for completing the information in each of the fields. These appear by holding the cursor over the specific field as seen below:
Enrollment Online Parent Manual Data Systems Department Updated: 7/16/2015
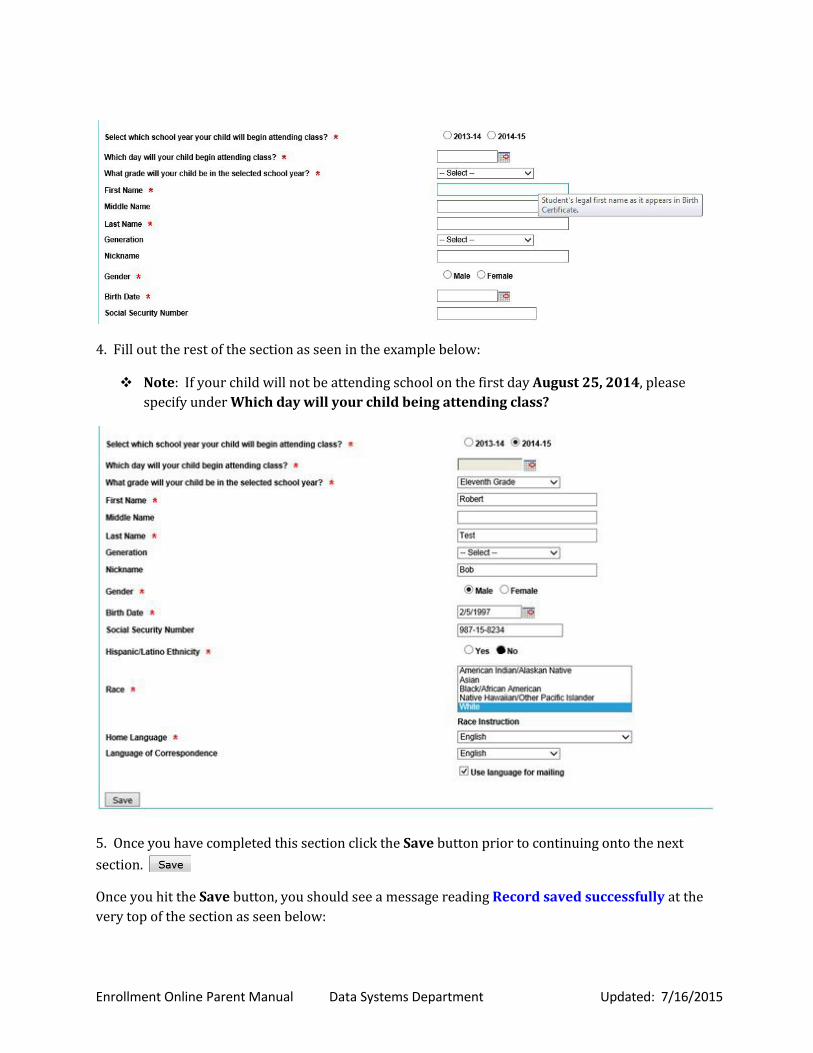
4. Fill out the rest of the section as seen in the example below:
Note: If your child will not be attending school on the first day August 25, 2014, please specify under Which day will your child being attending class?
5. Once you have completed this section click the Save button prior to continuing onto the next section.
Once you hit the Save button, you should see a message reading Record saved successfully at the very top of the section as seen below:
Enrollment Online Parent Manual Data Systems Department Updated: 7/16/2015
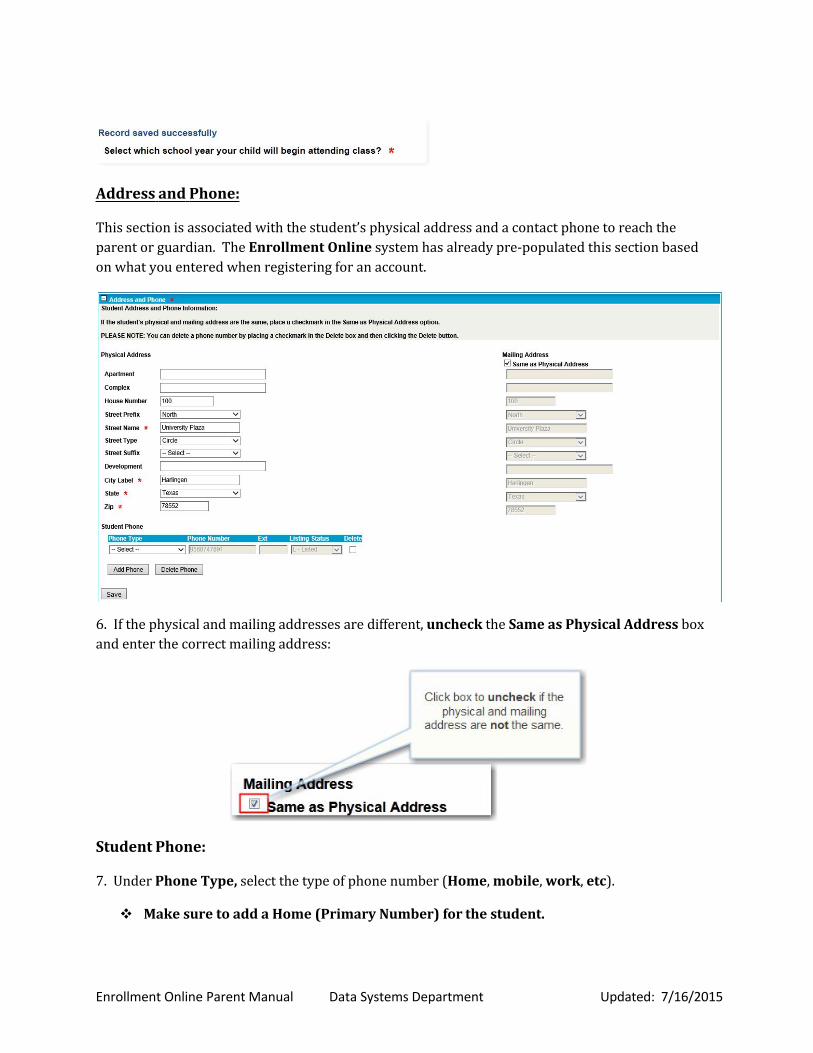
Address and Phone:
This section is associated with the student’s physical address and a contact phone to reach the parent or guardian. The Enrollment Online system has already pre‐populated this section based on what you entered when registering for an account.
6. If the physical and mailing addresses are different, uncheck the Same as Physical Address box and enter the correct mailing address:
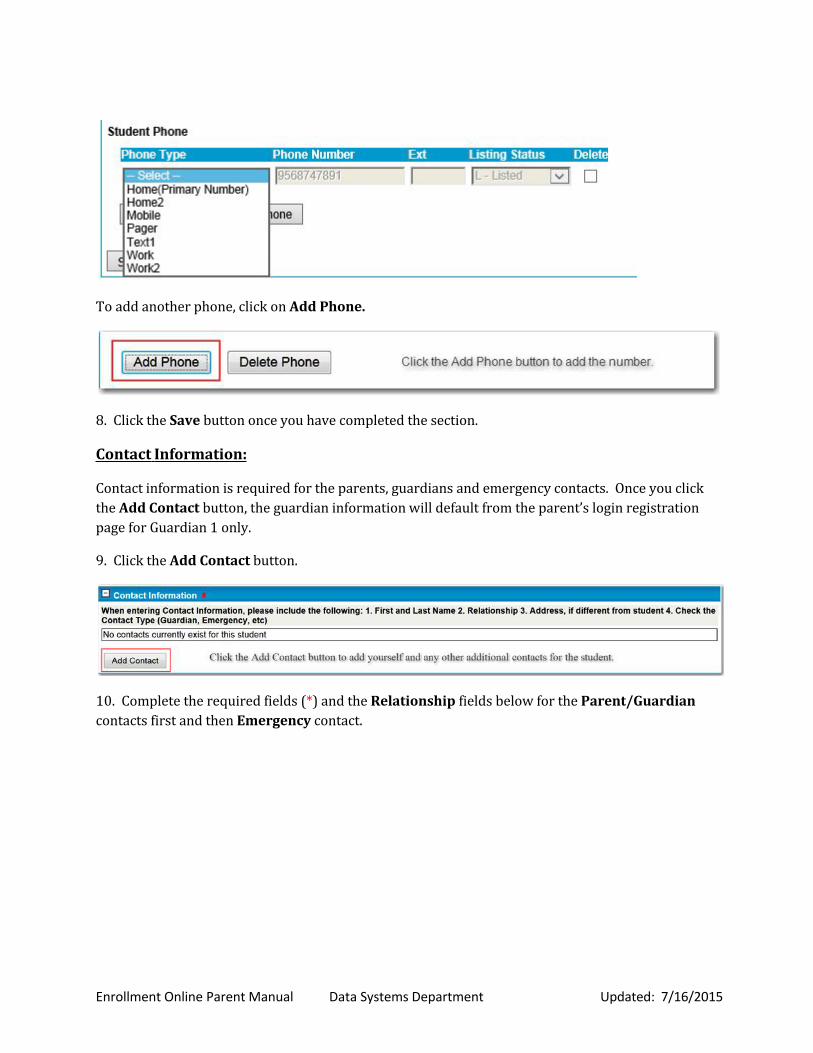
Student Phone:
7. Under Phone Type, select the type of phone number (Home, mobile, work, etc).
Make sure to add a Home (Primary Number) for the student.
Enrollment Online Parent Manual Data Systems Department Updated: 7/16/2015
To add another phone, click on Add Phone.
8. Click the Save button once you have completed the section.
Contact Information:
Contact information is required for the parents, guardians and emergency contacts. Once you click the Add Contact button, the guardian information will default from the parent’s login registration page for Guardian 1 only.
9. Click the Add Contact button.
10. Complete the required fields (*) and the Relationship fields below for the Parent/Guardiancontacts first and then Emergency contact.
Enrollment Online Parent Manual Data Systems Department Updated: 7/16/2015
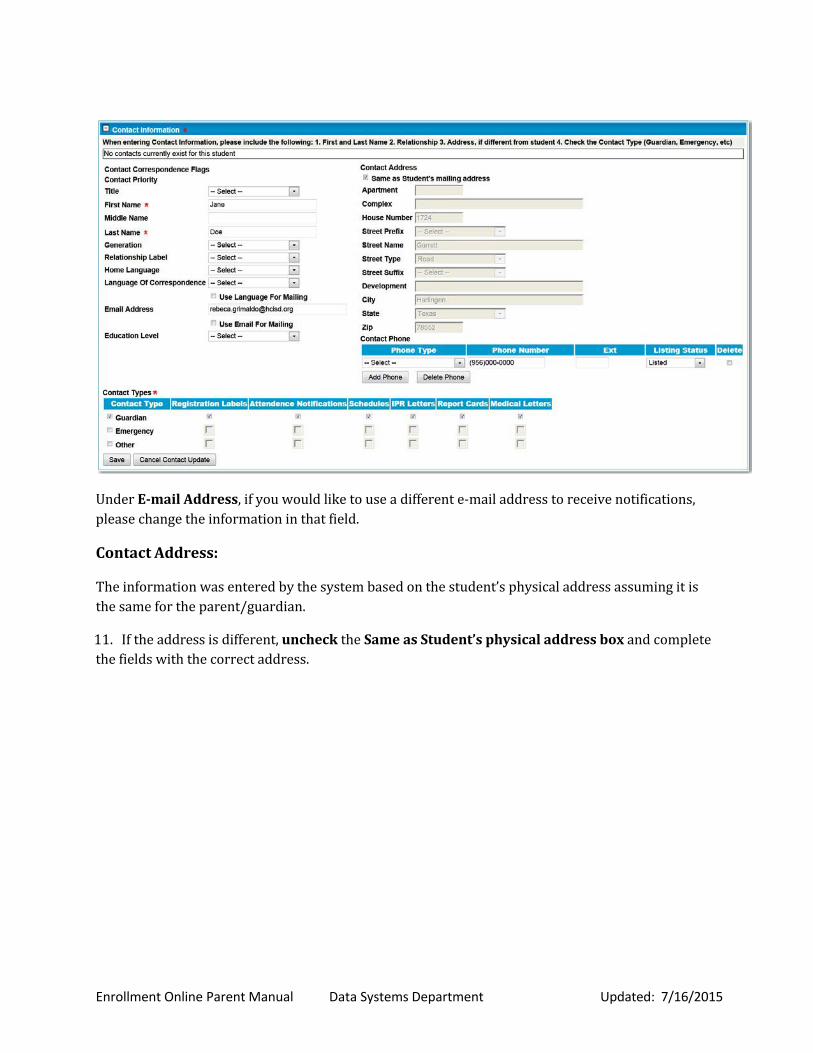
Under E-mail Address, if you would like to use a different e‐mail address to receive notifications, please change the information in that field.
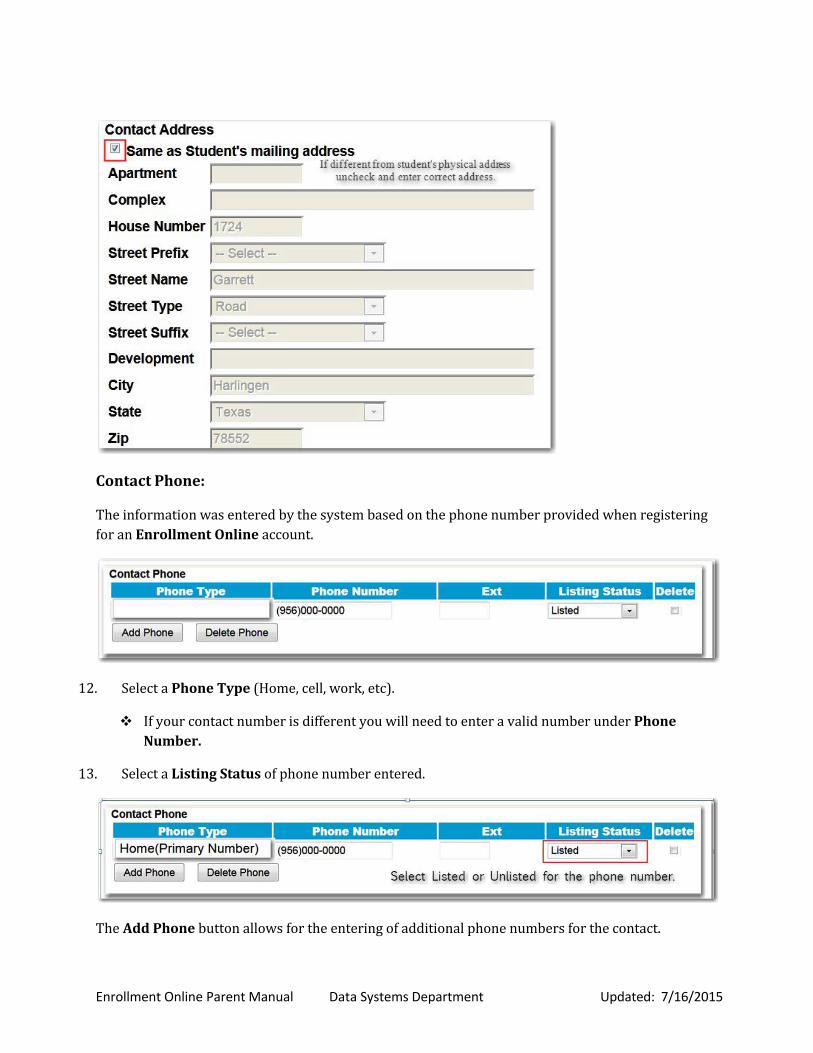
Contact Address:
The information was entered by the system based on the student’s physical address assuming it is the same for the parent/guardian.
11. If the address is different, uncheck the Same as Student’s physical address box and complete the fields with the correct address.
Enrollment Online Parent Manual Data Systems Department Updated: 7/16/2015
Contact Phone:
The information was entered by the system based on the phone number provided when registering for an Enrollment Online account.
12. Select a Phone Type (Home, cell, work, etc).
If your contact number is different you will need to enter a valid number under Phone Number.
13. Select a Listing Status of phone number entered.
The Add Phone button allows for the entering of additional phone numbers for the contact.
Enrollment Online Parent Manual Data Systems Department Updated: 7/16/2015
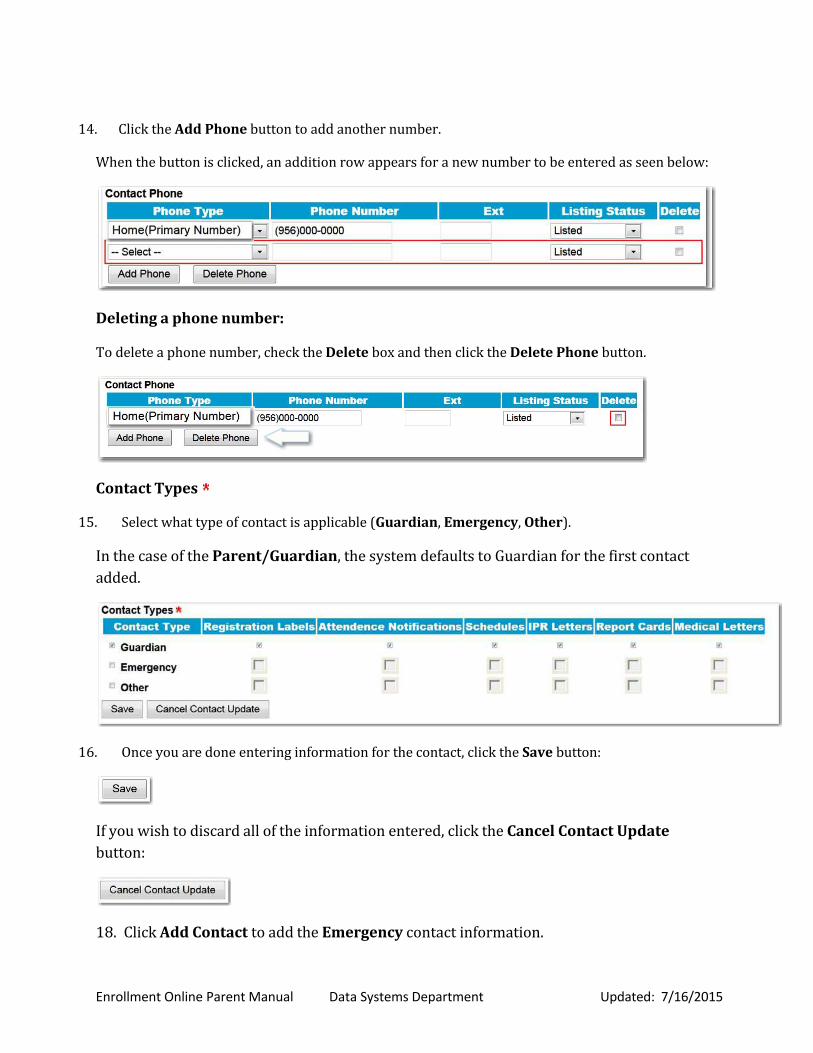
14. Click the Add Phone button to add another number.
When the button is clicked, an addition row appears for a new number to be entered as seen below:
Deleting a phone number:
To delete a phone number, check the Delete box and then click the Delete Phone button.
Contact Types
15. Select what type of contact is applicable (Guardian, Emergency, Other).
In the case of the Parent/Guardian, the system defaults to Guardian for the first contact added.
16. Once you are done entering information for the contact, click the Save button:
If you wish to discard all of the information entered, click the Cancel Contact Updatebutton:
18. Click Add Contact to add the Emergency contact information.
Enrollment Online Parent Manual Data Systems Department Updated: 7/16/2015
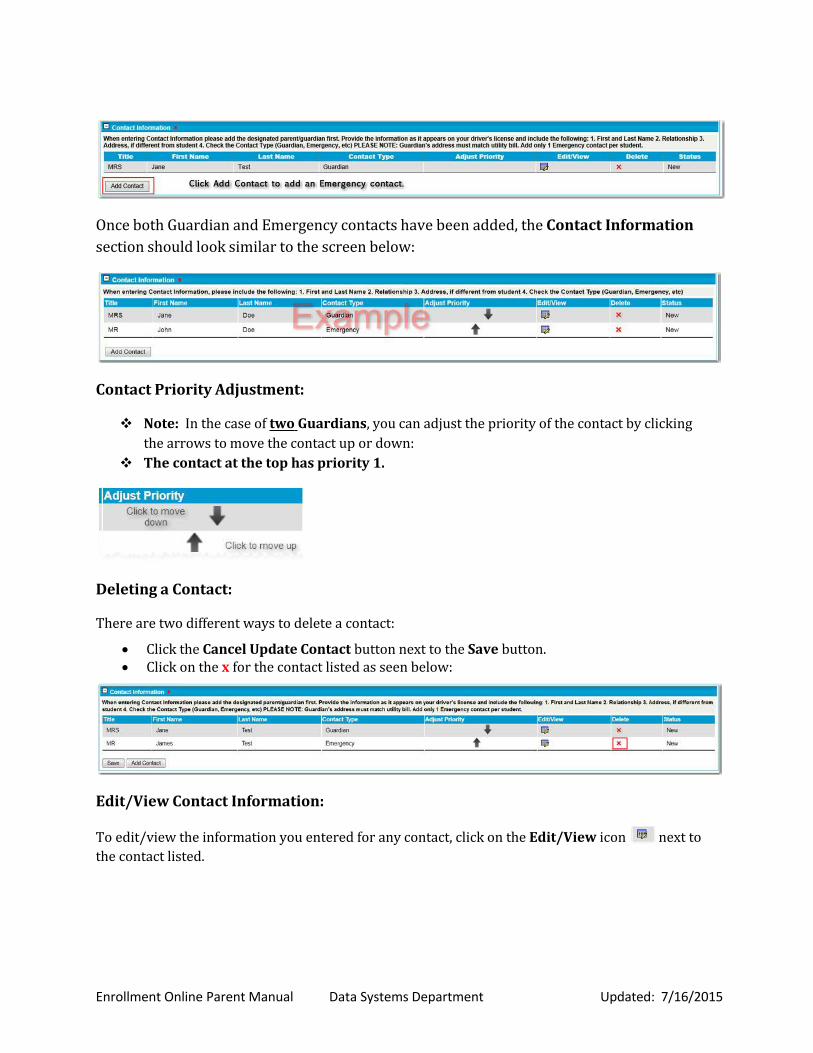
Once both Guardian and Emergency contacts have been added, the Contact Informationsection should look similar to the screen below:
Contact Priority Adjustment:
Note: In the case of two Guardians, you can adjust the priority of the contact by clicking the arrows to move the contact up or down:
The contact at the top has priority 1.
Deleting a Contact:
There are two different ways to delete a contact:
Click the Cancel Update Contact button next to the Save button. Click on the x for the contact listed as seen below:
Edit/View Contact Information:
To edit/view the information you entered for any contact, click on the Edit/View icon next to the contact listed.
Enrollment Online Parent Manual Data Systems Department Updated: 7/16/2015
Additional Information
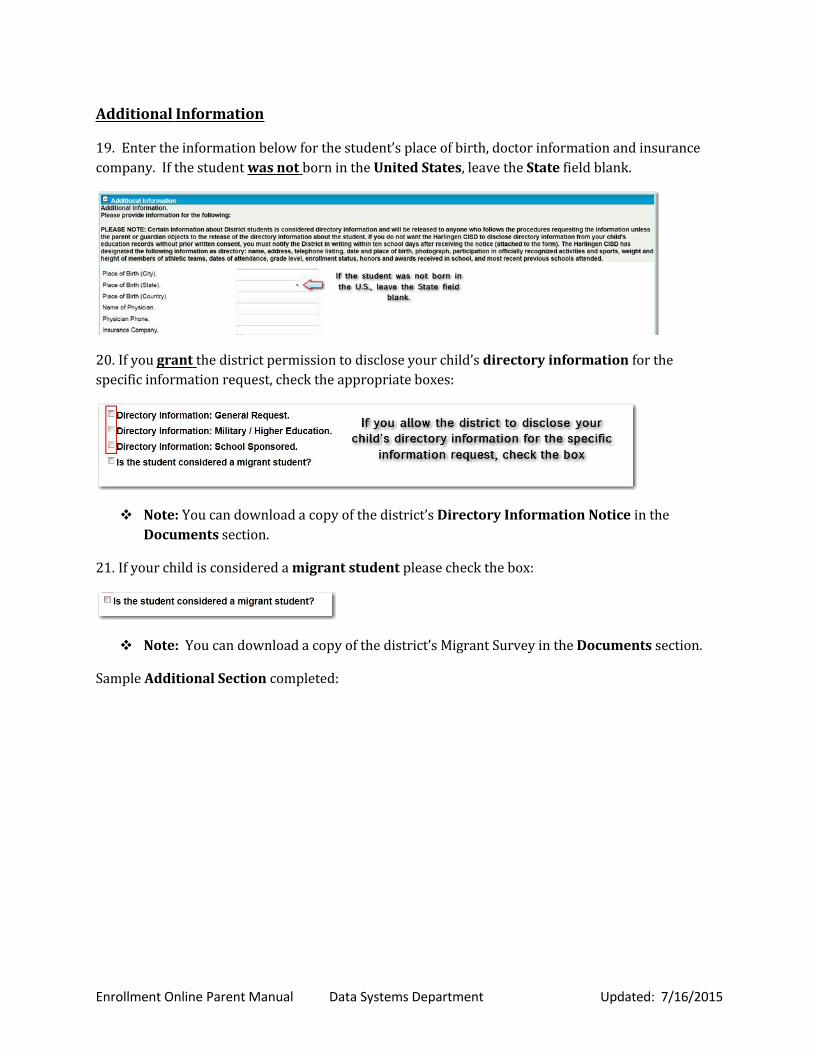
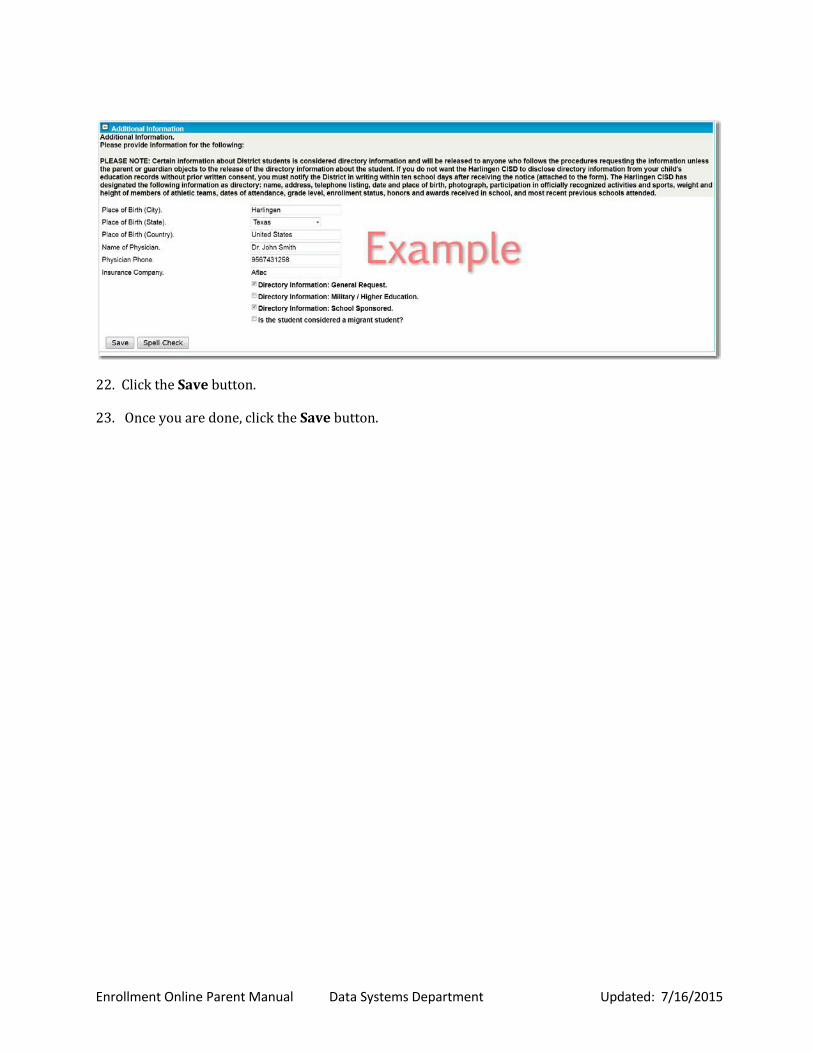
19. Enter the information below for the student’s place of birth, doctor information and insurance company. If the student was not born in the United States, leave the State field blank.
20. If you grant the district permission to disclose your child’s directory information for the specific information request, check the appropriate boxes:
Note: You can download a copy of the district’s Directory Information Notice in theDocuments section.
21. If your child is considered a migrant student please check the box:
Note: You can download a copy of the district’s Migrant Survey in the Documents section.
Sample Additional Section completed:
Enrollment Online Parent Manual Data Systems Department Updated: 7/16/2015
22. Click the Save button.
23. Once you are done, click the Save button.
Enrollment Online Parent Manual Data Systems Department Updated: 7/16/2015
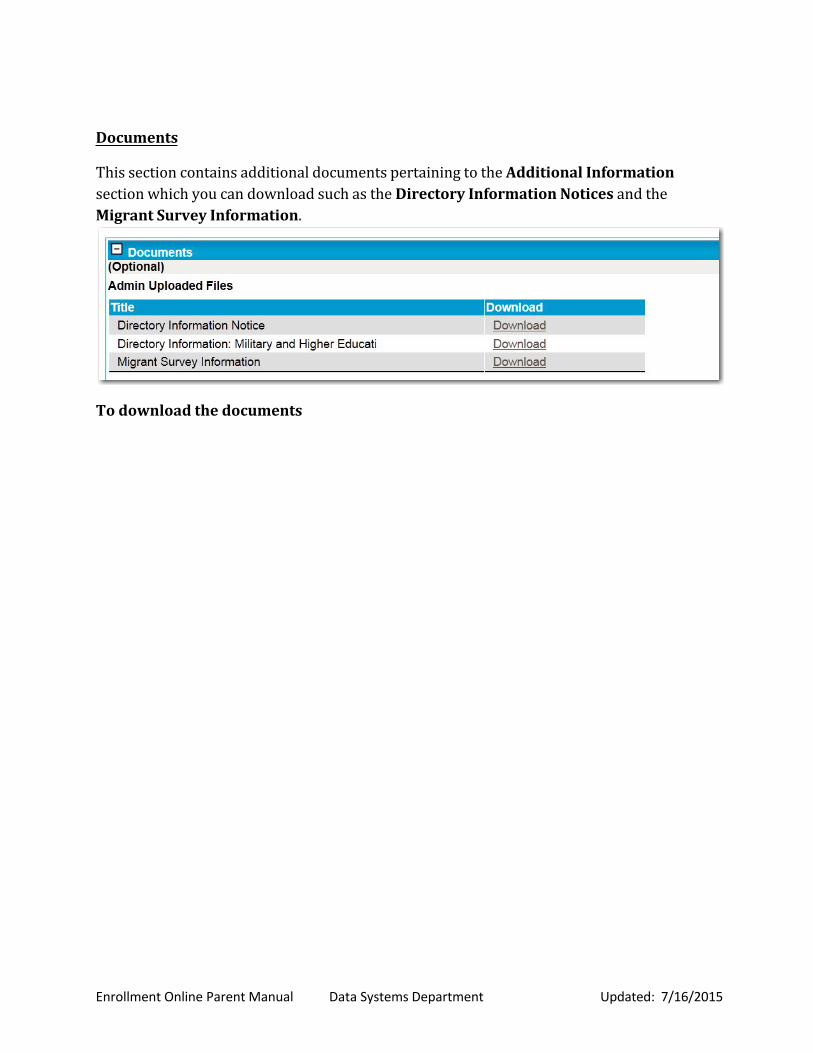
Documents
This section contains additional documents pertaining to the Additional Information section which you can download such as the Directory Information Notices and the Migrant Survey Information.
To download the documents
Enrollment Online Parent Manual Data Systems Department Updated: 7/16/2015
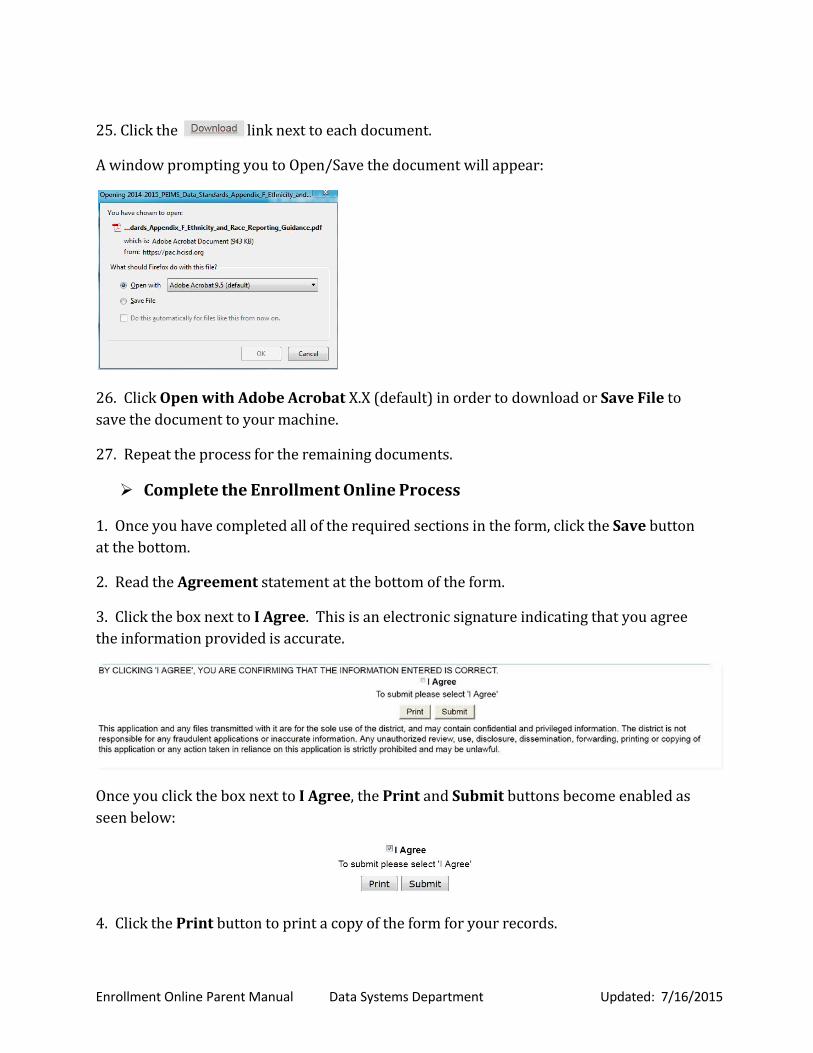
25. Click the link next to each document.
A window prompting you to Open/Save the document will appear:
26. Click Open with Adobe Acrobat X.X (default) in order to download or Save File to save the document to your machine.
27. Repeat the process for the remaining documents.
Complete the Enrollment Online Process
1. Once you have completed all of the required sections in the form, click the Save button at the bottom.
2. Read the Agreement statement at the bottom of the form.
3. Click the box next to I Agree. This is an electronic signature indicating that you agree the information provided is accurate.
Once you click the box next to I Agree, the Print and Submit buttons become enabled as seen below:
4. Click the Print button to print a copy of the form for your records.
Enrollment Online Parent Manual Data Systems Department Updated: 7/16/2015
5. Click the Submit button to submit the form to the campus registrar at either The Dalles Middle School or The Dalles High School.
If any additional information is required, you will be contacted via telephone or e‐mail.
Remember to either bring or upload the proof of residency in the form of a utility bill and the student immunization records in addition to any additional documentation required by the district the week of assigned registration.
Exit Enrollment Online
If you need to exit Enrollment Online Site at any time, follow the next steps:
1. Click the Save button at the bottom of the form.
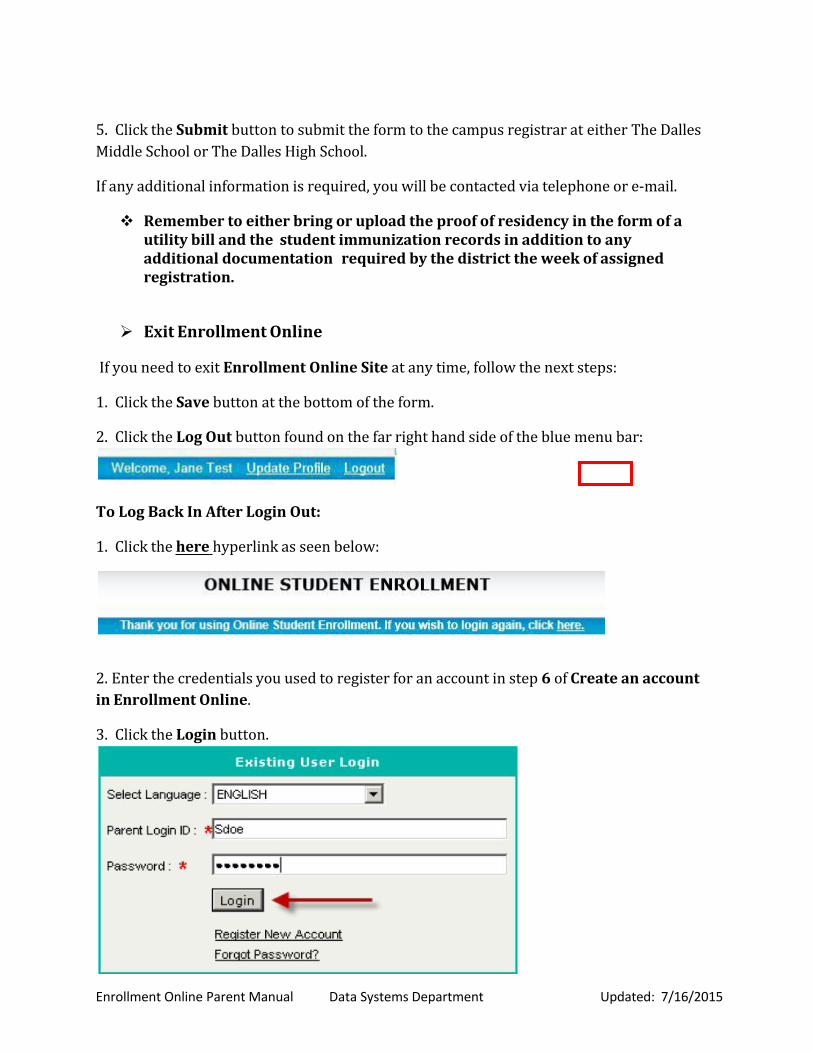
2. Click the Log Out button found on the far right hand side of the blue menu bar:
To Log Back In After Login Out:
1. Click the here hyperlink as seen below:
2. Enter the credentials you used to register for an account in step 6 of Create an account in Enrollment Online.
3. Click the Login button.

Enrollment Online Parent Manual Data Systems Department Updated: 7/16/2015
Complete a Saved Form
To continue where you left off on a saved form, follow the next steps:
Once you have successfully logged in to Enrollment Online, you should see the Saved Application for your student:
1. Click on Edit for the application you wish to continue making changes.
2. Continue with the form and make sure to click the Save button to save any changes.
3. Refer to the Complete the Enrollment Online Process to sign and submit the form.