part 1: getting started - jewelry & beading store€¦ · spiral wire necklace 88 birds of a...
TRANSCRIPT

Introduction 7
Part 1: Getting Started Enameling Basics: Overview of enameling techniques, materials, tools, setup, and safety 10
Metalwork Basics: Fundamentals of soldering, punching, drilling, dapping, sawing, filing, and polishing 33
Enameling & Metalwork Toolkits 44
Part 2: Projects Multidangle Earrings 48Holey Pod Earrings 51Kinetic Washers Necklace 53Stenciled Pendant 56Stamped Dog Tag 60Three-Toned Twins 63Foldformed Leaf Pendant 66Dots, Dots, Dots Pendant 69Teardrop Dangle Earrings 72Buds on a Vine Necklace 75Shimmer Earrings 77Enameled Dish 79Sticks & Stones Earrings 82Sgraffito Tab-Set Pendant 84Spiral Wire Necklace 88Birds of a Feather 92Serendipity Enameled Bead 95Riveted Hearts Pendant 98Gingko Leaf Pendant 101Cloisonné Lines Pendant 103Cityscape Pendant 107Plique-à-Jour Dots Earrings 110Soldered Reversible Pendant 114Enameled Cabochon Ring 117Frilly Flower Ring 124Giverny Pendant 128Amphora Pendant 132
Gallery 136Acknowledgments, About the Author 142 Index 143
Contents

7
You may have been curious and wanted to learn about enameling, but thought that
your only option was using a kiln or a torch setup with big tanks. This book is for you. My
approach is accessible because it uses a handheld butane torch. It is affordable due to
the short list of necessary yet small tools and equipment. Working with a torch intimately
involves you with the process, and the immediacy of the technique is addicting. Within a
short time, you’ll be creating beautiful enameled jewelry.
There are many methods for coloring metal, but there is a special sense of freedom
and movement watching glass flow and fuse to metal. This book introduces you to
the richness of this medium, showing you how magical and exciting it is with concrete
projects that take you step by step through some basic techniques for creating jewelry.
You’ll discover multiple ways to create depth and texture with enamel as well as hone
your metalsmithing skills. Endless possibilities will unfold as you begin to experience and
appreciate the subtleties of working with enamel.
Practicing a craft such as enameling on a daily basis is like cultivating a garden. You get
to delight in the process, your progress, and the lovely, colorful results.
Introduction Enameling is the art of fusing glass to metal, either in a kiln or with a torch. It is a complex and rich art form that comprises multiple techniques and methods. My goal with this book is to whet your appetite with an easy, affordable way to bring enamel into your work and your world.
About the book and DVDThis book-with-DVD is designed to give you all the benefits of a workshop—with all the convenience
of learning how to enamel at home. The Getting Started section introduces the fundamentals of adding
enamel color to metal. Lists of toolkits and supplies on p. 44–45 will help you pull together what
you need to get started. The jewelry projects, beginning with the easiest and gradually getting more
challenging, give you hands-on experience to build your confidence.
The video disk enclosed in the back of the book includes 12 short lessons. Icons throughout the
book indicate that you can see a technique in close-up action on your screen as I explain it. 2DVD

11
When people think of enameling, they usually picture firing in a kiln, which is the traditional way of enameling jewelry and large objects. In the mid-20th century, pioneers including Fred Ball and Joseph Spencer experimented with methods for firing enamel by applying heat directly with a torch.
Working with a torch is affordable and intimate. The flame puts you right there with the process, since it isn’t hidden inside the kiln, and you can control the application of heat in a way that can’t be matched by a kiln. You get to see the magic firsthand when the glass transforms and fuses to the metal.
On the other hand, using a kiln allows the artist to fire large pieces and multiple pieces at the same time. The heat is more uniform, and with some techniques, you’ll have more-consistent results. But with a little practice, a torch can not only create a wide variety of enamel finishes, but can also tackle techniques like cloisonné, champlevé, raku, and plique-à-jour.
This book focuses on torch-fired enameling and does not cover kiln techniques. Common torches that can be used for enameling include mini propane torches designed for weed control, larger propane or MAPP
gas torches commonly used by plumbers, a two-gas (oxygen and acetylene) setup, and butane. Each fuel type influences the color of the enamel.
Of these, handheld butane torches are the most accessible and affordable, and they do not require as much room or as many safety measures as do tank torches. You’ll be able to enamel all the projects in this book using a butane torch; most projects use the large-flame type shown here.
What is torch-fired enameling?
All the projects in this book use a handheld butane torch for firing enamel.
Large-flame butane torch.
19
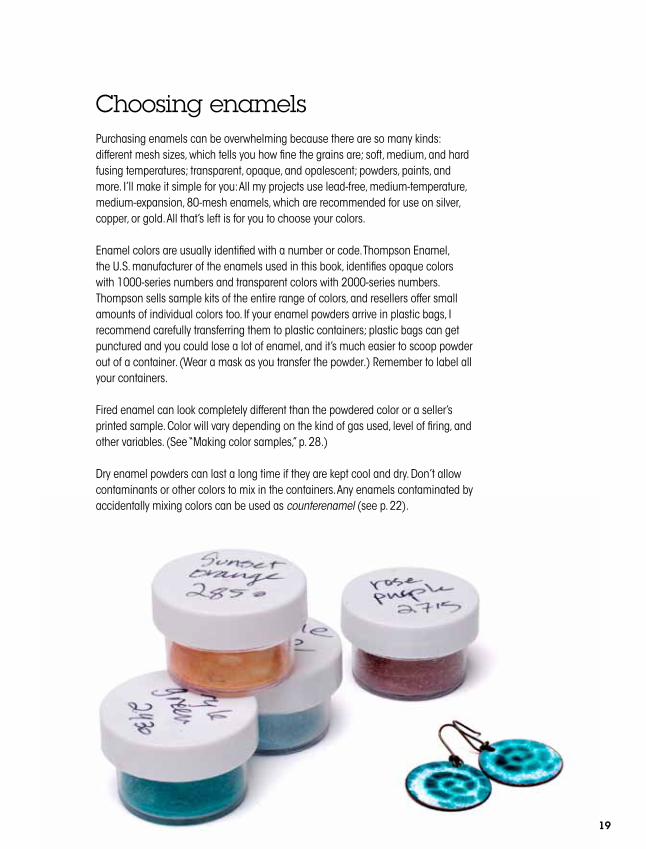
Purchasing enamels can be overwhelming because there are so many kinds: different mesh sizes, which tells you how fine the grains are; soft, medium, and hard fusing temperatures; transparent, opaque, and opalescent; powders, paints, and more. I’ll make it simple for you: All my projects use lead-free, medium-temperature, medium-expansion, 80-mesh enamels, which are recommended for use on silver, copper, or gold. All that’s left is for you to choose your colors.
Enamel colors are usually identified with a number or code. Thompson Enamel, the U.S. manufacturer of the enamels used in this book, identifies opaque colors with 1000-series numbers and transparent colors with 2000-series numbers. Thompson sells sample kits of the entire range of colors, and resellers offer small amounts of individual colors too. If your enamel powders arrive in plastic bags, I recommend carefully transferring them to plastic containers; plastic bags can get punctured and you could lose a lot of enamel, and it’s much easier to scoop powder out of a container. (Wear a mask as you transfer the powder.) Remember to label all your containers.
Fired enamel can look completely different than the powdered color or a seller’s printed sample. Color will vary depending on the kind of gas used, level of firing, and other variables. (See “Making color samples,” p. 28.)
Dry enamel powders can last a long time if they are kept cool and dry. Don’t allow contaminants or other colors to mix in the containers. Any enamels contaminated by accidentally mixing colors can be used as counterenamel (see p. 22).
Choosing enamels

27
G
When the surface is smooth and glossy, remove the heat and turn off the torch. Let the enamel cool for at least one minute; it will start to turn its final color [G]. Remove the piece from the trivet with tweezers and let the piece cool on the tile or kiln brick. Don’t be discouraged by dark hues when done firing. Wait for the magic as the enamel fully cools and the true color is revealed.
FAQWhat if my piece sticks to the trivet after firing? Pick up the hot trivet carefully with your tweezers and tap the base of the trivet against the tile. If the piece doesn’t release, flip it over and tap the top of the trivet against the tile. Usually one of these two taps will do it!
Why can’t I just fire my enamels from above instead of from underneath? Firing directly over enamels can change the color, especially opaques, which get dark and muddy. Truer colors are achieved by firing from below. However, sometimes it’s possible to fire transparent colors from above, as I demonstrate in the Soldered Reversible Pendant project, p. 114.
What does it look like if I overfire a piece?Overfiring can cause pits and will darken the color.
If I am unhappy with the results after firing a piece, do I just throw it away? No! More often than not, a piece can be reworked into something better. Sift and fire an opaque color over the entire piece to make a blank canvas for starting over. You can also get creative: Sift more colors or add patterns of enamels with a stencil or stamps. You might be surprised by how much you learn from and love your mistake. It’s one of my favorite qualities about enameling!
What if I’ve used two layers of enamel and I don’t like how it turned out? Is it too much to add more enamel?Yes, adding more layers could be too heavy and warp your piece. If it’s a flat piece, flip it over and use the old front as your new counterenamel side. As long as you used only one layer of counterenamel, adding another layer to this new front will be fine.
If I don’t like the shiny enamel and I want a matte finish, what can I do? The quickest and most reliable way is to use a glass etchant, available at craft stores.
Overfired piece.
Underfired piece. The enamel has an orange-peel appearance.

56
materials•24-gauge copper sheet,
11⁄8" (29mm) square
•1430 Spruce
•1830 Marigold
•1995 Black
tools & supplies •basic enameling toolkit
•stencil
•fine-tip paintbrush
Technique Stenciling
Stenciled Pendant
Use stencils to create patterns as you sift! Lots of
materials can be used to make stencils. You can
cut your own from paper or use found objects—
open-weave rubber placemats or wire mesh make
interesting patterns, or try laser-pierced greeting
cards or metal filigree.
57
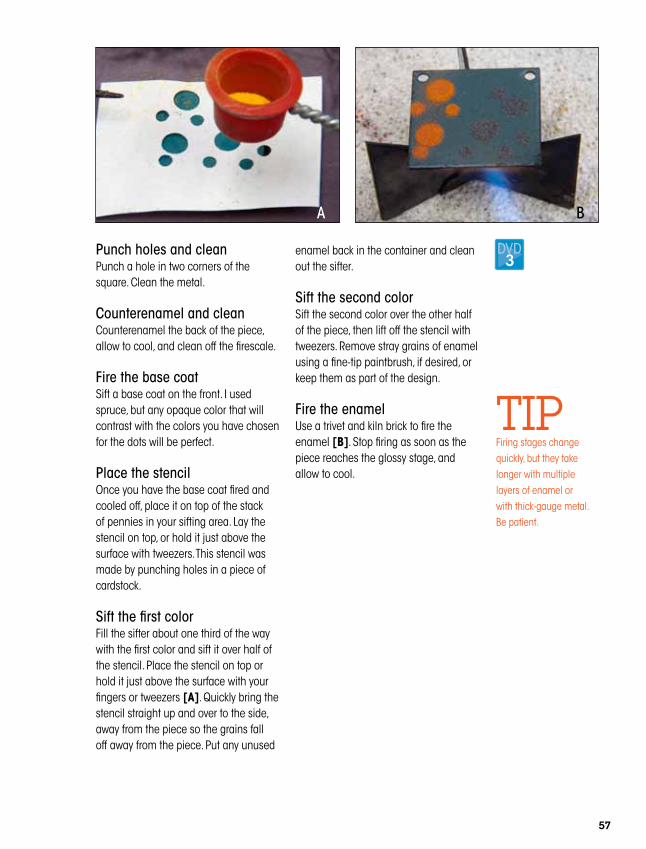
Punch holes and cleanPunch a hole in two corners of the square. Clean the metal.
Counterenamel and cleanCounterenamel the back of the piece, allow to cool, and clean off the firescale.
Fire the base coat Sift a base coat on the front. I used spruce, but any opaque color that will contrast with the colors you have chosen for the dots will be perfect.
Place the stencil Once you have the base coat fired and cooled off, place it on top of the stack of pennies in your sifting area. Lay the stencil on top, or hold it just above the surface with tweezers. This stencil was made by punching holes in a piece of cardstock.
Sift the first colorFill the sifter about one third of the way with the first color and sift it over half of the stencil. Place the stencil on top or hold it just above the surface with your fingers or tweezers [A]. Quickly bring the stencil straight up and over to the side, away from the piece so the grains fall off away from the piece. Put any unused
enamel back in the container and clean out the sifter.
Sift the second colorSift the second color over the other half of the piece, then lift off the stencil with tweezers. Remove stray grains of enamel using a fine-tip paintbrush, if desired, or keep them as part of the design.
Fire the enamelUse a trivet and kiln brick to fire the enamel [B]. Stop firing as soon as the piece reaches the glossy stage, and allow to cool.
TIPFiring stages change quickly, but they take longer with multiple layers of enamel or with thick-gauge metal. Be patient.
BA
3DVD

66
materials•24-gauge copper sheet,
11⁄2 x2" (38x51mm)
•2030 Medium Fusing Clear
•2240 Olive
•2840 Mandarin Orange
•2330 Avocado
•2220 Chartreuse
tools & supplies•basic enameling toolkit
•rawhide mallet
•goldsmith’s or planishing hammer
•dull butter knife
•auto center punch
•dimple pliers: 3mm, 4mm, or 7mm (optional)
•steel bench block
•bench pin
•320-grit wet/dry sandpaper
Techniques Sawing metal, filing, sanding, foldforming, annealing, texturing
Foldformed Leaf PendantHandmade leaves in all shapes
and sizes are always beautiful.
This project demonstrates how to
make a lovely line fold and create
a varied, textured surface for
enameling. Experiment with both
opaque and transparent enamel to
create vivid or muted leaves.
TIPDimple pliers produce nice textures of hills and valleys. Use one size or a variety in this leaf project. These pliers can also be used to create ruffles on the edges of thin-gauge metals.

67
Create the leaf shapeDraw a leaf shape directly onto the copper with an indelible marker and saw it out [A]. Using the bench pin as a work surface [B], file the edges to refine the shape and sand the leaf, including the edges, with 320-grit wet/dry sandpaper.
AnnealIn order to easily fold and form the line down the middle of the leaf, anneal it so it’s soft and malleable. Draw a marker line on the metal, place it on a kiln brick, and heat it with the torch [C]. When the line disappears and the metal turns a light red, keep heating for 30 more seconds, quench it in water, and dry. I usually wait to pickle the metal until it’s ready to texture, because I will have to anneal it again.
Fold the leafPlace the leaf on a square steel bench block, with the centerline on the edge. Use a mallet to fold half of the leaf over the edge [D]. Place the partially folded leaf on the bench block and use
the mallet to finish folding it [E]. For a tighter, more defined fold line, strike it with a polished hammer to planish the fold [F]. To make a line texture on the fold, move the leaf to the edge of the block and use the narrow wedge of a goldsmith’s hammer. Be careful to hit the metal and not to ding your hammer! Flip it over and repeat on the other side.
Anneal againThe metal is work-hardened now. Anneal it again to soften it.
A
D
B
E
C
F

82
materials•24-gauge copper disks with
7⁄8" (22mm) round cutouts, 15 ⁄8" (41mm) diameter, 2
•seed beads, size 11 and 8, opaque yellow and yellow-green
•opaque black glass threaders
•pair of earring wires
•1465 Peacock
tools & supplies•basic enameling toolkit
•tripod with screen
Technique Embedding glass into enamel
Sticks & Stones EarringsJust like enamel, seed beads are made
of glass, so they can be fired right along
with your sifted color. Use beads and glass
threaders to create unusual designs.
TIP I purchased my copper blanks with offset cutouts already made. You can design your own donut shapes using a jeweler’s saw or a disk cutter.

5DVD
83
Punch holes and clean the metalPunch a hanging hole in the top of each copper shape. Clean the pieces, rinse, and dry.
Counterenamel and cleanSift on counterenamel and place the pieces on a trivet on a tripod. The tripod should be on a tile for safety. Fire to a glossy coat. Repeat for both earrings. Allow to cool. Clean, rinse, and dry.
Fire the base coatSift and fire on the base coat on both pieces. Repeat for a second coat if desired. Allow to cool.
Add beads and threadersAfter the pieces have cooled, spray them with a holding agent to fix the glass beads and threaders in place during firing. You can also sift on a light coat of the same color (or 2030 medium fusing clear), and add the beads and threaders.
Place one piece on the trivet. Make sure it’s level to prevent the beads from rolling off. Place the seed beads and threaders to make a pattern. Let the piece dry for 10 minutes before firing [A].
Heat slowlyHeat from below using a medium flame, from far away. The goal is to heat the piece so it stabilizes and so the glass adheres to the surface without jumping around before the enamel fuses.
Fire to glossy and finishIncrease the flame and continue firing from below, concentrating on each segment of the trivet until the enamel goes through its stages. At the glossy stage, although the beads and threaders will look raised, they will be securely embedded in the enamel. Repeat placing beads and threaders on the second piece. Fire and allow both pieces to cool. Add earring wires to finish.
TIPFiring anything that is open like a washer this way prevents dark areas from forming on the top surface.A
a smooth surface For the earrings, I stopped firing as the enamel layer turned glossy. The thin threaders were slightly raised but well connected. The seed beads were raised even higher but also securely anchored. As you fire longer, the threaders and beads will melt and blend into the surface, as they did in this pendant. Fire just past the glossy stage and stop when you see the details sink into the enamel.
95
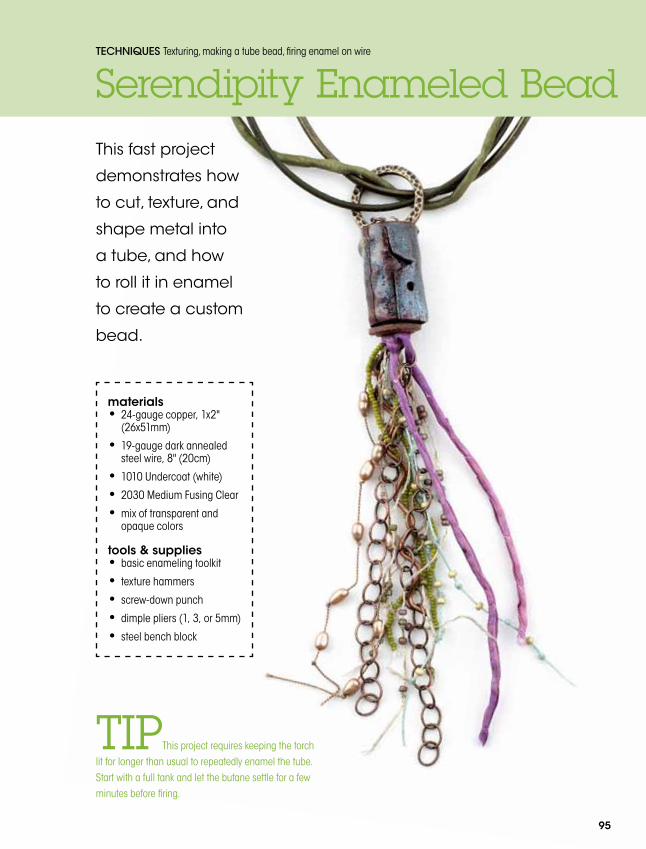
Techniques Texturing, making a tube bead, firing enamel on wire
Serendipity Enameled BeadThis fast project
demonstrates how
to cut, texture, and
shape metal into
a tube, and how
to roll it in enamel
to create a custom
bead.
materials•24-gauge copper, 1x2"
(26x51mm)
•19-gauge dark annealed steel wire, 8" (20cm)
•1010 Undercoat (white)
•2030 Medium Fusing Clear
•mix of transparent and opaque colors
tools & supplies•basic enameling toolkit
•texture hammers
•screw-down punch
•dimple pliers (1, 3, or 5mm)
•steel bench block
TIPThis project requires keeping the torch lit for longer than usual to repeatedly enamel the tube. Start with a full tank and let the butane settle for a few minutes before firing.