part 3 © j. serresseque, 2012 · spray your wing sheet on the print side first, lay it on a flat...
TRANSCRIPT
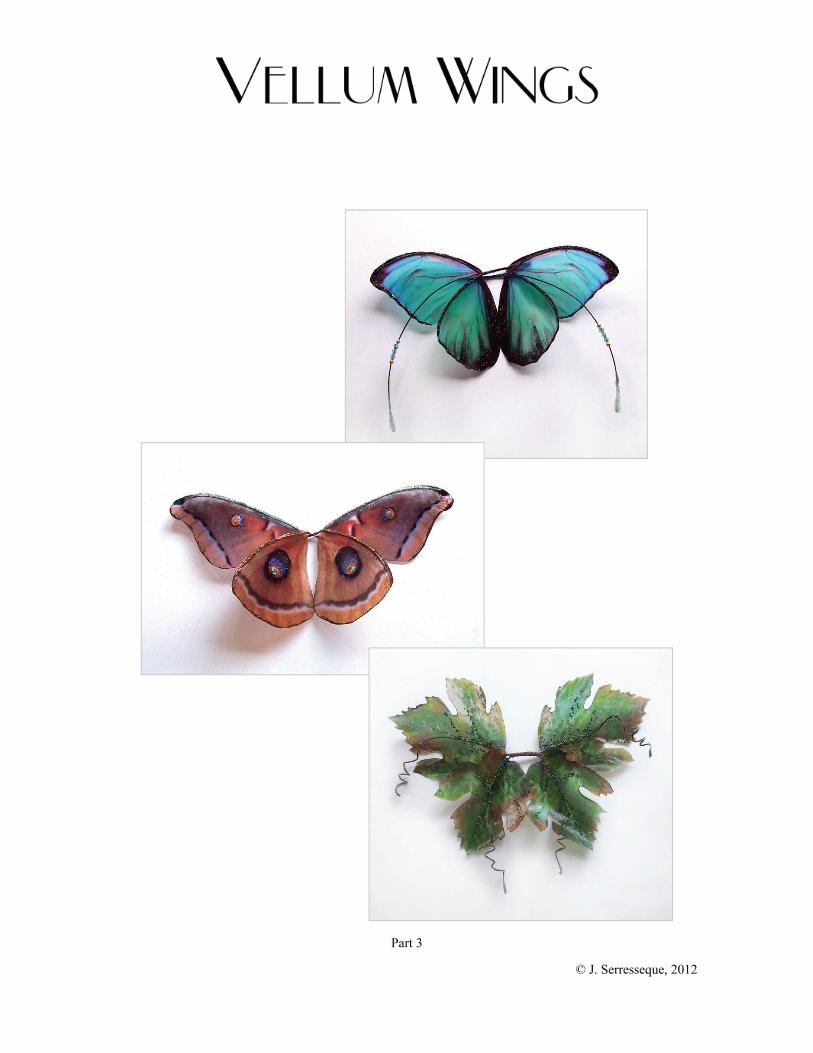
© J. Serresseque, 2012
Part 3

2 © J. Serresseque, 2012
What is Vellum? Vellum is a paper product. It’s lightweight and translucent. The image will show through the opposite side, but will be less vivid. Since it’s a paper product, it requires a different type of texturing technique. Paper is porous and when wet, will start to ripple. To help minimize this, the wing prints need to be sealed. I’ve listed several options for this. Use the Hi-Gloss Spray Lacquer. The object is to create a waterproof coating as much a possible. Texturing will be done using either Liquitex Glazing Medium or you can use the Golden brand if you like that product or Liquitex Gloss Heavy Gel. These are acrylic sealers. The object is to create a lighter looking texture and or dimension to a flat surface. DG3 , Sakura or Diamond Glaze are not recommended for vellum wings. These products take a while to dry and the time the wet adhesive will be sitting on the image will cause the paper to absorb the liquid and become all rippled and unattractive.
Vellum wings are among my favorite wing media. I get excited when I see a new pattern that can be translated into a potential wing design. The nice thing about Vellum is the softness it produces. Wings made from Vel-lum look a bit more natural.
Supply List: 1. Vellum Wing printed sheet
2. Liquitex Glazing Medium
3. Liquitex Gloss Heavy Gel (optional - See page
13)
4. A soft bristle brush, preferably 1/2 inch wide
for Glazing Medium or a Wisp brush for the Gel
Medium (depending on the texture you want).
5. Spray Lacquer (any brand will work as long as it
says LACQUER)
6. FabriTac
7. Craft Wire (20g)
8. Scissors
9. 3M Super 77 Spray Adhesive (optional for film)
10. 2 pair of pliers (see part one—Film wings)
Copyright 2012 by J. Serresseque. All rights reserved. The material, including images in this tutorial may not be duplicated, sold or redistributed in whole or in part without written permission of the author. This tutorial is for the individual’s personal use only. Any finished wings made from the use of this tutorial are the property of the artist and they may do as they wish with their finished wings.
3 © J. Serresseque, 2012
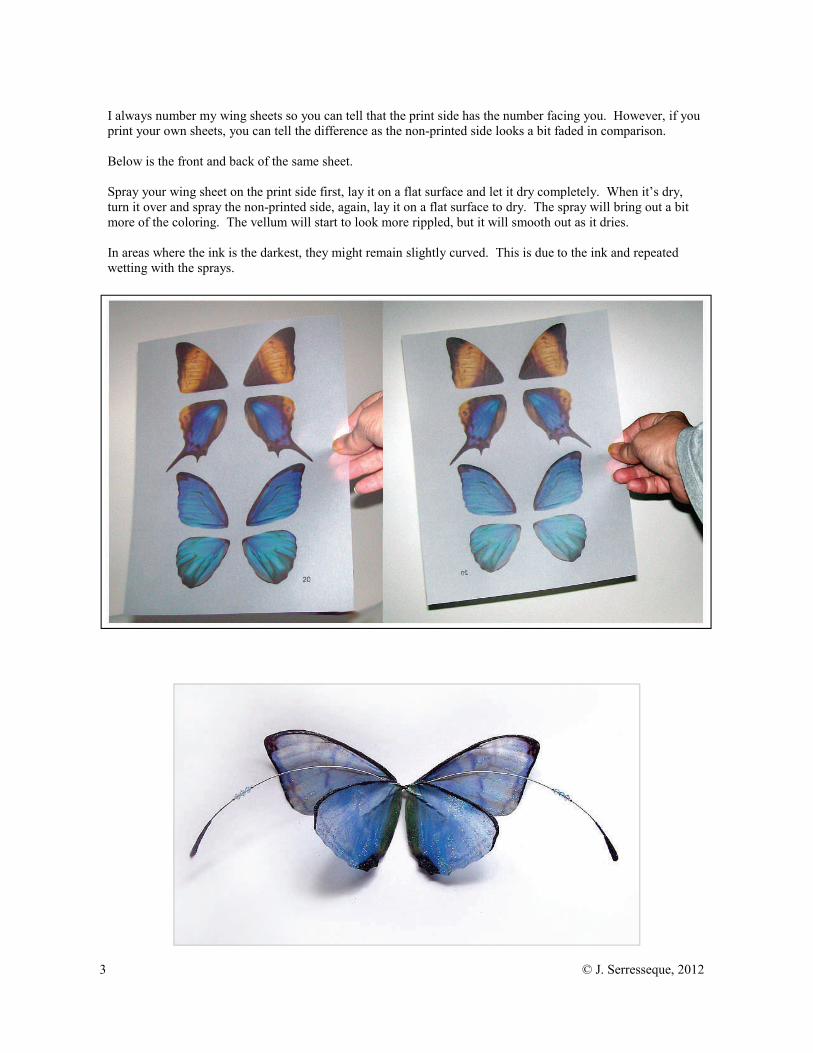
I always number my wing sheets so you can tell that the print side has the number facing you. However, if you print your own sheets, you can tell the difference as the non-printed side looks a bit faded in comparison. Below is the front and back of the same sheet. Spray your wing sheet on the print side first, lay it on a flat surface and let it dry completely. When it’s dry, turn it over and spray the non-printed side, again, lay it on a flat surface to dry. The spray will bring out a bit more of the coloring. The vellum will start to look more rippled, but it will smooth out as it dries. In areas where the ink is the darkest, they might remain slightly curved. This is due to the ink and repeated wetting with the sprays.
4 © J. Serresseque, 2012
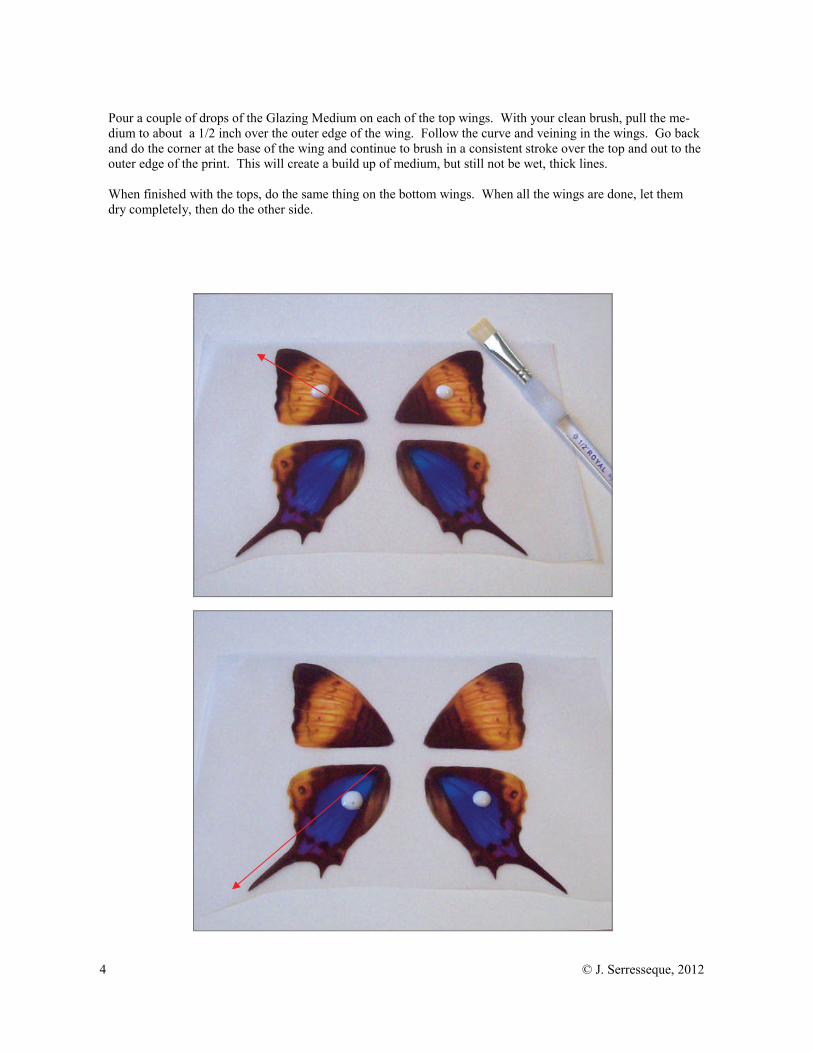
Pour a couple of drops of the Glazing Medium on each of the top wings. With your clean brush, pull the me-dium to about a 1/2 inch over the outer edge of the wing. Follow the curve and veining in the wings. Go back and do the corner at the base of the wing and continue to brush in a consistent stroke over the top and out to the outer edge of the print. This will create a build up of medium, but still not be wet, thick lines. When finished with the tops, do the same thing on the bottom wings. When all the wings are done, let them dry completely, then do the other side.

5 © J. Serresseque, 2012
You can see the ridges of Liquitex Glazing Medium on the top image. When this dries, it will be clear, but the ridges will pick up light, giving the wing dimension rather than a flat paper appearance.
This is what it looks like all dry. Both sides are finished and it’s ready to cut out.
6 © J. Serresseque, 2012
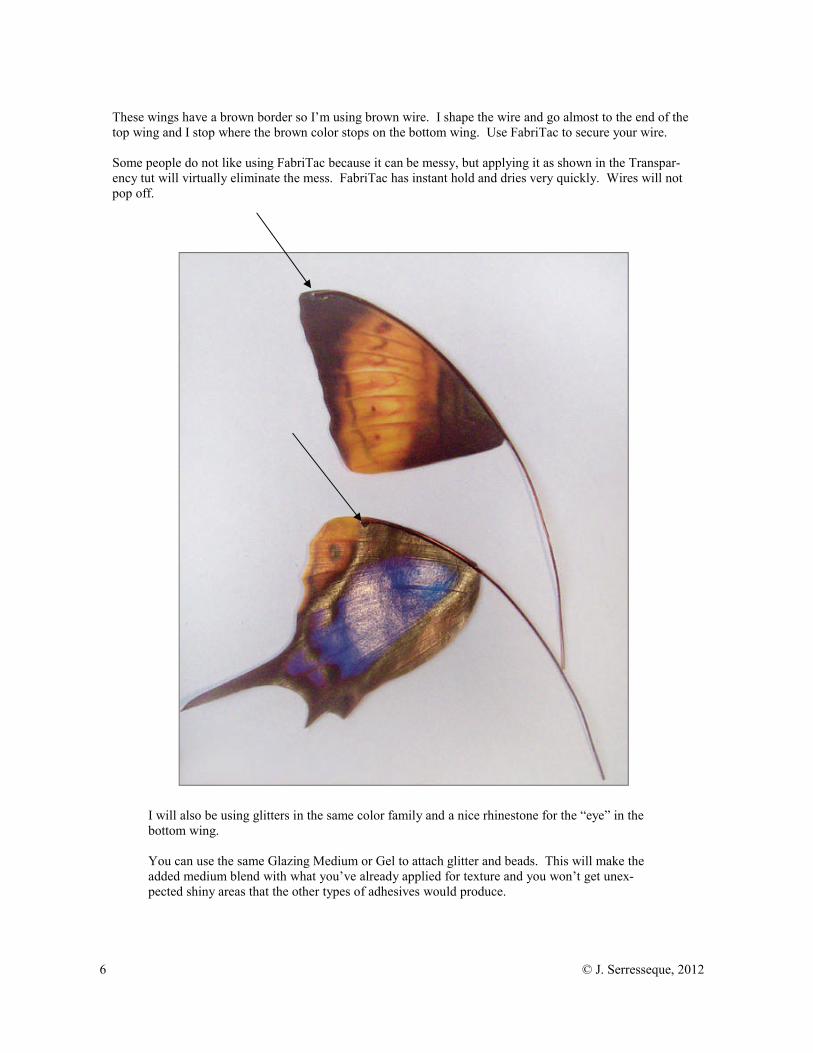
These wings have a brown border so I’m using brown wire. I shape the wire and go almost to the end of the top wing and I stop where the brown color stops on the bottom wing. Use FabriTac to secure your wire. Some people do not like using FabriTac because it can be messy, but applying it as shown in the Transpar-ency tut will virtually eliminate the mess. FabriTac has instant hold and dries very quickly. Wires will not pop off.
I will also be using glitters in the same color family and a nice rhinestone for the “eye” in the bottom wing. You can use the same Glazing Medium or Gel to attach glitter and beads. This will make the added medium blend with what you’ve already applied for texture and you won’t get unex-pected shiny areas that the other types of adhesives would produce.
7 © J. Serresseque, 2012
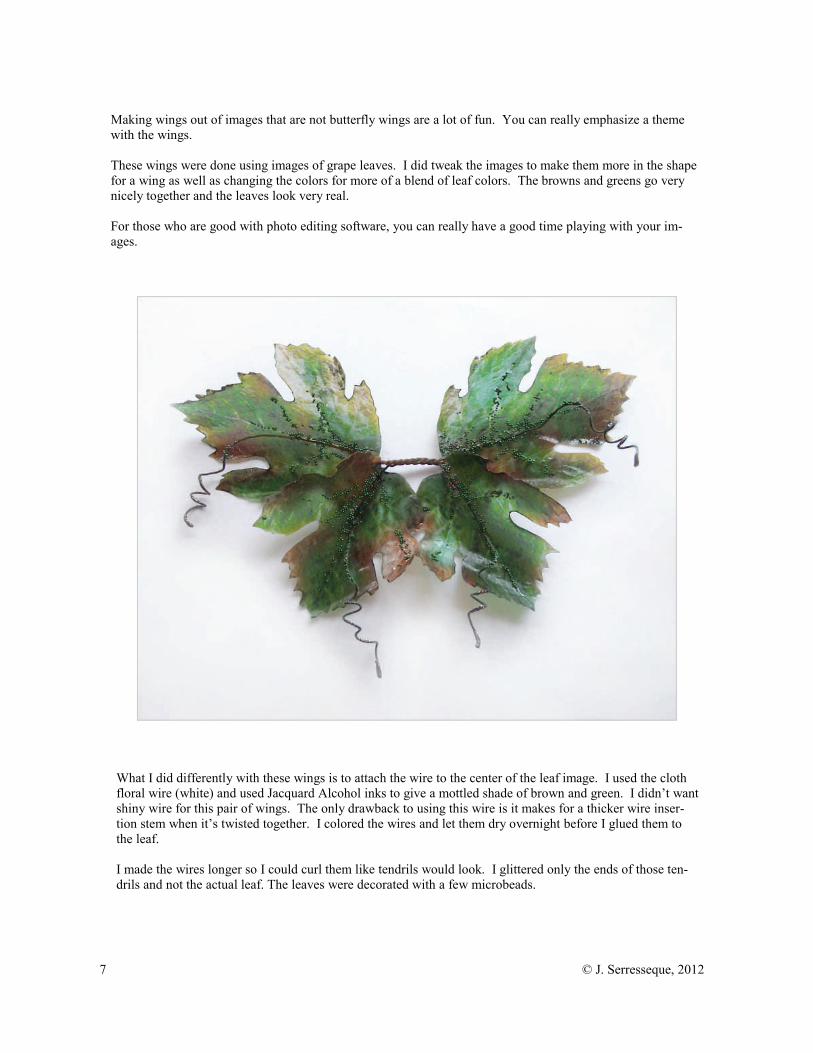
Making wings out of images that are not butterfly wings are a lot of fun. You can really emphasize a theme with the wings. These wings were done using images of grape leaves. I did tweak the images to make them more in the shape for a wing as well as changing the colors for more of a blend of leaf colors. The browns and greens go very nicely together and the leaves look very real. For those who are good with photo editing software, you can really have a good time playing with your im-ages.
What I did differently with these wings is to attach the wire to the center of the leaf image. I used the cloth floral wire (white) and used Jacquard Alcohol inks to give a mottled shade of brown and green. I didn’t want shiny wire for this pair of wings. The only drawback to using this wire is it makes for a thicker wire inser-tion stem when it’s twisted together. I colored the wires and let them dry overnight before I glued them to the leaf. I made the wires longer so I could curl them like tendrils would look. I glittered only the ends of those ten-drils and not the actual leaf. The leaves were decorated with a few microbeads.
8 © J. Serresseque, 2012
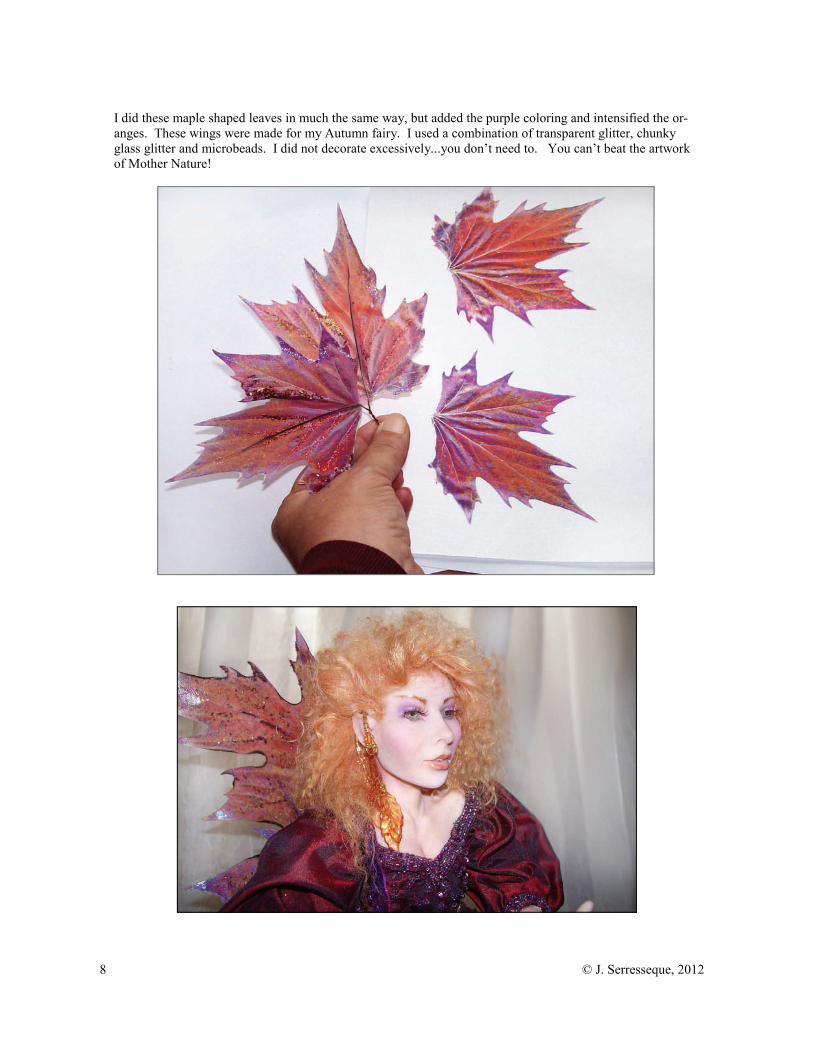
I did these maple shaped leaves in much the same way, but added the purple coloring and intensified the or-anges. These wings were made for my Autumn fairy. I used a combination of transparent glitter, chunky glass glitter and microbeads. I did not decorate excessively...you don’t need to. You can’t beat the artwork of Mother Nature!
9 © J. Serresseque, 2012
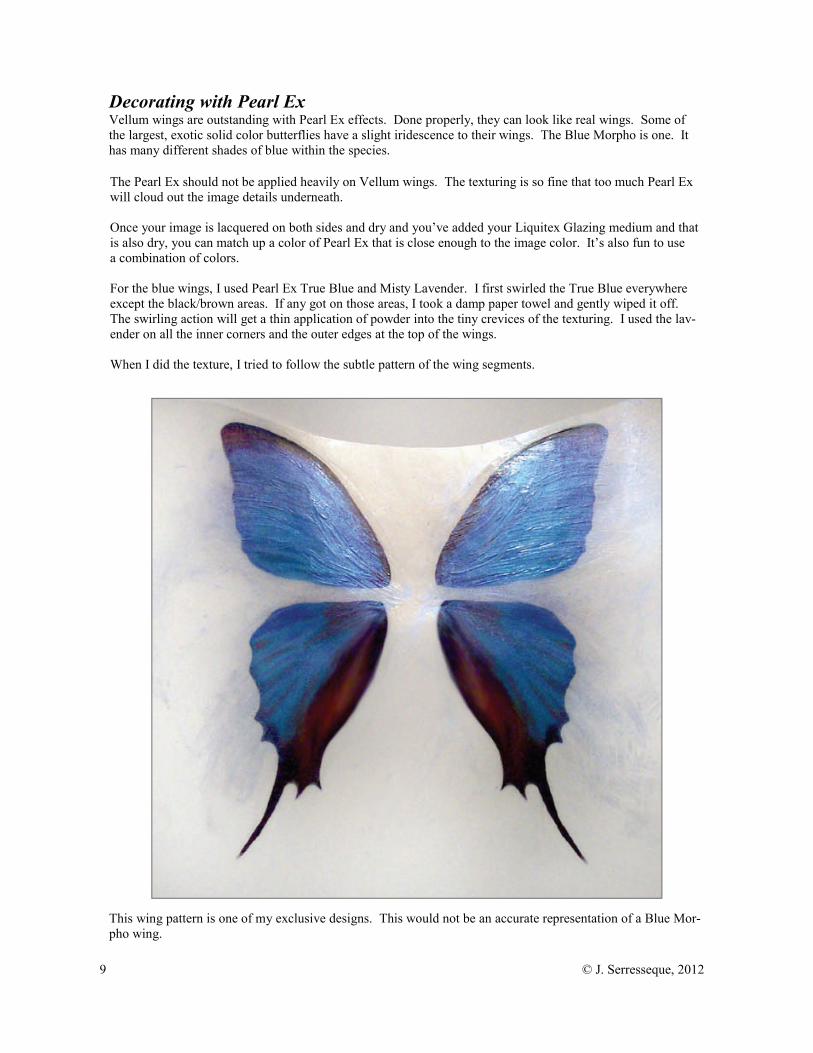
Decorating with Pearl Ex Vellum wings are outstanding with Pearl Ex effects. Done properly, they can look like real wings. Some of the largest, exotic solid color butterflies have a slight iridescence to their wings. The Blue Morpho is one. It has many different shades of blue within the species.
The Pearl Ex should not be applied heavily on Vellum wings. The texturing is so fine that too much Pearl Ex will cloud out the image details underneath. Once your image is lacquered on both sides and dry and you’ve added your Liquitex Glazing medium and that is also dry, you can match up a color of Pearl Ex that is close enough to the image color. It’s also fun to use a combination of colors. For the blue wings, I used Pearl Ex True Blue and Misty Lavender. I first swirled the True Blue everywhere except the black/brown areas. If any got on those areas, I took a damp paper towel and gently wiped it off. The swirling action will get a thin application of powder into the tiny crevices of the texturing. I used the lav-ender on all the inner corners and the outer edges at the top of the wings. When I did the texture, I tried to follow the subtle pattern of the wing segments.
This wing pattern is one of my exclusive designs. This would not be an accurate representation of a Blue Mor-pho wing.
10 © J. Serresseque, 2012
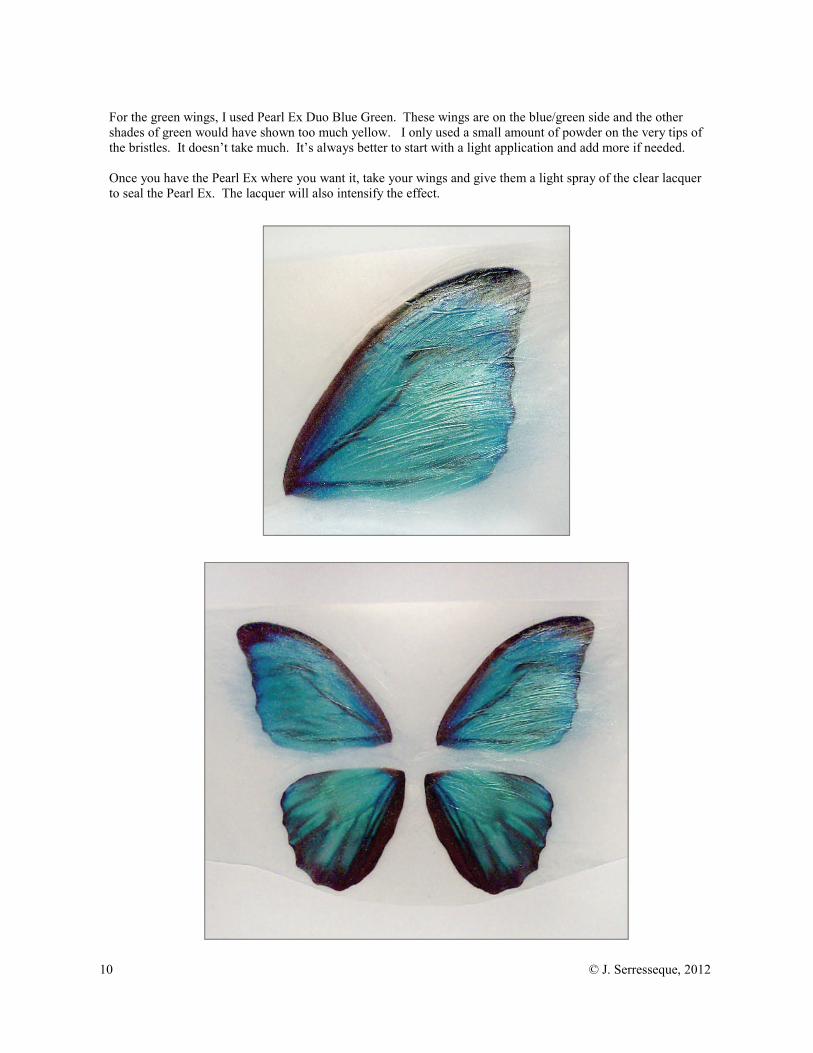
For the green wings, I used Pearl Ex Duo Blue Green. These wings are on the blue/green side and the other shades of green would have shown too much yellow. I only used a small amount of powder on the very tips of the bristles. It doesn’t take much. It’s always better to start with a light application and add more if needed. Once you have the Pearl Ex where you want it, take your wings and give them a light spray of the clear lacquer to seal the Pearl Ex. The lacquer will also intensify the effect.
11 © J. Serresseque, 2012
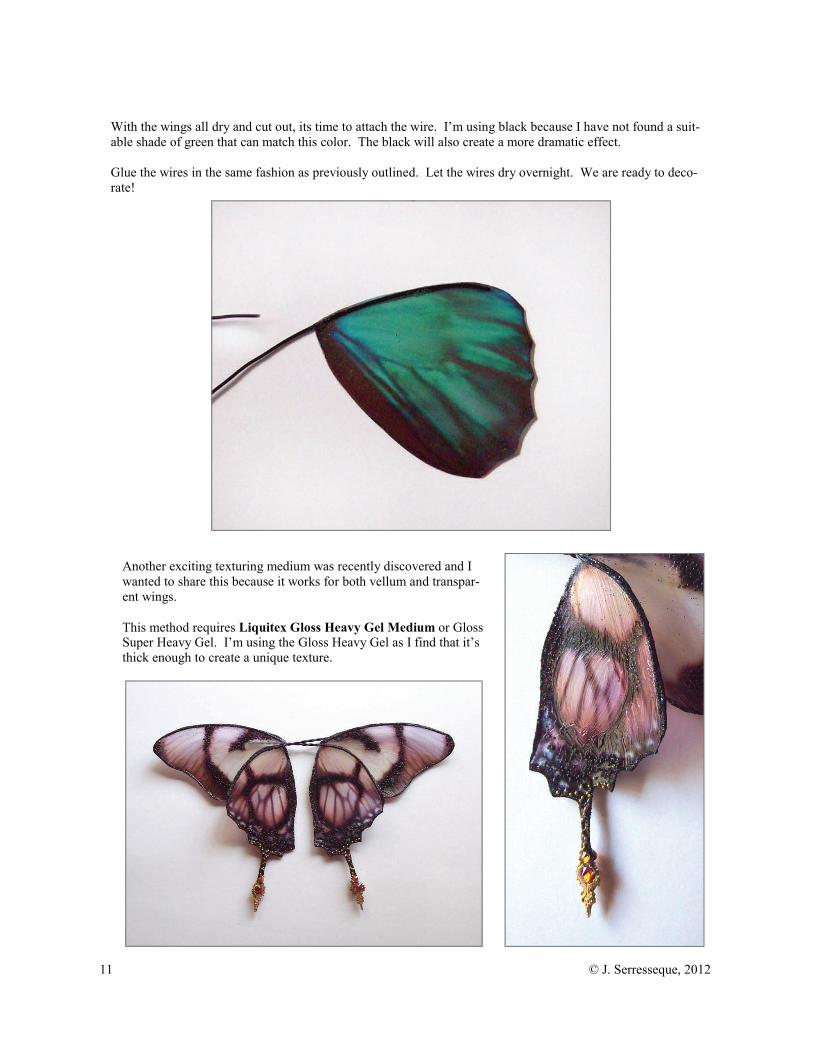
With the wings all dry and cut out, its time to attach the wire. I’m using black because I have not found a suit-able shade of green that can match this color. The black will also create a more dramatic effect. Glue the wires in the same fashion as previously outlined. Let the wires dry overnight. We are ready to deco-rate!
Another exciting texturing medium was recently discovered and I wanted to share this because it works for both vellum and transpar-ent wings. This method requires Liquitex Gloss Heavy Gel Medium or Gloss Super Heavy Gel. I’m using the Gloss Heavy Gel as I find that it’s thick enough to create a unique texture.
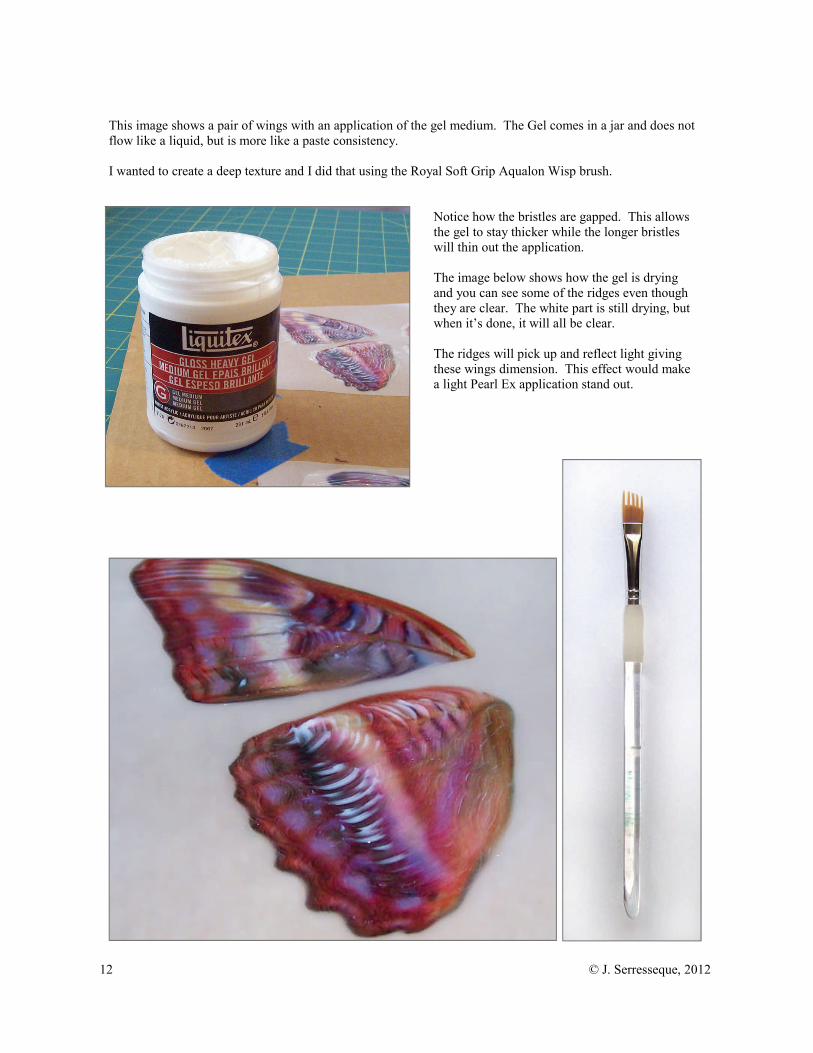
12 © J. Serresseque, 2012
This image shows a pair of wings with an application of the gel medium. The Gel comes in a jar and does not flow like a liquid, but is more like a paste consistency. I wanted to create a deep texture and I did that using the Royal Soft Grip Aqualon Wisp brush.
Notice how the bristles are gapped. This allows the gel to stay thicker while the longer bristles will thin out the application. The image below shows how the gel is drying and you can see some of the ridges even though they are clear. The white part is still drying, but when it’s done, it will all be clear. The ridges will pick up and reflect light giving these wings dimension. This effect would make a light Pearl Ex application stand out.
13 © J. Serresseque, 2012
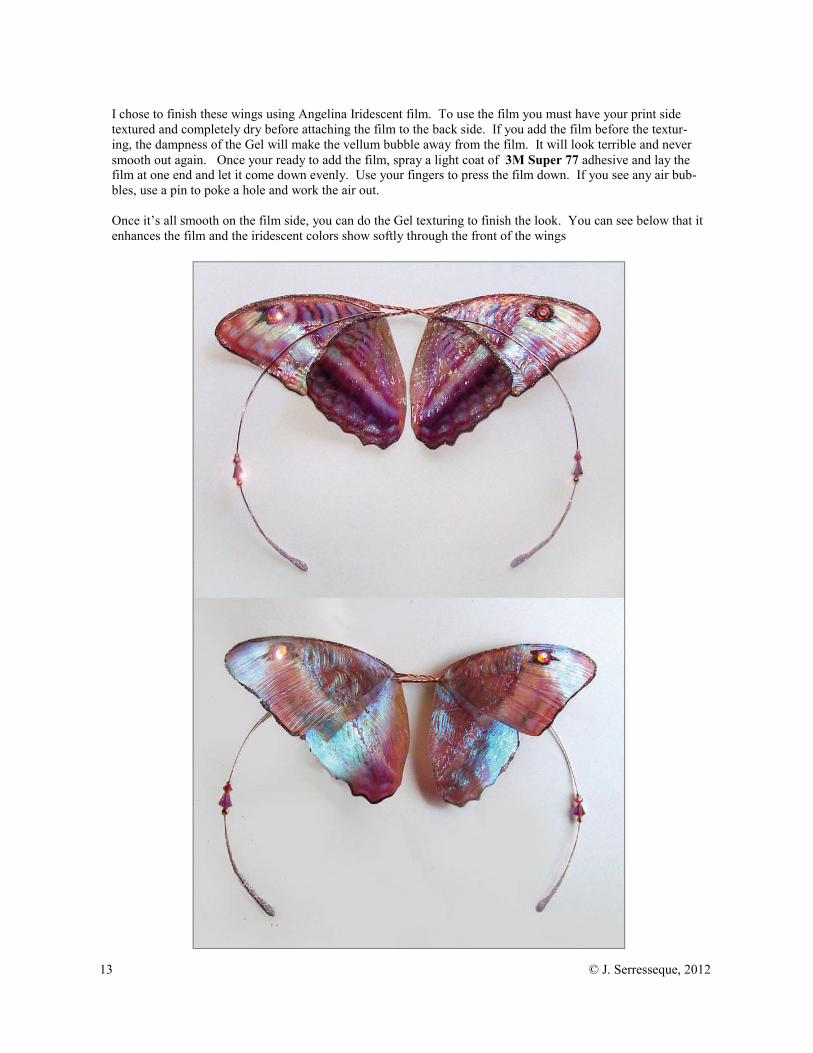
I chose to finish these wings using Angelina Iridescent film. To use the film you must have your print side textured and completely dry before attaching the film to the back side. If you add the film before the textur-ing, the dampness of the Gel will make the vellum bubble away from the film. It will look terrible and never smooth out again. Once your ready to add the film, spray a light coat of 3M Super 77 adhesive and lay the film at one end and let it come down evenly. Use your fingers to press the film down. If you see any air bub-bles, use a pin to poke a hole and work the air out. Once it’s all smooth on the film side, you can do the Gel texturing to finish the look. You can see below that it enhances the film and the iridescent colors show softly through the front of the wings
14 © J. Serresseque, 2012
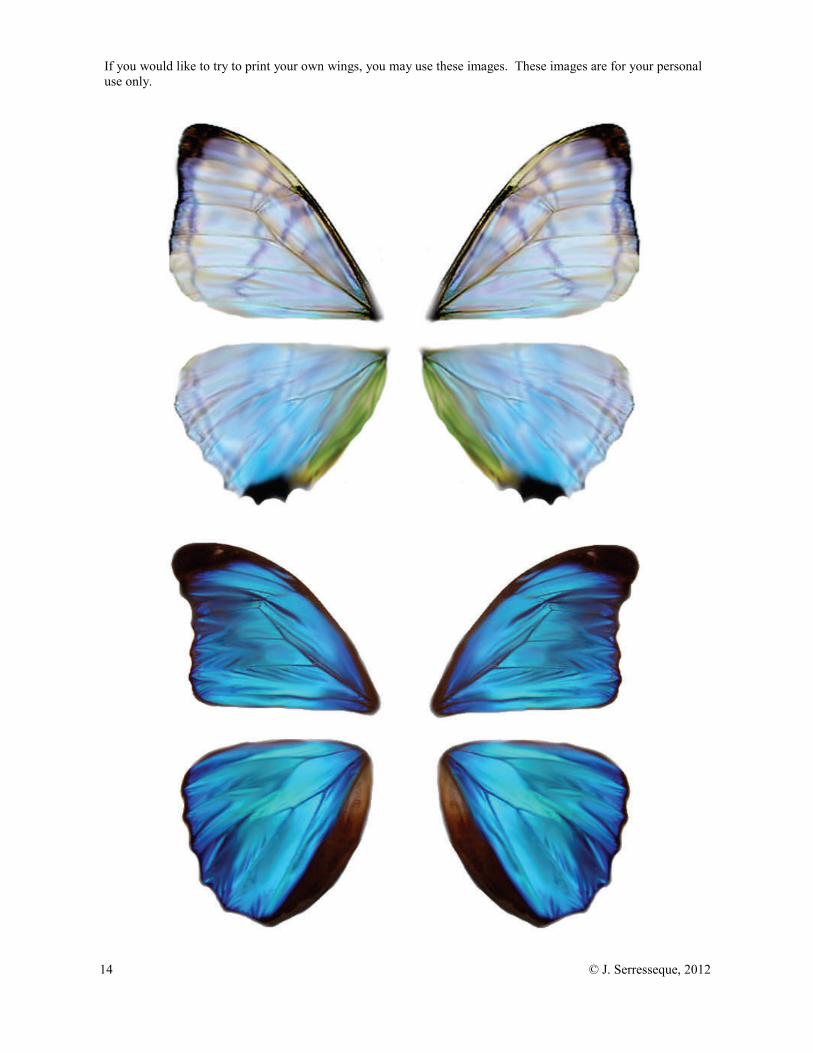
If you would like to try to print your own wings, you may use these images. These images are for your personal use only.