parts list operating and service · pdf fileparts list operating and service manual legend ......
TRANSCRIPT
l
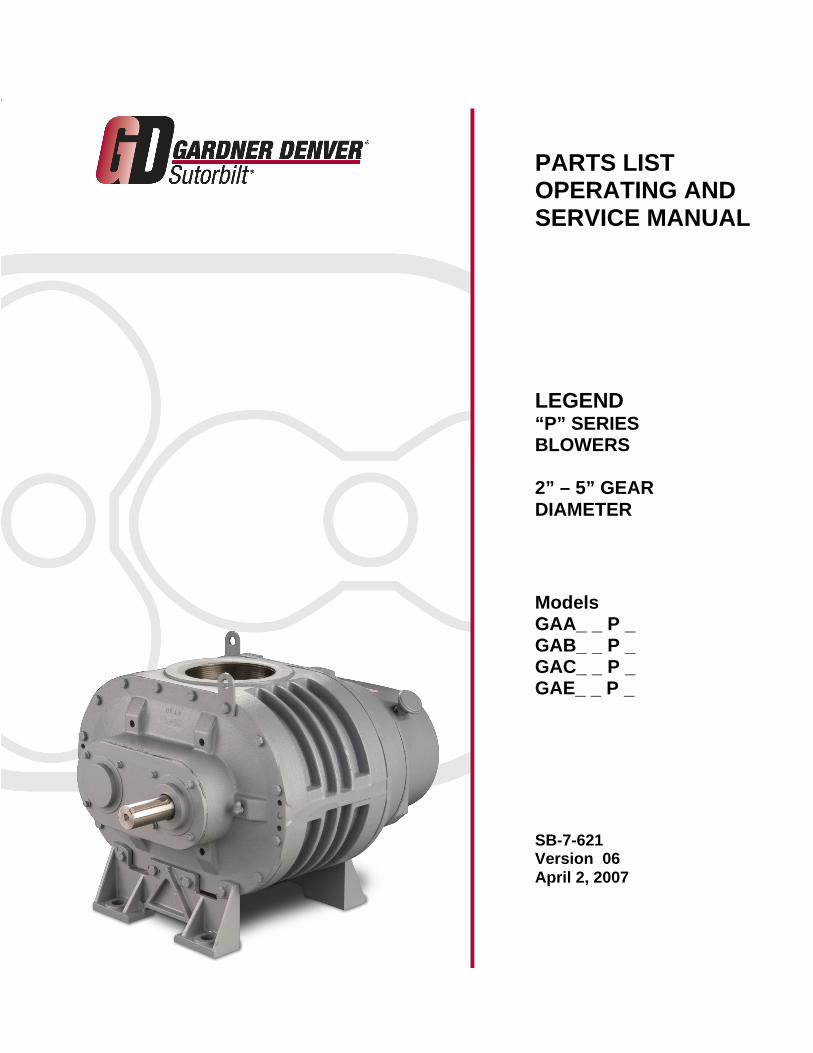
PARTS LIST OPERATING AND SERVICE MANUAL
LEGEND “P” SERIES BLOWERS
2” – 5” GEAR DIAMETER
Models GAA_ _ P _ GAB_ _ P _ GAC_ _ P _ GAE_ _ P _
SB-7-621 Version 06 April 2, 2007

SB-7-621 Page 2
MAINTAIN BLOWER RELIABILITY AND PERFORMANCE WITH GENUINE GARDNER DENVER PARTS AND SUPPORT SERVICES
Factory genuine parts, manufactured to design tolerances, are developed for optimum dependability - - - specifically for your blower. Design and material innovations are born from years of experience with hundreds of different blower applications. When you specify factory genuine parts you are assured of receiving parts that incorporate the most current design advancements manufactured in our state-of-the-art blower factory under exacting quality standards.
Your AUTHORIZED DISTRIBUTOR offers all the backup you require. A worldwide network of authorized distributors provides the finest product support in the blower industry.
1. Trained parts technical representatives to assist you in selecting the correct replacement parts.
2. Complete inventory of new machines and new, genuine factory parts.
3. A full line of factory tested AEON™ PD blower lubricants specifically formulated for optimum performance in all blowers.
4. Authorized distributor service technicians are factory-trained and skilled in blower maintenance and repair. They are ready to respond and assist you by providing fast, expert maintenance and repair service.
INSTRUCTIONS FOR DETERMINING BLOWER CONFIGURATION
1. Face the blower drive shaft. 2. In a VERTICAL configuration, air flow is horizontal. 3. In a HORIZONTAL configuration, air flow is vertical. 4. In a vertical configuration, a BOTTOM HAND exists when the drive shaft is below the horizontal
center line of the blower. A TOP HAND exits when the drive shaft is above the horizontal center line of the blower.
5. In a horizontal configuration, a RIGHT HAND exists when the drive shaft is to the right of the vertical center line of the blower. A LEFT HAND exists when the drive shaft is to the left of the vertical center line of the blower.
INSTRUCTIONS FOR ORDERING REPAIR PARTS
For pricing, and ordering information contact your nearest AUTHORIZED FACTORY DISTRIBUTOR. When ordering parts, specify Blower MODEL and SERIAL NUMBER (see nameplate on unit).
Rely upon the knowledge and experience of your AUTHORIZED DISTRIBUTOR and let them assist you in making the proper parts selection for your blower.
For the location of your local authorized Gardner Denver blower distributor refer to the yellow pages of your phone directory, check the Web site at www.gardnerdenver.com or contact:
Gardner Denver Compressor Division 1800 Gardner Expressway Quincy, IL 62305 Phone: (217) 222-5400 Fax: (217) 221-8780
SB-7-621 Page 3
GARDNER DENVER LUBRICANT ORDER INFORMATION
Re--order Part Numbers for Factory--Recommended Lubricants.
Gear End
AEON PD Synthetic Lubricant or AEON PD--Food Grade Synthetic Lubricant
AEON PD Synthetic Lubricant
Description
Part Number
1 Quart 28G23 Case/12Quarts 28G24 1 Gallon Container 28G40 5 Gallon Pail 28G25 55 Gallon Drum 28G28
AEON PD--Food Grade Synthetic Lubricant
Description
Part Number
1 Quart 28H97 Case/12Quarts 28H98 1 Gallon Container 28H333 5 Gallon Pail 28H99 55 Gallon Drum 28H100
Drive End
AEON PD Grease
Description
Part Number
Case/10 Tubes 28H283
Call your local Sutorbilt Distributor to place your order for Gardner Denver lubricants. Your Authorized Gardner Denver Distributor is:
SB-7-621 Page 4
FOREWORD Sutorbilt blowers are the result of advanced engineering and skilled manufacturing. To be assured of receiving maximum service from this machine, the owner must exercise care in its operation and maintenance. This book is written to give the operator and maintenance department essential information for day-to-day operation, maintenance and adjustment. Careful adherence to these instructions will result in economical operation and minimum downtime.
Danger is used to indicate the presence of a hazard which will cause severe personal injury, death, or substantial property damage if the warning is ignored.
Warning is used to indicate the presence of a hazard which can cause severe personal injury, death, or substantial property damage if the warning is ignored.
Caution is used to indicate the presence of a hazard which will or can cause minor personal injury or property damage if the warning is ignored.
NOTICE Notice is used to notify people of installation, operation or maintenance information which is important but not hazard-related.
SB-7-621 Page 5
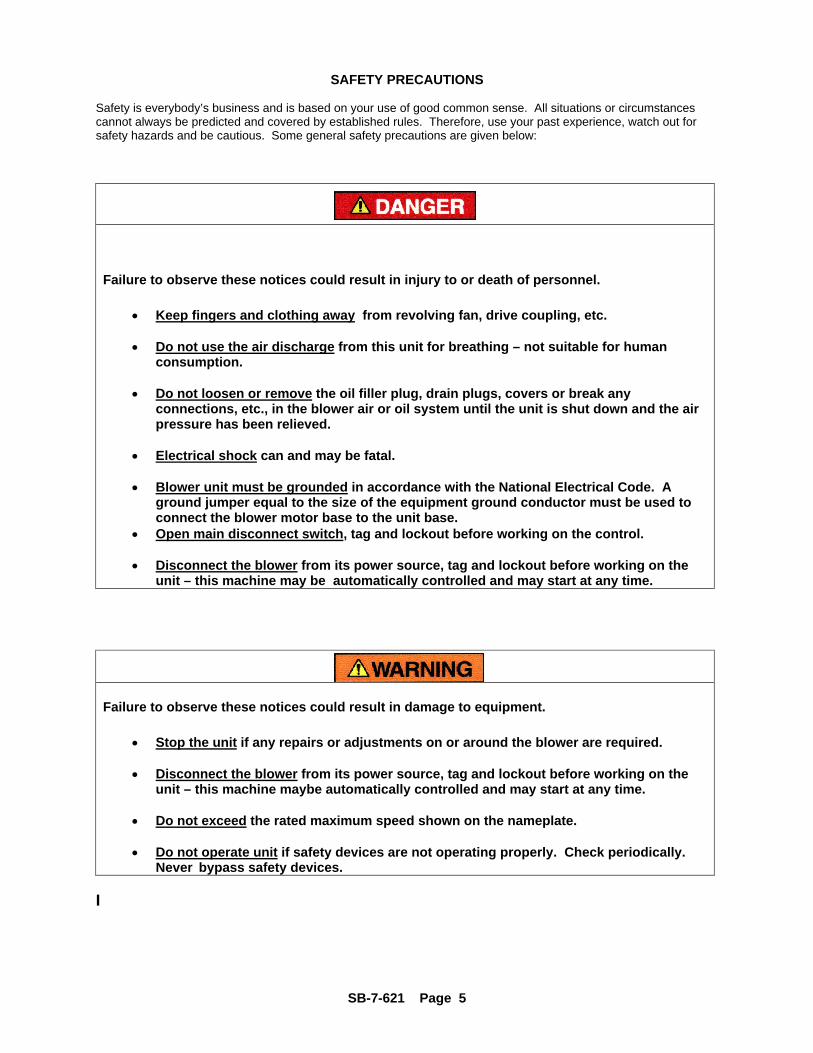
SAFETY PRECAUTIONS
Safety is everybody’s business and is based on your use of good common sense. All situations or circumstances cannot always be predicted and covered by established rules. Therefore, use your past experience, watch out for safety hazards and be cautious. Some general safety precautions are given below:
Failure to observe these notices could result in injury to or death of personnel.
Keep fingers and clothing away from revolving fan, drive coupling, etc.
Do not use the air discharge from this unit for breathing – not suitable for human consumption.
Do not loosen or remove the oil filler plug, drain plugs, covers or break any connections, etc., in the blower air or oil system until the unit is shut down and the air pressure has been relieved.
Electrical shock can and may be fatal.
Blower unit must be grounded in accordance with the National Electrical Code. A ground jumper equal to the size of the equipment ground conductor must be used to connect the blower motor base to the unit base.
Open main disconnect switch, tag and lockout before working on the control.
Disconnect the blower from its power source, tag and lockout before working on the unit – this machine may be automatically controlled and may start at any time.
Failure to observe these notices could result in damage to equipment.
Stop the unit if any repairs or adjustments on or around the blower are required.
Disconnect the blower from its power source, tag and lockout before working on the unit – this machine maybe automatically controlled and may start at any time.
Do not exceed the rated maximum speed shown on the nameplate.
Do not operate unit if safety devices are not operating properly. Check periodically. Never bypass safety devices.
I
SB-7-621 Page 6
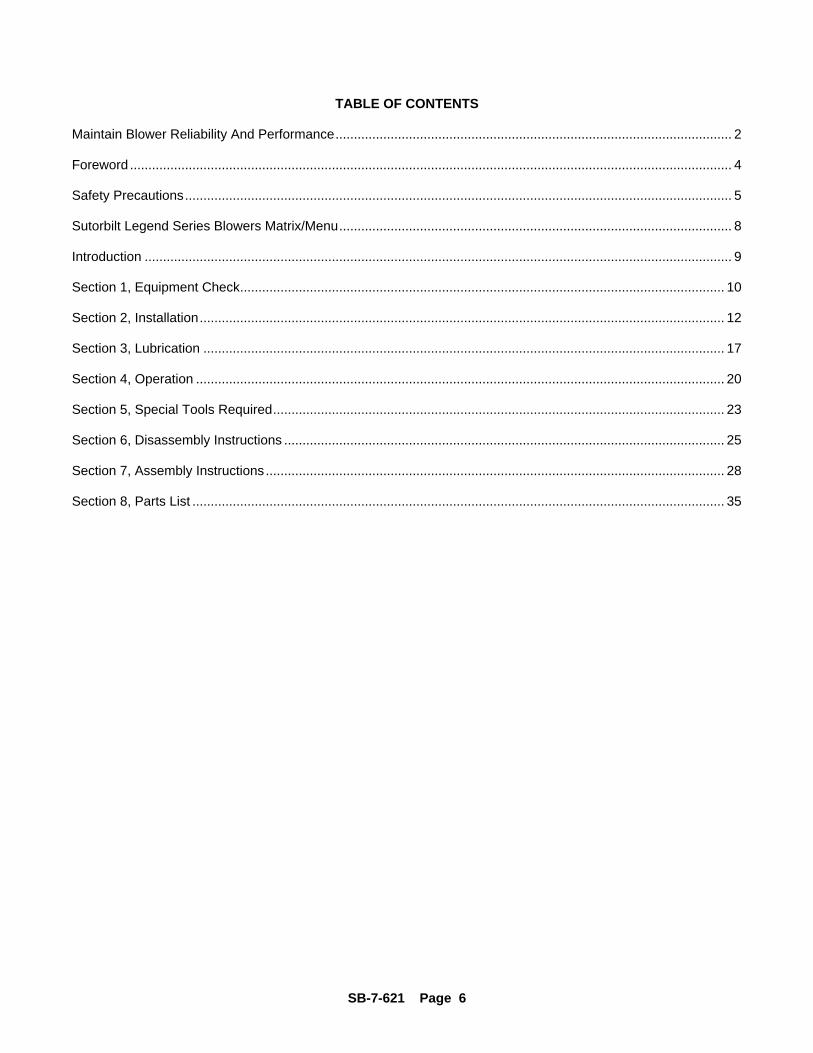
TABLE OF CONTENTS
Maintain Blower Reliability And Performance............................................................................................................ 2
Foreword .................................................................................................................................................................... 4
Safety Precautions..................................................................................................................................................... 5
Sutorbilt Legend Series Blowers Matrix/Menu........................................................................................................... 8
Introduction ................................................................................................................................................................ 9
Section 1, Equipment Check.................................................................................................................................... 10
Section 2, Installation............................................................................................................................................... 12
Section 3, Lubrication .............................................................................................................................................. 17
Section 4, Operation ................................................................................................................................................ 20
Section 5, Special Tools Required........................................................................................................................... 23
Section 6, Disassembly Instructions ........................................................................................................................ 25
Section 7, Assembly Instructions............................................................................................................................. 28
Section 8, Parts List ................................................................................................................................................. 35
SB-7-621 Page 7
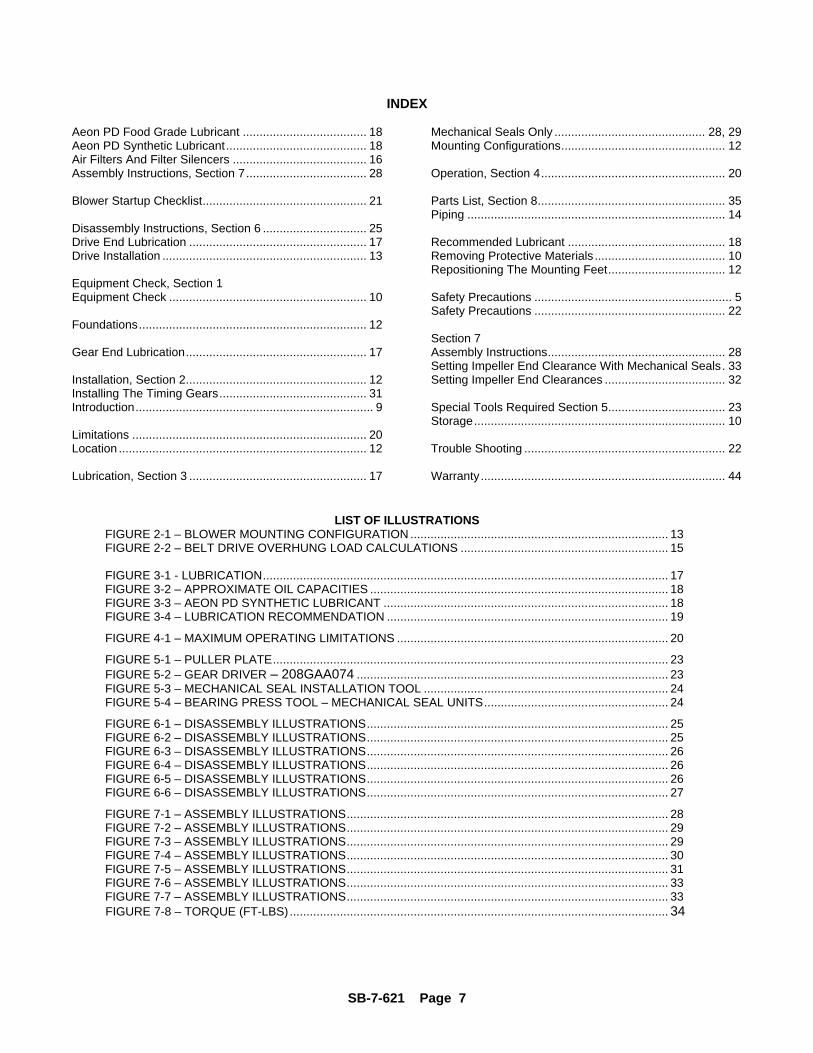
INDEX
Aeon PD Food Grade Lubricant ..................................... 18 Aeon PD Synthetic Lubricant.......................................... 18 Air Filters And Filter Silencers ........................................ 16 Assembly Instructions, Section 7.................................... 28
Blower Startup Checklist................................................. 21
Disassembly Instructions, Section 6 ............................... 25 Drive End Lubrication ..................................................... 17 Drive Installation ............................................................. 13
Equipment Check, Section 1 Equipment Check ........................................................... 10
Foundations.................................................................... 12
Gear End Lubrication...................................................... 17
Installation, Section 2...................................................... 12 Installing The Timing Gears............................................ 31 Introduction....................................................................... 9
Limitations ...................................................................... 20 Location .......................................................................... 12
Lubrication, Section 3 ..................................................... 17
Mechanical Seals Only ............................................. 28, 29 Mounting Configurations................................................. 12
Operation, Section 4....................................................... 20
Parts List, Section 8........................................................ 35 Piping ............................................................................. 14
Recommended Lubricant ............................................... 18 Removing Protective Materials ....................................... 10 Repositioning The Mounting Feet................................... 12
Safety Precautions ........................................................... 5 Safety Precautions ......................................................... 22
Section 7 Assembly Instructions..................................................... 28 Setting Impeller End Clearance With Mechanical Seals. 33 Setting Impeller End Clearances .................................... 32
Special Tools Required Section 5................................... 23 Storage........................................................................... 10
Trouble Shooting ............................................................ 22
Warranty......................................................................... 44
LIST OF ILLUSTRATIONS FIGURE 2-1 – BLOWER MOUNTING CONFIGURATION ............................................................................. 13 FIGURE 2-2 – BELT DRIVE OVERHUNG LOAD CALCULATIONS .............................................................. 15
FIGURE 3-1 - LUBRICATION......................................................................................................................... 17 FIGURE 3-2 – APPROXIMATE OIL CAPACITIES ......................................................................................... 18 FIGURE 3-3 – AEON PD SYNTHETIC LUBRICANT ..................................................................................... 18 FIGURE 3-4 – LUBRICATION RECOMMENDATION .................................................................................... 19
FIGURE 4-1 – MAXIMUM OPERATING LIMITATIONS ................................................................................. 20
FIGURE 5-1 – PULLER PLATE...................................................................................................................... 23 FIGURE 5-2 – GEAR DRIVER – 208GAA074 ............................................................................................. 23 FIGURE 5-3 – MECHANICAL SEAL INSTALLATION TOOL ......................................................................... 24 FIGURE 5-4 – BEARING PRESS TOOL – MECHANICAL SEAL UNITS....................................................... 24
FIGURE 6-1 – DISASSEMBLY ILLUSTRATIONS.......................................................................................... 25 FIGURE 6-2 – DISASSEMBLY ILLUSTRATIONS.......................................................................................... 25 FIGURE 6-3 – DISASSEMBLY ILLUSTRATIONS.......................................................................................... 26 FIGURE 6-4 – DISASSEMBLY ILLUSTRATIONS.......................................................................................... 26 FIGURE 6-5 – DISASSEMBLY ILLUSTRATIONS.......................................................................................... 26 FIGURE 6-6 – DISASSEMBLY ILLUSTRATIONS.......................................................................................... 27
FIGURE 7-1 – ASSEMBLY ILLUSTRATIONS................................................................................................ 28 FIGURE 7-2 – ASSEMBLY ILLUSTRATIONS................................................................................................ 29 FIGURE 7-3 – ASSEMBLY ILLUSTRATIONS................................................................................................ 29 FIGURE 7-4 – ASSEMBLY ILLUSTRATIONS................................................................................................ 30 FIGURE 7-5 – ASSEMBLY ILLUSTRATIONS................................................................................................ 31 FIGURE 7-6 – ASSEMBLY ILLUSTRATIONS................................................................................................ 33 FIGURE 7-7 – ASSEMBLY ILLUSTRATIONS................................................................................................ 33 FIGURE 7-8 – TORQUE (FT-LBS)................................................................................................................. 34
SB-7-621 Page 8
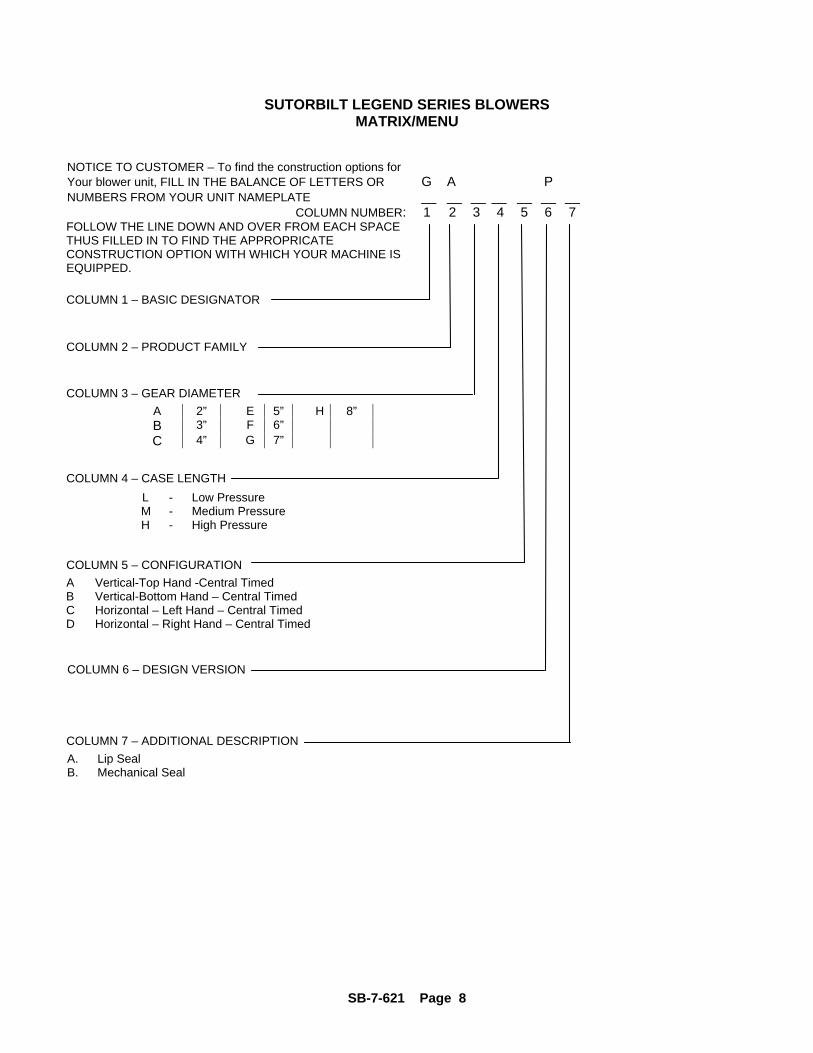
SUTORBILT LEGEND SERIES BLOWERS MATRIX/MENU
NOTICE TO CUSTOMER – To find the construction options for Your blower unit, FILL IN THE BALANCE OF LETTERS OR G A P NUMBERS FROM YOUR UNIT NAMEPLATE __ __ __ __ __ __ __
COLUMN NUMBER:
1 2 3 4 5 6 7
FOLLOW THE LINE DOWN AND OVER FROM EACH SPACE THUS FILLED IN TO FIND THE APPROPRICATE CONSTRUCTION OPTION WITH WHICH YOUR MACHINE IS EQUIPPED.
COLUMN 1 – BASIC DESIGNATOR
COLUMN 2 – PRODUCT FAMILY
COLUMN 3 – GEAR DIAMETER
A 2” E 5” H
8” B 3” F 6” C 4” G 7”
COLUMN 4 – CASE LENGTH
L - Low Pressure M
- Medium Pressure H - High Pressure
COLUMN 5 – CONFIGURATION
A Vertical-Top Hand -Central Timed B Vertical-Bottom Hand – Central Timed C Horizontal – Left Hand – Central Timed D Horizontal – Right Hand – Central Timed
COLUMN 6 – DESIGN VERSION
COLUMN 7 – ADDITIONAL DESCRIPTION
A. Lip Seal B. Mechanical Seal
SB-7-621 Page 9
INTRODUCTION YOUR KEY TO TROUBLE FREE SERVICE
Thank you for investing in Sutorbilt quality. The Sutorbuilt reputation for rugged dependability has been earned by over 50 years of service in demanding, industrial operations where downtime cannot be tolerated and efficient blower performance is expected.
Your Sutorbilt blower is a precision engineered blower that has been carefully manufactured and thoroughly tested at the state-of the art Gardner Denver Blower Factory in Sedalia, Missouri.
As with other precision machinery, there are several relatively simple installation, operation and maintenance procedures that you must observe to assure optimum blower performance. There is no guesswork in the manufacture of your highly advanced Sutorbilt blower and there must be none in preparing the blower to get the job done in the field.
The purpose of this manual is to help you properly install, operate and maintain your Sutorbilt blower. It is essential that you review all sections of this manual in preparation for installing your blower. Follow the instructions for installing your blower. Follow the instructions carefully and you will be rewarded with trouble-free Sutorbilt service year in and year out.
SB-7-621 Page 10
SECTION 1 EQUIPMENT CHECK
Before uncrating, check the packing slip carefully to be sure all the parts have been received. All accessories are listed as separate items on the packing slip, and small important accessories such as relief valves can be overlooked or lost. After every item on the packing slip has been checked off, uncrate carefully.
NOTICE Register a claim with the carrier for lost or damaged equipment.
Customers are cautioned to provide adequate protection, warning and safety equipment necessary to protect personnel against hazards involved in installation and operation of this equipment in the system or facility.
STORAGE
Your Gardner Denver Blower was packaged at the factory with adequate protection to permit normal storage for up to six (6) months.
If the unit is to be stored under adverse conditions or for extended periods of time, the following additional measures should be taken to prevent damage.
1. Store the blower in a clean, dry, heated (if possible) area. 2. Make certain inlet and discharge air ports are tightly covered to prevent foreign material from entering
the air box. 3. All exposed, non-painted surfaces should be protected against rust and corrosion. 4. Provide adequate protection to avoid accidental mechanical damage. 5. In high humidity or corrosive environments, additional measures may be required to prevent rusting of
the blower internal surfaces. 6. To prevent rusting of gears, bearings, etc., the oil reservoirs may be filled with normal operating oil.
Before running the blower, drain the oil and replace to the proper operating level with clean, fresh lubricant.
7. Rotate the blower shaft (10 to 25 turns) weekly during storage. Inspect the blower shaft (near the shaft seal area) monthly and spray with rust inhibitor if needed.
8. For long term storage (over six (6) months), contact Gardner Denver Compressor Division Customer Service for recommendations.
REMOVING PROTECTIVE MATERIALS
The shaft extension is protected with rust inhibitor which can be removed with any standard solvent.
Follow the safety directions of the solvent manufacturer.

SB-7-621 Page 11
Blower inlet and outlet are temporarily capped to keep out dirt and other contaminants during shipment. These covers must be removed before start-up.
The internal surfaces of all Sutorbilt units are mist sprayed with a rust preventative to protect the machine during shipment. Remove this film upon initial startup, using any commercial safety solvent. Position the blower so that the inlet and discharge connections are in the vertical position (vertical airflow). On vertically mounted units, it will be necessary to lay the unit on its side supporting the ends of the unit so as not to restrict the port on the bottom side. Place a shallow pan on the under side of the unit. With the blower disconnected from power, spray the solvent in the top port, rotating the impellers by spinning the shaft manually. Continue this procedure until the unit is visibly clean.
Rotating components will cause severe injury in case of personal contact. Keep hands and loose clothing away from blower inlet and discharge ports.
SB-7-621 Page 12
SECTION 2 INSTALLATION
LOCATION
Install the blower in a well lit, clean dry place with plenty of room for inspection and maintenance.
FOUNDATIONS
For permanent installation we recommend concrete foundations be provided, and the equipment should be grouted to the concrete. It is necessary that a suitable base be used, such as a steel combination base under blower and motor, or a separate sole plate under each. Before grouting, equipment must be leveled, free of all stains, and anchored so no movement will occur during setting of grout. After grout has completely hardened, a recheck is necessary to compensate for shrinkage, etc. If required, add shims under blower feet after final tightening of foundation anchor bolts to remove strain from the blower housing.
Where jack screws or wedges are used during grouting, they must be backed off and wedges removed before final tightening of anchor bolts. Refer to grouting instructions.
Where a concrete foundation is not feasible, care must be taken to insure that equipment is firmly anchored to adequate structural members, restricting movement and vibration.
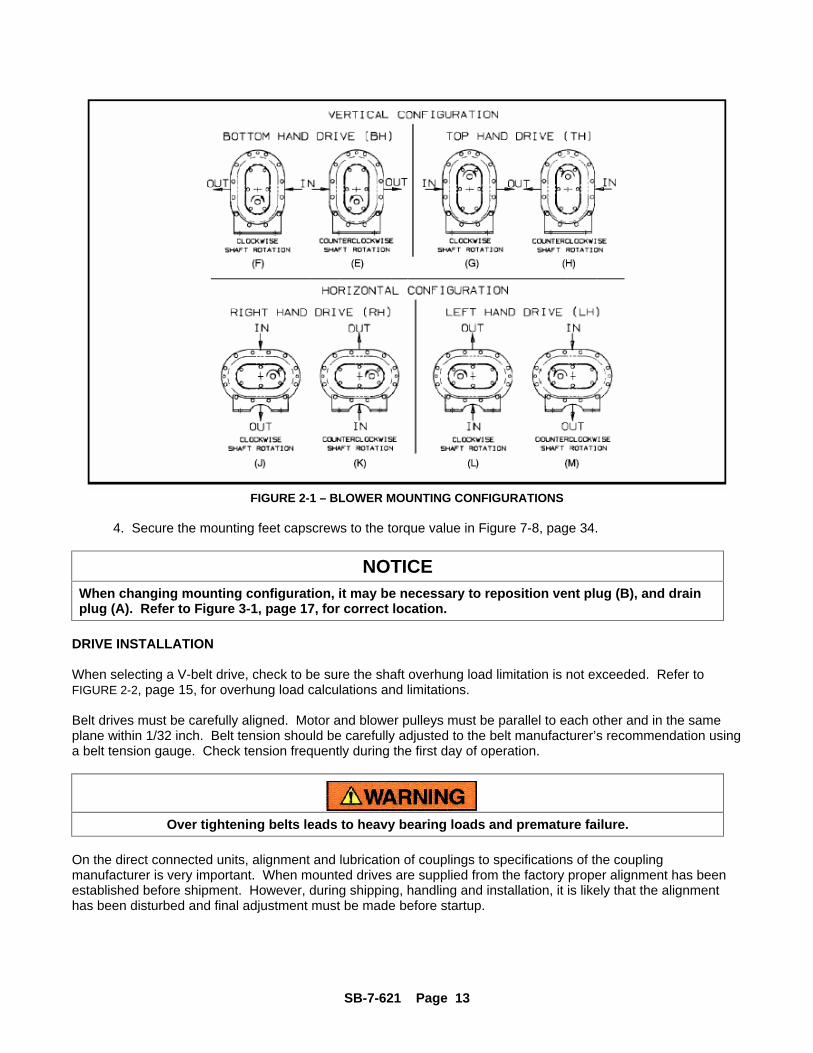
MOUNTING CONFIGURATIONS
The blower flex-mount design enables horizontal and vertical mounting configurations with top or bottom hand, right or left hand shaft positioning. The units are center timed allowing rotation in either direction (refer to Figure 2-1). If converting a blower from vertical to horizontal, or horizontal to vertical mounting configuration, additional mounting feet will be required.
REPOSITIONING THE MOUNTING FEET.
1. Position the mounting feet to the desired location and snug the capscrew.
2. Place the blower on its feet on a flat surface.
3. Loosen mounting feet capscrews and level unit up. The bench or blower base flatness should be within .002 of an inch.
NOTICE If the unit is not flat within .002 of an inch, it will be necessary to shim the blower feet at installation.
SB-7-621 Page 13
FIGURE 2-1 – BLOWER MOUNTING CONFIGURATIONS
4. Secure the mounting feet capscrews to the torque value in Figure 7-8, page 34.
NOTICE When changing mounting configuration, it may be necessary to reposition vent plug (B), and drain plug (A). Refer to Figure 3-1, page 17, for correct location.
DRIVE INSTALLATION
When selecting a V-belt drive, check to be sure the shaft overhung load limitation is not exceeded. Refer to FIGURE 2-2, page 15, for overhung load calculations and limitations.
Belt drives must be carefully aligned. Motor and blower pulleys must be parallel to each other and in the same plane within 1/32 inch. Belt tension should be carefully adjusted to the belt manufacturer’s recommendation using a belt tension gauge. Check tension frequently during the first day of operation.
Over tightening belts leads to heavy bearing loads and premature failure.
On the direct connected units, alignment and lubrication of couplings to specifications of the coupling manufacturer is very important. When mounted drives are supplied from the factory proper alignment has been established before shipment. However, during shipping, handling and installation, it is likely that the alignment has been disturbed and final adjustment must be made before startup.
SB-7-621 Page 14
Exceeding overhung load limitations leads to unwarrantable premature bearing failure and shaft breakage.
The location of the sheave on the blower shaft greatly affects the stress in the shaft. The optimum blower sheave positioning is as close as possible to the blower drive cover, not to exceed dimension “C” in Drive Shaft Illustration, FIGURE 2-2, page 15
The calculated shaft moment must not exceed the maximum allowable moment listed in Maximum Allowable Moment Chart, FIGURE 2-2 page 15. If the calculated shaft moment exceed the maximum allowable moment:
Increase Sheave Diameters to Reduce Belt Pull
Use Jackshaft Drive
Use Direct Coupled or Gearbox Drive
To calculate shaft moment for a given V-Belt Drive Arrangement:
1. Use the formula for Calculation of Belt Pull, FIGURE 2-2, page 15, to calculate belt pull. Refer to Arc of Contact Factor Chart, Figure 2-2, page 15.
2. Insert the calculated belt pull into the formula for Calculation of Shaft Moment, FIGURE 2-2, page 15 to arrive at the calculated shaft moment.
PIPING Inlet and discharge connections on all blowers are large enough to handle maximum volume with minimum friction loss. Reducing the pipe diameter on either inlet or discharge will only create additional line loss and increase the overall pressure differential. Excessive weight of piping and fittings will cause internal misalignment and premature wear. Never allow the blower to carry the weight of the pipe. If possible, a spool or sleeve-type expansion joint should be installed between the unit and the piping. Where a flexible connection is not practical, the weight of the rigid connection must be separately supported.
All system piping must be cleaned internally before connecting to the blower.
Sutorbilt blowers are shipped dry from the factory. Do not attempt to operate the blower before following proper lubrication instructions. Permanent damage to the gears, bearings and seals will occur.
SB-7-621 Page 15
Dimensions (Inches)
Gear
Diameter
(Inches) A B C
(Max)
Maximum
Allowable Moment (LB-IN)
2 2.76 .80 .38 146 3 2.88 .85 .38 385 4 3.49 1.10 .38 490 5 3.90 1.40 .38 1245
MAXIMUM ALLOWABLE MOMENT
DRIVE SHAFT ILLUSTRATION
Z Ac Z Ac Z Ac Z Ac Z Ac Z Ac
0.000 1.000 0.250 0.966 0.500 0.926 0.750 0.879 1.000 0.823 1.250 0.751 0.025 0.997 0.275 0.962 0.525 0.922 0.775 0.874 1.025 0.816 1.275 0.742 0.050 0.994 0.300 0.958 0.550 0.917 0.800 0.869 1.050 0.810 1.300 0.734 0.075 0.990 0.325 0.954 0.575 0.913 0.825 0.864 1.075 0.803 1.325 0.725 0.100 0.987 0.350 0.951 0.600 0.908 0.850 0.858 1.100 0.796 1.350 0.716 0.125 0.983 0.375 0.947 0.625 0.904 0.875 0.852 1.125 0.789 1.375 0.706 0.150 0.980 0.400 0.943 0.650 0.899 0.900 0.847 1.150 0.782 1.400 0.697 0.175 0.977 0.425 0.939 0.675 0.894 0.925 0.841 1.175 0.774 1.425 0.687 0.200 0.973 0.450 0.935 0.700 0.889 0.950 0.835 1.200 0.767 0.225 0.969 0.475 0.930 0.725 0.884 0.975 0.829 1.225 0.759
ARC OF CONTACT FACTORS
Belt Pull = 2.5 – Ac
X 125954 x Hp x S.F.
Ac D x RPM
Key: Ac = Arc of Contact Factor (Refer to Arc of Contact Factor Chart above) Hp = Blower Horsepower for Operating Conditions S.F. = Actual Drive Service Factor D = Blower Sheave Pitch Diameter in Inches RPM = Blower Sheave Speed
Z = Large Sheave Pitch Diameter (in) – Small Sheave Pitch Diameter (in) Sheave Center Distance (in)
CALCULATION OF BELT PULL
Shaft Moment (LB-IN) = Belt Pull x B + C+ Sheave Width
2
CALCULATION OF SHAFT MOMENT
FIGURE 2-2 – BELT DRIVE OVERHUNG LOAD CALCULATIONS
SB-7-621 Page 16
AIR FILTERS AND FILTER SILENCERS
Servicing the air filters is one of the most important maintenance operations to be performed to insure long blower life.
Servicing frequency of filter elements is not time predictable. A differential pressure indicator, with a continuous gauge reading, should be installed across the inlet filter. It will tell how much of the service life of the filter element has been used. It will also eliminate both premature filter servicing and premature blower failure due to a plugged filter when the filter pressure drop is used to establish maintenance points. In all cases refer to the filter manufacturer’s service instructions. Due to the many types of filters, it is not practical to give specific instructions covering all models.
NOTICE No matter what type of filter is used, always make sure all seats, gaskets, clamps and hose connections on the filter and inlet line are absolutely air tight. Each time the filter is serviced, inspect interior of the blower for dirt.
SB-7-621 Page 17
SECTION 3 LUBRICATION
FIGURE 3-1 - LUBRICATION
DRIVE END LUBRICATION
Drive end bearings are grease lubricated at the factory with Lithium Complex based grease. For relubrication, use Gardner Denver AEON PD Grease, Part Number 28H283. AEON PD Grease is a high temperature, high performance grease that is formulated with antiwear additives to provide superior service under the severe operating conditions of positive displacement blowers. It contains rust inhibitors which provide excellent protection against rust and corrosion. If you choose not to use AEON PD Grease, select compatible base grease. The grease should be NLGI Grade 2 EP, contain rust inhibitors, and be suitable for blower discharge temperatures up to 350° F (177° C). Completely clean or purge the factory--filled grease from the blower. Do not mix different types of grease as they may not be compatible. Substitutions may cause early bearing failure.
Re-grease bearings every 500 hours of operation. Lubricate each bearing through the grease fittings located at C in FIGURE 3-1 (2 places). When re-greasing, the old grease will be forced out of the vents (E in FIGURE 3-1). To prevent damage to seals, these vents must be open at all times.
Do not over--grease bearings as this could cause premature bearing failure.
GEAR END LUBRICATION At the gear end, the timing gear teeth are lubricated by being partially submerged in oil. The gear teeth serve as oil slingers for gear end bearings.
Approximate oil sump capacities are listed in FIGURE 3-2, page 18.
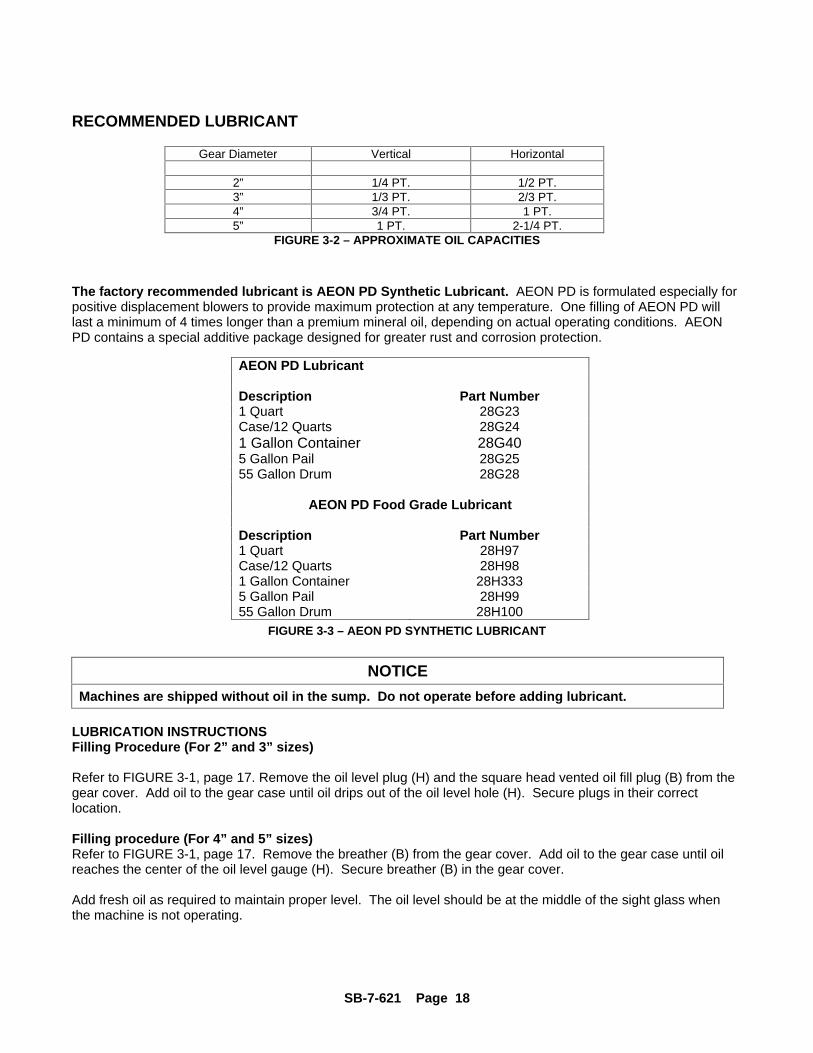
SB-7-621 Page 18
RECOMMENDED LUBRICANT
Gear Diameter Vertical Horizontal
2” 1/4 PT. 1/2 PT. 3” 1/3 PT. 2/3 PT. 4” 3/4 PT. 1 PT. 5” 1 PT. 2-1/4 PT.
FIGURE 3-2 – APPROXIMATE OIL CAPACITIES
The factory recommended lubricant is AEON PD Synthetic Lubricant. AEON PD is formulated especially for positive displacement blowers to provide maximum protection at any temperature. One filling of AEON PD will last a minimum of 4 times longer than a premium mineral oil, depending on actual operating conditions. AEON PD contains a special additive package designed for greater rust and corrosion protection.
AEON PD Lubricant
Description Part Number 1 Quart 28G23 Case/12 Quarts 28G24 1 Gallon Container 28G40 5 Gallon Pail 28G25 55 Gallon Drum 28G28
AEON PD Food Grade Lubricant
Description Part Number 1 Quart 28H97 Case/12 Quarts 28H98 1 Gallon Container 28H333 5 Gallon Pail 28H99 55 Gallon Drum 28H100
FIGURE 3-3 – AEON PD SYNTHETIC LUBRICANT
NOTICE
Machines are shipped without oil in the sump. Do not operate before adding lubricant.
LUBRICATION INSTRUCTIONS Filling Procedure (For 2” and 3” sizes)
Refer to FIGURE 3-1, page 17. Remove the oil level plug (H) and the square head vented oil fill plug (B) from the gear cover. Add oil to the gear case until oil drips out of the oil level hole (H). Secure plugs in their correct location.
Filling procedure (For 4” and 5” sizes) Refer to FIGURE 3-1, page 17. Remove the breather (B) from the gear cover. Add oil to the gear case until oil reaches the center of the oil level gauge (H). Secure breather (B) in the gear cover.
Add fresh oil as required to maintain proper level. The oil level should be at the middle of the sight glass when the machine is not operating.
SB-7-621 Page 19
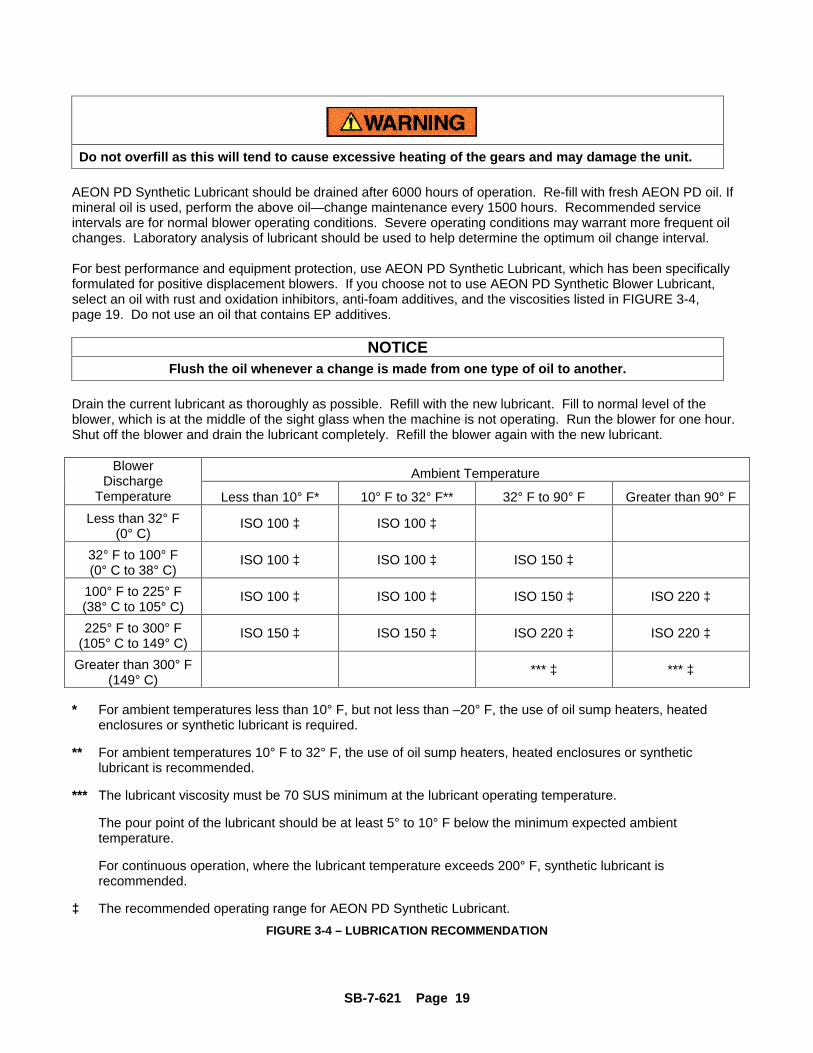
Do not overfill as this will tend to cause excessive heating of the gears and may damage the unit.
AEON PD Synthetic Lubricant should be drained after 6000 hours of operation. Re-fill with fresh AEON PD oil. If mineral oil is used, perform the above oil—change maintenance every 1500 hours. Recommended service intervals are for normal blower operating conditions. Severe operating conditions may warrant more frequent oil changes. Laboratory analysis of lubricant should be used to help determine the optimum oil change interval.
For best performance and equipment protection, use AEON PD Synthetic Lubricant, which has been specifically formulated for positive displacement blowers. If you choose not to use AEON PD Synthetic Blower Lubricant, select an oil with rust and oxidation inhibitors, anti-foam additives, and the viscosities listed in FIGURE 3-4, page 19. Do not use an oil that contains EP additives.
NOTICE Flush the oil whenever a change is made from one type of oil to another.
Drain the current lubricant as thoroughly as possible. Refill with the new lubricant. Fill to normal level of the blower, which is at the middle of the sight glass when the machine is not operating. Run the blower for one hour. Shut off the blower and drain the lubricant completely. Refill the blower again with the new lubricant.
Ambient Temperature Blower Discharge
Temperature Less than 10° F* 10° F to 32° F** 32° F to 90° F Greater than 90° F
Less than 32° F (0° C)
ISO 100 ‡ ISO 100 ‡
32° F to 100° F (0° C to 38° C)
ISO 100 ‡ ISO 100 ‡ ISO 150 ‡
100° F to 225° F (38° C to 105° C)
ISO 100 ‡ ISO 100 ‡ ISO 150 ‡ ISO 220 ‡
225° F to 300° F (105° C to 149° C)
ISO 150 ‡ ISO 150 ‡ ISO 220 ‡ ISO 220 ‡
Greater than 300° F (149° C)
*** ‡ *** ‡
* For ambient temperatures less than 10° F, but not less than –20° F, the use of oil sump heaters, heated enclosures or synthetic lubricant is required.
** For ambient temperatures 10° F to 32° F, the use of oil sump heaters, heated enclosures or synthetic lubricant is recommended.
*** The lubricant viscosity must be 70 SUS minimum at the lubricant operating temperature.
The pour point of the lubricant should be at least 5° to 10° F below the minimum expected ambient temperature.
For continuous operation, where the lubricant temperature exceeds 200° F, synthetic lubricant is recommended.
‡ The recommended operating range for AEON PD Synthetic Lubricant.
FIGURE 3-4 – LUBRICATION RECOMMENDATION
SB-7-621 Page 20
SECTION 4 OPERATION
Future operating problems can be avoided if proper precautions are observed when the equipment is first put into service.
Before starting under power, the blower should be turned over by hand to make certain there is not binding or internal contact.
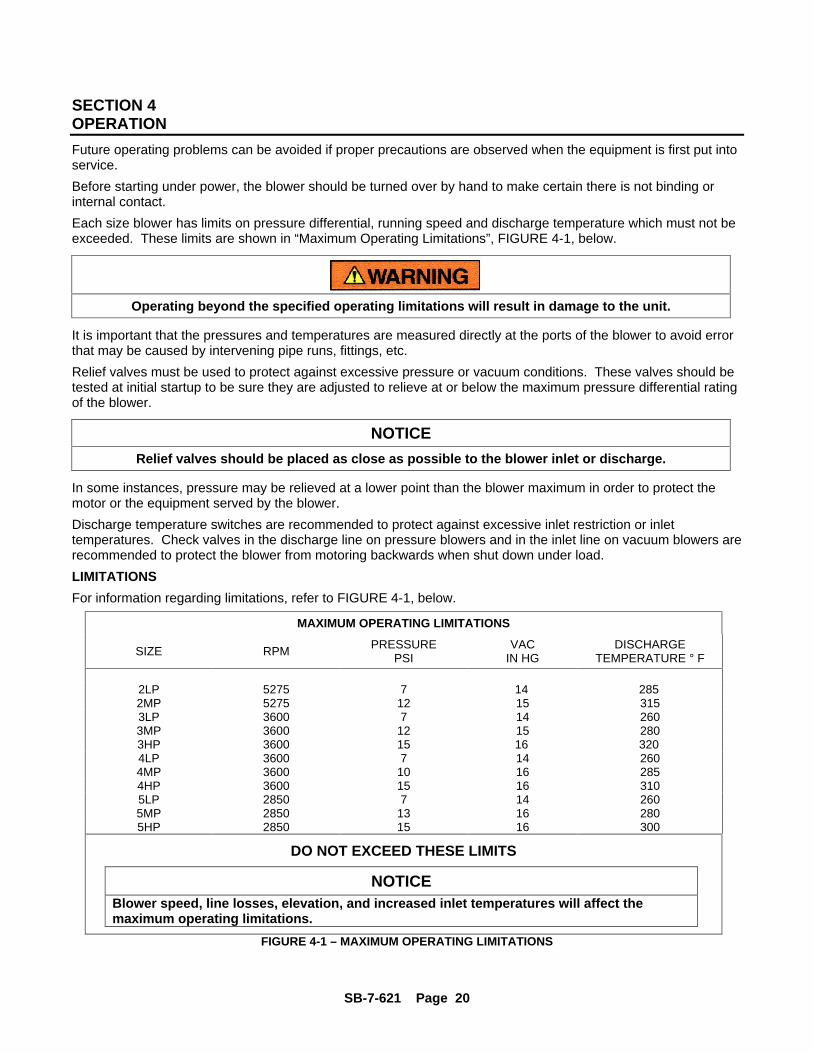
Each size blower has limits on pressure differential, running speed and discharge temperature which must not be exceeded. These limits are shown in “Maximum Operating Limitations”, FIGURE 4-1, below.
Operating beyond the specified operating limitations will result in damage to the unit.
It is important that the pressures and temperatures are measured directly at the ports of the blower to avoid error that may be caused by intervening pipe runs, fittings, etc.
Relief valves must be used to protect against excessive pressure or vacuum conditions. These valves should be tested at initial startup to be sure they are adjusted to relieve at or below the maximum pressure differential rating of the blower.
NOTICE
Relief valves should be placed as close as possible to the blower inlet or discharge.
In some instances, pressure may be relieved at a lower point than the blower maximum in order to protect the motor or the equipment served by the blower.
Discharge temperature switches are recommended to protect against excessive inlet restriction or inlet temperatures. Check valves in the discharge line on pressure blowers and in the inlet line on vacuum blowers are recommended to protect the blower from motoring backwards when shut down under load.
LIMITATIONS
For information regarding limitations, refer to FIGURE 4-1, below.
MAXIMUM OPERATING LIMITATIONS
SIZE RPM PRESSURE PSI
VAC IN HG
DISCHARGE TEMPERATURE ° F
2LP 5275 7 14 285 2MP 5275 12 15 315 3LP 3600 7 14 260 3MP 3600 12 15 280 3HP 3600 15 16 320 4LP 3600 7 14 260 4MP 3600 10 16 285 4HP 3600 15 16 310 5LP 2850 7 14 260 5MP 2850 13 16 280 5HP 2850 15 16 300
DO NOT EXCEED THESE LIMITS
NOTICE Blower speed, line losses, elevation, and increased inlet temperatures will affect the maximum operating limitations.
FIGURE 4-1 – MAXIMUM OPERATING LIMITATIONS
SB-7-621 Page 21
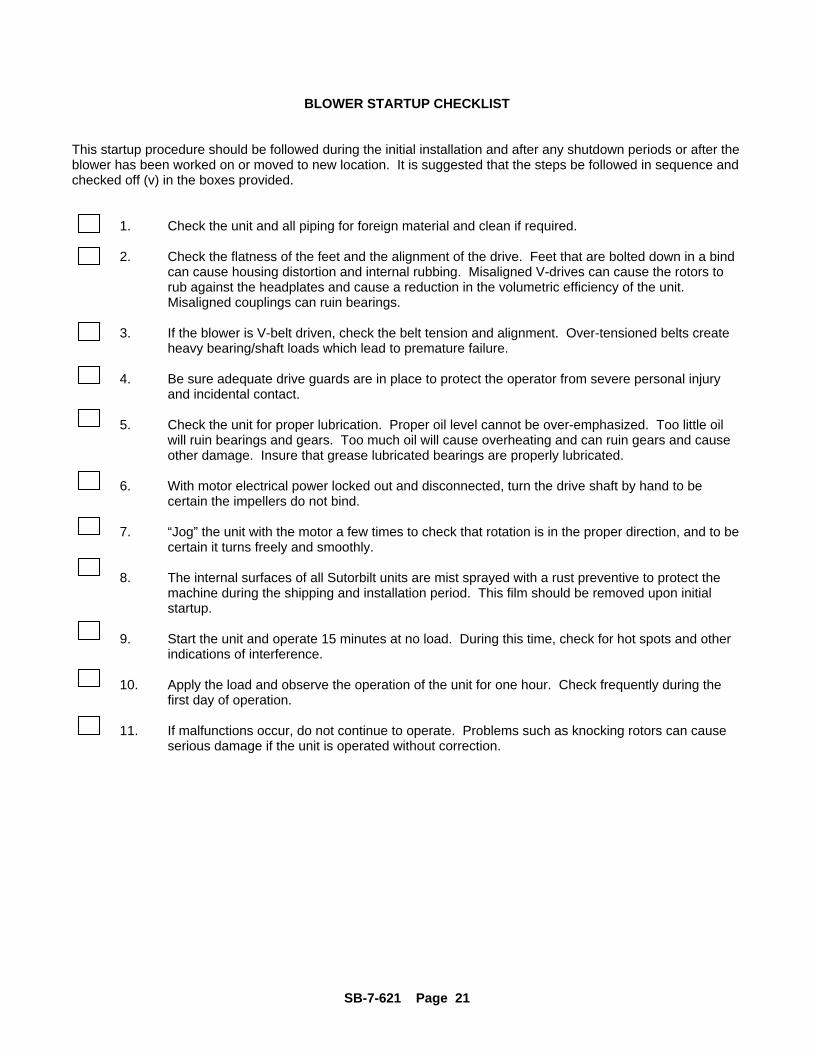
BLOWER STARTUP CHECKLIST
This startup procedure should be followed during the initial installation and after any shutdown periods or after the blower has been worked on or moved to new location. It is suggested that the steps be followed in sequence and checked off (v) in the boxes provided.
1. Check the unit and all piping for foreign material and clean if required.
2. Check the flatness of the feet and the alignment of the drive. Feet that are bolted down in a bind can cause housing distortion and internal rubbing. Misaligned V-drives can cause the rotors to rub against the headplates and cause a reduction in the volumetric efficiency of the unit. Misaligned couplings can ruin bearings.
3. If the blower is V-belt driven, check the belt tension and alignment. Over-tensioned belts create heavy bearing/shaft loads which lead to premature failure.
4. Be sure adequate drive guards are in place to protect the operator from severe personal injury and incidental contact.
5. Check the unit for proper lubrication. Proper oil level cannot be over-emphasized. Too little oil will ruin bearings and gears. Too much oil will cause overheating and can ruin gears and cause other damage. Insure that grease lubricated bearings are properly lubricated.
6. With motor electrical power locked out and disconnected, turn the drive shaft by hand to be certain the impellers do not bind.
7. “Jog” the unit with the motor a few times to check that rotation is in the proper direction, and to be certain it turns freely and smoothly.
8. The internal surfaces of all Sutorbilt units are mist sprayed with a rust preventive to protect the machine during the shipping and installation period. This film should be removed upon initial startup.
9. Start the unit and operate 15 minutes at no load. During this time, check for hot spots and other indications of interference.
10. Apply the load and observe the operation of the unit for one hour. Check frequently during the first day of operation.
11. If malfunctions occur, do not continue to operate. Problems such as knocking rotors can cause serious damage if the unit is operated without correction.
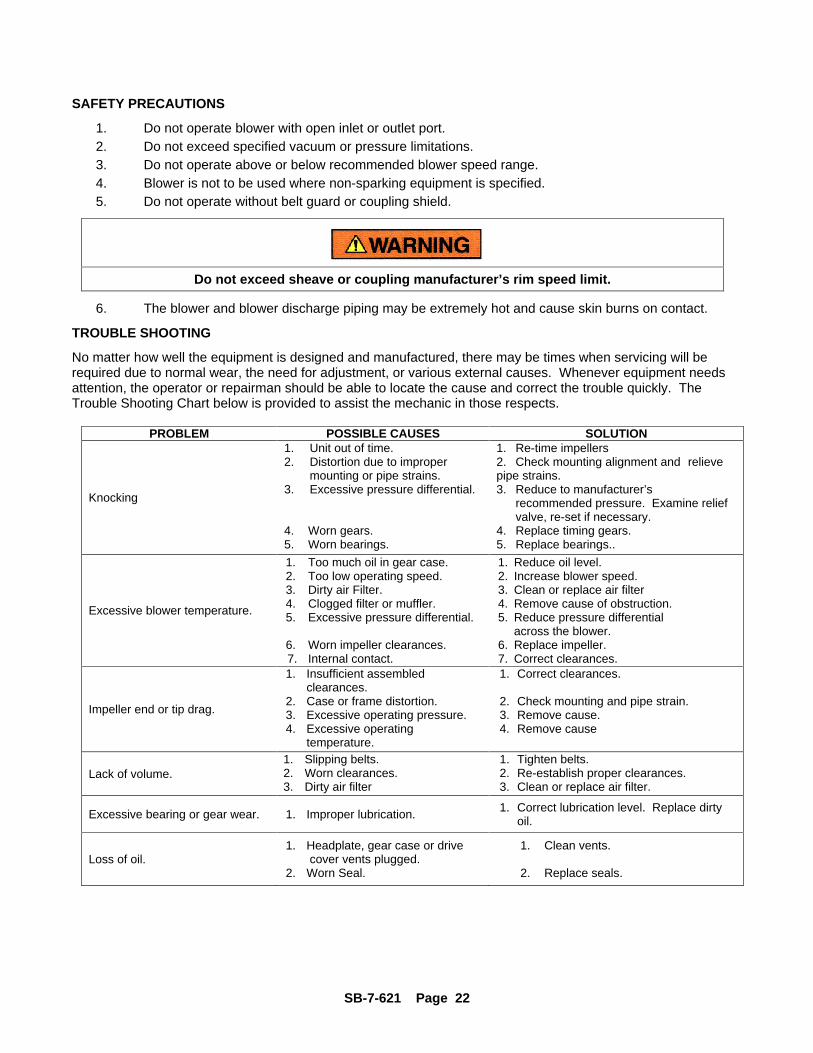
SB-7-621 Page 22
SAFETY PRECAUTIONS
1. Do not operate blower with open inlet or outlet port. 2. Do not exceed specified vacuum or pressure limitations. 3. Do not operate above or below recommended blower speed range. 4. Blower is not to be used where non-sparking equipment is specified. 5. Do not operate without belt guard or coupling shield.
Do not exceed sheave or coupling manufacturer’s rim speed limit.
6. The blower and blower discharge piping may be extremely hot and cause skin burns on contact.
TROUBLE SHOOTING
No matter how well the equipment is designed and manufactured, there may be times when servicing will be required due to normal wear, the need for adjustment, or various external causes. Whenever equipment needs attention, the operator or repairman should be able to locate the cause and correct the trouble quickly. The Trouble Shooting Chart below is provided to assist the mechanic in those respects.
PROBLEM POSSIBLE CAUSES SOLUTION
Knocking
1. Unit out of time. 2. Distortion due to improper
mounting or pipe strains. 3. Excessive pressure differential.
4. Worn gears. 5. Worn bearings.
1. Re-time impellers 2. Check mounting alignment and relieve pipe strains. 3. Reduce to manufacturer’s
recommended pressure. Examine relief valve, re-set if necessary.
4. Replace timing gears. 5. Replace bearings..
Excessive blower temperature.
1. Too much oil in gear case. 2. Too low operating speed. 3. Dirty air Filter. 4. Clogged filter or muffler. 5. Excessive pressure differential.
6. Worn impeller clearances. 7. Internal contact.
1. Reduce oil level. 2. Increase blower speed. 3. Clean or replace air filter 4. Remove cause of obstruction. 5. Reduce pressure differential
across the blower. 6. Replace impeller. 7. Correct clearances.
Impeller end or tip drag.
1. Insufficient assembled clearances.
2. Case or frame distortion. 3. Excessive operating pressure. 4. Excessive operating
temperature.
1. Correct clearances.
2. Check mounting and pipe strain. 3. Remove cause. 4. Remove cause
Lack of volume. 1. Slipping belts. 2. Worn clearances. 3. Dirty air filter
1. Tighten belts. 2. Re-establish proper clearances. 3. Clean or replace air filter.
Excessive bearing or gear wear. 1. Improper lubrication. 1. Correct lubrication level. Replace dirty oil.
Loss of oil. 1. Headplate, gear case or drive
cover vents plugged. 2. Worn Seal.
1. Clean vents.
2. Replace seals.
SB-7-621 Page 23
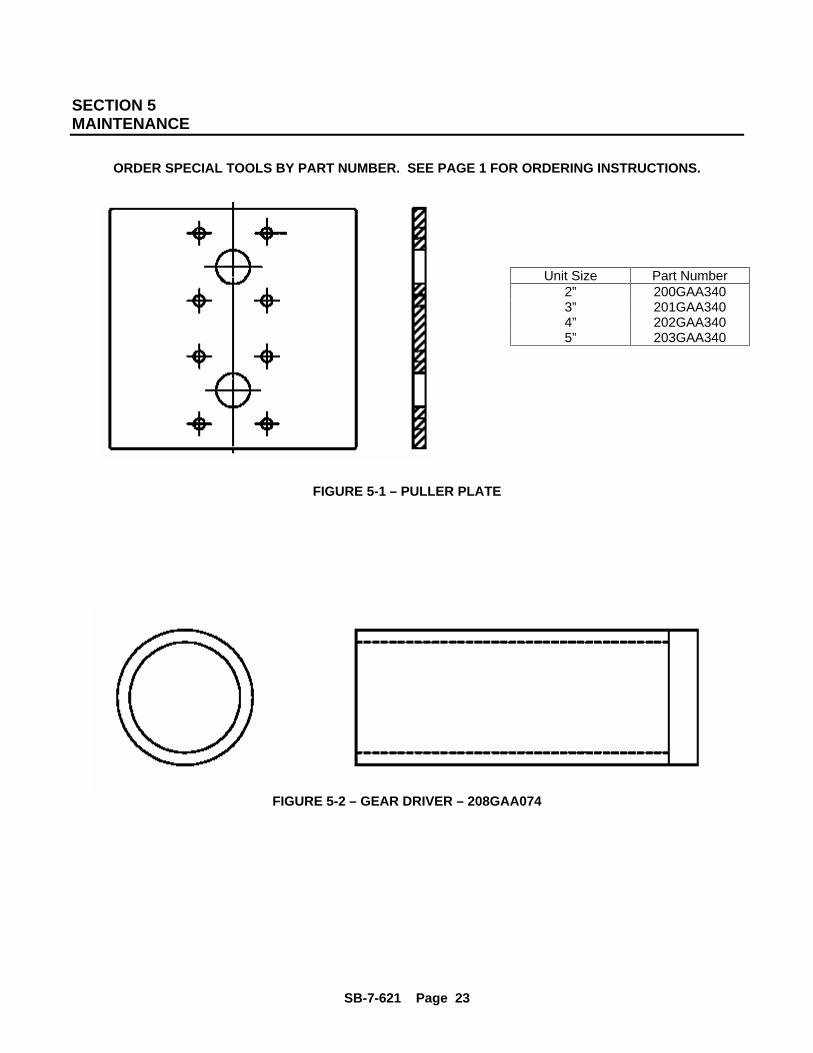
SECTION 5 MAINTENANCE
ORDER SPECIAL TOOLS BY PART NUMBER. SEE PAGE 1 FOR ORDERING INSTRUCTIONS.
Unit Size Part Number 2” 200GAA340 3” 201GAA340 4” 202GAA340 5” 203GAA340
FIGURE 5-1 – PULLER PLATE
FIGURE 5-2 – GEAR DRIVER – 208GAA074
SB-7-621 Page 24
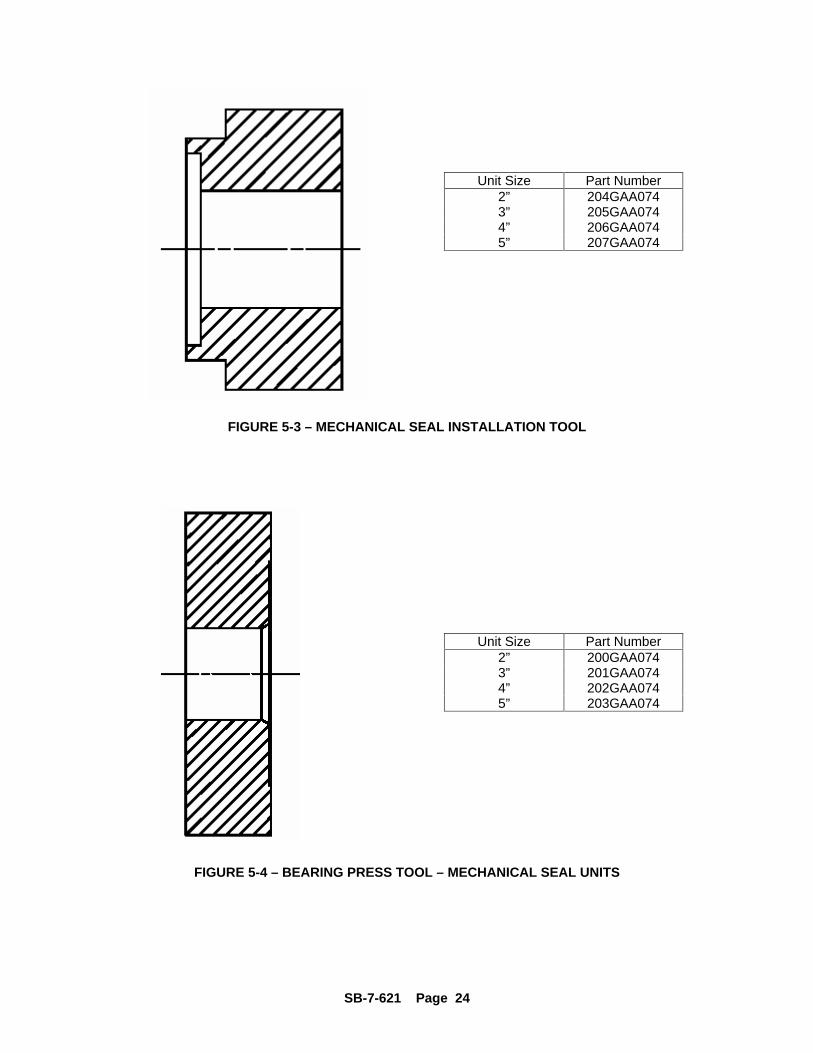
Unit Size Part Number 2” 204GAA074 3” 205GAA074 4” 206GAA074 5” 207GAA074
FIGURE 5-3 – MECHANICAL SEAL INSTALLATION TOOL
Unit Size Part Number 2” 200GAA074 3” 201GAA074 4” 202GAA074 5” 203GAA074
FIGURE 5-4 – BEARING PRESS TOOL – MECHANICAL SEAL UNITS
SB-7-621 Page 25
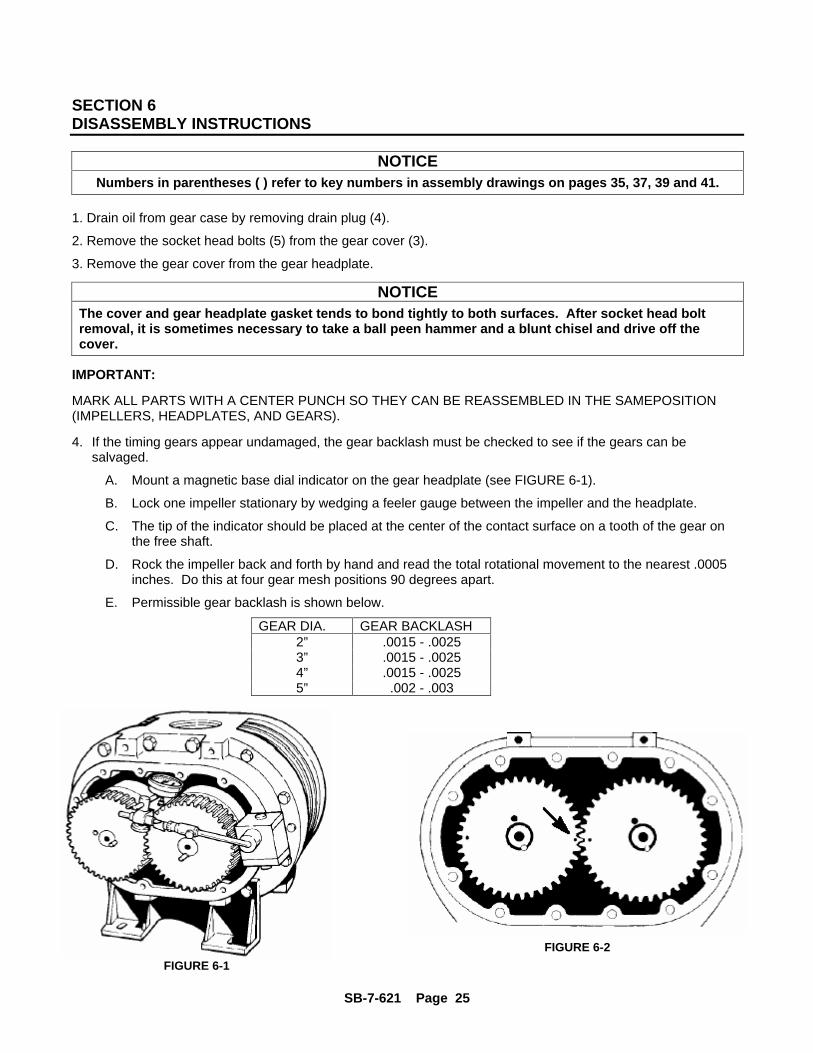
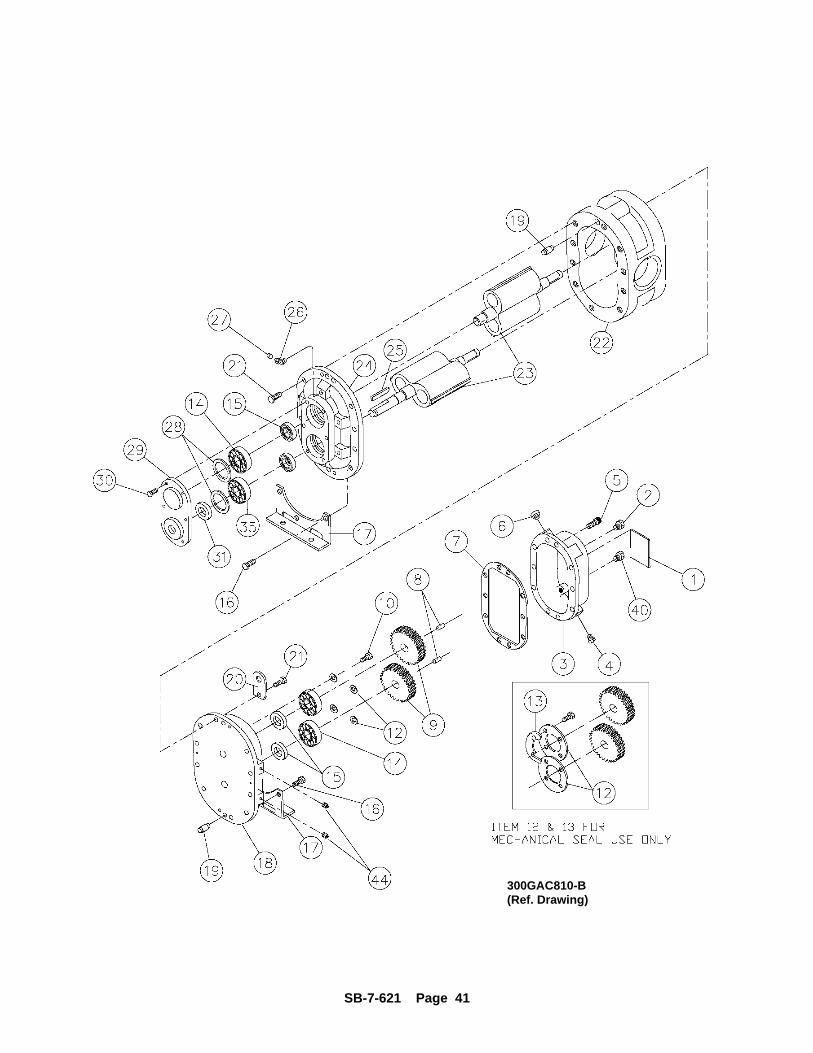
SECTION 6 DISASSEMBLY INSTRUCTIONS
NOTICE
Numbers in parentheses ( ) refer to key numbers in assembly drawings on pages 35, 37, 39 and 41.
1. Drain oil from gear case by removing drain plug (4).
2. Remove the socket head bolts (5) from the gear cover (3).
3. Remove the gear cover from the gear headplate.
NOTICE The cover and gear headplate gasket tends to bond tightly to both surfaces. After socket head bolt removal, it is sometimes necessary to take a ball peen hammer and a blunt chisel and drive off the cover.
IMPORTANT:
MARK ALL PARTS WITH A CENTER PUNCH SO THEY CAN BE REASSEMBLED IN THE SAMEPOSITION (IMPELLERS, HEADPLATES, AND GEARS).
4. If the timing gears appear undamaged, the gear backlash must be checked to see if the gears can be salvaged.
A. Mount a magnetic base dial indicator on the gear headplate (see FIGURE 6-1).
B. Lock one impeller stationary by wedging a feeler gauge between the impeller and the headplate.
C. The tip of the indicator should be placed at the center of the contact surface on a tooth of the gear on the free shaft.
D. Rock the impeller back and forth by hand and read the total rotational movement to the nearest .0005 inches. Do this at four gear mesh positions 90 degrees apart.
E. Permissible gear backlash is shown below.
GEAR DIA. GEAR BACKLASH 2” .0015 - .0025 3” .0015 - .0025 4” .0015 - .0025 5” .002 - .003
FIGURE 6-1
FIGURE 6-2
SB-7-621 Page 26
NOTICE If backlash is above the specified limit, the gears are not necessarily unusable. Excessive play could be caused by worn bearings.
5. If timing gears appear to be reusable, match marktiming gear toothmesh by making small punch marks on the ends of meshing gear teeth with a pin punch and hammer (see FIGURE 6-2, page 25). The impeller tip
to valley (throat) and the case to headplates should also be matchmarked to facilitate blower reassembly.
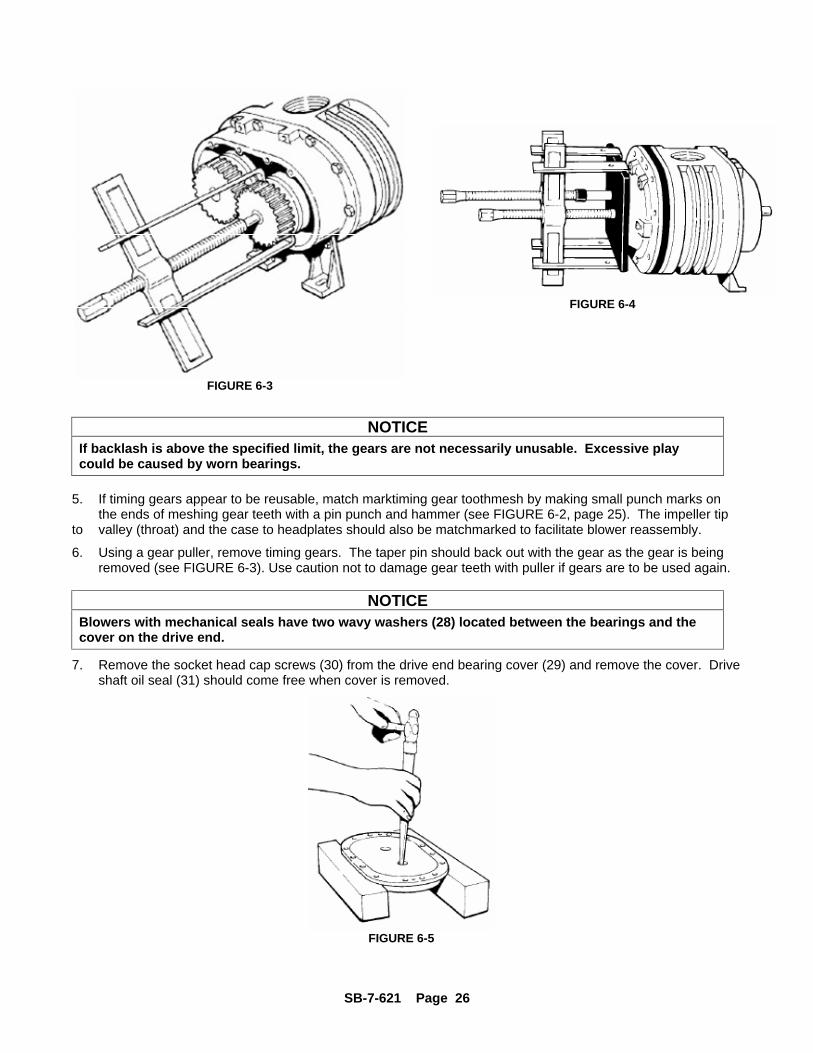
6. Using a gear puller, remove timing gears. The taper pin should back out with the gear as the gear is being removed (see FIGURE 6-3). Use caution not to damage gear teeth with puller if gears are to be used again.
NOTICE Blowers with mechanical seals have two wavy washers (28) located between the bearings and the cover on the drive end.
7. Remove the socket head cap screws (30) from the drive end bearing cover (29) and remove the cover. Drive shaft oil seal (31) should come free when cover is removed.
FIGURE 6-3
FIGURE 6-4
FIGURE 6-5
SB-7-621 Page 27
8. Remove mounting foot (17) from the drive headplate (24) by removing the capscrews (16).
9. Remove the capscrews (21) which secure the drive headplate (24) to the impeller case (22).
10. Using the puller plate shown on page 23, bolt to the drive headplate using the tapped holes used to secure the drive cover.
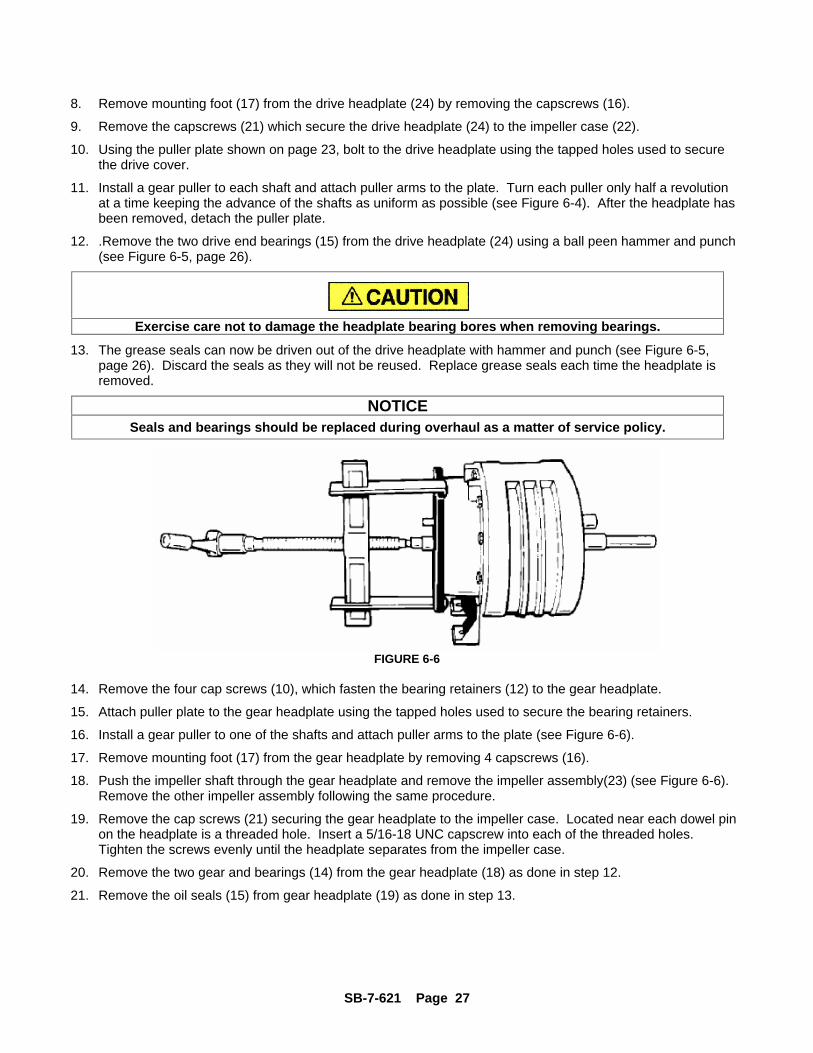
11. Install a gear puller to each shaft and attach puller arms to the plate. Turn each puller only half a revolution at a time keeping the advance of the shafts as uniform as possible (see Figure 6-4). After the headplate has been removed, detach the puller plate.
12. .Remove the two drive end bearings (15) from the drive headplate (24) using a ball peen hammer and punch (see Figure 6-5, page 26).
Exercise care not to damage the headplate bearing bores when removing bearings.
13. The grease seals can now be driven out of the drive headplate with hammer and punch (see Figure 6-5, page 26). Discard the seals as they will not be reused. Replace grease seals each time the headplate is removed.
NOTICE Seals and bearings should be replaced during overhaul as a matter of service policy.
FIGURE 6-6
14. Remove the four cap screws (10), which fasten the bearing retainers (12) to the gear headplate.
15. Attach puller plate to the gear headplate using the tapped holes used to secure the bearing retainers.
16. Install a gear puller to one of the shafts and attach puller arms to the plate (see Figure 6-6).
17. Remove mounting foot (17) from the gear headplate by removing 4 capscrews (16).
18. Push the impeller shaft through the gear headplate and remove the impeller assembly(23) (see Figure 6-6). Remove the other impeller assembly following the same procedure.
19. Remove the cap screws (21) securing the gear headplate to the impeller case. Located near each dowel pin on the headplate is a threaded hole. Insert a 5/16-18 UNC capscrew into each of the threaded holes. Tighten the screws evenly until the headplate separates from the impeller case.
20. Remove the two gear and bearings (14) from the gear headplate (18) as done in step 12.
21. Remove the oil seals (15) from gear headplate (19) as done in step 13.
SB-7-621 Page 28
SECTION 7 ASSEMBLY INSTRUCTIONS
NOTICE
Numbers in parentheses ( ) refer to key numbers in assembly drawings on pages 35, 37, 39 and 41.
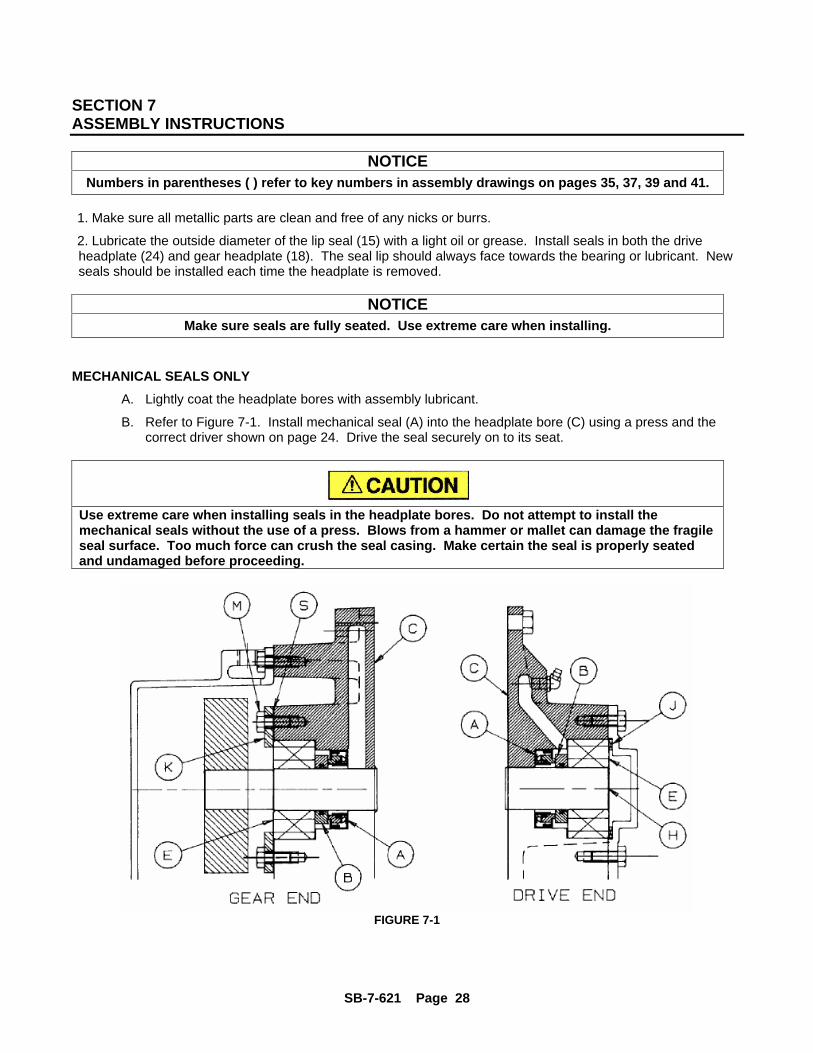
1. Make sure all metallic parts are clean and free of any nicks or burrs.
2. Lubricate the outside diameter of the lip seal (15) with a light oil or grease. Install seals in both the drive headplate (24) and gear headplate (18). The seal lip should always face towards the bearing or lubricant. New seals should be installed each time the headplate is removed.
NOTICE Make sure seals are fully seated. Use extreme care when installing.
MECHANICAL SEALS ONLY
A. Lightly coat the headplate bores with assembly lubricant.
B. Refer to Figure 7-1. Install mechanical seal (A) into the headplate bore (C) using a press and the correct driver shown on page 24. Drive the seal securely on to its seat.
Use extreme care when installing seals in the headplate bores. Do not attempt to install the mechanical seals without the use of a press. Blows from a hammer or mallet can damage the fragile seal surface. Too much force can crush the seal casing. Make certain the seal is properly seated and undamaged before proceeding.
FIGURE 7-1
SB-7-621 Page 29
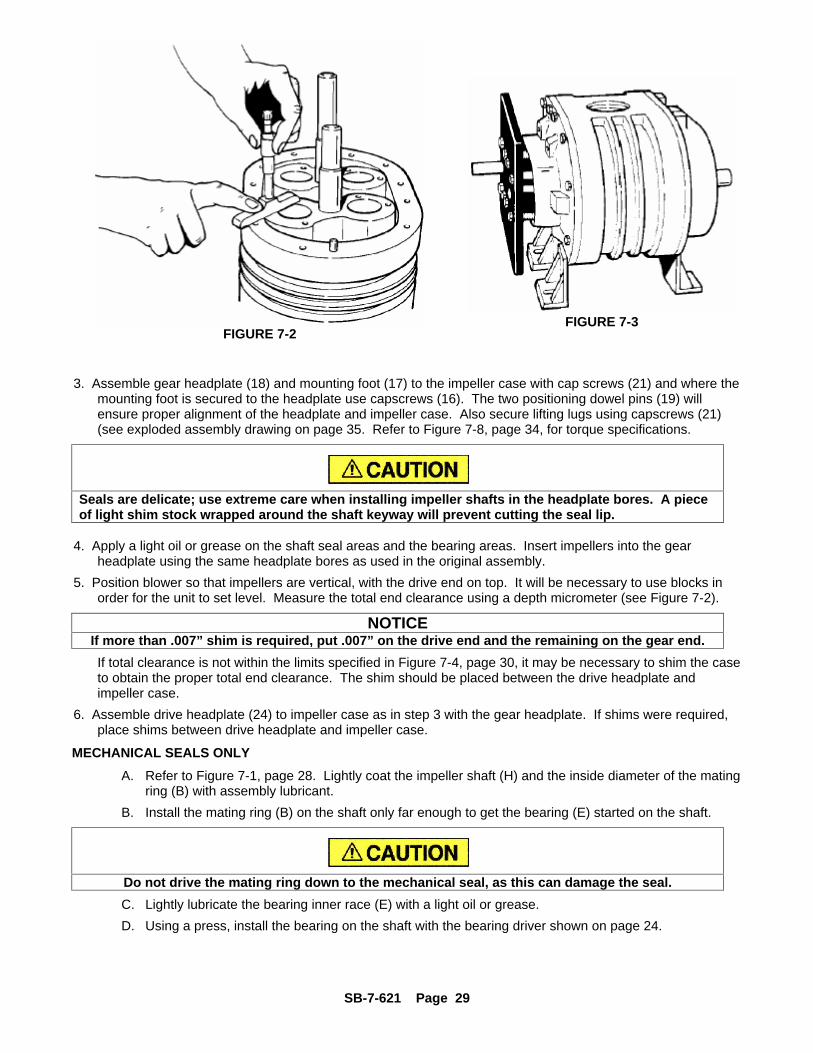
3. Assemble gear headplate (18) and mounting foot (17) to the impeller case with cap screws (21) and where the mounting foot is secured to the headplate use capscrews (16). The two positioning dowel pins (19) will ensure proper alignment of the headplate and impeller case. Also secure lifting lugs using capscrews (21) (see exploded assembly drawing on page 35. Refer to Figure 7-8, page 34, for torque specifications.
Seals are delicate; use extreme care when installing impeller shafts in the headplate bores. A piece of light shim stock wrapped around the shaft keyway will prevent cutting the seal lip.
4. Apply a light oil or grease on the shaft seal areas and the bearing areas. Insert impellers into the gear headplate using the same headplate bores as used in the original assembly.
5. Position blower so that impellers are vertical, with the drive end on top. It will be necessary to use blocks in order for the unit to set level. Measure the total end clearance using a depth micrometer (see Figure 7-2).
NOTICE If more than .007” shim is required, put .007” on the drive end and the remaining on the gear end.
If total clearance is not within the limits specified in Figure 7-4, page 30, it may be necessary to shim the case to obtain the proper total end clearance. The shim should be placed between the drive headplate and impeller case.
6. Assemble drive headplate (24) to impeller case as in step 3 with the gear headplate. If shims were required, place shims between drive headplate and impeller case.
MECHANICAL SEALS ONLY
A. Refer to Figure 7-1, page 28. Lightly coat the impeller shaft (H) and the inside diameter of the mating ring (B) with assembly lubricant.
B. Install the mating ring (B) on the shaft only far enough to get the bearing (E) started on the shaft.
Do not drive the mating ring down to the mechanical seal, as this can damage the seal.
C. Lightly lubricate the bearing inner race (E) with a light oil or grease.
D. Using a press, install the bearing on the shaft with the bearing driver shown on page 24.
FIGURE 7-2
FIGURE 7-3
SB-7-621 Page 30
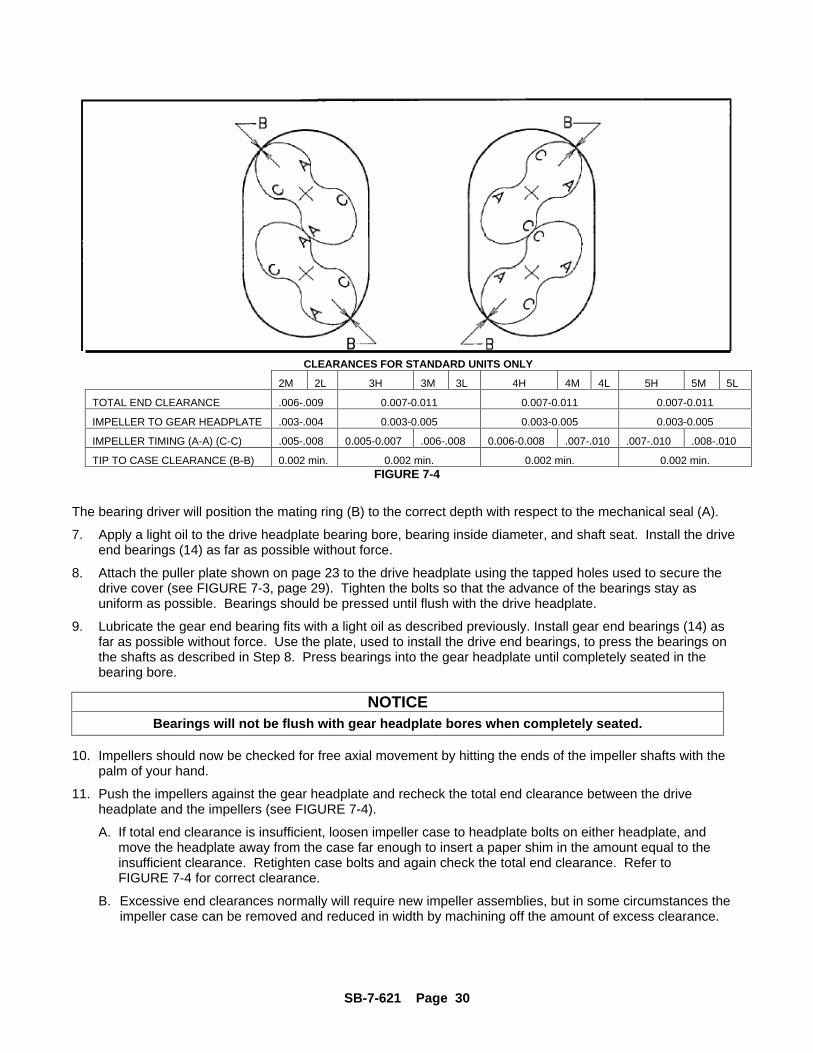
CLEARANCES FOR STANDARD UNITS ONLY
2M 2L 3H 3M 3L 4H 4M 4L 5H 5M 5L
TOTAL END CLEARANCE .006-.009 0.007-0.011 0.007-0.011 0.007-0.011
IMPELLER TO GEAR HEADPLATE .003-.004 0.003-0.005 0.003-0.005 0.003-0.005
IMPELLER TIMING (A-A) (C-C) .005-.008 0.005-0.007 .006-.008 0.006-0.008 .007-.010 .007-.010 .008-.010
TIP TO CASE CLEARANCE (B-B) 0.002 min. 0.002 min. 0.002 min. 0.002 min. FIGURE 7-4
The bearing driver will position the mating ring (B) to the correct depth with respect to the mechanical seal (A).
7. Apply a light oil to the drive headplate bearing bore, bearing inside diameter, and shaft seat. Install the drive end bearings (14) as far as possible without force.
8. Attach the puller plate shown on page 23 to the drive headplate using the tapped holes used to secure the drive cover (see FIGURE 7-3, page 29). Tighten the bolts so that the advance of the bearings stay as uniform as possible. Bearings should be pressed until flush with the drive headplate.
9. Lubricate the gear end bearing fits with a light oil as described previously. Install gear end bearings (14) as far as possible without force. Use the plate, used to install the drive end bearings, to press the bearings on the shafts as described in Step 8. Press bearings into the gear headplate until completely seated in the bearing bore.
NOTICE Bearings will not be flush with gear headplate bores when completely seated.
10. Impellers should now be checked for free axial movement by hitting the ends of the impeller shafts with the palm of your hand.
11. Push the impellers against the gear headplate and recheck the total end clearance between the drive headplate and the impellers (see FIGURE 7-4).
A. If total end clearance is insufficient, loosen impeller case to headplate bolts on either headplate, and move the headplate away from the case far enough to insert a paper shim in the amount equal to the insufficient clearance. Retighten case bolts and again check the total end clearance. Refer to FIGURE 7-4 for correct clearance.
B. Excessive end clearances normally will require new impeller assemblies, but in some circumstances the impeller case can be removed and reduced in width by machining off the amount of excess clearance.
SB-7-621 Page 31
These impeller-to-impeller and impeller-to-case clearances are extremely critical. Even though the blower may turn freely by hand when cold, under operating conditions, the parts expand, and the rotors are subject to slight defection.
If the clearances are not sufficient, the impellers may contact each other or the housing with destructive results. If the clearances are too great, the blower may not develop the pressure or airflow that is required to perform its function.
12. Impeller tip to case clearance should be checked at this time by inserting the correct thickness feeler gauge between the tip and the case and rotating the impeller (see FIGURE 7-4, page 30). Repeat the procedure on both impellers.
NOTICE When checking the tip to case clearance, move the feeler gauge over the entire length of the impeller
to ensure that the tips do not bind along their length.
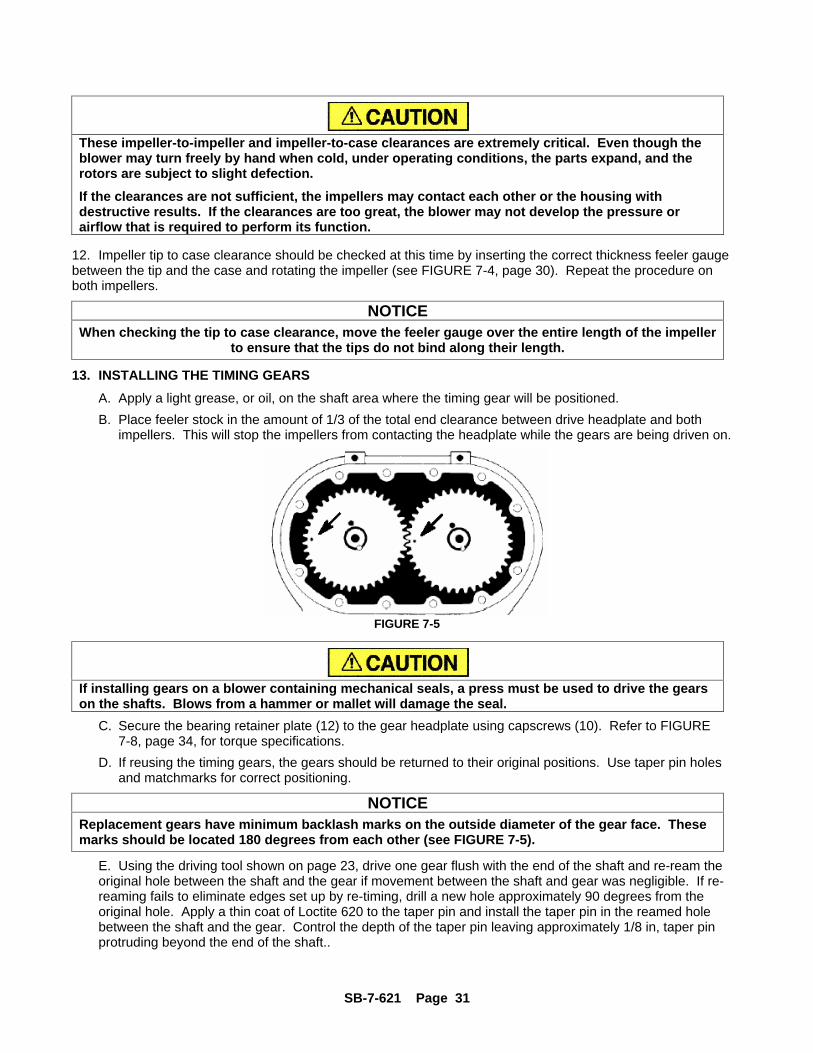
13. INSTALLING THE TIMING GEARS
A. Apply a light grease, or oil, on the shaft area where the timing gear will be positioned.
B. Place feeler stock in the amount of 1/3 of the total end clearance between drive headplate and both impellers. This will stop the impellers from contacting the headplate while the gears are being driven on.
FIGURE 7-5
If installing gears on a blower containing mechanical seals, a press must be used to drive the gears on the shafts. Blows from a hammer or mallet will damage the seal.
C. Secure the bearing retainer plate (12) to the gear headplate using capscrews (10). Refer to FIGURE 7-8, page 34, for torque specifications.
D. If reusing the timing gears, the gears should be returned to their original positions. Use taper pin holes and matchmarks for correct positioning.
NOTICE Replacement gears have minimum backlash marks on the outside diameter of the gear face. These marks should be located 180 degrees from each other (see FIGURE 7-5).
E. Using the driving tool shown on page 23, drive one gear flush with the end of the shaft and re-ream the original hole between the shaft and the gear if movement between the shaft and gear was negligible. If re-reaming fails to eliminate edges set up by re-timing, drill a new hole approximately 90 degrees from the original hole. Apply a thin coat of Loctite 620 to the taper pin and install the taper pin in the reamed hole between the shaft and the gear. Control the depth of the taper pin leaving approximately 1/8 in, taper pin protruding beyond the end of the shaft..
SB-7-621 Page 32
NOTICE If gears are being replaced, taper pin holes must be drilled after the gears are correctly positioned. Be careful not to let cuttings drop behind the gears and contaminate the bearings.
Be careful not to let cuttings drop behind the gears and contaminate the bearings.
F. Place impellers in the position shown in FIGURE 7-4, page 30. Check to be sure impellers are in correct position as previously match marked.
G. Drive the mating gear on the other shaft within 1/2” of being flush with the end of the shaft.
H. Refer to diagram in FIGURE 7-4, page 30. Use feeler gauges to check clearances between impeller lobes at positions A--A and C--C. Add the clearances, and divide the total clearance evenly between A--A and C--C.
I. If the lobe clearance is not equal between A--A and C--C, the impellers require shifting relative to the gears. Insert a feeler gauge .010 inch larger than required clearance between the impellers at the tight spot and rotate the impellers wedging the feeler gauge between the lobes. Place the driving tool against the gear that is not flush with the end of the shaft, and strike the driver with a quick blow. This will drive the gear further onto the shaft, causing it to turn relative to the shaft due to the torque value set--up by the oversized feeler gauge wedged between the impeller lobes. Adjust so that the clearance at A--A is equal to C--C within .001 inch. Clearances must be checked on both sides of each impeller lobe over the entire length. This procedure may require repeating several times until the impeller lobe clearance is equal on both sides.
NOTICE The gear used for adjustment should be flush with its mate on completion of the timing.
J. Check gear backlash four places at 90 degree intervals as described in the disassembly procedure (Item 4).
NOTICE If any of the four gear backlash readings are not within the specified limits, the gears must be replaced.
14. After timing adjustments are completed, re-ream the original hole between shaft and adjustment gear if movement between the shaft and gear are negligible. If reaming fails a new hole approximately 90 degrees from the original hole. Apply a thin coat of Loctite 620 to the taper pin and install the taper pin in the reamed hole between the shaft and gear.
NOTICE Replacement gears are not drilled. These holes must be drilled after the gears are in the proper position and the unit retimed.
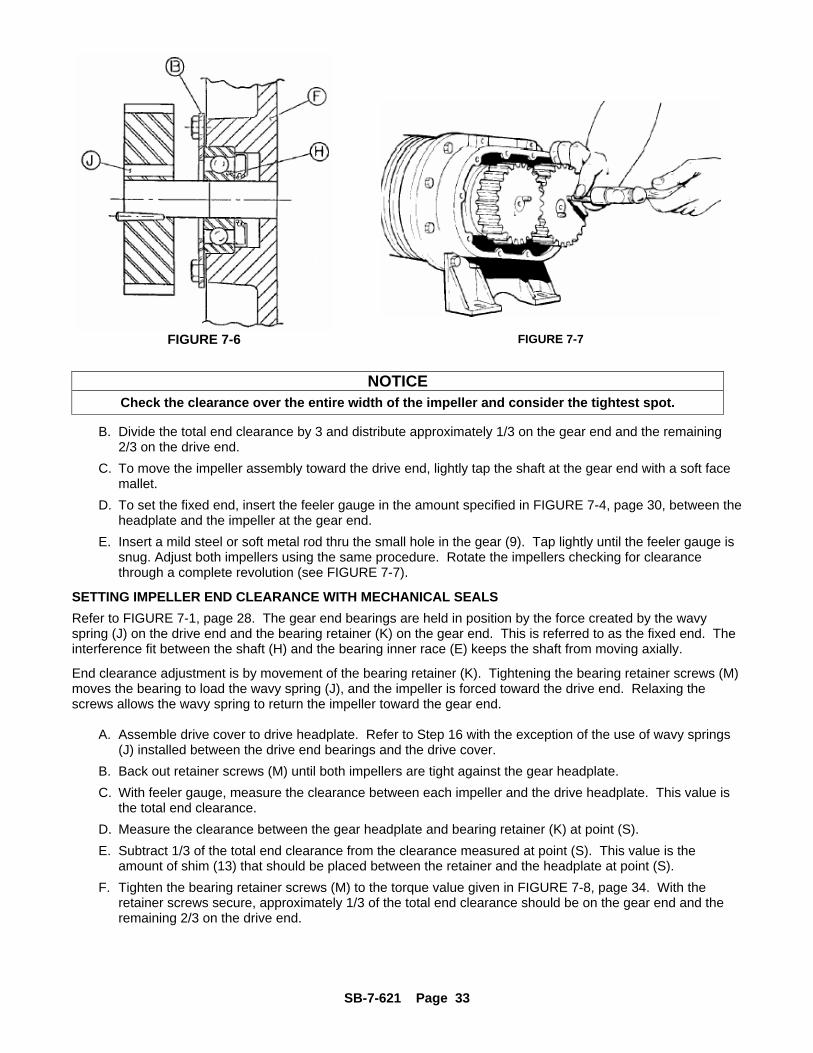
15. SETTING IMPELLER END CLEARANCES
Refer to FIGURE 7-6, page 33. The outer races of the gear end bearings are clamped against the headplate (F) by the bearing retainer (B).
This is referred to as the “fixed end”. The interference fit between the shaft and the bearing inner race (H) keeps the shaft from moving axially. Adjustment is by movement of the shaft through the gear end bearing inner race (H).
A. Check the total end clearance by adding the clearance between the impellers and the drive headplate to the clearance between the impellers and the gear headplate.
SB-7-621 Page 33
NOTICE Check the clearance over the entire width of the impeller and consider the tightest spot.
B. Divide the total end clearance by 3 and distribute approximately 1/3 on the gear end and the remaining 2/3 on the drive end.
C. To move the impeller assembly toward the drive end, lightly tap the shaft at the gear end with a soft face mallet.
D. To set the fixed end, insert the feeler gauge in the amount specified in FIGURE 7-4, page 30, between the headplate and the impeller at the gear end.
E. Insert a mild steel or soft metal rod thru the small hole in the gear (9). Tap lightly until the feeler gauge is snug. Adjust both impellers using the same procedure. Rotate the impellers checking for clearance through a complete revolution (see FIGURE 7-7).
SETTING IMPELLER END CLEARANCE WITH MECHANICAL SEALS
Refer to FIGURE 7-1, page 28. The gear end bearings are held in position by the force created by the wavy spring (J) on the drive end and the bearing retainer (K) on the gear end. This is referred to as the fixed end. The interference fit between the shaft (H) and the bearing inner race (E) keeps the shaft from moving axially.
End clearance adjustment is by movement of the bearing retainer (K). Tightening the bearing retainer screws (M) moves the bearing to load the wavy spring (J), and the impeller is forced toward the drive end. Relaxing the screws allows the wavy spring to return the impeller toward the gear end.
A. Assemble drive cover to drive headplate. Refer to Step 16 with the exception of the use of wavy springs (J) installed between the drive end bearings and the drive cover.
B. Back out retainer screws (M) until both impellers are tight against the gear headplate.
C. With feeler gauge, measure the clearance between each impeller and the drive headplate. This value is the total end clearance.
D. Measure the clearance between the gear headplate and bearing retainer (K) at point (S).
E. Subtract 1/3 of the total end clearance from the clearance measured at point (S). This value is the amount of shim (13) that should be placed between the retainer and the headplate at point (S).
F. Tighten the bearing retainer screws (M) to the torque value given in FIGURE 7-8, page 34. With the retainer screws secure, approximately 1/3 of the total end clearance should be on the gear end and the remaining 2/3 on the drive end.
FIGURE 7-6
FIGURE 7-7

SB-7-621 Page 34
16. Replace drive shaft grease seal (31) in the drive end cover (29). The seal lip should always face towards the bearing or lubricant. Pack bearing cavities with recommended grease and secure drive cover with capscrews (30) to drive headplate. Refer to FIGURE 7-8 for torque specifications.
Exercise care not to damage the seal lip as it passes over the shaft keyway.
17. Assemble the gear cover (3) and gasket (7) to the gear headplate (18) using capscrews (5). Tighten the capscrews alternately and evenly. Refer to FIGURE 7-8 for torque specifications.
18. Place the blower on its feet on a flat surface. Loosen cap screws (16) and level the unit up. The bench or blower base flatness should be within .002 of an inch. Re--tighten cap screws (16) to the specification in FIGURE 7-8.
NOTICE If the unit is not flat within .002 of an inch, it will be necessary to shim the blower feet at installation.
GEAR DIAMETER FASTENERS 2 3 4 5 CAPSCREW (21) 13 – 17 23 – 30 23 – 30 23 -- 30 CAPSCREW (16) 13 – 17 23 – 30 23 – 30 23 -- 30 SOCKET HD CAPSCREW (5) 6 – 8 6 – 8 13 – 17 13 -- 17 SOCKET HD CAPSCREW (30)
6 – 8 6 – 8 13 – 17 6 -- 8 CAPSCREW (10) 6 – 8 6 – 8 13 – 17 13 -- 17
NOTE: ( ) DENOTES ITEMS IN EXPLODED VIEW DRAWINGS ON PAGES 35, 37, 39 AND 41.
FIGURE 7-8 – TORQUE (FT-LBS)
SB-7-621 Page 35
SECTION 8 PARTS LIST
300GAA810-C
(Ref. Drawing)
SB-7-621 Page 36
Order by Part Number and Description. Reference Numbers are for your convenience only.
MODEL GAA
Ref.
No.
Size -- 2M
Size -- 2L
No.
Description
Req’d
GAAM_P_
GAAL_P_
1 NAMEPLATE............................................................... 1 302GAA496 302GAA496 2 OIL LEVEL PLUG........................................................ 2 64AC1 64AC1 3 GEAR CASE................................................................ 1 900893022801 900893022801 4 DRAIN PLUG............................................................... 1 64AC1 64AC1 5 SCREW--GEAR CASE TO BEARING HOUSING ....... 6 75LM224 75LM224 6 VENT PLUG ................................................................ 1 900639650102 900639650102
O 7 GASKET GEAR CASE ................................................ 1 200GAA715 200GAA715 O 8 TAPER PIN.................................................................. 2 62V73 62V73
9 TIMING GEAR GROUP............................................... 1 200GAA6008 200GAA6008 O 10 SCREW--BEARING RETAINER TO BEARING
HOUSING....................................................................
8 75A185N 75A185N 12 BEARING RETAINER ................................................. 2 900892021801 900892021801
+ 13 SHIM SET.................................................................... 1 900891022900 900891022900 O 14 BEARING .................................................................... 4 12BA142 12BA142 O 15 MAIN SEAL--PER APPLICATION BELOW
LIP SEAL VERSION.................................................... 4 60DD713 60DD713 MECHANICAL SEAL VERSION.................................. 4 900871020002 900871020002
16 SCREW--FOOT TO BEARING HOUSING .................. 6 75A34 75A34 17 FOOT GROUP
VERTICAL FOOT GROUP.......................................... 1 GAA81896 GAA81896 HORIZONTAL FOOT GROUP .................................... 1 GAA81897 GAA81897
18 HOUSING--BEARING (GEAR END) LIP SEAL..................................................................... 1 900894021001 900894021001 MECHANICAL SEAL................................................... 1 204GAA006 204GAA006
19 DOWEL PIN ................................................................ 4 62M48 62M48 20 LIFTING LUG .............................................................. 2 200GAA451 200GAA451 21 SCREW--BEARING HOUSINGS TO IMPELLER
CASE...........................................................................
14 75A34 75A34 22 IMPELLER CASE. ....................................................... 1 900894021201 900894021401 23 SHAFT ASSEMBLY GROUP (SEAL VENTS)............. 1 GAA81899 GAA81898
SHAFT ASSEMBLY GROUP CONSISTS OF: (1)ASSEMBLY SHAFT – LONG (1) ASSEMBLY SHAFT – SHORT
24 HOUSING--BEARING (DRIVE) LIP SEAL............................................................... 1 900894020801 900894020801 MECHANICAL SEAL............................................. 1 205GAA006 205GAA006
25 DRIVE KEY ................................................................. 1 900891023101 900891023101 26 GREASE FITTING....................................................... 2 900639910304 900639910304 27 GREASE FITTING CAP .............................................. 2 40P58 40P58
+ 28 WAVY SPRING ........................................................... 2 78W65 78W65. 29 DRIVE COVER............................................................ 1 900893021701 900893021701 30 SCREW--DRIVE COVER TO BEARING HOUSING ... 6 75A185N 75A185N
O 31 DRIVE SEAL ............................................................... 1 900639010802 900639010802 *+ 42 PLUGS REQUIRED WITH MECHANICAL SEAL........ 6 64AC1 64AC1
SHIM--IMPELLER CASE PAPER (.0015/.0020) .................................................. 0 202GAA732 202GAA732 PAPER (.003) .............................................................. 0 200GAA732 200GAA732 ALUMINUM (.010) ....................................................... 0 201GAA732 201GAA732
O OVERHAUL KIT LIP SEAL.......................................... 0 200GAA6010 200GAA6010 O OVERHAUL KIT MECHANICAL SEAL........................ 0 201GAA6010 201GAA6010
76 LOCTITE 620 .............................................................. 1 25BC749 25BC749
* NOT SHOWN o OVERHAUL KITS CONSIST OF BEARINGS, SEALS, GASKET, SHIMS, TAPER PINS AND BEARING RETAINER SCREWS. + MECHANICAL SEAL UNITS ONLY.

SB-7-621 Page 37
200GAB810-E
(Ref. Drawing)
SB-7-621 Page 38
Order by Part Number and Description. Reference Numbers are for your convenience only.
MODEL GAB Ref. No. Size-- 3H Size -- 3M Size -- 3L No. Description Req’d GABH_P_ GABM_P_ GABL_P_
1 NAMEPLATE............................................................................ 1 302GAA496 302GAA496 302GAA496 2 OIL LEVEL PLUG..................................................................... 2 64AC2 64AC2 64AC2 3 GEAR CASE............................................................................. 1 900873032901 900873032901 900873032901 4 DRAIN PLUG............................................................................ 1 64AC2 64AC2 64AC2 5 SCREW--GEAR CASE TO BEARING HOUSING.................... 10 75LM224 75LM224 75LM224 6 BREATHER .............................................................................. 1 5L306 5L306 5L306
o 7 GASKET GEAR CASE ............................................................. 1 200GAB715 200GAB715 200GAB715 o 8 TAPER PIN............................................................................... 2 62V58 62V58 62V58
9 TIMING GEAR GROUP............................................................ 1 201GAB6008 201GAB6008 201GAB6008 o 10 SCREW--BEARING RETAINER TO BEARING HOUSING ..... 8 75A185N 75A185N 75A185N
12 BEARING RETAINER .............................................................. 2 900883031401 900883031401 900883031401 + 13 SHIM SET................................................................................. 1 900881032200 900881032200 900881032200 o 14 BEARING ................................................................................. 3 12BA143 12BA143 12BA143 o 15 MAIN SEAL--PER APPLICATION BELOW
LIP SEAL VERSION .......................................................... 4 900891030601 900891030601 900891030601 MECHANICAL SEAL VERSION ........................................ 4 900871020003 900871020003 900871020003
16 SCREW--FOOT TO BEARING HOUSING............................... 8 655ED050 655ED050 655ED050 17 FOOT GROUP
VERTICAL FOOT GROUP....................................................... 1 GAB81903 GAB81903 GAB81903 HORIZONTAL FOOT GROUP ................................................. 1 GAB81904 GAB81904 GAB81904
18 HOUSING--BEARING (GEAR END) LIP SEAL ........................................................................... 1 900873033301 900873033301 900873033301 MECHANICAL SEAL ......................................................... 1 900883030101 900883030101 900883030101
19 DOWEL PIN ............................................................................. 4 62M48 62M48 62M48 20 LIFTING LUG ........................................................................... 2 200GAA451 200GAA451 200GAA451 21 SCREW--BEARING HOUSINGS TO IMPELLER CASE.......... 16 655ED040 655ED040 655ED040 22 IMPELLER CASE ..................................................................... 1 900873034301 900873033801 900873034201 23 SHAFT ASSEMBLY GROUP ................................................... 1 GAB81905 GAB81907 GAB81906
SHAFT ASSEMBLY GROUP CONSISTS OF: (1) ASSEMBLY SHAFT – LONG (1) ASSEMBLY SHAFT – SHORT
24 HOUSING--BEARING (DRIVE END) LIP SEAL ............................................................................ 1 900873033501 900873033501 900873033501 MECHANICAL SEAL.......................................................... 1 900883030301 900883030301 900883030301
25 DRIVE KEY .............................................................................. 1 900639910304 900639910304 900639910304 26 GREASE FITTING.................................................................... 2 40E9 40E9 40E9 27 GREASE FITTING CAP ........................................................... 2 40P58 40P58 40P58
+ 28 WAVY SPRING ........................................................................ 2 900669170203 900669170203 900669170203 29 DRIVE COVER......................................................................... 1 900873033701 900873033701 900873033701 30 SCREW--DRIVE COVER TO BEARING HOUSING................ 6 75LM224 75LM224 75LM224
o 31 DRIVE SEAL ............................................................................ 1 60DD725 60DD725 60DD725 o 35 BEARING DRIVE END DRIVE SHAFT .................................... 1 12BA153 12BA153 12BA153 *+ 42 PLUGS REQUIRED WITH MECHANICAL SEAL (Drive End) . 4 64AC1 64AC1 64AC1
44 SCREW—SET.......................................................................... 2 76F92 76F92 76F92 *+ 46 PLUGS REQUIRED WITH MECHANICAL SEAL (Gear End).. 2 64AC2 64AC2 64AC2 .
SHIM--IMPELLER CASE PAPER (.0015/.0020) ........................................................ 0 202GAB732 202GAB732 202GAB732 PAPER (.003) .................................................................... 0 200GAB732 200GAB732 200GAB732 ALUMINUM (.010) ............................................................. 0 201GAB732 201GAB732 201GAB732
o OVERHAUL KIT LIP SEAL....................................................... 0 203GAB6010 203GAB6010 203GAB6010 o OVERHAUL KIT MECHANICAL SEAL .................................... 0 204GAB6010 204GAB6010 204GAB6010
76 LOCTITE 620 ......................................................................... 1 25BC749 25BC749 25BC749
* NOT SHOWN o OVERHAUL KITS CONSIST OF BEARINGS, SEALS, GASKET, SHIMS, TAPER PINS AND BEARING RETAINER SCREWS. + MECHANICAL SEAL UNITS ONLY.
SB-7-621 Page 39
300GAC810-B
(Ref. Drawing)

SB-7-621 Page 40
Order by Part Number and Description. Reference Numbers are for your convenience only.
MODEL GAC Ref. No. Size -- 4H Size -- 4M Size -- 4L No. Description Req’d GACH_P_ GACM_P_ GACL_P_
1 NAMEPLATE .............................................................................. 1 302GAA496 302GAA496 302GAA496
2 PLUG FOR ALTERNATE OIL LEVEL CONN............................. 1 64AC3 64AC3 64AC3 3 GEAR CASE ............................................................................... 1 900883040701 900883040701 900883040701 4 DRAIN PLUG .............................................................................. 1 64AC2 64AC2 64AC2 5 SCREW--GEAR CASE TO BEARING HOUSING ...................... 12 75LM113 75LM113 75LM113 6 BREATHER................................................................................. 1 5L306 5L306 5L306
O 7 GASKET GEAR CASE................................................................ 1 200GAC715 200GAC715 200GAC715 O 8 TAPER PIN ................................................................................. 2 62V58 62V58 62V58
9 TIMING GEAR GROUP .............................................................. 1 200GAC6008 200GAC6008 200GAC6008 O 10 SCREW--BEARING RETAINER TO BEARING HOUSING........ 8 75A33N 75A33N 75A33N
12 BEARING RETAINER................................................................. 2 900883040201 900883040201 900883040201 + 13 SHIM SET ................................................................................... 1 900881042900 900881042900 900881042900 O 14 BEARING.................................................................................... 3 12BA144 12BA144 12BA144 O 15 MAIN SEAL--PER APPLICATION BELOW
LIP SEAL VERSION............................................................. 4 60DD630 60DD630 60DD630 MECHANICAL SEAL VERSION........................................... 4 900871020004 900871020004 900871020004
16 SCREW--FOOT TO BEARING HOUSING ................................. 8 655ED050 655ED050 655ED050 17 FOOT GROUP
VERTICAL FOOT GROUP ......................................................... 1 GAC81911 GAC81911 GAC81911 HORIZONTAL FOOT GROUP.................................................... 1 GAC81912 GAC81912 GAC81912
18 HOUSING--BEARING (GEAR END) LIP SEAL .............................................................................. 1 900883040501 900883040501 900883040501 MECHANICAL SEAL............................................................ 1 900883041601 900883041601 900883041601
19 DOWEL PIN ................................................................................ 4 62M48 62M48 62M48 20 LIFTING LUG.............................................................................. 2 200GAA451 200GAA451 200GAA451 21 SCREW--BEARING HOUSINGS TO IMPELLER CASE ............ 16 655ED040 655ED040 655ED040 22 IMPELLER CASE........................................................................ 1 900883042201 900883041801 900883042001 23 SHAFT ASSEMBLY GROUP...................................................... 1 208GAC4028 207GAC4028 206GAC4028
SHAFT ASSEMBLY GROUP CONSISTS OF: (1) ASSEMBLY SHAFT – LONG (1) ASSEMBLY SHAFT – SHORT
24 HOUSING--BEARING (DRIVE END) LIP SEAL .............................................................................. 1 300GAC006 300GAC006 300GAC006 MECHANICAL SEAL............................................................ 1 900883041201 900883041201 900883041201
25 DRIVE KEY 1 900639910304..................................................... 1 900639910304 900639910304 900639910304 26 GREASE FITTING ...................................................................... 2 40E9 40E9 40E9 27 GREASE FITTING CAP.............................................................. 2 40P58 40P58 40P58
+ 28 WAVY SPRING........................................................................... 2 900669170304 900669170304 900669170304 29 DRIVE COVER ........................................................................... 1 900883040301 900883040301 900883040301 30 SCREW--DRIVE COVER TO BEARING HOUSING .................. 8 75LM113 75LM113 75LM113
O 31 DRIVE SEAL.......................................................................... 1 60DD716 60DD716 60DD716 O 35 BEARING—ROLLER ............................................................ 1 12BA154 12BA154 12BA154
40 GAUGE--OIL LEVEL................................................................... 1 40P34 40P34 40P34 *+ 42 PLUGS REQUIRED WITH MECHANICAL SEAL (Drive End).... 4 64AC1 64AC1 64AC1
44 SCREW—SET ............................................................................ 2 76F92 76F92 76F92 *+ 46 PLUGS REQUIRED WITH MECHANICAL SEAL (Gear End) .... 2 64AC2 64AC2 64AC2 .
SHIM--IMPELLER CASE PAPER (.0015/.0020)............................................................ 0 202GAC732 202GAC732 202GAC732 PAPER (.003)........................................................................ 0 200GAC732 200GAC732 200GAC732 ALUMINUM (.010) ................................................................ 0 201GAC732 201GAC732 201GAC732
O OVERHAUL KIT LIP SEAL ......................................................... 0 202GAC6010 202GAC6010 202GAC6010 O OVERHAUL KIT MECHANICAL SEAL....................................... 0 203GAC6010 203GAC6010 203GAC6010
76 LOCTITE 620 ......................................................................... 1 25BC749 25BC749 25BC749
* NOT SHOWN O OVERHAUL KITS CONSIST OF BEARINGS, SEALS, GASKET, SHIMS, TAPER PINS AND BEARING RETAINER SCREWS. + MECHANICAL SEAL UNITS ONLY.
SB-7-621 Page 41
300GAC810-B
(Ref. Drawing)

SB-7-621 Page 42
Order by Part Number and Description. Reference Numbers are for your convenience only.
MODEL GAE Ref. No. Size -- 5H Size -- 5M Size -- 5L No. Description Req’d GAEH_P_ GAEM_P_ GAEL_P_
1 NAMEPLATE ............................................................................... 1 301GAE496 301GAE496 301GAE496 2 PLUG FOR ALTERNATE OIL LEVEL CONN.............................. 1 64AC3 64AC3 64AC3 3 GEAR CASE ................................................................................ 1 900883051001 900883051001 900883051001 4 DRAIN PLUG ............................................................................... 1 64AC2 64AC2 64AC2 5 SCREW--GEAR CASE TO BEARING HOUSING ....................... 2 75LM113 75LM113 75LM113 6 VENT PLUG................................................................................. 1 5L306 5L306 5L306
O 7 GASKET GEAR CASE................................................................. 1 200GAE715 200GAE715 200GAE715 O 8 TAPER PIN .................................................................................. 2 62V58 62V58 62V58
9 TIMING GEAR GROUP ............................................................... 1 201GAE6008 201GAE6008 201GAE6008 +O 10 SCREW--BEARING RETAINER TO BEARING HOUSING......... 8 75A33 75A33 75A33
10 SCREW........................................................................................ 4 75A33P 75A33P 75A33P + 12 BEARING RETAINER.................................................................. 2 900883050501 900883050501 900883050501
12 4 95A2 95A2 95A2 + 13 SHIM SET .................................................................................... 1 900881052900 900881052900 900881052900 O 14 BEARING..................................................................................... 3 8500397 8500397 8500397 O 15 MAIN SEAL--PER APPLICATION BELOW
LIP SEAL VERSION.............................................................. 4 60DD714 60DD714 60DD714 MECHANICAL SEAL VERSION............................................ 4 900871020005 900871020005 900871020005
16 SCREW--FOOT TO BEARING HOUSING .................................. 8 655ED050 655ED050 655ED050 17 FOOT GROUP
VERTICAL FOOT GROUP .......................................................... 1 GAE81922 GAE81922 GAE81922 HORIZONTAL FOOT GROUP..................................................... 1 GAE81923 GAE81923 GAE81923
18 HOUSING--BEARING (GEAR END) LIP SEAL ............................................................................... 1 900883052101 900883052101 900883052101 MECHANICAL SEAL............................................................. 1 900883050301 900883050301 900883050301
19 DOWEL PIN ................................................................................. 4 62M48 62M48 62M48 20 LIFTING LUG............................................................................... 2 200GAA451 200GAA451 200GAA451 21 SCREW--BEARING HOUSINGS TO IMPELLER CASE ............. 24 655ED040 655ED040 655ED040 22 IMPELLER CASE......................................................................... 1 900883051701 900883051801 900883051901 23 SHAFT ASSEMBLY GROUP....................................................... 1 207GAE4028 206GAE4028 205GAE4028
SHAFT ASSEMBLY GROUP CONSISTS OF: (1) ASSEMBLY SHAFT – LONG (1) ASSEMBLY SHAFT – SHORT
24 HOUSING--BEARING (DRIVE END) LIP SEAL ............................................................................... 1 206GAE006 206GAE006 206GAE006 MECHANICAL SEAL............................................................. 1 207GAE006 207GAE006 207GAE006
25 DRIVE KEY.................................................................................. 1 900639910305 900639910305 900639910305 26 GREASE FITTING ....................................................................... 2 911659990606 911659990606 911659990606 27 GREASE FITTING CAP............................................................... 2 40P58 40P58 40P58
+ 28 WAVY SPRING............................................................................ 2 900669170405 900669170405 900669170405 29 DRIVE COVER ............................................................................ 1 900883050401 900883050401 900883050401 30 SCREW--DRIVE COVER TO BEARING HOUSING ................... 8 75LM113 75LM113 75LM113
O 31 DRIVE SEAL................................................................................ 1 60DD726 60DD726 60DD726 O 35 BEARING—ROLLER................................................................... 1 12BA155 12BA155 12BA155
40 GAUGE--OIL LEVEL.................................................................... 1 40P34 40P34 40P34 *+ 42 PLUGS REQUIRED WITH MECHANICAL SEAL (Drive End)..... 4 64AC1 64AC1 64AC1
44 SCREW—SET ............................................................................. 4 76F92 76F92 76F92 *+ 46 PLUGS REQUIRED WITH MECHANICAL SEAL (Gear End) ..... 4 64AC2 64AC2 64AC2
SHIM--IMPELLER CASE PAPER (.0015/.0020) ............................................................ 0 202GAE732 202GAE732 202GAE732 PAPER (.003) ........................................................................ 0 200GAE732 200GAE732 200GAE732 ALUMINUM (.010) ................................................................. 0 201GAE732 201GAE732 201GAE732
O OVERHAUL KIT LIP SEAL .......................................................... 0 200GAE6010 200GAE6010 200GAE6010 O OVERHAUL KIT MECHANICAL SEAL........................................ 0 203GAE6010 203GAE6010 203GAE6010
76 LOCTITE 620 ............................................................................... 1 25BC749 25BC749 25BC749
* NOT SHOWN o OVERHAUL KITS CONSIST OF BEARINGS, SEALS, GASKET, SHIMS, TAPER PINS AND BEARING RETAINER SCREWS. + MECHANICAL SEAL UNITS ONLY.
SB-7-621 Page 43

For additional information contact your local representative or Gardner Denver, 1800 Gardner Expressway, Quincy, IL 62305 Customer Service Department Telephone: (800) 682-9868 Fax: (217) 221-8780 Sales and Service in all major cities. www.gardnerdenver.com [email protected]
© 2007 Gardner Denver, Inc. Litho in U.S.A.

This document was created with Win2PDF available at http://www.win2pdf.com.The unregistered version of Win2PDF is for evaluation or non-commercial use only.This page will not be added after purchasing Win2PDF.