payables student guide - ucsf health finance · ledger application where the chart of account is...
TRANSCRIPT
McKesson Fiscal Management
TM
Payables
Student Guide
Product Education
December 2013
2 McKesson Fiscal Management
Publication Information Publication date 12/15/2013 Produced in Cork, Ireland
Copyright notice Copyright © 2016 McKesson Corporation and/or one of its subsidiaries. All Rights Reserved. Use of this documentation and related software is governed by a license agreement. This documentation and related software contain confidential, proprietary and trade secret information of McKesson Corporation and/or one of its subsidiaries and are protected under United States and international copyright and other intellectual property laws. Use, disclosure, reproduction, modification, distribution, or storage in a retrieval system in any form or by any means is prohibited without the prior express written permission of McKesson Corporation and/or one of its subsidiaries. This documentation and related software are subject to change without notice.
Release McKesson Fiscal Management™ 15.1
Trademarks All other product and company names may be trademarks or registered trademarks of their respective companies.
Disclaimer The names used in this publication are not the names of real individuals. Any similarity or likeness of the names used in this publication with the names of actual persons is purely coincidental and not intentional.
©McKesson Corporation Proprietary to McKesson – Subject to Confidentiality Agreement
Payables 3
Contents
Publication Information ..........................................................................................2
Chapter 1 – Overview ............................................................................................5 Introduction .......................................................................................................7
Log into Payables .........................................................................................7 Navigate Ribbon Bar .........................................................................................9
Quick access toolbar .................................................................................. 11 Navigate a dialog box ................................................................................. 12 Find information .......................................................................................... 13 View SignOn features ................................................................................. 14
Chapter 2 – Administration .................................................................................. 15 Processing Sets .............................................................................................. 17 Security ........................................................................................................... 19
Review security structure ............................................................................ 20 Integration ....................................................................................................... 21 Chart of Accounts ........................................................................................... 24
Identify account components ...................................................................... 24 Remittance Vendors ....................................................................................... 24
Create a remittance vendor ........................................................................ 25
Chapter 3 – Payment Process ............................................................................ 27 Invoice Payment Process ............................................................................... 29 Payment Production Process .......................................................................... 30
Phase 1 – Payment Selection ..................................................................... 31 Phase 2 – Payment Review ........................................................................ 34 Phase 3 – Payment Approval ..................................................................... 36 Phase 4 – Payment Production .................................................................. 37 Payment production process summary ....................................................... 40
Chapter 4 – Inquiries ........................................................................................... 41 Inquiries .......................................................................................................... 43
Vendor inquiries .......................................................................................... 44 Invoice summary inquiry ............................................................................. 45 Invoice inquiry ............................................................................................. 46 Account inquiry ........................................................................................... 47
Chapter 5 – Void Payment Process .................................................................... 49 Void Payment Process .................................................................................... 51
Void a payment ........................................................................................... 51 Verify payment void .................................................................................... 53 Disable remove invoice option .................................................................... 54
Chapter 6 – Check Reconciliation Process ......................................................... 55
©McKesson Corporation Proprietary to McKesson – Subject to Confidentiality Agreement
4 McKesson Fiscal Management
Check Reconciliation Process ......................................................................... 57 Phase 1 – Select Checks for Reconciliation ............................................... 58 Phase 2 – Reconcile Payments .................................................................. 59 Phase 3 – Process Reconciliation .............................................................. 64
Chapter 7 – Reports ............................................................................................ 65 Reports ........................................................................................................... 67
View and delete reports from SignOn ......................................................... 68 Generate reports in McKesson ERP Solutions Reports .............................. 69
Chapter 8 – Utilities ............................................................................................. 71 Balancing Overview ........................................................................................ 73
Close accounting periods ........................................................................... 74 Utility features ................................................................................................. 75
Delete an invoice - invoice adjustment ....................................................... 75 Payment export........................................................................................... 76 Check Designer .......................................................................................... 76
1099 Processing ............................................................................................. 77
Chapter 9 – Advanced Selection Methods .......................................................... 79 Payment Skeleton Process ............................................................................. 81 Advanced Selection for Payment .................................................................... 85
©McKesson Corporation Proprietary to McKesson – Subject to Confidentiality Agreement
Payables 5
Chapter 1 – Overview
©McKesson Corporation Proprietary to McKesson – Subject to Confidentiality Agreement

6 McKesson Fiscal Management
Objectives Learning goals
Upon successful completion of this chapter, you will be able to:
• Describe the fiscal management system
• Log on and off applications
• Access features and functions
• Find information
• Manage the SignOn application
©McKesson Corporation Proprietary to McKesson – Subject to Confidentiality Agreement
Payables 7
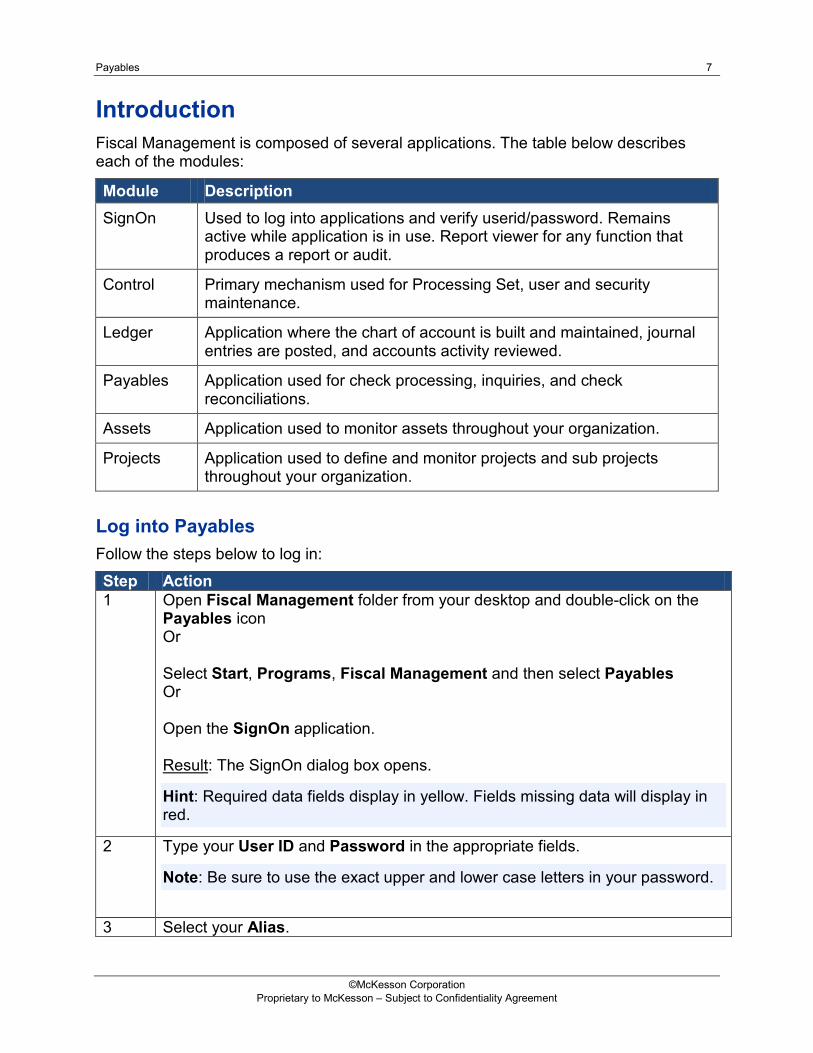
Introduction Fiscal Management is composed of several applications. The table below describes each of the modules:
Module Description SignOn Used to log into applications and verify userid/password. Remains
active while application is in use. Report viewer for any function that produces a report or audit.
Control Primary mechanism used for Processing Set, user and security maintenance.
Ledger Application where the chart of account is built and maintained, journal entries are posted, and accounts activity reviewed.
Payables Application used for check processing, inquiries, and check reconciliations.
Assets Application used to monitor assets throughout your organization.
Projects Application used to define and monitor projects and sub projects throughout your organization.
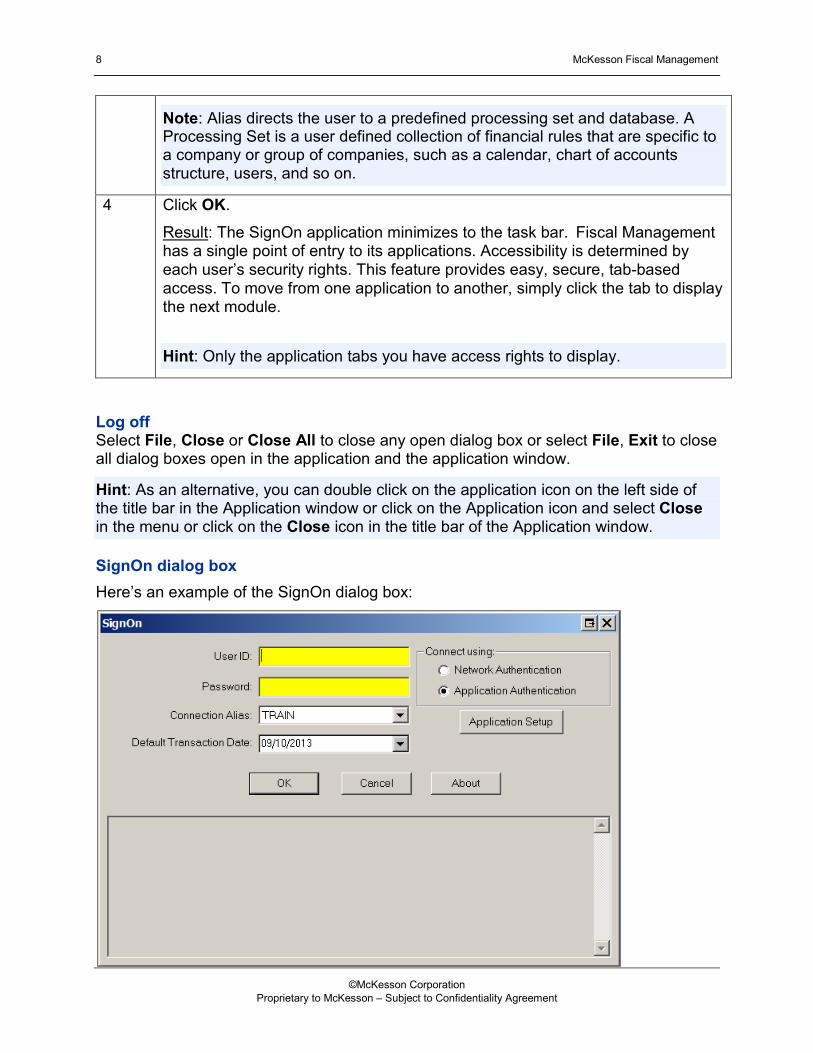
Log into Payables Follow the steps below to log in:
Step Action 1 Open Fiscal Management folder from your desktop and double-click on the
Payables icon Or Select Start, Programs, Fiscal Management and then select Payables Or Open the SignOn application. Result: The SignOn dialog box opens.
Hint: Required data fields display in yellow. Fields missing data will display in red.
2 Type your User ID and Password in the appropriate fields.
Note: Be sure to use the exact upper and lower case letters in your password.
3 Select your Alias.
©McKesson Corporation Proprietary to McKesson – Subject to Confidentiality Agreement
8 McKesson Fiscal Management
Log off Select File, Close or Close All to close any open dialog box or select File, Exit to close all dialog boxes open in the application and the application window.
Hint: As an alternative, you can double click on the application icon on the left side of the title bar in the Application window or click on the Application icon and select Close in the menu or click on the Close icon in the title bar of the Application window.
SignOn dialog box Here’s an example of the SignOn dialog box:
Note: Alias directs the user to a predefined processing set and database. A Processing Set is a user defined collection of financial rules that are specific to a company or group of companies, such as a calendar, chart of accounts structure, users, and so on.
4 Click OK.
Result: The SignOn application minimizes to the task bar. Fiscal Management has a single point of entry to its applications. Accessibility is determined by each user’s security rights. This feature provides easy, secure, tab-based access. To move from one application to another, simply click the tab to display the next module.
Hint: Only the application tabs you have access rights to display.
©McKesson Corporation Proprietary to McKesson – Subject to Confidentiality Agreement
Payables 9
Field definitions
Field/Button Description/Purpose
User ID ID assigned to each user for purposes of signing on to Fiscal Mgmt; used for assignment of security and tasks/functions that each user can access.
Password User-specific password granting access to system.
Alias Directs the user to a predefined processing set and database
Default Transaction Date
Default date used when posting transactions, journal entries, etc.
About Displays information about the server and database you are accessing
Learning activities – Sign in
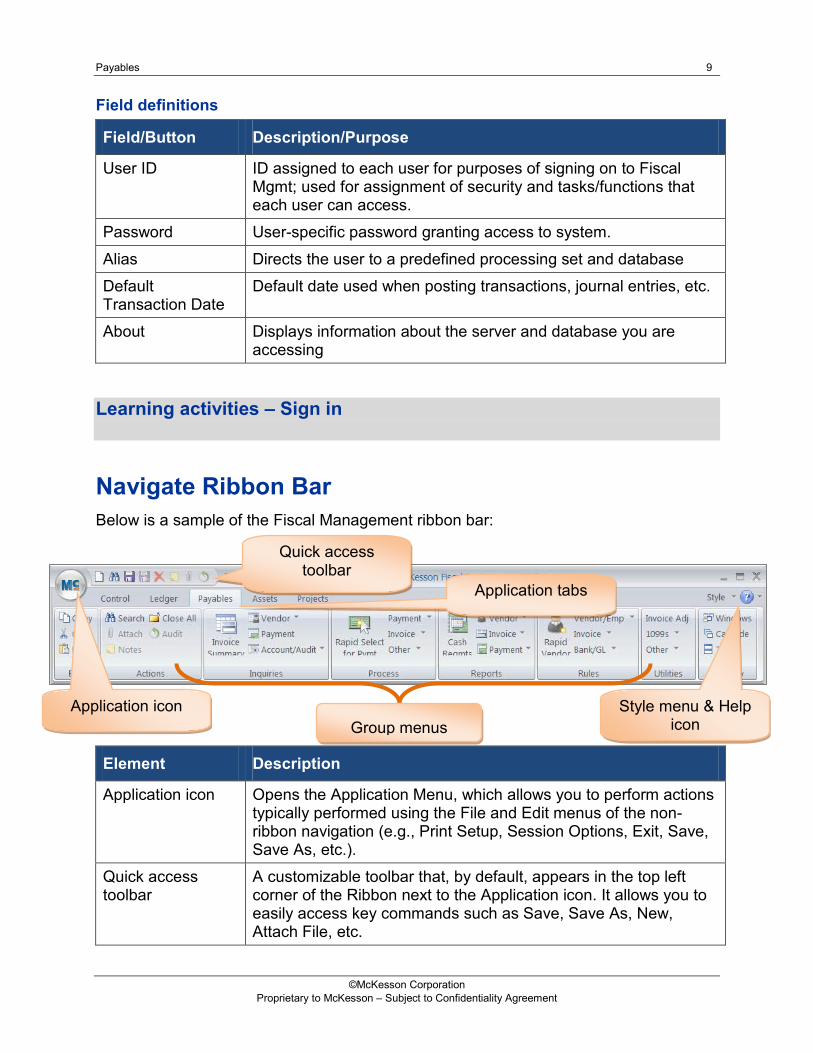
Navigate Ribbon Bar Below is a sample of the Fiscal Management ribbon bar:
Element Description
Application icon Opens the Application Menu, which allows you to perform actions typically performed using the File and Edit menus of the non-ribbon navigation (e.g., Print Setup, Session Options, Exit, Save, Save As, etc.).
Quick access toolbar
A customizable toolbar that, by default, appears in the top left corner of the Ribbon next to the Application icon. It allows you to easily access key commands such as Save, Save As, New, Attach File, etc.
Quick access toolbar
Application icon Style menu & Help icon
Application tabs
Group menus
©McKesson Corporation Proprietary to McKesson – Subject to Confidentiality Agreement
10 McKesson Fiscal Management
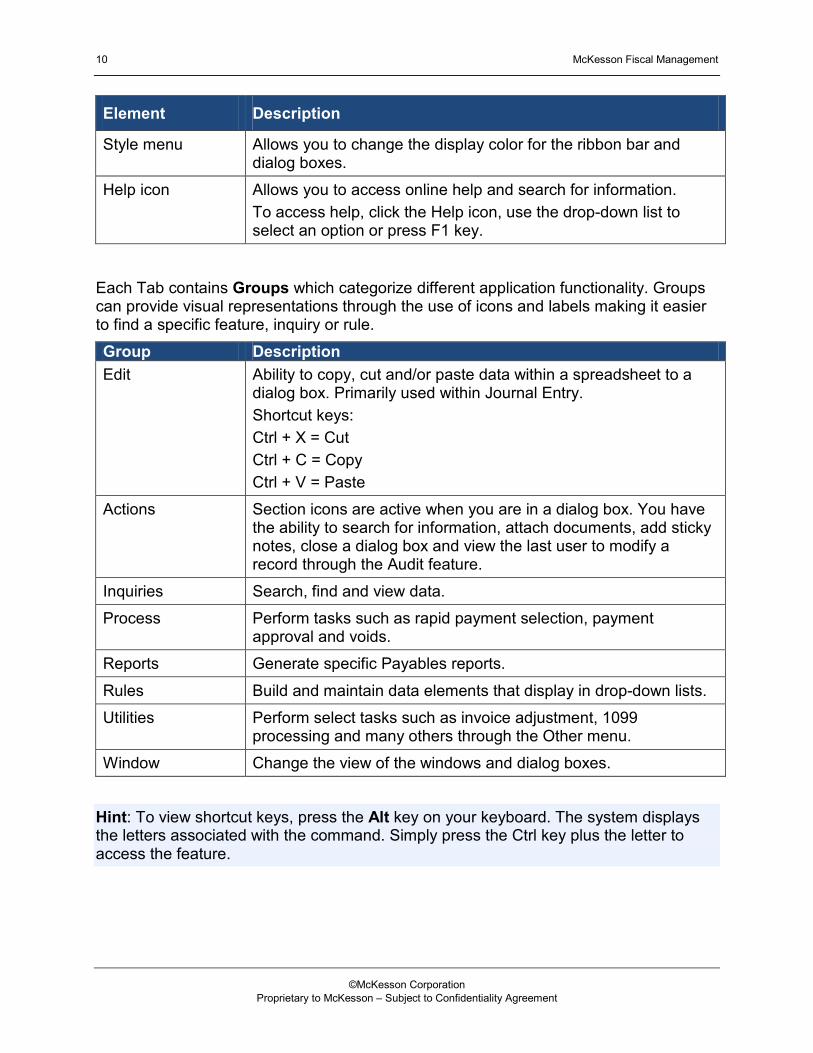
Element Description
Style menu Allows you to change the display color for the ribbon bar and dialog boxes.
Help icon Allows you to access online help and search for information. To access help, click the Help icon, use the drop-down list to select an option or press F1 key.
Each Tab contains Groups which categorize different application functionality. Groups can provide visual representations through the use of icons and labels making it easier to find a specific feature, inquiry or rule.
Group Description Edit Ability to copy, cut and/or paste data within a spreadsheet to a
dialog box. Primarily used within Journal Entry. Shortcut keys: Ctrl + X = Cut Ctrl + C = Copy Ctrl + V = Paste
Actions Section icons are active when you are in a dialog box. You have the ability to search for information, attach documents, add sticky notes, close a dialog box and view the last user to modify a record through the Audit feature.
Inquiries Search, find and view data.
Process Perform tasks such as rapid payment selection, payment approval and voids.
Reports Generate specific Payables reports.
Rules Build and maintain data elements that display in drop-down lists.
Utilities Perform select tasks such as invoice adjustment, 1099 processing and many others through the Other menu.
Window Change the view of the windows and dialog boxes.
Hint: To view shortcut keys, press the Alt key on your keyboard. The system displays the letters associated with the command. Simply press the Ctrl key plus the letter to access the feature.
©McKesson Corporation Proprietary to McKesson – Subject to Confidentiality Agreement
Payables 11
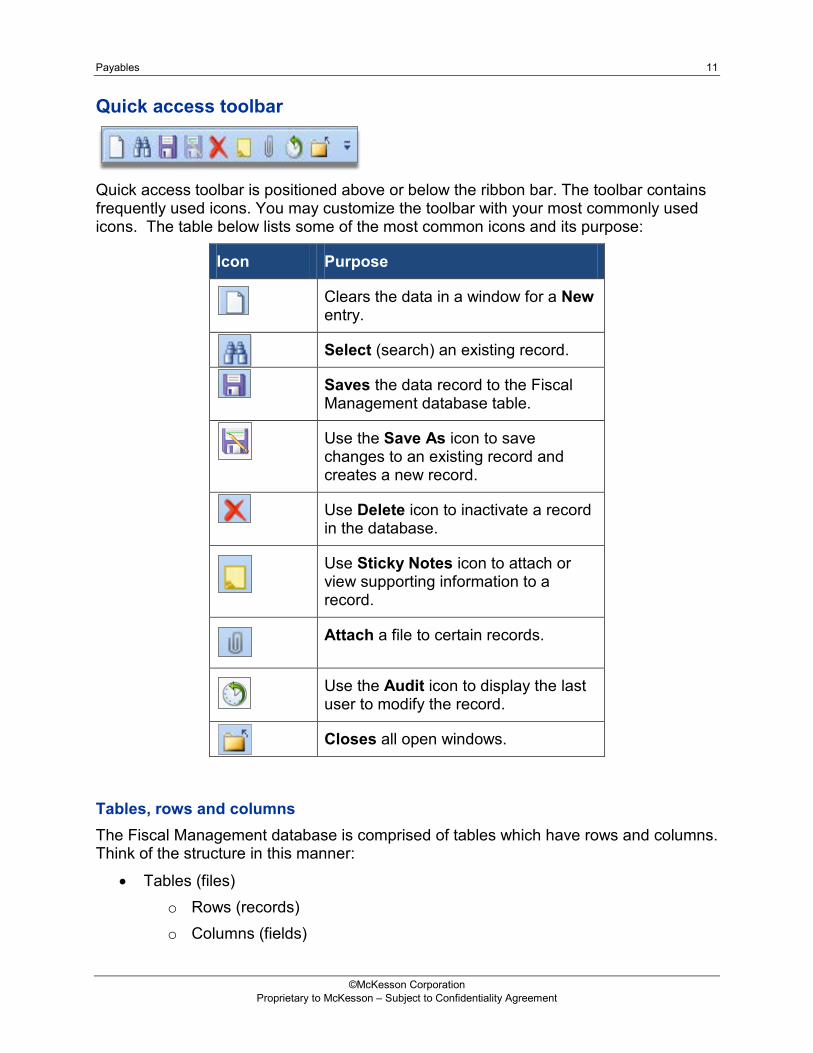
Quick access toolbar
Quick access toolbar is positioned above or below the ribbon bar. The toolbar contains frequently used icons. You may customize the toolbar with your most commonly used icons. The table below lists some of the most common icons and its purpose:
Icon Purpose
Clears the data in a window for a New entry.
Select (search) an existing record.
Saves the data record to the Fiscal Management database table.
Use the Save As icon to save changes to an existing record and creates a new record.
Use Delete icon to inactivate a record in the database.
Use Sticky Notes icon to attach or view supporting information to a record.
Attach a file to certain records.
Use the Audit icon to display the last user to modify the record.
Closes all open windows.
Tables, rows and columns The Fiscal Management database is comprised of tables which have rows and columns. Think of the structure in this manner:
• Tables (files) o Rows (records) o Columns (fields)
©McKesson Corporation Proprietary to McKesson – Subject to Confidentiality Agreement

12 McKesson Fiscal Management
Navigate a dialog box Tasks are performed on the system through the use of dialog boxes. Each dialog box provides access to a table and information retrieved on a dialog box pertains to one row of information.
You may find it easier to move between fields using
• the mouse when you are learning,
• Tab when you are comfortable with the system. Remember: Shift + Tab moves you to the previous field.
Discard message At times when viewing information in a dialog box and you close it a warning message displays:
The message allows you to save or discard your changes. Click Cancel if you don’t want to close the dialog box.
The Binocular icon indicates you can search & select an option.
Each field represents a column in the data table.
©McKesson Corporation Proprietary to McKesson – Subject to Confidentiality Agreement

Payables 13
Find information There are several methods you can use to find and select data within Fiscal Management. Let’s say you want to find a Pay Control Number. First you click the Search icon and then you can use the Wildcard (%) and click Search or you can enter a few characters into the journal batch number field and click Search.
When searching for account numbers, you can use the account mask feature. The underscore character acts like a wildcard for account numbers.
In this example see how the masking character ( _ ) displays in the responsibility code field and account classification code field. The search result reveals all responsibility codes that start with an account classification code of 1 for company code 100.
You can filter and sort your search results using the options available.
©McKesson Corporation Proprietary to McKesson – Subject to Confidentiality Agreement
14 McKesson Fiscal Management
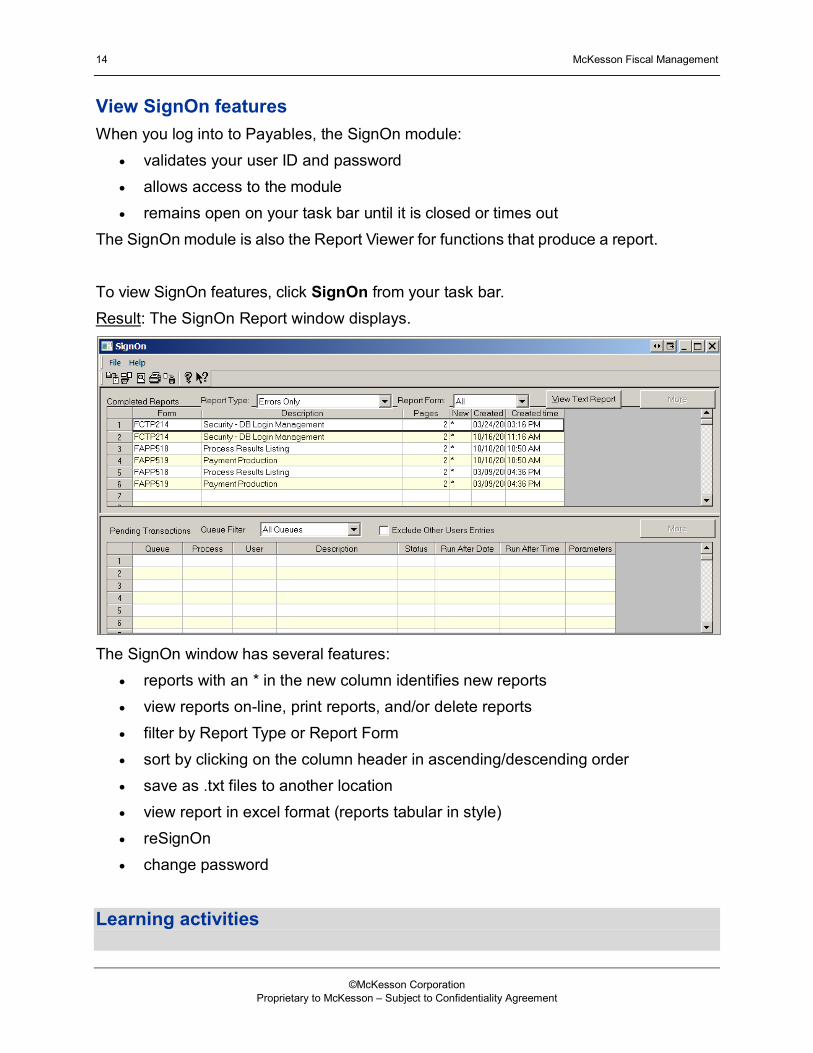
View SignOn features When you log into to Payables, the SignOn module:
• validates your user ID and password • allows access to the module • remains open on your task bar until it is closed or times out
The SignOn module is also the Report Viewer for functions that produce a report. To view SignOn features, click SignOn from your task bar. Result: The SignOn Report window displays.
The SignOn window has several features:
• reports with an * in the new column identifies new reports • view reports on-line, print reports, and/or delete reports • filter by Report Type or Report Form • sort by clicking on the column header in ascending/descending order • save as .txt files to another location • view report in excel format (reports tabular in style) • reSignOn • change password
Learning activities
©McKesson Corporation Proprietary to McKesson – Subject to Confidentiality Agreement
Payables 15
Chapter 2 – Administration
©McKesson Corporation Proprietary to McKesson – Subject to Confidentiality Agreement
16 McKesson Fiscal Management
Objectives Learning goals
Upon successful completion of this chapter, you will be able to:
• Identify key components of the processing set
• Recognize components that make up security
• Identify the key integration data elements between McKesson Fiscal Management and McKesson Supply Chain Management
• Locate remittance vendors and identify the vendor benefits found in Payables
• Identify the account component names for McKesson Fiscal Management and McKesson Supply Chain Management
©McKesson Corporation Proprietary to McKesson – Subject to Confidentiality Agreement

Payables 17
Processing Sets Introduction A processing set is a collection of financial rules that are specific to a company or group of companies, such as a calendar, chart of accounts structure, users, and so on. The system allows you to enter default settings which are used throughout Payables. These defaults improve the speed of data entry as select fields are pre-populated on the dialog windows. To access the Payables Processing Set, go to the Rules menu, click the Bank/GL menu and select Processing Set Defaults. Result: The Processing Set dialog box displays.
There are several categories of defaults organized under the following tabs:
Tab Description
Ledger Define default settings for account codes, journal codes, accounting basis, GL effective date, general ledger xref settings for invoice and payment.
Invoice/Vendor Define default settings for invoice, duplicate checking, monthly & yearly accrual, fixed asset information, vendor settings, auto number masks, amortized prepaids, scanned invoice options and invoice batch.
Payment Define default settings for banking settings, email notification,
©McKesson Corporation Proprietary to McKesson – Subject to Confidentiality Agreement

18 McKesson Fiscal Management
Tab Description auto number masks, approvals, ACH settings and payment segment aging columns and formula definition.
Tax Define default settings for invoice tax rules. Note: Integrated customers setup tax rules in Supply Chain Management.
Vertex Allows you to integrate the vertex sales and use tax system with Payables.
Reference online help for additional information about the Payables Processing Set.
Integration between Fiscal Management and Supply Chain Management strongly recommends use of one processing set. See your Implementation Consultant for information about multiple processing sets within an integrated environment.
Notes section:
©McKesson Corporation Proprietary to McKesson – Subject to Confidentiality Agreement
Payables 19
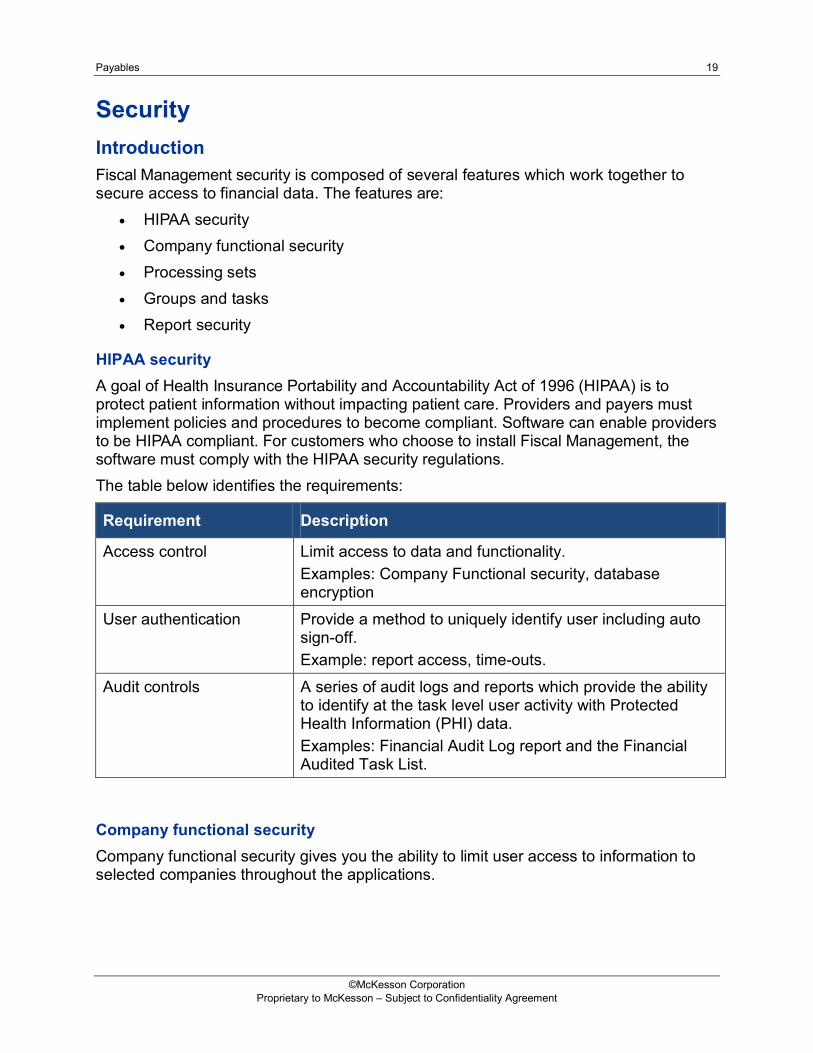
Security Introduction Fiscal Management security is composed of several features which work together to secure access to financial data. The features are:
• HIPAA security • Company functional security • Processing sets • Groups and tasks • Report security
HIPAA security A goal of Health Insurance Portability and Accountability Act of 1996 (HIPAA) is to protect patient information without impacting patient care. Providers and payers must implement policies and procedures to become compliant. Software can enable providers to be HIPAA compliant. For customers who choose to install Fiscal Management, the software must comply with the HIPAA security regulations. The table below identifies the requirements:
Requirement Description
Access control Limit access to data and functionality. Examples: Company Functional security, database encryption
User authentication Provide a method to uniquely identify user including auto sign-off. Example: report access, time-outs.
Audit controls A series of audit logs and reports which provide the ability to identify at the task level user activity with Protected Health Information (PHI) data. Examples: Financial Audit Log report and the Financial Audited Task List.
Company functional security Company functional security gives you the ability to limit user access to information to selected companies throughout the applications.
©McKesson Corporation Proprietary to McKesson – Subject to Confidentiality Agreement
20 McKesson Fiscal Management
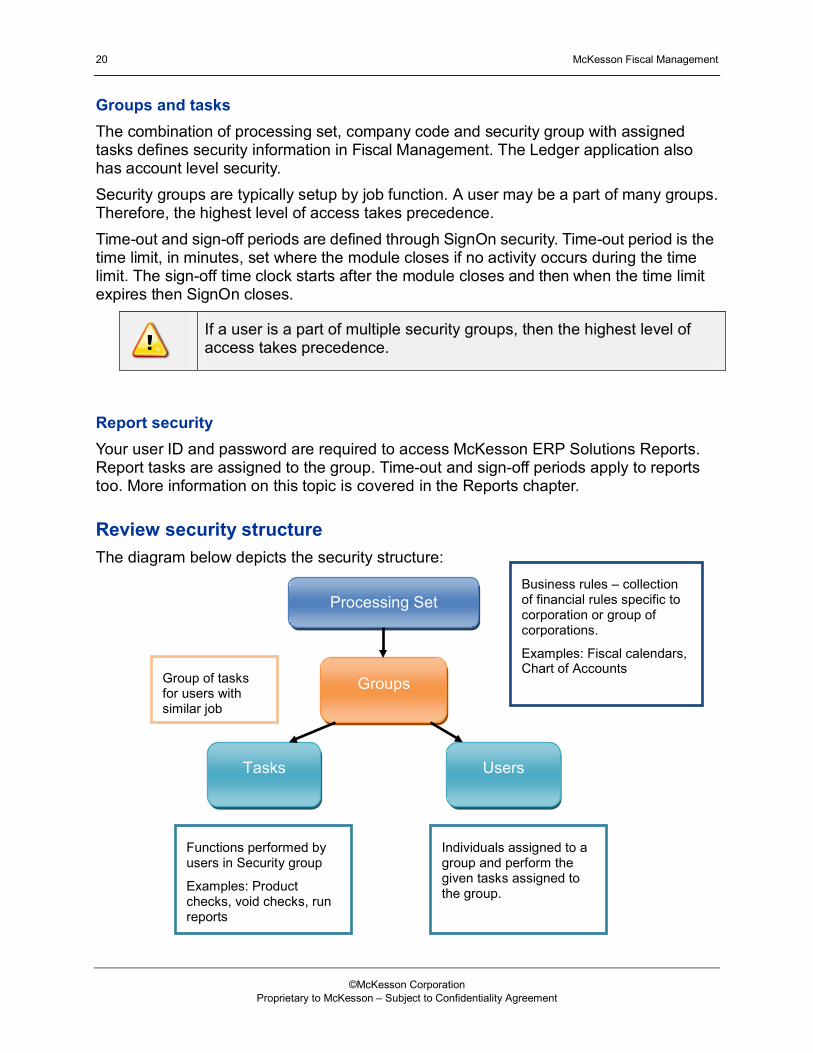
Groups and tasks The combination of processing set, company code and security group with assigned tasks defines security information in Fiscal Management. The Ledger application also has account level security. Security groups are typically setup by job function. A user may be a part of many groups. Therefore, the highest level of access takes precedence. Time-out and sign-off periods are defined through SignOn security. Time-out period is the time limit, in minutes, set where the module closes if no activity occurs during the time limit. The sign-off time clock starts after the module closes and then when the time limit expires then SignOn closes.
If a user is a part of multiple security groups, then the highest level of access takes precedence.
Report security Your user ID and password are required to access McKesson ERP Solutions Reports. Report tasks are assigned to the group. Time-out and sign-off periods apply to reports too. More information on this topic is covered in the Reports chapter.
Review security structure The diagram below depicts the security structure:
Processing Set
Groups
Tasks Users
Business rules – collection of financial rules specific to corporation or group of corporations.
Examples: Fiscal calendars, Chart of Accounts
Group of tasks for users with similar job
Functions performed by users in Security group
Examples: Product checks, void checks, run reports
Individuals assigned to a group and perform the given tasks assigned to the group.
©McKesson Corporation Proprietary to McKesson – Subject to Confidentiality Agreement

Payables 21
Integration Introduction This section defines the major integration points between Payables and other modules, including:
• Ledger • Assets and Projects • Supply Chain Management
There are several types of integration used with Fiscal Management and Supply Chain Management systems as described in the table below:
Integration Type Description
Database Synchronizes data touchpoints between FM and SCM. This integration is based on SQL triggers that are activated by changes to specific tables in each database and SQL Jobs that run stored procedures that transfer the changed data.
Component Extends Fiscal Management product functionality to the Supply Chain Mgmt system using Web Services to standardize communications between the two systems. This mechanism enables centralized configuration and maintenance rather than by individual user workstations.
Drill back Allows users in one system to view source transactional data from the other system without having to manually log in and search for the requested data. This ability to drill across from one system to the other system streamlines the research process and provides the necessary detail in the right hands at the right time. This model utilizes Web Services and command line execution of the module.
Report Utilizes the DATABASE_INFO table to identify the connection data used to target a report request. The table is located in a centralized database called System Integration Map (SIM) database.
©McKesson Corporation Proprietary to McKesson – Subject to Confidentiality Agreement

22 McKesson Fiscal Management
Touchpoints Key tables integrate (real time) between the systems. A web service is used to pass the elements. The table below identifies the touchpoint, the system direction and required Fiscal Management module:
Touchpoint Direction Required FM Module
Invoices SCM to FM Payables
Remit Vendor SCM to FM Payables
Payment Detail Pulls FM data into SCM Payables
Fixed Assets Transactional data captured through Requisitioning, Purchasing, Receiving or Invoice Matching is passed from SCM to FM
Assets
Projects/Subprojects Transactional data captured through Requisitioning, Purchasing, Receiving or Invoice Matching is passed from SCM to FM
Projects
User/Password Management
bi-directional Control
Sub-Ledgers Transactional data captured through Requisitioning, Inventory Management, Purchasing or Invoice Matching is passed from SCM to FM
Ledger
Void Invoice FM to SCM Payables
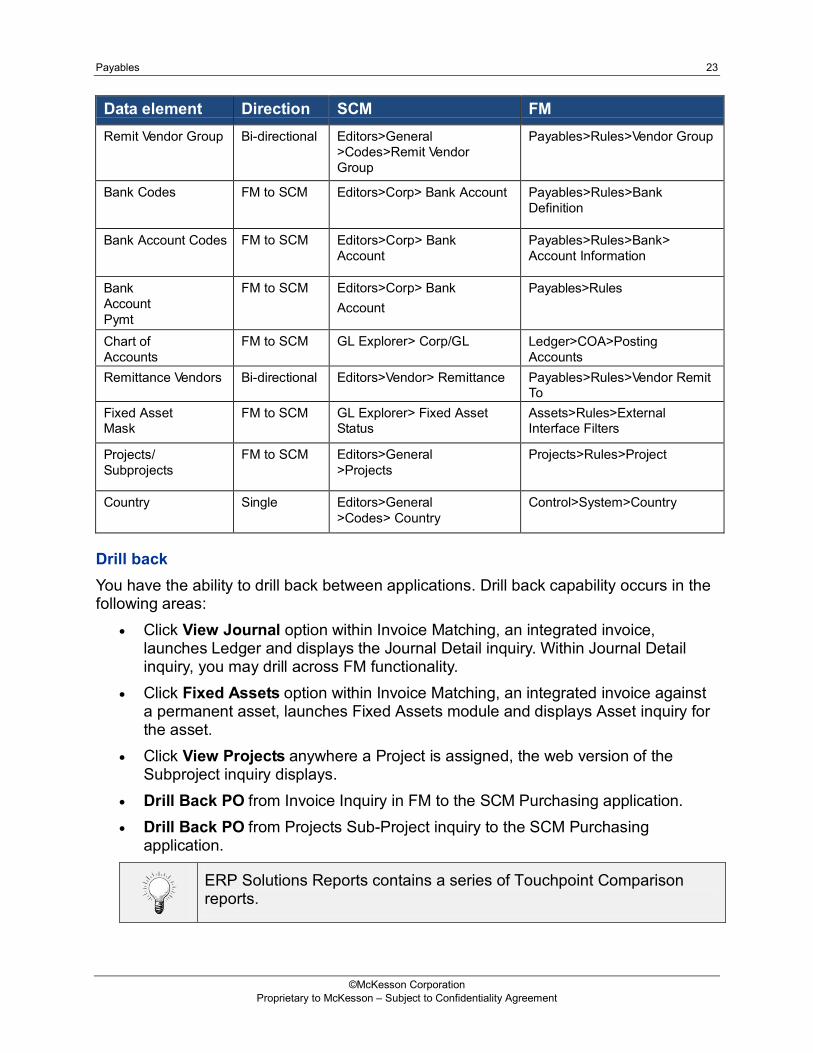
Key Editor tables flow between the Supply Chain Management and Fiscal Management systems using SQL jobs. Some data is updated in either Supply Chain Management or Fiscal Management and sent to the other system (bi-directional). While other data elements are updated in one product and sent to the other product (one-way). The table below highlights the data element, direction and application location:
Data element Direction SCM FM
1099 Codes Bi-directional Editors>Codes> Federal 1099
Payables>Rules>Tax Related>1099
Account Group Codes
Bi-directional GL Explorer >Account Group
Payables>Rules>GL Interface>Group Definition
Payment Terms Bi-directional Editors>Vendor> Terms Payables>Rules>Terms
©McKesson Corporation Proprietary to McKesson – Subject to Confidentiality Agreement
Payables 23
Data element Direction SCM FM
Remit Vendor Group Bi-directional Editors>General >Codes>Remit Vendor Group
Payables>Rules>Vendor Group
Bank Codes FM to SCM Editors>Corp> Bank Account Payables>Rules>Bank Definition
Bank Account Codes FM to SCM Editors>Corp> Bank Account
Payables>Rules>Bank> Account Information
Bank Account Pymt
FM to SCM Editors>Corp> Bank Account
Payables>Rules
Chart of Accounts
FM to SCM GL Explorer> Corp/GL Ledger>COA>Posting Accounts
Remittance Vendors Bi-directional Editors>Vendor> Remittance Payables>Rules>Vendor Remit To
Fixed Asset Mask
FM to SCM GL Explorer> Fixed Asset Status
Assets>Rules>External Interface Filters
Projects/ Subprojects
FM to SCM Editors>General >Projects
Projects>Rules>Project
Country Single Editors>General >Codes> Country
Control>System>Country
Drill back You have the ability to drill back between applications. Drill back capability occurs in the following areas:
• Click View Journal option within Invoice Matching, an integrated invoice, launches Ledger and displays the Journal Detail inquiry. Within Journal Detail inquiry, you may drill across FM functionality.
• Click Fixed Assets option within Invoice Matching, an integrated invoice against a permanent asset, launches Fixed Assets module and displays Asset inquiry for the asset.
• Click View Projects anywhere a Project is assigned, the web version of the Subproject inquiry displays.
• Drill Back PO from Invoice Inquiry in FM to the SCM Purchasing application. • Drill Back PO from Projects Sub-Project inquiry to the SCM Purchasing
application.
ERP Solutions Reports contains a series of Touchpoint Comparison reports.
©McKesson Corporation Proprietary to McKesson – Subject to Confidentiality Agreement

24 McKesson Fiscal Management
Chart of Accounts
Identify account components Applications identify the chart of accounts components as A, B, C. The components vary in name between applications. The table below compares the naming conventions for the various A, B, C elements that make up the account code.
Product A B C Fiscal Mgmt Company User Defined
Component Account Classification Code
Supply Chain Mgmt Corporation Cost Center Expense Code
STAR Entity Department Sub-Account
Valid account types built within the chart of accounts include:
• Assets
• Liabilities
• Equity
• Revenues
• Expenses
If you use a third party General Ledger system, a FM Ledger Skeleton is used for the Chart of Accounts. Data is interfaced between third party GL and Fiscal Management system.
Remittance Vendors Introduction Integrated remittance vendors are created and maintained in both Fiscal Management and Supply Chain Management. Security can be set up to limit user access to the Payables Remit Vendor dialog boxes if desired. When a remittance vendor is built in Supply Chain and integrated to Payables, several remit vendor tables are populated: Vendor Definition (Master Vendors), Remit To Location, and Vendor Buying Location.
©McKesson Corporation Proprietary to McKesson – Subject to Confidentiality Agreement

Payables 25
Create a remittance vendor To create a vendor record, first you need to define the vendor.
1. Go to the Rules menu, click the Vendor/Emp menu and then select Master Vendors. Result: The Vendor Definition dialog box displays.
2. Enter the data fields. At a minimum the system requires a Vendor Code. 3. Click the Save icon. 4. Next enter the vendor remit to location. From the Vendor/Emp menu, select
Remit To Locations. It is the physical location where you submit payments. Result: the Vendor Remit To Location dialog box displays.
5. Click the Select icon to search for the vendor code recently created.
©McKesson Corporation Proprietary to McKesson – Subject to Confidentiality Agreement
26 McKesson Fiscal Management
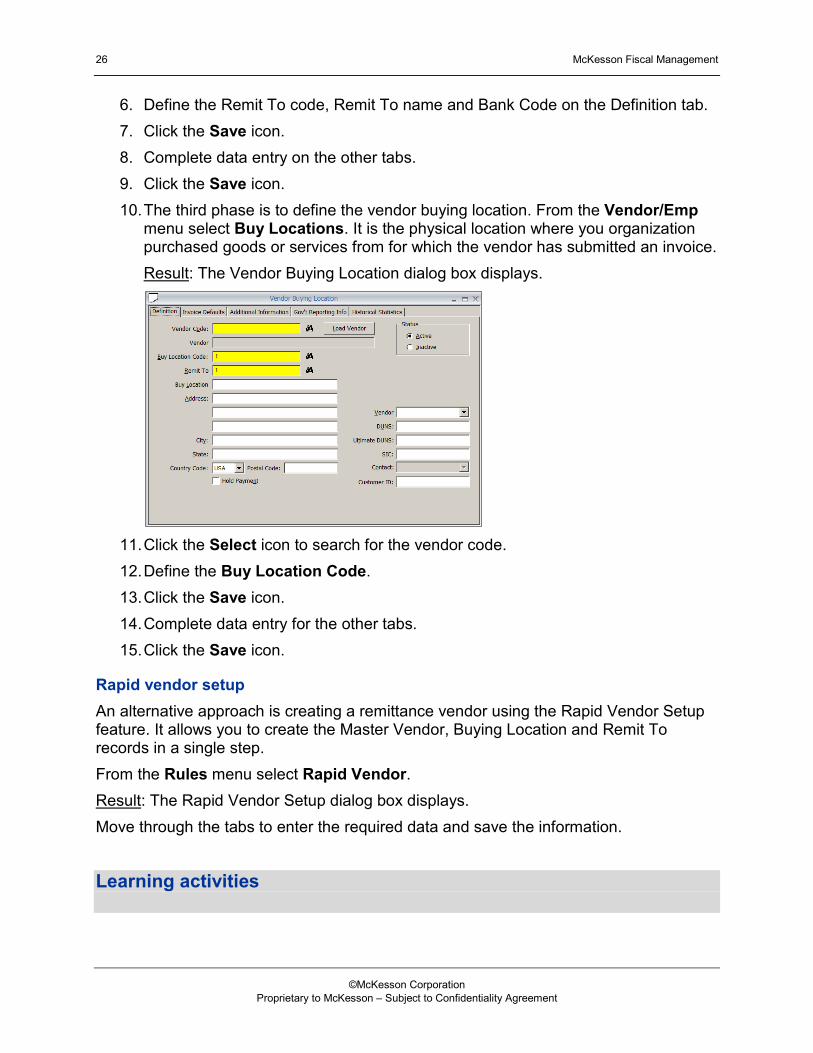
6. Define the Remit To code, Remit To name and Bank Code on the Definition tab. 7. Click the Save icon. 8. Complete data entry on the other tabs. 9. Click the Save icon. 10. The third phase is to define the vendor buying location. From the Vendor/Emp
menu select Buy Locations. It is the physical location where you organization purchased goods or services from for which the vendor has submitted an invoice. Result: The Vendor Buying Location dialog box displays.
11. Click the Select icon to search for the vendor code. 12. Define the Buy Location Code. 13. Click the Save icon. 14. Complete data entry for the other tabs. 15. Click the Save icon.
Rapid vendor setup An alternative approach is creating a remittance vendor using the Rapid Vendor Setup feature. It allows you to create the Master Vendor, Buying Location and Remit To records in a single step. From the Rules menu select Rapid Vendor. Result: The Rapid Vendor Setup dialog box displays. Move through the tabs to enter the required data and save the information.
Learning activities
©McKesson Corporation Proprietary to McKesson – Subject to Confidentiality Agreement
Payables 27
Chapter 3 – Payment Process
©McKesson Corporation Proprietary to McKesson – Subject to Confidentiality Agreement

28 McKesson Fiscal Management
Objectives Learning goals
Upon successful completion of this chapter, you will be able to:
• List the payment processing steps
• Select invoices for payment
• Deselect and adjust payments in a pay control
• Produce payments for a payment control group
• Identify when journal entries are created
©McKesson Corporation Proprietary to McKesson – Subject to Confidentiality Agreement

Payables 29
Invoice Payment Process Introduction The payment process involves a number of steps which can be broken down into three parts:
Payables data flow The diagram below depicts the flow of data from SCM Invoice Matching to FM Payables:
• Define invoice selection criteria using Rapid Selection for Payment • Save the selection criteria • Process the pay control group
Select invoices for payment
• Review or adjust invoices within a pay control group • Approve the pay control group
Review and adjust payment data
• Print checks from within Payables, generate a file for electronic funds transfer, or generate a file for a third-party check printing software
• Reconcile the check numbers on the system (required for pre-printed check stock users only)
Produce payments
Invoice entry Check Request,
PO Invoice
Payables Approved invoices awaiting payment
Payables Invoices
selected for Payment, then paid invoices
©McKesson Corporation Proprietary to McKesson – Subject to Confidentiality Agreement

30 McKesson Fiscal Management
Payment Production Process Introduction There are several phases to the payment production process. The phases build upon each other in an effect to create a check run. The payment phases are performed under the Process menu.
Phase Payment Menu Description
1 Rapid Selection for Payment
Payment Selection Select invoices for payment using the Rapid Selection for Payment feature. Define criteria and build a pay control.
2 Payment Review Review pay control group online or print preliminary report. Adjust invoices as needed.
3 Payment Approval Applicable if approvals are active. The pay control group must be approved before proceeding to Phase 4.
4 Payment Production Print checks. Run check register report.
If you use preprinted check stock, then complete the process through the Update Payment Info feature. Match check numbers with checks produced.
1
2
3
4
©McKesson Corporation Proprietary to McKesson – Subject to Confidentiality Agreement

Payables 31
Phase 1 – Payment Selection There are two payment selection methods available with Payables.
• Rapid Selection for Payment is used to quickly choose invoices for payment. • Advanced Selection for Payment allows you to select only those invoice records
that have been processed. Essential steps of the payment selection process are:
• define invoice selection criteria such as processing options, sorting and source method
• save payment criteria • process the payment control
Note: This section focuses on the Rapid Selection for Payment method. The Advanced Selection for Payment feature is covered later in this course.
Step 1 – Define invoice selection criteria Perform the following steps to select invoices:
1. Click Rapid Select for Pymt from the Process menu. Result: The Rapid Selection for Payment dialog box displays.
2. Select the AutoNumber Rule, if applicable. It is a required field that contains a
default value established in the Control application and turned on in the Processing Set – Payment tab. If the Pay Control check box is selected during the processing set setup, then invoice records in a pay control group uses auto numbered.
3. Verify the Payment Date field. Default is today’s date.
©McKesson Corporation Proprietary to McKesson – Subject to Confidentiality Agreement
32 McKesson Fiscal Management
4. Type a description for the Payment Control for easy identification. (optional)
Note: If you set invoice selection criteria by a standard set of values, then click Copy and select a Skeleton Code. Instruction on using Skeletons is covered later in this course.
5. Define your payment selection criteria. 6. Click the Save icon.
Result: The Payment Control number is assigned and the Process button is active.
7. Click Process. Result: Invoices matching criteria are gathered and the Payment Review, Reports in Summary/Detail and Unprocess buttons are active.
Define invoice selection criteria The Rapid Selection for Payment dialog box contains a variety of fields that allows you to define the invoice selection criteria. It can be described as three sections:
• Filter/Sorting • Source definitions • Functionality buttons
The filter/sorting section includes Additional Processing Options as:
• Payment Limit allows you to limit the payment control to a specified dollar amount. Payment Limit Amount and Selection Priority fields become active.
• Check limit includes maximum or minimum fields. Set limits on the amounts per payment for an invoice.
• Net Receivables and Split By AP Batch are not intended for use with McKesson products.
• Include Credit Memos allows you to include credits with the invoice selection.
• Bank Override allows you to select another bank, bank account, and payment method.
• Select discount options; Take All Unexpired, percentage or Force Expired
• Define sorting options for Payment and Remittance Set source definitions using the Source and Method drop-down options. For example you can select and then define the Operands (text fields).
©McKesson Corporation Proprietary to McKesson – Subject to Confidentiality Agreement
Payables 33
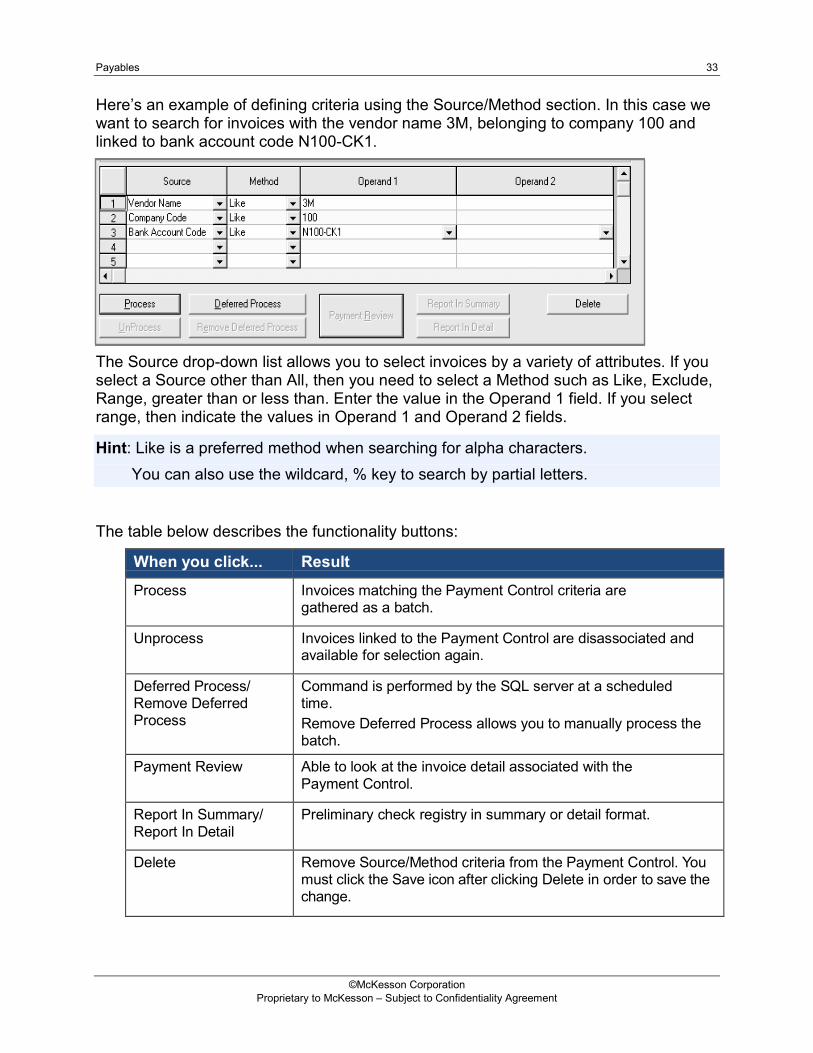
Here’s an example of defining criteria using the Source/Method section. In this case we want to search for invoices with the vendor name 3M, belonging to company 100 and linked to bank account code N100-CK1. The Source drop-down list allows you to select invoices by a variety of attributes. If you select a Source other than All, then you need to select a Method such as Like, Exclude, Range, greater than or less than. Enter the value in the Operand 1 field. If you select range, then indicate the values in Operand 1 and Operand 2 fields.
Hint: Like is a preferred method when searching for alpha characters. You can also use the wildcard, % key to search by partial letters.
The table below describes the functionality buttons:
When you click... Result
Process Invoices matching the Payment Control criteria are gathered as a batch.
Unprocess Invoices linked to the Payment Control are disassociated and available for selection again.
Deferred Process/ Remove Deferred Process
Command is performed by the SQL server at a scheduled time. Remove Deferred Process allows you to manually process the batch.
Payment Review Able to look at the invoice detail associated with the Payment Control.
Report In Summary/ Report In Detail
Preliminary check registry in summary or detail format.
Delete Remove Source/Method criteria from the Payment Control. You must click the Save icon after clicking Delete in order to save the change.
©McKesson Corporation Proprietary to McKesson – Subject to Confidentiality Agreement

34 McKesson Fiscal Management
Step 2 – Save payment criteria After defining the payment selection criteria, it is time to save the information and obtain a Payment Control number.
1. Click the Save icon. Result: Record has been saved message displays.
2. Click OK. Result: The Payment Control number is assigned and the Process, Deferred Process, and Delete buttons display.
Step 3 – Process the payment control 1. Click Process.
Result: A series of events occur.
• The system gathers invoices that match payment selection criteria
• No longer able to edit those invoices in SCM Invoice Matching
• Invoices in Payment Control are ready for payment
• The system removes any checks that result in a negative payment from the pay control (if defined in the initialization file)
• The Payment Production dialog box displays
• Report buttons activate and you can view the information online in summary or detail format
• Pay Control status equals Released for Payment
Note: If the system didn’t include the invoices you expected, then check your selection criteria. First, click the Unprocess button to release those invoices assigned to the Payment Control. Then modify the Source and Method values as needed. To remove a Source/Method row, select the row and then click the Delete button. Remember to click the Save icon to save your changes before you click Process again.
Phase 2 – Payment Review The new phase involves reviewing the invoices selected for payment. Once you have selected invoices for payment you can:
• Review Pay Control in bank summary format
• Review invoice discount and payment data
• Change the payment amount for an invoice
• Remove a bank with associated invoices or an individual invoice from a Pay Control
©McKesson Corporation Proprietary to McKesson – Subject to Confidentiality Agreement
Payables 35
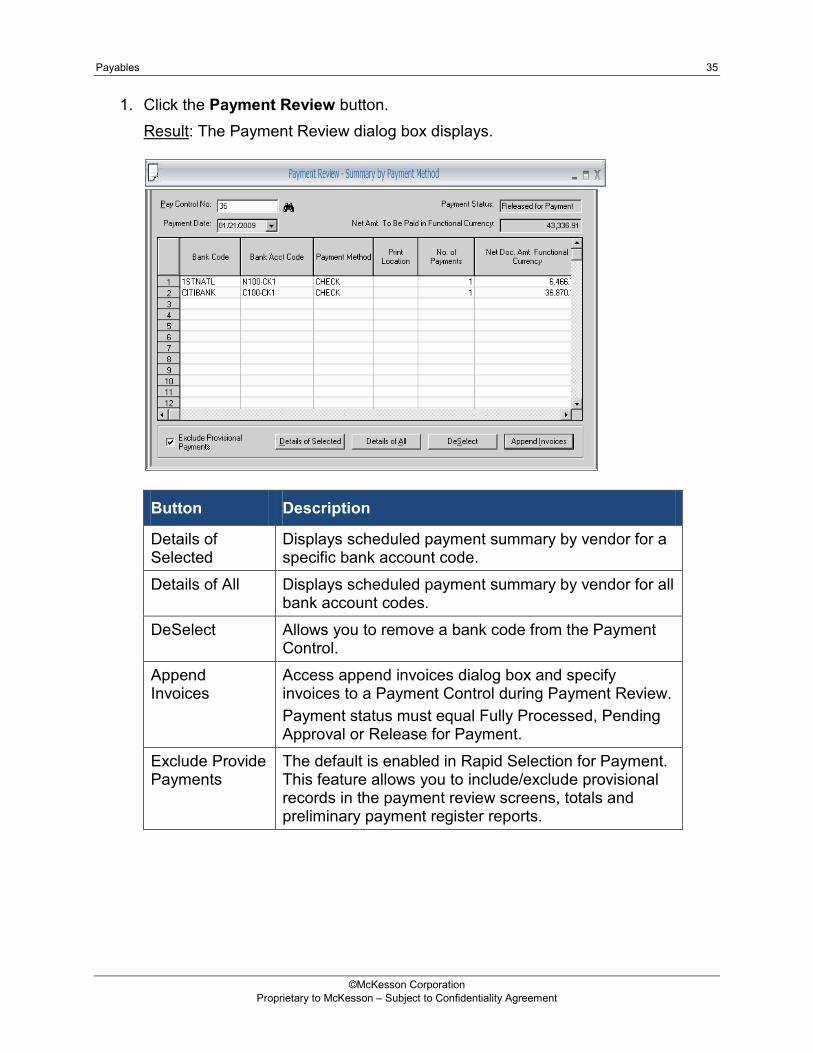
1. Click the Payment Review button. Result: The Payment Review dialog box displays.
Button Description
Details of Selected
Displays scheduled payment summary by vendor for a specific bank account code.
Details of All Displays scheduled payment summary by vendor for all bank account codes.
DeSelect Allows you to remove a bank code from the Payment Control.
Append Invoices
Access append invoices dialog box and specify invoices to a Payment Control during Payment Review. Payment status must equal Fully Processed, Pending Approval or Release for Payment.
Exclude Provide Payments
The default is enabled in Rapid Selection for Payment. This feature allows you to include/exclude provisional records in the payment review screens, totals and preliminary payment register reports.
©McKesson Corporation Proprietary to McKesson – Subject to Confidentiality Agreement

36 McKesson Fiscal Management
2. Drill into the payment details.
• The Payment Details dialog box displays key data for the associated invoices.
• You have the ability to change the following data fields: o discounts taken o schedule payment o pay status
• Able to sort columns in ascending or descending order by clicking on column header.
• Review additional information about the invoice through Additional Entries and Invoice Inquiry buttons.
3. Click OK to return to the Payment Review dialog box.
Phase 3 – Payment Approval Payment Approval is a required step if it is active in the Payment Process. Once your Payables Administrator sets up the payment approval feature, payment controls requiring approval need to be reviewed and released by an authorized approver before Payment Production. Setup consists of defining your approvers (Rules>Invoice>Approval>Approvers), creating an approval rule definition (Rules>Invoice>Approval>Rules), and then assigning Approvers and Tasks to the approval rule. Lastly link the approval rule to the Payables processing set (Rules>Bank/GL>Processing Set).
©McKesson Corporation Proprietary to McKesson – Subject to Confidentiality Agreement
Payables 37
When utilizing Payment Approval functionality, the authorized approvers: • access the Payment Approval screen • enter Authorization Code/Password • review the invoices and take appropriate action on each invoice.
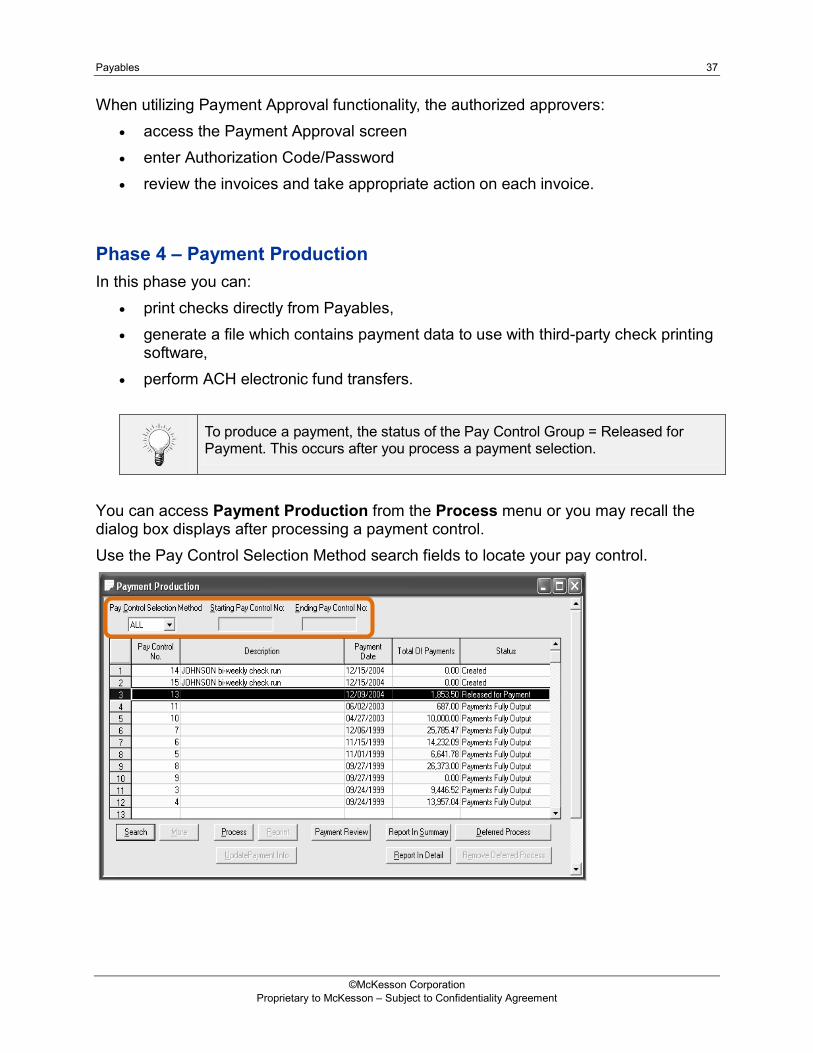
Phase 4 – Payment Production In this phase you can:
• print checks directly from Payables, • generate a file which contains payment data to use with third-party check printing
software, • perform ACH electronic fund transfers.
To produce a payment, the status of the Pay Control Group = Released for Payment. This occurs after you process a payment selection.
You can access Payment Production from the Process menu or you may recall the dialog box displays after processing a payment control. Use the Pay Control Selection Method search fields to locate your pay control.
©McKesson Corporation Proprietary to McKesson – Subject to Confidentiality Agreement

38 McKesson Fiscal Management
There are several key statuses assigned to a Pay Control. The table below describes them:
Status Description
Created Payment Control has not yet been processed. No invoices selected.
Released for Payment
Payment Control has been processed. Batch is ready to produce checks.
Deferred Payment Control has been deferred for producing at a later time.
Partially/Fully Processed
Checks produced but need to update check numbers.
Pending Approval
Payment Approval required. When approval is granted Payment Control status changes to Released for Payment.
Partially/Fully Produced
Checks have been either partially or fully produced in Payables.
Payment Partially/Fully Output
Export check files have been either partially or fully output.
Generate a payment To generate a payment:
1. Search for the pay control(s). 2. Select the pay control row(s). Hint: Status = Released for Payment. 3. Click Process.
Result: There are different results depending on the check writer method you utilize to produce checks.
• Print checks from Payables
• Generate file for EFT
• Generate export file for 3rd party check writer
The payment method is assigned under Rules>Bank/GL>Bank Account Payment Methods per bank account code.
©McKesson Corporation Proprietary to McKesson – Subject to Confidentiality Agreement
Payables 39
Here are some tips to keep in mind depending upon your setup: • Pre-printed check stock
If you have pre-printed check stock, you must perform Update Payment Info to assign check numbers within Payables.
• Zero dollar checks Printing zero dollars checks depends on the FAP000.ini file settings.
• Reprint checks In the event the SignOn report is deleted prior to printing the Pay Control’s checks to check stock, click Reprint to reprint the entire Pay Control again to SignOn. Answer No to print align forms and Yes to do you want to reprint payments.
Journal entries Journal Entries are created after the following events:
• an invoice is matched • a payment is produced (check numbers must be resolved first for pre-printed
stock) • the check is reconciled and service charges are applied.
When checks are produced, the necessary journal entries to balance out Cash accounts and AP Liability accounts are produced. You can post the journal entries to Ledger either manually or automatically. For automatic post, the Journal Source must be flagged appropriately. The Payment Production Listing Report automatically generates after a Pay Control has been processed for payment. Go to SignOn to review the report. You may want to run Payment Register Report found under Reports or the Detail Check Register report through McKesson ERP Solutions Reports. Specify the Pay Control number you wish to review check register details.
Notes section:
©McKesson Corporation Proprietary to McKesson – Subject to Confidentiality Agreement
40 McKesson Fiscal Management
Payment production process summary Follow the quick reference steps below:
1. Select invoices for payment
• Click Rapid Select for Pymt.
• Define your invoice selection criteria and then save it. Result: Pay Control number is generated
• Click Process. Result: Invoices gathered that meet criteria.
• Go to Payment Review or Payment Production.
2. Go to Payment Review to adjust or deselect invoices on a Pay Control. Process>Payment>Payment Review
• Run Preliminary Check Register reports in either summary or detail format.
• Go to next step if approvals are required or go to last step to generate checks.
3. Go to Approvals if approval is required for Pay Control.
Process>Payment>Payment Approval • Approve Pay Control.
• Go to last step to generate checks.
4. Go to Payment Production to produce checks or check file Process>Payment>Payment Production
• Select Pay Control number.
• Click Process to start check production for payment controls with a status of Released for Payment.
When in doubt, double-click in a field to search data. Use the wildcard % to perform a partial search.
Learning activities
©McKesson Corporation Proprietary to McKesson – Subject to Confidentiality Agreement

Payables 41
Chapter 4 – Inquiries
©McKesson Corporation Proprietary to McKesson – Subject to Confidentiality Agreement

42 McKesson Fiscal Management
Objectives Learning goals
Upon successful completion of this chapter, you will be able to:
• List and describe the Payables inquiry options
©McKesson Corporation Proprietary to McKesson – Subject to Confidentiality Agreement

Payables 43
Inquiries Introduction The basic function of inquiries is to view information about remit vendors, invoices, checks, and transactions. There are several inquiry options within Payables. The table below describes the basic functions of the key inquiries:
Inquiry Description
Vendor Displays basic demographic information as well as invoice data for the vendor.
Invoice Provides detailed invoice information. You are able to drill- down to the Payment and Transaction history for the invoice.
Account Shows account distribution.
Payment Displays check data.
Note: The Year End Accrual inquiry is not intended for McKesson customer use.
Inquiry drill down Inquiries give you the ability to select one inquiry and drill-down to view more information. The diagram depicts the flow:
Vendor Summary
Payment
Transaction Invoice Payment
Transaction Addl Entries Distribution
Invoice Summary
©McKesson Corporation Proprietary to McKesson – Subject to Confidentiality Agreement

44 McKesson Fiscal Management
Vendor inquiries The Vendor Inquiry function allows you to view demographic and/or invoice-level information about a specific vendor. There are three vendor inquiries: Vendor Summary, Vendor Buying Location Summary, and Vendor Remit To Summary. Here’s a look at the Vendor Summary Inquiry:
To begin, enter your criteria and then click Search. Select a row in the Results section and then click a feature button to drill to additional information.
Search criteria section
Results section
Features
Notes section:
©McKesson Corporation Proprietary to McKesson – Subject to Confidentiality Agreement

Payables 45
Invoice summary inquiry The Invoice Inquiry function allows you to view a specific invoice, and then drill- down for further information about the invoice.
Select your search criteria and then click Search. Select a row in the results section and then click a feature button to drill into the invoice, transactions, or payments.
The Invoice Adjustment button links you to the Invoice Adjustment Utility. Use this utility to void, mark as paid or adjust invoice records.
The table below list invoice statuses: Invoice Status Description Pending Approval The pay control group contains invoices that are awaiting approval before
payment can be processed.
Approved Payment for the Invoice record has been approved but not generated.
Held The invoice record is being held by the Accounting Department.
Payment Selected The invoice record has been selected for payment.
Paid (Pymt not cleared) Payment for the invoice record has been generated but not cleared by the bank.
Void Payment for the invoice record has been voided.
Paid (Pymt cleared) The payment for the invoice record has cleared and reconciled.
Search criteria section
Results section
Features
©McKesson Corporation Proprietary to McKesson – Subject to Confidentiality Agreement

46 McKesson Fiscal Management
Invoice inquiry To view detail about the invoice, select a row and then click View Invoice. Result: The Invoice Inquiry dialog box displays.
From here you can drill into transactions, payment history, additional information, distribution and purchase order information.
Hint: The PO info function allows you to seamlessly open Supply Chain Management’s Purchasing application and then view the PO number tied to the invoice. From there, you can view item information and receiving history.
You can drill into the GL information and view the journal postings from Payment Review or Distribution.
©McKesson Corporation Proprietary to McKesson – Subject to Confidentiality Agreement

Payables 47
Account inquiry Account Inquiry allow you to look up GL distribution accounts that have been involved in Payables transactions. From the Account/Audit menu, select Account. Result: The Account Inquiry dialog box displays.
Search for an account by code, journal code, batch number and/or dates. Use Invoice Inquiry to link back to the invoice associated with the selected account code.
Use the masking wildcard character “_” to search by a partial account code.
Learning activities
©McKesson Corporation Proprietary to McKesson – Subject to Confidentiality Agreement
48 McKesson Fiscal Management
Notes section:
©McKesson Corporation Proprietary to McKesson – Subject to Confidentiality Agreement
Payables 49
Chapter 5 – Void Payment Process
©McKesson Corporation Proprietary to McKesson – Subject to Confidentiality Agreement

50 McKesson Fiscal Management
Objectives Learning goals
Upon successful completion of this chapter, you will be able to:
• Void a check
©McKesson Corporation Proprietary to McKesson – Subject to Confidentiality Agreement

Payables 51
Void Payment Process Introduction A void payment in Payables means a paid invoice or set of paid invoices associated with a check has been deleted. The associated invoices are now available again to be a part of a Payment Control. There are several methods to select payments:
• Bank code/Bank Account Code • Pay Control • Check No or range of checks • Payment method
Void a payment To void a payment:
1. Select the Payment menu under Process and then click Void Payments. Result: The Void Payments dialog box displays.
2. Search for payments by Bank Code or Payment Control and then click Search. 3. Select the payment row you wish to void. You may select one or more rows. 4. Verify the GL Effective Date and then click Process.
Result: The line status updates and the void payment report posts to your SignOn viewer.
©McKesson Corporation Proprietary to McKesson – Subject to Confidentiality Agreement
52 McKesson Fiscal Management
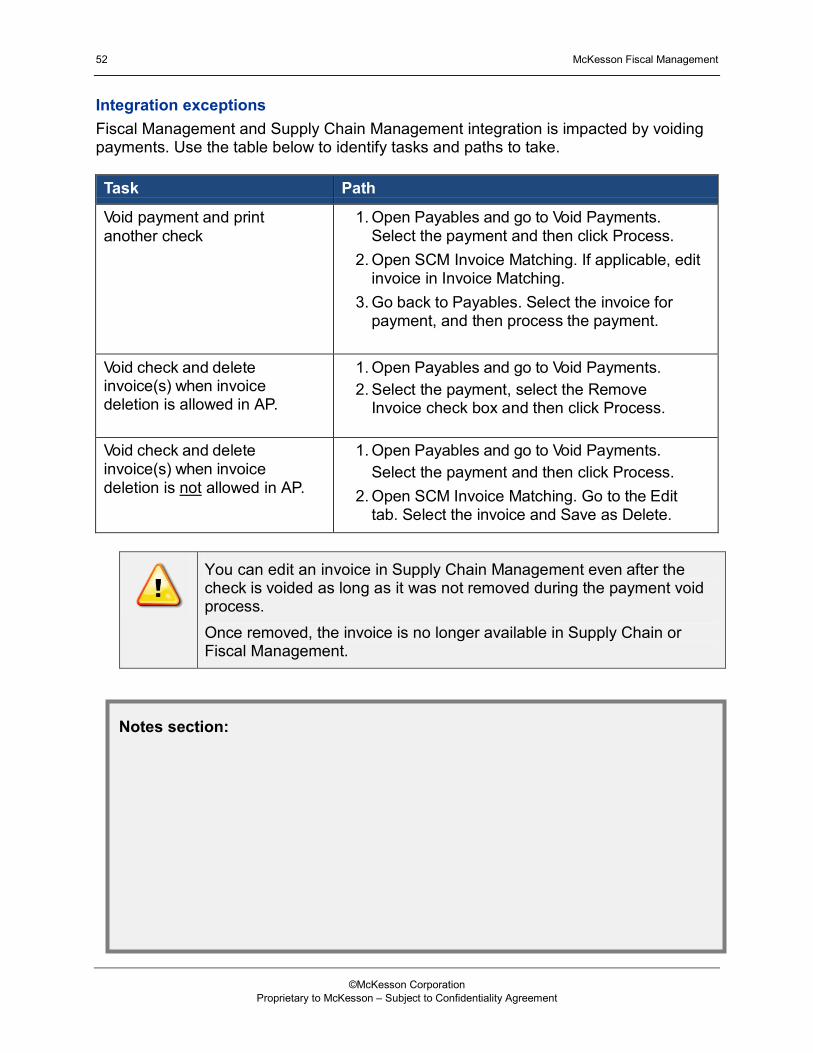
Integration exceptions Fiscal Management and Supply Chain Management integration is impacted by voiding payments. Use the table below to identify tasks and paths to take. Task Path
Void payment and print another check
1. Open Payables and go to Void Payments. Select the payment and then click Process.
2. Open SCM Invoice Matching. If applicable, edit invoice in Invoice Matching.
3. Go back to Payables. Select the invoice for payment, and then process the payment.
Void check and delete invoice(s) when invoice deletion is allowed in AP.
1. Open Payables and go to Void Payments. 2. Select the payment, select the Remove
Invoice check box and then click Process.
Void check and delete invoice(s) when invoice deletion is not allowed in AP.
1. Open Payables and go to Void Payments. Select the payment and then click Process.
2. Open SCM Invoice Matching. Go to the Edit tab. Select the invoice and Save as Delete.
You can edit an invoice in Supply Chain Management even after the check is voided as long as it was not removed during the payment void process. Once removed, the invoice is no longer available in Supply Chain or Fiscal Management.
Notes section:
©McKesson Corporation Proprietary to McKesson – Subject to Confidentiality Agreement

Payables 53
Verify payment void There are several methods available to verify if the check was voided:
• Review Void Payments line status • Payment or Transaction Review through Invoice Inquiry • Payment Inquiry
To verify the void status for a particular payment/invoice: 1. Select Invoice Summary. 2. Enter or search by Vendor Name, Invoice Number or Payment Number. 3. Filter by invoice status and then click Search.
Result: A listing of invoice(s) displays. 4. Select the invoice. 5. Click View Payment or View Transaction to view line details.
The same can be accomplished through Payment Inquiry. Use the inquiry’s feature buttons to drill to the invoice level.
Learning activities
©McKesson Corporation Proprietary to McKesson – Subject to Confidentiality Agreement
54 McKesson Fiscal Management
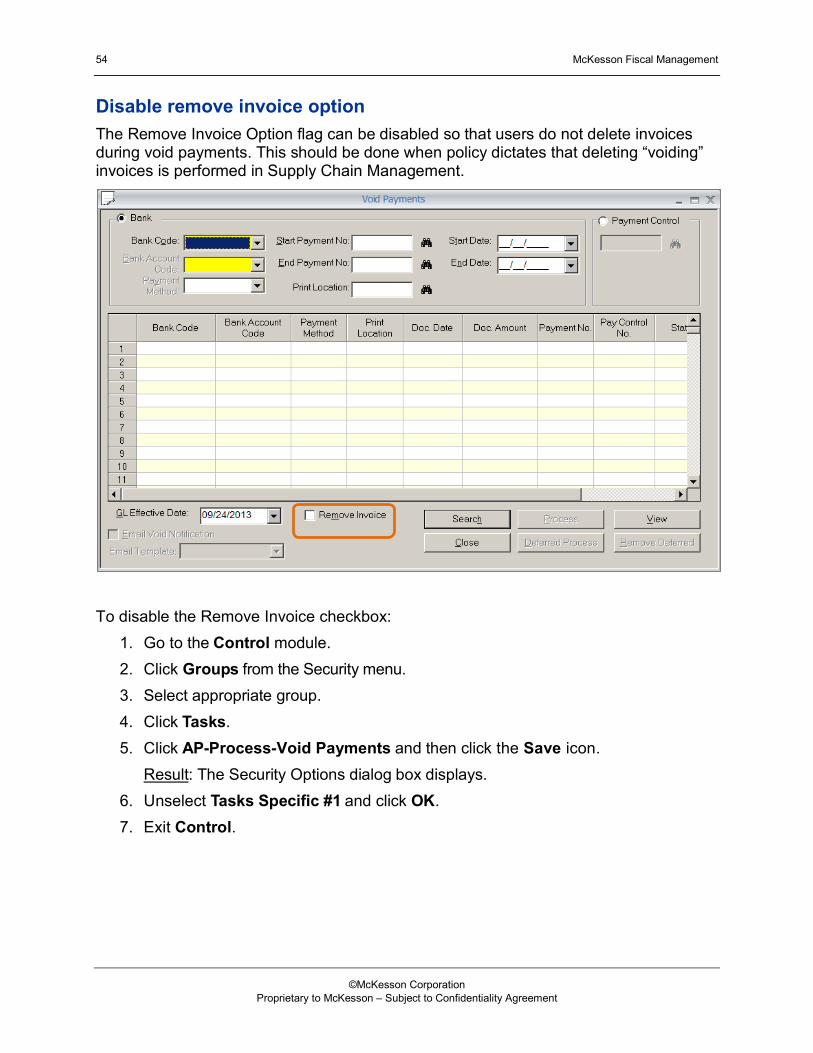
Disable remove invoice option The Remove Invoice Option flag can be disabled so that users do not delete invoices during void payments. This should be done when policy dictates that deleting “voiding” invoices is performed in Supply Chain Management.
To disable the Remove Invoice checkbox:
1. Go to the Control module. 2. Click Groups from the Security menu. 3. Select appropriate group. 4. Click Tasks. 5. Click AP-Process-Void Payments and then click the Save icon.
Result: The Security Options dialog box displays. 6. Unselect Tasks Specific #1 and click OK. 7. Exit Control.
©McKesson Corporation Proprietary to McKesson – Subject to Confidentiality Agreement

Payables 55
Chapter 6 – Check Reconciliation Process
©McKesson Corporation Proprietary to McKesson – Subject to Confidentiality Agreement

56 McKesson Fiscal Management
Objectives Learning goals
Upon successful completion of this chapter, you will be able to:
• identify the check reconciliation phases
• identify and describe the check reconciliation methods
• select checks to reconcile
• enter check and bank statement data
• process reconciled checks
• create journal entries for reconciled checks
©McKesson Corporation Proprietary to McKesson – Subject to Confidentiality Agreement

Payables 57
Check Reconciliation Process Introduction There are several check entry methods to process check reconciliations in Payables. The table below describes the methods:
Method Description
Manual Key the check numbers to be reconciled into Payables.
Automatic Enter a range of check numbers into Payables. The system automatically reconciles the check numbers. You may adjust data as needed.
Import A bank file is imported into Payables to be reconciled.
The check reconciliation process can be described as three processes.
Phase Description
1 Select Checks for Reconciliation Objective: Create reconciliation statement header information.
2 Reconcile Checks Objective: Enter check information for the checks on the bank statement. Methods include Manual, Automatic and Import.
3 Create Journal Entries for Reconciled Checks Objective: Process reconciliation batch and generate journal entries.
Notes section:
©McKesson Corporation Proprietary to McKesson – Subject to Confidentiality Agreement

58 McKesson Fiscal Management
Phase 1 – Select Checks for Reconciliation First phase of the Check Reconciliation process consists of creating the reconciliation batch header information. The process contains several parts:
1. Create a reconciliation batch (unique user-defined number) which contains the reconcilable checks for the bank statement.
2. Specify the bank account from which the checks were drawn. 3. Enter the control amounts which indicate the number of checks and the sum of
the check amounts the batch should contain. 4. Specify the check date input method
To select checks for reconciliation:
1. Click the Other menu drop-down from the Process menu. Click Reconciliation and then select Entry. Result: The Payment Reconciliation dialog box displays.
2. Enter your batch number.
©McKesson Corporation Proprietary to McKesson – Subject to Confidentiality Agreement
Payables 59
Hint: If you use auto batch numbering then select the Auto Batch Number code from the drop-down list.
3. Enter a batch description. 4. Select the bank code and bank account code. 5. Verify the dates.
Hint: The GL effective date is the batch date. The Activity Start and Activity End dates are the statement’s start and end dates.
6. Enter a service charge amount, if applicable.
Hint: Service charges entered in Phase I = lump sum. A service charge may be posted per check in Phase II. Phase III adds services charges from phases I and II to create a total journal entry amount.
7. Select an auto reconciliation option such as Doc Number or Date. Remember to select a Method and enter the data in the Operand 1 and Operand 2 fields.
Hint: None = manual entry
8. Select any additional document status options. 9. Enter the payment and batch amount control values. 10. Click the Save icon.
Result: The batch number is saved, the status equals Updated, and the Detail Entry button activates.
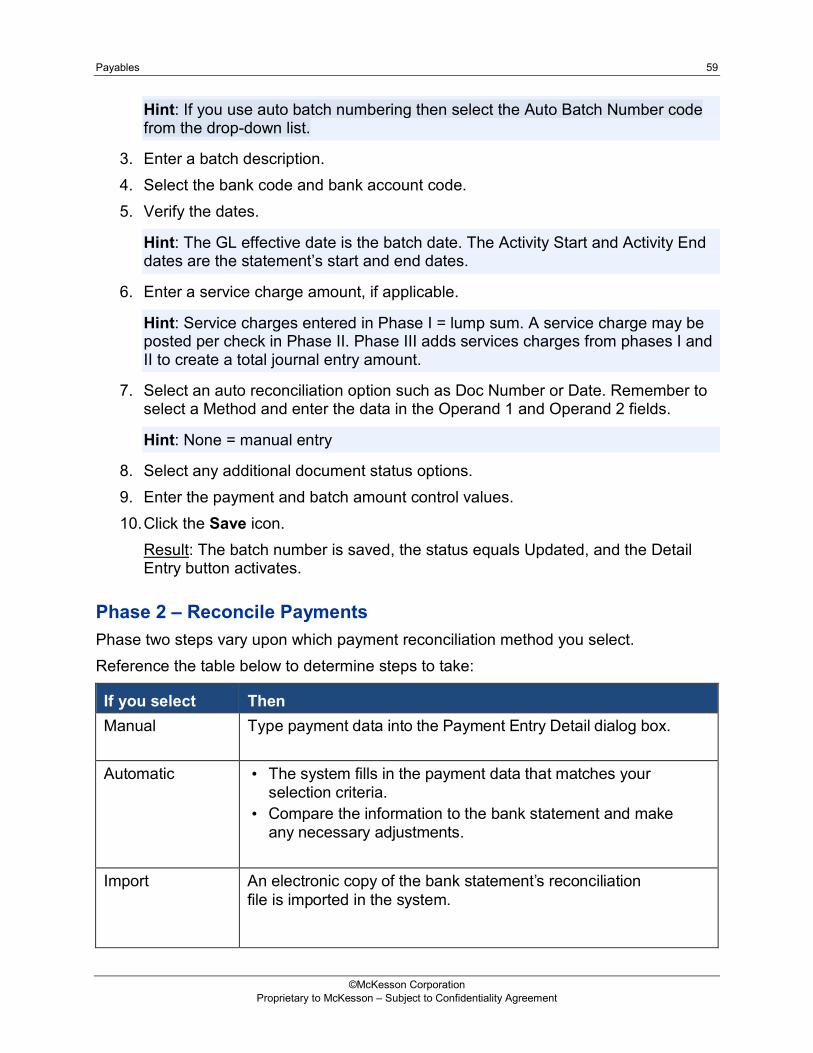
Phase 2 – Reconcile Payments Phase two steps vary upon which payment reconciliation method you select. Reference the table below to determine steps to take:
If you select Then Manual Type payment data into the Payment Entry Detail dialog box.
Automatic • The system fills in the payment data that matches your selection criteria.
• Compare the information to the bank statement and make any necessary adjustments.
Import An electronic copy of the bank statement’s reconciliation file is imported in the system.
©McKesson Corporation Proprietary to McKesson – Subject to Confidentiality Agreement
60 McKesson Fiscal Management
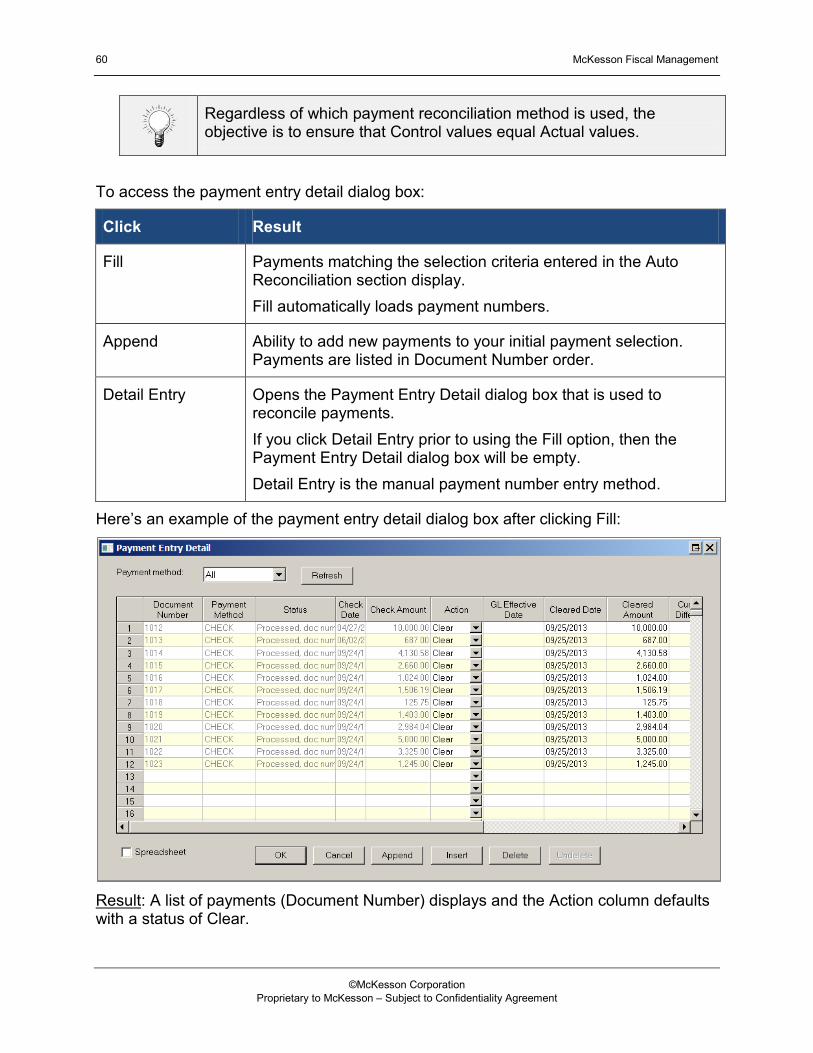
Regardless of which payment reconciliation method is used, the objective is to ensure that Control values equal Actual values.
To access the payment entry detail dialog box:
Click Result
Fill Payments matching the selection criteria entered in the Auto Reconciliation section display. Fill automatically loads payment numbers.
Append Ability to add new payments to your initial payment selection. Payments are listed in Document Number order.
Detail Entry Opens the Payment Entry Detail dialog box that is used to reconcile payments. If you click Detail Entry prior to using the Fill option, then the Payment Entry Detail dialog box will be empty. Detail Entry is the manual payment number entry method.
Here’s an example of the payment entry detail dialog box after clicking Fill:
Result: A list of payments (Document Number) displays and the Action column defaults with a status of Clear.
©McKesson Corporation Proprietary to McKesson – Subject to Confidentiality Agreement

Payables 61
You have the ability to modify the Action field by using the drop-down list and selecting another option such as Stop Payment or Skip.
Note: So what happens when you select Stop Payment as the Action?
• Any additional service charges are entered on the Batch Header dialog box.
• Upon processing the payment reconciliation batch, the invoice(s) associated with the payment becomes available for payment again. The invoice status displays as Approved.
• A journal entry is created as a payment void and an additional journal entry is created for the service charge.
If you need to adjust the clear amount, then go to the Cleared Amount field and type the new value.
Utilizing the features
Click the following feature buttons to perform a specific task:
• OK Saves the modified data and closes the dialog box. The Status changes to Completed.
• Cancel Does not save the data and closes the dialog box. No change to status.
• Append Move from row to row without tabbing through the fields. Short cut is press Alt and A.
• Insert Adds another row to enter new payment data.
• Delete Removes a row.
• Undelete Adds the deleted row back to the list.
Select the Spreadsheet check box when you want to copy/paste payment information from an external source such as an Excel spreadsheet into the Payment Entry Detail dialog box.
©McKesson Corporation Proprietary to McKesson – Subject to Confidentiality Agreement

62 McKesson Fiscal Management
Steps to manually load payments using the spreadsheet feature 1. Create a payment reconciliation batch.
• Access the dialog box through the Process> Other> Reconciliation> Entry menu.
• Enter the batch number, description, bank code, bank account code, statement date, activity dates, GL effective date, and control values.
• Select None for Auto Reconciliation. 2. Click the Save icon. [Status = Created] 3. Click the Detail Entry button. 4. Select the Spreadsheet checkbox. 5. Go to your external source file and copy the cleared check data. [Ctrl C] 6. Go back to the Payment Entry Detail dialog box and click the Document Number
cell for row 1. 7. Paste the data into the dialog box. [Ctrl V] 8. Unselect the Spreadsheet check box. 9. Modify the data as needed. 10. Click OK when finished.
Result: The status changes to Completed. If it doesn’t verify the Control values with the Actual values, modify data as needed and click OK again.
For any payment reconciliation batch, when the Control values = the Actual values, the Status = Completed
Notes section:
©McKesson Corporation Proprietary to McKesson – Subject to Confidentiality Agreement
Payables 63
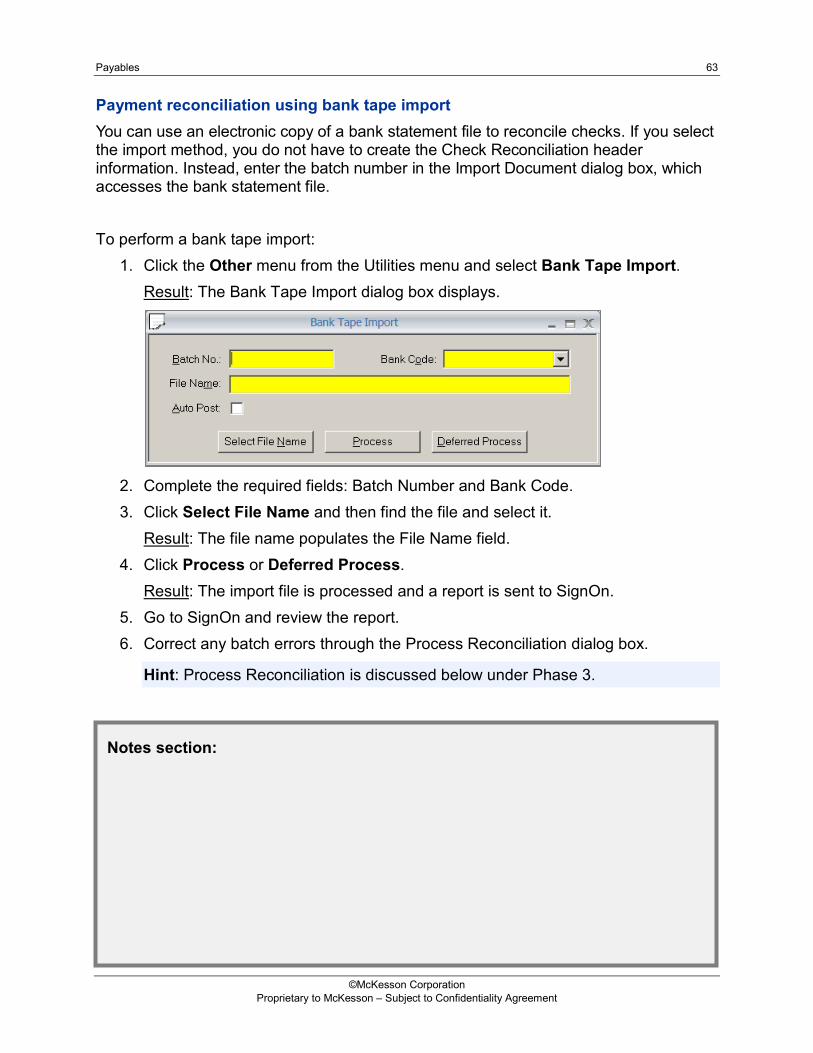
Payment reconciliation using bank tape import You can use an electronic copy of a bank statement file to reconcile checks. If you select the import method, you do not have to create the Check Reconciliation header information. Instead, enter the batch number in the Import Document dialog box, which accesses the bank statement file. To perform a bank tape import:
1. Click the Other menu from the Utilities menu and select Bank Tape Import. Result: The Bank Tape Import dialog box displays.
2. Complete the required fields: Batch Number and Bank Code. 3. Click Select File Name and then find the file and select it.
Result: The file name populates the File Name field. 4. Click Process or Deferred Process.
Result: The import file is processed and a report is sent to SignOn. 5. Go to SignOn and review the report. 6. Correct any batch errors through the Process Reconciliation dialog box.
Hint: Process Reconciliation is discussed below under Phase 3.
Notes section:
©McKesson Corporation Proprietary to McKesson – Subject to Confidentiality Agreement
64 McKesson Fiscal Management
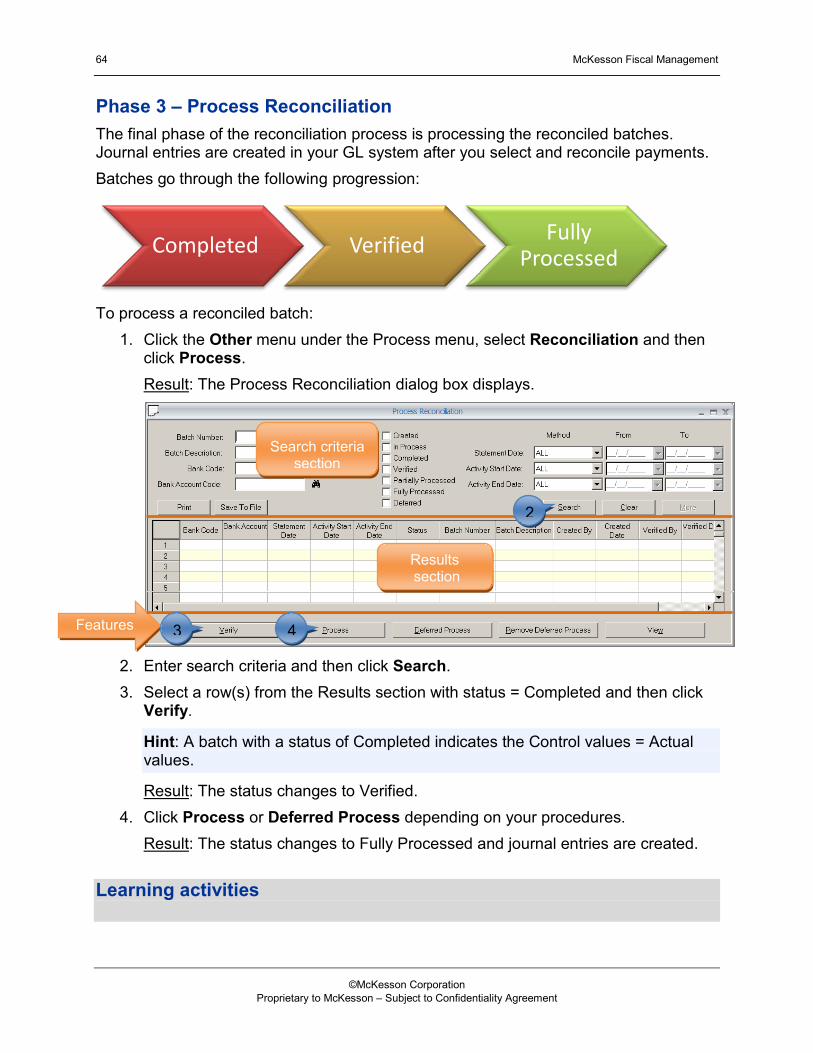
Phase 3 – Process Reconciliation The final phase of the reconciliation process is processing the reconciled batches. Journal entries are created in your GL system after you select and reconcile payments. Batches go through the following progression:
To process a reconciled batch:
1. Click the Other menu under the Process menu, select Reconciliation and then click Process. Result: The Process Reconciliation dialog box displays.
2. Enter search criteria and then click Search. 3. Select a row(s) from the Results section with status = Completed and then click
Verify.
Hint: A batch with a status of Completed indicates the Control values = Actual values.
Result: The status changes to Verified. 4. Click Process or Deferred Process depending on your procedures.
Result: The status changes to Fully Processed and journal entries are created. Learning activities
Completed Verified Fully Processed
Search criteria section
Results section
Features
2
3 4
©McKesson Corporation Proprietary to McKesson – Subject to Confidentiality Agreement
Payables 65
Chapter 7 – Reports
©McKesson Corporation Proprietary to McKesson – Subject to Confidentiality Agreement
66 McKesson Fiscal Management
Objectives Learning goals Upon successful completion of this chapter, you will be able to:
• Run and view reports in Payables
• View and delete reports from SignOn
• Generate standard reports in McKesson ERP Solutions Reports
©McKesson Corporation Proprietary to McKesson – Subject to Confidentiality Agreement

Payables 67
Reports Introduction Payables contains a variety of standard reports accessible through the Reports menu. You have the ability to customize the reports by defining your viewing criteria. The table below provides a list of the report menu categories and the reports available under each menu:
With each report, enter the required data and select either Print or Deferred Print.
Reference online help or the Reports Guide documents library for detailed information about the Payables reports.
•Cash Requirements
Cash Requirements
•1099 History •Buy from Invoice History •Remit to Invoice History •Remit to Payment History •Value-Added Tax
Vendor
•Aged Accounts Payable •AP Distribution •Approval Authorization •Credit Memo Listing •Discounts Lost and Discounts Taken •Sales/Use Tax
Invoice
•ACH File Report •Payment Reconciliation •Payment Register •Preliminary Payment Register •Withholding Certificate
Payment
©McKesson Corporation Proprietary to McKesson – Subject to Confidentiality Agreement
68 McKesson Fiscal Management
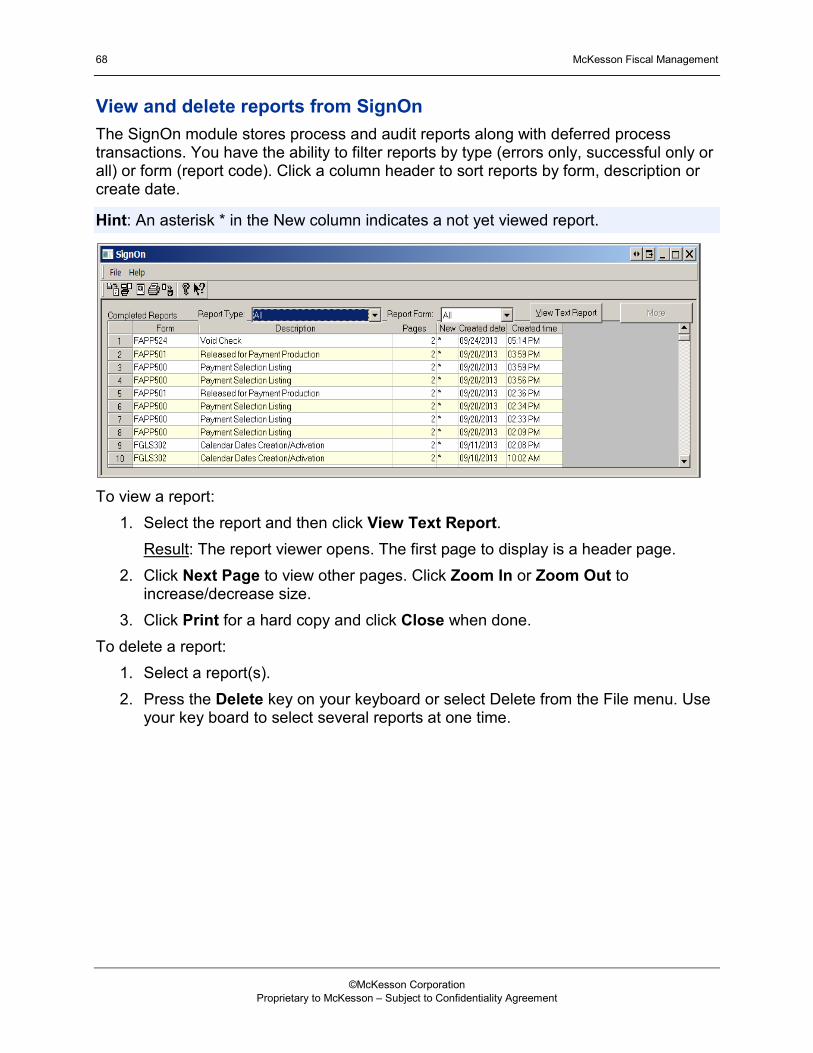
View and delete reports from SignOn The SignOn module stores process and audit reports along with deferred process transactions. You have the ability to filter reports by type (errors only, successful only or all) or form (report code). Click a column header to sort reports by form, description or create date.
Hint: An asterisk * in the New column indicates a not yet viewed report.
To view a report:
1. Select the report and then click View Text Report. Result: The report viewer opens. The first page to display is a header page.
2. Click Next Page to view other pages. Click Zoom In or Zoom Out to increase/decrease size.
3. Click Print for a hard copy and click Close when done. To delete a report:
1. Select a report(s). 2. Press the Delete key on your keyboard or select Delete from the File menu. Use
your key board to select several reports at one time.
©McKesson Corporation Proprietary to McKesson – Subject to Confidentiality Agreement

Payables 69
Generate reports in McKesson ERP Solutions Reports The standard reports module uses Crystal ReportsTM to generate reports. Standard reports enable you to quickly run a report without having to design it. You have the ability to filter, sort and extract information. Setup involves the following key elements:
Element Description
User access Users need a User ID/password with security rights to ERP Solutions Reports. The user ID/password combination is case sensitive. Users are granted access rights to various reports. If a user doesn’t have rights to a report, the icon is a combination lock. Security is built in Control>Groups.
Login attempts ERP Solutions Reports limits the number of user login attempts. After three unsuccessful login attempts, you are locked out of the reporting application. If you have access to Supply Chain Management and Fiscal Management, the most restrictive setting is applied, and you are locked out of both systems. Contact your system administrator for assistance.
SIM database 1. ERP Solutions Reports validates client/server connectivity through the ODBC. Fiscal Management uses the Database Source Name TITANIDN. 2. ERP Solutions Reports looks to the SIM database DATABASE_INFO table’s System Name for database/ server mappings.
Workstation default
You can pick the system name you want to use when generating reports or you can pre-set a default for the workstation. To setup a default, go to File>Options and type in the system name in the system default string field.
Inactivity time- outs
Inactivity time limit specifies the minutes ERP Solutions Reports can sit idle before the system notifies you and closes the application. The system looks to the user’s Fiscal Management’s sign-off period value and then the Processing Set level. The sign-off period value acts as both the time out and sign off mechanism for ERP Solutions Reports. The SignOn security sign- off period value must be greater than 0.
©McKesson Corporation Proprietary to McKesson – Subject to Confidentiality Agreement
70 McKesson Fiscal Management
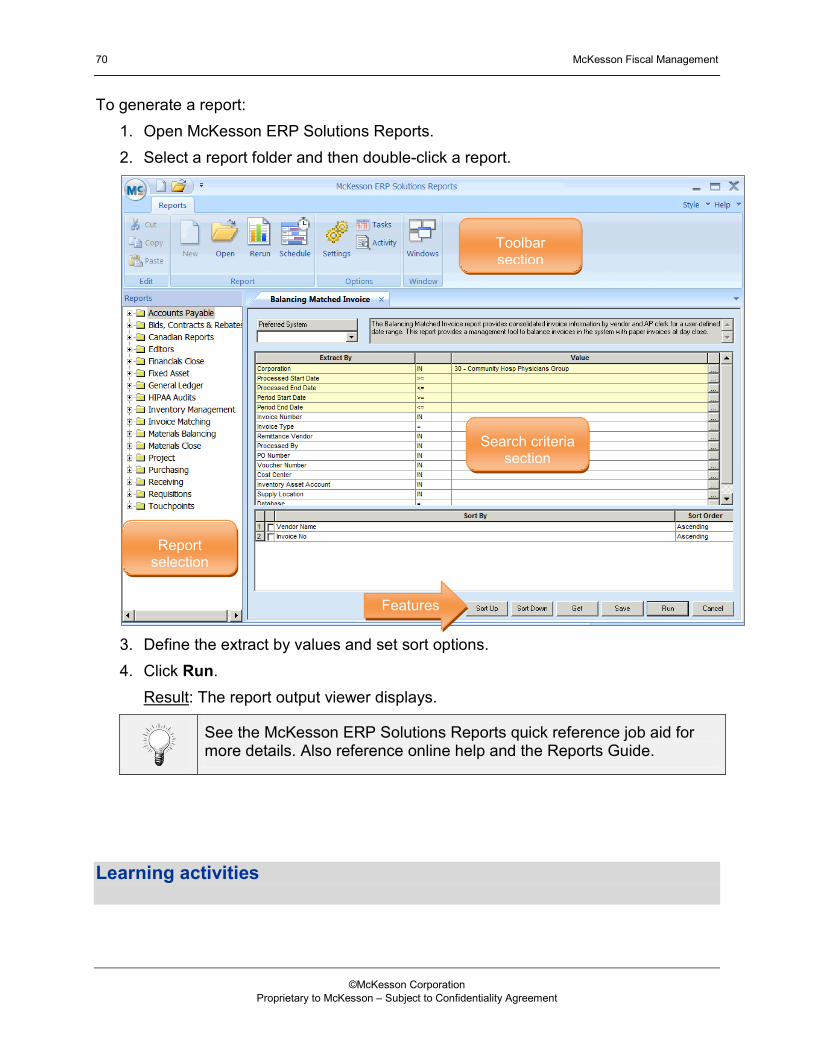
To generate a report: 1. Open McKesson ERP Solutions Reports. 2. Select a report folder and then double-click a report.
3. Define the extract by values and set sort options. 4. Click Run.
Result: The report output viewer displays.
See the McKesson ERP Solutions Reports quick reference job aid for more details. Also reference online help and the Reports Guide.
Learning activities
Toolbar section
Features
Search criteria section
Report selection
©McKesson Corporation Proprietary to McKesson – Subject to Confidentiality Agreement
Payables 71
Chapter 8 – Utilities
©McKesson Corporation Proprietary to McKesson – Subject to Confidentiality Agreement

72 McKesson Fiscal Management
Objectives Learning goals Upon successful completion of this chapter, you will be able to:
• Identify the key balancing phases
• Locate the close accounting period feature in McKesson Fiscal Management and McKesson Supply Chain Management
• Locate and describe the invoice adjustment feature
• Access the 1099 Utility module and adjust a 1099 invoice.
©McKesson Corporation Proprietary to McKesson – Subject to Confidentiality Agreement
Payables 73
Balancing Overview Introduction For this chapter reference the McKesson Fiscal Management Monthly Balancing Guide. It is designed to assist you with balancing invoices between Fiscal Management and Supply Chain Management, balancing transactions between Ledger and Payables, and balancing imported invoices between Fiscal Management and the external source. It describes in detail the monthly balancing process. Here’s a look at the key phases:
Note: For multiple company balancing use Fiscal Management to balance by processing set or by company if each company has its own bank account. If your department is decentralized but uses one database and processing set, one person may balance the entire processing set thus balance for all companies or require AP staff to balance the companies within their responsibility center.
Post • Post all journal entries
Close • Close the accounting period for Supply Chain Management through GL Explorer
Verify • Verify that NOVA_GL and ACCT are synchronized [Account Discrepancy Report under
the General Ledger report folder]
Balance • Balance invoices [Invoice Balancing report] • Balance Accounts Payables to the General Ledger [AP Balancing Summary report]
Resolve • Resolve any discrepancies
©McKesson Corporation Proprietary to McKesson – Subject to Confidentiality Agreement

74 McKesson Fiscal Management
Close accounting periods It is necessary to close the accounting period on the last day of the month or shortly thereafter so you can enter invoices for the next accounting period. Integrated Supply Chain Management and Fiscal Management environments must close the accounting period for both:
• Invoice Matching • Ledger
To close the Invoice Matching accounting period:
1. Open Supply Chain Management GL Explorer. 2. Select the corporation to close and then click the Finance tab.
3. In the Accounting Period End Date field, type the last day of the new accounting
period and then click Apply. 4. Repeat the steps for each corporation.
Note: You can set Supply Chain Management to make automatic changes to the accounting period by creating and scheduling the Update Accounting Period profile in Profile Manager.
©McKesson Corporation Proprietary to McKesson – Subject to Confidentiality Agreement

Payables 75
To close Ledger period: You may close the period on the last day of the month or a number of days after month end for each company. Multiple companies and multiple periods can be closed at the same time.
1. Open Ledger and select Period Close from the Process> Period End menu. 2. Enter a Request ID, Request Description and Request Date. 3. Select the Company Code and identify the number of periods to close and select
Next Close Date. 4. Click the Save icon. 5. Click Process or Deferred Process.
Result: The period closes.
Utility features Payables has a series of tasks and utilities available that allow you to import or export information. Many of these tasks can be found on the Utilities menu. Items include:
• Invoice adjustment • 1099 processing • ACH addendum rules • Bank tape import • Check designer • Import/export groups, processes and scheduler • Export file designer • Vendor move/merge
Delete an invoice - invoice adjustment Invoice adjustment allows authorized users the ability to adjust invoice records by voiding (delete) invoice records or marking invoice records as paid.
1. Click Invoice Adj from the Utilities menu. 2. Search for the invoice, select it and then click OK.
Result: The Invoice Adjustment dialog box displays. 3. Verify the information. 4. Click Void to delete the invoice or click Mark Paid to change the invoice status.
©McKesson Corporation Proprietary to McKesson – Subject to Confidentiality Agreement
76 McKesson Fiscal Management
Customers integrated with Supply Chain Management should contact McKesson Customer Support prior to utilizing this function. Adjusting invoices in Payables may have a negative impact on Supply Chain.
Payment export Payment Export also known as positive pay allows you to send a list of payments for export to your bank. It is another way to reconcile checks. With this export, the bank is notified of payments made and the dollar amounts. The bank can reconcile against the file and send you an import file to identify cleared checks.
Check Designer You have the ability to create check forms that contain customized check and remittance sections. There are three phases to creating a check form:
• Assign a form name and size • Define the check section of the form • Define the remittance section
Link the check form to a bank account record so that when the bank account record is used to pay a vendor it generates the payment using the check form.
For more information about building payment forms see the Payables Administrator’s Guide.
©McKesson Corporation Proprietary to McKesson – Subject to Confidentiality Agreement
Payables 77
1099 Processing 1099 year-end processing consists of:
• Creating a file with your 1099s • Clearing the 1099 totals maintained in the system • Clearing the Historical Statistics maintained under the Vendor Buy Location
The 1099 module gives you the ability to create electronic 1099 files so you can use the government approved formats to send the 1099 totals to the IRS with such tools as MagFiler. You have the ability to clear 1099 data for specified vendors, and make changes to 1099 invoices that were already paid. There are several key steps involved in processing year end 1099s:
Step Action
1 Run 1099 reports. You may want to review 1099 reports quarterly to identify potential errors and correct them.
2 1099 Adjust Paid Invoices. Make adjustments such as incorrect 1099 code for a vendor, missing 1099 amounts for an invoice or incorrect 1099 line distribution for an invoice. Select 1099 Adjustment from the Utilities>1099s menu. Locate the vendor and modify the invoice and/or vendor.
3 Export 1099 data to MagFiler. Select Export 1099 Info from the Utilities>1099s menu. View a 1099 history report and/or export data.
4 Clear 1099 data for next year. Select Clear 1099s from the Process>Other>Year End menu.
Learning activities
©McKesson Corporation Proprietary to McKesson – Subject to Confidentiality Agreement
78 McKesson Fiscal Management
Notes section:
©McKesson Corporation Proprietary to McKesson – Subject to Confidentiality Agreement

Payables 79
Chapter 9 – Advanced Selection Methods
©McKesson Corporation Proprietary to McKesson – Subject to Confidentiality Agreement
80 McKesson Fiscal Management
Objectives Learning goals Upon successful completion of this chapter, you will be able to:
• Create a payment skeleton
• Create pay controls with advanced Selection for payment
• Use skeletons to create pay controls.
©McKesson Corporation Proprietary to McKesson – Subject to Confidentiality Agreement
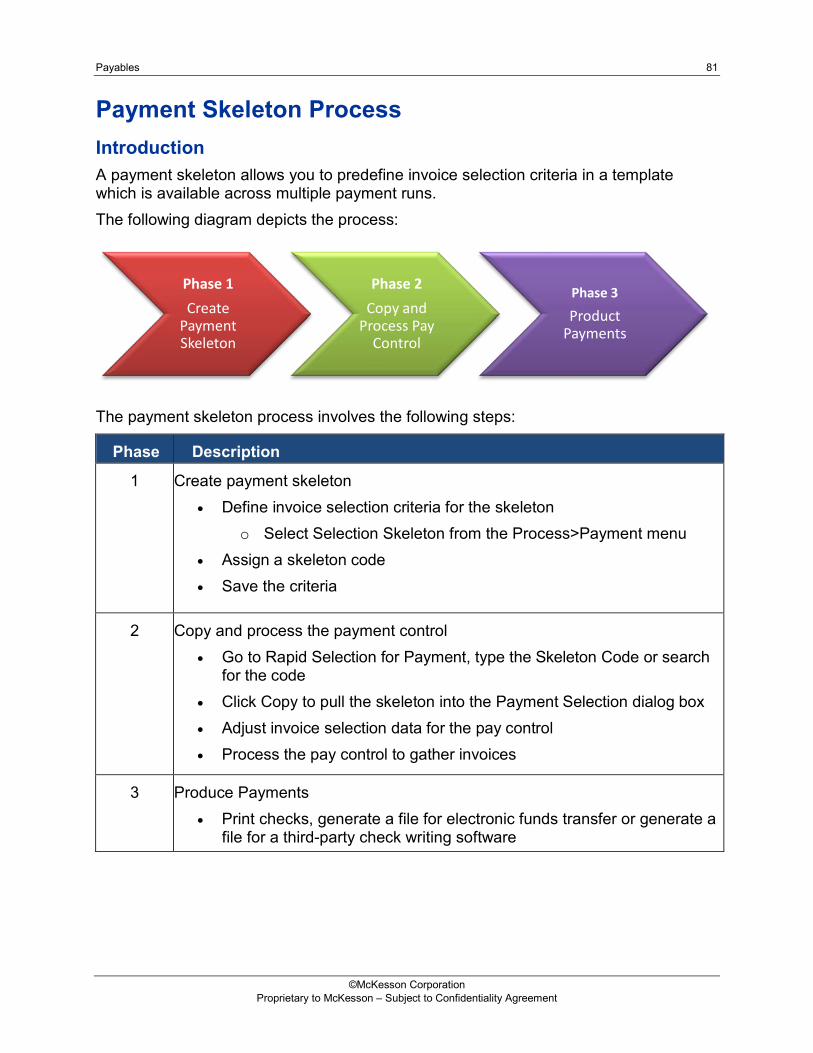
Payables 81
Payment Skeleton Process Introduction A payment skeleton allows you to predefine invoice selection criteria in a template which is available across multiple payment runs. The following diagram depicts the process:
The payment skeleton process involves the following steps:
Phase Description
1 Create payment skeleton • Define invoice selection criteria for the skeleton
o Select Selection Skeleton from the Process>Payment menu• Assign a skeleton code• Save the criteria
2 Copy and process the payment control • Go to Rapid Selection for Payment, type the Skeleton Code or search
for the code• Click Copy to pull the skeleton into the Payment Selection dialog box• Adjust invoice selection data for the pay control• Process the pay control to gather invoices
3 Produce Payments • Print checks, generate a file for electronic funds transfer or generate a
file for a third-party check writing software
Phase 1 Create
Payment Skeleton
Phase 2 Copy and
Process Pay Control
Phase 3
Product Payments
©McKesson Corporation Proprietary to McKesson – Subject to Confidentiality Agreement

82 McKesson Fiscal Management
Create the payment skeleton This is the first phase of the process. Creating skeleton is an infrequent task.
1. Enter a Skeleton Code and Description.2. Set the Pay Days from Run Date.
Hint: This field is used in conjunction with the processing date parameters during the payment skeleton process to determine the payment date for the pay control. Default value is zero which means the relative date is used during the payment skeleton process. Enter a value between 1 and 999 to increase the processing date by that value.
3. Define the additional processing options, payment sorting and remittance sortingvalues.
4. Click Add to define the Source and Method values for payment selection.5. Click the Save icon.6. Exit when done.
Copy and process the payment control Once a skeleton has been created, you can create a pay control group using that skeleton. This action can be performed from Rapid Selection for Payment or Advanced Selection for Payment.
12
3
4
©McKesson Corporation Proprietary to McKesson – Subject to Confidentiality Agreement

Payables 83
In this case, open Rapid Selection for Payment. • Click Copy and select the skeleton.• The skeleton values populate and a payment control number displays.• Click Process to gather invoices that match the skeleton criteria.• Review, modify payment control as needed and then produce payments.
Produce Payments The final phase in the process is to produce payments.
1. Select Process Selection Skeleton from the Process>Payment menu.Result: The Payment Skeleton Process dialog box displays.
2. Enter or search for the payment skeleton code.3. Select the row. The Last Pay Control Status must equal Released for Payment.4. Verify the processing date.5. Click Process.
In the processing section, enter the date or relative date to determine the payment date for the pay control. There is a relationship between the date field and the Pay Days From Run Date Skeleton Entry field. See table on next page.
©McKesson Corporation Proprietary to McKesson – Subject to Confidentiality Agreement
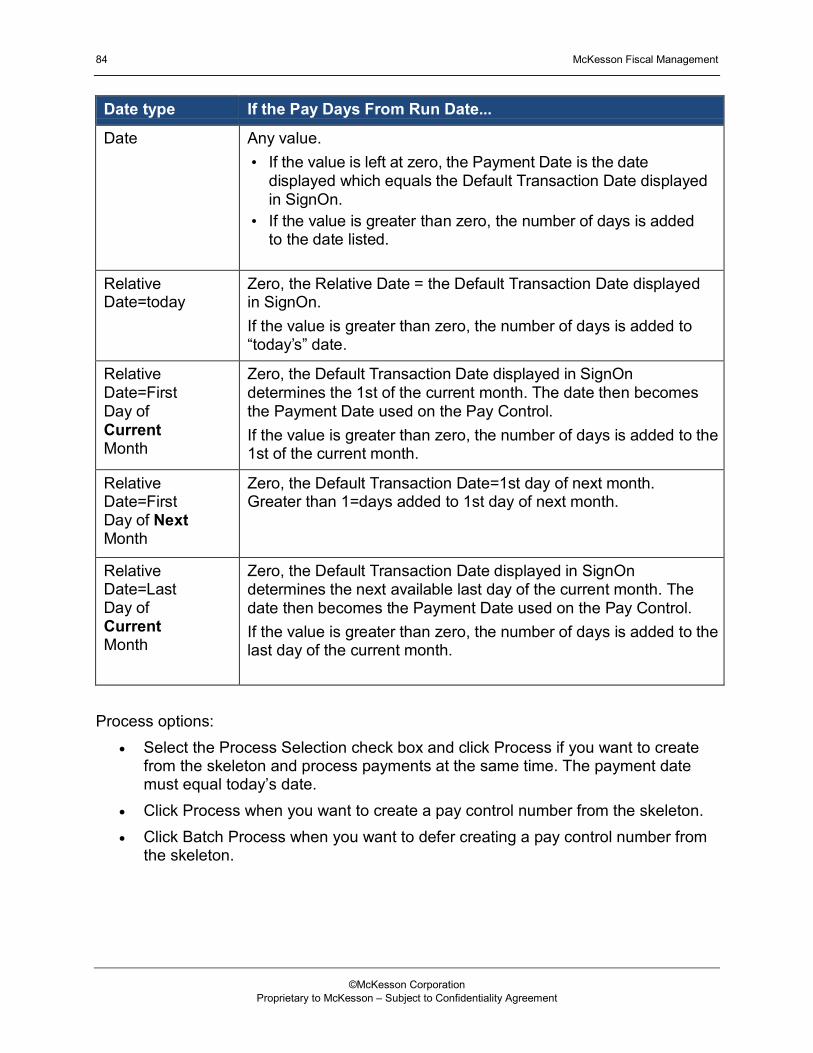
84 McKesson Fiscal Management
Date type If the Pay Days From Run Date...
Date Any value. • If the value is left at zero, the Payment Date is the date
displayed which equals the Default Transaction Date displayedin SignOn.
• If the value is greater than zero, the number of days is addedto the date listed.
Relative Date=today
Zero, the Relative Date = the Default Transaction Date displayed in SignOn. If the value is greater than zero, the number of days is added to “today’s” date.
Relative Date=First Day of Current Month
Zero, the Default Transaction Date displayed in SignOn determines the 1st of the current month. The date then becomes the Payment Date used on the Pay Control. If the value is greater than zero, the number of days is added to the 1st of the current month.
Relative Date=First Day of Next Month
Zero, the Default Transaction Date=1st day of next month. Greater than 1=days added to 1st day of next month.
Relative Date=Last Day of Current Month
Zero, the Default Transaction Date displayed in SignOn determines the next available last day of the current month. The date then becomes the Payment Date used on the Pay Control. If the value is greater than zero, the number of days is added to the last day of the current month.
Process options: • Select the Process Selection check box and click Process if you want to create
from the skeleton and process payments at the same time. The payment datemust equal today’s date.
• Click Process when you want to create a pay control number from the skeleton.• Click Batch Process when you want to defer creating a pay control number from
the skeleton.
©McKesson Corporation Proprietary to McKesson – Subject to Confidentiality Agreement
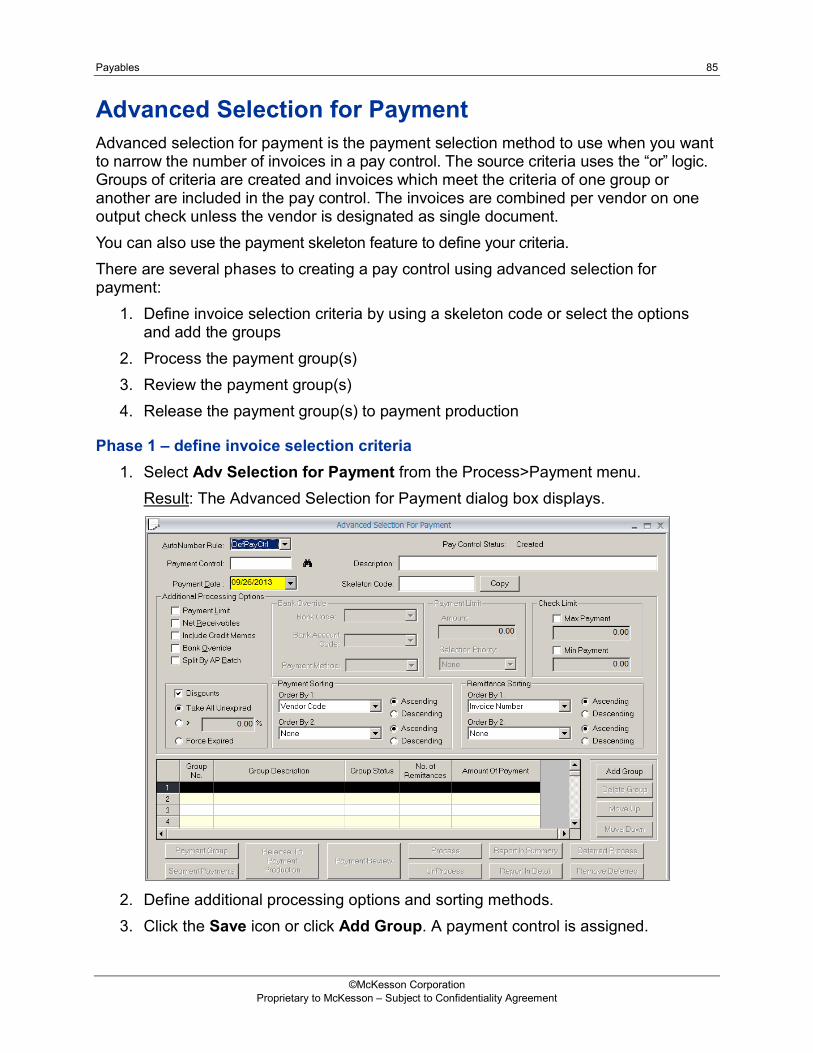
Payables 85
Advanced Selection for Payment Advanced selection for payment is the payment selection method to use when you want to narrow the number of invoices in a pay control. The source criteria uses the “or” logic. Groups of criteria are created and invoices which meet the criteria of one group or another are included in the pay control. The invoices are combined per vendor on one output check unless the vendor is designated as single document. You can also use the payment skeleton feature to define your criteria. There are several phases to creating a pay control using advanced selection for payment:
1. Define invoice selection criteria by using a skeleton code or select the optionsand add the groups
2. Process the payment group(s)3. Review the payment group(s)4. Release the payment group(s) to payment production
Phase 1 – define invoice selection criteria 1. Select Adv Selection for Payment from the Process>Payment menu.
Result: The Advanced Selection for Payment dialog box displays.
2. Define additional processing options and sorting methods.3. Click the Save icon or click Add Group. A payment control is assigned.
©McKesson Corporation Proprietary to McKesson – Subject to Confidentiality Agreement
86 McKesson Fiscal Management
4. Define Source and Method values through on the payment selection specialpayments dialog box.
5. Click OK when done.
Note: Each group can be processed independently. Therefore, you can add, process and review a group before releasing it to payment production. If you don’t want deselected invoices to be selected in another group, make sure to use the Exclude Method in order to not include them.
Phase 2 – process payment group(s) 1. Click Process. The results are similar to Rapid Selection for Payment.
Phase 3 – review the payment group(s) • Click Payment Review to look over invoices gathered for the group.• Click Segment Payments to perform an ad-hoc aging by vendor segment/group.
The benefit of this feature is used when limits have been specified for the PayControl and further adjustments may need to be made.
Segment Payments are used with the pay limits option. You can setup credit information in the Payables Processing Set such as Current Range 1 to 30, 31-90 Range 31-90 and Over 90 greater than 91. Then create a vendor group and tie it to a vendor(s). Next create a vendor segment like 30-60 days and tie it to the vendor group. This is an alternative approach to breaking down groups in order to pull old invoices for vendors who may not fall into a priority 1 category.
Phase 4 – release payment group(s) to payment production Click Release to Payment Production when ready to generate checks for a group or groups.
Learning activities
©McKesson Corporation Proprietary to McKesson – Subject to Confidentiality Agreement

McKesson Fiscal Management TM
Payables Learning Activities
Chapter 1 - Overview 1. Log into Fiscal Management and go to the Payables tab.
2. Search for a remit vendor.
Chapter 2 – Administration 1. Create a remit vendor.
2. Modify a remit vendor.
Chapter 3 – Payment Process 1. Create a check run for a specific vendor.
2. Create a check run for a date range.
3. Perform a payment review of the pay controls created above.
4. Produce a check run.
Chapter 4 – Inquiries 1. Perform a vendor inquiry.
2. Perform an invoice summary inquiry and then drill into the invoice detail.
3. Perform an account inquiry.
Propriety to McKesson Subject to Confidentiality Agreement Page 1 of 2
McKesson Fiscal Management TM
Payables Learning Activities
Chapter 5 – Void Payment Process
1. Void a payment.
2. Modify the invoice in Invoice Matching, save as match and generate a check again.
3. Inquiry the payment.
4. Void a payment and then delete the invoice in Invoice Matching.
Chapter 6 – Check Reconciliation Process 1. Select checks for bank reconciliation.
2. Reconcile the payments.
3. Process the reconciliation batch.
Chapter 7 – Reports 1. Generate a report in Fiscal Management.
2. Generate a payables report in ERP Solutions Reports.
Chapter 8 – Utilities 1. Perform an invoice adjustment. 2. Navigate the 1099 processing utility.
Chapter 9 – Advanced Selection Methods 1. Select invoices for payment using Advanced Selection. 2. Produce a check run.
Propriety to McKesson Page 2 of 2 Subject to Confidentiality Agreement

Name:
McKesson Fiscal Management TM
Payables Checklist
The user can successfully demonstrate or verbalize the following skills. If the skill is not applicable, print N/A in the Verified by field.
Application
Application Function Verified by Date
Log into Payables Navigate Payables Create a remittance vendor Select invoices for payment Review invoices Produce payments Perform a vendor inquiry Perform an invoice inquiry Perform an account inquiry Void a payment Perform a bank reconciliation Generate a report in Fiscal Management Generate a report in ERP Solutions Reports
Propriety to McKesson Subject to Confidentiality Agreement Page 1 of 1