payroll processing guide - enterprisehr.us.adp.com cycle processes ... troubleshooting micr test...
TRANSCRIPT

HR. Payroll. Benefits.
ADP Enterprise HR®
Payroll Processing Guide
Version 5.04ADP-Hosted Clients
Versions 5.01, 5.02, and 5.03

ADP Copyright InformationCopyright 1993–2013 by ADP, Inc.Portions copyright 1988–1998 PeopleSoft, Inc.
Third-Party Copyright InformationFor copyright information about the third-party software used in ADP’s HR/payroll solutions, click Copyright Information.
This manual supports ADP Enterprise HR Version 5.04.01. Published Fall 2013.
All rights reserved. The information contained in this document is proprietary and confidential to ADP. No part of this document may be reproduced or transmitted in any form or by any means, mechanical or electronic, including photography and recording, for any purpose without the express written permission of ADP.
The core software technology for ADP’s product offering has been acquired through a licensing agreement with PeopleSoft, Inc., Pleasanton, California. Portions of the following text have been copied by permission of PeopleSoft, Inc. Product specifications are subject to change without notice. No product warranty should be implied from this document.
ADP and the ADP Logo are registered trademarks of ADP of North America, Inc. Enterprise HR is a registered trademark of ADP of North America Inc. Microsoft, Windows, Internet Explorer are registered trademarks, and Excel is a trademark of Microsoft Corporation. PeopleSoft and Java are registered trademarks of Oracle Corporation. SQR is a registered trademark of Hyperion Solutions Corporation.
Printed in the United States.

Contents
About This Guide
Introduction. . . . . . . . . . . . . . . . . . . . . . . . . . . . . . . . . . . . . . . . . . . . . . . . . . . . . . . . . . . . . . . . . . . . . . . . . .xviAudience for This Guide . . . . . . . . . . . . . . . . . . . . . . . . . . . . . . . . . . . . . . . . . . . . . . . . . . . . . . . . . . . . . . xviiIntroducing the Enterprise Payroll Documentation Library . . . . . . . . . . . . . . . . . . . . . . . . . . . . . . . . . . . .xviiiWhat’s in This Book. . . . . . . . . . . . . . . . . . . . . . . . . . . . . . . . . . . . . . . . . . . . . . . . . . . . . . . . . . . . . . . . . . .xixWhat’s New . . . . . . . . . . . . . . . . . . . . . . . . . . . . . . . . . . . . . . . . . . . . . . . . . . . . . . . . . . . . . . . . . . . . . . . . .xxiRelated Documentation . . . . . . . . . . . . . . . . . . . . . . . . . . . . . . . . . . . . . . . . . . . . . . . . . . . . . . . . . . . . . . . xxiiDocumentation Conventions . . . . . . . . . . . . . . . . . . . . . . . . . . . . . . . . . . . . . . . . . . . . . . . . . . . . . . . . . . .xxiiiProviding Comments . . . . . . . . . . . . . . . . . . . . . . . . . . . . . . . . . . . . . . . . . . . . . . . . . . . . . . . . . . . . . . . . . xxv
1 Introduction to Enterprise Payroll
Introduction. . . . . . . . . . . . . . . . . . . . . . . . . . . . . . . . . . . . . . . . . . . . . . . . . . . . . . . . . . . . . . . . . . . . . . . . . .1-2Company Definitions . . . . . . . . . . . . . . . . . . . . . . . . . . . . . . . . . . . . . . . . . . . . . . . . . . . . . . . . . . . . . . . . . .1-3Employee Payroll Information . . . . . . . . . . . . . . . . . . . . . . . . . . . . . . . . . . . . . . . . . . . . . . . . . . . . . . . . . . .1-4Payroll Cycle Process . . . . . . . . . . . . . . . . . . . . . . . . . . . . . . . . . . . . . . . . . . . . . . . . . . . . . . . . . . . . . . . . . .1-5Post-Payroll Cycle Processes . . . . . . . . . . . . . . . . . . . . . . . . . . . . . . . . . . . . . . . . . . . . . . . . . . . . . . . . . . . .1-6Periodic Payroll Processes . . . . . . . . . . . . . . . . . . . . . . . . . . . . . . . . . . . . . . . . . . . . . . . . . . . . . . . . . . . . . .1-7Year-End Tax Reporting. . . . . . . . . . . . . . . . . . . . . . . . . . . . . . . . . . . . . . . . . . . . . . . . . . . . . . . . . . . . . . . .1-8Enterprise Payroll Reports . . . . . . . . . . . . . . . . . . . . . . . . . . . . . . . . . . . . . . . . . . . . . . . . . . . . . . . . . . . . . .1-9
2 Generating Initial Paysheets
Introduction. . . . . . . . . . . . . . . . . . . . . . . . . . . . . . . . . . . . . . . . . . . . . . . . . . . . . . . . . . . . . . . . . . . . . . . . . .2-2Prerequisites . . . . . . . . . . . . . . . . . . . . . . . . . . . . . . . . . . . . . . . . . . . . . . . . . . . . . . . . . . . . . . . . . . . . . . . . .2-3Viewing and Approving Pending Retroactive Payments . . . . . . . . . . . . . . . . . . . . . . . . . . . . . . . . . . . . . . .2-4Generating the Pay Cycle Data (Paysheets) . . . . . . . . . . . . . . . . . . . . . . . . . . . . . . . . . . . . . . . . . . . . . . . . .2-9Reviewing Initial Pay Cycle Data. . . . . . . . . . . . . . . . . . . . . . . . . . . . . . . . . . . . . . . . . . . . . . . . . . . . . . . .2-11Modifying and/or Adding Pay Cycle Data . . . . . . . . . . . . . . . . . . . . . . . . . . . . . . . . . . . . . . . . . . . . . . . . .2-13
3 Entering Pay Cycle Data Using Paysheets
Introduction. . . . . . . . . . . . . . . . . . . . . . . . . . . . . . . . . . . . . . . . . . . . . . . . . . . . . . . . . . . . . . . . . . . . . . . . . .3-2Reviewing Pay Cycle Data on the Paysheet . . . . . . . . . . . . . . . . . . . . . . . . . . . . . . . . . . . . . . . . . . . . .3-2Accepting the Pay Cycle Data on the Paysheet . . . . . . . . . . . . . . . . . . . . . . . . . . . . . . . . . . . . . . . . . .3-2Adding Pay Cycle Data to the Paysheet . . . . . . . . . . . . . . . . . . . . . . . . . . . . . . . . . . . . . . . . . . . . . . . .3-2Changing Pay Cycle Data on the Paysheet . . . . . . . . . . . . . . . . . . . . . . . . . . . . . . . . . . . . . . . . . . . . . .3-3
Reviewing and/or Modifying Pay Cycle Data . . . . . . . . . . . . . . . . . . . . . . . . . . . . . . . . . . . . . . . . . . . . . . .3-4Understanding Paysheet Information . . . . . . . . . . . . . . . . . . . . . . . . . . . . . . . . . . . . . . . . . . . . . . . . . .3-4Reviewing/Modifying Earnings and Overrides . . . . . . . . . . . . . . . . . . . . . . . . . . . . . . . . . . . . . . . . .3-11
ContentsPayroll Processing Guide Version 5.04.01

iv Contents
Viewing Earnings and Overrides for Employees by Pay Group . . . . . . . . . . . . . . . . . . . . . . . . 3-11Viewing All Earnings and Overrides from All Pay Groups for a Specific Employee. . . . . . . . 3-13
Reviewing/Modifying Earnings and Distributions . . . . . . . . . . . . . . . . . . . . . . . . . . . . . . . . . . . . . . 3-15Viewing/Modifying Earnings . . . . . . . . . . . . . . . . . . . . . . . . . . . . . . . . . . . . . . . . . . . . . . . . . . . . . . 3-17
Viewing Earnings for Employees by Pay Group . . . . . . . . . . . . . . . . . . . . . . . . . . . . . . . . . . . . 3-17Viewing All Earnings from All Pay Groups for a Specific Employee . . . . . . . . . . . . . . . . . . . 3-19
Reviewing/Modifying FLSA Overtime Earnings . . . . . . . . . . . . . . . . . . . . . . . . . . . . . . . . . . . . . . . 3-21Adding Pay Cycle Data for a New Employee . . . . . . . . . . . . . . . . . . . . . . . . . . . . . . . . . . . . . . . . . . . . . . 3-23Modifying Earnings Information. . . . . . . . . . . . . . . . . . . . . . . . . . . . . . . . . . . . . . . . . . . . . . . . . . . . . . . . 3-26Entering a One-time Deduction Override . . . . . . . . . . . . . . . . . . . . . . . . . . . . . . . . . . . . . . . . . . . . . . . . . 3-27
Making Permanent Deduction Changes . . . . . . . . . . . . . . . . . . . . . . . . . . . . . . . . . . . . . . . . . . . . . . 3-27Entering Deduction Data . . . . . . . . . . . . . . . . . . . . . . . . . . . . . . . . . . . . . . . . . . . . . . . . . . . . . . . . . . 3-28
Entering a One-time Garnishment Override . . . . . . . . . . . . . . . . . . . . . . . . . . . . . . . . . . . . . . . . . . . . . . . 3-33Entering a One-time Tax Override . . . . . . . . . . . . . . . . . . . . . . . . . . . . . . . . . . . . . . . . . . . . . . . . . . . . . . 3-36
Making Permanent Tax Changes. . . . . . . . . . . . . . . . . . . . . . . . . . . . . . . . . . . . . . . . . . . . . . . . . . . . 3-36Entering the One-time Tax Data . . . . . . . . . . . . . . . . . . . . . . . . . . . . . . . . . . . . . . . . . . . . . . . . . . . . 3-36
Entering Gross-Ups . . . . . . . . . . . . . . . . . . . . . . . . . . . . . . . . . . . . . . . . . . . . . . . . . . . . . . . . . . . . . . . . . . 3-39Selecting Processing Options. . . . . . . . . . . . . . . . . . . . . . . . . . . . . . . . . . . . . . . . . . . . . . . . . . . . . . . 3-40Adding a Paysheet Page. . . . . . . . . . . . . . . . . . . . . . . . . . . . . . . . . . . . . . . . . . . . . . . . . . . . . . . . . . . 3-40Entering One-time Deduction Information . . . . . . . . . . . . . . . . . . . . . . . . . . . . . . . . . . . . . . . . . . . . 3-42
Setting Up Third Party Sick Pay . . . . . . . . . . . . . . . . . . . . . . . . . . . . . . . . . . . . . . . . . . . . . . . . . . . . . . . . 3-43Adding Third Party Sick Pay Data . . . . . . . . . . . . . . . . . . . . . . . . . . . . . . . . . . . . . . . . . . . . . . . . . . 3-43Printing Reports with Third Party Sick Pay Data . . . . . . . . . . . . . . . . . . . . . . . . . . . . . . . . . . . . . . . 3-46
Entering Exception Time Reporting . . . . . . . . . . . . . . . . . . . . . . . . . . . . . . . . . . . . . . . . . . . . . . . . . . . . . 3-47Specifying Separate Checks for an Employee. . . . . . . . . . . . . . . . . . . . . . . . . . . . . . . . . . . . . . . . . . . . . . 3-49Distributing Earnings Across Multiple Departments . . . . . . . . . . . . . . . . . . . . . . . . . . . . . . . . . . . . . . . . 3-52Changing Multiple Jurisdiction Entries. . . . . . . . . . . . . . . . . . . . . . . . . . . . . . . . . . . . . . . . . . . . . . . . . . . 3-55Importing Pay Cycle Data . . . . . . . . . . . . . . . . . . . . . . . . . . . . . . . . . . . . . . . . . . . . . . . . . . . . . . . . . . . . . 3-57Deleting Pay Cycle Data for a Specific Payroll Run ID . . . . . . . . . . . . . . . . . . . . . . . . . . . . . . . . . . . . . . . . . . . . . . . . . . . . . . . . . . . . . . . . . . . . . . . . . . . . 3-58
4 Entering Payroll Data Using Rapid Pay Data Entry
Introduction . . . . . . . . . . . . . . . . . . . . . . . . . . . . . . . . . . . . . . . . . . . . . . . . . . . . . . . . . . . . . . . . . . . . . . . . . 4-2Logging on to Rapid Pay Data Entry (ADP Hosted Clients) . . . . . . . . . . . . . . . . . . . . . . . . . . . . . . . . . . . 4-4Using the Rapid Pay Data Entry Application . . . . . . . . . . . . . . . . . . . . . . . . . . . . . . . . . . . . . . . . . . . . . . . 4-7
Using the Desktop Menu Bar. . . . . . . . . . . . . . . . . . . . . . . . . . . . . . . . . . . . . . . . . . . . . . . . . . . . . . . 4-11Using Toolbar Tasks . . . . . . . . . . . . . . . . . . . . . . . . . . . . . . . . . . . . . . . . . . . . . . . . . . . . . . . . . . . . . 4-11Using Right Mouse Click Options. . . . . . . . . . . . . . . . . . . . . . . . . . . . . . . . . . . . . . . . . . . . . . . . . . . 4-12Using Keyboard Shortcuts . . . . . . . . . . . . . . . . . . . . . . . . . . . . . . . . . . . . . . . . . . . . . . . . . . . . . . . . . 4-12Using the Employee Information Bar . . . . . . . . . . . . . . . . . . . . . . . . . . . . . . . . . . . . . . . . . . . . . . . . 4-13
Creating and Maintaining Templates . . . . . . . . . . . . . . . . . . . . . . . . . . . . . . . . . . . . . . . . . . . . . . . . . . . . 4-14Using Pre-Defined Templates . . . . . . . . . . . . . . . . . . . . . . . . . . . . . . . . . . . . . . . . . . . . . . . . . . . . . . 4-15Creating a New Template . . . . . . . . . . . . . . . . . . . . . . . . . . . . . . . . . . . . . . . . . . . . . . . . . . . . . . . . . 4-18Copying a Template. . . . . . . . . . . . . . . . . . . . . . . . . . . . . . . . . . . . . . . . . . . . . . . . . . . . . . . . . . . . . . 4-20Editing a Template. . . . . . . . . . . . . . . . . . . . . . . . . . . . . . . . . . . . . . . . . . . . . . . . . . . . . . . . . . . . . . . 4-21Deleting Templates . . . . . . . . . . . . . . . . . . . . . . . . . . . . . . . . . . . . . . . . . . . . . . . . . . . . . . . . . . . . . . 4-23
Creating Batches and Spreadsheets . . . . . . . . . . . . . . . . . . . . . . . . . . . . . . . . . . . . . . . . . . . . . . . . . . . . . . 4-24Linking a Spreadsheet to a Template . . . . . . . . . . . . . . . . . . . . . . . . . . . . . . . . . . . . . . . . . . . . . . . . . . . . 4-25Entering Data in a Spreadsheet . . . . . . . . . . . . . . . . . . . . . . . . . . . . . . . . . . . . . . . . . . . . . . . . . . . . . . . . . 4-27
Opening an Existing Spreadsheet . . . . . . . . . . . . . . . . . . . . . . . . . . . . . . . . . . . . . . . . . . . . . . . . . . . 4-28
ContentsPayroll Processing Guide Version 5.04.01

Contents v
Entering Data . . . . . . . . . . . . . . . . . . . . . . . . . . . . . . . . . . . . . . . . . . . . . . . . . . . . . . . . . . . . . . . . . . .4-29Using the Pick List (F4) . . . . . . . . . . . . . . . . . . . . . . . . . . . . . . . . . . . . . . . . . . . . . . . . . . . . . . .4-30Using the Insert Employee(s) Function (F5). . . . . . . . . . . . . . . . . . . . . . . . . . . . . . . . . . . . . . . .4-31Using Query Definitions (F6) . . . . . . . . . . . . . . . . . . . . . . . . . . . . . . . . . . . . . . . . . . . . . . . . . . .4-32Importing Data from a or RPD File . . . . . . . . . . . . . . . . . . . . . . . . . . . . . . . . . . . . . . . . . . . . . .4-42
Viewing Profile Information for an Employee . . . . . . . . . . . . . . . . . . . . . . . . . . . . . . . . . . . . . . . . . .4-45Sorting Spreadsheet Data . . . . . . . . . . . . . . . . . . . . . . . . . . . . . . . . . . . . . . . . . . . . . . . . . . . . . . . . . .4-46Saving Data . . . . . . . . . . . . . . . . . . . . . . . . . . . . . . . . . . . . . . . . . . . . . . . . . . . . . . . . . . . . . . . . . . . . .4-47
Saving Data to a Currently Opened Batch/Spreadsheet . . . . . . . . . . . . . . . . . . . . . . . . . . . . . . .4-47Saving Data to an Existing Batch/Spreadsheet . . . . . . . . . . . . . . . . . . . . . . . . . . . . . . . . . . . . . .4-47
Printing the Spreadsheet . . . . . . . . . . . . . . . . . . . . . . . . . . . . . . . . . . . . . . . . . . . . . . . . . . . . . . . . . . .4-48Showing Data in Microsoft Excel. . . . . . . . . . . . . . . . . . . . . . . . . . . . . . . . . . . . . . . . . . . . . . . . . . . .4-49
Validating Spreadsheet Data . . . . . . . . . . . . . . . . . . . . . . . . . . . . . . . . . . . . . . . . . . . . . . . . . . . . . . . . . . .4-50Comparing Calculation Totals . . . . . . . . . . . . . . . . . . . . . . . . . . . . . . . . . . . . . . . . . . . . . . . . . . . . . .4-50Checking for Errors. . . . . . . . . . . . . . . . . . . . . . . . . . . . . . . . . . . . . . . . . . . . . . . . . . . . . . . . . . . . . . .4-53
Validating Data for the Entire Spreadsheet. . . . . . . . . . . . . . . . . . . . . . . . . . . . . . . . . . . . . . . . .4-53Validating Data in a Specific Spreadsheet Cell. . . . . . . . . . . . . . . . . . . . . . . . . . . . . . . . . . . . . .4-54
Exporting Spreadsheet Data to a File . . . . . . . . . . . . . . . . . . . . . . . . . . . . . . . . . . . . . . . . . . . . . . . . . . . .4-55
5 Importing Pay Cycle Data
Introduction . . . . . . . . . . . . . . . . . . . . . . . . . . . . . . . . . . . . . . . . . . . . . . . . . . . . . . . . . . . . . . . . . . . . . . . . .5-2Importing Pay Cycle Data Through the ADP Pay Data Entry System . . . . . . . . . . . . . . . . . . . . . . . . . . . .5-3
Creating Batch Information . . . . . . . . . . . . . . . . . . . . . . . . . . . . . . . . . . . . . . . . . . . . . . . . . . . . . . . . .5-4Setting Up Batch Information . . . . . . . . . . . . . . . . . . . . . . . . . . . . . . . . . . . . . . . . . . . . . . . . . . . .5-4Setting Up Spreadsheet Information . . . . . . . . . . . . . . . . . . . . . . . . . . . . . . . . . . . . . . . . . . . . . . .5-6Deleting Batches and Spreadsheets . . . . . . . . . . . . . . . . . . . . . . . . . . . . . . . . . . . . . . . . . . . . . . . .5-7
Entering Employee Pay Data in ADP Pay Data Entry . . . . . . . . . . . . . . . . . . . . . . . . . . . . . . . . . . . . .5-9Adding Pay Data for an Employee . . . . . . . . . . . . . . . . . . . . . . . . . . . . . . . . . . . . . . . . . . . . . . . .5-9Updating Pay Data for an Employee. . . . . . . . . . . . . . . . . . . . . . . . . . . . . . . . . . . . . . . . . . . . . .5-14
Importing Data from the Time and Attendance Application . . . . . . . . . . . . . . . . . . . . . . . . . . . . . . .5-20Preparing for the External File Import . . . . . . . . . . . . . . . . . . . . . . . . . . . . . . . . . . . . . . . . . . . .5-20Importing the Batch into the Time and Attendance Application . . . . . . . . . . . . . . . . . . . . . . . .5-22
Importing Data from ADP Rapid Pay Data Entry . . . . . . . . . . . . . . . . . . . . . . . . . . . . . . . . . . . . . . .5-24Indicating that Pay Data Entry is Complete . . . . . . . . . . . . . . . . . . . . . . . . . . . . . . . . . . . . . . . . . . . .5-24Verifying that All Batches are Complete . . . . . . . . . . . . . . . . . . . . . . . . . . . . . . . . . . . . . . . . . . . . . .5-26Correcting Pay Cycle Data . . . . . . . . . . . . . . . . . . . . . . . . . . . . . . . . . . . . . . . . . . . . . . . . . . . . . . . . .5-27Reviewing Pay Cycle Data . . . . . . . . . . . . . . . . . . . . . . . . . . . . . . . . . . . . . . . . . . . . . . . . . . . . . . . . .5-29
Reviewing Batch Information Online . . . . . . . . . . . . . . . . . . . . . . . . . . . . . . . . . . . . . . . . . . . . .5-29Printing the Batch Totals List . . . . . . . . . . . . . . . . . . . . . . . . . . . . . . . . . . . . . . . . . . . . . . . . . . .5-31Customizing the Batch Detail List Report . . . . . . . . . . . . . . . . . . . . . . . . . . . . . . . . . . . . . . . . .5-32
Moving the Pay Cycle Data into Paysheets Using TAA020 . . . . . . . . . . . . . . . . . . . . . . . . . . . . . . .5-33Importing Pay Cycle Data Using PAY020. . . . . . . . . . . . . . . . . . . . . . . . . . . . . . . . . . . . . . . . . . . . . . . . .5-36
Importing Pay Cycle Data from an External File . . . . . . . . . . . . . . . . . . . . . . . . . . . . . . . . . . . . . . . .5-36Importing Performance Plan Payment Data into Paysheets . . . . . . . . . . . . . . . . . . . . . . . . . . . . . . . .5-41
Selecting Import Criteria . . . . . . . . . . . . . . . . . . . . . . . . . . . . . . . . . . . . . . . . . . . . . . . . . . . . . . .5-41Selecting Performance Plan Payment Criteria and Importing the Data . . . . . . . . . . . . . . . . . . .5-45
Reviewing and Correcting Imported Pay Cycle Data. . . . . . . . . . . . . . . . . . . . . . . . . . . . . . . . . . . . .5-46Importing One-Time Deductions Using PAY021 . . . . . . . . . . . . . . . . . . . . . . . . . . . . . . . . . . . . . . . . . . .5-47
Importing One-Time Deductions from an External File. . . . . . . . . . . . . . . . . . . . . . . . . . . . . . . . . . .5-47
ContentsPayroll Processing Guide Version 5.04.01

vi Contents
6 Calculating and Confirming Your Payroll
Introduction . . . . . . . . . . . . . . . . . . . . . . . . . . . . . . . . . . . . . . . . . . . . . . . . . . . . . . . . . . . . . . . . . . . . . . . . . 6-2Calculating Retroactive Pay . . . . . . . . . . . . . . . . . . . . . . . . . . . . . . . . . . . . . . . . . . . . . . . . . . . . . . . . . . . . 6-3Calculating the Preliminary Payroll . . . . . . . . . . . . . . . . . . . . . . . . . . . . . . . . . . . . . . . . . . . . . . . . . . . . . . 6-5
Processing Your Initial Payroll Calculation . . . . . . . . . . . . . . . . . . . . . . . . . . . . . . . . . . . . . . . . . . . . 6-6Reviewing Error Messages and Warnings. . . . . . . . . . . . . . . . . . . . . . . . . . . . . . . . . . . . . . . . . . . . . . 6-8
Viewing All Error/Warning Messages Online . . . . . . . . . . . . . . . . . . . . . . . . . . . . . . . . . . . . . . . 6-8Printing employee-level error/warning messages . . . . . . . . . . . . . . . . . . . . . . . . . . . . . . . . . . . 6-10Reviewing Company-level Error Messages Only . . . . . . . . . . . . . . . . . . . . . . . . . . . . . . . . . . . 6-11
Correcting Errors in Your Payroll . . . . . . . . . . . . . . . . . . . . . . . . . . . . . . . . . . . . . . . . . . . . . . . . . . . 6-12Viewing Benefit Deductions Not in the Current Benefit Program . . . . . . . . . . . . . . . . . . . . . . 6-12
Recalculating Your Payroll . . . . . . . . . . . . . . . . . . . . . . . . . . . . . . . . . . . . . . . . . . . . . . . . . . . . . . . . 6-14Viewing Preliminary Check Data . . . . . . . . . . . . . . . . . . . . . . . . . . . . . . . . . . . . . . . . . . . . . . . . . . . 6-14
Viewing Paycheck Summary Information . . . . . . . . . . . . . . . . . . . . . . . . . . . . . . . . . . . . . . . . . 6-15Viewing Paycheck Earnings Information . . . . . . . . . . . . . . . . . . . . . . . . . . . . . . . . . . . . . . . . . 6-17Viewing Paycheck Tax Information . . . . . . . . . . . . . . . . . . . . . . . . . . . . . . . . . . . . . . . . . . . . . 6-19Viewing Paycheck Deduction Information . . . . . . . . . . . . . . . . . . . . . . . . . . . . . . . . . . . . . . . . 6-21Viewing Paycheck Garnishment Information . . . . . . . . . . . . . . . . . . . . . . . . . . . . . . . . . . . . . . 6-23Viewing Paycheck Special Accumulator Information . . . . . . . . . . . . . . . . . . . . . . . . . . . . . . . . 6-25Viewing Paycheck Distribution Information . . . . . . . . . . . . . . . . . . . . . . . . . . . . . . . . . . . . . . . 6-26Viewing Retroactive Earnings Information . . . . . . . . . . . . . . . . . . . . . . . . . . . . . . . . . . . . . . . . 6-27Viewing Pending Performance Plan Payment Information . . . . . . . . . . . . . . . . . . . . . . . . . . . . 6-29
Completing the Payroll . . . . . . . . . . . . . . . . . . . . . . . . . . . . . . . . . . . . . . . . . . . . . . . . . . . . . . . . . . . . . . . 6-32Running the Final Pay Calculation . . . . . . . . . . . . . . . . . . . . . . . . . . . . . . . . . . . . . . . . . . . . . . . . . . 6-32Confirming Your Payroll . . . . . . . . . . . . . . . . . . . . . . . . . . . . . . . . . . . . . . . . . . . . . . . . . . . . . . . . . . 6-34Reviewing System Messages. . . . . . . . . . . . . . . . . . . . . . . . . . . . . . . . . . . . . . . . . . . . . . . . . . . . . . . 6-36Reviewing Pay Confirmation Results . . . . . . . . . . . . . . . . . . . . . . . . . . . . . . . . . . . . . . . . . . . . . . . . 6-37Reviewing Confirmed Paysheets . . . . . . . . . . . . . . . . . . . . . . . . . . . . . . . . . . . . . . . . . . . . . . . . . . . . 6-37
Reversing Accruals and Unconfirming a Payroll . . . . . . . . . . . . . . . . . . . . . . . . . . . . . . . . . . . . . . . . . . . 6-38Reversing Leave Balances . . . . . . . . . . . . . . . . . . . . . . . . . . . . . . . . . . . . . . . . . . . . . . . . . . . . . . . . . 6-38Unconfirming Your Payroll . . . . . . . . . . . . . . . . . . . . . . . . . . . . . . . . . . . . . . . . . . . . . . . . . . . . . . . . 6-40
Preparing for the Next Payroll Cycle . . . . . . . . . . . . . . . . . . . . . . . . . . . . . . . . . . . . . . . . . . . . . . . . . . . . 6-42Deleting Confirmed Pay Cycle Data . . . . . . . . . . . . . . . . . . . . . . . . . . . . . . . . . . . . . . . . . . . . . . . . . 6-42Updating Time and Labor Management System Data. . . . . . . . . . . . . . . . . . . . . . . . . . . . . . . . . . . . 6-43
Exporting TLM Data to Enterprise eTIME . . . . . . . . . . . . . . . . . . . . . . . . . . . . . . . . . . . . . . . . 6-43Exporting Employee TLM Data to eTIME . . . . . . . . . . . . . . . . . . . . . . . . . . . . . . . . . . . . . . . . 6-50Exporting Employee TLM Data to eTIME . . . . . . . . . . . . . . . . . . . . . . . . . . . . . . . . . . . . . . . . 6-51Exporting Employee TLM Data to TimeSaver . . . . . . . . . . . . . . . . . . . . . . . . . . . . . . . . . . . . . 6-52Exporting Employee TLM Data to Total Time . . . . . . . . . . . . . . . . . . . . . . . . . . . . . . . . . . . . . 6-56
Creating Estimates of Paychecks. . . . . . . . . . . . . . . . . . . . . . . . . . . . . . . . . . . . . . . . . . . . . . . . . . . . . . . . 6-58Configuring Sample Employee Information . . . . . . . . . . . . . . . . . . . . . . . . . . . . . . . . . . . . . . . . . . . 6-58Viewing Estimated Pay . . . . . . . . . . . . . . . . . . . . . . . . . . . . . . . . . . . . . . . . . . . . . . . . . . . . . . . . . . . 6-61Viewing the Calculation Log. . . . . . . . . . . . . . . . . . . . . . . . . . . . . . . . . . . . . . . . . . . . . . . . . . . . . . . 6-64
7 Generating Summary Reports
Introduction . . . . . . . . . . . . . . . . . . . . . . . . . . . . . . . . . . . . . . . . . . . . . . . . . . . . . . . . . . . . . . . . . . . . . . . . . 7-2Generating the Deduction Register (PAY001) . . . . . . . . . . . . . . . . . . . . . . . . . . . . . . . . . . . . . . . . . . . . . . 7-3Generating the Cost Center Report (PAY005) . . . . . . . . . . . . . . . . . . . . . . . . . . . . . . . . . . . . . . . . . . . . . . 7-5Generating the Deductions Not Taken Report (PAY008). . . . . . . . . . . . . . . . . . . . . . . . . . . . . . . . . . . . . . 7-7
ContentsPayroll Processing Guide Version 5.04.01

Contents vii
Generating the Savings Bond Report and File (PAY016) . . . . . . . . . . . . . . . . . . . . . . . . . . . . . . . . . . . . . .7-9Generating the Payroll Summary (PAY018) . . . . . . . . . . . . . . . . . . . . . . . . . . . . . . . . . . . . . . . . . . . . . . .7-10Generating the Payroll Registers (PAY025H, PAY025W) . . . . . . . . . . . . . . . . . . . . . . . . . . . . . . . . . . . .7-12
Payroll Register by Home Dept (PAY025H) . . . . . . . . . . . . . . . . . . . . . . . . . . . . . . . . . . . . . . . . . . .7-12Payroll Register by Worked Dept (PAY025W) . . . . . . . . . . . . . . . . . . . . . . . . . . . . . . . . . . . . . . . . .7-14
Generating the Negative Leave Accrual Report (PAY031) . . . . . . . . . . . . . . . . . . . . . . . . . . . . . . . . . . . .7-16Generating the 414(v) Catch Up Report (PAY033) . . . . . . . . . . . . . . . . . . . . . . . . . . . . . . . . . . . . . . . . . .7-18Generating the Leave Accrual Summary (PAY040) . . . . . . . . . . . . . . . . . . . . . . . . . . . . . . . . . . . . . . . . .7-20Generating the Retro Pay Report (PAY042) . . . . . . . . . . . . . . . . . . . . . . . . . . . . . . . . . . . . . . . . . . . . . . .7-22Generating the Garnishment Deduction Report (PAY044) . . . . . . . . . . . . . . . . . . . . . . . . . . . . . . . . . . . .7-24Generating the Wage and Tax Register (PAY047) . . . . . . . . . . . . . . . . . . . . . . . . . . . . . . . . . . . . . . . . . .7-26Generating the Tax Deposit Summary (TAX001) . . . . . . . . . . . . . . . . . . . . . . . . . . . . . . . . . . . . . . . . . . .7-28Generating the Local Tax Deposit Summary (TAX009) . . . . . . . . . . . . . . . . . . . . . . . . . . . . . . . . . . . . . .7-30Generating the Tax Summary (TAX010). . . . . . . . . . . . . . . . . . . . . . . . . . . . . . . . . . . . . . . . . . . . . . . . . .7-32Generating the Quarterly Tax Balance Audit (TAX011) . . . . . . . . . . . . . . . . . . . . . . . . . . . . . . . . . . . . . .7-34Generating the Payroll Fund Detail Report (PAY101) . . . . . . . . . . . . . . . . . . . . . . . . . . . . . . . . . . . . . . .7-35Generating the Fund Transaction History Report (PAY102). . . . . . . . . . . . . . . . . . . . . . . . . . . . . . . . . . .7-37
8 Generating and Transmitting ADP Premium Service Files
Introduction . . . . . . . . . . . . . . . . . . . . . . . . . . . . . . . . . . . . . . . . . . . . . . . . . . . . . . . . . . . . . . . . . . . . . . . . .8-2Generating and Transmitting ADP TAXServices Tax Files . . . . . . . . . . . . . . . . . . . . . . . . . . . . . . . . . . . .8-3
Creating the Periodic Tax Files. . . . . . . . . . . . . . . . . . . . . . . . . . . . . . . . . . . . . . . . . . . . . . . . . . . . . . .8-5Recreating the Periodic Tax File . . . . . . . . . . . . . . . . . . . . . . . . . . . . . . . . . . . . . . . . . . . . . . . . . .8-7
Transmitting Periodic Files. . . . . . . . . . . . . . . . . . . . . . . . . . . . . . . . . . . . . . . . . . . . . . . . . . . . . . . . . .8-7Transferring the Periodic File . . . . . . . . . . . . . . . . . . . . . . . . . . . . . . . . . . . . . . . . . . . . . . . . . . . .8-7Manually Tracking Periodic File Transmissions. . . . . . . . . . . . . . . . . . . . . . . . . . . . . . . . . . . . . .8-8
Verifying the Periodic Tax File Transmission . . . . . . . . . . . . . . . . . . . . . . . . . . . . . . . . . . . . . . . . . .8-10Viewing the Periodic File List . . . . . . . . . . . . . . . . . . . . . . . . . . . . . . . . . . . . . . . . . . . . . . . . . . . . . .8-10
Generating and Transmitting ADP Payment Solutions Services Files. . . . . . . . . . . . . . . . . . . . . . . . . . . .8-13Completing the Prerequisites . . . . . . . . . . . . . . . . . . . . . . . . . . . . . . . . . . . . . . . . . . . . . . . . . . . . . . .8-14Generating the Payroll Files . . . . . . . . . . . . . . . . . . . . . . . . . . . . . . . . . . . . . . . . . . . . . . . . . . . . . . . .8-14
Setting Up ADP Payment Solutions Services File Information . . . . . . . . . . . . . . . . . . . . . . . . .8-15Defining View Window Fields . . . . . . . . . . . . . . . . . . . . . . . . . . . . . . . . . . . . . . . . . . . . . . . . . .8-19Indicating On-cycle/off-cycle, Attaching the Run ID, and Generating the File . . . . . . . . . . . . .8-20
Generating the Billing Interface Report (PAY037) (ADP Hosted Clients Only). . . . . . . . . . . . . . . .8-21Generating a Label File Using PAY038 . . . . . . . . . . . . . . . . . . . . . . . . . . . . . . . . . . . . . . . . . . . . . . .8-23Transferring Files to ADP Payment Solutions Services . . . . . . . . . . . . . . . . . . . . . . . . . . . . . . . . . . .8-24Importing Check Detail Using PAY032 . . . . . . . . . . . . . . . . . . . . . . . . . . . . . . . . . . . . . . . . . . . . . . .8-24
Generating and Transmitting ADP WGPS Files . . . . . . . . . . . . . . . . . . . . . . . . . . . . . . . . . . . . . . . . . . . .8-26Importing the WGPS Letter Notification Request . . . . . . . . . . . . . . . . . . . . . . . . . . . . . . . . . . . . . . .8-26Generating the WGPS File . . . . . . . . . . . . . . . . . . . . . . . . . . . . . . . . . . . . . . . . . . . . . . . . . . . . . . . . .8-28Verifying that the WGPS File was Successfully Built . . . . . . . . . . . . . . . . . . . . . . . . . . . . . . . . . . . .8-29Transferring the WGPS File . . . . . . . . . . . . . . . . . . . . . . . . . . . . . . . . . . . . . . . . . . . . . . . . . . . . . . . .8-29Viewing all WGPS Files Generated for a Specific Year . . . . . . . . . . . . . . . . . . . . . . . . . . . . . . . . . .8-29Importing Garnishment Detail Using PAYWGP04 . . . . . . . . . . . . . . . . . . . . . . . . . . . . . . . . . . . . . .8-31
ContentsPayroll Processing Guide Version 5.04.01

viii Contents
9 Distributing Your Payroll
Introduction . . . . . . . . . . . . . . . . . . . . . . . . . . . . . . . . . . . . . . . . . . . . . . . . . . . . . . . . . . . . . . . . . . . . . . . . . 9-2Setting Up the Logo and Signature Digitization . . . . . . . . . . . . . . . . . . . . . . . . . . . . . . . . . . . . . . . . . . . . . 9-3
Ordering Logo Digitalization and Signature Image Files . . . . . . . . . . . . . . . . . . . . . . . . . . . . . . . . . . 9-3Testing MICR Quality. . . . . . . . . . . . . . . . . . . . . . . . . . . . . . . . . . . . . . . . . . . . . . . . . . . . . . . . . . . . . . . . . 9-4
Testing the MICR Line Quality of the Printer . . . . . . . . . . . . . . . . . . . . . . . . . . . . . . . . . . . . . . . . . . . 9-4Visually Inspecting the Checks . . . . . . . . . . . . . . . . . . . . . . . . . . . . . . . . . . . . . . . . . . . . . . . . . . . . . . 9-5Using the MICR Positioning Gauge . . . . . . . . . . . . . . . . . . . . . . . . . . . . . . . . . . . . . . . . . . . . . . . . . . 9-5Using a Signal Strength MICR Tester . . . . . . . . . . . . . . . . . . . . . . . . . . . . . . . . . . . . . . . . . . . . . . . . . 9-6Troubleshooting MICR Test Problems . . . . . . . . . . . . . . . . . . . . . . . . . . . . . . . . . . . . . . . . . . . . . . . . 9-6
Printing Paychecks and Direct Deposit Advices . . . . . . . . . . . . . . . . . . . . . . . . . . . . . . . . . . . . . . . . . . . . . 9-8Adding a Message to Display on Paychecks/Advices . . . . . . . . . . . . . . . . . . . . . . . . . . . . . . . . . . . . . 9-8
Adding the Default Message . . . . . . . . . . . . . . . . . . . . . . . . . . . . . . . . . . . . . . . . . . . . . . . . . . . . 9-8Overriding the Default Message for Selected Companies . . . . . . . . . . . . . . . . . . . . . . . . . . . . . 9-11Overriding the Default Message for Selected Employees . . . . . . . . . . . . . . . . . . . . . . . . . . . . . 9-13Overriding the Default Message for Employees Sharing the Same Criteria . . . . . . . . . . . . . . . 9-15
Printing Paychecks. . . . . . . . . . . . . . . . . . . . . . . . . . . . . . . . . . . . . . . . . . . . . . . . . . . . . . . . . . . . . . . 9-17Printing Direct Deposit Advices . . . . . . . . . . . . . . . . . . . . . . . . . . . . . . . . . . . . . . . . . . . . . . . . . . . . 9-21
Generating the Direct Deposit Prenotification (DDP005) . . . . . . . . . . . . . . . . . . . . . . . . . . . . . 9-22Creating a Domestic NACHA File . . . . . . . . . . . . . . . . . . . . . . . . . . . . . . . . . . . . . . . . . . . . . . 9-24Creating an International NACHA File . . . . . . . . . . . . . . . . . . . . . . . . . . . . . . . . . . . . . . . . . . . 9-26Generating the Direct Deposit Prenote Memo (DDP006) . . . . . . . . . . . . . . . . . . . . . . . . . . . . . 9-28Printing Your Advices . . . . . . . . . . . . . . . . . . . . . . . . . . . . . . . . . . . . . . . . . . . . . . . . . . . . . . . . 9-30
Viewing Your Paychecks and Direct Deposit Advices. . . . . . . . . . . . . . . . . . . . . . . . . . . . . . . . . . . . . . . 9-35Printing the Paycheck Register (PAY004) . . . . . . . . . . . . . . . . . . . . . . . . . . . . . . . . . . . . . . . . . . . . 9-35Printing the Direct Deposit Register (DDP002) . . . . . . . . . . . . . . . . . . . . . . . . . . . . . . . . . . . . . . . . 9-37Printing the Payroll Advice Register (DDP004) . . . . . . . . . . . . . . . . . . . . . . . . . . . . . . . . . . . . . . . . 9-38
Reprinting Checks . . . . . . . . . . . . . . . . . . . . . . . . . . . . . . . . . . . . . . . . . . . . . . . . . . . . . . . . . . . . . . . . . . . 9-40Preparing to Reprint. . . . . . . . . . . . . . . . . . . . . . . . . . . . . . . . . . . . . . . . . . . . . . . . . . . . . . . . . . . . . . 9-41Reviewing the Results . . . . . . . . . . . . . . . . . . . . . . . . . . . . . . . . . . . . . . . . . . . . . . . . . . . . . . . . . . . . 9-43Printing the Checks . . . . . . . . . . . . . . . . . . . . . . . . . . . . . . . . . . . . . . . . . . . . . . . . . . . . . . . . . . . . . . 9-44Viewing Reprinted Checks . . . . . . . . . . . . . . . . . . . . . . . . . . . . . . . . . . . . . . . . . . . . . . . . . . . . . . . . 9-46
10 Researching and Correcting Employee Payroll Data
Introduction . . . . . . . . . . . . . . . . . . . . . . . . . . . . . . . . . . . . . . . . . . . . . . . . . . . . . . . . . . . . . . . . . . . . . . . . 10-2Using the Checks by Range Task to Research Payroll Data . . . . . . . . . . . . . . . . . . . . . . . . . . . . . . . . . . . 10-3
Selecting the Check Criteria . . . . . . . . . . . . . . . . . . . . . . . . . . . . . . . . . . . . . . . . . . . . . . . . . . . . . . . 10-3Viewing Check Information . . . . . . . . . . . . . . . . . . . . . . . . . . . . . . . . . . . . . . . . . . . . . . . . . . . . . . . 10-5
Totaling Selected Checks . . . . . . . . . . . . . . . . . . . . . . . . . . . . . . . . . . . . . . . . . . . . . . . . . . . . . . 10-6Viewing Check Detail for a Specific Check . . . . . . . . . . . . . . . . . . . . . . . . . . . . . . . . . . . . . . . 10-7Viewing Summary Information for a Group of Checks. . . . . . . . . . . . . . . . . . . . . . . . . . . . . . . 10-7
Reviewing Employee Distribution Information . . . . . . . . . . . . . . . . . . . . . . . . . . . . . . . . . . . . . . . . . . . 10-12Viewing the Paycheck Distribution Summary. . . . . . . . . . . . . . . . . . . . . . . . . . . . . . . . . . . . . . . . . 10-12Viewing Direct Deposit Advice Summary Information . . . . . . . . . . . . . . . . . . . . . . . . . . . . . . . . . 10-13Viewing MTD, QTD, and YTD Paycheck Totals . . . . . . . . . . . . . . . . . . . . . . . . . . . . . . . . . . . . . . 10-15
Researching and Correcting Employee Earnings . . . . . . . . . . . . . . . . . . . . . . . . . . . . . . . . . . . . . . . . . . 10-17Researching Earnings . . . . . . . . . . . . . . . . . . . . . . . . . . . . . . . . . . . . . . . . . . . . . . . . . . . . . . . . . . . 10-17
Viewing Earnings for a Specific Check . . . . . . . . . . . . . . . . . . . . . . . . . . . . . . . . . . . . . . . . . . 10-17Viewing Special Accumulators for a Specific Check . . . . . . . . . . . . . . . . . . . . . . . . . . . . . . . 10-19
ContentsPayroll Processing Guide Version 5.04.01

Contents ix
Viewing MTD, QTD, and YTD Data for an Earnings Type. . . . . . . . . . . . . . . . . . . . . . . . . . .10-20Viewing MTD, QTD, and YTD Data for a Special Accumulator . . . . . . . . . . . . . . . . . . . . . .10-22Viewing All Earnings by Month . . . . . . . . . . . . . . . . . . . . . . . . . . . . . . . . . . . . . . . . . . . . . . .10-24Viewing All Special Accumulators by Month . . . . . . . . . . . . . . . . . . . . . . . . . . . . . . . . . . . . .10-25Viewing Employee Job Information . . . . . . . . . . . . . . . . . . . . . . . . . . . . . . . . . . . . . . . . . . . . .10-27Viewing FLSA Averaging Information by Pay Run. . . . . . . . . . . . . . . . . . . . . . . . . . . . . . . . .10-27Viewing FLSA Averaging Information by Work Period . . . . . . . . . . . . . . . . . . . . . . . . . . . . .10-29Adjusting Leave Balances . . . . . . . . . . . . . . . . . . . . . . . . . . . . . . . . . . . . . . . . . . . . . . . . . . . . .10-31Viewing Leave Balances by Accrual Date . . . . . . . . . . . . . . . . . . . . . . . . . . . . . . . . . . . . . . . .10-33Viewing a Summary of All Leave Balances . . . . . . . . . . . . . . . . . . . . . . . . . . . . . . . . . . . . . . .10-34
Correcting Earnings . . . . . . . . . . . . . . . . . . . . . . . . . . . . . . . . . . . . . . . . . . . . . . . . . . . . . . . . . . . . .10-38Modifying Earnings Information on the Paysheet . . . . . . . . . . . . . . . . . . . . . . . . . . . . . . . . . .10-38Modifying Additional Pay. . . . . . . . . . . . . . . . . . . . . . . . . . . . . . . . . . . . . . . . . . . . . . . . . . . . .10-39Preparing Paycheck Adjustments . . . . . . . . . . . . . . . . . . . . . . . . . . . . . . . . . . . . . . . . . . . . . . .10-40
Researching and Correcting Employee Deductions . . . . . . . . . . . . . . . . . . . . . . . . . . . . . . . . . . . . . . . . .10-41Researching Deductions . . . . . . . . . . . . . . . . . . . . . . . . . . . . . . . . . . . . . . . . . . . . . . . . . . . . . . . . . .10-41
Viewing Deductions for a Specific Check . . . . . . . . . . . . . . . . . . . . . . . . . . . . . . . . . . . . . . . .10-41Viewing MTD, QTD, and YTD Data for a Deduction . . . . . . . . . . . . . . . . . . . . . . . . . . . . . . .10-43Viewing MTD, QTD, and YTD Data for Arrears . . . . . . . . . . . . . . . . . . . . . . . . . . . . . . . . . . .10-45Viewing All Deductions by Month . . . . . . . . . . . . . . . . . . . . . . . . . . . . . . . . . . . . . . . . . . . . . .10-46Viewing Savings Bond Activity . . . . . . . . . . . . . . . . . . . . . . . . . . . . . . . . . . . . . . . . . . . . . . . .10-48
Correcting Deductions . . . . . . . . . . . . . . . . . . . . . . . . . . . . . . . . . . . . . . . . . . . . . . . . . . . . . . . . . . .10-50Changing General Deductions. . . . . . . . . . . . . . . . . . . . . . . . . . . . . . . . . . . . . . . . . . . . . . . . . .10-50Recording a Deduction Override. . . . . . . . . . . . . . . . . . . . . . . . . . . . . . . . . . . . . . . . . . . . . . . .10-51Preparing a Pay Cycle Deduction Override . . . . . . . . . . . . . . . . . . . . . . . . . . . . . . . . . . . . . . .10-51
Researching and Correcting Employee Garnishments . . . . . . . . . . . . . . . . . . . . . . . . . . . . . . . . . . . . . . .10-52Researching Garnishments . . . . . . . . . . . . . . . . . . . . . . . . . . . . . . . . . . . . . . . . . . . . . . . . . . . . . . . .10-52
Viewing Garnishments for a Specific Check . . . . . . . . . . . . . . . . . . . . . . . . . . . . . . . . . . . . . .10-52Viewing MTD, QTD, and YTD Data for a Garnishment . . . . . . . . . . . . . . . . . . . . . . . . . . . . .10-54
Correcting Garnishments . . . . . . . . . . . . . . . . . . . . . . . . . . . . . . . . . . . . . . . . . . . . . . . . . . . . . . . . .10-56Changing Employee Garnishments . . . . . . . . . . . . . . . . . . . . . . . . . . . . . . . . . . . . . . . . . . . . . .10-56Changing Employee Garnishment Deduction Data . . . . . . . . . . . . . . . . . . . . . . . . . . . . . . . . .10-56Preparing a Pay Cycle Garnishment Override . . . . . . . . . . . . . . . . . . . . . . . . . . . . . . . . . . . . .10-56
Researching and Correcting Employee Taxes . . . . . . . . . . . . . . . . . . . . . . . . . . . . . . . . . . . . . . . . . . . . .10-58Researching Taxes . . . . . . . . . . . . . . . . . . . . . . . . . . . . . . . . . . . . . . . . . . . . . . . . . . . . . . . . . . . . . .10-58
Viewing Taxes for a Specific Check. . . . . . . . . . . . . . . . . . . . . . . . . . . . . . . . . . . . . . . . . . . . .10-58Viewing MTD, QTD, and YTD Data for a Tax Deduction . . . . . . . . . . . . . . . . . . . . . . . . . . .10-60Viewing All Taxes by Month . . . . . . . . . . . . . . . . . . . . . . . . . . . . . . . . . . . . . . . . . . . . . . . . . .10-62
Correcting Taxes . . . . . . . . . . . . . . . . . . . . . . . . . . . . . . . . . . . . . . . . . . . . . . . . . . . . . . . . . . . . . . . .10-66
11 Processing an Off-Cycle Payroll
Introduction . . . . . . . . . . . . . . . . . . . . . . . . . . . . . . . . . . . . . . . . . . . . . . . . . . . . . . . . . . . . . . . . . . . . . . . .11-2Creating Manual Checks Using the Standard Off-Cycle Process . . . . . . . . . . . . . . . . . . . . . . . . . . . . . . .11-4
Adding a Paysheet Page . . . . . . . . . . . . . . . . . . . . . . . . . . . . . . . . . . . . . . . . . . . . . . . . . . . . . . . . . . .11-5Entering One-time Deductions . . . . . . . . . . . . . . . . . . . . . . . . . . . . . . . . . . . . . . . . . . . . . . . . . . . . . .11-8Entering One-time Garnishments . . . . . . . . . . . . . . . . . . . . . . . . . . . . . . . . . . . . . . . . . . . . . . . . . . .11-10Entering One-time Taxes . . . . . . . . . . . . . . . . . . . . . . . . . . . . . . . . . . . . . . . . . . . . . . . . . . . . . . . . .11-11Entering Third-party Sick Pay . . . . . . . . . . . . . . . . . . . . . . . . . . . . . . . . . . . . . . . . . . . . . . . . . . . . .11-12Calculating Retroactive Pay . . . . . . . . . . . . . . . . . . . . . . . . . . . . . . . . . . . . . . . . . . . . . . . . . . . . . . .11-12Calculating Your Manual Check(s) . . . . . . . . . . . . . . . . . . . . . . . . . . . . . . . . . . . . . . . . . . . . . . . . .11-14
ContentsPayroll Processing Guide Version 5.04.01

x Contents
Processing Your Initial Payroll Calculation. . . . . . . . . . . . . . . . . . . . . . . . . . . . . . . . . . . . . . . 11-14Reviewing Error Messages and Warnings . . . . . . . . . . . . . . . . . . . . . . . . . . . . . . . . . . . . . . . . 11-16Correcting Errors in Your Payroll . . . . . . . . . . . . . . . . . . . . . . . . . . . . . . . . . . . . . . . . . . . . . . 11-16Recalculating Your Payroll . . . . . . . . . . . . . . . . . . . . . . . . . . . . . . . . . . . . . . . . . . . . . . . . . . . 11-17Viewing Preliminary Check Data . . . . . . . . . . . . . . . . . . . . . . . . . . . . . . . . . . . . . . . . . . . . . . 11-17
Completing Your Payroll. . . . . . . . . . . . . . . . . . . . . . . . . . . . . . . . . . . . . . . . . . . . . . . . . . . . . . . . . 11-18Running the Final Pay Calculation . . . . . . . . . . . . . . . . . . . . . . . . . . . . . . . . . . . . . . . . . . . . . 11-18Confirming Your Payroll . . . . . . . . . . . . . . . . . . . . . . . . . . . . . . . . . . . . . . . . . . . . . . . . . . . . . 11-20Reviewing Pay Confirmation Results . . . . . . . . . . . . . . . . . . . . . . . . . . . . . . . . . . . . . . . . . . . 11-22
Creating On-Demand Checks Using the Standard Off-Cycle Process . . . . . . . . . . . . . . . . . . . . . . . . . . . . . . . . . . . . . . . . . . . . . . . . . . . . . . . . . . . . . . . . . . 11-23
Adding a Paysheet Page. . . . . . . . . . . . . . . . . . . . . . . . . . . . . . . . . . . . . . . . . . . . . . . . . . . . . . . . . . 11-24Entering One-time Deductions . . . . . . . . . . . . . . . . . . . . . . . . . . . . . . . . . . . . . . . . . . . . . . . . . . . . 11-26Entering One-Time Taxes . . . . . . . . . . . . . . . . . . . . . . . . . . . . . . . . . . . . . . . . . . . . . . . . . . . . . . . . 11-26Entering One-time Garnishments . . . . . . . . . . . . . . . . . . . . . . . . . . . . . . . . . . . . . . . . . . . . . . . . . . 11-28Entering Third-party Sick Pay . . . . . . . . . . . . . . . . . . . . . . . . . . . . . . . . . . . . . . . . . . . . . . . . . . . . . 11-29Calculating Retroactive Pay. . . . . . . . . . . . . . . . . . . . . . . . . . . . . . . . . . . . . . . . . . . . . . . . . . . . . . . 11-29Calculating and Completing Your On-demand Check(s) . . . . . . . . . . . . . . . . . . . . . . . . . . . . . . . . 11-29
Creating Manual and On-Demand Checks Using the On-Line Check Process . . . . . . . . . . . . . . . . . . . 11-30Completing Prerequisites . . . . . . . . . . . . . . . . . . . . . . . . . . . . . . . . . . . . . . . . . . . . . . . . . . . . . . . . . 11-31Specifying the Action . . . . . . . . . . . . . . . . . . . . . . . . . . . . . . . . . . . . . . . . . . . . . . . . . . . . . . . . . . . 11-31Reversing a Check . . . . . . . . . . . . . . . . . . . . . . . . . . . . . . . . . . . . . . . . . . . . . . . . . . . . . . . . . . . . . . 11-33Setting Up General Check Information . . . . . . . . . . . . . . . . . . . . . . . . . . . . . . . . . . . . . . . . . . . . . . 11-34Reviewing and/or Setting Up Earnings . . . . . . . . . . . . . . . . . . . . . . . . . . . . . . . . . . . . . . . . . . . . . . 11-36Performing Your Initial Calculation of Your On-line Check . . . . . . . . . . . . . . . . . . . . . . . . . . . . . 11-38
Correcting Errors and Recalculating Your On-line Check . . . . . . . . . . . . . . . . . . . . . . . . . . . 11-39Reviewing and/or Modifying Check Information . . . . . . . . . . . . . . . . . . . . . . . . . . . . . . . . . . . . . . 11-40
Reviewing Paycheck Summary Information . . . . . . . . . . . . . . . . . . . . . . . . . . . . . . . . . . . . . . 11-41Reviewing and/or Modifying General Information . . . . . . . . . . . . . . . . . . . . . . . . . . . . . . . . . 11-42Reviewing and/or Modifying Earnings . . . . . . . . . . . . . . . . . . . . . . . . . . . . . . . . . . . . . . . . . . 11-43Reviewing and/or Modifying Deductions . . . . . . . . . . . . . . . . . . . . . . . . . . . . . . . . . . . . . . . . 11-44Reviewing and/or Modifying Garnishments . . . . . . . . . . . . . . . . . . . . . . . . . . . . . . . . . . . . . . 11-46Reviewing and/or Modifying Taxes . . . . . . . . . . . . . . . . . . . . . . . . . . . . . . . . . . . . . . . . . . . . 11-48
Recalculating Your On-line Check . . . . . . . . . . . . . . . . . . . . . . . . . . . . . . . . . . . . . . . . . . . . . . . . . 11-51Confirming Your On-line Check and Printing the Check . . . . . . . . . . . . . . . . . . . . . . . . . . . . . . . . 11-51
Adjusting a Check . . . . . . . . . . . . . . . . . . . . . . . . . . . . . . . . . . . . . . . . . . . . . . . . . . . . . . . . . . . . . . . . . . 11-53Setting Up Adjustment Earnings Types and Deduction Codes . . . . . . . . . . . . . . . . . . . . . . . . . . . . 11-53Processing the Check Adjustment . . . . . . . . . . . . . . . . . . . . . . . . . . . . . . . . . . . . . . . . . . . . . . . . . . 11-54Entering Adjustments into Paysheets . . . . . . . . . . . . . . . . . . . . . . . . . . . . . . . . . . . . . . . . . . . . . . . 11-57Calculating Your Adjusted Check(s) . . . . . . . . . . . . . . . . . . . . . . . . . . . . . . . . . . . . . . . . . . . . . . . . 11-57Completing Your Adjustment . . . . . . . . . . . . . . . . . . . . . . . . . . . . . . . . . . . . . . . . . . . . . . . . . . . . . 11-58
Reversing a Check. . . . . . . . . . . . . . . . . . . . . . . . . . . . . . . . . . . . . . . . . . . . . . . . . . . . . . . . . . . . . . . . . . 11-60Identifying the Check(s) . . . . . . . . . . . . . . . . . . . . . . . . . . . . . . . . . . . . . . . . . . . . . . . . . . . . . . . . . 11-60Processing the Check Reversal(s) . . . . . . . . . . . . . . . . . . . . . . . . . . . . . . . . . . . . . . . . . . . . . . . . . . 11-61Reviewing the Paycheck Reversal(s). . . . . . . . . . . . . . . . . . . . . . . . . . . . . . . . . . . . . . . . . . . . . . . . 11-63Completing Your Reversal . . . . . . . . . . . . . . . . . . . . . . . . . . . . . . . . . . . . . . . . . . . . . . . . . . . . . . . 11-63
Deleting an Adjusted/Reversed Check . . . . . . . . . . . . . . . . . . . . . . . . . . . . . . . . . . . . . . . . . . . . . . . . . . 11-66Unconfirming Your Payroll . . . . . . . . . . . . . . . . . . . . . . . . . . . . . . . . . . . . . . . . . . . . . . . . . . . . . . . 11-66Identifying the Check(s) . . . . . . . . . . . . . . . . . . . . . . . . . . . . . . . . . . . . . . . . . . . . . . . . . . . . . . . . . 11-66Deleting Your Adjusted/Reversed Check(s) . . . . . . . . . . . . . . . . . . . . . . . . . . . . . . . . . . . . . . . . . . 11-67Reviewing the Deleted Checks . . . . . . . . . . . . . . . . . . . . . . . . . . . . . . . . . . . . . . . . . . . . . . . . . . . . 11-69Completing the Deletion . . . . . . . . . . . . . . . . . . . . . . . . . . . . . . . . . . . . . . . . . . . . . . . . . . . . . . . . . 11-69
ContentsPayroll Processing Guide Version 5.04.01

Contents xi
12 Adjusting Payroll Balances
Introduction . . . . . . . . . . . . . . . . . . . . . . . . . . . . . . . . . . . . . . . . . . . . . . . . . . . . . . . . . . . . . . . . . . . . . . . .12-2Establishing Tax Adjustment Earnings Types . . . . . . . . . . . . . . . . . . . . . . . . . . . . . . . . . . . . . . . . . . . . . .12-3
Establishing the Taxable Gross Definition . . . . . . . . . . . . . . . . . . . . . . . . . . . . . . . . . . . . . . . . . . . . .12-3Establishing the Earnings Types . . . . . . . . . . . . . . . . . . . . . . . . . . . . . . . . . . . . . . . . . . . . . . . . . . . . .12-4
Creating Manual Checks for Employee Balance Adjustments . . . . . . . . . . . . . . . . . . . . . . . . . . . . . . . . .12-7Assigning a Pay Run ID to a Pay Calendar . . . . . . . . . . . . . . . . . . . . . . . . . . . . . . . . . . . . . . . . . . . .12-8Adding a Paysheet Page . . . . . . . . . . . . . . . . . . . . . . . . . . . . . . . . . . . . . . . . . . . . . . . . . . . . . . . . . . .12-8Entering One-time Taxes . . . . . . . . . . . . . . . . . . . . . . . . . . . . . . . . . . . . . . . . . . . . . . . . . . . . . . . . .12-11Running Pay Calculation and Confirmation Processes . . . . . . . . . . . . . . . . . . . . . . . . . . . . . . . . . .12-13
Adjusting Federal Tax Balance Records . . . . . . . . . . . . . . . . . . . . . . . . . . . . . . . . . . . . . . . . . . . . . . . . .12-14Adding a Paysheet Page . . . . . . . . . . . . . . . . . . . . . . . . . . . . . . . . . . . . . . . . . . . . . . . . . . . . . . . . . .12-14Entering One-time Taxes . . . . . . . . . . . . . . . . . . . . . . . . . . . . . . . . . . . . . . . . . . . . . . . . . . . . . . . . .12-16Running Pay Calculation and Confirmation Processes . . . . . . . . . . . . . . . . . . . . . . . . . . . . . . . . . .12-17
Adjusting State Tax Balance Records . . . . . . . . . . . . . . . . . . . . . . . . . . . . . . . . . . . . . . . . . . . . . . . . . . .12-18Backing Out Wages from Incorrect State Records . . . . . . . . . . . . . . . . . . . . . . . . . . . . . . . . . . . . . .12-18
Adding a Paysheet Page . . . . . . . . . . . . . . . . . . . . . . . . . . . . . . . . . . . . . . . . . . . . . . . . . . . . . .12-18Entering One-time Taxes. . . . . . . . . . . . . . . . . . . . . . . . . . . . . . . . . . . . . . . . . . . . . . . . . . . . . .12-21
Running Pay Calculation and Confirmation Processes . . . . . . . . . . . . . . . . . . . . . . . . . . . . . . . . . .12-23Correcting Tax Data and Job Records . . . . . . . . . . . . . . . . . . . . . . . . . . . . . . . . . . . . . . . . . . . . . . .12-23Updating Correct Tax Data to Reflect the Correct State . . . . . . . . . . . . . . . . . . . . . . . . . . . . . . . . .12-23
Adding a Paysheet Page . . . . . . . . . . . . . . . . . . . . . . . . . . . . . . . . . . . . . . . . . . . . . . . . . . . . . .12-24Entering One-time Taxes. . . . . . . . . . . . . . . . . . . . . . . . . . . . . . . . . . . . . . . . . . . . . . . . . . . . . .12-26
Performing Balance Adjustments. . . . . . . . . . . . . . . . . . . . . . . . . . . . . . . . . . . . . . . . . . . . . . . . . . . . . . .12-28Creating an Adjustment/Open Balance. . . . . . . . . . . . . . . . . . . . . . . . . . . . . . . . . . . . . . . . . . . . . . .12-29
Entering a Manual Adjustment/Open Balance . . . . . . . . . . . . . . . . . . . . . . . . . . . . . . . . . . . . .12-29Reviewing Balance Adjustments Before Loading . . . . . . . . . . . . . . . . . . . . . . . . . . . . . . . . . . . . . .12-52
Reviewing the Adjustment Audit Report (PAY035) . . . . . . . . . . . . . . . . . . . . . . . . . . . . . . . .12-52Reviewing/Modifying Pending Balance Adjustments . . . . . . . . . . . . . . . . . . . . . . . . . . . . . . .12-54
Loading Balance Adjustments . . . . . . . . . . . . . . . . . . . . . . . . . . . . . . . . . . . . . . . . . . . . . . . . . . . . .12-65Reviewing the Status of an Adjustment Run ID (Optional) . . . . . . . . . . . . . . . . . . . . . . . . . . .12-65Loading Balance Adjustments Entered on the Balance Panels. . . . . . . . . . . . . . . . . . . . . . . . .12-67Loading Balance Adjustments Imported from a . File . . . . . . . . . . . . . . . . . . . . . . . . . . . . . . .12-69
Reviewing Balance Adjustment Transactions . . . . . . . . . . . . . . . . . . . . . . . . . . . . . . . . . . . . . . . . .12-70Reviewing Earnings Balance Adjustment Transactions . . . . . . . . . . . . . . . . . . . . . . . . . . . . . .12-71Reviewing Deduction Balance Adjustment Transactions . . . . . . . . . . . . . . . . . . . . . . . . . . . . .12-72Reviewing Tax Balance Adjustment Transactions . . . . . . . . . . . . . . . . . . . . . . . . . . . . . . . . . .12-73Reviewing Garnishment Balance Adjustment Transactions . . . . . . . . . . . . . . . . . . . . . . . . . . .12-75Reviewing Arrears Balance Adjustment Transactions . . . . . . . . . . . . . . . . . . . . . . . . . . . . . . .12-76
Posting Current/Prior Period Adjustments to the General Ledger . . . . . . . . . . . . . . . . . . . . . . . . . .12-78Posting to the General Ledger . . . . . . . . . . . . . . . . . . . . . . . . . . . . . . . . . . . . . . . . . . . . . . . . . .12-78Viewing the Adjustment GL Summary Reports . . . . . . . . . . . . . . . . . . . . . . . . . . . . . . . . . . . .12-79
Reversing a Specific Balance Adjustment Transaction . . . . . . . . . . . . . . . . . . . . . . . . . . . . . . . . . .12-80Reviewing Loaded Earnings Balance Adjustment Transactions . . . . . . . . . . . . . . . . . . . . . . .12-80Reviewing Loaded Deduction Balance Adjustment Transactions . . . . . . . . . . . . . . . . . . . . . .12-83Reviewing Loaded Tax Balance Adjustment Transactions . . . . . . . . . . . . . . . . . . . . . . . . . . .12-85Reviewing Loaded Garnishment Balance Adjustment Transactions . . . . . . . . . . . . . . . . . . . .12-87Reviewing Loaded Arrears Balance Adjustment Transactions. . . . . . . . . . . . . . . . . . . . . . . . .12-89Running the Reversal . . . . . . . . . . . . . . . . . . . . . . . . . . . . . . . . . . . . . . . . . . . . . . . . . . . . . . . .12-91
Updating Current/Prior Period Adjustment Balances when Reversing a Check . . . . . . . . . . . . . . .12-92Identifying the Check(s) . . . . . . . . . . . . . . . . . . . . . . . . . . . . . . . . . . . . . . . . . . . . . . . . . . . . . .12-92
ContentsPayroll Processing Guide Version 5.04.01

xii Contents
Processing the Check Reversal(s) . . . . . . . . . . . . . . . . . . . . . . . . . . . . . . . . . . . . . . . . . . . . . . 12-92Reviewing the Paycheck Reversal(s) . . . . . . . . . . . . . . . . . . . . . . . . . . . . . . . . . . . . . . . . . . . . 12-95Completing Your Reversal. . . . . . . . . . . . . . . . . . . . . . . . . . . . . . . . . . . . . . . . . . . . . . . . . . . . 12-95
13 Performing Monthly Processes
Introduction . . . . . . . . . . . . . . . . . . . . . . . . . . . . . . . . . . . . . . . . . . . . . . . . . . . . . . . . . . . . . . . . . . . . . . . . 13-2Updating Leave Balances . . . . . . . . . . . . . . . . . . . . . . . . . . . . . . . . . . . . . . . . . . . . . . . . . . . . . . . . . . . . . 13-3Performing a One-Time Update on Your ETD History . . . . . . . . . . . . . . . . . . . . . . . . . . . . . . . . . . . . . . 13-5Creating General Ledger Accruals . . . . . . . . . . . . . . . . . . . . . . . . . . . . . . . . . . . . . . . . . . . . . . . . . . . . . . 13-6
Producing the GL Distribution Summary Report . . . . . . . . . . . . . . . . . . . . . . . . . . . . . . . . . . . . . . . 13-6Generating the File . . . . . . . . . . . . . . . . . . . . . . . . . . . . . . . . . . . . . . . . . . . . . . . . . . . . . . . . . . . 13-6Producing the Report . . . . . . . . . . . . . . . . . . . . . . . . . . . . . . . . . . . . . . . . . . . . . . . . . . . . . . . . . 13-8
Producing the Paid Time-Off Accruals Detail Report. . . . . . . . . . . . . . . . . . . . . . . . . . . . . . . . . . . . 13-8Generating the File . . . . . . . . . . . . . . . . . . . . . . . . . . . . . . . . . . . . . . . . . . . . . . . . . . . . . . . . . . . 13-8Producing the Report . . . . . . . . . . . . . . . . . . . . . . . . . . . . . . . . . . . . . . . . . . . . . . . . . . . . . . . . 13-10
Reconciling Your Checks . . . . . . . . . . . . . . . . . . . . . . . . . . . . . . . . . . . . . . . . . . . . . . . . . . . . . . . . . . . . 13-11Using Bank Files . . . . . . . . . . . . . . . . . . . . . . . . . . . . . . . . . . . . . . . . . . . . . . . . . . . . . . . . . . . . . . . 13-12Running Paycheck Reconciliation A . . . . . . . . . . . . . . . . . . . . . . . . . . . . . . . . . . . . . . . . . . . . . . . . 13-12Running Paycheck Reconciliation B . . . . . . . . . . . . . . . . . . . . . . . . . . . . . . . . . . . . . . . . . . . . . . . . 13-13Researching Your Outstanding Checks . . . . . . . . . . . . . . . . . . . . . . . . . . . . . . . . . . . . . . . . . . . . . . 13-15
Purchasing U.S. Savings Bonds . . . . . . . . . . . . . . . . . . . . . . . . . . . . . . . . . . . . . . . . . . . . . . . . . . . . . . . 13-16Generating the Bond Purchase Report. . . . . . . . . . . . . . . . . . . . . . . . . . . . . . . . . . . . . . . . . . . . . . . 13-17Creating Federal Reserve Bank Files for Savings Bonds . . . . . . . . . . . . . . . . . . . . . . . . . . . . . . . . 13-18
Creating the ADP UCM Services Wage File . . . . . . . . . . . . . . . . . . . . . . . . . . . . . . . . . . . . . . . . . . . . . 13-21Mapping the UCM Code and Earnings Code . . . . . . . . . . . . . . . . . . . . . . . . . . . . . . . . . . . . . . . . . 13-21Generating the ADP UCM Service File . . . . . . . . . . . . . . . . . . . . . . . . . . . . . . . . . . . . . . . . . . . . . 13-23
Generating Monthly Summary Reports. . . . . . . . . . . . . . . . . . . . . . . . . . . . . . . . . . . . . . . . . . . . . . . . . . 13-24Generating the Payroll Balances Report (PAY030) . . . . . . . . . . . . . . . . . . . . . . . . . . . . . . . . . . . . 13-24Generating the Tax Summary (TAX010) . . . . . . . . . . . . . . . . . . . . . . . . . . . . . . . . . . . . . . . . . . . . 13-25
14 Performing Quarterly Processes
Introduction . . . . . . . . . . . . . . . . . . . . . . . . . . . . . . . . . . . . . . . . . . . . . . . . . . . . . . . . . . . . . . . . . . . . . . . . 14-2Understanding Multi-Company and Multi-Work Site Reporting . . . . . . . . . . . . . . . . . . . . . . . . . . . . . . . 14-3Setting Up Multiple-Company Reporting . . . . . . . . . . . . . . . . . . . . . . . . . . . . . . . . . . . . . . . . . . . . . . . . . 14-4
Verifying the SQR . . . . . . . . . . . . . . . . . . . . . . . . . . . . . . . . . . . . . . . . . . . . . . . . . . . . . . . . . . . . . . . 14-4Verifying Tax Reporting Parameters . . . . . . . . . . . . . . . . . . . . . . . . . . . . . . . . . . . . . . . . . . . . . . . . . 14-4Verifying State Unemployment Information. . . . . . . . . . . . . . . . . . . . . . . . . . . . . . . . . . . . . . . . . . . 14-4Verifying Company Information . . . . . . . . . . . . . . . . . . . . . . . . . . . . . . . . . . . . . . . . . . . . . . . . . . . . 14-5
Setting Up Multiple Work-Site Reporting . . . . . . . . . . . . . . . . . . . . . . . . . . . . . . . . . . . . . . . . . . . . . . . . 14-6Verifying the SQR . . . . . . . . . . . . . . . . . . . . . . . . . . . . . . . . . . . . . . . . . . . . . . . . . . . . . . . . . . . . . . . 14-6Verifying Tax Reporting Parameters . . . . . . . . . . . . . . . . . . . . . . . . . . . . . . . . . . . . . . . . . . . . . . . . 14-6Verifying Data on the UI Report Codes Panel . . . . . . . . . . . . . . . . . . . . . . . . . . . . . . . . . . . . . . . . . 14-6
Running Your Quarterly State Wage Reports . . . . . . . . . . . . . . . . . . . . . . . . . . . . . . . . . . . . . . . . . . . . . . 14-8Basic Troubleshooting . . . . . . . . . . . . . . . . . . . . . . . . . . . . . . . . . . . . . . . . . . . . . . . . . . . . . . . . . . . . 14-9
Multi-Company Messages . . . . . . . . . . . . . . . . . . . . . . . . . . . . . . . . . . . . . . . . . . . . . . . . . . . . . 14-9Work-Site Messages. . . . . . . . . . . . . . . . . . . . . . . . . . . . . . . . . . . . . . . . . . . . . . . . . . . . . . . . . . 14-9
Generating Quarterly Summary Reports . . . . . . . . . . . . . . . . . . . . . . . . . . . . . . . . . . . . . . . . . . . . . . . . . 14-10Generating the Employee Earnings Record (PAY014) . . . . . . . . . . . . . . . . . . . . . . . . . . . . . . . . . . 14-10
ContentsPayroll Processing Guide Version 5.04.01

Contents xiii
Generating the Payroll Balances Report (PAY030) . . . . . . . . . . . . . . . . . . . . . . . . . . . . . . . . . . . . .14-12Generating the Quarterly State Employee Wage Listing (TAX002) . . . . . . . . . . . . . . . . . . . . . . . .14-12Generating the Quarterly Federal Tax Summary . . . . . . . . . . . . . . . . . . . . . . . . . . . . . . . . . . . . . . .14-14Generating the Quarterly State Tax Summary (TAX008) . . . . . . . . . . . . . . . . . . . . . . . . . . . . . . . .14-16Generating the Tax Summary (TAX010) . . . . . . . . . . . . . . . . . . . . . . . . . . . . . . . . . . . . . . . . . . . . .14-18Generating the Quarterly Tax Balance Audit (TAX011) . . . . . . . . . . . . . . . . . . . . . . . . . . . . . . . . .14-18Generating the Ohio Local Tax Reconciliation Report (TAX012) . . . . . . . . . . . . . . . . . . . . . . . . .14-18Generating the Quarterly LIT Report (TAX015) . . . . . . . . . . . . . . . . . . . . . . . . . . . . . . . . . . . . . . .14-20
Processing Quarterly Tax Data. . . . . . . . . . . . . . . . . . . . . . . . . . . . . . . . . . . . . . . . . . . . . . . . . . . . . . . . .14-23Establishing the Year and Quarter to Be Run. . . . . . . . . . . . . . . . . . . . . . . . . . . . . . . . . . . . . . . . . .14-24Generating the Quarterly Detail File. . . . . . . . . . . . . . . . . . . . . . . . . . . . . . . . . . . . . . . . . . . . . . . . .14-24Transmitting Quarterly Files. . . . . . . . . . . . . . . . . . . . . . . . . . . . . . . . . . . . . . . . . . . . . . . . . . . . . . .14-28Viewing Quarterly Detail File Details . . . . . . . . . . . . . . . . . . . . . . . . . . . . . . . . . . . . . . . . . . . . . . .14-28Processing End-of-Quarter Adjustments . . . . . . . . . . . . . . . . . . . . . . . . . . . . . . . . . . . . . . . . . . . . .14-30
15 Performing Annual Processes
Introduction . . . . . . . . . . . . . . . . . . . . . . . . . . . . . . . . . . . . . . . . . . . . . . . . . . . . . . . . . . . . . . . . . . . . . . . .15-2Creating a Pay Calendar . . . . . . . . . . . . . . . . . . . . . . . . . . . . . . . . . . . . . . . . . . . . . . . . . . . . . . . . . . . . . . .15-3
Using Pay Calendars and a Pay Run ID with Pay Groups . . . . . . . . . . . . . . . . . . . . . . . . . . . . . . . . .15-3Setting up employees with a Non-standard Number of Pays . . . . . . . . . . . . . . . . . . . . . . . . . . . . . . .15-4Building Pay Calendars Automatically. . . . . . . . . . . . . . . . . . . . . . . . . . . . . . . . . . . . . . . . . . . . . . . .15-4
Building the Pay Calendar. . . . . . . . . . . . . . . . . . . . . . . . . . . . . . . . . . . . . . . . . . . . . . . . . . . . . .15-4Reviewing Error Messages and Warnings . . . . . . . . . . . . . . . . . . . . . . . . . . . . . . . . . . . . . . . . .15-7Printing Pay Calendar Information . . . . . . . . . . . . . . . . . . . . . . . . . . . . . . . . . . . . . . . . . . . . . . .15-7
Building Pay Calendars Manually . . . . . . . . . . . . . . . . . . . . . . . . . . . . . . . . . . . . . . . . . . . . . . . . . . .15-8Building the calendar. . . . . . . . . . . . . . . . . . . . . . . . . . . . . . . . . . . . . . . . . . . . . . . . . . . . . . . . . .15-8Entering Scheduled Run Dates for Payroll Processes (ADP Hosted Clients Only) . . . . . . . . .15-13
Deleting a Pay Calendar . . . . . . . . . . . . . . . . . . . . . . . . . . . . . . . . . . . . . . . . . . . . . . . . . . . . . . . . . .15-14Assigning a Pay Run ID to a Pay Calendar . . . . . . . . . . . . . . . . . . . . . . . . . . . . . . . . . . . . . . . . . . . . . . .15-16
Establishing the Pay Run ID . . . . . . . . . . . . . . . . . . . . . . . . . . . . . . . . . . . . . . . . . . . . . . . . . . . . . . .15-16Attaching a Pay Run ID to a Pay Calendar. . . . . . . . . . . . . . . . . . . . . . . . . . . . . . . . . . . . . . . . . . . .15-18Verifying that the Pay Run ID Is Attached to the Pay Calendar . . . . . . . . . . . . . . . . . . . . . . . . . . .15-19
Defining a Holiday Schedule . . . . . . . . . . . . . . . . . . . . . . . . . . . . . . . . . . . . . . . . . . . . . . . . . . . . . . . . . .15-21Using the Archive/Delete/Restore/Convert Program . . . . . . . . . . . . . . . . . . . . . . . . . . . . . . . . . . . . . . . .15-22
Archiving Payroll Data . . . . . . . . . . . . . . . . . . . . . . . . . . . . . . . . . . . . . . . . . . . . . . . . . . . . . . . . . . .15-23Adding an Archive Run Control . . . . . . . . . . . . . . . . . . . . . . . . . . . . . . . . . . . . . . . . . . . . . . . .15-23Viewing the Payroll Archive Control Report . . . . . . . . . . . . . . . . . . . . . . . . . . . . . . . . . . . . . .15-26
Deleting Archived Payroll Data . . . . . . . . . . . . . . . . . . . . . . . . . . . . . . . . . . . . . . . . . . . . . . . . . . . .15-26Deleting Data. . . . . . . . . . . . . . . . . . . . . . . . . . . . . . . . . . . . . . . . . . . . . . . . . . . . . . . . . . . . . . .15-27Viewing the Payroll Delete Control Report . . . . . . . . . . . . . . . . . . . . . . . . . . . . . . . . . . . . . . .15-28
Restoring Payroll Data . . . . . . . . . . . . . . . . . . . . . . . . . . . . . . . . . . . . . . . . . . . . . . . . . . . . . . . . . . .15-29Converting Archived V4 or Earlier Payroll Data to a Current Version Format . . . . . . . . . . . .15-29Restoring Data. . . . . . . . . . . . . . . . . . . . . . . . . . . . . . . . . . . . . . . . . . . . . . . . . . . . . . . . . . . . . .15-31Viewing the Payroll Restore Control Report . . . . . . . . . . . . . . . . . . . . . . . . . . . . . . . . . . . . . .15-33
Preparing for Year-End Processing . . . . . . . . . . . . . . . . . . . . . . . . . . . . . . . . . . . . . . . . . . . . . . . . . . . . .15-34
A Configuring Your Printer
Introduction . . . . . . . . . . . . . . . . . . . . . . . . . . . . . . . . . . . . . . . . . . . . . . . . . . . . . . . . . . . . . . . . . . . . . . . . A-2Selecting Your Printer . . . . . . . . . . . . . . . . . . . . . . . . . . . . . . . . . . . . . . . . . . . . . . . . . . . . . . . . . . . . . . . . A-3
ContentsPayroll Processing Guide Version 5.04.01

xiv Contents
Preparing the Printer . . . . . . . . . . . . . . . . . . . . . . . . . . . . . . . . . . . . . . . . . . . . . . . . . . . . . . . . . . . . . . . . . .A-4
B Implementing and Using Signatures, Logos, and Disclaimers
Introduction . . . . . . . . . . . . . . . . . . . . . . . . . . . . . . . . . . . . . . . . . . . . . . . . . . . . . . . . . . . . . . . . . . . . . . . . . B-2Implementing Image Files for Checks and Direct Deposit Advices . . . . . . . . . . . . . . . . . . . . . . . . . . . . . . B-3
Implementing Logo and Signature Images for Checks . . . . . . . . . . . . . . . . . . . . . . . . . . . . . . . . . . . . B-3Designating a Different Image File to Use . . . . . . . . . . . . . . . . . . . . . . . . . . . . . . . . . . . . . . . . . . . . . B-6Deleting an Image File from a Process . . . . . . . . . . . . . . . . . . . . . . . . . . . . . . . . . . . . . . . . . . . . . . . . B-8Modifying the Check when the Company Address is Embedded in the Logo Image. . . . . . . . . . . . B-10
Modifying the Code in CHECKPRT.SQC. . . . . . . . . . . . . . . . . . . . . . . . . . . . . . . . . . . . . . . . . B-10Implementing Images for Reports . . . . . . . . . . . . . . . . . . . . . . . . . . . . . . . . . . . . . . . . . . . . . . . . . . . . . . . B-12
Implementing Image Files for Reports . . . . . . . . . . . . . . . . . . . . . . . . . . . . . . . . . . . . . . . . . . . . . . . B-12Designating a Different Image File to use for a Logo . . . . . . . . . . . . . . . . . . . . . . . . . . . . . . . . . . . . B-15Deleting an Image File from a Process . . . . . . . . . . . . . . . . . . . . . . . . . . . . . . . . . . . . . . . . . . . . . . . B-17
C Creating Custom Export Definitions: Enterprise eTIME and/or TimeSaver
Introduction . . . . . . . . . . . . . . . . . . . . . . . . . . . . . . . . . . . . . . . . . . . . . . . . . . . . . . . . . . . . . . . . . . . . . . . . . C-2Creating the Custom Export Definition. . . . . . . . . . . . . . . . . . . . . . . . . . . . . . . . . . . . . . . . . . . . . . . . . . . . C-3
D Multi-Company and Work-Site Reporting SQRs
E Archived and Deleted Tables
Index
ContentsPayroll Processing Guide Version 5.04.01

About This Guide
PAGE TOPIC
xvi Introduction
xvii Audience for This Guide
xviii Introducing the Enterprise Payroll Documentation Library
xix What’s in This Book
xxi What’s New
xxii Related Documentation
xxiii Documentation Conventions
xxv Providing Comments
About This GuidePayroll Processing Guide Version 5.04.01

xvi Introduction
Introduction
This guide provides the procedures and tasks required to process a typical payroll using
ADP®’s Enterprise HR® payroll solution (referred to as Enterprise Payroll). In addition, it provides instructions on running an off-cycle payroll for on-demand and manual checks, adjustments, and reversals. It also provides information on post-payroll cycle processes such as preparing your payroll distributions and building your ADP TAXServices Interface file.
About This GuidePayroll Processing Guide Version 5.04.01

Audience for This Guide xvii
Audience for This Guide
This guide is written for payroll professionals who are using ADP’s Enterprise HR solution (referred to as ADP Enterprise HR) to process their payroll.
To take full advantage of this guide, we recommend that you have a basic understanding of how to use the ADP Enterprise HR product and have completed the Enterprise Payroll training course(s). This guide is not intended to be a tutorial.
You should be familiar with how to navigate around in the ADP Enterprise HR product and how to add, modify, and delete information. In addition, you should be comfortable with using a graphical user interface as well as a web-enabled application.
About This GuidePayroll Processing Guide Version 5.04.01

xviii Introducing the Enterprise Payroll Documentation Library
Introducing the Enterprise Payroll Documentation Library
The Enterprise Payroll library consists of the following guides:
• Payroll Setup and Maintenance Guide - describes all the payroll activities that you must complete before you can process a payroll, such as setting up and maintaining company definitions and employee payroll information.
• Employee Tax Setup Guide - describes the procedures and information necessary to set up employee tax withholding information. Customized instructions are provided for states and localities with special withholding requirements.
• Payroll Processing Guide - describes the process of running a typical payroll. In addition, it provides instructions on running an off-cycle payroll for on-demand or on-line checks, adjustments, and reversals. It also provides information on post-payroll cycle processes such as preparing your payroll distributions and building your ADP TAXServices and ADP WGPS files. Finally, it describes all payroll activities that you must complete on a monthly, quarterly, and yearly basis and includes tasks that you can complete during the year in preparation for running your year-end tax reports.
About This GuidePayroll Processing Guide Version 5.04.01

What’s in This Book xix
What’s in This Book
This guide, the Payroll Processing Guide, covers the following topics:
Chapter 1, “Introduction to Enterprise Payroll,” provides an overview of Enterprise Payroll.
Chapter 2, “Generating Initial Paysheets,” provides step-by-step instructions for the tasks you complete when generating initial pay cycle data (paysheets).
Chapter 3, “Entering Pay Cycle Data Using Paysheets,” provides step-by-step instructions for the tasks you complete when entering pay cycle data into your paysheets after you have generated your initial pay cycle data.
Chapter 4, “Entering Payroll Data Using Rapid Pay Data Entry,” provides instructions on using the ADP Rapid Pay Data Entry program that was delivered with previous product versions.
Chapter 5, “Importing Pay Cycle Data,” provides step-by-step instructions on using the ADP Pay Data Entry System, a “heads-down” data entry capability for entering payroll exception data.
Chapter 6, “Calculating and Confirming Your Payroll,” provides step-by-step instructions for using ADP’s Time and Attendance application, which you can use to import pay cycle data you have entered in a time collection system (such as Total Time and e-TIME) and then update your paysheets.
Chapter 7, “Generating Summary Reports,” provides step-by-step instructions for running your payroll.
Chapter 8, “Generating and Transmitting ADP Premium Service Files,” provides an overview of each summary report that allows you to view your processed payroll data as well as step-by-step instructions for generating the report.
Chapter 9, “Distributing Your Payroll,” provides step-by-step instructions for ADP Premium Service processes that are a part of your on-cycle or off-cycle payroll cycle. Those services include ADP TAXServices (formerly ADP Financial and Compliance Services), ADP Print Services, and ADP Wage Garnishment Processing Services (WGPS).
Chapter 10, “Researching and Correcting Employee Payroll Data,” provides step-by-step instructions for printing paychecks and advices, reprinting checks, and purchasing U.S. savings bonds.
Chapter 11, “Processing an Off-Cycle Payroll,” provides step-by-step instructions for printing paychecks and advices, reprinting checks, and purchasing U.S. savings bonds.
Chapter 12, “Adjusting Payroll Balances,” provides step-by-step instructions for researching employee payroll errors and then correcting this errors.
Chapter 13, “Performing Monthly Processes,” provides step-by-step instructions for completing monthly payroll processes such as reconciling checks, purchasing savings bonds, and creating general ledger accruals.
About This GuidePayroll Processing Guide Version 5.04.01

xx What’s in This Book
Chapter 14, “Performing Quarterly Processes,” provides step-by-step instructions for completing quarterly payroll processes such as running your quarterly state wage reports and processing Tax Service Interface quarterly data.
Chapter 15, “Performing Annual Processes,” provides step-by-step instructions for completing annual payroll processes such as creating a pay calendar, defining a holiday schedule, and running the Archive/Delete/Restore payroll data process. In addition, it provides instructions for year-end tax reporting tasks that you can complete throughout the year rather than waiting until the end of the year.
Appendix A, “Configuring Your Printer,” provides instructions for the system administrator on purchasing the appropriate printer, setting it up, and then customizing it to use a digitized company signature and logo.
Appendix B, “Implementing and Using Signatures, Logos, and Disclaimers,” provides configuration information for setting up your signatures and logo to print on your checks.
Appendix C, “Creating Custom Export Definitions: Enterprise eTIME and/or TimeSaver,” contains information on how to use the Custom Export Definitions task for Enterprise eTIME (TAA028.SQR) and TimeSaver (TAA030.SQR)
Appendix D, “Multi-Company and Work-Site Reporting SQRs,” provides a list of the states that require multi-company/multi-worksite options and the corresponding enhanced SQRs for this type of reporting.
Appendix E, “Archived and Deleted Tables,” provides a list of the tables that the Archive/Delete/Restore/Convert program archives and then deletes from the active ADP Enterprise HR database.
About This GuidePayroll Processing Guide Version 5.04.01

What’s New xxi
What’s New
The following changes have been made to this guide for Version 5.04:
• Several enhancements have been made to Rapid Pay Data Entry:
– Entering employee pay data in ADP Pay Data Entry has been enhanced. The Employee Pay Data Entry task is now three separate tasks:
- Pay Data Entry: Add Employee - Add pay data for a single employee to a spreadsheet.
- Pay Data Entry by Employee - Update pay data for one employee.
- Pay Data Entry by Spreadsheet - Open the spreadsheet and perform heads-down data entry for multiple employees.
See “Entering Employee Pay Data in ADP Pay Data Entry” on page 5-9
– Using the new Order Entered option, you can now sort your spreadsheet data in the order that it was originally entered.
– You can now enter data for employees with a status of Leave of Absence and/or Retired. In addition, you can also retrieve data for these employees when creating a query definition.
See “Entering Payroll Data Using Rapid Pay Data Entry” on page 4-1.
• If an error occurs when running the TAA020 (Move to Pay Cycle Data - Paysheets) process, a status of NotSuccess displays in the Process Monitor. Previously, a Success* status displayed (asterisk indicated errors).
See “Moving the Pay Cycle Data into Paysheets Using TAA020” on page 5-33
• Basic of Payment now displays on the employee’s paystub. This is the employees type from the latest effective-dated row on the Job/Pay/Location panel. If the employee is paid with one check for two jobs, then the basis displayed is for the primary job.
PAY036 (ADP Print Services File) process- See “Generating the Payroll Files” on page 8-14.
PAY003 (Print Paychecks) process- See “Printing Paychecks” on page 9-17.
PAY036 (ADP Print Services File) process- See “Printing Your Advices” on page 9-30.
About This GuidePayroll Processing Guide Version 5.04.01

xxii Related Documentation
Related Documentation
This guide describes all the payroll activities that you must complete before you can process a payroll. It includes step-by-step instructions for setting up and maintaining both company-level and employee-level payroll information.
You may need to refer to related documentation for other areas of the product. You can access the documentation in the following locations:
• Online manuals through the ADP Enterprise HR application Help menu
• Printed and online manuals on the web at adp4me.adp.com, select the Product Knowledgebase tab and then select Payroll / HR
The Using ADP Enterprise HR Guide also includes a related documentation table which lists
the documentation set delivered with the application, the purpose of the documents, and where the documents can be located. This table also includes a list of delivered online help.
To access the ADP Enterprise HR guides on this web site, you must be assigned the ADP4ME User role in the ADP Netsecure Security Management System. This role is issued a digital certificate. For more information, contact your system administrator.
About This GuidePayroll Processing Guide Version 5.04.01

Documentation Conventions xxiii
Documentation Conventions
Table 1 describes the documentation conventions used in this guide.
ADP Enterprise HR allows your administrator to configure panels, translate values, and the ADP Enterprise HR home page. Your administrator can change field labels, assign default values to fields, define fields as required, hide fields, as well as re-align fields on a panel. Translate values can be added, changed or deleted for many fields. Panel illustrations and field descriptions used throughout this guide represent the default settings as delivered by ADP. For specifics on configuring ADP Enterprise HR, see the Using ADP Enterprise HR Guide.
Table 1. Documentation Conventions
Documentation Convention Description
bold In procedures, user interface items that you select, click, or enter information for are shown in bold. For instance, panel names, buttons, and field names.
command Indicates that you should type the command on your computer.
Signifies important additional information.
Signifies very important additional information
Identifies helpful—but not necessary—information.
Signifies that a failure to follow the recommended procedure could result in a loss of data or could result in the product not performing properly.
Used to indicate either of the following:
• You can find additional information in the online Help
• You can find additional information on interface shortcuts and tips in the user’s guide.
Company Definitions ~ Organization Definitions
At the beginning of a procedure, shows the path or navigation to a process or task.
People ~ Personnel Actions ~ Change Employee’s Job/Position ~ Change Job Position
Within text, shows the path or navigation to a process, task, or panel.
About This GuidePayroll Processing Guide Version 5.04.01

xxiv Documentation Conventions
Indicates that you have reached the end of one step in a multiple-step process. Instructions are given after this convention to help you find the next step in the process and other related information.
Indicates that you have reached the end of a procedure. If additional information is available, it is noted after this convention.
Indicates where you can find a complete description of every field on a panel.
This convention is placed either to the left or, less often, to the right of a screen illustration.
Lists each step in a multi-step process, and indicates which step the current section is documenting.
In this example, the third step is currently being documented. Note that this step is highlighted in bold and is preceded by a check mark.
If you are viewing an online manual, click the highlighted text to jump to the desired section.
Table 1. Documentation Conventions (cont.)
Documentation Convention Description
For a description of the fields on this panel, press F1.
MULTI-STEP PROCESS
First step in process
Second step in process
Third step in process
About This GuidePayroll Processing Guide Version 5.04.01

Providing Comments xxv
Providing Comments
We welcome your comments and suggestions about the documentation delivered with ADP Enterprise HR. That way, we can continue to improve the manuals and online Help. You can provide comments in one of the following ways:
• Select Help ~ Online Manuals from the ADP Enterprise HR application and then click the link to submit your suggestions.
• Give us feedback by visiting the web at www.adp4me.adp.com. ~ Product Knowledgebase ~ Payroll / HR.
About This GuidePayroll Processing Guide Version 5.04.01

xxvi Providing Comments
About This GuidePayroll Processing Guide Version 5.04.01

Chapter 1
Introduction to Enterprise Payroll
PAGE TOPIC
1-2 Introduction
1-3 Company Definitions
1-4 Employee Payroll Information
1-5 Payroll Cycle Process
1-6 Post-Payroll Cycle Processes
1-7 Periodic Payroll Processes
1-8 Year-End Tax Reporting
1-9 Enterprise Payroll Reports
Chapter 1: Introduction to Enterprise PayrollPayroll Processing Guide Version 5.04.01

1-2 Introduction
Introduction
Enterprise Payroll is an intuitive, innovative payroll system that provides complete control over all aspects of payroll operation—from time reporting, payroll calculation, and tax computation to check preparation, payroll reporting, and tax reporting.
This chapter provides an overview of the flow of activities relative to using Enterprise Payroll and processing your payroll.
Chapter 1: Introduction to Enterprise PayrollPayroll Processing Guide Version 5.04.01

Company Definitions 1-3
Company Definitions
Before running a payroll, you must establish company definitions. These tasks include setting up and maintaining the following definitions:
• Earnings
• Special accumulators
• Group-based earnings
• Deductions
• Garnishments
• Section 415 limits
• Company tax data
• System tax data
• Pay groups
• Payroll calendars
• Fund accounting
• Payroll forms
• Holiday schedules
• Banking information
• Time and Attendance
• Time and Labor Management (TLM) system interface
• Pay Data Entry views
• Enterprise Payroll messages
• ADP TAXServices interface
• ADP Wage Garnishment Processing Service (WGPS)
• Third-party sick pay
• ADP company code
• Organization definitions
For detailed information on setting up company definitions, refer to the Payroll Setup and Maintenance Guide.
Chapter 1: Introduction to Enterprise PayrollPayroll Processing Guide Version 5.04.01

1-4 Employee Payroll Information
Employee Payroll Information
Before an employee can be paid, you must enter employee payroll information. These tasks include:
• Special earnings for specific employees
• Group-based earnings for individual employees
• Federal, state, and local tax data
• General deductions and overrides
• Direct deposits
• Garnishments
• Paycheck delivery information
• Time and Labor Management (TLM) data
• Job earnings distributions
• Savings bonds
• Leave balances
For detailed information on setting up employee payroll information, refer to this guide.
For detailed information on setting up federal, state, and local tax data, refer to the Employee Tax Setup Guide.
Chapter 1: Introduction to Enterprise PayrollPayroll Processing Guide Version 5.04.01

Payroll Cycle Process 1-5
Payroll Cycle Process
The Enterprise Payroll payroll cycle consists of the following tasks:
• Generating initial pay cycle data (paysheets)
• Entering pay cycle data using paysheets
• Entering pay cycle data using the Pay Data Entry system
• Importing pay cycle data
• Updating pay cycle data
• Recording third party sick payments
• Calculating retroactive pay
• Viewing preliminary check data
• Calculating and confirming your payroll
• Performing adjustments and reversals
• Creating manual checks using the On-Line Check process
• Processing Time and Attendance data
• Handling prior period adjustments
• Deleting pay cycle data
• Unconfirming a payroll
• Reversing leave balances
For detailed information on running your payroll cycle, refer to this guide.
Chapter 1: Introduction to Enterprise PayrollPayroll Processing Guide Version 5.04.01

1-6 Post-Payroll Cycle Processes
Post-Payroll Cycle Processes
Post-payroll cycle processes consist of the following:
• Generating summary reports
• Printing checks and advices
• Creating the NACHA file
• Creating the ADP Payment Solutions Services file
• Reprinting checks
• Generating and transmitting ADP TAXServices files
• Generating and transmitting ADP Wage Garnishment Processing Service (WGPS) files
• Distributing your payroll
• Researching and correcting employee payroll data
• Processing manual and on-demand checks
• Adjusting and/or reversing a paychecks
For detailed information on running your payroll cycle, refer to this guide.
Chapter 1: Introduction to Enterprise PayrollPayroll Processing Guide Version 5.04.01

Periodic Payroll Processes 1-7
Periodic Payroll Processes
You perform several payroll processes on a monthly, quarterly, or annual basis.
Monthly tasks include:
• Updating leave balances
• Creating general ledger accruals for leave balances
• Reconciling your checks
• Purchasing savings bonds
• Creating Federal Reserve Bank files for savings bonds
• Creating the ADP UCM Services Wage file
• Generating monthly summary reports
• Updating dead paychecks
Quarterly tasks include:
• Setting up multiple-company reporting
• Setting up multiple work-site reporting
• Running your quarterly state wage reports
• Generating summary reports
• Processing Financial and Compliance Services Interface quarterly data
Annual tasks include:
• Creating a pay calendar
• Assigning a pay run ID to a pay calendar
• Defining a holiday schedule
• Archiving/deleting/restoring/converting payroll data
• Preparing for year-end tax reporting
For detailed information on running your periodic payroll processes, refer to this guide.
Chapter 1: Introduction to Enterprise PayrollPayroll Processing Guide Version 5.04.01

1-8 Year-End Tax Reporting
Year-End Tax Reporting
Enterprise Payroll is designed to help you organize and process your year-end data and reports in the most efficient possible way. The primary goal of year-end processing is to produce accurate tax reports—the key report being the W-2, which must be mailed to every employee by January 31.
For instructions on year-end tax reporting processes you can complete throughout the year, refer to the Payroll Processing Guide.
For detailed information on all aspects of year-end tax reporting, refer to the Year-End Tax Reporting Guide.
Chapter 1: Introduction to Enterprise PayrollPayroll Processing Guide Version 5.04.01

Enterprise Payroll Reports 1-9
Enterprise Payroll Reports
Enterprise Payroll reports support your payroll requirements by providing the following types of reports and processes:
• Payroll cycle
• Paychecks
• Direct deposits
• General ledger
• Tax reports
• Tax definitions
• Tax Service
• Time and Attendance
• Payroll definitions
• Payroll utilities
These standard reports are created using Structured Query Report Writer (SQR). ADP delivers this third party product with Enterprise to provide you with ability to customize the standard reports to meet your specific needs. For additional information on SQR, refer to the SQR User’s Guide provided by Hyperion Solutions Corporation.
You will find information about running specific Enterprise Payroll reports and processes throughout all of the Enterprise Payroll guides. For detailed information about the reports that Enterprise provides, refer to the Standard Reports Guide.
Chapter 1: Introduction to Enterprise PayrollPayroll Processing Guide Version 5.04.01

1-10 Enterprise Payroll Reports
Chapter 1: Introduction to Enterprise PayrollPayroll Processing Guide Version 5.04.01

Chapter 2
Generating Initial Paysheets
PAGE TOPIC
2-2 Introduction
2-3 Prerequisites
2-4 Viewing and Approving Pending Retroactive Payments
2-9 Generating the Pay Cycle Data (Paysheets)
2-11 Reviewing Initial Pay Cycle Data
2-13 Modifying and/or Adding Pay Cycle Data
Chapter 2: Generating Initial PaysheetsPayroll Processing Guide Version 5.04.01

2-2 Introduction
Introduction
Before you can run any payroll calculations, you must first generate your initial pay cycle data and create your paysheets. Your paysheets serve as a transport for the raw data that Enterprise Payroll requires to calculate employee pay for each pay period. They enable you to enter time as well as any additional payroll-related information, such as earnings, one-time overrides for deductions, garnishments, accounting data, tax periods, and frequency.
When generating initial pay cycle data (also referred to as paysheets) for regular payroll cycles, Enterprise Payroll gathers the employee information from the various system tables of the pay groups for which you are processing a payroll. Enterprise Payroll automatically assigns 15 paylines per page of the “paysheet” and assigns as many sequential page numbers as needed. It then generates pay earnings information for each payline from the paysheet.
Some of these procedures may vary slightly depending on how you set up the information in
the Company Definitions and Employee Information processes. To change pay earnings information, you must first clear the Job Pay check box. Otherwise, some of the fields you want to change remain grayed out. If an option is already turned off on your panels, you can disregard this step.
After you generate your initial paysheets, you can update an employee’s pay cycle data by using the on-line paysheets, Pay Data Entry, Time and Attendance, or an external time entry system.
This chapter provides step-by-step instructions for the tasks you complete when generating initial pay cycle data (paysheets).
You can often complete a task in the product in multiple ways. For information on interface
shortcuts and tips, refer to the Using ADP Enterprise HR Guide.
As you work through the tasks in this chapter, you may have questions about fields and options on the panels. To display a description of the fields and options, press F1 (Help) from the panel.
Chapter 2: Generating Initial PaysheetsPayroll Processing Guide Version 5.04.01

Prerequisites 2-3
Prerequisites
Before you can process a payroll, you must establish payroll run IDs and then attach the run IDs to a pay calendar. For step-by-step instructions, see “Creating a Pay Calendar” on page 15-3 and “Assigning a Pay Run ID to a Pay Calendar” on page 15-16.
Chapter 2: Generating Initial PaysheetsPayroll Processing Guide Version 5.04.01

2-4 Viewing and Approving Pending Retroactive Payments
Viewing and Approving Pending Retroactive Payments
Use the Pending Retro Pay panel to determine if an employee has retroactive pay to be processed and then to approve the transaction. You can view all pending retroactive payments or you can choose to view pending payments for a specific employee or pay group.
For employees with multiple pending retroactive payment transactions, Enterprise Payroll “stacks” the transactions. Only one transaction has an “Approved” status and all others have an “On Hold” status. After you calculate your retro pay (Calculate Retro Pay task) or build paysheets with the Calculate Retro Pay check box selected (Prepare Initial Pay Cycle Data - Paysheets task), Enterprise Payroll automatically processes the “Approved” retroactive pay transaction. In addition, Enterprise Payroll automatically selects the Approved check box for the “On Hold” transaction based on the retroactive payment start date, the effective date, and finally the sequence number. The next time you build a paysheet or calculate retroactive pay Enterprise Payroll repeats this process, processing the “Approved” transaction and approving the next “On Hold” transaction based on the criteria.
The information displayed on the Pending Retro Pay panel is set up on the Compensation Information panel (People ~ Personnel Actions ~ Change Pay Rate ~ Change Employee’s Pay Rate). For more information, see the Hiring, Staffing, and Job Maintenance Guide.
To view and approve pending retroactive payments, do the following:
1. Click Payroll and make the following selections:
Payroll Cycle Processes ~ Scheduled Payroll (On Cycle)
Chapter 2: Generating Initial PaysheetsPayroll Processing Guide Version 5.04.01

Viewing and Approving Pending Retroactive Payments 2-5
2. Double-click the Review Pending Retro Pay task. The Pending Retro Pay panel displays.
.
Figure 2-1. Pending Retro Pay Panel
3. In the Search Criteria area, select one of the following options:
• Select Employee ID - Select to view pending retroactive pay for a specific employee.
– If you select this option, then select a specific employee from the Employee ID field. The employee’s pending retroactive pay information displays.
• Select Company/Pay Group - Select to view pending retroactive pay for a specific company and pay group. Selecting this option displays the Company and Pay Group fields.
– If you select this option, then select a specific Company and Pay Group. Pending retroactive pay information displays for all employees in the specific company and pay group.
• Select All - Select to view pending retroactive pay information for all employees in all companies and pay groups.
For a description of the fields on this panel, press F1.
Chapter 2: Generating Initial PaysheetsPayroll Processing Guide Version 5.04.01

2-6 Viewing and Approving Pending Retroactive Payments
The information for the specified pending retroactive payments displays on the panel as follows:
Figure 2-2. Pending Retro Pay Panel
4. Review the pending retroactive payment information as follows.
To sort by a specific column, click the column heading.
• Approved - If this check box is selected, this indicates that the retroactive payment will be the next eligible retroactive payment transaction. During the Calculate Retro Pay process, Enterprise Payroll automatically approves the next eligible retroactive payment transaction with an On Hold status and selects the Approved check box.
• Employee ID - Displays the ID for the employee.
• Company - Displays the code that identifies the company.
• Pay Group - Displays the employee’s pay group.
• Effective Date - Displays the date the retroactive pay is effective.
• Sequence - Displays the sequence number for the effective date entry of this retroactive pay.
• Retro Start Date - Displays the date to begin calculating retroactive pay.
• Hourly Rate - Displays the hourly rate of the employee.
For a description of the fields on this panel, press F1.
Chapter 2: Generating Initial PaysheetsPayroll Processing Guide Version 5.04.01

Viewing and Approving Pending Retroactive Payments 2-7
• Retro Status - Each retroactive payment will have one of the following statuses displayed in the Retro Status column:
• New Hire - Indicates if the employee is a newly hired employee. You must scroll over to view this column.
5. To approve a retroactive payment transaction with an Unapproved or On Hold status in the Retro Status column, do one of the following:
• To approve the processing of a retroactive payment for an employee with only one pending payment (indicated by an On Hold status), select the Approved check box. The status in the Retro Status column for the payment(s) changes to Initial Load.
• To approve the processing of a retroactive payment for an employee with multiple pending payments (indicated by an Unapproved status), do the following:
You can only approve and process one retroactive pay transaction at a time for a
specific employee.
– Determine which retroactive payment needs to be processed first based on the retro start date, the effective date, and finally the sequence number.
– Select the Approved check box for that retroactive payment. The status in the Retro Status column for the payment(s) changes to Initial Load.
6. To delete the pending retroactive pay for one or more employees, choose from the following:
Once you delete the pending retroactive pay from this panel, the transaction will no
longer display in the Pending Retro Pay panel or Review Retro Pay Calculations panel after you save your changes. However, the deleted transaction remains in the database, and the corresponding row to the pay rate change from the employee’s job record is not deleted.
• Select the Delete check box for each employee.
• Click Select All for Delete to automatically select the Delete check box for all employees displayed.
Click Clear All for Delete to automatically clear the Delete check box for all
employees displayed.
Initial Load Indicates that the retroactive payment has already been approved. The Approved check box is already selected.
On Hold Indicates that the employee has more than one retroactive payment pending. The transaction will not be processed until the user selects the Approved check box.
Unapproved Indicates that the retroactive payment has been postponed. It will not be processed until the user selects the Approved check box.
Chapter 2: Generating Initial PaysheetsPayroll Processing Guide Version 5.04.01

2-8 Viewing and Approving Pending Retroactive Payments
7. When you are finished, click (Save).
You have just finished viewing pending retroactive pay and approved transactions as necessary.
Chapter 2: Generating Initial PaysheetsPayroll Processing Guide Version 5.04.01

Generating the Pay Cycle Data (Paysheets) 2-9
Generating the Pay Cycle Data (Paysheets)
When you generate pay cycle data (paysheets), Enterprise Payroll does the following:
• Provides a data entry point for hours, additional earnings, one-time deductions, one-time garnishments, one-time taxes, and overrides to previously established employee-level data.
• Allows earnings and hours to be divided among two or more departments, accounts, and locations.
• Works with the payroll calendar and the holiday schedule to automatically set up the holiday earnings code and hours for any pay period that contains a holiday (using the holiday earnings code you establish on the Earnings/Payment Data panel from the Pay Groups task).
• Establishes prorations for employees who work for only part of the pay period or whose holiday pay must be prorated (for part-time employees).
• Creates multiple lines for employees working multiple jobs during the pay period. You must use the concurrent job processing feature and establish employment record numbers (multiple jobs) for your employees.
• Creates multiple lines for employees who are taxed in multiple states and localities. The taxes for the states and localities must be set up on the Federal, State, and Local panels prior to creating the paysheet. For more information, see “Correcting Taxes” on page 10-66.
You must select the option to include multi jurisdiction paylines on the paysheet in the pay group settings on the Employee Type Options panel (Payroll ~ Company Definitions ~ Pay Groups and Pay Calendars ~ Pay Groups). Also, the earnings must be set up on the Taxing Options panel (Payroll ~ Company Definitions ~ Earnings ~ Earnings). For detailed information, see the Payroll Setup and Maintenance Guide.
• Provides for the printing of turn-around or data entry documents, which you can distribute to department managers or supervisors.
To generate the pay cycle data, do the following:
1. Click Payroll and make the following selections:
Payroll Cycle Processes ~ Scheduled Payroll (On Cycle)
Chapter 2: Generating Initial PaysheetsPayroll Processing Guide Version 5.04.01

2-10 Generating the Pay Cycle Data (Paysheets)
2. Double-click the Prepare Initial Pay Cycle Data (Paysheets) task. The Prepare Pay Cycle Data panel displays.
Figure 2-3. Prepare Pay Cycle Data Panel
3. Enter an alpha/numeric batch run ID that uniquely identifies the run in the Batch Run ID field.
4. Select the payroll run ID from the Payroll run ID field.
5. If you want Enterprise Payroll to calculate retroactive pay when you generate your initial pay data so that it will be included on your paysheets, select the Calculate Retro Pay check box.
6. Click (Save).
7. Click Run Paysheets. You will receive a message notifying you that your process has
been submitted. Click OK. To confirm completion, click (Process Monitor).
Enterprise Payroll scans through all employees and selects the employees that are
scheduled to be paid for the specified pay period. This scan is possible since Enterprise Payroll assigns the employee's pay groups to a pay calendar entry that is associated with the payroll run ID indicated for this run control.
For additional information on using the Process Monitor, see the Using ADP Enterprise HR Guide.
You have just finished processing your pay cycle data. Next, you can review your initial pay cycle data (paysheet).
For a description of the fields on this panel, press F1.
Chapter 2: Generating Initial PaysheetsPayroll Processing Guide Version 5.04.01

Reviewing Initial Pay Cycle Data 2-11
Reviewing Initial Pay Cycle Data
Once you run paysheets, you can review your initial pay cycle data by viewing the Balances panel.
To review your initial pay cycle data, do the following:
1. Click Payroll and make the following selections:
Payroll Cycle Processes ~ Update Pay Cycle Data
You can also access this panel from Payroll ~ Payroll Cycle Processes ~ Scheduled
Payroll (On Cycle) ~ Modify Employee Pay Cycle Data (Payline).
2. Double-click the Earnings and Overrides (Paysheets) task. The Search dialog box displays.
Figure 2-4. Search Dialog Box
3. Enter as much information as you can in the fields on the dialog box and then click OK .
4. From the Search Results area, double-click the line that displays the correct employee. The Earnings panel displays.
Chapter 2: Generating Initial PaysheetsPayroll Processing Guide Version 5.04.01

2-12 Reviewing Initial Pay Cycle Data
5. Click the Balances tab.
Figure 2-5. Balances Panel
6. Review your initial paysheet balance information:
• Total Lines - Displays the total number of lines in your paysheet.
• Total Regular Hours - Displays the total number of regular hours for this paysheet.
• Total Overtime Hours - Displays the total number of overtime hours for this paysheet.
• Total Other Hours - Displays the total number of other hours for this paysheet.
• Total Lines OK to Pay - Displays the total number of lines that are marked OK to Pay on the paysheet.
• Total Regular Earnings - Displays the total amount of regular earnings for this paysheet.
• Total Other Earnings - Displays the sum of the other earnings (not regular, overtime, or additional pay earnings) on this paysheet page.
• Total Hourly Rate - Displays the total amount of hourly rates for this paysheet.
7. Click (Close).
You’ve just finished reviewing paysheets, which is the last step in generating initial pay cycle data (paysheets).
For a description of the fields on this panel, press F1.
Chapter 2: Generating Initial PaysheetsPayroll Processing Guide Version 5.04.01

Modifying and/or Adding Pay Cycle Data 2-13
Modifying and/or Adding Pay Cycle Data
Once you generate your initial pay cycle data, you can modify and/or add paysheet information in any of the following ways:
• Entering Pay Cycle Data Using Paysheets, (Chapter 3)
• Entering Employee Pay Data in ADP Pay Data Entry (Chapter 4)
• Importing Data from the Time and Attendance Application (Chapter 5)
• Importing Pay Cycle Data from an External File (Chapter 5)
For detailed instructions on modifying pay cycle data, refer to the appropriate chapter.
Chapter 2: Generating Initial PaysheetsPayroll Processing Guide Version 5.04.01

2-14 Modifying and/or Adding Pay Cycle Data
Chapter 2: Generating Initial PaysheetsPayroll Processing Guide Version 5.04.01

Chapter 3
Entering Pay Cycle Data UsingPaysheets
PAGE TOPIC
3-2 Introduction
3-4 Reviewing and/or Modifying Pay Cycle Data
3-23 Adding Pay Cycle Data for a New Employee
3-26 Modifying Earnings Information
3-27 Entering a One-time Deduction Override
3-33 Entering a One-time Garnishment Override
3-36 Entering a One-time Tax Override
3-39 Entering Gross-Ups
3-43 Setting Up Third Party Sick Pay
3-47 Entering Exception Time Reporting
3-49 Specifying Separate Checks for an Employee
3-52 Distributing Earnings Across Multiple Departments
3-55 Changing Multiple Jurisdiction Entries
3-57 Importing Pay Cycle Data
3-58 Deleting Pay Cycle Data for a Specific Payroll Run ID
Chapter 3: Entering Pay Cycle Data Using PaysheetsPayroll Processing Guide Version 5.04.01

3-2 Introduction
Introduction
After you generate your initial pay cycle data and create your paysheet(s), you can do any of the following tasks:
• Reviewing Pay Cycle Data on the Paysheet
• Accepting the Pay Cycle Data on the Paysheet
• Adding Pay Cycle Data to the Paysheet
• Changing Pay Cycle Data on the Paysheet
You can often complete a task in the product in multiple ways. For information on interface
shortcuts and tips, refer to the Using ADP Enterprise HR Guide.
As you work through the tasks in this chapter, you may have questions about fields and options on the panels. To display a description of the fields and options, press F1 (Help) from the panel.
Reviewing Pay Cycle Data on the Paysheet
To determine if you need to add and/or modify any pay cycle data on your paysheet(s), you can view the data on your paysheets. For detailed information, see “Reviewing and/or Modifying Pay Cycle Data” on page 3-4.
Accepting the Pay Cycle Data on the Paysheet
You have the option to accept the data on the paysheets under the following circumstances:
• All the employees are salaried.
• Enterprise Payroll has turned on the OK to Pay option (as determined by the pay group record).
• There are no changes (other earnings, additional pay, and so on) Enterprise Payroll requires for the data.
• You are ready to process your preliminary pay calculation run.
Adding Pay Cycle Data to the Paysheet
You can add data to the paysheet if you have an employee that was hired after you generated your initial paysheets. You may also need to select the OK to Pay check box. Refer to the “Adding Pay Cycle Data for a New Employee” on page 3-23 for additional information.
Chapter 3: Entering Pay Cycle Data Using PaysheetsPayroll Processing Guide Version 5.04.01

Introduction 3-3
Changing Pay Cycle Data on the Paysheet
You can modify your pay cycle data by accessing the paysheet by pay group or by employee. For detailed information, refer to one of the following sections of this chapter:
• “Modifying Earnings Information” on page 3-26.
• “Entering a One-time Deduction Override” on page 3-27.
• “Entering a One-time Garnishment Override” on page 3-33.
• “Entering a One-time Tax Override” on page 3-36.
• “Entering Gross-Ups” on page 3-39.
• “Setting Up Third Party Sick Pay” on page 3-43.
Chapter 3: Entering Pay Cycle Data Using PaysheetsPayroll Processing Guide Version 5.04.01

3-4 Reviewing and/or Modifying Pay Cycle Data
Reviewing and/or Modifying Pay Cycle Data
After you generate your initial pay cycle data, you can view this data in any of the following ways to determine if you need to add or change information:
• Understanding Paysheet Information
• Reviewing/Modifying Earnings and Overrides
• Reviewing/Modifying Earnings and Distributions
• Viewing/Modifying Earnings
• Reviewing/Modifying FLSA Overtime Earnings
Understanding Paysheet Information
Before reviewing and/or modifying paysheet data, you should first have a good understanding of the items a paysheet contains. Refer to Table 3-1 for a detailed description of each item found on a paysheet.
The task you select from Payroll ~ Update Pay Cycle Data determines the paysheet items
that will be displayed on the panel.
Table 3-1. Paysheet Items
Item Description
Empl ID If you are manually adding a page or payline, you can select the employee ID for the pay data transaction. Otherwise, this field is grayed and unavailable.
Enterprise Payroll automatically enters the ID based on the
paysheet sort you established using the Payroll Calendar task (Payroll ~ Company Definitions ~ Pay Groups and Payroll Calendars).
Rcd # For employees performing concurrent jobs, indicates the job to which the record pertains. New hire employment record numbers are always 0.
This field only displays when you’re using multiple or concurrent
job processing functionality as indicated through the Installation task (System Admin ~ Human Resources Setup (Required) ~ Human Resources Setup) when the Multiple Jobs Allowed check box is selected.
Reviewing and/or Modifying Pay Cycle Data
Understanding Paysheet Informa-tion
Reviewing/Modify-ing Earnings and Overrides
Reviewing/Modify-ing Earnings and Distributions
Viewing/Modifying Earnings
Reviewing/Modify-ing FLSA Overtime Earnings
Chapter 3: Entering Pay Cycle Data Using PaysheetsPayroll Processing Guide Version 5.04.01

Reviewing and/or Modifying Pay Cycle Data 3-5
Ben # This option is available only if you use multiple job processing. For more information, refer to the Hiring Staffing, and Job Maintenance Guide.
Benefit record number identifies an employee's benefit group within the company. If an employee is a member of only one benefit group, he or she has only one set of benefit records. Such records have a benefit record number of zero. If an employee is a member of more than one benefit group, he or she has one set of benefit records per job. Records for the first job have an benefit record number of zero; records for the second job have a benefit record number of 1.
Line # Displays the payline number on a paysheet page. During the paysheet creation process, Enterprise Payroll automatically assigns 15 paylines per page, starting with line 1, and assigns as many sequential page numbers as needed, starting with page 1. New paylines can be added to new or existing pages, up to a maximum of 99 lines per page. The default number of paylines per page can be modified using the Company task (Payroll ~ Company Definitions ~ Organization Definitions).
Pay Line Message This brief system-maintained message describes the type of paysheet entry this line represents. For example, the message might read Manual Check, Pay Data Change, or Adjustment-Partial Period.
Empl Status Indicates the status of the employee: active, terminated, or on leave of absence.
Manual Check If you are recording a manual check, select this check box so that you can enter the check number and date, total gross, and net pay.
Validation occurs during Calculate Payroll program. The
gross-to-net calculation must cross-foot.
Chk # If you are recording a manual check, enter the check number.
Dt If you are recording a manual check, enter the check date.
Tot Gross If you are recording a manual check, enter the total gross earnings for the paycheck.
Net Pay If you are recording a manual check, enter the net pay.
Addl # To add a line to an existing payline for an employee, click the
outer scroll bar and click (Insert Row). This field will then be displayed and will list the new line number. To view existing paylines, scroll on the middle scroll bar.
Table 3-1. Paysheet Items
Item Description
Chapter 3: Entering Pay Cycle Data Using PaysheetsPayroll Processing Guide Version 5.04.01

3-6 Reviewing and/or Modifying Pay Cycle Data
Direct Deposit Select one of the following options:
All pay earnings on the same check must share the identical
direct deposit type.
• None - The money will not be deposited into the employee’s direct deposit account. Instead, he will receive a check.
• Special - The money will be deposited into the direct deposit account that has the Use for Special Payrolls check box selected on the Direct Deposit panel (Payroll ~ Employee Information ~ Employee Payroll Data ~ Direct Deposit).
• Standard - The money will be deposited based on the employee’s direct deposit options established on the Direct Deposit panel (Payroll ~ Employee Information ~ Employee Payroll Data ~ Direct Deposit).
For details on the Direct Deposit panel, refer to the Payroll Setup and Maintenance Guide.
OK to Pay Each payline on a paysheet has its own OK to Pay check box. This check box must be selected to calculate pay. If the check box is not selected, the record will be bypassed and no calculation will be performed during the payroll calculation process. Even if an employee is not receiving pay, you should select this check box if you want deductions calculated. If you have a payline that warrants more research before approving, but you do not want to hold up calculation, clear this check box, to put the payline on hold.
If you want a warning message to automatically display upon
saving if you have changed a payline but have not selected the OK to Pay check box, you can select the OK to Pay Warning check box on the Earnings/Payment Basics panel (Company Definitions ~ Pay Groups and Payroll Calendars ~ Pay Groups). For details, refer to the Payroll Setup and Maintenance Guide.
Table 3-1. Paysheet Items
Item Description
Chapter 3: Entering Pay Cycle Data Using PaysheetsPayroll Processing Guide Version 5.04.01

Reviewing and/or Modifying Pay Cycle Data 3-7
Job Pay This check box controls the link between the paysheet and the employee's job record. Normally, a paysheet should reflect data from the current job record, so Enterprise Payroll automatically populates the paysheet with job data and selects this check box as the default setting. While this check box is selected, the fields populated from the job record are protected from data entry and should not be changed on the paysheet. If you need to permanently change any protected fields displayed on the paysheet, you should update the job record rather than change the fields on the paysheet.
If the applicable pay group is defined using the Payroll Calendar task (Payroll ~ Company Definitions ~ Pay Groups and Payroll Calendars) to perform an automatic paysheet update, then if you select the Job Pay check box on the Earnings panel, any job changes that are effective for the pay period of the paysheet will automatically update the paysheet data. If you need to temporarily change paysheet data (for the current pay cycle), then clear the Job Pay check box so that all fields are available for update. Once you have cleared the Job Pay check box, Enterprise Payroll no longer calculates against the employee’s job record (assuming the data on the paysheet should).
You can update several fields on the paysheet even though the Job Pay check box is selected, since it is data that does not come from the job record. For a salaried employee, you can change the Direct Deposit field and add additional earnings. For an hourly employee, you can change direct deposit, additional earnings, and regular hours.
Gross-Up If you want Enterprise Payroll to gross-up a check for these earnings, select this check box. Grossing-up means to calculate gross pay from net pay. Earnings to be grossed-up should be entered in the Other Earnings portion of the panel and be contained on a separate check.
All pay earnings on the same check must share the identical
gross-up.
For more information on processing gross-ups, refer to “Entering Gross-Ups” on page 3-39.
Retro If this paysheet contains retroactive pay, Enterprise Payroll enables this check box.
Reg Hrs For hourly and exemption hourly employees, Enterprise Payroll populates this field with standard hours from the employee’s job record.
OT Hrs Enter the number of overtime hours worked by the employee during the pay period.
Table 3-1. Paysheet Items
Item Description
Chapter 3: Entering Pay Cycle Data Using PaysheetsPayroll Processing Guide Version 5.04.01

3-8 Reviewing and/or Modifying Pay Cycle Data
Hrly Rate Enterprise Payroll populates this field with standard hours from the employee’s job record.
Reg Earns For salaried employees, enter the regular earnings earned by the employee during this pay period.
Dept ID Select the department to which these earnings are posted for accounting purposes.
Job Cd Select the job code to which these earnings are posted for accounting purposes.
Pos# Enter the position number to which these earnings are posted for accounting purposes.
Shift Select the work shift to which these earnings are charged for accounting purposes and rate/differential calculation.
If you creating a paysheet manually, the shift will default from the
employee’s job record.
GL Type Enter the general ledger pay type if department ID, employee type, and earnings type are insufficient for charging salaries and wages to the proper G/L account.
For example, assume two employees have the same department ID, employee type, and earnings type, but their salaries should be charged to two different accounts because the employees are classified differently for accounting purposes. Use G/L pay type to differentiate between the two charges.
Acct Cd Select the account code to which these earnings are posted for labor accounting.
Sep Chk# If you want to create a separate paycheck containing specific earnings for an employee, click the middle scroll bar and click
(Insert Row). This field will be displayed so that you can enter a check occurrence number. You can enter nine additional checks above the primary check.
Reason Select the reason you are adding a separate check in the SepChk # field. This field displays only if you have clicked on the middle
scroll bar and clicked (Insert Row).
Wk # If the pay group to which the employee belongs is bi-weekly and you need Enterprise Payroll to perform FLSA weekly averaging, select this option.
Table 3-1. Paysheet Items
Item Description
Chapter 3: Entering Pay Cycle Data Using PaysheetsPayroll Processing Guide Version 5.04.01

Reviewing and/or Modifying Pay Cycle Data 3-9
Begin Enter the earnings begin date for this job in this pay period. If the employee worked the entire pay period at this job, the earnings begin and end dates are the same as the pay period begin and end dates. If the employee worked only a partial pay period at this job, the begin and end dates are displayed here.
For a new hire or termination, the earnings begin date is updated
during the paysheet creation process.
End Enter the earnings end date for this job in this pay period. If the employee worked the entire pay period at this job, the earnings begin and end dates are the same as the pay period begin and end dates. Otherwise, there are multiple earnings dates for the same pay period.
For a new hire or termination, the earnings end date is updated
when you generate your initial pay cycle data and create paysheets.
State Use the default unless it is different from the employee’s primary job record.
Locality Use the default unless it is different from the employee’s primary job record.
Tax Periods Enter the number of pay periods over which to spread the taxing of these earnings. Enterprise Payroll uses this field in conjunction with the Pay Frequency field to determine how much tax to withhold each pay period. (For example, if the tax frequency for the earnings is biweekly and you enter 3 in the Tax Periods field, taxes are calculated as if the earnings were earned over a six-week period.)
Pay Freq Select the frequency at which these earnings are taxed or use the default, which is the employee’s pay group pay frequency. Use this option in conjunction with the Tax Periods field. For example, an employee paid biweekly receives severance. Taxes on the advance are to be spread out over three pay periods. You would create a new payline on the paysheet for the employee and enter 3 in the Tax Periods field. The tax frequency defaults to biweekly (the employee's pay frequency). This causes Enterprise Payroll to calculate taxes on the advance as if the earnings were earned over a six-week period.
Tax Method Select from the tax method you want Enterprise Payroll to use to calculate tax on this earnings type. If a tax method is specified on the Taxing Options panel (Payroll ~ Company Definitions ~ Earnings and Special Accumulators ~ Earnings), you cannot make a selection here.
Table 3-1. Paysheet Items
Item Description
Chapter 3: Entering Pay Cycle Data Using PaysheetsPayroll Processing Guide Version 5.04.01

3-10 Reviewing and/or Modifying Pay Cycle Data
Annual Annualizes your earnings, calculates tax on the annualized amount, and divides the tax by the number of pay periods in the year. The result is your withholding for the pay period. This is the most common tax method, and it's based on the number of withholding allowances.
Cum Adds together your year-to-date earnings and the earnings for this pay period, annualizes the result, and calculates the tax. Enterprise Payroll deannualizes the tax by dividing it by the number of tax periods you specified on the paysheet. The result is compared to your year-to-date withholding; if it's greater than your year-to-date withholding, the difference becomes your withholding for the pay period. You generally use this tax method for employees whose wages vary significantly from pay period to pay period, such as salespeople on commission.
Supplemental Calculates taxes using a straight percent rather than allowances, and the percentage depends on federal or state requirements. Federal withholding is calculated based on a percent of earnings specified using the Tax Data task (Payroll ~ Employee Information ~ Change Employee Payroll Data). Other states may vary the percent based on annual income, while still other states use tax tables instead. This tax method is typically used for earnings such as a bonus.
Other Earnings Enter data about earnings other than regular and overtime for the current pay period. For example, bonus and commission are defined as other earnings.
An employee can have a maximum 20 additional earnings per
paysheet.
Code Select the code for the earnings.
Seq If you need to change the employee’s recurring additional earnings, select the additional pay sequence number. Otherwise leave this field blank.
Oth Hrs Enter the number of hours associated with the other earnings type, if applicable.
Amount Enter the dollar amount associated with the earnings code, if applicable.
Table 3-1. Paysheet Items
Item Description
Chapter 3: Entering Pay Cycle Data Using PaysheetsPayroll Processing Guide Version 5.04.01

Reviewing and/or Modifying Pay Cycle Data 3-11
Reviewing/Modifying Earnings and Overrides
You can review and/or modify earnings and overrides for all employees in a specific pay group or all earnings from all pay groups for a specific employee, depending on which Earnings and Overrides task you use.
To view all earnings and overrides for employees by pay group, refer to “Viewing Earnings and Overrides for Employees by Pay Group” on page 3-11.
To view all earnings and overrides from all pay groups for a specific employee, see “Viewing All Earnings and Overrides from All Pay Groups for a Specific Employee” on page 3-13.
Viewing Earnings and Overrides for Employees by Pay Group
To view earnings and overrides by pay group, use the Earnings and Overrides (Paysheet) task. The Earnings panel that you access using this task displays a snapshot of paysheet data for the current pay period that Enterprise Payroll generates when you process the initial pay cycle data.
Table 3-2 displays the purpose for each scroll bar on the Earnings panel.
Table 3-2. Scroll Bar Functionality
To view or modify all earnings and overrides for employees by pay group, do the following:
1. Click Payroll and make the following selections:
Payroll Cycle Processes ~ Update Pay Cycle Data
This scroll bar... Controls...
Outer scroll bar The payline. Use this bar to move from employee to employee or from job to job (in case of a single employee with multiple job records).
Middle scroll bar Pay earnings entries within a payline. Use this scroll bar to move among an individual employee’s additional pay earnings lines. These additional pay earnings lines are flagged with additional numbers.
Inner scroll bar Multiple other earnings—such as bonus pay, commissions, sick pay, vacation pay, and so on—associated with a single pay earnings record. These other earnings use the distributions from the associated pay earnings record.
Reviewing and/or Modifying Pay Cycle Data
Understanding Paysheet Information
Reviewing/Modify-ing Earnings and Overrides
Reviewing/Modify-ing Earnings and Distributions
Viewing/Modifying Earnings
Reviewing/Modify-ing FLSA Overtime Earnings
Chapter 3: Entering Pay Cycle Data Using PaysheetsPayroll Processing Guide Version 5.04.01

3-12 Reviewing and/or Modifying Pay Cycle Data
2. Double-click the Earnings and Overrides (Paysheets) task. The Search dialog box displays.
Figure 3-1. Search Dialog Box
3. Enter as much information about the paysheet as you can and then click OK.
4. From the Search Results area, double-click the pay group you want to view. The Earnings panel displays.
Figure 3-2. Earnings Panel
5. Review the earnings information on the paysheet and modify if necessary. For detailed information on the paysheet fields on this panel, refer to Table 3-1, “Paysheet Items,”on page 3-4.
6. If you want to view the deduction, tax, and garnishment data, select the appropriate panel. For illustrations of these panels, see:
• “Deduction Override Panel” on page 3-29
• “Garnishment Override Panel” on page 3-34
• “Tax Override Panel” on page 3-37
7. When are finished reviewing and/or modifying the paysheet data, click (Close).
For a description of the fields on this panel, press F1.
Chapter 3: Entering Pay Cycle Data Using PaysheetsPayroll Processing Guide Version 5.04.01

Reviewing and/or Modifying Pay Cycle Data 3-13
You’ve just finished viewing all earnings and overrides for employees by pay group. If you want to view all earnings and overrides for all of an employee’s pay groups, see “Viewing All Earnings and Overrides from All Pay Groups for a Specific Employee” on page 3-13.
Viewing All Earnings and Overrides from All Pay Groups for a Specific Employee
If you access the Earnings panel using the Earnings and Overrides by Employee (Payline) task, you can request to view specific employee data to help speed the process of making new entries and adjustments. Each employee you schedule to pay during a specific pay period must have at least one payline and one pay earnings record. Without this information, Enterprise Payroll is unable to calculate earnings, taxes, and deductions.
A payline consists of the employee ID (for the employee eligible to be paid), any manual check information, and one or more pay earnings records, such as:
• Amount of regular pay
• Number of regular hours
• Additional pay
• Tax information
• Job data such as department and job code
• Other earnings
Table 3-3 describes how you use each scroll bar on the Earnings panel.
To view all earnings and overrides from all pay groups for a specific employee, do the following:
1. Click Payroll and make the following selections:
Payroll Cycle Processes ~ Update Pay Cycle Data
Table 3-3. The Earnings (Payline) Panel Scroll Bars
This scroll bar... Controls...
Outer scroll bar Pay earnings entries within a payline. Use this scroll bar to move among an individual employee’s additional pay earnings lines. These additional pay earnings lines are flagged with additional numbers.
Inner scroll bar Multiple other earnings—such as bonus pay, commissions, sick pay, vacation pay, and so on—associated with a single pay earnings record. These other earnings use the distributions from the associated pay earnings record.
Chapter 3: Entering Pay Cycle Data Using PaysheetsPayroll Processing Guide Version 5.04.01
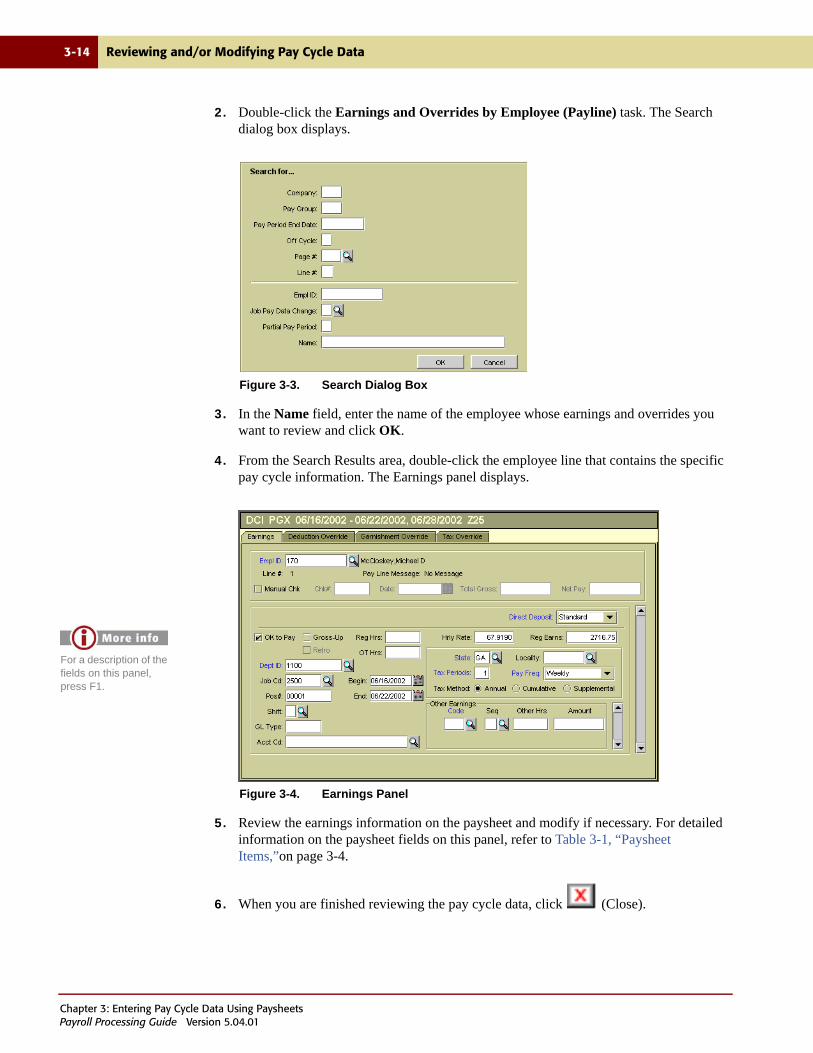
3-14 Reviewing and/or Modifying Pay Cycle Data
2. Double-click the Earnings and Overrides by Employee (Payline) task. The Search dialog box displays.
Figure 3-3. Search Dialog Box
3. In the Name field, enter the name of the employee whose earnings and overrides you want to review and click OK.
4. From the Search Results area, double-click the employee line that contains the specific pay cycle information. The Earnings panel displays.
Figure 3-4. Earnings Panel
5. Review the earnings information on the paysheet and modify if necessary. For detailed information on the paysheet fields on this panel, refer to Table 3-1, “Paysheet Items,”on page 3-4.
6. When you are finished reviewing the pay cycle data, click (Close).
For a description of the fields on this panel, press F1.
Chapter 3: Entering Pay Cycle Data Using PaysheetsPayroll Processing Guide Version 5.04.01

Reviewing and/or Modifying Pay Cycle Data 3-15
You’ve just finished reviewing all earnings and overrides from all pay groups for a specific employee, which is the last way you can view earnings.
If you want to view only earnings (no overrides) by employee, see “Viewing/Modifying Earnings” on page 3-17. If you want to view earnings and distributions, see “Reviewing/Modifying Earnings and Distributions” on page 3-15. If you want to view FLSA overtime earnings by employee and pay run ID, refer to “Reviewing/Modifying FLSA Overtime Earnings” on page 3-21.
Reviewing/Modifying Earnings and Distributions
You can review and/or modify earnings and distributions for a specific employee.
To view earnings and distributions for a specific employee, use the Earnings and Distributions by Employee task. The Earnings and Distributions (Payline) panel that you access using this task displays a snapshot of paysheet data for the current pay period that Enterprise Payroll generates when you process the initial pay cycle data.
Table 3-4 displays the purpose for each scroll bar on the Earnings and Distributions panel.
To view all earnings and distributions for a specific employee, do the following:
1. Click Payroll and make the following selections:
Payroll Cycle Processes ~ Update Pay Cycle Data
Table 3-4. The Earnings and Distributions (Payline) Panel Scroll Bars
This scroll bar... Controls...
Outer scroll bar The payline. Use this bar to move from employee to employee or from job to job (in case of a single employee with multiple job records).
Middle scroll bar Pay earnings entries within a payline. Use this scroll bar to move among an individual employee’s additional pay earnings lines. These additional pay earnings lines are flagged with additional numbers.
Inner scroll bar Multiple other earnings—such as bonus pay, commissions, sick pay, vacation pay, and so on—associated with a single pay earnings record. These other earnings use the distributions from the associated pay earnings record.
Reviewing and/or Modifying Pay Cycle Data
Understanding Paysheet Information
Reviewing/Modify-ing Earnings and Overrides
Reviewing/Modify-ing Earnings and Distributions
Viewing/Modifying Earnings
Reviewing/Modify-ing FLSA Overtime Earnings
Chapter 3: Entering Pay Cycle Data Using PaysheetsPayroll Processing Guide Version 5.04.01

3-16 Reviewing and/or Modifying Pay Cycle Data
2. Double-click the Earnings and Distributions by Employee task. The Search dialog box displays.
.
Figure 3-5. Search Dialog Box
3. Enter as much information about the paysheet as you can and then click OK.
4. From the Search Results area, double-click the pay group you want to view. The Earnings and Distributions panel displays.
Figure 3-6. Earnings and Distributions Panel
5. Review the earnings and distributions information on the paysheet and modify if necessary. For detailed information on the paysheet fields on this panel, refer to Table 3-1, “Paysheet Items,”on page 3-4.
6. When you are finished reviewing the pay cycle data, click (Close).
For a description of the fields on this panel, press F1.
Chapter 3: Entering Pay Cycle Data Using PaysheetsPayroll Processing Guide Version 5.04.01

Reviewing and/or Modifying Pay Cycle Data 3-17
You’ve just finished reviewing all earnings and distributions for a specific employee.
If you want to view earnings and overrides, see “Reviewing/Modifying Earnings and Overrides” on page 3-11. If you want to view only earnings (no overrides) by employee, see “Viewing/Modifying Earnings” on page 3-17. If you want to view FLSA overtime earnings by employee and pay run ID, refer to “Reviewing/Modifying FLSA Overtime Earnings” on page 3-21.
Viewing/Modifying Earnings
You can review and/or modify earnings for all employees in a specific pay group or all earnings from all pay groups for a specific employee.
To view all earnings for employees by pay group, refer to “Viewing Earnings for Employees by Pay Group” on page 3-17.
To view all earnings from all pay groups for a specific employee, refer to “Viewing All Earnings from All Pay Groups for a Specific Employee” on page 3-19.
Viewing Earnings for Employees by Pay Group
The Earnings panel displays an abbreviated view of the paysheet. This form limits the number of items you can change on that panel for an employee, but provides for faster, less complicated data entry.
Table 3-5 describes how you use each scroll bar on the Earnings panel.
To view all earnings for employees by pay group, do the following:
1. Click Payroll and make the following selections:
Payroll Cycle Processes ~ Update Pay Cycle Data
Table 3-5. The Earnings Panel Scroll Bars
This scroll bar... Controls...
Outer scroll bar The payline. Use this bar to move from employee to employee or from job to job (in case of a single employee with multiple job records).
Middle scroll bar Pay earnings entries within a payline. Use this scroll bar to move among an individual employee’s additional pay earnings lines. These additional pay earnings lines are flagged with additional numbers.
Inner scroll bars Multiple other earnings—such as bonus pay, commissions, sick pay, vacation pay, and so on—associated with a single pay earnings record. These other earnings use the distributions from the associated pay earnings record.
Reviewing and/or Modifying Pay Cycle Data
Understanding Paysheet Information
Reviewing/Modify-ing Earnings and Overrides
Reviewing/Modify-ing Earnings and Distributions
Viewing/Modifying Earnings
Reviewing/Modify-ing FLSA Overtime Earnings
Chapter 3: Entering Pay Cycle Data Using PaysheetsPayroll Processing Guide Version 5.04.01

3-18 Reviewing and/or Modifying Pay Cycle Data
2. Double-click the Earnings Short Form (Paysheets) task. The Search dialog box displays.
.
Figure 3-7. Search area
3. Enter as much information about the paysheet as possible and then OK.
4. From the Search Results area, double-click the line that contains the specific pay cycle information. The Earnings panel displays.
Figure 3-8. Earnings Panel
5. Review the earnings information on the paysheet and modify if necessary. For detailed information on the paysheet fields on this panel, refer to Table 3-1, “Paysheet Items,”on page 3-4.
6. When you are finished reviewing the pay cycle data, click (Close).
You’ve just finished viewing all earnings for employees by pay group. Next, you can view all earnings from all pay groups for a specific employee.
For a description of the fields on this panel, press F1.
Chapter 3: Entering Pay Cycle Data Using PaysheetsPayroll Processing Guide Version 5.04.01

Reviewing and/or Modifying Pay Cycle Data 3-19
Viewing All Earnings from All Pay Groups for a Specific Employee
You can view all earnings for a specific employee even if these earnings exist in different pay groups by using the Hourly Earnings by Employee task. This panel is similar to the Earnings Short Form panel but provides additional distribution information: job code, week number, and position number.
Table 3-6 describes how you use each scroll bar on the Hourly Earnings panel.
To view all earnings from all pay groups for a specific employee, do the following:
1. Click Payroll and make the following selections:
Payroll Cycle Processes ~ Update Pay Cycle Data
2. Double-click the Hourly Earnings by Employee task. The Search dialog box displays.
Figure 3-9. Search Dialog Box
3. Enter the employee’s name in the Name field and click OK.
Table 3-6. The Hourly Earnings Panel Scroll Bars
This scroll bar... Controls...
Outer scroll bar Pay earnings entries within a payline. Use this scroll bar to move among an individual employee’s additional pay earnings lines which could reflect information such as job code and/or department.
Inner scroll bars Multiple other earnings—such as bonus pay, commissions, sick pay, vacation pay, and so on—associated with a single pay earnings record. These other earnings use the distributions from the associated pay earnings record.
Chapter 3: Entering Pay Cycle Data Using PaysheetsPayroll Processing Guide Version 5.04.01

3-20 Reviewing and/or Modifying Pay Cycle Data
4. From the Search Results area, double-click the employee line that you want to review. The Hourly Earnings panel displays.
Figure 3-10. Hourly Earnings Panel
5. View all the employee’s hourly earnings for the pay period (regardless of pay group or department) and modify if necessary. For detailed information on the paysheet fields on this panel, refer to Table 3-1, “Paysheet Items,”on page 3-4.
6. When you are finished reviewing the pay cycle data, click (Close).
You’ve just finished viewing all earnings from all pay groups for a specific employee, which is the last way you can view earnings only (no overrides) by employee. Next you can view FLSA overtime earnings by employee and pay run ID.
For a description of the fields on this panel, press F1.
Chapter 3: Entering Pay Cycle Data Using PaysheetsPayroll Processing Guide Version 5.04.01

Reviewing and/or Modifying Pay Cycle Data 3-21
Reviewing/Modifying FLSA Overtime Earnings
You can review and/or modify employee earnings and distributions by employee regardless of pay group, company or pay end date as long as the data belongs to only one payroll run ID by using the Hourly Earnings Distribution panel. The Hourly Earnings Distribution panel is most useful in reviewing and modifying FLSA overtime. The panel displays the total number of FLSA eligible hours for the payroll run ID and employee.
This panel is not intended for initial data entry of your pay cycle data. Instead, you should use
it to correct existing paysheet data.
You can click the middle scroll bar of the Hourly Earnings Distribution panel to review hours by week and to recategorize as necessary for overtime.
Table 3-7 describes how you use each scroll bar on the Hourly Earnings Distribution panel.
To view FLSA overtime earnings by employee and pay run ID, do the following:
1. Click Payroll and make the following selections:
Payroll Cycle Processes ~ Update Pay Cycle Data
2. Double-click the Hourly Earnings Distribution Review task. The Search dialog box displays.
Figure 3-11. Search Dialog Box
This panel does not have Department security! This allows the user to view all payroll hours across all departments of the company. Assign users carefully.
Table 3-7. The Hourly Earnings Distribution Panel Scroll Bars
This scroll bar... Controls...
Outer scroll bar The payline. Use this bar to move from job to job (in case of a single employee with multiple job records) or multiple paylines.
Middle scroll bar Pay earnings entries within a payline. Use this scroll bar to move among an individual employee’s additional pay earnings lines. These additional pay earnings lines are flagged with additional numbers. Weekly hours are separated from other weeks through the use of additional pay earnings lines.
Inner scroll bars Multiple other earnings—such as bonus pay, commissions, sick pay, vacation pay, and so on—associated with a single pay earnings record. These other earnings use the distributions from the associated pay earnings record.
Reviewing and/or Modifying Pay Cycle Data
Understanding Paysheet Information
Reviewing/Modify-ing Earnings and Overrides
Reviewing/Modify-ing Earnings and Distributions
Viewing/Modifying Earnings
Reviewing/Modify-ing FLSA Over-time Earnings
Chapter 3: Entering Pay Cycle Data Using PaysheetsPayroll Processing Guide Version 5.04.01

3-22 Reviewing and/or Modifying Pay Cycle Data
3. Select the pay run ID from the Pay Run ID field.
4. Select the employee’s ID from the Empl ID field.
5. Indicate if this is an off-cycle payroll by entering Y or N in the Off Cycle field and click OK. The Hourly Earnings Distribution panel displays.
Figure 3-12. Hourly Earnings Distribution Panel
6. View the hourly earnings distribution information on the paysheet and modify if necessary. For detailed information on the paysheet fields on this panel, refer to Table 3-1, “Paysheet Items,”on page 3-4.
7. When you are finished, click (Close).
You’ve just finished viewing FLSA overtime earnings by employee and pay run ID, which is the last method of reviewing/modifying pay cycle data.
For a description of the fields on this panel, press F1.
Chapter 3: Entering Pay Cycle Data Using PaysheetsPayroll Processing Guide Version 5.04.01

Adding Pay Cycle Data for a New Employee 3-23
Adding Pay Cycle Data for a New Employee
If you a new employee that began working after your generated your initial pay cycle data, you can add his/her pay cycle data to an existing paysheet as follows:
1. Click Payroll and make the following selections.
Payroll Cycle Processes ~ Scheduled Payroll (On Cycle)
2. Click next to the Enter Pay Cycle Earnings (Paysheets) task. The Add dialog box displays.
Figure 3-13. Add Dialog Box
3. Enter as much information about the paysheet as you can and then click OK.
4. From the Search Results area, double-click the pay group you want to view. The Earnings panel displays.
Figure 3-14. Earnings Panel
For a description of the fields on this panel, press F1.
Chapter 3: Entering Pay Cycle Data Using PaysheetsPayroll Processing Guide Version 5.04.01

3-24 Adding Pay Cycle Data for a New Employee
5. Select the employee’s ID number from the Empl ID field.
If you select an employee that is hourly or exemption hourly, Enterprise Payroll populates
the Reg Hrs field with standard hours from the employee’s job record. For all employees, Enterprise Payroll also populates the Hrly Rate field with the employee’s rate from the job record.
6. Select the OK to Pay check box.
If you want a warning message to automatically display upon saving if you have changed
a payline but have not selected the OK to Pay check box, you can select the OK to Pay Warning check box on the Earnings/Payment Basics panel (Company Definitions ~ Pay Groups and Payroll Calendars ~ Pay Groups). For details, refer to the Payroll Setup and Maintenance Guide.
7. If the employee has worked any overtime hours during the pay period, enter the amount in the OT Hrs field.
8. For a salaried employee, enter the regular earnings earned during this pay period in the Reg Earns field.
9. Select one of the following options from the Direct Deposit field:
• None - The money will not be deposited into the employee’s direct deposit account. Instead, he will receive a check.
• Special - The money will be deposited into the direct deposit account that has the Use for Special Payrolls check box selected on the Direct Deposit panel (Payroll ~ Employee Information ~ Employee Payroll Data ~ Direct Deposit).
• Standard - The money will be deposited based on the employee’s direct deposit options established on the Direct Deposit panel (Payroll ~ Employee Information ~ Employee Payroll Data ~ Direct Deposit).
For details on the Direct Deposit panel, refer to the Payroll Setup and Maintenance
Guide.
10. From the Shift field, select the work shift to which these earnings are charged for accounting purposes and rate/differential calculation.
11. From the Dept ID field, select the department to which the earnings are posted for accounting purposes.
12. From the Job Cd field, select the job code to which the earnings are posted for accounting purposes.
13. From the Pos# field, select the position number to which the earnings are posted for accounting purposes.
14. In the GL Type field, enter the general ledger pay type if department ID, employee type, and earnings type are insufficient for charging salaries and wages to the proper general ledger account.
15. For labor accounting only, select the account code to which the earnings are posted from the Acct Cd field.
Chapter 3: Entering Pay Cycle Data Using PaysheetsPayroll Processing Guide Version 5.04.01

Adding Pay Cycle Data for a New Employee 3-25
16. In the Begin field, enter the earnings begin date for the employee’s job in this pay period.
17. In the End field, enter the earnings end date for the employee’s job in this pay period.
18. From the Tax Method area, select the tax method you want Enterprise Payroll to use to calculate tax on this earnings type.
If a tax method is specified on the Taxing Options panel (Payroll ~ Company Definitions ~
Earnings and Special Accumulators ~ Earnings), you cannot make a selection here.
19. In the Tax Periods field, enter the number of pay periods over which to spread the taxing of these earnings.
20. From the Pay Freq field, select the frequency at which these earnings are taxes or use the default, which is the employee’s pay group pay frequency.
21. If the employee has any earnings other than regular and overtime for the current pay period, enter the earnings information in the Other Earnings area.
You’ve just finished adding a paysheet page to your paysheet for a new employee that began his/her job after you generated your initial pay cycle data.
Chapter 3: Entering Pay Cycle Data Using PaysheetsPayroll Processing Guide Version 5.04.01

3-26 Modifying Earnings Information
Modifying Earnings Information
After viewing your pay cycle data, you may determine that you need to add or change earnings information on your paysheets. To modify earnings information on your paysheet(s), you can use any of the tasks that are part of the Update Pay Cycle Data process (Payroll ~ Payroll Cycle Process). See “Reviewing and/or Modifying Pay Cycle Data” on page 3-4 to determine which of these tasks would be most helpful in modifying your specific earnings information.
You’ve just finished modifying earnings information.
Chapter 3: Entering Pay Cycle Data Using PaysheetsPayroll Processing Guide Version 5.04.01

Entering a One-time Deduction Override 3-27
Entering a One-time Deduction Override
You can use the Deduction Override panel to:
• Enter a one-time deduction to be taken only in the current pay period
• Override an existing deduction one time
• Override an existing deduction subset one time
• Increase an existing deduction one time
• Refund a deduction amount one time
• Reduce an arrears balance one time
Making Permanent Deduction Changes
Regular deductions are computed by Enterprise Payroll during payroll calculation and are based on deduction data set up at the company level and at the employee level. If you want to make a permanent change to deduction data, use the following guidelines in Table 3-8.
Table 3-8. Guidelines for Permanent Changes to Deduction Data
Task Function
Deductions (Payroll ~ Company Definitions ~ Deductions)
Change the basic attributes of a deduction, such as processing priority, classification (such as before-tax or nontaxable benefit), effect on Social Security and Medicare (FICA) gross and FUT gross, maximum yearly deduction, deduction frequency, and pay periods in which the deduction is taken.
General Deduction Override (Payroll ~ Employee Information ~ Change Employee Payroll Data
Override, at the employee level, certain fields normally controlled by the data you enter on the panels from the Deductions task (pay periods in which a deduction is taken, or information on maximum arrears payback)
General Deductions (Payroll ~ Employee Information ~ Change Employee Payroll Data)
Change the standard deduction calculation routine for a general deduction.
This data includes the calculation option for the deduction (with related dollar amounts or rates or percents), start and stop dates for the deduction, and a goal amount and current goal balance for the deduction.
Entering a One-time Deduction Override
Making Permanent Deduction Changes
Entering Deduction Data
Chapter 3: Entering Pay Cycle Data Using PaysheetsPayroll Processing Guide Version 5.04.01

3-28 Entering a One-time Deduction Override
Entering Deduction Data
To enter a one-time deduction override, do the following:
1. Click Payroll and make the following selections:
Payroll Cycle Processes ~ Update Pay Cycle Data
You can also access this panel from Payroll ~ Payroll Cycle Processes ~ Scheduled
Payroll (On Cycle) ~ Modify Employee Pay Cycle Data (Payline)
2. Double-click the Earnings and Overrides by Employee (Payline) task. The Search dialog box displays.
Figure 3-15. Search Dialog Box
3. Enter as much information as you can in the fields on the dialog box and then click OK .
Entering a One-time Deduction Override
Making Permanent Deduction Changes
Entering Deduction Data
Chapter 3: Entering Pay Cycle Data Using PaysheetsPayroll Processing Guide Version 5.04.01

Entering a One-time Deduction Override 3-29
4. From the Search Results area, double-click the line that displays the correct employee. The Earnings panel displays.
Figure 3-16. Earnings Panel
For detailed information on the paysheet fields on this panel, refer to Table 3-1, “Paysheet Items,”on page 3-4.
5. Clear the Job Pay check box.
6. Click the Deduction Override tab.
Figure 3-17. Deduction Override Panel
For a description of the fields on this panel, press F1.
For a description of the fields on this panel, press F1.
Chapter 3: Entering Pay Cycle Data Using PaysheetsPayroll Processing Guide Version 5.04.01

3-30 Entering a One-time Deduction Override
7. To calculate pay, select the OK to Pay check box.
If the check box is not selected, the record will be bypassed and no calculation will be performed during the payroll calculation process. Even if an employee is not receiving pay, you should select this check box if you want deductions calculated. If you have a payline that warrants more research before approving, but you do not want to hold up calculation, clear this check box, to put the payline on hold. Then you can select this check box and recalculate before confirming.
If you want a warning message to automatically display upon saving if you have changed
a payline but have not selected the OK to Pay check box, you can select the OK to Pay Warning check box on the Earnings/Payment Basics panel (Company Definitions ~ Pay Groups and Payroll Calendars ~ Pay Groups). For details, refer to the Payroll Setup and Maintenance Guide.
8. Select one of the following processing options from the Deduction field:
All pay earnings on the same check must share the identical deduction type.
• None - No additional deductions will be taken from the wages.
• Standard - The employee’s current deductions will remain the same and process as normal.
• Subset - Select a deduction subset to override the employee’s current deductions.
If you select this option, then select the appropriate deduction subset from the
Subset field. The fields in the One-Time Deduction Data area do not apply; therefore, they are grayed.
9. If you do not want arrears to be deducted from the employee’s pay in addition to the employee’s standard deduction, clear the Process Arrears check box.
This field does not apply to garnishment deductions, since these types of arrears should
always be processed.
10. In the Plan Type field, select the plan type for the deduction that you want to override, add, refund, or process an arrears payback.
11. Select the benefit plan in the Benefit Plan field.
12. Select the code for the deduction in the Deduction Code field.
13. From the Deduction Class field, select one of the following classes to indicate how this deduction affects FIT taxable gross and employee net pay:
• After-tax - The typical type of deduction that reduces net pay.
Example: Parking allowance
• Before-tax - An employee contribution that reduces net pay and FIT taxable gross. (Ex: An employee contribution to a 401(k) plan)
• Taxable benefit - An employer contribution (taxable for FIT purposes) to an employee benefit plan. The contribution increases FIT taxable gross (for tax
Chapter 3: Entering Pay Cycle Data Using PaysheetsPayroll Processing Guide Version 5.04.01

Entering a One-time Deduction Override 3-31
purposes) but does not increase total gross (for pay purposes). (Ex: An employer contribution to an employee’s savings plan)
• Non-taxable benefit - An employer contribution (not taxable for FIT purposes) to an employee benefit plan. The contribution has no payroll effect. (Ex: An employer contribution to an employee's health plan or 401(k) plan)
14. Select one of the following options from the Exception Type field to indicate the one-time deduction type:
• Override - Select to ignore the regular calculation and replace it with the calculation this panel specifies.
• Addition - Select to add the calculated amount (this panel specifies) to the regular calculation.
• Refund - Select to deduct the standard deduction and refund the amount indicated on this panel.
• Arrears Payback - Select to ignore standard arrears processing and calculates arrears to be processed as this panel specifies.
The one-time Arrears Payback feature is not appropriate for situations where an
employee gives you a check to pay back an arrears amount they owe.
15. From the Calculation Routine area, select the option that specifies how Enterprise Payroll will calculate the one-time deduction.
If no data is entered in the One-Time Deduction Data area, then Enterprise Payroll will
calculate the deduction as usual.
16. If you selected Flat Amount from the Calculation Routine area, enter an amount in the Flat/Addl Amount field that represents the one-time override that is to be taken in the current pay period.
If you enter the refund amount for an employee with no earnings, Enterprise Payroll does
not net a difference but rather refunds the straight amount.
Example:
An employee's initial gross pay is $800. The effect of the four types of deduction classifications on total gross and FIT taxable gross is shown below:
Deduction Class Deduction Amount FIT Tax Gross
After-tax $10 $800
Before-tax $30 $770
Taxable benefit $50 $850
Non-taxable benefit $15 $800
Chapter 3: Entering Pay Cycle Data Using PaysheetsPayroll Processing Guide Version 5.04.01

3-32 Entering a One-time Deduction Override
If you select to refund a flat amount for an employee without earnings and the employee record has additional tax, you need to do a tax override to avoid the additional tax from being withheld from the transaction.
17. In the Rate/Percent field, enter the rate or percent depending on the option selected in the Calculation Routine area.
While each one-time deduction record is linked to a corresponding pay earnings record, the one-time deduction calculation is based on all the pay earnings associated with the employee. The only exception is when you link the one-time deduction to a specific pay earnings that is paid on a separate check.
18. Click (Save).
You have just finished overriding, adding, refunding, or processing an arrears payback for a one-time deduction.
Chapter 3: Entering Pay Cycle Data Using PaysheetsPayroll Processing Guide Version 5.04.01

Entering a One-time Garnishment Override 3-33
Entering a One-time Garnishment Override
Use the Garnishment Override panel to override, suspend, or refund an existing garnishment (one-time).
To enter a one-time garnishment, do the following:
1. Click Payroll and make the following selections:
Payroll Cycle Processes ~ Update Pay Cycle Data
You can also access this panel from Payroll ~ Payroll Cycle Processes ~ Scheduled
Payroll (On Cycle) ~ Modify Employee Pay Cycle Data (Payline)
2. Double-click the Earnings and Overrides by Employee (Payline) task. The Search dialog box displays.
Figure 3-18. Search Dialog Box
3. Enter as much information as you can in the fields on the dialog box and then click OK .
4. From the Search Results area, double-click the line that displays the correct employee. The Earnings panel displays.
Chapter 3: Entering Pay Cycle Data Using PaysheetsPayroll Processing Guide Version 5.04.01

3-34 Entering a One-time Garnishment Override
5. Click the Garnishment Override tab.
Figure 3-19. Garnishment Override Panel
6. Click the inner scroll bar until you find the specific garnishment that you want to override, refund, or suspend.
7. In the One-Time Garnishment area, select the Garnish ID that points to the specific garnishment specification data record you want to override.
8. Select one of the following calculation methods from the Calculation field:
• Maximum Allowed
If you select this option, the DE Percent and Flat Amount fields are grayed.
• % DE + Flat Amount
– To establish a specific amount for an override, leave the DE Percent field blank, and enter an amount in the Flat Amount field.
If you enter a value in this field, then select the Frequency option to indicate if the
calculation frequency should be daily, weekly, or monthly.
– To establish a specific percent for an override or refund, enter a percent in the DE Percent field.
9. Select one of the following options from the Garnishment One-Time Code area:
For permanent changes to the garnishment calculation parameters, you must update the
employee's garnishment specification data.
• Override - Select to ignore the regular calculation and replace it with the calculation this panel specifies.If you want to establish a specific amount for the override, select the % DE + Flat Amount option, leave the DE Percent field blank, and enter a flat amount in the Flat Amount field.
For a description of the fields on this panel, press F1.
Chapter 3: Entering Pay Cycle Data Using PaysheetsPayroll Processing Guide Version 5.04.01

Entering a One-time Garnishment Override 3-35
If you select this option, you will not be able to enter a percent in the % of Deduction
field (Processing Fees area) unless you have entered a dollar amount in the Flat Amount field.
• Refund - Select to deduct the standard deduction and refund the amount indicated on this panel.
To process a one-time straight refund for a specified amount, select the % DE + Flat
Amount option, select the Override option instead of the Refund option, and specify the amount under the Flat Amount field.
• Suspend - Select this if you want Enterprise Payroll to suspend the garnishment deduction for this paycheck.
10. Enter the processing fees associated with the garnishment that are due to the company and the payee in the Processing Fees area. You should enter the greater of percent deduction or flat amount.
If you selected the Override or Refund option from the Garnishment One-Time Code
area, you will not be able to enter a percent in the % of Deduction field unless you have entered a dollar amount in the Flat Amount field.
For garnishment refunds, keep these guidelines in mind:
• You must enter an amount in one of the fields in this area so that the result will be a net fee amount.
• If you enter a flat amount, regular fees minus refunded fees will be taken, resulting in a net fee amount for the employee.
• If you enter a percentage of deduction, the refunded fee will be the percent of the refund amount. This amount will be added to any fees calculated for the garnishment, resulting in a net fee amount for the employee.
11. Click (Save).
You have just finished overriding, suspending, or refunding a one-time garnishment.
Chapter 3: Entering Pay Cycle Data Using PaysheetsPayroll Processing Guide Version 5.04.01

3-36 Entering a One-time Tax Override
Entering a One-time Tax Override
Use the Tax Override panel to override or increase a regular tax amount or to refund a tax amount. Enterprise Payroll computes regular taxes based on tax data set up at the company level and at the employee level. The tax override, refund, or addition applies to the payline in which it is associated.
While each one-time tax record is linked to a corresponding pay earnings record, the one-time tax is based on all the pay earnings associated with the employee. If you want a one-time tax to apply to only one pay earnings, you must indicate that the pay earnings is paid on a separate check. If you enter more than a one-time tax on multiple pay earnings but do not enter separate check information, Enterprise Payroll calculates taxes based on all the one-time tax information for all the pay earnings records combined.
Making Permanent Tax Changes
If you want to make a permanent change to deduction data, use the following guidelines in Table 3-9.
Entering the One-time Tax Data
To override, increase, or refund a one-time tax amount, do the following:
1. Click Payroll and make the following selections:
Payroll Cycle Processes ~ Update Pay Cycle Data
You can also access this panel from Payroll ~ Payroll Cycle Processes ~ Scheduled
Payroll (On Cycle) ~ Modify Employee Pay Cycle Data (Payline)
Table 3-9. Guidelines for Permanent Changes to Deduction Data
Tasks Function
State Tax Data taskLocal Tax Data task (Payroll ~ Company Definitions ~ Company Tax Data)
Change the basic attributes of a tax, such as employee tax IDs, standard deduction amounts, state disability rate, tax reporting data, and state tax brackets.
Tax Withholding task(Payroll ~ Employee Information ~ Change Employee Payroll Data)
Change employee-specific data for federal, state, and local taxes.
Entering a One-time Tax Override
Making Permanent Tax Changes
Entering the One-time Tax Data
Chapter 3: Entering Pay Cycle Data Using PaysheetsPayroll Processing Guide Version 5.04.01

Entering a One-time Tax Override 3-37
2. Double-click the Earnings and Overrides by Employee (Payline) task. The Search dialog box displays.
Figure 3-20. Search Dialog Box
3. Enter as much information as you can in the fields on the dialog box and then click OK .
4. From the Search Results area, double-click the line that displays the correct employee. The Earnings panel displays.
5. Click the Tax Override tab.
Figure 3-21. Tax Override Panel
6. Scroll on the inner scroll bar until you find the specific tax that you want to override, refund, or add to.
For a description of the fields on this panel, press F1.
Chapter 3: Entering Pay Cycle Data Using PaysheetsPayroll Processing Guide Version 5.04.01

3-38 Entering a One-time Tax Override
7. In the One-Time Tax Data area do one of the following:
a. Indicate if the tax you are overriding refunding, or adding to is a federal or state tax by doing one of the following:
• For federal taxes, select Federal.
If you select Federal, the State and Locality fields disappear.
• For state taxes, select the state and locality from the State and Locality fields. This is the state/locality to which this one-time tax is reported. The one-time tax is taken only in the current pay period.
b. Select a Tax Class to specify which tax is to be overridden.
In general, you should not use the One-time Taxes panel to change taxes that have
wage limits associated with them (such as Social Security and Medicare, State Disability and State Unemployment). Enterprise Payroll recalculates taxes with maximums each time you run the Calculate Payroll program. If you make an adjustment this pay period, Enterprise Payroll corrects such taxes the next pay period.
c. Select one of the following options from the Tax Type field:
• Override - Select to ignore the regular calculation and replace it with the calculation this panel specifies.
If the employee has IRS tax lock-in letter, you will not be able to select the
Override option.
• Refund - Select to deduct the standard deduction and refund the amount indicated on this panel.
• Addition - Select to calculate the standard tax and add the amount this panel specifies.
d. In the Tax Amt field, enter the amount of tax deducted for the specified taxing jurisdiction and tax type. Leave this field blank if you do not want Enterprise Payroll to take out tax.
Click the inner scroll bar and click (Insert Row) to record additional tax
amounts that apply to the manual check. The one-time tax is taken only in the current pay period.
8. Click (Save).
You have just finished overriding, suspending, or refunding a one-time tax.
Chapter 3: Entering Pay Cycle Data Using PaysheetsPayroll Processing Guide Version 5.04.01

Entering Gross-Ups 3-39
Entering Gross-Ups
A gross-up is a transaction in which you create a check for an employee for an exact net amount and have Enterprise Payroll calculate the taxes and subsequent gross pay. For example, you might want to give an employee a bonus of $500 net pay. Enterprise Payroll would “gross-up” from the net of $500 by determining which tax method is specified for the earnings. Enterprise Payroll calculates the gross based on the tax variables.
In a gross-up you are indicating, in effect, that the company is paying all the taxes, both employer and employee. That is, the employee is getting an actual net bonus of $500 in the pocket.
Enterprise Payroll processes gross-ups along with all other paysheet transactions, during an on-cycle or off-cycle payroll run.
If, during a normal on-cycle payroll run, you process a gross-up for an employee in addition to their regular check, you must create an additional check for the gross-up. All earnings included in the gross-up must be on a separate check since you cannot combine a gross-up with an ordinary check that is calculated gross-to-net.
If the employee has a re-occuring earnings, it can be set up on the Additional Pay panel by selecting the Gross-up check box. For more information, see the Payroll Setup and Maintenance Guide.
Selecting this check box will gross up all additional pay. If you want to gross up only one of
the additional pay earnings, you must separate the additional pay into different checks.
In addition, if you clear the Gross-up check box at the paysheet level, then the gross-up set up on the Additional Pay panel is not taken.
Processing a gross-up consists of:
• Selecting Processing Options
• Adding a Paysheet Page
• Entering One-time Deduction Information
Chapter 3: Entering Pay Cycle Data Using PaysheetsPayroll Processing Guide Version 5.04.01

3-40 Entering Gross-Ups
Selecting Processing Options
Before entering a gross-up, you need to make a few decisions regarding the gross-up. Some of these decisions include the following:
• What type of earning do you want to use? Is it a regular earning? Is it a bonus, gift, or any other special earnings type?
• What type of tax method should you use? Any tax method can be selected. The default tax method is usually annualized. (The earnings type itself may determine the tax method.) If you choose either annualized or cumulative, Enterprise Payroll uses the employee’s federal and state filing status and number of exemptions. If you choose the supplemental tax method, Enterprise Payroll ignores the employee’s filing status and uses the supplemental rates you set up using the Federal/State Tax Configuration task (Payroll ~ Company Definitions ~ System Tax Data).
• What tax period should you use for the gross-up? You can specify the exact tax period for the gross-up.
• Should you override any deductions? Enterprise Payroll takes deductions automatically unless you override them using the Deduction Override task. These deductions reduce the net pay.
• Do you need Enterprise Payroll to calculate any additional tax amounts or percents? Enterprise Payroll may not be able to calculate additional tax amounts or percents. If, after a number of attempts, the gross-up cannot be calculated, an error message displays. To correct this situation, turn off the additional tax amounts or percents. You may not override a tax amount using the Tax Override task. However, you can stop a particular tax from being applied.
If you are processing a gross-up with a garnishment, refer to the Payroll Setup and
Maintenance Guide.
Adding a Paysheet Page
First you should determine what taxes you want grossed up. By default, Enterprise Payroll attempts to take all taxes normally associated with the employee. You can only indicate what taxes not to take. You cannot indicate an override amount, additional amount, or refund amount.
The pay calendar that you are attaching to cannot not be confirmed.
To add a paysheet page for a gross-up, do the following:
1. Click Payroll and make the following selections.
Payroll Cycle Processes ~ Scheduled Payroll (On-Cycle)
Entering Gross-Ups
Selecting Processing Options
Adding a Paysheet Page
Entering One-time Deduction Information
Entering Gross-Ups
Selecting Processing Options
Adding a Paysheet Page
Entering One-time Deduction Information
Chapter 3: Entering Pay Cycle Data Using PaysheetsPayroll Processing Guide Version 5.04.01

Entering Gross-Ups 3-41
2. Click next to the Enter Pay Cycle Earnings (Paysheet) task. The Add dialog box displays.
Figure 3-22. Add Dialog Box
3. Enter as much information about the paysheet as you can and then click OK.
4. From the Search Results area, double-click the pay group you want to view. The Earnings panel displays.
Figure 3-23. Earnings Panel
For detailed information on the paysheet fields on this panel, refer to Table 3-1, “Paysheet Items,”on page 3-4.
5. Click the outer scroll bar until the ID for the employee you want to perform a gross-up for displays in the Empl ID field.
6. Click the middle scroll bar and then click (Insert Row) to preserve history.
7. To use the regular earnings type for the gross-up, enter the amount of the gross-up in the Reg Earns field.
For a description of the fields on this panel, press F1.
Chapter 3: Entering Pay Cycle Data Using PaysheetsPayroll Processing Guide Version 5.04.01

3-42 Entering Gross-Ups
8. Select the OK to Pay check box.
If you want a warning message to automatically display upon saving if you have changed
a payline but have not selected the OK to Pay check box, you can select the OK to Pay Warning check box on the Earnings/Payment Basics panel (Company Definitions ~ Pay Groups and Payroll Calendars ~ Pay Groups). For details, refer to the Payroll Setup and Maintenance Guide.
9. Select the Gross-Up check box so that the check is grossed-up for the earnings.
All pay earnings on the same check must share the identical gross-up.
10. Select the Tax Method option that applies to the gross-up.
11. Select from the Pay Freq field the tax period you want to use for the gross-up.
12. Click the inner scroll bar and then click (Insert Row) to enter information in the Other Earnings area.
13. In the Other Earnings area, enter the code for the earnings in the Code field.
14. Enter the dollar amount associated with the earnings code in the Amount field.
You have just finished adding a paysheet page for the gross-up. Next, enter one-time deduction information for the gross-up on the Deduction Override panel.
Entering One-time Deduction Information
Use the Deduction Override task to enter any deductions to be taken from the gross-up. In general, only taxes are deducted from the “gross-up” amount to arrive at the specified target net. If this is the processing you desire, you can use this task to specify that no deductions should be taken in the gross-up. However, if you want to take certain deductions, you must select either the Standard or Subset option. In this circumstance, you can specify the amounts to deduct for the applicable items. If a garnishment deduction is to be taken, then in addition to specifying other deduction handling here, you can specify other garnishment amounts using the Garnishment Override task. If the Deduction option is set to None, then no garnishments or other deductions will be taken.
For step-by-step instructions on entering one-time deduction information, see “Entering a One-time Deduction Override” on page 3-27.
You have just finished entering one-time deduction information for the gross-up, which is the last step in setting up gross-up information on your paysheet.
Entering Gross-Ups
Selecting Processing Options
Adding a Paysheet Page
Entering One-time Deduction Information
Chapter 3: Entering Pay Cycle Data Using PaysheetsPayroll Processing Guide Version 5.04.01

Setting Up Third Party Sick Pay 3-43
Setting Up Third Party Sick Pay
If you subscribe to the ADP Tax Service, then you can enter third party sick pay data onto your paysheets after you have established your earnings code(s) and the taxable gross component ID for the third party sick payments.
You must first set up the payroll calendar data for the company and pay group using the
Payroll Calendar task (Payroll ~ Company Definitions ~ Pay Groups and Payroll Calendars) before entering third party sick pay.
Setting up third-party sick pay data consists of:
• Adding Third Party Sick Pay Data
• Printing Reports with Third Party Sick Pay Data
Adding Third Party Sick Pay Data
To enter third party sick pay onto your paysheets, do the following:
1. Click Payroll and make the following selections.
Pay Cycle Processes ~ Scheduled Payroll (On-Cycle)
2. Click next to the Record Third Party Sick Payments task. The Add dialog box displays.
Figure 3-24. Add Dialog Box
To modify an existing third party sick payment, double-click the Record Third Party Sick
Payments task, enter the search criteria in the Search dialog box, and click OK. To
preserve history, click (Insert Row).
3. Enter the company in the Company field.
4. Enter the pay group in the Pay Group field.
5. Enter the pay period end date in the Pay Period End Date field.
Setting Up Third Party Sick Pay
Adding Third Party Sick Pay Data
Printing Reports with Third Party Sick Pay Data
Chapter 3: Entering Pay Cycle Data Using PaysheetsPayroll Processing Guide Version 5.04.01

3-44 Setting Up Third Party Sick Pay
6. Enter N or Y in the Off Cycle field.
7. Enter the page number in the Page # field and click OK. The Third Party Sick Payments panel displays.
Figure 3-25. Third Party Sick Payments Panel
8. Verify that the OK to Pay check box is selected so that Enterprise Payroll processes the third party sick payments.
9. Enter the check number of the third party sick pay payment in the Check # field.
10. Enter the check date of the third party sick pay payment in the Dt field in the MMDDYYYY format.
11. Enter the total gross pay of the third party sick pay payment in the Total Gross field.
12. Enter the net pay of the third party sick pay payment in the Net Pay field.
13. In the Third Party Sick Pay Earnings area, do the following:
a. From the Code field, select the earnings code associated with the third party sick pay payment.
You must first set up the earnings codes for third party sick pay using the Earnings
task (Payroll ~ Company Definitions ~ Earnings and Special Accumulators). Select the Sick Pay Paid by a Third Party option from the Special Tax Reporting Category field on the Taxing Options panel.
b. Enter the earnings amount associated with each earnings code in the Amount field.
14. Verify that the sum of the earnings listed in the Third Party Sick Pay Earnings area equal the amount entered in the Total Gross field.
If the total earnings amounts do not equal the total gross, you will receive an error when
you are running the pay calculation process.
For a description of the fields on this panel, press F1.
Chapter 3: Entering Pay Cycle Data Using PaysheetsPayroll Processing Guide Version 5.04.01

Setting Up Third Party Sick Pay 3-45
15. In the Tax area, do the following:
a. Indicate whether the tax is federal or state by doing one of the following:
• For federal taxes, select the Fed check box.
If you select this check box, the State and Locality fields disappear.
• For state/local taxes, select the state and locality from the State and Locality fields.
If you need to set up federal, state, and local tax information, click the Tax scroll bar
and click (Insert Row).
b. Select the valid tax class for federal, state and/or local taxes from the Tax Balance Class field.
c. Enter the tax amount associated with the tax type and classification of the third party sick pay in the Tax Amount field.
16. Verify that the amount in the Total Gross field minus the amount in the Tax Amount field equals the amount in the Net Pay field.
If the total gross minus the tax amount does not equal the net pay, you will receive an
error when you are running the pay calculation process.
The following shows an example of a completed Third Party Sick Payments panel:
Figure 3-26. Third Party Sick Payments panel
17. Click (Save).
For a description of the fields on this panel, press F1.
Chapter 3: Entering Pay Cycle Data Using PaysheetsPayroll Processing Guide Version 5.04.01

3-46 Setting Up Third Party Sick Pay
You have just finished entering third party sick payment information onto your paysheets. Next, you can print reports that contain third party sick payment data.
Printing Reports with Third Party Sick Pay Data
The following reports reflect employer and employee third party sick pay tax liability information:
• PAY018- Payroll Summary
• TAX007- Quarterly Federal Tax Summary
• TAX008- Quarterly State Tax Summary
The following reports reflect employer third party sick pay tax liability information only:
• TAX001- Tax Deposit Summary
Third Party Sick Pay Summary prints at the end of TAX001 if you have third party sick pay
payments.
• TAX010- Tax Summary
For step-by-step instructions on generating the Payroll Summary (PAY018), the Tax Deposit Summary (TAX001), and the Tax Summary (TAX010), refer to Chapter 7, “Generating Summary Reports.”
For step-by-step instructions on generating the Quarterly Federal Tax Summary (TAX007), “Generating the Quarterly Federal Tax Summary” on page 14-14.
For step-by-step instructions on generating the Quarterly State Tax Summary (TAX008), see “Generating the Quarterly State Tax Summary (TAX008)” on page 14-16.
You’ve just finished printing reports that provide third party sick payment information, which is the last step in entering third party sick pay.
Setting Up Third Party Sick Pay
Adding Third Party Sick Pay Data
Printing Reports with Third Party Sick Pay Data
Chapter 3: Entering Pay Cycle Data Using PaysheetsPayroll Processing Guide Version 5.04.01

Entering Exception Time Reporting 3-47
Entering Exception Time Reporting
After you review your employees’ time cards, you may have some exception time reporting to do before you calculate the payroll.
To enter positive hours for a specific employee, do the following:
1. Click Payroll and make the following selections:
Payroll Cycle Processes ~ Update Pay Cycle Data
2. Double-click the Earnings and Overrides by Employee (Payline) task. The Search dialog box displays.
Figure 3-27. Search Dialog Box
3. Enter the name of the employee for which you need to enter positive time in the Name field and click OK.
Chapter 3: Entering Pay Cycle Data Using PaysheetsPayroll Processing Guide Version 5.04.01

3-48 Entering Exception Time Reporting
4. From the Search Results area, double-click the employee line that contains the specific pay cycle information. The Earnings panel displays.
Figure 3-28. Earnings Panel
For detailed information on the paysheet fields on this panel, refer to Table 3-1, “Paysheet Items,”on page 3-4.
5. Click the outer scroll bar and click (Insert Row) to preserve history.
6. Verify that the OK to Pay check box is selected.
If you want a warning message to automatically display upon saving if you have changed
a payline but have not selected the OK to Pay check box, you can select the OK to Pay Warning check box on the Earnings/Payment Basics panel (Company Definitions ~ Pay Groups and Payroll Calendars ~ Pay Groups). For details, refer to the Payroll Setup and Maintenance Guide.
7. In the Reg Hrs field, replace the standard hours with the reported hours.
8. In the OT Hrs field, enter the number of overtime hours.
9. Enter data in any other fields, as necessary.
10. Click (Save).
You have just finished entering exception time for an employee.
For a description of the fields on this panel, press F1.
Chapter 3: Entering Pay Cycle Data Using PaysheetsPayroll Processing Guide Version 5.04.01

Specifying Separate Checks for an Employee 3-49
Specifying Separate Checks for an Employee
To specify that an employee should receive separate checks for different earnings, do the following:
1. Click Payroll and make the following selections:
Payroll Cycle Processes ~ Update Pay Cycle Data
2. Double-click the Earnings and Overrides by Employee (Payline) task. The Search dialog box displays.
Figure 3-29. Search Dialog Box
3. Enter the name of the employee to receive multiple checks in the Name field and click OK.
Chapter 3: Entering Pay Cycle Data Using PaysheetsPayroll Processing Guide Version 5.04.01

3-50 Specifying Separate Checks for an Employee
4. From the Search Results area, double-click the employee line that contains the specific pay cycle information. The Earnings panel displays.
Figure 3-30. Earnings Panel
For detailed information on the paysheet fields on this panel, refer to Table 3-1, “Paysheet Items,”on page 3-4.
5. Click the outer scroll bar and click (Insert Row) to preserve history.
6. Verify that the OK to Pay check box is selected.
If you want a warning message to automatically display upon saving if you have changed
a payline but have not selected the OK to Pay check box, you can select the OK to Pay Warning check box on the Earnings/Payment Basics panel (Company Definitions ~ Pay Groups and Payroll Calendars ~ Pay Groups). For details, refer to the Payroll Setup and Maintenance Guide.
7. Enter 1 in the Sep Chk # field.
Valid values for this field are 0-9. Up to 10 checks may be issued to an employee in a
single pay run. Generally, the employee’s regular pay is associated with a default value of 0 (or blank) in the Sep Chk # field. Additional checks are designated with unique values, 1-9, in the Sep Chk # field.
8. Select the reason for the separate check in the Reason field.
9. Select the appropriate tax method option in the Tax Method field.
10. In the Other Earnings area, select the code in the Code field that correlates to the earnings being entered.
11. If applicable, enter the number of hours corresponding to the Code field in the Oth Hrs field.
12. If applicable, enter the amount to be paid the employee for this additional earnings.
For a description of the fields on this panel, press F1.
Chapter 3: Entering Pay Cycle Data Using PaysheetsPayroll Processing Guide Version 5.04.01

Specifying Separate Checks for an Employee 3-51
13. Click (Save).
You have just finished specifying separate checks for an employee.
Chapter 3: Entering Pay Cycle Data Using PaysheetsPayroll Processing Guide Version 5.04.01

3-52 Distributing Earnings Across Multiple Departments
Distributing Earnings Across Multiple Departments
Another common paysheet task is that of making payline adjustments for an employee splitting his time between two departments. The pay earnings record for each employee identifies distribution information for each type of earnings you associate with it. Typical changes involve changing the department, job, position number, general ledger pay type, or account code to which the earnings will be charged. One of the more common types of distribution changes involves using the Account Code field to indicate labor distribution detail.
To make payline adjustments for an employee splitting his time between two departments, do the following:
1. Click Payroll and make the following selections:
Payroll Cycle Processes ~ Update Pay Cycle Data
2. Double-click the Earnings and Overrides by Employee (Payline) task. The Search dialog box displays.
Figure 3-31. Search Dialog Box
3. In the Name field, enter the name of the employee whose distribution information you need to change and click OK.
Chapter 3: Entering Pay Cycle Data Using PaysheetsPayroll Processing Guide Version 5.04.01

Distributing Earnings Across Multiple Departments 3-53
4. From the Search Results area, double-click the employee line that contains the specific pay cycle information. The Earnings panel displays.
Figure 3-32. Earnings Panel
For detailed information on the paysheet fields on this panel, refer to Table 3-1, “Paysheet Items,”on page 3-4.
5. Clear the Job Pay check box.
6. Enter the appropriate number of hours for the first department to be charged in the Reg Hours field.
7. Move to the Dept ID field and select the code designating the first department to be charged.
8. Click the outer scroll bar and click (Insert Row) to preserve history to add a payline for the other hours being distributed to a different department.
9. Select the OK to Pay check box.
If you want a warning message to automatically display upon saving if you have changed
a payline but have not selected the OK to Pay check box, you can select the OK to Pay Warning check box on the Earnings/Payment Basics panel (Company Definitions ~ Pay Groups and Payroll Calendars ~ Pay Groups). For details, refer to the Payroll Setup and Maintenance Guide.
10. Enter the appropriate number of hours for the second department in the Reg Hrs field. Since you want all the earnings on a single check, leave the Sep Check#/Reason field blank.
11. Go to the Dept ID field and select the second department.
12. Click (Save).
For a description of the fields on this panel, press F1.
Chapter 3: Entering Pay Cycle Data Using PaysheetsPayroll Processing Guide Version 5.04.01

3-54 Distributing Earnings Across Multiple Departments
After you calculate your payroll, you can return to this employee's payline to confirm the
calculation and to view the calculated earnings to be charged to each department.
You have just finished changing distribution information for an employee.
Chapter 3: Entering Pay Cycle Data Using PaysheetsPayroll Processing Guide Version 5.04.01

Changing Multiple Jurisdiction Entries 3-55
Changing Multiple Jurisdiction Entries
Multi jurisdiction taxing allows you to accurately reflect the taxable wages for your employees that work in multiple jurisdictions. You determine the portion of wages taxed based on where your employees live or work, as well as, the amount of time they work in a jurisdiction.
The only states and localities available for an employee are the ones set up with multi jurisdiction settings on the Federal, State, and Local panels. The taxes for the states and localities must be set up prior to creating the paysheet. For more information on multi jurisdiction settings for an employee’s states and localities, see “Correcting Taxes” on page 10-66.
For retro pay, you must manually make adjustments for multi jurisdiction taxes.
After you create a paysheet, you can manually change an employee’s multiple jurisdiction entries.
To edit an employee’s Multi Jurisdiction payline, do the following:
1. Click Payroll and make the following selections:
Payroll Cycle Processes ~ Update Pay Cycle Data
2. Double-click the Earnings and Overrides by Employee (Payline) task. The Search dialog box displays.
Figure 3-33. Search Dialog Box
3. Enter the name of the employee to receive multiple checks in the Name field and click OK.
Chapter 3: Entering Pay Cycle Data Using PaysheetsPayroll Processing Guide Version 5.04.01

3-56 Changing Multiple Jurisdiction Entries
4. From the Search Results area, double-click the employee line that contains the specific pay cycle information. The Earnings panel displays.
Figure 3-34. Earnings Panel
For detailed information on the paysheet fields on this panel, refer to Table 3-1, “Paysheet Items,”on page 3-4.
5. Click the outer scroll bar and select the record to change.
6. In the State field, select the state code that corresponds to the state jurisdiction for which the employee’s wages should be taxed.
7. In the Locality field, select the locality code that corresponds to the local jurisdiction for which the employee’s wages should be taxed.
8. Click (Save).
You have just finished changing a multiple jurisdiction payline for an employee.
For a description of the fields on this panel, press F1.
Chapter 3: Entering Pay Cycle Data Using PaysheetsPayroll Processing Guide Version 5.04.01

Importing Pay Cycle Data 3-57
Importing Pay Cycle Data
You can also import pay cycle data into your paysheets. For detailed information on these import options, refer to Chapter 5, “Importing Pay Cycle Data.”
Chapter 3: Entering Pay Cycle Data Using PaysheetsPayroll Processing Guide Version 5.04.01

3-58 Deleting Pay Cycle Data for a Specific Payroll Run ID
Deleting Pay Cycle Data for a Specific Payroll Run ID
If you need to delete all pay cycle data (paysheets) associated with a specific payroll run ID before you confirm your payroll, you can run the Delete Pay Cycle Data (PAYUNSHT) utility.
For Time and Attendance users, running the Delete Pay Cycle Data (PAYUNSHT) utility after you have already run TAA020 will reset the Transaction Status to “Initial” on the Pay Data Entry panel in Time and Attendance application.
1. Click Payroll and make the following selections:
Payroll Cycle Processing ~ Utilities
2. Double-click the Delete Pay Cycle Data (PAYUNSHT) task. The Delete Pay Cycle Data panel displays.
Figure 3-35. Delete Pay Cycle Data Panel
3. Select one of the options from the Cycle Option field to indicate whether you want the report to include payroll information for an on-cycle payroll, off-cycle payroll, or both.
4. Select the payroll run ID from the Pay Run ID field.
5. In the Page # fields, enter the page number range for the paysheet information you want deleted.
If you run this utility, Enterprise Payroll will delete ALL pay cycle data (paysheets) tied to the specified payroll run ID.
For a description of the fields on this panel, press F1.
Chapter 3: Entering Pay Cycle Data Using PaysheetsPayroll Processing Guide Version 5.04.01

Deleting Pay Cycle Data for a Specific Payroll Run ID 3-59
6. If the payroll run ID includes multiple pay calendar entries, then you must select the company from the Company field, the pay group from the Pay Group field, and the pay period end date from the Pay End Date field.
7. Click Run Report. You will receive a message notifying you that your process has been
submitted. Click OK. To confirm successful completion of your process, click (Process Monitor).
For additional information on using the Process Monitor, see the Using ADP Enterprise HR Guide.
You’ve just finished deleting all pay cycle data (paysheets) associated with a specific payroll run.
Chapter 3: Entering Pay Cycle Data Using PaysheetsPayroll Processing Guide Version 5.04.01

3-60 Deleting Pay Cycle Data for a Specific Payroll Run ID
Chapter 3: Entering Pay Cycle Data Using PaysheetsPayroll Processing Guide Version 5.04.01

Chapter 4
Entering Payroll DataUsing Rapid Pay Data Entry
PAGE TOPIC
4-2 Introduction
4-4 Logging on to Rapid Pay Data Entry
4-7 Using the Rapid Pay Data Entry Application
4-14 Creating and Maintaining Templates
4-24 Creating Batches and Spreadsheets
4-25 Linking a Spreadsheet to a Template
4-27 Entering Data in a Spreadsheet
4-50 Validating Spreadsheet Data
4-55 Exporting Spreadsheet Data to a File
Chapter 4: Entering Payroll Data Using Rapid Pay Data EntryPayroll Processing Guide Version 5.04.01

4-2 Introduction
Introduction
Rapid Pay Data Entry (RPDE) is a program that provides an additional method of entering exception pay data into ADP Enterprise HR using a spreadsheet.
In Enterprise Payroll, employee payroll data for a pay period is accumulated and displayed on paysheets in the Earnings panel. Paysheets include information such as amount of regular pay, additional pay, job data, and tax data. Once you have the paysheets created, you can edit them to make pay period changes to an employee's pay. When you save your changes, Enterprise Payroll validates the new data against all of the related tables in the database one record at a time. While this process has advantages in terms of data integrity, the process can become quite lengthy and cumbersome when changes are required for large numbers of employees.
Rapid Pay Data Entry provides “heads-down” data entry capability for entering Enterprise Payroll exception data. Hours, earnings, and other paysheet-specific data are keyed into a spreadsheet format and saved directly to Enterprise Payroll.
With Rapid Pay Data Entry, you can customize the format by creating and modifying templates to hide or display optional columns, changing column headings, and automatically inserting default data values. You can also load employee data into the spreadsheet and import and export employee data with Microsoft Excel. You can enter or edit employee payroll data using standard Microsoft® Windows® editing commands such as Cut, Copy, Paste, and Fill.
Rapid Pay Data Entry features include the following:
• ADP Enterprise HR organizational context security, which is applied by limiting the load and employee row insertion process to only those employees in the user’s authorized security view.
• Prompting ability against ADP Enterprise HR tables for valid earnings codes.
• Creating, saving, and editing payroll data directly in the ADP Enterprise HR database.
Rapid Pay Data Entry enables you to do the following:
• Create and display different templates of the employee data stored in Enterprise Payroll. Figure 4-1 shows a spreadsheet based on a template called FB1 that displays data input fields that may be found on an employee's timesheet. The user can customize the standard templates supplied with Enterprise Payroll to exactly match their company's printed timesheets or to create new templates to meet specific payroll entry needs.
• Load and simultaneously edit multiple rows of employee data. The user can load employee data from one or multiple departments within a company and sort that information by combinations of key fields.
• Rapidly enter and edit exceptions to regular employee payroll data. You can use standard Windows editing commands such as Cut, Copy, and Paste to rapidly enter or edit employee payroll data. In addition, you can use icons, menus, and keyboard commands when working with your spreadsheet.
Chapter 4: Entering Payroll Data Using Rapid Pay Data EntryPayroll Processing Guide Version 5.04.01

Introduction 4-3
• Perform “heads-down” data entry of employee payroll data. The interface is designed to allow rapid data entry of employee payroll information.
• Validate data integrity during the data entry process. All data entered through the Rapid Pay Data Entry interface is validated against the appropriate tables in the ADP Enterprise HR database during the process of entering the data. This ensures that codes for employees, departments, and earning types are valid and reduces the chance of errors during the payroll process.
Figure 4-1 displays a spreadsheet showing how Rapid Pay Data Entry allows payroll personnel to quickly enter and edit employee payroll data.
Figure 4-1. Enterprise Payroll Rapid Pay Data Entry Spreadsheet
Chapter 4: Entering Payroll Data Using Rapid Pay Data EntryPayroll Processing Guide Version 5.04.01

4-4 Logging on to Rapid Pay Data Entry
Logging on to Rapid Pay Data Entry
You access Rapid Pay Data Entry through a link on the Self Service Practitioner Home page. This link allows you to go directly to the Rapid Pay Data Entry application without signing on again. Users must be registered for ADP Self Service, assigned profile ID (operator ID) in ADP Enterprise HR, and designated as a practitioner in ADP Self Service.
To log in to Rapid Pay Data Entry, do the following:
1. Access the URL for Self Service, https://portal.adp.com. The Self-Service Portal Login page displays.
Figure 4-2. Self-Service Portal Login Page
If you are an ADP non-hosted client, log on to Rapid Pay Data Entry through the HTTP address provided by the system administrator. At the Rapid Pay Data Entry login screen, enter your Operator ID and Password, and click OK. The ADP Payroll Rapid Pay Data Entry window displays.
Chapter 4: Entering Payroll Data Using Rapid Pay Data EntryPayroll Processing Guide Version 5.04.01

Logging on to Rapid Pay Data Entry 4-5
2. Click Practitioner Login.
1. Enter your User ID and Password and click OK. The Portal Integration page displays.
Figure 4-3. Portal Integration Page
Your page may appear differently dependingo n how your company has been set up and
your security access.
2. Select Enterprise from the Human Resources or Payroll tab.
You may be prompted to run the certified Java version. For more information, see the
Using Java for ADP Enterprise HR Guide.
Chapter 4: Entering Payroll Data Using Rapid Pay Data EntryPayroll Processing Guide Version 5.04.01

4-6 Logging on to Rapid Pay Data Entry
When your user profile and password have been automatically confirmed, the Rapid Pay Data Entry window displays.
Figure 4-4. Rapid Pay Data Entry Window
This completes the procedure for logging on to Rapid Pay Data Entry.
If, after logging in, you are inactive for 18 minutes, you will receive a warning that your session is about to timeout. Click OK to resume the session or cancel to close the session.
Chapter 4: Entering Payroll Data Using Rapid Pay Data EntryPayroll Processing Guide Version 5.04.01

Using the Rapid Pay Data Entry Application 4-7
Using the Rapid Pay Data Entry Application
Rapid Pay Data Entry (RPDE) simplifies your payroll data entry and processing, providing easy-to-access navigation options and offering multiple ways to complete your tasks. This section describes the navigation tools and shortcuts you can use when working with RPDE.
Information for navigation consists of the following:
• Using the Desktop Menu Bar
• Using Toolbar Tasks
• Using Right Mouse Click Options
• Using Keyboard Shortcuts
• Using the Employee Information Bar
The following table allows you to quickly see the different ways you can access a task. If you can access the task through the menu and/or the toolbar, you’ll see the toolbar icon in the Menu column. If you can access the task through keyboard commands and/or right mouse click options, the Shortcut column will list them.
Table 4-1. RPDE Menus and Shortcuts
Menu Description Shortcut
File From the File menu you can create a new spreadsheet, open an existing spreadsheet, search for a spreadsheet, save a spreadsheet, close a spreadsheet, print, and exit the product.
None
New Displays the New dialog box where you create a new spreadsheet and associate it with a template.
Ctrl-N
Open Displays the Open dialog box from where you choose an existing payroll spreadsheet to open.
Ctrl-O
Save Saves your current payroll spreadsheet. Ctrl-S
Save As Saves the current payroll spreadsheet under a new name.
None
Close Closes the current spreadsheet. This option will prompt you to save if you haven’t saved before exiting the spreadsheet.
None
Print Selecting this option will print your spreadsheet information.
Ctrl-P
Chapter 4: Entering Payroll Data Using Rapid Pay Data EntryPayroll Processing Guide Version 5.04.01

4-8 Using the Rapid Pay Data Entry Application
Exit Select Exit to close the Rapid Pay Data Entry application.
None
Edit From the Edit menu you can cut, copy, and paste pay data, or you can clear an entire column of data. You can open the Find dialog box to find data and then you can select Find Next to continue the search. Insert Row, Delete Row, Fill Column, Insert a row with employee default data.
None
Cut Moves selected data to the clipboard. Cut only works on a single cell.
Ctrl-X
Right mouse click
Copy Copies selected data to the clipboard. Copy works only in single cells when copying from a single cell.
Ctrl-C
Right mouse click
Paste Copies data from the clipboard to the selected cell.
Ctrl-V
Right mouse click
Clear Column Removes all of the data in the column you select. To clear all of the data in a column, select a cell in the column.
Ctrl-R
Find, Find Next Find searches the spreadsheet for the information you choose.
From the Edit menu, click Find. Enter the information you want to find and click Find.
Select Find Next to search the spreadsheet for the information you entered in the Find option.
Find:
Ctrl-FRight mouse click
Find Next:
F3
Insert Row ( )Inserts a row. To add a row, select a cell in a row. In the Edit menu, select Insert Row.
The new row is inserted after the selected row.
F7
Delete Row
( )
Deletes a row. To delete a row, select a cell in a row. From the Edit menu, select Delete Row. The row below becomes the current row.
F8
Table 4-1. RPDE Menus and Shortcuts (cont.)
Menu Description Shortcut
Chapter 4: Entering Payroll Data Using Rapid Pay Data EntryPayroll Processing Guide Version 5.04.01

Using the Rapid Pay Data Entry Application 4-9
Fill Down Copies the data from the active cell (the cell with the highlight border) to all cells below the selected column. This function only works in a single column at a time.
Select the cell whose contents you want to copy. All cells below the selected cell in the same column are filled.
Ctrl-W
Insert Row w/Empl
Inserts a blank row with employee default information for the employee you select. For example, the default information includes the employee name and department.
Select a cell in the employee’s row. From the Edit menu, select Insert Row w/Emp.
Ctrl-E
Right mouse click
Data Sort, Validate, Pick List, Insert Employee(s), Insert Employee(s) by Query, Batch Totals, Spreadsheet Totals, Show Results in Excel, Export, Import.
None
Sort Displays the Sort Spreadsheet Data dialog box from which you can apply three levels of data sorting for the payroll spreadsheet. With each level, you can specify that the sort is to be in ascending or descending order.
Sort options include:
• First by - Select the first data item for the primary sort field.
• Then by - Select the second item for the secondary sort field.
• Then by - Select the third item for the tertiary sort field.
The sort order you specify applies only
while the spreadsheet is open. Each time the spreadsheet is reopened, the data is displayed in employee order.
None
Validate Validates the data in the payroll spreadsheet. None
Pick List For certain spreadsheet columns, brings up a list of valid values to choose from.
F4
Insert Employee(s)
Add an employee selected from the employee list to the current spreadsheet.
F5
Table 4-1. RPDE Menus and Shortcuts (cont.)
Menu Description Shortcut
Chapter 4: Entering Payroll Data Using Rapid Pay Data EntryPayroll Processing Guide Version 5.04.01

4-10 Using the Rapid Pay Data Entry Application
Insert Employee(s) by Query
Allows you to run a query to select one or more employees to insert into the spreadsheet.
F6
Right mouse click
Batch Totals Totals are maintained for regular, overtime, and other hours and earnings for a payroll batch. Select this option to see the calculated and control totals for a batch.
F2
Spreadsheet Totals
Totals are maintained for regular, overtime, and other hours and earnings for a spreadsheet. Select this option to see the calculated and control totals for a spreadsheet.
F9
Right mouse click
Show Results in Excel
Displays the current spreadsheet data in Microsoft Excel.
None
Export Displays the Export to File dialog box to export the current spreadsheet.
None
Import Displays the Import File dialog box from which you can import a or rpd file.
None
Options From the Options menu you can edit a template, open the Employee Info dialog box, and view Help.
None
Edit Templates Displays the Edit Templates dialog box where you can edit, create, and delete templates.
None
New Batch Header
Displays the New Batch/Spreadsheet header dialog box.
None
Show Employee Info
Displays the Employee Info dialog box, which shows profile information for the current employee. The dialog box remains open until you close it and is updated when the current employee in the spreadsheet changes.
None
Right mouse click
Help From the Help menu you can view ADP Enterprise HR help, online manuals, and the About Rapid Pay Data Entry information.
Table 4-1. RPDE Menus and Shortcuts (cont.)
Menu Description Shortcut
Chapter 4: Entering Payroll Data Using Rapid Pay Data EntryPayroll Processing Guide Version 5.04.01

Using the Rapid Pay Data Entry Application 4-11
Using the Desktop Menu Bar
The three most common Rapid Pay Data Entry tasks—New, Open, and Import—are displayed on the desktop. These tasks and others also are available from menus and the toolbar. The menu bar displays at the top of the RPDE window. The menu options provide access to all available RPDE tasks.
For details of each menu, see Table 4-1 on page 4-7.
Using Toolbar Tasks
Use the toolbar buttons, located at the top of each Rapid Pay Data Entry window, to perform the most common tasks, such as Save, Insert Row, and Open. A tool tip that identifies each button displays when you move your mouse cursor over the button.
For details of each task, see Table 4-1 on page 4-7.
Figure 4-5. Rapid Pay Data Entry Toolbar
Navigating RPDE
Using the Desktop Menu Bar
Using Toolbar Tasks
Using Right Mouse Click Options
Using Keyboard Shortcuts
Using the Employee Information Bar
Navigating RPDE
Using the Desktop Menu Bar
Using Toolbar Tasks
Using Right Mouse Click Options
Using Keyboard Shortcuts
Using the Employee Information Bar
New Open Save Print InsertRow
DeleteRow
ShowResults in Excel
ExportResults to File
Import Data from File
InsertEmployees
CloseSpreadsheet
Chapter 4: Entering Payroll Data Using Rapid Pay Data EntryPayroll Processing Guide Version 5.04.01

4-12 Using the Rapid Pay Data Entry Application
Using Right Mouse Click Options
You can use the right mouse button to access popup menu options. The options include Spreadsheet Totals, Insert Row w/Emp, Find, Show Employee Info, Load Employee(s), Cut, Copy, and Paste.
For details of each option, see Table 4-1 on page 4-7.
Figure 4-6. Right Mouse Popup Menu
Using Keyboard Shortcuts
The following keyboard shortcuts allow you to quickly move around in the spreadsheet.
See Table 4-2, “Rapid Pay Data Entry Spreadsheet Shortcuts,”on page 4-12 for a complete list of function and shortcut keys used in RPDE.
Table 4-2. Rapid Pay Data Entry Spreadsheet Shortcuts
Description Keyboard Keys
Move to the beginning of the line/row you are on. Home
Move to the first data row and first cell/column. Ctrl + Home
Move to the end of the line/row you are on. End
Move to the last row and last column. Ctrl + End
Navigating RPDE
Using the Desktop Menu Bar
Using Toolbar Tasks
Using Right Mouse Click Options
Using Keyboard Shortcuts
Using the Employee Information Bar
Navigating RPDE
Using the Desktop Menu Bar
Using Toolbar Tasks
Using Right Mouse Click Options
Using Keyboard Shortcuts
Using the Employee Information Bar
Chapter 4: Entering Payroll Data Using Rapid Pay Data EntryPayroll Processing Guide Version 5.04.01

Using the Rapid Pay Data Entry Application 4-13
Using the Employee Information Bar
Rapid Pay Data Entry for the Web displays an employee information bar at the bottom of the window. The information bar displays the employee’s ID, record number, and name. With this information, you can identify the employee for whom you are entering data, even when you have scrolled to the right on that employee’s row and cannot see the initial, identifying information in the row itself.
You have learned about menu options, toolbar options, right-mouse click options, and the employee information bar.
Navigating RPDE
Using the Desktop Menu Bar
Using Toolbar Tasks
Using Right Mouse Click Options
Using Keyboard Shortcuts
Using the Employee Information Bar
Chapter 4: Entering Payroll Data Using Rapid Pay Data EntryPayroll Processing Guide Version 5.04.01

4-14 Creating and Maintaining Templates
Creating and Maintaining Templates
In Rapid Pay Data Entry, you use templates to organize the spreadsheet in which you enter and maintain data. This section describes the pre-defined templates that come with Rapid Pay Data Entry, and explains how to copy, edit, create and delete templates.
Rapid Pay Data Entry displays specified fields as columns in a spreadsheet. A template specifies which columns or fields display in the spreadsheet, and in which order. The columns correspond to the fields on a paysheet. There are several types of columns, as follows:
• Columns that contain data about the employee and his/her job. These include Employee ID, Job Code, and Department ID. These values are validated against the ADP Enterprise HR tables.
• One column that contains codes for earnings types. This column is called Earnings Code and must contain a valid value from the Earnings Type in ADP Enterprise HR.
• Columns that contain hours and amounts. You can assign a default value to hours and amounts columns. Usually these columns will be positioned next to the Earnings Code column. You can insert multiple earnings codes/hours or amounts combination in a template.
• Columns to which you assign earning codes with an entered amount or hours. These columns are called Quick Pay columns. You can use up to ten Quick Pay-type columns in a template.
• Other columns that contain fields from paysheets, including Direct Deposit, Deduction Subset, and GL Type.
When you design a template, consider the types of data that you frequently need to enter as exception data before you decide which columns to show in the template. For example, if you frequently enter bonus amounts during the payroll process, you might want to create a template that contains the following columns: Employee ID, Employee Name, and Bonus Amount.
During data entry, the user would then enter only the employee ID and the amount of the bonus. The earnings code for the bonus can be associated with the amount of the bonus through a Quick Pay column. To define the characteristics of a Quick Pay type, you assign a name to the column, associate an earnings code, and select whether the value should be hours or an amount. You can also assign a default value to the column. The Timesheet template delivered with Rapid Pay Data Entry contains several examples of Quick Pay columns.
Chapter 4: Entering Payroll Data Using Rapid Pay Data EntryPayroll Processing Guide Version 5.04.01

Creating and Maintaining Templates 4-15
This section discusses the following topics:
• Using Pre-Defined Templates
• Creating a New Template
• Copying a Template
• Editing a Template
• Deleting Templates
Using Pre-Defined Templates
Rapid Pay Data Entry provides seven pre-defined templates in the demonstration database. You can use pre-defined templates as is, modify them (except PAYDATAENTRY - PY), create your own templates by copying the pre-defined templates and editing the copies, or create completely new templates. Table 4-3 lists the pre-defined templates and the columns included in each.
Table 4-3. Rapid Pay Data Entry Templates
Template Name Columns Purpose
BONUS - PY Empl IDEmployee NameDepartment IDSeparate CheckBonus
Use this template to enter data about bonus pay.
FASTTIMEENTRY - PY Empl IDEmployee NameEarnings CodeHours
Use this template to enter exception earnings codes for employees. For example, if a number of employees worked overtime in a pay period, you would enter the earnings code and the hours for the overtime in this template.
FULLPAYROLL - PY Empl IDEmployee NameEmp Rec NumberDepartment IDShiftHourly RateAccount CodeOther EarnsHoursOT PayVacationSickShift Pay
Use this template to enter full earnings data for employees.
Creating and Maintaining Templates
Using Pre-Defined Templates
Creating a New Template
Copying a Template
Editing a Template
Deleting Templates
Chapter 4: Entering Payroll Data Using Rapid Pay Data EntryPayroll Processing Guide Version 5.04.01

4-16 Creating and Maintaining Templates
FULLDATAENTRY - PY Empl IDEmployee NameEmp Rec NumberDepartment IDJob CodePos NumberShiftHourly RateGL Pay TypeAccount CodeEarnings CodeHoursAmountComb Earnings
Use this template to enter exception data for employees. For example, if an employee's hours are charged to a different department for this pay period, you would enter that department in this template.
IMPUTEDINCOME - PY Empl IDEmployee NameAccount CodePers Use Co Car
Use this template to enter data about an employee’s imputed income, as from personal use of a company car.
Table 4-3. Rapid Pay Data Entry Templates
Template Name Columns Purpose
Chapter 4: Entering Payroll Data Using Rapid Pay Data EntryPayroll Processing Guide Version 5.04.01

Creating and Maintaining Templates 4-17
You have learned about using the pre-defined templates provided with Rapid Pay Data Entry.
PAYDATAENTRY - PY Empl IDEmployee NameEmp Rec NumberDepartment IDJob CodePos NumberShiftHourly RateGL Pay TypeAccount CodeAdditional TaxesGross UpSeparate CheckStateLocalityDirect DepositDeduction TakenDeduction SubsetEarnings CodeHoursAmountWeek Nbr
Use this template to accept a full range of employee payroll data in Rapid Pay Data Entry. You cannot customize this template, because it provides a standard template for certain spreadsheets that were modified in ADP Enterprise HR (Employee Pay Data Entry or TAA015). The template is automatically applied to spreadsheets that have had data entered into columns that were not represented in the spreadsheet’s original templates.
TIMSHEET - PY Empl IDEmployee NameOther Hrs CodeOther HrsReg HrsOvertimeVacationHolidaySickAuto$
Use this template to perform “heads-down” data entry directly from employees' timesheets.
Table 4-3. Rapid Pay Data Entry Templates
Template Name Columns Purpose
Chapter 4: Entering Payroll Data Using Rapid Pay Data EntryPayroll Processing Guide Version 5.04.01

4-18 Creating and Maintaining Templates
Creating a New Template
Besides using pre-defined templates, as is, you can copy existing templates and customize them, or you can create new templates that are not based on existing ones. To create a new template, do the following:
1. Select Edit Templates from the Options menu. The Template Operations dialog box displays.
Figure 4-7. Template Operations Dialog Box
For a description of the fields on this dialog box, click Help.
2. In the Template Operations dialog box, click New. The Edit Template dialog box displays.
Figure 4-8. Edit Template Dialog Box
3. Enter a name for the new template in the Template name field.
Creating and Maintaining Templates
Using Pre-Defined Templates
Creating a New Template
Copying a Template
Editing a Template
Deleting Templates
For a description of the fields on this dialog box, click Help.
Chapter 4: Entering Payroll Data Using Rapid Pay Data EntryPayroll Processing Guide Version 5.04.01

Creating and Maintaining Templates 4-19
4. From the Available Columns area, select the column(s) you want to include in your template by doing one of the following:
The column(s) will be added after the highlighted column in the Included Columns area.
The employee ID is always included in the template by default and cannot be removed.
• - Click to move the highlighted column(s) into the Included Columns area. To select multiple columns at one time, press and hold Ctrl and then click.
• - Click to move all columns into the Included Columns area at once.
5. Verify the columns listed in the Included Columns area. If you need to delete a column so that it won’t display on your spreadsheet, do one of the following:
The column(s) will be added back to the Available Columns area in the original
order.The employee ID is always included in the template by default and cannot be removed.
• - Click to move the highlighted column(s) out of the Included Columns area and back to the Available Columns area.
• - Click to move all columns from the Included Columns area back to the Available Columns area all at once.
6. Verify that you want to use the default heading name, value, and/or earnings code and type for each column listed in the Included Columns area as follows:
a. Highlight a column.
The Column Detail area displays the formal Column name (as it appears in the Included Columns area) as well as the default column Heading that will display on your spreadsheet. In addition, it displays the Default Value for certain columns and the Earnings code and Earnings Type for Quick Pay columns.
b. If necessary, change the Heading that will display on your spreadsheet.
c. For columns that require a default value, select or enter the appropriate Default Value.
d. For a Quick Pay-type column, change the default Earnings code and/or Earnings Type if necessary.
7. Determine the order that you want the columns in the Included Columns area to display
on your spreadsheet (from left to right) by selecting the column(s) and clicking or
. The column(s) move up/down one position. Continue clicking the appropriate button until the column(s) are in the correct position.
Chapter 4: Entering Payroll Data Using Rapid Pay Data EntryPayroll Processing Guide Version 5.04.01

4-20 Creating and Maintaining Templates
The following shows a completed Edit Template dialog box:
Figure 4-9. Edit Template Dialog Box
8. Click OK.
You have just created a new template.
Copying a Template
You can copy a template and then use the new template with or without changes. To create a template based on an existing template, do the following:
1. Select Edit Templates from the Options menu. The Template Operations dialog box displays.
Figure 4-10. Template Operations Dialog Box
For a description of the fields on this dialog box, click Help.
For a description of the fields on this dialog box, click Help.
Creating and Maintaining Templates
Using Pre-Defined Templates
Creating a New Template
Copying a Template
Editing a Template
Deleting Templates
Chapter 4: Entering Payroll Data Using Rapid Pay Data EntryPayroll Processing Guide Version 5.04.01

Creating and Maintaining Templates 4-21
2. Select a template, and click Copy. The Copy Template dialog box displays.
Figure 4-11. Copy Template Dialog Box
3. Enter a name for the new template in the Copy to field, and click OK.
You’ve just finished copying an existing template to create a new template.
Editing a Template
To edit a template, do the following:
1. Select Edit Template from the Options menu. The Template Operations dialog box displays.
Figure 4-12. Template Operations Dialog Box
For a description of the fields on this dialog box, click Help.
Creating and Maintaining Templates
Using Pre-Defined Templates
Creating a New Template
Copying a Template
Editing a Template
Deleting Templates
Chapter 4: Entering Payroll Data Using Rapid Pay Data EntryPayroll Processing Guide Version 5.04.01

4-22 Creating and Maintaining Templates
2. Select the template in the Template Operations dialog box, and click Edit. The Edit Template dialog box displays.
Figure 4-13. Edit Template Dialog Box
3. For step-by-step instructions on changing information in the Edit Template dialog box, see “Creating a New Template” on page 4-18.
You have just edited a template.
For a description of the fields on this dialog box, click Help.
Chapter 4: Entering Payroll Data Using Rapid Pay Data EntryPayroll Processing Guide Version 5.04.01

Creating and Maintaining Templates 4-23
Deleting Templates
When you no longer need a template, and it is no longer linked to a spreadsheet, you can delete the template.
You cannot delete a template if you do not own it. In addition, if you own a template and have
already linked it to a spreadsheet, you cannot delete the template.
To delete a template, do the following:
1. Select Edit Template from the Options menu. The Template Operations dialog box displays.
Figure 4-14. Template Operations Dialog Box
2. Select the template in the Template Operations dialog box, and click Delete.
3. Click Yes to confirm the deletion.
You have finished deleting a template.
Creating and Maintaining Templates
Using Pre-Defined Templates
Creating a New Template
Copying a Template
Editing a Template
Deleting Templates
For a description of the fields on this dialog box, click Help.
Chapter 4: Entering Payroll Data Using Rapid Pay Data EntryPayroll Processing Guide Version 5.04.01

4-24 Creating Batches and Spreadsheets
Creating Batches and Spreadsheets
When you enter data into Rapid Pay Data Entry, you enter the hours and earnings into batches and spreadsheets. The first step in this process is creating a batch, as follows:
1. Select New Batch Header from the Options menu. The New Batch/Spreadsheet Header dialog box displays with all existing batches listed.
Figure 4-15. New Batch/Spreadsheet Header Dialog Box
2. Enter a name for the batch in the Batch Name field.
3. Enter a description for the batch in the Batch Description field.
4. Select a run ID from the Run ID field. Listed are all run IDs for which checks have not yet been confirmed.
For existing batches, this field is grayed and unavailable.
5. Enter a name for the spreadsheet in the Spreadsheet name field.
6. Enter a description for the spreadsheet in the Spreadsheet description field, and click OK. The batch is now available to receive data.
You just finished creating batches and spreadsheets.
For a description of the fields on this dialog box, click Help.
Chapter 4: Entering Payroll Data Using Rapid Pay Data EntryPayroll Processing Guide Version 5.04.01

Linking a Spreadsheet to a Template 4-25
Linking a Spreadsheet to a Template
Now that you have defined a template for your data entry spreadsheet and a batch and a spreadsheet as a repository for the data, you link them together as the last step before beginning data entry.
The owner of a spreadsheet is the user who first entered data into it. The owner of a template
is the user who created it.
1. Select New from the File menu. The New dialog box displays the empty batches/spreadsheets, run IDs, and templates that you own (created).
Figure 4-16. New Dialog Box
2. Select the spreadsheet that you want to link to a template.
To bring a specific batch or spreadsheet to the top of a lengthy list, enter a full or partial
batch/spreadsheet name in the Batch and/or Spreadsheet field and click Find. You can also click on the column headings to sort by a specific column.
For a description of the fields on this dialog box, click Help.
Chapter 4: Entering Payroll Data Using Rapid Pay Data EntryPayroll Processing Guide Version 5.04.01

4-26 Linking a Spreadsheet to a Template
3. Select the template that you want to link to a spreadsheet by selecting one of the following options:
• My templates - Select to view all templates you created (own).
• All templates - Select to view all existing templates, even those you do not own.
To bring a template to the top of a lengthy list, enter a full or template name in the
Template field and click Find. You can also click on the column headings to sort by a specific column.
4. Click OK. The New dialog box closes, and the spreadsheet that you use to enter payroll data displays.
You have created a template and a spreadsheet and linked them.
Chapter 4: Entering Payroll Data Using Rapid Pay Data EntryPayroll Processing Guide Version 5.04.01

Entering Data in a Spreadsheet 4-27
Entering Data in a Spreadsheet
After you’ve created a batch and a spreadsheet and then linked a spreadsheet to a template, you are ready to begin entering your data into the spreadsheet.
Entering this data consists of the following:
• Opening an Existing Spreadsheet
• Entering Data
• Viewing Profile Information for an Employee
• Sorting Spreadsheet Data
• Saving Data
• Saving Data
• Printing the Spreadsheet
• Showing Data in Microsoft Excel
Chapter 4: Entering Payroll Data Using Rapid Pay Data EntryPayroll Processing Guide Version 5.04.01

4-28 Entering Data in a Spreadsheet
Opening an Existing Spreadsheet
To open an existing spreadsheet, do the following:
1. Select Open from the File menu. The Open dialog box displays the batches and templates owned by your user ID.
Figure 4-17. Open Dialog Box
For a description of the fields on this dialog box, click Help.
2. To open a batch/spreadsheet for data entry, do one of the following:
• Select a batch/spreadsheet that has a template assigned to it in the Template column and click OK. The Open dialog box closes, and the spreadsheet displays with the appropriate cell headings displayed based on the template you selected.
To view all existing batches/spreadsheets, not just the ones that you own, click the All
batches option. Batches/spreadsheets not linked to a new template will also be displayed.
To bring a specific batch or spreadsheet to the top of a lengthy list, enter a full or partial batch/spreadsheet name in the Batch and/or Spreadsheet field and click Find. To sort by column, click the column heading.
Entering Data in a Spreadsheet
Opening an Existing Spreadsheet
Entering Data
Viewing Profile Information for an Employee
Sorting Spreadsheet Data
Saving Data
Printing the Spreadsheet
Showing Data in Microsoft Excel
Chapter 4: Entering Payroll Data Using Rapid Pay Data EntryPayroll Processing Guide Version 5.04.01

Entering Data in a Spreadsheet 4-29
• Select a batch/spreadsheet with no template attached, select a template from the Template area, and then click OK. The Open dialog box closes, and the spreadsheet displays with the appropriate cell headings displayed based on the template you selected.
If you want to view a list of all existing templates, even those you do not own, select
the All templates option.
To bring a template to the top of a lengthy list, enter a full or partial template name in the Template field and click Find. To sort by column, click the column heading.
3. Enter payroll data for the batch/spreadsheet. For details, see “Entering Data in a Spreadsheet” on page 4-27.
You’ve just finished opening an existing spreadsheet. Next, begin entering your payroll data in to the spreadsheet.
Entering Data
After creating a batch header and spreadsheet and linking a template to the spreadsheet, you use the resulting spreadsheet to enter payroll data into Rapid Pay Data Entry.
You can enter data in to the spreadsheet in one of four ways:
• Using the Pick List (F4)
• Using the Insert Employee(s) Function (F5)
• Using Query Definitions (F6)
• Importing Data from a or RPD File
Entering Data in a Spreadsheet
Opening an Existing Spreadsheet
Entering Data
Viewing Profile Information for an Employee
Sorting Spreadsheet Data
Saving Data
Printing the Spreadsheet
Showing Data in Microsoft Excel
Chapter 4: Entering Payroll Data Using Rapid Pay Data EntryPayroll Processing Guide Version 5.04.01

4-30 Entering Data in a Spreadsheet
Using the Pick List (F4)
Use the Pick List (F4) to enter employees one at a time on the spreadsheet. To use the Pick List, do the following:
1. While in an open spreadsheet, position your cursor in the next available data entry row.
2. Press F4 or select Pick List from the Data menu. The Select Employee dialog box displays.
Figure 4-18. Select Employee ID Dialog Box
3. Select the employee you want to add to the spreadsheet by doing one of the following:
• Select an individual employee from the list by highlighting the row and clicking OK. The employee’s data is added to the spreadsheet.
• To find a specific employee, do the following:
– Enter either the employee ID in the Empl ID field or a name in the Name field, and click Find. All employees meeting the search requirements display.
If you enter a portion of an employee ID, any employee ID beginning with the entry
displays. If you enter a portion of a name, any last name beginning with the entry displays.
– Select an individual employee from the list by highlighting the row and clicking OK. The employee’s data is added to the spreadsheet.
You’ve just finished using the Pick List to add an individual employee to the spreadsheet.
For a description of the fields on this dialog box, click Help.
Chapter 4: Entering Payroll Data Using Rapid Pay Data EntryPayroll Processing Guide Version 5.04.01

Entering Data in a Spreadsheet 4-31
Using the Insert Employee(s) Function (F5)
Use the Insert Employee(s) function (F5) to add multiple employees at one time to the spreadsheet. To insert multiple employees into the spreadsheet, do the following:
1. While in an open spreadsheet, determine where you want to add the employee data and then position your cursor in the row above. A new row will be inserted below the row with the cursor.
2. Press F5 or select Insert Employee(s) from the Data menu. The Select Employee dialog box displays.
Figure 4-19. Select Employee ID Dialog Box
3. Select the employees you want to add to the spreadsheet by doing one of the following:
• Select an individual employee from the list by highlighting the row
• To select multiple employees throughout the list, press and hold the Ctrl key while selecting individual employees.
• To select a continuous range of employees in the list, select the first employee, press and hold the Shift key, and click the last employee in the range.
• To select all employees from the list, select the Select All check box.
4. To assign more than one row in the spreadsheet to each employee (to handle earning distribution, for example), select a number from the Rows to insert for each employee field.
5. Click OK. The data for all selected employees is added to the spreadsheet.
You can also click (Insert Employees) on the toolbar.
For a description of the fields on this dialog box, click Help.
Chapter 4: Entering Payroll Data Using Rapid Pay Data EntryPayroll Processing Guide Version 5.04.01

4-32 Entering Data in a Spreadsheet
You’ve just finished using the Insert Employee(s) feature (F5) to add multiple employees at one time to the spreadsheet.
Using Query Definitions (F6)
Rapid Pay Data Entry allows you to load data from ADP Enterprise HR. This feature provides a quick means of loading and sorting data. For example, you might want to load all of the employees from a group of departments and sort them by employee ID within each department.
With the Queries dialog box, as shown in Figure 4-23, you can establish multiple criteria based on key employee or company data for the load process. In addition, you can load by employee type or status. Finally, you can set up primary and secondary sort order parameters for the Insert Employee(s) dialog box.
From this dialog box you can copy, edit, load, or delete existing query definitions, or create a new set.
The sort order you specify applies only while the spreadsheet is open. Each time the
spreadsheet is reopened, the data is displayed in employee order.
Using query definitions consists of the following:
• Running Query Definitions
• Creating a Query Definition
• Editing a Query Definition
• Copying an Existing Query Definition
• Deleting a Query Definition
Chapter 4: Entering Payroll Data Using Rapid Pay Data EntryPayroll Processing Guide Version 5.04.01

Entering Data in a Spreadsheet 4-33
Running Query Definitions
If a query definition already exists, you can select and run it.
1. While in the spreadsheet, select Insert Employee(s) by Query from the Data menu. The Queries dialog box opens and displays the query definitions that you own.
You can also press F6 to access the Queries dialog box.
Figure 4-20. Queries Dialog Box
2. If you want to view a list of all query definitions, not just the ones you own, select the All query definitions option.
3. Highlight the query definition that you want to run and click Run.
The Insert Employee(s) dialog box displays, listing all employees that belong to the query you ran.
Figure 4-21. Insert Employee(s) Dialog Box
4. If necessary, change the number of Rows to insert for each employee.
For a description of the fields on this dialog box, click Help.
For a description of the fields on this dialog box, click Help.
Chapter 4: Entering Payroll Data Using Rapid Pay Data EntryPayroll Processing Guide Version 5.04.01

4-34 Entering Data in a Spreadsheet
5. Select the employees you want to add to the spreadsheet by doing one of the following:
• Select an individual employee.
• Select multiple employees by pressing and holding Ctrl while selecting individual employees.
• To select a continuous range of employees in the list, select the first employee, press and hold the Shift key, and click the last employee in the range.
• Include all employees by selecting the Select all check box.
6. Click OK to add the selected employees to the spreadsheet. Your Excel spreadsheet reappears.
Creating a Query Definition
You can create a query definition, and save it for future use. To do so, follow this procedure:
1. Select Insert Employee(s) by Query from the Data menu. The Queries dialog box opens and displays the query definitions that you own.
You can also press F6 to access the Queries dialog box.
Figure 4-22. Queries Dialog Box
For a description of the fields on this dialog box, click Help.
Chapter 4: Entering Payroll Data Using Rapid Pay Data EntryPayroll Processing Guide Version 5.04.01

Entering Data in a Spreadsheet 4-35
2. Click New. The Query Definition dialog box displays.
Figure 4-23. Query Definition Dialog Box
For a description of the fields on this panel, click Help.
3. If you plan to save this query definition for future use, enter a name for the new query in the Definition name field.
4. In the Conditional Selection area, do the following:
a. To begin defining the range to be included in the query criteria, select a Field option and press Tab.
b. In the From and To fields next to the Field field, enter or select the lowest and highest values, respectively, to be included in the definition.
c. To further expand or narrow the selection criteria, you can select a second, third, and fourth field by which to select. First, select a boolean operator in the Operator field. Select And to include only those employees whose data matches the criteria in both the current row and the next row. Select Or to include records that match either the current criteria or the next one.
d. Repeat the preceding three steps to add more selection criteria.
5. In the Employee Type area, specify whether to include Hourly, Exception Hourly and/or Salaried employees in the query.
6. Select one or more check boxes from the Employee Status area to indicate whether the data for employees with a status of Active, Terminated, Leave with Pay, Leave of Absence, and/or Retired should be retrieved.
For a description of the fields on this dialog box, click Help.
Chapter 4: Entering Payroll Data Using Rapid Pay Data EntryPayroll Processing Guide Version 5.04.01

4-36 Entering Data in a Spreadsheet
7. Use the following fields in the Sort area to specify how the retrieved employees are to be sorted:
The sort order you specify applies only while the spreadsheet is open. Each time the
spreadsheet is reopened, the data is displayed in employee order.
a. Enter the primary sort criteria in the First by field, and select the direction of sorting: Ascending (A-Z and 0-9) or Descending (Z-A and 9-0).
b. Enter the secondary criteria in the Then by field, and select the direction of sorting: Ascending or Descending.
8. When you are finished, click one of the following:
• Run—Runs the query without saving the query definition.
• Save & Run—Saves the query definition with the name you entered in the Definition Name field and runs the query.
The Insert Employees dialog box displays.
Figure 4-24. Insert Employee(s) Dialog Box
9. Select the employees you want to insert into the spreadsheet by doing one of the following:
• Select an individual employee.
• Select multiple employees by pressing and holding Ctrl while selecting individual employees.
• To select a continuous range of employees in the list, select the first employee, press and hold the Shift key, and click the last employee in the range.
• Include all employees by selecting the Select all check box.
10. Click OK to insert the selected employees into the spreadsheet.
For a description of the fields on this dialog box, click Help.
Chapter 4: Entering Payroll Data Using Rapid Pay Data EntryPayroll Processing Guide Version 5.04.01

Entering Data in a Spreadsheet 4-37
Editing a Query Definition
You can open an existing query definition and edit its contents.
1. Select Insert Employee(s) by Query from the Data menu. The Queries dialog box opens and displays the query definitions that you own.
You can also press F6 to access the Queries dialog box.
Figure 4-25. Queries Dialog Box
2. If you do not see the desired query definition in the Queries dialog box, select All query definitions. This expands the list of queries to include those owned by others.
3. Select the query definition, and click Edit. The Query Definition dialog box displays.
Figure 4-26. Query Definition Dialog Box
For a description of the fields on this panel, click Help.
For a description of the fields on this dialog box, click Help.
For a description of the fields on this dialog box, click Help.
Chapter 4: Entering Payroll Data Using Rapid Pay Data EntryPayroll Processing Guide Version 5.04.01

4-38 Entering Data in a Spreadsheet
4. In the Conditional Selection area, do the following:
a. To begin defining the range to be included in the query criteria, select a Field option to load into the From and To fields.
b. In the From and To fields next to the Field field, enter or select the lowest and highest values, respectively, to be included in the definition.
c. To further expand or narrow the selection criteria, you can select a second, third, and fourth field by which to select. First, select a boolean operator in the Operator field. Select And to include only those employees whose data matches the criteria in both the current row and the next row. Select Or to include records that match either the current criteria or the next one.
d. Repeat the preceding three steps to add more selection criteria.
5. Specify the types of employee to include in the load. Select one or more of the following in the Employee Type area:
• Hourly
• Exceptioned Hourly
• Salaried
6. Select one or more employee status check boxes for the load from the Employee Status area:
• Active
• Terminated
• Leave with Pay
7. Use the following fields in the Sort area to specify how the retrieved employees are to be sorted:
The sort order you specify applies only while the spreadsheet is open. Each time the
spreadsheet is reopened, the data is displayed in employee order.
a. Enter the primary sort criteria in the First by field, and select the direction of sorting: Ascending (A-Z and 0-9) or Descending (Z-A and 9-0).
b. Enter the secondary criteria in the Then by field, and select the direction of sorting: Ascending or Descending.
8. When you are finished, click one of the following:
• Run—Runs the query without saving the load definition.
• Save & Run—Saves the query definition with the name you entered in the Definition Name field and runs the query.
Chapter 4: Entering Payroll Data Using Rapid Pay Data EntryPayroll Processing Guide Version 5.04.01

Entering Data in a Spreadsheet 4-39
The Insert Employee(s) dialog box displays.
Figure 4-27. Insert Employee(s) Dialog Box
9. Select the employees you want to insert into the spreadsheet by doing one of the following:
• Select an individual employee.
• Select multiple employees by pressing and holding Ctrl while selecting individual employees.
• Include all employees by selecting the Select all check box.
10. To assign more than one row in the spreadsheet to each employee, select a number from the Rows to insert for each employee field.
11. Click OK to add the employee(s) to the spreadsheet.
For a description of the fields on this dialog box, click Help.
Chapter 4: Entering Payroll Data Using Rapid Pay Data EntryPayroll Processing Guide Version 5.04.01

4-40 Entering Data in a Spreadsheet
Copying an Existing Query Definition
You can make a copy of an existing query definition, as follows:
1. Select Insert Employee(s) by Query from the Data menu. The Queries dialog box opens and displays the query definitions that you own.
You can also press F6 to access the Queries dialog box.
Figure 4-28. Load Operation Dialog Box
2. If you want to view a list of all query definitions, not just the ones you own (created), select the All query definitions option.
3. Select the query definition that you want to copy, and click Copy. The Copy Query Definition dialog box opens.
Figure 4-29. Copy Query Definition Dialog Box
4. Enter a name for the duplicate data set in the Copy to field, and click OK.
For a description of the fields on this dialog box, click Help.
For a description of the fields on this dialog box, click Help.
Chapter 4: Entering Payroll Data Using Rapid Pay Data EntryPayroll Processing Guide Version 5.04.01

Entering Data in a Spreadsheet 4-41
Deleting a Query Definition
If you own a query definition, you can delete it, as follows:
1. Select Insert Employee(s) by Query from the Data menu. The Queries dialog box opens and displays the query definitions that you own.
You can also press F6 to access the Queries dialog box.
Figure 4-30. Load Operation Dialog Box
2. Select the query definition you want to delete, and click Delete.
3. When you are prompted to confirm the deletion, click Yes.
For a description of the fields on this dialog box, click Help.
Chapter 4: Entering Payroll Data Using Rapid Pay Data EntryPayroll Processing Guide Version 5.04.01

4-42 Entering Data in a Spreadsheet
Importing Data from a or RPD File
You can import data from and rpd files in to your spreadsheet.
Importing Files
You can import (comma-separated values) files into Rapid Pay Data Entry. A file does not include a view name, and it may not have column headings.
To import a file, do the following:
1. Select Import from the Data menu. The Import File dialog box displays.
Figure 4-31. Import File Dialog Box
2. Use the Look In field to navigate to the location of the file to be imported, and select the field.
3. From the Files of Type list, select .
For a description of the fields on this dialog box, click Help.
Chapter 4: Entering Payroll Data Using Rapid Pay Data EntryPayroll Processing Guide Version 5.04.01

Entering Data in a Spreadsheet 4-43
4. Click Open. The Import File - Select Batch/Spreadsheet dialog box displays.
Figure 4-32. Import File - Select Batch/Spreadsheet Dialog Box
5. Select the appropriate batch/spreadsheet and template and click OK. (If the template you are seeking is not in the template list, select the All Templates option to see more templates.) The imported data displays in the Rapid Pay Data Entry spreadsheet.
Only new batches/spreadsheets display in the batch list. In addition, only those
templates with the same number of columns as the file are displayed.
If you are not sure that a template is an exact match for the data you are importing, open the template in the Edit Templates dialog box to verify the match. See “Editing a Template” on page 4-21 for instructions.
For a description of the fields on this dialog box, click Help.
Chapter 4: Entering Payroll Data Using Rapid Pay Data EntryPayroll Processing Guide Version 5.04.01

4-44 Entering Data in a Spreadsheet
Importing an RPD File
You can import rpd (Rapid Pay Data) files into Rapid Pay Data Entry. An rpd file has the name of the template on which it is based embedded in it. For the import to be successful, the template embedded in the RPD must match a template that is present in Rapid Pay Data Entry, and the number and headings of the columns in the RPD must match the number and headings of the template on the system.
To import an rpd file, do the following:
1. Select Import from the Data menu. The Import File dialog box displays.
Figure 4-33. Import File Dialog Box
2. Use the Look In field to navigate to the location of the file to be imported, and select the field.
3. From the Files of Type list, select RPD.
4. Click Open. If the rpd file has a matching template, the data appears in the spreadsheet. If not, an error message displays, and the import fails.
You’ve just finished using query definitions to enter employee data in to the spreadsheet.
For a description of the fields on this dialog box, click Help.
Chapter 4: Entering Payroll Data Using Rapid Pay Data EntryPayroll Processing Guide Version 5.04.01

Entering Data in a Spreadsheet 4-45
Viewing Profile Information for an Employee
Rapid Pay Data Entry includes an option to view profile information for a selected employee.
To view employee data in Rapid Pay Data Entry, do the following:
1. On the spreadsheet, select a cell in the row of the employee to view.
2. Select Show Employee Info from the Options menu.
3. The Employee Info dialog box displays.
Figure 4-34. Employee Info Dialog Box
This dialog box is updated when the current employee in the spreadsheet changes.
4. Click (Close) to close the Employee Info dialog box and return to the spreadsheet.
You’ve just finished viewing profile information for a specific employee.
Entering Data in a Spreadsheet
Opening an Existing Spreadsheet
Entering Data
Viewing Profile Information for an Employee
Sorting Spreadsheet Data
Saving Data
Printing the Spreadsheet
Showing Data in Microsoft Excel
Chapter 4: Entering Payroll Data Using Rapid Pay Data EntryPayroll Processing Guide Version 5.04.01

4-46 Entering Data in a Spreadsheet
Sorting Spreadsheet Data
Rapid Pay Data Entry features three levels of data sorting. With each level, you can specify that the sort is to be in ascending or descending order. The entire spreadsheet will be sorted based on the criteria you specify.
The sort order you specify applies only while the spreadsheet is open. Each time the
spreadsheet is reopened, the data is displayed in employee order. If you would like your data to be sorted in the order that it was originally entered, you can select the Order Entered option from the First by field and leave all other fields blank.
You can also click on the column headings to sort by a specific column.
To access the sort feature, do the following.
1. Select Sort from the Data menu. The Sort Spreadsheet Data dialog box displays.
Figure 4-35. Sort Spreadsheet Data Dialog Box
2. Select an item of data to sort in the First by field.
3. Select the sort order by selecting either the Ascending or Descending option.
4. To do a secondary and/or tertiary sort, select other items from the Then by fields and select Ascending or Descending.
5. Click OK to finish.
You’ve just sorted spreadsheet data.
Entering Data in a Spreadsheet
Opening an Existing Spreadsheet
Entering Data
Viewing Profile Information for an Employee
Sorting Spreadsheet Data
Saving Data
Printing the Spreadsheet
Showing Data in Microsoft Excel
Chapter 4: Entering Payroll Data Using Rapid Pay Data EntryPayroll Processing Guide Version 5.04.01

Entering Data in a Spreadsheet 4-47
Saving Data
As you enter and maintain data and after you complete your work, you save the data to the database. You may want to save data periodically if you are performing large amounts of data entry.
Select one of the following methods to save your data:
• Saving Data to a Currently Opened Batch/Spreadsheet
• Saving Data to an Existing Batch/Spreadsheet
Saving Data to a Currently Opened Batch/Spreadsheet
To save your data to a currently opened batch/spreadsheet, do the following:
1. Select Save from the File menu.
2. When you are prompted to validate your data, click Yes to validate or No to skip validation. For more information, see “Checking for Errors” on page 4-53.
Saving Data to an Existing Batch/Spreadsheet
To save your data to an existing batch/spreadsheet, do the following:
3. Select Save As from the File menu.
4. When prompted to validate the data, click Yes to validate or No to skip validation. The Save As dialog box opens and displays all the batches that you own.
Figure 4-36. Save As Dialog Box
You can also save your changes by pressing Ctrl-S.
Entering Data in a Spreadsheet
Opening an Existing Spreadsheet
Entering Data
Viewing Profile Information for an Employee
Sorting Spreadsheet Data
Saving Data
Printing the Spreadsheet
Showing Data in Microsoft Excel
For a description of the fields on this dialog box, click Help.
Chapter 4: Entering Payroll Data Using Rapid Pay Data EntryPayroll Processing Guide Version 5.04.01

4-48 Entering Data in a Spreadsheet
5. If you want to view all existing batches, even those you do not own, select the All batches option.
• If the list of batches is too long, enter part of the batch name you are seeking in the Batch field, or enter some or all of a spreadsheet name in the Spreadsheet field, and click Find. The list of batches is filtered to show only batches and spreadsheets that match your search criteria.
6. Select the batch/spreadsheet that you want to save your data to, and click Save.
7. When Rapid Pay Data Entry prompts you to confirm that you are adding the new data to the existing batch, click OK.
You cannot save data to another batch that is assigned to another Run ID or to a
spreadsheet that is owned by another user.
If you save the data in a spreadsheet that uses a different template than the one you have been using for the current data, the new data overwrites the old data. If the templates match, Rapid Pay Data Entry gives you the option of replacing the existing data or combining the new data with the current data.
You’ve just saved your spreadsheet data.
Printing the Spreadsheet
Rapid Pay Data Entry includes an option for printing. The print feature prints all the information contained in the spreadsheet. You can choose to print spreadsheet information at any time.
To print, do the following:
1. Select Print from the File menu. The Windows Print dialog box displays.
Figure 4-37. Print Dialog Box
Entering Data in a Spreadsheet
Opening an Existing Spreadsheet
Entering Data
Viewing Profile Information for an Employee
Sorting Spreadsheet Data
Saving Data
Printing the Spreadsheet
Showing Data in Microsoft Excel
Chapter 4: Entering Payroll Data Using Rapid Pay Data EntryPayroll Processing Guide Version 5.04.01

Entering Data in a Spreadsheet 4-49
2. Click Print to print the spreadsheet.
Your Print dialog box may vary depending on your selected print driver.
You have just finished printing a spreadsheet.
Showing Data in Microsoft Excel
After you create or open a payroll batch, you can show the data in Microsoft Excel.
From an open Rapid Pay Data Entry spreadsheet, select Show Results in Excel from the Data menu. The data displays in Microsoft Excel.
Figure 4-38. Batch in Microsoft Excel
You’ve just finished showing spreadsheet data in Microsoft Excel.
Entering Data in a Spreadsheet
Opening an Existing Spreadsheet
Entering Data
Viewing Profile Information for an Employee
Sorting Spreadsheet Data
Saving Data
Printing the Spreadsheet
Showing Data in Microsoft Excel
Chapter 4: Entering Payroll Data Using Rapid Pay Data EntryPayroll Processing Guide Version 5.04.01

4-50 Validating Spreadsheet Data
Validating Spreadsheet Data
You can validate spreadsheet data by:
• Comparing Calculation Totals
• Checking for Errors
Comparing Calculation Totals
At any point during the data entry process, you can compare wage and hour totals to control totals for a specific batch or spreadsheet. The Batch Totals and Spreadsheet Totals dialog boxes display the total hours and earnings by category (Regular, Overtime, and Other) for the batch/spreadsheet selected. Calculations are based on the earning codes set up in Enterprise Payroll.
You also can initiate batch or spreadsheet totals when no batch is open. If no batch is open
when you select Batch Totals or Spreadsheet Totals from the Data menu, Rapid Pay Data Entry opens a Batch or Spreadsheet dialog box, in which you select a batch or spreadsheet for which to calculate totals.
Validating Spreadsheet Data
Comparing Calculation Totals
Checking for Errors
Chapter 4: Entering Payroll Data Using Rapid Pay Data EntryPayroll Processing Guide Version 5.04.01

Validating Spreadsheet Data 4-51
To calculate totals, follow this procedure:
1. Select Batch Totals or Spreadsheet Totals from the Data menu. The Batch Totals, or nearly identical Spreadsheet Totals dialog box displays current balances, or shows out-of-balance condition when calculated values differ from the control totals.
Figure 4-39. Batch Totals Dialog Box
Figure 4-40. Spreadsheet Totals Dialog Box
For a description of the fields on this dialog box, click Help.
For a description of the fields on this dialog box, click Help.
Chapter 4: Entering Payroll Data Using Rapid Pay Data EntryPayroll Processing Guide Version 5.04.01

4-52 Validating Spreadsheet Data
2. You may click Auto Balance to balance the batch/spreadsheet. Rapid Pay Data Entry enters in the Control column an amount equal to the amount in the Calculated column, making the Difference column zero (0) as follows:
Figure 4-41. Batch Totals Dialog Box
Figure 4-42. Spreadsheet Totals Dialog Box
3. When no other changes will be made to a batch/spreadsheet, select the Complete check box.
4. Click OK when you are finished.
You’ve just finished comparing wage and hour totals to control totals for a specific batch or spreadsheet. Next, you can check for errors in the spreadsheet.
Chapter 4: Entering Payroll Data Using Rapid Pay Data EntryPayroll Processing Guide Version 5.04.01

Validating Spreadsheet Data 4-53
Checking for Errors
To check for errors in the spreadsheet, you have two options:
• Validating Data for the Entire Spreadsheet
• Validating Data in a Specific Spreadsheet Cell
Validating Data for the Entire Spreadsheet
The Validate feature in Rapid Pay Data Entry checks the entire active spreadsheet for errors such as missing earnings codes or conflicting hours and amounts.
1. Select Validate from the Data menu.The Data Validate dialog box displays, identifying any errors.
Figure 4-43. Data Validate Dialog Box
For a description of the fields on this dialog box, click Help.
2. Use the information in this dialog box to correct the errors. When you finish reviewing the information in the dialog box, click Close.
When you select a row in this dialog box, the focus moves to the spreadsheet cell in
error.
You can use this command at any time during the data entry process.
Rapid Pay Data Entry prompts you to perform validation when you save data.
Validating Spreadsheet Data
Comparing Calculation Totals
Checking for Errors
Chapter 4: Entering Payroll Data Using Rapid Pay Data EntryPayroll Processing Guide Version 5.04.01

4-54 Validating Spreadsheet Data
Validating Data in a Specific Spreadsheet Cell
To validate data in a specific spreadsheet cell, do the following
1. Highlight the cell whose data format you want to validate and press Tab.
2. Look at the bottom of the spreadsheet below the employee status line to see if an error message displays.
3. If an error message displays, take the corrective action to fix the cell format.
You’ve validated your data entry.
Example:
Highlight a cell in a Y/N column that contains the letter R and press Tab. An error message displays at the bottom of the spreadsheet, indicating that you have entered an invalid entry in the cell.
Chapter 4: Entering Payroll Data Using Rapid Pay Data EntryPayroll Processing Guide Version 5.04.01

Exporting Spreadsheet Data to a File 4-55
Exporting Spreadsheet Data to a File
To export payroll data from Rapid Pay Data Entry, do the following:
1. In the Rapid Pay Data Entry spreadsheet, select Export from the Data menu. The Export Data to File dialog box displays.
Figure 4-44. Export Data to File Dialog Box
The File Name field displays the system-defined default filename, in the form rpde_viewname_seqnumber..
2. Verify that the filename is correct. Edit the name if necessary.
3. Click Save.
You’ve just finished exporting spreadsheet data to a file.
For a description of the fields on this dialog box, click Help.
Chapter 4: Entering Payroll Data Using Rapid Pay Data EntryPayroll Processing Guide Version 5.04.01

4-56 Exporting Spreadsheet Data to a File
Chapter 4: Entering Payroll Data Using Rapid Pay Data EntryPayroll Processing Guide Version 5.04.01

Chapter 5
Importing Pay Cycle Data
PAGE TOPIC
5-2 Introduction
5-3 Importing Pay Cycle Data Through the ADP Pay Data Entry System
5-36 Importing Pay Cycle Data Using PAY020
Chapter 5: Importing Pay Cycle DataPayroll Processing Guide Version 5.04.01

5-2 Introduction
Introduction
In addition to manually entering your pay cycle data into paysheets, you can import pay cycle data in several ways:
• From ADP Employee Pay Data Entry, ADP Rapid Pay Data Entry, or an external csv file; all into the ADP Pay Data Entry (PDE) system, and from there via the TAA020 process to the paysheet.
• From an external file or from Performance Plan Payment data via the PAY020 process into the paysheet.
This chapter explains how to import data via the TAA020 and PAY020 processes.
For information about manually entering data directly into paysheets, see Chapter 3, “Entering Pay Cycle Data Using Paysheets.”
For information about importing data through Rapid Pay Data Entry, see Chapter 4, “Entering Payroll Data Using Rapid Pay Data Entry.”
As you work through the tasks in this chapter, you may have questions about fields and
options on the panels. To display a description of the fields and options, press F1 (Help) from the panel.
You can often complete a task in the product in multiple ways. For information on interface shortcuts and tips, refer to the Using ADP Enterprise HR Guide.
Chapter 5: Importing Pay Cycle DataPayroll Processing Guide Version 5.04.01

Importing Pay Cycle Data Through the ADP Pay Data Entry System 5-3
Importing Pay Cycle Data Through the ADP Pay Data Entry System
You can import pay data from multiple sources through the Pay Data Entry system and the TAA020 Import module. You can do the following:
• Use Employee Pay Data Entry to enter pay data directly into Pay Data Entry.
• Use Rapid Pay Data Entry to use a convenient spreadsheet model to enter data directly into Pay Data Entry.
• Use TAA015 Import module to import data from external .csv files.
This section explains how to import pay data using the ADP Pay Data Entry System. This information is presented in the following sections:
• Creating Batch Information
• Entering Employee Pay Data in ADP Pay Data Entry
• Importing Data from the Time and Attendance Application
• Importing Data from ADP Rapid Pay Data Entry
• Indicating that Pay Data Entry is Complete
• Verifying that All Batches are Complete
• Reviewing Pay Cycle Data
• Correcting Pay Cycle Data
• Moving the Pay Cycle Data into Paysheets Using TAA020
Chapter 5: Importing Pay Cycle DataPayroll Processing Guide Version 5.04.01

5-4 Importing Pay Cycle Data Through the ADP Pay Data Entry System
Creating Batch Information
To organize data you are importing, you create batches and one or more spreadsheets per batch. To create batches and spreadsheets, you use the Batch task.
Establishing batch information consists of the following:
• Setting Up Batch Information
• Setting Up Spreadsheet Information
• Deleting Batches and Spreadsheets
Setting Up Batch Information
To add the batch information, do the following:
1. Click Payroll and make the following selections:
Payroll Cycle Processes ~ Time and Attendance
2. Click next to the Batch Information task. The Add dialog box displays.
Figure 5-1. Add Dialog Box
To modify existing batch header information, double-click the Batch Information task,
enter the search criteria in the Search dialog box, and click OK. To preserve history, click
(Insert Row).
Importing Pay Cycle Data Through the ADP Pay Data Entry System
Creating Batch Information
Entering Employee Pay Data in ADP Pay Data Entry
Importing Data from the Time and Attendance Application
Importing Data from ADP Rapid Pay Data Entry
Indicating that Pay Data Entry is Complete
Verifying that All Batches are Complete
Correcting Pay Cycle Data
Reviewing Pay Cycle Data
Moving the Pay Cycle Data into Paysheets Using TAA020
Chapter 5: Importing Pay Cycle DataPayroll Processing Guide Version 5.04.01

Importing Pay Cycle Data Through the ADP Pay Data Entry System 5-5
3. Enter your batch identification in the Batch field and click OK. The Batch panel displays.
Figure 5-2. Batch Panel
4. Review the following transaction information:
• Total Transactions - Displays the total number of transactions in the pay data file to be updated to paysheets.
• Imported Transactions - Displays the total number of transactions in the pay data file that have been imported.
5. Enter a description of the batch header in the Description field.
6. From the Pay Run ID field, select a run ID.
Only run IDs for payroll cycles that have not yet been confirmed are listed.
7. If you know the control total hours and earnings for the batch—regular, overtime, and other—enter that data in the Data Entry column.
For a description of the fields on this panel, press F1.
Chapter 5: Importing Pay Cycle DataPayroll Processing Guide Version 5.04.01

5-6 Importing Pay Cycle Data Through the ADP Pay Data Entry System
Setting Up Spreadsheet Information
To set up the spreadsheet information, do the following:
1. Click the Spreadsheet(s) tab. The Spreadsheet(s) panel displays.
Figure 5-3. Spreadsheet(s) Panel
2. Enter the name for your spreadsheet in the Spreadsheet field.
This name is defaulted by Enterprise Payroll to the batch name.
3. Enter a description of the spreadsheet (such as biweekly, hourly, or overtime) in the Description field.
4. If you know the control total hours and earnings for the spreadsheet—regular, overtime, and other—enter that data in the Data Entry column.
5. After you have entered your pay cycle data for this spreadsheet using Rapid Pay Data Entry, ADP Employee Pay Data Entry, or Import (TAA015), you can manually select the Completed check box. This may be useful for a remote site to inform the central payroll office that the information is complete.
6. When you are finished, click (Save).
For a description of the fields on this panel, press F1.
Chapter 5: Importing Pay Cycle DataPayroll Processing Guide Version 5.04.01

Importing Pay Cycle Data Through the ADP Pay Data Entry System 5-7
Deleting Batches and Spreadsheets
If you have batches and/or spreadsheets that you don’t use anymore or you created a batch/spreadsheet erroneously, you can use the Delete Batches/Spreadsheets task to delete the batch and/or spreadsheet.
To delete a batch and/or spreadsheet, do the following:
1. Click Payroll and make the following selections:
Payroll Cycle Processes ~ Time and Attendance
2. Double-click the Delete Batches/Spreadsheets task. The Search dialog box displays.
Figure 5-4. Search Dialog Box
3. Enter your batch identification in the Batch field, and click OK. The Delete Batch/Spreadsheet(s) panel displays.
Figure 5-5. Delete Batch/Spreadsheet(s) Panel
For a description of the fields on this panel, press F1.
Chapter 5: Importing Pay Cycle DataPayroll Processing Guide Version 5.04.01

5-8 Importing Pay Cycle Data Through the ADP Pay Data Entry System
4. Review the following information about the spreadsheets:
• Spreadsheet - Displays the name of the spreadsheet.
• Description - Displays the description for the spreadsheet.
• Completed - Indicates that the spreadsheet has been completed.
• Total Transactions - Displays the total number of entries made in the spreadsheet.
• Processed Transactions - Displays the total number of entries moved into paysheets within ADP Enterprise HR.
5. To delete batches/spreadsheets, do one of the following:
• To delete only some of the spreadsheets that are part of the batch, select the Delete check box by each of the appropriate spreadsheets listed on the panel.
• To delete the batch and all spreadsheets that are part of the batch, click Select All.
6. When you are finished, click (Save) to delete the batch and/or spreadsheets. You will receive the following confirmation:
The Selected Batch/Spreadsheets and their Pay Data Entry transaction have been deleted.
You have just finished adding and deleting batch and spreadsheet information, which is the last step in creating batch information for the pay cycle data file.
Next, you can enter data into ADP Pay Data Entry, as explained in “Entering Employee Pay Data in ADP Pay Data Entry” on page 5-9; import data from the Time and Attendance Application, as explained in “Importing Data from the Time and Attendance Application” on page 5-20; or import data from ADP Rapid Pay Data Entry, as explained in “Importing Data from ADP Rapid Pay Data Entry” on page 5-24.
Chapter 5: Importing Pay Cycle DataPayroll Processing Guide Version 5.04.01

Importing Pay Cycle Data Through the ADP Pay Data Entry System 5-9
Entering Employee Pay Data in ADP Pay Data Entry
You can enter employee pay cycle data using the Pay Data Entry tasks (Payroll ~ Payroll Cycle Processes ~ Time and Attendance).
To add an employee to a spreadsheet, use one of the following tasks:
• Pay Data Entry: Add Employee - Add pay data for a single employee to a spreadsheet.
See “Adding an Individual Employee to a Spreadsheet” on page 5-9.
• Pay Data Entry by Spreadsheet - Open the spreadsheet and perform heads-down data entry for multiple employees.
See “Adding Data for Multiple Employees in the Same Spreadsheet” on page 5-12.
To update pay data for an employee already in a spreadsheet, use one of the following tasks:
• Pay Data Entry by Employee - Update pay data for one employee.
See “Updating an Individual Employee’s Pay Data” on page 5-14.
• Pay Data Entry by Spreadsheet - Open the spreadsheet and perform heads-down data entry for multiple employees.
See “Adding Data for Multiple Employees in the Same Spreadsheet” on page 5-12.
Adding Pay Data for an Employee
To add an employee to a spreadsheet, use one of the following processes:
• Adding an Individual Employee to a Spreadsheet
• Adding Data for Multiple Employees in the Same Spreadsheet.
Adding an Individual Employee to a Spreadsheet
To add pay data to a spreadsheet for an individual employee, do the following:
1. Click Payroll and make the following selections:
Payroll Cycle Processes ~ Time and Attendance
For extremely large spreadsheets, use the Pay Data Entry: Add Employee task instead to optimize performance.
For extremely large spreadsheets, use the Pay Data Entry by Employee task instead to optimize performance.
For extremely large spreadsheets, use the Pay Data Entry: Add Employee task instead to optimize performance.
Importing Pay Cycle Data Through the ADP Pay Data Entry System
Creating Batch Information
Entering Employee Pay Data in ADP Pay Data Entry
Importing Data from the Time and Attendance Application
Importing Data from ADP Rapid Pay Data Entry
Indicating that Pay Data Entry is Complete
Verifying that All Batches are Complete
Correcting Pay Cycle Data
Reviewing Pay Cycle Data
Moving the Pay Cycle Data into Paysheets Using TAA020
Chapter 5: Importing Pay Cycle DataPayroll Processing Guide Version 5.04.01

5-10 Importing Pay Cycle Data Through the ADP Pay Data Entry System
2. Click next to the Pay Data Entry:Add Employee task. The Add dialog box displays.
Figure 5-6. Add Dialog Box
3. Select the Batch in which the employee’s pay cycle data resides.
4. Select a Spreadsheet from the batch.
5. Select the Empl ID for the employee and click OK. The Pay Data Entry panel displays.
Figure 5-7. Pay Data Entry Panel
6. To review detailed employee information, click to view the Pay Data Entry Information in Figure 5-19 on page 5-27.
7. To change the default job data for this transaction, complete the information in the Job Data Overrides area:
If any field is left blank, the employee’s job record default values are used when the
spreadsheet is imported to the paysheet using TAA020.
• Department - Select a department number.
• Job - Select a job code.
• Position - Select a position number.
For a description of the fields on this panel, press F1.
Chapter 5: Importing Pay Cycle DataPayroll Processing Guide Version 5.04.01

Importing Pay Cycle Data Through the ADP Pay Data Entry System 5-11
• Shift - Select a shift number.
• Hourly Rate - Enter an hourly pay rate for the employee. If the employee is to receive a flat amount of pay, and you entered that amount in the Amount field, leave this field blank.
• GL Pay Type - Enter a general ledger pay type.
• Account/Fund - Select an account or fund code.
8. To change the default paysheet-related data for the employee, complete the information in the Paysheet Option Overrides area:
• Separate Check # - Enter a number for a separate check.
• Additional Taxes - Select this check box to have additional taxes deducted from the pay.
• Gross-Up - Select this check box to perform gross-up calculation on the employee’s pay.
• State - Enter a state where the employee pay is to be accounted.
• Week Number - For FLSA processing, the number assigned to the week to be processed.
• Locality - If you select or enter a state in the State field, and the employee is to be paid in a locality with its own taxes, enter or select the locality here.
• Direct Deposit - Select None, Standard, or Special for direct deposit of the employee’s pay.
• Deduction Taken- Select None, Standard, or Subset for deductions from the employee’s pay.
• Deduction Subset - If you select Subset in the Deduction field, you may enter or select a subset value in this field.
9. Select the earnings code for the employee and the hours you are entering from the Earning field.
10. Enter the number of hours the employee worked during this payroll cycle in the Hours field or a flat dollar amount in the Amount field.
11. When you are finished, click (Save).
You’ve just finished adding pay data for a individual employee. Next, you can learn how to add pay data for multiple employees in the same spreadsheet. If you are finished entering employee pay data into the spreadsheets, see “Indicating that Pay Data Entry is Complete” on page 5-24.
Chapter 5: Importing Pay Cycle DataPayroll Processing Guide Version 5.04.01

5-12 Importing Pay Cycle Data Through the ADP Pay Data Entry System
Adding Data for Multiple Employees in the Same Spreadsheet
You can use the Pay Data Entry by Spreadsheet task to perform heads-down data entry for multiple employees in the same spreadsheet.
To add pay data for multiple employees to the same spreadsheet, do the following:
1. Click Payroll and make the following selections:
Payroll Cycle Processes ~ Time and Attendance
2. Double-click the Pay Data Entry by Spreadsheet task. The Search dialog box displays.
Figure 5-8. Search Dialog Box
3. Select the Batch and Spreadsheet to which you want to add the employee and click OK.
The Pay Data Entry panel displays.
Figure 5-9. Pay Data Entry Panel
4. Review the following transaction status information:
For extremely large spreadsheets, use the Pay Data Entry: Add Employee task or the Pay Data Entry by Employee task instead to optimize performance.
Use the scroll bar to view pay data for each employee in the spreadsheet.
For a description of the fields on this panel, press F1.
Chapter 5: Importing Pay Cycle DataPayroll Processing Guide Version 5.04.01

Importing Pay Cycle Data Through the ADP Pay Data Entry System 5-13
• Transaction Status - Indicates the status of each entry in the batch:
– In Error - Indicates that you have tried to move the pay cycle data into paysheets (TAA020) but that process was unsuccessful. For more information about your
error, click (Report Outputs), select the log file from the batch directory that TAA020 generated, and review the data.
– Initial - Indicates that data was just entered.
– Processed - Indicates that Enterprise Payroll has moved the pay cycle data to paysheets.
• Last Updated By - Displays the last user that updated the batch.
5. To add an employee to the spreadsheet:
a. Click (Insert Row)
b. Select the Employee ID.
c. Select the employee’s record number from the Rec # field.
6. To review detailed employee information, click to view the Pay Data Entry Information in Figure 5-19 on page 5-27.
7. To change the default job data for this transaction, update the information in the Job Data Overrides area:
If any field is left blank, the employee’s job record default values are used when the
spreadsheet is imported to the paysheet using TAA020.
• Department - Select a department number.
• Job - Select a job code.
• Position - Select a position number.
• Shift - Select a shift number.
• Hourly Rate - Enter an hourly pay rate for the employee. If the employee is to receive a flat amount of pay, and you entered that amount in the Amount field, leave this field blank.
• GL Pay Type - Enter a general ledger pay type.
• Account/Fund - Select an account or fund code.
8. To change the default paysheet-related data for the employee, change the information in the Paysheet Option Overrides area:
• Separate Check # - Enter a number for a separate check.
• Additional Taxes - Select this check box to have additional taxes deducted from the pay.
Chapter 5: Importing Pay Cycle DataPayroll Processing Guide Version 5.04.01

5-14 Importing Pay Cycle Data Through the ADP Pay Data Entry System
• Gross-Up - Select this check box to perform gross-up calculation on the employee’s pay.
• State - Enter a state where the employee pay is to be accounted.
• Week Number - For FLSA processing, the number assigned to the week to be processed.
• Locality - If you select or enter a state in the State field, and the employee is to be paid in a locality with its own taxes, enter or select the locality here.
• Direct Deposit - Select None, Standard, or Special for direct deposit of the employee’s pay.
• Deduction Taken- Select None, Standard, or Subset for deductions from the employee’s pay.
• Deduction Subset - If you select Subset in the Deduction field, you may enter or select a subset value in this field.
9. Select the earnings code for the employee and the hours you are entering from the Earning field.
10. Enter the number of hours the employee worked during this payroll cycle in the Hours field or a flat dollar amount in the Amount field.
11. When you are finished, click (Save).
You’ve just finished adding pay data for multiple employees in the same spreadsheet. Next, you can learn how update pay data. If you are finished entering employee pay data into the spreadsheets, see “Indicating that Pay Data Entry is Complete” on page 5-24.
Updating Pay Data for an Employee
To update employee pay data information in a spreadsheet, use one of the following processes:
• Updating an Individual Employee’s Pay Data
• Adding Data for Multiple Employees in the Same Spreadsheet.
Updating an Individual Employee’s Pay Data
To update pay data for an employee already in a spreadsheet, do the following:
1. Click Payroll and make the following selections:
Payroll Cycle Processes ~ Time and Attendance
For extremely large spreadsheets, use the Pay Data Entry by Employee task instead to optimize performance.
Chapter 5: Importing Pay Cycle DataPayroll Processing Guide Version 5.04.01

Importing Pay Cycle Data Through the ADP Pay Data Entry System 5-15
2. Double-click the Pay Data Entry by Employee task. The Add dialog box displays.
Figure 5-10. Add Dialog Box
3. Select the Batch and Spreadsheet in which the employee’s pay cycle data resides.
4. Select the Empl ID for the employee.
5. To specify that you want to view pay data with a specific transaction status, select one of the following options from the Include Employees with field and then and click OK:
• Transactions in Error
• Initially Loaded Transactions
• Processed Transactions
The Pay Data Entry panel displays.
Figure 5-11. Pay Data Entry Panel
6. Review the following transaction status information:
• Transaction Status - Indicates the status of each entry in the batch:
Use the scroll bar to view all of the employee’s earnings.
For a description of the fields on this panel, press F1.
Chapter 5: Importing Pay Cycle DataPayroll Processing Guide Version 5.04.01

5-16 Importing Pay Cycle Data Through the ADP Pay Data Entry System
– In Error - Indicates that you have tried to move the pay cycle data into paysheets (TAA020) but that process was unsuccessful. For more information about your
error, click (Report Outputs), select the log file from the batch directory that TAA020 generated, and review the data.
– Initial - Indicates that data was just entered. When paysheets are deleted using the Delete Pay Cycle Data (PAYUNSHT) utility, the Transaction Status will change from “Processed” to “Initial.”
– Processed - Indicates that Enterprise Payroll has moved the pay cycle data to paysheets.
• Last Updated By - Displays the last user that updated the batch.
7. To review detailed employee information, click to view the Pay Data Entry Information in Figure 5-19 on page 5-27.
8. To change the default job data for this transaction, update the information in the Job Data Overrides area:
If any field is left blank, the employee’s job record default values are used when the
spreadsheet is imported to the paysheet using TAA020.
• Department - Select a department number.
• Job - Select a job code.
• Position - Select a position number.
• Shift - Select a shift number.
• Hourly Rate - Enter an hourly pay rate for the employee. If the employee is to receive a flat amount of pay, and you entered that amount in the Amount field, leave this field blank.
• GL Pay Type - Enter a general ledger pay type.
• Account/Fund - Select an account or fund code.
9. To change the default paysheet-related data for the employee, change the information in the Paysheet Option Overrides area:
• Separate Check # - Enter a number for a separate check.
• Additional Taxes - Select this check box to have additional taxes deducted from the pay.
• Gross-Up - Select this check box to perform gross-up calculation on the employee’s pay.
• State - Enter a state where the employee pay is to be accounted.
• Week Number - For FLSA processing, the number assigned to the week to be processed.
Chapter 5: Importing Pay Cycle DataPayroll Processing Guide Version 5.04.01

Importing Pay Cycle Data Through the ADP Pay Data Entry System 5-17
• Locality - If you select or enter a state in the State field, and the employee is to be paid in a locality with its own taxes, enter or select the locality here.
• Direct Deposit - Select None, Standard, or Special for direct deposit of the employee’s pay.
• Deduction Taken- Select None, Standard, or Subset for deductions from the employee’s pay.
• Deduction Subset - If you select Subset in the Deduction field, you may enter or select a subset value in this field.
10. Select the earnings code for the employee and the hours you are entering from the Earning field.
11. Enter the number of hours the employee worked during this payroll cycle in the Hours field or a flat dollar amount in the Amount field.
12. When you are finished, click (Save).
You’ve just finished updating a specific employee’s pay data data. Next, you can learn how to update data for multiple employees in the same spreadsheet. If you are finished entering employee pay data into the spreadsheets, see “Indicating that Pay Data Entry is Complete” on page 5-24.
Updating Data for Multiple Employees in the Same Spreadsheet
You can use the Pay Data Entry by Spreadsheet task to perform heads-down data entry for multiple employees in the same spreadsheet.
To update pay data, do the following:
1. Click Payroll and make the following selections:
Payroll Cycle Processes ~ Time and Attendance
2. Double-click the Pay Data Entry by Spreadsheet task. The Search dialog box displays.
Figure 5-12. Search Dialog Box
For extremely large spreadsheets, use the Pay Data Entry: Add Employee task or the Pay Data Entry by Employee task instead to optimize performance.
Chapter 5: Importing Pay Cycle DataPayroll Processing Guide Version 5.04.01

5-18 Importing Pay Cycle Data Through the ADP Pay Data Entry System
3. Select the Batch and Spreadsheet that contains the employee’s pay data and click OK. The Pay Data Entry panel displays.
Figure 5-13. Pay Data Entry Panel
4. Review the following transaction status information:
• Transaction Status - Indicates the status of each entry in the batch:
– In Error - Indicates that you have tried to move the pay cycle data into paysheets (TAA020) but that process was unsuccessful. For more information about your
error, click (Report Outputs), select the log file from the batch directory that TAA020 generated, and review the data.
– Initial - Indicates that data was just entered. When paysheets are deleted using the Delete Pay Cycle Data (PAYUNSHT) utility, the Transaction Status will change from “Processed” to “Initial.”
– Processed - Indicates that Enterprise Payroll has moved the pay cycle data to paysheets.
• Last Updated By - Displays the last user that updated the batch.
5. If necessary, change the employee’s record number from the Rec # field.
6. To review detailed employee information, click to view the Pay Data Entry Information in Figure 5-19 on page 5-27.
7. To change the default job data for this transaction, update the information in the Job Data Overrides area:
If any field is left blank, the employee’s job record default values are used when the
spreadsheet is imported to the paysheet using TAA020.
Use the scroll bar to view pay data for each employee in the spreadsheet.
For a description of the fields on this panel, press F1.
Chapter 5: Importing Pay Cycle DataPayroll Processing Guide Version 5.04.01

Importing Pay Cycle Data Through the ADP Pay Data Entry System 5-19
• Department - Select a department number.
• Job - Select a job code.
• Position - Select a position number.
• Shift - Select a shift number.
• Hourly Rate - Enter an hourly pay rate for the employee. If the employee is to receive a flat amount of pay, and you entered that amount in the Amount field, leave this field blank.
• GL Pay Type - Enter a general ledger pay type.
• Account/Fund - Select an account or fund code.
8. To change the default paysheet-related data for the employee, change the information in the Paysheet Option Overrides area:
• Separate Check # - Enter a number for a separate check.
• Additional Taxes - Select this check box to have additional taxes deducted from the pay.
• Gross-Up - Select this check box to perform gross-up calculation on the employee’s pay.
• State - Enter a state where the employee pay is to be accounted.
• Week Number - For FLSA processing, the number assigned to the week to be processed.
• Locality - If you select or enter a state in the State field, and the employee is to be paid in a locality with its own taxes, enter or select the locality here.
• Direct Deposit - Select None, Standard, or Special for direct deposit of the employee’s pay.
• Deduction Taken- Select None, Standard, or Subset for deductions from the employee’s pay.
• Deduction Subset - If you select Subset in the Deduction field, you may enter or select a subset value in this field.
9. Select the earnings code for the employee and the hours you are entering from the Earning field.
10. Enter the number of hours the employee worked during this payroll cycle in the Hours field or a flat dollar amount in the Amount field.
11. When you are finished, click (Save).
You’ve just finished updating pay data for multiple employees in the same spreadsheet. If you are finished entering employee pay data into the spreadsheets, see “Indicating that Pay Data Entry is Complete” on page 5-24.
Chapter 5: Importing Pay Cycle DataPayroll Processing Guide Version 5.04.01

5-20 Importing Pay Cycle Data Through the ADP Pay Data Entry System
Importing Data from the Time and Attendance Application
Importing Pay Cycle Data consists of the following:
• Preparing for the External File Import
• Importing the Batch into the Time and Attendance Application
• Reviewing Pay Cycle Data
• Correcting Pay Cycle Data
Preparing for the External File Import
Before you can import external pay cycle data into Time and Attendance, you must complete the following tasks:
1. Collect time data using an automated time collection system. (Refer to the documentation for your time collection system.)
2. Make sure that your external time collection file meets the ADP file specifications listed in the following table so that it can be imported into Time and Attendance.
If you file does not meet these file specifications, you must modify the applicable SQRs.
Column Description Position Length Column Format
Import File Type 01 01 Required. Alphanumeric.
Employee ID 02 11 Required. Alphanumeric, Left-justified.
Employee Rcd# 13 03 Required. Numeric, Right-justified, Left zero-filled.
Pay Period End Date 16 08 Required. CCYYMMDD.
Department 24 10 Alphanumeric, Left-justified.
Job Code 34 06 Alphanumeric, Left-justified.
Rate 40 08 Numeric, Right-justified, Left zero-filled (9999.999).
Pay Category 48 10 Alphanumeric, Left-justified.
Hours Worked 58 08 Required. Numeric: positive value ' ' (blank)negative value '-' (hyphen) Right Justify, Left Zero Filled (s9999.99).
Importing Pay Cycle Data Through the ADP Pay Data Entry System
Creating Batch Information
Entering Employee Pay Data in ADP Pay Data Entry
Importing Data from the Time and Attendance Application
Importing Data from ADP Rapid Pay Data Entry
Indicating that Pay Data Entry is Complete
Verifying that All Batches are Complete
Correcting Pay Cycle Data
Reviewing Pay Cycle Data
Moving the Pay Cycle Data into Paysheets Using TAA020
Chapter 5: Importing Pay Cycle DataPayroll Processing Guide Version 5.04.01

Importing Pay Cycle Data Through the ADP Pay Data Entry System 5-21
Total record length = 143 bytes plus CR/LF record terminator
You’ve just prepared for the external file import. Next, you can import the pay cycle data.
$ Amount 66 12 Required. Numeric: positive value ' ' (blank)negative value '-' (hyphen)Right Justify, Left Zero Filled (s99999999.99).
Shift 78 01 Alphanumeric.
Position # 79 08 Alphanumeric, Right-justified, Left space-filled.
GL Pay Type 87 06 Alphanumeric, Left-justified.
Account Code 93 25 Alphanumeric, Left-justified.
Pay Period Begin Date
118 08 CCYYMMDD (used to determine week number for FLSA processing).
Additional Taxes 126 1 Y or N. Default is Y.
Gross-Up 127 1 Y or N. Default is N.
Separate Check 128 1 0-9. Default is 0.
Direct Deposit 129 1 N (Standard), S (Special), Y (None). Default is N.
Deduction Taken 130 1 D (Standard), N (None), or S (Subset). Default is D.
Deduction Subset 131 3 Alphanumeric. If Deduction Taken=Standard (N) or None (Y) , this field is blank. Default is N (Standard).
State 134 2 Alphanumeric.
Locality 136 7 Alphanumeric. If State is blank, this field is blank.
Column Description Position Length Column Format
Chapter 5: Importing Pay Cycle DataPayroll Processing Guide Version 5.04.01

5-22 Importing Pay Cycle Data Through the ADP Pay Data Entry System
Importing the Batch into the Time and Attendance Application
Before executing the external pay data file import process for each external file, you must establish the batch import information.
To define the batch import information, do the following:
1. Click Payroll and make the following selections:
Payroll Cycle Processes ~ Time and Attendance
2. Double-click the Import T&A Batch (TAA015) task. The Import T&A Batch panel displays.
Figure 5-14. Import T&A Batch Panel
3. In the Import Name field, select an import name that has been defined using the Time and Attendance Imports task (Payroll ~ Company Definitions ~ Time and Attendance). The File Type and Default File Name automatically display.
4. If you want to override the current filename displayed in the Default File Name field, enter a different filename in the Override File Name field.
5. From the Target Spreadsheet area, do the following:
a. Batch ID field, select the batch containing the spreadsheet into which you want the data imported.
b. From the Spreadsheet field, select the spreadsheet into which you want the data imported.
For a description of the fields on this panel, press F1.
Chapter 5: Importing Pay Cycle DataPayroll Processing Guide Version 5.04.01

Importing Pay Cycle Data Through the ADP Pay Data Entry System 5-23
6. From the Run Type area, select one of the following options:
• Report Only - If you select this option, Enterprise Payroll validates and lists errors but does not store the data.
• Report and Update - If you select this option, Enterprise Payroll validates, lists errors, and stores the data.
7. When you are finished, click (Save).
8. Click Run Report. You will receive a message notifying you that your process has been
submitted. Click OK. To confirm successful completion of your process, click (Process Monitor).
For additional information on using the Process Monitor, see the Using ADP Enterprise HR Guide.
You’ve just imported pay cycle data from the Time and Attendance Application. When you finish entering data for a spreadsheet, you can indicate that the current spreadsheet is complete.
Chapter 5: Importing Pay Cycle DataPayroll Processing Guide Version 5.04.01

5-24 Importing Pay Cycle Data Through the ADP Pay Data Entry System
Importing Data from ADP Rapid Pay Data Entry
Rapid Pay Data Entry (RPDE) is a program that provides an additional method of entering exception pay data into ADP Enterprise HR using a spreadsheet.
Rapid Pay Data Entry provides “heads-down” data entry capability for entering Enterprise Payroll exception data. Hours, earnings, and other paysheet-specific data are keyed into a spreadsheet format and saved directly to Enterprise Payroll.
For information about Rapid Pay Data Entry, see Chapter 4, “Entering Payroll Data Using Rapid Pay Data Entry.”
You’ve just imported pay cycle data from ADP Rapid Pay Data Entry. When you finish entering data for a spreadsheet, you can indicate that the current spreadsheet is complete.
Indicating that Pay Data Entry is Complete
After you’ve entered all your pay cycle data for a specific spreadsheet, you can select the Completed check box on the Spreadsheet(s) panel to indicate that the spreadsheet is complete. Using the Batch Status panel, the central payroll office can determine when the remote offices have completed their pay data entry and so that they can move the pay cycle data for a specific pay run ID into paysheets.
To indicate that pay data entry for a specific spreadsheet is complete, do the following:
1. Click Payroll and make the following selections:
Payroll Cycle Processes ~ Time and Attendance
2. Double-click the Batch Information task. The Search dialog box displays.
Figure 5-15. Search Dialog Box
3. Enter your batch identification in the Batch field, and click OK. The Batch panel displays that batch’s data.
Importing Pay Cycle Data Through the ADP Pay Data Entry System
Creating Batch Information
Entering Employee Pay Data in ADP Pay Data Entry
Importing Data from the Time and Attendance Application
Importing Data from ADP Rapid Pay Data Entry
Indicating that Pay Data Entry is Complete
Verifying that All Batches are Complete
Correcting Pay Cycle Data
Reviewing Pay Cycle Data
Moving the Pay Cycle Data into Paysheets Using TAA020
Chapter 5: Importing Pay Cycle DataPayroll Processing Guide Version 5.04.01

Importing Pay Cycle Data Through the ADP Pay Data Entry System 5-25
4. Click the Spreadsheet(s) tab. The Spreadsheet(s) panel displays.
Figure 5-16. Spreasheet(s) Panel
For a description of the fields on this panel, see page 5-6.
5. For each spreadsheet that is complete, select the Completed check box.
6. Click (Save).
You’ve just indicated that a spreadsheet is complete. Next you can verify that all batches are complete.
For a description of the fields on this panel, press F1.
Chapter 5: Importing Pay Cycle DataPayroll Processing Guide Version 5.04.01

5-26 Importing Pay Cycle Data Through the ADP Pay Data Entry System
Verifying that All Batches are Complete
Before you move the pay cycle data into paysheets, you can verify that all batches attached to a specific pay run ID are complete. This is especially helpful for a central payroll office that wants to verify that all remote offices have completed the pay data entry.
To verify that all batches are complete, do the following:
1. Click Payroll and make the following selections:
Payroll Cycle Processes ~ Time and Attendance
2. Double-click the Batch Status task. The Search dialog box displays.
Figure 5-17. Search Dialog Box
3. Enter the batch number in the Batch field, and click OK. The Batch Status panel displays data about that batch.
Figure 5-18. Batch Status Panel
For a description of the fields on this panel, press F1.
4. Verify that the Completed check box is selected for each spreadsheet that is a part of the batch.
Importing Pay Cycle Data Through the ADP Pay Data Entry System
Creating Batch Information
Entering Employee Pay Data in ADP Pay Data Entry
Importing Data from the Time and Attendance Application
Importing Data from ADP Rapid Pay Data Entry
Indicating that Pay Data Entry is Complete
Verifying that All Batches are Complete
Correcting Pay Cycle Data
Reviewing Pay Cycle Data
Moving the Pay Cycle Data into Paysheets Using TAA020
Chapter 5: Importing Pay Cycle DataPayroll Processing Guide Version 5.04.01

Importing Pay Cycle Data Through the ADP Pay Data Entry System 5-27
5. To view information for other batches that are part of the same pay run ID, click
(Repeat Add/Search) and select the next batch number.
6. When you are finished reviewing the information, click (Close).
You’ve just finished verifying that all batches attached to a specific pay run ID are complete. Next, you can correct any errors in your pay cycle data.
Correcting Pay Cycle Data
After reviewing the pay cycle data, you may need to make corrections for specific employees. You can do this by correcting the information on the Pay Data Entry panel (Employee Pay Data Entry task).
At any time while you are correcting pay cycle data for an employee on the Pay Data Entry
panel, you can click to view key employee information on the Pay Data Entry Information panel, as shown in Figure 5-19.
Figure 5-19. Pay Data Entry Information Panel
To correct pay cycle data for a specific employee, do the following:
1. Click Payroll and make the following selections:
Payroll Cycle Processes ~ Time and Attendance
Importing Pay Cycle Data Through the ADP Pay Data Entry System
Creating Batch Information
Entering Employee Pay Data in ADP Pay Data Entry
Importing Data from the Time and Attendance Application
Importing Data from ADP Rapid Pay Data Entry
Indicating that Pay Data Entry is Complete
Verifying that All Batches are Complete
Correcting Pay Cycle Data
Reviewing Pay Cycle Data
Moving the Pay Cycle Data into Paysheets Using TAA020
Chapter 5: Importing Pay Cycle DataPayroll Processing Guide Version 5.04.01

5-28 Importing Pay Cycle Data Through the ADP Pay Data Entry System
2. Double-click the Employee Pay Data Entry task. The Search dialog box displays.
Figure 5-20. Search Dialog Box
3. In the Batch field, select the ID of the batch in which the employee’s pay cycle data resides.
4. Select the spreadsheet for the batch from the Spreadsheet field.
5. In the Empl ID field, select the ID of the first employee whose pay cycle data you need to correct, and click OK. The Pay Data Entry panel displays.
Figure 5-21. Pay Data Entry Panel
For detailed information on the fields on this panel, see page 5-7.
6. In the Earnings field, select the earnings code for the transaction you want to change.
7. Do one of the following to enter hours or amounts:
• In the Hours field, enter the number of hours that are affected by this transaction.
• In the Amount field, enter the amount that is affected by this transaction.
8. If you want to override any of the home department information on the paysheets, enter the data in the Job Data Overrides area.
9. When you are finished, click (Save).
For a description of the fields on this panel, press F1.
Chapter 5: Importing Pay Cycle DataPayroll Processing Guide Version 5.04.01

Importing Pay Cycle Data Through the ADP Pay Data Entry System 5-29
You have finished correcting pay cycle data. Next, you can review the information.
Reviewing Pay Cycle Data
Once you’ve entered or imported your pay cycle data into Time and Attendance, and corrected any errors, you can review the information.
Reviewing pay cycle data consists of the following tasks:
• Reviewing Batch Information Online
• Printing the Batch Totals List
• Customizing the Batch Detail List Report
Reviewing Batch Information Online
To view the batch information online in the Batch panel, do the following:
1. Click Payroll and make the following selections:
Payroll Cycle Processes ~ Time and Attendance
2. Double-click the Batch Information task. The Search dialog box displays.
Figure 5-22. Search Dialog Box
Importing Pay Cycle Data Through the ADP Pay Data Entry System
Creating Batch Information
Entering Employee Pay Data in ADP Pay Data Entry
Importing Data from the Time and Attendance Application
Importing Data from ADP Rapid Pay Data Entry
Indicating that Pay Data Entry is Complete
Verifying that All Batches are Complete
Correcting Pay Cycle Data
Reviewing Pay Cycle Data
Moving the Pay Cycle Data into Paysheets Using TAA020
Chapter 5: Importing Pay Cycle DataPayroll Processing Guide Version 5.04.01

5-30 Importing Pay Cycle Data Through the ADP Pay Data Entry System
3. Enter the batch ID in the Batch field, and click OK. The Batch panel displays.
Figure 5-23. Batch Panel
For a description of the fields on this panel, see page 5-4.
4. View the batch information.
The difference between all the employee record totals for hours and earnings and the
total of the Calculated and Data Entry columns displays in the Difference column.
5. Click the Spreadsheet(s) tab to view the spreadsheet header information. The Spreadsheet(s) panel displays.
Figure 5-24. Spreadsheet(s) Panel
For a description of the fields on this panel, see page 5-6.
Chapter 5: Importing Pay Cycle DataPayroll Processing Guide Version 5.04.01

Importing Pay Cycle Data Through the ADP Pay Data Entry System 5-31
6. View the spreadsheet information.
The difference between all the employee record totals for hours and earnings and the
total of the Calculated and Data Entry columns displays in the Difference column.
7. When you are finished, click (Close).
You have just finished viewing batch header and spreadsheet header information online. Next, you can print the batch information.
Printing the Batch Totals List
You can view the batch ID, hours, and earnings in the Calculated column on the Batch Totals List (TAA001).
To print the Batch Totals List, do the following:
1. Click Payroll and make the following selections:
Payroll Cycle Processes ~ Time and Attendance
2. Double-click the Print Batch Totals (TAA001) task. The Print Batch Totals List panel displays.
No input is required for this report.
3. Click Run Report. You will receive a message notifying you that your process has been
submitted. Click OK. When the process has completed, click (Report Outputs) to view the report.
For additional information on running, viewing, and printing reports, refer to the Using ADP Enterprise HR Guide. For details on sources, sort order, and an illustration of the report, see the Standard Reports Guide.
Chapter 5: Importing Pay Cycle DataPayroll Processing Guide Version 5.04.01

5-32 Importing Pay Cycle Data Through the ADP Pay Data Entry System
Customizing the Batch Detail List Report
You can review detailed pay data transactions on the Batch Detail List report (TAA002). This report displays all batches, confirmed and unconfirmed. You can customize the Batch Detail List report so that it displays only the batch information you want to see so that it can be used as a troubleshooting aid.
To specify what you want to view in the Batch Detail report and then print the report, do the following:
1. Click Payroll and make the following selections:
Payroll Cycle Processes ~ Time and Attendance
2. Double-click the Print Batch Details (TAA002) task. The Print Batch Details panel displays.
Figure 5-25. Print Batch Details Panel
3. From the Print Detail for area, select one of the following options:
• Batch ID - If you want to print the detail for a single batch, select this option and then select the specific batch ID.
• All batches associated with Pay Run ID - If you want to print the detail for multiple batches that are attached to the same run ID, select this option and then select the pay run ID to which all batches are attached.
4. From the Sort Order Within Batches area, indicate how you want the information in the batch sorted.
5. When you are finished, click (Save).
For a description of the fields on this panel, press F1.
Chapter 5: Importing Pay Cycle DataPayroll Processing Guide Version 5.04.01

Importing Pay Cycle Data Through the ADP Pay Data Entry System 5-33
6. Click Run Report. You will receive a message notifying you that your process has been
submitted. Click OK. When the process has completed, click (Report Outputs) to view the report.
For additional information on running, viewing, and printing reports, refer to the Using ADP Enterprise HR Guide. For details on sources, sort order, and an illustration of the report, see the Standard Reports Guide.
You’ve finished reviewing imported data. Next, you can move the pay cycle data into paysheets, using TAA020.
Moving the Pay Cycle Data into Paysheets Using TAA020
After you’ve entered your pay cycle data and made any necessary corrections, you are ready to integrate the pay cycle data with the initial pay cycle data that exists on your paysheets.
Use the Move to Pay Cycle Data (Paysheets) task to transfer data from specific Pay Data Entry batches into paysheets. Enterprise Payroll moves all pay cycle data contained in the batches attached to the pay run ID you define in this task. In addition, you can select OK to Pay on the payline when moving pay cycle data into paysheets.
All pay earnings on the same check must share the identical gross-up, direct deposit type,
and deduction type. If they do not, a warning will display on the TAA020.LIS file.
The job code, position number, shift, GL pay type, and account code will default from the employee’s job record if any of the fields are left blank on the Pay Data Entry panel (Payroll ~ Payroll Cycle Pocesses ~ Time and Attendance ~ Employee Pay Data Entry).
Running TAA020 will set the Transaction Status on the Pay Data Entry panel in the Time and Attendance application to one of the following statuses:
• Processed - Displays if the pay cycle data was successfully moved to paysheets.
• In Error - Displays if transaction was unsuccessful.
In addition, the Process Monitor displays one of the following statuses:
• Success - Displays if the pay cycle data was successfully moved to paysheets.
• NotSuccess - Displays if errors occurred in the process. Review the .LIS or .LOG file.
To enter a process run ID, do the following:
1. Click Payroll and make the following selections:
Payroll Cycle Processes ~ Time and Attendance
Importing Pay Cycle Data Through the ADP Pay Data Entry System
Creating Batch Information
Entering Employee Pay Data in ADP Pay Data Entry
Importing Data from the Time and Attendance Application
Importing Data from ADP Rapid Pay Data Entry
Indicating that Pay Data Entry is Complete
Verifying that All Batches are Complete
Correcting Pay Cycle Data
Reviewing Pay Cycle Data
Moving the Pay Cycle Data into Paysheets Using TAA020
Chapter 5: Importing Pay Cycle DataPayroll Processing Guide Version 5.04.01

5-34 Importing Pay Cycle Data Through the ADP Pay Data Entry System
2. Double-click the Move to Pay Cycle Data (Paysheets) (TAA020) task. The Move to Pay Cycle Data panel displays.
Figure 5-26. Move to Pay Cycle Data Panel
3. In the Pay Run ID field, select the pay run ID that is attached to the group of paysheets you want to update, or select a pay run ID for which you want to create paysheets.
4. Select the Turn OK to Pay Indicator On check box if you want to turn on OK to Pay on the payline (Earnings panel) when moving pay cycle data into paysheets.
5. Select the Create Paysheets check box if necessary based on the following conditions:
• Enterprise Payroll checks to see if paysheets exist for employees in the batch.
• If a paysheet exists and data from the paysheet matches the data to be imported, Enterprise Payroll appends earnings data to the existing paysheet.
• If data does not match, and the Create Paysheets check box is selected on the Pay Data Interface Error/Control Report panel, Enterprise Payroll creates new paysheets.
• If data does not match and the Create Paysheets check box is cleared, then data to be imported is not moved to paysheets.
For contract employees, Enterprise Payroll verifies that each employee has an active
contract. Enterprise Payroll then checks to see if the associated payroll calendar is between the start and stop dates of the contract. If it is, the paysheets are built and the employee is paid.
6. In the Run Type area, select whether to run the report and an update, or just the report for the pay run ID.
7. Click (Save).
For a description of the fields on this panel, press F1.
Chapter 5: Importing Pay Cycle DataPayroll Processing Guide Version 5.04.01

Importing Pay Cycle Data Through the ADP Pay Data Entry System 5-35
8. Click Run Report. You will receive a message notifying you that your process has been
submitted. Click OK. To confirm successful completion of your process, click (Process Monitor).
For additional information on using the Process Monitor, see the Using ADP Enterprise HR Guide.
You’ve just finished running the Move to Pay Cycle Data (Paysheets) (TAA020) process, which is the last step in moving your pay cycle data into the existing paysheets. Next, you can calculate and confirm your payroll. For more information, see Chapter 6, “Calculating and Confirming Your Payroll.”
Chapter 5: Importing Pay Cycle DataPayroll Processing Guide Version 5.04.01
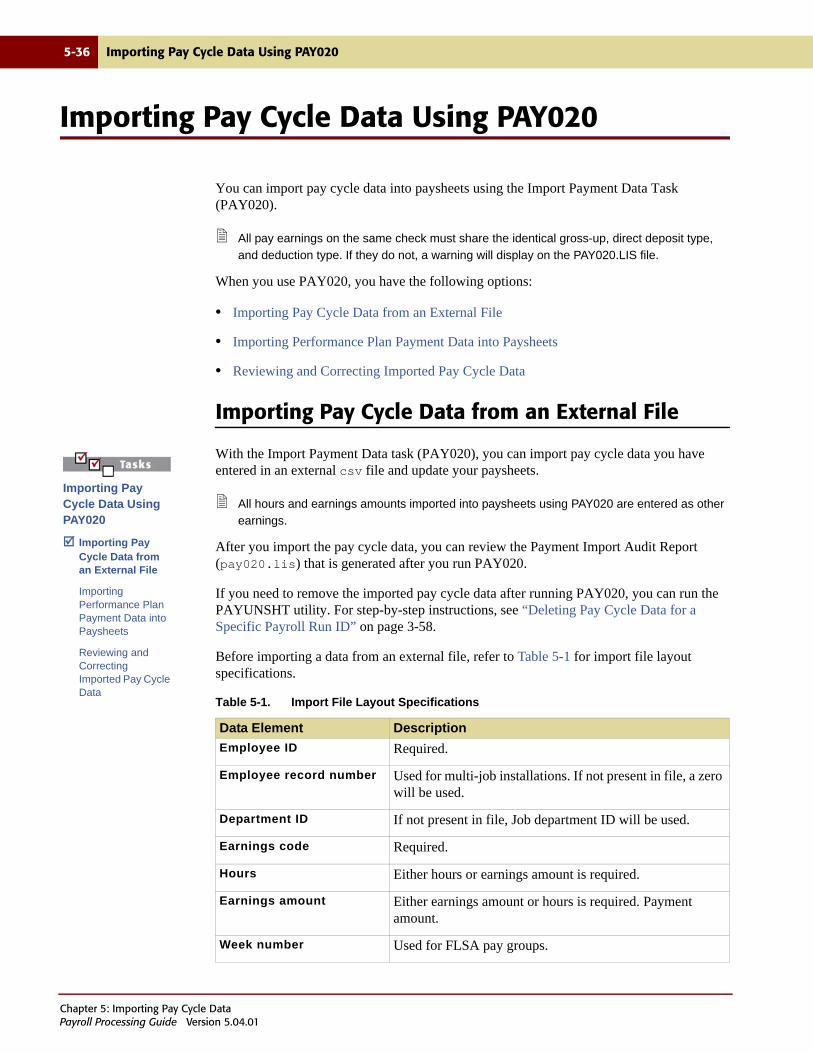
5-36 Importing Pay Cycle Data Using PAY020
Importing Pay Cycle Data Using PAY020
You can import pay cycle data into paysheets using the Import Payment Data Task (PAY020).
All pay earnings on the same check must share the identical gross-up, direct deposit type,
and deduction type. If they do not, a warning will display on the PAY020.LIS file.
When you use PAY020, you have the following options:
• Importing Pay Cycle Data from an External File
• Importing Performance Plan Payment Data into Paysheets
• Reviewing and Correcting Imported Pay Cycle Data
Importing Pay Cycle Data from an External File
With the Import Payment Data task (PAY020), you can import pay cycle data you have entered in an external csv file and update your paysheets.
All hours and earnings amounts imported into paysheets using PAY020 are entered as other
earnings.
After you import the pay cycle data, you can review the Payment Import Audit Report (pay020.lis) that is generated after you run PAY020.
If you need to remove the imported pay cycle data after running PAY020, you can run the PAYUNSHT utility. For step-by-step instructions, see “Deleting Pay Cycle Data for a Specific Payroll Run ID” on page 3-58.
Before importing a data from an external file, refer to Table 5-1 for import file layout specifications.
Table 5-1. Import File Layout Specifications
Data Element Description
Employee ID Required.
Employee record number Used for multi-job installations. If not present in file, a zero will be used.
Department ID If not present in file, Job department ID will be used.
Earnings code Required.
Hours Either hours or earnings amount is required.
Earnings amount Either earnings amount or hours is required. Payment amount.
Week number Used for FLSA pay groups.
Importing Pay Cycle Data Using PAY020
Importing Pay Cycle Data from an External File
Importing Performance Plan Payment Data into Paysheets
Reviewing and Correcting Imported Pay Cycle Data
Chapter 5: Importing Pay Cycle DataPayroll Processing Guide Version 5.04.01

Importing Pay Cycle Data Using PAY020 5-37
To import pay cycle data, do the following:
1. Click Payroll and make the following selections.
Payroll Cycle Processes ~ Scheduled Payroll (On Cycle)
2. Double-click the Import Payment Data (PAY020) task. The Import Payment Data panel displays.
Figure 5-27. Import Payment Data Panel
3. Select a payroll run ID from the Pay Run ID field and press Tab.
4. If you want the payroll to be processed as an off-cycle payroll, select the Off Cycle check box.
If you select this check box, the Set Paysheets Run on Pay Calendar check box is
grayed and unavailable.
General ledger pay type Populated into pay earnings. In the PAY020 module, import file data overrides, run control data, and run control data overrides data from the employee’s Job record.
General ledger account code
Populated into pay earnings. In the PAY020 module, import file data overrides, run control data, and run control data overrides data from the employee’s Job record.
Table 5-1. Import File Layout Specifications (cont.)
Data Element Description
For a description of the fields on this panel, press F1.
Chapter 5: Importing Pay Cycle DataPayroll Processing Guide Version 5.04.01

5-38 Importing Pay Cycle Data Using PAY020
5. Select the Insert new earnings (Create paysheets if necessary) check box if necessary based on the following conditions:
• Enterprise Payroll checks to see if paysheets exist for employees in the batch.
• If a paysheet exists and data from the paysheet matches the data to be imported, Enterprise Payroll appends earnings data to the existing paysheet.
• If data does not match, and the Insert new earnings (Create paysheets if necessary) check box is selected, Enterprise Payroll creates new paysheets.
• If data does not match and the Insert new earnings (Create paysheets if necessary) check box is cleared, the data to be imported is not moved to paysheets.
For contract employees, Enterprise Payroll verifies that each employee has an active
contract. Enterprise Payroll then checks to see if the associated payroll calendar is between the start and stop dates of the contract. If it is, the paysheets are built and the employee is paid.
6. If you want to manually select the Paysheets Run check box on the Payroll Calendars panel, select the Set Paysheets Run on Pay Calendar check box.
This check box is grayed and unavailable unless the paysheets assigned to the specified
pay run ID have not been run and the pay run is an on-cycle payroll.
7. Select the Import from CSV file option.
8. Enter the name of the file that contains the payment data you are importing in the Input File Name field.
9. Select the Job Pay check box to turn the option on at the paysheet level.
10. Select the OK to Pay check box to turn the option on at the paysheet level.
11. Select the Additional Taxes check box to take the additional withholding specified on the employee’s Federal Tax Withholding, State Tax Withholding, and Local Tax Data panels from an individual check.
Clear this check box to prevent additional withholding from being taken out of a particular
check.
12. Select the Gross-Up check box to gross-up a check by calculating gross pay from net pay.
All pay earnings on the same check must share the identical gross-up. If they do not, a
warning will display on the PAY020.LIS file.
13. If you do not want arrears to be deducted from the employee’s pay in addition to the employee’s standard deduction, clear the Process Arrears check box.
This field does not apply to garnishment deductions, since these types of arrears should
always be processed.
Chapter 5: Importing Pay Cycle DataPayroll Processing Guide Version 5.04.01

Importing Pay Cycle Data Using PAY020 5-39
14. If you want to create a separate check for the employees in the special payroll, enter a unique check number in the Sep Chk # field.
If the check number you enter here already exists on a paysheet, then the data will
append to the paysheet instead of creating a separate check.
15. Select one of the following options from the Direct Deposit field:
All pay earnings on the same check must share the identical direct deposit type. If they
do not, a warning will display on the PAY020.LIS file.
• None - The money will not be deposited into the employee’s direct deposit account. Instead, he will receive a check.
• Special - The money will be deposited into the direct deposit account that has the Use for Special Payrolls check box selected on the Direct Deposit panel (Payroll ~ Employee Information ~ Employee Payroll Data ~ Direct Deposit).
• Standard - The money will be deposited based on the employee’s direct deposit options established on the Direct Deposit panel (Payroll ~ Employee Information ~ Employee Payroll Data ~ Direct Deposit).
For details on the Direct Deposit panel, refer to the Payroll Setup and Maintenance
Guide.
16. From the Tax Method area, select the tax method you want Enterprise Payroll to use to calculate tax.
17. Select one of the following options from the Ded Taken field:
All pay earnings on the same check must share the identical deduction type. If they do
not, a warning will display on the PAY020.LIS file.
• None - No additional deductions will be taken from the wages.
• Standard - The employee’s current deductions will remain the same and process as normal.
• Subset - Select a deduction subset to override the employee’s current deductions.
If you select this option, then select the appropriate deduction subset from the Ded
Subset field.
18. Enter the following general ledger information in the General Ledger area:
If you enter general ledger data, it will override any data being imported from your file as
well as the general ledger information on the employees’ job record.
a. Enter the pay type in the GL Pay Type field.
b. Select the account number from the Account/Fund field.
Chapter 5: Importing Pay Cycle DataPayroll Processing Guide Version 5.04.01

5-40 Importing Pay Cycle Data Using PAY020
19. From the SSN Display Option field, select one of the following options to specify how you want Social Security Numbers to display:
• Hide xxx-xx-xxxx
• Mask xxx-xx-6789
• Show 123-45-6789
The options that are available for selection depend on the field display options selected
on the user’s security profile (System Admin ~ Security Administration ~ Operator ~ Profile). If the user profile is set to Hide, the option is grayed out when generating files. The process will automatically print the fields according to the user’s display setting. However, if the user is set to Show, the Display Option fields will be available and the user can choose to change the default of Hide to either Show or Mask. If the user is set to Mask, the Display Option fields will be available and the user can choose to change the default of Hide to Mask.For more information on the user Profile settings, see the Application Administrator’s Guide.
20. In the Run Type area, select one of the following options:
a. Report Only - Print a report of all pay cycle data that will be imported.
b. Report and Update - Import the pay cycle data and then generate a report listing the imported data.
21. Click Run Process. You will receive a message notifying you that your process has been
submitted. Click OK. To confirm successful completion, click (Process Monitor).
For additional information on running a process, refer to the Using ADP Enterprise HR Guide.
You’ve just finished importing a .csv file. Next, you can import Performance Plan Payment data.
Chapter 5: Importing Pay Cycle DataPayroll Processing Guide Version 5.04.01

Importing Pay Cycle Data Using PAY020 5-41
Importing Performance Plan Payment Data into Paysheets
With the Import Payment Data task, you can import performance plan payment data into your paysheets. Performance plan payment data comes from running the CMP012 process which updates the Merit/Bonus Worksheet.
For detailed information on running CMP012, refer to the Planning, Compensation, and
Compliance Guide.
Importing performance plan payment data consists of the following:
• Selecting Import Criteria
• Selecting Performance Plan Payment Criteria and Importing the Data
If you need to remove the imported data after running PAY020, you can run the PAYUNSHT
utility. For step-by-step instructions, see “Deleting Pay Cycle Data for a Specific Payroll Run ID” on page 3-58.
Selecting Import Criteria
Use the Import Payment Data panel to indicate how you want to import performance plan payment data.
To select import criteria, do the following:
1. Click Payroll and make the following selections.
Payroll Cycle Processes ~ Scheduled Payroll (On Cycle)
Importing Pay Cycle Data Using PAY020
Importing Pay Cycle Data from an External File
Importing Performance Plan Payment Data into Paysheets
Reviewing and Correcting Imported Pay Cycle Data
Chapter 5: Importing Pay Cycle DataPayroll Processing Guide Version 5.04.01

5-42 Importing Pay Cycle Data Using PAY020
2. Double-click the Import Payment Data (PAY020) task. The Import Payment Data panel displays.
Figure 5-28. Import Payment Data Panel
For a description of the fields on this panel, press F1 or see page 5-36.
3. Select a payroll run ID from the Pay Run ID field.
4. Select the Import Performance Plan Payments option.
5. If you want the payroll to be processed as an off-cycle payroll, select the Off Cycle check box.
6. Select the Create Paysheets check box if necessary based on the following conditions:
• Enterprise Payroll checks to see if paysheets exist for employees in the batch.
• If a paysheet exists and data from the paysheet matches the data to be imported, Enterprise Payroll appends earnings data to the existing paysheet.
• If data does not match, and the Create Paysheets check box is selected, Enterprise Payroll creates new paysheets.
• If data does not match and the Create Paysheets check box is cleared, the data to be imported is not moved to paysheets.
For contract employees, Enterprise Payroll verifies that each employee has an active
contract. Enterprise Payroll then checks to see if the associated payroll calendar is between the start and stop dates of the contract. If it is, the paysheets are built and the employee is paid.
7. Select the Job Pay check box to turn the option on at the paysheet level.
8. Select the OK to Pay check box to turn the option on at the paysheet level.
Chapter 5: Importing Pay Cycle DataPayroll Processing Guide Version 5.04.01

Importing Pay Cycle Data Using PAY020 5-43
9. Select the Additional Taxes check box to take the additional withholding specified on the employee’s Federal Tax Withholding, State Tax Withholding, and Local Tax Data panels.
Clear this check box to prevent additional withholding from being taken out of a particular
check.
10. Select the Gross-Up check box to gross-up a check by calculating gross pay from net pay.
All pay earnings on the same check must share the identical gross-up. If they do not, a
warning will display on the PAY020.LIS file.
11. If you want to create a separate check for the employees in the special payroll, enter a unique check number in the Sep Chk # field.
If the separate check number you enter here already exists on a paysheet, then the data
will append to the paysheet instead of creating a separate check.
12. Select one of the following options from the Direct Deposit field:
All pay earnings on the same check must share the identical direct deposit type. If they
do not, a warning will display on the PAY020.LIS file.
• None - The money will not be deposited into the employee’s direct deposit account. Instead, he will receive a check.
• Special - The money will be deposited into the direct deposit account that has the Use for Special Payrolls check box selected on the Direct Deposit panel (Payroll ~ Employee Information ~ Employee Payroll Data ~ Direct Deposit).
• Standard - The money will be deposited based on the employee’s direct deposit options established on the Direct Deposit panel (Payroll ~ Employee Information ~ Employee Payroll Data ~ Direct Deposit).
For details on the Direct Deposit panel, refer to the Payroll Setup and Maintenance
Guide.
13. From the Tax Method area, select the tax method you want Enterprise Payroll to use to calculate tax.
14. Enter the following general ledger information in the General Ledger area:
If you enter general ledger data, it will override any data being imported from your file
from the employee’s job record.
a. Enter the pay type in the GL Pay Type field.
b. Select the account number from the Account/Fund field.
Chapter 5: Importing Pay Cycle DataPayroll Processing Guide Version 5.04.01

5-44 Importing Pay Cycle Data Using PAY020
15. Select one of the following options from the Ded taken field:
All pay earnings on the same check must share the identical deduction type. If they do
not, a warning will display on the PAY020.LIS file.
• None - No deductions will be taken.
• Standard - The employee’s current deductions will remain the same and process as normal.
• Subset - Select a deduction subset to override the employee’s current deductions.
If you select this option, then select the appropriate deduction subset from the Ded
Subset field.
16. In the Run Type area, select one of the following options:
a. Report Only - Print a report of all performance plan data hat will be imported.
b. Report and Update - Import the performance plan data and then generate a report listing the imported data.
17. From the SSN Option field, select one of the following options to specify how you want Social Security Numbers to display on the report output:
• Hide xxx-xx-xxxx
• Mask xxx-xx-6789
• Show 123-45-6789
The options that are available for selection depend on the field display options selected
on the user’s security profile (System Admin ~ Security Administration ~ Operator ~ Profile). If the user profile is set to Hide, the option is grayed out when generating files. The process will automatically print the fields according to the user’s display setting. However, if the user is set to Show, the Display Option fields will be available and the user can choose to change the default of Hide to either Show or Mask. If the user is set to Mask, the Display Option fields will be available and the user can choose to change the default of Hide to Mask.For more information on the user Profile settings, see the Application Administrator’s Guide.
18. Click the Performance Plan Payments tab.
Chapter 5: Importing Pay Cycle DataPayroll Processing Guide Version 5.04.01

Importing Pay Cycle Data Using PAY020 5-45
Selecting Performance Plan Payment Criteria and Importing the Data
On the Performance Plan Payments panel, you select the performance pay plan IDs, select the earnings code (by employee type) that you want to apply payments to, and then run the import process.
To select this criteria and run the import process, do the following:
1. Click the Performance Plan Payments tab. The Performance Plan Payments panel displays.
When importing performance plan payments, you must first start on the Import Payment
Data panel. See page 5-37 for more information.
Figure 5-29. Performance Plan Payments Panel
2. From the Performance Pay Plan ID field, select the ID for the performance pay plan you want to import.
An ID for an existing performance pay plan will not be available for selection if CMP012
has not been run to update the Merit/Bonus Worksheet. For detailed information on running CMP012, refer to the Planning, Compensation, and Compliance Guide.
3. From the Earnings Code by Employee Type area, select the earnings code for Hourly, Exception Hourly, or Salaried employees that you want to apply payments to.
4. To select criteria for multiple performance pay plan IDs, click (Insert Row) and then the select another performance pay plan ID and the earnings codes by employee type.
For a description of the fields on this panel, press F1.
Chapter 5: Importing Pay Cycle DataPayroll Processing Guide Version 5.04.01

5-46 Importing Pay Cycle Data Using PAY020
5. Click Run Process. You will receive a message notifying you that your process has been
submitted. Click OK. To confirm successful completion, click (Process Monitor).
For additional information on the Process Monitor, refer to the Using ADP Enterprise HR Guide.
You’ve just finished selecting import criteria for performance plan payments and importing the data using PAY020. Next, you can review and correct imported pay cycle data.
Reviewing and Correcting Imported Pay Cycle Data
After you’ve imported payroll data, you can review the imported data and make changes, if necessary.
First, you can review the imported data by reviewing the Payment Import Audit Report (pay020.lis) that is generated when you run PAY020.
Second, you can review imported data within ADP Enterprise HR. See “Reviewing Pay Cycle Data on the Paysheet” on page 3-2 for details.
You’ve just finished reviewing and correcting imported pay cycle data, which is the last step in importing the pay cycle data.
Importing Pay Cycle Data Using PAY020
Importing Pay Cycle Data from an External File
Importing Performance Plan Payment Data into Paysheets
Reviewing and Correcting Imported Pay Cycle Data
Chapter 5: Importing Pay Cycle DataPayroll Processing Guide Version 5.04.01

Importing One-Time Deductions Using PAY021 5-47
Importing One-Time Deductions Using PAY021
You can import one-time general and benefit deductions into paysheets using the Import One-Time Deductions Task (PAY021). When you use , you have the following options:
• Importing Pay Cycle Data from an External File
• Reviewing and Correcting Imported Pay Cycle Data
Importing One-Time Deductions from an External File
With the Import One-Time Deductions task (PAY021), you can import one-time general and benefit deductions you have entered in an external .csv file and update your paysheets.
Before importing one-time deductions from an external file, refer to Table 5-2 for import file layout specifications.
Table 5-2. Import File Layout Specifications
Data Element Description
Employee ID Required.
Employee record number Used for multi-job installations. If not present in file, a zero will be used.
Separate check Specifies if a deduction should be imported in a separate paycheck for an employee. If not present, a zero will be used.
Plan type Specifies the deduction’s plan type. Required.
Benefit plan Specifies the deduction’s benefit plan. Required for all deductions except general deductions (plan type 00).
Deduction code Specifies the deduction’s code. Required. converted to uppercase.
Deduction class Specifies the deduction’s effect on FIT taxable gross. Required. Converted to uppercase. Possible values are:
• A - After-tax
• B - Before-tax
• N - Nontaxable Benefit
• O - Nontaxable Benefit B (only for plan types 40-49)
• T - Taxable Benefit
Importing One-Time Deductions Using PAY021
Importing Pay Cycle Data from an External File
Importing Performance Plan Payment Data into Paysheets
Reviewing and Correcting Imported Pay Cycle Data
Chapter 5: Importing Pay Cycle DataPayroll Processing Guide Version 5.04.01

5-48 Importing One-Time Deductions Using PAY021
To import one-time deductions, do the following:
1. Click Payroll and make the following selections.
Payroll Cycle Processes ~ Scheduled Payroll (On Cycle)
Exception type Specifies how the deduction will be calculated. If not specified, defaults to (O)verride. Converted to uppercase.
Possible values are:
O (Override) - Ignores the regular calculation and replaces it with the amount indicated in the import file.
A (Addition) - Adds the amount indicated in the import file to the regular calculation.
R (Refund) - Calculates the standard deduction and refunds the amount indicated in the import file.
P (Arrears Payback) - Ignores standard arrears processing and uses the amount indicated in the import file as the payback amount from arrears.
Flat amount Specifies the amount that represents the one-time deduction that is to be taken. Format is 8.2 and can be positive or negative (signed number). If not present, a zero will be used. Decimal point can be omitted. Thousands delimiter are not accepted.
Table 5-2. Import File Layout Specifications (cont.)
Data Element Description
Chapter 5: Importing Pay Cycle DataPayroll Processing Guide Version 5.04.01

Importing One-Time Deductions Using PAY021 5-49
2. Double-click the Import One-Time Deductions (PAY021) task. The Import One-Time Deductions panel displays.
Figure 5-30. Import One-Time Deductions Panel
3. Select a payroll run ID from the Pay Run ID field and press Tab.
4. If you want the payroll to be processed as an off-cycle payroll, select the Off Cycle check box.
5. Select the Insert new one-time deductions (Create paysheets if necessary) check box if necessary based on the following conditions:
If you have a one-time deduction already set up on the Deduction Override panel in the
Earnings and Overrides by Employee (Payline) task, you do not need to select this check box.
• Enterprise Payroll checks to see if paysheets exist for employees in the batch.
• If a paysheet exists and data from the paysheet matches the data from Pay Data Entry, Enterprise Payroll appends deduction data to the existing paysheet.
• If deduction data does not match, and the Insert new one-time deductions (Create paysheets if necessary)check box is selected, Enterprise Payroll creates new paysheets.
• If data does not match and the Insert new one-time deductions (Create paysheets if necessary) check box is cleared, then data from Pay Data Entry is not moved to paysheets.
6. Enter the name of the file that contains the payment data you are importing in the Input File Name field.
For a description of the fields on this panel, press F1.
Chapter 5: Importing Pay Cycle DataPayroll Processing Guide Version 5.04.01

5-50 Importing One-Time Deductions Using PAY021
7. From the SSN Option field, select one of the following options to specify how you want Social Security Numbers to display:
• Hide xxx-xx-xxxx
• Mask xxx-xx-6789
• Show 123-45-6789
The options that are available for selection depend on the field display options selected
on the user’s security profile (System Admin ~ Security Administration ~ Operator ~ Profile). If the user profile is set to Hide, the option is grayed out when generating files. The process will automatically print the fields according to the user’s display setting. However, if the user is set to Show, the Display Option fields will be available and the user can choose to change the default of Hide to either Show or Mask. If the user is set to Mask, the Display Option fields will be available and the user can choose to change the default of Hide to Mask.For more information on the user Profile settings, see the Application Administrator’s Guide.
8. In the Run Type area, select one of the following options:
a. Report Only - Print a report of all pay cycle data that will be imported.
b. Report and Update - Import the pay cycle data and then generate a report listing the imported data.
9. Click Run Process. You will receive a message notifying you that your process has been
submitted. Click OK. To confirm successful completion, click (Process Monitor).
For additional information on running a process, refer to the Using ADP Enterprise HR Guide.
You’ve just finished importing one-time deduction data you have entered in an external .csv file and updating your paysheets.
Chapter 5: Importing Pay Cycle DataPayroll Processing Guide Version 5.04.01

Chapter 6
Calculating and ConfirmingYour Payroll
PAGE TOPIC
6-2 Introduction
6-3 Calculating Retroactive Pay
6-5 Calculating the Preliminary Payroll
6-32 Completing the Payroll
6-42 Preparing for the Next Payroll Cycle
6-58 Creating Estimates of Paychecks
Chapter 6: Calculating and Confirming Your PayrollPayroll Processing Guide Version 5.04.01

6-2 Introduction
Introduction
After you have all pay cycle data residing in your paysheets, you are ready to run your payroll.
During payroll calculation, the Enterprise Payroll determines earnings, deductions, taxes, and net pay for all employees having pay earnings marked OK to Pay using the Earnings and Overrides (Paysheets) or Earnings and Overrides by Employee (Payline) tasks (Payroll ~ Payroll Cycle Processes ~ Update Pay Cycle Data). Enterprise Payroll processes one company at a time, and within each company, every pay group is assigned to a pay run ID. It also indicates how many checks are being calculated and how many have already been calculated as it processes each pay group.
After you verify that the pay calculation is correct, you can complete your payroll. During the payroll confirmation process, Enterprise Payroll updates all to-date totals for earnings, deductions, taxes, and arrears, and assigns check or advice numbers. Once Enterprise Payroll confirms a payroll, you can generate checks, advices, other payroll reports, direct deposit, general ledger, and other interfaces. You can also review an employee’s check totals and payroll balances online.
For additional information about pay run IDs and pay calendars, see “Creating a Pay Calendar” on page 15-3 and “Assigning a Pay Run ID to a Pay Calendar” on page 15-16.
For step-by-step instructions on running an off-cycle payroll, refer to Chapter 11, “Processing an Off-Cycle Payroll.”
You can often complete a task in the product in multiple ways. For information on interface
shortcuts and tips, refer to the Using ADP Enterprise HR Guide.
As you work through the tasks in this chapter, you may have questions about fields and options on the panels. To display a description of the fields and options, press F1 (Help) from the panel.
Chapter 6: Calculating and Confirming Your PayrollPayroll Processing Guide Version 5.04.01

Calculating Retroactive Pay 6-3
Calculating Retroactive Pay
If you didn’t process retroactive pay when you generated your initial paysheets but you want to include this pay in this payroll cycle, you can use the Calculate Retro Pay task. For a new hire with retroactive pay, this process includes earnings distributions for regular pay.
Before calculating your retroactive pay, you can view a pending retroactive pay report (retrorpt.lis) by selecting the Report Only option on the Calculate Retro Pay panel.
You cannot calculate retroactive pay for a confirmed payroll run.
For information on establishing your retroactive pay earnings codes, refer to the Payroll Setup and Maintenance Guide.
To process your initial retroactive pay calculation, do the following:
1. Click Payroll and make the following selections:
Payroll Cycle Processes ~ Scheduled Payroll (On Cycle)
2. Double-click the Calculate Retro Pay task. The Calculate Retro Pay panel displays.
Figure 6-1. Calculate Retro Pay panel
3. Enter an alpha/numeric batch run ID in the Batch Run ID field. When you run the Calculate Payroll program, Enterprise Payroll prompts you for this ID.
4. In the On-Cycle Run area, enter the payroll run ID in the Pay Run ID field.
The payroll run ID Enterprise Payroll uses to calculate your payroll should be identical to
the payroll run ID you used to generate your initial pay cycle data (paysheets).
For a description of the fields on this panel, press F1.
Chapter 6: Calculating and Confirming Your PayrollPayroll Processing Guide Version 5.04.01

6-4 Calculating Retroactive Pay
5. From the Run Type area, select one of the following options:
• Report Only - Select to generate the retrorpt.lis report listing the pending retroactive pay for the specified payroll run.
• Report and Update - Select to generate the retrorpt.lis report and calculate your initial retroactive payments.
6. Click (Save).
7. Click Run Retro Calc. You will receive a message notifying you that your process has been submitted. Click OK.
8. To confirm successful completion of your process, click (Process Monitor).
9. To view the retrorpt.lis report, click (Report Outputs). When the Report
Outputs dialog box displays, highlight the report you want to view and click (View). A secondary browser window displays your report.
For additional information on running, viewing, and printing reports, refer to the Using ADP Enterprise HR Guide. For details on sources, sort order, and an illustration of the report, see the Standard Reports Guide.
You’ve just finished calculating your initial retroactive payments. Next, you can calculate your preliminary payroll.
Chapter 6: Calculating and Confirming Your PayrollPayroll Processing Guide Version 5.04.01

Calculating the Preliminary Payroll 6-5
Calculating the Preliminary Payroll
Enterprise Payroll allows you to specify whether you want to calculate pay as follows:
• In preliminary or final mode
• For all employees or only for employees with changes to their payroll data
You can select any combination of options and run payroll calculation as many times as you need in any mode. The only restriction is that you must correct all payroll calculation errors before running the Confirm Payroll program.
For faster payroll confirmation processing of payroll runs containing pay groups with over
7,000 employees, you can set up multi-thread batch processing. By doing this, multiple, smaller payroll batches or “threads” will be calculated concurrently for one pay run ID. You must set up multi-thread batch processing before calculating your payrolls because the calculation process determines how the payroll batches will be formed during the confirmation process. Refer to the Hiring, Staffing, and Job Maintenance Guide for details on the Multi-Thread Batch Processing option located on the Payroll panel of the Installation task (Human Resources Setup -Required ~ Human Resources Setup).
The hours for salaried employees paid on a monthly or semi-monthly pay cycle are calculated based on fixed number of hours associated with their earnings unless they are prorated during the pay cycle. Fixed hours are derived by using 2,080 hours per year divided by the number of pay periods (either 12 or 24) as shown in the following table:
ADP Enterprise HR calculates earnings in the following order: 1) annualized, 2) cumulative, and 3) supplemental. If you want to change the order that earnings are processed, you can increase or decrease this default number. For example, if you want cumulative earnings to be processed last, you would select Cumulative as the Tax Method on the Taxing Options panel. Then you would increase the number in Earnings Calc Seq field so that it would be the highest earnings calculation sequence number among all your earnings. For detailed information on changing the calculation order, refer to the Payroll Setup and Maintenance Guide.
Table 6-1. Example of Calculation for Salaried Employees
Month Hours Earnings
January 173.33 $3,000.00
February 173.33 $3,000.00
March 173.33 $3,000.00
Chapter 6: Calculating and Confirming Your PayrollPayroll Processing Guide Version 5.04.01

6-6 Calculating the Preliminary Payroll
Calculating the initial payroll consists of the following:
• Processing Your Initial Payroll Calculation
• Reviewing Error Messages and Warnings
• Correcting Errors in Your Payroll
• Recalculating Your Payroll
• Viewing Preliminary Check Data
Processing Your Initial Payroll Calculation
Processing your initial payroll calculation consists of setting up a batch ID and payroll run ID, indicating whether you want to calculate all checks or only those whose pay cycle data has changed since the last time you calculated, and indicating if this is a preliminary calculation. Each time you recalculate your payroll, you must set up all this information again.
To process your initial payroll calculation, do the following:
1. Click Payroll and make the following selections:
Payroll Cycle Processes ~ Scheduled Payroll (On Cycle)
2. Double-click the Calculate Preliminary Payroll task. The Payroll Calculation panel displays.
Figure 6-2. Payroll Calculation panel
3. Enter an alpha/numeric batch run ID in the Batch Run ID field. When you run the Calculate Payroll program, Enterprise Payroll prompts you for this ID.
Calculating the Preliminary Payroll
Processing Your Initial Payroll Calculation
Reviewing Error Messages and Warnings
Correcting Errors in Your Payroll
Recalculating Your Payroll
Viewing Preliminary Check Data
For a description of the fields on this panel, press F1.
Chapter 6: Calculating and Confirming Your PayrollPayroll Processing Guide Version 5.04.01

Calculating the Preliminary Payroll 6-7
4. In the On-Cycle Run area, enter the payroll run ID in the Pay Run ID field.
The payroll run ID Enterprise Payroll uses to calculate your payroll should be identical to
the payroll run ID you used to generate your initial pay cycle data (paysheets).
5. Select the Preliminary Calculation Run check box to indicate that this is not your final calculation. You can run in this mode as many times as necessary to correct any errors and adjust payroll information.
Do not clear this check box until you have corrected all errors from the preliminary runs
and are ready to process your final pay calculation.
6. Select one of the options in the Select Checks to Calculate area to select which checks you want to calculate in your run:
• Only Calculate Where Needed - Select to calculate paysheets not yet calculated or those with record changes. When you recalculate your payroll after correcting errors, select this option.
This option minimizes your processing time.
• (Re)Calculate All Checks - Select only if you have made company level changes, such as insurance rate adjustments, that affect pay calculations. The only time you should select this option is for changes to non-employee-level information affecting payroll processing.
7. Click (Save).
8. Click Run Pay Calc. You will receive a message notifying you that your process has been submitted. Click OK.
9. To confirm successful completion of your process, click (Process Monitor).
You’ve just finished processing your initial payroll calculation. Next, you can review error messages generated during payroll calculation.
Chapter 6: Calculating and Confirming Your PayrollPayroll Processing Guide Version 5.04.01

6-8 Calculating the Preliminary Payroll
Reviewing Error Messages and Warnings
Enterprise Payroll provides several ways you can view your error messages. The following methods are discussed in this section:
• Viewing All Error/Warning Messages Online
• Printing employee-level error/warning messages
• Reviewing Company-level Error Messages Only
Viewing All Error/Warning Messages Online
You can review both employee-level error/warning messages and company-level errors/warnings messages on line. This panel displays errors messages for errors/warnings that occur when running the Generate Paysheets, Calculate Payroll, or Confirm Payroll process.
An error message indicates that you must correct the situation before proceeding with your payroll. A warning message will not prevent you from running your payroll but you may want to research the issue before continuing.
If the message is an employee-level error message, then you can use buttons on this panel to go directly to the panels in the product where you can fix the problem. After making your changes, you can close the panel to return to the Payroll Messages panel.
To view all error messages online, do the following:
1. Click Payroll and make the following selections:
Payroll Cycle Processes ~ Scheduled Payroll (On Cycle)
2. Double-click the Review Payroll Messages task. The Search dialog box displays.
Figure 6-3. Search Dialog Box
Calculating the Preliminary Payroll
Processing Your Initial Payroll Calculation
Reviewing Error Messages and Warnings
Correcting Errors in Your Payroll
Recalculating Your Payroll
Viewing Preliminary Check Data
Chapter 6: Calculating and Confirming Your PayrollPayroll Processing Guide Version 5.04.01

Calculating the Preliminary Payroll 6-9
3. Enter the payroll run ID for the payroll that contains errors/warnings and click OK . The Payroll Messages panel displays.
Figure 6-4. Payroll Messages Panel
For detailed information on the paysheet fields on this panel, press F1 or refer to Table 3-1, “Paysheet Items,”on page 3-4.
4. Review any error messages/warnings displayed in the Message area.
5. If the messages displayed are employee-level error messages, you can click on one of the following buttons to go directly to the panel where you can fix the problem.
These buttons do not display if the message is an employee-level warning message or a
company-level error/warning message.
• Paysheet - Clicking this button takes you to the panels in the Modify Pay Cycle Data (Payline) task.
• Job Data - Clicking this button takes you to the panels in the Change Job/Position Information task.
• Tax Data - Clicking this button takes you to the panels in the Tax Withholding task.
• Additional Pay - Clicking this button takes you to the panels in the Additional Pay task.
• Deductions - Clicking this button takes you to the panels in the Deductions task.
When you have made your changes, click (Close) to return to the Payroll
Messages panel.
6. Click (Close).
Chapter 6: Calculating and Confirming Your PayrollPayroll Processing Guide Version 5.04.01

6-10 Calculating the Preliminary Payroll
You have just finished viewing on line any payroll calculation errors you received after calculating your payroll and fixing employee-level errors. Next, you can print these errors.
Printing employee-level error/warning messages
To review your employee-level error/warning messages on paper, you can generate the Payroll Error Messages for Employees report (PAY011).
Error messages will grouped together first on the report, followed by the warning messages.You will get a Success status when running PAY011 if you have warning messages only. If you have any error messages, you will get a NotSuccess status.
Company-level errors/warnings do not appear on this report.
To print your error/warning messages for a specific payroll run, do the following:
1. Click Payroll and make the following selections:
Payroll Cycle Processes ~ Schedule Payroll (On Cycle)
2. Double-click the Print Payroll Messages (PAY011) task. The Print Payroll Messages panel displays.
.
Figure 6-5. Print Payroll Messages Panel
3. Select one of the options from the Cycle Option field to indicate whether you want the report to include payroll information for an on-cycle payroll, off-cycle payroll, or both.
4. Select the payroll run ID for the payroll that contains errors/warnings from the Pay Run ID field.
5. In the Page # fields, enter the page number range for the paysheet information you want included in the report.
For a description of the fields on this panel, press F1.
Chapter 6: Calculating and Confirming Your PayrollPayroll Processing Guide Version 5.04.01

Calculating the Preliminary Payroll 6-11
6. If the payroll run ID includes multiple pay calendar entries, then you must select the company from the Company field, the pay group from the Pay Group field, and the pay period end date from the Pay End Date field.
7. If you want to review a list of employees that have errors/warnings that do not affect you being able to complete your payroll, select the Print employees flagged with errors but no payroll error messages check box.
8. Click Run Report. You will receive a message notifying you that your process has been
submitted. Click OK. When the process has completed, click (Report Outputs) to view the report.
For additional information on running, viewing, and printing reports, refer to the Using ADP Enterprise HR Guide. For details on sources, sort order, and an illustration of the report, see the Standard Reports Guide.
You have just finished printing the Payroll Messages report (PAY011). Next, you correct any errors in your payroll.
Reviewing Company-level Error Messages Only
In addition to reviewing company-level error messages by using the Review Payroll Messages task, you can also review log files that Enterprise Payroll generates each time a specific process runs and overwrites the previous file for that process.
You can view these log files by clicking (Report Outputs), and selecting the application name.log file(s) from the Batch directory.
Example:
The file created after calculating your payroll would be named:
calcpay.log
Chapter 6: Calculating and Confirming Your PayrollPayroll Processing Guide Version 5.04.01

6-12 Calculating the Preliminary Payroll
Correcting Errors in Your Payroll
Before completing your payroll, you must correct any errors.
Sometimes you need to correct information on your paysheets, in your company definitions, or in your employee information because of pay calculation errors, late paperwork, data entry errors or other issues. Depending on the results of the preliminary calculation run, you can select from a variety of corrective actions.
You can also run the Benefit Deductions report (PAY046) to view benefit deductions in a specific payroll run that are not in the employee’s current benefit program. For details, see “Viewing Benefit Deductions Not in the Current Benefit Program” on page 6-12.
If you are unable to correct an error or lack information for an employee, return to the Earnings panel (Payroll ~ Payroll Cycle Processes ~ Update Pay Cycle Data ~ Earnings and Overrides-Paysheets) and clear the OK to Pay check box for the specific employee. Enterprise Payroll then ignores the employee so that you can continue processing the payroll on schedule. You can later issue a manual check to any employees that could not be processed as part of your payroll run.
Viewing Benefit Deductions Not in the Current Benefit Program
The Benefit Deductions exception report lists all deductions (excluding general deductions) calculated in a specified payroll run that were part of an employee’s prior benefit program but are not part of the current program. For example, if an employee is reassigned to a new benefit deduction program prior to the pay period end date, this employee and deductions from the prior program will display on the report.
Not only does this report list the deductions by plan type and benefit code, but it also lists by employee ID and provides the prior and current benefit program names. Finally, the report includes the deduction amount and end date (based on the pay calendar).
To generate the Benefit Deductions Report, do the following:
1. Click Payroll and make the following selections:
Payroll Reports ~ Pay Cycle Reports
Calculating the Preliminary Payroll
Processing Your Initial Payroll Calculation
Reviewing Error Messages and Warnings
Correcting Errors in Your Payroll
Recalculating Your Payroll
Viewing Preliminary Check Data
Chapter 6: Calculating and Confirming Your PayrollPayroll Processing Guide Version 5.04.01

Calculating the Preliminary Payroll 6-13
2. Double-click the Benefit Deductions Report (PAY046) task. The Benefit Deductions Report panel displays.
Figure 6-6. Benefit Deductions Report Panel
3. From the Pay Run ID field, select the payroll run for which you want benefit deduction information generated.
4. Click Run Report. You will receive a message notifying you that your process has been
submitted. Click OK. When the process has completed, click (Report Outputs) to view the report.
5. For additional information on running, viewing, and printing reports, refer to the Using ADP Enterprise HR Guide. For details on sources, sort order, and an illustration of the report, see the Standard Reports Guide.
You have just finished correcting any existing payroll errors you received after calculating your payroll. Next, you must recalculate your payroll.
For a description of the fields on this panel, press F1.
Chapter 6: Calculating and Confirming Your PayrollPayroll Processing Guide Version 5.04.01

6-14 Calculating the Preliminary Payroll
Recalculating Your Payroll
After correcting all errors, recalculate your payroll again to ensure the accuracy of the payroll. Refer to “Processing Your Initial Payroll Calculation” on page 6-6. You can keep recalculating until you are satisfied with the results. You must set up the run control each time before recalculating your payroll.
When you use the Calculate Preliminary Payroll task, Enterprise Payroll automatically
recalculates paylines with errors and recalculates the pay for those employees who had changes made to their paylines.
You have just finished recalculating your payroll after correcting any payroll errors. Next, you can review your pay calculation results.
Viewing Preliminary Check Data
You can view the following preliminary check data online for a specific employee:
• Viewing Paycheck Summary Information
• Viewing Paycheck Earnings Information
• Viewing Paycheck Tax Information
• Viewing Paycheck Deduction Information
• Viewing Paycheck Garnishment Information
• Viewing Paycheck Special Accumulator Information
• Viewing Paycheck Distribution Information
• Viewing Retroactive Earnings Information
• Viewing Pending Performance Plan Payment Information
If you try to view information for a employee’s check that has changed in paysheets since the last time you calculated your payroll, Enterprise Payroll displays a message stating that no records were found matching the specified keys.
When you change an employee’s pay cycle data in paysheets, Enterprise Payroll does not immediately update online panels; instead, it updates the panel each time you calculate your payroll. Therefore, you cannot view pay cycle data online until after you calculate your payroll. This avoids the confusion that can arise if an employee’s paysheet contains updated information but the online information has not been refreshed.
Calculating the Preliminary Payroll
Processing Your Initial Payroll Calculation
Reviewing Error Messages and Warnings
Correcting Errors in Your Payroll
Recalculating Your Payroll
Viewing Preliminary Check Data
Chapter 6: Calculating and Confirming Your PayrollPayroll Processing Guide Version 5.04.01

Calculating the Preliminary Payroll 6-15
Viewing Paycheck Summary Information
The Paycheck View panel displays a summary of earnings, taxes, deductions, and net pay all on one panel.
To view paycheck summary information, do the following:
1. Click Payroll and make the following selections:
Payroll Cycle Processes ~ Scheduled Payroll (On Cycle)
2. Double-click the View Preliminary Paycheck Data task. The Search dialog box displays.
Figure 6-7. Search Dialog Box
3. Enter the employee’s name in the Name field and then click OK.
Chapter 6: Calculating and Confirming Your PayrollPayroll Processing Guide Version 5.04.01

6-16 Calculating the Preliminary Payroll
4. From the Search Results area, double-click the line that contains the payroll cycle information you want to view. The Paycheck View panel displays.
Figure 6-8. Paycheck View Panel
5. Review the check summary information as follows:
• Check # - Displays the check number.
• Issue Date - Displays the date printed on the paycheck.
• Earnings - Displays the earnings amount for the paycheck.
• Taxes - Displays the taxes taken out for the paycheck.
• Deductions - Displays the deductions taken out for the paycheck.
• Net Pay - Displays the net pay for the paycheck.
• Regular and Overtime Earnings - Displays the total pay for this paycheck for both regular and overtime hours.
• Other Earnings - Displays the codes, hours, and amounts for any additional earnings. Also indicates if the earnings type adds to gross.
• Taxes - Displays an itemized list of all taxes taken out of this paycheck. The list includes the type of tax as well as the amount.
• Deductions - Displays an itemized list of any before-tax and after-tax deductions taken out of this paycheck. The list includes the type of deduction as well as the amount.
You’ve just finished viewing the results of pay calculation on earnings, taxes, deductions, and net pay. Next, view the employee’s earnings on the Earnings panel.
For a description of the fields on this panel, press F1.
Chapter 6: Calculating and Confirming Your PayrollPayroll Processing Guide Version 5.04.01

Calculating the Preliminary Payroll 6-17
Viewing Paycheck Earnings Information
The Earnings panel displays detailed earnings information and totals for calculated taxes, deductions, and net pay.
To view paycheck earnings information, do the following:
1. Click the Earnings tab.
Figure 6-9. Earnings Panel
2. Review the following earnings information:
• Name - Displays the name of the employee.
• Check # - Displays the paycheck number.
• Issue Date - Displays the date printed on the paycheck.
• Earnings - Displays the total gross earnings for the paycheck.
• Taxes - Displays the total taxes for the paycheck.
• Deductions - Displays the total deductions for the paycheck.
• Net Pay - Displays the net pay for the paycheck.
• Earnings Type - Displays the earnings type for the employee’s hours.
• Hours - Displays the number of hours associated with the employee's earnings type for the pay period.
• Earnings - This area displays the total hours and regular earnings for the earnings type indicated.
• Regular Hours - Displays the number of regular hours worked by the employee during the pay period. Enterprise Payroll calculates regular hourly earnings by multiplying hourly rate by regular hours.
For a description of the fields on this panel, press F1.
Chapter 6: Calculating and Confirming Your PayrollPayroll Processing Guide Version 5.04.01

6-18 Calculating the Preliminary Payroll
• Overtime Hours - Displays the number of overtime hours worked by the employee during the pay period. Enterprise Payroll calculates overtime hourly earnings by multiplying hourly rate by overtime hours.
• Reg Earnings - Displays the employee's regular earnings for the pay period. If this amount differs from regular pay entered on the paysheet for the employee, Enterprise Payroll may have subtracted amounts attributable to such items as vacation or sick leave.
• Dates - Displays the earnings begin and end dates for this job in this pay period. If the employee worked the entire pay period at this job, the earnings begin and end dates are the same as the pay period begin and end dates. If the employee worked only a partial pay period at this job, the begin and end dates are displayed here.
The pay calculation process uses these dates to prorate employee hours and earnings if the employee didn't work the entire pay period at one job.
• Hourly Rate - Displays the employee's compensation rate for these earnings, expressed as an hourly rate. Enterprise Payroll calculates regular hourly earnings by multiplying hourly rate by regular hours. Overtime hourly earnings are calculated by multiplying hourly rate by overtime hours.
• Department - Displays the department to which these earnings are posted for accounting purposes.
• Job Code - Displays unique identifier assigned to a job or a group of similar jobs. On this panel, this is the job code to which these earnings are posted for accounting purposes.
• Position Nbr - Displays the position number to which these earnings are posted for accounting purposes. On this panel, this is the position number to which these earnings are posted for accounting purposes.
Position number further refines job code by allowing you to assign a unique identifier to each job. Position number is useful if the company wants to control position budgets at a lower level than job code.
• GL Pay Type - Displays the general ledger pay type if department ID, employee type, and earnings type are insufficient for charging salaries and wages to the proper G/L account.
For example, assume two employees have the same department ID, employee type, and earnings type, but their salaries should be charged to two different accounts because the employees are classified differently for accounting purposes. This field differentiates between the two charges.
• Shift/Rate - Displays the work shift to which these earnings are posted for accounting purposes as well as the rate Enterprise Payroll used to calculate the shift differential.
• State/Locality - Displays the standard postal abbreviation for a state, territory, or province and the locality code. On this panel, this is the state to which these earnings are reported for tax purposes. This is the locality to which these earnings are reported for tax purposes.
Chapter 6: Calculating and Confirming Your PayrollPayroll Processing Guide Version 5.04.01

Calculating the Preliminary Payroll 6-19
• Tax Periods - The number of pay periods over which to spread the taxing of these earnings. Enterprise Payroll uses this field in conjunction with tax frequency to determine how much tax to withhold each pay period.
For example, If the tax frequency for the earnings is biweekly and you enter 3 in the Tax Periods field, taxes are calculated as if the earnings were earned over a six-week period.
• Tax Method - Displays the tax method used to calculate tax on these earnings.
• Other Earnings - Displays earnings other than regular, overtime, and additional pay for the current pay period. Examples: bonus, commission.
• Account Code - Displays the account code to which these earnings are posted for labor accounting.
• Addl # - Displayed if this is an additional payline created for the employee.
• Addl Pay Reason - Displays only on an additional payline and specifies a reason for the additional pay, such as retroactive pay, pay for a prior period, or performance award.
You’ve just finished viewing detailed earnings information and totals for calculated taxes, deductions, and net pay. Next, view the employee’s tax on the Taxes panel.
Viewing Paycheck Tax Information
The Taxes panel displays detailed tax information and totals for calculated earnings, deductions, and net pay.
To view tax information, do the following:
1. Click the Taxes tab.
Figure 6-10. Taxes Panel
For a description of the fields on this panel, press F1.
Chapter 6: Calculating and Confirming Your PayrollPayroll Processing Guide Version 5.04.01

6-20 Calculating the Preliminary Payroll
2. Review the following tax information:
• Name - Displays the name of the employee.
• Check # - Displays the paycheck number.
• Issue Date - Displays the date printed on the paycheck.
• Earnings - Displays the total gross earnings for the paycheck.
• Taxes - Displays the total taxes for the paycheck.
• Deductions - Displays the total deductions for the paycheck.
• Net Pay - Displays the net pay for the paycheck.
• Tax Entity - Indicates whether the tax is a state or federal tax.
• PSD Code - If applicable to the locality, displays the political subdivision (PSD) code. The PSD code is maintained by ADP on the Local Tax panel (Payroll ~ Company Definitions ~ System Tax Data ~ Local Tax Configuration).
• Res - Indicates whether resident taxes are taken for this tax entity (state and/or locality).
• Tax Class - Displays the classification to which these earnings are reported for tax purposes.
• Amount - Displays tax amount for the current pay period.
• Taxable Gross - Displays taxable gross for the current pay period.
• No Limit Gross/Amt Not Taken - Displays the total gross for this tax for the current pay period as if no maximum gross limit existed or the tax amount not taken because earnings for the current pay period are insufficient to cover the entire tax amount.
For example, assume Social Security and Medicare (FICA) applies to the first $48,000 of employee earnings. If the employee earned $100,000 year-to-date, the current taxable gross for Social Security and Medicare (FICA) would be $48,000 and the current no-limit gross would be $100,000.
You’ve just finished viewing detailed tax information and totals for calculated earnings, deductions, and net pay. Next, view the employee’s deductions on the Deductions panel.
Chapter 6: Calculating and Confirming Your PayrollPayroll Processing Guide Version 5.04.01

Calculating the Preliminary Payroll 6-21
Viewing Paycheck Deduction Information
The Deductions panel displays detailed deduction information and totals for calculated earnings, taxes, and net pay.
To view deductions information, do the following:
1. Click the Deductions tab.
Figure 6-11. Deductions Panel
2. Review the following deduction information:
• Name - Displays the name of the employee.
• Check # - Displays the check number.
• Issue Date - Displays the date printed on the paycheck.
• Earnings - Displays the earnings amount for the paycheck.
• Taxes - Displays the taxes taken out for the paycheck.
• Deductions - Displays the deductions taken out for the paycheck.
• Net Pay - Displays the net pay for the paycheck.
• Deduction - Displays the deduction code, description, and tax class for the current pay period.
• Amount - Displays the deduction amount for the current pay period.
For a description of the fields on this panel, press F1.
Chapter 6: Calculating and Confirming Your PayrollPayroll Processing Guide Version 5.04.01

6-22 Calculating the Preliminary Payroll
• Amount Not Taken/Calculated Base - The first field displays a deduction amount not taken because earnings for the current pay period are insufficient to cover the entire deduction amount.
The second field displays the base used in computing the deduction. If a deduction is not deducted from the employee’s wages, you see the reason in this column. For example, if an employee has exceeded the amount allowed for a pre-tax 401(k) deduction, the reason displays.
There are several reasons that a deduction is not taken from an employee’s earnings:
– Sec. 415 Limit exceeded - The deduction was not taken because it would have exceeded the 415 limit set by the IRS.
– HCE Limit exceeded - The deduction was not taken because it would have exceeded the Highly Compensated Employee Limit set by the IRS.
– Maximum yearly deduction exceeded - The deduction was not taken because the employee has met the maximum yearly deduction amount.
– Employee goal amount exceeded - The deduction was not taken because the employee has already met their goal amount for the calendar year.
– Not enough net pay - The deduction was not taken because there was not enough net pay to cover the deduction amount.
– Multiple reasons - There was more than one of the above reason a deduction was not taken from the employee's pay.
• Payback Amount/Refund Amount - Displays an amount refunded in the current pay period to the employee.
You’ve just finished viewing detailed deduction information and totals for calculated earnings, taxes, and net pay. Next, view the employee’s garnishments on the Garnishments panel.
Chapter 6: Calculating and Confirming Your PayrollPayroll Processing Guide Version 5.04.01

Calculating the Preliminary Payroll 6-23
Viewing Paycheck Garnishment Information
The Garnishments panel displays detailed garnishment information and totals for calculated earnings, taxes, deductions, and net pay. This panel is useful when you need to verify the accuracy of a garnishment calculation.
To view garnishment information, do the following:
1. Click the Garnishments tab.
Figure 6-12. Garnishments Panel
2. Review the following garnishment information:
• Name - Displays the name of the employee.
• Check # - Displays the paycheck number.
• Issue Date - Displays the date printed on the paycheck.
• Earnings - Displays the total gross earnings for the paycheck.
• Taxes - Displays the total taxes for the paycheck.
• Deductions - Displays the total deductions for the paycheck.
• Net Pay - Displays the net pay for the paycheck.
• Priority - Displays the processing priority of this garnishment in relation to all other garnishments for the employee. This is not the same as deduction priority. The highest priority number is zero, then 1, 2, and so on.
• Garnish ID - Displays the code that is unique for this employee’s garnishments.
• Type - Displays the description of the garnishment.
• Payee Name - Displays the payee to whom the garnishment check is paid.
• DE for Rule - Displays the amount of disposable earnings.
For a description of the fields on this panel, press F1.
Chapter 6: Calculating and Confirming Your PayrollPayroll Processing Guide Version 5.04.01

6-24 Calculating the Preliminary Payroll
• Less Exemption - Displays the amount of the exemption.
• Less Other Garnishments - Displays the amount of other garnishments.
• Maximum Deduction - Displays the amount of the maximum deduction possible.
• Adjusted for Fees Included in - Select if the amount is adjusted for fees included in the disposable earnings.
• Garnishment - Displays the amount deducted for the garnishment. This amount doesn't include any handling fees paid to the company and/or the payee.
• Company Fee - Displays the amount deducted for any handling fees payable to the company.
• Payee Fee - Displays the amount deducted for any handling fees payable to the payee.
• Total Deducted - Displays the total deduction amount for the garnishment, including the actual garnishment amount and any handling fees paid to the company and/or the payee.
You’ve just finished viewing detailed garnishment information and totals for calculated earnings, taxes, deductions, and net pay. Next, view the employee’s special accumulators on the Special Accumulators panel.
Chapter 6: Calculating and Confirming Your PayrollPayroll Processing Guide Version 5.04.01

Calculating the Preliminary Payroll 6-25
Viewing Paycheck Special Accumulator Information
The Special Accumulators panel displays all accumulators (for both deductions and earnings) that affected a specific paycheck. The panel lists a description of each accumulator and provides the total hours and amount.
To view special accumulator, do the following:
1. Click the Special Accumulators tab.
Figure 6-13. Special Accumulators Panel
2. Review the following special accumulators information:
• Name - Displays the name of the employee.
• Check # - Displays the paycheck number.
• Issue Date - Displays the date printed on the paycheck.
• Earnings - Displays the total gross earnings for the paycheck.
• Taxes - Displays the total taxes for the paycheck.
• Deductions - Displays the total deductions for the paycheck.
• Net Pay - Displays the net pay for the paycheck.
• Special Accumulator - This code identifies the special accumulator balances for the current pay period.
• Description - Displays the description of the special accumulator.
• Hours - Displays the number of hours associated with the special accumulator for the current pay period.
• Amount - Displays the amount associated with the special accumulator for the current pay period.
For a description of the fields on this panel, press F1.
Chapter 6: Calculating and Confirming Your PayrollPayroll Processing Guide Version 5.04.01

6-26 Calculating the Preliminary Payroll
You’ve just finished viewing detailed special accumulator information and totals for calculated earnings, taxes, deductions, and net pay. Next, view the employee’s distributions on the Distributions panel.
Viewing Paycheck Distribution Information
The Distributions panel displays the details of an employee’s direct deposit advices. These details include bank account information and totals for calculated earnings, taxes, deductions, and net pay.
To view distribution information, do the following:
1. Click the Distributions tab.
Figure 6-14. Distributions Panel
2. Review the following distributions information:
• Name - Displays the name of the employee.
• Check # - Displays the paycheck number.
• Check/Advice Issue Date - Displays the date printed on the paycheck.
• Earnings - Displays the total gross earnings for the paycheck.
• Taxes - Displays the total taxes for the paycheck.
• Deductions - Displays the total deductions for the paycheck.
• Net Pay - Displays the net pay for the paycheck.
• Check/Advice # - Displays the paycheck number.
• Type - Displays the type of account as well as the transit number of the bank where the employee's direct deposit account is located.
For a description of the fields on this panel, press F1.
Chapter 6: Calculating and Confirming Your PayrollPayroll Processing Guide Version 5.04.01

Calculating the Preliminary Payroll 6-27
• Account # - Displays the account number into which the direct deposit is paid for the employee.
The data in this field displays in Show, Mask, or Hide format depending on the field
display options selected on the user’s security profile (System Admin ~ Security Administration ~ Operator ~ Profile). For more information on the user Profile settings, see the Application Administrator’s Guide.
• Amount - Displays the dollar amount of the employee's paycheck automatically deposited in the specified account.
• Transit # - Displays the transit number of the direct deposit.
The data in this field displays in Show, Mask, or Hide format depending on the field
display options selected on the user’s security profile (System Admin ~ Security Administration ~ Operator ~ Profile). For more information on the user Profile settings, see the Application Administrator’s Guide.
3. Click (Close).
You’ve just finished viewing the details of an employee’s direct deposit advices. Next, view the employee’s retroactive earnings.
Viewing Retroactive Earnings Information
The Calculated Retro Pay panel displays all the retroactive earnings payments for a specific employee.
To view retroactive earnings information, do the following:
1. Click Payroll and make the following selections:
Payroll Cycle Processes ~ Scheduled Payroll (On Cycle)
2. Double-click the Review Calculated Retro Pay task. The Search dialog box displays.
Figure 6-15. Search Dialog Box
3. Enter as much information as you can and click OK.
Chapter 6: Calculating and Confirming Your PayrollPayroll Processing Guide Version 5.04.01

6-28 Calculating the Preliminary Payroll
4. From the search results area, double-click the line that contains the specific retroactive pay information. The Calculated Retro Pay panel displays.
Figure 6-16. Calculated Retro Pay Panel
5. Review the following information on the panel to verify that all calculated retroactive pay information is correct:
• Off Cycle - Indicates if the paysheet for the pay cycle data is for an off-cycle payroll.
• Pay End Date - Displays the date the pay period ends. Pay period end dates must be established on the Pay Calendar panel before they can be used elsewhere in Enterprise Payroll.
• Page # - Displays the paysheet page number. During the paysheet creation process, Enterprise Payroll automatically assigns 15 paylines per page, starting with line 1, and assigns as many sequential page numbers as needed, starting with page 1. New page numbers can be manually added as needed, up to a maximum of 9999.
• Line # - Displays the payline number on a paysheet page. When you generate your initial pay cycle data and generate your paysheet(s), Enterprise Payroll automatically assigns 15 paylines per page, starting with line 1, and assigns as many sequential page numbers as needed, starting with page 1. New paylines can be added to new or existing pages, up to a maximum of 99 lines per page. The default number of paylines per page can be modified on the Company panel.
• Earns Code - Displays the Earnings Code assigned to regular earnings.
• Earns Begin Date - Displays the date the regular earnings begins.
• Earns End Date - Displays the date the regular earnings ends.
• Original Hours - Displays the number of hours worked for the regular earnings time period.
• Original Rate - Displays the original regular earnings pay rate.
• Retro Rate - Displays the rate for retroactive pay.
For a description of the fields on this panel, press F1.
Chapter 6: Calculating and Confirming Your PayrollPayroll Processing Guide Version 5.04.01

Calculating the Preliminary Payroll 6-29
• Retro Code - Displays the retroactive pay earnings code.
• Retro Hours - Displays the hours eligible for retroactive pay.
• Dept ID Number - Displays the code that identifies the department.
• OK to Pay - Indicates that confirmation was previously given to pay retroactive pay using one of the following methods:
– by selecting the OK to Pay check box on the Earnings panel (Payroll ~ Payroll Cycle Processes ~ Schedule Payroll-On Cycle ~ Modify Employee Pay Cycle Data-Payline)
– by not selecting the Confirmation Required to Pay option on the Employee Type Options panel (Payroll ~ Company Definitions ~ Pay Groups and Payroll Calendars ~ Pay Groups)
In addition, confirmation can be given from the Earnings panel using the following
path: (Payroll ~ Payroll Cycle Processes ~ On-Demand Payroll-Off Cycle ~ Modify Employee Pay Cycle Data-Payline). If off-cycle, dates must be in the correct range for retroactive pay.
6. When you are finished, click (Close).
You’ve just finished viewing the details of an employee’s retroactive payments. Next, see “Viewing Pending Performance Plan Payment Information” on page 6-29.
Viewing Pending Performance Plan Payment Information
The Pending Performance Plan Payments panel displays pending performance plan payment information for all employees within a specific performance pay plan.
To view pending performance plan payment information, do the following:
1. Click Payroll and make the following selections:
Payroll Cycle Processes ~ Scheduled Payroll (On Cycle)
2. Double-click the View Pending Performance Plan Payments task. The Search dialog box displays.
Figure 6-17. Search Dialog Box
Chapter 6: Calculating and Confirming Your PayrollPayroll Processing Guide Version 5.04.01

6-30 Calculating the Preliminary Payroll
3. Select an ID from the Performance Pay Plan ID field and click OK. The Pending Performance Plan Payments panel displays.
Figure 6-18. Pending Performance Plan Payments Panel
4. Review the following information on the panel to verify that all pending performance plan payment information is correct:
• Empl ID - Displays the employee’s unique identifier.
• Rcd # - For employees performing concurrent jobs, indicates the job to which the record pertains. New hire employment record numbers are always 0.
This field only displays when you’re using multiple or concurrent job processing functionality as indicated through the Installation task (System Admin ~ Human Resources Setup (Required) ~ Human Resources Setup) when the Multiple Jobs Allowed check box is selected.
• Name - Displays the employee’s name.
• Payment Date - Displays the payment date of the performance plan payment.
• Payment Amount - Displays the payment amount of the performance plan payment.
• Company - Displays the code that identifies the company.
• Pay Group - Displays the employee's pay group. A pay group is an identifier assigned to a set of employees grouped together for payroll processing purposes.
• Department ID - Displays the employee’s department ID.
5. When you are finished, click (Close).
For a description of the fields on this panel, press F1.
Chapter 6: Calculating and Confirming Your PayrollPayroll Processing Guide Version 5.04.01

Calculating the Preliminary Payroll 6-31
You’ve just finished viewing the pending performance plan payments for a specific performance pay plan, which is the last step in viewing preliminary check data after calculating your payroll. Next, you’re ready to complete your payroll.
Chapter 6: Calculating and Confirming Your PayrollPayroll Processing Guide Version 5.04.01

6-32 Completing the Payroll
Completing the Payroll
When you are satisfied with the results of your preliminary pay calculation runs and you have corrected all errors, you are ready to run the final pay calculation and confirm your payroll.
Completing the payroll consists of the following:
• Running the Final Pay Calculation
• Confirming Your Payroll
• Reviewing System Messages
• Reviewing Pay Confirmation Results
• Reviewing Confirmed Paysheets
After completing your payroll, you can review your result on line or on printed reports. For more information, see Chapter 7, “Generating Summary Reports.”
Running the Final Pay Calculation
Recalculate your payroll one more time, this time clearing the Preliminary Calculation Run check box in the Payroll Calculation panel.
To run your final pay calculation, do the following:
1. Click Payroll and make the following selections:
Payroll Cycle Processes ~ Scheduled Payroll (On Cycle)
Running the Payroll Confirmation process while another Confirm process is executing can cause duplicate check numbers if both processes are using the same form ID.
Completing the Payroll
Running the Final Pay Calculation
Confirming Your Payroll
Reviewing System Messages
Reviewing Pay Confirmation Results
Reviewing Confirmed Paysheets
Chapter 6: Calculating and Confirming Your PayrollPayroll Processing Guide Version 5.04.01

Completing the Payroll 6-33
2. Double-click the Calculate Final Payroll task. The Payroll Calculation panel displays.
Figure 6-19. Payroll Calculation Panel
For a description of the fields on this panel, press F1 or see page 6-6.
3. Enter an alpha/numeric batch run ID in the Batch Run ID field.
4. In the On-Cycle Run area, enter the payroll run ID in the Pay Run ID field.
The payroll run ID Enterprise Payroll uses to calculate your payroll should be identical to
the payroll run ID you used to generate your initial pay cycle data (paysheets).
5. Clear the Preliminary Calculation Run check box.
Do clear this check box until you have corrected all errors from the preliminary runs and
are ready to process your final pay calculation.
6. Select the (Re)Calculate All Checks option from the Select Checks to Calculate area.
When you recalculate your payroll after correcting errors, select the Only Calculate
Where Needed option.
7. Click (Save).
8. Click Run Pay Calc. You will receive a message notifying you that your process has been submitted. Click OK.
9. To confirm successful completion of your process, click (Process Monitor).
You’ve just finished running your final pay calculation. Next, you are ready to confirm your payroll.
Chapter 6: Calculating and Confirming Your PayrollPayroll Processing Guide Version 5.04.01

6-34 Completing the Payroll
Confirming Your Payroll
After you have run your final pay calculation without receiving any errors, you are ready to confirm your payroll.
Running the Confirm Payroll process while another Confirm process is executing can cause
duplicate check numbers if both processes are using the same form ID.
Once you begin the confirmation process, Enterprise Payroll assumes that you have reviewed and approved all payroll information for this pay run.
When you confirm your payroll, Enterprise Payroll processes one company at a time. Enterprise Payroll also processes every pay group you assign to the pay run ID and indicates how many checks are being calculated and how many have already been calculated.
In the confirmation process, Enterprise Payroll verifies that no outstanding on-cycle and/or off-cycle paysheets are outstanding for the current pay calendar. If a paysheet has not been calculated, you will receive an error message when you attempt to confirm your payroll. For example, you add an off-cycle paysheet and select the OK to Pay check box but do not calculate the off-cycle paysheet. Then you attempt to confirm an on-cycle paysheet. The on-cycle confirmation will be unsuccessful until you calculate the off-cycle paysheet.
In addition, it assigns check and advice numbers. Enterprise Payroll looks at the last form number Enterprise Payroll uses on the Paycheck and Deposit Forms panel (Payroll ~ Company Definitions ~ Other Payroll Definitions ~ Paycheck and Deposit Forms), adds one, and assigns this number to the first person on the paysheets. Enterprise Payroll assigns the remaining check or advice numbers sequentially according to the order of the employees on the paysheets.
You can clear the TotalPay Card distribution so that checks will be issued instead.
Finally, if you are using fund accounting, you can tell Enterprise Payroll to stop the process if any fund(s) would be exhausted by the pay run confirmation.
To confirm your payroll, do the following:
1. Click Payroll and make the following selections:
Payroll Cycle Processes ~ Scheduled Payroll (On Cycle)
You cannot update paysheet information once you confirm your payroll. Make sure that all amounts are calculated properly. If you forget to recalculate your payroll with the Preliminary Calculation Run check box cleared and you try to confirm your payroll, you will receive an error message notifying you that your payroll is not final.
Completing the Payroll
Running the Final Pay Calculation
Confirming Your Payroll
Reviewing System Messages
Reviewing Pay Confirmation Results
Reviewing Confirmed Paysheets
Chapter 6: Calculating and Confirming Your PayrollPayroll Processing Guide Version 5.04.01

Completing the Payroll 6-35
2. Double-click the Complete Payroll (Confirm) task. The Payroll Confirmation panel displays.
Figure 6-20. Payroll Confirmation Panel
3. Enter an alpha/numeric batch run ID in the Batch Run ID field.
4. Enter the pay run ID in the Pay Run ID field.
The payroll run ID Enterprise Payroll uses when confirming your payroll should be
identical to the payroll run ID you used to generate your initial pay cycle data (paysheets) and calculate your payroll.
5. If you are a TotalPay Card subscriber but want checks to be issued instead of generating a TotalPay Card distribution, clear the Process TotalPay Card check box.
6. If you are using fund accounting and want Enterprise Payroll to determine whether any fund(s) would be exhausted by the pay run, select the Test for Fund Exhaustion check box.
If this option is selected and the sum of any fund’s transactions would cause the fund to fall to or below zero, then the confirm process ends and reports the fund(s) that lack sufficient balances to continue.
7. Click (Save).
8. Click Run Pay Confirm. You will receive a message notifying you that your process has been submitted. Click OK.
9. To confirm successful completion of your process, click (Process Monitor).
You’ve just finished confirming your payroll. Next, you can review system messages generated as a result of confirming your payroll.
For a description of the fields on this panel, press F1.
Chapter 6: Calculating and Confirming Your PayrollPayroll Processing Guide Version 5.04.01

6-36 Completing the Payroll
Reviewing System Messages
Enterprise Payroll displays messages to your screen during the execution of payroll programs and then saves these messages to a log file for viewing after the process is completed. Enterprise Payroll recreates this log file each time a specific process runs and overwrites the previous log file for that process.
Enterprise Payroll places the log file in your Temp directory if you are running from a Windows workstation or in your Temp directory if you are running from a UNIX server. It uses the following naming conventions to name the files:
• Log files— application name.log
You’ve just finished reviewing system messages generated as a result of confirming your payroll. If you need to unconfirm your payroll, see “Unconfirming Your Payroll” on page 6-40. Otherwise, you can review your final payroll results. For more information, see “Reviewing Pay Confirmation Results” on page 6-37.
Example:
The file created after confirming your payroll would be named:
confirm.log
Completing the Payroll
Running the Final Pay Calculation
Confirming Your Payroll
Reviewing System Messages
Reviewing Pay Confirmation Results
Reviewing Confirmed Paysheets
Chapter 6: Calculating and Confirming Your PayrollPayroll Processing Guide Version 5.04.01

Completing the Payroll 6-37
Reviewing Pay Confirmation Results
After you complete your payroll, you can view the results of paycheck earnings, deductions, and taxes using the panels as discussed in “Viewing Preliminary Check Data” on page 6-14.
Enterprise Payroll also provides numerous reports that allow you to view your processed payroll data. For detailed information, see Chapter 7, “Generating Summary Reports.”
You’ve just finished reviewing the results of the pay confirmation. Next, review your confirmed paysheets.
Reviewing Confirmed Paysheets
After completing your payroll, you can open the confirmed paysheets and review earnings as well as deduction, garnishment, and tax overrides. When you access the paysheet panel using this navigation, you are able to review all the panels but are not be allowed to make any changes.
To access the confirmed paysheets, use the following navigation:
Employee Information ~ View Paycheck Detail ~ Confirmed Pay Cycle Data (Paysheets)
Only paysheets that have the OK to Pay check box selected prior to running payroll
confirmation will be visible on the paysheet panels.
For field descriptions of fields on the paysheet panels, see the following:
• “Modifying Earnings Information” on page 3-26.
• “Entering a One-time Deduction Override” on page 3-27.
• “Entering a One-time Garnishment Override” on page 3-33.
• “Entering a One-time Tax Override” on page 3-36.
You’ve just finished reviewing the results of the pay confirmation in paysheets, which is the last step in completing your payroll.
Completing the Payroll
Running the Final Pay Calculation
Confirming Your Payroll
Reviewing System Messages
Reviewing Pay Confirmation Results
Reviewing Confirmed Paysheets
Chapter 6: Calculating and Confirming Your PayrollPayroll Processing Guide Version 5.04.01

6-38 Reversing Accruals and Unconfirming a Payroll
Reversing Accruals and Unconfirming a Payroll
If you need to include additional data in your payroll, you can unconfirm your payroll. If you have run the leave accruals process, you also need to reverse the accrual balances.
Although you confirm your payroll prior to updating your leave balances, you must reverse the leave balances before you unconfirm your payroll. If you do not reverse your leave balances first, your accruals will not be accurate.
For detailed information about reversing accrual balances and unconfirming your payroll, see the following:
• Reversing Leave Balances
• Unconfirming Your Payroll
Reversing Leave Balances
If you confirm your payroll, process your leave accruals, and unconfirm your payroll, you need to reverse the leave accruals balances prior to unconfirming your payroll. When you unconfirm your payroll, the leave accruals are not automatically reversed.
To reverse leave balances, do the following:
1. Click Payroll and make the following selections:
Payroll Cycle Processes ~ Utilities
Reversing Accruals and Unconfirming a Payroll
Reversing Leave Balances
Unconfirming Your Payroll
Chapter 6: Calculating and Confirming Your PayrollPayroll Processing Guide Version 5.04.01

Reversing Accruals and Unconfirming a Payroll 6-39
2. Double-click the Reverse Leave Balances task. The Reverse Leave Balances panel displays.
Figure 6-21. Reverse Leave Balances Panel
3. Enter an alpha/numeric batch run ID in the Batch Run ID field.
4. In the Plan Type field, select the number that corresponds with the plan type.
Only 5x plan types are available for reversal.
5. In the Accrual Frequency field, select the frequency of the plan type.
6. Review the following benefits information:
• Benefit Plan - Displays the name of the benefit plan. All of the accruals associated with the plan type and accrual frequency are listed.
• Description - Displays the description of the benefit plan.
• Last Process Date - Displays the date that the accrual was last updated by the leave accrual process.
7. Clear the Include check box if you do not want to reverse the leave accrual for the benefit plan.
8. Click (Save).
9. Click Run Reverse Accruals. You will receive a message notifying you that your process has been submitted. Click OK.
10. To confirm successful completion of your process, click (Process Monitor).
You’ve just reversed your accrual balances.
For a description of the fields on this panel, press F1.
Chapter 6: Calculating and Confirming Your PayrollPayroll Processing Guide Version 5.04.01

6-40 Reversing Accruals and Unconfirming a Payroll
Unconfirming Your Payroll
Because Enterprise Payroll does not allow you to make changes to a confirmed payroll, you can use the Unconfirm Payroll task to unconfirm and make the necessary changes.
To unconfirm a payroll that has already been confirmed, do the following:
1. Set up a run control. For detailed instructions, see “Processing Your Initial Payroll Calculation” on page 6-6.
2. Click Payroll and make the following selections:
Payroll Cycle Processes ~ Utilities
3. Double-click the Unconfirm Payroll task. The Unconfirm Payroll panel displays.
Figure 6-22. Unconfirm Payroll Panel
4. Enter an alpha/numeric batch run ID in the Batch Run ID field.
5. In the On-Cycle Run area, enter the pay run ID in the Pay Run ID field.
The payroll run ID Enterprise Payroll uses when unconfirming your payroll should be
identical to the payroll run ID you used to generate your initial pay cycle data (paysheets) and calculate your payroll.
6. Click (Save).
7. Click Run Pay Unconfirm. You will receive a message notifying you that your process has been submitted. Click OK.
8. To confirm successful completion of your process, click (Process Monitor).
Reversing Accruals and Unconfirming a Payroll
Reversing Leave Balances
Unconfirming Your Payroll
For a description of the fields on this panel, press F1.
Chapter 6: Calculating and Confirming Your PayrollPayroll Processing Guide Version 5.04.01

Reversing Accruals and Unconfirming a Payroll 6-41
You’ve just unconfirmed a payroll.
Chapter 6: Calculating and Confirming Your PayrollPayroll Processing Guide Version 5.04.01

6-42 Preparing for the Next Payroll Cycle
Preparing for the Next Payroll Cycle
After you have calculated and confirmed your payroll, you can get ready to process your next payroll. Preparing for the next payroll cycle consists of the following:
• Deleting Confirmed Pay Cycle Data
• Updating Time and Labor Management System Data
Deleting Confirmed Pay Cycle Data
To prepare for the next payroll cycle, you can delete pay cycle data for a specific pay run ID you used on a confirmed payroll. Using the Delete Prior Time and Attendance Data task, you to delete all pay data transactions and batches attached to the pay run ID.
To delete confirmed pay cycle data, do the following:
1. Select Payroll and make the following selections:
Payroll Cycle Processes ~ Time and Attendance
2. Double-click the Delete Prior Time and Attendance Data task. The Delete Time and Attendance Data panel displays.
Figure 6-23. Delete Time and Attendance Data Panel
3. In the Delete Pay Data for Pay Run ID field, select the pay run ID whose data you want to delete.
ADP recommends you delay doing this step until a few days after employees receive their paychecks.
Preparing for the Next Payroll Cycle
Deleting Confirmed Pay Cycle Data
Updating Time and Labor Management System Data
For a description of the fields on this panel, press F1.
Chapter 6: Calculating and Confirming Your PayrollPayroll Processing Guide Version 5.04.01

Preparing for the Next Payroll Cycle 6-43
4. If you want to later re-use the same header data that you used for the pay run ID displayed in the Delete Pay Data for Pay Run ID field, then select the Retain Batch Headers, SubBatch Headers (spreadsheets), and Saved Selections check box.
If you do not select this check box, Enterprise Payroll deletes the batch headers and pay
data entry detail associated with the pay run ID as well as the associated sub-batch header information and the saved preload selections.
5. To attach the existing header information to a new pay run ID for your next payroll cycle, select the pay run ID from the New Pay Run ID field.
6. Review the following batch information:
• Total Entries - This column displays the total number of rows for each batch that is attached to the payroll run ID being deleted.
• Batch - This column displays all batches that are attached to the specified pay run ID.
• Description - This column displays a description of the batch.
7. When you are finished, click (Save).
You have just finished deleting pay cycle data for a specific pay run ID you used on a confirmed payroll. Next, you need to update your time clock information.
Updating Time and Labor Management System Data
After every payroll, you should update your Time and Labor Management (TLM) system information. Enterprise Payroll provides utilities that finds any TLM information that you have updated/added since the last payroll. These utilities write the information to a file you can then export from ADP Enterprise HR to the TLM system. Refer to one of the following sections for information on running this utility:
• Exporting TLM Data to Enterprise eTIME
• Exporting Employee TLM Data to eTIME
• Exporting Employee TLM Data to TimeSaver
• Exporting Employee TLM Data to Total Time
Exporting TLM Data to Enterprise eTIME
Exporting TLM data to Enterprise eTIME consists of the following:
• Exporting Employee TLM Data
• Exporting Labor Level TLM Data
Preparing for the Next Payroll Cycle
Deleting Confirmed Pay Cycle Data
Updating Time and Labor Management System Data
Chapter 6: Calculating and Confirming Your PayrollPayroll Processing Guide Version 5.04.01

6-44 Preparing for the Next Payroll Cycle
Exporting Employee TLM Data
The utility, TAA028.SQR, automatically locates time collection information in ADP Enterprise HR that has been updated/added since the last time you ran TAA028. It then writes the information to a file, epretime.trn, that is used by Enterprise eTIME. The epretime.trn file contains all employees with the status of: (A)ctive, (P)aid Leave of Absence, (S)uspended, and (L)eave that fit the specified report selection criteria. TAA028 also creates change transactions for the external time clock/time entry systems.
After the initial export, you should run TAA028 as often as necessary for the frequency of
changes that are entered. You should select the Modified Employees only option.
The column names in Table 6-2 are the information included in the epretime.trn file.
Table 6-2. Columns Exported in epretime.trn
Column Name Description
Person Type Identifies the type of employee.
New Person Type The employee’s new person type.
ID Number The ID number assigned to the employee.
New ID Number Not applicable for Enterprise Payroll. Blank in file.
Badge Number The badge number assigned to the employee.
Badge Effective Date The effective date that the employee badge number will display on the employee’s Enterprise eTIME TLM setup panel.
First Name The employee’s first name.
Middle Name The employee’s middle initial.
Last Name The employee’s last name.
Hire Date The employee’s hire date.
Pay Rule The business standards by which the employee is paid.
Wage Rate The employee’s hourly rate.
Labor Levels The employees home labor account. There can be up to seven labor levels.
Group Schedule The employee’s group schedule.
Group Schedule Effective Date
The effective date that the group schedule will display on the employee’s Enterprise eTIME TLM setup panel.
Terminal Group The terminal group to which the employee is assigned.
Time Zone The employee’s time zone.
Effective Termination Date
The effective date for the employee’s termination, inactive, or active status.
Status The employee’s status: active, inactive, or terminated.
Chapter 6: Calculating and Confirming Your PayrollPayroll Processing Guide Version 5.04.01

Preparing for the Next Payroll Cycle 6-45
TLM Effective Date The effective date that the employee can participate in the TLM process. This is information only.
FLSA Status The employee’s FSLA status.
Time Entry The method that the employee uses for entering time: timestamp, timestamp and hourly view, hourly view, project view.
Wage Profile The employee’s wage profile.
Accrual Profile The employees accrual profile.
Social Security Number The employee’s Social Security Number.
Manager ID The ID of the employee’s manager.
Manager’s Full Name The full name of the employee’s manager.
FT Expected Amount The full-time hours for the employee.
PT Expected Amount The part-time hours for the employee.
Phone Number The employee’s work phone number.
Email Address The employee’s email address.
Address1 The employee’s home address.
Address2 Line 2 of the employee’s home address.
Address3 Line 3 of the employee’s home address.
City The city in the employee’s home address.
State The state in the employee’s home address.
Zip The zip code in the employee’s home address.
Birthdate The employee’s birthdate.
Userfield1-10 Additional employee TLM data.
FLSA O/T Indicator Indicator that determines which calculation method is used to determine the employee’s FLSA overtime.
State Tax Code The tax code for the state in which the employee works.
Job Entry Date The date that the employee started the current job.
Dept Entry Date The date that the employee entered the current department.
Employee Type Indicates whether the employee is salaried, hourly, exception hourly, or daily.
Data Control User-defined code that is used for special coding on AutoPay.
Clock ID The clock identifier for an external time clock system.
Union Code The union to which the employee belongs.
Table 6-2. Columns Exported in epretime.trn (cont.)
Column Name Description
Chapter 6: Calculating and Confirming Your PayrollPayroll Processing Guide Version 5.04.01

6-46 Preparing for the Next Payroll Cycle
To run the Enterprise eTIME Employee Export process (TAA028), do the following:
1. Click Payroll and make the following selections:
Company Definitions ~ Time and Attendance - Enterprise eTIME
Rehire Date The rehire date if the employee has been rehired.
Service Date The date on which the employee’s length of service is calculated.
Company Seniority Date
The date of the employee’s seniority.
Acquisition Date The date that the company or division was acquired, thereby indicating the hire date for employees from that company.
Expected Return Date The date the employee is expected to return from a leave of absence.
Probation Date The date a probationary period begins
Retirement Date The date that the employee’s retirement went into effect.
Date Last Worked The last date the employee worked for the company.
Accrual Codes The accrual code for the employee. There can be up to five accrual codes.
Accrual Amount The accrual amount for the employee. There can be up to five accrual amounts.
Table 6-2. Columns Exported in epretime.trn (cont.)
Column Name Description
Chapter 6: Calculating and Confirming Your PayrollPayroll Processing Guide Version 5.04.01

Preparing for the Next Payroll Cycle 6-47
2. Double-click the eTIME Employee Export (TAA028) task. The Export to Enterprise eTIME panel displays.
Figure 6-24. Export to Enterprise eTIME Panel
3. If necessary, change the effective date in the Effective Date field.
You may enter a future date to include future-dated new hires in the report file.
4. If you want the epretime.trn file to include time collection data that is not a part of the original TAA028 export utility, select an export ID from the Export ID field.
To use this option, you must set up custom export definitions using the Custom Export
Definitions task. For step-by-step instructions, refer to Appendix C, “Creating Custom Export Definitions: Enterprise eTIME and/or TimeSaver.”
5. From the File Options field, select one of the following options:
• Accrual file only - Select if you want to create only the accrual file.
• Combine accr file - Select if you want a demographic file created with accrual information.
• Separate accr file - Select if you want to exclude the accrual information from the epretime.trn file and generate a separate file, epretime.acc, that contains only accrual data.
6. In the Process area, select one of the following options:
• All employees - Select to have the report include TLM data for only employees that fit the specified report selection criteria.
• Modified employees only - Select to have the report include TLM data for only employees that fit the specified report selection criteria and have had TLM data changes since the last export.
For a description of the fields on this panel, press F1.
Chapter 6: Calculating and Confirming Your PayrollPayroll Processing Guide Version 5.04.01

6-48 Preparing for the Next Payroll Cycle
7. From the Report Selection Criteria field, select one of the following options:
• None - Select to have the report include TLM data for all employees.
• By Department Range - Select to have the report include TLM data for employees in a specific department number range.
– If you select this option, you can select a department range using the Department ID fields.
• By Location Range - Select to have the report include TLM data for employees in a specific location range.
– If you select this option, you can select a location range using the Location Code fields.
• By Pay Group - Select to have the report include TLM data for employees in a specific pay group.
– If you select this option, you can select a pay group(s) from the Pay Group Processing field.
You may select multiple pay groups by clicking (Insert Row).
8. Click Run Report. You will receive a message notifying you that your process has been
submitted. Click OK. To confirm successful completion, click (Process Monitor).
For additional information on the Process Monitor, refer to the Using ADP Enterprise HR Guide.
You have just finished exporting the initial employee TLM file to Enterprise eTIME. Next you can export labor level data.
Chapter 6: Calculating and Confirming Your PayrollPayroll Processing Guide Version 5.04.01

Preparing for the Next Payroll Cycle 6-49
Exporting Labor Level TLM Data
The utility, TAA032.SQR, retrieves all labor level entries in ADP Enterprise HR, including overrides at the employee level. The export file includes the labor level definition, name, and description. It then writes the information to a file, eprlbrlv.trn, that is used by Enterprise eTIME.
User fields are not included in eprlbrlv.trn unless the pay group is set up for Time and
Attendance.
The column names in Table 6-3 are the information included in the eprlbrlv.trn file.
After the initial export, you should run TAA032 as often as necessary for the frequency of
changes that are entered.
To run the Export Labor Levels to Enterprise eTIME process (TAA032), do the following:
1. Click Payroll and make the following selections:
Employee Information and Processes ~ Time and Attendance - Enterprise eTIME
2. Double-click the Export Labor Levels to Enterprise eTIME (TAA032) task. The Export Labor Levels to Enterprise panel displays.
3. Click Run Report. You will receive a message notifying you that your process has been
submitted. Click OK. To confirm successful completion, click (Process Monitor).
For additional information on the Process Monitor, refer to the Using ADP Enterprise HR Guide.
You have just finished exporting the initial employee TLM file and labor level setup to Enterprise eTIME, which are the last steps in setting up and using the Enterprise eTIME interface.
Table 6-3. Columns exported in eprlbrlv.trn
Column Name Description
Labor Level Definition Identifies the labor level that is associated with a labor level entry.
Name Identifies the name of the labor level entry.
Description Contains text that describes the labor level name.
Chapter 6: Calculating and Confirming Your PayrollPayroll Processing Guide Version 5.04.01

6-50 Preparing for the Next Payroll Cycle
Exporting Employee TLM Data to eTIME
Enterprise Payroll provides a utility, TAA026.SQR, that automatically locates time collection information in Time and Attendance that has been updated/added since the last payroll. It then writes the information to a file, ttrans.krn, that is used by eTIME. The ttrans.krn file contains all employees for each time reporting location with the status of: (A)ctive, (P)aid Leave of Absence, (S)uspended, and (L)eave. TAA026 also creates change transactions for the external time clock/time entry systems.
After the initial export, you should run TAA026 every night.
To run the eTIME Employee Export process (TAA026), do the following:
1. Click Payroll and make the following selections:
Company Definitions ~ Time and Attendance - eTIME
2. Double-click the eTIME Employee Export (TAA026) task. The eTIME Employee Export panel displays.
3. Click Run Report. You will receive a message notifying you that your process has been
submitted. Click OK. To confirm successful completion, click (Process Monitor).
For additional information on the Process Monitor, refer to the Using ADP Enterprise HR Guide.
You have just finished exporting the initial employee TLM file to eTIME.
Chapter 6: Calculating and Confirming Your PayrollPayroll Processing Guide Version 5.04.01

Preparing for the Next Payroll Cycle 6-51
Exporting Employee TLM Data to eTIME
Enterprise Payroll provides a utility, TAA026.SQR, that automatically locates time collection information in Time and Attendance that has been updated/added since the last payroll. It then writes the information to a file, ttrans.krn, that is used by eTIME. The ttrans.krn file contains all employees for each time reporting location with the status of: (A)ctive, (P)aid Leave of Absence, (S)uspended, and (L)eave. TAA026 also creates change transactions for the external time clock/time entry systems.
After the initial export, you should run TAA026 every night.
To run the eTIME Employee Export process (TAA026), do the following:
1. Click Payroll and make the following selections:
Company Definitions ~ Time and Attendance - eTIME
2. Double-click the eTIME Employee Export (TAA026) task. The eTIME Employee Export panel displays.
3. Click Run Report. You will receive a message notifying you that your process has been
submitted. Click OK. To confirm successful completion, click (Process Monitor).
For additional information on the Process Monitor, refer to the Using ADP Enterprise HR Guide.
You have just finished exporting the initial employee TLM file to eTIME.
Chapter 6: Calculating and Confirming Your PayrollPayroll Processing Guide Version 5.04.01

6-52 Preparing for the Next Payroll Cycle
Exporting Employee TLM Data to TimeSaver
The utility, TAA030.SQR, automatically locates time collection information in ADP Enterprise HR that has been updated/added since the last time you ran TAA030. It then writes the information to a file, timesavr.trn, that is used by TimeSaver. The timesavr.trn file contains all employees for each time reporting location with the status of: (A)ctive, (P)aid Leave of Absence, (S)uspended, or (L)eave that fit the specified report selection criteria. TAA030 also creates change transactions for the external time clock/time entry systems.
After the initial export, you should run TAA030 as often as necessary for the frequency of
changes that are entered. You should select the Modified Employees Only option.
The column names in Table 6-4 are the information included in the timesavr.trn file.
Table 6-4. Columns exported in timesvr.trn
Column Name Description
Employee ID The ID number assigned to the employee.
Pay Group The pay group to which the employee is assigned.
Badge Number The badge number assigned to the employee.
Social Security Number The employee’s Social Security Number.
Employee First Name The employee’s first name.
Employee Middle Initial
The employee’s middle initial.
Employee Last Name The employee’s last name.
Address The employee’s home address.
Address2 Line 2 of the employee’s home address.
Address3 Line 3 of the employee’s home address.
City The city in the employee’s home address.
State The state in the employee’s address.
Zip Code The zip code in the employee’s address.
PhoneNumber The employee’s work phone number.
Birth Date The employee’s birthdate.
Original Hire Date The employee’s original hire date.
Service Date The date on which the employee’s length of service is calculated. Usually this field populates with the employee’s original date of hire.
Hire Date The employee’s hire date.
Date Terminated The date the employee was terminated.
Chapter 6: Calculating and Confirming Your PayrollPayroll Processing Guide Version 5.04.01

Preparing for the Next Payroll Cycle 6-53
Effective Date The effective date for the hire of the employee.
Employee Status The employment status of an employee: on leave, inactive, full-time, or part-time.
Status Group The status group to which the employee is assigned.
Site Code The site code assigned to the employee.
Pay Group Code The code for the employee’s pay group.
Department Code The department ID assigned to the employee.
Position Code The employee’s job code.
Pay Type The pay type assigned to the employee.
Shift Premium Indicator that the employee is eligible for or receives a shift premium.
Tipped Indicator that the employee is eligible for or receives tips.
Probation Indicator that the employee is on a probationary period.
Union Code The employee’s union code.
Hours The employee’s standard hours.
Employee Pos Rate The employee’s hourly rate.
Week Day The days of the week that are work days for the employee.
Benefit Plan The leave benefit plan for which the employee is eligible.
Benefit Date The date the employee is eligible for the leave benefit plan.
FLSA Status The employee’s FLSA status.
User Field 1-10 Additional employee TLM data.
FLSA Overtime Indicator
Indicator that determines which calculation method is used to determine the employee’s FLSA overtime.
State Tax Code The tax code for the state in which the employee works.
Job Entry Date The date that the employee started the current job.
Dept Entry Date The date that the employee entered the current department.
Employee Type Indicates whether the employee is salaried, hourly, exception hourly, or daily.
Data Control User-defined code that is used for special coding on AutoPay.
Clock Number The clock number for an external time clock system.
Union Code The union code.
Rehire Date The rehire date if the employee has been rehired.
Table 6-4. Columns exported in timesvr.trn
Column Name Description
Chapter 6: Calculating and Confirming Your PayrollPayroll Processing Guide Version 5.04.01

6-54 Preparing for the Next Payroll Cycle
To export the employee data file to TimeSaver, do the following:
1. Click Payroll and make the following selections:
Company Definitions ~ Time and Attendance - TimeSaver
Service Date The date of service.
Company Seniority Date
The date of the employee’s seniority.
Acquisition Date The date that the company or division was acquired, thereby indicating the hire date for employees from that company.
Expected Return Date The date the employee is expected to return from a leave of absence.
Probation Date The date a probationary period begins
Retirement Date The date that the employee’s retirement went into effect.
Date Last Worked The last date the employee worked for the company.
Accrual Codes The accrual code for the employee. There can be up to five accrual codes.
Accrual Amount The accrual amount for the employee. There can be up to five accrual amounts.
Accrual Effective Date The accrual balance effective date.
Table 6-4. Columns exported in timesvr.trn
Column Name Description
Chapter 6: Calculating and Confirming Your PayrollPayroll Processing Guide Version 5.04.01

Preparing for the Next Payroll Cycle 6-55
2. Double-click the TimeSaver Employee Export (TAA030) task. The Export to TimeSaver panel displays.
Figure 6-25. Export to TimeSaver Panel
3. If necessary, change the effective date in the Effective Date field.
You may enter a future date to include future-dated new hires in the report file.
4. If you want the timesavr.trn file to include time collection data that is not a part of the original TAA030 export utility, then select an export ID from the Export ID field.
To use this option, you must set up custom export definitions using the Custom Export
Definitions task. For step-by-step instructions, refer to Appendix C, “Creating Custom Export Definitions: Enterprise eTIME and/or TimeSaver.”
5. From the File Options field, select one of the following options:
• Accrual file only - Select if you want to create only the accrual file.
• Demographic file only - Select if you want to create only a demographic file.
• Separate Demogr/Accr file - check box if you want to exclude the accrual information from the timesavr.trn file and generate a separate file, timesavr.acc, that contains only accrual data
6. In the Process area, select one of the following options:
• All employees - Select to have the report include TLM data for only employees that fit the specified report selection criteria.
• Modified employees only - Select to have the report include TLM data for only employees that fit the specified report selection criteria AND have had TLM data changes since the last export.
For a description of the fields on this panel, press F1.
Chapter 6: Calculating and Confirming Your PayrollPayroll Processing Guide Version 5.04.01

6-56 Preparing for the Next Payroll Cycle
7. From the Report Selection Criteria field, select one of the following options:
• None - Select to have the report include TLM data for all employees.
• By Department Range - Select to have the report include TLM data for employees in a specific department number range.
– If you select this option, you can select a department range using the Department ID fields.
• By Location Range - Select to have the report include TLM data for employees in a specific location range.
– If you select this option, you can select a location range using the Location Code fields.
• By Pay Group - Select to have the report include TLM data for employees in a specific pay group.
– If you select this option, you can select a pay group(s) from the Pay Group Processing field.
You may select multiple pay groups by clicking (Insert Row).
8. Click Run Report. You will receive a message notifying you that your process has been
submitted. Click OK. To confirm successful completion, click (Process Monitor).
For additional information on the Process Monitor, refer to the Using ADP Enterprise HR Guide.
You have just finished exporting the initial employee TLM file to TimeSaver.
Exporting Employee TLM Data to Total Time
Enterprise Payroll provides a utility, TAA025.SQR, that automatically locates time collection information in Time and Attendance that has been updated/added since the last payroll. It then writes the information to a file, taaextr.txt, that is used by Total Time. The taaextr.txt file contains all employees for each time reporting location with the status of: (A)ctive, (P)aid Leave of Absence, (S)uspended, and (L)eave. TAA025 also creates change transactions for the external time clock/time entry systems.
After the initial export, you should run TAA025 every night.
To export the employee data file to Total Time, do the following:
1. Click Payroll and make the following selections:
Company Definitions ~ Time and Attendance - Total Time
Chapter 6: Calculating and Confirming Your PayrollPayroll Processing Guide Version 5.04.01

Preparing for the Next Payroll Cycle 6-57
2. Double-click the Total Time Employee Export (TAA025) task. The Export to Total Time panel displays.
3. Click Run Report. You will receive a message notifying you that your process has been
submitted. Click OK. To confirm successful completion, click (Process Monitor).
For additional information on the Process Monitor, refer to the Using ADP Enterprise HR Guide.
You have just finished exporting the initial employee TLM file to Total Time.
Chapter 6: Calculating and Confirming Your PayrollPayroll Processing Guide Version 5.04.01

6-58 Creating Estimates of Paychecks
Creating Estimates of Paychecks
Enterprise Payroll provides a utility that allows you to estimate the amount of an employee’s paycheck. By entering an employee’s salary, federal and state allowances, and other data into the estimator, Enterprise Payroll estimates the total of the paycheck. You can use the Paycheck Estimator to see how changing an employee’s payroll information affects the employee’s net pay.
The Paycheck Estimator creates estimates of paychecks; it does not cover every possible
payroll scenario. For example, the Paycheck Estimator calculates federal income tax and state income tax for a single state (if provided), and assumes that the sample employee is subject to both. It does not calculate all local income tax scenarios or multi-jurisdictional state income tax calculations.
Estimating paychecks consists of the following:
• Configuring Sample Employee Information
• Viewing Estimated Pay
• Viewing the Calculation Log
Configuring Sample Employee Information
To configure paycheck information for an employee, do the following:
1. Click Payroll and make the following selections:
Employee Information ~ Change Employee Payroll Data ~ Paycheck Estimator
Creating Estimates of Paychecks
Configuring Sample Employee Information
Viewing Estimated Pay
Viewing the Calculation Log
Chapter 6: Calculating and Confirming Your PayrollPayroll Processing Guide Version 5.04.01

Creating Estimates of Paychecks 6-59
2. Double-click the Paycheck Estimator task. The Configuration panel displays.
Figure 6-26. Configuration Panel
3. In the Tax Year field, enter the tax year for which you want to calculate a paycheck estimate.
The Paycheck Estimator uses tax information on file as of December 31 of the current
year to perform its calculation.
4. In the Gross Pay field, enter the employee’s gross pay in the first field, and then use the corresponding field to indicate whether the gross pay is an annual amount or a per-pay amount.
5. In the YTD Wages field, you can optionally enter the employee’s year-to-date wages.
You can enter prior YTD wages to determine if annual social security limits and/or annual
federal supplemental limits have been reached.
6. In the Pay Frequency field, enter how often the employee will receive a paycheck (for example, weekly or biweekly).
7. If this paycheck applies only to supplemental pay, select the Supplemental check box. If you do not select this check box, it indicates that the paycheck is for regular pay.
The Paycheck Estimator does not support supplemental/consolidated pay.
8. In the Federal Tax area, do the following:
a. Select the employee’s federal filing status from the Filing Status field. The filing status determines the rate at which income is taxed.
b. In the Allowances field, enter the number of allowances to claim for federal withholding tax purposes. Tax tables generally depend on the filing status and number of allowances to determine the amount of tax withheld.
c. In the Additional W/H $ field, enter any additional withholding amounts to indicate additional federal income taxes to be taken.
For a description of the fields on this panel, press F1.
Chapter 6: Calculating and Confirming Your PayrollPayroll Processing Guide Version 5.04.01

6-60 Creating Estimates of Paychecks
d. If you’d like to indicate that the gross pay amount is subject to Social Security and Medicare taxes, select the Subject to FICA check box.
9. In the State Tax area, do the following:
a. Enter the employee’s state in the State field. (This step is optional.)
If the selected state is one of the states that does not use state income tax, the
remaining fields in the State Tax area are grayed and unavailable.
b. In the Filing Status field, select the employee’s filing status for state withholding. The filing status determines the rate at which income is taxed.
The filing status choices vary depending upon the selected state.
c. In the Allowances field, enter the number of allowances to claim for state withholding tax purposes.
d. In the Additional W/H $ field, enter any additional withholding amounts, if applicable.
10. Use the Special State Values area to indicate any values that are unique to the state in which this employee earns wages.
The available choices depend upon the selected state. If there are no special state
values for the selected state, the fields in this area will be grayed and unavailable.
11. In the Deductions area, enter any additional deductions you’d like to include in the paycheck estimate. For example, you could create a deduction for uniforms. For each deduction you create, enter the following:
• Name—Enter a name for the deduction.
• Per Pay Amount—Enter the per pay amount of the deduction.
• Type (Fixed $ Amount or Percent of Gross)—Select whether the deduction is a fixed dollar amount or percentage of gross.
• Exempt From (FIT, FICA, and/or SIT)—Use this area to indicate whether the deduction is exempt from FIT, Social Security and Medicare taxes (FICA), or SIT.
12. When you’ve finished entering the sample employee’s information, click Calculate to perform the paycheck estimations. The Estimated Pay panel displays.
You can click Reset All to clear all of the fields on the Configuration tab.
You have just finished configuring employee information for the Paycheck Estimator. Next, view the estimated pay.
Chapter 6: Calculating and Confirming Your PayrollPayroll Processing Guide Version 5.04.01
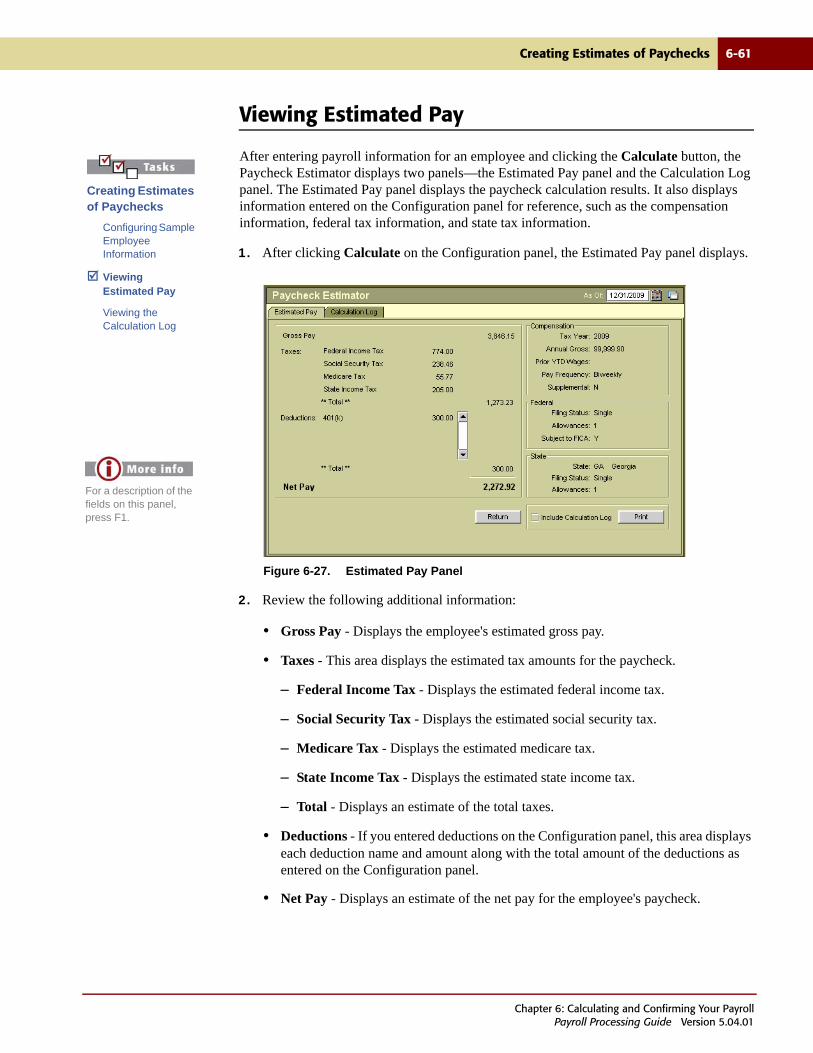
Creating Estimates of Paychecks 6-61
Viewing Estimated Pay
After entering payroll information for an employee and clicking the Calculate button, the Paycheck Estimator displays two panels—the Estimated Pay panel and the Calculation Log panel. The Estimated Pay panel displays the paycheck calculation results. It also displays information entered on the Configuration panel for reference, such as the compensation information, federal tax information, and state tax information.
1. After clicking Calculate on the Configuration panel, the Estimated Pay panel displays.
Figure 6-27. Estimated Pay Panel
2. Review the following additional information:
• Gross Pay - Displays the employee's estimated gross pay.
• Taxes - This area displays the estimated tax amounts for the paycheck.
– Federal Income Tax - Displays the estimated federal income tax.
– Social Security Tax - Displays the estimated social security tax.
– Medicare Tax - Displays the estimated medicare tax.
– State Income Tax - Displays the estimated state income tax.
– Total - Displays an estimate of the total taxes.
• Deductions - If you entered deductions on the Configuration panel, this area displays each deduction name and amount along with the total amount of the deductions as entered on the Configuration panel.
• Net Pay - Displays an estimate of the net pay for the employee's paycheck.
Creating Estimates of Paychecks
Configuring Sample Employee Information
Viewing Estimated Pay
Viewing the Calculation Log
For a description of the fields on this panel, press F1.
Chapter 6: Calculating and Confirming Your PayrollPayroll Processing Guide Version 5.04.01

6-62 Creating Estimates of Paychecks
• Compensation - This area displays the compensation information as entered on the Configuration tab.
– Tax Year - Displays the selected tax year.
– Annual Gross - Displays the annual gross income as entered on the Configuration panel.
– Pay Frequency - Displays the selected pay frequency.
• Federal - This area displays the federal tax information as you entered it on the Configuration panel.
– Filing Status - Displays the federal filing status selected for the employee.
– Allowances - Displays the number of allowances entered for the employee.
– Additional W/H - Displays the additional withholding amount entered for the employee.
– Subject to FICA - Indicates whether or not you selected to calculate FICA taxes for this paycheck.
• State - This area displays the state tax information as you entered it on the Configuration panel.
3. To print the paycheck estimator results, do the following:
• To print the estimated pay displayed on this panel, click Print.
• If you would also like to print the Calculation Log, select the Include Calculation Log and then click Print.
The Paycheck Estimator print process provides for the generation of up to 10 sample
calculation output files. You can generate up to 10 files before the files are overwritten because the process incorporates a sequence number in the output filename (pay049-xx.lis). After 10 file generations, the sequence number cycles back to 01 (pay049-01.lis).
Example:
You generate output for 5 sample calculations for an employee on Monday: pay_049-01.lis through pay_049-05.lis.
On Tuesday you generate an additional 6 sample calculations for that same employee. the first 5 sample calculations you generate will be named pay_049-06.lis through pay_049-10.lis. The sixth calculation will be named pay_049-01.lis and will overwrite the pay_049-01.lis you generated on Monday.
Chapter 6: Calculating and Confirming Your PayrollPayroll Processing Guide Version 5.04.01

Creating Estimates of Paychecks 6-63
4. Click Return to return to the Configuration panel, or click the Calculation Log tab to view a log of the calculations.
You have just finished viewing the estimated pay for an employee’s paycheck. Next, view the calculation log.
Chapter 6: Calculating and Confirming Your PayrollPayroll Processing Guide Version 5.04.01

6-64 Creating Estimates of Paychecks
Viewing the Calculation Log
The Calculation Log panel displays the step-by-step progression followed in the calculation of federal and state income taxes. Each log statement corresponds to a formula statement. This display-only information is presented so you can see how the paycheck is calculated.
To review the calculation log, do the following:
1. Click the Calculation Log tab. The Calculation Log displays.
Figure 6-28. Calculation Log Panel
2. Review the information in the log.
3. To print the information in the Calculation Log, do the following:
a. Click the Estimated Pay tab.
b. Select the Include Calculation Log check box.
c. Click Print.
4. When you are finished reviewing the Calculation Log, click (Close) to return to the Configuration panel.
You have just finished viewing the calculation log.
Creating Estimates of Paychecks
Configuring Sample Employee Information
Viewing Estimated Pay
Viewing the Calculation Log
For a description of the fields on this panel, press F1.
Chapter 6: Calculating and Confirming Your PayrollPayroll Processing Guide Version 5.04.01

Chapter 7
Generating Summary Reports
PAGE TOPIC
7-2 Introduction
7-3 Generating the Deduction Register (PAY001)
7-5 Generating the Cost Center Report (PAY005)
7-7 Generating the Deductions Not Taken Report (PAY008)
7-9 Generating the Savings Bond Report and File (PAY016)
7-10 Generating the Payroll Summary (PAY018)
7-12 Generating the Payroll Registers (PAY025H, PAY025W)
7-16 Generating the Negative Leave Accrual Report (PAY031)
7-18 Generating the 414(v) Catch Up Report (PAY033)
7-20 Generating the Leave Accrual Summary (PAY040)
7-22 Generating the Retro Pay Report (PAY042)
7-26 Generating the Wage and Tax Register (PAY047)
7-28 Generating the Tax Deposit Summary (TAX001)
7-30 Generating the Local Tax Deposit Summary (TAX009)
7-32 Generating the Tax Summary (TAX010)
7-34 Generating the Quarterly Tax Balance Audit (TAX011)
Chapter 7: Generating Summary ReportsPayroll Processing Guide Version 5.04.01

7-2 Introduction
Introduction
Enterprise Payroll provides many summary reports that allow you to view your processed payroll data. This chapter provides an overview of each report (in numeric order) as well as step-by-step instructions for generating the report.
Refer to the Standard Reports Guide for details on sources, sort order, and an illustration of each report.
You can often complete a task in the product in multiple ways. For information on interface
shortcuts and tips, refer to the Using ADP Enterprise HR Guide.
As you work through the tasks in this chapter, you may have questions about fields and options on the panels. To display a description of the fields and options, press F1 (Help) from the panel.
Chapter 7: Generating Summary ReportsPayroll Processing Guide Version 5.04.01

Generating the Deduction Register (PAY001) 7-3
Generating the Deduction Register (PAY001)
The Deduction Register (PAY001) shows the amount of money deducted from each employee paycheck for benefits as of the end of a pay period. Enterprise Payroll defines deductions as all non-tax amounts subtracted from employee pay. If the amount contains adjustments for refunds, amounts paid in arrears, or amounts excluded, the report lists them in separate columns and provides column totals.
The report includes totals for month-to-date, quarter-to-date, and year-to-date deductions by employee and a grand total for the pay period. It also prints goal amounts and lists each deduction type on a separate page and the cumulative totals on the last page.
To generate the Deduction Register (PAY001), do the following:
1. Click Payroll and make the following selections:
Payroll Reports ~ Pay Cycle Reports
2. Double-click the Deduction Register (PAY001) task. The Deduction Register panel displays.
Figure 7-1. Deduction Register Panel
3. Select one of the options from the Cycle Option field to indicate whether you want the report to include payroll information for an on-cycle payroll, off-cycle payroll, or both.
4. Select the payroll run ID from the Pay Run ID field.
5. In the Page # fields, enter the page number range for the paysheet information you want included in the report.
For a description of the fields on this panel, press F1.
Chapter 7: Generating Summary ReportsPayroll Processing Guide Version 5.04.01

7-4 Generating the Deduction Register (PAY001)
6. If the payroll run ID includes multiple pay calendar entries, then you must select the company from the Company field, the pay group from the Pay Group field, and the pay period end date from the Pay End Date field.
7. Click Run Report. You will receive a message notifying you that your process has been
submitted. Click OK. When the process has completed, click (Report Outputs) to view the report.
For additional information on running, viewing, and printing reports, refer to the Using ADP Enterprise HR Guide. For details on sources, sort order, and an illustration of the report, see the Standard Reports Guide.
You’ve just finishing running PAY001 to generate the Deduction Register that you can view and print.
Chapter 7: Generating Summary ReportsPayroll Processing Guide Version 5.04.01

Generating the Cost Center Report (PAY005) 7-5
Generating the Cost Center Report (PAY005)
The Cost Center report lists employee hours and earnings by cost center. It reports cost center information by pay period for each company within the organization. Totals are supplied at the cost center level.
Within the cost center, the reports lists employee name and ID and the hours and earnings represented in the current pay period. The hours and earnings are further grouped into regular, overtime, and other types, including a total earnings column for each employee line.
To generate the Cost Center report (PAY005), do the following:
1. Click Payroll and make the following selections:
Payroll Reports ~ Pay Cycle Reports
2. Double-click the Cost Center (PAY005) task. The Cost Center panel displays.
Figure 7-2. Cost Center Panel
3. Select one of the options from the Cycle Option field to indicate whether you want the report to include payroll information for an on-cycle payroll, off-cycle payroll, or both.
4. Select the payroll run ID from the Pay Run ID field.
5. In the Page # fields, enter the page number range for the paysheet information you want included in the report.
6. If the payroll run ID includes multiple pay calendar entries, then you must select the company from the Company field, the pay group from the Pay Group field, and the pay period end date from the Pay End Date field.
For a description of the fields on this panel, press F1.
Chapter 7: Generating Summary ReportsPayroll Processing Guide Version 5.04.01

7-6 Generating the Cost Center Report (PAY005)
7. Click Run Report. You will receive a message notifying you that your process has been
submitted. Click OK. When the process has completed, click (Report Outputs) to view the report.
For additional information on running, viewing, and printing reports, refer to the Using ADP Enterprise HR Guide. For details on sources, sort order, and an illustration of the report, see the Standard Reports Guide.
You’ve just finishing running PAY005 to generate the Cost Center report that you can view and print.
Chapter 7: Generating Summary ReportsPayroll Processing Guide Version 5.04.01

Generating the Deductions Not Taken Report (PAY008) 7-7
Generating the Deductions Not Taken Report (PAY008)
The Deductions not Taken report (PAY008) lists employees who have had benefits deductions omitted for a particular pay period. For each employee, it lists the pay group, deduction name and code, and the amount omitted. If this amount is in arrears, the report shows a Y in the Added to Arrears column and the new total of the arrears amount for that employee. It also prints the number and date of the check affected.
The report supplies totals for all deductions not taken in the pay period, for each company, and includes a grand total for all companies.
To generate the Deductions not Taken report (PAY008), do the following:
1. Click Payroll and make the following selections:
Payroll Reports ~ Pay Cycle Reports
2. Double-click the Deductions Not Taken (PAY008) task. The Deductions not Taken panel displays.
Figure 7-3. Deductions not Taken Panel
3. Select one of the options from the Cycle Option field to indicate whether you want the report to include payroll information for an on-cycle payroll, off-cycle payroll, or both.
4. Select the payroll run ID from the Pay Run ID field.
5. In the Page # fields, enter the page number range for the paysheet information you want included in the report.
For a description of the fields on this panel, press F1.
Chapter 7: Generating Summary ReportsPayroll Processing Guide Version 5.04.01

7-8 Generating the Deductions Not Taken Report (PAY008)
6. If the payroll run ID includes multiple pay calendar entries, then you must select the company from the Company field, the pay group from the Pay Group field, and the pay period end date from the Pay End Date field.
7. Click Run Report. You will receive a message notifying you that your process has been
submitted. Click OK. When the process has completed, click (Report Outputs) to view the report.
8. For additional information on running, viewing, and printing reports, refer to the Using ADP Enterprise HR Guide. For details on sources, sort order, and an illustration of the report, see the Standard Reports Guide.
You’ve just finishing running PAY008 to generate the Deductions not Taken report that you can view and print.
Chapter 7: Generating Summary ReportsPayroll Processing Guide Version 5.04.01

Generating the Savings Bond Report and File (PAY016) 7-9
Generating the Savings Bond Report and File (PAY016)
The Savings Bond report lists all bonds purchased since the last payroll processed. It selects all Bond Log records with status of “R” and prepares the report. It then sets the status to “distributed” (D) for each record selected.
The report identifies relevant information about co-owners and/or beneficiaries. It supplies a page break after each different bond denomination, and totals each denomination and all bonds purchased.
The Bond Purchase Report also prepares a Bond Purchase file, bondfile.out.
For step-by-step instructions on generating this report and file, see “Purchasing U.S. Savings Bonds” on page 13-16.
You’ve just finishing running PAY016 to generate the Savings Bond Purchases report that you can view and print.
Chapter 7: Generating Summary ReportsPayroll Processing Guide Version 5.04.01

7-10 Generating the Payroll Summary (PAY018)
Generating the Payroll Summary (PAY018)
The Payroll Summary (PAY018) summarizes on a separate page summary information for paycheck amounts, regular earnings amounts, special accumulator amounts, employee deduction amounts, employer contribution amounts, employee/employer tax amounts, and other earnings amounts.The summary only includes checks that have a check number.
To generate the Payroll Summary (PAY018), do the following:
1. Click Payroll and make the following selections:
Payroll Reports ~ Pay Cycle Reports
2. Double-click the Payroll Summary (PAY018) task. The Payroll Summary panel displays.
Figure 7-4. Payroll Summary Panel
3. Select one of the options from the Cycle Option field to indicate whether you want the report to include payroll information for an on-cycle payroll, off-cycle payroll, or both.
4. Select the payroll run ID from the Pay Run ID field.
5. In the Page # fields, enter the page number range for the paysheet information you want included in the report.
6. If the payroll run ID includes multiple pay calendar entries, then you must select the company from the Company field, the pay group from the Pay Group field, and the pay period end date from the Pay End Date field.
For a description of the fields on this panel, press F1.
Chapter 7: Generating Summary ReportsPayroll Processing Guide Version 5.04.01

Generating the Payroll Summary (PAY018) 7-11
7. Click Run Report. You will receive a message notifying you that your process has been
submitted. Click OK. When the process has completed, click (Report Outputs) to view the report.
For additional information on running, viewing, and printing reports, refer to the Using ADP Enterprise HR Guide. For details on sources, sort order, and an illustration of the report, see the Standard Reports Guide.
You’ve just finishing running PAY018 to generate the Payroll Summary that you can view and print.
Chapter 7: Generating Summary ReportsPayroll Processing Guide Version 5.04.01

7-12 Generating the Payroll Registers (PAY025H, PAY025W)
Generating the Payroll Registers (PAY025H, PAY025W)
The following reports provide a listing of check data for a particular payroll run ID. These reports allows you to print all check data or only check data for selected departments, employees or locations.
• Payroll Register by Home Dept (PAY025H)
• Payroll Register by Worked Dept (PAY025W)
Payroll Register by Home Dept (PAY025H)
You can generate the Payroll Register by Home Dept (PAY025H) to view payroll information organized by home department.
If an employee works in two departments, he will be listed on the report by his home
department only.
To generate the Payroll Register by Home Dept (PAY025H), do the following:
1. Click Payroll and make the following selections:
Payroll Reports ~ Pay Cycle Reports
2. Double-click the Payroll Register by Home Dept (PAY025H) task. The Payroll Register by Home Dept panel displays.
Figure 7-5. Payroll Register by Home Dept Panel
For a description of the fields on this panel, press F1.
Chapter 7: Generating Summary ReportsPayroll Processing Guide Version 5.04.01

Generating the Payroll Registers (PAY025H, PAY025W) 7-13
3. Select one of the options from the Cycle Option field to indicate whether you want the report to include payroll information for an on-cycle payroll, off-cycle payroll, or both.
4. Select the payroll run ID from the Pay Run ID field. Available pay run IDs are listed by pay end date and display in descending order.
5. In the Page # fields, enter the page number range for the paysheet information you want included in the report.
6. If the payroll run ID includes multiple pay calendar entries, then you must select the company from the Company field, the pay group from the Pay Group field, and the pay period end date from the Pay End Date field.
7. From the Report Type area, select the appropriate option to indicate whether you want to generate the Detail Labor Report or the Labor Department Totals Report.
8. From the Targeted Employees area, select one of the following options:
• All Departments/Locations/Employees - Select this option if you want the Payroll Register to include payroll information for all departments, locations, and employees.
• Selected Departments Only - Select this option to indicate specific departments that you want included in the Payroll Register.
– If you select this option, select the specific department from the Departments
field. To select more than one department, click (Insert Row) on the scroll bar.
• Selected Locations Only - Select this option to indicate specific locations that you want included in the Payroll Register.
– If you select this option, select the specific location from the Locations field. To
select more than one location, click (Insert Row) on the scroll bar.
• Selected Employees Only - Select this option to indicate specific employees that you want included in the Payroll Register.
– If you select this option, select the specific employee from the Employees field.
To select more than one employee, click (Insert Row) on the scroll bar.
9. Click Run Report. You will receive a message notifying you that your process has been
submitted. Click OK. When the process has completed, click (Report Outputs) to view the report.
Chapter 7: Generating Summary ReportsPayroll Processing Guide Version 5.04.01

7-14 Generating the Payroll Registers (PAY025H, PAY025W)
For additional information on running, viewing, and printing reports, refer to the Using ADP Enterprise HR Guide. For details on sources, sort order, and an illustration of the report, see the Standard Reports Guide.
You’ve just finishing running PAY025H to generate the Payroll Register by Home Dept that you can view and print. Next, you can run PAY025W to generate the Payroll Register by Worked Dept.
Payroll Register by Worked Dept (PAY025W)
You can generate the Payroll Register by Worked Dept (PAY025W) to view payroll information organized by worked department.
To generate the Payroll Register by Worked Dept (PAY025W), do the following:
1. Click Payroll and make the following selections:
Payroll Reports ~ Pay Cycle Reports
2. Double-click the Payroll Register by Worked Dept (PAY025W) task. The Payroll Register by Worked Dept panel displays.
Figure 7-6. Payroll Register by Worked Dept Panel
3. Select one of the options from the Cycle Option field to indicate whether you want the report to include payroll information for an on-cycle payroll, off-cycle payroll, or both.
4. Select the payroll run ID from the Pay Run ID field. Available pay run IDs are listed by pay end date and display in descending order.
5. In the Page # fields, enter the page number range for the paysheet information you want included in the report.
For a description of the fields on this panel, press F1.
Chapter 7: Generating Summary ReportsPayroll Processing Guide Version 5.04.01

Generating the Payroll Registers (PAY025H, PAY025W) 7-15
6. If the payroll run ID includes multiple pay calendar entries, then you must select the company from the Company field, the pay group from the Pay Group field, and the pay period end date from the Pay End Date field.
7. From the Report Type area, select the appropriate option to indicate whether you want to generate the Detail Labor Report or the Labor Department Totals Report.
8. From the Targeted Employees area, select one of the following options:
• All Departments/Locations/Employees - Select this option if you want the report to include payroll information for all departments, locations, and employees.
• Selected Departments Only - Select this option to indicate specific departments that you want included in the report.
– If you select this option, select the specific department from the Departments
field. To select more than one department, click (Insert Row) on the scroll bar.
• Selected Locations Only - Select this option to indicate specific locations that you want included in the report.
– If you select this option, select the specific location from the Locations field. To
select more than one location, click (Insert Row) on the scroll bar.
• Selected Employees Only - Select this option to indicate specific employees that you want included in the report.
– If you select this option, select the specific employee from the Employees field.
To select more than one employee, click (Insert Row) on the scroll bar.
9. Click Run Report. You will receive a message notifying you that your process has been
submitted. Click OK. When the process has completed, click (Report Outputs) to view the report.
For additional information on running, viewing, and printing reports, refer to the Using ADP Enterprise HR Guide. For details on sources, sort order, and an illustration of the report, see the Standard Reports Guide.
You’ve just finishing running PAY025W to generate the Payroll Register by Worked Dept that you can view and print.
Chapter 7: Generating Summary ReportsPayroll Processing Guide Version 5.04.01

7-16 Generating the Negative Leave Accrual Report (PAY031)
Generating the Negative Leave Accrual Report (PAY031)
The Negative Leave Accrual report lists all employees with a negative leave accrual balance for a specific payroll run. The report lists by the plan type, leave accrual balance Paid Time Off (PTO) hours to be paid, and the difference between the leave accrual balance and the PTO hours to be paid.
In addition, PAY031 automatically corrects the amount of the leave accrual entered on the paysheet if you select the Automatically update the Paysheet information option.
You do not need to run this report if the Allow Negative Balance check box is enabled on
the Manual Accrual/First Year Values panel (System Admin ~ Benefits Setup ~ Leave Plans ~ Accrual/Services Rates). If this check box is selected, then ADP Enterprise allows you to process a payroll with negative leave accruals.
To run PAY031, do the following:
1. Click Payroll and make the following selections:
Payroll Reports ~ Pay Cycle Reports
2. Double-click the Negative Leave Accrual (PAY031) task. The Negative Leave Accrual panel displays.
Figure 7-7. Negative Leave Accrual Panel
3. Select the pay run ID from the Pay Run ID field.
4. If you want to automatically correct negative leave balances on your paysheets, select the Automatically update the Paysheet information check box.
For a description of the fields on this panel, press F1.
Chapter 7: Generating Summary ReportsPayroll Processing Guide Version 5.04.01

Generating the Negative Leave Accrual Report (PAY031) 7-17
5. Click Run Report. You will receive a message notifying you that your process has been
submitted. Click OK. When the process has completed, click (Report Outputs) to view the report.
For additional information on running, viewing, and printing reports, refer to the Using ADP Enterprise HR Guide. For details on sources, sort order, and an illustration of the report, see the Standard Reports Guide.
You’ve just finishing running PAY031 to generate the Negative Leave Accrual report that you can view and print.
Chapter 7: Generating Summary ReportsPayroll Processing Guide Version 5.04.01

7-18 Generating the 414(v) Catch Up Report (PAY033)
Generating the 414(v) Catch Up Report (PAY033)
The Catch Up Report lists all employees that are currently enrolled a 414(v) Catch Up plan. The report provides a list of employees names and balances who have both 401(k) and 414(v) deduction balances. You can select all 401(k) plans in which employees have participated over the course of a calendar year.
To run PAY033, do the following:
1. Click Payroll and make the following selections:
Payroll Reports ~ Pay Cycle Reports
2. Double-click the Catch Up Report 414(v) (PAY033) task. The Catch Up Report 414(v) panel displays.
Figure 7-8. Catch Up Report 414(v) Panel
3. Indicate whether you would like the report data sorted by company, pay group, or employee name by selecting an option in the Sort Report By area.
4. In the Plan Type/Deduction Code for 401(k) area, do the following
a. From the Plan Type field, select the plan type that you want to receive 401(k) information on. You may select 00 (general deduction) or any plan types beginning with the number 4.
b. From the Deduction Code field, select the deduction code that you want to receive 401(k) information on.
Click (Insert Row) to select additional deduction codes/plan types.
For a description of the fields on this panel, press F1.
Chapter 7: Generating Summary ReportsPayroll Processing Guide Version 5.04.01

Generating the 414(v) Catch Up Report (PAY033) 7-19
5. In the Plan Type/Deduction Code for 414(v) area, do the following:
a. From the Plan Type field, select the plan type that you want to receive 414(v) information on. You may select 00 (general deduction) or any plan types beginning with the number 4.
b. From the Deduction Code field, select the deduction code that you want to receive 414(v) information on.
Click (Insert Row) to select additional deduction codes/plan types.
6. In the Print for area, select the appropriate option to indicate whether you want the report to print information for all employees or for only employees in a specific company.
7. If you selected the Selected Companies option from the Print for area, then select the company from the Select Companies for report field.
To select multiple companies, click (Insert Row), and select another company
code.
8. When you are finished, click (Save).
9. Click Run Report. You will receive a message notifying you that your process has been
submitted. Click OK. When the process has completed, click (Report Outputs) to view the report.
For additional information on running, viewing, and printing reports, refer to the Using ADP Enterprise HR Guide. For details on sources, sort order, and an illustration of the report, see the Standard Reports Guide.
You’ve just finishing running PAY033 to generate the Catch Up Report 414(v) that you can view and print.
Chapter 7: Generating Summary ReportsPayroll Processing Guide Version 5.04.01

7-20 Generating the Leave Accrual Summary (PAY040)
Generating the Leave Accrual Summary (PAY040)
The Leave Accrual Summary report lists all employees and their leave accrual balances based on the companies and plan types you select. The report lists employees by the company (pay group) and plan type. You use this report to audit the change in an employee’s vacation liability amount and to validate an employee’s vacation accrual.
This report includes the year-to-date hours, unprocessed hours, the balance of hours, the earnings liability, and the date that the accrual was processed for each employee in the company (pay group). A summary for each plan type contains the totals for all of the employees in the company (pay group).
To run PAY040, do the following:
1. Click Payroll and make the following selections:
Payroll Reports ~ Pay Cycle Reports
2. Double-click the Leave Accrual Summary (PAY040) task. The Leave Accrual Summary panel displays.
Figure 7-9. Leave Accrual Summary Panel
3. Indicate whether you would like the report to print detail or summary by selecting an option in the Report Type area.
4. Indicate whether you would like to print the summary for all of the companies or the companies you select by selecting an option in the Company Selection area.
5. Indicate whether you would like to print the summary for all plan types or the plan types you select by selecting an option in the Plan Type Selection area.
For a description of the fields on this panel, press F1.
Chapter 7: Generating Summary ReportsPayroll Processing Guide Version 5.04.01

Generating the Leave Accrual Summary (PAY040) 7-21
6. If you selected the Print Selection option from the Company Selection area, then select the company from the Selected Companies field.
To select multiple companies, click (Insert Row), and select another company
code.
7. If you selected the Print Selection option from the Plan Type Selection area, then select the plan type from the Selected Plan Types.
To select multiple plan types, click (Insert Row), and select another plan type
code.
8. When you are finished, click (Save).
9. Click Run Report. You will receive a message notifying you that your process has been
submitted. Click OK. When the process has completed, click (Report Outputs) to view the report.
For additional information on running, viewing, and printing reports, refer to the Using ADP Enterprise HR Guide. For details on sources, sort order, and an illustration of the report, see the Standard Reports Guide.
You’ve just finishing running PAY040 to generate the Leave Accrual Summary report that you can view and print.
Chapter 7: Generating Summary ReportsPayroll Processing Guide Version 5.04.01

7-22 Generating the Retro Pay Report (PAY042)
Generating the Retro Pay Report (PAY042)
The Retro Pay Report lists retroactive pay, by employee, that were processed for a specific payroll.
This report includes the original hours and rate, the retro hours and rate, and the earnings code begin and end dates. In addition, it lists the additive, shift, and earnings-based code percentages.
To run PAY042, do the following:
1. Click Payroll and make the following selections:
Payroll Reports ~ Pay Cycle Reports
2. Double-click the Retro Pay Report (PAY042) task. The Retro Pay Report panel displays.
Figure 7-10. Retro Pay Report Panel
3. From the Pay Run ID field, select a payroll run ID to indicate the payroll whose processed retroactive pay you want to view.
4. If the payroll run ID includes multiple pay calendar entries, then you must select the company from the Company field, the pay group from the Pay Group field, and the pay period end date from the Pay End Date field.
For a description of the fields on this panel, press F1.
Chapter 7: Generating Summary ReportsPayroll Processing Guide Version 5.04.01

Generating the Retro Pay Report (PAY042) 7-23
5. Click Run Report. You will receive a message notifying you that your process has been
submitted. Click OK. When the process has completed, click (Report Outputs) to view the report.
For additional information on running, viewing, and printing reports, refer to the Using ADP Enterprise HR Guide. For details on sources, sort order, and an illustration of the report, see the Standard Reports Guide.
You’ve just finishing running PAY042 to generate the Retro Pay Report that you can view and print.
Chapter 7: Generating Summary ReportsPayroll Processing Guide Version 5.04.01

7-24 Generating the Garnishment Deduction Report (PAY044)
Generating the Garnishment Deduction Report (PAY044)
The Garnishment Deduction Report lists all garnishments, by employee, that were processed for a specific payroll.
This report includes the garnishment type, amount, status, rule, state law, and payee code. In addition, it lists the company fee and payee fee for the garnishment.
You can also view all existing garnishment data, not just the garnishments that were
processed for a specific payroll, by running the Garnishment Specification Report (PAY043). For more information, refer to the Payroll Setup and Maintenance Guide.
To run PAY044, do the following:
1. Click Payroll and make the following selections:
Payroll Reports ~ Pay Cycle Reports
2. Double-click the Garnishment Deduction Report (PAY044) task. The Garnishment Deduction Report panel displays.
Figure 7-11. Garnishment Deduction Report Panel
3. From the Pay Run ID field, select a payroll run ID to indicate the payroll whose processed garnishments you want to view.
For a description of the fields on this panel, press F1.
Chapter 7: Generating Summary ReportsPayroll Processing Guide Version 5.04.01

Generating the Garnishment Deduction Report (PAY044) 7-25
4. Select one or more of the following criteria to include in the garnishment report:
a. Garnish Type - Select a garnishment type.
b. Payee Code - Select the client-defined code used to identify the recipient of the funds.
c. Garnish Law State - Select the state for the garnishment law.
d. Resident State - Select the resident state of the employee(s).
5. From the SSN Display Option field, select one of the following options to specify how you want Social Security Numbers to display:
• Hide xxx-xx-xxxx
• Mask xxx-xx-6789
• Show 123-45-6789
The options that are available for selection depend on the field display options selected
on the user’s security profile (System Admin ~ Security Administration ~ Operator ~ Profile). If the user profile is set to Hide, the option is grayed out when generating files. The process will automatically print the fields according to the user’s display setting. However, if the user is set to Show, the Display Option fields will be available and the user can choose to change the default of Hide to either Show or Mask. If the user is set to Mask, the Display Option fields will be available and the user can choose to change the default of Hide to Mask.For more information on the user Profile settings, see the Application Administrator’s Guide.
6. Click Run Report. You will receive a message notifying you that your process has been
submitted. Click OK. When the process has completed, click (Report Outputs) to view the report.
For additional information on running, viewing, and printing reports, refer to the Using ADP Enterprise HR Guide. For details on sources, sort order, and an illustration of the report, see the Standard Reports Guide.
You’ve just finishing running PAY044 to generate the Garnishment Deduction Report that you can view and print.
Chapter 7: Generating Summary ReportsPayroll Processing Guide Version 5.04.01

7-26 Generating the Wage and Tax Register (PAY047)
Generating the Wage and Tax Register (PAY047)
The Wage and Tax Register lists an employee’s quarter-to-date and year-to-date federal, state, and local taxable wages and the amount of tax withheld for each. In addition, it indicates the number of weeks (by state) that the employee worked during the quarter and year. The report alphabetically groups employees by company, provides company tax totals directly at the end of the employee information, and includes a grand total for all companies included.
To generate the Wage and Tax Register, do the following:
1. Click Payroll and make the following selections:
Payroll Reports ~ Pay Cycle Reports
2. Double-click the Wage and Tax Register (PAY047) task. The Report Options panel displays.
Figure 7-12. Report Options Panel
3. In the Year field, enter the year for which you want wage and tax information generated.
4. From the Quarter field, select whether you want the wage and tax information for the first, second, third, or fourth quarter generated.
5. From the Targeted Employees area, select from one of the following three options:
a. All Companies/Employees - Select if you want to the wage and tax information for all companies and employees included in the Wage and Tax Register.
For a description of the fields on this panel, press F1.
Chapter 7: Generating Summary ReportsPayroll Processing Guide Version 5.04.01

Generating the Wage and Tax Register (PAY047) 7-27
b. Selected Companies Only - Select if you want to specify the companies for which you want to generate wage and tax information. If you select this option, you must do the following:
• From the Companies area, select the first company you want included in the Wage and Tax Register.
To enter multiple companies, click (Insert Row) and add the next company.
c. Selected employees only - Select if you want to specify the employees for which you want to generate wage and tax information.
If select this option, the Employees area replaces the Companies area, as shown in
Figure 7-13.
Figure 7-13. Report Options Panel (with Employees Area)
– From the Employees area, select the first employee you want included in the Wage and Tax Register.
To enter multiple employees, click (Insert Row) and add the next employee.
6. Click Run Report. You will receive a message notifying you that your process has been
submitted. Click OK. When the process has completed, click (Report Outputs) to view the report.
For additional information on running, viewing, and printing reports, refer to the Using ADP Enterprise HR Guide. For details on sources, sort order, and an illustration of the report, see the Standard Reports Guide.
You’ve just finishing running PAY047 to generate the Wage and Tax Register that you can view and print.
For a description of the fields on this panel, press F1.
Chapter 7: Generating Summary ReportsPayroll Processing Guide Version 5.04.01

7-28 Generating the Tax Deposit Summary (TAX001)
Generating the Tax Deposit Summary (TAX001)
The Tax Deposit Summary (TAX001) provides details by pay period or quarter of federal, state, and local taxes withheld from employees, as well as liabilities incurred for employer-paid taxes.
For each check date, the report shows taxable gross amounts and taxes listed by taxing jurisdiction. Federal taxes are first, followed by states and localities. There are separate sections for withholding, Social Security and Medicare/disability, unemployment amounts, and third party sick on this report. It shows employee contributions to unemployment insurance separately with a tax type of UI-EE. The report shows special employer unemployment taxes-such as the medical Security Tax in Massachusetts and Louisiana's special assessment-separately under the “Unemployment” columns of the report as a tax type of UI-SP.
In addition, the report provides a summary of the tax liabilities for the specific payroll run.
Finally, the report displays two sets of locality lines for tax filing clients with ADP TAXServices if the employee has paid both resident and non-resident taxes during the period. The first line displays the resident locality while the second line displays the non-resident locality.
To generate the Tax Deposit Summary (TAX001), do the following:
1. Click Payroll and make the following selections:
Payroll Reports ~ Tax Reports
2. Double-click the Tax Deposit Summary (TAX001) task. The Tax Deposit Summary panel displays.
Figure 7-14. Tax Deposit Summary Panel
For a description of the fields on this panel, press F1.
Chapter 7: Generating Summary ReportsPayroll Processing Guide Version 5.04.01

Generating the Tax Deposit Summary (TAX001) 7-29
3. From the Report Type area, select one of the following options:
• Pay Period - To generate a report for a specific pay period, select this option.
• Quarterly - To generate the report for a specific quarter, select this option.
4. If you selected Pay Period as the Report Type, do the following:
a. Select one of the options from the Cycle Option field to indicate whether you want the report to include payroll information for an on-cycle payroll, off-cycle payroll, or both.
b. Select the payroll run ID from the Pay Run ID field.
c. In the Page # fields, enter the page number range for the paysheet information you want included in the report.
d. If the payroll run ID includes multiple pay calendar entries, then you must select the company from the Company field, the pay group from the Pay Group field, and the pay period end date from the Pay End Date field.
5. If you selected Quarterly as the Report Type, do the following:
a. Select the year from the Calendar Year field.
b. Select the specific quarter from the Quarter field.
6. Click Run Report. You will receive a message notifying you that your process has been
submitted. Click OK. When the process has completed, click (Report Outputs) to view the report.
For additional information on running, viewing, and printing reports, refer to the Using ADP Enterprise HR Guide. For details on sources, sort order, and an illustration of the report, see the Standard Reports Guide.
You’ve just finishing running TAX001 to generate the Tax Deposit Summary that you can view and print.
Chapter 7: Generating Summary ReportsPayroll Processing Guide Version 5.04.01

7-30 Generating the Local Tax Deposit Summary (TAX009)
Generating the Local Tax Deposit Summary (TAX009)
The Local Tax Deposit Summary (TAX009) is a pay period report showing local taxes withheld. This report provides more detail for local taxes than the Tax Deposit Summary (TAX001). For each locality, it lists total taxes withheld for residents and non-residents separately. The report shows the number of employees in each category and counts employees receiving more than one check only once.
To generate the Local Tax Deposit Summary (TAX009), do the following:
1. Click Payroll and make the following selections:
Payroll Reports ~ Tax Reports
2. Double-click the Local Tax Deposit Summary (TAX009) task. The Local Tax Deposit Summary panel displays.
Figure 7-15. Local Tax Deposit Summary Panel
3. Select one of the options from the Cycle Option field to indicate whether you want the report to include payroll information for an on-cycle payroll, off-cycle payroll, or both.
4. Select the payroll run ID from the Pay Run ID field.
5. In the Page # fields, enter the page number range for the paysheet information you want included in the report.
6. If the payroll run ID includes multiple pay calendar entries, then you must select the company from the Company field, the pay group from the Pay Group field, and the pay period end date from the Pay End Date field.
For a description of the fields on this panel, press F1.
Chapter 7: Generating Summary ReportsPayroll Processing Guide Version 5.04.01

Generating the Local Tax Deposit Summary (TAX009) 7-31
7. Click Run Report. You will receive a message notifying you that your process has been submitted. Click OK. When the process has completed, When the process has completed,
click (Report Outputs) to view the report.
For additional information on running, viewing, and printing reports, refer to the Using ADP Enterprise HR Guide. For details on sources, sort order, and an illustration of the report, see the Standard Reports Guide.
You’ve just finishing running TAX009 to generate the Local Tax Deposit Summary that you can view and print.
Chapter 7: Generating Summary ReportsPayroll Processing Guide Version 5.04.01

7-32 Generating the Tax Summary (TAX010)
Generating the Tax Summary (TAX010)
This report summarizes, by jurisdiction, period-to-date income tax withheld, disability, Social Security and Medicare, and unemployment taxes at the federal, state, and local levels. The Tax Summary report also summarizes third party sick pay. In addition, it reports box 12 and box 14 deduction amounts based on the deduction class for each deduction plan that is part of a tax form definition.
To generate the Tax Summary (TAX010), do the following:
1. Click Payroll and make the following selections:
Payroll Reports ~ Tax Reports
2. Double-click the Tax Summary (TAX010) task. The Tax Summary panel displays.
Figure 7-16. Tax Summary Panel
3. Enter the year you want to review in the Year field.
4. Select one of the following options from the Report Type area:
• Monthly - Select if you want a monthly tax summary.
– If you select this option, then select the month you want to review from the Month field.
• Quarterly - Select if you want a quarterly tax summary.
For a description of the fields on this panel, press F1.
Chapter 7: Generating Summary ReportsPayroll Processing Guide Version 5.04.01

Generating the Tax Summary (TAX010) 7-33
If you select this option, the Quarter field replaces the Month field, as shown in
Figure 7-13.
Figure 7-17. Tax Summary Panel (with Quarterly Field)
– From the Quarter field, select the quarter that you want to review.
5. To include itemized totals for W-2 boxes 12 and 14 in the report, select the Include Totals for W-2 Boxes 12 and 14 check box.
6. Click Run Report. You will receive a message notifying you that your process has been
submitted. Click OK. When the process has completed, click (Report Outputs) to view the report.
For additional information on running, viewing, and printing reports, refer to the Using ADP Enterprise HR Guide. For details on sources, sort order, and an illustration of the report, see the Standard Reports Guide.
You’ve just finishing running TAX010 to generate the Tax Summary that you can view and print.
For a description of the fields on this panel, press F1.
Chapter 7: Generating Summary ReportsPayroll Processing Guide Version 5.04.01

7-34 Generating the Quarterly Tax Balance Audit (TAX011)
Generating the Quarterly Tax Balance Audit (TAX011)
For each tax class and tax jurisdiction, the Quarterly Tax Balance Audit (TAX011) compares employee quarter-to-date tax balances with the sum of tax detail records from each payroll run.
You can use this report to verify that Enterprise Payroll computations are correct for these balances after each payroll confirmation.
For detailed instructions on generating this report, see “Generating the Quarterly Tax Balance Audit (TAX011)” on page 14-18.
You’ve just finished generating the Quarterly Tax Balance Audit (TAX011).
Chapter 7: Generating Summary ReportsPayroll Processing Guide Version 5.04.01

Generating the Payroll Fund Detail Report (PAY101) 7-35
Generating the Payroll Fund Detail Report (PAY101)
The Payroll Fund Detail Report provides a detailed accounting of fund activity for a given pay run. The report groups information by fund, then by company within each fund. Since employer costs may be tracked in addition to earnings, the information in the Pay Element column may represent earnings, deductions, and/or taxes. Company subtotals are provided.
To print the report, do the following:
1. Click Payroll and make the following selections:
Payroll Reports ~ Fund Accounting
2. Double-click the Payroll Fund Detail (PAY101) task. The Payroll Fund Detail panel displays.
Figure 7-18. Payroll Fund Detail Panel
3. Select one of the options from the Cycle Option field to indicate whether you want the report to include payroll information for an on-cycle payroll, off-cycle payroll, or both.
4. If applicable, select the payroll run ID from the Pay Run ID field.
5. If applicable, in the Page # fields, enter the page number range for the paysheet information you want included in the report.
6. If the payroll run ID includes multiple pay calendar entries, then you must select the company from the Company field, the pay group from the Pay Group field, and the pay period end date from the Pay End Date field if applicable.
For a description of the fields on this panel, press F1.
Chapter 7: Generating Summary ReportsPayroll Processing Guide Version 5.04.01

7-36 Generating the Payroll Fund Detail Report (PAY101)
7. Click Run Report. You will receive a message notifying you that your process has been
submitted. When the process has completed, click (Report Outputs) to view the report.
For specific instructions on running, viewing, and printing reports, refer to the Using ADP Enterprise HR Guide. See the Standard Reports Guide for details on sources, sort order, and an illustration of the report.
You have just finished printing payroll fund detail information.
Chapter 7: Generating Summary ReportsPayroll Processing Guide Version 5.04.01

Generating the Fund Transaction History Report (PAY102) 7-37
Generating the Fund Transaction History Report (PAY102)
The Fund Transaction History Report provides an accounting register detailing the fund balance activity on record for a given fund.
When the report is run from the Clear Fund History feature, it is labeled PAY104.
To print the report, do the following:
1. Click Payroll and make the following selections:
Payroll Reports ~ Fund Accounting
2. Double-click the Fund Transaction History (PAY102) task. The Fund Transaction History panel displays.
Figure 7-19. Fund Transaction History Panel
3. Select the Fund ID from the Fund field.
4. Click Run Report. You will receive a message notifying you that your process has been
submitted. Click OK. When the process has completed, click (Report Outputs) to view the report.
For specific instructions on running, viewing, and printing reports, refer to the Using ADP Enterprise HR Guide. See the Standard Reports Guide for details on sources, sort order, and an illustration of the report.
For a description of the fields on this panel, press F1.
Chapter 7: Generating Summary ReportsPayroll Processing Guide Version 5.04.01

7-38 Generating the Fund Transaction History Report (PAY102)
You have just finished printing fund transaction history information.
Chapter 7: Generating Summary ReportsPayroll Processing Guide Version 5.04.01

Chapter 8
Generating and TransmittingADP Premium Service Files
PAGE TOPIC
8-2 Introduction
8-3 Generating and Transmitting ADP TAXServices Tax Files
8-13 Generating and Transmitting ADP Payment Solutions Services Files
8-26 Generating and Transmitting ADP WGPS Files
Chapter 8: Generating and Transmitting ADP Premium Service FilesPayroll Processing Guide Version 5.04.01

8-2 Introduction
Introduction
This chapter provides information on the following post-payroll cycle processes:
• Generating and Transmitting ADP TAXServices Tax Files
• Generating and Transmitting ADP Payment Solutions Services Files
• Generating and Transmitting ADP WGPS Files
You can often complete a task in the product in multiple ways. For information on interface
shortcuts and tips, refer to the Using ADP Enterprise HR Guide.
As you work through the tasks in this chapter, you may have questions about fields and options on the panels. To display a description of the fields and options, press F1 (Help) from the panel.
Chapter 8: Generating and Transmitting ADP Premium Service FilesPayroll Processing Guide Version 5.04.01

Generating and Transmitting ADP TAXServices Tax Files 8-3
Generating and Transmitting ADP TAXServices Tax Files
If you subscribe to an ADP tax service, you can use the Tax Service interface to produce the required files that enable ADP to file your periodic tax deposits, provide timely reconciliation of the various tax reports and data, and file the quarterly state unemployment reports, income tax and federal reports. This chapter provides step-by-step instructions for Tax Service processes that are a part of your on-cycle or off-cycle payroll cycle.
Contact your ADP TAXServices Coordinator to obtain software and telephone numbers you
need to transmit the tax files to ADP.
The ADP TAXServices interface requires that two additional steps occur within every pay cycle process (as shown in Figure 8-1). Standard payroll processing includes establishment of a pay run ID, the creation and update of paysheets, preliminary and final calculation steps, and a payroll confirm process prior to the generation of checks and direct deposit advices.
Because of the time-critical nature of tax deposits, ADP recommends that the additional steps that build and transmit the periodic file for ADP be executed after the pay confirmation process and before the check/advice print process. However, if you confirm your payrolls several days in advance of the check date, it may be acceptable to build and transmit the file(s) after you generate the checks. Your tax service agreement with ADP is specific as to the timing requirements for receipt of the interface file.
The payroll calendar tracks the steps of the payroll process and displays the status of the tax files (if built and/or transmitted). You can view the information on the Periodic File List panel to determine specifics of each tax file built.
When a pay run ID is associated with a pay calendar and this is a tax service company,
Enterprise Payroll confirms that all other calendar records having the same pay run ID have the same paycheck issue date. If the check dates are not identical, then you cannot save the data. You must set up a new pay run ID and run a separate payroll for pay calendars having differing check dates.
Generating and transmitting ADP TAXServices tax files consists of the following:
• Creating the Periodic Tax Files
• Transmitting Periodic Files
• Verifying the Periodic Tax File Transmission
• Viewing the Periodic File List
Chapter 8: Generating and Transmitting ADP Premium Service FilesPayroll Processing Guide Version 5.04.01

8-4 Generating and Transmitting ADP TAXServices Tax Files
Figure 8-1 illustrates how the ADP TAXServices interface impacts the payroll processing cycle. The * (asterisk) indicate steps specific to the Tax Service interface only.
Figure 8-1. Payroll process with ADP TAXServices interface
Establish pay calendar with pay run ID
Create/update paysheets for processing
Run preliminary pay calculation
Run final pay calculation
Run pay confirmation
* Create periodic tax file
*Transmit files using ADP File Transfer program
Update periodic tax file status
Print checks and advices
Review Periodic File List
Chapter 8: Generating and Transmitting ADP Premium Service FilesPayroll Processing Guide Version 5.04.01

Generating and Transmitting ADP TAXServices Tax Files 8-5
Creating the Periodic Tax Files
The periodic tax file is created with each confirmed on- or off-cycle payroll. Because of the time-critical nature of tax deposit filing, you may need to create and transmit this file to ADP as soon as the payroll calculation and confirm processes are complete. The periodic file contains wage and tax totals for the tax filing company for all jurisdictions where employee or employer taxes were calculated during current pay cycle processing.
The pay run ID specified on the Create Periodic Tax File panel determines the set of employee records to include in the building of the periodic file(s). All employee tax balances matching the company and/or pay group of the pay run ID are included in the totals on the periodic file. The records included on this file consist of a header record, a single federal tax record, a variable number of state and locality records, and a file trailer record.
If the payroll has been rerun and reconfirmed since the original periodic file was built, you
must create a new file by selecting the Rerun check box on the Create Periodic Tax File panel.
When you create the periodic tax file, Enterprise Payroll builds a separate file for each tax service company represented in the pay run ID. As each file is built, all corresponding information on the Payroll Calendar panel is updated to indicate that the tax file is built. Also, rows are generated to the periodic tax file table to identify pertinent details of each file created.
In addition, Enterprise Payroll generates a combined periodic tax file, tfxxx.prl, making transferring easier and quicker. It contains all individual period files as well as an additional trailer record totaling all of the Tax Filing Company trailer records.
Enterprise Payroll also writes the Tax Liability by Jurisdiction Report, a Combined Report, a Control Report, and an error log to the directory specified by the TEMP environment variable. These files are placed in your temp directory along with the other periodic files.
These files are replaced each time you select the Rerun check box on the Create Periodic
Tax File panel and click Run Tax File Build.
The filenames for the files generated when you create the periodic tax file are as follows:
• Tax Liability by Jurisdiction Report- xxxxsnnn.rpt
where xxx is the pay run ID from the Create Periodic Tax File panel and nnn is the file sequence number.
The Tax Liability by Jurisdiction Report reflects the off -cycle check date for your off-cycle
payroll cycle when you build the tax file.
• Combined Report - tfxxx.prl
• Control Report- tfcntl.rpt
• Error Log - xxxxsnnn.err
where xxxx is the tax service company code and nnn is the file sequence number.
Generating and Transmitting ADP TAXServices Tax Files
Creating the Periodic Tax Files
Transmitting Periodic Files
Verifying the Periodic Tax File Transmission
Viewing the Periodic File List
Chapter 8: Generating and Transmitting ADP Premium Service FilesPayroll Processing Guide Version 5.04.01

8-6 Generating and Transmitting ADP TAXServices Tax Files
To create the periodic tax file, do the following:
1. Click Payroll and make the following selections:
Post-Payroll Cycle Processes ~ Build Tax Service File
2. Double-click the Create Periodic Tax File task. The Create Periodic Tax File panel displays.
Figure 8-2. Create Periodic Tax File Panel
3. In the Batch Run ID field, enter a value to identify the person/organization submitting this run control.
4. In the Pay Run ID field, select the pay run ID of the payroll for which the periodic file is to be built.
This is generally the same pay run ID submitted for the last pay confirmation process.
5. If this is a rerun of a previously created periodic file, select the Rerun check box.
This check box is only available if the Periodic Tax File has already been processed
once.
6. If you selected a payroll run ID that is attached to both an on-cycle and off-cycle payroll, you can select the Off Cycle Only check box so that Enterprise Payroll will only include the off-cycle payroll information in the periodic tax file.
If you select the Off Cycle Only check box, the Tax Liability by Jurisdiction Report will
reflect the off-cycle check date.
7. Enter the issue date of the paycheck in the Paycheck Issue Date field.
8. Click (Save).
For a description of the fields on this panel, press F1.
Chapter 8: Generating and Transmitting ADP Premium Service FilesPayroll Processing Guide Version 5.04.01

Generating and Transmitting ADP TAXServices Tax Files 8-7
9. Click Run Tax File Build. You will receive a message notifying you that your process
has been submitted. Click OK. To confirm successful completion, click (Process Monitor).
For additional information on the Process Monitor, refer to the Using ADP Enterprise HR Guide.
You’ve just finished creating the periodic tax file. Next, you need to recreate the periodic tax file, and/or transmit the periodic file.
Recreating the Periodic Tax File
You have the option of recreating your periodic tax file. If you choose to do this, Enterprise Payroll re-records previously reported TOS changes into the new file and builds the status change record to indicate that the previous file is being replaced. Set the run control on the Create Periodic Tax File panel to identify the process as a rerun. This allows Enterprise Payroll to identify the file sequence number of the previously created file via the TF_DAILY_FIL table and to scan for any type of service data associated with the original run and re-report it in the new file.
Transmitting Periodic Files
Before you can transmit your periodic files, you must contact your ADP TAXServices Coordinator to obtain software and telephone numbers you need to transfer the tax files.
You may have multiple periodic files to transfer if your company has several FEINs because ADP TAXServices assigns company codes by FEIN. Therefore, the periodic tax file program generates individual periodic tax files as well as a combined periodic tax file.
The combined file is named tfxxx.prl, where xxx is the pay run ID from the Create Periodic Tax File panel. It contains all individual period files as well as an additional trailer record totaling all of the Tax Filing Company trailer records. Enterprise Payroll places this file in your temp directory along with the other periodic files and replaces it each time you recreate the periodic tax file.
Each time you transfer a periodic file, use the Update Periodic File Status task to indicate to Enterprise Payroll that the file has been transmitted.
Transmitting periodic files consists of the following:
• Transferring the Periodic File
• Manually Tracking Periodic File Transmissions
Transferring the Periodic File
To transfer the periodic tax file, double-click the ADP File Transfer icon and run the ADP File Transfer program. Refer to the National Accounts Tax Service Client Workstation User’s Guide for specific instructions on running the ADP Tax Service File Transfer program.
Generating and Transmitting ADP TAXServices Tax Files
Creating the Periodic Tax Files
Transmitting Periodic Files
Verifying the Periodic Tax File Transmission
Viewing the Periodic File List
Chapter 8: Generating and Transmitting ADP Premium Service FilesPayroll Processing Guide Version 5.04.01

8-8 Generating and Transmitting ADP TAXServices Tax Files
You’ve just finished updating the transmit status of your periodic files. Next, you must use the Update Periodic File Status task to indicate to Enterprise Payroll that the file has been transmitted.
Manually Tracking Periodic File Transmissions
After you transmit your periodic files, you may choose to use the Update Periodic File Status task to manually indicate to Enterprise Payroll that the file has been transmitted. The Periodic File Status panel displays all period files, listing the untransmitted files first. It provides the sequence numbers assigned to these files, their creation dates, and their pay run IDs. Enterprise Payroll creates this data each time you create a periodic tax file.
In addition, it provides a Transmission Status check box that allows you to manually indicate if a specific file has been transmitted for your own tracking purposes. Selecting the Transmission Status check box for a specific pay run ID automatically selects the Tax File Transmitted check box on the Payroll Calendar panel.
To manually track your file transmissions, do the following:
1. Click Payroll and make the following selections:
Post-Payroll Cycle Processes ~ Build Tax Service File
2. Double-click the Update Periodic File Status task. The Search dialog box displays.
Figure 8-3. Search Dialog Box
Chapter 8: Generating and Transmitting ADP Premium Service FilesPayroll Processing Guide Version 5.04.01

Generating and Transmitting ADP TAXServices Tax Files 8-9
3. Enter the calendar year and then click OK. The Periodic File Status panel displays.
Figure 8-4. Periodic File Status Panel
4. Review the following periodic file status information:
• Calendar Year - Displays the year in which you are transferring the file.
• Employer Payroll Files - Use the options in this area to indicate if a file has been transmitted and to view the transmittal information.
• Transmission Status - For each periodic file listed in the Employer Payroll Files area that has been transmitted, you can select this check box. Selecting this option for a specific pay run ID automatically selects the Tax File Transmitted check box on the Payroll Calendar panel.
• Tax Service Company - Displays the tax filing company code.
• Seq # - Displays the file sequence number assigned to this file. This field value is used as the sequential run number in the header record of the file passed to ADP's tax service. This field uniquely identifies this particular file for ADP, in case of later reruns.
• Pay Run ID - Displays the identifier of the payroll cycle for which this file contains data.
• Paycheck Issue Date - Displays the check date for the payroll data in this file.
• Generation Date - Displays the date that the periodic tax file was actually built by Enterprise Payroll.
• Transmission Date/Time - Displays the date and time that the periodic tax file was transmitted to ADP. If no data displays, then the file has not been transmitted to ADP.
• TOS Updates - If this field displays a Y (Yes), this indicates that there were changes to the type of service that were recorded in this file.
For a description of the fields on this panel, press F1.
Chapter 8: Generating and Transmitting ADP Premium Service FilesPayroll Processing Guide Version 5.04.01

8-10 Generating and Transmitting ADP TAXServices Tax Files
• Replaced - If this field displays a Y (Yes), this indicates that the periodic tax file was created and replaced by a rerun of the Tax Service Daily Build program. The program created a new periodic tax file with a different sequential run number (see Seq# field description). Files that have been replaced prior to the transmission process will not be transmitted.
5. For each transmitted periodic file, select the Transmission Status check box.
If you do not select the Transmission Status check box for each transmitted file, you will
receive a warning message when you try to print your checks and advices. This message will indicate that you have not yet transmitted your periodic files.
6. Click (Save).
You’ve just finished manually tracking file transmissions. Next, you must verify that the periodic file has been transmitted.
Verifying the Periodic Tax File Transmission
If you opted to manually track file transmission by selecting the Transmission Status check box (Update Periodic File Status task) for each transmitted file, you can review the transmitted files in the Payroll Calendar panel. The Tax File Transmitted check box will be selected on this panel.
If you did not manually select the Transmission Status check box on the Periodic File Status
panel, then the Tax File Transmitted check box will not be selected.
For detailed information on this panel, see “Building Pay Calendars Manually” on page 15-8.
You’ve just verified that the periodic file has been transmitted by viewing the transmission time and date on the Periodic File Status panel and verifying that the Tax File Transmitted check box on the Payroll Calendar panel is selected. Next, you can view information about the periodic file that has been set up and/or transmitted.
Viewing the Periodic File List
Using the View Periodic File List task, you can view data associated with the creation of the periodic files. The Periodic File List panel is display-only and provides the sequence numbers assigned to these files, their creation dates, and their pay run IDs. The most recent file displays at the top of the list. This data is created as each periodic file is built. It is later updated with the transmission date/time as the file(s) are successfully transmitted to ADP.
Generating and Transmitting ADP TAXServices Tax Files
Creating the Periodic Tax Files
Transmitting Periodic Files
Verifying the Periodic Tax File Transmission
Viewing the Periodic File List
Chapter 8: Generating and Transmitting ADP Premium Service FilesPayroll Processing Guide Version 5.04.01

Generating and Transmitting ADP TAXServices Tax Files 8-11
To view information about the periodic file that has been set up and/or transmitted, do the following:
1. Click Payroll and make the following selections:
Post-Payroll Cycle Processes ~ Build Tax Service File
2. Double-click the View Periodic File List task. The Search dialog box displays.
Figure 8-5. Search Dialog Box
3. Enter your ADP company code in the ADP Company Code field.
4. Enter the year in which you transmitted the file in the Calendar Year field and click OK. The Periodic File List panel displays.
.
Figure 8-6. Periodic File List Panel
5. Review the following periodic file information:
• Tax Service Company Code - Displays the tax service company code.
• FEIN - Displays the FEIN.
• Calendar Year - Displays the year in which you are transferring the file.
• Employer Payroll Files - Use the options in this area to indicate if a file has been transmitted and to view the transmittal information.
For a description of the fields on this panel, press F1.
Chapter 8: Generating and Transmitting ADP Premium Service FilesPayroll Processing Guide Version 5.04.01

8-12 Generating and Transmitting ADP TAXServices Tax Files
• Seq # - Displays the file sequence number assigned to this file. This field value is used as the sequential run number in the header record of the file passed to ADP's Tax Service organization. This field uniquely identifies this particular file for ADP in case of later reruns.
• Pay Run ID - Displays the identifier of the payroll cycle for which this file contains data.
• Off Cycle - Indicates whether the file is an off-cycle or on-cycle payroll.
• Paycheck Issue Date - Displays the check date for the payroll data in this file.
• Generation Date - Displays the date that the periodic tax file was actually built by Enterprise Payroll.
• Transmission Date/Time - Displays the date and time that the periodic tax file was transmitted to ADP. If no data displays, then the file has not been transmitted to ADP.
• Type of Service Updates - If this field displays a Y (Yes), this indicates that there were changes to the type of service which were recorded in this file.
• Replaced - If this field displays a Y (Yes), this indicates that the periodic tax file was created and replaced by a rerun of the Tax Service Daily Build program. The program created a new periodic tax file with a different sequential run number (see Seq# field description). Files that have been replaced prior to the transmission process will not be transmitted.
6. When you are finished, click (Close).
You’ve just viewed information about the periodic file that has been set up and/or transmitted, which is the last step in generating and transmitting ADP TAXServices files.
Chapter 8: Generating and Transmitting ADP Premium Service FilesPayroll Processing Guide Version 5.04.01

Generating and Transmitting ADP Payment Solutions Services Files 8-13
Generating and Transmitting ADP Payment Solutions Services Files
If you subscribe to any of the following premium services offered through ADP Payment Solutions Services, then you must generate a file after each payroll is confirmed and transmit this file to ADP Payment Solutions Services:
• Check printing
• ADPCheck
• Full Service Direct Deposit (FSDD)
• iPayStatements
ADP hosted clients do not generate their own ADP Payment Solutions Services files. Instead,
the Hosting center generates and transmits the files.
Generating ADP Payment Solutions Services files consists of the following:
• Completing the Prerequisites
• Generating the Payroll Files
• Generating the Billing Interface Report (PAY037) (ADP Hosted Clients Only)
• Generating a Label File Using PAY038
• Transferring Files to ADP Payment Solutions Services
• Importing Check Detail Using PAY032
Chapter 8: Generating and Transmitting ADP Premium Service FilesPayroll Processing Guide Version 5.04.01

8-14 Generating and Transmitting ADP Payment Solutions Services Files
Completing the Prerequisites
You must meet the following prerequisites before generating and submitting your payroll files to ADP Payment Solutions Services:
• Work with your ADP Payment Solutions Services Coordinator to submit the appropriate paperwork along with your company logo and authorized signature to ADP.
• Obtain your ADP company code from ADP. You will need an ADP company code for each logo and authorized signature you want to print.
• Identify your company as an ADPCheck, FSDD, iPayStatements, and/or TotalPay Card subscriber at the installation level and company level. For step-by-step instructions, refer to the Payroll Setup and Maintenance Guide.
You’ve just finished completing the prerequisites for generating ADP Payment Solutions Services files. Next, you are ready to generate the payroll files.
Generating the Payroll Files
When you generate the payroll file for ADP Payment Solutions Services, Enterprise Payroll does the following:
• Formats paycheck information and writes it to a file called xxxpay.fil, where xxx is your pay run ID.
• Creates an sqr log file.
• Creates an sqr list file. This file contains a summary of the checks processed and written to the paycheck information file.
When you generate your payroll file, the employee ID will automatically print on the check
stub.
The order of checks in the generated file is determined by the paycheck delivery options defined on the Paycheck Options panel (Payroll ~ Company Definitions ~ Pay Groups and Payroll Calendars ~ Pay Groups) for the pay group at the time the payroll was confirmed. For more information, see the Payroll Setup and Maintenance Guide.
Generating and Transmitting ADP Payment Solutions Services Files
Completing the Prerequisites
Generating the Payroll Files
Generating the Billing Interface Report (PAY037) (ADP Hosted Clients Only)
Generating a Label File Using PAY038
Transferring Files to ADP Payment Solutions Services
Importing Check Detail Using PAY032
Chapter 8: Generating and Transmitting ADP Premium Service FilesPayroll Processing Guide Version 5.04.01

Generating and Transmitting ADP Payment Solutions Services Files 8-15
The following items will print on the check:
• Earnings rate - Prints on the check stub if you select Include Rate on the Basic Data panel (Payroll ~ Company Definitions ~ Earnings and Special Accumulators ~ Earnings ~ Basic Data). For more information, see the Payroll Setup and Maintenance Guide.
• Employer benefits - Prints on the pay statements if you have selected the Include on Pay Statement option on the Deduction Options panel (System Admin ~ Payroll Setup - Required ~ Deductions).
• Earned Income Credit (EIC).
• Garnishments - Prints garnishment line items for each garnishment ID along with each amount associated with that ID.
• Basic of Payment - Displays the employee type from the latest effective-dated row on the Job/Pay/Location panel. If the employee is paid with one check for two jobs, then the basis displayed is for the primary job.
To print checks and vouchers, you must set up options on the Basic Options panel (System Admin ~ HR Setup (Required) ~ HR Setup ~ Installation), the Paycheck Options panel at the employee level (Payroll ~ Employee Information ~ Change Employee Payroll Data ~ Paycheck Options), and the ADP Print Services File panel (Post Payroll Cycle Processes ~ Prepare Payroll Distributions). Checks will always print, but Table 8-1 provides the option setting on each panel and the combinations that will suppress or print vouchers.
Generating the ADP Payment Solutions Services file consists of the following:
• Setting Up ADP Payment Solutions Services File Information
• Indicating On-cycle/off-cycle, Attaching the Run ID, and Generating the File
Setting Up ADP Payment Solutions Services File Information
Use the first panel of the PAY036 task, the ADP Print Service File panel, to set up file information for ADP Payment Solutions Services as follows:
1. Click Payroll and make the following selections:
Post-Payroll Cycle Process ~ Prepare Payroll Distributions
Table 8-1. Checks and Vouchers Options
Basic Options Panel
Print Vouchers
Paycheck Options Panel
Print Vouchers
ADP Print Services File Panel
Print VouchersVouchers suppressed in ADP Payment Solutions Services file?
N Y or N Y or N Vouchers suppressed.
Y Y Y Vouchers print.
Y N Y Voucher is suppressed for selected employee.
Y Y or N N Vouchers suppressed.
Chapter 8: Generating and Transmitting ADP Premium Service FilesPayroll Processing Guide Version 5.04.01

8-16 Generating and Transmitting ADP Payment Solutions Services Files
2. Click next to the ADP Print Services File (PAY036) task. The Add dialog box displays.
If you do not have this task available to select, contact your System Administrator.
Figure 8-7. Add Dialog Box
To modify existing file information for ADP Payment Solutions Services, double-click the
ADP Print Services Files (PAY036) task, enter the search criteria in the Search dialog
box, and click OK. To preserve history, click (Insert Row).
3. Enter the run control ID and click OK. The ADP Print Services File panel displays.
Figure 8-8. ADP Print Services File Panel
4. Enter the run number in the Run Number field.
5. Select the file type (such as Production) from the Pay File Type field.
6. In the Contact Name field, enter the name of the person at your company that ADP can contact with questions about your file.
7. Enter a message in the Void Message field, if necessary. For example, you could type “Void after 90 days.”
8. For Full Service Direct Deposit (FSDD) subscribers only, enter the prenote date of the checks in the Prenote Date field.
For a description of the fields on this panel, press F1.
Chapter 8: Generating and Transmitting ADP Premium Service FilesPayroll Processing Guide Version 5.04.01

Generating and Transmitting ADP Payment Solutions Services Files 8-17
9. If necessary, change the number of earnings to display on the employee’s pay stub.
Increasing the number of earnings displayed on a pay stub may result in additional
pages being printed.
10. If necessary, enter the number of deductions to display on the employee’s pay stub.
Increasing the number of deductions displayed on a pay stub may result in additional
pages being printed.
11. From the Transit Number field, select one of the following options to specify how you want transit numbers to display:
• Hide xxxxxxxxx
• Mask xxxxxx234
• Show 123456789
The options that are available for selection depend on the field display options selected
on the user’s security profile (System Admin ~ Security Administration ~ Operator ~ Profile). If the user profile is set to Hide, the option is grayed out when generating files. The process will automatically print the fields according to the user’s display setting. However, if the user is set to Show, the Display Option fields will be available and the user can choose to change the default of Hide to either Show or Mask. If the user is set to Mask, the Display Option fields will be available and the user can choose to change the default of Hide to Mask.For more information on the user Profile settings, see the Application Administrator’s Guide.
12. From the Account Number field, select one of the following options to specify how you want account numbers to display:
• Hide xxxxxxxxxxxxxxxxx
• Mask xxxxxxxxxxxxx1234
• Show 12345678901234567
The options that are available for selection depend on the field display options selected
on the user’s security profile (System Admin ~ Security Administration ~ Operator ~ Profile). If the user profile is set to Hide, the option is grayed out when generating files. The process will automatically print the fields according to the user’s display setting. However, if the user is set to Show, the Display Option fields will be available and the user can choose to change the default of Hide to either Show or Mask. If the user is set to Mask, the Display Option fields will be available and the user can choose to change the default of Hide to Mask.For more information on the user Profile settings, see the Application Administrator’s Guide.
13. If you do not want the pay stub to have a header, select the Suppress Stub Headers check box.
14. If you do not want the pay stub to contain Social Security Number, select the Suppress Stub Social Security check box.
If you do not select this check box, then the Social Security Number will appear on all
paystubs and advices for all states in the format xxxx-xx-1234.
Chapter 8: Generating and Transmitting ADP Premium Service FilesPayroll Processing Guide Version 5.04.01

8-18 Generating and Transmitting ADP Payment Solutions Services Files
For California employees, the Social Security Number will also appear in this format, even if you have not selected this check box.
15. If you do not want the employee’s address printed on the pay stub, select the Suppress Payee Address check box.
16. If you do not want ADP Payment Solutions Services to print check vouchers, clear the Print Voucher check box.
17. To print prenotes for the advices, select the Print Prenotes check box.
18. If you want ADP Payment Solutions Services to post the iPayStatements file to the Internet, select the iPayStatements check box.
This check box is grayed and unavailable unless the iPayStatements check box is
selected on the Payroll panel in the Installation task (Human Resources Setup - Required ~ Human Resources Setup ~ Installation).
19. For Full Service Direct Deposit (FSDD) clients, if you want IAT records to be sent with the PAY036 records, select the Create IAT Records check box.
20. If you selected the iPayStatements check box, determine whether to select or clear the Print Paychecks check box by using the following guidelines:
• If you want ADP Payment Solutions Services to print live paychecks in addition to posting the iPayStatements file, select this check box.
• If you printed checks manually in the office and only want ADP Payment Solutions Services to post the iPayStatements file, do not select this check box.
This check box is grayed and unavailable unless the iPayStatements check box is
selected on the Payroll panel in the Installation task (Human Resources Setup - Required ~ Human Resources Setup ~ Installation).
You’ve just finished setting up file information for ADP Payment Solutions Services. Next, define view window fields, field lengths, and labels.
If you do not select the Print Paychecks check box, employees will not receive a printed live check.
Chapter 8: Generating and Transmitting ADP Premium Service FilesPayroll Processing Guide Version 5.04.01

Generating and Transmitting ADP Payment Solutions Services Files 8-19
Defining View Window Fields
Use the View Window Fields panel to define view window fields, field lengths, and labels.
These fields are not applicable for iPayStatements subscribers.
To define view windows, do the following:
1. Click the View Window Fields tab.
Figure 8-9. View Window Fields Panel
2. In the Sequence field, enter the order you want the field to appear in the view window.
3. From the View Field field, select one of the following view fields and press Tab:
4. If necessary, change the default length of the field in the Field Length field.
Enterprise Payroll automatically populates the Field Length and Field Label fields.
5. If necessary, change the default label for the field in the Field Label field.
Enterprise Payroll automatically populates the Field Length and Field Label fields.
View Field Description
COMP Company
DEPT Department
EMPL Employee ID
LOCN Location
MAIL Mail Drop
PAYG Pay Group
SUPV Supervisor ID
For a description of the fields on this panel, press F1.
Chapter 8: Generating and Transmitting ADP Premium Service FilesPayroll Processing Guide Version 5.04.01

8-20 Generating and Transmitting ADP Payment Solutions Services Files
6. To add additional view window fields, click (Insert Row) and repeat steps 2-5.
You’ve just finished defining view window fields. Next, indicate if the print job is an on-cycle or off-cycle payroll, attach the pay run ID, and then generate the file.
Indicating On-cycle/off-cycle, Attaching the Run ID, and Generating the File
To indicate if the print job is an on-cycle or off-cycle payroll, attach the pay run ID, and then generate the file, do the following:
1. Click the Pay Run Data tab.
When you generate your Print Services file (PAY036), you must start on the ADP Print
Services File panel. See page 8-23 for more information.
Figure 8-10. Pay Run Data Panel
2. Select one of the options from the Cycle Option field to indicate whether you want the report to include payroll information for an on-cycle payroll, off-cycle payroll, or both.
3. Select the payroll run ID from the Pay Run ID field.
4. In the Page # fields, enter the page number range for the paysheet information you want included in the file.
For a description of the fields on this panel, press F1.
Chapter 8: Generating and Transmitting ADP Premium Service FilesPayroll Processing Guide Version 5.04.01

Generating and Transmitting ADP Payment Solutions Services Files 8-21
5. If the payroll run ID includes multiple pay calendar entries, then you must do the following:
a. Select the company from the Company field.
b. Select the pay group from the Pay Group field.
c. Select the pay period end date from the Pay End Date field. Pay end dates listed include all pay end dates available for the company selected.
6. Click Run Report. You will receive a message notifying you that your process has been
submitted. Click OK. When the process has completed, click (Report Outputs) to view the .log or .lis file.
For additional information on running, viewing, and printing reports, refer to the Using ADP Enterprise HR Guide. For details on sources, sort order, and an illustration of the report, see the Standard Reports Guide.
You’ve just finished setting up file information for ADP Payment Solutions Services. Next, if you are an ADP hosted client proceed to “Generating the Billing Interface Report (PAY037) (ADP Hosted Clients Only)” on page 8-21. If you are an ADP non-hosted client, proceed to “Generating a Label File Using PAY038” on page 8-23.
Generating the Billing Interface Report (PAY037) (ADP Hosted Clients Only)
You can run PAY037 to generate the Billing Interface report. This report contains transaction statistics pertaining to the number of active employees and the number of checks and direct deposit advises issued per payroll cycle. The report only includes checks that have a check number.
To generate the report, do the following:
1. Click Payroll and make the following selections:
Payroll Reports ~ Payroll Utilities
Generating and Transmitting ADP Payment Solutions Services Files
Completing the Prerequisites
Generating the Payroll Files
Generating the Billing Interface Report (PAY037) (ADP Hosted Clients Only)
Generating a Label File Using PAY038
Transferring Files to ADP Payment Solutions Services
Importing Check Detail Using PAY032
Chapter 8: Generating and Transmitting ADP Premium Service FilesPayroll Processing Guide Version 5.04.01

8-22 Generating and Transmitting ADP Payment Solutions Services Files
2. Double-click the Billing Interface (PAY037) task. The Billing Interface panel displays.
Figure 8-11. Billing Interface Panel
3. In the From Date and Thru Date fields, enter the date range for the statistics you want included in the report.
If you leave the From Date and Thru Date fields empty, the report contains the
information from the last full week. Only confirmed payrolls are included on the report.
4. Click Run Report. You will receive a message notifying you that your process has been
submitted. Click OK. When the process has completed, click (Report Outputs) to view the report.
For additional information on running, viewing, and printing reports, refer to the Using ADP Enterprise HR Guide. For details on sources, sort order, and an illustration of the report, see the Standard Reports Guide.
You’ve just finished generating the Billing Interface report. Next, generate your label file.
For a description of the fields on this panel, press F1.
Chapter 8: Generating and Transmitting ADP Premium Service FilesPayroll Processing Guide Version 5.04.01

Generating and Transmitting ADP Payment Solutions Services Files 8-23
Generating a Label File Using PAY038
If you use PAY036 to generate your payroll file, you can create a file that ADP Payment Solutions Services uses to generate a shipping label for your payroll. You must set up your shipping instructions on the Shipping Information panel (System Admin ~ Human Resources Setup (Required) ~ Human Resources Setup ~ Locations) and the Shipping Accounts panel (Payroll ~ Company Definitions ~ Organization Definitions ~ Shipping Accounts). For more information, see the Payroll Setup and Maintenance Guide.
Depending on your shipping setup instructions, the ADP Payment Solutions Services uses the following files to create labels:
• abmmddyyyy.txt for an Airborne label
• upmmddyyyy.txt for a UPS label
• fxmmddyyyy.txt for a Federal Express label
To generate your shipping label file using PAY038, do the following:
1. Click Payroll and make the following selections:
Post-Payroll Cycle Process ~ Prepare Payroll Distributions
2. Double-click the ADP Print Services Label File (PAY038) task. The ADP Print Services Label File panel displays.
Figure 8-12. ADP Print Services Label File
3. In the ADP Company Code field, enter your ADP Company code that corresponds to the payroll file you generated using PAY036.
4. In the Ship Date field, enter the date your payroll will be shipped.
Generating and Transmitting ADP Payment Solutions Services Files
Completing the Prerequisites
Generating the Payroll Files
Generating the Billing Interface Report (PAY037) (ADP Hosted Clients Only)
Generating a Label File Using PAY038
Transferring Files to ADP Payment Solutions Services
Importing Check Detail Using PAY032
For a description of the fields on this panel, press F1.
Chapter 8: Generating and Transmitting ADP Premium Service FilesPayroll Processing Guide Version 5.04.01

8-24 Generating and Transmitting ADP Payment Solutions Services Files
5. Click Run Report. You will receive a message notifying you that your process has been
submitted. Click OK. When the process has completed, click (Report Outputs) to view the .txt file.
For additional information on running, viewing, and printing reports, refer to the Using ADP Enterprise HR Guide. For details on sources, sort order, and an illustration of the report, see the Standard Reports Guide.
You’ve just finished generating your label file for ADP Payment Solutions Services. Finally, you can transfer your files to ADP Payment Solutions Services.
Transferring Files to ADP Payment Solutions Services
After you generate your ADP Print Services file(s), you are ready to transfer them to ADP Print Services for printing.
To transfer the file(s), follow these steps:
1. Compress the files using PKZIP or WINZIP.
2. Use your communications software to upload your compressed files to ADP.
Contact your ADP consultant for assistance in setting up communications parameters
such as the phone number.
After you upload your files, ADP prints your checks and ships them to you.
You’ve just finished transferring your files to ADP Print Services, which is the last step in generating ADP Print Services files. Next, you can import a Client Detail File from ADP Print Services after your checks are printed.
Importing Check Detail Using PAY032
After ADP Print Services prints your checks, you can use PAY032 to import from ADP Print Services to ADP Enterprise HR a Client Detail File that contains the check numbers assigned to your employees’ checks by ADP Print Services. When you import the Client Detail File, the check numbers in Enterprise are replaced by the check numbers in file.
To prevent the advice number in Enterprise from being overwritten when you import the Client Detail File, you should use different a form ID for ADP Check and FSDD. You select the form IDs on the Earnings/Payment Option panel (Payroll ~ Company Definitions ~ Pay Groups and Payroll Calendars ~ Pay Groups). For more information, see the Payroll Setup and Maintenance Guide.
The process produces the pay032.lis file. You can use this file to view the original check numbers and the new check numbers assigned by ADP Print Services. The list is sorted by pay group.
Generating and Transmitting ADP Payment Solutions Services Files
Completing the Prerequisites
Generating the Payroll Files
Generating the Billing Interface Report (PAY037) (ADP Hosted Clients Only)
Generating a Label File Using PAY038
Transferring Files to ADP Payment Solutions Services
Importing Check Detail Using
Chapter 8: Generating and Transmitting ADP Premium Service FilesPayroll Processing Guide Version 5.04.01

Generating and Transmitting ADP Payment Solutions Services Files 8-25
To import the ADP check detail file, do the following:
1. Click Payroll and make the following selections:
Payroll Reports ~ Paychecks
2. Double-click the ADP Check File Import (PAY032) task. The ADP Check File Import panel displays.
Figure 8-13. ADP Check File Import Panel
3. In the Import File Name field, enter the name of the import file.
4. Click Run Report. You will receive a message notifying you that your process has been
submitted. Click OK. When the process has completed, click (Report Outputs) to view the report.
For additional information on running, viewing, and printing reports, refer to the Using ADP Enterprise HR Guide. For details on sources, sort order, and an illustration of the report, see the Standard Reports Guide.
You’ve just finished importing the ADP Check Detail File to ADP Enterprise HR.
For a description of the fields on this panel, press F1.
Chapter 8: Generating and Transmitting ADP Premium Service FilesPayroll Processing Guide Version 5.04.01

8-26 Generating and Transmitting ADP WGPS Files
Generating and Transmitting ADP WGPS Files
With Enterprise Payroll, you can send your WGPS data to ADP for processing after you have run the final confirmation on your payroll. ADP TAXServices then automatically calculates, collects and disburses all types of wage garnishments and income withholding payments, such as child support orders, tax levies, and bankruptcy orders. In addition, if you subscribe to ADP’s WGPS letter service, then ADP TAXServices disburses letters after receiving the WGPS file.
Generating and transmitting your WGPS files consists of the following:
• Importing the WGPS Letter Notification Request
• Generating the WGPS File
• Verifying that the WGPS File was Successfully Built
• Transferring the WGPS File
• Viewing all WGPS Files Generated for a Specific Year
• Importing Garnishment Detail Using PAYWGP04
Importing the WGPS Letter Notification Request
If you subscribe to WGPS letter notification service, then run PAYWGP05 to export a WGPS letter information request to ADP TAXServices.
To import the WGPS letter request, do the following:
1. Click Payroll and make the following selections:
Post Payroll Cycle Processes ~ Build WGPS File
Generating and Transmitting ADP WGPS Files
Importing the WGPS Letter Notification Request
Generating the WGPS File
Verifying that the WGPS File was Successfully Built
Transferring the WGPS File
Viewing all WGPS Files Generated for a Specific Year
Importing Garnishment Detail Using PAYWGP04
Chapter 8: Generating and Transmitting ADP Premium Service FilesPayroll Processing Guide Version 5.04.01

Generating and Transmitting ADP WGPS Files 8-27
2. Double-click the Process WGPS Letter File (PAYWGP05) task. The WGPS Letter File panel displays.
Figure 8-14. WGPS Letter File Panel
3. Enter the name of the file you want to import in the Import File Name field.
This file must reside in the sqrout directory.
4. Click Run Report. You will receive a message notifying you that your process has been
submitted. Click OK. To confirm successful completion, click (Process Monitor).
For additional information on using the Process Monitor, see the Using ADP Enterprise HR Guide.
You’ve just finishing running PAYWGP05 to import the WGPS letter information file from ADP TAXServices. Next, generate the WGPS file.
For a description of the fields on this panel, press F1.
Chapter 8: Generating and Transmitting ADP Premium Service FilesPayroll Processing Guide Version 5.04.01

8-28 Generating and Transmitting ADP WGPS Files
Generating the WGPS File
You can run PAYWGP03 to generate your WGPS transmission file. If you have already run PAYWGP05, then this file will also include WGPS letter information.
To generate your file, do the following:
1. Click Payroll and make the following selections:
Post-Payroll Cycle Processes ~ Build WGPS File
2. Double-click the Build WGPS File (PAYWGP03) task. The Build WGPS File panel displays.
Figure 8-15. Build WGPS File Panel
For a description of the fields on this panel, press F1.
3. From the Pay Run ID field, select the payroll run ID assigned to the payroll cycle for which you want to generate the WGPS file.
4. Enter the Calendar Year for which you want to generate your WGPS files.
5. If the payroll has been rerun and reconfirmed since the original periodic file was built, you must create a new file by selecting the Rerun check box.
6. If you are generating a file for an off-cycle payroll, select the Off Cycle Only check box.
7. Enter the check date for the off-cycle payroll data to be included in this file in the Paycheck Issue Date field.
Generating and Transmitting ADP WGPS Files
Importing the WGPS Letter Notification Request
Generating the WGPS File
Verifying that the WGPS File was Successfully Built
Transferring the WGPS File
Viewing all WGPS Files Generated for a Specific Year
Importing Garnishment Detail Using PAYWGP04
Chapter 8: Generating and Transmitting ADP Premium Service FilesPayroll Processing Guide Version 5.04.01

Generating and Transmitting ADP WGPS Files 8-29
8. Click Run Report. You will receive a message notifying you that your process has been
submitted. Click OK. When the process has completed, click (Report Outputs) to view the xxxxsyyy.grn file (where xxxx is the tax filing company code and yyy is the file sequence number).
You can also view the paywgp03.lis file to review your transmission information in a
simple, straight-forward file.
For additional information on running, viewing, and printing reports, refer to the Using ADP Enterprise HR Guide. For details on sources, sort order, and an illustration of the report, see the Standard Reports Guide.
You’ve just finished generated your WGPS file. Next, you can verify that the file was successfully built.
Verifying that the WGPS File was Successfully Built
If your WGPS file was successfully built, the payroll calendar will be updated to indicate this. The WGPS File Built check box will be selected on the Payroll Calendar panel.
For detailed instructions on the Payroll Calendar panel, see “Building Pay Calendars Manually” on page 15-8.
You’ve just finished verifying that your WGPS file was successfully built. Next, you can transfer the file to ADP WGPS Services.
Transferring the WGPS File
After verifying that your WGPS file was built, you can transfer the .grn file to the ADP WGPS center. To do this, double-click the ADP File Transfer icon and run the ADP File Transfer program. Refer to the National Accounts Tax Service Client Workstation User’s Guide for specific instructions on running this program.
Viewing all WGPS Files Generated for a Specific Year
To view a list of all WGPS files that you have generated for a specific year, use the View WGPS File List task. The Payroll WGPS File List panel displays a list of the generated files in order of sequence number. It displays the payroll run ID, paycheck issue date, and check generation date for each file. Finally, it indicates whether the file was built for an off-cycle payroll.
Generating and Transmitting ADP WGPS Files
Importing the WGPS Letter Notification Request
Generating the WGPS File
Verifying that the WGPS File was Successfully Built
Transferring the WGPS File
Viewing all WGPS Files Generated for a Specific Year
Importing Garnishment Detail Using PAYWGP04
Chapter 8: Generating and Transmitting ADP Premium Service FilesPayroll Processing Guide Version 5.04.01

8-30 Generating and Transmitting ADP WGPS Files
To view this list, do the following:
1. Click Payroll and make the following selections:
Post-Payroll Cycle Processes ~ Build WGPS File
2. Double-click the View WGPS File List task. The Search dialog box displays.
Figure 8-16. Search Dialog Box
3. Select your ADP company code from the ADP Company Code field.
4. Enter the calendar year for which you want to view a list of all your generated WGPS files in the Calendar Year field. The WGPS File List panel displays.
Figure 8-17. WGPS File List Panel
5. Review the following summary information for the WGPS files that have been generated for the specified year:
• WGPS Company Code - Displays the company that subscribes to WGPS.
• Calendar Year - Displays the calendar year for which you are viewing a list of built files.
• FEIN - Displays the company’s Federal Employer Identification Number (FEIN).
• WGPS Files - This area displays information about the WGPS files.
For a description of the fields on this panel, press F1.
Chapter 8: Generating and Transmitting ADP Premium Service FilesPayroll Processing Guide Version 5.04.01

Generating and Transmitting ADP WGPS Files 8-31
• Seq # - Displays the sequence number assigned to the WGPS file. This number can start at one and increment up to 99. Enterprise Payroll requires this number to uniquely identify the WGPS file.
• Pay Run ID - Lists the pay run ID to which the file is attached.
• Off Cycle - Indicates if the payroll run was an off-cycle payroll.
• Paycheck Issue Date - Displays the date that the paychecks for that payroll were issued.
• Generation Date - Displays the date the WGPS file was generated.
6. When finished, click (close).
You’ve just finished viewing a list of all WGPS files that you have generated for a specific year.
Importing Garnishment Detail Using PAYWGP04
If you are a full-service WGPS client, you can use PAYWGP04 to import a Client Detail File that contains garnishment details. The file contains new and updated garnishment information. When you import the garnishment detail file, you can choose to update your employee records with the garnishment details.
After you import the garnishment details, you can review the garnishment setup for each employee in the Garnishment Specification Data (Payroll ~ Employee Information ~ Change Employee Garnishment).
To import the garnishment detail file, do the following:
1. Click Payroll and make the following selections:
Employee Information ~ Change Employee Garnishment
Generating and Transmitting ADP WGPS Files
Importing the WGPS Letter Notification Request
Generating the WGPS File
Verifying that the WGPS File was Successfully Built
Transferring the WGPS File
Viewing all WGPS Files Generated for a Specific Year
Importing Garnishment Detail Using PAYWGP04
Chapter 8: Generating and Transmitting ADP Premium Service FilesPayroll Processing Guide Version 5.04.01

8-32 Generating and Transmitting ADP WGPS Files
2. Double-click the Import WGPS File (PAYWGP04) task. The Import WGPS File panel displays.
Figure 8-18. Import WGPS File Panel
3. In the File Name field, enter the name of the file you want to import.
4. To update employee deduction data, select the Update Database check box.
5. In the Deduction Code for new Garnishments field, select the deduction code.
6. If the company's fees should be deducted from the employee's disposable earnings before garnishment deductions are taken, select the Include company fee in disposable earnings check box.
Voucher fees are handling fees related to garnishments and may be charged by the company and/or the payee. The company's fees are deducted from the employee's disposable earnings before garnishment deductions are taken.
If you select this check box, Enterprise Payroll automatically updates the Deduction
Options panel (Payroll ~ Employee Information ~ Change Employee Garnishment ~ Garnishment Specification Data).
7. If the payee's fees should be deducted from the employee's disposable earnings before garnishment deductions are taken, select the Include payee fee in disposable earnings check box.
Voucher fees are handling fees related to garnishments and may be charged by the company and/or the payee. The payee's fees are deducted from the employee's disposable earnings before garnishment deductions are taken.
If you select this check box, Enterprise Payroll automatically updates the Deduction
Options panel (Payroll ~ Employee Information ~ Change Employee Garnishment ~ Garnishment Specification Data).
For a description of the fields on this panel, press F1.
Chapter 8: Generating and Transmitting ADP Premium Service FilesPayroll Processing Guide Version 5.04.01

Generating and Transmitting ADP WGPS Files 8-33
8. Click Run Report. You will receive a message notifying you that your process has been
submitted. Click OK. To confirm successful completion, click (Process Monitor).
For additional information on using the Process Monitor, see the Using ADP Enterprise HR Guide.
You’ve just finished importing the ADP WGPS File to Enterprise.
Chapter 8: Generating and Transmitting ADP Premium Service FilesPayroll Processing Guide Version 5.04.01

8-34 Generating and Transmitting ADP WGPS Files
Chapter 8: Generating and Transmitting ADP Premium Service FilesPayroll Processing Guide Version 5.04.01

Chapter 9
Distributing Your Payroll
PAGE TOPIC
9-2 Introduction
9-3 Setting Up the Logo and Signature Digitization
9-4 Testing MICR Quality
9-8 Printing Paychecks and Direct Deposit Advices
9-35 Viewing Your Paychecks and Direct Deposit Advices
9-40 Reprinting Checks
Chapter 9: Distributing Your PayrollPayroll Processing Guide Version 5.04.01

9-2 Introduction
Introduction
After you confirm your payroll, you are ready to print your paychecks and direct deposit devices. This chapter focuses on configuring your printer options, printing paychecks and advices, reprinting checks, generating ADP Payment Solutions Services files, and purchasing U.S. savings bonds.
For information on configuring the printer, see Appendix A, “Configuring Your Printer.” For
information on implementing the image files for signatures, logos, and disclaimers, see Appendix B, “Implementing and Using Signatures, Logos, and Disclaimers.”
You can often complete a task in the product in multiple ways. For information on interface
shortcuts and tips, refer to the Using ADP Enterprise HR Guide.
As you work through the tasks in this chapter, you may have questions about fields and options on the panels. To display a description of the fields and options, press F1 (Help) from the panel.
Chapter 9: Distributing Your PayrollPayroll Processing Guide Version 5.04.01

Setting Up the Logo and Signature Digitization 9-3
Setting Up the Logo and Signature Digitization
ADP offers the option of purchasing digitized signatures and logos. For a small fee per logo/signature, ADP takes your company’s signature and logo and digitizes them for use with our standard check. HP Raster Graphics files are created by ADP and then sent to you to be embedded in our standard Check Print process.
Setting up the logo and signature digitization consists of the following tasks:
• Ordering Logo Digitalization and Signature Image Files
• Loading the image files which is described in Appendix B, “Implementing and Using Signatures, Logos, and Disclaimers.”
Ordering Logo Digitalization and Signature Image Files
You can purchase digitized signatures and logos for your checks from ADP. ADP will create a separate HP Raster Graphics file for each signature and logo.
To order digitized logos and signatures, do the following:
1. Complete the Check Signature Authorization form.
2. Attach the black and white camera-ready artwork for your logo.
3. Send the form to the following address:
ADP Inc. - Enterprise Payroll ServicesAttn: Service Consultant/Implementation Consultant5800 Windward ParkwayAlpharetta, GA 30005
You have just finished setting up the logo and signature digitization. You are now ready to test the MICR quality.
Chapter 9: Distributing Your PayrollPayroll Processing Guide Version 5.04.01

9-4 Testing MICR Quality
Testing MICR Quality
The banking industry requires high quality MICR lines to process checks properly. Therefore, test MICR quality at the beginning of every print session, after changing the MICR toner or paper, and after service or maintenance. Verify MICR quality by printing sample checks. Do this by testing checks at various stages of the print session. Select checks at various stages so that you can ensure consistent quality throughout the print session.
Testing the MICR quality consists of the following:
• Testing the MICR Line Quality of the Printer
• Visually Inspecting the Checks
• Using the MICR Positioning Gauge
• Using a Signal Strength MICR Tester
• Troubleshooting MICR Test Problems
Testing the MICR Line Quality of the Printer
To test the MICR line quality of each printer, sample the checks at the beginning, middle, and end of the print session. In addition, sample the checks in each of the following situations:
• At the beginning of a print session. This ensures that the paper is the correct check stock and is loaded and aligned properly. It also verifies that the paper is feeding correctly. It is especially important to sample the check if paper other than check stock was loaded into the printer, such as plain paper, labels, forms, or reports.
• When you receive a low toner signal.
• When you reload the paper tray.
• When you replace any part of your printer such as toner, print cartridge, or any other replaceable item.
• When your printer has been serviced.
If you change the toner cartridge or replace the check paper after you start a print session, collect and examine checks from the print job since you cannot print a sample check after a print session has started.
You’ve just finished testing the MICR line quality of the printer. Next, you can visually inspect the checks.
Testing MICR Quality
Testing the MICR Line Quality of the Printer
Visually Inspecting the Checks
Using the MICR Positioning Gauge
Using a Signal Strength MICR Tester
Troubleshooting MICR Test Problems
Chapter 9: Distributing Your PayrollPayroll Processing Guide Version 5.04.01
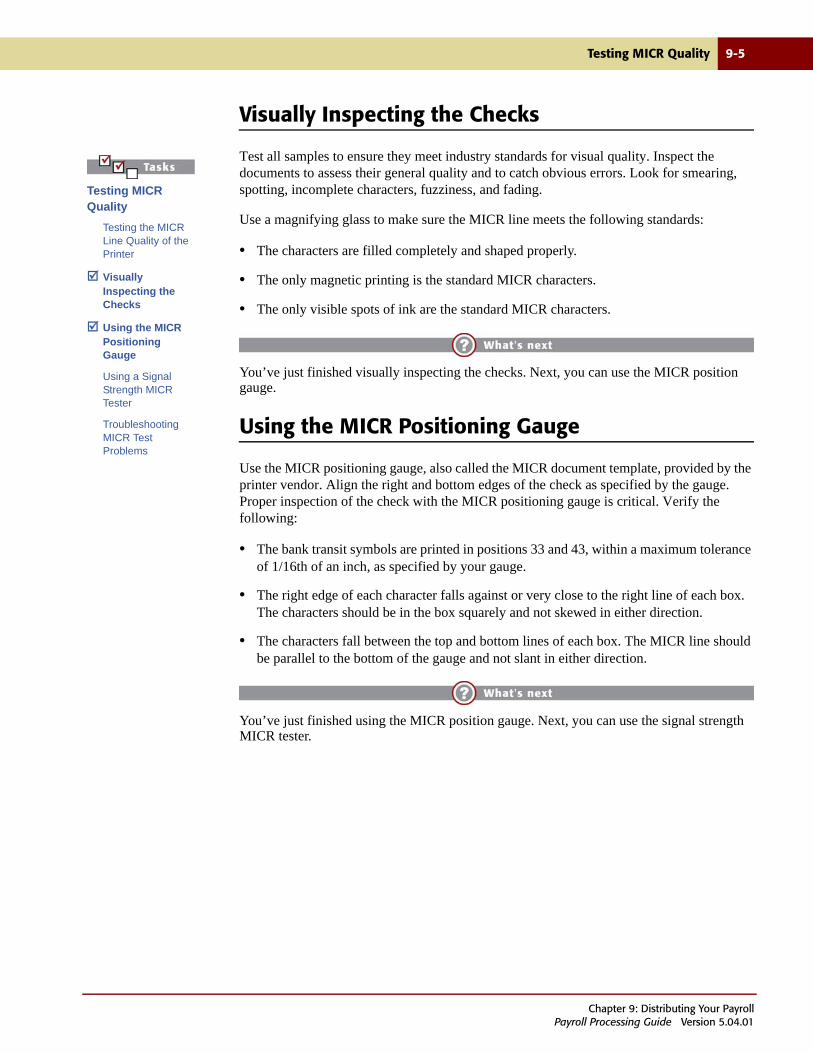
Testing MICR Quality 9-5
Visually Inspecting the Checks
Test all samples to ensure they meet industry standards for visual quality. Inspect the documents to assess their general quality and to catch obvious errors. Look for smearing, spotting, incomplete characters, fuzziness, and fading.
Use a magnifying glass to make sure the MICR line meets the following standards:
• The characters are filled completely and shaped properly.
• The only magnetic printing is the standard MICR characters.
• The only visible spots of ink are the standard MICR characters.
You’ve just finished visually inspecting the checks. Next, you can use the MICR position gauge.
Using the MICR Positioning Gauge
Use the MICR positioning gauge, also called the MICR document template, provided by the printer vendor. Align the right and bottom edges of the check as specified by the gauge. Proper inspection of the check with the MICR positioning gauge is critical. Verify the following:
• The bank transit symbols are printed in positions 33 and 43, within a maximum tolerance of 1/16th of an inch, as specified by your gauge.
• The right edge of each character falls against or very close to the right line of each box. The characters should be in the box squarely and not skewed in either direction.
• The characters fall between the top and bottom lines of each box. The MICR line should be parallel to the bottom of the gauge and not slant in either direction.
You’ve just finished using the MICR position gauge. Next, you can use the signal strength MICR tester.
Testing MICR Quality
Testing the MICR Line Quality of the Printer
Visually Inspecting the Checks
Using the MICR Positioning Gauge
Using a Signal Strength MICR Tester
Troubleshooting MICR Test Problems
Chapter 9: Distributing Your PayrollPayroll Processing Guide Version 5.04.01

9-6 Testing MICR Quality
Using a Signal Strength MICR Tester
ADP recommends that you use a signal strength MICR tester. Follow the tester’s manual closely on how to use it.
Even though the industry standard for the ON-US symbol signal strength is between 50% and 200% of nominal value, ADP recommends a signal strength between 90% and 160%. A signal strength above 110% is preferred. Also, verify that the signal strength MICR tester reports no other problems with the MICR line because it may check for other character parameters.
You must adjust the signal strength MICR tester before you test any checks. Use the calibration document provided with your signal strength MICR tester. You must pass the calibration document through the signal strength MICR tester again after you test the checks. The first and second readings of the calibration document must be within plus or minus 3%. If it is not, adjust the signal strength MICR tester and test the checks again.
You’ve just finished using the signal strength MICR tester.
If you have MICR problems that you cannot resolve, refer to “Troubleshooting MICR Test Problems” on page 9-6.
If the MICR quality meets your standards, you can print your paychecks and direct deposit advices. For more information, see “Printing Paychecks and Direct Deposit Advices” on page 9-8.
Troubleshooting MICR Test Problems
If the results of any MICR quality tests are questionable or your checks fail the MICR quality test, do not process any other checks until you resolve the issue. For future reference, document and date any samples with borderline results and store them for at least 30 days.
Use the following chart to resolve check printing problems:
If you cannot resolve MICR line format or paper registration errors, call your ADP consultant.
If you think the problem is related to your laser printer, stop printing checks and call your printer manufacturer.
Table 9-1. Troubleshooting MICR Test Problems
If the check contains... Then...
MICR line format errors Have your System Administrator check your printer setup and configuration against your setup.
Paper registration errors Reload the paper tray carefully so that paper is aligned correctly before you reprint anymore checks.
Visual or magnetic MICR quality errors
Inspect the toner cartridge for any obvious problems, defects, and toner content and distribution. Clean your printer and replace the toner, if necessary.
Testing MICR Quality
Testing the MICR Line Quality of the Printer
Visually Inspecting the Checks
Using the MICR Positioning Gauge
Using a Signal Strength MICR Tester
Troubleshooting MICR Test Problems
Chapter 9: Distributing Your PayrollPayroll Processing Guide Version 5.04.01

Testing MICR Quality 9-7
If the MICR quality meets your standards, you can print your paychecks and direct deposit advices.
Chapter 9: Distributing Your PayrollPayroll Processing Guide Version 5.04.01

9-8 Printing Paychecks and Direct Deposit Advices
Printing Paychecks and Direct Deposit Advices
After you configure your printer, you are ready to print your paychecks and direct deposit advices. Enterprise Payroll paychecks and advices (earnings statements) are designed to print on standard (8.5 x 11) size paper. You can laser print these earnings statements onto white paper using technology that preloads forms designs, such as logo and signature files, to the printer and uses magnetic ink to encode the MICR data. This process results in bank-acceptable checks with no need for pre-printed check stock, its storage, or maintenance security. Alternatively, you can print onto preprinted check forms.
Printing paychecks and direct deposit advices consists of the following:
• Adding a Message to Display on Paychecks/Advices
• Printing Paychecks
• Printing Direct Deposit Advices
Adding a Message to Display on Paychecks/Advices
Using the Define Paycheck Messages task, you can add a default message that will be printed on all paychecks/advices for the specified payroll run. In addition, you can set up a one-time message override for selected companies, selected employees, or a group of employees that meet specified criteria.
Adding a message to display on paychecks/advices consists of the following:
• Adding the Default Message
• Overriding the Default Message for Selected Companies
• Overriding the Default Message for Selected Employees
• Overriding the Default Message for Employees Sharing the Same Criteria
Adding the Default Message
To add a message to a paycheck/advice, do the following:
1. Click Payroll and make the following selections:
Payroll Cycle Processes ~ Scheduled Payroll (On Cycle)
Printing Paychecks and Direct Deposit Advices
Adding a Message to Display on Paychecks/Advices
Printing Paychecks
Printing Direct Deposit Advices
Chapter 9: Distributing Your PayrollPayroll Processing Guide Version 5.04.01

Printing Paychecks and Direct Deposit Advices 9-9
2. Click next to the Define Paycheck Messages task. The Add dialog box displays.
Figure 9-1. Search Dialog Box
To modify an existing paycheck message, double-click the Define Paycheck Messages
task, enter the search criteria in the Search dialog box, and click OK. To preserve history,
click (Insert Row).
3. Enter the pay run ID in the Pay Run ID field.
4. In the Off Cycle field, enter an N or Y to indicate if the payroll run is an on-cycle or off-cycle payroll and click OK. The Paycheck Messages panel displays.
Figure 9-2. Paycheck Messages Panel
5. In the Paycheck Messages area, enter the message that you want to display on the paychecks/advices for all employees included in the payroll run ID.
For a description of the fields on this panel, press F1.
Chapter 9: Distributing Your PayrollPayroll Processing Guide Version 5.04.01

9-10 Printing Paychecks and Direct Deposit Advices
The following figure shows an example of a completed panel:
Figure 9-3. Paycheck Messages Panel
6. Do one of the following:
• To override the default message for specific companies/employees, proceed to the Override Paycheck Messages panel.
• If you do not need to override this message, click (Save).
You’ve just finished setting up the default message that will display on the paychecks/advices for all employees that are a part of the payroll run. To override the default message for specified companies/employees, proceed to “Overriding the Default Message for Selected Companies” on page 9-11, “Overriding the Default Message for Selected Employees” on page 9-13, or “Overriding the Default Message for Employees Sharing the Same Criteria” on page 9-15.
For a description of the fields on this panel, press F1.
Chapter 9: Distributing Your PayrollPayroll Processing Guide Version 5.04.01

Printing Paychecks and Direct Deposit Advices 9-11
Overriding the Default Message for Selected Companies
To override the default message you entered on the Paycheck Messages panel for selected companies within the payroll run, do the following:
1. Click the Override Paycheck Messages tab. The Override Paycheck messages panel displays.
Figure 9-4. Override Paycheck Messages Panel
2. From the Target Options area, select the Selected Companies option.
When you select this option, the fields in the Companies area become active and the
default message entered on the Paycheck Messages panel displays in the Override Paycheck Messages area.
3. Select from the Company field the first company whose employees you want to receive the override message.
4. From the Pay Group field, select the pay group whose employees you want to receive the override message.
5. From the Pay End Date field, select the end date for the payroll you will be processing.
6. In the Override Paycheck Messages lines, enter the message that you want to display on the paycheck/advice.
7. To enter multiple companies, click (Insert Row) and add the next company.
For a description of the fields on this panel, press F1.
Chapter 9: Distributing Your PayrollPayroll Processing Guide Version 5.04.01

9-12 Printing Paychecks and Direct Deposit Advices
The following figure shows an example of a completed panel:
Figure 9-5. Override Paycheck Messages Panel
8. Click (Save).
You’ve just finished entering a special paycheck message for selected companies within the payroll run. Next, see “Printing Paychecks” on page 9-17 or “Printing Direct Deposit Advices” on page 9-21.
For a description of the fields on this panel, press F1.
Chapter 9: Distributing Your PayrollPayroll Processing Guide Version 5.04.01

Printing Paychecks and Direct Deposit Advices 9-13
Overriding the Default Message for Selected Employees
To override the default message you entered on the Paycheck Messages panel for selected employees, do the following:
1. Click the Override Paycheck Messages tab. The Override Paycheck Messages panel displays.
Figure 9-6. Override Paycheck Messages Panel
2. From the Target Options area, select the Selected Employees option.
When you select this option, the Employees area replaces the Companies area and the
default message entered on the Paycheck Messages panel displays in the Override Paycheck Messages area.
Figure 9-7. Override Paycheck Message Panel
For a description of the fields on this panel, press F1.
For a description of the fields on this panel, press F1.
Chapter 9: Distributing Your PayrollPayroll Processing Guide Version 5.04.01

9-14 Printing Paychecks and Direct Deposit Advices
3. From the ID field, select the employee’s ID.
To select multiple employees to receive the same override message, click (Insert
Row) and add the next employee.
4. If the employee has multiple jobs, select the appropriate record number from the Rcd# field.
5. In the Override Paycheck Messages lines, enter the override message that you want to display on the paycheck/advice.
If you want specific employees to receive individual override messages, click
(Insert Row) from the Override Paycheck Messages area. The cursor returns to the ID field so that you can select a different employee and record number and then enter a different override message.
The following figure shows an example of a completed panel:
Figure 9-8. Override Paycheck Messages Panel
6. Click (Save).
You’ve just finished entering a special paycheck message for selected employees within the payroll run. Next, see “Printing Paychecks” on page 9-17 or “Printing Direct Deposit Advices” on page 9-21.
For a description of the fields on this panel, press F1.
Chapter 9: Distributing Your PayrollPayroll Processing Guide Version 5.04.01

Printing Paychecks and Direct Deposit Advices 9-15
Overriding the Default Message for Employees Sharing the Same Criteria
To override the default message you entered on the Paycheck Messages panel for employees sharing the same criteria, do the following:
1. Click the Override Paycheck Messages tab. The Override Paycheck messages tab displays.
Figure 9-9. Override Paycheck Messages Panel
2. From the Target Options area, select the Employee Selection Criteria option.
If you select this option, the Filter area becomes active.
3. From the Filter field, select one of the following criteria options:
• Department
• Earnings Code
• Job Code
• Location
• Position Number
• Shift
For a description of the fields on this panel, press F1.
Chapter 9: Distributing Your PayrollPayroll Processing Guide Version 5.04.01

9-16 Printing Paychecks and Direct Deposit Advices
4. Press Tab to display all matches for the payroll run in the Include area, as illustrated in the following figure.
Pressing Tab also displays the default message entered on the Paycheck Messages
panel in the Override Paycheck Messages area.
Figure 9-10. Override Paycheck Message Panel
5. In the Include area, select the check box for each item that should receive the override message. All employees that match the criteria selected will receive the override message.
Click Select All to select all items at once, and click Clear All to clear all the check
boxes at once.
6. In the Override Paycheck Messages lines, enter the override message that you want to display on the paycheck/advice.
For a description of the fields on this panel, press F1.
Chapter 9: Distributing Your PayrollPayroll Processing Guide Version 5.04.01

Printing Paychecks and Direct Deposit Advices 9-17
The following figure shows an example of a completed panel:
Figure 9-11. Override Paycheck Messages Panel
7. Click (Save).
You’ve just finished entering a special paycheck message for selected employees within the payroll run. Next, see “Printing Paychecks” on page 9-17 or “Printing Direct Deposit Advices” on page 9-21.
Printing Paychecks
During the confirmation process, Enterprise Payroll sorts the employee checks according to the options you select when you set up your pay group and paycheck delivery and then assigns check numbers. The Print Paychecks process (PAY003) formats the data from the paycheck file and prints the checks in check number order, which is the order they exist in the file.
You can print paychecks on blank paper or on forms. You can modify PAY003 to reflect your company's individual style of check stock and specific formatting requirements for printed paychecks. If you have loaded signature and/or logo image files, you are prompted to select the image file you want to print on the checks.
For more information on loading image files for see Appendix B, “Implementing and Using
Signatures, Logos, and Disclaimers.”
For a description of the fields on this panel, press F1.
Printing Paychecks and Direct Deposit Advices
Adding a Message to Display on Paychecks/Advices
Printing Paychecks
Printing Direct Deposit Advices
Chapter 9: Distributing Your PayrollPayroll Processing Guide Version 5.04.01

9-18 Printing Paychecks and Direct Deposit Advices
The following items will print on the check:
• Earnings rate - Prints on the check if you select Include Rate on the Basic Data panel (Payroll ~ Company Definitions ~ Earnings ~ Earnings ~ Basic Data). For more information, see the Payroll Setup and Maintenance Guide.
• Employer benefits - Prints on the check if you have selected the Include on Pay Statement option on the Deduction Options panel (System Admin ~ Payroll Setup - Required ~ Deductions).
• Earned Income Credit (EIC).
• Garnishments - Prints garnishment line items for each garnishment ID along with each amount associated with that ID.
• Social Security Number - Prints on all paystubs and advices for all states in the format xxxx-xx-1234.
• Basic of Payment - Displays the employee type from the latest effective-dated row on the Job/Pay/Location panel. If the employee is paid with one check for two jobs, then the basis displayed is for the primary job.
The paycheck name that appears on the PAY003 file is pulled from Personal Data (People ~
Personal Information ~ Name/SSN).
The following panels contain options for sorting and sequencing your employees’ paychecks:
To print your paychecks, do the following:
1. Click Payroll and make the following selections:
Post-Payroll Cycle Process ~ Prepare Payroll Distributions
Table 9-2. Panels with Paycheck Sort and/or Sequence Options
Panel Location
Proration Rules Payroll ~ Company Definitions ~ Pay Groups and Payroll Calendars ~ Pay Groups
Paycheck Options Payroll ~ Company Definitions ~ Pay Groups and Payroll Calendars ~ Pay Groups
Paycheck Print Sequence
Payroll ~ Company Definitions ~ Pay Groups and Payroll Calendars ~ Pay Groups
Paycheck Delivery Options
Payroll ~ Employee Information ~ Change Employee Payroll Data ~ Paycheck/Time and Attendance Data
Chapter 9: Distributing Your PayrollPayroll Processing Guide Version 5.04.01

Printing Paychecks and Direct Deposit Advices 9-19
2. Click next to the Print Paychecks (PAY003) task. The Add dialog box displays.
If you do not have this task available to select, contact your System Administrator.
Figure 9-12. Add Dialog Box
To modify existing paycheck file information, double-click the Print Paychecks (PAY003)
task, enter the search criteria in the Search dialog box, and click OK. To preserve history,
click (Insert Row).
3. Enter the run control ID and click OK.
The Print Paychecks panel displays.
Figure 9-13. Print Paychecks Panel
4. Select one of the options from the Cycle Option field to indicate whether you want the report to include payroll information for an on-cycle payroll, off-cycle payroll, or both.
5. Select the payroll run ID from the Pay Run ID field.
6. In the Page # fields, enter the page number range for the paysheet information you want included in the report.
7. If the payroll run ID includes multiple pay calendar entries, then you must do the following:
a. Select the company from the Company field.
b. Select the pay group from the Pay Group field.
For a description of the fields on this panel, press F1.
Chapter 9: Distributing Your PayrollPayroll Processing Guide Version 5.04.01

9-20 Printing Paychecks and Direct Deposit Advices
c. Select the pay period end date from the Pay End Date field.
Pay end dates listed include all pay end dates available for the company selected.
8. If you want to print a range of checks for the specified pay run ID, do the following:
a. Enter a beginning check number in the Beginning Check Number field. If only one check is being reprinted, enter the number here.
b. In the Ending Check Number field, enter the last paycheck number in a range of paychecks being reprinted. If only one paycheck is being reprinted, leave this field blank.
For example, if paycheck numbers 13958 through 14067 are being reprinted, enter 13958 in the First Check # field and enter 14067 in the Last Check # field.in the Ending Check Number field.
If you want to print only one check, the beginning and ending check number should be
the same.
9. If you entered a beginning or ending check number instead of leaving the default, then you may choose to do the following:
These fields are only available If you entered a beginning or ending check number
instead of leaving the default.
a. Select the Include Reversals/Adjustments check box if you want to print a reversal and/or adjustment.
b. To override the default check date printed on the stub, enter a date in the Override Printed Check Date field.
10. If necessary, change the number of earnings to display on the employee’s paystub.
Increasing the number of earnings displayed on a pay stub may result in additional
pages being printed.
11. If necessary, change the number of deductions to display on the employee’s paystub.
Increasing the number of deductions displayed on a pay stub may result in additional
pages being printed.
12. Select the Suppress SSN check box if you do not want to print the Social Security Number on the paycheck.
13. Click Run Report. You will receive a message notifying you that your process has been
submitted. Click OK. When the process has completed, click (Report Outputs) to view the pay003.lis file.
14. If you loaded a logo image file and/or a signature file, do one or both of the following:
If you have not elected to use signatures and/or logos for your checks, the File Viewer
displays with the generated check(s). You can go ahead and print your check(s).
Chapter 9: Distributing Your PayrollPayroll Processing Guide Version 5.04.01

Printing Paychecks and Direct Deposit Advices 9-21
a. If you have loaded an logo image file, the Select Macro dialog box for Logos displays.
Figure 9-14. Select Macro Dialog Box
Select the logo you want to use and click OK.
b. If you have loaded a signature file, the Select Macro box for Signatures displays.
Figure 9-15. Select Macro Dialog Box
Select the signature you want to use and click OK. Once you have selected the signature and/or the logo image you want to use, the generated check displays in the File Viewer.
15. Click (Print).
You have just finished printing your paychecks. For detailed information on loading an image file for a disclaimer or logo file, see Appendix B, “Implementing and Using Signatures, Logos, and Disclaimers.” To print direct deposit advices, refer to “Printing Direct Deposit Advices” on page 9-21.
Printing Direct Deposit Advices
Printing direct deposit advices consists of the following:
• Generating the Direct Deposit Prenotification (DDP005)
• Creating a Domestic NACHA File
• Creating an International NACHA File
• Generating the Direct Deposit Prenote Memo (DDP006)
• Printing Your Advices
Printing Paychecks and Direct Deposit Advices
Adding a Message toDisplay on Paychecks/Advices
Printing Paychecks
Printing Direct Deposit Advices
Chapter 9: Distributing Your PayrollPayroll Processing Guide Version 5.04.01

9-22 Printing Paychecks and Direct Deposit Advices
Generating the Direct Deposit Prenotification (DDP005)
The Direct Deposit Prenotification report provides notification of the amounts slated for deposit and the associated accounts before the transactions actually take place so that your employees can verify that the information is correct and make changes if necessary.
For each company and pay period, this reports lists the employees who have been added to the direct deposit instructions since the last pay period was completed. It shows the employee ID, priority of the types of deposits, the code, such as checking or savings, for the type of account designated to receive the deposit, the bank transit number, and the checking account number.
You must run this report before creating the NACHA file to provide the necessary employee data for producing printed prenotification notices for employees who are affected.
To generate the Direct Deposit Prenotification, do the following:
1. Click Payroll and make the following selections:
Post-Payroll Cycle Process ~ Prepare Payroll Distributions
2. Double-click the Direct Deposit Prenotification (DDP005) task. The Direct Deposit Prenotification panel displays.
Figure 9-16. Direct Deposit Prenotification Panel
3. Select the payroll run ID from the Pay Run ID field.
For a description of the fields on this panel, press F1.
Chapter 9: Distributing Your PayrollPayroll Processing Guide Version 5.04.01

Printing Paychecks and Direct Deposit Advices 9-23
4. If the payroll run ID includes multiple pay calendar entries, then you must do the following:
a. Select the company from the Company field.
b. Select the pay group from the Pay Group field.
c. Select the pay period end date from the Pay End Date field.
5. From the Display Options area, do the following:
a. From the Transit Number field, select one of the following options to specify how you want transit numbers to display:
• Hide xxxxxxxxx
• Mask xxxxxx234
• Show 123456789
The options that are available for selection depend on the field display options
selected on the user’s security profile (System Admin ~ Security Administration ~ Operator ~ Profile). If the user profile is set to Hide, the option is grayed out when generating files. The process will automatically print the fields according to the user’s display setting. However, if the user is set to Show, the Display Option fields will be available and the user can choose to change the default of Hide to either Show or Mask. If the user is set to Mask, the Display Option fields will be available and the user can choose to change the default of Hide to Mask.For more information on the user Profile settings, see the Application Administrator’s Guide.
b. From the Account Number field, select one of the following options to specify how you want account numbers to display:
• Hide xxxxxxxxxxxxxxxxx
• Mask xxxxxxxxxxxxx1234
• Show 12345678901234567
The options that are available for selection depend on the field display options
selected on the user’s security profile (System Admin ~ Security Administration ~ Operator ~ Profile). If the user profile is set to Hide, the option is grayed out when generating files. The process will automatically print the fields according to the user’s display setting. However, if the user is set to Show, the Display Option fields will be available and the user can choose to change the default of Hide to either Show or Mask. If the user is set to Mask, the Display Option fields will be available and the user can choose to change the default of Hide to Mask.For more information on the user Profile settings, see the Application Administrator’s Guide.
6. To include groups using ADP Full Service Direct Deposit (FSDD) processing, select the Include deposits processed by ADP Full Service Direct Deposit (FSDD) check box.
Chapter 9: Distributing Your PayrollPayroll Processing Guide Version 5.04.01

9-24 Printing Paychecks and Direct Deposit Advices
7. Click Run Report. You will receive a message notifying you that your process has been
submitted. Click OK. When the process has completed, click (Report Outputs) to view the report.
For additional information on running, viewing, and printing reports, refer to the Using ADP Enterprise HR Guide. For details on sources, sort order, and an illustration of the report, see the Standard Reports Guide.
You have just finished generating the Direct Deposit Prenotification. Next, you can create the NACHA file.
Creating a Domestic NACHA File
You must generate the Direct Deposit Prenotification (DDP005) before creating the NACHA file to provide the necessary employee data for producing printed prenotification notices for employees who are affected. If you have set up a NACHA account override on the Account Override panel (System Admin ~ Payroll Setup (Optional) ~ NACHA Account Override), your NACHA file uses the bank transit number and account number you defined when you create the file.
The order of advices in the generated file is determined by the paycheck delivery options defined on the Paycheck Options panel (Payroll ~ Company Definitions ~ Pay Groups and Payroll Calendars ~ Pay Groups) for the pay group at the time the payroll was confirmed. For more information, see the Payroll Setup and Maintenance Guide.
To create the NACHA file, do the following:
1. Click Payroll and make the following selections:
Post-Payroll Cycle Process ~ Prepare Payroll Distributions
Chapter 9: Distributing Your PayrollPayroll Processing Guide Version 5.04.01

Printing Paychecks and Direct Deposit Advices 9-25
2. Double-click the Create NACHA File (DDP001) task. The Create NACHA File panel displays.
The Include IAT Records check box is not applicable when creating a domestic NACHA
file.
Figure 9-17. Create NACHA File Panel
3. Select the payroll run ID from the Pay Run ID field.
4. If the payroll run ID includes multiple pay calendar entries, then you must do the following:
a. Select the company from the Company field.
b. Select the pay group from the Pay Group field.
c. Select the pay period end date from the Pay End Date field.
Pay end dates listed include all pay end dates available for the company selected.
5. Enter the date of the prenotification in the Prenotification Date field.
6. Enter a description of the file in the Description field.
7. From the Company Code for File Header field, select the company code for the file header you want to use for the prenotification.
8. Click Run Report.
You will receive a message notifying you that your process has been submitted. Click
OK. To confirm successful completion, click (Process Monitor).
For additional information on the Process Monitor, refer to the Using ADP Enterprise HR Guide.
For a description of the fields on this panel, press F1.
Chapter 9: Distributing Your PayrollPayroll Processing Guide Version 5.04.01

9-26 Printing Paychecks and Direct Deposit Advices
You have just finished creating the domestic NACHA file. Next, you can create an international NACHA file.
Creating an International NACHA File
You must generate the Direct Deposit Prenotification (DDP005) before creating the international NACHA file to provide the necessary employee data for producing printed prenotification notices for employees who are affected. If you have set up a NACHA account override on the Account Override panel (System Admin ~ Payroll Setup (Optional) ~ NACHA Account Override), your NACHA file uses the bank transit number and account number you defined when you create the file.
The order of advices in the generated file is determined by the paycheck delivery options defined on the Paycheck Options panel (Payroll ~ Company Definitions ~ Pay Groups and Payroll Calendars ~ Pay Groups) for the pay group at the time the payroll was confirmed. For more information, see the Payroll Setup and Maintenance Guide.
If the company is funded overseas, the following is true:
• You must set up an account on the International Bank Table panel.
• All employees will be generated with IAT records, even if the Requires IAT record check box (employee Direct Deposit panel) is not selected and the Include IAT Records check box on the Create NACHA File panel is not selected.
If the company is not funded overseas but you have employees with domestic bank accounts tied to foreign accounts, the following is true:
• The Requires IAT record check box on the employee Direct Deposit panel must be selected.
• The Include IAT Records check box on the Create NACHA File panel must be selected.
• Only employees with the Requires IAT record check box selected on Direct Deposit panel will be generated with IAT records.
To create the international NACHA file, do the following:
1. Click Payroll and make the following selections:
Post-Payroll Cycle Process ~ Prepare Payroll Distributions
Chapter 9: Distributing Your PayrollPayroll Processing Guide Version 5.04.01

Printing Paychecks and Direct Deposit Advices 9-27
2. Double-click the Create NACHA File (DDP001) task. The Create NACHA File panel displays.
Figure 9-18. Create NACHA File Panel
3. Select the payroll run ID from the Pay Run ID field.
4. If the payroll run ID includes multiple pay calendar entries, then you must do the following:
a. Select the company from the Company field.
b. Select the pay group from the Pay Group field.
c. Select the pay period end date from the Pay End Date field.
Pay end dates listed include all pay end dates available for the company selected.
5. Enter the date of the prenotification in the Prenotification Date field.
6. If the company is not funded overseas but you have employees with domestic bank accounts tied to foreign accounts, select the Include IAT Records check box.
7. Enter a description of the file in the Description field.
8. From the Company Code for File Header field, select the company code for the file header you want to use for the prenotification.
If you do not select this check box, the employees will not have IAT records included on the file.
For a description of the fields on this panel, press F1.
Chapter 9: Distributing Your PayrollPayroll Processing Guide Version 5.04.01
9-28 Printing Paychecks and Direct Deposit Advices
9. Click Run Report.
If any of the banks have been set up on the International Bank Table panel and those
banks’ ABA numbers are associated to a pay form, then PAY007 will run instead of PAY001.
You will receive a message notifying you that your process has been submitted. Click
OK. To confirm successful completion, click (Process Monitor).
For additional information on the Process Monitor, refer to the Using ADP Enterprise HR Guide.
You have just finished creating an international NACHA file.
Next, you can generate the Direct Deposit Prenote Memo, which you can distribute to employees who are having their pay deposited directly into their checking accounts for the first time. For more information, see “Generating the Direct Deposit Prenote Memo (DDP006)” on page 9-28.
If you do not need to print the Direct Deposit Prenote Memo, you can print your advices. For more information, see “Printing Your Advices” on page 9-30.
Generating the Direct Deposit Prenote Memo (DDP006)
You can print the Direct Deposit Prenote Memo (DDP006) and distribute to employees who are having their pay deposited directly into their checking accounts for the first time. The program is set up to print the memo on your company stationery or memo forms.
The text of the memo informs the employee of the direct deposit and lists the bank transit number, account number, account type, and deposit instructions for verification, as recorded in the Direct Deposit Prenotification Report (DDP005).
To generate the Direct Deposit Prenote Memo, do the following:
1. Click Payroll and make the following selections:
Payroll Reports ~ Direct Deposits
Chapter 9: Distributing Your PayrollPayroll Processing Guide Version 5.04.01

Printing Paychecks and Direct Deposit Advices 9-29
2. Double-click the Direct Deposit Prenote Memo (DDP006) task. The Direct Deposit Prenote Memo panel displays.
Figure 9-19. Direct Deposit Prenote Memo Panel
3. Select the payroll run ID from the Pay Run ID field.
4. If the payroll run ID includes multiple pay calendar entries, then you must do the following:
a. Select the company from the Company field.
b. Select the pay group from the Pay Group field.
c. Select the pay period end date from the Pay End Date field.
5. From the Display Options area, do the following:
a. From the Transit Number field, select one of the following options to specify how you want transit numbers to display:
• Hide xxxxxxxxx
• Mask xxxxxx234
• Show 123456789
The options that are available for selection depend on the field display options
selected on the user’s security profile (System Admin ~ Security Administration ~ Operator ~ Profile). If the user profile is set to Hide, the option is grayed out when generating files. The process will automatically print the fields according to the user’s display setting. However, if the user is set to Show, the Display Option fields will be available and the user can choose to change the default of Hide to either Show or Mask. If the user is set to Mask, the Display Option fields will be available and the user can choose to change the default of Hide to Mask.For more information on the user Profile settings, see the Application Administrator’s Guide.
For a description of the fields on this panel, press F1.
Chapter 9: Distributing Your PayrollPayroll Processing Guide Version 5.04.01

9-30 Printing Paychecks and Direct Deposit Advices
b. From the Account Number field, select one of the following options to specify how you want account numbers to display:
• Hide xxxxxxxxxxxxxxxxx
• Mask xxxxxxxxxxxxx1234
• Show 12345678901234567
The options that are available for selection depend on the field display options
selected on the user’s security profile (System Admin ~ Security Administration ~ Operator ~ Profile). If the user profile is set to Hide, the option is grayed out when generating files. The process will automatically print the fields according to the user’s display setting. However, if the user is set to Show, the Display Option fields will be available and the user can choose to change the default of Hide to either Show or Mask. If the user is set to Mask, the Display Option fields will be available and the user can choose to change the default of Hide to Mask.For more information on the user Profile settings, see the Application Administrator’s Guide.
6. To include groups using ADP Full Service Direct Deposit (FSDD) processing, select the Include deposits processed by ADP Full Service Direct Deposit (FSDD) check box.
7. Click Run Report. You will receive a message notifying you that your process has been
submitted. Click OK. When the process has completed, click (Report Outputs) to view the report.
For additional information on running, viewing, and printing reports, refer to the Using ADP Enterprise HR Guide. For details on sources, sort order, and an illustration of the report, see the Standard Reports Guide.
You have just finished generating the Direct Deposit Prenote Memo, which you can distribute to employees who are having their pay deposited directly into their checking accounts for the first time. Next, you can print your direct deposit advices.
Printing Your Advices
Use the Print Direct Deposit Advices (DDP003) task to prepare the employee pay detail for formatting to the direct deposit advice. The process produces the ddp003.lis file located in the temp directory. You can use this file when printing your advices.
If you have loaded logo or disclaimer image files for use with advices, you select the logo
and/or disclaimer that you want to print on the direct deposit advices. For more information, see Appendix B, “Implementing and Using Signatures, Logos, and Disclaimers.”.
The following items will print on the advice:
• Earnings rate - Prints on the advice if you select Include Rate on the Basic Data panel (Payroll ~ Company Definitions ~ Earnings and Special Accumulators ~ Earnings ~ Basic Data). For more information, see the Payroll Setup and Maintenance Guide.
• Employer benefits - Prints on the advice if you have selected the Include on Pay Statement option on the Deduction Options panel (System Admin ~ Payroll Setup - Required ~ Deductions).
Chapter 9: Distributing Your PayrollPayroll Processing Guide Version 5.04.01

Printing Paychecks and Direct Deposit Advices 9-31
• Earned Income Credit (EIC).
• Garnishments - Prints garnishment line items for each garnishment ID along with each amount associated with that ID.
• Social Security Number - Prints on all paystubs and advices for all states in the format xxxx-xx-1234.
• Basic of Payment - Displays the employee type from the latest effective-dated row on the Job/Pay/Location panel. If the employee is paid with one check for two jobs, then the basis displayed is for the primary job.
The paycheck name that you enter on the Paycheck Options panel (Employee Information ~
Change Employee Payroll Data ~ Paycheck Options) appears in the DDP003 file when you generate your advices.
To print your direct deposit advices, do the following
1. Click Payroll and make the following selections:
Post-Payroll Cycle Process ~ Prepare Payroll Distributions
2. Click next to the Print Direct Deposit Advices (DDP003) task. The Add dialog box displays.
If you do not have this task available to select, contact your System Administrator.
Figure 9-20. Add Dialog Box
To modify existing direct deposit file information, double-click the Print Direct Deposit
Advices (DDP003) task, enter the search criteria in the Search dialog box, and click OK.
To preserve history, click (Insert Row).
Chapter 9: Distributing Your PayrollPayroll Processing Guide Version 5.04.01

9-32 Printing Paychecks and Direct Deposit Advices
3. Enter the run control ID and click OK. The Print Direct Deposit Advices panel displays.
Figure 9-21. Print Direct Deposit Advices Panel
4. Select one of the options from the Cycle Option field to indicate whether you want the report to include payroll information for an on-cycle payroll, off-cycle payroll, or both.
5. Select the payroll run ID from the Pay Run ID field.
6. In the Page # fields, enter the page number range for the paysheet information you want included in the report.
7. If the payroll run ID includes multiple pay calendar entries, then you must do the following:
a. Select the company from the Company field.
b. Select the pay group from the Pay Group field.
c. Select the pay period end date from the Pay End Date field.
Pay end dates listed include all pay end dates available for the company selected.
8. Enter the beginning advice number in the Beginning Advice Number field.
9. If necessary, change the number of earnings to display on the employee’s pay stub.
Increasing the number of earnings displayed on a pay stub may result in additional
pages being printed.
10. Enter the number of deductions to display on the employee’s pay stub.
Increasing the number of deductions displayed on a pay stub may result in additional
pages being printed.
11. Select the Suppress SSN check box if you do not want to print the Social Security Number on the paycheck.
For a description of the fields on this panel, press F1.
Chapter 9: Distributing Your PayrollPayroll Processing Guide Version 5.04.01

Printing Paychecks and Direct Deposit Advices 9-33
12. From the Transit Number field, select one of the following options to specify how you want transit numbers to display:
• Hide xxxxxxxxx
• Mask xxxxxx234
• Show 123456789
The options that are available for selection depend on the field display options
selected on the user’s security profile (System Admin ~ Security Administration ~ Operator ~ Profile). If the user profile is set to Hide, the option is grayed out when generating files. The process will automatically print the fields according to the user’s display setting. However, if the user is set to Show, the Display Option fields will be available and the user can choose to change the default of Hide to either Show or Mask. If the user is set to Mask, the Display Option fields will be available and the user can choose to change the default of Hide to Mask.For more information on the user Profile settings, see the Application Administrator’s Guide.
13. From the Account Number field, select one of the following options to specify how you want account numbers to display:
• Hide xxxxxxxxxxxxxxxxx
• Mask xxxxxxxxxxxxx1234
• Show 12345678901234567
The options that are available for selection depend on the field display options
selected on the user’s security profile (System Admin ~ Security Administration ~ Operator ~ Profile). If the user profile is set to Hide, the option is grayed out when generating files. The process will automatically print the fields according to the user’s display setting. However, if the user is set to Show, the Display Option fields will be available and the user can choose to change the default of Hide to either Show or Mask. If the user is set to Mask, the Display Option fields will be available and the user can choose to change the default of Hide to Mask.For more information on the user Profile settings, see the Application Administrator’s Guide.
14. Click Run Report. You will receive a message notifying you that your process has been
submitted. Click OK. When the process has completed, click (Report Outputs) to view the ddp003.lis file.
15. If you have elected to use disclaimers and/or logos for your advices, do one or both of the following:
If you have not elected to use disclaimers and/or logos for your advices, the File Viewer
displays with the generated advice(s). You can go ahead and print the advices.
a. If you loaded a logo image file, the Select Macro dialog box for Logos displays.
Figure 9-22. Select Macro Dialog Box
Chapter 9: Distributing Your PayrollPayroll Processing Guide Version 5.04.01

9-34 Printing Paychecks and Direct Deposit Advices
Select the logo you want to use and click OK.
b. If you have loaded a disclaimer image file, the Select Macro box for Disclaimers displays.
Figure 9-23. Select Macro Dialog Box
Select the disclaimer you want to use and click OK.
16. Once you have selected the disclaimer and/or the logo image you want to use, the
generated advice displays in the File Viewer from which you can click (Print).
You have just finished printing your direct deposit advices, which is the last step in printing paychecks and direct deposit advices. For detailed information on loading an image file for a disclaimer or logo file, see Appendix B, “Implementing and Using Signatures, Logos, and Disclaimers.”
Chapter 9: Distributing Your PayrollPayroll Processing Guide Version 5.04.01

Viewing Your Paychecks and Direct Deposit Advices 9-35
Viewing Your Paychecks and Direct Deposit Advices
You can view a list of your paychecks and direct deposits by printing out the available registers.
Enterprise Payroll provides the following registers:
• Printing the Paycheck Register (PAY004)
• Printing the Direct Deposit Register (DDP002)
• Printing the Payroll Advice Register (DDP004)
Printing the Paycheck Register (PAY004)
The Paycheck Register (PAY004) lists all checks, in check number order, written in the pay period for each company within the organization. It prints the following information about the checks: date, amount, name of payee employee, employee ID, department name and ID, location name and ID, and pay group and address option for the employee. Each company within the organization has its own register page.
The report totals the check amounts and number of checks written by company and shows a grand total for all companies included in the report.
The paycheck name that appears on the PAY004 file is pulled from Personal Data (People ~
Personal Information ~ Name/SSN).
To print the Paycheck Register, do the following:
1. Click Payroll and make the following selections:
Post-Payroll Cycle Processes ~ Prepare Payroll Distributions
Viewing Your Paychecks and Direct Deposit Advices
Printing the Paycheck Register (PAY004)
Printing the Direct Deposit Register (DDP002)
Printing the Payroll Advice Register (DDP004)
Chapter 9: Distributing Your PayrollPayroll Processing Guide Version 5.04.01

9-36 Viewing Your Paychecks and Direct Deposit Advices
2. Double-click the Paycheck Register (PAY004) task. The Paycheck Register panel displays.
Figure 9-24. Paycheck Register Panel
3. Select one of the options from the Cycle Option field to indicate whether you want the report to include payroll information for an on-cycle payroll, off-cycle payroll, or both.
4. Select the payroll run ID from the Pay Run ID field.
5. In the Page # fields, enter the page number range for the paysheet information you want included in the report.
6. If the payroll run ID includes multiple pay calendar entries, then you must select the company from the Company field, the pay group from the Pay Group field, and the pay period end date from the Pay End Date field.
7. Click Run Report. You will receive a message notifying you that your process has been
submitted. Click OK. When the process has completed, click (Report Outputs) to view the report.
For additional information on running, viewing, and printing reports, refer to the Using ADP Enterprise HR Guide. For details on sources, sort order, and an illustration of the report, see the Standard Reports Guide.
You’ve just finishing running PAY004 to generate the Paycheck Register that you can view and print.
For a description of the fields on this panel, press F1.
Chapter 9: Distributing Your PayrollPayroll Processing Guide Version 5.04.01

Viewing Your Paychecks and Direct Deposit Advices 9-37
Printing the Direct Deposit Register (DDP002)
The Direct Deposit Register (DDP002) lists all direct deposits for employees within each company in the organization. It includes employee name and ID, check date, department ID, the advice number associated with the amount, their net pay, and any check amounts deducted before deposit.
The deposit detail includes: type of account, bank transit number, employee bank account number, and total amount of the employee deposit. The report totals deposit amounts by department at the end of each department grouping. In addition, it supplies totals for pay group, pay period, company, and a grand total of all deposits.
The paycheck name that appears on the DDP002 file is pulled from Personal Data (People ~
Personal Information ~ Name/SSN).
To print the Direct Deposit Register, do the following:
1. Click Payroll and make the following selections:
Post-Payroll Cycle Processes ~ Prepare Payroll Distributions
2. Double-click the Direct Deposit Register (DDP002) task. The Direct Deposit Register panel displays.
Figure 9-25. Direct Deposit Register Panel
3. Select one of the options from the Cycle Option field to indicate whether you want the report to include payroll information for an on-cycle payroll, off-cycle payroll, or both.
4. Select the payroll run ID from the Pay Run ID field.
5. In the Page # fields, enter the page number range for the paysheet information you want included in the report.
Viewing Your Paychecks and Direct Deposit Advices
Printing the Paycheck Register (PAY004)
Printing the Direct Deposit Register (DDP002)
Printing the Payroll Advice Register (DDP004)
For a description of the fields on this panel, press F1.
Chapter 9: Distributing Your PayrollPayroll Processing Guide Version 5.04.01

9-38 Viewing Your Paychecks and Direct Deposit Advices
6. If the payroll run ID includes multiple pay calendar entries, then you must select the company from the Company field, the pay group from the Pay Group field, and the pay period end date from the Pay End Date field.
7. Click Run Report. You will receive a message notifying you that your process has been
submitted. Click OK. When the process has completed, click (Report Outputs) to view the report.
For additional information on running, viewing, and printing reports, refer to the Using ADP Enterprise HR Guide. For details on sources, sort order, and an illustration of the report, see the Standard Reports Guide.
You’ve just finishing running DDP002 to generate the Direct Deposit Register that you can view and print.
Printing the Payroll Advice Register (DDP004)
The Payroll Advice Register (DDP004) is similar to the Paycheck Register (PAY004). It reports those payroll amounts paid directly into the employee's bank account as direct deposits. It lists the direct deposit transactions by advice number.
The register shows the check date for each advice, the net amount deposited, the employee name and ID, employee department information, pay group, and the employee choice for delivery address. It totals the advice amounts at the company level and prints a grand total of all companies reported.
The paycheck name that appears on the DDP004 file is pulled from Personal Data (People ~
Personal Information ~ Name/SSN).
To print the Payroll Advice Register, do the following:
1. Click Payroll and make the following selections:
Post-Payroll Cycle Processes ~ Prepare Payroll Distributions
Viewing Your Paychecks and Direct Deposit Advices
Printing the Paycheck Register (PAY004)
Printing the Direct Deposit Register (DDP002)
Printing the Payroll Advice Register (DDP004)
Chapter 9: Distributing Your PayrollPayroll Processing Guide Version 5.04.01

Viewing Your Paychecks and Direct Deposit Advices 9-39
2. Double-click the Payroll Advice Register (DDP004) task. The Payroll Advice Register panel displays.
Figure 9-26. Payroll Advice Register Panel
3. Select one of the options from the Cycle Option field to indicate whether you want the report to include payroll information for an on-cycle payroll, off-cycle payroll, or both.
4. Select the payroll run ID from the Pay Run ID field.
5. In the Page # fields, enter the page number range for the paysheet information you want included in the report.
6. If the payroll run ID includes multiple pay calendar entries, then you must select the company from the Company field, the pay group from the Pay Group field, and the pay period end date from the Pay End Date field.
7. Click Run Report. You will receive a message notifying you that your process has been
submitted. Click OK. When the process has completed, click (Report Outputs) to view the report.
For additional information on running, viewing, and printing reports, refer to the Using ADP Enterprise HR Guide. For details on sources, sort order, and an illustration of the report, see the Standard Reports Guide.
You’ve just finishing running DDP004 to generate the Payroll Advice Register that you can view and print.
For a description of the fields on this panel, press F1.
Chapter 9: Distributing Your PayrollPayroll Processing Guide Version 5.04.01

9-40 Reprinting Checks
Reprinting Checks
If you printed onto pre-numbered check stock but during the print process some checks were damaged, you can reassign check numbers to the damaged and subsequent checks.
For example, the results of an initial print run (as shown in Table 9-3) indicates that you need to reprint checks 100085–100089, as well as print the remainder of the run (10090–10106).
Table 9-3. Results of Initial Print Run
Check No. Results
100082 Printed OK
100083 Printed OK
100084 Printed OK
100085 Destroyed
100086 Destroyed
100087 Destroyed
100088 Destroyed
100089 Destroyed
100090 Not yet printed
100091 Not yet printed
100092 Not yet printed
100090 Not yet printed
100093 Not yet printed
100094 Not yet printed
100095 Not yet printed
100096 Not yet printed
100097 Not yet printed
100098 Not yet printed
100099 Not yet printed
100100 Not yet printed
100101 Not yet printed
100102 Not yet printed
100103 Not yet printed
Chapter 9: Distributing Your PayrollPayroll Processing Guide Version 5.04.01

Reprinting Checks 9-41
Reprinting checks consists of the following:
• Preparing to Reprint
• Reviewing the Results
• Printing the Checks
• Viewing Reprinted Checks
Preparing to Reprint
Before you can reprint your checks, you must first set up a reprint run control and run the Prepare to Reprint process. The Prepare to Reprint process reassigns check numbers, re-doing the process of assigning check numbers that ordinarily takes place when you confirm your payroll.
To prepare to reprint your checks, do the following:
1. Click Payroll and make the following selections:
Post-Payroll Cycle Processes ~ Prepare Payroll Distributions
100104 Not yet printed
100105 Not yet printed
100106 Not yet printed
Table 9-3. Results of Initial Print Run
Check No. Results
Reprinting Checks
Preparing to Reprint
Reviewing the Results
Printing the Checks
Viewing Reprinted Checks
Chapter 9: Distributing Your PayrollPayroll Processing Guide Version 5.04.01

9-42 Reprinting Checks
2. Double-click the Prepare to Reprint Paychecks task. The Prepare to Reprint Paychecks panel displays.
Figure 9-27. Prepare to Reprint Paychecks Panel
3. Enter the batch run ID in the Batch Run ID field. When the Prepare to Reprint process is run, Enterprise Payroll prompts you for this ID.
4. Select from the Form ID field the type of form you want to reprint.
5. Enter in the Form Alignment Count field the number of checks you need for manually aligning the check forms in your printer. Enterprise Payroll inserts the check numbers into the dead paychecks file.
6. In the Paycheck Reprint Range area, do the following:
• In the First Check # field, enter the first check number in a range of checks being reprinted. If only one check is being reprinted, enter the number here.
• In the Last Check # field, Enter the last paycheck number in a range of paychecks being reprinted. If only one paycheck is being reprinted, leave this field blank.
For example, if paycheck numbers 13958 through 14067 are being reprinted, enter 13958 in the First Check # field and enter 14067 in the Last Check # field.
7. Select from the Paycheck(s) Issue Date field the original issue date of the checks to be reprinted.
If you need to reprint checks with different issue dates, you must run the check reprint
process separately for each issue date.
8. Click (Save).
For a description of the fields on this panel, press F1.
Chapter 9: Distributing Your PayrollPayroll Processing Guide Version 5.04.01

Reprinting Checks 9-43
9. Click Prepare to Reprint Checks.
You will receive a message notifying you that your process has been submitted. Enterprise Payroll copies the paycheck record and reverses the signs (plus/minus) in the amount fields. The original paycheck record is not deleted. Click OK.
10. To confirm successful completion, click (Process Monitor).
Enterprise Payroll displays the number of employees processed and generates replacement checks.
For specific instructions on confirming your process, viewing the file, and printing results, refer to the Using ADP Enterprise HR Guide.
You have just finished preparing to reprint your checks. Next, you can review the results.
Reviewing the Results
Enterprise Payroll moves ruined checks to the Dead Paycheck file. It also produces another type of dead paychecks: check number skipped. For each check number in the Paycheck Reprint Range field on the Prepare to Reprint Checks panel (Payroll ~ Post-Payroll Cycle Processes ~ Prepare Payroll Distributions ~ Prepare to Reprint Checks), Enterprise Payroll places the same number of additional checks in the dead paycheck file. These are the check numbers used in setting up the run control. You can view the original check numbers and their replacement check numbers in the dead paychecks file.
To review the dead paychecks file, do the following:
1. Click Payroll and make the following selections:
Periodic Payroll Processes ~ Monthly Processes
2. Double-click the Update Dead Paychecks task. The Search dialog box displays.
Figure 9-28. Search Dialog Box
3. Enter the form ID in the Form Identification field.
4. Enter the paycheck number of the damaged check in the Paycheck Number field.
Reprinting Checks
Preparing to Reprint
Reviewing the Results
Printing the Checks
Viewing Reprinted Checks
Chapter 9: Distributing Your PayrollPayroll Processing Guide Version 5.04.01

9-44 Reprinting Checks
5. Enter the paycheck number of the replacement check in the Check # Replacing Dead Check field and click OK. The Dead Paychecks panel displays.
Figure 9-29. Dead Paychecks Panel
6. View the original check numbers and their replacement check numbers.
7. When you are finished, click (Close).
You have just finished reviewing the results of your reprint. Next, you can run the Print Paychecks process.
Printing the Checks
After running the Prepare to Reprint Checks process, you can reprint your checks as you normally print checks—by running completing the Print Paychecks (PAY003) task. For detailed instructions, see “Printing Paychecks” on page 9-17.
As an example, Table 9-3, “Results of Initial Print Run” illustrates that the initial print run left checks 100082–100084 printed, checks 100085–100089 destroyed, and checks 100090–100106 unprinted. You can set up a check reprint run control, run the Prepare to Reprint Checks process, print out replacements (for the destroyed checks), and print the checks that were not previously printed (check numbers 100090–100106).
When you run the Prepare to Reprint Checks process, Enterprise Payroll places the destroyed checks into the dead paycheck file. Enterprise Payroll continues with the next number, 100090, and assigns numbers up to 100106.
You can compare your original and after-reprint the Paycheck Register (PAY004) to extract this same information. For detailed instructions on running this report, see “Printing the Paycheck Register (PAY004)” on page 9-35.
For a description of the fields on this panel, press F1.
Reprinting Checks
Preparing to Reprint
Reviewing the Results
Printing the Checks
Viewing Reprinted Checks
Chapter 9: Distributing Your PayrollPayroll Processing Guide Version 5.04.01

Reprinting Checks 9-45
At this point, Enterprise Payroll takes the next available numbers, 100107–100109, and uses them for the three form alignment checks. Enterprise Payroll pronounces these checks dead and places them in the dead paycheck file. Enterprise Payroll starts with the next available number, 100110, and assigns replacement numbers for the five checks that were destroyed in the initial print run.
Table 9-4. Results of Print Run
Check No. After Confirmation Check No. After Running
100082 Printed OK 10082 Already printed
100083 Printed OK 100083 Already printed
100084 Printed OK 100084 Already printed
100085 Destroyed 100085 Dead
100086 Destroyed 100086 Dead
100087 Destroyed 100087 Dead
100088 Destroyed 100088 Dead
100089 Destroyed 100089 Dead
100090 Not yet printed 100090 Printed OK (Restart)
100091 Not yet printed 100091 Printed OK
100092 Not yet printed 100092 Printed OK
100093 Not yet printed 100093 Printed OK
100094 Not yet printed 100094 Printed OK
100095 Not yet printed 100095 Printed OK
100096 Not yet printed 100096 Printed OK
100097 Not yet printed 100097 Printed OK
100098 Not yet printed 100098 Printed OK
100099 Not yet printed 100099 Printed OK
100100 Not yet printed 100100 Printed OK
100101 Not yet printed 100101 Printed OK
100102 Not yet printed 100102 Printed OK
100103 Not yet printed 100103 Printed OK
100104 Not yet printed 100104 Printed OK
100105 Not yet printed 100105 Printed OK
100106 Not yet printed 100106 Printed OK
100107 Dead—Used for
100108 Dead—Used for
Chapter 9: Distributing Your PayrollPayroll Processing Guide Version 5.04.01

9-46 Reprinting Checks
You have just finished printing your checks. Next, you can view the reprinted checks in a report or online.
Viewing Reprinted Checks
You can view the reprinted checks by printing the Paycheck Register. For instructions on printing this register, see “Printing the Paycheck Register (PAY004)” on page 9-35.
You can also view the reprinted checks online in the Earnings panel. For instructions on viewing online, see “Viewing Paycheck Earnings Information” on page 6-17.
You’ve just finished viewing your reprinted checks, which is the last step in reprinting your checks.
100109 Dead—Used for
100110 Printed OK
100111 Printed OK
100112 Printed OK
100113 Printed OK
100114 Printed OK
Table 9-4. Results of Print Run (cont.)
Check No. After Confirmation Check No. After Running
Reprinting Checks
Preparing to Reprint
Reviewing the Results
Printing the Checks
Viewing Reprinted Checks
Chapter 9: Distributing Your PayrollPayroll Processing Guide Version 5.04.01

Chapter 10
Researching and Correcting EmployeePayroll Data
PAGE TOPIC
10-2 Introduction
10-3 Using the Checks by Range Task to Research Payroll Data
10-12 Reviewing Employee Distribution Information
10-17 Researching and Correcting Employee Earnings
10-41 Researching and Correcting Employee Deductions
10-52 Researching and Correcting Employee Garnishments
10-58 Researching and Correcting Employee Taxes
Chapter 10: Researching and Correcting Employee Payroll DataPayroll Processing Guide Version 5.04.01

10-2 Introduction
Introduction
If, after confirming your payroll, you must research a possible employee payroll error, Enterprise Payroll provides several solutions. You can access panels that contain earnings, deduction, tax, and garnishment information for a specific employee. This chapter provides step-by-step instructions for researching an employee payroll error and then correcting this error.
You can often complete a task in the product in multiple ways. For information on interface
shortcuts and tips, refer to the Using ADP Enterprise HR Guide.
As you work through the tasks in this chapter, you may have questions about fields and options on the panels. To display a description of the fields and options, press F1 (Help) from the panel.
Chapter 10: Researching and Correcting Employee Payroll DataPayroll Processing Guide Version 5.04.01

Using the Checks by Range Task to Research Payroll Data 10-3
Using the Checks by Range Task to Research Payroll Data
With the Checks by Range task, you can select check criteria for a specific employee and then view summary information for all of the employee’s checks that meet that criteria. In addition, you can view check details (such as taxes, deductions, and earnings) for a specific check as well as a group of checks.
Using the Checks by Range task consists of the following:
• Selecting the Check Criteria
• Viewing Check Information
Selecting the Check Criteria
Once you access the Select Checks panel, you can use the items in the Selection Criteria area to filter the type of checks you’d like to review. To select your criteria, do the following:
1. Click Payroll and make the following selections:
Employee Information ~ View Paycheck Detail
2. Double-click the Checks by Range task. The Search dialog box displays.
Figure 10-1. Search Dialog Box
Using the Checks by Range Task to Research Payroll Data
Selecting the Check Criteria
Viewing Check Information
Chapter 10: Researching and Correcting Employee Payroll DataPayroll Processing Guide Version 5.04.01

10-4 Using the Checks by Range Task to Research Payroll Data
3. Enter the employee’s name or employee ID and then click OK. The Select Checks panel displays.
If the employee has checks for the current year, all checks will automatically display in
the check list area.
Figure 10-2. Select Checks Panel
4. From the Range field, select the type of check range you want to review.
5. Enter a range in the From and To fields.
If you selected the All Checks option, these fields are greyed and unavailable.
6. If you selected the All Checks or Check Number option from the Range field, then you may enter the year in the Year field.
7. If you want the check list area to only display checks with a specific earnings type, do the following:
a. Select the Include only checks with Earning check box.
b. Select the earnings code.
8. If you want the summary view to only display checks with a specific deduction, do the following:
a. Select the Include only checks with Deduction check box.
b. Select the plan type.
c. Select the deduction code.
9. From the Include field, select whether you want to review on-cycle, off-cycle, or both.
10. Click Search to display the check list area. This area displays all of the employee’s checks that meet the selection criteria.
For a description of the fields on this panel, press F1.
Chapter 10: Researching and Correcting Employee Payroll DataPayroll Processing Guide Version 5.04.01

Using the Checks by Range Task to Research Payroll Data 10-5
You’ve just finished selecting the check criteria for a specific employee. Next, view check information.
Viewing Check Information
After clicking Search on the Select Checks panel, the check list area displays, as shown in Figure 10-3. This area displays all checks for the employee that meet the criteria specified in the Selection Criteria area and provides the following details for each check:
• Check date
• Pay period end date
• Check number
• Check status
– * = Off-Cycle
– A = Adjusted
– F = Confirmed
– R = Reversed
• Gross pay
• Taxes
• Deductions
• Net pay
Figure 10-3. Select Checks - Check List Area Displayed
Using the Checks by Range Task to Research Payroll Data
Selecting the Check Criteria
Viewing Check Information
For a description of the fields on this panel, press F1.
Chapter 10: Researching and Correcting Employee Payroll DataPayroll Processing Guide Version 5.04.01

10-6 Using the Checks by Range Task to Research Payroll Data
For additional check detail, see the following sections:
• Totaling Selected Checks
• Viewing Check Detail for a Specific Check
• Viewing Summary Information for a Group of Checks
You’ve just finished reviewing the information in the check list area. Next, you can select specific checks in the check list area and then view the group totals.
Totaling Selected Checks
You can select specific checks in the check list area and then view the group totals for the following:
• Gross pay
• Taxes
• Deductions
• Net pay
To total selected checks, do the following:
1. In the check list area, check the box for each check you want included in the totals.
2. Look at the totals displayed in the Totals area.
Figure 10-4. Totals Area
The group totals are automatically updated and the number of checks included in the totals is indicated.
You’ve just finished viewing group totals for gross pay, taxes, deductions, and net pay. Next, view check detail for a specific check.
You can use the Select All and Clear All buttons to quickly select or clear all the check boxes in the check list area.
Chapter 10: Researching and Correcting Employee Payroll DataPayroll Processing Guide Version 5.04.01

Using the Checks by Range Task to Research Payroll Data 10-7
Viewing Check Detail for a Specific Check
To view detailed information on earnings, taxes, deductions, garnishments, special accumulators, and distributions, click the specific check number in the Number column to go directly to the Paycheck Detail panels. Click Return from the Paycheck Detail panels to return to the Select Checks panel.
For explanations of these panels, press F1 from the panels or refer to one of the following sections in this chapter:
• Viewing the Paycheck Distribution Summary
• Viewing Earnings for a Specific Check
• Viewing Special Accumulators for a Specific Check
• Viewing Deductions for a Specific Check
• Viewing Garnishments for a Specific Check
• Viewing Taxes for a Specific Check
You’ve just finished viewing check detail for a specific check. Next, view summary information for a group of checks.
Viewing Summary Information for a Group of Checks
To view summary information for a group of checks, do the following:
1. In the check list area, check the box for each check you want included in the summary.
2. Click Summary. The three summary panels display.
3. Click the tabs to view each panel.
4. Click Return from any panel to return to the Select Checks panel.
For specific information on these panels, see:
• Viewing Hours and Earnings
• Viewing Deductions
• Viewing Taxes
You’ve just learned how to access the summary tabs. Next, view the check information displayed on the Hours and Earnings Summary panel.
Chapter 10: Researching and Correcting Employee Payroll DataPayroll Processing Guide Version 5.04.01

10-8 Using the Checks by Range Task to Research Payroll Data
Viewing Hours and Earnings
The Hours and Earnings panel (Figure 10-5) provides the following summary information for all checks selected in the check list area on the Select Checks panel:
• Regular hours and earnings totals for an hourly and/or salaried employee
• Overtime hours and earnings totals for an hourly employee
• List of earnings codes, including the description, hours, and amount for each.
To view hours and earnings, do the following:
1. From the Select Checks panel, click Summary. The Hours and Earnings panel displays.
Figure 10-5. Hours and Earnings Panel
2. Review the following hours and earnings information:
• Regular Earnings - Displays regular earnings totals for an hourly employee.
• Overtime Hours - Displays overtime hours totals for an hourly employee.
• Overtime Earnings - Displays overtime earnings totals for an hourly employee.
• Salaried - Displays regular hours and earnings totals for a salaried employee.
• Regular Hours - Displays regular hours totals for a salaried employee.
• Regular Earnings - Displays regular earnings totals for a salaried employee.
• Code - This column displays all earnings types from the checks selected on the Select Checks panel.
• Description - This column displays a description of each earnings type.
For a description of the fields on this panel, press F1.
Chapter 10: Researching and Correcting Employee Payroll DataPayroll Processing Guide Version 5.04.01

Using the Checks by Range Task to Research Payroll Data 10-9
• Hours - This column displays the number of hours associated with each of the employee's earnings types.
• Amount - This column displays the amount associated with each of the employee's earnings types.
You’ve just finished viewing hours and earnings. Next, view the check information on the Deductions Summary panel.
Viewing Deductions
The Deductions panel (Figure 10-5) lists all deductions for the checks selected in the check list area on the Select Checks panel. The deduction information displayed includes:
• Plan type code and description
• Deduction code and description
• Deduction class and description
• Deduction amount
To review deduction information, do the following:
1. Click the Deductions tab. The Deductions panel displays.
Figure 10-6. Deductions Panel
2. Review the following deduction information:
• Plan Type - This column displays the plan type associated with each of the employee's deductions.
• Plan Type Description - This column displays a description of each plan type.
For a description of the fields on this panel, press F1.
Chapter 10: Researching and Correcting Employee Payroll DataPayroll Processing Guide Version 5.04.01

10-10 Using the Checks by Range Task to Research Payroll Data
• Deduction - This column displays all deductions from the checks selected on the Select Checks panel.
• Deduction Description - This column displays a description of each deduction.
• Class - This column displays the class for each deduction.
• Class Description - This column displays a description of each deduction class.
• Amount - This column displays the amount associated with each of the employee's deductions.
You’ve just finished viewing the Deductions summary panel. Next, view the check information on the Taxes Summary panel.
Viewing Taxes
The Taxes panel (Figure 10-5) lists all federal, state, and local taxes for the checks selected in the check list area on the Select Checks panel.
The following tax information displays:
• Federal taxes
– Lists “Federal” in State Name column
– Tax class code and description
– Tax amount
• State taxes
– State abbreviation and full name
– Tax class code and description
– Tax amount
• Local taxes
– Locality abbreviation and full name
– Tax class code and description
– Tax amount
Chapter 10: Researching and Correcting Employee Payroll DataPayroll Processing Guide Version 5.04.01

Using the Checks by Range Task to Research Payroll Data 10-11
To view taxes, do the following:
1. Click the Taxes tab. The Taxes panel displays.
Figure 10-7. Taxes Panel
2. Review the following tax information:
• State - This column displays all states with tax withholding from the checks selected on the Select Checks panel.
• State Name - This column displays the name for each state or lists “Federal” in this column to indicate that it is a federal tax.
• Locality - This column displays all localities with tax withholding from the checks selected on the Select Checks panel.
• Locality Name - This column displays the name for each locality.
• Class - This column displays the tax class for each state, federal, and local withholding from the checks selected on the Select Checks panel.
• Tax Class Description - This column displays a description of each tax class.
• Amount - This column displays the tax amount withheld for each state, federal, and local withholding from the checks selected on the Select Checks panel.
You’ve just finished viewing the Taxes summary panel, which is the last step in using the Checks by Range task.
For a description of the fields on this panel, press F1.
Chapter 10: Researching and Correcting Employee Payroll DataPayroll Processing Guide Version 5.04.01

10-12 Reviewing Employee Distribution Information
Reviewing Employee Distribution Information
You can review employee distribution information for a particular payroll cycle, in the following ways:
• Viewing the Paycheck Distribution Summary
• Viewing Direct Deposit Advice Summary Information
• Viewing MTD, QTD, and YTD Paycheck Totals
Viewing the Paycheck Distribution Summary
The Paycheck View panel displays a summary of earnings, taxes, deductions, and net pay all on one panel.
To view paycheck summary information, do the following:
1. Click Payroll and make the following selections:
Employee Information ~ View Paycheck Detail
2. Double-click the Paycheck Detail task. The Search dialog box displays.
Figure 10-8. Search Dialog Box
3. Enter the employee’s name in the Name field and then click OK.
Reviewing Employee Distribution Information
Viewing the Paycheck Distribution Summary
Viewing Direct Deposit Advice Summary Information
Viewing MTD, QTD, and YTD Paycheck Totals
Chapter 10: Researching and Correcting Employee Payroll DataPayroll Processing Guide Version 5.04.01

Reviewing Employee Distribution Information 10-13
4. From the Search Results area, double-click the line that contains the payroll cycle information you want to view. The Paycheck View panel displays.
Figure 10-9. Paycheck View Panel
5. Review the check summary information. For details on this panel, press F1 or see page 6-16.
6. Click (Close).
You’ve just finished viewing the results of pay calculation on earnings, taxes, deductions, and net pay.
Viewing Direct Deposit Advice Summary Information
The Distributions panel displays the details of an employee’s direct deposit advices. These details include bank account information and totals for calculated earnings, taxes, deductions, and net pay.
To view direct deposit advice information, do the following:
1. Click Payroll and make the following selections:
Employee Information ~ View Paycheck Detail
For a description of the fields on this panel, press F1.
Reviewing Employee Distribution Information
Viewing the Paycheck Distribution Summary
Viewing Direct Deposit Advice Summary Information
Viewing MTD, QTD, and YTD Paycheck Totals
Chapter 10: Researching and Correcting Employee Payroll DataPayroll Processing Guide Version 5.04.01

10-14 Reviewing Employee Distribution Information
2. Double-click the Paycheck Detail task. The Search dialog box displays.
Figure 10-10. Search Dialog Box
3. Enter the employee’s name in the Name field and then click OK.
4. From the Search Results area, double-click the line that contains the payroll cycle information you want to view. The Paycheck View panel displays.
5. Click the Distributions tab.
Figure 10-11. Distributions Panel
6. Review the distributions information. For details on this panel, press F1 or see page 6-26.
7. Click (Close).
You’ve just finished viewing the details of an employee’s direct deposit advices.
For a description of the fields on this panel, press F1.
Chapter 10: Researching and Correcting Employee Payroll DataPayroll Processing Guide Version 5.04.01

Reviewing Employee Distribution Information 10-15
Viewing MTD, QTD, and YTD Paycheck Totals
The Paycheck Totals YTD panel displays paycheck totals by month, quarter, and year.
To view paycheck totals, do the following:
1. Click Payroll and make the following selections:
Employee Information ~ View Balances (MTD, QTD, YTD)
2. Double-click the Paycheck Totals YTD task. The Search dialog box displays.
Figure 10-12. Search Dialog Box
3. Enter the employee’s name in the Name field and then click OK.
4. From the Search Results area, double-click the line that contains the payroll cycle information you want to view. The Paycheck Totals YTD panel displays.
Figure 10-13. Paycheck Totals YTD Panel
5. Review the paycheck totals area:
• Company - Displays the code that identifies the company.
• Calendar Year - Displays the calendar year to which these balances apply.
Reviewing Employee Distribution Information
Viewing the Paycheck Distribution Summary
Viewing Direct Deposit Advice Summary Information
Viewing MTD, QTD, and YTD Paycheck Totals
For a description of the fields on this panel, press F1.
Chapter 10: Researching and Correcting Employee Payroll DataPayroll Processing Guide Version 5.04.01

10-16 Reviewing Employee Distribution Information
• Quarter - Displays the quarter for which these balances apply.
• Month - Displays the month for which these balances apply.
• Check Balances - Displays the employees’ total gross, taxes, deductions, and net pay year-to-date.
• Total Gross YTD - Displays the employee's total pay year-to-date.
• Total Taxes YTD - Displays the employee's total taxes year-to-date.
• Total Deductions YTD - Displays the employee's total deductions year-to-date.
• Net Pay YTD - Displays the employee's net pay year-to-date.
6. Click (Close).
You’ve just finished viewing paycheck totals by month, quarter, and year.
Chapter 10: Researching and Correcting Employee Payroll DataPayroll Processing Guide Version 5.04.01

Researching and Correcting Employee Earnings 10-17
Researching and Correcting Employee Earnings
If, after confirming your payroll, you must research a possible employee payroll error, Enterprise Payroll provides several solutions. You can access panels that contain earnings, special accumulators, additional pay, and FLSA averaging information for a specific employee.
This section covers the following:
• Researching Earnings
• Correcting Earnings
Researching Earnings
You can research an employee’s earnings as follows:
• Viewing Earnings for a Specific Check
• Viewing Special Accumulators for a Specific Check
• Viewing MTD, QTD, and YTD Data for an Earnings Type
• Viewing MTD, QTD, and YTD Data for a Special Accumulator
• Viewing All Earnings by Month
• Viewing All Special Accumulators by Month
• Viewing Employee Job Information
• Viewing FLSA Averaging Information by Pay Run
• Viewing FLSA Averaging Information by Work Period
• Adjusting Leave Balances
• Viewing Leave Balances by Accrual Date
• Viewing a Summary of All Leave Balances
Viewing Earnings for a Specific Check
The Earnings panel displays an employee’s earnings for a specific check.
To view earnings for a specific check, do the following:
1. Click Payroll and make the following selections:
Post-Payroll Cycle Processes ~ Research and Correct Employee Earnings
Researching and Correcting Employee Earnings
Researching Earnings
Correcting Earnings
Chapter 10: Researching and Correcting Employee Payroll DataPayroll Processing Guide Version 5.04.01

10-18 Researching and Correcting Employee Earnings
2. Double-click the Employee Earnings task. The Search dialog box displays.
Figure 10-14. Search Dialog Box
3. Enter the employee’s name in the Name field and then click OK.
4. From the Search Results area, double-click the line that contains the payroll cycle information you want to view. The Paycheck View panel displays.
5. Click the Earnings tab.
Figure 10-15. Earnings Panel
6. Review the earnings information. For details on this panel, press F1 or see page 6-17.
7. Click (Close).
You’ve just finished viewing the details of an employee’s earnings for a specific check.
For a description of the fields on this panel, press F1.
Chapter 10: Researching and Correcting Employee Payroll DataPayroll Processing Guide Version 5.04.01

Researching and Correcting Employee Earnings 10-19
Viewing Special Accumulators for a Specific Check
The Special Accumulators panel displays an employee’s special accumulators for a specific check.
To view special accumulators for a specific check, do the following:
1. Click Payroll and make the following selections:
Post-Payroll Cycle Processes ~ Research and Correct Employee Earnings
2. Double-click the Employee Earnings task. The Search dialog box displays.
Figure 10-16. Search Dialog Box
3. Enter the employee’s name in the Name field and then click OK.
4. From the Search Results area, double-click the line that contains the payroll cycle information you want to view. The Paycheck View panel displays.
Chapter 10: Researching and Correcting Employee Payroll DataPayroll Processing Guide Version 5.04.01

10-20 Researching and Correcting Employee Earnings
5. Click the Special Accumulators tab.
Figure 10-17. Special Accumulators Panel
6. View the special accumulators information. For details on this panel, press F1 or see page 6-25.
7. Click (Close).
You’ve just finished viewing the details of an employee’s special accumulators for a specific check.
Viewing MTD, QTD, and YTD Data for an Earnings Type
You can view all earnings that an employee received in a specific month in the Earnings by Month panel.
To view MTD, QTD, and YTD data for a specific earnings, do the following:
1. Click Payroll and make the following selections:
Employee Information ~ View Balances (MTD, QTD, YTD)
For a description of the fields on this panel, press F1.
Chapter 10: Researching and Correcting Employee Payroll DataPayroll Processing Guide Version 5.04.01

Researching and Correcting Employee Earnings 10-21
2. Double-click the Earnings task. The Search dialog box displays.
Figure 10-18. Search Dialog Box
3. Select the employee ID from the Empl ID field.
4. Select the company from the Company field.
5. Enter the calendar year in the Calendar Year field.
6. Select an earnings type (if you want to search for a specific type) from the Earnings Type field and click OK. The Earnings panel displays.
Figure 10-19. Earnings Panel
7. Review the following earnings information:
• Company - Displays the code that identifies the company.
• Calendar Year - Displays the calendar year to which these balances apply.
• Earnings Type - Displays the earnings type for the pay. Enterprise Payroll validates the earnings type against the earnings established using the Earnings task (Payroll ~ Company Definitions ~ Earnings and Special Accumulators).
For a description of the fields on this panel, press F1.
Chapter 10: Researching and Correcting Employee Payroll DataPayroll Processing Guide Version 5.04.01

10-22 Researching and Correcting Employee Earnings
• Balances - Displays the earnings amounts and hours of the employee for each month. Hours and earnings balances for employees are updated each time payroll is processed if the Maintain Balances option is turned on for this earnings type using the Earnings task (Payroll ~ Company Definitions ~ Earnings and Special Accumulators).
• Month - Indicates the month to which these balances apply.
• Earnings Amounts - Displays the earnings by month-to-date, quarter-to-date, and year-to-date.
• Hours - Displays the hours by month-to-date, quarter-to-date, and year-to-date.
8. Click (Close).
You’ve just finished viewing an employee’s hours and gross earnings for a specific earnings type across multiple months within the selected year.
Viewing MTD, QTD, and YTD Data for a Special Accumulator
You can view an employee’s year-, quarter-, month-, prior quarter-, and prior month-to-date gross earnings and hours for a specific special accumulator in the Special Accumulators panel.
To view MTD, QTD, and YTD data for a special accumulator, do the following:
1. Click Payroll and make the following selections:
Employee Information ~ View Balances (MTD, QTD, YTD)
2. Double-click the Special Accumulators task. The Search dialog box displays.
Figure 10-20. Search Dialog Box
3. Select the employee ID from the Empl ID field.
4. Select the company in the Company field.
5. Enter the calendar year in the Calendar Year field.
Chapter 10: Researching and Correcting Employee Payroll DataPayroll Processing Guide Version 5.04.01

Researching and Correcting Employee Earnings 10-23
6. Select a special accumulator code from the Special Accumulator Code field and click OK. The Special Accumulators panel displays.
Figure 10-21. Special Accumulators Panel
7. Review the following special accumulators information:
• Company - Displays the code that identifies the company.
• Calendar Year - Displays the calendar year to which these balances apply.
• Spcl Accum Cd - Displays the special earnings type to which these balances apply.
• Balances - Displays the special accumulators earnings amounts and hours by month.The hours and earnings balances for employees are updated each time payroll is processed if the Maintain Balances option is turned on for this earnings type using the Earnings task (Payroll ~ Company Definitions ~ Earnings and Special Accumulators).
• Month - Displays the month to which these balances apply.
• Accumulator Amounts - Displays the year-, quarter-, and month-to-date gross earnings balance for the special accumulator.
• Hours - Displays the year-, quarter-, and month-to-date hours balance for the special accumulator.
8. Click (Close).
You’ve just finished viewing an employee’s year-, quarter-, month-, prior quarter-, and prior month-to-date gross earnings and hours for a specific special accumulator.
For a description of the fields on this panel, press F1.
Chapter 10: Researching and Correcting Employee Payroll DataPayroll Processing Guide Version 5.04.01

10-24 Researching and Correcting Employee Earnings
Viewing All Earnings by Month
You can view all earnings that an employee received in a specific month in the Earnings by Month panel.
To view all earnings by month, do the following:
1. Click Payroll and make the following selections:
Employee Information ~ View Monthly Balances
2. Double-click the Earnings task. The Search dialog box displays.
Figure 10-22. Search Dialog Box
3. Select the employee ID in the Empl ID field.
4. Select the company in the Company field.
5. Enter the calendar year in the Calendar Year field.
6. Select the month from the Month field and click OK. The Earnings by Month panel displays.
Figure 10-23. Earnings by Month Panel
For a description of the fields on this panel, press F1.
Chapter 10: Researching and Correcting Employee Payroll DataPayroll Processing Guide Version 5.04.01

Researching and Correcting Employee Earnings 10-25
7. Review the following earnings information:
• Company - Displays the code that identifies the company.
• Calendar Year - Displays the calendar year to which these balances apply.
• Month - Displays the month to which these balances apply.
• Balances - Displays the month-, quarter-, and year-to-date earnings amounts and hours of the employee for each month.
• Earnings - Displays the earnings codes that apply for the employee.
• Earnings Amounts - Displays the month-, quarter-, and year-to-date totals for each earning.
• Hours - Displays the month-, quarter-, and year-to-date hours for each earning.
8. Click (Close).
You’ve just finished viewing all earnings that an employee received in a specific month.
Viewing All Special Accumulators by Month
You can view all special accumulators (for both earnings and deductions) for a specific employee by a specific month.
To view all special accumulators by month, do the following:
1. Click Payroll and make the following selections:
Employee Information ~ View Monthly Balances
2. Double-click the Special Accumulators task. The Search dialog box displays.
Figure 10-24. Search Dialog Box
3. Select the employee ID in the Empl ID field.
4. Select the company in the Company field.
Chapter 10: Researching and Correcting Employee Payroll DataPayroll Processing Guide Version 5.04.01

10-26 Researching and Correcting Employee Earnings
5. Enter the calendar year in the Calendar Year field.
6. Select the month from the Month field and click OK. The Special Accumulators by Month panel displays.
Figure 10-25. Special Accumulators by Month Panel
7. Review the following special accumulators information:
• Company - Displays the code that identifies the company.
• Calendar Year - Displays the calendar year to which these balances apply.
• Month - Displays the month to which these balances apply.
• Balances - Displays the special accumulator codes that apply to the employee and the month-, quarter-, and year-to-date earnings amount and hours for each code.
• Accum Cd - Displays the special accumulator code to which these balances apply.
• Accumulator Amounts - Displays the year-, quarter-, and month-to-date gross earnings balance for each special accumulator code.
• Hours - Displays the year-, quarter-, and month-to-date hours balance for special accumulator code.
8. Click (Close).
You’ve just finished viewing all special accumulators that an employee received in a specific month.
For a description of the fields on this panel, press F1.
Chapter 10: Researching and Correcting Employee Payroll DataPayroll Processing Guide Version 5.04.01

Researching and Correcting Employee Earnings 10-27
Viewing Employee Job Information
You can review employee job information such as pay rate and earnings distribution on the Earnings Distribution panel. You can access this panel by making the following selections from the Task Manager:
Post-Payroll Cycle Processes ~ Research and Correct Employee Earnings
For detailed information on this panel, refer to the Hiring, Staffing, and Job Maintenance Guide.
You’ve just finished viewing employee job information.
Viewing FLSA Averaging Information by Pay Run
The FLSA Average Rate by Pay Run panel displays an employee’s hours and amounts associated with a specific payroll run ID and indicates whether these hours and amounts are FLSA eligible. All earnings are displayed by pay end date, with the original earnings listed first followed by the retro earnings. This view is most helpful when reviewing FLSA averaging information for a pay group that is set up as a weekly or bi-weekly FLSA average type on the Basic Pay Group Data panel (Company Definitions ~ Pay Groups and Payroll Calendars ~ Pay Groups).
If the FLSA averate rate is less than the employee’s job rate, then the employee’s job rate will
be used to calculate the FLSA pay earnings.
To review FLSA averaging information by pay run, do the following:
1. Click Payroll and make the following selections:
Employee Information ~ View Paycheck Detail
2. Double-click the FLSA Average Rate by Pay Run task. The Search dialog box displays.
Figure 10-26. Search Dialog Box
3. Select a payroll run ID from the Pay Run ID field.
4. Select the employee ID from the Empl ID field.
Chapter 10: Researching and Correcting Employee Payroll DataPayroll Processing Guide Version 5.04.01

10-28 Researching and Correcting Employee Earnings
5. Enter the week number in the Week Number field.
6. Indicate if this is an off-cycle payroll by entering Y or N in the Off Cycle field and click OK. The FLSA Average Rate by Pay Run panel displays.
Figure 10-27. FLSA Average Rate by Pay Run Panel
7. Review the following FLSA averaging information:
• Week Nbr - Displays the week number in which the FLSA average rate is calculated. If the pay group is set to a weekly pay frequency and the FLSA averaging is set to biweekly, and the pay frequency is set to weekly or biweekly, the week number is 00.
• Off Cycle - Indicates if this is an off-cycle payroll run.
• Company - Displays the company.
• Pay Grp - Displays all pay groups that are eligible for FLSA overtime.
• Pay End Dt - Displays the pay period end date. For retroactive earnings, this is the actual date that the earnings was paid.
• Department - Displays the department to which the FLSA earnings are being charged.
• Earn Type - Displays all earnings types, including other earnings types such as retroactive earnings.
• Payline Rate - Displays the employee’s payline rate for the specific earnings type.
• Hours - Displays the number of hours (for the specific earnings type) for which the employee is being paid. These hours are pulled from the paysheet.
• FLSA - If selected, the hours for the specific earnings type is figured into the FLSA average rate calculation. This check box is not applicable to retroactive earnings.
For a description of the fields on this panel, press F1.
Chapter 10: Researching and Correcting Employee Payroll DataPayroll Processing Guide Version 5.04.01

Researching and Correcting Employee Earnings 10-29
• Amount - Displays the dollar value that the employee is being paid for this earnings type in a specific department during a specific week.
• FLSA - If selected, the amount for the specific earnings type is figured into the FLSA average rate calculation.
• FLSA Eligible Totals - Displays the total number of hours and total amount of the employee’s earnings that are FLSA eligible. If retroactive earnings apply to this week, they are also included in these totals.
• FLSA Average Rate - Displays the employee’s FLSA average rate for the week. This rate is calculated by dividing the FLSA eligible amount by the FLSA eligible hours.
If the FLSA average rate calculates at a lower rate than the job rate, EPayroll uses
the job rate instead.
8. Click (Close).
You’ve just finished viewing FLSA averaging information.
Viewing FLSA Averaging Information by Work Period
The Review FLSA Average Rate by Working Period panel displays an employee’s hours and amounts associated with a specific working period and indicates whether these hours and amounts are FLSA eligible. All earnings are displayed by pay end date, with the original earnings listed first followed by the retro earnings. This view is most helpful when reviewing FLSA averaging information for a pay group that is set up as a 14, 21, or 28 day FLSA average type on the Basic Pay Group Data panel (Company Definitions ~ Pay Groups and Payroll Calendars ~ Pay Groups).
If the FLSA averate rate is less than the employee’s job rate, then the employee’s job rate will
be used to calculate the FLSA pay earnings.
To review FLSA averaging information by work period, do the following:
1. Click Payroll and make the following selections:
Employee Information ~ View Paycheck Detail
2. Double-click the FLSA Average Rate by Working Period task. The Search dialog box displays.
Figure 10-28. Search Dialog Box
Chapter 10: Researching and Correcting Employee Payroll DataPayroll Processing Guide Version 5.04.01

10-30 Researching and Correcting Employee Earnings
3. Select an employee from the Empl ID field.
4. In the FLSA Work Period End Date field, enter the end date of the work period and click OK. The Review FLSA Average Rate by Working Period panel displays.
Figure 10-29. Review FLSA Average Rate by Working Period Panel
5. Review the following FLSA averaging information:
• FLSA Work Period Begin Date - Displays the beginning date for the FLSA work period.
• FLSA Work Period End Date - Displays the ending date for the FLSA work period.
• Run ID - Displays the payroll run ID for the payroll cycle that the earnings was taken from.
• Week Nbr - Displays the week number in which the payroll was processed.
• Off Cycle - Indicates if this is an off-cycle payroll run.
• Company - Displays the company.
• Pay Grp - Displays all pay groups that are eligible for FLSA overtime.
• Pay End Dt - Displays the pay period end date. For retroactive earnings, this is the actual date that the earnings was paid.
• Earn Type - Displays all earnings types, including other earnings types such as retroactive earnings.
• Payline Rate - Displays the employee’s payline rate for the specific earnings type.
• Hours - Displays the number of hours (for the specific earnings type) for which the employee is being paid. These hours are pulled from the paysheet.
For a description of the fields on this panel, press F1.
Chapter 10: Researching and Correcting Employee Payroll DataPayroll Processing Guide Version 5.04.01

Researching and Correcting Employee Earnings 10-31
– FLSA - If selected, the hours for the specific earnings type is figured into the FLSA average rate calculation. This check box is not applicable to retroactive earnings.
• Amount - Displays the dollar value that the employee is being paid for this earnings type in a specific department during a specific week.
– FLSA - If selected, the amount for the specific earnings type is figured into the FLSA average rate calculation.
• FLSA Average - Displays the FLSA average type that is assigned to the pay group on the Basic Pay Group Data panel (Company Definitions ~ Pay Groups and Payroll Calendars ~ Pay Groups).
• FLSA Eligible Totals - Displays the total number of hours and total amount of the employee’s earnings that are FLSA eligible. If retroactive earnings apply to this week, they are also included in these totals.
• Pay Period FLSA Average Rate - Displays the amount that is calculated for a given payroll cycle. This amount is used in the current pay period to compute any FLSA earnings. This rate is calculated by dividing the FLSA eligible amount by the FLSA eligible hours. If the pay group is biweekly, this field displays the FLSA average rate calculated for the second week of the current pay period.
If the pay period FLSA average rate calculates at a lower rate than the job rate,
EPayroll uses the job rate instead.
• Working Period FLSA Average Rate - Displays the employee’s FLSA average rate after the final payroll cycles of the defined working period have been calculated. If the last week listed on this panel is not the last week of the FLSA working period, this field displays the rate calculated by dividing the FLSA eligible amount by the FLSA eligible hours available till now in the working period.
6. Click (Close).
You’ve just finished viewing FLSA averaging information.
Adjusting Leave Balances
You can adjust leave balances for a specific employee in the Leave Balances panel.
To view leave balances, do the following:
1. Click Payroll and make the following selections:
Employee Information ~ Change Employee Leave Balances
Chapter 10: Researching and Correcting Employee Payroll DataPayroll Processing Guide Version 5.04.01

10-32 Researching and Correcting Employee Earnings
2. Double-click the Leave Balances task. The Search dialog box displays.
Figure 10-30. Search Dialog Box
3. Enter the employee ID in the Empl ID field and click OK. The Leave Balances panel displays.
Figure 10-31. Leave Balances Panel
4. Adjust the hours in the Accrual Balances - Hours area as needed. For details on the fields on this panel, see page 10-35.
5. For unprocessed hours, adjust the hours in the Service Hours field if necessary.
6. When you are finished, click (Save).
You’ve just finished adjusting leave balances.
For a description of the fields on this panel, press F1.
Chapter 10: Researching and Correcting Employee Payroll DataPayroll Processing Guide Version 5.04.01

Researching and Correcting Employee Earnings 10-33
Viewing Leave Balances by Accrual Date
You can view any existing leave balances by accrual date for a specific employee in the Leave Balances panel. In addition, you can change adjust the hours in the Earned Year-to-Date field.
To view leave balances by accrual date, do the following:
1. Click Payroll and make the following selections:
Employee Information ~ View Balances (MTD, QTD, YTD)
2. Double-click the Leave Balances task. The Search dialog box displays.
Figure 10-32. Search Dialog Box
3. Enter the employee ID in the Empl ID field and click OK. The Leave Balances panel displays.
Figure 10-33. Leave Balances Panel
4. Review the leave balances for the employee.
5. Click (Close).
For a description of the fields on this panel, press F1.
Chapter 10: Researching and Correcting Employee Payroll DataPayroll Processing Guide Version 5.04.01

10-34 Researching and Correcting Employee Earnings
You’ve just finished viewing leave balances.
Viewing a Summary of All Leave Balances
You can view all accrual postings for a specific employee through the Leave Balance Summary task.
To view accrual postings, do the following:
1. Click Payroll and make the following selections:
Employee Information ~ View Balances (MTD, QTD, YTD)
2. Double-click the Leave Balance Summary task. The Search dialog box displays.
Figure 10-34. Search Dialog Box
3. Select the company from the Company field.
4. Enter the employee ID in the Empl ID field.
Chapter 10: Researching and Correcting Employee Payroll DataPayroll Processing Guide Version 5.04.01

Researching and Correcting Employee Earnings 10-35
5. Select the plan type from the Plan Type field and click OK. The Balance Summary panel displays.
Figure 10-35. Balance Summary Panel
6. Review the posted accruals for the employee as follows:
• Plan Type - Displays the plan type.
• Accrual Date - Displays the “as of” date for these leave accrual values.
• Accrued YTD - Displays the number of leave hours taken by the employee since the last accrual date.
• Unprocessed YTD - Displays the hours that you have not yet processed using the accrual process.
• Prior Years’ Carryover - Displays the number of hours carried over from previous years for this leave plan.
• Balance - Displays the total number of unused hours for this leave plan as of the accrual date.
For a description of the fields on this panel, press F1.
Chapter 10: Researching and Correcting Employee Payroll DataPayroll Processing Guide Version 5.04.01

10-36 Researching and Correcting Employee Earnings
7. To view details about a specific accrual, do one of the following:
• Click the Balance Details Summary panel and scroll on the scroll bar until you find the specific accrual you want to view details on.
• Click the Detail button for the specific accrual. The Balance Detail panel displays with the details for the accrual.
Figure 10-36. Balance Detail Panel
a. Review details about a specific accrual as follows:
• Plan Type - Displays the plan type.
• Accrual Date - Displays the “as of” date for these leave accrual values.
• Benefit Program - Displays the benefit program for this plan.
• Currency - Indicates the type of currency, such as U.S. dollars, in which the employee is paid.
• Pay End Date - Displays the date of the last leave accrual processed in a payroll.
• Accrual Balances - Hours - Displays year-to-date hours for an employee, such as earned year-to-date and taken year-to-date. The last two fields, Bought Year-to-Date and Sold Year-to-Date are for vacation buy and sell leave accrual processing.
• Leave accruals are calculated as follows:
• Leave Balance = Carried Over + Earned YTD - Taken YTD + Adjusted YTD + Bought YTD - Sold YTD
• You have the option of adjusting these balances. To adjust the earned year-to-date balance, we suggest that to make an adjustment you use the Adjusted check box on the Accruals and Accumulators panel (Payroll ~ Company Definitions ~ Earnings and Accumulators ~ Earnings). That way, you have an audit trail for adjustments.
For a description of the fields on this panel, press F1.
Chapter 10: Researching and Correcting Employee Payroll DataPayroll Processing Guide Version 5.04.01

Researching and Correcting Employee Earnings 10-37
• Carried Over from Previous Year - Displays the number of hours carried over from previous years for this leave plan.
• Earned Year-to-Date - Displays the number of hours earned year-to-date in the designated calendar year for this leave plan. You can enter a different number in this field to adjust the accrued leave.
• Taken Year-to-Date - Displays the number of hours taken year-to-date for this Leave plan as of the accrual date. This value does not include Hours Taken in the Unprocessed Hours area.
• Adjusted Year-to-Date - Displays the number of hours adjusted year-to-date for this leave plan as of the accrual date. This value does not include Hours Adjusted in the Unprocessed Hours area.
• Bought Year-to-Date - Displays the number of hours bought year-to-date for this leave plan as of the accrual date.
• Sold Year to Date - Displays the number of hours sold year-to-date for this leave plan as of the accrual date.
• Accrual Totals - Contains information about unused hours.
• Hours Balance - Displays the total number of unused hours for this leave plan as of the accrual date. This value is calculated by adding together the hours carried over from previous years and the hours earned year-to-date, and then subtracting the hours taken year-to-date from that sum.
• (Hours x Hourly Rate) - Displays the dollar value of the total number of unused hours for this leave plan. Enterprise Payroll calculates the hours value or value of the unused hours by multiplying the leave balance by the current hourly rate for hourly employees or the hourly equivalent for salaried employees.
• Service Information - Displays the service date, or the date you use for length of service calculations, and service hours, or the number of hours accrued that qualify as service hours worked.
• Service Date - Displays the date on which the employee’s service ranking within the company is based.
• Service Hours - Displays the number of service hours accrued by the employee. This value includes service hours from the Unprocessed Hours area.
• Unprocessed Hours - Displays the hours that you have not yet processed using the accrual process. These are leave hours an employee took, or that you adjusted through Enterprise Payroll after you ran the last leave accrual process. These hours are included in the Accrual Totals area.
• Hours Taken - Displays the number of leave hours taken by the employee since the last accrual date. These unprocessed hours have not yet been added to Hours Taken Year-to-Date in the Accrual Totals area. The next time the accrual batch process is run, the accrual totals are updated with the data in the Unprocessed Hours area.
Chapter 10: Researching and Correcting Employee Payroll DataPayroll Processing Guide Version 5.04.01

10-38 Researching and Correcting Employee Earnings
• Hours Adjusted - Displays the number of leave hours adjusted for the employee since the last accrual date. These unprocessed hours have not yet been added to Hours Adjusted Year-to-Date in the Accrual Balances-Hours area. The next time the accrual batch process is run, the accrual totals are updated with the data in the Unprocessed Hours area.
• Hours Bought - Displays the total hours bought for vacation buy processing.
• Hours Sold - Displays the total hours sold for vacation sell processing.
• Service Hours - Displays the number of service hours accrued by the employee since the last accrual date. These unprocessed hours have not yet been added to Hours Earned Year-to-Date in the Accrual Totals area. The next time the accrual batch process is run, the accrual totals are updated with the data in the Unprocessed Hours area.
• Accrual Totals - displays the actual leave totals for this employee as of the date you initiated leave processing. For unprocessed data such as hours taken, the leave accrual process includes those hours in the Accrual Totals area.
8. When you have finished reviewing the posted accruals, click (Close).
You’ve just finished viewing all accrual postings for an employee.
Correcting Earnings
After you’ve determined which earnings information is incorrect, you may need to complete one of the following tasks:
• Modifying Earnings Information on the Paysheet
• Modifying Additional Pay
• Preparing Paycheck Adjustments
Modifying Earnings Information on the Paysheet
After viewing your pay cycle data, you may determine that you need to add or change earnings information on your paysheets. To modify earnings information on your paysheet(s), you can use any of the tasks that are part of the Update Pay Cycle Data process (Payroll ~ Payroll Cycle Process). See “Modifying Earnings Information” on page 3-26 to determine which of these tasks would be most helpful in modifying your specific earnings information.
You’ve just finished modifying earnings information on the paysheet.
Researching and Correcting Employee Earnings
Researching Earnings
Correcting Earnings
Chapter 10: Researching and Correcting Employee Payroll DataPayroll Processing Guide Version 5.04.01

Researching and Correcting Employee Earnings 10-39
Modifying Additional Pay
The object of additional pay is to automate the processing of extra pay an employee receives on a regular basis. For example, if an employee receives a car allowance once a month, you can create an additional pay entry for the car allowance. Then, when Enterprise Payroll creates paysheets, a payline for the car allowance is automatically created on the paysheet for the pay periods specified in the additional pay record.
Another way to use additional pay is to pay an employee who has two part-time jobs within the same company. The primary job is represented on the database by the employee's active job record. The second job can be set up as an additional pay entry. Then, when Enterprise Payroll creates paysheets, one payline is created for regular earnings from the primary job (from the job record) and one payline is created for the earnings from the second job (from the additional pay record).
Additional pay is not the same as a one-time payment, such as overtime or an expense reimbursement, which you should enter directly on the paysheet.
An active job record must exist for the employee before an additional pay entry can be
processed. Information entered using the Additional Pay task when no job record is active for the employee will not be printed on the paysheet and will not be paid.
Additional pay is calculated and posted as specified in the employee's active Job record unless overrides are entered using the Additional Pay task. Each additional pay record generates one line on the paysheet. The new lines follow the payline for regular earnings for an employee. Additional pay can be paid on the same check as regular pay, or on a separate check.
You can manipulate additional pay in the following ways:
• Typically, you would create an additional pay entry for the employee and either enter overrides on panels used in the Additional Pay task or let Enterprise Payroll default to the entries on the employee's active job record.
• To split an employee's time between two regular part-time jobs, create an additional pay entry with blank earnings type and hours. During paysheet creation, Enterprise Payroll creates a payline for this entry, with blank earnings type and hours. Then, during time input on paysheets, you can enter the correct earnings type and hours.
• To split an employee's time between two regular part-time jobs, create an additional pay entry with blank hours only. During paysheet creation, Enterprise Payroll creates a payline for this entry, with blank hours. Then, during time input on paysheets, you can enter the correct hours.
You can access the Employee Additional Pay task by making the following selections from the Task Manager:
Post-Payroll Cycle Process ~ Research and Correct Employee Earnings
For step-by-step instructions on modifying additional pay, refer the Payroll Setup and Maintenance Guide.
Chapter 10: Researching and Correcting Employee Payroll DataPayroll Processing Guide Version 5.04.01

10-40 Researching and Correcting Employee Earnings
Preparing Paycheck Adjustments
If you need to adjust and/or reverse a paycheck, refer to Chapter 10, “Researching and Correcting Employee Payroll Data” for step-by-step instructions.
You’ve just finished preparing paycheck adjustments.
Chapter 10: Researching and Correcting Employee Payroll DataPayroll Processing Guide Version 5.04.01

Researching and Correcting Employee Deductions 10-41
Researching and Correcting Employee Deductions
If, after confirming your payroll, you must research a possible employee payroll error, Enterprise Payroll provides several solutions. You can access panels that contain deduction information for a specific employee.
This section covers the following:
• Researching Deductions
• Correcting Deductions
Researching Deductions
You can research an employee’s deductions as follows:
• Viewing Deductions for a Specific Check
• Viewing MTD, QTD, and YTD Data for a Deduction
• Viewing MTD, QTD, and YTD Data for Arrears
• Viewing All Deductions by Month
• Viewing Savings Bond Activity
Viewing Deductions for a Specific Check
The Deductions panel displays an employee’s deductions for a specific check.
To view deductions for a specific check, do the following:
1. Click Payroll and make the following selections:
Post-Payroll Cycle Processes ~ Research and Correct Employee Deductions
Researching and Correcting Employee Deductions
Researching Deductions
Correcting Deductions
Chapter 10: Researching and Correcting Employee Payroll DataPayroll Processing Guide Version 5.04.01

10-42 Researching and Correcting Employee Deductions
2. Double-click the Employee Deductions task. The Search dialog box displays.
Figure 10-37. Search Dialog Box
3. Enter the employee’s name in the Name field and then click OK.
4. From the Search Results area, double-click the line that contains the payroll cycle information you want to view. The Paycheck View panel displays.
5. Click the Deductions panel.
Figure 10-38. Deductions Panel
6. Review the deduction information. For details on this panel, press F1 or see page 6-21.
7. Click (Close).
You’ve just finished viewing the details of an employee’s deductions for a specific check.
Chapter 10: Researching and Correcting Employee Payroll DataPayroll Processing Guide Version 5.04.01

Researching and Correcting Employee Deductions 10-43
Viewing MTD, QTD, and YTD Data for a Deduction
You can view an employee’s year-, quarter-, month-, prior quarter-, and prior month-to-date totals for a specific deduction code and class in the Deductions panel.
To view MTD, QTD, and YTD data for a deduction, do the following:
1. Click Payroll and make the following selections:
Employee Information ~ View Balances (MTD, QTD, YTD)
2. Double-click the Deductions task. The Search dialog box displays.
Figure 10-39. Search Dialog Box
3. Enter the employee ID in the Empl ID field.
4. Enter the company in the Company field.
5. Enter the calendar year in the Calendar Year field.
6. Enter the plan type in the Plan Type field.
7. Enter the deduction code in the Deduction Code field.
Chapter 10: Researching and Correcting Employee Payroll DataPayroll Processing Guide Version 5.04.01

10-44 Researching and Correcting Employee Deductions
8. Enter a deduction classification (if you want to search for a specific class) in the Deduction Classification field and click OK. The Deductions panel displays.
Figure 10-40. Deductions Panel
9. Review the following deduction information:
• Company - Displays the code that identifies the company.
• Calendar Year - Displays the calendar year to which these balances apply.
• Deduction Code - Displays the deduction code.
• Plan Type - Displays the plan type. A plan type code is assigned to each benefit plan offered by your company. During pay calculation, Enterprise Payroll uses these codes to determine deduction processing rules.
• Deduction Class - Displays the deduction tax class for the deduction.
• Employment To Date - This area displays the balance.
• Balance - Displays the deduction balance.
• As Of Date - Displays the date Enterprise Payroll last calculated the deduction balance.
• Balances - Displays the year-, quarter-, and month-to-date balances for the deduction for each month of the year.
10. Click (Close).
You’ve just finished viewing an employee’s year-, quarter-, month-, prior quarter-, and prior month-to-date totals for a specific deduction code and class.
For a description of the fields on this panel, press F1.
Chapter 10: Researching and Correcting Employee Payroll DataPayroll Processing Guide Version 5.04.01

Researching and Correcting Employee Deductions 10-45
Viewing MTD, QTD, and YTD Data for Arrears
You can view an employee’s year-, quarter-, month-, prior quarter-, and prior month-to-date totals for a specific arrears in the Arrears panel. Enterprise Payroll creates an arrears when an employee’s net pay (in a pay period) is insufficient to cover all or part of a deduction. Enterprise Payroll can also create a deduction arrears balance as a payback balance for recapture in the next pay period (such as for a draw).
To view MTD, QTD, and YTD data for an arrears, do the following:
1. Click Payroll and make the following selections:
Employee Information ~ View Balances (MTD, QTD, YTD)
2. Double-click the Arrears task. The Search dialog box displays.
Figure 10-41. Search Dialog Box
3. Enter the employee ID in the Empl ID field.
4. Enter the company in the Company field and click OK. The Deduction Arrears panel displays.
Figure 10-42. Deduction Arrears Panel
For a description of the fields on this panel, press F1.
Chapter 10: Researching and Correcting Employee Payroll DataPayroll Processing Guide Version 5.04.01

10-46 Researching and Correcting Employee Deductions
5. Review the following arrears information:
• Company - Displays the code that identifies the company.
• Plan Type - Displays the plan type. A plan type code is assigned to each benefit plan offered by your company.
• Benefit Plan - Displays a unique identifier assigned to a benefit provider.
• Deduction Code - Displays the deduction code.
• Deduction Classification - Displays the deduction tax class for the deduction.
• Arrears Balance - Displays the dollar amount of deduction arrears owed to the company by the employee. An arrears balance is created when the employee's net pay in a pay period is insufficient to cover all or part of a deduction. Enterprise Payroll normally attempts to deduct all or part of the arrears balance from the employee's pay during payroll processing in subsequent pay periods.
Arrears balances are updated only if the Deduction Arrears Allowed check box is
selected for this deduction code using the Deductions task (Payroll ~ Company Definitions ~ Deductions).
6. Click (Close).
You’ve just finished viewing an employee’s year-, quarter-, month-, prior quarter-, and prior month-to-date totals for a specific arrears in the Deduction Arrears panel.
Viewing All Deductions by Month
You can view all deductions that an employee received in a specific month in the Deductions by Month panel.
To view all deductions by month, do the following:
1. Click Payroll and make the following selections:
Employee Information ~ View Monthly Balances
Chapter 10: Researching and Correcting Employee Payroll DataPayroll Processing Guide Version 5.04.01

Researching and Correcting Employee Deductions 10-47
2. Double-click the Deductions task. The Search dialog box displays.
.
Figure 10-43. Search Dialog Box
3. Enter the employee ID in the Empl ID field.
4. Enter the company in the Company field.
5. Enter the calendar year in the Calendar Year field.
6. Enter the plan type in the Plan Type field.
7. Enter the deduction code in the Deduction Code field.
8. Enter a deduction classification in the Deduction Classification field and click OK. The Deductions by Month panel displays.
Figure 10-44. Deductions by Month Panel
9. Review the following deductions information:
• Company - Displays the code that identifies the company.
• Calendar Year - Displays the calendar year to which these balances apply.
• Month - Displays the month to which these balances apply.
For a description of the fields on this panel, press F1.
Chapter 10: Researching and Correcting Employee Payroll DataPayroll Processing Guide Version 5.04.01

10-48 Researching and Correcting Employee Deductions
• Balances - Displays the month-, quarter-, and year-to-date balances for all employee deductions. In addition, it displays the deduction tax class of the deduction.
• Benefit Plan - Displays all benefit plans for the employee.
• Deductions - Displays all deduction codes for the employee.
• Ded Class - Displays the deduction tax class for each deduction code.
• MTD - Displays the month-to-date deduction balance.
• QTD - Displays the quarter-to-date deduction balance.
• YTD - Displays the year-to-date deduction balance.
10. Click (Close).
You’ve just finished viewing all deductions that an employee received in a specific month.
Viewing Savings Bond Activity
You can view the activity of bond purchases and amounts collected towards each bond on the Savings Bond Activity Log panel. Enterprise Payroll updates the information on this panel each time you confirm a payroll.
Enterprise Payroll does not actually purchase bonds for you, but it does let you know how
much money has been deducted toward bond purchase and how many units that money will buy.
To view savings bond activity, do the following:
1. Click Payroll and make the following selections:
Employee Information ~ View Balances (MTD, QTD, YTD)
2. Double-click the Savings Bond Activity Log task. The Search dialog box displays.
Figure 10-45. Search Dialog Box
Chapter 10: Researching and Correcting Employee Payroll DataPayroll Processing Guide Version 5.04.01

Researching and Correcting Employee Deductions 10-49
3. Enter the employee ID in the Empl ID field and click OK. The Savings Bond Activity Log panel displays.
Figure 10-46. Savings Bond Activity Log Panel
4. Review the bond activity for the employee as follows:
• Bond Log Number - Enterprise Payroll assigns the bond log number to link the data in the Savings Bond Types panel (Payroll ~ Company Definitions ~ Deductions ~ Savings Bond Types) to the data in the Savings Bond Activity Log panel.
• Bond Activity Seq # - Enterprise Payroll assigns a sequence number, starting with 1, to each activity processed against this bond for a given activity date. For example, if a deduction for bonds was taken and then reversed, Enterprise Payroll produces two records, with sequence numbers 1 and 2, for the same bond and activity date.
• Bond ID - Displays the denomination of the savings bond.
• Owner - If the employee is the bond owner, EE displays. If the bond owner is someone other than the employee, the person’s dependent ID (pulled from the Dependent/ Beneficiary record) displays.
• Other Registrant - If the employee is the co-owner or beneficiary of the bond, EE displays. If the co-owner or beneficiary is someone other than the employee, the person’s dependent ID (pulled from the Dependent/Beneficiary record) displays.
• Bond Activity Status - Displays one of the following three conditions:
– Funds Not Ready - Sufficient funds are not available to purchase the bond.
– Funds Ready - Sufficient funds are available to purchase the bond when you run the Bond Purchase report.
– Funds Disbursed - You have run the Savings Bond Report and File process (PAY016), and funds have been disbursed for every employee whose record showed the Funds Ready status before running the report.
For a description of the fields on this panel, press F1.
Chapter 10: Researching and Correcting Employee Payroll DataPayroll Processing Guide Version 5.04.01

10-50 Researching and Correcting Employee Deductions
• Reversed - If this bond contribution was reversed, Enterprise Payroll selects this check box.
• Check Number - Displays the paycheck number to which this bond deduction applies.
• Paycheck Issue Date - Displays the date printed on the paycheck.
• Amount Collected - Displays the amount distributed to this bond specification for this pay period.
• Amount Disbursed - Displays the amount disbursed toward purchase of this bond. This amount is zero if the full purchase price of the bond has not been reached.
• Number of Units Purchased - Displays the number of bonds purchased for this bond specification.
• Remaining Balance - Displays the amount accumulated toward the purchase of a bond. This amount is always less than the purchase price. When the purchase price is reached, Enterprise Payroll subtracts it from the remaining balance and then adds it to the amount disbursed.
5. Click (Close).
You’ve just finished viewing savings bond activity.
Correcting Deductions
After you’ve determined which deduction information is incorrect, you may need to complete one of the following tasks:
• Changing General Deductions
• Recording a Deduction Override
• Preparing a Pay Cycle Deduction Override
Changing General Deductions
You can use the Change Employee Deductions task to modify data for a general deduction.
To access the Change Employee Deductions task, make the following selections from the Task Manager:
Payroll ~ Post-Payroll Cycle Processes ~ Research and Correct Employee Deductions
For step-by-step instructions on using this task, refer to the Payroll Setup and Maintenance
Guide.
Researching and Correcting Employee Deductions
Researching Deductions
Correcting Deductions
Chapter 10: Researching and Correcting Employee Payroll DataPayroll Processing Guide Version 5.04.01

Researching and Correcting Employee Deductions 10-51
You’ve just finished modifying general deduction information.
Recording a Deduction Override
Use the General Deduction Override panel to override deduction information contained in
the Deduction panel for general (non-benefit) deductions. If you do not use ADP®’s Enterprise HRSM benefits solution (referred to as Enterprise Benefits) and benefit deductions are contained in the General Deductions panel (Payroll ~ Post-Payroll Cycle Processes ~ Research and Correct Employee Deductions ~ Change Employee Deductions), you can use this panel to override benefits deductions as well.
The pay periods in which a deduction is taken and maximum arrears payback information are typically specified on the Deduction panel. If entries for the same fields are recorded on the General Deduction Override panel, they override the default settings on the Deduction panel for an individual employee.
To access the Record Deduction Override task, make the following selections from the Task Manager:
Payroll ~ Post-Payroll Cycle Processes ~ Research and Correct Employee Deductions
For step-by-step instructions on using this task, refer to the Payroll Setup and Maintenance
Guide.
You have just finished overriding a general deduction.
Preparing a Pay Cycle Deduction Override
After viewing your pay cycle data, you may determine that you need to add or change deduction information on your paysheets. To modify deduction information on your paysheet(s), you can use any of the tasks that are part of the Update Pay Cycle Data process (Payroll ~ Payroll Cycle Process). See “Entering a One-time Deduction Override” on page 3-27 to determine which of these tasks would be most helpful in modifying your specific deduction information.
You’ve just finished preparing a pay cycle deduction override.
Chapter 10: Researching and Correcting Employee Payroll DataPayroll Processing Guide Version 5.04.01

10-52 Researching and Correcting Employee Garnishments
Researching and Correcting Employee Garnishments
If, after confirming your payroll, you must research a possible employee payroll error, Enterprise Payroll provides several solutions. You can access panels that contain garnishment information for a specific employee.
This section covers the following:
• Researching Garnishments
• Correcting Garnishments
Researching Garnishments
You can research an employee’s garnishments as follows:
• Viewing Garnishments for a Specific Check
• Viewing MTD, QTD, and YTD Data for a Garnishment
Viewing Garnishments for a Specific Check
The Garnishments panel displays an employee’s garnishments for a specific check.
To view garnishments for a specific check, do the following:
1. Click Payroll and make the following selections:
Post-Payroll Cycle Processes ~ Research and Correct Employee Garnishments
Researching and Correcting Employee Garnishments
Researching Garnishments
Correcting Garnishments
Chapter 10: Researching and Correcting Employee Payroll DataPayroll Processing Guide Version 5.04.01

Researching and Correcting Employee Garnishments 10-53
2. Double-click the Employee Garnishment Deductions task. The Search dialog box displays.
Figure 10-47. Search Dialog Box
3. Enter the employee’s name in the Name field and then click OK.
4. From the Search Results area, double-click the line that contains the payroll cycle information you want to view. The Paycheck View panel displays.
5. Click the Garnishments tab.
Figure 10-48. Garnishments Panel
6. Review the garnishment information. For details on this panel, press F1 or see page 6-23.
7. Click (Close).
For a description of the fields on this panel, press F1.
Chapter 10: Researching and Correcting Employee Payroll DataPayroll Processing Guide Version 5.04.01

10-54 Researching and Correcting Employee Garnishments
You’ve just finished viewing the details of an employee’s garnishments for a specific check.
Viewing MTD, QTD, and YTD Data for a Garnishment
You can view an employee’s year-, quarter-, month-, prior quarter-, and prior month-to-date totals for a specific garnishment in the Garnishments panel.
To view MTD, QTD, and YTD data for a garnishment, do the following:
1. Click Payroll and make the following selections:
Employee Information ~ View Balances (MTD, QTD, YTD)
2. Double-click the Garnishments task. The Search dialog box displays.
Figure 10-49. Search Dialog Box
3. Enter the employee ID in the Empl ID field.
4. Enter the company in the Company field.
5. Enter the calendar year in the Calendar Year field.
6. Enter the deduction code in the Deduction Code field.
Chapter 10: Researching and Correcting Employee Payroll DataPayroll Processing Guide Version 5.04.01

Researching and Correcting Employee Garnishments 10-55
7. Enter a garnishment ID (if you want to search for a specific garnishment) in the Garnish ID field and click OK. The Garnishments panel displays.
Figure 10-50. Garnishments Panel
8. Review the following garnishment information:
• Company - Displays the code that identifies the company.
• Calendar Year - Displays the calendar year to which these balances apply.
• Deduction Code - Displays the deduction code for garnishments.
• Garnish ID - Displays the identifier assigned to this garnishment.
• Payee Name - Displays the payee to whom the garnishment check is paid.
• Balances - Displays the month-, quarter-, and year-to-date balances for all employee deductions.
• Month - Displays the month to which these balances apply.
• Total Deduction/Garnishment Amount - Displays the month-, quarter-, and year-to-date amounts included in the actual garnishment amount and the handling fees deducted for the company and/or the payee. Also displays the month-, quarter-, and year-to-date amount deducted year-to-date to satisfy the garnishment. It does not include any handling fees paid to the company and/or the payee.
• Company Fee/Payee Fee - Displays the month-, quarter-, and year-to-date amount deducted year-to-date for handling fees paid to the company and to the employee.
9. Click (Close).
You’ve just finished viewing an employee’s year-, quarter-, month-, prior quarter-, and prior month-to-date totals for a specific garnishment.
For a description of the fields on this panel, press F1.
Chapter 10: Researching and Correcting Employee Payroll DataPayroll Processing Guide Version 5.04.01

10-56 Researching and Correcting Employee Garnishments
Correcting Garnishments
After you’ve determined which garnishment information is incorrect, you may need to complete one of the following tasks:
• Changing Employee Garnishments
• Changing Employee Garnishment Deduction Data
• Preparing a Pay Cycle Garnishment Override
Changing Employee Garnishments
You can modify employee garnishment information using the Change Employee Garnishments task. This task allows you to modify the garnishment type, payee information, deduction parameters and limitations, deduction and process fees defaults, deduction schedule and calculation methods, excluded deductions, garnishment laws and exemption parameters, and WGPS data.
To access the Change Employee Garnishments task, make the following selections from the Task Manager:
Post-Payroll Cycle Processes ~ Research and Correct Employee Garnishments
For step-by-step instructions on changing employee garnishments, refer the Payroll Setup and Maintenance Guide.
You’ve just finished changing an employee garnishment.
Changing Employee Garnishment Deduction Data
You can change employee garnishment deduction data on the General Deductions panel. For step-by-step instructions, see “Changing General Deductions” on page 10-50.
You’ve just finished changing employee garnishment deduction data.
Preparing a Pay Cycle Garnishment Override
After viewing your pay cycle data, you may determine that you need to add or change garnishment information on your paysheets. To modify garnishment information on your paysheet(s), you can use any of the tasks that are part of the Update Pay Cycle Data process (Payroll ~ Payroll Cycle Process). See “Entering a One-time Garnishment Override” on page 3-33 to determine which of these tasks would be most helpful in modifying your specific garnishment information.
Researching and Correcting Employee Garnishments
Researching Garnishments
Correcting Garnishments
Chapter 10: Researching and Correcting Employee Payroll DataPayroll Processing Guide Version 5.04.01

Researching and Correcting Employee Garnishments 10-57
You’ve just finished preparing a pay cycle garnishment override.
Chapter 10: Researching and Correcting Employee Payroll DataPayroll Processing Guide Version 5.04.01

10-58 Researching and Correcting Employee Taxes
Researching and Correcting Employee Taxes
If, after confirming your payroll, you must research a possible employee payroll error, Enterprise Payroll provides several solutions. You can access panels that contain tax information for a specific employee.
This section covers the following:
• Researching Taxes
• Correcting Taxes
Researching Taxes
You can research an employee’s taxes as follows:
• Viewing Taxes for a Specific Check
• Viewing MTD, QTD, and YTD Data for a Tax Deduction
• Viewing All Taxes by Month
Viewing Taxes for a Specific Check
The Taxes panel displays an employee’s taxes for a specific check.
To view garnishments for a specific check, do the following:
1. Click Payroll and make the following selections:
Post-Payroll Cycle Processes ~ Research and Correct Employee Taxes
Researching and Correcting Employee Taxes
Researching Taxes
Correcting Taxes
Chapter 10: Researching and Correcting Employee Payroll DataPayroll Processing Guide Version 5.04.01

Researching and Correcting Employee Taxes 10-59
2. Double-click the Employee Tax Deductions task. The Search dialog box displays.
Figure 10-51. Search Dialog Box
3. Enter the employee’s name in the Name field and then click OK.
4. From the Search Results area, double-click the line that contains the payroll cycle information you want to view. The Paycheck View panel displays.
5. Click the Taxes tab.
Figure 10-52. Taxes Panel
6. Review the tax information. For details on this panel, press F1 or see page 6-19.
7. Click (Close).
You’ve just finished viewing the details of an employee’s taxes for a specific check.
For a description of the fields on this panel, press F1.
Chapter 10: Researching and Correcting Employee Payroll DataPayroll Processing Guide Version 5.04.01

10-60 Researching and Correcting Employee Taxes
Viewing MTD, QTD, and YTD Data for a Tax Deduction
You can view year-to-date, quarter-to-date, month-to-date, prior quarter-to-date and prior month-to-date tax balances in the Tax Balances panel. In addition, ADP TAXServices clients can view local tax balances by resident code on the Locality Taxes by Residency panel.
Viewing MTD, QTD, and YTD Tax Data
To view MTD, QTD, and YTD tax balances, do the following:
1. Click Payroll and make the following selections:
Employee Information ~ View Balances (MTD, QTD, YTD)
2. Double-click the Taxes task. The Search dialog box displays.
If you want to search by month, access the Taxes task by selecting Payroll ~ Employee
Information ~ View Monthly Balances.
Figure 10-53. Search Dialog Box
3. Enter the employee ID in the Empl ID field.
4. Enter the company in the Company field.
5. Enter the calendar year in the Calendar Year field.
6. Enter the state that is subject to taxes in the State field.
7. Enter the locality (if applicable) that is subject to taxes in the Locality field.
Chapter 10: Researching and Correcting Employee Payroll DataPayroll Processing Guide Version 5.04.01

Researching and Correcting Employee Taxes 10-61
8. Enter a tax balance class (if you want to search for a specific class) in the Tax Balance Class field and click OK. The Taxes panel displays.
Figure 10-54. Taxes Panel
9. Review the following tax information:
• Co - Displays the code that identifies the company.
• Calendar Year - Displays the calendar year to which these balances apply.
• Tax Class - Identifies the tax balance classification.
• State/US Federal - This field displays in one of the following ways:
– State- Displays the state in which the taxes were withheld.
– US Federal- Indicates that the taxes withheld were federal taxes.
• Balances - This area displays year-, quarter-, and month-to-date tax, taxable gross, and no limit gross information for a specific tax balance class.
• Month - Displays the month to which these balances apply.
• Tax - Displays the employee's taxes year-to-date for the specified tax class.
• Taxable Gross/No Limit Gross - Displays the employee's taxable gross or no-limit gross month-to-date, quarter-to-date, and year-to-date for the specified tax class. Taxable gross, unlike no-limit gross, takes into consideration any maximum gross limit imposed for the specified tax class.
For example, assume that Social Security is taken only on the first $72,600 of employee earnings. If the employee has earned $100,000 year-to-date, the employee's taxable gross year-to-date is $72,600 and the no-limit gross year-to-date is $100,000.
10. Click (Close).
For a description of the fields on this panel, press F1.
Chapter 10: Researching and Correcting Employee Payroll DataPayroll Processing Guide Version 5.04.01

10-62 Researching and Correcting Employee Taxes
Viewing All Taxes by Month
You can view all taxes that an employee received in a specific month using the Taxes task. In addition, ADP TAXServices clients can view local tax balances by resident code on the Locality Taxes by Residency panel.
Viewing Tax Information by Month
You can view all taxes that an employee received in a specific month in the Taxes by Month panel. To view all taxes by month, do the following:
1. Click Payroll and make the following selections:
Employee Information ~ View Monthly Balances
2. Double-click the Taxes task. The Search dialog box displays.
Figure 10-55. Search Dialog Box
3. Enter the employee ID in the Empl ID field.
4. Enter the company in the Company field.
5. Enter the calendar year in the Calendar Year field.
6. Enter the state that is subject to taxes in the State field.
7. Enter the locality (if applicable) that is subject to taxes in the Locality field.
Chapter 10: Researching and Correcting Employee Payroll DataPayroll Processing Guide Version 5.04.01

Researching and Correcting Employee Taxes 10-63
8. Enter a tax balance class (if you want to search for a specific class) in the Tax Balance Class field and click OK. The Taxes by Month panel displays.
Figure 10-56. Taxes by Month Panel
9. Review the following tax information:
• Co
• Displays the code that identifies the company.
• Calendar Year
• Displays the calendar year to which these balances apply.
• Tax Class
• Identifies the tax balance classification.
• StateUS Federal
• This field displays in one of the following ways:
• State- Displays the state in which the taxes were withheld.
• US Federal- Indicates that the taxes withheld were federal taxes.
• Balances
• This area displays year-, quarter-, and month-to-date tax, taxable gross, and no limit gross information for a specific tax balance class.
• Month
• Displays the month to which these balances apply.
• Tax - Displays the employee's taxes year-to-date for the specified tax class.
For a description of the fields on this panel, press F1.
Chapter 10: Researching and Correcting Employee Payroll DataPayroll Processing Guide Version 5.04.01

10-64 Researching and Correcting Employee Taxes
• Taxable Gross/No Limit Gross - Displays the employee's taxable gross or no-limit gross month-to-date, quarter-to-date, and year-to-date for the specified tax class. Taxable gross, unlike no-limit gross, takes into consideration any maximum gross limit imposed for the specified tax class.
For example, assume that Social Security is taken only on the first $72,600 of employee earnings. If the employee has earned $100,000 year-to-date, the employee's taxable gross year-to-date is $72,600 and the no-limit gross year-to-date is $100,000.
Viewing Local Tax Balances
ADP TAXServices clients can view local tax balances by resident code on the Locality Taxes by Residency panel.
1. Click Payroll and make the following selections:
Employee Information ~ View Balances (MTD, QTD, YTD)
2. Double-click the Taxes task. The Search dialog box displays.
Figure 10-57. Search Dialog Box
3. Enter the employee ID in the Empl ID field.
4. Enter the company in the Company field.
5. Enter the calendar year in the Calendar Year field.
6. Enter the state that is subject to taxes in the State field.
Chapter 10: Researching and Correcting Employee Payroll DataPayroll Processing Guide Version 5.04.01

Researching and Correcting Employee Taxes 10-65
7. Enter a tax balance class (if you want to search for a specific class) in the Tax Balance Class field and click OK. The Local Taxes by Residency panel displays.
Figure 10-58. Local Taxes by Residency Panel
8. Review the following local tax balances:
• Co - Displays the code that identifies the company.
• Calendar Year - Displays the calendar year to which these balances apply.
• Tax Class - Displays each tax balance classification that applies to this employee.
• PSD Code - If applicable to the locality, displays the political subdivision (PSD) code. The PSD code is maintained by ADP on the Local Tax panel (Payroll ~ Company Definitions ~ System Tax Data ~ Local Tax Configuration).
• State/US Federal - This field displays in one of the following ways:
– State- Displays the state in which the taxes were withheld.
– US Federal- Indicates that the taxes withheld were federal taxes.
• Locality - This field displays the locality in which the taxes were withheld.
• Balances - This area displays month-, quarter-, and year-to-date tax, taxable gross, and no limit gross information for a specific tax balance class.
• Month - Displays the month to which these balances apply.
• Resident - Indicates if the employee is a resident of the locality.
• Tax/Taxable Gross - The top monetary amount displays the month-, quarter-, and year-to-date totals for each tax class. The bottom monetary amount displays the employee's taxable gross month-to-date, quarter-to-date, and year-to-date for the specified tax class. Taxable gross takes into consideration any maximum gross limit imposed for the specified tax class.
For a description of the fields on this panel, press F1.
Chapter 10: Researching and Correcting Employee Payroll DataPayroll Processing Guide Version 5.04.01

10-66 Researching and Correcting Employee Taxes
For example, assume that Social Security is taken only on the first $97,500 of employee earnings. If the employee has earned $100,000 year-to-date, the employee's taxable gross year-to-date is $97,500 and the no-limit gross year-to-date is $100,000.
9. When you are finished reviewing the information, click (Close).
You’ve just finished viewing an employee’s year-, quarter-, month-, prior quarter-, and prior month-to-date totals for taxes.
Correcting Taxes
After you’ve determined which garnishment information is incorrect, you may need to modify federal, state, and local tax data using the Change Employee Tax Withholding task.
In addition, you can pay a new employee “on time” even if you have not yet received the employee’s withholding certificates using the Default Tax Configuration option. When you initially hire a new employee, Enterprise Payroll automatically generates a set of default tax data records. This feature allows Enterprise Payroll to proceed to pay the employee, calculating the maximum applicable income tax for the jurisdictions. Once you receive the employee’s withholding certificates, you use the Change Employee Tax Withholding task to update the employee tax data.
For step-by-step instructions on modifying federal, state, and local tax data, refer to the Employee Tax Setup Guide.
Researching and Correcting Employee Taxes
Researching Taxes
Correcting Taxes
Chapter 10: Researching and Correcting Employee Payroll DataPayroll Processing Guide Version 5.04.01

Chapter 11
Processing an Off-Cycle Payroll
PAGE TOPIC
11-2 Introduction
11-4 Creating Manual Checks Using the Standard Off-Cycle Process
11-23 Creating On-Demand Checks Using the Standard Off-Cycle Process
11-30 Creating Manual and On-Demand Checks Using the On-Line Check Process
11-53 Adjusting a Check
11-60 Reversing a Check
11-66 Deleting an Adjusted/Reversed Check
Chapter 11: Processing an Off-Cycle PayrollPayroll Processing Guide Version 5.04.01

11-2 Introduction
Introduction
Off-cycle processing refers to calculating and creating a paycheck for one or more employees outside the normally scheduled (on-cycle) payroll run for their pay group. You can produce manual and on-demand checks and run paycheck reversals and/or adjustments during an off-cycle payroll. Processing an off-cycle payroll is similar to processing a normal on-cycle payroll.
However, you must meet these conditions before running an off-cycle payroll:
• Off-cycle payrolls cannot be processed in a pay period that has already been confirmed.
• Make sure you are processing against the most current open pay period.
• All paychecks for the current quarter must be processed before you can run an off-cycle payroll in the next quarter.
• A pay run ID must be assigned to the pay period in the pay calendar before off-cycle processing may begin.
• You need to run the Pay Confirmation process for off-cycle payrolls before you can continue to calculate or confirm your on-cycle payroll for that period.
With a manual check, you calculate the check manually and then enter the calculations into Enterprise Payroll. With an on-demand check, Enterprise Payroll calculates and creates the check for you as you need. Although these checks are typically processed as off-cycle payroll runs, you can produce these checks as part of your normal on-cycle payroll process as well.
Reverse a check if you produce a check that should not have been produced or is incorrect, but it has not yet been cashed and has been returned to the payroll office. When you reverse the check, you generally cut a new check for the correct amount or do nothing after having reversed it. Refer to “Adjusting a Check” on page 11-53 for instructions on reversing a check.
Adjust a check if you produce a check that should not have been produced or is incorrect, and it has been cashed. When you adjust a check, you calculate the check the way it should have been calculated and compare the new calculation to the calculation used on the incorrect check. Then you either give the employee a check for the difference or have the employee pay the company for the difference, whichever is applicable.
Chapter 11: Processing an Off-Cycle PayrollPayroll Processing Guide Version 5.04.01

Introduction 11-3
Table 11-1 displays the differences between an off-cycle paysheet page produced by a reversal and an off-cycle paysheet page produced by an adjustment:
This chapter explains how to create “on-demand” checks and manual checks using the standard process as well as the On-Line Check process. In addition, it provides instructions for adjusting and reversing a check.
You can often complete a task in the product in multiple ways. For information on interface
shortcuts and tips, refer to the Using ADP Enterprise HR Guide.
As you work through the tasks in this chapter, you may have questions about fields and options on the panels. To display a description of the fields and options, press F1 (Help) from the panel.
Table 11-1. Difference Between Reversal and Adjustment Off-Cycle Paysheet Page
Type Description
Reversal Produces an off-cycle paysheet page with a “negative image” of the original check (pay record), with all the amounts changed from positive to negative. This effectively “backs the check out” of Enterprise Payroll.
Adjustment Produces an off-cycle paysheet page with two records:
• A reversing adjustment with a net pay of zero
• An adjustment where you enter the information for the check as it “should have been”.
Chapter 11: Processing an Off-Cycle PayrollPayroll Processing Guide Version 5.04.01

11-4 Creating Manual Checks Using the Standard Off-Cycle Process
Creating Manual Checks Using the Standard Off-Cycle Process
A manual check is a check you prepare manually outside of Enterprise Payroll. The manual check amounts are calculated by hand (or calculator) and the physical check is typed up or written out by hand. For example, you may have a remote office that does not have access to Enterprise Payroll but occasionally needs to write a manual check to handle a last-minute payroll adjustment. You can also produce manual checks for errors occurring in Enterprise Payroll-produced paychecks.
The manual check process does not include retroactive pay.
When you create a manual check, you need to record it in Enterprise Payroll to update your employee’s earnings, deductions, and tax balances. Because manual checks are created outside of Enterprise Payroll, you must record all earnings, deductions, and tax information for manual checks into Enterprise Payroll through the Earnings panel (Payroll ~ Payroll Cycle Processes ~ On-Demand Payroll - Off Cycle ~ Enter Pay Cycle Earnings - Paysheets).
Although you normally process manual checks in off-cycle payroll runs, you can record them as part of your on-cycle payroll process.
To create manual checks using the standard off-cycle process, you set up an off-cycle paysheet using the panels that are part of the Enter Pay Cycle Earnings (Paysheets) task, and run the pay calculation and confirmation processes. In most cases, you will use this standard process to create manual checks if you need to process checks for more than 25 employees.
You can also process manual checks on-cycle by adding a paysheet to your on-cycle run.
Processing a manual check consists of the following:
• Adding a Paysheet Page
• Entering One-time Deductions
• Entering One-time Garnishments
• Entering One-time Taxes
• Entering Third-party Sick Pay
• Calculating Retroactive Pay
• Calculating Your Manual Check(s)
• Completing Your Payroll
Chapter 11: Processing an Off-Cycle PayrollPayroll Processing Guide Version 5.04.01

Creating Manual Checks Using the Standard Off-Cycle Process 11-5
Adding a Paysheet Page
You must create a paysheet entry so that you can enter manual check data - such as employee’s earnings, taxes, and deductions - into the paysheet. Enterprise Payroll calculates employer-paid taxes and benefits.
To add a paysheet page so that you can enter manual check data, do the following:
1. Click Payroll and make the following selections.
Payroll Cycle Processes ~ On-Demand Payroll (Off Cycle)
2. Click next to the Enter Pay Cycle Earnings (Paysheets) task. The Add dialog box displays.
Figure 11-1. Add Dialog Box
To modify an existing paysheet page, double-click the Enter Pay Cycle Earnings
(Paysheets) task, enter the search criteria in the Search dialog box, and click OK. To
preserve history, click (Insert Row).
3. Enter the company in the Company field.
4. Enter the pay group in the Pay Group field.
5. Enter the next on-cycle pay period end date in the Pay Period End Date field.
6. Enter Y in the Off Cycle field.
7. Enter the paysheet page number in the Page # field.
The page number can be any page that is not already assigned to an existing set of
paysheets for the specified company and pay group. Use a unique number so that you can easily identify manual checks.
For an employee set up with a contract, Enterprise Payroll will first verify the employee is active via the job record. Next it will verify the employee’s contract is active. If both of these conditions are met, a paysheet will be created for the employee. When an employee is active but the contract is not, a warning will display, but a paysheet can still be created.
Creating Manual Checks Using the Standard Off-Cycle Process
Adding a Paysheet Page
Entering One-time Deductions
Entering One-time Garnishments
Entering One-time Taxes
Entering Third-party Sick Pay
Calculating Retroactive Pay
Calculating Your Manual Check(s)
Completing Your Payroll
Chapter 11: Processing an Off-Cycle PayrollPayroll Processing Guide Version 5.04.01

11-6 Creating Manual Checks Using the Standard Off-Cycle Process
The Earnings panel displays.
Figure 11-2. Earnings Panel
For detailed information on the paysheet fields on this panel, press F1 or refer to Table 3-1, “Paysheet Items,”on page 3-4.
8. Select the first employee to receive a manual check from the Empl D field and then press Tab to display the employee’s name.
9. Select the Manual Check check box.
10. Enter the actual number of the physical manual check in the Check # field.
The check number does not need to correspond in any way with check numbers
Enterprise Payroll produces.
11. Enter the check date of the manual check in the Dt field.
The off-cycle check date should be within the same quarter as the on-cycle calendar.
12. Enter the employee’s total gross before taxes and deductions in the Tot Gross field.
13. Enter the calculated net pay amount in the Net Pay field.
For a description of the fields on this panel, press F1.
Chapter 11: Processing an Off-Cycle PayrollPayroll Processing Guide Version 5.04.01

Creating Manual Checks Using the Standard Off-Cycle Process 11-7
14. Select one of the following options from the Direct Deposit field:
• None - The money will not be deposited into the employee’s direct deposit account. Instead, he will receive a check.
• Special - The money will be deposited into the direct deposit account that has the Use for Special Payrolls check box selected on the Direct Deposit panel (Payroll ~ Employee Information ~ Employee Payroll Data ~ Direct Deposit).
• Standard - The money will be deposited based on the employee’s direct deposit options established on the Direct Deposit panel (Payroll ~ Employee Information ~ Employee Payroll Data ~ Direct Deposit).
For details on the Direct Deposit panel, refer to the Payroll Setup and Maintenance
Guide.
15. Select the OK to Pay check box.
If you want a warning message to automatically display upon saving if you have changed
a payline but have not selected the OK to Pay check box, you can select the OK to Pay Warning check box on the Earnings/Payment Basics panel (Company Definitions ~ Pay Groups and Payroll Calendars ~ Pay Groups). For details, refer to the Payroll Setup and Maintenance Guide.
16. Enter the amount of regular earnings included in gross pay in the Reg Earns field.
17. If any additional earnings went into making up the total gross, select the code for the earnings from the Code field in the Other Earnings area.
18. If hours are associated with the earnings type, then enter the number of hours in the Oth Hrs field.
19. If the earnings type has a specific dollar amount, enter the amount in the Amount field.
If the amount in the Tot Gross field does not equal the sum of all additional earnings,
you will receive an error message during pay confirmation.
You have just finished adding a paysheet page for a manual check. Next, enter one-time deduction information for the manual check.
Chapter 11: Processing an Off-Cycle PayrollPayroll Processing Guide Version 5.04.01

11-8 Creating Manual Checks Using the Standard Off-Cycle Process
Entering One-time Deductions
Use the Deduction Override to enter deduction information for the manual check. Insert as many rows as necessary to record all employee-paid deductions taken in the manual check.
To enter one-time deductions, do the following:
1. Click the Deduction Override tab.
When entering a manual check, you must start on the Earnings panel. See page 11-5 for
more information.
Figure 11-3. Deduction Override Panel
For detailed information on this panel, press F1 or see page 3-29.
2. To calculate pay, select the OK to Pay check box.
If you want a warning message to automatically display upon saving if you have changed
a payline but have not selected the OK to Pay check box, you can select the OK to Pay Warning check box on the Earnings/Payment Basics panel (Company Definitions ~ Pay Groups and Payroll Calendars ~ Pay Groups). For details, refer to the Payroll Setup and Maintenance Guide.
3. Select one of the following options from the Deduction field:
• None - No additional deductions will be taken from the wages.
• Standard - The employee’s current deductions will remain the same and process as normal.
• Subset - Select a deduction subset to override the employee’s current deductions.
If you select this option, then select the appropriate deduction subset from the
Subset field.
Creating Manual Checks Using the Standard Off-Cycle Process
Adding a Paysheet Page
Entering One-time Deductions
Entering One-time Garnishments
Entering One-time Taxes
Entering Third-party Sick Pay
Calculating Retroactive Pay
Calculating Your Manual Check(s)
Completing Your Payroll
Chapter 11: Processing an Off-Cycle PayrollPayroll Processing Guide Version 5.04.01

Creating Manual Checks Using the Standard Off-Cycle Process 11-9
4. If you do not want arrears to be deducted from the employee’s pay in addition to the employee’s standard deduction, clear the Process Arrears check box.
This field does not apply to garnishment deductions, since these types of arrears should
always be processed.
5. In the One-Time Deduction Data area, select the plan type for the deduction from the Plan Type field.
6. Select the benefit plan from the Benefit Plan field.
7. Select the code from the Deduction Code field.
8. Select the class from the Deduction Class field.
9. Select Override as the Exception Type option.
10. Enter the amount of the manual deduction in the Flat/Addl Amt field.
11. Select Flat Amount from the Calculation Routine area.
12. To add additional one-time deductions, click the inner scroll bar and click (Insert Row).
You have just finished entering one-time deductions for the manual check. Next, enter one-time garnishment information for the manual check.
Chapter 11: Processing an Off-Cycle PayrollPayroll Processing Guide Version 5.04.01

11-10 Creating Manual Checks Using the Standard Off-Cycle Process
Entering One-time Garnishments
Use the Garnishment Override panel to override, suspend, or refund an existing garnishment (one-time).
1. Click the Garnishment Override tab.
When entering a manual check, you must start on the Earnings panel. See page 11-5 for
more information.
Figure 11-4. Garnishment Override Panel
For detailed information on this panel, press F1 or see page 3-34.
2. Click the outer scroll bar until you find the employee who is going to get the one-time garnishment.
3. Click the inner scroll bar until you find the specific garnishment that you want to override, refund, or suspend.
4. In the One-Time Garnishment area, select the garnish ID from the Garnish ID field.
5. Enter the priority of the garnishment in the Priority field.
6. Select Override, Refund, or Suspend from the Garnishment One-Time Code area.
7. When you are finished, click (Save).
You have just finished overriding, suspending, or refunding a one-time garnishment for a manual check. Next, you can enter one-time taxes, if necessary.
Creating Manual Checks Using the Standard Off-Cycle Process
Adding a Paysheet Page
Entering One-time Deductions
Entering One-time Garnishments
Entering One-time Taxes
Entering Third-party Sick Pay
Calculating Retroactive Pay
Calculating Your Manual Check(s)
Completing Your Payroll
Chapter 11: Processing an Off-Cycle PayrollPayroll Processing Guide Version 5.04.01

Creating Manual Checks Using the Standard Off-Cycle Process 11-11
Entering One-time Taxes
Use the Tax Override panel to enter tax information for the manual check. Insert as many rows as necessary to record all employee-paid taxes deducted in the manual check.
To enter one-time taxes, do the following:
1. Click the Tax Override tab.
When entering a manual check, you must start on the Earnings panel. See page 11-5 for
more information.
Figure 11-5. Tax Override Panel
For detailed information on this panel, press F1 or see page 3-37.
2. Clear the Additional Taxes check box so that Enterprise Payroll won’t look at the additional taxes the employee usually wants taken out.
3. In the One-Time Tax Data area, select the Federal check box if you are adjusting federal withholding taxes.
4. Select Override as the Tax Type option.
If the employee has IRS tax lock-in letter, you will not be able to select the Override
option.
5. Select the tax class from the Tax Class field.
Only record employee-paid taxes that were deducted in the manual checks.
6. Enter the amount of tax deducted in the Tax Amt field.
7. To enter state and local tax information, click the inner scroll bar and click (Insert Row).
Creating Manual Checks Using the Standard Off-Cycle Process
Adding a Paysheet Page
Entering One-time Deductions
Entering One-time Garnishments
Entering One-time Taxes
Entering Third-party Sick Pay
Calculating Retroactive Pay
Calculating Your Manual Check(s)
Completing Your Payroll
Chapter 11: Processing an Off-Cycle PayrollPayroll Processing Guide Version 5.04.01

11-12 Creating Manual Checks Using the Standard Off-Cycle Process
8. Select the state from the State field.
9. If you are specifying a local tax amount, select the taxing locality from the Locality field.
10. Select Override as the Tax Type option.
If the employee has IRS tax lock-in letter, you will not be able to select the Override
option.
11. Select the tax class from the Tax Class field.
Only record employee-paid taxes that were deducted in the manual checks.
12. Enter the amount of tax deducted in the Tax Amt field.
You have just finished entering one-time taxes for the manual check. Next, you can enter third-party sick pay, if necessary.
Entering Third-party Sick Pay
If you need to add or modify third-party sick pay, see “Setting Up Third Party Sick Pay” on page 3-43 for step-by-step instructions.
Use the following path to access this task:
Payroll Cycle Processes ~ On-Demand Payroll (Off Cycle)
You have just finished entering third-party sick pay. Next, you can calculate your retroactive pay, if necessary.
Calculating Retroactive Pay
If you want to include retroactive pay in your employee’s paychecks, you must first calculate this special pay using the Calculate Retro Pay task before calculating your payroll. To calculate retroactive pay, do the following:
1. Click Payroll and make the following selections:
Payroll Cycle Processes ~ On-Demand Payroll (Off Cycle)
Creating Manual Checks Using the Standard Off-Cycle Process
Adding a Paysheet Page
Entering One-time Deductions
Entering One-time Garnishments
Entering One-time Taxes
Entering Third-party Sick Pay
Calculating Retroactive Pay
Calculating Your Manual Check(s)
Completing Your Payroll
Chapter 11: Processing an Off-Cycle PayrollPayroll Processing Guide Version 5.04.01

Creating Manual Checks Using the Standard Off-Cycle Process 11-13
2. Double-click the Calculate Retro Pay task. The Calculate Retro Pay panel displays.
Figure 11-6. Calculate Retro Pay panel
For detailed information on this panel, press F1 or see page 6-3.
3. Enter an alpha/numeric batch run ID in the Batch Run ID field.
4. In the Off-Cycle Run area, do the following:
a. From the Empl ID field, select the ID for the employee who is receiving the manual check and press Tab. Enterprise Payroll automatically populates the Emp Rcd#, Name, Company, and Pay Group fields.
b. From the Pay End Date field, select the pay period end date.
c. Enter the check date in the Check Date field.
d. Enter the paysheet page number in the Page # field.
5. From the Run Type area, select one of the following options:
• Report Only - Select to generate the retrorpt.lis report listing the pending retroactive pay for the specified payroll run.
• Report and Update - Select to generate the retrorpt.lis report and calculate your initial retroactive payments.
6. Click (Save).
7. Click Run Retro Calc. You will receive a message notifying you that your process has been submitted. Click OK.
8. To confirm successful completion of your process, click (Process Monitor).
Chapter 11: Processing an Off-Cycle PayrollPayroll Processing Guide Version 5.04.01

11-14 Creating Manual Checks Using the Standard Off-Cycle Process
9. To view the retrorpt.lis report, click (Report Outputs). When the Report
Outputs dialog box displays, highlight the report you want to view and click (View). A secondary browser window displays your report.
For additional information on running, viewing, and printing reports, refer to the Using ADP Enterprise HR Guide. For details on sources, sort order, and an illustration of the report, see the Standard Reports Guide
You have just finished calculating retroactive pay. You are now ready to calculate your payroll.
Calculating Your Manual Check(s)
Enterprise Payroll allows you to specify whether you want to calculate pay as follows:
• In preliminary or final mode
• For all employees or only for employees with changes to their payroll data
You can select any combination of options and run payroll calculation as many times as you need in any mode. The only restriction is that you must correct all payroll calculation errors before running the Confirm Payroll program.
Running the preliminary Pay Calculation process consists of the following:
• Processing Your Initial Payroll Calculation
• Correcting Errors in Your Payroll
• Recalculating Your Payroll
• Viewing Preliminary Check Data
Processing Your Initial Payroll Calculation
Processing your initial payroll calculation consists of setting up a batch ID and payroll run ID, indicating whether you want to calculate all checks or only those whose pay cycle data has changed since the last time you calculated, and indicating if this is a preliminary calculation. Each time you recalculate your payroll, you must set up all this information again.
To process your initial payroll calculation, do the following:
1. Click Payroll and make the following selections:
Payroll Cycle Processes ~ On-Demand Payroll (Off Cycle)
Chapter 11: Processing an Off-Cycle PayrollPayroll Processing Guide Version 5.04.01

Creating Manual Checks Using the Standard Off-Cycle Process 11-15
2. Double-click the Calculate Preliminary Payroll task. The Payroll Calculation panel displays.
Figure 11-7. Payroll Calculation Panel
For detailed information on this panel, press F1 or see page 6-6.
3. Enter the batch run ID in the Batch Run ID field.
4. In the Off-Cycle Pay Calendar area, select the company from the Company field.
5. Select the pay group from the Pay Group field.
6. Select the pay period end date from the Pay End Date field.
7. Enter the paysheet page number range to be processed in the Process fields.
8. Select an option in the Select Checks to Calculate area that indicates whether you want all checks recalculated or only those that have been changed.
9. Click (Save).
10. Click Run Pay Calc. Enterprise Payroll displays the number of employees processed and generates replacement checks.
You will receive a message notifying you that your process has been submitted. Click
OK. To confirm successful completion, click (Process Monitor).
For additional information on the Process Monitor, refer to the Using ADP Enterprise HR Guide. To view your error messages, see “Correcting Errors in Your Payroll” on page 11-16.
Chapter 11: Processing an Off-Cycle PayrollPayroll Processing Guide Version 5.04.01

11-16 Creating Manual Checks Using the Standard Off-Cycle Process
You’ve just finished processing your initial payroll calculation.
If you would like to review error messages generated during payroll calculation, see “Reviewing Error Messages and Warnings” on page 11-16.
If you don’t have any errors, you can review your preliminary check data. For more information, see “Viewing Preliminary Check Data” on page 11-17.
Reviewing Error Messages and Warnings
Enterprise Payroll provides several ways you can view your error messages and warnings. For detailed information, refer to “Reviewing Error Messages and Warnings” on page 6-8.
You’ve just finished reviewing error messages generated during payroll calculation. Next, correct any errors in your payroll.
Correcting Errors in Your Payroll
Before completing your payroll, you must correct any errors.
Use the following path to access the tasks for correcting errors:
Payroll Cycle Processes ~ On-Demand Payroll (Off-Cycle)
Sometimes you need to correct information on your paysheets, in your company definitions, or in your employee information because of pay calculation errors, late paperwork, data entry errors or other issues. Depending on the results of the preliminary calculation run, you can select from a variety of corrective actions.
If you are unable to correct an error or lack information for an employee, return to the Earnings panel (Payroll ~ Payroll Cycle Processes ~ Update Pay Cycle Data ~ Earnings and Overrides-Paysheets) and clear the OK to Pay check box for the specific employee. Enterprise Payroll then ignores the employee so that you can continue processing the payroll on schedule. You can later issue a manual check to any employees that could not be processed as part of your payroll run.
You have just finished correcting any existing payroll errors you received after calculating your payroll. Next, you must recalculate your payroll.
Chapter 11: Processing an Off-Cycle PayrollPayroll Processing Guide Version 5.04.01

Creating Manual Checks Using the Standard Off-Cycle Process 11-17
Recalculating Your Payroll
After correcting all errors, run the Calculate Payroll program again to ensure the accuracy of the payroll. Refer to “Calculating Your Manual Check(s)” on page 11-14.
Use the following path to access this task:
Payroll Cycle Processes ~ On-Demand Payroll (Off-Cycle)
You can keep processing the pay calculation process until you are satisfied with the results. You must set up the run control each time before running the Calculate Payroll program.
When you use the Calculate Preliminary Payroll task, Enterprise Payroll automatically
recalculates paylines with errors and recalculates the pay for those employees who had changes made to their paylines.
You have just finished recalculating your payroll after correcting any payroll errors. Next, you can review your pay calculation results.
Viewing Preliminary Check Data
You can view the following preliminary check data online for a specific employee:
• Paycheck summary
• Earnings
• Taxes
• Garnishments
• Special accumulators
• Distributions
• Retroactive earnings
Use the following path to access the preliminary check data:
Payroll Cycle Processes ~ On-Demand Payroll (Off-Cycle)
For step-by-step instructions on accessing this information, refer to “Viewing Preliminary Check Data” on page 6-14.
You’ve just finished viewing the details of an on-demand or manual check viewing preliminary check data after calculating your payroll. Next, you’re ready to complete your payroll.
Chapter 11: Processing an Off-Cycle PayrollPayroll Processing Guide Version 5.04.01

11-18 Creating Manual Checks Using the Standard Off-Cycle Process
Completing Your Payroll
When you are satisfied with the results of your preliminary pay calculation runs and you have corrected all errors, you are ready to run the final pay calculation and confirm your payroll.
Completing the payroll consists of the following:
• Running the Final Pay Calculation
• Confirming Your Payroll
• Reviewing Pay Confirmation Results
After completing your payroll, you can review your result on line or on printed reports. For more information, see Chapter 7, “Generating Summary Reports.”
Running the Final Pay Calculation
Recalculate your payroll one more time, this time clearing the Preliminary Calculation Run check box in the Payroll Calculation panel.
To run your final pay calculation, do the following:
1. Click Payroll and make the following selections:
Payroll Cycle Processes ~ On-Demand Payroll (Off Cycle)
2. Double-click the Calculate Final Payroll task. The Payroll Calculation panel displays.
Figure 11-8. Payroll Calculation Panel
For detailed information on this panel, press F1 or see page 6-6.
Creating Manual Checks Using the Standard Off-Cycle Process
Adding a Paysheet Page
Entering One-time Deductions
Entering One-time Garnishments
Entering One-time Taxes
Entering Third-party Sick Pay
Calculating Retroactive Pay
Calculating Your Manual Check(s)
Completing Your Payroll
Chapter 11: Processing an Off-Cycle PayrollPayroll Processing Guide Version 5.04.01

Creating Manual Checks Using the Standard Off-Cycle Process 11-19
3. Enter the batch run ID in the Batch Run ID field.
4. In the Off-Cycle Pay Calendar group, select the company from the Company field.
5. Select the pay group from the Pay Group field.
6. Select the pay period end date from the Pay End Date field.
7. Enter the paysheet page number range to be processed in the Process Page # fields.
8. From the Pay Period of the Month field, select the pay period of the month in which you are running the off-cycle pay calculation. The pay period you select determines which earnings, deductions and taxes are assigned during pay calculation.
9. Select one of the options from the Select Checks to Calculate area to indicate which checks you want to calculate in your run:
• Only Calculate Where Needed - Select to calculate paysheets not yet calculated, those with errors, or those with record changes.
This option minimizes your processing time.
• (Re)Calculate All Checks - Select only if you have made company level changes, such as insurance rate adjustments, which affect pay calculations. The only time you should select this option is for changes to non-employee-level information affecting payroll processing.
10. Click (Save).
11. Click Run Pay Calc. You will receive a message notifying you that your process has
been submitted. Click OK. To confirm successful completion, click (Process Monitor).
For additional information on the Process Monitor, refer to the Using ADP Enterprise HR Guide. To view your error messages, see “Correcting Errors in Your Payroll” on page 11-16.
You’ve just finished running your final pay calculation. Next, you are ready to confirm your payroll.
Chapter 11: Processing an Off-Cycle PayrollPayroll Processing Guide Version 5.04.01

11-20 Creating Manual Checks Using the Standard Off-Cycle Process
Confirming Your Payroll
After you have run your final pay calculation without receiving any errors, you are ready to confirm your payroll.
Running the Confirm Payroll process while another Confirm process is executing can cause
duplicate check numbers if both processes are using the same form ID.
Once you begin the confirmation process, Enterprise Payroll assumes that you have reviewed and approved all payroll information for this pay run.
When you confirm your payroll, Enterprise Payroll processes one company at a time. Enterprise Payroll also processes every pay group you assign to the pay run ID and indicates how many checks are being calculated and how many have already been calculated.
In addition, it assigns check and advice numbers. Enterprise Payroll looks at the last form number Enterprise Payroll uses on the Paycheck and Deposit Forms panel (Payroll ~ Company Definitions ~ Other Payroll Definitions ~ Paycheck and Deposit Forms), adds one, and assigns this number to the first person on the paysheets. Enterprise Payroll assigns the remaining check or advice numbers sequentially according to the order of the employees on the paysheets.
Finally, if you are using fund accounting, you can tell Enterprise Payroll to stop the process if any fund(s) would be exhausted by the pay run confirmation.
To confirm your payroll, do the following:
1. Click Payroll and make the following selections:
Payroll Cycle Processes ~ On-Demand Payroll (Off Cycle)
You cannot update paysheet information once you confirm your payroll. Make sure that all amounts are calculated properly. If you forget to recalculate your payroll with the Preliminary Calculation Run check box cleared and you try to confirm your payroll, you will receive an error message notifying you that your payroll is not final.
Chapter 11: Processing an Off-Cycle PayrollPayroll Processing Guide Version 5.04.01

Creating Manual Checks Using the Standard Off-Cycle Process 11-21
2. Double-click the Complete Payroll (Confirm) task. The Payroll Confirmation panel displays.
Figure 11-9. Payroll Confirmation Panel
3. Enter the batch run ID in the Batch Run ID field.
4. In the Off-Cycle Pay Calendar area, select the company from the Company field.
5. Select the pay group from the Pay Group field.
6. Select the pay period end date for the on-demand/manual check(s) from the Pay End Date field.
7. If you want to specify that Enterprise Payroll should only process the on-demand/manual checks within a specific paysheet page range, enter the page range in the Process Page # fields.
8. If you want Enterprise Payroll to process all on-demand/manual checks on the paysheet, select the All Reversals/Adjustments check box.
9. If you are a TotalPay Card subscriber but want checks to be issued instead of generating a TotalPay Card distribution, clear the Process Paycard check box.
10. If you are using fund accounting and want Enterprise Payroll to determine whether any fund(s) would be exhausted by the pay run, select the Test for Fund Exhaustion check box.
11. Click (Save).
For a description of the fields on this panel, press F1.
Chapter 11: Processing an Off-Cycle PayrollPayroll Processing Guide Version 5.04.01

11-22 Creating Manual Checks Using the Standard Off-Cycle Process
12. Click Run Pay Confirm.You will receive a message notifying you that your process has
been submitted. Click OK. To confirm successful completion, click (Process Monitor).
For additional information on the Process Monitor, refer to the Using ADP Enterprise HR Guide. To view your error messages, see “Correcting Errors in Your Payroll” on page 11-16.
You’ve just finished confirming your payroll.
If you have errors, you can review your system messages. For more information, see “Reviewing System Messages” on page 6-36.
If you confirmed without errors, you can review your final payroll results. For more information, see “Reviewing Pay Confirmation Results” on page 11-22.
Reviewing Pay Confirmation Results
After you complete the pay confirmation process, you can view the results of paycheck earnings, deductions, and taxes using the panels as discussed in “Viewing Preliminary Check Data” on page 11-17.
Enterprise Payroll also includes several standard reports that you can print and customize to help you verify the results of the pay confirmation. For more information on these reports, see Chapter 7, “Generating Summary Reports.”
You’ve just finished reviewing the results of the pay confirmation, which is the last step in creating manual checks using the standard off-cycle process.
To print your manual checks, see Chapter 9, “Distributing Your Payroll.” To review your employee balances after completing your payroll, see Chapter 7, “Generating Summary Reports.”
Chapter 11: Processing an Off-Cycle PayrollPayroll Processing Guide Version 5.04.01

Creating On-Demand Checks Using the Standard Off-Cycle Process 11-23
Creating On-Demand Checks Using the Standard Off-Cycle Process
It may be more efficient to use the standard off-cycle process to produce sets of 25 or more checks. For example, you would probably use the standard off-cycle process to produce a set of bonus checks. You could also use this process to reverse and reissue checks for a group of people whose paychecks were shorted on on-call pay.
For information about creating checks for contract employees with a non-standard number of
pay periods, see “Creating Manual Checks Using the Standard Off-Cycle Process” on page 11-4.
Using the standard off-cycle process to produce an on-demand check consists of the following:
• Adding a Paysheet Page
• Entering One-time Deductions
• Entering One-Time Taxes
• Entering One-time Garnishments
• Entering Third-party Sick Pay
• Calculating Retroactive Pay
• Calculating and Completing Your On-demand Check(s)
Chapter 11: Processing an Off-Cycle PayrollPayroll Processing Guide Version 5.04.01

11-24 Creating On-Demand Checks Using the Standard Off-Cycle Process
Adding a Paysheet Page
You must create a paysheet entry so that you can enter on-demand check data - such as employee’s earnings, taxes, and deductions - into the paysheet. Enterprise Payroll calculates employer-paid taxes and benefits.
To add a paysheet page so that you can enter on-demand check data, do the following:
1. Click Payroll and make the following selections.
Payroll Cycle Processes ~ On-Demand Payroll (Off Cycle)
2. Click next to the Enter Pay Cycle Earnings (Paysheets) task. The Add dialog box displays.
Figure 11-10. Add Dialog Box
To modify an existing paysheet page, double-click the Enter Pay Cycle Earnings
(Paysheets) task, enter the search criteria in the Search dialog box, and click OK. To
preserve history, click (Insert Row).
3. Enter the company in the Company field.
4. Enter the pay group in the Pay Group field.
5. Enter the next on-cycle pay period end date in the Pay Period End Date field.
6. Enter Y in the Off Cycle field.
Creating On-Demand Checks Using the Standard Off-Cycle Process
Adding a Paysheet Page
Entering One-time Deductions
Entering One-Time Taxes
Entering One-time Garnishments
Entering Third-party Sick Pay
Calculating Retroactive Pay
Calculating and Completing Your On-demand Check(s)
Chapter 11: Processing an Off-Cycle PayrollPayroll Processing Guide Version 5.04.01

Creating On-Demand Checks Using the Standard Off-Cycle Process 11-25
7. Enter the paysheet page number in the Page # field. The Earnings panel displays.
The page number can be any page that is not already assigned to an existing set of
paysheets for the specified company and pay group. Use a unique number so that you can easily identify on-demand checks.
Figure 11-11. Earnings Panel
For detailed information on this panel, press F1 or see Table 3-1 on page 3-4.
8. Select the first employee to receive a on-demand check from the Empl D field and then press Tab to display the employee’s name.
9. Select the OK to Pay check box.
If you want a warning message to automatically display upon saving if you have changed
a payline but have not selected the OK to Pay check box, you can select the OK to Pay Warning check box on the Earnings/Payment Basics panel (Company Definitions ~ Pay Groups and Payroll Calendars ~ Pay Groups). For details, refer to the Payroll Setup and Maintenance Guide.
10. Enter the number of regular hours included in gross pay in the Reg Hrs field.
11. Enter the number of overtime hours included in gross pay in the OT Hrs field.
12. Select the Standard option from the Direct Deposit field.
13. If any additional earnings went into making up the total gross, select the code for the earnings from the Code field in the Other Earnings area.
14. If re-established additional pay is being recorded, select the additional pay sequence number in the Seq field.
15. If hours are associated with the earnings type, then enter the number of hours in the Oth Hrs field.
16. If the earnings type has a specific dollar amount, enter the amount in the Amount field.
Chapter 11: Processing an Off-Cycle PayrollPayroll Processing Guide Version 5.04.01

11-26 Creating On-Demand Checks Using the Standard Off-Cycle Process
You have just finished adding a paysheet page. Next, enter one-time deduction information for the on-demand check.
Entering One-time Deductions
Use the Deduction Override panel to enter deduction information for the on-demand check. Insert as many rows as necessary to record all employee-paid deductions taken in the on-demand check.
For step-by-step instructions on entering one-time deductions, see “Entering a One-time Deduction Override” on page 3-27.
You have just finished entering one-time deductions for the on-demand check. Next, enter one-time tax information for the on-demand check.
Entering One-Time Taxes
Use the Tax Override panel to enter tax information for the on-demand check. Insert as many rows as needed to record all employee-paid taxes deducted in the on-demand check.
To enter one-time taxes, do the following:
1. Click the Tax Override tab.
When entering an on-demand check, you must start on the Earnings panel. See
page 11-5 for more information.
Figure 11-12. Tax Override Panel
For detailed information on this panel, press F1 or see page 3-37.
Creating On-Demand Checks Using the Standard Off-Cycle Process
Adding a Paysheet Page
Entering One-time Deductions
Entering One-Time Taxes
Entering One-time Garnishments
Entering Third-party Sick Pay
Calculating Retroactive Pay
Calculating and Completing Your On-demand Check(s)
Chapter 11: Processing an Off-Cycle PayrollPayroll Processing Guide Version 5.04.01

Creating On-Demand Checks Using the Standard Off-Cycle Process 11-27
2. Clear the Additional Taxes check box if you don’t want Enterprise Payroll to look at the additional taxes the employee usually wants taken out.
3. In the One-Time Tax Data area, select the Federal check box if you are adjusting federal taxes.
4. Select Override as the Tax Type option.
If the employee has IRS tax lock-in letter, you will not be able to select the Override
option.
5. Select the tax class from the Tax Class field.
6. Enter the amount of tax deducted in the Tax Amt field.
7. To enter state and local tax information, click the inner scroll bar and click (Insert Row).
8. Select the state from the State field.
9. If you are specifying a local tax amount, select the taxing locality from the Locality field.
10. Select Override as the Tax Type option.
11. Select the tax class from the Tax Class field.
Only record employee-paid taxes that were deducted in the on-demand checks.
12. Enter the amount of tax deducted in the Tax Amt field.
You have just finished entering one-time taxes for the on-demand check. Next, enter one-time garnishment information for the on-demand check.
Chapter 11: Processing an Off-Cycle PayrollPayroll Processing Guide Version 5.04.01

11-28 Creating On-Demand Checks Using the Standard Off-Cycle Process
Entering One-time Garnishments
Use the Garnishment Override panel to override, suspend, or refund an existing garnishment (one-time).
1. Click the Garnishment Override tab.
When entering a manual check, you must start on the Earnings panel. See page 11-5 for
more information.
Figure 11-13. Garnishment Override Panel
For detailed information on this panel, press F1 or see page 3-34.
2. Click the outer scroll bar until you find the employee who is going to get the one-time garnishment.
3. Click the inner scroll bar until you find the specific garnishment that you want to override, refund, or suspend.
4. In the One-Time Garnishment area, select the garnish ID from the Garnish ID field.
5. Enter the priority of the garnishment in the Priority field.
6. Select Override, Refund, or Suspend from the Garnishment One-Time Code area.
7. When you are finished, click (Save).
You have just finished overriding, suspending, or refunding a one-time garnishment for a manual check. Next, you can enter third-party sick pay, if necessary.
Creating On-Demand Checks Using the Standard Off-Cycle Process
Adding a Paysheet Page
Entering One-time Deductions
Entering One-Time Taxes
Entering One-time Garnishments
Entering Third-party Sick Pay
Calculating Retroactive Pay
Calculating and Completing Your On-demand Check(s)
Chapter 11: Processing an Off-Cycle PayrollPayroll Processing Guide Version 5.04.01

Creating On-Demand Checks Using the Standard Off-Cycle Process 11-29
Entering Third-party Sick Pay
If you need to add or modify third-party sick pay, see “Setting Up Third Party Sick Pay” on page 3-43 for step-by-step instructions.
Use the following path to access this task:
Payroll Cycle Processes ~ On-Demand Payroll (Off-Cycle)
You have just finished modifying third-party sick pay. Next, you can calculate your retroactive pay, if necessary.
Calculating Retroactive Pay
If you want to include retroactive pay in your employee’s paychecks, you must first calculate this special pay before calculating your payroll. To review your pending retroactive payments, see “Prerequisites” on page 2-3. For step-by-step instructions on calculating the retroactive pay, see “Calculating Retroactive Pay” on page 11-12.
You have just finished calculating retroactive pay. You are now ready to calculate your payroll.
Calculating and Completing Your On-demand Check(s)
You calculate and complete your on-demand check(s) using the same tasks for calculating manual checks. To calculate and complete your on-demand checks, refer to the following:
• “Calculating Your Manual Check(s)” on page 11-14
• “Viewing Preliminary Check Data” on page 11-17
• “Confirming Your Payroll” on page 11-20
You’ve just finished reviewing the results of the pay confirmation, which is the last step in creating on-demand checks using the standard off-cycle process.
To print your on-demand checks, see Chapter 9, “Distributing Your Payroll.” To review your employee balances after completing your payroll, see Chapter 7, “Generating Summary Reports.”
Creating On-Demand Checks Using the Standard Off-Cycle Process
Adding a Paysheet Page
Entering One-time Deductions
Entering One-Time Taxes
Entering One-time Garnishments
Entering Third-party Sick Pay
Calculating Retroactive Pay
Calculating and Completing Your On-demand Check(s)
Chapter 11: Processing an Off-Cycle PayrollPayroll Processing Guide Version 5.04.01

11-30 Creating Manual and On-Demand Checks Using the On-Line Check Process
Creating Manual and On-Demand Checks Using the On-Line Check Process
An alternative to producing manual and on-demand checks is to use the On-Line Check process, which allows you to quickly process an individual paycheck without creating a paysheet and going through the payroll calculation and confirmation processes separately. The On-Line Check process is a system guided, interactive program that creates a seamless user interface among the various steps of the process. Within this process, you can review and/or add to and modify an employee’s default pay cycle data.
The On-Line Check process for manual checks does not include retroactive pay.
In addition, you cannot run simultaneous on-line check processes for the same company, pay group, and pay end date.
You would probably use this process to produce individual checks or sets of under 25 checks. For example, you might need to produce a check for an employee who you recently hired, but you cannot enter it into Enterprise Payroll in time for the regularly scheduled payroll run. Other situations calling for on-demand checks might include producing a final check for a terminated employee or producing a travel expense check. The On-Line Check process uses regular earnings rather than regular amounts when calculating earnings for salaried employees.
If, at any time during your on-line check process, you want to cancel the on-line check you’re
creating, click the Cancel button on any panel. This will prompt Enterprise Payroll to remove the paysheet that you’ve created for the employee.
Using the On-Line Check process to produce manual and on-demand checks consists of the following:
• Specifying the Action
• Reversing a Check
• Setting Up General Check Information
• Reviewing and/or Setting Up Earnings
• Performing Your Initial Calculation of Your On-line Check
• Reviewing and/or Modifying Check Information
• Recalculating Your On-line Check
• Confirming Your On-line Check and Printing the Check
Chapter 11: Processing an Off-Cycle PayrollPayroll Processing Guide Version 5.04.01

Creating Manual and On-Demand Checks Using the On-Line Check Process 11-31
Completing Prerequisites
Before you can create a manual or on-demand check using the On-Line Check process, you must make sure you have opened a payroll calendar that includes the current day’s date using the Payroll Calendar task (Enterprise Payroll ~ Scheduled Payroll (On Cycle) ~ Update Payroll Calendar). For step-by-step instructions, refer to the Payroll Processing Guide
You’ve just finished completing prerequisites. Nex,t you can specify whether you are creating a manual or on-demand check.
Specifying the Action
To specify whether you are printing a check or calculating a manual check and to indicate if you are reversing a prior check, do the following:
1. Click Payroll and make the following selections.
Payroll Cycle Processes ~ On-Line Check
2. Double-click the Calculate On-Line Check task. The Search dialog box displays.
Figure 11-14. Search Dialog Box
3. Enter the employee ID of the employee to receive the on-line check in the Empl ID field.
Creating Manual and On-Demand Checks Using the On-Line Check Process
Completing Prerequisites
Specifying the Action
Reversing a Check
Setting Up General Check Information
Reviewing and/or Setting Up Earnings
Performing Your Initial Calculation of Your On-line Check
Reviewing and/or Modifying Check Information
Recalculating Your On-line Check
Confirming Your On-line Check and Printing the Check
Chapter 11: Processing an Off-Cycle PayrollPayroll Processing Guide Version 5.04.01

11-32 Creating Manual and On-Demand Checks Using the On-Line Check Process
4. If the employee has more than one job in the company, enter the employment record number in the Employment Record Number field and click OK. The On-Line Check panel displays.
Figure 11-15. On-Line Check Panel
5. Enter a new check date in the Check Date field, if necessary.
The default date is the date you are processing the on-line check, not the pay period end
date.
6. In the Action area, select one of the following options:
• Print System Check - Select to indicate that you are printing a check through Enterprise Payroll.
• Calculate Manual Check - Select to indicate that you are calculating a manual check. If you select this option, the Manual Check Number field becomes active.
– If you select this option, enter the number of the manual check in the Manual Check Number field.
7. If you are reversing and reissuing a check that has already been processed in the current year, select the Reverse and Reissue Prior Check option.
If the employee does not have any existing checks, then the Reverse and Reissue
Prior Check field is not active.
8. Select the prior check number from the Prior Check Number field.
After you select the check number of the check you are reversing, the Prior Check
Information area displays the issue date and the net pay of the paycheck.
If the employee does not have any existing checks, then the Reverse and Reissue Prior Check field is not active.
For a description of the fields on this panel, press F1.
Chapter 11: Processing an Off-Cycle PayrollPayroll Processing Guide Version 5.04.01

Creating Manual and On-Demand Checks Using the On-Line Check Process 11-33
9. To continue calculating your on-line check, do one of the following:
• If you are creating a system check or a manual check, click Next to set up general check information.
• If you are reversing and reissuing a check, click Reverse.
For an employee set up with a contract, Enterprise Payroll will first verify the employee is
active via the job record. Next it will verify the employee’s contract is active. If both of these conditions are met, a paysheet will be created for the employee. When an employee is active but the contract is not, a warning will display, but a paysheet can still be created.
You have just finished specifying whether you are printing a system check, calculating a manual check, or reversing and reissuing a prior check. If you are printing a system check or calculating a manual check, proceed to “Setting Up General Check Information” on page 11-34. If you are reversing and reissuing a check, proceed to “Reversing a Check” on page 11-33.
Reversing a Check
To run the reversal process on a check, do the following:
1. After clicking Reverse on the On-Line Check panel, the On-Line Check Reversals panel displays.
Figure 11-16. On-Line Check Reversals Panel
For a description of the fields on this panel, press F1.
2. In the Amounts Reversed area, review the dollar amounts of the earnings, deductions, and taxes that Enterprise Payroll has reversed for this check.
Creating Manual and On-Demand Checks Using the On-Line Check Process
Completing Prerequisites
Specifying the Action
Reversing a Check
Setting Up General Check Information
Reviewing and/or Setting Up Earnings
Performing Your Initial Calculation of Your On-line Check
Reviewing and/or Modifying Check Information
Recalculating Your On-line Check
Confirming Your On-line Check and Printing the Check
Chapter 11: Processing an Off-Cycle PayrollPayroll Processing Guide Version 5.04.01

11-34 Creating Manual and On-Demand Checks Using the On-Line Check Process
3. If the amounts are correct, do one of the following:
• Click Next to confirm the reversal. The General panel displays.
• Click Cancel to cancel the reversal.
You have just finished running the reversal process for the check you are reversing. Next, you can set up general check information for the check you are reissuing.
Setting Up General Check Information
To set up general check information, do the following:
1. Click Next on the On-Line Check panel. The General panel displays.
Figure 11-17. General Panel
For a description of the fields on this panel, press F1.
2. Enter a new check date in the Check Date field, if necessary.
The default date is the date you are processing the on-line check, not the pay period end
date.
3. From the Pay Period of the Month field, select the pay period of the month to specify which deduction set gets calculated.
For example, if the pay period end date’s pay period is 1, you can calculate the deduction set for pay period 3 by specifying it in this field.
This field defaults to the period associated with the pay period end date in the pay
calendar.
Creating Manual and On-Demand Checks Using the On-Line Check Process
Completing Prerequisites
Specifying the Action
Reversing a Check
Setting Up General Check Information
Reviewing and/or Setting Up Earnings
Performing Your Initial Calculation of Your On-line Check
Reviewing and/or Modifying Check Information
Recalculating Your On-line Check
Confirming Your On-line Check and Printing the Check
Chapter 11: Processing an Off-Cycle PayrollPayroll Processing Guide Version 5.04.01

Creating Manual and On-Demand Checks Using the On-Line Check Process 11-35
4. Select one of the following processing options from the Deduction field:
This field will be grayed and unavailable if the check is not on the first payline number on
a paysheet.
• None - No additional deductions will be taken from the wages.
• Standard - The employee’s current deductions will remain the same and process as normal.
• Subset - Select a deduction subset to override the employee’s current deductions.
– If you select this option, select the appropriate deduction subset from the Subset field.
This field will be grayed and unavailable if the check is not on the first payline
number on a paysheet.
5. From the Tax Selections area, enter the number of pay periods over which to spread the taxing in the Tax Periods field.
Enterprise Payroll uses the employee’s pay frequency to determine how much tax to
withhold each pay period.
For example, if the tax frequency for the earnings is biweekly and you enter 3 in the Tax Periods field, taxes are calculated as if the earnings were earned over a six-week period.
6. In the Tax Method area, select one of the following methods to indicate how you want Enterprise Payroll to calculate tax on the earnings:
• Annual - Annualizes your earnings, calculates tax on the annualized amount, and divides the tax by the number of pay periods in the year. The result is your withholding for the pay period. This is the most common tax method, and it's based on the number of withholding allowances.
• Cum (Cumulative) - Adds together your year-to-date earnings and the earnings for this pay period, annualizes the result, and calculates the tax. Enterprise Payroll de annualizes the tax by dividing it by the number of tax periods you specified on the paysheet. The result is compared to your year-to-date withholding; if it's greater than your year-to-date withholding, the difference becomes your withholding for the pay period. You generally use this tax method for employees whose wages vary significantly from pay period to pay period, such as salespeople on commission.
• Supplemental - Calculates taxes using a straight percent rather than allowances, and the percentage depends on federal or state requirements. Federal withholding is calculated based on a percent of earnings specified using the Federal/State Tax Configuration task (Payroll ~ Company Definitions ~ System Tax Data). Other states may vary the percent based on annual income, while still other states use tax tables instead. This tax method is typically used for earnings such as a bonus.
Chapter 11: Processing an Off-Cycle PayrollPayroll Processing Guide Version 5.04.01

11-36 Creating Manual and On-Demand Checks Using the On-Line Check Process
7. Review the Status of the on-line check you are processing:
• Calculated - Indicates that you have calculated your on-line check at least once since you ran your initial calculation.
• Error - Indicates that you have calculated and have an error in your on-line check information.
• Initial - Indicates that you have not run your first calculation of your on-line check.
• Updated - Indicates that you have changed some of the pay cycle data for the on-line check since the last time you have calculated; you must recalculate.
You have just finished setting up general check information.Next, click the Earnings tab to review and/or set up earnings for this check.
Reviewing and/or Setting Up Earnings
To review and/or set up earnings for the on-line check, do the following:
1. Click the Earnings tab.
Figure 11-18. Earnings Panel
For a description of the fields on this panel, press F1.
2. Review the established earnings information for the employee.
This information defaults from either the employee’s job record if you are generating a
system or manual check. If you are reversing and reissuing a check, the information defaults to the check information for the check you’re reversing.
If you need to add or modify the earnings information on this panel, refer to Steps 3 through 20. If the earnings information does not change, proceed to “Performing Your Initial Calculation of Your On-line Check” on page 11-38.
Creating Manual and On-Demand Checks Using the On-Line Check Process
Completing Prerequisites
Specifying the Action
Reversing a Check
Setting Up General Check Information
Reviewing and/or Setting Up Earnings
Performing Your Initial Calculation of Your On-line Check
Reviewing and/or Modifying Check Information
Recalculating Your On-line Check
Confirming Your On-line Check and Printing the Check
Chapter 11: Processing an Off-Cycle PayrollPayroll Processing Guide Version 5.04.01

Creating Manual and On-Demand Checks Using the On-Line Check Process 11-37
3. Enter or modify the number of regular hours in the Reg Hrs field. This field displays the standard hours from the employee’s job record or from the corresponding earnings line in the reversed check, if applicable.
4. Enter any overtime hours in the OT Hrs field. This field displays the number of overtime hours worked by the employee during the pay period.
5. If necessary, modify the employee’s hourly rate in the Hrly Rate field. This field displays the standard hourly rate from the employee’s job record or the reversed check.
6. Enter or modify the amount of regular earnings in the Reg Earns field. This field displays the regular earnings earned by the salaried employee during this pay period.
7. If you need to change the shift, select from the Shift field the work shift to which these earnings are charged for accounting purposes and rate/differential calculation.
8. If the pay group to which the employee belongs is bi-weekly and you need Enterprise Payroll to perform FLSA weekly averaging, enter a week number in the Wk field.
9. If necessary, change the earnings begin date for this pay period in the Earns Begin field.
If the employee worked the entire pay period at this job, the earnings begin and end
dates are the same as the pay period begin and end dates. If the employee worked only a partial pay period at this job, the begin and end dates are displayed here.
10. If necessary change the earnings end date for this pay period in the Earns End field.
If the employee worked the entire pay period at this job, the earnings begin and end
dates are the same as the pay period begin and end dates. Otherwise, there are multiple earnings dates for the same pay period.
11. If you want Enterprise Payroll to gross-up a check for these earnings, select the Gross-Up check box.
This field will be grayed and unavailable if the check is not on the first payline number on
a paysheet.
12. If necessary, select a different department from the Department field to indicate the department to which these earnings are posted for accounting purposes.
13. If necessary, select a different job code from the Job Code field to indicate the job code to which these earnings are posted for accounting purposes.
14. If necessary, enter in the Position # field the position number to which these earnings are posted for accounting purposes.
15. If necessary, enter the general ledger pay type in the GL type field if department ID, employee type, and earnings type are insufficient for charging salaries and wages to the proper G/L account.
For example, assume two employees have the same department ID, employee type, and earnings type, but their salaries should be charged to two different accounts because the employees are classified differently for accounting purposes.
You should enter earnings to be grossed-up in the Other Earnings group box.
Chapter 11: Processing an Off-Cycle PayrollPayroll Processing Guide Version 5.04.01

11-38 Creating Manual and On-Demand Checks Using the On-Line Check Process
16. If necessary, select from the Account code field the account code to which these earnings are posted for labor accounting.
17. To add or modify a code for an other earnings, select the code for the earnings from the Code field.
18. To change the employee’s recurring additional earnings, select the additional pay sequence number from the Seq field.
19. To add or modify the number of hours associated with the other earnings type, enter the hours in the Oth Hrs field.
This field is disabled if the corresponding earnings has no hourly rate.
20. If necessary, enter the dollar amount associated with the other earnings code in the Amount field.
You have just finished reviewing, adding and/or modifying earnings information. You are now ready to calculate your on-line check.
Performing Your Initial Calculation of Your On-line Check
After you have entered the general check information and reviewed/updated earnings information as needed, you can calculate your on-line check as follows:
1. Click Calculate.
You will receive a message notifying you that your process has been submitted. Enterprise Payroll saves the paysheet, performs a calculation, and, if successful, displays the Review On-Line Check panels.
2. To confirm successful completion of your process, post the On-Line Check task to the
Board and then click (Process Monitor). For step-by-step instructions on using the Process Monitor, see the Using ADP Enterprise HR guide.
After calculating your on-line check, the Status on the General tab is Initial.
You have just finished calculating your on-line check.
If the message area displays any error messages, see “Correcting Errors and Recalculating Your On-line Check” on page 11-39.
If you do not have any errors, you can review a summary of the on-line check information and then add or change earnings, tax, deduction, or garnishment information. See “Reviewing and/or Modifying Check Information” on page 11-40.
Creating Manual and On-Demand Checks Using the On-Line Check Process
Completing Prerequisites
Specifying the Action
Reversing a Check
Setting Up General Check Information
Reviewing and/or Setting Up Earnings
Performing Your Initial Calculation of Your On-line Check
Reviewing and/or Modifying Check Information
Recalculating Your On-line Check
Confirming Your On-line Check and Printing the Check
Chapter 11: Processing an Off-Cycle PayrollPayroll Processing Guide Version 5.04.01

Creating Manual and On-Demand Checks Using the On-Line Check Process 11-39
Correcting Errors and Recalculating Your On-line Check
If you have errors in your on-line check after calculating, Enterprise Payroll displays the General panel, the Status field displays the message “Error,” the control bar name changes to On-Line Check with Error Messages, and the Pay Messages panel displays.
An error message indicates that you must correct the situation before proceeding with your payroll. A warning message will not prevent you from running your payroll but you may want to research the issue before continuing.
To view the errors, do the following:
1. Click the Pay Messages tab.
If the Pay Messages panel does not display any error messages, this indicates that the
error is not an employee-level error. Instead, it is a company-level error, such as the employee benefit plan not existing on the Benefit Program table. To review company-level errors, post the on-line check process to the Board and follow the instructions in “Viewing All Error/Warning Messages Online” on page 6-8 and/or “Reviewing Company-level Error Messages Only” on page 6-11.
Figure 11-19. Pay Messages Panel
2. Review employee-level message information in the Pay Messages panel.
3. If no messages display on this panel, post the on-line check process to the Board and follow the instructions in “Viewing All Error/Warning Messages Online” on page 6-8 and/or “Reviewing Company-level Error Messages Only” on page 6-11 to view company-level error messages.
4. Correct your pay cycle data and then recalculate the on-line check by clicking Calculate from any panel other than the Pay Messages panel.
When Enterprise Payroll calculates the on-line check with no errors, the Check View panel displays and “Calculated” appears in the Status field.
For a description of the fields on this panel, press F1.
Chapter 11: Processing an Off-Cycle PayrollPayroll Processing Guide Version 5.04.01

11-40 Creating Manual and On-Demand Checks Using the On-Line Check Process
You have just finished correcting pay calculation errors and recalculating your on-line check. Next, you can review a summary of the on-line check information and then add or change earnings, tax, deduction, or garnishment information.
Reviewing and/or Modifying Check Information
After you calculate your on-line check with no errors, Enterprise Payroll displays the Review On-Line Check panels as well as the message “Calculated” in the Status field.
With the Review On-Line Check panels, you can then review and/or modify your on-line check information. You can click Calculate from any of these review panels to do another calculation of your on-line check.
When you calculate your on-line check with no errors, Enterprise Payroll returns you to the
Paycheck View panel.
Reviewing and/or modifying your on-line check information consists of the following:
• Reviewing Paycheck Summary Information
• Reviewing and/or Modifying General Information
• Reviewing and/or Modifying Earnings
• Reviewing and/or Modifying Deductions
• Reviewing and/or Modifying Garnishments
• Reviewing and/or Modifying Taxes
Creating Manual and On-Demand Checks Using the On-Line Check Process
Completing Prerequisites
Specifying the Action
Reversing a Check
Setting Up General Check Information
Reviewing and/or Setting Up Earnings
Performing Your Initial Calculation of Your On-line Check
Reviewing and/or Modifying Check Information
Recalculating Your On-line Check
Confirming Your On-line Check and Printing the Check
Chapter 11: Processing an Off-Cycle PayrollPayroll Processing Guide Version 5.04.01

Creating Manual and On-Demand Checks Using the On-Line Check Process 11-41
Reviewing Paycheck Summary Information
The Paycheck View panel, as shown in Figure 11-20, displays a summary of earnings, taxes, deductions, and net pay all on one panel. This is the default panel that displays after Enterprise Payroll calculates a successful on-line check.
Figure 11-20. Paycheck View Panel
Review the summary information for the on-line check. For details on this panel, press F1 or see page 6-16.
You’ve just finished viewing the results of pay calculation on earnings, taxes, deductions, and net pay. If the on-line check information is accurate, you can confirm and print the check. Refer to “Confirming Your On-line Check and Printing the Check” on page 11-51.
If you need to review and/or modify any of the paycheck information, click the appropriate Review On-Line Check tab. Refer to the appropriate section(s) that follow:
• “Reviewing and/or Modifying General Information” on page 11-42
• “Reviewing and/or Modifying Earnings” on page 11-43.
• “Reviewing and/or Modifying Deductions” on page 11-44.
• “Reviewing and/or Modifying Garnishments” on page 11-46.
• “Reviewing and/or Modifying Taxes” on page 11-48.
For a description of the fields on this panel, press F1.
Chapter 11: Processing an Off-Cycle PayrollPayroll Processing Guide Version 5.04.01

11-42 Creating Manual and On-Demand Checks Using the On-Line Check Process
Reviewing and/or Modifying General Information
To review and/or modify the general check information you set up at the beginning of the on-line check process, do the following:
1. Click the General tab.
Figure 11-21. General Panel
2. Review the general information. For details on this panel, press F1 or see page 11-34.
3. If you need to modify the information, refer to “Setting Up General Check Information” on page 11-34.
You’ve just finished reviewing and/or modifying the general on-line check information. If the on-line check information is now accurate, you can confirm and print the check. Refer to “Confirming Your On-line Check and Printing the Check” on page 11-51. If you need to review and/or modify any other paycheck information, click the appropriate Review On-Line Check tab. Refer to the appropriate section(s) that follow:
• “Reviewing and/or Modifying Earnings” on page 11-43.
• “Reviewing and/or Modifying Deductions” on page 11-44.
• “Reviewing and/or Modifying Garnishments” on page 11-46.
• “Reviewing and/or Modifying Taxes” on page 11-48.
For a description of the fields on this panel, press F1.
Chapter 11: Processing an Off-Cycle PayrollPayroll Processing Guide Version 5.04.01

Creating Manual and On-Demand Checks Using the On-Line Check Process 11-43
Reviewing and/or Modifying Earnings
To review and/or modify the earning information, do the following:
1. Click the Earnings tab.
Figure 11-22. Earnings Panel
2. Review the earnings information. For details on this panel, press F1 or see page 11-36.
3. If you need to modify the information, refer to “Reviewing and/or Setting Up Earnings” on page 11-36.
You’ve just finished reviewing and/or modifying the earnings information. If the on-line check information is now accurate, you can confirm and print the check. Refer to “Confirming Your On-line Check and Printing the Check” on page 11-51. If you need to review and/or modify any other paycheck information, click the appropriate Review On-Line Check tab. Refer to the appropriate section(s) that follow:
• “Reviewing and/or Modifying General Information” on page 11-42.
• “Reviewing and/or Modifying Deductions” on page 11-44.
• “Reviewing and/or Modifying Garnishments” on page 11-46.
• “Reviewing and/or Modifying Taxes” on page 11-48.
For a description of the fields on this panel, press F1.
Chapter 11: Processing an Off-Cycle PayrollPayroll Processing Guide Version 5.04.01

11-44 Creating Manual and On-Demand Checks Using the On-Line Check Process
Reviewing and/or Modifying Deductions
To review and/or modify the deduction information, do the following:
1. Click the Deductions tab.
Figure 11-23. Deductions Panel
2. Select one of the following processing options from the Deduction field:
• None - No additional deductions will be taken from the wages.
• Standard - The employee’s current deductions will remain the same and process as normal.
• Subset - Select a deduction subset to override the employee’s current deductions.
– If you select this option, then select the appropriate deduction subset from the Subset field.
3. Enter the following one-time deduction information in the One-Time Deduction Data area.
The codes in this area tell Enterprise Payroll what type of deduction you are establishing.
Since these codes are already set up for your company, you can choose from a list of valid options. To record multiple deductions, place your cursor in the Deduction Code
field, click the inner scroll bar, and click (Insert Row).
a. In the Plan Type field, select the plan type for the deduction that you want to override, add, refund, or process an arrears payback.
b. Select the benefit plan in the Benefit Plan field.
c. Select the code for the deduction in the Deduction Code field.
This is a one-time deduction taken for the current pay period only.
For a description of the fields on this panel, press F1.
Chapter 11: Processing an Off-Cycle PayrollPayroll Processing Guide Version 5.04.01

Creating Manual and On-Demand Checks Using the On-Line Check Process 11-45
d. Select one of the following classes in the Deduction Class field:
• After-tax - The typical type of deduction that reduces net pay. (Example: Parking allowance)
• Before-tax - An employee contribution that reduces net pay and FIT taxable gross. (Example: An employee contribution to a 401(k) plan)
• Taxable benefit - An employer contribution (taxable for FIT purposes) to an employee benefit plan. The contribution increases FIT taxable gross (for tax purposes) but does not increase total gross (for pay purposes). (Example: An employer contribution to an employee’s savings plan)
• Non-taxable benefit - An employer contribution (not taxable for FIT purposes) to an employee benefit plan. The contribution has no payroll effect. (Example: An employer contribution to an employee's health plan or 401(k) plan)
4. Select the option from the Exception Type field that indicates whether you want to override, add, refund, or process an arrears payback for the deduction.
5. Select one of the following options from the Exception Type field to indicate the one-time deduction type:
• Override - Select to ignore the regular calculation and replace it with the calculation this panel specifies.
• Addition - Select to add the calculated amount (this panel specifies) to the regular calculation.
• Refund - Select to deduct the standard deduction and refund the amount indicated on this panel.
• Arrears Payback - Select to ignore standard arrears processing and calculates arrears to be processed as this panel specifies.
The one-time Arrears Payback feature is not appropriate for situations where an
employee gives you a check to pay back an arrears amount they owe.
6. From the Calculation Routine area, select the option that specifies how Enterprise Payroll should calculate the deduction.
Example:
An employee's initial gross pay is $800. The effect of the four types of deduction classifications on total gross and FIT taxable gross is shown below:
Deduction Class Deduction Amount FIT Tax Gross
After-tax $10 $800
Before-tax $30 $770
Taxable benefit $50 $850
Non-taxable benefit $15 $800
Chapter 11: Processing an Off-Cycle PayrollPayroll Processing Guide Version 5.04.01

11-46 Creating Manual and On-Demand Checks Using the On-Line Check Process
7. Enter an amount in the Flat/Addl Amt field if you selected Flat Amount from the Calculation Routine area.
8. Enter a rate or percent in the Rate/Percent field if you specified a deduction calculation in the Calculation Routine area that requires you to supply the rate/percent Enterprise Payroll uses.
You’ve just finished reviewing and/or modifying the deduction information. The following section contains the field descriptions for the Deductions panel.
If the on-line check information is now accurate, you can confirm and print the check. Refer to “Confirming Your On-line Check and Printing the Check” on page 11-51.
If you need to review and/or modify any other paycheck information, click the appropriate Review On-Line Check tab. Refer to the appropriate section(s) that follow:
• “Reviewing and/or Modifying General Information” on page 11-42.
• “Reviewing and/or Modifying Earnings” on page 11-43.
• “Reviewing and/or Modifying Garnishments” on page 11-46.
• “Reviewing and/or Modifying Taxes” on page 11-48.
Reviewing and/or Modifying Garnishments
To review and/or modify the garnishment information, do the following:
1. Click the Garnishments tab.
Figure 11-24. Garnishments Panel
2. Review the garnishment information.
3. Click the inner scroll bar until you find the specific garnishment that you want to override, refund, or suspend.
For a description of the fields on this panel, press F1.
Chapter 11: Processing an Off-Cycle PayrollPayroll Processing Guide Version 5.04.01

Creating Manual and On-Demand Checks Using the On-Line Check Process 11-47
4. From the Garnish ID field, select the garnish ID that points to the specific garnishment specification data record you want to override.
5. Select the calculation method from the Calculation field.
6. If you want to establish a specific amount for an override, select the % DE + Flat Amount option, leave the DE Percent field blank, and enter an amount in the Flat Amount field.
7. If you want to establish a specific percent for an override, refund, or suspension, enter a percent in the DE Percent field.
8. Select from the Garnishment One-Time Code area the action that you want to apply to the garnishment.
For permanent changes to the garnishment calculation parameters, you must update the
employee’s garnishment specification data.
• Override - Select to override the calculation and processing fees you set up for this garnishment deduction on a one-time basis.
• Refund - Select if you want to refund a previously taken garnishment deduction (or a portion thereof) to the employee, backing relevant amounts out of payroll balances. The refund appears as a negative deduction on the employee’s check. If you select this option, you must also enter an amount in the Flat Amount field.
• Suspend - Select this if you want Enterprise Payroll to suspend the garnishment deduction for this paycheck.
9. Enter the processing fees associated with the garnishment that are due to the company and the payee in the Processing Fees area. You should enter the greater of percent deduction or flat amount.
You’ve just finished reviewing and/or modifying the garnishment information. The following section contains the field descriptions for the Garnishments panel.
If the on-line check information is now accurate, you can confirm and print the check. Refer to “Confirming Your On-line Check and Printing the Check” on page 11-51.
If you need to review and/or modify any other paycheck information, click the appropriate Review On-Line Check tab. Refer to the appropriate section(s) that follow:
• “Reviewing and/or Modifying General Information” on page 11-42.
• “Reviewing and/or Modifying Earnings” on page 11-43.
• “Reviewing and/or Modifying Deductions” on page 11-44.
• “Reviewing and/or Modifying Taxes” on page 11-48.
Chapter 11: Processing an Off-Cycle PayrollPayroll Processing Guide Version 5.04.01

11-48 Creating Manual and On-Demand Checks Using the On-Line Check Process
Reviewing and/or Modifying Taxes
To review and/or modify the tax information, do the following:
1. Click the Taxes tab.
Figure 11-25. Taxes Panel
2. Scroll on the inner scroll bar until you find the specific tax that you want to override, refund, or add to.
3. Clear the Additional Taxes check box to prevent additional withholding from being taken out of a particular check.
This option determines whether Enterprise Payroll takes the additional withholding specified on the employee’s Federal Tax Withholding, State Tax Withholding, and Local Tax Data panels from an individual check.
Enterprise Payroll ignores the status of the Additional Taxes option when the Override
option is selected from the One-Time Tax Type field.
4. From the One-Time Tax Data area, do one of the following:
• If the tax you are overriding, refunding, or adding to is a federal tax, then select Federal in the One-Time Tax Data area.
If you select Federal, the State and Locality fields disappear.
• If the tax you are overriding, refunding, or adding to is a state tax, then select the state and locality from the State and Locality fields in the One-Time Tax Data area.
On this panel, this is the state to which this one-time tax is reported. The one-time
state/local tax is taken only in the current pay period.
For a description of the fields on this panel, press F1.
Chapter 11: Processing an Off-Cycle PayrollPayroll Processing Guide Version 5.04.01

Creating Manual and On-Demand Checks Using the On-Line Check Process 11-49
5. From the Tax Type field, select one of the following options:
• Override - Ignores the standard tax calculation and replaces it with the calculation this panel specifies.
If the employee has IRS tax lock-in letter, you will not be able to select the Override
option.
• Refund - Observes the standard deduction and refunds the amount indicated on this panel.
• Addition - Calculates the standard tax and adds the amount this panel specifies.
6. From the Tax Class field, select one of the following tax classes to specify which tax is to be overridden.
In general, you should not use the One-time Taxes panel to change taxes that have
wage limits associated with them (such as Social Security and Medicare, State Disability and State Unemployment). Enterprise Payroll recalculates taxes with maximums each time you run the Calculate Payroll program. If you make an adjustment this pay period, Enterprise Payroll corrects such taxes the next pay period.
• DIS-ER - Disability- employer
• Earned Inc - Earned Income Credit
• Excise - Excise
• Loc ER/EE - Local- employer and employee
• Local ER - Local employer
• Medicare - Medicare
• NJ HCSF - New Jersey HCSF
• NJ WFDP - New Jersey WFDP
• Occ priv - Occupational Privilege Tax
• SS/Dis - Social Security/Disability
• UI-Spcl - Unemployment- special
• Unempl EE - Unemployment- employee
• Unempl ER - Unemployment- employer
• VPDI EE - Voluntary/Private Disability employee
• VPDI ER - Voluntary/Private Disability- employer
• Withholdng - FIT, SIT, LIT
• Wks Worked - The number of weeks during which the employee earned $20.00 or more. Some states use this value to determine the eligibility of employee SUT claims.
Chapter 11: Processing an Off-Cycle PayrollPayroll Processing Guide Version 5.04.01

11-50 Creating Manual and On-Demand Checks Using the On-Line Check Process
7. In the Tax Amt field, enter the amount of tax deducted for the specified taxing jurisdiction and tax type. Leave this field blank to tell Enterprise Payroll you want to take no tax.
Click the inner scroll bar and click (Insert Row) to record additional tax amounts
that apply to the manual check. The one-time tax is taken only in the current pay period.
You’ve just finished reviewing and/or modifying the tax information. The following section contains the field descriptions for the Taxes panel.
If the on-line check information is now accurate, you can confirm and print the check. Refer to “Confirming Your On-line Check and Printing the Check” on page 11-51.
If you need to review and/or modify any other paycheck information, click the appropriate Review On-Line Check tab. Refer to the appropriate section(s) that follow:
• “Reviewing and/or Modifying General Information” on page 11-42.
• “Reviewing and/or Modifying Earnings” on page 11-43.
• “Reviewing and/or Modifying Deductions” on page 11-44.
• “Reviewing and/or Modifying Garnishments” on page 11-46.
Chapter 11: Processing an Off-Cycle PayrollPayroll Processing Guide Version 5.04.01

Creating Manual and On-Demand Checks Using the On-Line Check Process 11-51
Recalculating Your On-line Check
If you have made any changes to the employee’s pay cycle data, you need to recalculate your payroll. When you click Calculate, the message “Updated” displays in the Status field. For step-by-step instructions, see “Performing Your Initial Calculation of Your On-line Check” on page 11-38.
If you receive errors after recalculating, the Status field displays “Error,” the Paycheck View panel disappears, and the General panel displays. For viewing and correcting errors you may receive after recalculating, see “Correcting Errors and Recalculating Your On-line Check” on page 11-39.
You’ve just finished recalculating your on-line check. Next, you can confirm your on-line check and then print the check.
Confirming Your On-line Check and Printing the Check
After you have calculated your on-line check with no errors, Enterprise Payroll displays the Paycheck View panel with a Print button if you are processing a system check or performing a reversal and check reissue. If you are processing a manual check, Enterprise Payroll displays a Confirm button. For all type of on-line checks, Enterprise Payroll displays “Calculated” in the Status field. This indicates that you are ready to confirm the on-line check and run the Print Paychecks process (PAY003).
If you are using the On-Line Check process to create a manual check, Enterprise Payroll
confirms the payroll but does not run PAY003.
Creating Manual and On-Demand Checks Using the On-Line Check Process
Completing Prerequisites
Specifying the Action
Reversing a Check
Setting Up General Check Information
Reviewing and/or Setting Up Earnings
Performing Your Initial Calculation of Your On-line Check
Reviewing and/or Modifying Check Information
Recalculating Your On-line Check
Confirming Your On-line Check and Printing the Check
Chapter 11: Processing an Off-Cycle PayrollPayroll Processing Guide Version 5.04.01

11-52 Creating Manual and On-Demand Checks Using the On-Line Check Process
To confirm the payroll and run the Print Paychecks process (system check and reversal and check reissue only), do the following:
1. Review the information in the Paycheck View panel, as shown in Figure 11-26. If you need to make any changes before you confirm the check, click the appropriate tab.
Figure 11-26. Paycheck View Panel
For details on this panel, press F1 or see page 6-16.
2. To complete the process, do one of the following:
• To process a system check or a reversal and reissue, click Print.
• If you are processing a manual check, click Confirm.
You will receive a message notifying you that your process has been submitted.
Enterprise Payroll confirms the check. If you are processing a system check or performing a reversal and reissue of a check, Enterprise Payroll also runs the Print Paychecks process (PAY003).
You have just finished running the pay confirmation process for the new check and printing the check which is the last step in processing an on-line check.
Chapter 11: Processing an Off-Cycle PayrollPayroll Processing Guide Version 5.04.01

Adjusting a Check 11-53
Adjusting a Check
To process adjustments, Enterprise Payroll uses a special deduction called NETPAY. Typically, this deduction is defined during your initial Enterprise Payroll implementation. When you run the Reverse Checks program for an adjustment, Enterprise Payroll reverses the original check—producing a calculated check reversal—by subtracting on the paysheet the NETPAY deduction equal to the employee’s net pay on the original check.
When you reverse and then adjust a paycheck, the possible outcomes are as follows:
• No change in net pay.
• The company owes the employee money. In this situation, Enterprise Payroll produces a check for the amount owed.
• The employee owes the company money. In this case, you can put the amount into an arrears balance to be taken out of their next paycheck, or you can attempt to get the money back from the employee by other means.
Adjusting a check consists of the following:
• Setting Up Adjustment Earnings Types and Deduction Codes
• Processing the Check Adjustment
• Entering Adjustments into Paysheets
• Calculating Your Adjusted Check(s)
• Completing Your Adjustment
Setting Up Adjustment Earnings Types and Deduction Codes
Usually the special earnings types and deduction codes you need to use to process an adjustment are set up during your initial Enterprise Payroll implementation. If these earnings types and deduction codes are not yet established, refer to the Payroll Setup and Maintenance Guide for step-by-step instructions.
You set up a NETPAY deduction with a plan type of 00 (general deduction) using the Deductions task (Payroll ~ Company Definitions ~ Deductions). Then you select the deduction calculation routine for the deduction using the General Deductions task (Payroll ~ Company Definitions ~ Deductions).
In addition, you need to setup several adjustment deductions for arrears—one for each adjustment arrears payback situation you encounter. For example, if you are adjusting checks that were calculated using the wrong taxing jurisdiction, you might set up a Tax Adjustment deduction coded TAXADJ.
Adjusting a Check
Setting Up Adjustment Earnings Types and Deduction Codes
Processing the Check Adjustment
Entering Adjustments into Paysheets
Calculating Your Adjusted Check(s)
Completing Your Adjustment
Chapter 11: Processing an Off-Cycle PayrollPayroll Processing Guide Version 5.04.01

11-54 Adjusting a Check
Finally, you need to set up an adjustments earnings type to process check adjustments in situations where the employee owes the company money. The earnings type can be set up to add to gross pay by selecting a general deduction code from the Payback Deduction Code field and turning off the Subject to FIT, Subject to FICA, and Subject to FUT options on the Taxing Options panel (Payroll ~ Company Definitions ~ Earnings and Special Accumulators ~ Earnings).
You’ve just finished setting up special earnings types and deduction codes you need to use to process an adjustment. You’re now ready to process the paycheck adjustment.
Processing the Check Adjustment
You can process multiple check adjustments at one time by using the Prepare Paycheck Adjustments panel.
To process your adjustment(s), do the following
1. Click Payroll and make the following selections:
Payroll Cycle Processes ~ Paycheck Adjustments (Off Cycle)
2. Double-click the Prepare Paycheck Adjustments task. The Paycheck Adjustments panel displays.
Figure 11-27. Paycheck Adjustments Panel
Adjusting a Check
Setting Up Adjustment Earnings Types and Deduction Codes
Processing the Check Adjustment
Entering Adjustments into Paysheets
Calculating Your Adjusted Check(s)
Completing Your Adjustment
For a description of the fields on this panel, press F1.
Chapter 11: Processing an Off-Cycle PayrollPayroll Processing Guide Version 5.04.01

Adjusting a Check 11-55
3. Enter a batch run ID for the adjustment batch in the Run ID field.
This is not the batch run ID for the original check.
You can process multiple batches at the same time by clicking the outer scroll bar and
clicking (Insert Row).
4. Select the employee’s company from the Company field.
5. Select the employee’s pay group from the Pay Group field.
6. From the Period End field, select the pay period end date that corresponds to the pay calendar in which you want to process the adjustment, usually your next active pay period, and press Tab.
The payroll run ID assigned to that particular pay period end date displays in the Pay Run ID field.
7. Enter paycheck information in the Targeted Check area by doing one of the following:
You can adjust multiple checks from the same batch by clicking the outer scroll bar
and clicking (Insert Row).
• If you know the paycheck number, then enter it in the Check Number field and press Tab.
Enterprise Payroll automatically populates the Employee and Check Date fields and selects the Off cycle check box (if necessary).
• If you do not know the paycheck number, select the appropriate information from the Employee and Check Date fields and press Tab.
Enterprise Payroll automatically populates the Check Number field and selects the Off Cycle check box (if necessary).
If multiple checks exist on the same date, you must enter the check number in the
Check Number field and press Tab.
Chapter 11: Processing an Off-Cycle PayrollPayroll Processing Guide Version 5.04.01

11-56 Adjusting a Check
The panel now displays the page, line, separate check number, pay period end date, and net pay information for the specific check.
Figure 11-28. Paycheck Adjustments - Paycheck Information Displayed
8. Select the Reverse and adjust the targeted check option.
9. To adjust multiple checks at the same time,
10. Click (Save).
11. Click Run Batch.You will receive a message notifying you that your process has been
submitted. Click OK. To confirm successful completion, click (Process Monitor).
For additional information on the Process Monitor, refer to the Using ADP Enterprise HR Guide.
You have just finished processing the check adjustment. Next, you can enter adjustments into paysheets.
For a description of the fields on this panel, press F1.
Chapter 11: Processing an Off-Cycle PayrollPayroll Processing Guide Version 5.04.01

Adjusting a Check 11-57
Entering Adjustments into Paysheets
After processing your paycheck adjustment, you must enter your adjustments manually into your paysheets by using the Modify Pay Cycle Adjustments (Payline) task. The first paysheet entry will appear as a reversing adjustment, with all fields grayed out and a net pay of zero (blank). If you use the outer scroll bar to move to the other paysheet entry created by running the Check Adjustment process, the adjustment displays.
Use the following path to access the Modify Pay Cycle Adjustments (Payline) task:
Payroll Cycle Processes ~ Paycheck Adjustments (Off Cycle)
For detailed information on entering pay cycle data into paysheets, see Chapter 3, “Entering Pay Cycle Data Using Paysheets.”
You have just finished entering adjustments into paysheets. Next you must calculate your adjusted check(s).
Calculating Your Adjusted Check(s)
After you enter adjustments into your paysheets, you must process an off-cycle pay calculation to update the employee balances and assign a check number. If the employee owes the company money, the message in the Payroll Messages panel states:
“The net pay calculated for this check is a negative amount.”
In addition, the Message Data field displays a negative amount, which is the amount the employee owes the company. Enterprise Payroll treats the situation as an error since it is designed to produce checks for positive or zero amounts. A negative net amount will not process. If the employee is still employed at your company, you can get the money back by putting it in an arrears balance and having Enterprise Payroll take it out of the employee’s next paycheck.
Calculating your adjusted check consists of the following:
• Processing Your Initial Payroll Calculation
• Correcting Errors in Your Payroll
• Recalculating Your Payroll
• Viewing Preliminary Check Data
Use the following path to access tasks you use to calculate your adjusted check(s):
Payroll Cycle Processes ~ Paycheck Adjustments (Off-Cycle)
Adjusting a Check
Setting Up Adjustment Earnings Types and Deduction Codes
Processing the Check Adjustment
Entering Adjustments into Paysheets
Calculating Your Adjusted Check(s)
Completing Your Adjustment
Chapter 11: Processing an Off-Cycle PayrollPayroll Processing Guide Version 5.04.01

11-58 Adjusting a Check
For step-by-step instructions, see “Calculating Your Manual Check(s)” on page 11-14.
You have just finished calculating your adjusted check(s). Next you can confirm your adjustment.
Completing Your Adjustment
After you have calculated your adjusted check(s), you can complete your adjustment(s). To complete the reversal, do the following:
To confirm the adjustment, do the following:
1. Click Payroll and make the following selections:
Payroll Cycle Processes ~ Paycheck Adjustments (Off-Cycle)
2. Double-click the Complete Reversal (Confirm) task. The Payroll Confirmation panel displays.
Figure 11-29. Payroll Confirmation Panel
3. In the Batch Run ID field, enter an alpha/numeric batch run ID that uniquely identifies the run.
To enter more than one batch run ID, click (Insert Row).
Adjusting a Check
Setting Up Adjustment Earnings Types and Deduction Codes
Processing the Check Adjustment
Entering Adjustments into Paysheets
Calculating Your Adjusted Check(s)
Completing Your Adjustment
For a description of the fields on this panel, press F1.
Chapter 11: Processing an Off-Cycle PayrollPayroll Processing Guide Version 5.04.01

Adjusting a Check 11-59
4. From the Off-Cycle Pay Calendar area, do the following:
a. Select the company from the Company field.
b. Select the pay group from the Pay Group field.
c. Select the date the pay period ends from the Pay End Date field.
d. Do one of the following to indicate if you want one or all adjustments confirmed:
• Select the paysheet page number range to be processed in the Process Page # fields.
• Select the All Reversals/Adjustments check box.
5. Click (Save).
6. Click Run Pay Confirm.You will receive a message notifying you that your process has
been submitted. Click OK. To confirm successful completion, click (Process Monitor).
For additional information on the Process Monitor, refer to the Using ADP Enterprise HR Guide.
You have just completed the payroll for your paycheck adjustments, which is the last step in adjusting a check.
Chapter 11: Processing an Off-Cycle PayrollPayroll Processing Guide Version 5.04.01

11-60 Reversing a Check
Reversing a Check
Payroll departments often need to reverse incorrect system-generated checks. You should reverse a check if you produce a check that should not have been produced or is incorrect, but it has not yet been cashed and has been returned to the payroll office. When you reverse the check, you generally cut a new check for the correct amount or do nothing after having reversed it.
When you run the paycheck reversal process, Enterprise Payroll finds the check or checks you specify and reverses the plus/minus signs. Since Enterprise Payroll determines the amounts from the original check data, no additional calculation is necessary.Therefore, you can skip the payroll calculation process and run the payroll confirmation process only.
Reversing a check consists of the following:
• Identifying the Check(s)
• Processing the Check Reversal(s)
• Reviewing the Paycheck Reversal(s)
• Completing Your Reversal
Identifying the Check(s)
Use Table 11-2 to determine the paycheck number and issue date of the check(s) you are reversing.
You have just identified the paycheck number and date of the check(s) to be reversed. Next, you can process your check reversal(s).
Table 11-2. Finding the Paycheck Number and Issue Date
Find... By...
On-line View the panels that are part of the View Reversed Paychecks task. (Payroll ~ Payroll Cycle Processes ~ Paycheck Reversals (Off-Cycle) ~ Review Pay Cycle Reversals - Off-Cycle). For detailed information on these panels, see “Viewing Preliminary Check Data” on page 6-14.
Off-line Refer to your Payroll Summary or Payroll Register reports discussed in Chapter 7, “Generating Summary Reports.”
Reversing a Check
Identifying the Check(s)
Processing the Check Reversal(s)
Reviewing the Paycheck Reversal(s)
Completing Your Reversal
Chapter 11: Processing an Off-Cycle PayrollPayroll Processing Guide Version 5.04.01

Reversing a Check 11-61
Processing the Check Reversal(s)
After you identify the paycheck number and the paycheck issue date, you are ready to process your check reversal(s).
When you run the check reversal, Enterprise Payroll locates the checks you are reversing and creates an off-cycle paysheet page for each reversal. The resulting paylines reflect the original paysheet entries with negatives in the hours and amount fields. Enterprise Payroll grays out these pages so you cannot enter data.
During the reversal process, Enterprise Payroll makes a copy of the paycheck record and reverses the signs (plus/minus) on the amount fields. The original paycheck record is not deleted. On the reversed check, all of the amounts display as negative numbers, and “Calculated Check Reversal” displays in the Payline Message field.
To process the check reversal, do the following:
1. Click Payroll and make the following selections:
Payroll Cycle Processes ~ Paycheck Reversals (Off Cycle)
2. Double-click the Prepare Paycheck Reversals task. The Paycheck Reversals panel displays.
Figure 11-30. Paycheck Reversals Panel
3. In the Batch ID area, do the following:
a. Enter a batch run ID in the Run ID field.
This is not the batch run ID for the original check. You can process multiple batches
at the same time by clicking the outer scroll bar and clicking (Insert Row).
Reversing a Check
Identifying the Check(s)
Processing the Check Reversal(s)
Reviewing the Paycheck Reversal(s)
Completing Your Reversal
For a description of the fields on this panel, press F1.
Chapter 11: Processing an Off-Cycle PayrollPayroll Processing Guide Version 5.04.01

11-62 Reversing a Check
b. Select the employee’s company from the Company field.
c. Select the employee’s pay group from the Pay group field.
d. From the Period end field, select the pay period end date that corresponds to the pay calendar in which you want to process the reversal, usually your next active pay period, and press Tab.
The payroll run ID assigned to that particular pay period end date displays in the
Pay run ID field.
4. From the Targeted Check area, do one of the following:
You can reverse multiple checks from the same batch by clicking the outer scroll bar and
clicking (Insert Row).
• If you know the paycheck number, then enter it in the Check number field.
Enterprise Payroll automatically populates the Employee and Check date fields, selects the Off cycle check box (if necessary), and displays the page, line, separate check number, pay period end date, and net pay information for the specific check.
• If you do not know the paycheck number, select the appropriate information from the Employee and Check date fields and press Tab.
If multiple checks exist on the same date, you must enter the check number in the
Check number field and press Tab.
Enterprise Payroll automatically populates the Check number field, selects the Off cycle check box (if necessary), and displays the page, line, separate check number, pay period end date, and net pay information for the specific check.
Figure 11-31. Paycheck Reversals
5. Select the Reverse the targeted check option.
For a description of the fields on this panel, press F1.
Chapter 11: Processing an Off-Cycle PayrollPayroll Processing Guide Version 5.04.01

Reversing a Check 11-63
6. Click (Save).
7. Click Run Batch. You will receive a message notifying you that your process has been
submitted. Click OK. To confirm successful completion, click (Process Monitor).
For additional information on the Process Monitor, refer to the Using ADP Enterprise HR Guide.
You have just finished processing paycheck reversal. Next, you can review the paycheck reversals.
Reviewing the Paycheck Reversal(s)
You can view both the original and the reversed check(s) using the Review Pay Cycle Reversals (Payline) task. The panels that are part of this task display all the amounts as negative numbers on the reversed check.
Use the following path to review the paycheck reversal(s):
Payroll Cycle Processes ~ Paycheck Reversals (Off-Cycle) ~ Review Pay Cycle Reversals (Payline)
For detailed information on reviewing the paycheck reversal(s), see “Viewing All Earnings and Overrides from All Pay Groups for a Specific Employee” on page 3-13.
You have just finished reviewing the reversed checks. You are now ready to confirm your payroll.
Completing Your Reversal
After you have reviewed your reversed check(s), you can complete your reversal. To complete the reversal, do the following:
To confirm the reversal, do the following:
1. Click Payroll and make the following selections:
Payroll Cycle Processes ~ Paycheck Reversals (Off-Cycle)
Reversing a Check
Identifying the Check(s)
Processing the Check Reversal(s)
Reviewing the Paycheck Reversal(s)
Completing Your Reversal
Chapter 11: Processing an Off-Cycle PayrollPayroll Processing Guide Version 5.04.01

11-64 Reversing a Check
2. Double-click the Complete Reversal (Confirm) task. The Payroll Confirmation panel displays.
Figure 11-32. Payroll Confirmation Panel
3. Complete the information in the Off-Cycle Pay Calendar area as follows:
a. Select the company from the Company field.
b. Select the pay group from the Pay Group field.
c. Select the pay period end date from the Pay End Date field.
d. Do one of the following to indicate if you want one or all reversals confirmed:
e. Enter the page numbers of the reversal in the Process Page # fields.
f . Select the All Reversals/Adjustments check box.
g. If you are a TotalPay Card subscriber but want checks to be issued instead of generating a TotalPay Card distribution, clear the Process Paycard check box.
h. If you are using fund accounting and want Enterprise Payroll to determine whether any fund(s) would be exhausted by the reversal, select the Test for Fund Exhaustion check box.
4. Click (Save).
5. Click Run Pay Confirm.You will receive a message notifying you that your process has
been submitted. Click OK. To confirm successful completion, click (Process Monitor).
For additional information on the Process Monitor, refer to the Using ADP Enterprise HR Guide.
For a description of the fields on this panel, press F1.
Chapter 11: Processing an Off-Cycle PayrollPayroll Processing Guide Version 5.04.01

Reversing a Check 11-65
You have just completed the payroll for your paycheck reversals, which is the last step in reversing a check.
Chapter 11: Processing an Off-Cycle PayrollPayroll Processing Guide Version 5.04.01

11-66 Deleting an Adjusted/Reversed Check
Deleting an Adjusted/Reversed Check
If you reverse/adjust a check and then realize you made a mistake, you can delete the adjusted/reversed check.
Deleting an adjusted/reversed check consists of the following:
• Unconfirming Your Payroll
• Identifying the Check(s)
• Deleting Your Adjusted/Reversed Check(s)
• Reviewing the Deleted Checks
• Completing the Deletion
Unconfirming Your Payroll
If you have already confirmed the adjustment/reversal, you must unconfirm your payroll. For step-by-step instructions, refer to “Unconfirming Your Payroll” on page 6-40.
You’ve just finished unconfirming your payroll. Next, you can identify the check(s) that you want to delete.
Identifying the Check(s)
After you unconfirm your payroll, you can use Table 11-3 to determine the paycheck number and issue date or the check you need to delete.
You have just identified the paycheck number and date of the adjusted/reversed check(s) to be deleted. Next, you can delete your adjusted/reversed check.
Table 11-3. Finding the Paycheck Number and Issue Date
Find... By...
On-line View the panels that are part of the View Reversed Paychecks task. (Payroll ~ Payroll Cycle Processes ~ Paycheck Reversals-Off Cycle). For detailed information on these panels, see “Viewing Preliminary Check Data” on page 6-14.
Off-line Refer to your Payroll Summary or Payroll Register reports discussed in Chapter 7, “Generating Summary Reports.”
Deleting an Adjusted/Reversed Check
Unconfirming Your Payroll
Identifying the Check(s)
Deleting Your Adjusted/Reversed Check(s)
Reviewing the Deleted Checks
Completing the Deletion
Chapter 11: Processing an Off-Cycle PayrollPayroll Processing Guide Version 5.04.01

Deleting an Adjusted/Reversed Check 11-67
Deleting Your Adjusted/Reversed Check(s)
After you identify the paycheck number and the paycheck issue date, you are ready to delete your adjusted/reversed check(s).
To delete your adjusted/reversed check(s), do the following:
1. Click Payroll and make the following selections:
Payroll Cycle Processes ~ Paycheck Reversals (Off Cycle)
2. Double-click the Prepare Paycheck Reversals task. The Paycheck Reversals panel displays.
Figure 11-33. Paycheck Reversals Panel
3. Complete the following in the Batch ID area:
a. Enter a batch run ID in the Run ID field.
b. This is not the batch run ID for the original check.
c. You can process multiple batches at the same time by clicking the outer scroll bar
and clicking (Insert Row).
d. Select the employee’s company from the Company field.
e. Select the employee’s pay group from the Pay group field.
Deleting an Adjusted/Reversed Check
Unconfirming Your Payroll
Identifying the Check(s)
Deleting Your Adjusted/Reversed Check(s)
Reviewing the Deleted Checks
Completing the Deletion
For a description of the fields on this panel, press F1.
Chapter 11: Processing an Off-Cycle PayrollPayroll Processing Guide Version 5.04.01

11-68 Deleting an Adjusted/Reversed Check
f . From the Period end field, select the pay period end date that corresponds to the pay calendar in which you want to delete a calculated check adjustment/reversal, usually your next active pay period, and press Tab.
The payroll run ID assigned to that particular pay period end date displays in the
Pay run ID field.
4. Enter paycheck information in the Targeted Check area by doing one of the following:
You can adjust multiple checks from the same batch by clicking the outer scroll bar
and clicking (Insert Row).
• If you know the paycheck number, then enter it in the Check number field.
Enterprise Payroll automatically populates the Employee and Check date fields, selects the Off cycle check box (if necessary), and displays the page, line, separate check number, pay period end date, and net pay information for the specific check.
• If you do not know the paycheck number, select the appropriate information from the Employee and Check date fields and press Tab.
If multiple checks exist on the same date, you must enter the check number in the
Check number field and press Tab.
Enterprise Payroll automatically populates the Check number field, selects the Off cycle check box (if necessary), and displays the page, line, separate check number, pay period end date, and net pay information for the specific check.
Figure 11-34. Paycheck Reversals Panel - Paycheck Information Displayed
5. Select the Delete calculated reversals/adjustments for the targeted check option.
6. Click (Save).
7. Click Run Batch.
For a description of the fields on this panel, press F1.
Chapter 11: Processing an Off-Cycle PayrollPayroll Processing Guide Version 5.04.01

Deleting an Adjusted/Reversed Check 11-69
8. You will receive a message notifying you that your process has been submitted. Click
OK. To confirm successful completion, click (Process Monitor).
For additional information on the Process Monitor, refer to the Using ADP Enterprise HR Guide.
You have just finished deleting the adjusted/reversed check(s). Next, you can review the original and deleted check reversal.
Reviewing the Deleted Checks
You can view both the original and the deleted reversed check(s) using the Review Pay Cycle Reversals (Payline) task. The panels that are part of this task display all the amounts as negative numbers on the adjusted/reversed check.
Use the following path to review the deleted check(s):
Payroll Cycle Processes ~ Paycheck Reversals (Off-Cycle)
For detailed information on reviewing the paycheck adjustment/reversal(s), see “Viewing All Earnings and Overrides from All Pay Groups for a Specific Employee” on page 3-13.
You have just finished reviewing the deleted adjusted/reversed check(s). You are now ready to complete your reversal.
Completing the Deletion
After you have reviewed the deleted adjusted/reversed check(s), you can complete your deletion.
Completing your deletion consists of the following:
• Confirming Your Payroll
• Reviewing Pay Confirmation Results
For step-by-step instructions, see “Completing Your Payroll” on page 11-18.
You have just finished completing the deletion of an adjusted/reversed check.
Deleting an Adjusted/Reversed Check
Unconfirming Your Payroll
Identifying the Check(s)
Deleting Your Adjusted/Reversed Check(s)
Reviewing the Deleted Checks
Completing the Deletion
Chapter 11: Processing an Off-Cycle PayrollPayroll Processing Guide Version 5.04.01

11-70 Deleting an Adjusted/Reversed Check
Chapter 11: Processing an Off-Cycle PayrollPayroll Processing Guide Version 5.04.01

Chapter 12
Adjusting Payroll Balances
PAGE TOPIC
12-2 Introduction
12-3 Establishing Tax Adjustment Earnings Types
12-7 Creating Manual Checks for Employee Balance Adjustments
12-14 Adjusting Federal Tax Balance Records
12-18 Adjusting State Tax Balance Records
12-28 Performing Balance Adjustments
Chapter 12: Adjusting Payroll BalancesPayroll Processing Guide Version 5.04.01

12-2 Introduction
Introduction
This chapter provides step-by-step instructions for adjusting payroll balances.
You can often complete a task in the product in multiple ways. For information on interface
shortcuts and tips, refer to the Using ADP Enterprise HR Guide.
As you work through the tasks in this chapter, you may have questions about fields and options on the panels. To display a description of the fields and options, press F1 (Help) from the panel.
Chapter 12: Adjusting Payroll BalancesPayroll Processing Guide Version 5.04.01

Establishing Tax Adjustment Earnings Types 12-3
Establishing Tax Adjustment Earnings Types
Before you can adjust employee tax records, you must first establish tax adjustment earnings types. Establishing these earnings types consists of:
• Establishing the Taxable Gross Definition
• Establishing the Earnings Types
Establishing the Taxable Gross Definition
Before you set up the tax adjustment earnings types using the Earnings task, you must first use the Taxable Gross Definition task (Company Definitions ~ System Tax Data) to set up the taxable gross definition for each earnings type.
Table 12-1 shows another way to represent the relationship between earnings and the Taxable Gross Definition panel. This table looks at the entries required on the Taxable Gross Definition panel and the related earnings types that each entry applies to.
Table 12-1. Requirements for Taxable Gross Definition Panel Based on Earnings Types
Taxable Gross Definition Panel Earnings Types
State or Locality Tax Type
Base Gross
Taxable Gross Component ID
Effect of Action on State or Locality
Earnings Code Description
CA Withholding FIT $FED Subtract AAF Adjust All—Federal
$FIT Subtract AFW Adjust Federal—Withholding
$STAT Add AAS Adjust All—State
$SIT Add ASW Adjust State—Withholding
CA Disability FUT $FED Subtract AAF Adjust All—Federal
$FUT Subtract AFU Adjust Federal—Unemployment
$STAT Add AAS Adjust All—State
Establishing Tax Adjustment Earnings Types
Establishing the Taxable Gross Definition
Establishing the Earnings Types
Chapter 12: Adjusting Payroll BalancesPayroll Processing Guide Version 5.04.01

12-4 Establishing Tax Adjustment Earnings Types
For instructions on setting up the taxable gross definition, refer to the Payroll Setup and Maintenance Guide.
You have just finished establishing the taxable gross definition. Next, establish tax adjustment earnings types.
Establishing the Earnings Types
To cover various adjustment situations, establish a set of earnings types, or codes, based on Table 12-2. You may need more earnings codes than listed.
$SDI Add ASD Adjust State—Disability
CA Unemployment FUT $FED Subtract AAF Adjust All—Federal
$FUT Subtract AFU Adjust Federal—Unemployment
$STAT Add AAS Adjust All—State
$SUT Add ASU Adjust State—Unemployment
Table 12-2. Earnings Codes
Earnings Codes Description
AAT Adjust All Taxes
AAF Adjust All—Federal
AFF Adjust Federal—FICA
AFW Adjust Federal—Withholding
AFU Adjust Federal—Unemployment
AAS Adjust All—State
ASW Adjust State—Withholding
Table 12-1. Requirements for Taxable Gross Definition Panel Based on Earnings Types (cont.)
Taxable Gross Definition Panel Earnings Types
State or Locality Tax Type
Base Gross
Taxable Gross Component ID
Effect of Action on State or Locality
Earnings Code Description
Establishing Tax Adjustment Earnings Types
Establishing the Taxable Gross Definition
Establishing the Earnings Types
Chapter 12: Adjusting Payroll BalancesPayroll Processing Guide Version 5.04.01

Establishing Tax Adjustment Earnings Types 12-5
For example, if you need to increase an employee’s federal withholding taxable amount by $1,000, establish an earnings type to adjust federal withholding (AFW). Enter AFW as the earnings code and enter an amount of $1,000 in the Other Earnings area of the Earnings panel (Pay Cycle Processes ~ Scheduled Payroll - On-Cycle ~ Enter Pay Cycle Earnings-Paysheet).
What this paysheet entry of $1,000 actually means depends on the options you select when establishing the AFW earnings type. You determine the taxability of each earnings type on the Earnings panel. This panel allows you to specify whether an earnings is considered taxable for the three federal-level taxes—FIT, FICA (Social Security and Medicare), and FUT. Enterprise Payroll uses these definitions, in turn, as defaults for the state and local taxability of that earnings type.
Using the state of California as an example, Table 12-3 shows the earnings types you should set up, their appropriate “Subject To” options turned on or off, the taxable gross component ID, and the related requirements for the Taxable Gross Definition panel.
You need to duplicate the entries on the Taxable Gross Definition panel for every state in
which you have employees living or working.
ASU Adjust State—Unemployment
ASD Adjust State—Disability
AAL Adjust All—Local
Table 12-3. Earnings Types and Requirements for Taxable Gross Definition Panel
Earnings TypesTaxable Gross Definition Panel
EarningsCode Description
Subject to FIT?
Subject to FICA?
Subject to FUTA? Taxable
State or Locality
Effect of Action on State/Locality
AAT Adjust all taxes
Y Y Y
AAF Adjust all Federal
Y Y Y FED CA Disability
Subtract
CA Unemploy-ment
Subtract
CA With-holding
Subtract
Table 12-2. Earnings Codes (cont.)
Earnings Codes Description
Chapter 12: Adjusting Payroll BalancesPayroll Processing Guide Version 5.04.01

12-6 Establishing Tax Adjustment Earnings Types
For instructions on setting up earnings types, refer to the Payroll Setup and Maintenance Guide.
You have just finished establishing the earnings types, which is the last step in establishing tax adjustment earnings types.
AFF Adjust Federal—FICA
N Y N
AFW Adjust Federal—Withholding
Y N N FIT CA With-holding
Subtract
AFU Adjust Federal
N N Y FUT CA Disability
Subtract
CA Unemploy-ment
Subtract
AAS Adjust All—State
N N N STATE CA Disability
Add
CA With-holding
Add
CA Unemploy-ment
Add
ASW Adjust State—Withholding
N N N SIT CA With-holding
Add
ASU Adjust State—Unemployment
N N N SUT CA Unemploy-ment
Add
ASD Adjust State—Disability
N N N SDI CA Disability
Add
Table 12-3. Earnings Types and Requirements for Taxable Gross Definition Panel (cont.)
Earnings TypesTaxable Gross Definition Panel
EarningsCode Description
Subject to FIT?
Subject to FICA?
Subject to FUTA? Taxable
State or Locality
Effect of Action on State/Locality
Chapter 12: Adjusting Payroll BalancesPayroll Processing Guide Version 5.04.01

Creating Manual Checks for Employee Balance Adjustments 12-7
Creating Manual Checks for Employee Balance Adjustments
Once you set up the appropriate earnings types and Taxable Gross Definition panel entries, you are ready to make your actual adjustments in the form of manual checks. You may process these manual checks either on-cycle or off-cycle, running the pay calculation and pay confirmation processes as normal. During the pay calculation process, Enterprise Payroll double-checks your entries to ensure that each manual check crossfoots. During the pay confirmation process, Enterprise Payroll updates employee tax balances.
For example, you may need to make some of this year’s year-end tax adjustments in January of the coming year. Let’s say an employee is taxed in Rhode Island in error instead of California throughout 2002. If this employee is on a weekly payroll, it’s not practical to adjust her 52 checks individually. You need a way of backing her Rhode Island taxables and taxes out of Enterprise Payroll and entering a year’s worth of California taxables and taxes at one time. You do this by creating manual checks.
You may need to make an adjustment to an employee’s federal withholding taxables and tax. For example, an employee's tax balance is understated by $10.00 and the taxable by $1,000.00. You make the adjustment by entering a manual check to process on-cycle with the 12/31/02 pay calendar, which you attach to a pay run ID of YEA (Year-End Adjustments).
If you succeed in making all your adjustments to the employee tax balances during this calendar year, everything will run smoothly when you create your W-2s.
Creating a manual check to adjust an employee balance consists of the following:
• Assigning a Pay Run ID to a Pay Calendar
• Adding a Paysheet Page
• Entering One-time Taxes
• Running Pay Calculation and Confirmation Processes
Chapter 12: Adjusting Payroll BalancesPayroll Processing Guide Version 5.04.01

12-8 Creating Manual Checks for Employee Balance Adjustments
Assigning a Pay Run ID to a Pay Calendar
If you have already run your last payroll of the year, then you must first establish a pay run ID and assign it to a pay period.
If you have not run the last payroll of the year, you can attach your adjustment runs to the last
pay run of last year and process them in the off-cycle mode.
Since these are really the previous year’s changes, make the paycheck issue date and pay end date (of the pay calendar you are processing the adjustments with) reflect a date appropriate for last year's adjustments. For detailed instructions on establishing a pay run ID and assigning it to a pay period, see “Assigning a Pay Run ID to a Pay Calendar” on page 15-16.
You have just finished assigning a pay run ID to a pay calendar. Next, add a paysheet page.
Adding a Paysheet Page
You must create a paysheet entry so that you can enter manual check data - such as employee’s earnings, taxes, and deductions - into the paysheet. Enterprise Payroll calculates employer-paid taxes and benefits.
To add a paysheet page, do the following:
1. Click Payroll and make the following selections.
Payroll Cycle Processes ~ Scheduled Payroll (On-Cycle)
2. Click next to the Enter Pay Cycle Earnings (Paysheet) task. The Add dialog box displays, as shown in Figure 12-1.
Figure 12-1. Add Dialog Box
To modify an existing paysheet page, double-click the Enter Pay Cycle Earnings
(Paysheets) task, enter the search criteria in the Search dialog box, and click OK. To
preserve history, click (Insert Row).
3. Select the company from the Company field.
Creating Manual Checks for Employee Balance Adjustments
Assigning a Pay Run ID to a Pay Calendar
Adding a Paysheet Page
Entering One-time Taxes
Running Pay Calculation and Confirmation Processes
Chapter 12: Adjusting Payroll BalancesPayroll Processing Guide Version 5.04.01

Creating Manual Checks for Employee Balance Adjustments 12-9
4. Select the pay group to which the employee belongs from the Pay Group field.
Enter the end date for the pay period to which you are adding the employee in the Pay Period End Date field.
5. Enter a Y or N in the Off Cycle field to indicate if the gross-up is part of an off-cycle payroll.
6. Enter the paysheet page number you are adding for this gross-up in the Page # field and click OK. The Earnings panel displays.
Figure 12-2. Earnings Panel
For detailed information on the paysheet fields on this panel, press F1 or refer to Table 3-1, “Paysheet Items,”on page 3-4.
7. Select the first employee to be on the paysheet from the Empl ID field and then press Tab to display the employee’s name.
8. Select the Manual Check check box.
9. Enter the actual number of the physical manual check in the Check # field.
The check number does not need to correspond in any way with check numbers
Enterprise Payroll produces.
10. Enter the check date of the manual check in the Dt field.
This date should be the date Enterprise Payroll associates with the pay calendar entry
you use when running the Confirm Payroll program on the manual check. Enterprise Payroll updates the employee’s payroll balances based upon the check date.
11. Do not enter an amount in the Tot Gross field.
Chapter 12: Adjusting Payroll BalancesPayroll Processing Guide Version 5.04.01

12-10 Creating Manual Checks for Employee Balance Adjustments
12. Enter the total amount of tax adjusted in the Net Pay field. If you are adjusting a taxable amount only, leave this field blank.
This amount must equal the (negative) sum of the tax amounts you enter on the Tax
Override panel. If you are issuing a refund to the employee, net pay is a positive number.
13. Select the OK to Pay check box.
If you want a warning message to automatically display upon saving if you have changed
a payline but have not selected the OK to Pay check box, you can select the OK to Pay Warning check box on the Earnings/Payment Basics panel (Company Definitions ~ Pay Groups and Payroll Calendars ~ Pay Groups). For details, refer to the Payroll Setup and Maintenance Guide.
14. Select the Disable Dir Dep check box.
15. In the Amount field in the Other Earnings area, enter the amount of each adjustment to a taxable amount (in conjunction with one of the special tax adjustment earnings codes).
Since these earnings types all have the Add to Gross Pay option turned off, they have
no effect on the employee’s total gross or net pay.
16. If hours are associated with the earnings type, then enter the number of hours in the Oth Hrs field.
You have just finished adding a paysheet page. Next, click the Tax Override tab to enter one-time tax information for the manual check.
Chapter 12: Adjusting Payroll BalancesPayroll Processing Guide Version 5.04.01

Creating Manual Checks for Employee Balance Adjustments 12-11
Entering One-time Taxes
Use the Tax Override panel to enter tax information for the manual check. Insert as many rows as necessary to record all employee-paid taxes deducted in the manual check.
To enter one-time taxes, do the following:
1. Click the Tax Override tab.
When entering a manual check, you must start on the Earnings panel. See page 12-8 for
more information.
Figure 12-3. Tax Override Panel
For detailed information on this panel, press F1 or see page 3-37.
2. Select the OK to Pay check box.
If you want a warning message to automatically display upon saving if you have changed
a payline but have not selected the OK to Pay check box, you can select the OK to Pay Warning check box on the Earnings/Payment Basics panel (Company Definitions ~ Pay Groups and Payroll Calendars ~ Pay Groups). For details, refer to the Payroll Setup and Maintenance Guide.
3. Clear the Additional Taxes check box so that Enterprise Payroll won’t look at the additional taxes the employee usually wants taken out.
4. In the One-Time Tax Data area, select the Federal check box if you are adjusting federal withholding taxes.
5. From the Tax Type field, select either the Override option or the Refund option depending on the adjustment.
If the employee has IRS tax lock-in letter, you will not be able to select the Override
option.
Creating Manual Checks for Employee Balance Adjustments
Assigning a Pay Run ID to a Pay Calendar
Adding a Paysheet Page
Entering One-time Taxes
Running Pay Calculation and Confirmation Processes
Chapter 12: Adjusting Payroll BalancesPayroll Processing Guide Version 5.04.01

12-12 Creating Manual Checks for Employee Balance Adjustments
6. Select the tax class from the Tax Class field.
Only record employee-paid taxes that were deducted in the manual checks.
7. Enter the amount of tax deducted in the Tax Amt field.
8. To enter state and local tax information, click the inner scroll bar and click (Insert Row).
9. Select the state from the State field.
10. If you are specifying a local tax amount, select the taxing locality from the Locality field.
11. From the Tax Type field, select either the Override option or the Refund option depending on the adjustment.
12. Select the tax class from the Tax Class field.
Only record employee-paid taxes that were deducted in the manual checks.
13. Enter the amount of tax deducted in the Tax Amt field.
14. If you have other employees from the same company and pay group that you need to enter manual check information for, then click the Earnings tab. Click the outer scroll
bar and then click (Insert Row) so that you can select the next employee. Enter the paysheet and one-time taxes information as needed.
15. When you are finished entering manual check information for all necessary employees,
click (Save).
You have just finished entering one-time taxes for the manual check. Next, run the pay calculation and confirmation processes.
Chapter 12: Adjusting Payroll BalancesPayroll Processing Guide Version 5.04.01

Creating Manual Checks for Employee Balance Adjustments 12-13
Running Pay Calculation and Confirmation Processes
After you set up your paysheet page and enter any one-time deductions and/or taxes, you must process a pay calculation and confirmation. For step-by-step instructions on calculating and confirming a payroll, see Chapter 6, “Calculating and Confirming Your Payroll.”
You have just finished running pay calculation and confirmation processes, which is the last step in adjusting federal tax balance records.
Creating Manual Checks for Employee Balance Adjustments
Assigning a Pay Run ID to a Pay Calendar
Adding a Paysheet Page
Entering One-time Taxes
Running Pay Calculation and Confirmation Processes
Chapter 12: Adjusting Payroll BalancesPayroll Processing Guide Version 5.04.01

12-14 Adjusting Federal Tax Balance Records
Adjusting Federal Tax Balance Records
Adjusting federal tax balance records consists of the following:
• Adding a Paysheet Page
• Entering One-time Taxes
• Running Pay Calculation and Confirmation Processes
Adding a Paysheet Page
To add a paysheet page, do the following:
1. Click Payroll and make the following selections.
Payroll Cycle Processes ~ Scheduled Payroll (On-Cycle)
2. Click next to the Enter Pay Cycle Earnings (Paysheet) task. The Add dialog box displays, as shown in Figure 12-4.
Figure 12-4. Add Dialog Box
To modify an existing paysheet page, double-click the Enter Pay Cycle Earnings
(Paysheets) task, enter the search criteria in the Search dialog box, and click OK. To
preserve history, click (Insert Row).
3. Select the company from the Company field.
4. Select the pay group to which the employee belongs from the Pay Group field.
Enter the end date for the pay period to which you are adding the employee in the Pay Period End Date field.
5. Enter a Y or N in the Off Cycle field to indicate if the gross-up is part of an off-cycle payroll.
Adjusting Federal Tax Balance Records
Adding a Paysheet Page
Entering One-time Taxes
Running Pay Calculation and Confirmation Processes
Chapter 12: Adjusting Payroll BalancesPayroll Processing Guide Version 5.04.01

Adjusting Federal Tax Balance Records 12-15
6. Enter the paysheet page number you are adding for this gross-up in the Page # field and click OK. The Earnings panel displays.
Figure 12-5. Earnings Panel
For detailed information on the paysheet fields on this panel, press F1 or refer to Table 3-1, “Paysheet Items,”on page 3-4.
7. Select the first employee to be on the paysheet from the ID field and then press Tab to display the employee’s name.
8. Select the Manual Check check box.
9. Enter a dummy check number in the Check # field.
10. Enter the date of the dummy check in the Dt field.
11. Do not enter an amount in the Tot Gross field.
12. Enter the total amount of tax adjusted in the Net Pay field. If you are adjusting a taxable amount only, leave this field blank.
This amount must equal the (negative) sum of the tax amounts you enter on the Tax
Override panel. If you are issuing a refund to the employee, net pay is a positive number.
13. Select the OK to Pay check box.
If you want a warning message to automatically display upon saving if you have changed
a payline but have not selected the OK to Pay check box, you can select the OK to Pay Warning check box on the Earnings/Payment Basics panel (Company Definitions ~ Pay Groups and Payroll Calendars ~ Pay Groups). For details, refer to the Payroll Setup and Maintenance Guide.
14. Select the Disable Dir Dep check box.
Chapter 12: Adjusting Payroll BalancesPayroll Processing Guide Version 5.04.01

12-16 Adjusting Federal Tax Balance Records
15. In the Amount field in the Other Earnings area, enter the amount of each adjustment to a taxable amount (in conjunction with one of the special tax adjustment earnings codes).
Since these earnings types all have the Add to Gross Pay option turned off, they do not
effect the employee’s total gross or net pay.
16. Select the special adjustment code in the Code field.
17. If the earnings type has a specific dollar amount, enter the amount in the Amount field.
If the amount in the Tot Gross field does not equal the sum of all additional earnings,
you will receive an error message when you run the Confirm Payroll program.
You have just finished adding a paysheet page. Next, the Tax Override panel to enter one-time tax information for the adjustment.
Entering One-time Taxes
Use the Tax Override panel to make tax adjustments.
To enter one-time taxes, do the following:
1. Click the Tax Override tab.
When entering a manual check, you must start on the Earnings panel. See page 12-14
for more information.
Figure 12-6. Tax Override Panel
For detailed information on this panel, press F1 or see page 3-37.
2. Select the OK to Pay check box.
Adjusting Federal Tax Balance Records
Adding a Paysheet Page
Entering One-time Taxes
Running Pay Calculation and Confirmation Processes
Chapter 12: Adjusting Payroll BalancesPayroll Processing Guide Version 5.04.01

Adjusting Federal Tax Balance Records 12-17
3. Clear the Additional Taxes check box so that Enterprise Payroll won’t look at the additional taxes the employee usually wants taken out.
4. In the One-Time Tax Data area, select the Federal check box if you are adjusting federal withholding taxes.
5. From the Tax Type field, select either the Override option or the Refund option depending on the adjustment.
If the employee has IRS tax lock-in letter, you will not be able to select the Override
option.
6. Select the tax class from the Tax Class field.
Only record employee-paid taxes that were deducted in the manual checks.
7. Enter the amount of tax deducted in the Tax Amt field.
8. If you have other employees from the same company and pay group that you need to make an adjustment for, then click the Earnings tab. Click the outer scroll bar and then
click (Insert Row) so that you can select the next employee. Enter the paysheet and one-time taxes information as needed.
9. When you are finished entering adjustments for all necessary employees, click (Save).
You have just finished entering one-time tax adjustments. Next, run the pay calculation and confirmation processes.
Running Pay Calculation and Confirmation Processes
After you set up your paysheet page and enter any one-time deductions and/or taxes, you must process a pay calculation and confirmation. For step-by-step instructions, see Chapter 6, “Calculating and Confirming Your Payroll.”
You have just finished running pay calculation and confirmation processes, which is the last step in adjusting federal tax balance records.
Adjusting Federal Tax Balance Records
Adding a Paysheet Page
Entering One-time Taxes
Running Pay Calculation and Confirmation Processes
Chapter 12: Adjusting Payroll BalancesPayroll Processing Guide Version 5.04.01

12-18 Adjusting State Tax Balance Records
Adjusting State Tax Balance Records
Taxing an employee in the wrong state is not uncommon. Adjusting state tax balances records consists of the following:
• Backing Out Wages from Incorrect State Records
• Running Pay Calculation and Confirmation Processes
• Correcting Tax Data and Job Records
• Updating Correct Tax Data to Reflect the Correct State
Backing Out Wages from Incorrect State Records
Let’s say you taxed an employee incorrectly in the state of California throughout 2002; he should be taxed in Pennsylvania. Table 12-4 shows the table grosses, no-limit grosses, and tax amounts of his current records. The amounts are expressed as negative numbers to signify that they need to be backed out.
You need to back this data out of Enterprise Payroll so that this employee has zero balances for California. To do this, you must add a paysheet page and adjust tax data.
Adding a Paysheet Page
To add a paysheet page, do the following:
1. Click Payroll and make the following selections.
Payroll Cycle Processes ~ Scheduled Payroll (On-Cycle)
Table 12-4. Example Data for Backing Out Wages
CaliforniaTaxable Gross
No Limit Gross Tax Amount
SIT <$39,799.54> <3,641.13>
SUT (ER) <$7,000.00> <$40,560.34> <$245.00>
SDI <$31,767.00> <$40,560.34> <$397.09>
Weeks worked <52>
Adjusting State Tax Balance Records
Backing Out Wages from Incorrect State Records
Running Pay Calculation and Confirmation Processes
Correcting Tax Data and Job Records
Updating Correct Tax Data to Reflect the Correct State
Chapter 12: Adjusting Payroll BalancesPayroll Processing Guide Version 5.04.01

Adjusting State Tax Balance Records 12-19
2. Click next to the Enter Pay Cycle Earnings (Paysheet) task. The Add dialog box displays, as shown in Figure 12-7.
Figure 12-7. Add Dialog Box
To modify an existing paysheet page, double-click the Enter Pay Cycle Earnings
(Paysheets) task, enter the search criteria in the Search dialog box, and click OK. To
preserve history, click (Insert Row).
3. Select the company from the Company field.
4. Select the pay group to which the employee belongs from the Pay Group field.
Enter the end date for the pay period to which you are adding the employee in the Pay Period End Date field.
5. Enter a Y or N in the Off Cycle field to indicate if the gross-up is part of an off-cycle payroll.
6. Enter the paysheet page number you are adding for this gross-up in the Page # field and click OK. The Earnings panel displays.
.
Figure 12-8. Earnings Panel
For detailed information on the paysheet fields on this panel, press F1 or refer to Table 3-1, “Paysheet Items,”on page 3-4.
Chapter 12: Adjusting Payroll BalancesPayroll Processing Guide Version 5.04.01

12-20 Adjusting State Tax Balance Records
7. Select the first employee to be on the paysheet from the ID field and then press Tab to display the employee’s name.
8. Select the Manual Check check box.
9. Enter a dummy check number in the Check # field.
10. Enter date of the dummy check in the Dt field.
11. Do not enter an amount in the Tot Gross field.
12. Enter the total amount of tax adjusted in the Net Pay field. If you are adjusting a taxable amount only, leave this field blank.
This amount must equal the (negative) sum of the tax amounts you enter on the Tax
Override panel. If you are issuing a refund to the employee, net pay is a positive number.
13. Select the OK to Pay check box.
If you want a warning message to automatically display upon saving if you have changed
a payline but have not selected the OK to Pay check box, you can select the OK to Pay Warning check box on the Earnings/Payment Basics panel (Company Definitions ~ Pay Groups and Payroll Calendars ~ Pay Groups). For details, refer to the Payroll Setup and Maintenance Guide.
14. Select the Disable Dir Dep check box.
15. In the Amount field in the Other Earnings area, enter the amount of each adjustment to a taxable amount (in conjunction with one of the special tax adjustment earnings codes).
Since these earnings types all have the Add to Gross Pay option turned off, they have
no effect on the employee’s total gross or net pay.
16. Select the special adjustment code in the Code field.
17. If the earnings type has a specific dollar amount, enter the amount in the Amount field.
If the amount in the Tot Gross field does not equal the sum of all additional earnings,
you will receive an error message during pay confirmation.
You have just finished adding a paysheet page. Next, enter one-time tax information for the adjustment.
Chapter 12: Adjusting Payroll BalancesPayroll Processing Guide Version 5.04.01

Adjusting State Tax Balance Records 12-21
Entering One-time Taxes
Use the Tax Override panel to make tax adjustments. Insert as many rows as necessary to record all employee-paid tax adjustments.
Table 12-5 shows a summary of the four rows on a sample completed Tax Override panel.
To enter one-time taxes, do the following:
1. Click the Tax Override tab.
When entering a manual check, you must start on the Earnings panel. See page 12-18
for more information.
Figure 12-9. Tax Override Panel
For detailed information on this panel, press F1 or see page 3-37.
2. Select the OK to Pay check box.
If you want a warning message to automatically display upon saving if you have changed
a payline but have not selected the OK to Pay check box, you can select the OK to Pay Warning check box on the Earnings/Payment Basics panel (Company Definitions ~ Pay Groups and Payroll Calendars ~ Pay Groups). For details, refer to the Payroll Setup and Maintenance Guide.
Table 12-5. Summary of Rows on Tax Override Panel
StateTax Class One-Time Tax Type One-Time Tax Amount
CA H Refund $3,641.13
CA U Refund $245.00
CA D Refund $397.00
CA W Refund 52
Chapter 12: Adjusting Payroll BalancesPayroll Processing Guide Version 5.04.01

12-22 Adjusting State Tax Balance Records
3. Clear the Additional Taxes check box so that Enterprise Payroll won’t look at the additional taxes the employee usually wants taken out.
4. In the One-Time Tax Data area, select the Federal check box if you are adjusting federal withholding taxes.
5. From the Tax Type field, select either the Override option or the Refund option depending on the adjustment.
If the employee has IRS tax lock-in letter, you will not be able to select the Override
option.
6. Select the tax class from the Tax Class field.
Only record employee-paid taxes that were deducted in the manual checks.
7. Enter the amount of tax deducted in the Tax Amt field.
8. If you have other employees from the same company and pay group that you need to make an adjustment for, click the Earnings tab. Click the outer scroll bar and then click
(Insert Row) so that you can select the next employee. Enter the paysheet and one-time taxes information as needed.
9. When you are finished entering adjustments for all necessary employees, click (Save).
You have just finished making adjustments. Next, run the pay calculation and confirmation processes.
Chapter 12: Adjusting Payroll BalancesPayroll Processing Guide Version 5.04.01

Adjusting State Tax Balance Records 12-23
Running Pay Calculation and Confirmation Processes
After you set up your paysheet page and enter any one-time deductions and/or taxes, you must process a pay calculation and confirmation. For step-by-step instructions, see Chapter 6, “Calculating and Confirming Your Payroll.”
You have just run the pay calculation and confirmation processes. Next, you correct tax data and job records.
Correcting Tax Data and Job Records
After you add a paysheet and enter your adjustments, you can correct tax data and job records. For step-by-step instructions on correcting employee tax data, refer to the Employee Tax Setup Guide.
Updating Correct Tax Data to Reflect the Correct State
Updating the employee’s tax records to the correct state so that the employee has the correct balances consists of the following:
• Adding a Paysheet Page
• Entering One-time Taxes
Table 12-6 shows the taxable grosses, no-limit grosses, and tax amounts his records should show for Pennsylvania:
You need to enter this data into Enterprise Payroll so this employee has the correct balances for Pennsylvania. To do so, add a paysheet page, enter the correct tax data for the correct state.
Table 12-6. Example Tax Data for Pennsylvania
Pennsylvania Taxable Gross No Limit Gross Tax Amount
SIT $39,799.54 $3,641.13
SUT (ER) $8,000.00 $40,560.34 $245.00
Local $40,560.34 $397.00
Weeks worked 52
Adjusting State Tax Balance Records
Backing Out Wages from Incorrect State Records
Running Pay Calculation and Confirmation Processes
Correcting Tax Data and Job Records
Updating Correct Tax Data to Reflect the Correct State
Chapter 12: Adjusting Payroll BalancesPayroll Processing Guide Version 5.04.01

12-24 Adjusting State Tax Balance Records
Adding a Paysheet Page
To update Enterprise Payroll with data for the correct state, do the following:
This example uses California tax data throughout the instructions.
1. Click Payroll and make the following selections.
Payroll Cycle Processes ~ Scheduled Payroll (On-Cycle)
2. Click next to the Enter Pay Cycle Earnings (Paysheet) task. The Add dialog box displays, as shown in Figure 12-10.
Figure 12-10. Add Dialog Box
To modify an existing paysheet page, double-click the Enter Pay Cycle Earnings
(Paysheets) task, enter the search criteria in the Search dialog box, and click OK. To
preserve history, click (Insert Row).
3. Select the company from the Company field.
4. Select the pay group to which the employee belongs from the Pay Group field.
Enter the end date for the pay period to which you are adding the employee in the Pay Period End Date field.
5. Enter a Y or N in the Off Cycle field to indicate if the gross-up is part of an off-cycle payroll.
Chapter 12: Adjusting Payroll BalancesPayroll Processing Guide Version 5.04.01

Adjusting State Tax Balance Records 12-25
6. Enter the paysheet page number you are adding for this gross-up in the Page # field and click OK. The Earnings panel displays.
Figure 12-11. Earnings Panel
For detailed information on the paysheet fields on this panel, press F1 or refer to Table 3-1, “Paysheet Items,”on page 3-4.
7. Select the Manual Check check box.
8. Enter the total tax amount to be charged to the employee in the Net Pay field. This is the same amount as the employee’s total refund for the California taxes you backed out, but expressed as a negative number.
9. Move the employee’s California state withholding to Pennsylvania state withholding. Since this employee is living and working in Philadelphia, the employee will also have to pay a local tax, which didn’t need to be paid in California. In short, the taxes in the two states don’t directly correspond to each other.
10. Move the employee’s California employer-paid state unemployment to Pennsylvania employer-paid state unemployment.
11. Move the employee’s California disability to Philadelphia local tax. California has state disability tax for employees, whereas Pennsylvania does not.
12. Enter the taxable gross amounts (using the appropriate earnings codes) in the Other Earnings area.
13. Click (Insert Row) to insert new rows of data.
14. Select ASW (Adjust State—Withholding) in the Code field in the Other Earnings area. Use this earnings type to enter the employee’s SIT taxable gross.
15. Select ASU (Adjust State—Unemployment) in the Code field in the Other Earnings area. Use this earnings type to enter the employee's SUT no-limit gross.
Chapter 12: Adjusting Payroll BalancesPayroll Processing Guide Version 5.04.01

12-26 Adjusting State Tax Balance Records
16. Select AAL (Adjust All—Local) in the Code field in the Other Earnings area. Use this earnings type to enter the employee's state taxable gross.
You have just finished adding a paysheet page. Next, enter one-time tax information for the adjustment.
Entering One-time Taxes
Use the Tax Override panel to make tax adjustments. Insert as many rows as necessary to record all employee-paid tax adjustments.
Table 12-7 shows a summary of the five rows on your completed Tax Override panel.
Table 12-7. Rows Completed on the Tax Override Panel
State/Locality Tax Class One-Time Tax Type One-Time Tax Amount
PA/Philadelphia H Override $397.09
PA H Override $3641.13
PA U Override $245.00
PA V Override 0
PA W Override 52
Chapter 12: Adjusting Payroll BalancesPayroll Processing Guide Version 5.04.01

Adjusting State Tax Balance Records 12-27
To enter one-time taxes, do the following:
1. Click the Tax Override tab.
When entering a manual check, you must start on the Earnings panel. See page 12-24
for more information.
Figure 12-12. Tax Override Panel
For detailed information on this panel, press F1 or see page 3-37.
2. Enter the state in the State field.
3. Enter the locality code in the Locality field.
4. Enter the tax class (H for withholding) in the Tax Class field.
5. Select the Override option in the Tax Type area.
If the employee has an IRS tax lock-in letter, you will not be able to select the Override
option during the lock-in period.
6. Enter the local tax amount in the Tax Amt field. This is the amount of tax to add.
7. Click (Save).
You have just finished entering one-time tax adjustments, which is the last step in adjusting state tax balance records.
Chapter 12: Adjusting Payroll BalancesPayroll Processing Guide Version 5.04.01

12-28 Performing Balance Adjustments
Performing Balance Adjustments
In ADP Enterprise HR, you can perform balance adjustments on existing balances or opening balances. You can enter adjustments/open balances to earnings, deductions, taxes, arrears, and garnishments for one or more current/prior periods in a batch. When creating balance adjustments, you can choose to enter the adjustment/opening balance manually using the Balance panels or automatically using the new Adjustment/Opening Balance Data Import (PRUTL002). For opening balances, you can enter quarter-to-date and year-to-date adjustments in addition to month-to-date adjustments on the Balance panels.
After entering the balance adjustments, you can then use the Pending Transaction Load Process task or the Adjustment Audit Report (PAY035) to review pending balance adjustment transactions before loading. With the Pending Transaction Load Process task, you can also make changes before loading. After loading your balance adjustments, you can review the processed adjustment transactions through the panels in the Transactions Summary task.
Finally, you can reverse a specific balance adjustment transaction after the data has been loaded.
If you are an ADP TAXServices client, you should submit an amended quarterly tax file after
the batch of adjustments is loaded. The amended quarterly tax files should include all of the quarters that have been affected by the adjustments.
Performing balance adjustments consists of the following:
• Creating an Adjustment/Open Balance
• Reviewing Balance Adjustments Before Loading
• Loading Balance Adjustments
• Reviewing Balance Adjustment Transactions
• Posting Current/Prior Period Adjustments to the General Ledger
• Reversing a Specific Balance Adjustment Transaction
• Updating Current/Prior Period Adjustment Balances when Reversing a Check
Chapter 12: Adjusting Payroll BalancesPayroll Processing Guide Version 5.04.01

Performing Balance Adjustments 12-29
Creating an Adjustment/Open Balance
When creating balance adjustments, you can choose to enter the adjustment/opening balance in one of two ways:
• Entering a Manual Adjustment/Open Balance
• Automatically Importing Adjustment/Opening Balance Data
Entering a Manual Adjustment/Open Balance
You can enter a manual adjustment/open balance to arrears, deduction, earnings, garnishment, or tax balance as follows:
• Adjusting an Arrears Balance
• Adjusting a Deduction Balance
• Adjusting an Earnings Balance
• Adjusting a Garnishment Balance
• Adjusting a Tax Balance
Adjusting an Arrears Balance
To enter an arrears balance adjustment, do the following:
1. Click Payroll and make the following selections:
Payroll Cycle Processes ~ Balance Adjustment
2. Click next to the Arrears Balance task.The Add dialog box displays.
Figure 12-13. Add Dialog Box
To modify an existing arrears balance adjustment, double-click the Arrears Balance
Adjustment task, enter the search criteria in the Search dialog box, and click OK. To
preserve history, click (Insert Row).
The Adjustment Run ID defaults to PEND.
3. In the Empl ID field, select the employee ID number.
Performing Balance Adjustments
Creating an Adjustment/Open Balance
Reviewing Balance Adjustments Before Loading
Loading Balance Adjustments
Reviewing Balance Adjustment Transactions
Posting Current/Prior Period Adjustments to the General Ledger
Reversing a Specific Balance Adjustment Transaction
Updating Current/Prior Period Adjustment Balances when Reversing a Check
Chapter 12: Adjusting Payroll BalancesPayroll Processing Guide Version 5.04.01

12-30 Performing Balance Adjustments
4. In the Employee Record Number field, select the record number for that employee.
5. In the Company field, select the company code.
6. If necessary, change the Adjustment Type to Opening Balance so that you can enter quarter-to-date and year-to-date adjustment data in addition to month-to-date data. Click OK. The Arrears Balance panel displays and indicates if you are creating an adjustment or an opening balance.
Figure 12-14. Arrears Balance Panel
7. From the Benefit Plan Date field, select a date that falls in the benefit plan year in which the adjustment is made.
For example, if the benefit plan year is October 2007 through September 2008, you must enter a date within that time frame.
8. In the Plan Type field, select the plan type available during the year of the benefit plan date.
9. In the Benefit Plan field, select the benefit plan available with the plan type.
A benefit plan is not required for a general deduction (plan type 00).
10. In the Deduction Code field, select the deduction code available for the benefit plan. The benefit plan determines the available deduction codes.
11. In the Deduction Class field, select the deduction class available for the deduction code. The deduction code determines the available deduction classes.
12. In the Reason field, enter the reason for the adjustment. The reason displays on the Adjustment Deduction Summary panel.
For a description of the fields on this panel, press F1.
Chapter 12: Adjusting Payroll BalancesPayroll Processing Guide Version 5.04.01

Performing Balance Adjustments 12-31
13. In the Arrears Balance area, enter the adjustment amount in one of the following fields and press Tab:
• Adjustment - If you enter the amount of the arrears balance adjustment, the New Balance field automatically updates.
• New Balance - If you enter the amount of the arrears balance adjustment, the Adjustment field automatically updates.
14. Verify that the adjusted year-to-date balance in the New Balance field is positive. If the balance is negative, you will not be allowed to save your changes.
15. To enter information for another arrears balance adjustment, click (Insert Row).
16. Click (Save).
You have just finished entering an arrears balance adjustment. Next, you can add a deduction balance adjustment.
Adjusting a Deduction Balance
The Deduction Balance panel updates the month-to-date, quarter-to-date, and year-to-date balances for the employee. You can add multiple deduction adjustments for one employee or adjustments for multiple employees to the adjustment run ID. For any adjustment you add that has tax implications, you must adjust taxes separately.
To enter a deduction balance adjustment, do the following:
1. Click Payroll and make the following selections:
Payroll Cycle Processes ~ Balance Adjustment
Chapter 12: Adjusting Payroll BalancesPayroll Processing Guide Version 5.04.01

12-32 Performing Balance Adjustments
2. Click next to the Deduction Balance task. The Add dialog box displays.
Figure 12-15. Add Dialog Box
To modify an existing deduction balance adjustment, double-click the Deduction
Balance Adjustment task, enter the search criteria in the Search dialog box, and click
OK. To preserve history, click (Insert Row).
The Adjustment Run ID defaults to PEND.
3. In the Empl ID field, select the employee ID number.
4. In the Company field, select the company code.
5. If necessary, change the Adjustment Type to Opening Balance so that you can enter quarter-to-date and year-to-date adjustment data in addition to month-to-date data. Click OK. The Deduction Balance panel displays and indicates if you are creating an adjustment or an opening balance.
Figure 12-16. Deduction Balance Panel
6. In the Year field, enter the year for which the adjustment is made.
7. In the Month field, select the month in which the adjustment is made.
For a description of the fields on this panel, press F1.
Chapter 12: Adjusting Payroll BalancesPayroll Processing Guide Version 5.04.01

Performing Balance Adjustments 12-33
8. If necessary, change the Benefit Plan Date.
This field is automatically populated with the last day of the month.
9. In the Plan Type field, select the plan type available during the year of the benefit plan date.
10. In the Benefit Plan field, select the benefit plan available with the plan type.
A benefit plan is not required for a general deduction (plan type 00).
11. In the Deduction Code field, select the deduction code available for the benefit plan. The benefit plan determines the available deduction codes.
12. In the Deduction Class field, select the deduction class available for the deduction code. The deduction code determines the available deduction classes.
13. Select the Update all Special Accumulators check box to update all the special accumulator balances associated with the deduction code.
This field does not display for opening balances. You must enter each special
accumulator individually.
14. In the Reason field, enter the reason for the adjustment. The reason displays on the Adjustment Arrears Summary panel.
15. If you do not want the balance information included in the Adjustment GL Summary Report, then select the Remove from G/L Update check box.
16. In the Deduction Balance area, enter the adjustment amount(s) as follows:
The fields in the Deduction Balance area automatically populate after selecting all
deduction balances settings.
• For adjustments, enter the amount of the deduction balance adjustment in the MTD Adjustment field. Press Tab to automatically populate/update the QTD and YTD fields.
• For opening balances, do one of the following:
– In the Adjustment column, enter the MTD, QTD, and YTD amounts or YTD amounts only.
– In the New Balance column, enter the MTD, QTD, and YTD amounts or YTD amounts only.
If you did not select Opening Balance as the Adjustment Type in the Add dialog box,
the QTD and YTD fields are grayed and unavailable.
17. Verify that the adjusted year-to-date balance in the New Balance field is positive. If the balance is negative, you will not be allowed to save your changes.
18. In the Special Accumulators area, review the special accumulator(s) to which the deduction is assigned.
Chapter 12: Adjusting Payroll BalancesPayroll Processing Guide Version 5.04.01

12-34 Performing Balance Adjustments
19. To enter information for another deduction balance adjustment, click (Insert Row).
20. Click (Save).
You have just finished entering a deduction balance adjustment. Next, you can add an earnings balance adjustment.
Adjusting an Earnings Balance
When you adjust an earnings balance, the month-to-date, quarter-to-date, and year-to-date balances for the specified year reflect the adjustment. If an earnings code's association with a special accumulator has changed, you can select the special accumulator you want to adjust.
Adjustments for third party sick pay is unavailable in the Earnings Balance Adjustment task.
To enter an earnings balance adjustment, do the following:
1. Click Payroll and make the following selections:
Payroll Cycle Processes ~ Balance Adjustment
2. Click next to the Earnings Balance task. The Add dialog box displays.
Figure 12-17. Add Dialog Box
To modify an existing earnings balance adjustment, double-click the Earnings Balance
Adjustment task, enter the search criteria in the Search dialog box, and click OK. To
preserve history, click (Insert Row).
The Adjustment Run ID defaults to PEND.
3. In the Empl ID field, select the employee ID number.
4. In the Company field, select the company code.
Chapter 12: Adjusting Payroll BalancesPayroll Processing Guide Version 5.04.01

Performing Balance Adjustments 12-35
5. If necessary, change the Adjustment Type to Opening Balance so that you can enter quarter-to-date and year-to-date adjustment data in addition to month-to-date data. Click OK. The Earnings Balance panel displays and indicates if you are creating an adjustment or an opening balance.
Figure 12-18. Earnings Balance Panel
6. In the Year field, enter the year for which the adjustment is made.
7. In the Month field, select the month for which the adjustment is made.
8. To adjust a single special accumulator balance, select the Special Earnings Accumulator check box. If you select this option, the earnings balance adjustment will update one accumulator and the Earning/Accumulator field will only provide special accumulators to choose from.
If you select this check box, then the Update All Special Accumulators check box will
be grayed and unavailable.
9. In the Earning/Accumulator field, select the earnings code to be adjusted. The data in the Special Accumulators area automatically populates.
10. In the State field, select an active state associated with the earnings type.
A state is required for all earnings types.
11. In the Reason field, enter the reason you are making the arrears balance adjustment. The reason displays on the Adjustment Earnings Summary panel.
12. If you do not want the balance information included in the Adjustment GL Summary Report, then select the Remove from G/L Update check box.
For a description of the fields on this panel, press F1.
Chapter 12: Adjusting Payroll BalancesPayroll Processing Guide Version 5.04.01

12-36 Performing Balance Adjustments
13. If you want to update all of the special accumulator balances associated with an earnings type, select the Update All Special Accumulators check box. The special accumulators display under Special Accumulators.
This check box will be grayed if you are creating an opening balance. It will also be
grayed if the Special Earnings Accumulator check box is selected.
If you select the Special Earnings Accumulator check box and select one Earning/Accumulator type, the Update all Special Accumulators option will not update all special accumulators for the earnings code.
14. In the Hours area, adjust the hours of the earnings as follows:
• For adjustments, enter the hours of the earnings balance adjustment in the MTD Amount field. Press Tab to automatically populate/update the QTD and YTD fields.
• For opening balances, do one of the following:
– Enter the MTD, QTD, and/or YTD hours of the deduction balance adjustment in the Amount column.
– Enter the MTD, QTD, and/or YTD hours of the deduction balance adjustment in the New Balance column.
If you did not select Opening Balance as the Adjustment Type in the Add dialog box,
the QTD and YTD fields are grayed and unavailable.
15. In the Earnings Balance area, adjust the amount of the earnings as follows:
• For adjustments, enter the amount of the earnings balance adjustment in the MTD Amount field. Press Tab to automatically populate/update the QTD and YTD fields.
• For opening balances, do one of the following:
– Enter the MTD, QTD, and/or YTD amounts of the deduction balance adjustment in the Amount column.
– Enter the MTD, QTD, and/or YTD amounts of the deduction balance adjustment in the New Balance column.
If you did not select Opening Balance as the Adjustment Type in the Add dialog box,
the QTD and YTD fields are grayed and unavailable.
16. Verify that the adjusted year-to-date balances in the New Balance fields are positive. If the balance is negative, you will not be allowed to save your changes.
Example:
on January 1, 2007 the earnings code REG is associated with the special accumulator 401(k). On January 25, 2007, REG is associated with special accumulators 401(k) and 125. In November 2008, you enter an earnings balance adjustment. When you add an earnings balance adjustment for an employee, the special accumulator associated with the earnings will not change. To prevent the 401(k) and 125 from being updated, do not select the Update All Special Accumulators check box.
Chapter 12: Adjusting Payroll BalancesPayroll Processing Guide Version 5.04.01

Performing Balance Adjustments 12-37
17. To enter information for another earnings balance adjustment, click (Insert Row).
18. Click (Save).
You have just finished adding an earnings balance adjustment. Next, you can add a garnishment balance adjustment.
Adjusting a Garnishment Balance
If an employee has garnishments, you can use the Garnishment Balance Adjustment task to adjust them.
To enter a garnishment balance adjustment, do the following:
1. Click Payroll and make the following selections:
Payroll Cycle Processes ~ Balance Adjustment
2. Click next to the Garnishment Balance task. The Add dialog box displays.
Figure 12-19. Add Dialog Box
To modify an existing garnishment balance adjustment, double-click the Garnishment
Balance Adjustment task, enter the search criteria in the Search dialog box, and click
OK. To preserve history, click (Insert Row).
The Adjustment Run ID defaults to PEND.
3. In the Empl ID field, select the employee ID number.
4. In the Company field, select the company code.
Chapter 12: Adjusting Payroll BalancesPayroll Processing Guide Version 5.04.01

12-38 Performing Balance Adjustments
5. If necessary, change the Adjustment Type to Opening Balance so that you can enter quarter-to-date and year-to-date adjustment data in addition to month-to-date data. Click OK. The Garnishment panel displays and indicates if you are creating an adjustment or an opening balance.
Figure 12-20. Garnishment Panel
6. In the Year field, enter the year for which the adjustment is made.
7. In the Month field, select the month for which the adjustment is made.
8. In the Deduction Code field, select the deduction code available for the benefit plan. The benefit plan determines the available deduction codes.
9. In the Deduction Class field, select the deduction class available for the deduction code. The deduction code determines the available deduction classes.
10. In the Garnish ID field, select the garnishment ID available for the employee.
11. In the Reason field, enter the reason for the adjustment. The reason displays on the Adjustment Garnishment Summary panel.
12. If you do not want the balance information included in the Adjustment GL Summary Report, then select the Remove from G/L Update check box.
For a description of the fields on this panel, press F1.
Chapter 12: Adjusting Payroll BalancesPayroll Processing Guide Version 5.04.01

Performing Balance Adjustments 12-39
13. Click the Balance tab. The Balance panel displays.
Month-to-date, quarter-to-date, and year-to-date deduction balances display in the Deduction Balance area. Amounts in this area are calculated as a sum of adjustments made in the Garnishment Balance, Company Fee Balance, and Payee Fee Balance areas.
Figure 12-21. Balance Panel
14. In the Garnishment Balance area, enter the adjustment(s) as follows:
• For adjustments, enter the amount of the garnishment balance adjustment in the MTD Adjustment field. Press Tab to automatically populate/update the QTD and YTD fields.
• For opening balances, do one of the following:
– Enter the MTD, QTD, and/or YTD amounts of the garnishment balance adjustment in the Adjustment column.
– Enter the MTD, QTD, and/or YTD amounts of the garnishment balance adjustment in the New Balance column.
If you did not select Opening Balance as the Adjustment Type in the Add dialog box,
the QTD and YTD fields are grayed and unavailable.
For a description of the fields on this panel, press F1.
Chapter 12: Adjusting Payroll BalancesPayroll Processing Guide Version 5.04.01

12-40 Performing Balance Adjustments
15. In the Company Fee Balance area, enter the adjustment(s) as follows:
• For adjustments, enter the amount of the company fee balance adjustment in the MTD Adjustment field. Press Tab to automatically populate/update the QTD and YTD fields.
• For opening balances, do one of the following:
– Enter the MTD, QTD, and/or YTD amounts of the company fee balance adjustment in the Adjustment column.
– Enter the MTD, QTD, and/or YTD amounts of the company fee balance adjustment in the New Balance column.
If you did not select Opening Balance as the Adjustment Type in the Add dialog box,
the QTD and YTD fields are grayed and unavailable.
16. In the Payee Fee Balance area, enter the adjustment(s) as follows:
• For adjustments, enter the amount of the payee fee balance adjustment in the MTD Adjustment field. Press Tab to automatically populate/update the QTD and YTD fields.
• For opening balances, do one of the following:
– Enter the MTD, QTD, and/or YTD amounts of the payee fee balance adjustment in the Adjustment column.
– Enter the MTD, QTD, and/or YTD amounts of the payee fee balance adjustment in the New Balance column.
If you did not select Opening Balance as the Adjustment Type in the Add dialog box,
the QTD and YTD fields are grayed and unavailable.
17. In the Deduction Balance area, enter the adjustment(s) as follows:
• For adjustments, enter the amount of the deduction balance adjustment in the MTD Adjustment field. Press Tab to automatically populate/update the QTD and YTD fields.
• For opening balances, do one of the following:
– Enter the MTD, QTD, and/or YTD amounts of the deduction balance adjustment in the Adjustment column.
– Enter the MTD, QTD, and/or YTD amounts of the deduction balance adjustment in the New Balance column.
If you did not select Opening Balance as the Adjustment Type in the Add dialog box,
the QTD and YTD fields are grayed and unavailable.
18. Verify that the adjusted year-to-date balances in the New Balance fields are positive. If the balance is negative, you will not be allowed to save your changes.
Chapter 12: Adjusting Payroll BalancesPayroll Processing Guide Version 5.04.01

Performing Balance Adjustments 12-41
19. To enter information for another garnishment balance adjustment, click (Insert Row).
20. Click (Save).
You have just finished entering a garnishment balance adjustment. Next, you can add a tax balance adjustment.
Adjusting a Tax Balance
You can update federal, state, and local tax balances for an employee. Each tax class must be adjusted separately. If you adjust earnings or deductions, you must adjust the taxes associated with them.
You can also transfer balances to a different jurisdiction for an employee.
To enter a tax balance adjustment, do the following:
1. Click Payroll and make the following selections:
Payroll Cycle Processes ~ Balance Adjustment
2. Click next to the Tax Balance task. The Add dialog box displays.
Figure 12-22. Add Dialog Box
To modify an existing tax balance adjustment, double-click the Tax Balance Adjustment
task, enter the search criteria in the Search dialog box, and click OK. To preserve history,
click (Insert Row).
The Adjustment Run ID defaults to PEND.
3. In the Empl ID field, select the employee ID number.
4. In the Company field, select the company code.
Chapter 12: Adjusting Payroll BalancesPayroll Processing Guide Version 5.04.01

12-42 Performing Balance Adjustments
5. If necessary, change the Adjustment Type to Opening Balance so that you can enter quarter-to-date and year-to-date adjustment data in addition to month-to-date data. Click OK. The Tax Balance panel displays and indicates if you are creating an adjustment or an opening balance.
Figure 12-23. Tax Balance Panel
6. In the Year field, enter the year for which the adjustment is made.
7. In the Month field, select the month for which the adjustment is made. The Tax Date field automatically populates.
8. If necessary, change the Tax Date.
The date must fall within the year state and local taxes were set up for the employee.
9. In the State field, select the state available for the tax date to which the adjustment will be transferred.
Available states are those in effect during the tax date.
For a description of the fields on this panel, press F1.
Chapter 12: Adjusting Payroll BalancesPayroll Processing Guide Version 5.04.01

Performing Balance Adjustments 12-43
10. In the Locality field, select the locality available for the tax date to which the adjustment will be transferred. If you selected a locality, the Resident Locality check box displays and is automatically selected. This indicates that the local tax balances will be updated by residency.
Figure 12-24. Tax Balance Panel
11. Clear the Resident Locality check box if you do not want the local tax balances to be updated by residency.
12. In the Tax Class field, select the tax class you want to adjust. The state and locality determine the available tax class.
Tax classes are adjusted individually.
13. In the Reason field, enter the reason for the adjustment. The reason displays on the Adjustment Taxes Summary panel.
14. Select the Remove from G/L Update check box if you do not want the balance information included in the Adjustment GL Summary Report.
For a description of the fields on this panel, press F1.
Chapter 12: Adjusting Payroll BalancesPayroll Processing Guide Version 5.04.01

12-44 Performing Balance Adjustments
15. Select the Transfer to another Jurisdiction check box to assign the adjustment to a different state and locality for an employee. If you select this check box, then do the following:
a. In the State field, select the state to which the adjustment will be transferred.
You can select from any of the states on the employee’s tax record. After you select
a state, the Locality field becomes active.
You can select from any of the states on the employee’s tax record. After you select a state, the Locality field becomes active.
Only localities set up for the tax date are available.
b. In the Locality field, select the locality to which the adjustment will be transferred. If you selected a locality, the Resident Locality check box displays and is automatically selected. This indicates that the local tax balances will be updated by residency.
Only localities set up for the tax date are available.
Figure 12-25. Tax Balance Panel
c. Clear the Resident Locality check box if you do not want the local tax balances to be updated by residency.
For a description of the fields on this panel, press F1.
Chapter 12: Adjusting Payroll BalancesPayroll Processing Guide Version 5.04.01

Performing Balance Adjustments 12-45
16. In the Tax Balance area, enter the adjustment(s) as follows:
• For adjustments, enter the amount of the tax balance adjustment in the MTD Adjustment field. Press Tab to automatically populate/update the QTD and YTD fields.
• For opening balances, do one of the following:
– Enter the MTD, QTD, and/or YTD amounts of the tax balance adjustment in the Adjustment column.
– Enter the MTD, QTD, and/or YTD amounts of the tax balance adjustment in the New Balance column.
If you did not select Opening Balance as the Adjustment Type in the Add dialog box,
the QTD and YTD fields are grayed and unavailable.
17. In the No Limit Gross area, enter the adjustment(s) as follows:
• For adjustments, enter the amount of the no limit gross adjustment in the MTD Adjustment field. Press Tab to automatically populate/update the QTD and YTD fields.
• For opening balances, do one of the following:
– Enter the MTD, QTD, and/or YTD amounts of the no limit gross balance adjustment in the Adjustment column.
– Enter the MTD, QTD, and/or YTD amounts of the no limit gross balance adjustment in the New Balance column.
If you did not select Opening Balance as the Adjustment Type in the Add dialog box,
the QTD and YTD fields are grayed and unavailable.
18. In the Taxable Gross area, enter the amount of the adjustment(s) as follows:
• For adjustments, enter the amount of the taxable gross adjustment in the MTD Adjustment field. Press Tab to automatically populate/update the QTD and YTD fields.
• For opening balances, do one of the following:
– Enter the MTD, QTD, and/or YTD amounts of the no taxable gross balance adjustment in the Adjustment column.
– Enter the MTD, QTD, and/or YTD amounts of the taxable gross balance adjustment in the New Balance column.
If you did not select Opening Balance as the Adjustment Type in the Add dialog box,
the QTD and YTD fields are grayed and unavailable.
19. Verify that the adjusted year-to-date balances in the New Balance fields are positive. If the balance is negative, you will not be allowed to save your changes.
20. To enter information for another tax balance adjustment, click (Insert Row).
Chapter 12: Adjusting Payroll BalancesPayroll Processing Guide Version 5.04.01

12-46 Performing Balance Adjustments
21. Click (Save).
You have just finished adding a tax balance adjustment, which is the last step in entering a manual balance adjustment/opening balance. Next, see “Reviewing Balance Adjustments Before Loading” on page 12-52.
Automatically Importing Adjustment/Opening Balance Data
You can use the Adjustment/Opening Balance Data Import (PRUTL002) task to automatically enter all adjustments/opening balances of the same type at one time by importing the data from a . file. For example, you can import all garnishment adjustments at once and then go back and import all earnings adjustments.
Automatically importing adjustment/opening balances of the same type consists of the following:
• Reviewing File Specifications
• Importing the Data from a . File
Reviewing File Specifications
Before you can import adjustment/opening balance data from a . file, you must make sure that your . file meets the ADP file specifications listed in Table 12-8 through Table 12-12.
Table 12-8. Arrears Specifications
Field Name Length Comments
EMPLID 11
EMPLID RCD # 3
COMPANY 3
BENEFIT PLAN DATE 11
PLAN TYPE 10
BENEFIT PLAN 6 No required if general deduction.
DEDUCTION CODE 6
DEDUCTION CLASS 10
ADJUSTMENT REASON 100 Not required.
REMOVE FROM G/L 1 Default is N.
ADJ AMOUNT 8.2
Chapter 12: Adjusting Payroll BalancesPayroll Processing Guide Version 5.04.01

Performing Balance Adjustments 12-47
Table 12-9. Earnings Specifications
Field Name Length Comments
EMPLID 11
EMPLID RCD # 3
COMPANY 3
YEAR 4
MONTH 2
SPCL BALANCE 1 Default is N.
ERN CD 3
STATE 2
ADJUSTMENT REASON 100 Not required.
REMOVE G/L 1 Default is N.
UPDATE ALL 1 Default is N.
MTD ADJ HRS 6.2
QTD ADJ HRS 6.2 Applicable only for opening balance.
YTD ADJ HRS 6.2 Applicable only for opening balance.
MTD ADJ AMOUNTS 9.2
QTD ADJ AMOUNTS 9.2 Applicable only for opening balance.
YTD ADJ AMOUNT 9.2 Applicable only for opening balance.
Chapter 12: Adjusting Payroll BalancesPayroll Processing Guide Version 5.04.01

12-48 Performing Balance Adjustments
Table 12-10. Deductions Specifications
Field Name Length Comments
EMPLID 11
EMPLID RCD # 3
COMPANY 3
YEAR 4
MONTH 2
BENEFIT PLAN DATE 11
BENEFIT TYPE 10 Not required if deduction.
BENEFIT PLAN 6
DEDCD 6
DED CLASS 10
UPDATE ALL SPEC 1 Default is N.
ADJUSTMENT REASON 100 Not required.
REMOVE FROM G/L 1 Default is N.
MTD ADJ AMOUNT 8.2
QTD ADJ AMOUNT 8.2 Applicable only for opening balance.
YTD ADJ AMOUNT 8.2 Applicable only for opening balance.
Chapter 12: Adjusting Payroll BalancesPayroll Processing Guide Version 5.04.01

Performing Balance Adjustments 12-49
Table 12-11. Garnishment Specifications
Field Name Length Comments
EMPLID 11
EMPLID RCD # 3
COMPANY 3
YEAR 4
MONTH 2
DEDCD 6
DED CLASS 10
GARN ID 6
ADJUSTMENT REASON 100 Not required.
REMOVE FROM G/L 1 Default is N.
MTD ADJ AMOUNT 8.2
QTD ADJ AMOUNT 8.2 Applicable only for opening balance.
YTD ADJ AMOUNT 8.2 Applicable only for opening balance.
MTD CO FEE ADJUSTMENT 8.2 Applicable only for opening balance.
QTD CO FEE ADJUSTMENT 8.2 Applicable only for opening balance.
YTD CO FEE ADJUSTMENT 8.2 Applicable only for opening balance.
MTD CO PAYEE FEE ADJUSTMENT
8.2 Applicable only for opening balance.
QTD CO PAYEE FEE ADJUSTMENT
8.2 Applicable only for opening balance.
YTD CO PAYEE FEE ADJUSTMENT
8.2 Applicable only for opening balance.
MTD DED ADJUSTMENT AMOUNT
8.2 Applicable only for opening balance.
QTD DED ADJUSTMENT AMOUNT
8.2 Applicable only for opening balance.
YTD DED ADJUSTMENT AMOUNT
8.2 Applicable only for opening balance.
Chapter 12: Adjusting Payroll BalancesPayroll Processing Guide Version 5.04.01

12-50 Performing Balance Adjustments
Table 12-12. Taxes Specifications
Field Name Length Comments
EMPLID 11
EMPLID RCD # 3
COMPANY 3
YEAR 4
MONTH 2
TAX DATE
STATE
LOCALITY Required only for local changes.
TAX CLASS
RESIDENT
ADJUSTMENT REASON Not required.
REMOVE FROM G/L Default is N.
TRANSFER JURISDICTION Used only for transferring to new jurisdiction.
TRANSFER STATE Used only for transferring to new jurisdiction.
TRANSFER LOCAL Used only for transferring to new jurisdiction.
TRANSFER RESIDENT Used only for transferring to new jurisdiction.
MTD TAX ADJUSTMENT
QTD TAX ADJUSTMENT Applicable only for opening balance.
YTD TAX ADJUSTMENT Applicable only for opening balance.
MTD NLG ADJUSTMENT AMOUNT
QTD NLG ADJUSTMENT AMOUNT
Applicable only for opening balance.
YTD NLG ADJUSTMENT AMOUNT
Applicable only for opening balance.
MTD TAXABLE GROSS
QTD TAXABLE GROSS Applicable only for opening balance.
YTD TAXABLE GROSS Applicable only for opening balance.
Chapter 12: Adjusting Payroll BalancesPayroll Processing Guide Version 5.04.01

Performing Balance Adjustments 12-51
Importing the Data from a . File
To import data from a . file, do the following:
1. Click Payroll and make the following selections:
Payroll Cycle Processes ~ Balance Adjustment
2. Double-click the Adjustment/Opening Balance Data Import (PRUTL002) task. The Adjustment/Opening Balance Data Import panel displays.
Figure 12-26. Adjustment/Opening Balance Data Import Panel
3. From the Adjustment Type field, select Adjustment or Opening Balance.
4. For an adjustment only, select the Create balance record if none exists check box if you want a balance to be automatically created if none exists.
5. From the Balance Type area, indicate the type of balance data you are importing.
6. Enter the name of the . file in the Input File Name field.
7. In the Run Type area, select one of the following options:
a. Report Only - Print a report of all balance data that will be imported.
b. Report and Update - Import the balance data and then generate a report listing the imported data.
For a description of the fields on this panel, press F1.
Chapter 12: Adjusting Payroll BalancesPayroll Processing Guide Version 5.04.01

12-52 Performing Balance Adjustments
8. Click Run Process. You will receive a message notifying you that your process has been submitted.
9. When the process has completed, click (Report Outputs) to view the report.
For additional information on running, viewing, and printing reports, refer to the Using
ADP Enterprise HR Guide. For details on sources, sort order, and an illustration of the report, see the Standard Reports Guide.
10. For each additional balance type you want to import, repeat steps 3 - 8.
You’ve just finished automatically importing balance adjustments using PRUTL002. Next you can review balance adjustments before loading.
Reviewing Balance Adjustments Before Loading
Before you load the balance adjustments to the employee records, you review the adjustments and determine if you need to make any changes or additions.
After you load the adjustments, you are unable to change or reverse any of the adjustments
that you grouped into the adjustment run ID.
After you add the current/prior period adjustments through the Balance panels or using the Adjustment/Opening Balance Data Import (PRUTL002), do the following to review and/or modify the adjustments:
• Reviewing the Adjustment Audit Report (PAY035)
• Reviewing/Modifying Pending Balance Adjustments
Reviewing the Adjustment Audit Report (PAY035)
After you have completed adding adjustments but before they are loaded to the employees’ records, you can generate the Adjustment Audit Report (PAY035). This report contains all adjustments that are scheduled to be loaded.You can select the adjustments you want to display by all employees, adjustment run ID, company, or a specific employee.
You can use the report to view tax, earnings, garnishment, arrears, and deduction balances.
To generate the Adjustment Audit Report, do the following:
1. Click Payroll and make the following selections:
Payroll Cycle Processes ~ Balance Adjustment
Performing Balance Adjustments
Creating an Adjustment/Open Balance
Reviewing Balance Adjustments Before Loading
Loading Balance Adjustments
Reviewing Balance Adjustment Transactions
Posting Current/Prior Period Adjustments to the General Ledger
Reversing a Specific Balance Adjustment Transaction
Updating Current/Prior Period Adjustment Balances when Reversing a Check
Chapter 12: Adjusting Payroll BalancesPayroll Processing Guide Version 5.04.01

Performing Balance Adjustments 12-53
2. Double-click the Adjustment Audit Report (PAY035) task. The Adjustment Audit Report panel displays.
Figure 12-27. Adjustment Audit Report Panel
3. In the Report For field, select one of the following options to indicate which adjustments you want included in the report:
• Adjustment Run ID - Select to display all adjustments for a specific run ID.
If you select this option, the Adjustment Run ID field displays.
– If you select this option, then select an Adjustment Run ID.
• All Employees - Select to display all adjustments for all employees.
• Specific Employee - Select to display all adjustments for the employee you select.
The Employee field displays if you select this option.
– If you select this option, select the employee ID in the Empl ID field.
• Company - Select to display all adjustments for the company you select.
The Company field displays if you select this option.
– If you select this option, select the company code In the Company field.
4. In the Process Status field, select whether to display all, processed, or unprocessed adjustments.
If you selected the Adjustment Run ID option from the Report For field, then this field is
not applicable.
5. Select an option from the Adjustment Type field to indicate the type of adjustment (such as Garnishment) that you are running the report for.
For a description of the fields on this panel, press F1.
Chapter 12: Adjusting Payroll BalancesPayroll Processing Guide Version 5.04.01

12-54 Performing Balance Adjustments
6. From the Adjustment/Opening Balance field, select whether to display opening balances, adjustments, or both.
7. In the Amount Over field, enter the amount that an adjustment must exceed to display on the report.
8. In the Calendar Year field, enter the calendar year for which to display the adjustments.
9. In the Quarter field, select a specific quarter for which to display the adjustments.
If you selected the Adjustment Run ID option from the Report For field, then this field is
not applicable.
10. In Sort By field, select the method you want to use to sort the records.
11. Click Run Report. You will receive a message notifying you that your process has been
submitted. Click OK. When the process has completed, click (Report Outputs) to view the report.
For additional information on running, viewing, and printing reports, refer to the Using ADP Enterprise HR Guide. For details on sources, sort order, and an illustration of the report, see the Standard Reports Guide.
You have just finished generating the Adjustment Audit Report. To make changes to a balance adjustment, do one of the following:
• Return to the Balances panels (See “Creating an Adjustment/Open Balance” on page 12-29).
• Use the panels in the Pending Transaction Load Process task (See “Reviewing Balance Adjustments Before Loading” on page 12-52).
Reviewing/Modifying Pending Balance Adjustments
Before loading your balance adjustments, you can review details for pending earnings, deductions, taxes, garnishments, and arrears adjustments through the Pending Transaction Load Process task. If you need to make changes, you can easily access the appropriate Balance panel by clicking the hyperlink in the Emplid column from any of the Pending Transaction Load Process panels.
Reviewing/modifying balance adjustments that are pending consists of the following:
• Reviewing/Modifying Pending Earnings Balance Adjustments
• Reviewing/Modifying Pending Deduction Balance Adjustments
• Reviewing/Modifying Pending Tax Balance Adjustments
• Reviewing/Modifying Pending Garnishment Balance Adjustments
• Reviewing/Modifying Pending Arrears Balance Adjustments
Chapter 12: Adjusting Payroll BalancesPayroll Processing Guide Version 5.04.01

Performing Balance Adjustments 12-55
Reviewing/Modifying Pending Earnings Balance Adjustments
To review and/or modify pending earnings balance adjustments, do the following:
1. Click Payroll and make the following selections:
Payroll Cycle Processes ~ Balance Adjustment
2. Double-click the Pending Transaction Load Process task. The Earnings Pending panel displays.
Figure 12-28. Earnings Pending Panel
3. From the Selection Criteria field, select one of the following options:
• Adj Type - Select to view either adjustments or open balances. If you select this option, select Open Bal or Adjustment from the field that displays.
• All - Select to view all pending balance adjustments.
• Company - Select to view pending balance adjustments for a specific company. If you select this option, select the company from the field that displays.
• Employee - Select to view pending balance adjustments for a specific employee. If you select this option, select the employee from the field that displays.
If you imported employee balance adjustments using the Adjustment/Opening
Balance Data Import (PRUTL002), you must select this option.
For a description of the fields on this panel, press F1.
Chapter 12: Adjusting Payroll BalancesPayroll Processing Guide Version 5.04.01

12-56 Performing Balance Adjustments
After making your selection from the Selection Criteria field and pressing Tab, the results that meet your criteria display.
Figure 12-29. Earnings Pending Panel
4. View the following adjustment earnings summary information:
You can sort the displayed information in various ways by clicking on a specific column
header.
• Emplid - Displays the ID for the employee.
• Rcd Nbr - For employees performing concurrent jobs, indicates the job to which the record pertains. New hire employment record numbers are always 0.
• Company - Displays the company assigned to the employee.
• Year - Displays the year for which the adjustment will be made.
• Quarter - Displays the quarter for which the adjustment will be made.
• Month - Displays the month for which the adjustment will be made.
• Spl Bal - Indicates if the earnings to be adjusted is a special accumulator.
• Earn Code - Displays the earnings code or accumulator to be adjusted.
• State - Displays the state if the adjustment will affect a state with a special tax-reporting category.
• Adj Type - Indicates whether the balance adjustment is an opening balance or an adjustment.
For a description of the fields on this panel, press F1.
Chapter 12: Adjusting Payroll BalancesPayroll Processing Guide Version 5.04.01

Performing Balance Adjustments 12-57
• Adjustment Run ID - Displays the adjustment run ID assigned to the balance adjustment.
• Update Origin - Indicates whether you entered the balance adjustment through the Earnings Balance panel or imported the adjustments in a . file.
5. To make changes to a specific balance adjustment, do the following:
a. In the Emplid column, click the employee link for the balance adjustment. The Earnings Balance panel displays.
b. Make changes as necessary and click (Save).
c. Click (close). The Earnings Pending panel redisplays.
You’ve just finished reviewing/modifying pending earnings balance adjustments. Next, you can review/modify pending deduction balance adjustments.
Reviewing/Modifying Pending Deduction Balance Adjustments
To review and/or modify pending deduction balance adjustments, do the following:
1. Click the Deductions Pending tab. The Deductions Pending panel displays.
Figure 12-30. Deductions Pending Panel
For a description of the fields on this panel, press F1.
Chapter 12: Adjusting Payroll BalancesPayroll Processing Guide Version 5.04.01

12-58 Performing Balance Adjustments
2. From the Selection Criteria field, select one of the following options:
If you have already selected a Selection Criteria on another Pending panel, this panel
automatically displays data that matches that specified criteria.
• Adj Type - Select to view either adjustments or open balances. If you select this option, select Open Bal or Adjustment from the field that displays.
• All - Select to view all pending balance adjustments.
• Company - Select to view pending balance adjustments for a specific company. If you select this option, select the Company from the field that displays.
• Employee - Select to view pending balance adjustments for a specific employee. If you select this option, select the Employee from the field that displays.
If you imported employee balance adjustments using the Adjustment/Opening
Balance Data Import (PRUTL002), you must select this option.
3. View the following adjustment deduction summary information:
You can sort the displayed information in various ways by clicking on a specific column
header.
• Emplid - Displays the ID for the employee.
• Rcd Nbr - For employees performing concurrent jobs, indicates the job to which the record pertains. New hire employment record numbers are always 0.
• Company - Displays the company assigned to the employee.
• Year - Displays the year for which the adjustment will be made.
• Quarter - Displays the quarter for which the adjustment will be made.
• Month - Displays the month for which the adjustment will be made.
• Eff Date - Displays the effective date of the balance adjustment.
• Plan Type - Displays the plan type to be adjusted.
• Benefit Plan - Displays the benefit plan to be adjusted.
• Ded Code - Displays the deduction code to be adjusted.
• Ded Class - Displays the deduction code to be adjusted.
• Adj Type - Indicates whether the balance adjustment is an opening balance or an adjustment.
• Adjustment Run ID - Displays the adjustment run ID assigned to the balance adjustment.
• Update Origin - Indicates whether you entered the balance adjustment through the Deduction Balance panel (Adj panel) or imported the adjustments in a . file.
Chapter 12: Adjusting Payroll BalancesPayroll Processing Guide Version 5.04.01

Performing Balance Adjustments 12-59
4. To make changes to a specific balance adjustment, do the following:
a. In the Emplid column, click the employee link for the balance adjustment. The Deduction Balance panel displays.
b. Make changes as necessary and click (Save).
c. Click (close). The Deductions Pending panel redisplays.
You’ve just finished reviewing/modifying pending deduction balance adjustments. Next, you can review/modify pending tax balance adjustments.
Reviewing/Modifying Pending Tax Balance Adjustments
To review and/or modify pending tax balance adjustments, do the following:
1. Click the Taxes Pending tab. The Taxes Pending panel displays.
Figure 12-31. Taxes Pending Panel
2. From the Selection Criteria field, select one of the following options:
If you have already selected a Selection Criteria on another Pending panel, this panel
automatically displays data that matches that specified criteria.
• Adj Type - Select to view either adjustments or open balances. If you select this option, select Open Bal or Adjustment from the field that displays.
• All - Select to view all pending balance adjustments.
• Company - Select to view pending balance adjustments for a specific company. If you select this option, select the Company from the field that displays.
For a description of the fields on this panel, press F1.
Chapter 12: Adjusting Payroll BalancesPayroll Processing Guide Version 5.04.01

12-60 Performing Balance Adjustments
• Employee - Select to view pending balance adjustments for a specific employee. If you select this option, select the Employee from the field that displays.
If you imported employee balance adjustments using the Adjustment/Opening
Balance Data Import (PRUTL002), you must select this option.
3. View the following adjustment deduction summary information:
You can sort the displayed information in various ways by clicking on a specific column
header.
• Emplid - Displays the ID for the employee.
• Rcd Nbr - For employees performing concurrent jobs, indicates the job to which the record pertains. New hire employment record numbers are always 0.
• Company - Displays the company assigned to the employee.
• Year - Displays the year for which the adjustment will be made.
• Quarter - Displays the quarter for which the adjustment will be made.
• Month - Displays the month for which the adjustment will be made.
• Eff Date - Displays the effective date of the balance adjustment.
• State - Displays the state to which the tax is reported.
• Locality - Displays the locality to which the tax is reported.
• Tax Class - Displays the class for the tax.
• Adj Type - Indicates whether the balance adjustment is an opening balance or an adjustment.
• Adjustment Run ID - Displays the adjustment run ID assigned to the balance adjustment.
• Update Origin - Indicates whether you entered the balance adjustment through the Deduction Balance panel (Adj panel) or imported the adjustments in a . file.
4. To make changes to a specific balance adjustment, do the following:
a. In the Emplid column, click the employee link for the balance adjustment. The Tax Balance panel displays.
b. Make changes as necessary and click (Save).
c. Click (close). The Taxes Pending panel redisplays.
You’ve just finished reviewing/modifying pending tax balance adjustments. Next, you can review/modify pending garnishment balance adjustments.
Chapter 12: Adjusting Payroll BalancesPayroll Processing Guide Version 5.04.01

Performing Balance Adjustments 12-61
Reviewing/Modifying Pending Garnishment Balance Adjustments
You can view adjustments for individual employees within a specific adjustment run ID.
If an employee has multiple adjustments, you can use the scroll bar to move from one adjustment to another.
To review and/or modify pending garnishments balance adjustments, do the following:
1. Click the Garnishments Pending tab. The Garnishments Pending panel displays.
Figure 12-32. Garnishments Pending Panel
2. From the Selection Criteria field, select one of the following options:
If you have already selected a Selection Criteria on another Pending panel, this panel
automatically displays data that matches that specified criteria.
• Adj Type - Select to view either adjustments or open balances. If you select this option, select Open Bal or Adjustment from the field that displays.
• All - Select to view all pending balance adjustments.
• Company - Select to view pending balance adjustments for a specific company. If you select this option, select the Company from the field that displays.
• Employee - Select to view pending balance adjustments for a specific employee. If you select this option, select the Employee from the field that displays.
If you imported employee balance adjustments using the Adjustment/Opening
Balance Data Import (PRUTL002), you must select this option.
For a description of the fields on this panel, press F1.
Chapter 12: Adjusting Payroll BalancesPayroll Processing Guide Version 5.04.01

12-62 Performing Balance Adjustments
3. View the following adjustment deduction summary information:
You can sort the displayed information in various ways by clicking on a specific column
header.
• Emplid - Displays the ID for the employee.
• Rcd Nbr - For employees performing concurrent jobs, indicates the job to which the record pertains. New hire employment record numbers are always 0.
• Company - Displays the company assigned to the employee.
• Year - Displays the year for which the adjustment will be made.
• Quarter - Displays the quarter for which the adjustment will be made.
• Month - Displays the month for which the adjustment will be made.
• Eff Date - Displays the effective date of the balance adjustment.
• Plan Type - Displays the plan type to be adjusted.
• Benefit Plan - Displays the benefit plan to be adjusted.
• Ded Code - Displays the deduction code to be adjusted.
• Ded Class - Displays the deduction code to be adjusted.
• Garnish ID - Displays the ID for the garnishment to be adjusted.
• Adj Type - Indicates whether the balance adjustment is an opening balance or an adjustment.
• Adjustment Run ID - Displays the adjustment run ID assigned to the balance adjustment.
• Update Origin - Indicates whether you entered the balance adjustment through the Deduction Balance panel (Adj panel) or imported the adjustments in a . file.
4. To make changes to a specific balance adjustment, do the following:
a. In the Emplid column, click the employee link for the balance adjustment. The Garnishment Balance panel displays.
b. Make changes as necessary and click (Save).
c. Click (close). The Garnishments Pending panel redisplays.
You’ve just finished reviewing/modifying pending garnishment balance adjustments. Next, you can review/modify pending arrears balance adjustments.
Chapter 12: Adjusting Payroll BalancesPayroll Processing Guide Version 5.04.01

Performing Balance Adjustments 12-63
Reviewing/Modifying Pending Arrears Balance Adjustments
You can view adjustments for individual employees within a specific adjustment run ID. If an employee has multiple adjustments, you can use the scroll bar to move from one adjustment to another.
To display the Adjustment Arrears Summary, do the following:
1. Click the Arrears Pending tab. The Arrears Pending panel displays.
Figure 12-33. Arrears Pending Panel
2. From the Selection Criteria field, select one of the following options:
If you have already selected a Selection Criteria on another Pending panel, this panel
automatically displays data that matches that specified criteria.
• Adj Type - Select to view either adjustments or open balances. If you select this option, select Open Bal or Adjustment from the field that displays.
• All - Select to view all pending balance adjustments.
• Company - Select to view pending balance adjustments for a specific company. If you select this option, select the Company from the field that displays.
• Employee - Select to view pending balance adjustments for a specific employee. If you select this option, select the Employee from the field that displays.
If you imported employee balance adjustments using the Adjustment/Opening
Balance Data Import (PRUTL002), you must select this option.
For a description of the fields on this panel, press F1.
Chapter 12: Adjusting Payroll BalancesPayroll Processing Guide Version 5.04.01

12-64 Performing Balance Adjustments
3. View the following adjustment deduction summary information:
You can sort the displayed information in various ways by clicking on a specific column
header.
• Emplid - Displays the ID for the employee.
• Rcd Nbr - For employees performing concurrent jobs, indicates the job to which the record pertains. New hire employment record numbers are always 0.
• Company - Displays the company assigned to the employee.
• Eff Date - Displays the effective date of the balance adjustment.
• Plan Type - Displays the plan type to be adjusted.
• Benefit - Displays the benefit plan to be adjusted.
• Ded Code - Displays the deduction code to be adjusted.
• Ded Class - Displays the deduction code to be adjusted.
• Adj Type - Indicates whether the balance adjustment is an opening balance or an adjustment.
• Adjustment Run ID - Displays the adjustment run ID assigned to the balance adjustment.
• Update Origin - Indicates whether you entered the balance adjustment through the Deduction Balance panel (Adj panel) or imported the adjustments in a . file.
4. To make changes to a specific balance adjustment, do the following:
a. In the Emplid column, click the employee link for the balance adjustment. The Arrears Balance panel displays.
b. Make changes as necessary and click (Save).
c. Click (close). The Arrears Pending panel redisplays.
You’ve just finished reviewing/modifying pending arrears balance adjustments, which is the last step in reviewing/modifying pending balance adjustments.
Next, see “Loading Balance Adjustments Imported from a . File” on page 12-69 or “Loading Balance Adjustments Entered on the Balance Panels” on page 12-67.
Chapter 12: Adjusting Payroll BalancesPayroll Processing Guide Version 5.04.01

Performing Balance Adjustments 12-65
Loading Balance Adjustments
After reviewing your balance adjustments and making changes as necessary, you can load the adjustments as follows:
• Reviewing the Status of an Adjustment Run ID (Optional)
• Loading Balance Adjustments Entered on the Balance Panels
• Loading Balance Adjustments Imported from a . File
Reviewing the Status of an Adjustment Run ID (Optional)
Before loading your balance adjustments, you may want to review a particular adjustment run ID to see if has already been used. To review an adjustment run ID, do the following:
1. Click Payroll and make the following selections:
Payroll Cycle Processes ~ Balance Adjustment
2. Double-click the Adjustment Run ID Table task. The Search dialog box displays.
Figure 12-34. Search Dialog Box
Performing Balance Adjustments
Creating an Adjustment/Open Balance
Reviewing Balance Adjustments Before Loading
Loading Balance Adjustments
Reviewing Balance Adjustment Transactions
Posting Current/Prior Period Adjustments to the General Ledger
Reversing a Specific Balance Adjustment Transaction
Updating Current/Prior Period Adjustment Balances when Reversing a Check
Chapter 12: Adjusting Payroll BalancesPayroll Processing Guide Version 5.04.01

12-66 Performing Balance Adjustments
3. Enter the Operator ID (profile ID), Batch Run ID, and Adjustment Run ID and click OK . The Adjustment Run ID panel displays.
Figure 12-35. Adjustment Run ID Panel
4. Review the following information:
• Adjustment Load Run - If this check box is selected, then the run ID has been loaded.
• Reversal Load Run - If this check box is selected, then the run ID has been reversed.
5. Click (Close).
You have just finished review the status of an adjustment run ID. Next, see “Loading Balance Adjustments Entered on the Balance Panels” on page 12-67 or “Loading Balance Adjustments Imported from a . File” on page 12-69.
For a description of the fields on this panel, press F1.
Chapter 12: Adjusting Payroll BalancesPayroll Processing Guide Version 5.04.01

Performing Balance Adjustments 12-67
Loading Balance Adjustments Entered on the Balance Panels
If you entered adjustment balances on the Balance panels, you can load all adjustment types at once using the Load Run Control panel, which is the sixth and last panel in the Pending Transaction Load Process task. On each Pending panel, you must first select the Process check box for each balance adjustment you want to load and then proceed to the Load Run Control panel for processing.
To load balance adjustments, do the following:
1. On the Earnings Pending panel, select the Process check box for each balance adjustment you want to load.
Click Select All to select this check box for all balance adjustments. Click Clear All to
deselect the Process check box for all balance adjustments.
Figure 12-36. Earnings Pending Panel
2. Click on all other Pending tabs and select the Process check box for each balance adjustment you want to load.
For a description of the fields on this panel, press F1.
Chapter 12: Adjusting Payroll BalancesPayroll Processing Guide Version 5.04.01

12-68 Performing Balance Adjustments
3. Click the Load Run Control tab. The Load Run Control panel displays.
Figure 12-37. Load Run Control Panel
4. Enter the Batch Run ID.
5. If necessary, change the Adjustment Run ID. The adjustment run ID defaults to the current date hour minute second.
6. For information purposes only, enter a Description of the adjustment run ID.
7. Click Load Adjustments. You will receive a message notifying you that your process
has been submitted. Click OK. To confirm successful completion, click (Process Monitor).
For additional information on running a process, refer to the Using ADP Enterprise HR Guide.
You’ve just finished loading balance adjustments entered on the Balances panels. Next, see “Posting Current/Prior Period Adjustments to the General Ledger” on page 12-78.
For a description of the fields on this panel, press F1.
Chapter 12: Adjusting Payroll BalancesPayroll Processing Guide Version 5.04.01

Performing Balance Adjustments 12-69
Loading Balance Adjustments Imported from a . File
If you used the Adjustment/Opening Balance Data Import (PRUTL002) to import adjustments from a . file, you can import one adjustment type at a time on the Load Pending Import Data panel. To load balance adjustments, do the following:
1. Click Payroll and make the following selections:
Payroll Cycle Processes ~ Balance Adjustment
2. Double-click the Adjustment/Opening Balance Data Import (PRUTL002) task. The Adjustment/Opening Balance Data Import panel displays.
3. Click the Load Pending Import Data tab. The Load Pending Import Data panel displays.
Figure 12-38. Load Pending Import Data Panel
4. Enter the Batch Run ID.
5. If necessary, change the Adjustment Run ID. The adjustment run ID defaults to the current date hour minute second.
6. For information purposes only, enter a Description of the adjustment run ID.
7. From the Adjustment Type field, select Adjustment or Opening Balance.
8. From the Balance Type area, select all balance types that you want to load.
If a balance type is grayed and unavailable, this indicates that no balances of that type
have been imported from a . file.
For a description of the fields on this panel, press F1.
Chapter 12: Adjusting Payroll BalancesPayroll Processing Guide Version 5.04.01

12-70 Performing Balance Adjustments
9. Click Load Adjustments. You will receive a message notifying you that your process
has been submitted. Click OK. To confirm successful completion, click (Process Monitor).
For additional information on running a process, refer to the Using ADP Enterprise HR Guide.
10. To load balance adjustments of a different adjustment type, repeat steps 4 through 9.
You’ve just finished loading balance adjustments. Next, you can review the processed balance adjustments using the Transactions Summary task.
Reviewing Balance Adjustment Transactions
After loading your balance adjustments, you can review the processed adjustments through the five panels in the Transactions Summary task. The adjustment data contained on the Summary panels is identical to the Pending panels in the Pending Transaction Load Process task. However, the Summary panels are display-only and do not display the Process column.
Reviewing balance adjustment transactions consists of the following:
• Reviewing Earnings Balance Adjustment Transactions
• Reviewing Deduction Balance Adjustment Transactions
• Reviewing Tax Balance Adjustment Transactions
• Reviewing Garnishment Balance Adjustment Transactions
• Reviewing Arrears Balance Adjustment Transactions
Performing Balance Adjustments
Creating an Adjustment/Open Balance
Reviewing Balance Adjustments Before Loading
Loading Balance Adjustments
Reviewing Balance Adjustment Transactions
Posting Current/Prior Period Adjustments to the General Ledger
Reversing a Specific Balance Adjustment Transaction
Updating Current/Prior Period Adjustment Balances when Reversing a Check
Chapter 12: Adjusting Payroll BalancesPayroll Processing Guide Version 5.04.01

Performing Balance Adjustments 12-71
Reviewing Earnings Balance Adjustment Transactions
To review earnings balance adjustment transactions, do the following:
1. Click Payroll and make the following selections:
Payroll Cycle Processes ~ Balance Adjustment
2. Double-click the Transactions Summary task. The Earnings Summary panel displays.
Figure 12-39. Earnings Summary Panel
3. From the Selection Criteria field, select one of the following options:
• Adj Type - Select to view either adjustments or open balances. If you select this option, select Open Bal or Adjustment from the field that displays.
• All - Select to view all loaded balance adjustments.
• Company - Select to view loaded balance adjustments for a specific company. If you select this option, select the Company from the field that displays.
• Employee - Select to view loaded balance adjustments for a specific employee. If you select this option, select the Employee from the field that displays.
If you imported and loaded employee balance adjustments using the
Adjustment/Opening Balance Data Import (PRUTL002), you must select this option.
4. Review the adjustment earnings transaction summary information.
The Earnings Summary panel is identical to the Earnings Pending panel except that it
does not have a Process column. See page 12-56 for descriptions of the fields on this panel.
For a description of the fields on this panel, press F1.
Chapter 12: Adjusting Payroll BalancesPayroll Processing Guide Version 5.04.01

12-72 Performing Balance Adjustments
5. To view additional details for a specific balance adjustment transaction, do the following:
a. In the Emplid column, click the employee link for the balance adjustment. The Earnings Summary panel displays.
The Earnings Summary panel that displays is identical to the Earnings Summary
panel except that it is display-only. No changes can be made to the balance adjustment data. See page 12-35 for descriptions of the fields on this panel.
b. Click (close). The Earnings Summary panel redisplays.
You’ve just finished reviewing earnings balance adjustment transactions. Next, you can review deduction balance adjustment transactions.
Reviewing Deduction Balance Adjustment Transactions
To review deduction balance adjustment transactions, do the following:
1. Click the Deductions Summary tab. The Deductions Summary panel displays.
Figure 12-40. Deductions Summary Panel
2. From the Selection Criteria field, select one of the following options:
If you have already selected a Selection Criteria on another Summary panel, this panel
automatically displays data that matches that specified criteria.
• Adj Type - Select to view either adjustments or open balances. If you select this option, select Open Bal or Adjustment from the field that displays.
• All - Select to view all loaded balance adjustments.
• Company - Select to view loaded balance adjustments for a specific company. If you select this option, select the Company from the field that displays.
For a description of the fields on this panel, press F1.
Chapter 12: Adjusting Payroll BalancesPayroll Processing Guide Version 5.04.01

Performing Balance Adjustments 12-73
• Employee - Select to view loaded balance adjustments for a specific employee. If you select this option, select the Employee from the field that displays.
If you imported and loaded employee balance adjustments using the
Adjustment/Opening Balance Data Import (PRUTL002), you must select this option.
3. Review the adjustment earnings transaction summary information.
The Deductions Summary panel is identical to the Deductions Pending panel except that
it does not have a Process column. See page 12-57 for descriptions of the fields on this panel.
4. To view additional details for a specific balance adjustment transaction, do the following:
a. In the Emplid column, click the employee link for the balance adjustment. The Deduction Summary panel displays.
The Deduction Summary panel is identical to the Deduction Balance panel except
that it is display-only. No changes can be made to the balance adjustment data. See page 12-32 for descriptions of the fields on this panel.
b. Click (close). The Deductions Summary panel redisplays.
You’ve just finished reviewing deduction balance adjustment transactions. Next, you can review tax balance adjustment transactions.
Reviewing Tax Balance Adjustment Transactions
To review tax balance adjustment transactions, do the following:
1. Click the Tax Summary tab. The Tax Summary panel displays.
Figure 12-41. Tax Summary Panel
For a description of the fields on this panel, press F1.
Chapter 12: Adjusting Payroll BalancesPayroll Processing Guide Version 5.04.01

12-74 Performing Balance Adjustments
2. From the Selection Criteria field, select one of the following options:
If you have already selected a Selection Criteria on another Summary panel, this panel
automatically displays data that matches that specified criteria.
• Adj Type - Select to view either adjustments or open balances. If you select this option, select Open Bal or Adjustment from the field that displays.
• All - Select to view all loaded balance adjustments.
• Company - Select to view loaded balance adjustments for a specific company. If you select this option, select the Company from the field that displays.
• Employee - Select to view loaded balance adjustments for a specific employee. If you select this option, select the Employee from the field that displays.
If you imported and loaded employee balance adjustments using the
Adjustment/Opening Balance Data Import (PRUTL002), you must select this option.
3. Review the adjustment earnings transaction summary information.
The Tax Summary panel is identical to the Taxes Pending panel except that it does not
have a Process column. See page 12-56 for descriptions of the fields on this panel.
4. To view additional details for a specific balance adjustment transaction, do the following:
a. In the Emplid column, click the employee link for the balance adjustment. The Tax Summary panel displays.
The Tax Summary panel is identical to the Tax Balance panel except that it is
display-only. No changes can be made to the balance adjustment data. See page 12-42 for descriptions of the fields on this panel.
b. Click (close). The Tax Summary panel redisplays.
You’ve just finished reviewing tax balance adjustment transactions. Next, you can review garnishment balance adjustment transactions.
Chapter 12: Adjusting Payroll BalancesPayroll Processing Guide Version 5.04.01

Performing Balance Adjustments 12-75
Reviewing Garnishment Balance Adjustment Transactions
To review garnishment balance adjustment transactions, do the following:
1. Click the Garnishment Summary tab. The Garnishment Summary panel displays.
Figure 12-42. Garnishment Summary Panel
2. From the Selection Criteria field, select one of the following options:
If you have already selected a Selection Criteria on another Summary panel, this panel
automatically displays data that matches that specified criteria.
• Adj Type - Select to view either adjustments or open balances. If you select this option, select Open Bal or Adjustment from the field that displays.
• All - Select to view all pending balance adjustments.
• Company - Select to view loaded balance adjustments for a specific company. If you select this option, select the Company from the field that displays.
• Employee - Select to view loaded balance adjustments for a specific employee. If you select this option, select the Employee from the field that displays.
If you imported and loaded employee balance adjustments using the
Adjustment/Opening Balance Data Import (PRUTL002), you must select this option.
3. Review the adjustment earnings transaction summary information.
The Garnishment Summary panel is identical to the Garnishments Pending panel except
that it does not have a Process column. See page 12-61 for descriptions of the fields on this panel.
For a description of the fields on this panel, press F1.
Chapter 12: Adjusting Payroll BalancesPayroll Processing Guide Version 5.04.01

12-76 Performing Balance Adjustments
4. To view additional details for a specific balance adjustment transaction, do the following:
a. In the Emplid column, click the employee link for the balance adjustment. The Garnishment Summary panel displays.
The Garnishment Summary panel is identical to the garnishment Balance
Adjustment panel except that it is display-only. No changes can be made to the balance adjustment data. See page 12-39 for descriptions of the fields on this panel.
b. Click (close). The Garnishment Summary panel redisplays.
You’ve just finished reviewing garnishment balance adjustment transactions. Next, you can review arrears balance adjustment transactions.
Reviewing Arrears Balance Adjustment Transactions
To review arrears balance adjustment transactions, do the following:
1. Click the Arrears Summary tab. The Arrears Summary panel displays.
Figure 12-43. Arrears Pending Panel
2. From the Selection Criteria field, select one of the following options:
If you have already selected a Selection Criteria on another Summary panel, this panel
automatically displays data that matches that specified criteria.
• Adj Type - Select to view either adjustments or open balances. If you select this option, select Open Bal or Adjustment from the field that displays.
• All - Select to view all pending balance adjustments.
• Company - Select to view pending balance adjustments for a specific company. If you select this option, select the Company from the field that displays.
For a description of the fields on this panel, press F1.
Chapter 12: Adjusting Payroll BalancesPayroll Processing Guide Version 5.04.01

Performing Balance Adjustments 12-77
• Employee - Select to view pending balance adjustments for a specific employee. If you select this option, select the Employee from the field that displays.
If you imported employee balance adjustments using the Adjustment/Opening
Balance Data Import (PRUTL002), you must select this option.
3. Review the adjustment earnings transaction summary information.
The Arrears Summary panel is identical to the Arrears Pending panel except that it does
not have a Process column. See page 12-63 for descriptions of the fields on this panel.
4. To view additional details for a specific balance adjustment transaction, do the following:
a. In the Emplid column, click the employee link for the balance adjustment. The Arrears Summary panel displays.
b. The Arrears Summary panel is identical to the Arrears Balance panel except that it is display-only. No changes can be made to the balance adjustment data. See page 12-30 for descriptions of the fields on this panel.
c. Click (close). The Arrears Summary panel redisplays.
You have just finished reviewing balance adjustment transactions. Next, you can post current/prior period adjustments to the general ledger.
Chapter 12: Adjusting Payroll BalancesPayroll Processing Guide Version 5.04.01

12-78 Performing Balance Adjustments
Posting Current/Prior Period Adjustments to the General Ledger
If you are using the Enterprise Payroll General Ledger interface, you can run GLX005 to post current/prior period adjustments to the general ledger. Then you can run GLX006 to generate the Adjustment GL Summary reports and review all adjustments.
Posting to the general ledger consists of the following:
• Posting to the General Ledger
• Viewing the Adjustment GL Summary Reports
Posting to the General Ledger
To post current/prior period adjustments to the general ledger, do the following:
1. Click Payroll and make the following selections:
Payroll Cycle Processes ~ Balance Adjustment
2. Double-click the Adjustment GL Interface File (GLX005) task. The Adjustment GL Interface File Summary panel displays.
Figure 12-44. Adjustment GL Interface File Panel
For a description of the fields on this panel, press F1.
3. Select a valid adjustment run ID from the Adjustment Run ID field.
You must have the adjustment run ID set up on the Adjustment Run ID Table panel
(Payroll ~ Payroll Cycle Processes ~ Balance Adjustment ~ Adjustment Run ID Table).
4. Select the date you want the current/prior period adjustments to post to the general ledger.
Performing Balance Adjustments
Creating an Adjustment/Open Balance
Reviewing Balance Adjustments Before Loading
Loading Balance Adjustments
Reviewing Balance Adjustment Transactions
Posting Current/Prior Period Adjustments to the General Ledger
Reversing a Specific Balance Adjustment Transaction
Updating Current/Prior Period Adjustment Balances when Reversing a Check
Chapter 12: Adjusting Payroll BalancesPayroll Processing Guide Version 5.04.01

Performing Balance Adjustments 12-79
5. Click Run Process. You will receive a message notifying you that your process has been
submitted. Click OK. To confirm successful completion of your process, click (Process Monitor).
For additional information on using the Process Monitor, see the Using ADP Enterprise HR Guide.
Viewing the Adjustment GL Summary Reports
Running the Adjustment GL Summary (GLX006) will generate two summary reports:
• The General Ledger Distribution Summary - Prior Period Adjustments (glx006.lis) lists each GL account number with a description of each adjustment along with the debit or credit amount. In addition, it provides the prior period adjustment, company, and grand totals.
You can set up the report to show either hours or amounts. The report automatically generates with general ledger hours; however, if you want the report to show dollars instead, you can select the Build Statistical Hours File option located on the GL Options tab (Payroll ~ Company Definitions ~ Organization Definitions ~ Company). For details on setting up this option, refer to the Company and Employee Payroll Maintenance Guide.
• General Ledger Statistical Hours Summary - Prior Period Adjustments (glx006_1.lis) lists each GL account number with the statistical hours and descriptions. In addition, it provides the prior period adjustment, company, and grand totals.
You can set up the report to show either hours or amounts. The report automatically generates with general ledger hours; however, if you want the report to show dollars instead, you can select the Build Statistical Hours File option located on the GL Options tab (Payroll ~ Company Definitions ~ Organization Definitions ~ Company). For details on setting up this option, refer to the Company and Employee Payroll Maintenance Guide.
Before you can produce these reports, you must first generate the general ledger interface
file, GLX005.
To generate the Adjustment GL Summary reports, click Payroll and make the following selections:
Payroll Cycle Processes ~ Balance Adjustment ~ Adjustment GL Summary (GLX006)
No input is required for these reports. For specific instructions on running, viewing, and printing reports, refer to the Using ADP Enterprise HR Guide. See the Standard Reports Guide for details on sources, sort order, and an illustration of the report.
Chapter 12: Adjusting Payroll BalancesPayroll Processing Guide Version 5.04.01

12-80 Performing Balance Adjustments
Reversing a Specific Balance Adjustment Transaction
You can use the Transaction Reversals task to reverse balance adjustment transactions in one of two ways:
• You can select specific adjustment transactions to reverse.
• You can reverse all adjustment transactions grouped in one adjustment run ID.
Reversing balance adjustments that have already been loaded consists of the following:
• Reviewing Loaded Earnings Balance Adjustment Transactions
• Reviewing Loaded Deduction Balance Adjustment Transactions
• Reviewing Loaded Tax Balance Adjustment Transactions
• Reviewing Loaded Garnishment Balance Adjustment Transactions
• Reviewing Loaded Arrears Balance Adjustment Transactions
Reviewing Loaded Earnings Balance Adjustment Transactions
To review loaded earnings balance adjustment transactions, do the following:
1. Click Payroll and make the following selections:
Payroll Cycle Processes ~ Balance Adjustment
Performing Balance Adjustments
Creating an Adjustment/Open Balance
Reviewing Balance Adjustments Before Loading
Loading Balance Adjustments
Reviewing Balance Adjustment Transactions
Posting Current/Prior Period Adjustments to the General Ledger
Reversing a Specific Balance Adjustment Transaction
Updating Current/Prior Period Adjustment Balances when Reversing a Check
Chapter 12: Adjusting Payroll BalancesPayroll Processing Guide Version 5.04.01

Performing Balance Adjustments 12-81
2. Double-click the Transaction Reversals task. The Earnings Reversal panel displays.
Figure 12-45. Earnings Reversal Panel
3. From the Selection Criteria field, select one of the following options:
• Adj Type - Select to view either adjustments or open balances. If you select this option, select Open Bal or Adjustment from the field that displays.
• All - Select to view all loaded balance adjustments.
• Company - Select to view loaded balance adjustments for a specific company. If you select this option, select the Company from the field that displays.
• Employee - Select to view pending balance adjustments for a specific employee. If you select this option, select the Employee from the field that displays.
4. View the following adjustment earnings summary information:
• Emplid - Displays the ID for the employee.
• Rcd Nbr - For employees performing concurrent jobs, indicates the job to which the record pertains. New hire employment record numbers are always 0.
• Company - Displays the company assigned to the employee.
• Year - Displays the year for which the adjustment was made.
• Quarter - Displays the quarter for which the adjustment was made.
• Month - Displays the month for which the adjustment was made.
• Spl Bal - Indicates if the earnings adjusted was a special accumulator.
• Earn Code - Displays the earnings code or accumulator that was adjusted.
For a description of the fields on this panel, press F1.
Chapter 12: Adjusting Payroll BalancesPayroll Processing Guide Version 5.04.01

12-82 Performing Balance Adjustments
• State - Displays the state if the adjustment affected a state with a special tax-reporting category.
• Adj Type - Indicates whether the balance adjustment was an opening balance or an adjustment.
• Adjustment Run ID - Displays the adjustment run ID assigned to the balance adjustment.
• Update Origin - Indicates whether you entered the balance adjustment through the Earnings Balance panel or imported the adjustments in a . file.
5. To review details for a specific balance adjustment, do the following:
a. In the Emplid column, click the employee link for the balance adjustment. The Earnings Balance panel displays.
The Earnings Balance panel is display-only. No changes can be made to the
balance adjustment data. See page 12-35 for descriptions of the fields on this panel.
b. Review the balance adjustment details.
c. Click (close). The Earnings Reversal panel redisplays.
6. For each balance adjustment you want to reverse, select the Process check box.
If you want to reverse all balance transactions grouped in one adjustment run ID, you do
not need to select this check box. Instead, you will enter the adjustment run ID on the Reverse Run Control panel.
Click Select All to select this check box for all balance adjustments. Click Clear All to deselect the Process check box for all balance adjustments.
You’ve just finished reviewing/modifying loaded earnings balance adjustments. Next, you can review/modify loaded deduction balance adjustments.
Chapter 12: Adjusting Payroll BalancesPayroll Processing Guide Version 5.04.01

Performing Balance Adjustments 12-83
Reviewing Loaded Deduction Balance Adjustment Transactions
To review a loaded deduction balance adjustment transactions, do the following:
1. Click the Deductions Reversal tab. The Deductions Reversal panel displays.
Figure 12-46. Deductions Reversal Panel
2. From the Selection Criteria field, select one of the following options:
• Adj Type - Select to view either adjustments or open balances. If you select this option, select Open Bal or Adjustment from the field that displays.
• All - Select to view all loaded balance adjustments.
• Company - Select to view loaded balance adjustments for a specific company. If you select this option, select the Company from the field that displays.
• Employee - Select to view loaded balance adjustments for a specific employee. If you select this option, select the Employee from the field that displays.
3. View the following adjustment deduction summary information:
• Emplid - Displays the ID for the employee.
• Rcd Nbr - For employees performing concurrent jobs, indicates the job to which the record pertains. New hire employment record numbers are always 0.
• Company - Displays the company assigned to the employee.
• Year - Displays the year for which the adjustment was made.
• Quarter - Displays the quarter for which the adjustment was made.
• Month - Displays the month for which the adjustment was made.
• Eff Date - Displays the effective date of the balance adjustment.
For a description of the fields on this panel, press F1.
Chapter 12: Adjusting Payroll BalancesPayroll Processing Guide Version 5.04.01

12-84 Performing Balance Adjustments
• Plan Type - Displays the plan type that was adjusted.
• Benefit Plan - Displays the benefit plan that was adjusted.
• Ded Code - Displays the deduction code that was adjusted.
• Ded Class - Displays the deduction code that was adjusted.
• Adj Type - Indicates whether the balance adjustment was an opening balance or an adjustment.
• Adjustment Run ID - Displays the adjustment run ID assigned to the balance adjustment.
• Update Origin - Indicates whether you entered the balance adjustment through the Deduction Balance panel (Adj panel) or imported the adjustments in a . file.
4. To review details for a specific balance adjustment, do the following:
a. In the Emplid column, click the employee link for the balance adjustment. The Deduction Balance panel displays.
The Deduction Balance panel is display-only. No changes can be made to the
balance adjustment data. See page 12-32 for descriptions of the fields on this panel.
b. Review the balance adjustment details.
c. Click (close). The Deductions Reversal panel redisplays.
5. For each balance adjustment you want to reverse, select the Process check box.
If you want to reverse all balance transactions grouped in one adjustment run ID, you do
not need to select this check box. Instead, you will enter the adjustment run ID on the Reverse Run Control panel.
Click Select All to select this check box for all balance adjustments. Click Clear All to deselect the Process check box for all balance adjustments.
You’ve just finished reviewing/modifying loaded deduction balance adjustments. Next, you can review/modify loaded tax balance adjustments.
Chapter 12: Adjusting Payroll BalancesPayroll Processing Guide Version 5.04.01

Performing Balance Adjustments 12-85
Reviewing Loaded Tax Balance Adjustment Transactions
To review a loaded tax balance adjustment transactions, do the following:
1. Click the Taxes Reversal tab. The Taxes Reversal panel displays.
Figure 12-47. Taxes Reversal Panel
2. From the Selection Criteria field, select one of the following options:
• Adj Type - Select to view either adjustments or open balances. If you select this option, select Open Bal or Adjustment from the field that displays.
• All - Select to view all loaded balance adjustments.
• Company - Select to view loaded balance adjustments for a specific company. If you select this option, select the Company from the field that displays.
• Employee - Select to view pending balance adjustments for a specific employee. If you select this option, select the Employee from the field that displays.
3. View the following adjustment deduction summary information:
• Emplid - Displays the ID for the employee.
• Rcd Nbr - For employees performing concurrent jobs, indicates the job to which the record pertains. New hire employment record numbers are always 0.
• Company - Displays the company assigned to the employee.
• Year - Displays the year for which the adjustment was made.
• Quarter - Displays the quarter for which the adjustment was made.
• Month - Displays the month for which the adjustment was made.
• Eff Date - Displays the effective date of the balance adjustment.
For a description of the fields on this panel, press F1.
Chapter 12: Adjusting Payroll BalancesPayroll Processing Guide Version 5.04.01

12-86 Performing Balance Adjustments
• State - Displays the state to which the tax was reported.
• Locality - Displays the locality to which the tax was reported.
• Tax Class - Displays the class for the tax.
• Adj Type - Indicates whether the balance adjustment was an opening balance or an adjustment.
• Adjustment Run ID - Displays the adjustment run ID assigned to the balance adjustment.
• Update Origin - Indicates whether you entered the balance adjustment through the Deduction Balance panel (Adj panel) or imported the adjustments in a . file.
4. To review details for a specific balance adjustment, do the following:
a. In the Emplid column, click the employee link for the balance adjustment. The Tax Balance panel displays.
The Tax Balance panel is display-only. No changes can be made to the balance
adjustment data. See page 12-42 for descriptions of the fields on this panel.
b. Review the balance adjustment details.
c. Click (close). The Taxes Reversal panel redisplays.
5. For each balance adjustment you want to reverse, select the Process check box.
If you want to reverse all balance transactions grouped in one adjustment run ID, you do
not need to select this check box. Instead, you will enter the adjustment run ID on the Reverse Run Control panel.
Click Select All to select this check box for all balance adjustments. Click Clear All to deselect the Process check box for all balance adjustments.
You’ve just finished reviewing/modifying loaded tax balance adjustments. Next, you can review/modify loaded garnishment balance adjustments.
Chapter 12: Adjusting Payroll BalancesPayroll Processing Guide Version 5.04.01

Performing Balance Adjustments 12-87
Reviewing Loaded Garnishment Balance Adjustment Transactions
To review a loaded garnishments balance adjustment transactions, do the following:
1. Click the Garnishments Reversal tab. The Garnishments Reversal panel displays.
Figure 12-48. Garnishments Reversal Panel
2. From the Selection Criteria field, select one of the following options:
• Adj Type - Select to view either adjustments or open balances. If you select this option, select Open Bal or Adjustment from the field that displays.
• All - Select to view all loaded balance adjustments.
• Company - Select to view loaded balance adjustments for a specific company. If you select this option, select the Company from the field that displays.
• Employee - Select to view loaded balance adjustments for a specific employee. If you select this option, select the Employee from the field that displays.
3. View the following adjustment deduction summary information:
• Emplid - Displays the ID for the employee.
• Rcd Nbr - For employees performing concurrent jobs, indicates the job to which the record pertains. New hire employment record numbers are always 0.
• Company - Displays the company assigned to the employee.
• Year - Displays the year for which the adjustment was made.
• Quarter - Displays the quarter for which the adjustment was made.
• Month - Displays the month for which the adjustment was made.
• Eff Date - Displays the effective date of the balance adjustment.
For a description of the fields on this panel, press F1.
Chapter 12: Adjusting Payroll BalancesPayroll Processing Guide Version 5.04.01

12-88 Performing Balance Adjustments
• Plan Type - Displays the plan type that was adjusted.
• Benefit Plan - Displays the benefit plan that was adjusted.
• Ded Code - Displays the deduction code that was adjusted.
• Ded Class - Displays the deduction code that was adjusted.
• Garnish ID - Displays the ID for the garnishment that was adjusted.
• Adj Type - Indicates whether the balance adjustment was an opening balance or an adjustment.
• Adjustment Run ID - Displays the adjustment run ID assigned to the balance adjustment.
• Update Origin - Indicates whether you entered the balance adjustment through the Deduction Balance panel (Adj panel) or imported the adjustments in a . file.
4. To review details for a specific balance adjustment, do the following:
a. In the Emplid column, click the employee link for the balance adjustment. The Garnishment panel displays.
Both the Garnishment and Balance panels are display-only. No changes can be
made to the balance adjustment data. See page 12-38 and page 12-39 for descriptions of the fields on these panels.
b. Review the balance adjustment details on both the Garnishment and Balance panels.
c. Click (close). The Garnishments Reversal panel redisplays.
5. For each balance adjustment you want to reverse, select the Process check box.
If you want to reverse all balance transactions grouped in one adjustment run ID, you do
not need to select this check box. Instead, you will enter the adjustment run ID on the Reverse Run Control panel.
Click Select All to select this check box for all balance adjustments. Click Clear All to deselect the Process check box for all balance adjustments.
You’ve just finished reviewing/modifying loaded garnishment balance adjustments. Next, you can review/modify loaded arrears balance adjustments.
Chapter 12: Adjusting Payroll BalancesPayroll Processing Guide Version 5.04.01

Performing Balance Adjustments 12-89
Reviewing Loaded Arrears Balance Adjustment Transactions
To review a loaded arrears balance adjustment transactions, do the following:
1. Click the Arrears Reversal tab. The Arrears Reversal panel displays.
Figure 12-49. Arrears Reversal Panel
2. From the Selection Criteria field, select one of the following options:
• Adj Type - Select to view either adjustments or open balances. If you select this option, select Open Bal or Adjustment from the field that displays.
• All - Select to view all loaded balance adjustments.
• Company - Select to view loaded balance adjustments for a specific company. If you select this option, select the Company from the field that displays.
• Employee - Select to view loaded balance adjustments for a specific employee. If you select this option, select the Employee from the field that displays.
3. View the following adjustment deduction summary information:
• Emplid - Displays the ID for the employee.
• Rcd Nbr - For employees performing concurrent jobs, indicates the job to which the record pertains. New hire employment record numbers are always 0.
• Company - Displays the company assigned to the employee.
• Eff Date - Displays the effective date of the balance adjustment.
• Plan Type - Displays the plan type that was adjusted.
• Benefit - Displays the benefit plan that was adjusted.
• Ded Code - Displays the deduction code that was adjusted.
For a description of the fields on this panel, press F1.
Chapter 12: Adjusting Payroll BalancesPayroll Processing Guide Version 5.04.01

12-90 Performing Balance Adjustments
• Ded Class - Displays the deduction code that was adjusted.
• Adj Type - Indicates whether the balance adjustment was an opening balance or an adjustment.
• Adjustment Run ID - Displays the adjustment run ID assigned to the balance adjustment.
• Update Origin - Indicates whether you entered the balance adjustment through the Deduction Balance panel (Adj panel) or imported the adjustments in a . file.
4. To review details for a specific balance adjustment, do the following:
a. In the Emplid column, click the employee link for the balance adjustment. The Arrears Balance panel displays.
The Arrears Balance panel is display-only. No changes can be made to the balance
adjustment data. See page 12-42 for descriptions of the fields on this panel.
b. Review the balance adjustment details.
c. Click (close). The Arrears Reversal panel redisplays.
5. For each balance adjustment you want to reverse, select the Process check box.
If you want to reverse all balance transactions grouped in one adjustment run ID, you do
not need to select this check box. Instead, you will enter the adjustment run ID on the Reverse Run Control panel.
Click Select All to select this check box for all balance adjustments. Click Clear All to deselect the Process check box for all balance adjustments.
You’ve just finished reviewing/modifying loaded arrears balance adjustments. Next, you can run the reversal process.
Chapter 12: Adjusting Payroll BalancesPayroll Processing Guide Version 5.04.01

Performing Balance Adjustments 12-91
Running the Reversal
You can choose to reverse adjustment transactions in one of two ways:
• You can select specific adjustment transactions to reverse by selecting the Reversal check box for each transaction on the appropriate Reversal panel.
• You can reverse all adjustment transactions grouped in one adjustment run ID by entering the run ID on the Reversal Run Control panel.
To reverse balance adjustments, do the following:
1. Click the Reversal Run Control tab. The Reversal Run Control panel displays.
Figure 12-50. Reversal Run Control Panel
2. Enter the Batch Run ID.
3. If necessary, change the Adjustment Run ID. The adjustment run ID defaults to the current date hour minute second.
4. For information purposes only, enter a Description of the adjustment run ID.
5. If you are reversing all adjustment transactions for a specific adjustment run ID, select a run ID from the Adjustment Run ID to Reverse field.
6. Click Reverse Adjustments. You will receive a message notifying you that your process
has been submitted. Click OK. To confirm successful completion, click (Process Monitor).
For additional information on running a process, refer to the Using ADP Enterprise HR Guide.
You’ve just finished reversing a specific balance adjustment transaction.
For a description of the fields on this panel, press F1.
Chapter 12: Adjusting Payroll BalancesPayroll Processing Guide Version 5.04.01

12-92 Performing Balance Adjustments
Updating Current/Prior Period Adjustment Balances when Reversing a Check
Payroll departments often need to reverse incorrect system-generated checks. You should reverse a check if you produce a check that should not have been produced or is incorrect, but it has not yet been cashed and has been returned to the payroll department. When you reverse the check, you generally cut a new check for the correct amount or do nothing after having reversed it.
When you run the paycheck reversal process, Enterprise Payroll finds the check or checks you specify and reverses the plus/minus signs. Since Enterprise Payroll determines the amounts from the original check data, no additional calculation is necessary.Therefore, you can skip the payroll calculation process and run the payroll confirmation process only.
Reversing a check consists of the following:
• Identifying the Check(s)
• Processing the Check Reversal(s)
• Reviewing the Paycheck Reversal(s)
• Completing Your Reversal
Identifying the Check(s)
For step-by-step instructions on determining the paycheck number and issue date of the check(s) you are reversing, see “Identifying the Check(s)” on page 12-92.
You have just identified the paycheck number and date of the check(s) to be reversed. Next, you can process your check reversal(s).
Processing the Check Reversal(s)
After you identify the paycheck number and the paycheck issue date, you are ready to process your check reversal(s).
When you run the check reversal, Enterprise Payroll locates the checks you are reversing and creates an off-cycle paysheet page for each reversal. The resulting paylines reflect the original paysheet entries with negatives in the hours and amount fields. Enterprise Payroll grays out these pages so you cannot enter data.
During the reversal process, Enterprise Payroll makes a copy of the paycheck record and reverses the signs (plus/minus) on the amount fields. The original paycheck record is not deleted. On the reversed check, all of the amounts display as negative numbers, and “Calculated Check Reversal” displays in the Payline Message field.
Performing Balance Adjustments
Creating an Adjustment/Open Balance
Reviewing Balance Adjustments Before Loading
Loading Balance Adjustments
Reviewing Balance Adjustment Transactions
Posting Current/Prior Period Adjustments to the General Ledger
Reversing a Specific Balance Adjustment Transaction
Updating Current/Prior Period Adjustment Balances when Reversing a Check
Chapter 12: Adjusting Payroll BalancesPayroll Processing Guide Version 5.04.01

Performing Balance Adjustments 12-93
To process the check reversal, do the following:
1. Click Payroll and make the following selections:
Payroll Cycle Processes ~ Balance Adjustment
2. Double-click the Prepare Paycheck Reversals task. The Paycheck Reversals panel displays.
Figure 12-51. Paycheck Reversals Panel
For details on this panel, press F1 or see page 11-61.
3. Enter a batch run ID in the Run ID field.
This is not the batch run ID for the original check.
You can process multiple batches at the same time by clicking the outer scroll bar and
clicking (Insert Row).
4. Select the employee’s company from the Company field.
5. Select the employee’s pay group from the Pay group field.
6. From the Period end field, select the pay period end date that corresponds to the pay calendar in which you want to process the reversal, usually your next active pay period, and press Tab.
The payroll run ID assigned to that particular pay period end date displays in the Pay run ID field.
Chapter 12: Adjusting Payroll BalancesPayroll Processing Guide Version 5.04.01

12-94 Performing Balance Adjustments
7. Enter paycheck information in the Targeted Check area by doing one of the following:
You can reverse multiple checks from the same batch by clicking the outer scroll bar and
clicking (Insert Row).
• If you know the paycheck number, then enter it in the Check number field.
Enterprise Payroll automatically populates the Employee and Check date fields, selects the Off cycle check box (if necessary), and displays the page, line, separate check number, pay period end date, and net pay information for the specific check.
• If you do not know the paycheck number, select the appropriate information from the Employee and Check date fields and press Tab.
If multiple checks exist on the same date, you must enter the check number in the
Check number field and press Tab.
Enterprise Payroll automatically populates the Check number field, selects the Off cycle check box (if necessary), and displays the page, line, separate check number, pay period end date, and net pay information for the specific check.
Figure 12-52. Paycheck Reversals - Paycheck Information Displayed
8. Select the Reversal option.
9. Select the Post Reversal to Prior Period check box to update balances from the check date to the current balances.
If you want to update current balances only, do not select this check box.
10. Click (Save).
Chapter 12: Adjusting Payroll BalancesPayroll Processing Guide Version 5.04.01

Performing Balance Adjustments 12-95
11. Click Run Reversals. You will receive a message notifying you that your process has
been submitted. Click OK. To confirm successful completion, click (Process Monitor).
For additional information on the Process Monitor, refer to the Using ADP Enterprise HR Guide.
If you attempt to run reversal against a closed pay calendar, you will receive an error
message. You can run a paycheck reversal only against an open pay calendar.
For specific instructions on confirming your process, refer to the Using ADP Enterprise HR Guide.
You have just finished processing paycheck reversal. Next, you can review the paycheck reversals.
Reviewing the Paycheck Reversal(s)
You can view both the original and the reversed check(s) using the Review Pay Cycle Reversals (Payline) task. The panels that are part of this task display all the amounts as negative numbers on the reversed check.
Use the following path to review the paycheck reversal(s):
Payroll Cycle Processes ~ Balance Adjustment ~ Review Pay Cycle Reversals (Payline)
For detailed information on reviewing the paycheck reversal(s), see “Viewing All Earnings and Overrides from All Pay Groups for a Specific Employee” on page 3-13.
You have just finished reviewing the reversed checks. You are now ready to complete the reversal.
Completing Your Reversal
After you have reviewed your reversed check(s), you can complete your reversal. To complete the reversal, do the following:
To confirm your reversal, do the following:
1. Click Payroll and make the following selections:
Payroll Cycle Processes ~ Balance Adjustment
Chapter 12: Adjusting Payroll BalancesPayroll Processing Guide Version 5.04.01

12-96 Performing Balance Adjustments
2. Double-click the Complete Reversal (Confirm) task. The Payroll Confirmation panel displays.
.
Figure 12-53. Payroll Confirmation Panel
For details on this panel, press F1 or see page 6-35.
3. Select the company from the Company field.
4. Select the pay group from the Pay Group field.
5. Select the pay period end date from the Pay End Date field.
6. Do one of the following to indicate if you want one or all reversals confirmed:
• Enter the page numbers of the reversal in the Process Page # fields.
• Select the All Reversals/Adjustments check box.
7. If you are using fund accounting and want Enterprise Payroll to determine whether any fund(s) would be exhausted by the reversal, select the Test for Fund Exhaustion check box.
8. Click (Save).
9. Click Run Pay Confirm. You will receive a message notifying you that your process has
been submitted. Click OK. To confirm successful completion, click (Process Monitor).
For additional information on the Process Monitor, refer to the Using ADP Enterprise HR Guide.
You’ve just finished confirming your reversal.
Chapter 12: Adjusting Payroll BalancesPayroll Processing Guide Version 5.04.01

Chapter 13
Performing Monthly Processes
PAGE TOPIC
13-2 Introduction
13-3 Updating Leave Balances
13-5 Performing a One-Time Update on Your ETD History
13-6 Creating General Ledger Accruals
13-11 Reconciling Your Checks
13-16 Purchasing U.S. Savings Bonds
13-18 Creating Federal Reserve Bank Files for Savings Bonds
13-21 Creating the ADP UCM Services Wage File
13-24 Generating Monthly Summary Reports
Chapter 13: Performing Monthly ProcessesPayroll Processing Guide Version 5.04.01

13-2 Introduction
Introduction
This chapter provides step-by-step instructions for tasks that you should complete on a monthly basis, such as reconciling your checks and purchasing savings bonds.
You can often complete a task in the product in multiple ways. For information on interface
shortcuts and tips, refer to the Using ADP Enterprise HR Guide.
As you work through the tasks in this chapter, you may have questions about fields and options on the panels. To display a description of the fields and options, press F1 (Help) from the panel.
Chapter 13: Performing Monthly ProcessesPayroll Processing Guide Version 5.04.01

Updating Leave Balances 13-3
Updating Leave Balances
You can update leave balances with Active, Leave of Absence, or Paid leave of Absence statuses by leave plan type, one per leave accrual frequency. For example, for a leave plan in which you accrue leave monthly, initiate the leave accrual process once each month, even if pay frequency is biweekly.
To update leave balances, do the following:
1. Click Payroll and make the following selections:
Periodic Payroll Processes ~ Monthly Processes
2. Double-click the Update Leave Balances task. The Update Leave Balances panel displays.
Figure 13-1. Update Leave Balances Panel
3. In the Batch Run ID field, enter the batch run ID that uniquely identifies this process.
4. In the Accrual Process Date field, enter the next date the leave accrual calculation process will be run using the MMDDYYYY format.
This date must be more recent than the date of the previous leave accrual run displayed
in the Last Process Date field.
5. From the Plan Type area, select the option that indicates the plan type code assigned to the benefit plan.
During pay calculation, the plan type determines the deduction processing rules.
For a description of the fields on this panel, press F1.
Chapter 13: Performing Monthly ProcessesPayroll Processing Guide Version 5.04.01

13-4 Updating Leave Balances
6. In the Accrual Frequency field, enter the frequency that the plan type is run. Only frequencies set up for the leave plan of the plan type are available.
7. Review the following benefit information:
• Benefit Plan - Displays the unique identifier assigned to the benefit plan.
• Description - Displays a description of the benefit plan.
• Last Process Date - Displays the date this type of leave was last processed for this company.
8. Select the Include check box for each plan you want to include when running the Leave Accruals process.
Only the active Batch Run ID row is run, as opposed to every row in the scroll bar.
9. Click Run Leave Accruals.
Included plans must have a Last Process Date earlier than the Batch Run’s Accrual
Process Date.
You will receive a message notifying you that your process has been submitted. Click
OK. To confirm successful completion, click (Process Monitor).
For additional information on the Process Monitor, refer to the Using ADP Enterprise HR Guide.
You have just finished updating leave balances.
Chapter 13: Performing Monthly ProcessesPayroll Processing Guide Version 5.04.01

Performing a One-Time Update on Your ETD History 13-5
Performing a One-Time Update on Your ETD History
If you need to do a one-time update to pull in your employment-to-date history, run the Update ETD Deduction Balances (PAY718) report.
To run PAY718, do the following:
1. Click Payroll and make the following selections:
Payroll Reports ~ Payroll Utilities
Double-click the Update ETD Deduction Balances (PAY718) task. The Populate Employment-To-Date Deduction Balances panel displays .
Figure 13-2. Populate Employment-To-Date Deduction Balances Panel
2. Enter the beginning date from which you want Enterprise Payroll to pull in the ETD history in the As Of Date field.
3. Click Run Report. You will receive a message notifying you that your process has been
submitted. Click OK. To confirm successful completion of your process, click (Process Monitor).
For additional information on using the Process Monitor, see the Using ADP Enterprise HR Guide.
You have just performed a one-time update on your earnings-to-date history.
For a description of the fields on this panel, press F1.
Chapter 13: Performing Monthly ProcessesPayroll Processing Guide Version 5.04.01

13-6 Creating General Ledger Accruals
Creating General Ledger Accruals
If you are using the Enterprise Payroll General Ledger interface, you can track employee wages, benefits, employee taxes, and paid time-off accruals. Then you can generate the following monthly reports for statistical hours and paid time-off accruals:
• Producing the GL Distribution Summary Report
• Producing the Paid Time-Off Accruals Detail Report
If you use the Pathways Financial Management System, the General Ledger interface
generates these files in a format compatible with your system.
For ADP hosted clients, Enterprise Payroll interfaces with ADP’s General Ledger solution.
ADP General Ledger is a self-service internet-based application that provides you access to payroll data from a general ledger perspective. It provides benefit accruals, labor distribution, total gross earnings, deductions, taxes, and more. Enterprise Payroll transfers earnings, deductions, and taxes to ADP General Ledger. Adjustments details are not transferred to ADP General Ledger. Additionally, multiple state employer tax records, for an employee working in multiple states, are sent to ADP General Ledger under one state for general ledger purposes.
For more information on setting up the export process and on exporting ADP General Ledger data files, see the Application Administrator’s Guide. For information about the ADP General Ledger solution, refer to the ADP General Ledger User’s Guide.
Producing the GL Distribution Summary Report
You can set up the General Ledger Distribution Summary Report to show either hours or amounts. The report automatically generates with general ledger hours; however, if you want the report to show dollars instead, you can select the Build Statistical Hours File check box located on the GL Options panel (Payroll ~ Company Definitions ~ Organization Definitions ~ Company). For details on setting up this option, refer to the Payroll Setup and Maintenance Guide.
Before you can produce the General Ledger Distribution Summary Report, you must first generate the general ledger interface file, GLX001.
Generating the File
To generate the general ledger interface file, do the following:
1. Click Payroll and make the following selections:
Payroll Reports ~ General Ledger
Creating General Ledger Accruals
Producing the GL Distribution Summary Report
Producing the Paid Time-Off Accruals Detail Report
Chapter 13: Performing Monthly ProcessesPayroll Processing Guide Version 5.04.01

Creating General Ledger Accruals 13-7
2. Double-click the Generate GL Interface File (GLX001) task. The Generate GL Interface File panel displays.
Figure 13-3. Generate GL Interface File Panel
3. Select a valid payroll run ID in the Pay Run ID field.
You must have the pay run ID set up on the Payroll Calendars panel (Payroll ~ Company
Definitions ~ Pay Groups and Payroll Calendars ~ Payroll Calendar).
4. If the payroll run ID includes multiple pay calendar entries, then you must select the company from the Company field, the pay group from the Pay Group field, and the pay period end date from the Pay End Date field.
5. Click Run Report. You will receive a message notifying you that your process has been
submitted. Click OK. To confirm successful completion of your process, click (Process Monitor).
For additional information on using the Process Monitor, see the Using ADP Enterprise HR Guide.
You have just finished running GLX001 to generate the GL Interface file. Next, run GLX002 to generate, view, and print your report.
For a description of the fields on this panel, press F1.
Chapter 13: Performing Monthly ProcessesPayroll Processing Guide Version 5.04.01

13-8 Creating General Ledger Accruals
Producing the Report
To access the General Ledger Distribution Summary Report, do the following:
1. Click Payroll and make the following selections:
Payroll Reports ~ General Ledger ~ GL Distribution Summary (GLX002)
No input is required for this report. For specific instructions on running, viewing, and printing reports, refer to the Using ADP Enterprise HR Guide. See the Standard Reports Guide for details on sources, sort order, and an illustration of the report.
You have just finished producing the General Ledger Distribution Summary Report. Next, you can produce the Paid Time-Off Accruals Detail report.
Producing the Paid Time-Off Accruals Detail Report
To be able to produce the Paid Time-Off Accruals Detail Report, you must have the Build PTO Accruals File option selected on the GL Options panel (Payroll ~ Company Definitions ~ Organization Definitions ~ Company). Activating this option causes Enterprise Payroll to record the value of the paid time off accrued by employees of a specific company. For details on setting up this option, refer to the Payroll Setup and Maintenance Guide.
Before you can produce the Paid Time-Off Accruals Detail Report, you must first generate the GL Leave Accruals file, GLX003.
Generating the File
To generate the GL Leave Accruals file, do the following:
1. Click Payroll and make the following selections:
Periodic Payroll Processes ~ Monthly Processes
Creating General Ledger Accruals
Producing the GL Distribution Summary Report
Producing the Paid Time-Off Accruals Detail Report
Chapter 13: Performing Monthly ProcessesPayroll Processing Guide Version 5.04.01

Creating General Ledger Accruals 13-9
2. Double-click the Generate GL Leave Accruals (GLX003) task. The Generate GL Leave Accruals panel displays.
Figure 13-4. Generate GL Leave Accruals Panel
3. Enter the date you are processing the accrual in the Accrual Process Date field.
4. Click Run Report. You will receive a message notifying you that your process has been
submitted. Click OK. To confirm successful completion of your process, click (Process Monitor).
For additional information on using the Process Monitor, see the Using ADP Enterprise HR Guide.
You have just finished running GLX003 to generate the GL Leave Accruals file. Next, run GLX004 to generate, view, and print your report.
For a description of the fields on this panel, press F1.
Chapter 13: Performing Monthly ProcessesPayroll Processing Guide Version 5.04.01

13-10 Creating General Ledger Accruals
Producing the Report
To access the GL Leave Accruals Summary report, do the following:
1. Click Payroll and make the following selections:
Periodic Payroll Processes ~ Monthly Processes ~ GL Leave Accruals Summary (GLX004)
No input is required for this report. For specific instructions on running, viewing, and printing reports, refer to the Using ADP Enterprise HR Guide. See the Standard Reports Guide for details on sources, sort order, and an illustration of the report.
You have just finished producing the Leave Accruals GL Summary report, which is the last step in creating general ledger accruals for leave balances.
Chapter 13: Performing Monthly ProcessesPayroll Processing Guide Version 5.04.01

Reconciling Your Checks 13-11
Reconciling Your Checks
Enterprise Payroll comes with two SQR programs that together enable you to reconcile checks: Paycheck Reconciliation A (PAY015A) and Paycheck Reconciliation B (PAY015B). These reports assist you in determining which paychecks have been cashed and which are still outstanding. They alert you to checks that the bank has cashed for an amount other than the amount your records show.
PAY015A places cashed checks, reversed checks, and outstanding checks in a temporary Check Reconciliation file on the database. Enterprise Payroll assumes that checks for which no match is found on the database are unprocessed manual checks. The program places these in an Unprocessed Manual Checks file.
PAY015A also produces an Error Listing report which shows checks with the wrong Net amount, checks flagged as already having been cashed, and checks flagged as having been reversed. It identifies all computer and manual checks, including check reversals, processed by Enterprise Payroll during the current payroll periods specified by the payroll run ID.
Then, it inserts one entry for each check into the temporary Check Reconciliation file. Next, it identifies all outstanding checks; that is, it identifies all checks that have been “confirmed” and are not reversing entries and have not yet been cashed. Finally, it inserts one entry for each outstanding check into the temporary Check Reconciliation file.
PAY015B lists the entries in the temporary Check Reconciliation file generated by PAY015A. The entries are divided by predetermined report types. A page break is supplied for each report type within this category and totals are given for item count and net pay. Report types included are: issued checks (computer), checks reconciled from bank checks file, outstanding checks, and unprocessed manual checks.
The report is divided into the following sections:
• Issued Checks (Computer)
• Checks Reconciled From Bank Checks File
• Outstanding Checks
• Unprocessed Manual Checks
After you run your report, you can use the Dead Paychecks task to view your outstanding checks and verify why they are missing.
Reconciling your checks consists:
• Using Bank Files
• Running Paycheck Reconciliation A
• Running Paycheck Reconciliation B
• Researching Your Outstanding Checks
Chapter 13: Performing Monthly ProcessesPayroll Processing Guide Version 5.04.01

13-12 Reconciling Your Checks
Using Bank Files
Enterprise Payroll accepts bank files in the following format:
Transit# (9 positions)Account# (15 positions)Check# (8 positions; numeric)Check Date (6 positions)Bank Net Pay (10 positions; numeric; implied decimal point)You can easily adapt the sample SQR programs to accommodate a bank file with a different format.
Enterprise Payroll reads this bank file and attempts to reconcile each check against the check information in your payroll database. In addition, Enterprise Payroll verifies its own file of unprocessed manual checks to determine if they are in Enterprise Payroll since the last time you ran the check reconciliation process.
Running Paycheck Reconciliation A
To run Paycheck Reconciliation A, (PAY015A), do the following:
1. Obtain a magnetic media file from your bank that provides a list of cashed payroll checks and copy it to: c:\temp\bankfile.trn.
2. Click Payroll and make the following selections:
Periodic Payroll Processes ~ Monthly Processes
3. Double-click the Run Paycheck Reconciliation A (PAY015A) task. The Paycheck Reconciliation A panel displays.
Figure 13-5. Paycheck Reconciliation A Panel
Reconciling Your Checks
Using Bank Files
Running Paycheck Reconciliation A
Running Paycheck Reconciliation B
Researching Your Outstanding Checks
For a description of the fields on this panel, press F1.
Chapter 13: Performing Monthly ProcessesPayroll Processing Guide Version 5.04.01

Reconciling Your Checks 13-13
4. Select one of the options from the Cycle Option field to indicate whether you want the report to include payroll information for an on-cycle payroll, off-cycle payroll, or both.
5. Select the payroll run ID from the Pay Run ID field.
6. In the Page # fields, enter the page number range for the paysheet information you want included in the report.
7. If the payroll run ID includes multiple pay calendar entries, then you must select the company from the Company field, the pay group from the Pay Group field, and the pay period end date from the Pay End Date field.
8. From the Display Options area, select how you want the Transit Number and Account Number to display in the report.
The options that are available for selection depend on the field display options selected
on the user’s security profile (System Admin ~ Security Administration ~ Operator ~ Profile). If the user profile is set to Hide, the option is grayed out when generating files. The process will automatically print the fields according to the user’s display setting. However, if the user is set to Show, the Display Option fields will be available and the user can choose to change the default of Hide to either Show or Mask. If the user is set to Mask, the Display Option fields will be available and the user can choose to change the default of Hide to Mask.For more information on the user Profile settings, see the Application Administrator’s Guide.
9. Click Run Report. You will receive a message notifying you that your process has been
submitted. Click OK. To confirm successful completion of your process, click (Process Monitor).
For additional information on using the Process Monitor, see the Using ADP Enterprise HR Guide.
You have just finished running PAY015A to generate the paycheck reconciliation file. Next, run PAY015B to generate, view, and print your report.
Running Paycheck Reconciliation B
PAY015B lists the entries in the temporary Check Reconciliation file generated by PAY015A. The entries are divided by predetermined report types. A page break is supplied for each report type within this category and totals are given for item count and net pay. Report types included are: issued checks (computer), checks reconciled from bank checks file, outstanding checks, and unprocessed manual checks.
To generate the Paycheck Reconciliation B (PAY015B), do the following:
1. Click Payroll and make the following selections:
Periodic Payroll Processes ~ Monthly Processes
Reconciling Your Checks
Using Bank Files
Running Paycheck Reconciliation A
Running Paycheck Reconciliation B
Researching Your Outstanding Checks
Chapter 13: Performing Monthly ProcessesPayroll Processing Guide Version 5.04.01

13-14 Reconciling Your Checks
2. Double-click the Run Paycheck Reconciliation B (PAY015B) task. The Paycheck Reconciliation B panel displays.
Figure 13-6. Paycheck Reconciliation B Panel
3. From the Display Options area, select how you want the Transit Number and Account Number to display in the report.
The options that are available for selection depend on the field display options selected
on the user’s security profile (System Admin ~ Security Administration ~ Operator ~ Profile). If the user profile is set to Hide, the option is grayed out when generating files. The process will automatically print the fields according to the user’s display setting. However, if the user is set to Show, the Display Option fields will be available and the user can choose to change the default of Hide to either Show or Mask. If the user is set to Mask, the Display Option fields will be available and the user can choose to change the default of Hide to Mask.For more information on the user Profile settings, see the Application Administrator’s Guide.
4. Click Run Report. You will receive a message notifying you that your process has been
submitted. Click OK. To confirm successful completion of your process, click (Process Monitor).
For additional information on using the Process Monitor, see the Using ADP Enterprise HR Guide.
You’ve just finishing running PAY015B to generate the report that you can view and print. Next, you can view all outstanding checks and verify why they are missing on your report.
For a description of the fields on this panel, press F1.
Chapter 13: Performing Monthly ProcessesPayroll Processing Guide Version 5.04.01

Reconciling Your Checks 13-15
Researching Your Outstanding Checks
You can use the Dead Paychecks task to view all outstanding checks and verify why they are missing on your report. For detailed instructions on the Dead Paychecks task, “Reviewing the Results” on page 9-43.
You have just finished reviewing the results of your check reprinting which is the last step in reconciling your paychecks.
Reconciling Your Checks
Using Bank Files
Running Paycheck Reconciliation A
Running Paycheck Reconciliation B
Researching Your Outstanding Checks
Chapter 13: Performing Monthly ProcessesPayroll Processing Guide Version 5.04.01

13-16 Purchasing U.S. Savings Bonds
Purchasing U.S. Savings Bonds
With Enterprise Payroll, you can create a file that you can use to purchase bonds electronically by running the Bond Purchase Report, PAY016. The report you generate lists all bonds purchased since the last program run. During payroll confirmation, Enterprise Payroll “marks” a bond as having been purchased (that is, when the employee’s deductions are sufficient to cover the cost of the bond). PAY016 selects all Bond Log records with status of “R” and prepares the report. It then sets the status to “distributed” (D) for each record selected.
The report identifies relevant information about co-owners and/or beneficiaries. It supplies a page break after each different bond denomination, and totals each denomination and all bonds purchased.
The Bond Purchase Report also prepares a Bond Purchase file (bondfile.out). Each transaction contains the fields shown in Table 13-1.
You can easily change this format to accommodate your particular interface requirements.
Purchasing U.S. savings bonds consists of the following:
• Generating the Bond Purchase Report
• Creating Federal Reserve Bank Files for Savings Bonds
Table 13-1. Fields for Each Transaction in Bond Purchase File
Item Number of Positions Comments
Denomination 5
No. of Bonds Purchased 3
Purchase Date 6 DDYYMM
Owner Name 30
Owner SSN 9
Other Registrant Name 30 Optional
Other Registrant SSN 9
Other Registrant Type 1 Optional
Chapter 13: Performing Monthly ProcessesPayroll Processing Guide Version 5.04.01

Purchasing U.S. Savings Bonds 13-17
Generating the Bond Purchase Report
You can run PAY016 (Savings Bond Report and File) to create a file that you can use to purchase bonds electronically.
To generate the Bond Purchase Report, do the following:
1. Click Payroll and make the following selections:
Periodic Payroll Processes ~ Monthly Processes
2. Double-click the Saving Bond Report and File (PAY016) task. The Savings Bond Report and File panel displays.
Figure 13-7. Savings Bond Report and File Panel
3. Select one of the options from the Cycle Option field to indicate whether you want the report to include payroll information for an on-cycle payroll, off-cycle payroll, or both.
4. Select the payroll run ID from the Pay Run ID field.
5. In the Page # fields, enter the page number range for the paysheet information you want included in the report.
6. If the payroll run ID includes multiple pay calendar entries, then you must select the company from the Company field, the pay group from the Pay Group field, and the pay period end date from the Pay End Date field.
Purchasing U.S. Savings Bonds
Generating the Bond Purchase Report
Creating Federal Reserve Bank Files for Savings Bonds
For a description of the fields on this panel, press F1.
Chapter 13: Performing Monthly ProcessesPayroll Processing Guide Version 5.04.01

13-18 Purchasing U.S. Savings Bonds
7. From the SSN Display Option field, select one of the following options to specify how you want Social Security Numbers to display:
• Hide xxx-xx-xxxx
• Mask xxx-xx-6789
• Show 123-45-6789
The options that are available for selection depend on the field display options selected
on the user’s security profile (System Admin ~ Security Administration ~ Operator ~ Profile). If the user profile is set to Hide, the option is grayed out when generating files. The process will automatically print the fields according to the user’s display setting. However, if the user is set to Show, the Display Option fields will be available and the user can choose to change the default of Hide to either Show or Mask. If the user is set to Mask, the Display Option fields will be available and the user can choose to change the default of Hide to Mask.For more information on the user Profile settings, see the Application Administrator’s Guide.
8. Click Run Report. You will receive a message notifying you that your process has been
submitted. Click OK. When the process has completed, click (Report Outputs) to view the report.
For additional information on running, viewing, and printing reports, refer to the Using ADP Enterprise HR Guide. For details on sources, sort order, and an illustration of the report, see the Standard Reports Guide.
You have just finished generating the Bond Purchase Report, PAY016.
Creating Federal Reserve Bank Files for Savings Bonds
With Enterprise Payroll, you can set up your Federal Reserve Bank information and then run PAY016B that generates a savings bond file in the required format published by the Federal Reserve Bank. You can send this file directly to the Federal Reserve Bank. For instructions on setting up your Federal Reserve Bank information, refer to the Payroll Setup and Maintenance Guide.
To build your Federal Reserve file, do the following:
1. Click Payroll and make the following selections:
Periodic Payroll Processes ~ Monthly Processes
Purchasing U.S. Savings Bonds
Generating the Bond Purchase Report
Creating Federal Reserve Bank Files for Savings Bonds
Chapter 13: Performing Monthly ProcessesPayroll Processing Guide Version 5.04.01

Purchasing U.S. Savings Bonds 13-19
2. Double-click the Savings Bond Report and FRB File (PAY016B) task. The Savings Bond Report and FRB File panel displays.
Figure 13-8. Savings Bond Report and FRB File Panel
3. Select the payroll run ID from the Pay Run ID field.
4. If the payroll run ID includes multiple pay calendar entries, then you must select the company from the Company field, the pay group from the Pay Group field, and the pay period end date from the Pay End Date field.
5. Select either diskette or tape from the Output Format area.
6. From the SSN Display Option field, select one of the following options to specify how you want Social Security Numbers to display:
• Hide xxx-xx-xxxx
• Mask xxx-xx-6789
• Show 123-45-6789
The options that are available for selection depend on the field display options selected
on the user’s security profile (System Admin ~ Security Administration ~ Operator ~ Profile). If the user profile is set to Hide, the option is grayed out when generating files. The process will automatically print the fields according to the user’s display setting. However, if the user is set to Show, the Display Option fields will be available and the user can choose to change the default of Hide to either Show or Mask. If the user is set to Mask, the Display Option fields will be available and the user can choose to change the default of Hide to Mask.For more information on the user Profile settings, see the Application Administrator’s Guide.
7. Click Run Report. You will receive a message notifying you that your process has been
submitted. Click OK. When the process has completed, click (Report Outputs) to view the frbfile.xxx file.
For a description of the fields on this panel, press F1.
Chapter 13: Performing Monthly ProcessesPayroll Processing Guide Version 5.04.01

13-20 Purchasing U.S. Savings Bonds
For additional information on running, viewing, and printing reports, refer to the Using ADP Enterprise HR Guide. For details on sources, sort order, and an illustration of the report, see the Standard Reports Guide.
You have just finished generating a savings bond file that you can send to the Federal Reserve Bank and generating a report that you can view and print.
Chapter 13: Performing Monthly ProcessesPayroll Processing Guide Version 5.04.01

Creating the ADP UCM Services Wage File 13-21
Creating the ADP UCM Services Wage File
ADP provides an optional UCM Service that processes your unemployment claims as well as audits/monitors changes to the state unemployment account(s). To provide this service, ADP must receive payroll wage history/earnings for your company for the past 18 months.
If you are using this service, this section provides step-by-step instructions for setting up your new hire information and running your bimonthly New Hire reports.
If you can run TAX816 to generate the necessary unemployment data and write it to a file. You should run this utility each time you process a payroll and then send the generated file to ADP.
Using unemployment claims consists of the following:
• Mapping the UCM Code and Earnings Code
• Generating the ADP UCM Service File
Mapping the UCM Code and Earnings Code
Before running your UCM reports, you must first map your company earnings codes and related earnings codes to a specific UCM code on a panel within Enterprise Payroll.
To map your earnings codes to a specific UCM code, do the following:
1. Click Payroll and make the following selections:
Periodic Payroll Processes ~ Monthly Processes
2. Click next to the Update UCM Wage Data task. The Add dialog box displays.
Figure 13-9. Add Dialog Box
To modify existing mappings, double-click the Update UCM Wage Data task, enter the
search criteria in the Search dialog box, and click OK. To preserve history, click (Insert Row).
3. Select the appropriate company from the Company field.
Creating the ADP UCM Services Wage File
Mapping the UCM Code and Earnings Code
Generating the ADP UCM Service File
Chapter 13: Performing Monthly ProcessesPayroll Processing Guide Version 5.04.01

13-22 Creating the ADP UCM Services Wage File
4. Enter the UCM company ID in the UCM Company ID field and click OK. The UCM Wage Data panel displays.
Figure 13-10. UCM Wage Data Panel
5. Select the UCM wage category you want to set up from the UCM Wage Category field.
6. Select the earnings type to which you want to link the UCM wage category from the Earnings Type field. By doing this, any employee assigned this earnings type will also fall into the specified UCM wage category.
7. To set up other UCM wage categories, click the scroll bar and click (Insert Row) to preserve history. Then select the appropriate UCM wage category and earnings type.
8. When you are finished, click (Save).
You have just finished mapping your earnings codes to a specific UCM code. You are now ready to generate your reports.
For a description of the fields on this panel, press F1.
Chapter 13: Performing Monthly ProcessesPayroll Processing Guide Version 5.04.01

Creating the ADP UCM Services Wage File 13-23
Generating the ADP UCM Service File
To generate the ADP UCM Service file, do the following:
1. Click Payroll and make the following selections:
Periodic Payroll Processes ~ Monthly Processes
2. Double-click the Create ADP UCM Service Wage File (TAX816) task. The ADP Unemployment Compensation Service Wage Data panel displays.
Figure 13-11. ADP Unemployment Compensation Service Wage Data Panel
3. Select the payroll run ID from the Pay Run ID field.
4. If you want to create separate output for individual diskettes, select the Separate Output for Individual Diskettes check box.
5. If you want this file to replace the existing UCM file, select the Replacement for Existing UCM File check box.
6. Click Run Report. You will receive a message notifying you that your process has been
submitted. Click OK. To confirm successful completion of your process, click (Process Monitor).
For additional information on using the Process Monitor, see the Using ADP Enterprise HR Guide.
Contact your ADP account manager for details on sending this file.
You have just finished generating the ADP UCM Service wage file.
Creating the ADP UCM Services Wage File
Mapping the UCM Code and Earnings Code
Generating the ADP UCM Service File
For a description of the fields on this panel, press F1.
Chapter 13: Performing Monthly ProcessesPayroll Processing Guide Version 5.04.01

13-24 Generating Monthly Summary Reports
Generating Monthly Summary Reports
Enterprise Payroll provides many monthly reports that you can view and print. This section provides an overview of each report (in numeric order) as well as step-by-step instructions for generating the report.
Refer to the Standard Reports Guide for details on sources, sort order, and an illustration of each report.
You can generate the following monthly reports:
• Generating the Payroll Balances Report (PAY030)
• Generating the Tax Summary (TAX010)
Generating the Payroll Balances Report (PAY030)
The Payroll Balances Report (PAY030) provides a monthly, quarterly, or yearly listing of employee balance data with or without employee detail for a particular company or all companies. In addition, it provides company-level totals for each earnings, tax, and deduction balances that will print at company breaks and the end of the report.
To run the Payroll Balances Report (PAY030), do the following:
1. Click Payroll and make the following selections:
Payroll Reports ~ Pay Cycle Reports
2. Double-click the Payroll Balances (PAY030) task. The Payroll Balances panel displays.
Figure 13-12. Payroll Balances Panel
Generating Monthly Summary Reports
Generating the Payroll Balances Report (PAY030)
Generating the Tax Summary (TAX010)
For a description of the fields on this panel, press F1.
Chapter 13: Performing Monthly ProcessesPayroll Processing Guide Version 5.04.01

Generating Monthly Summary Reports 13-25
3. Enter the year for which you want to review payroll balances in the Calendar Year field.
4. From the Report Type area, select one of the following options to specify the time period of the payroll data you want in the report:
• Yearly - Select to print the entire year of payroll data.
• Quarterly - Select to print payroll data for a specific quarter.
– If you select this option, the Quarter field displays so that you can select a quarter.
• Monthly - Select to print payroll data for a specific month.
– If you select this option, the Month field displays so that you can select a month.
5. If you want the report to include employee detail, select the Print Employee Detail check box.
6. Do one of the following to specify which companies you want payroll information included for:
• To include payroll information for all companies, select the Include All Companies check box.
• To include payroll information for specific company, select a company from the Company field.
7. Click Run Report. You will receive a message notifying you that your process has been
submitted. Click OK. When the process has completed, click (Report Outputs) to view the report.
For additional information on running, viewing, and printing reports, refer to the Using ADP Enterprise HR Guide. For details on sources, sort order, and an illustration of the report, see the Standard Reports Guide.
You’ve just finishing running PAY030 to generate the Payroll Balances Report that you can view and print.
Generating the Tax Summary (TAX010)
The Tax Summary (TAX010) summarizes, by jurisdiction, period-to-date income tax withheld, disability, Social Security and Medicare, and unemployment taxes at the federal, state, and local levels. You can run the report monthly or quarterly. For step-by-step instructions on running this report, see Chapter 7, “Generating the Tax Summary (TAX010).”
You’ve just finishing running TAX010 to generate the Tax Summary that you can view and print.
Generating Monthly Summary Reports
Generating the Payroll Balances Report (PAY030)
Generating the Tax Summary (TAX010)
Chapter 13: Performing Monthly ProcessesPayroll Processing Guide Version 5.04.01

13-26 Generating Monthly Summary Reports
Chapter 13: Performing Monthly ProcessesPayroll Processing Guide Version 5.04.01

Chapter 14
Performing Quarterly Processes
PAGE TOPIC
14-2 Introduction
14-3 Understanding Multi-Company and Multi-Work Site Reporting
14-4 Setting Up Multiple-Company Reporting
14-6 Setting Up Multiple Work-Site Reporting
14-8 Running Your Quarterly State Wage Reports
14-10 Generating Quarterly Summary Reports
14-23 Processing Quarterly Tax Data
Chapter 14: Performing Quarterly ProcessesPayroll Processing Guide Version 5.04.01

14-2 Introduction
Introduction
This chapter provides step-by-step instructions for tasks that you should complete on a quarterly basis, such as running quarterly state wage reports and running the Quarterly Tax Balance Audit report.
You can often complete a task in the product in multiple ways. For information on interface
shortcuts and tips, refer to the Using ADP Enterprise HR Guide.
As you work through the tasks in this chapter, you may have questions about fields and options on the panels. To display a description of the fields and options, press F1 (Help) from the panel.
Chapter 14: Performing Quarterly ProcessesPayroll Processing Guide Version 5.04.01

Understanding Multi-Company and Multi-Work Site Reporting 14-3
Understanding Multi-Company and Multi-Work Site Reporting
You can produce your State Unemployment Insurance (SUI) Quarterly Wage Reports on paper, magnetic media, or diskette format. You generally report on paper or on magnetic media depending on the number of employees in the state. Each state, plus the District of Columbia and Puerto Rico, has two SQRs: one for generating a paper report and one for generating a report on magnetic media. Not all states provide for diskette reporting, but where applicable, Enterprise Payroll supports diskette reporting as the preferred method. Below are the SUI Quarterly Wage Report SQRs:
• Paper reporting— TAX002xx.SQR
• Tape reporting— TAX810xx.SQR
• Diskette reporting— TAX811xx.SQR
xx is the state postal abbreviation.
Before running these reports, you must first set up the reporting information in Enterprise Payroll. In addition, you must also complete all payrolls for the quarter being reported, including any necessary adjustments.
Before running your quarterly state wage reports, make sure that you are familiar with your
state tax reporting requirements.
Enterprise Payroll supports multi-company or multi-work-site reporting for many states. Refer to Appendix B, “Multi-Company and Work-Site Reporting SQRs,” for a list of specific states that Enterprise Payroll supports.
For multiple-company reporting, you can combine all employees from multiple “divisions” or “companies” on one report if your company has more than one company in the same state that shares the identical FEIN and SEIN. If you set up your information correctly, the quarterly reporting programs automatically combine all employees from different “companies” with the same report company and federal Employer Identification Number (EIN) into one quarterly report.
For multiple work-site reporting, you can group employees together based on their work locations. In Enterprise Payroll, the UI report code controls how employees from different locations are grouped. To group multiple company/location combinations into a single “work-site”, you assign each to a common UI report code. Enterprise Payroll uses the UI report code values are as a sort/selection criteria for multiple work-site reporting.
Chapter 14: Performing Quarterly ProcessesPayroll Processing Guide Version 5.04.01

14-4 Setting Up Multiple-Company Reporting
Setting Up Multiple-Company Reporting
Before you run your quarterly reports for multi-company reporting, first verify that work-site reporting is disabled in the SQR. Then verify that your reporting information is set up correctly.
Setting up multiple-company reporting consists of the following:
• Verifying the SQR
• Verifying Tax Reporting Parameters
• Verifying State Unemployment Information
• Verifying Company Information
Verifying the SQR
In the SQR, verify that the #define PLANT_RPTG statement near the beginning of the SQR is set to N, the ADP Enterprise HR default.
You have just verified that the SQR is accurate. Next, verify tax reporting parameters.
Verifying Tax Reporting Parameters
You can verify your tax reporting parameters using the W-2 Reporting Parameters task. For step-by-step instructions, refer to the Year-End Tax Reporting Guide.
Verifying State Unemployment Information
You should verify the following state unemployment information on the State Tax Data panel using the State Tax Data task:
• In the Employer IDs area, verify that the company’s employer ID displayed in the State Unemployment field is correct for the company you are viewing.
• If you are processing quarterly state unemployment reports under multi-company rules, verify that the company’s employer ID displayed in the State Unemployment field is identical to the other “combined” companies.
• If your company is located in multiple states, verify the information for each state by going to the Search Results area and double-clicking the next state for your company.
For step-by-step instructions on this task, refer to the Payroll Setup and Maintenance Guide.
Setting Up Multiple-Company Reporting
Verifying the SQR
Verifying Tax Reporting Parameters
Verifying State Unemployment Information
Verifying Company Information
Chapter 14: Performing Quarterly ProcessesPayroll Processing Guide Version 5.04.01

Setting Up Multiple-Company Reporting 14-5
Verifying Company Information
You should verify the following company information on the W-2Company Data panel using the W-2 Company Data task.
• Verify that the date in the Calendar Year field is accurate.
• Verify that the EIN listed in the Federal EIN field is the employer ID for the company listed in the Reporting Co field.
• If applicable, verify additional federal EIN for the W-2 reporting company in the Other EIN field.
This second EIN does not display on the employee’s W-2. This field is for your internal
use only.
• If you are processing quarterly state unemployment reports under multi-company rules, verify that the W-2 reporting company listed in the Reporting Co field and the Federal EIN listed in the Federal EIN field are the same for all “combined” companies.
• For all companies within your organization that withheld third-party tax this year, verify the total amount in the Income Tax W/H field.
For step-by-step instructions on this task, refer to the Year-End Tax Reporting Guide.
You’ve just finished setting up multiple-company reporting.
Setting Up Multiple-Company Reporting
Verifying the SQR
Verifying Tax Reporting Parameters
Verifying State Unemployment Information
Verifying Company Information
Chapter 14: Performing Quarterly ProcessesPayroll Processing Guide Version 5.04.01

14-6 Setting Up Multiple Work-Site Reporting
Setting Up Multiple Work-Site Reporting
Setting up multiple work-site reporting consists of the following:
• Verifying the SQR
• Verifying Tax Reporting Parameters
• Verifying Data on the UI Report Codes Panel
Verifying the SQR
In the SQR, verify that the #define PLANT_RPTG statement near the beginning of the SQR is set to Y.
The ADP Enterprise HR default is N.
You’ve just finished verifying the SQR. Next, verify tax reporting parameters.
Verifying Tax Reporting Parameters
Information on this panel is already discussed in the section “Setting Up Multiple-Company Reporting.” For instructions, see “Verifying Tax Reporting Parameters” on page 14-6.
You’ve just finished verifying tax reporting parameters. Next, verify data on the UI Report Code panel.
Verifying Data on the UI Report Codes Panel
You verify the following work-site reporting data on the UI Report Codes panel:
• Verify that all locations of a company that should be combined as a single location in the work-site report have identical UI report codes.
• If your company has multiple UI report codes, verify the information for each code by going to the Search Results area and double-clicking the next UI report code for your company.
To access this panel, click Payroll and make the following selections from the Task Manager:
Periodic Payroll Processes ~ Quarterly Processes ~ Define Quarterly UI Report Codes
Setting Up Multiple Work-Site Reporting
Verifying the SQR
Verifying Tax Reporting Parameters
Verifying Data on the UI Report Codes Panel
Chapter 14: Performing Quarterly ProcessesPayroll Processing Guide Version 5.04.01

Setting Up Multiple Work-Site Reporting 14-7
For step-by-step instructions on the UI Report Codes panel, refer to the Payroll Setup and Maintenance Guide.
You’ve just finished verifying the information on the UI Report Codes panel, which is the last step in setting up multiple work-site reporting.
Chapter 14: Performing Quarterly ProcessesPayroll Processing Guide Version 5.04.01

14-8 Running Your Quarterly State Wage Reports
Running Your Quarterly State Wage Reports
When you run your reports using Enterprise Payroll, the format of output follows either “standard” ADP format or a format specifically outlined by the state.
When running your reports, some of the prompts may be state specific. Make sure that you are familiar with your state tax reporting requirements before you begin generating your reports. To run your SUI quarterly wage reports, do the following:
Access the SUI quarterly wage reports as follows:
1. Click Payroll and make one of the following selections, depending on the format you want your reports in:
Periodic Payroll Processes ~ Quarterly SUI (Diskette)
Periodic Payroll Processes ~ Quarterly SUI (Electronic)
Periodic Payroll Processes ~ Quarterly SUI (Magnetic Tape)
Periodic Payroll Processes ~ Quarterly SUI (Paper)
2. Select the task that runs the report for your specific state. The panel for your specific state displays.
3. Enter the necessary information in the fields.
4. Click Run Report. You will receive a message notifying you that your process has been
submitted. Click OK. When the process has completed, click (Report Outputs) to view the report.
For additional information on running, viewing, and printing reports, refer to the Using ADP Enterprise HR Guide. For details on sources, sort order, and an illustration of the report, see the Standard Reports Guide.
You’ve just finished your quarterly state wage reports. For basic troubleshooting information, refer to “Basic Troubleshooting” on page 14-9.
Chapter 14: Performing Quarterly ProcessesPayroll Processing Guide Version 5.04.01

Running Your Quarterly State Wage Reports 14-9
Basic Troubleshooting
Enterprise Payroll provides simple multi-company and worksite messages in its log when it cannot run the requested report.
Multi-Company Messages
Work-Site Messages
Message: If companies being combined do not have the identical federal EIN, processing stops and the following message is sent to the log:
“Warning - Company AAA uses same EIN as BBB but has a different W2 Reporting Company.”
where AAA and BBB indicate the company codes.
Action: Verify that all companies being combined have the same federal EIN entered on the W-2 Company panel (Payroll ~ Year-End Tax Reporting ~ Setup W-2 and 1099-R Data ~ Define W-2 Company Data) and on the Tax Data panel (Payroll ~ Company Definitions ~ Organization Definitions ~ Company).
Message: If companies being combined do not have the identical state unemployment account number, processing continues but the following message is sent to the log:
“Special Notice - Company AAA uses the same Federal EIN as BBB, but is set up with a different State Unemployment ID. Review the ID numbers set up for these companies. Correct if necessary, and run the SQR again.”
where AAA and BBB indicate the company codes.
Action: Verify that all companies being combined have the identical number listed in the State Unemployment field on the Basic Data panel (Payroll ~ Company Definitions ~ Company Specific Tax Data ~ State Tax Data).
Message: If a location does not have a UI code established, processing continues but a message is sent to the log:
“Warning - Company AAA Location BBB does not have an entry in the UI Report Code Table.”
where AAA indicates the company code and BBB indicates the location code.
In addition, the log will list employees at that location that are grouped together.
Action: Go to the UI Report Codes panel (Payroll ~ Periodic Payroll Processes ~ Quarterly Processes ~ Define Quarterly UI Report Codes) and enter the UI code for the company in the UI Report Code field.
Chapter 14: Performing Quarterly ProcessesPayroll Processing Guide Version 5.04.01

14-10 Generating Quarterly Summary Reports
Generating Quarterly Summary Reports
Enterprise Payroll provides many quarterly reports that you can view and print. This section provides an overview of each report (in numeric order) as well as step-by-step instructions for generating the report.
Refer to the Standard Reports Guide for details on sources, sort order, and an illustration of each report.
You can generate the following quarterly reports:
• Generating the Employee Earnings Record (PAY014)
• Generating the Payroll Balances Report (PAY030)
• Generating the Quarterly State Employee Wage Listing (TAX002)
• Generating the Quarterly Federal Tax Summary
• Generating the Quarterly State Tax Summary (TAX008)
• Generating the Tax Summary (TAX010)
• Generating the Quarterly Tax Balance Audit (TAX011)
• Generating the Ohio Local Tax Reconciliation Report (TAX012)
• Generating the Quarterly LIT Report (TAX015)
Generating the Employee Earnings Record (PAY014)
The Employee Earnings Record shows the quarterly earnings summary record for each employee selected from the personal data record. The report totals the columns for the quarter and also for the quarter-to-date and year-to-date.
To generate the Employee Earnings Record (PAY014), do the following:
1. Click Payroll and make the following selections:
Payroll Reports ~ Payroll Cycle Reports
Chapter 14: Performing Quarterly ProcessesPayroll Processing Guide Version 5.04.01

Generating Quarterly Summary Reports 14-11
2. Double-click the Employee Earnings Record (PAY014) task. The Employee Earnings Record panel displays.
Figure 14-1. Employee Earnings Record Panel
3. Enter the calendar year in the Calendar Year field.
4. From the Quarter field, select the quarter for which you want to generate the report.
5. From the Companies area, select one of the following:
• All companies - Select if you want the report to contain all companies.
• Selected companies - Select if you want to specify the companies you want included in the report.
– If you select this option, then select a specific company from the field. To add
multiple companies, click on the Companies scroll bar, and then click (Insert Row).
6. Click Run Report. You will receive a message notifying you that your process has been
submitted. Click OK. When the process has completed, click (Report Outputs) to view the report.
For additional information on running, viewing, and printing reports, refer to the Using ADP Enterprise HR Guide. For details on sources, sort order, and an illustration of the report, see the Standard Reports Guide.
You’ve just finishing running PAY014 to generate the Employee Earnings Record that you can view and print.
For a description of the fields on this panel, press F1.
Chapter 14: Performing Quarterly ProcessesPayroll Processing Guide Version 5.04.01

14-12 Generating Quarterly Summary Reports
Generating the Payroll Balances Report (PAY030)
Payroll Balances Report (PAY030) provides a monthly, quarterly, or yearly listing of employee balance data with or without employee detail for a particular company or all companies.
For step-by-step instructions on generating the Payroll Balances Report (PAY030), see “Generating the Payroll Balances Report (PAY030)” on page 13-24.
Generating the Quarterly State Employee Wage Listing (TAX002)
The Quarterly State Employee Wage Listing (TAX002) provides state unemployment wage listings in a general format for quarterly reporting and includes page and state totals.
To generate the Quarterly State Employee Wage Listing (TAX002), do the following:
1. Click Payroll and make the following selections:
Payroll Reports ~ Tax Reports
2. Double-click the Quarterly State Employee Wage Listing (TAX002) task. The Quarterly State Employee Wage Listing panel displays.
Figure 14-2. Quarterly State Employee Wage Listing Panel
3. Enter the calendar year in the Calendar Year field.
4. From the Quarter field, select the quarter for which you want to generate the report.
For a description of the fields on this panel, press F1.
Chapter 14: Performing Quarterly ProcessesPayroll Processing Guide Version 5.04.01

Generating Quarterly Summary Reports 14-13
5. From the SSN Display Option field, select one of the following options to specify how you want Social Security Numbers to display:
• Hide xxx-xx-xxxx
• Mask xxx-xx-6789
• Show 123-45-6789
The options that are available for selection depend on the field display options selected
on the user’s security profile (System Admin ~ Security Administration ~ Operator ~ Profile). If the user profile is set to Hide, the option is grayed out when generating files. The process will automatically print the fields according to the user’s display setting. However, if the user is set to Show, the Display Option fields will be available and the user can choose to change the default of Hide to either Show or Mask. If the user is set to Mask, the Display Option fields will be available and the user can choose to change the default of Hide to Mask.For more information on the user Profile settings, see the Application Administrator’s Guide.
6. From the Companies area, select one of the following:
• All companies - Select if you want the report to contain all companies.
• Selected companies - Select if you want to specify the companies you want included in the report.
– If you select this option, then select a specific company from the field. To add
multiple companies, click on the Companies scroll bar, and then click (Insert Row).
7. From the States area, select one of the following:
• All states - Select if you want the report to contain all states.
• Selected states - Select if you want to specify the states you want included in the report.
– If you select this option, then select a specific state from the field. To add multiple
states, click on the States scroll bar, and then click (Insert Row).
8. Click Run Report. You will receive a message notifying you that your process has been
submitted. Click OK. When the process has completed, click (Report Outputs) to view the report.
For additional information on running, viewing, and printing reports, refer to the Using ADP Enterprise HR Guide. For details on sources, sort order, and an illustration of the report, see the Standard Reports Guide.
You’ve just finishing running TAX002 to generate the Quarterly State Employee Wage Listing that you can view and print.
Chapter 14: Performing Quarterly ProcessesPayroll Processing Guide Version 5.04.01

14-14 Generating Quarterly Summary Reports
Generating the Quarterly Federal Tax Summary
The Quarterly Federal Tax Summary (TAX007) details for each employee quarter-to-date federal withholding, Social Security and Medicare, and unemployment taxes. It lists employees by Social Security Number and name. In addition, it provides page totals as well as company totals.
To generate the Quarterly Federal Tax Summary (TAX007), do the following:
1. Click Payroll and make the following selections:
Payroll Reports ~ Tax Reports
2. Double-click the Quarterly Federal Tax Summary (TAX007) task. The Quarterly Federal Tax Summary panel displays.
Figure 14-3. Quarterly Federal Tax Summary Panel
3. Enter the calendar year in the Calendar Year field.
4. From the Quarter field, select the quarter for which you want to generate the report.
Chapter 14: Performing Quarterly ProcessesPayroll Processing Guide Version 5.04.01

Generating Quarterly Summary Reports 14-15
5. From the SSN Display Option field, select one of the following options to specify how you want Social Security Numbers to display:
• Hide xxx-xx-xxxx
• Mask xxx-xx-6789
• Show 123-45-6789
The options that are available for selection depend on the field display options selected
on the user’s security profile (System Admin ~ Security Administration ~ Operator ~ Profile). If the user profile is set to Hide, the option is grayed out when generating files. The process will automatically print the fields according to the user’s display setting. However, if the user is set to Show, the Display Option fields will be available and the user can choose to change the default of Hide to either Show or Mask. If the user is set to Mask, the Display Option fields will be available and the user can choose to change the default of Hide to Mask.For more information on the user Profile settings, see the Application Administrator’s Guide.
6. From the Companies area, select one of the following:
• All companies - Select if you want the report to contain all companies.
• Selected companies - Select if you want to specify the companies you want included in the report.
– If you select this option, then select a specific company from the field. To add
multiple companies, click on the Companies scroll bar, and then click (Insert Row).
7. Click Run Report. You will receive a message notifying you that your process has been
submitted. Click OK.When the process has completed, click (Report Outputs) to view the report.
For additional information on running, viewing, and printing reports, refer to the Using ADP Enterprise HR Guide. For details on sources, sort order, and an illustration of the report, see the Standard Reports Guide.
You’ve just finishing running TAX007 to generate the Quarterly Federal Tax Summary that you can view and print.
Chapter 14: Performing Quarterly ProcessesPayroll Processing Guide Version 5.04.01

14-16 Generating Quarterly Summary Reports
Generating the Quarterly State Tax Summary (TAX008)
The Quarterly State Tax Summary (TAX008) summarizes employee quarter-to-date state withholding, disability, unemployment taxes, and weeks worked. It lists employees by Social Security Number and name. The report shows page totals as well as company totals.
To generate the Quarterly State Tax Summary (TAX008), do the following:
1. Click Payroll and make the following selections:
Payroll Reports ~ Tax Reports
2. Double-click the Quarterly State Tax Summary (TAX008) task. The Quarterly State Tax Summary panel displays.
Figure 14-4. Quarterly State Tax Summary Panel
The fields on this panel are identical to those on the Quarterly State Employee Wage Listing panel. For a description of these fields, press F1 or see page 14-12.
3. Enter the calendar year in the Calendar Year field.
4. From the Quarter field, select the quarter for which you want to generate the report.
Chapter 14: Performing Quarterly ProcessesPayroll Processing Guide Version 5.04.01

Generating Quarterly Summary Reports 14-17
5. From the SSN Display Option field, select one of the following options to specify how you want Social Security Numbers to display:
• Hide xxx-xx-xxxx
• Mask xxx-xx-6789
• Show 123-45-6789
The options that are available for selection depend on the field display options selected
on the user’s security profile (System Admin ~ Security Administration ~ Operator ~ Profile). If the user profile is set to Hide, the option is grayed out when generating files. The process will automatically print the fields according to the user’s display setting. However, if the user is set to Show, the Display Option fields will be available and the user can choose to change the default of Hide to either Show or Mask. If the user is set to Mask, the Display Option fields will be available and the user can choose to change the default of Hide to Mask.For more information on the user Profile settings, see the Application Administrator’s Guide.
6. From the Companies area, select one of the following:
• All companies - Select if you want the report to contain all companies.
• Selected companies - Select if you want to specify the companies you want included in the report.
– If you select this option, then select a specific company from the field. To add
multiple companies, click on the Companies scroll bar, and then click (Insert Row).
7. From the States area, select one of the following:
• All states - Select if you want the report to contain all states.
• Selected states - Select if you want to specify the states you want included in the report.
– If you select this option, then select a specific state from the field. To add multiple
states, click on the States scroll bar, and then click (Insert Row).
8. Click Run Report. You will receive a message notifying you that your process has been
submitted. When the process has completed, click (Report Outputs) to view the report.
For additional information on running, viewing, and printing reports, refer to the Using ADP Enterprise HR Guide. For details on sources, sort order, and an illustration of the report, see the Standard Reports Guide.
You’ve just finishing running TAX008 to generate the Quarterly State Tax Summary that you can view and print.
Chapter 14: Performing Quarterly ProcessesPayroll Processing Guide Version 5.04.01

14-18 Generating Quarterly Summary Reports
Generating the Tax Summary (TAX010)
The Tax Summary (TAX010) summarizes, by jurisdiction, period-to-date income tax withheld, disability, Social Security and Medicare, and unemployment taxes at the federal, state, and local levels. You can run the report monthly or quarterly.
For step-by-step instructions on generating the Tax Summary (TAX010), see Chapter 7, “Generating the Tax Summary (TAX010).”
You’ve just finishing running TAX010 to generate the Tax Summary that you can view and print.
Generating the Quarterly Tax Balance Audit (TAX011)
For each tax class and tax jurisdiction, the Quarterly Tax Balance Audit (TAX011) compares employee quarter-to-date tax balances with the sum of tax detail records from each payroll run. You can use this report to verify that Enterprise Payroll computations are correct for these balances after each payroll confirmation.
For step-by-step instructions on generating the Quarterly Tax Balance Audit (TAX011), see “Generating the Quarterly Tax Balance Audit (TAX011)” on page 7-34.
You’ve just finishing running TAX011 to generate the Quarterly Tax Balance Audit that you can view and print.
Generating the Ohio Local Tax Reconciliation Report (TAX012)
Ohio Local Tax Reconciliation report provides the information you need to complete the Ohio Form W-3 and local variations. For each taxing locality, the report lists employee counts, taxable gross amount, and tax withheld. It also lists employees paying resident and non-resident taxes separately, providing a total for each.
In addition, the report also shows taxes withheld for residents working in other taxing jurisdictions. Ohio taxing authorities apply credit for work tax paid to the residence tax liability (up to the rate of the residence tax). The report lists these work credits by locality name and includes the work tax rate and shows an asterisk next to the work tax rate if it exceeds the residence locality rate. In this case, Enterprise Payroll calculates the credit based on the residence rate.
A summary line includes: total taxable gross for the locality, calculated tax based on the residence tax rate, actual tax withheld, total credit amount, and sum of actual tax withheld and credits. The calculated tax should be within pennies of the withheld tax and credits.
Chapter 14: Performing Quarterly ProcessesPayroll Processing Guide Version 5.04.01

Generating Quarterly Summary Reports 14-19
To run the Ohio Local Tax Reconciliation report (TAX012), do the following
1. Click Payroll and make the following selections:
Payroll Reports ~ Tax Reports
2. Double-click the Ohio Local Tax Reconciliation (TAX012) task. The Ohio Local Tax Reconciliation panel displays.
Figure 14-5. Ohio Local Tax Reconciliation Panel
3. Enter the year for which you want to report information in the Year field.
4. In the Report Type area, select one of the following options to indicate if you want a monthly report or a quarterly report:
• Monthly - Select if you want the report to provide monthly information.
– If you select this option, select the month from the Month field.
• Quarterly - Select if you want the report to provide quarterly information.
– If you select this option, select the quarter from the Quarter field.
5. Click Run Report. You will receive a message notifying you that your process has been
submitted. Click OK. When the process has completed, click (Report Outputs) to view the report.
For additional information on running, viewing, and printing reports, refer to the Using ADP Enterprise HR Guide. For details on sources, sort order, and an illustration of the report, see the Standard Reports Guide.
For a description of the fields on this panel, press F1.
Chapter 14: Performing Quarterly ProcessesPayroll Processing Guide Version 5.04.01

14-20 Generating Quarterly Summary Reports
You’ve just finishing running TAX014 to generate the Ohio Local Tax Reconciliation report that you can view and print.
Generating the Quarterly LIT Report (TAX015)
The Quarterly LIT - Employee Detail report provides quarter-to-date employee detail information including the taxable gross amount and tax withheld for taxing localities. It lists the employees paying resident and non-resident taxes separately and provides a total for each.
To run the Quarterly LIT - Employee Detail report (TAX015), do the following
1. Click Payroll and make the following selections:
Periodic Payroll Processes ~ Quarterly Processes
2. Double-click the Quarterly LIT - Employee Detail (TAX015) task. The Quarterly LIT - Employee Detail panel displays.
Figure 14-6. Quarterly LIT - Employee Detail Panel
3. Enter the calendar year in the Calendar Year field.
4. From the Quarter field, select the quarter for which you want to generate the report.
For a description of the fields on this panel, press F1.
Chapter 14: Performing Quarterly ProcessesPayroll Processing Guide Version 5.04.01

Generating Quarterly Summary Reports 14-21
5. From the SSN Display Option field, select one of the following options to specify how you want Social Security Numbers to display:
• Hide xxx-xx-xxxx
• Mask xxx-xx-6789
• Show 123-45-6789
The options that are available for selection depend on the field display options selected
on the user’s security profile (System Admin ~ Security Administration ~ Operator ~ Profile). If the user profile is set to Hide, the option is grayed out when generating files. The process will automatically print the fields according to the user’s display setting. However, if the user is set to Show, the Display Option fields will be available and the user can choose to change the default of Hide to either Show or Mask. If the user is set to Mask, the Display Option fields will be available and the user can choose to change the default of Hide to Mask.For more information on the user Profile settings, see the Application Administrator’s Guide.
6. From the Companies area, select one of the following:
• All companies - Select if you want the report to contain all companies.
• Selected companies - Select if you want to specify the companies you want included in the report.
– If you select this option, then select a specific company from the Company field. To add multiple companies, click on the Companies scroll bar, and then click
(Insert Row).
7. From the States/Localities area, select one of the following:
• All States/All Localities - Select if you want the report to contain all states and localities.
• Selected State/All Localities- Select if you want all localities for one specific state included in the report.
– If you select this option, then select a specific state from the State field.
• Selected Locality- Select if you want to specify one locality to include in the report.
– If you select this option, then select a specific state from the State field and a specific locality from the Locality field.
8. Click Run Report. You will receive a message notifying you that your process has been
submitted. Click OK. When the process has completed, click (Report Outputs) to view the report.
For additional information on running, viewing, and printing reports, refer to the Using ADP Enterprise HR Guide. For details on sources, sort order, and an illustration of the report, see the Standard Reports Guide.
Chapter 14: Performing Quarterly ProcessesPayroll Processing Guide Version 5.04.01

14-22 Generating Quarterly Summary Reports
You’ve just finishing running TAX015 to generate the Quarterly LIT Report that you can view and print.
Chapter 14: Performing Quarterly ProcessesPayroll Processing Guide Version 5.04.01

Processing Quarterly Tax Data 14-23
Processing Quarterly Tax Data
The Quarterly Detail file contains company and employee wage and tax detail as calculated for the calendar quarter just ended. The Quarterly Detail file must be created and forwarded to ADP before ADP’s tax quarter closes. Contact your ADP TAXServices Account Manager for specific date requirements. The Quarterly Detail file must be created and forwarded sometime between the beginning of the new quarter and the 8th or 10th of the first month of the new quarter, preferably as soon as you consider the previous quarter closed including any adjustments that must be made to the quarter’s balances.
Clients that have their taxes filed by ADP TAXServices will receive a warning message during
the Payroll Confirmation process if they have not processed their Quarterly Detail file before confirming a payroll.
When executed, the Tax Service Quarter Detail File program (TAX812) determines the processing quarter from the W-2 Transmittal Data panel (Payroll ~ Periodic Payroll Processes ~ Quarterly Processes ~ Establish Quarter Code to Report). In general, the program is run to create a file for all employees in Enterprise Payroll companies that subscribe to ADP TAXServices. However, a program option allows you to create a file for a single company.
The company is set up as a W-2 reporting or 1099-R reporting company on the Tax and
Interface Data panel (Payroll ~ Company Definitions ~ Organization Definitions ~ Company).
The program creates a single file regardless of the number of tax companies defined for the organization. The file header and trailer records are file-specific but not tax company-specific. The client header records within the file are generated for each tax filing company within the CSS-defined organization. All data records are developed according to the ADP tax filing service’s file specifications. The generated file contains all active companies, even if a company does not have a tax balance.
The Tax Service Quarter Detail File program uses the data that has been recorded to the Tax Form Definition panel (Payroll ~ Year-End Tax Reporting ~ Setup W-2 and 1099-R Data ~ Establish Tax Form Definitions). This panel must reflect any special user-assigned earnings and deduction data which are calculated and printed in special boxes of the W-2 (such as deferred compensation and dependent care benefits).
Your ADP TAXServices Account Manager will provide details regarding the file medium and
shipment to ADP.
Processing quarterly tax data consists of the following:
• Establishing the Year and Quarter to Be Run
• Generating the Quarterly Detail File
• Transmitting Quarterly Files
• Viewing Quarterly Detail File Details
• Processing End-of-Quarter Adjustments
Chapter 14: Performing Quarterly ProcessesPayroll Processing Guide Version 5.04.01

14-24 Processing Quarterly Tax Data
Establishing the Year and Quarter to Be Run
For step-by-step instructions on establishing the year and quarter of the file you are going to run, refer to the Year-End Tax Reporting Guide. You will use the following path:
Periodic Payroll Processes ~ Quarterly Tax Service Processes ~ Establish Quarter Code to Report
You’ve just established the year and quarter of the file you are going to run. Next, run the Tax Service Quarter Detail File (TAX812).
Generating the Quarterly Detail File
The Quarterly Detail File program produces a control report that indicates the file sequence number, company codes, payroll data associated with the file, and record counts. The generated file contains all active companies, even if a company does not have a tax balance.
To run the Quarterly Detail File, do the following:
1. Click Payroll and make the following selections:
Periodic Payroll Processes ~ Quarterly Tax Service Processes
2. Click next to the Build Quarterly Tax Service File (TAX812) task. The Add dialog box displays.
Figure 14-7. Add Dialog Box
To modify existing Quarterly Tax File parameters, double-click the Build Quarterly Tax
Service File (TAX812) task, enter the search criteria in the Search dialog box, and click
OK. To preserve history, click (Insert Row).
Processing Quarterly Tax Data
Establishing the Year and Quarter to Be Run
Generating the Quarterly Detail File
Transmitting Quarterly Files
Viewing Quarterly Detail File Details
Processing End-of-Quarter Adjustments
Chapter 14: Performing Quarterly ProcessesPayroll Processing Guide Version 5.04.01

Processing Quarterly Tax Data 14-25
3. Enter a run control ID in the Run Control ID field and click OK. The File Creation panel displays.
Figure 14-8. File Creation Panel
4. Select one of the following options from the Selection Criteria area to indicate which tax companies you want included in your file:
• All Tax Service Companies - Select to include all companies in the report.
• Selected Tax Service Companies - Select to specify which companies you would like included in the report.
– If you select this option, select a company code from the Tax Service Company Code field.
To include multiple company codes in your file, click (Insert Row) and select
another company code.
• Selected Employees - Select to specify which employees you would like included in the report.
This option is for client balancing purposes only. Quarterly tax files created for
selected employees should not be sent for processing to ADP TAXServices.
– If you select this option, select an employee from the Employee ID field.
To include multiple employees in your file, click (Insert Row) and select
another employee.
5. Select the Include Tax Information for International Employees check box if you want to include tax information for international employees in the file.
For a description of the fields on this panel, press F1.
Chapter 14: Performing Quarterly ProcessesPayroll Processing Guide Version 5.04.01

14-26 Processing Quarterly Tax Data
6. If you have employees living or working in Puerto Rico, click the Territories tab. If not, proceed to step 11.
Figure 14-9. Territories Panel
7. Select the Include Tax Information for Employees Living or Working in Puerto Rico check box if you want to include tax information for employees living or working in Puerto Rico in the file.
8. If you selected to include tax information for employees living or working in Puerto Rico, then you may choose plan type, deduction code, and deduction class from the Pension Annuity area.
To include multiple annuity plans in your file, click (Insert Row).
9. If you selected to include tax information for employees living or working in Puerto Rico, then you may choose plan type, deduction code, and deduction class from the Retirement Fund area.
To include multiple retirement funds in your file, click (Insert Row).
For a description of the fields on this panel, press F1.
Chapter 14: Performing Quarterly ProcessesPayroll Processing Guide Version 5.04.01

Processing Quarterly Tax Data 14-27
10. Click the Report Options tab.
Figure 14-10. Report Options Panel
11. If your company offers an employee-paid health savings account, select a plan type, deduction code, and class from the YTD Employee Paid Health Savings Account area.
12. From the Exercised Stock Options area, select the earnings type associated with the stock option from the Earnings Type field.
To include multiple earnings, click (Insert Row) and select another earning
type.
13. From the State Stock Options area, select the earnings type associated with the state stock option in the Earnings Type field.
To include multiple earnings, click (Insert Row) and select another earning
type.
14. From the Local Stock Options area, select the earnings type associated with the local stock option in the Earnings Type field.
To include multiple earnings, click (Insert Row) and select another earning
type.
15. Click Run Report. You will receive a message notifying you that your process has been
submitted. When the process has completed, click (Report Outputs) to view the report.
For additional information on running, viewing, and printing reports, refer to the Using ADP Enterprise HR Guide. For details on sources, sort order, and an illustration of the report, see the Standard Reports Guide.
For a description of the fields on this panel, press F1.
Chapter 14: Performing Quarterly ProcessesPayroll Processing Guide Version 5.04.01

14-28 Processing Quarterly Tax Data
You’ve just run the Quarter Detail File (TAX812). Next, transmit your quarterly files.
Transmitting Quarterly Files
Before you can transmit your quarterly files, you must contact your ADP TAXServices Account Manager to obtain software and telephone numbers you need to transfer the tax files.
Refer to the National Accounts Tax Service Client Workstation User’s Guide for specific instructions on running the ADP Tax Service File Transfer program.
You’ve just transmitted your quarterly files. Next, view Quarterly Detail File details.
Viewing Quarterly Detail File Details
The Quarterly File List panel may be used to display data associated with the creation of the Quarterly Detail files. This panel is display-only and provides the sequence numbers assigned to these files and their creation date.
To view Quarterly Detail File details, do the following:
1. Click Payroll and make the following selections:
Periodic Payroll Processes ~ Quarterly Tax Service Processes
2. Double-click the View Quarterly Tax Service File List task. The Search dialog box displays.
Figure 14-11. Search Dialog Box
3. Enter the ADP company code in the ADP Company Code field.
Processing Quarterly Tax Data
Establishing the Year and Quarter to Be Run
Generating the Quarterly Detail File
Transmitting Quarterly Files
Viewing Quarterly Detail File Details
Processing End-of-Quarter Adjustments
Chapter 14: Performing Quarterly ProcessesPayroll Processing Guide Version 5.04.01

Processing Quarterly Tax Data 14-29
4. Enter the year in which you transmitted the file in the Calendar Year field and click OK. The Quarterly File List panel displays.
Figure 14-12. Quarterly File List Panel
5. Review the following details of the quarterly file generation:
• Tax Service Company Code - Displays the tax service company code.
• FEIN - Displays the Federal Employer Identification Number.
• Calendar Year - Displays the year in which the Quarterly Detail file was processed.
• Quarterly Detail Files - This area displays details about the Quarterly Detail file.
• Seq # - Displays the file sequence number which has been uniquely assigned to this Quarterly Detail file.
• Quarter - Displays the calendar quarter code (1-4) of the quarter for which this file contains data.
• Generation Date - Displays the date that the file was actually created by Enterprise Payroll.
6. When you are finished, click (Close).
You’ve just viewed Quarterly Detail File details on the Quarterly File List panel. Next, you may need to process end-of-quarter adjustments.
For a description of the fields on this panel, press F1.
Chapter 14: Performing Quarterly ProcessesPayroll Processing Guide Version 5.04.01

14-30 Processing Quarterly Tax Data
Processing End-of-Quarter Adjustments
The successful use of Enterprise Payroll with respect to tax filing requires what may be a change in the way that clients are accustomed to doing their quarter-end adjustments. It is a design requirement of Enterprise Payroll that all adjustments to a month, quarter, or year be performed before the first confirmed payroll of the next month, quarter, or year. The use of the “off-cycle” concept has been used to include prior period adjustments associated with the first on-cycle payroll of the next period. By identifying the adjustments as being “off-cycle” and running the off-cycle calculation and confirm processes before the confirm of the on-cycle (which is required by Enterprise Payroll), those prior period adjustments are processed before the first new period on-cycle confirm. However, those adjustments are then associated with the on-cycle pay run ID.
For most implementations, a different procedure needs to be applied for the end of period adjustments, similar to the process some clients currently use at year end.
This section will refer to quarter end processing, but the same technique can be applied at
year end and, if desired, at month end.
It is a common practice in payroll systems that adjustments arising from errors in a previous period may be corrected in the current period. The implementation of ADP TAXServices does not impact this process. In fact, it cannot discern that this type of correction has occurred if the transactions are dated in the current period. Sometimes you must correct balances that were previously erroneously created. Accomplishing this would ideally occur throughout the quarter but often is deferred until near the end of the quarter, even following the final regular payroll of the period.
For Enterprise Payroll, these adjustments can be deferred until the end of the quarter, although it is not advised. If the adjustments are deferred, the (new) procedure for processing those adjustments requires that a special on-cycle payroll be established for the purpose of making these adjustments. The dates associated with a new on-cycle payroll must include a unique pay period end date and check issue date in the third month of the ending quarter. The check date causes all balance updates to occur to the correct quarter. The pay period end date must be unique for the company/pay group calendar records. Since that date is irrelevant in the processing of adjustments, it may be dated any day of the month where regular pay period ends do not occur.
All transactions entered to this new on-cycle payroll are created through the process of adding a paysheet. This pay cycle is then processed as an on-cycle payroll. For ADP TAXServices subscribers, the Employer Payroll (daily) file build and transmission programs are then invoked as for all on-cycle payrolls. The adjustments are then segregated into their own daily file, apart from activity for the next quarter. This is a requirement for ADP TAXServices.
The Tax Service Quarter Detail File report (TAX812) can then be run for ADP TAXServices subscribers. See “Generating the Quarterly Detail File” on page 14-24. The Quarterly Detail file must be built before the confirmation of the first pay cycle of the new quarter.
You’ve just finished processing end-of-quarter adjustments, which is the last step in processing ADP TAXServices Interface quarterly data.
Processing Quarterly Tax Data
Establishing the Year and Quarter to Be Run
Generating the Quarterly Detail File
Transmitting Quarterly Files
Viewing Quarterly Detail File Details
Processing End-of-Quarter Adjustments
Chapter 14: Performing Quarterly ProcessesPayroll Processing Guide Version 5.04.01

Chapter 15
Performing Annual Processes
PAGE TOPIC
15-2 Introduction
15-3 Creating a Pay Calendar
15-16 Assigning a Pay Run ID to a Pay Calendar
15-21 Defining a Holiday Schedule
15-22 Using the Archive/Delete/Restore/Convert Program
15-34 Preparing for Year-End Processing
Chapter 15: Performing Annual ProcessesPayroll Processing Guide Version 5.04.01

15-2 Introduction
Introduction
This chapter provides step-by-step instructions for tasks that you should complete on a annual basis, such as creating a payroll calendar and holiday schedule.
You can often complete a task in the product in multiple ways. For information on interface
shortcuts and tips, refer to the Using ADP Enterprise HR Guide.
As you work through the tasks in this chapter, you may have questions about fields and options on the panels. To display a description of the fields and options, press F1 (Help) from the panel.
Chapter 15: Performing Annual ProcessesPayroll Processing Guide Version 5.04.01

Creating a Pay Calendar 15-3
Creating a Pay Calendar
Two types of processing are associated with a pay calendar:
• On-cycle processing - the normal, scheduled payroll processing for a pay group and pay period.
• Off-cycle processing - consists of recording manual checks, on-demand checks calculated and issued during this period, and reversals processed during this period. Off-cycle processing is any other payroll activity that deviates from the norm.
You can build your pay calendar in one of two ways:
• Building Pay Calendars Automatically
• Building Pay Calendars Manually
Building pay calendars automatically is the recommended option since it simplifies the process. However, if your pay periods are not on a scheduled basis or if you are processing an off-cycle run (for example, bonus payment), building the pay calendar manually is the option to choose.
Using Pay Calendars and a Pay Run ID with Pay Groups
With the Payroll Calendar task, you schedule payroll cycles for your pay groups by entering information about pay periods begin and end, and pay run IDs.
Each entry on the Payroll Calendar panel corresponds to a specific pay period—defined by its begin and end dates—for a pay group. So a monthly pay group would have 12 entries in the Payroll Calendar panel, representing one year of processing.
You group pay calendar entries from different pay groups together for processing, using a pay run ID. This pay run ID is set up using the Payroll Run ID task (Payroll ~ Company Definitions ~ Earnings and Special Accumulators). You must assign the pay calendar entry a run ID to process a payroll. Generally, all pay calendar entries that share a pay run ID have the same pay end date and check date, but not necessarily the same pay frequency. Typically, you set up a different pay run ID for each pay period end date using the Payroll Calendar task (Payroll ~ Company Definitions ~ Earnings and Special Accumulators).
For example, if you have a semimonthly and a monthly pay calendar, you can process both calendar entries together for the month-end run because they have the same pay period end date. Your own processing schedule determines which groups can or cannot be grouped together.
Creating a Pay Calendar
Using Pay Calendars and a Pay Run ID with Pay Groups
Setting up employees with a Non-standard Number of Pays
Building Pay Calendars Automatically
Building Pay Calendars Manually
Deleting a Pay Calendar
Chapter 15: Performing Annual ProcessesPayroll Processing Guide Version 5.04.01

15-4 Creating a Pay Calendar
Setting up employees with a Non-standard Number of Pays
You can create calendars for fragmented periods of time or for less than a full year. If you selected the Non-Standard Number of Pay Periods option on the pay group level, the Pay Periods Per Year field on the Create Payroll Calendars panel will become active and you can change the number of pay periods. You can then enter another Pay Period End Date. The result will be two “sets” of calendars. Otherwise the Pay Periods Per Year field will remain grayed for pay groups processing on a normal schedule.
Building Pay Calendars Automatically
Use the Create Payroll Calendars panel to run the calendar process automatically, which builds the pay calendar entries for all or part of a year.
Each time you run the Pay Calendar Build process, Enterprise Payroll deletes the run control data from the current run. Therefore, whenever you need to rerun the process, you must recreate the run control data on this panel.
Building a pay calendar automatically consists of the following tasks:
• Building the Pay Calendar
• Reviewing Error Messages and Warnings
• Printing Pay Calendar Information
Building the Pay Calendar
To build the pay calendar, do the following:
1. Click Payroll and make the following selections:
Periodic Payroll Processes ~ Annual Processes
Example:
Pay Period End Date = 1/31/2006 and Number of Calendars per Year = 5 will create calendars from January to May
Pay Period End Date = 8/31/2006 and Number of Calendars per Year = 5 will create calendars from August to December
Creating a Pay Calendar
Using Pay Calendars and a Pay Run ID with Pay Groups
Setting up employees with a Non-standard Number of Pays
Building Pay Calendars Automatically
Building Pay Calendars Manually
Deleting a Pay Calendar
Chapter 15: Performing Annual ProcessesPayroll Processing Guide Version 5.04.01

Creating a Pay Calendar 15-5
2. Double-click the Create Payroll Calendars task. The Create Payroll Calendars panel displays.
Figure 15-1. Create Payroll Calendars Panel
3. Enter an ID that uniquely identifies this run in the Batch Run ID field.
4. Select the company for which you want to build a pay calendar in the Company field.
5. Select the pay group for which you want to build a pay calendar in the Pay Group field and press Tab.
Enterprise Payroll automatically populates the Pay Periods Per Year field. In addition, if the pay group is set up for a non-standard number of pay periods, additional fields display as shown:
Figure 15-2. Create Payroll Calendars Panel
For a description of the fields on this panel, press F1.
For a description of the fields on this panel, press F1.
Chapter 15: Performing Annual ProcessesPayroll Processing Guide Version 5.04.01

15-6 Creating a Pay Calendar
6. If necessary, change the number of pay periods per year displayed in the Pay Periods Per Year field.
7. In the Initial Pay Period End Date field, enter the pay period end date of the first pay period for the calendar year. The Build Calendar program will use this date to determine the subsequent end dates.
8. In the Days from Pay Period End Date to Check Date field, enter the usual number of days (plus or minus) from the pay period end date to the check issue date.
Should the check date fall on a holiday or weekend day, Enterprise Payroll automatically
searches backwards on the calendar to find the first workday before the holiday or weekend day to issue checks.
For example, if your biweekly pay group is always paid on the Friday following the pay period end occurring on Sunday, then the value of this field would be 5. If your semimonthly pay dates equal the pay period end date, then the value of this field would be 0.
9. If the pay group is set up for a non-standard number of pay periods, do the following:
These fields do not display on the panel unless the Non-Standard Number of Pay
Periods check box is selected on the Basic Pay Group Data panel (Company Definitions ~ Pay Groups and Payroll Calendars ~ Pay Groups).
a. Enter the number of pay calendars (first set) in the first Number of Pay Calendars field.
The total number of pay calendars cannot exceed the number of pay periods per
year.
b. Enter the pay period end date of the next set of pay calendars in the Subsequent Pay Period End Date field.
c. Enter the number of pay calendars (second set) in the second Number of Pay Calendars field.
The total number of pay calendars cannot exceed the number of pay periods per
year.
10. If the pay group is set up for FLSA processing with any FLSA averaging other than weekly or bi-weekly, enter an end date for the first work period in the FLSA Work Period End Date field.
This field does not display on the panel unless FLSA processing is set up for 14, 21, or
28 days on the Basic Pay Group Data panel (Company Definitions ~ Pay Groups and Payroll Calendars ~ Pay Groups).
11. Click (Save).
Chapter 15: Performing Annual ProcessesPayroll Processing Guide Version 5.04.01

Creating a Pay Calendar 15-7
12. Click Run Calendar Build. You will receive a message notifying you that your process has been submitted. Click OK. To confirm successful completion of your process, click
(Process Monitor).
For additional information on using the Process Monitor, see the Using ADP Enterprise HR Guide.
The Build Calendar program does not automatically assign values to pay run ID, accrual
percent, and reverse accrual. After you run the Build Calendar program, you need to complete the appropriate fields on the Payroll Calendar panel before you start running your payroll. Although accrual percent and reverse accrual are optional, all pay calendars must have a pay run ID prior to running the payroll. To review error messages generated from the build calendar program, see “Reviewing Error Messages and Warnings” on page 15-7.
You have just finished the building the payroll calendar automatically. Next, you can review any error messages you received.
Reviewing Error Messages and Warnings
Enterprise Payroll provides several ways you can view your error messages and warnings. For detailed information, refer to “Reviewing Error Messages and Warnings” on page 6-8.
You’ve just finished reviewing error messages generated during payroll calendar creation. Next, print the pay calendar information.
Printing Pay Calendar Information
To print your pay calendar definitions by running PAY714, click Payroll and make the following selections:
Payroll Reports ~ Payroll Definitions ~ Payroll Calendar Definitions (PAY714)
No input is required for this report. For specific instructions on running, viewing, and printing reports, refer to the Using ADP Enterprise HR Guide. See the Standard Reports Guide for details on sources, sort order, and an illustration of the report.
You’ve just finishing running PAY714 to generate the report that you can view and print. This is the last step in creating a pay calendar.
Chapter 15: Performing Annual ProcessesPayroll Processing Guide Version 5.04.01

15-8 Creating a Pay Calendar
Building Pay Calendars Manually
If you choose to build the pay calendar manually, use the Payroll Calendar task for each calendar entry you need to add. You must have a calendar entry for every pay period for each pay group you set up.
After you have built a pay calendar,
For instructions on printing pay calendar information, see “Printing Pay Calendar
Information,” on page 15-7.
Building the calendar
To build pay calendars manually, do the following:
1. Select Payroll and make the following selections.
Periodic Payroll Processes ~ Annual Processes
2. Click next to the Payroll Calendar task. The Add dialog box displays.
Figure 15-3. Add Dialog Box
To modify an existing payroll calendar, double-click the Payroll Calendar task, enter the
search criteria in the Search dialog box, and click OK. To preserve history, click (Insert Row).
3. Enter the company in the Company field.
4. Enter the pay group in the Pay Group field.
Creating a Pay Calendar
Using Pay Calendars and a Pay Run ID with Pay Groups
Setting up employees with a Non-standard Number of Pays
Building Pay Calendars Automatically
Building Pay Calendars Manually
Deleting a Pay Calendar
Chapter 15: Performing Annual ProcessesPayroll Processing Guide Version 5.04.01

Creating a Pay Calendar 15-9
5. Enter the pay period end date in the Pay Period End Date field and click OK. The Payroll Calendar panel displays.
If the pay group has FLSA averaging assigned to it, the FLSA information displays in the
FLSA area.
Figure 15-4. Payroll Calendar Panel
6. Enter the pay period begin date in the Pay Period Begin Date field.
7. In the Paycheck Issue Date field, enter the date to display on the employee's paycheck or advice slip and press Tab. The calendar year, quarter and month for the paycheck/advice displays in the Check Issue area.
8. For weekly FLSA pay groups, do the following:
a. Enter the two-digit number of the week in the 1st Week Number field. For example, if the week ends on January 14 then enter 02.
b. In the 1st Week Ending Date field, enter the date the first week pay period ends.
If the FLSA Average is set to None on the Basic Pay Group Data panel, these fields will
be grayed and unavailable.
9. For biweekly FLSA pay groups, do the following:
a. Enter the two-digit number of the first week of the pay period in the 1st Week Number field.
b. In the 1st Week Ending Date field, enter the date the first week pay period ends.
c. Enter the two-digit number of the second week of the pay period in the 2nd Week Number field. For example, if the week ends on January 21 then enter 03.
For a description of the fields on this panel, press F1.
Chapter 15: Performing Annual ProcessesPayroll Processing Guide Version 5.04.01

15-10 Creating a Pay Calendar
d. In the 2nd Week Begin Date field, enter the date the second week pay period begins.
If the FLSA Average is set to None on the Basic Pay Group Data panel, these fields will
be grayed and unavailable.
10. Select the pay run ID from the Pay Run ID field.
Each payroll run requires a pay run ID to determine what pay group(s) it should process. Enterprise Payroll processes all pay calendar entries with the same run ID at the same time.
All payroll calendars attached to the identical run ID must share the same FLSA average
type.
11. In the Weeks in this Period field, enter the number of weeks based on the number of Wednesdays in the pay period.
12. Select from the Pay Period of the Month field the pay period to which earnings, deductions and taxes are assigned for this calendar entry and press Tab. Enterprise Payroll automatically populates the Pay Periods Per Year field.
The pay period is determined from the paycheck issue date. When you create paysheets, Enterprise Payroll looks to see if the pay period for additional pay matches the pay period being processed, then adds the additional pay to the paysheet. During pay calculation, if the pay period for a deduction matches the pay period being processed, Enterprise Payroll takes the deduction from the gross pay.
13. In the Accrual Percent field, enter a percentage that Enterprise Payroll should use to adjust accrual totals for the General Ledger interface. This percentage handles pay periods that overlap accounting periods or do not correspond to calendar months (such as a monthly pay period from January 17 through February 17).
If you enter a percent in this field, then you must clear the Reverse Accruals check box. To reverse the accruals, leave the Accrual Percent field blank and select the Reverse Accruals check box.
If a percent is specified in this field, that percent of pay for the last pay period of the
month is added to accrual fields for the general ledger interface.
14. If you specified a percent in the Accrual Percent field, you can reverse those accruals by doing the following:
a. Select the Reverse Accruals check box.
b. Leave the Accrual Percent field blank in the first pay period of the following month.
15. If you are using this payroll calendar for an unscheduled payroll, select the Unscheduled Payroll check box.
Chapter 15: Performing Annual ProcessesPayroll Processing Guide Version 5.04.01

Creating a Pay Calendar 15-11
16. For pay groups that have an FLSA average type of 14, 21, or 28 days set up on the Basic Pay Group Data panel (Company Definitions ~ Pay Groups and Payroll Calendars ~ Pay Groups), enter the last day of the work period in the Work Period End Date field and press Tab. Enterprise Payroll automatically populates the Work Period Begin Date field.
This field as well as the Work Period Begin Date field will not display on the panel
unless the pay group is set to a 14, 21, or 28 day FLSA average type.
The following shows an example of a completed Payroll Calendar panel:
Figure 15-5. Payroll Calendar panel
For each of the following processes that have been run, Enterprise Payroll automatically selects the corresponding check box:
• Paysheets Run - After paysheets are processed for this calendar entry, Enterprise Payroll selects this check box.
• Payroll Preliminary Calc Run - After a preliminary payroll calculation is run for this calendar entry, Enterprise Payroll selects this check box.
• Payroll Calculation Run - After the final payroll calculation is run for this calendar entry, Enterprise Payroll selects this check box.
• Payroll Confirmation Started - After payroll confirmation has started for this calendar entry, Enterprise Payroll selects this check box. After pay confirmation has started, Enterprise Payroll won't accept any further additions, changes, or reversals of payroll data.
• Payroll Confirmation Run - After payroll confirmation is run for this calendar entry, Enterprise Payroll selects this check box.
• Paychecks Run - If this check box is selected, this indicates that you cannot print checks for this payroll run.
Chapter 15: Performing Annual ProcessesPayroll Processing Guide Version 5.04.01

15-12 Creating a Pay Calendar
• Off-Cycle Calcs Outstanding - If there are off-cycle calculated checks that have not yet been confirmed for this pay period and pay group, Enterprise Payroll selects this check box. Off-cycle checks are checks produced by a payroll run outside the normal processing cycle; typically used for terminations, manual checks, and reversals.
• Off-Cycle Closed - If Enterprise Payroll won't accept any further off-cycle processing for this pay period and pay group, it selects this check box.
Enterprise Payroll closes pay cycle processing for a given pay period when the
confirmation process is run for pay for the following pay period. Therefore, you cannot unconfirm or recalculate this pay cycle.
• GL Interface Run - After the general ledger interface is run for this calendar entry, Enterprise Payroll selects this check box.
• Single Chk for Multiple Jobs - After employees who hold multiple concurrent jobs within the same pay group (and who receive single checks rather than multiple checks if) have been processed, Enterprise Payroll selects this check box.
This option is available only if the Multiple Jobs Allowed check box is selected using
the Installation task (System Admin ~ Human Resources Setup (Required) ~ Human Resources Setup ~ Installation).
• UCM File Built - After the UCM file has been built, Enterprise Payroll selects this check box.
• Tax File Built - After the tax file has been built, Enterprise Payroll selects this check box.
This check box does not display unless you are a tax filing client with ADP
TAXServices.
• Tax File Transmitted - This check box is selected if you selected the Transmission Status option (Periodic File Status panel) after the periodic file has been transmitted. Enterprise Payroll does not require that this check box be selected before running your next payroll.
This check box does not display unless you are a tax filing client with ADP
TAXServices.
• WGPS File Built - After the WGPS file has been built, Enterprise Payroll selects this check box.
This check box does not display unless you are a WGPS client with ADP
TAXServices.
• ADP Check Imported - After the ADP Check file has been imported, Enterprise Payroll selects this check box.
17. Click (Save).
You have just finished building a pay calendar manually. If you are an ADP hosted client, you can enter scheduled run dates for payroll processes next.
Chapter 15: Performing Annual ProcessesPayroll Processing Guide Version 5.04.01

Creating a Pay Calendar 15-13
Entering Scheduled Run Dates for Payroll Processes (ADP Hosted Clients Only)
If you are an ADP hosted client, you or your Enterprise Payroll Services (EPS) Consultant can manually enter your scheduled run dates for payroll processes for informational purposes.
To manually enter run dates, do the following:
1. Click the Scheduled Run Dates tab.
Figure 15-6. Scheduled Run Dates Panel
2. In the Scheduled Run Date fields, select a schedule date for each process, as applicable:
3. Click (Save).
You’ve just finished manually recording scheduled run dates for your payroll processes, which is the last step in manually setting up a payroll calendar.
For a description of the fields on this panel, press F1.
Chapter 15: Performing Annual ProcessesPayroll Processing Guide Version 5.04.01

15-14 Creating a Pay Calendar
Deleting a Pay Calendar
You can delete unused pay calendars by calendar year and/or company and pay group. Calendars are deleted whose Pay End Date falls within the calendar year specified. The calendars processed must have the following check boxes on the Payroll Calendar panel cleared:
• Paysheets Run
• Payroll Preliminary Calc Run
• Payroll Calculation Run
• Payroll Confirmation Started
• Payroll Confirmation Run
• Off-Cycle Closed
To delete a pay calendar, do the following:
1. Select Payroll and make the following selections.
Payroll Cycle Processes ~ Utilities
2. Click the Delete Unused Payroll Calendars (PRUTL001) task. The Delete Unused Payroll Calendars panel displays.
Figure 15-7. Delete Unused Payroll Calendars Panel
3. Enter the calendar year in the Calendar Year field.
4. In the Run Type area, select whether to run the report and an update, or just the report for the calendar year.
Creating a Pay Calendar
Using Pay Calendars and a Pay Run ID with Pay Groups
Setting up employees with a Non-standard Number of Pays
Building Pay Calendars Automatically
Building Pay Calendars Manually
Deleting a Pay Calendar
For a description of the fields on this panel, press F1.
Chapter 15: Performing Annual ProcessesPayroll Processing Guide Version 5.04.01

Creating a Pay Calendar 15-15
5. Select the company from the Company field.
6. Select the pay group from the Pay Group field. You can enter one or more company/ pay group combinations, or leave these fields blank to process all calendar records for the calendar year.
7. Click Run Report. You will receive a message notifying you that your process has been
submitted. Click OK. When the process has completed, click (Report Outputs) to view the report.
For additional information on running, viewing, and printing reports, refer to the Using ADP Enterprise HR Guide. For details on sources, sort order, and an illustration of the report, see the Standard Reports Guide.
You have just finished generating the Delete Unused Payroll Calendars report.
Chapter 15: Performing Annual ProcessesPayroll Processing Guide Version 5.04.01

15-16 Assigning a Pay Run ID to a Pay Calendar
Assigning a Pay Run ID to a Pay Calendar
Before you can process a payroll, you need to assign a pay run ID to the pay calendar.
You use the Pay Run Table task to establish valid pay run IDs that you use to group pay calendar entries from different pay groups together for processing. A pay run ID identifies a single pay calendar to process. When you have several pay groups, you might want to process them together in a single run, by assigning them the same pay run ID.
Generally, all calendar entries that share a pay run ID have the same pay end date, but not necessarily the same pay frequency. For example, if you have a semimonthly and a monthly pay calendar (for the month-end run) you can process both calendars together since they have identical pay period end dates.
The pay run ID identifies all on-cycle payroll processing and reporting. Each calendar entry is associated with a pay run ID. When you process off-cycle payroll activity, you need to use a pay calendar entry that is already assigned a pay run ID. Generally, you can use the calendar entry for the next pay period. If the calendar entry for the current pay period is still open for off-cycle processing, you can use it instead.
A pay run ID must be unique throughout payroll history. You must create pay run IDs on this
panel before you enter them on the Payroll Calendar panel.
Assigning a pay run ID to a pay calendar consists of the following:
• Establishing the Pay Run ID
• Attaching a Pay Run ID to a Pay Calendar
• Verifying that the Pay Run ID Is Attached to the Pay Calendar
Establishing the Pay Run ID
To establish a pay run ID, do the following:
1. Click Payroll and make the following selections.
Periodic Payroll Processes ~ Annual Processes
Assigning a Pay Run ID to a Pay Calendar
Establishing the Pay Run ID
Attaching a Pay Run ID to a Pay Calendar
Verifying that the Pay Run ID Is Attached to the Pay Calendar
Chapter 15: Performing Annual ProcessesPayroll Processing Guide Version 5.04.01

Assigning a Pay Run ID to a Pay Calendar 15-17
2. Click next to the Payroll Run ID task. The Add dialog box displays.
Figure 15-8. Add Dialog Box
To modify an existing payroll run ID, double-click the Payroll Run ID task, enter the
search criteria in the Search dialog box, and click OK. To preserve history, click (Insert Row).
3. Enter the pay run ID in the Pay Run ID field and click OK . The Payroll Run ID panel displays.
Figure 15-9. Payroll Run ID Panel
4. Enter a description to identify the use of this pay run ID in the Description field.
5. Enter a short description in the Short Description field.
6. Click (Save).
You have just finished establishing the pay run ID. Next, assign a pay run ID to a pay calendar.
For a description of the fields on this panel, press F1.
Chapter 15: Performing Annual ProcessesPayroll Processing Guide Version 5.04.01

15-18 Assigning a Pay Run ID to a Pay Calendar
Attaching a Pay Run ID to a Pay Calendar
Before you can process a payroll, you need to assign a pay run ID to the pay calendar.
To assign a pay run ID, do the following:
1. Click Payroll and make the following selections:
Periodic Payroll Processes ~ Monthly Processes
2. Double-click the Payroll Calendar task. The Search dialog box displays.
Figure 15-10. Search Dialog Box
3. Enter the company in the Company field.
4. Enter the pay group in the Pay Group field.
5. Enter the pay period end date in the Pay Period End Date field and click OK .
6. Select the pay run ID from the list and click OK . The Payroll Calendar panel displays.
Figure 15-11. Payroll Calendar Panel
7. Select the pay run ID from the Pay Run ID field.
Assigning a Pay Run ID to a Pay Calendar
Establishing the Pay Run ID
Attaching a Pay Run ID to a Pay Calendar
Verifying that the Pay Run ID Is Attached to the Pay Calendar
For a description of the fields on this panel, press F1.
Chapter 15: Performing Annual ProcessesPayroll Processing Guide Version 5.04.01

Assigning a Pay Run ID to a Pay Calendar 15-19
8. Click (Save).
You have just finished assigning a pay run ID to a pay calendar. Next, verify that the pay run ID is now assigned to a pay calendar.
Verifying that the Pay Run ID Is Attached to the Pay Calendar
To verify that the pay run ID is attached to the pay calendar, do the following:
1. Click Payroll and make the following selections:
Periodic Payroll Processes ~ Annual Processes
Double-click the Payroll Run ID task. The Search dialog box displays.
Figure 15-12. Search Dialog Box
2. Enter the pay run ID in the Pay Run ID field and click OK . The Payroll Run ID panel displays.
Figure 15-13. Payroll Run ID Panel
Assigning a Pay Run ID to a Pay Calendar
Establishing the Pay Run ID
Attaching a Pay Run ID to a Pay Calendar
Verifying that the Pay Run ID Is Attached to the Pay Calendar
For a description of the fields on this panel, press F1.
Chapter 15: Performing Annual ProcessesPayroll Processing Guide Version 5.04.01

15-20 Assigning a Pay Run ID to a Pay Calendar
3. Verify that the Company, Pay Group, and Pay Period End Date display in the Pay Calendar Data area and that it is the information for the pay calendar you assigned to the pay run ID.
4. Click (Close).
You have just finished verifying that the pay run ID is attached to the correct pay calendar.
Chapter 15: Performing Annual ProcessesPayroll Processing Guide Version 5.04.01

Defining a Holiday Schedule 15-21
Defining a Holiday Schedule
Enterprise Payroll automatically establishes an employee’s holiday earnings based on the scheduled holidays you set up using the Holiday Schedules task. You access this task by clicking Payroll and making the following selections from the Task Manager:
Company Definitions ~ Other Payroll Definitions ~ Holiday Schedules
During the paysheet creation process, if a defined holiday occurs within the pay period, Enterprise Payroll automatically sets up a holiday earnings type on the paysheet for the number of hours indicated in the Holiday Schedule panel. If you turned on the Hours Only option on the Basic Data panel (Payroll ~ Company Definitions ~ Earnings ~ Earnings), the number of regular hours is reduced by the number of holiday hours during the payroll calculation process.
You should not include floating holidays when you set up your holiday schedule.
Enterprise Payroll prorates the hours on the holiday schedule for part-time employees based on their standard hours on the employee job record and standard hours for the job code.
After setting up the holiday schedule, you must go to the Earnings panel using the Earnings task (Payroll ~ Company Definitions ~ Earnings) to specify the default earnings type and holiday schedule. Enterprise Payroll also uses the default holiday schedule from the Earnings panel during the pay calendar build process to ensure that the check issue dates fall neither on weekends nor on holidays.
For step-by-step instructions on setting up the holiday schedule, refer to the Hiring, Staffing, and Job Maintenance Guide.
You have just finished setting up a holiday schedule.
Chapter 15: Performing Annual ProcessesPayroll Processing Guide Version 5.04.01

15-22 Using the Archive/Delete/Restore/Convert Program
Using the Archive/Delete/Restore/Convert Program
When necessary, usually depending on the volume of storage space available and after the close of a tax reporting year, you can specify to Enterprise Payroll to copy old paysheet, paycheck, and payroll balance data from the ADP Enterprise HR database to an archive file. You can also specify whether you want Enterprise Payroll to delete all or some of this archived data from the active ADP Enterprise HR database.
In addition, if necessary, you can specify to Enterprise Payroll to restore the previously archived paysheet, paycheck, and/or payroll balance data to the active ADP Enterprise HR database.
Finally, if you have previously archived payroll data using an earlier version of ADP Enterprise HR, you must convert this archived paysheet, paycheck, and/or payroll balance data to the version format you are currently running.
This process has been designed so that all paysheet, paycheck, and balances data for a year is written to a single archive file. Once an archive file has been created for a year, data may be restored or subsequently deleted as necessary. However, it is vital that the original archive file be protected and saved. ADP recommends that the archive file be copied to magnetic media tape or diskette, possibly compressed or encrypted, and that the disk version be deleted for security purposes. For subsequent restore as necessary, the magnetic tape file, uncompressed or decrypted, must be copied back to a disk directory with its original filename “payyyy.arc” where yyyy is the year.
The run control creation for archiving, deleting, and restoring is different from other run controls in Enterprise Payroll. These run controls are not deleted once processed; therefore, they can serve as a reference as to what data has been previously archived, deleted, or restored. Since an archive process for a given year must occur before a delete or restore process, the archive run controls are generally “added” by specifying the year. Delete and restore run controls can be established by doing an “update/display” for the necessary year and then inserting a run control after visual review of the original archive run control. Edits are in place to prevent the creation of a delete run control unless an archive has been performed on that year’s data. Another edit requires that only a single “unprocessed” run control can exist at a time. This ensures the control of the sequence of Archive/Delete/Restore/Convert processing.
Access to the panel that creates the run controls for this process must be issued with care. Only those users with authority to remove payroll data from the database should have access to the Archive/Delete/Restore/Convert task.
Chapter 15: Performing Annual ProcessesPayroll Processing Guide Version 5.04.01

Using the Archive/Delete/Restore/Convert Program 15-23
While no data can be deleted through this process without previously being archived, it is important that the generated archive file be handled with due consideration to both the sensitive nature of the data it contains as well as the fact that it is now the only source of the historical payroll detail.
This process is designed to archive, delete, and/or restore specific data on the ADP
Enterprise HR database. It is designed to archive, delete, and/or restore paysheets, paycheck data, and/or payroll balances. These balances include month-, quarter-, and year-to-date earnings, taxes, deductions, garnishments, and special accumulators. Company definitions and employee payroll data – such as tax filing status and exemptions, direct deposit data, and general deduction data – are not included in this process.
Archiving Payroll Data
The archive process consists of two steps:
1. Copying payroll data from the ADP Enterprise HR database to the archive file.
2. Deleting corresponding data from the database.
Once archived, the paysheet and paycheck data are automatically deleted.
When you select the run type Archive All w/Delete Data Option, the options displaying in the Data Options area apply only to the data deletion option. ADP Enterprise HR always deletes paysheet and paycheck data and archives both types of data regardless of the status of the options.
You can only archive payroll data for an entire year; therefore, you cannot archive data for the
current year. In addition, you can not archive for the last year if the current month is January or February.
Archiving payroll data consists of the following:
• Adding an Archive Run Control
• Viewing the Payroll Archive Control Report
Adding an Archive Run Control
You can create an archive run control for the first time for a specific year or you can update an existing archive run control before you run the Archive/Delete/Restore/Convert program.
Using the Archive/Delete/Restore/Convert task, you can set up an archive of specific payroll information for a prior year. During the Archive process, ADP Enterprise HR deletes check detail data from the database but deletes balance data only if specified. You can delete balance data later by selecting Delete (no archive) in the Run Type field. In addition, you can specify archived payroll information to be restored to the active ADP Enterprise HR database if necessary.
You can create an archive run control to archive data for a prior year.
Using the Archive/Delete/Restore/Convert Program
Archiving Payroll Data
Deleting Archived Payroll Data
Restoring Payroll Data
Chapter 15: Performing Annual ProcessesPayroll Processing Guide Version 5.04.01

15-24 Using the Archive/Delete/Restore/Convert Program
To create the new run control, do the following:
1. Click Payroll and make the following selections:
Periodic Payroll Processes ~ Annual Processes
2. Click next to the Archive/Delete/Restore/Convert task and click OK. The Add dialog box displays.
Figure 15-14. Add Dialog Box
To modify an existing archive settings, double-click the
Archive/Delete/Restore/Convert task, enter the search criteria in the Search dialog
box, and click OK. To preserve history, click (Insert Row).
3. Enter the year of payroll data you want to archive in the Calendar Year field and click OK.
You set up run controls for prior years only. You cannot set up a run control for the
current year, nor can you set up a run control for the prior year if you are currently in the month of January or February. For example, you cannot set up a run control to archive 2008 files until March 2009.
The Archive/Delete/Restore/Convert panel displays.
The Creation Date/Time field displays the date and time of the creation of this run control. This field is part of the key to the record to uniquely identify the run control.
Chapter 15: Performing Annual ProcessesPayroll Processing Guide Version 5.04.01

Using the Archive/Delete/Restore/Convert Program 15-25
Different from other payroll run control records, these are saved for later determination of the archive/restore processes that have been run.)
Figure 15-15. Archive/Delete/Restore/Convert Panel
4. Enter the batch run ID in the Batch Run ID field. This field is used for identification of the run control information in the event that multiple users submit concurrent processes.
5. Verify that the Run Type field is set to the Archive w/Delete Data Optn option.
6. In the Data Options area, clear the Balances check box if you do not want to delete the balances data from the database.
The following shows an example of a completed Archive/Delete/Restore/Convert panel:
Figure 15-16. Archive/Delete/Restore/Convert panel
7. When you are finished, click (Save).
For a description of the fields on this panel, press F1.
For a description of the fields on this panel, press F1.
Chapter 15: Performing Annual ProcessesPayroll Processing Guide Version 5.04.01

15-26 Using the Archive/Delete/Restore/Convert Program
The Archive/Restore Filename field displays the name of the file that will be created in the specified directory when you run the Archive/Delete/Restore/Convert program.
This field is not stored in the database but rather is a derived field of the format
payyyyy.arc where yyyy is the calendar year.
8. Click Run Process. You will receive a message notifying you that your process has been
submitted. Click OK. To confirm successful completion of your process, click (Process Monitor). For additional information on using the Process Monitor, see the Using ADP Enterprise HR Guide.
When the process date/time displays in the Process Date/Time field, this indicates that the process (archive, delete, or restore) that is tied to this run control has been successfully completed. You can no longer make changes to the data on the panel.
You’ve just finished adding an archive run control and running the Archive/Delete/Restore/Convert program. Next, you can view the Payroll Archive Control Report.
Viewing the Payroll Archive Control Report
To view the Payroll Archive Control Report, go the workstation/server directory specified in the Archive/Restore File Directory area on the Archive/Delete/Restore/Convert panel and open archive.log.
The data written to the archive file is not encrypted or protected in any special way. Users are
advised to copy to tape, compress, and/or encrypt this data upon completion of the archive using commonly available tools and then delete the original archive file. If a subsequent restore of the data should become necessary, copy/uncompress/de-encrypt this data back to a file with the original archive filename.
You’ve just viewed the Payroll Archive Control Report, which is the last step in archiving payroll data.
Deleting Archived Payroll Data
Deleting archived payroll data consists of the following:
• Deleting Data
• Viewing the Payroll Delete Control Report
Using the Archive/Delete/Restore/Convert Program
Archiving Payroll Data
Deleting Archived Payroll Data
Restoring Payroll Data
Chapter 15: Performing Annual ProcessesPayroll Processing Guide Version 5.04.01

Using the Archive/Delete/Restore/Convert Program 15-27
Deleting Data
To set up the delete run control and then run the Archive/Delete/Restore/Convert program, do the following:
1. Click Payroll and make the following selections:
Periodic Payroll Processes ~ Annual Processes
2. Double-click the Archive/Delete/Restore/Convert task and click OK. The Search dialog box displays.
Figure 15-17. Search Dialog Box
3. Enter the year whose archive run control you want to update in the Calendar Year field and click OK. The Archive/Delete/Restore/Convert panel displays.
Figure 15-18. Archive/Delete/Restore/Convert Panel
4. Review this data to ensure that the archive was previously processed as expected.
5. Click (Insert Row) to preserve history.
6. Enter the batch run ID in the Batch Run ID field.
7. Select the Delete (No archive) option from Run Type field.
For a description of the fields on this panel, press F1.
Chapter 15: Performing Annual ProcessesPayroll Processing Guide Version 5.04.01

15-28 Using the Archive/Delete/Restore/Convert Program
8. In the Data Options area, you may choose to do the following:
a. Clear the Balances check box if you do not want to delete or restore earnings, tax, deduction, garnishment, check-YTD and special accumulator balances for the specified year.
b. Clear the Paysheet/Paycheck Data check box if you do not want to delete or restore paysheet data that was input to the pay cycles and paycheck data generated by the calculation process.
9. When you are finished, click (Save).
10. The Archive/Restore Filename field displays the name of the file that will be expected in the specified directory when you run the Archive/Delete/Restore/Convert program. This field is not stored in the database but rather is a derived field of the format payyyyy.arc where yyyy is the calendar year.
You can go back and make changes to this panel at any time before you run the
Archive/Delete/Restore/Convert program.
11. Click Run Process. You will receive a message notifying you that your process has been
submitted. Click OK. To confirm successful completion of your process, click (Process Monitor). For additional information on using the Process Monitor, see the Using ADP Enterprise HR Guide.
When the process date/time displays in the Process Date/Time field, this indicates that the process (archive, delete, or restore) that is tied to this run control has been successfully completed. You can no longer make changes to the data on the panel.
You’ve just finished adding a delete run control and running the Archive/Delete/Restore/Convert program. Next, you can view the Payroll Delete Control Report.
Viewing the Payroll Delete Control Report
To view the Payroll Delete Control Report, go the workstation/server directory specified in the Archive/Restore File Directory area on the Archive/Delete/Restore/Convert panel and open archive.log.
The data written to the archive file is not encrypted or protected in any special way. Users are
advised to copy to tape, compress, and/or encrypt this data upon completion of the archive using commonly available tools and then delete the original archive file. If a subsequent restore of the data should become necessary, copy/uncompress/de-encrypt this data back to a file with the original archive filename.
You’ve just viewed the Payroll Delete Control Report, which is the last step in deleting archived payroll data.
Chapter 15: Performing Annual ProcessesPayroll Processing Guide Version 5.04.01

Using the Archive/Delete/Restore/Convert Program 15-29
Restoring Payroll Data
You can restore the previously archived paysheet, paycheck, and/or payroll balance data to the active ADP Enterprise HR database. If you archived payroll data using ADP Enterprise HR Version 2.0, 3.0 or 4.0, but you are now running on Version 5.0, you must first convert the archived data to a v5 format.
Restoring archived payroll data consists of the following:
• Converting Archived V4 or Earlier Payroll Data to a Current Version Format
• Restoring Data
• Viewing the Payroll Restore Control Report
Converting Archived V4 or Earlier Payroll Data to a Current Version Format
To convert an archive Version 2.0, 3.0 or 4.0 file to a Version 5.0 file, do the following:
1. Click Payroll and make the following selections:
Periodic Payroll Processes ~ Annual Processes
2. Double-click the Archive/Delete/Restore/Convert task and click OK. The Search dialog box displays.
Figure 15-19. Search Dialog Box
Using the Archive/Delete/Restore/Convert Program
Archiving Payroll Data
Deleting Archived Payroll Data
Restoring Payroll Data
Chapter 15: Performing Annual ProcessesPayroll Processing Guide Version 5.04.01

15-30 Using the Archive/Delete/Restore/Convert Program
3. Enter the year whose archive run control you want to update in the Calendar Year field and click OK. The Archive/Delete/Restore/Convert panel displays.
Figure 15-20. Archive/Delete/Restore/Convert Panel
4. Review this data to ensure that the archive was previously processed as expected.
5. Click (Insert Row) to preserve history.
6. Enter the batch run ID in the Batch Run ID field.
7. Select the Convert Archived File option from the Run Type field.
8. When you are finished, click (Save).
The Archive/Restore Filename field displays the name of the file that will be expected in the specified directory when you run the Archive/Delete/Restore/Convert program.
Because you probably removed the original archive file from that location for security
purposes, you must return the file to this directory to convert data. If the original archive file was encrypted and/or compressed, you must reverse those processes when converting the original archive file.
You can go back and make changes to this panel at any time BEFORE you run the Archive/Delete/Restore/Convert program.
9. Click Run Process. You will receive a message notifying you that your process has been
submitted. Click OK. To confirm successful completion of your process, click (Process Monitor). For additional information on using the Process Monitor, see the Using ADP Enterprise HR Guide.
When the process date/time displays in the Process Date/Time field, this indicates that the process (archive, delete, or restore) that is tied to this run control has been successfully completed. You can no longer make changes to the data on the panel.
For a description of the fields on this panel, press F1.
Chapter 15: Performing Annual ProcessesPayroll Processing Guide Version 5.04.01

Using the Archive/Delete/Restore/Convert Program 15-31
You’ve just finished converting archived Version 2.0, 3.0, or 4.0 payroll data to a Version 5.0 format and running the Archive/Delete/Restore/Convert program. Next, you can restore your archived payroll data.
Restoring Data
To set up the restore run control, do the following:
1. Click Payroll and make the following selections:
Periodic Payroll Processes ~ Annual Processes
2. Double-click the Archive/Delete/Restore/Convert task and click OK. The Search dialog box displays.
Figure 15-21. Search Dialog Box
3. Enter the year whose archive run control you want to update in the Calendar Year field and click OK. The Archive/Delete/Restore/Convert panel displays.
Figure 15-22. Archive/Delete/Restore/Convert Panel
4. Review this data to ensure that the archive was previously processed as expected.
5. Click (Insert Row) to preserve history and insert a restore run control for the specified year.
For a description of the fields on this panel, press F1.
Chapter 15: Performing Annual ProcessesPayroll Processing Guide Version 5.04.01

15-32 Using the Archive/Delete/Restore/Convert Program
6. Enter the batch run ID in the Batch Run ID field.
7. Select the Restore option from the Run Type field.
8. In the Data Options area, you may choose to do the following:
a. Clear the Balances check box if you do not want to delete or restore earnings, tax, deduction, garnishment, check-YTD and special accumulator balances for the specified year.
b. Clear the Paysheet/Paycheck Data check box if you do not want to delete or restore paysheet data that was input to the pay cycles and paycheck data generated by the calculation process.
9. When you are finished, click (Save).
The Archive/Restore Filename field displays the name of the file that will be expected in the specified directory when you run the Archive/Delete/Restore/Convert program.
Because you probably removed the original archive file from that location for security
purposes, you must return the file to this directory to restore data. If the original archive file was encrypted and/or compressed, you must reverse those processes when restoring the original archive file.
You can go back and make changes to this panel at any time BEFORE you run the Archive/Delete/Restore/Convert program.
10. Click Run Process. You will receive a message notifying you that your process has been
submitted. Click OK. To confirm successful completion of your process, click (Process Monitor). For additional information on using the Process Monitor, see the Using ADP Enterprise HR Guide.
When the process date/time displays in the Process Date/Time field, this indicates that the process (archive, delete, or restore) that is tied to this run control has been successfully completed. You can no longer make changes to the data on the panel.
You’ve just finished adding a restore run control and running the Archive/Delete/Restore/Convert program. Next, you can view the Payroll Restore Control Report.
Chapter 15: Performing Annual ProcessesPayroll Processing Guide Version 5.04.01

Using the Archive/Delete/Restore/Convert Program 15-33
Viewing the Payroll Restore Control Report
To view the Payroll Restore Control Report, go the workstation/server directory specified in the Archive/Restore File Directory area on the Archive/Delete/Restore/Convert panel and open archive.log.
The data written to the archive file is not encrypted or protected in any special way. Users are
advised to copy to tape, compress, and/or encrypt this data upon completion of the archive using commonly available tools and then delete the original archive file. If a subsequent restore of the data should become necessary, copy/uncompress/de-encrypt this data back to a file with the original archive filename.
You’ve just viewed the Payroll Restore Control Report, which is the last step in restoring payroll data.
Chapter 15: Performing Annual ProcessesPayroll Processing Guide Version 5.04.01

15-34 Preparing for Year-End Processing
Preparing for Year-End Processing
Before beginning the year-end tax reporting process, you must complete the following tasks:
• Set up the tax report type
• Define company tax reporting parameters
• Define the tax forms
• Verify earnings codes for the Quarterly Tax File (ADP TAXServices clients only)
• Set up transmittal information
Refer to the Year-End Tax Reporting Guide for step-by-step instructions on preparing for year-end processing and generating W-2s and 1099-Rs.
Chapter 15: Performing Annual ProcessesPayroll Processing Guide Version 5.04.01

Appendix A
Configuring Your Printer
PAGE TOPIC
A-2 Introduction
A-3 Selecting Your Printer
A-4 Preparing the Printer
Appendix A: Configuring Your PrinterPayroll Processing Guide Version 5.04.01

A-2 Introduction
Introduction
Before the payroll department can print paychecks and advices, the system administrator must purchase the appropriate printer, set it up, and then customize it to use a digitized company signature and logo. This appendix provides instructions for configuring your printer.
Appendix A: Configuring Your PrinterPayroll Processing Guide Version 5.04.01

Selecting Your Printer A-3
Selecting Your Printer
Choosing the correct printer is critical to successfully producing payroll checks.
Although you can use Enterprise Payroll to print checks, you should work with your bank to
ensure that the checks meet the bank’s requirements and specifications. ADP does not guarantee that a check printed through Enterprise Payroll is readable by all banking equipment.
When printing checks, ADP recommends that clients use a printer manufactured by Troy, which is the licensed manufacturer of Hewlett-Packard laser printers equipped for MICR printing. For a list of Troy models that conform to the American Banking Association specifications for MICR printing and are readable by various bank scanning equipment, contact Troy at 1-800-332-6427 or at www.troygroup.com.
If you do not have to print MICR characters using magnetic toner, then you can use any HP-PCL-5/6 compliant laser printer. MICR is an exacting specification that includes magnetic ink and optical character recognition.
For information on ordering Troy printers, contact TROY Systems Inc. by phone, fax, or E-mail at the following:
Phone:(304) 232-0899(800) 332-6427 (U.S. only)
Fax:(714) 250-8972(714) 250-9565 (International)
E-mail:[email protected]@troymicr.com
Appendix A: Configuring Your PrinterPayroll Processing Guide Version 5.04.01

A-4 Preparing the Printer
Preparing the Printer
As a checklist, make sure of the following before printing checks:
• The printer cables are connected correctly.
• The MICR font cartridge has been inserted into the printer.
• The MICR toner cartridge has been inserted into the printer.
Always use toner from the printer’s manufacturer. Do not use recycled toner cartridges.
• You have check paper in the paper tray, and you are using the appropriate paper tray.
Make sure the software is set up properly, as follows:
• The MICR printer driver has been installed and configured correctly on your computer.
• The appropriate printer port has been selected.
• The check paper tray is set up.
• The MICR line on the check is properly aligned.
Look at the sample check through a signal strength MICR tester to verify that the check is printed with MICR toner.
Always print a sample check before printing or reprinting checks and vouchers. Do this to make sure none of the settings were changed since the last time you used the printer.
Appendix A: Configuring Your PrinterPayroll Processing Guide Version 5.04.01

Appendix B
Implementing and Using Signatures,Logos, and Disclaimers
PAGE TOPIC
B-2 Introduction
B-3 Implementing Image Files for Checks and Direct Deposit Advices
B-12 Implementing Images for Reports
Appendix B: Implementing and Using Signatures, Logos, and DisclaimersPayroll Processing Guide Version 5.04.01

B-2 Introduction
Introduction
Company logos, digitized signature, and disclaimer files can be loaded into the database. This allows you to print signatures on checks, disclaimers on direct deposit advices, and logos on both checks and direct deposit advices. When you print a check (PAY003) or direct deposit advice (DDP001), you can select from images files that you have loaded. You can also load the report images so that you can select the appropriate image when you print the report.
Signature images cannot be used for direct deposit advices; however, legal disclaimers can.
For more information on printing checks, see “Printing Paychecks and Direct Deposit Advices” on page 9-8. For information on printing a report, see documentation specific to the individual report or the Using ADP Enterprise HR Guide.
Appendix B: Implementing and Using Signatures, Logos, and DisclaimersPayroll Processing Guide Version 5.04.01

Implementing Image Files for Checks and Direct Deposit Advices B-3
Implementing Image Files for Checks and Direct Deposit Advices
Use the Check Images panel to specify the image file(s) you want to use as logos, signatures, or disclaimers when printing checks or direct deposit advices. You can also restrict access to the image files via user security access.
The signature/logo image files available when printing check(s) or direct deposit advice(s) are
based on the user’s profileID and access privileges.
Once you have designated an image file to use, you are allowed to select that image during the print procedure. If you load images to be used for a logo and a signature, you can select either or both.
You can also designate logos for reports through the Report Printing process. For more
information, see “Implementing Images for Reports,” on page B-12.
Implementing Logo and Signature Images for Checks
You can implement multiple logo, signatures, and/or disclaimer images for use when you print checks or direct deposit advices. Do the following:
For more information on printing a check or direct deposit advice, see “Printing Paychecks
and Direct Deposit Advices,” on page 9-8.
1. Click System Admin and make the following selections:
Payroll Setup (Required) ~ Payroll Forms
2. Click next to the Check Images task. The Add dialog box displays.
Figure B-1. Add Dialog Box
To modify an existing logo, signature, and/or disclaimer image, double-click the Check
Images task, enter the search criteria in the Search dialog box, and click OK. To
preserve history, click (Insert Row).
Once you have loaded an image, it is strongly recommended that you test the printing of your checks or direct deposit advices before using them with live payroll items.
Implementing Image Files for Checks and Direct Deposit Advices
Implementing Logo and Signature Images for Checks
Designating a Different Image File to Use
Deleting an Image File from a Process
Modifying the Check when the Company Address is Embedded in the Logo Image
Appendix B: Implementing and Using Signatures, Logos, and DisclaimersPayroll Processing Guide Version 5.04.01

B-4 Implementing Image Files for Checks and Direct Deposit Advices
3. From the Process Name field, select the process for which you want to use the logo or signature/disclaimer file. You can use the Check Images panel to load logos and signatures for checks (PAY003) or disclaimers for direct deposit advices (DDP001).
4. From the Macro Number field, select the macro number for the type of image you are implementing, l for Signature/Disclaimer or 2 for Logo, and click Add. The Check Images panel displays.
Figure B-2. Check Images Panel
5. In the Effective Date field, enter the date the use of the image file takes effect.
6. Enter a description of the type of image you are using in the Image Type field. The default is based on the selection you made when adding the image load:
• Logo or disclaimer for direct deposit advices
• Signature or logo for checks
Image numbers are the unique identifiers for the image which is useful when you have multiple images. The first image you implement is defaulted as 1 (one). The value for the Image Number field is automatically incremented as you add additional images.
7. In Image Description, enter a description of the image. When you print a check or direct deposit advice, this description is what you will select to use the image. For example, if you enter a description of Bobby Smith’s signature, you can select Bobby Smith’s signature when printing.
For a description of the fields on this panel, press F1.
Appendix B: Implementing and Using Signatures, Logos, and DisclaimersPayroll Processing Guide Version 5.04.01

Implementing Image Files for Checks and Direct Deposit Advices B-5
8. Click Load Image. The Select file dialog box displays. Navigate to the location of the image file you want to use.
Figure B-3. Select file Dialog Box
9. Select the image file you want to use from the presented list. The .HPR files display by default. Select a different file type from Files of Type if your image file is not listed.
There are two file types available to you, Macro file .hpr and Macro file .hp@.
10. Once you have selected your image file, click Use this file. The Check Images panel displays. The Loaded check box is selected and grayed.
Figure B-4. Check Images Panel
11. If you are loading an .hp@ file, select the Encrypted check box.
.HP@ files are the encrypted version of an .hpr file. If you are loading an .hp@ file, you must select the Encrypted check box on the Check Images panel. If you do not select this check box, Enterprise does not decrypt the file. It will be unreadable and therefore unusable.
For a description of the fields on this panel, press F1.
Appendix B: Implementing and Using Signatures, Logos, and DisclaimersPayroll Processing Guide Version 5.04.01

B-6 Implementing Image Files for Checks and Direct Deposit Advices
12. From the Status group, select whether you want the file to be Active or Inactive.
13. To specify that selected user profiles or classe(s) can use the loaded image, do the following:
a. From the Operator/Class field, select the user profile ID or class which you want to allow access to the loaded image.
b. To add multiple user profile ID(s)/class(es), select the scroll bar, click (Insert Row), and select the next profile ID(s)/class(es).
14. To add additional images, select the middle scroll bar and click (Insert Row). Repeat the preceding steps. As you add multiple images, the image number is incremented.
15. Click (Save).
You have finished loading image(s) to use as a logo, or signature/disclaimer when printing a check or direct deposit advice.
Designating a Different Image File to Use
To select a different image do the following:
1. Click System Admin and make the following selections:
Payroll Setup (Required) ~ Payroll Forms
2. Double-click the Check Images task. The Search dialog box displays.
Figure B-5. Search Dialog Box
3. From the Process Name field, select the name of the process.
Implementing Image Files for Checks and Direct Deposit Advices
Implementing Logo and Signature Images for Checks
Designating a Different Image File to Use
Deleting an Image File from a Process
Modifying the Check when the Company Address is Embedded in the Logo Image
Appendix B: Implementing and Using Signatures, Logos, and DisclaimersPayroll Processing Guide Version 5.04.01

Implementing Image Files for Checks and Direct Deposit Advices B-7
4. From the Macro Number field, select the number of the macro and click OK. The Check Images panel displays.
Figure B-6. Check Images Panel
For a description of the fields on this panel, press F1 or see page B-5.
5. Select the outer scroll bar and click (Insert Row) to preserve history. A new row is inserted with the current date as the effective date. Your original information is retained but no longer applicable.
6. Click Load Image to select a different image file.
7. Complete any other changes you want to the image file information and click (Save).
If you do not insert a row before saving, a Confirm History Update dialog box displays
asking if you want to override the current information.
You have finished designating a different image file be used for a signature or logo. Next, you can delete image files from a process.
Appendix B: Implementing and Using Signatures, Logos, and DisclaimersPayroll Processing Guide Version 5.04.01

B-8 Implementing Image Files for Checks and Direct Deposit Advices
Deleting an Image File from a Process
When you implement an image file for printing a manual check or pay stub, you associate that image file with a specific process. When you run the process, a selection dialog box displays allowing you to select and use a specific image file with the process for printing a manual check or printing a pay stub. To delete an image file from a process, do the following:
The following procedure does not delete the physical image file from Enterprise Payroll. It
deletes only the image file’s association with the process. The image file can be reused.
1. Click System Admin and make the following selections:
Payroll Setup (Required) ~ Payroll Forms
2. Double-click the Check Images task. The Search dialog box displays.
Figure B-7. Search Dialog Box
3. From the Process Name field, select the name of the process.
Implementing Image Files for Checks and Direct Deposit Advices
Implementing Logo and Signature Images for Checks
Designating a Different Image File to Use
Deleting an Image File from a Process
Modifying the Check when the Company Address is Embedded in the Logo Image
Appendix B: Implementing and Using Signatures, Logos, and DisclaimersPayroll Processing Guide Version 5.04.01

Implementing Image Files for Checks and Direct Deposit Advices B-9
4. From the Macro Number field, select the number of the macro and click OK. The Check Images panel displays.
Figure B-8. Check Images Panel
For a description of the fields on this panel, press F1 or see page B-5.
5. Click the outer scroll bar and display the image row you want to delete.
6. Click (Delete Row) . Repeat until all the rows you want to delete are gone.
7. Click (Save).
You have finished deleting image files from a process.
Appendix B: Implementing and Using Signatures, Logos, and DisclaimersPayroll Processing Guide Version 5.04.01

B-10 Implementing Image Files for Checks and Direct Deposit Advices
Modifying the Check when the Company Address is Embedded in the Logo Image
In some cases, a company’s logo may contain the company name and address. By default, the ADP check printing programs are written to extract the company name and address from the ADP Enterprise HR database and print this information on the check. This information is printed in two places (as is the company logo, when used): In the upper left corner of the page (the “header” area of the check), and in the upper left corner of the check itself (which prints on the lower third of the page). It is a simple matter to suppress the printing of these lines when the digitized company logo already contains them.
Locate the checkprt.sqc in the sqr directory. Modify the checkprt.sqc to comment out the printing of the company name and address. The logo will print on top of it, not in place of it, if this is not done.
Modifying the Code in CHECKPRT.SQC
There are two occurrences of the code which prints the company name and address information on the check. Both instances may need to be modified when the digitized company macro contains the company address. In both cases, the program code to be changed can be found by using a text editor’s search capabilities to search for the text “$CAddrLine1”. The first occurrence is in a comment in the file header. The second and third are in the actual code, and are described in detail below.
First Modification
print $CName (0,{start_company_name})do Format_Address ($CStreet1, $CStreet2, $CCity, $CState, $CZip, $CAddrLine1, $CAddrLine2, $CAddrLine3)print $CAddrLine1 (+1,{start_company_name})print $CAddrLine2 (+1,{start_company_name})print $CAddrLine3 (+1,{start_company_name})print $CAddrLine4 (+1,{start_company_name})
You do not have to comment out the “do Format Address” line above.
The 4 lines beginning with the PRINT command can be commented out by placing an exclamation point at the beginning of each line. The line beginning with DO FORMAT_ADDRESS is also probably unnecessary for the specific purpose of printing the company address here, but the function may also perform other operations that are used elsewhere. (At a minimum, this function takes the first 5 variables as parameters and reformats their contents into three lines in a “standard” address format, returning these 3 lines in the last 3 parameters referenced in the function call.) Since the overhead of the single function call is trivial, it is more appropriate to leave that line of code functioning, in case it performs other operations, or in case its results are used elsewhere.
Implementing Image Files for Checks and Direct Deposit Advices
Implementing Logo and Signature Images for Checks
Designating a Different Image File to Use
Deleting an Image File from a Process
Modifying the Check when the Company Address is Embedded in the Logo Image
Appendix B: Implementing and Using Signatures, Logos, and DisclaimersPayroll Processing Guide Version 5.04.01

Implementing Image Files for Checks and Direct Deposit Advices B-11
Second Modification
print $CName (0,{start_company_name})print $CAddrLine1 (+1,{start_company_name})print $CAddrLine2 (+1,{start_company_name})print $CAddrLine3 (+1,{start_company_name})print $CAddrLine4 (+1,{start_company_name})
Again, the 4 lines beginning with the PRINT command can be commented out, simply by placing an exclamation point at the beginning of each line. Note that the DO FORMAT_ADDRESS function is not invoked here, since it was invoked previously, and thus the variables used here have already been set.
Appendix B: Implementing and Using Signatures, Logos, and DisclaimersPayroll Processing Guide Version 5.04.01

B-12 Implementing Images for Reports
Implementing Images for Reports
Through the Report Printing task, you can load an image file that, in conjunction with customizations to the report’s SQR, allow you to include the image on the printed report. You could use this process to include:
• A company logo on a printed report.
• An image in the heading of a report that may vary by pay group, location, and so forth.
• An image of a legal disclaimer.
If you use a single image file for all of your reports all the time (static), then you do not need to implement image files through the Report Printing task. However, if you have multiple image files from which to select for a printed report, you can implement the images through the Report Images panel which will then provide you with a selection mechanism at print time.
Although you are loading the image file for use with a printed report, you will still need to
modify the SQR in order for an image to print on a report. For more information on modifying an SQR to use a specific image, see your SQR manual for the correct modifications to the PRINT-DIRECT command.
If you have heavily customized a report or checks using macro numbers other than the ADP delivered macros, you would load the image files for those macros using the Report Images panel rather than the Checks Image panel. Manual checks and pay stubs are generated through ALPAY013 and ALPAY019. Although these reports are used to generate the manual check or pay stub, for clarity this section refers only to reports. For information on loading signature/logo files for a manual check, see “Implementing Image Files for Checks and Direct Deposit Advices” on page B-3.
Loading image files for printing reports is appropriate only if you have more than one image
for a report from which to select. Although only logos and signatures are cited as uses for the loaded image files, they can also be used for legal disclaimers. Sample signature/logo files are provided for your use. They are placed in the ADP Enterprise HR database ETOOLS/BIN folder during installation.
Implementing Image Files for Reports
You can implement multiple image files for use when you print a report. Once you have designated an image file to use, you are allowed to select that image after the process has generated the report and you view and/or print the report. To implement an image file, do the following:
For more information on printing a report, see the Using ADP Enterprise HR Guide.
1. Click System Admin and make the following selections:
Payroll Setup (Optional) ~ Report Printing
Implementing Images for Reports
Implementing Image Files for Reports
Designating a Different Image File to use for a Logo
Deleting an Image File from a Process
Appendix B: Implementing and Using Signatures, Logos, and DisclaimersPayroll Processing Guide Version 5.04.01

Implementing Images for Reports B-13
2. Click next to the Report Images task. The Add dialog box displays.
Figure B-9. Add Dialog Box
To modify an existing image file, double-click the Report Images task, enter the search
criteria in the Search dialog box, and click OK. To preserve history, click (Insert Row).
3. From the Process Name field, select the process for which you want to use the image file.
4. From the Macro Number field, enter the macro number for the type of image you are implementing and click OK. The Report Images panel displays.
Figure B-10. Report Images Panel
5. In the Effective Date field, enter the date the use of the image file takes effect.
6. Enter a description of the type of image you are using in the Image Type field.
Image numbers are the unique identifiers for the image which is useful when you have multiple images.
7. In Image Description, enter a description of the image. When you print a report this description is what you will select to use the image. For example, if you enter a description of Globe Inc. logo you can select Globe Inc. logo when printing a report.
For a description of the fields on this panel, press F1.
Appendix B: Implementing and Using Signatures, Logos, and DisclaimersPayroll Processing Guide Version 5.04.01

B-14 Implementing Images for Reports
8. Click Load Image. The Select file dialog box displays. Navigate to the location of the image file you want to use.
Figure B-11. Select file Dialog Box
9. Select the image file you want to use from the presented list. The .HPR files display by default. Select a different file type from Files of Type if you image file is not listed.
There are two file types available to you, Macro file .hpr and Macro file .hp@.
10. Once you have selected your image file, click Use this file. The Report Images panel displays with the Loaded check box selected and grayed.
11. If you are loading an .hp@ file, select the Encrypted check box.
Figure B-12. Report Images Panel
.HP@ files are the encrypted version of an .hpr file. If you are loading an .hp@ file, you must select the Encrypted check box on the Report Images panel. If you do not select this check box, Enterprise does not decrypt the file. It will be unreadable and therefore unusable.
For a description of the fields on this panel, press F1.
Appendix B: Implementing and Using Signatures, Logos, and DisclaimersPayroll Processing Guide Version 5.04.01

Implementing Images for Reports B-15
12. From the Status group, select whether you want the file to be Active or Inactive.
13. To specify that selected user profiles or classe(s) can use the loaded image, do the following:
a. From the Operator/Class field, select the user profile ID or class which you want to allow access to the loaded image.
b. To add multiple user profile ID(s)/class(es), select the scroll bar, click (Insert Row), and select the next user profile ID(s)/class(es).
14. To add additional images, select the middle scroll bar and click (Insert Row). Repeat the preceding steps. As you add multiple images, the image number is incremented.
15. Click (Save).
You’ve just finished implementing an image file to use when printing a report. Next, you can implement a different image file to use for a logo.
Designating a Different Image File to use for a Logo
To select a different image file to use, do the following:
1. Click System Admin and make the following selections:
Payroll Setup (Optional) ~ Report Printing
2. Double-click the Report Images task. The Search dialog box displays.
Figure B-13. Search Dialog Box
3. From the Process Name field, select the name of the process.
Implementing Images for Reports
Implementing Image Files for Reports
Designating a Different Image File to use for a Logo
Deleting an Image File from a Process
Appendix B: Implementing and Using Signatures, Logos, and DisclaimersPayroll Processing Guide Version 5.04.01

B-16 Implementing Images for Reports
4. From the Macro Number field, enter the number of the macro and click OK. The Report Images panel displays.
Figure B-14. Report Images Panel
For a description of the fields on this panel, press F1 or see page B-14.
5. Select the outer scroll bar and click (Insert Row). A new row is inserted with the current date as the effective date. Your original information is retained but no longer applicable.
6. Click Load Image to select a different image file.
7. Complete any other changes you want to the image file information and click (Save). A Confirm History Update dialog box displays asking if you want to override the current information. If you do, click OK.
You have finished designating a different image file be used. Next, you can delete image files from a process.
Appendix B: Implementing and Using Signatures, Logos, and DisclaimersPayroll Processing Guide Version 5.04.01

Implementing Images for Reports B-17
Deleting an Image File from a Process
When you implement an image file for printing with a report, you associate that image file with a specific process. When you run the process, a selection dialog box displays allowing you to select and use a specific image file with the printing of the report. To delete an image file from a process, do the following:
The following procedure does not delete the physical image file from Enterprise Payroll. It
deletes only the image file’s association with the process. The image file can be reused.
1. Click System Admin and make the following selections:
Payroll Setup (Optional) ~ Report Printing
2. Double-click the Report Images task. The Search dialog box displays.
Figure B-15. Search Dialog Box
3. From the Process Name field, select the name of the process.
Implementing Images for Reports
Implementing Image Files for Reports
Designating a Different Image File to use for a Logo
Deleting an Image File from a Process
Appendix B: Implementing and Using Signatures, Logos, and DisclaimersPayroll Processing Guide Version 5.04.01

B-18 Implementing Images for Reports
4. From the Macro Number field, enter the number of the macro and click OK. The Report Images panel displays.
Figure B-16. Report Images Panel
For a description of the fields on this panel, press F1 or see page B-14.
5. Click the outer scroll bar and display the image row you want to delete.
6. Click (Delete Row) and a confirmation message for the delete displays. Click OK and repeat this until all the rows you want to delete are gone.
7. Click (Save).
You have finished deleting image files from a process.
Appendix B: Implementing and Using Signatures, Logos, and DisclaimersPayroll Processing Guide Version 5.04.01

Appendix C
Creating Custom Export Definitions:Enterprise eTIME and/or TimeSaver
PAGE TOPIC
C-2 Introduction
C-3 Creating the Custom Export Definition
Appendix C: Creating Custom Export Definitions: Enterprise eTIME and/or TimeSaverPayroll Processing Guide Version 5.04.01

C-2 Introduction
Introduction
This appendix contains information on how to use the Custom Export Definitions task for Enterprise eTIME (TAA028) and TimeSaver (TAA030).
Appendix C: Creating Custom Export Definitions: Enterprise eTIME and/or TimeSaverPayroll Processing Guide Version 5.04.01

Creating the Custom Export Definition C-3
Creating the Custom Export Definition
ADP Enterprise HR provides a utility for Enterprise eTIME (TAA028.SQR) and TimeSaver (TAA030.SQR), that automatically locates time collection information in Time and Attendance that has been updated/added since the last payroll. It then writes the information to a file, epretime.trn (Enterprise eTIME) or TIMESAVR.TRN (TimeSaver), that can be exported to the appropriate time and labor management system.
If you want additional time collection data from the AL_TAX_DATA, EMPLOYMENT, HRUSER_DATA, JOB, or PERSONAL_DATA tables that are not a part of TAA028 or TAA030 to be included in the export file, you can set up custom export definitions using the Custom Export Definitions task. This task allows you to select specific fields from these specific tables and group them together by an export ID. Then, you can select this export ID when you run TAA028 or TAA030 so that your file will contain columns for all fields that are a part of the custom export definition.
For step-by-step instructions on running TAA028 and TAA030, refer to Chapter 6,
“Calculating and Confirming Your Payroll.”
To create a custom export definition for Enterprise eTIME and/or TimeSaver, do the following:
1. Click System Admin and make the following selections:
Payroll Setup (Optional) ~ Time and Attendance - Enterprise eTIME
2. Double-click the Custom Export Definitions task. The Add dialog box appears, as shown in Figure C-1.
Figure C-1. Add Dialog Box
To modify an existing custom export definition, double-click the Custom Export
Definitions task, enter the search criteria in the Search dialog box, and click OK. To
preserve history, click (Insert Row).
Appendix C: Creating Custom Export Definitions: Enterprise eTIME and/or TimeSaverPayroll Processing Guide Version 5.04.01

C-4 Creating the Custom Export Definition
3. In the Export ID field, enter an identifier for the export definition you are creating and click Add. The Export Definition tab displays.
Figure C-2. Export Definition Panel
4. Enter the name of the export definition in the Export Name field.
5. Click the Export Details tab.
Figure C-3. Export Details Panel
6. Enter a column number in the Column field and press Tab.
7. From the Record (Table) Name field, select the table from which you want to pull a field and press Tab.
For a description of the fields on this tab, press F1.
For a description of the fields on this tab, press F1.
Appendix C: Creating Custom Export Definitions: Enterprise eTIME and/or TimeSaverPayroll Processing Guide Version 5.04.01

Creating the Custom Export Definition C-5
8. From the Field Name field, select the field that you want included in the export file and press Tab. As applicable for that field, data displays in the Data Type, Length, Integer, and Decimal fields.
If you are entering translates for fields that are defined as numeric with decimal places,
the translates should not contain decimals if the value is a whole number. For example, you should enter 40 and not 40.00.
9. If the field has translate values and you would like the export file to contain different names for the ADP Enterprise HR values, do the following:
a. Click Translate. The Data Translation tab displays.
Figure C-4. Data Translation Panel
If you are entering translates for fields that are defined as numeric with decimal places,
the translates should not contain decimals if the value is a whole number. For example, you should enter 40 and not 40.00.
b. Click the From Value field, select the name of the ADP Enterprise HR value you would like to rename, and press Tab.
c. In the To (Exported Value) field, enter the name that you would like to appear in the export file.
d. Click (Save).
e. Click Return. The Export Details tab reappears.
10. To add another column, click (Insert Row) and repeat steps 7-10 as necessary.
11. To rearrange the column order, click the Column field, enter the number where you want the column to be moved to, and press Tab.
12. Click (Save) when you have completed your custom export definition.
For a description of the fields on this panel, press F1.
Appendix C: Creating Custom Export Definitions: Enterprise eTIME and/or TimeSaverPayroll Processing Guide Version 5.04.01

C-6 Creating the Custom Export Definition
Appendix C: Creating Custom Export Definitions: Enterprise eTIME and/or TimeSaverPayroll Processing Guide Version 5.04.01

Appendix D
Multi-Company andWork-Site Reporting SQRs
Some states require multi-company/multi-worksite options and have enhanced SQRs for this type of reporting.
All states listed also support paper reporting.
Table D-1 lists these states and their SQRs.
Table D-1. Multi-Company & Work-Site Reports
State Reporting Type SQR
Alabama Electronic TAX820AL
Alaska Electronic TAX820AK
Arizona Diskette TAX811AZ
California Diskette TAX811CA
Colorado Electronic TAX820CO
Florida Electronic TAX820FL
Georgia Diskette TAX002GA
Illinois Electronic TAX820IL
Indiana Electronic TAX820IN
Iowa Electronic TAX820IA
Massachusetts Electronic TAX820MA
Michigan Tape TAX810MI
Minnesota Electronic TAX820MN
Mississippi Diskette TAX811MS
Missouri Diskette TAX811MO
New Jersey Electronic TAX820NJ
New Mexico Diskette TAX811NM
New York Electronic TAX820NY
North Carolina Electronic TAX820NC
Appendix D: Multi-Company and Work-Site Reporting SQRsPayroll Processing Guide Version 5.04.01

D-2
Ohio Diskette TAX811OH
Pennsylvania Diskette TAX811PA
Texas Diskette TAX811TX
Wyoming Paper Only TAX810WY
Table D-1. Multi-Company & Work-Site Reports (cont.)
State Reporting Type SQR
Appendix D: Multi-Company and Work-Site Reporting SQRsPayroll Processing Guide Version 5.04.01

Appendix E
Archived and Deleted Tables
The Archive/Delete/Restore/Convert program archives the following tables and deletes
them from the active ADP Enterprise HR database:
PS_CHECK_YTD PS_PAY_GARNISH
PS_DEDUCTION_BAL PS_PAY_LINE
PS_EARNINGS_BAL PS_PAY_ONE_TIME
PS_FLSA_AVGRTE_CAL PS_PAY_OTH_EARNS
PS_GARN_BALANCE PS_PAY_PAGE
PS_PAY_CALENDAR PS_PAY_SPCL_EARNS
PS_PAY_CHECK PS_PAY_TAX
PS_PAY_DEDUCTION PS_PAY_TAX_OVRD
PS_PAY_DISTRIBUTN PS_RETRO_PAY_TBL
PS_PAY_EARNINGS PS_TAX_BAL_RES
PS_PAY_FUND_ACCTG PS_TAX_BALANCE
PS_PAY_GARN_OVRD
Appendix E: Archived and Deleted TablesPayroll Processing Guide Version 5.04.01

E-2
Appendix E: Archived and Deleted TablesPayroll Processing Guide Version 5.04.01

Index
Symbols(Hours x Hourly Rate) field 10-37
Numerics414(v) Catch Up Report (PAY033) 7-18
AAccount # column 6-27Account Code field 6-19Account Number field 8-17, 9-23, 9-30, 9-33Account/Fund field 5-11, 5-13, 5-16, 5-19, 5-39,
5-43Accrual Balances - Hours group box 10-36Accrual Date column 10-35Accrual Date field 10-36Accrual Percent field 15-10Accrual Process Date field 13-3, 13-9Accrual Totals group box 10-37Accrued YTD column 10-35Acct Cd field 3-8Accum Cd field 10-26Accumulator Amounts column 10-23, 10-26Additional pay
correcting employee payroll errorsoverview 10-39
Additional Taxes check box 5-11, 5-13, 5-16, 5-19, 5-38, 5-43
Additional W/H $ field 6-59, 6-60Addl # (additional payline number) field 3-6, 6-19Addl Pay Reason field 6-19Adj Type field 12-56, 12-82Adjusted for Fees Included in DE option 6-24Adjusted Year-to-Date field 10-37Adjusting
state tax balance records 12-18Adjustment Audit Report task 12-53Adjustment GL Interface File (GLX005) task 12-78Adjustment GL Interface File Panel
accessing 12-78illustration of 12-78
Adjustment GL Summary Report (GLX006) 12-79Adjustment Run ID field 12-57, 12-58, 12-60,
12-62, 12-64, 12-68, 12-69, 12-82, 12-84, 12-86, 12-88, 12-90, 12-91
Adjustment Run ID panelillustration of 12-66
Adjustment Run ID Table task 12-65Adjustment Type field 12-51, 12-69Adjustment/Opening Balance Data Import
panel 12-51, 12-69illustration of 12-51
Adjustment/Opening Balance Data Import task 12-51, 12-69
Adjustmentscalculating your adjusted check(s) 11-57confirming your payroll 11-58creating manual checks 12-7
adding paysheet page 12-8assigning pay run ID 12-8entering one-time taxes 12-11
deleting adjusted checkcompleting the deletion 11-69deleting the adjustment 11-67identifying the check(s) 11-66overview 11-66reviewing the deleted check 11-69unconfirming your payroll 11-66
entering adjustments into paysheets 11-57for federal tax balance records
see Federal taxesfor state tax balance records
see State taxesoverviewprocessing the check adjustment 11-54quarterly
adjusting in the Tax Service Interface 14-30reviewing adjustment results 11-58running final pay calculation 11-58setting up adjustment deduction codes 11-53setting up adjustment earnings types 11-53
ADP Check File Import (PAY032) task 8-25
Payroll Processing Guide Version 5.04.01

i-2 Index
ADP Check File Import panelaccessing 8-25illustration of 8-25
ADP File Transfer programrunning 8-7
ADP General Ledgerinterfacing with Enterprise Payroll 13-6
ADP Pay Data Entryentering data directly into 5-9
ADP Pay Data Entry systemsee Pay Data Entry system
ADP Payment Solutions Servicesgenerating and transmitting files
overviewtransferring files to ADP Payment Solutions
Services 8-24ADP Print Services
see ADP Payment Solutions ServicesADP Print Services File (PAY036) task 8-16ADP Print Services File Label File panel
illustration of 8-23ADP Print Services File Label panel
accessing 8-23ADP Print Services File panel
accessing 8-15illustration of 8-16
ADP Print Services Label File (PAY038) task 8-23ADP Tax Service interface
see Tax Service interfaceADP UCM Services
creating wage filegenerating service file (TAX816) 13-23mapping UCM code and earnings code 13-21overview 13-21
ADP Unemployment Compensation Service Wage Data panelaccessing 13-23illustration of 13-23
ADP Wage Garnishment Processing Servicessee WGPS Services
Advicesprinting
creating NACHA file (DDP001) 9-24, 9-26generating Direct Deposit Prenote Memo
(DDP006) 9-28generating Direct Deposit Prenotification
(DDP005) 9-22overview 9-21running Print Direct Deposit Advices
(DDP003) 9-30see Printing paychecks and advices
Advices (cont.)reviewing after printing
overview 9-35printing Direct Deposit Register (DDP002) 9-37printing Payroll Advice Register (DDP004) 9-38
viewing summary information 10-13All batches associated with Pay Run ID option 5-32All Departments/Locatoins/Employees option 7-13,
7-15Allowances field 6-59, 6-60Amount Collected field 10-50Amount column 6-20, 6-21, 6-25, 6-27, 10-9, 10-10,
10-11, 10-29, 10-31Amount Disbursed field 10-50Amount field 3-10, 5-11, 5-14, 5-17, 5-19, 5-28Amount Not Taken/Calculated Base column 6-22Annual option 3-10Annual Processes process
Archive/Delete/Restore task 15-24, 15-27, 15-29, 15-31
Create Payroll Calendars task 15-4Payroll Calendar task 15-8Payroll Run ID task 15-16, 15-19
archive.log file 15-26, 15-28, 15-33Archive/Delete/Restore/Convert panel
accessing 15-24, 15-27, 15-29, 15-31illustration of 15-25, 15-27, 15-30, 15-31
Archive/Delete/Restore/Convert programoverview 15-22
Archive/Delete/Restore/Convert task 15-24, 15-27, 15-29, 15-31
Archive/Restore Filename field 15-26, 15-28, 15-30, 15-32
Archiving payroll dataoverview 15-23viewing Payroll Archive Control Report 15-26
Arrearssee Deduction arrears
Arrears Balance Adjustment panelaccessing 12-29
Arrears Balance field 10-46Arrears Balance panel
illustration of 12-30Arrears Balance task 12-29Arrears Pending Panel
accessing 12-63illustration of 12-63, 12-76, 12-89
Arrears Reversal Panelaccessing 12-89illustration of 12-89
Payroll Processing Guide Version 5.04.01

Index i-3
Arrears Summary Panelaccessing 12-76illustration of 12-76
Arrears task 10-45Ascending sort order
Sort Spreadsheet Data dialog box 4-46Auto Balance button
Batch Totals dialog box 4-52
BBalance Adjustment panel
accessing 12-39Balance Adjustment process
Adjustment Arrears Summary task 12-55Adjustment Audit Report task 12-52Adjustment GL Interface File Summary
(GLX005) 12-78Adjustment GL Summary (GLX006) 12-79Adjustment Run ID Table task 12-65Adjustment/Opening Balance Data Import
(PRUTL002) task 12-51, 12-69Arrears Balance task 12-29Complete Reversal (Confirm) task 12-95Deduction Balance task 12-31Earnings Balance task 12-34Garnishment Balance task 12-37Prepare Paycheck Reversals task 12-93Tax Balance task 12-41Transaction Reversals task 12-80Transactions Summary task 12-71
Balance adjustmentsoverview 12-28
Balance Detail panelaccessing 10-34illustration of 10-36
Balance field 10-35Balance panel
illustration of 12-39Balance Summary panel
accessing 10-34illustration of 10-35
Balance Type area 12-51, 12-69Balances group box 10-22, 10-23, 10-25, 10-26,
10-44, 10-48, 10-55, 10-61, 10-63, 10-65Balances option 15-25Balances panel
accessing 2-11illustration of 2-12
bankfile.trn file 13-12Batch calculations 4-50
Batch column 6-43Batch Description field
New Batch/Spreadsheet Header dialog boxRapid Pay Data Entry 4-24
Batch Detail List report (TAA002) 5-32Batch Header Information task 5-24Batch headers
establishing data for pay cycle data filesetting up batch headers 5-4setting up spreadsheets 5-6
importing into Time and Attendance 5-22Batch ID field 5-22Batch ID option 5-32Batch information
adding 5-4Batch Information task 5-4, 5-29Batch name field
New Batch/Spreadsheet Header dialog boxRapid Pay Data Entry 4-24
Batch Panelillustration of 5-5
Batch panelaccessing 5-4, 5-29illustration of 5-30
Batch Run ID field 12-68, 12-69, 12-91, 13-3, 15-5, 15-25, 15-27, 15-30, 15-32
Batch Status panelaccessing 5-26illustration of 5-26
Batch Status task 5-26Batch Totals
Data menu 4-51Batch Totals dialog box
illustration of 4-51Batch Totals List (TAA001) 5-31Batch Totals or SpreadsheetTotals dialog box
accessing 4-51Batches
creating 5-4establishing data for pay cycle data file
deleting batches and spreadsheets 5-7Begin field 3-9Ben #
see Benefit Record Number fieldBenefit 12-58, 12-62, 12-84, 12-88Benefit Deductions Report (PAY046) task 6-13Benefit Deductions Report panel
accessing 6-12illustration of 6-13
Benefit field 12-64, 12-89Benefit Plan column 10-48Benefit Plan field 10-46, 12-58, 12-62, 12-84, 12-88
Payroll Processing Guide Version 5.04.01

i-4 Index
Benefit Program field 10-36Benefit Record Number fieldBilling Interface (PAY037) task 8-22Billing Interface panel
accessing 8-21illustration of 8-22
Bond Activity Seq # field 10-49Bond Activity Status field 10-49Bond ID field 10-49Bond Log Number field 10-49Bond Purchase Report (PAY016)
overview 13-16bondfile.out file 13-16Bought Year-to-Date field 10-37Build Payroll WGPS File process
Build Payroll WGPS File (PAYWGP03) task 8-28View Payroll WGPS File List task 8-30
Build Quarterly Tax Service File (TAX812) task 14-24
Build Tax Service File processCreate Periodic Tax File task 8-6Update Periodic File Status task 8-8View Periodic File List task 8-11
Build WGPS File panelaccessing 8-28illustration of 8-28
Build WGPS File process 8-26
CCalculate button 6-60Calculate Final Payroll task 6-33, 11-18Calculate On-Line Check task 11-31Calculate Preliminary Payroll task
in On-Demand Payroll (Off Cycle) process 11-15in Scheduled Payroll (On Cycle) process 6-6
Calculate Retro Pay panelaccessing 6-3, 11-12illustration of 6-3, 11-13
Calculated column 5-31Calculated Retro Pay panel
accessing 6-27illustration of 6-28
Calculating your payrollcalculating preliminary payroll
correcting errors 6-12overview 6-5processing initial calculation 6-6recalculating your payroll 6-14reviewing error messages 6-8
calculating retroactive pay 6-3
Calculating your payroll (cont.)generating summary reports 7-1overview 6-2processing off-cycle payrolls
see Off-cycle payrollsreviewing preliminary check data
overview 6-14paycheck deduction data 6-21paycheck distribution data 6-26paycheck earnings data 6-17paycheck garnishment data 6-23paycheck special accumulator data 6-25paycheck summary data 6-15paycheck tax data 6-19performance plan payment data 6-29retroactive earnings data 6-27
running final pay calculation 6-32Calculation Log panel
illustration of 6-64Calendar Year field 8-9, 8-11, 10-15, 10-21, 10-23,
10-25, 10-26, 10-44, 10-47, 10-55, 10-61, 10-63, 10-65, 14-5, 14-29, 15-14
Calendarssee Pay calendars
Carried Over from Previous Years field 10-37Catch Up Report 414(v) (PAY033) task 7-18Catch Up Report 414(v) panel
accessing 7-18illustration of 7-18
Change Employee Leave Balances processLeave Balances task 10-31
Check # field 6-16, 6-17, 6-20, 6-21, 6-23, 6-25, 6-26
Check Balances group box 10-16Check data
reviewing preliminary 6-14paycheck deduction data 6-21paycheck distribution data 6-26paycheck earnings data 6-17paycheck garnishment data 6-23paycheck special accumulator data 6-25paycheck summary data 6-15paycheck tax data 6-19performance plan payments 6-29retroactive earnings data 6-27
Check Images panelaccessing B-3, B-6, B-8illustration of B-4, B-7, B-9
Check Number field 10-50Check Signature Authorization form 9-3Check/Advice # column 6-26Check/Advice Issue Date field 6-26
Payroll Processing Guide Version 5.04.01

Index i-5
Checkschanging logos and signatures B-6deleting logos and signatures B-8entering manual checks 12-8see Paychecks
Checks by Range task 10-3Chk # field 3-5CKPRNT.SQC B-10Class column 10-10, 10-11Class Description column 10-10Co (Company) field 10-61Code column 10-8Code field 3-10Company Definitions process group
overview 1-3tasks 1-3
Company Fee field 6-24Company Fee/Payee Fee column 10-55Company field 10-55Complete Payroll (Confirm) task
in On-Demand Payroll (Off Cycle) process 11-21in Schedule Payroll (On Cycle) process 6-35
Complete Reversal (Confirm) taskin Balance Adjustment process 11-58, 11-64, 12-96
Completed check box 5-6, 5-25, 5-26Completed column 5-8Completed pay data entry 5-24Configuration panel
accessing 6-58illustration of 6-59
Confirming your payroll 6-34generating summary reports 7-1overview 6-2preparing for next payroll cycle
deleting confirmed pay cycle data 6-42overview 6-42
reviewing confirmed paysheets 6-37reviewing pay results 6-37, 11-22reviewing results 6-37reviewing system messages 6-36unconfirming a confirmed payroll 6-40
Contact Name field 8-16Copy button
Preload Operation dialog box 4-40Copy Query Definition dialog box 4-40Copy Template dialog box
Rapid Pay Data Entry 4-21Copy View dialog box
illustration of 4-21Cost Center (PAY005) task 7-5
Cost Center panelaccessing 7-5illustration of 7-5
Cost Center report (PAY005) 7-5Create balance record if none exists check box 12-51Create IAT Records check box 8-18Create NACHA File (DDP001) 9-24, 9-26Create NACHA File (DDP001) task 9-25, 9-27Create NACHA File panel
accessing 9-24, 9-26illustration of 9-25, 9-27
Create Payroll Calendars panelaccessing 15-4illustration of 15-5
Create Payroll Calendars task 15-5Create Paysheets check box 5-34, 5-38, 5-42Create Periodic Tax File panel
accessing 8-6illustration of 8-6
Create Periodic Tax File task 8-6csv file
exporting and importing 4-42Cum (Cumulative) option 3-10Currency field 10-36Custom export definitions
creating C-3Custom Export Definitions task C-3
DData
exporting 4-55importing from CSV or RPD file 4-42
Data Entry column 5-5, 5-6, 5-31Data Options group box 15-25, 15-28, 15-32Data Translation tab
accessing C-5illustration of C-5
Data Validate dialog boxaccessing 4-53illustration of 4-53
Dates column 6-18DDP001.SQR (Create NACHA File) 9-24, 9-26DDP002.SQR (Direct Deposit Register) 9-37DDP003.SQR Print Direct Deposit Advices
process 9-30DDP004.SQR (Payroll Advice Register) 9-38DDP005.SQR (Direct Deposit Prenotification) 9-22DDP006.SQR (Direct Deposit Prenote Memo) 9-28DE for Rule field 6-23Dead Paycheck file 9-43
Payroll Processing Guide Version 5.04.01

i-6 Index
Dead Paychecks panelaccessing 9-43illustration of 9-44
Ded Class field 12-58, 12-62, 12-64, 12-84, 12-88, 12-90
Ded Code field 12-58, 12-62, 12-64, 12-84, 12-88, 12-89
Ded Subset field 5-39, 5-44Ded Taken field 5-39Ded taken field 5-44Deduction arrears
viewing MTD, QTD, YTD dataDeduction Arrears panel
accessing 10-45illustration of 10-45
Deduction Balance Adjustment panelaccessing 12-31
Deduction Balance panelillustration of 12-32
Deduction Balance task 12-32Deduction Class columns 10-48Deduction Class field 10-44Deduction Classification field 10-46Deduction Code field 10-44, 10-46, 10-55Deduction column 6-21, 10-10Deduction Description column 10-10Deduction Override panel
in On-Demand Payroll (Off Cycle) process~Enter Pay Cycle Earnings (Paysheets) task
accessing 11-8illustration of 11-8
in the Earnings and Overrides by Employee (Payline) task
accessing 3-28, 3-29illustration of 3-29
Deduction Register (PAY001) 7-3Deduction Register (PAY001) task 7-3Deduction Register panel
accessing 7-3illustration of 7-3
Deduction Subset field 5-11, 5-14, 5-19Deduction Taken field 5-11, 5-14, 5-19Deductions
correcting employee payroll errorschanging general deductions 10-50overview 10-50preparing pay cycle deduction override 10-51recording deduction override 10-51
entering one-time overridesfor manual checks 11-8for on-demand checks 11-26
guidelines for permanent changes 3-27, 3-36
Deductions (cont.)importing one-time deductions 5-47one-time
recording 3-27reviewing employee payroll errors
overview 10-41viewing by month 10-46viewing for specific check 10-41viewing MTD, QTD, YTD data 10-43viewing MTD, QTD, YTD data for arrears 10-45viewing savings bond activity 10-48
viewing paycheck information 6-21Deductions area 6-60Deductions by Month panel
accessing 10-46illustration of 10-47
Deductions column 10-48Deductions field 6-16, 6-17, 6-20, 6-21, 6-23, 6-25,
6-26Deductions group box 6-16Deductions Not Taken (PAY008) task 7-7Deductions not Taken panel
accessing 7-7illustration of 7-7
Deductions not Taken report (PAY008) 7-7Deductions panel
in Checks by Range taskaccessing 10-7illustration of 10-9
in Deductions taskaccessing 10-43illustration of 10-44
in Employee Deductions taskaccessing 10-41illustration of 10-42
in Review On-Line Check taskaccessing 11-44illustration of 11-44
in View Preliminary Paycheck Data taskaccessing 6-21illustration of 6-21
Deductions Pending panelaccessing 12-57illustration of 12-57
Deductions Reversal panelaccessing 12-83illustration of 12-83
Deductions Summary panelaccessing 12-72illustration of 12-72
Payroll Processing Guide Version 5.04.01

Index i-7
Deductions taskin View Balances (MTD, QTD, YTD) process 10-43in View Monthly Balances process 10-47
Default File Name field 5-22Define Paycheck Messages task 9-9Delete Batch/Spreadsheet(s) panel
accessing 5-7illustration of 5-7
Delete Batches or SubBatches task 5-7Delete Pay Cycle Data (PAYUNSHT) task 3-58Delete Pay Cycle Data panel
accessing 3-58illustration of 3-58
Delete Prior Time and Attendance Data task 6-42Delete Time and Attendance Data panel
accessing 6-42illustration of 6-42
Delete Unused Payroll Calendars (PRUTL001) task 15-14
Delete Unused Payroll Calendars panelaccessing 15-14illustration of 15-14
Department column 10-28Department field 5-10, 5-13, 5-16, 5-19, 6-18Department ID field 6-30Departments field 7-13, 7-15Dept ID field 3-8Dept ID Number column 6-29Descending sort order
Sort Spreadsheet Data dialog box 4-46Description column 6-25Difference column 5-31Direct Deposit Advice Information file
transferring to ADP 8-24Direct Deposit Advice Print (Generate) process
(DDP003) 9-30Direct deposit advices
see AdvicesDirect Deposit field 3-6, 5-11, 5-14, 5-17, 5-19,
5-39, 5-43Direct Deposit Prenote Memo (DDP006) 9-28Direct Deposit Prenote Memo (DDP006) task 9-29Direct Deposit Prenote Memo panel
accessing 9-28illustration of 9-29
Direct Deposit Prenotification (DDP005) 9-22Direct Deposit Prenotification (DDP005) task 9-22Direct Deposit Prenotification panel
accessing 9-22illustration of 9-22
Direct Deposit Register (DDP002) 9-37Direct Deposit Register (DDP002) task 9-37
Direct Deposit Register panelaccessing 9-37illustration of 9-37
Direct depositsviewing advice information 6-26
Direct Deposits processDirect Deposit Prenote Memo (DDP006) task 9-28
Display Options area 9-23, 9-29Distributions
changing information 3-52reviewing employee information
overview 10-12viewing direct deposit advice summary
data 10-13viewing paycheck summary data 10-12
Distributions panelin Employee Earnings task
accessing 10-13illustration of 10-14
in View Preliminary Paycheck Data taskaccessing 6-26illustration of 6-26
Dt field 3-5
EEarn Type column 10-28, 10-30Earned Year-to-Date field 10-37Earning field 5-11, 5-14, 5-17, 5-19Earnings
correcting employee payroll errorsmodifying additional pay 10-39modifying earnings data on paysheets 10-38overview 10-38preparing paycheck adjustments 10-40
researching employee payroll errorsoverview 10-17viewing all by month 10-24viewing all special accumulators by month 10-25viewing employee job data 10-27viewing FLSA overtime earnings by pay
run 10-27viewing FLSA overtime earnings by work
period 10-29viewing for specific check 10-17viewing leave balances by accrual date 10-31,
10-33viewing leave balances summary 10-34viewing MTD, QTD, YTD data for earnings
type 10-20
Payroll Processing Guide Version 5.04.01

i-8 Index
Earningsresearching employee payroll errors (cont.)
viewing MTD, QTD, YTD data for special accumulator 10-22
viewing special accumulators for specific check 10-19
viewing by employee and/or pay group 3-17Earnings Amounts column 10-22, 10-25Earnings and distributions
viewing by employee 3-15Earnings and Distributions by Employee task 3-16Earnings and Distributions panel
accessing 3-15illustration of 3-16
Earnings and overridesviewing by employee and/or pay group 3-11
Earnings and Overrides (Paysheets) task 3-12Earnings and Overrides by Employee (Payline)
task 3-14, 3-28, 3-33, 3-37, 3-47, 3-49, 3-52, 3-55, 11-5
Earnings Balance Adjustment panelaccessing 12-34
Earnings Balance panelillustration of 12-35
Earnings Balance task 12-34Earnings by Month panel
accessing 10-24illustration of 10-24
Earnings Calc Seq field 6-5Earnings Code by Employee Type area 5-45Earnings column 6-17Earnings field 5-28, 6-16, 6-17, 6-20, 6-21, 6-23,
6-25, 6-26, 10-25Earnings panel
accessing 12-8, 12-14, 12-18, 12-24illustration of 12-9, 12-15, 12-19, 12-25in Calculate On-Line Check task
accessing 11-36illustration of 11-36
in Earnings and Overrides (Paysheets) taskaccessing 3-11illustration of 3-12
in Earnings and Overrides by Employee (Payline) taskaccessing 3-13illustration of 3-14, 3-48, 3-50, 3-53, 3-56scroll bars 3-13
in Earnings Short Form (Paysheets) taskaccessing 3-17illustration of 3-18scroll bars 3-17
Earnings panel (cont.)in Employee Earnings task
accessing 10-17illustration of 10-18
in Enter Pay Cycle Earnings (Paysheets) taskaccessing 3-23, 3-40illustration of 3-23, 3-41
in On-Demand Payroll (Off Cycle) process~Enter Pay Cycle Earnings (Paysheets) task
accessing 11-5, 11-24illustration of 11-6, 11-25
in Review On-Line Check taskaccessing 11-43illustration of 11-43
in the Earnings and Overrides by Employee (Payline) task
illustration of 3-29in View Balances (MTD, QTD, YTD) process~Earn-
ings taskaccessing 10-20illustration of 10-21
in View Preliminary Paycheck Data taskaccessing 6-17illustration of 6-17
Earnings Pending Panelaccessing 12-55illustration of 12-55, 12-71, 12-81
Earnings Reversal Panelaccessing 12-80illustration of 12-81
Earnings Short Form (Paysheets) task 3-18Earnings Summary Panel
accessing 12-71illustration of 12-71
Earnings taskin View Balances (MTD, QTD, YTD) process 10-21in View Monthly Balances process 10-24
Earnings Type field 6-17, 10-21Earnings types
establishing for tax adjustments 12-4requirements for Taxable Gross Definition
panel 12-5Earns Begin Date column 6-28Earns Code column 6-28Earns End Date column 6-28Edit Template dialog box
illustration of 4-18, 4-22Edit Templates dialog box
accessing 4-18Edit Views
Options menuRapid Pay Data Entry 4-20
Payroll Processing Guide Version 5.04.01

Index i-9
Empl Status field 3-5Employee Deductions task 10-42Employee dialog box
illustration 4-45Employee Earnings Record (PAY014) task 14-11Employee Earnings Record panel
accessing 14-10illustration of 14-11
Employee Earnings task 10-18, 10-19Employee Garnishment Deductions task 10-53Employee goal amount exceeded reason 6-22Employee info
viewing 4-45Employee Information
Import WGPS File (PAYWGP04) 8-31Employee Information process
View Paycheck Detail task 10-27, 10-29Employee Information process group
overview 1-4tasks 1-4
Employee Pay Data Entry task 5-28Employee Record Number field 3-4Employee Tax Deductions task 10-59Employee TLM data
exportingTAA028.SQR C-2, C-3
Employees field 7-13, 7-15Employer IDs group box 14-4Employer Payroll Files group box 8-9, 8-11Employment Record Number fieldEnd field 3-9Enter Pay Cycle Earnings (Paysheet) task
in Scheduled Payroll (On Cycle) process 12-8, 12-14, 12-19, 12-24
Enter Pay Cycle Earnings (Paysheets) taskin On-Demand Payroll (Off Cycle) process 11-5,
11-24in Scheduled Payroll (On Cycle) process 3-23, 3-41
Enterprise eTime employee TLM dataexporting 6-49
Enterprise Payrollinterfacing with ADP General Ledger 13-6
EPayroll Rapid Pay Data Entry 4-3Ern Code field 12-56, 12-81Error Listing report 13-11Error messages
reviewing payroll calculation messagesoverview 6-8printing employee-level error messages 6-10reviewing company-level error messages
only 6-11viewing all error messages online 6-8
Error messages (cont.)reviewing payroll confirmation messages 6-36
Establish Quarter Code to Report task 14-24Establishing pay run IDs 15-16Estimated Pay panel
illustration of 6-61Estimating paychecks
overview 6-58ETD history
one time update 13-5e-TIME Employee Export (TAA026) task 6-50,
6-51eTIME Employee Export panel
accessing 6-50, 6-51e-TIME employee file
exporting 6-44, 6-50, 6-51, 6-52, 6-56Exception time reporting
entering into the paysheet 3-47modifying payline information 3-47
Expanded fields -xxiiExport Data to CSV File dialog box
accessing 4-55illustration of 4-55
Export Definition tabillustration of C-4
Export Details tabaccessing C-4illustration of C-4
Export Labor Levels to Enterprise eTIME (TAA032) task 6-49
Export labor Levels to Enterprise panelaccessing 6-49
Export optionData menu 4-55
Export to Enterprise eTIME panelaccessing 6-46, C-3illustration of 6-47
Export to TimeSaver panelaccessing 6-54illustration of 6-55
Export to Total Time panelaccessing 6-56
External File Import Error/Control Report panelillustration of 5-22
External filesimporting into paysheets 3-57
Payroll Processing Guide Version 5.04.01

i-10 Index
FFederal EIN field 14-5Federal Reserve Bank
savings bondsbuilding files for 13-18
Federal Tax area 6-59Federal taxes
adjusting balancesadding paysheet page 12-14entering one-time taxes 12-16overview 12-14running pay calculation and confirmation
processes 12-13, 12-17FEIN field 8-11, 14-29File Creation panel
in Build Quarterly Tax Service File (TAX812) taskaccessing 14-24illustration of 14-25
File Name fieldExport Data to CSV File dialog box 4-55
File Type field 5-22Files of Type list
Import File dialog box 4-42, 4-44Filing Status field 6-59, 6-60First by field
Sort Spreadsheet Data dialog box 4-46FLSA Average field 10-31FLSA Average Rate by Pay Run panel
accessing 10-27illustration of 10-28
FLSA Average Rate by Pay Run task 10-27, 10-29FLSA Average Rate field 10-29FLSA Eligible Totals field 10-29, 10-31FLSA option 10-28, 10-30FLSA overtime earnings
researching employee payroll errorsviewing by employee and payroll run 10-27viewing by employee and work period 10-29
viewing before pay confirmation 3-21FLSA Work Period Begin Date field 10-30FLSA Work Period End Date field 10-30Frequency option 3-34Fund Transaction History panel
illustration of 7-37Fund Transaction History Report (PAY102) 7-37
GGarnish ID column 6-23Garnish ID field 10-55, 12-62, 12-88Garnishment Balance task 12-37
Garnishment Deduction Report (PAY044) 7-24Garnishment Deduction Report (PAY044) task 7-24Garnishment Deduction Report panel
accessing 7-24illustration of 7-24
Garnishment field 6-24Garnishment Override panel
Earnings (Paysheets) taskillustration of 11-10
in Earnings and Overrides by Employee (Payline) taskaccessing 3-33illustration of 3-34
in Enter Pay Cycle Earnings (Paysheets) taskaccessing 11-10, 11-28illustration of 11-28
Garnishment Specification Data task 8-28Garnishment Summary panel
accessing 12-75illustration of 12-75
Garnishmentscorrecting employee payroll errors
changing employee garnishment deduction data 10-56
changing employee garnishments 10-56overview 10-56preparing pay cycle garnishment override 10-56
entering one-time overridesfor manual checks 11-10for on-demand checks 11-28
one-timerecording 3-33
researching employee payroll errorsoverview 10-52viewing for specific paycheck 10-52viewing MTD, QTD, YTD data 10-54
viewing paycheck information 6-23Garnishments panel
in Employee Garnishment Deductions taskaccessing 10-52illustration of 10-53
in Review On-Line Check taskaccessing 11-46illustration of 11-46
in View Balances (MTD, QTD, YTD) process~Gar-nishments task
accessing 10-54illustration of 10-55
in View Preliminary Paycheck Data taskaccessing 6-23illustration of 6-23
Payroll Processing Guide Version 5.04.01

Index i-11
Garnishments Pending panelaccessing 12-61illustration of 12-61
Garnishments Reversal panelaccessing 12-87illustration of 12-87
Garnishments taskin View Balances (MTD, QTD, YTD) process 10-54
General ledgercreating accruals for leave balances 13-6reports
General Ledger Distribution Summary Report (GLX002) 13-8
General ledger interface file (GLX001) 13-6General ledger leave accruals file
(GLX003) 13-8Leave Accrual GL Summary Report
(GLX004) 13-10General Ledger area 5-39, 5-43General Ledger Distribution Summary Report
generating the file (GLX001) 13-6producing the report (GLX002) 13-6
General ledger interface file (GLX001) 13-6General ledger leave accruals file (GLX003) 13-8General Ledger process
Generate GL Interface File (GLX001) task 13-6GL Distribution Summary (GLX002) task 13-8
General panelin On-Line Check task
accessing 11-34illustration of 11-34
in Review On-Line Check taskaccessing 11-42illustration of 11-42
Generate ADP UCM Service File (TAX816) task 13-23
Generate GL Interface File (GLX001) task 13-7Generate GL Interface File panel
accessing 13-6illustration of 13-7
Generate GL Leave Accruals (GLX003) task 13-9Generate GL Leave Accruals panel
accessing 13-8illustration of 13-9
Generation Date column 8-9, 8-12, 14-29GL Distribution Summary (GLX002) task 13-8GL Distribution Summary panel
accessing 13-8GL Interface Run option 15-12GL Leave Accruals Summary (GLX004) task 13-10GL Leave Accruals Summary panel
accessing 13-10
GL Pay Type field 5-11, 5-13, 5-16, 5-19, 5-39, 5-43, 6-18
GL Type field 3-8GLX001.SQR (General ledger interface file) 13-6GLX002.SQR (General Ledger Distribution
Summary Report) 13-8GLX003.SQR (General ledger leave accruals
file) 13-8GLX004.SQR (Leave Accrual GL Summary
Report) 13-10GLX006 (Adjustment GL Summary Report) 12-79Gross Pay field 6-59Gross-Up check box 5-11, 5-14, 5-16, 5-19, 5-38,
5-43Gross-Up option 3-7Gross-ups
enteringadding a paysheet page 3-40entering one-time deduction information 3-42overview 3-39selecting processing options 3-40
overview 3-39
HHCE Limit exceeded reason 6-22Holiday schedule
defining 15-21Hourly Earnings by Employee task 3-19Hourly Earnings Distribution panel
accessing 3-21illustration of 3-22scroll bars 3-21
Hourly Earnings Distribution Review task 3-21Hourly Earnings panel
accessing 3-19illustration of 3-20scroll bars 3-19
Hourly Rate field 5-11, 5-13, 5-16, 5-19, 6-18Hours Adjusted field 10-38Hours and Earnings panel
accessing 10-7illustration of 10-8
Hours Balance field 10-37Hours Bought field 10-38Hours column 6-17, 6-25, 10-9, 10-22, 10-23,
10-25, 10-26, 10-28, 10-30Hours field 5-11, 5-14, 5-17, 5-19, 5-28Hours Sold field 10-38Hours Taken field 10-37HP Raster Graphics file 9-3
Payroll Processing Guide Version 5.04.01

i-12 Index
Hrly Rate field 3-8
IIAT
creating an international NACHA File 9-26Import csv and rpd files 4-42, 4-44Import File dialog box
accessing 4-42, 4-44illustration of 4-42, 4-44
Import from CSV file option 5-38Import Name field 5-22Import One-Time Deductions (PAY021) task
in Scheduled Payroll (On Cycle) process 5-49Import One-Time Deductions panel
accessing 5-48illustration of 5-49
Import One-Time Deductions Taskusing to import one-time deduction data 5-47
Import optionData menu 4-42, 4-44
Import Payment Data (PAY020) taskin Scheduled Payroll (On Cycle) process 5-37, 5-42
Import Payment Data panelaccessing 5-37, 5-41illustration of 5-37, 5-42
Import Payment Data Taskusing to import pay cycle data 5-36
Import Performance Plan Payments option 5-42Import T&A Batch (TAA015) task 5-22Import T&A Batch panel
accessing 5-22illustration of 5-22
Import WGPS File (PAYWGP04) task 8-32Import WGPS File panel
accessing 8-31illustration of 8-32
Imported Transactions field 5-5Include deposits processed by ADP Full Service
Direct Deposit (FSDD) check box 9-23, 9-30Include IAT Records check box 9-27Input CSV File Name field 12-51Input File Name field 5-38, 5-49Insert Employee(s) dialog box
illustration of 4-33, 4-36, 4-39Insert new one-time deductions (Create paysheets if
necessary) check box 5-49iPayStatements check box 8-18Issue Date field 6-16, 6-17, 6-20, 6-21, 6-23, 6-25
JJob Cd field 3-8Job Code field 6-18Job Data Overrides area 5-13, 5-16, 5-18, 5-28Job field 5-10, 5-13, 5-16, 5-19Job information
researching employee payroll errorsviewing by employee 10-27
Job Pay check box 3-7, 5-38, 5-42Job records
correctingsee State taxes, adjusting balances
LLast Process Date field 13-3Leave Accrual GL Summary Report
(GLX004) 13-10Leave Accrual Summary (PAY040) task 7-20Leave Accrual Summary panel
accessing 7-20illustration of 7-20
Leave accrualsformula for calculating 10-36
Leave Balance Summary task 10-34Leave balances
creating general ledger accruals for 13-6researching employee payroll errors
viewing by accrual date 10-31, 10-33viewing summary 10-34
updating 13-3Leave Balances panel
accessing 10-31, 10-33illustration of 10-32, 10-33
Leave Balances task 10-32, 10-33Less Exemption field 6-24Less Other Garnishments field 6-24Line # field 3-5, 6-28Load Employee(s) option
Data menu 4-33Load Pending Import Data panel
accessing 12-69illustration of 12-69
Load Run Control panelaccessing 12-68illustration of 12-68
Local Tax Deposit Summary (TAX009) 7-30Local Tax Deposit Summary (TAX009) task 7-30Local Tax Deposit Summary panel
accessing 7-30illustration of 7-30
Payroll Processing Guide Version 5.04.01

Index i-13
Local Taxes by Residency panelaccessing 10-62illustration of 10-65
Locality column 10-11Locality field 3-9, 5-11, 5-14, 5-17, 5-19Locality Name column 10-11Locations field 7-13, 7-15Logos
changing image files B-6, B-15deleting from check process B-8deleting from report process B-17implementing for reports B-12
Logos and signaturesdigitizing for your checks and advices 9-3
Look In fieldImport File dialog box 4-42, 4-44
MManual Check field 3-5Manual checks
creating for employee balance adjustmentssee Adjustments, creating manual checks
On-Line Check processsee On-Line Check process
standard off-cycle processadding paysheet page 11-5confirming your payroll 11-20correcting errors in your payroll 11-16entering one-time deductions 11-8entering one-time garnishments 11-10entering one-time taxes 11-11entering third-party sick pay 11-12overview 11-4processing initial calculation 11-14recalculating your payroll 11-17reviewing confirmation results 11-22running final pay calculation 11-18viewing preliminary check data 11-17
Maximum Deduction field 6-24Maximum yearly deduction exceeded reason 6-22MICR quality
testingoverview 9-4testing line quality of printer 9-4troubleshooting MICR test problems 9-6using a signal strength MICR tester 9-6using MICR positioning gauge 9-5visually inspecting checks 9-5
Month column 10-61, 10-63
Month field 10-16, 10-22, 10-23, 10-25, 10-26, 10-47, 10-55, 10-65, 12-56, 12-58, 12-60, 12-62, 12-81, 12-83, 12-85, 12-87
Monthly Processes processGenerate GL Leave Accruals (GLX003) task 13-8Leave Accrual GL Summary (GLX004) task 13-10Run Paycheck Reconciliation A (PAY015A)
task 13-12Run Paycheck Reconciliation B (PAY015B)
task 13-13Savings Bond Report and File (PAY016) task 13-17Savings Bond Report and FRB File (PAY016B)
task 13-18Update Dead Paychecks task 9-43Update Leave Balances task 13-3Update UCM Wage Data task 13-21
Move to Pay Cycle Data (Paysheets) (TAA020) task 5-34
Move to Pay Cycle Data panelaccessing 5-33illustration of 5-34
MTD column 10-48Multi jurisdiction taxing 3-55Multi-company reporting
see State Unemployment Insurance (SUI) Quarterly Wage Reports
Multiple reasons 6-22Multi-worksite reporting
see State Unemployment Insurance (SUI) Quarterly Wage Reports
NName field 6-17, 6-25Negative Leave Accrual panel
accessing 7-16illustration of 7-16
Net Pay field 3-5, 6-16, 6-17, 6-20, 6-21, 6-23, 6-25, 6-26
Net Pay YTD field 10-16New Batch/Spreadsheet Header dialog box
illustration of 4-24Rapid Pay Data Entry
accessing 4-24illustration of 4-24
New dialog boxillustration of 4-25
New templatecreating in Rapid Pay Data Entry 4-18
No Limit Gross/Amt Not Taken column 6-20
Payroll Processing Guide Version 5.04.01

i-14 Index
Not enough net pay reason 6-22Number of Units Purchased field 10-50
OOff Cycle check box 5-37, 5-49Off Cycle column 8-12Off Cycle field 6-28, 10-28, 10-30Off-Cycle Calcs Outstanding option 15-12Off-Cycle Closed option 15-12Off-cycle payrolls
adjustmentssee Adjustments
manual checkssee Manual checks 11-4
on-demand checkssee On-demand checks 11-23
overviewreversals
see ReversalsOhio Local Tax Reconciliation panel
accessing 14-19illustration of 14-19
OK to Pay check box 5-38, 5-42OK to Pay option 3-6, 6-29On-demand checks
On-Line Check processsee On-Line Check process
standard off-cycle processadding paysheet page 11-24calculating and completing your checks 11-29calculating retroactive pay 11-29entering one-time deductions 11-26entering one-time garnishments 11-28entering one-time taxes 11-26entering third-party sick pay 11-29overview 11-23
On-Demand Payroll (Off Cycle) processCalculate Final Payroll task 11-18Calculate Preliminary Payroll task 11-14Complete Payroll (Confirm) task 11-20Enter Pay Cycle Earnings (Paysheet) task 11-5Enter Pay Cycle Earnings (Paysheets) task 11-24
On-Line Check panelaccessing 11-31illustration of 11-32
On-Line Check processCalculate On-Line Check task 11-31confirming your on-line check 11-51correcting errors 11-39overview 11-30
On-Line Check process (cont.)performing initial calculation 11-38printing your on-line check 11-51recalculating 11-39recalculating your on-line check 11-51reviewing and/or setting up earnings 11-36reviewing/modifying check data
overview 11-40reviewing paycheck summary data 11-41reviewing/modifying deductions 11-44reviewing/modifying earnings 11-43reviewing/modifying garnishments 11-46reviewing/modifying general data 11-42reviewing/modifying taxes 11-48
setting up general check data 11-34specifying the action 11-31
On-Line Check Reversals panelaccessing 11-33illustration of 11-33
Open buttonImport File dialog box 4-43, 4-44
Opening balancesadding
overview 12-28Original Hours column 6-28Original Rate column 6-28OT Hrs field 3-7, 3-8Oth Hrs field
see Other Hours fieldOther Earnings group box 3-10, 6-16, 6-19Other Hours fieldOther Registrant field 10-49Override File Name field 5-22Override Paycheck Messages panel
accessing 9-8illustration of 9-11, 9-12, 9-13, 9-14, 9-15, 9-16, 9-17
Overtime Earnings field 10-8Overtime Hours field 6-18, 10-8Overview
of Enterprise Payroll 1-2of process groups 1-2
Owner field 10-49
PPage # field 6-28Paid Time-Off Accruals Detail Report
generating the file (GLX003) 13-8producing the report (GLX004) 13-8
Pathways Financial Management System 13-6
Payroll Processing Guide Version 5.04.01

Index i-15
Pay calculationsee Calculating your payroll
Pay Calendar Data group box 15-20Pay calendars
assigning a pay run ID 15-16assigning to pay calendar 15-18establishing pay run ID 15-16verifying pay run ID is attached to pay
calendar 15-19creating
building automatically 15-4building manually 15-8using with pay run ID and pay group 15-3
printing information 15-7Pay confirmation
see Confirming your payrollPay cycle data
adding for new employee 3-23deleting confirmed 6-42deleting for a specific pay run ID 3-58entering exception time reporting
overview 3-47entering gross-ups
adding a paysheet page 3-40entering one-time deduction information 3-42overview 3-39selecting processing options 3-40
entering into paysheetsoverview 3-1, 3-2
entering one-time deduction overrideentering deduction data 3-28overview 3-27permanent deduction changes 3-27
entering one-time garnishment overrideoverview 3-33
entering one-time tax overrideentering tax data 3-36overview 3-36permanent tax changes 3-36
entering third-party sick payadding 3-43overview 3-43printing data 3-46
entering using ADP Pay Data Entry Systemsee Pay Data Entry system
entering using Pay Data Entry systemindicating pay data entry is complete 5-24
Pay cycle data (cont.)generating initial
generating pay cycle data (paysheets) 2-9overview 2-1reviewing pay cycle data
2-11viewing pending retroactive pay 2-4
importing from external fileoverview 5-36, 5-47reviewing and correcting imported data 5-46
Importing through ADP Pay Data Entry System 5-4importing using Import Payment Data Task
(PAY020) 5-36modifying earnings information 3-26moving into paysheets using TAA020 5-33reviewing confirmed data
distributions 10-12reviewing initial pay cycle data
earnings and distributions by employee 3-15earnings and overrides by employee and/or pay
group 3-11earnings by employee and/or pay group 3-17FLSA overtime earnings by employee and pay
run ID 3-21overview 3-4
reviewing using Checks by Range taskselecting check criteria 10-3viewing check data 10-5
specifying separate checks for an employee 3-49, 3-52
Pay Cycle Reports processCost Center (PAY005) task 7-5Deduction Register (PAY001) task 7-3Deductions not Taken (PAY008) task 7-7Negative Leave Accrual (PAY031) task 7-16Payroll Balances (PAY030) task 13-24Payroll Register by Home Dept task 7-12Payroll Register by Worked Dept (PAY025W)
task 7-14Payroll Summary (PAY018) task 7-10
Pay dataentering directly into ADP Pay Data Entry
adding an employee to a spreadsheet 5-9adding for multiple employees in same
spreadsheet 5-12overview 5-9updating an for individual employee 5-14updating an for multiple employees in same
spreadsheet 5-17Pay Data Entry
Add Employee task 5-10Pay Data Entry by Employee task 5-15
Payroll Processing Guide Version 5.04.01

i-16 Index
Pay Data Entry by Spreadsheet tas 5-17Pay Data Entry by Spreadsheet task 5-12Pay data entry completed 5-24Pay Data Entry Information panel
illustration of 5-27Pay Data Entry Panel
illustration of 5-10, 5-12, 5-15, 5-18Pay Data Entry panel
accessing 5-9, 5-12, 5-14, 5-17, 5-27illustration of 5-28
Pay Data Entry Systemimporting pay cycle data through 5-4
Pay Data Entry systemestablishing batch data
deleting batches and spreadsheets 5-7establishing batch header data
setting up batch headers 5-4setting up spreadsheets 5-6
indicating pay data entry is complete 5-24moving pay cycle data into paysheets
verifying batches are complete 5-26overview
Pay Data Interface Error/Control Report panelillustration of 5-34
Pay End Date field 3-59, 6-11, 6-28, 7-4, 7-5, 7-8, 7-10, 7-13, 7-15, 7-22, 7-29, 7-30, 7-35, 8-21, 9-23, 9-25, 9-27, 9-29, 9-32, 9-36, 9-38, 9-39, 10-36, 13-7, 13-13, 13-17
Pay End Dt column 10-28, 10-30Pay File Type field 8-16Pay Freq field 3-9Pay Frequency field 6-59Pay Group field 6-30, 13-7, 15-5Pay Groups and Payroll Calendars process
Payroll Calendar task 15-18Pay Grp column 10-28, 10-30Pay Line Message field 3-5Pay Messages panel
accessing 11-39illustration of 11-39
Pay Period Begin Date field 15-9Pay Period End Date field 15-9Pay Period FLSA Average Rate field 10-31Pay Period of the Month field 15-10Pay Run Data panel
accessing 8-20illustration of 8-20
Pay Run ID column 8-9, 8-12Pay Run ID field 5-5, 5-34, 5-42, 10-28, 13-7, 15-10,
15-17, 15-18
Pay run IDsassigning to pay calendar
see Pay calendarsPAY001.SQR (Deduction Register) 7-3PAY003.SQR (Print Paychecks) process 9-17, 9-44PAY004.SQR (Paycheck Register) 9-35, 9-44PAY005.SQR (Cost Center report) 7-5PAY008.SQR (Deductions not Taken report) 7-7PAY011.SQR (Payroll Error Messages for
Employees report) 6-10PAY015A.SQR (Paycheck Reconciliation A)
overview of 13-11running 13-12
PAY015B.SQR (Paycheck Reconciliation B)overview of 13-11running 13-13
PAY016.SQR (Bond Purchase Report)overview 13-16
PAY016.SQR (Savings Bond report file) 7-9PAY016B.SQR (Savings Bond Report and FRB
File) 13-18PAY018.SQR (Payroll Summary) 3-46, 7-10PAY020
using to import pay cycle data 5-36PAY021
using to import one-time deduction data 5-47PAY025H.SQR (Payroll Register by Home
Dept) 7-12PAY025W.SQR (Payroll Register by Worked
Dept) 7-12, 7-14PAY030.SQR (Payroll Balances Report) 13-24PAY033 (414v Catch Up Report) 7-18PAY042 (Retro Pay Report) 7-22PAY044 (Garnishment Deduction Report) 7-24PAY047 (Wage and Tax Register) 7-26PAY714.SQR (Payroll Calendars Definitions) 15-7Paycheck Adjustments (Off Cycle) process
Prepare Paycheck Adjustments task 11-54Paycheck Adjustments (Off-Cycle) process
Complete Reversal (Confirm) task 11-58Paycheck Adjustments panel
accessing 11-54illustration of 11-54
Paycheck datasee Check data
Paycheck Detail task 10-12, 10-14Paycheck Estimator task 6-59Paycheck Information file
transferring to ADP 8-24Paycheck Issue Date column 8-9, 8-12Paycheck Issue Date field 10-50
Payroll Processing Guide Version 5.04.01

Index i-17
Paycheck Messages panelaccessing 9-8illustration of 9-9, 9-10
Paycheck Reconciliation A (PAY015A)overview of 13-11running 13-12
Paycheck Reconciliation A panelaccessing 13-12illustration of 13-12
Paycheck Reconciliation B (PAY015B)overview of 13-11running 13-13
Paycheck Reconciliation B panelaccessing 13-13illustration of 13-14
Paycheck Register (PAY004) 9-35Paycheck Register (PAY004) task 9-36Paycheck Register panel
accessing 9-35illustration of 9-36
Paycheck Register report (PAY004) 9-44Paycheck Reversals (Off Cycle) process
Prepare Paycheck Reversals task 11-61, 11-67Paycheck Reversals (Off-Cycle) process
Complete Reversal (Confirm) task 11-63Paycheck Reversals panel
accessing 11-61, 11-67, 12-93illustration of 11-61, 11-67, 12-93
Paycheck Totals YTD panelaccessing 10-15illustration of 10-15
Paycheck Totals YTD task 10-15Paycheck View panel
in Employee Earnings taskaccessing 10-12illustration of 10-13
in Review On-Line Check taskillustration of 11-41, 11-52
in View Preliminary Paycheck Data taskaccessing 6-15illustration of 6-16
Paychecksadjusting
see AdjustmentsADP Check File Import (PAY032) task 8-23, 8-25calculating estimates 6-58deleting reversed checks 11-66entering manual checks 11-23entering manual checks into the system
using On-Line Check processoverview of reconciling 13-11
Paychecks (cont.)printing 9-17
see Printing paychecks and advicesprocessing manual checks 11-4reconciling
bank file format 13-12, 13-13, 13-15, 13-17, 13-18
researching outstanding checks 13-15running PAy015A 13-12running PAy015B 13-13using bank files 13-12
reprinting 8-5, 8-7, 8-10, 8-14, 8-21, 8-23, 8-24overviewpreparing to reprint 9-41printing replacement checks 9-44reviewing results 9-43viewing reprinted checks 9-46
reversingsee Reversals
reviewing printed checksPaycheck Register (PAY004) 9-35
viewingMTD, QTD, YTD paycheck totals 10-15summary information 10-12
viewing through Checks by Range taskselecting check criteria 10-3viewing check data 10-5
Paychecks Run option 15-11Payee Fee field 6-24Payee Name column 6-23Payee Name field 10-55Payline
modifying payline information for exception time reporting 3-47
Payline Rate column 10-28, 10-30Paylines
modifying payline information for exception time reporting 3-47
relationship to paysheets 3-4Payment Amount field 6-30Payment Date field 6-30Payroll
calculating and confirmingsee Calculating your payrollsee Confirming your payroll
process, with Tax Service interface 8-4Payroll Advice Register (DDP004) 9-38Payroll Advice Register (DDP004) task 9-39Payroll Advice Register panel
accessing 9-38illustration of 9-39
Payroll Processing Guide Version 5.04.01

i-18 Index
Payroll Archive Control Reportviewing 15-26
Payroll Balances (PAY030) task 13-24Payroll Balances panel
accessing 13-24illustration of 13-24
Payroll Balances Report (PAY030) 13-24Payroll calculation
reviewing system messages 6-8, 6-36, 11-16, 15-7running final calculation 6-32
Payroll Calculation panelin Calculate Final Payroll task
accessing 6-32illustration of 6-33
in On-Demand Payroll (Off Cycle) process~Calculate Final Payroll task
accessing 11-18illustration of 11-18
in On-Demand Payroll (Off Cycle) process~Calculate Preliminary Payroll task
accessing 11-14illustration of 11-15
in Scheduled Payroll (On Cycle) process~Calculate Preliminary Payroll task
accessing 6-6illustration of 6-6
Payroll Calculation Run option 15-11Payroll Calendar Definitions (PAY714) task 15-7Payroll Calendar Definitions panel
accessing 15-7Payroll Calendar panel
accessing 15-8, 15-18illustration of 15-9, 15-11, 15-18
Payroll Calendar task 15-8, 15-18Payroll Calendars Definitions (PAY714) 15-7Payroll Confirmation panel
in Balance Adjustment process~Complete Reversals (Confirm) task
accessing 12-95illustration of 12-96
in On-Demand Payroll (Off Cycle) process~Complete Payroll (Confirm) task
accessing 11-20illustration of 11-21
in Paycheck Adjustments (Off-Cycle) process~Com-plete Reversals (Confirm) task
accessing 11-58illustration of 11-58
in Paycheck Reversals (Off-Cycle) process~Complete Reversals (Confirm) task
accessing 11-63illustration of 11-64
Payroll Confirmation panel (cont.)in Scheduled Payroll (On Cycle) process~Complete
Payroll (Confirm) taskaccessing 6-34illustration of 6-35
Payroll Confirmation Run option 15-11Payroll Confirmation Started option 15-11Payroll Cycle Processes process group
overview 1-5tasks 1-5
Payroll dataarchiving
overview 15-22, 15-23viewing Payroll Archive Control Report 15-26
deleting archived dataoverview 15-22, 15-26viewing Payroll Delete Control Report 15-28
restoring archived dataoverview 15-22, 15-29setting up run control 15-31viewing Payroll Restore Control Report 15-33
Payroll Definitions processPayroll Calendar Definitions (PAY714) task 15-7
Payroll Delete Control Report 15-28Payroll Error Messages for Employees report
(PAY011) 6-10Payroll Fund Detail panel
illustration of 7-35Payroll Fund Detail Report (PAY101) 7-35Payroll Messages panel
accessing 6-8illustration of 6-9
Payroll Preliminary Calc Run option 15-11Payroll Register by Home Dept (PAY025H)
task 7-12Payroll Register by Home Dept panel
accessing 7-12illustration of 7-12
Payroll Register by Worked Dept (PAY025W) task 7-14
Payroll Register by Worked Dept panelaccessing 7-14illustration of 7-14
Payroll Registers (PAY025H, PAY025W) 7-12Payroll Restore Control Report 15-33Payroll Run ID panel
accessing 15-16, 15-19illustration of 15-17, 15-19
Payroll Run ID task 15-17, 15-19Payroll Summary (PAY018) 3-46, 7-10Payroll Summary (PAY018) task 7-10
Payroll Processing Guide Version 5.04.01

Index i-19
Payroll Summary panelaccessing 7-10illustration of 7-10
Payroll Utilities processUpdate ETD Deduction Balances (PAY718)
task 13-5Paysheet Option Overrides area 5-11, 5-13, 5-16,
5-19Paysheet page
addingfor federal tax adjustments 12-14for manual checks 12-8for state tax balance adjustments 12-18
Paysheetsadding pay cycle data for new employee 3-23creating and using 3-1defining 3-4deleting pay cycle data for specific pay run ID 3-58distributing earnings across multiple
departments 3-52enter pay cycle data into
overview 3-1entering exception time reporting
overview 3-47entering gross-ups
entering a paysheet page 3-40entering one-time deduction information 3-42overview 3-39selecting processing options 3-40
entering one-time deduction overrideentering deduction data 3-28overview 3-27permanent deduction changes 3-27
entering one-time garnishment overrideoverview 3-33
entering one-time tax overrideentering tax data 3-36overview 3-36permanent tax changes 3-36
entering pay cycle dataoverview 3-2
entering third-party sick payadding 3-43overview 3-43printing data 3-46
generating initialgenerating pay cycle data (paysheets) 2-9overview 2-1reviewing pay cycle data 2-11viewing pending retroactive pay 2-4
importing external files 3-57modifying earnings information 3-26
Paysheets (cont.)modifying payline information for exception time
reporting 3-47relationship to paylines 3-4reviewing initial pay cycle data
earnings and distributions by employee 3-15earnings and overrides by employee and/or pay
group 3-11earnings by employee and/or pay group 3-17FLSA overtime earnings by employee and pay
run ID 3-21overview 3-4
specifying separate checks for an employee 3-49Paysheets Run option 15-11Pending Performance Plan Payments panel
accessing 6-29illustration of 6-30
Pending Retro Pay panelaccessing 2-4illustration of 2-5
Pending Transaction Load Process task 12-55Per Pay Amount field 6-60Performance Pay Plan ID field 5-45Performance plan payments
importing into paysheetsoverview 5-36, 5-41, 5-47reviewing and correcting imported data 5-46selecting basic payroll criteria 5-41selecting performance plan criteria 5-45
viewing pending 6-29Performance Plan Payments panel
accessing 5-45illustration of 5-45
Periodic File List panelaccessing 8-11illustration of 8-11
Periodic File Status panelaccessing 8-8illustration of 8-9
Periodic Payroll Processes processCreate ADP UCM Service Wage File (TAX816)
task 13-23Periodic Payroll Processes process group
overview 1-7tasks 1-7
Periodic tax filescreating after confirmed on-cycle payroll 8-5recreating 8-7transmitting
manually tracking file transmissions 8-8overview 8-7transferring file 8-7
Payroll Processing Guide Version 5.04.01

i-20 Index
Plan Type column 10-9Plan Type Description column 10-9Plan Type field 10-35, 10-36, 10-44, 10-46, 12-58,
12-60, 12-62, 12-64, 12-84, 12-86, 12-88, 12-89Plan Type group box 13-3Populate Employment-To-Date Deduction Balances
panelaccessing 13-5illustration of 13-5
Pos # fieldsee Position Number field
Position field 5-10, 5-13, 5-16, 5-19Position Number field 6-18Post-Payroll Cycle Processes process group
overview 1-6tasks 1-6
Pre-defined templatesRapid Pay Data Entry 4-15
Preload datacriteria 4-32sort order 4-32
Preload data fileselecting and preloading 4-33
Preload filecreating 4-34editing 4-37
Prenote Date field 8-16Prepare Initial Pay Cycle Data (Paysheets) task 2-10Prepare Pay Cycle Data panel
accessing 2-9illustration of 2-10
Prepare Paycheck Adjustments task 11-54Prepare Paycheck Reversals task 11-61, 11-67,
12-93Prepare Payroll Distributions
ADP Print Services Label (PAY038) task 8-23Prepare Payroll Distributions process
ADP Print Services File (PAY036) task 8-15Create NACHA File (DDP001) task 9-24, 9-26Direct Deposit Prenotification (DDP005) task 9-22Direct Deposit Register (DDP002) task 9-37Paycheck Register (PAY004) task 9-35Payroll Advice Register (DDP004) task 9-38Prepare to Reprint Paychecks task 9-41Print Direct Deposit Advices (DDP003) task 9-31Print Paychecks (PAY003) task 9-18
Prepare to Reprint Paychecks panelaccessing 9-41illustration of 9-42
Prepare to Reprint Paychecks task 9-42Preparing for External File Import 5-20Print Batch Details (TAA002) task 5-32
Print Batch Details panelaccessing 5-32illustration of 5-32
Print Batch Totals (TAA001) task 5-31Print Batch Totals List panel
accessing 5-31Print button
Print dialog box 4-48Print dialog box
accessing 4-48illustration of 4-48
Print Direct Deposit Advices (DDP003) 9-30Print Direct Deposit Advices panel
accessing 9-31illustration of 9-32
Print optionFile menu 4-48
Print Paychecks (PAY003) task 9-19, 9-31Print Paychecks check box 8-18Print Paychecks panel
accessing 9-18illustration of 9-19
Print Paychecks process (PAY003) 9-17, 9-44Print Payroll Messages (PAY011) task 6-10Print Payroll Messages panel
accessing 6-10illustration of 6-10
Print Prenotes check box 8-18Print Services
generating and transmitting filescompleting prerequisites 8-14
generating and transmitting payroll filesgenerating payroll file for ADP Print
Services 8-14Print Voucher check box 8-18Printers
configuration information for system administratorscustomizing printer to use digitized signature and
logo A-4overview A-2preparing the printer A-4selecting the printer A-3, E-1
Printing checks and advicessetting up logo and signature digitization 9-3
Printing paychecks and advicesoverview 9-8printing advices
printing advices using DDP003.SQR process 9-30
printing checks 9-17
Payroll Processing Guide Version 5.04.01

Index i-21
Printing paychecks and advices (cont.)printing direct deposit advices
creating the Direct Deposit Prenote Memo (DDP006) 9-28
creating the NACHA file (DDP001) 9-24, 9-26generating Direct Deposit Prenotification
(DDP005) 9-22overview 9-21
reprintingsee Reprinting paychecks
testing MICR qualitysee MICR quality
viewing generated paycheck and advice dataoverview 9-35printing Direct Deposit Register (DDP002) 9-37printing Paycheck Register (PAY004) 9-35printing Payroll Advice Register (DDP004) 9-38
Prior Years’ Carryover field 10-35Priority column 6-23Process Arrears check box 5-38Process check box 12-82, 12-84, 12-86, 12-88,
12-90Process groups
overview 1-2Processed Transactions column 5-8PSD Code field 6-20, 10-65
QQTD column 10-48Quarter column 14-29Quarter Detail File (TAX812) 14-23, 14-30Quarter field 10-16Quarterly adjustments
processing in the Tax Service Interface 14-30Quarterly Detail File (TAX812) 14-24Quarterly Detail Files group box 14-29Quarterly Federal Tax Summary (TAX007) 3-46Quarterly Federal Tax Summary (TAX007)
task 14-14Quarterly Federal Tax Summary panel
accessing 14-14illustration of 14-14
Quarterly File List panelaccessing 14-28illustration of 14-29
Quarterly LIT Report Employee Detail (TAX015) 14-20
Quarterly LIT Report Employee Detail (TAX015) task 14-20
Quarterly LIT Report panelaccessing 14-20illustration of 14-20
Quarterly Processes processDefine Quarterly UI Report Codes task 14-6Quarterly LIT Report Employee Detail (TAX015)
task 14-20Quarterly State Employee Wage Listing (TAX002)
task 14-12, 14-16Quarterly State Employee Wage Listing panel
accessing 14-12illustration of 14-12
Quarterly State Tax Summary (TAX008) 3-46Quarterly State Tax Summary (TAX008) task 14-16Quarterly State Tax Summary panel
accessing 14-16illustration of 14-16
Quarterly State Wage Reportssee State Unemployment Insurance (SUI) Quarterly
Wage ReportsQuarterly SUI (Diskette) process 14-8Quarterly SUI (Magnetic Tape) process 14-8Quarterly SUI (Paper) process 14-8Quarterly Tax Balance Audit (TAX011) 7-34Quarterly Tax Balance Audit (TAX011) task 14-19Quarterly tax balances
Quarterly LIT Report Employee Detail (TAX015) 14-20
Quarterly Tax Service Processes processBuild Quarterly Tax Service File (TAX812)
task 14-24Establish Quarter Code to Report task 14-24View Quarterly Tax Service File List task 14-28
Queries dialog box 4-32Query Definition dialog box
accessing 4-35, 4-37illustration of 4-35, 4-37
RRapid Pay Data Entry 4-2
loading data 4-32using 1-9
Rapid Pay Data Entry features 4-2Rapid Pay Data Entry window
illustration of 4-6Rcd # field
see Employment Record Number fieldReason field 3-8
Payroll Processing Guide Version 5.04.01

i-22 Index
Reconciling paychecksresearching outstanding checks 13-15running PAY015A 13-12running PAY015B 13-13using bank files 13-12
format 13-12, 13-13, 13-15, 13-17, 13-18Record Third Party Sick Payments task 3-43Records
adjusting employee data 12-3Reg Earnings field 6-18Reg Earns field
see Reg Earnings fieldReg Hrs field
see Regular Hours fieldRegular and Overtime Earnings group box 6-16Regular Earnings field 10-8Regular Hours field 6-17, 10-8Remaining Balance field 10-50Replaced column 8-10, 8-12Report Images panel
accessing B-13, B-15, B-17illustration of B-13, B-14, B-16, B-18
Report Options panelin Build Quarterly Tax Service File (TAX812) task
accessing 14-24illustration of 14-27
in Wage and Tax Register (PAY047) taskaccessing 7-26illustration of 7-26, 7-27, 7-33
Reportsfor Enterprise Payroll 1-9implementing logo images B-12
Reprintingchecks 9-40
Reprinting paychecksoverviewpreparing to reprint 9-41printing checks 9-44reviewing results 9-43viewing reprinted checks 9-46
Res column 6-20Research and Correct Employee Deductions process
Change Employee Deductions task 10-50Employee Deductions task 10-41Record Deduction Override task 10-51
Research and Correct Employee Earnings processEmployee Additional Pay task 10-39Employee Earnings task 10-17, 10-19Employee Job Information task 10-27
Research and Correct Employee Garnishments processChange Employee Garnishments task 10-56Employee Garnishment Deductions task 10-52
Research and Correct Employee Taxes processEmployee Tax Deductions task 10-58
Reset All button 6-60Retro Code column 6-29Retro Hours column 6-29Retro option 3-7Retro pay
adjusting for multi jurisdiction taxes 3-55Retro Pay Report (PAY042) 7-22Retro Pay Report (PAY042) task 7-22Retro Pay Report panel
accessing 7-22illustration of 7-22
Retro Rate column 6-28Retroactive pay
approving 2-4calculating
in off-cycle payroll 11-12in on-cycle payroll 6-3
deleting 2-4viewing 2-4viewing earnings information 6-27
Return button 6-63Reversal Run Control panel
accessing 12-91illustration of 12-91
Reversalsconfirming your reversal 11-63, 12-95deleting reversed check
completing the deletion 11-69deleting the reversal 11-67identifying the check(s) 11-66overview 11-66reviewing the deleted check 11-69unconfirming your payroll 11-66
identifying the check(s) 11-60, 12-92overviewprocessing check reversal(s) 11-61, 12-92reviewing paycheck reversals 11-63, 12-95
Reverse Accruals option 15-10Reverse Leave Balances panel
accessing 6-38illustration of 6-39
Reverse Leave Balances task 6-39Reversed option 10-50Review Calculated Retro Pay task 6-27
Payroll Processing Guide Version 5.04.01

Index i-23
Review FLSA Average Rate by Working Period panelaccessing 10-29illustration of 10-30
Review Payroll Messages task 6-8Review Pending Retro Pay task 2-5Rows to insert for each employee field
Preload to Rapid Pay Data Entry dialog box 4-39Select Employee ID dialog box 4-31
rpd fileimporting 4-44
RPDE. See Rapid Pay Data Entry.Run ID field 10-30Run Number field 8-16Run Paycheck Reconciliation A (PAY015A)
task 13-12Run Paycheck Reconciliation B (PAY015B)
task 13-14Run Type area 5-23, 5-34, 5-40, 5-44, 5-50, 12-51Run Type field 15-25, 15-27, 15-30, 15-32Run Type group box 15-14
SSalaried group box 10-8Save As dialog box
accessing 4-47illustration of 4-47
Save As optionFile menu 4-47
Save buttonExport Data to CSV File dialog box 4-55Save As dialog box 4-48
Saving Bond Report and File (PAY016) task 13-17Savings Bond Activity Log panel
accessing 10-48illustration of 10-49
Savings Bond Activity Log task 10-48Savings Bond report and file (PAY016) 7-9Savings Bond Report and File panel
accessing 13-17illustration of 13-17
Savings Bond Report and FRB File (PAY016B.SQR) 13-18
Savings Bond Report and FRB File (PAY016B) task 13-19
Savings Bond Report and FRB File panelaccessing 13-18illustration of 13-19
Savings bondsFederal Reserve Bank files
building with PAY016B 13-18printing Bond Purchase Report (PAY016) 13-17purchasing
Bond Purchase file (bondfile.out) 13-16overview 13-16
viewing activity 10-48Schedule Payroll (On Cycle) process
Define Paycheck Messages task 9-8Print Payroll Messages (PAY011) task 6-10
Scheduled Payroll (On Cycle)Calculate Final Payroll task 6-32
Scheduled Payroll (On Cycle) processCalculate Preliminary Payroll task 6-6Calculate Retro pay task 6-3Complete Payroll (Confirm) task 6-34Enter Pay Cycle Earnings (Paysheet) task 3-40, 12-8,
12-14, 12-18, 12-24Enter Pay Cycle Earnings (Paysheets) task 3-23Import Payment Data (PAY020) task 5-37, 5-41,
5-48Prepare Initial Pay Cycle Data task 2-9Record Third Party Sick Payments task 3-43Review Calculated Retro Pay task 6-27Review Payroll Messages task 6-8Review Pending Retro Pay task 2-4View Pending Performance Plan Payments 6-29View Preliminary Paycheck Data task 6-15
Scheduled Run Dates panelaccessing 15-13field descriptions for 15-13
Search dialog boxillustration of 5-26
Sec. 415 Limit exceeded reason 6-22Select All field
Select Employee ID dialog box 4-31Select Checks panel
accessing 10-3illustration of 10-4
Select Employee dialog boxillustration 4-46
Select Employee ID dialog boxillustration of 4-30, 4-31
Select file dialog boxillustration of B-5, B-14
Selected Departments Only option 7-13, 7-15Selected Employees Only option 7-13, 7-15Selected Locations Only option 7-13, 7-15Selection Criteria field 12-55, 12-58, 12-59, 12-61,
12-63, 12-71, 12-72, 12-74, 12-75, 12-76, 12-81, 12-83, 12-85, 12-87, 12-89
Payroll Processing Guide Version 5.04.01

i-24 Index
Self Servicelogging into 4-4
Sep Chk # field 5-39, 5-43Separate Check # field 3-8, 5-11, 5-13, 5-16, 5-19Seq # column 8-9, 8-12, 14-29Seq field 3-10Service Date field 10-37Service Hours field 10-37, 10-38Service Information group box 10-37Set Paysheets Run on Pay Calendar check box 5-38Shift field 3-8, 5-11, 5-13, 5-16, 5-19Shift/Rate field 6-18Show Employee Info
Options menu 4-45Signature images
changing image files B-6deleting B-8
Signatures and logosdigitizing for your checks and advices 9-3
Single Chk for Multiple Jobs option 15-12Sold Year to Date field 10-37Sort option
Data menu 4-46Sort order in spreadsheet 4-46Sort Order Within Batches area 5-32Sort Spreadsheet Data dialog box
accessing 4-46illustration of 4-46
Spcl Accum Cd field 10-23Spcl Bal field 12-56, 12-58, 12-60, 12-62, 12-64,
12-81, 12-84, 12-86, 12-88, 12-90Special Accumulator column 6-25Special accumulators
researching employee payroll errorsviewing by month 10-25viewing for specific check 10-19viewing MTD, QTD, YTD data 10-22
viewing paycheck information 6-25Special Accumulators by Month panel
accessing 10-25illustration of 10-26
Special Accumulators panelin Employee Earnings task
accessing 10-19illustration of 10-20
in View Balances (MTD, QTD, YTD) process~Spe-cial Accumulators task
accessing 10-22illustration of 10-23
in View Preliminary Check Data taskaccessing 6-25illustration of 6-25
Special Accumulators taskin View Monthly Balances process 10-25View Balances (MTD, QTD, YTD) process 10-22
Special State Values area 6-60Spreadsheet calculations 4-50Spreadsheet column 5-8Spreadsheet description field
New Batch/Spreadsheet Header dialog boxRapid Pay Data Entry 4-24
Spreadsheet field 5-6, 5-22Spreadsheet name field
New Batch/Spreadsheet Header dialog boxRapid Pay Data Entry 4-24
Spreadsheet panelillustration of 5-30
Spreadsheet TotalsData menu 4-51
Spreadsheet(s) panelaccessing 5-6, 5-30illustration of 5-6, 5-25
Spreadsheetscreating 5-4establishing data for pay cycle data file 5-6
SSN Display Option field 5-40, 8-17, 9-23, 9-29, 9-33, 14-13, 14-15, 14-17, 14-21
SSN Option field 5-44, 5-50State column 10-11State field 12-56, 12-82State Name column 10-11State Tax area 6-60State taxes
adjusting balancesbacking out wages 12-18correcting tax data and job records 12-23overview 12-18running pay calculation and confirmation
processes 12-23updating correct tax data to reflect correct
state 12-23State Unemployment field 14-4State Unemployment Insurance (SUI) Quarterly
Wage Reportsmulti-company reporting
list of state SQRs D-1overview 14-3troubleshooting 14-9verifying company information 14-5verifying state unemployment information 14-4verifying tax reporting parameters 14-4verifying the SQR 14-4
Payroll Processing Guide Version 5.04.01

Index i-25
State Unemployment Insurance (SUI) Quarterly Wage Reports (cont.)multi-worksite reporting
list of state SQRs D-1overview 14-3troubleshooting 14-9verifying tax reporting parameters 14-6verifying the SQR 14-6
overviewrunning 14-8SQRs 14-3
State/Locality field 6-18states and localities
multi jurisdiction availability 3-55Status bar
showing employee information in Rapid Pay Data Entry 4-7
Subject to FICA check box 6-60SUI Quarterly Wage Reports
see State Unemployment Insurance Quarterly Wage Reports
Supplemental check box 6-59Supplemental option 3-10Suppress Payee Address check box 8-18Suppress Stub Headers check box 8-17Suppress Stub Social Security check box 8-17
TTAA001.SQR (Batch Totals List) 5-31TAA002.SQR (Batch Detail List report) 5-32TAA020
moving pay cycle data into paysheets using 5-33TAA028.SQR C-2, C-3Taken Year-to-Date field 10-37Targeted Employees area 7-13, 7-15Tax adjustments
establishing earnings typesearnings types 12-4overview 12-3taxable gross definition 12-3
Tax Balance Adjustment panelaccessing 12-41
Tax Balance panelillustration of 12-42, 12-43, 12-44
Tax Balance task 12-41Tax balances
adjusting federal recordssee Federal taxes
adjusting state recordssee State taxes
Tax balances (cont.)Quarterly LIT Report Employee Detail
(TAX015) 14-20Tax Class column 6-20, 10-65Tax Class Description column 10-11Tax Class field 10-61, 10-63Tax column 10-61, 10-63Tax Deposit Summary (TAX001) 3-46, 7-28Tax Deposit Summary (TAX001) task 7-28Tax Deposit Summary panel
accessing 7-28illustration of 7-28
Tax Entity column 6-20Tax File Built option 15-12Tax File Transmitted option 15-12Tax Method area 5-39, 5-43Tax Method field 3-10, 6-19Tax Override panel
accessing 12-11, 12-16, 12-21, 12-27illustration of 12-11, 12-16, 12-21, 12-27in Earnings and Overrides by Employee (Payline) task
accessing 3-36illustration of 3-37
in On-Demand Payroll (Off Cycle) process~Enter Pay Cycle Earnings (Paysheets) task
accessing 11-11illustration of 11-11
On-Demand Payroll (Off Cycle) process~Enter Pay Cycle Earnings (Paysheets) task
accessing 11-26illustration of 11-26
summary of rows 12-21Tax Periods field 3-9, 3-10, 6-19Tax reports
see State Unemployment Insurance (SUI) Quarterly Wage Reports
Tax Reports processTax Deposit Summary (TAX001) task 7-28Tax Deposit Summary (TAX009) task 7-30Tax Summary (TAX010) task 7-32
Tax Service Company Code field 8-11, 14-29Tax Service Company column 8-9Tax Service interface
creating periodic tax files 8-5end of quarter adjustments 14-30overview 8-1payroll process with Tax Service interface
illustration of 8-4
Payroll Processing Guide Version 5.04.01

i-26 Index
Tax Service interface (cont.)quarterly data processing
establishing year and quarter to be run 14-24overview 14-23running Quarterly Detail File (TAX812) 14-24transmitting Quarterly Detail file 14-28viewing Quarterly Detail File details 14-28
recreating periodic tax files 8-7transmitting periodic files
manually tracking file transmissions 8-8overview 8-7transferring file 8-7
verifying file transmission 8-10viewing Periodic File List 8-10
Tax Service Quarter Detail File report 14-30Tax Summary (TAX010) 3-46, 7-32Tax Summary panel
accessing 7-32, 12-73illustration of 7-32, 12-73
Tax Year field 6-59Tax/Taxable Gross column 10-65TAX001.SQR (Tax Deposit Summary) 3-46, 7-28TAX002xx.SQR (Paper format-SUI Quarterly Wage
Report) 14-3TAX007.SQR (Quarterly Federal Tax
Summary 3-46TAX008.SQR (Quarterly State Tax Summary 3-46TAX009.SQR (Local Tax Deposit Summary) 7-30TAX010.SQR (Tax Summary) 3-46, 7-32TAX011.SQR (Quarterly Tax Balance Audit) 7-34TAX015.SQR Quarterly LIT Report Employee
Detail 14-20TAX810xx.SQR (Tape format-SUI Quarterly Wage
Report) 14-3TAX811xx D-1TAX811xx.SQR (Diskette format-SUI Quarterly
Wage Report) 14-3TAX812 (Quarterly Detail File) 14-24TAX812.SQR (Quarter Detail File) 14-23, 14-30TAX816.SQR (Generate ADP UCM Service
File) 13-23Taxable Gross column 6-20Taxable gross definition
requirements based on earnings types 12-3setting up for each earnings type 12-3
Taxable Gross/No Limit Gross column 10-61, 10-64Taxes
correcting employee payroll errorsoverview 10-66
Taxes (cont.)entering one-time override
for federal tax adjustments 12-16for manual checks 12-11for state tax balance adjustments 12-21, 12-26
entering one-time overridesfor manual checks 11-11for on-demand checks 11-26
one-timerecording 3-36
researching employee payroll errorsoverview 10-58viewing by month 10-62viewing for specific paycheck 10-58viewing MTD, QTD, YTD data 10-60
see State Unemployment Insurance (SUI) Quarterly Wage Reports
viewing paycheck information 6-19Taxes by Month panel
accessing 10-62illustration of 10-63
Taxes field 6-16, 6-17, 6-20, 6-21, 6-23, 6-25, 6-26Taxes group box 6-16Taxes panel
accessing 10-7illustration of 10-10in Employee Tax Deductions task
accessing 10-58illustration of 10-59
in Review On-Line Check taskaccessing 11-48illustration of 11-48
in Taxes taskaccessing 10-60illustration of 10-61
in View Preliminary Paycheck Data taskaccessing 6-19illustration of 6-19
Taxes Pending panelaccessing 12-59illustration of 12-59
Taxes Reversal panelaccessing 12-85illustration of 12-85
Taxes taskin View Balances (MTD, QTD, YTD) process 10-60in View Monthly Balances process 10-62, 10-64
Templatespre-defined in Rapid Pay Data Entry 4-15
Territories panelaccessing 14-24illustration of 14-26
Payroll Processing Guide Version 5.04.01

Index i-27
Third party sick payentering data
adding 3-43overview 3-43printing data 3-46
Third Party Sick Payments panelaccessing 3-43illustration of 3-44, 3-45
Time and Attendancedefining the time reporting location 6-44, 6-49, 6-52
Time and Attendance - Enterprise eTIME processCustom Export Definitions task C-3
Time and Attendance - TimeSaver processExport to TimeSaver (TAA026) task 6-54
Time and Attendance Applicationimporting data from 5-20
Time and Attendance applicationcorrecting imported pay cycle data
overview 5-27defining the time reporting location 6-42, 6-43importing pay cycle data
importing the batch 5-22performing operational procedures
reviewing data 5-29preparing for external file import 5-20preparing for the external file import 6-42, 6-43reviewing data 6-42, 6-43reviewing imported pay cycle data
customizing Batch Detail report (TAA002) 5-32overview 5-29printing Batch Totals List (TAA001) 5-31reviewing batch data online 5-29
Time and Attendance Interface - Enterprise eTIME processExport Labor Levels to Enterprise eTIME (TAA032)
task 6-49Time and Attendance process
Batch Header Information task 5-4, 5-24, 5-29Batch Status task 5-26Delete Batches/Spreadsheets task 5-7Delete Prior Time and Attendance Data task 6-42Employee Pay Data Entry task 5-27Enterprise e-TIME Employee Export (TAA028)
task 6-46e-TIME Employee Export (TAA026) task 6-50, 6-51Import T&A Batch task 5-22Move to Pay Cycle Data (Paysheets) task 5-33Pay Data Entry
Add Employee task 5-9Pay Data Entry by Employee task 5-14Pay Data Entry by Spreadsheet task 5-12, 5-17Print batch Details (TAA002) task 5-32
Time and Attendance process (cont.)Print Batch Totals List (TAA001) task 5-31
Time and Attendance- Total Time processTotal Time Employee Export (TAA026) task 6-56
TOS Updates column 8-9Tot Gross field 3-5Total Deducted field 6-24Total Deduction/Garnishment Amount
column 10-55Total Deductions YTD field 10-16Total Entries column 6-43Total Gross YTD field 10-16Total Taxes YTD field 10-16Total Time Employee Export (TAA025) task 6-57Total Transactions column 5-8Total Transactions field 5-5Totals
calculating 4-50Transaction Reversals task 12-81Transaction Status field 5-13, 5-15, 5-18Transactions Summary task 12-71Transferring files to ADP 8-24Transit # field 6-27Transmission Date/Time column 8-9, 8-12Transmission Status option 8-8, 8-9Turn OK to Pay Indicator On check box 5-34Type column 6-23, 6-26Type of Service Updates column 8-12
UUCM File Built option 15-12UCM Wage Data panel
accessing 13-21illustration of 13-22
UCM wage filecreating 13-21
generating service file (TAX816) 13-23mapping UCM code and earnings code 13-21
Unconfirm Payroll panelaccessing 6-40illustration of 6-40
Unconfirm Payroll task 6-40Unconfirming your payroll 6-40Unprocessed Hours group box 10-37Unprocessed Manual Checks file 13-11Unprocessed YTD column 10-35Update Dead Paychecks task 9-43Update ETD Deduction Balances (PAY718)
accessing 13-5
Payroll Processing Guide Version 5.04.01

i-28 Index
Update Leave Balances panelaccessing 13-3illustration of 13-3
Update Leave Balances task 13-3Update Origin field 12-57, 12-58, 12-60, 12-62,
12-64, 12-82, 12-84, 12-86, 12-88, 12-90Update Pay Cycle Data process
Earnings and Distributions by Employee task 3-15Earnings and Overrides (Paysheets) task 3-11Earnings and Overrides by Employee (Payline)
task 2-11, 3-13, 3-28, 3-33, 3-36, 3-47, 3-49, 3-52, 3-55
Earnings Short Form (Paysheets) task 3-17Hourly Earnings by Employee task 3-19Hourly Earnings Distribution Review task 3-21
Update Periodic File Status task 8-8Update UCM Wage Data task 13-21Utilities process
Delete Pay Cycle Data (PAYUNSHT) task 3-58Delete Unused Payroll Calendars (PRUTL001)
task 15-14Reverse Leave Balances task 6-38Unconfirm Payroll task 6-40
VValidation
when to perform 4-53View Balances (MTD, QTD, YTD) process
Arrears task 10-45Deductions task 10-43Earnings task 10-20Garnishments task 10-54Leave Balance Summary task 10-34Leave Balances task 10-33Paycheck Totals YTD task 10-15Savings Bond Activity Log task 10-48Special Accumulators task 10-22Taxes task 10-60, 10-64
View Monthly Balances processDeductions task 10-46Earnings task 10-24Special Accumulators task 10-25Taxes task 10-62
View Operations dialog box 4-18, 4-20, 4-21, 4-23View Paycheck Detail process
Checks by Range task 10-3Paycheck Detail task 10-12, 10-13
View Payroll WGPS File List task 8-30View Pending Performance Plan Payments
task 6-29
View Periodic File List task 8-11View Preliminary Paycheck Data task 6-15View Quarterly Tax Service File List task 14-28View Window Fields panel
accessing 8-19illustration of 8-19
Void Message field 8-16
WW-2s
reviewing 414(v) employee details 7-18Wage and Tax Register (PAY047) 7-26Wage and Tax Register (PAY047) task 7-26, 8-27Wages
backing out from incorrect state records 12-18Week Nbr field 10-28, 10-30Week Number field 5-11, 5-14, 5-16, 5-19Weeks in this Period field 15-10WGPS File Built option 15-12WGPS File List panel
accessing 8-30illustration of 8-30
WGPS Letter File panelaccessing 8-26illustration of 8-27
WGPS Servicesgenerating and transmitting files
generating the file 8-26, 8-28overviewtransferring the file 8-29verifying file build 8-29
Working Period FLSA Average Rate field 10-31
YYear field 12-56, 12-58, 12-60, 12-62, 12-64, 12-81,
12-83, 12-85, 12-87, 12-89Year-end tax reporting
overview 13-1, 14-1, 15-1Year-End Tax Reporting process group
overview 1-8tasks 1-8
YTD column 10-48YTD Wages field 6-59
Payroll Processing Guide Version 5.04.01