pc maintenance: preparing for a+ certification chapter 23: using a windows network
TRANSCRIPT

PC Maintenance: PC Maintenance: Preparing for A+ Preparing for A+
CertificationCertificationChapter 23: Using a Windows Chapter 23: Using a Windows
NetworkNetwork

Chapter 23 ObjectivesChapter 23 Objectives
Log on and off a networkLog on and off a network Configure a PC for domain or workgroupConfigure a PC for domain or workgroup Manage the list of allowed users Manage the list of allowed users Access other PCs on a networkAccess other PCs on a network Set up network shortcutsSet up network shortcuts Map a network driveMap a network drive Share local folders and printersShare local folders and printers TroubleshootTroubleshoot
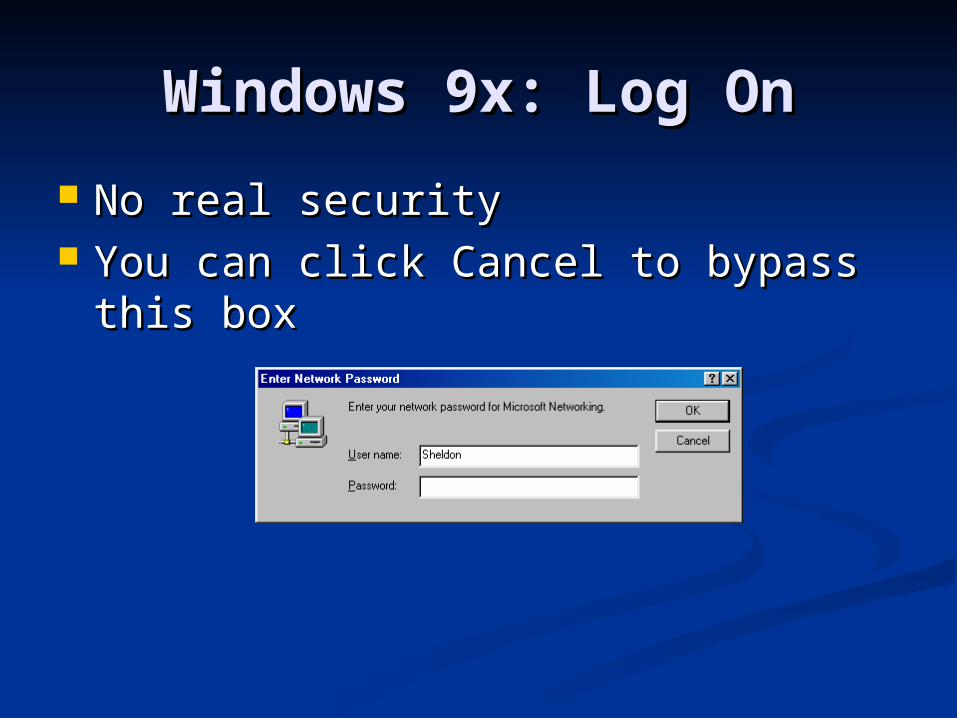
Windows 9x: Log OnWindows 9x: Log On
No real securityNo real security You can click Cancel to bypass this boxYou can click Cancel to bypass this box
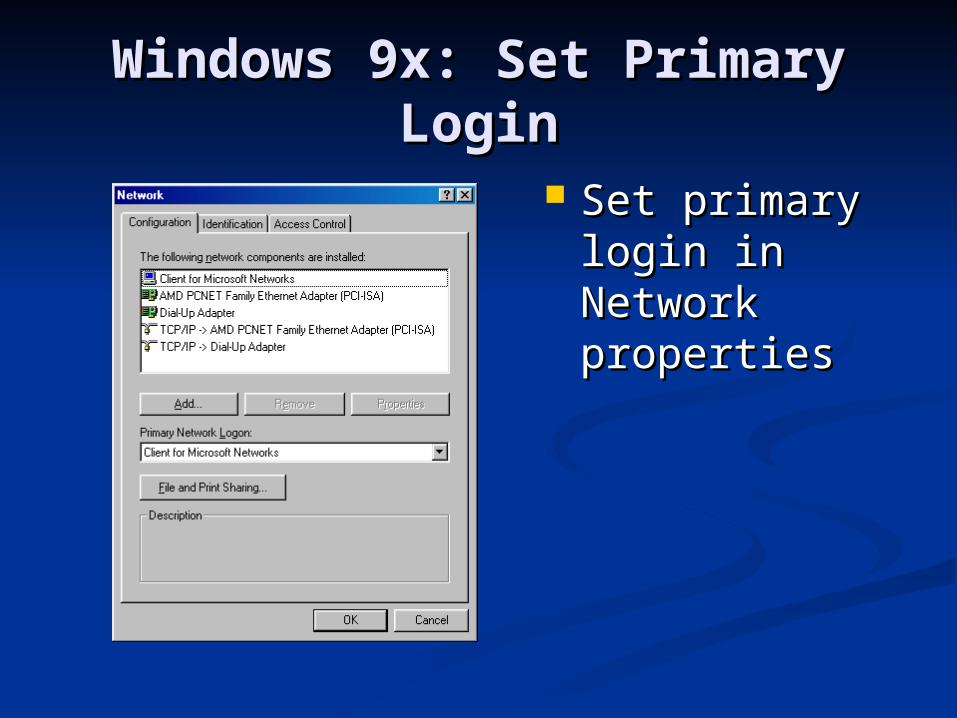
Windows 9x: Set Primary LoginWindows 9x: Set Primary Login
Set primary login Set primary login in Network in Network propertiesproperties

Windows 9x: Connect to a Windows 9x: Connect to a DomainDomain
To connect to a To connect to a domain, set it up in domain, set it up in Client for Microsoft Client for Microsoft Networks Networks PropertiesProperties

Windows 9x: Log OffWindows 9x: Log Off
Choose Logoff from the Start menuChoose Logoff from the Start menu Enter Network Password dialog box Enter Network Password dialog box
reappearsreappears

Windows 2000: Log OnWindows 2000: Log On
If Logon prompt appears, cannot be If Logon prompt appears, cannot be bypassed. User must enter a valid user bypassed. User must enter a valid user name and passwordname and password
This gives Windows 2000 better local This gives Windows 2000 better local security than Windows 9xsecurity than Windows 9x
Manage the allowed users from the Users Manage the allowed users from the Users and Passwords applet in the Control Paneland Passwords applet in the Control Panel
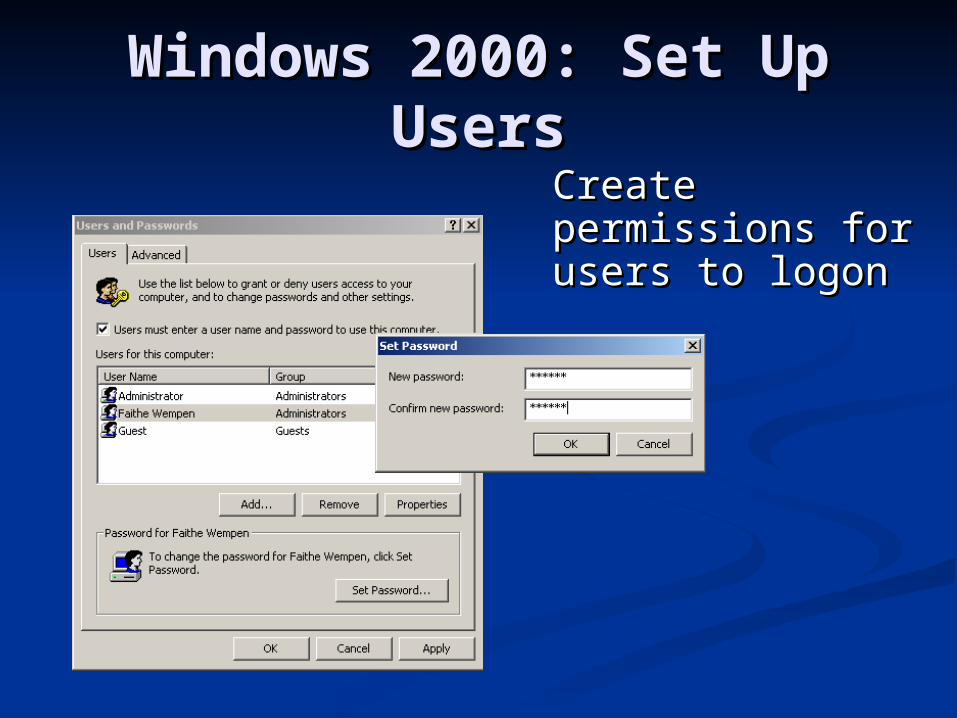
Windows 2000: Set Up UsersWindows 2000: Set Up Users
Create Create permissions for permissions for users to logonusers to logon

Windows 2000: Specify Whether Windows 2000: Specify Whether Login is RequiredLogin is Required
You can choose You can choose whether logon is whether logon is required from Users required from Users and Passwords and Passwords box, from Control box, from Control PanelPanel
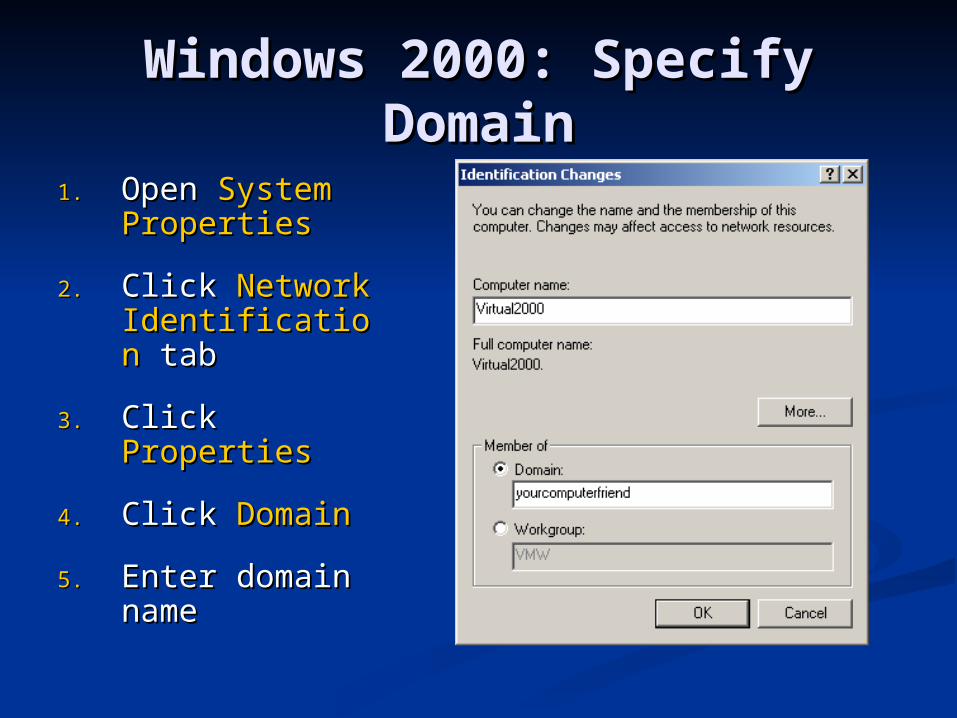
Windows 2000: Specify DomainWindows 2000: Specify Domain
1.1. Open Open System System PropertiesProperties
2.2. Click Click Network Network IdentificationIdentification tab tab
3.3. Click Click PropertiesProperties
4.4. Click Click DomainDomain
5.5. Enter domain Enter domain namename

Windows 2000: Log OffWindows 2000: Log Off
There is no Logoff command on the Start There is no Logoff command on the Start menumenu
Press Ctrl+Alt+Delete and then click the Press Ctrl+Alt+Delete and then click the Logoff buttonLogoff button

Windows XP: Log OnWindows XP: Log On
Welcome screen (default)Welcome screen (default) Log On to Windows Log On to Windows

Windows XP: Choose Login Windows XP: Choose Login TypeType
1.1. Go into Go into User User AccountsAccounts in in Control PanelControl Panel
2.2. Click Click Change the Change the Way Users Log On Way Users Log On or Offor Off
3.3. Clear the Clear the Use the Use the Welcome ScreenWelcome Screen checkboxcheckbox

Windows XP: Log OffWindows XP: Log Off
Use any of these methods:Use any of these methods: Choose Choose Log OffLog Off from Start menu from Start menu Display Task Manager and then choose Display Task Manager and then choose Shut DownShut Down, ,
Log Off {username}Log Off {username} Press Press Ctrl+Alt+DeleteCtrl+Alt+Delete
If Welcome screen in use, opens Task ManagerIf Welcome screen in use, opens Task Manager If Welcome screen not in use, opens Windows Security box; If Welcome screen not in use, opens Windows Security box;
click Log Off from thereclick Log Off from there

Windows XP: Manage User ListWindows XP: Manage User List
Create and change users from User Accounts in Create and change users from User Accounts in Control PanelControl Panel

Browsing the NetworkBrowsing the Network
My Network Places:My Network Places: Windows XP, 2000, Me Windows XP, 2000, Me Network Neighborhood:Network Neighborhood: Windows 95, 98 Windows 95, 98

Creating Network ShortcutsCreating Network Shortcuts
Drag icons onto desktop from any network Drag icons onto desktop from any network windowwindow
In Windows Me, 2000, or XP, use Add In Windows Me, 2000, or XP, use Add Network Place WizardNetwork Place Wizard

Mapping a Network DriveMapping a Network Drive
Creates a drive letter Creates a drive letter shortcut to a network shortcut to a network locationlocation
Can be set to Can be set to automatically automatically reestablish itself at reestablish itself at startupstartup
From Network From Network Neighborhood:Neighborhood: File, Map Network DriveFile, Map Network Drive
From My Network Places:From My Network Places: Tools, Map Network DriveTools, Map Network Drive

Sharing a Folder in Windows 9xSharing a Folder in Windows 9x
Right-click the Right-click the folder and choose folder and choose SharingSharing
Choose an access Choose an access typetype
Assign passwords Assign passwords for access types for access types (optional)(optional)

Sharing a Folder in Windows Sharing a Folder in Windows 20002000
Right-click the Right-click the folder and choose folder and choose SharingSharing
Set user limit if Set user limit if desireddesired

Sharing a Folder in Windows Sharing a Folder in Windows 20002000
(Optional) (Optional) Click Permissions Click Permissions button to set button to set permissionspermissions

Sharing a Folder in Windows XPSharing a Folder in Windows XP
Right-click the folder and choose Sharing Right-click the folder and choose Sharing and Securityand Security
Allow users to change files or notAllow users to change files or not For more complex permission choices, For more complex permission choices,
turn off Simple File Sharing (in Folder turn off Simple File Sharing (in Folder Options)Options)

Sharing a PrinterSharing a Printer
Right-click Right-click printer and printer and choose Sharingchoose Sharing
Similar to Similar to sharing a foldersharing a folder

Loading Additional Printer Loading Additional Printer DriversDrivers
Helpful if other Helpful if other network users have network users have different OS different OS versionsversions
Click Additional Click Additional Drivers on Sharing Drivers on Sharing tab of printer’s tab of printer’s Properties boxProperties box

Using a Network PrinterUsing a Network Printer
Add the printer Add the printer with Add Printer with Add Printer WizardWizard
Specify that it is Specify that it is a network printera network printer
Browse for it on Browse for it on the networkthe network
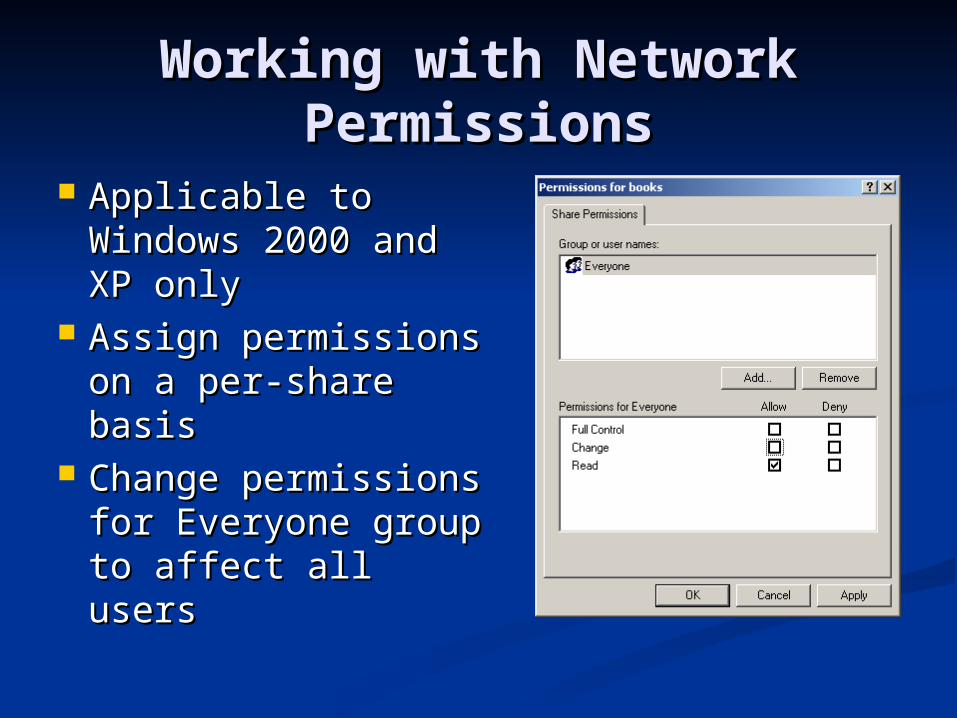
Working with Network Working with Network PermissionsPermissions
Applicable to Applicable to Windows 2000 and Windows 2000 and XP onlyXP only
Assign permissions Assign permissions on a per-share basison a per-share basis
Change permissions Change permissions for Everyone group for Everyone group to affect all usersto affect all users

TroubleshootingTroubleshooting
Work from the local computer outwardWork from the local computer outward Confirm that the NIC is installed and Confirm that the NIC is installed and
recognized in Windowsrecognized in Windows Confirm that a common protocol is Confirm that a common protocol is
installedinstalled Confirm that Client for Microsoft Networks Confirm that Client for Microsoft Networks
is installedis installed

TroubleshootingTroubleshooting
Confirm that the PC being accessed has Confirm that the PC being accessed has some shared resourcessome shared resources
Determine the PC’s IP addressDetermine the PC’s IP address Windows 9x: winipcfgWindows 9x: winipcfg Windows 2000/XP: ipconfigWindows 2000/XP: ipconfig
Ping the loopback address (127.0.0.1)Ping the loopback address (127.0.0.1) Ping the local IP addressPing the local IP address Ping the default gatewayPing the default gateway