pc software point creator for revit - hilti · manual column assignment. ... click the desired...
TRANSCRIPT

PC SoftwarePoint Creatorfor Revit
Quick-start guide en
Printed: 11.03.2014 | Doc-Nr: PUB / 5173510 / 000 / 00Printed: 02.04.2014 | Doc-Nr: PUB / 5173510 / 000 / 01

10
en
Introduction to Hilti Point Creator for RevitHilti Point Creator is used to extract point coordinates from 2D or 3D CAD/BIM drawings from Revit. The point coordinatesand attributes are used with the Hilti POS 150 and POS 180 robotic total station system. This plug-in for Revit is compat-ible with Revit versions 2012 and higher. The attributes, in particular, apply to products from the Hilti BIM/CAD library, and contain information such as Hilti itemnumber, product description and type of product. Additional information such as layer description and color of the graph-ical CAD element is taken from CAD models.The extracted point coordinates and attributes are assigned to a Point Identifier (PtID) and copied to a layer in the Revitsystem. The numerical values for the coordinates and attributes can be stored in data files with various formats for trans-fer to the Hilti POS 150 and POS 180 robotic total station system.Hilti Point Creator also provides a link to the Hilti BIM/CAD library for downloading of Hilti products for use in the designprocess for 3D models, especially for BIM relevant CAD modeling.
Summary of the process for transferring points from CAD/BIM to the jobsite1. Start Revit.2. Open or create the drawing you wish to work with.3. Go to the "Hilti" tab.4. Set the relevant parameters in General Settings.5. Define Single Point, Block or Multiple Point mode.6. Export the points to a data file.7. Save the file on your USB flash drive.8. Transfer the data from the USB flash drive to your Hilti total station system.
Printed: 11.03.2014 | Doc-Nr: PUB / 5173510 / 000 / 00Printed: 02.04.2014 | Doc-Nr: PUB / 5173510 / 000 / 01

11
en
QUICK-START GUIDE
PC Software Point Creator for Revit1. General information . . . . . . . . . . . . . . . . . . . . . . . . . . . . . . . . . . . . . . . . . . . . . . . . . . . . . . . . . 121.1 Initial installation . . . . . . . . . . . . . . . . . . . . . . . . . . . . . . . . . . . . . . . . . . . . . . . . . . . . . . . . . . . . . . . . . . . . . . . . 121.2 Starting Point Creator . . . . . . . . . . . . . . . . . . . . . . . . . . . . . . . . . . . . . . . . . . . . . . . . . . . . . . . . . . . . . . . . . . . . . 121.3 Updating . . . . . . . . . . . . . . . . . . . . . . . . . . . . . . . . . . . . . . . . . . . . . . . . . . . . . . . . . . . . . . . . . . . . . . . . . . . . . . . 12
2. Functional overview . . . . . . . . . . . . . . . . . . . . . . . . . . . . . . . . . . . . . . . . . . . . . . . . . . . . . . . . . 122.1 General settings . . . . . . . . . . . . . . . . . . . . . . . . . . . . . . . . . . . . . . . . . . . . . . . . . . . . . . . . . . . . . . . . . . . . . . . . . . 32.1.1 Naming points . . . . . . . . . . . . . . . . . . . . . . . . . . . . . . . . . . . . . . . . . . . . . . . . . . . . . . . . . . . . . . . . . . . . . . . . . . . 132.1.2 Displaying points . . . . . . . . . . . . . . . . . . . . . . . . . . . . . . . . . . . . . . . . . . . . . . . . . . . . . . . . . . . . . . . . . . . . . . . . . 132.1.3 Exporting columns . . . . . . . . . . . . . . . . . . . . . . . . . . . . . . . . . . . . . . . . . . . . . . . . . . . . . . . . . . . . . . . . . . . . . . . 142.1.4 Units . . . . . . . . . . . . . . . . . . . . . . . . . . . . . . . . . . . . . . . . . . . . . . . . . . . . . . . . . . . . . . . . . . . . . . . . . . . . . . . . . . 142.1.5 Language . . . . . . . . . . . . . . . . . . . . . . . . . . . . . . . . . . . . . . . . . . . . . . . . . . . . . . . . . . . . . . . . . . . . . . . . . . . . . . 14
2.2 Importing points . . . . . . . . . . . . . . . . . . . . . . . . . . . . . . . . . . . . . . . . . . . . . . . . . . . . . . . . . . . . . . . . . . . . . . . . . 14
2.3 Point extraction . . . . . . . . . . . . . . . . . . . . . . . . . . . . . . . . . . . . . . . . . . . . . . . . . . . . . . . . . . . . . . . . . . . . . . . . . 152.3.1 Single Point mode . . . . . . . . . . . . . . . . . . . . . . . . . . . . . . . . . . . . . . . . . . . . . . . . . . . . . . . . . . . . . . . . . . . . . . . . 152.3.2 Block mode . . . . . . . . . . . . . . . . . . . . . . . . . . . . . . . . . . . . . . . . . . . . . . . . . . . . . . . . . . . . . . . . . . . . . . . . . . . . . 162.3.3 Multiple Point mode . . . . . . . . . . . . . . . . . . . . . . . . . . . . . . . . . . . . . . . . . . . . . . . . . . . . . . . . . . . . . . . . . . . . . . 16
2.4 Exporting points . . . . . . . . . . . . . . . . . . . . . . . . . . . . . . . . . . . . . . . . . . . . . . . . . . . . . . . . . . . . . . . . . . . . . . . . . 17
2.5 Hilti BIM / CAD online library . . . . . . . . . . . . . . . . . . . . . . . . . . . . . . . . . . . . . . . . . . . . . . . . . . . . . . . . . . . . . . . 18
2.6 Help . . . . . . . . . . . . . . . . . . . . . . . . . . . . . . . . . . . . . . . . . . . . . . . . . . . . . . . . . . . . . . . . . . . . . . . . . . . . . . . . . . 18
3. FAQ/Further information . . . . . . . . . . . . . . . . . . . . . . . . . . . . . . . . . . . . . . . . . . . . . . . . . . . . . 19
Content
Printed: 11.03.2014 | Doc-Nr: PUB / 5173510 / 000 / 00Printed: 02.04.2014 | Doc-Nr: PUB / 5173510 / 000 / 01

12
en
2. Functional overviewHilti Point Creator offers the following functionality:• Settings
– General settings (define parameters for point naming,point display and data export options).
• Point import– Importing point data– File import formats are:*.txt, *.csv, *.oml, *.dxf
• Point extraction methods– Single Point (extracts data from single points and ele-
ments).– Block mode (points are extracted from a reference block
and transferred to other selected blocks of the sametype).
– Multiple Points (selects various graphical elements suchas lines, arcs, etc.. and extracts points).
1. General information
After successful installation, Point Creator will start auto-matically together with Revit.If no licence key is entered, Point Creator will run as a demoversion for 60 days. After this, Point Creator can be usedonly when a licence key has been entered.You must be connected to the Internet during the registra-tion process.The license key can be obtained from your Hilti accountmanager.Note:In the annex you will find an overview of the Revit versionssupported by Point Creator.
1.3 UpdatingYou receive updates through the AutoUpdater, which will beinstalled automatically together with Point Creator duringthe initial installation. AutoUpdater is located in the taskbar.After opening AutoUpdater, an overview of the alreadyinstalled Hilti applications is displayed. If you select one ofthese applications, details of the currently installed versionand the version available from the server will be shown.Click "Download" to download and install the latest version.Click the "Changes" button to display a summary of whathas changed since the previous version.
1.1 Initial installationStart the installation of Hilti Point Creator by double-clicking the .exe file and then follow the instructions displayed on thescreen.
1.2 Starting Point Creator
Printed: 11.03.2014 | Doc-Nr: PUB / 5173510 / 000 / 00Printed: 02.04.2014 | Doc-Nr: PUB / 5173510 / 000 / 01

13
en
2.1 General settings
2.1.1 Naming pointsDefine a prefix for the point identifier (PtID) with a maximumof 6 characters.The start number is the first numerical value to be added tothe prefix.The interval defines the increments (negative values maybe used for decrements).
• Data export– Export (for the extraction of point data - as defined in
the settings - in various output formats (coordinates andattributes).
• Link to the Hilti BIM/CAD online library– Download BIM/CAD objects for all Hilti products to Revit
(Hilti BIM/CAD objects can also be used in AutoCADand other design applications).
• Help– Help (instructions for use)– About (shows the version number and licence agree-
ment)
lick the General Settings button to open the menu to defineparameters for Hilti Point Creator.– Point naming– Point display– Export columns– Units– Language
2.1.2 Displaying pointsThe Point Display setting sets the text size for the PtID thatis shown in the drawing.
Printed: 11.03.2014 | Doc-Nr: PUB / 5173510 / 000 / 00Printed: 02.04.2014 | Doc-Nr: PUB / 5173510 / 000 / 01

14
en
2.1.3 Exporting columnsSelections made under Export Columns determine whichvalues are to be exported.The Move Up and Move Down buttons can be used to definethe sequence of the data to be exported.
2.1.4 UnitsThe units to be used for exporting point data can be defi-ned in the settings under Units.Note:When exporting data, check to ensure that the Hilti total sta-tion and Point Creator use the same units. Scaling errorswill otherwise result.
2.1.5 LanguageThe units to be used for exporting point data can be defi-ned in the settings under Units.Note:When exporting data, check to ensure that the Hilti total sta-tion and Point Creator use the same units. Scaling errorswill otherwise result.
2.2 Importing pointsThe Point Import function can be used to import existingpoints into Revit.This function supports the following data formats:– *.txt– *.csv– *.dxf– *.oml
Printed: 11.03.2014 | Doc-Nr: PUB / 5173510 / 000 / 00Printed: 02.04.2014 | Doc-Nr: PUB / 5173510 / 000 / 01
15
en
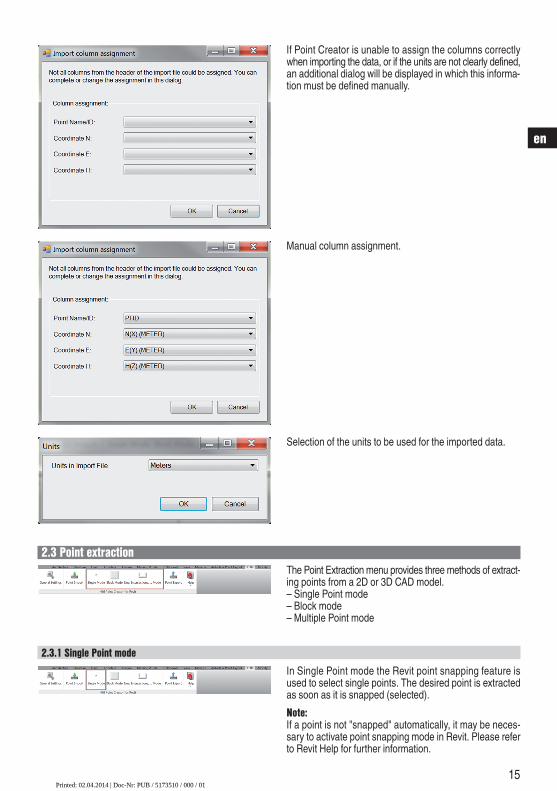
If Point Creator is unable to assign the columns correctlywhen importing the data, or if the units are not clearly defined,an additional dialog will be displayed in which this informa-tion must be defined manually.
Manual column assignment.
Selection of the units to be used for the imported data.
2.3 Point extractionThe Point Extraction menu provides three methods of extract-ing points from a 2D or 3D CAD model.– Single Point mode– Block mode– Multiple Point mode
2.3.1 Single Point modeIn Single Point mode the Revit point snapping feature isused to select single points. The desired point is extractedas soon as it is snapped (selected).Note: If a point is not "snapped" automatically, it may be neces-sary to activate point snapping mode in Revit. Please referto Revit Help for further information.
Printed: 11.03.2014 | Doc-Nr: PUB / 5173510 / 000 / 00Printed: 02.04.2014 | Doc-Nr: PUB / 5173510 / 000 / 01

16
en
Point extraction process1. Click to select all blocks to which the points are to be
transferred. 2. Click "Finish" to transfer the points to all selected blocks.
A PtID is assigned to all extracted points.
2.3.3 Multiple Point modeThe Multiple Point button opens a menu providing variousoptions for the extraction of points.Tick the boxes for the relevant elements and options.– Lines (extracts endpoints and midpoints of the line)– Arcs (extracts endpoints, midpoints and center point of
the arc)– Intersections (extracts intersections of lines)– Polygon corner points
Proceed as follows to extract points from lines:
Element selection process1. Select the element(s) (lines, arcs, etc…) to be used for
point extraction.– Click to select a single element or multiple elements.– Drag the cursor to mark all elements within the area.
2. To deselect an element, press the SHIFT key and clickon the selected element.
Proceed as follows to transfer points from one block to another block of the same type:Learning process1. Select Block mode from the Point Creator menu.2. Click the desired block to select it from the CAD model.3. Within the selected reference block, select the points you
wish to extract. 4. Once the points of a reference block are defined or “learned”
press ESC to continue with the point extraction.
2.3.2 Block modeBlock mode is a powerful option for extracting points fromCAD blocks. It "learns" which points are to be extracted froma block and then transfers these to other blocks of the samekind where points are also to be extracted.
Printed: 11.03.2014 | Doc-Nr: PUB / 5173510 / 000 / 00Printed: 02.04.2014 | Doc-Nr: PUB / 5173510 / 000 / 01

17
en
Note: For the *.txt and *.csv formats, the first two data linesof the file can be viewed as an example. The other formatscannot be shown here.
Click OK to export the point data as a file.
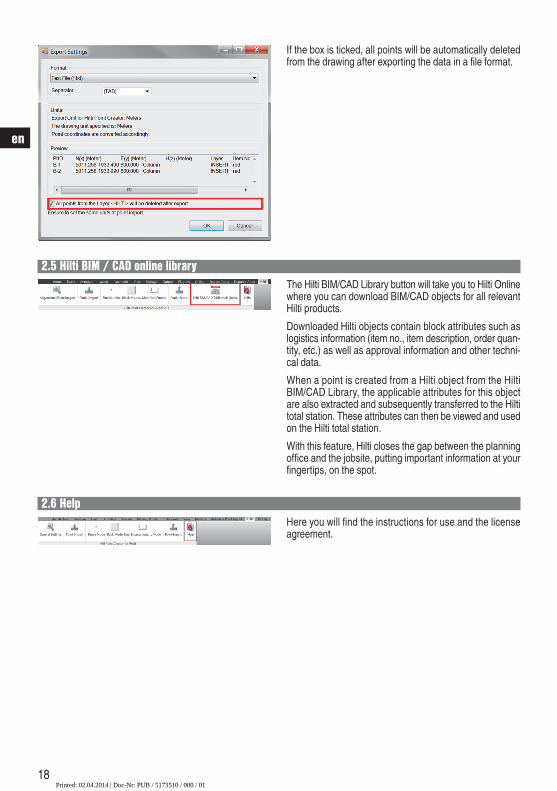
2.4 Exporting pointsThe Export button opens a menu providing options for selec-tion of the data export format.– text format (*.txt)– Excel format (*.csv)– dxf format (*.dxf)– Hilti format (*.oml)
Point extraction process1. Once one or more elements have been selected, click
"Finish" to start the point extraction process. A PtID isassigned to all extracted points.
Printed: 11.03.2014 | Doc-Nr: PUB / 5173510 / 000 / 00Printed: 02.04.2014 | Doc-Nr: PUB / 5173510 / 000 / 01
18
en
2.5 Hilti BIM / CAD online libraryThe Hilti BIM/CAD Library button will take you to Hilti Onlinewhere you can download BIM/CAD objects for all relevantHilti products. Downloaded Hilti objects contain block attributes such aslogistics information (item no., item description, order quan-tity, etc.) as well as approval information and other techni-cal data.When a point is created from a Hilti object from the HiltiBIM/CAD Library, the applicable attributes for this objectare also extracted and subsequently transferred to the Hiltitotal station. These attributes can then be viewed and usedon the Hilti total station.With this feature, Hilti closes the gap between the planningoffice and the jobsite, putting important information at yourfingertips, on the spot.
2.6 HelpHere you will find the instructions for use and the licenseagreement.
If the box is ticked, all points will be automatically deletedfrom the drawing after exporting the data in a file format.
Printed: 11.03.2014 | Doc-Nr: PUB / 5173510 / 000 / 00Printed: 02.04.2014 | Doc-Nr: PUB / 5173510 / 000 / 01
19
en
3. FAQ/Further informationWhat happens if I don't enter a license key?If no license key is entered, Hilti Point Creator can be used free of charge for 60 days. After this 60-day period, Point Cre-ator can no longer be used without a license code.
Where can I obtain a license key?• The license key can be obtained from your Hilti account manager.
When do I need to enter the license key?• After the installation procedure you need to enter your license key when starting Revit the first time. For the registration
process you need to be connected to the Internet.
Versions supported2011 2012 2013 2014
Revit – + + ++ supported • – not possible
I cannot install the software because the Auto Start function in Windows is disabled. What can I do?• Insert the CD-ROM in the drive• Double click the setup file in the root folder of the CD-ROM• Install the software
How can I update to the latest version using Hilti PROFIS AutoUpdate?• Open “Programs > Hilti > PROFIS AutoUpdate”• Select Point Creator and check if a new version is available• Press “Install” and your software will be updated to the latest version
I lost my installation CD. Where can I download the newest version?• Go to "System settings > Add/Remove Programs”• Remove Hilti Point Creator for Revit• Download the latest version from: www.hilti.com/point_creator_revit• Install the software on your computer
Hilti has much more to offer in the field of BIM. Where can I get more information?• Visit www.hilti.com/BIM to get the latest information and/or • Follow us on Twitter at: www.twitter.com/hilti_bim
What are the minimum system requirements for Point Creator• AutoCAD or Revit version 2012 or higher• Microsoft Windows XP or higher• 1 GB RAM• 100 MB free disk space
Printed: 11.03.2014 | Doc-Nr: PUB / 5173510 / 000 / 00Printed: 02.04.2014 | Doc-Nr: PUB / 5173510 / 000 / 01

*2066846*
2066
846
Hilti CorporationLI-9494 SchaanTel.: +423 / 234 21 11Fax:+423 / 234 29 65www.hilti.com
Hilti = registered trademark of Hilti Corp., Schaan W 0000 | 0214 | 00-Pos. 1_en | 1 Printed in Liechtenstein © 2014Right of technical and programme changes reserved S. E. & O. 2066846 / A3
Printed: 11.03.2014 | Doc-Nr: PUB / 5173510 / 000 / 00Printed: 02.04.2014 | Doc-Nr: PUB / 5173510 / 000 / 01