pcb-investigator physics · during operation, pcb-investigator physics enables you to simulate the...
TRANSCRIPT

Schindler & Schill GmbH
Bruderwöhrdstr. 15b Tel: +49 941 604 889 719
93055 Regensburg Email: [email protected]
Deutschland Web: www.easyLogix.de
07/2015
PCB-Investigator Physics
2
Why do I need PCBi-Physics?
Which data is needed?
How to run the Simulation?
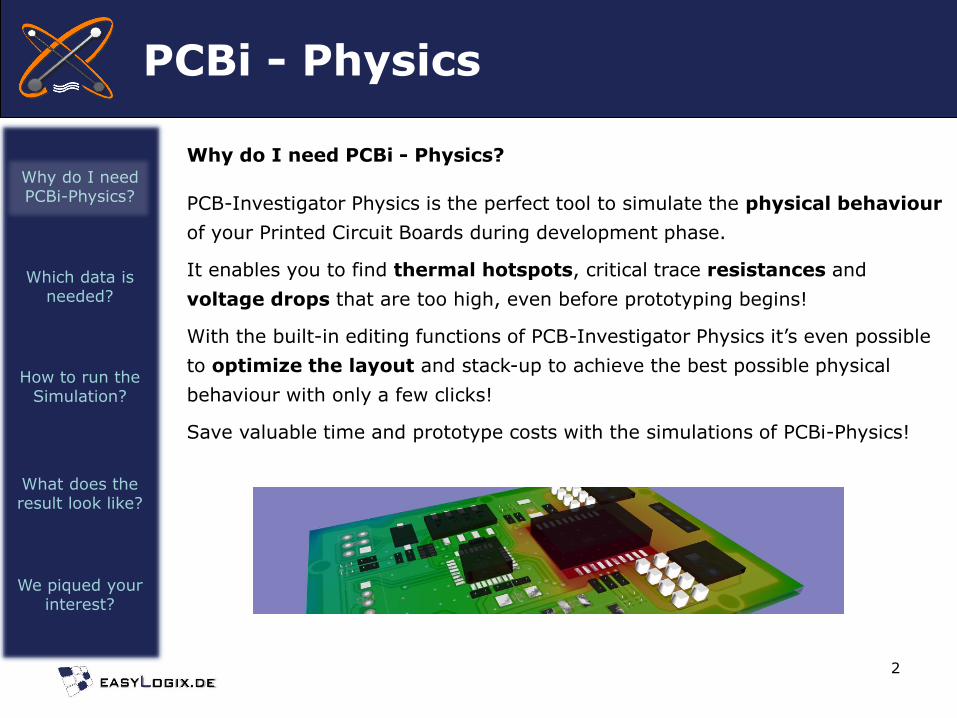
Why do I need PCBi - Physics?
PCB-Investigator Physics is the perfect tool to simulate the physical behaviour
of your Printed Circuit Boards during development phase.
It enables you to find thermal hotspots, critical trace resistances and
voltage drops that are too high, even before prototyping begins!
With the built-in editing functions of PCB-Investigator Physics it’s even possible
to optimize the layout and stack-up to achieve the best possible physical
behaviour with only a few clicks!
Save valuable time and prototype costs with the simulations of PCBi-Physics!
PCBi - Physics
What does the result look like?
We piqued your interest?
3
Why do I need PCBi-Physics?
Which data is needed?
How to run the Simulation?
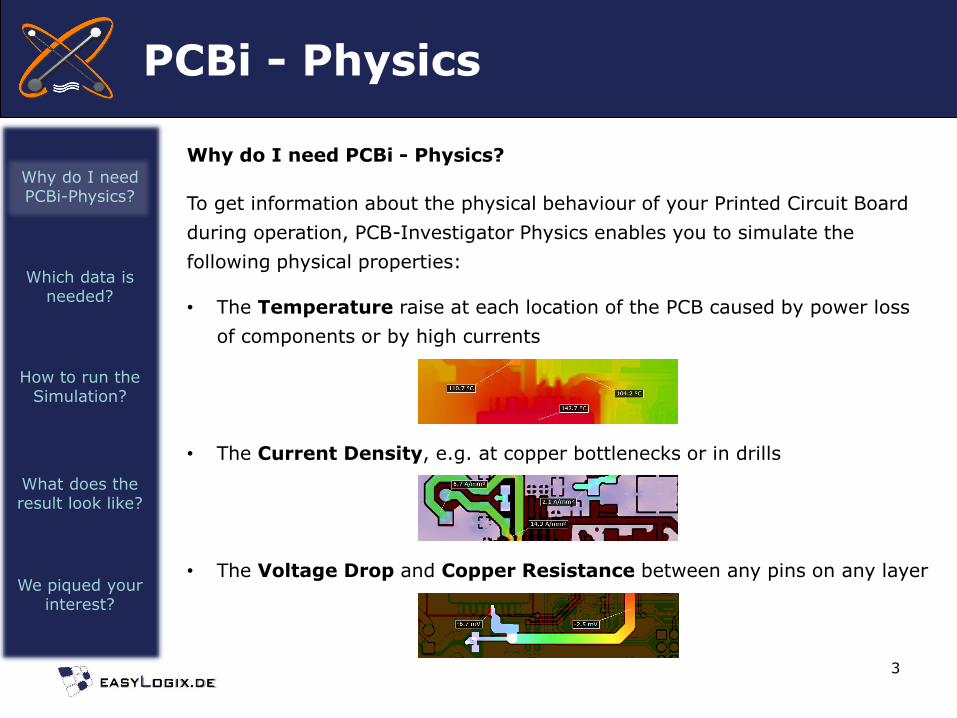
Why do I need PCBi - Physics?
To get information about the physical behaviour of your Printed Circuit Board
during operation, PCB-Investigator Physics enables you to simulate the
following physical properties:
• The Temperature raise at each location of the PCB caused by power loss
of components or by high currents
• The Current Density, e.g. at copper bottlenecks or in drills
• The Voltage Drop and Copper Resistance between any pins on any layer
PCBi - Physics
What does the result look like?
We piqued your interest?
4
Which data is needed?
How to run the Simulation?
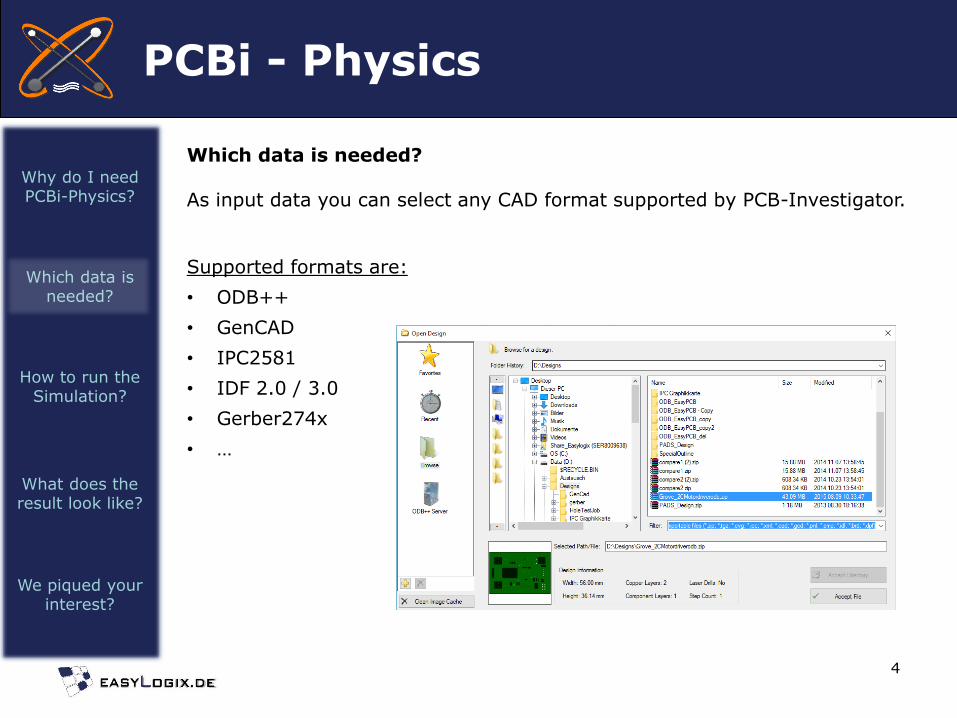
Which data is needed? As input data you can select any CAD format supported by PCB-Investigator. Supported formats are:
• ODB++
• GenCAD
• IPC2581
• IDF 2.0 / 3.0
• Gerber274x
• …
PCBi - Physics
What does the result look like?
We piqued your interest?
Why do I need PCBi-Physics?

5
Which data is needed?
How to run the Simulation?
How to run the Simulation? 1) Enter general Project parameters
PCBi - Physics
What does the result look like?
We piqued your interest?
Why do I need PCBi-Physics?

6
Which data is needed?
How to run the Simulation?
How to run the Simulation? 2) Enter Stack-Up information (Copper foils, Prepregs)
PCBi - Physics
What does the result look like?
We piqued your interest?
Why do I need PCBi-Physics?

7
Which data is needed?
How to run the Simulation?
How to run the Simulation? 3) Enter Current Sources / Sinks for each important net
PCBi - Physics
What does the result look like?
We piqued your interest?
Why do I need PCBi-Physics?
8
Which data is needed?
How to run the Simulation?
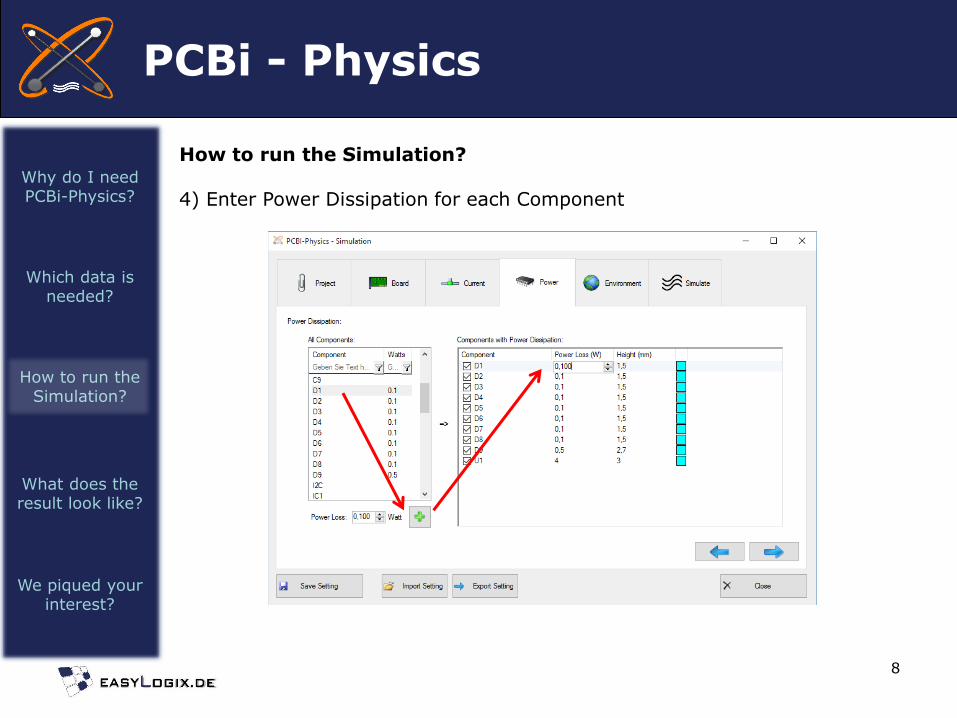
How to run the Simulation? 4) Enter Power Dissipation for each Component
PCBi - Physics
What does the result look like?
We piqued your interest?
Why do I need PCBi-Physics?

9
Which data is needed?
How to run the Simulation?
How to run the Simulation? 5) Enter environmental Temperatures and Heat Exchange values
PCBi - Physics
What does the result look like?
We piqued your interest?
Why do I need PCBi-Physics?

10
Which data is needed?
How to run the Simulation?
How to run the Simulation? 6) Click “Start” to initiate the simulation process
PCBi - Physics
What does the result look like?
We piqued your interest?
Why do I need PCBi-Physics?
11
Which data is needed?
How to run the Simulation?
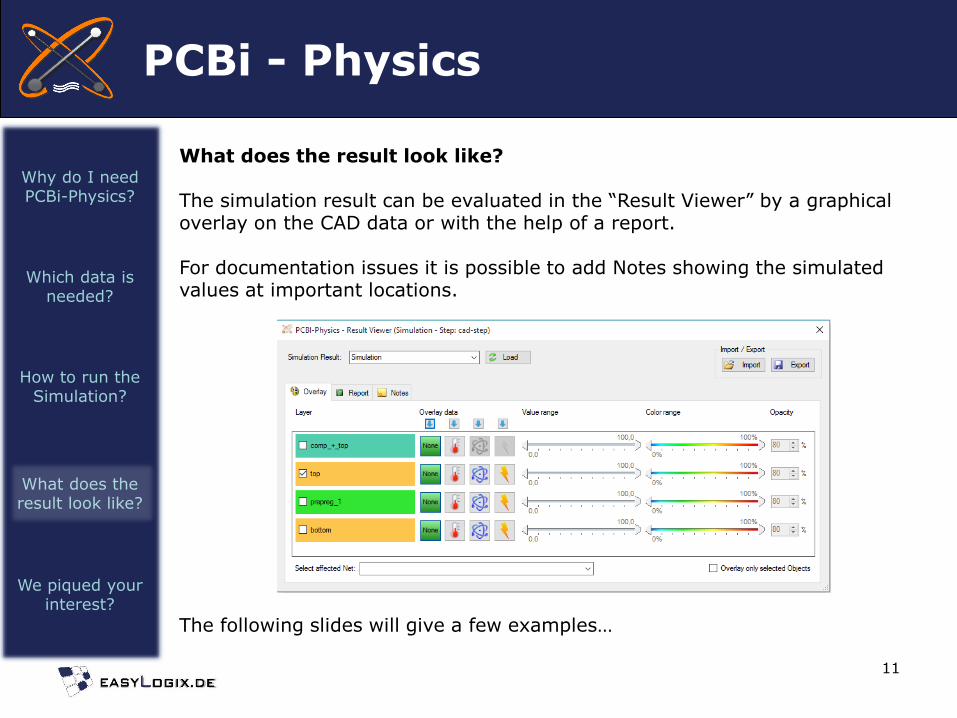
What does the result look like?
What does the result look like? The simulation result can be evaluated in the “Result Viewer” by a graphical overlay on the CAD data or with the help of a report. For documentation issues it is possible to add Notes showing the simulated values at important locations. The following slides will give a few examples…
PCBi - Physics
We piqued your interest?
Why do I need PCBi-Physics?

12
Which data is needed?
How to run the Simulation?
What does the result look like?
What does the result look like? Example 1: Temperature Overlay with Notes
PCBi - Physics
Temperature on the top signal layer (Filter: Temperature > 60°C)
We piqued your interest?
Why do I need PCBi-Physics?
13
Which data is needed?
How to run the Simulation?
What does the result look like?
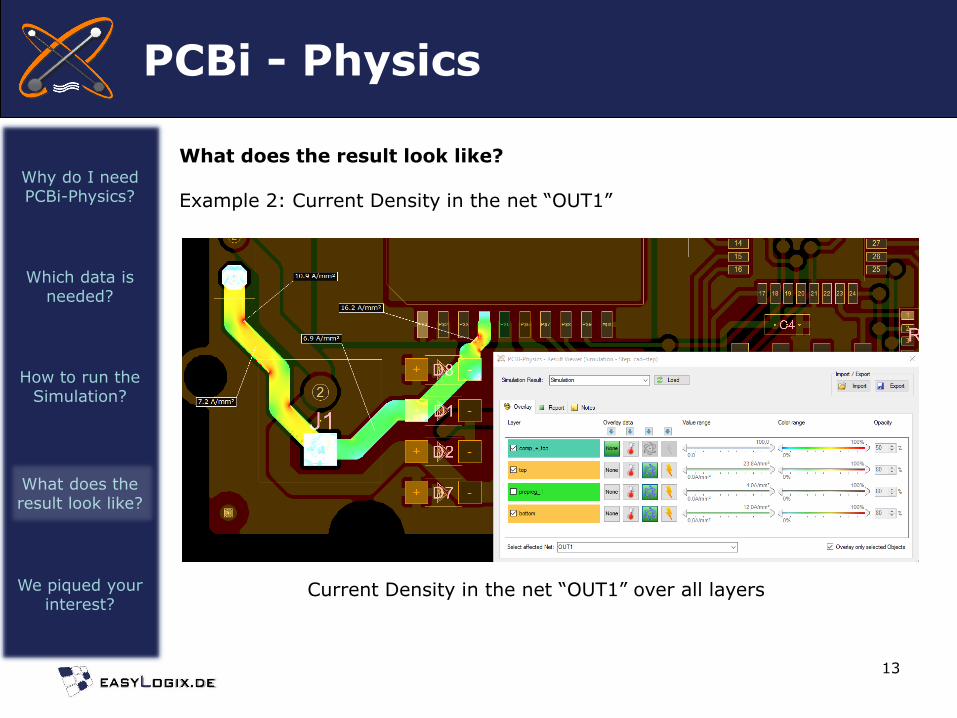
What does the result look like? Example 2: Current Density in the net “OUT1”
PCBi - Physics
Current Density in the net “OUT1” over all layers We piqued your interest?
Why do I need PCBi-Physics?
14
Which data is needed?
How to run the Simulation?
What does the result look like?
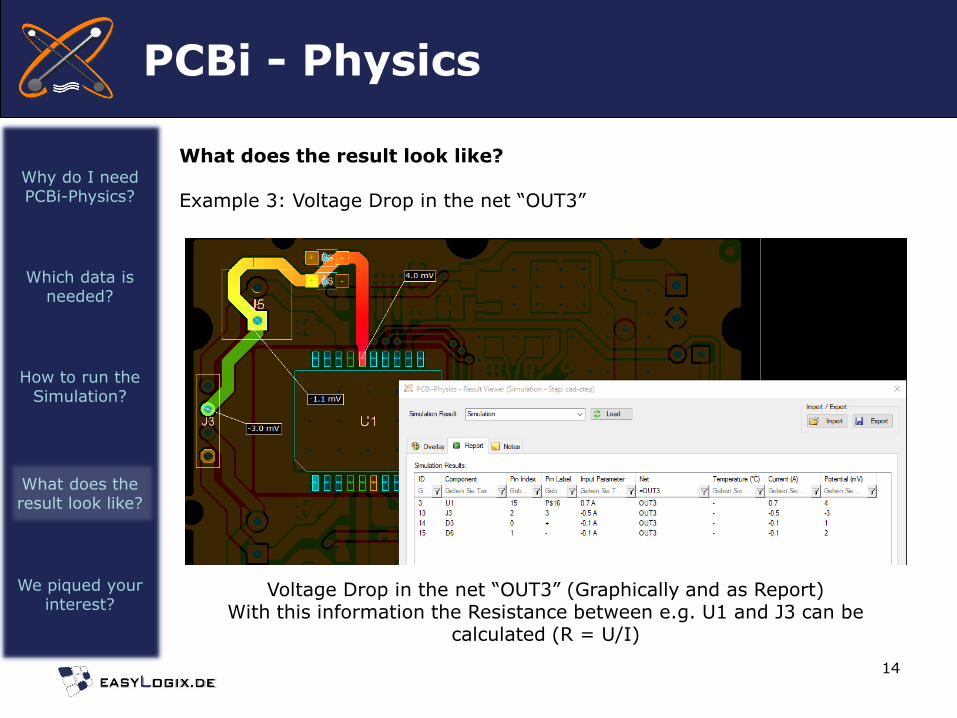
What does the result look like? Example 3: Voltage Drop in the net “OUT3”
PCBi - Physics
Voltage Drop in the net “OUT3” (Graphically and as Report) With this information the Resistance between e.g. U1 and J3 can be
calculated (R = U/I)
We piqued your interest?
Why do I need PCBi-Physics?

15
Which data is needed?
How to run the Simulation?
What does the result look like?
What does the result look like? Example 4: 3D Views with Temperature Overlay
PCBi - Physics
3D Views with Temperature Overlay
We piqued your interest?
Why do I need PCBi-Physics?
16
Which data is needed?
How to run the Simulation?
What does the result look like?
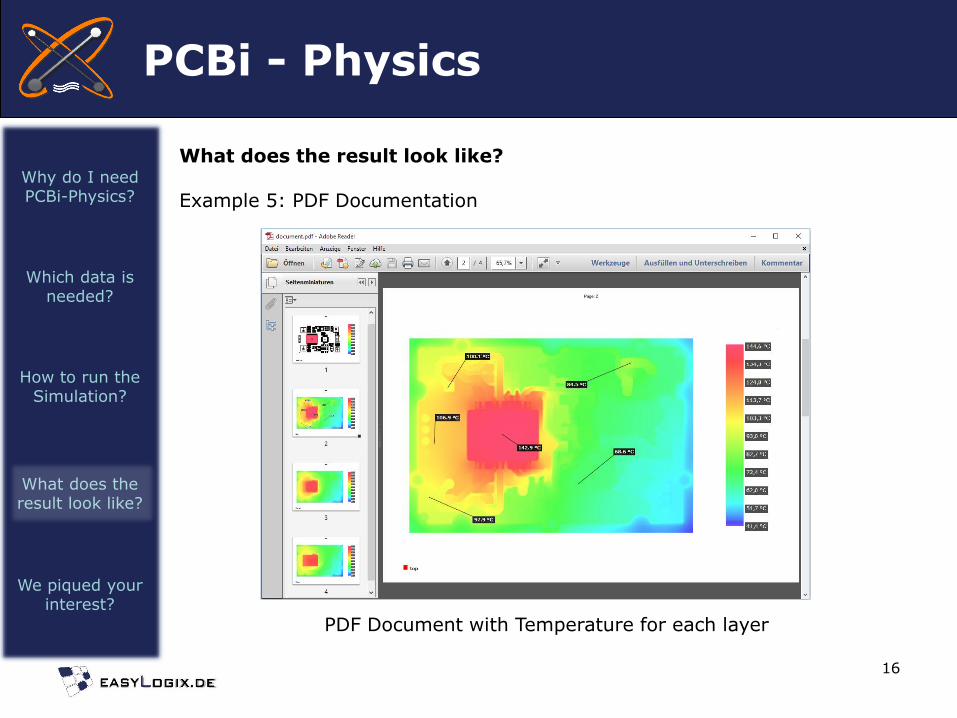
What does the result look like? Example 5: PDF Documentation
PCBi - Physics
PDF Document with Temperature for each layer
We piqued your interest?
Why do I need PCBi-Physics?

17
Which data is needed?
How to run the Simulation?
We piqued your interest?
PCBi - Physics
Get in touch!
[email protected] Günther Schindler
Tel. +49 941 604 889 719
or find more information here: www.PCBi-Physics.com
What does the result look like?
We piqued your interest? Why do I need
PCBi-Physics?

www.easyLogix.de
18
Useful Links: PCBi-Physics www.PCBi-Physics.com PCB-Investigator www.pcb-investigator.com Native Board Import (3D Interface to CATIA, SiemensNX, SolidWorks, SolidEdge) www.sts-development.biz GerberLogix www.gerberLogix.com Online Gerber Viewer www.Gerber-Viewer.com Software Development, CAD Converter, data connection www.easyLogix.de