pcc windows tutorial - the pits create as an alpha channel. rfactor uses the alpha channel for...
TRANSCRIPT

RFactor Tutorial Creating window and name graphics for the PCC mod v1.0
This short tutorial will show you how to create PCC window numbers and names. Paint Shop Pro 9 will be used. Other versions of PSP and Adobe Photoshop should be similar. I wrote this tutorial to help others because I had to figure this out through trial and error. There may be other methods but this works for me. The object of this tutorial is to make the window graphics for your PCC vehicle. Your name and number should be visible while the windows are clear. Masks and Alpha Channels are used to achieve this effect. A mask is used to hide portions of your image by introducing levels of transparency. The transparency information is defined using grayscale information. Where the mask is black that part of the layer is hidden and becomes transparent allowing lower layers to show through. Where the mask is white, the image is fully visible. Darker shades of gray are more transparent. You will use the mask you create as an alpha channel. rFactor uses the alpha channel for lighting effects. I will not be covering how to paint your vehicle because others have made tutorials already. Requirements:
1. Paint Shop Pro 9 or a similar graphics program supporting layers and alpha channels.
2. PCC vehicle template 3. PCC window template 4. rFactor Vehicle Viewer v1.0c (or higher) by Dave Noonan 5. DDS converter
Sources:
1. PSP - www.corel.com trial version available 2. Adobe Photoshop – www.adobe.com trial version available 3. PCC templates – German Sim Mod Foundation - www.team-gsmf.com 4. Vehicle Viewer – The Pits - www.thepits.us/rfshop.html 5. DDS converter – multiple sources – go to the rFactor forums at
http://forum.rscnet.org. Most PSP users need an older version. The latest version is at Nvidia. http://www.nvidia.com/object/photoshop_dds_plugins.html
Preparation: I usually start by creating a new team folder. For this tutorial I’ll use “Team America” as an example. I then copy the team files from another folder to the new folder. Copy the following five files from the “Araxa Racing” folder: PCC_03.dds, PCC_03.txt, PCC_03.veh, PCC_03Helmet.dds and PCC_03WING.dds to the “Team America” folder. I then rename the files. You can rename them most anything but there seems to be a limit to the number of characters (19?). If the vehicle does not show in your new team folder in rFactor, your name may be too long. For this example I’ll use PCCPepsi_22 for the new vehicle. Rename each file. You should now have: PCCPepsi_22.dds, PCCPepsi_22.txt, PCCPepsi_22.veh, PCCPepsi_22Helmet.dds and PCCPepsi_22WING.dds. Make the
RFactor Tutorial Creating window and name graphics for the PCC mod v1.0
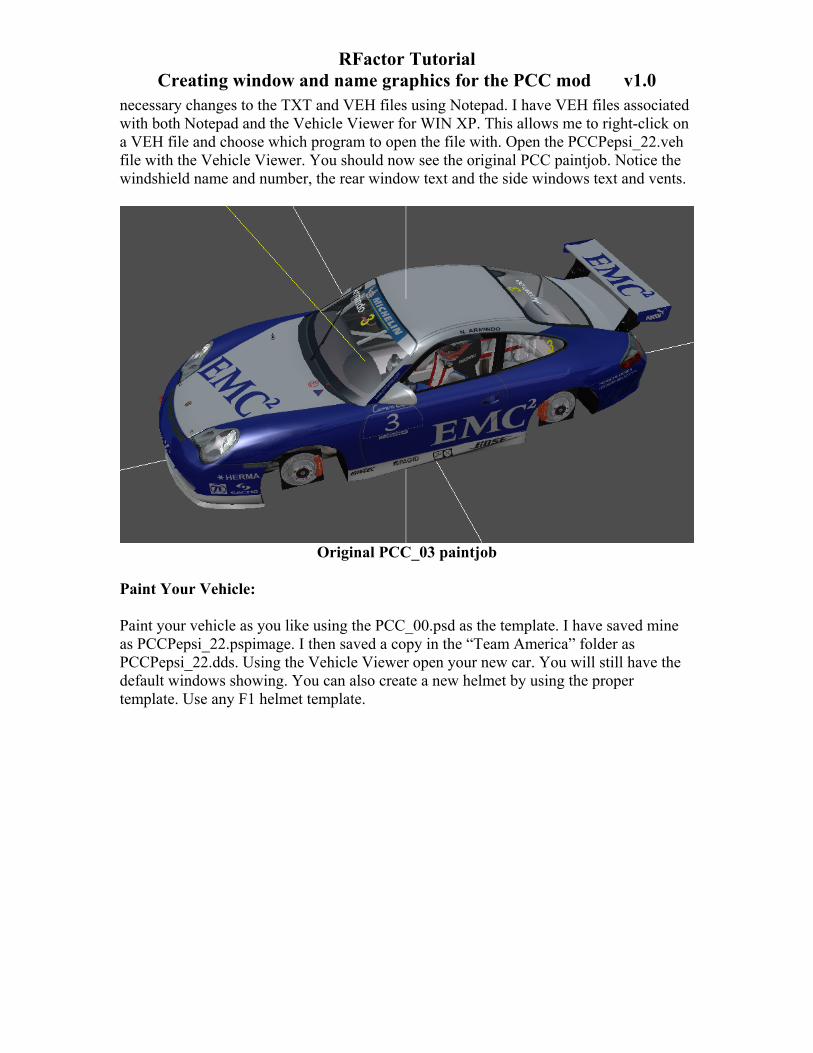
necessary changes to the TXT and VEH files using Notepad. I have VEH files associated with both Notepad and the Vehicle Viewer for WIN XP. This allows me to right-click on a VEH file and choose which program to open the file with. Open the PCCPepsi_22.veh file with the Vehicle Viewer. You should now see the original PCC paintjob. Notice the windshield name and number, the rear window text and the side windows text and vents.
Original PCC_03 paintjob
Paint Your Vehicle: Paint your vehicle as you like using the PCC_00.psd as the template. I have saved mine as PCCPepsi_22.pspimage. I then saved a copy in the “Team America” folder as PCCPepsi_22.dds. Using the Vehicle Viewer open your new car. You will still have the default windows showing. You can also create a new helmet by using the proper template. Use any F1 helmet template.

RFactor Tutorial Creating window and name graphics for the PCC mod v1.0
New Car With Default Windows
Making The New Windows File: The original template is named PCC_03WING.psd. I used this as a basis for my revised template. I modified the original to make it easier for me to create new window graphics. I created vector layers for the numbers and text. This makes changing the number, name and colors much easier. I will show you how to modify the original template to make your job much easier. Make a copy of the original template. Name it PCC_WingTemplate.pspimage or any other name you wish. You will need to create two groups. One group will have white text and the other will have colored text (unless you want white text on your vehicle).
1. Rename the ‘layer 2’ to wireframe. Turn this layer off. 2. Click on the upper ‘Armindo’ layer and create a new group named ‘white text’ .
Drag and drop the lower ‘Armindo’ layer and all four white ‘3’ layers below this layer. You should now have six layers in this group.
3. Delete the blank layers. Don’t know what the ‘background copy’ layer was for. 4. Create vector layers above each of the original layers. Give them applicable
names. I used Arial font, size 40 and bold for the names. Use white for the color. Rotate the front name @12 degrees to the right. If you have the talent create a curve matching the original and place the text on this curve. The numbers are size 60 Arial and bold. You can choose any font you wish and any size. Align each of the vector layers so that they are on top of the original raster layers. Use guidelines to help you. It will now be easy to change the number and the name.
5. Delete the six raster text layers. 6. Save a copy of the template to PCCPepsi_22WING.dds. Reload the texture in the
Vehicle Viewer. Verify that ALL text and ALL numbers are in the correct
RFactor Tutorial Creating window and name graphics for the PCC mod v1.0
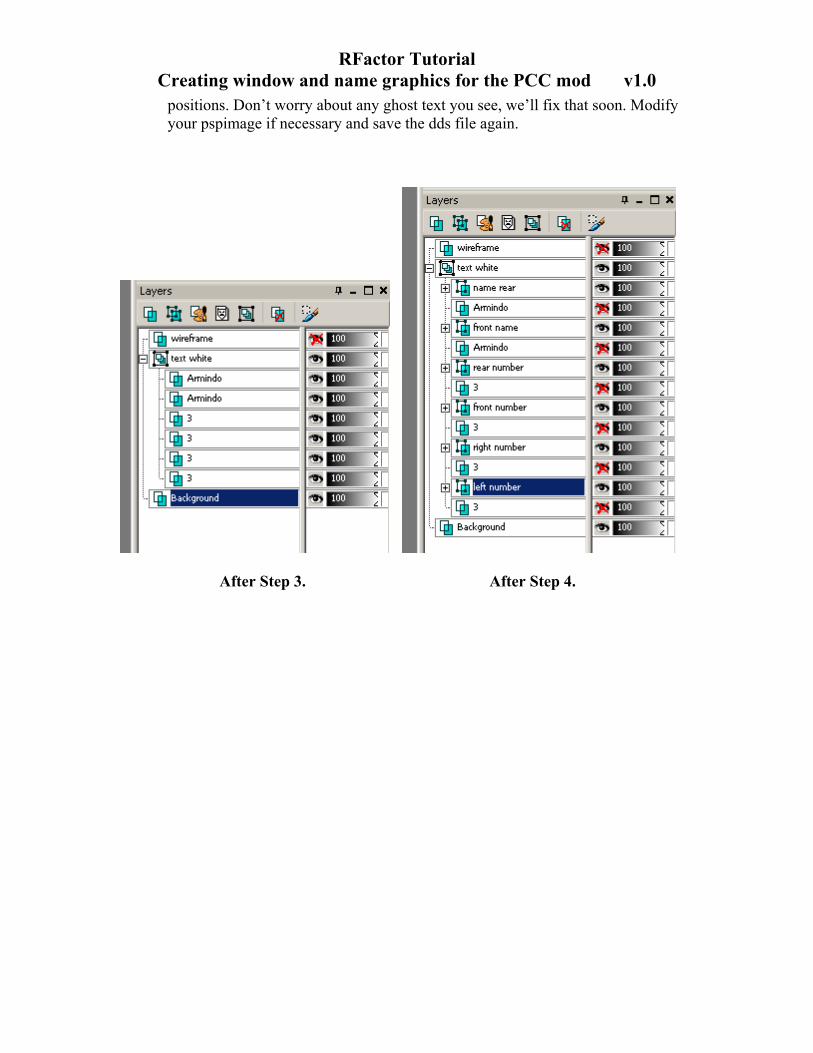
positions. Don’t worry about any ghost text you see, we’ll fix that soon. Modify your pspimage if necessary and save the dds file again.
After Step 3. After Step 4.

RFactor Tutorial Creating window and name graphics for the PCC mod v1.0
After Step 5. After Step 7.
7. Duplicate the ‘text white’ group. Rename the group ‘colored text’. Do not move either of the groups or your mask/alpha channel will be misaligned.
8. Modify the colors of any or all of the numbers and names. I have changed the text to red and the numbers to blue. If you want white text you can skip steps 7 and 8.
9. Turn off the ‘colored text layer’. 10. Make sure you do not have any alpha channels for this image. Use the ‘Image
Information’ if needed. Click ‘Image/Delete Alpha Channel’, select ‘all channels’, then click ‘OK’. This is grayed out if there are no alpha channels.
11. Duplicate the entire image. Use Shift+D. Minimize the PCCPepsi_22.pspimage. 12. Merge All Layers on the duplicate. You should now have a flat single layer. 13. Create a mask. Click on ‘Layers/New Mask Layer/From Image’. Click ‘OK’ to
promote to a full layer. Select ‘source luminance’ and then click ‘OK’. I can’t show you the original picture because it is too light. I made a red tinted version just to illustrate what it should look like. Yours will be grayscale.

RFactor Tutorial Creating window and name graphics for the PCC mod v1.0
After Step 11. After Step 12. (tinted red)
14. Create an alpha channel from the mask. Click ‘Layers/Load//Save Mask/Save Mask To Alpha Channel’. Click on ‘Save’. The name doesn’t matter. Minimize the duplicate image.
15. Create an alpha channel for your car. Open the original image. Click on ‘Selections/Load//Save Selection/Load Alpha Channel From Alpha Channel’. Make sure you load the alpha from your duplicate (image 16 in this case) and you ‘Replace selection’. Then click ‘Load’. You should now see the “marching ants.”

RFactor Tutorial Creating window and name graphics for the PCC mod v1.0
16. Save the alpha channel to this image. Click ‘Selections/Load//Save Selection/Save Selection To Alpha Channel’. Rename the alpha channel if you want. Then click ‘Save’.
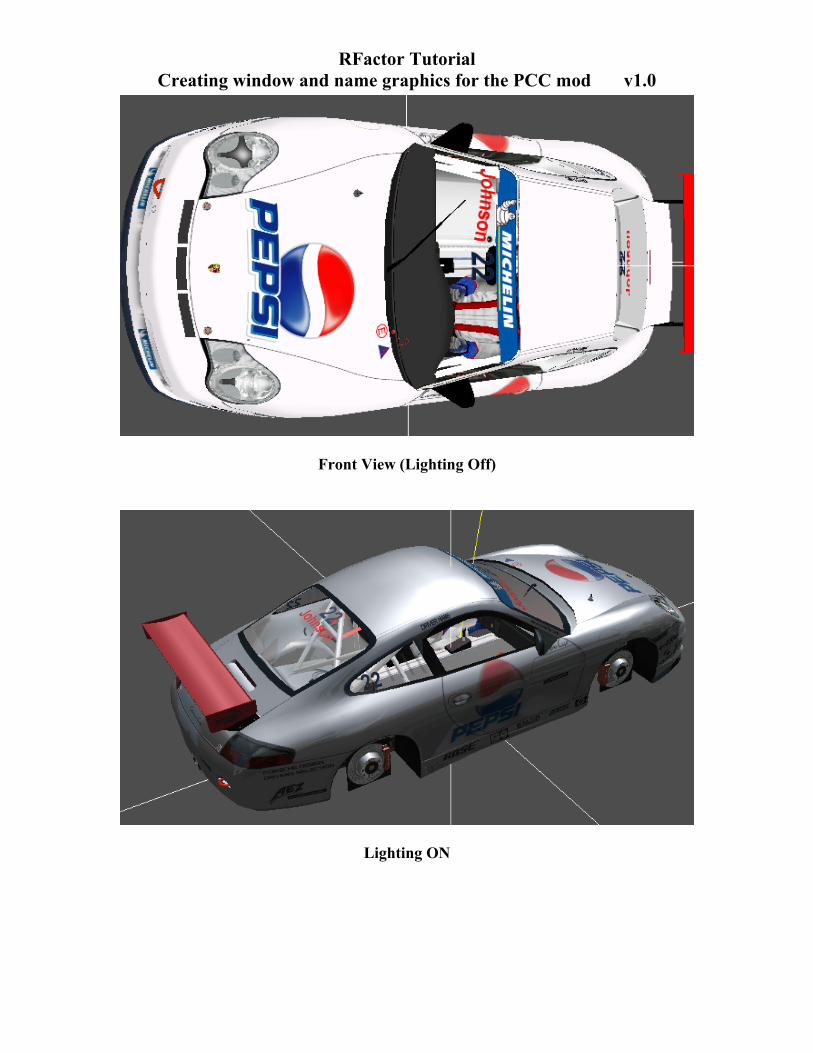
17. Save the DDS image. Turn on the ‘colored text’ layer. Save a copy of your image to PCCPepsi_22WING.dds. Reload the texture in the Vehicle Viewer.
Side View (Lighting Off)
RFactor Tutorial Creating window and name graphics for the PCC mod v1.0
Front View (Lighting Off)
Lighting ON

RFactor Tutorial Creating window and name graphics for the PCC mod v1.0
rFactor Selection Screen I’m sure this method will work with other mods that use a window DDS file. As you can see, you can use any color or font that you wish. You could also add logos but I haven’t tried it yet.
RFactor Tutorial Creating window and name graphics for the PCC mod v1.0
Credits: RFactor creators, Image Space Incorporated http://www.rfactor.net/ PCC Mod creators, German Sim Mod Foundation www.team-gsmf.com Dave Noonan , rFactor Vehicle Viewer author www.thepits.us/rfshop.html Race Sim Central Forums http://forum.rscnet.org The Pits Forums and downloads www.thepits.us I learned much of what I know about rFactor from the user forums. Thanks to all that share their knowledge with the rest of us. Legal Notice: There are none. I mainly wrote this tutorial so I could make my own vehicles. I wanted to make a guide for myself but decided to share this with other rFactor painters. If anybody wants to translate this to another language or there are any mistakes, contact myself at any forum I usually visit. The Pits, RSC or MasGrafx. (I have the original written in MS Word.) Bassman58 aka Micropterus58.