pci to 2 ports rs422/485 enhanced serial multi card
TRANSCRIPT

PCI to 2 Ports RS422/485 Enhanced Serial Multi Card
User’s Manual
All brand names and trademarks are properties of their respective owners

Features
■ Compliant with PCI Local Bus Specification 2.3
■ Supports PCI Power Management 1.2
■ Supports CompactPCI and CompactPCI Hot Swap
■ Supports 32-bit Bus / 33MHz and 66MHz
■ Supports data transmission of max. 264MB/sec
■ 256-byte Transmit FIFO
■ Programmable and Selectable Transmit and Receive FIFO Trigger Interrupt Generation
■ Programmable Sleep Mode
■ 9-bit Communication (Multi-drop with Auto Address Detection)
■ Software (Xon/Xoff) / Hardware (RTS#/CTS#) Flow Control
- Programmable Xon/Xoff Characters
- Programmable Auto-RTS and Auto-CTS
■ Optional Data Flow Resume by Xon Any Character Control
■ Optional Data Flow Additional Halt by Xoff Re-transmit Control
■ Programmable Serial Interface Characteristics
- 5, 6, 7, or 8-bit Characters
- Even, Odd, or No Parity Bit Generation and Detection
- 1, 1.5, or 2 Stop Bit Generation
System Requirements
Dos
Linux
Windows Server 2000/2003/2008/2016
Windows XP/vista/7/8/8.1/10
Installing windows 2000/XP/2003 Driver
1. Insert MultiPort/PCI board into PCI slot.
2. Turn on the PC and insert install CD.
3. Run the proper Windows version.
4. Check the “Found New Hardware” menu.
5. Found now hardware wizard begins, select “Install from a list or specific location” and click “Next”.

6. Select “Search for the best driver in these locations” and “Include this location in the
search”. Click “Next”. (Specify the location as below.
Windows x32 OS: “[CD-ROM]: \DRIVERS\SYSTEMBASE\1053\WinXP,2003, Vista,2008,7”
7. A warning window may show up. Click “Continue Anyway”.

8. Install finished for multifunction adapter. Press the “Finish” button.
9. Step 5 ~ 8 will be repeated to install serial ports and parallel. This will be repeated for
the number of serial ports and parallel port.

10. Select “Search for the best driver in these locations” and “Include this location in the
search”. Click “Next”. (Specify the location as below.
Windows x32 OS: “[CD-ROM]: \DRIVERS\WinXP,2003, Vista,2008,7”
11. A warning window may show up. Click “Continue Anyway”.
12. Install finished for serial port. Press the “Finish” button.


- Sleep Mode Setting
Our semiconductor, SB16C1050A, provides sleep mode operation to reduce its power
consumption when sleep mode is activated.
Check boxes are not checked (Default). If you want to use function of sleep mode, you click the

check box. Our program detects installed ports based on SB16C1050A automatically. For
example, in 6S mode, only 2 ports are based on 105x chip, others are based on 55x chip, so
only 2 ports are detected our program and displayed like below.
9-bit UART Setting
Our semi-conductor, SB16C1053APCI, supports 9-bit UART. In RS422 or RS485, each device
communicates using its unique address. In receiver side, after checking its address, the receiver
accepts the data when the address is same. To compare the address, 9-bit concept is
introduced.
But, if 9-bit communication is used, 9-bit data in serial data has only to „1‟, it is recognized for
address. Data doesn’t have to be checked because the data is judged that transmitted for its
own after the address is compared to its own address. Because of this, the slave device doesn‟t
have to do unnecessary comparison process. As a result, the performance is improved because
device‟s overhead is reduced and the device can be used in many ways.
It also detects installed ports based on SB16C1053A automatically. So, if the ports based on
SB16C1053A are COM3 and COM4, window is displayed COM3 and COM4 like below. The 9-
bit UART function can work as HW and SW. In HW, the 9-bit function is worked as the semi-
conductor chip internally. In SW, the 9-bit function is worked as our software program.
9-bit enable check boxes are not checked (Default). If you set the 9-bit UART Enable, HW
setting is default setting and my address is 1 and 2 default setting. If you want to change the
address, you have only to insert the address you want.

- COM/LPT I/O Address Remap
Our program supports the function of I/O address remap. It also detects installed serial ports
automatically. Each serial port can be set Auto or COM1~4. If it is set Auto, its input/output
address is set automatically and it is provided automatic PnP. Com1~4, mean basic COM‟s
address, are supported in main board. Also, parallel port can be also set Auto or LPT1~3.

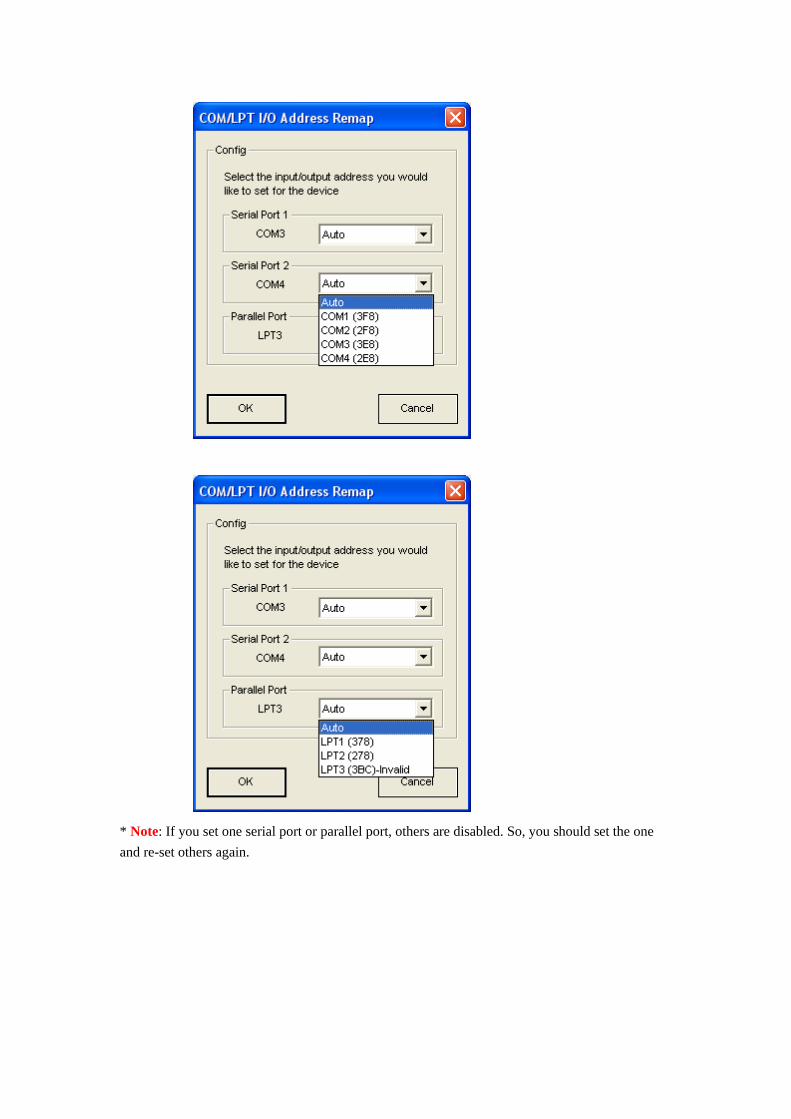
* Note: If you set one serial port or parallel port, others are disabled. So, you should set the one
and re-set others again.

** Note: First time, when you change the address that occupied already, you may think that the
address is changed. But, first time, the address is not changed in this situation. Then, after the
address is changed, invalid mark appears, you can recognize that you cannot change the
address that occupied already.
- Port Name Remap
Port Name Remap function supports to change the port name. If you want to change port name
of all ports sequentially, modify it. Specify this port name as you want and click the “OK” button.
The port names of the device will be rearranged.

* Note: I/O Address Remap and Port Name Remap are different. In I/O Address Remap, you
can change the address of basic COM‟s address, are supported in main board. But, In Port
Name Remap, you can just change the port name. So, change in address does not mean that it
will change the port name.
- Advanced Setting
The below picture is “Advanced Settings...”. If UART type is 16C105x, Flow Control would be
activated and the FIFO size occupies “256”. You can select the “AutoRTS”, “AutoCTS”,
“AutoXonXoff” in “Flow Control”, and the “Interrupt Trigger Level”. At “Interrupt Trigger
Level”,
RxFifo default is 32, TxFifo default is 64. If you click “Restore Defaults” button, “Advanced
Settings...” restores default.

Signal Jump
DB9 RS422 RS485