pdaa vinyl installation proficiency guide
TRANSCRIPT

Including PDAA Certification Guide
Professional Decal Application Alliance
PDAA Vinyl Installation Proficiency Guide Fifth Edition
PDPDP ADAD A

PDAA Vinyl Installation Proficiency Guide Fifth Edition
Including PDAA Certification Guide
Professional Decal Application Alliance
10015 Main Street • Fairfax, Virginia, 22031
SGIA.org/pdaa© 2015, Specialty Graphic Imaging Association

Introduction ..............................................................................................5
PDAA Vinyl Installation Proficiency Guide - Fifth EditionTools, Cleaning Supplies & Equipment................................................6
Tools .....................................................................................................6
Cleaning Solutions ..............................................................................13
Equipment ..........................................................................................15
Safety and Regulations ..........................................................................16
Substrates ................................................................................................17
Graphic Storage & Shipping ................................................................17
Testing the Paint ....................................................................................18
Graphic Installation Temperature ......................................................18
Adhesive Wet Out ...................................................................................19
Overlap ....................................................................................................20
Cleaning Procedures .............................................................................21
Key Points ..........................................................................................21
PDAA Approved Cleaning Methods ...................................................21
Drying Time ........................................................................................22
Positioning ..............................................................................................22
Masking Tape Hinge Methods ............................................................22
Modified Side Hinge ...........................................................................23
Floating Hinge Method .......................................................................26
Peel & Slap .........................................................................................26
Magnet Use .........................................................................................27
Application Information, Tips & Techniques ...................................27
Air Egress Technologies .....................................................................27
Bubbles - Causes & Prevention (non-air egress) ................................28
Wrinkles .............................................................................................29
Trimming and Cutting ........................................................................30
Cut-Resistant Tape ..............................................................................33
Knifeless Tape ....................................................................................33
Simple Curves vs. Complex Curves ...................................................33
Vinyl Memory .....................................................................................34
Stretching Vinyl ..................................................................................34
Pre-Stretching .....................................................................................35
Post-heating ........................................................................................35
Lamination ..........................................................................................36

Perforated Window Graphics .............................................................36
Rough Surface Materials .....................................................................37
Specialty Films ....................................................................................37
Finishing ..................................................................................................37
Removing Premask .............................................................................37
Removing Bubbles ..............................................................................38
Cutting and Tucking Seams ................................................................38
Sealing Rivets ......................................................................................38
Edges ..................................................................................................38
Re-squeegeeing ...................................................................................38
Brushing .............................................................................................38
Solvent Retention ...................................................................................39
PDAA Certification Guide General Information ...........................................................................40
PDAA (VIP) Certification Written Exam ............................................40
Basic Certification Installation Tests ..................................................41
Cleaning Test ......................................................................................41
Control of Depth Cut Test .................................................................42
Acrylic Test .........................................................................................43
Trailer Test - Flat with rivets ..............................................................44
Master Certification Installation Tests ...............................................45
Vehicle Wrap Side Test ......................................................................45
Vehicle Wrap Trimming and Finishing Test ......................................46
Vehicle Wrap Rear Test ......................................................................47
Glossary of Terms ..................................................................................48

Introduction
Who should read this guide?All PDAA Members. One requirement for all levels of PDAA Membership is that you agree to follow the installation procedures pre-scribed in this guide.
If you are a PDAA General member, you should make it your top priority to become a Master Certified member. This guide will help you achieve that goal. As you read and study this guide, the information will make you more knowledgeable and help you pass the PDAA Certification written exam. Begin using the techniques, processes and procedures for every installation, as they will make you a better installer.
If you are currently a PDAA Basic or Master Certified Member Company, you should read and study this guide as well. You are sure to find at least one pearl of wisdom or new technique that will benefit your company and your installations.
This document was written exclusively for the use of members of PDAA. The intent is to provide you with as much information as possible in regard to the process of vinyl graphic installation.
The techniques, processes and procedures have been reviewed by PDAA and adopted as “PDAA Approved.” That is not to say there are not other tech-niques that will yield a professional installation. Nor does it imply that new tools, vinyl and techniques will not become available and influence the way you should apply vinyl.
It does mean that all PDAA Members should use these techniques, pro-cesses and procedures whenever possible to ensure consistency and profes-sionalism across the board. Customers that choose PDAA Members to perform graphic installations expect a professional quality job that adheres to all PDAA and vinyl manufacturer guidelines. It is our job, as PDAA Members, to make sure that all PDAA installations meet or exceed that expectation.
PDAA Vinyl Installation Proficiency Guide - Fifth Edition • 5

Tools, Cleaning Supplies & Equipment
This section contains information about tools, cleaning supplies and equip-ment that are commonly used by PDAA members. You’ll find most, if not all of these items helpful at some point in your installation career. If you are unsure where to purchase an item, try contacting PDAA members in your area. You may find the answer to your question and make a new friend as well.
ToolsSqueegeesThere are many types of squeegees available: plastic, nylon, Teflon and felt. They come in several different sizes: 4”, 6” and 12”. Felt squee-gees can be rectangular or half rounds. Covered squeegees also are quite common today. They can be purchased with a felt or velour type cover on one edge, a Velcro type cover on one edge, or you can add your own covering. We have seen installers add denim, suede, Teflon tape, nylon fabric and vari-ous iron-on patch materials. Covers are added to squeegees to prevent or minimize scratching of graphics that have no premask, or specialty films not requiring lamination.
Each and every one of these different squeegees may come in handy from time to time. With the wide variety of graphic installations a professional installer is called on to perform, one cannot own too many varieties. It might be wise to get at least one of each type and try them on different installations to determine which squeegees work best in each situation.
Keeping in mind the purpose of the squeegee, which is to push out all of the air, conform the vinyl to the substrate and apply adequate pressure to adhere the vinyl to the substrate, some general recommendations have been included:
• For all graphics that have premask, try using a 4” nylon squeegee (i.e. 3M Gold or Lidco Silver). Note: If applying to mildly textured surfaces like painted sheetrock walls or painted wood (barricades) graphics, you need the pressure you can get a from a firm nylon squeegee, due
Vinyl application squeegees are used to apply vinyl to substrates.
6 • PDAA Vinyl Installation Proficiency Guide - Fifth Edition

to the premask. However, the graphic will only be adhered to the high points of the texture, so once the premask is carefully removed, you will need to use a tool that will push the vinyl down into the texture for better adhesion. For this step try using a felt squeegee or one with a Velcro cover. Other new techniques involve using some heat followed by a foam roller tool. Many of us have also used a rivet brush to mash the vinyl onto the texture. Be careful when using heat on sheetrock and wood - the surface and the vinyl can burn easily.
• For vinyl laminated graphics without premask (on completely flat, smooth, rigid surfaces), use a covered, felt or Teflon squeegee.
• For vinyl laminated graphics without premask (on flat aluminum with rivets or screws), use a covered or felt squeegee.
• For vinyl laminated graphics without premask (on complex curve vehicle shapes) use a covered squeegee. Thinner coverings work bet-ter on these difficult shapes, allowing you to better direct the flow of the vinyl.
• For vinyl laminated graphics without premask (on textured surfaces like sheetrock, painted wood or barricades) use a covered or felt squeegee.
NOTE: PDAA does not recommend installing graphics less than 3 mil in thickness, unless they have a vinyl laminate or premask, or both.
Rivet BrushesA rivet brush is designed to conform vinyl to the shape of a rivet or screw head — with the use of heat — after the vinyl has been applied with a squeegee. If the graphic has pre-mask, remove it after applying the vinyl and poke at least one small hole with a fine needle-type device before using the rivet brush and heat.
NOTE: PDAA recommends using a rivet brush and a propane torch to finish vinyl applied over rivets and screws. We do not recom-mend using a squeegee!
Rivet brushes also come in handy when applying graphics to corrugated and textured surfaces like banners, flex face, drywall or sheetrock.
A rivet brush is used to make vinyl tight around rivets.
PDAA Vinyl Installation Proficiency Guide - Fifth Edition • 7

Foam RollerFoam roller tools have become in-creasingly common among install-ers, particularly for installation to either riveted or rough surfaces. The compressibility of the foam surface of the roller allows heated vinyl to stretch into or around small, three-dimensional features.
KnifePDAA recommends sturdy stainless steel knives with break-off blades. They tend to have less “wobble” than most plastic knives, which helps en-sure a better, straighter cut. The blade tip used for cutting should be very sharp, so it is wise to break off the used ones frequently. The blades come in two different angles, 45-degree (shown in photo) and a 30-degree blade that is longer and thinner at the tip. This blade is best suited for criti-cal cuts on round and curved objects like keyholes on a vehicle door. The 45-degree blade is used primarily for less detailed or straighter trims.
Air Release ToolsAlways use a fine, needle tip for poking holes in vinyl to release air from bubbles and around rivets and screws. PDAA does NOT ap-prove of using any kind of knife to puncture holes in vinyl.
The two most common PDAA ap-proved tools used today are the Griffhold Stylus Burnisher (a pencil size, wooden dowel with a needle tip) or an Air Release tool (a metal tool with a retractable fine needle tip).
An Olfa knife is a cutting tool common to many installers.
An air release tool is used to eliminate air bubbles.
A seam ripper is a common slitting tool.
8 • PDAA Vinyl Installation Proficiency Guide - Fifth Edition

Slitting ToolsThese tools, whether made spe-cifically for graphics installation or for other purposes, are essential for allowing installers to cut away liner paper without fear of cutting the graphic.
Vinyl Removal Scrapers/Plastic Razor BladesSmall plastic devices that work well for lifting the edge of applied vinyl for removal, taking off smaller emblems on vehicles, and for tak-ing off small text and graphics (used for scraping when a razor might scratch the surface).
Letter OpenerSmall plastic letter openers with recessed cutting edges can be great for cutting away backing paper.
Stabilo PencilsThe best all-purpose marking de-vice used today is called a Stabilo and is available in many different colors. Mark along the edge of the graphics, but do not apply vinyl on top of the Stabilo mark — it will not stick well.
Tape MeasureUse a 25’ or 30’ ones, with a 1” wide blade. On big graphics, it pays to have a big tape measure.
PRO TIP: CenterPoint Tape measures feature a “half-size” scale on the bot-tom edge, instead of the usual metric that is rarely used in the US. It allows you to find the “center point” of any measurement quickly and easily, and is available at most hardware stores.
A Lil’ Chizler is used to remove applied vinyl and vehicle emblems.
The Stabilo marker is used to mark vinyl.
PDAA Vinyl Installation Proficiency Guide - Fifth Edition • 9

Six Inch RulerA six-inch ruler fits easily in any tool pouch and they are extremely handy.
Chalk Line/Laser LevelA chalk line is also a good thing to include in your tool kit. However, you must never apply vinyl to the chalk dust — it will not stick.
A laser level can also provide a useful straight line whether used on horizontal or vertical surfaces. It can easily be used by one person.
PRO TIP: When you need a long straight line, pop the line away from the surface first to shake out excess chalk, and then pop the regular line. Use a Stabilo to make periodic marks along the line, instead of measuring multiple times, then simply wipe off the chalk and install the graphics (see note under “Stabilo”).
Squeeze ClampsSqueeze clamps are great for clamping substrates, banners and signs to a table in order to hold them while applying vinyl. They also work great for clamping a ruler to something being cut, to avoid having the ruler slip. They also can be used to help graphics from blowing away in the wind!
Masking TapeMasking tape is a must for every installer laying out and installing graphics, especially on non-mag-netic surfaces. A high quality 2” masking tape may be expensive, but well worth it.
MagnetsMany installers are beginning to use magnets for positioning vinyl on magnetic vehicle surfaces.
Razor ScrapersRazor scrapers (with a new razor
Squeeze clamps are excellent tools for holding things in place.
Many installers use special magnets to help position graphics.
10 • PDAA Vinyl Installation Proficiency Guide - Fifth Edition

blade) are used in conjunction with 70 percent isopropyl rubbing alcohol (IPA), primarily to clean glass or remove vinyl graphics or adhesive from glass.
Note: Please do not use razor blades to scrape vinyl and adhesive off vehicle surfaces unless you are extremely proficient.
Small ToolsIt’s always a good idea to have a selection of common tools. Screwdrivers, a hammer, pliers, wrenches, sockets, Allen wrenches and torque bits are a good place to start. Compact, powered screwdrivers come in handy too.
Propane TorchesPropane torches can be used to seal edges and to remove small graphics. They also are recommended for sealing rivets. Most installers use them when a small amount of heat is needed to warm up vinyl, to remove wrinkles, or to relax the film.
PRO TIP: PDAA recommends BernzOmatic Self-Igniting Torches, which can be found at most hardware stores.
Understanding Propane Gas and MAPP GasPropane and MAPP gas are both sold in 14.1 oz. bottles (cans). Propane and MAPP gas will both attach to and work with the torches listed above. It is im-portant to understand the relation between the two. Both have a similar flame temperature in air — propane has a maximum temperature of 3,450° F and MAPP has a maximum temperature of 3,650° F. These temperatures, however, do not provide an accurate reflection of how the use of these different gases varies when used for heating vinyl. With regard to heating vinyl, two other factors more accurately reflect the behavior of these two gases: primary and secondary combustion heating values. The primary combustion heating value of Propane is 255 (BTU/CuFt) compared with the MAPP value of 517. The sec-ondary combustion heating value of Propane is 2,243 (BTU/CuFt) compared with the MAPP value of 1,889. Note that propane’s primary value is less than half that of MAPP. Practically speaking, if you hold a MAPP gas flame close to the vinyl, such that the “cone” (the hottest part of the flame) touches the vinyl, it will burn the vinyl twice as fast or in half the time that propane would. That is the primary effect. If you hold the MAPP gas further away from the surface, the secondary combustion heating value will take precedence, and propane will actually burn the same vinyl a little sooner than MAPP would.
What does this all mean? How close you hold the flame and how fast you move the torch can produce two totally different reactions depending on
PDAA Vinyl Installation Proficiency Guide - Fifth Edition • 11

which gas is used. You should pick one and stick with it. PDAA recommends using Propane gas, which is more readily available in stores and is less likely to burn the vinyl if you get too close.
Heat gunsIn the late seventies and early eighties, most installers used heat guns to warm or remove vinyl, but mainly to seal rivets. There were no vehicle wraps and installers never applied vinyl to complex curves. In the mid to late eighties, most installers retired their heat guns and replaced them with propane torches. There were many advantages, including no extension cords, no need for an outlet nearby and no waiting for a heat gun to warm up.
Today no one is getting rid of their torches, but many are pur-chasing high-quality heat guns with digital temperature readouts and extensive variable temperature ranges (120°–1200°F). The reason for this is a technique called “post-heating,” which is discussed in detail later in the “Finishing” section of this document. If you install vehicle wraps, you need a professional grade heat gun.
PRO TIP: PDAA recommends Steinel Heat Guns (www.steinel.net) with the features listed above. There are several to choose from and they change from time to time. Expect to pay $150–200.
Cleaning Supplies & SolutionsBucketsOne gallon plastic buckets with a handle work well. Having at least one bucket for each type of cleaning solution being used for a given job is a smart choice.
Cleaning and Drying TowelsWhite cotton shop towels (thin, not terrycloth and about the size of a common wash rag) work well for the wet part of the cleaning process. White cotton ter-rycloth towels (about the size of common hand towels) work well for drying.
Heat guns are used to post-heat vinyl, and where torches can not be used.
12 • PDAA Vinyl Installation Proficiency Guide - Fifth Edition

Neoprene GlovesThese gloves are chemical resistant and should be used when cleaning with strong solvents. Although they make holding on to a wet rag difficult, safety & health concerns must take priority.
Cleaning SolutionsBelow is a list of cleaning agents that are commonly used in our in-dustry for surface preparation and adhesive removal:
• Detergent and water• Xylol, Naphtha, PrepSol• Isopropyl (70 percent) rubbing alcohol• ZEP’s Orange Gel degreaser
NOTE: Material safety data sheets (MSDS) for these agents may be down-loaded at www.msds.com. Below is a more detailed explanation of these agents and their usage:
Detergent & WaterUse: For surfaces heavily contaminated with dirt, dust and mud. For detergent, PDAA recommends using “Joy” brand (mix one teaspoon per quart of water).
Do not use: Any detergents that contain hand cream, lotion or fragrance. The use of an inappropriate detergent may result in application problems and may interfere with the bond of the adhesive. Other options are purchasing a high-pressure washer, having the client provide a reasonably clean vehicle to start with, or taking it to a car wash yourself. Regardless of who washes the vehicle (if it is really dirty), you’re better off if it has plenty of time to dry. Water and moisture take a long time to evaporate in and around trim pieces, windows, handles, etc. If at all possible, have it washed one day and let it dry overnight before proceeding to the next cleaning steps and installing the graphics.
ZEP Orange Gel Degreaser AerosolThis organic, petroleum-free Cleaner/Degreaser/Deodorizer effectively emulsifies tar and asphalt, and removes many adhesives and industrial coatings. Thickened for use on vertical surfaces to promote longer contact time with grease and soil,
Careful cleaning prepares the surface for successful installation.
PDAA Vinyl Installation Proficiency Guide - Fifth Edition • 13

it is ideal as a graffiti remover. Its detergents are completely biodegradable and environmentally safe and water-soluble. It also contains no caustics, acids, petro-leum distillates, chlorinated hydrocarbons or chlorinated solvents.
PDAA recommends the use of this product for grease, tar and adhesive removal. Using it for tar and grease removal will make a bigger mess than a petroleum-based solvent, but it rinses off with water, is less toxic and will not damage the paint. Wear safety glasses when spraying to prevent eye contact. Rubber or neoprene gloves also are recommended.
PRO TIP: If you plan to use it on a vehicle and the vehicle needs to be washed with detergent and water as well, use the Orange Gel Degreaser first to remove tar, grease and adhesives, then wash the vehicle and finally use Isopropyl Alcohol as your final rinse.
NapthaUse to remove tar, wax, grease and diesel soot. Naptha is another petroleum-based solvent with the same properties as Xylol, just not as strong. It’s not very effective for adhesive removal. Use the same cautions as Xylol.
Petroleum-Based SolventsAlways wear safety glasses and neoprene gloves when working with solvents to prevent eye and skin contact.
Petroleum-based solvents should only be used in a well-ventilated area (out-doors is preferable). Use as little as is needed to do the job.
XylolUse to remove tar, wax, grease and diesel soot. Xylol, also called Xylene, is a petroleum-based solvent. If dirt and mud are present, use detergent and water to wash the vehicle first, then use the Xylol. Xylol can also be used for removing most adhesives. As with most solvents it may damage some painted surfaces and therefore must be tested on a small section first. Generally, if the surface has OEM paint and you are using it on tar, wax, grease and diesel soot, you will not get the surface wet enough, nor will it be left wet long enough to cause paint damage. If you are trying to take off large amounts of adhesive, it will require many applica-tions of the solvent and you’ll have to leave it on for a long time period. Do not use Xylol under these conditions because it will damage even a good OEM paint job.
If the vehicle has been repainted, you should definitely test Xylol on a very small area, in the least conspicuous spot. This product can be obtained from most local chemical supply houses under “Solvents” in the Yellow Pages. Use extreme caution with this chemical and always wear neoprene gloves!
14 • PDAA Vinyl Installation Proficiency Guide - Fifth Edition

PrepSolUse to remove tar, wax, grease and diesel soot. DuPont’s PrepSol brand solvent is another petroleum-based solvent. It is weaker than Naptha and not very effective for adhesive removal. The strength of these solvents is diluted by adding an oily substance, because oil and water do not mix. This product will leave an oily film that is difficult to remove. Consequently, most installers do not like using it. It does, however, have one important use — it can be used to remove tar and grease on paint that would be damaged by Xylol (and maybe Naptha). It is probably not possible to put on too much PrepSol or leave it on too long to damage vehicle paint, whether OEM or repainted, but it can harm latex paint. If you use PrepSol, make sure you use several drying rags to help remove the oiliness and use a lot of Isopropyl Alcohol as a final rinse.
Isopropyl 70 percent Rubbing AlcoholUse as a final rinse to ensure oily films and resi-dues are removed from the surface. Isopropyl, also called IPA, will remove some dirt and oxidation but will not remove wax, tar, or grease. Chemically, Isopropyl 70 percent Rubbing Alcohol is 70 percent Isopropanol and 30% water.
Equipment Weed BurnersWeed burners are large propane devices used to remove large graphics. If you do not have one, get one. However, before you use it, have an experienced PDAA professional teach you how to use it safely and efficiently.
PRO TIP: PDAA recommends the Bertha 500, Model 163 from LB White (www.lbwhite.com)
ScaffoldsScaffolds are available in several types and configurations. The main types are aluminum and steel. Both are acceptable. Aluminum scaffolds are more expen-sive but easier to transport and the collapsible “V-X” models, sold by Genie and Upright, can be set up by one person for trailer-height installations. They are designed for people who want to install large graphics quickly and easily.
PDAA Vinyl Installation Proficiency Guide - Fifth Edition • 15
Weed burners are used in the removal of large graphics.

Ladders
One of the keys to applying graphics well is having a solid stance in front of the graphic and being able to reach it comfortably without reaching too far (in any direction). While ladders are designed to help you reach things, they can be very dangerous and do not provide a good solid platform to install large graphics. The use of ladders is quite common; they are easy to find and rela-tively inexpensive to purchase and easily transported. In some instances, a lad-der can be the tool of choice. As far as graphic installation is concerned, you would be safer, save money (in the long run) and generally be more produc-tive if you invest in a good aluminum modular scaffold, as mentioned above.
NOTE: If you place a walk board between two ladders, more than four feet off the ground without guard rails, you are in violation of Federal law and OSHA can shut your installation down and fine your company.
Safety and Regulations
It is imperative for you to follow all safety guidelines and to obey all govern-ment regulations.
First Aid KitAlways have a first aid kit close by. Cuts and burns are common among people that use knives, torches and heat guns on a regular basis.
Sunglasses/SunscreenSunglasses and sunscreen can be a lifesaver when working outdoors.
Fire ExtinguisherAlways have a fire extinguisher readily available whenever you are working with any type of heating devices and/or flammable solvents.
MSDSMSDS stands for material safety data sheet. You must obtain these sheets on all chemicals used and have copies readily available at your office and on-site, per OSHA regulations.
Go to www.msds.com to download and print out each MSDS sheet you are required by law to have.
16 • PDAA Vinyl Installation Proficiency Guide - Fifth Edition

Neoprene Gloves
Before using hazardous chemicals to clean surfaces or remove graphics, de-termine whether personal protective equipment, such as neoprene gloves, must be worn to use the product safely.
Worksite Safety Evaluation
Relatively simple, but highly important: Whatever space you’re working in, take time before (and during) the job to consider how to make that space safe for both you and others, then make adjustments accordingly. This quick “hazard analysis” can save life, limb and money.
Substrates
Below are a few of the substrates that vinyl can be applied to given correct sur-face preparation and condition. As a PDAA Certified Installer, you are always expected to contact the appropriate vinyl manufacturer prior to installing their vinyl on any unfamiliar substrate. They should be able to tell you which, if any, of their products are recommended for the unfamiliar substrate.
• Glass• Aluminum• Acrylics• Painted Drywall• Painted Wood• PVC • Vehicles• Trailers• Banners• Flex Face• Brick• Stucco• Asphalt• Concrete
Graphic Storage & Shipping
Store graphics and vinyl films in a cool dry place. If you need to roll the graph-ics up, roll with the graphics on the outside. Do NOT roll too tight or cram too many in one box or tube, as this will lead to tunneling. Never use a core size
PDAA Vinyl Installation Proficiency Guide - Fifth Edition • 17

smaller than 3” diameter, or roll smaller than that. The more graph-ics there are on a roll, the larger the core size needed to prevent tunnel-ing. For a full vehicle wrap kit, core size or roll diameter should be 4–6 inches minimum.
Testing the Paint
Beware of repainted vehicles and signs. Test your cleaning solvents in an inconspicuous area first. Make sure the paint is cured and dry enough to apply vinyl.
Test by doing the following:
1. Push on the paint with your fingernail. If it leaves a mark, do not apply the graphics. If it passes your fingernail test, try the Snap Tape Test in an inconspicuous area.
2. Apply a small piece of the vinyl you will be using, post-heat, let cool, re-squeegee, then snap it off the surface. If it pulls paint, do NOT apply the graphics.
NOTE: PDAA does not recommend wrapping re-painted vehicles.
Graphic Installation Temperature
Surface and air temperatures are major factors in the installation process. Too cold and the vinyl becomes stiff and brittle and the adhesive will not stick. Too hot and the vinyl becomes soft and difficult to manage, and the adhesive sticks too much or too soon. Below are the minimum and maximum averages of manufacturer specifications taken from various product bulletins, and PDAA recommended optimum and recommended temperature ranges:
• The recommended minimum temperature range for applying most vinyl films, as specified in most vinyl manufacturer’s product and installation bulletins is 40–50°F.
• The recommended maximum temperature for applying most vinyl films, as specified in most vinyl manufacturer’s product and installa-tion bulletins is 100°F.
• PDAA recommended surface and ambient air temperature range for applying graphics is 60–80°F, with 70°F being optimum in the major-ity of cases.
A paint/vinyl snap test is performed to test the adhesion of paint to a surface.
18 • PDAA Vinyl Installation Proficiency Guide - Fifth Edition
Adhesive Wet Out
Pressure sensitive adhesives are designed to flow over a surface to maximize bond strength based on higher contact area. Applying adequate squeegee pressure during and after installation will accelerate adhesive flow and eliminate trapped air. This will ensure higher adhesive coverage of the substrate. Surface and air temperatures are also critical to the process. Try to always apply vinyl in the PDAA recommended range of 60–80°F with 70°F–80°F being ideal. The dwell time for the adhesive to wet-out varies slightly for different products, but averages 24 hours at room tem-perature (70°F). Colder temperatures will slow the process and can even stiffen the adhesive to the point it cannot flow at all and will not reach the intended bond strength. Higher temperatures can improve adhesive flow and speed up the bonding process. After the adhesive has wet out we expect the adhesive to have reached approximately 95 percent of its ultimate (or maximum) bond strength. On average, ultimate bond strength (100 percent) is reached with constant exposure of the adhesive to surface and ambient air temperatures of 70°F for 72 hours. As before, higher temperatures will reduce the time, lower temperatures increase the time (or even prevent it from happening until the proper conditions are met).
Proper post-heating will result in ultimate bond strength immediately. Proper post-heating includes raising the temperature of tight-fitting, air-free, well-squeegeed vinyl to 200–225°F and is also re-squeegeed after the vinyl has cooled to approxi-mately 100°F. Post heating is absolutely required for all graphics applied to complex curve shapes, because the vinyl has to be stretched to conform. This is in no way a guarantee or promise that the vinyl will not lift or fail. If everything else was done properly and extremely well, failure to post-heat could lead to failures. Think of it as your last line of defense, doing everything in your power to do your best. Vinyl applied to flat and simple curves should not require this extreme heating and pres-sure — unless it must be exposed to cold weather before it can wet out.
Please advise customers not to wash or wax the vehicle until after the adhesive has reached its ultimate bond strength (which varies based on surface temperature at time of installation, the amount of heat applied during and after the installation and ambient air temperature in the hours and days immediately following installation).
NOTE: The PDAA recommends post-heating all vinyl applied to complex curve shapes and keeping the vehicle surface temperature at room tem-perature or above during the first 24 hours after application (up to 72 hours if possible).
PDAA Vinyl Installation Proficiency Guide - Fifth Edition • 19

Overlap
The proper amount of overlap var-ies based on the graphic type and the substrate. If your company cuts or prints its own graphics, that de-termination is made during the de-sign/production stage. If someone else sends or provides the graphics, proper alignment of the graphics may dictate the amount of overlap. On the other hand, if striping is provided in sections, as opposed to a roll, and you are expected to install them to form one long stripe, then the choice is yours. Below are some guidelines that should help when it is up to you to designate the proper overlap amount:
• If you install sections of striping to create one long stripe, and as the installer you determine the overlap distance, manufacturers recom-mend a minimum of one-fourth inch and a maximum of one-half inch.
• If you design a computer cut graphic that needs to be tiled, you should specify an overlap of a minimum of one-fourth inch and a maximum of one-half inch.
• For provided multi-paneled digitally printed graphics, overlap so that the components of the print align properly.
• When specifying the overlap amount of multi-panel, digitally-printed graphics for vehicle wraps with complex curves, 1” works best.
• When specifying the overlap amount of multi-panel digitally printed graph-ics for riveted box trucks or trailers, one-half inch is recommended.
Overlap Direction
Overlap direction is important, as it protects the graphic from wind, rain and other environmental effects.
• For all outdoor graphics including vehicles, if a graphic has a top and bottom, install the bottom first and apply the top, overlapping onto the bottom.
• On vehicles, always start at the back and work your way forward. This allows the wind to slip over the overlap rather than working it loose.
PDAA recommends overlapping graphic panels by one inch.
20 • PDAA Vinyl Installation Proficiency Guide - Fifth Edition

• For indoor wall graphics, install graphics so the finished product will look best to the intended audience from their perspective. If the overlap is below eye level, install the bottom panel first. If the over-lap is above eye level, install the top panel first.
• For floor graphics, also install with audience perspective in mind. Also, however, consider the most common direction of persons walk-ing over the graphic, as a lifted overlap area that goes against traffic flow can quickly become a trip hazard.
Cleaning Procedures
Key Points
A clean surface is essential for vinyl to adhere properly. Consider all surfaces to be contami-nated, even if they appear clean to the naked eye. Never apply vinyl to signs, glass or vehicles without properly cleaning the surface first. Walls and barricades that are painted are a different story, as most are painted with latex. Minimal cleaning should be required. PDAA recom-mends using a clean towel, slightly dampened with water, and drying with a separate clean, dry towel, prior to evaporation.
Choice of cleaning solutions is dependent on two things: The type of substrate and the type of contamination. Use solutions that will dis-solve and clean the varieties of contamination present. If you are unsure about preparation, consult your supplier or film manufacturer for recommendations.
• Always choose solutions based on type of contamination• Always use a bucket and two towels, one wet and one dry• Always dry while the surface is still wet — before evaporation
PDAA Approved Cleaning Methods• For all solutions, pour some of the solution into a bucket. Immerse
a small rag in the solution and wring out the excess. Do not just “wash” the surface but also get it clean, this may involve some dwell
PDAA Vinyl Installation Proficiency Guide - Fifth Edition • 21
A clean installation surface is critical.

time and/or some scrubbing. While the surface is still wet, use a clean, dry, terrycloth towel to remove the solution (with the contami-nants dissolved in the solution) before it evaporates.
PDAA VIP approved vehicle cleaning steps:
• Clean vehicle surfaces with detergent and water if dirt and mud are present. Then dry the surface.
• Solvent wipe all vehicle surfaces and dry properly.• Always use Isopropyl 70 percent rubbing alcohol as a final rinse to
remove any residues that you may have missed. Dry properly.
NOTE: Rivets and seams on trailers must be completely dry before applying vinyl. To make sure, use a propane torch (not a weed burner) to heat each rivet and seam to drive out and evaporate any moisture.
Drying TimePrior to installation of any adhesive film, determine that the surface to which the film will be applied has dried completely. This is particularly important on vehicles, rough surfaces and other areas where water may remain in recessed areas after most of the surface has dried. For vehicle graphics, it is recom-mended that a vehicle that is wet from the rain, snow or washing is left to dry indoors overnight prior to vinyl application. Using heat to dry the surface can speed the process. Another good option may be to use a high-pressure air nozzle to blow moisture out from behind mirrors, moldings, etc.
Positioning
Every aspect of the application process is critical to a successful installation, and proper placement of the graphics is no exception. There are too many variables for PDAA to make recommendations for each situation. It’s enough to say that you need to place the graphics accurately. Here are a few of the methods em-ployed by PDAA members to “dry fit” or lay things out prior to application, and to anchor the graphic in the correct position as they begin application.
Masking Tape Hinge MethodsThere are several variations of the hinge method in common use, including top, side or end, center and bottom. In each case the graphic is placed on the surface (with the liner still on) and moved into the proper position, usually by measuring with a tape measure. Masking tape is placed on the four corners to
22 • PDAA Vinyl Installation Proficiency Guide - Fifth Edition

hold it in place. The graphic must be taut, which is accomplished by lifting one corner at a time, pulling it tight and then re-attaching the corner with the masking tape.
Next, the main hinge is added by applying masking tape half on the graphic, half on the surface. Below is an example of the top hinge method being used on a computer cut, premasked graphic:
The tape is removed from the bottom two corners, allowing the graphic to be lifted up to start removing the liner. The top hinge will keep the graphic anchored in the proper position. This technique would be appropriate if the graphic were quite large. Rather than removing the entire liner, an installer would lift the graphic up and carefully cut the graphic (so as not to cut the substrate), paper and all, between each letter or group of letters. This would allow installation of one or two large letters at a time. The removal of the liner should start at the top, next to the hinge and pull down. Each letter would be squeegeed horizontally, from the center out to the edges, working from top to bottom.
This brings up another key point when using hinges: Always apply the hinge par-allel to the direction you intend to squeegee. Using this example as a guide, you can figure out how and when to use the hinge on other edges when appropriate.
Modified Side HingeAnyone who plans to take the PDAA certification test should find this example an ideal method for approaching the Acrylic Test. It was submitted by our PDAA Certification Director, Rob Ivers, who began applying vinyl in 1978. He says, “It’s definitely old school, but it works. We did not have air egress technology the first 23 years I was in the business. Our customers did not want bubbles or wrinkles any more then than they do now, so we really had to learn how to install vinyl well. Using this method, you can apply some very sticky vinyl on some very hot surfaces and live to tell about it. If you master this technique you will be a much better installer. Most installers, even very talented ones, struggle with this test, unless they use this exact method. Of course, I have
PDAA Vinyl Installation Proficiency Guide - Fifth Edition • 23

done it quite a few times, but using this method, I can do a virtually perfect installation of the Acrylic Test in about ten minutes. It takes most people thirty minutes to an hour and they struggle, because no one ever taught them this method.”
Let’s say you are faced with installing a large graphic, by yourself, and the ini-tial tack of the graphic is quite aggressive and does not have air egress. Here is a method that provides the safest, most risk-free way to apply a graphic. Start by taping the corners, then adding hinge pieces, like this:
One at a time, move the four corner tapes to these new positions. Next, lift up the right edge of the graphic to the closest tape hinges as shown. Tuck the exposed liner on the right underneath the graphic, push it under as far as you can. Crease it very lightly so it lays a little flatter but not too tight. If you crease it flat, it defeats the whole purpose of this technique. This method should prevent you from ever having to take off all of the tape at one time, and the slight curvature of the liner will keep the vinyl from touching until you squeegee it, giving you maximum control.
Pull the exposed area back to its original position and tack it lightly in three places, away from the edges (in case you need to lift it, it makes it easier to grab) as indicated by the gray dashes in the image. Then start to squeegee in the location indicated by the arrows from the middle up, and from the middle down as shown. Do not start on the edge. Instead, start in 3–4 inches, where the graphic should look smooth and tight. If it doesn’t, do not squeegee it, but re-tension the corners.
24 • PDAA Vinyl Installation Proficiency Guide - Fifth Edition

Then, quickly (starting at the top of the area you just squeegeed) squeegee from left to right in quick, short strokes, finishing the loose right edge, work-ing from top to bottom.
NOTE: If you are left-handed, start on the left side instead of the right side.
The rest is simple and very repetitious, until you get near the end. Here are some tips:
• Peel the liner from right to left, squeegee up from the middle and down from the middle.
• Never squeegee right up to the liner, always leave a squeegee width, when you get that close, stop and peel some more liner away.
• Remove the top and bottom masking tapes as you approach them, making it easier to remove the liner.
• If the graphic develops some slack to your left in the unapplied areas, which it will, undo all of the tape and re-tension the graphic, hitting the guide marks you made, and press the remaining masking tape down to hold it in place.
• If you taped it as shown, pretty soon the liner will be sticking out on the left as shown below:
• The gray color indicates the part that has not been squeegeed. As the liner to the left of the graphic gets in your way, just cut some off. When you get close to the end, remove the rest of the masking tape, while maintaining slight tension on the graphic, and do not let it touch.
PDAA Vinyl Installation Proficiency Guide - Fifth Edition • 25

• Hold the graphic with your left hand low and close to the surface without touching, and quickly squeegee, again up and then down.
• Stop when you are 3–4 inches from the edge and squeegee from right to left (starting at the top in the area you just squeegeed) and squee-gee from left to right in quick, short strokes, finishing the loose left edge, working from top to bottom.
• Carefully remove the premask at a 180° angle, keeping it flat on itself, to prevent or minimize lifting of the graphic.
• Inspect the graphic. If you see thousands of small bubbles, it means you had a lousy squeegee or you did not press hard enough. In either case, go home and come take the test later after you have really practiced. If you only see one or two bubbles, congratulations you’re almost done!
• Poke the bubbles with an air release tool, push the air out, and re-squee-gee the entire graphic with a felt or similar non-scratching squeegee.
Floating Hinge MethodThis method will occasionally prove quite useful, especially if you do not have any masking tape.
• Remove all of the liner• Reapply liner to graphic, offset slightly• Measure and place graphic in proper position• Anchor in place by squeegeeing exposed area• Lift unapplied graphic and remove all or part of liner, then continue
applying the graphic
Peel & SlapNot a very cool name, but definitely the fastest way to apply graphics. Only use this technique when you are certain it will work. If you know you’ll be able to lightly snap the graphic and re-tension it if required, without damaging the graphics, why mess with the slower, peel-as-you-go methods?
• Measure and place graphic in proper position• Anchor in place with masking tape if needed• Mark position of graphic• Remove all of the liner• Align the graphic to your marks• Make sure graphic is tight• Squeegee carefully
26 • PDAA Vinyl Installation Proficiency Guide - Fifth Edition

Magnet Use
For some jobs, magnets can be used to position graphics on metal surfaces, like most vehicles.
• Two of these small magnets will hold up a large graphic panel on the side of a van.
• With the magnets in place, simply give the graphic a gentle pull to slide it into alignment and then let go and the magnets will hold it in place.
• Once you have the graphic in position, use extra magnets (like you would a hinge), line up 2–4 magnets across the graphic to securely hold it in place and pull the top down to start peeling the liner off.
• Once you get the liner started, you can use some magnets to hold it up and tight against the vehicle, so you can peel the graphic down and away.
Application Information, Tips & Techniques
Air Egress Technologies
Air egress technologies allow air to escape through a series of channels in the adhesive to the outer edges of the vinyl. The air does not come out through the vinyl face stock. The technology is a mechanical design feature — a series of inter-connected pathways. This technology can be applied to many different adhesives on many different vinyl face stocks.
Vinyls with air egress features take the same amount of pressure or more, but no less than vinyls with conventional adhesives, approximately 15 psi. In some cases, air egress products will save you a lot of time. At other times, it will make no difference. Generally, you will not have to poke holes to release air bubbles; you can simply push on them or re-squeegee the area. In some cases, you should poke rivets because of the amount of air trapped. Yes, you can work it out in most cases without poking holes, but most installers would rather poke them and move on to sealing the rivets because it will save time.
The air egress pattern in this adhesive allows air to escape.
PDAA Vinyl Installation Proficiency Guide - Fifth Edition • 27

Bubbles — Causes & Prevention: Non-Air Egress
The Four Main Causes of Bubbles
• Bad squeegees• ISP — Insufficient Squeegee
Pressure• Pre-tack• Stroke pattern
SqueegeeIf the squeegee has nicks or im-perfections, damaged areas will not make contact with the vinyl to push the air out, and this will leave bubbles.
ISPIf you do not push hard enough, you will leave air behind causing both bubbles and improper adhesion.
Pre-TackIf the vinyl sticks to the surface before you squeegee it, the areas that are stuck prevent air from escaping, causing bubbles.
Stroke PatternIf the stroke pattern of the squeegee pushes air toward areas that are already adhered, that air will become trapped, causing bubbles.
Dry ApplicationYou should always apply vinyl dry with the exception of translucent films (see below). Manufacturers do not warrant wet applications (except for translucent vinyl films).
Translucent FilmsWhen covering all or most of a glass or acrylic surface with translucent vinyl films (etched-look, transparent or translucent), a wet application is advisable.
28 • PDAA Vinyl Installation Proficiency Guide - Fifth Edition
Trapped air can cause one bubble, or many
Bubbles can be eliminated by using an air release tool.

Wet Installation
Spray the window and the adhesive side of the film with an application solu-tion, a mixture of water and liquid detergent. If using the latter, be certain that no more than a teaspoon of mild detergent is mixed with a gallon of water. The PDAA recommends Johnson’s® Baby Shampoo (or a liquid dishwashing detergent that contains no surfactants or lotions). Don’t use Dawn® or Ivory® for those reasons.
Position the film on the glass, it should slide easily. If not, lift it away from the surface and spray it until it does. When it is in the proper position, also spray the face of the vinyl to allow the squeegee to slide easily without scratching or tearing the vinyl. We recommend using a a Blue Max window tint squeegee. Using firm and consistent pressure, start at the top of the film, making overlap-ping strokes with the squeegee. Your objective is to push the water out to the edges so the adhesive makes proper contact with the glass.
An uneven visual appearance is not unusual but will disappear after it is dry and the adhesive wets out, usually in one to two days.
Preventing Bubbles• Use a squeegee with a perfectly smooth, straight edge.• Keep the vinyl off of the surface until you squeegee it.• Squeegee with firm pressure.• Use overlapping strokes, from the center out.• Concentrate on pushing out all the air.• Always push the air toward open areas to avoid trapping air.
WrinklesWrinkles occur when the vinyl sticks to itself. On flat and simple curve surface installations, they are easily avoided by professional installers. To avoid them, simply keep the vinyl taut and smooth (wrinkles need excess to form).
Avoiding wrinkles on complex curves can be more challenging. However, in light of how easily they can be repaired and removed with a little heat, there is no good
PDAA Vinyl Installation Proficiency Guide - Fifth Edition • 29
Wrinkled vinyl can and should be repaired.

reason to have wrinkles in your finished graphic installations. If a vehicle is so difficult to wrap that you cannot do it without wrinkles, then don’t take the job. PDAA does not accept the notion that wrinkles and bubbles are to be expected, nor do we find them “acceptable.” A PDAA Master Certified Installer should be able to recognize his limitations —to look at a job and know whether it can be done or not — and if it can be done, whether he can do it.
Trimming and CuttingQuality trimming and cutting should be the hallmark of every PDAA Master Certified Installer. Nothing can ruin the look of a graphic job, especially vehicle wraps, more than lousy trimming. Certain vehicle edges should be trimmed, while others need to be wrapped. Even a good trim, done in the wrong loca-tion, can lead to problems.
You should avoid having to cut vi-nyl directly on the finished graphic surface, whether it is a sign, window or wall, but especially on automotive paints.
We have seen and heard of vehicles that had to be repainted after a wrap was removed because the installer cut the paint. As if that wasn’t bad enough, they refused to pay for the damage. That is unacceptable!
NOTE: A PDAA Master Certified Installation company should be able to wrap and unwrap each and every vehicle consistently with no installer-caused paint damage of any kind (cuts, scratches, burns, etc.).
PDAA understands that accidents happen and people make mistakes that are not indicative of their normal expertise and quality. We also believe that all PDAA member companies should be willing to admit their mistake and assume complete financial responsibility for the damage they caused.
30 • PDAA Vinyl Installation Proficiency Guide - Fifth Edition
Quality trimming is critical to a successful installation.

Here are some rules to follow for vehicle graphics:
• Never cut the paint. If it is necessary to trim ON the paint, use knife-less tape or lay down a tape barrier under the vinyl that can be removed after the trim is made. Or mark the area to be trimmed, lift it away from the surface, make the trim and then re-install it.
• Always cut and tuck vinyl applied over every seam on any trailer or box truck.
• For flat metal edges on vehicles (like the rear edge of most driver doors), trim the vinyl flush with the edge. For vehicle wraps, angle your knife so that you glide along the edge making a nice smooth cut, but the angle leaves enough vinyl to barely cover the edge so no paint shows when the door is closed.
• For areas where the painted metal has a 90-degree return (rolls inside the vehicle like the main body of a Ford van, just behind the driver door), roll or wrap the vinyl.
Generally, if the metal does not go in, the vinyl does not go in — if the metal does go in, the vinyl does too. The one exception is flat edges that are part of a com-plex curve shape. If the vinyl was difficult to install because of the shape, and you had to “work” the vinyl to conform it, then those edges must be wrapped to prevent lifting of the graphic. We call this a 180 degree wrap. An example would be the front edge of most vehicle hoods. Below are some illustrations that depict the various edge types typically encountered, and whether you should trim them or wrap them:
These “top view” illustrations below are an imaginary view, as if you were look-ing down on the edges from above. The black is the metal body of the car and the gray is the vinyl. The dark gray line represents the knife path.
PDAA Vinyl Installation Proficiency Guide - Fifth Edition • 31
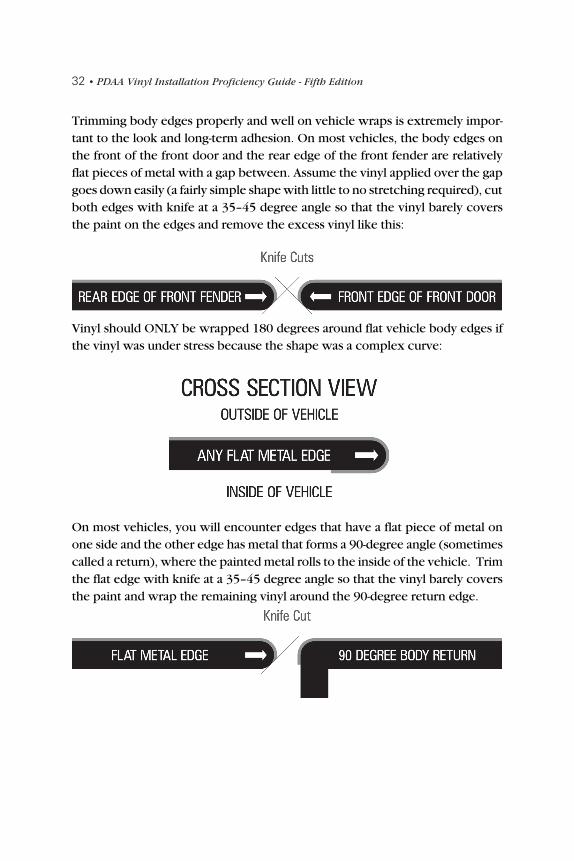
Trimming body edges properly and well on vehicle wraps is extremely impor-tant to the look and long-term adhesion. On most vehicles, the body edges on the front of the front door and the rear edge of the front fender are relatively flat pieces of metal with a gap between. Assume the vinyl applied over the gap goes down easily (a fairly simple shape with little to no stretching required), cut both edges with knife at a 35–45 degree angle so that the vinyl barely covers the paint on the edges and remove the excess vinyl like this:
Vinyl should ONLY be wrapped 180 degrees around flat vehicle body edges if the vinyl was under stress because the shape was a complex curve:
On most vehicles, you will encounter edges that have a flat piece of metal on one side and the other edge has metal that forms a 90-degree angle (sometimes called a return), where the painted metal rolls to the inside of the vehicle. Trim the flat edge with knife at a 35–45 degree angle so that the vinyl barely covers the paint and wrap the remaining vinyl around the 90-degree return edge.
32 • PDAA Vinyl Installation Proficiency Guide - Fifth Edition

Cut-Resistant TapeTo reduce significantly the risk of cutting the surface to which graph-ics are being applied, cut-resistant tape may be placed on the surface as protection. After the vinyl has been applied, a cut is made through the vinyl and onto the cut-resistant tape instead of the surface. Once the excess vinyl is removed, the cut resistant tape is pulled away and the finished edge of the vinyl is squee-geed into place.
Knifeless TapeKnifeless tape removes the possibil-ity of cutting the surface because the vinyl is cut from the inside out. A narrow tape is applied along the cut line, and then the vinyl is applied over the top of the tape. Inside the tape is a thin, strong filament that, when pulled upwards, cuts through the vinyl. The remaining tape is then removed via the cut line.
Simple Curves vs. Complex CurvesSimple curves are defined as changing shape in one direction or dimension at a time. Corrugations on trailers are one example. Another more common example is the main indentation on the flat side of a Ford van. Apply the vinyl in a relaxed manner to contours and indentations. Do NOT stretch the vinyl into these areas.
Complex curves are defined as changing shape in more than one direction or dimension at the same time. One good example is the corner of the front fender of a Ford van. Most vinyls are designed to conform and perform well over simple curves. Even the best vinyls are not truly and specifically designed to conform and perform well over complex curves. Our job as PDAA members and professional graphic installers is to be as knowledgeable about the properties and features of vinyl in general and the specific differences between one product and the next.
PDAA Vinyl Installation Proficiency Guide - Fifth Edition • 33
Cut-resistant tape is pulled away after a cut has been made.
Knifeless tape is applied to a vehicle surface.

Pay particular attention to the next three sections: Vinyl Memory, Stretching Vinyl, and Post-heating.
Vinyl MemoryVinyl has memory. In Webster’s Dictionary, one definition of mem-ory is: “A capacity for showing effects as the result of past treat-ment or for returning to a former condition.” When you stretch vi-nyl, it wants to return to its origi-nal shape. The memory feature of vinyl can cause lifting and failure, which are bad things in our busi-ness. On the other hand, a thor-ough understanding of vinyl memory, combined with good technique, can help minimize the problem. The memory features of vinyl also can be a very positive thing. The memory can be activated by heat, allowing us to remove wrinkles and unintentional stretching quite easily.
Stretching VinylOne of the most important rules to remember about installing graphics is to never stretch the vinyl. There is no need to stretch vinyl when you are apply-ing it to flat shapes and simple curves.
It is physically impossible, however, to apply a flat piece of vinyl to a complex curve without stretching it. With many rules, however, there are exceptions. Our original notion was to never stretch the vinyl, but we cannot apply vehicle wraps without encountering complex curves. Consequently, we cannot apply vinyl to a complex curve without stretching the vinyl. This leads us to another rule: When applying graphics to complex curves, stretch the vinyl to the abso-lute minimum required to apply it to the complex curve you are working on.
Below are some tips and techniques that you should take very seriously:
• For convex complex curves (you have too much vinyl instead of not enough), learn to “work” the vinyl. With your squeegee, continually redistribute large excesses of vinyl evenly across the entire graphic. This will result in many small, easier-to-deal-with areas, rather than one large one. Make sure to push the excess to the outer edges.
• Use heat only when necessary and only to relax the vinyl.
34 • PDAA Vinyl Installation Proficiency Guide - Fifth Edition
When “working” vinyl into a wheel well, avoid excessive stretching of the vinyl.

• Get in the habit of letting the vinyl lay loose on the surface while you are heating it. You can’t stretch it if you aren’t touching it.
• If you have to hold it while heating, give it some room to hang — leaving it loose.
• For concave complex curves (you do not have enough vinyl) plan ahead. Tack or squeegee the vinyl to anchor it in place as far away as possible from the deepest part of the indentation. Warm up the vinyl evenly across the entire loose, unsqueegeed area, to about 150°–180°F, then push it into the deepest area. This will allow the vinyl to pull from the loose vinyl around it, resulting in the smallest percentage of stretch.
• Consult the vinyl manufacturer to see if they recommend using an adhesive promoter in those tough concave, complex curve areas. Most do, but some do not.
Pre-StretchingIn some cases, vinyl can be heated, then pre-stretched, allowing it to more easily be worked around convex complex-curved elements, such as a side-view mirror. Once re-heated, the vinyl’s memory will take hold, tightening the pre-stretched material around the object.
Post-HeatingThe purpose of post-heating is to help prevent lifting of graphics ap-plied to complex, curved shapes. It involves raising the temperature of the installed graphic to around 200°–250°F (varies based on vinyl product used and manufacturer recommendations). Prior to post-heating any graphic, it is impera-tive to remove all bubbles, air and wrinkles. It is accomplished us-ing a heat gun and an IR Surface Temperature Thermometer to raise the temperature of the vinyl to 200°–250°F. This is a key step in successful vehicle wrapping and must be per-formed on all complex curve shapes.
Note: The PDAA requires all graphics applied to complex curves be post-heated to 200°–225°F, allowed to cool to around 90–100°F, then re-squeegeed.
PDAA Vinyl Installation Proficiency Guide - Fifth Edition • 35
Vinyl is post-heated using a heat gun and IR thermometer.

LaminationAll exterior printed graphics should be laminated. There are two main catego-ries of laminates: Liquid and vinyl.
The PDAA does not recommend installing 2 mil vinyl without a vinyl laminate, premask or both. Not to say it cannot be done (in isolated cases, on small pieces), but generally you should insist on a vinyl laminate, premask or both.
Liquid LaminatesLiquid lamination is essentially a liquid clear coat applied to a printed graphic. There are three types of liquid laminate you may encounter — solvent, ultra violet (UV) and water-based. They provide varying degrees of protection, but none compare to the protection afforded by a vinyl laminate. Lowering the cost of goods is the number one reason for choosing a liquid laminate over a vinyl laminate. They are typically much slower to apply than a vinyl laminate and require the use of premask — another direct cost, plus the production labor to apply the premask and the installer labor to remove it. They are less scratch resistant, provide less UV protection, and are more difficult to apply and remove.
Most installers do not like working with liquid laminated products, and would prefer the printed graphics they install and remove to have a vinyl laminate. If installers were to help drive the point home in their pricing — by charging what they should charge for all the extra time and difficulty — print providers would soon realize liquid laminates are not such a bargain after all. Printed graphics with liquid laminate must have premask, otherwise the graphic is simply too thin and flimsy to install.
Vinyl laminatesVinyl laminates vary in type and thickness. Some are cast, some calendared and some even polyester or Mylar. They are available in different finishes, including matte, luster or semi-gloss, and gloss or high gloss. Some vinyl laminates are optically clear. These are the only laminates suitable for perforated window graphic films.
NOTE: The PDAA recommends the use of vinyl laminates for all exterior graphic applications, especially for vehicle wraps.
Perforated Window GraphicsPerforated window graphic films have small holes to allow people to look through the non-printed side. They are commonly used on vehicle windows, retail glass and windows, and even on glass for “building wraps.” If perforated window graphics get wet, it is impossible to see through them unless they have an optically clear vinyl laminate. PDAA recommends optically clear vinyl
36 • PDAA Vinyl Installation Proficiency Guide - Fifth Edition

laminates be used on all exterior perforated window graphics and optically clear vinyl laminates for all vehicle wraps.
Note: It is illegal in the United States to cover the front driver and passenger windows with any graphic, even with a perforated window graphic.
Rough Surface MaterialsCertain film products are designed for application directly to rough surfaces, such as brick, concrete or ceramic tile. Application of these films often requires the use of a foam roller or other device to push the vinyl into the texture of the application surface. In some cases, heat must be applied either during or after application of the film. Consult the manufacturer’s technical information sheet for specific installation requirements.
Specialty FilmsIn recent years, a wide variety of specialty films have entered the market, including color-change films for vehicles and vinyl that includes textures such as brushed metal, carbon fiber and snakeskin. These products should be installed following manufacturer recommendations, and are generally applied without lamination.
Finishing Finishing procedures vary depending on the type of surface and the type of vinyl. Finishing procedures include removing the premask, remov-ing bubbles, cutting and tucking seams, sealing rivets and edges, post-heating, re-squeegeeing, and wiping off marks and smudges.
Removing Premask
Always remove the premask carefully. Remember to pull it away at a 180 degree angle, keeping the premask flat on itself to avoid lifting the graphic.
PDAA Vinyl Installation Proficiency Guide - Fifth Edition • 37
Premask is removed, revealing the vinyl below.
Window “perf” installed to the rear windows of a van.

Removing Bubbles
Release the air from all bubbles by poking a small round hole, with the ap-propriate air release tool (with a fine needle tip), at the edge of each bubble. Push the air out of the hole with your finger, thumb, or the squeegee.
Cutting and Tucking SeamsWhen working on surfaces that have breaks or seams, like a typical trailer side, always cut the vinyl along the seams and tuck the vinyl into the seams.
Sealing RivetsPoke a small round hole with an air release tool to release the air around rivets. Use a rivet brush and a propane torch or heat gun to finish sealing each rivet. The vinyl over a rivet should look “painted on” tight when done properly.
EdgesAll edges, seams, and overlaps must be re-squeegeed and inspected to verify complete adhesion.
Pro Tip: Waving some heat across the vinyl will help it adhere better and will help you spot any areas you may have missed.
Re-SqueegeeingIf a graphic has premask, the entire graphic must be re-squeegeed after re-moving the premask to ensure complete and maximum adhesion. To prevent scratching the graphic while re-squeegeeing, PDAA recommends using a felt squeegee or a wet-edge squeegee.
Brushing
When the surface is textured, you should brush the graphic into the texture after removing the premask.
38 • PDAA Vinyl Installation Proficiency Guide - Fifth Edition
A rivet, correctly done.

PDAA Vinyl Installation Proficiency Guide - Fifth Edition • 39
Solvent RetentionThe solvents in solvent inkjet prints need to escape completely prior to lami-nation to prevent damage to the vinyl and the adhesive, so they can perform as designed by the vinyl manufacturer.
You should avoid producing and/or installing graphics that have not been cured enough to allow all of the solvents to escape, due to the potential instal-lation issues and the probability of vinyl lifting and peeling later.
Fact: Solvent inks contain solvents that are used as carriers for the ink pigments.
Fact: The solvents migrate into the vinyl and the adhesive during printing.
Fact: The solvents adversely affect the vinyl and the adhesive unless allowed to escape.
Fact: The solvents cannot escape when the vinyl is rolled tight: If these solvents are not allowed to escape completely prior to lamination, they will remain trapped.
Fact: This can cause the adhesive to be extremely tacky and difficult to install and cause the vinyl to be extremely soft and the edges to curl inwards. It is often impossible to pull these curled edges apart. Long-term adhesion is drastically reduced as the solvents are allowed to “dwell” in the adhesive.
One test determined it can take up to 22 days for all of the solvents to escape from a eco-solvent digital print that was unrolled and laid flat on a table. No one has 22 days to wait, but no one wants the graphics to fail either. The best solution currently available is to build a fan drying system to diffuse the solvents in a reasonable timeframe prior to lamination. Simple to do and very helpful. A milk crate or similar (something that lets air flow through) on the floor to elevate the fan. Fan on top of that blowing up. Another milk crate or similar to hold the vinyl. The print is unrolled (or rolled loosely) such that no two layers are touching. The gaps between layers can be quite small — as long as there is a gap. Stand up the roll in the container over the fan. Turn on the fan. Wait 12 –24 hours before laminating.

PDAA Certification Guide
PDAA VIP Basic & Master Certification
General Information
To become a PDAA Basic or Master Certified Member Company, at least one full-time employee (not sub-contractor) must pass the PDAA Certification written exam with a passing score of 80 percent or higher and pass the cor-responding PDAA Certification Installation Tests (hands-on testing).
Although we do have two levels of Certification, Basic and Master, we cur-rently offer only one complete test. The Basic Certification status was created for two situations. First, we want to accommodate companies that have ab-solutely no interest in doing vehicle wraps with complex curves, but would like to be certified for flat installations (signs, glass, walls, and flat with rivet box trucks and trailers). Secondly, there are individuals that pass the Basic Certification Tests, but do not meet the Master Certification test requirements. Those individuals can earn distinction for their efforts and recognition of their current skill level. These individuals are encouraged to continue improving their skills and retake the test when they are ready. They do not have to retake the complete test, only the portions they did not pass the first time.
All of the information that will be covered on the written test is included in this guide. Your ability to pass hands-on testing will of course depend on your installation skills. The following is a description of each test.
PDAA (VIP) Certification Written ExamThe written exam has fifty multiple choice questions. All questions are per-tinent to vinyl graphics, installation, methods, techniques and procedures.
The result is a test we believe to be fair, accurate, relevant and comprehensive in regards to assessing the knowledge and expertise of today’s graphic instal-lation professionals.
40 • PDAA Vinyl Installation Proficiency Guide - Fifth Edition

Basic Certification Installation Tests
Cleaning TestPurposeThe purpose of the Cleaning Test is to demonstrate your understanding of PDAA-Approved cleaning methods and techniques, which includes selecting the appropriate cleaning solutions and using them properly.
SubstrateA passenger vehicle, glass, acrylic and flat aluminum with rivets (trailer and box truck surfaces).
InstructionsFrom a variety of cleaning supplies furnished, choose the right combination and thoroughly and properly clean the surfaces assigned to you by the test administrator.
ProcedureUse PDAA approved cleaning solutions and techniques:
• For all solutions, pour some of the solution into a bucket. Immerse a small rag in the solution and wring out the excess. Don’t just “wash” the surface but get it clean. This may involve some dwell time and/or scrubbing. While the surface is still wet, use a clean, dry terrycloth towel to remove the solution (with the contaminants dissolved in the solution) before it evaporates (spreading the contaminants evenly across the surface).
• Clean vehicle surfaces with detergent and water if dirt and mud are present. Dry surface.
• Solvent wipe all vehicle surfaces. Dry properly.• Always use Isopropyl 70 percent rubbing alcohol as a final rinse to
remove any residues that you may have missed. Dry properly.
Requirements to PassChoose the approved solutions and supplies, properly clean and dry the sur-faces assigned to you by the test administrator.
PDAA Vinyl Installation Proficiency Guide - Fifth Edition • 41

Control of Depth Cut Test
PurposeThe purpose of the Control of Depth Cut Test is to demonstrate your abil-ity to trim and cut applied graphics to the proper depth, precisely, with-out damaging the substrate.
SubstrateAluminum with a baked enamel finish.
GraphicThe vinyl used to create the graphic may vary, but will always be of a type commonly encountered in our industry. The graphic will already be applied to the substrate. The test administrator will provide you the exact specifications of the applied graphic.
InstructionsCarefully trim off one-fourth inch of vinyl from the right edge of the graphic and remove the trimmed portion. Carefully trim off another one-fourth inch of vinyl from the right edge of the graphic. Examine the area of your first cut and inspect for damage. Repeat the process until you make three perfect cuts in succession.
ProcedureTrim the graphic in a confident manner using PDAA approved techniques, which include:
• Using an Olfa knife with a stainless steel blade• Start each trim with a new, unused blade (snap off segments)• Use little to no inward pressure, simply draw the blade across the vinyl• The actual amount of pressure required depends on graphic thickness • For two mil vinyl, with a brand new, razor-sharp Olfa blade, no
inward pressure is required to make a perfect cut • For two mil vinyl with a two mil vinyl laminate, a very slight
amount of inward pressure is required to make a perfect cut• Err on the side of using too little pressure, not too much• Try this at home — in other words, practice on something other than
your customer’s vehicle/job• If you are unsure you can make the trim without damaging the sub-
strate, don’t trim on the substrate
Requirements to PassMake three perfect trims in succession.
42 • PDAA Vinyl Installation Proficiency Guide - Fifth Edition
Cut the vinyl, not the paint.

Acrylic Test
PurposeThe purpose of the Acrylic Test is to demonstrate your ability to handle any type of flat surface installations.
SubstrateAll testing is scheduled to be conducted indoors to avoid can-cellation due to weather. Many real-world installations do occur outdoors in hot weather. Acrylic (Plexiglas) was chosen for this test because it is difficult, even at room temperature. It has a high energy surface, causing vinyl to adhere to it aggressively.
NOTE: Although most vinyl manufacturers publish a minimum (40–50°F) to maximum (100°F) temperature range in product and instructional bulletins for most of their vinyl products, PDAA recommends a surface and ambient air temperature range of 60°–80°F for all vinyl installations.
GraphicRegular vinyl (cast or calendared), no air egress, computer cut, one color, 42 inch x 94 inch. The graphic is a solid vinyl rectangle with text weeded out, with premask.
InstructionsApply the graphic, centered on the acrylic.
ProcedureApply the graphic in a confident manner using PDAA approved techniques, which include:
• Cleaning the surface properly with Isopropyl 70 percent rubbing alcohol• Applying the graphic in the correct location• Remove the premask• Remove bubbles and wrinkles• Re-squeegee the entire graphic
Requirements to PassThe graphic was applied in a confident manner using PDAA VIP approved techniques listed. The graphic must also be free of wrinkles, bubbles and in the correct position within a tolerance of one-eighth inch.
Acrylic’s high-energy surface causes vinyl to adhere aggressively.
PDAA Vinyl Installation Proficiency Guide - Fifth Edition • 43

Trailer Test— Flat with Rivets
PurposeThe purpose of the Trailer Test— Flat with Rivets is to demonstrate your abil-ity to apply vinyl graphics to a flat surface with rivets.
SubstrateFlat aluminum with rivets (trailer and box truck surfaces).
GraphicTwo panel digital print, two mil vinyl with air egress, with cast vinyl laminate, no premask.
InstructionsApply the two graphic panels, properly aligned to each other (positioned per specs you’ll be given at the time by the test administrator and taking into account proper wind seam overlap), and seal the rivets.
ProcedureApply the graphic in a confident manner using PDAA approved techniques, which include:
• Cleaning the surface properly (solvent wipe with Xylol or Naptha)• Final cleaning with isopropyl alcohol• Applying the graphic• Cutting and tucking the seams• Sealing the rivets• Re-squeegee the graphic
Requirements to PassThe graphics were applied in a confident manner using PDAA approved tech-niques listed. The finished graphics must be free of wrinkles and bubbles and the two panels aligned properly with respect to each other, and in the correct position within a tolerance of one-eighth inch. The vinyl must be tight around the rivets, with all of the air removed using a rivet brush and adequate heat to prevent future lifting. All seams, edges and overlaps were re-squeegeed.
44 • PDAA Vinyl Installation Proficiency Guide - Fifth Edition
The Trailer Test measures multiple skills.

Vehicle Wrap Side Test
PurposeThe purpose of the Vehicle Wrap Side Test is to demonstrate your ability to properly apply graphics on vehicle doors, door handles, keyholes, complex curves and mirrors.
SubstrateA passenger vehicle, usually a late model Ford van or similar.
GraphicsDigitally printed with a solvent inkjet printer. Printed on a two mil vinyl with air egress, with a cast vinyl laminate, no premask, multiple panels, tiled verti-cally with a one inch overlap (approximate).
InstructionsProperly apply the graphic panels, positioned per the specifics given by the test administrator.
ProcedureApply the graphics in a confident manner using PDAA approved techniques, which include:
• Proper surface preparation• Apply the graphics with absolute minimum stretching• Apply the graphics in the proper position on the vehicle• Apply the graphic panels properly aligned to each other• Take into account the proper wind seam overlap direction• Properly remove all bubbles
Requirements to PassThe graphics were applied in a confident manner using PDAA approved tech-niques listed. The finished graphics must be free of wrinkles and bubbles on the exterior of the vehicle, panels aligned properly with respect to each other, and in the specified position on the vehicle.
PDAA Vinyl Installation Proficiency Guide - Fifth Edition • 45

Vehicle Wrap Trimming and Finishing Test
PurposeThe purpose of the Vehicle Wrap Trimming and Finishing Test is to demonstrate your ability to prop-erly trim and finish vehicle wrap graphics.
InstructionsProperly trim and finish the graph-ics just applied in the Vehicle Wrap Side Test.
ProcedureTrim and finish the graphics in a confident manner using PDAA VIP approved techniques, which include:
• Precisely trim, tuck and wrap the graphics in the correct manner and locations
• Make sure all seams and edges are properly finished• Post heat all complex curve areas• Wipe off the graphics to remove fingerprints, smudges and any marks
you may have made
Requirements to PassThe graphics were trimmed and finished in a confident manner using PDAA approved techniques listed. The graphic installation and finishing is complete and of the quality expected from a PDAA Master Certified installer.
46 • PDAA Vinyl Installation Proficiency Guide - Fifth Edition
Strong vinyl handling skills are essential for this test.

Vehicle Wrap Rear Test
PurposeThe purpose of the Vehicle Wrap Rear Test is to demonstrate your ability to properly apply graphics on vehicle hinges, license plates, windows and perforated window graphics.
SubstrateA passenger vehicle, usually a late model Ford van or similar.
GraphicsDigitally printed with a solvent inkjet printer. Printed on a two mil vinyl with air egress, with a cast vinyl laminate, no premask, multiple panels, tiled vertically with a one inch overlap (approximate). Includes vinyl and perforated window graphics.
InstructionsProperly apply the graphic panels, positioned per the specifics given by the test administrator.
ProcedureApply the graphics in a confident manner using PDAA approved techniques, which include:
• Proper surface preparation• Apply the graphics with absolute minimum stretching• Apply the graphics in the proper position on the vehicle• Apply the graphic panels in proper alignment to each other• Properly remove all bubbles• Precisely trim, tuck and wrap the graphics in the correct manner and locations• Make sure all seams and edges are properly finished• Post-heat all complex curve areas• Wipe off the graphics to remove fingerprints, smudges and any marks
you may have made
Requirements to PassThe graphics were applied in a confident manner using PDAA VIP approved techniques listed. The finished graphics must be free of wrinkles and bubbles on the exterior of the vehicle, panels aligned properly with respect to each other, and in the specified position on the vehicle. The graphics were trimmed and finished properly. The graphic installation and finishing is complete and of the quality expected from a PDAA Master Certified installer.
PDAA Vinyl Installation Proficiency Guide - Fifth Edition • 47
Attention to detail is critical for success in this test.

Glossary of Terms
AdhesionThe molecular attraction between unlike materials, similar to magnetic force, the ability to stick or bond to a substrate.
Complex Curves (also called compound curves)Complex curves change shape in more than one direction or dimension at the same time.
ContaminantsUndesirable elements from an outside source.
Dwell TimeIn the case of cleaning with solvents, dwell time is the time the solvent remains (wet) on the surface. In the case of PSA, the dwell time allows the adhesive to wet out.
High Energy Surface The higher the surface energy, the greater the attraction. Acrylic has a high energy surface.
Hinge Method(s)Using masking tape, or magnets, to anchor a graphic in place, allowing part of the graphic to be lifted away to remove some of the liner.
Initial TackThe initial contact attraction of an adhesive to a substrate. Initial tack is af-fected by temperature, the surface energy of the substrate, and solvent reten-tion, if present.
LinerProtective backing paper with a silicone coating that protects the adhesive and keeps it clean prior to installation and allows for easy release of the vinyl.
Low Energy SurfaceThe lower the surface energy, the weaker the attraction. PVC and sheetrock are low energy surfaces.
MSDSMaterial Safety Data Sheet
OSHAOccupational Safety and Hazard Administration.
48 • PDAA Vinyl Installation Proficiency Guide - Fifth Edition

Post heatingHeating a vinyl graphic, after it has been installed, using a heat gun and an IR Surface Temperature Thermometer to raise the temperature of the vinyl to 200°–250°F.
PressureApplying adequate pressure will accelerate the adhesive flow and eliminate trapped air. This will ensure higher adhesive coverage of the substrate. Typically 15 psi is recommended at room temperature for most vinyl graphics.
PSAPressure sensitive adhesive
Simple CurvesSimple curves change shape in one direction or dimension at a time.
Solvent RetentionWhen graphics are printed with solvent inks, the solvents migrate to the adhe-sive (solvent migration) and, if not given the opportunity to escape — usually due to being tightly rolled or laminated — solvent retention occurs.
SubstrateThe surface or material to which you want your PSA to stick.
Surface EnergyA measure of the molecular attraction of the facial contact of a material. The surface energy of a material determines the strength of this attraction. This property will affect the ability of the PSA to stick.
Wet outThe ability of an adhesive to flow and/or reflow over a surface to maximize bond strength based on higher contact area. The viscosity of PSAs allows them to flow on the substrates. No curing process, just dwell time.
PDAA Vinyl Installation Proficiency Guide - Fifth Edition • 49