pdf (1.9mb)
TRANSCRIPT

1© 2012 Canon U.S.A., Inc. All Rights Reserved. Reproduction in whole or in part without permission is prohibited.
EOSStep-by-Step Setup Guide
Wireless File TransmiTTer FTP mode InfraStructurE SEtup WindoWs 7

2
FTP ModeInfrastructure Network SetupOverviewFTP Mode allows you to wirelessly transfer images you capture on your EOS DSLR to a WiFi-enabled computer that you have set up as a remote FTP server. The EOS Wireless File Transmitter will func-tion as the FTP client.
This guide will describe how to create an infra-structure network FTP server on a PC running the Premium or Professional versions of Microsoft Win-dows 7. If you do not have either version installed on your PC you will either need to upgrade or, if you prefer, you can use one of the available third-party
FTP server software applications. Follow the soft-ware provider’s instructions for how to configure the server, login, password, and Windows firewall.
This setup requires you to assign a login name, password and WEP encryption. Please check to be sure you are operating in a secure environment before setup. Do not change the network settings on any computer without the permission of the network administrator. Be sure to write down your original network settings so that you can restore them later when necessary.
1Click Start, then Control Panel, then Programs. On the Programs window, click Turn Windows fea-tures on or off.
Install FTP Server

3
2Expand the option for Internet Information Services (IIS). Select FTP Server and IIS Management Console. Click OK and wait for the installation to complete. This may take a few minutes. When the installation has finished your FTP server will be ready for use.
3
Click Control Panel, then System and Security, then Administrative Tools to open Internet Information Services Manager. Under connections, right click on sites and click Add FTP Site as shown in the screenshot.

4
4Under Connections, right-click on the name of your computer. Select Add FTP Site on the dropdown menu that appears.
5Under Site Information, enter a name for your FTP site, click the ellipsis (...) to select a path to the folder you want to share, then click the Next button.

5
6Under Binding and SSL Set-tings, select the default IP address from the dropdown menu. Select No SSL from the list of SSL options, then click the Next button. Enter your FTP Server IP address here for reference: _____ . _____. _____ . _____
7Under Authorization and Authentication Information, choose the settings you pre-fer. Click Finish to complete your FTP server setup. You now need to set up the WFT.

6
Wireless Network Configuration
1Navigate to Control Panel > Network and Internet > Network and Sharing Center. Under Change your network settings, select Set up a new connection or network.
2Under Chose a connection option, select Manually connect to a wireless network, then click the Next button.

7
3Under Enter information for the wireless network you want to add, we suggest the following:
Network name: WFT FTP (or whatever name you wish to use)Security type: WEPEncryption type: ___Security Key: Enter 5 ASCII characters
Click the Next button.
4You will see a message that confirms the new network. Click the Close button.

8
6Right-click on the Wireless Network Connection for your Internet access point (the router you use to con-nect to the Internet.) Select Properties from the drop-down menu that appears.
5Return to Control Panel > Network and Internet > Network and Sharing Center. Click Change adapter settings.
9
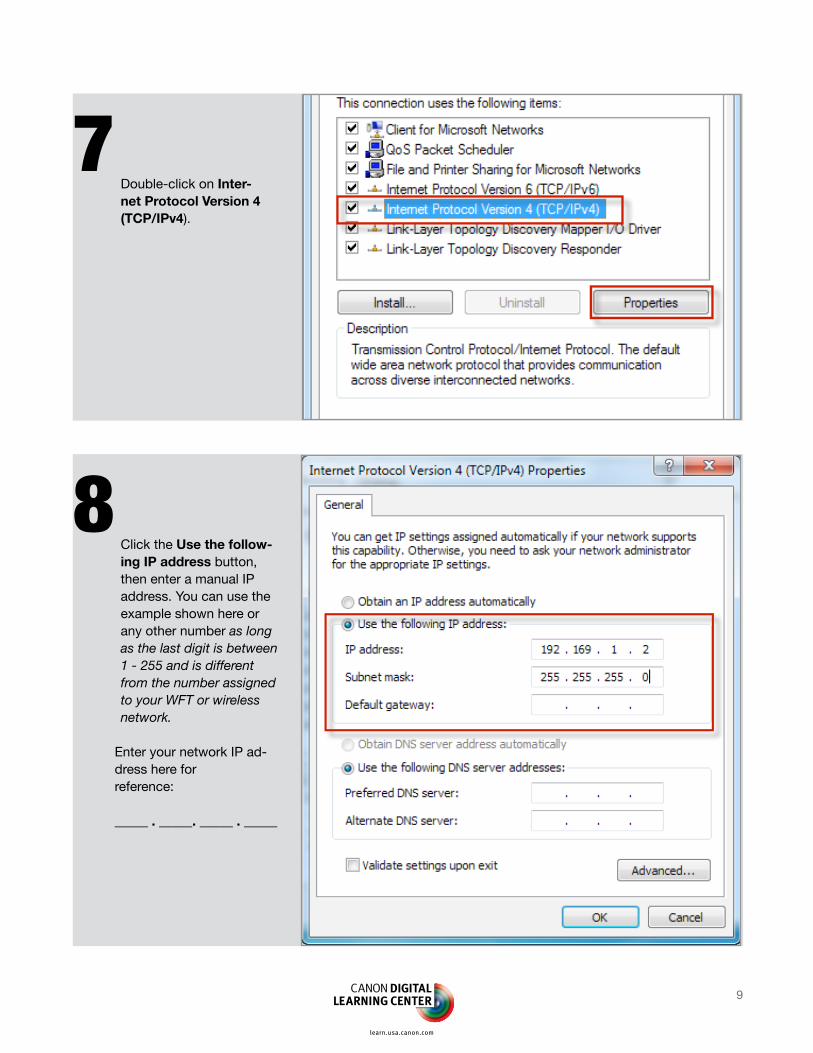
7Double-click on Inter-net Protocol Version 4 (TCP/IPv4).
8Click the Use the follow-ing IP address button, then enter a manual IP address. You can use the example shown here or any other number as long as the last digit is between 1 - 255 and is different from the number assigned to your WFT or wireless network.
Enter your network IP ad-dress here for reference: _____ . _____. _____ . _____

10
1The final step of FTP setup is to configure Windows Firewall to allow the Wireless File Transmitter to access the FTP server. Navigate to Control Panel > System and Security. Below Windows Firewall click Allow a program through Windows Firewall.
2Select FTP Server, then select whether you want it to be Home/Work (Private), Public, or both. Click the OK button.
Configure Windows Firewall

11
WFT Setup
1Turn on the camera and WFT unit.Press the MENU button on the camera.Navigate to the Tool menu that contains WFT Settings. Select [WFT Settings].
2Select [Connection wizard].
4Select [Wireless].Select [OK].
3Select [FTP trans.]. Select [OK].

12
5Select [Connect with wizard]. Select [OK].
6Select the name or SSID assigned to your wire-less network router. (The SSID shown here is only an example.) Select [OK].
7Select [Auto setting].Select [OK].
8Select [Address setting].Select [OK].

13
9Enter the exact IP address you wrote down in Step 4 of the FTP Server setup. Press the Menu button on your camera to select [OK].
10The address on the FTP Server screen should be identical to the address you wrote down in Step 4 of the FTP Server setup, Leave the port set to 00021. Select [OK].
11Select Passive mode [Disable].Select [OK].
12On Proxy server select [Disable].Select [OK].

14
13On Login method select [Login pass-word].Select [OK].
14On Login name, enter the name of your computer. (To find the name of your computer, click Start button/Control Panel, System and Maintenance, then System.You will find the computer name under the Computer name tab.
15On your camera’s Password screen, enter the password you use to log onto your PC. You must enter a login password for this setup to work. Press the Menu button on your camera to select OK.
15
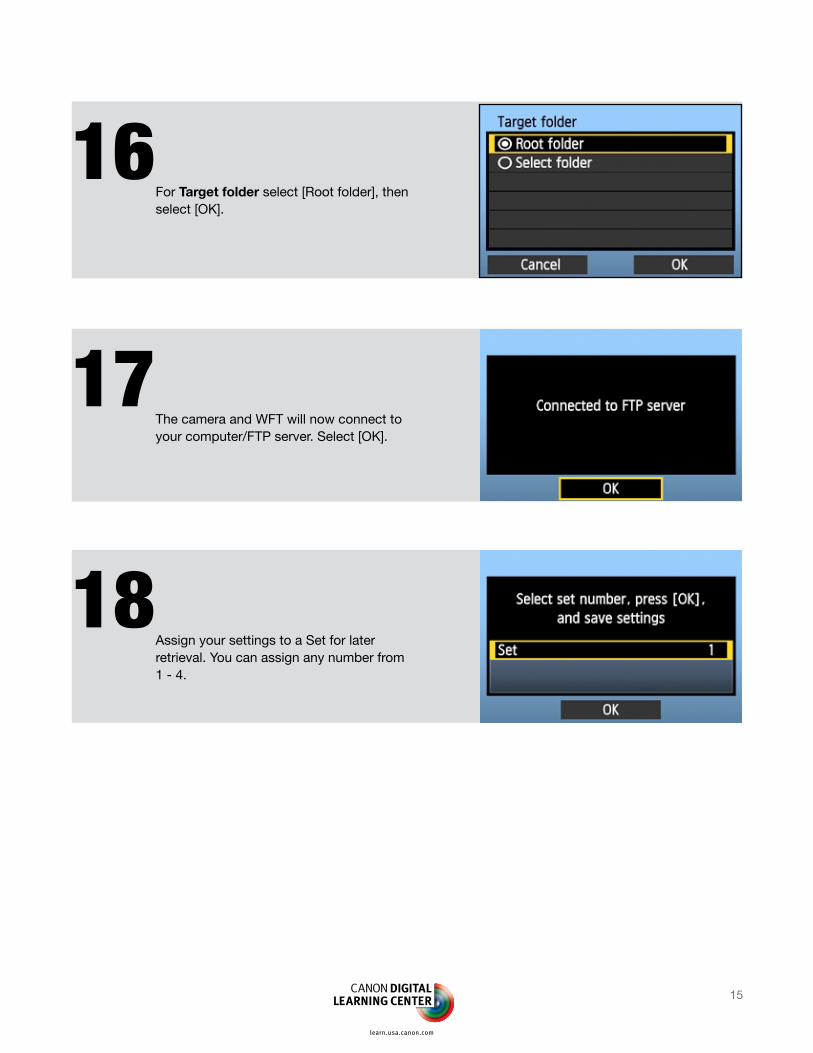
16For Target folder select [Root folder], then select [OK].
17The camera and WFT will now connect to your computer/FTP server. Select [OK].
18Assign your settings to a Set for later retrieval. You can assign any number from 1 - 4.

16
1Go to the WFT settings menu.Select [Set up].
Optional Automatic File Transfer Settings
2On the Set up menu enable [Automatic transfer]. Press the Menu button on your camera to confirm settings.
3Image files from your camera will automatically be transferred to a “house folder” identified on your computer as folder A. Note that any files you delete from your camera will not be deleted from the house folder.
17
© 2012 Canon U.S.A., Inc. All Rights Reserved. Reproduction in whole or in part without permission is prohibited.
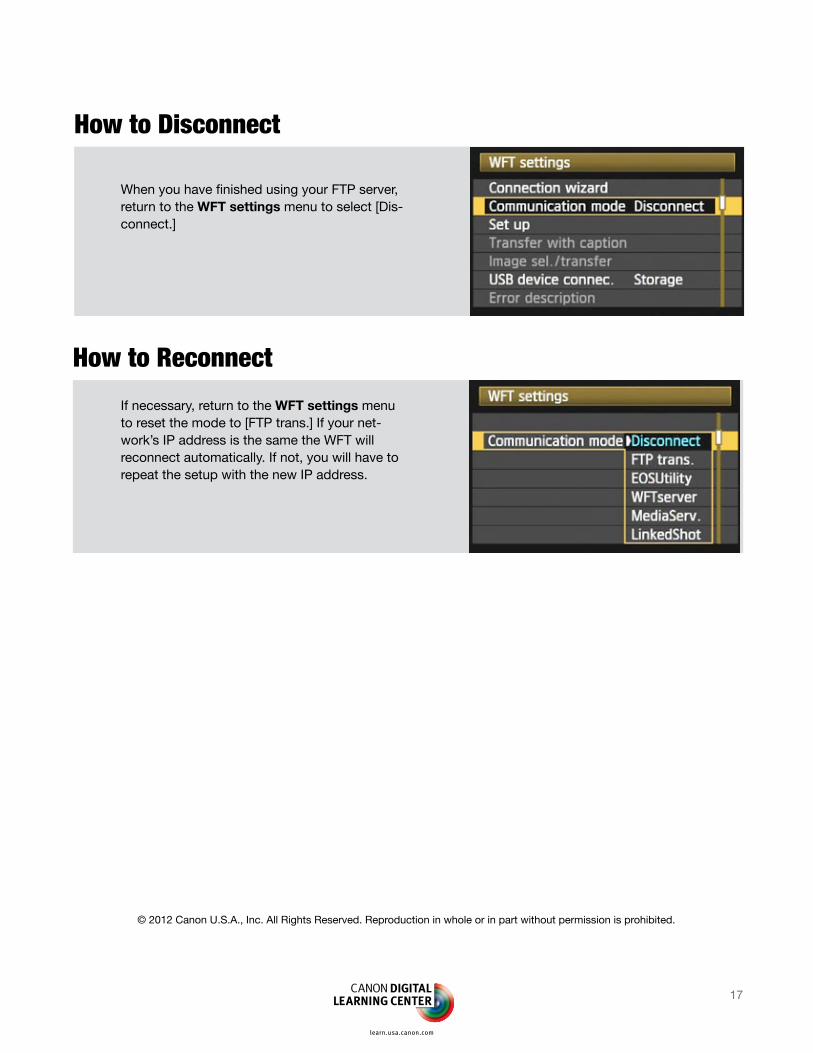
When you have finished using your FTP server, return to the WFT settings menu to select [Dis-connect.]
How to Disconnect
© 2011 Canon U.S.A., Inc. All Rights Reserved. Reproduction in whole or in part without permission is prohibited.
If necessary, return to the WFT settings menu to reset the mode to [FTP trans.] If your net-work’s IP address is the same the WFT will reconnect automatically. If not, you will have to repeat the setup with the new IP address.
How to Reconnect