gas-insulated switchgear - schneider...
TRANSCRIPT

AREVA T&D
Technical Instructions
WIGas-Insulated Switchgear
Installation InstructionsNo. AGS 531 566-01Edition 09/2009
>>
GAS INSULATED SWITCHGEAR

AREVA T&D Worldwide Contact Centrehttp://www.areva-td.com/contactcentre/ +44 (0) 1785 250 070http://www.areva-td.com
Manufacturer:
AREVA Energietechnik GmbH – Sachsenwerk Medium VoltageRathenaustraße 2D-93055 Regensburg, Germany +49 (0) 9 41 / 46 20-0 +49 (0) 9 41 / 46 20-418
Service:
Should you have any queries as to our service, please do not hesitate to contact:AREVA Energietechnik GmbH – Sachsenwerk Medium VoltageService-CenterD-93055 Regensburg, Germany +49 (0) 9 41 / 46 20-777 +49 (0) 9 41 / 46 20-778
©AREVA Energietechnik GmbH, Sachsenwerk Medium Voltage -2009-All rights reserved to this technical instruction.Reproduction and making available of this technical instruction, or extracts, to third parties are prohibited. Only the complete reproduc- tion of this technical instruction is permitted by written permission from AREVA Energietechnik GmbH, Sachsenwerk Medium Voltage.Electronic copies, e.g. as PDF format or as scanned version, have the status “for information only”.The only valid technical instructions are those which are supplied directly from the manufacturer with the delivery of the product.
3
1 Regulations and Provisions 41.1 Remarks on this manual 41.2 Terms and symbols used 41.3 Use in the line with the intended purpose 41.4 Applied standards 51.5 Safety provisions 61.6 Disposal after the end of the useful life 6
2 Panel type overview 7
3 Packaging and transport, weights and dimensions 9
4 Installation of panels 114.1 Safety provisions 114.2 Requirements regarding the switchgear room 114.3 Preparation for assembly 124.4 Installation of the first switchgear panel 144.5 Lining up panels 144.6 Busbar connections and busbar attachments 15
5 Insulating gas/rated filling pressure 18
6 Assembly work performed on the switchgear 206.1 Earth continuity conductor 206.2 Connecting external control lines 206.3 Attachment of cable support 21
7 High-voltage connection 22
8 Special attachments 238.1 Conditions for assembly 238.2 Compensator attachment 238.3 Facings 248.4 Damping resistor 258.5 Current transformer in line with busbar 258.6 Bus sectionalizer 25
9 Replacement of transformers 269.1 Voltage transformers 269.2 Current transformers 28
10 Final steps/commissioning 29
11 Annex 3011.1 Instructions for assembly 3011.2 Auxiliary products 3111.3 Screw couplings 31
Contents>>

4
1.1 Remarks on these instructions
This manual describes assembly of gas-insulated WI series medium-volt age switchgear.
These Instructions for Assembly are an integral part of the product and must be stored so that they are at any time readily accessible for and can be used by persons who are to work on the switchgear. If the switchgear is sold to new owners, they must receive this document along with the switchgear.
The following additional documents must be observed for this switch-gear:• Purchase contract with the agree-
ments on the configuration of the switchgear and with the legal
details• Operating Manual for WI series• the appropriate switchgear-
specific circuit diagrams / documen tation
• the Operating Manuals of the devices installed in the switchgear (e.g. IVIS, devices in low-voltage cabinet)
• the Instructions for Assembly of the manufacturer of the cable connection systems to be con-nected to the switchgear
• the Switchgear Configuration “WI”
• the assembly drawings supplied with the switchgear
• Use and handling of sulphur hexafluoride (SF6) in high-voltage switchgear (AGS 535051-01)
Since our products are constantly developed further, changes con-cerning images, technical data and standards are reserved.
All dimensions specified in this manual are in millimeters.
1.2 Terms and symbols used
This manual uses certain symbols which warn about dangers or pro-vide important information which must be complied with to avoid dan-ger to personnel and damage to equipment:
Warning! This symbol warns of dangerous electrical voltage. Contact with voltage may result in fatal injury !
Warning! This symbol is used for instructions non-com- pliance with which may result in serious injury, death or serious material damage.
Important! This symbol is used for information which is impor- tant to avoid damage.
1.3 Use in the line with the intended purpose
WI series gas-insulated medium- voltage switchgear units are exclu-sively intended for switching and distributing electrical power. They may only be used in the scope of the specified standards and the appro-priate switchgear-specific technical data. Any other use constitutes improper use and may result in dan-gers and damage.
Disclaimer of liability
The manufacturer shall not be held responsible for damage which occurs if• instructions in this manual are not
complied with,• the switchgear is not operated
according to its intended use (see above),
• the switchgear is assembled, connec ted or operated improperly,
• accessories or spare parts are used which have not been appro-ved by the manufacturer,
• the switchgear is modified with out the manufacturer’s approval, or if inadmissible parts are attached .
No liability is accepted for parts provided by customers, e.g. current transformers.
1 Regulations and provisions>>

1.4 Applied standards
WI series switchgear units are• metal-enclosed• SF6 insulated• type-tested
Designation IEC standard EN standard
Switchgear IEC 62271-1 EN 62271-1 IEC 62271-200 EN 62271-200
Circuit-breaker IEC 62271-100 EN 62271-100
Earthing switch IEC 62271-102 EN 62271-102
Disconnector IEC 62271-102 EN 62271-102
Current transformer IEC 60044-1 EN 60044-1
Voltage transformer IEC 60044-2 EN 60044-2
Voltage detection systems IEC 61243-5 EN 61243-5
Protection against accidental contact, foreign objects and water IEC 60529 EN 60529
Installation IEC 61936-1 HD 637 S1Operation of electrical equipment – EN 50110-1
5
2) See section 7
Insulating gas (acc. to IEC 60376)
Type Sulphurhexafluorid (SF6)
Rated pressure pre at 20 °C MPa 0.08-0.22 2)
WI series switchgear units meet the following standards and regulations:
3) optional: IP 52
Degree of protection against accidental contact and foreign objects (acc. IEC 60529)
Main electric circuits IP65
Drives IP2X
Low-voltage cabinet IP3X 3)
WI series switchgear may only be operated under normal operating conditions according to the specifi-cations IEC 62271-1.
Operation under conditions deviating from these is only admissible upon consultation with and approved by the manufacturer.
Environmental and operating conditions
Ambient conditions (acc. to IEC 62271-1)
Temperature class ”Minus 5 indoors” 1)
Min./max. ambient temperature °C -5 / 40 1)
Average value over 24 hours (max.) °C ≤ 35 1)
Average rel. air humidity 24 h/1 month % ≤ 95 / ≤ 90 1)
Max. installation altitude above sea level m ≤ 1000 1)
1) Other values on request

6
1.5 Safety provisions
The work described in this manual may only performed by staff of the Manufacturer’s Service Center, or by qualified staff who have been certi-fied for assembly of the WI series.
Applicable standards and regula-tions :
Please comply with:• the locally applicable health and
safety, operating and work in-structions
• Installation: IEC 61936-1 / HD 637 S1 1) • Operation of electrical installa tions
EN 50110-1 1)
1) The respective national standards in the country of manufacture are to be considered.
Read these instructions carefully before you work on the switchgear, and perform the work as described. Only perform such work if you have understood the instructions. Do not perform any work on the switchgear which is not described here.
Important! Operating reliability and useful life depend on correct opera tion.
Before performing work on the panel, make sure to comply with the following instructions:
Warning! Before starting work on the high-voltage components, de-ener-gize the system, verify it for zero voltage and earth the system according to the appli-cable safety rules pursuant to EN 50110-1.
Warning! Before performing work on the drives, switch off the auxiliary voltage and prevent it from reclosing.
Warning! There is a risk of injury when working on the drive mechanism. Release the circuit-breaker’s energy storing device by per-forming the cor responding • OFF-ON-OFF operating sequence.• in case of a make-proof earthing switch, by the appropriate ON-operation.
Behaviour in case of incidents or accidents
The WI series switchgear panels feature pressure relief ports for the case of an internal arc fault to en sure operator safety.
In case of fire or of internal faults, toxic and caustic decomposition products may arise. Comply with the locally applicable health and safety provisions.
In case of injuries damage, take first-aid measures or cause them to be taken.
1.6 Disposal after the end of the useful life
A material and recycling data sheet can be provided on request for the disposal of series WI switchgear at the end of its service life.
Disposal is performed as a service by the manufacturer’s Service Center which is subject to a fee.
The operating equipment contains the fluorinated greenhouse gas Sul-phur Hexafluoride (SF6) mentioned in the Kyoto protocol with a global warming potential (GWP) of 22 200. SF6 must be recovered and must not be released into the atmo-sphere. When using and handling SF6, comply with the specifications in the standard IEC 62271 High-Voltage Switchgear and Control-gear – Part 303 Use and Handling of Sulphur Hexafluoride (SF6).

7
�
�
�
�
�
Fig. 21 Drive with front control panel2 Tank with circuit breaker, disconnector and earthing switch3 Busbar chamber4 Supporting structure with cable connection area5 Low voltage cabinet
Single busbar series WIA up to 38 kV (40,5 kV, if Isc ≤ 31.5 kA)
Single busbar series WIA up to 52 kV / 55 kV(40,5 kV, if Isc ≤ 40 kA)
2 Panel type overview>>

8
�
�
�
�
��
Fig. 31 Drive with front control panel2 Tank with circuit breaker, disconnector and earthing switch3 Busbar chamber 14 Busbar chamber 25 Supporting structure with cable connection area6 Low voltage cabinet
Double busbar, series WIB up to 38 kV (40,5 kV, if Isc ≤ 31,5 kA)
Double busbar, series WIB up to 52 kV / 55 kV(40,5 kV, if Isc ≤ 40 kA)

9
Shipping units
WI switchgear is delivered as indi-vidual panels. One transport unit consists of a maximum of three panels lying horizontally and secured to a pallet. Bus section couplers and bus couplers in 2 panel widths are delivered as preassembled units.The busbar compartment, the circuit-breaker compartment with three-position switch and the drives are mounted ready for connection.The busbar is assembled and the busbar compartments filled with insulating gas on site.The low-voltage cabinets are assem-bled in the factory or supplied as accessories, according to custo-mer’s request.
Packaging
• If packed exclusively for truck transport, the panels are delivered on a pallet with PE protective film.
• For seaworthy transport, the units are packed in sealed aluminium film with desiccant and in a closed wooden case with tightly closed wooden base (also for container transport).
• In case of air transport, the panels are packaged in wooden crates with a protective PE film hood (dust protection) or in wooden crates, also with closed wooden bases, however without protective hoods (dust protection).
Transport
When transporting the panels, it must be ensured that the transport units do not slip or tilt (if necessary, nail down transport pallet on the loa-ding surface).
Transport using a forklift truck:The panel may only be transported on a pallet. The forks must be placed full-length under the transport unit.
Delivery
• Handle shipping units carefully when unloading and unpacking them.
• Shipping units must be unpacked immediately after receipt. Any damage occurred in transit must be recorded and reported imme-diately to the manufacturer.
• Check completeness of consi-gnment based on the transport documents.
• The supplier must be notified in writing about any differences.
Storage
If the panels are not installed com-pletely upon delivery, they can be stored temporarily.
• Re-use the original packaging to store parts which have been unpacked for inspection.
• Opened transport units must be protected against dust and conta-mination.
• The ambient conditions for stor-age must comply with the ad-missible operating conditions.
• Protect switchgear panels and accessories against condensation.
Warning! Ensure that the storage area is level and can support the weight of the equipment!
Fig. 1Transport unit3 individual switchgear panels on a pallet protected by PE film
3 Packaging and transport, weights and dimensions>>

10
WeightsThe weights are guide values for panels without packaging.
Panels One interrupter chamber Two interrupter chambers per phase per phase
WIA WIB WIA WIB
Weight in [kg]
Branch-circuit panel 700 1075 1125 1500
Branch circuit panel with multiple cable connection tank 800 1175 1225 1600
Metering panel 700 1075 1125 1500
Bus coupler in one panel width 700 1075 1125 1500
Transport unit consisting of coupler and busbar riser panel 1700 2450 2550 3300
Busbar unit without outgoing feeder (spare panel) 210 420 210 420
Additional weights for attachment of busbar compensation +100 +200 +100 +200 busbar earthing switch + 20 + 40 + 20 + 40 adapter attachment to busbar + 60 +120 + 60 +120
Dimensions
Panels One interrupter chamber per phase Two interrupter chambers per phase (38 kV – type) (52 kV / 55 kV – type)
WIA WIB WIA WIB
Dimensions [mm]
Panel depth (valid for all variants) 1692 with low–voltage cabinet (standard) 1517 with terminal box
Branch-circuit panel Height: Ir ≤ 2000 A 2100
2750 2664
3314 Ir > 2000 2750 3314 Width 600
Bus section coupler Height: Ir ≤ 2000 A 2100
2750 2664
3314 Ir > 2000 2750 3314 Width 1200Bus coupler Height - 2750 - 3314(in 2 panel widths) Width 1200 Options: Voltage transformer on
Height - + 475 - -the upper busbar Pressure relief on the upper busbar
Height - + 45 - + 45
Elevated panel supporting structure
Height + 300 Busbar compen-sation
Width + 200
Busbar earthing switch
Width + 145 (only at end of busbar)
Busbar cable Width: Size 1-2 + 200 (only at end of busbar)connection Size 3 + 240 (only at end of busbar) for series WI switchgear units: width - height - depth
Ir = Rated current of switchgear

4 Installation of panels>>
11
4.1 Safety provisions
Installation and assembly of the switchgear panels must be per-formed by accordingly certified staff or the manufacturer’s Service Center.
Warning! Comply with the safety provisions in section 1.5.
• Check technical data on rating plate.
• Check the supply voltage of the control and operating devices installed with reference to the switchgear-specific circuit dia-grams.
Warning! Pay attention to flooring ducts! Risk of accidents!
The WI series switchgear panels are delivered with the circuit breaker set to “OFF”, the energy storing device released and the earthing switch set to “ON”.
Warning! Risk of injuries. During installation, assembly and connec-tion, the energy storing device must not be charged.
Important! Condensation, dirt and dust should be avoided during assembly.
4.2 Requirements regard - ing the switchgear room
Before installing the switchgear panels, make sure that the switch-gear room is checked according to the switchgear documentation:- Ducts for high-voltage and low-
voltage cables- Check position of spacer bars- The load-bearing capacity of the
fastening areas must correspond to the weight of the switchgear (perform a stress analysis of the building)
- Observe the minimum distance between the switchgear and the building wall
- Check spacer bar frame for dimen-sions and tolerances in position
Before the switchgear is positioned on its site of installation, check the fastening points for flatness. Any unevenness must not exceed ±1 mm/meter.
≥
≥
≥
Fig. 4Example: wall distances, ceiling ducts, spacer bars

12
4.3 Preparation for assembly
Erecting the switchgear panels
Warning! Sufficient stability and evenness of the support ing area (floor) must be en sured.
1. Remove transport packaging (protective films).
2. Attach rope to the jack rings lo-cated on the circuit-breaker tank.
Warning! The heavy-load jack rings (accessories) must be used to erect the panels or to transport them using a crane.
Important! Make sure the rope is strong enough to bear the weight of the switchgear panel and to comply with the speci-fic regulations applicable for hoisting equipment.
3. The panel on the opposite side, at the end of the supporting struc-ture, must also be supported by the forks of the forklift truck.
4. Release the fasteners between the panel and the transport sup-port frame.
5. Lift the panel carefully on both sides, then lower the supporting structure slowly to the floor.
Erect panel completely using the crane.
6. Use yellow transport aids to move the panels (not included in scope of supply).
1
2
3
34
Fig. 6Erecting the switchgear panels1 WI panel2 Transport support frame3 Fastening points4 Jack rings on the panel
�����
Fig. 7Transport by means of a crane
Fig. 5Heavy-load jack ring (rotating, pink)
Fig. 81 Attach yellow transport aids in the panel supporting structure and fasten them.

13
Assembly of the transport rollers
1. Insert transport rollers (3) into the carriers in the supporting struc-ture and connect them using the securing pins (1) as shown in the drawing.
2. Lift panel using the setscrew (2).
Transport on rollers is only admis-sible on a completely level and horizontal floor.
Transverse movements on the spacer bar frame are only admis-sible over short distances (risk of tipping over).
Warning! Risk of tipping over! During transport, pay attention to the weight distri bution. The center of gravi-ty is at the gas tank level in the upper part of the switchgear panel.
Removal of transport securing device
Important! The transport securing device must not be removed earlier than necessary, but just before the assembly in question is started.
• Remove cardboard transport covers from the busbar chamber (1) by unscrewing them.
• If necessary, remove transport securing device (2) in the sup-porting structure (depending on variant) only after installation of the panel.
�
1
2
Fig. 12Transport securing device1 Transport covers on the busbars2 Transport securing device
Fig. 11Example WIA (52 kV) with single cable connection1 Center of gravity
1
23
Fig. 91 Securing pin2 Setscrew3 Transport rollers
1
2
3
4
Fig. 10Panel transport on the spacer bars1 Transport rollers mounted for longitudinal transport2 Spacer bars3 Transport rollers mounted for transverse transport4 Transport securing device

14
4.4 Installation of the first switchgear panel
1. Place the panel on the spacer bars according to the switch gear-specific space assignment plan.
2. Lower the switchgear panel and discharge the transport rollers.
3. Align front edge according to the space assignment plan.
4. Align the panel. Check the busbar chambers for
correct horizontal and vertical position.
If applicable, lift the panel via the transport rollers and place shims in the direct vicinity of the fa-stening areas, until the horizontal position has been reached.
Important! The first panel is decisive for the location of the following panels, thus it is essential that measuring is effected with utmost precision!
5. Remove the transport rollers.
6. Drill a thread M10 into the spa-cer bar frames in the 4 fastening areas. Screw down securing bolts (not included in scope of supply) only by hand, without using any tools.
Important! Only after all switchgear panels have been installed and adjusted may they be screw-fastened to the spacer bars.
4.5 Lining up panels
7. Place the second panel on the spacer bar next to the first panel according to the space assi-gnment plan.
8. Screw-fasten 4 threaded pins M10 with a clearance of 32±1 mm into the busbar chamber (see Fig. 14).
Fasten the 2 guide pins (not included in accessories) in the busbar chambers for assembly.
9. Coat the sealing surfaces on the busbar chambers and the seals (see Annex).
Insert the packing ring on the busbar chamber.
10. Push switchgear panel close to the first panel using the transport rollers.
The guide pins ensure that the busbar chambers are aligned correctly.
11. Screw-fasten the busbar cham-bers to each other
(see Fig. 15). Tighten screw couplings cross-
wise .
Important! Comply with the specified tightening torques (refer to Annex).
12. Align panel (according to installa-tion of the first panel).
Remove the transport rollers.
After having aligned and screw-fastened all panels to the busbar chambers (items 7-12), screw-fasten the panels to the spacer bars.
(The securing bolts are not in-cluded in the scope of supply.)
Make sure not to strain the panels in this process!
1
2
Fig. 15Screw fastening of the busbar chambers1 Hex. bolts with lock washer2 Nut and lock nut with lock washer
32 12
3
-2
Fig. 14Panel screw coupling1 Packing ring2 Threaded pin M103 Guide pins (no accessories)
ø14
ø14
Fig. 13Panel securing points in the supporting structure.

15
4.6 Busbar connections and busbar attach- ments
Busbar assembly
The busbar attachments are supplied with the switchgear accessories.
The busbars differ depending on the busbar rated current:Flat bars: ≤ 1600 ATubular bars: ≤ 2500 A
The assembly procedure is identical for the different busbar systems:
Preparation for assembly:
Access to the busbar carriers’ screw-fastening areas:Before assembly, the lower mounting cover must be removed from the busbar chamber.The screws and the cover must be kept in a safe place for re-use.
Installing the busbars:
1. Coat contact areas of the busbars, busbar carriers and the clamping piece (see Annex).
2. Pretreatment of the threads in the busbar carriers:
Degrease threads using a cleaning agent.
Coat at least two turns of the thread completely with a screw locking compound (e.g. Loctite, see Annex).
Warning! The contact sur- faces must not be coated.
3. Fasten busbars with clamping piece as shown in the diagram.
Important! Tightening torque: 10+2 Nm.
1
2
3 4 5 6
L1
L2
L3
Fig. 171 Busbar carrier with contact carrier 1600 A2 Flat busbars3 Clamping piece4 2 cup springs each5 Socket-head capscrews M10 (4x)6 Cup spring arrangement
1
2 3 5
6
4
Fig. 181 Busbar carrier 2500 A2 Tubular busbar3 Clamping piece4 2 cup springs each5 Socket-head capscrews M10 (4x)6 Cup spring arrangement
Fig.16Access to busbars for assembly

End panel
In each end panel, one end shim is fastened to the busbar carrier to gether with the clamping piece and the busbar.
Proceed as described above for screw-fastening the busbars.
For the tubular busbars, round end covers are used.Assembly is performed analogously.
End panel with busbar earthing contact
Set earthing contacts:1. First preadjust and tighten the
earthing contacts.2. Switch on earthing switch
(see Operating Manual).
Warning! Risk of injury due to the spring mechanism of the earthing blades.
3. Align earthing contacts to the con-tact blades. Subsequently, tighten them applying the spe cified tight-ening torque.
Description of assembly
Important! Coating of contact surfaces and tightening torques: refer to Annex.
Phase L1:The earthing contact is directly mounted to the busbar carrier to-gether with the busbar.Proceed as described above for screw-fastening the busbars.
Phase L2 und L3:The earthing contact and the busbar are screw-fastened to one another.
The busbar is fastened to the carrier according to the busbar screw-fas-tening procedure described above.
Assembly is effected analogously in case of tubular busbars.
16
�
��
Fig. 19Busbar attachment in end panel1 End shim
1
L 2
L3
L1
2x
2x
2x
2x
2x
Fig. 20Busbar attachment in end panel with earthing contact1 Attachment of mating contacts

17
Transfer resistance measurement of busbar screw fastening
Important! Comply with the manufac - turer’s specifications regarding the ohmmeter.
1. Connect the measuring device.
2. Measure transition resistance R between the individual busbar sections with direct current.
3. The resistance values measured should be comparable. If one measurand exceeds the average of the other values by max. 20 % or more, undo busbar screw fasten ing; clean contact surfaces carefully and repeat the mounting procedure.
Remounting the mounting cover
Before remounting the mounting cover to the busbar chambers, clean busbar compartments thoroughly to remove dust and impurities.
Mounting cover without desiccant:
1. Coat the sealing surfaces and seals (see Annex).
2. Insert a packing ring in the mount-ing cover.
3. Fasten mounting cover again to the busbar chamber.
Important! Comply with the tightening torques specified in the Annex.
Mounting cover with desiccant:
Mounting covers with desiccant are mounted in the end.
1. Coat the sealing surfaces and seals (see Annex).
2. Insert a packing ring in the moun-ting cover.
3. Check the outer desiccant bag for good condition.
Use desiccant only if the bag is not damaged.
4. Remove the inner desiccant bag and place it in the desiccant cover.
5. Screw-fasten the desiccant con-tainer to the mounting cover.
Pay attention to the equipotential bonding connection!
Metallic surfaces on the mounting flange and the desiccant container must be in contact (if necessary, expose metallic surfaces).
Important! Comply with the tightening torques specified in the Annex.
6. Fasten mounting cover again to the busbar chamber.
Important! Comply with the tightening torques specified in the Annex.
7. Evacuate the gas compartments: refer to chapter 5.
Warning! The appropriate busbar compartment must be closed and evacua-ted within 90 minutes after the outer de siccant bag has been opened.
1
2
3
4 5
Fig. 22Mounting cover on the busbar chamberwith desiccant attachment1 Desiccant2 Desiccant container3 Expose metallic surface4 Sealing surface5 Packing ring
Fig. 21Measure transition resistanc

18
Type of insulating gas:Sulphur hexafluoride SF6 according to IEC 60376
After filling the busbar and circuit-breaker compartments, the indica-tors and settings of the pressure indicator must be checked.
Important! The Operating Manual for the WI series, section 7 “Insulating gas monitoring”, must be ob served.
4
5
1
2
3
Fig. 241 Insulating gas monitoring of circuit-breaker compartment2 Gas connector socket for busbar compartment3 Temperature sensor for circuit-breaker compartment (only required for density controller)4 Top gas connector socket for circuit-breaker compartment5 Connecting line between insulating gas monitoring and compartment
Rated filling pressure (see also rating plate) and pickup values of insulating gas monitoring
The pressure data refer to +20 °C and an atmospheric pressure of 101.3 kPa abs.
Rated voltage [kV] 12/24 12/24/36 40.5 52/55
Rated nominal current [A] 1600 2500 2500 2500
Measuring device Ambient temperature- Density controller compensated pressure gauge
Rated filling pressure pre [MPa] 0.08 0.13 0.145 0.22
Pre-alarm in case of pressure drop [MPa] 0.05 0.10 0.115 0.19
Main alarm in case of pressure drop [MPa] 0.03 0.07 0.10 0.18
Main alarm in case of pressure increase [MPa] 0.14 0.20 0.22 0.26
Fig. 23Indication of pressure gauge / density controller1 Pressure indication2 Signalling contact 1 (=pre-alarm)3 Signalling contact 2 (=main alarm)4 Signalling contact 3 (=excess pressure)
123
4
5 Insulating gas / rated filling pressure>>

19
Workflow:
Important! SF6 must be recovered and must not be released into the atmosphere. When using and handling SF6, comply with the specifications in the standard IEC 62271 High-Voltage Switch-gear and Controlgear – Part 303 Use and Handling of Sulphur Hexa-fluoride (SF6).
A) Evacuating the busbar compartment
Use a vacuum pump or service equipment with pressure gauge for an absolute pressure of ≤1 kPa.
When evacuating gas-filled insulat-ing gas compartments, make sure to use only service equipment for SF6 insulating gas.
Connection to the vacuum pump should be made by short connecting hoses with a big inside diameter.
1. After removing the cap, connect vacuum pump to the gas connec-tor socket for the busbar com-partment (Fig. 24, item 2).
2. Evacuate the gas compartment to an absolute pressure of ≤1 kPa.
3. Disconnect the vacuum pump and mount the cap.
B) Filling the busbar compart- ment to the rated filling pressure
1. After removing the cap, connect the service equipment to the gas connector socket. The cap must have been removed previously.
2. Fill the busbar compartment to the rated filling pressure.
3. Disconnect service equipment and mount cap again.
C) Filling the circuit-breaker compartment to the rated filling pressure
The circuit-breaker compartment has been filled by the factory to a gauge pressure of min. 0.030 MPa.
1. After removing the cap, connect the service equipment to the gas connector socket.
2. Fill the circuit-breaker compart-ment to the rated filling pressure.
3. Disconnect service equipment and mount cap again.
After filling the busbar and circuit-breaker compartments, the indicators and settings of the pressure indica-tor must be checked (see also Ope-rating Manual).
D) Leakage test by means of leakage detector
A test for leakage is required when-ever flange couplings exposed to insulating gas have been made on site.
1. Use a leakage detector. Observe the instructions of the leakage detector‘s manufacturer.
2. Check the flange couplings mounted during assembly by hol-ding the leakage detector close to them. The flange coupling‘s tightness is ensured if the leak-age detector does not react.
E) Dew point measurement of the insulating gas (After approx. 48 hours)
1. Use a dew point measuring de-vice. Observe the instructions of the manufacturer of the dew point measuring device.
2. Connect dew point measuring device to a filling valve. The mea-suring procedure is described in the operating instructions for the dew point measuring device. The dew point temperature must not exceed -10 °C.
3. Disconnect dew point measuring device. Screw-fasten cap on fil-ling valve.
Fig. 25Each of the busbar sections is monitored by a pressure gauge /density controller on the appropriate busbar section.
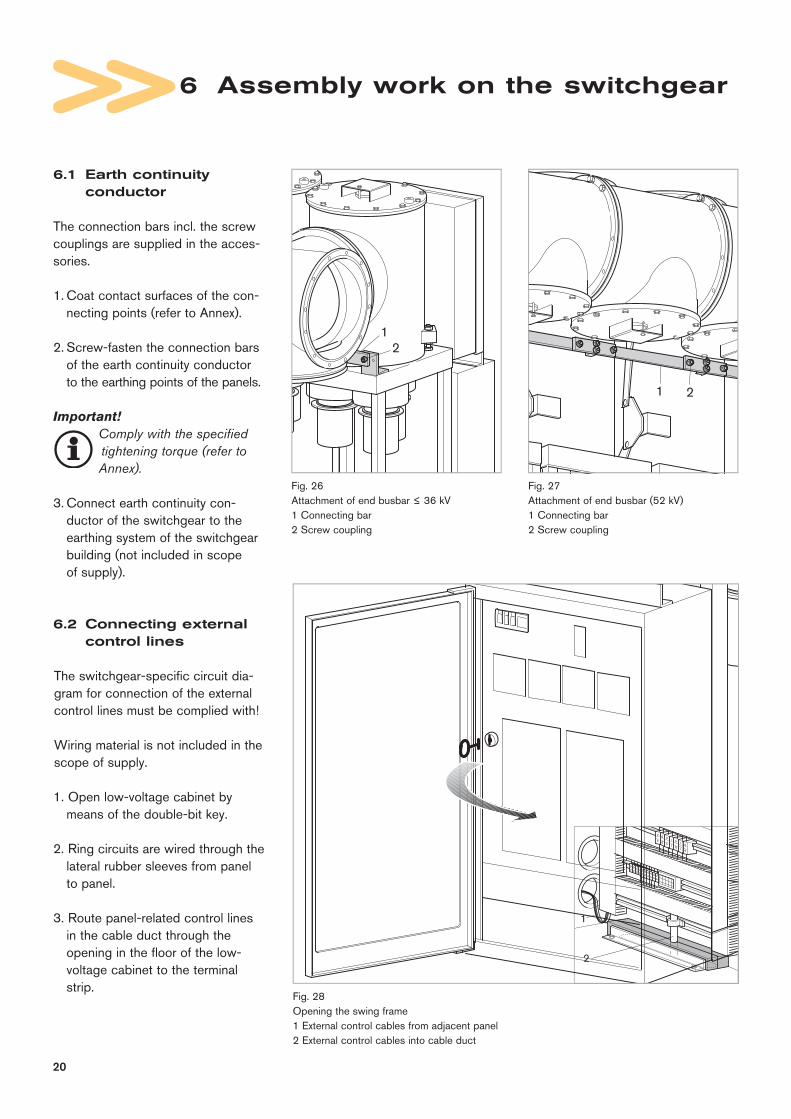
6.1 Earth continuity conductor
The connection bars incl. the screw couplings are supplied in the acces-sories.
1. Coat contact surfaces of the con-necting points (refer to Annex).
2. Screw-fasten the connection bars of the earth continuity conductor to the earthing points of the panels.
Important! Comply with the specified tightening torque (refer to Annex).
3. Connect earth continuity con-ductor of the switchgear to the ear thing system of the switchgear building (not included in scope of supply).
6.2 Connecting external control lines
The switchgear-specific circuit dia-gram for connection of the external control lines must be complied with!
Wiring material is not included in the scope of supply.
1. Open low-voltage cabinet by means of the double-bit key.
2. Ring circuits are wired through the lateral rubber sleeves from panel to panel.
3. Route panel-related control lines in the cable duct through the open ing in the floor of the low- voltage cabinet to the terminal strip.
20
1
2
Fig. 28Opening the swing frame1 External control cables from adjacent panel2 External control cables into cable duct
12
Fig. 26Attachment of end busbar ≤ 36 kV 1 Connecting bar2 Screw coupling
1 2
Fig. 27Attachment of end busbar (52 kV) 1 Connecting bar2 Screw coupling
6 Assembly work on the switchgear>>

21
6.3 Attachment of cable support
The attachments are included in the switchgear accessories.
Important! - Coat contact areas of earth transition - Comply with the specified tightening torques (refer to Annex)
1. Screw-fasten cable support to the carrier in the panel supporting structure. Observe the assembly drawings supplied with the equip-ment.
2. Slip support brackets into sections of the adjustable cable supports and screw-fasten the cable secu-ring section to them.
3. The number and setting of the cable securing sections depend on the cable connection type
(single or multi-cable connection).
Important! The cable securing sections are screwed down after introduction of the cable connectors and mounting the cable clips.
2
3
450
1
1 2
34
Fig. 29Cable support attachment (shown: single cable connection)1 Screw-fasten cable support to the carrier in the panel supporting structure2 Adjustable cable supports3 Cable securing section and support bracket
2
3
450
1
1 2
34
Fig. 30Multiple tank with 4 connectors per phase1 Cable support2 Cable securing section3 Low-voltage cabinet4 Busbar tank

22
Inner cone-type appliance couplers (e.g. acc. to EN 50181) are stan-dard equipment of the panels.
Warning! Cable connectors, tools, accessories (cable clips, screws, spring washers etc.) are not included in the scope of sup-ply.
Mount cable connectors accor-ding to the mounting instruc-tions of the cable connector‘s manufacturer. When mounting the cable connectors, comply with the specified tightening torques (see Annex).
Warning! When shrink-fitting cable boxes, make sure that the cable connec-tion area of the panel is not heated beyond the admissible service temperature.
We cannot accept any liabili-ty for consequential damage (charred cables of the capaci-tive indicator) which might result from shrink-fitting com -po nents in the cable connec tion compartment using an open flame.
Cable connectors for inner cone-type appliance coupler
1. Remove transport protective caps from the connector bushings (socket -contacts).
2. Mount cable connector according to the instructions of the cable connector manufacturer. Insert cable connector in inner cone-type appliance coupler (press down) and screw-fasten safely. Tighten screw couplings M8 with a torque of 15±3 Nm.
Warning! After the cable connec- tor has been inserted and screwed down, no canti lever loads or torsional forces must act on the inner cone-type appliance coupler (risk of damage to the inner cone-type appliance coupler).
3. If necessary, re-adjust cable sup-port , align cables and fasten them to the cable support using cable clips.
Connect earthing cable
1. Coat contact surfaces of earth connection (cable‘s Cu shield) with lubricant KL (refer to Annex).
2. Screw-fasten Cu shield of cable to cable support.
3. Close unused inner cone-type appliance couplers with surge-proof dummy plugs.
Connector shell with conductive contact surface with reference to switchgear‘s metal enclosure:
If the metallic connector shell features a conductive surface in contact with the metal cladding of the switchgear (this applies to the Pfisterer brand, system CONNEX), the cable‘s earth shield must not be connected to the connector shell (contacting). If for operational rea-sons it is not possible to provide an insulation between the cable‘s earth shield and the connector shell, con-sult the manufacturer.
1
2
3
4
Fig. 31Connection of cable connectors1 Cable connector2 Cable clip3 Adjustable cable supports4 Earth conductor
Fig. 32Appliance connector closed by dummy plug
7 High-voltage connectors>>

23
8.1 Conditions for assembly
Installation and assembly of the spe-cial attachments may only be per-formed by specifically trained staff, due to the technical requirements and the appropriate safety provisions involved.
Installation and assembly of the special attachments are performed by accordingly certified staff or, on request, by the manufacturer’s Ser-vice Center.
8.2 Compensator attach ment
The heat produced during switch-gear operation results in extension (depending on the normal current intensity).
The compensator attachments en-sure a longitudinal compensation of the busbar system. Compensator attach ments feature a panel width of 200 mm.They are required after 20 panels in case of single busbars, and after 10 panels in case of double busbars.
The attachments are included in the accessories.
Busbar connection
Specific tubular busbars must be monted to the busbar carriers in the left-hand and right-hand adjacent panel of the compensator attach-ment. The busbar sections are con-nected, depending on the busbar rated current, by multicontact bands which are placed in the groove of the contact pin.
Clearance between busbars on the multicontact connection.15±2 mm.This ensures a length compensation of the busbar.
Important! Comply with the specified coating of the contact surfaces and the tightening torques (refer to Annex).
Warning! After assembling the multicontact connec- tion, the busbar sec-tons must not be turned. Arrange their installation posi-tion previously, so that screw-ing down is possible without turning the busbars.
200
Fig. 33Compensator attachment
123
15±2
Fig. 34Assembly of round bars in case of compensator attachment1 Contact pin2 Groove with contact band3 Screw coupling on busbar carrier
Ir ≤ 1250 A: 1 contact bandIr > 1250 A and ≤ 2500 A: 2 contact bands
8 Special attachments>>

24
8.3 Facings
Front-side facings of the panels and compensator attachments or lateral switchgear facings can be mounted on customer’s request.
The attachment variants depend on the switchgear-specific panel types and the local dimensions of the switchgear compartment.
The attachments are included in the accessories.
1 2 3
Fig. 35Facings1 End panel attachment2 Cover attachment3 Cover attachment for compensator

8.4 Current transformer in line with busbars
The attachments are included in the accessories.
8.5 Bus sectionalizer
Switchgear panels comprising a disconnector in line with the busbar are completely installed in the factory and delivered in ready-to-connect condition. The attachments for the busbar connections are included in the accessories.
Warning! Risk of tipping over! During transport, pay attention to weight distribution.The center of gravity is at the gas tank level in the upper part of the switchgear panel (see also section 4.3).
25
Fig. 36Current transformer in line with busbars
Fig. 37Disconnector in line with busbarIllustrated: double busbar
SS2SS1
SS2
SS1

26
9.1 Replacement of voltage transformers
Replacement of the voltage transfor-mers in the cable outgoing feeder or, analogously, at the busbar.
Warning! Observe the safety provisions in chapter 1.5.
Warning! The isolating device for the voltage transfor- mer must be in earthed position.
Important! Please refer to the section “Disconnecting voltage transformers” in the Operating Manual of the WI series.
�
�
�
�
��
�
�
5 Inner cone-type appliance coupler6 Inner cone-type connector7 Screw coupling, flange8 Screw coupling, angle bracket
Fig. 38Voltage transformer attachment to the outgoing feeder block
1 Metal-enclosed voltage transformer2 Low-voltage wiring3 Cable clamp4 Isolating device
Fig. 39Transformer attachment to busbar 1
Fig. 40Transformer attachment to busbar 2
4ÜTransformer fastening points
9 Replacement of transformers>>

27
Disassembly of voltage trans-formers:
1. Release and identify transformer secondary cables.
2. Disconnect screw couplings of transformers (4 screws at the flan-ge coupling and 2 screws at the fixing bracket).
3. Pull transformer carefully and in correct axial alignment out of the inner cone-type appliance coupler. The weight of the transformers must be taken into con sideration! If necessary, support transformer using an elevating truck, or secure it by attaching a crane hook to the transformer’s jack rings.
Mounting the voltage trans-formers:
Important! Observe the instructions for assembly of the voltage trans formers.
Important! Contact and sealing sur- faces must be cleaned before assembly to remove grease and silicone .
1. Clean and grease contact sur-faces on the transformer con-nector and in the inner cone-type appliance coupler (see Annex).
2. Carefully clean the joining areas of the transformer connector and in the inner cone-type appliance coupler, and apply a uniform film of special paste.
3. Slip voltage transformer into the inner cone-type appliance coupler while observing correct axial alignment, and screw-fas-ten it by means of the 4 securing bolts. Screw-fasten the voltage trans former to the fixing bracket. Comply with the specified tighten-ing torques (refer to Annex)!
4. Connect the transformer’s secon-dary lines. Comply with the mar-king!

28
9.2 Replacement of the current transformers
The safety provisions must be com-plied with!
Warning! When working at the switchgear, disconnect the appropriate switch-gear section from the power supply, as otherwise operator safety according to IEC 62271-200 is restricted.
Earth the cable outgoing feeder, check for zero voltage and ensure that earthing is not damaged.
Warning! The safety provisions acc. to section 1.5 must be complied with.
Refer to the instructions for assembly.
Important! Refer to the instructions for assembly of the cable con nector manufacturer.
Important! Refer to the technical instruction for the “Use and handling of insulating gas” for the WI series.
Disassembly of the toroidal-core current transformer:
1. Remove cable connector with connecting cable.
2. Evacuate insulating gas of circuit-breaker cladded compartment, then fill with air to atmospheric pressure.
3. Disconnect the transformer lines in the low-voltage cabinet.
4. Remove container (10) of the inner cone-type socket.
- Unscrew earthing jumper (8).- If necessary, disconnect the
connec tor of the capacitive decoupling (11).
- Disconnect the 4 supporting seg-ments (9) and carefully remove the container by pulling it down.
The connector socket with the circular conductor is pulled out of the multicontact connection of the main current circuit.
Take the weights into account!
5. Unscrew the protective cover (6).
6. Disconnect the screw coupling (5) between the fixing bracket (4) and the retaining plate (3) and remove the package from the toroidal-core current transformer and the retain-ing plate.
The toroidal-core current trans-formers (1) can be completed or replaced once the fastener (2) has been released.
Assembly of the toroidal-core current transformer:
For assembly, reverse disassembly procedure analogously.
Important! Please observe the following instructions:
- Replace seals and multicontact bands.- Coating of contact surfaces of multicontact connection and earthing jumper (see Annex).- Coating of sealing surfaces (refer to Annex).- Tightening torques of the screw couplings (refer to Annex).
Subsequently, connect the transfor-mer lines in the low-voltage cabinet and mount cable connection again.
If necessary, replace desiccant in the open circuit-breaker compartment.Evacuate the circuit-breaker com-partment and fill it with insulating gas acc. to section 5.
If toroidal-core current transformers of multiple connectors must be replaced, proceed in principle in analogy to the above description. It may be necessary to disconnect additionally the conductor bar screw couplings in the multiple tank with the circular conductors.Replacement of the toroidal-core current transformers is performed on request by the manufacturer’s Service Center.
1
2345
6
89
10
11
13
7
12
1415
Fig.41Current transformer attachment1 Current transformer cores2 Holding straps3 Retaining plate4 Fixing bracket5 Screw coupling6 Protective cover7 Packing ring8 Earthing jumper9 Holding ring10 Container for connector socket11 Capactive decoupling12 Flange13 Screw coupling14 Multicontact conductor15 Screw coupling, protective cover
Fig. 42Connection to multiple tank

29
Final steps
Warning! The high-voltage supply must not be connected. All active parts must be earthed .
Clean and check assembly
• Clean the switchgear, removing con-tamination due to assembly work.
• Remove all the attached information tags, cards, brochures and instruc-tions no longer needed.
• Check the tightening torques of all screw couplings and connections established on the site of installation:
- Cable fitting on the appliance couplers
- Surge-proof caps on appliance couplers
- Earth conductor - Panel screw couplings - Special attachments• Check the connected cables
for phase coincidence with the appliance couplers.
Damaged paint
The panels are powder-coated. Minor damage to the paint can be repaired using commercially available paint (standard colour RAL 7044 or corresponding colour).
Verify:
• Check the switchgear for damage which might be due to transport or assembly work.
• Data on rating plate versus the re qui-red ratings.
• Filling pressure, according to rating plate, on the gas compartment moni-toring system.
Commissioning
Check switching functions / interlocks:
Important! The series WI Operating Manual must be observed.
• Perform manual switching trials on the individual switching devices.
• Check switch position indicators.
Important! While the power supply is not available, blocking coils (locking the interro-gating levers and circuit-breaker push-buttons, depending on design), are in “locked” position. One undervoltage release (optional) is released.
1. Check rated supply voltage of control and operating devices.
2. Check wiring laid on site.
3. Apply supply voltage.
Important! The energy-storing device of the circuit breaker drive is charged automatically as soon as the supply voltage is applied.
4. Check electrical functions of control and operating devices. - Motor drives for disconnector
and earthing switches - Closing and opening releases for circuit-breaker
Check switch position indicators and interlocks (see Operating Manual, section 5).
10 Final steps / commissioning >>

11.1 Instructions for assembly
Cleaning products, lubricant KL, SF6 multi-purpose lubricant MS and screw locking compound Loctite® appear in the Table “Auxiliary pro-ducts” on the following page.
How to treat sealing surfaces and seals
Important! Sealing surfaces, once coated with SF6 multi- purpose lubricant MS, should not be touched, if possible. Any contamination may impair function. 1. Sealing surfaces, seals (O rings)
and grooves for O rings must be cleaned and degreased with par-ticular care using a cleaning agent and a lint-free cloth.
2. Check visually.
3. Immediately afterwards, apply SF6 multi-purpose lubricant using a piece of leather which is exclu-sively reserved for this application; then keep the piece of leather in a place where it is protected against soiling.
How to treat the contact surfaces:
Important! Different lubricants most not be mixed on any account! Contact areas coated with lubricant KL should not be touched, if possible.
Contact surfaces must be subjec-ted to preliminary treatment before screw-fastening.
1. Clean - using a lint-free cloth, - in case of serious contamination:
using cleaning agent.
2. Polish to achieve a bright surface:
(A) - using emery cloth (grain size 100 or finer) - or using a steel brush which is only used for copper(B) - using emery cloth (grain size 100 or finer) - or using a steel brush which is only used for aluminium(C) - using emery cloth (grain size 100 or finer) or - using a steel brush which is only used for steel.
3. Immediately after cleaning the material metallically bright, coat it with lubricant KL so that the space between the contact surfaces is completely filled once the screws have been fastened.
Locking of screws using LOCTITE®
1. Preparation of the threaded areas- Clean and degrease the threaded
areas using a cleaning agent.
2. Apply adhesive- Coat the entire circumference of
2 or 3 threads in the area to be glued with liquid screw locking compound.
- maximum time for positioning: 60 s.
Note:- In case the thread reach exceeds
1.2 x the screw diameter and in case of blind hole threads, only wet the nut‘s thread.
30
Material of contact surfaces Measures
Copper, silver-plated none
Copper A
Aluminium, silver-plated none
Aluminium B
Steel C
Sheet metal, galvanized none
11 Annex>>

31
S 008 329
11.2 Auxiliary products
Warning! Risk of injury if the auxiliary products are handled improperly. Comply with the safety data sheets of the auxiliary products.
Auxiliary products Item no. Cleaning agent: Surfaces in gas tanks S 009 002
outside of the gas tanks S 008 152
Lubricant KL; 0.5 kg can ST 312-111-835
SF6 multi-purpose lubricant MS; 0.75 kg can S 008 134
Screw locking compound Loctite®
Transport rollers AGS 660 522-01
Transport aids (optional) S 880 061
Touch-up pen RAL 7044
silk-grey, 50 ml S 009 561
Touch-up pen, special paint (specify colour shade) S 009 562
The auxiliary products are available from the manufacturer.
The use of other auxiliary products is not admissible.
11.3 Screw couplings
The following elements must be used for all screw couplings:
- Screws and bolts: Grade ≥ 8.8,- Nuts: Grade 8.
Thread Tightening torque size [Nm] min. max. M6 7 9 M8 16 24 M10 36 44 M12 63 77
Table 1:Hex. bolts and socket-head cap screws (except slotted screws) and nuts (except self-locking nuts).
Thread Tightening torque size [Nm] min. max. M6 12.5 15.5 M8 32 40 M10 65 79 M12 90 110
Table 2:Self-locking bolts and nuts.
Important! Screw connections must not be greased.
Thread Tightening torque size [Nm] min. max. M6 5 7.5 M8 12 18 M10 24 38 M12 36 54
Table 3:Screw coupling with casting nuts in cast resin parts.
Thread Tightening torque size [Nm] min. max. M6 5.5 7.5 M8 15 19 M10 30 40 M12 60 76
Table 4:Screw coupling for current transfer, conductor material: copper.
Exception:Busbar fastening in section 4.6

32
Notes:

33
Notes:

Notes:
34


AREVA T&D
T&D Worldwide Contact Centre
www.areva-td.com
AR
EV
A E
nerg
iete
chn
ik G
mb
H -
Sach
sen
werk
Med
ium
Vo
ltag
e ©
- A
RE
VA
- 2
009.
A
RE
VA
, the
AR
EV
A lo
go a
nd a
ny a
ltern
ativ
e ve
rsio
n th
ereo
f are
tra
dem
arks
and
ser
vice
mar
ks o
f AR
EV
ATh
e ot
her
nam
es m
entio
ned,
reg
iste
red
or n
ot, a
re t
he p
rope
rty
of t
heir
resp
ectiv
e co
mpa
nies
- 3
8919
1982
RC
S P
AR
IS