pearson e-products teacher s guideprd1.pearson.com.hk/app/gs3e/_files/guide-teacher.pdf ·...
TRANSCRIPT

Pearson e-Products Teacher’s Guide

1
20160216
TABLE OF CONTENTS
Page
Pearson e-Bookshelf
Overview 2
Accessing e-Textbook resources 4
Adding notes and materials to e-Textbook 5
Showing / hiding resource links on book page 6
Sharing resources with students and other teacher users 7
Sending notification to students 8
Using e-Textbook across different platforms 9
Using e-Textbook offline 10
Viewing iWorkout report 11
Activating class control 12
iLesson
Getting started for iLesson 13
Conducting an iLesson activity 14
iActivity
Assigning an iActivity 15
Managing student posts 16
Starting peer evaluation 17
Appendix (Materials available online / offline) 18
2
20160216
Pearson e-Bookshelf
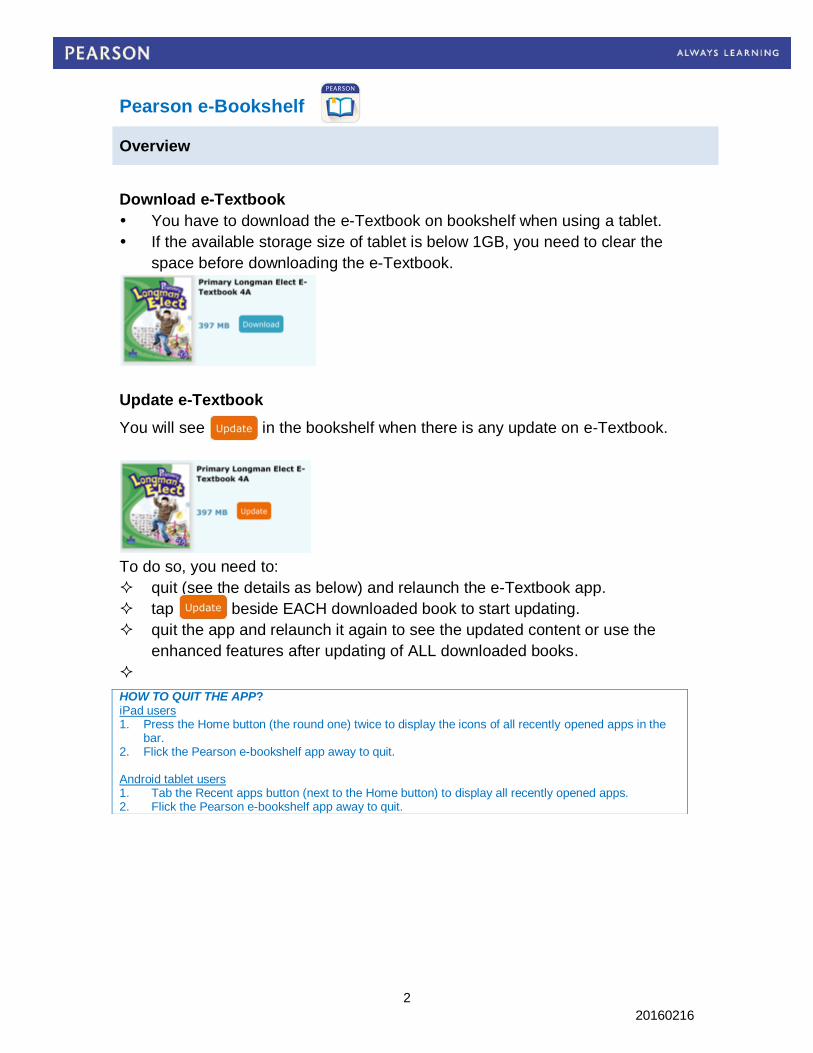
Download e-Textbook
You have to download the e-Textbook on bookshelf when using a tablet.
If the available storage size of tablet is below 1GB, you need to clear the
space before downloading the e-Textbook.
Update e-Textbook
You will see in the bookshelf when there is any update on e-Textbook.
To do so, you need to:
quit (see the details as below) and relaunch the e-Textbook app.
tap beside EACH downloaded book to start updating.
quit the app and relaunch it again to see the updated content or use the
enhanced features after updating of ALL downloaded books.
Overview
HOW TO QUIT THE APP? iPad users 1. Press the Home button (the round one) twice to display the icons of all recently opened apps in the
bar. 2. Flick the Pearson e-bookshelf app away to quit.
Android tablet users 1. Tab the Recent apps button (next to the Home button) to display all recently opened apps. 2. Flick the Pearson e-bookshelf app away to quit.

3
20160216
General functions
Table of
Contents
Student Handbook
Students can find resources
and exercises assigned by
teachers here.
Bookmarks
Tools
Users can find useful tools
such as dictionary and the
search function here.
Drawing
tools
Insert
Add your own resources
such as notes, pictures
and web links.
Show / Hide
Select notes to
show on page.
Single / Double
Page Mode
4
20160216
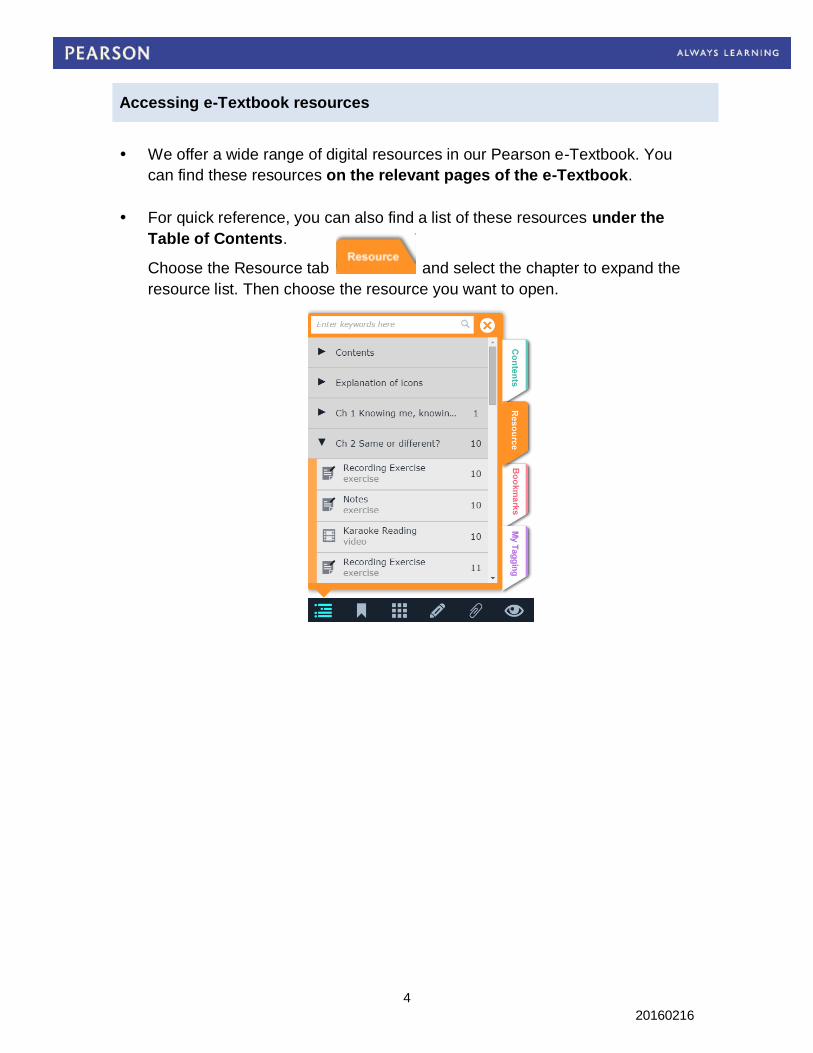
We offer a wide range of digital resources in our Pearson e-Textbook. You
can find these resources on the relevant pages of the e-Textbook.
For quick reference, you can also find a list of these resources under the
Table of Contents.
Choose the Resource tab and select the chapter to expand the
resource list. Then choose the resource you want to open.
Accessing e-Textbook resources

5
20160216
You can add notes to your e-Textbook with the following buttons:
Notes, pictures and web links added by teachers are marked with a red pin.
Those added by students themselves are marked with a green pin on their own
e-Textbook.
Adding notes and materials to e-Textbook
Pictures
Add pictures to the e-Textbook.
Drawing
Add markings and
drawings with this tool.
Note
Add notes to
the page.
Text
Add text directly
to the page.
Web link
Add URL links to useful
websites.

6
20160216
You can choose the types of resources to show on your e-Textbook.
Choose the Show / Hide option and select the types of resources that you
want to display on the book pages.
Showing / hiding resource links on book page
Show / Hide
Select the types of resources you want to
show on your e-Textbook.

7
20160216
You can share any notes or resources you have added to the
e-Textbook with your students and other teachers.
To do so, you need to …
open the resource item that you want to share;
choose the Share button at the bottom
right corner ;
select the class or teacher users whom you
want to share the item with and then choose
‘Done’;
choose to start sharing the item.
Sharing resources with students and other teacher users

8
20160216
You can assign exercises to your students. When you do so, you can also
send a notification to your students’ handbook to alert them.
To send a notification to your
students, open the relevant
exercise and then choose the
Notification button on the top
right hand corner. Select the class,
enter a message and then choose
‘Send’.
Your students will then receive a notification in their e-Textbook.
Sending notifications to students
Notifications and teacher’s message

9
20160216
You can access Pearson e-Textbook on different platforms (desktop
computers and tablet devices etc).This means that when you add a note to
your e-Textbook on your desktop computer, you will be able to see that note
in the e-Textbook on your tablet computer as well, by tapping the Cloud
and Refresh buttons manually on the current page.
When you see the ‘Cloud’ button in red it means that you have
materials stored on your local device. You need to go online to upload your
resources so that the e-Textbook on all different platforms can show the most
up-to-date resources or notes.
You need to refresh the e-Textbook one more time when you sign in
your account on another device.
Using e-Textbook across different platforms

10
20160216
Users can read Pearson e-Textbooks offline. To do so, you need to …
download and install the Pearson e-Textbook app on your tablet device;
sign in your account and download the e-Textbook that you want.
After you have downloaded an e-Textbook on your tablet device, you and
your students can do these offline …
read your e-Textbook;
edit / view bookmarks;
add notes and resources (e.g. text, pictures, web links etc).
submit iWorkout and other exercises (e.g. Recording activity and
iAssessment etc).
When you add notes or resources to the e-Textbook offline, all materials will
be saved on your local device. Once you sign in your account online again,
you need to refresh the e-Textbook manually to synchronise your
account across all platforms so as to upload any resources that have been
created while you are offline.
To see if iWorkout and other exercise are submitted successfully or not, you
can check the status of the icons out …
Status iWorkout Recording Activity
Note-taking Flipped Classroom
iAssessment
Not Submitted
Submitted online
Completed and saved on local device
Using e-Textbook offline

11
20160216
Teacher can view the reports in iWorkout for student records.
You can tap on the button under the ‘Student Record’ tab to view
individual student’s record of each question.
You can also tap on the button to export an Excel file for easy
administration.
Viewing iWorkout report

12
20160216
The class control function on Pearson e-Textbook allows teachers to
control student computers / tablet devices in the classroom for efficient
teaching and learning.
To activate this function, choose the Class Control icon and switch
it on. You can control your students’ computers / tablet devices in the
following ways:
Activating class control
Class control
Slide the button to switch on this function.
Flip page
Teachers can turn the pages on students’
e-Textbook remotely.
Lock page
Teachers can lock the screens of the students’
devices so that they cannot navigate away
from a certain book page.
When the Lock page mode is on, students are
still able to open any resources on the book
page. However, all functions on the menu bar,
except the Zoom function are disabled.
Blackout screens
Teachers can black out the screen on students’
devices so the class can focus on the lecture.
13
20160216
iLesson
iLesson activities are interactive in-class games to be used on tablet
devices. Students complete them during class time. Teachers control the
assignment of questions and answer checking using the teacher tablets.
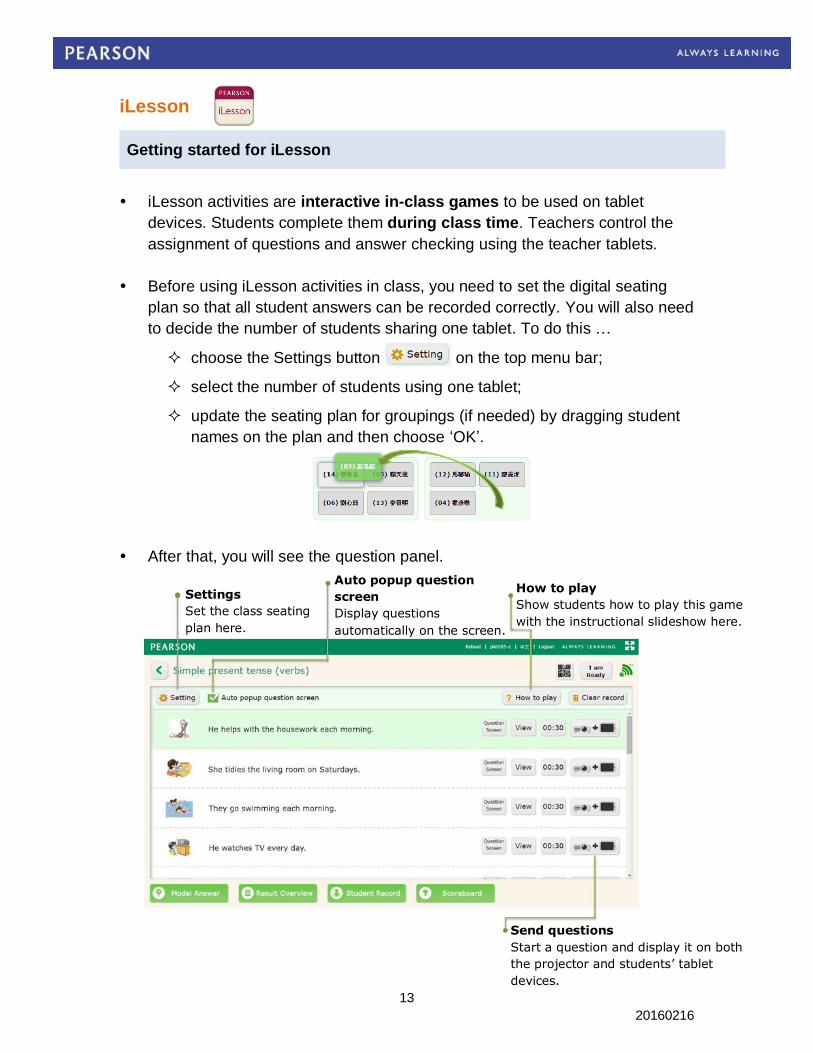
Before using iLesson activities in class, you need to set the digital seating
plan so that all student answers can be recorded correctly. You will also need
to decide the number of students sharing one tablet. To do this …
choose the Settings button on the top menu bar;
select the number of students using one tablet;
update the seating plan for groupings (if needed) by dragging student
names on the plan and then choose ‘OK’.
After that, you will see the question panel.
Getting started for iLesson
Settings
Set the class seating
plan here.
Auto popup question
screen
Display questions
automatically on the screen.
How to play
Show students how to play this game
with the instructional slideshow here.
Send questions
Start a question and display it on both
the projector and students’ tablet
devices.

14
20160216
To start an iLesson activity, select ‘Auto popup question screen’ and then
send out a question with the button.
The question will then be displayed on both the projector and student tablets.
You can also see the number of students who have submitted their answers
at the bottom of your teacher panel.
After each question, you can check the answers with the class and obtain
instant feedback on students’ performance with these buttons:
At times when students are assigned group activities, they will need to
complete them on a single tablet device. If each of them is initially using a
separate tablet, they will get a message on their screen asking them to use
the group leader’s tablet. The leader in each group will be assigned
automatically by the system.
If you have started iLesson from your e-Textbook, choose the Back to e-Book
button at the bottom to return to the e-Textbook.
Conducting an iLesson activity
Model answers
Choose this button and then the
button to check
answers on both the projector
and student tablets.
Result Overview
View the number of correct
and incorrect answers
submitted in a question.
Student Record
Review answers
submitted by individual
students.
Scoreboard
Show score records and
rankings with this button.

15
20160216
iActivity
iActivity is a collection of digital resources designed to enable your students
to post and share pictures, opinions or writings. Each grade level has a
total of 40GB of storage size for students and teachers to upload pictures
and audio clips throughout a school year. This is equivalent to a quota of
about 50 photos per students (2MB max per picture) and 50 audio clips per
student (6MB max per recording).
iActivity consists of the following interactive tools (some features may vary
depending on subjects):
iBoard – a digital bulletin board for posting pictures.
iForum – an online forum for sharing opinions.
iPost – an online platform for posting your writings such as articles and
stories etc.
You can notify your students about the assignment of an iActivity. To do so,
open an iActivity, choose the Notification button and select the class.
Enter a message and then choose ‘Done’. You students will then receive a
notification in their handbook.
Assigning an iActivity
Back to top
Block post
Block any posts
with inappropriate
contents.
Refresh
Add a post
Students add a post by uploading a picture
or entering their opinion / writing.
Notify students

16
20160216
You can adjust the settings of student posts under ‘Settings’. You can …
set the number of posts each student can make in an iActivity;
enable / disable the editing function of submitted posts.
You can also leave comments for your students’ work by typing in the
message board underneath each post.
At times when students post something inappropriate, teachers can choose
to block any student posts with the ‘Lock post’ function. Simply choose the
Lock post icon at the top right hand corner of a student’s post to
remove it.
You can also lock any inappropriate messages made by students with the
button.
Managing student posts
Miss Chan
Ben Wong
Li Ka Wai
Lock / unlock post
Block any posts or comments
that are inappropriate. Click
once to block the message and
click again to release it.
Great post!
Good job! Good choice of words.
Miss Chan
Share you opinion

17
20160216
iActivities encourage peer evaluation and sharing among students.
Students can …
view their classmates’ work;
leave comments for classmates.
Teachers can also choose to enable the Rating function so that students
can give ratings to their classmates’ work against a set of criteria. To do this,
simply choose the Rate button on the post. You can also modify the
rating criteria under the Settings section.
Starting peer evaluation

18
20160216
Appendix A quick glance of what are available online and offline.
App Online Offline
e-Bookshelf
e-Textbook view downloaded books download new books
bookmarks view bookmarks add / edit bookmarks
(new / edited bookmarks are temporarily saved on local device and will be sent to server once online)
notes view existing notes edit existing notes add new notes receive new notes from teachers
(new / edited notes are temporarily saved on local device and will be sent to server once online)
iWorkout /
Recording /
iAssessment
receive iAssessment from teachers
iLesson
iActivity (iBoard, iForum, iPost)
For assistance, please contact us by email: [email protected]
or visit Pearson’s Help and Digital Support page: www.pearson.com.hk/support