pearsonaccessnext user guide for the act test · system basics 3 organizational hierarchies in...
TRANSCRIPT

Spring 2019
PearsonAccess™next User Guide
for the ACT® Test
www.act.org

Contacting ACT Please direct all questions to:
ACT Test Administration
Hours: 7:00 a.m.–5:00 p.m., central time, Monday–Friday.
Phone: 800.553.6244 ext. 2800
Email: [email protected]
PearsonAccessnext: https://testadmin.act.org
© 2018 by ACT, Inc. All rights reserved. MA10007.OPS3811

i
ContentsSystem Basics 1Staff Roles within PearsonAccessnext 1
How to Access PearsonAccessnext 1
How to Reset Your Password 2The Home Screen 2Contacts versus Users 2Organizational Hierarchies 3How to Search for Data 3How to View Details on a Field 4How to Locate a Task to Complete 4
Managing Contacts and User Accounts 5How to Verify Test Coordinators and Physical
Addresses 5How to Change a School Test Coordinator 6Who Manages Contact and User Accounts 6How to Create a User Account 6How to Edit the Data of an Existing User 7How to Delete or Restore a User Account 7
Managing Participation 8Purpose of Completing a School’s Participation 8The Participation Process 8How to Submit Participation Data 9How to View or Edit Participation Data 10
Verifying Enrollment Information and Ordering Additional Materials 11Test Materials Process Overview 11District Enrollment and Ordering
Responsibilities 12When to Verify Enrollment for Test Materials 12How to Verify Enrollment for Test Materials 12Materials for Students Testing with ACT-Approved
Accommodations and Supports 13Additional Orders 13How to Create and Submit Additional Orders 14How to View the Status of a Submitted Additional
Order 15Makeup Orders 15How to View Shipment and Tracking
Information 15
Managing Examinee Information 16How to Change an Examinee’s Grade Level 16How to Submit a Request to Enroll or Unenroll an
Examinee 17How to Find the Student Code 18
Running Reports 19How to Run the Accommodations and Supports
Roster 19Accessing Other Operational Reports 19How to Access Published Reports 20

1
System BasicsStaff Roles within PearsonAccessnext
If your role in PearsonAccessnext is … Then you have permissions to …
District Test Coordinator Perform the following activities: • Manage participation, for the schools in your district, if
they do not • Replace or update school test coordinator information • Order additional materials, if requested by the school
test coordinator • Import data files (if part of your contract) • View shipment information
School Test Coordinator Perform the following activities: • Manage participation • Order additional materials • Import data files (if part of your contract) • View shipment information • Manage student information
Access PearsonAccessnext
1. Go to PearsonAccessnext at https://testadmin.act.org or follow the link in the email you receive when your account is created.
Note: ACT or someone with appropriate permissions must create your account before you can access the system. The email with this information comes from [email protected].
2. Select the Sign In button near the right side of the screen. The login page appears.
3. Enter your username and password, and select the Login button.

SySTEM BASICS
2
Reset Your Password1. Go to PearsonAccessnext at https://testadmin.act.org.
2. Select the Forgot Password link near the right side of the screen.
3. Enter your Username and Email and select the Request Password Reset button. Changes saved message box appears. You will receive an email with instructions on resetting your password.
4. Follow the instructions in the email to reset your password.
The Home ScreenThe diagram below explains the main components of the home screen.
Administration optionsNavigation icons
Navigation Icons
Home contains a link to your program's ACT hosted website
Setup used to navigate to options such as Organizations, Users, and Students
Testing only used for online testing
Reports used to access Operational and Published reports.
Support used only for Enroll/Unenroll requests
Administration Options
The testing company ACT
Your state or district testing test name and the year
ACT 2019 With Writing or ACT 2019 No Writing.
Your school or district name
Contacts versus UsersA “Contact” is a person whom ACT communicates with regarding testing deadlines, dates, policies, etc. The “Manage Contacts” feature (found under Setup, then Organizations) allows you to verify your contact information. The District Test Coordinator is responsible for updating the School Test Coordinator’s information, such as name and email, throughout the testing cycle. School and district address change cannot be made in PearsonAccessnext. Changes should be submitted to ACT in the Address Change Request Form.
A “User” is a person who has permission to perform activities and tasks within PearsonAccessnext. The “Users” feature (found under Setup, then Users) also requires an email address.
Important! To receive timely notices from ACT, District and School Test Coordinators’ contact information must be set up and kept up to date in the “Manage Contacts” screen, and “User” accounts must be created in PearsonAccessnext for new District or School Test Coordinators.

SySTEM BASICS
3
Organizational HierarchiesIn PearsonAccessnext, organizations exist in a specific hierarchy (i.e., statedistrictschool). You can view your own organization and others below you in the hierarchy, depending on your user level.
Search for DataMany tasks begin with a search for a user, organization, or student. The basic functions of these search screens are shown below.
To filter records, enter data into one or more of
these fields.
To search for a record, begin typing the user, organization, or student name in the Find field and select the Search button. Alternatively, you may select the drop-down arrow next to Search
and check the box next to Show all results.
You can also search for an organization within your hierarchy using the Administration options feature.
From the Organizations page, select the organization within your hierarchy from the drop-down in the top right corner.
You will only see the organization(s) for which you are the district test coordinator or school test coordinator.

SySTEM BASICS
4
View Details on a FieldYou can view additional information on certain fields by selecting the information icon when it is available.
Information icon
Additional information about the field appears. In this example, you can also select the Organization Enrollments, Test Administration Registration, Student Tests, or Sessions tabs for more information.
Locate a Task to CompleteAfter you’ve found and selected the checkbox next to your user, organization, or student, using a search method from above, select the drop-down next to the Start button for a list of available tasks to perform.
Then select one of the tasks to go to the task screen. Some options are shown below.

5
Managing Contacts and User AccountsVerify Test Coordinators and Physical Addresses1. Select the Setup icon and then select Organizations.
2. Select the arrow next to the Search button, and then the box next to “Show all results”.
3. Check the box next to the organization(s) you want to view information for.
4. Select the drop-down arrow next to the Start button. Select Manage Contacts.
5. Review the following information on the screen:
• Under Contacts, select Test Coordinator from the left side of your screen. If you are a district user, select the Test Coordinator that you want to review under the school name.
• If your testing program includes district shipping, select Shipping Contact/Address to view the contact and address.
Note: If your school will receive shipments, ACT will ship to the test coordinator’s contact address. If there is not a shipping contact and shipments should be sent somewhere other than the address listed for the test coordinator, contact ACT.
6. Use the following table to determine your next step.
If you are at a …
And if the school contact information … Then …
School is up to date • Go to Step 8. You do not need to do anything else.
needs updating • Go to Step 8 and contact your district test coordinator to make the change.
District is up to date • Go to Step 8. You do not need to do anything else.
needs updating • See the “Change a School Test Coordinator” section of this document. Then see the notes below and go to Step 7.
Notes:
• If you entered a new test coordinator, enter only the first and last name in the First and Last Name field, separated by a single space. Do not enter titles or suffixes. You’ll also need to create a user account for the new test coordinator if you haven’t already created one (see the “Create a User Account” section).
• If you need to change a school’s or the district’s physical address, use the Address Change Request Form.
7. If you made changes to any information on the Manage Contacts screen, select the Save button. A Success – Changes saved message appears.
8. Select the Exit Tasks button.

MANAGING CoNTACTS ANd USer ACCoUNTS
6
Change a School Test CoordinatorIf you need to change a school test coordinator, the district test coordinator must do three things:
• Update the contact on the Manage Contacts screen (see the “Verify Test Coordinators and Physical Addresses” section).
• Create the new school test coordinator’s user account (see the “Create a User Account” section).
• Delete the previous school test coordinator’s user account (see the “Delete or Restore a User Account” section).
Who Manages Contact and User AccountsUse the table below to determine the accounts you can manage.
If you are a user at this level … Then you can manage these staff accounts …
State • District test coordinator contact and user account • School test coordinator contact and user account
District Only staff at schools within your district, to include: • School test coordinator contact and user account
Create a User Account1. In PearsonAccessnext, confirm that you are in the correct administration and organization in the upper
right hand corner. See the “System Basics” section of this document for help if needed.
2. Select the Setup icon, and choose Users.
The Users screen appears. Select the drop-down list on the Start button, and select Create / Edit Users.
The Create / Edit Users screen appears.
3. Select the Organization Name.
Important! When creating a user account for someone at an organization beneath you in the hierarchy (e.g., if you are at a district and you are creating a school user account), be careful about the organization you assign them to. If you inadvertently assign them to your own organization, they will be able to see—and possibly edit—your information as well as the information for every organization that reports to you.
4. Select the Role for the new user.
5. Leave the Account as Enabled.
6. Enter the user's email address.
7. The email address will automatically populate in the Username field. Keep the email address as the username if you choose.
8. Enter the user’s first name and last name.
9. Leave the Active Begin Date and Active End Date fields blank.

MANAGING CoNTACTS ANd USer ACCoUNTS
7
10. Select the Create button. A Success – Changes saved message appears. Note: The new user will receive a “new account” email from PearsonAccessnext ([email protected]). The user will need to follow the instructions in that email to set their password for the account.
11. Select the Exit Tasks button.
Edit the Data of an Existing User 1. In PearsonAccessnext, confirm that you are in the correct administration and organization in the upper
right hand corner. See the “System Basics” section of this document for help if needed.
2. Select the Setup icon, and choose Users. The Users screen appears.
3. Select the drop-down list on the Search button, and check the box next to Show all results. A list of users appears. Optional: On the left, use the Filters feature to narrow the list of results.
4. Check the box next to the account you want to edit.
5. Select the drop-down list on the Start button, and select Create / Edit Users. The Create / Edit Users screen appears.
6. Select the user’s name from the Users list on the left.
7. Update fields with the new information and then select the Save button. A Success – Changes saved message appears.
8. Select the Exit Tasks button.
Delete or Restore a User Account1. Select the Setup icon, and choose Users. The Users screen appears.
a. If you are deleting a user, select the drop-down list on the Search button, and check the box next to Show all results. A list of users appears. You may use the Filters feature to narrow the list of results.
b. If you are restoring a deleted user, locate the Account Status filter on the left and then select the “Deleted” option. A list of deleted users appears.
2. Check the box next to the account you want to delete or restore.
3. Select the drop-down list on the Start button, and select Delete / Restore Users. The Delete / Restore Users screen and the user you selected appears. There will be a red X next to the name if you have already deleted the user and are now restoring the account.
4. Check the box next to the account you wish to delete or restore, and then select the Delete / Restore button. A Success – Changes saved message appears. If you deleted the account, the user’s name will now have a red X next to it.
5. Select the Exit Tasks button.

8
Managing ParticipationPurpose of Completing a School’s ParticipationSubmitting participation information is important because it verifies the following information for your school:
• The Paper Initial Standard Test Date
• The Paper Initial Accommodations Test Window Start Date
• The materials receipt date
• A reason if your school is not participating
The Participation ProcessThe table below describes the participation process.
Stage Who Does What
1 ACT Creates the following user accounts in PearsonAccessnext: • State test coordinator • District test coordinator • School test coordinator (if your state provides this
information to ACT).Note: If you have a pre-existing user account, ACT will not create a new one for you. However, you’ll receive email notification of being added to the new test administration. This notification will state you’ve been granted additional access to PearsonAccessnext; if you log in, you’ll see verification of the new administration.
2 PearsonAccessnext Sends account setup email to the state, district, and school test coordinators.
3 State, district, and school users
Set up their passwords (for new accounts).
4 School or district test coordinator
Manages participation by logging into the system and submitting participation for organizations in your hierarchy.
5 District test coordinator
Updates the school test coordinator, if necessary.Verifies contact/address information.

MANAGING PArTICIPATIoN
9
Submit Participation Data1. In PearsonAccessnext, confirm that you are in the correct administration and organization in the upper
right hand corner. See the “System Basics” section of this document for help if needed.
2. Select the Setup icon, and choose Organizations.
The Organizations screen appears.
3. Select the drop-down list on the Search button, and check the box next to Show all results.
A list of all organizations appears. Optional: On the left, use the Filters feature to narrow the list of results.
4. Check the box next to the organization(s) you wish to update.
Note: If you’re managing participation for multiple schools (organizations), you’ll need to follow the steps below for each school.
5. Select the drop-down list on the Start button, and choose Test Administration.
6. The Manage Participation screen appears.
Select the organization from the Organizations list on the left. The school’s participation details appear.

MANAGING PArTICIPATIoN
10
7. Use the table below to determine your next step.
If the school is … Then …
Participating Complete all three steps in the Participating section by: • Selecting a Paper Initial Standard Test Date from the
drop‑down list (the first test day on which you plan to administer the ACT for standard time examinees)
• Selecting a Paper Initial Accommodations Test Window Start Date from the drop‑down list (the first day of the accommodations testing window in which you plan to administer the ACT)
• Selecting Materials Receipt Dates from the drop‑down list (the week in which you can receive the first shipment of test materials)Note: If your entire organization is testing online, please choose Not Applicable/Online Testing.
Not participating Complete the Not Participating section by: • Selecting a Reason for Not Participating from the
drop‑down list • If selecting “Other,” completing Other Reason Not
ParticipatingNote: If you complete this section, you will not receive any test materials.
Note: Do not alter the ACT Use Only or the ACT Use Only Details boxes at the top.
8. Select the Save button. A Success – Changes saved message appears.
View or Edit Participation DataTo view already-submitted participation data, take Steps 1-6 in the section above. To edit the data, complete Steps 7-8.

11
Verifying Enrollment Information and Ordering Additional MaterialsTest Materials Process OverviewRefer to your Schedule of Events for timelines.
Stage Who Does What
1 School Test coordinator requests access and submits accommodations and english learner (eL) supports requests for students in the Test Accessibility and Accommodations System (TAA).
2 ACT Reviews requests for accommodations and/or supports and provides decisions.
3 State, district, or school (determined by your contract)
Loads Student data Upload (SdU) file into PearsonAccessnext. Note: The number of students in the file will be your baseline standard time and accommodations enrollment figure populated on the Edit Enrollment Counts screen (described below).
4 ACT Applies TAA PIN in PearsonAccessnext to populate accommodations and/or supports to the student’s record.Notes: • ACT will apply the TAA PIN to each student record as
quickly as possible. You can monitor if a PIN has been added to a student record by following the instructions in the “Run the Accommodations and Supports Roster”section in this document.
• After ACT applies the TAA PIN to student records, the amount and type of materials needed for students with approved accommodations and supports will auto-populate to the Accommodation Formats section of the Edit Enrollment Counts screen. It will also populate in the Braille Formats and Translated Test Instructions for English Learners sections.
VerIfYING eNroLLMeNT INforMATIoN ANd orderING AddITIoNAL MATerIALS
12
Stage Who Does What
5 School During the window to verify student enrollment: • Test coordinator reviews student enrollment (refer to
the “Verify Enrollment for Test Materials” section of this document).
• If a student enrolls or unenrolls from your school, test coordinator submits a request for ACT staff to complete this process (refer to the “Submit a Request to Enroll or Unenroll an Examinee” section in this document).
6 School If additional materials are needed because the enrollment has increased after the window to verify student enrollment has passed, test coordinator does the following: • For standard time, submits an additional order using
PearsonAccessnext
• For accommodations, contact the ACT Accommodations team
7 ACT Packages test materials and ships to schools.
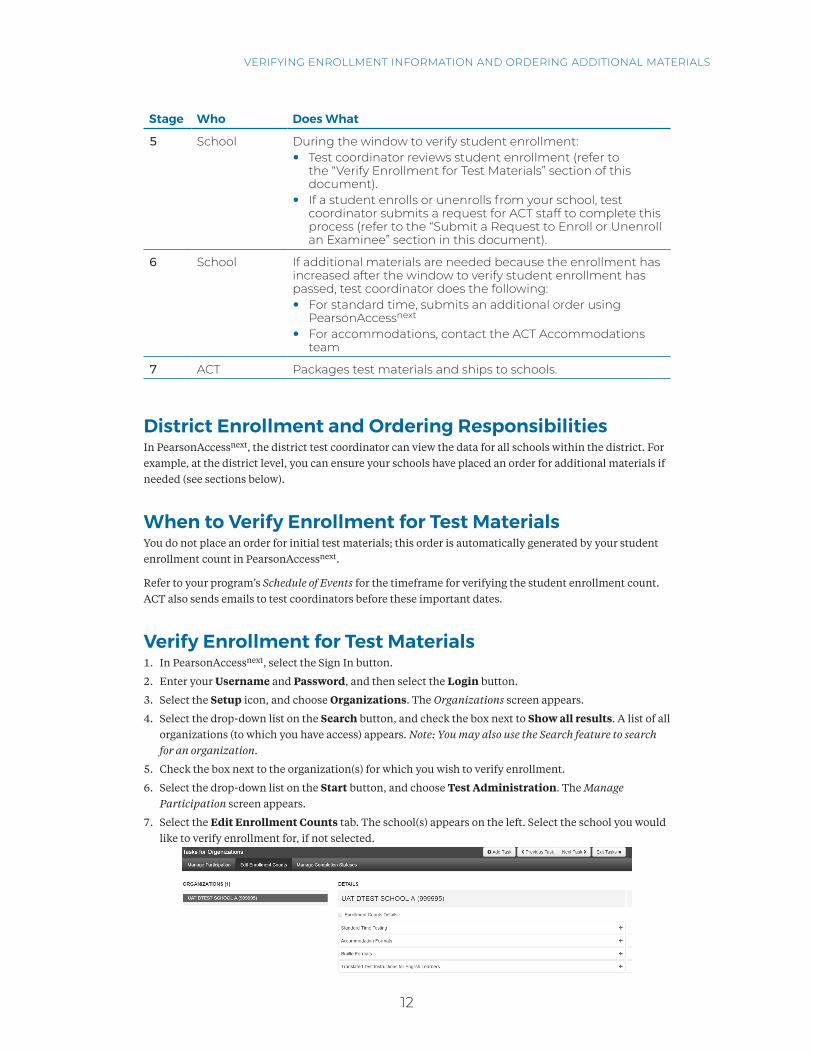
District Enrollment and Ordering ResponsibilitiesIn PearsonAccessnext, the district test coordinator can view the data for all schools within the district. For example, at the district level, you can ensure your schools have placed an order for additional materials if needed (see sections below).
When to Verify Enrollment for Test MaterialsYou do not place an order for initial test materials; this order is automatically generated by your student enrollment count in PearsonAccessnext.
Refer to your program’s Schedule of Events for the timeframe for verifying the student enrollment count. ACT also sends emails to test coordinators before these important dates.
Verify Enrollment for Test Materials1. In PearsonAccessnext, select the Sign In button.
2. Enter your Username and Password, and then select the Login button.
3. Select the Setup icon, and choose Organizations. The Organizations screen appears.
4. Select the drop-down list on the Search button, and check the box next to Show all results. A list of all organizations (to which you have access) appears. Note: You may also use the Search feature to search for an organization.
5. Check the box next to the organization(s) for which you wish to verify enrollment.
6. Select the drop-down list on the Start button, and choose Test Administration. The Manage Participation screen appears.
7. Select the Edit Enrollment Counts tab. The school(s) appears on the left. Select the school you would like to verify enrollment for, if not selected.

VerIfYING eNroLLMeNT INforMATIoN ANd orderING AddITIoNAL MATerIALS
13
8. Select the “+” icons located on the right side of the screen. The quantity of materials displayed for each title comes from the SDU file loaded and TAA PINs entered into PearsonAccessnext.
9. Review the quantity of standard time and accommodations test materials displayed.
Note: The “Calc” in the figure below refers to the student enrollment information ACT received from the SDU file and/or the student enrollment and unenrollment process.
10. If you need to adjust the total enrollment at your school, refer to the “Submit a Request to Enroll or Unenroll an Examinee” section of this document.
11. Select the Exit Tasks button.
Materials for Students Testing with ACT-Approved Accommodations and/or SupportsYou do not place an initial order for ACT-approved accommodations and/or supports materials for students.
Materials for accommodations and/or supports, including alternate formats, are provided based on the approval of a student’s request within TAA. When an approval occurs, the test coordinator receives an email directing them to the decision notification in the TAA system. ACT then enters the TAA PIN into the student’s record in PearsonAccessnext. This automatically populates the Accommodation Formats, Braille Formats, and Translated Test Instructions for English Learners (if applicable) portions of the Edit Enrollment Counts screen, so you can view the accommodations and/or supports approved for the student.
Note: There is no request process for non-college reportable accommodations, if this is part of your contract. Refer to the “Additional Orders” section.
Additional OrdersBefore test day, if you need additional test materials beyond what was received in your initial shipment or if you need to order non-college reportable materials (if your state allows), you can place an order for these materials in PearsonAccessnext. However, you may need to add additional students to your school in PearsonAccessnext before additional orders of test materials can be placed for them. Use the instructions in the “Submit a Request to Enroll or Unenroll an Examinee” section of this document.
Note: You must place any additional orders within the window on your Schedule of Events. If you try to place the order outside of this window, you won’t see any available items to order or be able to place an order.

VerIfYING eNroLLMeNT INforMATIoN ANd orderING AddITIoNAL MATerIALS
14
Create and Submit Additional OrdersOrder one initial standard time kit in PearsonAccessnext for each additional examinee who is testing with standard time. The kit includes:
• One secure test book (and one secure writing test booklet, if applicable)
• One answer document
• One copy of Taking The ACT® Test
Order the appropriate NCR kit in PearsonAccessnext for each examinee who needs non-college reportable accommodations (if applicable). The kit includes:
• One secure test book (and one secure writing test booklet, if applicable)
• Alternate format test materials, if requested
Important! The NCR kit does not include an answer document.
Take the following steps to create and submit an additional order in PearsonAccessnext.
1. In PearsonAccessnext, verify your administration option is correct in the upper right-hand corner of the screen. Refer to the “System Basics” section of this document for identifying administration options, or if you need to change your option, if applicable.
2. Select the Setup icon.
3. Select the Orders & Shipment Tracking option. The Orders & Shipment Tracking screen appears.
4. Select the drop-down arrow next to the Start button.
5. Select the Orders option. The Additional Orders screen appears.
6. Complete your order, starting with a future date on which you'll need the test materials. Use the calendar icon to select a specific date. Do not select today's date.
Note: ACT will determine the shipping method and when to ship your materials.
7. Use the drop-down arrow next to Reason to select a reason why you need the additional materials.
8. The Test Coordinator’s contact information will auto-populate on the screen under Use a Stored Contact.
Note: For most schools, you will only see one contact option. For district shipping, you will need to select the alternate contact.
9. Verify all the information that appears on the screen and then select Add Items under Materials Order. The Edit Materials Order screen appears.
10. The available items for you to order appear. Use the Filters of Material Type, Test Option, or Test Format to narrow your search for items if needed.
11. Use the up and down arrows or type in the Amount field to change the default amount of 0 for each item as needed, until your order is complete.
Note: If you need items that are not listed in PearsonAccessnext, contact the ACT State Testing and District Testing Test Administration team for standard time materials or the Accommodations team for accommodations materials.
12. Select the Save button to save your order. You’ll return to the Additional Orders screen.
13. Verify that your order is correct and then select the Create button. A Success – Changes saved message appears at the top of the screen.
14. Select the Exit Tasks button to return to the Orders & Shipment Tracking screen.

VerIfYING eNroLLMeNT INforMATIoN ANd orderING AddITIoNAL MATerIALS
15
View the Status of a Submitted Additional Order1. Log into PearsonAccessnext.
2. Verify your administration option is correct in the upper right-hand corner of the screen. See the “System Basics” section of this document if needed.
3. Select the Setup icon.
4. Select the Orders & Shipment Tracking option. The Orders & Shipment Tracking screen appears.
5. Use the drop -down menu under Find Orders Placed or Updated in to change the default search period as needed.
6. Select the Search button. The results from the search appear by order number.
7. After finding your order, locate the Status column. You will see one of 7 statuses: Submitted, Rejected, Pending, Processing, Backordered, Transit, or Delivered. An email notification is sent to the person listed as the "Ship To" recipient. The notification may include a list of the materials ordered, any changes with shipping, and tracking information.
8. You can also use the Orders & Shipment Tracking option to view the delivery method and expected ship date.
Note: If you have further questions about the status of your order, you may contact the ACT State and District Testing team for standard time materials orders or the Accommodations team for accommodations materials orders.
Makeup OrdersFor additional orders of standard time test materials for makeup testing, follow the same steps above, but also order one makeup kit from the Edit Materials Order screen for each examinee who is testing makeup. The makeup kit includes:
• One secure test book (and one secure writing test booklet, if applicable)
• Nonsecure materials, including but not limited to:
~ Administration manual
~ Processing envelope
Notes:
• Keep unused answer documents and other nonsecure materials (e.g., administration manuals and forms) from initial testing to use for makeup testing. Test booklets from initial testing cannot be used for makeup testing.
• Place the order for additional makeup materials within the window noted in your Schedule of Events. If you try to place the order outside of this window, you won’t see any available items to order or be able to place an order.
• For additional orders of accommodations and/or supports materials for makeup testing, email or telephone the ACT Accommodations team.
View Shipment and Tracking InformationFor any type of materials order in PearsonAccessnext, you can view information about the shipment of the materials, including items that may have been backordered. Take the following steps to view this information:
1. In PearsonAccessnext, select the Setup icon on the main screen.
2. Select the Orders & Shipment Tracking option. A list of shipments and orders appears.
3. Select the information icon for the Order # to view details about that order.
4. Select the Shipments tab to view the status of the shipment, including an external link to information from the shipping vendor. If the external link does not work, you can copy and paste the tracking number and use it on the shipping vendor’s website.
Note: Tracking information for the shipment will appear once the status is updated to Transit.

16
Managing Examinee InformationChange an Examinee’s Grade LevelFor ACT to report an examinee’s scores appropriately, the grade level assigned to individual examinees may need to be changed using PearsonAccessnext; it cannot be changed on an answer document.
Take the following steps before test day in PearsonAccessnext to change an examinee’s grade level:
Step Action
1 Select the Setup icon and select Students. The Students screen appears with a list of examinees.
2 Select the checkbox next to examinees whose grade levels are to be changed. Note: All applicable examinees may be selected at this time.
3 Select the drop‑down arrow next to the Start button, and choose Create / Edit Students. The Create / Edit Students screen appears.
4 Select a student from the Students menu on the left side of the screen.
5 Change the grade level of the examinee in the Actual Grade of Student field.
6 Select the Save button. A Success – Changes saved message appears.
7 Repeat the above steps for other examinees selected.
8 When finished, select the Exit Tasks button. Note: An examinee's Name, Student ID number(s), Gender, and Date of Birth can also be changed before test day by following the steps above.

MANAGING exAMINee INforMATIoN
17
Submit a Request to Enroll or Unenroll an ExamineeIf an examinee enrolls or unenrolls from your school before the test date, you need to submit a request for ACT staff to make this change for you. Take the following steps in PearsonAccessnext to submit this request:
Step Action
1 Select the Support icon from the main menu and then select Documentation from the drop‑down. Download the Enroll or Unenroll Students form and include the following details in the appropriate fields for the student (or for multiple students): • Student Code (if known – see the “Find the Student Code” section for help) • Unenroll School organization Code (provide ACT High School Code, if
known) • enroll School organization Code (provide ACT High School Code, if known) • Last Name • first Name • Middle Initial • Grade • Date of Birth • State Student Id (if no State Student Id, provide Local Id) • delivery format (paper=P, online=o) • TAA PIN (if known)
Save the form locally on your computer.
2 From the home screen, select the Support icon and then select Support Requests from the drop‑down. The Support Requests screen appears.
3 Select the drop‑down list on the Start button, and select Create / Edit Requests. The Create / Edit Requests screen appears.
4 Using the drop‑down arrows on the appropriate fields, enter the organization (your school) and category (enroll Student or Unenroll Student) for the request.
5 Provide an appropriate title for your request; use the word “enroll” or “unenroll” in the title. enter additional instructions in the Question / Concern field.
6 Select Choose Files to locate and attach the saved file for uploading to PearsonAccessnext.Note: Verify that the correct file was attached by checking the file name.
7 Select the Create button. A Success – Changes saved message appears.
8 The person submitting the request will receive email notifications from PearsonAccessnext confirming that the request was received and also when the enrollment or unenrollment information is completed by ACT staff.Note: You can view the status of your request at any time through your PearsonAccessnext account.
9 Select Exit Tasks to return to the previous screen. If you have other examinees to request enrollment or unenrollment for, repeat the steps above.

rUNNING rePorTS
18
Find the Student CodeStep Action
1 Log in to PearsonAccessnext.
2 Select the Setup icon and then Students. The Students screen appears.
3 Use the drop‑down next to the Search button and then check the “Show all results” box. A list of students appears.
4 Locate the Student Code on the left of a row for an examinee.
5 Select the information icon for a Details screen that also shows the Student Code for that examinee.

19
Running ReportsThere are two types of reports available in PearsonAccessnext, Operational Reports and Published Reports. Operational Reports help you with test administration, while Published Reports relate to which examinees tested and test scores.
Run the Accommodations and Supports RosterAfter the TAA PIN of an examinee with ACT-approved accommodations and/or English learner (EL) supports is entered in PearsonAccessnext, the examinee is listed on the Accommodations and Supports Roster.
Note: An examinee must be listed in the Accommodations and Supports Roster for ACT-approved accommodations and/or English learner (EL) supports materials to be shipped. The roster will include examinees approved through late consideration.
Take the following steps in PearsonAccessnext to run the Accommodations and Supports Roster:
Step Action
1 Select the Reports icon.
2 Select the Operational Reports title. The Operational Reports screen appears.
3 Under Report Categories on the left, check the box next to Students & Registrations. A list of Students & Registrations reports appears.
4 Select Accommodations and Supports Roster. The report page appears.
5 Select Request Report Refresh. Leave default options in the drop‑down menu, and select Refresh Report. Select the refresh arrows until the Download Report button appears.
5 Select Download Report to download the .csv file of the report.
6 When finished, select the Exit Report button.
Accessing Other Operational ReportsTo access other Operational Reports available to you, follow Steps 1-2 above and then check the box under Report Categories for the type of report you’d like to view and save (if needed). Each category opens a list of reports on the screen. You can also check multiple boxes to see the reports available for more than one category at a time.
Note the description of a report, and then select the title to open and view it.

rUNNING rePorTS
20
Access Published Reports1. Log in to your PearsonAccessnext account.
2. Make sure your organization appears in the upper right-hand corner of the screen. To change organizations, see the “Systems Basics” section of this document for help if needed.
3. Under the Reports tab on the Home screen, select Published Reports. The Published Reports screen appears with a list of reports for your organization.
Note: If you are a district or state user and want to change the organization view on this screen, use the filters on the left to select the correct Organization Type and Name. To view all reports for your state or district, remove the organization populated in the Organization Name box.
4. Access the report(s) you want by:
• Using the checkbox to the left of the File Name and then selecting the Download button in the top right. You can also use this method for multiple reports, or all the reports available (use the checkbox next to File Name to select all).
• Selecting the File Name of the report directly
Notes:
• The icon next to the title of the report on the Published Reports screen shows you the available formats (e.g., PDF or Excel).
• We recommend that you download and save your reports locally (e.g., to your computer). The reports for a specific administration are not available permanently in PearsonAccessnext.
