penta manual 3010 4110 5610 - penta tmr mixers, tillage ... series/5610... · penta 3 introduction...
TRANSCRIPT
PENTA
1
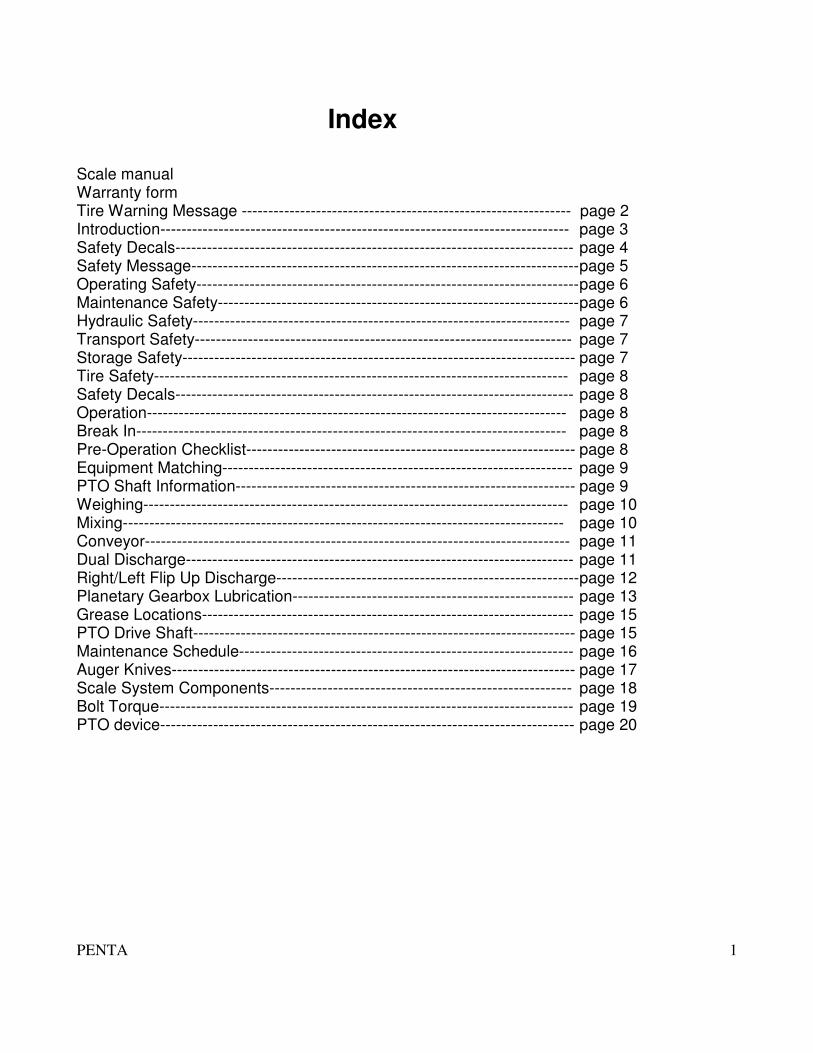
Index Scale manual Warranty form Tire Warning Message -------------------------------------------------------------- page 2 Introduction----------------------------------------------------------------------------- page 3 Safety Decals--------------------------------------------------------------------------- page 4 Safety Message------------------------------------------------------------------------- page 5 Operating Safety------------------------------------------------------------------------ page 6 Maintenance Safety-------------------------------------------------------------------- page 6 Hydraulic Safety----------------------------------------------------------------------- page 7 Transport Safety----------------------------------------------------------------------- page 7 Storage Safety-------------------------------------------------------------------------- page 7 Tire Safety------------------------------------------------------------------------------ page 8 Safety Decals--------------------------------------------------------------------------- page 8 Operation------------------------------------------------------------------------------- page 8 Break In--------------------------------------------------------------------------------- page 8 Pre-Operation Checklist-------------------------------------------------------------- page 8 Equipment Matching------------------------------------------------------------------ page 9 PTO Shaft Information---------------------------------------------------------------- page 9 Weighing-------------------------------------------------------------------------------- page 10 Mixing----------------------------------------------------------------------------------- page 10 Conveyor-------------------------------------------------------------------------------- page 11 Dual Discharge------------------------------------------------------------------------- page 11 Right/Left Flip Up Discharge--------------------------------------------------------- page 12 Planetary Gearbox Lubrication----------------------------------------------------- page 13 Grease Locations---------------------------------------------------------------------- page 15 PTO Drive Shaft------------------------------------------------------------------------ page 15 Maintenance Schedule--------------------------------------------------------------- page 16 Auger Knives---------------------------------------------------------------------------- page 17 Scale System Components--------------------------------------------------------- page 18 Bolt Torque------------------------------------------------------------------------------ page 19 PTO device------------------------------------------------------------------------------ page 20
PENTA
2
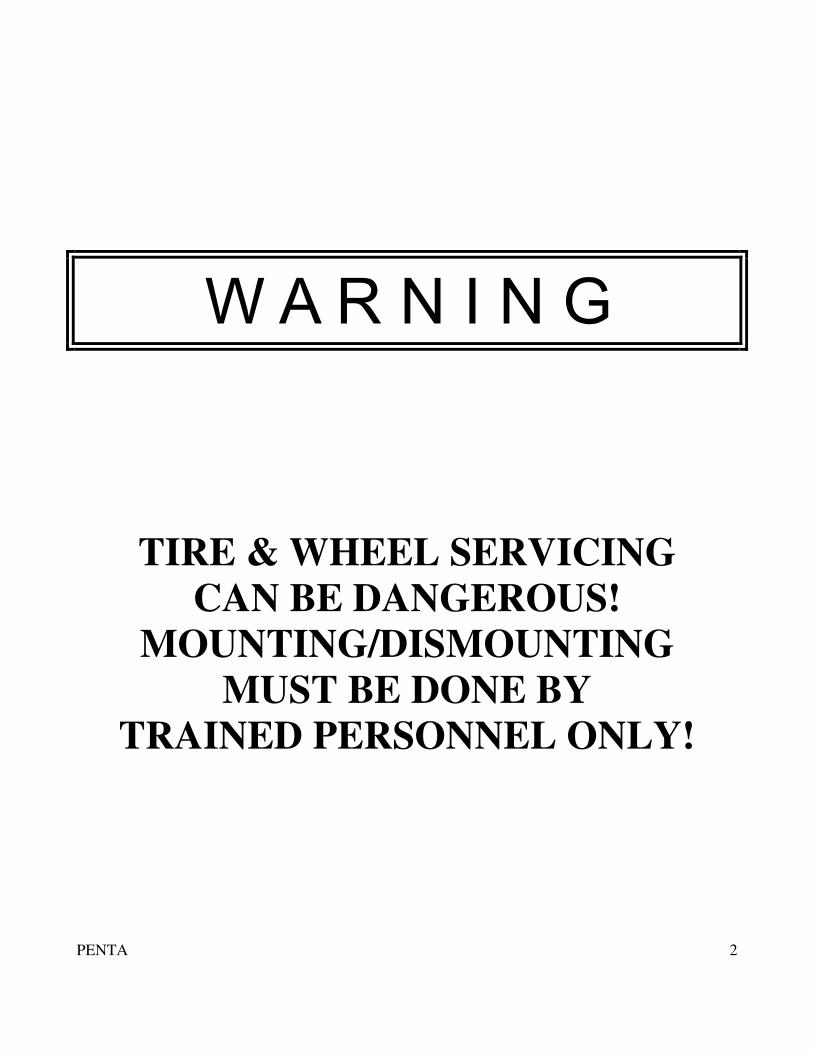
TIRE & WHEEL SERVICING
CAN BE DANGEROUS!
MOUNTING/DISMOUNTING
MUST BE DONE BY
TRAINED PERSONNEL ONLY!
PENTA
3
INTRODUCTION
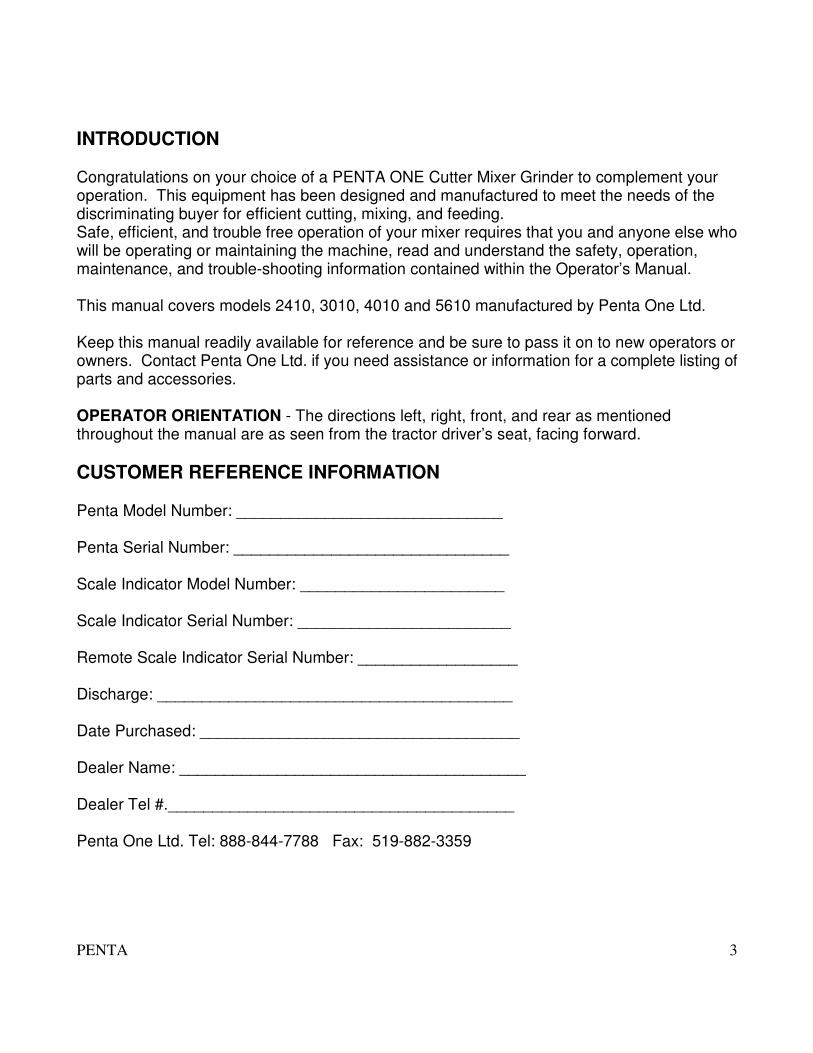
Congratulations on your choice of a PENTA ONE Cutter Mixer Grinder to complement your operation. This equipment has been designed and manufactured to meet the needs of the discriminating buyer for efficient cutting, mixing, and feeding. Safe, efficient, and trouble free operation of your mixer requires that you and anyone else who will be operating or maintaining the machine, read and understand the safety, operation, maintenance, and trouble-shooting information contained within the Operator’s Manual. This manual covers models 2410, 3010, 4010 and 5610 manufactured by Penta One Ltd. Keep this manual readily available for reference and be sure to pass it on to new operators or owners. Contact Penta One Ltd. if you need assistance or information for a complete listing of parts and accessories. OPERATOR ORIENTATION - The directions left, right, front, and rear as mentioned throughout the manual are as seen from the tractor driver’s seat, facing forward.
CUSTOMER REFERENCE INFORMATION Penta Model Number: ______________________________ Penta Serial Number: _______________________________ Scale Indicator Model Number: _______________________ Scale Indicator Serial Number: ________________________ Remote Scale Indicator Serial Number: __________________ Discharge: ________________________________________ Date Purchased: ____________________________________ Dealer Name: _______________________________________ Dealer Tel #._______________________________________ Penta One Ltd. Tel: 888-844-7788 Fax: 519-882-3359
PENTA
4
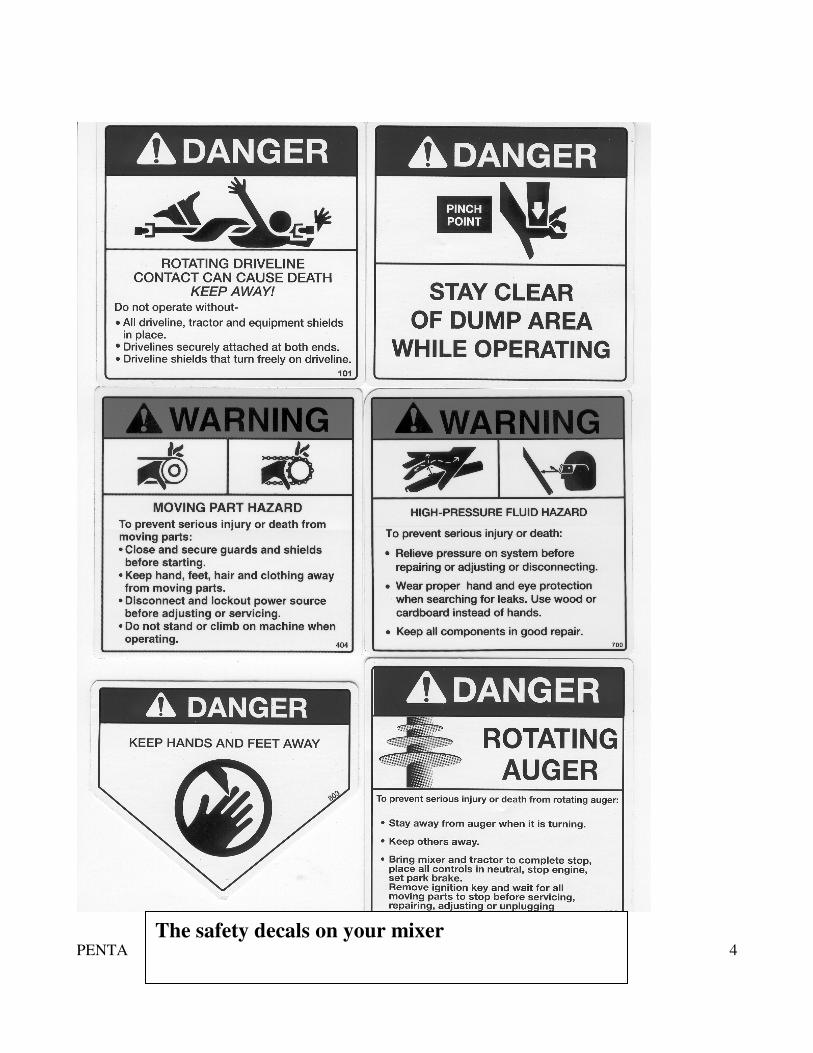
The safety decals on your mixer
PENTA
5
SAFETY The Safety Alert Symbol identifies important safety messages on your Penta Mixer and in the Operators Manual. When you see this symbol, be alert to the possibility of personal injury or death. Follow the instructions in the safety message.
DANGER You are responsible for the SAFE operation and maintenance of your PENTA ONE MIXER. You must ensure that you, and anyone else who will be operating, maintaining, servicing, or working around the mixer be familiar with the operating and maintenance procedures and related safety information contained in this manual. This manual will take you step-by step through the operation procedures, and alerts you to all good safety practices that should be adhered to while operating the Penta Mixer. Remember, YOU are the key to safety. Good safety practices not only protect you, but also the people around you. Make these practices a working part of your safety program. Be certain that EVERYONE operating this equipment is familiar with the recommended operating and maintenance procedures and follows all the safety precautions. Most accidents can be prevented. Do not risk injury or death by ignoring good safety practices.
• Mixer owners must give operating instructions to their employees before allowing them to operate the machine and ensure that all operators have read and understood the safety and operating procedures.
• The most important safety device on the equipment is a SAFE operator. It is the operator’s responsibility to read and understand ALL safety and operating instructions in the manual and follow them.
• A person who has not read and understood all operating and safety instructions is not qualified to operate this machine. An untrained operator exposes himself and bystanders to possible or serious injury or death.
• Do not modify the equipment in any way. Unauthorized modifications may impair the function and/or safety and could affect the life and warranty of the equipment.
• Think SAFETY! Work SAFELY! Have a first-aid kit available for use should the need arise. Do not allow riders on machinery. Wear appropriate protective gear. Place all controls in neutral, stop the engine, set park brake, remove ignition key, and wait for all moving parts to come to a complete stop before servicing, repairing, or unplugging machinery. Review safety related items annually with all personnel who will be operating or maintaining the PENTA ONE MIXER.
PENTA
6
OPERATING SAFETY 1. Read and understand the Operator’s Manual and all safety decals before using the
equipment. 2. Clean reflectors, slow moving vehicle signs, and lights before transporting. 3. Before applying pressure to the hydraulic system, make sure all components are tight
and that all lines, hoses, and couplings are in good condition. 4. Place all controls in neutral, stop the engine, set park brake, remove ignition key, and
wait for all moving parts to come to a complete stop before servicing or repairing. 5. Install and secure guards before starting. 6. Keep hands, feet, hair, and clothing away from all moving and/or rotating parts. 7. Do not operate when guards are missing or broken. 8. Clear the area of all bystanders, especially children, before starting. 9. Do not allow children to play on or around the machine. 10. Do not allow riders, on the PENTA ONE MIXER or tractor. 11. Be sure the PTO drive line guard telescopes and rotates freely on the shaft before
installation. 12. Stay away from overhead power lines when loading. Electrocution can occur without
contact. 13. Use hazard flashers on tractor when transporting on roads, and follow all local laws. 14. Attach securely to the tractor using a retainer on the drawbar, and a safety chain. 15. Do not operate with leaks in the hydraulic system or lubrication system. 16. Review safety instructions annually.
MAINTENANCE SAFETY 1. Follow ALL the operating, maintenance, and safety information in this manual. 2. Place all controls in neutral, stop the engine, set park brake, remove ignition key, and
wait for all moving parts to come to a complete stop before servicing, adjusting, repairing, or unplugging.
3. Relieve pressure from hydraulic circuit before servicing or disconnecting from tractor. 4. Support the machine with blocks or safety stands when changing tires or working
beneath it. 5. Follow good shop practices: - Keep service area clean and dry. - Be sure electrical outlets and tools are properly grounded. - Use adequate lighting for job at hand 6. Use only tools, jacks, and hoists of sufficient capacity for the job. 7. Make sure all guards and shields are in place and properly secured when maintenance
work is completed. 8. Before applying pressure to the hydraulic system, make sure all lines, fittings, and
couplers are tight and in good condition. 9. Keep hands, feet, hair, and clothing away from all moving and/or rotating parts. 10. Clear the area of all bystanders, especially children, when operating, repairing, or
making adjustments to the machine.
PENTA
7
HYDRAULIC SAFETY 1. Make sure that all components in the hydraulic system are kept in good condition and
are clean. 2. Relieve pressure before working on the hydraulic system. 3. Replace any rusted, worn, cut, abraded, flattened, or kinked hoses and metal lines immediately. 4. Do not attempt makeshift repairs to hydraulic lines, fittings, or hoses by using tape,
clamps, or cements. The hydraulic system operates under extremely high pressure. Such repairs will fail suddenly, and create a hazardous and unsafe condition.
5. Wear proper hand and eye protection when searching for a high pressure hydraulic leak. Use a piece of wood or metal as a backstop instead of hands to isolate and identify leak. Do not attempt to repair a leak, but replace the hose instead.
6. If injured by a concentrated high pressure stream of hydraulic fluid, seek medical attention immediately. Serious infection or toxic reaction can develop from hydraulic fluid piercing the skin.
7. Before applying pressure to the system, make sure all components are tight and that lines, hoses, and couplings are not damaged.
Think SAFETY! Work SAFELY!
TRANSPORT SAFETY 1. Make sure you are in compliance with all local regulations regarding equipment on
public roadways and highways. 2. Make sure SMV (Slow Moving Vehicle) emblem and all the lights and reflectors required
by law are in place, clean, and can be seen clearly by overtaking and oncoming traffic. 3. Attach mixer securely to the tractor using a retainer on the drawbar pin and safety pin. 4. Do not allow anyone to ride on the PENTA mixer or on the tractor during transport. 5. Do not exceed 15km (10 mph). Reduce speed on rough roads and surfaces. 6. Always use hazard warning flashers on tractor when transporting, unless prohibited by
law. 7. Add extra lights or use pilot vehicle when transporting during times of limited visibility.
STORAGE SAFETY 1. Store the unit in an area away from human activity. 2. Do not permit children to play on or around the stored machine. 3. Store the unit in a dry, level area. 4. Do not lay hydraulic hoses on the ground and keep the fittings free of dirt. 5. Make sure the implement jack is properly fastened to the unit.
PENTA
8
TIRE SAFETY 1. Failure to follow proper procedures when mounting a tire on a wheel or rim can cause an
explosion which may result in serious injury or death. 2. Do not attempt to mount a tire unless you have the proper equipment and are qualified to
do the job. 3. Have a qualified tire dealer or repair service perform required maintenance.
SAFETY DECALS The safety decals are placed on the mixer at the time of manufacture. It is important that all the decals are kept clean and legible at all times. If any decals have become illegible or have been removed, replacements are available through Penta machinery dealer, or from PENTA ONE LIMITED Penta One Limited 4480 progress drive Petrolia, Ontario N0N 1R0 TEL: 888-844-7788 FAX: 519-882-3359
OPERATION The Penta Cutter-Mixer-Feeder is specifically designed to cut and mix feed ingredients into a total mixed ration (TMR). Many of the features incorporated into this machine are the result of suggestions made by customers like you. Read this manual carefully to learn how to operate the machine safely and how to adjust it to provide maximum efficiency. Following the operating instructions with a proper maintenance program will extend the life of your machinery.
BREAK-IN After the first several hours of use, it is important to check the wheel nuts and other fasteners to make sure that they are all tightened properly. Also check to make sure the mixer is properly greased and the fluid reservoirs are filled to the proper level.
PRE-OPERATION CHECKLIST Efficient and safe operation of the PENTA ONE MIXER requires that each operator reads and understands al the operating procedures and all the related safety precautions outlined in this section.
PENTA
9
1. Lubricate the machine as per the schedule in the Service and Maintenance section of the manual.
2. Use only tractor with adequate power to operate your PENTA ONE MIXER. 3. Make sure the gearbox oil reservoir is filled to the proper level. (See Figure 2). 4. Check the gearboxes. Make sure the drain plugs are properly installed and tightened
and not leaking. 5. Ensure that the machine is properly attached to your tractor. Be sure the retainer is
installed in the draw pin, and the safety chain is attached. Also make sure that all hitch bolts in the adjustable hitch cradle are properly secured and tightened.
6. Check the hydraulic system. 7. Inspect all hydraulic and oil lines, hoses, fittings, and coupler for tightness. 8. Check the tires and make sure they are inflated to the specified pressure. 9. Torque all wheel nuts to 180 ft. lbs. 10. Check for and remove entangled material from the PTO, driveshaft, auger, conveyor
and axles. 11. Check that PTO drive line is pinned to the tractor and the guard is chained to the frame. 12. Close and secure all guards.
EQUIPMENT MATCHING The PENTA ONE Cutter-Mixer-Feeder trailer model is designed to be used with Agricultural tractors. To ensure a good performance, the following recommendations regarding minimum equipment size and horse-power should be met. Model PTO Horsepower 2410 55 minimum 3010 65 minimum 4010 70 minimum 5610 80 minimum A loaded machine may weigh as much as 10,000 kg, or 22,000 lbs. An operator must use his own discretion when determining whether the tractor attached is suitable for the terrain. Using a small tractor on a heavy piece of machinery can cause severe injury or death if the operator loses control of the machinery.
P.T.O. SHAFT INFORMATION When the mixer is attached to the tractor, the length of the PTO shaft should be such that proper overlap of the inner and outer tubes is maintained in all cases. If it does not exceed the measurement, the drawbar should be shortened. The PTO shaft is not designed to operate at any greater length than specified by the manufacturer, and damage can result. See the attached section, located at the back of this manual, for PTO Shaft maintenance, trouble-shooting, and repair information. Note: Pivoting the tractor and the mixer will shorten PTO shaft.
PENTA
10
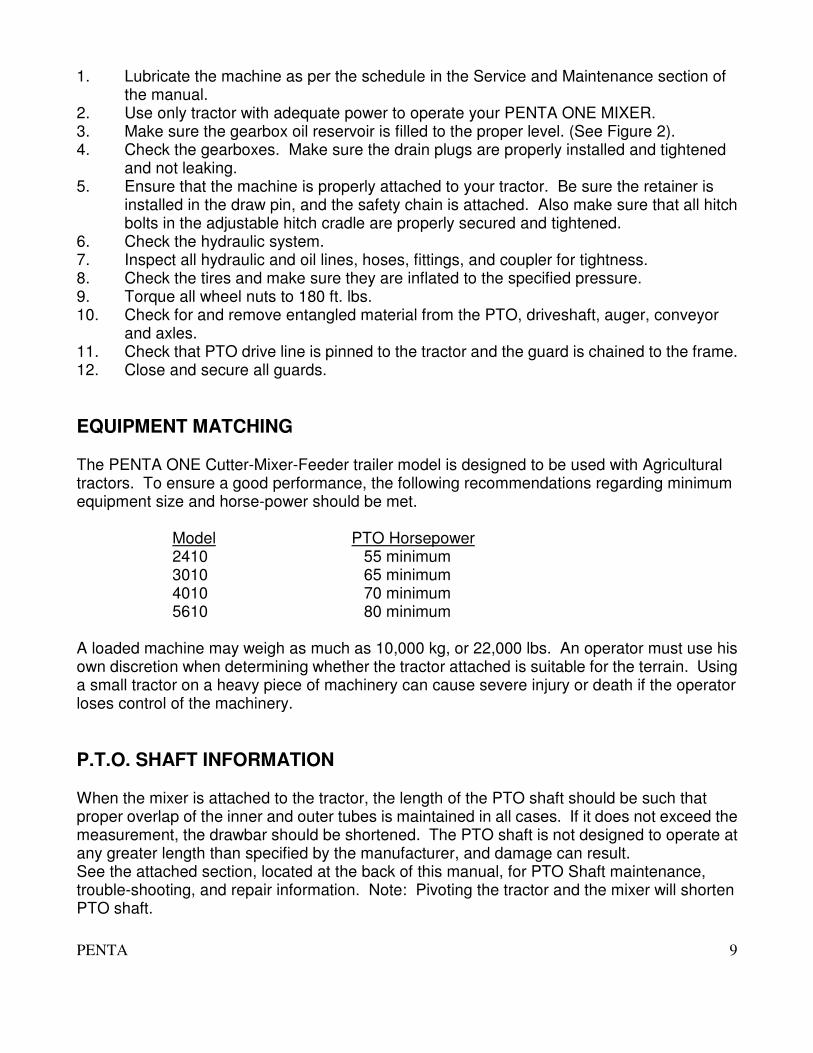
WEIGHING There are various scale indicators available for use on your PENTA ONE MIXER. The mounting assembly for all DIGI-STAR scale indicators is the same. When attaching the indicator to the Mixer, be sure it is securely fastened. The indicator bolts onto the mounting bracket. (Digi-Star EZ2000) The scale indicator is mounted, on standard models, on the viewing platform of the mixer and is able to turn to face every direction. Be certain that the indicator is fastened securely, especially when traveling at speeds over 10 km/h (6 mph) or over uneven surfaces. The 12 volt D.C. negative ground power supply which is needed to power standard models can be taken from the power supply of the tractor which can be supplied by two different power plugs. (Figure 1) For mixers using a self-contained battery, the tractor plug is to be connected directly to the battery. Be sure to conform to all safety and operational instructions and containing to the battery to avoid injury or death. NOTE: The scale will be programmed to display the weight in either kilograms or pounds. This is set by the manufacturer and must be ordered to suit. If your scale is not programmed to your preferred units of measurements, please contact your local PENTA ONE Vertical Mixer Dealer.
Note: For complete information on Scale operation and setting see the attached Digi-Star Users
Manual.
MIXING The operation of the PENTA ONE Mixer will vary greatly with the various feeds and climate conditions. In most instances, “trial and error” is the best method of setting the machine up for a particular commodity to obtain maximum performance. To prevent over-cutting the feed, we suggest to start with the restrictor blades in the out position, and then adjust to obtain the desired coarseness of the mix. The bulkiest and lightest feed should be added first. Once these commodities are partially cut and broken apart, the finer ingredients can be added for mixing purposes. Remember, additional cutting will take place during mixing, so be careful not to over cut. The order in which the secondary ingredients are added is up to the individual user. The type of mix required varies from one operation to the other, and therefore mixing procedures will vary as well.
PENTA
11
The Restrictor blades are located on the sides of the machine and come complete with pins that lock the blades in position. On standard units, there are two restrictor blades on the mixer. When completely inserted, the restrictor blades will slow a large bale or mixed feed from moving around the outside of the mixing chamber, allowing the knives to perform aggressive cutting. The restrictor blades may be retracted to the out position to lessen the cutting action. Again, the positions of the restrictor blades will be based on user preferences. Always add commodities to the mixer while the augers are turning. Starting the augers from a standstill with a full load in the tub places additional stress on the drive train. Even though it is designed to handle this stress, it may affect the life span of the machine. If however, due to circumstances, it is required to restart the machine while loaded, retract the restrictor blades all the way in order to decrease torque as much as possible.
Note: Restarting the Mixer while loaded places additional strain on the Tractor and the mixer Should excessive loads be placed on the drive train, the shear bolt will break. This is a safety feature. Do not depend on this as the maximum load indicator. If the shear bolt does break, it must be replaced with the correct bolt specified by the manufacturer. While loading the mixer, be certain that no bucket or loading device comes into contact with the rotating auger inside the mixing chamber. This may cause serious damage to the mixer and/or loader, and may cause injury or death to the operator.
CONVEYOR The conveyor must be greased on a regular basis, as per the maintenance schedule. When unloading the mixer, activate the conveyor before opening the discharge door. The speed of the conveyor can be adjusted to suit unloading requirements by adjusting the flow control on the tractor. The conveyor has an adjustment to tighten or loosen the chain. There is an adjuster located on both sides of the conveyor, opposite the hydraulic motor. Use wrenches to tighten or loosen the tension on the conveyor chain. Over tightening the chain will shorten the life span of the chain.
DUAL DISCHARGE On mixers equipped with dual side unloading, the conveyor will unload on both sides of the mixer. For left and right discharge, the conveyor is operated using the controls on the tractor. (The conveyor will reverse from its direction of discharge when the remote is moved to the opposite position).
PENTA
12
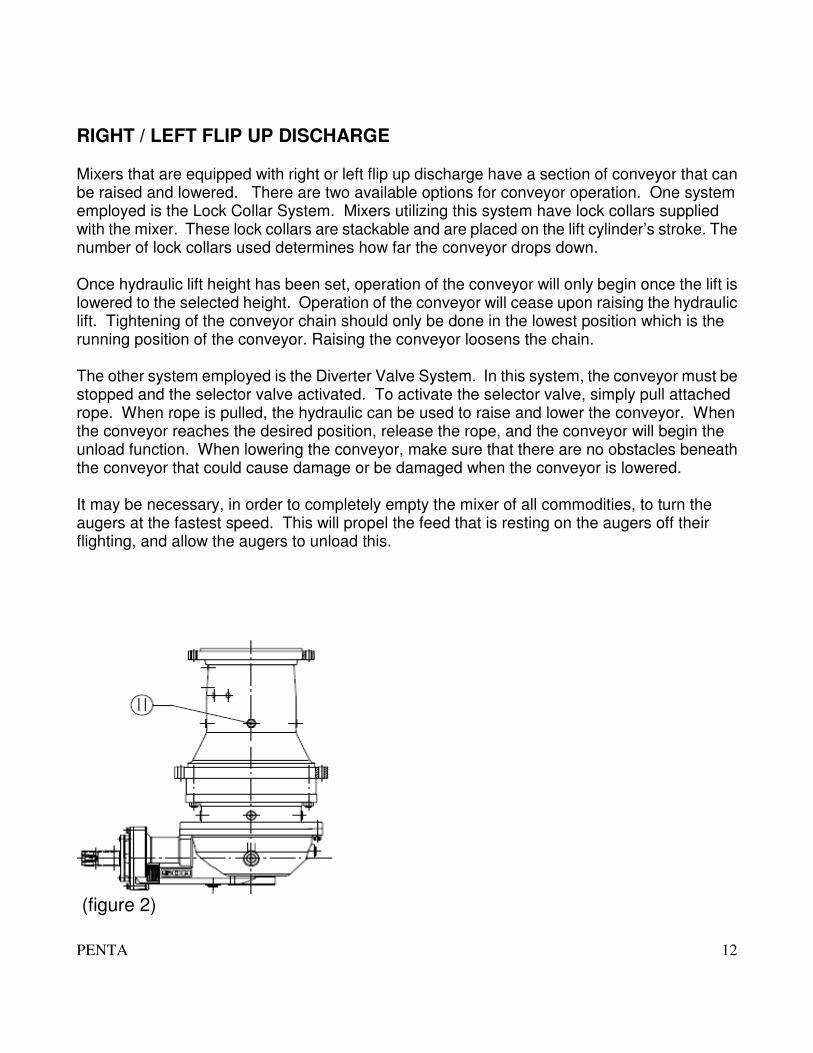
RIGHT / LEFT FLIP UP DISCHARGE Mixers that are equipped with right or left flip up discharge have a section of conveyor that can be raised and lowered. There are two available options for conveyor operation. One system employed is the Lock Collar System. Mixers utilizing this system have lock collars supplied with the mixer. These lock collars are stackable and are placed on the lift cylinder’s stroke. The number of lock collars used determines how far the conveyor drops down. Once hydraulic lift height has been set, operation of the conveyor will only begin once the lift is lowered to the selected height. Operation of the conveyor will cease upon raising the hydraulic lift. Tightening of the conveyor chain should only be done in the lowest position which is the running position of the conveyor. Raising the conveyor loosens the chain. The other system employed is the Diverter Valve System. In this system, the conveyor must be stopped and the selector valve activated. To activate the selector valve, simply pull attached rope. When rope is pulled, the hydraulic can be used to raise and lower the conveyor. When the conveyor reaches the desired position, release the rope, and the conveyor will begin the unload function. When lowering the conveyor, make sure that there are no obstacles beneath the conveyor that could cause damage or be damaged when the conveyor is lowered. It may be necessary, in order to completely empty the mixer of all commodities, to turn the augers at the fastest speed. This will propel the feed that is resting on the augers off their flighting, and allow the augers to unload this.
(figure 2)
PENTA
13
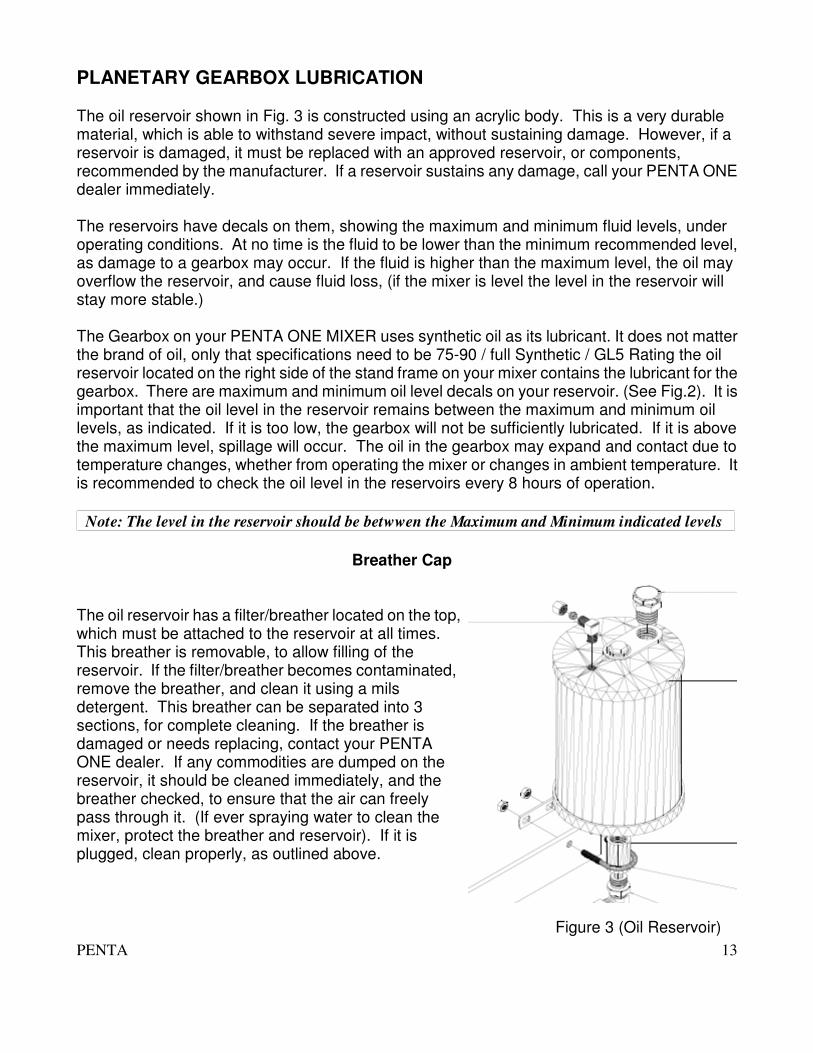
PLANETARY GEARBOX LUBRICATION The oil reservoir shown in Fig. 3 is constructed using an acrylic body. This is a very durable material, which is able to withstand severe impact, without sustaining damage. However, if a reservoir is damaged, it must be replaced with an approved reservoir, or components, recommended by the manufacturer. If a reservoir sustains any damage, call your PENTA ONE dealer immediately. The reservoirs have decals on them, showing the maximum and minimum fluid levels, under operating conditions. At no time is the fluid to be lower than the minimum recommended level, as damage to a gearbox may occur. If the fluid is higher than the maximum level, the oil may overflow the reservoir, and cause fluid loss, (if the mixer is level the level in the reservoir will stay more stable.) The Gearbox on your PENTA ONE MIXER uses synthetic oil as its lubricant. It does not matter the brand of oil, only that specifications need to be 75-90 / full Synthetic / GL5 Rating the oil reservoir located on the right side of the stand frame on your mixer contains the lubricant for the gearbox. There are maximum and minimum oil level decals on your reservoir. (See Fig.2). It is important that the oil level in the reservoir remains between the maximum and minimum oil levels, as indicated. If it is too low, the gearbox will not be sufficiently lubricated. If it is above the maximum level, spillage will occur. The oil in the gearbox may expand and contact due to temperature changes, whether from operating the mixer or changes in ambient temperature. It is recommended to check the oil level in the reservoirs every 8 hours of operation.
Note: The level in the reservoir should be betwwen the Maximum and Minimum indicated levels Breather Cap The oil reservoir has a filter/breather located on the top, which must be attached to the reservoir at all times. This breather is removable, to allow filling of the reservoir. If the filter/breather becomes contaminated, remove the breather, and clean it using a mils detergent. This breather can be separated into 3 sections, for complete cleaning. If the breather is damaged or needs replacing, contact your PENTA ONE dealer. If any commodities are dumped on the reservoir, it should be cleaned immediately, and the breather checked, to ensure that the air can freely pass through it. (If ever spraying water to clean the mixer, protect the breather and reservoir). If it is plugged, clean properly, as outlined above.
Figure 3 (Oil Reservoir)
PENTA
14
Note: Never operate PENTA ONE MIXER if the breather is not properly attached or is damaged. Twice annually, or every 200 hours of operation, which ever comes first, it is recommended to remove the bottom plug, located near the back of each bottom section of each gearbox. Use a rubber plug to stop the oil from flowing out of the gearbox while the bottom plug is removed. This is a magnetic plug, designed to attract any metal particles that are present in the oil. If the plug has metal filings stuck to it, or any other particles are found in the oil, the gearbox should be drained into a clean container, and refilled with new oil. As well, contact your PENTA ONE Machinery dealer immediately. In addition to checking the oil, inspect the exterior of the gearbox for sight of leakage. The plugs that are visible on the gearbox should be checked, to make sure they are properly tightened. If signs of oil are found on the casing of the gearbox, there may be a leak. If signs of leakage are present, contact your PENTA ONE Equipment Dealer immediately. PENTA ONE LTD. recommends that the following procedures be followed, when re-filling the gearbox:
• Remove the breather cap from the top of the reservoir.
• To pump the synthetic oil into the gearbox, remove the hydraulic hose that is attached to the bottom of the reservoir and attach it to your pump.
• There are two ways to check if the gearbox is full: 1. Unbolt and lift the auger and check the oil level in the tower plug 2. The air line that goes to the top of the reservoir also goes to the top of the tower. This line can be checked if the gearbox if full but it takes a lot of pressure to pump it all the way through the entire line. If the line is cut 8-12 inches below the floor, the oil will come out of the line when the gearbox is full. (18 litres or 5 U.S. gallons)
• Remove the pump and reattach hose to the reservoir.
• Install a coupler in the air line.
• Add last several litres of oil to the reservoir using a funnel until the oil in the reservoir reaches the recommended operating level.
Note: When pumping oil, do not exceed 48.2 KpA's of pressure (7psi) If, for any reason, the oil level in the reservoir does not stay at the recommended level, and oil must be added on a regular basis, contact your PENTA ONE Equipment Dealer.
PENTA
15
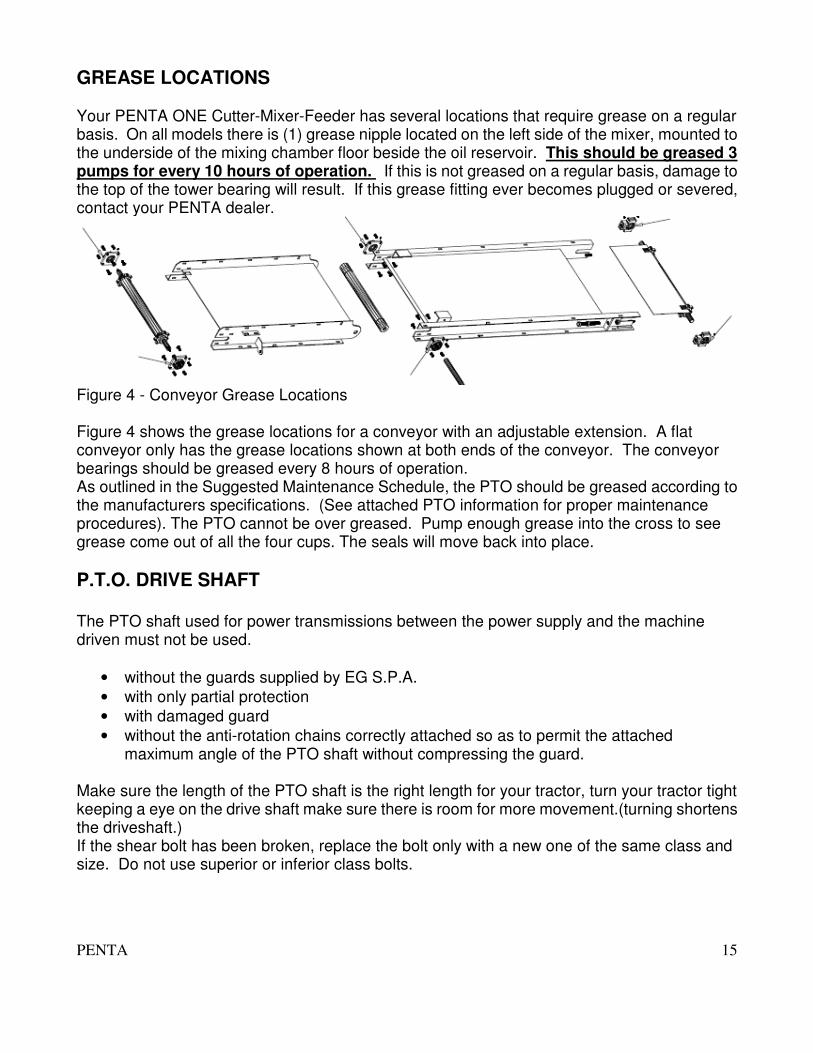
GREASE LOCATIONS Your PENTA ONE Cutter-Mixer-Feeder has several locations that require grease on a regular basis. On all models there is (1) grease nipple located on the left side of the mixer, mounted to the underside of the mixing chamber floor beside the oil reservoir. This should be greased 3 pumps for every 10 hours of operation. If this is not greased on a regular basis, damage to the top of the tower bearing will result. If this grease fitting ever becomes plugged or severed, contact your PENTA dealer.
Figure 4 - Conveyor Grease Locations Figure 4 shows the grease locations for a conveyor with an adjustable extension. A flat conveyor only has the grease locations shown at both ends of the conveyor. The conveyor bearings should be greased every 8 hours of operation. As outlined in the Suggested Maintenance Schedule, the PTO should be greased according to the manufacturers specifications. (See attached PTO information for proper maintenance procedures). The PTO cannot be over greased. Pump enough grease into the cross to see grease come out of all the four cups. The seals will move back into place.
P.T.O. DRIVE SHAFT The PTO shaft used for power transmissions between the power supply and the machine driven must not be used.
• without the guards supplied by EG S.P.A.
• with only partial protection
• with damaged guard
• without the anti-rotation chains correctly attached so as to permit the attached maximum angle of the PTO shaft without compressing the guard.
Make sure the length of the PTO shaft is the right length for your tractor, turn your tractor tight keeping a eye on the drive shaft make sure there is room for more movement.(turning shortens the driveshaft.) If the shear bolt has been broken, replace the bolt only with a new one of the same class and size. Do not use superior or inferior class bolts.
PENTA
16
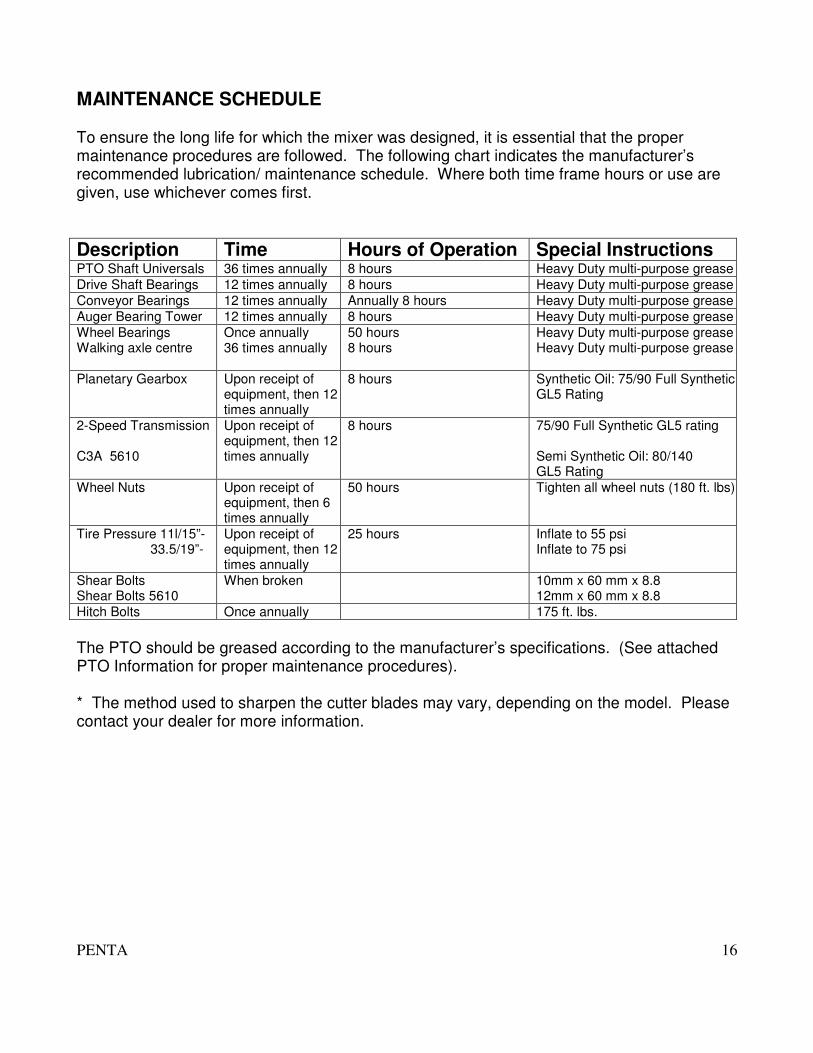
MAINTENANCE SCHEDULE To ensure the long life for which the mixer was designed, it is essential that the proper maintenance procedures are followed. The following chart indicates the manufacturer’s recommended lubrication/ maintenance schedule. Where both time frame hours or use are given, use whichever comes first.
Description Time Hours of Operation Special Instructions PTO Shaft Universals 36 times annually 8 hours Heavy Duty multi-purpose grease
Drive Shaft Bearings 12 times annually 8 hours Heavy Duty multi-purpose grease
Conveyor Bearings 12 times annually Annually 8 hours Heavy Duty multi-purpose grease
Auger Bearing Tower 12 times annually 8 hours Heavy Duty multi-purpose grease
Wheel Bearings Walking axle centre
Once annually 36 times annually
50 hours 8 hours
Heavy Duty multi-purpose grease Heavy Duty multi-purpose grease
Planetary Gearbox Upon receipt of equipment, then 12 times annually
8 hours Synthetic Oil: 75/90 Full Synthetic GL5 Rating
2-Speed Transmission C3A 5610
Upon receipt of equipment, then 12 times annually
8 hours 75/90 Full Synthetic GL5 rating Semi Synthetic Oil: 80/140 GL5 Rating
Wheel Nuts Upon receipt of equipment, then 6 times annually
50 hours Tighten all wheel nuts (180 ft. lbs)
Tire Pressure 11l/15”- 33.5/19”-
Upon receipt of equipment, then 12 times annually
25 hours Inflate to 55 psi Inflate to 75 psi
Shear Bolts Shear Bolts 5610
When broken 10mm x 60 mm x 8.8 12mm x 60 mm x 8.8
Hitch Bolts Once annually 175 ft. lbs.
The PTO should be greased according to the manufacturer’s specifications. (See attached PTO Information for proper maintenance procedures). * The method used to sharpen the cutter blades may vary, depending on the model. Please contact your dealer for more information.
PENTA
17
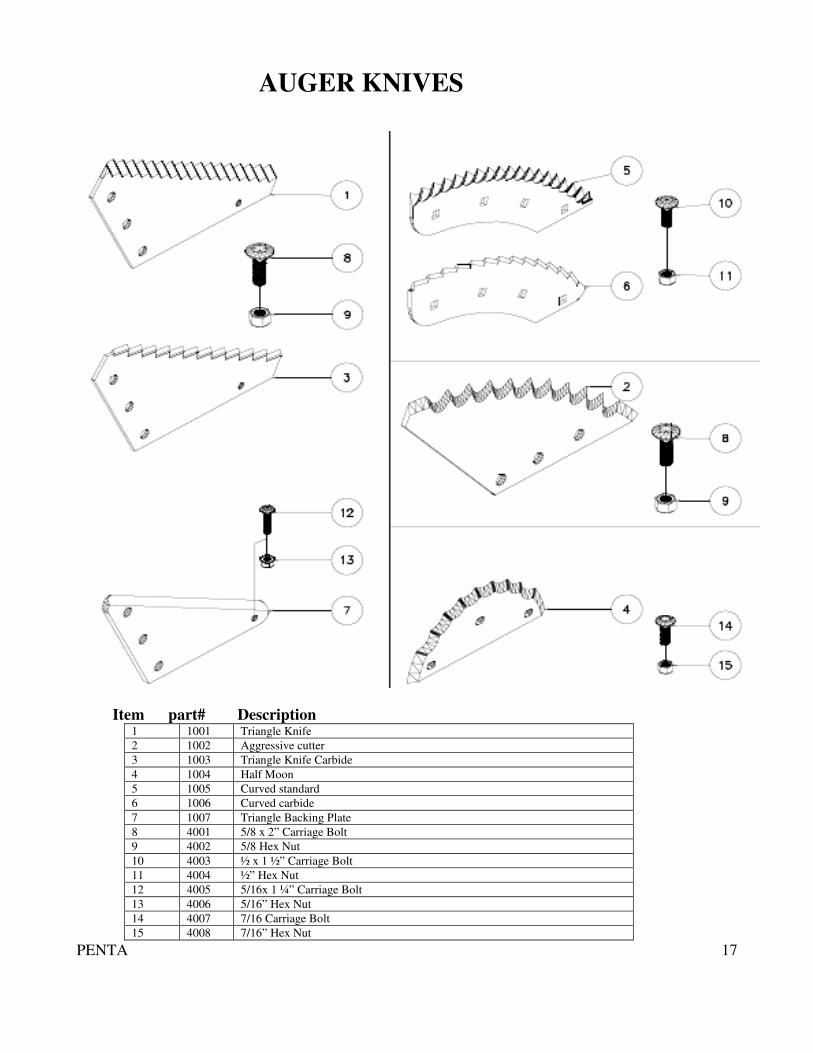
AUGER KNIVES
Item part# Description 1 1001 Triangle Knife
2 1002 Aggressive cutter
3 1003 Triangle Knife Carbide
4 1004 Half Moon
5 1005 Curved standard
6 1006 Curved carbide
7 1007 Triangle Backing Plate
8 4001 5/8 x 2” Carriage Bolt
9 4002 5/8 Hex Nut
10 4003 ½ x 1 ½” Carriage Bolt
11 4004 ½” Hex Nut
12 4005 5/16x 1 ¼” Carriage Bolt
13 4006 5/16” Hex Nut
14 4007 7/16 Carriage Bolt
15 4008 7/16” Hex Nut

PENTA
18
SCALE SYSTEM COMPONENTS
Item# Part# Description
1 5001 EZ 2000 Scale Digi-star
2 5002 J-Box
3 5003 2 1/8 ND Weigh bar
4 3/8 x 3 ½ gr5 bolt + nut
5 5005 10 ft battery power cord
6 5006 15 ft tractor power cord
7 5007 15 ft 7 pin tractor power cord
8 5008 Tractor power plug
PENTA
19
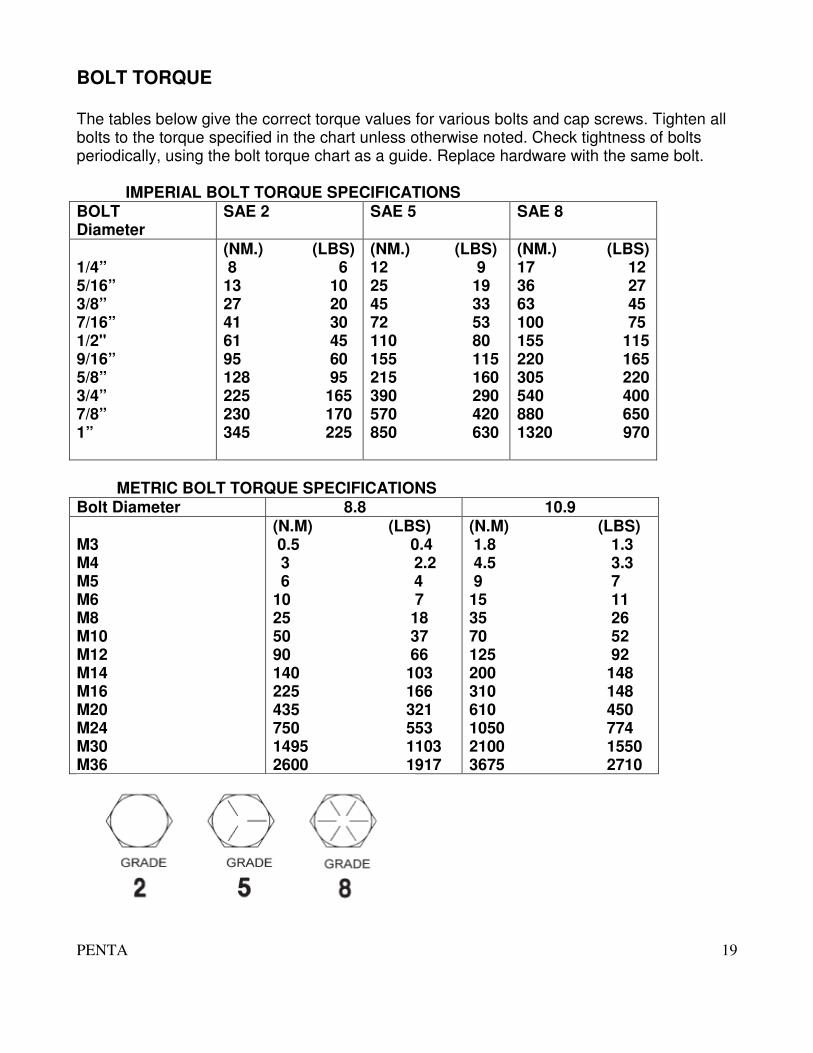
BOLT TORQUE The tables below give the correct torque values for various bolts and cap screws. Tighten all bolts to the torque specified in the chart unless otherwise noted. Check tightness of bolts periodically, using the bolt torque chart as a guide. Replace hardware with the same bolt. IMPERIAL BOLT TORQUE SPECIFICATIONS BOLT Diameter
SAE 2 SAE 5 SAE 8
1/4” 5/16” 3/8” 7/16” 1/2" 9/16” 5/8” 3/4” 7/8” 1”
(NM.) (LBS) 8 6 13 10 27 20 41 30 61 45 95 60 128 95 225 165 230 170 345 225
(NM.) (LBS) 12 9 25 19 45 33 72 53 110 80 155 115 215 160 390 290 570 420 850 630
(NM.) (LBS) 17 12 36 27 63 45 100 75 155 115 220 165 305 220 540 400 880 650 1320 970
METRIC BOLT TORQUE SPECIFICATIONS Bolt Diameter 8.8 10.9 M3 M4 M5 M6 M8 M10 M12 M14 M16 M20 M24 M30 M36
(N.M) (LBS) 0.5 0.4 3 2.2 6 4
10 7 25 18 50 37 90 66 140 103 225 166 435 321 750 553 1495 1103 2600 1917
(N.M) (LBS) 1.8 1.3 4.5 3.3 9 7 15 11 35 26 70 52 125 92 200 148 310 148 610 450 1050 774 2100 1550 3675 2710

PENTA
20

PENTA
21