peoplesoft (9.1): journals and internal funds transfer (ift) · peoplesoft to the journal. (it is...
TRANSCRIPT

Page | 1
Financial Services Training Guide
PeopleSoft (9.1): Journals and
Internal Funds Transfer (IFT)

Page | 2
Table of Contents
1 Journals: an overview ................................................................................................................................ 3
1.1. What is a journal? .............................................................................................................................. 3
1.2. Journal types/sources ........................................................................................................................ 3
1.3. Internal process workflow ................................................................................................................. 4
2 How to create a journal? ........................................................................................................................... 5
3 How to search and retrieve an existing journal? ..................................................................................... 10
4 How to copy and reverse a journal? ........................................................................................................ 11
4.1. Copy a journal .................................................................................................................................. 11
4.2. Reverse a journal ............................................................................................................................. 13
5 How to create and post multiple line journals? ...................................................................................... 15
6 How to view the immediate impact of a journal? ................................................................................... 16
7 Internal Funds Transfer (IFT) ................................................................................................................... 18
7.1. Create a new IFT .............................................................................................................................. 18
8 Training and development ...................................................................................................................... 19
8.1. Web based materials ....................................................................................................................... 19
8.2. PeopleSoft Help – User Productivity Kit (UPK) ................................................................................ 19
8.3. OSDS ................................................................................................................................................ 19

Page | 3
1 Journals: an overview
1.1. What is a journal? A journal is an internal accounting transaction (within the same Faculty/School/Business Unit) used to make a
transfer, adjustment or an accrual accounting entry. The entry indicates the two aspects of the transaction, the debit
and the credit and the chart fields to be charged. In PeopleSoft these are made as two individual entry lines, each of
which is given its own line number for identification.
The total amount to be debited must equal the total amount to be credited. A journal entry must be accompanied by
a brief, meaningful explanation and relevant supporting documentation.
Business units have the ability to generate their own internal journal entries to transfer or correct data within the
business unit and within the university, depending on the authorised level of security. However, if a transfer between
Faculties is required, an Internal Funds Transfer (IFT) needs to be completed in PeopleSoft. Financial Services as
Administrators will finalise the journals daily.
When processing a Journal be sure to check the account code rules on the Financial Services webpage: http://www.finserv.uwa.edu.au/accounting/general-ledger/account-issues EXAMPLE: account code 509 & 529 must be used on both sides of a journal. These account codes are only used for
journals; they cannot be used for AP Invoice Authority Forms.
1.2. Journal types/sources ONL Online Input Faculty/School
ONR Online Input Research Services only
ONF Online Input Financial Services only
AMM Asset Management Module Financial Services
APS Accounts Payable Subsystem Financial Services
ARS Accounts Receivable Subsystem Financial Services
BIS Billing System Financial Services
BUD Advisor Budget Journals Financial Services
CAS Cashier – OneStop Financial Services
COM Commitment Journal (salaries) Human Resources
DBT Debtors Interface Financial Services
MAX Maximo Job Costing Source Campus Management
POS Purchase Order Subsystem Financial Services
RCT Receipt Batch Financial Services
SAL Salary Human Resources
SYS BATCHSYS Correction Financial Services
SNT SalesNet - Internet Payments Student Services
INT Internal Funds Transfer Source (transfer of funds between business units)
Faculty/School, Finalised by Financial Services
EXP Expenses (credit card acquittal/reimbursements) EXA source
Faculty/School

Page | 4
1.3. Internal process workflow
Summarised description Detailed description
1 Create / post journal in
PeopleSoft.
Finance Officer/Assistant receives request to transfer funds from
one Project Grant (PG)/account code to another.
Finance Officer/Assistant creates and posts a journal in PeopleSoft.
Finance Officer/Assistant prints out journal report.
2 Keep adequate supporting
paperwork of the journal.
This supporting paperwork can
be attached electronically in
PeopleSoft to the journal.
(It is recommended that all
journals are filed by the
PeopleSoft Journal ID
#0000xxxxx)
Finance Officer/ Assistant keeps all adequate supporting documents
to support journal for future internal and external audit purposes.
Supporting documents include:
PeopleSoft Journal Report, with the Journal ID# highlighted.
Other back up papers supporting the request to transfer funds, e.g.
email, memo etc.
NOTE: Faculty Accountants review all journals on a monthly basis.
3 Storage of supporting
documents and review reports.
Finance Officer/Assistant, together with Faculty Support
Accountant to discuss storage to facilitate the retrieval and review
process.
4 Further information is available. Finance Officer/Assistants are responsible to know the latest and
current policies on this matter. Latest information is available on
the Financial Services website.

Page | 5
2 How to create a journal? a) From the Main Menu, click General Ledger.
b) Click Journals.
c) Click Journal Entry.
d) Click Create/Update Journal Entries (current tab is highlighted in blue).
e) In the Business Unit: field confirm or enter business unit number.
f) Click Add.
g) The Header screen is now displayed. Complete the Long Description: field (meaningful description as to why
the journal is being entered). Click on the Modal Screen icon to complete/display full description.
h) Check and confirm the relevant period is showing in the Fiscal Year: and Period: fields for the journal to be
posted (refer to the Financial Services Reporting Timetable for month end deadlines).
NOTE: If the journal is valid and you don’t want to post it at the time of processing, click the Save Journal Incomplete
Status box so it doesn’t post the journal automatically overnight. If the journal has an error it will not post regardless.

Page | 6
To add supporting documentation electronically to the journal, click on the Attachments hyperlink. On the Attachments screen, click Add Attachment which will display the File Attachment message. Click Browse to view/select the attachment required. Once selected, click Upload to add the attachment, (this process can be repeated for multiple attachments) then OK to return to the Header screen. Referring to the Attachments hyperlink on the Header screen, it will indicate in brackets ( ) how many attachments have been added.
i) Click on the Lines tab and enter the following information:
Confirm or enter Business Unit number in the Unit field.
Account code number in the Account field.
Project Grant (PG) number in the Project field.
Amount in the Amount field (use the negative sign in front of the dollar amount to represent the credit
side of the transaction e.g. -50.00).
NOTE: if adding 1 line only PeopleSoft assumes the other side of the journal is a credit entry which will
automatically add the negative sign.
Reference = 10 character field (e.g. PG number of the other side of the journal).
Journal Line Description = 30 character field (meaningful description).
To enter the other side of the journal or to enter multiple lines, click on the Insert Lines icon next to the Lines to add field. Enter the number of lines to add if adding multiple. To delete a line or multiple lines, tick the line/s to be deleted under the Select column and click on the Delete Selected
Journal Lines icon next to the Lines to add field. NOTE: The Journal Status will show T and the Budget Status will show N.
Page | 7
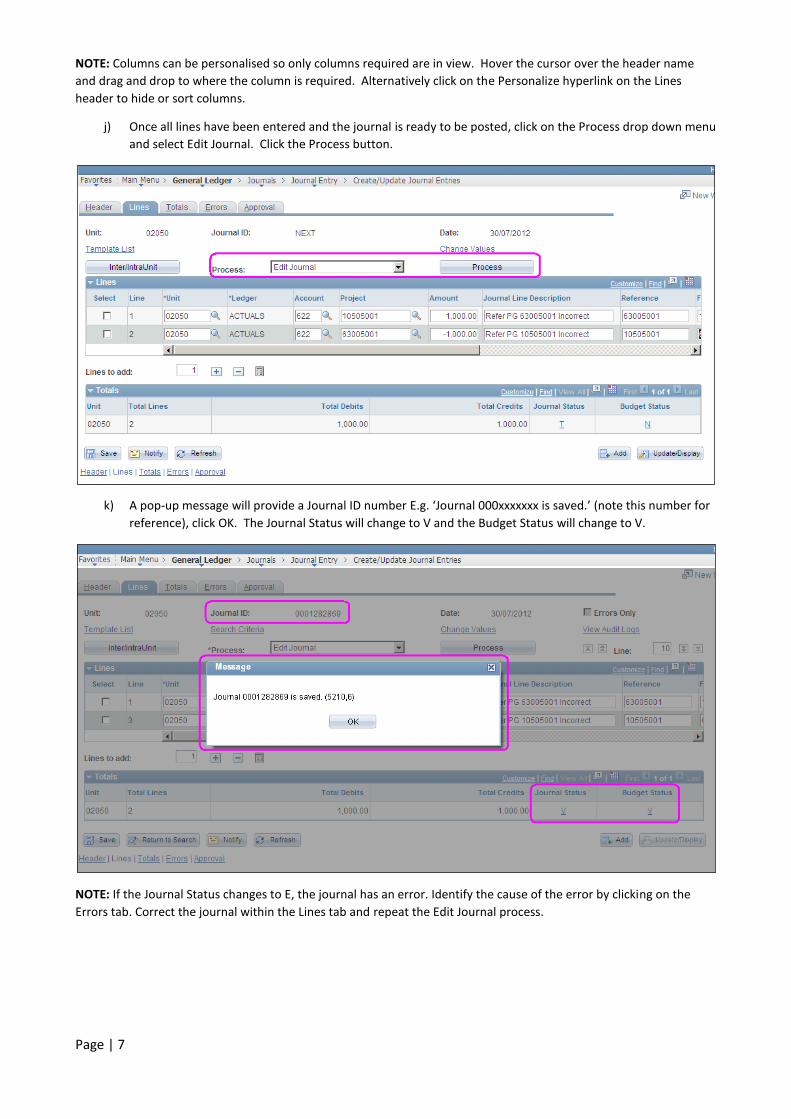
NOTE: Columns can be personalised so only columns required are in view. Hover the cursor over the header name
and drag and drop to where the column is required. Alternatively click on the Personalize hyperlink on the Lines
header to hide or sort columns.
j) Once all lines have been entered and the journal is ready to be posted, click on the Process drop down menu
and select Edit Journal. Click the Process button.
k) A pop-up message will provide a Journal ID number E.g. ‘Journal 000xxxxxxx is saved.’ (note this number for
reference), click OK. The Journal Status will change to V and the Budget Status will change to V.
NOTE: If the Journal Status changes to E, the journal has an error. Identify the cause of the error by clicking on the
Errors tab. Correct the journal within the Lines tab and repeat the Edit Journal process.

Page | 8
l) Click on the Process drop down menu and select Post Journal. Click Process.
m) A message will be displayed ‘Are you sure you want to post this journal?’ click OK.
n) When the journal is posted the Journal Status will change to P and Budget Status will remain as V. As the
journal has been posted it cannot be deleted.
Page | 9
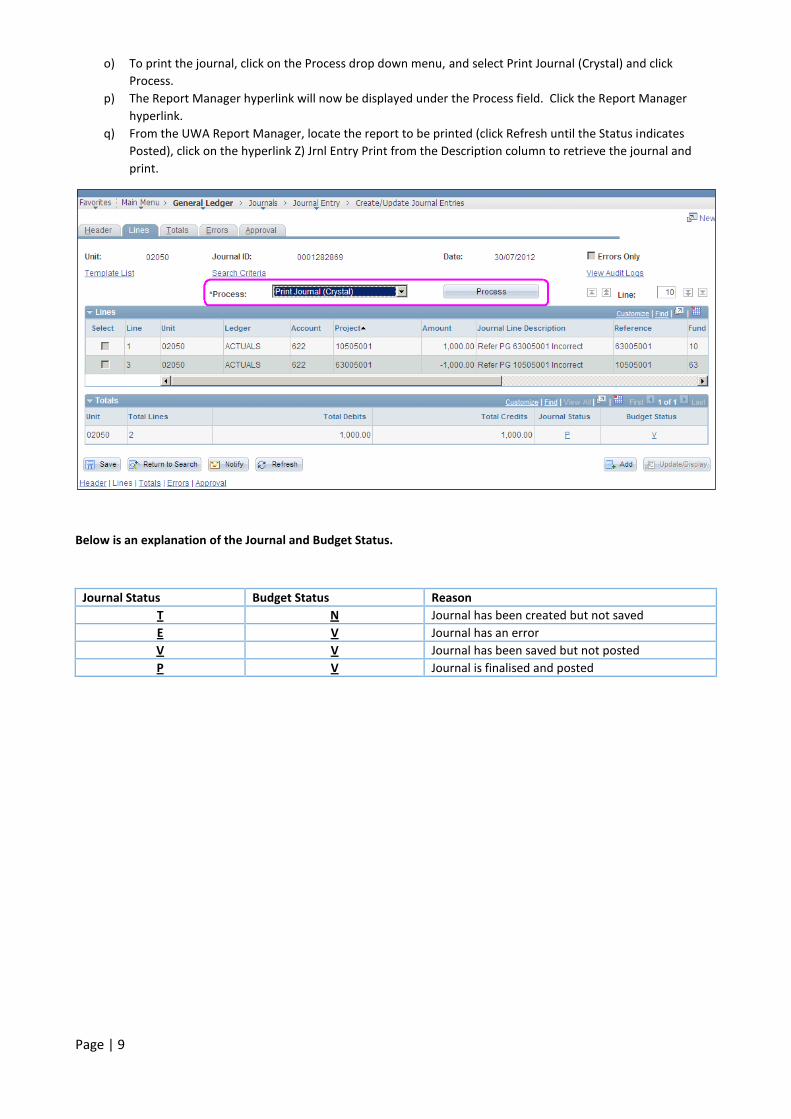
o) To print the journal, click on the Process drop down menu, and select Print Journal (Crystal) and click
Process.
p) The Report Manager hyperlink will now be displayed under the Process field. Click the Report Manager
hyperlink.
q) From the UWA Report Manager, locate the report to be printed (click Refresh until the Status indicates
Posted), click on the hyperlink Z) Jrnl Entry Print from the Description column to retrieve the journal and
print.
Below is an explanation of the Journal and Budget Status.
Journal Status Budget Status Reason
T N Journal has been created but not saved
E V Journal has an error
V V Journal has been saved but not posted
P V Journal is finalised and posted

Page | 10
3 How to search and retrieve an existing journal? a) From the Main Menu, click General Ledger.
b) Click Journals.
c) Click Journal Entry.
d) Click Create/Update Journal Entries.
e) Click on the Find an Existing Value tab (current tab is highlighted in blue) and click Clear to remove all data
from search fields.
f) Narrow the search by confirming or entering Business Unit, Journal ID if known, Journal Date or Source.
TIP: If searching for a journal and you’re unable to locate it, try entering the Business Unit number in the Line Business
Unit field especially if this has been a bulk journal upload. This will pick up the Business Unit number from any line
within the journal.

Page | 11
4 How to copy and reverse a journal?
4.1. Copy a journal a) Retrieve existing journal (refer Content 3 - How to search and retrieve an existing journal?).
b) Click on the Lines tab.
c) Click on the Process drop down menu and select Copy Journal. Click Process.

Page | 12
d) The Journal Entry Copy screen will display, confirm Journal Date and click OK.
e) The lines screen will display and a new Journal ID will be assigned. The Journal Status will change to T and
the Budget Status will change to N.
f) Before completing the journal, ensure the line details are correct (account code/project grant number) and
amend the Header Long Description if appropriate. Complete the journal by Editing and Posting.

Page | 13
4.2. Reverse a journal a) Retrieve existing journal.
b) Click on the Lines tab.
c) Click on the Process drop down menu and select Copy Journal. Click Process.
d) The Journal Entry Copy screen will display, tick the Reverse Signs box, confirm Journal Date and click OK.

Page | 14
e) The Lines screen will display and a new Journal ID will be assigned (note the debits and credits will be
reversed). The Journal Status will change to T and the Budget Status will change to N.
f) Before completing the journal, ensure the Line details are correct (Account Code/Project Number) and
amend the Long Description on the Header screen if required (e.g. cross reference with journal being
reversed.). Complete the journal by Editing and Posting.

Page | 15
5 How to create and post multiple line journals? If multiple line journals need to be created and posted at once (bulk journal input) use the Excel Journal Upload
Template.
This spreadsheet template is located on the Financial Services website, link below:
http://www.finserv.uwa.edu.au/accounting/forms
NOTE: As this form is constantly being updated please ensure the current version is used at all times.
How to use this template?
a) Input all journal information in the required fields.
b) Check the journal balances and all details are accurate.
c) Click Validate Journal.
d) Correct any errors before submitting to Financial Services.
NOTE: Be sure to select the correct Source code
e) Raise an incident/Ask a Question to Client Services by using askUWA and attach the completed template
http://staff.ask.uwa.edu.au/app/ask/list.
f) Client Services will download the journal to PeopleSoft and post. The askUWA incident will be updated
advising the journal has been posted which will include the Journal ID number.
NOTE: When saving the Excel Journal Upload Template (before sending to Financial Services) change the Save as type:
to Excel Macro-Enabled Workbook, then click Save. The following pop-up will display, click Yes.

Page | 16
6 How to view the immediate impact of a journal? a) From the Main Menu, click General Ledger
b) Click Review Financial Information
c) Click Ledger
d) Click on the Add a New Value tab (current tab is highlighted in blue), enter a name in the Inquiry Name: field
and click Add.
e) The Ledger Inquiry enables specific information about the ledger to be reviewed based on the criteria
entered. Complete the following:
Confirm or enter the Business Unit number in the Unit field.
Ledger = ACTUALS.
Fiscal Year = Year to be reviewed.
From Period and To Period = Period to be reviewed (e.g. January is Period 1, February is Period 2 etc.).
f) Tick the Show YTD Balance field.
g) Tick the Show Transaction Details field.
h) Under the header Chartfield Criteria, complete the relevant Value columns (e.g. Account and Project to view
a particular Account Code for a Project Grant number) based on the specific inquiry, or leave all the columns
blank to search in full by Business Unit number. As an option tick the Sum By field.
i) Click Save, this will save all parameters for use at a later date.
j) Click Search. The Transaction Detail screen will now be displayed.
k) To view further information from the Transactions Details screen, click the Journal ID hyperlink. If the Show
Transaction Details field isn’t ticked, the Ledger Summary screen will be displayed. For further information
click the Activity hyperlink to drill down and from the Transaction Details screen, click the Journal ID
hyperlink.

Page | 17
NOTE: A Journal Detail (Actual Report) by Journal Line report can also be run.
a) From the Main Menu, Click UWA Reports.
b) Click GL Transaction Reports.
c) Click Journal Details.
d) Search or enter a Run Control ID.
e) Enter Journal ID: number.
f) Click Run.
g) The Process Scheduler Request screen will now be displayed. Select the description of how the report is to
be viewed.
h) Click OK.
i) Click the Report Manager hyperlink.
j) From the UWA Report Manager, locate the report to be printed (click Refresh until the Dist Status indicates
Posted), click on the Description hyperlink to view and print the journal.

Page | 18
7 Internal Funds Transfer (IFT)
7.1. Create a new IFT The Internal Funds Transfer process has been developed to allow inter- business unit transactions with appropriate
authorities. Access will be given to users who have a minimum financial delegation band level 6 and on receipt of a
Financial Systems Access/Amendment form (refer to section B2: User Access, Finance Modules and select IFT).
a) From the Main Menu, Click UWA Processes.
b) Click Internal Funds Transfer.
c) Click IFT Entry.
d) Click IFT Entry (current tab is highlighted in blue),
e) Click Add.
For training notes on how to use IFT (Internal Funds Transfer) download the User Guidelines from the Financial
Services website. http://www.finserv.uwa.edu.au/payable/ift
If you have any queries regarding account codes please refer to the Financial Handbook for Finance Officers at the
below link: http://www.finserv.uwa.edu.au/accounting/handbook/account-codes or contact your Faculty Accountant.
Page | 19
8 Training and development
8.1. Web based materials – Financial Services website – www.finserv.uwa.edu.au PeopleSoft workshop materials are available on the Financial Services website, located under the relevant header,
Professional Development (E.g. Accounts payable/Professional Development).
Frequently asked questions and answers can be found by using askUWA FAQs. (http://staff.ask.uwa.edu.au/). If the answer you are seeking is not available within an askUWA FAQ please click on the "Ask a Question" button and one of our Client Service team members will get back to you with an answer to your query.
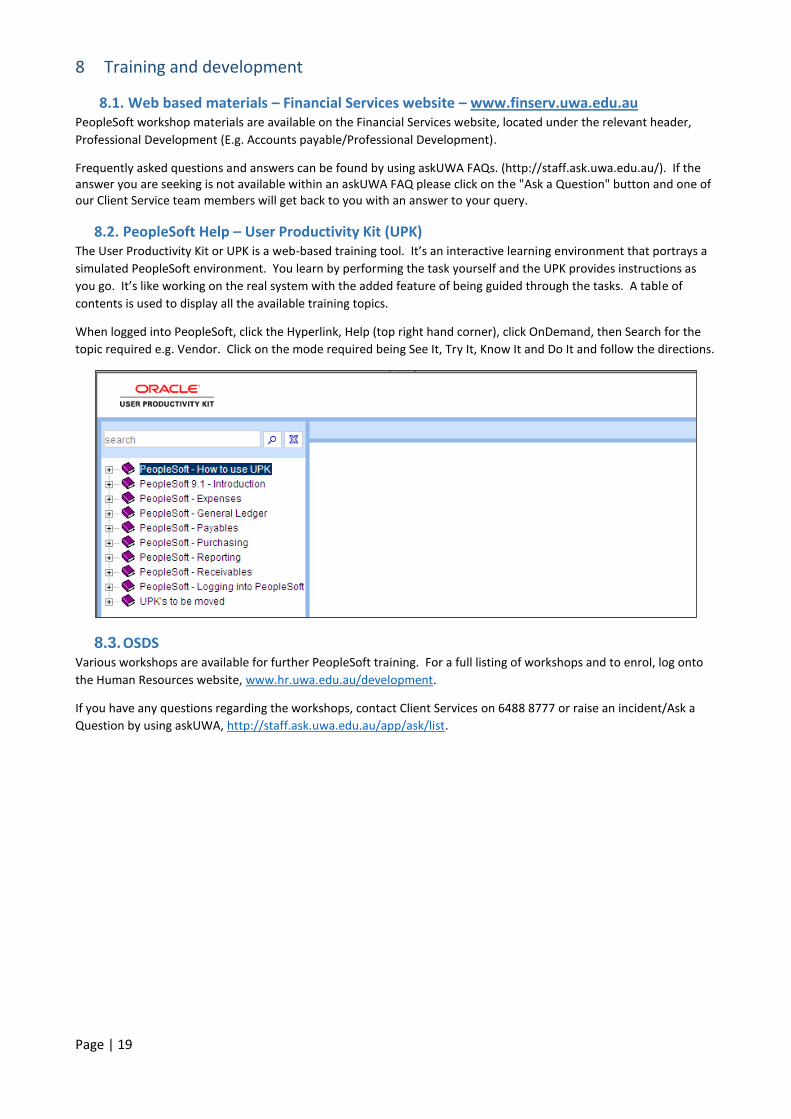
8.2. PeopleSoft Help – User Productivity Kit (UPK) The User Productivity Kit or UPK is a web-based training tool. It’s an interactive learning environment that portrays a
simulated PeopleSoft environment. You learn by performing the task yourself and the UPK provides instructions as
you go. It’s like working on the real system with the added feature of being guided through the tasks. A table of
contents is used to display all the available training topics.
When logged into PeopleSoft, click the Hyperlink, Help (top right hand corner), click OnDemand, then Search for the
topic required e.g. Vendor. Click on the mode required being See It, Try It, Know It and Do It and follow the directions.
8.3. OSDS Various workshops are available for further PeopleSoft training. For a full listing of workshops and to enrol, log onto
the Human Resources website, www.hr.uwa.edu.au/development.
If you have any questions regarding the workshops, contact Client Services on 6488 8777 or raise an incident/Ask a
Question by using askUWA, http://staff.ask.uwa.edu.au/app/ask/list.