peoplesoft requisition creation - palomar college€¦ · peoplesoft finance version 8 vs. version...
TRANSCRIPT

PeopleSoft Requisition Creation
Purchasing > Requisitions > Add/Update Requisitions PeopleSoft Finance version 8 vs. version 9 Top Menu Features p. 1 Removing the Top Menu Features p. 1 Description page Put the Main Menu back on the page p. 2 - 3
1. Entering a New Requisition p. 4 2. OPTIONAL – Requisition Name p. 4 3. Requisition Defaults p. 5 - 6 4. Add Comments p. 6 - 11 5. Approval Justification p. 12 6. Item Description p. 13 7. Quantity, UOM, Category, Unit Price p. 13 8. OPTIONAL - Change Schedule p. 13 - 16
and Distribution information. (if necessary).
9. OPTIONAL – Line Comments p. 17 10. Save. p. 18 11. OPTIONAL – Budget Pre-Check p. 19 12. Budget Check p. 19 13. Green checkmark. p. 19 14. Save. p. 19 15. OPTIONAL – View Approvals p. 19 - 20 16. Changing Requisition Defaults p. 20 - 21

1
PeopleSoft Finance v8 vs. v9
When you first log into PeopleSoft Finance v9, this is what you will see. This page explains some of the features of the new version.
To remove this page: click on Pagelet Settings and Remove.

2
How to put the Main Menu back on the page: Click the Content link
Choose Menu or Menu – Classic and Save. The Classic Menu looks like the old version
MENU: CLASSIC MENU:

PeopleSoft Requisition Creation
3
Entering a New Requisition Purchasing > Requisitions > Add/Update Requisitions NEW VERSION
The advantage to using the Main Menu option is that you will see the pagelets across the page.
Whether you use the Main Menu option at the top, have the Menu – Classic or Menu open on the page, the navigation to add/update a req. is the same: Purchasing > Requisitions > Add/Update Requisitions The Breadcrumbs at the top show the navigation.

PeopleSoft Requisition Creation
4
Entering a New Requisition Purchasing > Requisitions > Add/Update Requisitions Do not enter a Requisition ID number. “NEXT” should always appear in the box and the system will automatically assign the next available number.
1. Click “Add.” The requisition form will automatically populate the requisition Header with assigned defaults. The requisition number will be assigned when the requisition is saved.
NOTE: Turn on Caps Lock before entering any information on a Req.
2. Requisition Name: OPTIONAL– You can give the requisition a name for easier searches. If left blank the default is the requisition number.
The main differences on this page are 1) the Requisition Name: defaults to the Requisition ID when req. is saved but you can name the req. for easier searches and 2) the location of the Requisition Defaults and Add Comments.

PeopleSoft Requisition Creation
5
3. Click on Requisition Defaults.
Requisition Defaults NOTE: These defaults can be overridden on the Requisition Line, Schedule and Distribution.
Enter the Supplier and the Due Date. If the chartfields (Distributions) don’t default in, fill them in also.
Old version: Vendor

PeopleSoft Requisition Creation
6
Supplier • If you don’t know what Supplier to use or you expect Purchasing to select the supplier for you,
enter BEST VENDR as the Supplier ID. • If you know the Supplier Name, but not the ID number, use the Supplier Lookup link to search for
the Supplier ID. • If you want a certain supplier who is not found in Supplier Lookup, enter NEW VENDR as the
Supplier ID. You will also need to list the Supplier name, address and contact information in the body of the requisition in the “REQ-INFO” Requisition Comment. (Step 2) Note: Although you may have used this Supplier in the past, they may not be “current / active” in the Vendor System if it has been a long time since we have issued them a Purchase Order or payment, or if you purchased from them using your CalCard.
Due Date • Enter the date the items are required.
Distributions – Distribution details may default in from your Requester Set-up. You may make any
necessary changes to the distribution information here. Change the entire account string or part of it. You must fill in a value for Fund, Dept, Program, Class, Program, and Project.
When finished, click the yellow “OK” button. You are returned to the main Requisition page. ** NOTE: COMPUTER is no longer required in the CATEGORY for Technology Equipment or Software. Routing for these items is done by the expenditure accounts listed below:
WORKFLOW ROUTING FOR TECHNOLOGY EQUIPMENT 515300 Software Licensing Fees 565200 Maintenance Agreement, Software 644700 Equipment, Technology Instructional > $4,999 644750 Equipment, Technology Instructional < $4,999 644800 Equipment, Technology Non-Instructional > $4,999 644850 Equipment, Technology Non-Instructional < $4,999 644900 Software , Instructional > $4,999 644950 Software, Non-Instructional > $4,999
4. Click on Add Comments.

PeopleSoft Requisition Creation
7
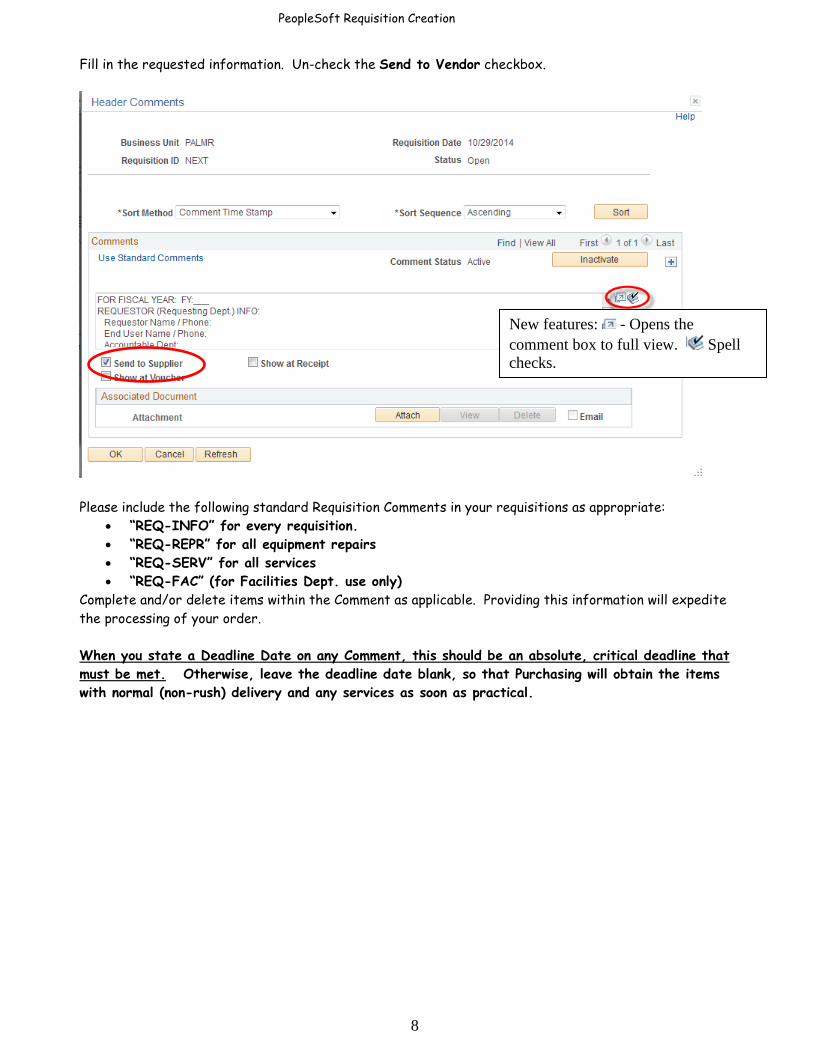
Header Comments Click Use Standard Comments to access the comment that needs to be added to every requisition.
Enter REQ as the Comment Type and INFO as the Comment ID, then click OK.
PeopleSoft Requisition Creation
8
Fill in the requested information. Un-check the Send to Vendor checkbox.
Please include the following standard Requisition Comments in your requisitions as appropriate:
• “REQ-INFO” for every requisition. • “REQ-REPR” for all equipment repairs • “REQ-SERV” for all services • “REQ-FAC” (for Facilities Dept. use only)
Complete and/or delete items within the Comment as applicable. Providing this information will expedite the processing of your order. When you state a Deadline Date on any Comment, this should be an absolute, critical deadline that must be met. Otherwise, leave the deadline date blank, so that Purchasing will obtain the items with normal (non-rush) delivery and any services as soon as practical.
New features: - Opens the comment box to full view. Spell checks.
PeopleSoft Requisition Creation
9
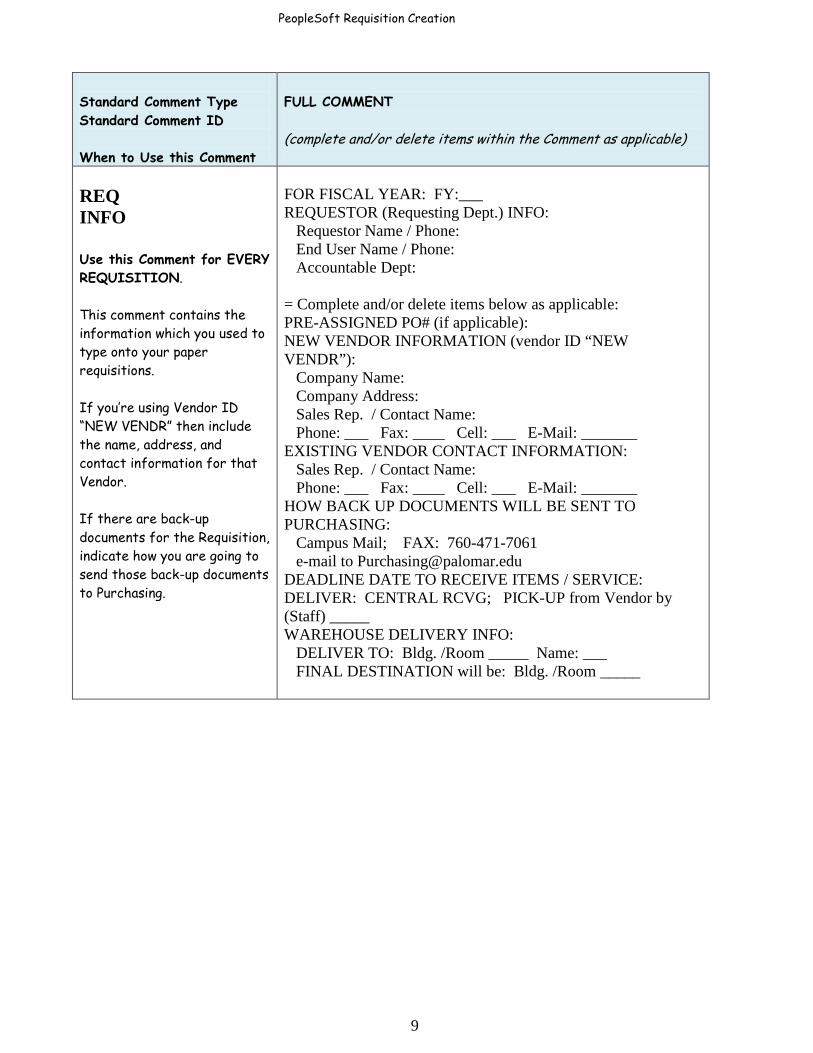
Standard Comment Type Standard Comment ID When to Use this Comment
FULL COMMENT (complete and/or delete items within the Comment as applicable)
REQ INFO Use this Comment for EVERY REQUISITION. This comment contains the information which you used to type onto your paper requisitions. If you’re using Vendor ID “NEW VENDR” then include the name, address, and contact information for that Vendor. If there are back-up documents for the Requisition, indicate how you are going to send those back-up documents to Purchasing.
FOR FISCAL YEAR: FY:___ REQUESTOR (Requesting Dept.) INFO: Requestor Name / Phone: End User Name / Phone: Accountable Dept: = Complete and/or delete items below as applicable: PRE-ASSIGNED PO# (if applicable): NEW VENDOR INFORMATION (vendor ID “NEW VENDR”): Company Name: Company Address: Sales Rep. / Contact Name: Phone: ___ Fax: ____ Cell: ___ E-Mail: _______ EXISTING VENDOR CONTACT INFORMATION: Sales Rep. / Contact Name: Phone: ___ Fax: ____ Cell: ___ E-Mail: _______ HOW BACK UP DOCUMENTS WILL BE SENT TO PURCHASING: Campus Mail; FAX: 760-471-7061 e-mail to [email protected] DEADLINE DATE TO RECEIVE ITEMS / SERVICE: DELIVER: CENTRAL RCVG; PICK-UP from Vendor by (Staff) _____ WAREHOUSE DELIVERY INFO: DELIVER TO: Bldg. /Room _____ Name: ___ FINAL DESTINATION will be: Bldg. /Room _____

PeopleSoft Requisition Creation
10
Standard Comment Type Standard Comment ID When to Use this Comment
FULL COMMENT (complete and/or delete items within the Comment as applicable)
REQ REPR Use this Comment for any EQUIPMENT REPAIR. Describe the equipment, and the problem and current location. Indicate who will be responsible for scheduling / coordinating the repair (staff or vendor?) Indicate any absolute, critical deadline date for the repair. State if the repair will be performed on-site or at the Vendor’s facility.
= Complete and/or delete items below as applicable: DESCRIBE EQUIPMENT: Brand/Mfg: ___ Model: ____ S/N: ______ Asset Tag: ___ PROBLEM: CURRENT LOCATION OF THE EQUIPMENT: Bldg/Room ____ JOB COORDINATION (Select one): = VENDOR TO CONTACT STAFF: Vendor is to contact (Palomar Staff Name) at (760) 744-1150, EXT. __, to schedule / coordinate the work (and the pick up and the return of the equipment). = STAFF TO CONTACT VENDOR: (Palomar Staff Name) at (760) 744-1150, EXT. __, will contact Vendor to schedule / coordinate work (and/ or will take equipment to vendor for repair and will pick back up from Vendor after repair completed). DEADLINE FOR EVALUATION AND / OR REPAIR: REPAIR TO BE PERFORMED: ON-SITE or at VENDOR FACILITY
REQ SERV Use this Comment when you need SERVICES TO BE PERFORMED. Indicate who will be responsible for scheduling / coordinating the services (staff or vendor?) Indicate any absolute, critical deadline date for the services. State if the services will be performed on-site or at the Vendor’s facility.
= Complete and/or delete items below as applicable: JOB COORDINATION (Select one): = VENDOR TO CONTACT STAFF: Vendor is to contact (Palomar Staff Name) at (760) 744-1150, EXT. __, to schedule / coordinate the work. = STAFF TO CONTACT VENDOR: (Palomar Staff Name) at (760) 744-1150, EXT. __, will contact Vendor to schedule / coordinate work. DEADLINE FOR COMPLETION: SERVICES TO BE PERFORMED: ON-SITE or at VENDOR FACILITY.
PeopleSoft Requisition Creation
11
Standard Comment Type Standard Comment ID When to Use this Comment
FULL COMMENT (complete and/or delete items within the Comment as applicable)
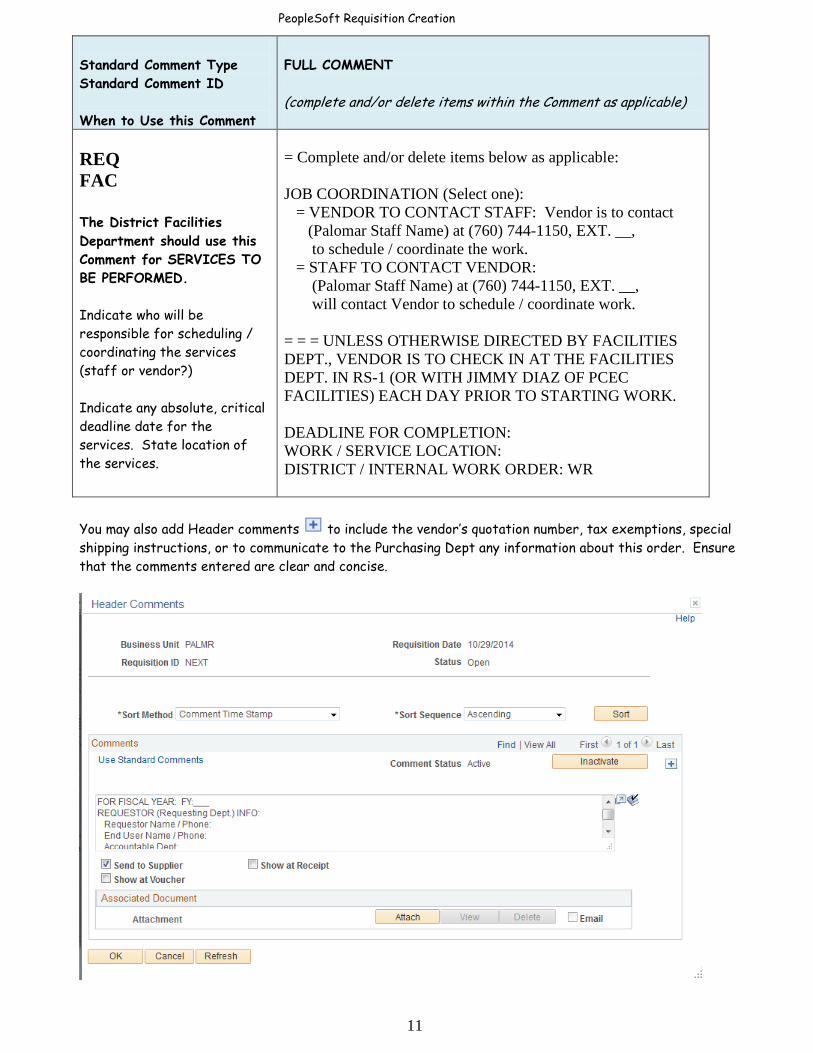
REQ FAC The District Facilities Department should use this Comment for SERVICES TO BE PERFORMED. Indicate who will be responsible for scheduling / coordinating the services (staff or vendor?) Indicate any absolute, critical deadline date for the services. State location of the services.
= Complete and/or delete items below as applicable: JOB COORDINATION (Select one): = VENDOR TO CONTACT STAFF: Vendor is to contact (Palomar Staff Name) at (760) 744-1150, EXT. __, to schedule / coordinate the work. = STAFF TO CONTACT VENDOR: (Palomar Staff Name) at (760) 744-1150, EXT. __, will contact Vendor to schedule / coordinate work. = = = UNLESS OTHERWISE DIRECTED BY FACILITIES DEPT., VENDOR IS TO CHECK IN AT THE FACILITIES DEPT. IN RS-1 (OR WITH JIMMY DIAZ OF PCEC FACILITIES) EACH DAY PRIOR TO STARTING WORK. DEADLINE FOR COMPLETION: WORK / SERVICE LOCATION: DISTRICT / INTERNAL WORK ORDER: WR
You may also add Header comments to include the vendor’s quotation number, tax exemptions, special shipping instructions, or to communicate to the Purchasing Dept any information about this order. Ensure that the comments entered are clear and concise.

PeopleSoft Requisition Creation
12
5. Approval Justification: You may also add an additional Header comment to include information that
will be provided to the approver when you send the requisition forward. To do this click the to add a Comment. Click on the Approval Justification box and add a comment in the comment box. This information will be provided to the approver.
Click the yellow ‘OK’ button. You are returned to the Requisition main page. Note that the Add Comments link has changed to Edit Comments, indicating that Header Comments exist.

PeopleSoft Requisition Creation
13
6. Click on the button to enter an item description. This should be the basic information needed by the vendor to fill the order. Click ‘OK’ to return to the main Requisition page.
NOTE: If this is an emergency req, use EMERGENCY as the first word in the description.
7. Enter the Quantity, Unit of Measure (UOM), Category*, and Unit Price.
*Category is the account number.
If multiple lines are required, click , then click on the Add button. In the prompt box, enter the number of lines desired and click OK. Complete additional lines as described above. Save after each line.
8. OPTIONAL – Change Schedule and Distribution Information on a Line The schedule and distribution pages must be completed for each line ONLY if it’s different than the default information entered earlier.
Click on the Schedule icon near the right side of the requisition line.
6 7 8

PeopleSoft Requisition Creation
14
Click on the Distributions icon near the right side of the schedule.
The distribution information defaulted in from the Requisition Defaults. Make any necessary changes. On the far right end of the page there are and icons to add or delete distribution lines. If multiple distributions are required, click on the Add button.
In the prompt box, enter the number of rows desired and click OK. (If the prompt box does not appear, click the colored bar at the top of your screen to allow scripted windows.)

PeopleSoft Requisition Creation
15
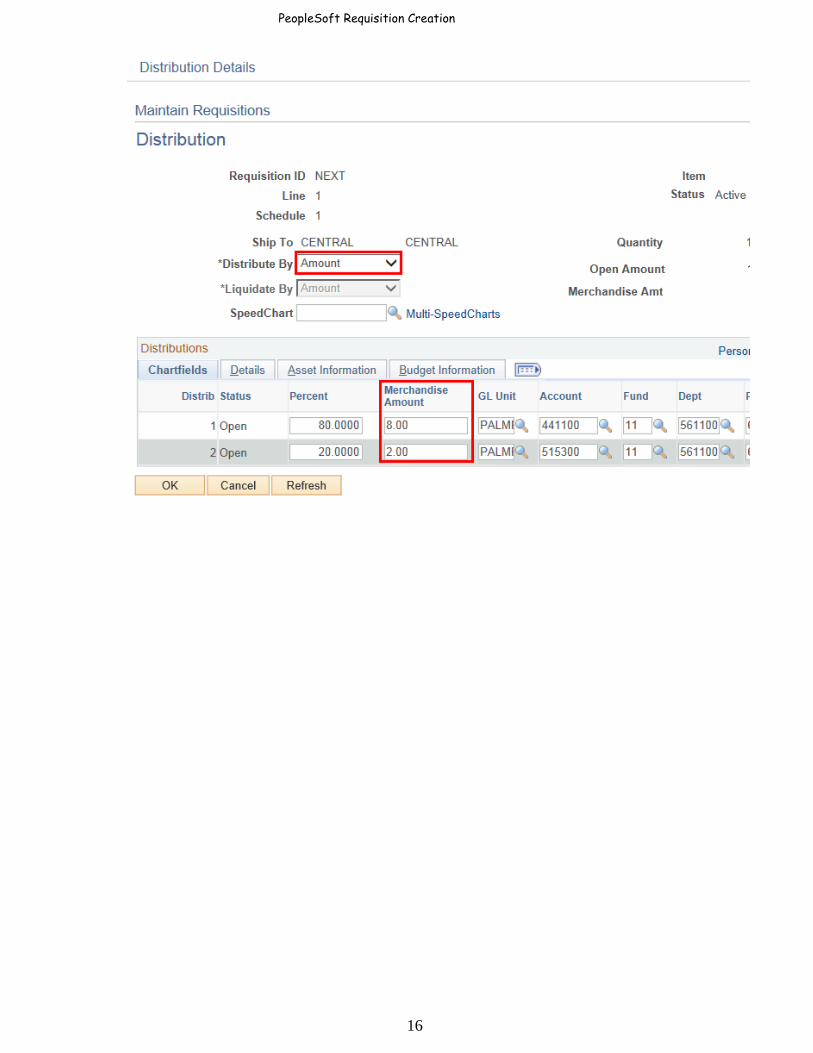
Distributing by Quantity or Amount Notice the Distribute by: box indicating “Quantity.” Currently the requisition is distributed by quantity. The Amount field is unavailable for editing.
• If you need to split the distribution based on percentage or quantity, leave the Distribute by: indicator as “Quantity.” Change the percentages or quantities to the required values and enter the chartfield information.
• If you need to split the distribution based on dollar amount, change the drop down box to “Amount.”
Notice that the “Amount” data box is now available to edit. Enter the amounts and chartfield information.
PeopleSoft Requisition Creation
16

PeopleSoft Requisition Creation
17
9. OPTIONAL – Line Comments From the main Requisition page, click the callout bubble at the right side of the line to add line comments. Enter additional identifying information for a specific line in the Line Comments. Such information could be size, color, fabric style, packaging instructions or the name of the teacher ordering the item. If the vendor needs this information, make sure the Send to Vendor checkbox is checked. You can also use this area to communicate to the Purchasing Department any additional information about this line item. In this case, make sure the Send to Vendor checkbox is not checked.
Click the ‘OK’ button. The callout bubble now has lines in it indicating that the line contains comments.

PeopleSoft Requisition Creation
18
10. When all information has been entered on the requisition, click and note the Req number (Requisition ID) that has been assigned to the Requisition.
Recommended: When entering multiple rows of information into the requisition, it is recommended that the Requester save frequently. Frequent saving minimizes the chances that data will be lost from system slowdowns, loss of power, or interruptions during data entry. All information for a particular line, however, must be completed before a Save can occur. Recommended: Before Budget Checking it would be advisable to use the View Printable Version link to view the requisition to make sure that everything is correct on the req. Once the req. is forwarded for approval no changes can be made.

PeopleSoft Requisition Creation
19
11. OPTIONAL: Budget Pre-Check the Req. You can do a budget pre-check to make sure you have enough money in the account to cover the
requisition before doing a Budget Check. Click on the link next to the Budget Check button. This may be helpful if you are waiting for a budget transfer to be completed before officially budget checking the req. This would eliminate the need to go to Budget Overview before completing the req.
12. When you’re finished entering all the information, click on the budget check icon located near the top of the page. This will verify that there’s sufficient budget to cover the purchase, and more importantly, will pre-encumber the money so it can’t be spent on something else.
13. If the Req passes the budget check (the Budget Status is Valid) and it’s ready to be approved, click the green check mark. The status will change from Open to Pending (pending approval). If the Req is not ready for approval, don’t click the check mark!
14. Click one last time.
15. OPTIONAL: If you want to verify the routing for the requisition click on View Approvals

PeopleSoft Requisition Creation
20
This screen shows you the routing for this requisition.
16. Changing Requisition Defaults
If it is determined that the Distribution, Ship To or other information entered into the Requisition Defaults is incorrect, the Requester can change the default values and then click OK. By clicking OK, it will change the default information for all lines on the requisition. After clicking OK, a “Retrofit” message box appears. The Requester can select those values to be changed on the lines by checking the box next to the value. If all boxes are to be checked, the “Mark All” link can be clicked. Click OK to apply the information.

PeopleSoft Requisition Creation
21
Remember: Changing the Requisition Defaults and responding positively to the Retrofit box will change the information on all lines of the requisition. To change the information on only one line, change the information directly on the line itself.