personal navigation system - sony esupport · user's manual sony personal navigation system...
TRANSCRIPT
Personal Navigation System
User's Manual
NV-U70 NV-U50
© 2005 Sony Corporation

The information contained herein may be changed at any time without prior notification. This manual nor any parts thereof may not be reproduced for any purpose whatsoever without the express written consent of Sony, nor transmitted in any form either electronically or mechanically, including photocopying and recording.
User's manual Sony Personal Navigation System
User's manual Table of contents i
Table of contents Introduction ...................................................................... 3
Search facilities and conventions.................................................. 4 Liability .................................................................................... 5 Trademarks .............................................................................. 5
Operating the navigation software.................................... 7 Managing languages and maps .................................................... 8 Hardware keys .......................................................................... 8 Software keyboard..................................................................... 8
Character keyboard.......................................................... 9 Mobile phone keyboard................................................... 10
Lists....................................................................................... 12 Command buttons ................................................................... 16 Information............................................................................. 16
Battery condition ........................................................... 16 GPS-Status ................................................................... 17
Navigation....................................................................... 19 Starting the Sony Personal Navigation System ............................. 20
Menu ........................................................................... 20 Basic settings .......................................................................... 23 Indicating a destination ............................................................ 26
Specifying the country of your destination ......................... 26 Entering an address ....................................................... 27 Selecting a point of interest............................................. 28 Indicating destinations on the map................................... 36 Favorites ...................................................................... 39 Recent destinations........................................................ 41 Navigating homewards ................................................... 42
Destination management .......................................................... 42 Saving a destination....................................................... 42 Renaming a destination .................................................. 43 Deleting a destination..................................................... 44
Indicating several destinations (Itinerary with stages)................... 45 Indicating route points.................................................... 45 Editing, saving and managing itineraries ........................... 46 Calculating the route ...................................................... 52 Displaying the itinerary on the map .................................. 53 Simulating the route ...................................................... 54
Starting navigation................................................................... 56
Working with the map..................................................... 59 Selecting a map....................................................................... 60 Operating the map................................................................... 61
Standard map view ........................................................ 62 Search for destination view ............................................. 63
Representation of the map in navigation mode............................. 66
User's manual Sony Personal Navigation System
ii Table of contents User's manual
Useful functions for navigation ....................................... 69 Show the entire route............................................................... 70 Next destination ...................................................................... 71 Blocking a route section............................................................ 72 Change route options ............................................................... 74 Simulation .............................................................................. 75
Configuring the Sony Personal Navigation System .......... 77 Settings.................................................................................. 78
Volume ........................................................................ 78 Select map ................................................................... 79 Map information ............................................................ 79 Route information .......................................................... 79 Signpost information ...................................................... 80 Light sensor .................................................................. 80 Screen setting ............................................................... 80 Touch screen calibration ................................................. 81 Viewing options ............................................................. 81 Routing options ............................................................. 82 Itinerary....................................................................... 82 Time zone..................................................................... 83 Format ......................................................................... 83 Select language............................................................. 83 Home address ............................................................... 84 Radio muting ................................................................ 84 Demo mode .................................................................. 84 Product information........................................................ 84
Glossary .......................................................................... 85
Index .............................................................................. 87
User's manual Sony Personal Navigation System
Introduction - 3 -
Introduction
Topics covered in this chapter:
Search facilities and conventions page 4
Liability page 5
Trademarks page 5
User's manual Sony Personal Navigation System
- 4 - Search facilities and conventions
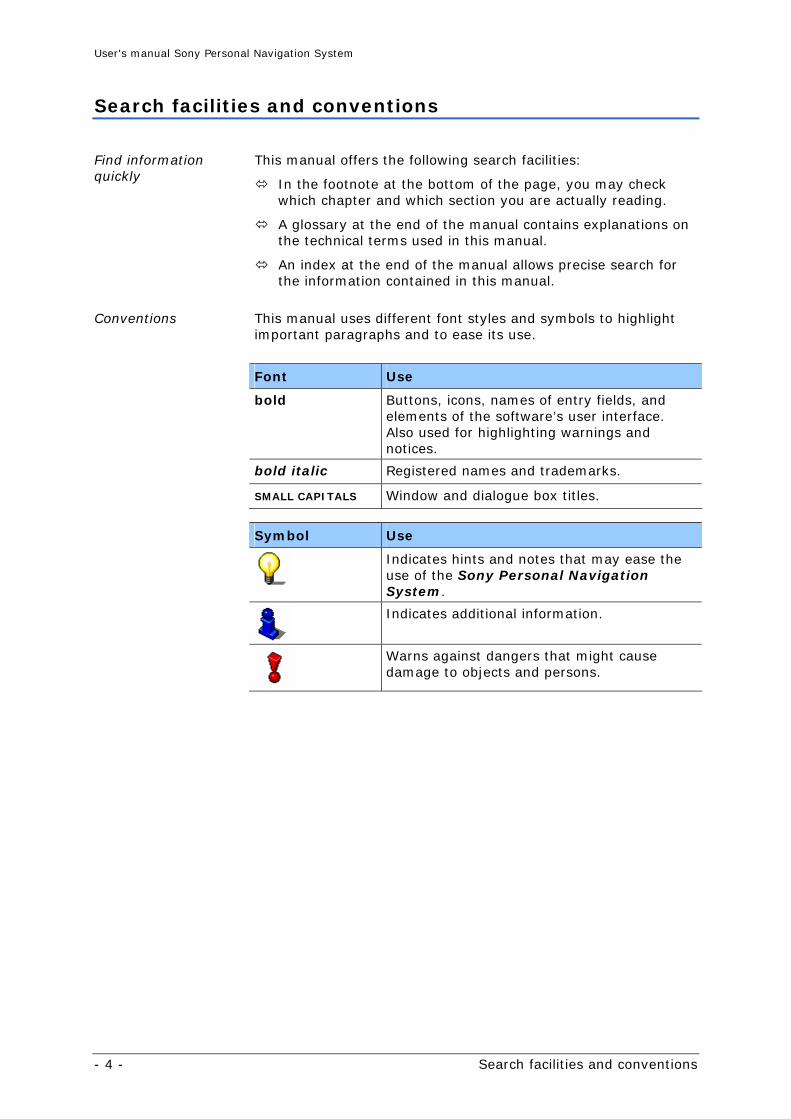
Search facilities and conventions
This manual offers the following search facilities: Find information quickly In the footnote at the bottom of the page, you may check
which chapter and which section you are actually reading.
A glossary at the end of the manual contains explanations on the technical terms used in this manual.
An index at the end of the manual allows precise search for the information contained in this manual.
Conventions This manual uses different font styles and symbols to highlight
important paragraphs and to ease its use.
Font Use
bold Buttons, icons, names of entry fields, and elements of the software’s user interface. Also used for highlighting warnings and notices.
bold italic Registered names and trademarks.
SMALL CAPITALS Window and dialogue box titles. Symbol Use
Indicates hints and notes that may ease the use of the Sony Personal Navigation System.
Indicates additional information.
Warns against dangers that might cause damage to objects and persons.
User's manual Sony Personal Navigation System
Introduction - 5 -
Liability
Limitation of liability The software and the manual are subject to change without notice. Sony may not be liable for the correctness of the information contained in this manual nor for damages resulting from the use of this manual.
Trademarks
Registered trademarks
All brands and trademarks mentioned in this document are possibly registered by third party and subject to the current legislation and to the rights of their respective owners without reservation. All mentioned names of products, societies, or brands may be registered trademarks of their respective owners. Every right that is not explicitly accorded is reserved.
The absence of an explicit labeling of registered trademarks does not allow the conclusion that this brand was not subject to the rights of third party.
Windows and ActiveSync are registered trademarks of the Microsoft Corporation.

User's manual Sony Personal Navigation System
Operating the navigation software - 7 -
Operating the navigation software
Topics covered in this chapter:
Managing languages and maps page 8
Hardware keys page 8
Software keyboard page 8
Character keyboard Mobile phone keyboard
Lists page 12
Command buttons page 16
Information page 16
Battery condition GPS-Status
User's manual Sony Personal Navigation System
- 8 - Managing languages and maps
Managing languages and maps
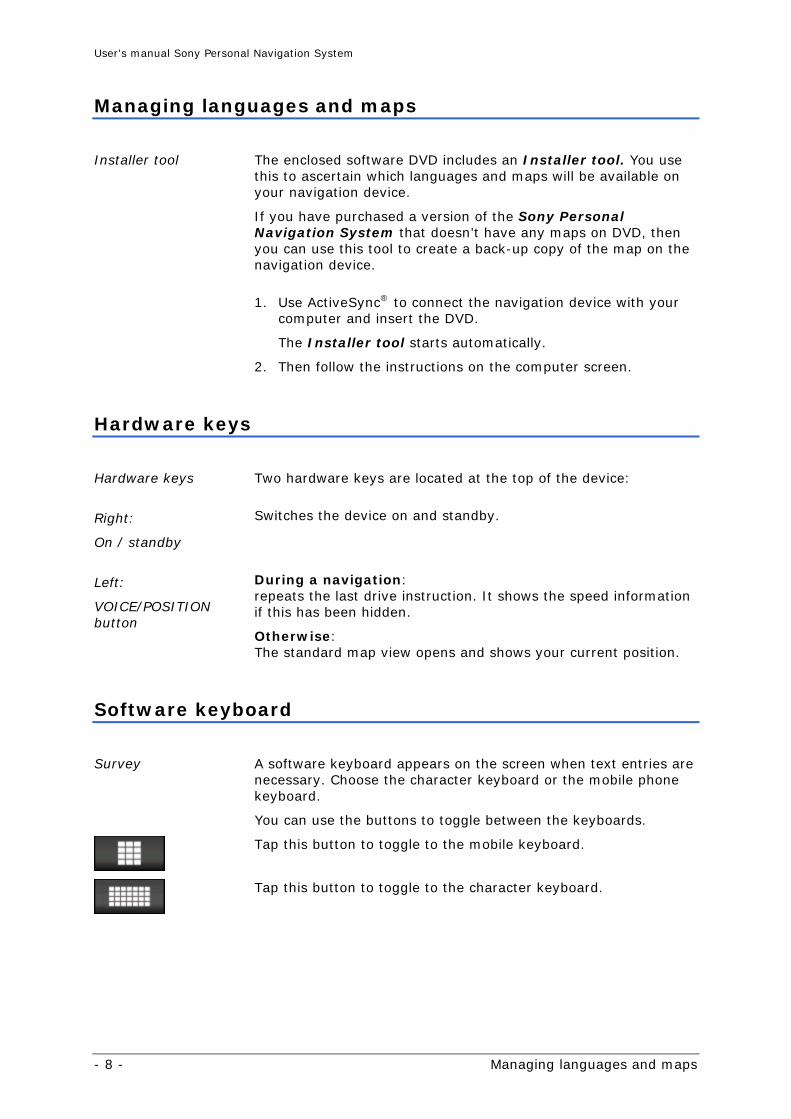
Installer tool The enclosed software DVD includes an Installer tool. You use this to ascertain which languages and maps will be available on your navigation device.
If you have purchased a version of the Sony Personal Navigation System that doesn’t have any maps on DVD, then you can use this tool to create a back-up copy of the map on the navigation device.
1. Use ActiveSync® to connect the navigation device with your
computer and insert the DVD.
The Installer tool starts automatically.
2. Then follow the instructions on the computer screen.
Hardware keys
Hardware keys Two hardware keys are located at the top of the device:
Right:
On / standby
Switches the device on and standby.
Left:
VOICE/POSITION button
During a navigation: repeats the last drive instruction. It shows the speed information if this has been hidden.
Otherwise: The standard map view opens and shows your current position.
Software keyboard
Survey A software keyboard appears on the screen when text entries are necessary. Choose the character keyboard or the mobile phone keyboard.
You can use the buttons to toggle between the keyboards.
Tap this button to toggle to the mobile keyboard.
Tap this button to toggle to the character keyboard.
User's manual Sony Personal Navigation System
Operating the navigation software - 9 -
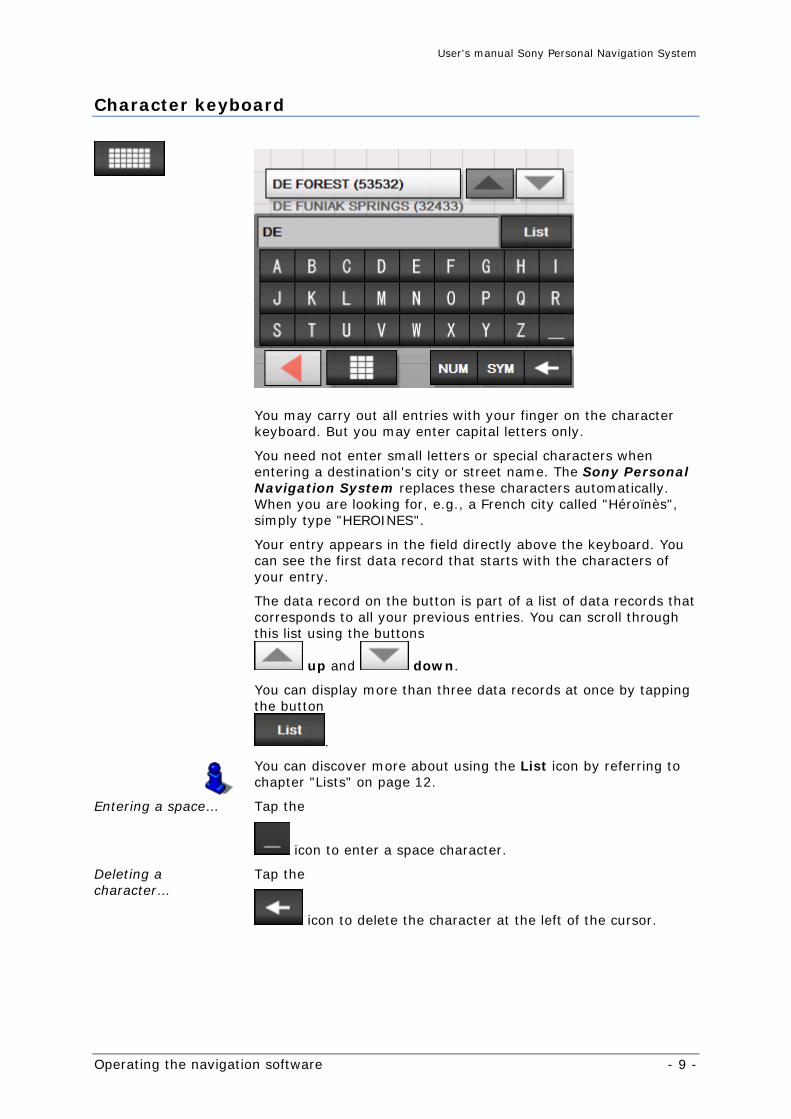
Character keyboard
You may carry out all entries with your finger on the character
keyboard. But you may enter capital letters only.
You need not enter small letters or special characters when entering a destination's city or street name. The Sony Personal Navigation System replaces these characters automatically. When you are looking for, e.g., a French city called "Héroïnès", simply type "HEROINES".
Your entry appears in the field directly above the keyboard. You can see the first data record that starts with the characters of your entry.
The data record on the button is part of a list of data records that corresponds to all your previous entries. You can scroll through this list using the buttons
up and down.
You can display more than three data records at once by tapping the button
.
You can discover more about using the List icon by referring to chapter "Lists" on page 12.
Entering a space… Tap the
icon to enter a space character.
Deleting a character…
Tap the
icon to delete the character at the left of the cursor.
User's manual Sony Personal Navigation System
- 10 - Software keyboard
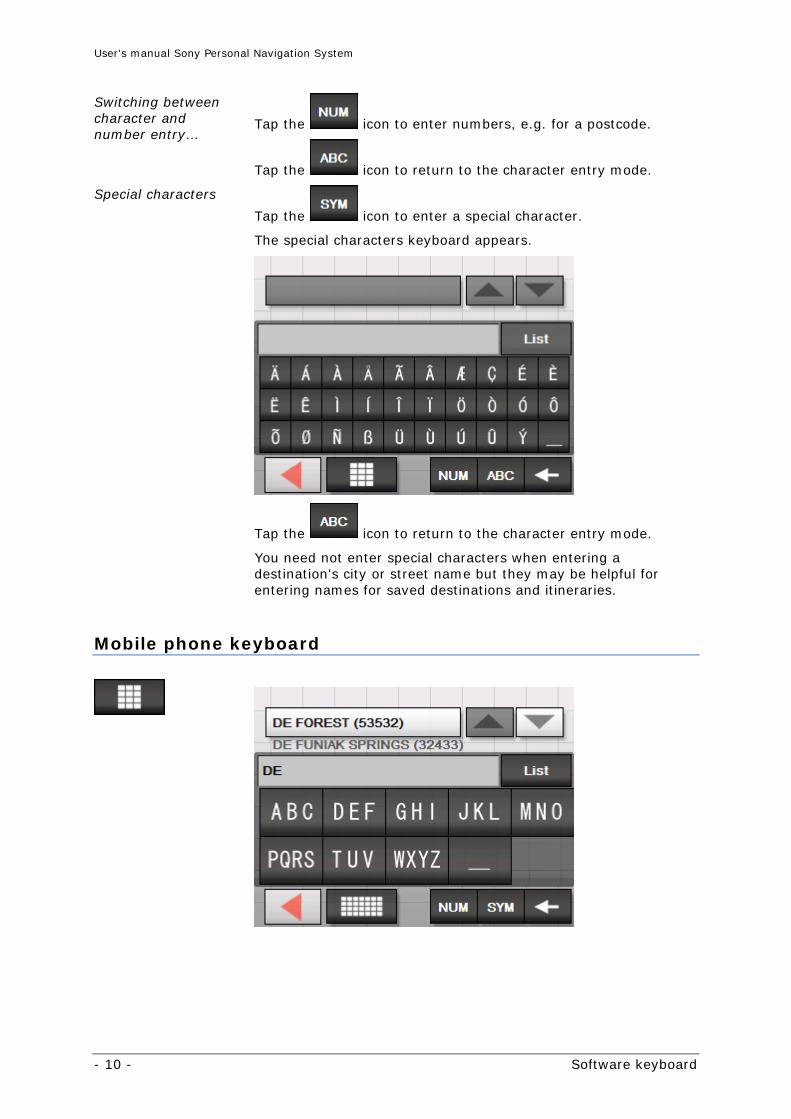
Switching between character and number entry…
Tap the icon to enter numbers, e.g. for a postcode.
Tap the icon to return to the character entry mode.
Special characters
Tap the icon to enter a special character.
The special characters keyboard appears.
Tap the icon to return to the character entry mode.
You need not enter special characters when entering a destination's city or street name but they may be helpful for entering names for saved destinations and itineraries.
Mobile phone keyboard
User's manual Sony Personal Navigation System
Operating the navigation software - 11 -
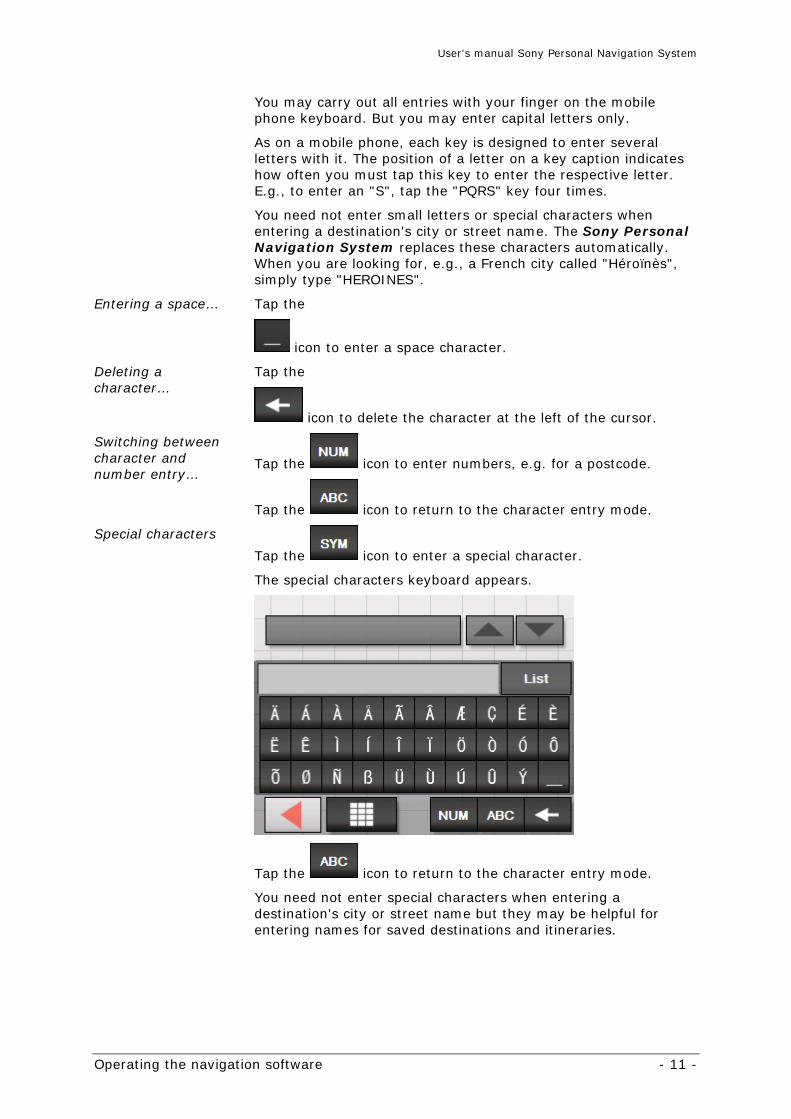
You may carry out all entries with your finger on the mobile phone keyboard. But you may enter capital letters only.
As on a mobile phone, each key is designed to enter several letters with it. The position of a letter on a key caption indicates how often you must tap this key to enter the respective letter. E.g., to enter an "S", tap the "PQRS" key four times.
You need not enter small letters or special characters when entering a destination's city or street name. The Sony Personal Navigation System replaces these characters automatically. When you are looking for, e.g., a French city called "Héroïnès", simply type "HEROINES".
Entering a space… Tap the
icon to enter a space character.
Deleting a character…
Tap the
icon to delete the character at the left of the cursor.
Switching between character and number entry…
Tap the icon to enter numbers, e.g. for a postcode.
Tap the icon to return to the character entry mode.
Special characters
Tap the icon to enter a special character.
The special characters keyboard appears.
Tap the icon to return to the character entry mode.
You need not enter special characters when entering a destination's city or street name but they may be helpful for entering names for saved destinations and itineraries.
User's manual Sony Personal Navigation System
- 12 - Lists
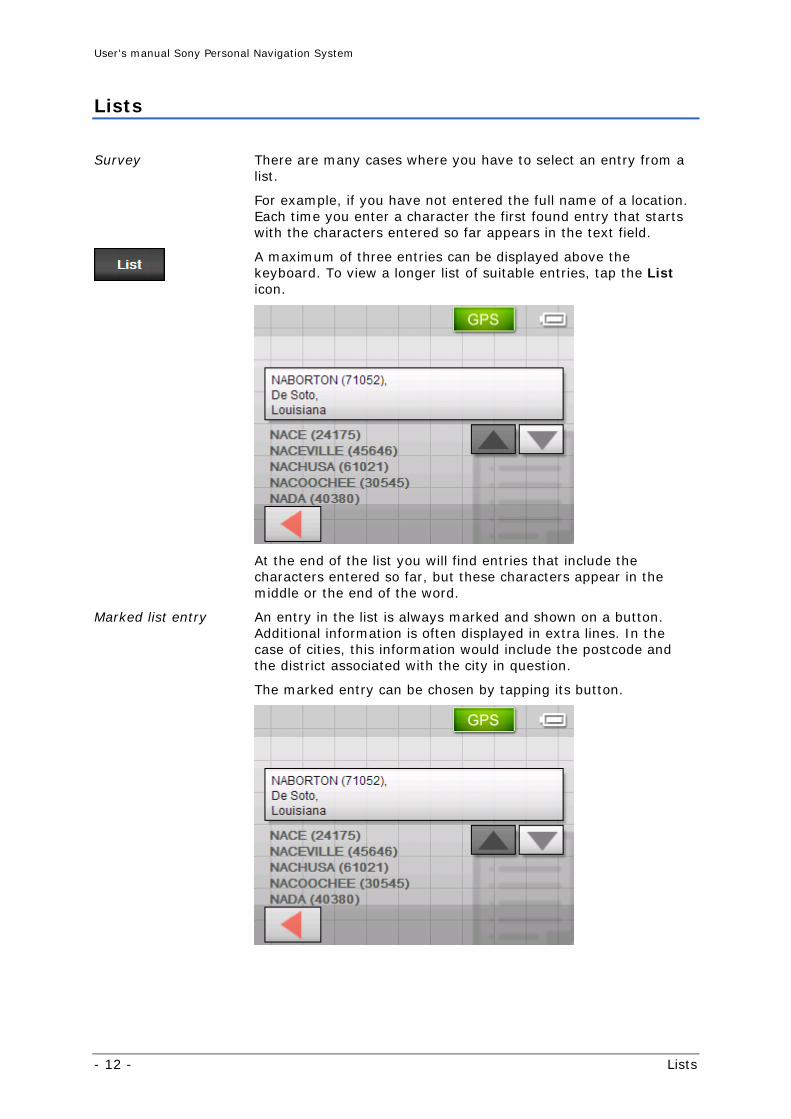
Lists
Survey There are many cases where you have to select an entry from a list.
For example, if you have not entered the full name of a location. Each time you enter a character the first found entry that starts with the characters entered so far appears in the text field.
A maximum of three entries can be displayed above the keyboard. To view a longer list of suitable entries, tap the List icon.
At the end of the list you will find entries that include the characters entered so far, but these characters appear in the middle or the end of the word.
Marked list entry An entry in the list is always marked and shown on a button. Additional information is often displayed in extra lines. In the case of cities, this information would include the postcode and the district associated with the city in question.
The marked entry can be chosen by tapping its button.
User's manual Sony Personal Navigation System
Operating the navigation software - 13 -
Buttons The lists screens have three buttons located on the right and lower edge of the screen:
Up: Tap this icon to scroll the list one item up.
Down: Tap this icon to scroll the list one item down.
Back: Tap this icon to return to the entry screen without selecting a listed element.
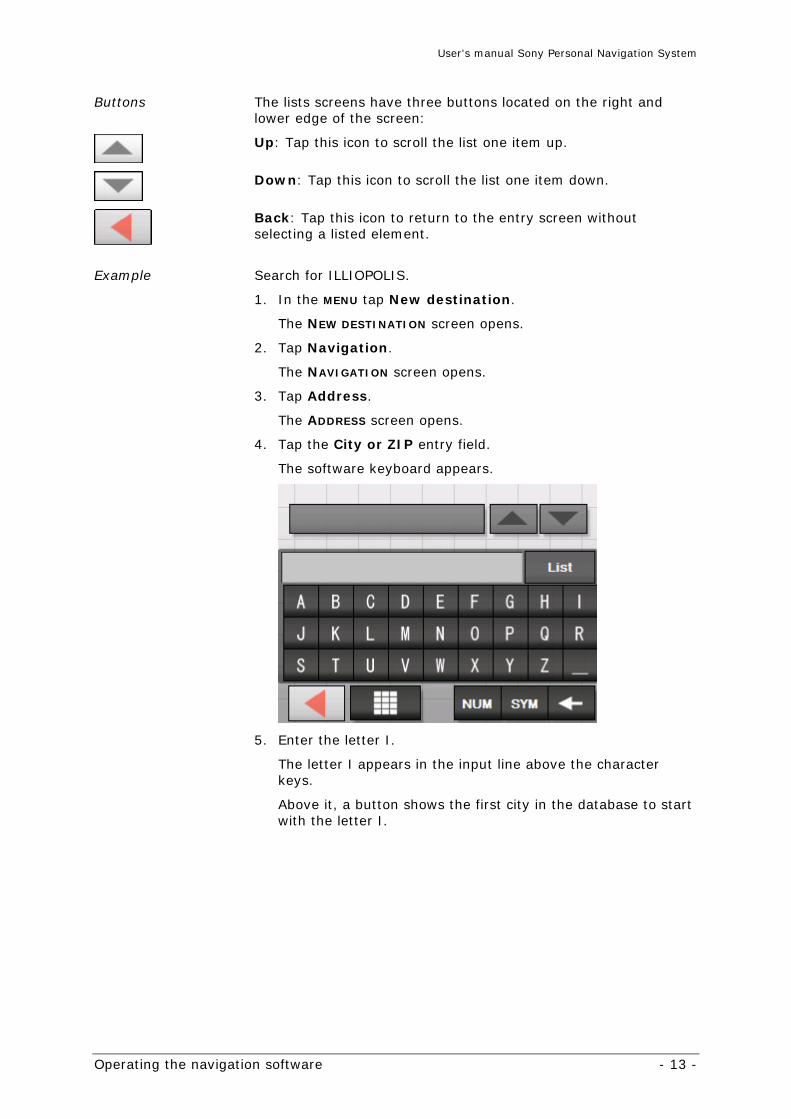
Example Search for ILLIOPOLIS.
1. In the MENU tap New destination.
The NEW DESTINATION screen opens.
2. Tap Navigation.
The NAVIGATION screen opens.
3. Tap Address.
The ADDRESS screen opens.
4. Tap the City or ZIP entry field.
The software keyboard appears.
5. Enter the letter I.
The letter I appears in the input line above the character keys.
Above it, a button shows the first city in the database to start with the letter I.
User's manual Sony Personal Navigation System
- 14 - Lists
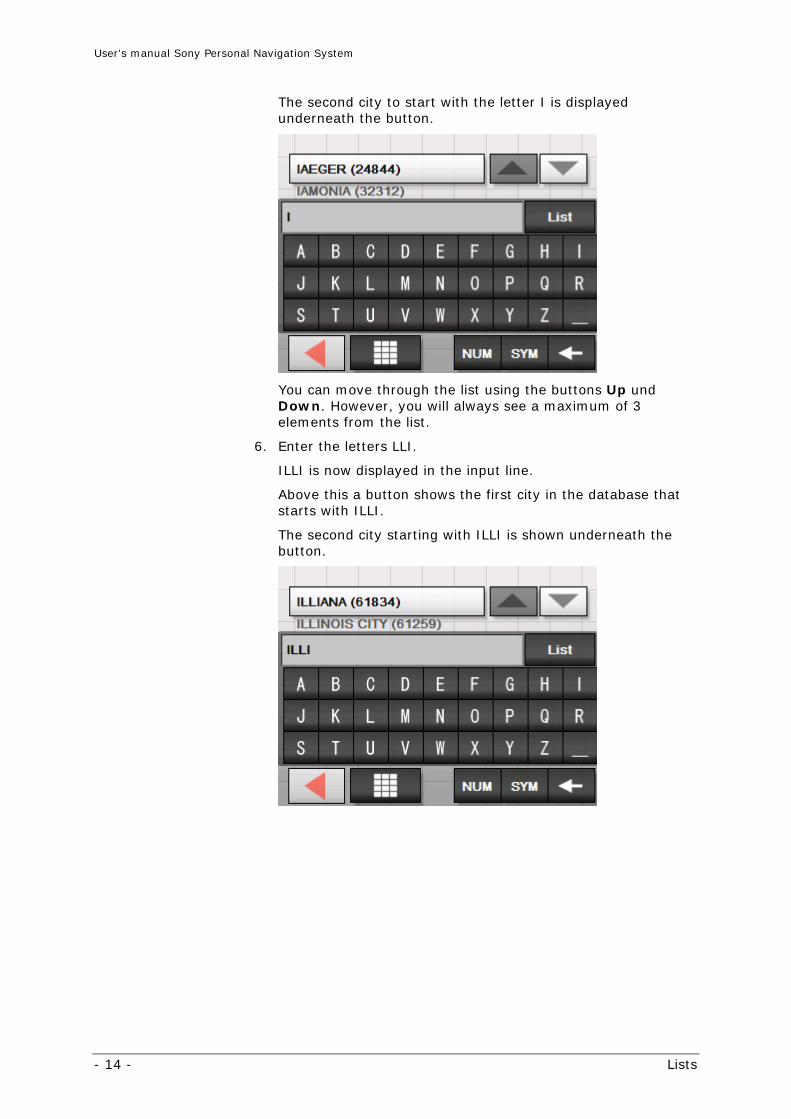
The second city to start with the letter I is displayed underneath the button.
You can move through the list using the buttons Up und Down. However, you will always see a maximum of 3 elements from the list.
6. Enter the letters LLI.
ILLI is now displayed in the input line.
Above this a button shows the first city in the database that starts with ILLI.
The second city starting with ILLI is shown underneath the button.
User's manual Sony Personal Navigation System
Operating the navigation software - 15 -
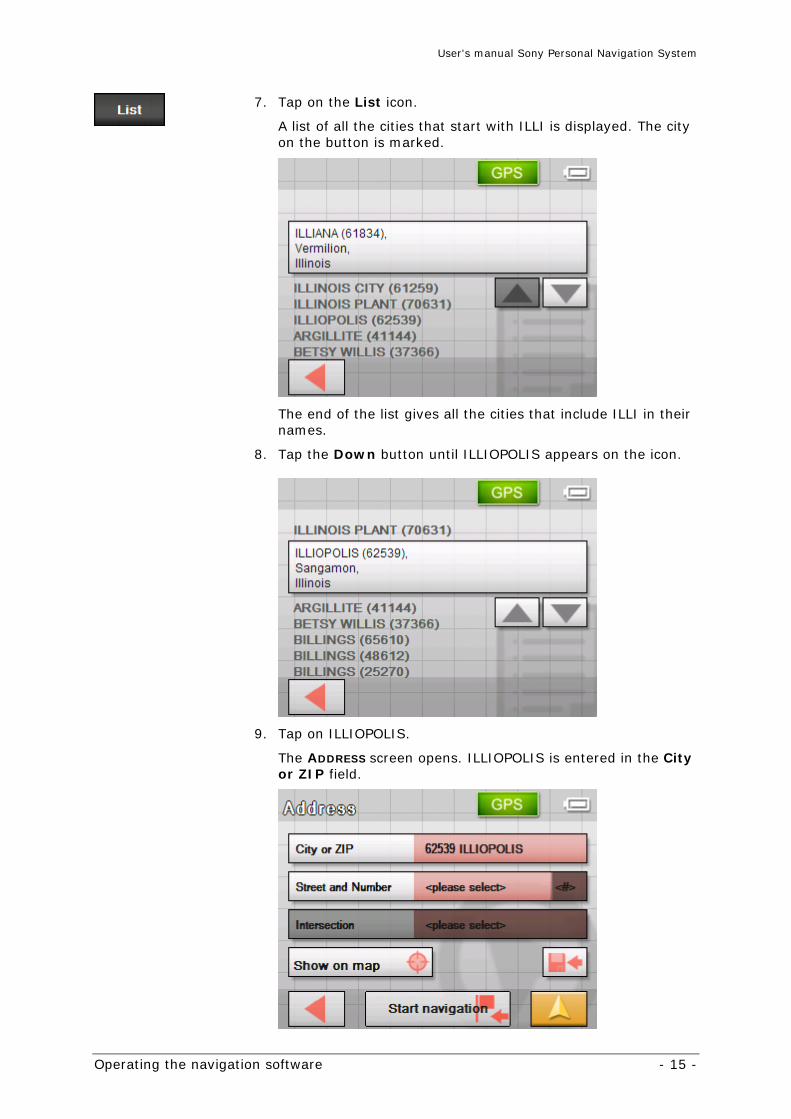
7. Tap on the List icon.
A list of all the cities that start with ILLI is displayed. The city on the button is marked.
The end of the list gives all the cities that include ILLI in their names.
8. Tap the Down button until ILLIOPOLIS appears on the icon.
9. Tap on ILLIOPOLIS.
The ADDRESS screen opens. ILLIOPOLIS is entered in the City or ZIP field.
User's manual Sony Personal Navigation System
- 16 - Command buttons
Command buttons
Icons Most of the Sony Personal Navigation System screens have the following buttons:
Return
Tap this icon to return to the previous screen.
You can use this icon to stop navigation.
Map view
Tap on this button to return to the standard map view. From there you can open the MENU by tapping on any point in the map.
Information
Survey On virtually all the Sony Personal Navigation System screens you will find the GPS button. You can use this to display the current GPS status at any time.
Battery condition
The Battery condition icon is placed at the top right corner of the screen. The color of the icon and the symbol displayed on it have the following significance:
Color/Symbol Significance
The device is connected to an external power supply. The battery is being charged.
The charge state of the battery is sufficient. The size of the segment on the battery indicates its charge state (3/3 or 2/3).
The device is being supplied by its internal battery. The charge state of the battery is weak. The size of the segment on the battery indicates its charge state (0 or 1/3). A message window informs you when the charge state of the battery becomes insufficient.
User's manual Sony Personal Navigation System
Operating the navigation software - 17 -
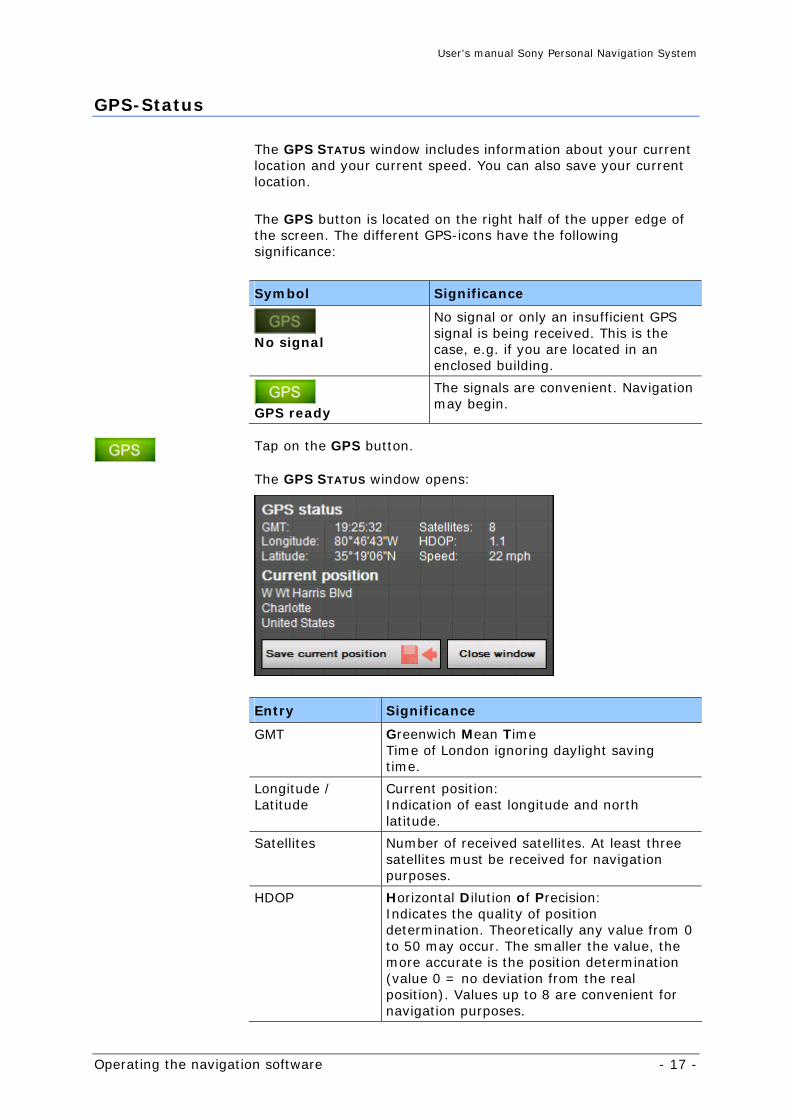
GPS-Status
The GPS STATUS window includes information about your current location and your current speed. You can also save your current location.
The GPS button is located on the right half of the upper edge of
the screen. The different GPS-icons have the following significance:
Symbol Significance
No signal
No signal or only an insufficient GPS signal is being received. This is the case, e.g. if you are located in an enclosed building.
GPS ready
The signals are convenient. Navigation may begin.
Tap on the GPS button.
The GPS STATUS window opens:
Entry Significance
GMT Greenwich Mean Time Time of London ignoring daylight saving time.
Longitude / Latitude
Current position: Indication of east longitude and north latitude.
Satellites Number of received satellites. At least three satellites must be received for navigation purposes.
HDOP Horizontal Dilution of Precision: Indicates the quality of position determination. Theoretically any value from 0 to 50 may occur. The smaller the value, the more accurate is the position determination (value 0 = no deviation from the real position). Values up to 8 are convenient for navigation purposes.
User's manual Sony Personal Navigation System
- 18 - Information
Entry Significance
Speed Indicates your current speed.
Current position Indicates the address of your current position.
Save current position
Tap on this button to save the current location in FAVORITES.
Close window Tap this button to quit the GPS screen.
User's manual Sony Personal Navigation System
Navigation - 19 -
Navigation
Topics covered in this chapter:
Starting the Sony Personal Navigation System page 20
Menu
Basic settings page 23
Indicating a destination page 26
Specifying the country of your destination Entering an address Selecting a point of interest Indicating destinations on the map Favorites Recent destinations Navigating homewards
Destination management page 42
Saving a destination Renaming a destination Deleting a destination
Indicating several destinations (Itinerary with stages) page 45
Indicating route points Editing, saving and managing itineraries Calculating the route Displaying the itinerary on the map Simulating the route
Starting navigation page 56
User's manual Sony Personal Navigation System
- 20 - Starting the Sony Personal Navigation System
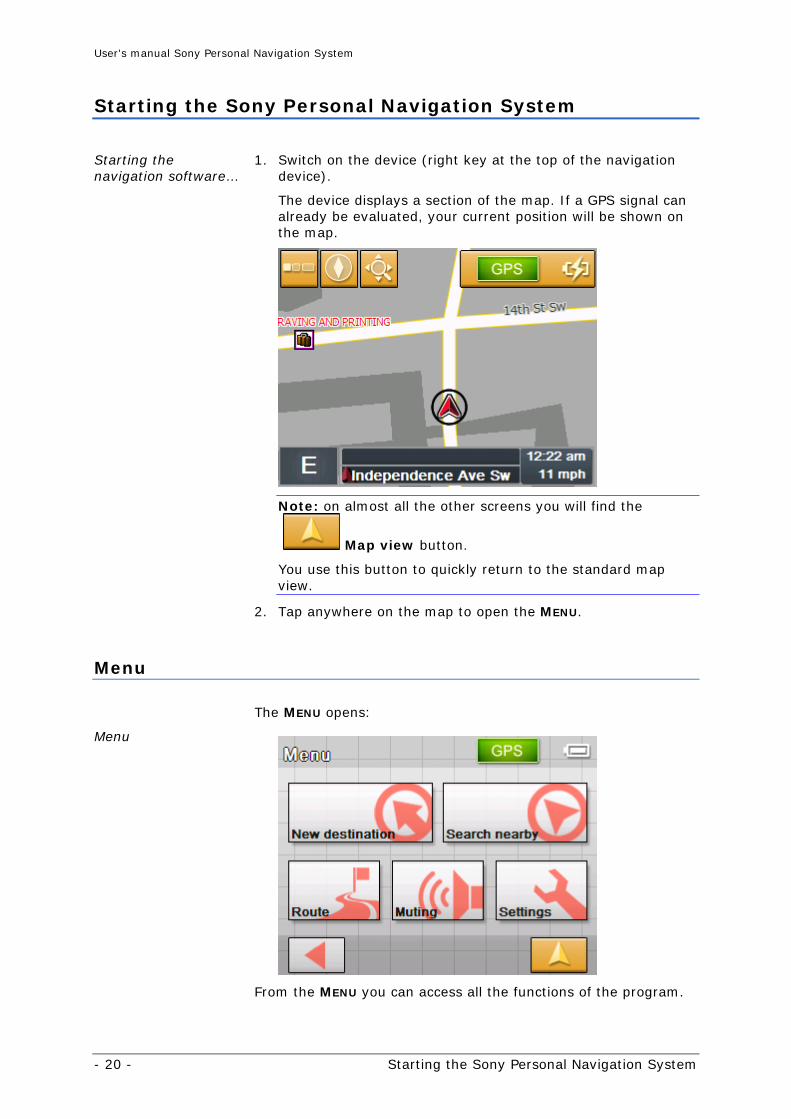
Starting the Sony Personal Navigation System
Starting the navigation software…
1. Switch on the device (right key at the top of the navigation device).
The device displays a section of the map. If a GPS signal can already be evaluated, your current position will be shown on the map.
Note: on almost all the other screens you will find the
Map view button.
You use this button to quickly return to the standard map view.
2. Tap anywhere on the map to open the MENU.
Menu
The MENU opens:
Menu
From the MENU you can access all the functions of the program.
User's manual Sony Personal Navigation System
Navigation - 21 -
Note: The Sony Personal Navigation System always opens with the screen that was active at the time you switched off the device.
New destination Tap on the New destination button to enter a destination for
the navigation, or plan a route.
Find out more about the navigation to a specific destination from section "Indicating a destination" on page23.
Find out more about navigation home from section "Navigating homewards" on page 42.
Find out more about route planning from section "Indicating several destinations (Itinerary with stages)" on page 45.
Vicinity search Tap on the Search nearby button to search for a point of
interest in the vicinity of your current position.
Refer to section "Point of interest nearby" on page28.
Route Tap on the Route button to process or simulate an already
calculated route.
Find out more information about displaying the entire route from section "Indicating a destination" on page 23.
Find out more about blocking a route section whilst navigating from section "Blocking a route section" on page 72.
Find out more about simulating a route from section "Simulating the route" on page 54.
Find out more about skipping a stage point from section "Next destination" on page71.
Find out more about route options from section "Routing options" on page82.
Loudspeaker off Tap the Loudspeaker off button to switch off the device’s
loudspeaker. You will no longer be able to hear drive instructions. The button appears pressed.
Tap this button again to switch the loudspeaker back on.
User's manual Sony Personal Navigation System
- 22 - Starting the Sony Personal Navigation System
Settings Tap the Settings button to modify the settings of the Sony
Personal Navigation System.
For details, please refer to "Settings", page 78.
Quit navigation This button is only visible while you are navigating or while you
are simulating a navigation.
Tap on the Quit Navigation button to cancel navigation (or a simulation).
GPS status Tap on the GPS button to obtain information about the GPS
positioning and about your current location.
For details, please refer to "GPS-Status", page 17.
Tap on the Map view button to open the standard map view.
The Back button in the MENU carries out the same function.
User's manual Sony Personal Navigation System
Navigation - 23 -
Basic settings
Basic settings Before working with the Sony Personal Navigation System, we recommend
indicating the time zone of the region you are staying in currently so that the system can indicate correct times of arrival in navigation mode,
entering the home address. You may then navigate home from anywhere.
1. In the MENU, tap Settings.
The SETTINGS screen opens.
2. Tap the Down button until you see the screen page with the
Time zone button. Then tap on Time zone.
Indicate the time zone…
The TIME ZONE screen opens.
3. Tap into the Time zone entry filed.
User's manual Sony Personal Navigation System
- 24 - Basic settings
The SELECT THE TIME ZONE list opens.
4. Use the Up and Down buttons to select a valid time zone for
your present location (without daylight saving time). The display of cities or states in the presently chosen zone makes it easier for you to choose.
5. Tap the selected time zone.
The time zone is then transferred to the TIME ZONE screen.
6. Tap on the Daylight saving time field to toggle between daylight saving time (yes) and standard time (no).
Note: If there is a clock change or if you are traveling into another time zone, you will have to adjust the respective setting.
7. Tap Save.
8. Tap on Back.
The SETTINGS screen opens.
9. Use the Up and Down buttons to select the screen page with
the Home address button. Then tap on Home address.
Saving your home address…
The HOME ADDRESS screen opens.
10. Tap Enter your home address.
User's manual Sony Personal Navigation System
Navigation - 25 -
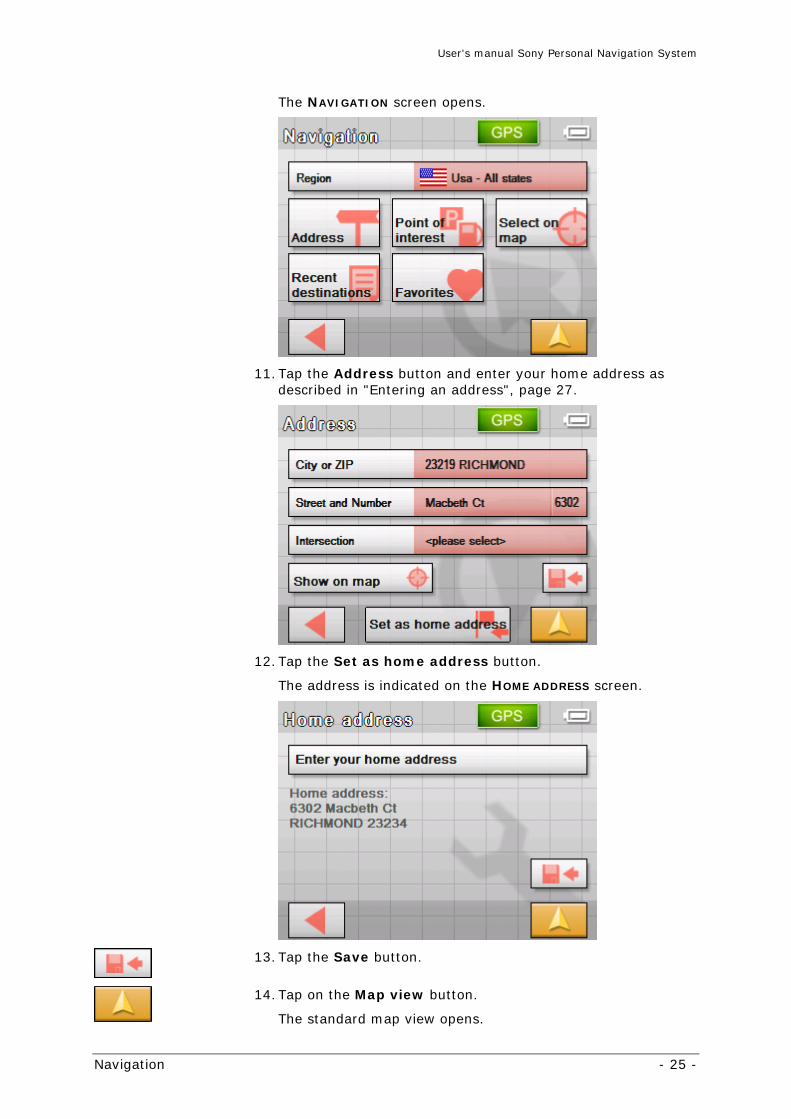
The NAVIGATION screen opens.
11. Tap the Address button and enter your home address as described in "Entering an address", page 27.
12. Tap the Set as home address button.
The address is indicated on the HOME ADDRESS screen.
13. Tap the Save button.
14. Tap on the Map view button.
The standard map view opens.
User's manual Sony Personal Navigation System
- 26 - Indicating a destination
Indicating a destination
Basic principle of navigation
In this chapter you will learn about the possibilities for indicating and managing destinations in the Sony Personal Navigation System.
For details on how to start navigation to a destination, please refer to "Starting navigation", page 56.
Indicating a destination
In the Sony Personal Navigation System there are several possibilities to enter or to select destinations:
Entering an address, see page 27
Selecting a point of interest, see page 28
Indicating destinations on the map, see page 36
Favorites, see page 39
Recent destinations, see page 41
Navigating homewards, see page 42
Specifying the country of your destination
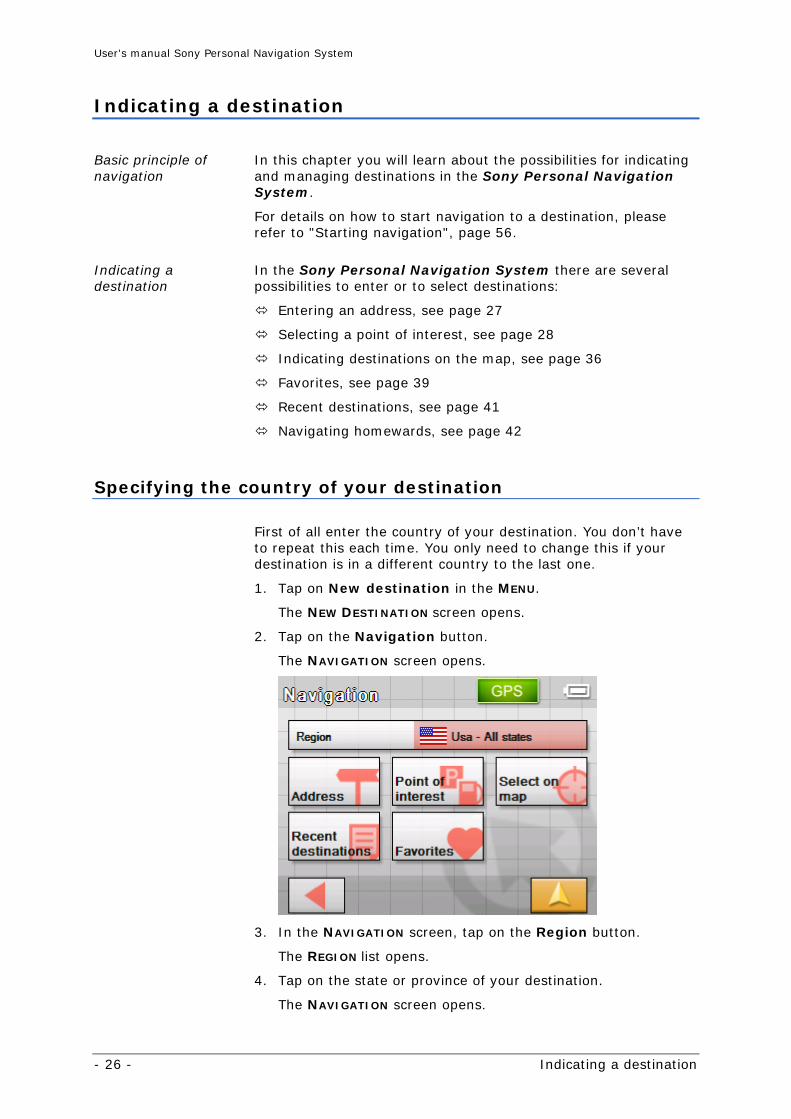
First of all enter the country of your destination. You don’t have to repeat this each time. You only need to change this if your destination is in a different country to the last one.
1. Tap on New destination in the MENU.
The NEW DESTINATION screen opens.
2. Tap on the Navigation button.
The NAVIGATION screen opens.
3. In the NAVIGATION screen, tap on the Region button.
The REGION list opens.
4. Tap on the state or province of your destination.
The NAVIGATION screen opens.
User's manual Sony Personal Navigation System
Navigation - 27 -
Note: Only states or provinces of which at least a part is represented on the currently loaded map may be selected.
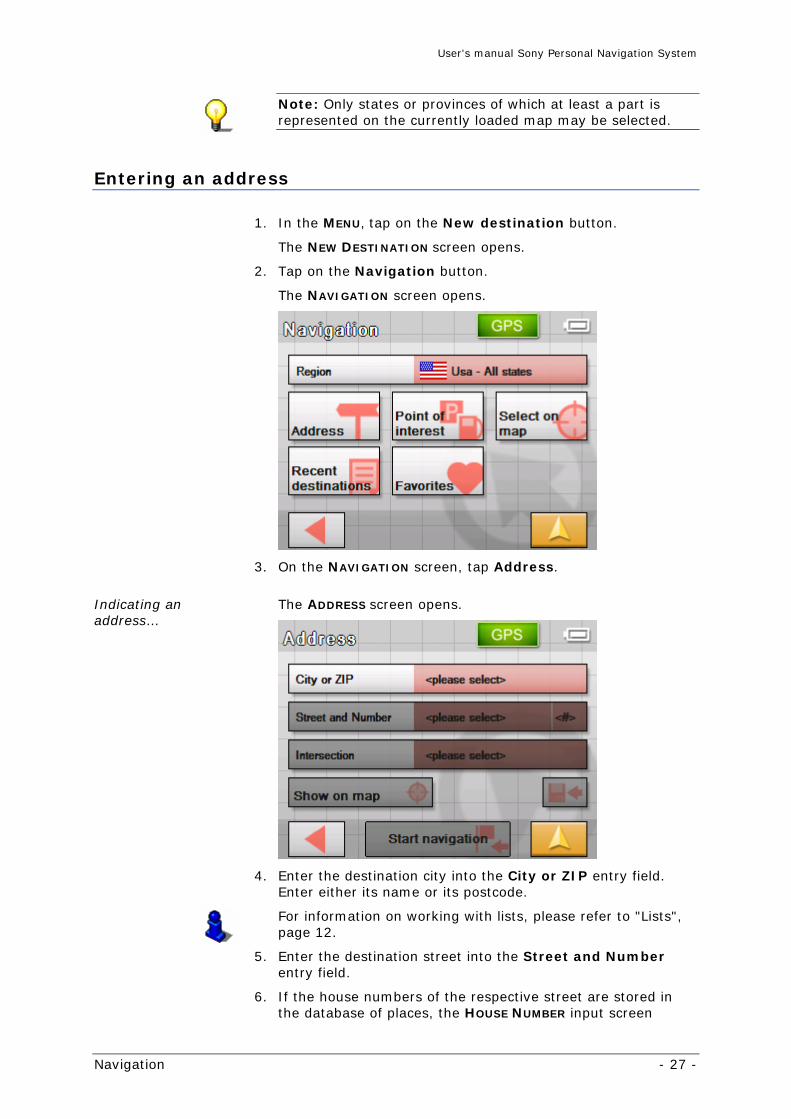
Entering an address
1. In the MENU, tap on the New destination button.
The NEW DESTINATION screen opens.
2. Tap on the Navigation button.
The NAVIGATION screen opens.
3. On the NAVIGATION screen, tap Address.
Indicating an address…
The ADDRESS screen opens.
4. Enter the destination city into the City or ZIP entry field. Enter either its name or its postcode.
For information on working with lists, please refer to "Lists", page 12.
5. Enter the destination street into the Street and Number entry field.
6. If the house numbers of the respective street are stored in the database of places, the HOUSE NUMBER input screen

User's manual Sony Personal Navigation System
- 28 - Indicating a destination
appears automatically.
Note: If no house numbers are stored, the HOUSE NUMBER input screen will not appear. The software navigates to the respective street.
7. Enter the name of a crossroad into the Intersection entry field if you want to define an intersection as destination point (e.g. because the house number is not available).
For information on working with lists, please refer to "Lists", page 12.
Start navigation Tap on the Start navigation button to commence navigation to
the specified destination.
Look this up in chapter "Starting navigation" on page56.
Show on map Tap on the Show on map button to see the specified address on
the map.
Look this up in chapter "Indicating several destinations (Itinerary with stages)" on page 45.
Save Tap on the Save button to save the specified address under
Favorites.
Look this up in chapter "Saving a destination" on page 42.
Selecting a point of interest
Points of interest Points of Interest, also referred to as POIs, are stored in the database of places and may be displayed on the map. Ports, airports, restaurants, hotels, petrol stations, public buildings, and others belong to the special destinations. Indicate a point of interest by selecting one
Point of interest nearby
Note: You may only select Points of interest nearby if the GPS reception is sufficient for the positioning.
1. In the MENU, tap on the New destination button.
The NEW DESTINATION screen opens.
2. Tap on the Navigation button.
User's manual Sony Personal Navigation System
Navigation - 29 -
The NAVIGATION screen opens.
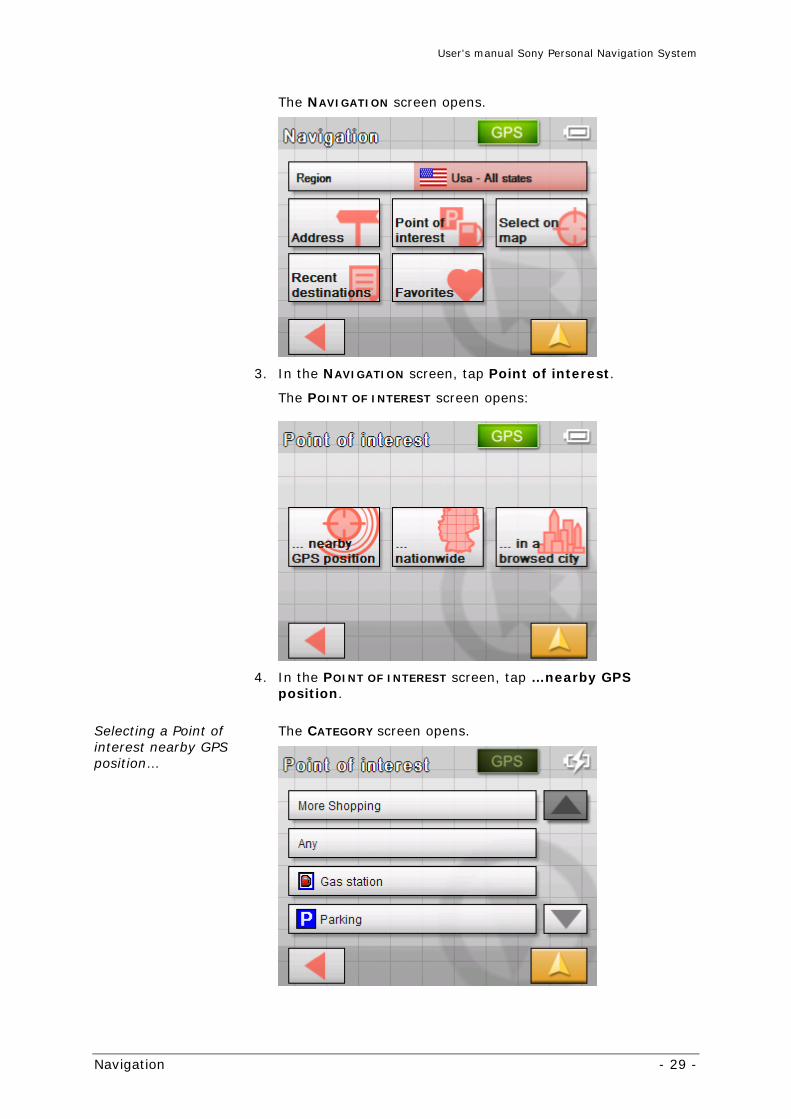
3. In the NAVIGATION screen, tap Point of interest.
The POINT OF INTEREST screen opens:
4. In the POINT OF INTEREST screen, tap …nearby GPS position.
Selecting a Point of interest nearby GPS position…
The CATEGORY screen opens.
User's manual Sony Personal Navigation System
- 30 - Indicating a destination
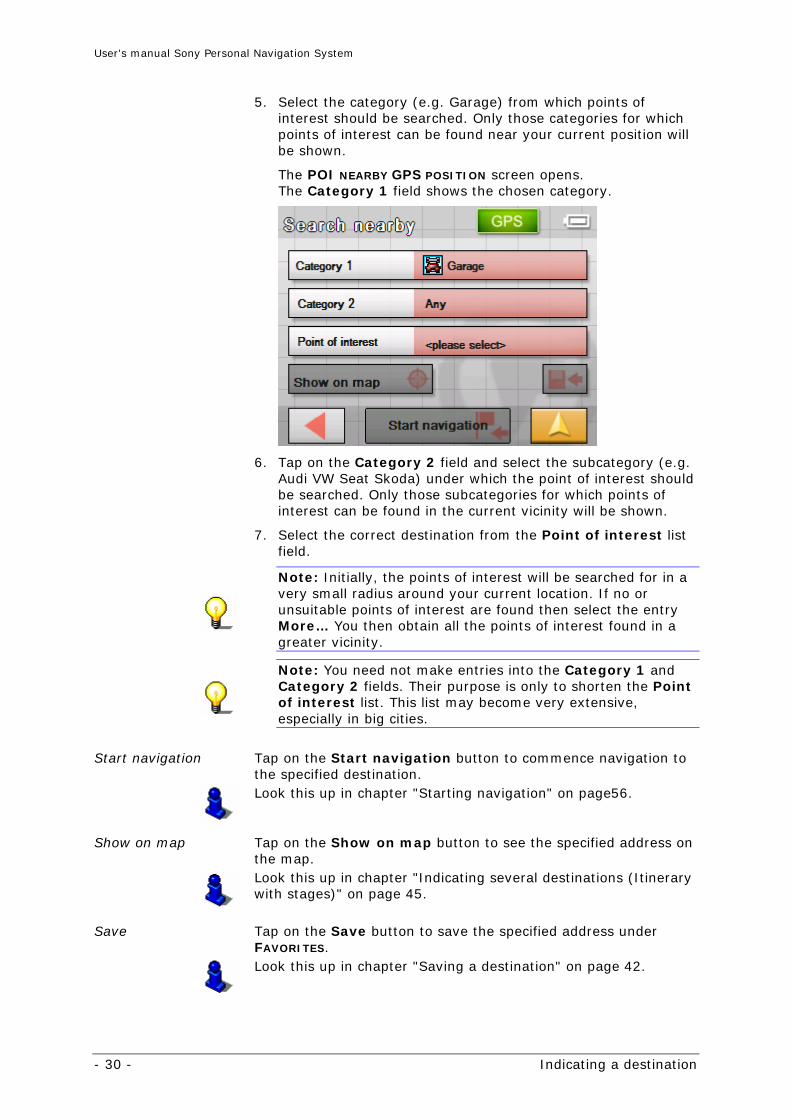
5. Select the category (e.g. Garage) from which points of interest should be searched. Only those categories for which points of interest can be found near your current position will be shown.
The POI NEARBY GPS POSITION screen opens. The Category 1 field shows the chosen category.
6. Tap on the Category 2 field and select the subcategory (e.g. Audi VW Seat Skoda) under which the point of interest should be searched. Only those subcategories for which points of interest can be found in the current vicinity will be shown.
7. Select the correct destination from the Point of interest list field.
Note: Initially, the points of interest will be searched for in a very small radius around your current location. If no or unsuitable points of interest are found then select the entry More… You then obtain all the points of interest found in a greater vicinity.
Note: You need not make entries into the Category 1 and Category 2 fields. Their purpose is only to shorten the Point of interest list. This list may become very extensive, especially in big cities.
Start navigation Tap on the Start navigation button to commence navigation to
the specified destination.
Look this up in chapter "Starting navigation" on page56.
Show on map Tap on the Show on map button to see the specified address on
the map.
Look this up in chapter "Indicating several destinations (Itinerary with stages)" on page 45.
Save Tap on the Save button to save the specified address under
FAVORITES.
Look this up in chapter "Saving a destination" on page 42.
User's manual Sony Personal Navigation System
Navigation - 31 -
Point of interest in a certain city
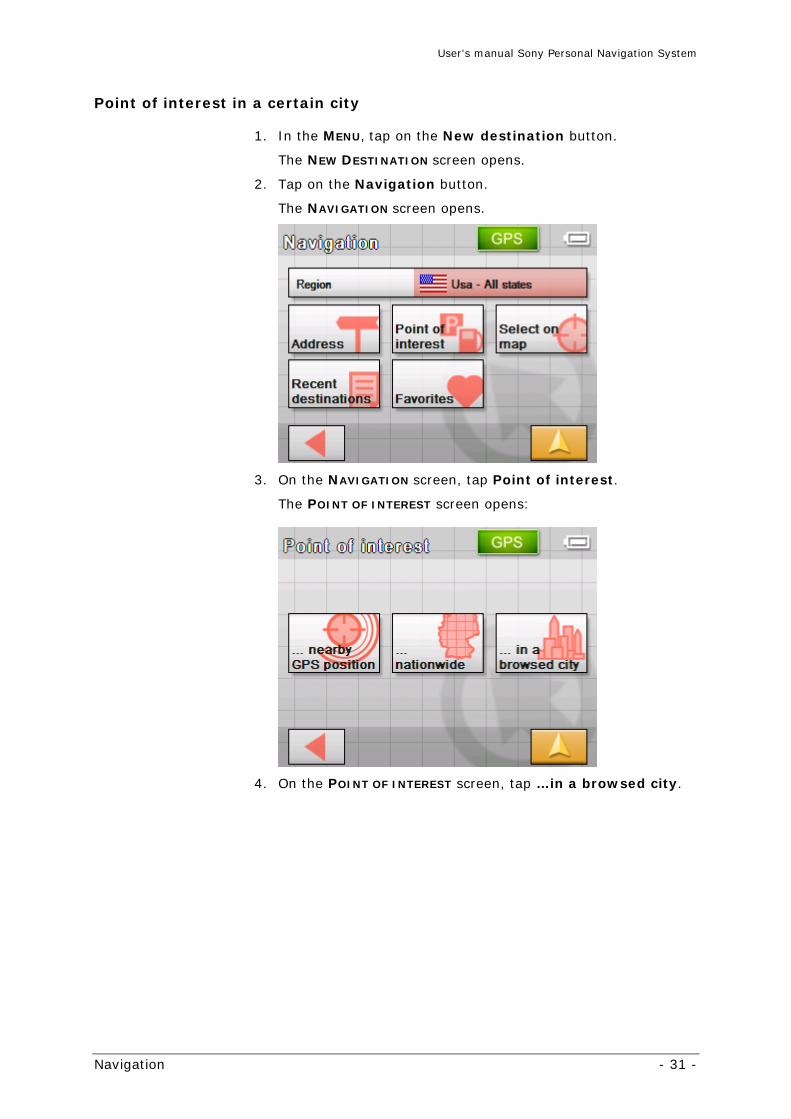
1. In the MENU, tap on the New destination button.
The NEW DESTINATION screen opens.
2. Tap on the Navigation button.
The NAVIGATION screen opens.
3. On the NAVIGATION screen, tap Point of interest.
The POINT OF INTEREST screen opens:
4. On the POINT OF INTEREST screen, tap …in a browsed city.
User's manual Sony Personal Navigation System
- 32 - Indicating a destination
Selecting a Point of interest in browsed city…
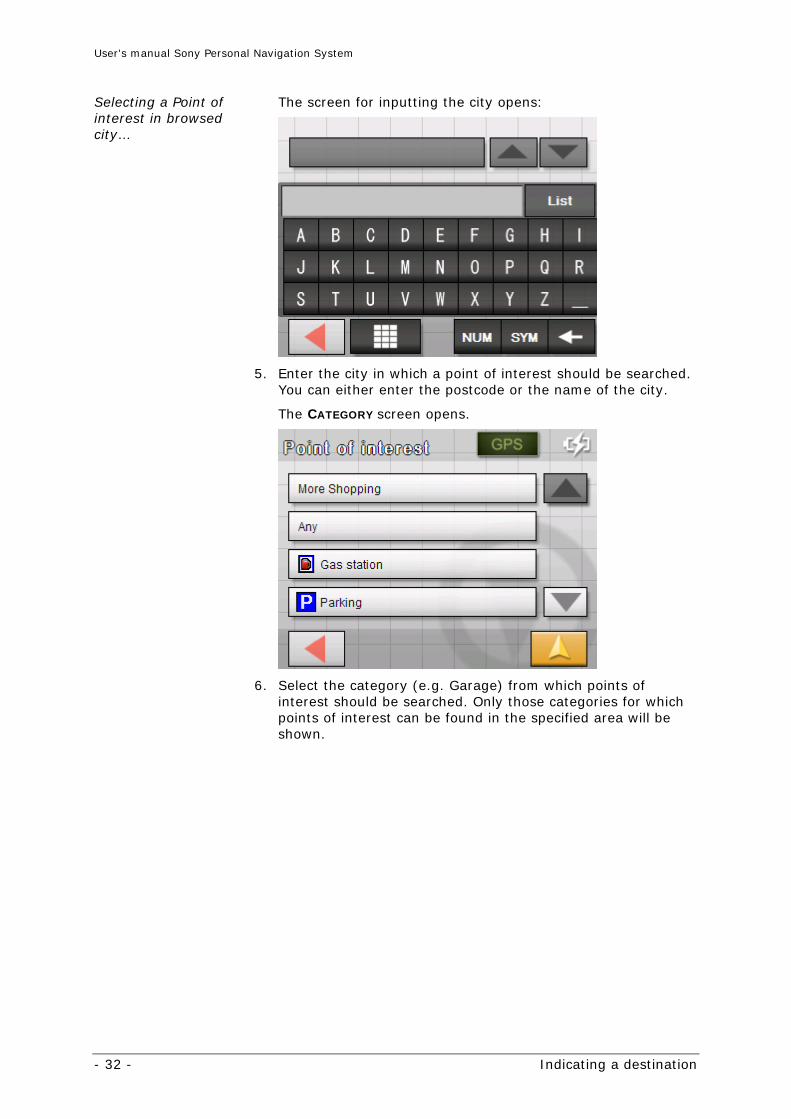
The screen for inputting the city opens:
5. Enter the city in which a point of interest should be searched. You can either enter the postcode or the name of the city.
The CATEGORY screen opens.
6. Select the category (e.g. Garage) from which points of interest should be searched. Only those categories for which points of interest can be found in the specified area will be shown.
User's manual Sony Personal Navigation System
Navigation - 33 -
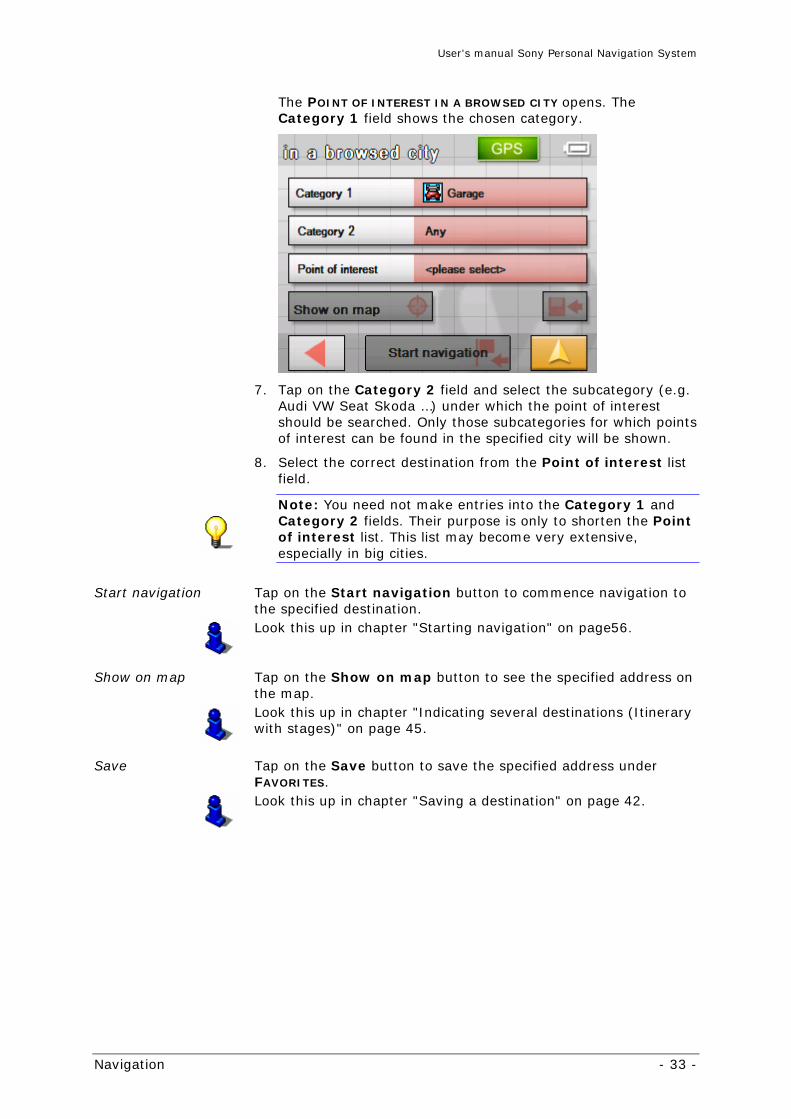
The POINT OF INTEREST IN A BROWSED CITY opens. The Category 1 field shows the chosen category.
7. Tap on the Category 2 field and select the subcategory (e.g. Audi VW Seat Skoda …) under which the point of interest should be searched. Only those subcategories for which points of interest can be found in the specified city will be shown.
8. Select the correct destination from the Point of interest list field.
Note: You need not make entries into the Category 1 and Category 2 fields. Their purpose is only to shorten the Point of interest list. This list may become very extensive, especially in big cities.
Start navigation Tap on the Start navigation button to commence navigation to
the specified destination.
Look this up in chapter "Starting navigation" on page56.
Show on map Tap on the Show on map button to see the specified address on
the map.
Look this up in chapter "Indicating several destinations (Itinerary with stages)" on page 45.
Save Tap on the Save button to save the specified address under
FAVORITES.
Look this up in chapter "Saving a destination" on page 42.
User's manual Sony Personal Navigation System
- 34 - Indicating a destination
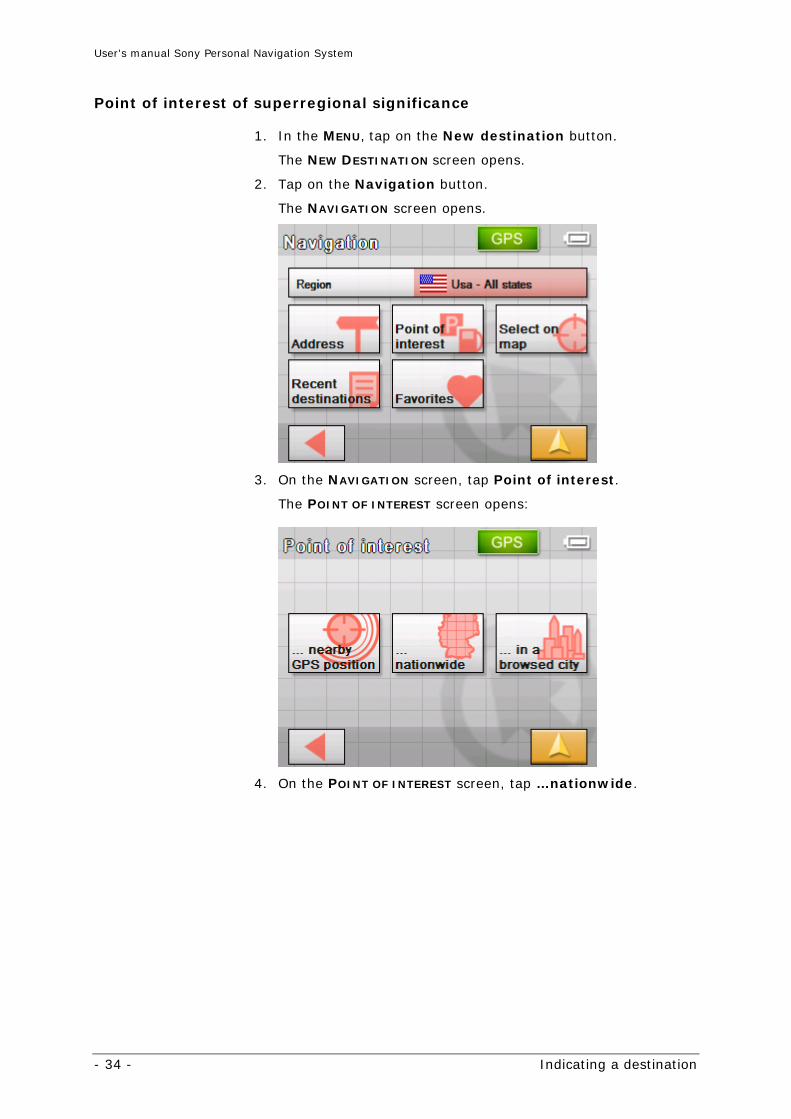
Point of interest of superregional significance
1. In the MENU, tap on the New destination button.
The NEW DESTINATION screen opens.
2. Tap on the Navigation button.
The NAVIGATION screen opens.
3. On the NAVIGATION screen, tap Point of interest.
The POINT OF INTEREST screen opens:
4. On the POINT OF INTEREST screen, tap …nationwide.

User's manual Sony Personal Navigation System
Navigation - 35 -
Selecting a Point of interest of superregional significance…
The CATEGORY screen opens.
5. Select the category (e.g. car airport) from which points of interest should be searched. Only categories of superregional importance will be shown.
The POI NATIONWIDE screen opens. The Category field shows the chosen category.
6. Select the correct destination from the Point of interest list field.
Note: You need not make entries into the Category field. Their purpose is only to shorten the Point of interest list. This list may become very extensive, especially in big cities.
Start navigation Tap on the Start navigation button to commence navigation to
the specified destination.
Look this up in chapter "Starting navigation" on page56.
Show on map Tap on the Show on map button to see the specified address on
the map.
Look this up in chapter "Indicating several destinations (Itinerary with stages)" on page 45.
Save Tap on the Save button to save the specified address under
FAVORITES.
User's manual Sony Personal Navigation System
- 36 - Indicating a destination
Look this up in chapter "Saving a destination" on page 42.
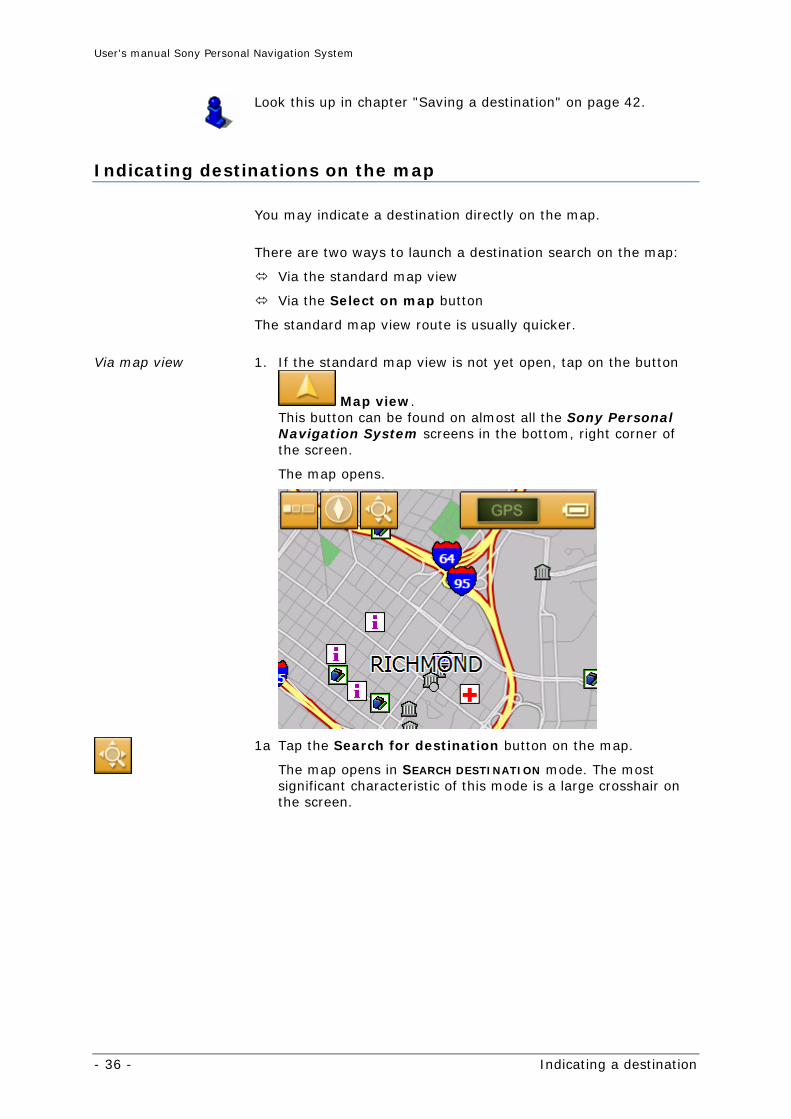
Indicating destinations on the map
You may indicate a destination directly on the map.
There are two ways to launch a destination search on the map:
Via the standard map view
Via the Select on map button
The standard map view route is usually quicker.
Via map view 1. If the standard map view is not yet open, tap on the button
Map view. This button can be found on almost all the Sony Personal Navigation System screens in the bottom, right corner of the screen.
The map opens.
1a Tap the Search for destination button on the map.
The map opens in SEARCH DESTINATION mode. The most significant characteristic of this mode is a large crosshair on the screen.
User's manual Sony Personal Navigation System
Navigation - 37 -
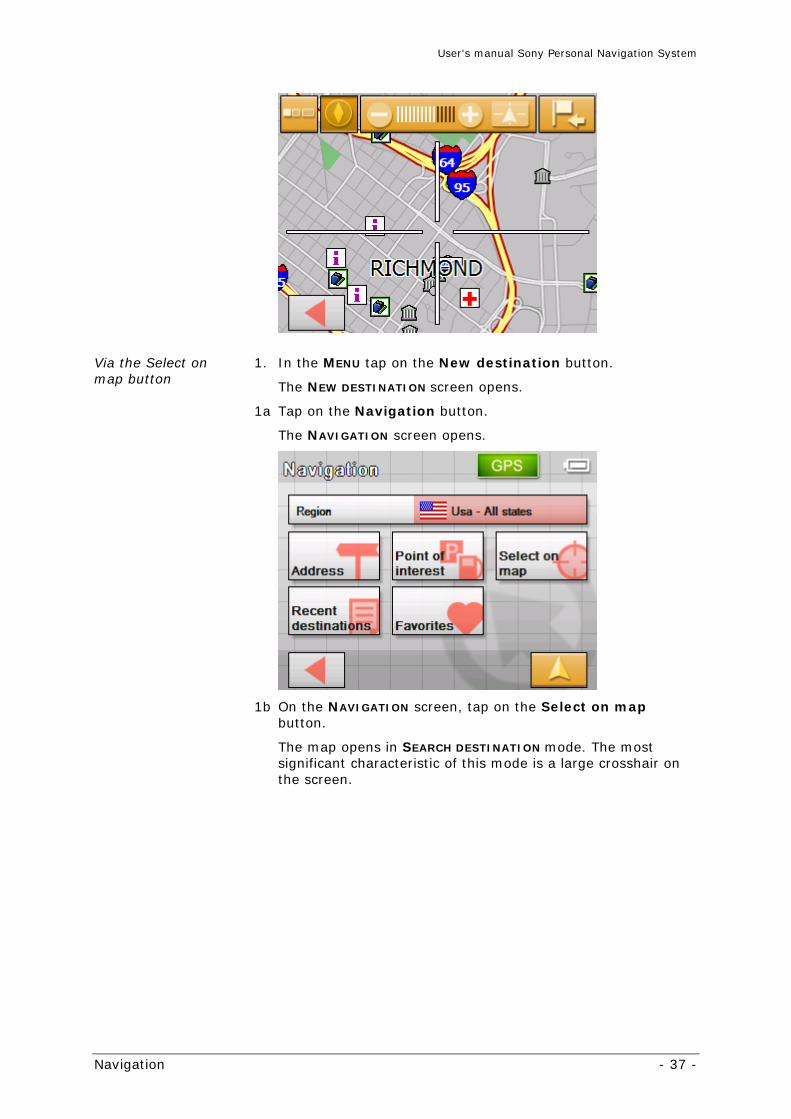
Via the Select on map button
1. In the MENU tap on the New destination button.
The NEW DESTINATION screen opens.
1a Tap on the Navigation button.
The NAVIGATION screen opens.
1b On the NAVIGATION screen, tap on the Select on map button.
The map opens in SEARCH DESTINATION mode. The most significant characteristic of this mode is a large crosshair on the screen.
User's manual Sony Personal Navigation System
- 38 - Indicating a destination
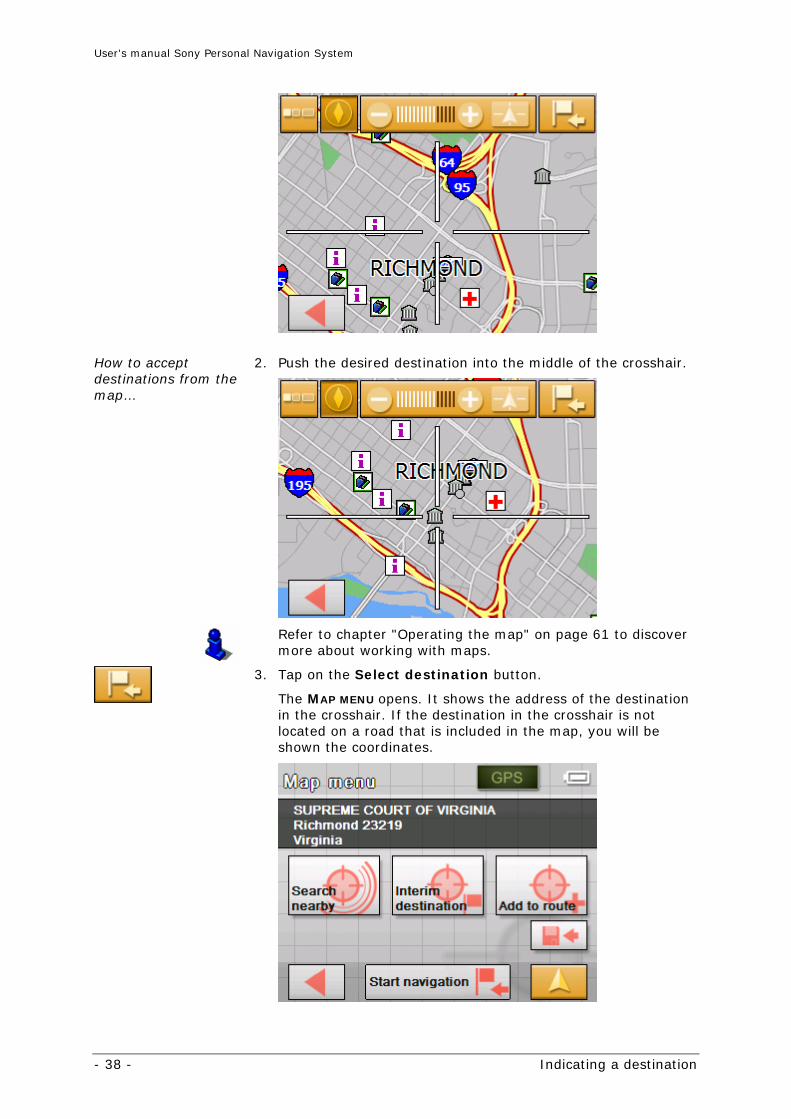
How to accept destinations from the map…
2. Push the desired destination into the middle of the crosshair.
Refer to chapter "Operating the map" on page 61 to discover more about working with maps.
3. Tap on the Select destination button.
The MAP MENU opens. It shows the address of the destination in the crosshair. If the destination in the crosshair is not located on a road that is included in the map, you will be shown the coordinates.
User's manual Sony Personal Navigation System
Navigation - 39 -
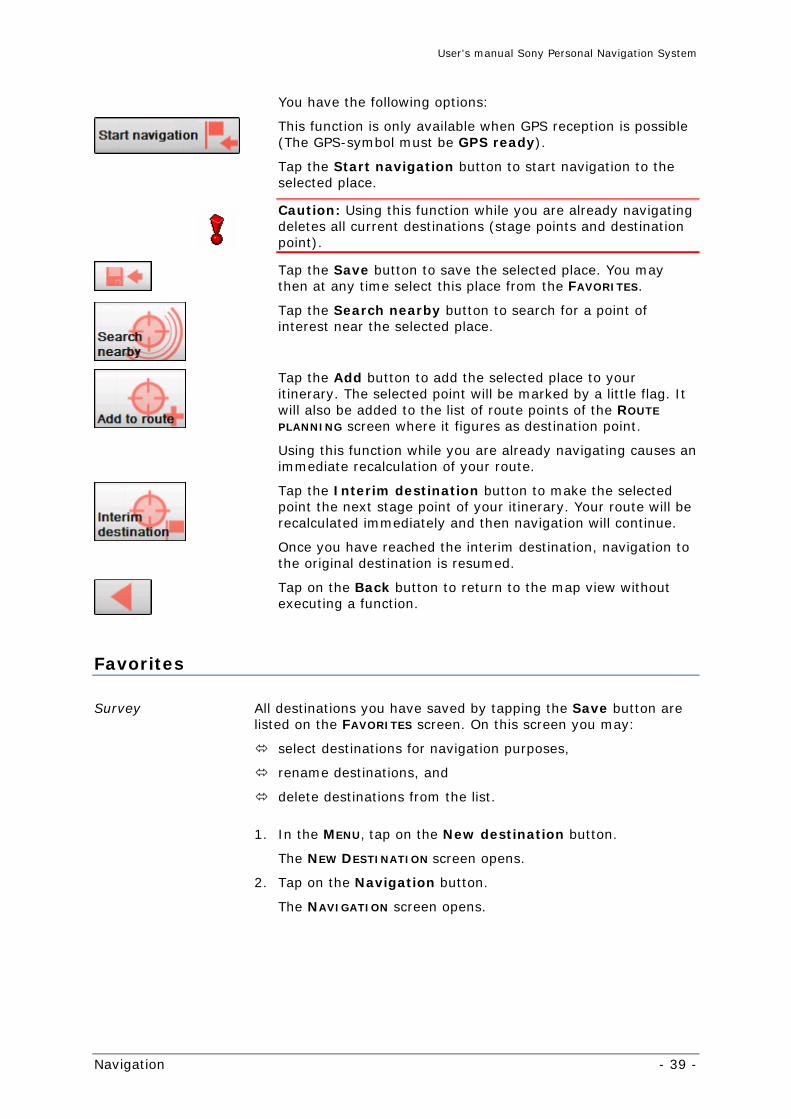
You have the following options:
This function is only available when GPS reception is possible (The GPS-symbol must be GPS ready).
Tap the Start navigation button to start navigation to the selected place.
Caution: Using this function while you are already navigating deletes all current destinations (stage points and destination point).
Tap the Save button to save the selected place. You may then at any time select this place from the FAVORITES.
Tap the Search nearby button to search for a point of interest near the selected place.
Tap the Add button to add the selected place to your itinerary. The selected point will be marked by a little flag. It will also be added to the list of route points of the ROUTE
PLANNING screen where it figures as destination point.
Using this function while you are already navigating causes an immediate recalculation of your route.
Tap the Interim destination button to make the selected point the next stage point of your itinerary. Your route will be recalculated immediately and then navigation will continue.
Once you have reached the interim destination, navigation to the original destination is resumed.
Tap on the Back button to return to the map view without executing a function.
Favorites
Survey All destinations you have saved by tapping the Save button are listed on the FAVORITES screen. On this screen you may:
select destinations for navigation purposes,
rename destinations, and
delete destinations from the list.
1. In the MENU, tap on the New destination button.
The NEW DESTINATION screen opens.
2. Tap on the Navigation button.
The NAVIGATION screen opens.
User's manual Sony Personal Navigation System
- 40 - Indicating a destination
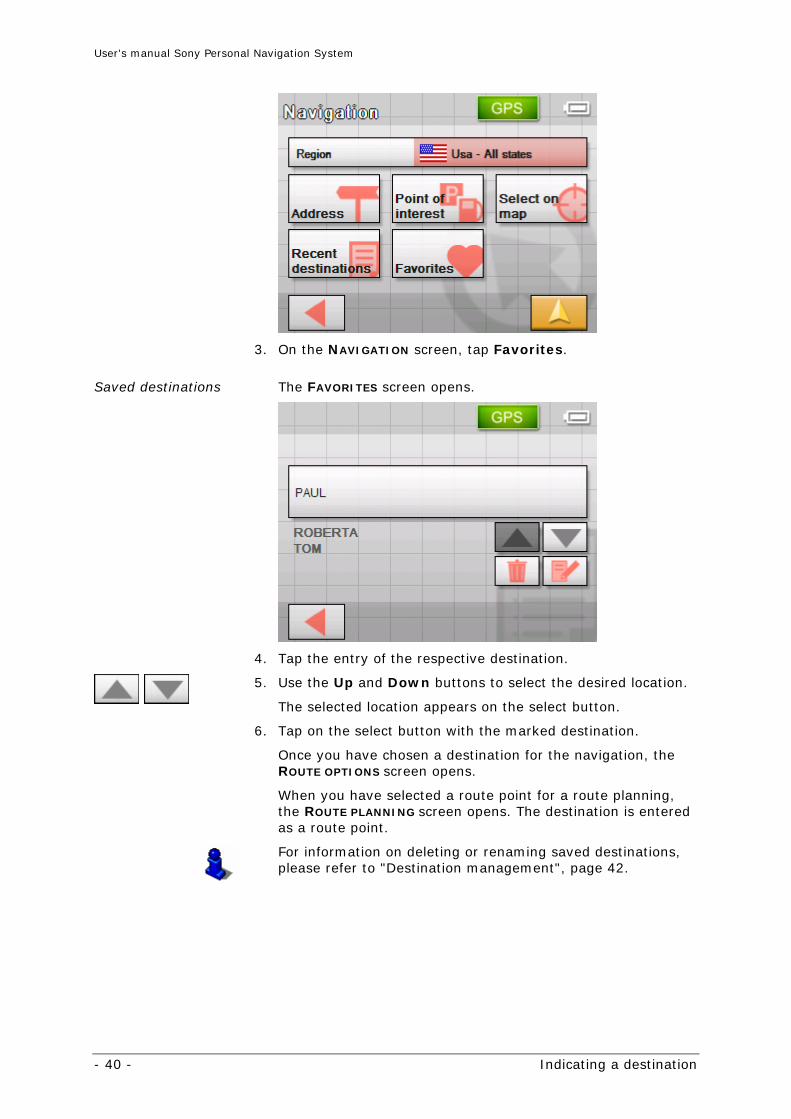
3. On the NAVIGATION screen, tap Favorites.
Saved destinations The FAVORITES screen opens.
4. Tap the entry of the respective destination.
5. Use the Up and Down buttons to select the desired location.
The selected location appears on the select button.
6. Tap on the select button with the marked destination.
Once you have chosen a destination for the navigation, the ROUTE OPTIONS screen opens.
When you have selected a route point for a route planning, the ROUTE PLANNING screen opens. The destination is entered as a route point.
For information on deleting or renaming saved destinations, please refer to "Destination management", page 42.
User's manual Sony Personal Navigation System
Navigation - 41 -
Recent destinations
Survey All destinations you have navigated to recently are listed on the RECENT DESTINATIONS screen. On this screen you may:
select destinations for navigation purposes,
Add destinations to the SAVED DESTINATIONS list, and
delete destinations from the RECENT DESTINATIONS list.
1. In the MENU, tap on the New destination button.
The NEW DESTINATION screen opens.
2. Tap on the Navigation button.
The NAVIGATION screen opens.
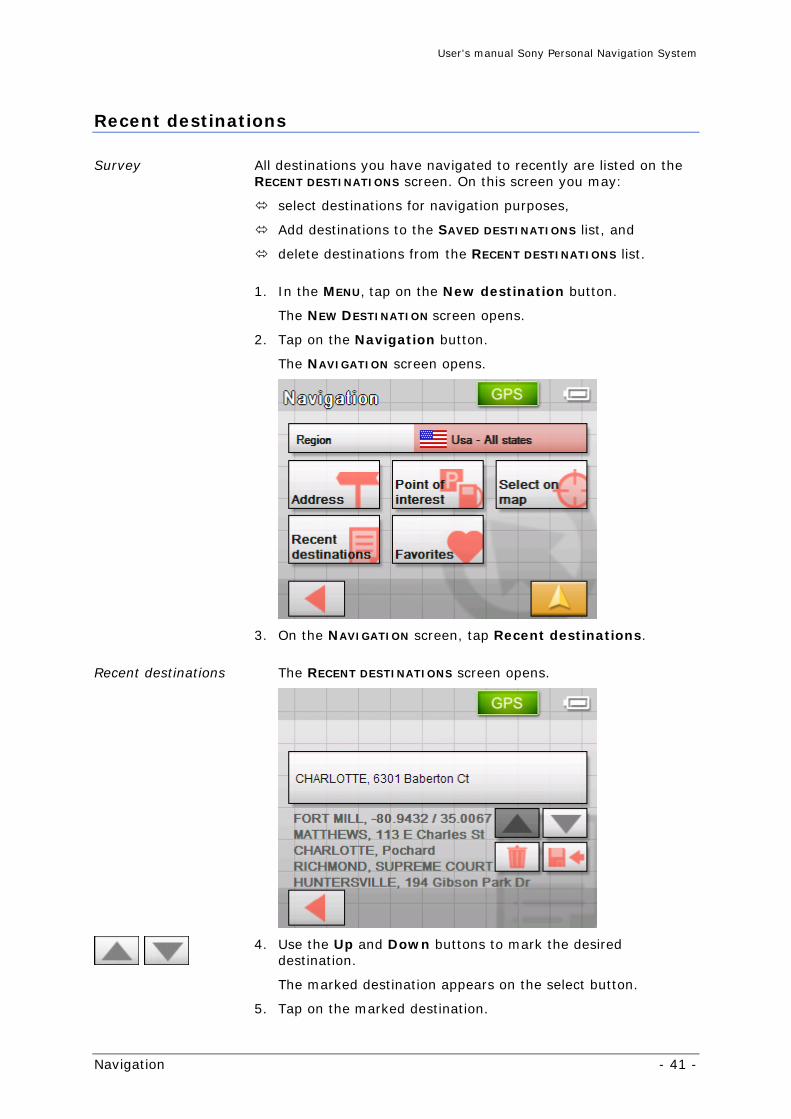
3. On the NAVIGATION screen, tap Recent destinations.
Recent destinations The RECENT DESTINATIONS screen opens.
4. Use the Up and Down buttons to mark the desired
destination.
The marked destination appears on the select button.
5. Tap on the marked destination.
User's manual Sony Personal Navigation System
- 42 - Destination management
When you have chosen a destination for the navigation the ROUTE OPTIONS screen opens.
When you have chosen a route point for a route planning, the ROUTE PLANNING screen opens. The destination is entered as a route point.
Refer to chapter "Destination management" on page 42 to find out how to delete the marked destination or save it under Favorites.
Navigating homewards
Survey If you have stored your home address you may quickly start navigation home at any place.
For information on saving your home address, please refer to "Home address", page 84.
Navigating homewards…
1. In the MENU tap on the New destination button.
The NEW DESTINATION screen opens.
2. Tap on the Home button.
The route is now being calculated and navigation starts.
The route calculation takes into account the settings that are established in the ROUTING OPTIONS screen.
For details, please refer to "Settings", page 78.
Destination management
Survey Destinations may be stored in two lists:
the FAVORITES
the RECENT DESTINATIONS list
Every destination you are indicating and the destinations from the RECENT DESTINATIONS list may be added to the FAVORITES. This makes sense if you want to navigate more often to the respective destination.
Destinations from the FAVORITES may be renamed.
Items from both lists may be deleted.
Saving a destination
Precondition You have entered a destination as described in "Indicating a destination", page 26 - OR – You have opened the RECENT DESTINATIONS list as described in "Recent destinations", page 41.
User's manual Sony Personal Navigation System
Navigation - 43 -
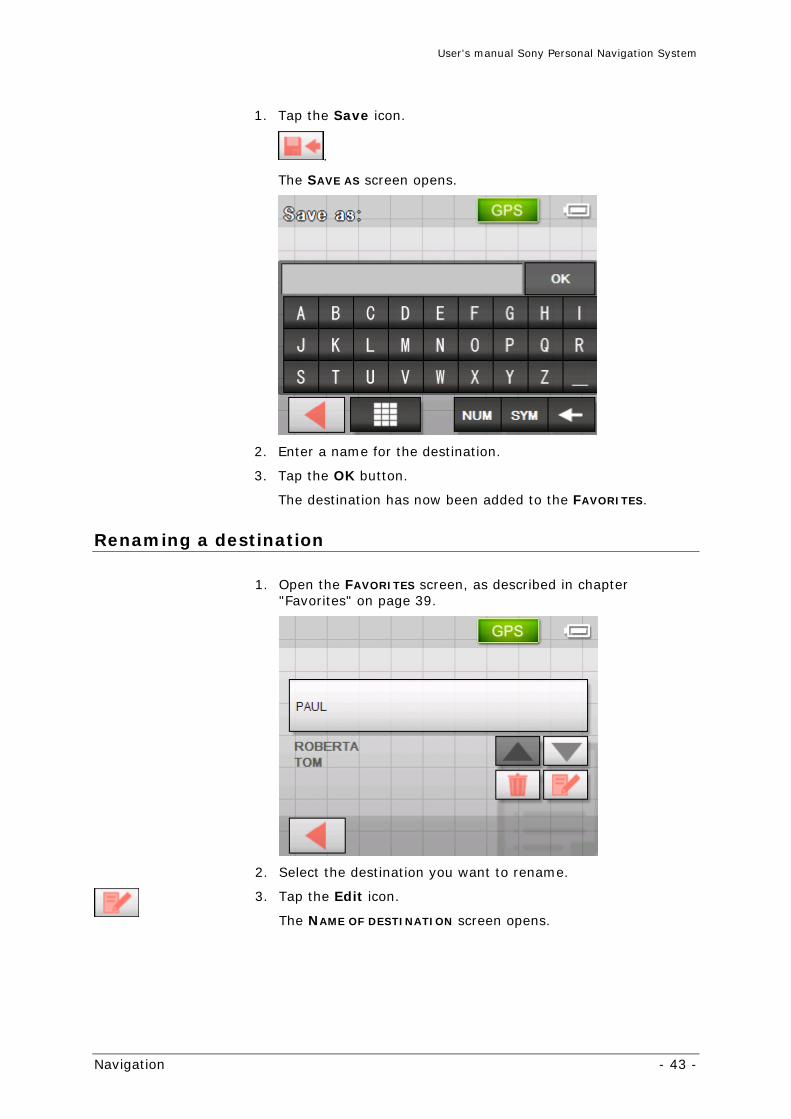
1. Tap the Save icon.
.
The SAVE AS screen opens.
2. Enter a name for the destination.
3. Tap the OK button.
The destination has now been added to the FAVORITES.
Renaming a destination
1. Open the FAVORITES screen, as described in chapter "Favorites" on page 39.
2. Select the destination you want to rename.
3. Tap the Edit icon.
The NAME OF DESTINATION screen opens.
User's manual Sony Personal Navigation System
- 44 - Destination management
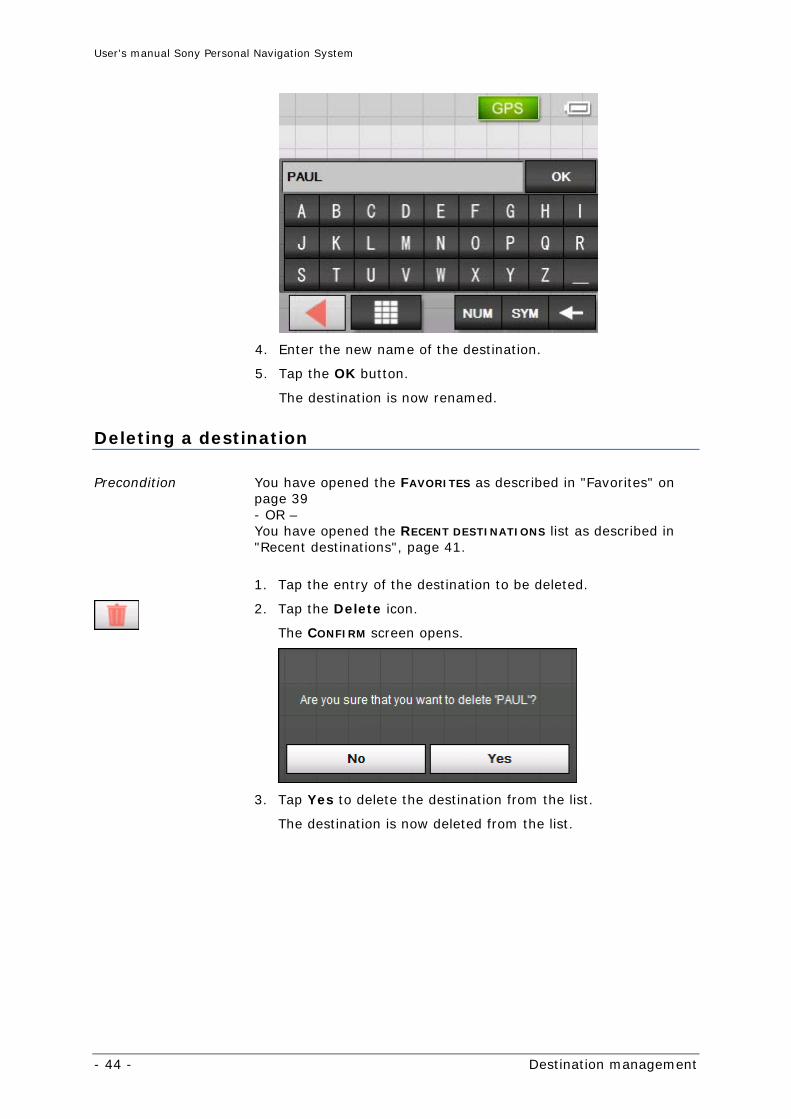
4. Enter the new name of the destination.
5. Tap the OK button.
The destination is now renamed.
Deleting a destination
Precondition You have opened the FAVORITES as described in "Favorites" on page 39 - OR – You have opened the RECENT DESTINATIONS list as described in "Recent destinations", page 41.
1. Tap the entry of the destination to be deleted.
2. Tap the Delete icon.
The CONFIRM screen opens.
3. Tap Yes to delete the destination from the list.
The destination is now deleted from the list.
User's manual Sony Personal Navigation System
Navigation - 45 -
Indicating several destinations (Itinerary with stages)
Itinerary planning You may plan itineraries without receiving GPS-signals, e.g. comfortably at home. Planned itineraries may be stored. Thus you may plan as many itineraries as you want, e.g. for holidays.
Indicating route points
Planning itineraries…
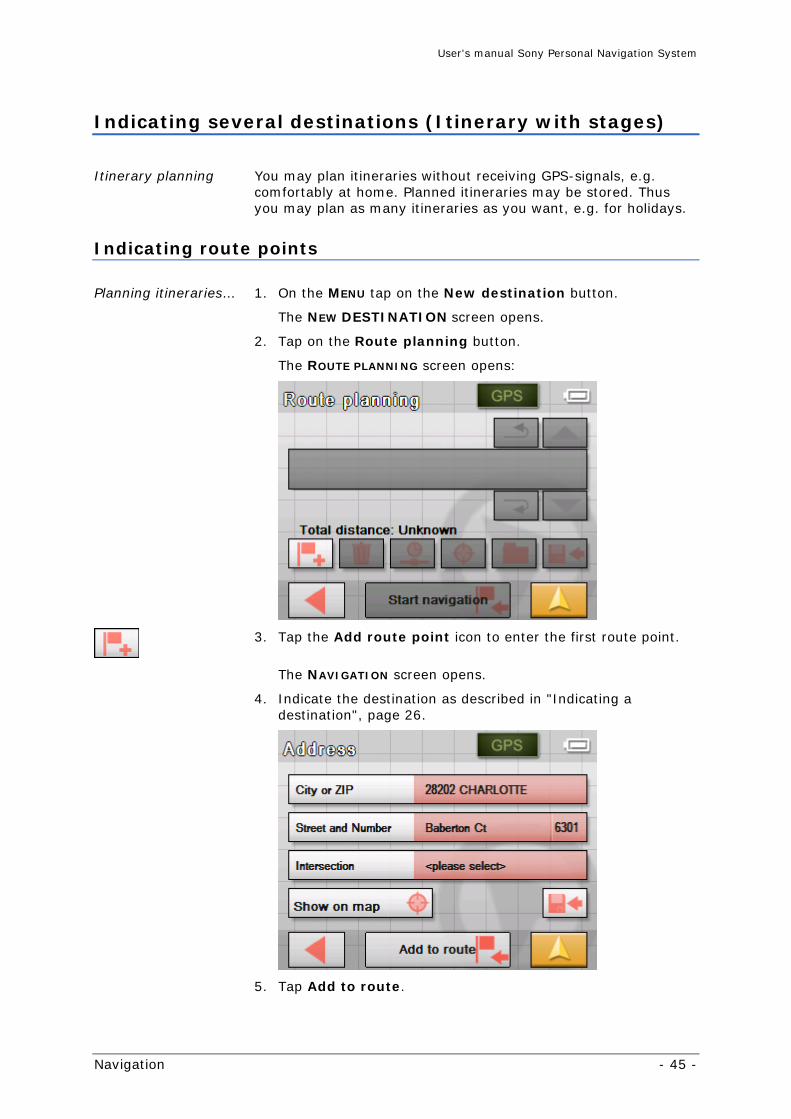
1. On the MENU tap on the New destination button.
The NEW DESTINATION screen opens.
2. Tap on the Route planning button.
The ROUTE PLANNING screen opens:
3. Tap the Add route point icon to enter the first route point.
The NAVIGATION screen opens.
4. Indicate the destination as described in "Indicating a destination", page 26.
5. Tap Add to route.
User's manual Sony Personal Navigation System
- 46 - Indicating several destinations (Itinerary with stages)
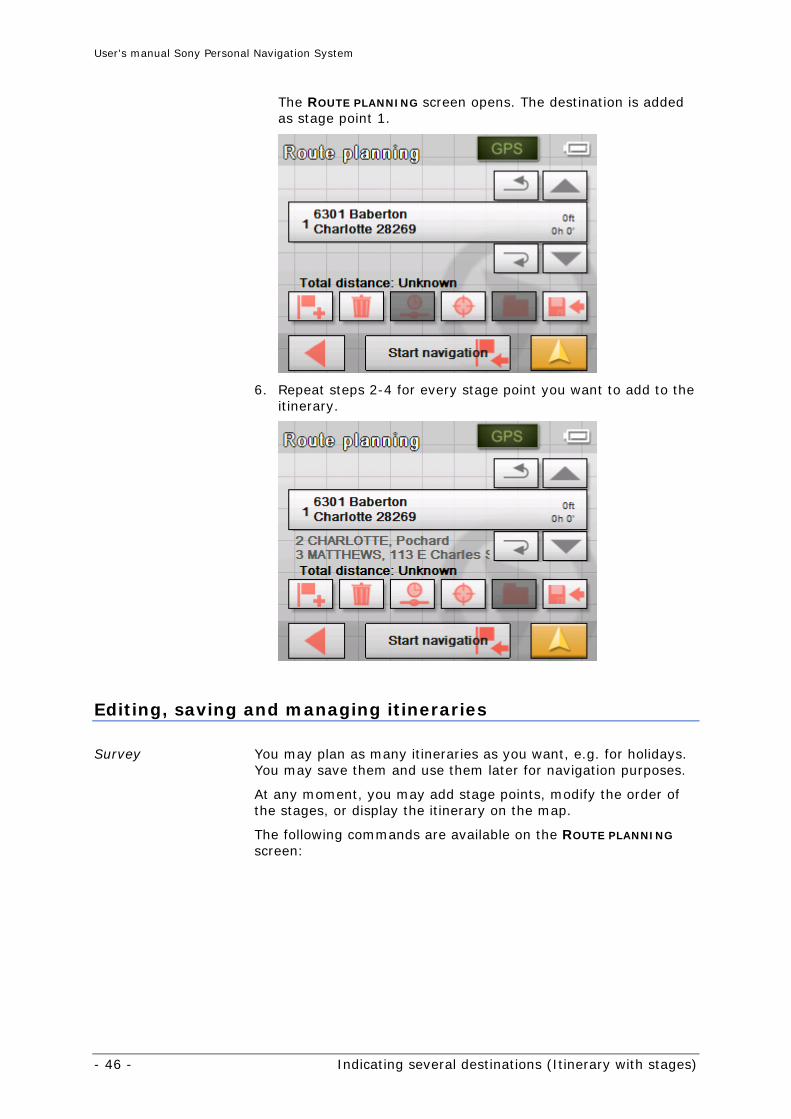
The ROUTE PLANNING screen opens. The destination is added as stage point 1.
6. Repeat steps 2-4 for every stage point you want to add to the itinerary.
Editing, saving and managing itineraries
Survey You may plan as many itineraries as you want, e.g. for holidays. You may save them and use them later for navigation purposes.
At any moment, you may add stage points, modify the order of the stages, or display the itinerary on the map.
The following commands are available on the ROUTE PLANNING screen:
User's manual Sony Personal Navigation System
Navigation - 47 -
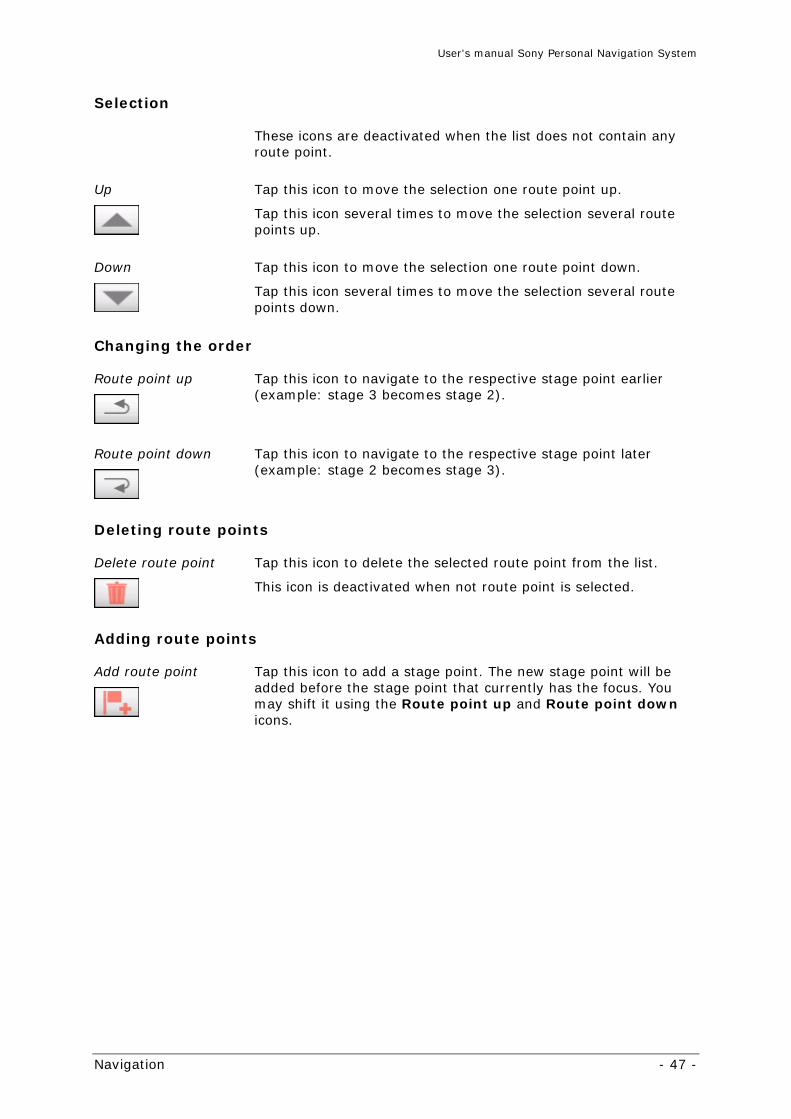
Selection
These icons are deactivated when the list does not contain any route point.
Up
Tap this icon to move the selection one route point up.
Tap this icon several times to move the selection several route points up.
Down
Tap this icon to move the selection one route point down.
Tap this icon several times to move the selection several route points down.
Changing the order
Route point up
Tap this icon to navigate to the respective stage point earlier (example: stage 3 becomes stage 2).
Route point down
Tap this icon to navigate to the respective stage point later (example: stage 2 becomes stage 3).
Deleting route points
Delete route point
Tap this icon to delete the selected route point from the list.
This icon is deactivated when not route point is selected.
Adding route points
Add route point
Tap this icon to add a stage point. The new stage point will be added before the stage point that currently has the focus. You may shift it using the Route point up and Route point down icons.
User's manual Sony Personal Navigation System
- 48 - Indicating several destinations (Itinerary with stages)
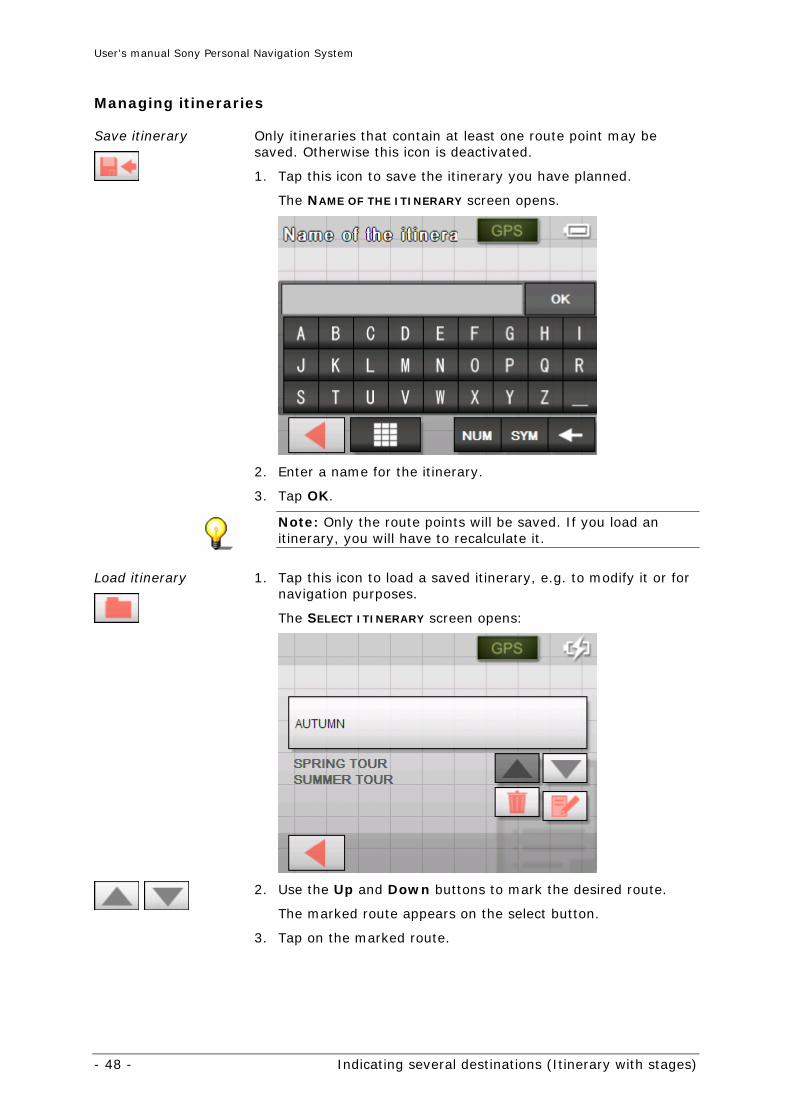
Managing itineraries
Save itinerary
Only itineraries that contain at least one route point may be saved. Otherwise this icon is deactivated.
1. Tap this icon to save the itinerary you have planned.
The NAME OF THE ITINERARY screen opens.
2. Enter a name for the itinerary.
3. Tap OK.
Note: Only the route points will be saved. If you load an itinerary, you will have to recalculate it.
Load itinerary
1. Tap this icon to load a saved itinerary, e.g. to modify it or for navigation purposes.
The SELECT ITINERARY screen opens:
2. Use the Up and Down buttons to mark the desired route.
The marked route appears on the select button.
3. Tap on the marked route.
User's manual Sony Personal Navigation System
Navigation - 49 -
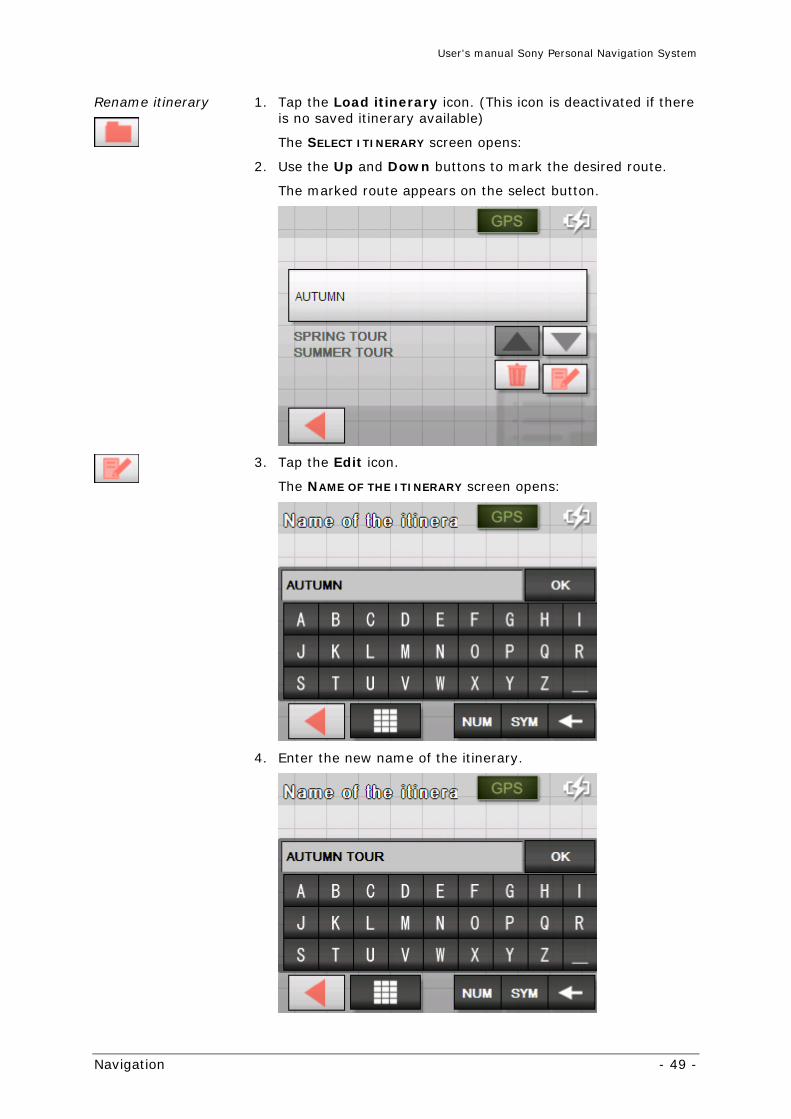
Rename itinerary
1. Tap the Load itinerary icon. (This icon is deactivated if there is no saved itinerary available)
The SELECT ITINERARY screen opens:
2. Use the Up and Down buttons to mark the desired route.
The marked route appears on the select button.
3. Tap the Edit icon.
The NAME OF THE ITINERARY screen opens:
4. Enter the new name of the itinerary.
User's manual Sony Personal Navigation System
- 50 - Indicating several destinations (Itinerary with stages)
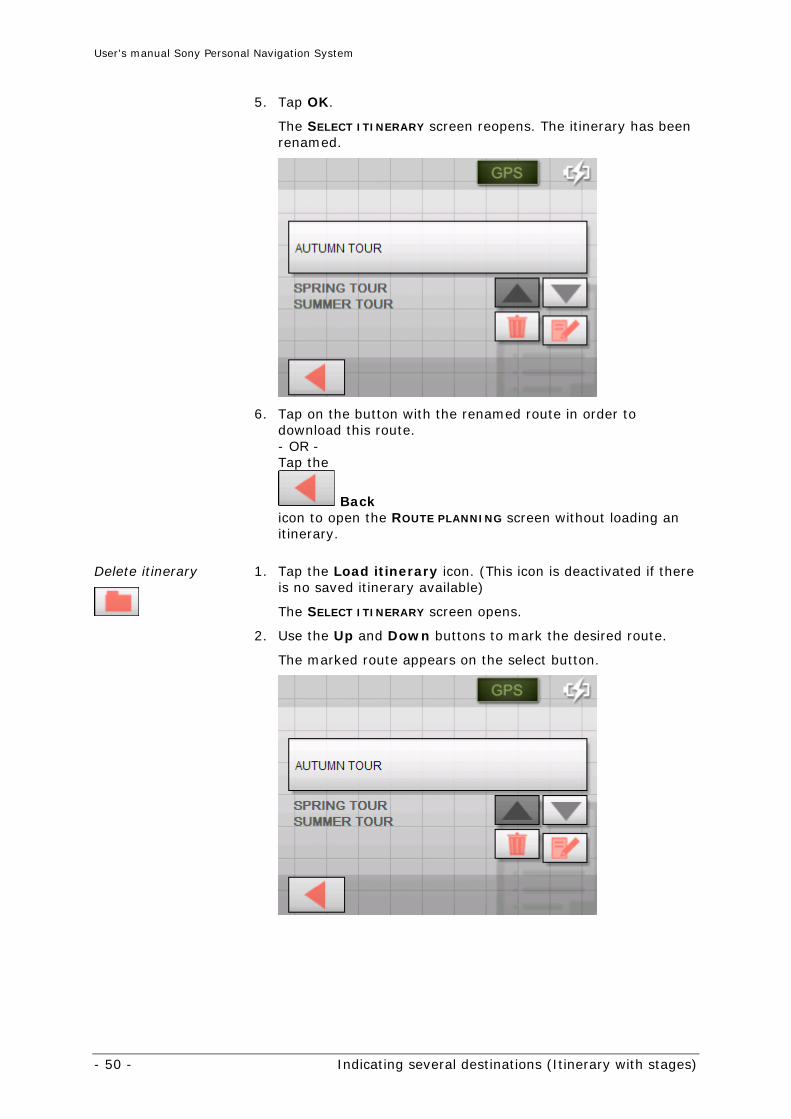
5. Tap OK.
The SELECT ITINERARY screen reopens. The itinerary has been renamed.
6. Tap on the button with the renamed route in order to download this route. - OR - Tap the
Back icon to open the ROUTE PLANNING screen without loading an itinerary.
Delete itinerary
1. Tap the Load itinerary icon. (This icon is deactivated if there is no saved itinerary available)
The SELECT ITINERARY screen opens.
2. Use the Up and Down buttons to mark the desired route.
The marked route appears on the select button.
User's manual Sony Personal Navigation System
Navigation - 51 -
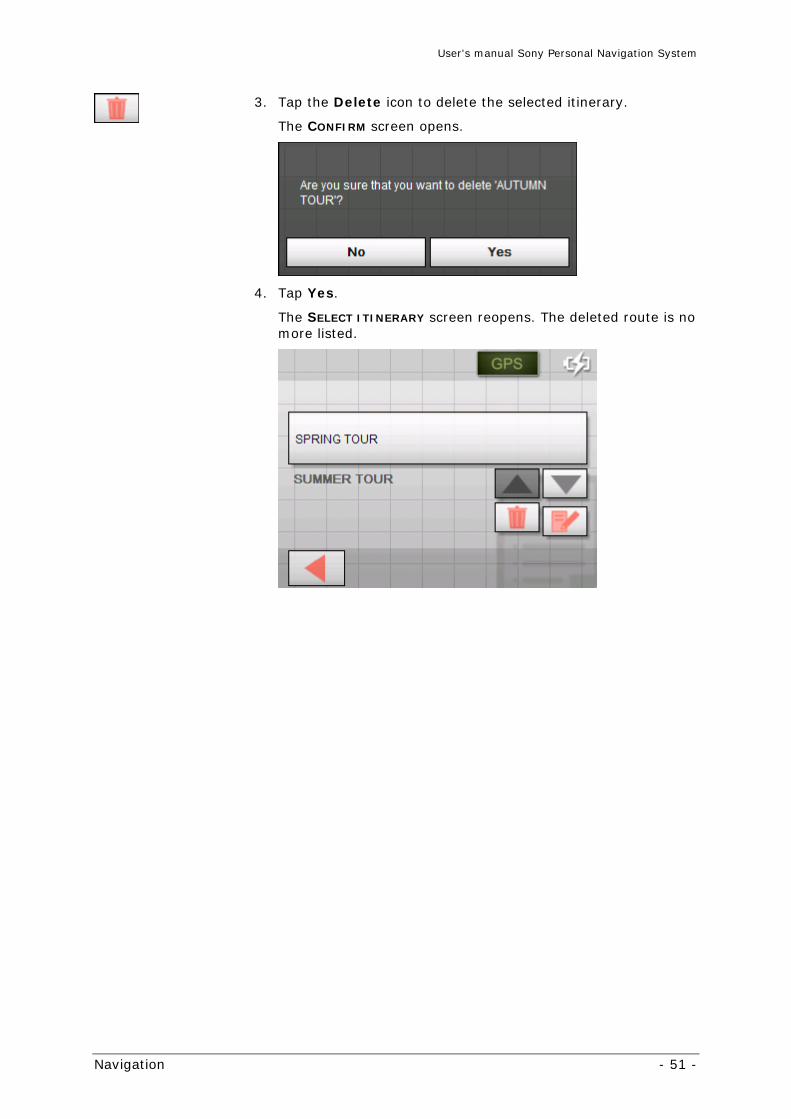
3. Tap the Delete icon to delete the selected itinerary.
The CONFIRM screen opens.
4. Tap Yes.
The SELECT ITINERARY screen reopens. The deleted route is no more listed.
User's manual Sony Personal Navigation System
- 52 - Indicating several destinations (Itinerary with stages)
Calculating the route
An itinerary may be calculated even without GPS reception in order to get an impression on the route.
The system assumes then the first route point to be the start point of the route.
Note: When you start navigation, the system identifies your current position and makes it the start point. The first indicated route point is then the first stage point.
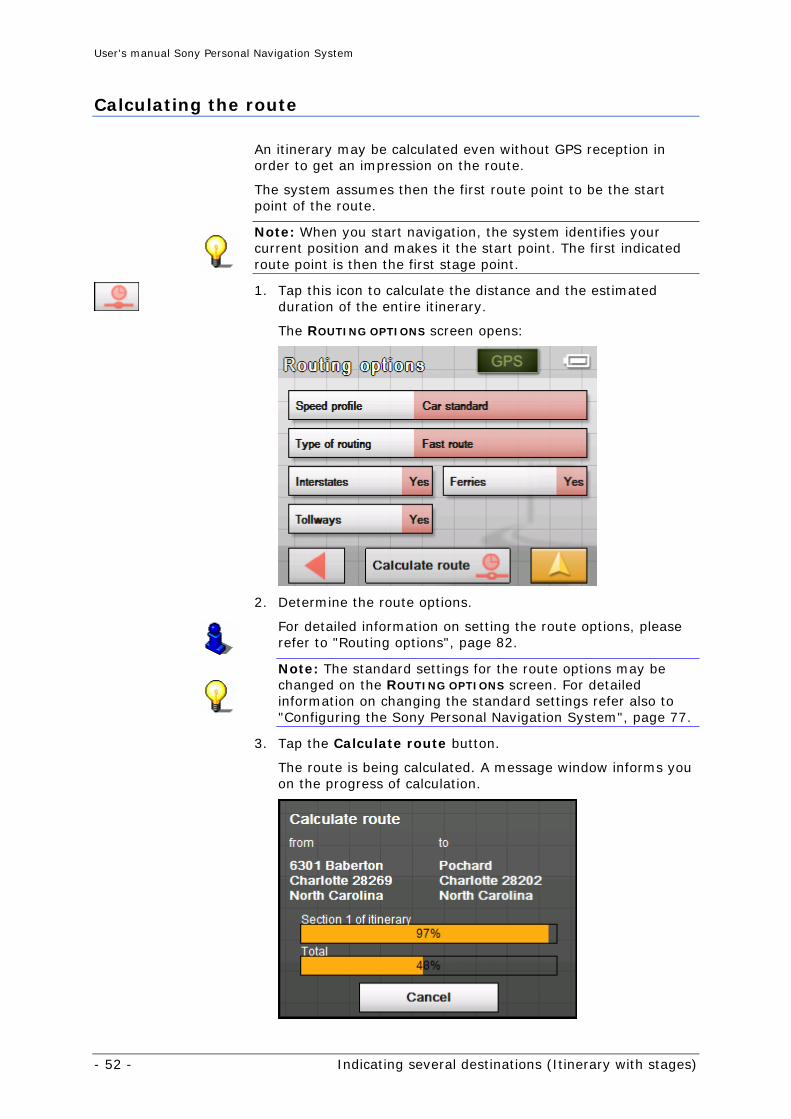
1. Tap this icon to calculate the distance and the estimated
duration of the entire itinerary.
The ROUTING OPTIONS screen opens:
2. Determine the route options.
For detailed information on setting the route options, please refer to "Routing options", page 82.
Note: The standard settings for the route options may be changed on the ROUTING OPTIONS screen. For detailed information on changing the standard settings refer also to "Configuring the Sony Personal Navigation System", page 77.
3. Tap the Calculate route button.
The route is being calculated. A message window informs you on the progress of calculation.
User's manual Sony Personal Navigation System
Navigation - 53 -
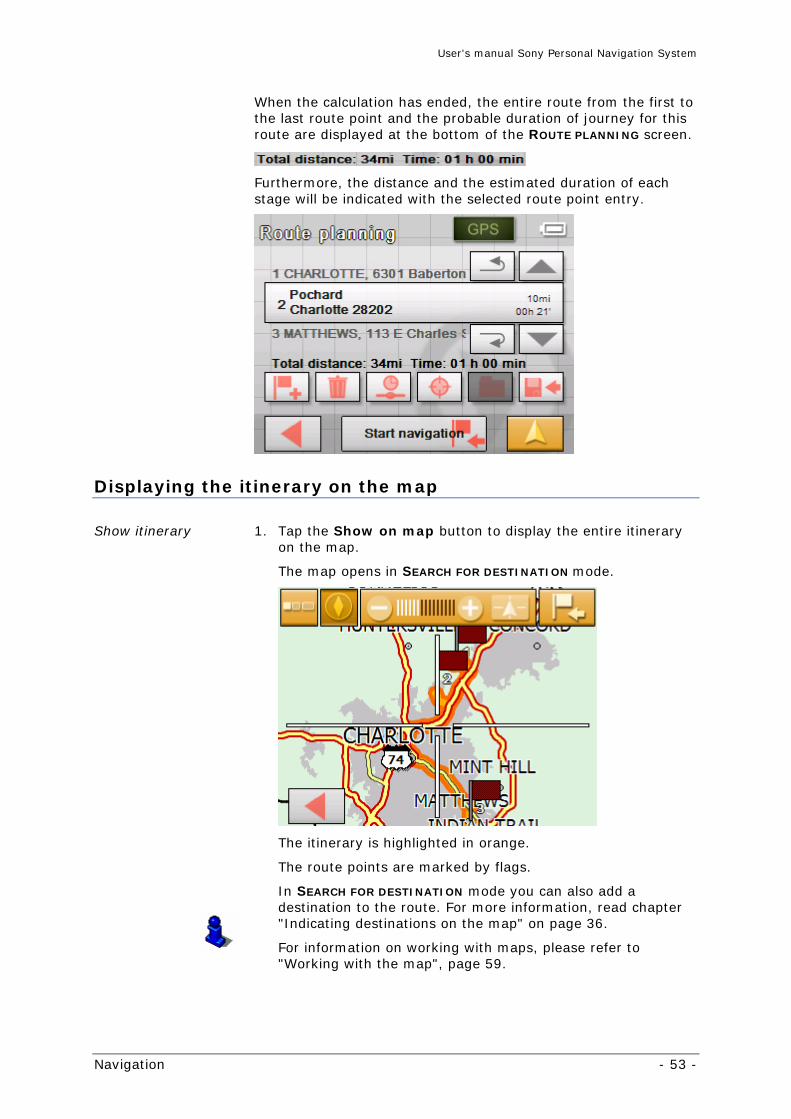
When the calculation has ended, the entire route from the first to the last route point and the probable duration of journey for this route are displayed at the bottom of the ROUTE PLANNING screen.
Furthermore, the distance and the estimated duration of each stage will be indicated with the selected route point entry.
Displaying the itinerary on the map
Show itinerary 1. Tap the Show on map button to display the entire itinerary on the map.
The map opens in SEARCH FOR DESTINATION mode.
The itinerary is highlighted in orange.
The route points are marked by flags.
In SEARCH FOR DESTINATION mode you can also add a destination to the route. For more information, read chapter "Indicating destinations on the map" on page 36.
For information on working with maps, please refer to "Working with the map", page 59.
User's manual Sony Personal Navigation System
- 54 - Indicating several destinations (Itinerary with stages)
2. Tap on the
Back button to return to the ROUTE PLANNING screen.
Simulating the route
Simulation You may execute a simulated navigation.
Note: The reception of GPS-signals is not necessary for the simulation.
Simulation is restricted to routes of 60 miles max.
Precondition You have planned or loaded a route as described in "Indicating several destinations (Itinerary with stages)" on page45.
The route must be calculated as described in "Calculating the route" on page52.
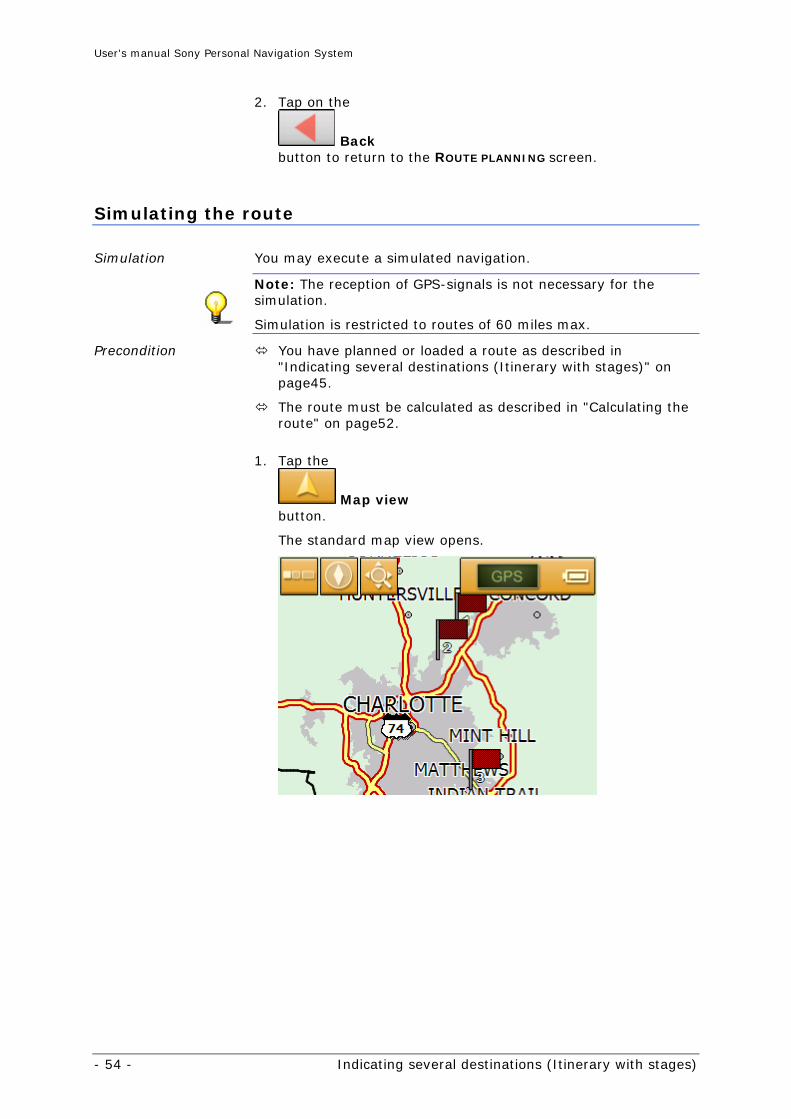
1. Tap the
Map view button.
The standard map view opens.
User's manual Sony Personal Navigation System
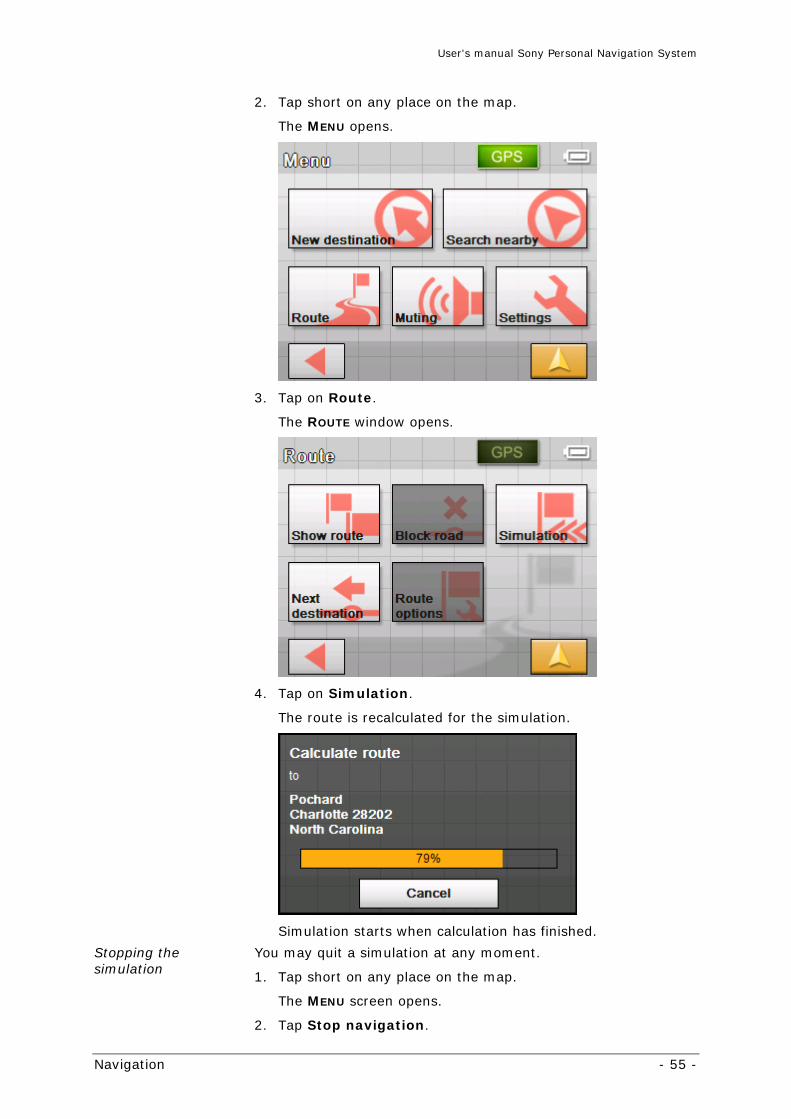
Navigation - 55 -
2. Tap short on any place on the map.
The MENU opens.
3. Tap on Route.
The ROUTE window opens.
4. Tap on Simulation.
The route is recalculated for the simulation.
Simulation starts when calculation has finished.
Stopping the simulation
You may quit a simulation at any moment.
1. Tap short on any place on the map.
The MENU screen opens.
2. Tap Stop navigation.
User's manual Sony Personal Navigation System
- 56 - Starting navigation
Starting navigation
Precondition
You have entered a destination as described in "Indicating a destination", page 26, - OR - You have selected a destination from the FAVORITES as described in "Favorites", page 39, - OR – You have selected one of your RECENT DESTINATIONS as described in "Recent destinations", page 41, - OR - You have planned or loaded an itinerary as described in "Indicating several destinations (Itinerary with stages)", page 45.
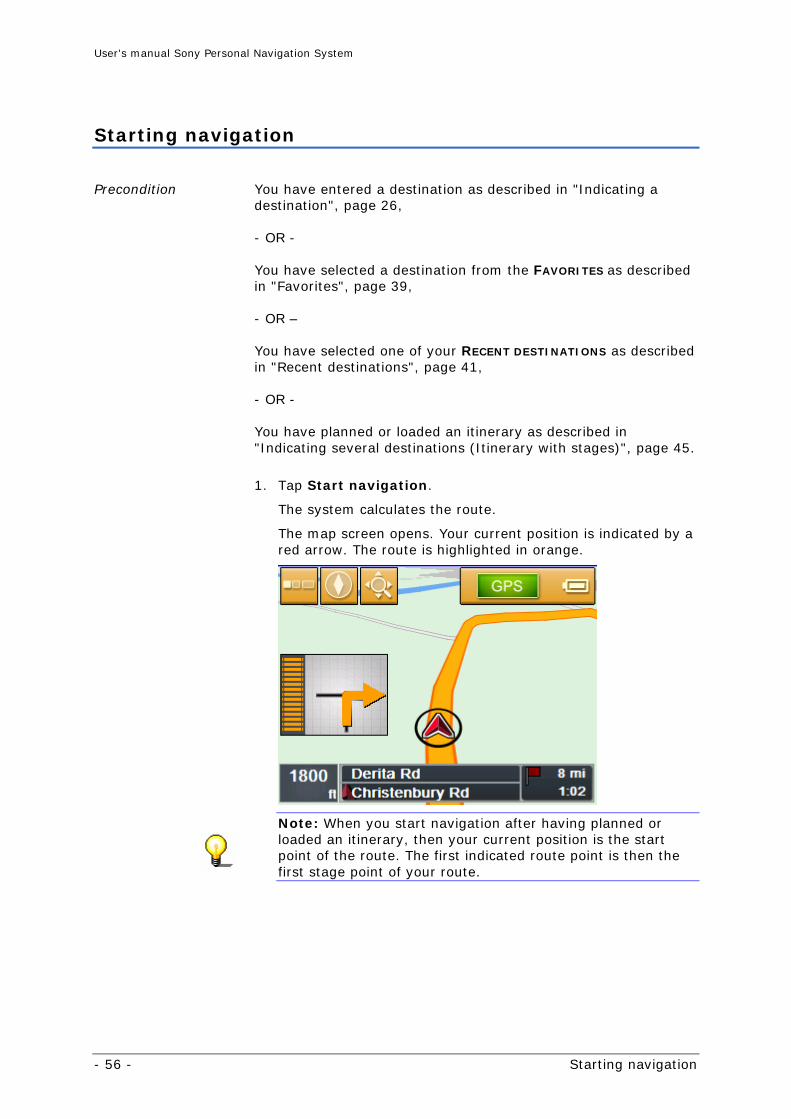
1. Tap Start navigation.
The system calculates the route.
The map screen opens. Your current position is indicated by a red arrow. The route is highlighted in orange.
Note: When you start navigation after having planned or loaded an itinerary, then your current position is the start point of the route. The first indicated route point is then the first stage point of your route.
User's manual Sony Personal Navigation System
Navigation - 57 -
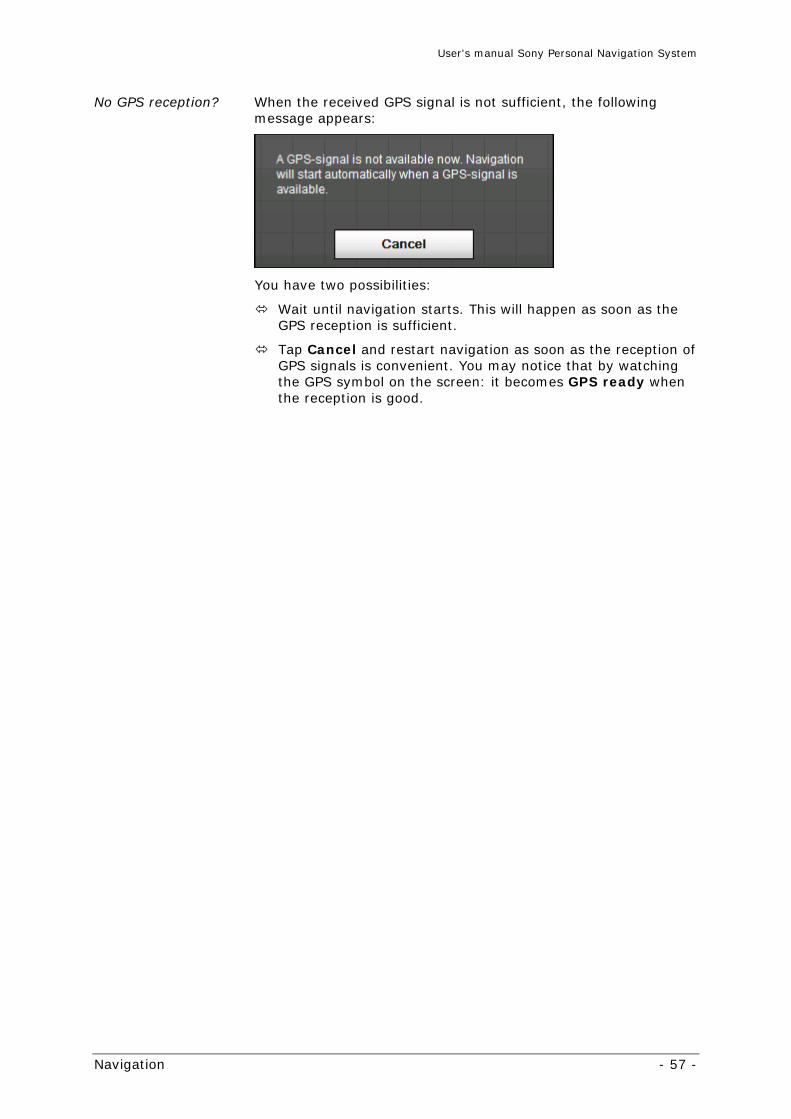
No GPS reception? When the received GPS signal is not sufficient, the following message appears:
You have two possibilities:
Wait until navigation starts. This will happen as soon as the GPS reception is sufficient.
Tap Cancel and restart navigation as soon as the reception of GPS signals is convenient. You may notice that by watching the GPS symbol on the screen: it becomes GPS ready when the reception is good.

User's manual Sony Personal Navigation System
Working with the map - 59 -
Working with the map
Topics covered in this chapter:
Selecting a map page 60
Operating the map page 61
Representation of the map in navigation mode page 66
User's manual Sony Personal Navigation System
- 60 - Selecting a map
Selecting a map
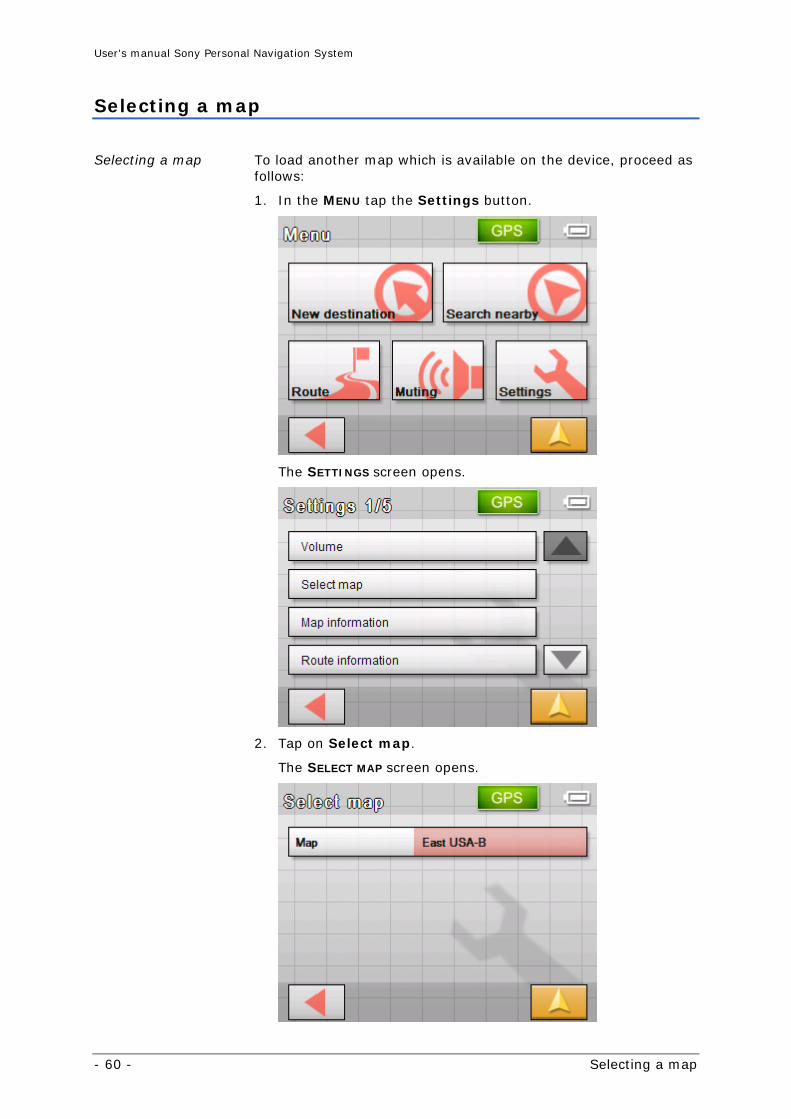
Selecting a map To load another map which is available on the device, proceed as follows:
1. In the MENU tap the Settings button.
The SETTINGS screen opens.
2. Tap on Select map.
The SELECT MAP screen opens.
User's manual Sony Personal Navigation System
Working with the map - 61 -
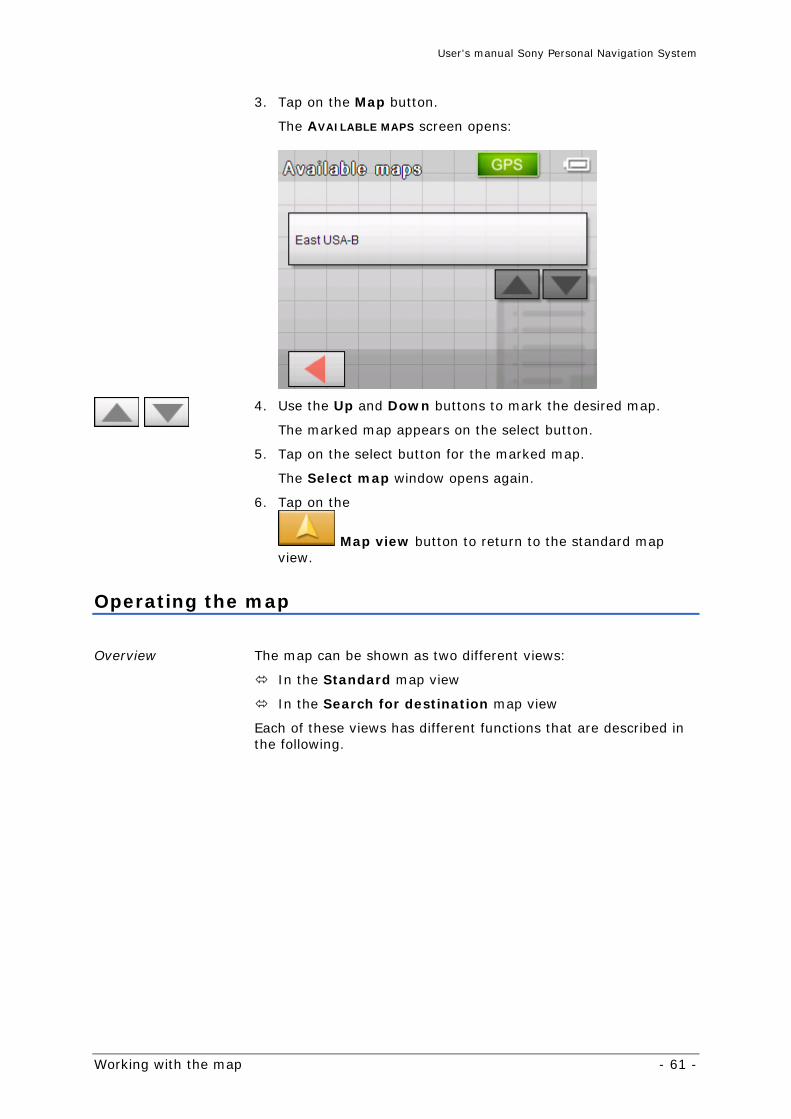
3. Tap on the Map button.
The AVAILABLE MAPS screen opens:
4. Use the Up and Down buttons to mark the desired map.
The marked map appears on the select button.
5. Tap on the select button for the marked map.
The Select map window opens again.
6. Tap on the
Map view button to return to the standard map view.
Operating the map
Overview
The map can be shown as two different views:
In the Standard map view
In the Search for destination map view
Each of these views has different functions that are described in the following.
User's manual Sony Personal Navigation System
- 62 - Operating the map
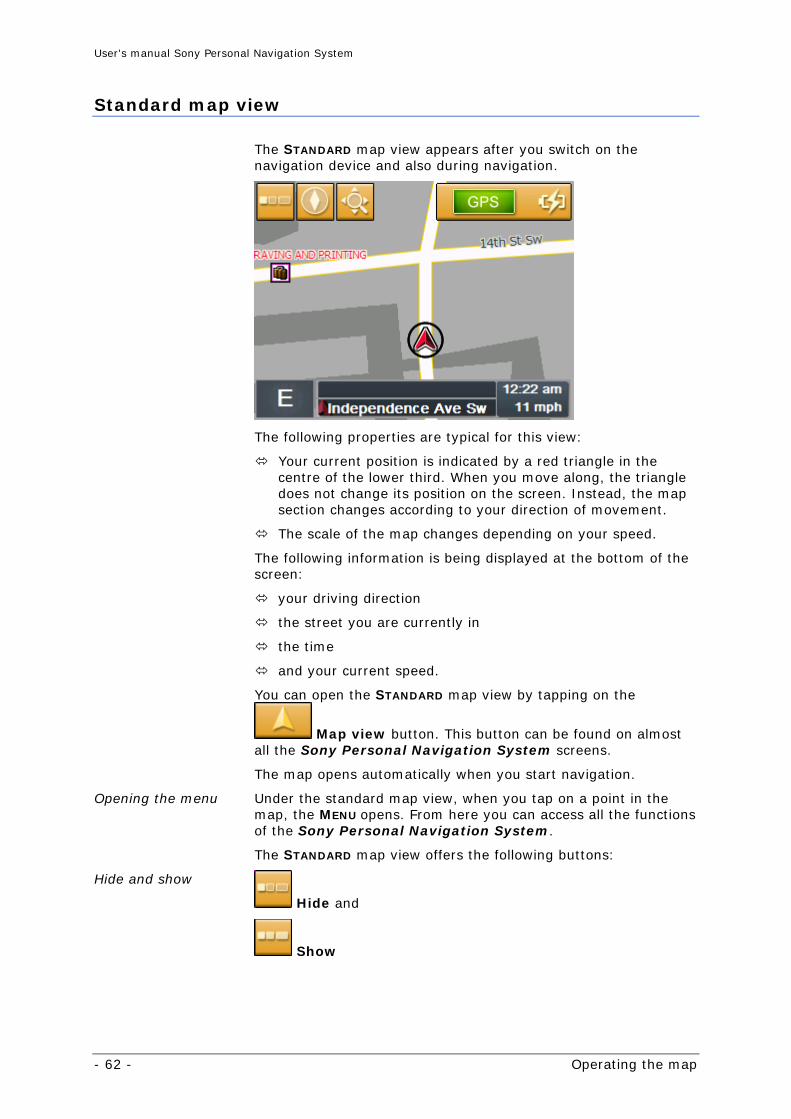
Standard map view
The STANDARD map view appears after you switch on the navigation device and also during navigation.
The following properties are typical for this view:
Your current position is indicated by a red triangle in the centre of the lower third. When you move along, the triangle does not change its position on the screen. Instead, the map section changes according to your direction of movement.
The scale of the map changes depending on your speed.
The following information is being displayed at the bottom of the screen:
your driving direction
the street you are currently in
the time
and your current speed.
You can open the STANDARD map view by tapping on the
Map view button. This button can be found on almost all the Sony Personal Navigation System screens.
The map opens automatically when you start navigation.
Opening the menu Under the standard map view, when you tap on a point in the map, the MENU opens. From here you can access all the functions of the Sony Personal Navigation System.
The STANDARD map view offers the following buttons:
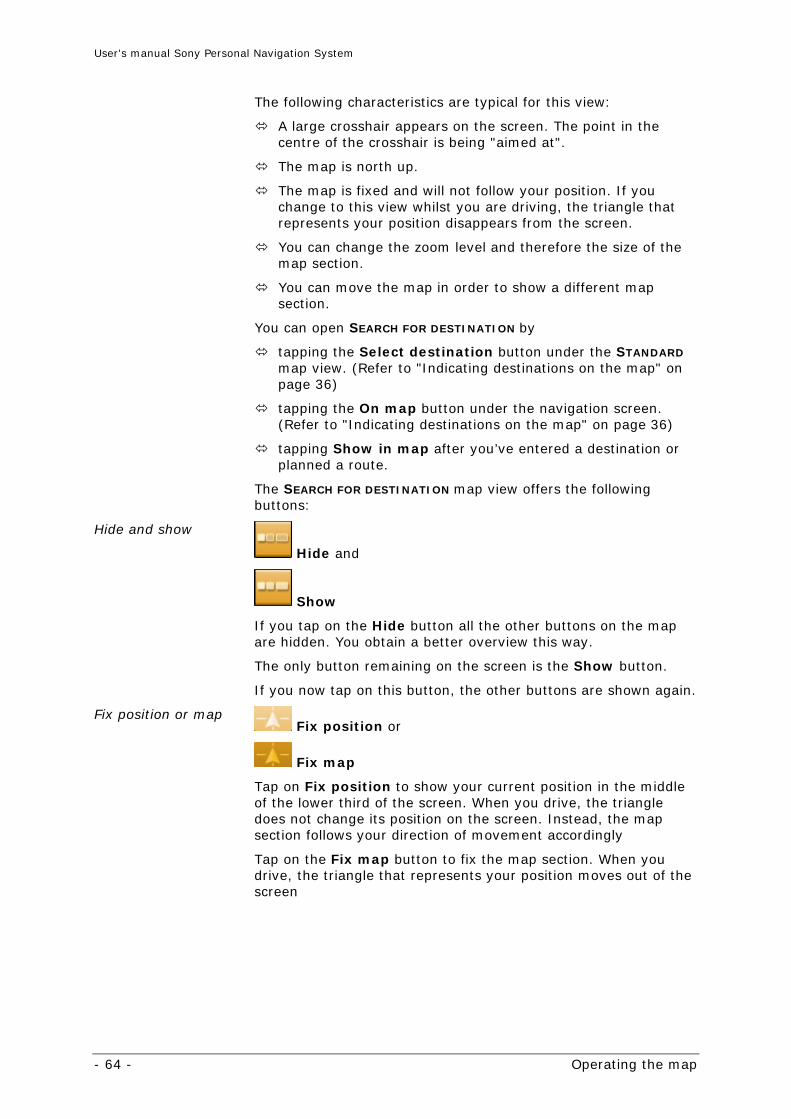
Hide and show
Hide and
Show
User's manual Sony Personal Navigation System
Working with the map - 63 -
When you tap on the Hide button, all the other buttons on the map are hidden. This gives you a better overview.
The only button on the screen is now the Show button.
If you now tap on this button, the other buttons will be shown again.
Map alignment
align North or
align In driving direction
Tap on North to align the map in such a way that north is always at the top.
This view corresponds to the map view of printed maps, but is impractical for the navigation.
Tap on In driving direction in order to align the map in such a way that the “straight ahead” direction of movement is always “pointing up” on the screen.
This view is recommended for the navigation because the directions right and left are shown on the map exactly as they are in reality.
Search for destination Search for destination
Tap on this button to change to the Search for destination map view. Refer to the next chapter ("Search for destination view" on page 63) for more information.
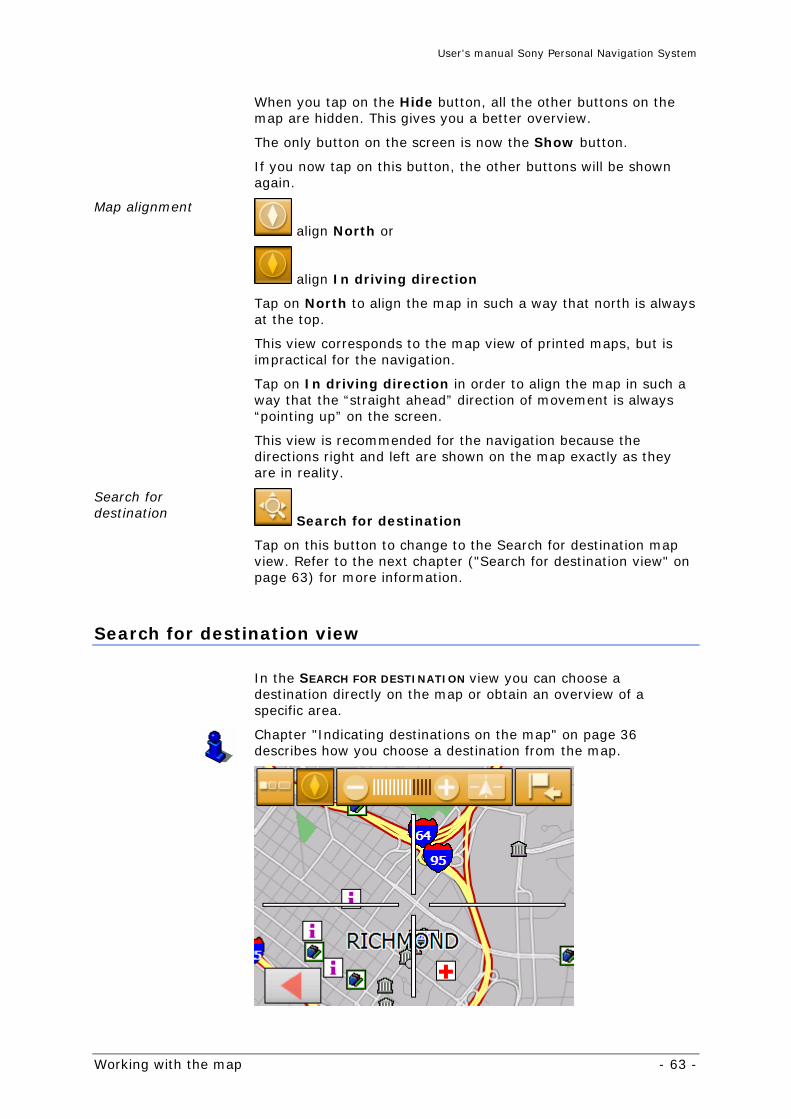
Search for destination view
In the SEARCH FOR DESTINATION view you can choose a destination directly on the map or obtain an overview of a specific area.
Chapter "Indicating destinations on the map" on page 36 describes how you choose a destination from the map.
User's manual Sony Personal Navigation System
- 64 - Operating the map
The following characteristics are typical for this view:
A large crosshair appears on the screen. The point in the centre of the crosshair is being "aimed at".
The map is north up.
The map is fixed and will not follow your position. If you change to this view whilst you are driving, the triangle that represents your position disappears from the screen.
You can change the zoom level and therefore the size of the map section.
You can move the map in order to show a different map section.
You can open SEARCH FOR DESTINATION by
tapping the Select destination button under the STANDARD map view. (Refer to "Indicating destinations on the map" on page 36)
tapping the On map button under the navigation screen. (Refer to "Indicating destinations on the map" on page 36)
tapping Show in map after you’ve entered a destination or planned a route.
The SEARCH FOR DESTINATION map view offers the following buttons:
Hide and show
Hide and
Show
If you tap on the Hide button all the other buttons on the map are hidden. You obtain a better overview this way.
The only button remaining on the screen is the Show button.
If you now tap on this button, the other buttons are shown again.
Fix position or map Fix position or
Fix map
Tap on Fix position to show your current position in the middle of the lower third of the screen. When you drive, the triangle does not change its position on the screen. Instead, the map section follows your direction of movement accordingly
Tap on the Fix map button to fix the map section. When you drive, the triangle that represents your position moves out of the screen
User's manual Sony Personal Navigation System
Working with the map - 65 -
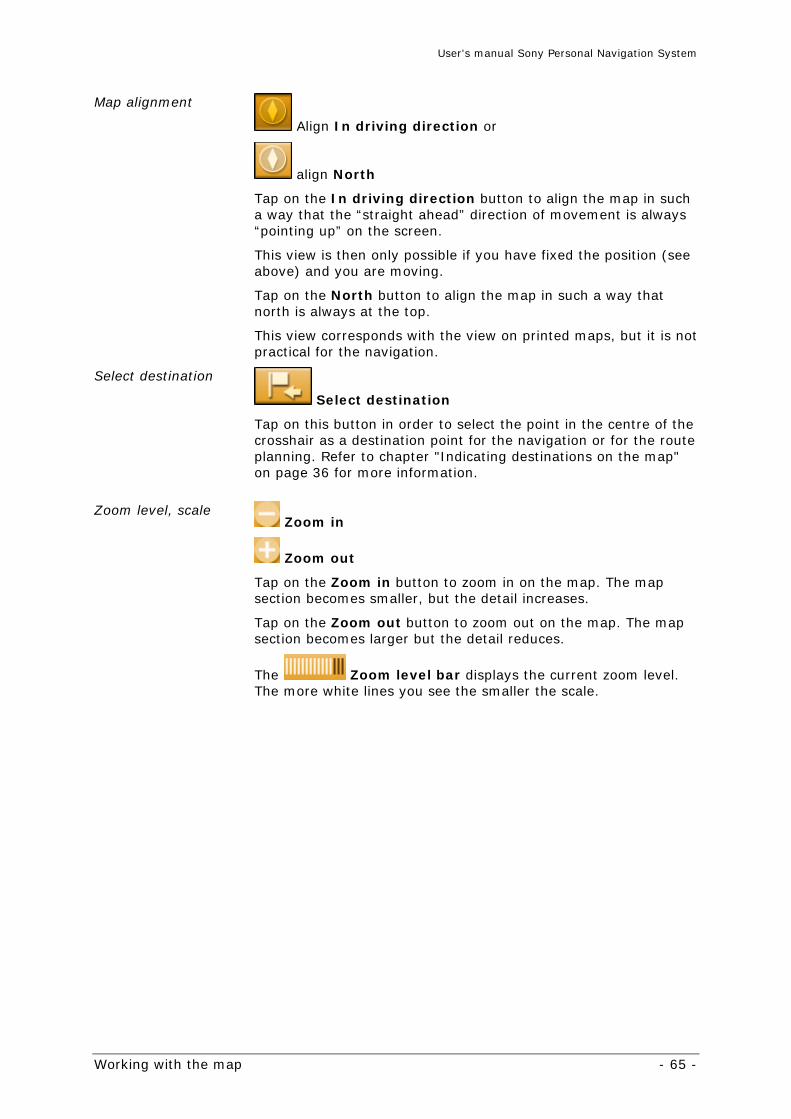
Map alignment
Align In driving direction or
align North
Tap on the In driving direction button to align the map in such a way that the “straight ahead” direction of movement is always “pointing up” on the screen.
This view is then only possible if you have fixed the position (see above) and you are moving.
Tap on the North button to align the map in such a way that north is always at the top.
This view corresponds with the view on printed maps, but it is not practical for the navigation.
Select destination
Select destination
Tap on this button in order to select the point in the centre of the crosshair as a destination point for the navigation or for the route planning. Refer to chapter "Indicating destinations on the map" on page 36 for more information.
Zoom level, scale
Zoom in
Zoom out
Tap on the Zoom in button to zoom in on the map. The map section becomes smaller, but the detail increases.
Tap on the Zoom out button to zoom out on the map. The map section becomes larger but the detail reduces.
The Zoom level bar displays the current zoom level. The more white lines you see the smaller the scale.
User's manual Sony Personal Navigation System
- 66 - Representation of the map in navigation mode
Representation of the map in navigation mode
During navigation the map opens in the STANDARD view. For the Mode 2D/3D, Autozoom and Alignment, the settings that have been established in the VIEWING OPTIONS screen will be used. Refer to chapter "Viewing options" on page 81 for more information.
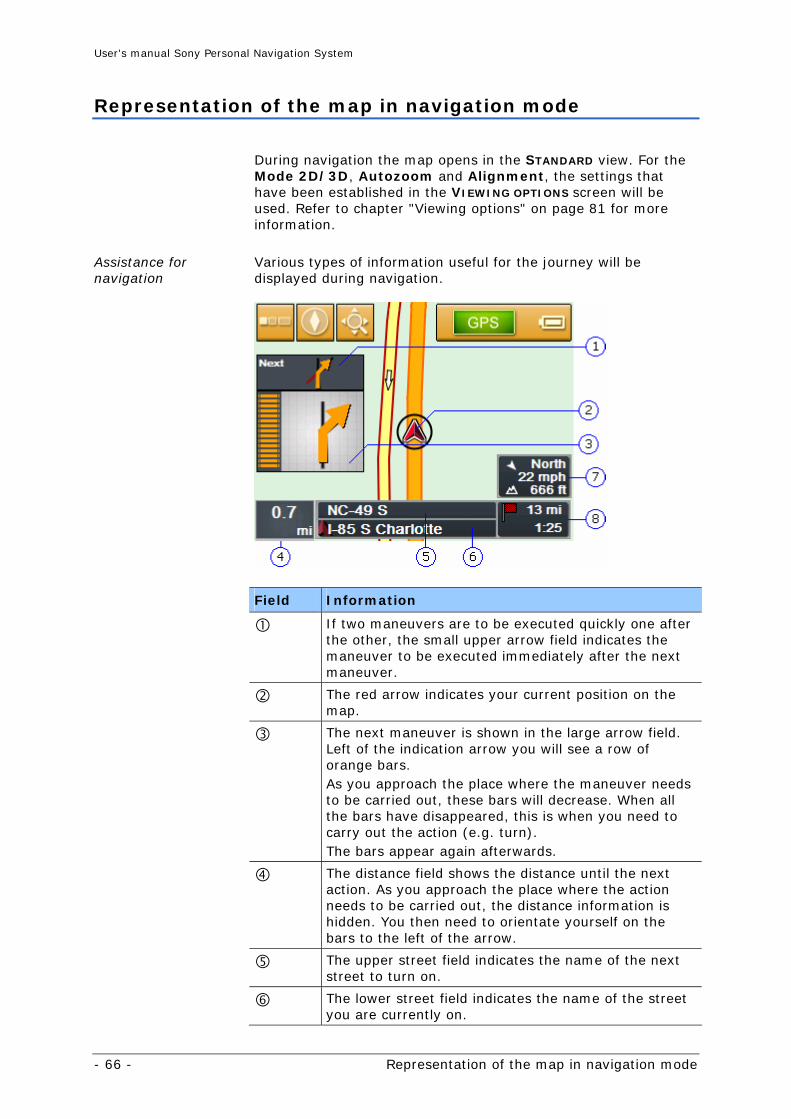
Assistance for navigation
Various types of information useful for the journey will be displayed during navigation.
Field Information
If two maneuvers are to be executed quickly one after the other, the small upper arrow field indicates the maneuver to be executed immediately after the next maneuver.
The red arrow indicates your current position on the map.
The next maneuver is shown in the large arrow field. Left of the indication arrow you will see a row of orange bars. As you approach the place where the maneuver needs to be carried out, these bars will decrease. When all the bars have disappeared, this is when you need to carry out the action (e.g. turn). The bars appear again afterwards.
The distance field shows the distance until the next action. As you approach the place where the action needs to be carried out, the distance information is hidden. You then need to orientate yourself on the bars to the left of the arrow.
The upper street field indicates the name of the next street to turn on.
The lower street field indicates the name of the street you are currently on.
User's manual Sony Personal Navigation System
Working with the map - 67 -
The info box displays the current height above sea level and the current speed. The compass needle shows where north is.
The route information field displays the remaining distance until you reach your destination and the probable time of arrival. If you have planned a route, this information refers to the next stage point.
Note: the information regarding the numbers to can also be hidden in the ROUTE INFORMATION screen. Refer to chapter "Route information" on page 79 to find out more.
Signpost info The upper part of the Map screen displays information on the
signposts you have to follow:
This information covers some of the other buttons on the map. Tap on the signposts to hide them.
Press the left hardware key on the device in order to show the signposts.
Note: this information can only be shown if it is included in the map material. You can completely suppress your presentation using the SIGNPOSTS screen. Refer to chapter "Signpost information" on page 80 to find out more.

User's manual Sony Personal Navigation System
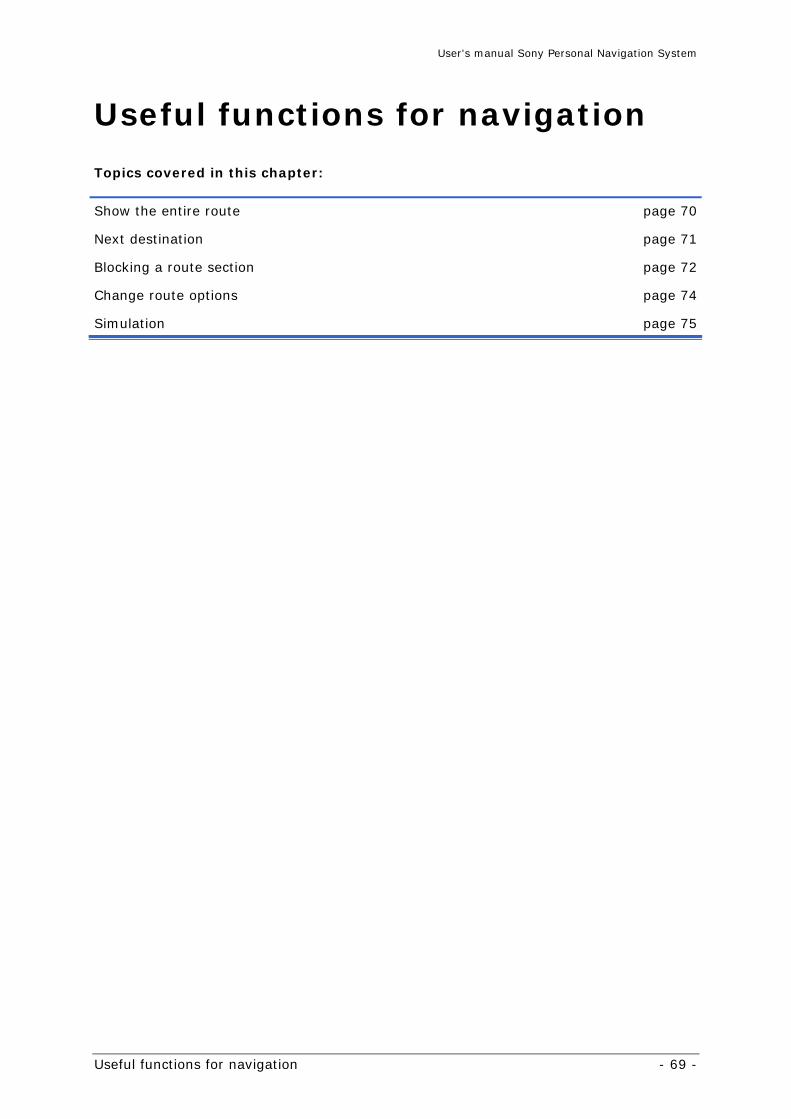
Useful functions for navigation - 69 -
Useful functions for navigation
Topics covered in this chapter:
Show the entire route page 70
Next destination page 71
Blocking a route section page 72
Change route options page 74
Simulation page 75

User's manual Sony Personal Navigation System
- 70 - Show the entire route
Survey The following functions are available during navigation or after calculating a planned route:
Show the entire route
Overview During navigation you always see only a part of the route on the screen. You can however display the entire route in order to gain a general overview.
The map is open in the STANDARD view.
1. Tap anywhere on the map.
The MENU opens.
2. Tap on the Route button.
The ROUTE screen opens.
3. Tap on the Show Route button.
The map opens in the SEARCH FOR DESTINATION view.
The route is highlighted in orange. The destination (in the case of a planned route, also the stage points) is labeled with a little flag.
User's manual Sony Personal Navigation System
Useful functions for navigation - 71 -
Note: you can now add or insert an interim destination. Refer to chapter "Indicating destinations on the map" on page 36 for more information.
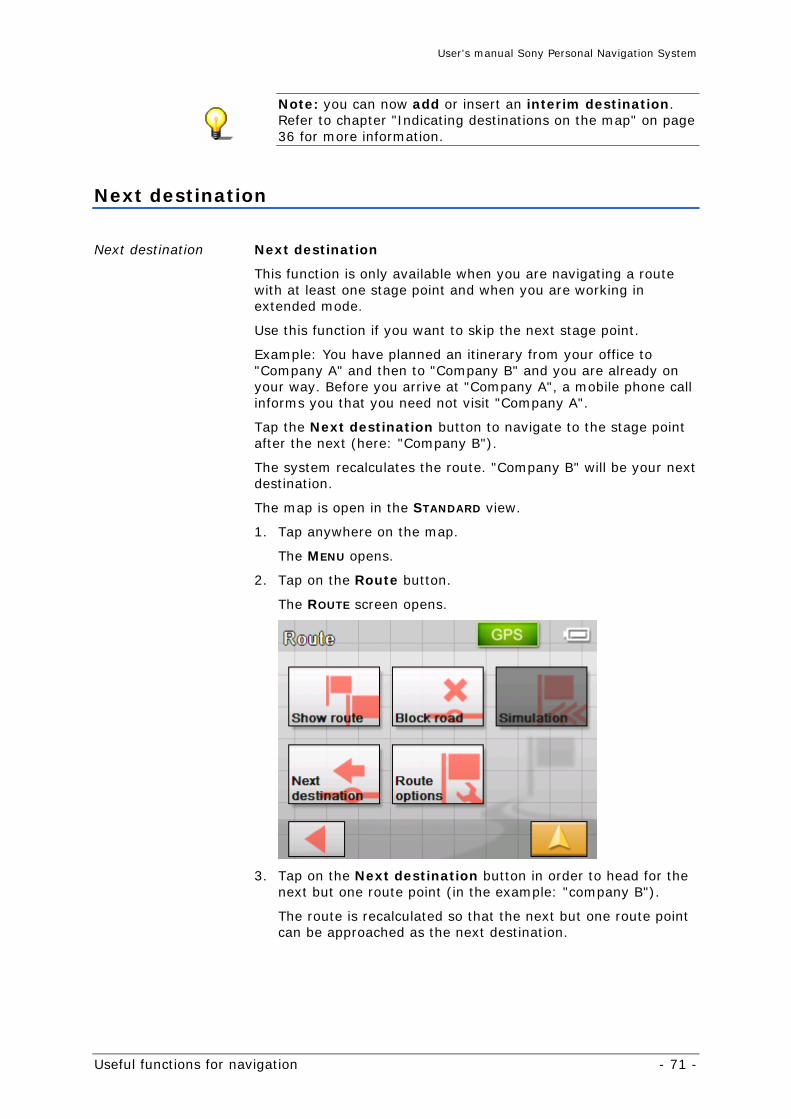
Next destination
Next destination Next destination
This function is only available when you are navigating a route with at least one stage point and when you are working in extended mode.
Use this function if you want to skip the next stage point.
Example: You have planned an itinerary from your office to "Company A" and then to "Company B" and you are already on your way. Before you arrive at "Company A", a mobile phone call informs you that you need not visit "Company A".
Tap the Next destination button to navigate to the stage point after the next (here: "Company B").
The system recalculates the route. "Company B" will be your next destination.
The map is open in the STANDARD view.
1. Tap anywhere on the map.
The MENU opens.
2. Tap on the Route button.
The ROUTE screen opens.
3. Tap on the Next destination button in order to head for the next but one route point (in the example: "company B").
The route is recalculated so that the next but one route point can be approached as the next destination.
User's manual Sony Personal Navigation System
- 72 - Blocking a route section
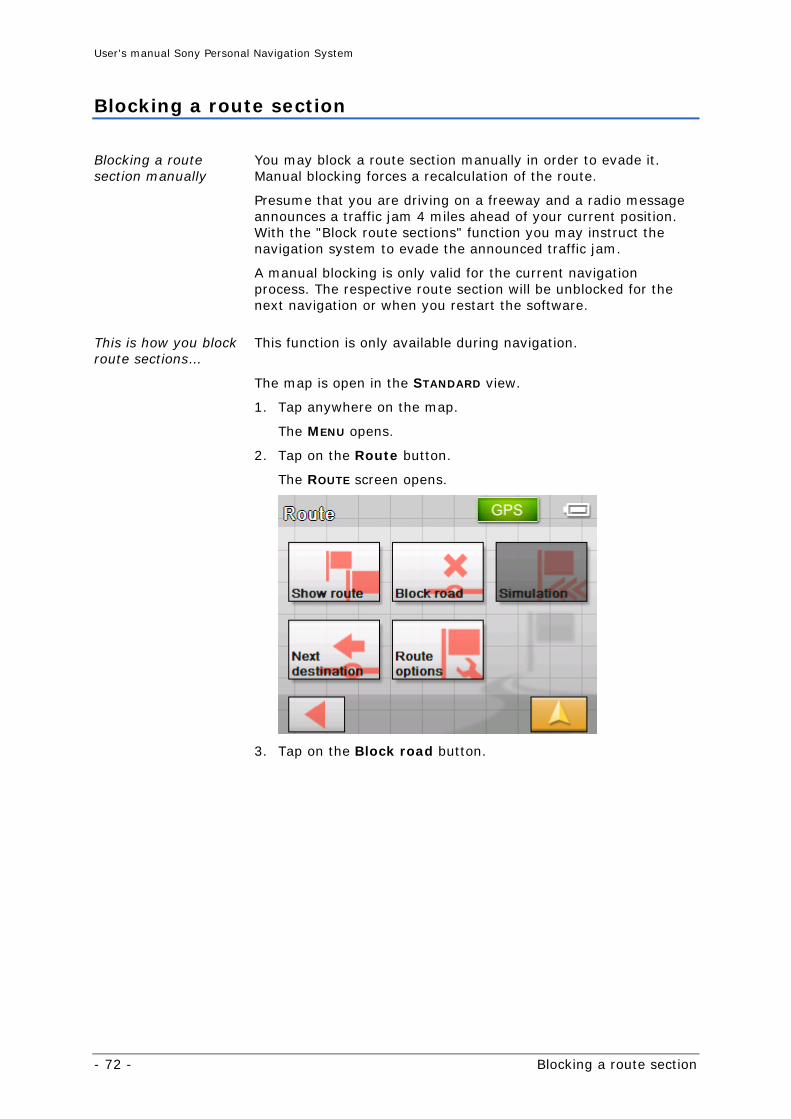
Blocking a route section
Blocking a route section manually
You may block a route section manually in order to evade it. Manual blocking forces a recalculation of the route.
Presume that you are driving on a freeway and a radio message announces a traffic jam 4 miles ahead of your current position. With the "Block route sections" function you may instruct the navigation system to evade the announced traffic jam.
A manual blocking is only valid for the current navigation process. The respective route section will be unblocked for the next navigation or when you restart the software.
This is how you block route sections…
This function is only available during navigation.
The map is open in the STANDARD view.
1. Tap anywhere on the map.
The MENU opens.
2. Tap on the Route button.
The ROUTE screen opens.
3. Tap on the Block road button.
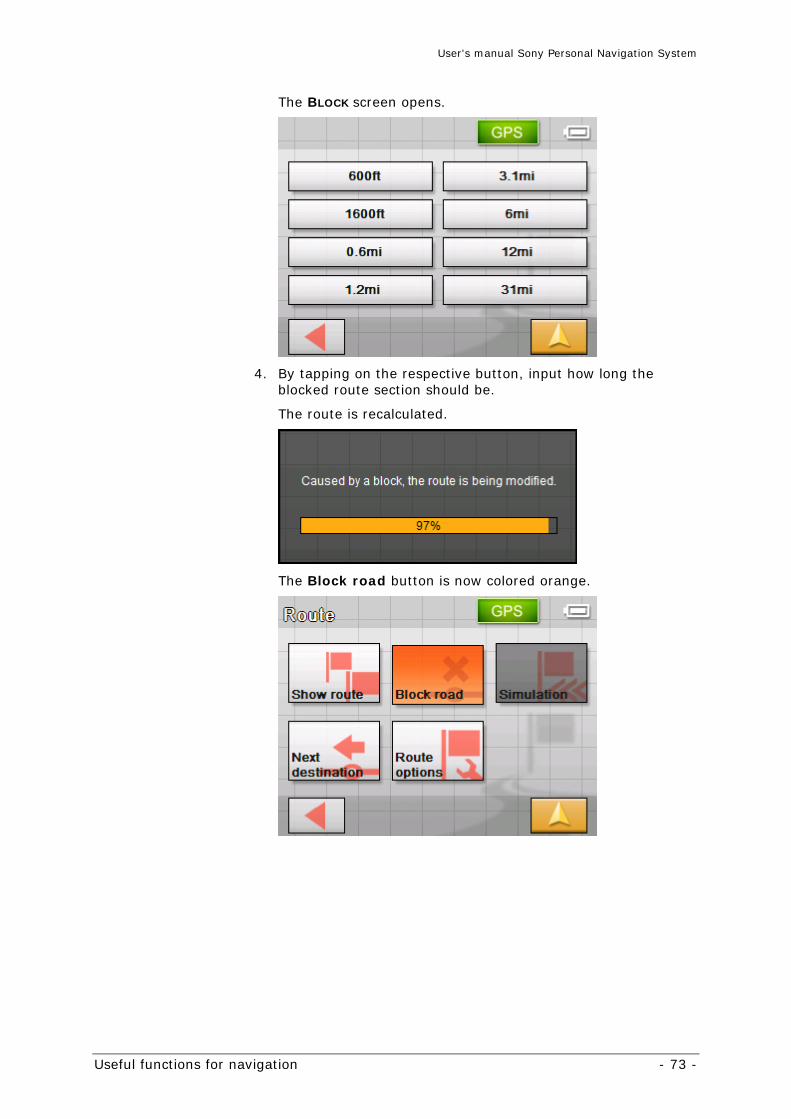
User's manual Sony Personal Navigation System
Useful functions for navigation - 73 -
The BLOCK screen opens.
4. By tapping on the respective button, input how long the blocked route section should be.
The route is recalculated.
The Block road button is now colored orange.
User's manual Sony Personal Navigation System
- 74 - Change route options
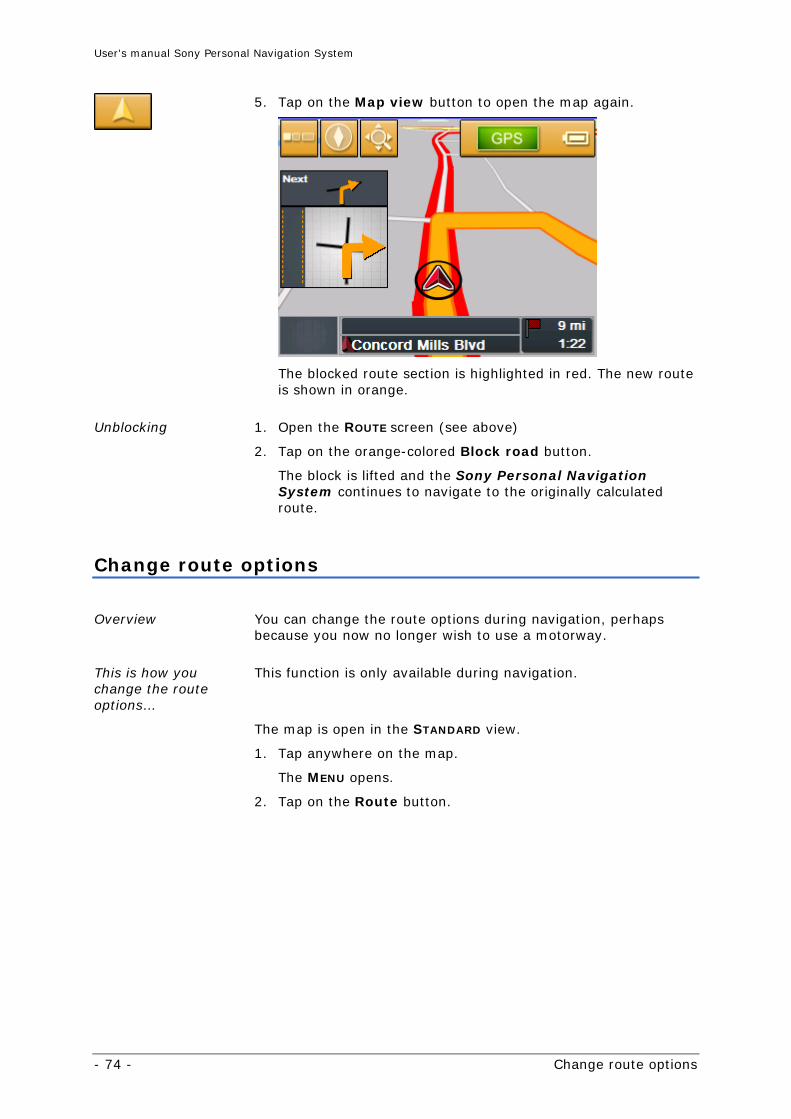
5. Tap on the Map view button to open the map again.
The blocked route section is highlighted in red. The new route is shown in orange.
Unblocking 1. Open the ROUTE screen (see above)
2. Tap on the orange-colored Block road button.
The block is lifted and the Sony Personal Navigation System continues to navigate to the originally calculated route.
Change route options
Overview You can change the route options during navigation, perhaps because you now no longer wish to use a motorway.
This is how you change the route options…
This function is only available during navigation.
The map is open in the STANDARD view.
1. Tap anywhere on the map.
The MENU opens.
2. Tap on the Route button.
User's manual Sony Personal Navigation System
Useful functions for navigation - 75 -
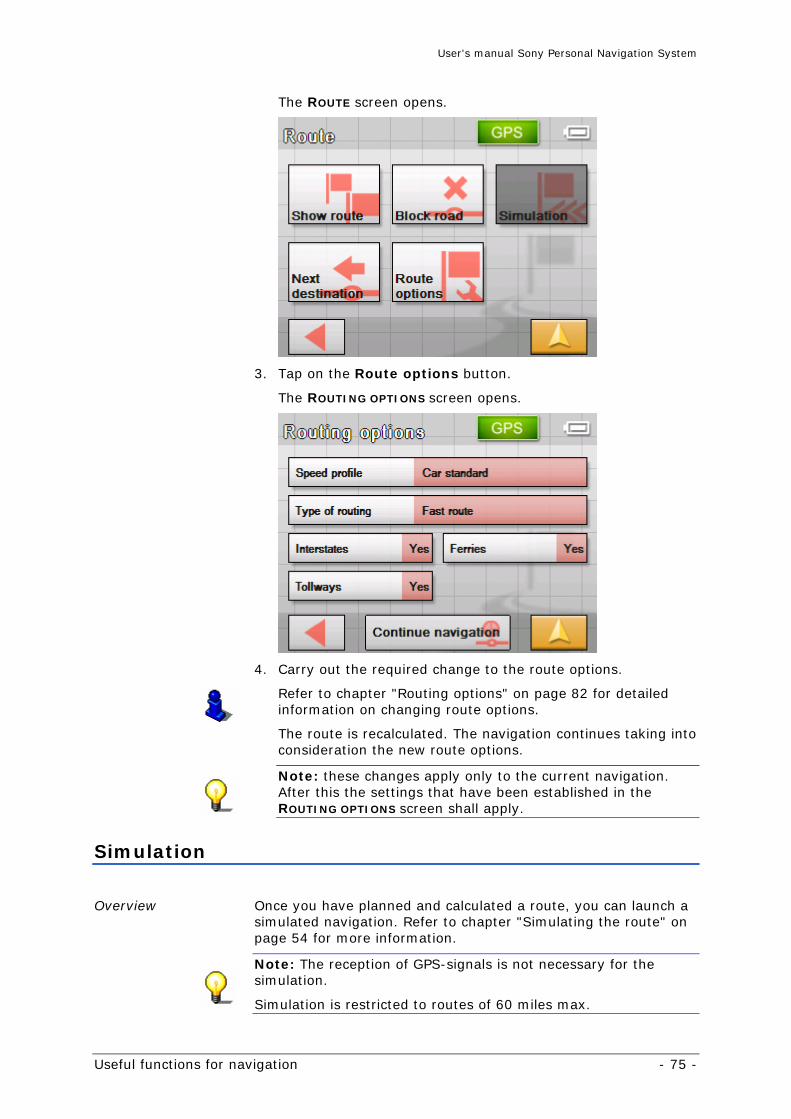
The ROUTE screen opens.
3. Tap on the Route options button.
The ROUTING OPTIONS screen opens.
4. Carry out the required change to the route options.
Refer to chapter "Routing options" on page 82 for detailed information on changing route options.
The route is recalculated. The navigation continues taking into consideration the new route options.
Note: these changes apply only to the current navigation. After this the settings that have been established in the ROUTING OPTIONS screen shall apply.
Simulation
Overview Once you have planned and calculated a route, you can launch a simulated navigation. Refer to chapter "Simulating the route" on page 54 for more information.
Note: The reception of GPS-signals is not necessary for the simulation.
Simulation is restricted to routes of 60 miles max.

User's manual Sony Personal Navigation System
- 76 - Simulation
User's manual Sony Personal Navigation System
Configuring the Sony Personal Navigation System - 77 -
Configuring the Sony Personal Navigation System
Topics covered in this chapter:
Settings page 78
Volume Select map Map information Route information Signpost information Light sensor Screen setting Touch screen calibration Viewing options Routing options Itinerary Time zone Format Select language Home address Radio muting Demo mode Product information
User's manual Sony Personal Navigation System
- 78 - Settings
Settings
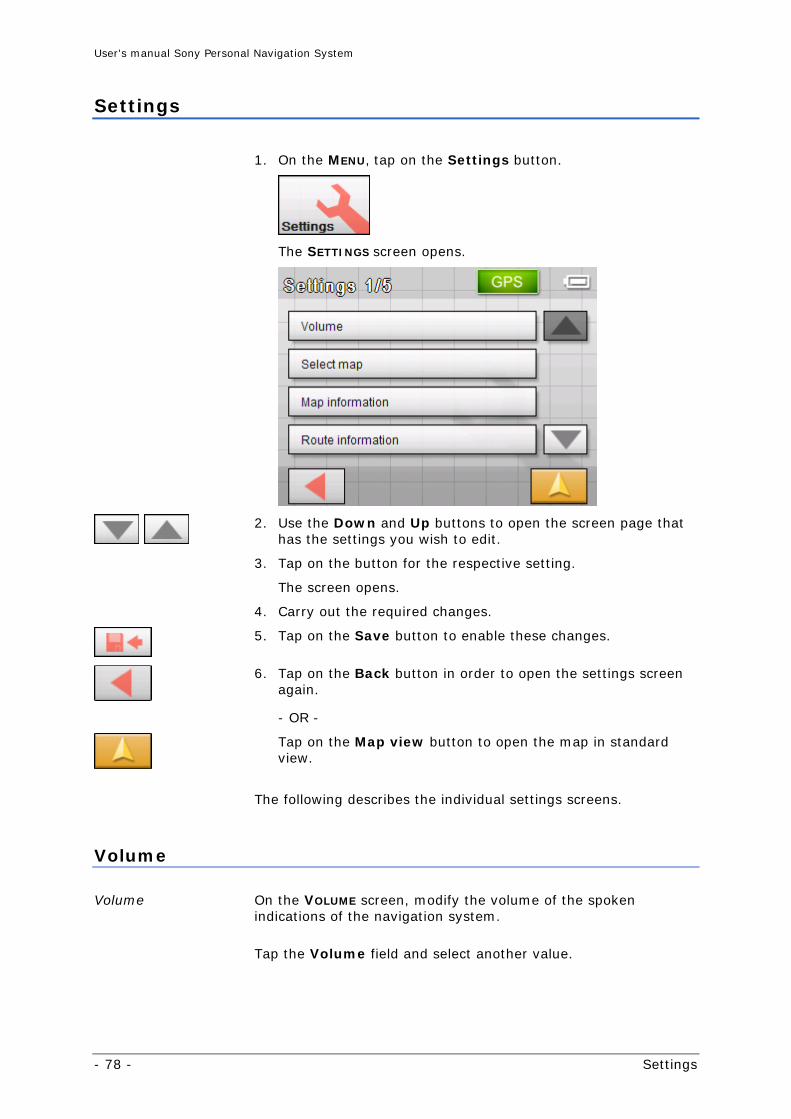
1. On the MENU, tap on the Settings button.
The SETTINGS screen opens.
2. Use the Down and Up buttons to open the screen page that
has the settings you wish to edit.
3. Tap on the button for the respective setting.
The screen opens.
4. Carry out the required changes.
5. Tap on the Save button to enable these changes.
6. Tap on the Back button in order to open the settings screen again.
- OR -
Tap on the Map view button to open the map in standard view.
The following describes the individual settings screens.
Volume
Volume On the VOLUME screen, modify the volume of the spoken indications of the navigation system.
Tap the Volume field and select another value.
User's manual Sony Personal Navigation System
Configuring the Sony Personal Navigation System - 79 -
Select map
Select map
In the SELECT MAP screen you can choose a different map from your device.
To do this, tap on the Map field and select a different map.
You can edit the maps that should be available by using the Installer tool. This can be found on the supplied software DVD.
Use ActiveSync® to connect the navigation device with your computer and insert the DVD.
The Installer tool starts automatically. Follow the on-screen instructions.
Map information
Info on the map On the MAP INFORMATION screen, you may effect the following modifications:
Element Signification
Points of Interest Tap the respective command button to display (On) or not (Off) Points of Interest on the map.
Street names Tap the respective command button to display (On) or not (Off) Street names on the map.
Route information
Route info On the ROUTE INFORMATION screen, you may effect the following modifications:
Element Signification
Distance to next destination
During navigation, shows the distance to the next destination and probable time of arrival.
Show street name During navigation, shows the name of the street on which you are driving and the street you need to head for next.
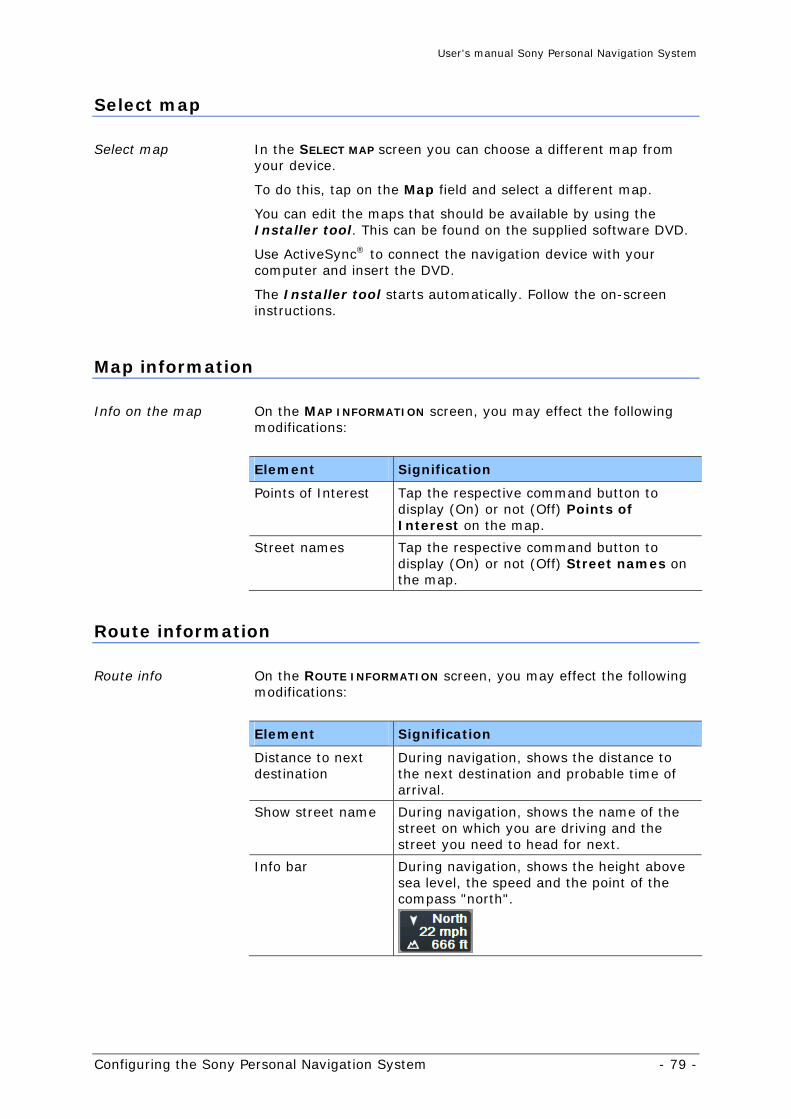
Info bar
During navigation, shows the height above sea level, the speed and the point of the compass "north".
User's manual Sony Personal Navigation System
- 80 - Settings
Signpost information
Signpost information On the SIGNPOST INFORMATION screen, you may effect the following modifications:
The Show traffic signs command indicates whether signposts
indicating exits from motorways or highways are currently being displayed or not.
Tap the Show traffic signs command to toggle between On and Off mode.
The new mode is now indicated on the button.
Note: This information can only be displayed when it is contained in the cartographic material.
Light sensor
Light sensor
Your device has a light sensor. When it becomes too dark, it can switch the screen of your device to night mode. (Refer to the next chapter)
You can adjust the sensitivity of the light sensor in the LIGHT
SENSOR screen.
Tap on the Sensitivity button and choose from high, medium or low.
The higher the sensitivity, the sooner the screen will switch over to night mode.
Screen setting
Screen setting On the SCREEN SETTING screen, you may effect the following modifications:
Setting Signification
Map view Set whether you want the map view to be day or night. Auto automatically changes the view as soon as the light sensor reacts. (Refer to previous chapter)
Brightness Set whether you want the day or night brightness setting. Auto automatically changes the brightness as soon as the light sensor reacts. (Refer to previous chapter)
Brightness day Select the brightness - day. (1-8)
Brightness night Select the brightness - night. (1-8)

User's manual Sony Personal Navigation System
Configuring the Sony Personal Navigation System - 81 -
Touch screen calibration
Touch screen calibration
If you think that the touch screen does not perceive contact positions correctly, the Sony Personal Navigation System may calibrate it.
Tap the Start calibration button and follow the instructions on the display.
Viewing options
Viewing options On the VIEWING OPTIONS screen you can establish the settings for the map in the standard view:
Setting Signification
Mode Select the default map view: 2D or 3D.
3D Autozoom Select the default for navigation with 3D view: Autozoom or No Autozoom. With Autozoom, the system changes the scale of the map depending on your current speed: When you drive slowly, the scale becomes small. When you drive fast, the scale becomes high.
2D Autozoom Select the default for navigation with 2D view: Low Autozoom, Standard Autozoom, High Autozoom, or No Autozoom. With Autozoom, the system changes the scale of the map depending on your current speed: When you drive slowly, the scale becomes small. When you drive fast, the scale becomes high. The lower the Autozoom, the lower the scale.
2D View Select the default for navigation with 2D view: North oriented or In driving direction.
Note: these settings have no influence on the Search for destination map view (with the crosshair).
User's manual Sony Personal Navigation System
- 82 - Settings
Routing options
Routing options On the ROUTING OPTIONS screen, indicate your speed profile. This entry will have an effect on the calculation of the remaining time and of the estimated time of arrival (ETA).
1. Tap the Speed profile button. Select one of the available
profiles and tap OK.
2. Tap the Type of routing field and select one of the following options:
Option Signification
Fast route The quickest route will be calculated.
Short route The shortest route will be calculated. 3. Tap the Interstates, Ferries, and Tollways fields
successively and select one of the following options:
Option Signification
Yes The respective kind of street will be regarded for route calculation.
No The respective kind of street will be disregarded for route calculation.
Itinerary
Proceeding automatically to the next stage point…
On the ITINERARY screen, determine whether you want to navigate automatically to the next stage point after having reached a stage point (Yes) or not (No).
Tap the Proceed automatically to the next stage point
button to toggle between Yes and No.
If you don’t proceed automatically, you may proceed as follows:
1. In navigation mode, tap short on any place on the map.
2. Select Next destination.
User's manual Sony Personal Navigation System
Configuring the Sony Personal Navigation System - 83 -
Time zone
Calculation of arrival times
On the TIME ZONE screen, select the time zone of the region you are currently staying in. This is necessary for the system to indicate correct times of arrival in navigation mode.
Element Signification
Time zone Tap this entry field to select the time zone of the region you are currently staying in.
Daylight saving time
Tap this entry field to switch between daylight saving time (yes) and standard time (no).
Note: If there is a clock change or if you are traveling into another time zone, you will have to adjust the respective setting.
Refer to chapter "Basic settings" on page 23 for more information.
Format
Units On the FORMAT screen, determine which units are to be used for time and distance indications.
Setting Signification
Time Tap the Time field to toggle between 12 hours (AM/PM) and 24 hours time format.
Distance Tap the Distance field to toggle between kilometers or miles distance units.
Select language
Select language In the SELECT LANGUAGE screen you can set in which language you would like to have the user interface for the software and the spoken driving instructions.
The software restarts when you change the language.
You can use the Installer tool (on the software DVD) to set which languages are available.
Use the ActiveSync® to connect the navigation device to your computer and then insert the DVD.
The Installer tool starts automatically. Then follow the on-screen instructions.
User's manual Sony Personal Navigation System
- 84 - Settings
Home address
Home address On the HOME ADDRESS screen, you may save your home address to quickly start navigation homewards from anywhere.
Tap Enter your home address.
The NAVIGATION screen opens.
3. Tap the Address button and enter your home address as described in "Entering an address", page 27.
4. Tap the Set as home address button.
The address is indicated on the HOME ADDRESS screen.
Radio muting
Radio muting This function is for European models only.
Demo mode
Demo mode On the DEMO MODE screen you can set whether or not demo mode should be started if you have not used the device for 5 minutes and you are not in the middle of navigating.
You can end the demo mode by tapping anywhere on the touch screen.
You can switch immediately to demo mode by tapping the Launch demo button.
Product information
Product information On the PRODUCT INFORMATION screen, the name and the version of the software are displayed.
Tap Show intro to make the system explain its most important functions.
User's manual Sony Personal Navigation System
Glossary - 85 -
Glossary
COM-port A COM port is a connector to a communications interface, usually the serial port. The ports are numbered by a number behind "COM". A communications interface is designed to connect hardware like a mouse or a GPS receiver.
GMT GMT (Greenwich Mean Time) is the mean solar time at the Royal
Greenwich Observatory in Greenwich near London, England, which by convention is at 0 degrees geographic longitude. Theoretically, noon Greenwich Mean Time is the moment when the Sun crosses the Greenwich meridian (and reaches its highest point in the sky in Greenwich). Up to 1972, GMT was the global time standard. Because of the Earth's uneven speed in its elliptic orbit, GMT has been replaced by UTC (Universal Time Coordinated) which is an ultra stable time standard based on atomic clocks.
GPS The GPS (Global Positioning System) is based on 24 satellites
that are in orbit round the earth. They are permanently emitting the time and their current position. The GPS receiver receives this information and calculates the longitude and the latitude of its own current position.
The signals of at least three satellites are needed to determine the longitude and the latitude. With the signals of at least four satellites the elevation may be calculated, too. The determination has an accuracy of about 3 yards.
HDOP The Horizontal Dilution of Precision (HDOP) indicates the quality
of position determination. Theoretically any value from 0 to 50 is possible. The smaller the value is, the more accurate is the position determination (value 0 = no deviation from the actual position). Values up to 8 are convenient for street navigation.
POI Point of Interest (POI). See Points of Interest.
Points of Interest Points of Interest, also called POI, are covered by the map and
may be displayed on it. Harbors, airports, restaurants, hotels, petrol stations, public buildings, and others belong to the points of interest. You may determine points of interest as itinerary points for navigation purposes.

User's manual Sony Personal Navigation System
Index - 87 -
Index
A
Assistance for navigation.................. 66
B
Battery Status......................................... 16
Blocking......................................... 72 Unblock....................................... 74
C
Configuration.................................. 78
D
Demo mode ................................... 84 Destination
Address....................................... 27 Navigate to.................................. 56
Destinations Delete......................................... 44 Manage....................................... 42 Rename ...................................... 43 Save........................................... 42
E
Energy........................................... 16
F
Favorites........................................ 39 Format .......................................... 83
G
GMT .............................................. 17 GPS
GPS icon ..................................... 17 GPS Info box .................................. 79
H
HDOP ............................................ 17 Home address ........................... 42, 84
I
Indication of destinations Favorites ..................................... 39 Home address .............................. 42 On the map ................................. 36 Points of interest .......................... 28 Recent destinations....................... 41 Saved destinations........................ 39
Intro.............................................. 84 Itineraries
Edit ............................................ 46 Manage ....................................... 46
Itinerary ........................................ 82 Simulate...................................... 54 Simulation ................................... 75
Itinerary info .................................. 79 Itinerary planning............................ 45
K
Keyboard .........................................8
L
Light sensor.................................... 80
M
Map Fix.............................................. 64 Icons .....................................62, 64 In driving direction........................ 65 North aligned ............................... 65 Operate....................................... 61 Points of Interest .......................... 79 Search view ................................. 63 Select ....................................60, 79 Signposts .................................... 67 Standard view.............................. 62 Street names ............................... 79 Zoom in ...................................... 65 Zoom out .................................... 65
Map info......................................... 79 Menu ............................................. 20
N
Navigation
User's manual Sony Personal Navigation System
- 88 - Index
Change route options .................... 74 Proceed automatically ................... 82 start ........................................... 56
P
POI ............................................... 28 Points of interest............................. 28
In a browsed city.......................... 32 Nationwide .................................. 35 Nearby........................................ 28
Points of Interest ............................ 79 Position
Fix ............................................. 64 Proceed automatically ...................... 82 Product information ......................... 84
R
Radio muting.................................. 84 Recent Destinations......................... 41 Route
Entire Route ................................ 70 Route info ...................................... 79 Route information ........................... 66 Route planning ............................... 45 Route section
Block .......................................... 72 Unblock....................................... 74
Routing options............................... 82
S
Screen Address....................................... 27 Configuration ............................... 78 Favorites ..................................... 40 Navigation................................... 27 Point of interest............................ 29 Point of interest nearby GPS position29 Recent destinations ...................... 41 Route planning............................. 45 Settings ...................................... 78
Screen setting ................................ 80
Search facilities.................................4 Select language .............................. 83 Settings ......................................... 78
Demo mode ................................. 84 Format........................................ 83 Home address .............................. 84 Itinerary...................................... 82 Itinerary info................................ 79 Light sensor................................. 80 Map info ...................................... 79 Radio muting ............................... 84 Route info.................................... 79 Routing options ............................ 82 Screen setting.............................. 80 Select language............................ 83 Select Map................................... 79 Signposts .................................... 80 Speed profile................................ 82 Time zone.................................... 83 Touchscreen ................................ 81 Viewing options ............................ 81 Volume ....................................... 78
Signposts ..................................67, 80 Simulation.................................54, 75 Software-keyboard ............................8 Sony Personal Navigation System
Start........................................... 20 Speed profile .................................. 82 Street names.................................. 79
T
Time zone ...................................... 83 Touchscreen ................................... 81
U
Units ............................................. 83
V
Viewing options............................... 81 Volume .......................................... 78