petsafe wireless pet containment system - petsafe® official website
TRANSCRIPT

H
A P P Y O W N E
RS
S
A F E P E T S
PetSafe WirelessPet Containment System®
Operating and Training GuideManual de adiestramiento y funcionamiento
Please read this entire guide before beginningPor favor, antes de comenzar, lea completamente esta guía

2 www.petsafe.net
Thank you for choosing PetSafe®, the number 1 selling brand of electronic training solutions in the world. Our mission is to ensure your pet’s safety by providing you with the tools and techniques to successfully train your pet. If you have any questions, please contact the Customer Care Center at 1-800-732-2677 or visit our website at www.petsafe.net.
___________________________________________
Table of ContentsComponents ....................................................................................................................................3Other Items You May Need ...............................................................................................................3How the System Works .....................................................................................................................4Key Defi nitions ................................................................................................................................4Operating Guide Set Up the Transmitter ...................................................................................................................5 Prepare the Receiver Collar ............................................................................................................5 Adjust the Pet Area to Desired Size ................................................................................................6 Transmitter Range Chart ...............................................................................................................7 Place the Boundary Flags ...............................................................................................................7 Fit the Receiver Collar ...................................................................................................................8Training Guide Be Patient With Your Pet ................................................................................................................9 Day 1 – Boundary Flag Awareness ..................................................................................................9 Days 2 thru 4 – Continue Boundary Flag Awareness .....................................................................10 Days 5 thru 8 – Distraction Phase ................................................................................................10 Days 9 thru 14 – Supervision Off the Lead ...................................................................................11 Taking Your Pet Out of the Pet Area ..............................................................................................11 Wireless - To - Go ........................................................................................................................12Accessories ....................................................................................................................................12Frequently Asked Questions ...........................................................................................................12Troubleshooting .............................................................................................................................14Test Light Instructions ...................................................................................................................15Terms of Use and Limitation of Liability .........................................................................................15Caution .........................................................................................................................................15Product Warranty ...........................................................................................................................15Español ........................................................................................................................................16Mounting Template ........................................................................................................................32FCC ..............................................................................................................................................32

www.petsafe.net 3
Components
Boundary Flags - 50
Test Light
Long Contact Points
Operating and Training Guide
Transmitter
H
A P P Y O W NE
RS
SA
F E P E T S
ReceiverCollar with Short
Contact Points Battery(PetSafe® RFA-67)
Power Adapter
Other Items You May Need• Pliers• Scissors• Lighter• Drill & mounting hardware• Tape measure• Non-metallic collar and lead
Extra Receiver Collar:If you have more than one dog, additional Receiver Collars are available. An unlimited number of dogs can be added to the system as long as they are wearing a PetSafe Wireless Pet Containment System® Receiver Collar.

4 www.petsafe.net
Note: In many neighborhoods, nearby property lines may limit how large the Pet Area can be.
Maximum 27.5m (90 ft) range(45 average steps)
P E T A R E ATransmitter
Key DefinitionsTransmitter: Transmits the radio signal and is the centre of the Pet Area.
Pet Area: The area around the Transmitter where your pet can roam freely.
Boundary Zone: A 0.6 to 1 m (2 to 3 ft) wide ring outside the Pet Area where your pet’s Receiver Collar will begin to beep and then begin to deliver a Static Correction. The correction will start in the Boundary Zone and continue anywhere beyond the Pet Area. Note: The Receiver Collar is equipped with a safety time-out feature that will stop correcting after 30 seconds if your pet remains outside the Pet Area.
Receiver Collar: Receives the radio signal from the Transmitter.
Correction Level Button: Adjusts the level of Static Correction your pet receives outside the Pet Area.
Receiver Indicator Light: Indicates the level of correction at which the Receiver Collar is set. This light also serves as a low battery indicator.
Contact Points: Deliver the safe Static Correction when your pet moves into the Boundary Zone.
Power Jack: Where the Power Adapter plugs into the Transmitter. The Transmitter is powered by a standard 220-240 volt outlet.
Boundary Switch: Adjusts the size according to the size of the Pet Area desired.
Power Light: Indicates when the Transmitter is on.
Boundary Control Dial: Adjusts the distance from the Transmitter to the Boundary Zone. Note: Adjusting the dial does not change the level of Static Correction on the Receiver Collar.
How the System WorksThe PetSafe Wireless Pet Containment System® has been proven safe, comfortable, and effective for pets over 3.6 kg (8 lb). The system works by transmitting a radio signal up to 27.5 m (90 ft) in all directions. You temporarily defi ne the Pet Area with Boundary Flags for a visual aid in training your pet. Your pet wears a Receiver Collar with Contact Points that touch his neck, and, once trained, is allowed to roam freely within the Pet Area. When your pet reaches the Boundary Zone, the Receiver Collar gives a warning beep before delivering a safe Static Correction through the Contact Points to get his attention until he returns to the Pet Area.
Transmitter
Receiver Collar
Contact Points
Battery
ReceiverIndicatorLight
Washers
CorrectionLevelButton
Boundary Switch
On/Off Switch
Power Jack
Power Light
Boundary Control Dial
H
A P P Y O W N
ER
S
S
AF E P E T S

www.petsafe.net 5
Set Up the TransmitterImportant: You may need to move the Transmitter several times before determining the final location.
The Transmitter is located at the exact centre of the desired Pet Area. Place the Transmitter:• 0.6 to 1.2 m (2 to 4 ft) above the floor.• In a dry, well ventilated, protected area.• In an area where temperatures do not fall below freezing (e.g., garage, basement, shed, cupboard).• On a non-metal table or mount on a wall (1A). A mounting template is included on the back of this guide.• At least 1 m (3 ft) from large metal objects, as these items may reduce the size and shape of your Pet Area
(1B).
To maximize your Pet Area, make sure the Boundary Switch is on “High” and the Boundary Control Dial is set to “8” (1C). Plug Power Adapter into Power Jack and standard 120-volt outlet. Turn the Transmitter on.
Prepare the Receiver CollarYour Receiver Collar comes with short Contact Points installed. Use the long Contact Points for pets with long or thick hair. Remove and retighten the Contact Points using pliers. The Contact Points should be tightened one-half turn beyond finger tight (2A). Check the tightness weekly.
To Insert and Remove the BatteryNote: Do not install the battery while the Receiver Collar is on your pet.
This process should be carried out within 1.5 m (5 ft) of the Transmitter.
The Receiver Collar utilizes a replaceable PetSafe® battery (RFA-67). This unique battery is designed to make battery replacement easier and increase water protection.
To insert the battery, align the symbols on the battery (arrow) and Receiver Collar (triangle) (2B). Use a large coin to turn the battery clockwise until the arrow lines up with the lock symbol on the housing (2C) .
To remove the battery, turn the battery anti-clockwise using a large coin (2D, 2E). DO NOT attempt to cut into or pry open the battery. Be sure to discard the used battery properly.
A replacement PetSafe® battery (RFA-67) can be found at many retailers. Contact the Customer Care Centre or visit our web site at www.petsafe.net to locate a retailer near you.
WWW PATIEN
3
3
2
A-67
4
1
2
5
Step
2
Operating GuideStep
1
BO
UN
DA
RY
CO
NT
RO
L
78
Power
Boundary SwitchLowHigh
8
1m(3ft)
WallMount
Tabletop

6 www.petsafe.net
Step
3
To Set the Static Correction LevelNote: Your Receiver Collar has been factory-set to Beep Only.
Read all the steps below before attempting to set the Static Correction Level. Refer to the Function and Response Table below for advice on setting the Static Correction Level that best suits your pet.1. Remove the clear plastic cover with a coin to
expose the Correction Level Button (2F).2. With the battery installed, press the Correction
Level Button and release when the Receiver LED Indicator Light lights up (2G).
3. The Receiver LED Indicator Light will emit a series of fl ashes corresponding to the Static Correction Level.
4. Increase the Static Correction Level by pressing and releasing the Correction Level Button within 5 seconds of the previous series of fl ashes.
5. After setting the Static Correction Level, replace the cover to protect the Correction Level Button.
The Static Correction levels increase in strength from 1 to 6. Pushing the Correction Level Button while the Receiver Collar is on level 6 will cause the Receiver Collar to revert to level 1. Refer to the Function and Response Table to choose the Static Correction level that best fi ts your pet.
The Receiver LED Indicator Light acts as a low battery indicator, fl ashing every 4 to 5 seconds when replacement is required.
Function and Response TableIndicator Light Response
Static Correction Level
Receiver Collar Function Temperament of Pet
1 Flash 1 No Static Correction, Beep Only
2 Flashes 2 Low Static Correction Timid
3 Flashes 3 Medium-Low Static Correction Timid or Average
4 Flashes 4 Medium Static Correction Average Energy
5 Flashes 5 Medium-High Static Correction Average or High Energy
6 Flashes 6 High Static Correction High Energy
Flashes once every 4 to 5 seconds
Indicates Low Battery
Note: Begin training with Static Correction Level 2 and only increase if your pet does not respond to the Static Correction.__________________________________________________Adjust the Pet Area to Desired SizeMake sure the entire Pet Area lies within your property boundaries (3A). Always start determining the Boundary Zone at the shortest distance from Transmitter. Place the Boundary Switch on “High” for Boundary Zones more than 13.5 m (45 ft) from the Transmitter. For Boundary Zones below this distance place the Boundary Switch on “Low.”
Two-Person MethodHold the Receiver Collar at your pet’s neck height (3B) with the Petsafe logo facing away from the Transmitter (3C). Walk to the edge of the desired Pet Area. Facing away from the Transmitter, hold the Receiver Collar at the edge of the desired Pet Area (3D).
Starting with the Boundary Control Dial set to “8”, have a second person turn the dial down SLOWLY. When the Receiver Collar starts to beep, tell the person to stop turning the Boundary Control Dial. Record your settings below for future reference.
PetArea
ST
RE
ET
3A

www.petsafe.net 7
TransmitterRange Chart
BoundaryControl
DialPosition
BoundarySwitchLOW
BoundarySwitchHIGH
1 1.5–3 m(5-10 ft)
1.5–3 m(5-10 ft)
2 1.5–3 m(5-10 ft)
1.5–3 m(5-10 ft)
3 4.5–6 m(15-20 ft)
7.5–10.5 m(25-35 ft)
4 6–7.5 m(20-25 ft)
12.5–16.5 m(42-55 ft)
5 7.5–9 m(25-30 ft)
16.5–19.5 m(55-65 ft)
6 10.5–12 m(35-40 ft)
23–26 m(75-85 ft)
7 12–13.5 m(40-45 ft)
26–27.5 m(85-90 ft)
8 12–13.5 m(40-45 ft)
26–27.5 m(85-90 ft)
Record Your SettingsFinal Boundary Switch Setting(HIGH or LOW)
Final Boundary Control DialPosition (1-8)
Receiver Static Correction Level (1-6)
Home
Camping
Vacation
Other
One-Person MethodMeasure the shortest distance from the desired Boundary Zone to the Transmitter. Place the Boundary Switch on “High” for Boundary Zones more than 13.5 m (45 ft) from the transmitter and on “Low” for Boundary Zones below this distance. Then set the Boundary Control Dial according to the Transmitter Range Chart below. Take the Receiver Collar to the Boundary Zone with the Receiver Collar at your pet’s neck height (3B) with logo side facing away from the Transmitter (3C). Determine where the Receiver Collar begins to beep. If the Receiver Collar beeps before or after the desired Boundary Zone, return to the Transmitter and adjust the Boundary Control Dial. Repeat this process until the Receiver Collar is beeping at the desired location. Record your settings below for future reference.
Note: If you cannot hear the beep, refer to the “Test Light Instructions” section.
3D
Boundary Zone
PetArea
3B 3C
Place the Boundary FlagsThe Boundary Flags are visual reminders for your pet of where the Boundary Zone is located. The Receiver Collar will activate within 0.6 to 1 m (2 to 3 ft) of the Boundary Flags.
1. Hold the Receiver Collar at your pet’s neck height with the PetSafe logo facing away from the Transmitter. 2. Walk towards the Boundary Zone until the Receiver Collar beeps (4A). 3. Place a Boundary Flag in the ground (4B). 4. Walk back into the Pet Area until the beeping stops. 5. Repeat this process around the Boundary Zone until it is marked with
Boundary Flags every 3 m (10 ft).
The Boundary Flags may be in different parts of the Boundary Zone and may not be in a line. The Boundary Zone is 0.6 to 1 m (2 to 3 ft) wide.
Note: If you cannot hear the beep, refer to the “Test Light Instructions” section.
4A
H
A P P Y O W N ERS
S A F E P E T S
4B
Step
4Note: These distances are approximate.

8 www.petsafe.net
Fit the Receiver Collar Important: The proper fit and placement of your Receiver Collar is important for effective training and the Safety of your pet. The Contact Points must have direct contact with your pet’s skin on the underside of his neck.
To assure a proper fit, please follow these steps:1. Make sure that the battery is not installed in the Receiver Collar. 2. Start with your pet standing comfortably (5A).3. To make it easier to hear the warning beep, place the Receiver Collar on your pet with the
PetSafe logo side of the Receiver facing up.4. Centre the Contact Points underneath your pet’s neck, touching the skin. If your pet has a long
or thick coat, use the enclosed long Contact Points to reach through the hair. Note: It is sometimes necessary to trim the hair around the Contact Points to make sure that contact is consistent.
5. Check the tightness of the Receiver Collar by inserting one finger between the end of a Contact Point and your pet’s neck. The fit should be snug but not constricting (5B).
6. Allow your pet to wear the collar for several minutes then recheck the fit. Check the fit again as your pet becomes more comfortable with the Receiver Collar.
7. Trim the collar as follows (5C):a. Mark the desired length of the Receiver Collar with a pen. Allow
for growth if your pet is young or grows a thick winter coat.b. Remove the Receiver Collar from your pet and cut off the excess. c. Before placing the Receiver Collar back onto your pet, seal the
edge of the cut collar by applying a flame along the frayed edge. Important: For comfort, safety and effectiveness of product, please ensure the following:• During the fi rst 2 weeks of training, do not use the training
device on your pet without direct supervision.• Check the fi t to prevent excessive pressure by being able to
insert one fi nger between the Contact Point and your pet’s skin.• Your pet must be carefully examined daily for any signs of a rash or sore.• If a rash or sore is observed, discontinue the use of the Receiver Collar for a few days.• If the condition persists beyond 48 hours, see your veterinarian.• Your pet’s neck and the Contact Points must be washed weekly with a wash cloth and mild hand soap,
then rinsed thoroughly.
A condition called Pressure Necrosis, which is a devitalization of the skin due to excessive and prolonged contact against the Contact Points, may occur if the steps above are not followed.
Step
5
To Re-Thread the CollarSlide Buckle
Ridges
The slide buckle prevents the collar from becoming loose around your pet’s neck.
The ridges must be facing up; the collar will slip if it is not prop-erly threaded.

www.petsafe.net 9
Be Patient With Your PetImportant: Proper training of your pet is essential to the success of the PetSafe Wireless Pet Containment System®. Read this section completely before beginning to train your pet. Remember that the PetSafe Wireless Pet Containment System® is not a solid barrier.
• Have fun with your pet throughout the training process. Training should be fun, fair, firm and consistent.
• Train for 10 to 15 minutes at a time. Don’t try to do too much too quickly. More-frequent short sessions are better than less-frequent longer sessions.
• We suggest a minimum of 14 days of training. Depending on your pet and how he learns, the training could take more or less time.
• If your pet shows signs of stress, slow down the training schedule, add additional days of training, or increase the amount of play time with your pet in the Pet Area. Common stress signals include:
- Pet pulling on leash toward the house - Ears tucked - Tail down - Body lowered - Nervous / frantic movement or stiffening of pet’s body
• Your pet must be completely comfortable near the Boundary Flags at the end of every training session. Spend at least 5 minutes of “play time” at the completion of each session within 10 feet of the Boundary Flags.
• Finish each training session on a positive note with lots of praise and play.
• Remove the Receiver Collar after each training session.
• Be sure to contain your pet by another means during the training period.
• During training, if you need to take your pet out of the Pet Area, remove the Receiver Collar and either pick your pet up or put him in the car to pass out of the Pet Area.
• Even if you think your pet is responding well to the training, complete the entire training. Reinforcement is important!
1 2 3 4 5 6 7
8 9 10 11 12 13 14
15 16 17 18 19 20 21
22 23 24 26 27 28
29 30 31
S M T W T F S
25
30
0
15min.
45
Training Guide
__________________________________________________
Day 1 - Boundary Flag AwarenessPerform three sessions on day 1, each training session lasting 10-15 minutes.
Goal:To have your pet learn that the Boundary Flags and warning beep from the Receiver Collar defi ne the new Pet Area.
Setup:• Program the Static Correction Level on the Receiver Collar depending on the size and temperament of your pet.• Put a separate non-metallic collar on your pet’s neck ABOVE the Receiver Collar and attach a lead. Note: Be sure
the extra collar does not put pressure on the Contact Points.• Have tiny pieces of treats that your pet will fi nd desirable available.• Have your pet’s favorite play toy available.
Phase
1

10 www.petsafe.net
Steps:1. Begin by walking your pet on a leash in the Pet Area. Calmly praise and talk to your pet, occasionally giving
treats. 2. Move toward the Boundary Flags (1A). Keep your mood happy and throw treats to the ground.3. With full control of your pet on a leash, toss a treat on the outside edge of the fl ags. As your pet enters the Boundary
Zone to receive the treat, the receiver collar will begin to beep (1B). As your pet remains in the Boundary Zone, he will receive a mild Static Correction. Allow your pet to stay in the Boundary Zone for 2 seconds then gently help him back into the Pet Area (1C). Immediately praise and offer your pet a treat as he enters the Pet Area, even if you have helped with the leash. Wiggle a Boundary Flag to help your pet understand that the discomfort of the Static Correction happens around the fl ags.
4. Repeat this process at several different Boundary Flags. Your pet should start to resist going after the treat in the Boundary Zone. If your pet continues to enter the Boundary Zone, check the fi t of his Receiver Collar and allow him 2-3 seconds in the zone before pulling him back to the Pet Area.
Note: Never allow your pet to eat the treat in the Boundary Zone.
__________________________________________________
Days 2 thru 4 - Continue Boundary Flag AwarenessPerform three sessions per day, each lasting 10-15 minutes.
Goal:To train your pet to stay in the Pet Area and respect the boundary while you are outside of it.
Setup:• Program the Static Correction Level on the Receiver Collar depending on the size and temperament of your pet.• Put a separate non-metallic collar on your pet’s neck ABOVE the Receiver Collar and attach a lead. Note: Be sure
the extra collar does not put pressure on the Contact Points.• Have tiny pieces of treats available.• Have your pet’s favorite play toy available.
Steps:1. Repeat steps 1-4 in Phase One2. Drop the lead, leaving your pet in the Pet Area.3. Walk outside the boundary and wiggle the Boundary Flags facing your pet.4. Continue around the entire boundary doing this, tossing treats to your pet in the Pet Area and praising him if he
stays within the Pet Area.5. If your enters the Boundary Zone and does not respond to the Static Correction, increase the Static Correction
Level by 1.__________________________________________________
Days 5 thru 8 - Distraction PhasePerform three training sessions per day, each lasting 10 - 15 minutes.
Goal:To train your pet to stay within the Pet Area with distractions outside of the Pet Area.Setup:• Program the Static Correction Level on the Receiver Collar depending on the size and temperament of your pet.
Phase
2
Phase
3

www.petsafe.net 11
• Put a separate non-metallic collar on your pet’s neck ABOVE the Receiver Collar and attach a lead. Note: Be sure the extra collar does not put pressure on the Contact Points.
• Have tiny pieces of treats available (hot dogs or lunch meat work well).• Have your pet’s favorite play toy available.• Create distractions to tempt your pet to enter the Boundary Zone, such as: - Have a family member cross from inside the Pet Area to outside of it. - Throw a ball outside of the Pet Area. - Have a neighbor walk their pet outside of the Pet Area.
Steps:1. With full control of your pet on a lead, have the distraction presented. 2. If your pet does not move toward the distraction, praise and offer a treat. 3. If your pet does react to the distraction, allow him to go into the Boundary Zone. 4. Help your pet back into the Pet Area if he does not turn back after 3 seconds. 5. Treat and praise your pet anytime he comes back into the Pet Area with or without help.6. Repeat this process with other distractions. Use other family members during this process.7. If your pet does not respond to the Static Correction, increase the Static Correction Level by 1.
__________________________________________________
Days 9 thru 14 - Supervision Off the LeadTraining sessions should start at 10-15 minutes, gradually increasing to over an hour.
Your pet is ready for this step only when he clearly avoids the entire Boundary Zone, regardless of any distractions or temptations. During this step, do not leave your pet unattended.
Goal:To give your pet free run of the Pet Area off the lead. Setup:Adjust the Receiver Collar to the permanent setting appropriate for your pet depending on his size and temperament.
Steps:1. Enter the Pet Area with your pet wearing the Receiver Collar. 2. Walk around the garden and play with your pet, staying within the Pet Area at all times.3. Preoccupy yourself with another task in the garden while watching your pet.4. Should your pet escape, take the Receiver Collar off or turn the system off at the Fence Transmitter and lead him
back into the Pet Area.
Phase
4
__________________________________________________
Taking Your Pet Out of the Pet AreaImportant: Remove the Receiver Collar and leave it in the Pet Area.
Once your pet learns the Boundary Zone, he will be reluctant to cross it for walks or car rides.
Option 1: Replace the Receiver Collar with a regular collar. Put your pet in a car that is within the Pet Area and drive him out of the Pet Area.
Option 2: Replace the Receiver Collar with a regular collar and lead. Walk your pet out of the Pet Area while giving a command such as “OK” at a specific place of the Boundary Zone (the end of your driveway, sidewalk, etc.). Always leave the Pet Area with a lead at this place and your pet will associate leaving the Pet Area only on a lead, only at this place, and only with a person. You may initially need to convince your pet to leave the Pet Area with a food treat and lots of praise.
Note: You may also carry your pet out of the Pet Area.

12 www.petsafe.net
Frequently Asked QuestionsIs the Receiver Collar waterproof? • Yes. When changing the battery, be sure to keep the battery area dry and
free from dirt and debris.
Will the PetSafe Wireless Pet Containment System® cover a larger circle than 55 m (180 ft) across?
• You can use another Wireless Transmitter with overlapping boundaries of at least 2 to 3 m (5 to 10 ft) to get a larger Pet Area.
Will a sloping garden affect the Pet Area?
• The Transmitter signal extends 27.5 m (90 ft) in all directions. A sloping garden can cause the Pet Area to appear less or more than expected. Consider repositioning the Transmitter to maximize your Pet Area.
Can I use more than one Receiver Collar with the Wireless System?
• Yes. There is no limit to the number of pets you can contain with the Wireless System. You must purchase an additional Receiver Collar for each pet. Contact the Customer Care Centre or visit our website at www.petsafe.net to locate a retailer near you.
Will the Wireless System keep other pets out of my garden?
• No. The Wireless System is only effective on pets who wear the Receiver Collar.
Is there a hand-held remote Transmitter that will work with the Wireless System Receiver Collar?
• No. You would need to purchase a separate Remote Training System. Contact the Customer Care Centre or visit our website at www.petsafe.net to locate a retailer near you.
Is there a smaller Receiver Collar or another compatible Receiver Collar that I can use with the Wireless Transmitter?
• No. Contact the Customer Care Centre or visit our website at www.petsafe.net for additional ideas or solutions.
If I have a question about my Wireless System or need replacement parts, where can I get answers or service?
• Contact the Customer Care Centre or visit our web site at www.petsafe.net.
Wireless - To - GoYour PetSafe Wireless Pet Containment System® is completely portable. Follow the set-up procedures (steps 1 through 4) wherever you wish to have containment of your pet. Reestablish the Pet Area and mark it with Boundary Flags so your pet knows his Boundary Zone. Note: If setting up in a metal building or vehicle, the maximum size of the Pet Area may be reduced. Be sure to remove the Receiver Collar battery before turning off the Transmitter. If you want to power the Transmitter from a car or other DC source, use an inverter rated for 50 watts or more.
_____________________________________________________
AccessoriesTo purchase additional accessories for your PetSafe Wireless Pet Containment System®, contact the Customer Care Centre or visit our website at www.petsafe.net to locate a retailer near you.
Component Part Number
Battery - two pack RFA-67D-11
Extra Receiver Collar PIF-275
Power Adapter 300-089
Replacement Collar RFA-48
Extra Flags RFA-2
Extra Wireless Transmitter IF-100
Accessory Pack RFA-135

www.petsafe.net 13
Can I use the Wireless System on an aggressive pet?
• We do not recommend using any electronic training devices on aggressive pets. If you are unsure if your dog is aggressive, please consult your veterinarian or a certifi ed trainer.
Can I use the Wireless System on a cat? • The Wireless System can be used as long as the cat can comfortably wear the Receiver Collar.
What happens if the power goes out? • The Wireless System is designed to recognize power cuts and shuts down without activating the Receiver Collar. However, if your pet is near the Boundary Zone during the power failure, he may receive a Static Correction. To lessen this chance, you may consider a battery back-up device for the Transmitter if your area experiences frequent power cuts.
What if I lose the clear plastic cover for the Correction Level Button?
• The clear plastic cover prohibits the Static Correction Level from accidentally being changed and also helps keep the Receiver waterproof. Contact the Customer Care Centre for a replacement.
If my pet leaves the Pet Area, for how long will he be corrected?
• Your pet will receive Static Correction as long as he is outside the Pet Area, for up to 30 seconds. The Receiver Collar has a safety time-out to stop correcting and beeping after 30 seconds until it is returned to the Pet Area.
How often do I need to replace the Receiver Collar battery?
• Battery life depends on how frequently your pet tests the Boundary Zone. The Receiver Indicator Light acts as a low battery indicator, flashing every 4 to 5 seconds when replacement is required.
Can I place the Receiver on another collar?
• Yes, any non-metallic collar. Make 2 holes in the collar to attach the Receiver. Use the collar in the kit as a template to locate the holes on the new collar.
Do I need to perform maintenance on my Wireless System?
• Check your pet’s neck daily for irritation from the Contact Points.• Check the Contact Points on the Receiver Collar weekly to make sure
they are tight and clean.• Check the fit of the Receiver Collar weekly.• The Receiver Indicator Light acts as a low battery indicator, flashing every
4 to 5 seconds when replacement is required.
How do I know the battery in the Receiver Collar is still working?
• Take the Receiver Collar off your pet and walk into the Boundary Zone. The Receiver Collar should beep. If not, replace the battery.
Will buildings and landscape features (trees, shrubs, etc.) affect the performance of the Wireless System?
• No. However, placing the Transmitter inside a metal building or vehicle can reduce the maximum range of the Wireless System.
What do I do if my pet’s neck becomes red and irritated?
• This condition is due to the Contact Points irritating the skin. Discontinue use of the Receiver Collar for a few days. If the condition persists beyond 48 hours, see your veterinarian. Once the skin returns to normal, replace the Receiver Collar and monitor the skin condition closely.
Can I attach a lead to the Receiver Collar?
• No. This can result in pulling the Contact Points too tightly against your pet’s neck. Attach a leash to a separate, non-metallic collar positioned above the Receiver Collar.
Why does my Receiver Collar have a beep only mode?
• The beep only mode can be used in training your pet to his boundary or for well-trained pets that no longer require Static Correction.

14 www.petsafe.net
TroubleshootingThe Receiver Collar is not beeping when setting up the Boundary Zone.
• The beep may be difficult to hear in a noisy environment. • Install the Test Light as explained in the “Test Light Instructions” section,
and use it to determine the location of Boundary Zone.• Check that the Transmitter is set up according to directions and install a
new Receiver Collar battery within 1.5 m (5 ft) of the Transmitter.
The Receiver Collar is not beeping or administering a Static Correction.
• Check that the Transmitter is plugged into a working outlet, turned on, the Power Light is on, and the Transmitter controls are set at your desired settings.
• Check Receiver battery to make sure it is installed properly. • When replacing the Receiver Collar battery, do so within 1.5 m (5 ft) of
the Transmitter.
The Receiver Collar is beeping everywhere.
• Check that the Transmitter is plugged into a working standard outlet, turned on, the Power Light is on, and the Transmitter controls are set at your desired settings.
• Bring Receiver Collar within 1.5 m (5 ft) of the Transmitter to reset.
The Receiver Collar is beeping inside the house.
• Make sure the Transmitter is on and set up according to the directions. • Ensure the entire house is within the Pet Area. The Transmitter may need
to be moved to adjust the Pet Area to include the entire house. • If relocating the Transmitter, remove the Receiver Collar from your pet
before turning the Transmitter off.
The Boundary Zone seems to fluctuate. • This is normal for the electro magnetic field of the Wireless System. The field may be affected by surrounding “electronic noise,” which can cause it to fluctuate up to 5%.
• Where the Receiver Collar activates is influenced by the speed and orientation of the Receiver Collar as your pet enters the Boundary Zone.
The Receiver Collar activates in the middle of the garden.
• The Receiver Collar activates when it loses the Transmitter signal. This sometimes occurs if a large metal object is between the Receiver Collar and Transmitter, if the orientation of the Receiver Collar changes near the Boundary Zone, or if the surrounding “electronic noise” interferes with the signal. If this continues to occur, consider relocating the Transmitter and resetting the Pet Area.
The Receiver Collar is beeping but my pet is not responding to the Static Correction.
• Make sure the Static Correction Level is set at 2 or above. • Test the Receiver Collar with the Test Light.• If the Test Light fl ashes, check the fi t of the Receiver Collar.• Trim your pet’s fur where the Contact Points touch the neck and/or
switch to the longer Contact Points. • Increase the Static Correction Level. • Repeat training steps to reinforce training.
My pet reacts strongly to the Static Correction and has become fearful.
• Lower the Static Correction Level.• Make sure you are in control of the situation when your pet receives his
first Static Corrections (have him on a leash attached to a separate, non-metallic collar) and lead him into the Pet Area and praise him. If your pet remains fearful, suspend training and start again the next day. Make sure to end all training sessions on a positive note with lots of praise and play.
The Power Light is not on. • Make sure the Transmitter On/Off Switch is on and the Power Adapter is plugged into the Transmitter and a working standard outlet.
I was setting up the Pet Area and after I turned down the Boundary Control Dial, the Receiver Collar would no longer beep or correct.
• You may have turned the Boundary Control Dial down too quickly, causing the Receiver Collar to go into power-fail mode. This is a safety feature designed to protect your pet when power to the Transmitter goes out. With the Receiver Collar within 1.5 m (5 ft) of the Transmitter, turn the Boundary Control Dial to “8” and reset the Boundary Zone, making sure to turn the dial down slowly.

www.petsafe.net 15
Test Light InstructionsImportant: Remove Test Light before placing Receiver Collar on your pet.
1. Set Receiver Collar to Static Correction Level 6.2. Remove the battery.3. Loosen the Contact Points with pliers.4. Bend the leads around the base of each Contact Point.5. Hand tighten the Contact Points, making sure that the leads stay in contact with the bases of the Contact Points.6. Replace the battery.7. The Test Light will flash in the Boundary Zone if the Receiver Collar is working properly.8. Remove the Test Light and tighten the Contact Points with pliers one-half turn beyond finger tight.Save the Test Light for future testing.
Note: If the Test Light does not flash, install a new battery and re-test. If Test Light still does not flash, contact the Customer Care Centre.________________________________________________________
A-67
Terms of Use and Limitation of Liability1. Terms of Use
This Product is offered to you conditionally upon your acceptance without modification of the terms, conditions and notices contained herein. Usage of this Product implies acceptance of all such terms, conditions, and notices.
2. Proper UseThis Product is designed for use with pets where training is desired. The specific temperament of your pet may not work with this Product. We recommend that you not use this Product if your pet is less than 3.6 kg (8 lb) or if your pet is aggressive. If you are unsure whether this is appropriate for your pet please consult your veterinarian or certified trainer.
Proper use includes reviewing the entire Guide provided with your Product and any specific Caution statements.
3. No Unlawful or Prohibited UseThis Product is designed for use with pets only. This pet training device is not intended to harm, injure or provoke. Using this Product in a way that is not intended could result in violation of National or local laws.
4. Limitation of LiabilityIn no event shall Radio Systems Corporation be liable for any direct, indirect, punitive, incidental, special or consequential damages, or any damages whatsoever arising out of or connected with the use or misuse of this Product. Buyer assumes all risks and liability from the use of this Product.
5. Modification of Terms and Conditions Radio Systems Corporation reserves the right to change the terms, conditions and notices under which this Product is offered._____________________________________________________
CautionThe PetSafe Wireless Pet Containment System® is NOT a solid barrier. The system is designed to act as a deterrent to remind pets by Static Correction to remain within the boundary established. It is important that you reinforce training with your pet on a regular basis. Since the tolerance level to Static Correction varies from pet to pet, Radio Systems Corporation CANNOT guarantee that the system will, in all cases, keep a pet within the established boundary. Not all pets can be trained to avoid crossing the boundary! Therefore, if you have reason to believe that your pet may pose a danger to others or harm himself if he is not kept from crossing the boundaries, you should NOT rely solely upon the PetSafe Wireless Pet Containment System™ to confine your pet. Radio Systems Corporation shall NOT be liable for any property damage, economic loss or any consequential damages, sustained as a result of any animal crossing the boundary._____________________________________________________Product WarrantyAll parts are covered under warranty for one (1) year. Misuse, loss, damage by pet or improper use or handling is not covered. PetSafe® will not pay for loss of time, inconvenience, loss of use of your product or any incidental or consequential damage. Warranty void if product resold. Please contact the Customer Care Center at 1-800-732-2677 (US) or 1-800-457-3911(Canada), if you need service or for help in troubleshooting your product. For customers outside of North America, please return product to the retailer. Also, please visit our website www.petsafe.net for Frequently Asked Questions and Troubleshooting Tips.

16 www.petsafe.net
Gracias por elegir PetSafe®, la primera marca del mundo en venta de soluciones de adiestramiento electrónico.Nuestro objetivo es conseguir la seguridad de su perro proporcionándole a usted las herramientas y técnicas de adiestramiento correcto. Si tiene alguna duda, le rogamos que se ponga en contacto con el Centro de Atención al Cliente o que visite nuestra página Web en www.petsafe.net.___________________________________________
Índice de contenidosComponentes .................................................................................................................................17Otros artículos que puede necesitar .................................................................................................17Cómo funciona el sistema ...............................................................................................................18Defi niciones clave ...........................................................................................................................18Manual de funcionamiento Instalación del transmisor ............................................................................................................19 Prepare el collar receptor..............................................................................................................19 Ajuste la zona del perro al tamaño deseado ...................................................................................20 Gráfi ca de alcance del transmisor .................................................................................................21 Coloque las banderas de límites ....................................................................................................21 Ajuste del collar receptor ..............................................................................................................22Guía de adiestramiento Sea paciente con su perro .............................................................................................................23 Día 1 – Aprendizaje de las banderas de límites ..............................................................................23 Días 2 a 4 – Continuación del aprendizaje de las banderas de límites .............................................24 Días 5 a 8 – Fase de distracción ....................................................................................................24 Días 9 a 14 - Supervisión sin correa ..............................................................................................25 Llevar al perro fuera de su zona ....................................................................................................25 Inalámbrico – para - llevar ............................................................................................................26Accesorios ......................................................................................................................................26Preguntas más frecuentes ................................................................................................................26Solución de problemas ..................................................................................................................28Instrucciones de luz de prueba ........................................................................................................29Condiciones de uso y limitación de responsabilidad .........................................................................29Precaución .....................................................................................................................................29Garantía del producto ....................................................................................................................29Plantilla de montaje ........................................................................................................................32

www.petsafe.net 17
Componentes
Banderas de límites - 50
Adaptador de corriente
Luz de prueba
Puntos de contacto largos
Transmisor
Manual de adiestramiento y funcionamiento
H
A P P Y O W NE
RS
SA
F E P E T S
ReceptorCollar con puntosde contacto cortos Pila
(PetSafe® RFA-67)
Otros artículos que puede necesitar• Alicates• Tijeras• Encendedor• Taladrador & herramientas de montaje• Cinta de medición• Collar y correa no metálicos
Collar receptor adicional: Si usted tiene más de un animal doméstico, se encuentran disponibles receptores adicionales. Se puede agregar un número ilimitado de animales domésticos a la cerca Wireless Pet Containment System® siempre que lleven puesto un collar receptor Wireless Pet Containment System® de PetSafe.

18 www.petsafe.net
Nota: En muchos vecindarios, las líneas de propiedad cercanas pueden limitar lo grande que puede ser el área del perro.
Alcance máximo 27,5 m (45 pasos normales)
ÁREA DEL PERROTransmisor
Defi niciones claveTransmisor: Transmite la señal de radio y es el centro del área del perro.
Zona del perro: Distancia desde el transmisor donde el perro puede correr libremente.
Zona de límites: Área de 0,6 a 1 m fuera de la zona del perro donde el collar receptor empezará a emitir un pitido para después proporcionar una corrección estática. La corrección empezará en la zona de límites y seguirá en cualquier sitio más allá de la zona del perro. Nota: El collar receptor está equipado con un dispositivo de seguridad que parará la corrección después de 30 segundos si el perro permanece fuera de su zona.
Collar receptor: Recibe la señal de radio del transmisor.
Botón de nivel de corrección: Ajusta el nivel de corrección estática que recibe el perro fuera de su zona.
Luz indicadora del receptor: Indica el nivel de corrección en el que se establece el collar receptor. Esta luz sirve también como un indicador de batería baja.
Puntos de contacto: Proporcionan la corrección estática de seguridad cuando el perro entra en la zona de límites.
Toma de alimentación: Donde el adaptador de corriente se enchufa al transmisor. El transmisor funciona con una salida estándar.
Conmutador de límites: Se ajusta en función del tamaño de la zona del perro que se quiera.
Luz de alimentación: Indica que el transmisor está encendido.
Selector de control de límites: Ajusta la distancia desde el transmisor a la zona de límites. Nota: El ajuste del selector no cambia el nivel de corrección estática en el collar receptor.
Cómo funciona el sistemaEl sistema de contencion sin cable de Petsafe® ha demostrado ser seguro, cómodo y efi caz para todos los perros de más de 3,6 kg. El sistema funciona transmitiendo una señal de radio hasta 27,5 m en todas direcciones. Se defi ne temporalmente esta zona del animal doméstico con banderas de límites para visualizar la zona y para entrenar al animal. El animal lleva un collar receptor con puntos de contacto con el cuello. Una vez esté entrenado, puede correr libremente por su zona. Cuando el perro llega a la zona de límites, el collar receptor emite un pitido de aviso antes de proporcionar una corrección estática de seguridad a través de los puntos de contacto para llamarle la atención hasta que vuelva a su área.
Transmisor
Collar receptor
Puntos de contacto
Pila
Luz indicadora del receptor
Arandelas
Botón de nivel de correcció
Conmutador de límites(Boundary Switch)
Interruptor deencendido/apagado(On/Off Switch)
Toma de alimentación(Power Jack)
Luz de alimentación(Power Light)
Selector de control de límites(Boundary Control)
H
A P P Y O W NE
RS
SA
F E P E T S

www.petsafe.net 19
1m(3ft)
Instalación del transmisorImportante: Puede que tenga que cambiar de sitio el transmisor varias veces antes de determinar su emplazamiento final.
El transmisor se sitúa en el centro mismo de la zona del perro. Coloque el transmisor:• De 60 a 120 cm por encima del suelo.• En una zona seca, bien ventilada y protegida.• En una zona en que las temperaturas no bajen de cero (por ejemplo garaje, sótano, cobertizo, armario).• En una mesa no metálica o montado en una pared (1A). Hay una plantilla de montaje en el dorso de este manual.• Como mínimo a 1 m de grandes objetos metálicos, ya que estos elementos pueden reducir el tamaño y la forma de
la zona del perro (1B).
Para maximizar la zona del perro, asegúrese de que el conmutador de límites está en “High” y que el selector de control de límites está en “8” (1C). Conecte el adaptador de corriente a la toma de alimentación y a la salida estándar. Encienda el transmisor.
Prepare el collar receptorEl collar receptor viene con puntos de contacto cortos instalados. Utilice los puntos de contacto largos para perros con pelo largo o espeso. Apriete medio giro los puntos de contacto con alicates más allá del ajuste del dedo (2A). Compruebe semanalmente el ajuste.
Para instalar y extraer la pilaNota: No instale la pila mientras el perro lleve el collar receptor.
Este proceso debe llevarse a cabo en un radio de 1,5 m del alcance del transmisor.
Este collar receptor utiliza una pila PetSafe® (RFA-67). Esta única pila está diseñada para facilitar el cambio de pila y aumentar la impermeabilidad.
Para instalar la pila, alinee los símbolos de la pila (fl echa) y el collar receptor (triángulo) (2B). Utilice una moneda grande para girar la pila en sentido de las agujas del reloj hasta que la fl echa se alinee con el símbolo de cierre de la caja (2C).
Para extraer la pila, gire la pila en sentido contrario a las agujas del reloj con una moneda grande (2D, 2E). NO intente abrir la pila. Asegúrese de desechar adecuadamente la pila usada.
Los repuestos de pilas PetSafe® (RFA-67) pueden encontrarse en muchas tiendas. Póngase en contacto con el Centro de Asistencia al Cliente o visite nuestra página Web en www.petsafe.net para localizar la tienda más cercana.
WWW PATIEN
3
3
2
A-67
4
1
2
5
Paso
2
Manual de funcionamientoPaso
1
BO
UN
DA
RY
CO
NT
RO
L
78
Power
Boundary SwitchLowHigh
8
Montajede pared
Encimade la mesa

20 www.petsafe.net
Paso
3
Para ajustar el nivel de corrección estáticaNota: El collar receptor viene ajustado de fábrica para sólo pitido.
Lea todos los pasos antes de intentar ajustar el nivel de corrección estática.1. Quite la cubierta de plástico transparente
con una moneda para exponer el botón de nivel de corrección (2F).
2. Con la pila instalada, pulse el botón de nivel de corrección y suéltelo cuando se encienda la luz indicadora del LED del receptor (2G).
3. La luz indicadora de LED del receptor emite una serie de parpadeos que representan el nivel de corrección estática.
4. Aumente el nivel de corrección estática pulsando y soltando el botón de nivel de corrección antes de 5 segundos de la anterior serie de parpadeos.
5. Después de ajustar el nivel de corrección estática, vuelva a poner la tapa del botón para protegerlo
Los niveles de corrección estática aumentan de potencia de 1 a 6. Si se aprieta el botón de nivel de corrección cuando el collar receptor está en el nivel 6, el collar receptor vuelve al nivel 1. Consulte la Tabla de Función y Respuesta para elegir el nivel que mejor se adapte a su perro.
La luz indicadora de LED del receptor actúa como un indicador de pila baja, parpadeando cada 4 ó 5 segundos cuando es necesario cambiarla.
Tabla de Función y RespuestaRespuesta de luz indicadora
Nivel de corrección estática
Función del collar receptor Carácter del perro
1 Parpadeo 1 Sin corrección estática, Sólo pitido
2 Parpadeos 2 Corrección estática baja Tímido
3 Parpadeos 3 Corrección estática media-baja Tímido o promedio
4 Parpadeos 4 Corrección estática media Energía media
5 Parpadeos 5 Corrección estática media-alta Energía alta o media
6 Parpadeos 6 Corrección estática alta Energía alta
Parpadea una vez cada 4 a 5 segundos
Indica pila baja
Nota: Inicie el adiestramiento con el nivel de corrección 2 y aumente sólo si su perro no responde a la corrección estática.__________________________________________________Ajuste la zona del perro al tamaño deseadoAsegúrese de que toda la zona del perro esté dentro de los límites de su propiedad (3A). Empiece siempre determinando la zona de límites en la distancia más corta del transmisor. Ponga el conmutador de límites en “Low” si la zona de límites es inferior a 13,5 m desde el transmisor.
Método de dos personasSostenga el collar receptor a la altura del cuello del perro (3B) con el lado del logo dirigido hacia la dirección opuesta del transmisor (3C). Camine hacia el extremo de la zona del perro deseada. Dirigiéndolo hacia el lado opuesto del transmisor, sostenga el collar receptor en el extremo de la zona del perro deseada (3D).
Empiece con el selector de control de límites en “8”, haga que otra persona gire el selector hacia LENTAMENTE. Cuando el collar receptor empiece a pitar, diga a la otra persona que deje de girar el selector de control de límites. Registre los ajustes para futuras referencias en la siguiente tabla.
Zonadel perro
CA
LL
E
3A

www.petsafe.net 21
Gráfica de alcancedel transmisor
Posición del
selector de control de límites
Conmutador de límites
LOW
Conmutador de límites
HIGH
1 1,5-3 m 1,5-3 m
2 1,5-3 m 1,5-3 m
3 4,5-6 m 7,5-10,5 m
4 6-7,5 m 12,5-16,5 m
5 7,5-9 m 16,5-19,5 m
6 10,5-12 m 23-26 m
7 12-13,5 m 26-27,5 m
8 12-13,5 m 26-27,5 m
Nota: Estas distancias son aproximadas.
Registre sus ajustesAjuste del conmutador de límites final (HIGH o LOW)
Posición de selector de control de límites final (1-8)
Nivel de corrección estática del receptor (1-6)
Casa
Camping
Vacaciones
Otros
Método de una personaMida la distancia más corta desde la zona de límites deseada al transmisor. Encuentre la distancia en la siguiente gráfica de alcance del transmisor y ajuste el conmutador de límites y el selector de control de límites. Lleve el collar receptor a la zona de límites con el collar receptor a la altura del cuello del perro (3B) con el lado del logo dirigido hacia la dirección opuesta del transmisor (3C). Determine dónde empieza a pitar el collar receptor. Si el collar receptor pita antes o después de la zona de límites deseada, vuelva al transmisor y ajuste el selector de control de límites. Repita este proceso hasta que el collar receptor pite en el lugar deseado. Registre los ajustes para futuras referencias en la siguiente tabla.
Nota: Si no puede oír el pitido, consulte la sección “Instrucciones de luz de prueba”.
3D
Zona de límites
Zona del perro
3B 3C
Coloque las banderas de límitesLas banderas de límites son recordatorios visuales para su perro de dónde está la zona de límites. El collar receptor se activa a una distancia de hasta 0,6 ó 1 m de las banderas de límites.
1. Sostenga el collar receptor a la altura del cuello del perro con el lado del logo dirigido hacia la dirección opuesta del transmisor.
2. Camine hacia la zona de límites hasta que el collar receptor pite (4A).
3. Coloque una bandera de límites en el suelo (4B).4. Vuelva hacia la zona del perro hasta que el pitido se pare.5. Repita este proceso alrededor de la zona hasta marcarla con
banderas de límites cada 3 m.
Las banderas pueden estar en diferentes partes de la zona de límites y pueden no estar en línea. La zona de límites es de 0,6 ó 1 m de ancho.
Nota: Si no puede oír el pitido, consulte la sección “Instrucciones de luz de prueba”.
4A
H
AP P Y O W
N
ER
S
S
AF E P E T S
4B
Paso
4

22 www.petsafe.net
Ajuste del collar receptorImportante: El ajuste y la colocación adecuados del collar receptor son importantes para un adiestramiento efectivo. Los puntos de contacto deben tocar directamente la piel del perro debajo del cuello. Para asegurar un ajuste correcto, siga los siguientes pasos:1. Asegúrese de que la pila no esté instalada en el collar receptor.2. Empiece con el perro cómodamente de pie (5A).3. Para que sea más fácil oír el pitido de advertencia, coloque el collar receptor en el perro con
el lado del logo del receptor hacia arriba.4. Centre los puntos de contacto debajo del cuello del perro, tocando
la piel. Si el perro tiene un pelo largo o espeso, utilice los puntos de contacto largos que se incluye para el contacto a través del pelo. Nota: A veces será necesario cortar un poco el pelo alrededor de los puntos de contacto para asegurar que el contacto sea consistente.
5. Compruebe el ajuste del collar receptor introduciendo un dedo entre el final del punto de contacto y el cuello del perro. El ajuste debe ser ceñido pero sin que le apriete demasiado (5B).
6. Deje que el perro lleve el collar durante unos minutos, luego vuelva a comprobar el ajuste. Cuando el perro esté más cómodo con el collar receptor, compruebe otra vez el ajuste.
7. Recorte el collar de la siguiente forma (5C):a. Marque la longitud deseada del collar receptor con un bolígrafo. Deje
un margen para el crecimiento si su perro es aún joven o si le crece un pelo muy espeso.
b. Quite el collar receptor del perro y corte la parte sobrante.c. Antes de volver a ponérselo, selle el extremo del collar cortado
aplicando una llama a lo largo del extremo deshilachado. Importante: Para una comodidad, seguridad y efi cacia del producto, asegúrese de lo siguiente:• Durante las 2 primeras semanas, no utilice el dispositivo de adiestramiento en el perro sin una
supervisión directa.• Para evitar una presión excesiva, compruebe el ajuste introduciendo un dedo entre el punto de
contacto y la piel del perro.• Examine con cuidado al perro diariamente para comprobar que no haya señales de erupciones
cutáneas o ulceraciones.• Si observa una erupción cutánea o ulceración, deje de ponerle el collar receptor durante unos días.• Si esta situación persiste durante más de 48 horas, consulte a su veterinario.• Lave el cuello del perro y los puntos de contacto semanalmente con una toalla y jabón suave, luego
enjuáguelo totalmente.Si no se siguen los anteriores pasos, puede producirse lo que se conoce como necrosis por presión, que es una desvitalización de la piel debida a un excesivo y prolongado contacto contra los puntos de contacto.
Paso
5
Para volver a pasar el collarBroche deslizante
Caballetes
La hebilla evita que el collar se afloje alrededor del cuello del perro.
Los pliegues deben estar hacia arriba; el collar resbalará si no se ensarta correctamente.

www.petsafe.net 23
Sea paciente con su perroImportante: El entrenamiento adecuado de su perro es fundamental para el éxito del sistema de contencion sin cable de Petsafe®. Lea esta sección completamente antes de empezar a adiestrar a su perro. Recuerde que el sistema de contencion sin cable de Petsafe® no es una barrera sólida.
• Disfrute con el perro durante el proceso de adiestramiento. El aprendizaje tiene que ser divertido, justo, firme y coherente.
• Entrene de 10 a 15 minutos cada vez. No intente hacer demasiadas cosas ni hacerlas demasiado deprisa. Es mejor hacer sesiones cortas más frecuentes que sesiones largas menos frecuentes.
• Sugerimos hacer un mínimo de 14 días de adiestramiento. Dependiendo del perro y de cómo aprenda, el adiestramiento puede tardar más o menos tiempo.
• Si el perro muestra señales de estrés, vaya más despacio en el proceso de adiestramiento, añada días de aprendizaje o aumente la cantidad de tiempo de juego con el perro en su zona. Algunas de las señales de estrés son las siguientes:
- El perro tira de la correa hacia la casa- Orejas retraídas- Cola hacia abajo- Cuerpo bajado- Nerviosismo o movimientos frenéticos o rigidez en el cuerpo
• El perro debe estar totalmente cómodo cerca de las banderas de límites antes del final de cada sesión de adiestramiento. Dedique como mínimo 5 minutos de “juego” al final de cada sesión dentro de los 3 m de las banderas de límites.
• Termine cada sesión de adiestramiento con un tono positivo con mucho juego y felicitación.
• Quite el collar receptor después de cada sesión de adiestramiento.
• Asegúrese de contener al perro de otra forma durante el período de adiestramiento.
• Durante el adiestramiento, si necesita sacar a su perro fuera de la zona, quítele el collar receptor y llévelo en brazos o póngale en el coche para pasar por la zona.
• Aunque crea que su perro responde bien al aprendizaje, complete todo el proceso de adiestramiento. ¡Es muy importante el refuerzo!
1 2 3 4 5 6 7
8 9 10 11 12 13 14
15 16 17 18 19 20 21
22 23 24 26 27 28
29 30 31
D L M M J V S
25
30
0
15min.
45
Guía de adiestramiento
__________________________________________________
Día 1 – Aprendizaje de las banderas de límitesRealice tres sesiones de adiestramiento el primer día, cada una que dure de 10 a 15 minutos.
Objetivo:El perro debe aprender que las banderas de límites y el pitido de advertencia del collar receptor definen su nueva zona.
Organización:• Programe el nivel de corrección estática en el collar receptor según el tamaño y el carácter del perro.• Coloque un segundo collar no metálico en el cuello del perro ENCIMA del collar receptor y ate una correa. Nota:
Asegúrese de que el segundo collar no presiona a los puntos de contacto.• Tenga a mano pequeños trozos de obsequios que su perro encuentre apetecibles (las salchichas o los trozos de
carne van bien).• Tenga a mano el juguete preferido del perro.
Fase
1

24 www.petsafe.net
Pasos:1. Empiece andando con el perro en una correa por la zona. Felicite y hable tranquilamente al perro, y ocasionalmente
ofrézcale obsequios.2. Vaya hacia las banderas de límites (1A). Manténgase de buen humor y tire obsequios al suelo.3. Con un control total del perro en la correa, tire un obsequio en el extremo exterior de las banderas. Cuando el
perro entre en la zona de límites para recibir el obsequio, el collar receptor empezará a pitar (1B). Cuando el perro permanezca en la zona de límites, recibirá una corrección estática suave. Déjele estar en la zona durante 2 segundos, luego ayúdele suavemente a volver a su zona (1C). Inmediatamente, prémiele y ofrézcale un obsequio cuando entre en su zona, aunque le haya ayudado usted con la correa. Mueva una bandera para que el perro pueda entender que la molestia de la corrección estática se produce alrededor de las banderas.
4. Repita este proceso con varias banderas de límites diferentes. El perro deberá empezar a resistir el ir tras el obsequio en la zona de límites. Si el perro sigue entrando en la zona de límites, compruebe que el collar esté bien ajustado y déjele 2-3 segundos en la zona antes de llevarlo de vuelta a su área.
Nota: No deje nunca que el perro coma el obsequio en la zona de límites.
__________________________________________________
Día 2 a 4 - Continuación del aprendizaje de las banderas de límitesRealice tres sesiones por día, cada una que dure de 10 a 15 minutos.
Objetivo:Adiestrar al perro a permanecer en su zona y respetar los límites mientras usted está fuera de la misma.
Organización:• Programe el nivel de corrección estática en el collar receptor según el tamaño y el carácter del perro.• Coloque un segundo collar no metálico en el cuello del perro ENCIMA del collar receptor y ate una correa.
Nota: Asegúrese de que el segundo collar no presiona a los puntos de contacto.• Tenga a mano pequeños trozos de obsequios (las salchichas o los trozos de carne van bien).• Tenga a mano el juguete preferido del perro.
Pasos:1. Repita los pasos 1-4 en la Fase Uno.2. Deje ir la correa, y deje al perro en su zona.3. Vaya fuera de los límites y ondee las banderas hacia el perro.4. Siga andando alrededor de los límites haciendo esto, lanzando obsequios al perro en su zona y premiándolo.5. Si el perro no responde a la corrección estática, aumente el nivel de corrección estática en 1.__________________________________________________Días 5 a 8 – Fase de distracciónRealice tres sesiones de adiestramiento por día, cada una que dure de 10 a 15 minutos.
Objetivo:Adiestrar al perro a permanecer dentro de la zona con distracciones fuera de la zona.
Fase
2
Fase
3

www.petsafe.net 25
Organización:• Programe el nivel de corrección estática en el collar receptor según el tamaño y el carácter del perro.• Coloque un segundo collar no metálico en el cuello del perro ENCIMA del collar receptor y ate una correa. Nota:
Asegúrese de que el segundo collar no presiona a los puntos de contacto.• Tenga a mano pequeños trozos de obsequios (las salchichas o los trozos de carne van bien).• Tenga a mano el juguete preferido del perro.• Cree distracciones para tentar al perro a entrar en la zona de límites, como por ejemplo: - Hacer que un miembro de la familia cruce desde dentro de la zona hacia fuera. - Lanzar una pelota fuera de la zona del perro. - Hacer que un vecino vaya con su perro por fuera del área.
Pasos:1. Controle totalmente al perro con la correa y preséntele la distracción.2. Si el perro no se mueve hacia la distracción, prémiele y ofrézcale un obsequio.3. Si reacciona a la distracción, permítale ir hacia la zona de límites.4. Ayude al perro a volver a su zona si no vuelve por sí solo después de 3 segundos.5. Obsequie y premie al perro en cualquier momento que vuelva a su zona con o sin ayuda.6. Repita este proceso con otras distracciones. Utilice a otros miembros de la familia durante este proceso.7. Si el perro no responde a la corrección estática, aumente el nivel de corrección en 1.
__________________________________________________
Días 9 a 14 - Supervisión sin correaLas sesiones de adiestramiento deben durar al principio de 10 a 15 minutos, y luego aumentar gradualmente a más de una hora.
El perro estará listo para ello sólo cuando evite claramente toda la zona de banderas, independientemente de cualquier distracción o tentación. Durante esta fase, no deje al perro desatendido.
Objetivo:Dejar que el perro pueda correr libremente por la zona sin la correa.
Organización:Ajuste el collar receptor a la configuración permanente adecuada para su perro según su tamaño y temperamento.
Pasos:1. Entre en la zona con el perro llevando el collar receptor.2. Camine por el terreno y juegue con el perro, estando siempre dentro de la zona.3. Ocúpese en alguna otra tarea en el terreno mientras presta atención al perro.4. Si el perro se escapa, quítele el collar receptor o desconecte el sistema en el transmisor de valla y conduzca al
perro de vuelta hacia la zona.
Fase
4
__________________________________________________
Llevar al perro fuera de su zonaImportante: Quítele el collar receptor y déjelo en la zona del perro.
Cuando el perro aprenda la zona de límites, no querrá cruzarla ni para pasear o ir en coche.
Opción 1: Sustituya el collar receptor por un collar normal. Meta al perro dentro de un coche que esté dentro de la zona y condúzcalo fuera de la misma.
Opción 2: Sustituya el collar receptor por un collar y correa normales. Saque al perro fuera de su zona a la vez que le da una orden como “Vale” en un lugar específico de la zona de límites (el final del camino de acceso, acera, etc.). Salga siempre de la zona con una correa por el mismo lugar y el perro asociará salir de la zona sólo con correa, sólo por este lugar, y sólo con una persona. Inicialmente puede que necesite convencer al perro de salir de la zona con un obsequio de comida y mucho encomio.
Nota: Quizás tenga que sacar al perro en brazos de su zona.

26 www.petsafe.net
Preguntas más frecuentes¿El collar receptor es impermeable? • Sí. Cuando cambie la pila, asegúrese de que el área de la pila esté limpia.
¿Cubre el sistema de contencion sin cable de Petsafe® un círculo más grande de 55 m de diámetro?
• Puede utilizarse otro transmisor inalámbrico con límites superpuestos de como mínimo 2 a 3 m para conseguir una zona más grande.
¿Un terreno inclinado afecta a la zona del animal doméstico?
• La señal del transmisor se extiende 27,5 m en todas direcciones. Un terreno inclinado puede hacer que una zona parezca más o menos de lo supuesto. Se puede recolocar el transmisor para maximizar la zona del animal doméstico.
¿Puedo utilizar más de un collar receptor con el sistema inalámbrico?
• Sí. El número de animales que se pueden contener con el sistema inalámbrico es ilimitado. Debe comprarse un collar receptor adicional para cada animal. Póngase en contacto con el Centro de Asistencia al Cliente o visite nuestra página Web en www.petsafe.net para localizar la tienda más cercana.
¿El sistema inalámbrico alejará a otros animales domésticos de mi terreno?
• No. El sistema inalámbrico sólo es efectivo para mascotas que lleven el collar receptor.
¿Existe algún transmisor a distancia portátil que funcione con el collar receptor del sistema inalámbrico?
• No. Hay que comprar un sistema de adiestramiento a distancia aparte. Póngase en contacto con el Centro de Asistencia al Cliente o visite nuestra página Web en www.petsafe.net para localizar la tienda más cercana.
¿Hay un collar receptor más pequeño u otro collar receptor compatible que pueda usar con el transmisor inalámbrico?
• No. Póngase en contacto con el Centro de Asistencia al Cliente o visite nuestra página Web en www.petsafe.net para obtener más ideas o soluciones.
¿Si tengo alguna pregunta acerca de mi sistema inalámbrico o necesito cambiar algunas piezas, dónde puedo obtener respuestas o servicio?
• Llame al Centro de Asistencia al Cliente o visite nuestra página Web www.petsafe.net.
Inalámbrico – para - llevarEl sistema de contencion sin cable de Petsafe® es totalmente portátil. Siga los procedimientos de instalación (pasos de 1 a 4) cuando quiera contener al perro. Reestablezca la zona del perro y márquela con banderas de límites para que el animal sepa cuál es su zona de límites. Nota: Si se instala en un vehículo o construcción metálica, el espacio máximo de la zona del animal doméstico puede reducirse. Asegúrese de extraer la pila del collar receptor antes de apagar el transmisor. Si quiere conectar el transmisor a un coche u otra fuente de CC, utilice un invertidor de 50 vatios o superior._____________________________________________________
AccesoriosPara comprar accesorios adicionales para el sistema de contencion sin cable de Petsafe®, póngase en contacto con el Centro de Asistencia al Cliente o visite nuestra página Web en www.petsafe.net para localizar la tienda más cercana.
Componente Número de pieza
Pila – paquete de dos RFA-67D-11
Collar receptor adicional PIF-275
Adaptador de corriente 300-089
Collar de sustitución RFA-48
Banderas adicionales RFA-2
Transmisor inalámbrico adicional IF-100
Paquete de accesorios RFA-135

www.petsafe.net 27
¿Puedo utilizar el sistema inalámbrico en un animal doméstico agresivo?
• No es recomendable utilizar ningún dispositivo de adiestramiento electrónico en animales domésticos agresivos. Si no está seguro de si su perro es agresivo, consulte al veterinario o a un entrenador profesional.
¿Puedo utilizar el sistema inalámbrico en un gato?
• El sistema inalámbrico puede utilizarse siempre y cuando el gato pueda llevar cómodamente el collar receptor.
¿Qué pasa si se corta la corriente? • El sistema inalámbrico está diseñado para reconocer los cortes o bajadas de corriente sin activar el collar receptor. Sin embargo, si el animal doméstico está cerca de la zona de límites durante el corte de corriente, puede que reciba una corrección estática. Para reducir esta posibilidad, puede utilizarse un dispositivo de batería de reserva para el transmisor si su zona experimenta frecuentes cortes de corriente.
¿Qué pasa si pierdo la tapa de plástico transparente para el botón de nivel de corrección?
• La tapa de plástico transparente impide que el nivel de corrección estática se cambie accidentalmente y, además, ayuda a mantener la impermeabilidad del receptor. Llame al Centro de Asistencia al Cliente para obtener otra nueva.
Si el animal abandona su zona, ¿durante cuánto tiempo será corregido?
• El animal recibirá corrección estática mientras esté fuera de su zona durante 30 segundos. El collar receptor tiene una pausa de seguridad para parar la corrección y el pitido después de 30 segundos hasta que el animal vuelva a su zona.
¿Con qué frecuencia tengo que cambiar la pila del collar receptor?
• La vida de la pila depende de cuántas veces el perro pruebe los límites. La luz indicadora del receptor actúa como un indicador de pila baja, parpadeando cada 5 segundos cuando sea necesario cambiarla.
¿Puedo colocar el receptor en otro collar?
• Sí, cualquier collar no metálico. Haga 2 agujeros en el collar para conectar el receptor. Utilice el collar en el kit como plantilla para localizar los agujeros en el nuevo collar.
¿Tengo que realizar servicio de mantenimiento en mi sistema inalámbrico?
• Compruebe diariamente que no haya irritación en el cuello del perro por los puntos de contacto.
• Compruebe semanalmente el ajuste del collar receptor.• Compruebe semanalmente los puntos de contacto en el collar receptor
para asegurar que están limpios y bien ajustados• La luz indicadora del receptor actúa como un indicador de pila baja,
parpadeando cada 4 ó 5 segundos cuando es necesario.
¿Cómo puedo saber que la pila del collar receptor funciona?
• Quite el collar receptor del perro y camine hacia la zona de límites. El collar receptor deberá emitir un pitido. Si no lo hace, cambie la pila.
¿Afectan los edificios o los obstáculos del paisaje (árboles, arbustos, etc.) al rendimiento del sistema inalámbrico?
• No. Sin embargo, si se coloca el transmisor dentro de una construcción metálica o de un vehículo puede reducirse el alcance máximo del sistema inalámbrico.
¿Qué debo hacer si el cuello del animal se irrita?
• Esto se debe a que los puntos de contacto irritan la piel. Deje de utilizar el collar receptor durante unos días. Si esta situación persiste durante más de 48 horas, consulte a su veterinario. Cuando la piel vuelva a su estado normal, cambie el collar receptor y vaya controlando muy de cerca el estado de la piel.
¿Puedo poner una correa en el collar receptor?
• No. Esto puede hacer que los puntos de contacto estén demasiado apretados contra el cuello del perro. Ate una correa a un collar separado y no metálico colocado encima del collar receptor.
¿Por qué tiene mi collar receptor un modo de sólo pitido?
• El modo de sólo pitido puede usarse para adiestrar al perro a sus límites o para perros bien adiestrados que ya no requieren corrección estática.
28 www.petsafe.net
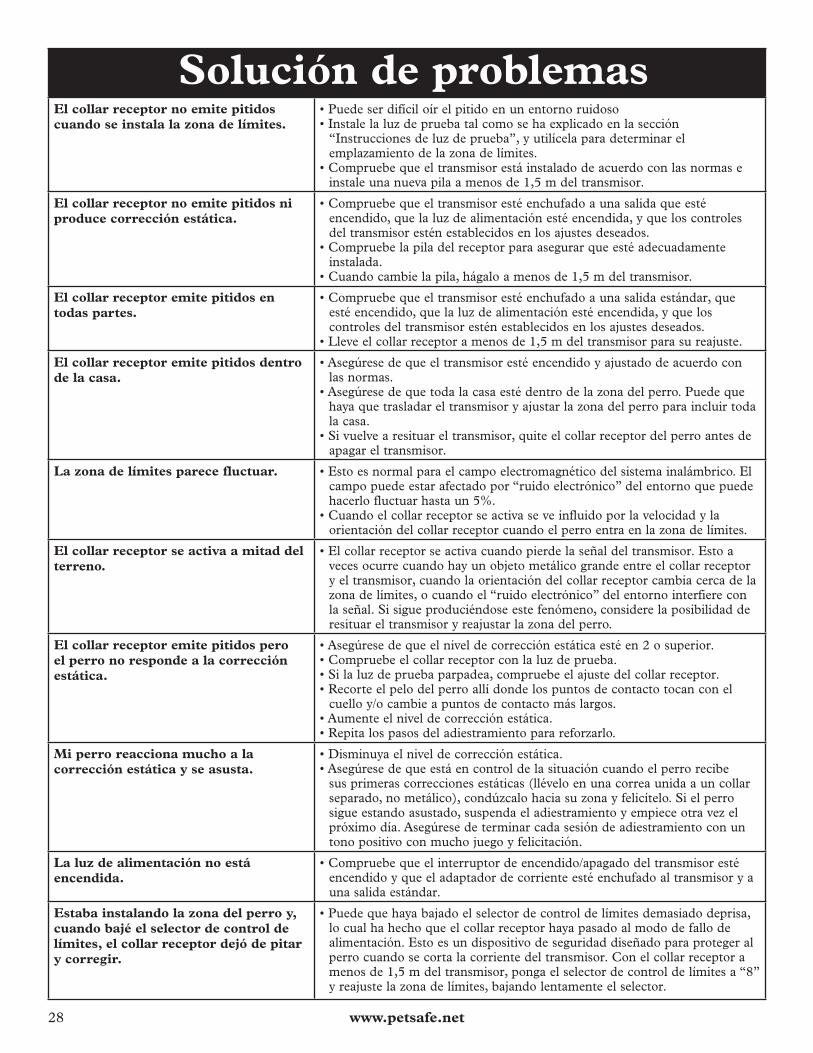
Solución de problemas
El collar receptor no emite pitidos cuando se instala la zona de límites.
• Puede ser difícil oír el pitido en un entorno ruidoso• Instale la luz de prueba tal como se ha explicado en la sección
“Instrucciones de luz de prueba”, y utilícela para determinar el emplazamiento de la zona de límites.
• Compruebe que el transmisor está instalado de acuerdo con las normas e instale una nueva pila a menos de 1,5 m del transmisor.
El collar receptor no emite pitidos ni produce corrección estática.
• Compruebe que el transmisor esté enchufado a una salida que esté encendido, que la luz de alimentación esté encendida, y que los controles del transmisor estén establecidos en los ajustes deseados.
• Compruebe la pila del receptor para asegurar que esté adecuadamente instalada.
• Cuando cambie la pila, hágalo a menos de 1,5 m del transmisor.
El collar receptor emite pitidos en todas partes.
• Compruebe que el transmisor esté enchufado a una salida estándar, que esté encendido, que la luz de alimentación esté encendida, y que los controles del transmisor estén establecidos en los ajustes deseados.
• Lleve el collar receptor a menos de 1,5 m del transmisor para su reajuste.
El collar receptor emite pitidos dentro de la casa.
• Asegúrese de que el transmisor esté encendido y ajustado de acuerdo con las normas.
• Asegúrese de que toda la casa esté dentro de la zona del perro. Puede que haya que trasladar el transmisor y ajustar la zona del perro para incluir toda la casa.
• Si vuelve a resituar el transmisor, quite el collar receptor del perro antes de apagar el transmisor.
La zona de límites parece fluctuar. • Esto es normal para el campo electromagnético del sistema inalámbrico. El campo puede estar afectado por “ruido electrónico” del entorno que puede hacerlo fluctuar hasta un 5%.
• Cuando el collar receptor se activa se ve influido por la velocidad y la orientación del collar receptor cuando el perro entra en la zona de límites.
El collar receptor se activa a mitad del terreno.
• El collar receptor se activa cuando pierde la señal del transmisor. Esto a veces ocurre cuando hay un objeto metálico grande entre el collar receptor y el transmisor, cuando la orientación del collar receptor cambia cerca de la zona de límites, o cuando el “ruido electrónico” del entorno interfiere con la señal. Si sigue produciéndose este fenómeno, considere la posibilidad de resituar el transmisor y reajustar la zona del perro.
El collar receptor emite pitidos pero el perro no responde a la corrección estática.
• Asegúrese de que el nivel de corrección estática esté en 2 o superior.• Compruebe el collar receptor con la luz de prueba.• Si la luz de prueba parpadea, compruebe el ajuste del collar receptor.• Recorte el pelo del perro allí donde los puntos de contacto tocan con el
cuello y/o cambie a puntos de contacto más largos.• Aumente el nivel de corrección estática.• Repita los pasos del adiestramiento para reforzarlo.
Mi perro reacciona mucho a la corrección estática y se asusta.
• Disminuya el nivel de corrección estática.• Asegúrese de que está en control de la situación cuando el perro recibe
sus primeras correcciones estáticas (llévelo en una correa unida a un collar separado, no metálico), condúzcalo hacia su zona y felicítelo. Si el perro sigue estando asustado, suspenda el adiestramiento y empiece otra vez el próximo día. Asegúrese de terminar cada sesión de adiestramiento con un tono positivo con mucho juego y felicitación.
La luz de alimentación no está encendida.
• Compruebe que el interruptor de encendido/apagado del transmisor esté encendido y que el adaptador de corriente esté enchufado al transmisor y a una salida estándar.
Estaba instalando la zona del perro y, cuando bajé el selector de control de límites, el collar receptor dejó de pitar y corregir.
• Puede que haya bajado el selector de control de límites demasiado deprisa, lo cual ha hecho que el collar receptor haya pasado al modo de fallo de alimentación. Esto es un dispositivo de seguridad diseñado para proteger al perro cuando se corta la corriente del transmisor. Con el collar receptor a menos de 1,5 m del transmisor, ponga el selector de control de límites a “8” y reajuste la zona de límites, bajando lentamente el selector.

www.petsafe.net 29
Instrucciones de luz de pruebaImportante: Quite la luz de prueba antes de colocar el collar receptor en el perro.
1. Ponga el collar receptor al nivel de corrección estática 6.2. Extraiga la pila.3. Afloje los puntos de contacto con alicates.4. Doble los cables alrededor de la base de cada punto de contacto.5. Apriete a mano los puntos de contacto, comprobando que los cables estén en contacto con las
bases de los puntos de contacto.6. Cambie la pila.7. La luz de prueba parpadeará en la zona de límites si el collar receptor funciona correctamente.8. Quite la luz de prueba y apriete los puntos de contacto con alicates medio giro más del ajuste
del dedo.Guarde la luz de prueba para otras comprobaciones.
Nota: Si la luz de prueba no parpadea, instale una nueva pila y vuelva a hacer la comprobación. Si la luz de prueba sigue sin parpadear, contacte con el Centro de Asistencia al Cliente.
A-67
_____________________________________________________Condiciones de uso y limitación de responsabilidad1. Condiciones de uso
Este producto se ofrece bajo condición de su aceptación sin modificación de los términos, condiciones y avisos aquí contenidos. El uso de este producto implica la aceptación de estos términos, condiciones y avisos.
2. Uso adecuadoEste producto está diseñado para su uso con animales domésticos a los que se quiera adiestrar. El carácter específico de su animal doméstico puede impedir que este producto funcione. No recomendamos utilizar este producto si el animal doméstico pesa menos de 3,6 kg o si es agresivo. Si no está seguro de que este producto sea adecuado para su animal doméstico, consulte al veterinario o a un entrenador profesional.
El uso adecuado incluye examinar todo el Manual proporcionado con el producto y cualquier advertencia que se haga.3. Uso ilegal o prohibido
Este producto está diseñado para su uso exclusivo con animales domésticos. Este dispositivo de adiestramiento de animales domésticos no está pensado para dañar, lastimar ni provocar.
El uso de este producto para otros fines para los que no esté destinado puede representar una violación de las leyes estatales, autonómicas o locales.
4. Limitación de responsabilidadRadio Systems Corporation no será en ningún caso responsable por ningún perjuicio directo, indirecto, punitivo, incidental, especial o consecuente, ni por ningún otro perjuicio, sea cual sea, que se produzca como consecuencia de o relacionado con el uso o mal uso de este producto.
El comprador asume todos los riesgos y toda la responsabilidad del uso de este producto.5. Modificación de los términos y condiciones
Radio Systems Corporation se reserva el derecho de cambiar los términos, condiciones y avisos bajo los que se ofrece este producto._____________________________________________________PrecauciónEl sistema de contencion sin cable de Petsafe® NO es una barrera sólida. El sistema está pensado para actuar como un impedimento que recuerde a los animales domésticos, mediante la corrección estática, a que permanezcan dentro de los límites establecidos. Es importante reforzar de forma regular el adiestramiento del animal doméstico. Dado que el nivel de tolerancia de la corrección estática varía de un animal a otro, Radio Systems Corporation NO PUEDE garantizar que, en cualquier caso, el sistema mantendrá a un animal doméstico dentro de los límites establecidos. ¡No todos los animales domésticos pueden ser adiestrados a evitar cruzar los límites! Por tanto, si tiene motivos para pensar que su animal doméstico puede ser un peligro para los demás o puede dañarse a sí mismo si no se le impide cruzar los límites, NO debe confiar solamente en el sistema de contencion sin cable de Petsafe™ para confinarlo. Radio Systems Corporation NO se hace responsable de ningún daño a la propiedad, pérdida económica, o por cualquier otro daño resultante de que un animal cruce los límites._____________________________________________________Garantía del productoRegistre el producto en línea en www.petsafe.net. La garantía ampara todas las piezas durante el primer año. El mal uso, la pérdida, el daño por parte de la mascota o el uso o la manipulación incorrectos no están cubiertos. PetSafe no pagará por pérdidas de tiempo, inconvenientes, pérdidas de uso del producto o cualquier daño incidental o resultante. La garantía se anula si el producto se revende. Si precisan más información sobre el uso o funcionamiento de su equipo, pónganse en contacto con el Centro de atención al cliente al 1-800-732-2677 (EE.UU) o al 1-800-457-3911 (Canadá). Si residen fuera de Norteamérica, les rogamos que devuelvan el equipo a la tienda. Además, visite nuestro sitio Web www.petsafe.net para consultar preguntas frecuentes y consejos para la resolución de problemas.

30 www.petsafe.net

www.petsafe.net 31

171 m
m (6.75 In
ches)
Radio Systems Corporation10427 Electric AvenueKnoxville, TN 37932
(865)-777-54041-800-732-2677www.petsafe.net
Protected by patents 6,879,300; 7,142,167; and D515,027. 400-1009-15
©2004 Radio Systems Corporation
Mounting Tem
plate / Plantilla de m
ontaje
Radio Standards Specifications (RSS)The frequency of operation for this device is 27.145 MHz. The field strength is: 138 uV/m @ 3m.
Operation is subject to the following two conditions: (1) this device may not cause interference, and (2) this device must accept any interference, including interference that may cause undesired operation of the device.
This unit is in compliance with the limits found in RSS-310.
FCCThis equipment has been tested and found to comply with the limits for a Class B digital device, pursuant to Part 15 of the FCC Rules. These limits are designed to provide reasonable protection against harmful interference when the equipment is operated in a residential environment. This equipment generates, uses, and can radiate radio frequency energy and, if not installed and used in accordance with the instruction guide, may cause harmful interference to radio communications. However, there is no guarantee that interference will not occur in a practical installation. If this equipment causes harmful interference to radio or television reception, which can be determined by turning the equipment off and on, the user is encouraged to try to correct the interference by one or more of the following measures:
• Relocate the interfered receiving antenna.• Increase the separation between the equipment and receiver.• Connect the equipment into an outlet on a circuit different to that to which the receiver is connected.• Contact the Customer Care Center at 1-800-732-2677.
Unauthorized changes or modifications to the equipment, not approved by Radio Systems Corporation, could result in not meeting compliance with FCC regulations and could void the user’s authority to operate the equipment.