philips gogear audio player sa1330 sa1305 user … · a data de compra, número do modelo e número...
TRANSCRIPT
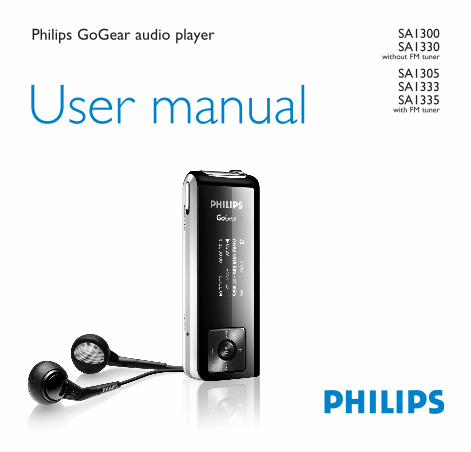
User manual
SA1300SA1330
without FM tuner
SA1305SA1333SA1335
with FM tuner
Philips GoGear audio player

Need help?Please visit www.philips.com/supportwhere you can access to a full set of supporting materialssuch as user manual, flash tutorial, the latest softwareupgrades and answers to frequently asked questions.
Or call our Customer Care Helpline, where our professional support team will be pleased to assistyou in solving any issues you may have with your player.
ii

Country Helpdesk Tariff / min Keep ready
Europe
Belgium 070 253 010 €0.17 La date d’achat la référence et le numéro de série du produitDenmark 3525 8761 Lokal tarif Indkøbsdato, type-, model- og serienummer
Germany 0180 5 007 532 €0,12 Das Kaufdatum. Modellnummer und Serial nummer
Spain 902 888 785 €0,15 Fecha de compra y número del modelo y número de serie
Fecha de compra y número del modelo y número de serie
Fecha de compra y número del modelo y número de serieFecha de compra y número del modelo y número de serie
Greek 0 0800 3122 1223 1 ������ ���� � ����� �� ����� ��� �� ������ ������ ������� ��� �� ������ ����� ��� �������� ���
Ireland 01 601 1161 Local tariff Date of Purchase. Model number and Serial numberItaly 199 404 042 €0.25 La data di acquisto, numero di modello e numero di serieLuxemburg 26 84 30 00 Tarification locale La date d’achat, la référence et le numéro de série du produitNetherlands 0900 0400 063 €0.20 De datum van aankoop, modelnummer en serienummeretNorway 2270 8250 Lokal tariff Datoen da du kjøpte produktet & modellnummer & serienummeretPortugal 2 1359 1440 Preço local A data de compra, número do modelo e número de série
A data de compra, número do modelo e número de série
Switzerland 02 2310 2116 Ortstarif Das Kaufdatum und Modellnummer und SeriennummerSweden
France 08 9165 0006 €0.23 La date d’achat la référence et le numéro de série du produitFinland 09 2290 1908 Paikallinen hinta Ostopäivä ja tarkka mallinumero ja sarjanumero
08 632 0016 Lokal kostnad Inköpsdatum, modellnummer och serienummer
UK 0906 1010 017 £0.15 Date of Purchase, Model number and Serial number
Austria 0820 901115 €0.20 Das Kaufdatum. Modellnummer und Seriennummer
North America
Canada 1-800-661-6162 Free(Francophone)1-888-744-5477(English / Spanish)
USA 1-888-744-5477 Free Date of Purchase, Model number and Serial number
Date of Purchase, Model number and Serial number
South America
Argentina 11 4544 2047 Tarifa localBrazil 0800 701 02 03
(Except Sao Paulo)2121 0203(Sao Paulo)
Grátis
Preço local
Chile 600 744 5477 Tarifa localMexico 01 800 504 6200 Gratis
Asia
China 4008 800 008 Date of Purchase, Model number and Serial numberHong Kong 2619 9663 Date of Purchase, Model number and Serial numberKorea 02 709 1200 Date of Purchase, Model number and Serial number
Country Helpdesk Tariff / min Keep ready

1
3 Your new player3 Accessories3 Register your product4 Overview of controls and connections
5 Getting started5 Install5 Connect and charge 6 Transfer6 Enjoy
7 Music mode8 Folder view9 Playback features
11 Radio mode*11 Manual tune11 Auto tune11 Play a preset station
12 Recordings12 Make voice recordings12 Make FM recordings*13 Play back recordings
14 Customize settings
Contents
* FM radio is only available to some regional versions.

15 About Firmware manager15 Install Firmware Manager15 Update and restore firmware
15 Troubleshooting
17 Important safety information
21 Technical Data
24 Organize and transfer music with Windows Media Player 10
24 About Windows Media Player 1024 Install Windows Media Player and Firmware Manager24 Launch Windows Media Player 1025 Search and add tracks to the Library 26 Transfer tracks to your device28 Add Tracks to a Playlist on your PC using WMP29 Delete Tracks and Playlists29 Edit Track Information30 Search for Tracks
2
Contents

3
Your new playerWith your newly purchased GoGear, you can enjoy the following:
• MP3 and WMA playback (see MUSIC MODE section)• FM radio* (see RADIO MODE section)• Recordings: FM* and voice (see RECORDINGS section)
* FM radio is only available to some regional versions.
Accessories
USB Extension cable
CD ROM with user manual, drivers and FAQ
Neckstrap
Register your productWe strongly recommend that you register your product in order to gain access to freeupgrades. To register your product, please log on to www.philips.com/register so that wecan inform you as soon as new updates become available.
Headphones

4
1
2
3
45
6
7
89
10
11
Overview of controls and connections
1 Mic Microphone
2 LOCK Disable key press
3 Display Dynamically display menu,options and track information
4 RESET Reset
5 2; Power on/off and Play /Pause, confirm a menu setting
J(/)K Rewind / Fast forward; Up /Down to 1 level
+ / - Volume control, scroll; skipto previous / next
6 p Headphones jack
7 REC Start or stop voice / FMrecording
8 A-B Repeat or loop a sequence
9 MENU Access menu options, pressand hold to go back to theroot menu.
10 USB slider Press and slide for USB
11 USB USB cable connector
Press and slide the USBslider to the position asshown in the figure toslide out the USBconnector.
Press and slide the USBslider to the position asshown in the figure toslide in the USBconnector.

5
Install1 Insert the CD supplied with your product into the CD ROM drive of your PC.
2 Follow the onscreen instructions to complete the installation of the Firmware manager.
3 If the installation program does not start automatically, browse the CD contents viaWindows Explorer and run the program by double clicking on the file ending with .exe.
Lost your CD? Don’t worry you can download the CD contents fromwww.philips.com/support or www.usasupport.philips.com (for U.S. residents).
Connect and charge Charge your player 1 Your player has a built-in USB rechargeable battery. To charge your player, press and slide
out the USB connector. Connect your player directly to your computer’s USB port.> A USB connection screen will be shown as soon as your player is connected.
2 Charge your player for 4 hours** or until the battery icon stops blinking.
Getting started
** Rechargeable batteries have a limited number of charge cycles and may eventually need to be replaced.Battery life and number of charge cycles vary by use and settings.

6
Tip When the batteries are nearly empty, the battery low screen blinks. Your playerwill power down in less than 60 seconds. Your player will save all settings and un-finishedrecordings before it powers down.
TransferYou can organize files and transfer music to your player during a USB connection sessionusing Windows Explorer.
1 In Windows Explorer, select one or more songs on your computer that you want totransfer to your player.
2 Use drag and drop actions in Windows Explorer from your computer to your player tocomplete the transfer. (Ensure that you drop songs into the Media folder and data filesinto the Data folder only.)
EnjoyPower on/offTo power on, press and hold 2; until the PHILIPS splash screen appears.
To power off, press and hold 2; again until there is no display on the screen.
Read the battery level indication of your playerThe approximate power levels of your battery are indicated as follows:
Full Two-thirds full Half full Low Empty
Tip Your player automatically powers down if there is no operation and no music playedfor the duration defined in General Settings > Time out.
7
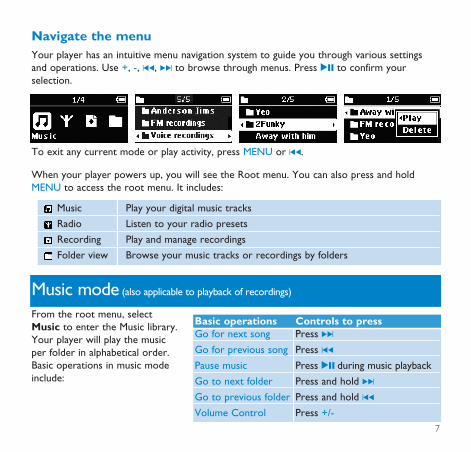
When your player powers up, you will see the Root menu. You can also press and holdMENU to access the root menu. It includes:
Music Play your digital music tracks
Radio Listen to your radio presets
Recording Play and manage recordings
Folder view Browse your music tracks or recordings by folders
From the root menu, selectMusic to enter the Music library.Your player will play the musicper folder in alphabetical order.Basic operations in music modeinclude:
Music mode (also applicable to playback of recordings)
Basic operations Controls to pressGo for next song Press )K
Go for previous song Press J(
Pause music Press 2; during music playback
Go to next folder Press and hold )K
Go to previous folder Press and hold J(
Volume Control Press +/-
Navigate the menuYour player has an intuitive menu navigation system to guide you through various settingsand operations. Use +, -, J(, )K to browse through menus. Press 2; to confirm yourselection.
To exit any current mode or play activity, press MENU or J(.

8
Folder viewThe Folder view displays your music and recordings in alphabetical order.
From the root menu, select Folder view to enter the folder view. The Folder view displaysyour music according to how you arrange them in folders when you transfer them by dragand drop.
Folders and tracks will be listed according to alphabetical order.
Basic operationsin Controls to pressFolder ViewGo to next track / folder Press +Go to previous track / folder Press -Go into a folder Press )K
Go up one folder level Press J(
Select an item Press 2;
After selecting an item, a small pop up window comes up. Press +/- to choose Play orDelete to start playing all the tracks from the selected point in the chosen folder, or deletethe chosen item respectively.
Tip you can only delete tracks (but not folders) in the folder view.

9
Play modesYou can set your player to play songs randomly and/or repeatedly.
1 Press MENU, select Play modes.
2 Press +/- to select different play modes (Repeat 1, Repeat all, Shuffle, ShuffleRepeat, Repeat Folder, Shuffle Folder or Off).
Icon MeaningOff Normal Playback
Repeat 1 Play one song repeatedly
Repeat all Play all songs repeatedly
Shuffle Play all songs randomly
Repeat Shuffle Play all songs randomly and repeatedly
Repeat folder Play all songs within folder repeatedly
Shuffle folder Play all songs within folder randomly
Playback featuresA-B RepeatTo repeat or loop a sequence in a song:
1 Press A-B at your chosen starting point.> appears on the screen.
2 Press A-B again at your chosen end point.> appears on the screen and the repeat sequence begins.

10
EqualizersYou can set your player to play music with different EQ (equalizers).
1 Press MENU, select Equalizer.
2 Press +/- to select Rock, Funk, Jazz, Classic, Hip Hop, Dance, Custom or Off.
Custom EQ
The equalizer custom settings provide 5 adjustable bands: Bass (B), Low (L), Mid (M), High(H) and Treble (T).
1 Press MENU and select Equalizer > Custom.
2 Press J( or )K to select your band.> Selected band flashes.
3 Press + once or more to increase the band settings, or press – once or more to reducethe band settings.
4 The newly set custom equalizer can be immediately heard if you are playing music.
Tip The custom EQ screen times out when there is more than 5 seconds of inactivity.

11
Radio mode*From the root menu, select Radio to enter the radio mode.
Manual tune1 Press MENU and select Manual tune.
2 Press 2; to confirm.
3 Press J( or )K to search the station or press and hold )Kto search for the next availablestation.
4 Press 2; to save your preset.
Auto tune1 Press MENU and select Auto tune.
2 Press 2; to confirm.> Your player will automatically select up to 30 strongest available stations.
Play a preset station1 From the root menu, select Radio to enter into the radio mode and tune to your
preferred station.
2 Press J( or )K to scroll up or down for your preset.> The preset will be automatically played.
* FM radio is only available to some regional versions.

12
When your player is not connected to the computer, you can make voice or radiorecordings.
Make voice recordingsBefore you start recording your voice, make sure that you are not in radio mode, musicmode, or recordings is in stop or pause status.
1 Press REC to start voice recording.> Your player shows the recording state.
2 Press REC again to stop voice recording> Your player shows the saving state. Your voice recording will be saved in your VOICE folder on
your player. (Filename: MIC-XXX.wav where XXX is the track number which is automaticallygenerated.)
Make FM recordings*In radio mode, tune to your preset station.
1 Press REC to start FM recording.> Your player shows the recording state.
2 Press REC again to stop FM recording.> Your player shows the saving state. Your FM recording will be saved in your FM folder on your
player. (Filename: FM-XXX.wav where XXX is the track number which is automaticallygenerated.)
* FM radio is only available to some regional versions.
Recordings

13
Play back recordingsYou can find your voice recordings and FM recordings in the VOICE and FM foldersrespectively.
1 From the root menu, select RECORDINGS to enter into the VOICE / FM library. Yourplayer will play all your recordings alphabetically in the VOICE/FM library as you press 2;.
2 Press 2; to pause the current playing recording.
3 Press J( or )K to play next or previous recordings.
Tip Playback of recordings functions the same way as in the Music mode. See Musicmode > Playback section for more information.

14
You can set your preferences in your player to suit your needs.
1 Press MENU and choose General settings.
2 Press 2; to confirm your selection, and press +/- to select further options.
3 Press MENU to exit the current settings screen.
Settings Further Options
Power save On / Off
Screen saver Display: Clock vertical / Clock horizontal / AnimationTime: 10 sec / 30 sec / 60 sec / Off
Time out 3 min / 5 min / 10 min / 30 min / Off
Sleep timer 15 min / 30 min / 45 min / 60 min / Off
Resume On / Off
Set date and time Day and time screens
OSD language English / French / German / Spanish / Italian / Portuguese / Dutch /Swedish / Poland
Information Firmware (FW) version / Memory available
Factory settings Restore factory settings
Customize settings
15
1 Insert the supplied CD into the CD ROM drive of your computer.
2 Install Firmware Manager from the supplied CD to your computer.
3 Connect to the Internet, launch Firmware Manager.
4 Follow onscreen instructions to complete restoring the firmware.
Your player is controlled by an internal program called firmware. With FirmwareManager, you can update and restore your player with a few simple clicks.
Install Firmware Manager1 Insert the supplied CD into the CD ROM drive of your computer.
2 Follow the onscreen instructions to begin and complete the installation.
Update and restore firmware
About Firmware manager
Warning Upgrade and repair result in loss of data and media contents on your player.You are suggested to backup your data regularly.

16
Symptoms
Hang up
Cannot power up
The player shows
Solutions
Press the reset button
Press 2; and power up your player. In case of device error,connect your player to the computer. Use Firmware Manager torestore your player.
Connect your player to the computer. Delete unwanted files,unplug safely and record again.
If a fault occurs, first check the points listed in the following pages. For further help andother troubleshooting tips, please also check out FAQs at www.philips.com/support.
If you are unable to find a solution by following these hints, consult your dealer or service center.
Troubleshooting
Warning Under no circumstances should you try to repair the set yourself, as this willinvalidate the warranty.

17
General maintenanceTo avoid damage or malfunction:
• Do not expose the player to excessive heat caused by heating equipment or directsunlight.
• Do not drop your player or allow objects to fall on your player.• Do not allow your player to be submersed in water. Do not expose headphone socket or
battery compartment to water, as water entering the set may cause major damage.• Do not use any cleaning agents containing alcohol, ammonia, benzene, or abrasives as
these may harm the set.• Active mobile phones in the vicinity may cause interference.• Backup your files. Please ensure that you retain the original files you have downloaded to
your device. Philips is not responsible for any loss of data if the product becomes damagedor not readable / legible.
About operating and storage temperatures
• Operate in a place where temperature is always between 0 and 35(C (32 to 95(F)• Store in a place where temperature is always between -20 and 45(C (-4 to 113(F)• Battery life may be shortened in low temperature conditions.
Important safety information

18
Hearing safetyListen at a moderate volume. Using the headphones at high volume can impair yourhearing. We recommend headphone no. SHE2550 for this product.
Important (for models supplied with headphones):
Philips guarantees compliance with the maximum sound power of its audio players asdetermined by relevant regulatory bodies only with the original model of providedheadphones.
In case this one needs replacement, we recommend that you contact your retailer to order amodel identical to that of the original, provided by Philips.
Traffic safetyDo not use the headphones while driving or cycling as you may cause an accident.
Copyright informationAll other brands and product names are trademarks of their respective companies ororganizations.
Unauthorized duplication of any recordings whether downloaded from the Internet or madefrom audio CDs is a violation of copyright laws and international treaties.
The making of unauthorized copies of copy-protected material, including computerprogrammes, files, broadcasts and sound recordings, may be an infringement of copyrightsand constitute a criminal offence. This equipment should not be used for such purposes.
19
Disposal of your old productYour product is designed and manufactured with high quality materials and components,which can be recycled and reused.
When this crossed-out wheeled bin symbol is attached to a product, it means theproduct is covered by the European Directive 2002/96/EC.
Please be informed about the local separate collection system for electrical andelectronic products.
Please act according to your local rules and do not dispose of your old product with yournormal household waste. The correct disposal of your old product will help prevent potentialnegative consequences to the environment and human health.
ModificationsModifications not authorized by the manufacturer may void user authority to operate thisdevice.

20
Notice for USANote:This equipment has been tested and found to comply with thelimits for a Class B digital device, pursuant to part 15 of the FCC Rules. These limits aredesigned to provide reasonable protection against harmful interference in a residentialinstallation. This equipment generates, uses, and can radiate radio frequency energy and, ifnot installed and used in accordance with the instruction manual, may cause harmfulinterference to radio communications.However, there is no guarantee that interference will not occur in a particular installation. Ifthis equipment does cause harmful interference to radio or television reception, which canbe determined by turning the equipment off and on, the user is encouraged to try to correctthe interference by one or more of the following measures:- Relocate the receiving antenna.- Increase the separation between the equipment and receiver.- Connect the equipment into an outlet on a circuit different from that to which the
receiver is connected.- Consult the dealer or an experienced radio/ TV technician for help.
Notice for CanadaThis Class B digital apparatus complies with Canadian ICES-003.The set complies with the FCC-Rules, Part 15 and with 21 CFR 1040.10. Operation issubject to the following two conditions:1 This device may not cause harmful interference, and2 This device must accept any interference received, including interference that may cause
undesired operation.
Notice for the European UnionThis product complies with the radio interference requirements of the European Union.
PhilipsSA1300 SA1305SA1330 SA1333SA1335

21
Power supply Rechargeable Li-polymer 280mAh
Picture / Display Dual color OLED, 128 x 64 pixels
Sound Channel separation 40dBEqualizer CustomizableEqualizer settings Rock / Funk /Jazz / Classic / Hip Hop / Dance /Custom / OffFrequency response 30-18000 HzSignal to noise ration >85dBOutput Power (RMS) 2 x 5 mW
Audio Playback
Compression formatMP3 (8-320 kbps and VBR; Sample rate: 8, 11.025, 16, 22.050, 24, 32,44.1, 48kHz)WAVWMA (5-192kbps)
ID3-tag support Album and title name
Audio Capturing Built-in microphone MonoVoice recording WAVFM recording* WAV
Storage Media SA1300 512MB NAND Flash+
SA1305 512MB NAND Flash+
SA1330 1GB NAND Flash+
SA1333 1GB NAND Flash+
SA1335 1GB NAND Flash+
Technical Data

22
Tuner / Reception / TransmissionAuto store / Tuner band: FM*
Connectivity Headphones 3.5mm, USB 2.0 ++
Music transfer Via Windows Media Player 10 or Windows Explorer
Data transfer Via Windows Explorer
System RequirementsWindows® XP (SP2 or above)Pentium Class 300MHz processor or higher128MB RAM500MB hard drive spaceInternet connectionMicrosoft Internet Explorer 6.0 or laterVideo display cardSoundcardUSB port
* FM radio is only available to some regional version.
** Rechargeable batteries have a limited number of charge cycles and may eventually need to bereplaced. Battery life and number of charge cycles vary by use and settings.
+ 1MB = 1 million bytes; available storage capacity will be less.1GB = 1 billion bytes; available storage capacity will be less.Full memory capacity may not be available as some memory will be reserved for the player.Storage capacity based on 4 minutes per song and 64kbps WMA encoding.
++Actual transfer speed may vary based on your operating system and software configuration.

23
About Windows Media Player 10With Windows Media Player you can easily manage your digital music collection and transfermusic to your player.
Install Windows Media Player and Firmware Manager1 Insert the supplied CD into your computer’s CD-ROM drive.
2 Follow screen instructions to begin and complete installation.
3 Install Windows Media Player.
4 Fill in necessary information when prompted to do so.
Launch Windows Media Player 101 Connect your player to your computer using the supplied USB cable. The USB connection
screen will automatically appear.
Organize and transfer music with Windows Media Player 10
Tip Please refer to your computer’s manual for the exact position of your USB port.Look for the USB symbol on the processing unit of your computer.
2 Launch Windows Media Player.

24
Search and add songs to the Library
1 Go to File menu. Click Add to Library > By Searching Computer...
2 Click Browse in the dialog box to point to the folder you want to add to.
3 Complete the information in the dialog box, and then click Search.
> Files will be added to the Library.
1
2
3

25
Transfer songs to your deviceSimply connect your device to your computer, choose the synchronization method youwant, and you’re ready to synchronize your library to your device.
Choose a synchronization method:Automatic. With this option, the Player synchronizes content to the device when youconnect it to your computer or when you change synchronization settings.The Playersynchronizes your entire library if it can fit, or the Player synchronizes your favoritecontent first.Manual. With this option, you pick specific files or playlists you want to synchronize eachtime you want to make changes to the content on your device.

26
1 Click on Sync.
2 In the Items to Copy pane, show the playlist, category, or other items that you want tocopy that you want to copy. Clear the check boxes next to any files you do not want tocopy.
3 In the Items on Device pane, show the device that you want to copy files to, i.e. GoGearAudio / Philips GoGear . Clear the check boxes next to any files you do not want tocopy.
4 Click the Start Sync button
For further details of music transfer on WMP 10, go to the help section of WindowsMedia Player and click Help > Synchronizing content to devices.
14
2 3
27
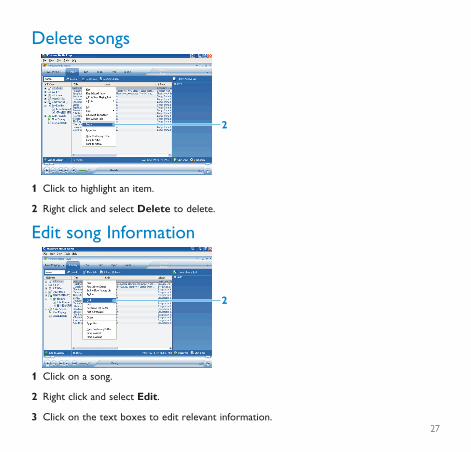
Delete songs
1 Click to highlight an item.
2 Right click and select Delete to delete.
Edit song Information
1 Click on a song.
2 Right click and select Edit.
3 Click on the text boxes to edit relevant information.
2
2

28
1 Type a search string in the Search field.
2 Click on Search to start searching.
> You will see songs that contain the search string.
3 You can play, transfer, delete or add these songs.
Search for songs 21

PHILIPS reserves the right to make design and specification changes for productimprovement without prior notice.
29