phone template · phone template cisco unified communications manager bulk administration (bat)...
TRANSCRIPT

Cisco Unified CoOL-22754-01
C H A P T E R 3
Phone TemplateCisco Unified Communications Manager Bulk Administration (BAT) gives the administrator a fast and efficient way to add, update, or delete large numbers of phones in batches, rather than performing individual updates through Cisco Unified Communications Manager Administration. You can use BAT to work with the following types of phones:
• Cisco Unified IP Phones (all models)
• CTI ports
• H.323 clients
The following topics provide information about how to use BAT to work with phone templates and other IP telephony devices:
• Adding Phones, page 3-1
• Using BAT Phone Templates, page 3-2
Adding PhonesWhen you use BAT to add phones and other IP telephony devices to the Cisco Unified Communications Manager database, you can add multiple lines, services, and speed dials for each phone. You can also add CTI ports and H.323 clients.
You have two options for creating a CSV data file for phones:
• Use the BAT spreadsheet (BAT.xlt) and export the data to the CSV format.
• Use a text editor to create a text file in CSV format (for experienced users).
Use the following steps to add phones and IP telephony devices in bulk.
Step 1 Choose Bulk Administration > Phones > Phone Template.
The Find and List Phone Templates window displays. See the “Using BAT Phone Templates” section on page 3-2 for information about configuring phone templates.
Step 2 To create a CSV data file for inserting phone templates by using the BAT spreadsheet, see “Using the BAT Spreadsheet to Create a CSV Data File for Phones” section on page 3-51
Text Editor to Create the CSV Data File
a. Choose Bulk Administration > Phones > Phone File Format > Create File Format.
The Find and List Phone File Formats window displays. See “Finding a Phone File Format” section on page 4-2 for information about configuring file formats for CSV data file.
3-1mmunications Manager Bulk Administration Guide

Chapter 3 Phone Template Using BAT Phone Templates
b. Use a text editor and create the CSV data file for phones that follows the file format that you want to use. For more information about creating a text-based CSV file, see the “Creating a Text-Based CSV File for Phones” section on page A-2.
c. Choose Bulk Administration > Phones > Phone File Format > Add File Format.
The Add File to Format window displays. See the “Associating the File Format with the CSV Data File” section on page 4-5 for information about associating file formats.
Step 3 Choose Bulk Administration > Phones > Validate Phones.
The Validate Phones window displays. See Chapter 5, “Validating Phone Records,” for information about validating phone records.
Step 4 Choose Bulk Administration > phones > Insert phones.
The Insert phones window displays. See the “Inserting Phones into Cisco Unified Communications Manager” section on page 6-1 for information about inserting phone records into the Cisco Unified Communications Manager database.
Additional Topics
See the “Related Topics” section on page 3-76.
Using BAT Phone TemplatesUse BAT phone templates to define the common phone attributes to add a group of new phones. Prior to creating the template, make sure phone settings such as device pool, location, calling search space, button template and softkey templates have already been configured in Cisco Unified Communications Manager Administration. You cannot create new settings in BAT.
Use these topics to work with BAT phone templates:
• Finding a BAT Phone Template, page 3-2
• Creating a New BAT Phone Template, page 3-4
• Adding or Updating Lines in a BAT Template, page 3-4
• Copying a BAT Phone Template, page 3-9
• Deleting Templates, page 3-10
• Field Descriptions for a BAT Phone Template, page 3-11
• Using the BAT Spreadsheet to Create a CSV Data File for Phones, page 3-51
Finding a BAT Phone TemplateBecause you might have several phone templates, Cisco Unified Communications Manager lets you locate specific phone template on the basis of specific criteria. Use the following procedure to locate templates.
3-2Cisco Unified Communications Manager Bulk Administration Guide
OL-22754-01

Chapter 3 Phone Template Using BAT Phone Templates
Note During your work in a browser session, your find/list search preferences are stored in the cookies on the client machine. If you navigate to other menu items and return to this menu item, or if you close the browser and then reopen a new browser window, your Cisco Unified Communications Manager search preferences are retained until you modify your search.
Procedure
Step 1 Choose Bulk Administration > Phones > Phone Template.
The Find and List Phone Templates window displays. Use the two drop-down list boxes to search for a template.
Step 2 From the first Find Phone Templates where drop-down list box, choose one of the following criteria:
• Device Name
• Description
• Directory Number
• Calling Search Space
• Device Pool
• Device Type
• Call Pickup Group
• LSC Status
• Authentication String
• Device Protocol
• Security Profile
• Common Device Configuration
From the second Find Phone Template where drop-down list box, choose one of the following criteria:
• begins with
• contains
• is exactly
• ends with
• is empty
• is not empty
Step 3 Specify the appropriate search text, if applicable, and click Find.
Tip To find all Phone Templates that are registered in the database, click Find without entering any search text.
A list of discovered templates displays.
Step 4 From the list of records, click the device name that matches your search criteria.
The window displays the phone template that you choose.
3-3Cisco Unified Communications Manager Bulk Administration Guide
OL-22754-01

Chapter 3 Phone Template Using BAT Phone Templates
Additional Information
See the “Related Topics” section on page 3-76.
Creating a New BAT Phone TemplateUse this procedure to create the phone template. After you create a phone template, you can add lines, services, and speed dials. Use the following procedure to create a phone template.
Procedure
Step 1 Choose Bulk Administration > Phones > Phone Template.
The Find and List Phone Templates window displays.
Step 2 Click Add New. The Add a New Phone Template window displays.
Step 3 From the Phone Type drop-down list box choose the phone model for which you are creating the template. Click Next.
Step 4 From the Select the Device Protocol drop-down list box, choose the device protocol. Click Next.
The Phone Template Configuration window displays with fields and default entries for the chosen device type.
Step 5 In the Template Name field, enter a name for the template. The name can contain up to 50 alphanumeric characters. Example: Sales_7975.
Step 6 In the Device Information area, enter the phone settings that this batch has in common. See Table 3-1 for field descriptions. Some phone models and device types do not have all the attributes that the table lists.
Step 7 After you have entered all the settings for this BAT phone template, click Save.
Step 8 When the status indicates that the transaction has completed, you can add line attributes.
Additional Information
See the “Related Topics” section on page 3-76.
Adding or Updating Lines in a BAT Template
To add one or more lines to the BAT template or to update existing lines, follow this procedure. The button template in use for this BAT template determines the number of lines that you can add or update. You can create a master phone template that has multiple lines. Then, you can use the master template to add phones with a single line or up to the number of lines in the master template. See the “Master Phone Templates” section on page 1-5 for more information.
Procedure
Step 1 Find the Phone Template to which you want to add line, by using the procedure in “Finding a BAT Phone Template” section on page 3-2.
Step 2 In the Phone Template Configuration window, click Line [1] Add a new DN, in the Associated Information area.
3-4Cisco Unified Communications Manager Bulk Administration Guide
OL-22754-01

Chapter 3 Phone Template Using BAT Phone Templates
The Line Template Configuration window displays.
Note The maximum number of lines that display for a BAT template depends on model and button template that you chose when you created the BAT phone template.
Step 3 Enter or choose the appropriate values for the line settings that are described in Table 3-2. Keep in mind that all phones or user device profiles in this batch will use the settings that you choose for this line. Treat all fields as optional.
Step 4 Click Save.
BAT adds the line to the phone template configuration.
Step 5 To add settings for any additional lines, repeat Step 2 through Step 4.
Note If you choose Back to Find/List from the Related Links drop-down list box in the upper, right, corner of the Line Template Configuration window, the Find and List Line Template window displays. To find existing line template, enter the appropriate search criteria and click Find. To add a new line template, click Add New on Find and List Line Template window.
Cisco recommends that you use alphanumeric characters for Line Template, so if numbers are given, a chance exists of this conflicting with an actual directory number. This would also avoid conflicts with features such as Call Pickup group number, Call Park number, and so on.
Note For some Cisco Unified IP Phone models, you can add Cisco Unified IP Phone services and speed dials to the template. For more information, see Adding or Updating IP Services in a BAT Template, page 3-5, and Adding or Updating Speed Dials in a BAT Template, page 3-6.
Additional Information
See the “Related Topics” section on page 3-76.
Adding or Updating IP Services in a BAT Template
You can subscribe Cisco Unified IP Phone services to the Cisco Unified IP Phone models that include this feature.
Note You can bulk subscribe users or phones to IP services with common service parameters but not to IP services with unique service parameters.This proves valid only for services that are subscribed through a phone template. For services with unique parameters, you can specify values through CSV file.
Procedure
Step 1 Find the phone template to which you want add an IP Service, by using the procedure in “Finding a BAT Phone Template” section on page 3-2.
3-5Cisco Unified Communications Manager Bulk Administration Guide
OL-22754-01

Chapter 3 Phone Template Using BAT Phone Templates
Step 2 In the Phone Template Configuration window, click Add a new SURL in the Associated Information area.
A popup window displays. In this window, you can subscribe to Cisco Unified IP Phone services that are available.
Step 3 In the Select a Service drop-down list box, choose a service to which you want all phones to be subscribed. The Service Description box displays details about the service that you choose.
Step 4 Click Next.
Step 5 In the Service Name field, modify the name of the service, if required.
Step 6 To associate these phone services to the phone template, click Subscribe.
Step 7 To add more services, repeat Step 3 through Step 6.
Step 8 To add all the services to the template, click Update.
Step 9 Close the popup window.
Step 10 You can add speed dials to the template by continuing to the “Adding or Updating Speed Dials in a BAT Template” section on page 3-6.
Additional Information
See the “Related Topics” section on page 3-76.
Adding or Updating Speed Dials in a BAT Template
You can add and update speed dials in the BAT template.
You can designate speed dials for phones and Cisco VGC phones if the Phone Button Template provides speed-dial buttons.
Procedure
Step 1 Find the Phone Template to which you want to add speed dials, by using the procedure in “Finding a BAT Phone Template” section on page 3-2
Step 2 In the Phone Template Configuration window, click Add a new SD in the Associated Information area or choose Add/Update Speed Dials from the Related Links drop-down list box in the upper, right-hand corner of the window.
A popup window displays. In this window, you can designate speed-dial buttons for Cisco Unified IP Phones and expansion modules. The phone button template in use for this BAT template determines the number of available speed-dial buttons.
Step 3 In the Speed Dial Settings area, enter the phone number, including any access or long-distance codes, in the Number field.
Step 4 In the Label field, enter a label that corresponds to the speed-dial number.
Step 5 In the ASCII Label field, enter the corresponding ASCII label for the speed-dial number.
Step 6 In the Abbreviated Dial Settings area, you can set abbreviated speed dials for applicable IP phone models by repeating Step 3 and Step 5.
Step 7 Click Save.
3-6Cisco Unified Communications Manager Bulk Administration Guide
OL-22754-01

Chapter 3 Phone Template Using BAT Phone Templates
BAT inserts the speed-dial settings in the template, and the popup window closes.
Additional Topics
See the “Related Topics” section on page 3-76.
Adding or Updating Busy Lamp Field in a BAT Template
You can add and update busy lamp filed speed dials in the BAT template.
You can designate busy lamp field speed dials for phones and Cisco VGC phones if the Phone Button Template provides speed-dial buttons.
Procedure
Step 1 Find the Phone Template you want to add speed dials to, using the procedure in “Finding a BAT Phone Template” section on page 3-2
Step 2 In the Phone Template Configuration window, click Add a new BLF SD in the Associated Information area or choose Add/Update Busy Lamp Field Speed Dials from the Related Links drop-down list box in the upper, right-hand corner of the window.
A popup window displays. In this window, you can designate busy lamp field speed-dial (BLF SD) buttons for Cisco Unified IP Phones and expansion modules. The phone button template in use for this BAT template determines the number of available BLF SD buttons.
Step 3 In the Speed Dial Settings area, enter the destination, including any access or long-distance codes, in the Destination field.
Step 4 Choose the directory number from the drop-down list box. You can click Find to search for directory numbers.
Step 5 In the Label field, enter a label that corresponds to the BLF SD number.
Step 6 In the ASCII Label field, enter the corresponding ASCII label for the BLF SD number.
Step 7 Click Save.
BAT inserts the BLF SD settings in the template, and the popup window closes.
Adding or Updating Busy Lamp Field Directed Call Park in a BAT Template
You can add and update busy lamp field (BLF) directed call park in the BAT template.
You can designate BLF directed call park for phones and Cisco VGC phones if the Phone Button Template provides speed-dial buttons.
Procedure
Step 1 Find the Phone Template you want to add BLF speed directed call park to, using the procedure in “Finding a BAT Phone Template” section on page 3-2
Step 2 In the Phone Template Configuration window, click Add a new BLF Directed Call Park in the Associated Information area or choose Add/Update BLF Directed Call Park from the Related Links drop-down list box in the upper, right-hand corner of the window.
3-7Cisco Unified Communications Manager Bulk Administration Guide
OL-22754-01

Chapter 3 Phone Template Using BAT Phone Templates
A popup window displays. In this window, you can designate BLF Directed Call Park buttons for Cisco Unified IP Phones and expansion modules. The phone button template in use for this BAT template determines the number of available BLF Directed Call Park buttons.
Step 3 In the Unassigned Busy Lamp Field/Directed Call Park Settings area, choose the directory number from the drop-down list box. You can click Find to search for directory numbers.
Step 4 In the Label field, enter a label that corresponds to the BLF Directed Call Park number.
Step 5 In the ASCII Label field, enter the corresponding ASCII label for the BLF Directed Call Park number.
Step 6 Click Save.
BAT inserts the BLF Directed Call Park settings in the template, and the popup window closes.
Adding or Updating Intercom Template in a BAT Template
To add one or more Intercom templates to the BAT template or to update existing ones, follow this procedure. The button template in use for this BAT template determines the number of lines that you can add or update. You can create a master phone template that has multiple lines. Then, you can use the master template to add phones with a single line or up to the number of lines in the master template. See the “Master Phone Templates” section on page 1-5 for more information.
Procedure
Step 1 Find the Phone Template to which you want to add the intercom template, by using the procedure in “Finding a BAT Phone Template” section on page 3-2.
Step 2 In the Phone Template Configuration window, click Intercom [1] - Add a new Intercom, in the Associated Information area.
The Intercom Template Configuration window displays.
Note The maximum number of lines that display for a BAT template depends on model and button template that you chose when you created the BAT phone template.
Step 3 Enter or choose the appropriate values for the intercom template settings that are described in Table 3-3. Keep in mind that all phones or user device profiles in this batch will use the settings that you choose for this intercom template.
Step 4 Click Save.
BAT adds the intercom template to the phone template configuration.
Step 5 To add settings for any additional intercom templates, repeat Step 2 through Step 4.
Note If you choose Back to Find/List from the Related Links drop-down list box in the upper, right, corner of the Intercom Template Configuration window, the Find and List Intercom Directory Number window displays. To find existing Intercom directory numbers, enter the appropriate search criteria and click Find. To add a new intercom directory number, click Add New on Find and List Intercom Directory Number window.
3-8Cisco Unified Communications Manager Bulk Administration Guide
OL-22754-01

Chapter 3 Phone Template Using BAT Phone Templates
Cisco recommends that you use alphanumeric characters for intercom template, so if numbers are given, a chance exists of this conflicting with an actual directory number. This would also avoid conflicts with features such as Call Pickup group number, Call Park number, and so on.
Note For some Cisco Unified IP Phone models, you can add Cisco Unified IP Phone services and speed dials to the template. For more information, see Adding or Updating IP Services in a BAT Template, page 3-5, Adding or Updating Lines in a BAT Template, page 3-4, and Adding or Updating Speed Dials in a BAT Template, page 3-6.
Additional Topics
See the “Related Topics” section on page 3-76.
Modifying BAT Phone TemplatesUse this procedure to view or modify an existing phone or user device profile template. You can add or update lines, services, and speed dials.
Procedure
Step 1 Find the Phone Template that you want to modify, by using the procedure in “Finding a BAT Phone Template” section on page 3-2
Step 2 In the phone Template Configuration window, add, change, or remove settings in the template. See “Field Descriptions for a Phone Template” section on page 3-11 for more information.
Step 3 After you have modified the settings to update the template, click Save.
Step 4 If you want to update other attributes, choose one of the following procedures:
• Adding or Updating Lines in a BAT Template, page 3-4
• Adding or Updating IP Services in a BAT Template, page 3-5
• Adding or Updating Speed Dials in a BAT Template, page 3-6
Additional Information
See the “Related Topics” section on page 3-76.
Copying a BAT Phone TemplateYou can copy the properties of a phone template into a new phone template when you want to change only a few fields.
Note Ensure that the new template that you create is the same device type as the original template, such as Cisco IP Phone 7975.
Use the following procedure to copy an existing BAT phone template.
3-9Cisco Unified Communications Manager Bulk Administration Guide
OL-22754-01

Chapter 3 Phone Template Using BAT Phone Templates
Procedure
Step 1 Find the Phone Template that you want to copy, by using the procedure in “Finding a BAT Phone Template” section on page 3-2
Step 2 In the Phone Template Configuration window, verify that this is the template that you want to copy and click Copy.
Note You can also copy the phone template from the Find and List Phone Templates window. Click the icon in the Copy or Copy with Lines column that corresponds to the phone template that you want to copy.
The template reproduces and creates a copy. The copy duplicates all the values that were specified in the original template. If you click the icon in the Copy with Lines column in the Find and List Phone Templates window, all the lines that are associated with the template also get copied.
Step 3 In the Template Name field, enter a name for the template. The name can contain up to 50 alphanumeric characters. Example: Sales_7975.
Step 4 Update the fields as needed for the new template. See “Field Descriptions for a Phone Template” section on page 3-11 for information.
Step 5 Click Save. The template that is added to BAT displays in the Phone Templates column on the left.
Step 6 For more information on adding lines to the phone template, see the “Adding or Updating Lines in a BAT Template” section on page 3-4. You can also define services and speed-dial buttons.
Additional Topics
See the “Related Topics” section on page 3-76.
Deleting TemplatesYou can delete BAT templates when you no longer require them. Use this procedure to delete a template.
Procedure
Step 1 Find the Phone Template that you want to delete, by using the procedure in “Finding a BAT Phone Template” section on page 3-2.
Step 2 In the Phone Template Configuration window, verify that this is the template that you want to delete and click Delete.
Note You can also delete the phone template from the Find and List Phone Templates window.check the check box next to the template that you want to delete and click Delete Selected
A message displays that asks you to confirm the delete operation.
Step 3 To delete the template, click OK. The template name disappears from the list of phone templates list on the Find and List Phone Templates window.
3-10Cisco Unified Communications Manager Bulk Administration Guide
OL-22754-01

Chapter 3 Phone Template Using BAT Phone Templates
Caution If you submit a job that uses a particulate phone template and if you delete the phone template, the job also gets deleted.
Additional Topics
See the “Related Topics” section on page 3-76.
Field Descriptions for a BAT Phone TemplateTable 3-1 provides descriptions of all possible fields that display when you are adding a BAT phone template for all IP telephony devices. Some device types do not require all the phone settings.
Some fields display the values that were configured in Cisco Unified Communications Manager Administration.
In the BAT user interface, field names that have an asterisk require an entry. Treat fields that do not have an asterisk as optional.
For related procedures, see the “Related Topics” section on page 3-76.
Table 3-1 Field Descriptions for a Phone Template
Field Description
Device Information
Template Name Enter the name for the template.
Description Enter a description for the phone template that you want to create. The description can include up to 50 characters in any language, but it cannot include double-quotes ("), percentage sign (%), ampersand (&), back-slash (\), or angle brackets (<>).
Device Pool Choose the device pool for this group of phones/ports.
For devices, a device pool defines sets of common characteristics, such as region, date/time group, Cisco Unified Communications Manager group, and calling search space for auto-registration.
Common Device Configuration Choose the common device configuration to which you want this phone assigned. The common device configuration includes the attributes (services or features) that are associated with a particular user. You configure the Common device configurations in the Common Device Configuration window. See Common Device Configuration for more information.
To see the common device configuration settings, click the View Details link.
Phone Button Template Choose the button template for all phones in this group. Button templates determine the button identity (line, speed dial) and the button location on the phone. Button templates include the expansion modules.
Softkey Template Choose the softkey template to be used for all phones in this group.
3-11Cisco Unified Communications Manager Bulk Administration Guide
OL-22754-01

Chapter 3 Phone Template Using BAT Phone Templates
Common Phone Profile From the drop-down list box, choose a common phone profile from the list of available common phone profiles.
Calling Search Space Choose the calling search space for this group of phones/ports.
A calling search space specifies the collection of Route Partitions that are searched to determine how a dialed number should be routed.
AAR Calling Search Space Choose the appropriate calling search space for the device to use when it performs automated alternate routing (AAR). The AAR calling search space specifies the collection of route partitions that are searched to determine how to route a collected (originating) number that is otherwise blocked due to insufficient bandwidth.
Media Resource Group List Choose the media resource group list (MRGL) for this group of phones/ports.
An MRGL specifies a list of prioritized media resource groups. An application can choose required media resources from the available ones according to the order that is defined in the MRGL.
User Hold MOH Audio Source Choose the user hold audio source for this group of phones/ports.
The user hold audio source identifies the audio source from which music is played when a user places a call on hold.
Network Hold MOH Audio Source
Choose the network hold audio source for this group of IP phones or ports.
The network hold audio source identifies the audio source from which music is played when the system places a call on hold, such as when the user transfers or parks a call.
Location Choose the appropriate location for this group of IP phones or ports.
The location specifies the total bandwidth that is available for calls to and from this location. A location setting of None means that the locations feature does not keep track of the bandwidth that this Cisco IP Phone consumes.
AAR Group Choose the automated alternate routing (AAR) group for this device. The AAR group provides the prefix digits that are used to route calls that are otherwise blocked due to insufficient bandwidth.
Set AAR Group to <None> to prevent rerouting blocked calls.
User Locale Choose the country and language set that you want to associate with this group of IP phones.
This choice determines which cultural-dependent attributes exist for this user and which language displays for the user in the Cisco Unified Communications Manager user windows and phones.
Network Locale Choose the network locale that you want to associate with this group of phones.
The Network Locale comprises a set of tones and cadences that Cisco gateways and phones use when they communicate with the PSTN and other networks in a specific geographical area.
Table 3-1 Field Descriptions for a Phone Template (continued)
Field Description
3-12Cisco Unified Communications Manager Bulk Administration Guide
OL-22754-01

Chapter 3 Phone Template Using BAT Phone Templates
Built In Bridge Enable or disable the built-in conference bridge for the barge feature by using the Built In Bridge drop-down list box (choose On, Off, or Default).
For more configuration information, refer to the Barge and Privacy Features in the Cisco Unified Communications Manager Features and Services Guide.
Privacy For each phone that wants Privacy, choose On in the Privacy drop-down list box.
For more configuration information, refer to Barge and Privacy Features in the Cisco Unified Communications Manager Features and Services Guide.
Device Mobility Mode From the drop-down list box, turn the device mobility feature on or off for this device or choose Default to use the default device mobility mode.
Click View Current Device Mobility Settings to display the current values of these device mobility parameters:
• Cisco Unified Communications Manager Group
• Roaming Device Pool
• Location
• Region
• Network Locale
• AAR Group
• AAR Calling Search Space
• Device Calling Search Space
• Media Resource Group List
• SRST
Tip For more configuration information, refer to Device Mobility in the Cisco Unified Communications Manager Features and Services Guide.
Owner User ID Enter a user ID for the primary phone user.
Mobility User ID
(Dual-mode phones only)
From the drop-down list box, choose the user ID of the person to whom this dual-mode phone is assigned.
Note The Mobility User ID configuration gets used for the Mobile Connect and Mobile Voice Access features for dual-mode phones.
Note The Owner User ID and Mobility User ID can differ.
Table 3-1 Field Descriptions for a Phone Template (continued)
Field Description
3-13Cisco Unified Communications Manager Bulk Administration Guide
OL-22754-01

Chapter 3 Phone Template Using BAT Phone Templates
Phone Personalization From the drop-down list box, enable or disable the personalization settings on the phone, or choose Default to use the phone personalization that is set in the Common Phone Profile. You can choose one of the following options:
• Disabled—None of the personalization settings on the phone get activated.
• Enabled—This setting accepts a personalized background image file, which is used for the phone screen; it accepts a preview image file for temporary display; and it accepts a personalized tone file, so the default ring tone can be personalized.
• Default—Use the phone personalization setting that is in the Common Phone Profile.
Services Provisioning From the drop-down list box, choose the Services Provisioning setting that you want to use from the following values:
• Internal
• External URLs
• Both
• Default: Internal
This parameter controls whether the phone uses the services provisioned from the configuration file (Internal), services received from the Services URLs (External URLs), or both. The External URLs option provides backward compatibility with third party provisioning servers. The Both option allows users to subscribe to the services specified in the configuration file while also appending services from an external provisioning server.
This is a required field.
Phone Load Name Enter the custom phone load, if applicable.
Note Any value that is entered in this field overrides the default value for the chosen model.
For more information about Cisco IP Phone software and configuration, refer to the Cisco IP Phone Administration Guide for Cisco Unified Communications Manager, which is specific to the phone model.
Table 3-1 Field Descriptions for a Phone Template (continued)
Field Description
3-14Cisco Unified Communications Manager Bulk Administration Guide
OL-22754-01

Chapter 3 Phone Template Using BAT Phone Templates
Single Button Barge From the drop-down list box, enable or disable the Single Button Barge/cBarge feature for this device or choose Default to use the service parameter setting.
• Off—This setting disables the Single Button Barge/cBarge feature; however, the regular Barge or cBarge features will still work.
• Barge—This setting enables the Singe Button Barge feature.
• cBarge—This setting enables the Single Button cBarge feature.
• Default—This setting uses the Single Button Barge/cBarge setting that is in the service parameter.
Tip For more configuration information, refer to Barge and Privacy in the Cisco Unified Communications Manager Features and Services Guide.
Join Across Lines From the drop-down list box, enable or disable the Join Across Lines feature for this device or choose Default to use the service parameter setting.
• Off—This setting disables the Join Across Lines feature.
• On—This setting enables the Join Across Lines feature.
• Default—Uses the Join Across Lines setting that is in the service parameter.
Table 3-1 Field Descriptions for a Phone Template (continued)
Field Description
3-15Cisco Unified Communications Manager Bulk Administration Guide
OL-22754-01

Chapter 3 Phone Template Using BAT Phone Templates
Use Trusted Relay Point From the drop-down list box, enable or disable whether Cisco Unified Communications Manager inserts a trusted relay point (TRP) device with this media endpoint. Choose one of the following values:
• Default—If you choose this value, the device uses the Use Trusted Relay Point setting from the common device configuration with which this device associates.
• Off—Choose this value to disable the use of a TRP with this device. This setting overrides the Use Trusted Relay Point setting in the common device configuration with which this device associates.
• On—Choose this value to enable the use of a TRP with this device. This setting overrides the Use Trusted Relay Point setting in the common device configuration with which this device associates.
A Trusted Relay Point (TRP) device designates an MTP or transcoder device that is labeled as Trusted Relay Point.
Cisco Unified Communications Manager places the TRP closest to the associated endpoint device if more than one resource is needed for the endpoint (for example, a transcoder or RSVPAgent).
If both TRP and MTP are required for the endpoint, TRP gets used as the required MTP.
Tip See TRP Insertion Requirements in the Cisco Unified Communications Manager System Guide for details of call behavior.
BLF Audible Alert Setting (Phone Idle)
From the drop-down list box, choose the BLF Audible Alert setting that you want to use from the following values:
• On
• Off
• Default
This parameter provides an audible alert in addition to a visual alert on a phone that is currently idle when a call comes in to one of the lines that is monitored by way of a busy line field (BLF) button.
This is a required field.
Table 3-1 Field Descriptions for a Phone Template (continued)
Field Description
3-16Cisco Unified Communications Manager Bulk Administration Guide
OL-22754-01

Chapter 3 Phone Template Using BAT Phone Templates
BLF Audible Alert Setting (Phone Busy)
This parameter for this required field provides an audible alert in addition to a visual alert on a phone that is currently in use when a call comes in to one of the lines that is monitored by way of a busy line field (BLF) button.
From the drop-down list box, choose the BLF Audible Alert setting that you want to use from the following values:
• On
• Off
• Default
Always Use Prime Line From the drop-down list box, choose one of the following options:
• Off—When the phone is idle and receives a call on any line, the phone user answers the call from the line on which the call is received.
• On—When the phone is idle (off-hook) and receives a call on any line, the primary line gets chosen for the call. Calls on other lines continue to ring, and the phone user must select those other lines to answer these calls.
• Default—Cisco Unified Communications Manager uses the configuration from the Always Use Prime Line service parameter, which supports the Cisco CallManager service.
Always Use Prime Line for Voice Message
From the drop-down list box, choose one of the following options:
• On—If the phone is idle, the primary line on the phone becomes the active line for retrieving voice messages when the phone user presses the Messages button on the phone.
• Off—If the phone is idle, pressing the Messages button on the phone automatically dials the voice-messaging system from the line that has a voice message. Cisco Unified Communications Manager always selects the first line that has a voice message. If no line has a voice message, the primary line gets used when the phone user presses the Messages button.
• Default—Cisco Unified Communications Manager uses the configuration from the Always Use Prime Line for Voice Message service parameter, which supports the Cisco CallManager service.
Calling Party Transformation CSS
This setting allows you to localize the calling party number on the device. Make sure that the Calling Party Transformation CSS that you choose contains the calling party transformation pattern that you want to assign to this device.
The device takes on the attributes of the Calling Party Transformation Pattern when you assign the pattern to a partition where the Calling Party Transformation CSS exists.
Tip For more configuration information, refer to Cisco Unified Communications Manager Features and Services Guide.
Table 3-1 Field Descriptions for a Phone Template (continued)
Field Description
3-17Cisco Unified Communications Manager Bulk Administration Guide
OL-22754-01

Chapter 3 Phone Template Using BAT Phone Templates
Geo Location From the drop-down list box, choose a geo location.
You can choose the Unspecified geo location, which designates that this device does not associate with a geo location.
You can also choose a geolocation that has been configured with the System > Geolocation Configuration menu option.
Feature Control Policy Choose the Feature Control Policy for this group of phones.
A feature control policy specifies the appearance of features and the associated softkeys that are displayed on the phone.
Use Device Pool Calling Party Transformation CSS
To use the Calling Party Transformation CSS that is configured in the device pool that is assigned to this device, check this check box. If you do not check this check box, the device uses the Calling Party Transformation CSS that you configured in the device configuration window.
Device Security Mode From the drop-down list box, choose the mode that you want to set for the device:
Use System Default—The phone uses the value that you specified for the enterprise parameter, Device Security Mode.
Non-secure—No security features exist for the phone. A TCP connection opens to Cisco Unified Communications Manager.
Authenticated—Cisco Unified Communications Manager provides integrity and authentication for the phone. A TLS connection that uses NULL/SHA opens.
Encrypted—Cisco Unified Communications Manager provides integrity, authentication, and encryption for the phone. A TLS connection that uses AES128/SHA opens.
This field displays only if the phone model supports authentication or encryption.
Retry Video Call as Audio This check box applies only to video endpoints that receive a call. If this phone receives a call that does not connect as video, the call tries to connect as an audio call.
By default, the system checks this check box to specify that this device should immediately retry a video call as an audio call (if it cannot connect as a video call) prior to sending the call to call control for rerouting.
If you uncheck this check box, a video call that fails to connect as video does not try to establish as an audio call. The call then fails to call control, and call control routes the call via Automatic Alternate Routing (AAR) and/or route/hunt list.
Ignore Presentation Indicators (Internal Calls Only)
Check this check box to configure call display restrictions on a call-by-call basis. When this check box is checked, Cisco Unified Communications Manager ignores any presentation restriction that is received for internal calls.
Table 3-1 Field Descriptions for a Phone Template (continued)
Field Description
3-18Cisco Unified Communications Manager Bulk Administration Guide
OL-22754-01

Chapter 3 Phone Template Using BAT Phone Templates
Allow Control of Device from CTI
Check this check box to allow control of all CTI controllable devices from CTI.
You can enable or disable this check box based on CTI Controllable Device Type and Device Protocol. For example, a 7975 with SIP protocol does not get supported by CTI; therefore, the check box should be disabled. A 7975 with SCCP protocol does get supported by CTI; hence check box should be enabled.
Logged into Hunt Group This check box, which gets checked by default for all phones, indicates that the phone is currently logged in to a hunt list (group). When the phone gets added to a hunt list, the administrator can log the user in or out by checking (and unchecking) this check box.
Users use the softkey on the phone to log their phone in or out of the hunt list.
Remote Device If you are experiencing delayed connect times over SCCP to remote sites, check the Remote Device check box in the Phone Configuration window. Checking this check box tells Cisco Unified Communications Manager to allocate a buffer for the phone device when it registers and to bundle SCCP messages to the phone.
Because this feature consumes resources, be sure to check this check box only when you are experiencing signaling delays for phones that are running SCCP. Most users do not require this option.
Protected Device Check this check box to designate a phone as "protected." This enables the phone to play a two-second tone notifying the user when a call is both encrypted and both phones are configured as protected devices. The tone plays for both parties when the call is answered. The tone does not play unless both phones are "protected" and the call occurs over encrypted media.
Tip For a detailed description of the secure-tone feature and the configuration requirements, see the Cisco Unity Connection System Administration Guide.
Hotline Device Check this check box to make this device a Hotline device. Hotline devices can only connect to other Hotline devices. This feature is an extension of PLAR, which configures a phone to automatically dial one directory number when it goes off-hook. Hotline provides additional restrictions that you can apply to devices that use PLAR.
To implement Hotline, you must also create a softkey template without supplementary service softkeys, and apply it to the Hotline device.
Associated Mobility Identity —These mobility fields are available only for Nokia S60 device and Cisco Unified Mobile Communicator phones. Click the Add New Mobile Identity link to display the Mobile Identity Configuration page.
Name Enter a name that identifies the mobile identity.
Table 3-1 Field Descriptions for a Phone Template (continued)
Field Description
3-19Cisco Unified Communications Manager Bulk Administration Guide
OL-22754-01

Chapter 3 Phone Template Using BAT Phone Templates
Destination Number Enter the telephone number for the identity. Include the area code and any additional digits that are required to obtain an outside line. Maximum field length equals 24 characters; individual characters can take the values 0-9, *, and #. Cisco recommends that you configure the caller ID of the smart phone destination.
Add the necessary translation pattern or route patterns to route the destination number.
Answer Too Soon Timer Enter the minimum time in milliseconds that must pass before the mobile phone can be answered.
Range: 0 - 10,000 milliseconds
Default: 1,500 milliseconds
Answer Too Late Timer Enter the maximum time in milliseconds that can pass before the mobile phone must be answered.
Range: 10,000 - 300,000 milliseconds
Default: 19,000 milliseconds
Delay Before Ringing Timer Enter the time that elapses before the mobile phone rings when a call is transferred from the desktop phone.
Range: 0 - 30,000 milliseconds
Default: 4,000 milliseconds
Time of Day Access From the drop-down list box, choose a time-of-day access record to associate with this destination.
Time Zone From the drop-down list box, choose a time zone to use for this remote destination.
Note The time zone that you use for this remote destination is used by the time-of-day access feature to allow or block calls to this destination.
Mobile Phone Check the check box if you want calls that are answered by the desktop phone to be sent to your mobile phone as the remote destination.
Note You must check this check box for Mobile Connect to work with this remote destination.
Enable Mobile Connect Check the check box to allow an incoming call to ring your desktop phone and remote destination at the same time.
Associated Remote Destinations— Click the Add a New Remote Destination link to display the Remote Destination Configuration page
Name Enter a name that identifies the remote destination.
Table 3-1 Field Descriptions for a Phone Template (continued)
Field Description
3-20Cisco Unified Communications Manager Bulk Administration Guide
OL-22754-01

Chapter 3 Phone Template Using BAT Phone Templates
Destination Number Enter the telephone number for the destination. Include the area code and any additional digits that are required to obtain an outside line. Maximum field length equals 24 characters; individual characters can take the values 0-9, *, and #. Cisco recommends that you configure the caller ID of the remote destination.
Add the necessary translation pattern or route patterns to route the destination number.
Answer Too Soon Timer Enter the minimum time in milliseconds that must pass before the mobile phone can be answered.
Range: 0 - 10,000 milliseconds
Default: 1,500 milliseconds
Answer Too Late Timer Enter the maximum time in milliseconds that can pass before the mobile phone must be answered.
Range: 10,000 - 300,000 milliseconds
Default: 19,000 milliseconds
Delay Before Ringing Timer Enter the time that elapses before the mobile phone rings when a call is transferred from the desktop phone.
Range: 0 - 30,000 milliseconds
Default: 4,000 milliseconds
Time of Day Access From the drop-down list box, choose a time-of-day access record to associate with this remote destination.
Time Zone From the drop-down list box, choose a time zone to use for this remote destination.
Note The time zone that you use for this remote destination is used by the time-of-day access feature to allow or block calls to this remote destination.
Mobile Phone Check the check box if you want calls that are answered by the desktop phone to be sent to your mobile phone as the remote destination.
Note You must check this check box for Mobile Connect to work with this remote destination.
Enable Mobile Connect Check the check box to allow an incoming call to ring your desktop phone and remote destination at the same time.
Protocol Specific Information
Packet Capture Mode From the drop-down list box, choose the mode that you want to set for signal packet capture:
• None—Choose None if you do not want to specify a mode.
• Real-Time Mode—Use this mode for real-time signal packet capture.
• Batch Processing Mode—Use this mode for batch processing signal packet capture mode.
Table 3-1 Field Descriptions for a Phone Template (continued)
Field Description
3-21Cisco Unified Communications Manager Bulk Administration Guide
OL-22754-01

Chapter 3 Phone Template Using BAT Phone Templates
Packet Capture Duration Enter the time for packet capture in minutes. You can enter a maximum duration of 300 minutes. The default duration specifies 60 minutes.
Presence Group Used with the Presence feature, the phone that is running SIP or SCCP serves as a watcher because it requests status about the presence entity; for example, directory number, that is configured as a BLF speed dial button on the phone.
If you want the phone to receive the status of the presence entity, choose a Presence group that is allowed to view the status of the Presence group that is applied to the directory number, as indicated in the Presence Group Configuration window.
Tip For more information on the Presence feature, refer to the Cisco Unified Communications Manager Features and Services Guide.
SIP Dial Rules If required, choose the appropriate SIP dial rule. SIP dial rules provide local dial plans for Cisco IP phones 7905, 7912, 7940, and 7975 that are running SIP, so users do not have to press a key or wait for a timer before the call gets processed.
Leave the SIP Dial Rules field set to <None> if you do not want dial rules applied to the IP phone that is running SIP. This means the user will have to use the Dial softkey or wait for the timer to expire before the call gets processed.
Device Security Profile For phones that are running SCCP or SIP, choose the security profile that you want to apply to the device.
All phones require that you apply a security profile. If the phone does not support security, choose a nonsecure profile.
MTP Preferred Originating Codec
From the drop-down list box, choose the codec to use if a media termination point is required for SIP calls.
Rerouting Calling Search Space From the drop-down list box, choose a calling search space to use for rerouting.
The rerouting calling search space of the referrer gets used to find the route to the refer-to target. When the Refer fails due to the rerouting calling search space, the Refer Primitive rejects the request with the “405 Method Not Allowed” message.
The redirection (3xx) primitive and transfer feature also uses the rerouting calling search space to find the redirect-to or transfer-to target.
Table 3-1 Field Descriptions for a Phone Template (continued)
Field Description
3-22Cisco Unified Communications Manager Bulk Administration Guide
OL-22754-01

Chapter 3 Phone Template Using BAT Phone Templates
Out-of-Dialog Refer Calling Search Space
From the drop-down list box, choose an out-of-dialog refer calling search space.
Cisco Unified Communications Manager uses the out-of-dialog (OOD) Refer Authorization calling search space (CSS) to authorize the SIP out-of-dialog Refer. The administrator can restrict the use of out-of-dialog Refer by configuring the OOD CSS of the Referrer. Refer Primitive rejects the OOD Refer request with a “403 Forbidden” message.
SUBSCRIBE Calling Search Space
Used with the Presence feature, the SUBSCRIBE Calling Search Space determines how Cisco Unified Communications Manager routes the subscription requests that come from the phone. From the drop-down list box, choose the calling search space that you want to use for this purpose.
Tip For more information on the Presence feature, refer to the Cisco Unified Communications Manager Features and Services Guide.
SIP Profile Choose the default SIP profile or a specific profile that was previously created. SIP profiles provide specific SIP information for the phone such as default telephony event payload type, registration and keepalive timers, media ports, Iris, and dynamic DNS server addresses.
Digest User Used with digest authentication (SIP security), choose an end user that you want to associate with the phone.
Ensure that you configured digest credentials for the user that you choose, as specified in the End User Configuration window.
After you save the phone configuration and reset the phone, the digest credentials for the user get added to the phone configuration file.
For more information on digest authentication, refer to the Cisco Unified Communications Manager Security Guide.
Media Termination Point Required
Use this field to indicate whether a media termination point is used to implement features that H.323 does not support (such as hold and transfer).
Check the Media Termination Point Required check box if you want to use an MTP to implement features. Uncheck the Media Termination Point Required check box if you do not want to use an MTP to implement features.
Use this check box only for H.323 clients and those H.323 devices that do not support the H.245 empty capabilities set or if you want media streaming to terminate through a single source.
Unattended Port Check this check box to indicate an unattended port on this device.
Require DTMF Reception For phones that are running SIP and SCCP, check this check box to require DTMF reception for this phone.
Table 3-1 Field Descriptions for a Phone Template (continued)
Field Description
3-23Cisco Unified Communications Manager Bulk Administration Guide
OL-22754-01

Chapter 3 Phone Template Using BAT Phone Templates
RFC2833 Disabled For phones that are running SCCP, check this check box to disable RFC2833 support.
Certification Authority Proxy Function (CAPF) Information (These parameters display only for devices with the capability to support authentication or encryption.)
Certificate Operation From the drop-down list box, choose the Certification Operation that you want to perform from the following options:
• No Pending Operation—No pending Certification Operation lists exist for this device. Choosing this option disables the remaining CAPF fields.
• Install/Upgrade—Install or upgrade a Certification Operation.
• Delete—Delete a Certification Operation.
• Troubleshoot—Troubleshoot a Certification Operation.
Authentication Mode From the drop-down list box, choose the Authentication Mode by which you want the phone to authenticate with CAPF during the certificate operation from the following options:
• By Null String—Install/upgrade, delete, or troubleshoot a locally significant certificate without user intervention.
• <None>
Note This option prompts you to specify a value for the Authentication Mode.
• By Authentication String—Installs/upgrades, deletes, or troubleshoots a locally significant certificate only when the user enters the CAPF authentication string on the phone.
• By Existing Certificate (precedence to LSC)—Installs/upgrades, deletes, or troubleshoots a locally significant certificate if a manufacture-installed certificate (MIC) or locally significant certificate (LSC) exists in the phone.
Note Before you choose this option, verify that a certificate exists in the phone. If you choose this option and no certificate exists in the phone, the operation fails.
• By Existing Certificate (precedence to MIC)—Installs/upgrades, deletes, or troubleshoots a locally significant certificate if a LSC or MIC exists in the phone.
Note Before you choose this option, verify that a certificate exists in the phone. If you choose this option and no certificate exists in the phone, the operation fails.
Table 3-1 Field Descriptions for a Phone Template (continued)
Field Description
3-24Cisco Unified Communications Manager Bulk Administration Guide
OL-22754-01

Chapter 3 Phone Template Using BAT Phone Templates
Authentication String If you chose the By Authentication String option from the Authentication Mode drop-down list box in the security profile, this setting applies. Manually enter a numeric string that contains 4 to 10 digits. To install, upgrade, or troubleshoot a locally significant certificate, the phone user or administrator must enter the authentication string on the phone.
Key Size (Bits) From the drop-down list box, choose the Key Size that you want for the certificate from the following options:
• 1024—This is the default option.
• <None>
Note This option prompts you to specify a value for the Key Size for the certificate.
• 2048
• 512
Note If you choose a higher key size than the default setting, the phones take longer to generate the entropy that is required to generate the keys. Key generation, which is set at low priority, allows the phone to function while the action occurs. Depending on the phone model, you may notice that key generation takes up to 30 or more minutes to complete.
Operation Completes By This field, which supports the Install/Upgrade, Delete, and Troubleshoot Certificate Operation options, specifies the date and time in which you must complete the operation.
Certificate Operation Status This field displays the progress of the certificate operation; for example, <operation type> pending, failed, or successful, where operating type equals the Install/Upgrade, Delete, or Troubleshoot Certificate Operation options. You cannot change the information that displays in this field.
Expansion Module Information
Module 1 Choose the expansion module if it is installed in the phone.
Module 1 Load Name Enter the firmware load for the first Cisco Unified IP Phone Expansion Module, if applicable. Leave this field blank to use the default load.
Module 2 Choose the expansion module if it is installed in the phone.
Module 2 Load Name Enter the firmware load for the second Cisco Unified IP Phone Expansion Module, if applicable. Leave this field blank to use the default load.
Cisco Unified IP Phone - External Data Locations
Information Enter the help text URL for the information button for Cisco Unified IP Phones.
Directory Enter the URL of the directory server for Cisco Unified IP Phones.
Table 3-1 Field Descriptions for a Phone Template (continued)
Field Description
3-25Cisco Unified Communications Manager Bulk Administration Guide
OL-22754-01

Chapter 3 Phone Template Using BAT Phone Templates
Messages Enter the voice-messaging access pilot number for Cisco Unified IP Phones.
Services Enter the URL for the services menu for Cisco Unified IP Phones.
Authentication Server Enter the URL that the phone uses to validate requests that are made to the phones web server. If you do not provide an authentication URL, the advanced features on the Cisco Unified IP Phone models that require authentication will not function. Leave this field blank to accept the default setting.
By default, this URL accesses a Cisco Unified IP Phone User Options window that was configured during installation.
Proxy Server Enter the host and port (for example, proxy.cisco.com:80) that are used to proxy HTTP requests for access to non-local host addresses from the phones HTTP client.
If the phone receives a URL such as www.cisco.com in a service and the phone is not configured in the cisco.com domain, the phone uses the proxy server to access the URL. If the phone is configured in the cisco.com domain, the phone accesses the URL without using the proxy because it is in the same domain as the URL.
Leave this field blank to accept the default setting.
Idle Enter the URL of the XML service that will appear as the idle display on the Cisco Unified IP Phone LCD screen when the Phone has not been used for the time that is specified in the Idle Timer field. For example, you can display a logo on the LCD screen when the phone has not been used for 5 minutes. Leave this field blank to use the default value.
Idle Timer Enter the seconds that you want to elapse before the phone displays the URL that is specified in the Idle field. Leave this field blank to use the default value.
Secure Authentication URL Enter the secure URL that the phone uses to validate requests that are made to the phone web server.
Note If you do not provide a Secure Authentication URL, the device uses the nonsecure URL. If you provide both a secure URL and a nonsecure URL, the device chooses the appropriate URL, based on its capabilities.
By default, this URL accesses a Cisco Unified CM User Options window that was configured during installation.
Leave this field blank to accept the default setting.
Maximum length: 255
Table 3-1 Field Descriptions for a Phone Template (continued)
Field Description
3-26Cisco Unified Communications Manager Bulk Administration Guide
OL-22754-01
Chapter 3 Phone Template Using BAT Phone Templates
Secure Directory URL Enter the secure URL for the server from which the phone obtains directory information. This parameter specifies the URL that secured Cisco Unified IP Phones use when you press the Directory button.
Note If you do not provide a Secure Directory URL, the device uses the nonsecure URL. If you provide both a secure URL and a nonsecure URL, the device chooses the appropriate URL, based on its capabilities.
Leave this field blank to accept the default setting.
Maximum length: 255
Secure Idle URL Enter the secure URL for the information that displays on the Cisco Unified IP Phone display when the phone is idle, as specified in Idle Timer field. For example, you can display a logo on the LCD when the phone has not been used for 5 minutes.
Note If you do not provide a Secure Idle URL, the device uses the nonsecure URL. If you provide both a secure URL and a nonsecure URL, the device chooses the appropriate URL, based on its capabilities.
To accept the default setting, leave this field blank.
Maximum length: 255
Secure Information URL Enter the secure URL for the server location where the Cisco Unified IP Phone can find help text information. This information displays when the user presses the information (i) button or the question mark (?) button.
Note If you do not provide a Secure Information URL, the device uses the nonsecure URL. If you provide both a secure URL and a nonsecure URL, the device chooses the appropriate URL, based on its capabilities.
To accept the default setting, leave this field blank.
Maximum length: 255
Secure Messages URL Enter the secure URL for the messages server. The Cisco Unified IP Phone contacts this URL when the user presses the Messages button.
Note If you do not provide a Secure Messages URL, the device uses the nonsecure URL. If you provide both a secure URL and a nonsecure URL, the device chooses the appropriate URL, based on its capabilities.
To accept the default setting, leave this field blank.
Maximum length: 255
Table 3-1 Field Descriptions for a Phone Template (continued)
Field Description
3-27Cisco Unified Communications Manager Bulk Administration Guide
OL-22754-01

Chapter 3 Phone Template Using BAT Phone Templates
Secure Services URL Enter the secure URL for Cisco Unified IP Phone services. The is the location that the secure Cisco Unified IP Phone contacts when the user presses the Services button.
Note If you do not provide a Secure Services URL, the device uses the nonsecure URL. If you provide both a secure URL and a nonsecure URL, the device chooses the appropriate URL, based on its capabilities.
To accept the default setting, leave this field blank.
Maximum length: 255
Extension Mobility (Device Profile) Information
Enable Extension Mobility Check this check box to enable the extension mobility feature. Extension mobility allows a user to log in and out of a Cisco IP Phone. Refer to the Cisco Unified Communications Manager Features and Services Guide for more information about extension mobility.
Log Out Profile Choose the profile that a phone should load when an extension mobility user logs out. You must configure logout profiles in Cisco Unified Communications Manager Administration.
Use Current Device Setting—This choice creates an autogenerated device profile as the default device profile.
Select a User Device Profile—This choice assigns a user device profile, which has already been defined, that becomes the default device profile for this device.
The chosen user device profile gets loaded onto the device when no user is logged in.
MultiLevel Precedence and Preemption (MLPP) Information
MLPP Indication If available, this setting specifies whether a device that is capable of playing precedence tones will use the capability when it places an MLPP precedence call.
From the drop-down list box, choose a setting to assign to this device from the following options:
• Default—This device inherits its MLPP indication setting from its device pool.
• Off—This device does not send indication of an MLPP precedence call.
• On—This device does send indication of an MLPP precedence call.
Note Do not configure a device with the following combination of settings: MLPP Indication is set to Off while MLPP Preemption is set to Forceful.
Table 3-1 Field Descriptions for a Phone Template (continued)
Field Description
3-28Cisco Unified Communications Manager Bulk Administration Guide
OL-22754-01

Chapter 3 Phone Template Using BAT Phone Templates
MLPP Preemption If available, this setting specifies whether a device that is capable of preempting calls in progress will use the capability when it places an MLPP precedence call.
From the drop-down list box, choose a setting to assign to this device from the following options:
• Default—This device inherits its MLPP preemption setting from its device pool.
• Disabled—This device does not preempt calls in progress when it places an MLPP precedence call.
• Forceful—This device preempts calls in progress when it places an MLPP precedence call.
Note Do not configure a device with the following combination of settings: MLPP Indication is set to Off while MLPP Preemption is set to Forceful.
MLPP Domain (e.g., "0000FF") Enter a hexadecimal value for the MLPP domain that is associated with this device. Ensure that this field is blank or a value between 0 and FFFFFF.
H.323 Device Information
Signaling Port The value designates the H.225 signaling port that this device uses.
The default value specifies 1720. Valid values include 1 through 65535.
Retry Video Call as Audio This check box applies only to video endpoints that receive a call. If this phone receives a call that does not connect as video, the call tries to connect as an audio call.
By default, the system checks this check box to specify that the sending device should immediately retry a video call that does not connect as an audio call prior to sending the call to call control for rerouting.
If you uncheck this check box, a video call that fails to connect as video fails to call control. At this point, call control reroutes the call within the route list. If Automatic Alternate Routing (AAR) is configured and enabled, call control also reroutes the call between route lists.
Wait for Far End H.245 Terminal Capability Set
By default, the system keeps this check box checked to specify that Cisco Unified Communications Manager should initiate capabilities exchange. This check box specifies that the Cisco Unified Communications Manager needs to receive the far-end H.245 Terminal Capability Set before it sends its H.245 Terminal Capability Set.
H.323 Protocol Specific Information
SRTP Allowed When this check box is checked, ensure that IPSec is configured in the network to provide end-to-end security. Failure to do so will expose keys and other information.
Table 3-1 Field Descriptions for a Phone Template (continued)
Field Description
3-29Cisco Unified Communications Manager Bulk Administration Guide
OL-22754-01
Chapter 3 Phone Template Using BAT Phone Templates
MTP Preferred Originating Codec
From the drop-down list box, choose the codec to use if a media termination point is required for SIP calls.
Media Termination Point Required
Use this field to indicate whether a media termination point (MTP) is used to implement features that H.323 does not support (such as hold and transfer).
Check the Media Termination Point Required check box if you want to use a media termination point to implement features. Uncheck the Media Termination Point Required check box if you do not want to use a media termination point to implement features.
Use this check box only for H.323 clients and those H.323 devices that do not support the H.245 empty capabilities set or if you want media streaming to terminate through a single source.
If you check this check box to require an MTP and this device becomes the endpoint of a video call, the call works as audio only.
H.323 Information
Outgoing Caller ID Pattern For incoming calls to the phone, enter the pattern, from 0 to 24 digits, that you want to use for caller ID.
Calling Party Selection Choose one of the following options to specify which directory number is sent:
• Originator—Send the directory number of the calling device.
• First Redirect Number-—Send the directory number of the redirecting device.
• Last Redirect Number—Send the directory number of the last device to redirect the call.
• First Redirect Number(external)—Send the directory number of the redirecting device.
• Last Redirect Number(external)—Send the directory number of the last device to redirect the call.
Calling Party Presentation Choose whether the central office transmits or blocks caller ID:
• Choose Allowed if you want the central office to send caller ID.
• Choose Restricted if you do not want the central office to send caller ID.
• Default displays the caller ID unless the caller ID was restricted in a previous level in the call stream.
Display IE Delivery Check the check box to deliver the display information element (IE) in SETUP and CONNECT messages for the calling and called party name delivery service.
Table 3-1 Field Descriptions for a Phone Template (continued)
Field Description
3-30Cisco Unified Communications Manager Bulk Administration Guide
OL-22754-01
Chapter 3 Phone Template Using BAT Phone Templates
Redirecting Number IE Delivery—Outbound
Check this check box to include the Redirecting Number IE in the outgoing SETUP message from the Cisco Unified Communications Manager to indicate the first redirecting number and the redirecting reason of the call when the call is forwarded.
Uncheck the check box to exclude the first redirecting number and the redirecting reason from the outgoing SETUP message.
Use Redirecting Number IE for voice-messaging integration only. If your configured voice-messaging system supports Redirecting Number IE, check the check box.
Redirecting Number IE delivery—Inbound
Use Redirecting Number IE when you are integrating a voice-messaging system that supports Redirecting Number IE.
Check this check box to accept the Redirecting Number IE in the incoming SETUP message to the Cisco Unified Communications Manager.
Uncheck the check box to exclude the Redirecting Number IE in the incoming SETUP message to the Cisco Unified Communications Manager.
Gatekeeper Information
Gatekeeper Name Choose the gatekeeper for the gatekeeper-controlled H.323 device from the drop-down list box.
Note If you do not choose the device, the system disables the E.164, Technology Prefix, and Zone fields.
Note You cannot change the device to a gatekeeper-controlled phone if more than one directory number is configured for the device.
E.164 Choose the E.164 address that is registered with the gatekeeper.
Note Ensure the H.323 client is configured as a gatekeeper-controlled device.
Note You must enter a value in this field for a gatekeeper-controlled H.323 client. You can enter only numbers (0-9) and special characters # and * in this field.
Technology Prefix Enter the technology prefix to eliminate the need for entering the IP address for every Cisco Unified Communications Manager system when the gw-type-prefix command is configured. For example, you can enter 1#* in this field if you can use the following gw-type-prefix command on the gatekeeper:
gw-type-prefix 1#* default-technology.
Note You must enter a value in this field for a gatekeeper-controlled H.323 client. You can enter only numbers (0-9) and special characters # and * in this field.
Table 3-1 Field Descriptions for a Phone Template (continued)
Field Description
3-31Cisco Unified Communications Manager Bulk Administration Guide
OL-22754-01

Chapter 3 Phone Template Using BAT Phone Templates
Zone On the gatekeeper, enter the specific zone with which Cisco Unified Communications Manager will register. The zone specifies the total bandwidth that is available for calls between this zone and another zone.
Note You must enter a value in this field for a gatekeeper-controlled phone. You can enter only letters, numbers, spaces, dashes, dots, and underscores in this field.
Gatekeeper Controlled H.323 Client
Check this check box to configure the H.323 client gatekeeper as a controlled gatekeeper.
Do Not Disturb (DND)
Do Not Disturb Check this check box if you want DND to be enabled.
DND Option From the drop-down list box, choose a DND option from the following options:
• None
• Ringer Off
DND Incoming Call Alert From the drop-down list box, choose one of the following options:
• None
• Disable
• Flash Only
• Beep Only
Secure Shell Information
Secure Shell User Enter a user ID for the secure shell user. If the phone that you are configuring does not support secure shell access, this field does not display. Cisco Technical Assistance Center (TAC) uses secure shell for troubleshooting. Contact TAC for further assistance.
Secure Shell Password Enter the password for a secure shell user. If the phone you are configuring does not support secure shell access, this field does not display. Contact TAC for further assistance.
Product-Specific Configuration
Model-specific configuration fields defined by the device manufacturers
The device manufacturer specifies the model-specific fields under product-specific configuration. Because they are dynamically configured, they can change without notice.
To view field descriptions and help for product-specific configuration items, click the “?” information icon to the right of the Product Specific Configuration heading to display help in a popup dialog box.
If you need more information, refer to the documentation for the specific device that you are configuring or contact the manufacturer.
Table 3-1 Field Descriptions for a Phone Template (continued)
Field Description
3-32Cisco Unified Communications Manager Bulk Administration Guide
OL-22754-01

Chapter 3 Phone Template Using BAT Phone Templates
Note To continue configuring the BAT phone template, go to the “Creating a New BAT Phone Template” section on page 3-4
Field Descriptions for Adding or Updating a Line to a BAT TemplateTable 3-2 provides descriptions of all possible fields that display when you are adding a line in a BAT phone, gateway, or UDP template. Some device types do not require all the phone settings.
Some fields display the values that were configured in Cisco Unified Communications Manager Administration.
In the BAT user interface, field names that have an asterisk require an entry. Treat fields that do not have asterisk as optional.
For related procedures, see the “Related Topics” section on page 3-76.
Table 3-2 Field Descriptions for Adding a Line to a BAT Template
Field Description
Directory Number Information
Line Template Name Enter a unique name for the line template.
Be aware that this field is available only when you are adding a line and not when you are updating an existing line.
Route Partition Choose a route partition to which the directory number belongs.
Note The directory number can appear in more than one partition.
Description Enter description for the line template. The description can include up to 50 characters in any language, but it cannot include double-quotes ("), percentage sign (%), ampersand (&), or angle brackets (<>).
Alerting Name This name represents the name that displays during an alert to a shared directory number. For non-shared directory numbers, during alerts, the system uses the name that is entered in the Display field.
Alerting Name ASCII This field provides the same information as the Alerting Name field, but you must limit input to ASCII characters. Devices that do not support Unicode (internationalized) characters display the content of the Alerting Name ASCII field.
Active Checking this check box allows calls to this DN to be forwarded (if forwarding is configured). If check box is not checked, Cisco Unified Communications Manager ignores the DN.
Directory Number Settings
Voice Mail Profile Choose this parameter to make the pilot number the same as the directory number for this line. This action proves useful if you do not have a voice-messaging server that is configured for this phone.
3-33Cisco Unified Communications Manager Bulk Administration Guide
OL-22754-01

Chapter 3 Phone Template Using BAT Phone Templates
Calling Search Space Choose partitions that are searched for numbers that are called from this directory number.
Note Changes cause an update of Pickup Group Names that are listed in the Call Pickup Group field. The setting applies to all devices that are using this directory number.
Presence Group Used with the Presence feature, the directory number serves as the presence entity; that is, watchers request the status of the directory number, so the real-time status of the directory number displays on the device.
If you want the phone to receive the status of the presence entity, make sure that the Presence group of the watcher is allowed to view the status of the Presence group that is applied to the directory number, as indicated in the Presence Group Configuration window.
For information on the Presence feature, refer to the Cisco Unified Communications Manager Features and Services Guide.
User Hold MOH Audio Source Choose the music on hold audio source to be played when the user presses HOLD to place a call on hold.
Network Hold MOH Audio Source Choose the music on hold audio source to be played when the system places a call on hold while the user transfers a call or initiates a conference or call park.
Auto Answer Choose one of the following options to activate the Auto Answer feature for this directory number:
• Auto Answer Off <Default>
• Auto Answer with Headset
• Auto Answer with Speakerphone
Note Make sure that the headset or speakerphone is not disabled when you choose Auto Answer with headset or Auto Answer with speakerphone.
Do not configure Auto Answer for devices that have shared lines.
AAR Settings—The settings in this row of fields specify treatment of calls for which insufficient bandwidth exists to reach the destination. Automated alternate routing (AAR)handles these calls that are routed to the AAR Destination Mask or Voice Mail.
AAR Voice Mail Check this check box to use settings in the Voice Mail Profile Configuration window.
Note When this check box is checked, Cisco Unified CallManager ignores the settings in the Coverage/Destination box and Calling Search Space.
AAR Destination Mask Use this setting instead of the external phone number mask to determine the AAR Destination to be dialed.
Table 3-2 Field Descriptions for Adding a Line to a BAT Template (continued)
Field Description
3-34Cisco Unified Communications Manager Bulk Administration Guide
OL-22754-01

Chapter 3 Phone Template Using BAT Phone Templates
AAR CSS Choose the appropriate calling search space for the device to use when it performs automated alternate routing (AAR). The AAR calling search space specifies the collection of route partitions that are searched to determine how to route a collected (originating) number that is otherwise blocked due to insufficient bandwidth.
AAR Group Choose the automated alternate routing (AAR) group for this device. The AAR group provides the prefix digits that are used to route calls that are otherwise blocked due to insufficient bandwidth.
Set AAR Group to <None> to prevent rerouting blocked calls.
Retain this destination in the call forwarding history
Checking this check box allows the AAR leg of the call to be present in the Call History.
Visual Message Waiting Indicator Policy
Use this field to configure the handset lamp illumination policy. Choose one of the following options:
• Use System Policy (The directory number refers to the service parameter "Message Waiting Lamp Policy" setting.)
• Light and Prompt
• Prompt Only
• Light Only
• None
Setting applies only to the current device unless you check the Update Shared Device Settings check box and click the Propagate Selected button. (The check box displays only if other devices share this directory number.)
Audible Message Waiting Indicator Policy
Use this field to configure an audible message waiting indicator policy. Choose one of the following options:
• Off
• On-When you select this option, you will receive a stutter dial tone when you take the handset off hook.
• Default-When you select this option, the phone uses the default that was set at the system level.
Table 3-2 Field Descriptions for Adding a Line to a BAT Template (continued)
Field Description
3-35Cisco Unified Communications Manager Bulk Administration Guide
OL-22754-01

Chapter 3 Phone Template Using BAT Phone Templates
Call Pickup Group Audio Alert Setting (Phone Idle)
This field determines the type of notification an incoming call sends to members of a call pickup group. If the called phone does not answer, the phones in the call pickup group that are idle will either hear a short ring (ring once) or hear nothing (disabled).
• Use System Default-The value of this field gets determined by the setting of the Cisco CallManager service parameter Call Pickup Group Audio Alert Setting of Idle Station.
• Disable-No alert is sent to members of the call pickup group.
• Ring Once-A short ring is sent to members of the call pickup group.
Call Pickup Group Audio Alert Setting (Phone Active)
This field determines the type of notification an incoming call sends to members of a call pickup group. If the called phone does not answer, the phones in the call pickup group that are busy will either hear a beep (beep beep) or hear nothing (disabled).
• Use System Default-The value of this field gets determined by the setting of the Cisco CallManager service parameter Call Pickup Group Audio Alert Setting of Busy Station.
• Disable-No alert is sent to member of the call pickup group.
• Beep Only-A beep beep is sent to members of the call pickup group.
Recording Option This field determines the recording option on the line appearance of an agent. By default, the recording option specifies Call Recording Disabled.
Choose one of the following options:
• Call Recording Disabled-The calls that the agent makes on this line appearance are not recorded.
• Automatic Call Recording Enabled-The calls that the agent makes on this line appearance are automatically recorded.
• Application Invoked Call Recording Enabled-The calls that the agent makes on this line appearance are recorded if an application invokes calling recording.
When the recording option is set to either Automatic Call Recording Enabled or Application Invoked Call Recording Enabled, the line appearance can be associated with a recording profile.
When automatic recording is enabled, the application's recording requests get rejected.
Recording Profile This field determines the recording profile on the line appearance of an agent.
Table 3-2 Field Descriptions for Adding a Line to a BAT Template (continued)
Field Description
3-36Cisco Unified Communications Manager Bulk Administration Guide
OL-22754-01

Chapter 3 Phone Template Using BAT Phone Templates
Monitoring CSS The monitoring calling search space of the supervisor line appearance must include the agent line or device partition to allow monitoring the agent.
Set the monitoring calling search space on the supervisor line appearance window. Choose an existing calling search space from the drop-down list box.
The default value specifies None.
Call Forward and Pickup Settings
Forward All Voice Mail Check this check box if you want calls to forward to the number that you chose in the voice-mail profile.
Checking this check box makes the Forward All Destination field and Forward All Calling Search Space check box not relevant.
Forward All Destination Enter the directory number to which all calls are forwarded.
Note The setting applies to any dialable phone number, including an outside destination unless restricted, and to all devices that are using this directory number.
Forward All Calling Search Space Choose the calling search space to use when calls are forwarded to the specified destination.
Note This setting applies to all devices that are using this directory number.
Secondary Calling Search Space for Forward All
Choose the secondary calling search space (CSS) from the drop-down list box.
Because Call Forwarding is a line-based feature, in cases where the device calling search space is unknown, the system uses only the line calling search space to forward the call. If the line calling search space is restrictive and not routable, the forward attempt fails.
Addition of a secondary calling search space for Call Forward All provides a solution to enable forwarding. The primary calling search space for Call Forward All and secondary calling search space for Call Forward All get concatenated (Primary CFA CSS + Secondary CFA CSS) when Call Forward All is processed. Cisco Unified Communications Manager uses this combination to validate the CFA destination and to forward the call.
Forward Busy Internal Voice Mail Check this check box if you want calls from an internal number to be forwarded to a number that you chose in the voice-mail profile.
Checking this check box makes the Forward Busy Internal Destination field and Calling Search Space check box not relevant.
Table 3-2 Field Descriptions for Adding a Line to a BAT Template (continued)
Field Description
3-37Cisco Unified Communications Manager Bulk Administration Guide
OL-22754-01

Chapter 3 Phone Template Using BAT Phone Templates
Forward Busy Internal Destination Enter the directory number to which an internal call is forwarded when the line is in use.
Note This setting applies to any internal, dialable phone number and to all devices that are using this directory number.
Forward Busy Internal Calling Search Space
Choose the calling search space to use when internal calls are forwarded to the specified destination.
Note This setting applies to all devices that are using this directory number.
Forward Busy External Voice Mail Check this check box if you want calls from an external number to be forwarded to a number that you chose in the voice-mail profile.
Checking this check box makes the Forward Busy External Destination field and Calling Search Space check box not relevant.
Forward Busy External Destination Enter the directory number to which an external call is forwarded when the line is in use.
Note This setting applies to any dialable external phone number, including an outside destination unless restricted, and to all devices that are using this directory number.
Forward Busy External Calling Search Space
Choose the calling search space to use when external calls are forwarded to the specified destination.
Note This setting applies to all devices that are using this directory number.
Forward No Answer Internal Voice Mail
Check this check box if you want calls from an internal number forwarded to the number that you chose in the voice-mail profile.
Checking this check box makes the Forward No Answer Internal Destination field and Calling Search Space check box not relevant.
Forward No Answer Internal Destination
Enter a directory number to which an internal call is forwarded when the phone is not answered.
Note This setting applies to any internal, dialable phone number and to all devices that are using this directory number.
Forward No Answer Internal Calling Search Space
Choose the calling search space to use when internal calls are forwarding to the specified destination. The setting displays only if it is configured in the system.
Note This setting applies to all devices that are using this directory number.
Table 3-2 Field Descriptions for Adding a Line to a BAT Template (continued)
Field Description
3-38Cisco Unified Communications Manager Bulk Administration Guide
OL-22754-01

Chapter 3 Phone Template Using BAT Phone Templates
Forward No Answer External Voice Mail
Check this check box if you want calls to forward to an external number that you chose in the voice-mail profile.
Checking this check box makes the Forward No Answer Externally Destination field and External Calling Search Space check box not relevant.
Forward No Answer External Destination
Enter a directory number to which an external call is forwarded when the phone is not answered.
Note This setting applies to any external, dialable phone number, including an outside destination unless restricted, and to all devices that are using this directory number.
Forward No Answer External Calling Search Space
Choose the calling search space to use when external calls are forwarded to the specified destination. The setting displays only if it is configured in the system.
Note This setting applies to all devices that are using this directory number.
Forward No Coverage Internal Voice Mail
Check this check box if you want calls from an internal number forwarded to the number that you chose in the voice-mail profile.
Checking this check box makes the Forward No Answer Destination field and Calling Search Space check box not relevant.
Forward No Coverage Internal Destination
Enter an directory number to which an internal call is forwarded when the phone has no coverage.
Note This setting applies to any internal, dialable phone number and to all devices that are using this directory number.
Forward No Coverage Internal Calling Search Space
Choose the calling search space to use when internal calls are forwarded to the specified destination. The setting displays only if it is configured in the system.
Note This setting applies to all devices that are using this directory number.
Forward No Coverage External Voice Mail
Check this check box if you want calls from an external number to be forwarded to the number that you chose in the voice-mail profile.
Checking this check box makes the Forward No Answer Destination field and Calling Search Space check box not relevant.
Forward No Coverage External Destination
Enter a directory number to which an external call is forwarded when the phone has no coverage.
Note This setting applies to any dialable phone number, which includes an outside destination unless restricted, and to all devices that are using this directory number.
Table 3-2 Field Descriptions for Adding a Line to a BAT Template (continued)
Field Description
3-39Cisco Unified Communications Manager Bulk Administration Guide
OL-22754-01

Chapter 3 Phone Template Using BAT Phone Templates
Forward No Coverage External Calling Search Space
Choose the calling search space to use when external calls are forwarded to the specified destination. The setting displays only if it is configured in the system.
Note This setting applies to all devices that are using this directory number.
Forward on CTI Failure Voice Mail The Forward on CTI Failure field applies only to CTI route points and CTI ports. The settings in this row specify the forwarding treatment for external calls to this CTI route point or CTI port if the CTI route point or CTI port fails.
Check this check box to use settings in the Voice Mail Profile Configuration window.
When this check box is checked, Cisco Unified Communications Manager ignores the settings in the Destination box and Calling Search Space. When this check box is checked for internal calls, the system automatically checks the Voice Mail check box for external calls. If you do not want external calls to forward to the voice-messaging system, you must uncheck the Voice Mail check box for external calls.
Forward on CTI Failure Destination This setting specifies the directory number to which an internal, nonconnected call is forwarded when an application that controls that directory number fails. Use any dialable phone number, including an outside destination.
When you enter a destination value for internal calls, the system automatically copies this value to the Destination field for external calls. If you want external calls to forward to a different destination, you must enter a different value in the Destination field for external calls.
Forward on CTI Failure Calling Search Space
This setting applies to all devices that are using this directory number.
When you choose a Calling Search Space for internal calls, the system automatically copies this setting to the Calling Search Space setting for external calls. If you want external calls to forward to a different calling search space, choose a different setting in the Calling Search Space for external calls.
No Answer Ring Duration Enter the number of seconds to allow the call to ring before the system forwards the call to the Forward No Answer Destination.
Call Pickup Group Choose a Pickup Group Name to specify the call pickup group, which can answer incoming calls to this directory number by dialing the appropriate pickup group number.
Table 3-2 Field Descriptions for Adding a Line to a BAT Template (continued)
Field Description
3-40Cisco Unified Communications Manager Bulk Administration Guide
OL-22754-01

Chapter 3 Phone Template Using BAT Phone Templates
Park Monitoring
Park Monitoring Forward No Retrieve Destination External
When the parkee is an external party, then the call will be forwarded to the specified destination in the parker’s Park Monitoring Forward No Retrieve Destination External parameter. If the Forward No Retrieve Destination External field value is empty, the parkee will be redirected to the parker’s line.
Park Monitoring Forward No Retrieve Destination Internal
When the parkee is an internal party, then the call will be forwarded to the specified destination in the parker’s Park Monitoring Forward No Retrieve Destination Internal parameter. If the Forward No Retrieve Destination Internal is empty, the parkee will be redirected to the parker’s line.
Park Monitoring Reversion Timer This parameter determines the number of seconds that Cisco Unified Communications Manager waits before prompting the user to retrieve a call that the user parked. This timer starts when the user presses the Park softkey on the phone, and a reminder is issued when the timer expires.
Default: 60 seconds
Note If you configure a non-zero value, this value overrides the value of this parameter set in the Service Parameters window. However, if you configure a value of 0 here, then the value in the Service Parameters window will be used.
Park Monitoring Forward No Retrieve Internal Voice Mail
Check this check box to use settings in the Voice Mail Profile Configuration window.
Note When this check box is checked, Cisco Unified Communications Manager ignores the settings in the Destination box and Calling Search Space.
Park Monitoring Forward No Retrieve External Voice Mail
Check this check box to use settings in the Voice Mail Profile Configuration window.
Note When this check box is checked, Cisco Unified Communications Manager ignores the settings in the Destination box and Calling Search Space.
Park Monitoring Forward No Retrieve External CSS
Choose the calling search space to apply to the directory number.
Park Monitoring Forward No Retrieve Internal CSS
Choose the calling search space to apply to the directory number.
Table 3-2 Field Descriptions for Adding a Line to a BAT Template (continued)
Field Description
3-41Cisco Unified Communications Manager Bulk Administration Guide
OL-22754-01

Chapter 3 Phone Template Using BAT Phone Templates
Forward Unregistered Internal Voice Mail
This field applies to unregistered internal DN calls. The calls are rerouted to a specified Destination Number or Voice Mail.
Check this check box if you want calls from an unregistered internal number to be forwarded to a number that you chose in the voice-mail profile.
Checking this check box makes the Forward Unregistered Internal Destination field and Calling Search Space drop-down list box not relevant.
Forward Unregistered Internal Destination
Enter the directory number to which an unregistered internal call is forwarded when the line is in use.
This setting applies to any internal, dialable phone number and to all devices that are using this directory number.
Forward Unregistered Internal CSS Choose the calling search space to use when unregistered internal calls are forwarded to the specified destination.
This setting applies to all devices that are using this directory number.
Forward Unregistered External Voice Mail
This field applies to unregistered external DN calls. The calls are rerouted to a specified Destination Number or Voice Mail.
Note You must also specify the maximum number of forwards in the Service Parameters Configuration window for a Directory Number.
Forward Unregistered External Destination
Enter the directory number to which an external call is forwarded when the line is in use.
This setting applies to any dialable external phone number, including an outside destination unless restricted, and to all devices that are using this directory number.
Forward Unregistered External CSS Choose the calling search space to use when external calls are forwarded to the specified destination.
This setting applies to all devices that are using this directory number.
Multilevel Precedence and Preemption Alternate Party Settings
Target (Destination) Enter the number to which MLPP precedence calls should be directed if this directory number receives a precedence call and neither this number nor its call forward destination answers the precedence call.
Values can include numeric characters, pound (#), and asterisk (*).
MLPP Calling Search Space From the drop-down list box, choose the calling search space to associate with the alternate party target (destination) number.
Table 3-2 Field Descriptions for Adding a Line to a BAT Template (continued)
Field Description
3-42Cisco Unified Communications Manager Bulk Administration Guide
OL-22754-01

Chapter 3 Phone Template Using BAT Phone Templates
MLPP No Answer Ring Duration (Seconds)
Enter the number of seconds (between 4 and 30) after which an MLPP precedence call will get directed to the alternate party of this directory number if this directory number and its call forwarding destination have not answered the precedence call.
Leave this setting blank to use the value that is set in the Cisco Unified Communications Manager enterprise parameter, Precedence Alternate Party Timeout.
Line Settings for This Phone
Display (Internal Caller ID) Use this field only if you do not want the directory number to show on the line appearance. Enter text that identifies this directory number for a line/phone combination.
Suggested entries include name of the boss, department, or other appropriate information to identify multiple directory numbers to secretary/assistant who monitors multiple directory numbers.
ASCII Display (Internal Caller ID) This field provides the same information as the Display (Internal Caller ID) field, but you must limit input to ASCII characters. Devices that do not support Unicode (internationalized) characters display the content of the ASCII Display (Internal Caller ID) field.
Setting applies only to the current device unless you check the check box at right (Update Shared Device Settings) and click the Propagate Selected button. (The check box at right displays only if other devices share this directory number.)
Line Text Label Enter text that identifies this directory number for a line/phone combination.
Note The default language specifies English
ASCII Line Text Label This field provides the same information as the Line Text Label field, but you must limit input to ASCII characters. Devices that do not support Unicode (internationalized) characters display the content of the ASCII Line Text Label field.
Setting applies only to the current device unless you check the check box at right (Update Shared Device Settings) and click the Propagate Selected button. (The check box at right displays only if other devices share this directory number.)
External Phone Number Mask Enter the phone number (or mask) that is sent for Caller ID information when a call is placed from this line.
You can enter a maximum of 24 numbers and “X” characters. The Xs represent the directory number and must appear at the end of the pattern. For example, if you specify a mask of 972813XXXX, an external call from extension 1234 displays a caller ID number of 9728131234.
Table 3-2 Field Descriptions for Adding a Line to a BAT Template (continued)
Field Description
3-43Cisco Unified Communications Manager Bulk Administration Guide
OL-22754-01

Chapter 3 Phone Template Using BAT Phone Templates
Visual Message Waiting Indicator Policy
Use this field to configure the handset lamp illumination policy. Choose one of the following options:
• Use System Policy (The directory number refers to the service parameter "Message Waiting Lamp Policy" setting.)
• Light and Prompt
• Prompt Only
• Light Only
• None
Setting applies only to the current device unless you check the Update Shared Device Settings check box and click the Propagate Selected button. (The check box displays only if other devices share this directory number.)
Audible Message Waiting Indicator Policy
Use this field to configure an audible message waiting indicator policy. Choose one of the following options:
• Off
• On-When you select this option, you will receive a stutter dial tone when you take the handset off hook.
• Default-When you select this option, the phone uses the default that was set at the system level.
Ring Setting (Phone Idle) Choose the ring setting for the line appearance when an incoming call is received and no other active calls exist on that device. Choose one of the following options:
• Use system default
• Disable
• Flash only
• Ring once
• Ring
Ring Setting (Phone Active) Choose the ring setting that is used when this phone has another active call on a different line. Choose one of the following options:
• Use system default
• Disable
• Flash only
• Ring once
• Ring
• Beep only
Table 3-2 Field Descriptions for Adding a Line to a BAT Template (continued)
Field Description
3-44Cisco Unified Communications Manager Bulk Administration Guide
OL-22754-01

Chapter 3 Phone Template Using BAT Phone Templates
Call Pickup Group Audio Alert Setting (Phone Idle)
This field determines the type of notification an incoming call sends to members of a call pickup group. If the called phone does not answer, the phones in the call pickup group that are idle will either hear a short ring (ring once) or hear nothing (disabled).
• Use System Default—The value of this field gets determined by the setting of the Cisco CallManager service parameter Call Pickup Group Audio Alert Setting of Idle Station.
• Disable—No alert is sent to members of the call pickup group.
• Ring Once—A short ring is sent to members of the call pickup group.
Call Pickup Group Audio Alert Setting (Phone Active)
This field determines the type of notification an incoming call sends to members of a call pickup group. If the called phone does not answer, the phones in the call pickup group that are busy will either hear a beep (beep beep) or hear nothing (disabled).
• Use System Default—The value of this field gets determined by the setting of the Cisco CallManager service parameter Call Pickup Group Audio Alert Setting of Busy Station.
• Disable—No alert is sent to member of the call pickup group.
• Beep Only—A beep beep is sent to members of the call pickup group.
Recording Option This field determines the recording option on the line appearance of an agent. By default, the recording option specifies Call Recording Disabled.
Choose one of the following options:
• Call Recording Disabled—The calls that the agent makes on this line appearance are not recorded.
• Automatic Call Recording Enabled—The calls that the agent makes on this line appearance are automatically recorded.
• Application Invoked Call Recording Enabled—The calls that the agent makes on this line appearance are recorded if an application invokes calling recording.
When the recording option is set to either Automatic Call Recording Enabled or Application Invoked Call Recording Enabled, the line appearance can be associated with a recording profile.
When automatic recording is enabled, the application’s recording requests get rejected.
Table 3-2 Field Descriptions for Adding a Line to a BAT Template (continued)
Field Description
3-45Cisco Unified Communications Manager Bulk Administration Guide
OL-22754-01

Chapter 3 Phone Template Using BAT Phone Templates
Recording Profile This field determines the recording profile on the line appearance of an agent. Choose an existing recording profile from the drop-down list box. To create a recording profile, use the Device > Device Settings > Recording Profile menu option.
The default value specifies None.
Monitoring Calling Search Space The monitoring calling search space of the supervisor line appearance must include the agent line or device partition to allow monitoring the agent.
Set the monitoring calling search space on the supervisor line appearance window. Choose an existing calling search space from the drop-down list box.
The default value specifies None.
Log Missed Calls This check box allows you to turn this feature on or off. If the check box displays as checked (turned on), which is the default for this setting, Cisco Unified Communications Manager logs missed calls in the call history for that directory number on the phone.
Forward All CSS Activation Policy Select one of the following options from the drop-down list box:
• Use System Default
• With Configured CSS
• With Activating Device/Line CSS
If you select the With Configured CSS option, the Forward All Calling Search Space that is explicitly configured in the Directory Number Configuration window controls the forward all activation and call forwarding. If the Forward All Calling Search Space is set to None, no CSS gets configured for Forward All. A forward all activation attempt to any directory number with a partition will fail. No change in the Forward All Calling Search Space and Secondary Calling Search Space for Forward All occurs during the forward all activation.
If you prefer to utilize the combination of the Directory Number Calling Search Space and Device Calling Search Space without explicitly configuring a Forward All Calling Search Space, select With Activating Device/Line CSS for the Calling Search Space Activation Policy. With this option, when Forward All is activated from the phone, the Forward All Calling Search Space and Secondary Calling Search Space for Forward All automatically gets populated with the Directory Number Calling Search Space and Device Calling Search Space for the activating device.
Table 3-2 Field Descriptions for Adding a Line to a BAT Template (continued)
Field Description
3-46Cisco Unified Communications Manager Bulk Administration Guide
OL-22754-01

Chapter 3 Phone Template Using BAT Phone Templates
Hold Reversion Ring Duration (seconds)
Enter a number from 0 to 1200 (inclusive) to specify the wait time in seconds before issuing a reverted call alert to the holding party phone.
If you enter a value of 0, Cisco Unified Communications Manager does not invoke the reverted call feature for a held call.
Hold Reversion Notification Interval (seconds)
Enter a number from 0 to 1200 (inclusive) to specify the interval time in seconds for sending periodic reminder alerts to the holding party phone.
If you enter a value of 0, Cisco Unified Communications Manager does not send reminder alerts.
Party Entrance Tone Choose one of the following options from the drop-down list box:
• Default—Use the value that you configured in the Party Entrance Tone service parameter.
• On—A tone plays on the phone when a basic call changes to a multi party call; that is, a barge call, cBarge call, ad hoc conference, meet-me conference, or a joined call. In addition, a different tone plays when a party leaves the multi party call. If the controlling device, that is, the originator of the multi party call has a built-in bridge, the tone gets played to all parties if you choose On for the controlling device. When the controlling device, for example, the conference controller, no longer remains present on the call or if the controlling device cannot play the tone, Cisco Unified Communications Manager does not play the tone even if you choose On.
• Off—A tone does not play on the phone when a basic call changes to a multi party call.
Multiple Call/Call Waiting Settings
Maximum Number of Calls You can configure up to 184 calls for a line on a device in a cluster, with the limiting factor being the device. As you configure the number of calls for one line, the calls that are available for another line decrease.
The default specifies 4. If the phone does not allow multiple calls for each line, the default specifies 2.
For CTI route points, you can configure up to 10,000 calls for each port. The default specifies 5000 calls.
Use this field in conjunction with the Busy Trigger field.
Table 3-2 Field Descriptions for Adding a Line to a BAT Template (continued)
Field Description
3-47Cisco Unified Communications Manager Bulk Administration Guide
OL-22754-01

Chapter 3 Phone Template Using BAT Phone Templates
Note To complete the procedure for phones, go to the “Adding or Updating Lines in a BAT Template” section on page 3-4; for Remote Destination Profiles, see “Adding or Updating lines in a Remote Destination Profile Template” section on page 59-3; for UDPs, see Chapter 45, “Adding Lines in UDP” and Chapter 44, “Updating Lines for User Device Profiles.” To complete the updates for gateways, see Chapter 48, “Gateway Template.”
Note You can edit the device or line by choosing device name in the Associated Devices list box and clicking Edit Device or Edit Line Appearance.
Field Descriptions for Adding an Intercom Template to a BAT TemplateThis section provides descriptions of all possible fields that display when you are adding a line in a BAT phone, gateway, or UDP template. Some device types do not require all the phone settings.
Some fields display the values that were configured in Cisco Unified Communications Manager Administration.
In the BAT user interface, field names that have an asterisk require an entry. Treat fields that do not have asterisk as optional.
For related procedures, see the “Related Topics” section on page 3-76.
Busy Trigger This setting, which works in conjunction with Maximum Number of Calls and Call Forward Busy, determines the maximum number of calls to be presented at the line. If maximum number of calls is set for 50 and the busy trigger is set to 40, incoming call 41 gets rejected with a busy cause (and will get forwarded if Call Forward Busy is set). If this line is shared, be aware that all the lines must be busy before incoming calls get rejected.
Use this field in conjunction with Maximum Number of Calls for CTI route points. The default specifies 4500 calls.
Forwarded Call Information Display for This Device
Caller Name Check this check box to include the caller name in the display when a forwarded call is received. Default leaves this check box checked.
Caller Number Check this check box to include the caller number in the display when a forwarded call is received.
Redirected Number Check this check box to include the redirected number in the display when a forwarded call is received.
Dialed Number Check this check box to include the dialed number in the display when a forwarded call is received. The default setting leaves this check box checked.
Table 3-2 Field Descriptions for Adding a Line to a BAT Template (continued)
Field Description
3-48Cisco Unified Communications Manager Bulk Administration Guide
OL-22754-01

Chapter 3 Phone Template Using BAT Phone Templates
Table 3-3 Field Descriptions for Adding an Intercom Template to a BAT Template
Field Description
Intercom Directory Number Information
Intercom Template Name Enter a unique name for the intercom template.
Route Partition Choose a route partition to which the directory number belongs.
Note The directory number can appear in more than one partition.
Description Enter a description of the directory number and route partition. The description can include up to 50 characters in any language, but it cannot include double-quotes ("), percentage sign (%), ampersand (&), or angle brackets (<>).
Display (Internal Caller ID) Use this field only if you do not want the directory number to show on the line appearance. Enter text that identifies this directory number for a line/phone combination.
Suggested entries include name of the boss, department, or other appropriate information to identify multiple directory numbers to secretary/assistant who monitors multiple directory numbers.
ASCII Display (Internal Caller ID) This field provides the same information as the Display (Internal Caller ID) field, but you must limit input to ASCII characters. Devices that do not support Unicode (internationalized) characters display the content of the ASCII Display (Internal Caller ID) field.
Setting applies only to the current device unless you check the check box at right (Update Shared Device Settings) and click the Propagate Selected button. (The check box at right displays only if other devices share this directory number.)
Line Text Label Enter text that identifies this directory number for a line/phone combination.
Note The default language specifies English
ASCII Line Text Label This field provides the same information as the Line Text Label field, but you must limit input to ASCII characters. Devices that do not support Unicode (internationalized) characters display the content of the ASCII Line Text Label field.
Setting applies only to the current device unless you check the check box at right (Update Shared Device Settings) and click the Propagate Selected button. (The check box at right displays only if other devices share this directory number.)
Alerting Name This name represents the name that displays during an alert to a shared directory number. For non-shared directory numbers, during alerts, the system uses the name that is entered in the Display field.
3-49Cisco Unified Communications Manager Bulk Administration Guide
OL-22754-01

Chapter 3 Phone Template Using BAT Phone Templates
Alerting Name ASCII This field provides the same information as the Alerting Name field, but you must limit input to ASCII characters. Devices that do not support Unicode (internationalized) characters display the content of the Alerting Name ASCII field.
Speed Dial Enter the number that you want the system to dial when the user presses the speed-dial button. You can enter digits 0 through 9, *, #, and +, which is the international escape character.
External Phone Number Mask Enter the phone number (or mask) that is sent for Caller ID information when a call is placed from this line.
You can enter a maximum of 24 numbers and “X” characters. The Xs represent the directory number and must appear at the end of the pattern. For example, if you specify a mask of 972813XXXX, an external call from extension 1234 displays a caller ID number of 9728131234.
Intercom Directory Number Settings
Calling Search Space From the drop-down list box, choose the appropriate calling search space. A calling search space comprises a collection of partitions that are searched for numbers that are called from this directory number. The value that you choose applies to all devices that are using this directory number.
Presence Group Configure this field with the presence feature.
From the drop-down list box, choose a Presence Group for this directory number. The selected group specifies the devices, end users, and application users that can monitor this directory number.
Table 3-3 Field Descriptions for Adding an Intercom Template to a BAT Template (continued)
Field Description
3-50Cisco Unified Communications Manager Bulk Administration Guide
OL-22754-01

Chapter 3 Phone Template Using BAT Phone Templates
Additional Topics
See the “Related Topics” section on page 3-76.
Using the BAT Spreadsheet to Create a CSV Data File for PhonesWhen you are adding new phones or IP telephony devices to the system, you can use the Microsoft Excel spreadsheet that was designed to use with BAT. The spreadsheet includes macros that automatically adjust the options for the selected devices. You can define the file format within the spreadsheet, and the BAT spreadsheet uses the data file formats to display the fields for the CSV data file.
Use the following procedure to create the CSV data file by using the BAT spreadsheet for adding new phones and other IP telephony devices.
For information about installing and using the BAT spreadsheet, see the “Using the BAT Spreadsheet for Gathering Data” section on page 1-8.
Procedure
Step 1 To open the BAT spreadsheet, locate and double-click the BAT.xlt file
Step 2 When prompted, click Enable Macros to use the spreadsheet capabilities.
Step 3 To display the phones options, click the Phones tab at the bottom of the spreadsheet.
Step 4 Choose a radio button for one of the following device types:
Auto Answer Choose one of the following options to activate the auto answer feature for this directory number:
• Auto Answer Off <Default>
• Auto Answer with Headset
• Auto Answer with Speakerphone
Note Do not configure auto answer for devices that have shared lines.
Default Activated Device From the drop-down list box, choose a default activated device for this directory number. The selected device specifies the phone on which this directory number is activated by default. The drop-down list box lists only devices that support intercom.
Note You must specify a default activated device for this intercom directory number to be active as an intercom line.
Note If an intercom DN is specified in a device profile that is configured for Cisco Extension Mobility, that intercom DN will display as an intercom line only when a user logs in to the specified default activated device by using that device profile, as long as the device supports the intercom feature.
Table 3-3 Field Descriptions for Adding an Intercom Template to a BAT Template (continued)
Field Description
3-51Cisco Unified Communications Manager Bulk Administration Guide
OL-22754-01

Chapter 3 Phone Template Using BAT Phone Templates
• Phones
• CTI Port
• H.323 Client
• VGC Phones
• VGC Virtual Phones
• Cisco IP Communicator Phone
The spreadsheet displays options that are available for the chosen device. For example, when you choose phones, fields for the number of phone lines and the number of speed dials display.
Note The device type that you select determines the validation criteria for data in the BAT spreadsheet.
Step 5 To choose the device and line fields that you can define for each phone, click Create File Format. The Field Selection popup window displays.
Step 6 To choose the device fields, click a device field name in the Device Field box and then click the arrow to move the field to the Selected Device Fields box.
A CSV data file must include MAC Address/Device Name and Description; therefore, these fields always remain selected.
Tip You can select a range of items in the list by holding down the Shift key. To select random field names, hold down the Ctrl key and click field names.
Step 7 Click a line field name in the Line Field box and click the arrow to move the field to the Selected Line Fields box.
Tip You can change the order of the items in the Selected Line and Device boxes. Choose an item and use the up arrow to move the field closer to the beginning of the list, or use the down arrow to move the item to the end of the list.
Step 8 A message asks whether you want to overwrite the existing CSV format, click Create to modify the CSV data file format.
Step 9 Click OK. New columns for the selected fields display in the BAT spreadsheet in the order that you specified.
Step 10 Scroll to the right to locate the Number of Phone Lines box. The number of lines that you specify here must not exceed the number of lines that are configured in the BAT template.
Note When you insert a CSV data file, the number of lines on phones must not exceed the number of lines in the BAT phone template, or you receive an error.
Step 11 For phones, you must enter the number of speed-dial buttons in the Maximum Number of Speed Dials box. After you enter the number, columns display for each speed-dial number.
3-52Cisco Unified Communications Manager Bulk Administration Guide
OL-22754-01

Chapter 3 Phone Template Using BAT Phone Templates
Note When you insert the data records, do not exceed the number of speed dials that are configured in the BAT template, or an error will result when the CSV data file and BAT phone template are inserted.
Step 12 Enter the number of Busy Lamp Field (BLF) speed-dial buttons in the Maximum Number of BLF Speed Dials box. After you enter the number, columns display for each BLF speed-dial number.
Step 13 Enter data for an individual phone on each line in the spreadsheet. Complete all mandatory fields and any relevant, optional fields. Each column heading specifies the length of the field and whether it is required or optional. Table 3-4 describes all the phone fields in the BAT spreadsheet.
Step 14 If you did not enter the MAC address for each phone, check the Create Dummy MAC Address check box.
When you choose the dummy MAC address option, you can update the phones later with the correct MAC address by manually entering this information into Cisco Unified Communications Manager Administration or by using the Unified CM Auto-Register phone Tool tool. See the “Introducing TAPS” section on page 80-1 for more information about Unified CM Auto-Register Phone Tool.
Note If you are adding CTI ports, the dummy MAC address option gives a unique device name to each CTI port in the form of the dummy MAC addresses.Do not use the dummy MAC address option for H.323 clients, VGC phones, or VGC virtual phones.
Step 15 To transfer the data from the BAT Excel spreadsheet into a CSV formatted data file, click Export to BAT Format.
The system saves the file to your choice of a folder on your local workstation under the following filename:
<tabname>-<timestamp>.txt
where <tabname> represents the type of input file that you created, such as phones, and <timestamp> represents the precise date and time that the file was created.
Note If you enter a comma in one of the fields, BAT.xlt encloses that field entry in double quotes when you export to BAT format.If you enter a blank row in the spreadsheet, the system treats the empty row as the end of the file. The system does not convert data that is entered after a blank line to the BAT format.
Note You cannot upload aCSV filename with a comma (for example, abcd,e.txt) to the Cisco Unified Communications Manager server.
You must upload the CSV data file to the Cisco Unified Communications Manager first node database server, so BAT can access the CSV data file. For more information on uploading and downloading files, see Chapter 2, “Uploading and Downloading Files.”
3-53Cisco Unified Communications Manager Bulk Administration Guide
OL-22754-01

Chapter 3 Phone Template Using BAT Phone Templates
Note For information on how to read the exported CSV data file, click the link to View Sample File in the Insert phones window in BAT.
Additional Topics
See the “Related Topics” section on page 3-76.
Field Descriptions for Phones in the BAT SpreadsheetTable 3-4 provides descriptions of the phone fields that are available for adding device and line details in a CSV data file. For related procedures, see the “Related Topics” section on page 3-76.
Table 3-4 Phone Field Descriptions for the BAT Spreadsheet
Field Description
Device Fields
MAC Address/Device Name Enter the MAC address for phones, VGC virtual phones, and VGC phones. Enter a unique identifier (Device Name) for the CTI port or H.323 client. You can check the Create Dummy MAC Addresses check box to automatically generate unique device identifiers.
Description Enter a description such as “Conference Room A” or “John Smith” that identifies the phone or device. The description can include up to 50 characters in any language, but it cannot include double-quotes ("), percentage sign (%), ampersand (&), back-slash (\), or angle brackets (<>).
Media Resource Group List Enter the media resource group list (MRGL) for this group of phones/ports.
An MRGL specifies a list of prioritized media resource groups. An application can choose required media resources from the available ones according to the order that is defined in the MRGL.
User Hold Audio Source Enter the user hold audio source that this group of IP phones or CTI ports should use.
The user hold audio source identifies the audio source from which music is played when a user places a call on hold.
Network Hold Audio Source Enter the network hold audio source that this group of IP phones or CTI ports should use.
The network hold audio source identifies the audio source from which music is played when the system places a call on hold, such as when the user transfers or parks a call.
User Locale Enter the country and language set that you want to associate with this group of IP phones.
This choice determines which cultural-dependent attributes exist for this user and which language displays for the user in the Cisco Unified Communications Manager user windows and phones.
3-54Cisco Unified Communications Manager Bulk Administration Guide
OL-22754-01

Chapter 3 Phone Template Using BAT Phone Templates
Network Locale Enter the network locale that you want to associate with this group of phones.
The Network Locale comprises a set of tones and cadences that Cisco gateways and phones use when they communicate with the PSTN and other networks in a specific geographical area.
Softkey Template Enter the softkey template to be used for all phones in this group.
Common Phone Profile From the drop-down list box, choose a common phone profile from the list of available common phone profiles.
Presence Group Used with the Presence feature, the phone that is running SIP or SCCP serves as a watcher because it requests status about the presence entity; for example, directory number, that is configured as a BLF speed dial button on the phone.
If you want the phone to receive the status of the presence entity, choose a Presence Group that is allowed to view the status of the Presence Group that is applied to the directory number, as indicated in the Presence Group Configuration window.
Tip For more information on the presence feature, refer to the Cisco Unified Communications Manager Features and Services Guide.
Phone Load Name Enter the custom phone load, if applicable.
Note Any value that is entered in this field overrides the default value for the chosen phone.
Value does not apply for CTI ports.
Security Profile Enter the security profile that you want to apply to the device. If the phone does not support the profile that you choose, Cisco Unified Communications Manager does not allow you to apply the configuration.
All phones require that you apply a security profile. If the phone does not support security, choose a nonsecure profile.
SUBSCRIBE Calling Search Space
Used with the presence feature, the SUBSCRIBE Calling Search Space determines how Cisco Unified Communications Manager routes the subscription requests that come from the phone. Enter the calling search space that you want to use for this purpose.
Tip For more information on the presence feature, refer to the Cisco Unified Communications Manager Features and Services Guide.
E.164 Choose the E.164 address that is registered with the gatekeeper.
Note Ensure the H.323 client is configured as a gatekeeper-controlled device.
Note You must enter a value in this field for a gatekeeper-controlled H.323 client. You can enter only numbers (0-9) and special characters # and * in this field.
Table 3-4 Phone Field Descriptions for the BAT Spreadsheet (continued)
Field Description
3-55Cisco Unified Communications Manager Bulk Administration Guide
OL-22754-01

Chapter 3 Phone Template Using BAT Phone Templates
User ID Enter the user ID for the phone user.
Media Resource Group List This list provides a prioritized grouping of media resource groups. An application chooses the required media resource, such as a Music On Hold server, from among the available media resources according to the priority order that is defined in a Media Resource List.
AAR Calling Search Space Enter the appropriate calling search space for the device to use when it performs automated alternate routing (AAR). The AAR calling search space specifies the collection of route partitions that are searched to determine how to route a collected (originating) number that is otherwise blocked due to insufficient bandwidth.
MLPP Domain Enter a hexadecimal value for the MLPP domain that is associated with this device. Ensure that this value is blank or a value between 0 and FFFFFF
MLPP Indication If available, this setting specifies whether a device that is capable of playing precedence tones will use the capability when it places an MLPP precedence call.
• Default—This device inherits its MLPP indication setting from its device pool.
• Off—This device does not handle nor process indication of an MLPP precedence call.
• On—This device does handle and process indication of an MLPP precedence call.
MLPP Preemption If available, this setting specifies whether a device that is capable of preempting calls in progress will use the capability when it places an MLPP precedence call.
• Default—This device inherits its MLPP indication setting from its device pool.
• Off—This device does not handle nor process indication of an MLPP precedence call.
• On—This device does handle and process indication of an MLPP precedence call.
Signal Packet Capture Mode Enter the mode that you want to set for signal packet capture:
• None—Choose None if you do not want to specify a mode.
• Real-Time Mode—Use this mode for real-time signal packet capture.
• Batch Processing Mode—Use this mode for batch processing signal packet capture mode.
Packet Capture Duration Enter the time for packet capture in minutes. You can enter a maximum duration of 300 minutes.
Authentication String Enter a numeric string that contains 4 to 10 digits. To install, upgrade, or troubleshoot a locally significant certificate, the phone user or administrator must enter the authentication string on the phone.
Table 3-4 Phone Field Descriptions for the BAT Spreadsheet (continued)
Field Description
3-56Cisco Unified Communications Manager Bulk Administration Guide
OL-22754-01

Chapter 3 Phone Template Using BAT Phone Templates
Ignore Presentation Indicator Enter Yes or No to configure call display restrictions on a call-by-call basis. When this check box is checked, Cisco Unified Communications Manager ignores any presentation restriction that is received for internal calls.
SIP Profile Enter the default SIP profile or a specific profile that was previously created. SIP profiles provide specific SIP information for the phone such as default telephony event payload type, registration and keep alive timers, media ports, Iris, and dynamic DNS server addresses.
Digest User Used with digest authentication (SIP security), choose an end user that you want to associate with the phone.
Ensure that you configured digest credentials for the user that you choose, as specified in the End User Configuration window.
After you save the phone configuration and reset the phone, the digest credentials for the user get added to the phone configuration file.
For more information on digest authentication, refer to the Cisco Unified Communications Manager Security Guide.
Log Out Profile Enter the profile that a phone should load when an extension mobility user logs out. You must configure logout profiles in Cisco Unified Communications Manager Administration.
Use Current Device Setting—This choice creates an autogenerated device profile as the default device profile.
Select a User Device Profile—This choice assigns a user device profile, which has already been defined, that becomes the default device profile for this device.
The chosen user device profile gets loaded onto the device when no user is logged in.
SIPCodec_MTPPreferredOrigCodec
Enter the codec to use if a media termination point is required for SIP calls.
Dial Rules If required, enter the appropriate SIP dial rule. SIP dial rules provide local dial plans for Cisco Unified IP Phones 7905, 7912, 7940, and 7975 that run SIP, so users do not have to press a key or wait for a timer before the call gets processed.
Leave the SIP Dial Rules field set to <None> if you do not want dial rules applied to the IP phone that is running SIP. This means the user must use the Dial softkey or wait for the timer to expire before the call gets processed.
Table 3-4 Phone Field Descriptions for the BAT Spreadsheet (continued)
Field Description
3-57Cisco Unified Communications Manager Bulk Administration Guide
OL-22754-01

Chapter 3 Phone Template Using BAT Phone Templates
CSS Reroute Enter a calling search space to use for rerouting.
The system uses the rerouting calling search space of the referrer to find the route to the refer-to target. When the Refer fails due to the rerouting calling search space, the Refer Primitive rejects the request with the “405 Method Not Allowed” message.
The redirection (3xx) primitive and transfer feature also uses the rerouting calling search space to find the redirect-to or transfer-to target.
Common Phone Configuration
Enter the common phone configuration to which you want this phone assigned. The common phone configuration includes the attributes (services or features) that are associated with a particular user.
Calling Search Space Refer Enter an out-of-dialog refer calling search space.
Cisco Unified Communications Manager uses the out-of-dialog (OOD) Refer Authorization calling search space (CSS) to authorize the SIP out-of-dialog Refer. The administrator can restrict the use of out-of-dialog Refer by configuring the OOD CSS of the Referrer. Refer Primitive rejects the OOD Refer request with a “403 Forbidden” message.
Certificate Operation Enter the Certification Operation that you want to perform from the following options:
• No Pending Operation—No pending Certification Operation lists exist for this device. Choosing this option disables the remaining CAPF fields.
• Install/Upgrade—Install or upgrade a Certification Operation.
• Delete—Delete a Certification Operation
• Troubleshoot—Troubleshoot a Certification Operation.
Certificate Operation Completion Time
This field, which supports the Install/Upgrade, Delete, and Troubleshoot Certificate Operation options, specifies the date and time in which you must complete the operation.
Secure Shell User Enter a user ID for the secure shell user. If the phone that you are configuring does not support secure shell access, this field does not display. Cisco Technical Assistance Center (TAC) uses secure shell for troubleshooting. Contact TAC for further assistance.
Secure Shell Password Enter the password for a secure shell user. If the phone that you are configuring does not support secure shell access, this field does not display. Contact TAC for further assistance.
Device Pool Enter the appropriate device pool.
The device pool specifies a collection of properties for this device that includes Communications Manager Group, Date/Time Group, Region, and Calling Search Space for auto registration of devices.
Table 3-4 Phone Field Descriptions for the BAT Spreadsheet (continued)
Field Description
3-58Cisco Unified Communications Manager Bulk Administration Guide
OL-22754-01

Chapter 3 Phone Template Using BAT Phone Templates
Built-in Bridge Enter On, Off, or Default to enable or disable the built-in conference bridge for the barge feature.
For more configuration information, refer to the Barge and Privacy Features in the Cisco Unified Communications Manager Features and Services Guide.
Calling Search Space Enter the appropriate calling search space. A calling search space comprises a collection of partitions that are searched for numbers that are called from this phone number. The value that you choose applies to all devices that are using this phone number. For configuration information about calling search space, refer to Cisco Unified Communications Manager Administration Guide.
Location Choose the appropriate location for this phone. A location setting of Hub_None means that the locations feature does not keep track of the bandwidth that this phone consumes.
Module 1 Enter the appropriate expansion module or none.
Module 1 Load Name Enter the custom software for the appropriate expansion module, if applicable.
The value that you enter overrides the default value for the current model. Ensure the firmware load matches the module load.
Module 2 Enter the appropriate expansion module or none.
Module 2 Load Name Enter the custom software for the second expansion module, if applicable.
The value that you enter overrides the default value for the current model. Ensure the firmware load matches the module load.
Phone Template Enter the phone template name that you created for this type of bulk transaction.
Authentication Server Enter the URL that the phone uses to validate requests that are made to the phones web server. If you do not provide an authentication URL, the advanced features on the Cisco Unified IP Phones that require authentication will not function. Leave this field blank to accept the default setting.
By default, this URL accesses a Cisco Unified IP Phone User Options window that was configured during installation.
Proxy Server Enter the host and port (for example, proxy.cisco.com:80) that are used to proxy HTTP requests for access to non-local host addresses from the phones HTTP client.
If the phone receives a URL such as www.cisco.com in a service and the phone is not configured in the cisco.com domain, the phone uses the proxy server to access the URL. If the phone is configured in the cisco.com domain, the phone accesses the URL without using the proxy because it is in the same domain as the URL.
Table 3-4 Phone Field Descriptions for the BAT Spreadsheet (continued)
Field Description
3-59Cisco Unified Communications Manager Bulk Administration Guide
OL-22754-01

Chapter 3 Phone Template Using BAT Phone Templates
Idle Enter the URL of the XML service that will appear as the idle display on the Cisco Unified IP Phone LCD screen when the phone has not been used for the time that is specified in the Idle Time field.
For example, you can display a logo on the LCD screen when the phone has not been used for 5 minutes.
Idle Timer Enter the seconds that you want to elapse before the phone displays the URL that is specified in the Idle field.
Secure Authentication URL Enter the secure URL that the phone uses to validate requests that are made to the phone web server.
Note If you do not provide a Secure Authentication URL, the device uses the nonsecure URL. If you provide both a secure URL and a nonsecure URL, the device chooses the appropriate URL, based on its capabilities.
By default, this URL accesses a Cisco Unified CM User Options window that was configured during installation.
Leave this field blank to accept the default setting.
Maximum length: 255
Secure Directory URL Enter the secure URL for the server from which the phone obtains directory information. This parameter specifies the URL that secured Cisco Unified IP Phones use when you press the Directory button.
Note If you do not provide a Secure Directory URL, the device uses the nonsecure URL. If you provide both a secure URL and a nonsecure URL, the device chooses the appropriate URL, based on its capabilities.
Leave this field blank to accept the default setting.
Maximum length: 255
Secure Idle URL Enter the secure URL for the information that displays on the Cisco Unified IP Phone display when the phone is idle, as specified in Idle Timer field. For example, you can display a logo on the LCD when the phone has not been used for 5 minutes.
Note If you do not provide a Secure Idle URL, the device uses the nonsecure URL. If you provide both a secure URL and a nonsecure URL, the device chooses the appropriate URL, based on its capabilities.
To accept the default setting, leave this field blank.
Maximum length: 255
Table 3-4 Phone Field Descriptions for the BAT Spreadsheet (continued)
Field Description
3-60Cisco Unified Communications Manager Bulk Administration Guide
OL-22754-01
Chapter 3 Phone Template Using BAT Phone Templates
Secure Information URL Enter the secure URL for the server location where the Cisco Unified IP Phone can find help text information. This information displays when the user presses the information (i) button or the question mark (?) button.
Note If you do not provide a Secure Information URL, the device uses the nonsecure URL. If you provide both a secure URL and a nonsecure URL, the device chooses the appropriate URL, based on its capabilities.
To accept the default setting, leave this field blank.
Maximum length: 255
Secure Messages URL Enter the secure URL for the messages server. The Cisco Unified IP Phone contacts this URL when the user presses the Messages button.
Note If you do not provide a Secure Messages URL, the device uses the nonsecure URL. If you provide both a secure URL and a nonsecure URL, the device chooses the appropriate URL, based on its capabilities.
To accept the default setting, leave this field blank.
Maximum length: 255
Secure Services URL Enter the secure URL for Cisco Unified IP Phone services. The is the location that the secure Cisco Unified IP Phone contacts when the user presses the Services button.
Note If you do not provide a Secure Services URL, the device uses the nonsecure URL. If you provide both a secure URL and a nonsecure URL, the device chooses the appropriate URL, based on its capabilities.
To accept the default setting, leave this field blank.
Maximum length: 255
Hotline Device Enter ‘T’ or ‘F’. Hotline devices can only connect to other Hotline devices. This feature is an extension of PLAR, which configures a phone to automatically dial one directory number when it goes off-hook. Hotline provides additional restrictions that you can apply to devices that use PLAR.
To implement Hotline, you must also create a softkey template without supplementary service softkeys, and apply it to the Hotline device.
Owner User ID Enter a user ID for the primary phone user.
Common Phone Profile Enter the common phone profile to which you want this phone assigned. The common phone profile includes the attributes (services or features) that are associated with a particular user.
Table 3-4 Phone Field Descriptions for the BAT Spreadsheet (continued)
Field Description
3-61Cisco Unified Communications Manager Bulk Administration Guide
OL-22754-01
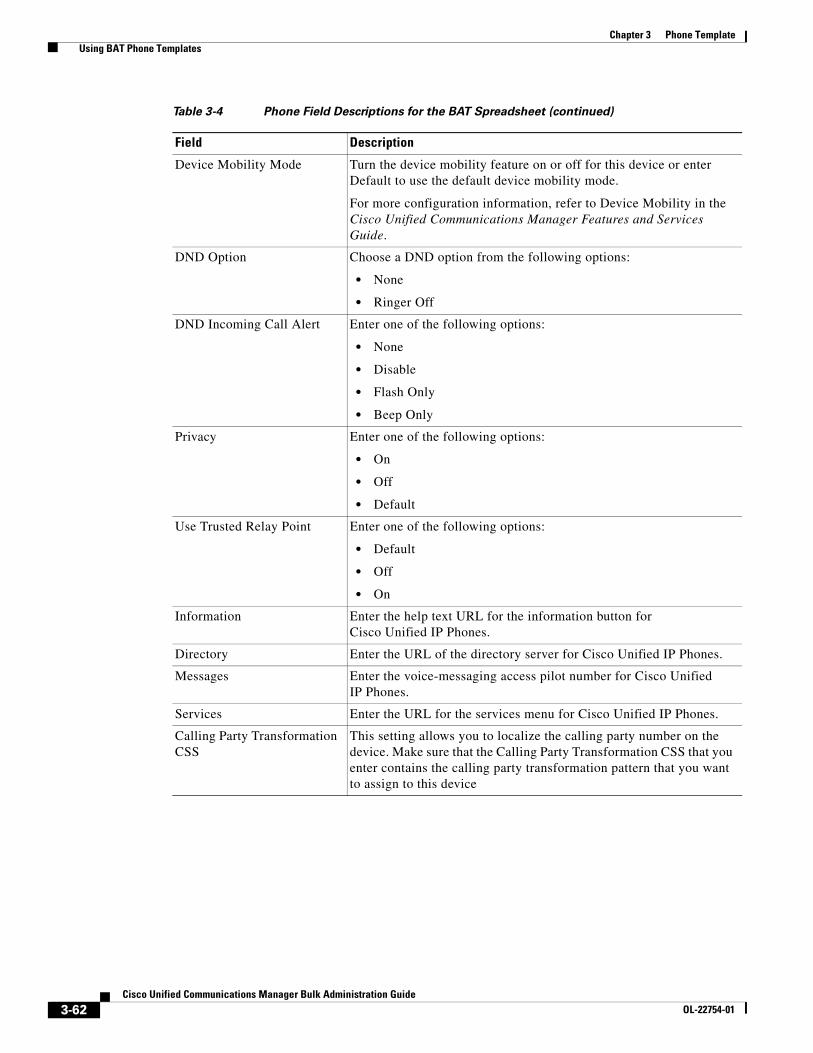
Chapter 3 Phone Template Using BAT Phone Templates
Device Mobility Mode Turn the device mobility feature on or off for this device or enter Default to use the default device mobility mode.
For more configuration information, refer to Device Mobility in the Cisco Unified Communications Manager Features and Services Guide.
DND Option Choose a DND option from the following options:
• None
• Ringer Off
DND Incoming Call Alert Enter one of the following options:
• None
• Disable
• Flash Only
• Beep Only
Privacy Enter one of the following options:
• On
• Off
• Default
Use Trusted Relay Point Enter one of the following options:
• Default
• Off
• On
Information Enter the help text URL for the information button for Cisco Unified IP Phones.
Directory Enter the URL of the directory server for Cisco Unified IP Phones.
Messages Enter the voice-messaging access pilot number for Cisco Unified IP Phones.
Services Enter the URL for the services menu for Cisco Unified IP Phones.
Calling Party Transformation CSS
This setting allows you to localize the calling party number on the device. Make sure that the Calling Party Transformation CSS that you enter contains the calling party transformation pattern that you want to assign to this device
Table 3-4 Phone Field Descriptions for the BAT Spreadsheet (continued)
Field Description
3-62Cisco Unified Communications Manager Bulk Administration Guide
OL-22754-01

Chapter 3 Phone Template Using BAT Phone Templates
Single Button Barge Enter one of the following options:
• Off—This setting disables the Single Button Barge/cBarge feature; however, the regular Barge or cBarge features will still work.
• Barge—This setting enables the Singe Button Barge feature.
• cBarge—This setting enables the Single Button cBarge feature.
• Default—This setting uses the Single Button Barge/cBarge setting that is in the service parameter.
Tip For more configuration information, refer to Barge and Privacy in the Cisco Unified Communications Manager Features and Services Guide.
Join Across Lines Enter one of the following options:
• Off—This setting disables the Join Across Lines feature.
• On—This setting enables the Join Across Lines feature.
• Default—Uses the Join Across Lines setting that is in the service parameter.
BLF Audible Alert Setting (Phone Idle)
Enter the BLF Audible Alert setting that you want to use from the following values:
• On
• Off
• Default
For this required field, this parameter provides an audible alert in addition to a visual alert on a phone that is currently idle when a call comes in to one of the lines that is monitored by way of a busy line field (BLF) button.
BLF Audible Alert Setting (Phone Busy)
For this required field, enter the BLF Audible Alert setting that you want to use from the following values:
• On
• Off
• Default
Always Use Prime Line Enter the Always Use Prime Line setting that you want to use from the following values:
• On
• Off
• Default
Table 3-4 Phone Field Descriptions for the BAT Spreadsheet (continued)
Field Description
3-63Cisco Unified Communications Manager Bulk Administration Guide
OL-22754-01

Chapter 3 Phone Template Using BAT Phone Templates
Always Use Prime Line for Voice Message
Enter the Always Use Prime Line for Voice Message setting that you want to use from the following values:
• On
• Off
• Default
Services Provisioning For this required field, enter one of the following values:
• Internal
• External URLs
• Both
• Default: Internal
Phone Personalization Enter one of the following values:
• Disabled—None of the the personalization settings on the phone get activated.
• Enabled—This setting accepts a personalized background image file, which is used for the phone screen; it accepts a preview image file for temporary display; and it accepts a personalized tone file, so the default ring tone can be personalized.
• Default—Use the phone personalization setting that is in the Common Phone Profile.
Mobility Identity Name Enter a name that identifies the remote destination.
Mobility Identity Destination Number
Enter the telephone number for the destination. Include the area code and any additional digits that are required to obtain an outside line. Maximum field length equals 24 characters; individual characters can take the values 0-9, *, and #. Cisco recommends that you configure the caller ID of the remote destination.
Add the necessary translation pattern or route patterns to route the destination number.
Mobility Identity Answer Too Soon Timer
Enter the minimum time in milliseconds that must pass before the mobile phone can be answered.
Range: 0 - 10,000 milliseconds
Default: 1,500 milliseconds
Mobility Identity Answer Too Late Timer
Enter the maximum time in milliseconds that can pass before the mobile phone must be answered.
Range: 10,000 - 300,000 milliseconds
Default: 19,000 milliseconds
Mobility Identity Delay Before Ringing Cell
Enter the time that elapses before the mobile phone rings when a call is transferred from the desktop phone.
Range: 0 - 30,000 milliseconds
Default: 4,000 milliseconds
Table 3-4 Phone Field Descriptions for the BAT Spreadsheet (continued)
Field Description
3-64Cisco Unified Communications Manager Bulk Administration Guide
OL-22754-01

Chapter 3 Phone Template Using BAT Phone Templates
Mobility Identity Time of Day Access
Enter a time-of-day access record to associate with this remote destination.
Mobility Identity Time Zone Enter a time zone to use for this remote destination.
Note The time zone that you use for this remote destination is used by the time-of-day access feature to allow or block calls to this remote destination.
Mobility Identity Enable Mobile Connect
Enter ‘T’ of ‘F’ this field to allow or disallow an incoming call to ring your desktop phone and remote destination at the same time.
Mobile Smart Client Profile Mobile Smart Client Profile is the Smart Client for smart client devices and dual-mode phones.
Enter “Standard Cisco Unified Mobile Communicator Profile” in this field to enable Cisco Unified Mobile Communicator. Leave it blank to disable it.
Geo Location Enter the geo location that you want to associate with the phone.
Enter “unspecified” if you do not want to associate the phone to any geo location.
Feature Control Policy Enter the Feature Control Policy for this group of phones.
A feature control policy specifies the appearance of features and the associated softkeys that are displayed on the phone.
Line Fields (Optional)
Directory Number Enter the directory number, up to 24 digits and special characters, for the phone.
Route Partition Enter a route partition to which the directory number belongs.
Note The directory number can appear in more than one partition.
Display Enter the text that you want to display on the called party phone display, such as the user name (John Smith) or phone location (Conference Room 1).
Note If this filed is left blank, the system uses the value that is entered in the Directory Number field.
Note The default language specifies English.
Line Text Label Enter text that identifies this directory number for a line/phone combination.
Note The default language specifies English
Voice Mail Profile Enter this parameter to make the pilot number the same as the directory number for this line. This action proves useful if you do not have a voice-messaging server that is configured for this phone.
Line Calling Search Space Enter partitions that are searched for numbers that are called from this directory number.
Note Changes cause an update of Pickup Group Names that are listed in the Call Pickup Group field. The setting applies to all devices that use this directory number.
Table 3-4 Phone Field Descriptions for the BAT Spreadsheet (continued)
Field Description
3-65Cisco Unified Communications Manager Bulk Administration Guide
OL-22754-01

Chapter 3 Phone Template Using BAT Phone Templates
AAR Group Enter the automated alternate routing (AAR) group for this device. The AAR group provides the prefix digits that are used to route calls that are otherwise blocked due to insufficient bandwidth.
Set AAR Group to <None> to prevent rerouting blocked calls.
Forward All CSS Enter the calling search space to use when a call is forwarded to the specified destination.
Note This setting applies to all devices that are using this directory number.
Secondary Calling Search Space for Forward All
Enter the secondary calling search space (CSS).
Forward All Destination Enter the directory number to which all calls get forwarded.
Note This setting applies to any dialable phone number, including an outside destination unless restricted, and to all devices that are using this directory number.
Forward Busy External CSS Enter the calling search space to use when a call from an external number gets forwarded to the specified destination.
Note This setting applies to all devices that are using this directory number.
Forward Busy Internal CSS Enter the calling search space to use when a call from an internal number gets forwarded to the specified destination.
Note This setting applies to all devices that are using this directory number.
Forward Busy Destination External
Enter the directory number to which a call that is coming from an external number gets forwarded when the line is in use.
Note This setting applies to any dialable phone number, including an outside destination unless restricted, and to all devices that are using this directory number.
Forward Busy Destination Internal
Enter the directory number to which a call that is coming from an internal number gets forwarded when the line is in use.
Note This setting applies to any dialable phone number, including an outside destination unless restricted, and to all devices that are using this directory number.
Calling Search Space Forward No Answer External
Enter the calling search space to use when a call from an external number gets forwarded to the specified destination. The setting displays only if it is configured in the system.
Note This setting applies to all devices that are using this directory number.
Forward No Answer Internal CSS
Enter the calling search space to use when a call from an internal number gets forwarded to the specified destination. The setting displays only if it is configured in the system.
Note This setting applies to all devices that are using this directory number.
Table 3-4 Phone Field Descriptions for the BAT Spreadsheet (continued)
Field Description
3-66Cisco Unified Communications Manager Bulk Administration Guide
OL-22754-01

Chapter 3 Phone Template Using BAT Phone Templates
Forward No Answer Destination External
Enter the directory number to which a call that is coming from an external number gets forwarded when the phone is not answered.
Note This setting applies to any dialable phone number, including an outside destination unless restricted, and to all devices that are using this directory number.
Forward No Answer Destination Internal
Enter the directory number to which a call that is coming from an internal number gets forwarded when the phone is not answered.
Note This setting applies to any dialable phone number, including an outside destination unless restricted, and to all devices that are using this directory number.
Forward No Coverage External CSS
Enter the calling search space to use when a call from an external number gets forwarded to the specified destination. The setting displays only if it is configured in the system.
Note This setting applies to all devices that are using this directory number.
Forward No Coverage Internal CSS
Enter the calling search space to use when a call from an internal number gets forwarded to the specified destination. The setting displays only if it is configured in the system.
Note This setting applies to all devices that are using this directory number.
Forward No Coverage Destination External
Enter the directory number to which a call that is coming from an external number gets forwarded when the phone does not have coverage.
Note This setting applies to any dialable phone number, including an outside destination unless restricted, and to all devices that are using this directory number.
Forward No Coverage Destination Internal
Enter the directory number to which a call that is coming from an internal number gets forwarded when the phone does not have coverage.
Note This setting applies to any dialable phone number, including an outside destination unless restricted, and to all devices that are using this directory number.
Calling Search Space Forward on Failure External/Internal
(CTI ports only) Enter the calling search space to use when a call from an internal or external call gets forwarded to the specified destination. The setting appears only if it is configured in the system.
Note This setting applies to all devices that are using this directory number.
Forward on Failure Destination External/Internal
(CTI ports only) Enter the directory number to which a call coming from an internal or an external number should get forwarded when a phone or CTI application fails.
Table 3-4 Phone Field Descriptions for the BAT Spreadsheet (continued)
Field Description
3-67Cisco Unified Communications Manager Bulk Administration Guide
OL-22754-01

Chapter 3 Phone Template Using BAT Phone Templates
Forward on CTI Failure Destination
This setting specifies the directory number to which an internal nonconnected call gets forwarded when an application that controls that directory number fails. Use any dialable phone number, including an outside destination.
When you enter a destination value for internal calls, the system automatically copies this value to the Destination field for external calls. If you want external calls to forward to a different destination, you must enter a different value in the Destination field for external calls.
Forward on CTI Failure Calling Search Space
This setting applies to all devices that are using this directory number.
When you choose a Calling Search Space for internal calls, the system automatically copies this setting to the Calling Search Space setting for external calls. If you want external calls to forward to a different calling search space, choose a different setting in the Calling Search Space for external calls.
Call Pickup Group Choose a Pickup Group Name to specify the call pickup group, which can answer incoming calls to this directory number by dialing the appropriate pickup group number.
External Phone Number Mask
Enter the phone number (or mask) that is sent for Caller ID information when a call is placed from this line.
You can enter a maximum of 24 numbers and “X” characters. The Xs represent the directory number and must appear at the end of the pattern. For example, if you specify a mask of 972813XXXX, an external call from extension 1234 displays a caller ID number of 9728131234.
Forward No Answer Ring Duration (CFNA)
Enter the number of seconds to allow the call to ring before forwarding the call to the Forward No Answer Destination.
Target Destination (MLPP) Enter the number to which MLPP precedence calls should be directed if this directory number receives a precedence call and neither this number nor its call forward destination answers the precedence call.
Values can include numeric characters, pound (#) ,and asterisk (*).
Calling Search Space (MLPP) Enter the calling search space to associate with the alternate party target (destination) number.
No Answer Ring Duration (MLPP)
Enter the time, seconds (between 4 and 30), after which an MLPP precedence call will be directed to this directory number’s alternate party if this directory number and its call forwarding destination have not answered the precedence call.
Leave this setting blank to use the value that is set in the Cisco Unified Communications Manager enterprise parameter, Precedence Alternate Party Timeout.
Table 3-4 Phone Field Descriptions for the BAT Spreadsheet (continued)
Field Description
3-68Cisco Unified Communications Manager Bulk Administration Guide
OL-22754-01

Chapter 3 Phone Template Using BAT Phone Templates
Maximum Number of Calls You can configure up to 200 calls for a line on a device in a cluster, with the limiting factor being the device. As you configure the number of calls for one line, the calls that are available for another line decrease.
The default specifies 4. If the phone does not allow multiple calls for each line, the default specifies 2.
For CTI route points, you can configure up to 10,000 calls for each port. The default specifies 5000 calls. Use this field in conjunction with the Busy Trigger field.
Busy Trigger This setting, which works in conjunction with Maximum Number of Calls and Call Forward Busy, determines the maximum number of calls to be presented at the line. If maximum number of calls is set for 50 and the busy trigger is set to 40, incoming call 41 gets rejected with a busy cause (and will get forwarded if Call Forward Busy is set). If this line is shared, be aware that all the lines must be busy before incoming calls get rejected.
Use this field in conjunction with Maximum Number of Calls for CTI route points. The default specifies 4500 calls.
Alerting Name This name represents the name that displays during an alert to a shared directory number. For non-shared directory numbers, during alerts, the system uses the name that is entered in the Display field.
Alerting Name ASCII This field provides the same information as the Alerting Name field, but you must limit input to ASCII characters. Devices that do not support Unicode (internationalized) characters display the content of the Alerting Name ASCII field.
Auto Answer Enter one of the following options to activate the Auto Answer feature for this directory number:
• Auto Answer Off <Default>
• Auto Answer with Headset
• Auto Answer with Speakerphone
Note Make sure that the headset or speakerphone is not disabled when you choose Auto Answer with headset or Auto Answer with speakerphone.
Do not configure Auto Answer for devices that have shared lines.
Table 3-4 Phone Field Descriptions for the BAT Spreadsheet (continued)
Field Description
3-69Cisco Unified Communications Manager Bulk Administration Guide
OL-22754-01

Chapter 3 Phone Template Using BAT Phone Templates
Route Filter Enter a name in the Route Filter Name field. The name can contain up to 50 alphanumeric characters and can contain any combination of spaces, periods (.), hyphens (-), and underscore characters (_). Ensure each route filter name is unique to the route plan.
Note Use concise and descriptive names for your route filters. The CompanynameLocationCalltype format usually provides enough detail and is short enough to enable you to quickly and easily identify a route filter. For example, CiscoDallasMetro identifies a route filter for toll free, inter-local access and transport area (LATA) calls from the Cisco office in Dallas.
Dial Plan Enter a dial plan; for example, North American Numbering Plan.
User Hold MOH Audio Source
Enter the audio source to use for music on hold (MOH) when a user initiates a hold action.
Line Network Hold MOH Audio Source
Enter the audio source to use for music on hold (MOH) when the network initiates a hold action.
Ring Setting (Phone Active) Enter the ring setting that is used when this phone has another active call on a different line. Choose one of the following options:
• Use system default
• Disable
• Flash only
• Ring once
• Ring
• Beep only
Ring Setting (Phone Idle) Enter the ring setting for the line appearance when an incoming call is received and no other active calls exist on that device. Choose one of the following options:
• Use system default
• Disable
• Flash only
• Ring once
• Ring
E.164 Enter the E.164 address that is registered with the gatekeeper.
Note Ensure the H.323 client is configured as a gatekeeper-controlled device.
Note You must enter a value in this field for a gatekeeper-controlled H.323 client. You can enter only numbers (0-9) and special characters # and * in this field.
AAR Destination Mask Enter the setting to use instead of the external phone number mask to determine the AAR Destination to be dialed.
Table 3-4 Phone Field Descriptions for the BAT Spreadsheet (continued)
Field Description
3-70Cisco Unified Communications Manager Bulk Administration Guide
OL-22754-01

Chapter 3 Phone Template Using BAT Phone Templates
Forward Unregistered Internal Destination
Enter the directory number to which an unregistered internal call is forwarded when the line is in use.
This setting applies to any internal, dialable phone number and to all devices that are using this directory number.
Forward Unregistered Internal CSS
Enter the calling search space to use when unregistered internal calls are forwarded to the specified destination.
This setting applies to all devices that are using this directory number.
Forward Unregistered External Destination
Enter the directory number to which an external call is forwarded when the line is in use.
This setting applies to any dialable external phone number, including an outside destination unless restricted, and to all devices that are using this directory number.
Forward Unregistered External CSS
Enter the calling search space to use when external calls are forwarded to the specified destination.
This setting applies to all devices that are using this directory number.
Audible Message Waiting Indicator Policy
Use this field to configure an audible message waiting indicator policy. Enter one of the following options:
• Off
• On-When you enter this option, you will receive a stutter dial tone when you take the handset off hook.
• Default-When you enter this option, the phone uses the default that was set at the system level.
Call Pickup Group Audio Alert Setting (Phone Idle)
This field determines the type of notification an incoming call sends to members of a call pickup group. If the called phone does not answer, the phones in the call pickup group that are idle will either hear a short ring (ring once) or hear nothing (disabled).
• Use System Default-The value of this field gets determined by the setting of the Cisco CallManager service parameter Call Pickup Group Audio Alert Setting of Idle Station.
• Disable-No alert is sent to members of the call pickup group.
• Ring Once-A short ring is sent to members of the call pickup group.
Call Pickup Group Audio Alert Setting (Phone Active)
This field determines the type of notification an incoming call sends to members of a call pickup group. If the called phone does not answer, the phones in the call pickup group that are busy will either hear a beep (beep beep) or hear nothing (disabled).
• Use System Default-The value of this field gets determined by the setting of the Cisco CallManager service parameter Call Pickup Group Audio Alert Setting of Busy Station.
• Disable-No alert is sent to member of the call pickup group.
• Beep Only-A beep beep is sent to members of the call pickup group.
Table 3-4 Phone Field Descriptions for the BAT Spreadsheet (continued)
Field Description
3-71Cisco Unified Communications Manager Bulk Administration Guide
OL-22754-01

Chapter 3 Phone Template Using BAT Phone Templates
Call Recording Option This field determines the recording option on the line appearance of an agent. By default, the recording option specifies Call Recording Disabled.
Enter one of the following options:
• Call Recording Disabled-The calls that the agent makes on this line appearance are not recorded.
• Automatic Call Recording Enabled-The calls that the agent makes on this line appearance are automatically recorded.
• Application Invoked Call Recording Enabled-The calls that the agent makes on this line appearance are recorded if an application invokes calling recording.
When the recording option is set to either Automatic Call Recording Enabled or Application Invoked Call Recording Enabled, the line appearance can be associated with a recording profile.
When automatic recording is enabled, the application's recording requests get rejected.
Recording Profile This field determines the recording profile on the line appearance of an agent.
Monitoring Calling Search Space
The monitoring calling search space of the supervisor line appearance must include the agent line or device partition to allow monitoring the agent.
Enter the monitoring calling search space on the supervisor line appearance window.
The default value specifies None.
Forward All CSS Activation Policy
Enter one of the following options:
• Use System Default
• With Configured CSS
ASCII Line Text Label This field provides the same information as the Line Text Label field, but you must limit input to ASCII characters. Devices that do not support Unicode (internationalized) characters display the content of the ASCII Line Text Label field.
Setting applies only to the current device unless you check the check box at right (Update Shared Device Settings) and click the Propagate Selected button. (The check box at right displays only if other devices share this directory number.)
Table 3-4 Phone Field Descriptions for the BAT Spreadsheet (continued)
Field Description
3-72Cisco Unified Communications Manager Bulk Administration Guide
OL-22754-01

Chapter 3 Phone Template Using BAT Phone Templates
Party Entrance Tone Enter one of the following Party Entrance Tone options:
• Default—Use the value that you configured in the Party Entrance Tone service parameter.
• On—A tone plays on the phone when a basic call changes to a multi-party call; that is, a barge call, cBarge call, ad hoc conference, meet-me conference, or a joined call. In addition, a different tone plays when a party leaves the multi-party call. If the controlling device, that is, the originator of the multi-party call has a built-in bridge, the tone gets played to all parties if you choose On for the controlling device. When the controlling device, for example, the conference controller, is no longer present on the call or if the controlling device cannot play the tone, Cisco Unified Communications Manager does not play the tone even if you choose On.
• Off—A tone does not play on the phone when a basic call changes to a multi-party call.
Park Monitor Forward No Retrieve Ext Destination
When the parkee is an external party, then the call will be forwarded to the specified destination in the parker’s Park Monitoring Forward No Retrieve Destination External parameter. If the Forward No Retrieve Destination External field value is empty, the parkee will be redirected to the parker’s line.
Park Monitor Forward No Retrieve Int Destination
When the parkee is an internal party, then the call will be forwarded to the specified destination in the parker’s Park Monitoring Forward No Retrieve Destination Internal parameter. If the Forward No Retrieve Destination Internal is empty, the parkee will be redirected to the parker’s line.
Park Monitor Forward No Retrieve Int Voice Mail
This setting uses the settings in the Voice Mail Profile Configuration window.
With this setting, Cisco Unified Communications Manager ignores the settings in the Destination box and Calling Search Space.
Park Monitor Forward No Retrieve Ext Voice Mail
This setting uses the settings in the Voice Mail Profile Configuration window.
With this setting, Cisco Unified Communications Manager ignores the settings in the Destination box and Calling Search Space.
Park Monitor Forward No Retrieve Ext CSS
Choose the calling search space to apply to the directory number.
Park Monitor Forward No Retrieve Int CSS
Choose the calling search space to apply to the directory number.
Table 3-4 Phone Field Descriptions for the BAT Spreadsheet (continued)
Field Description
3-73Cisco Unified Communications Manager Bulk Administration Guide
OL-22754-01

Chapter 3 Phone Template Using BAT Phone Templates
Park Monitor Reversion Timer
This parameter determines the number of seconds that Cisco Unified Communications Manager waits before prompting the user to retrieve a call that the user parked. This timer starts when the user presses the Park softkey on the phone, and a reminder is issued when the timer expires.
Default: 60 seconds
If you configure a non-zero value, this value overrides the value of this parameter set in the Service Parameters window. However, if you configure a value of 0 here, then the value in the Service Parameters window will be used.
Log Missed Calls This field allows you to turn this feature on or off. Enter ‘T’ to enable Cisco Unified Communications Manager to log missed calls in the call history for that directory number on the phone. Enter ‘F’ to disable this feature.
Intercom Fields (Optional)
Intercom Directory Number Enter a dialable phone number. Values can include numeric characters and route pattern wildcards and special characters except for (.) and (@).
The directory number that you enter can appear in more than one partition.
At the beginning of the directory number, enter \+ if you want to use the international escape character +. For this field, \+ does not represent a wildcard; instead, entering \+ represents a dialed digit.
Intercom Route Partition Enter the partition to which the directory number belongs. Make sure that the directory number that you enter in the Intercom Directory Number field is unique within the partition that you choose.
Note The directory number can appear in more than one partition.
Description Enter a description of the directory number and route partition.
Alerting Name Enter a name that you want to display on the phone of the caller.
This setting, which supports the Identification Services for the QSIG protocol, applies to shared and nonshared directory numbers.
Alerting Name ASCII This field provides the same information as the Alerting Name field, but you must limit input to ASCII characters. Devices that do not support Unicode (internationalized) characters display the content of the Alerting Name ASCII field.
Intercom Directory Number Settings
Calling Search Space Enter the appropriate calling search space. A calling search space comprises a collection of partitions that are searched for numbers that are called from this directory number. The value that you choose applies to all devices that are using this directory number.
Intercom Presence Group Enter a Presence Group for this directory number. The selected group specifies the devices, end users, and application users that can monitor this directory number.
Table 3-4 Phone Field Descriptions for the BAT Spreadsheet (continued)
Field Description
3-74Cisco Unified Communications Manager Bulk Administration Guide
OL-22754-01

Chapter 3 Phone Template Using BAT Phone Templates
Intercom Display Leave this field blank to have the system display the extension.
Use a maximum of 30 alphanumeric characters. Typically, use the user name or the directory number (if using the directory number, the person receiving the call may not see the proper identity of the caller).
Intercom ASCII Display This field provides the same information as the Display (Internal Caller ID) field, but you must limit input to ASCII characters. Devices that do not support Unicode (internationalized) characters display the content of the ASCII Display (Internal Caller ID) field.
Intercom Line Text Label Use this field only if you do not want the intercom directory number to show on the line appearance. Enter text that identifies this directory number for a line/phone combination.
Intercom Line Text Label ASCII
This field provides the same information as the Intercom Line Text Label field, but you must limit input to ASCII characters. Devices that do not support Unicode (internationalized) characters display the content of the Intercom Line Text Label ASCII field.
Intercom Speed Dial Enter the number that you want the system to dial when the user presses the speed-dial button. You can enter digits 0 through 9, *, #, and +, which is the international escape character.
Intercom External Phone Number Mask
Enter the phone number (or mask) that is used to send Caller ID information when a call is placed from this line.
You can enter a maximum of 24 number, the international escape character +, and “X” characters. The Xs represent the directory number and must appear at the end of the pattern. For example, if you specify a mask of 972813XXXX, an external call from extension 1234 displays a caller ID number of 9728131234.
Intercom Caller Name Enter ‘T’ to enable the caller name to display upon call forward. Enter ‘F’ to disable it.
Intercom Caller Number Enter ‘T’ to enable the caller number to display upon call forward. Enter ‘F’ to disable it.
Intercom Call Recording Option
Enter one of the following options:
• Call Recording Disabled—The calls that the agent makes on this line appearance are not recorded.
• Automatic Call Recording Enabled—The calls that the agent makes on this line appearance are automatically recorded.
• Application Invoked Call Recording Enabled—The calls that the agent makes on this line appearance are recorded if an application invokes calling recording.
Intercom Recording Profile Enter the recording profile on the line appearance of an agent.
Table 3-4 Phone Field Descriptions for the BAT Spreadsheet (continued)
Field Description
3-75Cisco Unified Communications Manager Bulk Administration Guide
OL-22754-01

Chapter 3 Phone Template Related Topics
Note To complete the procedure, go to the “Using the BAT Spreadsheet to Create a CSV Data File for Phones” section on page 3-51.
Related Topics• Adding Phones, page 3-1
• Using BAT Phone Templates, page 3-2
• Creating a New BAT Phone Template, page 3-4
• Adding or Updating Lines in a BAT Template, page 3-4
• Adding or Updating IP Services in a BAT Template, page 3-5
• Adding or Updating Speed Dials in a BAT Template, page 3-6
• Modifying BAT Phone Templates, page 3-9
• Copying a BAT Phone Template, page 3-9
• Deleting Templates, page 3-10
• Field Descriptions for a BAT Phone Template, page 3-11
• Using the BAT Spreadsheet to Create a CSV Data File for Phones, page 3-51
• Field Descriptions for Phones in the BAT Spreadsheet, page 3-54
Intercom Monitoring Calling Search Space
The monitoring calling search space of the supervisor line appearance must include the agent line or device partition to allow monitoring the agent.
Enter an existing calling search space.
The default value specifies None.
Auto Answer Enter one of the following options to activate the auto answer feature for this directory number:
• Auto Answer Off <Default>
• Auto Answer with Headset
• Auto Answer with Speakerphone
Note Do not configure auto answer for devices that have shared lines.
Table 3-4 Phone Field Descriptions for the BAT Spreadsheet (continued)
Field Description
3-76Cisco Unified Communications Manager Bulk Administration Guide
OL-22754-01