photo insights july '16
DESCRIPTION
An eMagazine devoted to inspirational photography and Photoshop techniques written and published by Jim Zuckerman.TRANSCRIPT
1
P H O T O I N S I G H T SJim Zuckerman’s
July 2016
Photographing starsSalvaging a flower in harsh lightCatchlightsPhoto toursStudent showcase
2 2
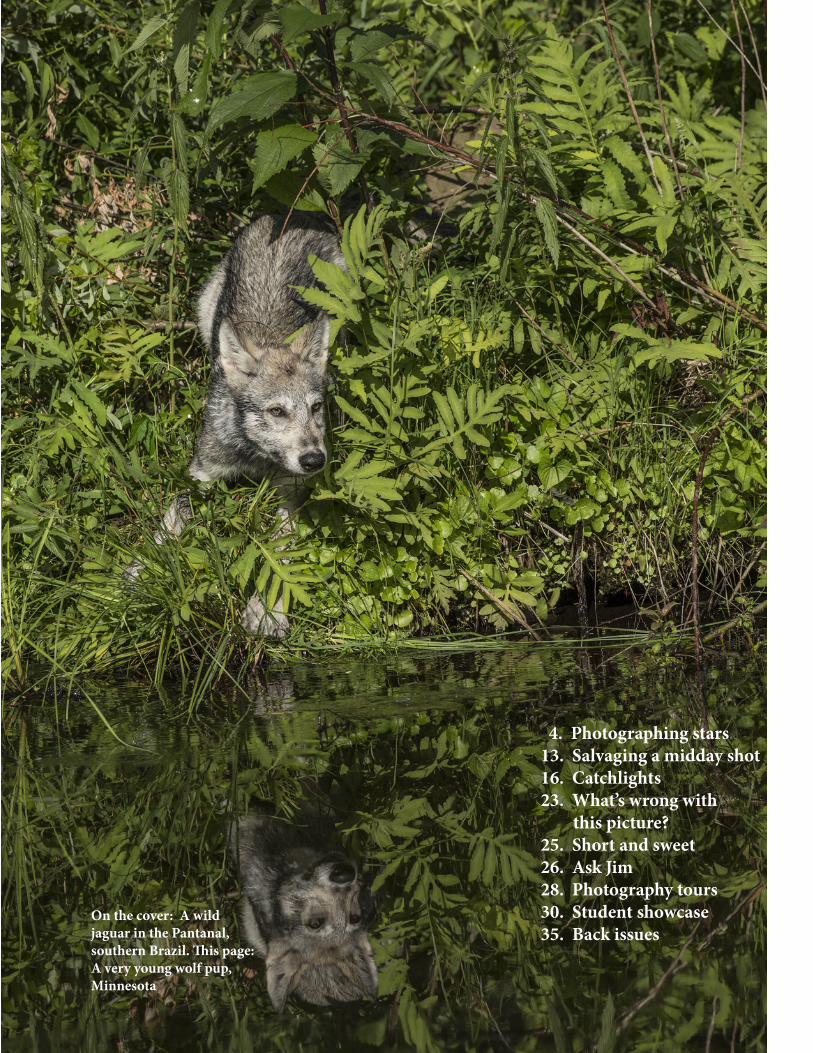
4. Photographing stars 13. Salvaging a midday shot 16. Catchlights 23. What’s wrong with this picture? 25. Short and sweet 26. Ask Jim 28. Photography tours 30. Student showcase 35. Back issues
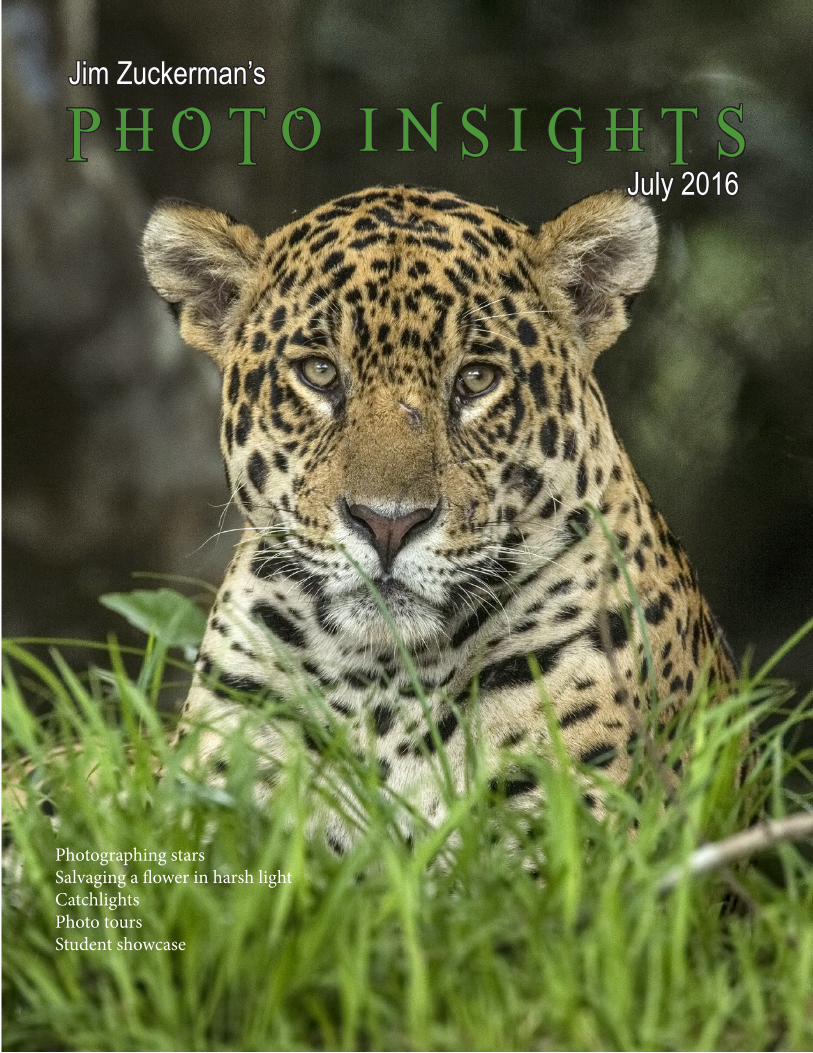
On the cover: A wild jaguar in the Pantanal, southern Brazil. This page: A very young wolf pup, Minnesota
3
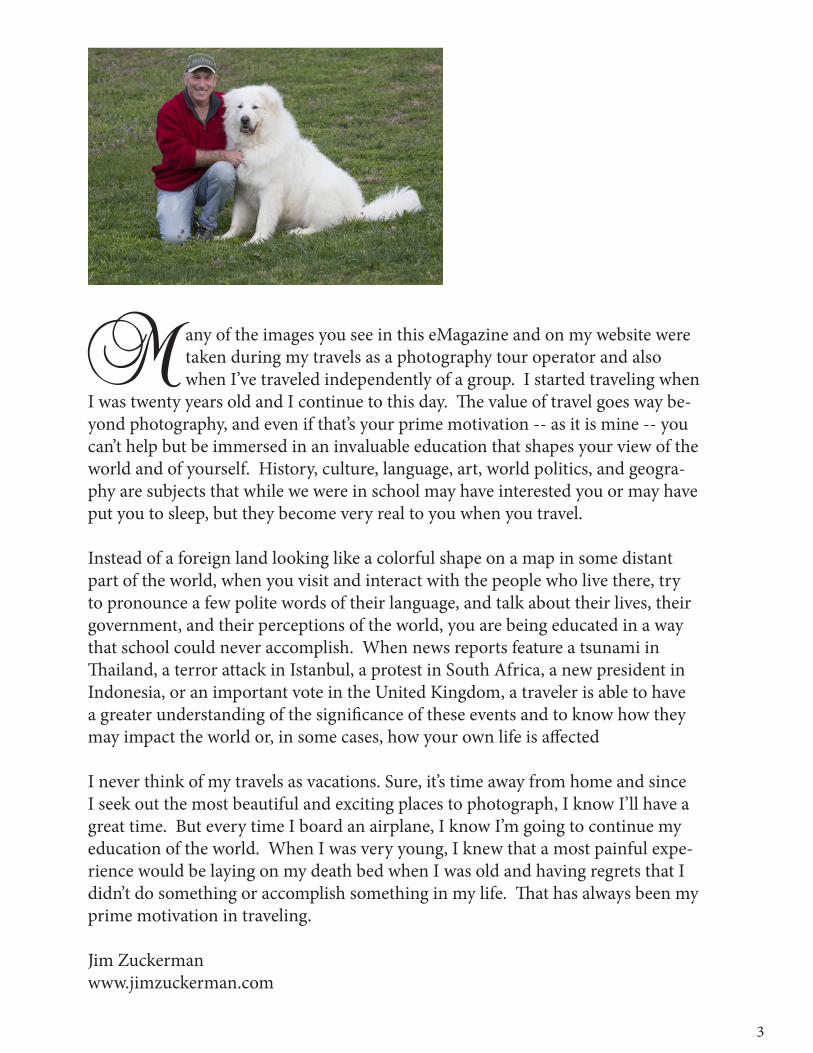
Many of the images you see in this eMagazine and on my website were taken during my travels as a photography tour operator and also when I’ve traveled independently of a group. I started traveling when
I was twenty years old and I continue to this day. The value of travel goes way be-yond photography, and even if that’s your prime motivation -- as it is mine -- you can’t help but be immersed in an invaluable education that shapes your view of the world and of yourself. History, culture, language, art, world politics, and geogra-phy are subjects that while we were in school may have interested you or may have put you to sleep, but they become very real to you when you travel.
Instead of a foreign land looking like a colorful shape on a map in some distant part of the world, when you visit and interact with the people who live there, try to pronounce a few polite words of their language, and talk about their lives, their government, and their perceptions of the world, you are being educated in a way that school could never accomplish. When news reports feature a tsunami in Thailand, a terror attack in Istanbul, a protest in South Africa, a new president in Indonesia, or an important vote in the United Kingdom, a traveler is able to have a greater understanding of the significance of these events and to know how they may impact the world or, in some cases, how your own life is affected
I never think of my travels as vacations. Sure, it’s time away from home and since I seek out the most beautiful and exciting places to photograph, I know I’ll have a great time. But every time I board an airplane, I know I’m going to continue my education of the world. When I was very young, I knew that a most painful expe-rience would be laying on my death bed when I was old and having regrets that I didn’t do something or accomplish something in my life. That has always been my prime motivation in traveling.
Jim Zuckermanwww.jimzuckerman.com
4
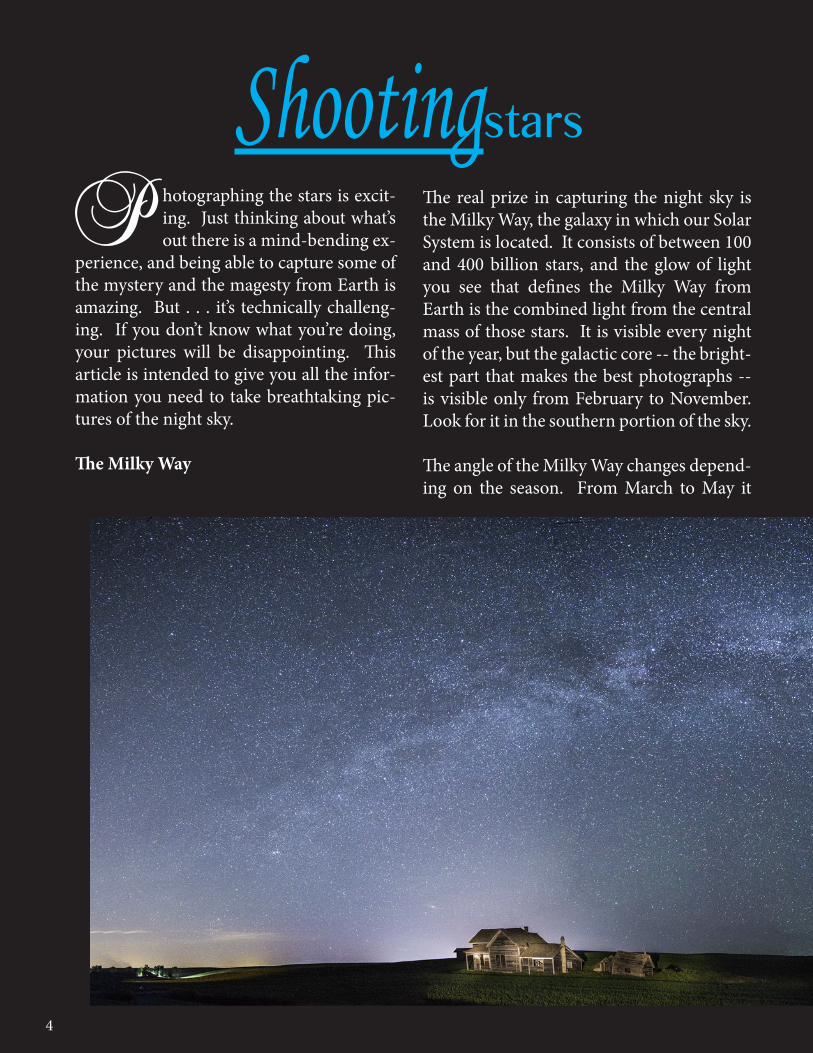
Shootingstars
Photographing the stars is excit-ing. Just thinking about what’s out there is a mind-bending ex-
perience, and being able to capture some of the mystery and the magesty from Earth is amazing. But . . . it’s technically challeng-ing. If you don’t know what you’re doing, your pictures will be disappointing. This article is intended to give you all the infor-mation you need to take breathtaking pic-tures of the night sky.
The Milky Way
The real prize in capturing the night sky is the Milky Way, the galaxy in which our Solar System is located. It consists of between 100 and 400 billion stars, and the glow of light you see that defines the Milky Way from Earth is the combined light from the central mass of those stars. It is visible every night of the year, but the galactic core -- the bright-est part that makes the best photographs -- is visible only from February to November. Look for it in the southern portion of the sky.
The angle of the Milky Way changes depend-ing on the season. From March to May it

5
forms a low horizontal arc above the horizon. From to May to July, the Milky Way appears diagonal in the night sky, and from July to No-vember, it is vertical.
Light pollution
In order to successfully photograph the night sky, and in particular to capture the Milky Way, you must be far away from a large city because the city lights drown out the stars. This is called light pollution. In addition, you must consult a calendar to find out when there is a new moon. This is the time when we can’t see the moon at all because the shadow of the Earth makes the lunar surface dark. This hap-pens once every 28 days, and most calendars indicate when this occurs. For example, for July, 2016 the new moon occurs on July 4, and next month it occurs on August 2. You don’t
want to photograph stars when the moon is visible because, again, it’s light pollution.
Weather
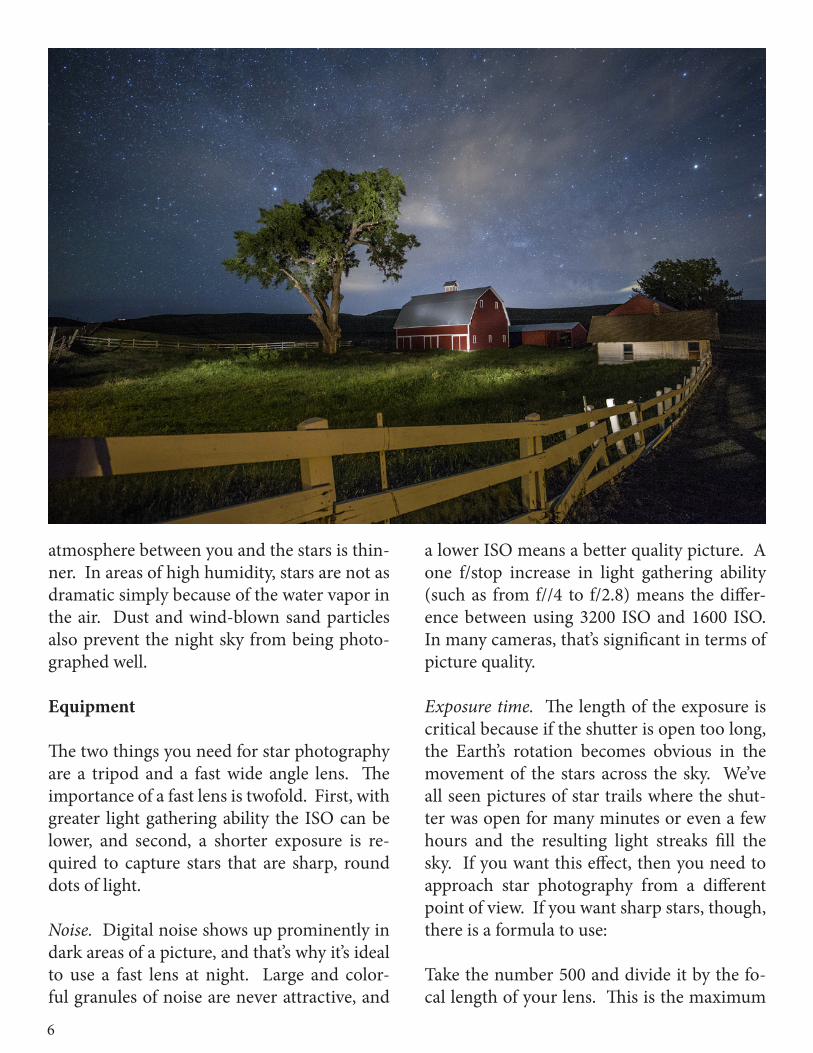
Obviously the weather plays an important fac-tor in star photography. The sky must be clear of clouds. Sometimes there are thin clouds that drift into your composition at night, and if they become too dense you can’t shoot. The picture of the red barn in the Palouse area of Washington State at the top of the next page shows thin, whispy clouds that still allowed me to shoot. They do, however, obscure some of the stars.
Atmospheric haze and smog essentially pre-vent good star photography. The best view of the stars is in the desert where the air is very dry and on the top of a mountain because the
The entire Milky Way fills the night sky, and you can’t encom-pass the entirety of it with a wide angle lens. This is a 7-shot panorama done with a 24mm focal length, each panel being vertical. I stictched it together in Photo-shop.
6
atmosphere between you and the stars is thin-ner. In areas of high humidity, stars are not as dramatic simply because of the water vapor in the air. Dust and wind-blown sand particles also prevent the night sky from being photo-graphed well.
Equipment
The two things you need for star photography are a tripod and a fast wide angle lens. The importance of a fast lens is twofold. First, with greater light gathering ability the ISO can be lower, and second, a shorter exposure is re-quired to capture stars that are sharp, round dots of light.
Noise. Digital noise shows up prominently in dark areas of a picture, and that’s why it’s ideal to use a fast lens at night. Large and color-ful granules of noise are never attractive, and
a lower ISO means a better quality picture. A one f/stop increase in light gathering ability (such as from f//4 to f/2.8) means the differ-ence between using 3200 ISO and 1600 ISO. In many cameras, that’s significant in terms of picture quality.
Exposure time. The length of the exposure is critical because if the shutter is open too long, the Earth’s rotation becomes obvious in the movement of the stars across the sky. We’ve all seen pictures of star trails where the shut-ter was open for many minutes or even a few hours and the resulting light streaks fill the sky. If you want this effect, then you need to approach star photography from a different point of view. If you want sharp stars, though, there is a formula to use:
Take the number 500 and divide it by the fo-cal length of your lens. This is the maximum
7
number of seconds the shutter can be open. For example, if you are using a 16mm lens, 500 divided by 16 is 31 seconds. For practical pur-poses, simply use 30 seconds.
Ideally, I like to use an exposure below the maximum to insure that the stars aren’t oblong. The beginning of a star streak is a point of light that appears ever so slightly oblong. So, if the maximum exposure time is, say, 31 seconds, I prefer to use 20 seconds. All of the exposures for the star pictures in this article were taken with 20 seconds with the exception of the im-age below, which I shot using 25 seconds. This turned out to be too long because you can see the oblong shape of the stars when this image is magnified to 100%. I took this picture with a 15mm focal length.
White balance
Even though we can tweak the white balance
in post-processing, I like to see the best colors on the LCD of the camera. Therefore, I suggest you use daylight white balance for star photos.
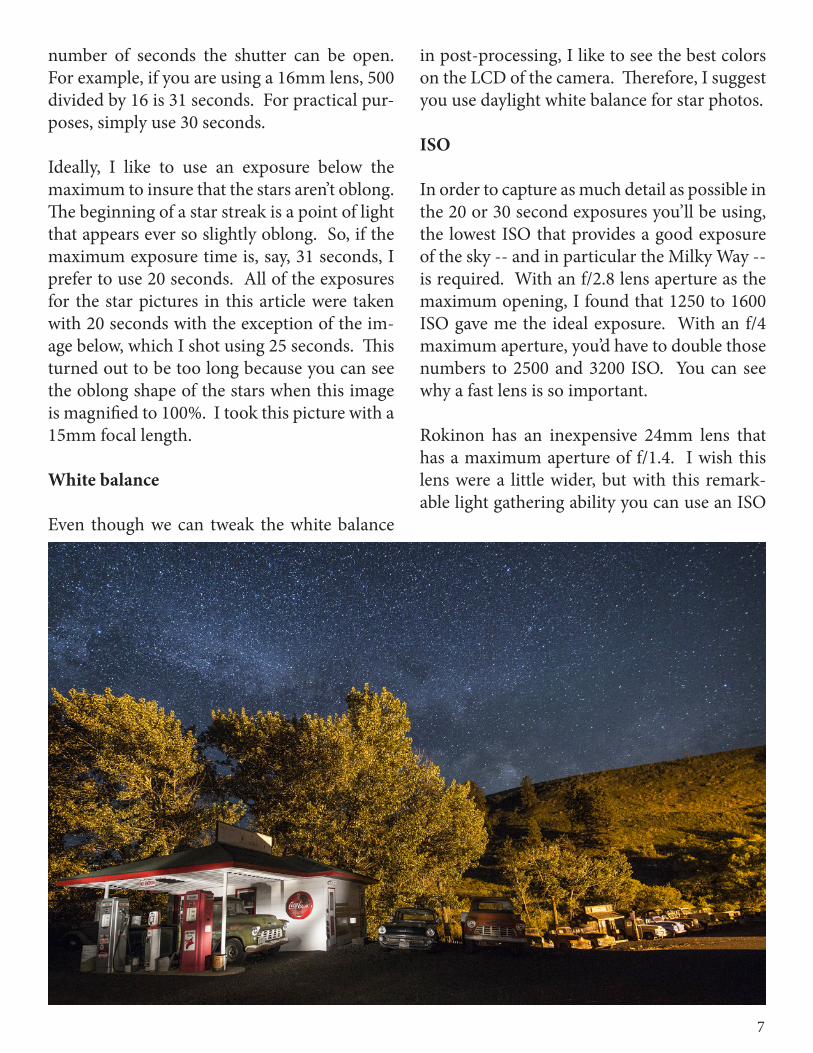
ISO
In order to capture as much detail as possible in the 20 or 30 second exposures you’ll be using, the lowest ISO that provides a good exposure of the sky -- and in particular the Milky Way -- is required. With an f/2.8 lens aperture as the maximum opening, I found that 1250 to 1600 ISO gave me the ideal exposure. With an f/4 maximum aperture, you’d have to double those numbers to 2500 and 3200 ISO. You can see why a fast lens is so important.
Rokinon has an inexpensive 24mm lens that has a maximum aperture of f/1.4. I wish this lens were a little wider, but with this remark-able light gathering ability you can use an ISO
8
range of 320 to 400 for the night sky.
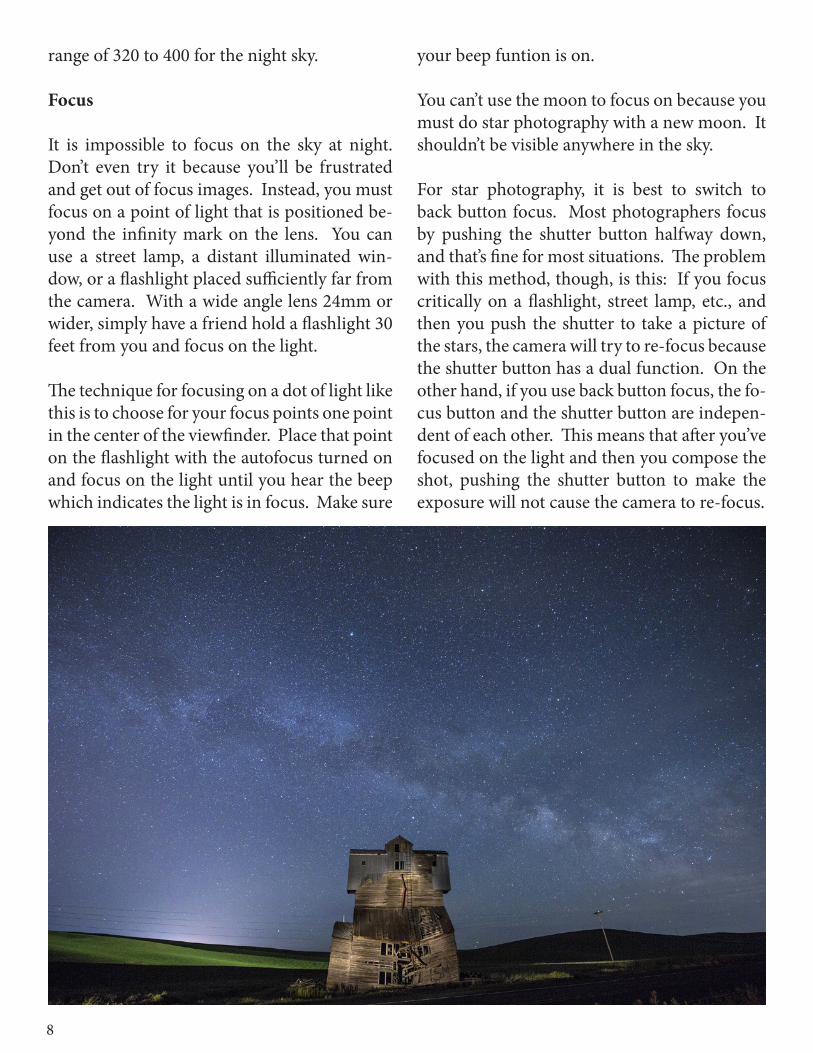
Focus
It is impossible to focus on the sky at night. Don’t even try it because you’ll be frustrated and get out of focus images. Instead, you must focus on a point of light that is positioned be-yond the infinity mark on the lens. You can use a street lamp, a distant illuminated win-dow, or a flashlight placed sufficiently far from the camera. With a wide angle lens 24mm or wider, simply have a friend hold a flashlight 30 feet from you and focus on the light.
The technique for focusing on a dot of light like this is to choose for your focus points one point in the center of the viewfinder. Place that point on the flashlight with the autofocus turned on and focus on the light until you hear the beep which indicates the light is in focus. Make sure
your beep funtion is on.
You can’t use the moon to focus on because you must do star photography with a new moon. It shouldn’t be visible anywhere in the sky.
For star photography, it is best to switch to back button focus. Most photographers focus by pushing the shutter button halfway down, and that’s fine for most situations. The problem with this method, though, is this: If you focus critically on a flashlight, street lamp, etc., and then you push the shutter to take a picture of the stars, the camera will try to re-focus because the shutter button has a dual function. On the other hand, if you use back button focus, the fo-cus button and the shutter button are indepen-dent of each other. This means that after you’ve focused on the light and then you compose the shot, pushing the shutter button to make the exposure will not cause the camera to re-focus.
9
Painting with light
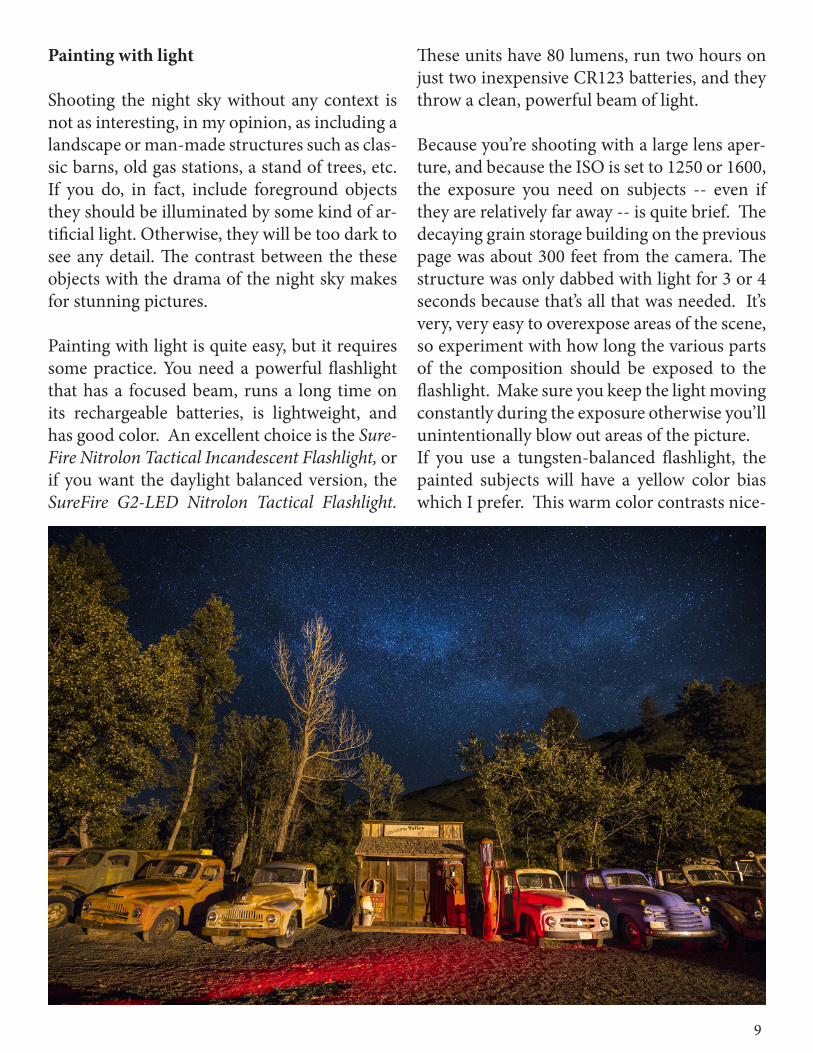
Shooting the night sky without any context is not as interesting, in my opinion, as including a landscape or man-made structures such as clas-sic barns, old gas stations, a stand of trees, etc. If you do, in fact, include foreground objects they should be illuminated by some kind of ar-tificial light. Otherwise, they will be too dark to see any detail. The contrast between the these objects with the drama of the night sky makes for stunning pictures.
Painting with light is quite easy, but it requires some practice. You need a powerful flashlight that has a focused beam, runs a long time on its rechargeable batteries, is lightweight, and has good color. An excellent choice is the Sure-Fire Nitrolon Tactical Incandescent Flashlight, or if you want the daylight balanced version, the SureFire G2-LED Nitrolon Tactical Flashlight.
These units have 80 lumens, run two hours on just two inexpensive CR123 batteries, and they throw a clean, powerful beam of light.
Because you’re shooting with a large lens aper-ture, and because the ISO is set to 1250 or 1600, the exposure you need on subjects -- even if they are relatively far away -- is quite brief. The decaying grain storage building on the previous page was about 300 feet from the camera. The structure was only dabbed with light for 3 or 4 seconds because that’s all that was needed. It’s very, very easy to overexpose areas of the scene, so experiment with how long the various parts of the composition should be exposed to the flashlight. Make sure you keep the light moving constantly during the exposure otherwise you’ll unintentionally blow out areas of the picture.If you use a tungsten-balanced flashlight, the painted subjects will have a yellow color bias which I prefer. This warm color contrasts nice-
10
w
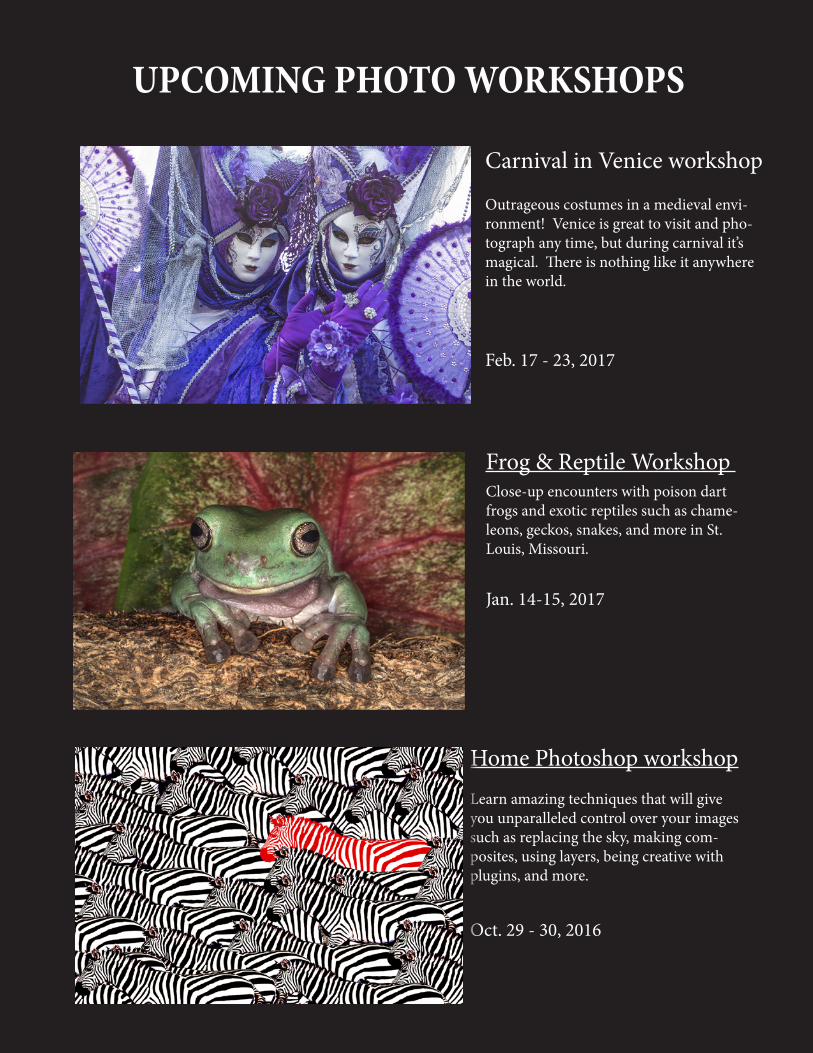
UPCOMING PHOTO WORKSHOPS
Carnival in Venice workshop
Outrageous costumes in a medieval envi-ronment! Venice is great to visit and pho-tograph any time, but during carnival it’s magical. There is nothing like it anywhere in the world.
Feb. 17 - 23, 2017
Frog & Reptile Workshop Close-up encounters with poison dart frogs and exotic reptiles such as chame-leons, geckos, snakes, and more in St. Louis, Missouri.
Jan. 14-15, 2017
Home Photoshop workshopLearn amazing techniques that will give you unparalleled control over your images such as replacing the sky, making com-posites, using layers, being creative with plugins, and more.
Oct. 29 - 30, 2016
11
ly with the cool, bluish tones of the night sky. In the case of the old cars and stand of trees on page 9, I didn’t have to use a flashlight at all be-cause there was a single sodium-type lamp on top of a telephone pole illuminating the scene. The light was coming from an angle which worked out beautifully because of the dramatic side lighting.
Initially, painting with light and photograph-ing stars requires a lot of trial and error. Start off with the settings I recommend in this ar-ticle -- 20 second exposure, the largest aperture available to you,1250 to 1600 ISO, and 3 to 4 seconds of light painting. Study the images on the LCD monitor to determine if: (1) they are sharp, (2) the stars are well exposed, and (3) the light painted objects are exposed well with-out any unattractive hot spots.
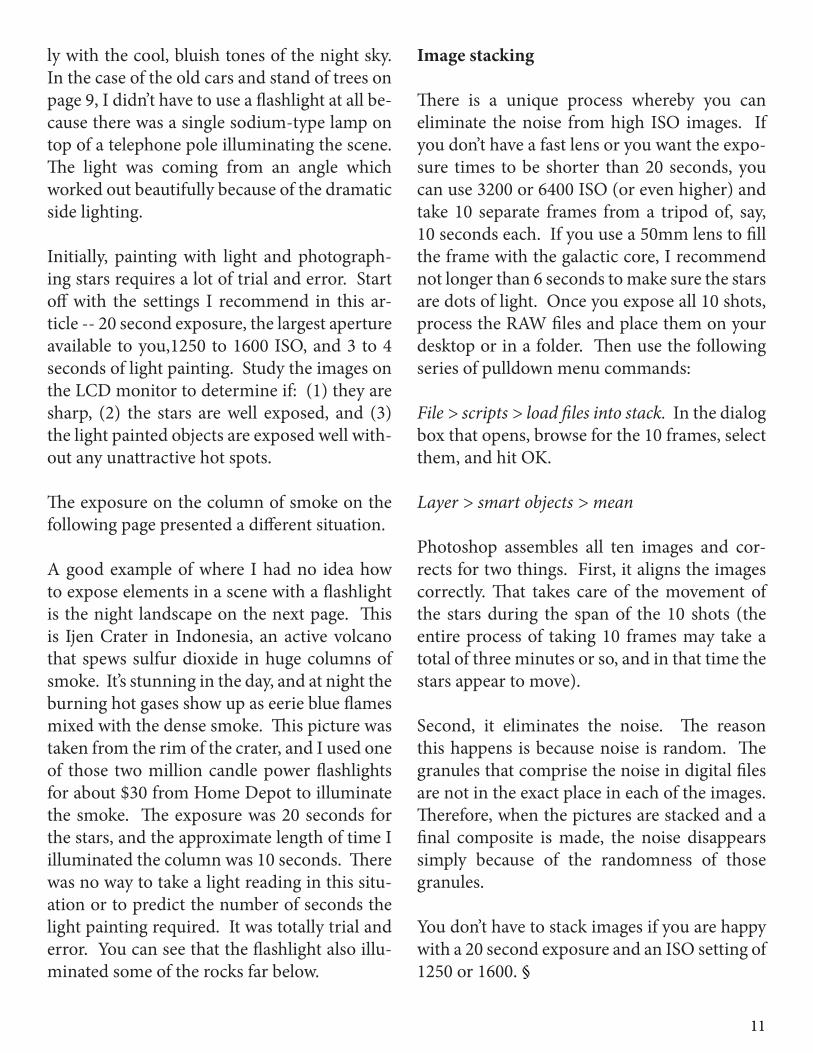
The exposure on the column of smoke on the following page presented a different situation.
A good example of where I had no idea how to expose elements in a scene with a flashlight is the night landscape on the next page. This is Ijen Crater in Indonesia, an active volcano that spews sulfur dioxide in huge columns of smoke. It’s stunning in the day, and at night the burning hot gases show up as eerie blue flames mixed with the dense smoke. This picture was taken from the rim of the crater, and I used one of those two million candle power flashlights for about $30 from Home Depot to illuminate the smoke. The exposure was 20 seconds for the stars, and the approximate length of time I illuminated the column was 10 seconds. There was no way to take a light reading in this situ-ation or to predict the number of seconds the light painting required. It was totally trial and error. You can see that the flashlight also illu-minated some of the rocks far below.
Image stacking
There is a unique process whereby you can eliminate the noise from high ISO images. If you don’t have a fast lens or you want the expo-sure times to be shorter than 20 seconds, you can use 3200 or 6400 ISO (or even higher) and take 10 separate frames from a tripod of, say, 10 seconds each. If you use a 50mm lens to fill the frame with the galactic core, I recommend not longer than 6 seconds to make sure the stars are dots of light. Once you expose all 10 shots, process the RAW files and place them on your desktop or in a folder. Then use the following series of pulldown menu commands:
File > scripts > load files into stack. In the dialog box that opens, browse for the 10 frames, select them, and hit OK.
Layer > smart objects > mean
Photoshop assembles all ten images and cor-rects for two things. First, it aligns the images correctly. That takes care of the movement of the stars during the span of the 10 shots (the entire process of taking 10 frames may take a total of three minutes or so, and in that time the stars appear to move).
Second, it eliminates the noise. The reason this happens is because noise is random. The granules that comprise the noise in digital files are not in the exact place in each of the images. Therefore, when the pictures are stacked and a final composite is made, the noise disappears simply because of the randomness of those granules.
You don’t have to stack images if you are happy with a 20 second exposure and an ISO setting of 1250 or 1600. §
1212
13
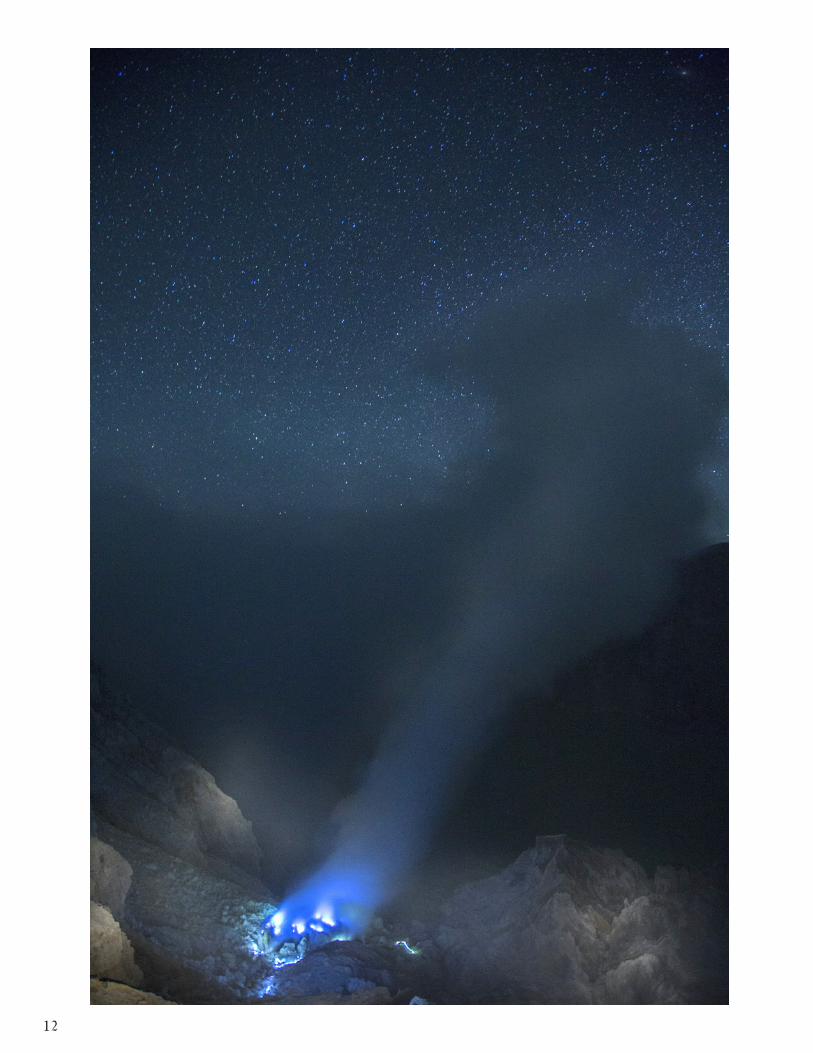
T he ever present problem that pho-tographers face is contrast. It’s a particularly vexing issue because
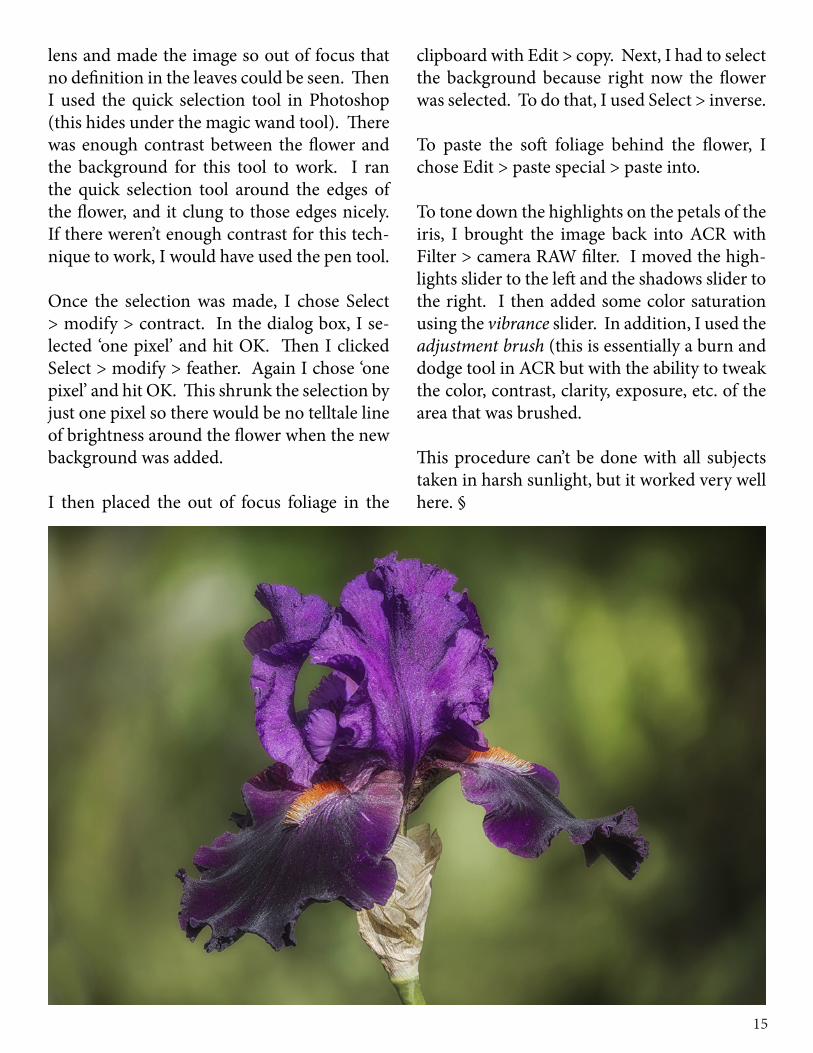
our eyes see one thing but a camera captures something different. For example, a bright sun in a clear blue sky looks beautiful on a brightly colored flower, but the way the digital sensor records the image makes the shadows go very dark or even black and the highlights are too light and possibly blown out.
The picture of the iris, below, is an example. Both the flower and the background are es-sentially middle toned subjects, but the garish light on this beautiful subject ruins the pic-ture. This shows that flowers should always
be photographed in diffused light, but the point I’m making is that even a non-contrasty subject is degraded by an overhead direct sun. To my eyes, of course, the flower didn’t look this bad at all . . . and that’s the challenge for beginning and even intermediate photographers. The camera isn’t capturing what we see.
I thought I would challenge myself to see if I could repair the damage from the contrasty lighting, and the image on page 14 is the result.
To do this, I first had to replace the background with something complementary and indicative of the ideal type of light. Therefore, I photo-graphed a tree in the shade with a telephoto
Salvaging images with HARSH CONTRAST
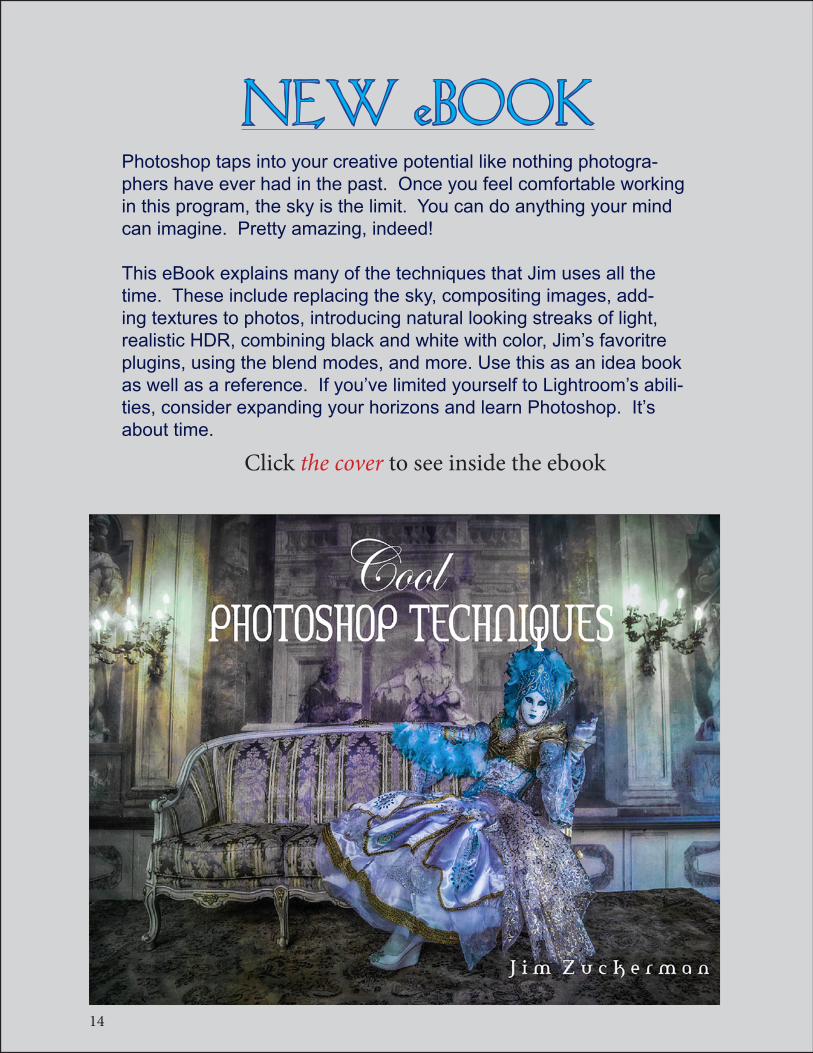
NEW eBOOKPhotoshop taps into your creative potential like nothing photogra-phers have ever had in the past. Once you feel comfortable working in this program, the sky is the limit. You can do anything your mind can imagine. Pretty amazing, indeed!
This eBook explains many of the techniques that Jim uses all the time. These include replacing the sky, compositing images, add-ing textures to photos, introducing natural looking streaks of light, realistic HDR, combining black and white with color, Jim’s favoritre plugins, using the blend modes, and more. Use this as an idea book as well as a reference. If you’ve limited yourself to Lightroom’s abili-ties, consider expanding your horizons and learn Photoshop. It’s about time.
Click the cover to see inside the ebook
14
15
lens and made the image so out of focus that no definition in the leaves could be seen. Then I used the quick selection tool in Photoshop (this hides under the magic wand tool). There was enough contrast between the flower and the background for this tool to work. I ran the quick selection tool around the edges of the flower, and it clung to those edges nicely. If there weren’t enough contrast for this tech-nique to work, I would have used the pen tool.
Once the selection was made, I chose Select > modify > contract. In the dialog box, I se-lected ‘one pixel’ and hit OK. Then I clicked Select > modify > feather. Again I chose ‘one pixel’ and hit OK. This shrunk the selection by just one pixel so there would be no telltale line of brightness around the flower when the new background was added.
I then placed the out of focus foliage in the
clipboard with Edit > copy. Next, I had to select the background because right now the flower was selected. To do that, I used Select > inverse.
To paste the soft foliage behind the flower, I chose Edit > paste special > paste into.
To tone down the highlights on the petals of the iris, I brought the image back into ACR with Filter > camera RAW filter. I moved the high-lights slider to the left and the shadows slider to the right. I then added some color saturation using the vibrance slider. In addition, I used the adjustment brush (this is essentially a burn and dodge tool in ACR but with the ability to tweak the color, contrast, clarity, exposure, etc. of the area that was brushed.
This procedure can’t be done with all subjects taken in harsh sunlight, but it worked very well here. §
16
C A T C H L I G H T S
16
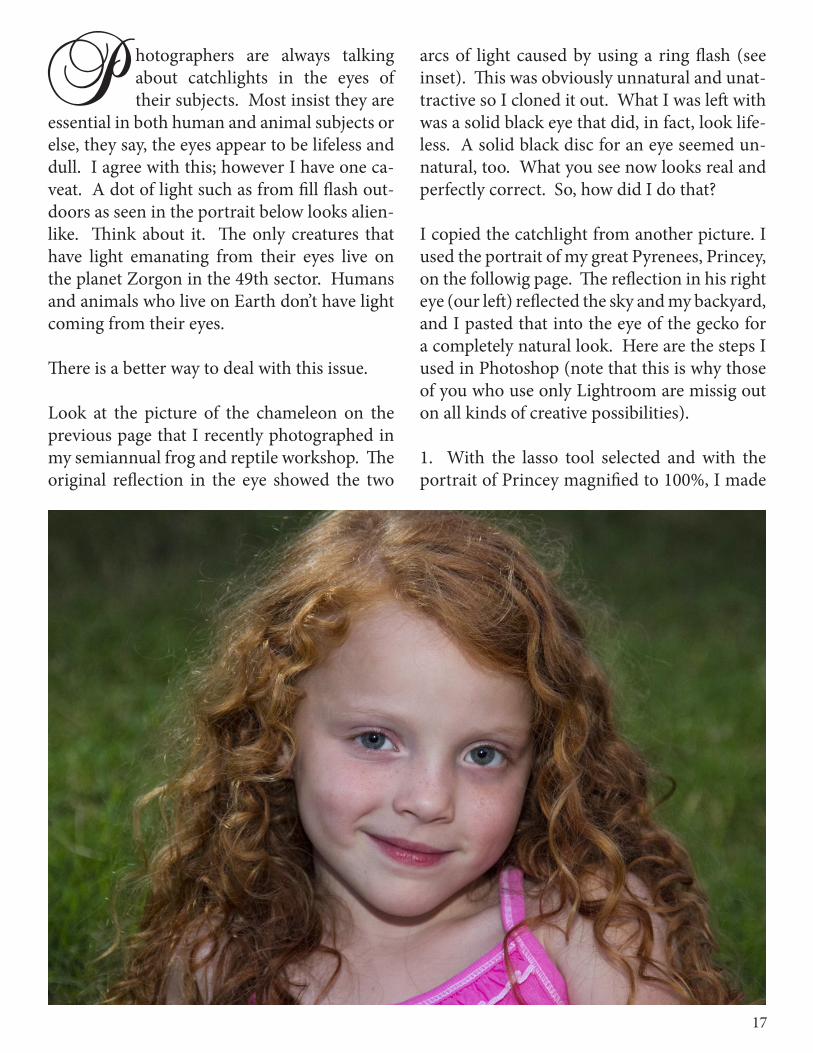
Photographers are always talking about catchlights in the eyes of their subjects. Most insist they are
essential in both human and animal subjects or else, they say, the eyes appear to be lifeless and dull. I agree with this; however I have one ca-veat. A dot of light such as from fill flash out-doors as seen in the portrait below looks alien-like. Think about it. The only creatures that have light emanating from their eyes live on the planet Zorgon in the 49th sector. Humans and animals who live on Earth don’t have light coming from their eyes.
There is a better way to deal with this issue.
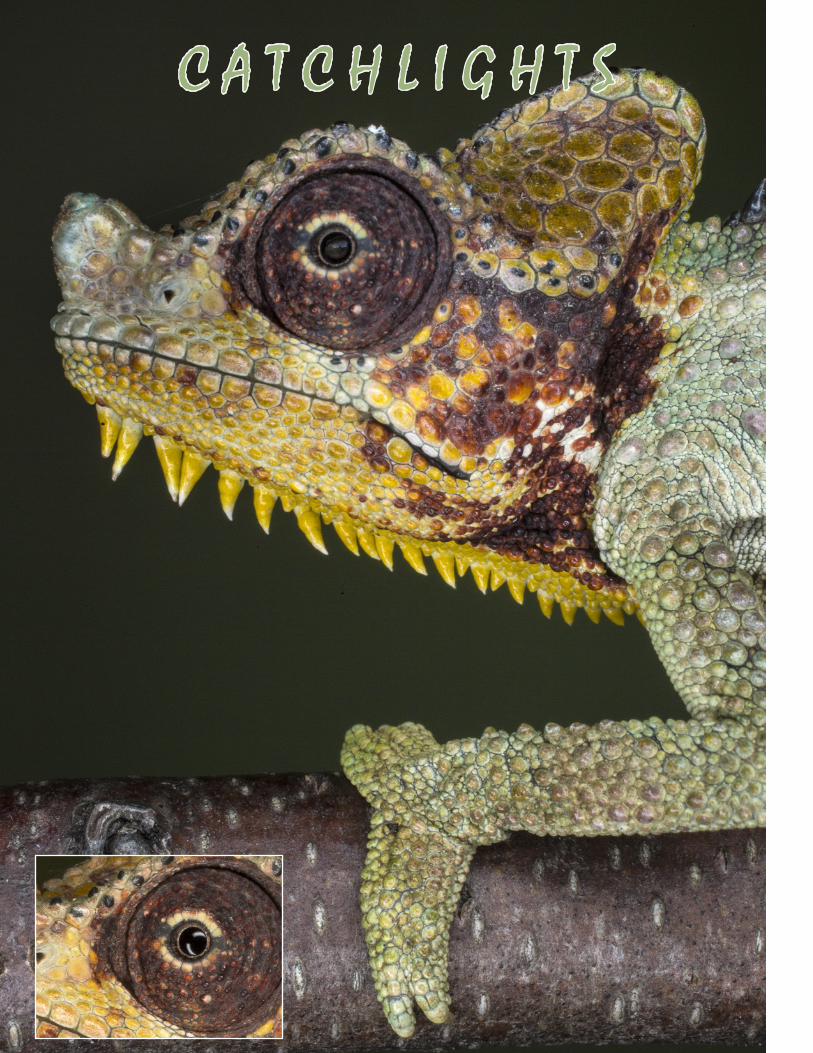
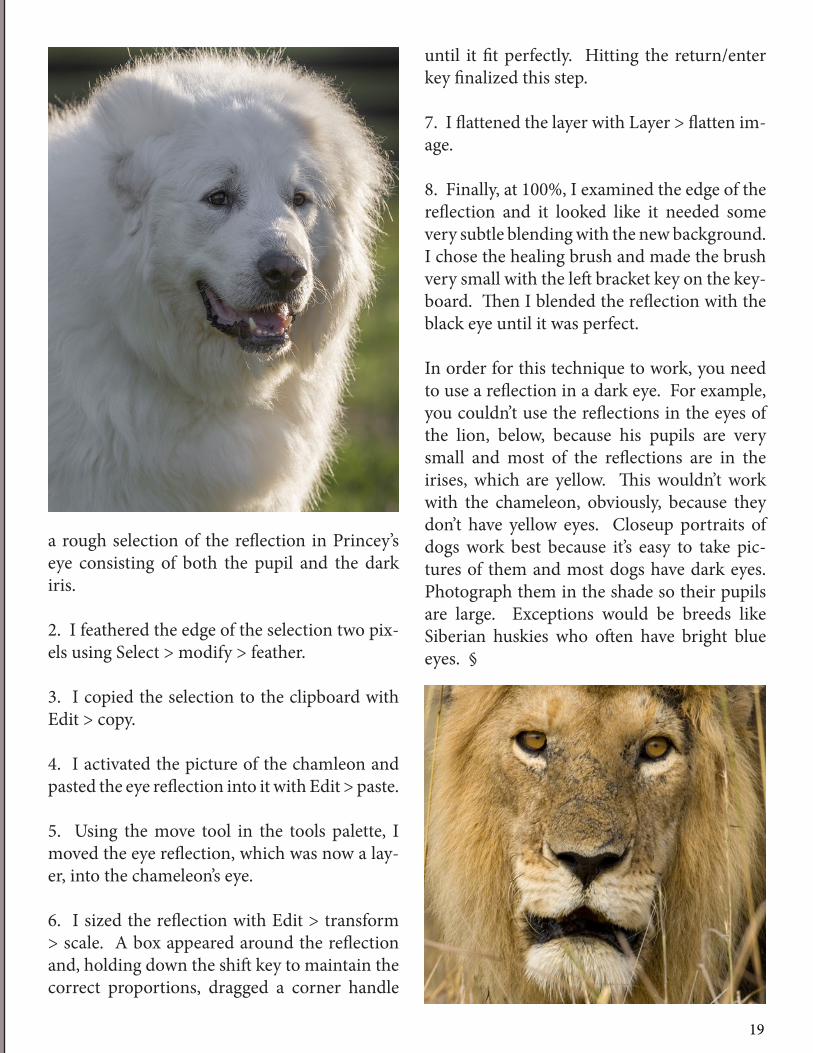
Look at the picture of the chameleon on the previous page that I recently photographed in my semiannual frog and reptile workshop. The original reflection in the eye showed the two
arcs of light caused by using a ring flash (see inset). This was obviously unnatural and unat-tractive so I cloned it out. What I was left with was a solid black eye that did, in fact, look life-less. A solid black disc for an eye seemed un-natural, too. What you see now looks real and perfectly correct. So, how did I do that?
I copied the catchlight from another picture. I used the portrait of my great Pyrenees, Princey, on the followig page. The reflection in his right eye (our left) reflected the sky and my backyard, and I pasted that into the eye of the gecko for a completely natural look. Here are the steps I used in Photoshop (note that this is why those of you who use only Lightroom are missig out on all kinds of creative possibilities).
1. With the lasso tool selected and with the portrait of Princey magnified to 100%, I made
17
18
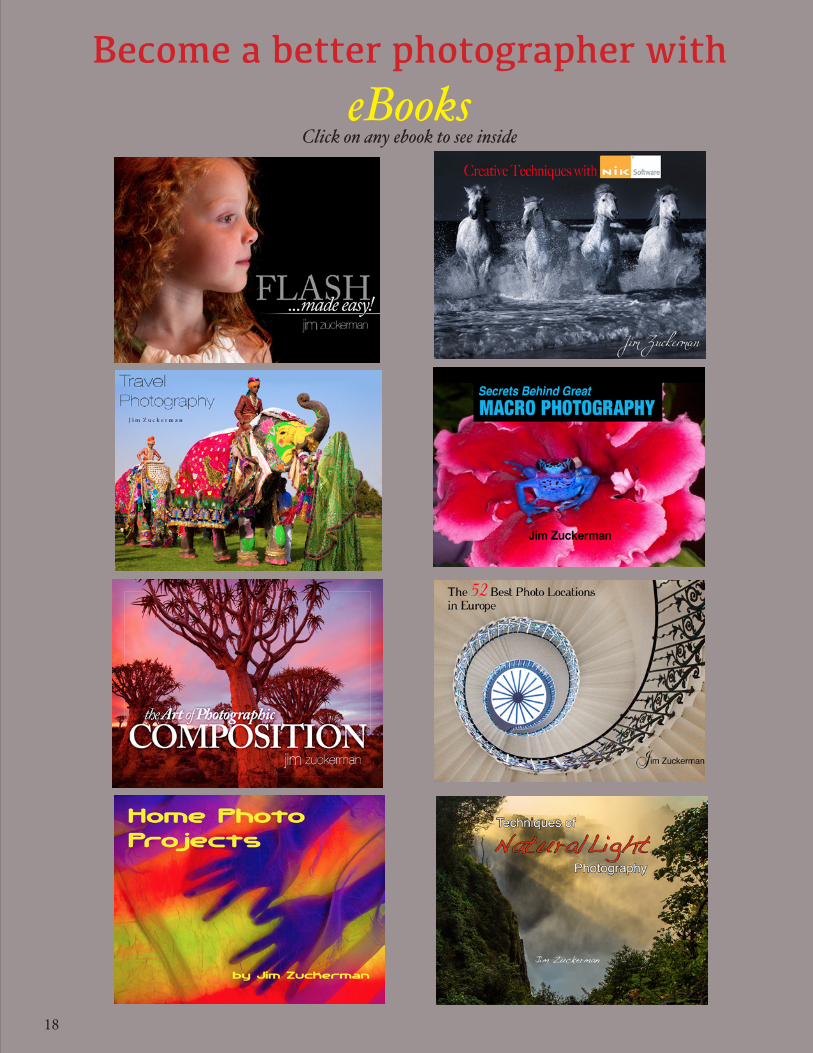
Become a better photographer witheBooks
Click on any ebook to see inside
18
19
a rough selection of the reflection in Princey’s eye consisting of both the pupil and the dark iris.
2. I feathered the edge of the selection two pix-els using Select > modify > feather.
3. I copied the selection to the clipboard with Edit > copy.
4. I activated the picture of the chamleon and pasted the eye reflection into it with Edit > paste.
5. Using the move tool in the tools palette, I moved the eye reflection, which was now a lay-er, into the chameleon’s eye.
6. I sized the reflection with Edit > transform > scale. A box appeared around the reflection and, holding down the shift key to maintain the correct proportions, dragged a corner handle
until it fit perfectly. Hitting the return/enter key finalized this step.
7. I flattened the layer with Layer > flatten im-age.
8. Finally, at 100%, I examined the edge of the reflection and it looked like it needed some very subtle blending with the new background. I chose the healing brush and made the brush very small with the left bracket key on the key-board. Then I blended the reflection with the black eye until it was perfect.
In order for this technique to work, you need to use a reflection in a dark eye. For example, you couldn’t use the reflections in the eyes of the lion, below, because his pupils are very small and most of the reflections are in the irises, which are yellow. This wouldn’t work with the chameleon, obviously, because they don’t have yellow eyes. Closeup portraits of dogs work best because it’s easy to take pic-tures of them and most dogs have dark eyes. Photograph them in the shade so their pupils are large. Exceptions would be breeds like Siberian huskies who often have bright blue eyes. §
20
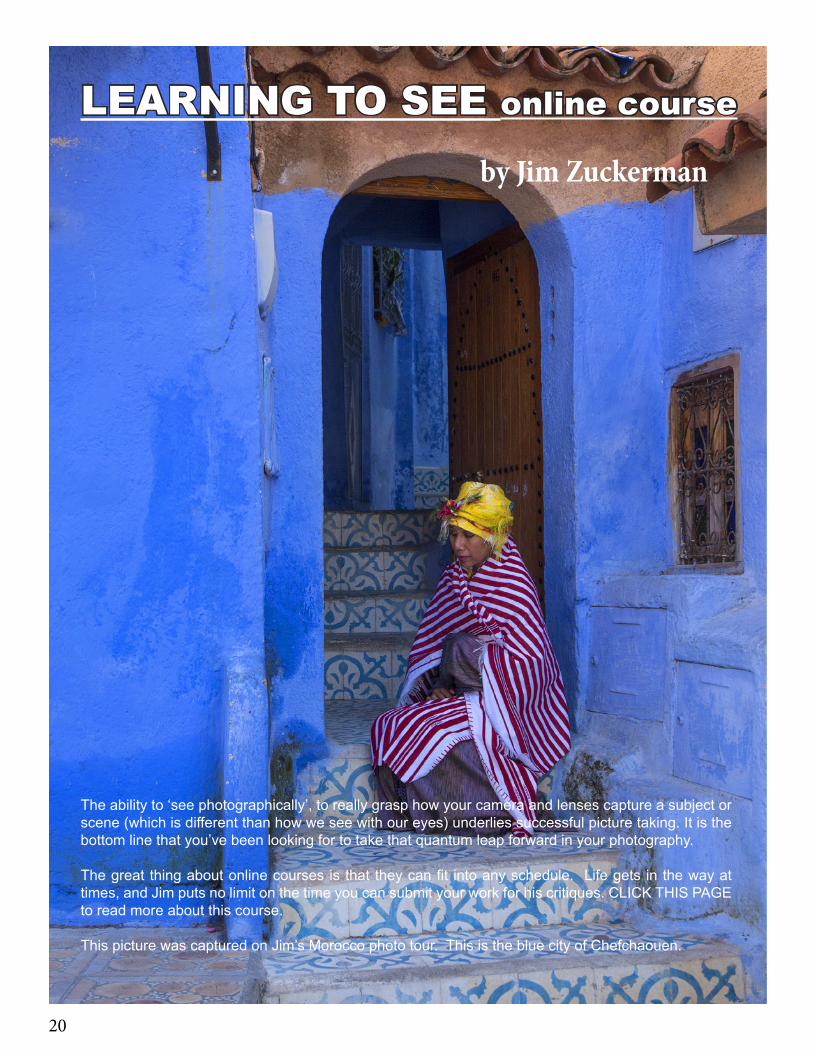
LEARNING TO SEE online course by Jim Zuckerman
The ability to ‘see photographically’, to really grasp how your camera and lenses capture a subject or scene (which is different than how we see with our eyes) underlies successful picture taking. It is the bottom line that you’ve been looking for to take that quantum leap forward in your photography.
The great thing about online courses is that they can fit into any schedule. Life gets in the way at times, and Jim puts no limit on the time you can submit your work for his critiques. CLICK THIS PAGE to read more about this course.
This picture was captured on Jim’s Morocco photo tour. This is the blue city of Chefchaouen.
21
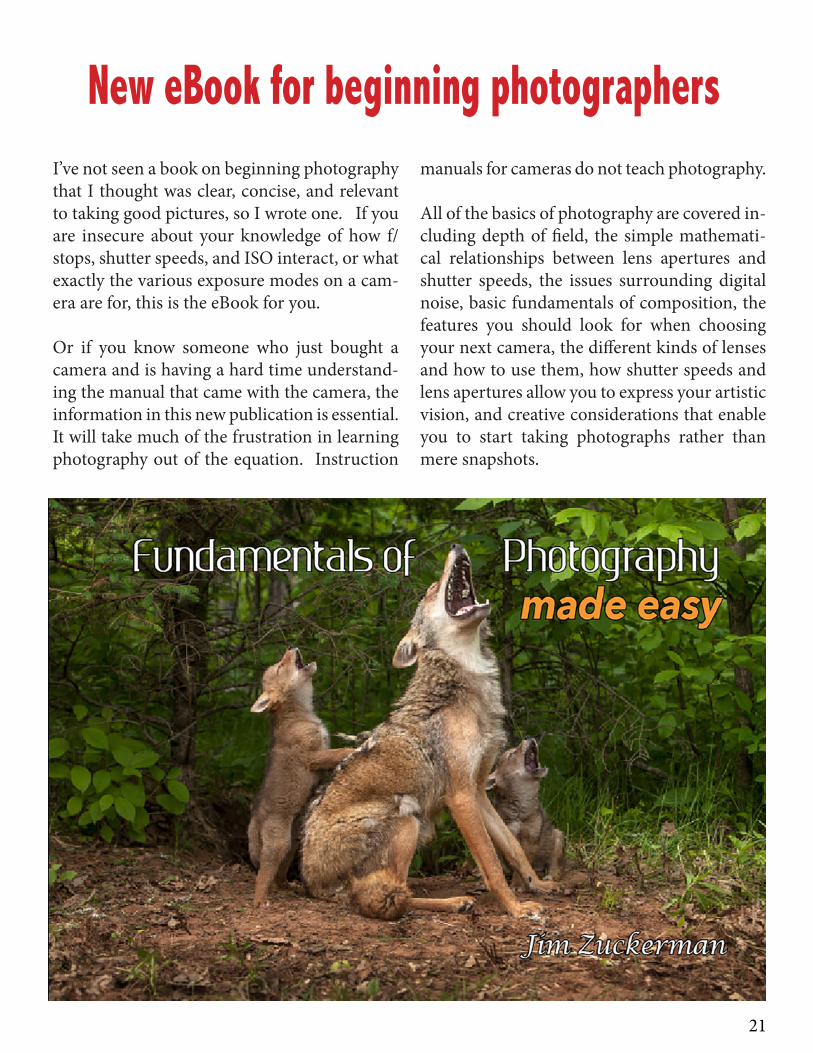
New eBook for beginning photographersI’ve not seen a book on beginning photography that I thought was clear, concise, and relevant to taking good pictures, so I wrote one. If you are insecure about your knowledge of how f/stops, shutter speeds, and ISO interact, or what exactly the various exposure modes on a cam-era are for, this is the eBook for you.
Or if you know someone who just bought a camera and is having a hard time understand-ing the manual that came with the camera, the information in this new publication is essential. It will take much of the frustration in learning photography out of the equation. Instruction
manuals for cameras do not teach photography.
All of the basics of photography are covered in-cluding depth of field, the simple mathemati-cal relationships between lens apertures and shutter speeds, the issues surrounding digital noise, basic fundamentals of composition, the features you should look for when choosing your next camera, the different kinds of lenses and how to use them, how shutter speeds and lens apertures allow you to express your artistic vision, and creative considerations that enable you to start taking photographs rather than mere snapshots.
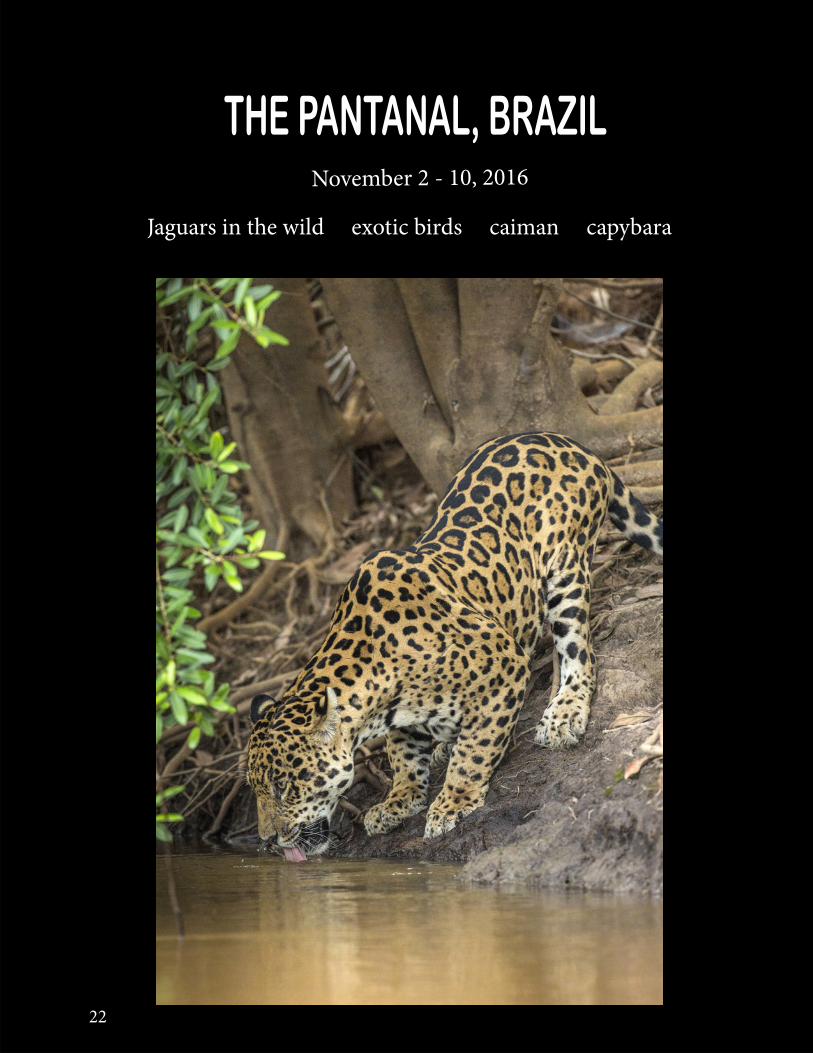
THE PANTANAL, BRAZIL November 2 - 10, 2016
22
Jaguars in the wild exotic birds caiman capybara
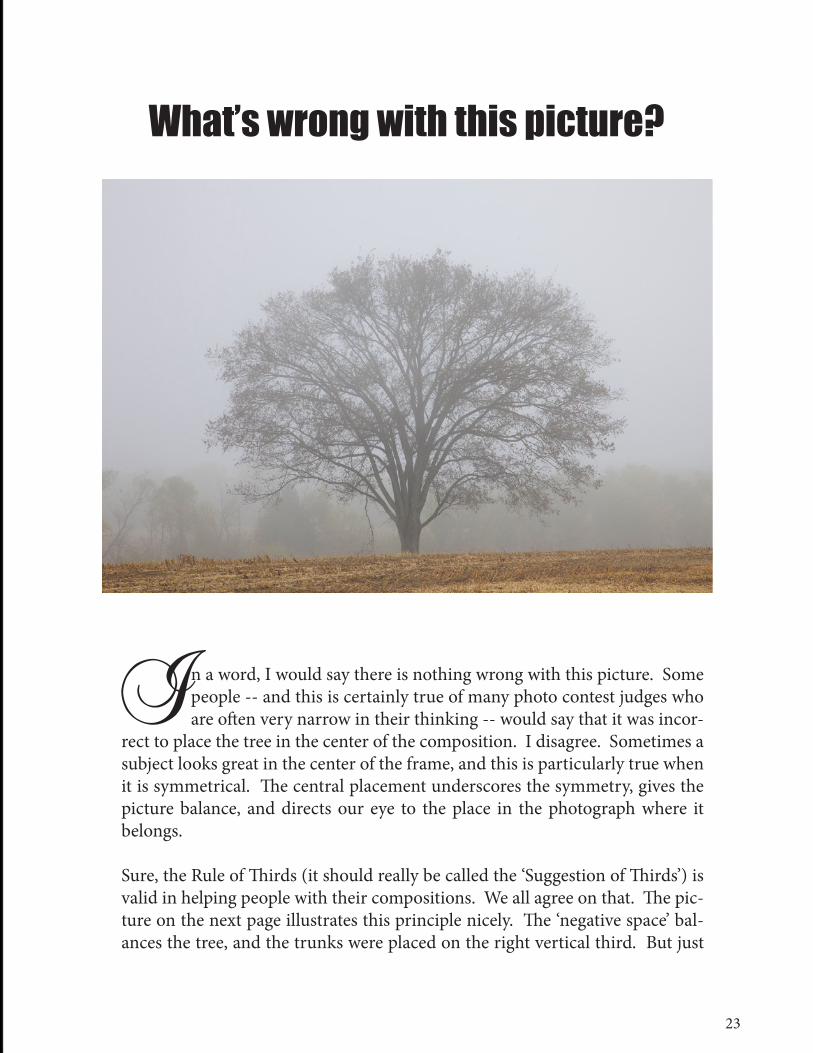
What’s wrong with this picture?
In a word, I would say there is nothing wrong with this picture. Some people -- and this is certainly true of many photo contest judges who are often very narrow in their thinking -- would say that it was incor-
rect to place the tree in the center of the composition. I disagree. Sometimes a subject looks great in the center of the frame, and this is particularly true when it is symmetrical. The central placement underscores the symmetry, gives the picture balance, and directs our eye to the place in the photograph where it belongs.
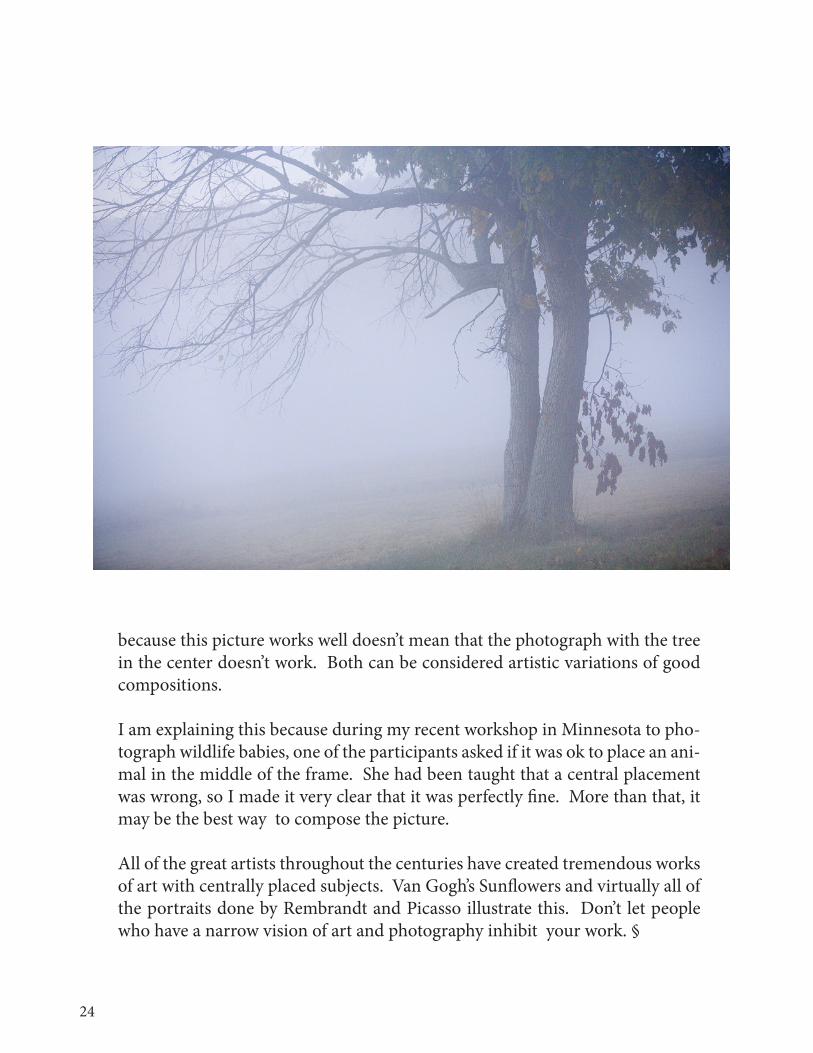
Sure, the Rule of Thirds (it should really be called the ‘Suggestion of Thirds’) is valid in helping people with their compositions. We all agree on that. The pic-ture on the next page illustrates this principle nicely. The ‘negative space’ bal-ances the tree, and the trunks were placed on the right vertical third. But just
23
24
because this picture works well doesn’t mean that the photograph with the tree in the center doesn’t work. Both can be considered artistic variations of good compositions.
I am explaining this because during my recent workshop in Minnesota to pho-tograph wildlife babies, one of the participants asked if it was ok to place an ani-mal in the middle of the frame. She had been taught that a central placement was wrong, so I made it very clear that it was perfectly fine. More than that, it may be the best way to compose the picture.
All of the great artists throughout the centuries have created tremendous works of art with centrally placed subjects. Van Gogh’s Sunflowers and virtually all of the portraits done by Rembrandt and Picasso illustrate this. Don’t let people who have a narrow vision of art and photography inhibit your work. §
SHORT AND SWEET
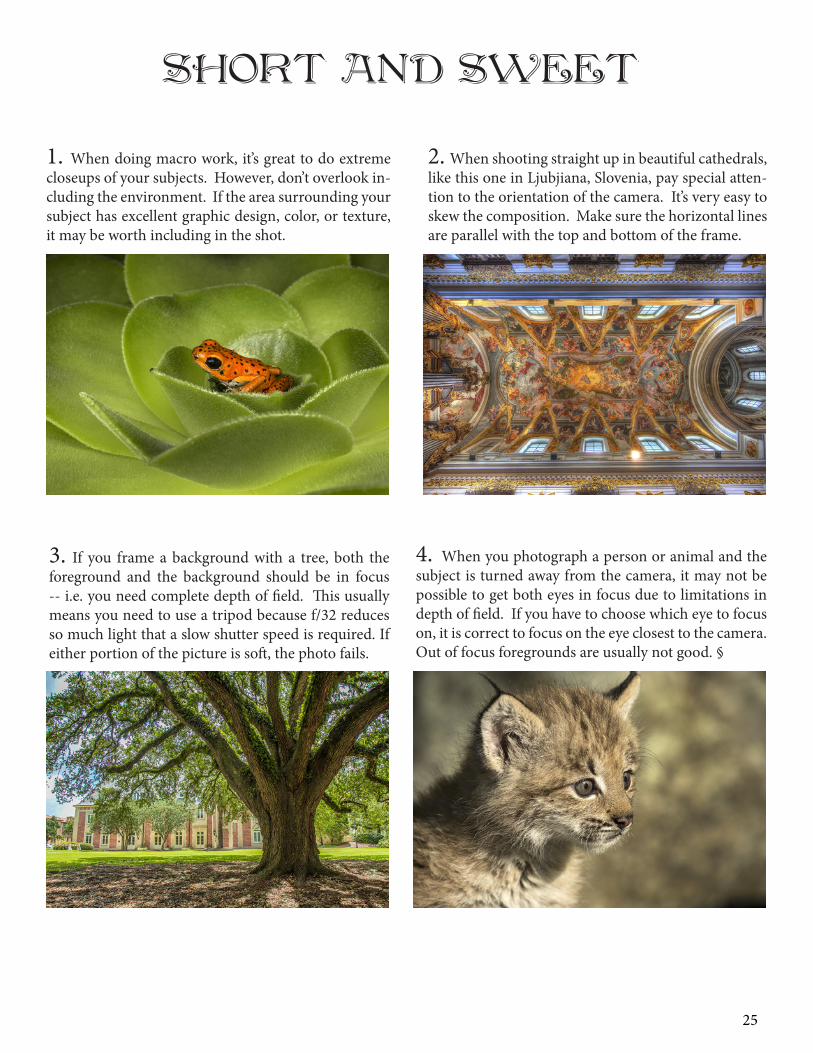
1. When doing macro work, it’s great to do extreme closeups of your subjects. However, don’t overlook in-cluding the environment. If the area surrounding your subject has excellent graphic design, color, or texture, it may be worth including in the shot.
3. If you frame a background with a tree, both the foreground and the background should be in focus -- i.e. you need complete depth of field. This usually means you need to use a tripod because f/32 reduces so much light that a slow shutter speed is required. If either portion of the picture is soft, the photo fails.
2. When shooting straight up in beautiful cathedrals, like this one in Ljubjiana, Slovenia, pay special atten-tion to the orientation of the camera. It’s very easy to skew the composition. Make sure the horizontal lines are parallel with the top and bottom of the frame.
4. When you photograph a person or animal and the subject is turned away from the camera, it may not be possible to get both eyes in focus due to limitations in depth of field. If you have to choose which eye to focus on, it is correct to focus on the eye closest to the camera. Out of focus foregrounds are usually not good. §
25
26
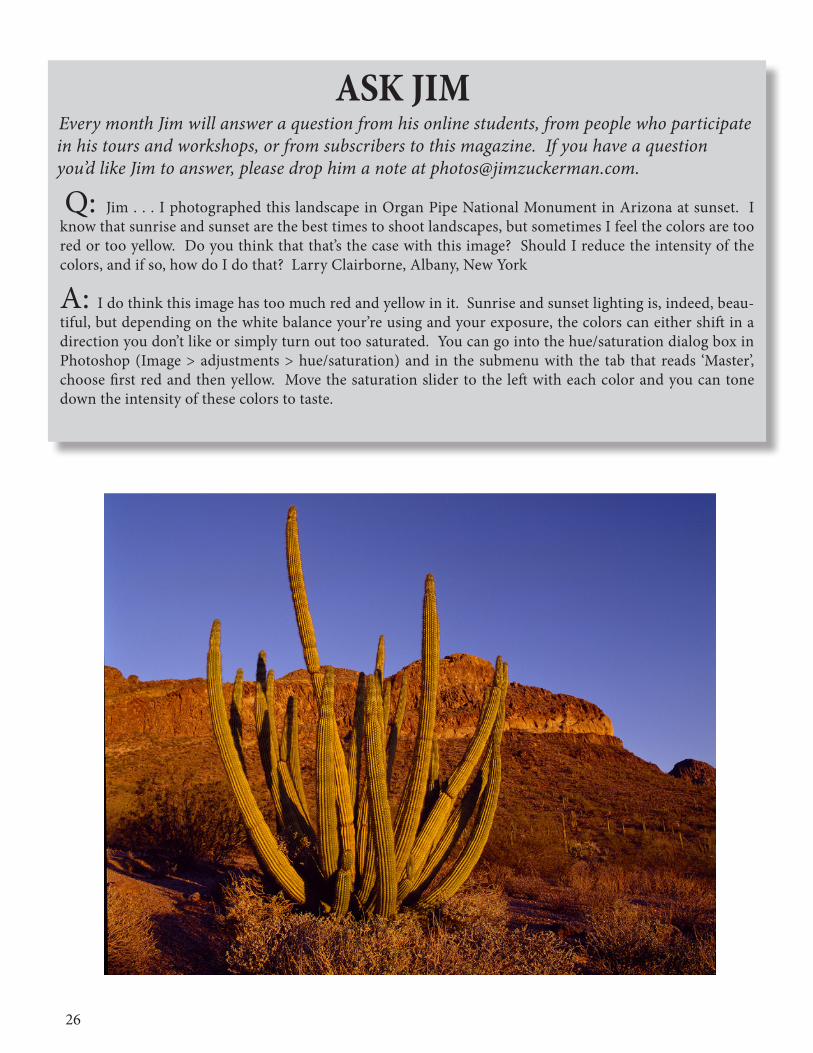
ASK JIM Every month Jim will answer a question from his online students, from people who participate in his tours and workshops, or from subscribers to this magazine. If you have a question you’d like Jim to answer, please drop him a note at [email protected].
Q: Jim . . . I photographed this landscape in Organ Pipe National Monument in Arizona at sunset. I know that sunrise and sunset are the best times to shoot landscapes, but sometimes I feel the colors are too red or too yellow. Do you think that that’s the case with this image? Should I reduce the intensity of the colors, and if so, how do I do that? Larry Clairborne, Albany, New York
A: I do think this image has too much red and yellow in it. Sunrise and sunset lighting is, indeed, beau-tiful, but depending on the white balance your’re using and your exposure, the colors can either shift in a direction you don’t like or simply turn out too saturated. You can go into the hue/saturation dialog box in Photoshop (Image > adjustments > hue/saturation) and in the submenu with the tab that reads ‘Master’, choose first red and then yellow. Move the saturation slider to the left with each color and you can tone down the intensity of these colors to taste.
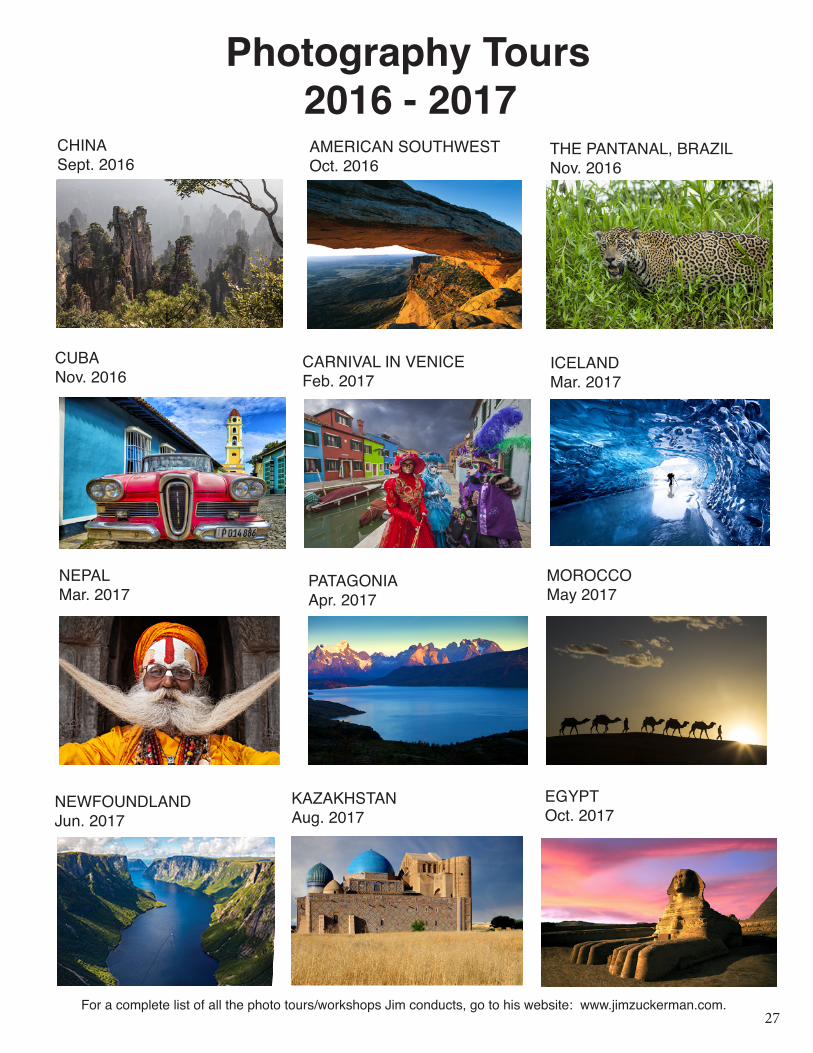
Photography Tours 2016 - 2017
For a complete list of all the photo tours/workshops Jim conducts, go to his website: www.jimzuckerman.com.
PATAGONIAApr. 2017
MOROCCOMay 2017
NEPALMar. 2017
ICELANDMar. 2017
KAZAKHSTANAug. 2017
EGYPTOct. 2017
NEWFOUNDLANDJun. 2017
THE PANTANAL, BRAZILNov. 2016
CARNIVAL IN VENICEFeb. 2017
CUBANov. 2016
AMERICAN SOUTHWESTOct. 2016
CHINASept. 2016
27
29
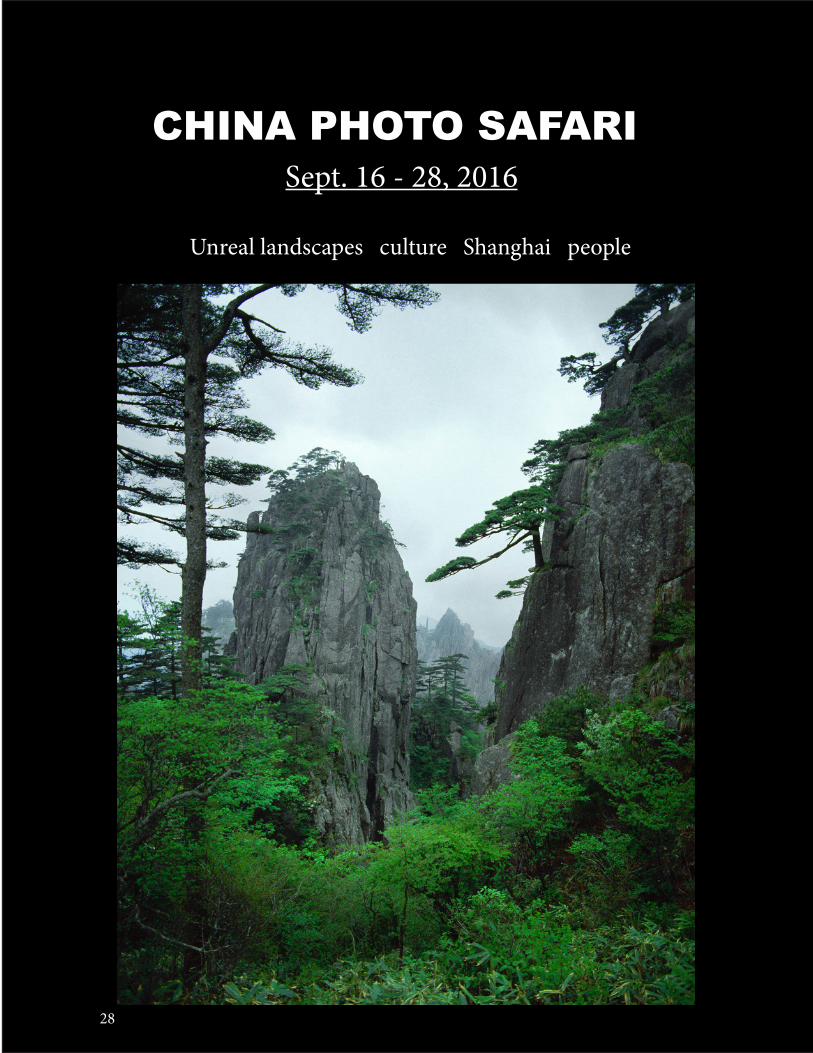
CHINA PHOTO SAFARI Sept. 16 - 28, 2016
Unreal landscapes culture Shanghai people
28
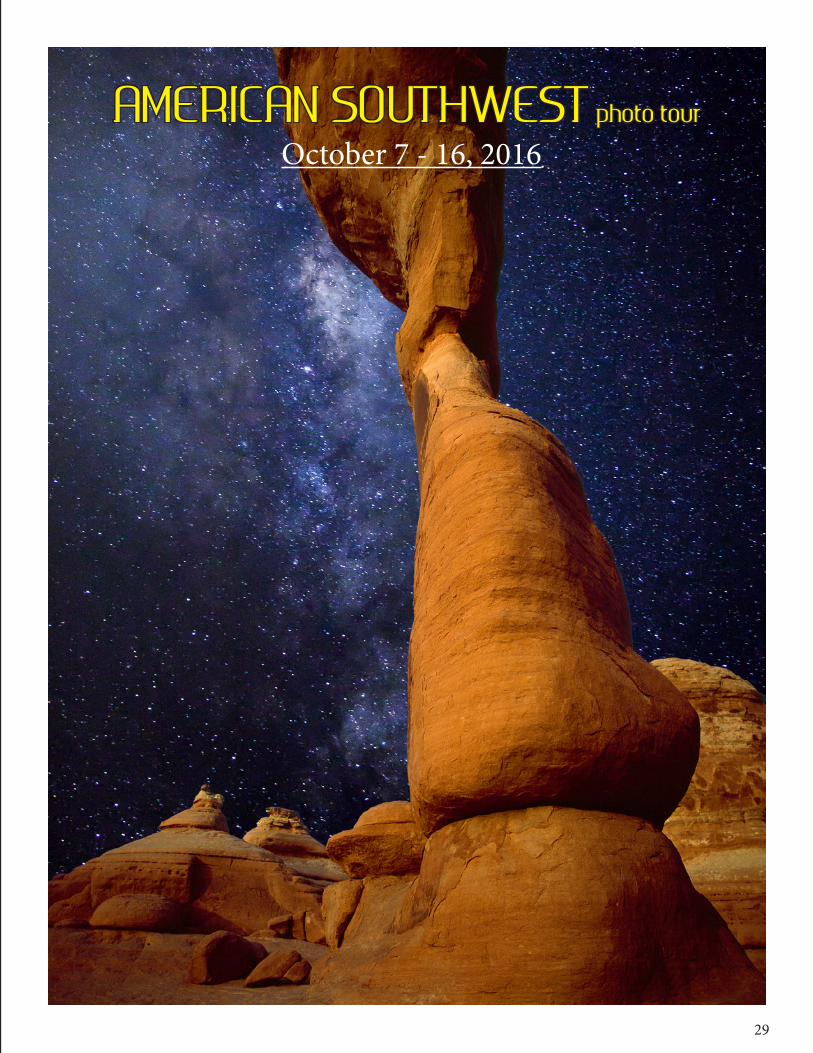
AMERICAN SOUTHWEST photo tour
October 7 - 16, 2016
29
30
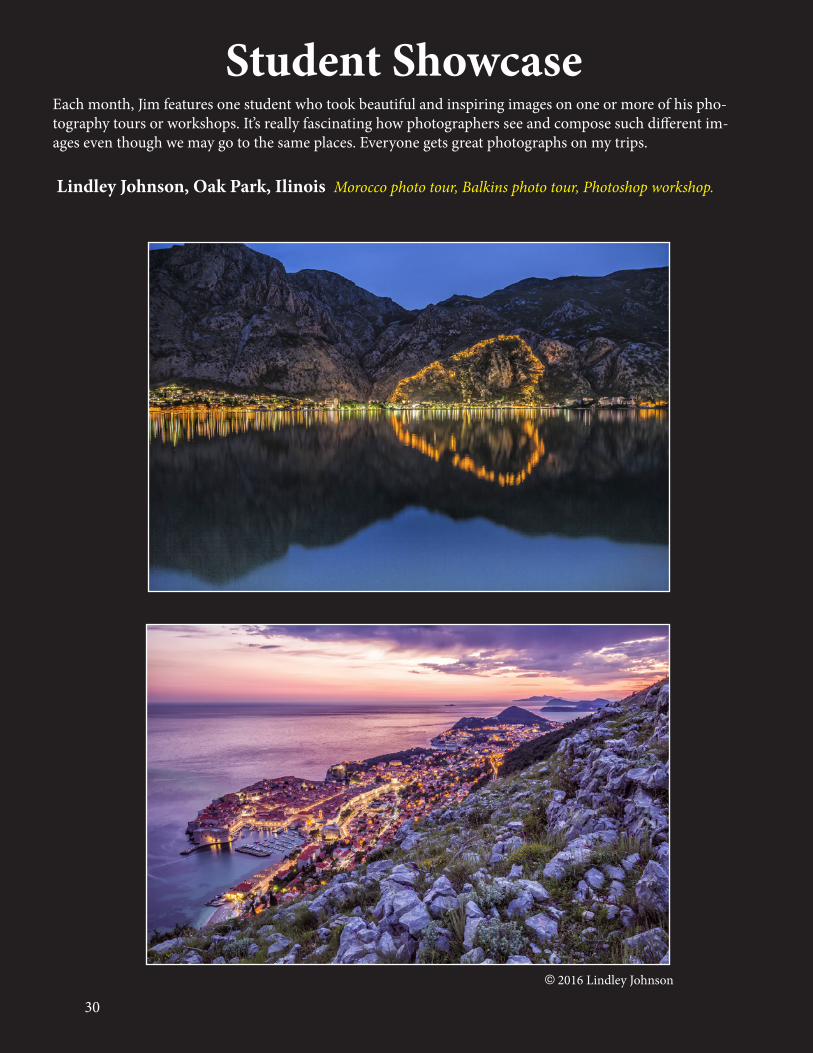
Student ShowcaseEach month, Jim features one student who took beautiful and inspiring images on one or more of his pho-tography tours or workshops. It’s really fascinating how photographers see and compose such different im-ages even though we may go to the same places. Everyone gets great photographs on my trips.
Lindley Johnson, Oak Park, Ilinois Morocco photo tour, Balkins photo tour, Photoshop workshop.
© 2016 Lindley Johnson
30

31
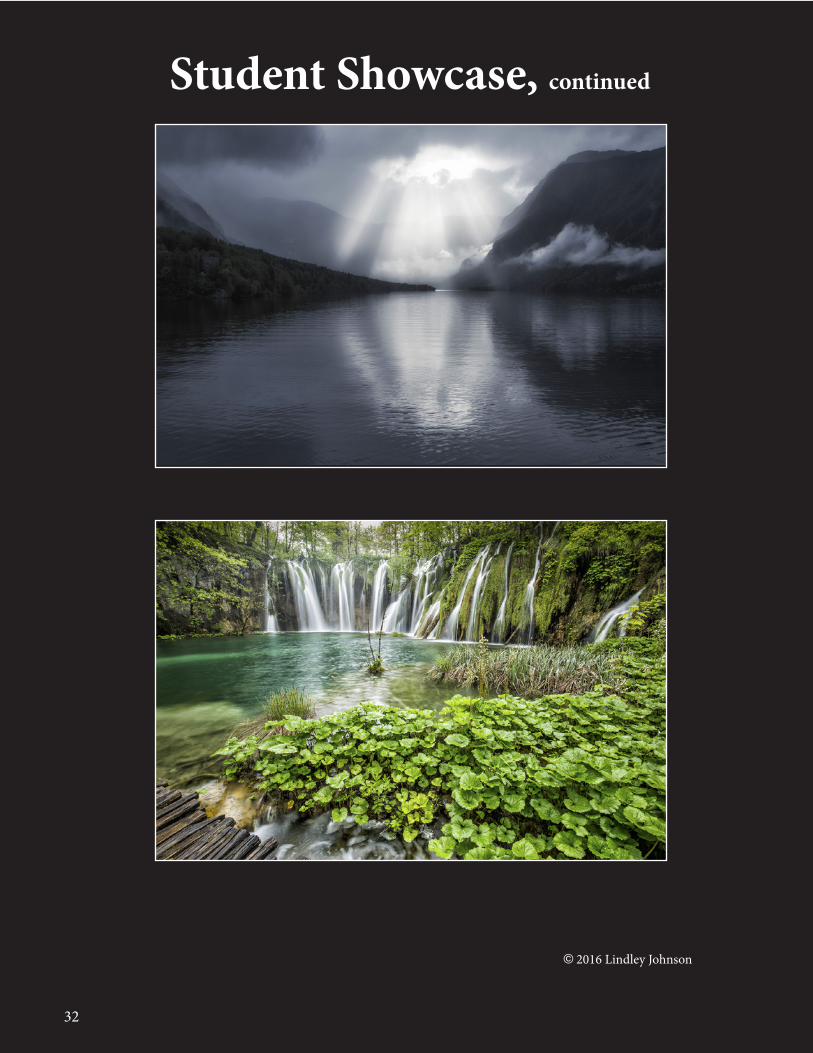
Student Showcase, continued
31
© 2016 Lindley Johnson
37
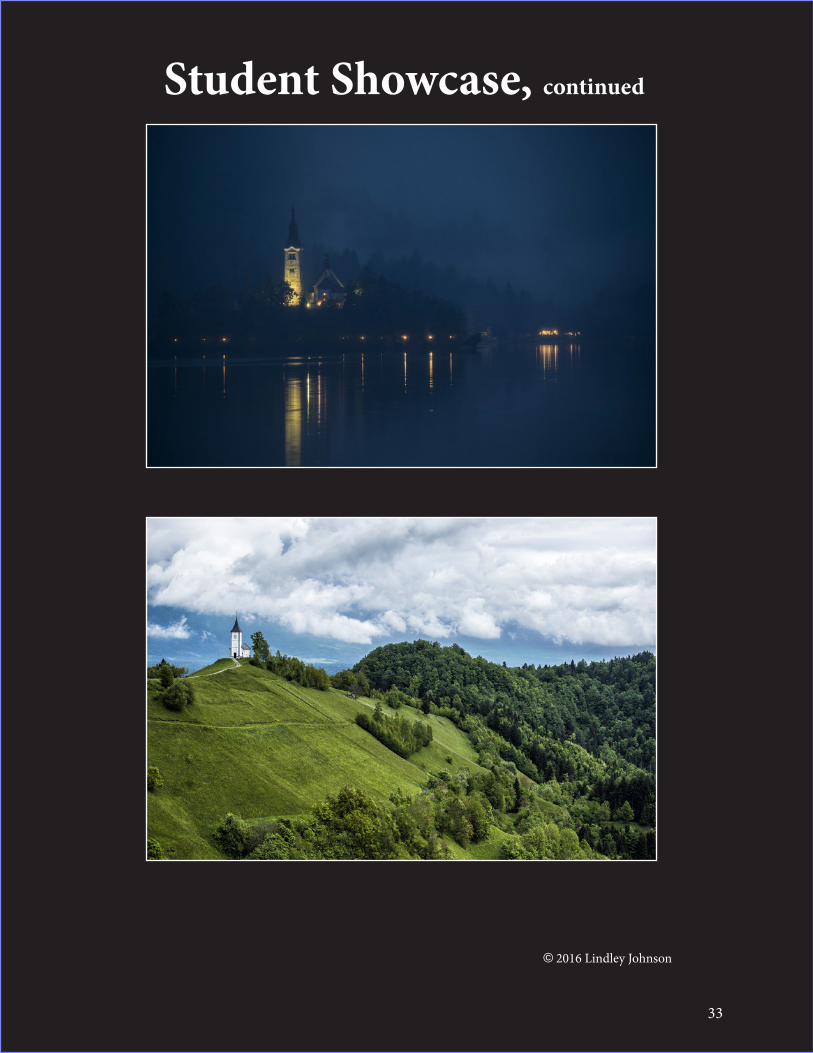
Student Showcase, continued
32
© 2016 Lindley Johnson
34
Student Showcase, continued
33
© 2016 Lindley Johnson
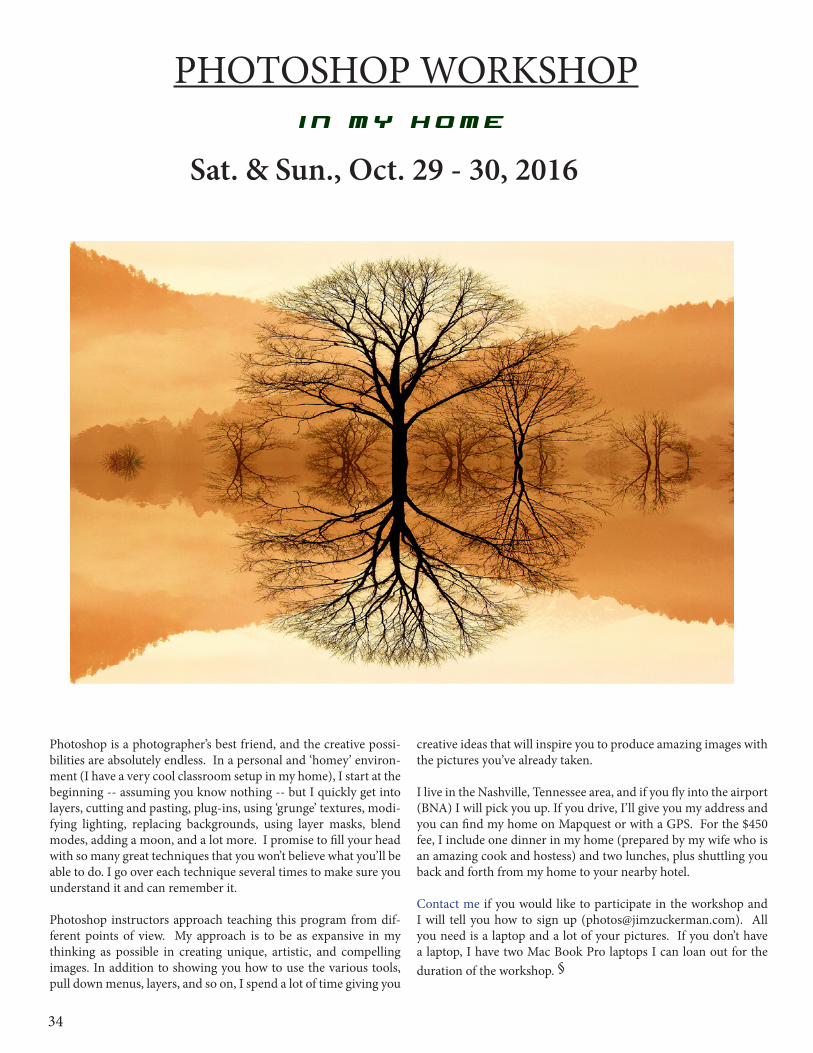
PHOTOSHOP WORKSHOP
Sat. & Sun., Oct. 29 - 30, 2016
Photoshop is a photographer’s best friend, and the creative possi-bilities are absolutely endless. In a personal and ‘homey’ environ-ment (I have a very cool classroom setup in my home), I start at the beginning -- assuming you know nothing -- but I quickly get into layers, cutting and pasting, plug-ins, using ‘grunge’ textures, modi-fying lighting, replacing backgrounds, using layer masks, blend modes, adding a moon, and a lot more. I promise to fill your head with so many great techniques that you won’t believe what you’ll be able to do. I go over each technique several times to make sure you understand it and can remember it.
Photoshop instructors approach teaching this program from dif-ferent points of view. My approach is to be as expansive in my thinking as possible in creating unique, artistic, and compelling images. In addition to showing you how to use the various tools, pull down menus, layers, and so on, I spend a lot of time giving you
creative ideas that will inspire you to produce amazing images with the pictures you’ve already taken.
I live in the Nashville, Tennessee area, and if you fly into the airport (BNA) I will pick you up. If you drive, I’ll give you my address and you can find my home on Mapquest or with a GPS. For the $450 fee, I include one dinner in my home (prepared by my wife who is an amazing cook and hostess) and two lunches, plus shuttling you back and forth from my home to your nearby hotel.
Contact me if you would like to participate in the workshop and I will tell you how to sign up ([email protected]). All you need is a laptop and a lot of your pictures. If you don’t have a laptop, I have two Mac Book Pro laptops I can loan out for the duration of the workshop. §
i n m y h o m e
34
Nov. ‘12 Dec. ‘12 Jan. ‘13
Click on the past issues of P H O T O I N S I G H T S
you would like to read.
Feb. ‘13 Mar. ‘13
Apr. ‘13 May. ‘13 Jun. ‘13 Jul. 13 Aug. ‘13
Sept. ‘13
Feb. ‘14 Mar. ‘14 Apr. ‘14 May ‘14 Jun.‘14
Oct. ‘13 Nov. ‘13 Dec. ‘13 Jan. ‘14
35
36
Click on the past issues of P H O T O I N S I G H T S
you would like to read.
Jul.‘14 Aug. ‘14 Sept. ‘14 Oct. ‘14 Nov. ‘14
Dec. ‘14
May ‘15 Jun ‘15 Jul.‘15 Aug.‘15 Sept.‘15
Oct.‘15 Nov. ‘15 Dec. ‘15 Jan. ‘16 Feb. ‘16
Jan. ‘15 Feb. ‘15 Mar. ‘15 Apr. ‘15
1
• Topaz Glow• A different approach to composition• Photographing puppies• Kaleidoscopic images• Online photo course• Student showcase• Photo tours
P H O T O I N S I G H T SJim Zuckerman’s
January 2015
1
• White balance• When can highlights be blown• Abstractions in soap• Fisheye lenses• Online photo course• Student showcase• Photo tours
P H O T O I N S I G H T SJim Zuckerman’s
February 2015
1
• Realistic HDR• Selective focus• Simulating bokeh• Sepia & Dark Contrast• Online photo courses• Student showcase• Photo tours
P H O T O I N S I G H T SJim Zuckerman’s
June 2015
37
Mar. ‘16 Apr. ‘16 May ‘16 Jun ‘16 Jul. ‘16
Click on the past issues of P H O T O I N S I G H T S
you would like to read.
38
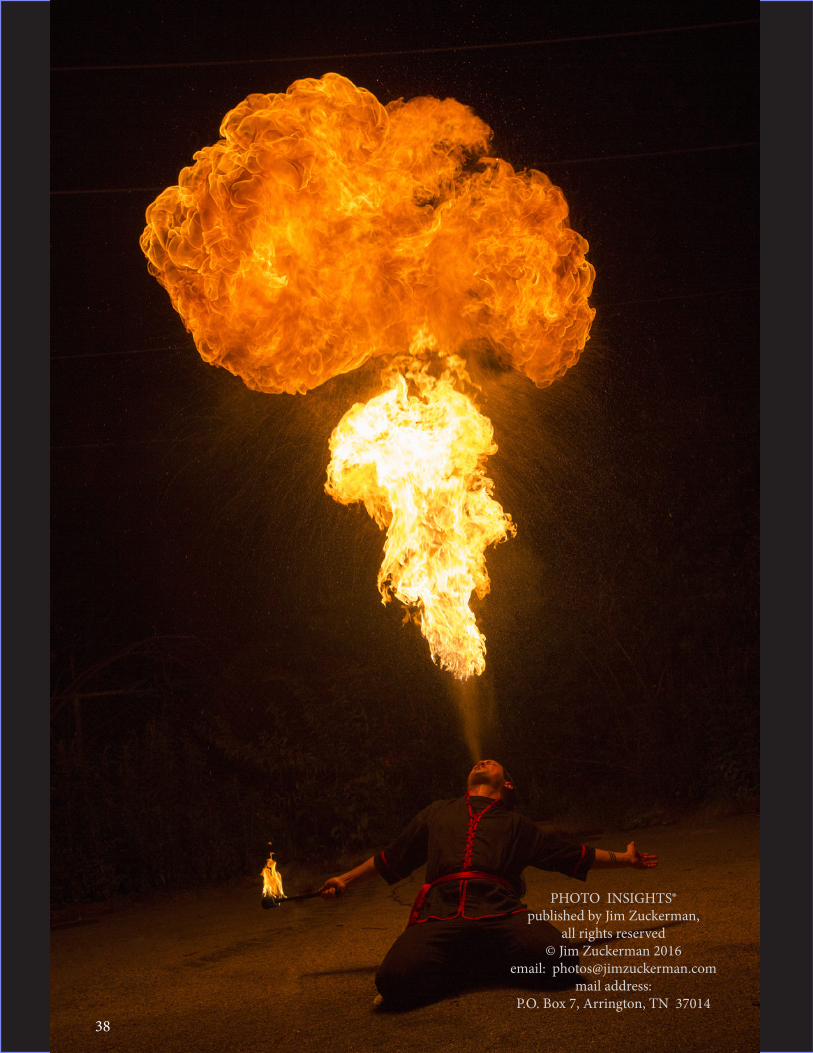
PHOTO INSIGHTS®published by Jim Zuckerman,
all rights reserved© Jim Zuckerman 2016
email: [email protected] address:
P.O. Box 7, Arrington, TN 3701438