photo insights september '14
DESCRIPTION
An eMagazine devoted to creative photography and Photoshop techniques published by Jim Zuckerman.TRANSCRIPT
1
• Aperture priority• Mixer brush tool• Implying motion• Shooting through wire mesh• Post-processing course• Student showcase• Photo tours
P H O T O I N S I G H T SJim Zuckerman’s
September 2014
2
4. Aperture priority10. Shooting through wire mesh15. Freeze the subject; blur the background18. Mixer brush tool21. Online photo course24. Whats wrong with this picture?26. Short and sweet28. Ask Jim31. Student showcase35. Back issues
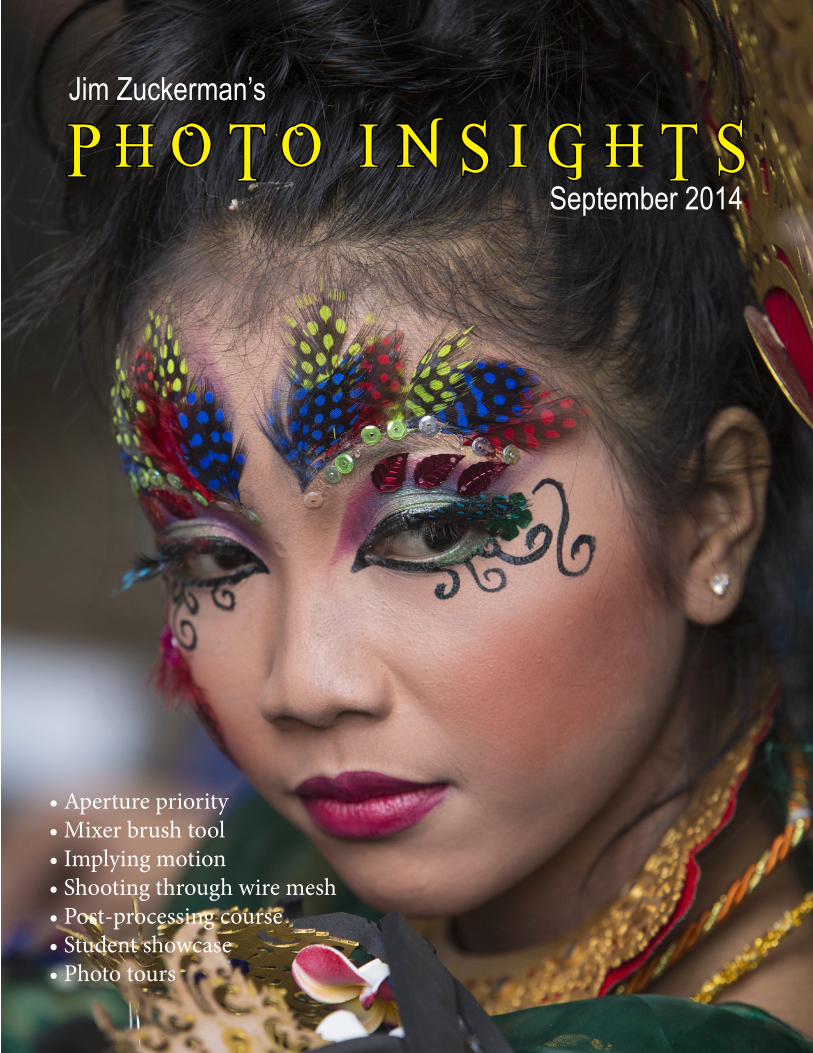
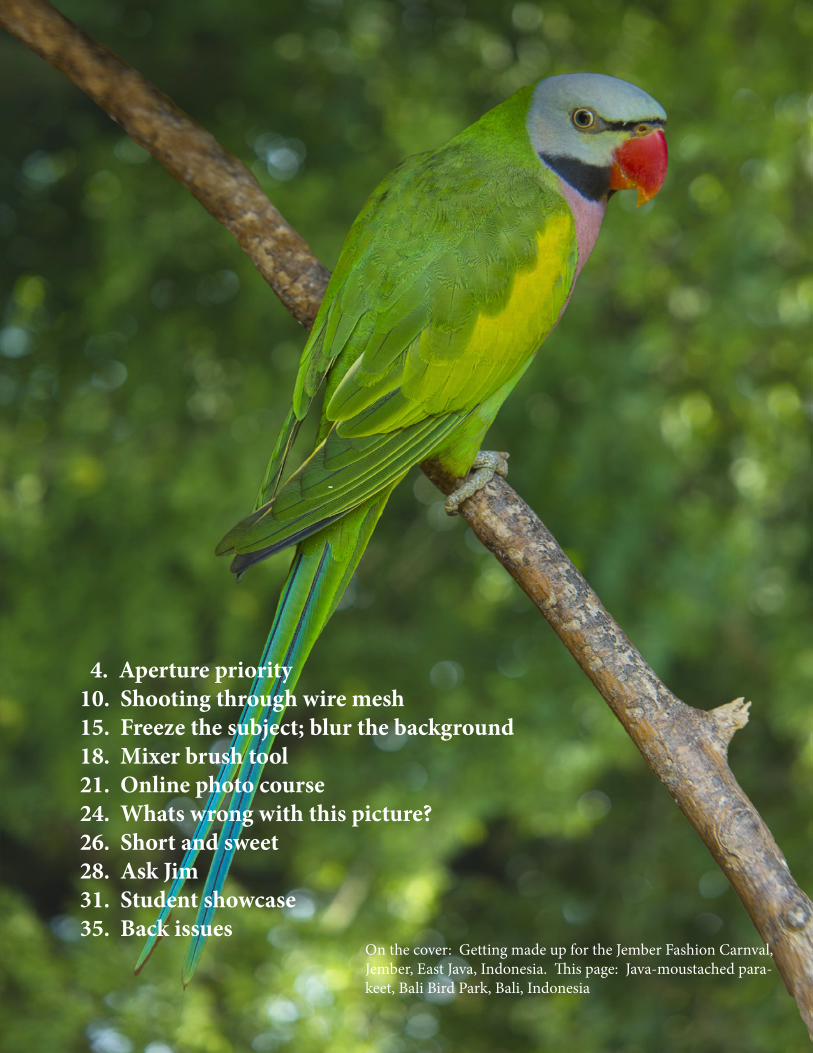
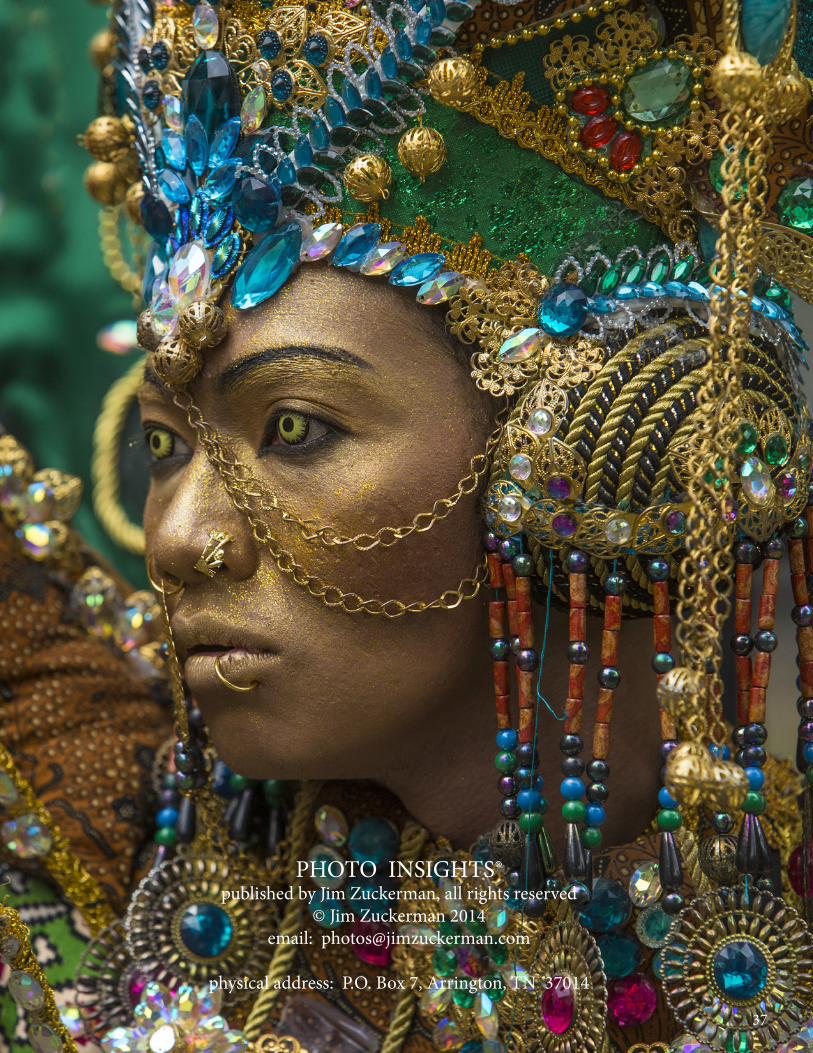
On the cover: Getting made up for the Jember Fashion Carnval, Jember, East Java, Indonesia. This page: Java-moustached para-keet, Bali Bird Park, Bali, Indonesia
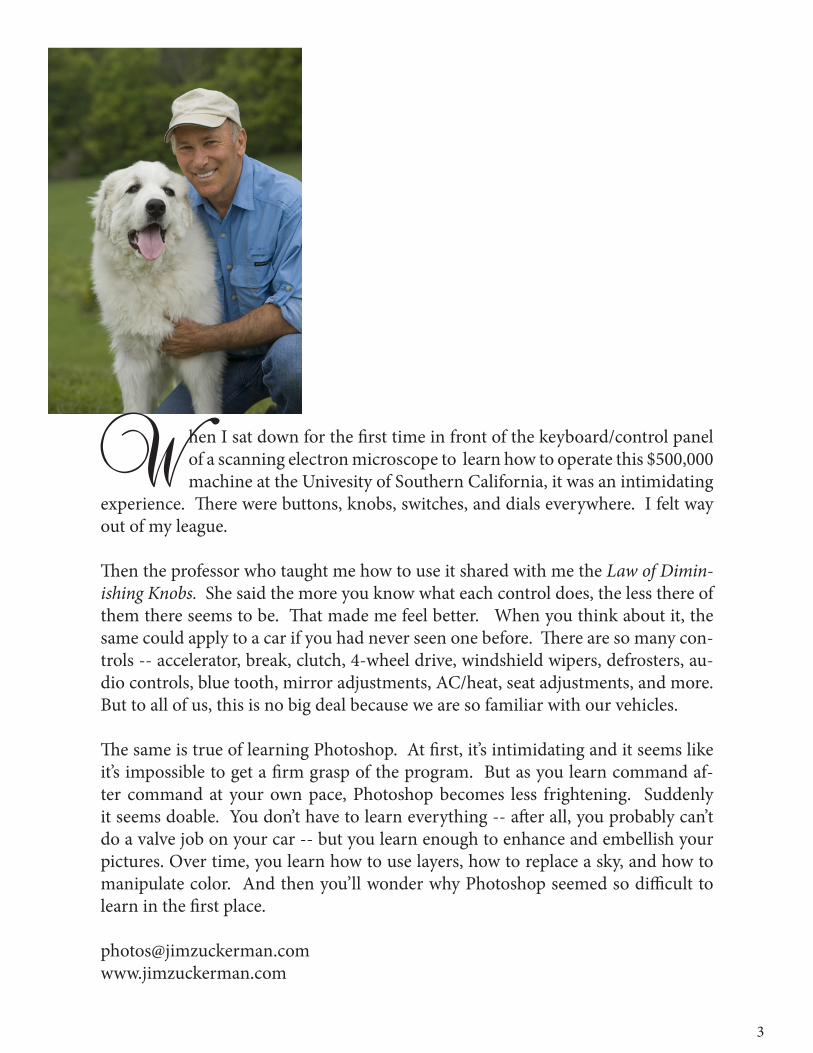
When I sat down for the first time in front of the keyboard/control panel of a scanning electron microscope to learn how to operate this $500,000 machine at the Univesity of Southern California, it was an intimidating
experience. There were buttons, knobs, switches, and dials everywhere. I felt way out of my league.
Then the professor who taught me how to use it shared with me the Law of Dimin-ishing Knobs. She said the more you know what each control does, the less there of them there seems to be. That made me feel better. When you think about it, the same could apply to a car if you had never seen one before. There are so many con-trols -- accelerator, break, clutch, 4-wheel drive, windshield wipers, defrosters, au-dio controls, blue tooth, mirror adjustments, AC/heat, seat adjustments, and more. But to all of us, this is no big deal because we are so familiar with our vehicles.
The same is true of learning Photoshop. At first, it’s intimidating and it seems like it’s impossible to get a firm grasp of the program. But as you learn command af-ter command at your own pace, Photoshop becomes less frightening. Suddenly it seems doable. You don’t have to learn everything -- after all, you probably can’t do a valve job on your car -- but you learn enough to enhance and embellish your pictures. Over time, you learn how to use layers, how to replace a sky, and how to manipulate color. And then you’ll wonder why Photoshop seemed so difficult to learn in the first place.
3
Aperture Priority
4
5
Most photographers use aperture priority as their exposure mode of choice. This is what I have deduced
based on leading many photo tours and having hundreds of people travel with me. Av is the best option in some, but not all, situations. Use aper-ture priority for the following scenarios:
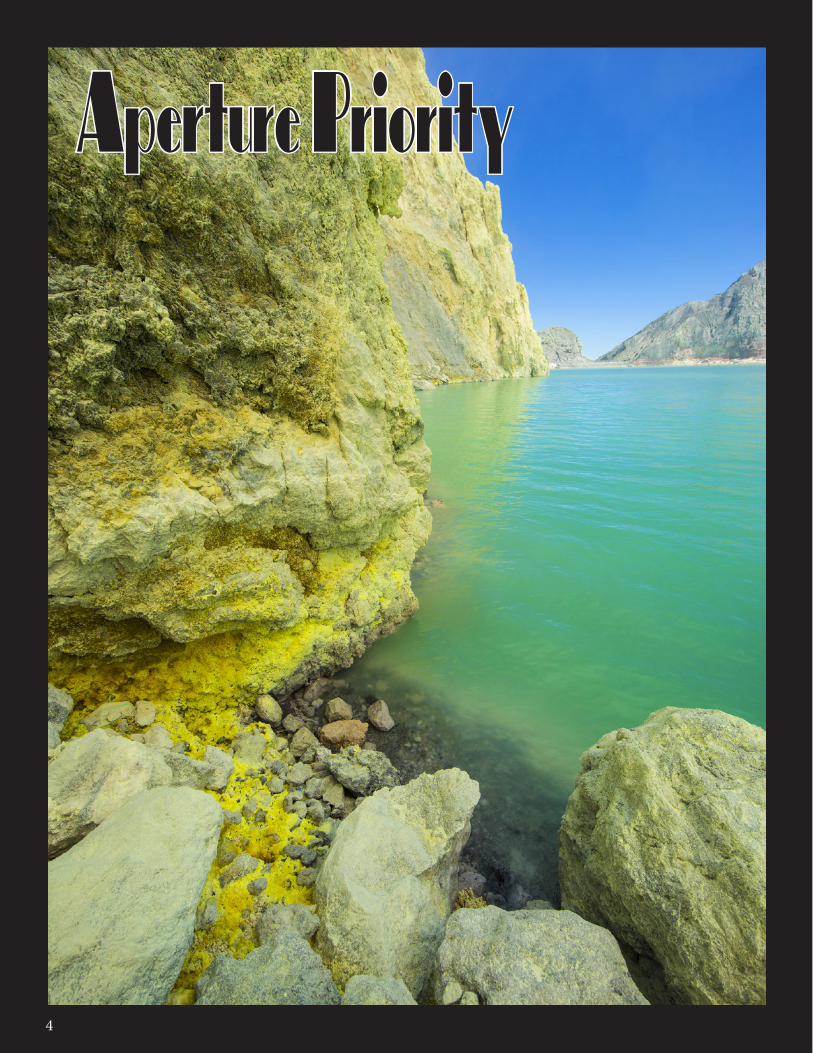
1. When you want extensive depth of field and the subject isn’t moving, and you are using a tri-pod. Landscape and architecture photography are examples. For the picture of the surreal lake in the Ijen Crater in Indonesia on the previous page, I wanted everything in the picture to be sharp. Therefore, I used Av and f/32. The shutter speed was irrelevant since I was using a tripod and nothing in the scene was moving except the shimmering of the water.
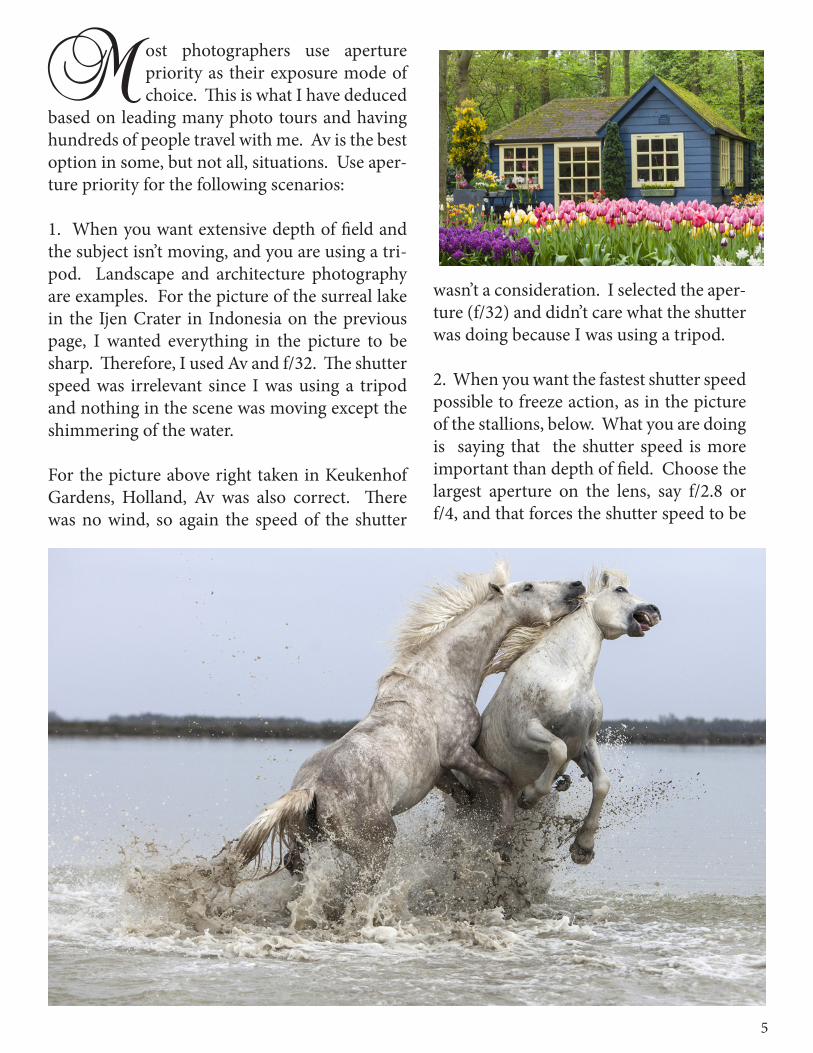
For the picture above right taken in Keukenhof Gardens, Holland, Av was also correct. There was no wind, so again the speed of the shutter
wasn’t a consideration. I selected the aper-ture (f/32) and didn’t care what the shutter was doing because I was using a tripod.
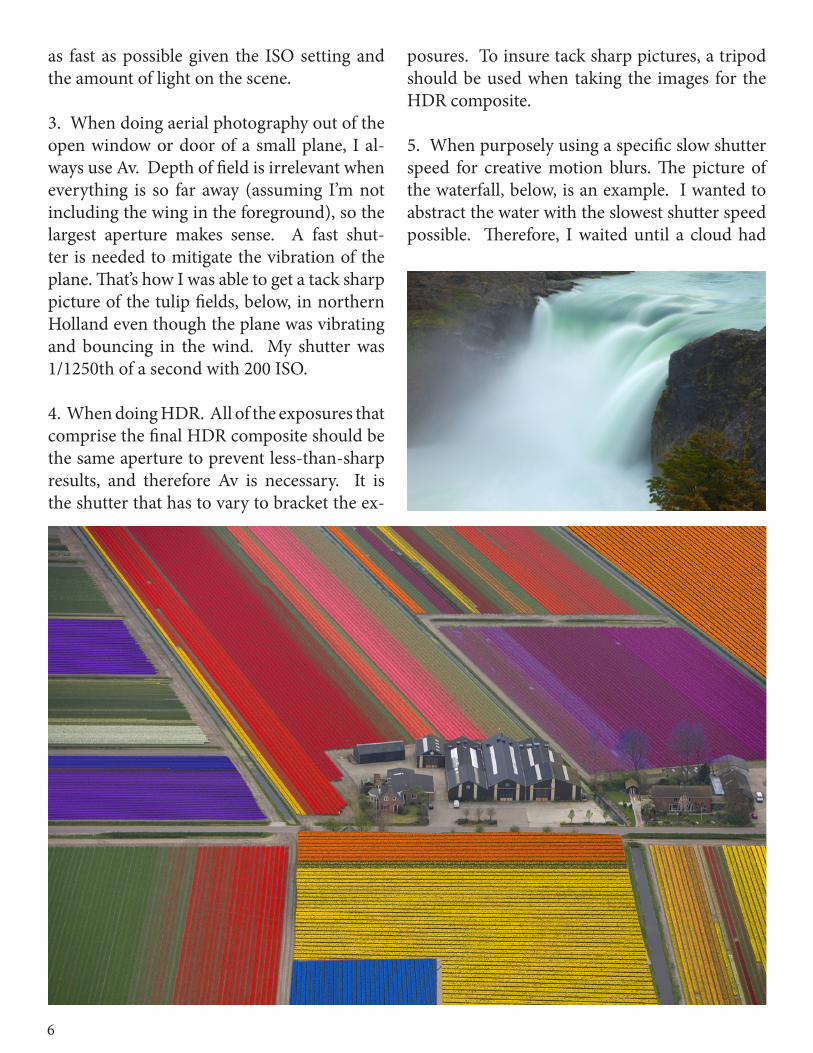
2. When you want the fastest shutter speed possible to freeze action, as in the picture of the stallions, below. What you are doing is saying that the shutter speed is more important than depth of field. Choose the largest aperture on the lens, say f/2.8 or f/4, and that forces the shutter speed to be
6
as fast as possible given the ISO setting and the amount of light on the scene.
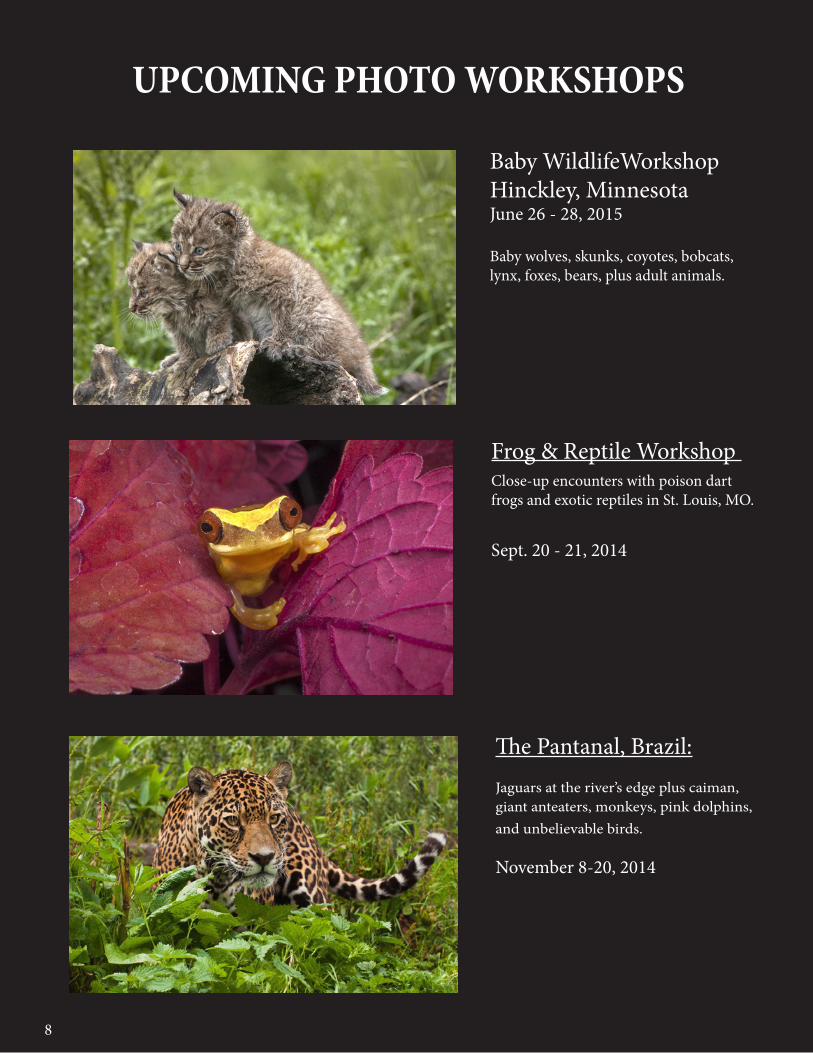
3. When doing aerial photography out of the open window or door of a small plane, I al-ways use Av. Depth of field is irrelevant when everything is so far away (assuming I’m not including the wing in the foreground), so the largest aperture makes sense. A fast shut-ter is needed to mitigate the vibration of the plane. That’s how I was able to get a tack sharp picture of the tulip fields, below, in northern Holland even though the plane was vibrating and bouncing in the wind. My shutter was 1/1250th of a second with 200 ISO.
4. When doing HDR. All of the exposures that comprise the final HDR composite should be the same aperture to prevent less-than-sharp results, and therefore Av is necessary. It is the shutter that has to vary to bracket the ex-
posures. To insure tack sharp pictures, a tripod should be used when taking the images for the HDR composite.
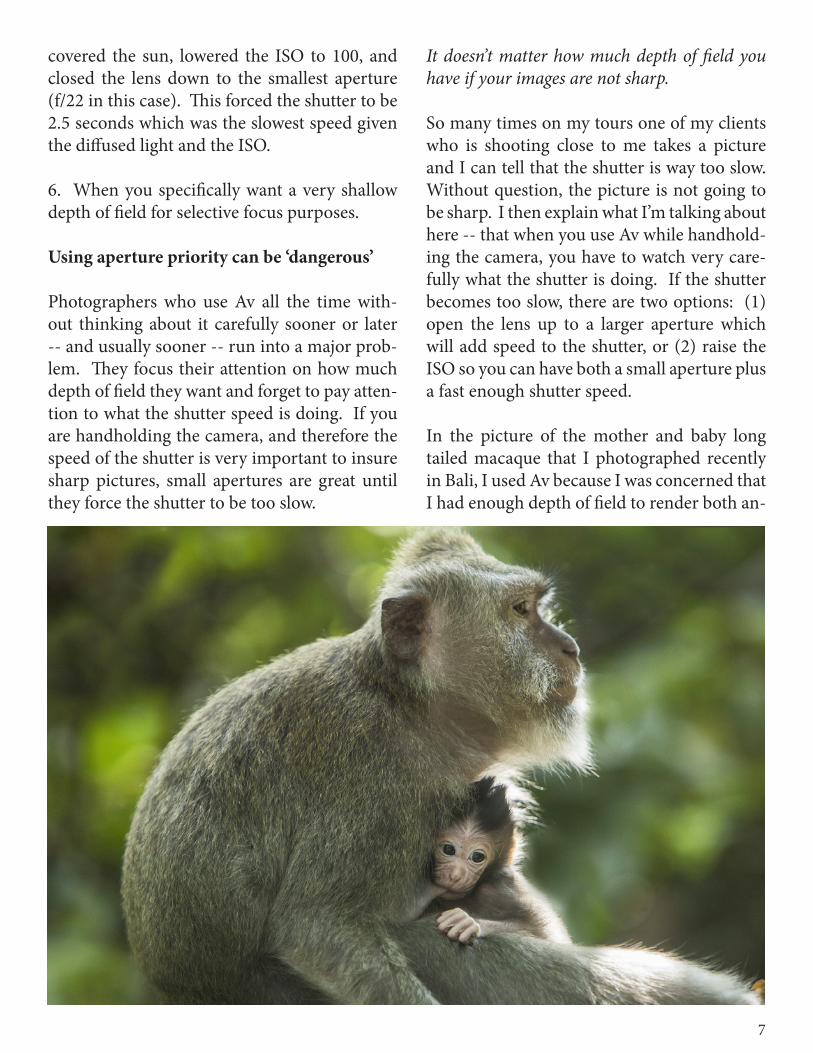
5. When purposely using a specific slow shutter speed for creative motion blurs. The picture of the waterfall, below, is an example. I wanted to abstract the water with the slowest shutter speed possible. Therefore, I waited until a cloud had
7
covered the sun, lowered the ISO to 100, and closed the lens down to the smallest aperture (f/22 in this case). This forced the shutter to be 2.5 seconds which was the slowest speed given the diffused light and the ISO.
6. When you specifically want a very shallow depth of field for selective focus purposes.
Using aperture priority can be ‘dangerous’
Photographers who use Av all the time with-out thinking about it carefully sooner or later -- and usually sooner -- run into a major prob-lem. They focus their attention on how much depth of field they want and forget to pay atten-tion to what the shutter speed is doing. If you are handholding the camera, and therefore the speed of the shutter is very important to insure sharp pictures, small apertures are great until they force the shutter to be too slow.
It doesn’t matter how much depth of field you have if your images are not sharp.
So many times on my tours one of my clients who is shooting close to me takes a picture and I can tell that the shutter is way too slow. Without question, the picture is not going to be sharp. I then explain what I’m talking about here -- that when you use Av while handhold-ing the camera, you have to watch very care-fully what the shutter is doing. If the shutter becomes too slow, there are two options: (1) open the lens up to a larger aperture which will add speed to the shutter, or (2) raise the ISO so you can have both a small aperture plus a fast enough shutter speed.
In the picture of the mother and baby long tailed macaque that I photographed recently in Bali, I used Av because I was concerned that I had enough depth of field to render both an-
w
UPCOMING PHOTO WORKSHOPS
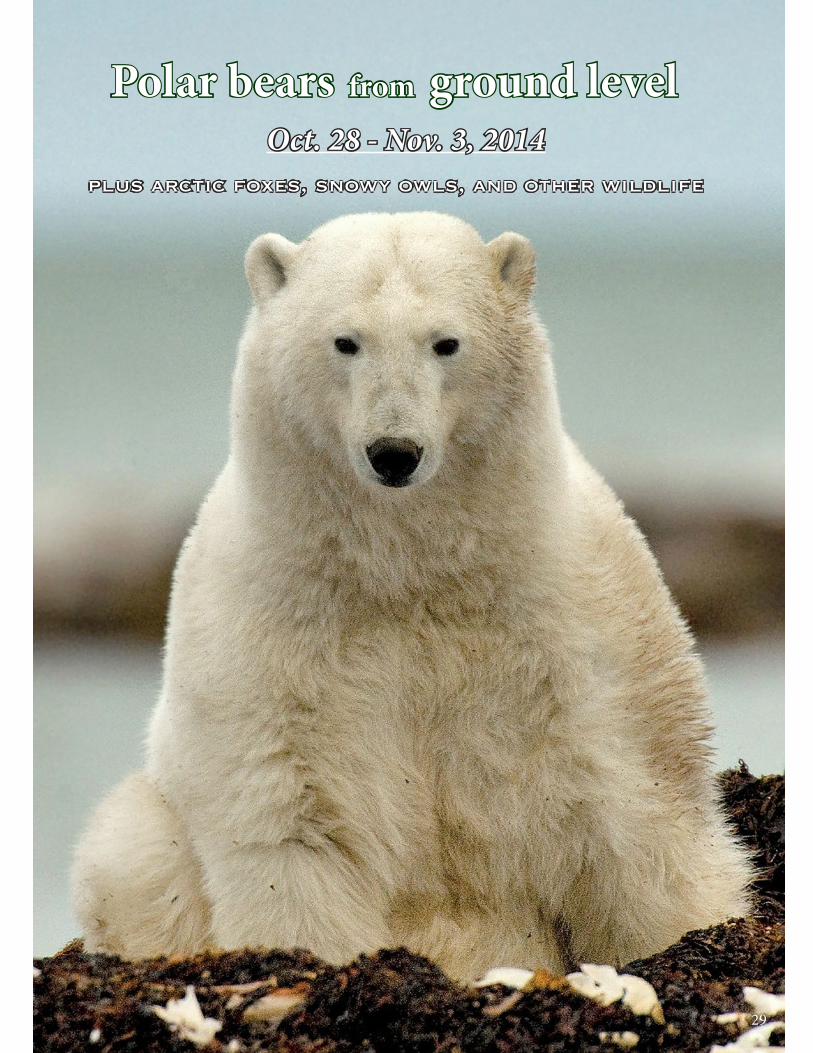
Baby WildlifeWorkshopHinckley, MinnesotaJune 26 - 28, 2015
Baby wolves, skunks, coyotes, bobcats, lynx, foxes, bears, plus adult animals.
Frog & Reptile Workshop Close-up encounters with poison dart frogs and exotic reptiles in St. Louis, MO.
Sept. 20 - 21, 2014
The Pantanal, Brazil:Jaguars at the river’s edge plus caiman, giant anteaters, monkeys, pink dolphins, and unbelievable birds.
November 8-20, 2014
8
9
imals sharp. I was shooting with a 70-200mm lens plus a 1.4x teleconverter, and that meant the depth of field was fairly shallow. The baby kept moving, and even though both faces were approximately on the same plane, if there was a discrepancy of even one or two inches where one of the monkey’s was slightly closer to the camera than the other, the picture would not be success-ful if both faces weren’t sharp. Therefore, I used an aperture of f/8 with an ISO of 2000. The light level was quite low in the for-est, and I had no choice but to raise the ISO set-ting. The shutter was 1/100th of a second, and with the 280mm focal length I used this speed was not ideal. I really needed a shutter speed of 1/300th, but I didn’t want to use a higher ISO. Instead, I switched on the image stabilization and that helped me get a sharp picture.
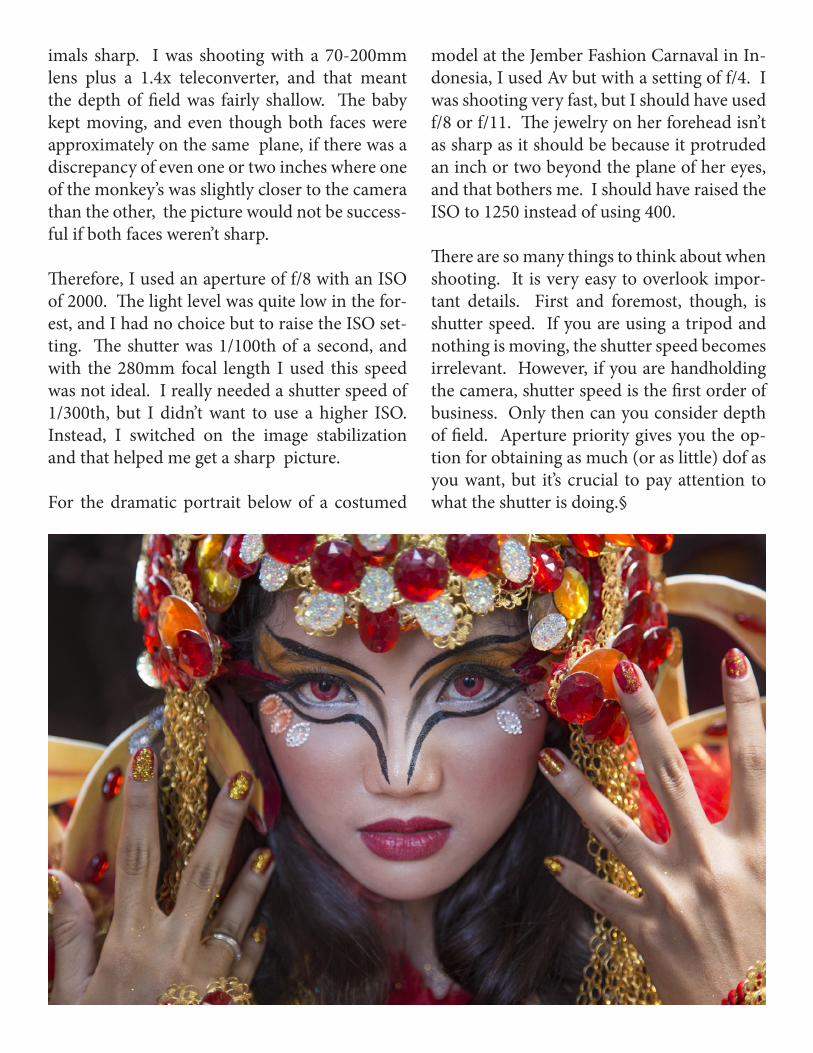
For the dramatic portrait below of a costumed
model at the Jember Fashion Carnaval in In-donesia, I used Av but with a setting of f/4. I was shooting very fast, but I should have used f/8 or f/11. The jewelry on her forehead isn’t as sharp as it should be because it protruded an inch or two beyond the plane of her eyes, and that bothers me. I should have raised the ISO to 1250 instead of using 400.
There are so many things to think about when shooting. It is very easy to overlook impor-tant details. First and foremost, though, is shutter speed. If you are using a tripod and nothing is moving, the shutter speed becomes irrelevant. However, if you are handholding the camera, shutter speed is the first order of business. Only then can you consider depth of field. Aperture priority gives you the op-tion for obtaining as much (or as little) dof as you want, but it’s crucial to pay attention to what the shutter is doing.§
10
SHOOTING THROUGH A WIRE MESH
Sooner or later you will be forced to photograph through a wire mesh fence or enclosure. We all hate this kind of
situation, of course, but in zoos, bird parks, and other places that have live animals for our obser-vation and education, they are an unpleasant ne-cessity and a very tough photographic challenge.
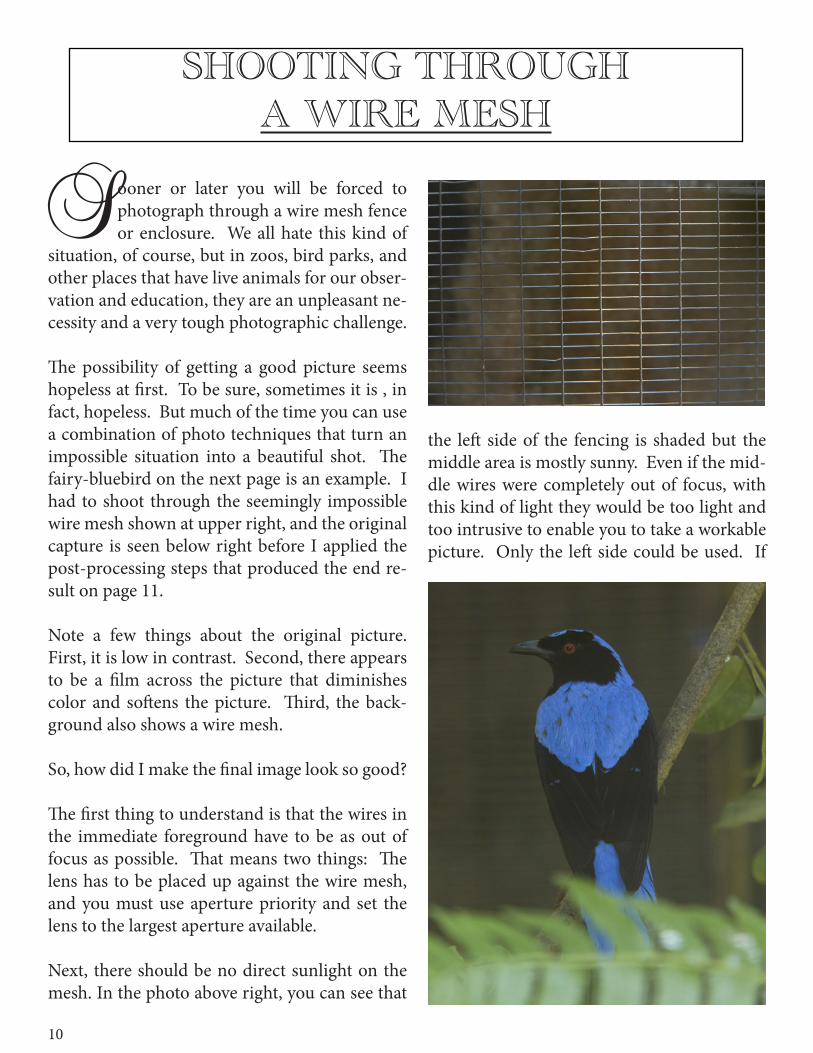
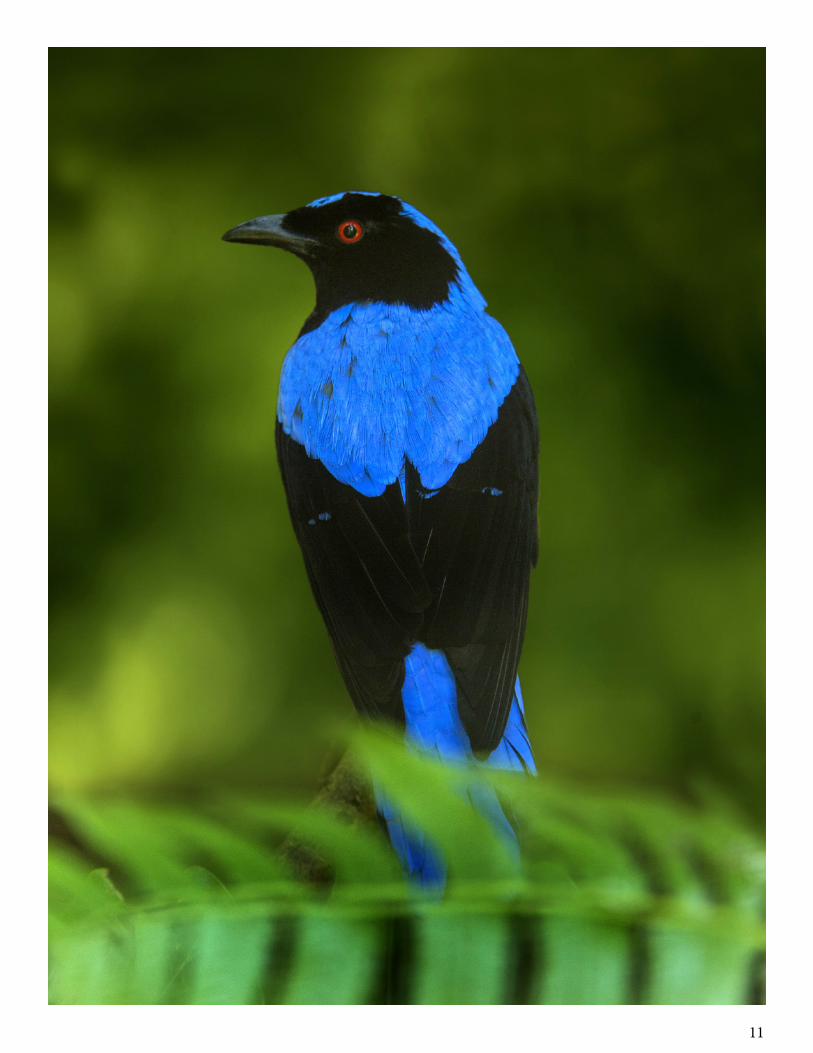
The possibility of getting a good picture seems hopeless at first. To be sure, sometimes it is , in fact, hopeless. But much of the time you can use a combination of photo techniques that turn an impossible situation into a beautiful shot. The fairy-bluebird on the next page is an example. I had to shoot through the seemingly impossible wire mesh shown at upper right, and the original capture is seen below right before I applied the post-processing steps that produced the end re-sult on page 11.
Note a few things about the original picture. First, it is low in contrast. Second, there appears to be a film across the picture that diminishes color and softens the picture. Third, the back-ground also shows a wire mesh.
So, how did I make the final image look so good?
The first thing to understand is that the wires in the immediate foreground have to be as out of focus as possible. That means two things: The lens has to be placed up against the wire mesh, and you must use aperture priority and set the lens to the largest aperture available.
Next, there should be no direct sunlight on the mesh. In the photo above right, you can see that
the left side of the fencing is shaded but the middle area is mostly sunny. Even if the mid-dle wires were completely out of focus, with this kind of light they would be too light and too intrusive to enable you to take a workable picture. Only the left side could be used. If
11
12
the situation was such that you had no choice and the entire wire mesh was sunlit, then have a friend stand close to you and cast a shadow on the wire. Or, use a piece of fabric (such as a large microfibre lens cloth), a hat, or a shirt to shade the mesh such that the wires directly in front of the lens are shaded. That solves the problem.
When you shoot through the fencing, it is best to keep the lens axis as perpendicular as possible to the plane of the mesh. This makes the openings as large as possible with the least amount of opaque wires in the way.
The background has to be disregarded. There is nothing you can do about that except re-place it completely in post-processing in Pho-toshop. Lightroom can not be used for this. Post processing
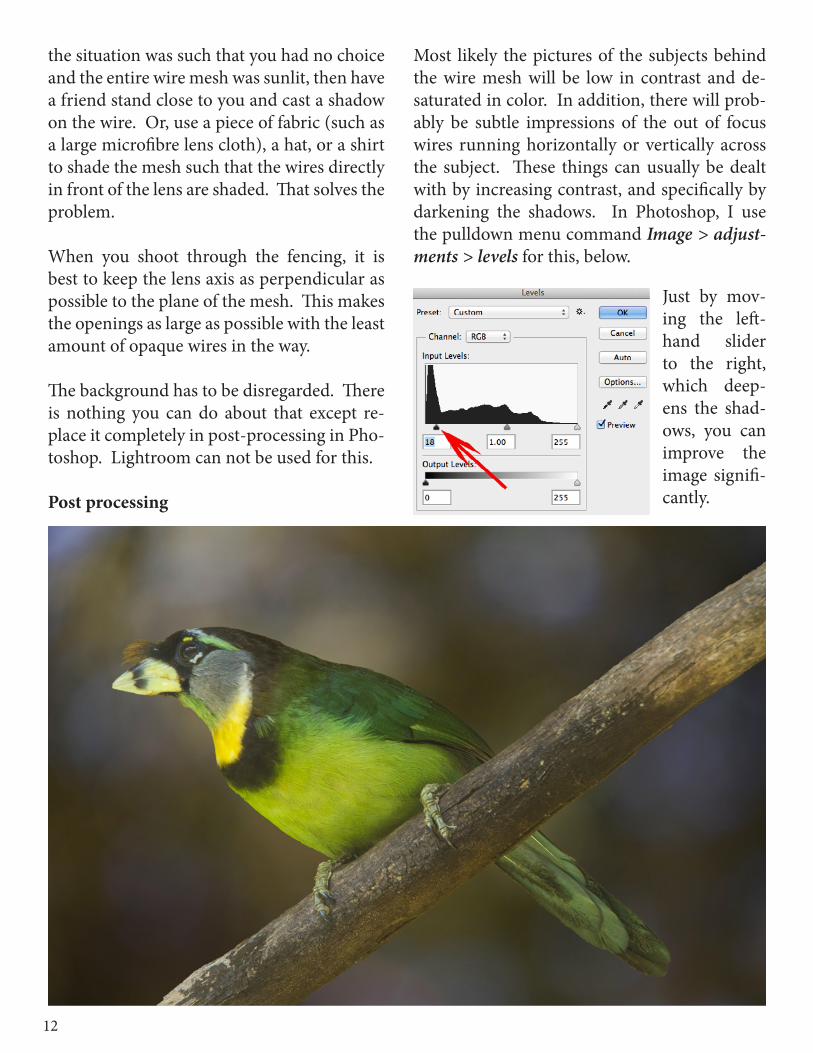
Most likely the pictures of the subjects behind the wire mesh will be low in contrast and de-saturated in color. In addition, there will prob-ably be subtle impressions of the out of focus wires running horizontally or vertically across the subject. These things can usually be dealt with by increasing contrast, and specifically by darkening the shadows. In Photoshop, I use the pulldown menu command Image > adjust-ments > levels for this, below.
Just by mov-ing the left-hand slider to the right, which deep-ens the shad-ows, you can improve the image signifi-cantly.

13
14
If there are subtle, out of focus impressions of the wires across the picture, these should be dimin-ished by adding contrast. If they still persist, you will have to use the clone tool and/or the healing brush and blend the edges of the lines with the surrounding colors. You may also need the burn or dodge tool to darken or lighten specific areas.
Replacing the background
The most natural background behind a bird or an animal in the wild is an out of focus green background. Presumably these creatures don’t allow a close approach, and therefore a telephoto lens must be used to fill a significant part of the frame. Telephotos have shallow depth of field, hence the soft foliage background.
I suggest creating a file of out of focus foliage backgrounds from which you can choose the type of look you want. Make some of them com-
pletely blurred, some with a certain amount of definition, some that includes a bit of sky, etc. Most of my foliage backgrounds were made of trees and leaves in diffused light since I avoid subjects in midday sunlight whenever possible.
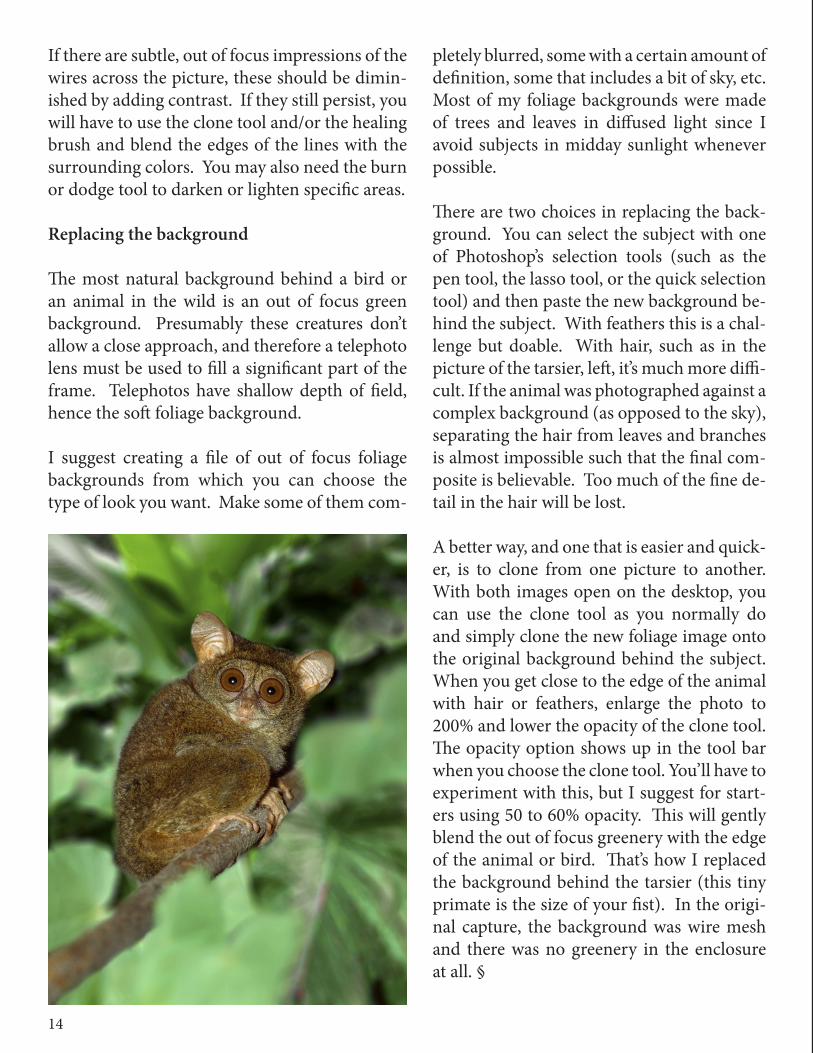
There are two choices in replacing the back-ground. You can select the subject with one of Photoshop’s selection tools (such as the pen tool, the lasso tool, or the quick selection tool) and then paste the new background be-hind the subject. With feathers this is a chal-lenge but doable. With hair, such as in the picture of the tarsier, left, it’s much more diffi-cult. If the animal was photographed against a complex background (as opposed to the sky), separating the hair from leaves and branches is almost impossible such that the final com-posite is believable. Too much of the fine de-tail in the hair will be lost.
A better way, and one that is easier and quick-er, is to clone from one picture to another. With both images open on the desktop, you can use the clone tool as you normally do and simply clone the new foliage image onto the original background behind the subject. When you get close to the edge of the animal with hair or feathers, enlarge the photo to 200% and lower the opacity of the clone tool. The opacity option shows up in the tool bar when you choose the clone tool. You’ll have to experiment with this, but I suggest for start-ers using 50 to 60% opacity. This will gently blend the out of focus greenery with the edge of the animal or bird. That’s how I replaced the background behind the tarsier (this tiny primate is the size of your fist). In the origi-nal capture, the background was wire mesh and there was no greenery in the enclosure at all. §
15
15
Freeze the Subject; Blur the Background
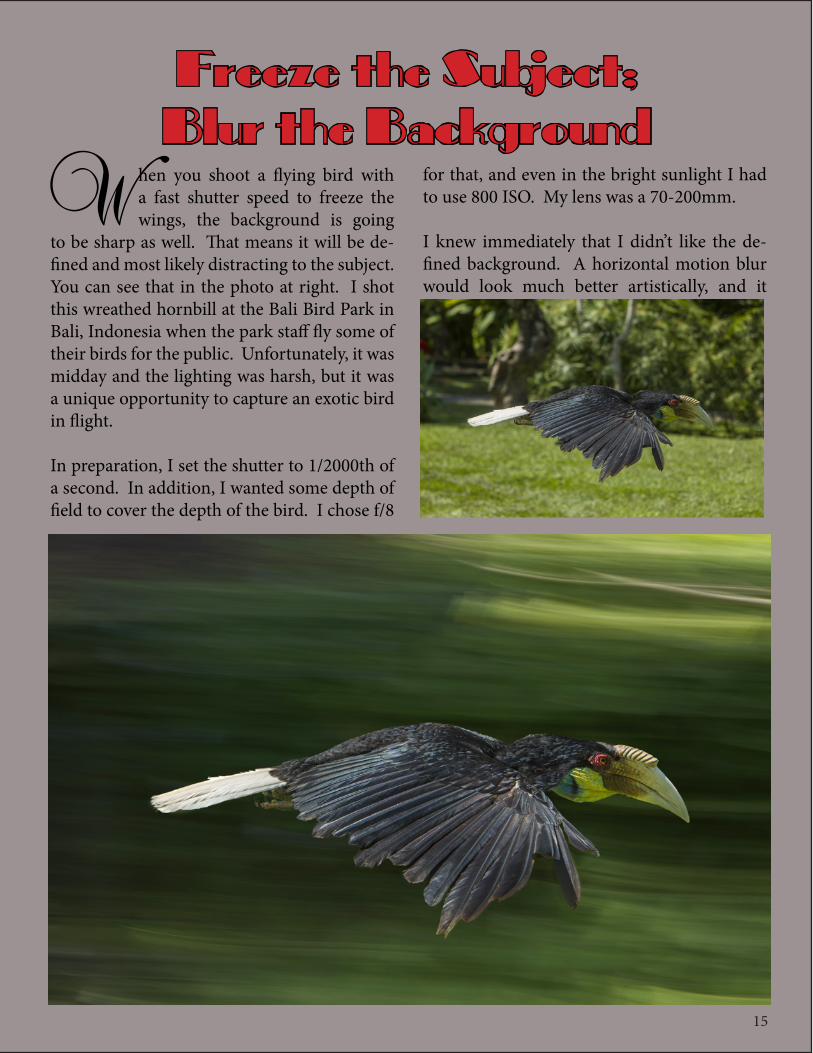
When you shoot a flying bird with a fast shutter speed to freeze the wings, the background is going
to be sharp as well. That means it will be de-fined and most likely distracting to the subject. You can see that in the photo at right. I shot this wreathed hornbill at the Bali Bird Park in Bali, Indonesia when the park staff fly some of their birds for the public. Unfortunately, it was midday and the lighting was harsh, but it was a unique opportunity to capture an exotic bird in flight.
In preparation, I set the shutter to 1/2000th of a second. In addition, I wanted some depth of field to cover the depth of the bird. I chose f/8
for that, and even in the bright sunlight I had to use 800 ISO. My lens was a 70-200mm.
I knew immediately that I didn’t like the de-fined background. A horizontal motion blur would look much better artistically, and it

16
Become a better photographer witheBooks
Click on any ebook to see inside
16 17
would also suggest in a still photograph that the bird was flying very fast.
Therefore, I lowered the ISO to 100 and set the lens aperture to f/32. This allowed me to use a shutter speed of 1/3 seconds, and I panned the trees that the hornbill had just flown by. This gave me a horizontal blur of the foliage, and this is what I used as the replacement background.
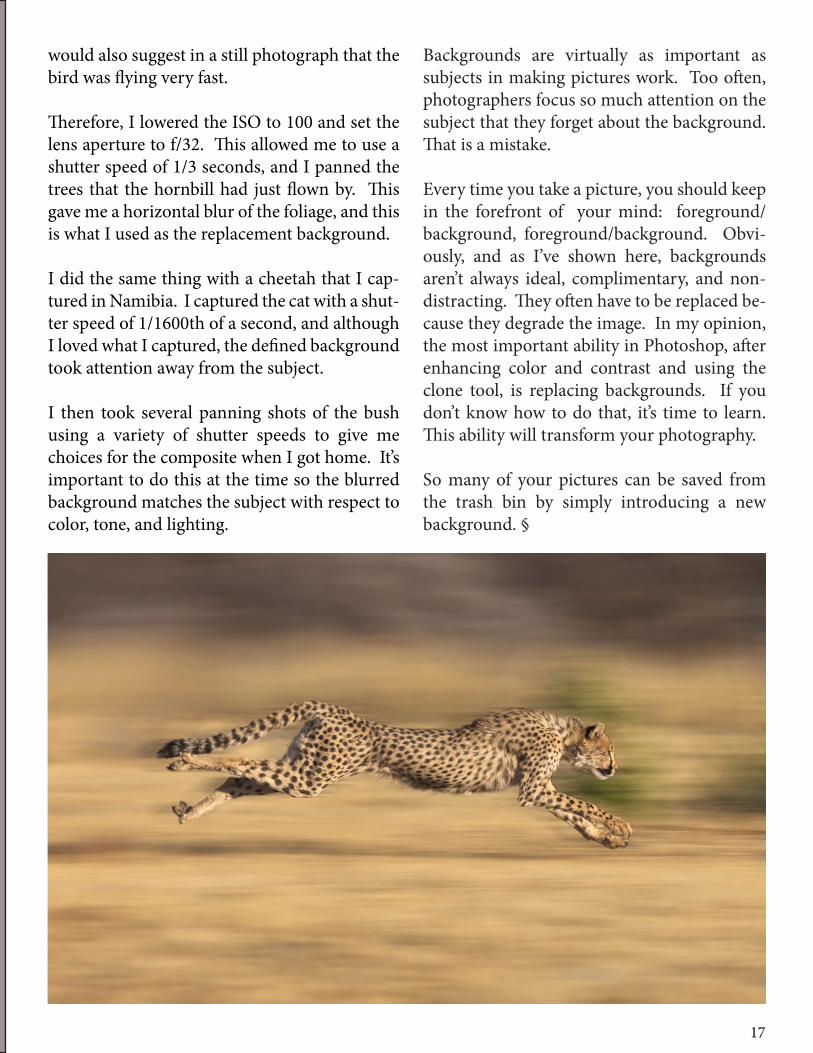
I did the same thing with a cheetah that I cap-tured in Namibia. I captured the cat with a shut-ter speed of 1/1600th of a second, and although I loved what I captured, the defined background took attention away from the subject.
I then took several panning shots of the bush using a variety of shutter speeds to give me choices for the composite when I got home. It’s important to do this at the time so the blurred background matches the subject with respect to color, tone, and lighting.
Backgrounds are virtually as important as subjects in making pictures work. Too often, photographers focus so much attention on the subject that they forget about the background. That is a mistake.
Every time you take a picture, you should keep in the forefront of your mind: foreground/background, foreground/background. Obvi-ously, and as I’ve shown here, backgrounds aren’t always ideal, complimentary, and non-distracting. They often have to be replaced be-cause they degrade the image. In my opinion, the most important ability in Photoshop, after enhancing color and contrast and using the clone tool, is replacing backgrounds. If you don’t know how to do that, it’s time to learn. This ability will transform your photography.
So many of your pictures can be saved from the trash bin by simply introducing a new background. §
18
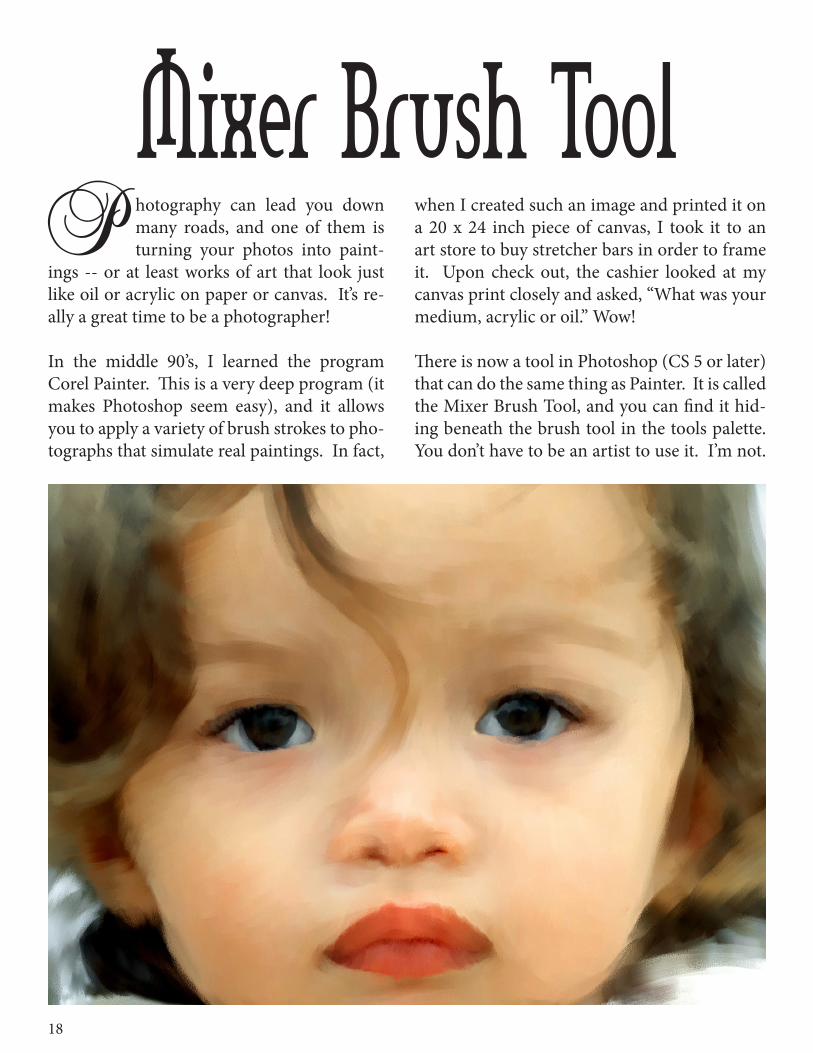
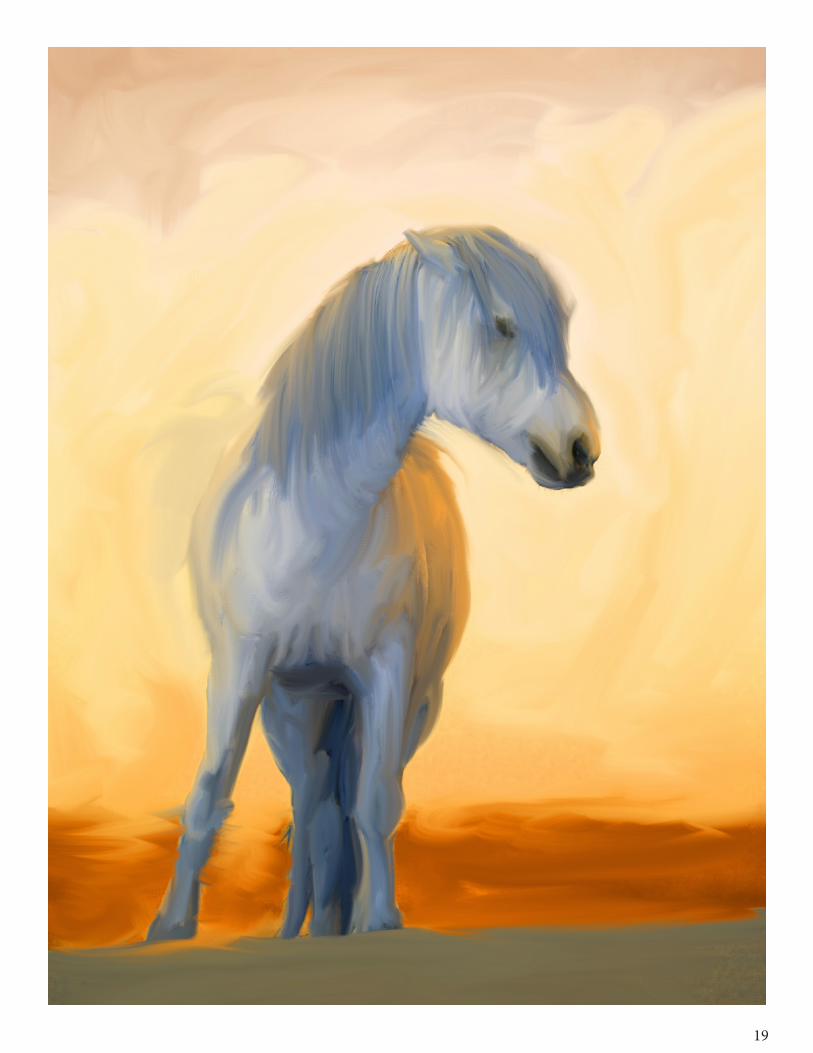
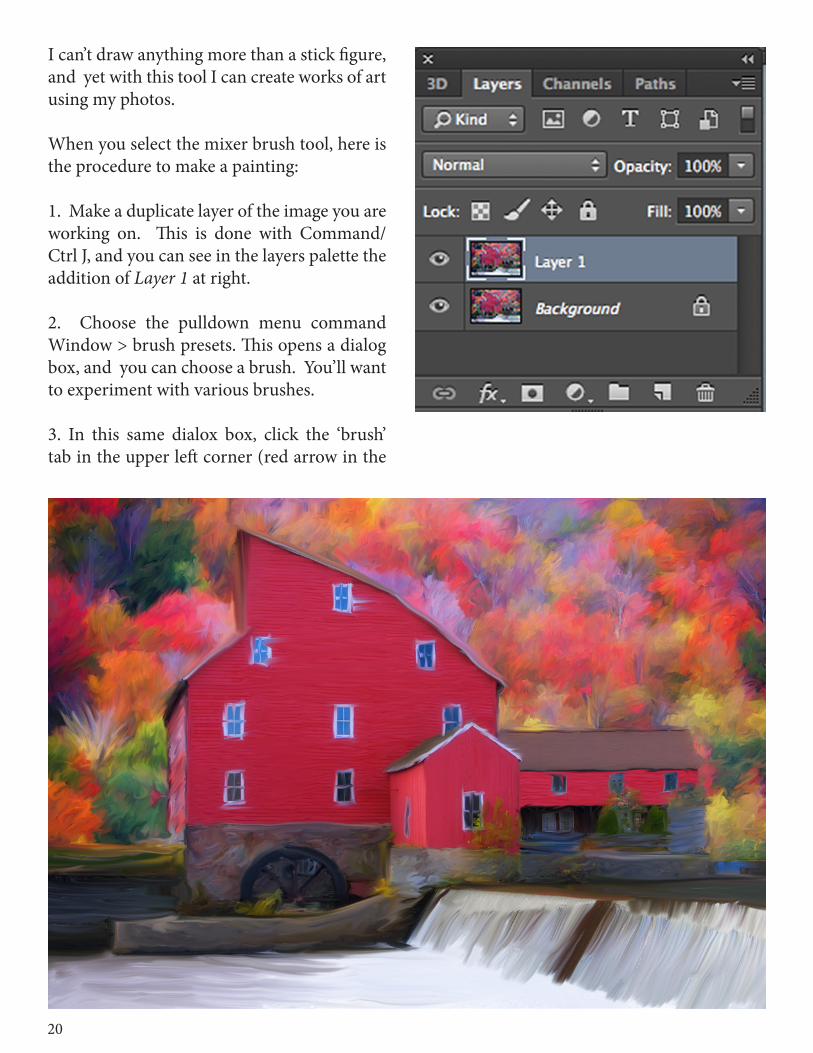
Mixer Brush ToolPhotography can lead you down
many roads, and one of them is turning your photos into paint-
ings -- or at least works of art that look just like oil or acrylic on paper or canvas. It’s re-ally a great time to be a photographer!
In the middle 90’s, I learned the program Corel Painter. This is a very deep program (it makes Photoshop seem easy), and it allows you to apply a variety of brush strokes to pho-tographs that simulate real paintings. In fact,
when I created such an image and printed it on a 20 x 24 inch piece of canvas, I took it to an art store to buy stretcher bars in order to frame it. Upon check out, the cashier looked at my canvas print closely and asked, “What was your medium, acrylic or oil.” Wow!
There is now a tool in Photoshop (CS 5 or later) that can do the same thing as Painter. It is called the Mixer Brush Tool, and you can find it hid-ing beneath the brush tool in the tools palette. You don’t have to be an artist to use it. I’m not.
19
20
I can’t draw anything more than a stick figure, and yet with this tool I can create works of art using my photos.
When you select the mixer brush tool, here is the procedure to make a painting:
1. Make a duplicate layer of the image you are working on. This is done with Command/Ctrl J, and you can see in the layers palette the addition of Layer 1 at right.
2. Choose the pulldown menu command Window > brush presets. This opens a dialog box, and you can choose a brush. You’ll want to experiment with various brushes.
3. In this same dialox box, click the ‘brush’ tab in the upper left corner (red arrow in the
Learning to See online course
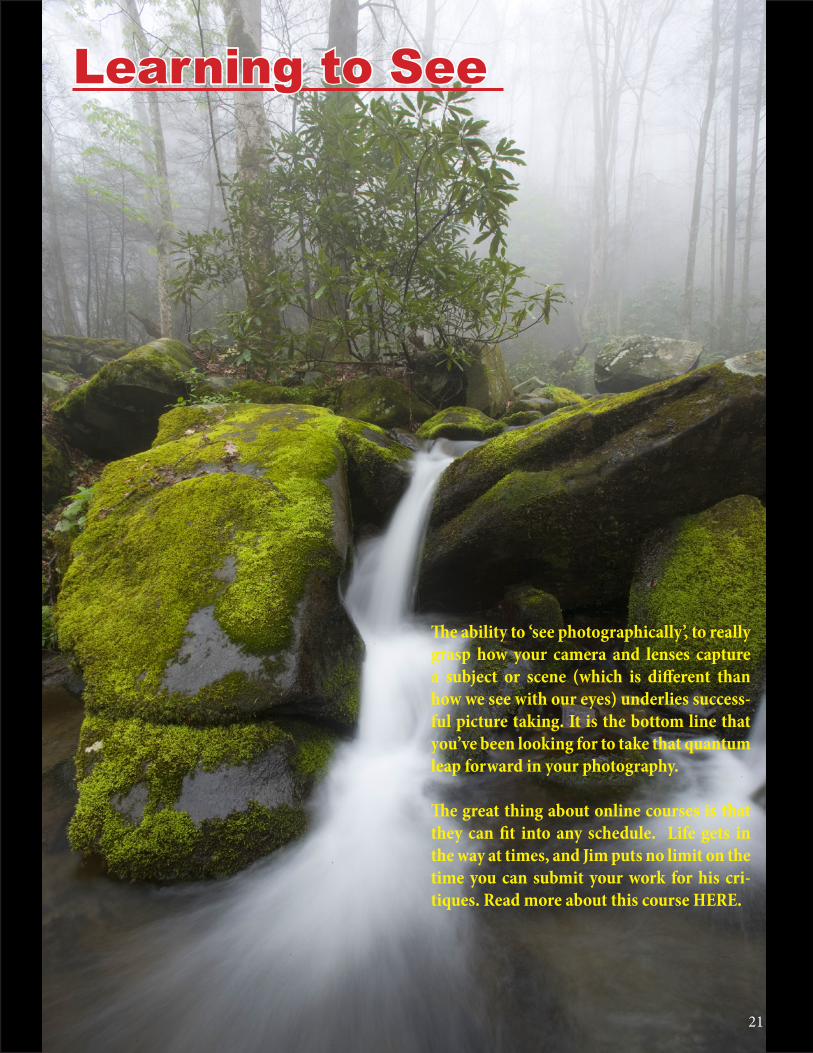
21
Learning to See online course
The ability to ‘see photographically’, to really grasp how your camera and lenses capture a subject or scene (which is different than how we see with our eyes) underlies success-ful picture taking. It is the bottom line that you’ve been looking for to take that quantum leap forward in your photography.
The great thing about online courses is that they can fit into any schedule. Life gets in the way at times, and Jim puts no limit on the time you can submit your work for his cri-tiques. Read more about this course HERE.
21
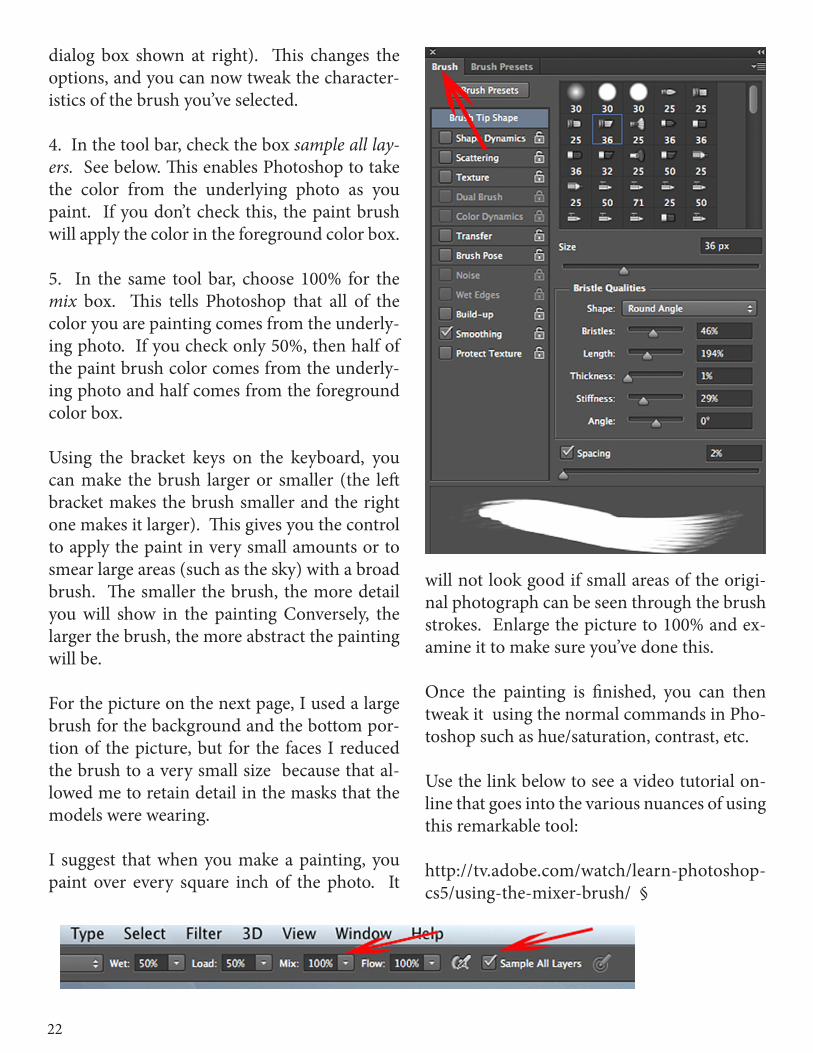
dialog box shown at right). This changes the options, and you can now tweak the character-istics of the brush you’ve selected.
4. In the tool bar, check the box sample all lay-ers. See below. This enables Photoshop to take the color from the underlying photo as you paint. If you don’t check this, the paint brush will apply the color in the foreground color box.
5. In the same tool bar, choose 100% for the mix box. This tells Photoshop that all of the color you are painting comes from the underly-ing photo. If you check only 50%, then half of the paint brush color comes from the underly-ing photo and half comes from the foreground color box.
Using the bracket keys on the keyboard, you can make the brush larger or smaller (the left bracket makes the brush smaller and the right one makes it larger). This gives you the control to apply the paint in very small amounts or to smear large areas (such as the sky) with a broad brush. The smaller the brush, the more detail you will show in the painting Conversely, the larger the brush, the more abstract the painting will be.
For the picture on the next page, I used a large brush for the background and the bottom por-tion of the picture, but for the faces I reduced the brush to a very small size because that al-lowed me to retain detail in the masks that the models were wearing.
I suggest that when you make a painting, you paint over every square inch of the photo. It
will not look good if small areas of the origi-nal photograph can be seen through the brush strokes. Enlarge the picture to 100% and ex-amine it to make sure you’ve done this.
Once the painting is finished, you can then tweak it using the normal commands in Pho-toshop such as hue/saturation, contrast, etc.
Use the link below to see a video tutorial on-line that goes into the various nuances of using this remarkable tool:
http://tv.adobe.com/watch/learn-photoshop-cs5/using-the-mixer-brush/ §
22
23
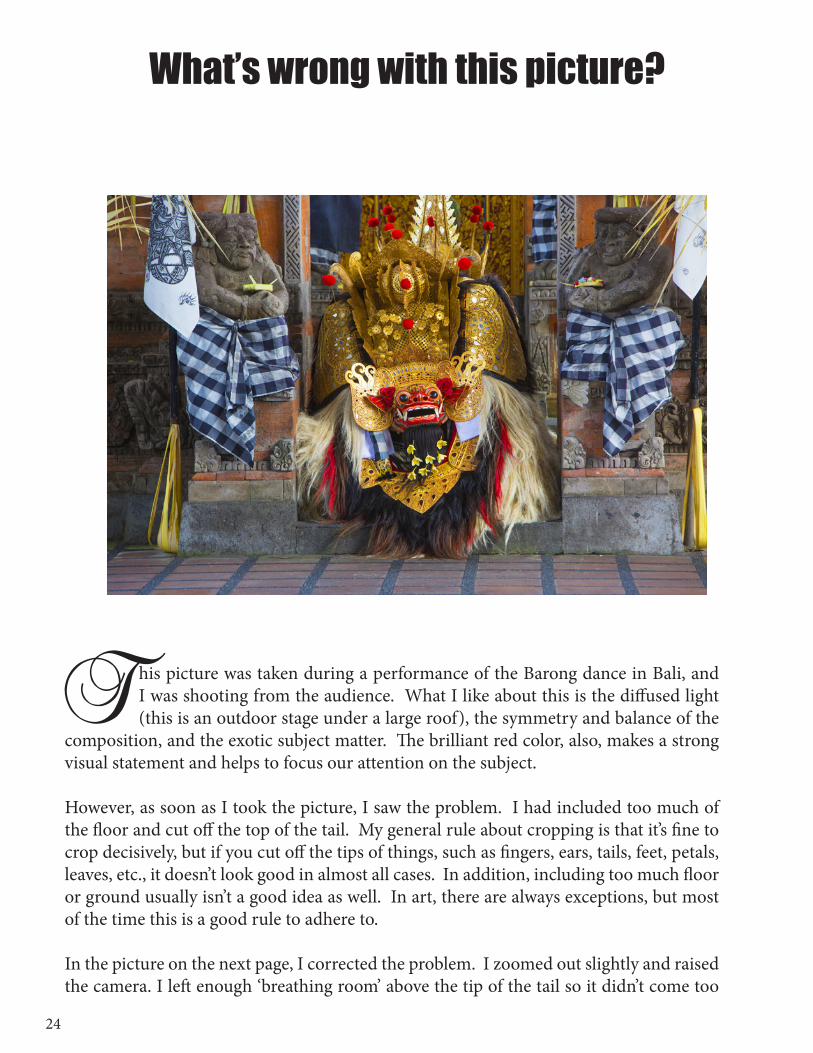
What’s wrong with this picture?
24
This picture was taken during a performance of the Barong dance in Bali, and I was shooting from the audience. What I like about this is the diffused light (this is an outdoor stage under a large roof), the symmetry and balance of the
composition, and the exotic subject matter. The brilliant red color, also, makes a strong visual statement and helps to focus our attention on the subject.
However, as soon as I took the picture, I saw the problem. I had included too much of the floor and cut off the top of the tail. My general rule about cropping is that it’s fine to crop decisively, but if you cut off the tips of things, such as fingers, ears, tails, feet, petals, leaves, etc., it doesn’t look good in almost all cases. In addition, including too much floor or ground usually isn’t a good idea as well. In art, there are always exceptions, but most of the time this is a good rule to adhere to.
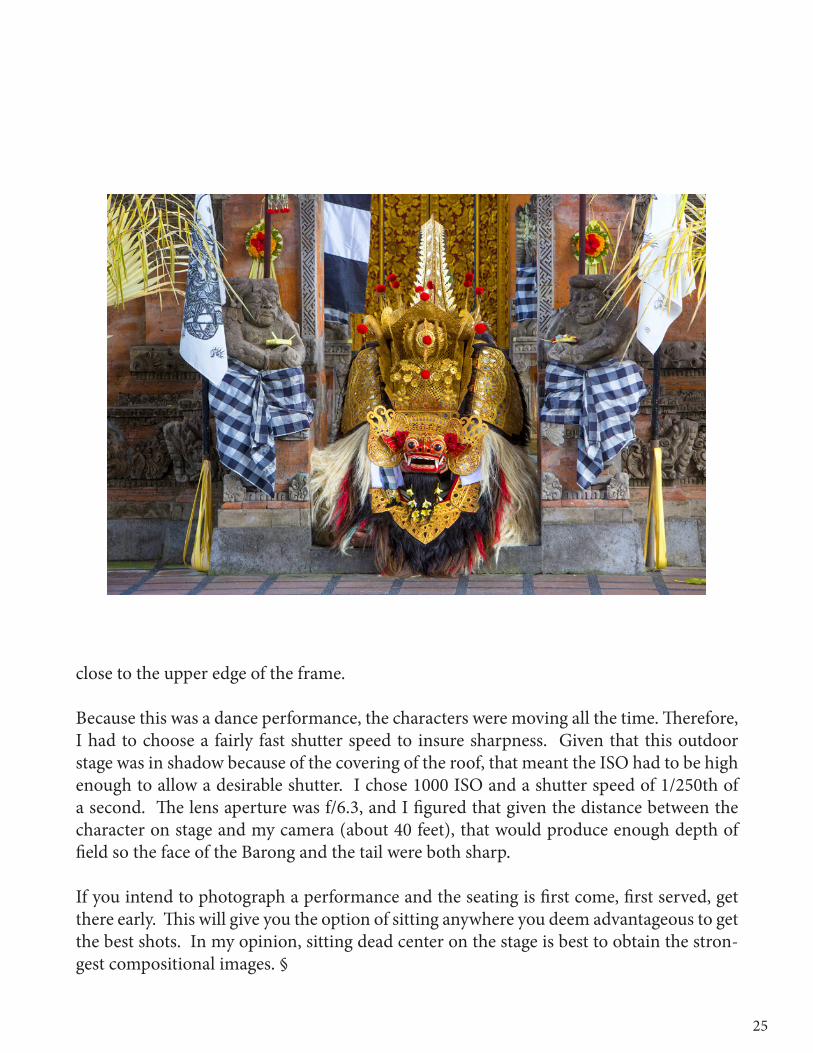
In the picture on the next page, I corrected the problem. I zoomed out slightly and raised the camera. I left enough ‘breathing room’ above the tip of the tail so it didn’t come too
25
close to the upper edge of the frame.
Because this was a dance performance, the characters were moving all the time. Therefore, I had to choose a fairly fast shutter speed to insure sharpness. Given that this outdoor stage was in shadow because of the covering of the roof, that meant the ISO had to be high enough to allow a desirable shutter. I chose 1000 ISO and a shutter speed of 1/250th of a second. The lens aperture was f/6.3, and I figured that given the distance between the character on stage and my camera (about 40 feet), that would produce enough depth of field so the face of the Barong and the tail were both sharp.
If you intend to photograph a performance and the seating is first come, first served, get there early. This will give you the option of sitting anywhere you deem advantageous to get the best shots. In my opinion, sitting dead center on the stage is best to obtain the stron-gest compositional images. §
SHORT AND SWEET
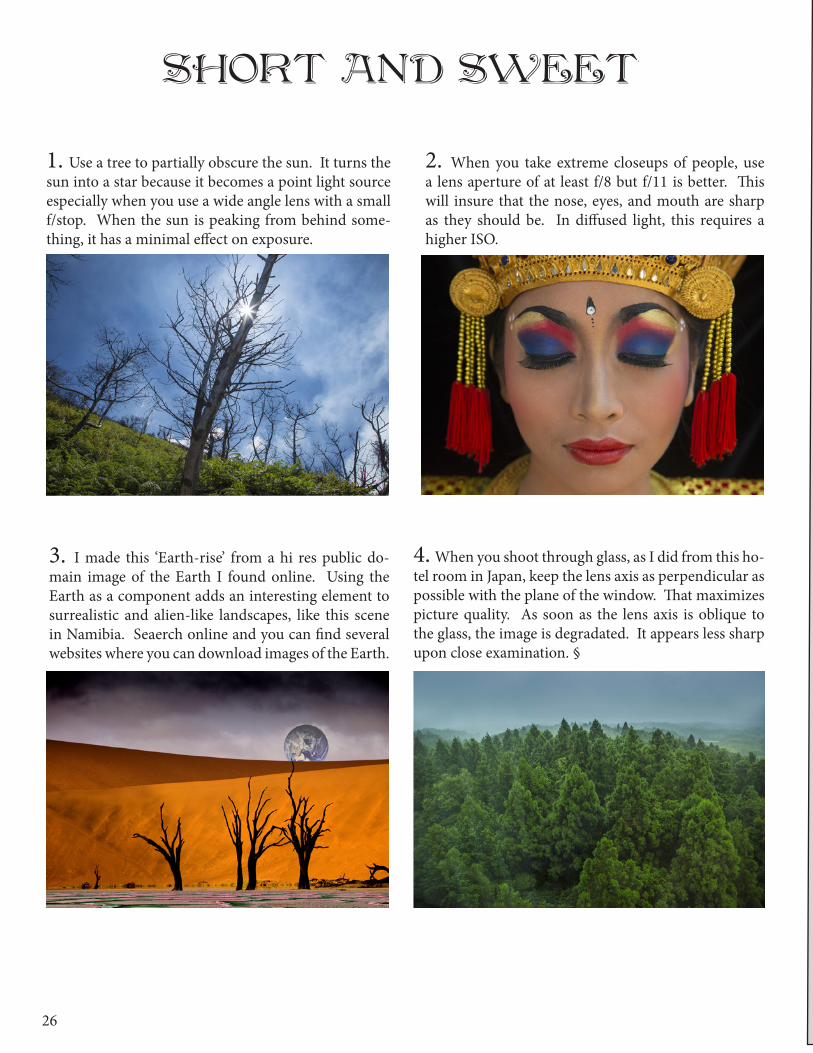
1. Use a tree to partially obscure the sun. It turns the sun into a star because it becomes a point light source especially when you use a wide angle lens with a small f/stop. When the sun is peaking from behind some-thing, it has a minimal effect on exposure.
3. I made this ‘Earth-rise’ from a hi res public do-main image of the Earth I found online. Using the Earth as a component adds an interesting element to surrealistic and alien-like landscapes, like this scene in Namibia. Seaerch online and you can find several websites where you can download images of the Earth.
2. When you take extreme closeups of people, use a lens aperture of at least f/8 but f/11 is better. This will insure that the nose, eyes, and mouth are sharp as they should be. In diffused light, this requires a higher ISO.
4. When you shoot through glass, as I did from this ho-tel room in Japan, keep the lens axis as perpendicular as possible with the plane of the window. That maximizes picture quality. As soon as the lens axis is oblique to the glass, the image is degradated. It appears less sharp upon close examination. §
26
27
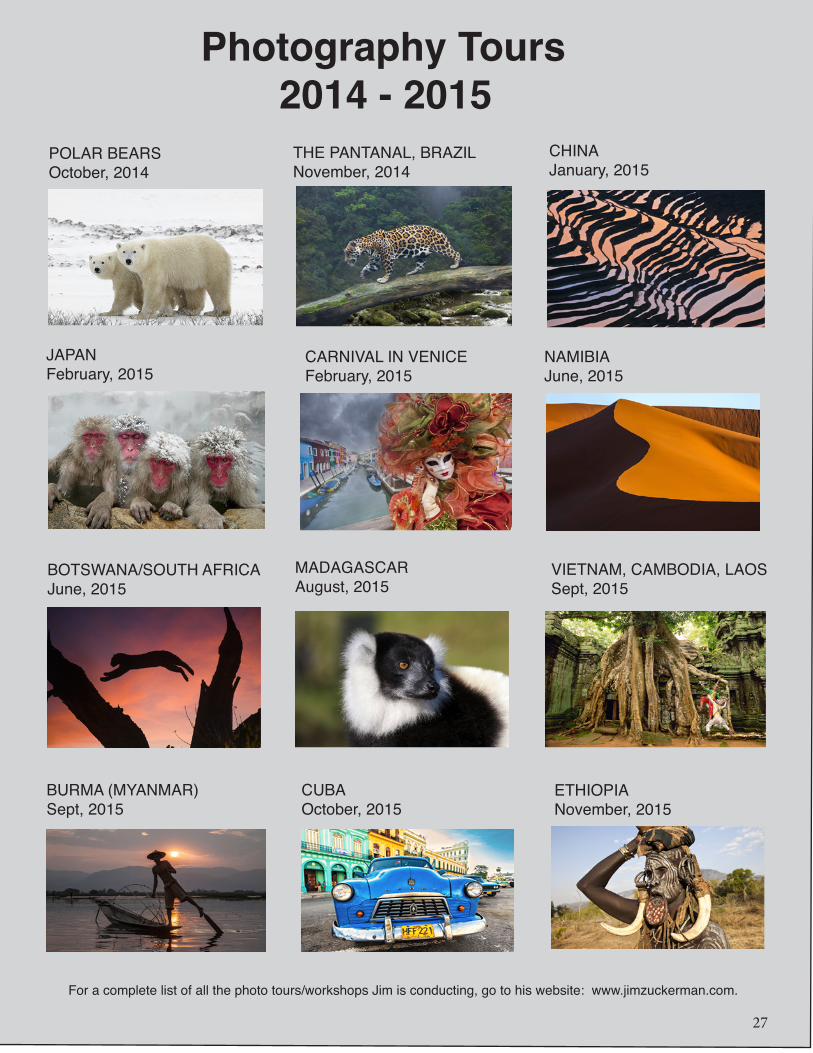
Photography Tours 2014 - 2015
For a complete list of all the photo tours/workshops Jim is conducting, go to his website: www.jimzuckerman.com.
JAPAN February, 2015
CHINA January, 2015
POLAR BEARSOctober, 2014
THE PANTANAL, BRAZILNovember, 2014
NAMIBIAJune, 2015
MADAGASCARAugust, 2015
27
CARNIVAL IN VENICEFebruary, 2015
BOTSWANA/SOUTH AFRICAJune, 2015
CUBAOctober, 2015
ETHIOPIANovember, 2015
VIETNAM, CAMBODIA, LAOSSept, 2015
BURMA (MYANMAR)Sept, 2015

28
ASK JIM Every month Jim will answer a question from his online students, from people who participate in his tours and workshops, or from subscribers to this magazine. If you have a question you’d like Jim to answer, please drop him a note at [email protected].
Q: Jim . . . Do black and white images sell as readily as color pictures in stock photo agencies? Dothe agencies charge the same price for black and white as color?Roberta Ortiz, New York, New York
A: Color pictures sell much more than black and white. Besides, everyone knows they can convertcolor into black and white but you can’t make color from black and white pictures. Therefore, I encourage photographers who are in agencies to submit only color. If you feel strongly about aparticular image and think it has a good chance selling as a monochrome, then submit both thecolor original and the black and white conversion.
The price is determined by the usage of a picture, not whether it’s in color or not.
© Roberta Ortiz 2014
27
Polar bears from ground level
plus arctic foxes, snowy owls, and other wildlife
Oct. 28 - Nov. 3, 2014
29
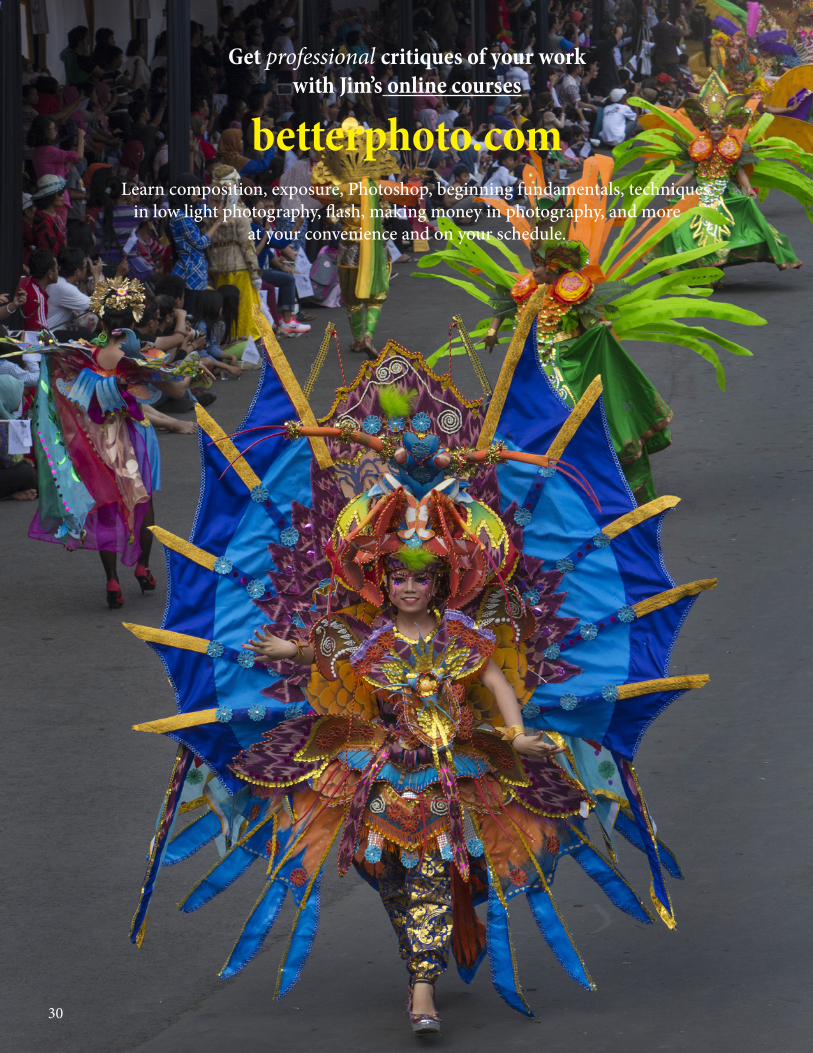
Get professional critiques of your work with Jim’s online courses
Betterphoto.com
20
Get professional critiques of your work with Jim’s online courses
betterphoto.com Learn composition, exposure, Photoshop, beginning fundamentals, techniques
in low light photography, flash, making money in photography, and moreat your convenience and on your schedule.
30
31
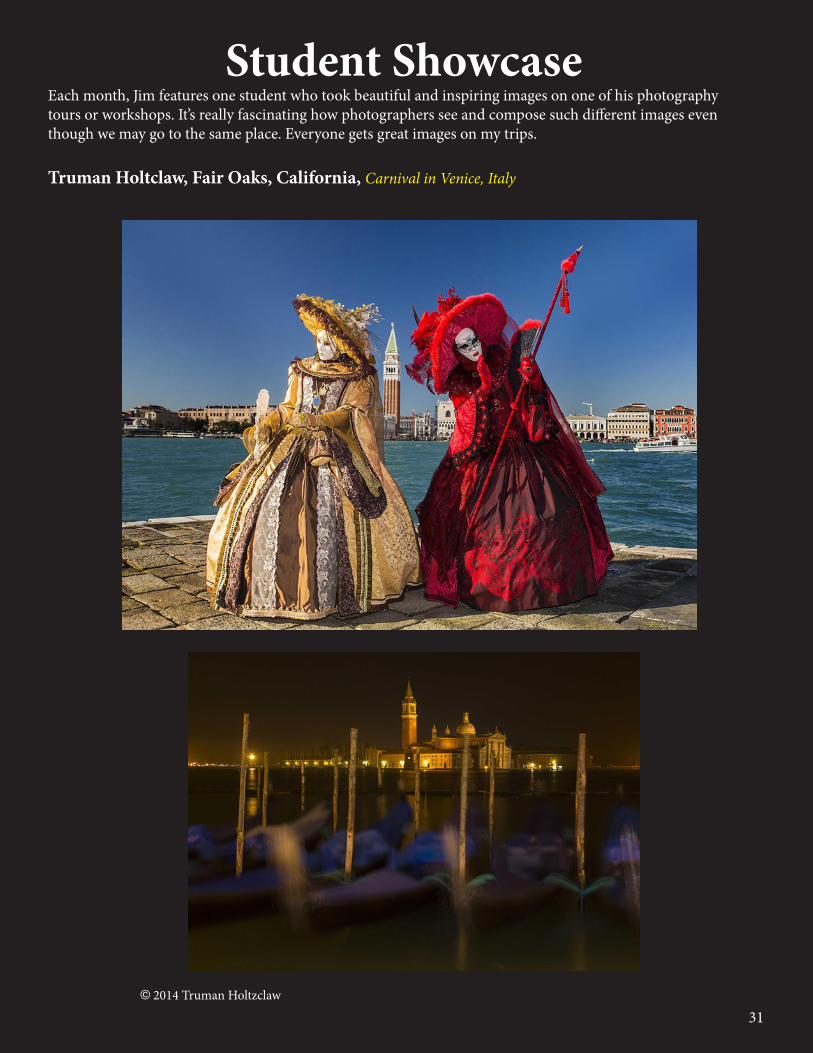
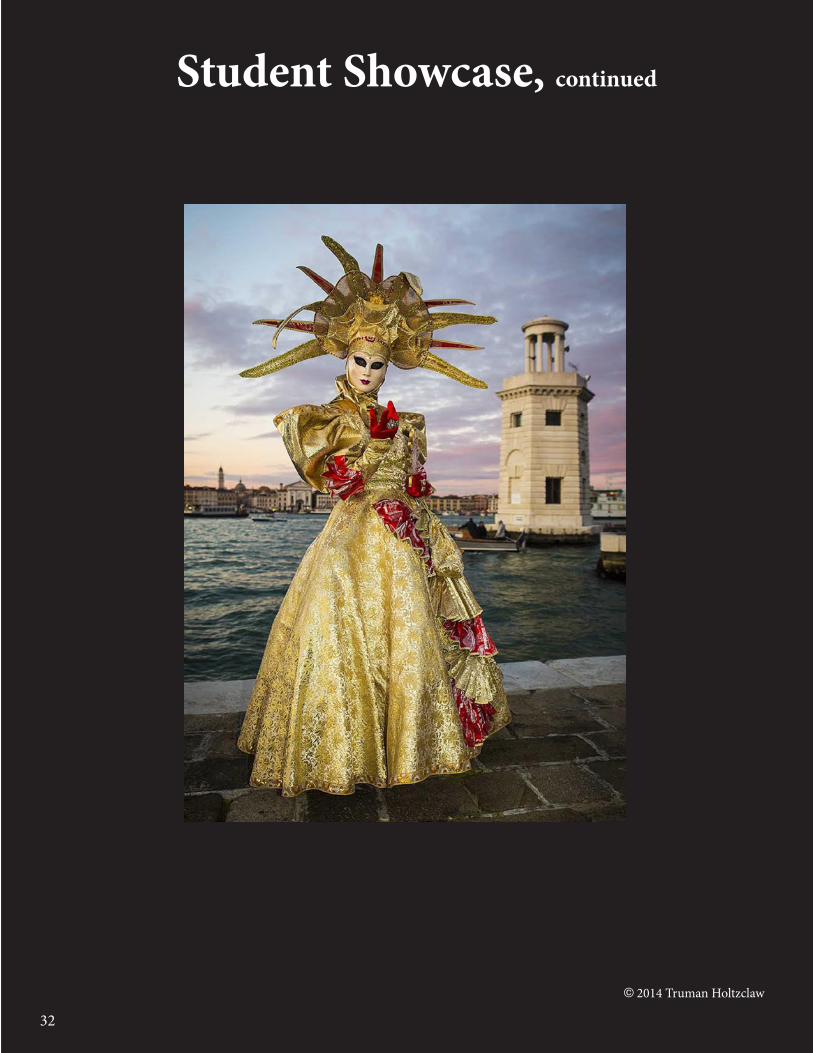
Student ShowcaseEach month, Jim features one student who took beautiful and inspiring images on one of his photography tours or workshops. It’s really fascinating how photographers see and compose such different images even though we may go to the same place. Everyone gets great images on my trips.
Truman Holtclaw, Fair Oaks, California, Carnival in Venice, Italy
31 © 2014 Truman Holtzclaw
3232
© 2014 Truman Holtzclaw
Student Showcase, continued
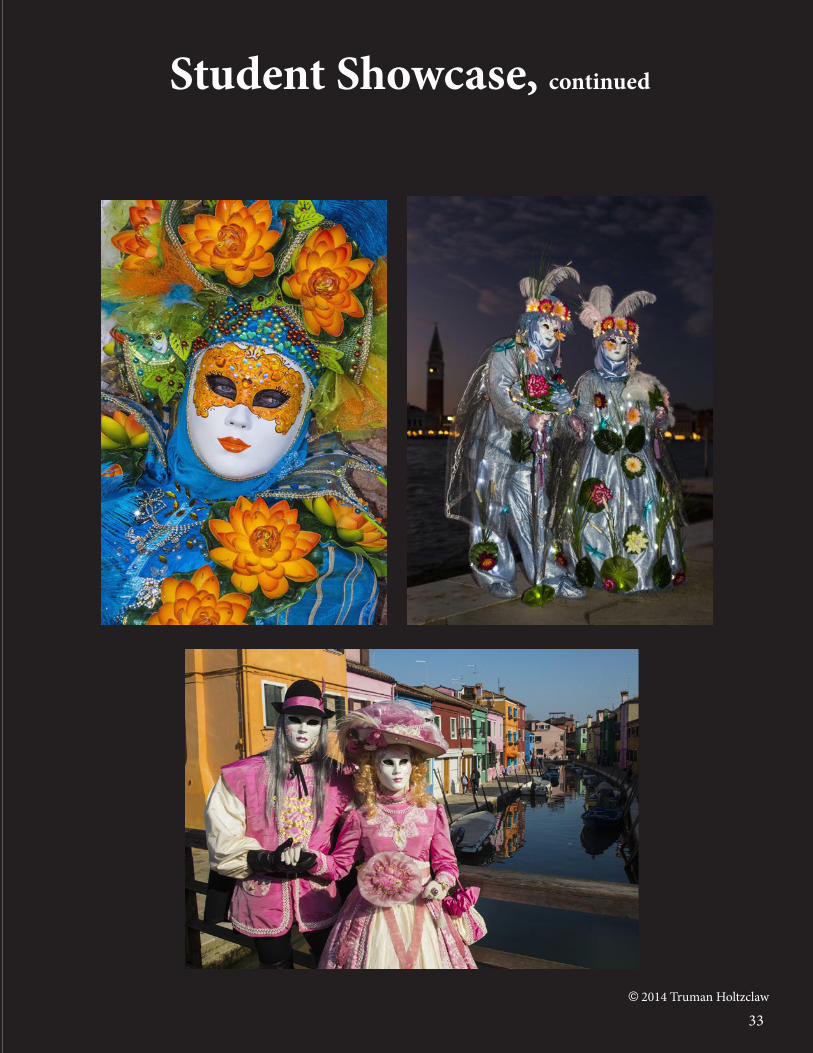
33 © 2014 Truman Holtzclaw
Student Showcase, continued
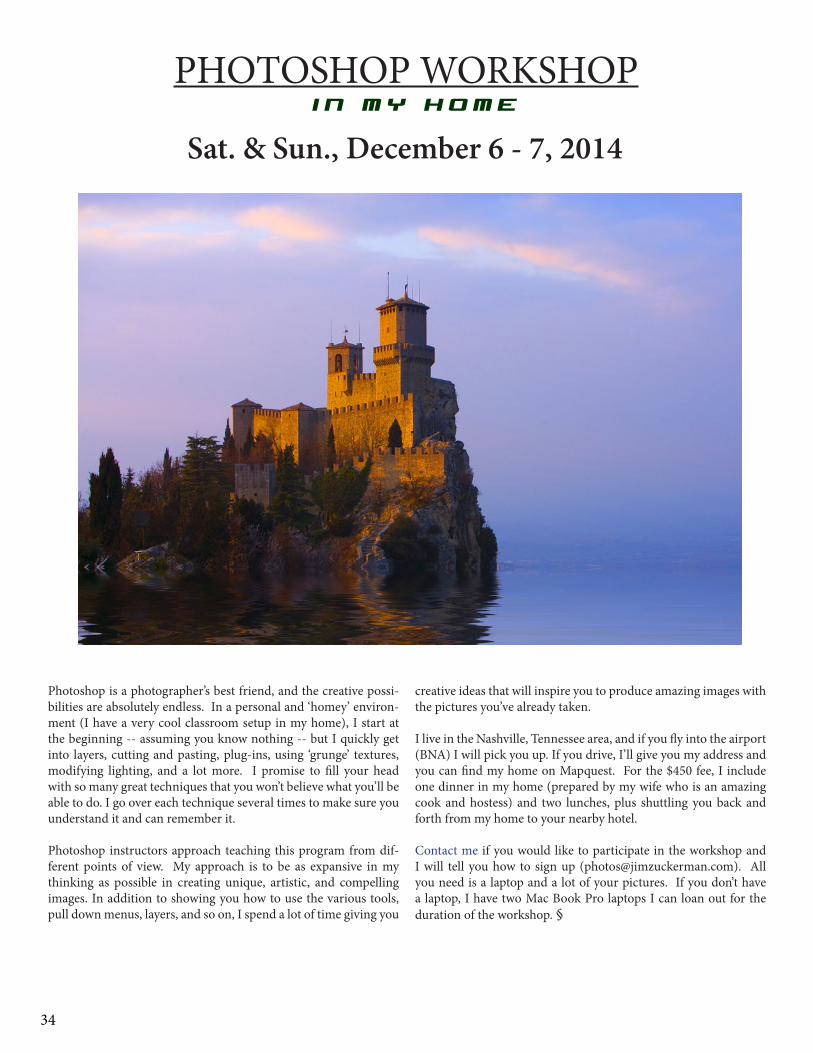
PHOTOSHOP WORKSHOP Sat. & Sun., December 6 - 7, 2014
Photoshop is a photographer’s best friend, and the creative possi-bilities are absolutely endless. In a personal and ‘homey’ environ-ment (I have a very cool classroom setup in my home), I start at the beginning -- assuming you know nothing -- but I quickly get into layers, cutting and pasting, plug-ins, using ‘grunge’ textures, modifying lighting, and a lot more. I promise to fill your head with so many great techniques that you won’t believe what you’ll be able to do. I go over each technique several times to make sure you understand it and can remember it.
Photoshop instructors approach teaching this program from dif-ferent points of view. My approach is to be as expansive in my thinking as possible in creating unique, artistic, and compelling images. In addition to showing you how to use the various tools, pull down menus, layers, and so on, I spend a lot of time giving you
creative ideas that will inspire you to produce amazing images with the pictures you’ve already taken.
I live in the Nashville, Tennessee area, and if you fly into the airport (BNA) I will pick you up. If you drive, I’ll give you my address and you can find my home on Mapquest. For the $450 fee, I include one dinner in my home (prepared by my wife who is an amazing cook and hostess) and two lunches, plus shuttling you back and forth from my home to your nearby hotel.
Contact me if you would like to participate in the workshop and I will tell you how to sign up ([email protected]). All you need is a laptop and a lot of your pictures. If you don’t have a laptop, I have two Mac Book Pro laptops I can loan out for the duration of the workshop. §
i n m y h o m e
34
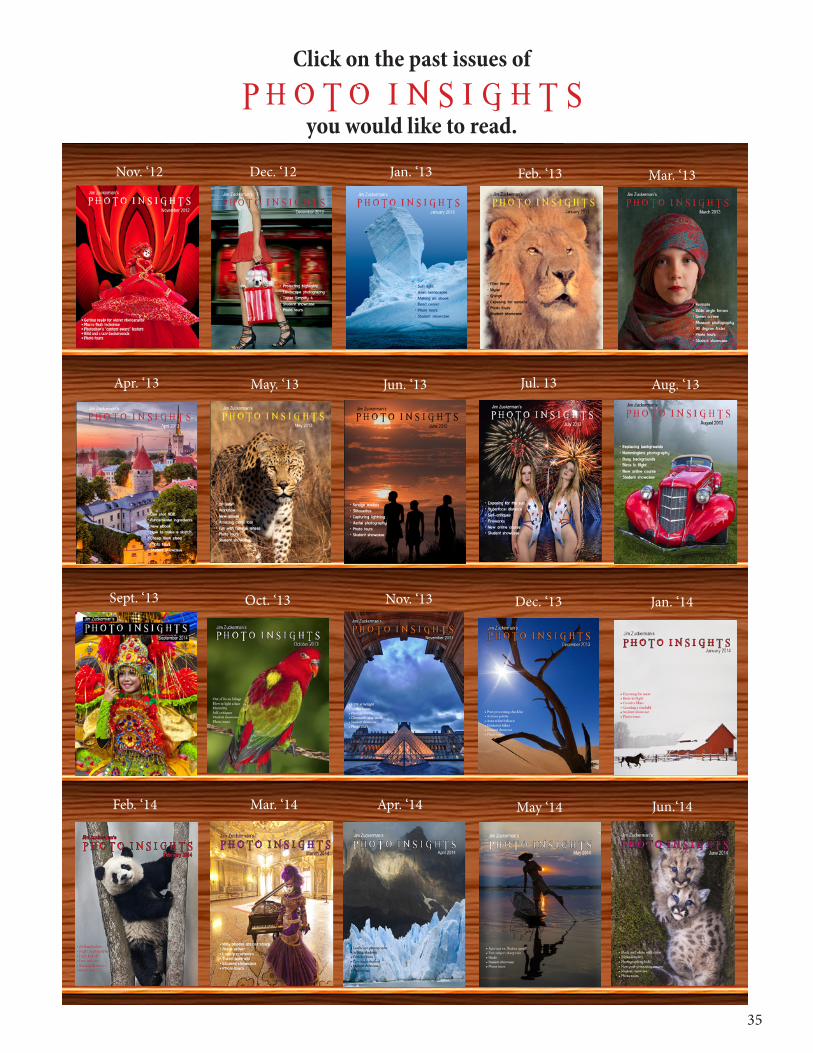
Nov. ‘12 Dec. ‘12 Jan. ‘13
Click on the past issues of P H O T O I N S I G H T S
you would like to read.
Feb. ‘13
35
Mar. ‘13
Apr. ‘13 May. ‘13 Jun. ‘13 Jul. 13 Aug. ‘13
Sept. ‘13
Feb. ‘14 Mar. ‘14 Apr. ‘14 May ‘14 Jun.‘14
Oct. ‘13 Nov. ‘13 Dec. ‘13 Jan. ‘14
Click on the past issues of P H O T O I N S I G H T S
you would like to read.
Jul.‘14 Aug. ‘14 Sept. ‘14
36
37
PHOTO INSIGHTS®published by Jim Zuckerman, all rights reserved
© Jim Zuckerman 2014 email: [email protected]
physical address: P.O. Box 7, Arrington, TN 37014