photographer instruction manual forrt5.cceb.med.upenn.edu/public/idx/idxphotographermanual.pdf ·...
TRANSCRIPT
Photographer Instruction Manual For:
A Multicenter Masked Study to compare analysis of the detection program IDx-DR
against Standard of Care Clinical Examination by Ophthalmologists to Differentiate
Levels of Diabetic Retinopathy and Diabetic Macular Edema.
Introduction
This study will compare grading of diabetic retinopathy and diabetic macular edema
determined by an ophthalmologist’s examination, a Reading Center’s Evaluation of the
digital photographs and a computer detection program analyzing the same
photographs. Obtaining excellent images of two fields of the retina in each eye is critical
to the success of the study. This manual will describe how to obtain excellent images
and then download them onto an internet server called Webscreen, which is available at
http://rt5.cceb.med.upenn.edu/idx_home.html
Goals of Photography
The photographer’s goal is to obtain two high-quality, 45° images of each eye with the
Topcon NW 200 fundus camera. The cameras and the Topcon User’s Manual have
been shipped to you. One image should be centered on the macula. The other image
should show the nasal retina but the entire optic disc should still be visible. This means
that the optic disc of the right eye should be on the far left of the image at 9:00 o’clock
and the disc in the left eye should be on the far right of the image at 3:00 o’clock. (See
figures and examples below. These were taken on a different camera, but they clearly
show which areas to capture)
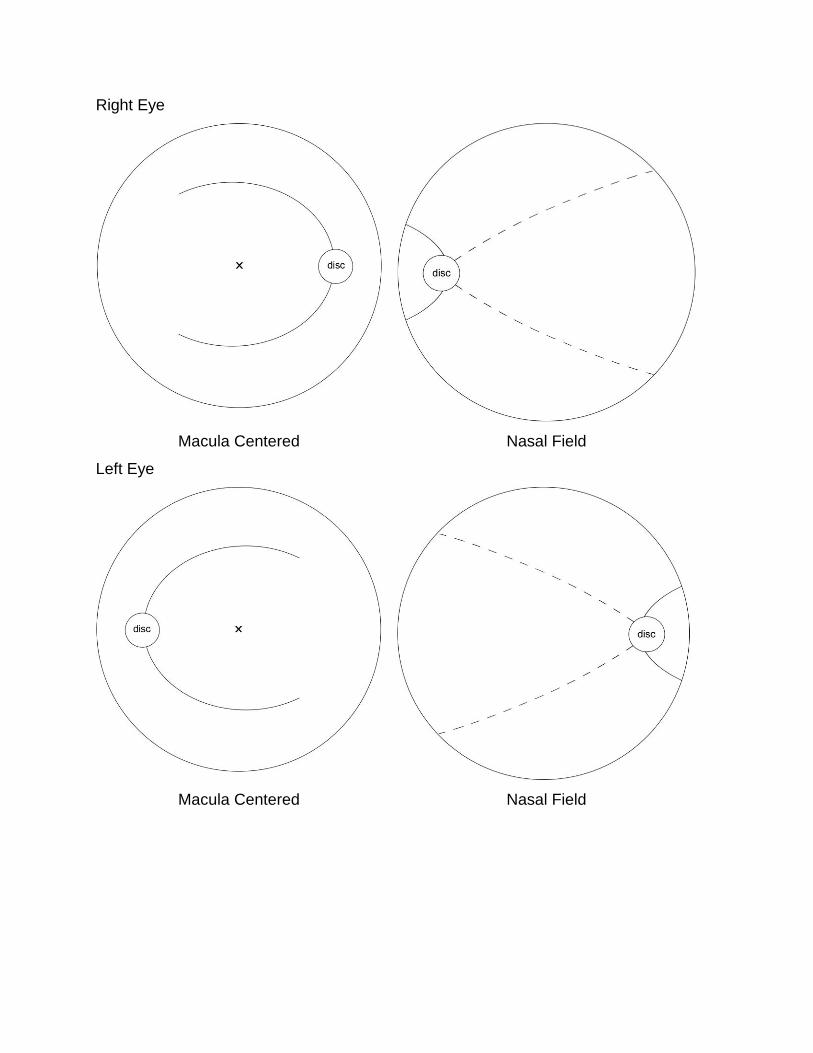
Right Eye
Macula Centered Nasal Field
Left Eye
Macula Centered Nasal Field

The following images were not taken with the Topcon Camera that will be used in the
study, but they do show the required photographic fields.
Right Macula Centered. Example taken
with a different camera type to show the
area to image
Right Nasal Field (disc should be slightly
lower at 9:00). Example taken with a
different camera type to show the area
to image
Left Macula Centered. Example taken
with a different camera type to show the
area to image
Left Nasal Field (disc should be closer to
edge of photo and IOL reflection).
Example taken with a different camera
type to show the area to image
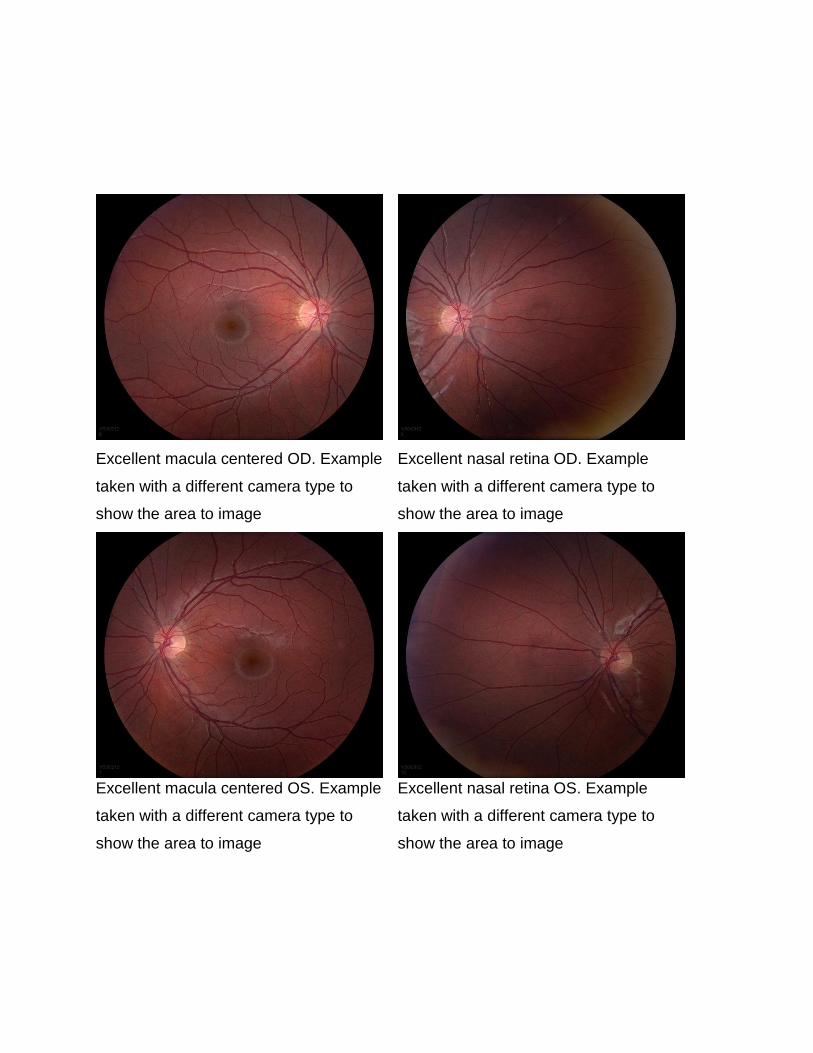
Excellent macula centered OD. Example
taken with a different camera type to
show the area to image
Excellent nasal retina OD. Example
taken with a different camera type to
show the area to image
Excellent macula centered OS. Example
taken with a different camera type to
show the area to image
Excellent nasal retina OS. Example
taken with a different camera type to
show the area to image

In order to capture the nasal field you will have to switch to the cameras external fixation
target. The best way to capture the images would be to take the right eye with the
internal fixation for the macula and then switch to the external fixation and direct the
patients gaze to get the nasal field. Then take the nasal field of the left eye with the
external fixation and switch back to the internal fixation and capture the macula.
Often you will have to take more than 2 photographs of each eye. You should check
the quality and positioning of the photographs while the patient is in the chair so you can
take additional images if necessary.
You should then pick out the best macula centered image of each eye and the best
nasal retina image of each eye and enter them on Webscreen. (Instructions on how to
access Webscreen and enter images are given below) This means for each subject,
you will enter four images. You should use the study ID given to you by the Study
Coordinator or Investigator. You may, of course, keep images on your image system for
later use by the doctors.
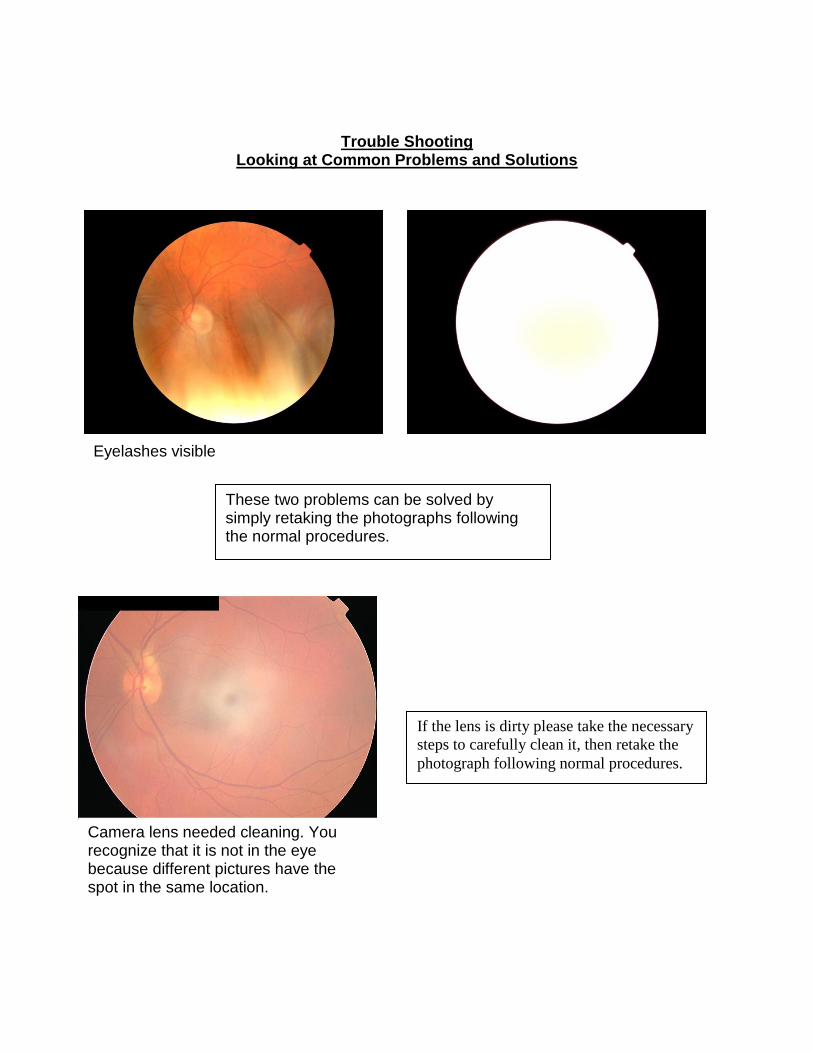
Trouble Shooting Looking at Common Problems and Solutions
Eyelashes visible
Camera lens needed cleaning. You recognize that it is not in the eye because different pictures have the spot in the same location.
If the lens is dirty please take the necessary
steps to carefully clean it, then retake the
photograph following normal procedures.
These two problems can be solved by simply retaking the photographs following the normal procedures.
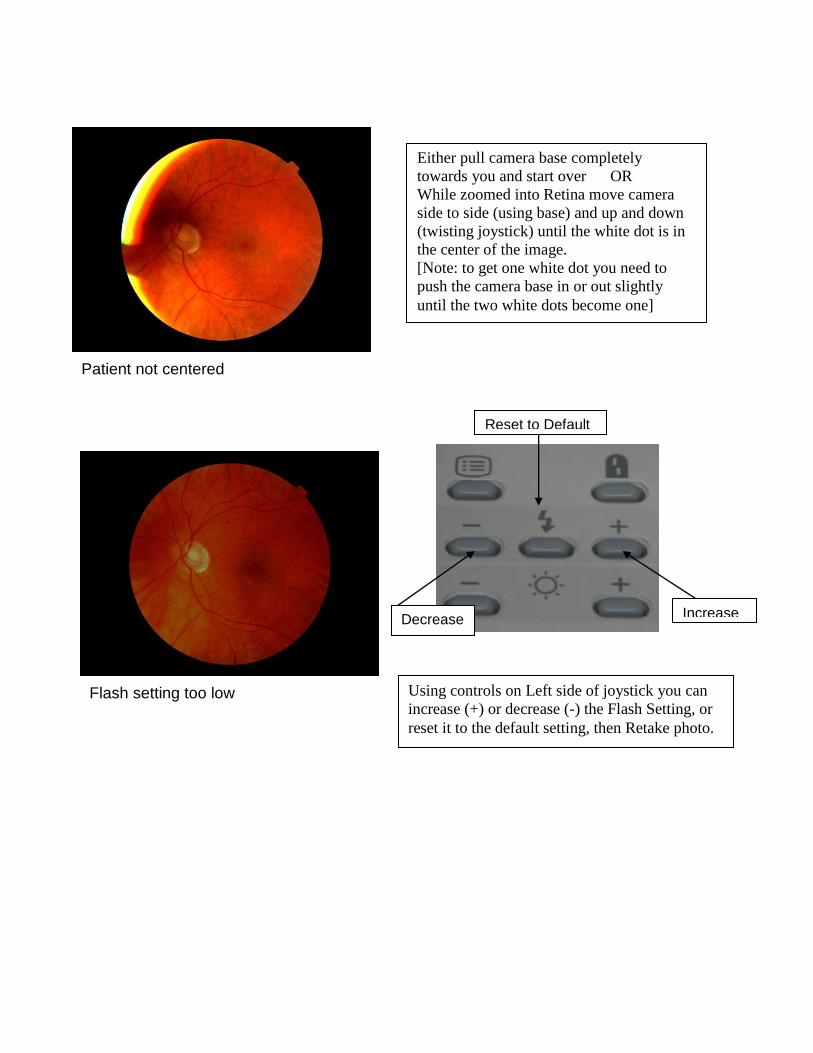
Patient not centered
Flash setting too low
Either pull camera base completely
towards you and start over OR
While zoomed into Retina move camera
side to side (using base) and up and down
(twisting joystick) until the white dot is in
the center of the image.
[Note: to get one white dot you need to
push the camera base in or out slightly
until the two white dots become one]
Using controls on Left side of joystick you can
increase (+) or decrease (-) the Flash Setting, or
reset it to the default setting, then Retake photo.
Decrease
Increase
Reset to Default
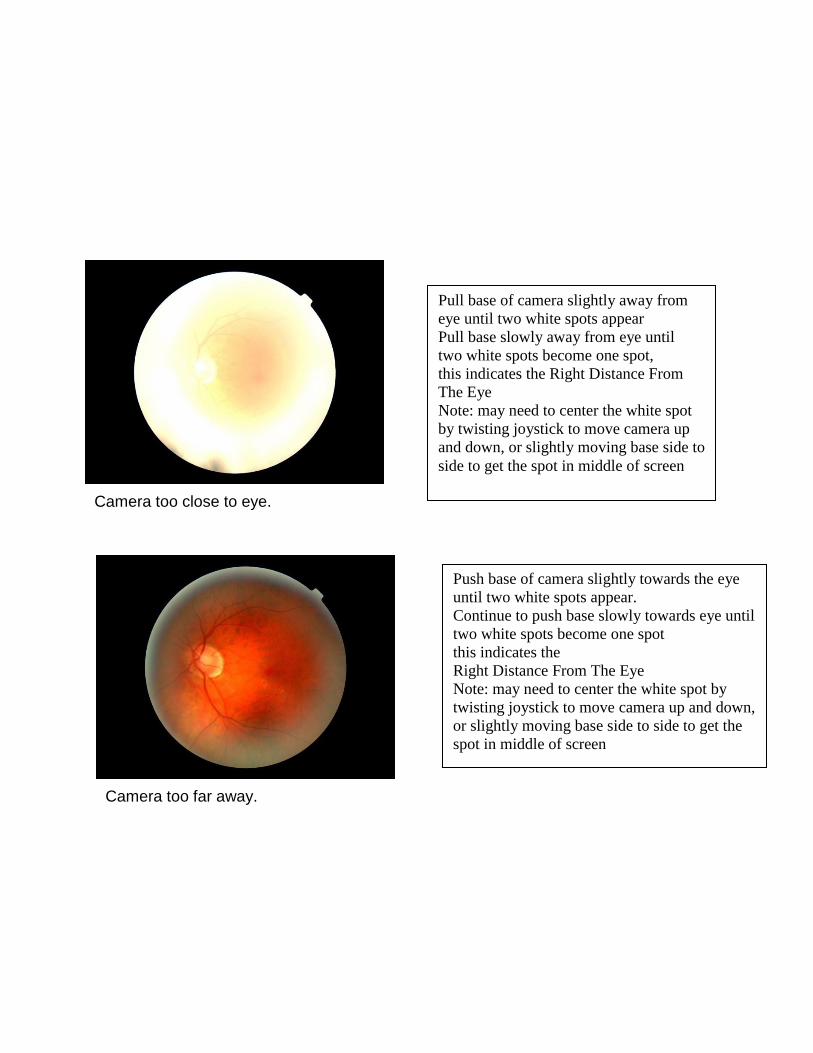
Camera too close to eye.
Pull base of camera slightly away from
eye until two white spots appear
Pull base slowly away from eye until
two white spots become one spot,
this indicates the Right Distance From
The Eye
Note: may need to center the white spot
by twisting joystick to move camera up
and down, or slightly moving base side to
side to get the spot in middle of screen
Camera too far away.
Push base of camera slightly towards the eye
until two white spots appear.
Continue to push base slowly towards eye until
two white spots become one spot
this indicates the
Right Distance From The Eye
Note: may need to center the white spot by
twisting joystick to move camera up and down,
or slightly moving base side to side to get the
spot in middle of screen
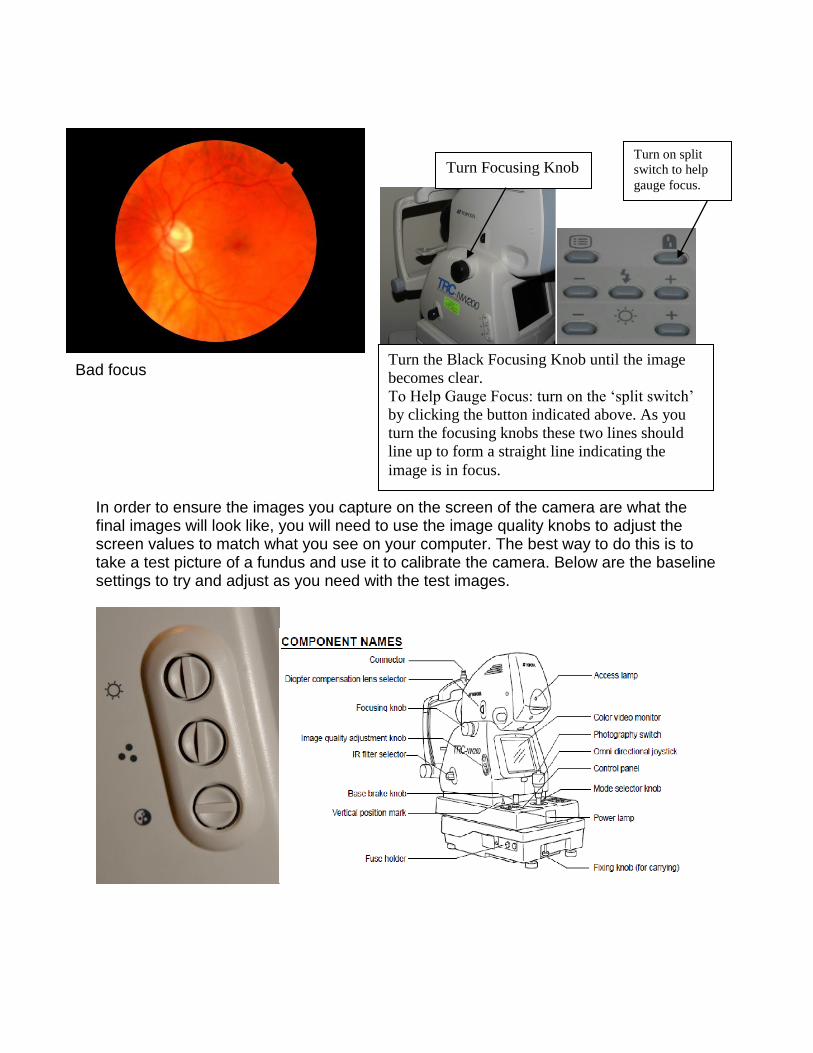
In order to ensure the images you capture on the screen of the camera are what the final images will look like, you will need to use the image quality knobs to adjust the screen values to match what you see on your computer. The best way to do this is to take a test picture of a fundus and use it to calibrate the camera. Below are the baseline settings to try and adjust as you need with the test images.
Bad focus
Turn Focusing Knob Turn on split
switch to help
gauge focus.
Turn the Black Focusing Knob until the image
becomes clear.
To Help Gauge Focus: turn on the ‘split switch’
by clicking the button indicated above. As you
turn the focusing knobs these two lines should
line up to form a straight line indicating the
image is in focus.
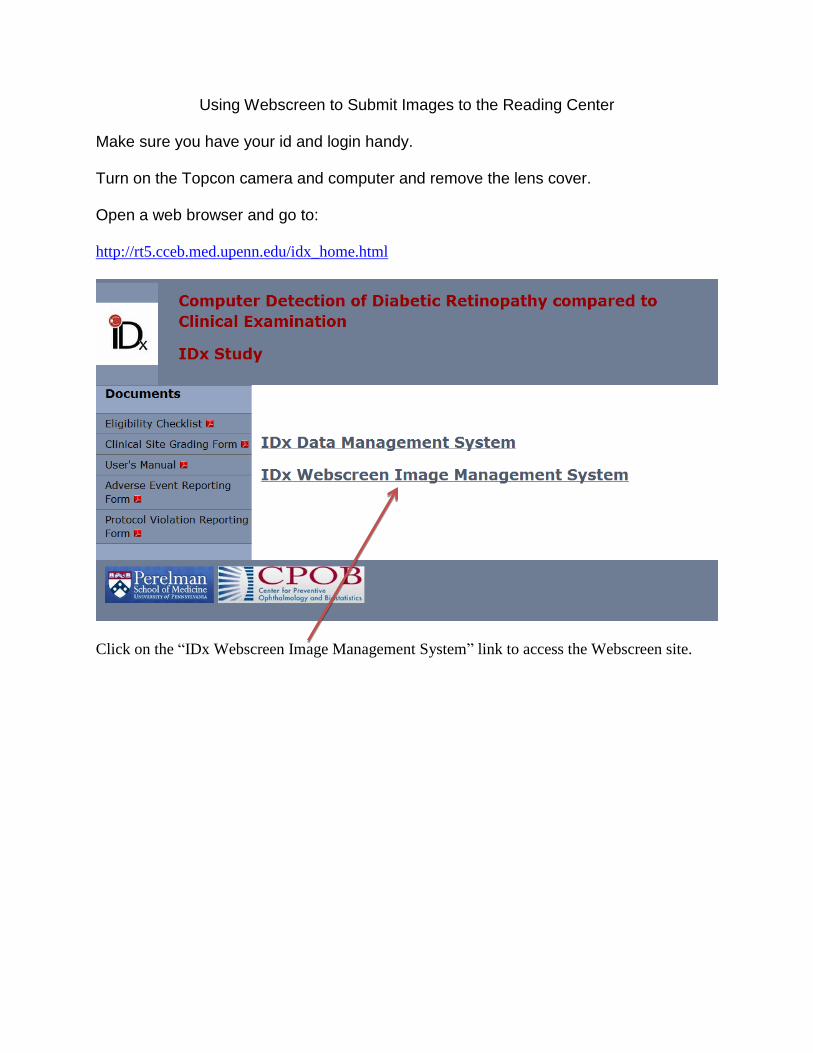
Using Webscreen to Submit Images to the Reading Center Make sure you have your id and login handy. Turn on the Topcon camera and computer and remove the lens cover. Open a web browser and go to: http://rt5.cceb.med.upenn.edu/idx_home.html
Click on the “IDx Webscreen Image Management System” link to access the Webscreen site.
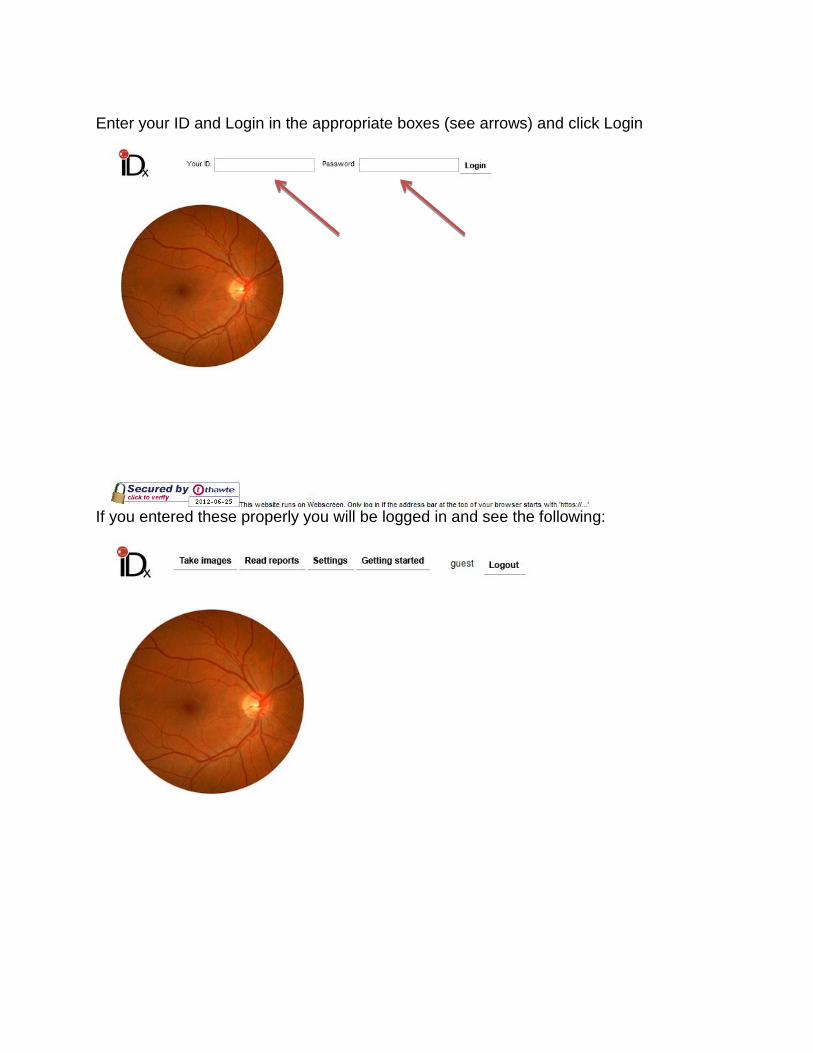
Enter your ID and Login in the appropriate boxes (see arrows) and click Login
If you entered these properly you will be logged in and see the following:
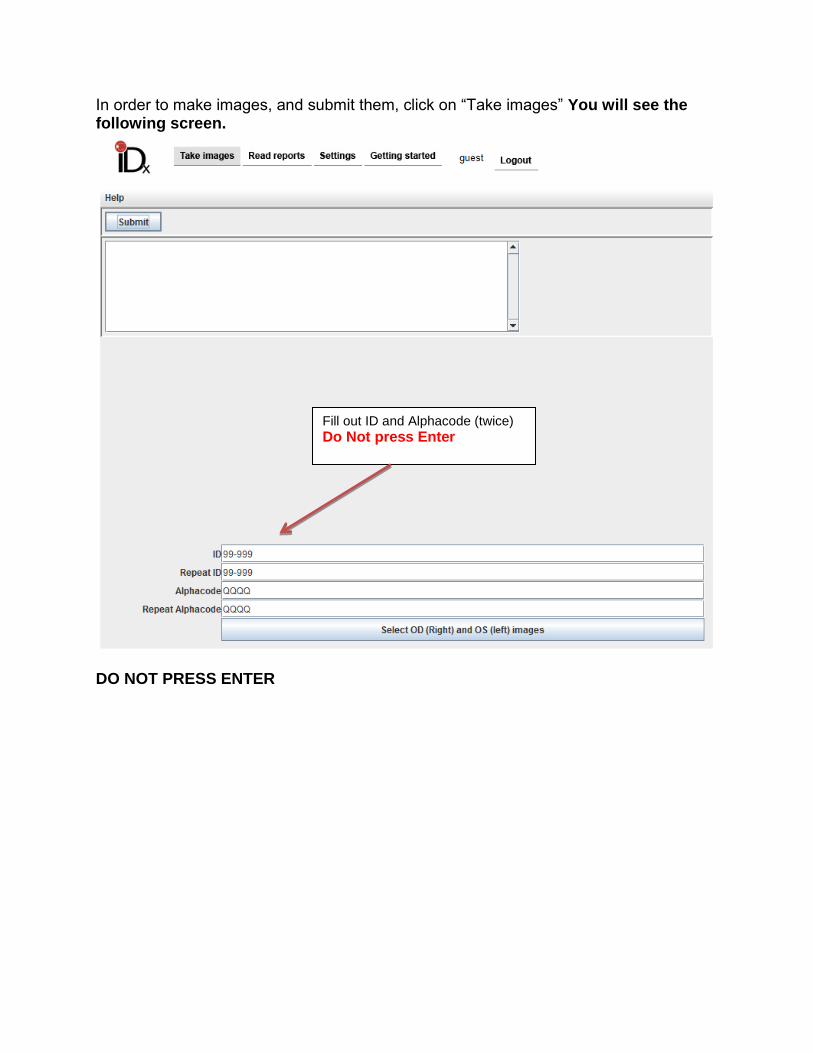
In order to make images, and submit them, click on “Take images” You will see the following screen.
DO NOT PRESS ENTER
Fill out ID and Alphacode (twice)
Do Not press Enter
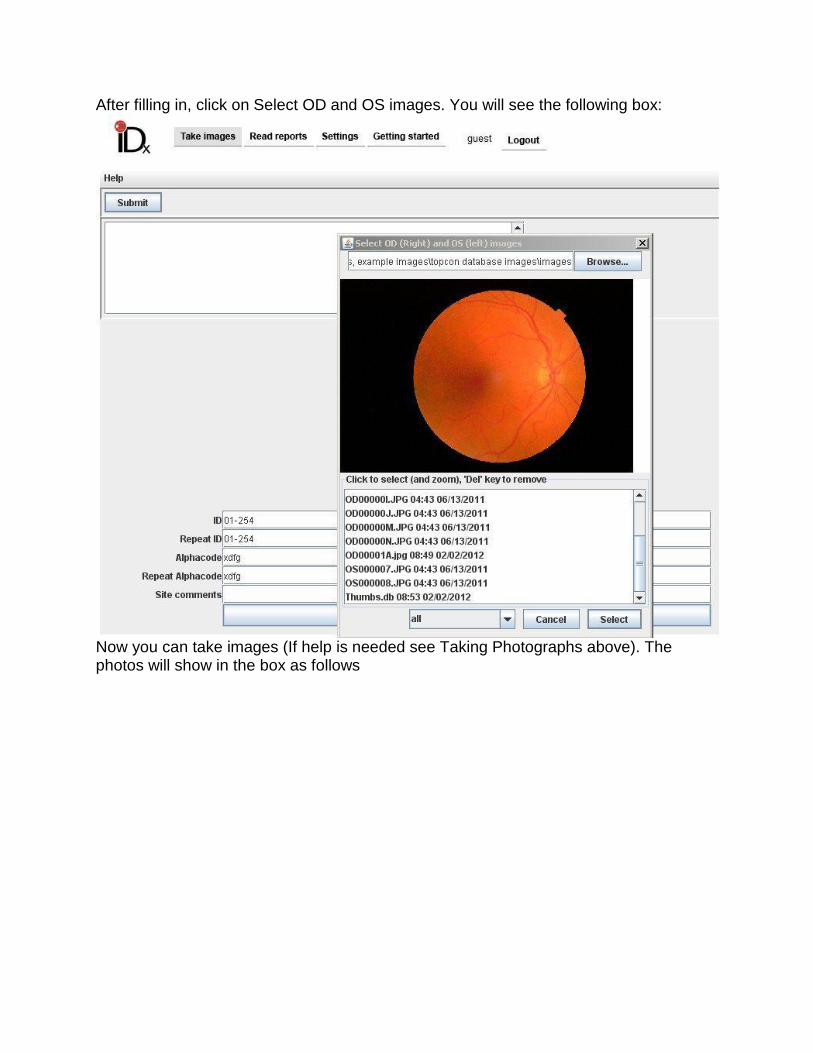
After filling in, click on Select OD and OS images. You will see the following box:
Now you can take images (If help is needed see Taking Photographs above). The photos will show in the box as follows
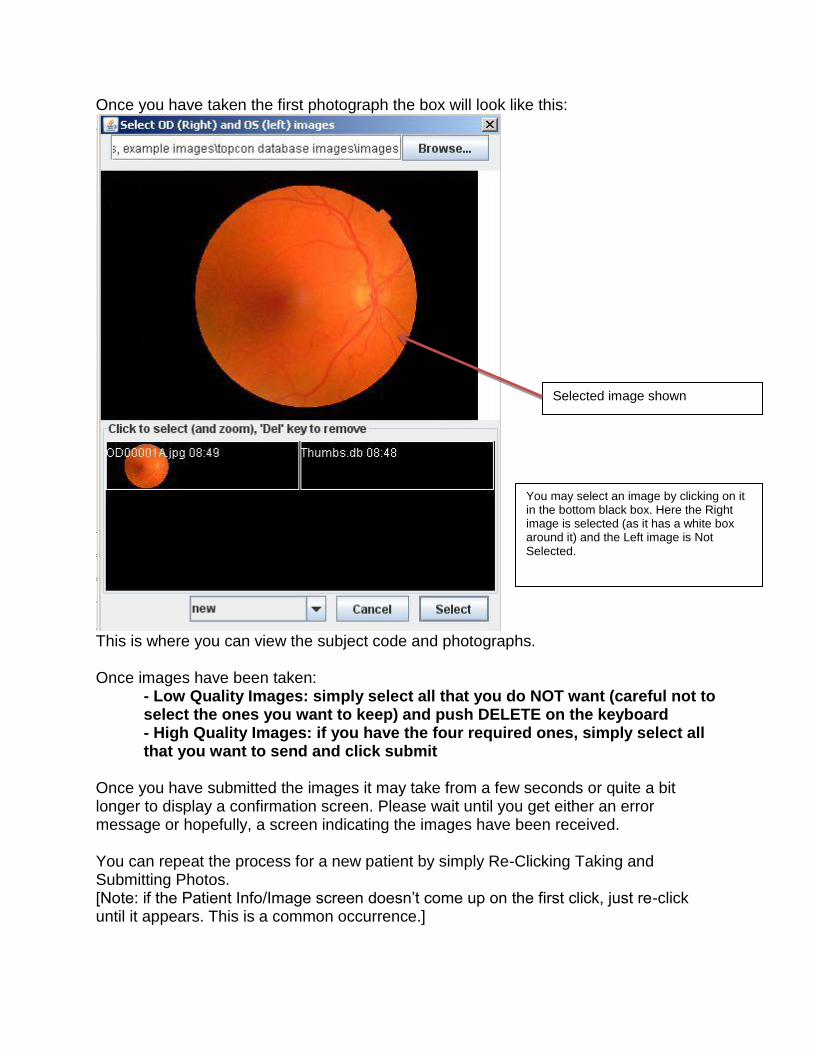
Once you have taken the first photograph the box will look like this:
This is where you can view the subject code and photographs. Once images have been taken:
- Low Quality Images: simply select all that you do NOT want (careful not to select the ones you want to keep) and push DELETE on the keyboard - High Quality Images: if you have the four required ones, simply select all that you want to send and click submit
Once you have submitted the images it may take from a few seconds or quite a bit longer to display a confirmation screen. Please wait until you get either an error message or hopefully, a screen indicating the images have been received. You can repeat the process for a new patient by simply Re-Clicking Taking and Submitting Photos. [Note: if the Patient Info/Image screen doesn’t come up on the first click, just re-click until it appears. This is a common occurrence.]
Selected image shown
You may select an image by clicking on it in the bottom black box. Here the Right image is selected (as it has a white box around it) and the Left image is Not Selected.

You may also view ALL images that have been taken -From Today: Select pull down menu from image box, select TODAY -From Clinic: Select pull down menu from image box, select ALL
You should enter the macula centered photograph followed by a nasal field photograph of the right eye. The fields and locations of the macula and optic disc have been described and shown in the first part of this manual. Next you should enter the macula centered and nasal field photography of the left eye. Contact Information for Questions/Problems: Webscreen Problems: [email protected]; 215-573-4623 Topcon NW 200 Problems: Brice Critser, [email protected], 319-621-1129 Photographic Protocol/Reading Center: Dr. Ebenezer Daniel, [email protected]