php and mysql - code? boom. -
TRANSCRIPT

1
PHP and MySQL
A2 Project Starter Guide
http://xkcd.com/327/
2
Contents About this guide ......................................................................................................................... 4
A quick word about software................................................................................................. 4
What is PHP? .............................................................................................................................. 5
How do I set up a server? .......................................................................................................... 6
Uh oh…why isn’t it working? ................................................................................................. 6
How do I write PHP programs? .................................................................................................. 7
Where do I put my programs? ............................................................................................... 7
How do I write a program? .................................................................................................... 8
What you should have understood so far ............................................................................. 8
PHP mixed with HTML ............................................................................................................... 9
Things to watch out for .......................................................................................................... 9
Concatenating variables ....................................................................................................... 10
PHP and HTML exercise ....................................................................................................... 11
Basic PHP .................................................................................................................................. 12
Assignment ....................................................................................................................... 12
Selection ........................................................................................................................... 12
While loop ........................................................................................................................ 12
For loop ............................................................................................................................ 12
Do-while loop ................................................................................................................... 12
Operators ......................................................................................................................... 12
PHP exercises ....................................................................................................................... 13
User input................................................................................................................................. 14
Important parts to note ................................................................................................... 14
What happens when I press the button? ............................................................................ 14
Mini Project 1 – Love Calculator .......................................................................................... 16
Input page – index.php .................................................................................................... 16
Processing/output page – calculate.php ......................................................................... 16
Sending information via the URL ......................................................................................... 17
Using $_GET data example .................................................................................................. 17
More PHP exercises ............................................................................................................. 19
PHP and MySQL – Database Integration.................................................................................. 21

3
Creating a MySQL user account ........................................................................................... 21
Creating a database ............................................................................................................. 22
Creating a table .................................................................................................................... 22
Connecting PHP with MySQL ................................................................................................... 24
Connecting to the database ................................................................................................. 24
Mini Project 2 – Shoutbox .................................................................................................... 25
Displaying the input form ................................................................................................ 25
Processing the data .......................................................................................................... 25
Putting data in to the database ........................................................................................... 26
What’s going on here? ..................................................................................................... 27
Getting data out of the database ........................................................................................ 28
A general example ........................................................................................................... 28
How to display your shouts ............................................................................................. 29
Improvements to the shoutbox ........................................................................................... 30

4
About this guide This guide is written for A2 Computing students, and as such it
assumes you have some basic procedural programming knowledge in
a language other than PHP.
I also assume you already know how to use basic HTML and CSS. If
you don’t, have a look at my HTML, CSS, Javascript and jQuery booklet
first.
PHP stands for PHP: Hypertext Preprocessor. The name is recursive - I hope you get the joke
If you would like to get in touch, please find me on Twitter @codeboom or visit
http://codeboom.wordpress.com
Please feel free to copy, adapt and distribute as described under this Creative Commons
license http://creativecommons.org/licenses/by-nc-sa/3.0/
A quick word about software
You will need to use a text editor to type in all of the code in this document. You could use
something really basic like Notepad (or TextEdit on Mac) but it’s probably worth
downloading a proper code editor, they are invaluable. I like these ones on Windows:
- Notepad++ - free
- PSPad – free
- Dreamweaver (code view) – not free, and a bit overkill, but if you already own it then
great!
You will also need an internet browser. I realise that in most schools you don’t have a choice
and you are probably stuck with Internet Explorer, but if your neighbourhood techies are
rather lovely it’s worth asking them to install Chrome just for the lovely JavaScript
debugging facilities.

5
What is PHP?
PHP is a scripting language primarily used to make interactive web pages. It is a server side
language which means it does its processing on a server, a bit like this:
So…the user only ever sees HTML pages. They cannot see the PHP code!
What is PHP good at? What is PHP bad at?
It is easy to connect your website to a database in order to store data
In order for anything to update on the page a request for a new page must be sent to the server (e.g. by clicking a link or submitting a form)
It has lots of useful built in functions you can use to help you, and good docs on php.net
You have to run a server (or pay for hosting with PHP) or your code will not run
You can use HTML to make your interface – easy!
Not really PHP’s fault, but you still have to contend with designing for multiple browsers.
It can be used procedurally or in Object Oriented style
The Object Oriented support in PHP is relatively new and some people don’t like it.
Server running PHP I clicked a link to
page.php
User
Request sent to server
Server processes
PHP code…
…and produces a
HTML page
…the HTML is
sent back to the
user

6
How do I set up a server? Happily, there are some nice people on the internet at http://apachefriends.org who have
made things very easy! They offer a package called XAMPP which contains everything we
need in one easily installable package. It even works on OSX and Linux (although my
instructions were written using Windows).
XAMPP contains…
Apache – a web server to send out the pages
PHP – interpreter for the PHP language
MySQL – database software
Some other stuff we don’t really need to care about
1. Download either XAMPP (the full Monty) or XAMPP USB Lite if you want the small
version so that you can install it on a USB stick or other portable hard drive.
2. Open the installer and follow the instructions. It is best to install XAMPP in a
permanent location rather than on the desktop.
3. Once the installer has finished, find the xampp-control.exe (you might want to make
a shortcut to this) and run it. Click on “Start” next to the Apache and MySQL options
and make sure they go green and say “Running”. You can now close the window.
Uh oh…why isn’t it working?
Obviously network environments vary and school networks are often frustratingly locked
down. Apache is a web server which operates on port 80, and MySQL uses port 3306. If you
have Skype or some other communication program running, this often uses port 80
meaning Apache won’t run – so close it and try again. For other problems consult
http://apachefriends.org or your friendly network technician (bring tea?)

7
How do I write PHP programs? First, let’s test whether your server is actually working. Assuming you managed to start
Apache and MySQL on the previous page, open up your browser and type in
http://localhost/ (or if you’re feeling techy, http://127.0.0.1 which means the same)
You should see the XAMPP test page if it’s working correctly, if not see the bottom of the
previous page for troubleshooting advice.
Where do I put my programs?
When we write PHP programs we need to save them in a special folder on the server called
htdocs. This is the web root – it’s where the server looks for pages. Find it by navigating to
the place where your XAMPP was installed and looking for the htdocs folder, here is mine:
1. Make a subfolder inside the htdocs
folder called myapp
2. Open up a blank file in a text editor
of your choice (I recommend
Notepad++) and save your file as
index.php inside the myapp folder
Be careful that you don’t
accidentally save the file as
index.php.txt which can easily
happen in Notepad if you don’t change the
‘Save as type’ dropdown to “*.* All files”. In
Notepad++, just change the ‘Save as type’ to
PHP and that should do the job nicely.
You might be wondering why we have called our page index.php ? Apache
(the web server) always looks for a page called index first – this is the
home page of any site or app we may make. Other files can just be saved
as filename.php and will work just as well.

8
How do I write a program?
Now we need to write some PHP code! PHP is always written within PHP tags which look
like this:
<?php ?>
Here is my program – I’m sure you can tell that the green part is a comment.
Now run the program by visiting this address
in your browser:
http://localhost/myapp
Congratulations, you are now a PHP programmer!
If you did not call your folder myapp, your address will be
http://localhost/yourfoldername - replace yourfoldername with the name you
called your folder.
What you should have understood so far
When you want to work on PHP code you need to start Apache/MySQL on the
XAMPP control panel
Save all of your PHP documents into the htdocs folder with the file extension .php
PHP files can be inside subfolders of htdocs
Run your PHP file by browsing to http://localhost/foldername
The default page (home page) of each folder is index.php
If you want to view a page with a different name, open
http://localhost/foldername/pagename.php

9
PHP mixed with HTML As I mentioned at the start, to create the interface for PHP programs you can use HTML.
This means we can combine PHP and HTML code in our program:
Document contains both PHP PHP statements evaluated Final output is
and HTML code to produce HTML code only HTML code
You can easily tell which parts are HTML code and which are PHP code because PHP code
always has to be inside the PHP tags <?php and ?>
Things to watch out for
1. If you want to output something from a PHP section, you have to print it as a string
Correct Will cause a syntax error

10
2. Sometimes you may want to put some HTML code inside a PHP section. This is fine,
but you must treat it as if it were just another string to be printed:
This will cause a syntax error because the
HTML code is inside a PHP section
This will work as you have treated the HTML
tags as strings
You can also do this
Concatenating variables
You can concatenate variables into your output using the concatenation operator which is a
dot in PHP:
11
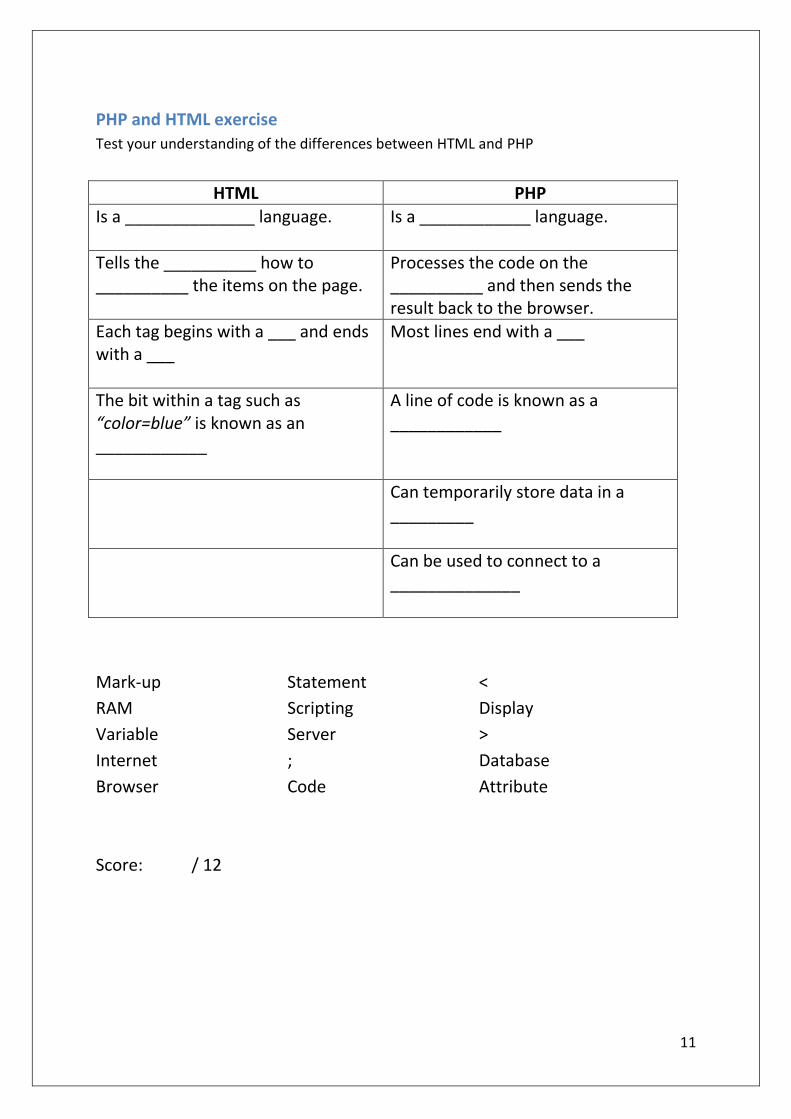
PHP and HTML exercise
Test your understanding of the differences between HTML and PHP
HTML PHP
Is a ______________ language.
Is a ____________ language.
Tells the __________ how to __________ the items on the page.
Processes the code on the __________ and then sends the result back to the browser.
Each tag begins with a ___ and ends with a ___
Most lines end with a ___
The bit within a tag such as “color=blue” is known as an ____________
A line of code is known as a ____________
Can temporarily store data in a _________
Can be used to connect to a ______________
Mark-up Statement <
RAM Scripting Display
Variable Server >
Internet ; Database
Browser Code Attribute
Score: / 12

12
Basic PHP You will already be familiar with another programming language from your AS work. Here is
a quick reference of the basic statement syntax for PHP
Assignment Variable names in PHP have a dollar sign ($) in front of them, e.g.
$name = “Bob”;
$age = 10;
The assignment operator is a single equals =
Selection if ( condition ){
// statements here
}
elseif ( condition ) {
// statements here
}
else {
// statements here
}
While loop
while( condition ){
// statements here
}
For loop
for( $i = 0; $i < 5; $i++ ){
// statements here
}
$i = 0 Create a variable $i and set its starting value to 0 $i < 5 Condition to test. While this condition remains true, the loop will execute $i++ Increment (add one) to $i
Do-while loop
do {
// statements
while ( condition );
Operators The comparison operator is a double equals == Logical ‘and’ operator is &&
Logical ‘or’ operator is || (pipe is to the left of Z on a Windows keyboard) The concatenation operator is a dot .
13
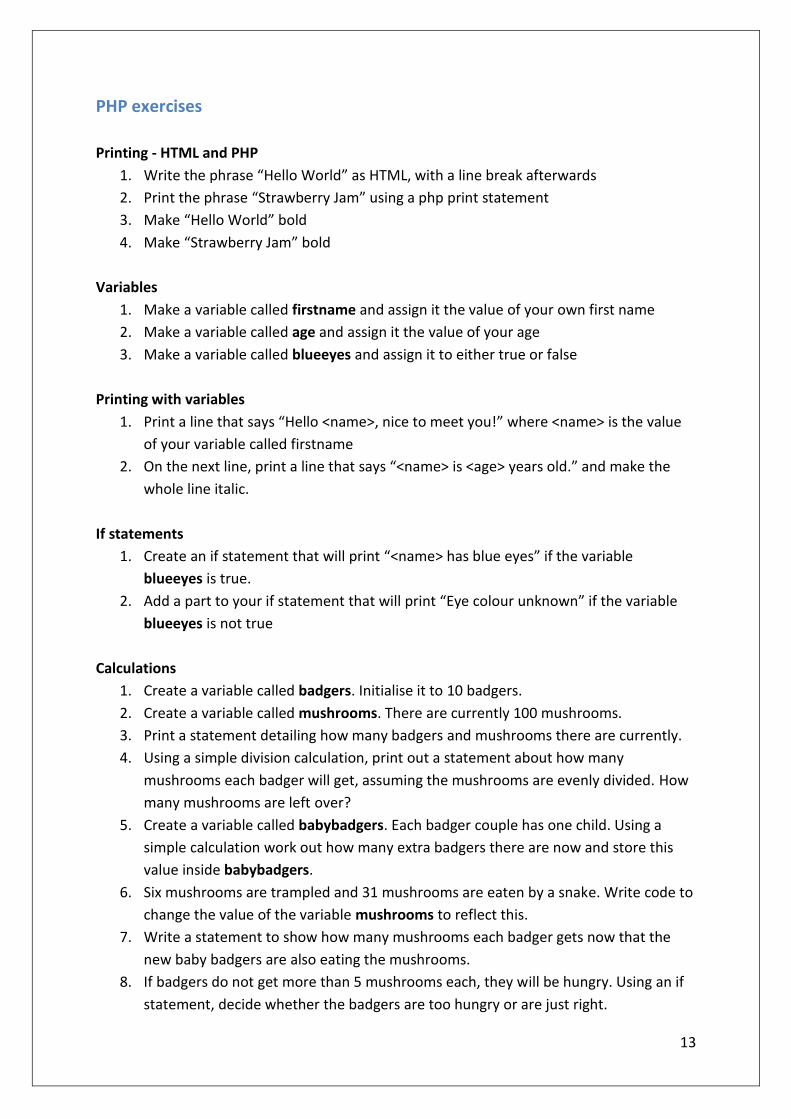
PHP exercises
Printing - HTML and PHP
1. Write the phrase “Hello World” as HTML, with a line break afterwards
2. Print the phrase “Strawberry Jam” using a php print statement
3. Make “Hello World” bold
4. Make “Strawberry Jam” bold
Variables
1. Make a variable called firstname and assign it the value of your own first name
2. Make a variable called age and assign it the value of your age
3. Make a variable called blueeyes and assign it to either true or false
Printing with variables
1. Print a line that says “Hello <name>, nice to meet you!” where <name> is the value
of your variable called firstname
2. On the next line, print a line that says “<name> is <age> years old.” and make the
whole line italic.
If statements
1. Create an if statement that will print “<name> has blue eyes” if the variable
blueeyes is true.
2. Add a part to your if statement that will print “Eye colour unknown” if the variable
blueeyes is not true
Calculations
1. Create a variable called badgers. Initialise it to 10 badgers.
2. Create a variable called mushrooms. There are currently 100 mushrooms.
3. Print a statement detailing how many badgers and mushrooms there are currently.
4. Using a simple division calculation, print out a statement about how many
mushrooms each badger will get, assuming the mushrooms are evenly divided. How
many mushrooms are left over?
5. Create a variable called babybadgers. Each badger couple has one child. Using a
simple calculation work out how many extra badgers there are now and store this
value inside babybadgers.
6. Six mushrooms are trampled and 31 mushrooms are eaten by a snake. Write code to
change the value of the variable mushrooms to reflect this.
7. Write a statement to show how many mushrooms each badger gets now that the
new baby badgers are also eating the mushrooms.
8. If badgers do not get more than 5 mushrooms each, they will be hungry. Using an if
statement, decide whether the badgers are too hungry or are just right.

14
User input This is probably slightly more complex than in the language you have already studied,
because of the fact that PHP is a server side language. Here’s how it works in PHP:
User sees input page User presses button Data received by PHP
and types in data to submit data page and processed
This is some HTML code for a basic input page
<form method=”post” action=”page2.php”>
<input type=”text” name=”username” value=”Text goes here”>
<input type=”submit” value=”Send Data”>
</form>
It will look something like this:
Important parts to note
The action of the form is the PHP page which will do the processing of this
information. (You can even tell the page to send the data to itself!)
You should have a submit button or you won’t be able to send the data
Be careful what you name your fields. In my example, the text box is called
username. You will use these names on the processing page.
Beware if you are copying the code from this document – Word adds styled quote
characters which will cause an error!
What happens when I press the button?
Because we have selected the method “post”, PHP takes all of the data that was typed in
and puts it in an array called $_POST
$_POST
Array key Value
‘username’ (What you typed in the box)

15
So on our processing page (in this case page2.php) we can put the following code to see
what the user typed in the box:
<?php
print $_POST[‘username’];
?>
We often want to see everything that was $_POST –ed to the next page for debugging
purposes. You can print the whole $_POST array on the processing page like this:
<?php
print “<pre>”;
print_r( $_POST );
print “</pre>”;
?>
This would produce the following output if I typed in awesomezz in the box:
The $_POST array is global so you can use it however you like on this page:
You can add more fields to your input page, they will be referenced in the $_POST array
with the name attribute as their key, e.g. whatever is typed into this field…
<input type=”text” name=”batman”>
…will become the variable
$_POST[‘batman’];
…on the processing page. (You can obviously decide on sensible variable names yourself!)
16
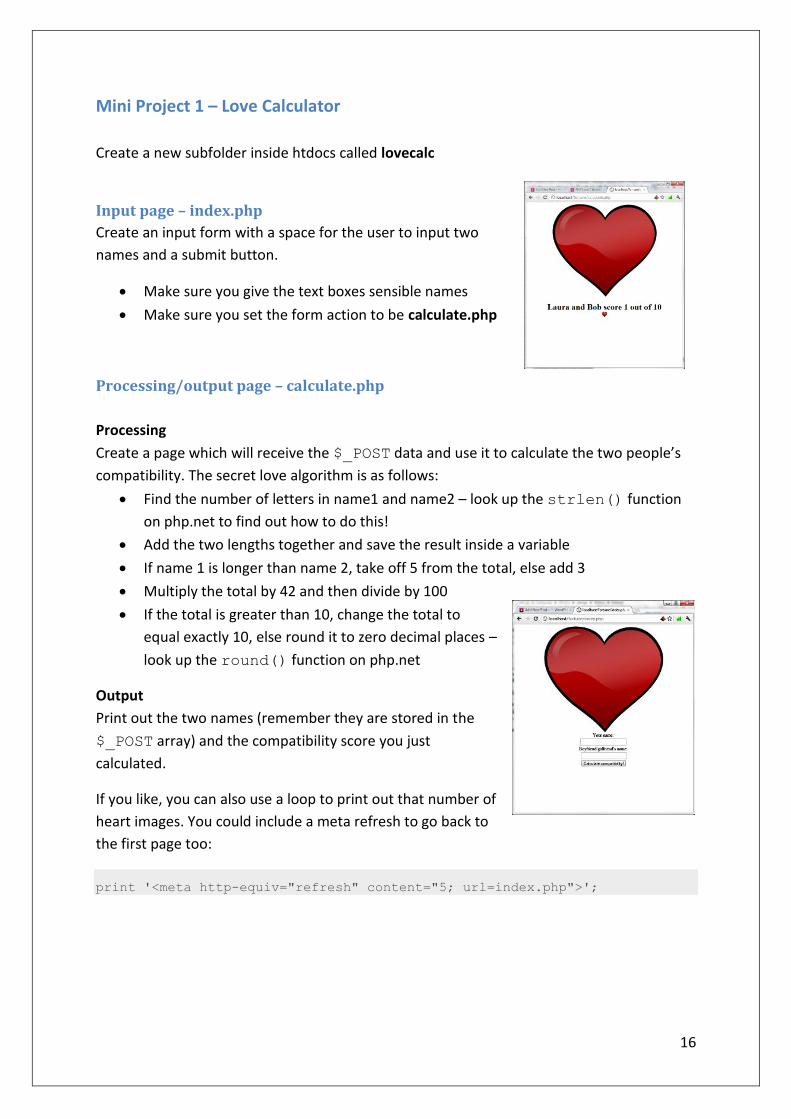
Mini Project 1 – Love Calculator
Create a new subfolder inside htdocs called lovecalc
Input page – index.php
Create an input form with a space for the user to input two
names and a submit button.
Make sure you give the text boxes sensible names
Make sure you set the form action to be calculate.php
Processing/output page – calculate.php
Processing
Create a page which will receive the $_POST data and use it to calculate the two people’s
compatibility. The secret love algorithm is as follows:
Find the number of letters in name1 and name2 – look up the strlen() function
on php.net to find out how to do this!
Add the two lengths together and save the result inside a variable
If name 1 is longer than name 2, take off 5 from the total, else add 3
Multiply the total by 42 and then divide by 100
If the total is greater than 10, change the total to
equal exactly 10, else round it to zero decimal places –
look up the round() function on php.net
Output
Print out the two names (remember they are stored in the
$_POST array) and the compatibility score you just
calculated.
If you like, you can also use a loop to print out that number of
heart images. You could include a meta refresh to go back to
the first page too:
print '<meta http-equiv="refresh" content="5; url=index.php">';

17
Sending information via the URL
Now we know how to get the user to input information using a form. However, sometimes
we need to send information from one page to the next without the user having to type
something in.
We can send information from one page to another via the URL – this is called $_GET data
because it is passed to the next page in an array called $_GET.
Here is a basic example:
Put the following HTML code on your first page – index.php
<a href=”page2.php?month=September”>Next page</a>
Put the following code on page2.php
<?php
print $_GET[‘month’];
?>
The name of the variable in bold will be the same as the name you gave it in the link
You can add more than one item to the link by separating it with & like this:
page2.php?month=September&year=2011&day=19
<?php
print $_GET[‘month’];
print $_GET[‘year’];
print $_GET[‘day’];
?>
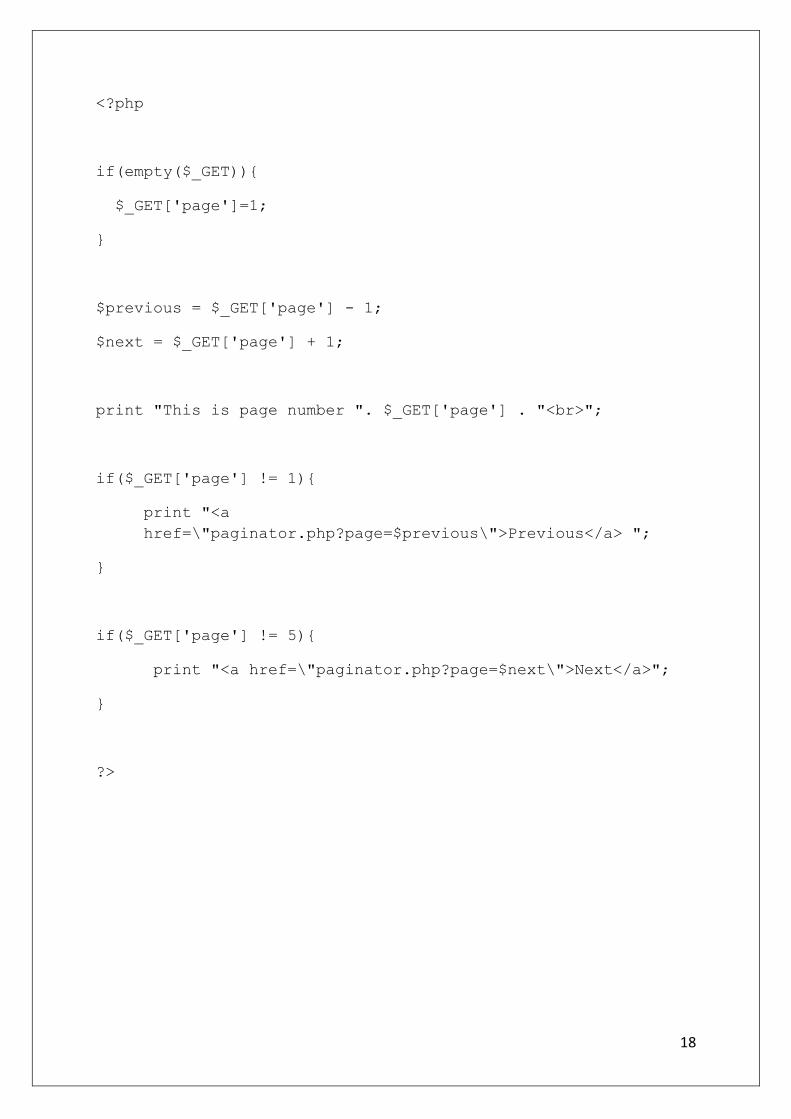
Using $_GET data example
Have you ever searched for products on a shopping website? When there are lots of results
they will often appear on several pages, and you can press next and previous to skip through
the pages. This can be done in PHP using $_GET data!
See if you can understand what the code on the next page does, and add
suitable comments (the comment escape is // in PHP) to explain what is
happening:
18
<?php
if(empty($_GET)){
$_GET['page']=1;
}
$previous = $_GET['page'] - 1;
$next = $_GET['page'] + 1;
print "This is page number ". $_GET['page'] . "<br>";
if($_GET['page'] != 1){
print "<a
href=\"paginator.php?page=$previous\">Previous</a> ";
}
if($_GET['page'] != 5){
print "<a href=\"paginator.php?page=$next\">Next</a>";
}
?>
19
More PHP exercises
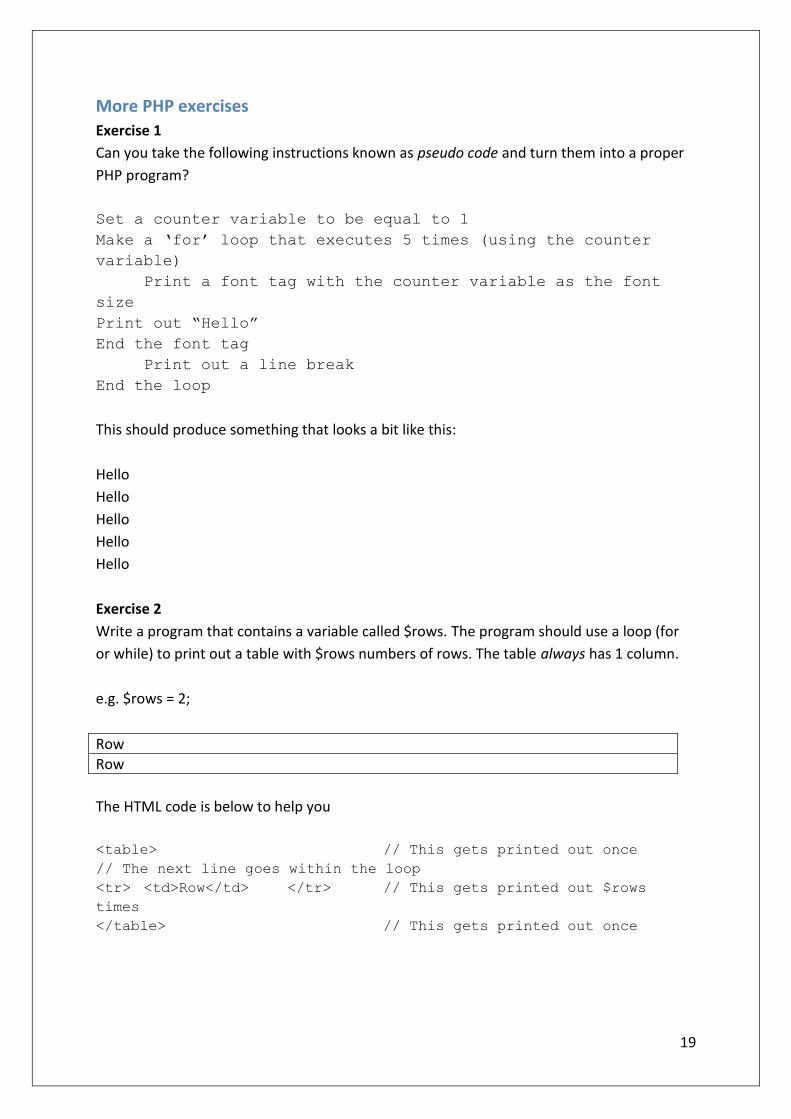
Exercise 1
Can you take the following instructions known as pseudo code and turn them into a proper
PHP program?
Set a counter variable to be equal to 1
Make a ‘for’ loop that executes 5 times (using the counter
variable)
Print a font tag with the counter variable as the font
size
Print out “Hello”
End the font tag
Print out a line break
End the loop
This should produce something that looks a bit like this:
Hello
Hello
Hello
Hello
Hello
Exercise 2
Write a program that contains a variable called $rows. The program should use a loop (for
or while) to print out a table with $rows numbers of rows. The table always has 1 column.
e.g. $rows = 2;
Row
Row
The HTML code is below to help you
<table> // This gets printed out once
// The next line goes within the loop
<tr> <td>Row</td> </tr> // This gets printed out $rows
times
</table> // This gets printed out once

20
Exercise 3
Alter your code from Event 2 to make it print out the correct row number inside each table
cell
Row 1
Row 2
Exercise 4
Write a program to automatically print out a one column table with alternating cell
background colours. You should be able to vary the amount of rows in a loop (see part 1) –
this will help you!
1
2
3
4
5
This is the HTML code to help you: <table>
<tr><td bgcolor=”white”>Cell</td></tr> // Print this $rows
times
<tr><td bgcolor=”grey”>Cell</td></tr>
….etc
</table>
Exercise 5
Anyone who can manage this is a true Programming God or Goddess!
Can you make a checkerboard effect?
R1 C1 R1 C2 R1 C3 R1 C4 R1 C5
R2 C1 R2 C2 R2 C3 R2 C4 R2 C5
Hint: If you want to decide whether a row is odd or even, you can use modulus:
$result = $counter % 2;
This divides $counter by 2 and puts the value of the remainder in the variable
$result – it will either be 0 (even) or 1 (odd)
So then you can do a check: if $result is 0 (print white) else (print grey)

21
PHP and MySQL – Database Integration
Creating a MySQL user account
Your installation of XAMPP comes with MySQL which allows you to create databases. There
is a useful interface to administrate your databases called phpmyadmin – you can get to it
by browsing to
http://localhost/phpmyadmin
This is the phpmyadmin
interface – you can see
some of the databases I
have already created in the
list on the left.
Some of the databases are
premade e.g.
information_schema – don’t
delete them or
phpmyadmin may go wrong
To create a user account for yourself so that you can connect to databases, click on
Privileges at the top and then click on Add a new user
Your installation of phpmyadmin might look slightly different to mine, but I’m
sure you can figure out how it works!
Choose a username.
Host should be localhost
Choose a password
Don’t click on generate
password!
Then scroll down and tick all of
the boxes (click on check all) to
make your user able to do
everything.
Then click the “Create User”
button

22
Creating a database
Now that you have a user account, you need to create a database. Click on the Databases
tab at the top:
Type the name of your database in the box and click “Create”. You can ignore the Collation
drop down. I called mine shoutbox because it is going to be for the project we will do later.
Don’t use any spaces in your database name use underscores or camel/Pascal
case to distinguish between words.
You should see the name of your database appear in the list on the left. You can click on its
name to see it (there is nothing inside it yet).
Creating a table
When you have clicked on your database in the left hand side list you will be given an
opportunity to create a table.
Type the name of the table and the number of columns inside the boxes. I am going to call
my table shouts and I want 3 columns – again, this is for our mini project that is coming up.
23
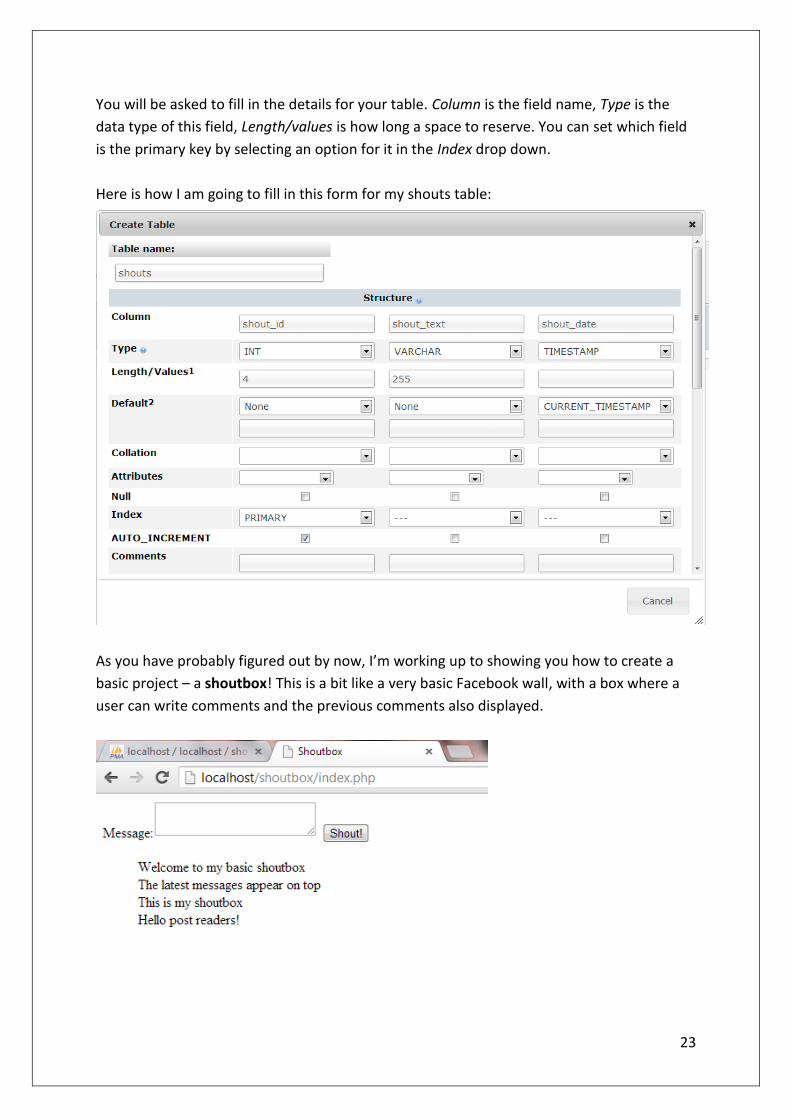
You will be asked to fill in the details for your table. Column is the field name, Type is the
data type of this field, Length/values is how long a space to reserve. You can set which field
is the primary key by selecting an option for it in the Index drop down.
Here is how I am going to fill in this form for my shouts table:
As you have probably figured out by now, I’m working up to showing you how to create a
basic project – a shoutbox! This is a bit like a very basic Facebook wall, with a box where a
user can write comments and the previous comments also displayed.
24
Connecting PHP with MySQL
PHP is really good for making applications which are linked to a database. You will have
learnt about SQL and databases in your F453 module so now it is time to apply those
concepts.
There are two sets of functions in PHP which allow you to connect to the
database – mysql and mysqli. They are NOT interchangeable which means
you must pick one and stick to it. I recommend picking mysqli as this is the
new version – mysql is out of date, or to use the proper term it is deprecated.
I will be using the procedural style in the following examples, OO is available – see php.net
Connecting to the database
The easiest way to do this is to create a file and save it as connection.php. Your connection
file should have the following information inside it:
<?php
$link = mysqli_connect('localhost', 'my_user', 'my_password', 'my_db');
?>
Obviously, fill in your own MySQL user, password and database name!
Then, whenever you need to connect to the database in a program, use the line:
<?php require_once(“connection.php”); ?>
This will grab the contents of the connection.php file and insert it into the page so that you
can use the $link variable as the connection you’ve already set up.
Why do I need a separate file? Can’t I just put the connection line on the top
of each page? Well yes, you can. But imagine if you change your server
details – which will definitely happen if you are testing your site on XAMPP
and uploading to an online webserver later on. You’ll have to change the
details in every single page. If you put them in a connection file and require that
file wherever a connection is needed, you only need to change the details once in
the connection file instead of everywhere. Genius!

25
Mini Project 2 – Shoutbox
We’ve actually already started this project, so if you have not already done so please start
from the “PHP and MySQL – Database Integration” section on page 21.
Create a subfolder called shoutbox inside htdocs, and inside there create a file called
index.php. Put the connection file you just created inside this folder as well.
Displaying the input form
We need a basic input form where the user can type in their shout, like this:
To make a larger box like the one above, you could use a <textarea>, the code looks like this:
<textarea name=”shout”></textarea>
If you can’t remember how to make the form, have a look on page 14 for some tips. You can
style the form to your liking using CSS if you want to make it look prettier.
Processing the data
When the user types their shout in the box and clicks the button, the code should send this
data to a processing page called send.php
This means that the form action inside index.php should be <form
action=”send.php”>
Create and save a file called send.php inside the shoutbox folder in htdocs

26
Putting data in to the database
Assuming you have already included your connection file, this is the basic format for a query
// Create the query
$query = “INSERT INTO tablename(field1, field2, field3) VALUES
(‘value1’, ‘value2’, ‘value3’)”;
// Execute the query
$result = mysqli_query($link, $query);
You need to put in your own table name, field names and values. The values should be in
the same order as the field names, i.e. value1 will go into field1 etc.
This is the code I have inside my send.php page
Lines 1-13 are PHP code to insert the shout into the database. Lines 15-24 are HTML code
which provides a meta refresh – on line 17 the code specifies to wait 0 seconds and then go
to index.php. This means that once the page is done with inserting the data into the
database, it redirects quickly to the first page.
If you like the cartoon on the front page of this booklet, you may be worried about
validation and SQL injection – these are improvements you can make to the shoutbox, see
page 30 for details.

27
What’s going on here?
Let’s take a closer look at some of the PHP code in the processing page
This is some validation – I am checking that the shout they entered was not an empty string.
I could also have done it this way:
if( !empty($_POST[‘shout’]) ) { … }
This checks whether the variable $_POST[‘shout’] is not empty. (Don’t forget we can refer to
what the user typed in as $_POST[‘shout’] because it is passed to this page in the $_POST
array, and it has the index ‘shout’ because that was the name of our textarea on index.php)
This part looks a bit technical, but it isn’t. The first argument on line 8 is the database link
variable that we created in the connection.php file. The second argument is the query itself.
In the above code, on line 11 we are using concatenation to put the $_POST[‘shout’]
variable inside the query. If the amount of quotes messes with your head, try renaming the
variable (line 8) and then you can use its short name on line 9. It works exactly the same but
it’s a poor and inefficient way of coding and you should try to understand the concatenation
method above if you can.
The “or die” part means that if the query cannot be done for whatever reason, the page
should stop executing and give us a mysql error message so that we can debug it.
28
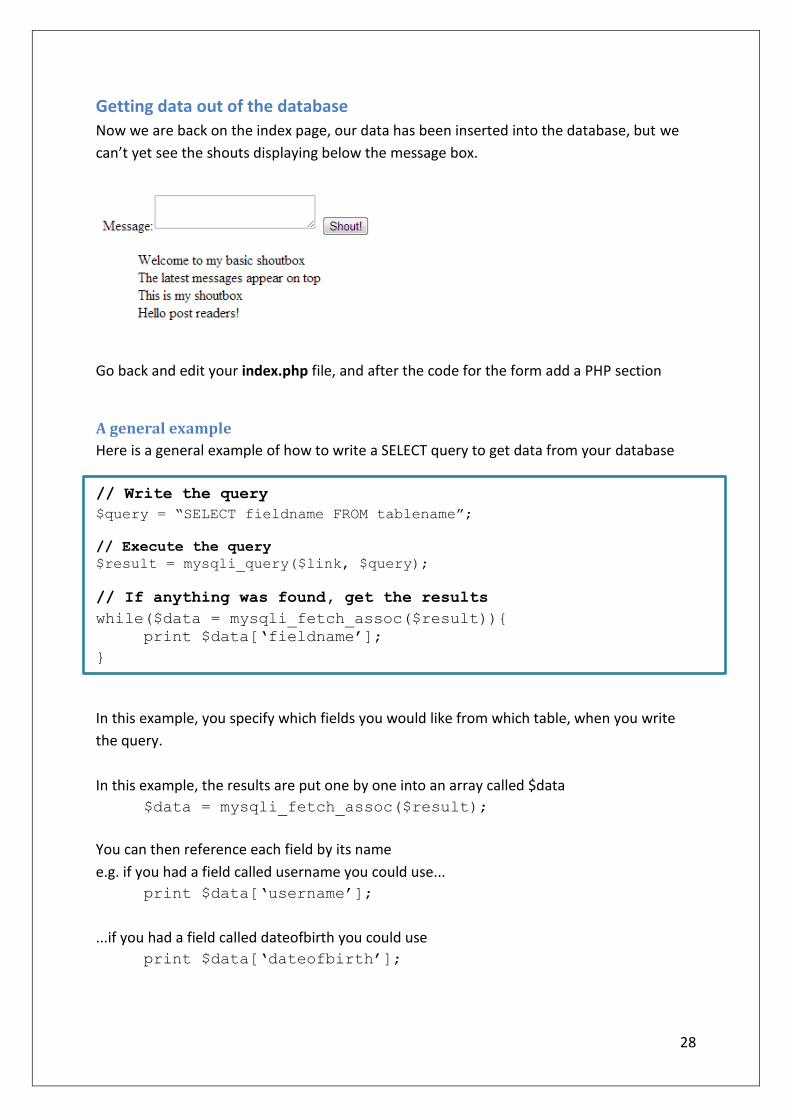
Getting data out of the database
Now we are back on the index page, our data has been inserted into the database, but we
can’t yet see the shouts displaying below the message box.
Go back and edit your index.php file, and after the code for the form add a PHP section
A general example
Here is a general example of how to write a SELECT query to get data from your database
// Write the query
$query = “SELECT fieldname FROM tablename”;
// Execute the query
$result = mysqli_query($link, $query);
// If anything was found, get the results
while($data = mysqli_fetch_assoc($result)){
print $data[‘fieldname’];
}
In this example, you specify which fields you would like from which table, when you write
the query.
In this example, the results are put one by one into an array called $data
$data = mysqli_fetch_assoc($result);
You can then reference each field by its name
e.g. if you had a field called username you could use...
print $data[‘username’];
...if you had a field called dateofbirth you could use
print $data[‘dateofbirth’];
29
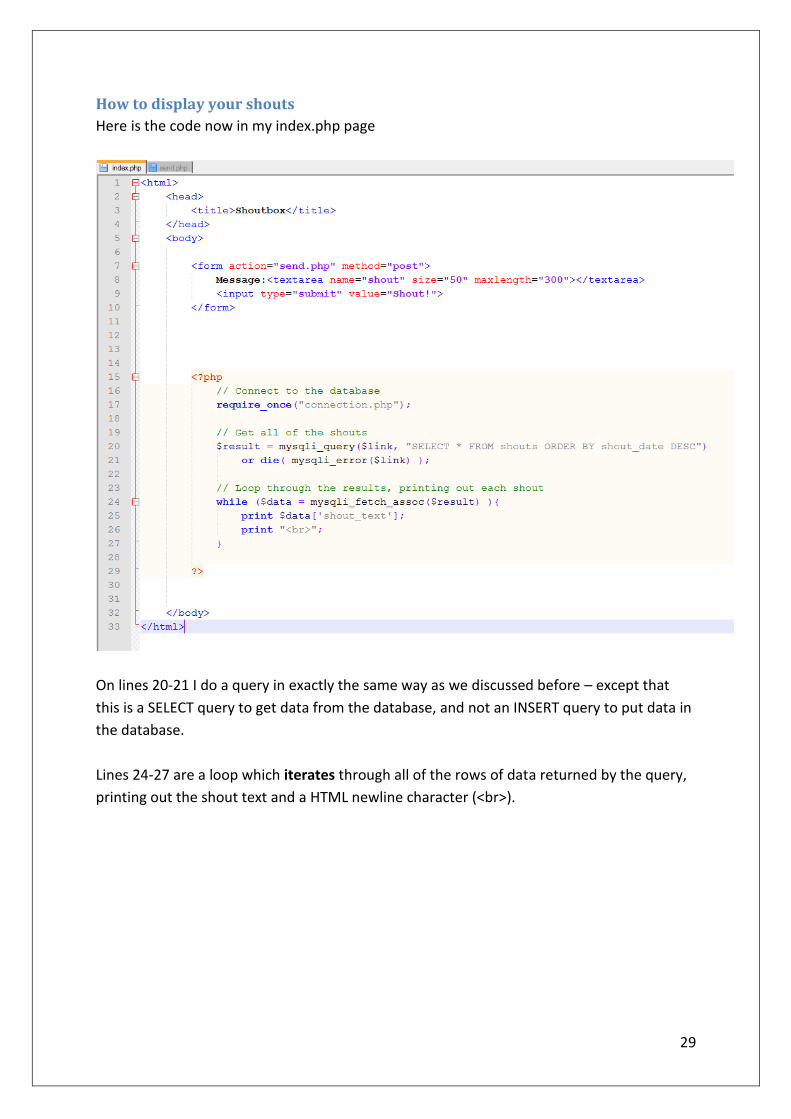
How to display your shouts
Here is the code now in my index.php page
On lines 20-21 I do a query in exactly the same way as we discussed before – except that
this is a SELECT query to get data from the database, and not an INSERT query to put data in
the database.
Lines 24-27 are a loop which iterates through all of the rows of data returned by the query,
printing out the shout text and a HTML newline character (<br>).

30
Improvements to the shoutbox
There are numerous ways you could improve your shoutbox code, here are some ideas for
you to work on, in order of difficulty!
Tidy up the presentation of your input form using CSS
Make the page display the time and date of the shout as well
Only show the top 5 most recent shouts
Print alternate shouts in a different colour (hint: use MOD or %)
Add another input box for the user’s name, save this in the database and display it
along with the shout
Make the user’s name persist in the box after they have submitted the form (hint:
try a hidden field in the form?)
Look up some PHP validation functions such as strip_tags() and stripslashes() on
php.net and try to use them to validate your input
Look up what SQL injection is and try to prevent it from being possible on your
shoutbox – try mysqli_real_escape_string() function on PHP.net
To come in future updates of the book:
- Session variables
- Creating a basic login system