pic17c7xx data sheet - ele.uva.esjesman/bigseti/ftp/microcontroladores... · pic17c7xx 1.0 overview...
TRANSCRIPT

PIC17C7XXHigh-Performance 8-bit CMOS EPROM Microcontrollers with 10-bit A/D
Microcontroller Core Features:
• Only 58 single word instructions to learn
• All single cycle instructions (121 ns), except for program branches and table reads/writes which are two-cycle
• Operating speed:
- DC - 33 MHz clock input- DC - 121 ns instruction cycle
• 8 x 8 Single-Cycle Hardware Multiplier
• Interrupt capability• 16 level deep hardware stack• Direct, indirect, and relative addressing modes
• Internal/external program memory execution, capable of addressing 64 K x 16 program memory space
Peripheral Features:
• Up to 66 I/O pins with individual direction control
• 10-bit, multi-channel Analog-to-Digital converter• High current sink/source for direct LED drive• Four capture input pins
- Captures are 16-bit, max resolution 121 ns• Three PWM outputs (resolution is 1 to 10-bits)• TMR0: 16-bit timer/counter with
8-bit programmable prescaler• TMR1: 8-bit timer/counter
• TMR2: 8-bit timer/counter• TMR3: 16-bit timer/counter• Two Universal Synchronous Asynchronous
Receiver Transmitters (USART/SCI) with independent baud rate generators
• Synchronous Serial Port (SSP) with SPI™ and I2C™ modes (including I2C Master mode)
Pin Diagrams
Special Microcontroller Features:
• Power-on Reset (POR), Power-up Timer (PWRT) and Oscillator Start-up Timer (OST)
• Watchdog Timer (WDT) with its own on-chip RC oscillator for reliable operation
• Brown-out Reset
• Code protection• Power saving SLEEP mode• Selectable oscillator options
CMOS Technology:
• Low power, high speed CMOS EPROMtechnology
• Fully static design
• Wide operating voltage range (3.0V to 5.5V)• Commercial and Industrial temperature ranges• Low power consumption
- < 5 mA @ 5V, 4 MHz- 100 µA typical @ 4.5V, 32 kHz- < 1 µA typical standby current @ 5V
DeviceMemory
Program (x16) Data (x8)
PIC17C752 8 K 678
PIC17C756A 16 K 902PIC17C762 8 K 678PIC17C766 16 K 902
RF
1/A
N5
RF
0/A
N4
AV
DD
AV
SS
RG
3/A
N0/
VR
EF+
RG
2/A
N1/
VR
EF-
RG
1/A
N2
RG
0/A
N3
NC
VS
SV
DD
RG
4/C
AP
3R
G5/
PW
M3
RG
7/T
X2
/CK
2R
G6/
RX
2/D
T2
RA
4/R
X1/
DT
1R
A5/
TX
1/C
K1
RJ0
RJ1
RH
6/A
N14
RH
7/A
N15
RD1/AD9RD0/AD8RE0/ALERE1/OERE2/WR
RE3/CAP4MCLR/VPP
TEST
VSSVDD
RF7/AN11RF6/AN10
RF5/AN9RF4/AN8RF3/AN7RF2/AN6
NC
RH2RH3
RH4/AN12RH5/AN13
1011121314151617181920212223242526 60
595857565554
53525150494847464544
9 8 7 6 5 4 3 2 1
272829303132
3334353637383940414243
PIC17C76X
RA0/INTRB0/CAP1RB1/CAP2RB3/PWM2RB4/TCLK12RB5/TCLK3RB2/PWM1VSSNCOSC2/CLKOUTOSC1/CLKINVDDRB7/SDO
RA3/SDI/SDARA2/SS/SCLRA1/T0CKI
RD
2/A
D10
RD
3/A
D11
RD
4/A
D12
RD
5/A
D13
RD
6/A
D14
RD
7/A
D15
RC
0/A
D0
VD
DN
CV
SS
RC
1/A
D1
RC
2/A
D2
RC
3/A
D3
RC
4/A
D4
RC
5/A
D5
RC
6/A
D6
RC
7/A
D7
RB6/SCK
RJ5RJ4
RJ7
RJ6
RJ3RJ2
RH
1R
H0
67666564636261
68
7473727170
767978778083828184 75
69
84 PLCC
2000 Microchip Technology Inc. DS30289B-page 1

PIC17C7XX
Pin Diagrams cont.’d
1011121314151617181920212223242526
6059585756555453525150494847464544
9 8 7 6 5 4 3 2 1 68 67 66 65 64 63 62 61
27 28 29 30 31 32 33 34 35 36 37 38 39 40 41 42 43
RA0/INTRB0/CAP1RB1/CAP2RB3/PWM2RB4/TCLK12RB5/TCLK3RB2/PWM1VSS
NCOSC2/CLKOUTOSC1/CLKINVDD
RB7/SDO
RA3/SDI/SDARA2/SS/SCLRA1/T0CKI
RD1/AD9RD0/AD8RE0/ALERE1/OERE2/WR
RE3/CAP4MCLR/VPP
TEST
VSS
VDD
RF7/AN11RF6/AN10
RF5/AN9RF4/AN8RF3/AN7RF2/AN6
RD
2/A
D10
RD
3/A
D11
RD
4/A
D12
RD
5/A
D13
RD
6/A
D14
RD
7/A
D15
RC
0/A
D0
VD
D
NC
VS
S
RC
1/A
D1
RC
2/A
D2
RC
3/A
D3
RC
4/A
D4
RC
5/A
D5
RC
6/A
D6
RC
7/A
D7
RF
1/A
N5
RF
0/A
N4
AV
DD
AV
SS
RG
3/A
N0/
VR
EF+
RG
2/A
N1/
VR
EF-
RG
1/A
N2
RG
0/A
N3
NC
VS
S
VD
D
RG
4/C
AP
3R
G5/
PW
M3
RG
7/T
X2/
CK
2R
G6/
RX
2/D
T2
RA
4/R
X1/
DT
1R
A5/
TX
1/C
K1
NC
RB6/SCK
PIC17C75X
12345678910111213141516
48474645444342414039383736353433
64 63 62 61 60 59 58 57 56 55 54 53 52 51 50 49
17 18 19 20 21 22 23 24 25 26 27 28 29 30 31 32
RD
2/A
D10
RD
3/A
D11
RD
4/A
D12
RD
5/A
D13
RD
6/A
D14
RD
7/A
D15
RC
0/A
D0
VD
D
VS
S
RC
1/A
D1
RC
2/A
D2
RC
3/A
D3
RC
4/A
D4
RC
5/A
D5
RC
6/A
D6
RC
7/A
D7
RD1/AD9RD0/AD8RE0/ALERE1/OERE2/WR
RE3/CAP4MCLR/VPP
TESTVSS
VDD
RF7/AN11RF6/AN10RF5/AN9RF4/AN8
RF3/AN7RF2/AN6
RA0/INT
RB0/CAP1RB1/CAP2RB3/PWM2RB4/TCLK12
RB5/TCLK3RB2/PWM1VSS
OSC2/CLKOUTOSC1/CLKINVDD
RB7/SDO
RA3/SDI/SDARA2/SS/SCLRA1/T0CKI
RF
1/A
N5
RF
0/A
N4
AV
DD
AV
SS
RG
3/A
N0/
VR
EF+
RG
2/A
N1/
VR
EF-
RG
1/A
N2
RG
0/A
N3
VS
S
VD
D
RG
4/C
AP
3R
G5/
PW
M3
RG
7/T
X2/
CK
2R
G6/
RX
2/D
T2
RA
4/R
X1/
DT
1R
A5/
TX
1/C
K1
RB6/SCK
PIC17C75X
68-Pin PLCC
64-Pin TQFP
DS30289B-page 2 2000 Microchip Technology Inc.

PIC17C7XX
Pin Diagrams cont.’d
RF
1/A
N5
RF
0/A
N4
AV
DD
AV
SS
RG
3/A
N0/
VR
EF+
RG
2/A
N1/
VR
EF-
RG
1/A
N2
RG
0/A
N3
NC
VS
SV
DD
RG
4/C
AP
3R
G5/
PW
M3
RG
7/T
X2/
CK
2R
G6/
RX
2/D
T2
RA
4/R
X1/
DT
1R
A5/
TX
1/C
K1
RJ0
RJ1
RH
6/A
N14
RH
7/A
N15
RD1/AD9RD0/AD8RE0/ALERE1/OERE2/WR
RE3/CAP4MCLR/VPP
TEST
VSSVDD
RF7/AN11RF6/AN10
RF5/AN9RF4/AN8RF3/AN7RF2/AN6
NC
RH2RH3
RH4/AN12RH5/AN13
1011121314151617181920212223242526 60
595857565554
53525150494847464544
9 8 7 6 5 4 3 2 1
272829303132
3334353637383940414243
PIC17C76X
RA0/INTRB0/CAP1RB1/CAP2RB3/PWM2RB4/TCLK12RB5/TCLK3RB2/PWM1VSSNCOSC2/CLKOUTOSC1/CLKINVDD
RB7/SDO
RA3/SDI/SDARA2/SS/SCLRA1/T0CKI
RD
2/A
D10
RD
3/A
D11
RD
4/A
D12
RD
5/A
D13
RD
6/A
D14
RD
7/A
D15
RC
0/A
D0
VD
DN
CV
SS
RC
1/A
D1
RC
2/A
D2
RC
3/A
D3
RC
4/A
D4
RC
5/A
D5
RC
6/A
D6
RC
7/A
D7
RB6/SCK
RJ5RJ4
RJ7
RJ6
RJ3RJ2
RH
1R
H0
67666564636261
68
7473727170
767978778083828184 75
69
84-pin PLCC
345678910111213141516
4847464544434241
4039
64636261
2122 2324 25 26272829 3031 32
RD
2/A
D10
RD
3/A
D11
RD
4/A
D12
RD
5/A
D13
RD
6/A
D14
RD
7/A
D15
RC
0/A
D0
VD
D
VS
S
RC
1/A
D1
RC
2/A
D2
RC
3/A
D3
RC
4/A
D4
RC
5/A
D5
RC
6/A
D6
RC
7/A
D7
RD1/AD9RD0/AD8RE0/ALERE1/OERE2/WR
RE3/CAP4MCLR/VPP
TESTVSS
VDD
RF7/AN11RF6/AN10
RF5/AN9RF4/AN8RF3/AN7RF2/AN6
RA0/INTRB0/CAP1RB1/CAP2RB3/PWM2RB4/TCLK12RB5/TCLK3RB2/PWM1VSS
OSC2/CLKOUTOSC1/CLKINVDD
RB7/SDO
RA3/SDI/SDARA2/SS/SCLRA1/T0CKI
RF
1/A
N5
RF
0/A
N4
AV
DD
AV
SS
RG
3/A
N0/
VR
EF+
RG
2/A
N1/
VR
EF-
RG
1/A
N2
RG
0/A
N3
VS
S
VD
D
RG
4/C
AP
3R
G5/
PW
M3
RG
7/T
X2/
CK
2R
G6/
RX
2/D
T2
RA
4/R
X1/
DT
1R
A5/
TX
1/C
K1
RB6/SCK
RJ7
RJ6
RH
1R
H0
12
RH2RH3
1718
RH4/AN12RH5/AN13
RH
6/A
N14
RH
7/A
N15
RJ1
RJ0
37
RJ3RJ2
5049
RJ5RJ4
1920
33 34 35 36 38
5857565554535251
6059
686766657271706974 73787776 757980
PIC17C76X
80-Pin TQFP
2000 Microchip Technology Inc. DS30289B-page 3

PIC17C7XX
Table of Contents
1.0 Overview ........................................................................................................................................................ 72.0 Device Varieties ............................................................................................................................................. 93.0 Architectural Overview ................................................................................................................................. 114.0 On-chip Oscillator Circuit ............................................................................................................................. 175.0 Reset............................................................................................................................................................ 236.0 Interrupts...................................................................................................................................................... 337.0 Memory Organization................................................................................................................................... 438.0 Table Reads and Table Writes .................................................................................................................... 599.0 Hardware Multiplier ...................................................................................................................................... 6710.0 I/O Ports....................................................................................................................................................... 7111.0 Overview of Timer Resources...................................................................................................................... 9512.0 Timer0.......................................................................................................................................................... 9713.0 Timer1, Timer2, Timer3, PWMs and Captures .......................................................................................... 10114.0 Universal Synchronous Asynchronous Receiver Transmitter (USART) Modules...................................... 11715.0 Master Synchronous Serial Port (MSSP) Module...................................................................................... 13316.0 Analog-to-Digital Converter (A/D) Module ................................................................................................. 17917.0 Special Features of the CPU ..................................................................................................................... 19118.0 Instruction Set Summary............................................................................................................................ 19719.0 Development Support ................................................................................................................................ 23320.0 PIC17C7XX Electrical Characteristics ....................................................................................................... 23921.0 PIC17C7XX DC and AC Characteristics.................................................................................................... 26722.0 Packaging Information ............................................................................................................................... 281Appendix A: Modifications ....................................................................................................................................... 287Appendix B: Compatibility........................................................................................................................................ 287Appendix C: What’s New ......................................................................................................................................... 288Appendix D: What’s Changed.................................................................................................................................. 288Index .......................................................................................................................................................................... 289On-Line Support .......................................................................................................................................................... 299Reader Response ....................................................................................................................................................... 300Product Identification System...................................................................................................................................... 301
DS30289B-page 4 2000 Microchip Technology Inc.

PIC17C7XX
TO OUR VALUED CUSTOMERS
It is our intention to provide our valued customers with the best documentation possible to ensure successful use of your Micro-chip products. To this end, we will continue to improve our publications to better suit your needs. Our publications will be refinedand enhanced as new volumes and updates are introduced.
If you have any questions or comments regarding this publication, please contact the Marketing Communications Departmentvia E-mail at [email protected] or fax the Reader Response Form in the back of this data sheet to (480) 792-4150. We welcome your feedback.
Most Current Data SheetTo obtain the most up-to-date version of this data sheet, please register at our Worldwide Web site at:
http://www.microchip.com
You can determine the version of a data sheet by examining its literature number found on the bottom outside corner of any page.The last character of the literature number is the version number, (e.g., DS30000A is version A of document DS30000).
ErrataAn errata sheet, describing minor operational differences from the data sheet and recommended workarounds, may exist for currentdevices. As device/documentation issues become known to us, we will publish an errata sheet. The errata will specify the revisionof silicon and revision of document to which it applies.
To determine if an errata sheet exists for a particular device, please check with one of the following:
• Microchip’s Worldwide Web site; http://www.microchip.com• Your local Microchip sales office (see last page)• The Microchip Corporate Literature Center; U.S. FAX: (480) 792-7277When contacting a sales office or the literature center, please specify which device, revision of silicon and data sheet (include lit-erature number) you are using.
Customer Notification SystemRegister on our web site at www.microchip.com/cn to receive the most current information on all of our products.
2000 Microchip Technology Inc. DS30289B-page 5

PIC17C7XX
NOTES:
DS30289B-page 6 2000 Microchip Technology Inc.

PIC17C7XX
1.0 OVERVIEW
This data sheet covers the PIC17C7XX group of thePIC17CXXX family of microcontrollers. The followingdevices are discussed in this data sheet:
• PIC17C752• PIC17C756A
• PIC17C762• PIC17C766
The PIC17C7XX devices are 68/84-pin, EPROMbased members of the versatile PIC17CXXX family oflow cost, high performance, CMOS, fully static, 8-bitmicrocontrollers.
All PICmicro® microcontrollers employ an advancedRISC architecture. The PIC17CXXX has enhancedcore features, 16-level deep stack, and multiple internaland external interrupt sources. The separate instruc-tion and data buses of the Harvard architecture allow a16-bit wide instruction word with a separate 8-bit widedata path. The two stage instruction pipeline allows allinstructions to execute in a single cycle, except for pro-gram branches (which require two cycles). A total of 58instructions (reduced instruction set) are available.Additionally, a large register set gives some of thearchitectural innovations used to achieve a very highperformance. For mathematical intensive applications,all devices have a single cycle 8 x 8 HardwareMultiplier.
PIC17CXXX microcontrollers typically achieve a 2:1code compression and a 4:1 speed improvement overother 8-bit microcontrollers in their class.
PIC17C7XX devices have up to 902 bytes of RAM and66 I/O pins. In addition, the PIC17C7XX adds severalperipheral features, useful in many high performanceapplications, including:
• Four timer/counters• Four capture inputs• Three PWM outputs
• Two independent Universal Synchronous Asyn-chronous Receiver Transmitters (USARTs)
• An A/D converter (multi-channel, 10-bit resolution)• A Synchronous Serial Port
(SPI and I2C w/ Master mode)
These special features reduce external components,thus reducing cost, enhancing system reliability andreducing power consumption.
There are four oscillator options, of which the single pinRC oscillator provides a low cost solution, the LF oscil-lator is for low frequency crystals and minimizes powerconsumption, XT is a standard crystal and the EC is forexternal clock input.
The SLEEP (power-down) mode offers additionalpower saving. Wake-up from SLEEP can occur throughseveral external and internal interrupts and deviceRESETS.
A highly reliable Watchdog Timer with its own on-chipRC oscillator provides protection against software mal-function.
There are four configuration options for the deviceoperational mode:
• Microprocessor• Microcontroller
• Extended microcontroller• Protected microcontroller
The microprocessor and extended microcontrollermodes allow up to 64K-words of external programmemory.
The device also has Brown-out Reset circuitry. Thisallows a device RESET to occur if the device VDD fallsbelow the Brown-out voltage trip point (BVDD). The chipwill remain in Brown-out Reset until VDD rises aboveBVDD.
A UV erasable, CERQUAD packaged version (compat-ible with PLCC), is ideal for code development, whilethe cost-effective One-Time-Programmable (OTP) ver-sion is suitable for production in any volume.
The PIC17C7XX fits perfectly in applications thatrequire extremely fast execution of complex softwareprograms. These include applications ranging fromprecise motor control and industrial process control toautomotive, instrumentation, and telecom applications.
The EPROM technology makes customization of appli-cation programs (with unique security codes, combina-tions, model numbers, parameter storage, etc.) fastand convenient. Small footprint package options(including die sales) make the PIC17C7XX ideal forapplications with space limitations that require highperformance.
High speed execution, powerful peripheral features,flexible I/O, and low power consumption all at low costmake the PIC17C7XX ideal for a wide range of embed-ded control applications.
1.1 Family and Upward Compatibility
The PIC17CXXX family of microcontrollers have archi-tectural enhancements over the PIC16C5X andPIC16CXX families. These enhancements allow thedevice to be more efficient in software and hardwarerequirements. Refer to Appendix A for a detailed list ofenhancements and modifications. Code written forPIC16C5X or PIC16CXX can be easily ported toPIC17CXXX devices (Appendix B).
1.2 Development Support
The PIC17CXXX family is supported by a full featuredmacro assembler, a software simulator, an in-circuitemulator, a universal programmer, a “C” compiler andfuzzy logic support tools. For additional information,see Section 19.0.
2000 Microchip Technology Inc. DS30289B-page 7

PIC17C7XX
TABLE 1-1: PIC17CXXX FAMILY OF DEVICES
Features PIC17C42A PIC17C43 PIC17C44 PIC17C752 PIC17C756A PIC17C762 PIC17C766
Maximum Frequencyof Operation
33 MHz 33 MHz 33 MHz 33 MHz 33 MHz 33 MHz 33 MHz
Operating Voltage Range 2.5 - 6.0V 2.5 - 6.0V 2.5 - 6.0V 3.0 - 5.5V 3.0 - 5.5V 3.0 - 5.5V 3.0 - 5.5V
Program Memory ( x16)
(EPROM) 2 K 4 K 8 K 8 K 16 K 8 K 16 K
(ROM) — — — — — — —
Data Memory (bytes) 232 454 454 678 902 678 902
Hardware Multiplier (8 x 8) Yes Yes Yes Yes Yes Yes Yes
Timer0(16-bit + 8-bit postscaler)
Yes Yes Yes Yes Yes Yes Yes
Timer1 (8-bit) Yes Yes Yes Yes Yes Yes Yes
Timer2 (8-bit) Yes Yes Yes Yes Yes Yes Yes
Timer3 (16-bit) Yes Yes Yes Yes Yes Yes Yes
Capture inputs (16-bit) 2 2 2 4 4 4 4
PWM outputs (up to 10-bit) 2 2 2 3 3 3 3
USART/SCI 1 1 1 2 2 2 2
A/D channels (10-bit) — — — 12 12 16 16
SSP (SPI/I2C w/Master mode)
— — — Yes Yes Yes Yes
Power-on Reset Yes Yes Yes Yes Yes Yes Yes
Watchdog Timer Yes Yes Yes Yes Yes Yes Yes
External Interrupts Yes Yes Yes Yes Yes Yes Yes
Interrupt Sources 11 11 11 18 18 18 18
Code Protect Yes Yes Yes Yes Yes Yes Yes
Brown-out Reset — — — Yes Yes Yes Yes
In-Circuit Serial Programming
— — — Yes Yes Yes Yes
I/O Pins 33 33 33 50 50 66 66
I/O High Current Capability
Source 25 mA 25 mA 25 mA 25 mA 25 mA 25 mA 25 mA
Sink 25 mA(1) 25 mA(1) 25 mA(1) 25 mA(1) 25 mA(1) 25 mA(1) 25 mA(1)
Package Types 40-pin DIP44-pin PLCC44-pin MQFP 44-pin TQFP
40-pin DIP44-pin PLCC
44-pin MQFP
44-pin TQFP
40-pin DIP44-pin PLCC
44-pin MQFP
44-pin TQFP
64-pin TQFP68-pin PLCC
64-pin TQFP68-pin PLCC
80-pin TQFP84-pin PLCC
80-pin TQFP84-pin PLCC
Note 1: Pins RA2 and RA3 can sink up to 60 mA.
DS30289B-page 8 2000 Microchip Technology Inc.

PIC17C7XX
2.0 DEVICE VARIETIES
Each device has a variety of frequency ranges andpackaging options. Depending on application and pro-duction requirements, the proper device option can beselected using the information in the PIC17C7XX Prod-uct Selection System section at the end of this datasheet. When placing orders, please use the“PIC17C7XX Product Identification System” at theback of this data sheet to specify the correct part num-ber. When discussing the functionality of the device,memory technology and voltage range does not matter.
There are two memory type options. These are speci-fied in the middle characters of the part number.
1. C, as in PIC17C756A. These devices haveEPROM type memory.
2. CR, as in PIC17CR756A. These devices haveROM type memory.
All these devices operate over the standard voltagerange. Devices are also offered which operate over anextended voltage range (and reduced frequencyrange). Table 2-1 shows all possible memory types andvoltage range designators for a particular device.These designators are in bold typeface.
TABLE 2-1: DEVICE MEMORY VARIETIES
2.1 UV Erasable Devices
The UV erasable version, offered in CERQUAD pack-age, is optimal for prototype development and pilotprograms.
The UV erasable version can be erased and repro-grammed to any of the configuration modes. Thirdparty programmers also are available; refer to the ThirdParty Guide for a list of sources.
2.2 One-Time-Programmable (OTP)Devices
The availability of OTP devices is especially useful forcustomers expecting frequent code changes andupdates.
The OTP devices, packaged in plastic packages, permitthe user to program them once. In addition to the programmemory, the configuration bits must be programmed.
2.3 Quick-Turnaround-Production (QTP) Devices
Microchip offers a QTP Programming Service for fac-tory production orders. This service is made availablefor users who choose not to program a medium to highquantity of units and whose code patterns have stabi-lized. The devices are identical to the OTP devices butwith all EPROM locations and configuration optionsalready programmed by the factory. Certain code andprototype verification procedures apply before produc-tion shipments are available. Please contact your localMicrochip Technology sales office for more details.
2.4 Serialized Quick-TurnaroundProduction (SQTP sm) Devices
Microchip offers a unique programming service, wherea few user defined locations in each device are pro-grammed with different serial numbers. The serial num-bers may be random, pseudo-random or sequential.
Serial programming allows each device to have aunique number which can serve as an entry code,password or ID number.
2.5 Read Only Memory (ROM) Devices
Microchip offers masked ROM versions of several ofthe highest volume parts, thus giving customers a lowcost option for high volume, mature products.
ROM devices do not allow serialization information inthe program memory space.
For information on submitting ROM code, please con-tact your regional sales office.
Memory TypeVoltage Range
Standard Extended
EPROM PIC17CXXX PIC17LCXXX
ROM PIC17CRXXX PIC17LCRXXX
Note: Not all memory technologies are availablefor a particular device. Note: Presently, NO ROM versions of the
PIC17C7XX devices are available.
2000 Microchip Technology Inc. DS30289B-page 9

PIC17C7XX
NOTES:
DS30289B-page 10 2000 Microchip Technology Inc.

PIC17C7XX
3.0 ARCHITECTURAL OVERVIEW
The high performance of the PIC17CXXX can be attrib-uted to a number of architectural features, commonlyfound in RISC microprocessors. To begin with, thePIC17CXXX uses a modified Harvard architecture.This architecture has the program and data accessedfrom separate memories. So, the device has a programmemory bus and a data memory bus. This improvesbandwidth over traditional von Neumann architecture,where program and data are fetched from the samememory (accesses over the same bus). Separatingprogram and data memory further allows instructions tobe sized differently than the 8-bit wide data word.PIC17CXXX opcodes are 16-bits wide, enabling singleword instructions. The full 16-bit wide program memorybus fetches a 16-bit instruction in a single cycle. A two-stage pipeline overlaps fetch and execution of instruc-tions. Consequently, all instructions execute in a singlecycle (121 ns @ 33 MHz), except for program branchesand two special instructions that transfer data betweenprogram and data memory.
The PIC17CXXX can address up to 64K x 16 of pro-gram memory space.
The PIC17C752 and PIC17C762 integrate 8K x 16 ofEPROM program memory on-chip.
The PIC17C756A and PIC17C766 integrate 16K x 16EPROM program memory on-chip.
A simplified block diagram is shown in Figure 3-1. Thedescriptions of the device pins are listed in Table 3-1.
Program execution can be internal only (Microcontrol-ler or Protected Microcontroller mode), external only(Microprocessor mode), or both (Extended Microcon-troller mode). Extended Microcontroller mode does notallow code protection.
The PIC17CXXX can directly or indirectly address itsregister files or data memory. All special function regis-ters, including the Program Counter (PC) and WorkingRegister (WREG), are mapped in data memory. ThePIC17CXXX has an orthogonal (symmetrical) instructionset that makes it possible to carry out any operation onany register using any addressing mode. This symmetri-cal nature and lack of ‘special optimal situations’ makeprogramming with the PIC17CXXX simple, yet efficient.In addition, the learning curve is reduced significantly.
One of the PIC17CXXX family architectural enhance-ments from the PIC16CXX family, allows two file regis-ters to be used in some two operand instructions. Thisallows data to be moved directly between two registerswithout going through the WREG register, thus increas-ing performance and decreasing program memoryusage.
The PIC17CXXX devices contain an 8-bit ALU andworking register. The ALU is a general purpose arith-metic unit. It performs arithmetic and Boolean functionsbetween data in the working register and any registerfile.
The WREG register is an 8-bit working register used forALU operations.
All PIC17CXXX devices have an 8 x 8 hardware multi-plier. This multiplier generates a 16-bit result in a singlecycle.
The ALU is 8-bits wide and capable of addition, sub-traction, shift and logical operations. Unless otherwisementioned, arithmetic operations are two's comple-ment in nature.
Depending on the instruction executed, the ALU mayaffect the values of the Carry (C), Digit Carry (DC), Zero(Z) and Overflow (OV) bits in the ALUSTA register. TheC and DC bits operate as a borrow and digit borrow outbit, respectively, in subtraction. See the SUBLW andSUBWF instructions for examples.
Signed arithmetic is comprised of a magnitude and asign bit. The overflow bit indicates if the magnitudeoverflows and causes the sign bit to change state. Thatis, if the result of 8-bit signed operations is greater than127 (7Fh), or less than -128 (80h).
Signed math can have greater than 7-bit values (mag-nitude), if more than one byte is used. The overflow bitonly operates on bit6 (MSb of magnitude) and bit7 (signbit) of each byte value in the ALU. That is, the overflowbit is not useful if trying to implement signed mathwhere the magnitude, for example, is 11-bits.
If the signed math values are greater than 7-bits (suchas 15-, 24-, or 31-bit), the algorithm must ensure thatthe low order bytes of the signed value ignore the over-flow status bit.
Example 3-1 shows two cases of doing signed arith-metic. The Carry (C) bit and the Overflow (OV) bit are themost important status bits for signed math operations.
EXAMPLE 3-1: 8-BIT MATH ADDITION
Hex Value Signed Values Unsigned Values
FFh+ 01h= 00h
C bit = 1OV bit = 0
DC bit = 1Z bit = 1
-1 + 1= 0 (FEh)
C bit = 1OV bit = 0
DC bit = 1Z bit = 1
255+ 1= 256 → 00h
C bit = 1OV bit = 0
DC bit = 1Z bit = 1
Hex Value Signed Values Unsigned Values
7Fh+ 01h= 80h
C bit = 0OV bit = 1
DC bit = 1Z bit = 0
127 + 1= 128 → 00h
C bit = 0OV bit = 1
DC bit = 1Z bit = 0
127+ 1= 128
C bit = 0OV bit = 1
DC bit = 1Z bit = 0
2000 Microchip Technology Inc. DS30289B-page 11

PIC17C7XX
FIGURE 3-1: PIC17C752/756A BLOCK DIAGRAM
RB0/CAP1RB1/CAP2
RB2/PWM1RB3/PWM2
RB4/TCLK12RB5/TCLK3
RB6/SCKRB7/SDO
RA0/INTRA1/T0CKI
RA2/SS/SCLRA3/SDI/SDARA4/RX1/DT1RA5/TX1/CK1
PORTA
RC0/AD0RC1/AD1RC2/AD2RC3/AD3RC4/AD4RC5/AD5RC6/AD6RC7/AD7
RD0/AD8RD1/AD9
RD2/AD10RD3/AD11RD4/AD12RD5/AD13RD6/AD14RD7/AD15
RE0/ALERE1/OERE2/WR
RE3/CAP4
RF0/AN4RF1/AN5RF2/AN6RF3/AN7RF4/AN8RF5/AN9
RF6/AN10RF7/AN11
RG0/AN3RG1/AN2
RG2/AN1/VREF-RG3/AN0/VREF+
RG4/CAP3RG5/PWM3
RG6/RX2/DT2RG7/TX2/CK2
Timer0
ClockGenerator
Power-onReset
WatchdogTimer
Test ModeSelect
VDD, VSS
OSC1,
MCLR, VPP
Test
Q1, Q2,
Chip_reset& OtherControl
Sys
tem
Bus
Inte
rfac
e
Decode
Data Latch
Address
ProgramMemory
(EPROM)
Table Pointer<16>
Stack16 x 16
Table
ROM Latch <16>
InstructionDecode
Control Outputs
IR Latch <16>
F1F9
16K x 16
PCH
PCLATH<8>
Literal
RAM
Data Latch
BSR
Data RAM
902 x 8
Latch
PCL
Read/WriteDecode
for
Mappedin Data Space
WREG<8> BITOP
ALU
Shifter
8 x 8 mult
PRODH PRODL
Registers
Latch <16>
AddressBuffer
USART1
Timer1 Timer3
Timer2 PWM1
PWM2
PWM3
Capture1 Capture3
Capture2
InterruptModule
10-bitA/D
PORTB
PORTC
PORTD
PORTE
PORTF
PORTG
AD<15:0>
Signals
Q3, Q4 OSC2
Data Bus<8>
16
16
16
16
8 8
8
8
12
16
IR<16>
SSP
PORTC,PORTD
ALE,WR,OE,PORTE
IR <7:0>BSR <7:4>
USART2 Capture4
Brown-outReset
17C756A
17C7528K x 16
17C756A
17C752678 x 8
DS30289B-page 12 2000 Microchip Technology Inc.

PIC17C7XX
FIGURE 3-2: PIC17C762/766 BLOCK DIAGRAM
RB0/CAP1RB1/CAP2
RB2/PWM1RB3/PWM2
RB4/TCLK12RB5/TCLK3
RB6/SCKRB7/SDO
RA0/INTRA1/T0CKI
RA2/SS/SCLRA3/SDI/SDARA4/RX1/DT1RA5/TX1/CK1
PORTA
RC0/AD0RC1/AD1RC2/AD2RC3/AD3RC4/AD4RC5/AD5RC6/AD6RC7/AD7
RD0/AD8RD1/AD9
RD2/AD10RD3/AD11RD4/AD12RD5/AD13RD6/AD14RD7/AD15
RE0/ALERE1/OERE2/WR
RE3/CAP4
RF0/AN4RF1/AN5RF2/AN6RF3/AN7RF4/AN8RF5/AN9
RF6/AN10RF7/AN11
RG0/AN3RG1/AN2
RG2/AN1/VREF-RG3/AN0/VREF+
RG4/CAP3RG5/PWM3
RG6/RX2/DT2RG7/TX2/CK2
Timer0
ClockGenerator
Power-onReset
WatchdogTimer
Test ModeSelect
VDD, VSS
OSC1,
MCLR, VPP
Test
Q1, Q2,
Chip_reset& OtherControl
Sys
tem
Bus
Inte
rfac
e
Decode
Data Latch
Address
ProgramMemory
(EPROM)
Table Pointer<16>
Stack16 x 16
Table
ROM Latch <16>
InstructionDecode
Control Outputs
IR Latch <16>
FSR0FSR1
16K x 16,
PCH
PCLATH<8>
Literal
RAM
Data Latch
BSR
Data RAM
902 x 8
Latch
PCL
Read/WriteDecode
for
Mappedin Data Space
WREG<8> BITOP
ALU
Shifter
8 x 8 mult
PRODH PRODL
Registers
Latch <16>
AddressBuffer
USART1
Timer1 Timer3
Timer2 PWM1
PWM2
PWM3
Capture1
Capture3Capture2InterruptModule
10-bitA/D
PORTB
PORTC
PORTD
PORTE
PORTF
PORTG
AD<15:0>
Signals
Q3, Q4 OSC2
Data Bus<8>
16
16
16
16
8 8
8
8
12
16
IR<16>
SSP
PORTC,PORTD
ALE,WR,OE,PORTE
IR <7:0>BSR <7:4>
USART2
Capture4
RH0RH1RH2RH3
RH4/AN12RH5/AN13RH6/AN14RH7/AN15
PORTH
RJ0RJ1RJ2RJ3RJ4RJ5RJ6RJ7
PORTJ
Brown-outReset
AVDD, AVSS
17C766
17C762678 x 8
and
17C766
and17C7628K x 16
2000 Microchip Technology Inc. DS30289B-page 13

PIC17C7XX
TABLE 3-1: PINOUT DESCRIPTIONS
Name
PIC17C75X PIC17C76X
DescriptionDIPNo.
PLCCNo.
TQFPNo.
PLCCNo.
QFPNo.
I/O/PType
BufferType
OSC1/CLKIN 47 50 39 62 49 I ST Oscillator input in Crystal/Resonator or RC Oscillator mode. External clock input in External Clock mode.
OSC2/CLKOUT 48 51 40 63 50 O — Oscillator output. Connects to crystal or resonator in Crystal Oscillator mode. In RC Oscillator or External Clock modes, OSC2 pin outputs CLKOUT which has one fourth the frequency (FOSC/4) of OSC1 and denotes the instruction cycle rate.
MCLR/VPP 15 16 7 20 9 I/P ST Master clear (RESET) input or Programming Voltage (VPP) input. This is the active low RESET input to the device.
PORTA pins have individual differentiations that are listed in the following descriptions:
RA0/INT 56 60 48 72 58 I ST RA0 can also be selected as an external inter-rupt input. Interrupt can be configured to be on positive or negative edge. Input only pin.
RA1/T0CKI 41 44 33 56 43 I ST RA1 can also be selected as an external inter-rupt input and the interrupt can be configured to be on positive or negative edge. RA1 can also be selected to be the clock input to the Timer0 timer/counter. Input only pin.
RA2/SS/SCL 42 45 34 57 44 I/O(2) ST RA2 can also be used as the slave select input for the SPI or the clock input for the I2C bus.High voltage, high current, open drain port pin.
RA3/SDI/SDA 43 46 35 58 45 I/O(2) ST RA3 can also be used as the data input for the SPI or the data for the I2C bus.High voltage, high current, open drain port pin.
RA4/RX1/DT1 40 43 32 51 38 I/O(1) ST RA4 can also be selected as the USART1 (SCI) Asynchronous Receive or USART1 (SCI) Synchronous Data. Output available from USART only.
RA5/TX1/CK1 39 42 31 50 37 I/O(1) ST RA5 can also be selected as the USART1 (SCI) Asynchronous Transmit or USART1 (SCI) Synchronous Clock. Output available from USART only.
PORTB is a bi-directional I/O Port with software configurable weak pull-ups.
RB0/CAP1 55 59 47 71 57 I/O ST RB0 can also be the Capture1 input pin.
RB1/CAP2 54 58 46 70 56 I/O ST RB1 can also be the Capture2 input pin.
RB2/PWM1 50 54 42 66 52 I/O ST RB2 can also be the PWM1 output pin.
RB3/PWM2 53 57 45 69 55 I/O ST RB3 can also be the PWM2 output pin.
RB4/TCLK12 52 56 44 68 54 I/O ST RB4 can also be the external clock input to Timer1 and Timer2.
RB5/TCLK3 51 55 43 67 53 I/O ST RB5 can also be the external clock input to Timer3.
RB6/SCK 44 47 36 59 46 I/O ST RB6 can also be used as the master/slave clock for the SPI.
RB7/SDO 45 48 37 60 47 I/O ST RB7 can also be used as the data output for the SPI.
Legend: I = Input only; O = Output only; I/O = Input/Output; P = Power; — = Not Used; TTL = TTL input; ST = Schmitt Trigger input
Note 1: The output is only available by the peripheral operation.2: Open drain input/output pin. Pin forced to input upon any device RESET.
DS30289B-page 14 2000 Microchip Technology Inc.

PIC17C7XX
PORTC is a bi-directional I/O Port.
RC0/AD0 2 3 58 3 72 I/O TTL This is also the least significant byte (LSB) of the 16-bit wide system bus in Microprocessor mode or Extended Microcontroller mode. Inmultiplexed system bus configuration, these pins are address output as well as data input or output.
RC1/AD1 63 67 55 83 69 I/O TTL
RC2/AD2 62 66 54 82 68 I/O TTL
RC3/AD3 61 65 53 81 67 I/O TTL
RC4/AD4 60 64 52 80 66 I/O TTL
RC5/AD5 58 63 51 79 65 I/O TTL
RC6/AD6 58 62 50 78 64 I/O TTL
RC7/AD7 57 61 49 77 63 I/O TTL
PORTD is a bi-directional I/O Port.
RD0/AD8 10 11 2 15 4 I/O TTL This is also the most significant byte (MSB) of the 16-bit system bus in Microprocessor mode or Extended Microcontroller mode. In multi-plexed system bus configuration, these pins are address output as well as data input or output.
RD1/AD9 9 10 1 14 3 I/O TTL
RD2/AD10 8 9 64 9 78 I/O TTL
RD3/AD11 7 8 63 8 77 I/O TTL
RD4/AD12 6 7 62 7 76 I/O TTL
RD5/AD13 5 6 61 6 75 I/O TTL
RD6/AD14 4 5 60 5 74 I/O TTL
RD7/AD15 3 4 59 4 73 I/O TTL
PORTE is a bi-directional I/O Port.
RE0/ALE 11 12 3 16 5 I/O TTL In Microprocessor mode or Extended Microcon-troller mode, RE0 is the Address Latch Enable (ALE) output. Address should be latched on the falling edge of ALE output.
RE1/OE 12 13 4 17 6 I/O TTL In Microprocessor or Extended Microcontroller mode, RE1 is the Output Enable (OE) control output (active low).
RE2/WR 13 14 5 18 7 I/O TTL In Microprocessor or Extended Microcontroller mode, RE2 is the Write Enable (WR) control output (active low).
RE3/CAP4 14 15 6 19 8 I/O ST RE3 can also be the Capture4 input pin.
PORTF is a bi-directional I/O Port.
RF0/AN4 26 28 18 36 24 I/O ST RF0 can also be analog input 4.
RF1/AN5 25 27 17 35 23 I/O ST RF1 can also be analog input 5.
RF2/AN6 24 26 16 30 18 I/O ST RF2 can also be analog input 6.
RF3/AN7 23 25 15 29 17 I/O ST RF3 can also be analog input 7.
RF4/AN8 22 24 14 28 16 I/O ST RF4 can also be analog input 8.
RF5/AN9 21 23 13 27 15 I/O ST RF5 can also be analog input 9.
RF6/AN10 20 22 12 26 14 I/O ST RF6 can also be analog input 10.
RF7/AN11 19 21 11 25 13 I/O ST RF7 can also be analog input 11.
TABLE 3-1: PINOUT DESCRIPTIONS (CONTINUED)
Name
PIC17C75X PIC17C76X
DescriptionDIPNo.
PLCCNo.
TQFPNo.
PLCCNo.
QFPNo.
I/O/PType
BufferType
Legend: I = Input only; O = Output only; I/O = Input/Output; P = Power; — = Not Used; TTL = TTL input; ST = Schmitt Trigger input
Note 1: The output is only available by the peripheral operation.2: Open drain input/output pin. Pin forced to input upon any device RESET.
2000 Microchip Technology Inc. DS30289B-page 15

PIC17C7XX
PORTG is a bi-directional I/O Port.
RG0/AN3 32 34 24 42 30 I/O ST RG0 can also be analog input 3.
RG1/AN2 31 33 23 41 29 I/O ST RG1 can also be analog input 2.
RG2/AN1/VREF- 30 32 22 40 28 I/O ST RG2 can also be analog input 1, or the ground reference voltage.
RG3/AN0/VREF+ 29 31 21 39 27 I/O ST RG3 can also be analog input 0, or the positive reference voltage.
RG4/CAP3 35 38 27 46 33 I/O ST RG4 can also be the Capture3 input pin.
RG5/PWM3 36 39 28 47 34 I/O ST RG5 can also be the PWM3 output pin.
RG6/RX2/DT2 38 41 30 49 36 I/O ST RG6 can also be selected as the USART2 (SCI) Asynchronous Receive or USART2 (SCI) Synchronous Data.
RG7/TX2/CK2 37 40 29 48 35 I/O ST RG7 can also be selected as the USART2 (SCI) Asynchronous Transmit or USART2 (SCI) Synchronous Clock.
PORTH is a bi-directional I/O Port. PORTH is only available on the PIC17C76X devices.RH0 — — — 10 79 I/O ST
RH1 — — — 11 80 I/O ST
RH2 — — — 12 1 I/O ST
RH3 — — — 13 2 I/O ST
RH4/AN12 — — — 31 19 I/O ST RH4 can also be analog input 12.
RH5/AN13 — — — 32 20 I/O ST RH5 can also be analog input 13.
RH6/AN14 — — — 33 21 I/O ST RH6 can also be analog input 14.
RH7/AN15 — — — 34 22 I/O ST RH7 can also be analog input 15.
PORTJ is a bi-directional I/O Port. PORTJ is only available on the PIC17C76X devices.
RJ0 — — — 52 39 I/O ST
RJ1 — — — 53 40 I/O ST
RJ2 — — — 54 41 I/O ST
RJ3 — — — 55 42 I/O ST
RJ4 — — — 73 59 I/O ST
RJ5 — — — 74 60 I/O ST
RJ6 — — — 75 61 I/O ST
RJ7 — — — 76 62 I/O ST
TEST 16 17 8 21 10 I ST Test mode selection control input. Always tie to VSS for normal operation.
VSS 17, 33, 49, 64
19, 36, 53, 68
9, 25, 41, 56
23, 44, 65, 84
11, 31, 51, 70
P Ground reference for logic and I/O pins.
VDD 1, 18, 34, 46
2, 20, 37, 49,
10, 26, 38, 57
24, 45, 61, 2
12, 32, 48, 71
P Positive supply for logic and I/O pins.
AVSS 28 30 20 38 26 P Ground reference for A/D converter.This pin MUST be at the same potential as VSS.
AVDD 27 29 19 37 25 P Positive supply for A/D converter.This pin MUST be at the same potential as VDD.
NC — 1, 18, 35, 52
— 1, 22, 43, 64
— No Connect. Leave these pins unconnected.
TABLE 3-1: PINOUT DESCRIPTIONS (CONTINUED)
Name
PIC17C75X PIC17C76X
DescriptionDIPNo.
PLCCNo.
TQFPNo.
PLCCNo.
QFPNo.
I/O/PType
BufferType
Legend: I = Input only; O = Output only; I/O = Input/Output; P = Power; — = Not Used; TTL = TTL input; ST = Schmitt Trigger input
Note 1: The output is only available by the peripheral operation.2: Open drain input/output pin. Pin forced to input upon any device RESET.
DS30289B-page 16 2000 Microchip Technology Inc.

PIC17C7XX
4.0 ON-CHIP OSCILLATOR CIRCUIT
The internal oscillator circuit is used to generate thedevice clock. Four device clock periods generate aninternal instruction clock (TCY).
There are four modes that the oscillator can operate in.They are selected by the device configuration bits dur-ing device programming. These modes are:
• LF Low Frequency (FOSC ≤ 2 MHz)• XT Standard Crystal/Resonator Frequency
(2 MHz ≤ FOSC ≤ 33 MHz)• EC External Clock Input
(Default oscillator configuration)• RC External Resistor/Capacitor
(FOSC ≤ 4 MHz)
There are two timers that offer necessary delays onpower-up. One is the Oscillator Start-up Timer (OST),intended to keep the chip in RESET until the crystaloscillator is stable. The other is the Power-up Timer(PWRT), which provides a fixed delay of 96 ms (nomi-nal) on POR and BOR. The PWRT is designed to keepthe part in RESET while the power supply stabilizes.With these two timers on-chip, most applications needno external RESET circuitry.
SLEEP mode is designed to offer a very low currentpower-down mode. The user can wake from SLEEPthrough external RESET, Watchdog Timer Reset, orthrough an interrupt.
Several oscillator options are made available to allowthe part to better fit the application. The RC oscillatoroption saves system cost while the LF crystal optionsaves power. Configuration bits are used to select var-ious options.
4.1 Oscillator Configurations
4.1.1 OSCILLATOR TYPES
The PIC17CXXX can be operated in four different oscil-lator modes. The user can program two configurationbits (FOSC1:FOSC0) to select one of these fourmodes:
• LF Low Power Crystal• XT Crystal/Resonator
• EC External Clock Input• RC Resistor/Capacitor
The main difference between the LF and XT modes isthe gain of the internal inverter of the oscillator circuit,which allows the different frequency ranges.
For more details on the device configuration bits, seeSection 17.0.
4.1.2 CRYSTAL OSCILLATOR/CERAMIC RESONATORS
In XT or LF modes, a crystal or ceramic resonator is con-nected to the OSC1/CLKIN and OSC2/CLKOUT pins toestablish oscillation (Figure 4-2). The PIC17CXXX oscil-lator design requires the use of a parallel cut crystal. Useof a series cut crystal may give a frequency out of thecrystal manufacturers specifications.
For frequencies above 24 MHz, it is common for thecrystal to be an overtone mode crystal. Use of overtonemode crystals require a tank circuit to attenuate thegain at the fundamental frequency. Figure 4-3 showsan example circuit.
4.1.3 OSCILLATOR/RESONATOR START-UP
As the device voltage increases from Vss, the oscillatorwill start its oscillations. The time required for the oscil-lator to start oscillating depends on many factors.These include:
• Crystal/resonator frequency• Capacitor values used (C1 and C2)• Device VDD rise time
• System temperature• Series resistor value (and type) if used• Oscillator mode selection of device (which selects
the gain of the internal oscillator inverter)
Figure 4-1 shows an example of a typical oscillator/resonator start-up. The peak-to-peak voltage of theoscillator waveform can be quite low (less than 50% ofdevice VDD) when the waveform is centered at VDD/2(refer to parameter #D033 and parameter #D043 in theelectrical specification section).
FIGURE 4-1: OSCILLATOR/ RESONATOR START-UP CHARACTERISTICS
VD
D
Crystal Start-up Time
Time
2000 Microchip Technology Inc. DS30289B-page 17

PIC17C7XX
FIGURE 4-2: CRYSTAL OR CERAMIC RESONATOR OPERATION (XT OR LF OSC CONFIGURATION)
TABLE 4-1: CAPACITOR SELECTION FOR CERAMIC RESONATORS
FIGURE 4-3: CRYSTAL OPERATION, OVERTONE CRYSTALS (XT OSC CONFIGURATION)
TABLE 4-2: CAPACITOR SELECTION FOR CRYSTAL OSCILLATOR
Oscillator Type
Resonator Frequency
Capacitor RangeC1 = C2(1)
LF 455 kHz2.0 MHz
15 - 68 pF10 - 33 pF
XT 4.0 MHz8.0 MHz16.0 MHz
22 - 68 pF33 - 100 pF33 - 100 pF
Higher capacitance increases the stability of the oscillator, but also increases the start-up time. These values are for design guidance only. Since each resonator has its own characteristics, the user should consult the resonator manu-facturer for appropriate values of external components. Note 1: These values include all board capacitances on
this pin. Actual capacitor value depends on board capacitance.
Resonators Used:
455 kHz Panasonic EFO-A455K04B ± 0.3%
2.0 MHz Murata Erie CSA2.00MG ± 0.5%
4.0 MHz Murata Erie CSA4.00MG ± 0.5%
8.0 MHz Murata Erie CSA8.00MT ± 0.5%
16.0 MHz Murata Erie CSA16.00MX ± 0.5%
Resonators used did not have built-in capacitors.
See Table 4-1 and Table 4-2 for recommended values of C1 and C2.
Note 1: A series resistor (Rs) may be required for AT strip cut crystals.
C1
C2
XTAL
OSC2
(Note 1)
OSC1
RF SLEEP
PIC17CXXX
To internallogic
OscType
Freq C1(2) C2(2)
LF 32 kHz1 MHz2 MHz
100-150 pF10-68 pF10-68 pF
100-150 pF10-68 pF10-68 pF
XT 2 MHz4 MHz8 MHz
16 MHz24 MHz(1)
32 MHz(1)
47-100 pF15-68 pF15-47 pF15-47 pF15-47 pF10-47 pF
47-100 pF15-68 pF15-47 pF15-47 pF15-47 pF10-47 pF
Higher capacitance increases the stability of the oscillator, but also increases the start-up time and the oscillator cur-rent. These values are for design guidance only. RS may be required in XT mode to avoid overdriving the crystals with low drive level specification. Since each crystal has its own characteristics, the user should consult the crystal manufac-turer for appropriate values for external components.Note 1: Overtone crystals are used at 24 MHz and
higher. The circuit in Figure 4-3 should be used to select the desired harmonic frequency.
2: These values include all board capacitances on this pin. Actual capacitor value depends on board capacitance.
Crystals Used:
32.768 kHz Epson C-001R32.768K-A ± 20 PPM
1.0 MHz ECS-10-13-1 ± 50 PPM
2.0 MHz ECS-20-20-1 ± 50 PPM
4.0 MHz ECS-40-20-1 ± 50 PPM
8.0 MHz ECS ECS-80-S-4ECS-80-18-1
± 50 PPM
16.0 MHz ECS-160-20-1 ± 50 PPM
25 MHz CTS CTS25M ± 50 PPM
32 MHz CRYSTEK HF-2 ± 50 PPM
C1
C2
0.1 µF
SLEEP
OSC2
OSC1
PIC17CXXX
To filter the fundamental frequency:1
L1*C2 = (2πf)2
Where f = tank circuit resonant frequency. This should bemidway between the fundamental and the 3rd overtonefrequencies of the crystal.
C3
C3 blocks DC current to ground.
L1
DS30289B-page 18 2000 Microchip Technology Inc.

PIC17C7XX
4.1.4 EXTERNAL CLOCK OSCILLATOR
In the EC oscillator mode, the OSC1 input can bedriven by CMOS drivers. In this mode, the OSC1/CLKIN pin is hi-impedance and the OSC2/CLKOUT pinis the CLKOUT output (4 TOSC).
FIGURE 4-4: EXTERNAL CLOCK INPUT OPERATION (EC OSC CONFIGURATION)
4.1.5 EXTERNAL CRYSTAL OSCILLATOR CIRCUIT
Either a prepackaged oscillator can be used, or a sim-ple oscillator circuit with TTL gates can be built. Pre-packaged oscillators provide a wide operating rangeand better stability. A well designed crystal oscillatorwill provide good performance with TTL gates. Twotypes of crystal oscillator circuits can be used: one withseries resonance, or one with parallel resonance.
Figure 4-5 shows implementation of a parallel resonantoscillator circuit. The circuit is designed to use the fun-damental frequency of the crystal. The 74AS04 inverterperforms the 180-degree phase shift that a paralleloscillator requires. The 4.7 kΩ resistor provides thenegative feedback for stability. The 10 kΩ potentiome-ter biases the 74AS04 in the linear region. This couldbe used for external oscillator designs.
FIGURE 4-5: EXTERNAL PARALLEL RESONANT CRYSTAL OSCILLATOR CIRCUIT
Figure 4-6 shows a series resonant oscillator circuit.This circuit is also designed to use the fundamental fre-quency of the crystal. The inverter performs a 180-degree phase shift in a series resonant oscillator cir-cuit. The 330 Ω resistors provide the negative feedbackto bias the inverters in their linear region.
FIGURE 4-6: EXTERNAL SERIES RESONANT CRYSTAL OSCILLATOR CIRCUIT
Clock from
ext. systemOSC1
OSC2
PIC17CXXX
CLKOUT
(FOSC/4)
20 pF
+5V
20 pF
10 kΩ4.7 kΩ
10 kΩ
74AS04
XTAL
10kΩ
74AS04 PIC17CXXX
OSC1
To OtherDevices
330 Ω
74AS04 74AS04 PIC17CXXX
OSC1
To OtherDevices
XTAL
330 Ω
74AS04
0.1 µF
2000 Microchip Technology Inc. DS30289B-page 19

PIC17C7XX
4.1.6 RC OSCILLATORFor timing insensitive applications, the RC deviceoption offers additional cost savings. RC oscillator fre-quency is a function of the supply voltage, the resistor(REXT) and capacitor (CEXT) values, and the operatingtemperature. In addition to this, oscillator frequency willvary from unit to unit due to normal process parametervariation. Furthermore, the difference in lead framecapacitance between package types will also affectoscillation frequency, especially for low CEXT values.The user also needs to take into account variation dueto tolerance of external R and C components used.Figure 4-7 shows how the R/C combination is con-nected to the PIC17CXXX. For REXT values below2.2 kΩ, the oscillator operation may become unstable,or stop completely. For very high REXT values (e.g.1 MΩ), the oscillator becomes sensitive to noise,humidity and leakage. Thus, we recommend to keepREXT between 3 kΩ and 100 kΩ.
Although the oscillator will operate with no externalcapacitor (CEXT = 0 pF), we recommend using valuesabove 20 pF for noise and stability reasons. With littleor no external capacitance, oscillation frequency canvary dramatically due to changes in external capaci-tances, such as PCB trace capacitance or packagelead frame capacitance.
See Section 21.0 for RC frequency variation from partto part due to normal process variation. The variation islarger for larger R (since leakage current variation willaffect RC frequency more for large R) and for smallerC (since variation of input capacitance will affect RCfrequency more).
See Section 21.0 for variation of oscillator frequencydue to VDD for given REXT/CEXT values, as well as fre-quency variation due to operating temperature forgiven R, C, and VDD values.
The oscillator frequency, divided by 4, is available onthe OSC2/CLKOUT pin and can be used for test pur-poses or to synchronize other logic (see Figure 4-8 forwaveform).
FIGURE 4-7: RC OSCILLATOR MODE
4.1.6.1 RC Start-up
As the device voltage increases, the RC will immedi-ately start its oscillations once the pin voltage levelsmeet the input threshold specifications (parameter#D032 and parameter #D042 in the electrical specifica-tion section). The time required for the RC to start oscil-lating depends on many factors. These include:
• Resistor value used• Capacitor value used• Device VDD rise time
• System temperature
VDD
REXT
CEXT
VSS
OSC1InternalClock
OSC2/CLKOUTFOSC/4
PIC17CXXX
DS30289B-page 20 2000 Microchip Technology Inc.

PIC17C7XX
4.2 Clocking Scheme/Instruction Cycle
The clock input (from OSC1) is internally divided byfour to generate four non-overlapping quadratureclocks, namely Q1, Q2, Q3 and Q4. Internally, the pro-gram counter (PC) is incremented every Q1 and theinstruction is fetched from the program memory andlatched into the instruction register in Q4. The instruc-tion is decoded and executed during the following Q1through Q4. The clocks and instruction execution floware shown in Figure 4-8.
4.3 Instruction Flow/Pipelining
An “Instruction Cycle” consists of four Q cycles (Q1,Q2, Q3 and Q4). The instruction fetch and execute arepipelined such that fetch takes one instruction cycle,while decode and execute takes another instructioncycle. However, due to the pipelining, each instructioneffectively executes in one cycle. If an instructioncauses the program counter to change (e.g. GOTO),then two cycles are required to complete the instruction(Example 4-1).
A fetch cycle begins with the program counter incre-menting in Q1.
In the execution cycle, the fetched instruction is latchedinto the “Instruction Register (IR)” in cycle Q1. Thisinstruction is then decoded and executed during the Q2,Q3 and Q4 cycles. Data memory is read during Q2(operand read) and written during Q4 (destination write).
FIGURE 4-8: CLOCK/INSTRUCTION CYCLE
EXAMPLE 4-1: INSTRUCTION PIPELINE FLOW
Q1 Q2 Q3 Q4 Q1 Q2 Q3 Q4 Q1 Q2 Q3 Q4
OSC1
Q1
Q2
Q3
Q4
PC
OSC2/CLKOUT(RC mode)
PC PC+1 PC+2
Fetch INST (PC)Execute INST (PC-1) Fetch INST (PC+1)
Execute INST (PC) Fetch INST (PC+2)Execute INST (PC+1)
InternalPhaseClock
All instructions are single cycle, except for any program branches. These take two cycles since the fetched instruc-tion is “flushed” from the pipeline, while the new instruction is being fetched and then executed.
TCY0 TCY1 TCY2 TCY3 TCY4 TCY5
1. MOVLW 55h Fetch 1 Execute 1
2. MOVWF PORTB Fetch 2 Execute 2
3. CALL SUB_1 Fetch 3 Execute 3
4. BSF PORTA, BIT3 (Forced NOP) Fetch 4 Flush
5. Instruction @ address SUB_1 Fetch SUB_1 Execute SUB_1
2000 Microchip Technology Inc. DS30289B-page 21

PIC17C7XX
NOTES:
DS30289B-page 22 2000 Microchip Technology Inc.

PIC17C7XX
5.0 RESET
The PIC17CXXX differentiates between various kindsof RESET:
• Power-on Reset (POR)
• Brown-out Reset• MCLR Reset• WDT Reset
Some registers are not affected in any RESET condi-tion, their status is unknown on POR and unchanged inany other RESET. Most other registers are forced to a“RESET state”. The TO and PD bits are set or cleareddifferently in different RESET situations, as indicated inTable 5-3. These bits, in conjunction with the POR andBOR bits, are used in software to determine the natureof the RESET. See Table 5-4 for a full description of theRESET states of all registers.
When the device enters the “RESET state”, the DataDirection registers (DDR) are forced set, which willmake the I/O hi-impedance inputs. The RESET state ofsome peripheral modules may force the I/O to otheroperations, such as analog inputs or the system bus.
A simplified block diagram of the On-Chip Reset Circuitis shown in Figure 5-1.
FIGURE 5-1: SIMPLIFIED BLOCK DIAGRAM OF ON-CHIP RESET CIRCUIT
Note: While the device is in a RESET state, theinternal phase clock is held in the Q1 state.Any processor mode that allows externalexecution will force the RE0/ALE pin as alow output and the RE1/OE and RE2/WRpins as high outputs.
S
R Q
ExternalReset
MCLR
VDD
OSC1
WDTModule
VDD RiseDetect
OST/PWRT
On-chipRC OSC†
WDT
Time_Out
Power_On_Reset
OST
10-bit Ripple Counter
PWRT
Chip_Reset
10-bit Ripple Counter
(Enable the PWRT timeronly during POR or BOR)
(If PWRT is invoked, or a Wake-up fromSLEEP and OSC type is XT or LF)
Reset
Ena
ble
OS
T
Ena
ble
PW
RT
† This RC oscillator is shared with the WDT when not in a power-up sequence.
BORModule
Brown-outReset
2000 Microchip Technology Inc. DS30289B-page 23

PIC17C7XX
5.1 Power-on Reset (POR), Power-up Timer (PWRT), Oscillator Start-up Timer (OST) and Brown-out Reset (BOR)
5.1.1 POWER-ON RESET (POR)
The Power-on Reset circuit holds the device in RESETuntil VDD is above the trip point (in the range of 1.4V -2.3V). The devices produce an internal RESET for bothrising and falling VDD. To take advantage of the POR,just tie the MCLR/VPP pin directly (or through a resistor)to VDD. This will eliminate external RC componentsusually needed to create Power-on Reset. A minimumrise time for VDD is required. See Electrical Specifica-tions for details.
Figure 5-2 and Figure 5-3 show two possible PORcircuits.
FIGURE 5-2: USING ON-CHIP POR
FIGURE 5-3: EXTERNAL POWER-ON RESET CIRCUIT (FOR SLOW VDD POWER-UP)
5.1.2 POWER-UP TIMER (PWRT)
The Power-up Timer provides a fixed 96 ms time-out(nominal) on power-up. This occurs from the risingedge of the internal POR signal if VDD and MCLR aretied, or after the first rising edge of MCLR (detectedhigh). The Power-up Timer operates on an internal RCoscillator. The chip is kept in RESET as long as thePWRT is active. In most cases, the PWRT delay allowsVDD to rise to an acceptable level.
The power-up time delay will vary from chip to chip andwith VDD and temperature. See DC parameters fordetails.
5.1.3 OSCILLATOR START-UP TIMER (OST)
The Oscillator Start-up Timer (OST) provides a 1024oscillator cycle (1024TOSC) delay whenever the PWRTis invoked, or a wake-up from SLEEP event occurs in XTor LF mode. The PWRT and OST operate in parallel.
The OST counts the oscillator pulses on the OSC1/CLKIN pin. The counter only starts incrementing afterthe amplitude of the signal reaches the oscillator inputthresholds. This delay allows the crystal oscillator orresonator to stabilize before the device exits RESET.The length of the time-out is a function of the crystal/resonator frequency.
Figure 5-4 shows the operation of the OST circuit. Inthis figure, the oscillator is of such a low frequency thatalthough enabled simultaneously, the OST does nottime-out until after the Power-up Timer time-out.
FIGURE 5-4: OSCILLATOR START-UP TIME (LOW FREQUENCY)
VDD
MCLR
PIC17CXXX
VDD
Note 1: An external Power-on Reset circuit is required only if VDD power-up time is too slow. The diode D helps discharge the capac-itor quickly when VDD powers down.
2: R < 40 kΩ is recommended to ensure that the voltage drop across R does not exceed 0.2V (max. leakage current spec. on the MCLR/VPP pin is 5 µA). A larger voltage drop will degrade VIH level on the MCLR/VPP pin.
3: R1 = 100Ω to 1 kΩ will limit any current flow-ing into MCLR from external capacitor C in the event of MCLR/VPP pin breakdown due to Electrostatic Discharge (ESD) or Electrical Overstress (EOS).
C
R1RD
VDD
MCLR
PIC17CXXX
VDD
VDD
MCLR
OSC2
OST TIME_OUT
PWRT TIME_OUT
INTERNAL RESET
TOSC1TOST
TPWRT
POR or BOR Trip Point
This figure shows in greater detail the timings involvedwith the oscillator start-up timer. In this example, the lowfrequency crystal start-up time is larger than power-uptime (TPWRT).
TOSC1 = time for the crystal oscillator to react to an oscil-lation level detectable by the Oscillator Start-up Timer(OST).
TOST = 1024TOSC.
DS30289B-page 24 2000 Microchip Technology Inc.

PIC17C7XX
5.1.4 TIME-OUT SEQUENCE
On power-up, the time-out sequence is as follows: First,the internal POR signal goes high when the POR trippoint is reached. If MCLR is high, then both the OST andPWRT timers start. In general, the PWRT time-out islonger, except with low frequency crystals/resonators.The total time-out also varies based on oscillator config-uration. Table 5-1 shows the times that are associatedwith the oscillator configuration. Figure 5-5 and Figure 5-6 display these time-out sequences.
If the device voltage is not within electrical specificationat the end of a time-out, the MCLR/VPP pin must beheld low until the voltage is within the device specifica-tion. The use of an external RC delay is sufficient formany of these applications.
The time-out sequence begins from the first rising edgeof MCLR.
Table 5-3 shows the RESET conditions for some spe-cial registers, while Table 5-4 shows the initializationconditions for all the registers.
TABLE 5-1: TIME-OUT IN VARIOUS SITUATIONS
TABLE 5-2: STATUS BITS AND THEIR SIGNIFICANCE
TABLE 5-3: RESET CONDITION FOR THE PROGRAM COUNTER AND THE CPUSTA REGISTER
OscillatorConfiguration
POR, BORWake-up from
SLEEPMCLR Reset
XT, LF Greater of: 96 ms or 1024TOSC 1024TOSC —
EC, RC Greater of: 96 ms or 1024TOSC — —
POR BOR(1) TO PD Event
0 0 1 1 Power-on Reset
1 1 1 0 MCLR Reset during SLEEP or interrupt wake-up from SLEEP
1 1 0 1 WDT Reset during normal operation
1 1 0 0 WDT Wake-up during SLEEP
1 1 1 1 MCLR Reset during normal operation
1 0 1 1 Brown-out Reset
0 0 0 x Illegal, TO is set on POR
0 0 x 0 Illegal, PD is set on POR
x x 1 1 CLRWDT instruction executed
Note 1: When BODEN is enabled, else the BOR status bit is unknown.
Event PCH:PCL CPUSTA(4) OST Active
Power-on Reset 0000h --11 1100 Yes
Brown-out Reset 0000h --11 1110 Yes
MCLR Reset during normal operation 0000h --11 1111 No
MCLR Reset during SLEEP 0000h --11 1011 Yes(2)
WDT Reset during normal operation 0000h --11 0111 No
WDT Reset during SLEEP(3) 0000h --11 0011 Yes(2)
Interrupt Wake-up from SLEEP GLINTD is set PC + 1 --11 1011 Yes(2)
GLINTD is clear PC + 1(1) --10 1011 Yes(2)
Legend: u = unchanged, x = unknown, - = unimplemented, read as '0'Note 1: On wake-up, this instruction is executed. The instruction at the appropriate interrupt vector is fetched and
then executed.2: The OST is only active (on wake-up) when the oscillator is configured for XT or LF modes.3: The Program Counter = 0; that is, the device branches to the RESET vector and places SFRs in WDT
Reset states. This is different from the mid-range devices.4: When BODEN is enabled, else the BOR status bit is unknown.
2000 Microchip Technology Inc. DS30289B-page 25

PIC17C7XX
In Figure 5-5, Figure 5-6 and Figure 5-7, the TPWRTtimer time-out is greater then the TOST timer time-out,as would be the case in higher frequency crystals. Forlower frequency crystals (i.e., 32 kHz), TOST may begreater.
FIGURE 5-5: TIME-OUT SEQUENCE ON POWER-UP (MCLR TIED TO VDD)
FIGURE 5-6: TIME-OUT SEQUENCE ON POWER-UP (MCLR NOT TIED TO VDD)
FIGURE 5-7: SLOW RISE TIME (MCLR TIED TO VDD)
TPWRT
TOST
VDD
MCLR
INTERNAL POR
PWRT TIME-OUT
OST TIME-OUT
INTERNAL RESET
TPWRT
TOST
VDD
MCLR
INTERNAL POR
PWRT TIME-OUT
OST TIME-OUT
INTERNAL RESET
VDD
MCLR
INTERNAL POR
PWRT TIME-OUT
OST TIME-OUT
INTERNAL RESET
0V 1V
5V
TPWRT
TOST
Minimum VDD Operating Voltage
DS30289B-page 26 2000 Microchip Technology Inc.

PIC17C7XX
TABLE 5-4: INITIALIZATION CONDITIONS FOR SPECIAL FUNCTION REGISTERS
Register AddressPower-on ResetBrown-out Reset
MCLR ResetWDT Reset
Wake-up from SLEEP through Interrupt
Unbanked
INDF0 00h N/A N/A N/A
FSR0 01h xxxx xxxx uuuu uuuu uuuu uuuu
PCL 02h 0000h 0000h PC + 1(2)
PCLATH 03h 0000 0000 uuuu uuuu uuuu uuuu
ALUSTA 04h 1111 xxxx 1111 uuuu 1111 uuuu
T0STA 05h 0000 000- 0000 000- 0000 000-
CPUSTA(3) 06h --11 11qq --11 qquu --uu qquu
INTSTA 07h 0000 0000 0000 0000 uuuu uuuu(1)
INDF1 08h N/A N/A N/A
FSR1 09h xxxx xxxx uuuu uuuu uuuu uuuu
WREG 0Ah xxxx xxxx uuuu uuuu uuuu uuuu
TMR0L 0Bh xxxx xxxx uuuu uuuu uuuu uuuu
TMR0H 0Ch xxxx xxxx uuuu uuuu uuuu uuuu
TBLPTRL 0Dh 0000 0000 0000 0000 uuuu uuuu
TBLPTRH 0Eh 0000 0000 0000 0000 uuuu uuuu
BSR 0Fh 0000 0000 0000 0000 uuuu uuuu
Bank 0
PORTA(4,6) 10h 0-xx 11xx 0-uu 11uu u-uu uuuu
DDRB 11h 1111 1111 1111 1111 uuuu uuuu
PORTB(4) 12h xxxx xxxx uuuu uuuu uuuu uuuu
RCSTA1 13h 0000 -00x 0000 -00u uuuu -uuu
RCREG1 14h xxxx xxxx uuuu uuuu uuuu uuuu
TXSTA1 15h 0000 --1x 0000 --1u uuuu --uu
TXREG1 16h xxxx xxxx uuuu uuuu uuuu uuuu
SPBRG1 17h 0000 0000 0000 0000 uuuu uuuu
Legend: u = unchanged, x = unknown, - = unimplemented, read as ’0’, q = value depends on conditionNote 1: One or more bits in INTSTA, PIR1, PIR2 will be affected (to cause wake-up).
2: When the wake-up is due to an interrupt and the GLINTD bit is cleared, the PC is loaded with the interrupt vector.
3: See Table 5-3 for RESET value of specific condition.4: This is the value that will be in the port output latch.5: When the device is configured for Microprocessor or Extended Microcontroller mode, the operation of this
port does not rely on these registers.6: On any device RESET, these pins are configured as inputs.
2000 Microchip Technology Inc. DS30289B-page 27

PIC17C7XX
Bank 1
DDRC(5) 10h 1111 1111 1111 1111 uuuu uuuu
PORTC(4,5) 11h xxxx xxxx uuuu uuuu uuuu uuuu
DDRD(5) 12h 1111 1111 1111 1111 uuuu uuuu
PORTD(4,5) 13h xxxx xxxx uuuu uuuu uuuu uuuu
DDRE(5) 14h ---- 1111 ---- 1111 ---- uuuu
PORTE(4,5) 15h ---- xxxx ---- uuuu ---- uuuu
PIR1 16h x000 0010 u000 0010 uuuu uuuu(1)
PIE1 17h 0000 0000 0000 0000 uuuu uuuu
Bank 2
TMR1 10h xxxx xxxx uuuu uuuu uuuu uuuu
TMR2 11h xxxx xxxx uuuu uuuu uuuu uuuu
TMR3L 12h xxxx xxxx uuuu uuuu uuuu uuuu
TMR3H 13h xxxx xxxx uuuu uuuu uuuu uuuu
PR1 14h xxxx xxxx uuuu uuuu uuuu uuuu
PR2 15h xxxx xxxx uuuu uuuu uuuu uuuu
PR3/CA1L 16h xxxx xxxx uuuu uuuu uuuu uuuu
PR3/CA1H 17h xxxx xxxx uuuu uuuu uuuu uuuu
Bank 3
PW1DCL 10h xx-- ---- uu-- ---- uu-- ----
PW2DCL 11h xx0- ---- uu0- ---- uuu- ----
PW1DCH 12h xxxx xxxx uuuu uuuu uuuu uuuu
PW2DCH 13h xxxx xxxx uuuu uuuu uuuu uuuu
CA2L 14h xxxx xxxx uuuu uuuu uuuu uuuu
CA2H 15h xxxx xxxx uuuu uuuu uuuu uuuu
TCON1 16h 0000 0000 0000 0000 uuuu uuuu
TCON2 17h 0000 0000 0000 0000 uuuu uuuu
TABLE 5-4: INITIALIZATION CONDITIONS FOR SPECIAL FUNCTION REGISTERS (CONTINUED)
Register AddressPower-on ResetBrown-out Reset
MCLR ResetWDT Reset
Wake-up from SLEEP through Interrupt
Legend: u = unchanged, x = unknown, - = unimplemented, read as ’0’, q = value depends on conditionNote 1: One or more bits in INTSTA, PIR1, PIR2 will be affected (to cause wake-up).
2: When the wake-up is due to an interrupt and the GLINTD bit is cleared, the PC is loaded with the interrupt vector.
3: See Table 5-3 for RESET value of specific condition.4: This is the value that will be in the port output latch.5: When the device is configured for Microprocessor or Extended Microcontroller mode, the operation of this
port does not rely on these registers.6: On any device RESET, these pins are configured as inputs.
DS30289B-page 28 2000 Microchip Technology Inc.

PIC17C7XX
Bank 4
PIR2 10h 000- 0010 000- 0010 uuu- uuuu(1)
PIE2 11h 000- 0000 000- 0000 uuu- uuuu
Unimplemented 12h ---- ---- ---- ---- ---- ----
RCSTA2 13h 0000 -00x 0000 -00u uuuu -uuu
RCREG2 14h xxxx xxxx uuuu uuuu uuuu uuuu
TXSTA2 15h 0000 --1x 0000 --1u uuuu --uu
TXREG2 16h xxxx xxxx uuuu uuuu uuuu uuuu
SPBRG2 17h 0000 0000 0000 0000 uuuu uuuu
Bank 5
DDRF 10h 1111 1111 1111 1111 uuuu uuuu
PORTF(4) 11h 0000 0000 0000 0000 uuuu uuuu
DDRG 12h 1111 1111 1111 1111 uuuu uuuu
PORTG(4) 13h xxxx 0000 uuuu 0000 uuuu uuuu
ADCON0 14h 0000 -0-0 0000 -0-0 uuuu uuuu
ADCON1 15h 000- 0000 000- 0000 uuuu uuuu
ADRESL 16h xxxx xxxx uuuu uuuu uuuu uuuu
ADRESH 17h xxxx xxxx uuuu uuuu uuuu uuuu
Bank 6
SSPADD 10h 0000 0000 0000 0000 uuuu uuuu
SSPCON1 11h 0000 0000 0000 0000 uuuu uuuu
SSPCON2 12h 0000 0000 0000 0000 uuuu uuuu
SSPSTAT 13h 0000 0000 0000 0000 uuuu uuuu
SSPBUF 14h xxxx xxxx uuuu uuuu uuuu uuuu
Unimplemented 15h ---- ---- ---- ---- ---- ----
Unimplemented 16h ---- ---- ---- ---- ---- ----
Unimplemented 17h ---- ---- ---- ---- ---- ----
TABLE 5-4: INITIALIZATION CONDITIONS FOR SPECIAL FUNCTION REGISTERS (CONTINUED)
Register AddressPower-on ResetBrown-out Reset
MCLR ResetWDT Reset
Wake-up from SLEEP through Interrupt
Legend: u = unchanged, x = unknown, - = unimplemented, read as ’0’, q = value depends on conditionNote 1: One or more bits in INTSTA, PIR1, PIR2 will be affected (to cause wake-up).
2: When the wake-up is due to an interrupt and the GLINTD bit is cleared, the PC is loaded with the interrupt vector.
3: See Table 5-3 for RESET value of specific condition.4: This is the value that will be in the port output latch.5: When the device is configured for Microprocessor or Extended Microcontroller mode, the operation of this
port does not rely on these registers.6: On any device RESET, these pins are configured as inputs.
2000 Microchip Technology Inc. DS30289B-page 29

PIC17C7XX
Bank 7
PW3DCL 10h xx0- ---- uu0- ---- uuu- ----
PW3DCH 11h xxxx xxxx uuuu uuuu uuuu uuuu
CA3L 12h xxxx xxxx uuuu uuuu uuuu uuuu
CA3H 13h xxxx xxxx uuuu uuuu uuuu uuuu
CA4L 14h xxxx xxxx uuuu uuuu uuuu uuuu
CA4H 15h xxxx xxxx uuuu uuuu uuuu uuuu
TCON3 16h -000 0000 -000 0000 -uuu uuuu
Unimplemented 17h ---- ---- ---- ---- ---- ----
Bank 8
DDRH 10h 1111 1111 1111 1111 uuuu uuuu
PORTH(4) 11h xxxx xxxx uuuu uuuu uuuu uuuu
DDRJ 12h 1111 1111 1111 1111 uuuu uuuu
PORTJ(4) 13h xxxx xxxx uuuu uuuu uuuu uuuu
Unbanked
PRODL 18h xxxx xxxx uuuu uuuu uuuu uuuu
PRODH 19h xxxx xxxx uuuu uuuu uuuu uuuu
TABLE 5-4: INITIALIZATION CONDITIONS FOR SPECIAL FUNCTION REGISTERS (CONTINUED)
Register AddressPower-on ResetBrown-out Reset
MCLR ResetWDT Reset
Wake-up from SLEEP through Interrupt
Legend: u = unchanged, x = unknown, - = unimplemented, read as ’0’, q = value depends on conditionNote 1: One or more bits in INTSTA, PIR1, PIR2 will be affected (to cause wake-up).
2: When the wake-up is due to an interrupt and the GLINTD bit is cleared, the PC is loaded with the interrupt vector.
3: See Table 5-3 for RESET value of specific condition.4: This is the value that will be in the port output latch.5: When the device is configured for Microprocessor or Extended Microcontroller mode, the operation of this
port does not rely on these registers.6: On any device RESET, these pins are configured as inputs.
DS30289B-page 30 2000 Microchip Technology Inc.

PIC17C7XX
5.1.5 BROWN-OUT RESET (BOR)
PIC17C7XX devices have on-chip Brown-out Resetcircuitry. This circuitry places the device into a RESETwhen the device voltage falls below a trip point (BVDD).This ensures that the device does not continue pro-gram execution outside the valid operation range of thedevice. Brown-out Resets are typically used in AC lineapplications, or large battery applications, where largeloads may be switched in (such as automotive).
The BODEN configuration bit can disable (if clear/programmed), or enable (if set) the Brown-out Resetcircuitry. If VDD falls below BVDD (typically 4.0 V,paramter #D005 in electrical specification section), forgreater than parameter #35, the Brown-out situationwill reset the chip. A RESET is not guaranteed to occurif VDD falls below BVDD for less than paramter #35. Thechip will remain in Brown-out Reset until VDD risesabove BVDD. The Power-up Timer and Oscillator Start-up Timer will then be invoked. This will keep the chip inRESET the greater of 96 ms and 1024 TOSC. If VDD
drops below BVDD while the Power-up Timer/OscillatorStart-up Timer is running, the chip will go back into aBrown-out Reset. The Power-up Timer/Oscillator Start-up Timer will be initialized. Once VDD rises aboveBVDD, the Power-up Timer/Oscillator Start-up Timerwill start their time delays. Figure 5-10 shows typicalBrown-out situations.
In some applications, the Brown-out Reset trip point ofthe device may not be at the desired level. Figure 5-8and Figure 5-9 are two examples of external circuitry
that may be implemented. Each needs to be evaluatedto determine if they match the requirements of theapplication.
FIGURE 5-8: EXTERNAL BROWN-OUT PROTECTION CIRCUIT 1
FIGURE 5-9: EXTERNAL BROWN-OUT PROTECTION CIRCUIT 2
FIGURE 5-10: BROWN-OUT SITUATIONS
Note: Before using the on-chip Brown-out for avoltage supervisory function, pleasereview the electrical specifications toensure that they meet your requirements.
VDD
33k
10kΩ
40 kΩ
VDD
MCLR
PIC17CXXX
This circuit will activate RESET when VDD goes below (Vz + 0.7V) where Vz = Zener voltage.
This brown-out circuit is less expensive, albeit lessaccurate. Transistor Q1 turns off when VDD is below acertain level such that:
VDD •R1
R1 + R2= 0.7V
R240 kΩ
VDD
MCLR
PIC17CXXX
R1
Q1
VDD
Greater of 96 ms
BVDD Max.BVDD Min.
VDD
InternalRESET
BVDD Max.BVDD Min.
VDD
InternalRESET
< 96 ms
BVDD Max.BVDD Min.
VDD
InternalRESET
and 1024 TOSC
Greater of 96 ms and 1024 TOSC
Greater of 96 ms and 1024 TOSC
2000 Microchip Technology Inc. DS30289B-page 31

PIC17C7XX
NOTES:
DS30289B-page 32 2000 Microchip Technology Inc.

PIC17C7XX
6.0 INTERRUPTSPIC17C7XX devices have 18 sources of interrupt:
• External interrupt from the RA0/INT pin• Change on RB7:RB0 pins• TMR0 Overflow• TMR1 Overflow• TMR2 Overflow• TMR3 Overflow• USART1 Transmit buffer empty• USART1 Receive buffer full• USART2 Transmit buffer empty• USART2 Receive buffer full• SSP Interrupt• SSP I2C bus collision interrupt• A/D conversion complete • Capture1• Capture2 • Capture3 • Capture4 • T0CKI edge occurred
There are six registers used in the control and status ofinterrupts. These are:
• CPUSTA• INTSTA• PIE1• PIR1• PIE2• PIR2
The CPUSTA register contains the GLINTD bit. This isthe Global Interrupt Disable bit. When this bit is set, allinterrupts are disabled. This bit is part of the controllercore functionality and is described in the Section 6.4.
When an interrupt is responded to, the GLINTD bit isautomatically set to disable any further interrupts, thereturn address is pushed onto the stack and the PC isloaded with the interrupt vector address. There are fourinterrupt vectors. Each vector address is for a specificinterrupt source (except the peripheral interrupts, whichall vector to the same address). These sources are:
• External interrupt from the RA0/INT pin• TMR0 Overflow• T0CKI edge occurred• Any peripheral interrupt
When program execution vectors to one of these inter-rupt vector addresses (except for the peripheral inter-rupts), the interrupt flag bit is automatically cleared.Vectoring to the peripheral interrupt vector addressdoes not automatically clear the source of the interrupt.In the peripheral Interrupt Service Routine, thesource(s) of the interrupt can be determined by testingthe interrupt flag bits. The interrupt flag bit(s) must becleared in software before re-enabling interrupts toavoid infinite interrupt requests.
When an interrupt condition is met, that individual inter-rupt flag bit will be set, regardless of the status of itscorresponding mask bit or the GLINTD bit.
For external interrupt events, there will be an interruptlatency. For two-cycle instructions, the latency could beone instruction cycle longer.
The “return from interrupt” instruction, RETFIE, can beused to mark the end of the Interrupt Service Routine.When this instruction is executed, the stack is “POPed”and the GLINTD bit is cleared (to re-enable interrupts).
FIGURE 6-1: INTERRUPT LOGIC RBIFRBIE
TMR3IFTMR3IE
TMR2IFTMR2IE
TMR1IFTMR1IE
CA2IFCA2IE
CA1IFCA1IE
TX1IFTX1IE
RC1IFRC1IE
T0IFT0IE
INTFINTE
T0CKIFT0CKIE
GLINTD (CPUSTA<4>)
PEIE
Wake-up (If in SLEEP mode)or terminate long write
Interrupt to CPU
PEIFSSPIFSSPIE
BCLIFBCLIE
ADIFADIE
CA4IFCA4IE
CA3IFCA3IE
TX2IFTX2IE
RC2IFRC2IE
PIR
1/P
IE1
PIR
2/P
IE2
INTSTA
2000 Microchip Technology Inc. DS30289B-page 33

PIC17C7XX
6.1 Interrupt Status Register (INTSTA)
The Interrupt Status/Control register (INTSTA) containsthe flag and enable bits for non-peripheral interrupts.
The PEIF bit is a read only, bit wise OR of all the periph-eral flag bits in the PIR registers (Figure 6-4 andFigure 6-5).
Care should be taken when clearing any of the INTSTAregister enable bits when interrupts are enabled(GLINTD is clear). If any of the INTSTA flag bits (T0IF,INTF, T0CKIF, or PEIF) are set in the same instructioncycle as the corresponding interrupt enable bit is cleared,the device will vector to the RESET address (0x00).
Prior to disabling any of the INTSTA enable bits, theGLINTD bit should be set (disabled).
REGISTER 6-1: INTSTA REGISTER (ADDRESS: 07h, UNBANKED)
Note: All interrupt flag bits get set by their speci-fied condition, even if the correspondinginterrupt enable bit is clear (interrupt dis-abled), or the GLINTD bit is set (all inter-rupts disabled).
R-0 R/W-0 R/W-0 R/W-0 R/W-0 R/W-0 R/W-0 R/W-0PEIF T0CKIF T0IF INTF PEIE T0CKIE T0IE INTE
bit 7 bit 0
bit 7 PEIF: Peripheral Interrupt Flag bitThis bit is the OR of all peripheral interrupt flag bits AND’ed with their corresponding enable bits.The interrupt logic forces program execution to address (20h) when a peripheral interrupt ispending.1 = A peripheral interrupt is pending0 = No peripheral interrupt is pending
bit 6 T0CKIF: External Interrupt on T0CKI Pin Flag bitThis bit is cleared by hardware, when the interrupt logic forces program execution to address (18h).1 = The software specified edge occurred on the RA1/T0CKI pin0 = The software specified edge did not occur on the RA1/T0CKI pin
bit 5 T0IF: TMR0 Overflow Interrupt Flag bitThis bit is cleared by hardware, when the interrupt logic forces program execution to address (10h).1 = TMR0 overflowed0 = TMR0 did not overflow
bit 4 INTF: External Interrupt on INT Pin Flag bitThis bit is cleared by hardware, when the interrupt logic forces program execution to address (08h).1 = The software specified edge occurred on the RA0/INT pin0 = The software specified edge did not occur on the RA0/INT pin
bit 3 PEIE: Peripheral Interrupt Enable bitThis bit acts as a global enable bit for the peripheral interrupts that have their correspondingenable bits set.1 = Enable peripheral interrupts0 = Disable peripheral interrupts
bit 2 T0CKIE: External Interrupt on T0CKI Pin Enable bit1 = Enable software specified edge interrupt on the RA1/T0CKI pin0 = Disable interrupt on the RA1/T0CKI pin
bit 1 T0IE: TMR0 Overflow Interrupt Enable bit1 = Enable TMR0 overflow interrupt0 = Disable TMR0 overflow interrupt
bit 0 INTE: External Interrupt on RA0/INT Pin Enable bit1 = Enable software specified edge interrupt on the RA0/INT pin0 = Disable software specified edge interrupt on the RA0/INT pin
Legend:
R = Readable bit W = Writable bit U = Unimplemented bit, read as ‘0’
- n = Value at POR Reset ’1’ = Bit is set ’0’ = Bit is cleared x = Bit is unknown
DS30289B-page 34 2000 Microchip Technology Inc.

PIC17C7XX
6.2 Peripheral Interrupt Enable Register1 (PIE1) and Register2 (PIE2)
These registers contains the individual enable bits forthe peripheral interrupts.
REGISTER 6-2: PIE1 REGISTER (ADDRESS: 17h, BANK 1)
R/W-0 R/W-0 R/W-0 R/W-0 R/W-0 R/W-0 R/W-0 R/W-0
RBIE TMR3IE TMR2IE TMR1IE CA2IE CA1IE TX1IE RC1IE
bit 7 bit 0
bit 7 RBIE: PORTB Interrupt-on-Change Enable bit1 = Enable PORTB interrupt-on-change0 = Disable PORTB interrupt-on-change
bit 6 TMR3IE: TMR3 Interrupt Enable bit1 = Enable TMR3 interrupt0 = Disable TMR3 interrupt
bit 5 TMR2IE: TMR2 Interrupt Enable bit1 = Enable TMR2 interrupt0 = Disable TMR2 interrupt
bit 4 TMR1IE: TMR1 Interrupt Enable bit1 = Enable TMR1 interrupt0 = Disable TMR1 interrupt
bit 3 CA2IE: Capture2 Interrupt Enable bit1 = Enable Capture2 interrupt0 = Disable Capture2 interrupt
bit 2 CA1IE: Capture1 Interrupt Enable bit1 = Enable Capture1 interrupt0 = Disable Capture1 interrupt
bit 1 TX1IE: USART1 Transmit Interrupt Enable bit1 = Enable USART1 Transmit buffer empty interrupt0 = Disable USART1 Transmit buffer empty interrupt
bit 0 RC1IE: USART1 Receive Interrupt Enable bit1 = Enable USART1 Receive buffer full interrupt0 = Disable USART1 Receive buffer full interrupt
Legend:
R = Readable bit W = Writable bit U = Unimplemented bit, read as ‘0’
- n = Value at POR Reset ’1’ = Bit is set ’0’ = Bit is cleared x = Bit is unknown
2000 Microchip Technology Inc. DS30289B-page 35

PIC17C7XX
REGISTER 6-3: PIE2 REGISTER (ADDRESS: 11h, BANK 4)
R/W-0 R/W-0 R/W-0 U-0 R/W-0 R/W-0 R/W-0 R/W-0SSPIE BCLIE ADIE — CA4IE CA3IE TX2IE RC2IE
bit 7 bit 0
bit 7 SSPIE: Synchronous Serial Port Interrupt Enable bit1 = Enable SSP interrupt0 = Disable SSP interrupt
bit 6 BCLIE: Bus Collision Interrupt Enable bit1 = Enable bus collision interrupt0 = Disable bus collision interrupt
bit 5 ADIE: A/D Module Interrupt Enable bit1 = Enable A/D module interrupt0 = Disable A/D module interrupt
bit 4 Unimplemented: Read as ‘0’
bit 3 CA4IE: Capture4 Interrupt Enable bit1 = Enable Capture4 interrupt0 = Disable Capture4 interrupt
bit 2 CA3IE: Capture3 Interrupt Enable bit1 = Enable Capture3 interrupt0 = Disable Capture3 interrupt
bit 1 TX2IE: USART2 Transmit Interrupt Enable bit1 = Enable USART2 Transmit buffer empty interrupt0 = Disable USART2 Transmit buffer empty interrupt
bit 0 RC2IE: USART2 Receive Interrupt Enable bit1 = Enable USART2 Receive buffer full interrupt0 = Disable USART2 Receive buffer full interrupt
Legend:
R = Readable bit W = Writable bit U = Unimplemented bit, read as ‘0’
- n = Value at POR Reset ’1’ = Bit is set ’0’ = Bit is cleared x = Bit is unknown
DS30289B-page 36 2000 Microchip Technology Inc.

PIC17C7XX
6.3 Peripheral Interrupt RequestRegister1 (PIR1) and Register2 (PIR2)
These registers contains the individual flag bits for theperipheral interrupts.
REGISTER 6-4: PIR1 REGISTER (ADDRESS: 16h, BANK 1)
Note: These bits will be set by the specified condi-tion, even if the corresponding interruptenable bit is cleared (interrupt disabled), orthe GLINTD bit is set (all interrupts disabled).Before enabling an interrupt, the user maywish to clear the interrupt flag to ensure thatthe program does not immediately branch tothe peripheral Interrupt Service Routine.
R/W-x R/W-0 R/W-0 R/W-0 R/W-0 R/W-0 R-1 R-0RBIF TMR3IF TMR2IF TMR1IF CA2IF CA1IF TX1IF RC1IF
bit 7 bit 0
bit 7 RBIF: PORTB Interrupt-on-Change Flag bit1 = One of the PORTB inputs changed (software must end the mismatch condition)0 = None of the PORTB inputs have changed
bit 6 TMR3IF: TMR3 Interrupt Flag bit
If Capture1 is enabled (CA1/PR3 = 1):1 = TMR3 overflowed0 = TMR3 did not overflow
If Capture1 is disabled (CA1/PR3 = 0):1 = TMR3 value has rolled over to 0000h from equalling the period register (PR3H:PR3L) value0 = TMR3 value has not rolled over to 0000h from equalling the period register (PR3H:PR3L) value
bit 5 TMR2IF: TMR2 Interrupt Flag bit1 = TMR2 value has rolled over to 0000h from equalling the period register (PR2) value0 = TMR2 value has not rolled over to 0000h from equalling the period register (PR2) value
bit 4 TMR1IF: TMR1 Interrupt Flag bit
If TMR1 is in 8-bit mode (T16 = 0):1 = TMR1 value has rolled over to 0000h from equalling the period register (PR1) value0 = TMR1 value has not rolled over to 0000h from equalling the period register (PR1) value
If Timer1 is in 16-bit mode (T16 = 1):1 = TMR2:TMR1 value has rolled over to 0000h from equalling the period register (PR2:PR1) value0 = TMR2:TMR1 value has not rolled over to 0000h from equalling the period register (PR2:PR1) value
bit 3 CA2IF: Capture2 Interrupt Flag bit1 = Capture event occurred on RB1/CAP2 pin0 = Capture event did not occur on RB1/CAP2 pin
bit 2 CA1IF: Capture1 Interrupt Flag bit1 = Capture event occurred on RB0/CAP1 pin0 = Capture event did not occur on RB0/CAP1 pin
bit 1 TX1IF: USART1 Transmit Interrupt Flag bit (state controlled by hardware)1 = USART1 Transmit buffer is empty0 = USART1 Transmit buffer is full
bit 0 RC1IF: USART1 Receive Interrupt Flag bit (state controlled by hardware)1 = USART1 Receive buffer is full0 = USART1 Receive buffer is empty
Legend:
R = Readable bit W = Writable bit U = Unimplemented bit, read as ‘0’
- n = Value at POR Reset ’1’ = Bit is set ’0’ = Bit is cleared x = Bit is unknown
2000 Microchip Technology Inc. DS30289B-page 37

PIC17C7XX
REGISTER 6-5: PIR2 REGISTER (ADDRESS: 10h, BANK 4)
R/W-0 R/W-0 R/W-0 U-0 R/W-0 R/W-0 R-1 R-0SSPIF BCLIF ADIF — CA4IF CA3IF TX2IF RC2IF
bit 7 bit 0
bit 7 SSPIF: Synchronous Serial Port (SSP) Interrupt Flag bit1 = The SSP interrupt condition has occurred and must be cleared in software before returning
from the Interrupt Service Routine. The conditions that will set this bit are:
SPI:A transmission/reception has taken place.
I2 C Slave/Master:A transmission/reception has taken place.
I2 C Master:The initiated START condition was completed by the SSP module.The initiated STOP condition was completed by the SSP module.The initiated Restart condition was completed by the SSP module.The initiated Acknowledge condition was completed by the SSP module.A START condition occurred while the SSP module was idle (Multi-master system).A STOP condition occurred while the SSP module was idle (Multi-master system).
0 = An SSP interrupt condition has NOT occurred
bit 6 BCLIF: Bus Collision Interrupt Flag bit1 = A bus collision has occurred in the SSP, when configured for I2C Master mode0 = No bus collision has occurred
bit 5 ADIF: A/D Module Interrupt Flag bit1 = An A/D conversion is complete0 = An A/D conversion is not complete
bit 4 Unimplemented: Read as ’0’
bit 3 CA4IF: Capture4 Interrupt Flag bit1 = Capture event occurred on RE3/CAP4 pin0 = Capture event did not occur on RE3/CAP4 pin
bit 2 CA3IF: Capture3 Interrupt Flag bit1 = Capture event occurred on RG4/CAP3 pin0 = Capture event did not occur on RG4/CAP3 pin
bit 1 TX2IF:USART2 Transmit Interrupt Flag bit (state controlled by hardware)1 = USART2 Transmit buffer is empty0 = USART2 Transmit buffer is full
bit 0 RC2IF: USART2 Receive Interrupt Flag bit (state controlled by hardware)1 = USART2 Receive buffer is full0 = USART2 Receive buffer is empty
Legend:
R = Readable bit W = Writable bit U = Unimplemented bit, read as ‘0’
- n = Value at POR Reset ’1’ = Bit is set ’0’ = Bit is cleared x = Bit is unknown
DS30289B-page 38 2000 Microchip Technology Inc.

PIC17C7XX
6.4 Interrupt Operation
Global Interrupt Disable bit, GLINTD (CPUSTA<4>),enables all unmasked interrupts (if clear), or disablesall interrupts (if set). Individual interrupts can be dis-abled through their corresponding enable bits in theINTSTA register. Peripheral interrupts need either theglobal peripheral enable PEIE bit disabled, or the spe-cific peripheral enable bit disabled. Disabling theperipherals via the global peripheral enable bit, dis-ables all peripheral interrupts. GLINTD is set onRESET (interrupts disabled).
The RETFIE instruction clears the GLINTD bit whileforcing the Program Counter (PC) to the value loadedat the Top-of-Stack.
When an interrupt is responded to, the GLINTD bit isautomatically set to disable any further interrupt, thereturn address is pushed onto the stack and the PC isloaded with the interrupt vector. There are four interruptvectors which help reduce interrupt latency.
The peripheral interrupt vector has multiple interruptsources. Once in the peripheral Interrupt Service Rou-tine, the source(s) of the interrupt can be determined bypolling the interrupt flag bits. The peripheral interruptflag bit(s) must be cleared in software before re-enabling interrupts to avoid continuous interrupts.
The PIC17C7XX devices have four interrupt vectors.These vectors and their hardware priority are shown inTable 6-1. If two enabled interrupts occur “at the sametime”, the interrupt of the highest priority will be ser-viced first. This means that the vector address of thatinterrupt will be loaded into the program counter (PC).
TABLE 6-1: INTERRUPT VECTORS/PRIORITIES
6.5 RA0/INT Interrupt
The external interrupt on the RA0/INT pin is edge trig-gered. Either the rising edge if the INTEDG bit(T0STA<7>) is set, or the falling edge if the INTEDG bitis clear. When a valid edge appears on the RA0/INTpin, the INTF bit (INTSTA<4>) is set. This interrupt canbe disabled by clearing the INTE control bit(INTSTA<0>). The INT interrupt can wake the proces-sor from SLEEP. See Section 17.4 for details onSLEEP operation.
6.6 T0CKI Interrupt
The external interrupt on the RA1/T0CKI pin is edgetriggered. Either the rising edge if the T0SE bit(T0STA<6>) is set, or the falling edge if the T0SE bit isclear. When a valid edge appears on the RA1/T0CKIpin, the T0CKIF bit (INTSTA<6>) is set. This interruptcan be disabled by clearing the T0CKIE control bit(INTSTA<2>). The T0CKI interrupt can wake up theprocessor from SLEEP. See Section 17.4 for details onSLEEP operation.
6.7 Peripheral Interrupt
The peripheral interrupt flag indicates that at least oneof the peripheral interrupts occurred (PEIF is set). ThePEIF bit is a read only bit and is a bit wise OR of all theflag bits in the PIR registers AND’d with the correspond-ing enable bits in the PIE registers. Some of the periph-eral interrupts can wake the processor from SLEEP.See Section 17.4 for details on SLEEP operation.
6.8 Context Saving During Interrupts
During an interrupt, only the returned PC value is savedon the stack. Typically, users may wish to save key reg-isters during an interrupt; e.g. WREG, ALUSTA and theBSR registers. This requires implementation in software.
Example 6-2 shows the saving and restoring of infor-mation for an Interrupt Service Routine. This is for asimple interrupt scheme, where only one interrupt mayoccur at a time (no interrupt nesting). The SFRs arestored in the non-banked GPR area.
Example 6-2 shows the saving and restoring of infor-mation for a more complex Interrupt Service Routine.This is useful where nesting of interrupts is required. Amaximum of 6 levels can be done by this example. TheBSR is stored in the non-banked GPR area, while theother registers would be stored in a particular bank.Therefore, 6 saves may be done with this routine (sincethere are 6 non-banked GPR registers). These routinesrequire a dedicated indirect addressing register, FSR0,to be selected for this.
The PUSH and POP code segments could either be ineach Interrupt Service Routine, or could be subroutinesthat were called. Depending on the application, otherregisters may also need to be saved.
Address Vector Priority
0008h External Interrupt on RA0/INT pin (INTF)
1 (Highest)
0010h TMR0 Overflow Interrupt (T0IF)
2
0018h External Interrupt on T0CKI (T0CKIF)
3
0020h Peripherals (PEIF) 4 (Lowest)
Note 1: Individual interrupt flag bits are set, regard-less of the status of their correspondingmask bit or the GLINTD bit.
2: Before disabling any of the INTSTA enablebits, the GLINTD bit should be set(disabled).
2000 Microchip Technology Inc. DS30289B-page 39

PIC17C7XX
FIGURE 6-2: INT PIN/T0CKI PIN INTERRUPT TIMING
Q2
Q1
Q3
Q4
Q2
Q1
Q3
Q4
Q2
Q1
Q3
Q4
Q2
Q1
Q3
Q4
Q2
Q1
Q3
Q4
Q2
Q1
Q3
Q4
Q2
Q1
Q3
Q4
OS
C1
OS
C2
RA
0/IN
T o
r R
A1/
T0C
KI
INT
F o
rT
0CK
IF
GLI
NT
D
PC
Inst
ruct
ion
Exe
cute
d
Sys
tem
Bus
Inst
ruct
ion
Fet
ched
PC
PC
+ 1
Add
r (V
ecto
r)
PC
Inst
(P
C)
Inst
(P
C+
1)
Inst
(P
C)
Dum
my
Dum
my
YY
YY
+ 1
RE
TF
IE
RE
TF
IE
Inst
(P
C+
1)In
st (
Vec
tor)
Add
rA
ddr
Add
rA
ddr
Add
rIn
st (
YY
+ 1
)
Dum
my
PC
+ 1
DS30289B-page 40 2000 Microchip Technology Inc.

PIC17C7XX
EXAMPLE 6-1: SAVING STATUS AND WREG IN RAM (SIMPLE)
; The addresses that are used to store the CPUSTA and WREG values must be in the data memory ; address range of 1Ah - 1Fh. Up to 6 locations can be saved and restored using the MOVFP ; instruction. This instruction neither affects the status bits, nor corrupts the WREG register. ; UNBANK1 EQU 0x01A ; Address for 1st location to save UNBANK2 EQU 0x01B ; Address for 2nd location to save UNBANK3 EQU 0x01C ; Address for 3rd location to save UNBANK4 EQU 0x01D ; Address for 4th location to save UNBANK5 EQU 0x01E ; Address for 5th location to save ; (Label Not used in program) UNBANK6 EQU 0x01F ; Address for 6th location to save ; (Label Not used in program) ; : ; At Interrupt Vector Address PUSH MOVFP ALUSTA, UNBANK1 ; Push ALUSTA value MOVFP BSR, UNBANK2 ; Push BSR value MOVFP WREG, UNBANK3 ; Push WREG value MOVFP PCLATH, UNBANK4 ; Push PCLATH value ; : ; Interrupt Service Routine (ISR) code ; POP MOVFP UNBANK4, PCLATH ; Restore PCLATH value MOVFP UNBANK3, WREG ; Restore WREG value MOVFP UNBANK2, BSR ; Restore BSR value MOVFP UNBANK1, ALUSTA ; Restore ALUSTA value ; RETFIE ; Return from interrupt (enable interrupts)
2000 Microchip Technology Inc. DS30289B-page 41

PIC17C7XX
EXAMPLE 6-2: SAVING STATUS AND WREG IN RAM (NESTED)
; The addresses that are used to store the CPUSTA and WREG values must be in the data memory ; address range of 1Ah - 1Fh. Up to 6 locations can be saved and restored using the MOVFP ; instruction. This instruction neither affects the status bits, nor corrupts the WREG register. ; This routine uses the FRS0, so it controls the FS1 and FS0 bits in the ALUSTA register. ; Nobank_FSR EQU 0x40 Bank_FSR EQU 0x41 ALU_Temp EQU 0x42 WREG_TEMP EQU 0x43 BSR_S1 EQU 0x01A ; 1st location to save BSR BSR_S2 EQU 0x01B ; 2nd location to save BSR (Label Not used in program) BSR_S3 EQU 0x01C ; 3rd location to save BSR (Label Not used in program) BSR_S4 EQU 0x01D ; 4th location to save BSR (Label Not used in program) BSR_S5 EQU 0x01E ; 5th location to save BSR (Label Not used in program) BSR_S6 EQU 0x01F ; 6th location to save BSR (Label Not used in program) ; INITIALIZATION ; CALL CLEAR_RAM ; Must Clear all Data RAM ; INIT_POINTERS ; Must Initialize the pointers for POP and PUSH CLRF BSR, F ; Set All banks to 0 CLRF ALUSTA, F ; FSR0 post increment BSF ALUSTA, FS1 CLRF WREG, F ; Clear WREG MOVLW BSR_S1 ; Load FSR0 with 1st address to save BSR MOVWF FSR0 MOVWF Nobank_FSR MOVLW 0x20 MOVWF Bank_FSR : : ; Your code : : ; At Interrupt Vector Address PUSH BSF ALUSTA, FS0 ; FSR0 has auto-increment, does not affect status bits BCF ALUSTA, FS1 ; does not affect status bits MOVFP BSR, INDF0 ; No Status bits are affected CLRF BSR, F ; Peripheral and Data RAM Bank 0 No Status bits are affected MOVPF ALUSTA, ALU_Temp ; MOVPF FSR0, Nobank_FSR ; Save the FSR for BSR values MOVPF WREG, WREG_TEMP ; MOVFP Bank_FSR, FSR0 ; Restore FSR value for other values MOVFP ALU_Temp, INDF0 ; Push ALUSTA value MOVFP WREG_TEMP, INDF0 ; Push WREG value MOVFP PCLATH, INDF0 ; Push PCLATH value MOVPF FSR0, Bank_FSR ; Restore FSR value for other values MOVFP Nobank_FSR, FSR0 ; ; : ; Interrupt Service Routine (ISR) code ; POP CLRF ALUSTA, F ; FSR0 has auto-decrement, does not affect status bits MOVFP Bank_FSR, FSR0 ; Restore FSR value for other values DECF FSR0, F ; MOVFP INDF0, PCLATH ; Pop PCLATH value MOVFP INDF0, WREG ; Pop WREG value BSF ALUSTA, FS1 ; FSR0 does not change MOVPF INDF0, ALU_Temp ; Pop ALUSTA value MOVPF FSR0, Bank_FSR ; Restore FSR value for other values DECF Nobank_FSR, F ; MOVFP Nobank_FSR, FSR0 ; Save the FSR for BSR values MOVFP ALU_Temp, ALUSTA ; MOVFP INDF0, BSR ; No Status bits are affected ; RETFIE ; Return from interrupt (enable interrupts)
DS30289B-page 42 2000 Microchip Technology Inc.

PIC17C7XX
7.0 MEMORY ORGANIZATION
There are two memory blocks in the PIC17C7XX; pro-gram memory and data memory. Each block has itsown bus, so that access to each block can occur duringthe same oscillator cycle.
The data memory can further be broken down intoGeneral Purpose RAM and the Special Function Reg-isters (SFRs). The operation of the SFRs that controlthe “core” are described here. The SFRs used to con-trol the peripheral modules are described in the sectiondiscussing each individual peripheral module.
7.1 Program Memory Organization
PIC17C7XX devices have a 16-bit program countercapable of addressing a 64K x 16 program memoryspace. The RESET vector is at 0000h and the interruptvectors are at 0008h, 0010h, 0018h, and 0020h(Figure 7-1).
7.1.1 PROGRAM MEMORY OPERATION
The PIC17C7XX can operate in one of four possibleprogram memory configurations. The configuration isselected by configuration bits. The possible modes are:
• Microprocessor• Microcontroller• Extended Microcontroller
• Protected Microcontroller
The Microcontroller and Protected Microcontrollermodes only allow internal execution. Any accessbeyond the program memory reads unknown data. TheProtected Microcontroller mode also enables the codeprotection feature.
The Extended Microcontroller mode accesses boththe internal program memory, as well as external pro-gram memory. Execution automatically switchesbetween internal and external memory. The 16-bits ofaddress allow a program memory range of 64K-words.
The Microprocessor mode only accesses the externalprogram memory. The on-chip program memory isignored. The 16-bits of address allow a program mem-ory range of 64K-words. Microprocessor mode is thedefault mode of an unprogrammed device.
The different modes allow different access to the con-figuration bits, test memory and boot ROM. Table 7-1lists which modes can access which areas in memory.Test Memory and Boot Memory are not required fornormal operation of the device. Care should be takento ensure that no unintended branches occur to theseareas.
FIGURE 7-1: PROGRAM MEMORY MAP AND STACK
PC<15:0>
Stack Level 1•
Stack Level 16
RESET Vector
INT Pin Interrupt Vector
Timer0 Interrupt Vector
T0CKI Pin Interrupt Vector
Peripheral Interrupt Vector
FOSC0FOSC1
WDTPS0WDTPS1
PM0Reserved
PM1
Reserved
••
Con
figur
atio
n M
emor
yS
pace
Use
r M
emor
yS
pace
(1)
CALL, RETURNRETFIE, RETLW
16
0000h
0008h
0010h
0020h0021h
0018h
FDFFhFE00hFE01hFE02hFE03hFE04hFE05hFE06hFE07h
FE0Fh
Test EPROM
Boot ROM
FE10hFF5FhFF60h
FFFFh
1FFFh
3FFFh
(PIC17C752
(PIC17C756A
Reserved
PM2
FE08h
Note 1: User memory space may be internal, external, or both. The memory configuration depends on the processor mode.
FE0EhBODENFE0Dh
PIC17C762)
PIC17C766)
2000 Microchip Technology Inc. DS30289B-page 43

PIC17C7XX
TABLE 7-1: MODE MEMORY ACCESS The PIC17C7XX can operate in modes where the pro-gram memory is off-chip. They are the Microprocessorand Extended Microcontroller modes. The Micropro-cessor mode is the default for an unprogrammeddevice.
Regardless of the processor mode, data memory isalways on-chip.
FIGURE 7-2: MEMORY MAP IN DIFFERENT MODES
OperatingMode
Internal Program Memory
Configuration Bits,Test Memory,
Boot ROM
Microprocessor No Access No Access
Microcontroller Access Access
ExtendedMicrocontroller
Access No Access
ProtectedMicrocontroller
Access Access
MicroprocessorMode
0000h
FFFFh
ExternalProgramMemory
ExternalProgramMemory
2000h
FFFFh
0000h
01FFFh
On-chipProgramMemory
ExtendedMicrocontrollerMode
MicrocontrollerModes
0000h
01FFFh2000h
FE00h
FFFFh
ON-CHIP ON-CHIP ON-CHIP
OFF-CHIP ON-CHIP OFF-CHIP ON-CHIP OFF-CHIP ON-CHIP
PR
OG
RA
M S
PA
CE
DA
TA S
PA
CE
Config. BitsTest MemoryBoot ROM
PIC17C752/762
0000h
FFFFh
ExternalProgramMemory
ExternalProgramMemory
FFFFh
0000h 0000h
3FFFh4000h
FE00h
FFFFh
OFF-CHIP ON-CHIP OFF-CHIP ON-CHIP OFF-CHIP ON-CHIP
Config. BitsTest MemoryBoot ROM
PR
OG
RA
M S
PA
CE
DA
TA S
PA
CE
ON-CHIPON-CHIP
00h
FFh 1FFh
120h
ON-CHIP
3FFFh
4000h
PIC17C756A/766
On-chipProgramMemory
On-chipProgramMemory
On-chipProgramMemory
2FFh
220h
3FFh
320h
00h
FFh 1FFh
120h
2FFh
220h
3FFh
320h
00h
FFh 1FFh
120h
2FFh
220h
3FFh
320h
00h
FFh 1FFh
120h
00h
FFh 1FFh
120h
00h
FFh 1FFh
120h
DS30289B-page 44 2000 Microchip Technology Inc.

PIC17C7XX
7.1.2 EXTERNAL MEMORY INTERFACE
When either Microprocessor or Extended Microcontrol-ler mode is selected, PORTC, PORTD and PORTE areconfigured as the system bus. PORTC and PORTD arethe multiplexed address/data bus and PORTE<2:0> isfor the control signals. External components areneeded to demultiplex the address and data. This canbe done as shown in Figure 7-4. The waveforms ofaddress and data are shown in Figure 7-3. For com-plete timings, please refer to the electrical specificationsection.
FIGURE 7-3: EXTERNAL PROGRAM MEMORY ACCESS WAVEFORMS
The system bus requires that there is no bus conflict(minimal leakage), so the output value (address) will becapacitively held at the desired value.
As the speed of the processor increases, externalEPROM memory with faster access time must be used.Table 7-2 lists external memory speed requirements fora given PIC17C7XX device frequency.
In Extended Microcontroller mode, when the device isexecuting out of internal memory, the control signalswill continue to be active. That is, they indicate theaction that is occurring in the internal memory. Theexternal memory access is ignored.
The following selection is for use with MicrochipEPROMs. For interfacing to other manufacturers mem-ory, please refer to the electrical specifications of thedesired PIC17C7XX device, as well as the desiredmemory device to ensure compatibility.
TABLE 7-2: EPROM MEMORY ACCESS TIME ORDERING SUFFIX
The electrical specifications now include timing specifi-cations for the memory interface with PIC17LCXXXdevices. These specifications reflect the capability ofthe device by characterization. Please validate yourdesign with these timings.
FIGURE 7-4: TYPICAL EXTERNAL PROGRAM MEMORY CONNECTION DIAGRAM
Q3Q1 Q2 Q4 Q3Q1 Q2 Q4
AD<15:0>
ALE
OE
WR’1’
Read Cycle Write Cycle
Address out Data in Address out Data out
Q1
PIC17C7XX Oscillator Frequency
Instruction Cycle Time
(TCY) EPROM Suffix
8 MHz 500 ns -25
16 MHz 250 ns -15
20 MHz 200 ns -10
25 MHz 160 ns -70
Note: The access times for this requires the useof fast SRAMs.
AD7-AD0
PIC17CXXX
AD15-AD8
ALE
I/O(1)
AD15-AD0
Memory(3)
(MSB)
Ax-A0
D7-D0
A15-A0
Memory(3)
(LSB)
Ax-A0
D7-D0
138(1)
OE
WR
OE OEWR(2) WR(2)
CE CE
Note 1: Use of I/O pins is only required for paged memory.2: This signal is unused for ROM and EPROM devices.3: 16-bit wide devices are now common and could be used instead of 8-bit wide devices.
373(3)
373(3)
2000 Microchip Technology Inc. DS30289B-page 45

PIC17C7XX
7.2 Data Memory Organization
Data memory is partitioned into two areas. The first isthe General Purpose Registers (GPR) area, and thesecond is the Special Function Registers (SFR) area.The SFRs control and provide status of device opera-tion.
Portions of data memory are banked, this occurs inboth areas. The GPR area is banked to allow greaterthan 232 bytes of general purpose RAM.
Banking requires the use of control bits for bank selec-tion. These control bits are located in the Bank SelectRegister (BSR). If an access is made to the unbankedregion, the BSR bits are ignored. Figure 7-5 shows thedata memory map organization.
Instructions MOVPF and MOVFP provide the means tomove values from the peripheral area (“P”) to any loca-tion in the register file (“F”), and vice-versa. The defini-tion of the “P” range is from 0h to 1Fh, while the “F”range is 0h to FFh. The “P” range has six more loca-tions than peripheral registers, which can be used asGeneral Purpose Registers. This can be useful in someapplications where variables need to be copied to otherlocations in the general purpose RAM (such as savingstatus information during an interrupt).
The entire data memory can be accessed eitherdirectly, or indirectly (through file select registers FSR0and FSR1) (see Section 7.4). Indirect addressing usesthe appropriate control bits of the BSR for access intothe banked areas of data memory. The BSR isexplained in greater detail in Section 7.8.
7.2.1 GENERAL PURPOSE REGISTER (GPR)
All devices have some amount of GPR area. The GPRsare 8-bits wide. When the GPR area is greater than232, it must be banked to allow access to the additionalmemory space.
All the PIC17C7XX devices have banked memory inthe GPR area. To facilitate switching between thesebanks, the MOVLR bank instruction has been added tothe instruction set. GPRs are not initialized by a Power-on Reset and are unchanged on all other RESETS.
7.2.2 SPECIAL FUNCTION REGISTERS (SFR)
The SFRs are used by the CPU and peripheral func-tions to control the operation of the device (Figure 7-5).These registers are static RAM.
The SFRs can be classified into two sets, those asso-ciated with the “core” function and those related to theperipheral functions. Those registers related to the“core” are described here, while those related to aperipheral feature are described in the section for eachperipheral feature.
The peripheral registers are in the banked portion ofmemory, while the core registers are in the unbankedregion. To facilitate switching between the peripheralbanks, the MOVLB bank instruction has been provided.
DS30289B-page 46 2000 Microchip Technology Inc.

PIC17C7XX
FIGURE 7-5: PIC17C7XX REGISTER FILE MAP
Addr Unbanked
00h INDF0
01h FSR0
02h PCL
03h PCLATH
04h ALUSTA
05h T0STA
06h CPUSTA
07h INTSTA
08h INDF1
09h FSR1
0Ah WREG
0Bh TMR0L
0Ch TMR0H
0Dh TBLPTRL
0Eh TBLPTRH
0Fh BSR
Bank 0 Bank 1(1) Bank 2(1) Bank 3(1) Bank 4(1) Bank 5(1) Bank 6(1) Bank 7(1) Bank 8(1,4)
10h PORTA DDRC TMR1 PW1DCL PIR2 DDRF SSPADD PW3DCL DDRH
11h DDRB PORTC TMR2 PW2DCL PIE2 PORTF SSPCON1 PW3DCH PORTH
12h PORTB DDRD TMR3L PW1DCH — DDRG SSPCON2 CA3L DDRJ
13h RCSTA1 PORTD TMR3H PW2DCH RCSTA2 PORTG SSPSTAT CA3H PORTJ
14h RCREG1 DDRE PR1 CA2L RCREG2 ADCON0 SSPBUF CA4L —
15h TXSTA1 PORTE PR2 CA2H TXSTA2 ADCON1 — CA4H —
16h TXREG1 PIR1 PR3L/CA1L TCON1 TXREG2 ADRESL — TCON3 —
17h SPBRG1 PIE1 PR3H/CA1H TCON2 SPBRG2 ADRESH — — —
Unbanked
18h PRODL
19h PRODH
1Ah
1Fh
General Purpose
RAM
Bank 0(2) Bank 1(2) Bank 2(2) Bank 3(2,3)
20h
FFh
General Purpose
RAM
General Purpose
RAM
General Purpose
RAM
General Purpose
RAM
Note 1: SFR file locations 10h - 17h are banked. The lower nibble of the BSR specifies the bank. All unbanked SFRs ignore the Bank Select Register (BSR) bits.
2: General Purpose Registers (GPR) locations 20h - FFh, 120h - 1FFh, 220h - 2FFh, and 320h - 3FFh are banked. The upper nibble of the BSR specifies this bank. All other GPRs ignore the Bank Select Register (BSR) bits.
3: RAM bank 3 is not implemented on the PIC17C752 and the PIC17C762. Reading any unimplemented reg-ister reads ‘0’s.
4: Bank 8 is only implemented on the PIC17C76X devices.
2000 Microchip Technology Inc. DS30289B-page 47

PIC17C7XX
,
---
uuu
000
uuu
uuu
00-
quu
000
---
uuu
uuu
uuu
uuu
000
000
000
1uu
111
uuu
00u
uuu
-1u
uuu
000
111
uuu
111
uuu
111
uuu
010
000
e
TABLE 7-3: SPECIAL FUNCTION REGISTERS
Address Name Bit 7 Bit 6 Bit 5 Bit 4 Bit 3 Bit 2 Bit 1 Bit 0Value on
POR,BOR
MCLRWDT
Unbanked00h INDF0 Uses contents of FSR0 to address Data Memory (not a physical register) ---- ---- ---- -
01h FSR0 Indirect Data Memory Address Pointer 0 xxxx xxxx uuuu u
02h PCL Low order 8-bits of PC 0000 0000 0000 0
03h(1) PCLATH Holding Register for upper 8-bits of PC 0000 0000 uuuu u
04h ALUSTA FS3 FS2 FS1 FS0 OV Z DC C 1111 xxxx 1111 u
05h T0STA INTEDG T0SE T0CS T0PS3 T0PS2 T0PS1 T0PS0 — 0000 000- 0000 0
06h(2) CPUSTA — — STKAV GLINTD TO PD POR BOR --11 11qq --11 q
07h INTSTA PEIF T0CKIF T0IF INTF PEIE T0CKIE T0IE INTE 0000 0000 0000 0
08h INDF1 Uses contents of FSR1 to address Data Memory (not a physical register) ---- ---- ---- -
09h FSR1 Indirect Data Memory Address Pointer 1 xxxx xxxx uuuu u
0Ah WREG Working Register xxxx xxxx uuuu u
0Bh TMR0L TMR0 Register; Low Byte xxxx xxxx uuuu u
0Ch TMR0H TMR0 Register; High Byte xxxx xxxx uuuu u
0Dh TBLPTRL Low Byte of Program Memory Table Pointer 0000 0000 0000 0
0Eh TBLPTRH High Byte of Program Memory Table Pointer 0000 0000 0000 0
0Fh BSR Bank Select Register 0000 0000 0000 0
Bank 0
10h PORTA(4,6) RBPU —RA5/TX1/
CK1RA4/RX1/
DT1RA3/SDI/
SDARA2/SS/
SCLRA1/T0CKI RA0/INT 0-xx 11xx 0-uu 1
11h DDRB Data Direction Register for PORTB 1111 1111 1111 1
12h PORTB(4) RB7/SDO
RB6/SCK
RB5/TCLK3
RB4/TCLK12
RB3/PWM2
RB2/PWM1
RB1/CAP2
RB0/CAP1
xxxx xxxx uuuu u
13h RCSTA1 SPEN RX9 SREN CREN — FERR OERR RX9D 0000 -00x 0000 -
14h RCREG1 Serial Port Receive Register xxxx xxxx uuuu u
15h TXSTA1 CSRC TX9 TXEN SYNC — — TRMT TX9D 0000 --1x 0000 -
16h TXREG1 Serial Port Transmit Register (for USART1) xxxx xxxx uuuu u
17h SPBRG1 Baud Rate Generator Register (for USART1) 0000 0000 0000 0
Bank 1
10h DDRC(5) Data Direction Register for PORTC 1111 1111 1111 1
11h PORTC(4,5) RC7/AD7 RC6/AD6 RC5/AD5 RC4/AD4 RC3/AD3 RC2/AD2 RC1/AD1 RC0/AD0 xxxx xxxx uuuu u
12h DDRD(5) Data Direction Register for PORTD 1111 1111 1111 1
13h PORTD(4,5) RD7/AD15
RD6/AD14
RD5/AD13
RD4/AD12
RD3/AD11
RD2/AD10
RD1/AD9 RD0/AD8 xxxx xxxx uuuu u
14h DDRE(5) Data Direction Register for PORTE ---- 1111 ---- 1
15h PORTE(4,5) — — — —RE3/CAP4
RE2/WR RE1/OE RE0/ALE ---- xxxx ---- u
16h PIR1 RBIF TMR3IF TMR2IF TMR1IF CA2IF CA1IF TX1IF RC1IF x000 0010 u000 0
17h PIE1 RBIE TMR3IE TMR2IE TMR1IE CA2IE CA1IE TX1IE RC1IE 0000 0000 0000 0
Legend: x = unknown, u = unchanged, - = unimplemented, read as '0', q = value depends on condition. Shaded cells are unimplemented, read as '0'.
Note 1: The upper byte of the program counter is not directly accessible. PCLATH is a holding register for PC<15:8> whose contents are updated from, or transferred to, the upper byte of the program counter.
2: The TO and PD status bits in CPUSTA are not affected by a MCLR Reset. 3: Bank 8 and associated registers are only implemented on the PIC17C76X devices.4: This is the value that will be in the port output latch.5: When the device is configured for Microprocessor or Extended Microcontroller mode, the operation of this port does not rely on thes
registers.6: On any device RESET, these pins are configured as inputs.
DS30289B-page 48 2000 Microchip Technology Inc.

PIC17C7XX
uuu
uuu
uuu
uuu
uuu
uuu
uuu
uuu
---
---
uuu
uuu
uuu
uuu
000
000
010
000
---
00u
uuu
-1u
uuu
000
111
000
111
000
0-0
000
uuu
uuu
,
e
Bank 210h TMR1 Timer1’s Register xxxx xxxx uuuu u
11h TMR2 Timer2’s Register xxxx xxxx uuuu u
12h TMR3L Timer3’s Register; Low Byte xxxx xxxx uuuu u
13h TMR3H Timer3’s Register; High Byte xxxx xxxx uuuu u
14h PR1 Timer1’s Period Register xxxx xxxx uuuu u
15h PR2 Timer2’s Period Register xxxx xxxx uuuu u
16h PR3L/CA1L Timer3’s Period Register - Low Byte/Capture1 Register; Low Byte xxxx xxxx uuuu u
17h PR3H/CA1H Timer3’s Period Register - High Byte/Capture1 Register; High Byte xxxx xxxx uuuu u
Bank 310h PW1DCL DC1 DC0 — — — — — — xx-- ---- uu-- -
11h PW2DCL DC1 DC0 TM2PW2 — — — — — xx0- ---- uu0- -
12h PW1DCH DC9 DC8 DC7 DC6 DC5 DC4 DC3 DC2 xxxx xxxx uuuu u
13h PW2DCH DC9 DC8 DC7 DC6 DC5 DC4 DC3 DC2 xxxx xxxx uuuu u
14h CA2L Capture2 Low Byte xxxx xxxx uuuu u
15h CA2H Capture2 High Byte xxxx xxxx uuuu u
16h TCON1 CA2ED1 CA2ED0 CA1ED1 CA1ED0 T16 TMR3CS TMR2CS TMR1CS 0000 0000 0000 0
17h TCON2 CA2OVF CA1OVF PWM2ON PWM1ON CA1/PR3 TMR3ON TMR2ON TMR1ON 0000 0000 0000 0
Bank 4
10h PIR2 SSPIF BCLIF ADIF — CA4IF CA3IF TX2IF RC2IF 000- 0010 000- 0
11h PIE2 SSPIE BCLIE ADIE — CA4IE CA3IE TX2IE RC2IE 000- 0000 000- 0
12h Unimplemented — — — — — — — — ---- ---- ---- -
13h RCSTA2 SPEN RX9 SREN CREN — FERR OERR RX9D 0000 -00x 0000 -
14h RCREG2 Serial Port Receive Register for USART2 xxxx xxxx uuuu u
15h TXSTA2 CSRC TX9 TXEN SYNC — — TRMT TX9D 0000 --1x 0000 -
16h TXREG2 Serial Port Transmit Register for USART2 xxxx xxxx uuuu u
17h SPBRG2 Baud Rate Generator for USART2 0000 0000 0000 0
Bank 5:
10h DDRF Data Direction Register for PORTF 1111 1111 1111 1
11h PORTF(4) RF7/AN11
RF6/AN10
RF5/AN9
RF4/AN8
RF3/AN7
RF2/AN6
RF1/AN5
RF0/AN4
0000 0000 0000 0
12h DDRG Data Direction Register for PORTG 1111 1111 1111 1
13h PORTG(4) RG7/TX2/CK2
RG6/RX2/DT2
RG5/PWM3
RG4/CAP3
RG3/AN0
RG2/AN1
RG1/AN2
RG0/AN3
xxxx 0000 uuuu 0
14h ADCON0 CHS3 CHS2 CHS1 CHS0 — GO/DONE — ADON 0000 -0-0 0000 -
15h ADCON1 ADCS1 ADCS0 ADFM — PCFG3 PCFG2 PCFG1 PCFG0 000- 0000 000- 0
16h ADRESL A/D Result Register Low Byte xxxx xxxx uuuu u
17h ADRESH A/D Result Register High Byte xxxx xxxx uuuu u
TABLE 7-3: SPECIAL FUNCTION REGISTERS (CONTINUED)
Address Name Bit 7 Bit 6 Bit 5 Bit 4 Bit 3 Bit 2 Bit 1 Bit 0Value on
POR,BOR
MCLRWDT
Legend: x = unknown, u = unchanged, - = unimplemented, read as '0', q = value depends on condition. Shaded cells are unimplemented, read as '0'.
Note 1: The upper byte of the program counter is not directly accessible. PCLATH is a holding register for PC<15:8> whose contents are updated from, or transferred to, the upper byte of the program counter.
2: The TO and PD status bits in CPUSTA are not affected by a MCLR Reset. 3: Bank 8 and associated registers are only implemented on the PIC17C76X devices.4: This is the value that will be in the port output latch.5: When the device is configured for Microprocessor or Extended Microcontroller mode, the operation of this port does not rely on thes
registers.6: On any device RESET, these pins are configured as inputs.
2000 Microchip Technology Inc. DS30289B-page 49

PIC17C7XX
000
000
000
000
uuu
---
---
---
---
uuu
uuu
uuu
uuu
uuu
000
---
111
uuu
111
uuu
---
---
---
---
uuu
uuu
,
e
Bank 6
10h SSPADD SSP Address Register in I2C Slave mode. SSP Baud Rate Reload Register in I2C Master mode 0000 0000 0000 0
11h SSPCON1 WCOL SSPOV SSPEN CKP SSPM3 SSPM2 SSPM1 SSPM0 0000 0000 0000 0
12h SSPCON2 GCEN AKSTAT AKDT AKEN RCEN PEN RSEN SEN 0000 0000 0000 0
13h SSPSTAT SMP CKE D/A P S R/W UA BF 0000 0000 0000 0
14h SSPBUF Synchronous Serial Port Receive Buffer/Transmit Register xxxx xxxx uuuu u
15h Unimplemented — — — — — — — — ---- ---- ---- -
16h Unimplemented — — — — — — — — ---- ---- ---- -
17h Unimplemented — — — — — — — — ---- ---- ---- -
Bank 7
10h PW3DCL DC1 DC0 TM2PW3 — — — — — xx0- ---- uu0- -
11h PW3DCH DC9 DC8 DC7 DC6 DC5 DC4 DC3 DC2 xxxx xxxx uuuu u
12h CA3L Capture3 Low Byte xxxx xxxx uuuu u
13h CA3H Capture3 High Byte xxxx xxxx uuuu u
14h CA4L Capture4 Low Byte xxxx xxxx uuuu u
15h CA4H Capture4 High Byte xxxx xxxx uuuu u
16h TCON3 — CA4OVF CA3OVF CA4ED1 CA4ED0 CA3ED1 CA3ED0 PWM3ON -000 0000 -000 0
17h Unimplemented — — — — — — — — ---- ---- ---- -
Bank 8(3)
10h(3) DDRH Data Direction Register for PORTH 1111 1111 1111 1
11h(3) PORTH(4) RH7/AN15
RH6/AN14
RH5/AN13
RH4/AN12
RH3 RH2 RH1 RH0 xxxx xxxx uuuu u
12h(3) DDRJ Data Direction Register for PORTJ 1111 1111 1111 1
13h(3) PORTJ(4) RJ7 RJ6 RJ5 RJ4 RJ3 RJ2 RJ1 RJ0 xxxx xxxx uuuu u
14h(3) Unimplemented — — — — — — — — ---- ---- ---- -
15h(3) Unimplemented — — — — — — — — ---- ---- ---- -
16h(3) Unimplemented — — — — — — — — ---- ---- ---- -
17h(3) Unimplemented — — — — — — — — ---- ---- ---- -
Unbanked18h PRODL Low Byte of 16-bit Product (8 x 8 Hardware Multiply) xxxx xxxx uuuu u
19h PRODH High Byte of 16-bit Product (8 x 8 Hardware Multiply) xxxx xxxx uuuu u
TABLE 7-3: SPECIAL FUNCTION REGISTERS (CONTINUED)
Address Name Bit 7 Bit 6 Bit 5 Bit 4 Bit 3 Bit 2 Bit 1 Bit 0Value on
POR,BOR
MCLRWDT
Legend: x = unknown, u = unchanged, - = unimplemented, read as '0', q = value depends on condition. Shaded cells are unimplemented, read as '0'.
Note 1: The upper byte of the program counter is not directly accessible. PCLATH is a holding register for PC<15:8> whose contents are updated from, or transferred to, the upper byte of the program counter.
2: The TO and PD status bits in CPUSTA are not affected by a MCLR Reset. 3: Bank 8 and associated registers are only implemented on the PIC17C76X devices.4: This is the value that will be in the port output latch.5: When the device is configured for Microprocessor or Extended Microcontroller mode, the operation of this port does not rely on thes
registers.6: On any device RESET, these pins are configured as inputs.
DS30289B-page 50 2000 Microchip Technology Inc.

PIC17C7XX
7.2.2.1 ALU Status Register (ALUSTA)The ALUSTA register contains the status bits of theArithmetic and Logic Unit and the mode control bits forthe indirect addressing register.
As with all the other registers, the ALUSTA register canbe the destination for any instruction. If the ALUSTAregister is the destination for an instruction that affectsthe Z, DC, C, or OV bits, then the write to these threebits is disabled. These bits are set or cleared accordingto the device logic. Therefore, the result of an instruc-tion with the ALUSTA register as destination may bedifferent than intended.
For example, the CLRF ALUSTA, F instruction will clearthe upper four bits and set the Z bit. This leaves theALUSTA register as 0000u1uu (where u = unchanged).
It is recommended, therefore, that only BCF, BSF, SWAPFand MOVWF instructions be used to alter the ALUSTAregister, because these instructions do not affect anystatus bits. To see how other instructions affect the sta-tus bits, see the “Instruction Set Summary.”
The Arithmetic and Logic Unit (ALU) is capable of car-rying out arithmetic or logical operations on two oper-ands, or a single operand. All single operandinstructions operate either on the WREG register, orthe given file register. For two operand instructions, oneof the operands is the WREG register and the other iseither a file register, or an 8-bit immediate constant.
REGISTER 7-1: ALUSTA REGISTER (ADDRESS: 04h, UNBANKED)
Note 1: The C and DC bits operate as a borrow anddigit borrow bit, respectively, in subtraction.See the SUBLW and SUBWF instructions forexamples.
2: The overflow bit will be set if the 2’s comple-ment result exceeds +127, or is less than -128.
R/W-1 R/W-1 R/W-1 R/W-1 R/W-x R/W-x R/W-x R/W-xFS3 FS2 FS1 FS0 OV Z DC C
bit 7 bit 0
bit 7-6 FS3:FS2: FSR1 Mode Select bits00 = Post auto-decrement FSR1 value01 = Post auto-increment FSR1 value1x = FSR1 value does not change
bit 5-4 FS1:FS0: FSR0 Mode Select bits00 = Post auto-decrement FSR0 value01 = Post auto-increment FSR0 value1x = FSR0 value does not change
bit 3 OV: Overflow bitThis bit is used for signed arithmetic (2’s complement). It indicates an overflow of the 7-bit magnitude, which causes the sign bit (bit7) to change state.1 = Overflow occurred for signed arithmetic (in this arithmetic operation)0 = No overflow occurred
bit 2 Z: Zero bit1 = The result of an arithmetic or logic operation is zero0 = The result of an arithmetic or logic operation is not zero
bit 1 DC: Digit carry/borrow bitFor ADDWF and ADDLW instructions.1 = A carry-out from the 4th low order bit of the result occurred0 = No carry-out from the 4th low order bit of the result
Note: For borrow, the polarity is reversed.
bit 0 C: Carry/borrow bit
For ADDWF and ADDLW instructions. Note that a subtraction is executed by adding the two’s complement of the second operand. For rotate (RRCF, RLCF) instructions, this bit is loaded with either the high or low order bit of thesource register.1 = A carry-out from the Most Significant bit of the result occurred 0 = No carry-out from the Most Significant bit of the result
Note: For borrow, the polarity is reversed.
Legend:
R = Readable bit W = Writable bit U = Unimplemented bit, read as ‘0’
- n = Value at POR Reset ’1’ = Bit is set ’0’ = Bit is cleared x = Bit is unknown
2000 Microchip Technology Inc. DS30289B-page 51

PIC17C7XX
7.2.2.2 CPU Status Register (CPUSTA)
The CPUSTA register contains the status and controlbits for the CPU. This register has a bit that is used toglobally enable/disable interrupts. If only a specificinterrupt is desired to be enabled/disabled, please referto the Interrupt Status (INTSTA) register and thePeripheral Interrupt Enable (PIE) registers. TheCPUSTA register also indicates if the stack is availableand contains the Power-down (PD) and Time-out (TO)bits. The TO, PD, and STKAV bits are not writable.These bits are set and cleared according to device
logic. Therefore, the result of an instruction with theCPUSTA register as destination may be different thanintended.
The POR bit allows the differentiation between aPower-on Reset, external MCLR Reset, or a WDTReset. The BOR bit indicates if a Brown-out Resetoccurred.
REGISTER 7-2: CPUSTA REGISTER (ADDRESS: 06h, UNBANKED)
Note 1: The BOR status bit is a don’t care and isnot necessarily predictable if the Brown-outcircuit is disabled (when the BODEN bit inthe Configuration word is programmed).
U-0 U-0 R-1 R/W-1 R-1 R-1 R/W-0 R/W-1— — STKAV GLINTD TO PD POR BOR
bit 7 bit 0
bit 7-6 Unimplemented: Read as '0'
bit 5 STKAV: Stack Available bitThis bit indicates that the 4-bit stack pointer value is Fh, or has rolled over from Fh → 0h (stack overflow).1 = Stack is available0 = Stack is full, or a stack overflow may have occurred (once this bit has been cleared by a
stack overflow, only a device RESET will set this bit)
bit 4 GLINTD: Global Interrupt Disable bitThis bit disables all interrupts. When enabling interrupts, only the sources with their enable bitsset can cause an interrupt.1 = Disable all interrupts0 = Enables all unmasked interrupts
bit 3 TO: WDT Time-out Status bit1 = After power-up, by a CLRWDT instruction, or by a SLEEP instruction0 = A Watchdog Timer time-out occurred
bit 2 PD: Power-down Status bit1 = After power-up or by the CLRWDT instruction0 = By execution of the SLEEP instruction
bit 1 POR: Power-on Reset Status bit1 = No Power-on Reset occurred0 = A Power-on Reset occurred (must be set by software)
bit 0 BOR: Brown-out Reset Status bit
When BODEN Configuration bit is set (enabled):1 = No Brown-out Reset occurred0 = A Brown-out Reset occurred (must be set by software)
When BODEN Configuration bit is clear (disabled):Don’t care
Legend:
R = Readable bit W = Writable bit U = Unimplemented bit, read as ‘0’
- n = Value at POR Reset ’1’ = Bit is set ’0’ = Bit is cleared x = Bit is unknown
DS30289B-page 52 2000 Microchip Technology Inc.

PIC17C7XX
7.2.2.3 TMR0 Status/Control Register (T0STA)
This register contains various control bits. Bit7(INTEDG) is used to control the edge upon which a sig-nal on the RA0/INT pin will set the RA0/INT interruptflag. The other bits configure Timer0, it’s prescaler andclock source.
REGISTER 7-3: T0STA REGISTER (ADDRESS: 05h, UNBANKED)
R/W-0 R/W-0 R/W-0 R/W-0 R/W-0 R/W-0 R/W-0 U-0INTEDG T0SE T0CS T0PS3 T0PS2 T0PS1 T0PS0 —
bit 7 bit 0
bit 7 INTEDG: RA0/INT Pin Interrupt Edge Select bitThis bit selects the edge upon which the interrupt is detected.1 = Rising edge of RA0/INT pin generates interrupt0 = Falling edge of RA0/INT pin generates interrupt
bit 6 T0SE: Timer0 External Clock Input Edge Select bitThis bit selects the edge upon which TMR0 will increment.
When T0CS = 0 (External Clock):1 = Rising edge of RA1/T0CKI pin increments TMR0 and/or sets the T0CKIF bit0 = Falling edge of RA1/T0CKI pin increments TMR0 and/or sets a T0CKIF bit
When T0CS = 1 (Internal Clock):Don’t care
bit 5 T0CS: Timer0 Clock Source Select bitThis bit selects the clock source for Timer0.1 = Internal instruction clock cycle (TCY)0 = External clock input on the T0CKI pin
bit 4-1 T0PS3:T0PS0: Timer0 Prescale Selection bitsThese bits select the prescale value for Timer0.
bit 0 Unimplemented: Read as ’0’
Legend:
R = Readable bit W = Writable bit U = Unimplemented bit, read as ‘0’
- n = Value at POR Reset ’1’ = Bit is set ’0’ = Bit is cleared x = Bit is unknown
T0PS3:T0PS0 Prescale Value
000000010010001101000101011001111xxx
1:11:21:41:81:161:321:641:1281:256
2000 Microchip Technology Inc. DS30289B-page 53

PIC17C7XX
7.3 Stack Operation
PIC17C7XX devices have a 16 x 16-bit hardware stack(Figure 7-1). The stack is not part of either the programor data memory space, and the stack pointer is neitherreadable nor writable. The PC (Program Counter) is“PUSH’d” onto the stack when a CALL or LCALLinstruction is executed, or an interrupt is acknowl-edged. The stack is “POP’d” in the event of a RETURN,RETLW, or a RETFIE instruction execution. PCLATH isnot affected by a “PUSH” or a “POP” operation.
The stack operates as a circular buffer, with the stackpointer initialized to '0' after all RESETS. There is astack available bit (STKAV) to allow software to ensurethat the stack will not overflow. The STKAV bit is setafter a device RESET. When the stack pointer equalsFh, STKAV is cleared. When the stack pointer rolls overfrom Fh to 0h, the STKAV bit will be held clear until adevice RESET.
After the device is “PUSH’d” sixteen times (without a“POP”), the seventeenth push overwrites the valuefrom the first push. The eighteenth push overwrites thesecond push (and so on).
7.4 Indirect Addressing
Indirect addressing is a mode of addressing data mem-ory where the data memory address in the instructionis not fixed. That is, the register that is to be read orwritten can be modified by the program. This can beuseful for data tables in the data memory. Figure 7-6shows the operation of indirect addressing. Thisdepicts the moving of the value to the data memoryaddress specified by the value of the FSR register.
Example 7-1 shows the use of indirect addressing toclear RAM in a minimum number of instructions. A sim-ilar concept could be used to move a defined numberof bytes (block) of data to the USART transmit register(TXREG). The starting address of the block of data tobe transmitted could easily be modified by the program.
FIGURE 7-6: INDIRECT ADDRESSING
7.4.1 INDIRECT ADDRESSING REGISTERS
The PIC17C7XX has four registers for indirect address-ing. These registers are:
• INDF0 and FSR0• INDF1 and FSR1
Registers INDF0 and INDF1 are not physically imple-mented. Reading or writing to these registers activatesindirect addressing, with the value in the correspondingFSR register being the address of the data. The FSR isan 8-bit register and allows addressing anywhere in the256-byte data memory address range. For bankedmemory, the bank of memory accessed is specified bythe value in the BSR.
If file INDF0 (or INDF1) itself is read indirectly via anFSR, all '0's are read (Zero bit is set). Similarly, if INDF0(or INDF1) is written to indirectly, the operation will beequivalent to a NOP, and the status bits are not affected.
Note 1: There is not a status bit for stack under-flow. The STKAV bit can be used to detectthe underflow which results in the stackpointer being at the Top-of-Stack.
2: There are no instruction mnemonicscalled PUSH or POP. These are actionsthat occur from the execution of the CALL,RETURN, RETLW and RETFIE instruc-tions, or the vectoring to an interruptvector.
3: After a RESET, if a “POP” operationoccurs before a “PUSH” operation, theSTKAV bit will be cleared. This willappear as if the stack is full (underflowhas occurred). If a “PUSH” operationoccurs next (before another “POP”), theSTKAV bit will be locked clear. Only adevice RESET will cause this bit to set.
Opcode Address
File = INDFx
FSR
InstructionExecuted
InstructionFetched
RAM
Opcode File
88
8
DS30289B-page 54 2000 Microchip Technology Inc.

PIC17C7XX
7.4.2 INDIRECT ADDRESSING OPERATION
The indirect addressing capability has been enhancedover that of the PIC16CXX family. There are two controlbits associated with each FSR register. These two bitsconfigure the FSR register to:
• Auto-decrement the value (address) in the FSR after an indirect access
• Auto-increment the value (address) in the FSR after an indirect access
• No change to the value (address) in the FSR after an indirect access
These control bits are located in the ALUSTA register.The FSR1 register is controlled by the FS3:FS2 bitsand FSR0 is controlled by the FS1:FS0 bits.
When using the auto-increment or auto-decrement fea-tures, the effect on the FSR is not reflected in theALUSTA register. For example, if the indirect addresscauses the FSR to equal '0', the Z bit will not be set.
If the FSR register contains a value of 0h, an indirectread will read 0h (Zero bit is set) while an indirect writewill be equivalent to a NOP (status bits are not affected).
Indirect addressing allows single cycle data transferswithin the entire data space. This is possible with theuse of the MOVPF and MOVFP instructions, where either'p' or 'f' is specified as INDF0 (or INDF1).
If the source or destination of the indirect address is inbanked memory, the location accessed will be deter-mined by the value in the BSR.
A simple program to clear RAM from 20h - FFh isshown in Example 7-1.
EXAMPLE 7-1: INDIRECT ADDRESSING
7.5 Table Pointer (TBLPTRL and TBLPTRH)
File registers TBLPTRL and TBLPTRH form a 16-bitpointer to address the 64K program memory space.The table pointer is used by instructions TABLWT andTABLRD.
The TABLRD and the TABLWT instructions allow trans-fer of data between program and data space. The tablepointer serves as the 16-bit address of the data wordwithin the program memory. For a more completedescription of these registers and the operation ofTable Reads and Table Writes, see Section 8.0.
7.6 Table Latch (TBLATH, TBLATL)
The table latch (TBLAT) is a 16-bit register, withTBLATH and TBLATL referring to the high and lowbytes of the register. It is not mapped into data or pro-gram memory. The table latch is used as a temporaryholding latch during data transfer between programand data memory (see TABLRD, TABLWT, TLRD andTLWT instruction descriptions). For a more completedescription of these registers and the operation ofTable Reads and Table Writes, see Section 8.0.
MOVLW 0x20 ; MOVWF FSR0 ; FSR0 = 20h BCF ALUSTA, FS1 ; Increment FSR BSF ALUSTA, FS0 ; after access BCF ALUSTA, C ; C = 0 MOVLW END_RAM + 1 ; LP CLRF INDF0, F ; Addr(FSR) = 0 CPFSEQ FSR0 ; FSR0 = END_RAM+1? GOTO LP ; NO, clear next : ; YES, All RAM is : ; cleared
2000 Microchip Technology Inc. DS30289B-page 55

PIC17C7XX
7.7 Program Counter Module
The Program Counter (PC) is a 16-bit register. PCL, thelow byte of the PC, is mapped in the data memory. PCLis readable and writable just as is any other register.PCH is the high byte of the PC and is not directlyaddressable. Since PCH is not mapped in data or pro-gram memory, an 8-bit register PCLATH (PC highlatch) is used as a holding latch for the high byte of thePC. PCLATH is mapped into data memory. The usercan read or write PCH through PCLATH.
The 16-bit wide PC is incremented after each instruc-tion fetch during Q1 unless:
• Modified by a GOTO, CALL, LCALL, RETURN, RETLW, or RETFIE instruction
• Modified by an interrupt response
• Due to destination write to PCL by an instruction
“Skips” are equivalent to a forced NOP cycle at theskipped address.
Figure 7-7 and Figure 7-8 show the operation of theprogram counter for various situations.
FIGURE 7-7: PROGRAM COUNTER OPERATION
FIGURE 7-8: PROGRAM COUNTER USING THE CALL AND GOTO INSTRUCTIONS
Using Figure 7-7, the operations of the PC andPCLATH for different instructions are as follows:
a) LCALL instructions:An 8-bit destination address is provided in theinstruction (opcode). PCLATH is unchanged.PCLATH → PCH Opcode<7:0> → PCL
b) Read instructions on PCL: Any instruction that reads PCL.PCL → data bus → ALU or destination
PCH → PCLATHc) Write instructions on PCL:
Any instruction that writes to PCL.
8-bit data → data bus → PCLPCLATH → PCH
d) Read-Modify-Write instructions on PCL:
Any instruction that does a read-write-modifyoperation on PCL, such as ADDWF PCL.
Read: PCL → data bus → ALUWrite: 8-bit result → data bus → PCL
PCLATH → PCH
e) RETURN instruction: Stack<MRU> → PC<15:0>
Using Figure 7-8, the operation of the PC and PCLATHfor GOTO and CALL instructions is as follows:
CALL, GOTO instructions:A 13-bit destination address is provided in theinstruction (opcode).Opcode<12:0> → PC<12:0>PC<15:13> → PCLATH<7:5>
Opcode<12:8> → PCLATH<4:0>
The read-modify-write only affects the PCL with theresult. PCH is loaded with the value in the PCLATH. Forexample, ADDWF PCL will result in a jump within thecurrent page. If PC = 03F0h, WREG = 30h andPCLATH = 03h before instruction, PC = 0320h after theinstruction. To accomplish a true 16-bit computed jump,the user needs to compute the 16-bit destinationaddress, write the high byte to PCLATH and then writethe low value to PCL.
The following PC related operations do not changePCLATH:
a) LCALL, RETLW, and RETFIE instructions.b) Interrupt vector is forced onto the PC.c) Read-modify-write instructions on PCL
(e.g. BSF PCL).
Internal Data Bus <8>
PCLATH 8
8
8
PCH PCL
8
15 0
7 5 4 0
12 8 7 0
8 7
PC<15:13>
PCLATH
From Instruction
5
3
8
PCH PCL
1315
DS30289B-page 56 2000 Microchip Technology Inc.

PIC17C7XX
7.8 Bank Select Register (BSR)
The BSR is used to switch between banks in the datamemory area (Figure 7-9). In the PIC17C7XX devices,the entire byte is implemented. The lower nibble isused to select the peripheral register bank. The uppernibble is used to select the general purpose memorybank.
All the Special Function Registers (SFRs) are mappedinto the data memory space. In order to accommodatethe large number of registers, a banking scheme hasbeen used. A segment of the SFRs, from address 10hto address 17h, is banked. The lower nibble of the bankselect register (BSR) selects the currently active“peripheral bank.” Effort has been made to group theperipheral registers of related functionality in one bank.However, it will still be necessary to switch from bank to
bank in order to address all peripherals related to a sin-gle task. To assist this, a MOVLB bank instruction hasbeen included in the instruction set.
The need for a large general purpose memory spacedictated a general purpose RAM banking scheme. Theupper nibble of the BSR selects the currently activegeneral purpose RAM bank. To assist this, a MOVLRbank instruction has been provided in the instructionset.
If the currently selected bank is not implemented (suchas Bank 13), any read will read all '0's. Any write iscompleted to the bit bucket and the ALU status bits willbe set/cleared as appropriate.
FIGURE 7-9: BSR OPERATION
Note: Registers in Bank 15 in the Special Func-tion Register area, are reserved forMicrochip use. Reading of registers in thisbank may cause random values to be read.
7 4 3 0
10h
17h
BSR
0 1 2 3 8 15
• • •
20h
FFh• • •
(1)(2)
Bank 15Bank 8Bank 3Bank 2Bank 1Bank 0
0 1 2
Bank 2Bank 1Bank 0
15
Bank 15
SFRBanks
GPRBanks
AddressRange
Note 1: For the SFRs only Banks 0 through 8 are implemented. Selection of an unimplemented bank is not recommended. Bank 15 is reserved for Microchip use, reading of registers in this bank may cause random values to be read.
2: For the GPRs, Bank 3 is unimplemented on the PIC17C752 and the PIC17C762. Selection of an unimplemented bank is not recommended.
3: SFR Bank 8 is only implemented on the PIC17C76X.
3
Bank 3
4
Bank 4
4 5 6 7
Bank 7Bank 6Bank 5Bank 4
(Peripheral)
(RAM)
2000 Microchip Technology Inc. DS30289B-page 57

PIC17C7XX
NOTES:
DS30289B-page 58 2000 Microchip Technology Inc.

PIC17C7XX
8.0 TABLE READS AND TABLE WRITES
The PIC17C7XX has four instructions that allow theprocessor to move data from the data memory space tothe program memory space, and vice versa. Since theprogram memory space is 16-bits wide and the datamemory space is 8-bits wide, two operations arerequired to move 16-bit values to/from the datamemory.
The TLWT t,f and TABLWT t,i,f instructions areused to write data from the data memory space to theprogram memory space. The TLRD t,f and TABLRDt,i,f instructions are used to write data from the pro-gram memory space to the data memory space.
The program memory can be internal or external. Forthe program memory access to be external, the deviceneeds to be operating in Microprocessor or ExtendedMicrocontroller mode.
Figure 8-1 through Figure 8-4 show the operation ofthese four instructions. The steps show the sequenceof operation.
FIGURE 8-1: TLWT INSTRUCTION OPERATION
FIGURE 8-2: TABLWT INSTRUCTION OPERATION
TABLE POINTER
TABLE LATCH (16-bit)
Program MemoryData
Memory
TBLPTRH TBLPTRL
TABLATH TABLATL
f
TLWT 1,f TLWT 0,f
1
Step 1: 8-bit value from register ’f’, loaded into the high or low byte in TABLAT (16-bit).
TABLE POINTER
TABLE LATCH (16-bit)
Program MemoryData
Memory
TBLPTRH TBLPTRL
TABLATH TABLATL
f
TABLWT 1,i,f TABLWT 0,i,f
1
Prog-Mem(TBLPTR)
2
Step 1: 8-bit value from register ’f’, loaded into the high or low byte in TABLAT (16-bit).
2: 16-bit TABLAT value written to address Program Memory (TBLPTR).
3: If “i” = 1, then TBLPTR = TBLPTR + 1, If “i” = 0, then TBLPTR is unchanged.
3 3
2000 Microchip Technology Inc. DS30289B-page 59
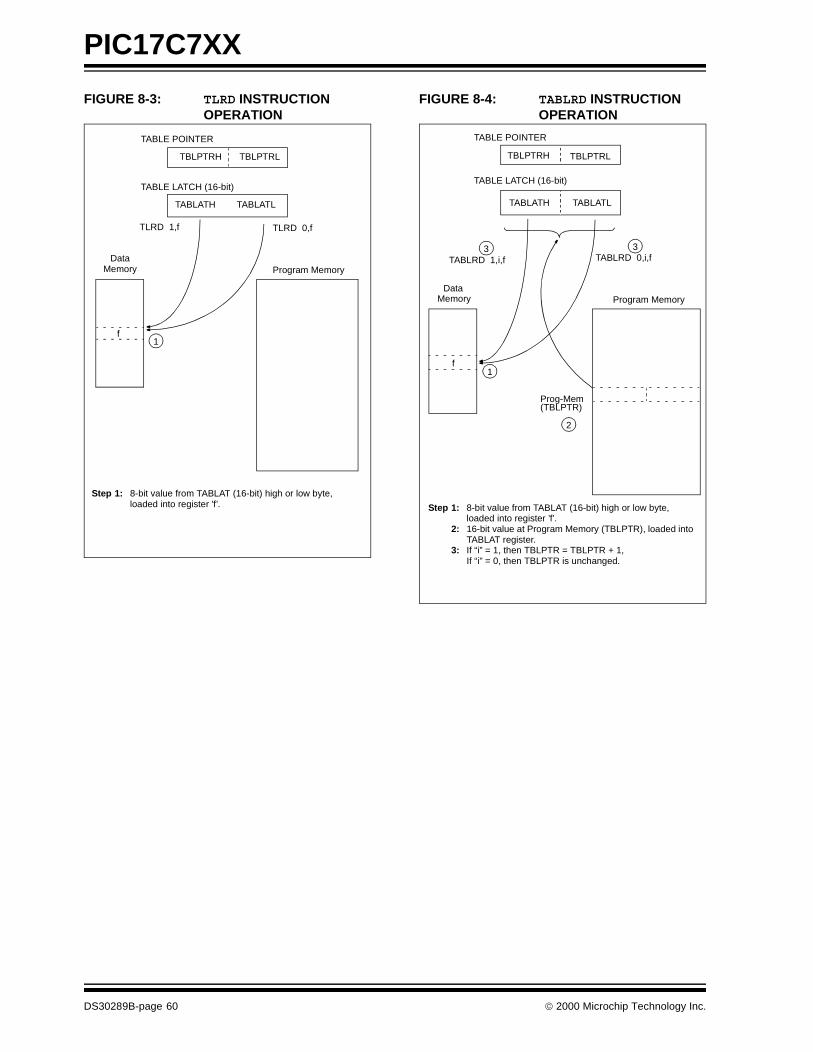
PIC17C7XX
FIGURE 8-3: TLRD INSTRUCTION OPERATION
FIGURE 8-4: TABLRD INSTRUCTION OPERATION
TABLE POINTER
TABLE LATCH (16-bit)
Program MemoryData
Memory
TBLPTRH TBLPTRL
TABLATH TABLATL
f
TLRD 1,f TLRD 0,f
1
Step 1: 8-bit value from TABLAT (16-bit) high or low byte, loaded into register ’f’.
TABLE POINTER
TABLE LATCH (16-bit)
Program MemoryData
Memory
TBLPTRH TBLPTRL
TABLATH TABLATL
f
TABLRD 1,i,f TABLRD 0,i,f
1
Prog-Mem(TBLPTR)
2
Step 1: 8-bit value from TABLAT (16-bit) high or low byte, loaded into register ’f’.
2: 16-bit value at Program Memory (TBLPTR), loaded into TABLAT register.
3: If “i” = 1, then TBLPTR = TBLPTR + 1,If “i” = 0, then TBLPTR is unchanged.
33
DS30289B-page 60 2000 Microchip Technology Inc.

PIC17C7XX
8.1 Table Writes to Internal Memory
A table write operation to internal memory causes along write operation. The long write is necessary forprogramming the internal EPROM. Instruction execu-tion is halted while in a long write cycle. The long writewill be terminated by any enabled interrupt. To ensurethat the EPROM location has been well programmed,a minimum programming time is required (see specifi-cation #D114). Having only one interrupt enabled to ter-minate the long write ensures that no unintentionalinterrupts will prematurely terminate the long write.
The sequence of events for programming an internalprogram memory location should be:
1. Disable all interrupt sources, except the sourceto terminate EPROM program write.
2. Raise MCLR/VPP pin to the programmingvoltage.
3. Clear the WDT.4. Do the table write. The interrupt will terminate
the long write.5. Verify the memory location (table read).
8.1.1 TERMINATING LONG WRITES
An interrupt source or RESET are the only events thatterminate a long write operation. Terminating the longwrite from an interrupt source requires that the interruptenable and flag bits are set. The GLINTD bit onlyenables the vectoring to the interrupt address.
If the T0CKI, RA0/INT, or TMR0 interrupt source isused to terminate the long write, the interrupt flag of thehighest priority enabled interrupt, will terminate the longwrite and automatically be cleared.
If a peripheral interrupt source is used to terminate thelong write, the interrupt enable and flag bits must beset. The interrupt flag will not be automatically clearedupon the vectoring to the interrupt vector address.
The GLINTD bit determines whether the program willbranch to the interrupt vector when the long write is ter-minated. If GLINTD is clear, the program will vector, ifGLINTD is set, the program will not vector to theinterrupt address.
TABLE 8-1: INTERRUPT - TABLE WRITE INTERACTION
Note 1: Programming requirements must bemet. See timing specification in electricalspecifications for the desired device.Violating these specifications (includingtemperature) may result in EPROMlocations that are not fully programmedand may lose their state over time.
2: If the VPP requirement is not met, thetable write is a 2-cycle write and the pro-gram memory is unchanged.
Note 1: If an interrupt is pending, the TABLWT isaborted (a NOP is executed). The highestpriority pending interrupt, from theT0CKI, RA0/INT, or TMR0 sources thatis enabled, has its flag cleared.
2: If the interrupt is not being used for theprogram write timing, the interruptshould be disabled. This will ensure thatthe interrupt is not lost, nor will it termi-nate the long write prematurely.
InterruptSource
GLINTDEnable
BitFlagBit
Action
RA0/INT, TMR0, T0CKI
0
011
1
101
1
0x1
Terminate long table write (to internal program memory), branch to interrupt vector (branch clears flag bit).None.None.Terminate long table write, do not branch to interrupt vector (flag is automatically cleared).
Peripheral 0011
1101
10x1
Terminate long table write, branch to interrupt vector.None.None.Terminate long table write, do not branch to interrupt vector (flag remains set).
2000 Microchip Technology Inc. DS30289B-page 61
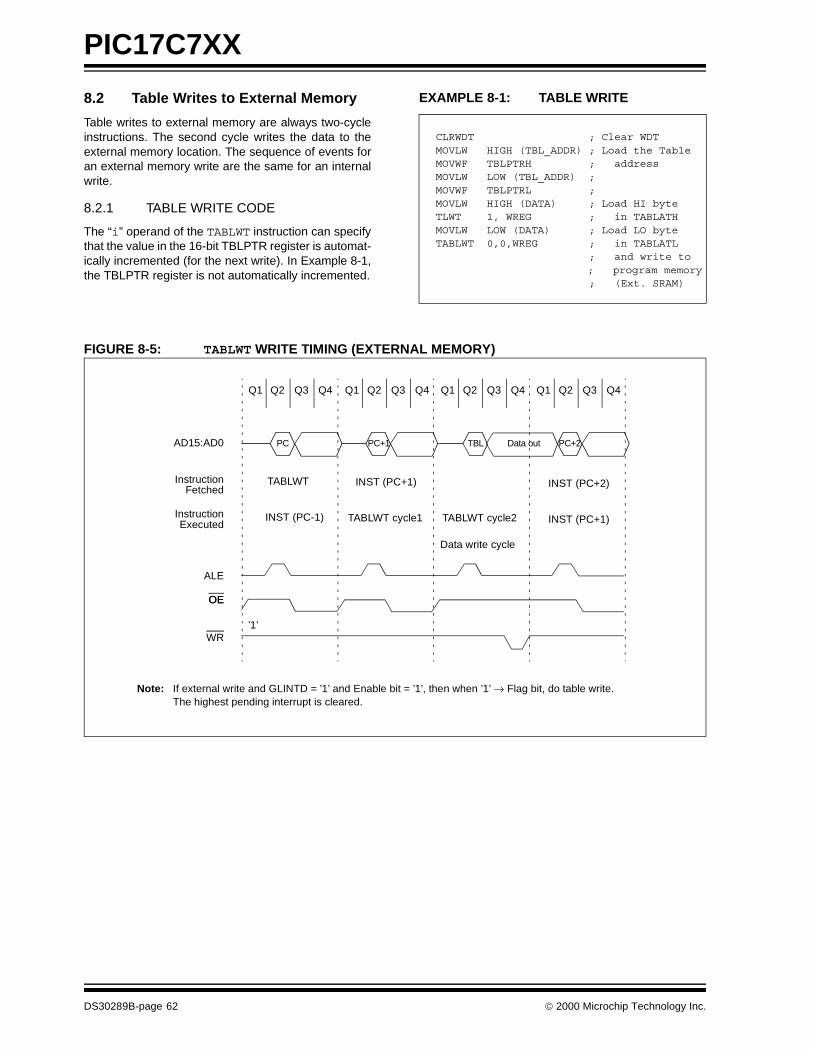
PIC17C7XX
8.2 Table Writes to External Memory
Table writes to external memory are always two-cycleinstructions. The second cycle writes the data to theexternal memory location. The sequence of events foran external memory write are the same for an internalwrite.
8.2.1 TABLE WRITE CODE
The “i” operand of the TABLWT instruction can specifythat the value in the 16-bit TBLPTR register is automat-ically incremented (for the next write). In Example 8-1,the TBLPTR register is not automatically incremented.
EXAMPLE 8-1: TABLE WRITE
FIGURE 8-5: TABLWT WRITE TIMING (EXTERNAL MEMORY)
CLRWDT ; Clear WDT MOVLW HIGH (TBL_ADDR) ; Load the Table MOVWF TBLPTRH ; address MOVLW LOW (TBL_ADDR) ; MOVWF TBLPTRL ; MOVLW HIGH (DATA) ; Load HI byte TLWT 1, WREG ; in TABLATH MOVLW LOW (DATA) ; Load LO byte TABLWT 0,0,WREG ; in TABLATL ; and write to ; program memory ; (Ext. SRAM)
Q1 Q2 Q3 Q4 Q1 Q2 Q3 Q4 Q1 Q2 Q3 Q4 Q1 Q2 Q3 Q4
AD15:AD0
InstructionFetched
InstructionExecuted
ALE
OE
WR
TABLWT INST (PC+1)
INST (PC-1) TABLWT cycle1 TABLWT cycle2
INST (PC+2)
Data write cycle
’1’
PC PC+1 TBL PC+2Data out
INST (PC+1)
Note: If external write and GLINTD = ’1’ and Enable bit = ’1’, then when ’1’ → Flag bit, do table write. The highest pending interrupt is cleared.
OE
DS30289B-page 62 2000 Microchip Technology Inc.

PIC17C7XX
FIGURE 8-6: CONSECUTIVE TABLWT WRITE TIMING (EXTERNAL MEMORY)
Q1 Q2 Q3 Q4 Q1 Q2 Q3 Q4 Q1 Q2 Q3 Q4 Q1 Q2 Q3 Q4 Q1 Q2 Q3 Q4 Q1 Q2 Q3 Q4
AD15:AD0
InstructionFetched
InstructionExecuted
ALE
OE
WR
PC
TABLWT1 TABLWT2 INST (PC+2)
INST (PC-1) TABLWT1 cycle1 TABLWT1 cycle2 TABLWT2 cycle1 TABLWT2 cycle2
Data write cycle Data write cycle
INST (PC+3)
PC+1 TBL1 PC+2 TBL2 PC+3Data out 1 Data out 2
INST (PC+2)
2000 Microchip Technology Inc. DS30289B-page 63

PIC17C7XX
8.3 Table Reads
The table read allows the program memory to be read.This allows constants to be stored in the program mem-ory space and retrieved into data memory whenneeded. Example 8-2 reads the 16-bit value at programmemory address TBLPTR. After the dummy byte hasbeen read from the TABLATH, the TABLATH is loadedwith the 16-bit data from program memory addressTBLPTR and then increments the TBLPTR value. Thefirst read loads the data into the latch and can be con-sidered a dummy read (unknown data loaded into ’f’).INDF0 should be configured for either auto-incrementor auto-decrement.
EXAMPLE 8-2: TABLE READ
FIGURE 8-7: TABLRD TIMING
FIGURE 8-8: TABLRD TIMING (CONSECUTIVE TABLRD INSTRUCTIONS)
MOVLW HIGH (TBL_ADDR) ; Load the Table MOVWF TBLPTRH ; address MOVLW LOW (TBL_ADDR) ; MOVWF TBLPTRL ; TABLRD 0, 1, DUMMY ; Dummy read, ; Updates TABLATH ; Increments TBLPTR TLRD 1, INDF0 ; Read HI byte ; of TABLATH TABLRD 0, 1, INDF0 ; Read LO byte ; of TABLATL and ; Update TABLATH ; Increment TBLPTR
Q1 Q2 Q3 Q4 Q1 Q2 Q3 Q4 Q1 Q2 Q3 Q4 Q1 Q2 Q3 Q4
AD15:AD0
InstructionFetched
InstructionExecuted
ALE
OE
WR
TABLRD INST (PC+1) INST (PC+2)
INST (PC-1) TABLRD cycle1 TABLRD cycle2 INST (PC+1)
Data read cycle
PC PC+1 TBL Data in PC+2
’1’
Q1 Q2 Q3 Q4 Q1 Q2 Q3 Q4 Q1 Q2 Q3 Q4 Q1 Q2 Q3 Q4 Q1 Q2 Q3 Q4 Q1 Q2 Q3 Q4
AD15:AD0
InstructionFetched
InstructionExecuted
TABLRD1 TABLRD2 INST (PC+2) INST (PC+3)
INST (PC+2)
ALE
OE
WR
INST (PC-1) TABLRD1 cycle1 TABLRD1 cycle2 TABLRD2 cycle1 TABLRD2 cycle2
Data read cycle Data read cycle
’1’
PC PC+1 PC+2 PC+3TBL1 Data in 1 TBL2 Data in 2
DS30289B-page 64 2000 Microchip Technology Inc.

PIC17C7XX
8.4 Operation with External Memory Interface
When the table reads/writes are accessing externalmemory (via the external system interface bus), thetable latch for the table reads is different from the tablelatch for the table writes (see Figure 8-9).
This means that you cannot do a TABLRD instruction,and use the values that were loaded into the tablelatches for a TABLWT instruction. Any table writesequence should use both the TLWT and then theTABLWT instructions.
FIGURE 8-9: ACCESSING EXTERNAL MEMORY WITH TABLRD AND TABLWT INSTRUCTIONS
TABLPTR
TABLATH (for Table Reads)
TABLATH (for Table Writes)
Program Memory
TABLRD
TABLWT
(In External Memory Space)
2000 Microchip Technology Inc. DS30289B-page 65

PIC17C7XX
NOTES:
DS30289B-page 66 2000 Microchip Technology Inc.

PIC17C7XX
9.0 HARDWARE MULTIPLIER
All PIC17C7XX devices have an 8 x 8 hardware multi-plier included in the ALU of the device. By making themultiply a hardware operation, it completes in a singleinstruction cycle. This is an unsigned multiply that givesa 16-bit result. The result is stored into the 16-bitProduct register (PRODH:PRODL). The multiplier doesnot affect any flags in the ALUSTA register.
Making the 8 x 8 multiplier execute in a single cyclegives the following advantages:
• Higher computational throughput
• Reduces code size requirements for multiply algo-rithms
The performance increase allows the device to be usedin applications previously reserved for Digital SignalProcessors.
Table 9-1 shows a performance comparison betweenPIC17CXXX devices using the single cycle hardwaremultiply and performing the same function without thehardware multiply.
Example 9-1 shows the sequence to do an 8 x 8unsigned multiply. Only one instruction is requiredwhen one argument of the multiply is already loaded inthe WREG register.
Example 9-2 shows the sequence to do an 8 x 8 signedmultiply. To account for the sign bits of the arguments,each argument’s most significant bit (MSb) is testedand the appropriate subtractions are done.
EXAMPLE 9-1: 8 x 8 UNSIGNED MULTIPLY ROUTINE
EXAMPLE 9-2: 8 x 8 SIGNED MULTIPLY ROUTINE
TABLE 9-1: PERFORMANCE COMPARISON
MOVFP ARG1, WREG ; MULWF ARG2 ; ARG1 * ARG2 -> ; PRODH:PRODL
MOVFP ARG1, WREG MULWF ARG2 ; ARG1 * ARG2 -> ; PRODH:PRODL BTFSC ARG2, SB ; Test Sign Bit SUBWF PRODH, F ; PRODH = PRODH ; - ARG1 MOVFP ARG2, WREG BTFSC ARG1, SB ; Test Sign Bit SUBWF PRODH, F ; PRODH = PRODH ; - ARG2
Routine Multiply MethodProgramMemory(Words)
Cycles(Max)
Time
@ 33 MHz @ 16 MHz @ 8 MHz
8 x 8 unsigned Without hardware multiply 13 69 8.364 µs 17.25 µs 34.50 µsHardware multiply 1 1 0.121 µs 0.25 µs 0.50 µs
8 x 8 signed Without hardware multiply — — — — —Hardware multiply 6 6 0.727 µs 1.50 µs 3.0 µs
16 x 16 unsigned Without hardware multiply 21 242 29.333 µs 60.50 µs 121.0 µs
Hardware multiply 24 24 2.91 µs 6.0 µs 12.0 µs16 x 16 signed Without hardware multiply 52 254 30.788 µs 63.50 µs 127.0 µs
Hardware multiply 36 36 4.36 µs 9.0 µs 18.0 µs
2000 Microchip Technology Inc. DS30289B-page 67
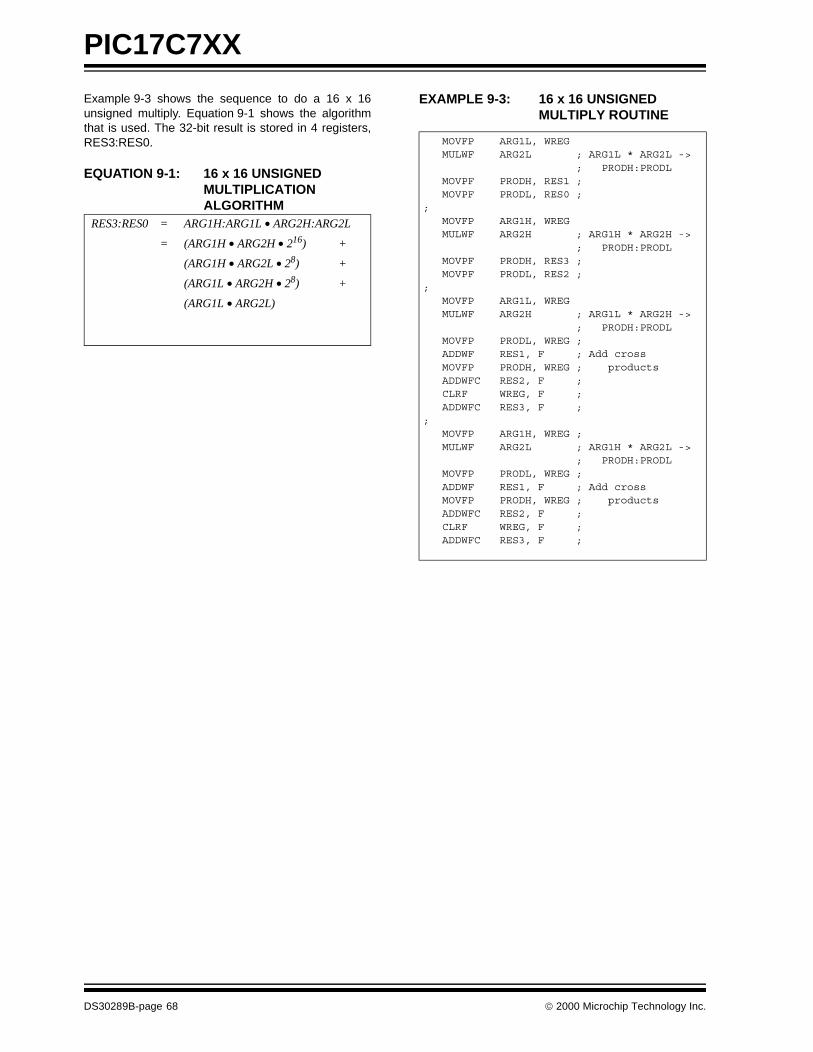
PIC17C7XX
Example 9-3 shows the sequence to do a 16 x 16unsigned multiply. Equation 9-1 shows the algorithmthat is used. The 32-bit result is stored in 4 registers,RES3:RES0.
EQUATION 9-1: 16 x 16 UNSIGNED MULTIPLICATION ALGORITHM
EXAMPLE 9-3: 16 x 16 UNSIGNED MULTIPLY ROUTINE
RES3:RES0 = ARG1H:ARG1L • ARG2H:ARG2L
= (ARG1H • ARG2H • 216) +
(ARG1H • ARG2L • 28) +
(ARG1L • ARG2H • 28) +
(ARG1L • ARG2L)
MOVFP ARG1L, WREG MULWF ARG2L ; ARG1L * ARG2L -> ; PRODH:PRODL MOVPF PRODH, RES1 ; MOVPF PRODL, RES0 ; ; MOVFP ARG1H, WREG MULWF ARG2H ; ARG1H * ARG2H -> ; PRODH:PRODL MOVPF PRODH, RES3 ; MOVPF PRODL, RES2 ; ; MOVFP ARG1L, WREG MULWF ARG2H ; ARG1L * ARG2H -> ; PRODH:PRODL MOVFP PRODL, WREG ; ADDWF RES1, F ; Add cross MOVFP PRODH, WREG ; products ADDWFC RES2, F ; CLRF WREG, F ; ADDWFC RES3, F ; ; MOVFP ARG1H, WREG ; MULWF ARG2L ; ARG1H * ARG2L -> ; PRODH:PRODL MOVFP PRODL, WREG ; ADDWF RES1, F ; Add cross MOVFP PRODH, WREG ; products ADDWFC RES2, F ; CLRF WREG, F ; ADDWFC RES3, F ;
DS30289B-page 68 2000 Microchip Technology Inc.

PIC17C7XX
Example 9-4 shows the sequence to do a 16 x 16signed multiply. Equation 9-2 shows the algorithmused. The 32-bit result is stored in four registers,RES3:RES0. To account for the sign bits of the argu-ments, each argument pairs most significant bit (MSb)is tested and the appropriate subtractions are done.
EQUATION 9-2: 16 x 16 SIGNED MULTIPLICATION ALGORITHM
EXAMPLE 9-4: 16 x 16 SIGNED MULTIPLY ROUTINE
RES3:RES0
= ARG1H:ARG1L • ARG2H:ARG2L
= (ARG1H • ARG2H • 216) +
(ARG1H • ARG2L • 28) +
(ARG1L • ARG2H • 28) +
(ARG1L • ARG2L) +
(-1 • ARG2H<7> • ARG1H:ARG1L • 216) +
(-1 • ARG1H<7> • ARG2H:ARG2L • 216)
MOVFP ARG1L, WREG MULWF ARG2L ; ARG1L * ARG2L -> ; PRODH:PRODL MOVPF PRODH, RES1 ; MOVPF PRODL, RES0 ; ; MOVFP ARG1H, WREG MULWF ARG2H ; ARG1H * ARG2H -> ; PRODH:PRODL MOVPF PRODH, RES3 ; MOVPF PRODL, RES2 ; ; MOVFP ARG1L, WREG MULWF ARG2H ; ARG1L * ARG2H -> ; PRODH:PRODL MOVFP PRODL, WREG ; ADDWF RES1, F ; Add cross MOVFP PRODH, WREG ; products ADDWFC RES2, F ; CLRF WREG, F ; ADDWFC RES3, F ; ; MOVFP ARG1H, WREG ; MULWF ARG2L ; ARG1H * ARG2L -> ; PRODH:PRODL MOVFP PRODL, WREG ; ADDWF RES1, F ; Add cross MOVFP PRODH, WREG ; products ADDWFC RES2, F ; CLRF WREG, F ; ADDWFC RES3, F ; ; BTFSS ARG2H, 7 ; ARG2H:ARG2L neg? GOTO SIGN_ARG1 ; no, check ARG1 MOVFP ARG1L, WREG ; SUBWF RES2 ; MOVFP ARG1H, WREG ; SUBWFB RES3 ; SIGN_ARG1 BTFSS ARG1H, 7 ; ARG1H:ARG1L neg? GOTO CONT_CODE ; no, done MOVFP ARG2L, WREG ; SUBWF RES2 ; MOVFP ARG2H, WREG ; SUBWFB RES3 ; CONT_CODE :
2000 Microchip Technology Inc. DS30289B-page 69

PIC17C7XX
NOTES:
DS30289B-page 70 2000 Microchip Technology Inc.

PIC17C7XX
10.0 I/O PORTS
PIC17C75X devices have seven I/O ports, PORTAthrough PORTG. PIC17C76X devices have nine I/Oports, PORTA through PORTJ. PORTB throughPORTJ have a corresponding Data Direction Register(DDR), which is used to configure the port pins asinputs or outputs. Some of these ports pins are multi-plexed with alternate functions.
PORTC, PORTD, and PORTE are multiplexed with thesystem bus. These pins are configured as the systembus when the device’s configuration bits are selected toMicroprocessor or Extended Microcontroller modes. Inthe two other microcontroller modes, these pins aregeneral purpose I/O.
PORTA, PORTB, PORTE<3>, PORTF, PORTG andthe upper four bits of PORTH are multiplexed with theperipheral features of the device. These peripheral fea-tures are:
• Timer Modules• Capture Modules
• PWM Modules• USART/SCI Modules• SSP Module
• A/D Module• External Interrupt pin
When some of these peripheral modules are turned on,the port pin will automatically configure to the alternatefunction. The modules that do this are:
• PWM Module
• SSP Module• USART/SCI Module
When a pin is automatically configured as an output bya peripheral module, the pins data direction (DDR) bitis unknown. After disabling the peripheral module, theuser should re-initialize the DDR bit to the desired con-figuration.
The other peripheral modules (which require an input)must have their data direction bits configured appropri-ately.
When the device enters the “RESET state”, the DataDirection registers (DDR) are forced set, which willmake the I/O hi-impedance inputs. The RESET state ofsome peripheral modules may force the I/O to otheroperations, such as analog inputs or the system bus.
Note: A pin that is a peripheral input, can be con-figured as an output (DDRx<y> is cleared).The peripheral events will be determinedby the action output on the port pin.
2000 Microchip Technology Inc. DS30289B-page 71

PIC17C7XX
10.1 PORTA Register
PORTA is a 6-bit wide latch. PORTA does not have acorresponding Data Direction Register (DDR). Upon adevice RESET, the PORTA pins are forced to be hi-impedance inputs. For the RA4 and RA5 pins, theperipheral module controls the output. When a deviceRESET occurs, the peripheral module is disabled, sothese pins are forced to be hi-impedance inputs.
Reading PORTA reads the status of the pins.
The RA0 pin is multiplexed with the external interrupt,INT. The RA1 pin is multiplexed with TMR0 clock input,RA2 and RA3 are multiplexed with the SSP functions,and RA4 and RA5 are multiplexed with the USART1functions. The control of RA2, RA3, RA4 and RA5 asoutputs, is automatically configured by their multi-plexed peripheral module when the module is enabled.
10.1.1 USING RA2, RA3 AS OUTPUTS
The RA2 and RA3 pins are open drain outputs. To usethe RA2 and/or the RA3 pin(s) as output(s), simplywrite to the PORTA register the desired value. A ’0’ willcause the pin to drive low, while a ’1’ will cause the pinto float (hi-impedance). An external pull-up resistorshould be used to pull the pin high. Writes to the RA2and RA3 pins will not affect the other PORTA pins.
Example 10-1 shows an instruction sequence to initial-ize PORTA. The Bank Select Register (BSR) must beselected to Bank 0 for the port to be initialized. The fol-lowing example uses the MOVLB instruction to load theBSR register for bank selection.
EXAMPLE 10-1: INITIALIZING PORTA
FIGURE 10-1: RA0 AND RA1 BLOCK DIAGRAM
FIGURE 10-2: RA2 BLOCK DIAGRAM
Note: When using the RA2 or RA3 pin(s) as out-put(s), read-modify-write instructions (suchas BCF, BSF, BTG) on PORTA are notrecommended.
Such operations read the port pins, do thedesired operation, and then write this valueto the data latch. This may inadvertentlycause the RA2 or RA3 pins to switch frominput to output (or vice-versa).
To avoid this possibility, use a shadow reg-ister for PORTA. Do the bit operations onthis shadow register and then move it toPORTA.
MOVLB 0 ; Select Bank 0 MOVLW 0xF3 ; MOVWF PORTA ; Initialize PORTA ; RA<3:2> are output low ; RA<5:4> and RA<1:0> ; are inputs ; (outputs floating)
Note: Input pins have protection diodes to VDD and VSS.
Data Bus
RD_PORTA(Q2)
Note: I/O pin has protection diodes to VSS.
Data Bus
WR_PORTA(Q4)
Q D
Q CK
RD_PORTA(Q2)
QD
EN
Peripheral Data In
1
0
I2C Mode Enable
SCL Out
DS30289B-page 72 2000 Microchip Technology Inc.

PIC17C7XX
FIGURE 10-3: RA3 BLOCK DIAGRAM FIGURE 10-4: RA4 AND RA5 BLOCK DIAGRAM
TABLE 10-1: PORTA FUNCTIONS
TABLE 10-2: REGISTERS/BITS ASSOCIATED WITH PORTA
Note: I/O pin has protection diodes to VSS.
Data Bus
WR_PORTA(Q4)
Q D
Q CK
RD_PORTA(Q2)
QD
EN
Peripheral Data In
SDA Out
SSP Mode
’1’
Note: I/O pins have protection diodes to VDD and VSS.
Data Bus
RD_PORTA(Q2)
Serial Port Output Signals
Serial Port Input Signal
OE = SPEN,SYNC,TXEN, CREN, SREN for RA4
OE = SPEN (SYNC+SYNC, CSRC) for RA5
Name Bit0 Buffer Type Function
RA0/INT bit0 ST Input or external interrupt input.
RA1/T0CKI bit1 ST Input or clock input to the TMR0 timer/counter and/or an external interrupt input.
RA2/SS/SCL bit2 ST Input/output or slave select input for the SPI, or clock input for the I2C bus. Output is open drain type.
RA3/SDI/SDA bit3 ST Input/output or data input for the SPI, or data for the I2C bus. Output is open drain type.
RA4/RX1/DT1 bit4 ST Input or USART1 Asynchronous Receive input, or USART1 Synchronous Data input/output.
RA5/TX1/CK1 bit5 ST Input or USART1 Asynchronous Transmit output, or USART1 Synchronous Clock input/output.
RBPU bit7 — Control bit for PORTB weak pull-ups.
Legend: ST = Schmitt Trigger input
Address Name Bit 7 Bit 6 Bit 5 Bit 4 Bit 3 Bit 2 Bit 1 Bit 0Value on
POR,BOR
MCLR, WDT
10h, Bank 0 PORTA(1) RBPU — RA5/TX1/CK1
RA4/RX1/DT1
RA3/SDI/SDA
RA2/SS/SCL RA1/T0CKI RA0/INT 0-xx 11xx 0-uu 11uu
05h, Unbanked T0STA INTEDG T0SE T0CS T0PS3 T0PS2 T0PS1 T0PS0 — 0000 000- 0000 000-
13h, Bank 0 RCSTA1 SPEN RX9 SREN CREN — FERR OERR RX9D 0000 -00x 0000 -00u
15h, Bank 0 TXSTA1 CSRC TX9 TXEN SYNC — — TRMT TX9D 0000 --1x 0000 --1u
Legend: x = unknown, u = unchanged, - = unimplemented, reads as '0'. Shaded cells are not used by PORTA.Note 1: On any device RESET, these pins are configured as inputs.
2000 Microchip Technology Inc. DS30289B-page 73

PIC17C7XX
10.2 PORTB and DDRB Registers
PORTB is an 8-bit wide, bi-directional port. The corre-sponding data direction register is DDRB. A ’1’ in DDRBconfigures the corresponding port pin as an input. A ’0’in the DDRB register configures the corresponding portpin as an output. Reading PORTB reads the status ofthe pins, whereas writing to PORTB will write to the portlatch.
Each of the PORTB pins has a weak internal pull-up. Asingle control bit can turn on all the pull-ups. This isdone by clearing the RBPU (PORTA<7>) bit. The weakpull-up is automatically turned off when the port pin isconfigured as an output. The pull-ups are enabled onany RESET.
PORTB also has an interrupt-on-change feature. Onlypins configured as inputs can cause this interrupt tooccur (i.e., any RB7:RB0 pin configured as an output isexcluded from the interrupt-on-change comparison).The input pins (of RB7:RB0) are compared with thevalue in the PORTB data latch. The “mismatch” outputsof RB7:RB0 are OR’d together to set the PORTB Inter-rupt Flag bit, RBIF (PIR1<7>).
This interrupt can wake the device from SLEEP. Theuser, in the Interrupt Service Routine, can clear theinterrupt by:
a) Read-Write PORTB (such as: MOVPF PORTB,PORTB). This will end the mismatch condition.
b) Then, clear the RBIF bit.
A mismatch condition will continue to set the RBIF bit.Reading, then writing PORTB, will end the mismatchcondition and allow the RBIF bit to be cleared.
This interrupt-on-mismatch feature, together with soft-ware configurable pull-ups on this port, allows easyinterface to a keypad and makes it possible for wake-up on key depression. For an example, refer to Appli-cation Note AN552, “Implementing Wake-up onKeystroke.”
The interrupt-on-change feature is recommended forwake-up on operations, where PORTB is only used forthe interrupt-on-change feature and key depressionoperations.
FIGURE 10-5: BLOCK DIAGRAM OF RB5:RB4 AND RB1:RB0 PORT PINS
Note: On a device RESET, the RBIF bit is inde-terminate, since the value in the latch maybe different than the pin.
Note: I/O pins have protection diodes to VDD and VSS.
Data Bus
Q
D
CK
Q
D
CK
WeakPull-up
PortInput Latch
Port
Data
OE
WR_PORTB (Q4)
WR_DDRB (Q4)
RD_PORTB (Q2)
RD_DDRB (Q2)
RBIF
RBPU
Match Signalfrom otherport pins
(PORTA<7>)
Peripheral Data In
DS30289B-page 74 2000 Microchip Technology Inc.

PIC17C7XX
Example 10-2 shows an instruction sequence to initial-ize PORTB. The Bank Select Register (BSR) must beselected to Bank 0 for the port to be initialized. The fol-lowing example uses the MOVLB instruction to load theBSR register for bank selection.
EXAMPLE 10-2: INITIALIZING PORTB
FIGURE 10-6: BLOCK DIAGRAM OF RB3:RB2 PORT PINS
MOVLB 0 ; Select Bank 0CLRF PORTB, F ; Init PORTB by clearing ; output data latchesMOVLW 0xCF ; Value used to initialize ; data directionMOVWF DDRB ; Set RB<3:0> as inputs ; RB<5:4> as outputs ; RB<7:6> as inputs
Note: I/O pins have protection diodes to VDD and VSS.
Data Bus
Q
D
CK
Q
D
CKR
WeakPull-up
PortInput Latch
Port
Data
OE
Peripheral_enable
Peripheral_output
WR_PORTB (Q4)
WR_DDRB (Q4)
RD_PORTB (Q2)
RD_DDRB (Q2)
RBIF
RBPU
Match Signalfrom otherport pins
(PORTA<7>)
Peripheral Data In
2000 Microchip Technology Inc. DS30289B-page 75

PIC17C7XX
FIGURE 10-7: BLOCK DIAGRAM OF RB6 PORT PIN
FIGURE 10-8: BLOCK DIAGRAM OF RB7 PORT PIN
Note: I/O pin has protection diodes to Vdd and Vss.
Data Bus
Q D
CK
QD
CK
WeakPull-up
PortData
OE
SPI Output Enable
SPI Output
WR_PORTB (Q4)
WR_DDRB (Q4)
RD_PORTB (Q2)
RD_DDRB (Q2)
RBIF
RBPU
Match Signalfrom otherport pins
(PORTA<7>)
Peripheral Data In
QD
EN
P
NQ
0
1
Note: I/O pin has protection diodes to VDD and VSS.
Data Bus
Q D
CK
QD
CK
WeakPull-up
PortData
OE
SPI Output Enable
SPI Output
WR_PORTB (Q4)
WR_DDRB (Q4)
RD_PORTB (Q2)
RD_DDRB (Q2)
RBIF
RBPU
Match Signalfrom otherport pins
(PORTA<7>)
Peripheral Data In
QD
EN
P
N Q
0
1
SS Output Disable
DS30289B-page 76 2000 Microchip Technology Inc.

PIC17C7XX
TABLE 10-3: PORTB FUNCTIONS
TABLE 10-4: REGISTERS/BITS ASSOCIATED WITH PORTB
Name Bit Buffer Type Function
RB0/CAP1 bit0 ST Input/output or the Capture1 input pin. Software programmable weak pull-up and interrupt-on-change features.
RB1/CAP2 bit1 ST Input/output or the Capture2 input pin. Software programmable weak pull-up and interrupt-on-change features.
RB2/PWM1 bit2 ST Input/output or the PWM1 output pin. Software programmable weak pull-up and interrupt-on-change features.
RB3/PWM2 bit3 ST Input/output or the PWM2 output pin. Software programmable weak pull-up and interrupt-on-change features.
RB4/TCLK12 bit4 ST Input/output or the external clock input to Timer1 and Timer2. Software programmable weak pull-up and interrupt-on-change features.
RB5/TCLK3 bit5 ST Input/output or the external clock input to Timer3. Software programmable weak pull-up and interrupt-on-change features.
RB6/SCK bit6 ST Input/output or the Master/Slave clock for the SPI. Software programmable weak pull-up and interrupt-on-change features.
RB7/SDO bit7 ST Input/output or data output for the SPI. Software programmable weak pull-up and interrupt-on-change features.
Legend: ST = Schmitt Trigger input
Address Name Bit 7 Bit 6 Bit 5 Bit 4 Bit 3 Bit 2 Bit 1 Bit 0Value on
POR,BOR
MCLR,WDT
12h, Bank 0 PORTB RB7/SDO
RB6/SCK
RB5/TCLK3
RB4/TCLK12
RB3/PWM2
RB2/PWM1
RB1/CAP2
RB0/CAP1
xxxx xxxx uuuu uuuu
11h, Bank 0 DDRB Data Direction Register for PORTB 1111 1111 1111 1111
10h, Bank 0 PORTA RBPU — RA5/TX1/CK1
RA4/RX1/DT1
RA3/SDI/SDA
RA2/SS/SCL
RA1/T0CKI RA0/INT 0-xx 11xx 0-uu 11uu
06h, Unbanked CPUSTA — — STKAV GLINTD TO PD POR BOR --11 11qq --11 qquu
07h, Unbanked INTSTA PEIF T0CKIF T0IF INTF PEIE T0CKIE T0IE INTE 0000 0000 0000 0000
16h, Bank 1 PIR1 RBIF TMR3IF TMR2IF TMR1IF CA2IF CA1IF TX1IF RC1IF x000 0010 u000 0010
17h, Bank 1 PIE1 RBIE TMR3IE TMR2IE TMR1IE CA2IE CA1IE TX1IE RC1IE 0000 0000 0000 0000
16h, Bank 3 TCON1 CA2ED1 CA2ED0 CA1ED1 CA1ED0 T16 TMR3CS TMR2CS TMR1CS 0000 0000 0000 0000
17h, Bank 3 TCON2 CA2OVF CA1OVF PWM2ON PWM1ON CA1/PR3 TMR3ON TMR2ON TMR1ON 0000 0000 0000 0000
Legend: x = unknown, u = unchanged, - = unimplemented, read as ’0’, q = value depends on condition. Shaded cells are not used by PORTB.
2000 Microchip Technology Inc. DS30289B-page 77

PIC17C7XX
10.3 PORTC and DDRC Registers
PORTC is an 8-bit bi-directional port. The correspond-ing data direction register is DDRC. A ’1’ in DDRC con-figures the corresponding port pin as an input. A ’0’ inthe DDRC register configures the corresponding portpin as an output. Reading PORTC reads the status ofthe pins, whereas writing to PORTC will write to the portlatch. PORTC is multiplexed with the system bus.When operating as the system bus, PORTC is the loworder byte of the address/data bus (AD7:AD0). The tim-ing for the system bus is shown in the Electrical Speci-fications section.
Example 10-3 shows an instruction sequence to initial-ize PORTC. The Bank Select Register (BSR) must beselected to Bank 1 for the port to be initialized. The fol-lowing example uses the MOVLB instruction to load theBSR register for bank selection.
EXAMPLE 10-3: INITIALIZING PORTC
FIGURE 10-9: BLOCK DIAGRAM OF RC7:RC0 PORT PINS
Note: This port is configured as the system buswhen the device’s configuration bits areselected to Microprocessor or ExtendedMicrocontroller modes. In the two othermicrocontroller modes, this port is ageneral purpose I/O.
MOVLB 1 ; Select Bank 1CLRF PORTC, F ; Initialize PORTC data ; latches before setting ; the data direction regMOVLW 0xCF ; Value used to initialize ; data directionMOVWF DDRC ; Set RC<3:0> as inputs ; RC<5:4> as outputs ; RC<7:6> as inputs
Note: I/O pins have protection diodes to VDD and VSS.
Q D
CK
TTL
0
1
Q D
CKR S
InputBuffer
PortData
To D_Bus → IR
INSTRUCTION READ
Data Bus
RD_PORTC
WR_PORTC
RD_DDRC
WR_DDRC
EX_EN
DATA/ADDR_OUT
DRV_SYSSystem BusControl
DS30289B-page 78 2000 Microchip Technology Inc.

PIC17C7XX
TABLE 10-5: PORTC FUNCTIONS
TABLE 10-6: REGISTERS/BITS ASSOCIATED WITH PORTC
Name Bit Buffer Type Function
RC0/AD0 bit0 TTL Input/output or system bus address/data pin.
RC1/AD1 bit1 TTL Input/output or system bus address/data pin.
RC2/AD2 bit2 TTL Input/output or system bus address/data pin.
RC3/AD3 bit3 TTL Input/output or system bus address/data pin.
RC4/AD4 bit4 TTL Input/output or system bus address/data pin.
RC5/AD5 bit5 TTL Input/output or system bus address/data pin.
RC6/AD6 bit6 TTL Input/output or system bus address/data pin.
RC7/AD7 bit7 TTL Input/output or system bus address/data pin.
Legend: TTL = TTL input
Address Name Bit 7 Bit 6 Bit 5 Bit 4 Bit 3 Bit 2 Bit 1 Bit 0Value on
POR,BOR
MCLR, WDT
11h, Bank 1 PORTC RC7/AD7
RC6/AD6
RC5/AD5
RC4/AD4
RC3/AD3
RC2/AD2
RC1/AD1
RC0/AD0 xxxx xxxx uuuu uuuu
10h, Bank 1 DDRC Data Direction Register for PORTC 1111 1111 1111 1111
Legend: x = unknown, u = unchanged
2000 Microchip Technology Inc. DS30289B-page 79

PIC17C7XX
10.4 PORTD and DDRD Registers
PORTD is an 8-bit bi-directional port. The correspond-ing data direction register is DDRD. A ’1’ in DDRD con-figures the corresponding port pin as an input. A ’0’ inthe DDRD register configures the corresponding portpin as an output. Reading PORTD reads the status ofthe pins, whereas writing to PORTD will write to the portlatch. PORTD is multiplexed with the system bus.When operating as the system bus, PORTD is the highorder byte of the address/data bus (AD15:AD8). Thetiming for the system bus is shown in the ElectricalSpecifications section.
Example 10-4 shows an instruction sequence to initial-ize PORTD. The Bank Select Register (BSR) must beselected to Bank 1 for the port to be initialized. The fol-lowing example uses the MOVLB instruction to load theBSR register for bank selection.
EXAMPLE 10-4: INITIALIZING PORTD
FIGURE 10-10: BLOCK DIAGRAM OF RD7:RD0 PORT PINS (IN I/O PORT MODE)
Note: This port is configured as the system buswhen the device’s configuration bits areselected to Microprocessor or ExtendedMicrocontroller modes. In the two othermicrocontroller modes, this port is a gen-eral purpose I/O.
MOVLB 1 ; Select Bank 1CLRF PORTD, F ; Initialize PORTD data ; latches before setting ; the data direction regMOVLW 0xCF ; Value used to initialize ; data directionMOVWF DDRD ; Set RD<3:0> as inputs ; RD<5:4> as outputs ; RD<7:6> as inputs
Note: I/O pins have protection diodes to VDD and VSS.
Q D
CK
TTL
0
1
Q D
CKR S
InputBuffer
PortData
To D_Bus → IR
INSTRUCTION READ
Data Bus
RD_PORTD
WR_PORTD
RD_DDRD
WR_DDRD
EX_EN
DATA/ADDR_OUT
DRV_SYSSystem BusControl
DS30289B-page 80 2000 Microchip Technology Inc.

PIC17C7XX
TABLE 10-7: PORTD FUNCTIONS
TABLE 10-8: REGISTERS/BITS ASSOCIATED WITH PORTD
Name Bit Buffer Type Function
RD0/AD8 bit0 TTL Input/output or system bus address/data pin.
RD1/AD9 bit1 TTL Input/output or system bus address/data pin.
RD2/AD10 bit2 TTL Input/output or system bus address/data pin.
RD3/AD11 bit3 TTL Input/output or system bus address/data pin.
RD4/AD12 bit4 TTL Input/output or system bus address/data pin.
RD5/AD13 bit5 TTL Input/output or system bus address/data pin.
RD6/AD14 bit6 TTL Input/output or system bus address/data pin.
RD7/AD15 bit7 TTL Input/output or system bus address/data pin.
Legend: TTL = TTL input
Address Name Bit 7 Bit 6 Bit 5 Bit 4 Bit 3 Bit 2 Bit 1 Bit 0Value on
POR,BOR
MCLR, WDT
13h, Bank 1 PORTD RD7/AD15
RD6/AD14
RD5/AD13
RD4/AD12
RD3/AD11
RD2/AD10
RD1/AD9
RD0/AD8 xxxx xxxx uuuu uuuu
12h, Bank 1 DDRD Data Direction Register for PORTD 1111 1111 1111 1111
Legend: x = unknown, u = unchanged
2000 Microchip Technology Inc. DS30289B-page 81

PIC17C7XX
10.5 PORTE and DDRE Register
PORTE is a 4-bit bi-directional port. The correspondingdata direction register is DDRE. A ’1’ in DDRE config-ures the corresponding port pin as an input. A ’0’ in theDDRE register configures the corresponding port pinas an output. Reading PORTE reads the status of thepins, whereas writing to PORTE will write to the portlatch. PORTE is multiplexed with the system bus.When operating as the system bus, PORTE containsthe control signals for the address/data bus(AD15:AD0). These control signals are Address LatchEnable (ALE), Output Enable (OE) and Write (WR).The control signals OE and WR are active low signals.The timing for the system bus is shown in the ElectricalSpecifications section.
Example 10-5 shows an instruction sequence to initial-ize PORTE. The Bank Select Register (BSR) must beselected to Bank 1 for the port to be initialized. The fol-lowing example uses the MOVLB instruction to load theBSR register for bank selection.
EXAMPLE 10-5: INITIALIZING PORTE
FIGURE 10-11: BLOCK DIAGRAM OF RE2:RE0 (IN I/O PORT MODE)
Note: Three pins of this port are configured asthe system bus when the device’s configu-ration bits are selected to Microprocessoror Extended Microcontroller modes. Theother pin is a general purpose I/O orCapture4 pin. In the two other micro-controller modes, RE2:RE0 are generalpurpose I/O pins.
MOVLB 1 ; Select Bank 1CLRF PORTE, F ; Initialize PORTE data ; latches before setting ; the data direction ; registerMOVLW 0x03 ; Value used to initialize ; data directionMOVWF DDRE ; Set RE<1:0> as inputs ; RE<3:2> as outputs ; RE<7:4> are always ; read as ’0’
Note: I/O pins have protection diodes to VDD and VSS.
Q D
CK
TTL
0
1
Q D
CKR S
InputBuffer
PortData
Data Bus
RD_PORTE
WR_PORTE
RD_DDRE
WR_DDRE
EX_EN
CNTL
DRV_SYSSystem BusControl
DS30289B-page 82 2000 Microchip Technology Inc.

PIC17C7XX
FIGURE 10-12: BLOCK DIAGRAM OF RE3/CAP4 PORT PIN
TABLE 10-9: PORTE FUNCTIONS
TABLE 10-10: REGISTERS/BITS ASSOCIATED WITH PORTE
Note: I/O pin has protection diodes to VDD and VSS.
D
CK
Q D
CKQ S
PortData
Data Bus
RD_PORTE
WR_PORTE
RD_DDRE
WR_DDRE
EN
QD
EN
P
N
Q
Q
Peripheral In
VDD
Name Bit Buffer Type Function
RE0/ALE bit0 TTL Input/output or system bus Address Latch Enable (ALE) control pin.
RE1/OE bit1 TTL Input/output or system bus Output Enable (OE) control pin.
RE2/WR bit2 TTL Input/output or system bus Write (WR) control pin.
RE3/CAP4 bit3 ST Input/output or Capture4 input pin.
Legend: TTL = TTL input, ST = Schmitt Trigger input
Address Name Bit 7 Bit 6 Bit 5 Bit 4 Bit 3 Bit 2 Bit 1 Bit 0Value on
POR,BOR
MCLR, WDT
15h, Bank 1 PORTE — — — — RE3/CAP4 RE2/WR RE1/OE RE0/ALE ---- xxxx ---- uuuu
14h, Bank 1 DDRE Data Direction Register for PORTE ---- 1111 ---- 1111
14h, Bank 7 CA4L Capture4 Low Byte xxxx xxxx uuuu uuuu
15h, Bank 7 CA4H Capture4 High Byte xxxx xxxx uuuu uuuu
16h, Bank 7 TCON3 — CA4OVF CA3OVF CA4ED1 CA4ED0 CA3ED1 CA3ED0 PWM3ON -000 0000 -000 0000
Legend: x = unknown, u = unchanged, - = unimplemented, read as '0'. Shaded cells are not used by PORTE.
2000 Microchip Technology Inc. DS30289B-page 83

PIC17C7XX
10.6 PORTF and DDRF Registers
PORTF is an 8-bit wide bi-directional port. The corre-sponding data direction register is DDRF. A ’1’ in DDRFconfigures the corresponding port pin as an input. A ’0’in the DDRF register configures the corresponding portpin as an output. Reading PORTF reads the status ofthe pins, whereas writing to PORTF will write to therespective port latch.
All eight bits of PORTF are multiplexed with 8 channelsof the 10-bit A/D converter.
Upon RESET, the entire Port is automatically config-ured as analog inputs and must be configured in soft-ware to be a digital I/O.
Example 10-6 shows an instruction sequence to initial-ize PORTF. The Bank Select Register (BSR) must beselected to Bank 5 for the port to be initialized. The fol-lowing example uses the MOVLB instruction to load theBSR register for bank selection.
EXAMPLE 10-6: INITIALIZING PORTF
FIGURE 10-13: BLOCK DIAGRAM OF RF7:RF0
MOVLB 5 ; Select Bank 5 MOVWF 0x0E ; Configure PORTF as MOVWF ADCON1 ; Digital CLRF PORTF, F ; Initialize PORTF data ; latches before ; the data direction ; register MOVLW 0x03 ; Value used to init ; data direction MOVWF DDRF ; Set RF<1:0> as inputs ; RF<7:2> as outputs
Data Bus
WR PORTF
WR DDRF
RD PORTF
Data Latch
DDRF Latch
P
VSS
I/O pin
PCFG3:PCFG0
QD
QCK
QD
QCK
EN
Q D
EN
N
STInputBuffer
VDD
RD DDRF
To other padsVAIN
CHS3:CHS0To other pads
Note: I/O pins have protection diodes to VDD and VSS.
DS30289B-page 84 2000 Microchip Technology Inc.

PIC17C7XX
TABLE 10-11: PORTF FUNCTIONS
TABLE 10-12: REGISTERS/BITS ASSOCIATED WITH PORTF
Name Bit Buffer Type Function
RF0/AN4 bit0 ST Input/output or analog input 4.
RF1/AN5 bit1 ST Input/output or analog input 5.
RF2/AN6 bit2 ST Input/output or analog input 6.
RF3/AN7 bit3 ST Input/output or analog input 7.
RF4/AN8 bit4 ST Input/output or analog input 8.
RF5/AN9 bit5 ST Input/output or analog input 9.
RF6/AN10 bit6 ST Input/output or analog input 10.
RF7/AN11 bit7 ST Input/output or analog input 11.
Legend: ST = Schmitt Trigger input
Address Name Bit 7 Bit 6 Bit 5 Bit 4 Bit 3 Bit 2 Bit 1 Bit 0Value on
POR,BOR
MCLR, WDT
10h, Bank 5 DDRF Data Direction Register for PORTF 1111 1111 1111 1111
11h, Bank 5 PORTF RF7/AN11
RF6/AN10
RF5/AN9
RF4/AN8
RF3/AN7
RF2/AN6
RF1/AN5
RF0/AN4
0000 0000 0000 0000
15h, Bank 5 ADCON1 ADCS1 ADCS0 ADFM — PCFG3 PCFG2 PCFG1 PCFG0 000- 0000 000- 0000
Legend: x = unknown, u = unchanged, - = unimplemented, read as '0'. Shaded cells are not used by PORTF.
2000 Microchip Technology Inc. DS30289B-page 85

PIC17C7XX
10.7 PORTG and DDRG Registers
PORTG is an 8-bit wide, bi-directional port. The corre-sponding data direction register is DDRG. A ’1’ inDDRG configures the corresponding port pin as aninput. A ’0’ in the DDRG register configures the corre-sponding port pin as an output. Reading PORTG readsthe status of the pins, whereas writing to PORTG willwrite to the port latch.
The lower four bits of PORTG are multiplexed with fourchannels of the 10-bit A/D converter.
The remaining bits of PORTG are multiplexed withperipheral output and inputs. RG4 is multiplexed withthe CAP3 input, RG5 is multiplexed with the PWM3output, RG6 and RG7 are multiplexed with theUSART2 functions.
Upon RESET, RG3:RG0 is automatically configured asanalog inputs and must be configured in software to bea digital I/O.
Example 10-7 shows the instruction sequence to initial-ize PORTG. The Bank Select Register (BSR) must beselected to Bank 5 for the port to be initialized. The fol-lowing example uses the MOVLB instruction to load theBSR register for bank selection.
EXAMPLE 10-7: INITIALIZING PORTG
FIGURE 10-14: BLOCK DIAGRAM OF RG3:RG0
MOVLB 5 ; Select Bank 5 MOVLW 0x0E ; Configure PORTG as MOVPF WREG, ADCON1 ; digital CLRF PORTG, F ; Initialize PORTG data ; latches before ; the data direction ; register MOVLW 0x03 ; Value used to init ; data direction MOVWF DDRG ; Set RG<1:0> as inputs ; RG<7:2> as outputs
Data Bus
WR PORTG
WR DDRG
RD PORTG
Data Latch
DDRG Latch
P
VSS
I/O pin
PCFG3:PCFG0
QD
QCK
QD
QCK
EN
Q D
EN
N
STInputBuffer
VDD
RD DDRG
To other padsVAIN
CHS3:CHS0To other pads
Note: I/O pins have protection diodes to VDD and VSS.
DS30289B-page 86 2000 Microchip Technology Inc.

PIC17C7XX
FIGURE 10-15: RG4 BLOCK DIAGRAM
FIGURE 10-16: RG7:RG5 BLOCK DIAGRAM
Note: I/O pins have protection diodes to VDD and VSS.
D
CK
Q D
CKQ
Data Bus
RD_PORTG
WR_PORTG
RD_DDRG
WR_DDRG
EN
QD
EN
P
N
Q
Peripheral Data In
VDD
Note: I/O pins have protection diodes to VDD and VSS.
Q D
CK1
0
Q D
CKR
PortData
Data Bus
RD_PORTG
WR_PORTG
RD_DDRG
WR_DDRG
N
QD
EN
P
N
Q
Q
OUTPUT
OUTPUT ENABLE
Peripheral Data In
VDD
2000 Microchip Technology Inc. DS30289B-page 87

PIC17C7XX
TABLE 10-13: PORTG FUNCTIONS
TABLE 10-14: REGISTERS/BITS ASSOCIATED WITH PORTG
Name Bit Buffer Type Function
RG0/AN3 bit0 ST Input/output or analog input 3.
RG1/AN2 bit1 ST Input/output or analog input 2.
RG2/AN1/VREF- bit2 ST Input/output or analog input 1 or the ground reference voltage.
RG3/AN0/VREF+ bit3 ST Input/output or analog input 0 or the positive reference voltage.
RG4/CAP3 bit4 ST Input/output or the Capture3 input pin.
RG5/PWM3 bit5 ST Input/output or the PWM3 output pin.
RG6/RX2/DT2 bit6 ST Input/output or the USART2 (SCI) Asynchronous Receive or USART2 (SCI) Synchronous Data.
RG7/TX2/CK2 bit7 ST Input/output or the USART2 (SCI) Asynchronous Transmit or USART2 (SCI) Synchronous Clock.
Legend: ST = Schmitt Trigger input
Address Name Bit 7 Bit 6 Bit 5 Bit 4 Bit 3 Bit 2 Bit 1 Bit 0Value on
POR,BOR
MCLR, WDT
12h, Bank 5 DDRG Data Direction Register for PORTG 1111 1111 1111 1111
13h, Bank 5 PORTG RG7/TX2/CK2
RG6/RX2/DT2
RG5/PWM3
RG4/CAP3
RG3/AN0
RG2/AN1
RG1/AN2
RG0/AN3
xxxx 0000 uuuu 0000
15h, Bank 5 ADCON1 ADCS1 ADCS0 ADFM — PCFG3 PCFG2 PCFG1 PCFG0 000- 0000 000- 0000
Legend: x = unknown, u = unchanged, - = unimplemented, read as '0'. Shaded cells are not used by PORTG.
DS30289B-page 88 2000 Microchip Technology Inc.

PIC17C7XX
10.8 PORTH and DDRH Registers (PIC17C76X only)
PORTH is an 8-bit wide, bi-directional port. The corre-sponding data direction register is DDRH. A ’1’ inDDRH configures the corresponding port pin as aninput. A ’0’ in the DDRH register configures the corre-sponding port pin as an output. Reading PORTH readsthe status of the pins, whereas writing to PORTH willwrite to the respective port latch.
The upper four bits of PORTH are multiplexed with4 channels of the 10-bit A/D converter.
The remaining bits of PORTH are general purpose I/O.
Upon RESET, RH7:RH4 are automatically configuredas analog inputs and must be configured in software tobe a digital I/O.
EXAMPLE 10-8: INITIALIZING PORTH
FIGURE 10-17: BLOCK DIAGRAM OF RH7:RH4
MOVLB 8 ; Select Bank 8 MOVLW 0x0E ; Configure PORTH as MOVPF ADCON1 ; digital CLRF PORTH, F ; Initialize PORTH data ; latches before ; the data direction ; register MOVLW 0x03 ; Value used to init ; data direction MOVWF DDRH ; Set RH<1:0> as inputs ; RH<7:2> as outputs
Data Bus
WR PORTH
WR DDRH
RD PORT
Data Latch
DDRH Latch
P
VSS
I/O pin
PCFG3:PCFG0
To other pads
QD
QCK
EN
Q D
EN
N
STInputBuffer
VDD
RD DDRH
To other pads
VAIN
CHS3:CHS0
QD
QCK
Note: I/O pins have protection diodes to VDD and VSS.
2000 Microchip Technology Inc. DS30289B-page 89
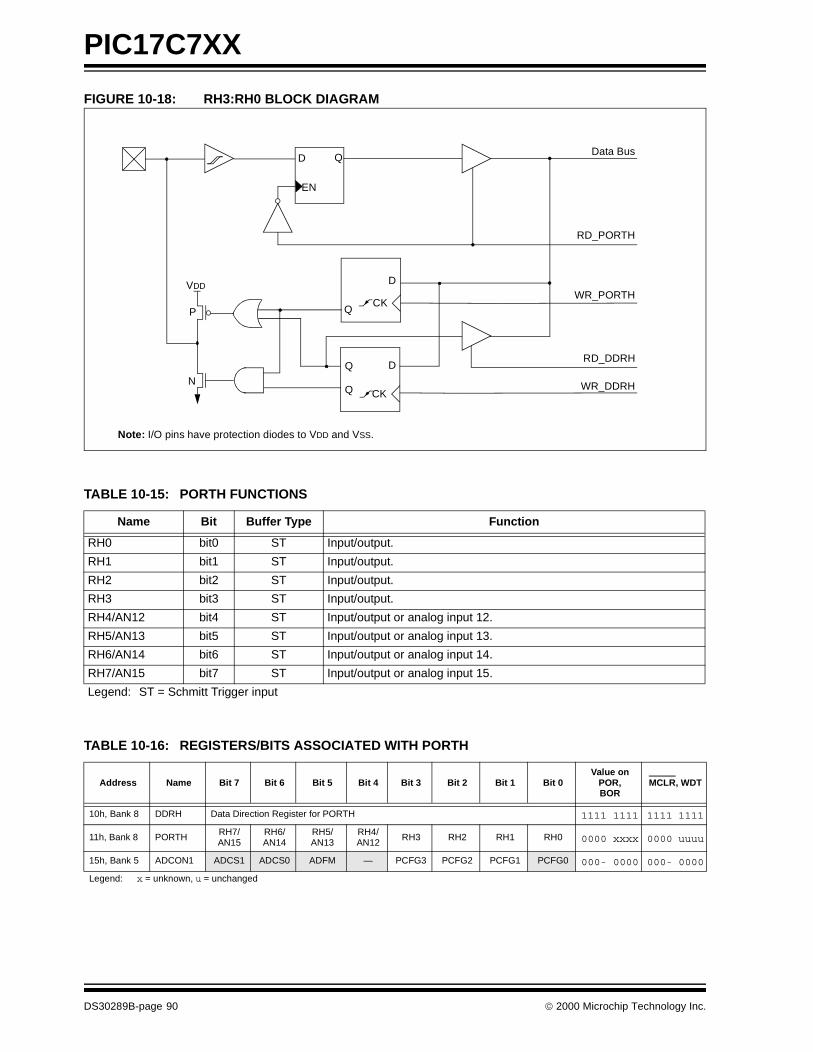
PIC17C7XX
FIGURE 10-18: RH3:RH0 BLOCK DIAGRAM
TABLE 10-15: PORTH FUNCTIONS
TABLE 10-16: REGISTERS/BITS ASSOCIATED WITH PORTH
Note: I/O pins have protection diodes to VDD and VSS.
D
CK
Q D
CKQ
Data Bus
RD_PORTH
WR_PORTH
RD_DDRH
WR_DDRH
EN
QD
EN
P
N
Q
VDD
Name Bit Buffer Type Function
RH0 bit0 ST Input/output.
RH1 bit1 ST Input/output.
RH2 bit2 ST Input/output.
RH3 bit3 ST Input/output.
RH4/AN12 bit4 ST Input/output or analog input 12.
RH5/AN13 bit5 ST Input/output or analog input 13.
RH6/AN14 bit6 ST Input/output or analog input 14.
RH7/AN15 bit7 ST Input/output or analog input 15.
Legend: ST = Schmitt Trigger input
Address Name Bit 7 Bit 6 Bit 5 Bit 4 Bit 3 Bit 2 Bit 1 Bit 0Value on
POR,BOR
MCLR, WDT
10h, Bank 8 DDRH Data Direction Register for PORTH 1111 1111 1111 1111
11h, Bank 8 PORTH RH7/AN15
RH6/AN14
RH5/AN13
RH4/AN12
RH3 RH2 RH1 RH0 0000 xxxx 0000 uuuu
15h, Bank 5 ADCON1 ADCS1 ADCS0 ADFM — PCFG3 PCFG2 PCFG1 PCFG0 000- 0000 000- 0000
Legend: x = unknown, u = unchanged
DS30289B-page 90 2000 Microchip Technology Inc.

PIC17C7XX
10.9 PORTJ and DDRJ Registers (PIC17C76X only)
PORTJ is an 8-bit wide, bi-directional port. The corre-sponding data direction register is DDRJ. A ’1’ in DDRJconfigures the corresponding port pin as an input. A ’0’in the DDRJ register configures the corresponding portpin as an output. Reading PORTJ reads the status ofthe pins, whereas writing to PORTJ will write to therespective port latch.
PORTJ is a general purpose I/O port.
EXAMPLE 10-9: INITIALIZING PORTJ
FIGURE 10-19: PORTJ BLOCK DIAGRAM
MOVLB 8 ; Select Bank 8CLRF PORTJ, F ; Initialize PORTJ data ; latches before setting ; the data direction ; registerMOVLW 0xCF ; Value used to initialize ; data directionMOVWF DDRJ ; Set RJ<3:0> as inputs ; RJ<5:4> as outputs ; RJ<7:6> as inputs
Note: I/O pins have protection diodes to VDD and VSS.
D
CK
Q D
CKQ
Data Bus
RD_PORTJ
WR_PORTJ
RD_DDRJ
WR_DDRJ
EN
QD
EN
P
N
Q
VDD
2000 Microchip Technology Inc. DS30289B-page 91

PIC17C7XX
TABLE 10-17: PORTJ FUNCTIONS
TABLE 10-18: REGISTERS/BITS ASSOCIATED WITH PORTJ
Name Bit Buffer Type Function
RJ0 bit0 ST Input/output
RJ1 bit1 ST Input/output
RJ2 bit2 ST Input/output
RJ3 bit3 ST Input/output
RJ4 bit4 ST Input/output
RJ5 bit5 ST Input/output
RJ6 bit6 ST Input/output
RJ7 bit7 ST Input/output
Legend: ST = Schmitt Trigger input
Address Name Bit 7 Bit 6 Bit 5 Bit 4 Bit 3 Bit 2 Bit 1 Bit 0Value on,
POR,BOR
MCLR, WDT
12h, Bank 8 DDRJ Data Direction Register for PORTJ 1111 1111 1111 1111
13h, Bank 8 PORTJ RJ7 RJ6 RJ5 RJ4 RJ3 RJ2 RJ1 RJ0 xxxx xxxx uuuu uuuu
Legend: x = unknown, u = unchanged
DS30289B-page 92 2000 Microchip Technology Inc.

PIC17C7XX
10.10 I/O Programming Considerations
10.10.1 BI-DIRECTIONAL I/O PORTS
Any instruction which writes, operates internally as aread, followed by a write operation. For example, theBCF and BSF instructions read the register into theCPU, execute the bit operation and write the resultback to the register. Caution must be used when theseinstructions are applied to a port with both inputs andoutputs defined. For example, a BSF operation on bit5of PORTB, will cause all eight bits of PORTB to be readinto the CPU. Then the BSF operation takes place onbit5 and PORTB is written to the output latches. Ifanother bit of PORTB is used as a bi-directional I/O pin(e.g. bit0) and it is defined as an input at this time, theinput signal present on the pin itself would be read intothe CPU and rewritten to the data latch of this particularpin, overwriting the previous content. As long as the pinstays in the input mode, no problem occurs. However,if bit0 is switched into output mode later on, the contentof the data latch may now be unknown.
Reading a port reads the values of the port pins. Writingto the port register writes the value to the port latch.When using read-modify-write instructions (BCF, BSF,BTG, etc.) on a port, the value of the port pins is read,the desired operation is performed with this value andthe value is then written to the port latch.
Example 10-10 shows the possible effect of twosequential read-modify-write instructions on an I/O port.
EXAMPLE 10-10: READ-MODIFY-WRITE INSTRUCTIONS ON ANI/O PORT
; Initial PORT settings: PORTB<7:4> Inputs; PORTB<3:0> Outputs; PORTB<7:6> have pull-ups and are; not connected to other circuitry;; PORT latch PORT pins; ---------- ---------; BCF PORTB, 7 ; 01pp pppp 11pp pppp BCF PORTB, 6 ; 10pp pppp 11pp pppp
BCF DDRB, 7 ; 10pp pppp 11pp pppp BCF DDRB, 6 ; 10pp pppp 10pp pppp;; Note that the user may have expected the; pin values to be 00pp pppp. The 2nd BCF; caused RB7 to be latched as the pin value; (High).
Note: A pin actively outputting a Low or Highshould not be driven from external devices,in order to change the level on this pin (i.e.,“wired-or”, “wired-and”). The resulting highoutput currents may damage the device.
2000 Microchip Technology Inc. DS30289B-page 93

PIC17C7XX
10.10.2 SUCCESSIVE OPERATIONS ON I/O PORTS
The actual write to an I/O port happens at the end of aninstruction cycle, whereas for reading, the data must bevalid at the beginning of the instruction cycle(Figure 10-20). Therefore, care must be exercised if awrite followed by a read operation is carried out on thesame I/O port. The sequence of instructions should besuch to allow the pin voltage to stabilize (load depen-dent) before executing the instruction that reads thevalues on that I/O port. Otherwise, the previous state ofthat pin may be read into the CPU, rather than the“new” state. When in doubt, it is better to separatethese instructions with a NOP, or another instructionnot accessing this I/O port.
Figure 10-21 shows the I/O model which causes thissituation. As the effective capacitance (C) becomeslarger, the rise/fall time of the I/O pin increases. As thedevice frequency increases, or the effective capaci-tance increases, the possibility of this subsequentPORTx read-modify-write instruction issue increases.This effective capacitance includes the effects of theboard traces.
The best way to address this is to add a series resistorat the I/O pin. This resistor allows the I/O pin to get tothe desired level before the next instruction.
The use of NOP instructions between the subsequentPORTx read-modify-write instructions, is a lower costsolution, but has the issue that the number of NOPinstructions is dependent on the effective capacitanceC and the frequency of the device.
FIGURE 10-20: SUCCESSIVE I/O OPERATION
FIGURE 10-21: I/O CONNECTION ISSUES
PC PC + 1 PC + 2 PC + 3
Q1 Q2 Q3 Q4 Q1 Q2 Q3 Q4 Q1 Q2 Q3 Q4 Q1 Q2 Q3 Q4
InstructionFetched
RB7:RB0
MOVWF PORTBwrite toPORTB
NOP
Port pinsampled here
NOPMOVF PORTB,W
InstructionExecuted MOVWF PORTB
write toPORTB
NOPMOVF PORTB,W
Note:
This example shows a write to PORTB, followed by a read from PORTB.
Note that:
data setup time = (0.25TCY - TPD)
where TCY = instruction cycleTPD = propagation delay
Therefore, at higher clock frequencies, awrite followed by a read may be problematic.
PIC17CXXX
I/O
C(1)
Q4 Q1 Q2 Q3 Q4 Q1
VIL
BSF PORTx, PINy
Q2 Q3
BSF PORTx, PINz
PORTx, PINy
Read PORTx, PINy as low
BSF PORTx, PINz clears the valueto be driven on the PORTx, PINy pin.
Note 1: This is not a capacitor to ground, but the effective capacitive loading on the trace.
DS30289B-page 94 2000 Microchip Technology Inc.

PIC17C7XX
11.0 OVERVIEW OF TIMER RESOURCES
The PIC17C7XX has four timer modules. Each modulecan generate an interrupt to indicate that an event hasoccurred. These timers are called:
• Timer0 - 16-bit timer with programmable 8-bit prescaler
• Timer1 - 8-bit timer• Timer2 - 8-bit timer• Timer3 - 16-bit timer
For enhanced time base functionality, four input Cap-tures and three Pulse Width Modulation (PWM) outputsare possible. The PWMs use the Timer1 and Timer2resources and the input Captures use the Timer3resource.
11.1 Timer0 Overview
The Timer0 module is a simple 16-bit overflow counter.The clock source can be either the internal systemclock (Fosc/4) or an external clock.
When Timer0 uses an external clock source, it has theflexibility to allow user selection of the incrementingedge, rising or falling.
The Timer0 module also has a programmable pres-caler. The T0PS3:T0PS0 bits (T0STA<4:1>) determinethe prescale value. TMR0 can increment at the follow-ing rates: 1:1, 1:2, 1:4, 1:8, 1:16, 1:32, 1:64, 1:128,1:256.
Synchronization of the external clock occurs after theprescaler. When the prescaler is used, the externalclock frequency may be higher than the device’s fre-quency. The maximum external frequency on theT0CKI pin is 50 MHz, given the high and low timerequirements of the clock.
11.2 Timer1 Overview
The Timer1 module is an 8-bit timer/counter with an 8-bit period register (PR1). When the TMR1 value rollsover from the period match value to 0h, the TMR1IFflag is set and an interrupt will be generated if enabled.In Counter mode, the clock comes from the RB4/TCLK12 pin, which can also be selected to be the clockfor the Timer2 module.
TMR1 can be concatenated with TMR2 to form a 16-bittimer. The TMR1 register is the LSB and TMR2 is theMSB. When in the 16-bit timer mode, there is a corre-sponding 16-bit period register (PR2:PR1). When theTMR2:TMR1 value rolls over from the period matchvalue to 0h, the TMR1IF flag is set and an interrupt willbe generated, if enabled.
11.3 Timer2 Overview
The Timer2 module is an 8-bit timer/counter with an 8-bit period register (PR2). When the TMR2 value rollsover from the period match value to 0h, the TMR2IFflag is set and an interrupt will be generated, if enabled.In Counter mode, the clock comes from the RB4/TCLK12 pin, which can also provide the clock for theTimer1 module.
TMR2 can be concatenated with TMR1 to form a 16-bittimer. The TMR2 register is the MSB and TMR1 is theLSB. When in the 16-bit timer mode, there is a corre-sponding 16-bit period register (PR2:PR1). When theTMR2:TMR1 value rolls over from the period matchvalue to 0h, the TMR1IF flag is set and an interrupt willbe generated, if enabled.
11.4 Timer3 Overview
The Timer3 module is a 16-bit timer/counter with a 16-bit period register. When the TMR3H:TMR3L valuerolls over to 0h, the TMR3IF bit is set and an interruptwill be generated, if enabled. In Counter mode, theclock comes from the RB5/TCLK3 pin.
When operating in the four Capture modes, the periodregisters become the second (of four) 16-bit captureregisters.
11.5 Role of the Timer/Counters
The timer modules are general purpose, but have ded-icated resources associated with them. TImer1 andTimer2 are the time bases for the three Pulse WidthModulation (PWM) outputs, while Timer3 is the timebase for the four input captures.
2000 Microchip Technology Inc. DS30289B-page 95

PIC17C7XX
NOTES:
DS30289B-page 96 2000 Microchip Technology Inc.

PIC17C7XX
12.0 TIMER0
The Timer0 module consists of a 16-bit timer/counter,TMR0. The high byte is register TMR0H and the lowbyte is register TMR0L. A software programmable 8-bitprescaler makes Timer0 an effective 24-bit overflowtimer. The clock source is software programmable aseither the internal instruction clock, or an external clockon the RA1/T0CKI pin. The control bits for this moduleare in register T0STA (Figure 12-1).
REGISTER 12-1: T0STA REGISTER (ADDRESS: 05h, UNBANKED)
R/W-0 R/W-0 R/W-0 R/W-0 R/W-0 R/W-0 R/W-0 U-0INTEDG T0SE T0CS T0PS3 T0PS2 T0PS1 T0PS0 —
bit 7 bit 0
bit 7 INTEDG: RA0/INT Pin Interrupt Edge Select bitThis bit selects the edge upon which the interrupt is detected.1 = Rising edge of RA0/INT pin generates interrupt0 = Falling edge of RA0/INT pin generates interrupt
bit 6 T0SE: Timer0 Clock Input Edge Select bitThis bit selects the edge upon which TMR0 will increment.
When T0CS = 0 (External Clock):1 = Rising edge of RA1/T0CKI pin increments TMR0 and/or sets the T0CKIF bit0 = Falling edge of RA1/T0CKI pin increments TMR0 and/or sets the T0CKIF bit
When T0CS = 1 (Internal Clock):Don’t care
bit 5 T0CS: Timer0 Clock Source Select bitThis bit selects the clock source for TMR0.1 = Internal instruction clock cycle (TCY)0 = External clock input on the T0CKI pin
bit 4-1 T0PS3:T0PS0: Timer0 Prescale Selection bitsThese bits select the prescale value for TMR0.
bit 0 Unimplemented: Read as ’0’
Legend:
R = Readable bit W = Writable bit U = Unimplemented bit, read as ‘0’
- n = Value at POR Reset ’1’ = Bit is set ’0’ = Bit is cleared x = Bit is unknown
T0PS3:T0PS0 Prescale Value
000000010010001101000101011001111xxx
1:11:21:41:81:161:321:641:1281:256
2000 Microchip Technology Inc. DS30289B-page 97

PIC17C7XX
12.1 Timer0 Operation
When the T0CS (T0STA<5>) bit is set, TMR0 incre-ments on the internal clock. When T0CS is clear, TMR0increments on the external clock (RA1/T0CKI pin). Theexternal clock edge can be selected in software. Whenthe T0SE (T0STA<6>) bit is set, the timer will incrementon the rising edge of the RA1/T0CKI pin. When T0SEis clear, the timer will increment on the falling edge ofthe RA1/T0CKI pin. The prescaler can be programmedto introduce a prescale of 1:1 to 1:256. The timer incre-ments from 0000h to FFFFh and rolls over to 0000h.On overflow, the TMR0 Interrupt Flag bit (T0IF) is set.The TMR0 interrupt can be masked by clearing the cor-responding TMR0 Interrupt Enable bit (T0IE). TheTMR0 Interrupt Flag bit (T0IF) is automatically clearedwhen vectoring to the TMR0 interrupt vector.
12.2 Using Timer0 with External Clock
When an external clock input is used for Timer0, it issynchronized with the internal phase clocks. Figure 12-2 shows the synchronization of the external clock. Thissynchronization is done after the prescaler. The outputof the prescaler (PSOUT) is sampled twice in everyinstruction cycle to detect a rising or a falling edge. Thetiming requirements for the external clock are detailedin the electrical specification section.
12.2.1 DELAY FROM EXTERNAL CLOCK EDGE
Since the prescaler output is synchronized with theinternal clocks, there is a small delay from the time theexternal clock edge occurs to the time TMR0 is actuallyincremented. Figure 12-2 shows that this delay isbetween 3TOSC and 7TOSC. Thus, for example, mea-suring the interval between two edges (e.g. period) willbe accurate within ±4TOSC (±121 ns @ 33 MHz).
FIGURE 12-1: TIMER0 MODULE BLOCK DIAGRAM
FIGURE 12-2: TMR0 TIMING WITH EXTERNAL CLOCK (INCREMENT ON FALLING EDGE)
RA1/T0CKI SynchronizationPrescaler(8 StageAsync RippleCounter)
T0SE(T0STA<6>)
FOSC/4
T0CS(T0STA<5>)
T0PS3:T0PS0(T0STA<4:1>)
Q2 Q4
0
1TMR0H<8> TMR0L<8>
Interrupt-on-Overflowsets T0IF
(INTSTA<5>)
4
PSOUT
Q1 Q2 Q3 Q4 Q1 Q2 Q3 Q4 Q1 Q2 Q3 Q4 Q1 Q2 Q3 Q4
PrescalerOutput
(PSOUT)
Sampled
PrescalerOutput
IncrementTMR0
TMR0 T0 T0 + 1 T0 + 2
(Note 3)
(Note 2)
Note 1: The delay from the T0CKI edge to the TMR0 increment is 3Tosc to 7Tosc. 2: ↑ = PSOUT is sampled here.3: The PSOUT high time is too short and is missed by the sampling circuit.
(Note 1)
DS30289B-page 98 2000 Microchip Technology Inc.

PIC17C7XX
12.3 Read/Write Consideration for TMR0
Although TMR0 is a 16-bit timer/counter, only 8-bits ata time can be read or written during a single instructioncycle. Care must be taken during any read or write.
12.3.1 READING 16-BIT VALUE
The problem in reading the entire 16-bit value is thatafter reading the low (or high) byte, its value maychange from FFh to 00h.
Example 12-1 shows a 16-bit read. To ensure a properread, interrupts must be disabled during this routine.
EXAMPLE 12-1: 16-BIT READ
12.3.2 WRITING A 16-BIT VALUE TO TMR0
Since writing to either TMR0L or TMR0H will effectivelyinhibit increment of that half of the TMR0 in the nextcycle (following write), but not inhibit increment of theother half, the user must write to TMR0L first andTMR0H second, in two consecutive instructions, asshown in Example 12-2. The interrupt must be dis-abled. Any write to either TMR0L or TMR0H clears theprescaler.
EXAMPLE 12-2: 16-BIT WRITE
12.4 Prescaler Assignments
Timer0 has an 8-bit prescaler. The prescaler selectionis fully under software control; i.e., it can be changed“on the fly” during program execution. Clearing theprescaler is recommended before changing its setting.The value of the prescaler is “unknown” and assigninga value that is less than the present value, makes it dif-ficult to take this unknown time into account.
FIGURE 12-3: TMR0 TIMING: WRITE HIGH OR LOW BYTE
MOVPF TMR0L, TMPLO ;read low tmr0 MOVPF TMR0H, TMPHI ;read high tmr0 MOVFP TMPLO, WREG ;tmplo −> wreg CPFSLT TMR0L ;tmr0l < wreg? RETURN ;no then return MOVPF TMR0L, TMPLO ;read low tmr0 MOVPF TMR0H, TMPHI ;read high tmr0 RETURN ;return
BSF CPUSTA, GLINTD ; Disable interruptsMOVFP RAM_L, TMR0L ;MOVFP RAM_H, TMR0H ;BCF CPUSTA, GLINTD ; Done, enable ; interrupts
Q1 Q2 Q3 Q4 Q1 Q2 Q3 Q4 Q1 Q2 Q3 Q4 Q1 Q2 Q3 Q4 Q1 Q2 Q3 Q4
AD15:AD0
ALE
TMR0L
TMR0H
MOVFP W,TMR0LWrite to TMR0L
MOVFP TMR0L,WRead TMR0L(Value = NT0)
MOVFP TMR0L,WRead TMR0L(Value = NT0)
MOVFP TMR0L,WRead TMR0L
(Value = NT0 +1)
T0 T0+1 New T0 (NT0) New T0+1
PC PC+1 PC+2 PC+3 PC+4
Fetch
InstructionExecuted
2000 Microchip Technology Inc. DS30289B-page 99

PIC17C7XX
FIGURE 12-4: TMR0 READ/WRITE IN TIMER MODE
TABLE 12-1: REGISTERS/BITS ASSOCIATED WITH TIMER0
InstructionExecuted
MOVFPDATAL,TMR0LWrite TMR0L
MOVFPDATAH,TMR0HWrite TMR0H
MOVPFTMR0L,W
Read TMR0L
MOVPFTMR0L,W
Read TMR0L
MOVPFTMR0L,W
Read TMR0L
Q1 Q2 Q3 Q4 Q1 Q2 Q3 Q4 Q1 Q2 Q3 Q4 Q1 Q2 Q3 Q4 Q1 Q2 Q3 Q4 Q1 Q2 Q3 Q4
AD15:AD0
ALE
WR_TRM0L
WR_TMR0H
RD_TMR0L
TMR0H
TMR0L
12 12 13 AB
FE FF 56 57 58
Note: In this example, old TMR0 value is 12FEh, new value of AB56h is written.
InstructionFetched
MOVFPDATAL,TMR0LWrite TMR0L
MOVFPDATAH,TMR0HWrite TMR0H
MOVPFTMR0L,W
Read TMR0L
MOVPFTMR0L,W
Read TMR0L
MOVPFTMR0L,W
Read TMR0L
MOVPFTMR0L,W
Read TMR0L
PreviouslyFetchedInstruction
Address Name Bit 7 Bit 6 Bit 5 Bit 4 Bit 3 Bit 2 Bit 1 Bit 0Value on
POR,BOR
MCLR, WDT
05h, Unbanked T0STA INTEDG T0SE T0CS T0PS3 T0PS2 T0PS1 T0PS0 — 0000 000- 0000 000-
06h, Unbanked CPUSTA — — STKAV GLINTD TO PD POR BOR --11 11qq --11 qquu
07h, Unbanked INTSTA PEIF T0CKIF T0IF INTF PEIE T0CKIE T0IE INTE 0000 0000 0000 0000
0Bh, Unbanked TMR0L TMR0 Register; Low Byte xxxx xxxx uuuu uuuu
0Ch, Unbanked TMR0H TMR0 Register; High Byte xxxx xxxx uuuu uuuu
Legend: x = unknown, u = unchanged, - = unimplemented, read as a '0', q = value depends on condition. Shaded cells are not used by Timer0.
DS30289B-page 100 2000 Microchip Technology Inc.

PIC17C7XX
13.0 TIMER1, TIMER2, TIMER3,PWMS AND CAPTURES
The PIC17C7XX has a wealth of timers and time basedfunctions to ease the implementation of control applica-tions. These time base functions include three PWMoutputs and four Capture inputs.
Timer1 and Timer2 are two 8-bit incrementing timers,each with an 8-bit period register (PR1 and PR2, respec-tively) and separate overflow interrupt flags. Timer1 andTimer2 can operate either as timers (increment on inter-nal FOSC/4 clock), or as counters (increment on fallingedge of external clock on pin RB4/TCLK12). They arealso software configurable to operate as a single 16-bittimer/counter. These timers are also used as the timebase for the PWM (Pulse Width Modulation) modules.
Timer3 is a 16-bit timer/counter which uses the TMR3Hand TMR3L registers. Timer3 also has two additionalregisters (PR3H/CA1H:PR3L/CA1L) that are config-urable as a 16-bit period register or a 16-bit captureregister. TMR3 can be software configured to incre-ment from the internal system clock (FOSC/4), or froman external signal on the RB5/TCLK3 pin. Timer3 is thetime base for all of the 16-bit captures.
Six other registers comprise the Capture2, Capture3,and Capture4 registers (CA2H:CA2L, CA3H:CA3L,and CA4H:CA4L).
Figure 13-1, Figure 13-2 and Figure 13-3 are the con-trol registers for the operation of Timer1, Timer2 andTimer3, as well as PWM1, PWM2, PWM3, Capture1,Capture2, Capture3 and Capture4.
Table 13-1 shows the Timer resource requirements forthese time base functions. Each timer is an openresource so that multiple functions may operate with it.
TABLE 13-1: TIME-BASE FUNCTION/ RESOURCE REQUIREMENTS
REGISTER 13-1: TCON1 REGISTER (ADDRESS: 16h, BANK 3)
Time Base Function Timer Resource
PWM1 Timer1PWM2 Timer1 or Timer2
PWM3 Timer1 or Timer2Capture1 Timer3Capture2 Timer3
Capture3 Timer3Capture4 Timer3
R/W-0 R/W-0 R/W-0 R/W-0 R/W-0 R/W-0 R/W-0 R/W-0CA2ED1 CA2ED0 CA1ED1 CA1ED0 T16 TMR3CS TMR2CS TMR1CS
bit 7 bit 0
bit 7-6 CA2ED1:CA2ED0: Capture2 Mode Select bits00 = Capture on every falling edge01 = Capture on every rising edge10 = Capture on every 4th rising edge11 = Capture on every 16th rising edge
bit 5-4 CA1ED1:CA1ED0: Capture1 Mode Select bits00 = Capture on every falling edge01 = Capture on every rising edge10 = Capture on every 4th rising edge11 = Capture on every 16th rising edge
bit 3 T16: Timer2:Timer1 Mode Select bit1 = Timer2 and Timer1 form a 16-bit timer0 = Timer2 and Timer1 are two 8-bit timers
bit 2 TMR3CS: Timer3 Clock Source Select bit1 = TMR3 increments off the falling edge of the RB5/TCLK3 pin0 = TMR3 increments off the internal clock
bit 1 TMR2CS: Timer2 Clock Source Select bit1 = TMR2 increments off the falling edge of the RB4/TCLK12 pin0 = TMR2 increments off the internal clock
bit 0 TMR1CS: Timer1 Clock Source Select bit1 = TMR1 increments off the falling edge of the RB4/TCLK12 pin0 = TMR1 increments off the internal clock
Legend:
R = Readable bit W = Writable bit U = Unimplemented bit, read as ‘0’
- n = Value at POR Reset ’1’ = Bit is set ’0’ = Bit is cleared x = Bit is unknown
2000 Microchip Technology Inc. DS30289B-page 101

PIC17C7XX
REGISTER 13-2: TCON2 REGISTER (ADDRESS: 17h, BANK 3)
R-0 R-0 R/W-0 R/W-0 R/W-0 R/W-0 R/W-0 R/W-0CA2OVF CA1OVF PWM2ON PWM1ON CA1/PR3 TMR3ON TMR2ON TMR1ON
bit 7 bit 0
bit 7 CA2OVF: Capture2 Overflow Status bitThis bit indicates that the capture value had not been read from the capture register pair(CA2H:CA2L) before the next capture event occurred. The capture register retains the oldestunread capture value (last capture before overflow). Subsequent capture events will not updatethe capture register with the TMR3 value until the capture register has been read (both bytes).1 = Overflow occurred on Capture2 register0 = No overflow occurred on Capture2 register
bit 6 CA1OVF: Capture1 Overflow Status bitThis bit indicates that the capture value had not been read from the capture register pair (PR3H/CA1H:PR3L/CA1L), before the next capture event occurred. The capture register retains the old-est unread capture value (last capture before overflow). Subsequent capture events will notupdate the capture register with the TMR3 value until the capture register has been read (bothbytes).1 = Overflow occurred on Capture1 register0 = No overflow occurred on Capture1 register
bit 5 PWM2ON: PWM2 On bit1 =PWM2 is enabled
(The RB3/PWM2 pin ignores the state of the DDRB<3> bit.)0 =PWM2 is disabled
(The RB3/PWM2 pin uses the state of the DDRB<3> bit for data direction.)
bit 4 PWM1ON: PWM1 On bit1 =PWM1 is enabled
(The RB2/PWM1 pin ignores the state of the DDRB<2> bit.)0 =PWM1 is disabled
(The RB2/PWM1 pin uses the state of the DDRB<2> bit for data direction.)
bit 3 CA1/PR3: CA1/PR3 Register Mode Select bit1 =Enables Capture1
(PR3H/CA1H:PR3L/CA1L is the Capture1 register. Timer3 runs without a period register.)0 =Enables the Period register
(PR3H/CA1H:PR3L/CA1L is the Period register for Timer3.)
bit 2 TMR3ON: Timer3 On bit1 = Starts Timer30 = Stops Timer3
bit 1 TMR2ON: Timer2 On bitThis bit controls the incrementing of the TMR2 register. When TMR2:TMR1 form the 16-bit timer(T16 is set), TMR2ON must be set. This allows the MSB of the timer to increment.1 = Starts Timer2 (must be enabled if the T16 bit (TCON1<3>) is set)0 = Stops Timer2
bit 0 TMR1ON: Timer1 On bit
When T16 is set (in 16-bit Timer mode):1 = Starts 16-bit TMR2:TMR10 = Stops 16-bit TMR2:TMR1
When T16 is clear (in 8-bit Timer mode:1 = Starts 8-bit Timer10 = Stops 8-bit Timer1
Legend:
R = Readable bit W = Writable bit U = Unimplemented bit, read as ‘0’
- n = Value at POR Reset ’1’ = Bit is set ’0’ = Bit is cleared x = Bit is unknown
DS30289B-page 102 2000 Microchip Technology Inc.

PIC17C7XX
REGISTER 13-3: TCON3 REGISTER (ADDRESS: 16h, BANK 7)
U-0 R-0 R-0 R/W-0 R/W-0 R/W-0 R/W-0 R/W-0— CA4OVF CA3OVF CA4ED1 CA4ED0 CA3ED1 CA3ED0 PWM3ON
bit 7 bit 0
bit 7 Unimplemented: Read as ‘0’
bit 6 CA4OVF: Capture4 Overflow Status bitThis bit indicates that the capture value had not been read from the capture register pair(CA4H:CA4L) before the next capture event occurred. The capture register retains the oldestunread capture value (last capture before overflow). Subsequent capture events will not updatethe capture register with the TMR3 value until the capture register has been read (both bytes).1 = Overflow occurred on Capture4 registers0 = No overflow occurred on Capture4 registers
bit 5 CA3OVF: Capture3 Overflow Status bitThis bit indicates that the capture value had not been read from the capture register pair(CA3H:CA3L) before the next capture event occurred. The capture register retains the oldestunread capture value (last capture before overflow). Subsequent capture events will not updatethe capture register with the TMR3 value until the capture register has been read (both bytes).1 = Overflow occurred on Capture3 registers0 = No overflow occurred on Capture3 registers
bit 4-3 CA4ED1:CA4ED0: Capture4 Mode Select bits00 = Capture on every falling edge01 = Capture on every rising edge10 = Capture on every 4th rising edge11 = Capture on every 16th rising edge
bit 2-1 CA3ED1:CA3ED0: Capture3 Mode Select bits00 = Capture on every falling edge01 = Capture on every rising edge10 = Capture on every 4th rising edge11 = Capture on every 16th rising edge
bit 0 PWM3ON: PWM3 On bit1 = PWM3 is enabled (the RG5/PWM3 pin ignores the state of the DDRG<5> bit)0 = PWM3 is disabled (the RG5/PWM3 pin uses the state of the DDRG<5> bit for data direction)
Legend:
R = Readable bit W = Writable bit U = Unimplemented bit, read as ‘0’
- n = Value at POR Reset ’1’ = Bit is set ’0’ = Bit is cleared x = Bit is unknown
2000 Microchip Technology Inc. DS30289B-page 103

PIC17C7XX
13.1 Timer1 and Timer2
13.1.1 TIMER1, TIMER2 IN 8-BIT MODE
Both Timer1 and Timer2 will operate in 8-bit modewhen the T16 bit is clear. These two timers can be inde-pendently configured to increment from the internalinstruction cycle clock (TCY), or from an external clocksource on the RB4/TCLK12 pin. The timer clock sourceis configured by the TMRxCS bit (x = 1 for Timer1,or = 2 for Timer2). When TMRxCS is clear, the clocksource is internal and increments once every instruc-tion cycle (FOSC/4). When TMRxCS is set, the clocksource is the RB4/TCLK12 pin and the counters willincrement on every falling edge of the RB4/TCLK12pin.
The timer increments from 00h until it equals the Periodregister (PRx). It then resets to 00h at the next incre-ment cycle. The timer interrupt flag is set when thetimer is reset. TMR1 and TMR2 have individual inter-rupt flag bits. The TMR1 interrupt flag bit is latched intoTMR1IF and the TMR2 interrupt flag bit is latched intoTMR2IF.
Each timer also has a corresponding interrupt enablebit (TMRxIE). The timer interrupt can be enabled/disabled by setting/clearing this bit. For peripheralinterrupts to be enabled, the Peripheral InterruptEnable bit must be set (PEIE = ’1’) and global interruptmust be enabled (GLINTD = ’0’).
The timers can be turned on and off under softwarecontrol. When the timer on control bit (TMRxON) is set,the timer increments from the clock source. WhenTMRxON is cleared, the timer is turned off and cannotcause the timer interrupt flag to be set.
13.1.1.1 External Clock Input for Timer1 and Timer2
When TMRxCS is set, the clock source is the RB4/TCLK12 pin, and the counter will increment on everyfalling edge on the RB4/TCLK12 pin. The TCLK12input is synchronized with internal phase clocks. Thiscauses a delay from the time a falling edge appears onTCLK12 to the time TMR1 or TMR2 is actually incre-mented. For the external clock input timing require-ments, see the Electrical Specification section.
FIGURE 13-1: TIMER1 AND TIMER2 IN TWO 8-BIT TIMER/COUNTER MODE
FOSC/4
RB4/TCLK12
TMR1ON(TCON2<0>)
TMR1CS(TCON1<0>)
TMR1
PR1
RESET
Equal
Set TMR1IF(PIR1<4>)
0
1
Comparator<8>Comparator x8
FOSC/4
TMR2ON(TCON2<1>)
TMR2CS(TCON1<1>)
TMR2
PR2
RESET
Equal
Set TMR2IF(PIR1<5>)
1
0
Comparator<8>Comparator x8
DS30289B-page 104 2000 Microchip Technology Inc.

PIC17C7XX
13.1.2 TIMER1 AND TIMER2 IN 16-BIT MODE
To select 16-bit mode, set the T16 bit. In this mode,TMR2 and TMR1 are concatenated to form a 16-bittimer (TMR2:TMR1). The 16-bit timer increments untilit matches the 16-bit period register (PR2:PR1). On thefollowing timer clock, the timer value is reset to 0h, andthe TMR1IF bit is set.
When selecting the clock source for the 16-bit timer, theTMR1CS bit controls the entire 16-bit timer andTMR2CS is a “don’t care”, however, ensure thatTMR2ON is set (allows TMR2 to increment). WhenTMR1CS is clear, the timer increments once everyinstruction cycle (FOSC/4). When TMR1CS is set, thetimer increments on every falling edge of the RB4/TCLK12 pin. For the 16-bit timer to increment, bothTMR1ON and TMR2ON bits must be set (Table 13-2).
TABLE 13-2: TURNING ON 16-BIT TIMER
13.1.2.1 External Clock Input for TMR2:TMR1
When TMR1CS is set, the 16-bit TMR2:TMR1 incre-ments on the falling edge of clock input TCLK12. Theinput on the RB4/TCLK12 pin is sampled and synchro-nized by the internal phase clocks twice every instruc-tion cycle. This causes a delay from the time a fallingedge appears on RB4/TCLK12 to the timeTMR2:TMR1 is actually incremented. For the externalclock input timing requirements, see the ElectricalSpecification section.
FIGURE 13-2: TMR2 AND TMR1 IN 16-BIT TIMER/COUNTER MODE
T16 TMR2ON TMR1ON Result
1 1 1 16-bit timer (TMR2:TMR1) ON
1 0 1 Only TMR1 increments
1 x 0 16-bit timer OFF
0 1 1 Timers in 8-bit mode
RB4/TCLK12FOSC/4
TMR1ON(TCON2<0>)
TMR1CS(TCON1<0>) TMR1 x 8
PR1 x 8
RESET
EqualSet Interrupt TMR1IF(PIR1<4>)
1
0
Comparator<8>Comparator x16
TMR2 x 8
PR2 x 8
MSB LSB
2000 Microchip Technology Inc. DS30289B-page 105

PIC17C7XX
TABLE 13-3: SUMMARY OF TIMER1, TIMER2 AND TIMER3 REGISTERS
Address Name Bit 7 Bit 6 Bit 5 Bit 4 Bit 3 Bit 2 Bit 1 Bit 0Value on
POR,BOR
MCLR, WDT
16h, Bank 3 TCON1 CA2ED1 CA2ED0 CA1ED1 CA1ED0 T16 TMR3CS TMR2CS TMR1CS 0000 0000 0000 0000
17h, Bank 3 TCON2 CA2OVF CA1OVF PWM2ON PWM1ON CA1/PR3 TMR3ON TMR2ON TMR1ON 0000 0000 0000 0000
16h, Bank 7 TCON3 — CA4OVF CA3OVF CA4ED1 CA4ED0 CA3ED1 CA3ED0 PWM3ON -000 0000 -000 0000
10h, Bank 2 TMR1 Timer1’s Register xxxx xxxx uuuu uuuu
11h, Bank 2 TMR2 Timer2’s Register xxxx xxxx uuuu uuuu
16h, Bank 1 PIR1 RBIF TMR3IF TMR2IF TMR1IF CA2IF CA1IF TX1IF RC1IF x000 0010 u000 0010
17h, Bank 1 PIE1 RBIE TMR3IE TMR2IE TMR1IE CA2IE CA1IE TX1IE RC1IE 0000 0000 0000 0000
07h, Unbanked INTSTA PEIF T0CKIF T0IF INTF PEIE T0CKIE T0IE INTE 0000 0000 0000 0000
06h, Unbanked CPUSTA — — STKAV GLINTD TO PD POR BOR --11 11qq --11 qquu
14h, Bank 2 PR1 Timer1 Period Register xxxx xxxx uuuu uuuu
15h, Bank 2 PR2 Timer2 Period Register xxxx xxxx uuuu uuuu
10h, Bank 3 PW1DCL DC1 DC0 — — — — — — xx-- ---- uu-- ----
11h, Bank 3 PW2DCL DC1 DC0 TM2PW2 — — — — — xx0- ---- uu0- ----
10h, Bank 7 PW3DCL DC1 DC0 TM2PW3 — — — — — xx0- ---- uu0- ----
12h, Bank 3 PW1DCH DC9 DC8 DC7 DC6 DC5 DC4 DC3 DC2 xxxx xxxx uuuu uuuu
13h, Bank 3 PW2DCH DC9 DC8 DC7 DC6 DC5 DC4 DC3 DC2 xxxx xxxx uuuu uuuu
11h, Bank 7 PW3DCH DC9 DC8 DC7 DC6 DC5 DC4 DC3 DC2 xxxx xxxx uuuu uuuu
Legend: x = unknown, u = unchanged, - = unimplemented, read as a '0', q = value depends on condition.Shaded cells are not used by Timer1 or Timer2.
DS30289B-page 106 2000 Microchip Technology Inc.

PIC17C7XX
13.1.3 USING PULSE WIDTH MODULATION (PWM) OUTPUTS WITH TIMER1 AND TIMER2
Three high speed pulse width modulation (PWM) out-puts are provided. The PWM1 output uses Timer1 asits time base, while PWM2 and PWM3 may indepen-dently be software configured to use either Timer1 orTimer2 as the time base. The PWM outputs are on theRB2/PWM1, RB3/PWM2 and RG5/PWM3 pins.
Each PWM output has a maximum resolution of 10-bits. At 10-bit resolution, the PWM output frequency is32.2 kHz (@ 32 MHz clock) and at 8-bit resolution thePWM output frequency is 128.9 kHz. The duty cycle ofthe output can vary from 0% to 100%.
Figure 13-3 shows a simplified block diagram of aPWM module.
The duty cycle registers are double buffered for glitchfree operation. Figure 13-4 shows how a glitch couldoccur if the duty cycle registers were not doublebuffered.
The user needs to set the PWM1ON bit (TCON2<4>)to enable the PWM1 output. When the PWM1ON bit isset, the RB2/PWM1 pin is configured as PWM1 outputand forced as an output, irrespective of the data direc-tion bit (DDRB<2>). When the PWM1ON bit is clear,the pin behaves as a port pin and its direction is con-trolled by its data direction bit (DDRB<2>). Similarly,the PWM2ON (TCON2<5>) bit controls the configura-tion of the RB3/PWM2 pin and the PWM3ON(TCON3<0>) bit controls the configuration of the RG5/PWM3 pin.
FIGURE 13-3: SIMPLIFIED PWM BLOCK DIAGRAM
FIGURE 13-4: PWM OUTPUT (NOT BUFFERED)
PWxDCH
Duty Cycle Registers PWxDCL<7:6>
Clear Timer,PWMx pin and Latch D.C.
(Slave)
Comparator
TMRx
Comparator
PRy
(Note 1)
R
S
Q
PWMxON
PWMx
Note 1: 8-bit timer is concatenated with 2-bit internalQ clock or 2 bits of the prescaler to create
Read
Write
10-bit time base.
0 10 20 30 40 0
PWMOutput
TimerInterrupt
Write NewPWM Duty Cycle Value
Timer InterruptNew PWM Duty Cycle ValueTransferred to Slave
The dotted line shows PWM output if duty cycle registers were not double buffered.If the new duty cycle is written after the timer has passed that value, then the PWM doesnot reset at all during the current cycle, causing a “glitch”.
In this example, PWM period = 50. Old duty cycle is 30. New duty cycle value is 10.
10 20 30 40 0
Note:
2000 Microchip Technology Inc. DS30289B-page 107

PIC17C7XX
13.1.3.1 PWM Periods
The period of the PWM1 output is determined byTimer1 and its period register (PR1). The period of thePWM2 and PWM3 outputs can be individually softwareconfigured to use either Timer1 or Timer2 as the time-base. For PWM2, when TM2PW2 bit (PW2DCL<5>) isclear, the time base is determined by TMR1 and PR1and when TM2PW2 is set, the time base is determinedby Timer2 and PR2. For PWM3, when TM2PW3 bit(PW3DCL<5>) is clear, the time base is determined byTMR1 and PR1, and when TM2PW3 is set, the timebase is determined by Timer2 and PR2.
Running two different PWM outputs on two differenttimers allows different PWM periods. Running allPWMs from Timer1 allows the best use of resources byfreeing Timer2 to operate as an 8-bit timer. Timer1 andTimer2 cannot be used as a 16-bit timer if any PWM isbeing used.
The PWM periods can be calculated as follows:
period of PWM1 = [(PR1) + 1] x 4TOSC
period of PWM2 = [(PR1) + 1] x 4TOSC or[(PR2) + 1] x 4TOSC
period of PWM3 = [(PR1) + 1] x 4TOSC or[(PR2) + 1] x 4TOSC
The duty cycle of PWMx is determined by the 10-bitvalue DCx<9:0>. The upper 8-bits are from registerPWxDCH and the lower 2-bits are from PWxDCL<7:6>(PWxDCH:PWxDCL<7:6>). Table 13-4 shows themaximum PWM frequency (FPWM), given the value inthe period register.
The number of bits of resolution that the PWM canachieve depends on the operation frequency of thedevice as well as the PWM frequency (FPWM).
Maximum PWM resolution (bits) for a given PWMfrequency:
where: FPWM = 1 / period of PWM
The PWMx duty cycle is as follows:
PWMx Duty Cycle = (DCx) x TOSC
where DCx represents the 10-bit value fromPWxDCH:PWxDCL.
If DCx = 0, then the duty cycle is zero. IfPRx = PWxDCH, then the PWM output will be low forone to four Q-clocks (depending on the state of thePWxDCL<7:6> bits). For a duty cycle to be 100%, thePWxDCH value must be greater then the PRx value.
The duty cycle registers for both PWM outputs are dou-ble buffered. When the user writes to these registers,they are stored in master latches. When TMR1 (orTMR2) overflows and a new PWM period begins, themaster latch values are transferred to the slave latchesand the PWMx pin is forced high.
The user should also avoid any "read-modify-write"operations on the duty cycle registers, such as:ADDWF PW1DCH. This may cause duty cycle outputsthat are unpredictable.
TABLE 13-4: PWM FREQUENCY vs. RESOLUTION AT 33 MHz
13.1.3.2 PWM INTERRUPTS
The PWM modules make use of the TMR1 and/orTMR2 interrupts. A timer interrupt is generated whenTMR1 or TMR2 equals its period register and on thefollowing increment is cleared to zero. This interruptalso marks the beginning of a PWM cycle. The usercan write new duty cycle values before the timerrollover. The TMR1 interrupt is latched into the TMR1IFbit and the TMR2 interrupt is latched into the TMR2IFbit. These flags must be cleared in software.
log ( FPWM
log (2)
FOSC )bits=
Note: For PW1DCH, PW1DCL, PW2DCH,PW2DCL, PW3DCH and PW3DCL regis-ters, a write operation writes to the "masterlatches", while a read operation reads the"slave latches". As a result, the user maynot read back what was just written to theduty cycle registers (until transferred toslave latch).
PWM Frequency
Frequency (kHz)
32.2 64.5 90.66 128.9 515.6
PRx Value 0xFF 0x7F 0x5A 0x3F 0x0FHigh Resolution
10-bit 9-bit 8.5-bit 8-bit 6-bit
Standard Resolution
8-bit 7-bit 6.5-bit 6-bit 4-bit
DS30289B-page 108 2000 Microchip Technology Inc.

PIC17C7XX
13.1.3.3 External Clock Source
The PWMs will operate, regardless of the clock sourceof the timer. The use of an external clock has ramifica-tions that must be understood. Because the externalTCLK12 input is synchronized internally (sampled onceper instruction cycle), the time TCLK12 changes to thetime the timer increments, will vary by as much as 1TCY
(one instruction cycle). This will cause jitter in the dutycycle as well as the period of the PWM output.
This jitter will be ±1TCY, unless the external clock is syn-chronized with the processor clock. Use of one of thePWM outputs as the clock source to the TCLK12 input,will supply a synchronized clock.
In general, when using an external clock source forPWM, its frequency should be much less than thedevice frequency (FOSC).
13.1.3.4 Maximum Resolution/Frequency for External Clock Input
The use of an external clock for the PWM time base(Timer1 or Timer2) limits the PWM output to a maxi-mum resolution of 8-bits. The PWxDCL<7:6> bits mustbe kept cleared. Use of any other value will distort thePWM output. All resolutions are supported when inter-nal clock mode is selected. The maximum attainablefrequency is also lower. This is a result of the timingrequirements of an external clock input for a timer (seethe Electrical Specification section). The maximumPWM frequency, when the timers clock source is theRB4/TCLK12 pin, is shown in Table 13-4 (StandardResolution mode).
TABLE 13-5: REGISTERS/BITS ASSOCIATED WITH PWM
Address Name Bit 7 Bit 6 Bit 5 Bit 4 Bit 3 Bit 2 Bit 1 Bit 0Value on
POR,BOR
MCLR, WDT
16h, Bank 3 TCON1 CA2ED1 CA2ED0 CA1ED1 CA1ED0 T16 TMR3CS TMR2CS TMR1CS 0000 0000 0000 0000
17h, Bank 3 TCON2 CA2OVF CA1OVF PWM2ON PWM1ON CA1/PR3 TMR3ON TMR2ON TMR1ON 0000 0000 0000 0000
16h, Bank 7 TCON3 — CA4OVF CA3OVF CA4ED1 CA4ED0 CA3ED1 CA3ED0 PWM3ON -000 0000 -000 0000
10h, Bank 2 TMR1 Timer1’s Register xxxx xxxx uuuu uuuu
11h, Bank 2 TMR2 Timer2’s Register xxxx xxxx uuuu uuuu
16h, Bank 1 PIR1 RBIF TMR3IF TMR2IF TMR1IF CA2IF CA1IF TX1IF RC1IF x000 0010 u000 0010
17h, Bank 1 PIE1 RBIE TMR3IE TMR2IE TMR1IE CA2IE CA1IE TX1IE RC1IE 0000 0000 0000 0000
07h, Unbanked INTSTA PEIF T0CKIF T0IF INTF PEIE T0CKIE T0IE INTE 0000 0000 0000 0000
06h, Unbanked CPUSTA — — STKAV GLINTD TO PD POR BOR --11 11qq --11 qquu
14h, Bank 2 PR1 Timer1 Period Register xxxx xxxx uuuu uuuu
15h, Bank 2 PR2 Timer2 Period Register xxxx xxxx uuuu uuuu
10h, Bank 3 PW1DCL DC1 DC0 — — — — — — xx-- ---- uu-- ----
11h, Bank 3 PW2DCL DC1 DC0 TM2PW2 — — — — — xx0- ---- uu0- ----
10h, Bank 7 PW3DCL DC1 DC0 TM2PW3 — — — — — xx0- ---- uu0- ----
12h, Bank 3 PW1DCH DC9 DC8 DC7 DC6 DC5 DC4 DC3 DC2 xxxx xxxx uuuu uuuu
13h, Bank 3 PW2DCH DC9 DC8 DC7 DC6 DC5 DC4 DC3 DC2 xxxx xxxx uuuu uuuu
11h, Bank 7 PW3DCH DC9 DC8 DC7 DC6 DC5 DC4 DC3 DC2 xxxx xxxx uuuu uuuu
Legend: x = unknown, u = unchanged, - = unimplemented, read as '0', q = value depends on conditions.Shaded cells are not used by PWM Module.
2000 Microchip Technology Inc. DS30289B-page 109

PIC17C7XX
13.2 Timer3
Timer3 is a 16-bit timer consisting of the TMR3H andTMR3L registers. TMR3H is the high byte of the timerand TMR3L is the low byte. This timer has an associ-ated 16-bit period register (PR3H/CA1H:PR3L/CA1L).This period register can be software configured to be aanother 16-bit capture register.
When the TMR3CS bit (TCON1<2>) is clear, the timerincrements every instruction cycle (FOSC/4). WhenTMR3CS is set, the counter increments on every fallingedge of the RB5/TCLK3 pin. In either mode, theTMR3ON bit must be set for the timer/counter to incre-ment. When TMR3ON is clear, the timer will not incre-ment or set flag bit TMR3IF.
Timer3 has two modes of operation, depending on theCA1/PR3 bit (TCON2<3>). These modes are:
• Three capture and one period register mode
• Four capture register mode
The PIC17C7XX has up to four 16-bit capture registersthat capture the 16-bit value of TMR3 when events aredetected on capture pins. There are four capture pins
(RB0/CAP1, RB1/CAP2, RG4/CAP3, and RE3/CAP4),one for each capture register pair. The capture pins aremultiplexed with the I/O pins. An event can be:
• A rising edge
• A falling edge• Every 4th rising edge• Every 16th rising edge
Each 16-bit capture register has an interrupt flag asso-ciated with it. The flag is set when a capture is made.The capture modules are truly part of the Timer3 block.Figure 13-5 and Figure 13-6 show the block diagramsfor the two modes of operation.
13.2.1 THREE CAPTURE AND ONE PERIOD REGISTER MODE
In this mode, registers PR3H/CA1H and PR3L/CA1Lconstitute a 16-bit period register. A block diagram isshown in Figure 13-5. The timer increments until itequals the period register and then resets to 0000h onthe next timer clock. TMR3 Interrupt Flag bit (TMR3IF)is set at this point. This interrupt can be disabled byclearing the TMR3 Interrupt Enable bit (TMR3IE).TMR3IF must be cleared in software.
FIGURE 13-5: TIMER3 WITH THREE CAPTURE AND ONE PERIOD REGISTER BLOCK DIAGRAM
PR3H/CA1H
TMR3H
Comparator<8>FOSC/4
TMR3ON
ResetEqual0
1
Comparator x16
RB5/TCLK3
Set TMR3IF
TMR3CS PR3L/CA1L
TMR3L
CA2H CA2LRB1/CAP2
Edge select,Prescaler select
2
Set CA2IF
Capture2
CA2ED1: CA2ED0(TCON1<7:6>)
(TCON2<2>)
(TCON1<2>)
(PIR1<3>)
(PIR1<6>)
Enable
CA3H CA3LRG4/CAP3
Edge select,Prescaler select
2
Set CA3IF
Capture3
CA3ED1: CA3ED0(TCON3<2:1>) (PIR2<2>)
Enable
CA4H CA4LRE3/CAP4
Edge select,Prescaler select
2
Set CA4IF
Capture4
CA4ED1: CA4ED0(TCON3<4:3>) (PIR2<3>)
Enable
DS30289B-page 110 2000 Microchip Technology Inc.

PIC17C7XX
This mode (3 Capture, 1 Period) is selected if control bitCA1/PR3 is clear. In this mode, the Capture1 register,consisting of high byte (PR3H/CA1H) and low byte(PR3L/CA1L), is configured as the period control regis-ter for TMR3. Capture1 is disabled in this mode and thecorresponding interrupt bit, CA1IF, is never set. TMR3increments until it equals the value in the period regis-ter and then resets to 0000h on the next timer clock.
All other Captures are active in this mode.
13.2.1.1 Capture Operation
The CAxED1 and CAxED0 bits determine the event onwhich capture will occur. The possible events are:
• Capture on every falling edge• Capture on every rising edge
• Capture every 4th rising edge• Capture every 16th rising edge
When a capture takes place, an interrupt flag is latchedinto the CAxIF bit. This interrupt can be enabled by set-ting the corresponding mask bit CAxIE. The PeripheralInterrupt Enable bit (PEIE) must be set and the GlobalInterrupt Disable bit (GLINTD) must be cleared for theinterrupt to be acknowledged. The CAxIF interrupt flagbit is cleared in software.
When the capture prescale select is changed, the pres-caler is not reset and an event may be generated.Therefore, the first capture after such a change will beambiguous. However, it sets the time-base for the nextcapture. The prescaler is reset upon chip RESET.
The capture pin, CAPx, is a multiplexed pin. Whenused as a port pin, the capture is not disabled. How-ever, the user can simply disable the Capture interruptby clearing CAxIE. If the CAPx pin is used as an outputpin, the user can activate a capture by writing to theport pin. This may be useful during development phaseto emulate a capture interrupt.
The input on the capture pin CAPx is synchronizedinternally to internal phase clocks. This imposes certainrestrictions on the input waveform (see the ElectricalSpecification section for timing).
The capture overflow status flag bit is double buffered.The master bit is set if one captured word is alreadyresiding in the Capture register (CAxH:CAxL) andanother “event” has occurred on the CAPx pin. Thenew event will not transfer the TMR3 value to the cap-ture register, protecting the previous unread capturevalue. When the user reads both the high and the lowbytes (in any order) of the Capture register, the masteroverflow bit is transferred to the slave overflow bit(CAxOVF) and then the master bit is reset. The usercan then read TCONx to determine the value of CAx-OVF.
The recommended sequence to read capture registersand capture overflow flag bits is shown in Example 13-1.
2000 Microchip Technology Inc. DS30289B-page 111

PIC17C7XX
13.2.2 FOUR CAPTURE MODE
This mode is selected by setting bit CA1/PR3. A blockdiagram is shown in Figure 13-6. In this mode, TMR3runs without a period register and increments from0000h to FFFFh and rolls over to 0000h. The TMR3interrupt Flag (TMR3IF) is set on this rollover. TheTMR3IF bit must be cleared in software.
Registers PR3H/CA1H and PR3L/CA1L make a 16-bitcapture register (Capture1). It captures events on pinRB0/CAP1. Capture mode is configured by theCA1ED1 and CA1ED0 bits. Capture1 Interrupt Flag bit(CA1IF) is set upon detection of the capture event. Thecorresponding interrupt mask bit is CA1IE. TheCapture1 Overflow Status bit is CA1OVF.
All the captures operate in the same manner. Refer toSection 13.2.1 for the operation of capture.
FIGURE 13-6: TIMER3 WITH FOUR CAPTURES BLOCK DIAGRAM
RB0/CAP1
Edge Select,Prescaler Select
PR3H/CA1H PR3L/CA1L
RB1/CAP2
RG4/CAP3
Edge Select,Prescaler Select
2
Set CA1IF(PIR1<2>)
Capture1 Enable
TMR3ONTMR3CS(TCON1<2>)
0
1
Set TMR3IF(PIR1<6>)
Edge Select,Prescaler Select
CA2H CA2L
Set CA2IF(PIR1<3>)
CA3H CA3L
Set CA3IF(PIR2<2>)
CA1ED1, CA1ED0(TCON1<5:4>)
(TCON2<2>)
FOSC/4
RB5/TCLK3
Capture2 Enable
Capture3 Enable
CA2ED1, CA2ED0(TCON1<7:6>)
2
CA3ED1: CA3ED0(TCON3<2:1>)
TMR3H TMR3L
2
RE3/CAP4
Edge Select,Prescaler Select
2CA4H CA4L
Set CA4IF(PIR2<3>)
Capture4 Enable
CA4ED1: CA4ED0(TCON3<4:3>)
DS30289B-page 112 2000 Microchip Technology Inc.

PIC17C7XX
13.2.3 READING THE CAPTURE REGISTERS
The Capture overflow status flag bits are double buff-ered. The master bit is set if one captured word isalready residing in the Capture register and another“event” has occurred on the CAPx pin. The new eventwill not transfer the TMR3 value to the capture register,protecting the previous unread capture value. Whenthe user reads both the high and the low bytes (in any
order) of the Capture register, the master overflow bit istransferred to the slave overflow bit (CAxOVF) andthen the master bit is reset. The user can then readTCONx to determine the value of CAxOVF.
An example of an instruction sequence to read captureregisters and capture overflow flag bits is shown inExample 13-1. Depending on the capture source, dif-ferent registers will need to be read.
EXAMPLE 13-1: SEQUENCE TO READ CAPTURE REGISTERS
TABLE 13-6: REGISTERS ASSOCIATED WITH CAPTURE
MOVLB 3 ; Select Bank 3 MOVPF CA2L, LO_BYTE ; Read Capture2 low byte, store in LO_BYTE MOVPF CA2H, HI_BYTE ; Read Capture2 high byte, store in HI_BYTE MOVPF TCON2, STAT_VAL ; Read TCON2 into file STAT_VAL
Address Name Bit 7 Bit 6 Bit 5 Bit 4 Bit 3 Bit 2 Bit 1 Bit 0Value on
POR,BOR
MCLR, WDT
16h, Bank 3 TCON1 CA2ED1 CA2ED0 CA1ED1 CA1ED0 T16 TMR3CS TMR2CS TMR1CS 0000 0000 0000 0000
17h, Bank 3 TCON2 CA2OVF CA1OVF PWM2ON PWM1ON CA1/PR3 TMR3ON TMR2ON TMR1ON 0000 0000 0000 0000
16h, Bank 7 TCON3 — CA4OVF CA3OVF CA4ED1 CA4ED0 CA3ED1 CA3ED0 PWM3ON -000 0000 -000 0000
12h, Bank 2 TMR3L Holding Register for the Low Byte of the 16-bit TMR3 Register xxxx xxxx uuuu uuuu
13h, Bank 2 TMR3H Holding Register for the High Byte of the 16-bit TMR3 Register xxxx xxxx uuuu uuuu
16h, Bank 1 PIR1 RBIF TMR3IF TMR2IF TMR1IF CA2IF CA1IF TX1IF RC1IF x000 0010 u000 0010
17h, Bank 1 PIE1 RBIE TMR3IE TMR2IE TMR1IE CA2IE CA1IE TX1IE RC1IE 0000 0000 0000 0000
10h, Bank 4 PIR2 SSPIF BCLIF ADIF — CA4IF CA3IF TX2IF RC2IF 000- 0010 000- 0010
11h, Bank 4 PIE2 SSPIE BCLIE ADIE — CA4IE CA3IE TX2IE RC2IE 000- 0000 000- 0000
07h, Unbanked INTSTA PEIF T0CKIF T0IF INTF PEIE T0CKIE T0IE INTE 0000 0000 0000 0000
06h, Unbanked CPUSTA — — STKAV GLINTD TO PD POR BOR --11 11qq --11 qquu
16h, Bank 2 PR3L/CA1L Timer3 Period Register, Low Byte/Capture1 Register, Low Byte xxxx xxxx uuuu uuuu
17h, Bank 2 PR3H/CA1H Timer3 Period Register, High Byte/Capture1 Register, High Byte xxxx xxxx uuuu uuuu
14h, Bank 3 CA2L Capture2 Low Byte xxxx xxxx uuuu uuuu
15h, Bank 3 CA2H Capture2 High Byte xxxx xxxx uuuu uuuu
12h, Bank 7 CA3L Capture3 Low Byte xxxx xxxx uuuu uuuu
13h, Bank 7 CA3H Capture3 High Byte xxxx xxxx uuuu uuuu
14h, Bank 7 CA4L Capture4 Low Byte xxxx xxxx uuuu uuuu
15h, Bank 7 CA4H Capture4 High Byte xxxx xxxx uuuu uuuu
Legend: x = unknown, u = unchanged, - = unimplemented, read as '0', q = value depends on condition.Shaded cells are not used by Capture.
2000 Microchip Technology Inc. DS30289B-page 113

PIC17C7XX
13.2.4 EXTERNAL CLOCK INPUT FOR TIMER3
When TMR3CS is set, the 16-bit TMR3 increments onthe falling edge of clock input TCLK3. The input on theRB5/TCLK3 pin is sampled and synchronized by theinternal phase clocks, twice every instruction cycle.This causes a delay from the time a falling edgeappears on TCLK3 to the time TMR3 is actually incre-mented. For the external clock input timing require-ments, see the Electrical Specification section.Figure 13-7 shows the timing diagram when operatingfrom an external clock.
13.2.5 READING/WRITING TIMER3
Since Timer3 is a 16-bit timer and only 8-bits at a timecan be read or written, care should be taken whenreading or writing while the timer is running. The bestmethod is to stop the timer, perform any read or writeoperation and then restart Timer3 (using the TMR3ONbit). However, if it is necessary to keep Timer3 free-running, care must be taken. For writing to the 16-bitTMR3, Example 13-2 may be used. For reading the 16-bit TMR3, Example 13-3 may be used. Interrupts mustbe disabled during this routine.
EXAMPLE 13-2: WRITING TO TMR3
EXAMPLE 13-3: READING FROM TMR3
FIGURE 13-7: TIMER1, TIMER2 AND TIMER3 OPERATION (IN COUNTER MODE)
BSF CPUSTA, GLINTD ; Disable interrupts MOVFP RAM_L, TMR3L ; MOVFP RAM_H, TMR3H ; BCF CPUSTA, GLINTD ; Done, enable interrupts
MOVPF TMR3L, TMPLO ; read low TMR3 MOVPF TMR3H, TMPHI ; read high TMR3 MOVFP TMPLO, WREG ; tmplo −> wreg CPFSLT TMR3L ; TMR3L < wreg? RETURN ; no then return MOVPF TMR3L, TMPLO ; read low TMR3 MOVPF TMR3H, TMPHI ; read high TMR3 RETURN ; return
Q1Q2Q3Q4 Q1Q2Q3Q4 Q1Q2Q3Q4 Q1Q2Q3Q4 Q1Q2Q3Q4Q1Q2Q3Q4
InstructionExecuted
MOVWF MOVFP TMRx,WTMRx
MOVFP TMRx,W
Write to TMRx Read TMRx Read TMRx
34h 35h A8h A9h 00h
’A9h’ ’A9h’
TCLK12
TMR1, TMR2, or TMR3
PR1, PR2, or PR3H:PR3L
WR_TMR
RD_TMR
TMRxIF
Note 1: TCLK12 is sampled in Q2 and Q4. 2: ↓ indicates a sampling point.3: The latency from TCLK12 ↓ to timer increment is between 2Tosc and 6Tosc.
or TCLK3
DS30289B-page 114 2000 Microchip Technology Inc.

PIC17C7XX
FIGURE 13-8: TIMER1, TIMER2 AND TIMER3 OPERATION (IN TIMER MODE)
Q1Q2 Q3 Q4 Q1Q2 Q3 Q4 Q1Q2 Q3 Q4 Q1Q2 Q3 Q4 Q1Q2 Q3 Q4 Q1Q2 Q3 Q4 Q1Q2 Q3 Q4 Q1Q2 Q3 Q4 Q1Q2 Q3 Q4 Q1Q2 Q3 Q4 Q1Q2 Q3 Q4
AD15:AD0
ALE
InstructionFetched
TMR1
PR1
TMR1ON
WR_TMR1
WR_TCON2
TMR1IF
RD_TMR1
TMR1Reads 03h
TMR1Reads 04h
MOVWFTMR1
Write TMR1
MOVFTMR1, W
Read TMR1
MOVFTMR1, W
Read TMR1
BSFTCON2, 0Stop TMR1
BCFTCON2, 0
Start TMR1
MOVLB 3 NOP NOP NOP NOP NOP
04h 05h 03h 04h 05h 06h 07h 08h 00h
2000 Microchip Technology Inc. DS30289B-page 115

PIC17C7XX
NOTES:
DS30289B-page 116 2000 Microchip Technology Inc.

PIC17C7XX
14.0 UNIVERSAL SYNCHRONOUS ASYNCHRONOUS RECEIVER TRANSMITTER (USART) MODULES
Each USART module is a serial I/O module. There aretwo USART modules that are available on thePIC17C7XX. They are specified as USART1 andUSART2. The description of the operation of these mod-ules is generic in regard to the register names and pinnames used. Table 14-1 shows the generic names thatare used in the description of operation and the actualnames for both USART1 and USART2. Since the controlbits in each register have the same function, their namesare the same (there is no need to differentiate).
The Transmit Status and Control Register (TXSTA) isshown in Figure 14-1, while the Receive Status andControl Register (RCSTA) is shown in Figure 14-2.
TABLE 14-1: USART MODULE GENERIC NAMES
REGISTER 14-1: TXSTA1 REGISTER (ADDRESS: 15h, BANK 0) TXSTA2 REGISTER (ADDRESS: 15h, BANK 4)
Generic Name USART1 Name USART2 Name
RegistersRCSTA RCSTA1 RCSTA2TXSTA TXSTA1 TXSTA2SPBRG SPBRG1 SPBRG2RCREG RCREG1 RCREG2TXREG TXREG1 TXREG2
Interrupt Control BitsRCIE RC1IE RC2IERCIF RC1IF RC2IFTXIE TX1IE TX2IETXIF TX1IF TX2IF
PinsRX/DT RA4/RX1/DT1 RG6/RX2/DT2TX/CK RA5/TX1/CK1 RG7/TX2/CK2
R/W-0 R/W-0 R/W-0 R/W-0 U-0 U-0 R-1 R/W-xCSRC TX9 TXEN SYNC — — TRMT TX9D
bit 7 bit 0
bit 7 CSRC: Clock Source Select bit
Synchronous mode:1 = Master mode (clock generated internally from BRG)0 = Slave mode (clock from external source)
Asynchronous mode:Don’t care
bit 6 TX9: 9-bit Transmit Select bit1 = Selects 9-bit transmission0 = Selects 8-bit transmission
bit 5 TXEN: Transmit Enable bit1 = Transmit enabled0 = Transmit disabledSREN/CREN overrides TXEN in SYNC mode
bit 4 SYNC: USART Mode Select bit(Synchronous/Asynchronous)1 = Synchronous mode0 = Asynchronous mode
bit 3-2 Unimplemented: Read as '0'
bit 1 TRMT: Transmit Shift Register (TSR) Empty bit1 = TSR empty0 = TSR full
bit 0 TX9D: 9th bit of Transmit Data (can be used to calculate the parity in software)
Legend:
R = Readable bit W = Writable bit U = Unimplemented bit, read as ‘0’
- n = Value at POR Reset ’1’ = Bit is set ’0’ = Bit is cleared x = Bit is unknown
2000 Microchip Technology Inc. DS30289B-page 117

PIC17C7XX
The USART can be configured as a full duplex asyn-chronous system that can communicate with peripheraldevices such as CRT terminals and personal comput-ers, or it can be configured as a half duplex synchro-nous system that can communicate with peripheraldevices such as A/D or D/A integrated circuits, SerialEEPROMs etc. The USART can be configured in thefollowing modes:• Asynchronous (full duplex)• Synchronous - Master (half duplex)
• Synchronous - Slave (half duplex)
The SPEN (RCSTA<7>) bit has to be set in order toconfigure the I/O pins as the Serial CommunicationInterface (USART).
The USART module will control the direction of the RX/DT and TX/CK pins, depending on the states of theUSART configuration bits in the RCSTA and TXSTAregisters. The bits that control I/O direction are:
• SPEN• TXEN• SREN• CREN• CSRC
REGISTER 14-2: RCSTA1 REGISTER (ADDRESS: 13h, BANK 0) RCSTA2 REGISTER (ADDRESS: 13h, BANK 4)
R/W-0 R/W-0 R/W-0 R/W-0 U-0 R-0 R-0 R-xSPEN RX9 SREN CREN — FERR OERR RX9D
bit 7 bit 0
bit 7 SPEN: Serial Port Enable bit1 = Configures TX/CK and RX/DT pins as serial port pins0 = Serial port disabled
bit 6 RX9: 9-bit Receive Select bit1 = Selects 9-bit reception0 = Selects 8-bit reception
bit 5 SREN: Single Receive Enable bitThis bit enables the reception of a single byte. After receiving the byte, this bit is automaticallycleared.
Synchronous mode:1 = Enable reception0 = Disable reception
Note: This bit is ignored in synchronous slave reception.
Asynchronous mode:Don’t care
bit 4 CREN: Continuous Receive Enable bitThis bit enables the continuous reception of serial data.
Asynchronous mode:1 = Enable continuous reception0 = Disables continuous reception
Synchronous mode:1 = Enables continuous reception until CREN is cleared (CREN overrides SREN)0 = Disables continuous reception
bit 3 Unimplemented: Read as '0'
bit 2 FERR: Framing Error bit1 = Framing error (updated by reading RCREG)0 = No framing error
bit 1 bit OERR: Overrun Error bit1 = Overrun (cleared by clearing CREN)0 = No overrun error
bit 0 RX9D: 9th bit of Receive Data (can be the software calculated parity bit)
Legend:
R = Readable bit W = Writable bit U = Unimplemented bit, read as ‘0’
- n = Value at POR Reset ’1’ = Bit is set ’0’ = Bit is cleared x = Bit is unknown
DS30289B-page 118 2000 Microchip Technology Inc.

PIC17C7XX
FIGURE 14-1: USART TRANSMIT
FIGURE 14-2: USART RECEIVE
CK/TX
DT
Sync/Async TSR
Start 0 1 7 8 Stop• • •÷ 16
÷ 4BRG
0 1 7• • •8 Bit Count
TXIE
Interrupt
TXEN/Write to TXREG
Clock
Sync/AsyncSync/Async
TXSTA<0>
SyncMaster/Slave
Data Bus
Load
TXREG
CK
RX0178Stop • • •
÷ 16
÷ 4BRG
Bit Count
Clock
BufferLogic
BufferLogic
SPEN
OSC
START
017RX9D • • •017RX9D • • •
FERRFERR
MajorityDetect
DataMSb LSb
RSR
RCREG
Async/Sync
Sync/AsyncMaster/SlaveSync
Enable
FIFOLogic
ClkFIFO
RCIE
Interrupt
RX9
Data Bus
SREN/CREN/Start_Bit
Async/Sync
Detect
2000 Microchip Technology Inc. DS30289B-page 119

PIC17C7XX
14.1 USART Baud Rate Generator (BRG)
The BRG supports both the Asynchronous and Syn-chronous modes of the USART. It is a dedicated 8-bitbaud rate generator. The SPBRG register controls theperiod of a free running 8-bit timer. Table 14-2 showsthe formula for computation of the baud rate for differ-ent USART modes. These only apply when the USARTis in Synchronous Master mode (internal clock) andAsynchronous mode.
Given the desired baud rate and Fosc, the nearest inte-ger value between 0 and 255 can be calculated usingthe formula below. The error in baud rate can then bedetermined.
TABLE 14-2: BAUD RATE FORMULA
Example 14-1 shows the calculation of the baud rateerror for the following conditions:
FOSC = 16 MHzDesired Baud Rate = 9600SYNC = 0
EXAMPLE 14-1: CALCULATING BAUD RATE ERROR
Writing a new value to the SPBRG, causes the BRGtimer to be reset (or cleared). This ensures that theBRG does not wait for a timer overflow before output-ting the new baud rate.
Effects of Reset
After any device RESET, the SPBRG register iscleared. The SPBRG register will need to be loadedwith the desired value after each RESET.
TABLE 14-3: REGISTERS ASSOCIATED WITH BAUD RATE GENERATOR
SYNC Mode Baud Rate
01
AsynchronousSynchronous
FOSC/(64(X+1))FOSC/(4(X+1))
X = value in SPBRG (0 to 255)
Desired Baud Rate = FOSC / (64 (X + 1))
9600 = 16000000 /(64 (X + 1))
X = 25.042 → 25
Calculated Baud Rate = 16000000 / (64 (25 + 1))
= 9615
Error = (Calculated Baud Rate - Desired Baud Rate) Desired Baud Rate
= (9615 - 9600) / 9600
= 0.16%
Address Name Bit 7 Bit 6 Bit 5 Bit 4 Bit 3 Bit 2 Bit 1 Bit 0Value on
POR,BOR
MCLR, WDT
US
AR
T1 13h, Bank 0 RCSTA1 SPEN RX9 SREN CREN — FERR OERR RX9D 0000 -00x 0000 -00u
15h, Bank 0 TXSTA1 CSRC TX9 TXEN SYNC — — TRMT TX9D 0000 --1x 0000 --1u
17h, Bank 0 SPBRG1 Baud Rate Generator Register 0000 0000 0000 0000
US
AR
T2 13h, Bank 4 RCSTA2 SPEN RX9 SREN CREN — FERR OERR RX9D 0000 -00x 0000 -00u
15h, Bank 4 TXSTA2 CSRC TX9 TXEN SYNC — — TRMT TX9D 0000 --1x 0000 --1u
17h, Bank 4 SPBRG2 Baud Rate Generator Register 0000 0000 0000 0000
Legend: x = unknown, u = unchanged, - = unimplemented, read as '0'. Shaded cells are not used by the Baud Rate Generator.
DS30289B-page 120 2000 Microchip Technology Inc.

PIC17C7XX
TABLE 14-4: BAUD RATES FOR SYNCHRONOUS MODE
BAUDRATE
(K)
FOSC = 33 MHzSPBRGVALUE
(DECIMAL)
FOSC = 25 MHzSPBRGVALUE
(DECIMAL)
FOSC = 20 MHzSPBRGVALUE
(DECIMAL)
FOSC = 16 MHzSPBRGVALUE
(DECIMAL)KBAUD %ERROR KBAUD %ERROR KBAUD %ERROR KBAUD %ERROR
0.3 NA — — NA — — NA — — NA — —
1.2 NA — — NA — — NA — — NA — —
2.4 NA — — NA — — NA — — NA — —
9.6 NA — — NA — — NA — — NA — —
19.2 NA — — NA — — 19.53 +1.73 255 19.23 +0.16 207
76.8 77.10 +0.39 106 77.16 +0.47 80 76.92 +0.16 64 76.92 +0.16 51
96 95.93 -0.07 85 96.15 +0.16 64 96.15 +0.16 51 95.24 -0.79 41
300 294.64 -1.79 27 297.62 -0.79 20 294.1 -1.96 16 307.69 +2.56 12
500 485.29 -2.94 16 480.77 -3.85 12 500 0 9 500 0 7
HIGH 8250 — 0 6250 — 0 5000 — 0 4000 — 0
LOW 32.22 — 255 24.41 — 255 19.53 — 255 15.625 — 255
BAUDRATE
(K)
FOSC = 10 MHzSPBRGVALUE
(DECIMAL)
FOSC = 7.159 MHzSPBRGVALUE
(DECIMAL)
FOSC = 5.068 MHzSPBRGVALUE
(DECIMAL)KBAUD %ERROR KBAUD %ERROR KBAUD %ERROR
0.3 NA — — NA — — NA — —
1.2 NA — — NA — — NA — —
2.4 NA — — NA — — NA — —
9.6 9.766 +1.73 255 9.622 +0.23 185 9.6 0 131
19.2 19.23 +0.16 129 19.24 +0.23 92 19.2 0 65
76.8 75.76 -1.36 32 77.82 +1.32 22 79.2 +3.13 15
96 96.15 +0.16 25 94.20 -1.88 18 97.48 +1.54 12
300 312.5 +4.17 7 298.3 -0.57 5 316.8 +5.60 3
500 500 0 4 NA — — NA — —
HIGH 2500 — 0 1789.8 — 0 1267 — 0
LOW 9.766 — 255 6.991 — 255 4.950 — 255
BAUDRATE
(K)
FOSC = 3.579 MHzSPBRGVALUE
(DECIMAL)
FOSC = 1 MHzSPBRGVALUE
(DECIMAL)
FOSC = 32.768 kHzSPBRGVALUE
(DECIMAL)KBAUD %ERROR KBAUD %ERROR KBAUD %ERROR
0.3 NA — — NA — — 0.303 +1.14 26
1.2 NA — — 1.202 +0.16 207 1.170 -2.48 6
2.4 NA — — 2.404 +0.16 103 NA — —
9.6 9.622 +0.23 92 9.615 +0.16 25 NA — —
19.2 19.04 -0.83 46 19.24 +0.16 12 NA — —
76.8 74.57 -2.90 11 83.34 +8.51 2 NA — —
96 99.43 _3.57 8 NA — — NA — —
300 298.3 -0.57 2 NA — — NA — —
500 NA — — NA — — NA — —
HIGH 894.9 — 0 250 — 0 8.192 — 0
LOW 3.496 — 255 0.976 — 255 0.032 — 255
2000 Microchip Technology Inc. DS30289B-page 121

PIC17C7XX
TABLE 14-5: BAUD RATES FOR ASYNCHRONOUS MODE
BAUDRATE
(K)
FOSC = 33 MHzSPBRGVALUE
(DECIMAL)
FOSC = 25 MHzSPBRGVALUE
(DECIMAL)
FOSC = 20 MHzSPBRGVALUE
(DECIMAL)
FOSC = 16 MHzSPBRGVALUE
(DECIMAL)KBAUD %ERROR KBAUD %ERROR KBAUD %ERROR KBAUD %ERROR
0.3 NA — — NA — — NA — — NA — —
1.2 NA — — NA — — 1.221 +1.73 255 1.202 +0.16 207
2.4 2.398 -0.07 214 2.396 0.14 162 2.404 +0.16 129 2.404 +0.16 103
9.6 9.548 -0.54 53 9.53 -0.76 40 9.469 -1.36 32 9.615 +0.16 25
19.2 19.09 -0.54 26 19.53 +1.73 19 19.53 +1.73 15 19.23 +0.16 12
76.8 73.66 -4.09 6 78.13 +1.73 4 78.13 +1.73 3 83.33 +8.51 2
96 103.12 +7.42 4 97.65 +1.73 3 104.2 +8.51 2 NA — —
300 257.81 -14.06 1 390.63 +30.21 0 312.5 +4.17 0 NA — —
500 515.62 +3.13 0 NA — — NA — — NA — —
HIGH 515.62 — 0 — — 0 312.5 — 0 250 — 0
LOW 2.014 — 255 1.53 — 255 1.221 — 255 0.977 — 255
BAUDRATE
(K)
FOSC = 10 MHzSPBRGVALUE
(DECIMAL)
FOSC = 7.159 MHzSPBRGVALUE
(DECIMAL)
FOSC = 5.068 MHzSPBRGVALUE
(DECIMAL)KBAUD %ERROR KBAUD %ERROR KBAUD %ERROR
0.3 NA — — NA — — 0.31 +3.13 255
1.2 1.202 +0.16 129 1.203 _0.23 92 1.2 0 65
2.4 2.404 +0.16 64 2.380 -0.83 46 2.4 0 32
9.6 9.766 +1.73 15 9.322 -2.90 11 9.9 -3.13 7
19.2 19.53 +1.73 7 18.64 -2.90 5 19.8 +3.13 3
76.8 78.13 +1.73 1 NA — — 79.2 +3.13 0
96 NA — — NA — — NA — —
300 NA — — NA — — NA — —
500 NA — — NA — — NA — —
HIGH 156.3 — 0 111.9 — 0 79.2 — 0
LOW 0.610 — 255 0.437 — 255 0.309 — 255
BAUDRATE
(K)
FOSC = 3.579 MHzSPBRGVALUE
(DECIMAL)
FOSC = 1 MHzSPBRGVALUE
(DECIMAL)
FOSC = 32.768 kHzSPBRGVALUE
(DECIMAL)KBAUD %ERROR KBAUD %ERROR KBAUD %ERROR
0.3 0.301 +0.23 185 0.300 +0.16 51 0.256 -14.67 1
1.2 1.190 -0.83 46 1.202 +0.16 12 NA — —
2.4 2.432 +1.32 22 2.232 -6.99 6 NA — —
9.6 9.322 -2.90 5 NA — — NA — —
19.2 18.64 -2.90 2 NA — — NA — —
76.8 NA — — NA — — NA — —
96 NA — — NA — — NA — —
300 NA — — NA — — NA — —
500 NA — — NA — — NA — —
HIGH 55.93 — 0 15.63 — 0 0.512 — 0
LOW 0.218 — 255 0.061 — 255 0.002 — 255
DS30289B-page 122 2000 Microchip Technology Inc.

PIC17C7XX
14.2 USART Asynchronous Mode
In this mode, the USART uses standard nonreturn-to-zero (NRZ) format (one START bit, eight or nine databits, and one STOP bit). The most common data formatis 8-bits. An on-chip dedicated 8-bit baud rate genera-tor can be used to derive standard baud rate frequen-cies from the oscillator. The USART’s transmitter andreceiver are functionally independent but use the samedata format and baud rate. The baud rate generatorproduces a clock x64 of the bit shift rate. Parity is notsupported by the hardware, but can be implemented insoftware (and stored as the ninth data bit). Asynchro-nous mode is stopped during SLEEP.
The Asynchronous mode is selected by clearing theSYNC bit (TXSTA<4>).
The USART Asynchronous module consists of the fol-lowing components:
• Baud Rate Generator• Sampling Circuit
• Asynchronous Transmitter• Asynchronous Receiver
14.2.1 USART ASYNCHRONOUS TRANSMITTER
The USART transmitter block diagram is shown inFigure 14-1. The heart of the transmitter is the transmitshift register (TSR). The shift register obtains its datafrom the read/write transmit buffer (TXREG). TXREG isloaded with data in software. The TSR is not loaded untilthe STOP bit has been transmitted from the previousload. As soon as the STOP bit is transmitted, the TSR isloaded with new data from the TXREG (if available).Once TXREG transfers the data to the TSR (occurs inone TCY at the end of the current BRG cycle), the TXREGis empty and an interrupt bit, TXIF, is set. This interruptcan be enabled/disabled by setting/clearing the TXIE bit.TXIF will be set, regardless of TXIE and cannot be resetin software. It will reset only when new data is loaded intoTXREG. While TXIF indicates the status of the TXREG,the TRMT (TXSTA<1>) bit shows the status of the TSR.
TRMT is a read only bit which is set when the TSR isempty. No interrupt logic is tied to this bit, so the user hasto poll this bit in order to determine if the TSR is empty.
Transmission is enabled by setting theTXEN (TXSTA<5>) bit. The actual transmission will notoccur until TXREG has been loaded with data and thebaud rate generator (BRG) has produced a shift clock(Figure 14-3). The transmission can also be started byfirst loading TXREG and then setting TXEN. Normally,when transmission is first started, the TSR is empty, soa transfer to TXREG will result in an immediate transferto TSR, resulting in an empty TXREG. A back-to-backtransfer is thus possible (Figure 14-4). Clearing TXENduring a transmission will cause the transmission to beaborted. This will reset the transmitter and the TX/CKpin will revert to hi-impedance.
In order to select 9-bit transmission, theTX9 (TXSTA<6>) bit should be set and the ninth bitvalue should be written to TX9D (TXSTA<0>). Theninth bit value must be written before writing the 8-bitdata to the TXREG. This is because a data write toTXREG can result in an immediate transfer of the datato the TSR (if the TSR is empty).
Steps to follow when setting up an AsynchronousTransmission:
1. Initialize the SPBRG register for the appropriatebaud rate.
2. Enable the asynchronous serial port by clearingthe SYNC bit and setting the SPEN bit.
3. If interrupts are desired, then set the TXIE bit.
4. If 9-bit transmission is desired, then set the TX9bit.
5. If 9-bit transmission is selected, the ninth bitshould be loaded in TX9D.
6. Load data to the TXREG register.7. Enable the transmission by setting TXEN (starts
transmission).
FIGURE 14-3: ASYNCHRONOUS MASTER TRANSMISSION
Note: The TSR is not mapped in data memory,so it is not available to the user.
Word 1STOP Bit
Word 1Transmit Shift Reg
START Bit Bit 0 Bit 1 Bit 7/8
Write to TXREGWord 1
BRG Output(Shift Clock)
TX
TXIF bit
TRMT bit
(TX/CK pin)
2000 Microchip Technology Inc. DS30289B-page 123

PIC17C7XX
FIGURE 14-4: ASYNCHRONOUS MASTER TRANSMISSION (BACK TO BACK)
TABLE 14-6: REGISTERS ASSOCIATED WITH ASYNCHRONOUS TRANSMISSION
Transmit Shift Reg.
Write to TXREG
BRG output(shift clock)
TX
TXIF bit
TRMT bit
Word 1 Word 2
Word 1 Word 2
START Bit STOP Bit START Bit
Transmit Shift Reg.
Word 1 Word 2Bit 0 Bit 1 Bit 7/8 Bit 0
Note: This timing diagram shows two consecutive transmissions.
(TX/CK pin)
Address Name Bit 7 Bit 6 Bit 5 Bit 4 Bit 3 Bit 2 Bit 1 Bit 0Value on
POR,BOR
MCLR, WDT
16h, Bank 1 PIR1 RBIF TMR3IF TMR2IF TMR1IF CA2IF CA1IF TX1IF RC1IF x000 0010 u000 0010
17h, Bank 1 PIE1 RBIE TMR3IE TMR2IE TMR1IE CA2IE CA1IE TX1IE RC1IE 0000 0000 0000 0000
13h, Bank 0 RCSTA1 SPEN RX9 SREN CREN — FERR OERR RX9D 0000 -00x 0000 -00u
16h, Bank 0 TXREG1 Serial Port Transmit Register (USART1) xxxx xxxx uuuu uuuu
15h, Bank 0 TXSTA1 CSRC TX9 TXEN SYNC — — TRMT TX9D 0000 --1x 0000 --1u
17h, Bank 0 SPBRG1 Baud Rate Generator Register (USART1) 0000 0000 0000 0000
10h, Bank 4 PIR2 SSPIF BCLIF ADIF — CA4IF CA3IF TX2IF RC2IF 000- 0010 000- 0010
11h, Bank 4 PIE2 SSPIE BCLIE ADIE — CA4IE CA3IE TX2IE RC2IE 000- 0000 000- 0000
13h, Bank 4 RCSTA2 SPEN RX9 SREN CREN — FERR OERR RX9D 0000 -00x 0000 -00u
16h, Bank 4 TXREG2 Serial Port Transmit Register (USART2) xxxx xxxx uuuu uuuu
15h, Bank 4 TXSTA2 CSRC TX9 TXEN SYNC — — TRMT TX9D 0000 --1x 0000 --1u
17h, Bank 4 SPBRG2 Baud Rate Generator Register (USART2) 0000 0000 0000 0000
Legend: x = unknown, u = unchanged, - = unimplemented, read as a '0'. Shaded cells are not used for asynchronous transmission.
DS30289B-page 124 2000 Microchip Technology Inc.

PIC17C7XX
14.2.2 USART ASYNCHRONOUS RECEIVER
The receiver block diagram is shown in Figure 14-2.The data comes in the RX/DT pin and drives the datarecovery block. The data recovery block is actually ahigh speed shifter operating at 16 times the baud rate,whereas the main receive serial shifter operates at thebit rate or at FOSC.
Once Asynchronous mode is selected, reception isenabled by setting bit CREN (RCSTA<4>).
The heart of the receiver is the receive (serial) shift reg-ister (RSR). After sampling the STOP bit, the receiveddata in the RSR is transferred to the RCREG (if it isempty). If the transfer is complete, the interrupt bit,RCIF, is set. The actual interrupt can be enabled/disabled by setting/clearing the RCIE bit. RCIF is aread only bit which is cleared by the hardware. It iscleared when RCREG has been read and is empty.RCREG is a double buffered register (i.e., it is a two-deep FIFO). It is possible for two bytes of data to bereceived and transferred to the RCREG FIFO and athird byte begin shifting to the RSR. On detection of theSTOP bit of the third byte, if the RCREG is still full, thenthe overrun error bit, OERR (RCSTA<1>) will be set.The word in the RSR will be lost. RCREG can be readtwice to retrieve the two bytes in the FIFO. The OERRbit has to be cleared in software which is done by reset-
ting the receive logic (CREN is set). If the OERR bit isset, transfers from the RSR to RCREG are inhibited, soit is essential to clear the OERR bit if it is set. The fram-ing error bit FERR (RCSTA<2>) is set if a STOP bit isnot detected.
14.2.3 SAMPLING
The data on the RX/DT pin is sampled three times by amajority detect circuit to determine if a high or a lowlevel is present at the RX/DT pin. The sampling is doneon the seventh, eighth and ninth falling edges of a x16clock (Figure 14-5).
The x16 clock is a free running clock and the threesample points occur at a frequency of every 16 fallingedges.
FIGURE 14-5: RX PIN SAMPLING SCHEME
FIGURE 14-6: START BIT DETECT
Note: The FERR and the 9th receive bit are buff-ered the same way as the receive data.Reading the RCREG register will allow theRX9D and FERR bits to be loaded with val-ues for the next received data. Therefore,it is essential for the user to read theRCSTA register before reading RCREG, inorder not to lose the old FERR and RX9Dinformation.
RX
Baud CLK
x16 CLK
START bit Bit0
Samples
1 2 3 4 5 6 7 8 9 10 11 12 13 14 15 16 1 2 3
Baud CLK for all but START bit(RX/DT pin)
RX
x16 CLK
Q2, Q4 CLK
START bit(RX/DT pin)
First rising edge of x16 clock after RX pin goes low
RX sampled low
2000 Microchip Technology Inc. DS30289B-page 125

PIC17C7XX
Steps to follow when setting up an AsynchronousReception:
1. Initialize the SPBRG register for the appropriatebaud rate.
2. Enable the asynchronous serial port by clearingthe SYNC bit and setting the SPEN bit.
3. If interrupts are desired, then set the RCIE bit.4. If 9-bit reception is desired, then set the RX9 bit.5. Enable the reception by setting the CREN bit.
6. The RCIF bit will be set when reception com-pletes and an interrupt will be generated if theRCIE bit was set.
7. Read RCSTA to get the ninth bit (if enabled) andFERR bit to determine if any error occurred dur-ing reception.
8. Read RCREG for the 8-bit received data.9. If an overrun error occurred, clear the error by
clearing the OERR bit.
FIGURE 14-7: ASYNCHRONOUS RECEPTION
TABLE 14-7: REGISTERS ASSOCIATED WITH ASYNCHRONOUS RECEPTION
Note: To terminate a reception, either clear theSREN and CREN bits, or the SPEN bit.This will reset the receive logic, so that itwill be in the proper state when receive isre-enabled.
STARTbit bit7/8bit1bit0 bit7/8 bit0STOP
bit
STARTbit
STARTbitbit7/8 STOP
bit
RX
RegRcv Buffer Reg
Rcv Shift
Read RcvBuffer Reg
RCREG
RCIF(Interrupt Flag)
OERR bit
CREN
Word 1RCREG
Word 2RCREG
STOPbit
Note: This timing diagram shows three words appearing on the RX input. The RCREG (receive buffer) is read after the third word,causing the OERR (overrun) bit to be set.
(RX/DT pin)
Word 3
Address Name Bit 7 Bit 6 Bit 5 Bit 4 Bit 3 Bit 2 Bit 1 Bit 0Value on
POR,BOR
MCLR, WDT
16h, Bank 1 PIR1 RBIF TMR3IF TMR2IF TMR1IF CA2IF CA1IF TX1IF RC1IF x000 0010 u000 0010
17h, Bank 1 PIE1 RBIE TMR3IE TMR2IE TMR1IE CA2IE CA1IE TX1IE RC1IE 0000 0000 0000 0000
13h, Bank 0 RCSTA1 SPEN RX9 SREN CREN — FERR OERR RX9D 0000 -00x 0000 -00u
14h, Bank 0 RCREG1 RX7 RX6 RX5 RX4 RX3 RX2 RX1 RX0 xxxx xxxx uuuu uuuu
15h, Bank 0 TXSTA1 CSRC TX9 TXEN SYNC — — TRMT TX9D 0000 --1x 0000 --1u
17h, Bank 0 SPBRG1 Baud Rate Generator Register 0000 0000 0000 0000
10h, Bank 4 PIR2 SSPIF BCLIF ADIF — CA4IF CA3IF TX2IF RC2IF 000- 0010 000- 0010
11h, Bank 4 PIE2 SSPIE BCLIE ADIE — CA4IE CA3IE TX2IE RC2IE 000- 0000 000- 0000
13h, Bank 4 RCSTA2 SPEN RX9 SREN CREN — FERR OERR RX9D 0000 -00x 0000 -00u
14h, Bank 4 RCREG2 RX7 RX6 RX5 RX4 RX3 RX2 RX1 RX0 xxxx xxxx uuuu uuuu
15h, Bank 4 TXSTA2 CSRC TX9 TXEN SYNC — — TRMT TX9D 0000 --1x 0000 --1u
17h, Bank 4 SPBRG2 Baud Rate Generator Register 0000 0000 0000 0000
Legend: x = unknown, u = unchanged, - = unimplemented, read as a '0'. Shaded cells are not used for asynchronous reception.
DS30289B-page 126 2000 Microchip Technology Inc.

PIC17C7XX
14.3 USART Synchronous Master Mode
In Master Synchronous mode, the data is transmitted ina half-duplex manner; i.e., transmission and receptiondo not occur at the same time: when transmitting data,the reception is inhibited and vice versa. The synchro-nous mode is entered by setting the SYNC(TXSTA<4>) bit. In addition, the SPEN (RCSTA<7>) bitis set in order to configure the I/O pins to CK (clock) andDT (data) lines, respectively. The Master mode indi-cates that the processor transmits the master clock onthe CK line. The Master mode is entered by setting theCSRC (TXSTA<7>) bit.
14.3.1 USART SYNCHRONOUS MASTER TRANSMISSION
The USART transmitter block diagram is shown inFigure 14-1. The heart of the transmitter is the transmit(serial) shift register (TSR). The shift register obtains itsdata from the read/write transmit buffer TXREG.TXREG is loaded with data in software. The TSR is notloaded until the last bit has been transmitted from theprevious load. As soon as the last bit is transmitted, theTSR is loaded with new data from TXREG (if available).Once TXREG transfers the data to the TSR (occurs inone TCY at the end of the current BRG cycle), TXREGis empty and the TXIF bit is set. This interrupt can beenabled/disabled by setting/clearing the TXIE bit. TXIFwill be set regardless of the state of bit TXIE and cannotbe cleared in software. It will reset only when new datais loaded into TXREG. While TXIF indicates the statusof TXREG, TRMT (TXSTA<1>) shows the status of theTSR. TRMT is a read only bit which is set when theTSR is empty. No interrupt logic is tied to this bit, so theuser has to poll this bit in order to determine if the TSRis empty. The TSR is not mapped in data memory, so itis not available to the user.
Transmission is enabled by setting the TXEN(TXSTA<5>) bit. The actual transmission will not occuruntil TXREG has been loaded with data. The first databit will be shifted out on the next available rising edgeof the clock on the TX/CK pin. Data out is stable aroundthe falling edge of the synchronous clock (Figure 14-9).The transmission can also be started by first loadingTXREG and then setting TXEN. This is advantageouswhen slow baud rates are selected, since BRG is keptin RESET when the TXEN, CREN, and SREN bits areclear. Setting the TXEN bit will start the BRG, creatinga shift clock immediately. Normally when transmissionis first started, the TSR is empty, so a transfer toTXREG will result in an immediate transfer to the TSR,resulting in an empty TXREG. Back-to-back transfersare possible.
Clearing TXEN during a transmission will cause thetransmission to be aborted and will reset the transmit-ter. The RX/DT and TX/CK pins will revert to hi-imped-ance. If either CREN or SREN are set during atransmission, the transmission is aborted and the RX/DT pin reverts to a hi-impedance state (for a reception).The TX/CK pin will remain an output if the CSRC bit isset (internal clock). The transmitter logic is not reset,although it is disconnected from the pins. In order toreset the transmitter, the user has to clear the TXEN bit.If the SREN bit is set (to interrupt an ongoing transmis-sion and receive a single word), then after the singleword is received, SREN will be cleared and the serialport will revert back to transmitting, since the TXEN bitis still set. The DT line will immediately switch from hi-impedance Receive mode to transmit and start driving.To avoid this, TXEN should be cleared.
In order to select 9-bit transmission, theTX9 (TXSTA<6>) bit should be set and the ninth bitshould be written to TX9D (TXSTA<0>). The ninth bitmust be written before writing the 8-bit data to TXREG.This is because a data write to TXREG can result in animmediate transfer of the data to the TSR (if the TSR isempty). If the TSR was empty and TXREG was writtenbefore writing the “new” TX9D, the “present” value ofTX9D is loaded.
Steps to follow when setting up a Synchronous MasterTransmission:
1. Initialize the SPBRG register for the appropriatebaud rate (see Baud Rate Generator Section fordetails).
2. Enable the synchronous master serial port bysetting the SYNC, SPEN, and CSRC bits.
3. Ensure that the CREN and SREN bits are clear(these bits override transmission when set).
4. If interrupts are desired, then set the TXIE bit(the GLINTD bit must be clear and the PEIE bitmust be set).
5. If 9-bit transmission is desired, then set the TX9 bit.6. If 9-bit transmission is selected, the ninth bit
should be loaded in TX9D.7. Start transmission by loading data to the TXREG
register.8. Enable the transmission by setting TXEN.
Writing the transmit data to the TXREG, then enablingthe transmit (setting TXEN), allows transmission to startsooner than doing these two events in the reverse order.
Note: To terminate a transmission, either clearthe SPEN bit, or the TXEN bit. This willreset the transmit logic, so that it will be inthe proper state when transmit is re-enabled.
2000 Microchip Technology Inc. DS30289B-page 127

PIC17C7XX
TABLE 14-8: REGISTERS ASSOCIATED WITH SYNCHRONOUS MASTER TRANSMISSION
FIGURE 14-8: SYNCHRONOUS TRANSMISSION
FIGURE 14-9: SYNCHRONOUS TRANSMISSION (THROUGH TXEN)
Address Name Bit 7 Bit 6 Bit 5 Bit 4 Bit 3 Bit 2 Bit 1 Bit 0Value on
POR,BOR
MCLR, WDT
16h, Bank 1 PIR1 RBIF TMR3IF TMR2IF TMR1IF CA2IF CA1IF TX1IF RC1IF x000 0010 u000 0010
17h, Bank 1 PIE1 RBIE TMR3IE TMR2IE TMR1IE CA2IE CA1IE TX1IE RC1IE 0000 0000 0000 0000
13h, Bank 0 RCSTA1 SPEN RX9 SREN CREN — FERR OERR RX9D 0000 -00x 0000 -00u
16h, Bank 0 TXREG1 TX7 TX6 TX5 TX4 TX3 TX2 TX1 TX0 xxxx xxxx uuuu uuuu
15h, Bank 0 TXSTA1 CSRC TX9 TXEN SYNC — — TRMT TX9D 0000 --1x 0000 --1u
17h, Bank 0 SPBRG1 Baud Rate Generator Register 0000 0000 0000 0000
10h, Bank 4 PIR2 SSPIF BCLIF ADIF — CA4IF CA3IF TX2IF RC2IF 000- 0010 000- 0010
11h, Bank 4 PIE2 SSPIE BCLIE ADIE — CA4IE CA3IE TX2IE RC2IE 000- 0000 000- 0000
13h, Bank 4 RCSTA2 SPEN RX9 SREN CREN — FERR OERR RX9D 0000 -00x 0000 -00u
16h, Bank 4 TXREG2 TX7 TX6 TX5 TX4 TX3 TX2 TX1 TX0 xxxx xxxx uuuu uuuu
15h, Bank 4 TXSTA2 CSRC TX9 TXEN SYNC — — TRMT TX9D 0000 --1x 0000 --1u
17h, Bank 4 SPBRG2 Baud Rate Generator Register 0000 0000 0000 0000
Legend: x = unknown, u = unchanged, - = unimplemented, read as a '0'. Shaded cells are not used for synchronous master transmission.
Q1 Q2Q3 Q4Q1 Q2Q3 Q4Q1 Q2Q3 Q4Q1 Q2Q3 Q4Q1 Q2Q3 Q4 Q1 Q2Q3 Q4Q1 Q2Q3 Q4Q1 Q2Q3 Q4Q1 Q2Q3 Q4Q1 Q2Q3 Q4Q1 Q2Q3 Q4Q3 Q4
DT
CK
Write toTXREG
TXIFInterrupt Flag
TRMT
TXEN’1’
Write Word 1 Write Word 2
bit0 bit1 bit2 bit7 bit0
Word 1 Word 2(RX/DT pin)
(TX/CK pin)
DT
CK
Write toTXREG
TXIF bit
TRMT bit
bit0 bit1 bit2 bit6 bit7(RX/DT pin)
(TX/CK pin)
DS30289B-page 128 2000 Microchip Technology Inc.

PIC17C7XX
14.3.2 USART SYNCHRONOUS MASTER RECEPTION
Once Synchronous mode is selected, reception isenabled by setting either the SREN (RCSTA<5>) bit orthe CREN (RCSTA<4>) bit. Data is sampled on the RX/DT pin on the falling edge of the clock. If SREN is set,then only a single word is received. If CREN is set, thereception is continuous until CREN is reset. If both bitsare set, then CREN takes precedence. After clockingthe last bit, the received data in the Receive ShiftRegister (RSR) is transferred to RCREG (if it is empty).If the transfer is complete, the interrupt bit RCIF is set.The actual interrupt can be enabled/disabled by set-ting/clearing the RCIE bit. RCIF is a read only bit whichis reset by the hardware. In this case, it is reset whenRCREG has been read and is empty. RCREG is a dou-ble buffered register; i.e., it is a two deep FIFO. It ispossible for two bytes of data to be received and trans-ferred to the RCREG FIFO and a third byte to beginshifting into the RSR. On the clocking of the last bit ofthe third byte, if RCREG is still full, then the overrunerror bit OERR (RCSTA<1>) is set. The word in theRSR will be lost. RCREG can be read twice to retrievethe two bytes in the FIFO. The OERR bit has to becleared in software. This is done by clearing the CRENbit. If OERR is set, transfers from RSR to RCREG areinhibited, so it is essential to clear the OERR bit if it isset. The 9th receive bit is buffered the same way as thereceive data. Reading the RCREG register will allowthe RX9D and FERR bits to be loaded with values forthe next received data; therefore, it is essential for theuser to read the RCSTA register before readingRCREG in order not to lose the old FERR and RX9Dinformation.
Steps to follow when setting up a Synchronous MasterReception:
1. Initialize the SPBRG register for the appropriatebaud rate. See Section 14.1 for details.
2. Enable the synchronous master serial port bysetting bits SYNC, SPEN, and CSRC.
3. If interrupts are desired, then set the RCIE bit.4. If 9-bit reception is desired, then set the RX9 bit.5. If a single reception is required, set bit SREN.
For continuous reception set bit CREN.6. The RCIF bit will be set when reception is com-
plete and an interrupt will be generated if theRCIE bit was set.
7. Read RCSTA to get the ninth bit (if enabled) anddetermine if any error occurred during reception.
8. Read the 8-bit received data by readingRCREG.
9. If any error occurred, clear the error by clearingCREN.
FIGURE 14-10: SYNCHRONOUS RECEPTION (MASTER MODE, SREN)
Note: To terminate a reception, either clear theSREN and CREN bits, or the SPEN bit.This will reset the receive logic so that it willbe in the proper state when receive is re-enabled.
CREN bit
DT
CK
Write to theSREN bit
SREN bit
RCIF bit
Read RCREG
Note: Timing diagram demonstrates SYNC Master mode with SREN = 1.
Q3 Q4 Q1 Q2 Q3 Q4 Q1 Q2 Q3 Q4Q2 Q1 Q2 Q3 Q4Q1 Q2 Q3 Q4 Q1 Q2 Q3 Q4Q1 Q2 Q3 Q4 Q1 Q2 Q3 Q4Q1 Q2 Q3 Q4 Q1 Q2 Q3 Q4
’0’
bit0 bit1 bit2 bit3 bit4 bit5 bit6 bit7
’0’
Q1 Q2 Q3 Q4
(RX/DT pin)
(TX/CK pin)
2000 Microchip Technology Inc. DS30289B-page 129

PIC17C7XX
TABLE 14-9: REGISTERS ASSOCIATED WITH SYNCHRONOUS MASTER RECEPTION
Address Name Bit 7 Bit 6 Bit 5 Bit 4 Bit 3 Bit 2 Bit 1 Bit 0Value on
POR,BOR
MCLR, WDT
16h, Bank 1 PIR1 RBIF TMR3IF TMR2IF TMR1IF CA2IF CA1IF TX1IF RC1IF x000 0010 u000 0010
17h, Bank 1 PIE1 RBIE TMR3IE TMR2IE TMR1IE CA2IE CA1IE TX1IE RC1IE 0000 0000 0000 0000
13h, Bank 0 RCSTA1 SPEN RX9 SREN CREN — FERR OERR RX9D 0000 -00x 0000 -00u
14h, Bank 0 RCREG1 RX7 RX6 RX5 RX4 RX3 RX2 RX1 RX0 xxxx xxxx uuuu uuuu
15h, Bank 0 TXSTA1 CSRC TX9 TXEN SYNC — — TRMT TX9D 0000 --1x 0000 --1u
17h, Bank 0 SPBRG1 Baud Rate Generator Register 0000 0000 0000 0000
10h, Bank 4 PIR2 SSPIF BCLIF ADIF — CA4IF CA3IF TX2IF RC2IF 000- 0010 000- 0010
11h, Bank 4 PIE2 SSPIE BCLIE ADIE — CA4IE CA3IE TX2IE RC2IE 000- 0000 000- 0000
13h, Bank 4 RCSTA2 SPEN RX9 SREN CREN — FERR OERR RX9D 0000 -00x 0000 -00u
14h, Bank 4 RCREG2 RX7 RX6 RX5 RX4 RX3 RX2 RX1 RX0 xxxx xxxx uuuu uuuu
15h, Bank 4 TXSTA2 CSRC TX9 TXEN SYNC — — TRMT TX9D 0000 --1x 0000 --1u
17h, Bank 4 SPBRG2 Baud Rate Generator Register 0000 0000 0000 0000
Legend: x = unknown, u = unchanged, - = unimplemented, read as a '0'. Shaded cells are not used for synchronous master reception.
DS30289B-page 130 2000 Microchip Technology Inc.

PIC17C7XX
14.4 USART Synchronous Slave Mode
The Synchronous Slave mode differs from the Mastermode, in the fact that the shift clock is supplied exter-nally at the TX/CK pin (instead of being supplied inter-nally in the Master mode). This allows the device totransfer or receive data in the SLEEP mode. The Slavemode is entered by clearing the CSRC (TXSTA<7>) bit.
14.4.1 USART SYNCHRONOUS SLAVE TRANSMIT
The operation of the SYNC Master and Slave modesare identical except in the case of the SLEEP mode.
If two words are written to TXREG and then the SLEEPinstruction executes, the following will occur. The firstword will immediately transfer to the TSR and will trans-mit as the shift clock is supplied. The second word willremain in TXREG. TXIF will not be set. When the firstword has been shifted out of TSR, TXREG will transferthe second word to the TSR and the TXIF flag will nowbe set. If TXIE is enabled, the interrupt will wake thechip from SLEEP and if the global interrupt is enabled,then the program will branch to the interrupt vector(0020h).
Steps to follow when setting up a Synchronous SlaveTransmission:
1. Enable the synchronous slave serial port by set-ting the SYNC and SPEN bits and clearing theCSRC bit.
2. Clear the CREN bit.3. If interrupts are desired, then set the TXIE bit.
4. If 9-bit transmission is desired, then set the TX9bit.
5. If 9-bit transmission is selected, the ninth bitshould be loaded in TX9D.
6. Start transmission by loading data to TXREG.7. Enable the transmission by setting TXEN.
Writing the transmit data to the TXREG, then enablingthe transmit (setting TXEN), allows transmission tostart sooner than doing these two events in the reverseorder.
14.4.2 USART SYNCHRONOUS SLAVE RECEPTION
Operation of the Synchronous Master and Slavemodes are identical except in the case of the SLEEPmode. Also, SREN is a “don't care” in Slave mode.
If receive is enabled (CREN) prior to the SLEEP instruc-tion, then a word may be received during SLEEP. Oncompletely receiving the word, the RSR will transfer thedata to RCREG (setting RCIF) and if the RCIE bit is set,the interrupt generated will wake the chip from SLEEP.If the global interrupt is enabled, the program willbranch to the interrupt vector (0020h).
Steps to follow when setting up a Synchronous SlaveReception:
1. Enable the synchronous master serial port bysetting the SYNC and SPEN bits and clearingthe CSRC bit.
2. If interrupts are desired, then set the RCIE bit.3. If 9-bit reception is desired, then set the RX9 bit.4. To enable reception, set the CREN bit.
5. The RCIF bit will be set when reception is com-plete and an interrupt will be generated if theRCIE bit was set.
6. Read RCSTA to get the ninth bit (if enabled) anddetermine if any error occurred during reception.
7. Read the 8-bit received data by readingRCREG.
8. If any error occurred, clear the error by clearingthe CREN bit.
Note: To terminate a transmission, either clearthe SPEN bit, or the TXEN bit. This willreset the transmit logic, so that it will be inthe proper state when transmit is re-enabled.
Note: To abort reception, either clear the SPENbit, or the CREN bit (when in ContinuousReceive mode). This will reset the receivelogic, so that it will be in the proper statewhen receive is re-enabled.
2000 Microchip Technology Inc. DS30289B-page 131

PIC17C7XX
TABLE 14-10: REGISTERS ASSOCIATED WITH SYNCHRONOUS SLAVE TRANSMISSION
TABLE 14-11: REGISTERS ASSOCIATED WITH SYNCHRONOUS SLAVE RECEPTION
Address Name Bit 7 Bit 6 Bit 5 Bit 4 Bit 3 Bit 2 Bit 1 Bit 0Value on
POR,BOR
MCLR, WDT
16h, Bank 1 PIR1 RBIF TMR3IF TMR2IF TMR1IF CA2IF CA1IF TX1IF RC1IF x000 0010 u000 0010
17h, Bank 1 PIE1 RBIE TMR3IE TMR2IE TMR1IE CA2IE CA1IE TX1IE RC1IE 0000 0000 0000 0000
13h, Bank 0 RCSTA1 SPEN RX9 SREN CREN — FERR OERR RX9D 0000 -00x 0000 -00u
15h, Bank 0 TXSTA1 CSRC TX9 TXEN SYNC — — TRMT TX9D 0000 --1x 0000 --1u
16h, Bank 0 TXREG1 TX7 TX6 TX5 TX4 TX3 TX2 TX1 TX0 xxxx xxxx uuuu uuuu
17h, Bank 0 SPBRG1 Baud Rate Generator Register 0000 0000 0000 0000
10h, Bank 4 PIR2 SSPIF BCLIF ADIF — CA4IF CA3IF TX2IF RC2IF 000- 0010 000- 0010
11h, Bank 4 PIE2 SSPIE BCLIE ADIE — CA4IE CA3IE TX2IE RC2IE 000- 0000 000- 0000
13h, Bank 4 RCSTA2 SPEN RX9 SREN CREN — FERR OERR RX9D 0000 -00x 0000 -00u
16h, Bank 4 TXREG2 TX7 TX6 TX5 TX4 TX3 TX2 TX1 TX0 xxxx xxxx uuuu uuuu
15h, Bank 4 TXSTA2 CSRC TX9 TXEN SYNC — — TRMT TX9D 0000 --1x 0000 --1u
17h, Bank 4 SPBRG2 Baud Rate Generator Register 0000 0000 0000 0000
Legend: x = unknown, u = unchanged, - = unimplemented, read as a '0'. Shaded cells are not used for synchronous slave transmission.
Address Name Bit 7 Bit 6 Bit 5 Bit 4 Bit 3 Bit 2 Bit 1 Bit 0Value on
POR,BOR
MCLR, WDT
16h, Bank1 PIR1 RBIF TMR3IF TMR2IF TMR1IF CA2IF CA1IF TX1IF RC1IF x000 0010 u000 0010
17h, Bank1 PIE1 RBIE TMR3IE TMR2IE TMR1IE CA2IE CA1IE TX1IE RC1IE 0000 0000 0000 0000
13h, Bank0 RCSTA1 SPEN RX9 SREN CREN — FERR OERR RX9D 0000 -00x 0000 -00u
14h, Bank0 RCREG1 RX7 RX6 RX5 RX4 RX3 RX2 RX1 RX0 xxxx xxxx uuuu uuuu
15h, Bank 0 TXSTA1 CSRC TX9 TXEN SYNC — — TRMT TX9D 0000 --1x 0000 --1u
17h, Bank 0 SPBRG1 Baud Rate Generator Register 0000 0000 0000 0000
10h, Bank 4 PIR2 SSPIF BCLIF ADIF — CA4IF CA3IF TX2IF RC2IF 000- 0010 000- 0010
11h, Bank 4 PIE2 SSPIE BCLIE ADIE — CA4IE CA3IE TX2IE RC2IE 000- 0000 000- 0000
13h, Bank 4 RCSTA2 SPEN RX9 SREN CREN — FERR OERR RX9D 0000 -00x 0000 -00u
14h, Bank 4 RCREG2 RX7 RX6 RX5 RX4 RX3 RX2 RX1 RX0 xxxx xxxx uuuu uuuu
15h, Bank 4 TXSTA2 CSRC TX9 TXEN SYNC — — TRMT TX9D 0000 --1x 0000 --1u
17h, Bank 4 SPBRG2 Baud Rate Generator Register 0000 0000 0000 0000
Legend: x = unknown, u = unchanged, - = unimplemented, read as a '0'. Shaded cells are not used for synchronous slave reception.
DS30289B-page 132 2000 Microchip Technology Inc.

PIC17C7XX
15.0 MASTER SYNCHRONOUS SERIAL PORT (MSSP) MODULE
The Master Synchronous Serial Port (MSSP) module isa serial interface useful for communicating with otherperipheral or microcontroller devices. These peripheraldevices may be serial EEPROMs, shift registers, dis-play drivers, A/D converters, etc. The MSSP modulecan operate in one of two modes:
• Serial Peripheral Interface (SPI)• Inter-Integrated CircuitTM (I2C)
Figure 15-1 shows a block diagram for the SPI mode,while Figure 15-2 and Figure 15-3 show the blockdiagrams for the two different I2C modes of operation.
FIGURE 15-1: SPI MODE BLOCK DIAGRAM
FIGURE 15-2: I2C SLAVE MODE BLOCK DIAGRAM
FIGURE 15-3: I2C MASTER MODE BLOCK DIAGRAM
Read Write
InternalData Bus
SSPSR reg
SSPBUF reg
SSPM3:SSPM0
bit0 ShiftClock
SS ControlEnable
EdgeSelect
Clock Select
TMR2 Output
ToscPrescaler4, 16, 64
2EdgeSelect
2
4
Data to TX/RX in SSPSRData Direction bit
2SMP:CKE
SDI
SDO
SS
SCK
Read Write
SSPSR reg
Match Detect
SSPADD reg
START and STOP bit Detect
SSPBUF reg
InternalData Bus
Addr Match
Set, ResetS, P bits
(SSPSTAT reg)
SCL
ShiftClock
MSb LSbSDA
or GeneralCall Detected
Read Write
SSPSR reg
Match detect
SSPADD reg
START and STOP bit Detect/Generate
SSPBUF reg
InternalData Bus
Addr Match
Set/Clear S bit
Clear/Set P, bit(SSPSTAT reg)
SCL
ShiftClock
MSb LSbSDA
Baud Rate Generator
7SSPADD<6:0>
and
and Set SSPIF
or GeneralCall Detected
2000 Microchip Technology Inc. DS30289B-page 133

PIC17C7XX
REGISTER 15-1: SSPSTAT: SYNC SERIAL PORT STATUS REGISTER (ADDRESS: 13h, BANK 6)R/W-0 R/W-0 R-0 R-0 R-0 R-0 R-0 R-0
SMP CKE D/A P S R/W UA BF
bit 7 bit 0
bit 7 SMP: Sample bit
SPI Master mode:1 = Input data sampled at end of data output time0 = Input data sampled at middle of data output time
SPI Slave mode:SMP must be cleared when SPI is used in Slave mode
In I2 C Master or Slave mode:1 = Slew rate control disabled for Standard Speed mode (100 kHz and 1 MHz)0 = Slew rate control enabled for High Speed mode (400 kHz)
bit 6 CKE: SPI Clock Edge Select (Figure 15-6, Figure 15-8 and Figure 15-9)
CKP = 0:1 = Data transmitted on rising edge of SCK0 = Data transmitted on falling edge of SCK
CKP = 1:1 = Data transmitted on falling edge of SCK0 = Data transmitted on rising edge of SCK
bit 5 D/A: Data/Address bit (I2C mode only)1 = Indicates that the last byte received or transmitted was data0 = Indicates that the last byte received or transmitted was address
bit 4 P: STOP bit (I2C mode only. This bit is cleared when the MSSP module is disabled, SSPEN is cleared.)1 = Indicates that a STOP bit has been detected last (this bit is ’0’ on RESET)0 = STOP bit was not detected last
bit 3 S: START bit (I2C mode only. This bit is cleared when the MSSP module is disabled, SSPEN is cleared.)1 = Indicates that a START bit has been detected last (this bit is ’0’ on RESET)0 = START bit was not detected last
bit 2 R/W: Read/Write bit Information (I2C mode only)This bit holds the R/W bit information following the last address match. This bit is only valid fromthe address match to the next START bit, STOP bit, or not ACK bit.
In I2 C Slave mode:1 = Read0 = Write
In I2 C Master mode:1 = Transmit is in progress0 = Transmit is not in progressOr’ing this bit with SEN, RSEN, PEN, RCEN, or ACKEN will indicate if the MSSP is in IDLE mode.
bit 1 UA: Update Address (10-bit I2C mode only)1 = Indicates that the user needs to update the address in the SSPADD register0 = Address does not need to be updated
bit 0 BF: Buffer Full Status bit
Receive (SPI and I2C modes)1 = Receive complete, SSPBUF is full0 = Receive not complete, SSPBUF is empty
Transmit (I2C mode only)1 = Data transmit in progress (does not include the ACK and STOP bits), SSPBUF is full0 = Data transmit complete (does not include the ACK and STOP bits), SSPBUF is empty
Legend:
R = Readable bit W = Writable bit U = Unimplemented bit, read as ‘0’
- n = Value at POR Reset ’1’ = Bit is set ’0’ = Bit is cleared x = Bit is unknown
DS30289B-page 134 2000 Microchip Technology Inc.
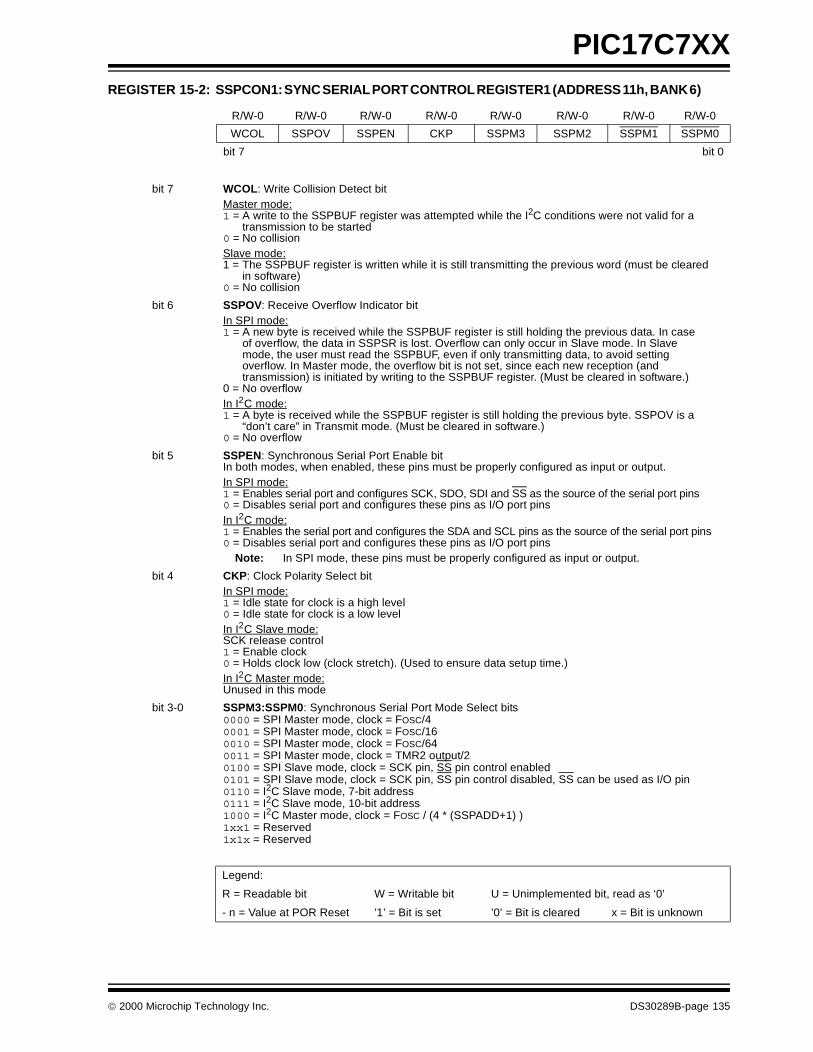
PIC17C7XX
REGISTER 15-2: SSPCON1: SYNC SERIAL PORT CONTROL REGISTER1 (ADDRESS 11h, BANK 6)R/W-0 R/W-0 R/W-0 R/W-0 R/W-0 R/W-0 R/W-0 R/W-0
WCOL SSPOV SSPEN CKP SSPM3 SSPM2 SSPM1 SSPM0
bit 7 bit 0
bit 7 WCOL: Write Collision Detect bit Master mode:1 = A write to the SSPBUF register was attempted while the I2C conditions were not valid for a
transmission to be started0 = No collisionSlave mode:1 = The SSPBUF register is written while it is still transmitting the previous word (must be cleared
in software)0 = No collision
bit 6 SSPOV: Receive Overflow Indicator bitIn SPI mode:1 = A new byte is received while the SSPBUF register is still holding the previous data. In case
of overflow, the data in SSPSR is lost. Overflow can only occur in Slave mode. In Slavemode, the user must read the SSPBUF, even if only transmitting data, to avoid setting overflow. In Master mode, the overflow bit is not set, since each new reception (and transmission) is initiated by writing to the SSPBUF register. (Must be cleared in software.)
0 = No overflowIn I2 C mode:1 = A byte is received while the SSPBUF register is still holding the previous byte. SSPOV is a
“don’t care” in Transmit mode. (Must be cleared in software.)0 = No overflow
bit 5 SSPEN: Synchronous Serial Port Enable bitIn both modes, when enabled, these pins must be properly configured as input or output.In SPI mode:1 = Enables serial port and configures SCK, SDO, SDI and SS as the source of the serial port pins0 = Disables serial port and configures these pins as I/O port pinsIn I2 C mode:1 = Enables the serial port and configures the SDA and SCL pins as the source of the serial port pins0 = Disables serial port and configures these pins as I/O port pins
Note: In SPI mode, these pins must be properly configured as input or output.
bit 4 CKP: Clock Polarity Select bitIn SPI mode:1 = Idle state for clock is a high level0 = Idle state for clock is a low levelIn I2 C Slave mode:SCK release control 1 = Enable clock 0 = Holds clock low (clock stretch). (Used to ensure data setup time.)In I2 C Master mode:Unused in this mode
bit 3-0 SSPM3:SSPM0: Synchronous Serial Port Mode Select bits0000 = SPI Master mode, clock = FOSC/4 0001 = SPI Master mode, clock = FOSC/16 0010 = SPI Master mode, clock = FOSC/64 0011 = SPI Master mode, clock = TMR2 output/2 0100 = SPI Slave mode, clock = SCK pin, SS pin control enabled 0101 = SPI Slave mode, clock = SCK pin, SS pin control disabled, SS can be used as I/O pin 0110 = I2C Slave mode, 7-bit address 0111 = I2C Slave mode, 10-bit address 1000 = I2C Master mode, clock = FOSC / (4 * (SSPADD+1) ) 1xx1 = Reserved 1x1x = Reserved
Legend:
R = Readable bit W = Writable bit U = Unimplemented bit, read as ‘0’
- n = Value at POR Reset ’1’ = Bit is set ’0’ = Bit is cleared x = Bit is unknown
2000 Microchip Technology Inc. DS30289B-page 135

PIC17C7XX
REGISTER 15-3: SSPCON2: SYNC SERIAL PORT CONTROL REGISTER2 (ADDRESS 12h, BANK 6)
R/W-0 R/W-0 R/W-0 R/W-0 R/W-0 R/W-0 R/W-0 R/W-0
GCEN ACKSTAT ACKDT ACKEN RCEN PEN RSEN SEN
bit 7 bit 0
bit 7 GCEN: General Call Enable bit (in I2C Slave mode only)1 = Enable interrupt when a general call address (0000h) is received in the SSPSR0 = General call address disabled
bit 6 ACKSTAT: Acknowledge Status bit (in I2C Master mode only)
In Master Transmit mode:1 = Acknowledge was not received from slave0 = Acknowledge was received from slave
bit 5 ACKDT: Acknowledge Data bit (in I2C Master mode only)
In Master Receive mode:Value that will be transmitted when the user initiates an Acknowledge sequence at the end of areceive.1 = Not Acknowledge0 = Acknowledge
bit 4 ACKEN: Acknowledge Sequence Enable bit (in I2C Master mode only)
In Master Receive mode:1 = Initiate Acknowledge sequence on SDA and SCL pins and transmit AKDT data bit.
Automatically cleared by hardware.0 = Acknowledge sequence idle
Note: If the I2C module is not in the IDLE mode, this bit may not be set (no spooling) andthe SSPBUF may not be written (or writes to the SSPBUF are disabled).
bit 3 RCEN: Receive Enable bit (in I2C Master mode only)1 = Enables Receive mode for I2C0 = Receive idle
Note: If the I2C module is not in the IDLE mode, this bit may not be set (no spooling) andthe SSPBUF may not be written (or writes to the SSPBUF are disabled).
bit 2 PEN: STOP Condition Enable bit (in I2C Master mode only)
SCK Release Control:1 = Initiate STOP condition on SDA and SCL pins. Automatically cleared by hardware.0 = STOP condition idle
Note: If the I2C module is not in the IDLE mode, this bit may not be set (no spooling) andthe SSPBUF may not be written (or writes to the SSPBUF are disabled).
bit 1 RSEN: Repeated Start Condition Enabled bit (in I2C Master mode only)1 = Initiate Repeated Start condition on SDA and SCL pins. Automatically cleared by hardware.0 = Repeated Start condition idle
Note: If the I2C module is not in the IDLE mode, this bit may not be set (no spooling) andthe SSPBUF may not be written (or writes to the SSPBUF are disabled).
bit 0 SEN: START Condition Enabled bit (In I2C Master mode only)1 = Initiate START condition on SDA and SCL pins. Automatically cleared by hardware.0 = START condition idle.
Note: If the I2C module is not in the IDLE mode, this bit may not be set (no spooling) andthe SSPBUF may not be written (or writes to the SSPBUF are disabled).
Legend:
R = Readable bit W = Writable bit U = Unimplemented bit, read as ‘0’
- n = Value at POR Reset ’1’ = Bit is set ’0’ = Bit is cleared x = Bit is unknown
DS30289B-page 136 2000 Microchip Technology Inc.
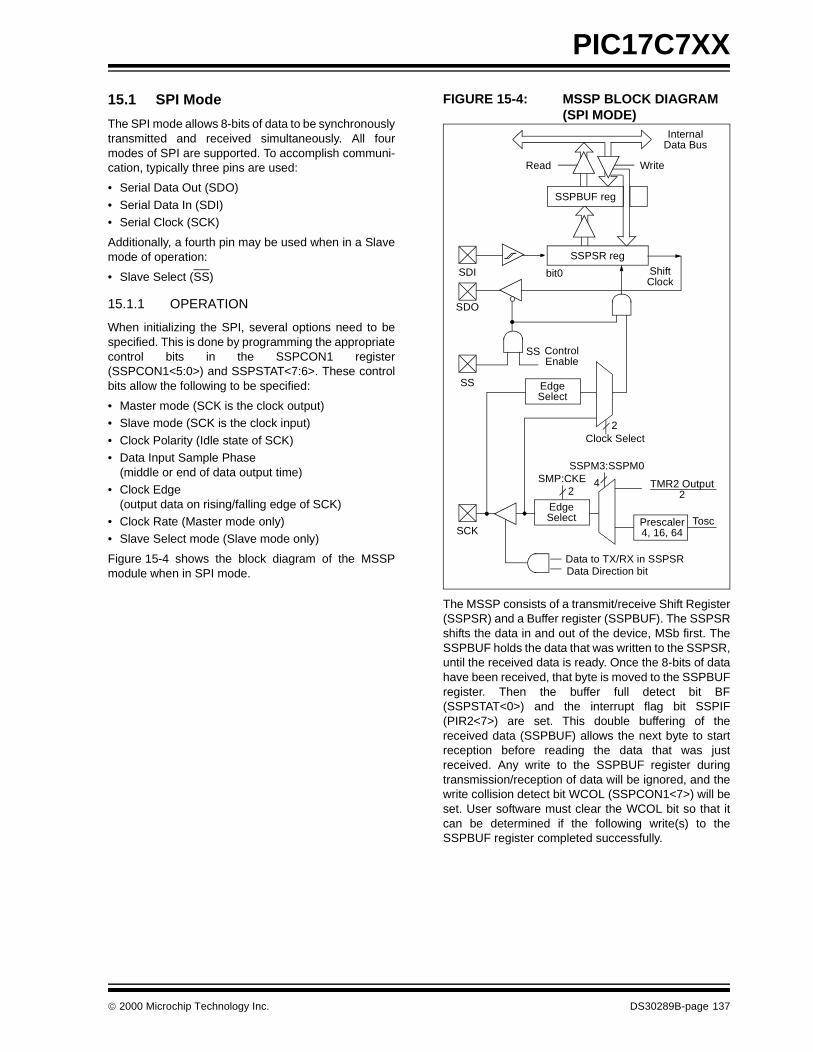
PIC17C7XX
15.1 SPI Mode
The SPI mode allows 8-bits of data to be synchronouslytransmitted and received simultaneously. All fourmodes of SPI are supported. To accomplish communi-cation, typically three pins are used:
• Serial Data Out (SDO)
• Serial Data In (SDI) • Serial Clock (SCK)
Additionally, a fourth pin may be used when in a Slavemode of operation:
• Slave Select (SS)
15.1.1 OPERATION
When initializing the SPI, several options need to bespecified. This is done by programming the appropriatecontrol bits in the SSPCON1 register(SSPCON1<5:0>) and SSPSTAT<7:6>. These controlbits allow the following to be specified:
• Master mode (SCK is the clock output)• Slave mode (SCK is the clock input)
• Clock Polarity (Idle state of SCK)• Data Input Sample Phase
(middle or end of data output time)• Clock Edge
(output data on rising/falling edge of SCK)• Clock Rate (Master mode only)• Slave Select mode (Slave mode only)
Figure 15-4 shows the block diagram of the MSSPmodule when in SPI mode.
FIGURE 15-4: MSSP BLOCK DIAGRAM (SPI MODE)
The MSSP consists of a transmit/receive Shift Register(SSPSR) and a Buffer register (SSPBUF). The SSPSRshifts the data in and out of the device, MSb first. TheSSPBUF holds the data that was written to the SSPSR,until the received data is ready. Once the 8-bits of datahave been received, that byte is moved to the SSPBUFregister. Then the buffer full detect bit BF(SSPSTAT<0>) and the interrupt flag bit SSPIF(PIR2<7>) are set. This double buffering of thereceived data (SSPBUF) allows the next byte to startreception before reading the data that was justreceived. Any write to the SSPBUF register duringtransmission/reception of data will be ignored, and thewrite collision detect bit WCOL (SSPCON1<7>) will beset. User software must clear the WCOL bit so that itcan be determined if the following write(s) to theSSPBUF register completed successfully.
Read Write
InternalData Bus
SSPSR reg
SSPBUF reg
SSPM3:SSPM0
bit0 ShiftClock
SS ControlEnable
EdgeSelect
Clock Select
TMR2 Output
ToscPrescaler4, 16, 64
2EdgeSelect
2
4
Data to TX/RX in SSPSRData Direction bit
2SMP:CKE
SDI
SDO
SS
SCK
2000 Microchip Technology Inc. DS30289B-page 137

PIC17C7XX
When the application software is expecting to receivevalid data, the SSPBUF should be read before the nextbyte of data to transfer is written to the SSPBUF. Bufferfull bit, BF (SSPSTAT<0>), indicates when SSPBUFhas been loaded with the received data (transmissionis complete). When the SSPBUF is read, bit BF iscleared. This data may be irrelevant if the SPI is only atransmitter. Generally the MSSP interrupt is used todetermine when the transmission/reception has com-pleted. The SSPBUF must be read and/or written. If theinterrupt method is not going to be used, then softwarepolling can be done to ensure that a write collision doesnot occur. Example 15-1 shows the loading of theSSPBUF (SSPSR) for data transmission.
EXAMPLE 15-1: LOADING THE SSPBUF (SSPSR) REGISTER
The SSPSR is not directly readable, or writable andcan only be accessed by addressing the SSPBUF reg-ister. Additionally, the MSSP status register (SSPSTAT)indicates the various status conditions.
15.1.2 ENABLING SPI I/O
To enable the serial port, MSSP Enable bit, SSPEN(SSPCON1<5>), must be set. To reset or reconfigureSPI mode, clear bit SSPEN, re-initialize the SSPCONregisters and then set bit SSPEN. This configures theSDI, SDO, SCK and SS pins as serial port pins. For thepins to behave as the serial port function, some musthave their data direction bits (in the DDR register)appropriately programmed. That is:
• SDI is automatically controlled by the SPI module • SDO must have DDRB<7> cleared• SCK (Master mode) must have DDRB<6> cleared
• SCK (Slave mode) must have DDRB<6> set • SS must have PORTA<2> set
Any serial port function that is not desired may be over-ridden by programming the corresponding data direc-tion (DDR) register to the opposite value.
15.1.3 TYPICAL CONNECTION
Figure 15-5 shows a typical connection between twomicrocontrollers. The master controller (Processor 1)initiates the data transfer by sending the SCK signal.Data is shifted out of both shift registers on their pro-grammed clock edge and latched on the opposite edgeof the clock. Both processors should be programmed tosame Clock Polarity (CKP), then both controllers wouldsend and receive data at the same time. Whether thedata is meaningful (or dummy data) depends on theapplication software. This leads to three scenarios fordata transmission:
• Master sends data — Slave sends dummy data• Master sends data — Slave sends data• Master sends dummy data — Slave sends data
FIGURE 15-5: SPI MASTER/SLAVE CONNECTION
MOVLB 6 ; Bank 6LOOP BTFSS SSPSTAT, BF ; Has data been ; received ; (transmit ; complete)? GOTO LOOP ; No MOVPF SSPBUF, RXDATA ; Save in user RAM MOVFP TXDATA, SSPBUF ; New data to xmit
Serial Input Buffer(SSPBUF)
Shift Register(SSPSR)
MSb LSb
SDO
SDI
PROCESSOR 1
SCK
SPI Master SSPM3:SSPM0 = 00xxb
Serial Input Buffer(SSPBUF)
Shift Register(SSPSR)
LSbMSb
SDI
SDO
PROCESSOR 2
SCK
SPI Slave SSPM3:SSPM0 = 010xb
Serial Clock
DS30289B-page 138 2000 Microchip Technology Inc.

PIC17C7XX
15.1.4 MASTER MODE
The master can initiate the data transfer at any timebecause it controls the SCK. The master determineswhen the slave (Processor 2, Figure 15-5) is to broad-cast data by the software protocol.
In Master mode, the data is transmitted/received assoon as the SSPBUF register is written to. If the SPI isonly going to receive, the SDO output could be dis-abled (programmed as an input). The SSPSR registerwill continue to shift in the signal present on the SDI pinat the programmed clock rate. As each byte isreceived, it will be loaded into the SSPBUF register asif a normal received byte (interrupts and status bitsappropriately set). This could be useful in receiverapplications as a “Line Activity Monitor” mode.
The clock polarity is selected by appropriately program-ming bit CKP (SSPCON1<4>). This then, would givewaveforms for SPI communication as shown in
Figure 15-6, Figure 15-8 and Figure 15-9, where theMSb is transmitted first. In Master mode, the SPI clockrate (bit rate) is user programmable to be one of thefollowing:
• FOSC/4 (or TCY)• FOSC/16 (or 4 • TCY)
• FOSC/64 (or 16 • TCY)• Timer2 output/2
This allows a maximum bit clock frequency (at 33 MHz)of 8.25 MHz.
Figure 15-6 shows the waveforms for Master mode.When CKE = 1, the SDO data is valid before there is aclock edge on SCK. The change of the input sample isshown based on the state of the SMP bit. The timewhen the SSPBUF is loaded with the received data isshown.
FIGURE 15-6: SPI MODE WAVEFORM (MASTER MODE)
SCK(CKP = 0
SCK(CKP = 1
SCK(CKP = 0
SCK(CKP = 1
4 clockmodes
InputSample
InputSample
SDI
bit7 bit0
SDO bit7 bit6 bit5 bit4 bit3 bit2 bit1 bit0
bit7 bit0
SDI
SSPIF
(SMP = 1)
(SMP = 0)
(SMP = 1)
CKE = 1)
CKE = 0)
CKE = 1)
CKE = 0)
(SMP = 0)
Write toSSPBUF
SSPSR toSSPBUF
SDO bit7 bit6 bit5 bit4 bit3 bit2 bit1 bit0
(CKE = 0)
(CKE = 1)
Next Q4 cycleafter Q2↓
2000 Microchip Technology Inc. DS30289B-page 139

PIC17C7XX
15.1.5 SLAVE MODE
In Slave mode, the data is transmitted and received asthe external clock pulses appear on SCK. When thelast bit is latched, the interrupt flag bit SSPIF (PIR2<7>)is set.
While in Slave mode, the external clock is supplied bythe external clock source on the SCK pin. This externalclock must meet the minimum high and low times asspecified in the electrical specifications.
While in SLEEP mode, the slave can transmit/receivedata. When a byte is received, the device will wake-upfrom SLEEP.
15.1.6 SLAVE SELECT SYNCHRONIZATION
The SS pin allows a Synchronous Slave mode. TheSPI must be in Slave mode with SS pin controlenabled (SSPCON1<3:0> = 04h). The pin must notbe driven low for the SS pin to function as an input.The RA2 Data Latch must be high. When the SS pinis low, transmission and reception are enabled and
the SDO pin is driven. When the SS pin goes high,the SDO pin is no longer driven, even if in the mid-dle of a transmitted byte and becomes a floatingoutput. External pull-up/pull-down resistors may bedesirable, depending on the application.
When the SPI module resets, the bit counter is forcedto 0. This can be done by either forcing the SS pin to ahigh level, or clearing the SSPEN bit.
To emulate two-wire communication, the SDO pin canbe connected to the SDI pin. When the SPI needs tooperate as a receiver, the SDO pin can be configuredas an input. This disables transmissions from the SDO.The SDI can always be left as an input (SDI function),since it cannot create a bus conflict.
FIGURE 15-7: SLAVE SYNCHRONIZATION WAVEFORM
Note 1: When the SPI is in Slave mode with SSpin control enabled (SSPCON<3:0> =0100), the SPI module will reset if the SSpin is set to VDD.
2: If the SPI is used in Slave mode withCKE = ’1’, then the SS pin control must beenabled.
SCK(CKP = 1
SCK(CKP = 0
InputSample
SDI
bit7
SDO bit7 bit6 bit7
SSPIFInterrupt
(SMP = 0)
CKE = 0)
CKE = 0)
(SMP = 0)
Write toSSPBUF
SSPSR toSSPBUF
SS
Flag
bit0
bit7
bit0
Next Q4 cycleafter Q2↓
DS30289B-page 140 2000 Microchip Technology Inc.

PIC17C7XX
FIGURE 15-8: SPI MODE WAVEFORM (SLAVE MODE WITH CKE = 0)
FIGURE 15-9: SPI MODE WAVEFORM (SLAVE MODE WITH CKE = 1)
SCK(CKP = 1
SCK(CKP = 0
InputSample
SDI
bit7 bit0
SDO bit7 bit6 bit5 bit4 bit3 bit2 bit1 bit0
SSPIFInterrupt
(SMP = 0)
CKE = 0)
CKE = 0)
(SMP = 0)
Write toSSPBUF
SSPSR toSSPBUF
SS
Flag
optional
Next Q4 cycleafter Q2↓
SCK(CKP = 1
SCK(CKP = 0
InputSample
SDI
bit7 bit0
SDO bit7 bit6 bit5 bit4 bit3 bit2 bit1 bit0
SSPIFInterrupt
(SMP = 0)
CKE = 1)
CKE = 1)
(SMP = 0)
Write toSSPBUF
SSPSR toSSPBUF
SS
Flag
not optional
Next Q4 cycleafter Q2↓
2000 Microchip Technology Inc. DS30289B-page 141
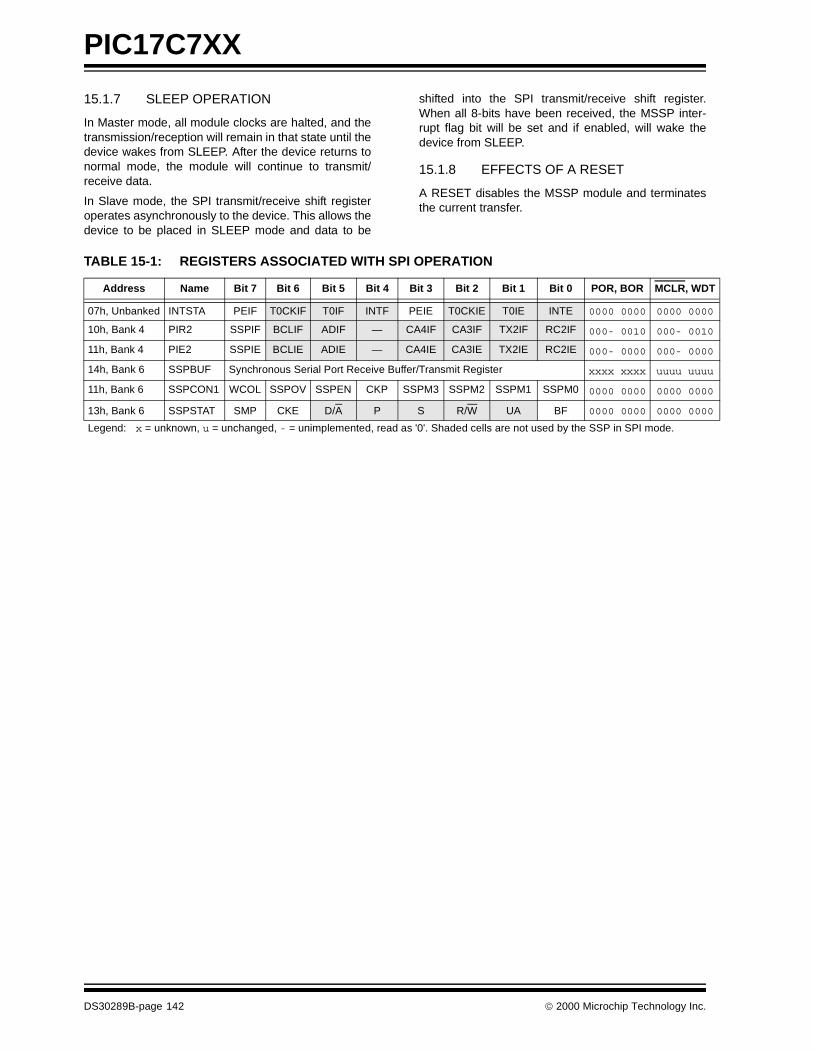
PIC17C7XX
15.1.7 SLEEP OPERATION
In Master mode, all module clocks are halted, and thetransmission/reception will remain in that state until thedevice wakes from SLEEP. After the device returns tonormal mode, the module will continue to transmit/receive data.
In Slave mode, the SPI transmit/receive shift registeroperates asynchronously to the device. This allows thedevice to be placed in SLEEP mode and data to be
shifted into the SPI transmit/receive shift register.When all 8-bits have been received, the MSSP inter-rupt flag bit will be set and if enabled, will wake thedevice from SLEEP.
15.1.8 EFFECTS OF A RESET
A RESET disables the MSSP module and terminatesthe current transfer.
TABLE 15-1: REGISTERS ASSOCIATED WITH SPI OPERATION
Address Name Bit 7 Bit 6 Bit 5 Bit 4 Bit 3 Bit 2 Bit 1 Bit 0 POR, BOR MCLR, WDT
07h, Unbanked INTSTA PEIF T0CKIF T0IF INTF PEIE T0CKIE T0IE INTE 0000 0000 0000 0000
10h, Bank 4 PIR2 SSPIF BCLIF ADIF — CA4IF CA3IF TX2IF RC2IF 000- 0010 000- 0010
11h, Bank 4 PIE2 SSPIE BCLIE ADIE — CA4IE CA3IE TX2IE RC2IE 000- 0000 000- 0000
14h, Bank 6 SSPBUF Synchronous Serial Port Receive Buffer/Transmit Register xxxx xxxx uuuu uuuu
11h, Bank 6 SSPCON1 WCOL SSPOV SSPEN CKP SSPM3 SSPM2 SSPM1 SSPM0 0000 0000 0000 0000
13h, Bank 6 SSPSTAT SMP CKE D/A P S R/W UA BF 0000 0000 0000 0000
Legend: x = unknown, u = unchanged, - = unimplemented, read as '0'. Shaded cells are not used by the SSP in SPI mode.
DS30289B-page 142 2000 Microchip Technology Inc.

PIC17C7XX
15.2 MSSP I2 C Operation
The MSSP module in I2C mode fully implements allmaster and slave functions (including general call sup-port) and provides interrupts on START and STOP bitsin hardware to determine a free bus (multi-master func-tion). The MSSP module implements the standardmode specifications as well as 7-bit and 10-bitaddressing.
Refer to Application Note AN578, “Use of the SSPModule in the I 2C Multi-Master Environment.”
A “glitch” filter is on the SCL and SDA pins when the pinis an input. This filter operates in both the 100 kHz and400 kHz modes. In the 100 kHz mode, when these pinsare an output, there is a slew rate control of the pin thatis independent of device frequency.
FIGURE 15-10: I2C SLAVE MODE BLOCK DIAGRAM
FIGURE 15-11: I2C MASTER MODE BLOCK DIAGRAM
Two pins are used for data transfer. These are the SCLpin, which is the clock and the SDA pin, which is thedata. The SDA and SCL pins are automatically config-ured when the I2C mode is enabled. The SSP modulefunctions are enabled by setting SSP Enable bitSSPEN (SSPCON1<5>).
The MSSP module has six registers for I2C operation.These are the:
• SSP Control Register1 (SSPCON1)• SSP Control Register2 (SSPCON2)• SSP Status Register (SSPSTAT)
• Serial Receive/Transmit Buffer (SSPBUF)• SSP Shift Register (SSPSR) - Not directly acces-
sible• SSP Address Register (SSPADD)
The SSPCON1 register allows control of the I2C oper-ation. Four mode selection bits (SSPCON1<3:0>) allowone of the following I2C modes to be selected:
• I2C Slave mode (7-bit address)
• I2C Slave mode (10-bit address)• I2C Master mode, clock = OSC/4 (SSPADD +1)
Before selecting any I2C mode, the SCL and SDA pinsmust be programmed to inputs by setting the appropri-ate DDR bits. Selecting an I2C mode, by setting theSSPEN bit, enables the SCL and SDA pins to be usedas the clock and data lines in I2C mode.
Read Write
SSPSR reg
Match Detect
SSPADD reg
START and STOP bit Detect
SSPBUF reg
InternalData Bus
Addr Match
Set, ResetS, P bits
(SSPSTAT reg)
SCL
ShiftClock
MSb LSbSDA
Read Write
SSPSR reg
Match Detect
SSPADD reg
START and STOP bit Detect/Generate
SSPBUF reg
InternalData Bus
Addr Match
Set/Clear S bit
Clear/Set P, bit(SSPSTAT reg)
SCL
ShiftClock
MSb LSbSDA
Baud Rate Generator
7SSPADD<6:0>
and
and Set SSPIF
2000 Microchip Technology Inc. DS30289B-page 143

PIC17C7XX
The SSPSTAT register gives the status of the datatransfer. This information includes detection of a STARTor STOP bit, specifies if the received byte was data oraddress if the next byte is the completion of 10-bitaddress and if this will be a read or write data transfer.
The SSPBUF is the register to which transfer data iswritten to or read from. The SSPSR register shifts thedata in or out of the device. In receive operations, theSSPBUF and SSPSR create a doubled bufferedreceiver. This allows reception of the next byte to beginbefore reading the last byte of received data. When thecomplete byte is received, it is transferred to theSSPBUF register and flag bit SSPIF is set. If anothercomplete byte is received before the SSPBUF registeris read, a receiver overflow has occurred and bitSSPOV (SSPCON1<6>) is set and the byte in theSSPSR is lost.
The SSPADD register holds the slave address. In10-bit mode, the user needs to write the high byte of theaddress (1111 0 A9 A8 0). Following the high byteaddress match, the low byte of the address needs to beloaded (A7:A0).
15.2.1 SLAVE MODE
In Slave mode, the SCL and SDA pins must be config-ured as inputs. The MSSP module will override theinput state with the output data when required (slave-transmitter).
When an address is matched or the data transfer afteran address match is received, the hardware automati-cally will generate the acknowledge (ACK) pulse andthen load the SSPBUF register with the received valuecurrently in the SSPSR register.
There are certain conditions that will cause the MSSPmodule not to give this ACK pulse. These are if either(or both):
a) The buffer full bit BF (SSPSTAT<0>) was setbefore the transfer was received.
b) The overflow bit SSPOV (SSPCON1<6>) wasset before the transfer was received.
If the BF bit is set, the SSPSR register value is notloaded into the SSPBUF, but bit SSPIF and SSPOV areset. Table 15-2 shows what happens when a datatransfer byte is received, given the status of bits BF andSSPOV. The shaded cells show the condition whereuser software did not properly clear the overflow condi-tion. Flag bit BF is cleared by reading the SSPBUF reg-ister, while bit SSPOV is cleared through software.
The SCL clock input must have a minimum high andlow time for proper operation. The high and low timesof the I2C specification, as well as the requirement ofthe MSSP module, are shown in timing parameter #100and parameter #101 of the Electrical Specifications.
DS30289B-page 144 2000 Microchip Technology Inc.
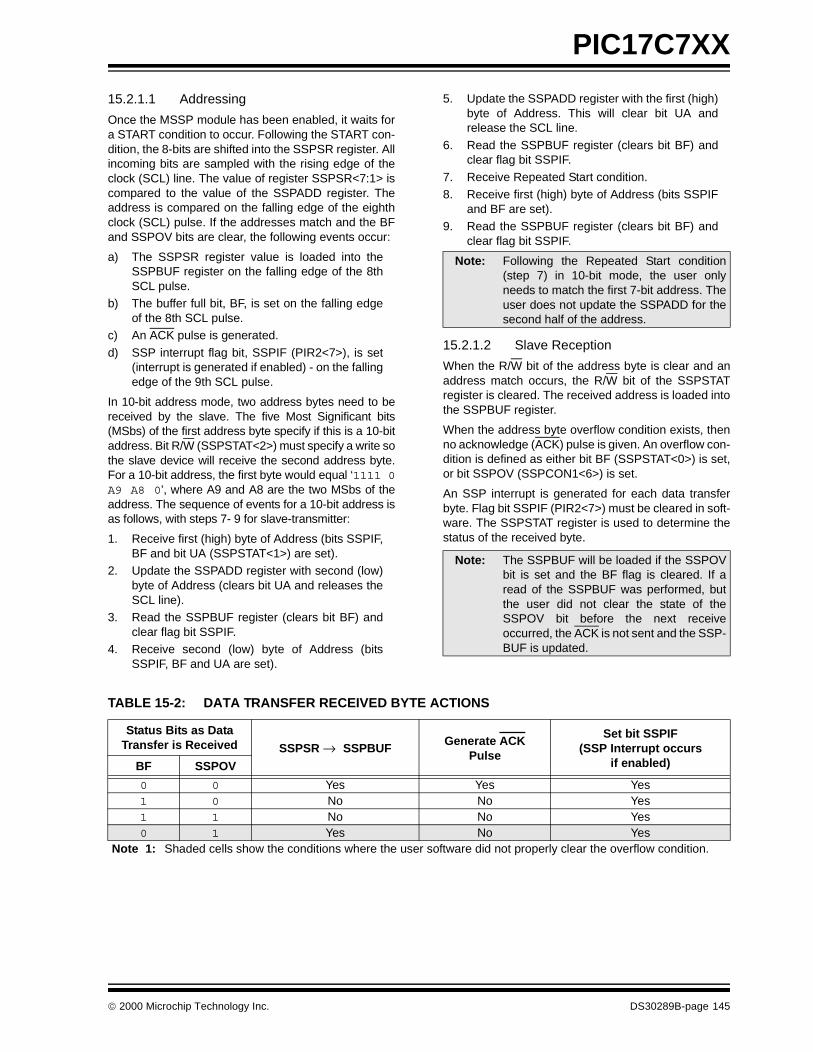
PIC17C7XX
15.2.1.1 Addressing
Once the MSSP module has been enabled, it waits fora START condition to occur. Following the START con-dition, the 8-bits are shifted into the SSPSR register. Allincoming bits are sampled with the rising edge of theclock (SCL) line. The value of register SSPSR<7:1> iscompared to the value of the SSPADD register. Theaddress is compared on the falling edge of the eighthclock (SCL) pulse. If the addresses match and the BFand SSPOV bits are clear, the following events occur:
a) The SSPSR register value is loaded into theSSPBUF register on the falling edge of the 8thSCL pulse.
b) The buffer full bit, BF, is set on the falling edgeof the 8th SCL pulse.
c) An ACK pulse is generated.
d) SSP interrupt flag bit, SSPIF (PIR2<7>), is set(interrupt is generated if enabled) - on the fallingedge of the 9th SCL pulse.
In 10-bit address mode, two address bytes need to bereceived by the slave. The five Most Significant bits(MSbs) of the first address byte specify if this is a 10-bitaddress. Bit R/W (SSPSTAT<2>) must specify a write sothe slave device will receive the second address byte.For a 10-bit address, the first byte would equal ‘1111 0A9 A8 0’, where A9 and A8 are the two MSbs of theaddress. The sequence of events for a 10-bit address isas follows, with steps 7- 9 for slave-transmitter:
1. Receive first (high) byte of Address (bits SSPIF,BF and bit UA (SSPSTAT<1>) are set).
2. Update the SSPADD register with second (low)byte of Address (clears bit UA and releases theSCL line).
3. Read the SSPBUF register (clears bit BF) andclear flag bit SSPIF.
4. Receive second (low) byte of Address (bitsSSPIF, BF and UA are set).
5. Update the SSPADD register with the first (high)byte of Address. This will clear bit UA andrelease the SCL line.
6. Read the SSPBUF register (clears bit BF) andclear flag bit SSPIF.
7. Receive Repeated Start condition.8. Receive first (high) byte of Address (bits SSPIF
and BF are set).9. Read the SSPBUF register (clears bit BF) and
clear flag bit SSPIF.
15.2.1.2 Slave Reception
When the R/W bit of the address byte is clear and anaddress match occurs, the R/W bit of the SSPSTATregister is cleared. The received address is loaded intothe SSPBUF register.
When the address byte overflow condition exists, thenno acknowledge (ACK) pulse is given. An overflow con-dition is defined as either bit BF (SSPSTAT<0>) is set,or bit SSPOV (SSPCON1<6>) is set.
An SSP interrupt is generated for each data transferbyte. Flag bit SSPIF (PIR2<7>) must be cleared in soft-ware. The SSPSTAT register is used to determine thestatus of the received byte.
TABLE 15-2: DATA TRANSFER RECEIVED BYTE ACTIONS
Note: Following the Repeated Start condition(step 7) in 10-bit mode, the user onlyneeds to match the first 7-bit address. Theuser does not update the SSPADD for thesecond half of the address.
Note: The SSPBUF will be loaded if the SSPOVbit is set and the BF flag is cleared. If aread of the SSPBUF was performed, butthe user did not clear the state of theSSPOV bit before the next receiveoccurred, the ACK is not sent and the SSP-BUF is updated.
Status Bits as DataTransfer is Received SSPSR → SSPBUF
Generate ACKPulse
Set bit SSPIF(SSP Interrupt occurs
if enabled)BF SSPOV
0 0 Yes Yes Yes1 0 No No Yes1 1 No No Yes0 1 Yes No Yes
Note 1: Shaded cells show the conditions where the user software did not properly clear the overflow condition.
2000 Microchip Technology Inc. DS30289B-page 145

PIC17C7XX
15.2.1.3 Slave Transmission
When the R/W bit of the incoming address byte is setand an address match occurs, the R/W bit of theSSPSTAT register is set. The received address isloaded into the SSPBUF register. The ACK pulse willbe sent on the ninth bit, and the SCL pin is held low.The transmit data must be loaded into the SSPBUFregister, which also loads the SSPSR register. ThenSCL pin should be enabled by setting bit CKP(SSPCON1<4>). The master must monitor the SCL pinprior to asserting another clock pulse. The slavedevices may be holding off the master by stretching theclock. The eight data bits are shifted out on the fallingedge of the SCL input. This ensures that the SDA sig-nal is valid during the SCL high time (Figure 15-13).
An SSP interrupt is generated for each data transferbyte. The SSPIF flag bit must be cleared in software,and the SSPSTAT register is used to determine the sta-tus of the byte transfer. The SSPIF flag bit is set on thefalling edge of the ninth clock pulse.
As a slave-transmitter, the ACK pulse from the master-receiver is latched on the rising edge of the ninth SCLinput pulse. If the SDA line was high (not ACK), thenthe data transfer is complete. When the not ACK islatched by the slave, the slave logic is reset and theslave then monitors for another occurrence of theSTART bit. If the SDA line was low (ACK), the transmitdata must be loaded into the SSPBUF register, whichalso loads the SSPSR register. Then, the SCL pinshould be enabled by setting the CKP bit.
FIGURE 15-12: I2C WAVEFORMS FOR RECEPTION (7-BIT ADDRESS)
FIGURE 15-13: I2C WAVEFORMS FOR TRANSMISSION (7-BIT ADDRESS)
P98765
D0D1D2D3D4D5D6D7
S
A7 A6 A5 A4 A3 A2 A1SDA
SCL 1 2 3 4 5 6 7 8 9 1 2 3 4 5 6 7 8 9 1 2 3 4
Bus MasterTerminatesTransfer
Bit SSPOV is set because the SSPBUF register is still full.
Cleared in softwareSSPBUF register is read
ACK Receiving DataReceiving Data
D0D1D2D3D4D5D6D7ACK
R/W = 0Receiving Address
SSPIF
BF (SSPSTAT<0>)
SSPOV (SSPCON1<6>)
ACK
ACK is not sent.
Not
SDA
SCL
SSPIF
BF (SSPSTAT<0>)
CKP (SSPCON1<4>)
A7 A6 A5 A4 A3 A2 A1ACK
D7 D6 D5 D4 D3 D2 D1 D0
Not ACKTransmitting DataR/W = 1
Receiving Address
1 2 3 4 5 6 7 8 9 1 2 3 4 5 6 7 8 9P
Cleared in softwareSSPBUF is written in software
From SSP InterruptService Routine
Set bit after writing to SSPBUF
SData in sampled
SCL held lowwhile CPU
responds to SSPIF
(the SSPBUF must be written tobefore the CKP bit can be set)
R/W = 0
DS30289B-page 146 2000 Microchip Technology Inc.

PIC17C7XX
FIGURE 15-14: I2C SLAVE-TRANSMITTER (10-BIT ADDRESS)
SD
A
SC
L
SS
PIF
BF
(S
SP
STA
T<
0>)
S1
23
45
67
89
12
34
56
78
91
23
45
78
9P
11
11
0A
9A
8A
7A
6A
5A
4A
3A
2A
1A
01
11
10
A8
R/W
=1
AC
KA
CK
R/W
= 0 AC
K
Rec
eive
Firs
t Byt
e of
Add
ress
Cle
ared
in s
oftw
are
Mas
ter
send
s N
AC
K
A9
6
(PIR
1<3>
)
Rec
eive
Sec
ond
Byt
e of
Add
ress
Cle
ared
by
hard
war
e w
hen
SS
PA
DD
is u
pdat
ed.
UA
(S
SP
STA
T<
1>)
Clo
ck is
hel
d lo
w u
ntil
upda
te o
f SS
PA
DD
has
ta
ken
plac
e
UA
is s
et in
dica
ting
that
the
SS
PA
DD
nee
ds to
be
upda
ted
UA
is s
et in
dica
ting
that
SS
PA
DD
nee
ds to
be
upda
ted
Cle
ared
by
hard
war
e w
hen
SS
PA
DD
is u
pdat
ed.
SS
PB
UF
is w
ritte
n w
ithco
nten
ts o
f SS
PS
RD
umm
y re
ad o
f SS
PB
UF
to c
lear
BF
flag
Rec
eive
Firs
t Byt
e of
Add
ress
12
34
57
89
D7
D6
D5
D4
D3
D1
AC
K
D2
6
Tra
nsm
ittin
g D
ata
Byt
e
D0
Dum
my
read
of S
SP
BU
Fto
cle
ar B
F fl
ag
Sr
Cle
ared
in s
oftw
are
Writ
e of
SS
PB
UF
initi
ates
tran
smit
Cle
ared
in s
oftw
are
Tra
nsm
it is
com
plet
e
CK
P h
as to
be
set f
or c
lock
to b
e re
leas
ed
Bus
Mas
ter
term
inat
estr
ansf
er
2000 Microchip Technology Inc. DS30289B-page 147

PIC17C7XX
FIGURE 15-15: I2C SLAVE-RECEIVER (10-BIT ADDRESS)
SD
A
SC
L
SS
PIF
BF
(S
SP
STA
T<
0>)
S1
23
45
67
89
12
34
56
78
91
23
45
78
9P
11
11
0A
9A
8A
7A
6A
5A
4A
3A
2A
1A
0D
7D
6D
5D
4D
3D
1D
0
Rec
eive
Dat
a B
yte
AC
K
R/W
= 0 A
CK
Rec
eive
Firs
t Byt
e of
Add
ress
Cle
ared
in s
oftw
are
Bus
Mas
ter
term
inat
estr
ansf
er
D2
6
(PIR
1<3>
)
Rec
eive
Sec
ond
Byt
e of
Add
ress
Cle
ared
by
hard
war
e w
hen
SS
PA
DD
is u
pdat
ed w
ith lo
wby
te o
f add
ress
.
UA
(S
SP
STA
T<
1>)
Clo
ck is
hel
d lo
w u
ntil
upda
te o
f SS
PA
DD
has
ta
ken
plac
e
UA
is s
et in
dica
ting
that
the
SS
PA
DD
nee
ds to
be
upda
ted
UA
is s
et in
dica
ting
that
SS
PA
DD
nee
ds to
be
upda
ted
SS
PB
UF
is w
ritte
n w
ithco
nten
ts o
f SS
PS
RD
umm
y re
ad o
f SS
PB
UF
to c
lear
BF
flag
AC
K
R/W
= 1
Cle
ared
in s
oftw
are
Dum
my
read
of S
SP
BU
Fto
cle
ar B
F fl
agR
ead
of S
SP
BU
Fcl
ears
BF
flag
Cle
ared
by
hard
war
e w
hen
SS
PA
DD
is u
pdat
ed w
ith h
igh
byte
of a
ddre
ss.
DS30289B-page 148 2000 Microchip Technology Inc.

PIC17C7XX
15.2.2 GENERAL CALL ADDRESS SUPPORT
The addressing procedure for the I2C bus is such thatthe first byte after the START condition usually deter-mines which device will be the slave addressed by themaster. The exception is the general call address,which can address all devices. When this address isused, all devices should, in theory, respond with anacknowledge.
The general call address is one of eight addressesreserved for specific purposes by the I2C protocol. Itconsists of all 0’s with R/W = 0.
The general call address is recognized when the Gen-eral Call Enable bit (GCEN) is enabled (SSPCON2<7>is set). Following a START bit detect, 8-bits are shiftedinto SSPSR and the address is compared againstSSPADD and is also compared to the general calladdress, fixed in hardware.
If the general call address matches, the SSPSR istransferred to the SSPBUF, the BF flag is set (eighthbit) and on the falling edge of the ninth bit (ACK bit), theSSPIF flag is set.
When the interrupt is serviced, the source for the inter-rupt can be checked by reading the contents of theSSPBUF to determine if the address was device spe-cific, or a general call address.
In 10-bit mode, the SSPADD is required to be updatedfor the second half of the address to match and the UAbit is set (SSPSTAT<1>). If the general call address issampled when GCEN is set, while the slave is config-ured in 10-bit address mode, then the second half ofthe address is not necessary, the UA bit will not be setand the slave will begin receiving data after theacknowledge (Figure 15-16).
FIGURE 15-16: SLAVE MODE GENERAL CALL ADDRESS SEQUENCE (7 OR 10-BIT MODE)
SDA
SCL
S
SSPIF
BF (SSPSTAT<0>)
SSPOV (SSPCON1<6>)
Cleared in Software
SSPBUF is Read
R/W = 0ACKGeneral Call Address
Address is compared to General Call Address
GCEN (SSPCON2<7>)
Receiving Data ACK
1 2 3 4 5 6 7 8 9 1 2 3 4 5 6 7 8 9
D7 D6 D5 D4 D3 D2 D1 D0
after ACK, set Interrupt
’0’
’1’
2000 Microchip Technology Inc. DS30289B-page 149

PIC17C7XX
15.2.3 SLEEP OPERATION
While in SLEEP mode, the I2C module can receiveaddresses or data and when an address match or com-plete byte transfer occurs, wake the processor fromSLEEP (if the SSP interrupt is enabled).
15.2.4 EFFECTS OF A RESET
A RESET disables the SSP module and terminates thecurrent transfer.
TABLE 15-3: REGISTERS ASSOCIATED WITH I2C OPERATION
Address Name Bit 7 Bit 6 Bit 5 Bit 4 Bit 3 Bit 2 Bit 1 Bit 0 POR, BOR MCLR, WDT
07h, Unbanked INTSTA PEIF T0CKIF T0IF INTF PEIE T0CKIE T0IE INTE 0000 0000 0000 0000
10h, Bank 4 PIR2 SSPIF BCLIF ADIF — CA4IF CA3IF TX2IF RC2IF 000- 0000 000- 0000
11h, Bank 4 PIE2 SSPIE BCLIE ADIE — CA4IE CA3IE TX2IE RC2IE 000- 0000 000- 0000
10h. Bank 6 SSPADD Synchronous Serial Port (I2C mode) Address Register 0000 0000 0000 0000
14h, Bank 6 SSPBUF Synchronous Serial Port Receive Buffer/Transmit Register xxxx xxxx uuuu uuuu
11h, Bank 6 SSPCON1 WCOL SSPOV SSPEN CKP SSPM3 SSPM2 SSPM1 SSPM0 0000 0000 0000 0000
12h, Bank 6 SSPCON2 GCEN ACKSTAT ACKDT ACKEN RCEN PEN RSEN SEN 0000 0000 0000 0000
13h, Bank 6 SSPSTAT SMP CKE D/A P S R/W UA BF 0000 0000 0000 0000
Legend: x = unknown, u = unchanged, - = unimplemented, read as '0'. Shaded cells are not used by the SSP in I2C mode.
DS30289B-page 150 2000 Microchip Technology Inc.

PIC17C7XX
15.2.5 MASTER MODE
Master mode of operation is supported by interruptgeneration on the detection of the START and STOPconditions. The STOP (P) and START (S) bits arecleared from a RESET, or when the MSSP module isdisabled. Control of the I2C bus may be taken when theP bit is set, or the bus is idle, with both the S and P bitsclear.
In Master mode, the SCL and SDA lines are manipu-lated by the MSSP hardware.
The following events will cause SSP Interrupt Flag bit,SSPIF, to be set (SSP Interrupt if enabled):
• START condition• STOP condition• Data transfer byte transmitted/received
• Acknowledge transmit• Repeated Start
FIGURE 15-17: SSP BLOCK DIAGRAM (I2C MASTER MODE)
Read Write
SSPSR
START bit, STOP bit,
SSPBUF
InternalData Bus
Set/Reset, S, P, WCOL (SSPSTAT)
ShiftClock
MSb LSb
SDA
AcknowledgeGenerate
SCL
SCL In
Bus Collision
SDA In
Rec
eive
Ena
ble
Clo
ck C
ntl
Clo
ck A
rbitr
ate/
WC
OL
Det
ect
(hol
d of
f clo
ck s
ourc
e)
SSPADD<6:0>
Baud
Set SSPIF, BCLIFReset ACKSTAT, PEN (SSPCON2)
RateGenerator
SSPM3:SSPM0
START bit Detect,STOP bit Detect
Write Collision DetectClock ArbitrationState Counter forend of XMIT/RCV
2000 Microchip Technology Inc. DS30289B-page 151

PIC17C7XX
15.2.6 MULTI-MASTER MODE
In Multi-Master mode, the interrupt generation on thedetection of the START and STOP conditions allowsthe determination of when the bus is free. The STOP(P) and START (S) bits are cleared from a RESET, orwhen the MSSP module is disabled. Control of the I2Cbus may be taken when bit P (SSPSTAT<4>) is set, orthe bus is idle, with both the S and P bits clear. Whenthe bus is busy, enabling the SSP interrupt will gener-ate the interrupt when the STOP condition occurs.
In Multi-Master operation, the SDA line must be moni-tored for arbitration, to see if the signal level is theexpected output level. This check is performed in hard-ware, with the result placed in the BCLIF bit.
The states where arbitration can be lost are:
• Address Transfer
• Data Transfer• A START Condition • A Repeated Start Condition
• An Acknowledge Condition
15.2.7 I2C MASTER MODE SUPPORT
Master mode is enabled by setting and clearing theappropriate SSPM bits in SSPCON1 and by setting theSSPEN bit. Once Master mode is enabled, the userhas six options.
• Assert a START condition on SDA and SCL.
• Assert a Repeated Start condition on SDA and SCL.
• Write to the SSPBUF register initiating transmission of data/address.
• Generate a STOP condition on SDA and SCL.• Configure the I2C port to receive data.• Generate an Acknowledge condition at the end of
a received byte of data.
15.2.7.1 I2C Master Mode Operation
The master device generates all of the serial clockpulses and the START and STOP conditions. A transferis ended with a STOP condition or with a RepeatedStart condition. Since the Repeated Start condition isalso the beginning of the next serial transfer, the I2Cbus will not be released.
In Master Transmitter mode, serial data is outputthrough SDA, while SCL outputs the serial clock. Thefirst byte transmitted contains the slave address of thereceiving device (7 bits) and the Read/Write (R/W) bit.In this case, the R/W bit will be logic '0'. Serial data istransmitted 8 bits at a time. After each byte is transmit-ted, an acknowledge bit is received. START and STOPconditions are output to indicate the beginning and theend of a serial transfer.
In Master Receive mode, the first byte transmitted con-tains the slave address of the transmitting device(7 bits) and the R/W bit. In this case, the R/W bit will belogic '1'. Thus, the first byte transmitted is a 7-bit slaveaddress, followed by a '1' to indicate receive bit. Serialdata is received via SDA, while SCL outputs the serialclock. Serial data is received 8 bits at a time. After eachbyte is received, an acknowledge bit is transmitted.START and STOP conditions indicate the beginningand end of transmission.
The baud rate generator used for SPI mode operationis now used to set the SCL clock frequency for either100 kHz, 400 kHz, or 1 MHz I2C operation. The baudrate generator reload value is contained in the lower 7bits of the SSPADD register. The baud rate generatorwill automatically begin counting on a write to the SSP-BUF. Once the given operation is complete (i.e., trans-mission of the last data bit is followed by ACK), theinternal clock will automatically stop counting and theSCL pin will remain in its last state
Note: The MSSP Module, when configured in I2CMaster mode, does not allow queueing ofevents. For instance: The user is notallowed to initiate a START condition andimmediately write the SSPBUF register toinitiate transmission before the STARTcondition is complete. In this case, theSSPBUF will not be written to and theWCOL bit will be set, indicating that a writeto the SSPBUF did not occur.
DS30289B-page 152 2000 Microchip Technology Inc.
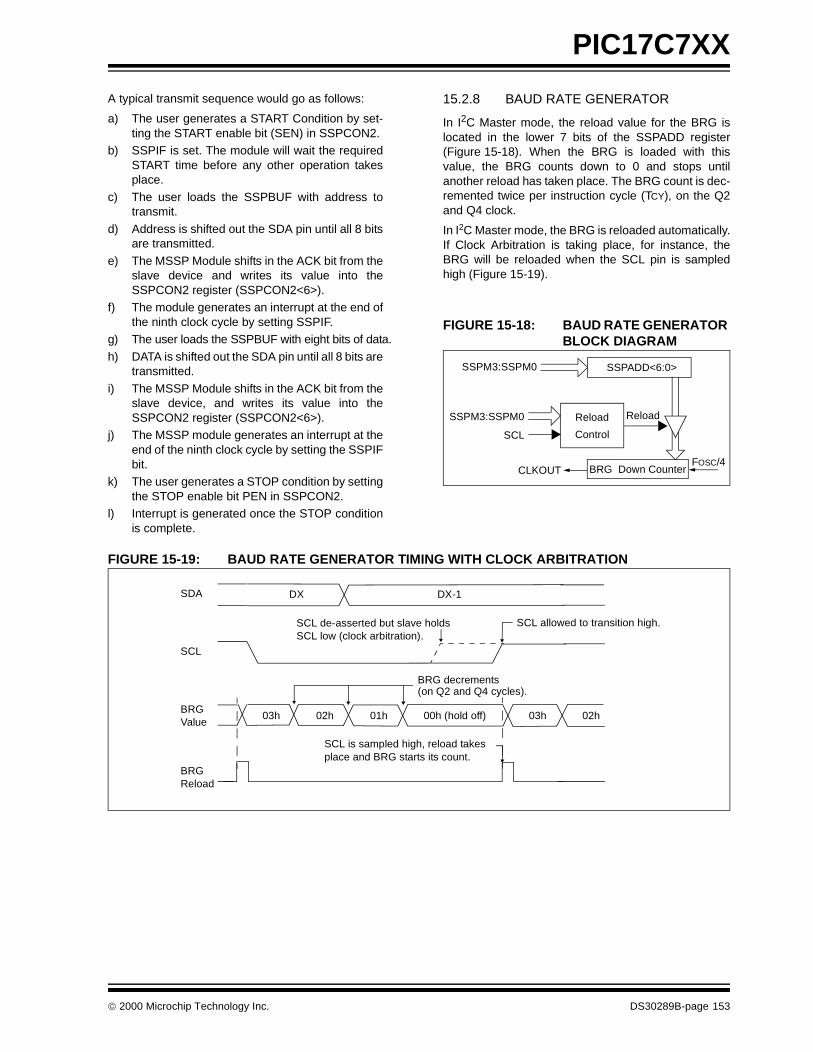
PIC17C7XX
A typical transmit sequence would go as follows:
a) The user generates a START Condition by set-ting the START enable bit (SEN) in SSPCON2.
b) SSPIF is set. The module will wait the requiredSTART time before any other operation takesplace.
c) The user loads the SSPBUF with address totransmit.
d) Address is shifted out the SDA pin until all 8 bitsare transmitted.
e) The MSSP Module shifts in the ACK bit from theslave device and writes its value into theSSPCON2 register (SSPCON2<6>).
f) The module generates an interrupt at the end ofthe ninth clock cycle by setting SSPIF.
g) The user loads the SSPBUF with eight bits of data.
h) DATA is shifted out the SDA pin until all 8 bits aretransmitted.
i) The MSSP Module shifts in the ACK bit from theslave device, and writes its value into theSSPCON2 register (SSPCON2<6>).
j) The MSSP module generates an interrupt at theend of the ninth clock cycle by setting the SSPIFbit.
k) The user generates a STOP condition by settingthe STOP enable bit PEN in SSPCON2.
l) Interrupt is generated once the STOP conditionis complete.
15.2.8 BAUD RATE GENERATOR
In I2C Master mode, the reload value for the BRG islocated in the lower 7 bits of the SSPADD register(Figure 15-18). When the BRG is loaded with thisvalue, the BRG counts down to 0 and stops untilanother reload has taken place. The BRG count is dec-remented twice per instruction cycle (TCY), on the Q2and Q4 clock.
In I2C Master mode, the BRG is reloaded automatically.If Clock Arbitration is taking place, for instance, theBRG will be reloaded when the SCL pin is sampledhigh (Figure 15-19).
FIGURE 15-18: BAUD RATE GENERATOR BLOCK DIAGRAM
FIGURE 15-19: BAUD RATE GENERATOR TIMING WITH CLOCK ARBITRATION
SSPM3:SSPM0
BRG Down CounterCLKOUTFOSC/4
SSPADD<6:0>
SSPM3:SSPM0
SCL
Reload
Control
Reload
SDA
SCL
SCL de-asserted but slave holds
DX-1DX
BRG
SCL is sampled high, reload takesplace and BRG starts its count.
03h 02h 01h 00h (hold off) 03h 02h
Reload
BRGValue
SCL low (clock arbitration).SCL allowed to transition high.
BRG decrements(on Q2 and Q4 cycles).
2000 Microchip Technology Inc. DS30289B-page 153

PIC17C7XX
15.2.9 I2C MASTER MODE START CONDITION TIMING
To initiate a START condition, the user sets the STARTcondition enable bit, SEN (SSPCON2<0>). If the SDAand SCL pins are sampled high, the baud rate genera-tor is reloaded with the contents of SSPADD<6:0> andstarts its count. If SCL and SDA are both sampled highwhen the baud rate generator times out (TBRG), theSDA pin is driven low. The action of the SDA beingdriven low while SCL is high is the START conditionand causes the S bit (SSPSTAT<3>) to be set. Follow-ing this, the baud rate generator is reloaded with thecontents of SSPADD<6:0> and resumes its count.When the baud rate generator times out (TBRG), theSEN bit (SSPCON2<0>) will be automatically clearedby hardware, the baud rate generator is suspended,leaving the SDA line held low and the START conditionis complete.
15.2.9.1 WCOL Status Flag
If the user writes the SSPBUF when a STARTsequence is in progress, then WCOL is set and thecontents of the buffer are unchanged (the write doesn’toccur).
FIGURE 15-20: FIRST START BIT TIMING
Note: If at the beginning of START condition, theSDA and SCL pins are already sampledlow, or if during the START condition, theSCL line is sampled low before the SDAline is driven low, a bus collision occurs.The Bus Collision Interrupt Flag (BCLIF) isset, the START condition is aborted andthe I2C module is reset into its IDLE state.
Note: Because queueing of events is notallowed, writing to the lower 5 bits ofSSPCON2 is disabled until the STARTcondition is complete.
SDA
SCL
S
TBRG
1st Bit 2nd Bit
TBRG
SDA = 1, At completion of START bit,SCL = 1
Write to SSPBUF occurs here.TBRG
Hardware clears SEN bit
TBRG
Write to SEN bit occurs here.Set S bit (SSPSTAT<3>)
and sets SSPIF bit.
DS30289B-page 154 2000 Microchip Technology Inc.

PIC17C7XX
FIGURE 15-21: START CONDITION FLOW CHART
Idle Mode
SEN (SSPCON2<0> = 1)
Bus Collision Detected,Set BCLIF, SDA = 1?
Load BRG with
Yes
BRGRollover?
Force SDA = 0,Load BRG with SSPADD<6:0>,
No
Yes
Force SCL = 0,
Clear SEN
Set S bit.
SSPADD<6:0>
SCL = 1?
SDA = 0?No
Yes
BRGRollover?
No
Clear SEN
START Condition Done,
No
Yes
Reset BRG
SCL= 0?
No
Yes
SCL = 0?No
Yes
Reset BRG
Release SCL,
SSPEN = 1,SSPCON1<3:0> = 1000
and set SSPIF
2000 Microchip Technology Inc. DS30289B-page 155

PIC17C7XX
15.2.10 I2C MASTER MODE REPEATED START CONDITION TIMING
A Repeated Start condition occurs when the RSEN bit(SSPCON2<1>) is programmed high and the I2C mod-ule is in the idle state. When the RSEN bit is set, theSCL pin is asserted low. When the SCL pin is sampledlow, the baud rate generator is loaded with the contentsof SSPADD<6:0> and begins counting. The SDA pin isreleased (brought high) for one baud rate generatorcount (TBRG). When the baud rate generator times out,if SDA is sampled high, the SCL pin will be de-asserted(brought high). When SCL is sampled high the baudrate generator is reloaded with the contents ofSSPADD<6:0> and begins counting. SDA and SCLmust be sampled high for one TBRG. This action is thenfollowed by assertion of the SDA pin (SDA is low) forone TBRG while SCL is high. Following this, the RSENbit in the SSPCON2 register will be automaticallycleared and the baud rate generator is not reloaded,leaving the SDA pin held low. As soon as a START con-dition is detected on the SDA and SCL pins, the S bit(SSPSTAT<3>) will be set. The SSPIF bit will not be setuntil the baud rate generator has timed out.
Immediately following the SSPIF bit getting set, theuser may write the SSPBUF with the 7-bit address in 7-bit mode, or the default first address in 10-bit mode.After the first eight bits are transmitted and an ACK isreceived, the user may then transmit an additional eightbits of address (10-bit mode), or eight bits of data (7-bitmode).
15.2.10.1 WCOL status flag
If the user writes the SSPBUF when a Repeated Startsequence is in progress, then WCOL is set and thecontents of the buffer are unchanged (the write doesn’toccur).
FIGURE 15-22: REPEAT START CONDITION WAVEFORM
Note 1: If the RSEN is programmed while anyother event is in progress, it will not takeeffect.
2: A bus collision during the Repeated Startcondition occurs if:
• SDA is sampled low when SCL goes from low to high.
• SCL goes low before SDA is asserted low. This may indicate that another master is attempting to transmit a data “1”.
Note: Because queueing of events is notallowed, writing of the lower 5 bits ofSSPCON2 is disabled until the RepeatedStart condition is complete.
SDA
SCL
Sr = Repeated Start
Write to SSPCON2
Write to SSPBUF occurs hereFalling edge of ninth clockEnd of Xmit
At completion of START bit, hardware clear RSEN bit
1st Bit
Set S (SSPSTAT<3>)
TBRG
TBRG
SDA = 1,
SDA = 1,
SCL (no change)
SCL = 1occurs here.
TBRG TBRG TBRG
and set SSPIF
DS30289B-page 156 2000 Microchip Technology Inc.

PIC17C7XX
FIGURE 15-23: REPEATED START CONDITION FLOW CHART (PAGE 1)
Idle Mode,SSPEN = 1,
Force SCL = 0
SCL = 0?
Release SDA,Load BRG with
SCL = 1?No
Yes
No
Yes
BRG
No
Yes
Release SCL
SSPCON1<3:0> = 1000
Rollover?
SSPADD<6:0>
Load BRG withSSPADD<6:0>
(Clock Arbitration)
A
B
C
SDA = 1?No
Yes
Start
RSEN = 1
Bus Collision,Set BCLIF,Release SDA,Clear RSEN
2000 Microchip Technology Inc. DS30289B-page 157

PIC17C7XX
FIGURE 15-24: REPEATED START CONDITION FLOW CHART (PAGE 2)
Force SDA = 0,Load BRG with SSPADD<6:0>
Yes
Repeated Start
Clear RSEN,
Yes
BRGRollover?
BRGRollover?
Yes
SDA = 0?No
SCL = 1?No
B
Set S
C A
No
No
Yes
Force SCL = 0,
Reset BRG
Set SSPIF.
SCL = ’0’?
Reset BRG
No
Yes
condition done,
DS30289B-page 158 2000 Microchip Technology Inc.

PIC17C7XX
15.2.11 I2C MASTER MODE TRANSMISSION
Transmission of a data byte, a 7-bit address, or eitherhalf of a 10-bit address, is accomplished by simply writ-ing a value to SSPBUF register. This action will set thebuffer full flag (BF) and allow the baud rate generator tobegin counting and start the next transmission. Each bitof address/data will be shifted out onto the SDA pinafter the falling edge of SCL is asserted (see data holdtime spec). SCL is held low for one baud rate generatorroll over count (TBRG). Data should be valid before SCLis released high (see Data setup time spec). When theSCL pin is released high, it is held that way for TBRG,the data on the SDA pin must remain stable for thatduration and some hold time after the next falling edgeof SCL. After the eighth bit is shifted out (the fallingedge of the eighth clock), the BF flag is cleared and themaster releases SDA, allowing the slave device beingaddressed to respond with an ACK bit during the ninthbit time, if an address match occurs or if data wasreceived properly. The status of ACK is read into theACKDT on the falling edge of the ninth clock. If themaster receives an acknowledge, the acknowledgestatus bit (AKSTAT) is cleared. If not, the bit is set. Afterthe ninth clock, the SSPIF is set and the master clock(baud rate generator) is suspended until the next databyte is loaded into the SSPBUF, leaving SCL low andSDA unchanged (Figure 15-26).
After the write to the SSPBUF, each bit of address willbe shifted out on the falling edge of SCL until all sevenaddress bits and the R/W bit are completed. On the fall-ing edge of the eighth clock, the master will de-assertthe SDA pin, allowing the slave to respond with anacknowledge. On the falling edge of the ninth clock, themaster will sample the SDA pin to see if the addresswas recognized by a slave. The status of the ACK bit isloaded into the ACKSTAT status bit (SSPCON2<6>).Following the falling edge of the ninth clock transmis-sion of the address, the SSPIF is set, the BF flag iscleared and the baud rate generator is turned off untilanother write to the SSPBUF takes place, holding SCLlow and allowing SDA to float.
15.2.11.1 BF Status Flag
In Transmit mode, the BF bit (SSPSTAT<0>) is setwhen the CPU writes to SSPBUF and is cleared whenall 8 bits are shifted out.
15.2.11.2 WCOL Status Flag
If the user writes the SSPBUF when a transmit isalready in progress (i.e., SSPSR is still shifting out adata byte), then WCOL is set and the contents of thebuffer are unchanged (the write doesn’t occur).
WCOL must be cleared in software.
15.2.11.3 AKSTAT Status Flag
In Transmit mode, the AKSTAT bit (SSPCON2<6>) iscleared when the slave has sent an acknowledge (ACK= 0) and is set when the slave does not acknowledge(ACK = 1). A slave sends an acknowledge when it hasrecognized its address (including a general call), orwhen the slave has properly received its data.
2000 Microchip Technology Inc. DS30289B-page 159

PIC17C7XX
FIGURE 15-25: MASTER TRANSMIT FLOW CHART
Idle Mode
Num_Clocks = 0,
Release SDA soSlave can drive ACK,Num_Clocks
Load BRG with
SDA = Current Data bit
Yes
BRGRollover?
NoBRG
No
Yes
Force SCL = 0
= 8?
Yes
No
Yes
BRGRollover?
No
Force SCL = 1,Stop BRG
SCL = 1?
Load BRG with
Count High Time
Rollover?No
Read SDA and place intoACKSTAT bit (SSPCON2<6>)
Force SCL = 0,
SCL = 1?
SDA =Data bit?
No
Yes
Yes
Rollover?
No
Yes
Stop BRG,Force SCL = 1
(Clock Arbitration)(Clock Arbitration)
Num_Clocks= Num_Clocks + 1
Bus Collision Detected
Set BCLIF, Hold Prescale Off,
Yes
No
BF = 1
Force BF = 0
SSPADD<6:0>, Start BRG Count,
Load BRG withSSPADD<6:0>, start BRG count
SSPADD<6:0>,
Load BRG with
Count SCL High TimeSSPADD<6:0>,
SDA =Data bit?
Yes
No
Clear XMIT Enable
SCL = 0?No
Yes
Reset BRG
Write SSPBUF
Set SSPIF
DS30289B-page 160 2000 Microchip Technology Inc.

PIC17C7XX
FIGURE 15-26: I2C MASTER MODE TIMING (TRANSMISSION, 7 OR 10-BIT ADDRESS)
SD
A
SC
L
SS
PIF
BF
(S
SP
STA
T<
0>)
SE
N
A7
A6
A5
A4
A3
A2
A1
AC
K =
0D
7D
6D
5D
4D
3D
2D
1D
0
AC
KT
rans
mitt
ing
Dat
a or
Sec
ond
Hal
fR
/W =
0T
rans
mit
Add
ress
to S
lave
12
34
56
78
91
23
45
67
89
P
Cle
ared
in S
oftw
are
Ser
vice
Rou
tine
SS
PB
UF
is W
ritte
n in
Sof
twar
e
Fro
m S
SP
inte
rrup
t
Afte
r S
TAR
T C
ondi
tion
SE
N C
lear
ed b
y H
ardw
are.
S
SS
PB
UF
Writ
ten
with
7-b
it A
ddre
ss a
nd R
/WS
tart
Tra
nsm
it
SC
L he
ld lo
ww
hile
CP
UR
espo
nds
to S
SP
IF
SE
N =
0
of 1
0-bi
t Add
ress
Writ
e S
SP
CO
N2<
0> S
EN
= 1
STA
RT
Con
ditio
n B
egin
sF
rom
Sla
ve C
lear
AC
KS
TAT
bit
SS
PC
ON
2<6>
AC
KS
TAT
in
SS
PC
ON
2 =
1
Cle
ared
in S
oftw
are
SS
PB
UF
Writ
ten
PE
N
Cle
ared
in S
oftw
are
R/W
2000 Microchip Technology Inc. DS30289B-page 161

PIC17C7XX
15.2.12 I2C MASTER MODE RECEPTION
Master mode reception is enabled by programming thereceive enable bit, RCEN (SSPCON2<3>).
The baud rate generator begins counting and on eachrollover, the state of the SCL pin changes (high to low/low to high) and data is shifted into the SSPSR. Afterthe falling edge of the eighth clock, the receive enableflag is automatically cleared, the contents of theSSPSR are loaded into the SSPBUF, the BF flag is set,the SSPIF is set and the baud rate generator is sus-pended from counting, holding SCL low. The SSP isnow in IDLE state, awaiting the next command. Whenthe buffer is read by the CPU, the BF flag is automati-cally cleared. The user can then send an acknowledgebit at the end of reception, by setting the acknowledgesequence enable bit, ACKEN (SSPCON2<4>).
15.2.12.1 BF Status Flag
In receive operation, BF is set when an address or databyte is loaded into SSPBUF from SSPSR. It is clearedwhen SSPBUF is read.
15.2.12.2 SSPOV Status Flag
In receive operation, SSPOV is set when 8 bits arereceived into the SSPSR, and the BF flag is already setfrom a previous reception.
15.2.12.3 WCOL Status Flag
If the user writes the SSPBUF when a receive isalready in progress (i.e., SSPSR is still shifting in a databyte), then WCOL is set and the contents of the bufferare unchanged (the write doesn’t occur).
Note: The SSP Module must be in an IDLESTATE before the RCEN bit is set, or theRCEN bit will be disregarded.
DS30289B-page 162 2000 Microchip Technology Inc.

PIC17C7XX
FIGURE 15-27: MASTER RECEIVER FLOW CHART
Idle Mode
Num_Clocks = 0,Release SDA
Force SCL=0,
Yes
NoBRGRollover?
Release SCL
Yes
NoSCL = 1?
Load BRG with
Yes
NoBRGRollover?
(Clock Arbitration)
Load BRG w/
Start Count
SSPADD<6:0>, Start Count.
Sample SDA,Shift Data into SSPSR
Num_Clocks= Num_Clocks + 1
Yes
Num_Clocks= 8?
No
Force SCL = 0,Set SSPIF,
Set BF.Move Contents of SSPSR
into SSPBUF,Clear RCEN.
RCEN = 1
SSPADD<6:0>,
SCL = 0?
Yes
No
2000 Microchip Technology Inc. DS30289B-page 163

PIC17C7XX
FIGURE 15-28: I2C MASTER MODE TIMING (RECEPTION 7-BIT ADDRESS)
P9
87
65
D0
D1
D2
D3
D4
D5
D6
D7
S
A7
A6
A5
A4
A3
A2
A1
SD
A
SC
L1
23
45
67
89
12
34
56
78
91
23
4
Bus
Mas
ter
Term
inat
esT
rans
fer
AC
K
Rec
eivi
ng D
ata
from
Sla
veR
ecei
ving
Dat
a fr
om S
lave
D0
D1
D2
D3
D4
D5
D6
D7
AC
K
R/W
= 1
Tra
nsm
it A
ddre
ss to
Sla
ve
SS
PIF
BF
AC
K is
Not
Sen
t
Writ
e to
SS
PC
ON
2<0>
(SE
N =
1)
Writ
e to
SS
PB
UF
Occ
urs
Her
eA
CK
from
Sla
veMas
ter
Con
figur
ed a
s a
Rec
eive
rby
Pro
gram
min
g S
SP
CO
N2<
3>, (
RC
EN
= 1
)P
EN
bit
= 1
Writ
ten
Her
e
Dat
a S
hifte
d in
on
Fal
ling
Edg
e of
CLK
Cle
ared
in S
oftw
are
Sta
rt X
MIT
SE
N =
0
SS
PO
V
SD
A =
0,
SC
L =
1w
hile
CP
U
(SS
PS
TAT
<0>
)
AC
K
Last
bit
is s
hifte
d in
to S
SP
SR
and
cont
ents
are
unl
oade
d in
to S
SP
BU
F
Cle
ared
in S
oftw
are
Cle
ared
in s
oftw
are
Set
SS
PIF
inte
rrup
tat
end
of r
ecei
ve
Set
P b
it (S
SP
STA
T<
4>)
and
SS
PIF
Cle
ared
inS
oftw
are
AC
K fr
om M
aste
r
Set
SS
PIF
at E
nd
Set
SS
PIF
Inte
rrup
tat
End
of A
ckno
wle
dge
Seq
uenc
e
Set
SS
PIF
Inte
rrup
tat
End
of A
ckno
w-
ledg
e se
quen
ce
of R
ecei
ve
Set
AC
KE
N, S
tart
Ack
now
ledg
e S
eque
nce
SS
PO
V is
Set
Bec
ause
SS
PB
UF
is S
till F
ull
SD
A =
AC
KD
T =
1
RC
EN
Cle
ared
Aut
omat
ical
lyR
CE
N =
1 S
tart
Nex
t Rec
eive
Writ
e to
SS
PC
ON
2<4>
to S
tart
Ack
now
ledg
e S
eque
nce
SD
A =
AC
KD
T (
SS
PC
ON
2<5>
) =
0
RC
EN
cle
ared
auto
mat
ical
ly
Res
pond
s to
SS
PIF
AC
KE
N
Beg
in S
TAR
T C
ondi
tion
Cle
ared
in s
oftw
are
SD
A =
AC
KD
T =
0
DS30289B-page 164 2000 Microchip Technology Inc.

PIC17C7XX
15.2.13 ACKNOWLEDGE SEQUENCE TIMING
An acknowledge sequence is enabled by setting theacknowledge sequence enable bit, ACKEN(SSPCON2<4>). When this bit is set, the SCL pin ispulled low and the contents of the acknowledge data bitis presented on the SDA pin. If the user wishes to gen-erate an acknowledge, then the ACKDT bit should becleared. If not, the user should set the ACKDT bitbefore starting an acknowledge sequence. The baudrate generator then counts for one rollover period(TBRG), and the SCL pin is de-asserted (pulled high).When the SCL pin is sampled high (clock arbitration),the baud rate generator counts for TBRG. The SCL pinis then pulled low. Following this, the ACKEN bit isautomatically cleared, the baud rate generator is turnedoff and the SSP module then goes into IDLE mode(Figure 15-29).
15.2.13.1 WCOL Status Flag
If the user writes the SSPBUF when an acknowledgesequence is in progress, then WCOL is set and thecontents of the buffer are unchanged (the write doesn’toccur).
FIGURE 15-29: ACKNOWLEDGE SEQUENCE WAVEFORM
Note: TBRG = one baud rate generator period.
SDA
SCL
Set SSPIF at the End
Acknowledge Sequence Starts Here,Write to SSPCON2 ACKEN Automatically Cleared
Cleared inof Receive
ACK
8
ACKEN = 1, ACKDT = 0
D0
9
SSPIF
Software
Set SSPIF at the Endof Acknowledge Sequence
Cleared inSoftware
TBRG TBRG
2000 Microchip Technology Inc. DS30289B-page 165

PIC17C7XX
FIGURE 15-30: ACKNOWLEDGE FLOW CHART
Idle Mode
Force SCL = 0
Yes
No SCL = 0?
Drive ACKDT bit
Yes
No BRGRollover?
(SSPCON2<5>)onto SDA pin,
Load BRG with SSPADD<6:0>,
Start Count.
Force SCL = 1
Yes
No SCL = 1?
NoACKDT = 1?
Load BRG with
No
BRGRollover?
SSPADD <6:0>,Start Count.
No
SDA = 1?
Bus Collision Detected,Set BCLIF,
Yes
Force SCL = 0,
(Clock Arbitration)
Clear ACKEN
No
SCL = 0? Reset BRG Clear ACKEN
Set ACKEN
Release SCL,
Yes
Yes
Yes
Set SSPIF
DS30289B-page 166 2000 Microchip Technology Inc.

PIC17C7XX
15.2.14 STOP CONDITION TIMING
A STOP bit is asserted on the SDA pin at the end of areceive/transmit by setting the Stop Sequence Enablebit PEN (SSPCON2<2>). At the end of a receive/transmit the SCL line is held low after the falling edgeof the ninth clock. When the PEN bit is set, the masterwill assert the SDA line low. When the SDA line is sam-pled low, the baud rate generator is reloaded andcounts down to ‘0’. When the baud rate generator timesout, the SCL pin will be brought high and one TBRG
(baud rate generator rollover count) later, the SDA pinwill be de-asserted. When the SDA pin is sampled highwhile SCL is high, the P bit (SSPSTAT<4>) is set. ATBRG later, the PEN bit is cleared and the SSPIF bit isset (Figure 15-31).
Whenever the firmware decides to take control of thebus, it will first determine if the bus is busy by checkingthe S and P bits in the SSPSTAT register. If the bus isbusy, then the CPU can be interrupted (notified) whena STOP bit is detected (i.e., bus is free).
15.2.14.1 WCOL Status Flag
If the user writes the SSPBUF when a STOP sequenceis in progress, then WCOL is set and the contents of thebuffer are unchanged (the write doesn’t occur).
FIGURE 15-31: STOP CONDITION RECEIVE OR TRANSMIT MODE
SCL
SDA
SDA asserted low before rising edge of clock
Write to SSPCON2Set PEN
Falling Edge of
SCL = 1 for TBRG, followed by SDA = 1 for TBRG
9th Clock
SCL brought high after TBRG.
Note: TBRG = one baud rate generator period.
TBRG TBRG
after SDA sampled high. P bit (SSPSTAT<4>) is set.
TBRG
to setup STOP condition.
ACK
PTBRG
PEN bit (SSPCON2<2>) is cleared by hardware and the SSPIF bit is set.
2000 Microchip Technology Inc. DS30289B-page 167

PIC17C7XX
FIGURE 15-32: STOP CONDITION FLOW CHART
Idle Mode,SSPEN = 1,
Force SDA = 0SCL Doesn’t Change
SDA = 0?
De-assert SCL,SCL = 1
SCL = 1?No
Yes
Start BRG
No
Yes
BRG
SDA going from0 to 1 while SCL = 1
No
Yes
Set SSPIF,
Release SDA,Start BRG
STOP Condition done,
SSPCON1<3:0> = 1000
Rollover?
NoBRGRollover?
Yes
P bit Set?No
Yes
Bus Collision Detected,Set BCLIF,Clear PEN
Start BRG
No
Yes
BRGRollover?
(Clock Arbitration)
PEN = 1
PEN cleared
DS30289B-page 168 2000 Microchip Technology Inc.

PIC17C7XX
15.2.15 CLOCK ARBITRATION
Clock arbitration occurs when the master, during anyreceive, transmit, or Repeated Start/Stop condition, de-asserts the SCL pin (SCL allowed to float high). Whenthe SCL pin is allowed to float high, the baud rate gen-erator (BRG) is suspended from counting until the SCLpin is actually sampled high. When the SCL pin is sam-pled high, the baud rate generator is reloaded with thecontents of SSPADD<6:0> and begins counting. Thisensures that the SCL high time will always be at leastone BRG rollover count, in the event that the clock isheld low by an external device (Figure 15-33).
15.2.16 SLEEP OPERATION
While in SLEEP mode, the I2C module can receiveaddresses or data and when an address match or com-plete byte transfer occurs, wake the processor fromSLEEP (if the SSP interrupt is enabled).
15.2.17 EFFECTS OF A RESET
A RESET disables the SSP module and terminates thecurrent transfer.
FIGURE 15-33: CLOCK ARBITRATION TIMING IN MASTER TRANSMIT MODE
SCL
SDA
BRG Overflow,Release SCL,If SCL = 1 Load BRG withSSPADD<6:0>, and Start Count BRG overflow occurs,
Release SCL, Slave device holds SCL low.SCL = 1 BRG starts countingclock high interval.
SCL line sampled once every machine cycle (TOSC • 4).Hold off BRG until SCL is sampled high.
TBRG TBRG TBRG
to measure high time interval.
2000 Microchip Technology Inc. DS30289B-page 169

PIC17C7XX
15.2.18 MULTI -MASTER COMMUNICATION, BUS COLLISION AND BUS ARBITRATION
Multi-Master mode support is achieved by bus arbitra-tion. When the master outputs address/data bits ontothe SDA pin, arbitration takes place when the masteroutputs a ’1’ on SDA, by letting SDA float high andanother master asserts a ’0’. When the SCL pin floatshigh, data should be stable. If the expected data onSDA is a ’1’ and the data sampled on the SDA pin = ’0’,then a bus collision has taken place. The master willset the Bus Collision Interrupt Flag, BCLIF and resetthe I2C port to its IDLE state (Figure 15-34).
If a transmit was in progress when the bus collisionoccurred, the transmission is halted, the BF flag iscleared, the SDA and SCL lines are de-asserted andthe SSPBUF can be written to. When the user ser-vices the bus collision Interrupt Service Routine and ifthe I2C bus is free, the user can resume communica-tion by asserting a START condition.
If a START, Repeated Start, STOP, or Acknowledgecondition was in progress when the bus collisionoccurred, the condition is aborted, the SDA and SCLlines are de-asserted and the respective control bits inthe SSPCON2 register are cleared. When the userservices the bus collision Interrupt Service Routine,and if the I2C bus is free, the user can resume commu-nication by asserting a START condition.
The master will continue to monitor the SDA and SCLpins and if a STOP condition occurs, the SSPIF bit willbe set.
A write to the SSPBUF will start the transmission ofdata at the first data bit, regardless of where the trans-mitter left off when bus collision occurred.
In Multi-Master mode, the interrupt generation on thedetection of START and STOP conditions allows thedetermination of when the bus is free. Control of theI2C bus can be taken when the P bit is set in the SSP-STAT register, or the bus is idle and the S and P bitsare cleared.
FIGURE 15-34: BUS COLLISION TIMING FOR TRANSMIT AND ACKNOWLEDGE
SDA
SCL
BCLIF
SDA released
SDA line pulled lowby another source.
Sample SDA. While SCL is highdata doesn’t match what is driven
Bus collision has occurred.
Set bus collisioninterrupt.
by the master.
by master.
Data changeswhile SCL = 0.
DS30289B-page 170 2000 Microchip Technology Inc.

PIC17C7XX
15.2.18.1 Bus Collision During a START Condition
During a START condition, a bus collision occurs if:
a) SDA or SCL are sampled low at the beginning ofthe START condition (Figure 15-35).
b) SCL is sampled low before SDA is asserted low(Figure 15-36).
During a START condition, both the SDA and the SCLpins are monitored.
If:
the SDA pin is already lowor the SCL pin is already low,
then:
the START condition is aborted, and the BCLIF flag is set,and the SSP module is reset to its IDLE state(Figure 15-35).
The START condition begins with the SDA and SCLpins de-asserted. When the SDA pin is sampled high,the baud rate generator is loaded from SSPADD<6:0>and counts down to ‘0’. If the SCL pin is sampled lowwhile SDA is high, a bus collision occurs, because it isassumed that another master is attempting to drive adata '1' during the START condition.
If the SDA pin is sampled low during this count, theBRG is reset and the SDA line is asserted early(Figure 15-37). If, however, a '1' is sampled on the SDApin, the SDA pin is asserted low at the end of the BRGcount. The baud rate generator is then reloaded andcounts down to 0 and during this time, if the SCL pin issampled as '0', a bus collision does not occur. At theend of the BRG count, the SCL pin is asserted low.
FIGURE 15-35: BUS COLLISION DURING START CONDITION (SDA ONLY)
Note: The reason that bus collision is not a factorduring a START condition is that no twobus masters can assert a START conditionat the exact same time. Therefore, onemaster will always assert SDA before theother. This condition does not cause a buscollision because the two masters must beallowed to arbitrate the first address follow-ing the START condition and if the addressis the same, arbitration must be allowed tocontinue into the data portion, RepeatedStart, or Stop conditions.
SDA
SCL
SEN
SDA sampled low before
SDA goes low before the SEN bit is set.
S bit and SSPIF set because
SSP module reset into IDLE state.SEN cleared automatically because of bus collision.
S bit and SSPIF set because
Set SEN, enable STARTcondition if SDA = 1, SCL=1.
SDA = 0, SCL = 1.
BCLIF
S
SSPIF
SDA = 0, SCL = 1.
SSPIF and BCLIF arecleared in software.
SSPIF and BCLIF arecleared in software.
. Set BCLIF,
START condition. Set BCLIF.
2000 Microchip Technology Inc. DS30289B-page 171

PIC17C7XX
FIGURE 15-36: BUS COLLISION DURING START CONDITION (SCL = 0)
FIGURE 15-37: BRG RESET DUE TO SDA COLLISION DURING START CONDITION
SDA
SCL
SENBus collision occurs, Set BCLIF.SCL = 0 before SDA = 0,
Set SEN, enable STARTsequence if SDA = 1, SCL = 1.
TBRG TBRG
SDA = 0, SCL = 1
BCLIF
S
SSPIF
Interrupts clearedin software.
Bus collision occurs, Set BCLIF.SCL = 0 before BRG time-out,
’0’
’0’
’0’
’0’
SDA
SCL
SEN
Set S
Set SEN, enable STARTsequence if SDA = 1, SCL = 1.
Less than TBRGTBRG
SDA = 0, SCL = 1
BCLIF
S
SSPIF
S
Interrupts clearedin software.Set SSPIF.
SDA = 0, SCL = 1
SDA pulled low by other master.Reset BRG and assert SDA.
SCL pulled low after BRGTime-out.
Set SSPIF
’0’
DS30289B-page 172 2000 Microchip Technology Inc.

PIC17C7XX
15.2.18.2 Bus Collision During a Repeated Start Condition
During a Repeated Start condition, a bus collisionoccurs if:
a) A low level is sampled on SDA when SCL goesfrom low level to high level.
b) SCL goes low before SDA is asserted low, indi-cating that another master is attempting to trans-mit a data ’1’.
When the user de-asserts SDA and the pin is allowedto float high, the BRG is loaded with SSPADD<6:0>and counts down to ‘0’. The SCL pin is then de-asserted and when sampled high, the SDA pin is sam-pled. If SDA is low, a bus collision has occurred (i.e.,another master is attempting to transmit a data ’0’). If,however, SDA is sampled high, then the BRG is
reloaded and begins counting. If SDA goes from high tolow before the BRG times out, no bus collision occursbecause no two masters can assert SDA at exactly thesame time.
If, however, SCL goes from high to low before the BRGtimes out and SDA has not already been asserted, thena bus collision occurs. In this case, another master isattempting to transmit a data ’1’ during the RepeatedStart condition.
If, at the end of the BRG time-out, both SCL and SDAare still high, the SDA pin is driven low, the BRG isreloaded and begins counting. At the end of the count,regardless of the status of the SCL pin, the SCL pin isdriven low and the Repeated Start condition is com-plete (Figure 15-38).
FIGURE 15-38: BUS COLLISION DURING A REPEATED START CONDITION (CASE 1)
FIGURE 15-39: BUS COLLISION DURING REPEATED START CONDITION (CASE 2)
SDA
SCL
RSEN
BCLIF
S
SSPIF
Sample SDA when SCL goes high.If SDA = 0, set BCLIF and release SDA and SCL.
Cleared in software.’0’
’0’
’0’
’0’
SDA
SCL
BCLIF
RSEN
S
SSPIF
Interrupt clearedin software.
SCL goes low before SDA,Set BCLIF. Release SDA and SCL.
TBRG TBRG
’0’
’0’
’0’
’0’
2000 Microchip Technology Inc. DS30289B-page 173

PIC17C7XX
15.2.18.3 Bus Collision During a STOP Condition
Bus collision occurs during a STOP condition if:
a) After the SDA pin has been de-asserted andallowed to float high, SDA is sampled low afterthe BRG has timed out.
b) After the SCL pin is de-asserted, SCL is sam-pled low before SDA goes high.
The STOP condition begins with SDA asserted low.When SDA is sampled low, the SCL pin is allowed tofloat. When the pin is sampled high (clock arbitration),the baud rate generator is loaded with SSPADD<6:0>and counts down to ‘0’. After the BRG times out, SDAis sampled. If SDA is sampled low, a bus collision hasoccurred. This is due to another master attempting todrive a data '0'. If the SCL pin is sampled low beforeSDA is allowed to float high, a bus collision occurs. Thisis another case of another master attempting to drive adata '0' (Figure 15-40).
FIGURE 15-40: BUS COLLISION DURING A STOP CONDITION (CASE 1)
FIGURE 15-41: BUS COLLISION DURING A STOP CONDITION (CASE 2)
SDA
SCL
BCLIF
PEN
P
SSPIF
TBRG TBRG TBRG
SDA asserted low.
SDA sampledlow after TBRG,Set BCLIF.
’0’
’0’
’0’
’0’
SDA
SCL
BCLIF
PEN
P
SSPIF
TBRG TBRG TBRG
Assert SDA. SCL goes low before SDA goes high.Set BCLIF.
’0’
’0’
DS30289B-page 174 2000 Microchip Technology Inc.

PIC17C7XX
15.3 Connection Considerations for I2C Bus
For standard mode I2C bus devices, the values ofresistors Rp Rs in Figure 15-42 depends on the follow-ing parameters:
• Supply voltage• Bus capacitance
• Number of connected devices (input current + leakage current)
The supply voltage limits the minimum value of resistorRp due to the specified minimum sink current of 3 mAat VOL max = 0.4V for the specified output stages. For
example, with a supply voltage of VDD = 5V +10% andVOL max = 0.4V at 3 mA, Rp min = (5.5-0.4)/0.003 =1.7 kΩ. VDD as a function of Rp is shown in Figure 15-42. The desired noise margin of 0.1 VDD for the lowlevel, limits the maximum value of Rs. Series resistorsare optional and used to improve ESD susceptibility.
The bus capacitance is the total capacitance of wire,connections and pins. This capacitance limits the max-imum value of Rp due to the specified rise time(Figure 15-42).
The SMP bit is the slew rate control enabled bit. This bitis in the SSPSTAT register and controls the slew rate ofthe I/O pins when in I2C mode (master or slave).
FIGURE 15-42: SAMPLE DEVICE CONFIGURATION FOR I2C BUS
RpRp
VDD + 10%
SDA
SCL
Note: I2C devices with input levels related to VDD must have one common supply line to which the pull-up resistor is
DEVICE
Cb = 10 - 400 pF
RsRs
also connected.
2000 Microchip Technology Inc. DS30289B-page 175

PIC17C7XX
15.4 Example Program
Example 15-2 shows MPLAB® C17 ’C’ code for usingthe I2C module in Master mode to communicate with a24LC01B serial EEPROM. This example uses thePICmicro® ’C’ libraries included with MPLAB C17.
EXAMPLE 15-2: INTERFACING TO A 24LC01B SERIAL EEPROM (USING MPLAB C17)
// Include necessary header files#include <p17c756.h> // Processor header file#include <delays.h> // Delay routines header file#include <stdlib.h> // Standard Library header file#include <i2c16.h> // I2C routines header file
#define CONTROL 0xa0 // Control byte definition for 24LC01B
// Function declarationsvoid main(void);void WritePORTD(static unsigned char data);void ByteWrite(static unsigned char address,static unsigned char data);unsigned char ByteRead(static unsigned char address);void ACKPoll(void);
// Main programvoid main(void)static unsigned char address; // I2C address of 24LC01Bstatic unsigned char datao; // Data written to 24LC01Bstatic unsigned char datai; // Data read from 24LC01B
address = 0; // Preset address to 0 OpenI2C(MASTER,SLEW_ON); // Configure I2C Module Master mode, Slew rate control on SSPADD = 39; // Configure clock for 100KHz
while(address<128) // Loop 128 times, 24LC01B is 128x8 datao = PORTB; do ByteWrite(address,datao); // Write data to EEPROM ACKPoll(); // Poll the 24LC01B for state datai = ByteRead(address); // Read data from EEPROM into SSPBUF while(datai != datao); // Loop as long as data not correctly // written to 24LC01B
address++; // Increment address while(1) // Done writing 128 bytes to 24LC01B, Loop forever Nop();
DS30289B-page 176 2000 Microchip Technology Inc.

PIC17C7XX
// Writes the byte data to 24LC01B at the specified addressvoid ByteWrite(static unsigned char address, static unsigned char data) StartI2C(); // Send start bit IdleI2C(); // Wait for idle condition WriteI2C(CONTROL); // Send control byte IdleI2C(); // Wait for idle condition if (!SSPCON2bits.ACKSTAT) // If 24LC01B ACKs WriteI2C(address); // Send control byte IdleI2C(); // Wait for idle condition
if (!SSPCON2bits.ACKSTAT) // If 24LC01B ACKs WriteI2C(data); // Send data IdleI2C(); // Wait for idle condition StopI2C(); // Send stop bit IdleI2C(); // Wait for idle condition return;
// Reads a byte of data from 24LC01B at the specified addressunsigned char ByteRead(static unsigned char address) StartI2C(); // Send start bit IdleI2C(); // Wait for idle condition WriteI2C(CONTROL); // Send control byte IdleI2C(); // Wait for idle condition if (!SSPCON2bits.ACKSTAT) // If the 24LC01B ACKs WriteI2C(address); // Send address IdleI2C(); // Wait for idle condition if (!SSPCON2bits.ACKSTAT) // If the 24LC01B ACKs RestartI2C(); // Send restart IdleI2C(); // Wait for idle condition WriteI2C(CONTROL+1); // Send control byte with R/W set IdleI2C(); // Wait for idle condition if (!SSPCON2bits.ACKSTAT) // If the 24LC01B ACKs getcI2C(); // Read a byte of data from 24LC01B IdleI2C(); // Wait for idle condition NotAckI2C(); // Send a NACK to 24LC01B IdleI2C(); // Wait for idle condition StopI2C(); // Send stop bit IdleI2C(); // Wait for idle condition return(SSPBUF);
EXAMPLE 15-2: INTERFACING TO A 24LC01B SERIAL EEPROM (USING MPLAB C17)
2000 Microchip Technology Inc. DS30289B-page 177

PIC17C7XX
void ACKPoll(void) StartI2C(); // Send start bit IdleI2C(); // Wait for idle condition WriteI2C(CONTROL); // Send control byte IdleI2C(); // Wait for idle condition // Poll the ACK bit coming from the 24LC01B // Loop as long as the 24LC01B NACKs while (SSPCON2bits.ACKSTAT) RestartI2C(); // Send a restart bit IdleI2C(); // Wait for idle condition WriteI2C(CONTROL); // Send control byte IdleI2C(); // Wait for idle condition IdleI2C(); // Wait for idle condition StopI2C(); // Send stop bit IdleI2C(); // Wait for idle condition return;
EXAMPLE 15-2: INTERFACING TO A 24LC01B SERIAL EEPROM (USING MPLAB C17)
DS30289B-page 178 2000 Microchip Technology Inc.

PIC17C7XX
16.0 ANALOG-TO-DIGITAL CONVERTER (A/D) MODULE
The analog-to-digital (A/D) converter module hastwelve analog inputs for the PIC17C75X devices andsixteen for the PIC17C76X devices.
The analog input charges a sample and hold capacitor.The output of the sample and hold capacitor is the inputinto the converter. The converter then generates a dig-ital result of this analog level via successive approxima-tion. This A/D conversion of the analog input signal,results in a corresponding 10-bit digital number.
The analog reference voltages (positive and negativesupply) are software selectable to either the device’ssupply voltages (AVDD, AVss), or the voltage level onthe RG3/AN0/VREF+ and RG2/AN1/VREF- pins.
The A/D converter has a unique feature of being ableto operate while the device is in SLEEP mode. To oper-ate in SLEEP, the A/D clock must be derived from theA/D’s internal RC oscillator.
The A/D module has four registers. These registersare:
• A/D Result High Register (ADRESH)• A/D Result Low Register (ADRESL)
• A/D Control Register0 (ADCON0)• A/D Control Register1 (ADCON1)
The ADCON0 register, shown in Register 16-1, con-trols the operation of the A/D module. The ADCON1register, shown in Register 16-2, configures the func-tions of the port pins. The port pins can be configuredas analog inputs (RG3 and RG2 can also be the volt-age references), or as digital I/O.
REGISTER 16-1: ADCON0 REGISTER (ADDRESS: 14h, BANK 5)
R/W-0 R/W-0 R/W-0 R/W-0 U-0 R/W-0 U-0 R/W-0
CHS3 CHS2 CHS1 CHS0 — GO/DONE — ADON
bit 7 bit 0
bit 7-4 CHS3:CHS0: Analog Channel Select bits0000 = channel 0, (AN0) 0001 = channel 1, (AN1)0010 = channel 2, (AN2)0011 = channel 3, (AN3)0100 = channel 4, (AN4)0101 = channel 5, (AN5)0110 = channel 6, (AN6)0111 = channel 7, (AN7)1000 = channel 8, (AN8)1001 = channel 9, (AN9) 1010 = channel 10, (AN10)1011 = channel 11, (AN11) 1100 = channel 12, (AN12) (PIC17C76X only)1101 = channel 13, (AN13) (PIC17C76X only)1110 = channel 14, (AN14) (PIC17C76X only)1111 = channel 15, (AN15) (PIC17C76X only)11xx = RESERVED, do not select (PIC17C75X only)
bit 3 Unimplemented: Read as ’0’
bit 2 GO/DONE: A/D Conversion Status bit
If ADON = 1:1 = A/D conversion in progress (setting this bit starts the A/D conversion, which is automatically
cleared by hardware when the A/D conversion is complete)0 = A/D conversion not in progress
bit 1 Unimplemented: Read as ’0’
bit 0 ADON: A/D On bit1 = A/D converter module is operating0 = A/D converter module is shut-off and consumes no operating current
Legend:
R = Readable bit W = Writable bit U = Unimplemented bit, read as ‘0’
- n = Value at POR Reset ’1’ = Bit is set ’0’ = Bit is cleared x = Bit is unknown
2000 Microchip Technology Inc. DS30289B-page 179

PIC17C7XX
REGISTER 16-2: ADCON1 REGISTER (ADDRESS 15h, BANK 5)R/W-0 R/W-0 R/W-0 U-0 R/W-0 R/W-0 R/W-0 R/W-0
ADCS1 ADCS0 ADFM — PCFG3 PCFG2 PCFG1 PCFG0
bit 7 bit 0
bit 7-6 ADCS1:ADCS0: A/D Conversion Clock Select bits00 = FOSC/801 = FOSC/3210 = FOSC/6411 = FRC (clock derived from an internal RC oscillator)
bit 5 ADFM: A/D Result Format Select1 = Right justified. 6 Most Significant bits of ADRESH are read as ’0’.0 = Left justified. 6 Least Significant bits of ADRESL are read as ’0’.
bit 4 Unimplemented: Read as '0'
bit 3-1 PCFG3:PCFG1: A/D Port Configuration Control bits
bit 0 PCFG0: A/D Voltage Reference Select bit 1 = A/D reference is the VREF+ and VREF- pins0 = A/D reference is AVDD and AVSS
Note: When this bit is set, ensure that the A/D voltage reference specifications are met.
Legend:
R = Readable bit W = Writable bit U = Unimplemented bit, read as ‘0’
- n = Value at POR Reset ’1’ = Bit is set ’0’ = Bit is cleared x = Bit is unknown
A = Analog input D = Digital I/O
PCFG3:PCFG0 AN15 AN14 AN13 AN12 AN11 AN10 AN9 AN8 AN7 AN6 AN5 AN4 AN3 AN2 AN1 AN0
000x A A A A A A A A A A A A A A A A
001x D A A A A A A A D A A A A A A A
010x D D A A A A A A D D A A A A A A
011x D D D A A A A A D D D A A A A A
100x D D D D A A A A D D D D A A A A
101x D D D D D A A A D D D D D A A A
110x D D D D D D A A D D D D D D A A
111x D D D D D D D D D D D D D D D D
DS30289B-page 180 2000 Microchip Technology Inc.

PIC17C7XX
The ADRESH:ADRESL registers contain the 10-bitresult of the A/D conversion. When the A/D conversionis complete, the result is loaded into this A/D result reg-ister pair, the GO/DONE bit (ADCON0<2>) is clearedand A/D interrupt flag bit, ADIF is set. The blockdiagrams of the A/D module are shown in Figure 16-1.After the A/D module has been configured as desired,the selected channel must be acquired before the con-version is started. The analog input channels musthave their corresponding DDR bits selected as inputs.To determine sample time, see Section 16.1. After thisacquisition time has elapsed, the A/D conversion canbe started. The following steps should be followed fordoing an A/D conversion:
1. Configure the A/D module:a) Configure analog pins/voltage reference/
and digital I/O (ADCON1)b) Select A/D input channel (ADCON0)
c) Select A/D conversion clock (ADCON0)d) Turn on A/D module (ADCON0)
2. Configure A/D interrupt (if desired):a) Clear ADIF bit
b) Set ADIE bit c) Clear GLINTD bit
3. Wait the required acquisition time.
4. Start conversion:a) Set GO/DONE bit (ADCON0)
5. Wait for A/D conversion to complete, by either:
a) Polling for the GO/DONE bit to be cleared
OR
b) Waiting for the A/D interrupt6. Read A/D Result register pair
(ADRESH:ADRESL), clear bit ADIF, if required.7. For next conversion, go to step 1 or step 2, as
required. The A/D conversion time per bit isdefined as TAD. A minimum wait of 2TAD isrequired before next acquisition starts.
FIGURE 16-1: A/D BLOCK DIAGRAM
(Input Voltage)
VIN
VREF-
(ReferenceVoltage)
AVDD
PCFG0
CHS3:CHS0
AN7
AN6
AN5
AN4
AN3
AN2
AN1/VREF-
AN0/VREF+
0111
0110
0101
0100
0011
0010
0001
0000
A/DConverter
AN11
AN10
AN9
AN8
1011
1010
1001
1000
VREF+
AVSS
AN12(1)1011
AN13(1)1011
AN14(1)1011
AN15(1)1011
Note 1: These channels are only available on PIC16C76X devices.
2000 Microchip Technology Inc. DS30289B-page 181

PIC17C7XX
Figure 16-2 shows the conversion sequence and theterms that are used. Acquisition time is the time that theA/D module’s holding capacitor is connected to theexternal voltage level. Then, there is the conversiontime of 12 TAD, which is started when the GO bit is set.The sum of these two times is the sampling time. Thereis a minimum acquisition time to ensure that the holdingcapacitor is charged to a level that will give the desiredaccuracy for the A/D conversion.
FIGURE 16-2: A/D CONVERSION SEQUENCE
Acquisition Time A/D Conversion Time
A/D Sample Time
When A/D holding capacitor starts to charge. After A/D conversion, or when new A/D channel is selected.
When A/D conversion is started(setting the GO bit).
A/D conversion complete, result is loaded in ADRES register.Holding capacitor begins acquiring voltage level on selectedchannel, ADIF bit is set.
DS30289B-page 182 2000 Microchip Technology Inc.

PIC17C7XX
16.1 A/D Acquisition Requirements
For the A/D converter to meet its specified accuracy,the charge holding capacitor (CHOLD) must be allowedto fully charge to the input channel voltage level. Theanalog input model is shown in Figure 16-3. Thesource impedance (RS) and the internal samplingswitch (RSS) impedance directly affect the timerequired to charge the capacitor CHOLD. The samplingswitch (RSS) impedance varies over the device voltage(VDD), Figure 16-3. The maximum recommendedimpedance for analog sources is 10 kΩ. As theimpedance is decreased, the acquisition time may bedecreased. After the analog input channel is selected(changed) this acquisition must be done before theconversion can be started.
To calculate the minimum acquisition time,Equation 16-1 may be used. This equation assumesthat 1/2 LSb error is used (1024 steps for the A/D). The1/2 LSb error is the maximum error allowed for the A/Dto meet its specified resolution.
Example 16-1 shows the calculation of the minimumrequired acquisition time (TACQ). This is based on thefollowing application system assumptions.
CHOLD = 120 pF Rs = 10 kΩ Conversion Error ≤ 1/2 LSb VDD = 5V → Rss = 7 kΩ
(see graph in Figure 16-3)Temperature = 50°C (system max.) VHOLD = 0V @ time = 0
EQUATION 16-1: ACQUISITION TIME
EQUATION 16-2: A/D MINIMUM CHARGING TIME
EXAMPLE 16-1: CALCULATING THE MINIMUM REQUIRED ACQUISITION TIME
TACQ = Amplifier Settling Time + Holding Capacitor Charging Time + Temperature Coefficient
= TAMP + TC + TCOFF
VHOLD = (VREF - (VREF/2048)) • (1 - e(-Tc/CHOLD(RIC + RSS + RS))) or TC = -(120 pF)(1 kΩ + RSS + RS) ln(1/2047)
TACQ = TAMP + TC + TCOFF
Temperature coefficient is only required for temperatures > 25°C.
TACQ = 2 µs + Tc + [(Temp - 25°C)(0.05 µs/°C)]
TC = -CHOLD (RIC + RSS + RS) ln(1/2047) -120 pF (1 kΩ + 7 kΩ + 10 kΩ) ln(0.0004885) -120 pF (18 kΩ) ln(0.0004885) -2.16 µs (-7.6241) 16.47 µs
TACQ = 2 µs + 16.47 µs + [(50×C - 25°C)(0.05 µs/°C)] 18.447 µs + 1.25 µs 19.72 µs
Note 1: The reference voltage (VREF) has no effect on the equation since it cancels itself out.
2: The charge holding capacitor (CHOLD) is not discharged after each conversion.
3: The maximum recommended impedance for analog sources is 10 kΩ. This is required to meet the pin leakage specification.
4: After a conversion has completed, a 2.0 TAD delay must complete before acquisition can begin again. During this time, the holding capacitor is not connected to the selected A/D input channel.
2000 Microchip Technology Inc. DS30289B-page 183

PIC17C7XX
FIGURE 16-3: ANALOG INPUT MODEL
CPINVA
RS ANx
5 pF
VDD
VT = 0.6V
VT = 0.6VI leakage
RIC ≤ 1k
SamplingSwitch
SS RSS
CHOLD= DAC capacitance
VSS
6V
Sampling Switch
5V4V3V2V
5 6 7 8 9 10 11
( kΩ )
VDD
= 120 pF± 500 nA
Legend CPIN
VT
I leakage
RIC
SSCHOLD
= input capacitance= threshold voltage= leakage current at the pin due to
= interconnect resistance= sampling switch= sample/hold capacitance (from DAC)
various junctions
DS30289B-page 184 2000 Microchip Technology Inc.

PIC17C7XX
16.2 Selecting the A/D Conversion Clock
The A/D conversion time per bit is defined as TAD. TheA/D conversion requires a minimum 12TAD per 10-bitconversion. The source of the A/D conversion clock issoftware selected. The four possible options for TAD
are:
• 8TOSC
• 32TOSC
• 64TOSC • Internal RC oscillator
For correct A/D conversions, the A/D conversion clock(TAD) must be selected to ensure a minimum TAD timeof 1.6 µs.
Table 16-1 and Table 16-2 show the resultant TAD timesderived from the device operating frequencies and theA/D clock source selected. These times are for stan-dard voltage range devices.
TABLE 16-1: TAD vs. DEVICE OPERATING FREQUENCIES (STANDARD DEVICES (C))
TABLE 16-2: TAD vs. DEVICE OPERATING FREQUENCIES (EXTENDED VOLTAGE DEVICES (LC))
AD Clock Source (TAD) Max FOSC
(MHz)Operation ADCS1:ADCS0
8TOSC 00 5
32TOSC 01 20
64TOSC 10 33
RC 11 —
Note: When the device frequency is greater than 1 MHz, the RC A/D conversion clock source is only recommended for SLEEP operation.
AD Clock Source (TAD) Max FOSC
(MHz)Operation ADCS1:ADCS0
8TOSC 00 2.67
32TOSC 01 10.67
64TOSC 10 21.33
RC 11 —
Note: When the device frequency is greater than 1 MHz, the RC A/D conversion clock source is only recommended for SLEEP operation.
2000 Microchip Technology Inc. DS30289B-page 185

PIC17C7XX
16.3 Configuring Analog Port Pins
The ADCON1, and DDR registers control the operationof the A/D port pins. The port pins that are desired asanalog inputs must have their corresponding DDR bitsset (input). If the DDR bit is cleared (output), the digitaloutput level (VOH or VOL) will be converted.
The A/D operation is independent of the state of theCHS2:CHS0 bits and the DDR bits.
16.4 A/D Conversions
Example 16-2 shows how to perform an A/D conver-sion. The PORTF and lower four PORTG pins are con-figured as analog inputs. The analog references(VREF+ and VREF-) are the device AVDD and AVSS. TheA/D interrupt is enabled, and the A/D conversion clockis FRC. The conversion is performed on the RG3/AN0pin (channel 0).
Clearing the GO/DONE bit during a conversion willabort the current conversion. The A/D result registerpair will NOT be updated with the partially completed A/D conversion sample. That is, the ADRESH:ADRESLregisters will continue to contain the value of the lastcompleted conversion (or the last value written to theADRESH:ADRESL registers). After the A/D conversionis aborted, a 2TAD wait is required before the nextacquisition is started. After this 2TAD wait, acquisitionon the selected channel is automatically started.
In Figure 16-4, after the GO bit is set, the first time seg-ment has a minimum of TCY and a maximum of TAD.
EXAMPLE 16-2: A/D CONVERSION
FIGURE 16-4: A/D CONVERSION TAD CYCLES
Note 1: When reading the port register, any pinconfigured as an analog input channel willread as cleared (a low level). Pins config-ured as digital inputs, will convert an ana-log input. Analog levels on a digitallyconfigured input will not affect the conver-sion accuracy.
2: Analog levels on any pin that is defined asa digital input (including the AN15:AN0pins), may cause the input buffer to con-sume current that is out of the devicesspecification.
Note: The GO/DONE bit should NOT be set inthe same instruction that turns on the A/D.
MOVLB 5 ; Bank 5 CLRF ADCON1, F ; Configure A/D inputs, All analog, TAD = Fosc/8, left just. MOVLW 0x01 ; A/D is on, Channel 0 is selected MOVWF ADCON0 ; MOVLB 4 ; Bank 4 BCF PIR2, ADIF ; Clear A/D interrupt flag bit BSF PIE2, ADIE ; Enable A/D interrupts BSF INTSTA, PEIE ; Enable peripheral interrupts BCF CPUSTA, GLINTD ; Enable all interrupts ; ; Ensure that the required sampling time for the selected input channel has elapsed. ; Then the conversion may be started. ; MOVLB 5 ; Bank 5 BSF ADCON0, GO ; Start A/D Conversion : ; The ADIF bit will be set and the GO/DONE bit : ; is cleared upon completion of the A/D Conversion
TAD1 TAD2 TAD3 TAD4 TAD5 TAD6 TAD7 TAD8 TAD9
Set GO bit
Holding capacitor is disconnected from analog input (typically 100 ns).
holding capacitor is connected to analog input.
b9 b8 b7 b6 b5 b4 b3 b2
TAD10 TAD11
b1 b0
TCY to TAD
GO bit is cleared,Next Q4: ADRES is loaded,
ADIF bit is set,
Conversion starts.
DS30289B-page 186 2000 Microchip Technology Inc.

PIC17C7XX
FIGURE 16-5: FLOW CHART OF A/D OPERATION
Acquire
ADON = 0
ADON = 0?
GO = 0?
A/D Clock
GO = 0,ADIF = 0
Abort Conversion
SLEEPPower-down A/D Wait 2TAD
Wake-up
Yes
No
Yes
No
No
Yes
Finish ConversionGO = 0,ADIF = 1
Device in
No
Yes
Finish ConversionGO = 0,ADIF = 1
Wait 2TAD
Stay in SLEEP
Selected Channel
= RC?SLEEP
No
Yes
Instruction?Start of A/D
Conversion Delayed1 Instruction Cycle
From SLEEP?
Power-down A/D
Yes
No
Wait 2TAD
Finish ConversionGO = 0,ADIF = 1
SLEEP?
2000 Microchip Technology Inc. DS30289B-page 187

PIC17C7XX
16.4.1 A/D RESULT REGISTERS
The ADRESH:ADRESL register pair is the locationwhere the 10-bit A/D result is loaded at the completionof the A/D conversion. This register pair is 16-bits wide.The A/D module gives the flexibility to left or right justifythe 10-bit result in the 16-bit result register. The A/DFormat Select bit (ADFM) controls this justification.Figure 16-6 shows the operation of the A/D result justi-fication. The extra bits are loaded with ’0’s’. When an A/D result will not overwrite these locations (A/D disable),these registers may be used as two general purpose 8-bit registers.
16.5 A/D Operation During SLEEP
The A/D module can operate during SLEEP mode. Thisrequires that the A/D clock source be set to RC(ADCS1:ADCS0 = 11). When the RC clock source isselected, the A/D module waits one instruction cyclebefore starting the conversion. This allows the SLEEPinstruction to be executed, which eliminates all digitalswitching noise from the conversion. When the conver-sion is completed, the GO/DONE bit will be cleared,and the result loaded into the ADRES register. If the A/D interrupt is enabled, the device will wake-up from
SLEEP. If the A/D interrupt is not enabled, the A/D mod-ule will then be turned off, although the ADON bit willremain set.
When the A/D clock source is another clock option (notRC), a SLEEP instruction will cause the present conver-sion to be aborted and the A/D module to be turned off,though the ADON bit will remain set.
Turning off the A/D places the A/D module in its lowestcurrent consumption state.
16.6 Effects of a RESET
A device RESET forces all registers to their RESETstate. This forces the A/D module to be turned off, andany conversion is aborted.
The value that is in the ADRESH:ADRESL registers isnot modified for a Power-on Reset. TheADRESH:ADRESL registers will contain unknown dataafter a Power-on Reset.
FIGURE 16-6: A/D RESULT JUSTIFICATION
Note: For the A/D module to operate in SLEEP,the A/D clock source must be set to RC(ADCS1:ADCS0 = 11). To allow the con-version to occur during SLEEP, ensure theSLEEP instruction immediately follows theinstruction that sets the GO/DONE bit.
10-Bit Result
ADRESH ADRESL
0000 00
ADFM = 0
02 1 0 77
10-bits
RESULT
ADRESH ADRESL
10-bits
0000 00
7 0 7 6 5 0
RESULT
ADFM = 1
Right Justified Left Justified
DS30289B-page 188 2000 Microchip Technology Inc.

PIC17C7XX
16.7 A/D Accuracy/Error
In systems where the device frequency is low, use ofthe A/D RC clock is preferred. At moderate to high fre-quencies, TAD should be derived from the device oscil-lator.
The absolute accuracy specified for the A/D converterincludes the sum of all contributions for quantizationerror, integral error, differential error, full scale error, off-set error, and monotonicity. It is defined as the maxi-mum deviation from an actual transition versus an idealtransition for any code. The absolute error of the A/Dconverter is specified at < ±1 LSb for VDD = VREF (overthe device’s specified operating range). However, theaccuracy of the A/D converter will degrade as VREF
diverges from VDD.
For a given range of analog inputs, the output digitalcode will be the same. This is due to the quantization ofthe analog input to a digital code. Quantization error istypically ± 1/2 LSb and is inherent in the analog to dig-ital conversion process. The only way to reduce quan-tization error is to increase the resolution of the A/Dconverter or oversample.
Offset error measures the first actual transition of acode versus the first ideal transition of a code. Offseterror shifts the entire transfer function. Offset error canbe calibrated out of a system or introduced into a sys-tem through the interaction of the total leakage currentand source impedance at the analog input.
Gain error measures the maximum deviation of the lastactual transition and the last ideal transition adjustedfor offset error. This error appears as a change in slopeof the transfer function. The difference in gain error tofull scale error is that full scale does not take offset errorinto account. Gain error can be calibrated out in soft-ware.
Linearity error refers to the uniformity of the codechanges. Linearity errors cannot be calibrated out ofthe system. Integral non-linearity error measures theactual code transition versus the ideal code transition,adjusted by the gain error for each code.
Differential non-linearity measures the maximum actualcode width versus the ideal code width. This measureis unadjusted.
The maximum pin leakage current is specified in theDevice Data Sheet electrical specification (Table 20-2,parameter #D060).
In systems where the device frequency is low, use ofthe A/D RC clock is preferred. At moderate to high fre-quencies, TAD should be derived from the device oscil-lator. TAD must not violate the minimum and should beminimized to reduce inaccuracies due to noise andsampling capacitor bleed off.
In systems where the device will enter SLEEP modeafter the start of the A/D conversion, the RC clocksource selection is required. In this mode, the digitalnoise from the modules in SLEEP are stopped. Thismethod gives high accuracy.
16.8 Connection Considerations
If the input voltage exceeds the rail values (VSS or VDD)by greater than 0.3V, then the accuracy of the conver-sion is out of specification.
An external RC filter is sometimes added for anti-aliasing of the input signal. The R component should beselected to ensure that the total source impedance iskept under the 10 kΩ recommended specification. Anyexternal components connected (via hi-impedance) toan analog input pin (capacitor, zener diode, etc.) shouldhave very little leakage current at the pin.
16.9 Transfer Function
The transfer function of the A/D converter is as follows:the first transition occurs when the analog input voltage(VAIN) equals Analog VREF / 1024 (Figure 16-7).
FIGURE 16-7: A/D TRANSFER FUNCTION
Dig
ital C
ode
Out
put3FEh
003h
002h
001h
000h
0.5
LSb
1 LS
b
1.5
LSb
2 LS
b
2.5
LSb
1022
LS
b
1022
.5 L
Sb
3 LS
b
Analog Input Voltage
3FFh
1023
LS
b
1023
.5 L
Sb
2000 Microchip Technology Inc. DS30289B-page 189

PIC17C7XX
16.10 References
A good reference for understanding A/D converter is the"Analog-Digital Conversion Handbook" third edition,published by Prentice Hall (ISBN 0-13-03-2848-0).
TABLE 16-3: REGISTERS/BITS ASSOCIATED WITH A/D
Address Name Bit 7 Bit 6 Bit 5 Bit 4 Bit 3 Bit 2 Bit 1 Bit 0 POR,BOR MCLR, WDT
06h, unbanked CPUSTA — — STAKAV GLINTD TO PD POR BOR --11 1100 --11 qq11
07h, unbanked INTSTA PEIF T0CKIF T0IF INTF PEIE T0CKIE T0IE INTE 0000 0000 0000 0000
10h, Bank 4 PIR2 SSPIF BCLIF ADIF — CA4IF CA3IF TX2IF RC2IF 000- 0010 000- 0010
11h, Bank 4 PIE2 SSPIE BCLIE ADIE — CA4IE CA3IE TX2IE RC2IE 000- 0000 000- 0000
10h, Bank 5 DDRF Data Direction Register for PORTF 1111 1111 1111 1111
11h, Bank 5 PORTF RF7/AN11
RF6/AN10
RF5/AN9
RF4/AN8
RF3/AN7
RF2/AN6
RF1/AN5
RF0/AN4 0000 0000 0000 0000
12h, Bank 5 DDRG Data Direction register for PORTG 1111 1111 1111 1111
13h, Bank 5 PORTGRG7/
TX2/CK2RG6/
RX2/DT2RG5/
PWM3RG4/CAP3
RG3/AN0/VREF+
RG2/AN1/VREF-
RG1/AN2
RG0/AN3 xxxx 0000 uuuu 0000
14h, Bank 5 ADCON0 CHS3 CHS2 CHS1 CHS0 — GO/DONE — ADON 0000 -0-0 0000 -0-0
15h, Bank 5 ADCON1 ADCS1 ADCS0 ADFM — PCFG3 PCFG2 PCFG1 PCFG0 000- 0000 000- 0000
16h, Bank 5 ADRESL A/D Result Low Register xxxx xxxx uuuu uuuu
17h, Bank 5 ADRESH A/D Result High Register xxxx xxxx uuuu uuuu
Legend: x = unknown, u = unchanged, - = unimplemented, read as '0'. Shaded cells are not used for A/D conversion.
Note: Other (non power-up) RESETS include: external RESET through MCLR and Watchdog Timer Reset.
DS30289B-page 190 2000 Microchip Technology Inc.

PIC17C7XX
17.0 SPECIAL FEATURES OF THE CPU
What sets a microcontroller apart from other proces-sors are special circuits to deal with the needs of real-time applications. The PIC17CXXX family has a host ofsuch features intended to maximize system reliability,minimize cost through elimination of external compo-nents, provide power saving operating modes and offercode protection. These are:
• Oscillator Selection (Section 4.0)• RESET (Section 5.0)
- Power-on Reset (POR)
- Power-up Timer (PWRT)- Oscillator Start-up Timer (OST)- Brown-out Reset (BOR)
• Interrupts (Section 6.0)• Watchdog Timer (WDT)• SLEEP mode
• Code protection
The PIC17CXXX has a Watchdog Timer which can beshut-off only through EPROM bits. It runs off its own RCoscillator for added reliability. There are two timers thatoffer necessary delays on POR and BOR. One is theOscillator Start-up Timer (OST), intended to keep thechip in RESET until the crystal oscillator is stable. Theother is the Power-up Timer (PWRT), which provides afixed delay of 96 ms (nominal) on power-up only,designed to keep the part in RESET while the powersupply stabilizes. With these two timers on-chip, mostapplications need no external RESET circuitry.
The SLEEP mode is designed to offer a very low cur-rent power-down mode. The user can wake fromSLEEP through external RESET, Watchdog TimerReset, or through an interrupt. Several oscillatoroptions are also made available to allow the part to fitthe application. The RC oscillator option saves systemcost, while the LF crystal option saves power. Configu-ration bits are used to select various options. This con-figuration word has the format shown in Figure 17-1.
REGISTER 17-1: CONFIGURATION WORDS
High (H) Table Read Addr. U-x R/P-1 R/P-1 U-x U-x U-x U-x U-x U-x
FE0Fh - FE08h — PM2 BODEN — — — — — —
bit 15 bit 8 bit 7 bit 0
Low (L) Table Read Addr. U-x U-x R/P-1 U-x R/P-1 R/P-1 R/P-1 R/P-1 R/P-1
FE07h - FE00h — — PM1 — PM0 WDTPS1 WDTPS0 FOSC1 FOSC0
bit 15 bit 8 bit 7 bit 0
bits 7H, 6L, 4L PM2, PM1, PM0: Processor Mode Select bits 111 = Microprocessor mode 110 = Microcontroller mode 101 = Extended Microcontroller mode 000 = Code Protected Microcontroller mode
bit 6H BODEN: Brown-out Detect Enable 1 = Brown-out Detect circuitry is enabled 0 = Brown-out Detect circuitry is disabled
bits 3L:2L WDTPS1:WDTPS0: WDT Postscaler Select bits11 = WDT enabled, postscaler = 1 10 = WDT enabled, postscaler = 256 01 = WDT enabled, postscaler = 64 00 = WDT disabled, 16-bit overflow timer
bits 1L:0L FOSC1:FOSC0: Oscillator Select bits 11 = EC oscillator 10 = XT oscillator 01 = RC oscillator 00 = LF oscillator
Shaded bits (—) Reserved
2000 Microchip Technology Inc. DS30289B-page 191

PIC17C7XX
17.1 Configuration BitsThe PIC17CXXX has eight configuration locations(Table 17-1). These locations can be programmed(read as ’0’), or left unprogrammed (read as ’1’) toselect various device configurations. Any write to aconfiguration location, regardless of the data, will pro-gram that configuration bit. A TABLWT instruction andraising the MCLR/VPP pin to the programming voltageare both required to write to program memory loca-tions. The configuration bits can be read by using theTABLRD instructions. Reading any configuration loca-tion between FE00h and FE07h will read the low byteof the configuration word (Figure 17-1) into the TAB-LATL register. The TABLATH register will be FFh.Reading a configuration location between FE08h andFE0Fh will read the high byte of the configuration wordinto the TABLATL register. The TABLATH register willbe FFh.
Addresses FE00h through FE0Fh are only in the pro-gram memory space for Microcontroller and Code Pro-tected Microcontroller modes. A device programmerwill be able to read the configuration word in any pro-cessor mode. See programming specifications formore detail.
TABLE 17-1: CONFIGURATION LOCATIONS
17.2 Oscillator Configurations
17.2.1 OSCILLATOR TYPES
The PIC17CXXX can be operated in four different oscil-lator modes. The user can program two configurationbits (FOSC1:FOSC0) to select one of these fourmodes:
• LF Low Power Crystal• XT Crystal/Resonator• EC External Clock Input
• RC Resistor/Capacitor
For information on the different oscillator types andhow to use them, please refer to Section 4.0.
Bit Address
FOSC0 FE00hFOSC1 FE01h
WDTPS0 FE02h
WDTPS1 FE03hPM0 FE04hPM1 FE06h
BODEN FE0EhPM2 FE0Fh
Note: When programming the desired configura-tion locations, they must be programmedin ascending order, starting with addressFE00h.
DS30289B-page 192 2000 Microchip Technology Inc.

PIC17C7XX
17.3 Watchdog Timer (WDT)The Watchdog Timer’s function is to recover from soft-ware malfunction, or to reset the device while in SLEEPmode. The WDT uses an internal free running on-chipRC oscillator for its clock source. This does not requireany external components. This RC oscillator is sepa-rate from the RC oscillator of the OSC1/CLKIN pin.That means that the WDT will run even if the clock onthe OSC1/CLKIN and OSC2/CLKOUT pins has beenstopped, for example, by execution of a SLEEP instruc-tion. During normal operation, a WDT time-out gener-ates a device RESET. The WDT can be permanentlydisabled by programming the configuration bitsWDTPS1:WDTPS0 as '00' (Section 17.1).
Under normal operation, the WDT must be cleared ona regular interval. This time must be less than the min-imum WDT overflow time. Not clearing the WDT in thistime frame will cause the WDT to overflow and resetthe device.
17.3.1 WDT PERIOD
The WDT has a nominal time-out period of 12 ms (withpostscaler = 1). The time-out periods vary with temper-ature, VDD and process variations from part to part (seeDC specs). If longer time-out periods are desired, con-figuration bits should be used to enable the WDT witha greater prescale. Thus, typical time-out periods up to3.0 seconds can be realized.
The CLRWDT and SLEEP instructions clear the WDTand its postscale setting and prevent it from timing out,thus generating a device RESET condition.
The TO bit in the CPUSTA register will be cleared upona WDT time-out.
17.3.2 CLEARING THE WDT AND POSTSCALER
The WDT and postscaler are cleared when:
• The device is in the RESET state• A SLEEP instruction is executed
• A CLRWDT instruction is executed• Wake-up from SLEEP by an interrupt
The WDT counter/postscaler will start counting on thefirst edge after the device exits the RESET state.
17.3.3 WDT PROGRAMMING CONSIDERATIONS
It should also be taken in account that under worst caseconditions (VDD = Min., Temperature = Max., Max.WDT postscaler), it may take several seconds before aWDT time-out occurs.
The WDT and postscaler become the Power-up Timerwhenever the PWRT is invoked.
17.3.4 WDT AS NORMAL TIMER
When the WDT is selected as a normal timer, the clocksource is the device clock. Neither the WDT nor thepostscaler are directly readable or writable. The over-flow time is 65536 TOSC cycles. On overflow, the TO bitis cleared (device is not RESET). The CLRWDT instruc-tion can be used to set the TO bit. This allows the WDTto be a simple overflow timer. The simple timer doesnot increment when in SLEEP.
FIGURE 17-1: WATCHDOG TIMER BLOCK DIAGRAM
TABLE 17-2: REGISTERS/BITS ASSOCIATED WITH THE WATCHDOG TIMER
WDT
WDT Enable
Postscaler
4 - to - 1 MUX WDTPS1:WDTPS0
On-chip RC
WDT Overflow
Oscillator(1)
Note 1: This oscillator is separate from the external RC oscillator on the OSC1 pin.
Address Name Bit 7 Bit 6 Bit 5 Bit 4 Bit 3 Bit 2 Bit 1 Bit 0 Value onPOR, BOR MCLR, WDT
— Config See Figure 17-1 for location of WDTPSx bits in Configuration Word. (Note 1) (Note 1)
06h, Unbanked CPUSTA — — STKAV GLINTD TO PD POR BOR --11 11qq --11 qquu
Legend: - = unimplemented, read as '0', q = value depends on condition. Shaded cells are not used by the WDT.Note 1: This value will be as the device was programmed, or if unprogrammed, will read as all '1's.
2000 Microchip Technology Inc. DS30289B-page 193

PIC17C7XX
17.4 Power-down Mode (SLEEP)
The Power-down mode is entered by executing aSLEEP instruction. This clears the Watchdog Timer andpostscaler (if enabled). The PD bit is cleared and theTO bit is set (in the CPUSTA register). In SLEEP mode,the oscillator driver is turned off. The I/O ports maintaintheir status (driving high,low, or hi-impedance input).
The MCLR/VPP pin must be at a logic high level(VIHMC). A WDT time-out RESET does not drive theMCLR/VPP pin low.
17.4.1 WAKE-UP FROM SLEEP
The device can wake-up from SLEEP through one ofthe following events:
• Power-on Reset
• Brown-out Reset• External RESET input on MCLR/VPP pin• WDT Reset (if WDT was enabled)
• Interrupt from RA0/INT pin, RB port change, T0CKI interrupt, or some peripheral interrupts
The following peripheral interrupts can wake the devicefrom SLEEP:
• Capture interrupts• USART synchronous slave transmit interrupts
• USART synchronous slave receive interrupts• A/D conversion complete• SPI slave transmit/receive complete
• I2C slave receive
Other peripherals cannot generate interrupts since dur-ing SLEEP, no on-chip Q clocks are present.
Any RESET event will cause a device RESET. Anyinterrupt event is considered a continuation of programexecution. The TO and PD bits in the CPUSTA registercan be used to determine the cause of a deviceRESET. The PD bit, which is set on power-up, iscleared when SLEEP is invoked. The TO bit is clearedif WDT time-out occurred (and caused a RESET).
When the SLEEP instruction is being executed, the nextinstruction (PC + 1) is pre-fetched. For the device towake-up through an interrupt event, the correspondinginterrupt enable bit must be set (enabled). Wake-up isregardless of the state of the GLINTD bit. If the GLINTDbit is set (disabled), the device continues execution atthe instruction after the SLEEP instruction. If theGLINTD bit is clear (enabled), the device executes theinstruction after the SLEEP instruction and thenbranches to the interrupt vector address. In caseswhere the execution of the instruction following SLEEPis not desirable, the user should have a NOP after theSLEEP instruction.
The WDT is cleared when the device wakes fromSLEEP, regardless of the source of wake-up.
17.4.1.1 Wake-up Delay
When the oscillator type is configured in XT or LFmode, the Oscillator Start-up Timer (OST) is activatedon wake-up. The OST will keep the device in RESETfor 1024TOSC. This needs to be taken into accountwhen considering the interrupt response time whencoming out of SLEEP.
FIGURE 17-2: WAKE-UP FROM SLEEP THROUGH INTERRUPT
Note: If the global interrupt is disabled (GLINTDis set), but any interrupt source has both itsinterrupt enable bit and the correspondinginterrupt flag bit set, the device will imme-diately wake-up from SLEEP. The TO bit isset and the PD bit is cleared.
Q2Q1 Q3 Q4 Q2Q1 Q3 Q4 Q2Q1 Q3 Q4 Q2Q1 Q3 Q4 Q2Q1 Q3 Q4
OSC1
CLKOUT(4)
INT
INTF Flag
GLINTD bit
INSTRUCTION FLOW
PC
InstructionFetchedInstructionExecuted
Interrupt Latency(2)
PC PC+1 PC+2 0004h 0005h
Dummy Cycle
Inst (PC) = SLEEP Inst (PC+1)
Inst (PC-1) SLEEP
TOST(2)
Processorin SLEEP
Inst (PC+2)
Inst (PC+1)
Note 1: XT or LF oscillator mode assumed.2: TOST = 1024TOSC (drawing not to scale). This delay will not be there for RC osc mode.3: When GLINTD = 0, processor jumps to interrupt routine after wake-up. If GLINTD = 1, execution will continue in line.4: CLKOUT is not available in these osc modes, but shown here for timing reference.
(RA0/INT pin)’0’ or ’1’
DS30289B-page 194 2000 Microchip Technology Inc.

PIC17C7XX
17.4.2 MINIMIZING CURRENT CONSUMPTION
To minimize current consumption, all I/O pins should beeither at VDD, or VSS, with no external circuitry drawingcurrent from the I/O pin. I/O pins that are hi-impedanceinputs should be pulled high or low externally to avoidswitching currents caused by floating inputs. TheT0CKI input should be at VDD or VSS. The contributionsfrom on-chip pull-ups on PORTB should also be con-sidered and disabled, when possible.
17.5 Code Protection
The code in the program memory can be protected byselecting the microcontroller in Code Protected mode(PM2:PM0 = ’000’).
In this mode, instructions that are in the on-chip pro-gram memory space, can continue to read or write theprogram memory. An instruction that is executed out-side of the internal program memory range will beinhibited from writing to, or reading from, programmemory.
If the code protection bit(s) have not been pro-grammed, the on-chip program memory can be readout for verification purposes.
Note: Microchip does not recommend code pro-tecting windowed devices.
2000 Microchip Technology Inc. DS30289B-page 195
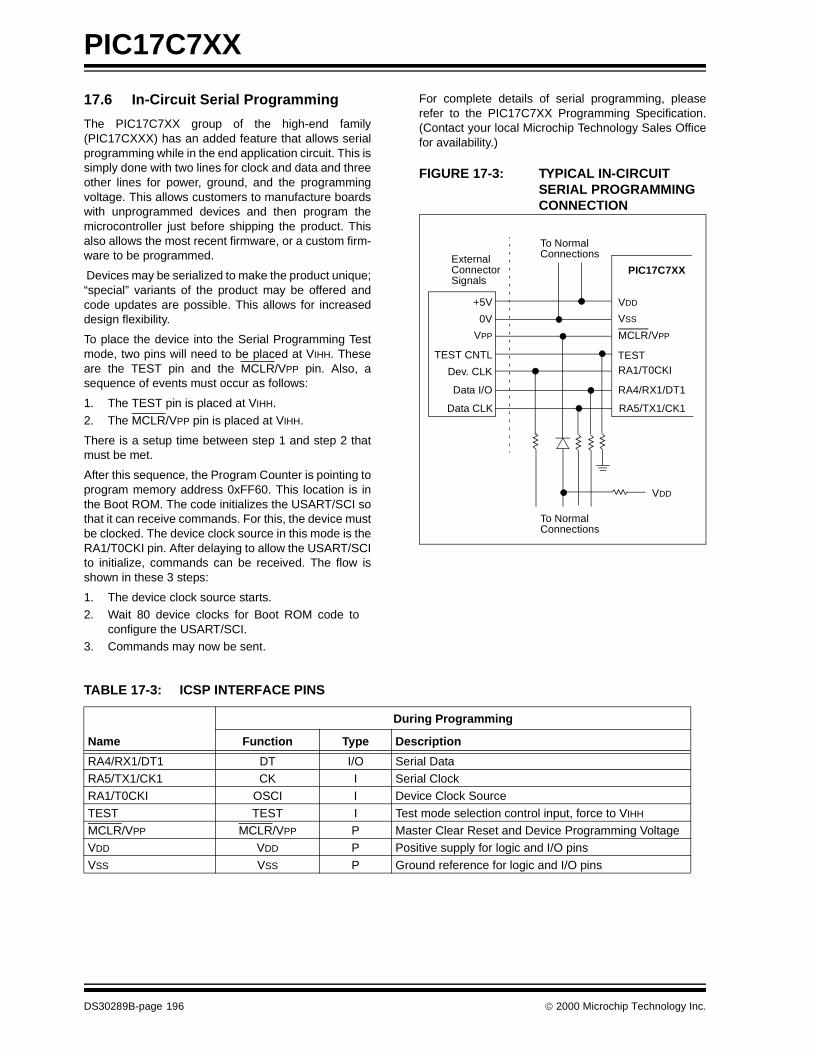
PIC17C7XX
17.6 In-Circuit Serial Programming
The PIC17C7XX group of the high-end family(PIC17CXXX) has an added feature that allows serialprogramming while in the end application circuit. This issimply done with two lines for clock and data and threeother lines for power, ground, and the programmingvoltage. This allows customers to manufacture boardswith unprogrammed devices and then program themicrocontroller just before shipping the product. Thisalso allows the most recent firmware, or a custom firm-ware to be programmed.
Devices may be serialized to make the product unique;“special” variants of the product may be offered andcode updates are possible. This allows for increaseddesign flexibility.
To place the device into the Serial Programming Testmode, two pins will need to be placed at VIHH. Theseare the TEST pin and the MCLR/VPP pin. Also, asequence of events must occur as follows:
1. The TEST pin is placed at VIHH.
2. The MCLR/VPP pin is placed at VIHH.
There is a setup time between step 1 and step 2 thatmust be met.
After this sequence, the Program Counter is pointing toprogram memory address 0xFF60. This location is inthe Boot ROM. The code initializes the USART/SCI sothat it can receive commands. For this, the device mustbe clocked. The device clock source in this mode is theRA1/T0CKI pin. After delaying to allow the USART/SCIto initialize, commands can be received. The flow isshown in these 3 steps:
1. The device clock source starts.2. Wait 80 device clocks for Boot ROM code to
configure the USART/SCI.3. Commands may now be sent.
For complete details of serial programming, pleaserefer to the PIC17C7XX Programming Specification.(Contact your local Microchip Technology Sales Officefor availability.)
FIGURE 17-3: TYPICAL IN-CIRCUIT SERIAL PROGRAMMING CONNECTION
TABLE 17-3: ICSP INTERFACE PINS
ExternalConnectorSignals
To NormalConnections
To NormalConnections
PIC17C7XX
VDD
VSS
MCLR/VPP
RA1/T0CKI
RA4/RX1/DT1
+5V
0V
VPP
Dev. CLK
Data I/O
VDD
RA5/TX1/CK1Data CLK
TESTTEST CNTL
During Programming
Name Function Type Description
RA4/RX1/DT1 DT I/O Serial DataRA5/TX1/CK1 CK I Serial ClockRA1/T0CKI OSCI I Device Clock Source
TEST TEST I Test mode selection control input, force to VIHH
MCLR/VPP MCLR/VPP P Master Clear Reset and Device Programming VoltageVDD VDD P Positive supply for logic and I/O pins
VSS VSS P Ground reference for logic and I/O pins
DS30289B-page 196 2000 Microchip Technology Inc.

PIC17C7XX
18.0 INSTRUCTION SET SUMMARY
The PIC17CXXX instruction set consists of 58 instruc-tions. Each instruction is a 16-bit word divided into anOPCODE and one or more operands. The opcodespecifies the instruction type, while the operand(s) fur-ther specify the operation of the instruction. ThePIC17CXXX instruction set can be grouped into threetypes:
• byte-oriented• bit-oriented
• literal and control operations
These formats are shown in Figure 18-1.
Table 18-1 shows the field descriptions for theopcodes. These descriptions are useful for understand-ing the opcodes in Table 18-2 and in each specificinstruction descriptions.
For byte-oriented instructions, 'f' represents a fileregister designator and 'd' represents a destinationdesignator. The file register designator specifies whichfile register is to be used by the instruction.
The destination designator specifies where the result ofthe operation is to be placed. If 'd' = '0', the result isplaced in the WREG register. If 'd' = '1', the result isplaced in the file register specified by the instruction.
For bit-oriented instructions, 'b' represents a bit fielddesignator which selects the number of the bit affectedby the operation, while 'f' represents the number of thefile in which the bit is located.
For literal and control operations, 'k' represents an 8-or 13-bit constant or literal value.
The instruction set is highly orthogonal and is groupedinto:
• byte-oriented operations• bit-oriented operations
• literal and control operations
All instructions are executed within one single instruc-tion cycle, unless:
• a conditional test is true
• the program counter is changed as a result of an instruction
• a table read or a table write instruction is executed (in this case, the execution takes two instruction cycles with the second cycle executed as a NOP)
One instruction cycle consists of four oscillator periods.Thus, for an oscillator frequency of 25 MHz, the normalinstruction execution time is 160 ns. If a conditional testis true or the program counter is changed as a result ofan instruction, the instruction execution time is 320 ns.
TABLE 18-1: OPCODE FIELD DESCRIPTIONS
Field Description
f Register file address (00h to FFh)
p Peripheral register file address (00h to 1Fh)
i Table pointer control i = ’0’ (do not change)i = ’1’ (increment after instruction execution)
t Table byte select t = ’0’ (perform operation on lower byte) t = ’1’ (perform operation on upper byte literal field, constant data)
WREG Working register (accumulator)
b Bit address within an 8-bit file register
k Literal field, constant data or label
x Don’t care location (= ’0’ or ’1’) The assembler will generate code with x = ’0’. It is the recommended form of use for compatibility with all Microchip software tools.
d Destination select0 = store result in WREG1 = store result in file register fDefault is d = ’1’
u Unused, encoded as ’0’
s Destination select0 = store result in file register f and in the WREG1 = store result in file register fDefault is s = ’1’
label Label name
C,DC,Z,OV
ALU status bits Carry, Digit Carry, Zero, Overflow
GLINTD Global Interrupt Disable bit (CPUSTA<4>)
TBLPTR Table Pointer (16-bit)
TBLAT Table Latch (16-bit) consists of high byte (TBLATH) and low byte (TBLATL)
TBLATL Table Latch low byte
TBLATH Table Latch high byte
TOS Top-of-Stack
PC Program Counter
BSR Bank Select Register
WDT Watchdog Timer Counter
TO Time-out bit
PD Power-down bit
dest Destination either the WREG register or the speci-fied register file location
[ ] Options
( ) Contents
→ Assigned to
< > Register bit field
∈ In the set of
italics User defined term (font is courier)
2000 Microchip Technology Inc. DS30289B-page 197

PIC17C7XX
Table 18-2 lists the instructions recognized by theMPASM assembler.All instruction examples use the following format to rep-resent a hexadecimal number:
0xhh
where h signifies a hexadecimal digit.
To represent a binary number:
0000 0100b
where b signifies a binary string.
FIGURE 18-1: GENERAL FORMAT FOR INSTRUCTIONS
18.1 Special Function Registers asSource/Destination
The PIC17C7XX’s orthogonal instruction set allowsread and write of all file registers, including specialfunction registers. There are some special situationsthe user should be aware of:
18.1.1 ALUSTA AS DESTINATION
If an instruction writes to ALUSTA, the Z, C, DC and OVbits may be set or cleared as a result of the instructionand overwrite the original data bits written. For exam-ple, executing CLRF ALUSTA will clear registerALUSTA and then set the Z bit leaving 0000 0100b inthe register.
18.1.2 PCL AS SOURCE OR DESTINATION
Read, write or read-modify-write on PCL may have thefollowing results:
Read PC: PCH → PCLATH; PCL → dest
Write PCL: PCLATH → PCH;8-bit destination value → PCL
Read-Modify-Write: PCL→ ALU operandPCLATH → PCH;8-bit result → PCL
Where PCH = program counter high byte (not anaddressable register), PCLATH = Program counterhigh holding latch, dest = destination, WREG or f.
18.1.3 BIT MANIPULATION
All bit manipulation instructions are done by first read-ing the entire register, operating on the selected bit andwriting the result back (read-modify-write (R-M-W)).The user should keep this in mind when operating onsome special function registers, such as ports.
Note 1: Any unused opcode is Reserved. Use ofany reserved opcode may cause unex-pected operation.
Byte-oriented file register operations
15 9 8 7 0
d = 0 for destination WREG
OPCODE d f (FILE #)
d = 1 for destination ff = 8-bit file register address
Bit-oriented file register operations
15 11 10 8 7 0OPCODE b (BIT #) f (FILE #)
b = 3-bit addressf = 8-bit file register address
Literal and control operations
15 8 7 0
OPCODE k (literal)
k = 8-bit immediate value
Byte to Byte move operations
15 13 12 8 7 0
OPCODE p (FILE #) f (FILE #)
CALL and GOTO operations
15 13 12 0
OPCODE k (literal)
k = 13-bit immediate value
p = peripheral register file addressf = 8-bit file register address
Note: Status bits that are manipulated by thedevice (including the interrupt flag bits) areset or cleared in the Q1 cycle. So, there isno issue on doing R-M-W instructions onregisters which contain these bits
DS30289B-page 198 2000 Microchip Technology Inc.

PIC17C7XX
18.2 Q Cycle ActivityEach instruction cycle (TCY) is comprised of four Qcycles (Q1-Q4). The Q cycle is the same as the deviceoscillator cycle (TOSC). The Q cycles provide the timing/designation for the Decode, Read, Process Data,Write, etc., of each instruction cycle. The following dia-gram shows the relationship of the Q cycles to theinstruction cycle.
The four Q cycles that make up an instruction cycle(TCY) can be generalized as:
Q1: Instruction Decode Cycle or forced No operation
Q2: Instruction Read Cycle or No operation
Q3: Process the Data
Q4: Instruction Write Cycle or No operation
Each instruction will show the detailed Q cycle opera-tion for the instruction.
FIGURE 18-2: Q CYCLE ACTIVITY
Q1 Q2 Q3 Q4 Q1 Q2 Q3 Q4 Q1 Q2 Q3 Q4
TCY1 TCY2 TCY3
TOSC
2000 Microchip Technology Inc. DS30289B-page 199

PIC17C7XX
TABLE 18-2: PIC17CXXX INSTRUCTION SET
Mnemonic,Operands
Description Cycles16-bit Opcode Status
AffectedNotes
MSb LSb
BYTE-ORIENTED FILE REGISTER OPERATIONS
ADDWF f,d ADD WREG to f 1 0000 111d ffff ffff OV,C,DC,Z
ADDWFC f,d ADD WREG and Carry bit to f 1 0001 000d ffff ffff OV,C,DC,Z
ANDWF f,d AND WREG with f 1 0000 101d ffff ffff Z
CLRF f,s Clear f, or Clear f and Clear WREG 1 0010 100s ffff ffff None 3
COMF f,d Complement f 1 0001 001d ffff ffff Z
CPFSEQ f Compare f with WREG, skip if f = WREG 1 (2) 0011 0001 ffff ffff None 6,8
CPFSGT f Compare f with WREG, skip if f > WREG 1 (2) 0011 0010 ffff ffff None 2,6,8
CPFSLT f Compare f with WREG, skip if f < WREG 1 (2) 0011 0000 ffff ffff None 2,6,8
DAW f,s Decimal Adjust WREG Register 1 0010 111s ffff ffff C 3
DECF f,d Decrement f 1 0000 011d ffff ffff OV,C,DC,Z
DECFSZ f,d Decrement f, skip if 0 1 (2) 0001 011d ffff ffff None 6,8
DCFSNZ f,d Decrement f, skip if not 0 1 (2) 0010 011d ffff ffff None 6,8
INCF f,d Increment f 1 0001 010d ffff ffff OV,C,DC,Z
INCFSZ f,d Increment f, skip if 0 1 (2) 0001 111d ffff ffff None 6,8
INFSNZ f,d Increment f, skip if not 0 1 (2) 0010 010d ffff ffff None 6,8
IORWF f,d Inclusive OR WREG with f 1 0000 100d ffff ffff Z
MOVFP f,p Move f to p 1 011p pppp ffff ffff None
MOVPF p,f Move p to f 1 010p pppp ffff ffff Z
MOVWF f Move WREG to f 1 0000 0001 ffff ffff None
MULWF f Multiply WREG with f 1 0011 0100 ffff ffff None
NEGW f,s Negate WREG 1 0010 110s ffff ffff OV,C,DC,Z 1,3
NOP — No Operation 1 0000 0000 0000 0000 None
RLCF f,d Rotate left f through Carry 1 0001 101d ffff ffff C
RLNCF f,d Rotate left f (no carry) 1 0010 001d ffff ffff None
RRCF f,d Rotate right f through Carry 1 0001 100d ffff ffff C
RRNCF f,d Rotate right f (no carry) 1 0010 000d ffff ffff None
SETF f,s Set f 1 0010 101s ffff ffff None 3
SUBWF f,d Subtract WREG from f 1 0000 010d ffff ffff OV,C,DC,Z 1
SUBWFB f,d Subtract WREG from f with Borrow 1 0000 001d ffff ffff OV,C,DC,Z 1
SWAPF f,d Swap f 1 0001 110d ffff ffff None
TABLRD t,i,f Table Read 2 (3) 1010 10ti ffff ffff None 7
TABLWT t,i,f Table Write 2 1010 11ti ffff ffff None 5
TLRD t,f Table Latch Read 1 1010 00tx ffff ffff None
TLWT t,f Table Latch Write 1 1010 01tx ffff ffff None
Legend: Refer to Table 18-1 for opcode field descriptions.Note 1: 2’s Complement method.
2: Unsigned arithmetic.3: If s = '1', only the file is affected: If s = '0', both the WREG register and the file are affected; If only the Working register
(WREG) is required to be affected, then f = WREG must be specified.4: During an LCALL, the contents of PCLATH are loaded into the MSB of the PC and kkkk kkkk is loaded into the LSB of the
PC (PCL).5: Multiple cycle instruction for EPROM programming when table pointer selects internal EPROM. The instruction is termi-
nated by an interrupt event. When writing to external program memory, it is a two-cycle instruction.6: Two-cycle instruction when condition is true, else single cycle instruction.7: Two-cycle instruction except for TABLRD to PCL (program counter low byte), in which case it takes 3 cycles.8: A “skip” means that instruction fetched during execution of current instruction is not executed, instead a NOP is executed.
DS30289B-page 200 2000 Microchip Technology Inc.

PIC17C7XX
TSTFSZ f Test f, skip if 0 1 (2) 0011 0011 ffff ffff None 6,8
XORWF f,d Exclusive OR WREG with f 1 0000 110d ffff ffff Z
BIT-ORIENTED FILE REGISTER OPERATIONS
BCF f,b Bit Clear f 1 1000 1bbb ffff ffff None
BSF f,b Bit Set f 1 1000 0bbb ffff ffff None
BTFSC f,b Bit test, skip if clear 1 (2) 1001 1bbb ffff ffff None 6,8
BTFSS f,b Bit test, skip if set 1 (2) 1001 0bbb ffff ffff None 6,8
BTG f,b Bit Toggle f 1 0011 1bbb ffff ffff None
LITERAL AND CONTROL OPERATIONS
ADDLW k ADD literal to WREG 1 1011 0001 kkkk kkkk OV,C,DC,Z
ANDLW k AND literal with WREG 1 1011 0101 kkkk kkkk Z
CALL k Subroutine Call 2 111k kkkk kkkk kkkk None 7
CLRWDT — Clear Watchdog Timer 1 0000 0000 0000 0100 TO, PD
GOTO k Unconditional Branch 2 110k kkkk kkkk kkkk None 7
IORLW k Inclusive OR literal with WREG 1 1011 0011 kkkk kkkk Z
LCALL k Long Call 2 1011 0111 kkkk kkkk None 4,7
MOVLB k Move literal to low nibble in BSR 1 1011 1000 uuuu kkkk None
MOVLR k Move literal to high nibble in BSR 1 1011 101x kkkk uuuu None
MOVLW k Move literal to WREG 1 1011 0000 kkkk kkkk None
MULLW k Multiply literal with WREG 1 1011 1100 kkkk kkkk None
RETFIE — Return from interrupt (and enable interrupts) 2 0000 0000 0000 0101 GLINTD 7
RETLW k Return literal to WREG 2 1011 0110 kkkk kkkk None 7
RETURN — Return from subroutine 2 0000 0000 0000 0010 None 7
SLEEP — Enter SLEEP mode 1 0000 0000 0000 0011 TO, PD
SUBLW k Subtract WREG from literal 1 1011 0010 kkkk kkkk OV,C,DC,Z
XORLW k Exclusive OR literal with WREG 1 1011 0100 kkkk kkkk Z
TABLE 18-2: PIC17CXXX INSTRUCTION SET (CONTINUED)
Mnemonic,Operands
Description Cycles16-bit Opcode Status
AffectedNotes
MSb LSb
Legend: Refer to Table 18-1 for opcode field descriptions.Note 1: 2’s Complement method.
2: Unsigned arithmetic.3: If s = '1', only the file is affected: If s = '0', both the WREG register and the file are affected; If only the Working register
(WREG) is required to be affected, then f = WREG must be specified.4: During an LCALL, the contents of PCLATH are loaded into the MSB of the PC and kkkk kkkk is loaded into the LSB of the
PC (PCL).5: Multiple cycle instruction for EPROM programming when table pointer selects internal EPROM. The instruction is termi-
nated by an interrupt event. When writing to external program memory, it is a two-cycle instruction.6: Two-cycle instruction when condition is true, else single cycle instruction.7: Two-cycle instruction except for TABLRD to PCL (program counter low byte), in which case it takes 3 cycles.8: A “skip” means that instruction fetched during execution of current instruction is not executed, instead a NOP is executed.
2000 Microchip Technology Inc. DS30289B-page 201

PIC17C7XX
ADDLW ADD Literal to WREG
Syntax: [ label ] ADDLW k
Operands: 0 ≤ k ≤ 255
Operation: (WREG) + k → (WREG)
Status Affected: OV, C, DC, Z
Encoding: 1011 0001 kkkk kkkk
Description: The contents of WREG are added to the 8-bit literal ’k’ and the result is placed in WREG.
Q Cycle Activity:
Q1 Q2 Q3 Q4
Decode Readliteral ’k’
Process Data
Write to WREG
Example: ADDLW 0x15
Before InstructionWREG = 0x10
After InstructionWREG = 0x25
ADDWF ADD WREG to f
Syntax: [ label ] ADDWF f,d
Operands: 0 ≤ f ≤ 255d ∈ [0,1]
Operation: (WREG) + (f) → (dest)
Status Affected: OV, C, DC, Z
Encoding: 0000 111d ffff ffff
Description: Add WREG to register ’f’. If ’d’ is 0 the result is stored in WREG. If ’d’ is 1 the result is stored back in register ’f’.
Words: 1
Cycles: 1
Q Cycle Activity:
Q1 Q2 Q3 Q4
Decode Readregister ’f’
Process Data
Write todestination
Example: ADDWF REG, 0
Before InstructionWREG = 0x17REG = 0xC2
After InstructionWREG = 0xD9REG = 0xC2
DS30289B-page 202 2000 Microchip Technology Inc.

PIC17C7XX
ADDWFC ADD WREG and Carry bit to f
Syntax: [ label ] ADDWFC f,d
Operands: 0 ≤ f ≤ 255d ∈ [0,1]
Operation: (WREG) + (f) + C → (dest)
Status Affected: OV, C, DC, Z
Encoding: 0001 000d ffff ffff
Description: Add WREG, the Carry Flag and data memory location ’f’. If ’d’ is 0, the result is placed in WREG. If ’d’ is 1, the result is placed in data memory location ’f’.
Words: 1
Cycles: 1
Q Cycle Activity:
Q1 Q2 Q3 Q4
Decode Readregister ’f’
Process Data
Write to destination
Example: ADDWFC REG 0
Before InstructionCarry bit = 1REG = 0x02WREG = 0x4D
After InstructionCarry bit = 0REG = 0x02WREG = 0x50
ANDLW And Literal with WREG
Syntax: [ label ] ANDLW k
Operands: 0 ≤ k ≤ 255
Operation: (WREG) .AND. (k) → (WREG)
Status Affected: Z
Encoding: 1011 0101 kkkk kkkk
Description: The contents of WREG are AND’ed with the 8-bit literal 'k'. The result is placed in WREG.
Words: 1
Cycles: 1
Q Cycle Activity:
Q1 Q2 Q3 Q4
Decode Read literal 'k'
Process Data
Write to WREG
Example: ANDLW 0x5F
Before InstructionWREG = 0xA3
After InstructionWREG = 0x03
2000 Microchip Technology Inc. DS30289B-page 203

PIC17C7XX
ANDWF AND WREG with f
Syntax: [ label ] ANDWF f,d
Operands: 0 ≤ f ≤ 255d ∈ [0,1]
Operation: (WREG) .AND. (f) → (dest)
Status Affected: Z
Encoding: 0000 101d ffff ffff
Description: The contents of WREG are AND’ed with register 'f'. If 'd' is 0 the result is stored in WREG. If 'd' is 1 the result is stored back in register 'f'.
Words: 1
Cycles: 1
Q Cycle Activity:
Q1 Q2 Q3 Q4
Decode Readregister 'f'
Process Data
Write to destination
Example: ANDWF REG, 1
Before Instruction WREG = 0x17REG = 0xC2
After InstructionWREG = 0x17REG = 0x02
BCF Bit Clear f
Syntax: [ label ] BCF f,b
Operands: 0 ≤ f ≤ 2550 ≤ b ≤ 7
Operation: 0 → (f<b>)
Status Affected: None
Encoding: 1000 1bbb ffff ffff
Description: Bit 'b' in register 'f' is cleared.
Words: 1
Cycles: 1
Q Cycle Activity:
Q1 Q2 Q3 Q4
Decode Readregister 'f'
Process Data
Writeregister 'f'
Example: BCF FLAG_REG, 7
Before InstructionFLAG_REG = 0xC7
After InstructionFLAG_REG = 0x47
DS30289B-page 204 2000 Microchip Technology Inc.

PIC17C7XX
BSF Bit Set f
Syntax: [ label ] BSF f,b
Operands: 0 ≤ f ≤ 2550 ≤ b ≤ 7
Operation: 1 → (f<b>)
Status Affected: None
Encoding: 1000 0bbb ffff ffff
Description: Bit ’b’ in register ’f’ is set.
Words: 1
Cycles: 1
Q Cycle Activity:
Q1 Q2 Q3 Q4
Decode Readregister ’f’
Process Data
Writeregister ’f’
Example: BSF FLAG_REG, 7
Before InstructionFLAG_REG = 0x0A
After InstructionFLAG_REG = 0x8A
BTFSC Bit Test, skip if Clear
Syntax: [ label ] BTFSC f,b
Operands: 0 ≤ f ≤ 2550 ≤ b ≤ 7
Operation: skip if (f<b>) = 0
Status Affected: None
Encoding: 1001 1bbb ffff ffff
Description: If bit 'b' in register ’f' is 0, then the next instruction is skipped.
If bit 'b' is 0, then the next instruction fetched during the current instruction exe-cution is discarded and a NOP is executed instead, making this a two-cycle instruction.
Words: 1
Cycles: 1(2)
Q Cycle Activity:
Q1 Q2 Q3 Q4
Decode Readregister 'f'
Process Data
No operation
If skip:
Q1 Q2 Q3 Q4
No operation
No operation
No operation
No operation
Example: HEREFALSETRUE
BTFSC::
FLAG,1
Before InstructionPC = address (HERE)
After InstructionIf FLAG<1> = 0;
PC = address (TRUE)If FLAG<1> = 1;
PC = address (FALSE)
2000 Microchip Technology Inc. DS30289B-page 205

PIC17C7XX
BTFSS Bit Test, skip if Set
Syntax: [ label ] BTFSS f,b
Operands: 0 ≤ f ≤ 1270 ≤ b < 7
Operation: skip if (f<b>) = 1
Status Affected: None
Encoding: 1001 0bbb ffff ffff
Description: If bit ’b’ in register ’f’ is 1, then the next instruction is skipped.
If bit ’b’ is 1, then the next instruction fetched during the current instruction exe-cution is discarded and a NOP is executed instead, making this a two-cycle instruction.
Words: 1
Cycles: 1(2)
Q Cycle Activity:
Q1 Q2 Q3 Q4
Decode Readregister ’f’
Process Data
No operation
If skip:
Q1 Q2 Q3 Q4
No operation
No operation
No operation
No operation
Example: HEREFALSETRUE
BTFSS::
FLAG,1
Before InstructionPC = address (HERE)
After InstructionIf FLAG<1> = 0;
PC = address (FALSE)If FLAG<1> = 1;
PC = address (TRUE)
BTG Bit Toggle f
Syntax: [ label ] BTG f,b
Operands: 0 ≤ f ≤ 2550 ≤ b < 7
Operation: (f<b>) → (f<b>)
Status Affected: None
Encoding: 0011 1bbb ffff ffff
Description: Bit ’b’ in data memory location ’f’ is inverted.
Words: 1
Cycles: 1
Q Cycle Activity:
Q1 Q2 Q3 Q4
Decode Readregister ’f’
Process Data
Writeregister ’f’
Example: BTG PORTC, 4
Before Instruction:PORTC = 0111 0101 [0x75]
After Instruction:PORTC = 0110 0101 [0x65]
DS30289B-page 206 2000 Microchip Technology Inc.

PIC17C7XX
CALL Subroutine Call
Syntax: [ label ] CALL k
Operands: 0 ≤ k ≤ 8191
Operation: PC+ 1→ TOS, k → PC<12:0>,k<12:8> → PCLATH<4:0>;PC<15:13> → PCLATH<7:5>
Status Affected: None
Encoding: 111k kkkk kkkk kkkk
Description: Subroutine call within 8K page. First, return address (PC+1) is pushed onto the stack. The 13-bit value is loaded into PC bits<12:0>. Then the upper-eight bits of the PC are copied into PCLATH. CALL is a two-cycle instruction.
See LCALL for calls outside 8K memory space.
Words: 1
Cycles: 2
Q Cycle Activity:
Q1 Q2 Q3 Q4
Decode Read literal ’k’<7:0>,
Push PC to stack
Process Data
Write to PC
No operation
No operation
No operation
No operation
Example: HERE CALL THERE
Before InstructionPC = Address(HERE)
After InstructionPC = Address(THERE)TOS = Address (HERE + 1)
CLRF Clear f
Syntax: [label] CLRF f,s
Operands: 0 ≤ f ≤ 255
Operation: 00h → f, s ∈ [0,1]00h → dest
Status Affected: None
Encoding: 0010 100s ffff ffff
Description: Clears the contents of the specified register(s).s = 0: Data memory location ’f’ and WREG are cleared.s = 1: Data memory location ’f’ is cleared.
Words: 1
Cycles: 1
Q Cycle Activity:
Q1 Q2 Q3 Q4
Decode Readregister ’f’
Process Data
Writeregister ’f’
and if specified WREG
Example: CLRF FLAG_REG, 1
Before InstructionFLAG_REG = 0x5AWREG = 0x01
After InstructionFLAG_REG = 0x00WREG = 0x01
2000 Microchip Technology Inc. DS30289B-page 207

PIC17C7XX
CLRWDT Clear Watchdog Timer
Syntax: [ label ] CLRWDT
Operands: None
Operation: 00h → WDT0 → WDT postscaler,1 → TO1 → PD
Status Affected: TO, PD
Encoding: 0000 0000 0000 0100
Description: CLRWDT instruction resets the Watch-dog Timer. It also resets the postscaler of the WDT. Status bits TO and PD are set.
Words: 1
Cycles: 1
Q Cycle Activity:
Q1 Q2 Q3 Q4
Decode No operation
Process Data
No operation
Example: CLRWDT
Before InstructionWDT counter = ?
After InstructionWDT counter = 0x00WDT Postscaler = 0TO = 1PD = 1
COMF Complement f
Syntax: [ label ] COMF f,d
Operands: 0 ≤ f ≤ 255d ∈ [0,1]
Operation: → (dest)
Status Affected: Z
Encoding: 0001 001d ffff ffff
Description: The contents of register ’f’ are comple-mented. If ’d’ is 0 the result is stored in WREG. If ’d’ is 1 the result is stored back in register ’f’.
Words: 1
Cycles: 1
Q Cycle Activity:
Q1 Q2 Q3 Q4
Decode Readregister ’f’
Process Data
Write todestination
Example: COMF REG1,0
Before InstructionREG1 = 0x13
After InstructionREG1 = 0x13WREG = 0xEC
(f )
DS30289B-page 208 2000 Microchip Technology Inc.

PIC17C7XX
CPFSEQCompare f with WREG, skip if f = WREG
Syntax: [ label ] CPFSEQ f
Operands: 0 ≤ f ≤ 255
Operation: (f) – (WREG), skip if (f) = (WREG) (unsigned comparison)
Status Affected: None
Encoding: 0011 0001 ffff ffff
Description: Compares the contents of data memory location ’f’ to the contents of WREG by performing an unsigned subtraction.
If ’f’ = WREG, then the fetched instruc-tion is discarded and a NOP is executed instead, making this a two-cycle instruction.
Words: 1
Cycles: 1 (2)
Q Cycle Activity:
Q1 Q2 Q3 Q4
Decode Readregister ’f’
Process Data
No operation
If skip:
Q1 Q2 Q3 Q4
No operation
No operation
No operation
No operation
Example: HERE CPFSEQ REGNEQUAL :EQUAL :
Before InstructionPC Address = HEREWREG = ?REG = ?
After InstructionIf REG = WREG;
PC = Address (EQUAL)If REG ≠ WREG;
PC = Address (NEQUAL)
CPFSGTCompare f with WREG, skip if f > WREG
Syntax: [ label ] CPFSGT f
Operands: 0 ≤ f ≤ 255
Operation: (f) − (WREG),skip if (f) > (WREG) (unsigned comparison)
Status Affected: None
Encoding: 0011 0010 ffff ffff
Description: Compares the contents of data memory location ’f’ to the contents of the WREG by performing an unsigned subtraction.
If the contents of ’f’ are greater than the contents of WREG, then the fetched instruction is discarded and a NOP is executed instead, making this a two-cycle instruction.
Words: 1
Cycles: 1 (2)
Q Cycle Activity:
Q1 Q2 Q3 Q4
Decode Readregister ’f’
Process Data
No operation
If skip:
Q1 Q2 Q3 Q4
No operation
No operation
No operation
No operation
Example: HERE CPFSGT REGNGREATER :GREATER :
Before InstructionPC = Address (HERE)WREG = ?
After InstructionIf REG > WREG;
PC = Address (GREATER)If REG £ WREG;
PC = Address (NGREATER)
2000 Microchip Technology Inc. DS30289B-page 209

PIC17C7XX
CPFSLTCompare f with WREG, skip if f < WREG
Syntax: [ label ] CPFSLT f
Operands: 0 ≤ f ≤ 255
Operation: (f) – (WREG),skip if (f) < (WREG) (unsigned comparison)
Status Affected: None
Encoding: 0011 0000 ffff ffff
Description: Compares the contents of data memory location ’f’ to the contents of WREG by performing an unsigned subtraction.
If the contents of ’f’ are less than the contents of WREG, then the fetched instruction is discarded and a NOP is executed instead, making this a two-cycle instruction.
Words: 1
Cycles: 1 (2)
Q Cycle Activity:
Q1 Q2 Q3 Q4
Decode Readregister ’f’
Process Data
No operation
If skip:
Q1 Q2 Q3 Q4
No operation
No operation
No operation
No operation
Example: HERE CPFSLT REGNLESS :LESS :
Before InstructionPC = Address (HERE)W = ?
After InstructionIf REG < WREG;PC = Address (LESS)If REG ≥ WREG;PC = Address (NLESS)
DAW Decimal Adjust WREG Register
Syntax: [label] DAW f,s
Operands: 0 ≤ f ≤ 255s ∈ [0,1]
Operation: If [ [WREG<7:4> > 9].OR.[C = 1] ].AND. [WREG<3:0> > 9] thenWREG<7:4> + 7→ f<7:4>, s<7:4>;
If [WREG<7:4> > 9].OR.[C = 1]thenWREG<7:4> + 6→ f<7:4>, s<7:4>;else WREG<7:4>→ f<7:4>, s<7:4>;
If [WREG<3:0> > 9].OR.[DC = 1]then WREG<3:0> + 6→ f<3:0>, s<3:0>;else WREG<3:0>→ f<3:0>, s<3:0>
Status Affected: C
Encoding: 0010 111s ffff ffff
Description: DAW adjusts the eight-bit value in WREG, resulting from the earlier addi-tion of two variables (each in packed BCD format) and produces a correct packed BCD result.s = 0: Result is placed in Data
memory location ’f’ and WREG.
s = 1: Result is placed in Data memory location ’f’.
Words: 1
Cycles: 1
Q Cycle Activity:
Q1 Q2 Q3 Q4
Decode Readregister ’f’
Process Data
Writeregister ’f’ and other specified register
Example: DAW REG1, 0
Before InstructionWREG = 0xA5REG1 = ??C = 0DC = 0
After InstructionWREG = 0x05REG1 = 0x05C = 1DC = 0
DS30289B-page 210 2000 Microchip Technology Inc.

PIC17C7XX
DECF Decrement f
Syntax: [ label ] DECF f,d
Operands: 0 ≤ f ≤ 255d ∈ [0,1]
Operation: (f) – 1 → (dest)
Status Affected: OV, C, DC, Z
Encoding: 0000 011d ffff ffff
Description: Decrement register ’f’. If ’d’ is 0, the result is stored in WREG. If ’d’ is 1, the result is stored back in register ’f’.
Words: 1
Cycles: 1
Q Cycle Activity:
Q1 Q2 Q3 Q4
Decode Readregister ’f’
Process Data
Write to destination
Example: DECF CNT, 1
Before InstructionCNT = 0x01Z = 0
After InstructionCNT = 0x00Z = 1
DECFSZ Decrement f, skip if 0
Syntax: [ label ] DECFSZ f,d
Operands: 0 ≤ f ≤ 255d ∈ [0,1]
Operation: (f) – 1 → (dest); skip if result = 0
Status Affected: None
Encoding: 0001 011d ffff ffff
Description: The contents of register ’f’ are decre-mented. If ’d’ is 0, the result is placed in WREG. If ’d’ is 1, the result is placed back in register ’f’.
If the result is 0, the next instruction, which is already fetched is discarded and a NOP is executed instead, making it a two-cycle instruction.
Words: 1
Cycles: 1(2)
Q Cycle Activity:
Q1 Q2 Q3 Q4
Decode Readregister ’f’
Process Data
Write to destination
If skip:
Q1 Q2 Q3 Q4
No operation
No operation
No operation
No operation
Example: HERE DECFSZ CNT, 1 GOTO HERENZEROZERO
Before InstructionPC = Address (HERE)
After InstructionCNT = CNT - 1If CNT = 0;
PC = Address (HERE)If CNT ≠ 0;
PC = Address (NZERO)
2000 Microchip Technology Inc. DS30289B-page 211

PIC17C7XX
DCFSNZ Decrement f, skip if not 0
Syntax: [label] DCFSNZ f,d
Operands: 0 ≤ f ≤ 255d ∈ [0,1]
Operation: (f) – 1 → (dest); skip if not 0
Status Affected: None
Encoding: 0010 011d ffff ffff
Description: The contents of register ’f’ are decre-mented. If ’d’ is 0, the result is placed in WREG. If ’d’ is 1, the result is placed back in register ’f’.
If the result is not 0, the next instruc-tion, which is already fetched is dis-carded and a NOP is executed instead, making it a two-cycle instruction.
Words: 1
Cycles: 1(2)
Q Cycle Activity:
Q1 Q2 Q3 Q4
Decode Readregister ’f’
Process Data
Write to destination
If skip:
Q1 Q2 Q3 Q4
No operation
No operation
No operation
No operation
Example: HERE DCFSNZ TEMP, 1ZERO : NZERO :
Before InstructionTEMP_VALUE = ?
After InstructionTEMP_VALUE = TEMP_VALUE - 1,If TEMP_VALUE = 0;
PC = Address (ZERO)If TEMP_VALUE ≠ 0;
PC = Address (NZERO)
GOTO Unconditional Branch
Syntax: [ label ] GOTO k
Operands: 0 ≤ k ≤ 8191
Operation: k → PC<12:0>;k<12:8> → PCLATH<4:0>,PC<15:13> → PCLATH<7:5>
Status Affected: None
Encoding: 110k kkkk kkkk kkkk
Description: GOTO allows an unconditional branch anywhere within an 8K page boundary. The thirteen-bit immediate value is loaded into PC bits <12:0>. Then the upper eight bits of PC are loaded into PCLATH. GOTO is always a two-cycle instruction.
Words: 1
Cycles: 2
Q Cycle Activity:
Q1 Q2 Q3 Q4
Decode Read literal ’k’
Process Data
Write to PC
No operation
No operation
No operation
No operation
Example: GOTO THERE
After InstructionPC = Address (THERE)
DS30289B-page 212 2000 Microchip Technology Inc.

PIC17C7XX
INCF Increment f
Syntax: [ label ] INCF f,d
Operands: 0 ≤ f ≤ 255d ∈ [0,1]
Operation: (f) + 1 → (dest)
Status Affected: OV, C, DC, Z
Encoding: 0001 010d ffff ffff
Description: The contents of register ’f’ are incre-mented. If ’d’ is 0, the result is placed in WREG. If ’d’ is 1, the result is placed back in register ’f’.
Words: 1
Cycles: 1
Q Cycle Activity:
Q1 Q2 Q3 Q4
Decode Readregister ’f’
Process Data
Write to destination
Example: INCF CNT, 1
Before InstructionCNT = 0xFFZ = 0C = ?
After InstructionCNT = 0x00Z = 1C = 1
INCFSZ Increment f, skip if 0
Syntax: [ label ] INCFSZ f,d
Operands: 0 ≤ f ≤ 255d ∈ [0,1]
Operation: (f) + 1 → (dest)skip if result = 0
Status Affected: None
Encoding: 0001 111d ffff ffff
Description: The contents of register ’f’ are incre-mented. If ’d’ is 0, the result is placed in WREG. If ’d’ is 1, the result is placed back in register ’f’.
If the result is 0, the next instruction, which is already fetched is discarded and a NOP is executed instead, making it a two-cycle instruction.
Words: 1
Cycles: 1(2)
Q Cycle Activity:
Q1 Q2 Q3 Q4
Decode Readregister ’f’
Process Data
Write to destination
If skip:
Q1 Q2 Q3 Q4
No operation
No operation
No operation
No operation
Example: HERE INCFSZ CNT, 1NZERO : ZERO :
Before InstructionPC = Address (HERE)
After InstructionCNT = CNT + 1If CNT = 0;
PC = Address(ZERO)If CNT ≠ 0;
PC = Address(NZERO)
2000 Microchip Technology Inc. DS30289B-page 213

PIC17C7XX
INFSNZ Increment f, skip if not 0
Syntax: [label] INFSNZ f,d
Operands: 0 ≤ f ≤ 255d ∈ [0,1]
Operation: (f) + 1 → (dest), skip if not 0
Status Affected: None
Encoding: 0010 010d ffff ffff
Description: The contents of register ’f’ are incre-mented. If ’d’ is 0, the result is placed in WREG. If ’d’ is 1, the result is placed back in register ’f’.
If the result is not 0, the next instruction, which is already fetched is discarded and a NOP is executed instead, making it a two-cycle instruction.
Words: 1
Cycles: 1(2)
Q Cycle Activity:
Q1 Q2 Q3 Q4
Decode Readregister ’f’
Process Data
Write to destination
If skip:
Q1 Q2 Q3 Q4
No operation
No operation
No operation
No operation
Example: HERE INFSNZ REG, 1ZERONZERO
Before InstructionREG = REG
After InstructionREG = REG + 1If REG = 1;
PC = Address (ZERO)If REG = 0;
PC = Address (NZERO)
IORLW Inclusive OR Literal with WREG
Syntax: [ label ] IORLW k
Operands: 0 ≤ k ≤ 255
Operation: (WREG) .OR. (k) → (WREG)
Status Affected: Z
Encoding: 1011 0011 kkkk kkkk
Description: The contents of WREG are OR’ed with the eight-bit literal 'k'. The result is placed in WREG.
Words: 1
Cycles: 1
Q Cycle Activity:
Q1 Q2 Q3 Q4
Decode Read literal 'k'
Process Data
Write to WREG
Example: IORLW 0x35
Before InstructionWREG = 0x9A
After InstructionWREG = 0xBF
DS30289B-page 214 2000 Microchip Technology Inc.

PIC17C7XX
IORWF Inclusive OR WREG with f
Syntax: [ label ] IORWF f,d
Operands: 0 ≤ f ≤ 255d ∈ [0,1]
Operation: (WREG) .OR. (f) → (dest)
Status Affected: Z
Encoding: 0000 100d ffff ffff
Description: Inclusive OR WREG with register ’f’. If ’d’ is 0, the result is placed in WREG. If ’d’ is 1, the result is placed back in register ’f’.
Words: 1
Cycles: 1
Q Cycle Activity:
Q1 Q2 Q3 Q4
Decode Readregister ’f’
Process Data
Write to destination
Example: IORWF RESULT, 0
Before InstructionRESULT = 0x13WREG = 0x91
After InstructionRESULT = 0x13WREG = 0x93
LCALL Long Call
Syntax: [ label ] LCALL k
Operands: 0 ≤ k ≤ 255
Operation: PC + 1 → TOS;k → PCL, (PCLATH) → PCH
Status Affected: None
Encoding: 1011 0111 kkkk kkkk
Description: LCALL allows an unconditional subrou-tine call to anywhere within the 64K program memory space.
First, the return address (PC + 1) is pushed onto the stack. A 16-bit desti-nation address is then loaded into the program counter. The lower 8-bits of the destination address are embedded in the instruction. The upper 8-bits of PC are loaded from PC high holding latch, PCLATH.
Words: 1
Cycles: 2
Q Cycle Activity:
Q1 Q2 Q3 Q4
Decode Readliteral ’k’
Process Data
Writeregister PCL
No operation
No operation
No operation
No operation
Example: MOVLW HIGH(SUBROUTINE)MOVPF WREG, PCLATHLCALL LOW(SUBROUTINE)
Before InstructionSUBROUTINE = 16-bit AddressPC = ?
After InstructionPC = Address (SUBROUTINE)
2000 Microchip Technology Inc. DS30289B-page 215

PIC17C7XX
MOVFP Move f to p
Syntax: [label] MOVFP f,p
Operands: 0 ≤ f ≤ 2550 ≤ p ≤ 31
Operation: (f) → (p)
Status Affected: None
Encoding: 011p pppp ffff ffff
Description: Move data from data memory location ’f’ to data memory location ’p’. Location ’f’ can be anywhere in the 256 byte data space (00h to FFh), while ’p’ can be 00h to 1Fh.
Either ’p' or 'f' can be WREG (a useful, special situation).
MOVFP is particularly useful for transfer-ring a data memory location to a periph-eral register (such as the transmit buffer or an I/O port). Both 'f' and 'p' can be indirectly addressed.
Words: 1
Cycles: 1
Q Cycle Activity:
Q1 Q2 Q3 Q4
Decode Readregister 'f'
Process Data
Writeregister 'p'
Example: MOVFP REG1, REG2
Before InstructionREG1 = 0x33,REG2 = 0x11
After InstructionREG1 = 0x33,REG2 = 0x33
MOVLB Move Literal to low nibble in BSR
Syntax: [ label ] MOVLB k
Operands: 0 ≤ k ≤ 15
Operation: k → (BSR<3:0>)
Status Affected: None
Encoding: 1011 1000 uuuu kkkk
Description: The four-bit literal ’k’ is loaded in the Bank Select Register (BSR). Only the low 4-bits of the Bank Select Register are affected. The upper half of the BSR is unchanged. The assembler will encode the “u” fields as '0'.
Words: 1
Cycles: 1
Q Cycle Activity:
Q1 Q2 Q3 Q4
Decode Readliteral 'k'
Process Data
Write literal 'k' to
BSR<3:0>
Example: MOVLB 5
Before InstructionBSR register = 0x22
After InstructionBSR register = 0x25 (Bank 5)
DS30289B-page 216 2000 Microchip Technology Inc.

PIC17C7XX
MOVLRMove Literal to high nibble in BSR
Syntax: [ label ] MOVLR k
Operands: 0 ≤ k ≤ 15
Operation: k → (BSR<7:4>)
Status Affected: None
Encoding: 1011 101x kkkk uuuu
Description: The 4-bit literal ’k’ is loaded into the most significant 4-bits of the Bank Select Register (BSR). Only the high 4-bits of the Bank Select Register are affected. The lower half of the BSR is unchanged. The assembler will encode the “u” fields as 0.
Words: 1
Cycles: 1
Q Cycle Activity:
Q1 Q2 Q3 Q4
Decode Read literal 'k'
Process Data
Writeliteral 'k' to BSR<7:4>
Example: MOVLR 5
Before InstructionBSR register = 0x22
After InstructionBSR register = 0x52
MOVLW Move Literal to WREG
Syntax: [ label ] MOVLW k
Operands: 0 ≤ k ≤ 255
Operation: k → (WREG)
Status Affected: None
Encoding: 1011 0000 kkkk kkkk
Description: The eight-bit literal 'k' is loaded into WREG.
Words: 1
Cycles: 1
Q Cycle Activity:
Q1 Q2 Q3 Q4
Decode Readliteral 'k'
Process Data
Write to WREG
Example: MOVLW 0x5A
After InstructionWREG = 0x5A
2000 Microchip Technology Inc. DS30289B-page 217

PIC17C7XX
MOVPF Move p to f
Syntax: [label] MOVPF p,f
Operands: 0 ≤ f ≤ 2550 ≤ p ≤ 31
Operation: (p) → (f)
Status Affected: Z
Encoding: 010p pppp ffff ffff
Description: Move data from data memory location ’p’ to data memory location ’f’. Location ’f’ can be anywhere in the 256 byte data space (00h to FFh), while ’p’ can be 00h to 1Fh.
Either ’p’ or ’f’ can be WREG (a useful, special situation).
MOVPF is particularly useful for transfer-ring a peripheral register (e.g. the timer or an I/O port) to a data memory loca-tion. Both ’f’ and ’p’ can be indirectly addressed.
Words: 1
Cycles: 1
Q Cycle Activity:
Q1 Q2 Q3 Q4
Decode Readregister ’p’
Process Data
Writeregister ’f’
Example: MOVPF REG1, REG2
Before InstructionREG1 = 0x11REG2 = 0x33
After InstructionREG1 = 0x11REG2 = 0x11
MOVWF Move WREG to f
Syntax: [ label ] MOVWF f
Operands: 0 ≤ f ≤ 255
Operation: (WREG) → (f)
Status Affected: None
Encoding: 0000 0001 ffff ffff
Description: Move data from WREG to register ’f’. Location ’f’ can be anywhere in the 256 byte data space.
Words: 1
Cycles: 1
Q Cycle Activity:
Q1 Q2 Q3 Q4
Decode Readregister ’f’
Process Data
Writeregister ’f’
Example: MOVWF REG
Before InstructionWREG = 0x4FREG = 0xFF
After InstructionWREG = 0x4FREG = 0x4F
DS30289B-page 218 2000 Microchip Technology Inc.

PIC17C7XX
MULLW Multiply Literal with WREG
Syntax: [ label ] MULLW k
Operands: 0 ≤ k ≤ 255
Operation: (k x WREG) → PRODH:PRODL
Status Affected: None
Encoding: 1011 1100 kkkk kkkk
Description: An unsigned multiplication is carried out between the contents of WREG and the 8-bit literal ’k’. The 16-bit result is placed in PRODH:PRODL register pair. PRODH contains the high byte.
WREG is unchanged.
None of the status flags are affected.
Note that neither overflow, nor carry is possible in this operation. A zero result is possible, but not detected.
Words: 1
Cycles: 1
Q Cycle Activity:
Q1 Q2 Q3 Q4
Decode Read literal ’k’
Process Data
Write registers PRODH:PRODL
Example: MULLW 0xC4
Before InstructionWREG = 0xE2PRODH = ?PRODL = ?
After InstructionWREG = 0xC4PRODH = 0xADPRODL = 0x08
MULWF Multiply WREG with f
Syntax: [ label ] MULWF f
Operands: 0 ≤ f ≤ 255
Operation: (WREG x f) → PRODH:PRODL
Status Affected: None
Encoding: 0011 0100 ffff ffff
Description: An unsigned multiplication is carried out between the contents of WREG and the register file location ’f’. The 16-bit result is stored in the PRODH:PRODL register pair. PRODH contains the high byte.
Both WREG and ’f’ are unchanged.
None of the status flags are affected.
Note that neither overflow, nor carry is possible in this operation. A zero result is possible, but not detected.
Words: 1
Cycles: 1
Q Cycle Activity:
Q1 Q2 Q3 Q4
Decode Readregister ’f’
Process Data
Writeregisters PRODH:PRODL
Example: MULWF REG
Before InstructionWREG = 0xC4REG = 0xB5PRODH = ?PRODL = ?
After InstructionWREG = 0xC4REG = 0xB5PRODH = 0x8APRODL = 0x94
2000 Microchip Technology Inc. DS30289B-page 219

PIC17C7XX
NEGW Negate W
Syntax: [label] NEGW f,s
Operands: 0 ≤ f ≤ 255s ∈ [0,1]
Operation: WREG + 1 → (f);WREG + 1 → s
Status Affected: OV, C, DC, Z
Encoding: 0010 110s ffff ffff
Description: WREG is negated using two’s comple-ment. If 's' is 0, the result is placed in WREG and data memory location 'f'. If 's' is 1, the result is placed only in data memory location 'f'.
Words: 1
Cycles: 1
Q Cycle Activity:
Q1 Q2 Q3 Q4
Decode Readregister 'f'
Process Data
Write register 'f' and other specified register
Example: NEGW REG,0
Before InstructionWREG = 0011 1010 [0x3A],REG = 1010 1011 [0xAB]
After InstructionWREG = 1100 0110 [0xC6]REG = 1100 0110 [0xC6]
NOP No Operation
Syntax: [ label ] NOP
Operands: None
Operation: No operation
Status Affected: None
Encoding: 0000 0000 0000 0000
Description: No operation.
Words: 1
Cycles: 1
Q Cycle Activity:
Q1 Q2 Q3 Q4
Decode No operation
No operation
No operation
Example:
None.
DS30289B-page 220 2000 Microchip Technology Inc.

PIC17C7XX
RETFIE Return from Interrupt
Syntax: [ label ] RETFIE
Operands: None
Operation: TOS → (PC);0 → GLINTD;PCLATH is unchanged.
Status Affected: GLINTD
Encoding: 0000 0000 0000 0101
Description: Return from Interrupt. Stack is POP’ed and Top-of-Stack (TOS) is loaded in the PC. Interrupts are enabled by clearing the GLINTD bit. GLINTD is the global interrupt disable bit (CPUSTA<4>).
Words: 1
Cycles: 2
Q Cycle Activity:
Q1 Q2 Q3 Q4
Decode No operation
Clear GLINTD
POP PC from stack
No operation
No operation
No operation
No operation
Example: RETFIE
After InterruptPC = TOSGLINTD = 0
RETLW Return Literal to WREG
Syntax: [ label ] RETLW k
Operands: 0 ≤ k ≤ 255
Operation: k → (WREG); TOS → (PC);PCLATH is unchanged
Status Affected: None
Encoding: 1011 0110 kkkk kkkk
Description: WREG is loaded with the eight-bit literal 'k'. The program counter is loaded from the top of the stack (the return address). The high address latch (PCLATH) remains unchanged.
Words: 1
Cycles: 2
Q Cycle Activity:
Q1 Q2 Q3 Q4
Decode Readliteral 'k'
Process Data
POP PC from stack,
Write to WREG
No operation
No operation
No operation
No operation
Example: CALL TABLE ; WREG contains table ; offset value ; WREG now has ; table value :TABLE ADDWF PC ; WREG = offset RETLW k0 ; Begin table RETLW k1 ; : : RETLW kn ; End of table
Before InstructionWREG = 0x07
After InstructionWREG = value of k7
2000 Microchip Technology Inc. DS30289B-page 221

PIC17C7XX
RETURN Return from Subroutine
Syntax: [ label ] RETURN
Operands: None
Operation: TOS → PC;
Status Affected: None
Encoding: 0000 0000 0000 0010
Description: Return from subroutine. The stack is popped and the top of the stack (TOS) is loaded into the program counter.
Words: 1
Cycles: 2
Q Cycle Activity:
Q1 Q2 Q3 Q4
Decode No operation
Process Data
POP PC from stack
No operation
No operation
No operation
No operation
Example: RETURN
After InterruptPC = TOS
RLCF Rotate Left f through Carry
Syntax: [ label ] RLCF f,d
Operands: 0 ≤ f ≤ 255d ∈ [0,1]
Operation: f<n> → d<n+1>;f<7> → C;C → d<0>
Status Affected: C
Encoding: 0001 101d ffff ffff
Description: The contents of register ’f’ are rotated one bit to the left through the Carry Flag. If ’d’ is 0, the result is placed in WREG. If ’d’ is 1, the result is stored back in register ’f’.
Words: 1
Cycles: 1
Q Cycle Activity:
Q1 Q2 Q3 Q4
Decode Readregister ’f’
Process Data
Write to destination
Example: RLCF REG,0
Before InstructionREG = 1110 0110C = 0
After InstructionREG = 1110 0110WREG = 1100 1100C = 1
C register f
DS30289B-page 222 2000 Microchip Technology Inc.

PIC17C7XX
RLNCF Rotate Left f (no carry)
Syntax: [ label ] RLNCF f,d
Operands: 0 ≤ f ≤ 255d ∈ [0,1]
Operation: f<n> → d<n+1>;f<7> → d<0>
Status Affected: None
Encoding: 0010 001d ffff ffff
Description: The contents of register ’f’ are rotated one bit to the left. If ’d’ is 0, the result is placed in WREG. If ’d’ is 1, the result is stored back in register ’f’.
Words: 1
Cycles: 1
Q Cycle Activity:
Q1 Q2 Q3 Q4
Decode Readregister ’f’
Process Data
Write to destination
Example: RLNCF REG, 1
Before InstructionC = 0REG = 1110 1011
After InstructionC =REG = 1101 0111
register f
RRCF Rotate Right f through Carry
Syntax: [ label ] RRCF f,d
Operands: 0 ≤ f ≤ 255d ∈ [0,1]
Operation: f<n> → d<n-1>;f<0> → C;C → d<7>
Status Affected: C
Encoding: 0001 100d ffff ffff
Description: The contents of register ’f’ are rotated one bit to the right through the Carry Flag. If ’d’ is 0, the result is placed in WREG. If ’d’ is 1, the result is placed back in register ’f’.
Words: 1
Cycles: 1
Q Cycle Activity:
Q1 Q2 Q3 Q4
Decode Readregister ’f’
Process Data
Write to destination
Example: RRCF REG1,0
Before InstructionREG1 = 1110 0110C = 0
After InstructionREG1 = 1110 0110WREG = 0111 0011C = 0
C register f
2000 Microchip Technology Inc. DS30289B-page 223

PIC17C7XX
RRNCF Rotate Right f (no carry)
Syntax: [ label ] RRNCF f,d
Operands: 0 ≤ f ≤ 255d ∈ [0,1]
Operation: f<n> → d<n-1>;f<0> → d<7>
Status Affected: None
Encoding: 0010 000d ffff ffff
Description: The contents of register ’f’ are rotated one bit to the right. If ’d’ is 0, the result is placed in WREG. If ’d’ is 1, the result is placed back in register ’f’.
Words: 1
Cycles: 1
Q Cycle Activity:
Q1 Q2 Q3 Q4
Decode Readregister ’f’
Process Data
Write to destination
Example 1: RRNCF REG, 1
Before InstructionWREG = ?REG = 1101 0111
After InstructionWREG = 0REG = 1110 1011
Example 2: RRNCF REG, 0
Before InstructionWREG = ?REG = 1101 0111
After InstructionWREG = 1110 1011REG = 1101 0111
register f
SETF Set f
Syntax: [ label ] SETF f,s
Operands: 0 ≤ f ≤ 255s ∈ [0,1]
Operation: FFh → f;FFh → d
Status Affected: None
Encoding: 0010 101s ffff ffff
Description: If ’s’ is 0, both the data memory location ’f’ and WREG are set to FFh. If ’s’ is 1, only the data memory location ’f’ is set to FFh.
Words: 1
Cycles: 1
Q Cycle Activity:
Q1 Q2 Q3 Q4
Decode Readregister ’f’
Process Data
Write register ’f’ and other specified register
Example1: SETF REG, 0
Before InstructionREG = 0xDAWREG = 0x05
After InstructionREG = 0xFFWREG = 0xFF
Example2: SETF REG, 1
Before InstructionREG = 0xDAWREG = 0x05
After InstructionREG = 0xFFWREG = 0x05
DS30289B-page 224 2000 Microchip Technology Inc.

PIC17C7XX
SLEEP Enter SLEEP mode
Syntax: [ label ] SLEEP
Operands: None
Operation: 00h → WDT;0 → WDT postscaler;1 → TO;0 → PD
Status Affected: TO, PD
Encoding: 0000 0000 0000 0011
Description: The power-down status bit (PD) is cleared. The time-out status bit (TO) is set. Watchdog Timer and its postscaler are cleared.
The processor is put into SLEEP mode with the oscillator stopped.
Words: 1
Cycles: 1
Q Cycle Activity:
Q1 Q2 Q3 Q4
Decode No operation
Process Data
Go tosleep
Example: SLEEP
Before InstructionTO = ?PD = ?
After InstructionTO = 1 †PD = 0
† If WDT causes wake-up, this bit is cleared
SUBLW Subtract WREG from LiteralSyntax: [ label ] SUBLW k
Operands: 0 ≤ k ≤ 255
Operation: k – (WREG) → (WREG)
Status Affected: OV, C, DC, Z
Encoding: 1011 0010 kkkk kkkk
Description: WREG is subtracted from the eight-bit literal ’k’. The result is placed in WREG.
Words: 1
Cycles: 1
Q Cycle Activity:
Q1 Q2 Q3 Q4
Decode Readliteral ’k’
Process Data
Write to WREG
Example 1: SUBLW 0x02
Before InstructionWREG = 1C = ?
After InstructionWREG = 1C = 1 ; result is positiveZ = 0
Example 2:
Before InstructionWREG = 2C = ?
After InstructionWREG = 0C = 1 ; result is zeroZ = 1
Example 3:
Before InstructionWREG = 3C = ?
After InstructionWREG = FF ; (2’s complement)C = 0 ; result is negativeZ = 0
2000 Microchip Technology Inc. DS30289B-page 225

PIC17C7XX
SUBWF Subtract WREG from fSyntax: [ label ] SUBWF f,d
Operands: 0 ≤ f ≤ 255d ∈ [0,1]
Operation: (f) – (W) → (dest)
Status Affected: OV, C, DC, Z
Encoding: 0000 010d ffff ffff
Description: Subtract WREG from register 'f' (2’s complement method). If 'd' is 0, the result is stored in WREG. If 'd' is 1, the result is stored back in register 'f'.
Words: 1
Cycles: 1
Q Cycle Activity:
Q1 Q2 Q3 Q4
Decode Readregister 'f'
Process Data
Write to destination
Example 1: SUBWF REG1, 1
Before InstructionREG1 = 3WREG = 2C = ?
After InstructionREG1 = 1WREG = 2C = 1 ; result is positiveZ = 0
Example 2:
Before InstructionREG1 = 2WREG = 2C = ?
After InstructionREG1 = 0WREG = 2C = 1 ; result is zeroZ = 1
Example 3:
Before InstructionREG1 = 1WREG = 2C = ?
After InstructionREG1 = FFWREG = 2C = 0 ; result is negativeZ = 0
SUBWFBSubtract WREG from f with Borrow
Syntax: [ label ] SUBWFB f,d
Operands: 0 ≤ f ≤ 255d ∈ [0,1]
Operation: (f) – (W) – C → (dest)
Status Affected: OV, C, DC, Z
Encoding: 0000 001d ffff ffff
Description: Subtract WREG and the carry flag (borrow) from register 'f' (2’s comple-ment method). If 'd' is 0, the result is stored in WREG. If 'd' is 1, the result is stored back in register 'f'.
Words: 1
Cycles: 1
Q Cycle Activity:
Q1 Q2 Q3 Q4
Decode Readregister 'f'
Process Data
Write to destination
Example 1: SUBWFB REG1, 1
Before InstructionREG1 = 0x19 (0001 1001)WREG = 0x0D (0000 1101)C = 1
After InstructionREG1 = 0x0C (0000 1011)WREG = 0x0D (0000 1101)C = 1 ; result is positiveZ = 0
Example2: SUBWFB REG1,0
Before InstructionREG1 = 0x1B (0001 1011)WREG = 0x1A (0001 1010)C = 0
After InstructionREG1 = 0x1B (0001 1011)WREG = 0x00C = 1 ; result is zeroZ = 1
Example3: SUBWFB REG1,1
Before InstructionREG1 = 0x03 (0000 0011)WREG = 0x0E (0000 1101)C = 1
After InstructionREG1 = 0xF5 (1111 0100) [2’s comp]WREG = 0x0E (0000 1101)C = 0 ; result is negativeZ = 0
DS30289B-page 226 2000 Microchip Technology Inc.

PIC17C7XX
SWAPF Swap f
Syntax: [ label ] SWAPF f,d
Operands: 0 ≤ f ≤ 255d ∈ [0,1]
Operation: f<3:0> → dest<7:4>;f<7:4> → dest<3:0>
Status Affected: None
Encoding: 0001 110d ffff ffff
Description: The upper and lower nibbles of register ’f’ are exchanged. If ’d’ is 0, the result is placed in WREG. If ’d’ is 1, the result is placed in register ’f’.
Words: 1
Cycles: 1
Q Cycle Activity:
Q1 Q2 Q3 Q4
Decode Readregister ’f’
Process Data
Write to destination
Example: SWAPF REG, 0
Before InstructionREG = 0x53
After InstructionREG = 0x35
TABLRD Table Read
Syntax: [ label ] TABLRD t,i,f
Operands: 0 ≤ f ≤ 255i ∈ [0,1]t ∈ [0,1]
Operation: If t = 1,TBLATH → f;If t = 0,TBLATL → f;Prog Mem (TBLPTR) → TBLAT;If i = 1, TBLPTR + 1 → TBLPTR If i = 0, TBLPTR is unchanged
Status Affected: None
Encoding: 1010 10ti ffff ffff
Description: 1. A byte of the table latch (TBLAT)is moved to register file ’f’.If t = 1: the high byte is moved;If t = 0: the low byte is moved.
2. Then, the contents of the pro-gram memory location pointed toby the 16-bit Table Pointer(TBLPTR) are loaded into the16-bit Table Latch (TBLAT).
3. If i = 1: TBLPTR is incremented;If i = 0: TBLPTR is not
incremented.
Words: 1
Cycles: 2 (3-cycle if f = PCL)
Q Cycle Activity:
Q1 Q2 Q3 Q4
Decode Readregister
TBLATH or TBLATL
Process Data
Writeregister ’f’
No operation
No operation
(Table Pointer on Address
bus)
No operation
No operation
(OE goes low)
2000 Microchip Technology Inc. DS30289B-page 227

PIC17C7XX
TABLRD Table Read
Example1: TABLRD 1, 1, REG ;
Before InstructionREG = 0x53TBLATH = 0xAATBLATL = 0x55TBLPTR = 0xA356MEMORY(TBLPTR) = 0x1234
After Instruction (table write completion)REG = 0xAATBLATH = 0x12TBLATL = 0x34TBLPTR = 0xA357MEMORY(TBLPTR) = 0x5678
Example2: TABLRD 0, 0, REG ;
Before InstructionREG = 0x53TBLATH = 0xAATBLATL = 0x55TBLPTR = 0xA356MEMORY(TBLPTR) = 0x1234
After Instruction (table write completion)REG = 0x55TBLATH = 0x12TBLATL = 0x34TBLPTR = 0xA356MEMORY(TBLPTR) = 0x1234
TABLWT Table Write
Syntax: [ label ] TABLWT t,i,f
Operands: 0 ≤ f ≤ 255i ∈ [0,1]t ∈ [0,1]
Operation: If t = 0,f → TBLATL;If t = 1,f → TBLATH;TBLAT → Prog Mem (TBLPTR);If i = 1, TBLPTR + 1 → TBLPTR If i = 0,TBLPTR is unchanged
Status Affected: None
Encoding: 1010 11ti ffff ffff
Description: 1. Load value in ’f’ into 16-bit tablelatch (TBLAT)If t = 1: load into high byte;If t = 0: load into low byte
2. The contents of TBLAT are writ-ten to the program memorylocation pointed to by TBLPTR.If TBLPTR points to externalprogram memory location, thenthe instruction takes two-cycle.If TBLPTR points to an internalEPROM location, then theinstruction is terminated whenan interrupt is received.
Note: The MCLR/VPP pin must be at the programmingvoltage for successful programming of internalmemory.If MCLR/VPP = VDD
the programming sequence of internal memorywill be interrupted. A short write will occur (2TCY). The internal memory location will not beaffected.
3. The TBLPTR can be automati-cally incrementedIf i = 1; TBLPTR is not
incrementedIf i = 0; TBLPTR is incremented
Words: 1
Cycles: 2 (many if write is to on-chip EPROM program memory)
Q Cycle Activity:
Q1 Q2 Q3 Q4
Decode Readregister 'f'
Process Data
Writeregister
TBLATH or TBLATL
No operation
No operation
(Table Pointer on Address
bus)
No operation
No operation
(Table Latch on Address bus, WR goes low)
DS30289B-page 228 2000 Microchip Technology Inc.

PIC17C7XX
TABLWT Table Write
Example1: TABLWT 1, 1, REG
Before InstructionREG = 0x53TBLATH = 0xAATBLATL = 0x55TBLPTR = 0xA356MEMORY(TBLPTR) = 0xFFFF
After Instruction (table write completion)REG = 0x53TBLATH = 0x53TBLATL = 0x55TBLPTR = 0xA357MEMORY(TBLPTR - 1) = 0x5355
Example 2: TABLWT 0, 0, REG
Before InstructionREG = 0x53TBLATH = 0xAATBLATL = 0x55TBLPTR = 0xA356MEMORY(TBLPTR) = 0xFFFF
After Instruction (table write completion)REG = 0x53TBLATH = 0xAATBLATL = 0x53TBLPTR = 0xA356MEMORY(TBLPTR) = 0xAA53
ProgramMemory
16 bits
15 0
TBLPTR
TBLAT
DataMemory
8 bits
15 8 7 0
TLRD Table Latch Read
Syntax: [ label ] TLRD t,f
Operands: 0 ≤ f ≤ 255t ∈ [0,1]
Operation: If t = 0,TBLATL → f;If t = 1,TBLATH → f
Status Affected: None
Encoding: 1010 00tx ffff ffff
Description: Read data from 16-bit table latch (TBLAT) into file register ’f’. Table Latch is unaffected.
If t = 1; high byte is read
If t = 0; low byte is read
This instruction is used in conjunction with TABLRD to transfer data from pro-gram memory to data memory.
Words: 1
Cycles: 1
Q Cycle Activity:
Q1 Q2 Q3 Q4
Decode Readregister
TBLATH or TBLATL
Process Data
Writeregister ’f’
Example: TLRD t, RAM
Before Instructiont = 0RAM = ?TBLAT = 0x00AF (TBLATH = 0x00)
(TBLATL = 0xAF)
After InstructionRAM = 0xAFTBLAT = 0x00AF (TBLATH = 0x00)
(TBLATL = 0xAF)
Before Instructiont = 1RAM = ?TBLAT = 0x00AF (TBLATH = 0x00)
(TBLATL = 0xAF)
After InstructionRAM = 0x00TBLAT = 0x00AF (TBLATH = 0x00)
(TBLATL = 0xAF)
ProgramMemory
16 bits
15 0
TBLPTR
TBLAT
DataMemory
8 bits
15 8 7 0
2000 Microchip Technology Inc. DS30289B-page 229

PIC17C7XX
TLWT Table Latch Write
Syntax: [ label ] TLWT t,f
Operands: 0 ≤ f ≤ 255t ∈ [0,1]
Operation: If t = 0,f → TBLATL;If t = 1,f → TBLATH
Status Affected: None
Encoding: 1010 01tx ffff ffff
Description: Data from file register ’f’ is written into the 16-bit table latch (TBLAT).
If t = 1; high byte is written
If t = 0; low byte is written
This instruction is used in conjunction with TABLWT to transfer data from data memory to program memory.
Words: 1
Cycles: 1
Q Cycle Activity:
Q1 Q2 Q3 Q4
Decode Readregister ’f’
Process Data
Writeregister
TBLATH or TBLATL
Example: TLWT t, RAM
Before Instructiont = 0RAM = 0xB7TBLAT = 0x0000 (TBLATH = 0x00) (TBLATL = 0x00)
After InstructionRAM = 0xB7TBLAT = 0x00B7 (TBLATH = 0x00) (TBLATL = 0xB7)
Before Instructiont = 1RAM = 0xB7TBLAT = 0x0000 (TBLATH = 0x00) (TBLATL = 0x00)
After InstructionRAM = 0xB7TBLAT = 0xB700 (TBLATH = 0xB7) (TBLATL = 0x00)
TSTFSZ Test f, skip if 0
Syntax: [ label ] TSTFSZ f
Operands: 0 ≤ f ≤ 255
Operation: skip if f = 0
Status Affected: None
Encoding: 0011 0011 ffff ffff
Description: If ’f’ = 0, the next instruction, fetched during the current instruction execution, is discarded and a NOP is executed, making this a two-cycle instruction.
Words: 1
Cycles: 1 (2)
Q Cycle Activity:
Q1 Q2 Q3 Q4
Decode Readregister ’f’
Process Data
No operation
If skip:
Q1 Q2 Q3 Q4
No operation
No operation
No operation
No operation
Example: HERE TSTFSZ CNTNZERO :ZERO :
Before InstructionPC = Address (HERE)
After InstructionIf CNT = 0x00,
PC = Address (ZERO)If CNT ¼ 0x00,
PC = Address (NZERO)
DS30289B-page 230 2000 Microchip Technology Inc.

PIC17C7XX
XORLWExclusive OR Literal with WREG
Syntax: [ label ] XORLW k
Operands: 0 ≤ k ≤ 255
Operation: (WREG) .XOR. k → (WREG)
Status Affected: Z
Encoding: 1011 0100 kkkk kkkk
Description: The contents of WREG are XOR’ed with the 8-bit literal 'k'. The result is placed in WREG.
Words: 1
Cycles: 1
Q Cycle Activity:
Q1 Q2 Q3 Q4
Decode Readliteral 'k'
Process Data
Write to WREG
Example: XORLW 0xAF
Before InstructionWREG = 0xB5
After InstructionWREG = 0x1A
XORWF Exclusive OR WREG with f
Syntax: [ label ] XORWF f,d
Operands: 0 ≤ f ≤ 255d ∈ [0,1]
Operation: (WREG) .XOR. (f) → (dest)
Status Affected: Z
Encoding: 0000 110d ffff ffff
Description: Exclusive OR the contents of WREG with register 'f'. If 'd' is 0, the result is stored in WREG. If 'd' is 1, the result is stored back in the register 'f'.
Words: 1
Cycles: 1
Q Cycle Activity:
Q1 Q2 Q3 Q4
Decode Readregister 'f'
Process Data
Write to destination
Example: XORWF REG, 1
Before InstructionREG = 0xAF 1010 1111WREG = 0xB5 1011 0101
After InstructionREG = 0x1A 0001 1010WREG = 0xB5
2000 Microchip Technology Inc. DS30289B-page 231

PIC17C7XX
NOTES:
DS30289B-page 232 2000 Microchip Technology Inc.

PIC17C7XX
19.0 DEVELOPMENT SUPPORT
The PICmicro® microcontrollers are supported with afull range of hardware and software development tools:
• Integrated Development Environment
- MPLAB® IDE Software• Assemblers/Compilers/Linkers
- MPASMTM Assembler
- MPLAB C17 and MPLAB C18 C Compilers- MPLINKTM Object Linker/
MPLIBTM Object Librarian• Simulators
- MPLAB SIM Software Simulator
• Emulators- MPLAB ICE 2000 In-Circuit Emulator- ICEPIC™ In-Circuit Emulator
• In-Circuit Debugger- MPLAB ICD for PIC16F87X
• Device Programmers
- PRO MATE® II Universal Device Programmer- PICSTART® Plus Entry-Level Development
Programmer• Low Cost Demonstration Boards
- PICDEMTM 1 Demonstration Board
- PICDEM 2 Demonstration Board- PICDEM 3 Demonstration Board- PICDEM 17 Demonstration Board
- KEELOQ® Demonstration Board
19.1 MPLAB Integrated Development Environment Software
The MPLAB IDE software brings an ease of softwaredevelopment previously unseen in the 8-bit microcon-troller market. The MPLAB IDE is a Windows®-basedapplication that contains:
• An interface to debugging tools- simulator
- programmer (sold separately)- emulator (sold separately)- in-circuit debugger (sold separately)
• A full-featured editor• A project manager• Customizable toolbar and key mapping
• A status bar• On-line help
The MPLAB IDE allows you to:
• Edit your source files (either assembly or ‘C’)• One touch assemble (or compile) and download
to PICmicro emulator and simulator tools (auto-matically updates all project information)
• Debug using:- source files
- absolute listing file- machine code
The ability to use MPLAB IDE with multiple debuggingtools allows users to easily switch from the cost-effective simulator to a full-featured emulator withminimal retraining.
19.2 MPASM Assembler
The MPASM assembler is a full-featured universalmacro assembler for all PICmicro MCU’s.
The MPASM assembler has a command line interfaceand a Windows shell. It can be used as a stand-aloneapplication on a Windows 3.x or greater system, or itcan be used through MPLAB IDE. The MPASM assem-bler generates relocatable object files for the MPLINKobject linker, Intel® standard HEX files, MAP files todetail memory usage and symbol reference, an abso-lute LST file that contains source lines and generatedmachine code, and a COD file for debugging.
The MPASM assembler features include:
• Integration into MPLAB IDE projects.• User-defined macros to streamline assembly
code.• Conditional assembly for multi-purpose source
files.• Directives that allow complete control over the
assembly process.
19.3 MPLAB C17 and MPLAB C18 C Compilers
The MPLAB C17 and MPLAB C18 Code DevelopmentSystems are complete ANSI ‘C’ compilers forMicrochip’s PIC17CXXX and PIC18CXXX family ofmicrocontrollers, respectively. These compilers providepowerful integration capabilities and ease of use notfound with other compilers.
For easier source level debugging, the compilers pro-vide symbol information that is compatible with theMPLAB IDE memory display.
2000 Microchip Technology Inc. DS30289B-page 233

PIC17C7XX
19.4 MPLINK Object Linker/MPLIB Object Librarian
The MPLINK object linker combines relocatableobjects created by the MPASM assembler and theMPLAB C17 and MPLAB C18 C compilers. It can alsolink relocatable objects from pre-compiled libraries,using directives from a linker script.
The MPLIB object librarian is a librarian for pre-compiled code to be used with the MPLINK objectlinker. When a routine from a library is called fromanother source file, only the modules that contain thatroutine will be linked in with the application. This allowslarge libraries to be used efficiently in many differentapplications. The MPLIB object librarian manages thecreation and modification of library files.
The MPLINK object linker features include:
• Integration with MPASM assembler and MPLAB C17 and MPLAB C18 C compilers.
• Allows all memory areas to be defined as sections to provide link-time flexibility.
The MPLIB object librarian features include:
• Easier linking because single libraries can be included instead of many smaller files.
• Helps keep code maintainable by grouping related modules together.
• Allows libraries to be created and modules to be added, listed, replaced, deleted or extracted.
19.5 MPLAB SIM Software Simulator
The MPLAB SIM software simulator allows code devel-opment in a PC-hosted environment by simulating thePICmicro series microcontrollers on an instructionlevel. On any given instruction, the data areas can beexamined or modified and stimuli can be applied froma file, or user-defined key press, to any of the pins. Theexecution can be performed in single step, executeuntil break, or trace mode.
The MPLAB SIM simulator fully supports symbolic debug-ging using the MPLAB C17 and the MPLAB C18 C com-pilers and the MPASM assembler. The software simulatoroffers the flexibility to develop and debug code outside ofthe laboratory environment, making it an excellent multi-project software development tool.
19.6 MPLAB ICE High Performance Universal In-Circuit Emulator with MPLAB IDE
The MPLAB ICE universal in-circuit emulator is intendedto provide the product development engineer with acomplete microcontroller design tool set for PICmicromicrocontrollers (MCUs). Software control of theMPLAB ICE in-circuit emulator is provided by theMPLAB Integrated Development Environment (IDE),which allows editing, building, downloading and sourcedebugging from a single environment.
The MPLAB ICE 2000 is a full-featured emulator sys-tem with enhanced trace, trigger and data monitoringfeatures. Interchangeable processor modules allow thesystem to be easily reconfigured for emulation of differ-ent processors. The universal architecture of theMPLAB ICE in-circuit emulator allows expansion tosupport new PICmicro microcontrollers.
The MPLAB ICE in-circuit emulator system has beendesigned as a real-time emulation system, withadvanced features that are generally found on moreexpensive development tools. The PC platform andMicrosoft® Windows environment were chosen to bestmake these features available to you, the end user.
19.7 ICEPIC In-Circuit Emulator
The ICEPIC low cost, in-circuit emulator is a solutionfor the Microchip Technology PIC16C5X, PIC16C6X,PIC16C7X and PIC16CXXX families of 8-bit One-Time-Programmable (OTP) microcontrollers. The mod-ular system can support different subsets of PIC16C5Xor PIC16CXXX products through the use of inter-changeable personality modules, or daughter boards.The emulator is capable of emulating without targetapplication circuitry being present.
DS30289B-page 234 2000 Microchip Technology Inc.

PIC17C7XX
19.8 MPLAB ICD In-Circuit Debugger
Microchip’s In-Circuit Debugger, MPLAB ICD, is a pow-erful, low cost, run-time development tool. This tool isbased on the FLASH PIC16F87X and can be used todevelop for this and other PICmicro microcontrollersfrom the PIC16CXXX family. The MPLAB ICD utilizesthe in-circuit debugging capability built into thePIC16F87X. This feature, along with Microchip’sIn-Circuit Serial ProgrammingTM protocol, offers cost-effective in-circuit FLASH debugging from the graphicaluser interface of the MPLAB Integrated DevelopmentEnvironment. This enables a designer to develop anddebug source code by watching variables, single-stepping and setting break points. Running at fullspeed enables testing hardware in real-time.
19.9 PRO MATE II Universal Device Programmer
The PRO MATE II universal device programmer is afull-featured programmer, capable of operating instand-alone mode, as well as PC-hosted mode. ThePRO MATE II device programmer is CE compliant.
The PRO MATE II device programmer has program-mable VDD and VPP supplies, which allow it to verifyprogrammed memory at VDD min and VDD max for max-imum reliability. It has an LCD display for instructionsand error messages, keys to enter commands and amodular detachable socket assembly to support variouspackage types. In stand-alone mode, the PRO MATE IIdevice programmer can read, verify, or programPICmicro devices. It can also set code protection in thismode.
19.10 PICSTART Plus Entry Level Development Programmer
The PICSTART Plus development programmer is aneasy-to-use, low cost, prototype programmer. It con-nects to the PC via a COM (RS-232) port. MPLABIntegrated Development Environment software makesusing the programmer simple and efficient.
The PICSTART Plus development programmer sup-ports all PICmicro devices with up to 40 pins. Larger pincount devices, such as the PIC16C92X andPIC17C76X, may be supported with an adapter socket.The PICSTART Plus development programmer is CEcompliant.
19.11 PICDEM 1 Low Cost PICmicroDemonstration Board
The PICDEM 1 demonstration board is a simple boardwhich demonstrates the capabilities of several ofMicrochip’s microcontrollers. The microcontrollers sup-ported are: PIC16C5X (PIC16C54 to PIC16C58A),PIC16C61, PIC16C62X, PIC16C71, PIC16C8X,PIC17C42, PIC17C43 and PIC17C44. All necessaryhardware and software is included to run basic demoprograms. The user can program the sample microcon-trollers provided with the PICDEM 1 demonstrationboard on a PRO MATE II device programmer, or aPICSTART Plus development programmer, and easilytest firmware. The user can also connect thePICDEM 1 demonstration board to the MPLAB ICE in-circuit emulator and download the firmware to the emu-lator for testing. A prototype area is available for theuser to build some additional hardware and connect itto the microcontroller socket(s). Some of the featuresinclude an RS-232 interface, a potentiometer for simu-lated analog input, push button switches and eightLEDs connected to PORTB.
19.12 PICDEM 2 Low Cost PIC16CXX Demonstration Board
The PICDEM 2 demonstration board is a simple dem-onstration board that supports the PIC16C62,PIC16C64, PIC16C65, PIC16C73 and PIC16C74microcontrollers. All the necessary hardware and soft-ware is included to run the basic demonstration pro-grams. The user can program the samplemicrocontrollers provided with the PICDEM 2 demon-stration board on a PRO MATE II device programmer,or a PICSTART Plus development programmer, andeasily test firmware. The MPLAB ICE in-circuit emula-tor may also be used with the PICDEM 2 demonstrationboard to test firmware. A prototype area has been pro-vided to the user for adding additional hardware andconnecting it to the microcontroller socket(s). Some ofthe features include a RS-232 interface, push buttonswitches, a potentiometer for simulated analog input, aserial EEPROM to demonstrate usage of the I2CTM busand separate headers for connection to an LCDmodule and a keypad.
2000 Microchip Technology Inc. DS30289B-page 235

PIC17C7XX
19.13 PICDEM 3 Low Cost PIC16CXXX Demonstration Board
The PICDEM 3 demonstration board is a simple dem-onstration board that supports the PIC16C923 andPIC16C924 in the PLCC package. It will also supportfuture 44-pin PLCC microcontrollers with an LCD Mod-ule. All the necessary hardware and software isincluded to run the basic demonstration programs. Theuser can program the sample microcontrollers pro-vided with the PICDEM 3 demonstration board on aPRO MATE II device programmer, or a PICSTART Plusdevelopment programmer with an adapter socket, andeasily test firmware. The MPLAB ICE in-circuit emula-tor may also be used with the PICDEM 3 demonstrationboard to test firmware. A prototype area has been pro-vided to the user for adding hardware and connecting itto the microcontroller socket(s). Some of the featuresinclude a RS-232 interface, push button switches, apotentiometer for simulated analog input, a thermistorand separate headers for connection to an externalLCD module and a keypad. Also provided on thePICDEM 3 demonstration board is a LCD panel, with 4commons and 12 segments, that is capable of display-ing time, temperature and day of the week. ThePICDEM 3 demonstration board provides an additionalRS-232 interface and Windows software for showingthe demultiplexed LCD signals on a PC. A simple serialinterface allows the user to construct a hardwaredemultiplexer for the LCD signals.
19.14 PICDEM 17 Demonstration Board
The PICDEM 17 demonstration board is an evaluationboard that demonstrates the capabilities of severalMicrochip microcontrollers, including PIC17C752,PIC17C756A, PIC17C762 and PIC17C766. All neces-sary hardware is included to run basic demo programs,which are supplied on a 3.5-inch disk. A programmedsample is included and the user may erase it andprogram it with the other sample programs using thePRO MATE II device programmer, or the PICSTARTPlus development programmer, and easily debug andtest the sample code. In addition, the PICDEM 17 dem-onstration board supports downloading of programs toand executing out of external FLASH memory on board.The PICDEM 17 demonstration board is also usablewith the MPLAB ICE in-circuit emulator, or thePICMASTER emulator and all of the sample programscan be run and modified using either emulator. Addition-ally, a generous prototype area is available for userhardware.
19.15 KEELOQ Evaluation and Programming Tools
KEELOQ evaluation and programming tools supportMicrochip’s HCS Secure Data Products. The HCS eval-uation kit includes a LCD display to show changingcodes, a decoder to decode transmissions and a pro-gramming interface to program test transmitters.
DS30289B-page 236 2000 Microchip Technology Inc.

PIC17C7XX
TABLE 19-1: DEVELOPMENT TOOLS FROM MICROCHIP
PIC12CXXX
PIC14000
PIC16C5X
PIC16C6X
PIC16CXXX
PIC16F62X
PIC16C7X
PIC16C7XX
PIC16C8X
PIC16F8XX
PIC16C9XX
PIC17C4X
PIC17C7XX
PIC18CXX2
24CXX/25CXX/93CXX
HCSXXX
MCRFXXX
MCP2510
Software Tools
MP
LA
B® In
teg
rate
dD
evel
op
men
t E
nvi
ron
men
t
á
á
á
á
á
á
á
á
á
á
á
á
á
á
MP
LA
B® C
17 C
Co
mp
iler
á
á
MP
LA
B® C
18 C
Co
mp
iler
á
MP
AS
MT
M A
ssem
ble
r/M
PL
INK
TM
Ob
ject
Lin
ker
á
á
á
á
á
á
á
á
á
á
á
á
á
á
á
á
Emulators
MP
LA
B® IC
E In
-Cir
cuit
Em
ula
tor
á
á
á
á
á
á
**
á
á
á
á
á
á
á
áIC
EP
ICT
M In
-Cir
cuit
Em
ula
tor
á
á
á
á
á
á
á
á
Debugger
MP
LA
B® IC
D In
-Cir
cuit
D
ebu
gg
er
á
*
á
*
á
Programmers
PIC
ST
AR
T® P
lus
En
try
Lev
elD
evel
op
men
t P
rog
ram
mer
á
á
á
á
á
á
**
á
á
á
á
á
á
á
á
PR
O M
AT
E® II
U
niv
ersa
l Dev
ice
Pro
gra
mm
er
á
á
á
á
á
á
**
á
á
á
á
á
á
á
á
á
á
Demo Boards and Eval Kits
PIC
DE
MT
M 1
Dem
on
stra
tio
n
Bo
ard
á
á
á
†
á
á
PIC
DE
MT
M 2
Dem
on
stra
tio
n
Bo
ard
á
†
á
†
á
PIC
DE
MT
M 3
Dem
on
stra
tio
n
Bo
ard
á
PIC
DE
MT
M 1
4A D
emo
nst
rati
on
B
oar
d
á
PIC
DE
MT
M 1
7 D
emo
nst
rati
on
B
oar
d
á
KE
EL
OQ
® E
valu
atio
n K
it
á
KE
EL
OQ
® T
ran
spo
nd
er K
it
á
mic
roID
TM P
rog
ram
mer
’s K
it
á
125
kHz
mic
roID
TM
Dev
elo
per
’s K
it
á
125
kHz
An
tico
llisi
on
mic
roID
TM
Dev
elo
per
’s K
it
á
13.5
6 M
Hz
An
tico
llisi
on
m
icro
IDT
M D
evel
op
er’s
Kit
á
MC
P25
10 C
AN
Dev
elo
per
’s K
it
á
*C
onta
ct th
e M
icro
chip
Tec
hnol
ogy
Inc.
web
site
at w
ww
.mic
roch
ip.c
om fo
r in
form
atio
n on
how
to u
se th
e M
PLA
B® IC
D In
-Circ
uit D
ebug
ger
(DV
1640
01)
with
PIC
16C
62, 6
3, 6
4, 6
5, 7
2, 7
3, 7
4, 7
6, 7
7.**
Con
tact
Mic
roch
ip T
echn
olog
y In
c. fo
r av
aila
bilit
y da
te.
†D
evel
opm
ent t
ool i
s av
aila
ble
on s
elec
t dev
ices
.
2000 Microchip Technology Inc. DS30289B-page 237

PIC17C7XX
NOTES:
DS30289B-page 238 2000 Microchip Technology Inc.
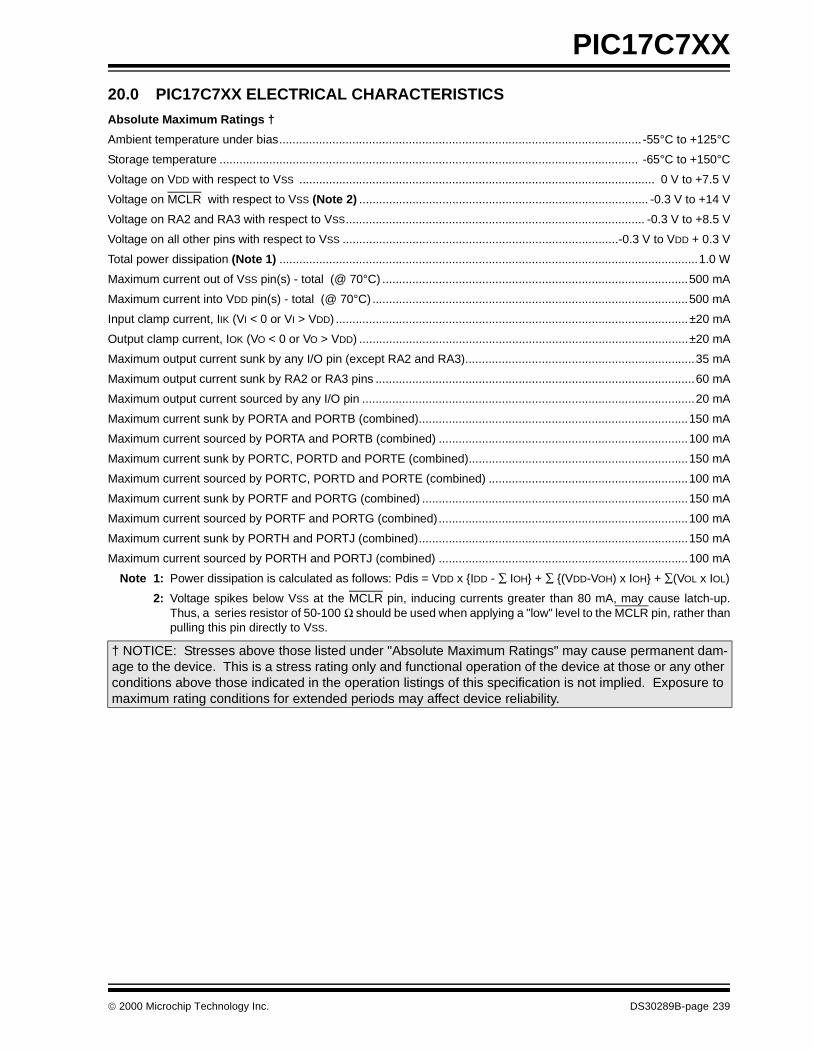
PIC17C7XX
20.0 PIC17C7XX ELECTRICAL CHARACTERISTICS
Absolute Maximum Ratings †
Ambient temperature under bias............................................................................................................. -55°C to +125°C
Storage temperature .............................................................................................................................. -65°C to +150°C
Voltage on VDD with respect to VSS ........................................................................................................... 0 V to +7.5 V
Voltage on MCLR with respect to VSS (Note 2) ....................................................................................... -0.3 V to +14 V
Voltage on RA2 and RA3 with respect to VSS.......................................................................................... -0.3 V to +8.5 V
Voltage on all other pins with respect to VSS ...................................................................................-0.3 V to VDD + 0.3 V
Total power dissipation (Note 1) ..............................................................................................................................1.0 W
Maximum current out of VSS pin(s) - total (@ 70°C) ............................................................................................500 mA
Maximum current into VDD pin(s) - total (@ 70°C)...............................................................................................500 mA
Input clamp current, IIK (VI < 0 or VI > VDD) ..........................................................................................................±20 mA
Output clamp current, IOK (VO < 0 or VO > VDD) ...................................................................................................±20 mA
Maximum output current sunk by any I/O pin (except RA2 and RA3).....................................................................35 mA
Maximum output current sunk by RA2 or RA3 pins ................................................................................................60 mA
Maximum output current sourced by any I/O pin ....................................................................................................20 mA
Maximum current sunk by PORTA and PORTB (combined).................................................................................150 mA
Maximum current sourced by PORTA and PORTB (combined) ...........................................................................100 mA
Maximum current sunk by PORTC, PORTD and PORTE (combined)..................................................................150 mA
Maximum current sourced by PORTC, PORTD and PORTE (combined) ............................................................100 mA
Maximum current sunk by PORTF and PORTG (combined) ................................................................................150 mA
Maximum current sourced by PORTF and PORTG (combined)...........................................................................100 mA
Maximum current sunk by PORTH and PORTJ (combined).................................................................................150 mA
Maximum current sourced by PORTH and PORTJ (combined) ...........................................................................100 mA
Note 1: Power dissipation is calculated as follows: Pdis = VDD x IDD - ∑ IOH + ∑ (VDD-VOH) x IOH + ∑(VOL x IOL)
2: Voltage spikes below VSS at the MCLR pin, inducing currents greater than 80 mA, may cause latch-up.Thus, a series resistor of 50-100 Ω should be used when applying a "low" level to the MCLR pin, rather thanpulling this pin directly to VSS.
† NOTICE: Stresses above those listed under "Absolute Maximum Ratings" may cause permanent dam-age to the device. This is a stress rating only and functional operation of the device at those or any other conditions above those indicated in the operation listings of this specification is not implied. Exposure to maximum rating conditions for extended periods may affect device reliability.
2000 Microchip Technology Inc. DS30289B-page 239

PIC17C7XX
FIGURE 20-1: PIC17C7XX-33 VOLTAGE-FREQUENCY GRAPHFIGURE 20-2: PIC17C7XX-16 VOLTAGE-FREQUENCY GRAPH
Frequency
Volta
ge
6.0 V
5.5 V
4.5 V
4.0 V
2.0 V
33 MHz
5.0 V
3.5 V
3.0 V
2.5 V
PIC17C7XX-33
Frequency
Volta
ge
6.0 V
5.5 V
4.5 V
4.0 V
2.0 V
16 MHz
5.0 V
3.5 V
3.0 V
2.5 V
PIC17C7XX-16
DS30289B-page 240 2000 Microchip Technology Inc.
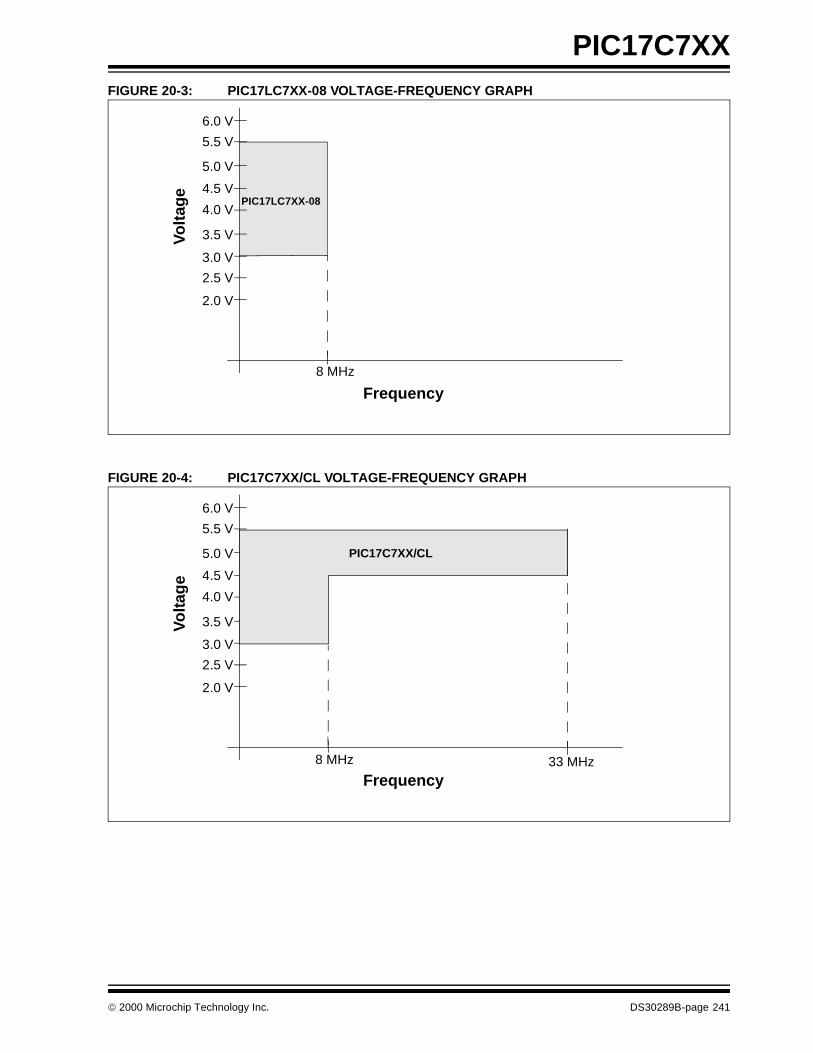
PIC17C7XX
FIGURE 20-3: PIC17LC7XX-08 VOLTAGE-FREQUENCY GRAPHFIGURE 20-4: PIC17C7XX/CL VOLTAGE-FREQUENCY GRAPH
Frequency
Vo
ltag
e
6.0 V
5.5 V
4.5 V
4.0 V
2.0 V
8 MHz
5.0 V
3.5 V
3.0 V
2.5 V
PIC17LC7XX-08
Frequency
Vo
ltag
e
6.0 V
5.5 V
4.5 V
4.0 V
2.0 V
8 MHz
5.0 V
3.5 V
3.0 V
2.5 V
33 MHz
PIC17C7XX/CL
2000 Microchip Technology Inc. DS30289B-page 241

PIC17C7XX
20.1 DC Characteristics
PIC17LC7XX-08 (Commercial, Industrial)
Standard Operating Conditions (unless otherwise stated)Operating temperature
-40°C ≤ TA ≤ +85°C for industrial and 0°C ≤ TA ≤ +70°C for commercial
PIC17C7XX-16 (Commercial, Industrial, Extended)PIC17C7XX-33 (Commercial, Industrial, Extended)
Standard Operating Conditions (unless otherwise stated)Operating temperature -40°C ≤ TA ≤ +125°C for extended
-40°C ≤ TA ≤ +85°C for industrial 0°C ≤ TA ≤ +70°C for commercial
Param.No.
Sym Characteristic Min Typ† Max Units Conditions
D001 VDD Supply Voltage
PIC17LC7XX 3.0 — 5.5 V
D001 PIC17C7XX-33PIC17C7XX-16
4.5VBOR
——
5.55.5
VV (BOR enabled) (Note 5)
D002 VDR RAM Data Retention Voltage (Note 1)
1.5 — — V Device in SLEEP mode
D003 VPOR VDD Start Voltage toensure internal Power-on Reset signal
— Vss — V See section on Power-on Reset for details
D004 SVDD VDD Rise Rate to ensure proper operation
PIC17LCXX 0.010 — — V/ms See section on Power-on Reset for details
D004 PIC17CXX 0.085 — — V/ms See section on Power-on Reset for details
D005 VBOR Brown-out Reset voltage trip point
3.65 — 4.35 V
D006 VPORTP Power-on Reset trip point
— 2.2 — V VDD = VPORTP
† Data in "Typ" column is at 5V, 25°C unless otherwise stated. Note 1: This is the limit to which VDD can be lowered in SLEEP mode without losing RAM data.
2: The supply current is mainly a function of the operating voltage and frequency. Other factors such as I/O pin loading and switching rate, oscillator type, internal code execution pattern and temperature also have an impact on the current consumption.
The test conditions for all IDD measurements in active operation mode are: OSC1 = external square wave, from rail to rail; all I/O pins tri-stated, pulled to VDD or VSS, T0CKI = VDD, MCLR = VDD; WDT disabled. Current consumed from the oscillator and I/O’s driving external capacitive or resistive loads needs to be considered.For the RC oscillator, the current through the external pull-up resistor (R) can be estimated as: VDD/(2 • R). For capacitive loads, the current can be estimated (for an individual I/O pin) as (CL • VDD) • fCL = Total capacitive load on the I/O pin; f = average frequency the I/O pin switches. The capacitive currents are most significant when the device is configured for external execution (includes Extended Microcontroller mode).
3: The power-down current in SLEEP mode does not depend on the oscillator type. Power-down current is measured with the part in SLEEP mode, with all I/O pins in hi-impedance state and tied to VDD or VSS.
4: For RC osc configuration, current through REXT is not included. The current through the resistor can be esti-mated by the formula IR = VDD/2REXT (mA) with REXT in kOhm.
5: This is the voltage where the device enters the Brown-out Reset. When BOR is enabled, the device (-16) will operate correctly to this trip point.
DS30289B-page 242 2000 Microchip Technology Inc.

PIC17C7XX
D010 IDD Supply Current (Note 2)PIC17LC7XX — 3 6 mA FOSC = 4 MHz (Note 4)
D010 PIC17C7XX — 3 6 mA FOSC = 4 MHz (Note 4)D011 PIC17LC7XX — 5 10 mA FOSC = 8 MHz
D011D012
PIC17C7XX ——
59
1018
mAmA
FOSC = 8 MHzFOSC = 16 MHz
D014 PIC17LC7XX — 85 150 µA FOSC = 32 kHz,(EC osc configuration)
D015 PIC17C7XX — 15 30 mA FOSC = 33 MHz D021 IPD Power-down Current (Note 3)
PIC17LC7XX — <1 5 µA VDD = 3.0V, WDT disabled
D021(commercial,
industrial)
PIC17C7XX — <1 20 µA VDD = 5.5V, WDT disabled
D021A (extended)
— 2 20 µA VDD = 5.5V, WDT disabled
Module Differential Current D023 ∆IBOR BOR circuitry – 75 150 µA VDD = 4.5V, BODEN
enabled
D024 ∆IWDT Watchdog Timer – 10 35 µA VDD = 5.5VD026 ∆IAD A/D converter – 1 – µA VDD = 5.5V, A/D not
converting
PIC17LC7XX-08 (Commercial, Industrial)
Standard Operating Conditions (unless otherwise stated)Operating temperature
-40°C ≤ TA ≤ +85°C for industrial and 0°C ≤ TA ≤ +70°C for commercial
PIC17C7XX-16 (Commercial, Industrial, Extended)PIC17C7XX-33 (Commercial, Industrial, Extended)
Standard Operating Conditions (unless otherwise stated)Operating temperature -40°C ≤ TA ≤ +125°C for extended
-40°C ≤ TA ≤ +85°C for industrial 0°C ≤ TA ≤ +70°C for commercial
Param.No.
Sym Characteristic Min Typ† Max Units Conditions
† Data in "Typ" column is at 5V, 25°C unless otherwise stated. Note 1: This is the limit to which VDD can be lowered in SLEEP mode without losing RAM data.
2: The supply current is mainly a function of the operating voltage and frequency. Other factors such as I/O pin loading and switching rate, oscillator type, internal code execution pattern and temperature also have an impact on the current consumption.
The test conditions for all IDD measurements in active operation mode are: OSC1 = external square wave, from rail to rail; all I/O pins tri-stated, pulled to VDD or VSS, T0CKI = VDD, MCLR = VDD; WDT disabled. Current consumed from the oscillator and I/O’s driving external capacitive or resistive loads needs to be considered.For the RC oscillator, the current through the external pull-up resistor (R) can be estimated as: VDD/(2 • R). For capacitive loads, the current can be estimated (for an individual I/O pin) as (CL • VDD) • fCL = Total capacitive load on the I/O pin; f = average frequency the I/O pin switches. The capacitive currents are most significant when the device is configured for external execution (includes Extended Microcontroller mode).
3: The power-down current in SLEEP mode does not depend on the oscillator type. Power-down current is measured with the part in SLEEP mode, with all I/O pins in hi-impedance state and tied to VDD or VSS.
4: For RC osc configuration, current through REXT is not included. The current through the resistor can be esti-mated by the formula IR = VDD/2REXT (mA) with REXT in kOhm.
5: This is the voltage where the device enters the Brown-out Reset. When BOR is enabled, the device (-16) will operate correctly to this trip point.
2000 Microchip Technology Inc. DS30289B-page 243

PIC17C7XX
20.2 DC Characteristics: PIC17C7XX-16 (Commercial, Industrial, Extended) PIC17C7XX-33 (Commercial, Industrial, Extended) PIC17LC7XX-08 (Commercial, Industrial)
DC CHARACTERISTICS
Standard Operating Conditions (unless otherwise stated)Operating temperature
-40°C ≤ TA ≤ +125°C for extended-40°C ≤ TA ≤ +85°C for industrial 0°C ≤ TA ≤ +70°C for commercial
Operating voltage VDD range as described in Section 20.1
Param.No.
Sym Characteristic Min Typ† Max Units Conditions
Input Low VoltageVIL I/O ports
D030 with TTL buffer (Note 6) VssVss
––
0.80.2VDD
VV
4.5V ≤ VDD ≤ 5.5V3.0V ≤ VDD ≤ 4.5V
D031 with Schmitt Trigger buffer RA2, RA3All others
VssVss
––
0.3VDD
0.2VDD
VV
I2C compliant
D032 MCLR, OSC1 (in EC and RC mode)
Vss – 0.2VDD V (Note 1)
D033 OSC1 (in XT, and LF mode) – 0.5VDD – VInput High Voltage
VIH I/O ports
D040 with TTL buffer (Note 6) 2.01 + 0.2VDD
––
VDD
VDD
VV
4.5V ≤ VDD ≤ 5.5V3.0V ≤ VDD ≤ 4.5V
D041 with Schmitt Trigger buffer RA2, RA3All others
0.7VDD
0.8VDD
––
VDD
VDD
VV
I2C compliant
D042 MCLR 0.8VDD – VDD V (Note 1)D043 OSC1 (XT, and LF mode) – 0.5VDD – VD050 VHYS Hysteresis of
Schmitt Trigger Inputs 0.15VDD – – V
† Data in “Typ” column is at 5V, 25°C unless otherwise stated.Note 1: In RC oscillator configuration, the OSC1/CLKIN pin is a Schmitt Trigger input. It is not recommended that the
PIC17CXXX devices be driven with external clock in RC mode.2: The leakage current on the MCLR pin is strongly dependent on the applied voltage level. Higher leakage
current may be measured at different input voltages.3: Negative current is defined as current sourced by the pin.4: These specifications are for the programming of the on-chip program memory EPROM through the use of the
table write instructions. The complete programming specifications can be found in: PIC17C7XX ProgrammingSpecifications (Literature number DS TBD).
5: The MCLR/VPP pin may be kept in this range at times other than programming, but is not recommended.6: For TTL buffers, the better of the two specifications may be used.
DS30289B-page 244 2000 Microchip Technology Inc.

PIC17C7XX
t
VV
V
Input Leakage Current (Notes 2, 3)
D060 IIL I/O ports (except RA2, RA3) – – ±1 µA Vss ≤ VPIN ≤ VDD, I/O Pin (in digital mode) ahi-impedance PORTB weak pull-ups disabled
D061 MCLR, TEST – – ±2 µA VPIN = Vss or VPIN = VDD
D062 RA2, RA3 ±2 µA Vss ≤ VRA2, VRA3 ≤ 12VD063 OSC1 (EC, RC modes) – – ±1 µA Vss ≤ VPIN ≤ VDD
D063B OSC1 (XT, LF modes) – – VPIN µA RF ≥ 1 MΩD064 MCLR, TEST – – 25 µA VMCLR = VPP = 12V
(when not programming)
D070 IPURB PORTB Weak Pull-up Current 85 130 260 µA VPIN = VSS, RBPU = 04.5V ≤ VDD ≤ 5.5V
Output Low Voltage
D080
D081
VOL I/O ports
with TTL buffer
–––
–––
0.1VDD
0.1VDD
0.4
VVV
IOL = VDD/1.250 mA4.5V ≤ VDD ≤ 5.5VVDD = 3.0VIOL = 6 mA, VDD = 4.5V(Note 6)
D082 RA2 and RA3 ––
––
3.00.6
VV
IOL = 60.0 mA, VDD = 5.5IOL = 60.0 mA, VDD = 4.5
D083D084
OSC2/CLKOUT (RC and EC osc modes)
––
––
0.40.1VDD
VV
IOL = 1 mA, VDD = 4.5VIOL = VDD/5 mA(PIC17LC7XX only)
Output High Voltage (Note 3)D090
D091
VOH I/O ports (except RA2 and RA3)
with TTL buffer
0.9VDD 0.9VDD
2.4
–––
–––
VVV
IOH = -VDD/2.5 mA4.5V ≤ VDD ≤ 5.5VVDD = 3.0VIOH = -6.0 mA, VDD = 4.5(Note 6)
D093D094
OSC2/CLKOUT (RC and EC osc modes)
2.40.9VDD
––
––
VV
IOH = -5 mA, VDD = 4.5VIOH = -VDD/5 mA(PIC17LC7XX only)
DC CHARACTERISTICS
Standard Operating Conditions (unless otherwise stated)Operating temperature
-40°C ≤ TA ≤ +125°C for extended-40°C ≤ TA ≤ +85°C for industrial 0°C ≤ TA ≤ +70°C for commercial
Operating voltage VDD range as described in Section 20.1
Param.No.
Sym Characteristic Min Typ† Max Units Conditions
† Data in “Typ” column is at 5V, 25°C unless otherwise stated.Note 1: In RC oscillator configuration, the OSC1/CLKIN pin is a Schmitt Trigger input. It is not recommended that the
PIC17CXXX devices be driven with external clock in RC mode.2: The leakage current on the MCLR pin is strongly dependent on the applied voltage level. Higher leakage
current may be measured at different input voltages.3: Negative current is defined as current sourced by the pin.4: These specifications are for the programming of the on-chip program memory EPROM through the use of the
table write instructions. The complete programming specifications can be found in: PIC17C7XX ProgrammingSpecifications (Literature number DS TBD).
5: The MCLR/VPP pin may be kept in this range at times other than programming, but is not recommended.6: For TTL buffers, the better of the two specifications may be used.
2000 Microchip Technology Inc. DS30289B-page 245
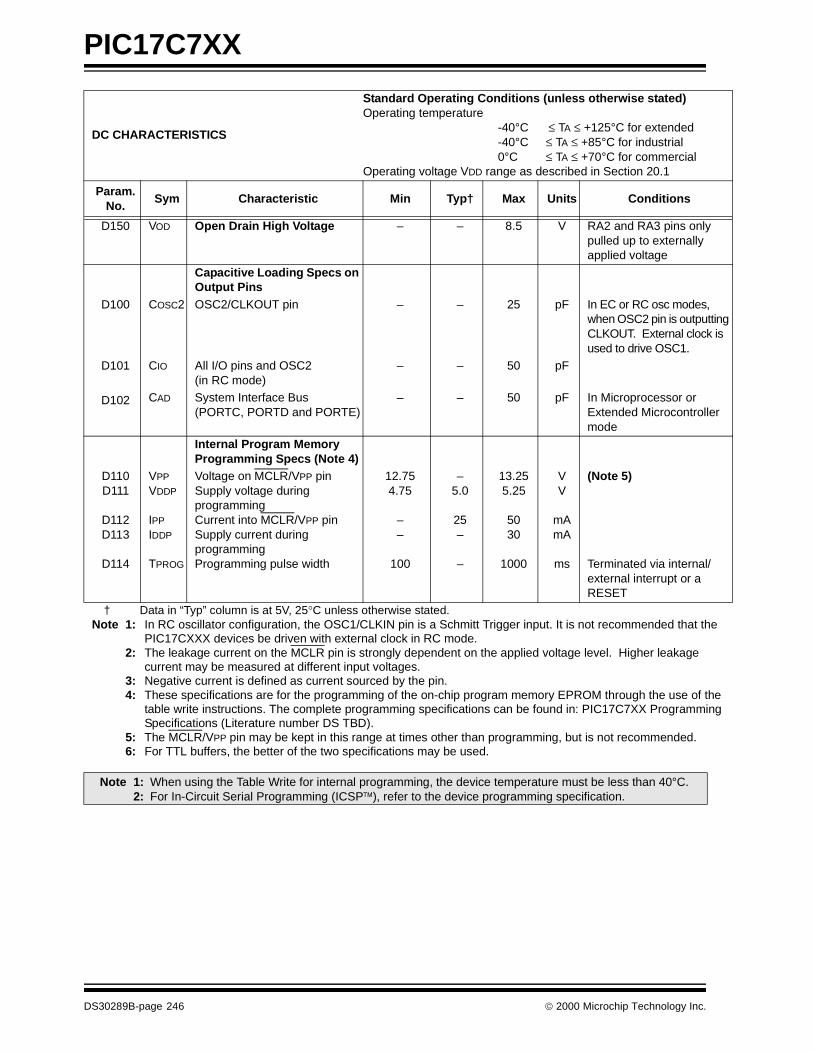
PIC17C7XX
g
D150 VOD Open Drain High Voltage – – 8.5 V RA2 and RA3 pins only pulled up to externally applied voltage
Capacitive Loading Specs on Output Pins
D100 COSC2 OSC2/CLKOUT pin – – 25 pF In EC or RC osc modes, when OSC2 pin is outputtinCLKOUT. External clock isused to drive OSC1.
D101 CIO All I/O pins and OSC2 (in RC mode)
– – 50 pF
D102 CAD System Interface Bus (PORTC, PORTD and PORTE)
– – 50 pF In Microprocessor or Extended Microcontrollermode
Internal Program Memory Programming Specs (Note 4)
D110D111
D112D113
D114
VPP
VDDP
IPP
IDDP
TPROG
Voltage on MCLR/VPP pinSupply voltage during programmingCurrent into MCLR/VPP pinSupply current during programmingProgramming pulse width
12.754.75
––
100
–5.0
25 –
–
13.255.25
50 30
1000
VV
mAmA
ms
(Note 5)
Terminated via internal/external interrupt or a RESET
DC CHARACTERISTICS
Standard Operating Conditions (unless otherwise stated)Operating temperature
-40°C ≤ TA ≤ +125°C for extended-40°C ≤ TA ≤ +85°C for industrial 0°C ≤ TA ≤ +70°C for commercial
Operating voltage VDD range as described in Section 20.1
Param.No.
Sym Characteristic Min Typ† Max Units Conditions
† Data in “Typ” column is at 5V, 25°C unless otherwise stated.Note 1: In RC oscillator configuration, the OSC1/CLKIN pin is a Schmitt Trigger input. It is not recommended that the
PIC17CXXX devices be driven with external clock in RC mode.2: The leakage current on the MCLR pin is strongly dependent on the applied voltage level. Higher leakage
current may be measured at different input voltages.3: Negative current is defined as current sourced by the pin.4: These specifications are for the programming of the on-chip program memory EPROM through the use of the
table write instructions. The complete programming specifications can be found in: PIC17C7XX ProgrammingSpecifications (Literature number DS TBD).
5: The MCLR/VPP pin may be kept in this range at times other than programming, but is not recommended.6: For TTL buffers, the better of the two specifications may be used.
Note 1: When using the Table Write for internal programming, the device temperature must be less than 40°C.2: For In-Circuit Serial Programming (ICSP), refer to the device programming specification.
DS30289B-page 246 2000 Microchip Technology Inc.

PIC17C7XX
20.3 Timing Parameter Symbology
The timing parameter symbols have been createdfollowing one of the following formats:
1. TppS2ppS 3. TCC:ST (I2C specifications only)2. TppS 4. Ts (I2C specifications only)
TF Frequency T TimeLowercase symbols (pp) and their meanings:
ppad Address/Data ost Oscillator Start-Up Timeral ALE pwrt Power-Up Timer
cc Capture1 and Capture2 rb PORTBck CLKOUT or clock rd RDdt Data in rw RD or WR
in INT pin t0 T0CKIio I/O port t123 TCLK12 and TCLK3mc MCLR wdt Watchdog Timer
oe OE wr WRos OSC1Uppercase symbols and their meanings:
SD Driven L LowE Edge P Period
F Fall R RiseH High V ValidI Invalid (Hi-impedance) Z Hi-impedance
2000 Microchip Technology Inc. DS30289B-page 247

PIC17C7XX
FIGURE 20-5: PARAMETER MEASUREMENT INFORMATION
0.9 VDD0.1 VDD
Rise Time Fall Time
VOH = 0.7VDDVDD/2
VOL = 0.3VDD
Data out valid
Data out invalid Outputhi-impedance
Outputdriven
0.25V
0.25V
0.25V0.25V
OUTPUT LEVEL CONDITIONS
PORTC, D, E, F, G, H and J pins
All other input pins
VIH = 2.4V
VIL = 0.4V
Data in valid
Data in invalid
VIH = 0.9VDD
VIL = 0.1VDD
Data in valid
Data in invalid
INPUT LEVEL CONDITIONS
LOAD CONDITIONS
Load Condition 1
PinCL
VSS
50 pF ≤ CL
All timings are measured between high and lowmeasurement points as indicated below.
DS30289B-page 248 2000 Microchip Technology Inc.

PIC17C7XX
20.4 Timing Diagrams and Specifications
FIGURE 20-6: EXTERNAL CLOCK TIMING
TABLE 20-1: EXTERNAL CLOCK TIMING REQUIREMENTS
OSC1
OSC2 †
Q4 Q1 Q2 Q3 Q4 Q1
1 3 34
42
† In EC and RC modes only.
ParamNo.
Sym Characteristic Min Typ† Max Units Conditions
FOSC External CLKIN Frequency (Note 1)
DCDCDC
———
81633
MHzMHzMHz
EC osc mode - 08 devices (8 MHz devices)- 16 devices (16 MHz devices)- 33 devices (33 MHz devices)
Oscillator Frequency (Note 1)
DC222
DC
—————
4816332
MHzMHzMHzMHzMHz
RC osc mode XT osc mode - 08 devices (8 MHz devices)
- 16 devices (16 MHz devices)- 33 devices (33 MHz devices)
LF osc mode
1 TOSC External CLKIN Period(Note 1)
12562.530.3
———
———
nsnsns
EC osc mode - 08 devices (8 MHz devices)- 16 devices (16 MHz devices)- 33 devices (33 MHz devices)
Oscillator Period(Note 1)
25012562.530.3500
—————
—1,0001,0001,000
—
nsnsnsnsns
RC osc mode XT osc mode - 08 devices (8 MHz devices)
- 16 devices (16 MHz devices)- 33 devices (33 MHz devices)
LF osc mode
2 TCY Instruction Cycle Time (Note 1)
121.2 4/FOSC DC ns
3 TosL,TosH
Clock in (OSC1) High or Low Time
10 — — ns EC oscillator
4 TosR,TosF
Clock in (OSC1) Rise or Fall Time
— — 5 ns EC oscillator
† Data in “Typ” column is at 5V, 25°C unless otherwise stated.Note 1: Instruction cycle period (TCY) equals four times the input oscillator time base period. All specified values are based on
characterization data for that particular oscillator type under standard operating conditions with the device executing code. Exceeding these specified limits may result in an unstable oscillator operation and/or higher than expected current consumption. All devices are tested to operate at “min.” values with an external clock applied to the OSC1/CLKIN pin.When an external clock input is used, the “max.” cycle time limit is “DC” (no clock) for all devices.
2000 Microchip Technology Inc. DS30289B-page 249

PIC17C7XX
FIGURE 20-7: CLKOUT AND I/O TIMING
TABLE 20-2: CLKOUT AND I/O TIMING REQUIREMENTS
OSC1
OSC2 †
I/O Pin(input)
I/O Pin(output)
Q4 Q1 Q2 Q3
10
13
14
17
20, 21
2223
1918
15
11
12
16
Old Value New Value
† In EC and RC modes only.
ParamNo.
Sym Characteristic Min Typ† Max Units Conditions
10 TosL2ckL OSC1↓ to CLKOUT↓ — 15 30 ns (Note 1)
11 TosL2ckH OSC1↓ to CLKOUT↑ — 15 30 ns (Note 1)
12 TckR CLKOUT rise time — 5 15 ns (Note 1)
13 TckF CLKOUT fall time — 5 15 ns (Note 1)
14 TckH2ioV CLKOUT ↑ to Port out valid — — 0.5TCY + 20 ns (Note 1)
15 TioV2ckH Port in valid before CLKOUT↑ 0.25TCY + 25 — — ns (Note 1)
16 TckH2ioI Port in hold after CLKOUT↑ 0 — — ns (Note 1)
17 TosL2ioV OSC1↓ (Q1 cycle) to Port out valid — — 100 ns
18 TosL2ioI OSC1↓ (Q2 cycle) to Port input invalid (I/O in hold time)
0 — — ns
19 TioV2osL Port input valid to OSC1↓ (I/O in setup time)
30 — — ns
20 TioR Port output rise time — 10 35 ns
21 TioF Port output fall time — 10 35 ns
22 TinHL INT pin high or low time 25 — — ns
23 TrbHL RB7:RB0 change INT high or low time
25 — — ns
† Data in “Typ” column is at 5V, 25°C unless otherwise stated. These parameters are for design guidance only and are not tested.
Note 1: Measurements are taken in EC mode, where CLKOUT output is 4 x TOSC.
DS30289B-page 250 2000 Microchip Technology Inc.

PIC17C7XX
FIGURE 20-8: RESET, WATCHDOG TIMER, OSCILLATOR START-UP TIMER, POWER-UP TIMER, AND BROWN-OUT RESET TIMING
TABLE 20-3: RESET, WATCHDOG TIMER, OSCILLATOR START-UP TIMER, POWER-UP TIMER, AND BROWN-OUT RESET REQUIREMENTS
VDD
MCLR
InternalPOR/BOR
PWRTTime-out
OSCTime-out
InternalReset
WatchdogTimerReset
33
32
30
31
Address/Data
35
Param.No.
Sym Characteristic Min Typ† Max Units Conditions
30 TmcL MCLR Pulse Width (low) 100 — — ns VDD = 5V
31 TWDT Watchdog Timer Time-out Period (Postscale = 1)
5 12 25 ms VDD = 5V
32 TOST Oscillation Start-up Timer Period — 1024TOSC — ms TOSC = OSC1 period
33 TPWRT Power-up Timer Period 40 96 200 ms VDD = 5V
34 TIOZ MCLR to I/O hi-impedance 100 — — ns Depends on pin load
35 TmcL2adI MCLR to System Interface bus (AD15:AD0>) invalid
PIC17C7XX — — 100 ns
PIC17LC7XX — — 120 ns
36 TBOR Brown-out Reset Pulse Width (low) 100 — — ns VDD within VBOR limits (parameter D005)
† Data in “Typ” column is at 5V, 25°C unless otherwise stated.
.
2000 Microchip Technology Inc. DS30289B-page 251

PIC17C7XX
FIGURE 20-9: TIMER0 EXTERNAL CLOCK TIMINGS
TABLE 20-4: TIMER0 EXTERNAL CLOCK REQUIREMENTS
FIGURE 20-10: TIMER1, TIMER2 AND TIMER3 EXTERNAL CLOCK TIMINGS
TABLE 20-5: TIMER1, TIMER2 AND TIMER3 EXTERNAL CLOCK REQUIREMENTS
RA1/T0CKI
40 41
42
Param No.
Sym Characteristic Min Typ† Max Units Conditions
40 Tt0H T0CKI High Pulse Width No Prescaler 0.5TCY + 20 — — ns
With Prescaler 10 — — ns
41 Tt0L T0CKI Low Pulse Width No Prescaler 0.5TCY + 20 — — ns
With Prescaler 10 — — ns
42 Tt0P T0CKI Period Greater of:20 ns or TCY + 40
N
— — ns N = prescale value (1, 2, 4, ..., 256)
† Data in "Typ" column is at 5V, 25°C unless otherwise stated.
TCLK12
45 46
orTCLK3
TMRx
48
4847
Param No.
Sym Characteristic Min Typ† Max Units Conditions
45 Tt123H TCLK12 and TCLK3 high time 0.5TCY + 20 — — ns
46 Tt123L TCLK12 and TCLK3 low time 0.5TCY + 20 — — ns
47 Tt123P TCLK12 and TCLK3 input period TCY + 40 N
— — ns N = prescale value (1, 2, 4, 8)
48 TckE2tmrI Delay from selected External Clock Edge to Timer increment
2TOSC — 6Tosc —
† Data in “Typ” column is at 5V, 25°C unless otherwise stated.
DS30289B-page 252 2000 Microchip Technology Inc.

PIC17C7XX
FIGURE 20-11: CAPTURE TIMINGS
TABLE 20-6: CAPTURE REQUIREMENTS
FIGURE 20-12: PWM TIMINGS
TABLE 20-7: PWM REQUIREMENTS
CAP pin(Capture mode)
50 51
52
Param No.
Sym Characteristic MinTyp
†Max
Units
Conditions
50 TccL Capture pin input low time 10 — — ns
51 TccH Capture pin input high time 10 — — ns
52 TccP Capture pin input period 2TCY N
— — ns N = prescale value (4 or 16)
† Data in “Typ” column is at 5V, 25°C unless otherwise stated.
PWM pin(PWM mode)
53 54
Param No.
Sym Characteristic MinTyp
†Max Units Conditions
53 TccR PWM pin output rise time — 10 35 ns
54 TccF PWM pin output fall time — 10 35 ns
† Data in “Typ” column is at 5V, 25°C unless otherwise stated.
2000 Microchip Technology Inc. DS30289B-page 253

PIC17C7XX
FIGURE 20-13: SPI MASTER MODE TIMING (CKE = 0)
TABLE 20-8: SPI MODE REQUIREMENTS (MASTER MODE, CKE = 0)
SS
SCK(CKP = 0)
SCK(CKP = 1)
SDO
SDI
70
71 72
7374
75, 76
787980
7978
MSb LSbBIT6 - - - - - -1
MSb IN LSb INBIT6 - - - -1
Note: Refer to Figure 20-5 for load conditions.
Param. No.
Symbol Characteristic Min Typ† Max Units Conditions
70 TssL2scH, TssL2scL
SS↓ to SCK↓ or SCK↑ input Tcy — — ns
71 TscH SCK input high time (Slave mode)
Continuous 1.25TCY + 30 — — ns
71A Single Byte 40 — — ns (Note 1)
72 TscL SCK input low time (Slave mode)
Continuous 1.25TCY + 30 — — ns
72A Single Byte 40 — — ns (Note 1)
73 TdiV2scH, TdiV2scL
Setup time of SDI data input to SCK edge 100 — — ns
73A TB2B Last clock edge of Byte1 to the 1st clock edge of Byte2
1.5TCY + 40 — — ns (Note 1)
74 TscH2diL, TscL2diL
Hold time of SDI data input to SCK edge 100 — — ns
75 TdoR SDO data output rise time — 10 25 ns
76 TdoF SDO data output fall time — 10 25 ns
78 TscR SCK output rise time (Master mode) — 10 25 ns
79 TscF SCK output fall time (Master mode) — 10 25 ns
80 TscH2doV,TscL2doV
SDO data output valid after SCK edge — — 50 ns
† Data in "Typ" column is at 5V, 25°C unless otherwise stated. Note 1: Specification 73A is only required if specifications 71A and 72A are used.
DS30289B-page 254 2000 Microchip Technology Inc.

PIC17C7XX
FIGURE 20-14: SPI MASTER MODE TIMING (CKE = 1)
TABLE 20-9: SPI MODE REQUIREMENTS (MASTER MODE, CKE = 1)
SS
SCK(CKP = 0)
SCK(CKP = 1)
SDO
SDI
81
71 72
74
75, 76
78
80
MSb
7973
MSb IN
BIT6 - - - - - -1
LSb INBIT6 - - - -1
LSb
Note: Refer to Figure 20-5 for load conditions.
Param. No.
Symbol Characteristic Min Typ† Max Units Conditions
71 TscH SCK input high time (Slave mode)
Continuous 1.25TCY + 30 — — ns
71A Single Byte 40 — — ns (Note 1)
72 TscL SCK input low time (Slave mode)
Continuous 1.25 TCY + 30 — — ns
72A Single Byte 40 — — ns (Note 1)
73 TdiV2scH, TdiV2scL
Setup time of SDI data input to SCK edge 100 — — ns
73A TB2B Last clock edge of Byte1 to the 1st clock edge of Byte2
1.5TCY + 40 — — ns (Note 1)
74 TscH2diL, TscL2diL
Hold time of SDI data input to SCK edge 100 — — ns
75 TdoR SDO data output rise time — 10 25 ns
76 TdoF SDO data output fall time — 10 25 ns
78 TscR SCK output rise time (Master mode) — 10 25 ns
79 TscF SCK output fall time (Master mode) — 10 25 ns
80 TscH2doV,TscL2doV
SDO data output valid after SCK edge — — 50 ns
81 TdoV2scH,TdoV2scL
SDO data output setup to SCK edge Tcy — — ns
† Data in "Typ" column is at 5V, 25°C unless otherwise stated. Note 1: Specification 73A is only required if specifications 71A and 72A are used.
2000 Microchip Technology Inc. DS30289B-page 255

PIC17C7XX
FIGURE 20-15: SPI SLAVE MODE TIMING (CKE = 0)
TABLE 20-10: SPI MODE REQUIREMENTS (SLAVE MODE TIMING, CKE = 0)
SS
SCK(CKP = 0)
SCK(CKP = 1)
SDO
SDI
70
71 72
7374
75, 76 77
787980
7978
SDI
MSb LSbBIT6 - - - - - -1
MSb IN BIT6 - - - -1 LSb IN
83
Note: Refer to Figure 20-5 for load conditions.
Param. No.
Symbol Characteristic Min Typ† Max Units Conditions
70 TssL2scH, TssL2scL
SS↓ to SCK↓ or SCK↑ input Tcy — — ns
71 TscH SCK input high time (Slave mode)
Continuous 1.25TCY + 30 — — ns
71A Single Byte 40 — — ns (Note 1)
72 TscL SCK input low time (Slave mode)
Continuous 1.25TCY + 30 — — ns
72A Single Byte 40 — — ns (Note 1)
73 TdiV2scH, TdiV2scL
Setup time of SDI data input to SCK edge 100 — — ns
73A TB2B Last clock edge of Byte1 to the 1st clock edge of Byte2
1.5TCY + 40 — — ns (Note 1)
74 TscH2diL, TscL2diL
Hold time of SDI data input to SCK edge 100 — — ns
75 TdoR SDO data output rise time — 10 25 ns
76 TdoF SDO data output fall time — 10 25 ns
77 TssH2doZ SS↑ to SDO output hi-impedance 10 — 50 ns
78 TscR SCK output rise time (Master mode) — 10 25 ns
79 TscF SCK output fall time (Master mode) — 10 25 ns
80 TscH2doV,TscL2doV
SDO data output valid after SCK edge — — 50 ns
83 TscH2ssH,TscL2ssH
SS ↑ after SCK edge 1.5TCY + 40 — — ns
† Data in "Typ" column is at 5V, 25°C unless otherwise stated.
Note 1: Specification 73A is only required if specifications 71A and 72A are used.
DS30289B-page 256 2000 Microchip Technology Inc.

PIC17C7XX
FIGURE 20-16: SPI SLAVE MODE TIMING (CKE = 1)
TABLE 20-11: SPI MODE REQUIREMENTS (SLAVE MODE, CKE = 1)
SS
SCK(CKP = 0)
SCK(CKP = 1)
SDO
SDI
70
71 72
82
SDI
74
75, 76
MSb BIT6 - - - - - -1 LSb
77
MSb IN BIT6 - - - -1 LSb IN
80
83
Note: Refer to Figure 20-5 for load conditions.
Param. No.
Symbol Characteristic Min Typ† Max Units Conditions
70 TssL2scH, TssL2scL
SS↓ to SCK↓ or SCK↑ input Tcy — — ns
71 TscH SCK input high time (Slave mode)
Continuous 1.25TCY + 30 — — ns
71A Single Byte 40 — — ns (Note 1)
72 TscL SCK input low time (Slave mode)
Continuous 1.25TCY + 30 — — ns
72A Single Byte 40 — — ns (Note 1)
73A TB2B Last clock edge of Byte1 to the 1st clock edge of Byte2
1.5TCY + 40 — — ns (Note 1)
74 TscH2diL, TscL2diL
Hold time of SDI data input to SCK edge 100 — — ns
75 TdoR SDO data output rise time — 10 25 ns
76 TdoF SDO data output fall time — 10 25 ns
77 TssH2doZ SS↑ to SDO output hi-impedance 10 — 50 ns
80 TscH2doV,TscL2doV
SDO data output valid after SCK edge — — 50 ns
82 TssL2doV SDO data output valid after SS↓ edge — — 50 ns
83 TscH2ssH,TscL2ssH
SS ↑ after SCK edge 1.5TCY + 40 — — ns
† Data in "Typ" column is at 5V, 25°C unless otherwise stated. Note 1: Specification 73A is only required if specifications 71A and 72A are used.
2000 Microchip Technology Inc. DS30289B-page 257

PIC17C7XX
FIGURE 20-17: I2C BUS START/STOP BITS TIMING
TABLE 20-12: I2C BUS START/STOP BITS REQUIREMENTS
Note: Refer to Figure 20-5 for load conditions.
91 93SCL
SDA
STARTCondition
STOPCondition
90 92
Param.No.
Sym Characteristic MinTyp
Max Units Conditions
90 Tsu:sta START condition 100 kHz mode 2(TOSC)(BRG + 1) — — ns Only relevant for Repeated Start conditionSetup time 400 kHz mode 2(TOSC)(BRG + 1) — —
1 MHz mode(1) 2(TOSC)(BRG + 1) — —
91 Thd:sta START condition 100 kHz mode 2(TOSC)(BRG + 1) — — ns After this period, the first clock pulse is generatedHold time 400 kHz mode 2(TOSC)(BRG + 1) — —
1 MHz mode(1) 2(TOSC)(BRG + 1) — —
92 Tsu:sto STOP condition 100 kHz mode 2(TOSC)(BRG + 1) — — ns
Setup time 400 kHz mode 2(TOSC)(BRG + 1) — —
1 MHz mode(1) 2(TOSC)(BRG + 1) — —
93 Thd:sto STOP condition 100 kHz mode 2(TOSC)(BRG + 1) — — ns
Hold time 400 kHz mode 2(TOSC)(BRG + 1) — —
1 MHz mode(1) 2(TOSC)(BRG + 1) — —
Note 1: Maximum pin capacitance = 10 pF for all I2C pins.
DS30289B-page 258 2000 Microchip Technology Inc.

PIC17C7XX
FIGURE 20-18: I2C BUS DATA TIMING
TABLE 20-13: I2C BUS DATA REQUIREMENTS
Param No.
Sym Characteristic Min Max Units Conditions
100 Thigh Clock high time 100 kHz mode 2(TOSC)(BRG + 1) — ms
400 kHz mode 2(TOSC)(BRG + 1) — ms
1 MHz mode(1) 2(TOSC)(BRG + 1) — ms
101 Tlow Clock low time 100 kHz mode 2(TOSC)(BRG + 1) — ms
400 kHz mode 2(TOSC)(BRG + 1) — ms
1 MHz mode(1) 2(TOSC)(BRG + 1) — ms
102 Tr SDA and SCL rise time 100 kHz mode — 1000 ns Cb is specified to be from 10 to 400 pF 400 kHz mode 20 + 0.1Cb 300 ns
1 MHz mode(1) — 300 ns
103 Tf SDA and SCL fall time 100 kHz mode — 300 ns Cb is specified to be from 10 to 400 pF 400 kHz mode 20 + 0.1Cb 300 ns
1 MHz mode(1) — 10 ns
90 Tsu:sta START condition setup time
100 kHz mode 2(TOSC)(BRG + 1) — ms Only relevant for Repeated Start condition400 kHz mode 2(TOSC)(BRG + 1) — ms
1 MHz mode(1) 2(TOSC)(BRG + 1) — ms
91 Thd:sta START condition hold time
100 kHz mode 2(TOSC)(BRG + 1) — ms After this period, the first clock pulse is generated400 kHz mode 2(TOSC)(BRG + 1) — ms
1 MHz mode(1) 2(TOSC)(BRG + 1) — ms
106 Thd:dat Data input hold time 100 kHz mode 0 — ns
400 kHz mode 0 0.9 ms
1 MHz mode(1) 0 — ns
107 Tsu:dat Data input setup time 100 kHz mode 250 — ns (Note 2)
400 kHz mode 100 — ns
1 MHz mode(1) 100 — ns
92 Tsu:sto STOP condition setup time
100 kHz mode 2(TOSC)(BRG + 1) — ms
400 kHz mode 2(TOSC)(BRG + 1) — ms
1 MHz mode(1) 2(TOSC)(BRG + 1) — ms
109 Taa Output valid from clock 100 kHz mode — 3500 ns
400 kHz mode — 1000 ns
1 MHz mode(1) — 400 ns
Note 1: Maximum pin capacitance = 10 pF for all I2C pins. 2: A fast mode (400 KHz) I2C bus device can be used in a standard mode I2C bus system, but the parameter # 107 ≥ 250 ns
must then be met. This will automatically be the case if the device does not stretch the LOW period of the SCL signal. If such a device does stretch the LOW period of the SCL signal, it must output the next data bit to the SDA line. Parameter #102 + #107 = 1000 + 250 = 1250 ns (for 100 kHz mode) before the SCL line is released.
3: Cb is specified to be from 10-400pF. The minimum specifications are characterized with Cb=10pF. The rise time spec (tr) is characterized with Rp=Rp min. The minimum fall time specification (tf) is characterized with Cb=10pF,and Rp=Rp max. These are only valid for fast mode operation (VDD=4.5-5.5V) and where the SPM bit (SSPSTAT<7>) =1.)
4: Max specifications for these parameters are valid for falling edge only. Specs are characterized with Rp=Rp min and Cb=400pF for standard mode, 200pF for fast mode, and 10pF for 1MHz mode.
Note: Refer to Figure 20-5 for load conditions.
9091 92
100
101
103
106107
109 109 110
102
SCL
SDAIn
SDAOut
2000 Microchip Technology Inc. DS30289B-page 259

PIC17C7XX
FIGURE 20-19: USART SYNCHRONOUS TRANSMISSION (MASTER/SLAVE) TIMING
TABLE 20-14: USART SYNCHRONOUS TRANSMISSION REQUIREMENTS
110 Tbuf Bus free time 100 kHz mode 4.7 — ms Time the bus must be free before a new transmission can start
400 kHz mode 1.3 — ms
1 MHz mode(1) 0.5 — ms
D102 Cb Bus capacitive loading — 400 pF
Param No.
Sym Characteristic Min Max Units Conditions
Note 1: Maximum pin capacitance = 10 pF for all I2C pins. 2: A fast mode (400 KHz) I2C bus device can be used in a standard mode I2C bus system, but the parameter # 107 ≥ 250 ns
must then be met. This will automatically be the case if the device does not stretch the LOW period of the SCL signal. If such a device does stretch the LOW period of the SCL signal, it must output the next data bit to the SDA line. Parameter #102 + #107 = 1000 + 250 = 1250 ns (for 100 kHz mode) before the SCL line is released.
3: Cb is specified to be from 10-400pF. The minimum specifications are characterized with Cb=10pF. The rise time spec (tr) is characterized with Rp=Rp min. The minimum fall time specification (tf) is characterized with Cb=10pF,and Rp=Rp max. These are only valid for fast mode operation (VDD=4.5-5.5V) and where the SPM bit (SSPSTAT<7>) =1.)
4: Max specifications for these parameters are valid for falling edge only. Specs are characterized with Rp=Rp min and Cb=400pF for standard mode, 200pF for fast mode, and 10pF for 1MHz mode.
121 121
120 122
TX/CK
RX/DTpin
pin
Param No.
Sym Characteristic Min Typ† Max Units Conditions
120 TckH2dtV SYNC XMIT (MASTER & SLAVE)Clock high to data out valid PIC17CXXX — — 50 ns
PIC17LCXXX — — 75 ns
121 TckRF Clock out rise time and fall time (Master mode)
PIC17CXXX — — 25 ns
PIC17LCXXX — — 40 ns
122 TdtRF Data out rise time and fall time PIC17CXXX — — 25 ns
PIC17LCXXX — — 40 ns
† Data in “Typ” column is at 5V, 25°C unless otherwise stated.
DS30289B-page 260 2000 Microchip Technology Inc.

PIC17C7XX
FIGURE 20-20: USART SYNCHRONOUS RECEIVE (MASTER/SLAVE) TIMING
TABLE 20-15: USART SYNCHRONOUS RECEIVE REQUIREMENTS
125
126
TX/CK
RX/DT
pin
pin
Param No.
Sym Characteristic Min Typ† MaxUnit
sConditions
125 TdtV2ckL SYNC RCV (MASTER & SLAVE)Data setup before CK↓ (DT setup time) 15 — — ns
126 TckL2dtl Data hold after CK↓ (DT hold time) 15 — — ns
† Data in “Typ” column is at 5V, 25°C unless otherwise stated.
2000 Microchip Technology Inc. DS30289B-page 261

PIC17C7XX
FIGURE 20-21: USART ASYNCHRONOUS MODE START BIT DETECT
TABLE 20-16: USART ASYNCHRONOUS MODE START BIT DETECT REQUIREMENTS
FIGURE 20-22: USART ASYNCHRONOUS RECEIVE SAMPLING WAVEFORM
TABLE 20-17: USART ASYNCHRONOUS RECEIVE SAMPLING REQUIREMENTS
RX
x16 CLK
Q2, Q4 CLK
START bit(RX/DT pin)
121A
120A123A
Param No.
Sym Characteristic Min Typ MaxUnit
sConditions
120A TdtL2ckH Time to ensure that the RX pin is sampled low — — TCY ns
121A TdtRF Data rise time and fall time Receive — — (Note 1) ns
Transmit — — 40 ns
123A TckH2bckL Time from RX pin sampled low to first rising edge of x16 clock
— — TCY ns
Note 1: Schmitt trigger will determine logic level.
RX
Baud CLK
x16 CLK
START bit Bit0
Samples
1 2 3 4 5 6 7 8 9 10 11 12 13 14 15 16 1 2 3
Baud CLK for all but START bit(RX/DT pin)
125A 126A
Param No.
Sym Characteristic Min Typ MaxUnit
sConditions
125A TdtL2ckH Setup time of RX pin to first data sampled TCY — — ns
126A TdtL2ckH Hold time of RX pin from last data sam-pled
TCY — — ns
DS30289B-page 262 2000 Microchip Technology Inc.

PIC17C7XX
TABLE 20-18: A/D CONVERTER CHARACTERISTICS
Param. No.
Sym Characteristic Min Typ† Max Units Conditions
A01 NR Resolution — — 10 bit VREF+ = VDD = 5.12V,VSS ≤ VAIN ≤ VREF+
— — 10 bit (VREF+ — VREF-) ≥ 3.0V,VREF- ≤ VAIN ≤ VREF+
A02 EABS Absolute error — — < ±1 LSb VREF+ = VDD = 5.12V,VSS ≤ VAIN ≤ VREF+
— — < ±1 LSb (VREF+ — VREF-) ≥ 3.0V,VREF- ≤ VAIN ≤ VREF+
A03 EIL Integral linearity error — — < ±1 LSb VREF+ = VDD = 5.12V,VSS ≤ VAIN ≤ VREF+
— — < ±1 LSb (VREF+ — VREF-) ≥ 3.0V,VREF- ≤ VAIN ≤ VREF+
A04 EDL Differential linearity error — — < ±1 LSb VREF+ = VDD = 5.12V,VSS ≤ VAIN ≤ VREF+
— — < ±1 LSb (VREF+ — VREF-) ≥ 3.0V,VREF- ≤ VAIN ≤ VREF+
A05 EFS Full scale error — — < ±1 LSb VREF+ = VDD = 5.12V,VSS ≤ VAIN ≤ VREF+
— — < ±1 LSb (VREF+ — VREF-) ≥ 3.0V,VREF- ≤ VAIN ≤ VREF+
A06 EOFF Offset error — — < ±1 LSb VREF+ = VDD = 5.12V,VSS ≤ VAIN ≤ VREF+
— — < ±1 LSb (VREF+ — VREF-) ≥ 3.0V,VREF- ≤ VAIN ≤ VREF+
A10 — Monotonicity — guaranteed(3) — — VSS ≤ VAIN ≤ VREF
A20 VREF Reference voltage(VREF+ — VREF-)
0V — — V VREF delta when changing voltage levels on VREF inputs
A20A 3V — — V Absolute minimum electrical spec.to ensure 10-bit accuracy
A21 VREF+ Reference voltage high AVSS + 3.0V
— AVDD + 0.3V
V
A22 VREF- Reference voltage low Avss - 0.3V
— AVDD - 3.0V
V
A25 VAIN Analog input voltage AVSS - 0.3V
— Vref + 0.3V
V
A30 ZAIN Recommended impedance of analog voltage source
— — 10.0 kΩ
A40 IAD A/D conversioncurrent (VDD)
PIC17CXXX — 180 — µA Average current consumption when A/D is on (Note 1)PIC17LCXXX — 90 — µA
A50 IREF VREF input current (Note 2) 10 — 1000 µA During VAIN acquisition. Based on differential of VHOLD to VAIN
— — 10 µA During A/D conversion cycle
† Data in “Typ” column is at 5V, 25°C unless otherwise stated. Note 1: When A/D is off, it will not consume any current other than minor leakage current. The power-down current spec includes
any such leakage from the A/D module.2: VREF current is from RG0 and RG1 pins or AVDD and AVSS pins, whichever is selected as reference input.3: The A/D conversion result never decreases with an increase in the Input Voltage and has no missing codes.
2000 Microchip Technology Inc. DS30289B-page 263

PIC17C7XX
FIGURE 20-23: A/D CONVERSION TIMING
TABLE 20-19: A/D CONVERSION REQUIREMENTS
Param. No.
Sym Characteristic Min Typ† Max Units Conditions
130 TAD A/D clock period PIC17CXXX 1.6 — — µs TOSC based, VREF ≥ 3.0V
PIC17LCXXX 3.0 — — µs TOSC based, VREF full range
PIC17CXXX 2.0 4.0 6.0 µs A/D RC mode
PIC17LCXXX 3.0 6.0 9.0 µs A/D RC mode
131 TCNV Conversion time (not including acquisition time) (Note 1)
11 — 12 Tad
132 TACQ Acquisition time (Note 2)
10
20
—
—
—
µs
µs The minimum time is the amplifier settling time. This may be used if the “new” input voltage has not changed by more than 1LSb (i.e., 5 mV @ 5.12V) from the last sampled voltage (as stated on CHOLD).
134 TGO Q4 to ADCLK start — Tosc/2 — — If the A/D clock source is selected as RC, a time of TCY is added before the A/D clock starts. This allows the SLEEP instruction to be executed.
† Data in “Typ” column is at 5V, 25°C unless otherwise stated. Note 1: ADRES register may be read on the following TCY cycle.
2: See Section 16.1 for minimum conditions when input voltage has changed more than 1 LSb.
131
130
132
BSF ADCON0, GO
Q4
A/D CLK
A/D DATA
ADRES
ADIF
GO
SAMPLE
OLD_DATA
SAMPLING STOPPED
DONE
NEW_DATA
(TOSC/2)(1)
9 8 7 2 1 0
Note 1: If the A/D clock source is selected as RC, a time of TCY is added before the A/D clock starts. This allows the SLEEP instruction to be executed.
1 TCY
. . . . . .
DS30289B-page 264 2000 Microchip Technology Inc.

PIC17C7XX
FIGURE 20-24: MEMORY INTERFACE WRITE TIMING
TABLE 20-20: MEMORY INTERFACE WRITE REQUIREMENTS
OSC1
ALE
OE
WR
AD<15:0>
Q1 Q2 Q3 Q4 Q1 Q2
150
151
152 153
154
addr out data out addr out
Q1
Param. No.
Sym Characteristic Min Typ† MaxUnit
sConditions
150 TadV2alL AD<15:0> (address) valid to
PIC17CXXX 0.25TCY - 10 — — ns
ALE↓ (address setup time)
PIC17LCXXX 0.25TCY - 10 — —
151 TalL2adI ALE↓ to address out invalid PIC17CXXX 0 — — ns
(address hold time) PIC17LCXXX 0 — —
152 TadV2wrL Data out valid to WR↓ PIC17CXXX 0.25TCY - 40 — — ns
(data setup time) PIC17LCXXX 0.25TCY - 40 — —
153 TwrH2adI WR↑ to data out invalid PIC17CXXX — 0.25TCY — ns
(data hold time) PIC17LCXXX — 0.25TCY —
154 TwrL WR pulse width PIC17CXXX — 0.25TCY — ns
PIC17LCXXX — 0.25TCY —
† Data in “Typ” column is at 5V, 25°C unless otherwise stated.
2000 Microchip Technology Inc. DS30289B-page 265

PIC17C7XX
FIGURE 20-25: MEMORY INTERFACE READ TIMING
TABLE 20-21: MEMORY INTERFACE READ REQUIREMENTS
OSC1
ALE
OE
AD<15:0>
WR
Q1 Q2 Q3
Data in Addr out
150151
160
166
165
162163
161
’1’ ’1’
Q4 Q1 Q2
Addr out
164168
167
Param. No.
Sym Characteristic Min Typ† MaxUnit
sConditions
150 TadV2alL AD15:AD0 (address) valid to PIC17CXXX 0.25TCY - 10 — — ns
ALE↓ (address setup time) PIC17LCXXX 0.25TCY - 10 — —
151 TalL2adI ALE↓ to address out invalid PIC17CXXX 5 — — ns
(address hold time) PIC17LCXXX 5 — —
160 TadZ2oeL AD15:AD0 hi-impedance to PIC17CXXX 0 — — ns
OE↓ PIC17LCXXX 0 — —
161 ToeH2adD
OE↑ to AD15:AD0 driven PIC17CXXX 0.25TCY - 15 — — ns
PIC17LCXXX 0.25TCY - 15 — —
162 TadV2oeH Data in valid before OE↑ PIC17CXXX 35 — — ns
(data setup time) PIC17LCXXX 45 — —
163 ToeH2adI OE↑to data in invalid PIC17CXXX 0 — — ns
(data hold time) PIC17LCXXX 0 — —
164 TalH ALE pulse width PIC17CXXX — 0.25TCY — ns
PIC17LCXXX — 0.25TCY —
165 ToeL OE pulse width PIC17CXXX 0.5TCY - 35 — — ns
PIC17LCXXX 0.5TCY - 35 — —
166 TalH2alH ALE↑ to ALE↑(cycle time) PIC17CXXX — TCY — ns
PIC17LCXXX — TCY —
167 Tacc Address access time PIC17CXXX — — 0.75TCY - 30 ns
PIC17LCXXX — — 0.75TCY - 45
168 Toe Output enable access time PIC17CXXX — — 0.5TCY - 45 ns
(OE low to data valid) PIC17LCXXX — — 0.5TCY - 75
† Data in “Typ” column is at 5V, 25°C unless otherwise stated.
DS30289B-page 266 2000 Microchip Technology Inc.

PIC17C7XX
21.0 PIC17C7XX DC AND AC CHARACTERISTICS
The graphs and tables provided in this section are for design guidance and are not tested nor guaranteed. In somegraphs or tables the data presented is outside specified operating range (e.g., outside specified VDD range). This is forinformation only and devices are ensured to operate properly only within the specified range.
The data presented in this section is a statistical summary of data collected on units from different lots over a period oftime.
• Typ or Typical represents the mean of the distribution at 25°C.• Max or Maximum represents (mean + 3σ) over the temperature range of -40°C to 85°C.
• Min or Minimum represents (mean - 3σ) over the temperature range of -40°C to 85°C.
Note: Standard deviation is denoted by sigma (σ).
TABLE 21-1: PIN CAPACITANCE PER PACKAGE TYPE
FIGURE 21-1: TYPICAL RC OSCILLATOR FREQUENCY vs. TEMPERATURE
Pin NameTypical Capacitance (pF)
68-pin PLCC 64-pin TQFP
All pins, except MCLR, VDD, and VSS 10 10
MCLR pin 20 20
FoscFosc (25°C)
1.10
1.08
1.06
1.04
1.02
1.00
0.98
0.96
0.94
0.92
0.90
0 10 20 25 30 40 50 60 70
T(°C)
Frequency normalized to +25°C
VDD = 5.5V
VDD = 3.5V
REXT ≥ 10 kΩCEXT = 100 pF
2000 Microchip Technology Inc. DS30289B-page 267

PIC17C7XX
FIGURE 21-2: TYPICAL RC OSCILLATOR FREQUENCY vs. VDDFIGURE 21-3: TYPICAL RC OSCILLATOR FREQUENCY vs. VDD
4.0
3.5
3.0
2.5
2.0
1.5
1.0
0.5
0.04.0 4.5 5.0 5.5 6.0 6.5
FO
SC
(M
Hz)
VDD (Volts)
R = 10k
CEXT = 22 pF, T = +25°C
R = 100k
4.0
3.5
3.0
2.5
2.0
1.5
1.0
0.5
0.04.0 4.5 5.0 5.5 6.0 6.5
FO
SC
(M
Hz)
VDD (Volts)
R = 10kCEXT = 100 pF, T = +25°C
R = 100k
R = 3.3k
R = 5.1k
DS30289B-page 268 2000 Microchip Technology Inc.

PIC17C7XX
FIGURE 21-4: TYPICAL RC OSCILLATOR FREQUENCY vs. VDDTABLE 21-2: RC OSCILLATOR FREQUENCIES
2.0
1.8
1.6
1.4
1.2
1.0
0.8
0.6
0.4
4.0 4.5 5.0 5.5 6.0 6.5
FO
SC
(M
Hz)
VDD (Volts)
R = 10k
CEXT = 300 pF, T = +25°C
R = 160k
R = 3.3k
R = 5.1k
0.2
0.0
CEXT REXTAverage
FOSC @ 5V, +25°C
22 pF 10k 3.33 MHz ± 12%100k 353 kHz ± 13%
100 pF 3.3k 3.54 MHz ± 10%5.1k 2.43 MHz ± 14%10k 1.30 MHz ± 17%
100k 129 kHz ± 10%300 pF 3.3k 1.54 MHz ± 14%
5.1k 980 kHz ± 12%
10k 564 kHz ± 16%160k 35 kHz ± 18%
2000 Microchip Technology Inc. DS30289B-page 269

PIC17C7XX
FIGURE 21-5: TRANSCONDUCTANCE (gm) OF LF OSCILLATOR vs. VDD
FIGURE 21-6: TRANSCONDUCTANCE (gm) OF XT OSCILLATOR vs. VDD
500
450
400
350
300
250
200
150
100
2.5 3.0 3.5 4.0 4.5 5.0
gm(µ
A/V
)
VDD (Volts)
Min @ +85°C
50
05.5 6.0
Max @ -40°C
Typ @ +25°C
20
18
16
14
12
10
8
6
4
2.5 3.0 3.5 4.0 4.5 5.0
gm(m
A/V
)
VDD (Volts)
Min @ +85°C
2
05.5 6.0
Max @ -40°C
Typ @ +25°C
DS30289B-page 270 2000 Microchip Technology Inc.

PIC17C7XX
FIGURE 21-7: TYPICAL IDD vs. FOSC OVER VDD (LF MODE)
FIGURE 21-8: MAXIMUM IDD vs. FOSC OVER VDD (LF MODE)
0.0
0.2
0.4
0.6
0.8
1.0
1.2
0.0 0.2 0.4 0.6 0.8 1.0 1.2 1.4 1.6 1.8 2.0
FOSC (MHz)
I DD
(mA
)
3.0V
3.5V
4.0V
5.5V
5.0V
4.5V
Typical: statistical mean @ 25°CMaximum: mean + 3s (-40°C to 125°C) Minimum: mean – 3s (-40°C to 125°C)
0.0
0.2
0.4
0.6
0.8
1.0
1.2
0.0 0.2 0.4 0.6 0.8 1.0 1.2 1.4 1.6 1.8 2.0
FOSC (MHz)
IDD
(mA
)
3.0V
3.5V
4.0V
5.5V
5.0V
4.5V
Typical: statistical mean @ 25°CMaximum: mean + 3s (-40°C to 125°C) Minimum: mean – 3s (-40°C to 125°C)
2000 Microchip Technology Inc. DS30289B-page 271

PIC17C7XX
FIGURE 21-9: TYPICAL IDD vs. FOSC OVER VDD (XT MODE)
FIGURE 21-10: MAXIMUM IDD vs. FOSC OVER VDD (XT MODE)
0
2
4
6
8
10
12
14
16
0 5 10 15 20 25 30 35
FOSC(MHz)
IDD
(mA
)
5.5V
5.0V
4.5V
4.0V3.5V
3.0V
Typical: s tatis tical mean @ 25°CMax imum: mean + 3σ (-40°C to 125°C) Minimum: mean – 3σ (-40°C to 125°C)
Typical: statistical mean @ 25°CMaximum: mean + 3s (-40°C to 125°C) Minimum: mean – 3s (-40°C to 125°C)
0
2
4
6
8
10
12
14
16
18
0 5 10 15 20 25 30 35
FOSC (MHz)
IDD
(mA
)
5.5V
5.0V
4.5V
4.0V
3.5V
3.0V
Typical: statis tical mean @ 25°CMaximum: mean + 3σ (-40°C to 125°C) Minimum: mean – 3σ (-40°C to 125°C)
Typical: statistical mean @ 25°CMaximum: mean + 3s (-40°C to 125°C) Minimum: mean – 3s (-40°C to 125°C)
DS30289B-page 272 2000 Microchip Technology Inc.

PIC17C7XX
FIGURE 21-11: TYPICAL AND MAXIMUM IPD vs. VDD (SLEEP MODE, ALL PERIPHERALS DISABLED, -40°C to +125°C)
FIGURE 21-12: TYPICAL AND MAXIMUM IPD vs. VDD (SLEEP MODE, BOR ENABLED, -40°C to +125°C)
0.0
1.0
2.0
3.0
4.0
5.0
6.0
3.0 3.5 4.0 4.5 5.0 5.5
V DD (V )
I PD (
uA
)
Max
Typ
Typical: statistical mean @ 25°CMaximum: mean + 3s (-40°C to 125°C) Minimum: mean – 3s (-40°C to 125°C)
0.0
0.2
0.4
0.6
0.8
1.0
1.2
1.4
1.6
1.8
2.0
3.0 3.5 4.0 4.5 5.0 5.5
VDD (V)
I DD
(mA
) Max Reset
Typ Reset (25C)
Max Sleep
Typ Sleep (25C)
Device in SleepDevice in Reset
Indeterminate State
Typical: statistical mean @ 25°CMaximum: mean + 3s (-40°C to 125°C) Minimum: mean – 3s (-40°C to 125°C)
2000 Microchip Technology Inc. DS30289B-page 273

PIC17C7XX
FIGURE 21-13: TYPICAL AND MAXIMUM ∆IPD vs. VDD (SLEEP MODE, WDT ENABLED, -40°C to +125°C)
FIGURE 21-14: TYPICAL AND MAXIMUM ∆IRBPU vs. VDD (MEASURED PER INPUT PIN, -40°C TO +125°C)
0
2
4
6
8
10
12
14
16
18
3.0 3.5 4.0 4.5 5.0 5.5
VDD (V)
I PD (
uA
)
Max
Typ
0
50
100
150
200
250
300
2.5 3.0 3.5 4.0 4.5 5.0 5.5
VDD (V)
∆I (
uA
)
Typical (25C)
Maximum
Typical: s tatis tical mean @ 25°CMaximum: mean + 3σ (-40°C to 125°C) Minimum: mean – 3σ (-40°C to 125°C)
Typical: statistical mean @ 25°CMaximum: mean + 3s (-40°C to 125°C) Minimum: mean – 3s (-40°C to 125°C)
DS30289B-page 274 2000 Microchip Technology Inc.

PIC17C7XX
FIGURE 21-15: TYPICAL, MINIMUM AND MAXIMUM WDT PERIOD vs. VDD (-40°C TO +125°C)
FIGURE 21-16: TYPICAL WDT PERIOD vs. VDD OVER TEMPERATURE (-40°C TO +125°C)
0
5
10
15
20
25
30
35
40
3.0 3.5 4.0 4.5 5.0 5.5
VDD (V)
WD
T P
erio
d (
ms)
Max (125C)
Typ (25C)
Min (-40C)
Typical: statis tical mean @ 25°CMaximum: mean + 3σ (-40°C to 125°C) Minimum: mean – 3σ (-40°C to 125°C)
Typical: statistical mean @ 25°CMaximum: mean + 3s (-40°C to 125°C) Minimum: mean – 3s (-40°C to 125°C)
0
5
10
15
20
25
30
3.0 3.5 4.0 4.5 5.0 5.5
VDD (V)
WD
T P
erio
d (
ms)
125C
85C
25C
-40C
2000 Microchip Technology Inc. DS30289B-page 275

PIC17C7XX
FIGURE 21-17: TYPICAL, MINIMUM AND MAXIMUM VOH vs. IOH (VDD = 5V, -40°C TO +125°C)
FIGURE 21-18: TYPICAL, MINIMUM AND MAXIMUM VOL vs. IOL (VDD = 5V, -40°C TO +125°C)
0.0
0.5
1.0
1.5
2.0
2.5
3.0
3.5
4.0
4.5
5.0
0 5 10 15 20 25
IOH (-mA)
VO
H (V
)
Max
Typ (25C)
Min
Typical: statistical mean @ 25°CMaximum: mean + 3s (-40°C to 125°C) Minimum: mean – 3s (-40°C to 125°C)
0 .0
0 .2
0 .4
0 .6
0 .8
1 .0
1 .2
1 .4
1 .6
0 5 1 0 1 5 2 0 2 5
IO L (m A)
VO
L (V
)
M a x ( 1 2 5 C )
T yp (2 5 C )
M in ( -4 0 C )
Ty p ic a l: s ta t is t ic a l m e a n @ 2 5 °CM a x im u m : m e a n + 3 σ ( - 4 0 °C to 1 2 5 °C ) M in im u m : m e a n – 3 σ ( - 4 0 °C to 1 2 5 °C)
Typical: statistical mean @ 25°CMaximum: mean + 3s (-40°C to 125°C) Minimum: mean – 3s (-40°C to 125°C)
DS30289B-page 276 2000 Microchip Technology Inc.

PIC17C7XX
FIGURE 21-19: TYPICAL, MINIMUM AND MAXIMUM VOH vs. IOH (VDD = 3V, -40°C TO +125°C)
FIGURE 21-20: TYPICAL, MINIMUM AND MAXIMUM VOL vs. IOL (VDD = 3V, -40°C TO +125°C)
0.0
0.5
1.0
1.5
2.0
2.5
3.0
0 5 10 15 20 25
IOH (-m A)
VO
H (V
)
M ax
Typ (25C)
M in
Typical: statistical mean @ 25°CMaximum: mean + 3s (-40°C to 125°C) Minimum: mean – 3s (-40°C to 125°C)
0.0
0 .2
0 .4
0 .6
0 .8
1 .0
1 .2
1 .4
1 .6
1 .8
2 .0
0 5 10 15 20 25
IOL (m A)
VO
L (V
) Max (125C )
Typ (25C )
Min (-40C )
Typical: s tatis tical mean @ 25°CMax imum: mean + 3σ (-40°C to 125°C) Minimum: mean – 3σ (-40°C to 125°C)
Typical: statistical mean @ 25°CMaximum: mean + 3s (-40°C to 125°C) Minimum: mean – 3s (-40°C to 125°C)
2000 Microchip Technology Inc. DS30289B-page 277

PIC17C7XX
FIGURE 21-21: TYPICAL, MAXIMUM AND MINIMUM VIN vs. VDD (TTL INPUT, -40°C to 125°C)
FIGURE 21-22: MAXIMUM AND MINIMUM VIN vs. VDD (ST Input, -40° C to +125°C)
0.0
0.2
0.4
0.6
0.8
1.0
1.2
1.4
1.6
1.8
3.0 3.5 4.0 4.5 5.0 5.5
VDD (V)
VIN
(V
)
Min
Max
Typ (25C)
Typical: statistical mean @ 25°CMaximum: mean + 3s (-40°C to 125°C) Minimum: mean – 3s (-40°C to 125°C)
0.0
0.5
1 .0
1 .5
2 .0
2 .5
3 .0
3 .5
3 .0 3 .5 4 .0 4 .5 5 .0 5 .5
VDD (V )
VIN
(V
)
Max R is in g
Min R is ing
Ma x Fa llin g
Min Fa ll ing
Typical: statistical mean @ 25°CMaximum: mean + 3s (-40°C to 125°C) Minimum: mean – 3s (-40°C to 125°C)
DS30289B-page 278 2000 Microchip Technology Inc.

PIC17C7XX
FIGURE 21-23: MAXIMUM AND MINIMUM VIN vs. VDD (I2C Input, -40°C to +125°C)
0.0
0.5
1 .0
1 .5
2 .0
2 .5
3 .0
3 .5
4 .0
3 .0 3 .5 4 .0 4 .5 5 .0 5 .5
VDD (V)
VIN
(V
)
Ma x R is in g
Min R is ing
Max Fa ll in g
Min Fa lling
Typical: statistical mean @ 25°CMaximum: mean + 3s (-40°C to 125°C) Minimum: mean – 3s (-40°C to 125°C)
2000 Microchip Technology Inc. DS30289B-page 279

PIC17C7XX
NOTES:
DS30289B-page 280 2000 Microchip Technology Inc.

PIC17C7XX
22.0 PACKAGING INFORMATION
22.1 Package Marking Information
64-Lead TQFP
XXXXXXXXXX
YYWWNNNXXXXXXXXXX
Example
XXXXXXXXXX-08I/PT
0017CAE
PIC17C752
Legend: XX...X Customer specific information*YY Year code (last 2 digits of calendar year)WW Week code (week of January 1 is week ‘01’)NNN Alphanumeric traceability code
Note: In the event the full Microchip part number cannot be marked on one line, it willbe carried over to the next line thus limiting the number of available charactersfor customer specific information.
68-Lead PLCC
YYWWNNN
XXXXXXXXXXXXXXXXXXXXXXXXXXXXXXXXXXXXXXXXXXXXXXXXXXXXXXXXXXXXXXXXXXXXXXXXXXXXXXXXXXXXX
Example
0048CAE
PIC17C756A-08/L
80-Lead TQFP
YYWWNNN
XXXXXXXXXXXXXXXXXXXXXXXX
Example
0017CAE
PIC17C762-08I/PT
* Standard OTP marking consists of Microchip part number, year code, week code, facility code, maskrev#, and assembly code. For OTP marking beyond this, certain price adders apply. Please check withyour Microchip Sales Office. For QTP devices, any special marking adders are included in QTP price.
2000 Microchip Technology Inc. DS30289B-page 281
PIC17C7XX
Package Marking Information (Cont.)84-Lead PLCC
YYWWNNN
XXXXXXXXXXXXXXXXXXXXXXXXXXXXXXXXXXXXXXXXXXXXXXXXXXXXXXXXXXXXXXXXXXXXXXXXXXXXXXXXXXXXX
Example
0048CAE
PIC17C766-08/L
DS30289B-page 282 2000 Microchip Technology Inc.

PIC17C7XX
64-Lead Plastic Thin Quad Flatpack (PT) 10x10x1 mm Body, 1.0/0.10 mm Lead Form (TQFP)* Controlling Parameter
Notes:Dimensions D1 and E1 do not include mold flash or protrusions. Mold flash or protrusions shall not exceed.010” (0.254mm) per side.JEDEC Equivalent: MS-026Drawing No. C04-085
1510515105βMold Draft Angle Bottom1510515105αMold Draft Angle Top
0.270.220.17.011.009.007BLead Width0.230.180.13.009.007.005cLead Thickness
1616n1Pins per Side
10.1010.009.90.398.394.390D1Molded Package Length10.1010.009.90.398.394.390E1Molded Package Width12.2512.0011.75.482.472.463DOverall Length12.2512.0011.75.482.472.463EOverall Width
73.5073.50φFoot Angle
0.750.600.45.030.024.018LFoot Length0.250.150.05.010.006.002A1Standoff §1.051.000.95.041.039.037A2Molded Package Thickness1.201.101.00.047.043.039AOverall Height
0.50.020pPitch6464nNumber of Pins
MAXNOMMINMAXNOMMINDimension LimitsMILLIMETERS*INCHESUnits
c
21
n
DD1
B
p
#leads=n1
E1
E
A2A1
A
L
CH x 45°
βφ
α
(F)
Footprint (Reference) (F) .039 1.00
Pin 1 Corner Chamfer CH .025 .035 .045 0.64 0.89 1.14
§ Significant Characteristic
2000 Microchip Technology Inc. DS30289B-page 283
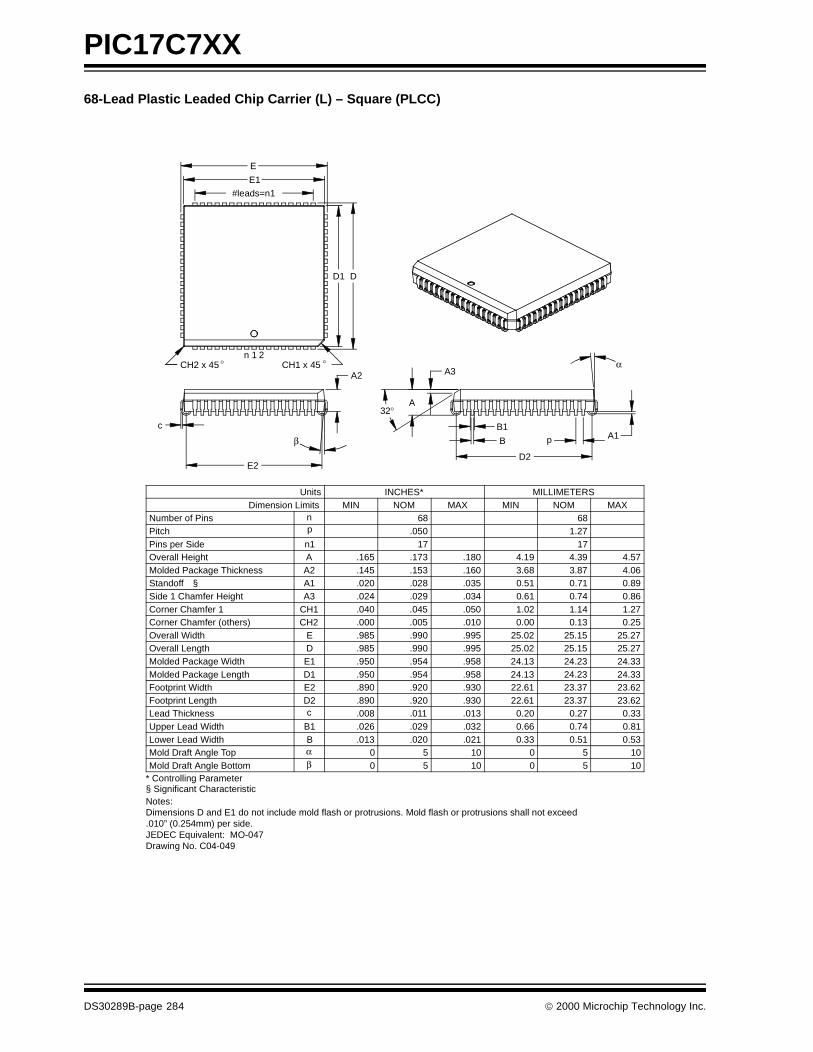
PIC17C7XX
68-Lead Plastic Leaded Chip Carrier (L) – Square (PLCC)
10501050βMold Draft Angle Bottom10501050αMold Draft Angle Top
0.530.510.33.021.020.013BLower Lead Width0.810.740.66.032.029.026B1Upper Lead Width0.330.270.20.013.011.008cLead Thickness
1717n1Pins per Side
23.6223.3722.61.930.920.890D2Footprint Length23.6223.3722.61.930.920.890E2Footprint Width24.3324.2324.13.958.954.950D1Molded Package Length24.3324.2324.13.958.954.950E1Molded Package Width25.2725.1525.02.995.990.985DOverall Length25.2725.1525.02.995.990.985EOverall Width
0.250.130.00.010.005.000CH2Corner Chamfer (others)1.271.141.02.050.045.040CH1Corner Chamfer 10.860.740.61.034.029.024A3Side 1 Chamfer Height
0.51.020A1Standoff §A2Molded Package Thickness
4.574.394.19.180.173.165AOverall Height
1.27.050pPitch68nNumber of Pins
MAXNOMMINMAXNOMMINDimension LimitsMILLIMETERSINCHES*Units
β
A2
c
E2
2
DD1
n
#leads=n1
E
E1
1α
pB
A3
A
B1
32°
D2
68
A1
.145 .153 .160 3.68 3.87 4.06.028 .035 0.71 0.89
CH1 x 45 °CH2 x 45 °
* Controlling Parameter
Notes:Dimensions D and E1 do not include mold flash or protrusions. Mold flash or protrusions shall not exceed .010” (0.254mm) per side.JEDEC Equivalent: MO-047Drawing No. C04-049
§ Significant Characteristic
DS30289B-page 284 2000 Microchip Technology Inc.

PIC17C7XX
80-Lead Plastic Thin Quad Flatpack (PT) 12x12x1 mm Body, 1.0/0.10 mm Lead Form (TQFP)
* Controlling Parameter
Notes:Dimensions D1 and E1 do not include mold flash or protrusions. Mold flash or protrusions shall not exceed .010” (0.254mm) per side.JEDEC Equivalent: MS-026Drawing No. C04-092
1.101.00.043.039
1.140.890.64.045.035.025CHPin 1 Corner Chamfer
1.00.039(F)Footprint (Reference)
(F)
EE1
#leads=n1
p
B
D1 D
n
12
φ
c
βL
A
A1A2
α
Units INCHES MILLIMETERS*Dimension Limits MIN NOM MAX MIN NOM MAX
Number of Pins n 80 80Pitch p .020 0.50
Overall Height A .047 1.20Molded Package Thickness A2 .037 .039 .041 0.95 1.00 1.05Standoff § A1 .002 .004 .006 0.05 0.10 0.15Foot Length L .018 .024 .030 0.45 0.60 0.75
Foot Angle φ 0 3.5 7 0 3.5 7Overall Width E .541 .551 .561 13.75 14.00 14.25Overall Length D .541 .551 .561 13.75 14.00 14.25Molded Package Width E1 .463 .472 .482 11.75 12.00 12.25Molded Package Length D1 .463 .472 .482 11.75 12.00 12.25
Pins per Side n1 20 20
Lead Thickness c .004 .006 .008 0.09 0.15 0.20Lead Width B .007 .009 .011 0.17 0.22 0.27
Mold Draft Angle Top α 5 10 15 5 10 15Mold Draft Angle Bottom β 5 10 15 5 10 15
CH x 45°
§ Significant Characteristic
2000 Microchip Technology Inc. DS30289B-page 285

PIC17C7XX
84-Lead Plastic Leaded Chip Carrier (L) – Square (PLCC)
10501050βMold Draft Angle Bottom10501050αMold Draft Angle Top
0.530.510.33.021.020.013BLower Lead Width0.810.740.66.032.029.026B1Upper Lead Width0.330.270.20.013.011.008cLead Thickness
1717n1Pins per Side
23.6223.3722.61.930.920.890D2Footprint Length23.6223.3722.61.930.920.890E2Footprint Width24.3324.2324.13.958.954.950D1Molded Package Length24.3324.2324.13.958.954.950E1Molded Package Width25.2725.1525.02.995.990.985DOverall Length25.2725.1525.02.995.990.985EOverall Width
0.250.130.00.010.005.000CH2Corner Chamfer (others)1.271.141.02.050.045.040CH1Corner Chamfer 10.860.740.61.034.029.024A3Side 1 Chamfer Height
0.51.020A1Standoff §A2Molded Package Thickness
4.574.394.19.180.173.165AOverall Height
1.27.050pPitch68nNumber of Pins
MAXNOMMINMAXNOMMINDimension LimitsMILLIMETERSINCHES*Units
β
A2
c
E2
2
DD1
n
#leads=n1
E
E1
1α
pB
A3
A
B1
32°
D2
68
A1
.145 .153 .160 3.68 3.87 4.06.028 .035 0.71 0.89
CH1 x 45 °CH2 x 45°
* Controlling Parameter
Notes:Dimensions D and E1 do not include mold flash or protrusions. Mold flash or protrusions shall not exceed .010” (0.254mm) per side.JEDEC Equivalent: MO-047Drawing No. C04-093
§ Significant Characteristic
DS30289B-page 286 2000 Microchip Technology Inc.

PIC17C7XX
APPENDIX A: MODIFICATIONS
The following is the list of modifications over thePIC16CXX microcontroller family:
1. Instruction word length is increased to 16-bit.This allows larger page sizes, both in programmemory (8 Kwords verses 2 Kwords) and regis-ter file (256 bytes versus 128 bytes).
2. Four modes of operation: Microcontroller,Protected Microcontroller, Extended Micro-controller, and Microprocessor.
3. 22 new instructions.The MOVF, TRIS and OPTION instructions areno longer supported.
4. Four new instructions (TLRD, TLWT, TABLRD,TABLWT) for transferring data between datamemory and program memory. They can be usedto “self program” the EPROM program memory.
5. Single cycle data memory to data memory trans-fers possible (MOVPF and MOVFP instructions).These instructions do not affect the Workingregister (WREG).
6. W register (WREG) is now directly addressable.7. A PC high latch register (PCLATH) is extended
to 8-bits. The PCLATCH register is now bothreadable and writable.
8. Data memory paging is redefined slightly.9. DDR registers replace function of TRIS regis-
ters.10. Multiple Interrupt vectors added. This can
decrease the latency for servicing interrupts.11. Stack size is increased to 16 deep.
12. BSR register for data memory paging.13. Wake-up from SLEEP operates slightly differently.14. The Oscillator Start-Up Timer (OST) and Power-
Up Timer (PWRT) operate in parallel and not inseries.
15. PORTB interrupt-on-change feature works onall eight port pins.
16. TMR0 is 16-bit, plus 8-bit prescaler.17. Second indirect addressing register added
(FSR1 and FSR2). Control bits can select theFSR registers to auto-increment, auto-decre-ment, remain unchanged after an indirectaddress.
18. Hardware multiplier added (8 x 8 → 16-bit).
19. Peripheral modules operate slightly differently.20. A/D has both VREF+ and VREF- inputs.21. USARTs do not implement BRGH feature.
22. Oscillator modes slightly redefined.23. Control/Status bits and registers have been
placed in different registers and the control bitfor globally enabling interrupts has inversepolarity.
24. In-circuit serial programming is implementeddifferently.
APPENDIX B: COMPATIBILITY
To convert code written for PIC16CXXX toPIC17CXXX, the user should take the following steps:
1. Remove any TRIS and OPTION instructions,and implement the equivalent code.
2. Separate the Interrupt Service Routine into itsfour vectors.
3. Replace:MOVF REG1, Wwith:MOVFP REG1, WREG
4. Replace:MOVF REG1, WMOVWF REG2 with:MOVPF REG1, REG2 ; Addr(REG1)<20horMOVFP REG1, REG2 ; Addr(REG2)<20h
5. Ensure that all bit names and register names areupdated to new data memory map locations.
6. Verify data memory banking.7. Verify mode of operation for indirect addressing.
8. Verify peripheral routines for compatibility.9. Weak pull-ups are enabled on RESET.10. WDT time-outs always reset the device (in run
or SLEEP mode).
B.1 Upgrading from PIC17C42 Devices
To convert code from the PIC17C42 to all the otherPIC17CXXX devices, the user should take the follow-ing steps.
1. If the hardware multiply is to be used, ensurethat any variables at address 18h and 19h aremoved to another address.
2. Ensure that the upper nibble of the BSR was notwritten with a non-zero value. This may causeunexpected operation since the RAM bank is nolonger 0.
3. The disabling of global interrupts has beenenhanced, so there is no additional testing of theGLINTD bit after a BSF CPUSTA, GLINTDinstruction.
Note: If REG1 and REG2 are both at addressesgreater then 20h, two instructions arerequired. MOVFP REG1, WREG ;MOVPF WREG, REG2 ;
2000 Microchip Technology Inc. DS30289B-page 287

PIC17C7XX
APPENDIX C: WHAT’S NEW
This is a new Data Sheet for the Following Devices:
• PIC17C752• PIC17C756A
• PIC17C762• PIC17C766
This Data Sheet is based on the PIC17C75X DataSheet (DS30246A).
APPENDIX D: WHAT’S CHANGED
Clarified the TAD vs. device maximum operating fre-quency tables in Section 16.2.
Added device characteristic graphs and charts inSection 21.
Removed the “Preliminary” status from the entiredocument.
DS30289B-page 288 2000 Microchip Technology Inc.

PIC17C7XX
INDEX AA/D
Accuracy/Error .......................................................... 189ADCON0 Register..................................................... 179ADCON1 Register..................................................... 180ADIF bit ..................................................................... 181Analog Input Model Block Diagram........................... 184Analog-to-Digital Converter....................................... 179Block Diagram........................................................... 181Configuring Analog Port Pins.................................... 186Configuring the Interrupt ........................................... 181Configuring the Module............................................. 181Connection Considerations....................................... 189Conversion Clock...................................................... 185Conversions .............................................................. 186Converter Characteristics ......................................... 263Delays ....................................................................... 183Effects of a RESET ................................................... 188Equations .................................................................. 183Flow Chart of A/D Operation..................................... 187GO/DONE bit ............................................................ 181Internal Sampling Switch (Rss) Impedence .............. 183Operation During SLEEP.......................................... 188Sampling Requirements............................................ 183Sampling Time .......................................................... 183Source Impedence.................................................... 183Time Delays .............................................................. 183Transfer Function...................................................... 189
A/D Interrupt........................................................................ 38A/D Interrupt Flag bit, ADIF................................................. 38A/D Module Interrupt Enable, ADIE .................................... 36ACK................................................................................... 144Acknowledge Data bit, AKD.............................................. 136Acknowledge Pulse........................................................... 144Acknowledge Sequence Enable bit, AKE ......................... 136Acknowledge Status bit, AKS ........................................... 136ADCON0 ............................................................................. 49ADCON1 ............................................................................. 49ADDLW ............................................................................. 202ADDWF............................................................................. 202ADDWFC .......................................................................... 203ADIE.................................................................................... 36ADIF.................................................................................... 38ADRES Register ............................................................... 179ADRESH ............................................................................. 49ADRESL.............................................................................. 49AKD................................................................................... 136AKE................................................................................... 136AKS........................................................................... 136, 159ALU ..................................................................................... 11ALUSTA ............................................................................ 198ALUSTA Register................................................................ 51ANDLW ............................................................................. 203ANDWF............................................................................. 204Application Note AN552, ’Implementing Wake-up on Keystroke.’ ..................................................................... 74Application Note AN578, "Use of the SSP Module in the I2C Multi-Master Environment."............................... 143Assembler
MPASM Assembler................................................... 233Asynchronous Master Transmission................................. 123Asynchronous Transmitter ................................................ 123
BBank Select Register (BSR) ............................................... 57Banking......................................................................... 46, 57Baud Rate Formula........................................................... 120Baud Rate Generator ....................................................... 153Baud Rate Generator (BRG) ............................................ 120Baud Rates
Asynchronous Mode................................................. 122Synchronous Mode................................................... 121
BCF .................................................................................. 204BCLIE ................................................................................. 36BCLIF ................................................................................. 38BF ............................................................. 134, 144, 159, 162Bit Manipulation ................................................................ 198Block Diagrams
A/D............................................................................ 181Analog Input Model................................................... 184Baud Rate Generator ............................................... 153BSR Operation ........................................................... 57External Brown-out Protection Circuit (Case1)........... 31External Power-on Reset Circuit ................................ 24External Program Memory Connection ...................... 45I2C Master Mode ...................................................... 151I2C Module................................................................ 143Indirect Addressing..................................................... 54On-chip Reset Circuit ................................................. 23PORTD ....................................................................... 80PORTE ........................................................... 82, 90, 91Program Counter Operation ....................................... 56PWM......................................................................... 107RA0 and RA1.............................................................. 72RA2............................................................................. 72RA3............................................................................. 73RA4 and RA5.............................................................. 73RB3:RB2 Port Pins ..................................................... 75RB7:RB4 and RB1:RB0 Port Pins .............................. 74RC7:RC0 Port Pins..................................................... 78SSP (I2C Mode)........................................................ 143SSP (SPI Mode) ....................................................... 137SSP Module (I2C Master Mode) ............................... 133SSP Module (I2C Slave Mode) ................................. 133SSP Module (SPI Mode) .......................................... 133Timer3 with One Capture and One Period Register. 110TMR1 and TMR2 in 16-bit Timer/Counter Mode ...... 105TMR1 and TMR2 in Two 8-bit Timer/Counter Mode 104TMR3 with Two Capture Registers........................... 112Using CALL, GOTO.................................................... 56WDT ......................................................................... 193
BODEN............................................................................... 31Borrow ................................................................................ 11BRG.......................................................................... 120, 153Brown-out Protection .......................................................... 31Brown-out Reset (BOR)...................................................... 31BSF................................................................................... 205BSR .................................................................................... 57BSR Operation ................................................................... 57BTFSC.............................................................................. 205BTFSS .............................................................................. 206BTG .................................................................................. 206Buffer Full bit, BF.............................................................. 144Buffer Full Status bit, BF................................................... 134Bus Arbitration .................................................................. 170Bus Collision
Section...................................................................... 170
2000 Microchip Technology Inc. DS30289B-page 289

PIC17C7XX
Bus Collision During a RESTART Condition..................... 173Bus Collision During a START Condition.......................... 171Bus Collision During a STOP Condition............................ 174Bus Collision Interrupt Enable, BCLIE ................................ 36Bus Collision Interrupt Flag bit, BCLIF ................................ 38CC.................................................................................... 11, 51CA1/PR3 ........................................................................... 102CA1ED0 ............................................................................ 101CA1ED1 ............................................................................ 101CA1IE.................................................................................. 35CA1IF .................................................................................. 37CA1OVF............................................................................ 102CA2ED0 ............................................................................ 101CA2ED1 ............................................................................ 101CA2H............................................................................. 28, 49CA2IE.......................................................................... 35, 111CA2IF .......................................................................... 37, 111CA2L ............................................................................. 28, 49CA2OVF............................................................................ 102CA3H................................................................................... 50CA3IE.................................................................................. 36CA3IF .................................................................................. 38CA3L ................................................................................... 50CA4H................................................................................... 50CA4IE.................................................................................. 36CA4IF .................................................................................. 38Calculating Baud Rate Error ............................................. 120CALL ........................................................................... 54, 207Capacitor Selection
Ceramic Resonators ................................................... 18Crystal Oscillator ......................................................... 18
Capture ..................................................................... 101, 110Capture Sequence to Read Example................................ 113Capture1
Mode ......................................................................... 101Overflow............................................................ 102, 103
Capture1 Interrupt ............................................................... 37Capture2
Mode ......................................................................... 101Overflow............................................................ 102, 103
Capture2 Interrupt ............................................................... 37Capture3 Interrupt Enable, CA3IE ...................................... 36Capture3 Interrupt Flag bit, CA3IF ...................................... 38Capture4 Interrupt Enable, CA4IE ...................................... 36Capture4 Interrupt Flag bit, CA4IF ...................................... 38Carry (C) ............................................................................. 11Ceramic Resonators ........................................................... 17Circular Buffer ..................................................................... 54CKE................................................................................... 134CKP................................................................................... 135Clearing the Prescaler....................................................... 193Clock Polarity Select bit, CKP ........................................... 135Clock/Instruction Cycle (Figure) .......................................... 21Clocking Scheme/Instruction Cycle..................................... 21CLRF................................................................................. 207CLRWDT........................................................................... 208Code Examples
Indirect Addressing ..................................................... 55Loading the SSPBUF register ................................... 138Saving Status and WREG in RAM.............................. 42Table Read ................................................................. 64Table Write.................................................................. 62
Code Protection ................................................................ 195COMF................................................................................ 208
ConfigurationBits............................................................................ 192Locations .................................................................. 192Oscillator............................................................. 17, 192Word ......................................................................... 191
CPFSEQ ........................................................................... 209CPFSGT ........................................................................... 209CPFSLT ............................................................................ 210CPUSTA ..................................................................... 52, 194Crystal Operation, Overtone Crystals ................................. 18Crystal or Ceramic Resonator Operation............................ 18Crystal Oscillator................................................................. 17DD/A.................................................................................... 134Data Memory
GPR...................................................................... 43, 46Indirect Addressing ..................................................... 54Organization ............................................................... 46SFR ............................................................................ 43
Data Memory Banking ........................................................ 46Data/Address bit, D/A ....................................................... 134DAW ................................................................................. 210DC................................................................................. 11, 51DDRB...................................................................... 27, 48, 74DDRC ..................................................................... 28, 48, 78DDRD ..................................................................... 28, 48, 80DDRE...................................................................... 28, 48, 82DDRF.................................................................................. 49DDRG ................................................................................. 49DECF ................................................................................ 211DECFSNZ......................................................................... 212DECFSZ ........................................................................... 211Delay From External Clock Edge........................................ 98Digit Borrow ........................................................................ 11Digit Carry (DC) .................................................................. 11Duty Cycle ........................................................................ 107EElectrical Characteristics
PIC17C752/756Absolute Maximum Ratings.............................. 239Capture Timing ................................................. 253CLKOUT and I/O Timing .................................. 250DC Characteristics............................................ 242External Clock Timing....................................... 249Memory Interface Read Timing ........................ 266Memory Interface Write Timing ........................ 265Parameter Measurement Information............... 248Reset, Watchdog Timer, Oscillator Start-up Timer and Power-up Timer Timing ................... 251Timer0 Clock Timing......................................... 252Timer1, Timer2 and Timer3 Clock Timing ........ 252Timing Parameter Symbology .......................... 247USART Module Synchronous Receive Timing. 261USART Module Synchronous Transmission Timing............................................................... 260
EPROM Memory Access Time Order Suffix....................... 45Errata .................................................................................... 5Extended Microcontroller .................................................... 43Extended Microcontroller Mode .......................................... 45External Memory Interface.................................................. 45External Program Memory Waveforms............................... 45
DS30289B-page 290 2000 Microchip Technology Inc.

PIC17C7XX
FFamily of Devices
PIC17C75X ................................................................... 8FERR ................................................................................ 125Flowcharts
Acknowledge............................................................. 166Master Receiver........................................................ 163Master Transmit ........................................................ 160RESTART Condition ................................................. 157Start Condition .......................................................... 155STOP Condition ........................................................ 168
FOSC0 .............................................................................. 191FOSC1 .............................................................................. 191FS0 ..................................................................................... 51FS1 ..................................................................................... 51FS2 ..................................................................................... 51FS3 ..................................................................................... 51FSR0................................................................................... 54FSR1................................................................................... 54GGCE .................................................................................. 136General Call Address Sequence....................................... 149General Call Address Support .......................................... 149General Call Enable bit, GCE ........................................... 136General Format for Instructions ........................................ 198General Purpose RAM........................................................ 43General Purpose RAM Bank............................................... 57General Purpose Register (GPR) ....................................... 46GLINTD......................................................... 39, 52, 111, 194Global Interrupt Disable bit, GLINTD .................................. 39GOTO ............................................................................... 212GPR (General Purpose Register) ....................................... 46GPR Banks ......................................................................... 57Graphs
RC Oscillator Frequency vs. VDD (CEXT = 100 pF)... 268RC Oscillator Frequency vs. VDD (CEXT = 22 pF)..... 268RC Oscillator Frequency vs. VDD (CEXT = 300 pF)... 269Transconductance of LF Oscillator vs.VDD ............... 270Transconductance of XT Oscillator vs. VDD.............. 270Typical RC Oscillator vs. Temperature ..................... 267
HHardware Multiplier ............................................................. 67II/O Ports
Bi-directional ............................................................... 93I/O Ports...................................................................... 71Programming Considerations ..................................... 93Read-Modify-Write Instructions................................... 93Successive Operations ............................................... 94
I2C..................................................................................... 143I2C Input ........................................................................... 279I2C Master Mode Receiver Flow Chart ............................. 163I2C Master Mode Reception.............................................. 162I2C Master Mode RESTART Condition............................. 156I2C Mode Selection ........................................................... 143I2C Module
Acknowledge Flow Chart .......................................... 166Acknowledge Sequence Timing................................ 165Addressing ................................................................ 145Baud Rate Generator................................................ 153Block Diagram........................................................... 151BRG Block Diagram.................................................. 153BRG Reset due to SDA Collision.............................. 172BRG Timing .............................................................. 153Bus Arbitration .......................................................... 170
Bus Collision............................................................. 170Acknowledge .................................................... 170RESTART Condition......................................... 173RESTART Condition Timing (Case1) ............... 173RESTART Condition Timing (Case2) ............... 173START Condition.............................................. 171START Condition Timing.......................... 171, 172STOP Condition................................................ 174STOP Condition Timing (Case1) ...................... 174STOP Condition Timing (Case2) ...................... 174Transmit Timing................................................ 170
Bus Collision Timing ................................................. 170Clock Arbitration ....................................................... 169Clock Arbitration Timing (Master Transmit) .............. 169Conditions to not give ACK Pulse............................. 144General Call Address Support .................................. 149Master Mode............................................................. 151Master Mode 7-bit Reception timing......................... 164Master Mode Operation............................................ 152Master Mode Start Condition.................................... 154Master Mode Transmission ...................................... 159Master Mode Transmit Sequence ............................ 152Master Transmit Flowchart ....................................... 160Multi-Master Communication.................................... 170Multi-master Mode.................................................... 152Operation.................................................................. 143Repeat Start Condition timing................................... 156RESTART Condition Flowchart ................................ 157Slave Mode............................................................... 144Slave Reception ....................................................... 145Slave Transmission .................................................. 146SSPBUF ................................................................... 144Start Condition Flowchart ......................................... 155Stop Condition Flowchart ......................................... 168Stop Condition Receive or Transmit timing .............. 167Stop Condition timing ............................................... 167Waveforms for 7-bit Reception ................................. 146Waveforms for 7-bit Transmission............................ 146
I2C Module Address Register, SSPADD .......................... 144I2C Slave Mode ................................................................ 144INCF ................................................................................. 213INCFSNZ .......................................................................... 214INCFSZ............................................................................. 213In-Circuit Serial Programming........................................... 196INDF0 ................................................................................. 54INDF1 ................................................................................. 54Indirect Addressing
Indirect Addressing..................................................... 54Operation.................................................................... 55Registers .................................................................... 54
Initializing PORTB............................................................... 75Initializing PORTC .............................................................. 78Initializing PORTD .............................................................. 80Initializing PORTE................................................... 82, 84, 86INSTA ................................................................................. 48Instruction Flow/Pipelining.................................................. 21Instruction Set
ADDLW..................................................................... 202ADDWF .................................................................... 202ADDWFC.................................................................. 203ANDLW..................................................................... 203ANDWF .................................................................... 204BCF .......................................................................... 204BSF........................................................................... 205BTFSC...................................................................... 205BTFSS ...................................................................... 206
2000 Microchip Technology Inc. DS30289B-page 291

PIC17C7XX
BTG........................................................................... 206CALL ......................................................................... 207CLRF......................................................................... 207CLRWDT................................................................... 208COMF ....................................................................... 208CPFSEQ ................................................................... 209CPFSGT ................................................................... 209CPFSLT .................................................................... 210DAW.......................................................................... 210DECF ........................................................................ 211DECFSNZ ................................................................. 212DECFSZ.................................................................... 211GOTO ....................................................................... 212INCF.......................................................................... 213INCFSNZ .................................................................. 214INCFSZ ..................................................................... 213IORLW ...................................................................... 214IORWF ...................................................................... 215LCALL ....................................................................... 215MOVFP ..................................................................... 216MOVLB ..................................................................... 216MOVLR ..................................................................... 217MOVLW .................................................................... 217MOVPF ..................................................................... 218MOVWF .................................................................... 218MULLW ..................................................................... 219MULWF..................................................................... 219NEGW....................................................................... 220NOP .......................................................................... 220RETFIE ..................................................................... 221RETLW ..................................................................... 221RETURN ................................................................... 222RLCF......................................................................... 222RLNCF ...................................................................... 223RRCF ........................................................................ 223RRNCF ..................................................................... 224SETF......................................................................... 224SLEEP ...................................................................... 225SUBLW ..................................................................... 225SUBWF ..................................................................... 226SUBWFB................................................................... 226SWAPF ..................................................................... 227TABLRD............................................................ 227, 228TABLWT ........................................................... 228, 229TLRD......................................................................... 229TLWT ........................................................................ 230TSTFSZ .................................................................... 230XORLW..................................................................... 231XORWF..................................................................... 231
Instruction Set Summary................................................... 197Instructions
TABLRD...................................................................... 64TLRD........................................................................... 64
INT Pin ................................................................................ 40INTE .................................................................................... 34INTEDG......................................................................... 53, 97Inter-Integrated Circuit (I2C).............................................. 133Internal Sampling Switch (Rss) Impedence ...................... 183Interrupt on Change Feature............................................... 74Interrupt Status Register (INTSTA) ..................................... 34Interrupts
A/D Interrupt................................................................ 38Bus Collision Interrupt ................................................. 38Capture1 Interrupt ....................................................... 37Capture2 Interrupt ....................................................... 37Capture3 Interrupt ....................................................... 38
Capture4 Interrupt ...................................................... 38Context Saving ........................................................... 39Flag bits
TMR1IE .............................................................. 33TMR1IF............................................................... 33TMR2IE .............................................................. 33TMR2IF............................................................... 33TMR3IE .............................................................. 33TMR3IF............................................................... 33
Global Interrupt Disable.............................................. 39Interrupts .................................................................... 33Logic ........................................................................... 33Operation .................................................................... 39Peripheral Interrupt Enable......................................... 35Peripheral Interrupt Request....................................... 37PIE2 Register ............................................................. 36PIR1 Register ............................................................. 37PIR2 Register ............................................................. 38PORTB Interrupt on Change ...................................... 37PWM......................................................................... 108RA0/INT...................................................................... 39Status Register ........................................................... 34Synchronous Serial Port Interrupt............................... 38T0CKI Interrupt ........................................................... 39Timing......................................................................... 40TMR1 Overflow Interrupt ............................................ 37TMR2 Overflow Interrupt ............................................ 37TMR3 Overflow Interrupt ............................................ 37USART1 Receive Interrupt ......................................... 37USART1 Transmit Interrupt ........................................ 37USART2 Receive Interrupt ......................................... 38Vectors
Peripheral Interrupt............................................. 39Program Memory Locations ............................... 43RA0/INT Interrupt ............................................... 39T0CKI Interrupt ................................................... 39
Vectors/Priorities......................................................... 39Wake-up from SLEEP............................................... 194
INTF.................................................................................... 34INTSTA Register................................................................. 34IORLW .............................................................................. 214IORWF.............................................................................. 215IRBPU VS. VDD ................................................................... 274KKeeLoq Evaluation and Programming Tools .................... 236LLCALL......................................................................... 54, 215MMaps
Register File Map........................................................ 47Memory
External Interface ....................................................... 45External Memory Waveforms ..................................... 45Memory Map (Different Modes) .................................. 44Mode Memory Access ................................................ 44Organization ............................................................... 43Program Memory ........................................................ 43Program Memory Map................................................ 43
Microcontroller .................................................................... 43Microprocessor ................................................................... 43Minimizing Current Consumption...................................... 195MOVFP ....................................................................... 46, 216Moving Data Between Data and Program Memories ......... 46MOVLB ....................................................................... 46, 216MOVLR ............................................................................. 217MOVLW ............................................................................ 217
DS30289B-page 292 2000 Microchip Technology Inc.

PIC17C7XX
MOVPF ....................................................................... 46, 218MOVWF ............................................................................ 218MPLAB Integrated Development Environment Software .. 233MULLW ............................................................................. 219Multi-Master Communication ............................................ 170Multi-Master Mode ............................................................ 152Multiply Examples
16 x 16 Routine........................................................... 6816 x 16 Signed Routine............................................... 698 x 8 Routine............................................................... 678 x 8 Signed Routine................................................... 67
MULWF............................................................................. 219NNEGW............................................................................... 220NOP .................................................................................. 220OOpcode Field Descriptions................................................ 197Opcodes.............................................................................. 56Oscillator
Configuration....................................................... 17, 192Crystal......................................................................... 17External Clock............................................................. 19External Crystal Circuit ............................................... 19External Parallel Resonant Crystal Circuit .................. 19External Series Resonant Crystal Circuit.................... 19RC............................................................................... 20RC Frequencies ........................................................ 269
Oscillator Start-up Time (Figure)......................................... 24Oscillator Start-up Timer (OST) .......................................... 24OST..................................................................................... 24OV................................................................................. 11, 51Overflow (OV) ..................................................................... 11PP........................................................................................ 134Packaging Information ...................................................... 281PC (Program Counter) ........................................................ 56PCFG0 bit ......................................................................... 180PCFG1 bit ......................................................................... 180PCFG2 bit ......................................................................... 180PCH .................................................................................... 56PCL ............................................................................. 56, 198PCLATH.............................................................................. 56PD ............................................................................... 52, 194PEIE............................................................................ 34, 111PEIF .................................................................................... 34Peripheral Bank .................................................................. 57Peripheral Banks................................................................. 57Peripheral Interrupt Enable ................................................. 35Peripheral Interrupt Request (PIR1) ................................... 37Peripheral Register Banks .................................................. 46PICDEM-1 Low-Cost PICmicro Demo Board.................... 235PICDEM-2 Low-Cost PIC16CXX Demo Board ................. 235PICDEM-3 Low-Cost PIC16CXXX Demo Board............... 236PICSTART“ Plus Entry Level Development System......... 235PIE .................................................................... 126, 130, 132PIE1 .............................................................................. 28, 48PIE2 ........................................................................ 28, 36, 49PIR .................................................................... 126, 130, 132PIR1 .............................................................................. 28, 48PIR2 .............................................................................. 28, 49PM0........................................................................... 191, 195PM1........................................................................... 191, 195POP .............................................................................. 39, 54POR .................................................................................... 24PORTA.................................................................... 27, 48, 72
PORTB ................................................................... 27, 48, 74PORTB Interrupt on Change .............................................. 37PORTC ................................................................... 28, 48, 78PORTD ................................................................... 28, 48, 80PORTE ................................................................... 28, 48, 82PORTF ............................................................................... 49PORTG............................................................................... 49Power-down Mode............................................................ 194Power-on Reset (POR)....................................................... 24Power-up Timer (PWRT) .................................................... 24PR1............................................................................... 28, 49PR2............................................................................... 28, 49PR3/CA1H .......................................................................... 28PR3/CA1L........................................................................... 28PR3H/CA1H........................................................................ 49PR3L/CA1L......................................................................... 49Prescaler Assignments ....................................................... 99PRO MATE“ II Universal Programmer.............................. 235PRODH......................................................................... 30, 50PRODL ......................................................................... 30, 50Program Counter (PC)........................................................ 56Program Memory
External Access Waveforms....................................... 45External Connection Diagram..................................... 45Map............................................................................. 43Modes
Extended Microcontroller.................................... 43Microcontroller .................................................... 43Microprocessor ................................................... 43Protected Microcontroller.................................... 43
Operation.................................................................... 43Organization ............................................................... 43
Protected Microcontroller.................................................... 43PS0............................................................................... 53, 97PS1............................................................................... 53, 97PS2............................................................................... 53, 97PS3............................................................................... 53, 97PUSH............................................................................ 39, 54PW1DCH ...................................................................... 28, 49PW1DCL....................................................................... 28, 49PW2DCH ...................................................................... 28, 49PW2DCL....................................................................... 28, 49PW3DCH ...................................................................... 30, 50PW3DCL....................................................................... 30, 50PWM......................................................................... 101, 107
Duty Cycle ................................................................ 108External Clock Source .............................................. 109Frequency vs. Resolution ......................................... 108Interrupts .................................................................. 108Max Resolution/Frequency for External Clock Input 109Output....................................................................... 107Periods ..................................................................... 108
PWM1....................................................................... 102, 103PWM1ON.................................................................. 102, 107PWM2....................................................................... 102, 103PWM2ON.................................................................. 102, 107PWM3ON.......................................................................... 103PWRT ................................................................................. 24
2000 Microchip Technology Inc. DS30289B-page 293

PIC17C7XX
RR/W ................................................................................... 134R/W bit .............................................................................. 145R/W bit .............................................................................. 145RA1/T0CKI pin .................................................................... 97RBIE.................................................................................... 35RBIF .................................................................................... 37RBPU .................................................................................. 74RC Oscillator ....................................................................... 20RC Oscillator Frequencies ................................................ 269RC1IE.................................................................................. 35RC1IF.................................................................................. 37RC2IE.................................................................................. 36RC2IF.................................................................................. 38RCE, Receive Enable bit, RCE ......................................... 136RCREG ..................................................... 125, 126, 130, 131RCREG1 ....................................................................... 27, 48RCREG2 ....................................................................... 27, 49RCSTA.............................................................. 126, 130, 132RCSTA1........................................................................ 27, 48RCSTA2........................................................................ 27, 49Read/Write bit, R/W .......................................................... 134Reading 16-bit Value........................................................... 99Receive Overflow Indicator bit, SSPOV ............................ 135Receive Status and Control Register ................................ 117Register File Map ................................................................ 47Registers
ADCON0 ..................................................................... 49ADCON1 ..................................................................... 49ADRESH ..................................................................... 49ADRESL...................................................................... 49ALUSTA .......................................................... 39, 48, 51BRG .......................................................................... 120BSR....................................................................... 39, 48CA2H .......................................................................... 49CA2L ........................................................................... 49CA3H .......................................................................... 50CA3L ........................................................................... 50CA4H .......................................................................... 50CA4L ........................................................................... 50CPUSTA ............................................................... 48, 52DDRB.......................................................................... 48DDRC.......................................................................... 48DDRD.......................................................................... 48DDRE.......................................................................... 48DDRF .......................................................................... 49DDRG ......................................................................... 49FSR0..................................................................... 48, 54FSR1..................................................................... 48, 54INDF0.................................................................... 48, 54INDF1.................................................................... 48, 54INSTA ......................................................................... 48INTSTA ....................................................................... 34PCL ............................................................................. 48PCLATH...................................................................... 48PIE1 ...................................................................... 35, 48PIE2 ...................................................................... 36, 49PIR1 ...................................................................... 37, 48PIR2 ...................................................................... 38, 49PORTA........................................................................ 48PORTB........................................................................ 48PORTC ....................................................................... 48PORTD ....................................................................... 48PORTE........................................................................ 48PORTF........................................................................ 49PORTG ....................................................................... 49
PR1............................................................................. 49PR2............................................................................. 49PR3H/CA1H................................................................ 49PR3L/CA1L................................................................. 49PRODH....................................................................... 50PRODL ....................................................................... 50PW1DCH .................................................................... 49PW1DCL..................................................................... 49PW2/DCL.................................................................... 49PW2DCH .................................................................... 49PW3DCH .................................................................... 50PW3DCL..................................................................... 50RCREG1..................................................................... 48RCREG2..................................................................... 49RCSTA1 ..................................................................... 48RCSTA2 ..................................................................... 49SPBRG1 ..................................................................... 48SPBRG2 ..................................................................... 49SSPADD..................................................................... 50SSPBUF ..................................................................... 50SSPCON1 .................................................................. 50SSPCON2 .................................................................. 50SSPSTAT ........................................................... 50, 134T0STA ............................................................ 48, 53, 97TBLPTRH ................................................................... 48TBLPTRL.................................................................... 48TCON1 ............................................................... 49, 101TCON2 ............................................................... 49, 102TCON3 ............................................................... 50, 103TMR0H ....................................................................... 48TMR1.......................................................................... 49TMR2.......................................................................... 49TMR3H ....................................................................... 49TMR3L........................................................................ 49TXREG1 ..................................................................... 48TXREG2 ..................................................................... 49TXSTA1 ...................................................................... 48TXSTA2 ...................................................................... 49WREG .................................................................. 39, 48
RegstersTMR0L........................................................................ 48
ResetSection........................................................................ 23Status Bits and Their Significance .............................. 25Time-Out in Various Situations ................................... 25Time-Out Sequence.................................................... 25
Restart Condition Enabled bit, RSE.................................. 136RETFIE ............................................................................. 221RETLW ............................................................................. 221RETURN........................................................................... 222RLCF ................................................................................ 222RLNCF.............................................................................. 223RRCF................................................................................ 223RRNCF ............................................................................. 224RSE .................................................................................. 136RX Pin Sampling Scheme ................................................ 125SS ....................................................................................... 134SAE................................................................................... 136Sampling........................................................................... 125Saving STATUS and WREG in RAM.................................. 42SCK .................................................................................. 137SCL................................................................................... 144SDA .................................................................................. 144SDI.................................................................................... 137SDO .................................................................................. 137
DS30289B-page 294 2000 Microchip Technology Inc.

PIC17C7XX
SEEVAL Evaluation and Programming System................ 236Serial Clock, SCK ............................................................. 137Serial Clock, SCL.............................................................. 144Serial Data Address, SDA................................................. 144Serial Data In, SDI ............................................................ 137Serial Data Out, SDO........................................................ 137SETF................................................................................. 224SFR................................................................................... 198SFR (Special Function Registers)....................................... 43SFR As Source/Destination .............................................. 198Signed Math........................................................................ 11Slave Select Synchronization ........................................... 140Slave Select, SS ............................................................... 137SLEEP ...................................................................... 194, 225SLEEP Mode, All Peripherals Disabled ............................ 273SLEEP Mode, BOR Enabled ............................................ 273SMP .................................................................................. 134Software Simulator (MPLAB SIM)..................................... 234SPBRG ............................................................. 126, 130, 132SPBRG1 ....................................................................... 27, 48SPBRG2 ....................................................................... 27, 49SPE................................................................................... 136Special Features of the CPU ............................................ 191Special Function Registers ......................................... 43, 198
Summary..................................................................... 48Special Function Registers, File Map ................................. 47SPI
Master Mode ............................................................. 139Serial Clock............................................................... 137Serial Data In ............................................................ 137Serial Data Out ......................................................... 137Serial Peripheral Interface (SPI) ............................... 133Slave Select .............................................................. 137SPI clock ................................................................... 139SPI Mode .................................................................. 137
SPI Clock Edge Select, CKE ............................................ 134SPI Data Input Sample Phase Select, SMP ..................... 134SPI Master/Slave Connection ........................................... 138SPI Module
Master/Slave Connection.......................................... 138Slave Mode............................................................... 140Slave Select Synchronization ................................... 140Slave Synch Timing .................................................. 140
SS ..................................................................................... 137SSP................................................................................... 133
Block Diagram (SPI Mode) ....................................... 137SPI Mode .................................................................. 137SSPADD ........................................................... 144, 145SSPBUF............................................................ 139, 144SSPCON1................................................................. 135SSPCON2................................................................. 136SSPSR.............................................................. 139, 144SSPSTAT.......................................................... 134, 144
SSP I2CSSP I2C Operation.................................................... 143
SSP ModuleSPI Master Mode ...................................................... 139SPI Master/Slave Connection ................................... 138SPI Slave Mode ........................................................ 140SSPCON1 Register .................................................. 143
SSP Overflow Detect bit, SSPOV ..................................... 144SSPADD ............................................................................. 50SSPBUF...................................................................... 50, 144SSPCON1........................................................... 50, 135, 143SSPCON2................................................................... 50, 136SSPEN.............................................................................. 135
SSPIE ................................................................................. 36SSPIF ......................................................................... 38, 145SSPM3:SSPM0 ................................................................ 135SSPOV ............................................................. 135, 144, 162SSPSTAT ........................................................... 50, 134, 144ST Input ............................................................................ 278Stack
Operation.................................................................... 54Pointer ........................................................................ 54Stack........................................................................... 43
START bit (S) ................................................................... 134START Condition Enabled bit, SAE.................................. 136STKAV.......................................................................... 52, 54STOP bit (P) ..................................................................... 134STOP Condition Enable bit............................................... 136SUBLW............................................................................. 225SUBWF............................................................................. 226SUBWFB .......................................................................... 226SWAPF............................................................................. 227Synchronous Master Mode............................................... 127Synchronous Master Reception........................................ 129Synchronous Master Transmission .................................. 127Synchronous Serial Port ................................................... 133Synchronous Serial Port Enable bit, SSPEN.................... 135Synchronous Serial Port Interrupt....................................... 38Synchronous Serial Port Interrupt Enable, SSPIE.............. 36Synchronous Serial Port Mode Select bits, SSPM3:SSPM0 ................................................................ 135Synchronous Slave Mode................................................. 131TT0CKI ................................................................................. 39T0CKI Pin ........................................................................... 40T0CKIE ............................................................................... 34T0CKIF ............................................................................... 34T0CS ............................................................................ 53, 97T0IE .................................................................................... 34T0IF .................................................................................... 34T0SE............................................................................. 53, 97T0STA ................................................................................ 53T16 ................................................................................... 101Table Latch......................................................................... 55Table Pointer ...................................................................... 55Table Read
Example...................................................................... 64Table Reads Section .................................................. 64TLRD .......................................................................... 64
Table WriteCode ........................................................................... 62Timing......................................................................... 62To External Memory ................................................... 62
TABLRD ................................................................... 227, 228TABLWT ................................................................... 228, 229TAD ................................................................................... 185TBLATH.............................................................................. 55TBLATL .............................................................................. 55TBLPTRH ........................................................................... 55TBLPTRL............................................................................ 55TCLK12 ............................................................................ 101TCLK3 .............................................................................. 101TCON1 ......................................................................... 28, 49TCON2 ............................................................................... 49TCON2,TCON3 .................................................................. 28TCON3 ....................................................................... 50, 103Time-Out Sequence............................................................ 25Timer Resources ................................................................ 95
2000 Microchip Technology Inc. DS30289B-page 295

PIC17C7XX
Timer0 ................................................................................. 97Timer1
16-bit Mode ............................................................... 105Clock Source Select.................................................. 101On bit ................................................................ 102, 103Section .............................................................. 101, 104
Timer216-bit Mode ............................................................... 105Clock Source Select.................................................. 101On bit ................................................................ 102, 103Section .............................................................. 101, 104
Timer3Clock Source Select.................................................. 101On bit ................................................................ 102, 103Section .............................................................. 101, 110
TimersTCON3...................................................................... 103
Timing DiagramsA/D Conversion......................................................... 264Acknowledge Sequence Timing................................ 165Asynchronous Master Transmission......................... 123Asynchronous Reception .......................................... 126Back to Back Asynchronous Master Transmission ... 124Baud Rate Generator with Clock Arbitration ............. 153BRG Reset Due to SDA Collision ............................. 172Bus Collision
START Condition Timing .................................. 171Bus Collision During a RESTART Condition (Case 1) .................................................................... 173Bus Collision During a RESTART Condition (Case 2) .................................................................... 173Bus Collision During a START Condition (SCL = 0)................................................................... 172Bus Collision During a STOP Condition ........................................................ 174Bus Collision for Transmit and Acknowledge............ 170External Parallel Resonant Crystal Oscillator Circuit .. 19External Program Memory Access ............................. 45I2C Bus Data ............................................................. 259I2C Bus START/STOP bits ....................................... 258I2C Master Mode First START bit Timing ................. 154I2C Master Mode Reception Timing .......................... 164I2C Master Mode Transmission Timing..................... 161Interrupt (INT, TMR0 Pins).......................................... 40Master Mode Transmit Clock Arbitration................... 169Oscillator Start-up Time .............................................. 24PIC17C752/756 Capture Timing............................... 253PIC17C752/756 CLKOUT and I/O ............................ 250PIC17C752/756 External Clock ................................ 249PIC17C752/756 Memory Interface Read.................. 266PIC17C752/756 Memory Interface Write .................. 265PIC17C752/756 PWM Timing................................... 253PIC17C752/756 Reset, Watchdog Timer, Oscillator Start-up Timer and Power-up Timer ......................... 251PIC17C752/756 Timer0 Clock .................................. 252PIC17C752/756 Timer1, Timer2 and Timer3 Clock .. 252PIC17C752/756 USART Module Synchronous Receive ..................................................................... 261PIC17C752/756 USART Module Synchronous Transmission....................................... 260Repeat START Condition ......................................... 156Slave Synchronization .............................................. 140STOP Condition Receive or Transmit ....................... 167Synchronous Reception............................................ 129Synchronous Transmission....................................... 128Table Write.................................................................. 62
TMR0.................................................................... 98, 99TMR0 Read/Write in Timer Mode............................. 100TMR1, TMR2, and TMR3 in Timer Mode ................. 115Wake-Up from SLEEP.............................................. 194
TLRD ................................................................................ 229TLWT ................................................................................ 230TMR0
16-bit Read ................................................................. 9916-bit Write ................................................................. 99Module ........................................................................ 98Operation .................................................................... 98Overview..................................................................... 95Prescaler Assignments ............................................... 99Read/Write Considerations......................................... 99Read/Write in Timer Mode........................................ 100Timing................................................................... 98, 99
TMR0 Status/Control Register (T0STA) ............................. 53TMR1 ............................................................................ 28, 49
8-bit Mode................................................................. 104External Clock Input.................................................. 104Overview..................................................................... 95Timer Mode............................................................... 115Two 8-bit Timer/Counter Mode ................................. 104Using with PWM ....................................................... 107
TMR1 Overflow Interrupt .................................................... 37TMR1CS ........................................................................... 101TMR1IE............................................................................... 35TMR1IF............................................................................... 37TMR1ON........................................................................... 102TMR2 ............................................................................ 28, 49
8-bit Mode................................................................. 104External Clock Input.................................................. 104In Timer Mode........................................................... 115Two 8-bit Timer/Counter Mode ................................. 104Using with PWM ....................................................... 107
TMR2 Overflow Interrupt .................................................... 37TMR2CS ........................................................................... 101TMR2IE............................................................................... 35TMR2IF............................................................................... 37TMR2ON........................................................................... 102TMR3
Example, Reading From........................................... 114Example, Writing To ................................................. 114External Clock Input.................................................. 114In Timer Mode........................................................... 115One Capture and One Period Register Mode........... 110Overview..................................................................... 95Reading/Writing ........................................................ 114
TMR3 Interrupt Flag bit, TMR3IF........................................ 37TMR3CS ................................................................... 101, 110TMR3H ......................................................................... 28, 49TMR3IE............................................................................... 35TMR3IF....................................................................... 37, 110TMR3L .......................................................................... 28, 49TMR3ON................................................................... 102, 110TO....................................................................... 52, 193, 194Transmit Status and Control Register............................... 117TSTFSZ ............................................................................ 230TTL INPUT........................................................................ 278Turning on 16-bit Timer .................................................... 105TX1IE.................................................................................. 35TX1IF .................................................................................. 37TX2IE.................................................................................. 36TX2IF .................................................................................. 38TXREG ..................................................... 123, 127, 131, 132TXREG1 ....................................................................... 27, 48
DS30289B-page 296 2000 Microchip Technology Inc.

PIC17C7XX
TXREG2........................................................................ 27, 49TXSTA .............................................................. 126, 130, 132TXSTA Register
TXEN Bit ......................................... 34, 51, 97, 101, 117TXSTA1 ........................................................................ 27, 48TXSTA2 ........................................................................ 27, 49UUA ..................................................................................... 134Update Address, UA ......................................................... 134Upward Compatibility ............................................................ 7USART
Asynchronous Master Transmission......................... 123Asynchronous Mode ................................................. 123Asynchronous Receive ............................................. 125Asynchronous Transmitter ........................................ 123Baud Rate Generator................................................ 120Synchronous Master Mode ....................................... 127Synchronous Master Reception................................ 129Synchronous Master Transmission........................... 127Synchronous Slave Mode ......................................... 131Synchronous Slave Transmit .................................... 131Transmit Enable (TXEN Bit)............ 34, 51, 97, 101, 117
USART1 Receive Interrupt ................................................. 37USART1 Transmit Interrupt ................................................ 37USART2 Receive Interrupt Enable, RC2IE......................... 36USART2 Receive Interrupt Flag bit, RC2IF ........................ 38USART2 Receive Interrupt Flag bit, TX2IF......................... 38USART2 Transmit Interrupt Enable, TX2IE ........................ 36VVDD.................................................................................... 242VOH VS. IOH ....................................................................... 276VOL VS. IOL ........................................................................ 276
WWake-up from SLEEP....................................................... 194Wake-up from SLEEP Through Interrupt.......................... 194Watchdog Timer ............................................................... 193Waveform for General Call Address Sequence................ 149Waveforms
External Program Memory Access ............................. 45WCOL....................................... 135, 154, 159, 162, 165, 167WCOL Status Flag............................................................ 154WDT ................................................................................. 193
Clearing the WDT ..................................................... 193Normal Timer............................................................ 193Period ....................................................................... 193Programming Considerations ................................... 193
WDT PERIOD................................................................... 275WDTPS0........................................................................... 191WDTPS1........................................................................... 191Write Collision Detect bit, WCOL...................................... 135WWW, On-Line Support ....................................................... 5XXORLW ............................................................................ 231XORWF ............................................................................ 231ZZ ................................................................................... 11, 51Zero (Z)............................................................................... 11
2000 Microchip Technology Inc. DS30289B-page 297

PIC17C7XX
NOTES:
DS30289B-page 298 2000 Microchip Technology Inc.

PIC17C7XX
ON-LINE SUPPORT
Microchip provides on-line support on the MicrochipWorld Wide Web (WWW) site.
The web site is used by Microchip as a means to makefiles and information easily available to customers. Toview the site, the user must have access to the Internetand a web browser, such as Netscape or MicrosoftExplorer. Files are also available for FTP downloadfrom our FTP site.
Connecting to the Microchip Internet Web Site
The Microchip web site is available by using yourfavorite Internet browser to attach to:
www.microchip.com
The file transfer site is available by using an FTP ser-vice to connect to:
ftp://ftp.microchip.com
The web site and file transfer site provide a variety ofservices. Users may download files for the latestDevelopment Tools, Data Sheets, Application Notes,User’s Guides, Articles and Sample Programs. A vari-ety of Microchip specific business information is alsoavailable, including listings of Microchip sales offices,distributors and factory representatives. Other dataavailable for consideration is:
• Latest Microchip Press Releases• Technical Support Section with Frequently Asked
Questions • Design Tips• Device Errata
• Job Postings• Microchip Consultant Program Member Listing• Links to other useful web sites related to
Microchip Products• Conferences for products, Development Systems,
technical information and more• Listing of seminars and events
2000 Microchip Technology Inc.
Systems Information and Upgrade Hot Line
The Systems Information and Upgrade Line providessystem users a listing of the latest versions of all ofMicrochip’s development systems software products.Plus, this line provides information on how customerscan receive any currently available upgrade kits.TheHot Line Numbers are:
1-800-755-2345 for U.S. and most of Canada, and
1-480-792-7302 for the rest of the world.
Trademarks: The Microchip name, logo, PIC, PICmicro, PICMASTER, PICSTART, PRO MATE, KEELOQ, SEEVAL, MPLAB and The Embedded Control Solutions Company are registered trademarks of Microchip Technology Incorporated in the U.S.A. and other countries. Total Endurance, ICSP, In-Circuit Serial Programming, FilterLab, MXDEV, microID, FlexROM, fuzzyLAB, MPASM, MPLINK, MPLIB, PICDEM, ICEPIC and Migratable Memory are trademarks and SQTP is a service mark of Microchip in the U.S.A.
All other trademarks mentioned herein are the property of their respective companies.
001024
DS30289B-page 299

PIC17C7XX
READER RESPONSE
It is our intention to provide you with the best documentation possible to ensure successful use of your Microchip prod-uct. If you wish to provide your comments on organization, clarity, subject matter, and ways in which our documentationcan better serve you, please FAX your comments to the Technical Publications Manager at (480) 792-4150.
Please list the following information, and use this outline to provide us with your comments about this Data Sheet.
1. What are the best features of this document?
2. How does this document meet your hardware and software development needs?
3. Do you find the organization of this data sheet easy to follow? If not, why?
4. What additions to the data sheet do you think would enhance the structure and subject?
5. What deletions from the data sheet could be made without affecting the overall usefulness?
6. Is there any incorrect or misleading information (what and where)?
7. How would you improve this document?
8. How would you improve our software, systems, and silicon products?
To: Technical Publications Manager
RE: Reader Response
Total Pages Sent
From: Name
Company
Address
City / State / ZIP / Country
Telephone: (_______) _________ - _________
Application (optional):
Would you like a reply? Y N
Device: Literature Number:
Questions:
FAX: (______) _________ - _________
DS30289BPIC17C7XX
DS30289B-page 300 2000 Microchip Technology Inc.

PIC17C7XX
PRODUCT IDENTIFICATION SYSTEM
To order or obtain information, e.g., on pricing or delivery, refer to the factory or the listed sales office.
* JW Devices are UV erasable and can be programmed to any device configuration. JW Devices meet the electrical requirement ofeach oscillator type.
Sales and Support
Data SheetsProducts supported by a preliminary Data Sheet may have an errata sheet describing minor operational differences and recom-mended workarounds. To determine if an errata sheet exists for a particular device, please contact one of the following:
1. Your local Microchip sales office2. The Microchip Corporate Literature Center U.S. FAX: (480) 792-72773. The Microchip Worldwide Site (www.microchip.com)
Please specify which device, revision of silicon and Data Sheet (include Literature #) you are using.
New Customer Notification SystemRegister on our web site (www.microchip.com/cn) to receive the most current information on our products.
PART NO. X /XX XXX
PatternPackageTemperatureRange
Device
Device PIC17C756: Standard VDD rangePIC17C756T: (Tape and Reel)PIC17LC756: Extended VDD range
Temperature Range - = 0°C to +70°CI = -40°C to +85°C
Package CL = Windowed LCCPT = TQFPL = PLCC
Pattern QTP, SQTP, ROM Code (factory specified) or Special Requirements . Blamk for OTP andWindowed devices.
Examples:
a) PIC17C756 – 16L Commercial Temp.,PLCC package, 16 MHz, normal VDD limits
b) PIC17LC756–08/PT Commercial Temp.,TQFP package, 8MHz, extended VDD limits
c) PIC17C756–33I/PT Industrial Temp.,TQFP package, 33 MHz, normal VDD limits
2000 Microchip Technology Inc. DS30289B-page 301

PIC17C7XX
NOTES:
DS30289B-page 302 2000 Microchip Technology Inc.

PIC17C7XX
NOTES:
2000 Microchip Technology Inc. DS30289B-page 303

Information contained in this publication regarding device applications and the like is intended through suggestion only and may be superseded byupdates. It is your responsibility to ensure that your application meets with your specifications. No representation or warranty is given and no liability isassumed by Microchip Technology Incorporated with respect to the accuracy or use of such information, or infringement of patents or other intellectualproperty rights arising from such use or otherwise. Use of Microchip’s products as critical components in life support systems is not authorized except withexpress written approval by Microchip. No licenses are conveyed, implicitly or otherwise, except as maybe explicitly expressed herein, under any intellec-tual property rights. The Microchip logo and name are registered trademarks of Microchip Technology Inc. in the U.S.A. and other countries. All rightsreserved. All other trademarks mentioned herein are the property of their respective companies.
DS30289B-page 304 2000 Microchip Technology Inc.
All rights reserved. © 2000 Microchip Technology Incorporated. Printed in the USA. 11/00 Printed on recycled paper.
AMERICASCorporate Office2355 West Chandler Blvd.Chandler, AZ 85224-6199Tel: 480-792-7200 Fax: 480-792-7277Technical Support: 480-792-7627Web Address: http://www.microchip.comRocky Mountain2355 West Chandler Blvd.Chandler, AZ 85224-6199Tel: 480-792-7966 Fax: 480-792-7456
Atlanta500 Sugar Mill Road, Suite 200BAtlanta, GA 30350Tel: 770-640-0034 Fax: 770-640-0307Boston2 Lan Drive, Suite 120Westford, MA 01886Tel: 978-692-3838 Fax: 978-692-3821Chicago333 Pierce Road, Suite 180Itasca, IL 60143Tel: 630-285-0071 Fax: 630-285-0075Dallas4570 Westgrove Drive, Suite 160Addison, TX 75001Tel: 972-818-7423 Fax: 972-818-2924DaytonTwo Prestige Place, Suite 130Miamisburg, OH 45342Tel: 937-291-1654 Fax: 937-291-9175DetroitTri-Atria Office Building 32255 Northwestern Highway, Suite 190Farmington Hills, MI 48334Tel: 248-538-2250 Fax: 248-538-2260Los Angeles18201 Von Karman, Suite 1090Irvine, CA 92612Tel: 949-263-1888 Fax: 949-263-1338New York150 Motor Parkway, Suite 202Hauppauge, NY 11788Tel: 631-273-5305 Fax: 631-273-5335San JoseMicrochip Technology Inc.2107 North First Street, Suite 590San Jose, CA 95131Tel: 408-436-7950 Fax: 408-436-7955Toronto6285 Northam Drive, Suite 108Mississauga, Ontario L4V 1X5, CanadaTel: 905-673-0699 Fax: 905-673-6509
ASIA/PACIFICChina - BeijingMicrochip Technology Beijing OfficeUnit 915New China Hong Kong Manhattan Bldg.No. 6 Chaoyangmen Beidajie Beijing, 100027, No. ChinaTel: 86-10-85282100 Fax: 86-10-85282104China - ShanghaiMicrochip Technology Shanghai OfficeRoom 701, Bldg. BFar East International PlazaNo. 317 Xian Xia RoadShanghai, 200051Tel: 86-21-6275-5700 Fax: 86-21-6275-5060Hong KongMicrochip Asia PacificRM 2101, Tower 2, Metroplaza223 Hing Fong RoadKwai Fong, N.T., Hong KongTel: 852-2401-1200 Fax: 852-2401-3431IndiaMicrochip Technology Inc.India Liaison OfficeDivyasree Chambers1 Floor, Wing A (A3/A4)No. 11, O’Shaugnessey RoadBangalore, 560 025, IndiaTel: 91-80-2290061 Fax: 91-80-2290062JapanMicrochip Technology Intl. Inc.Benex S-1 6F3-18-20, ShinyokohamaKohoku-Ku, Yokohama-shiKanagawa, 222-0033, JapanTel: 81-45-471- 6166 Fax: 81-45-471-6122KoreaMicrochip Technology Korea168-1, Youngbo Bldg. 3 FloorSamsung-Dong, Kangnam-KuSeoul, KoreaTel: 82-2-554-7200 Fax: 82-2-558-5934
ASIA/PACIFIC (continued)SingaporeMicrochip Technology Singapore Pte Ltd.200 Middle Road#07-02 Prime CentreSingapore, 188980Tel: 65-334-8870 Fax: 65-334-8850TaiwanMicrochip Technology Taiwan11F-3, No. 207Tung Hua North RoadTaipei, 105, TaiwanTel: 886-2-2717-7175 Fax: 886-2-2545-0139
EUROPEDenmarkMicrochip Technology Denmark ApSRegus Business CentreLautrup hoj 1-3Ballerup DK-2750 DenmarkTel: 45 4420 9895 Fax: 45 4420 9910FranceArizona Microchip Technology SARLParc d’Activite du Moulin de Massy43 Rue du Saule TrapuBatiment A - ler Etage91300 Massy, FranceTel: 33-1-69-53-63-20 Fax: 33-1-69-30-90-79GermanyArizona Microchip Technology GmbHGustav-Heinemann Ring 125D-81739 Munich, GermanyTel: 49-89-627-144 0 Fax: 49-89-627-144-44ItalyArizona Microchip Technology SRLCentro Direzionale Colleoni Palazzo Taurus 1 V. Le Colleoni 120041 Agrate BrianzaMilan, Italy Tel: 39-039-65791-1 Fax: 39-039-6899883United KingdomArizona Microchip Technology Ltd.505 Eskdale RoadWinnersh TriangleWokingham Berkshire, England RG41 5TUTel: 44 118 921 5869 Fax: 44-118 921-5820
10/01/00
WORLDWIDE SALES AND SERVICE
Microchip received QS-9000 quality system certification for its worldwide headquarters, design and wafer fabrication facilities in Chandler and Tempe, Arizona in July 1999. The Company’s quality system processes and procedures are QS-9000 compliant for its PICmicro® 8-bit MCUs, KEELOQ® code hopping devices, Serial EEPROMs and microperipheral products. In addition, Microchip’s quality system for the design and manufacture of development systems is ISO 9001 certified.