pickering getting started with lxi started with lxi detailed installation guide pickeringtest.com...
TRANSCRIPT
Page 1
LXI COMPLIANT CHASSIS 60-100/101
pickering
Issue 1.1 July 2017
Getting Started With LXI
Detailed Installation Guide
pickeringtest.com pickering

Page 2
LXI GETTING STARTED GUIDE
pickering
HARDWARE SET-UP
Before you begin, take a moment to check your box contents to ensure you have the necessary components present. Contact your local sales office if you find that any part or component is missing.
Your box will contain:
1) An LXI device - this could be an LXI Switching Device or an LXI Modular Switching Chassis.
2) The single page document entitled Pickering Interfaces’ LXI Getting Started Guide.
3) 2 meter Ethernet patch lead labelled Straight-through.
4) 2 meter Ethernet patch lead labelled Crossover. Note: This lead is not supplied with later versions of LXI device which have auto MDIX. It may be required for earlier LXI devices which are identified by No Auto-MDIX printed on the rear panel next to the LAN socket.
5) A power lead for your territory.
6) A driver DVD.
If you have purchased an LXI Modular Switching Chassis, you may also have a number of additional PXI modules. Check your shipping invoice for details.
Remove your LXI device from its protective packaging.
If the device is an LXI Modular Switching Chassis, insert the PXI modules you require for your application into it now. You may need to remove blanking panels to fit your modules. Retain these panels, as the chassis will not be cooled correctly with a module removed if these are not fitted.
OR
If you have an LXI Modular Switching Chassis, insert
your PXI modules

Page 3LXI GETTING STARTED GUIDE
pickering
If you are using an Ethernet hub or switch, use the Ethernet cable marked Straight-through. Connect one end to the socket on the back of your LXI device, and the other to a free socket on your hub or switch.
If you are connecting directly from your computer to the LXI device, use the Ethernet lead marked Crossover. Note: This is only applicable to older devices that have No Auto-MDIX printed on the rear panel next to the LAN socket. Newer LXI devices can connect directly to a computer with a straight through Ethernet cable.
If you are connecting directly using a laptop equipped with both wired and wireless Ethernet ports, disable the wireless port.
Insert the power lead into the socket on the back of your device and plug the other end into a mains electricity socket. You can now power up the device using the switch on the rear panel next to the mains inlet.
Connect one end of the Ethernet Cable to your LXI Switching Device
ORLXI Modular Switching Chassis
Connect the other end of the Ethernet Cable to a hub or switch
Connect the power Cable to your LXI Switching Device LXI Modular Switching ChassisOR
Page 4
LXI GETTING STARTED GUIDE
pickering
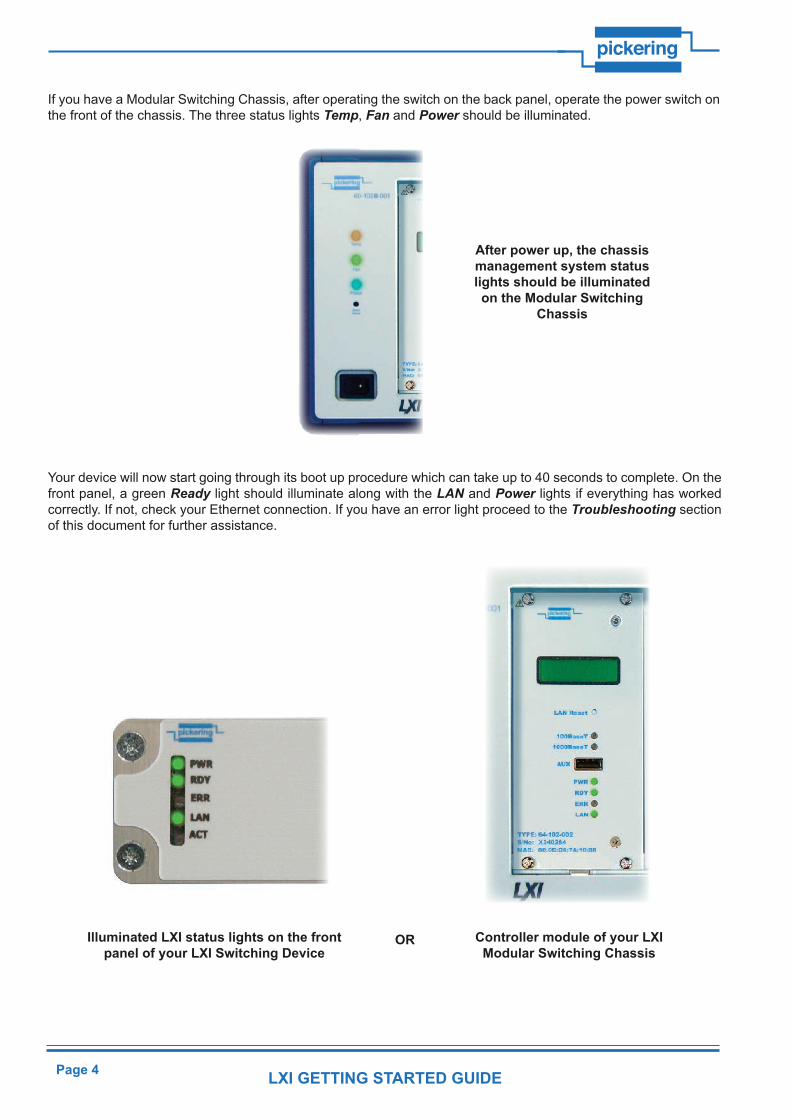
Your device will now start going through its boot up procedure which can take up to 40 seconds to complete. On the front panel, a green Ready light should illuminate along with the LAN and Power lights if everything has worked correctly. If not, check your Ethernet connection. If you have an error light proceed to the Troubleshooting section of this document for further assistance.
If you have a Modular Switching Chassis, after operating the switch on the back panel, operate the power switch on the front of the chassis. The three status lights Temp, Fan and Power should be illuminated.
After power up, the chassis management system status lights should be illuminated on the Modular Switching
Chassis
Illuminated LXI status lights on the front panel of your LXI Switching Device
Controller module of your LXI Modular Switching Chassis
OR
Page 5LXI GETTING STARTED GUIDE
pickering
CONNECTING YOUR LXI DEVICE
You can establish your LXI device’s TCP/IP address using one of three Discovery Tools as shown overleaf.
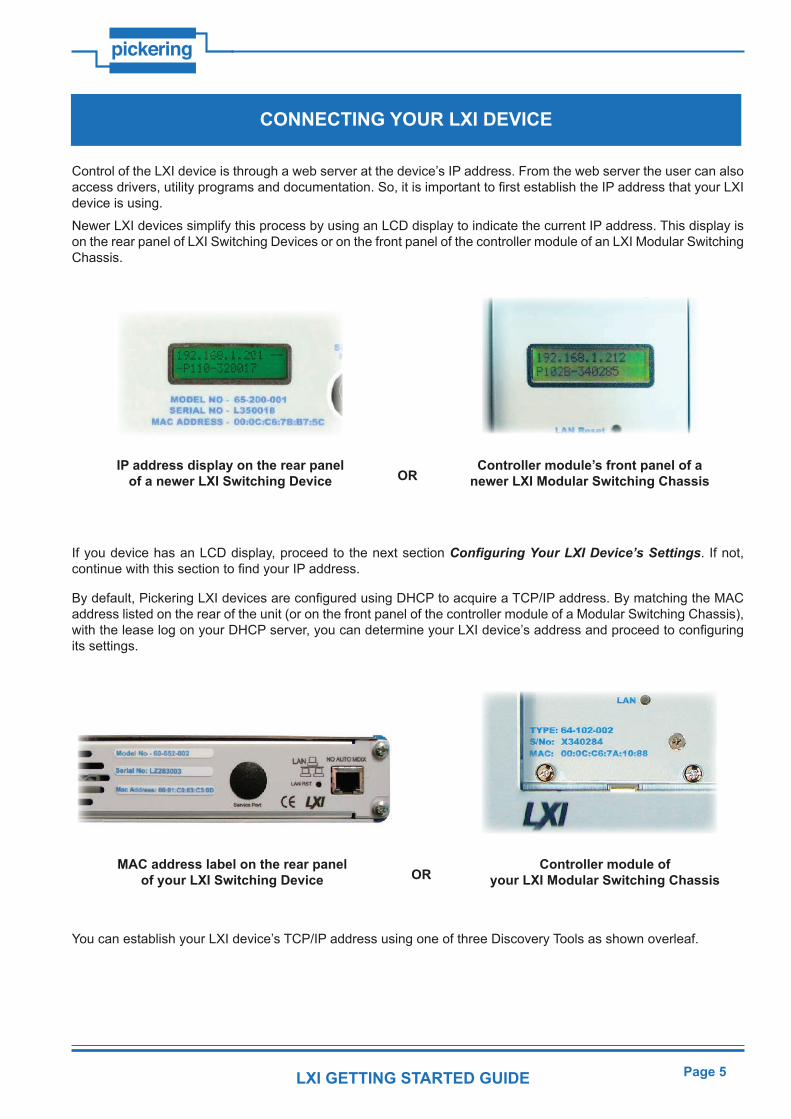
Control of the LXI device is through a web server at the device’s IP address. From the web server the user can also access drivers, utility programs and documentation. So, it is important to first establish the IP address that your LXI device is using.
Newer LXI devices simplify this process by using an LCD display to indicate the current IP address. This display is on the rear panel of LXI Switching Devices or on the front panel of the controller module of an LXI Modular Switching Chassis.
If you device has an LCD display, proceed to the next section Configuring Your LXI Device’s Settings. If not, continue with this section to find your IP address.
By default, Pickering LXI devices are configured using DHCP to acquire a TCP/IP address. By matching the MAC address listed on the rear of the unit (or on the front panel of the controller module of a Modular Switching Chassis), with the lease log on your DHCP server, you can determine your LXI device’s address and proceed to configuring its settings.
MAC address label on the rear panel of your LXI Switching Device
Controller module of your LXI Modular Switching ChassisOR
IP address display on the rear panel of a newer LXI Switching Device
Controller module’s front panel of a newer LXI Modular Switching ChassisOR

Page 6
LXI GETTING STARTED GUIDE
pickering
The Pickering Discovery tools located on the DVD supplied with your device can tell you the TCP/IP address your device is using. To use the DVD, insert it into you computer’s drive and wait for it to auto-run. On the first screen select LXI PRODUCTS.1) Find LXI – a simple Windows application which will list all Pickering LXI devices. The home page of an LXI device is displayed when the corresponding IP address is highlighted and Open Browser selected.
2) VXI-11 Discovery protocol.Some tools, for example Agilent IO Library, provide a VXI-11 protocol discovery tool. This may be used to establish the address of any connected LXI compliant device.A VXI-11 Discovery browser is supplied on the distribution DVD and may be used to locate any LXI device, Pickering or otherwise. To run this, select the VXI-11 Discovery application.
3) Bonjour or Rendezvous discovery protocol (recommended)By default, Pickering LXI devices have the Bonjour or Rendezvous service switched on, by using a suitable Bonjour client on your computer, you can search for and configure an LXI device without knowing its TCP/IP address beforehand. Use the MAC address on the rear of the device (or on the front of the controller module) and that present on the LXI devices homepage to confirm you are configuring the correct device if you have more than one LXI device running.A Rendezvous browser is shipped on the DVD, to use it click on the Rendezvous icon.Then click on Web Server (HTTP). A list of devices and MAC addresses should be displayed. Double click on the device with the same model number and MAC address as the unit you want to use.The IP address of the device will be displayed in the browser’s address field in the format:http://169.254.59.99/path=/ Delete the /path=/ section of the address and press Return to display the Instrument Home Page.All the discovery tools are located on the Pickering distribution DVD in the LXI Products/Tools directory.Once you have a valid IP address, you can move on to configuring your LXI device’s settings.
Page 7LXI GETTING STARTED GUIDE
pickering
CONFIGURING YOUR LXI DEVICE’S SETTINGS
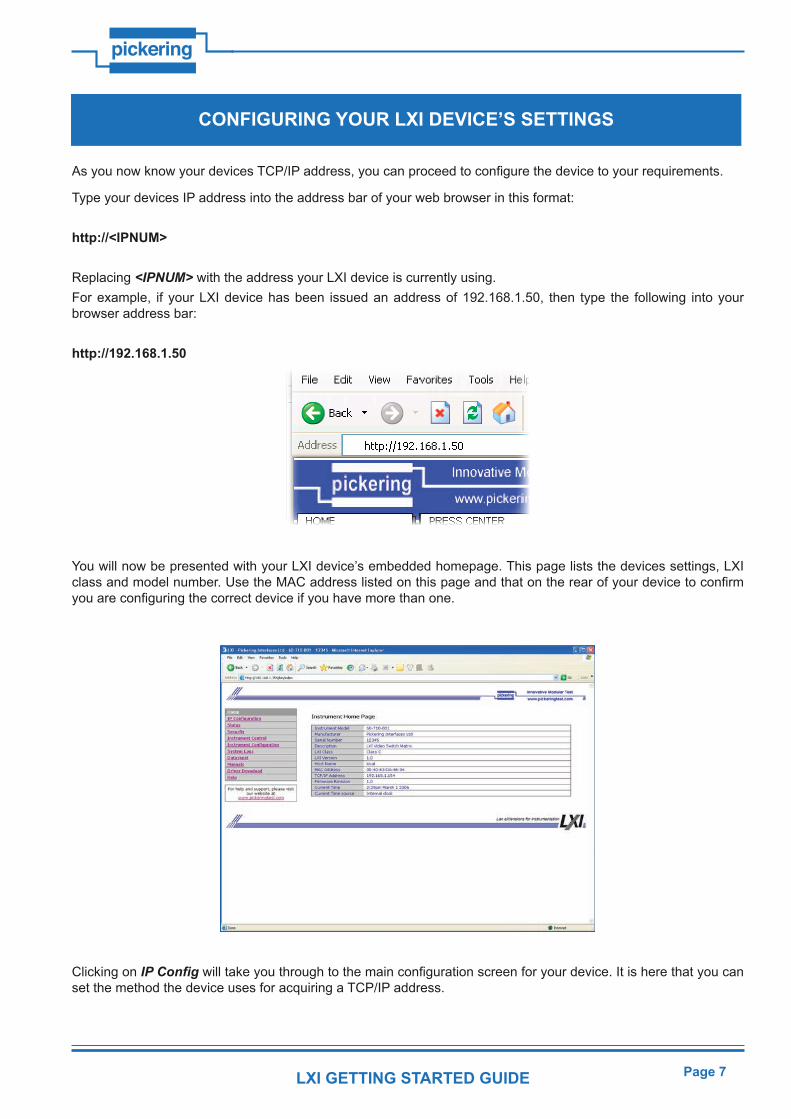
As you now know your devices TCP/IP address, you can proceed to configure the device to your requirements.
Type your devices IP address into the address bar of your web browser in this format:
http://<IPNUM>
Replacing <IPNUM> with the address your LXI device is currently using.For example, if your LXI device has been issued an address of 192.168.1.50, then type the following into your browser address bar:
http://192.168.1.50
You will now be presented with your LXI device’s embedded homepage. This page lists the devices settings, LXI class and model number. Use the MAC address listed on this page and that on the rear of your device to confirm you are configuring the correct device if you have more than one.
Clicking on IP Config will take you through to the main configuration screen for your device. It is here that you can set the method the device uses for acquiring a TCP/IP address.
Page 8
LXI GETTING STARTED GUIDE
pickering
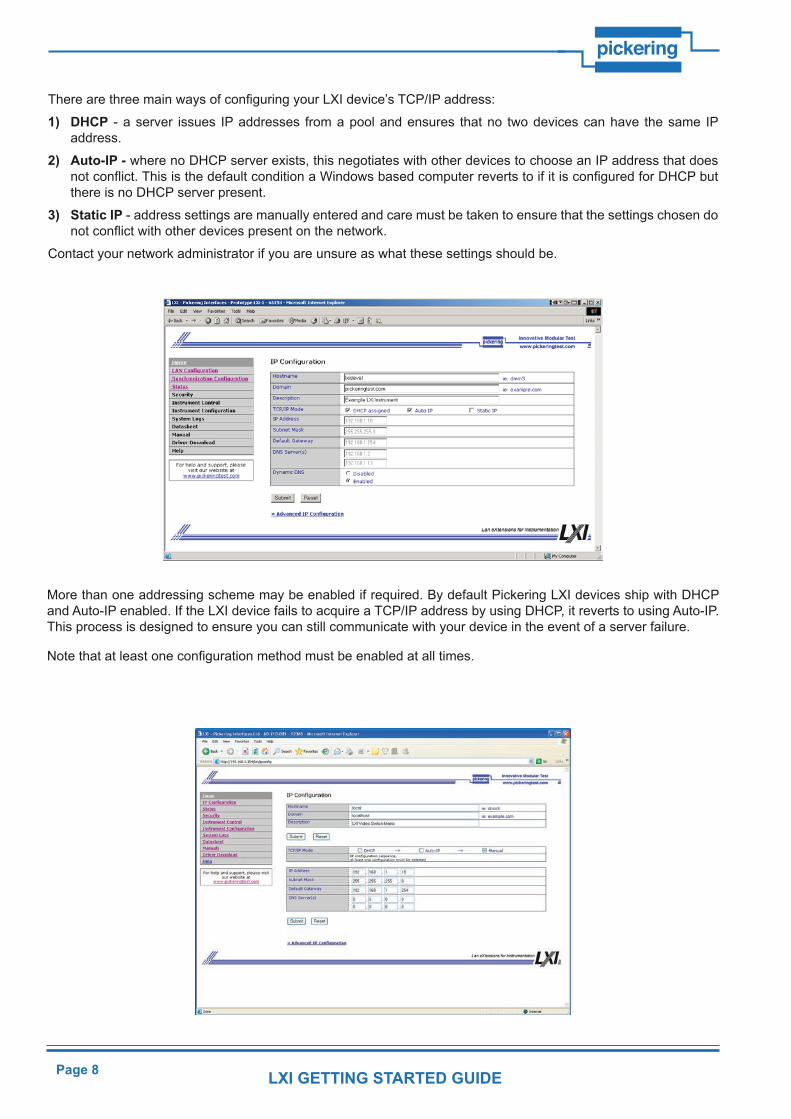
There are three main ways of configuring your LXI device’s TCP/IP address:
1) DHCP - a server issues IP addresses from a pool and ensures that no two devices can have the same IP address.
2) Auto-IP - where no DHCP server exists, this negotiates with other devices to choose an IP address that does not conflict. This is the default condition a Windows based computer reverts to if it is configured for DHCP but there is no DHCP server present.
3) Static IP - address settings are manually entered and care must be taken to ensure that the settings chosen do not conflict with other devices present on the network.
Contact your network administrator if you are unsure as what these settings should be.
More than one addressing scheme may be enabled if required. By default Pickering LXI devices ship with DHCP and Auto-IP enabled. If the LXI device fails to acquire a TCP/IP address by using DHCP, it reverts to using Auto-IP. This process is designed to ensure you can still communicate with your device in the event of a server failure.
Note that at least one configuration method must be enabled at all times.

Page 9LXI GETTING STARTED GUIDE
pickering
WHERE TO GO FROM HERE
If you have successfully configured a TCP/IP address for your LXI device, you can now make use of the resources built in to your device:
Drivers, manuals and data sheets are provided in the devices memory and can be downloaded and viewed at any time. You must have Adobe Acrobat Reader installed to view the embedded documents.
Some LXI devices also have the ability to be controlled from the web using Java Applets. You must have the Java Runtime environment to use this facility. This application can be downloaded from www.java.com.
From the Instrument Home Page select Instrument Control then click the relevant icon in the displayed window to launch the Java applet.
Your driver DVD contains other useful applications. A programming guide and example programs are installed on your computer when you install the driver for the LXI product.
Page 10
LXI GETTING STARTED GUIDE
pickering
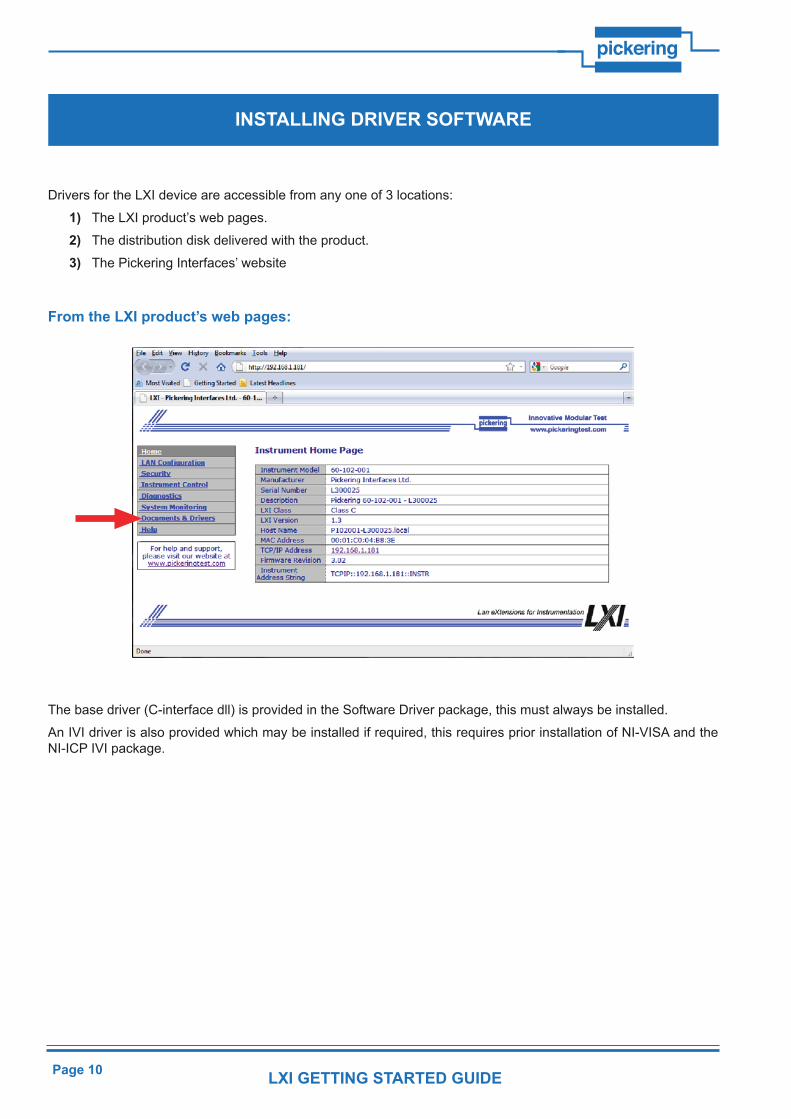
INSTALLING DRIVER SOFTWARE
Drivers for the LXI device are accessible from any one of 3 locations:
1) The LXI product’s web pages.
2) The distribution disk delivered with the product.
3) The Pickering Interfaces’ website
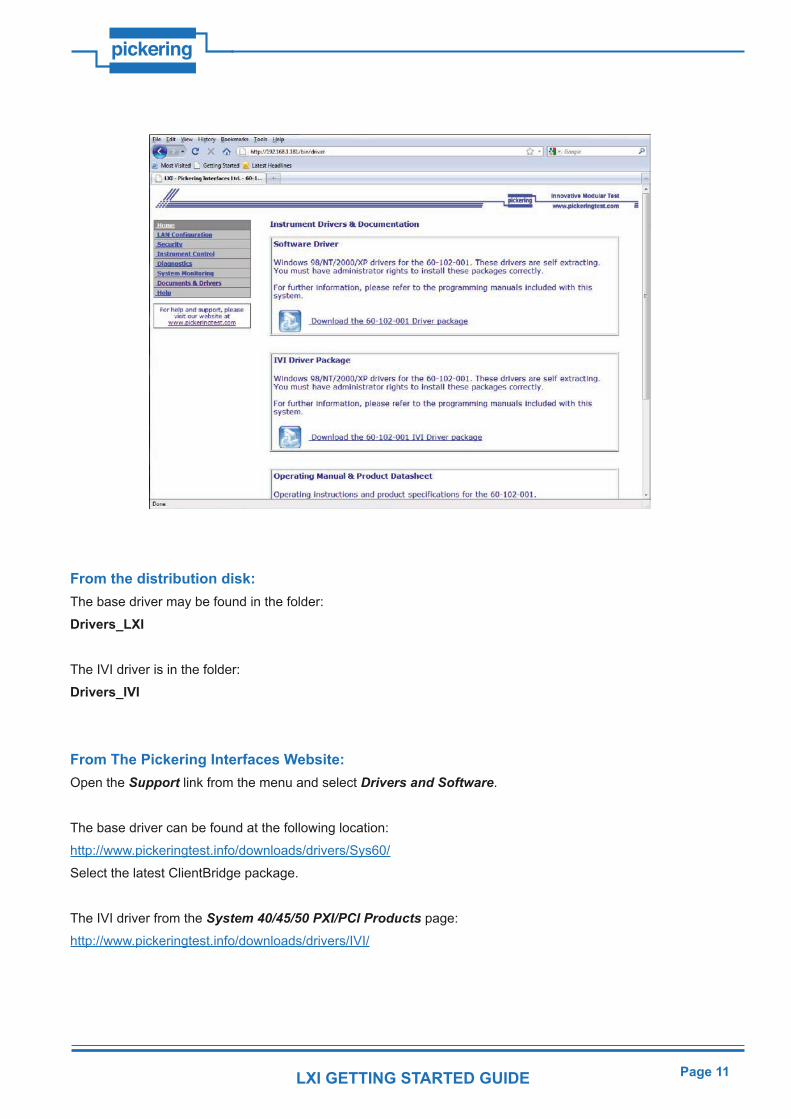
From the LXI product’s web pages:
The base driver (C-interface dll) is provided in the Software Driver package, this must always be installed.
An IVI driver is also provided which may be installed if required, this requires prior installation of NI-VISA and the NI-ICP IVI package.
Page 11LXI GETTING STARTED GUIDE
pickering
From the distribution disk:The base driver may be found in the folder:
Drivers_LXI
The IVI driver is in the folder:
Drivers_IVI
From The Pickering Interfaces Website:Open the Support link from the menu and select Drivers and Software.
The base driver can be found at the following location:
http://www.pickeringtest.info/downloads/drivers/Sys60/
Select the latest ClientBridge package.
The IVI driver from the System 40/45/50 PXI/PCI Products page:
http://www.pickeringtest.info/downloads/drivers/IVI/
Page 12
LXI GETTING STARTED GUIDE
pickering
CONFIGURING THE LXI DEVICE ISOLATED FROM A NETWORK
In some instances it may be preferable to configure a Pickering LXI device whilst isolated from the rest of a network. For example, using a laptop. This section of the document instructs a user on how to use the crossover LAN cable provided with your device to perform basic configuration and testing separate from your main network.
Note: The crossover cable is only required for older devices that have No Auto-MDIX printed on the rear panel next to the LAN socket. Newer LXI devices can connect directly to a computer with a straight through Ethernet cable.
Preliminaries
• It is assumed that your device is in default factory configuration. If this is not the case or you are unsure, perform a full factory reset by pressing the LAN Reset button for a minimum of five seconds. This is recessed in a small hole on the rear panel of an LXI Switching Device or on the front panel of a Modular Switching Chassis’ controller module.
• Obtain the Bonjour client for your system from http://www.apple.com/support/bonjour/ or install the web browser plug-in located on the installation DVD supplied with your LXI device. The installation program can be located in the folder:
<DVD Drive>:\LXI Products\Tools\
• If you are using a laptop equipped with both wired and wireless Ethernet ports, disable the wireless port as this has been known to cause conflicts with the configuration process on some machines.
• Firewalls can interfere with communication to the LXI device. Turn off any firewalls running in Windows and disable any other anti-virus software on your computer.
Windows XP/20001) Ensure that your LXI device is powered down. Plug in the network lead supplied with your LXI device into an
Ethernet port on the computer (the crossover network lead will be required for earlier LXI devices with No Auto-MDIX printed on the rear panel), and into the back of the LXI device.
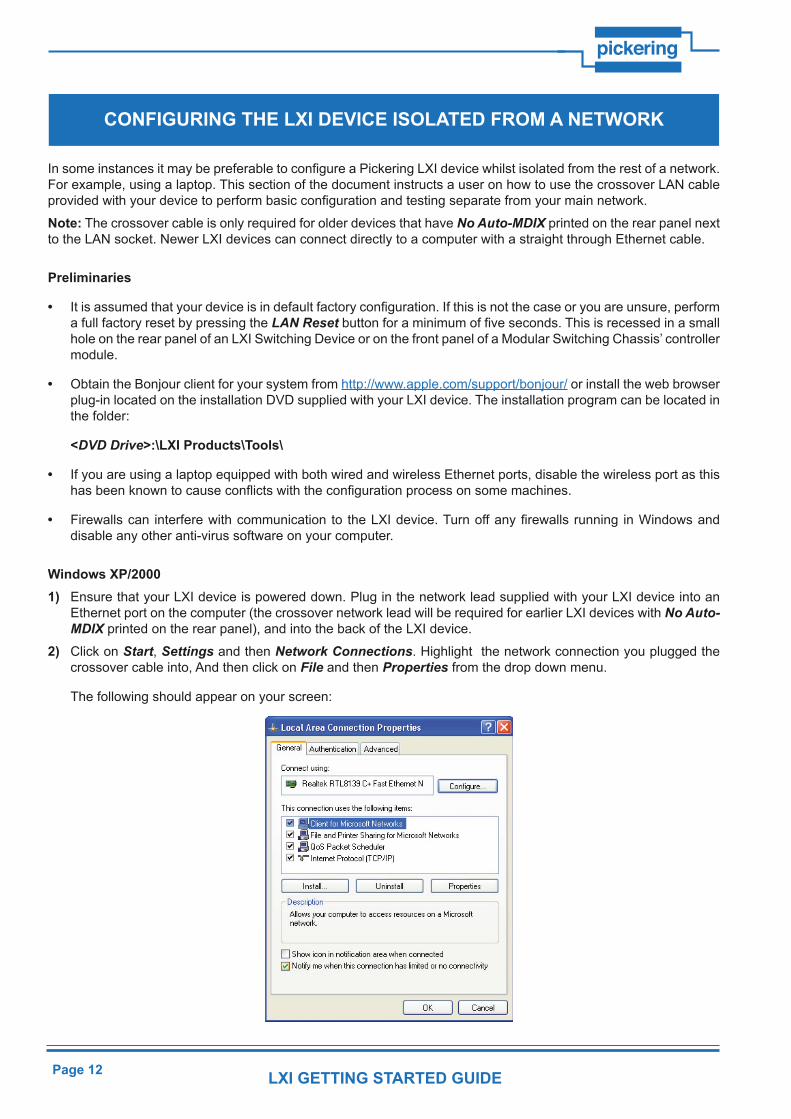
2) Click on Start, Settings and then Network Connections. Highlight the network connection you plugged the crossover cable into, And then click on File and then Properties from the drop down menu.
The following should appear on your screen:

Page 13LXI GETTING STARTED GUIDE
pickering
3) Highlight Internet Protocol (TCP/IP) and click on Properties. Make sure that Obtain an IP address automatically and Obtain DNS server address automatically are selected.
4) At this point click OK twice to bring you back to the Network Connections control panel. You may close this panel if you wish.
You should now power up your LXI device. It may take up to a minute for the device to boot, you should wait at least this amount of time before proceeding.
5) Whilst your LXI device is powering up, your computer will be attempting to receive an IP address from it. You may see something like this at the bottom of your screen with a small animated yellow dot moving around over your selected network connection:
After a period of time you will see something similar to this:
When you receive this message you are ready to proceed to the next step.

Page 14
LXI GETTING STARTED GUIDE
pickering
6) Start up your web browser.
If the Bonjour discovery panel is not present in your browser window, click on the Bonjour icon in the top toolbar.
Listed on the left should be a list of devices this computer has detected. Pickering LXI devices are identified by the model number followed by the last six digits of the LXI device’s MAC address. You can find the MAC address of your device by checking its rear panel data label where it will be clearly displayed.
7) Double click on the model number of the device and in the right hand pane of your browser window you should see the device’s welcome screen.
Page 15LXI GETTING STARTED GUIDE
pickering
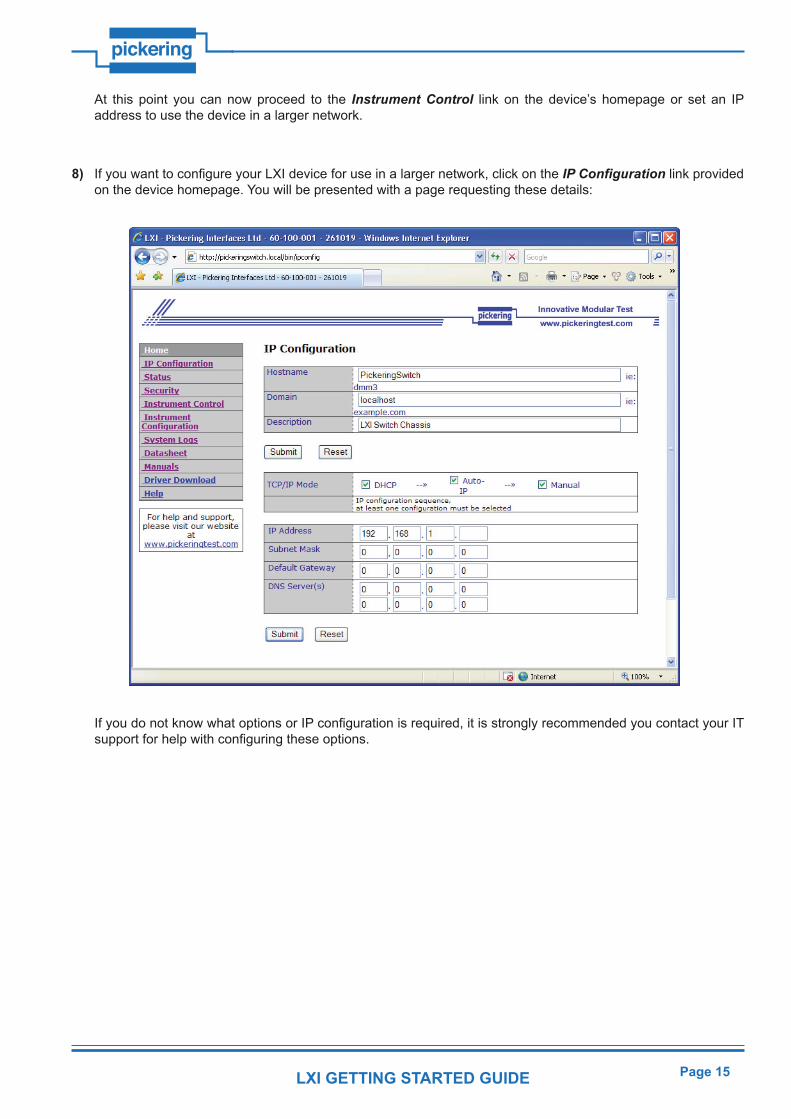
At this point you can now proceed to the Instrument Control link on the device’s homepage or set an IP address to use the device in a larger network.
8) If you want to configure your LXI device for use in a larger network, click on the IP Configuration link provided on the device homepage. You will be presented with a page requesting these details:
If you do not know what options or IP configuration is required, it is strongly recommended you contact your IT support for help with configuring these options.
Page 16
LXI GETTING STARTED GUIDE
pickering
System Specification For Network Administrators
System base: 2.6.18 Linux kernel read only file systemServices: Apache 2 Port 80 only VXI-11 RPC Bonjour Multicast DNS ServerBridge Multicast DNS
Unit supports network configuration: DHCP AutoIP (link-local addressing) Static IP
IPv4 only Auto-MDIX Ethernet port, speed selectable 10/100/1000 mbps, full or half duplex
Remote administration consoles: http only, no telnet or SSH server Java control panel for attached hardware.
Protocols supported: Pickering proprietary communication protocol http SOAP
Security: .htaccess security for configuration control. Physical storage media inside device holding configuration and OS.
Page 17LXI GETTING STARTED GUIDE
pickering
TROUBLESHOOTING
Q I have a Power light and a Ready light, but why does the LAN light flash green?A Your LXI device is being identified. Wait for this process to complete.
Q I have a Power light and a Ready light, but why is the LAN light illuminated red?A You have an IP conflict. There is another device on your network has the same TCP/IP address as your LXI
device. Remove the conflict or change the IP address of your LXI device.
Q The Power light is on, but why doesn’t the LAN indicator light up at all?A There is a cabling fault. Check your Ethernet lead is plugged into a working hub or switch. Most hubs and
switches have a link indicator to show when the connection is correct. In the case of older LXI devices that have “No Auto-MDIX” printed on the rear panel next to the LAN socket, check that you are using the correct cable type - “Straight-through” for a hub or switch or “Crossover” for connecting directly to a computer.
Q Why do I only have a Power light and a red Error light?A There is a hardware fault with your device, contact your local sales office.
Q How do I know when I can begin communicating with my device?A When the Ready light and LAN light are illuminated green.
Q What does it mean when my LXI device’s lights are all on, or flash wildly?A The system is booting up, these sequences are used to monitor the LXI device’s boot progress as an aid to fault
finding. Until the Ready and LAN lights are illuminated green, you should not attempt to communicate with your device.
Q My device’s Power and LAN lights are green, Error is red and Ready is off. What does this mean?A If you have a Modular Switching Chassis, this could be due to a faulty or unsupported module installed.
Otherwise, your device has a fault, contact your local sales office.
Please contact your local Pickering Interfaces sales office for any further support or email:[email protected] can also visit our website for product updates, help and downloadable materials at:http://www.pickeringtest.com
LAN RESET
If the device’s operation is inconsistent the user should try resetting using the LAN Reset button to see if this effects a cure. For an LXI Switching Device, this is recessed in a small hole on the rear panel next to the Ethernet Port. For an LXI Modular Switching Chassis, it is recessed in a small hole on the front panel of the controller module.
Momentary operation of the LAN Reset button causes a reset of the device, this is similar in effect to cycling the power.
Holding the LAN Reset button depressed for a period of about 5 seconds causes the device to be set back to factory default conditions. This will destroy any user configuration data already entered.
Alternatively, if operation over a network is still in doubt, connect the device to a laptop using an Ethernet cable (the supplied grey crossover cable will be required for older devices) and set it up as described in Configuring the LXI Device Isolated from a Network earlier in this document.
Page 18
LXI GETTING STARTED GUIDE
pickering
© COPYRIGHT (2017) PICKERING INTERFACES. ALL RIGHTS RESERVED.
No part of this publication may be reproduced, transmitted, transcribed, translated or stored in any form, or by any means without the written permission of Pickering Interfaces.
Technical details contained within this publication are subject to change without notice.
Page (III)REED RELAY MODULE 40-110/115/120/125
pickering
TECHNICAL SUPPORT
For Technical Support please contact Pickering Interfaces either by phone, the website or via e-mail.
WARRANTY
All products manufactured by Pickering Interfaces are warranted against defective materials and workmanship for a period of three years, excluding programmable power supplies, from the date of delivery to the original purchaser. Any product found to be
defective within this period will, at the discretion of Pickering Interfaces be repaired or replaced.
Products serviced and repaired outside of the warranty period are warranted for ninety days.
Extended warranty and service are available. Please contact Pickering Interfaces by phone, the website or via e-mail.
ENVIRONMENTAL POLICY
Pickering Interfaces operates under an environmental management system similar to ISO 14001.
Pickering Interfaces strives to fulfil all relevant environmental laws and regulations and reduce wastes and releases to the environment. Pickering Interfaces aims to design and operate products in a way that protects the environment and the health and safety of its employees, customers and the public. Pickering Interfaces endeavours to develop and manufacture products that can
be produced, distributed, used and recycled, or disposed of, in a safe and environmentally friendly manner.
Worldwide Technical Support and Product Informationpickeringtest.com
GermanyTel: +49 89 125 953 160E-mail: [email protected]
SwedenTel: +46 340-69 06 69E-mail: [email protected]
USATel: (West) +1 541 471 0700Tel: (East) +1 781 897 1710E-mail: [email protected]
Czech RepublicTel: +420 558 987 613E-mail: [email protected]
FranceTel +33 9 72 58 77 00E-mail [email protected]
Pickering Interfaces HeadquartersStephenson Road Clacton-on-Sea CO15 4NL United KingdomTel: +44 (0)1255-687900E-Mail: [email protected]
ChinaTel: +86 4008 799 765E-mail: [email protected]