pickup box ornamentation bar package installation (sport bar)box...note: the wire harnesses are...
TRANSCRIPT

2016 Chevrolet Silverado 4WD | Cheyenne, Sierra, Silverado Accessory Installation Manual | Accessories | Exterior Structural Accessories | Accessories | Document ID: 4276616
Pickup Box Ornamentation Bar Package Installation (Sport Bar)
Installation Instructions Part Number
23245111
Procedure
1. Carefully cut the bed rail moldings along the rectangular grooves (1) to expose front stake pockets.
© 2016 General Motors. All rights reserved.

2. Open the fuel tank filler door.
3. Remove the fuel tank filler to body fasteners (1) to disengage the fuel filler neck from housing (2).

Caution: Use the correct fastener in the correct location. Replacement fasteners must be the correct part number for thatapplication. Fasteners requiring replacement or fasteners requiring the use of thread locking compound or sealantare identified in the service procedure. Do not use paints, lubricants, or corrosion inhibitors on fasteners or fastenerjoint surfaces unless specified. These coatings affect fastener torque and joint clamping force and may damage thefastener. Use the correct tightening sequence and specifications when installing fasteners in order to avoid damageto parts and systems.
4. Assemble the clamp assemblies using horizontal extrusion (3), clamp block (2) and M8 clamping bolts (1).

5. Install Unuts (5) to stake pocket brackets (6). Mount stake pocket brackets to the pickup box using M8 mounting bolts (1),washers (2), (3). Hand tighten bolts while aligning top surface of stake pocket brackets with top surface of bed rail moldings(4).

6. Position foam tape pads at the bottom surfaces of sport bar mounting braces. Route wiring through the foam tape at thedriverside forward cutout. Remove backing and apply the adhesive surface of the foam tape to each mounting brace.
7. Guiding wire harness (2) into the driver side front stake pocket (1), lower sport bar assembly (3) onto the pickup box (4).
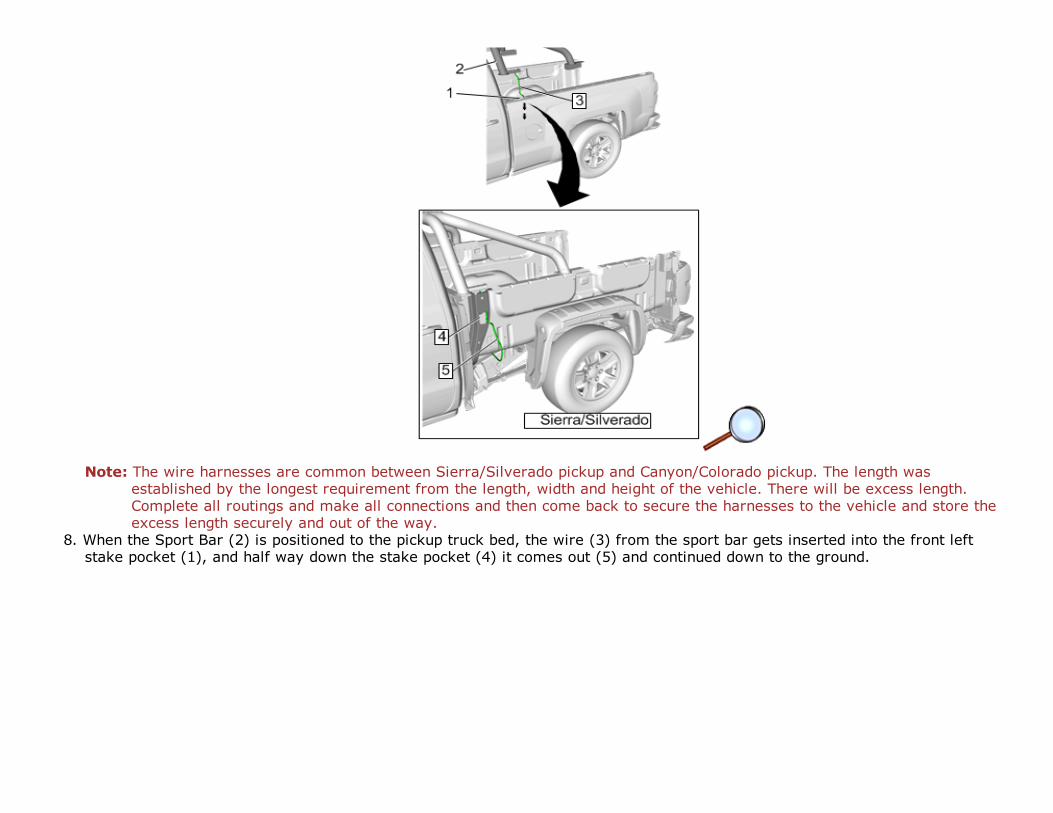
Note: The wire harnesses are common between Sierra/Silverado pickup and Canyon/Colorado pickup. The length wasestablished by the longest requirement from the length, width and height of the vehicle. There will be excess length.Complete all routings and make all connections and then come back to secure the harnesses to the vehicle and store theexcess length securely and out of the way.
8. When the Sport Bar (2) is positioned to the pickup truck bed, the wire (3) from the sport bar gets inserted into the front leftstake pocket (1), and half way down the stake pocket (4) it comes out (5) and continued down to the ground.

9. Align forward mounting holes in sport bar front mounting braces (2) with mounting holes in stake pocket brackets. Install theM6 mounting bolts (1).TightenTighten the M6 bolts (1) to 9 N.m (7 lb ft).

10. Install the plastic caps (1) into holes on driver side cover.

11. Align mounting holes of clamp assemblies with the appropriate mounting holes in sport bar rear mounting braces (1). Installthe M6 countersunk fasteners (6).
Note: If installing the sport bar to the 5’8” pickup box, use the rear holes (3) on the rear mounting brace (4).Note: If installing the sport bar to the 6’6” pickup box, Use the forward holes (5) on the rear mounting brace (4).TightenTighten the M6 fasteners (6) to 9 Nm (7 lb ft).TightenTighten the M8 bolts (2) to 22 Nm (16 lb ft).
12. Reinstall the fuel tank filler pipe housing assembly.
Sport Bar Harness Installation
Base CHMSL Front Harness Installation

1. This harness is used to provide CHMSL function to the Sport Bar if the vehicle does not also get Sport Bar mounted OffRoad Lamps. If the vehicle also gets Sport Bar Lights, use the larger harness that comes with the Light Kit instead.Follow these instructions plus the additional instructions with the Light Kit for the larger harness.
2. The harness routing starts with the 3way connector mounted to the inboard side of the UEC (1) (Underhood ElectricalCenter) with terminals pointing rearward.
Ground Installation

1. The ground eyelet will route forward and the two loose terminals will route rearward.
2. The ground is located on the front frame rail, near where a left tow hook would be located. 3. Remove the existing ground bolt (2), stack the new eyelet (1) and replace the ground bolt, tighten the bolt to 23 N.m (17
lb ft).
4. The two loose terminals route around the rear and into the UEC. The 1.5 mm terminal on the slightly shorter wire is forSierra/Silverado and the 2.8 mm terminal on the slightly longer wire is for the Canyon/Colorado. The current CHMSL onthe rear of the cab needs to be disabled, because the sport bar will block it from being viewed from behind. The newCHMSL in the sport bar will replace it.
UEC (Underhood Electrical Center)

1. Remove the top of the UEC (1), exposing the large connectors below.
2. Locate the CHMSL circuit in cavity M6 of UEC connector X3. It will be the grey, rear, outboard connector. 3. Remove the terminal from cavity M6. It will be a VT/GY wire. Replace it with the smaller of the two terminals, with the
shorter wire length on the new accessory harness.
4. Cover the terminal that was removed and the unneeded terminal from the accessory harness with vinyl tape and storethem out of the way.
Note: Do not cut off the terminal that was removed, the vehicle owner may want to return to the original CHMSL. 5. Reassemble the UEC making sure it is fully seated before engaging the locking levers.
Frame Rail Harness Installation

1. Attach the frame rail harness (1) to the 3–way connector (2) on the inboard side of the UEC and route rearward anddownward below the brake booster.

2. Route harness (1) along the outboard side of the frame rail to the fuel filler area of the pickup.

3. Connect harness (1) to the sport bar harness (2) hanging down from the front left stake pocket.
4. Secure excess wire length in the rear of the engine compartment and below the fuel filler area. 5. Pay attention to avoid any sharp edges, moving parts, areas of snow and ice packing and a possible droop if one tie
strap breaks.
6. Secure the accessory harnesses with the attached double headed tie straps to vehicle supports, wiring, fuel or brakelines and cut off the tie strap tails. Do not tighten the tie straps with excessive force.