pink fiberglas rigid foam insulation - owens...
TRANSCRIPT

PINK FIbERGlas® &RIGID FOam INsUlaTION
step-by-step instructions for everyinsulation project in your home
a GUIDE TO HOmE INsUlaTION aND NOIsE CONTROl
• aTTIC • basEmENT • NOIsE CONTROl
• Walls• CEIlINGs• FlOORs
QUICK & EasY TO INsTall!

saVE ENERGy, saVE moNEy, hElP saVE ThE PlaNET WITh PINK! 1saVE ENERGy, saVE moNEy, hElP saVE ThE PlaNET WITh PINK!
InsIde: Find out how to reduce your carbonfootprint and increase energy savings throughout your home with PInK!
2 Owens Corning products overview
4 The PINK Thermal Wall
Product InFormatIon
6 PINK FIbERGLAS® Insulation batts
7 QuietZone® Acoustic batt Insulation
8 Small Projects:
Multi-Purpose & PINK-PAK Insulation
9–11 FOAMULAR® Extruded Polystyrene
Rigid Insulation
9 FOAMULAR® C-200 Insulation
9 FOAMULAR® C-300 Insulation
10 FOAMULAR® InsulPink® Insulation
11 FOAMULAR® Codebord® Insulation
12 raft-R-mate® Attic Rafter Vents
13 FoamSealR™ Sill Gasket
BeFore You InsuLate
14–16 Calculate your needs
17 Safety and installation tips
18 Insulation FAQs
How to InsuLateStep-by-step instructions
23–31 Attic 24 The uninsulated attic 26 Topping up your attic insulation 28 Increase your living space/new construction 29 Insulating below the rafters 30 Cathedral and flat ceilings
32 Exterior walls
36 basement walls and crawlspace
42 Floors
45 Interior walls and noise control
47 Small projects

2 lEaRN moRE aT WWW.oWENscoRNING.ca 3saVE ENERGy, saVE moNEy, hElP saVE ThE PlaNET WITh PINK!
Pro
du
ct
s oV
erVIew
CompleteenergyeffiCienCyandnoiseControlsolutions
foryourhome
•saVesmoneyonheating andCoolingCosts*•highestreCyCledContent•reduCesCarBonfootprint•lessensnoise
raft-R-mate®
aTTIc RafTER VENTs
PINK fIbERGlas® INsulaTIoNR-40
PINK fIbERGlas®
INsulaTIoNR-20
foamulaR® c-300EXTRudEd PolysTyRENE
RIGId INsulaTIoN
foamulaR® c-200 or foamulaR® InsulPink®
EXTRudEd PolysTyRENE RIGId INsulaTIoN
mulTI-PuRPosEINsulaTIoN
QuietZone®
acousTIc baTT INsulaTIoN
foamulaR® codebord® EXTRudEd PolysTyRENE
RIGId INsulaTIoN
FoamSealR™
sIll GasKET
4 lEaRN moRE aT WWW.oWENscoRNING.ca 5saVE ENERGy, saVE moNEy, hElP saVE ThE PlaNET WITh PINK!
1
2
3
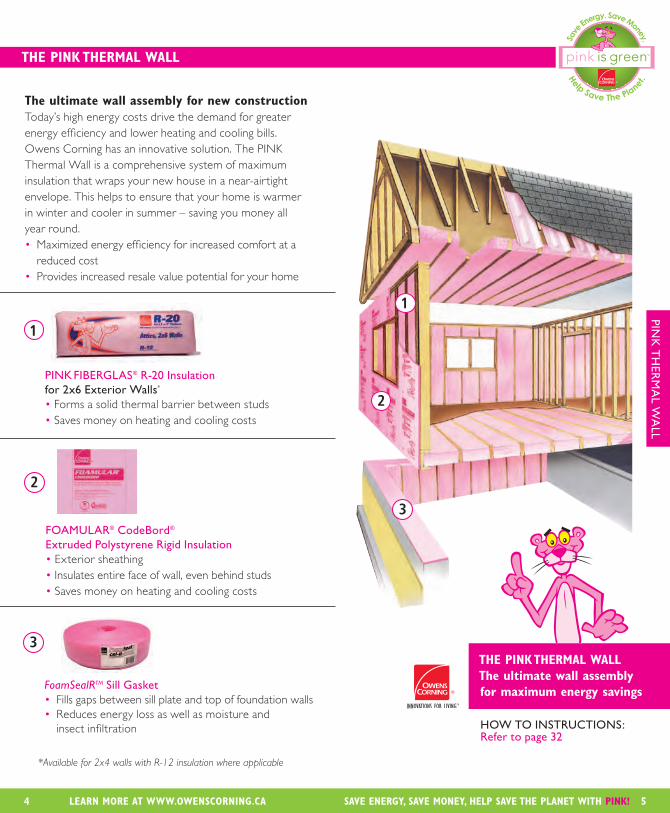
ThE PINK ThERmal Wall The ultimate wall assembly for maximum energy savings
The ultimate wall assembly for new constructionToday’s high energy costs drive the demand for greater energy efficiency and lower heating and cooling bills. Owens Corning has an innovative solution. The PINK Thermal Wall is a comprehensive system of maximum insulation that wraps your new house in a near-airtight envelope. This helps to ensure that your home is warmer in winter and cooler in summer – saving you money all year round.• Maximized energy efficiency for increased comfort at a reduced cost• Provides increased resale value potential for your home
PInK FIBerGLas® r-20 Insulationfor 2x6 exterior walls*
• Forms a solid thermal barrier between studs• Saves money on heating and cooling costs
FoamuLar® codeBord® extruded Polystyrene rigid Insulation • Exterior sheathing• Insulates entire face of wall, even behind studs• Saves money on heating and cooling costs
FoamSealRTM sill Gasket• Fills gaps between sill plate and top of foundation walls• Reduces energy loss as well as moisture and insect infiltration
*Available for 2x4 walls with R-12 insulation where applicable
ThE PINK ThERmal Wall
1
2
3
How to InstructIons:refer to page 32
PInK
tH
erm
aL w
aLL

lEaRN moRE aT WWW.oWENscoRNING.ca6 7saVE ENERGy, saVE moNEy, hElP saVE ThE PlaNET WITh PINK!
QuIetZone® acoustic Batt Insulation noIse controL
InterIor waLLs, ceILInGs, FLoors
BeneFIts• Minimizes unwanted noise in - bedrooms - bathrooms - basements - home theatres - laundry rooms - home office
calculate your needs: page 14 How to instructions: page 45
Prod
uc
t In
Fo
• Easy to install friction-fit batts• Safe for your home - Non-combustible - GREENGUARD Indoor Air Quality CertifiedSM
- Made in Canada with over 70% recycled content**
- SCS recycled content Certified
attIc, waLLs, ceILInGs, FLoors
BeneFIts• Saves money on heating and cooling costs• Canada’s No. 1 Insulation• Outstanding thermal performance• Easy to install friction-fit batts • Safe for your home - Non-combustible - GREENGUARD Indoor Air Quality CertifiedSM
- Made in Canada with over 70% recycled content**
- SCS recycled content Certified
PInK FIBerGLas® InsulationtHermaL Batts
calculate your needs: page 14 How to instructions: pages 23–48
A quiet home not only means comfort for its occupants but can also yield health benefits – noise levels above 85 db can harm hearing over time. The effectiveness in reducing or block-ing sound transmission through the assembly structures in a house – the walls, floors and ceilings – is measured by means of a decibel rating called Sound Transmission Class or STC. For example, a wall with a rating of STC 50 would reduce the noise of a portable stereo set on high from 112 db to about 62 db – the level of a normal conversation and reduce the noise level of a loud alarm clock from 80 db to about 30 db – the level of a soft whisper. Learn more about QuietZone® Noise Control Solutions for your home. Visit www.owenscorning.ca
QuIcK facTs: dId you KNoW?
application width Length thicknessin/mm in/mm in/mm in mm
Wood Stud 15/381 23/584 48/1219 1½/2½/3½/6 38/65/89/152
Steel Stud 16/406 24/610 48/1219 1½/2½/3½/6 38/65/89/152
Product specifications
lEaRN moRE aT WWW.oWENscoRNING.ca
Product specifications
^ coverage based on SpaceSaver packaging format
m n m n m q t q
381 15 1194 47 88.1 8.2
381 15 1194 47 97.9 9.1^
483 19 1194 47 124 11.5
1194 47 135.1 12.6
1194 47 150.1 13.9^
406 16 1219 48 106.7 9.9
610 24 1219 48 160 14.9
381 15 1194 47 78.3 7.3^
584 23 1194 47 120.1 11.2
1194 47 49 4.6
1194 47 78.3 7.3^
483 19 1194 47 99.2 9.2^
584 23 1194 47 120.1 11.2^
584 23 1194 47 75.1 7.0
381 15 1194 47 49 4.6
584 23 1194 47 75.1 7.0
375 14 3/4 1194 47 33.7 3.1
578 22 3/4 1194 47 52 4.8
406 16 1219 48 53.3 5.0^
610 24 1219 48 80 7.4^
406 16 1219 48 42.7 4.0
610 24 1219 48 64 5.9
R-35 267 10 1/2 610 24 1219 48 56 5.2
R-40 279 11 610 24 1219 48 48 4.5^
381
5 1/2140 R-24 (2x6 Wood Frame)
241 9 1/2
23
216 8 1/2
584
140 5 1/2
15
R-28
R-31
92 3 5/8
R-22 (2x6 Wood Stud)
n
89 3 1/2
ue
R-12 (2x4 Steel Stud)
R-12 (2x4 Wood Stud)
89 3 1/2
R-20/19 (2x6 Wood Stud) 152 6
R-14 (2x4 Wood Stud)

8 lEaRN moRE aT WWW.oWENscoRNING.ca 9saVE ENERGy, saVE moNEy, hElP saVE ThE PlaNET WITh PINK!
FoamuLar® c-200 and c-300 extruded Polystyrene rigid Insulation Basement FLoors and waLLs
BeneFIts• Saves money on heating and cooling costs• Long term thermal resistance• Easy to install, lightweight and durable • Moisture-resistant• 70% lower global warming potential***
• Achieves zero ozone depletion potential• 100% recyclable, 20% recycled content• GREENGUARD Indoor Air Quality CertifiedSM
sPecIFIcatIons- below grade/interior/exterior- Concrete floor slabs - 20 PSI (C-200); 30 PSI (C-300)- butt and shiplap edges
calculate your needs: page 15 How to instructions: attic walls page 29 Basement walls, floors pages 38-40, 44
Prod
uc
t In
Fo
BeneFIts• Saves money on heating and cooling costs• Prevents energy leaks at small gaps• Outstanding thermal performance• Easy to transport, easy to install• Handy size• Safe for your home - Non-combustible - GREENGUARD Indoor Air Quality CertifiedSM
- Made in Canada with over 70% recycled content**
- SCS recycled content Certified
How to instructions: page 47
PInK FIBerGLas® InsulationsmaLL ProJects: doors, wIndows, PIPes, HeatInG and cooLInG ducts, aIr condItIoners
QuIcK facTs: dId you KNoW?Every pound of glass fibre insulation annually saves 12 times more energy than was originally used to produce it.
in mm in mm ft m1 25 24 610 96 2438
1½ 38 24 610 96 2438
2 51 24 610 96 2438
2½ 64 24 610 96 2438
3 76 24 610 96 2438
3½ 89 24 610 96 2438
4 102 24 610 96 2438
thickness width Length
Product thickness width Length coveragein mm in mm ft mm ft2 m2
Multi-Purpose 2 51 16 406 48 1219 5.33 0.495
PINK-PAK 3½ 89 15 381 20 1219 25 2.32
Product specifications
Product specifications

lEaRN moRE aT WWW.oWENscoRNING.ca10 saVE ENERGy, saVE moNEy, hElP saVE ThE PlaNET WITh PINK!
BeneFIts • Saves money on heating and cooling costs• Long term thermal resistance• Easy to install, lightweight and durable • Moisture-resistant• 70% lower global warming potential***
• Achieves zero ozone depletion potential• 100% recyclable, 20% recycled content• GREENGUARD Indoor Air Quality CertifiedSM
calculate your needs: page 15 How to instructions: page 38
FoamuLar® InsulPink® extruded Polystyrene rigid Insulation Basement waLLs oreXterIor InsuLatInG sHeatHInG
FoamuLar® codeBord®
extruded Polystyrene rigid Insulation 2X4 or 2X6 eXterIor waLLs
BeneFIts• Saves money on heating and cooling costs• Long term thermal resistance• Easy to install, lightweight and durable • Moisture-resistant• 70% lower global warming potential***
• Achieves zero ozone depletion potential• 100% recyclable, 20% recycled content• GREENGUARD Indoor Air Quality CertifiedSM
calculate your needs: page 16 How to instructions: page 34
Prod
uc
t In
Fo
thickness width Length
in mm in mm in mm in mm1 25 48 1220 96 2438 108 2743
1½ 38 48 1220 96 2438 108 2743
2 51 48 1220 96 2438 108 2743
thickness width Lengthin mm in mm in mm2 51 24 610 96 2438
2½ 64 24 610 96 2438
3¼ 83 24 610 96 2438
Product specifications Product specifications
11lEaRN moRE aT WWW.oWENscoRNING.ca
And so are they.
We’re serious about safety in your home
PINK Insulation products are GREENGUARD Indoor Air Quality CertifiedSM, which means our products meet strict indoor air quality (IAQ) standards. Owens Corning is proud to be at the forefront of our industry when it comes to indoor air quality, energy efficiency, and environmental initiatives. And that really means PINK products are safe for your home.

lEaRN moRE aT WWW.oWENscoRNING.ca12 13saVE ENERGy, saVE moNEy, hElP saVE ThE PlaNET WITh PINK!
FoamSealR™ sill GasketFoundatIon: sILL PLate
BeneFIts• Saves money on heating and cooling costs• Fills gap between sill plate and foundation wall• Easy to install• Reduces air leakage in your home• Polyethylene foam is durable and moisture-resistant• Made in Canada
How to instructions: page 35calculate your needs: Measure the perimeter of your foundation wall. Divide the total perimeter in feet by 82 ft/roll to obtain the total number of rolls required.
Prod
uc
t In
Fo
BeneFIts• Increases attic ventilation• Easy to install• High resistance to moisture• Will not decay over time
How to instructions: page 28calculate your needs: To calculate the number of attic rafter vents required, please consult applicable building codes for required ventilation area.
raft-R-mate®
attIc raFter Vents
thickness width Lengthin mm in mm ft m2 51 22½ 572 4 1.2
Product specifications
thickness width Length
in mm in mm ft m3/16 4.7 3½ 89 82 25
3/16 4.7 5½ 140 82 25
Product specifications
PLUS…15% Home Renovation Tax Credits availableFederal/provincial governmentgrants and rebates
Learn more, visit insulationtaxcredit.ca
RE-INsulaTE youR aTTIc NoW!
Save up to 28%* on heating & cooling costs
Easy to install PINK FIBERGLAS® Insulation
lEaRN moRE aT WWW.oWENscoRNING.ca
o14 15saVE ENERGy, saVE moNEy, hElP saVE ThE PlaNET WITh PINK!
Pre-In
suLat
Ion
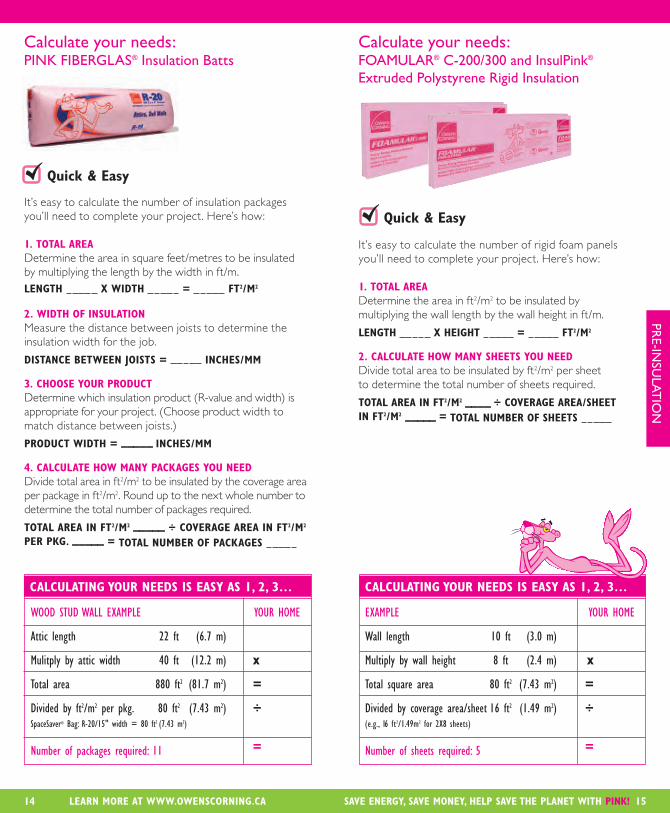
calculate your needs: PInK FIBerGLas® Insulation Batts
WoodstudWalleXample yourhome
atticlength 22ft (6.7m)
mulitplybyatticwidth 40ft (12.2m) x
totalarea 880ft2 (81.7m2) =
dividedbyft2/m2perpkg. 80ft2 (7.43m2) ÷ spacesaver®Bag:r-20/15"width=80ft2(7.43m2)
numberofpackagesrequired:11 =
calculaTING youR NEEds Is Easy as 1, 2, 3…
Quick & Easy It’s easy to calculate the number of insulation packages you’ll need to complete your project. Here’s how:
1. ToTal aREaDetermine the area in square feet/metres to be insulated by multiplying the length by the width in ft/m.lENGTh X WIdTh = fT2/m2
2. WIdTh of INsulaTIoN Measure the distance between joists to determine the insulation width for the job.
dIsTaNcE bETWEEN JoIsTs = INchEs/mm
3. choosE youR PRoducTDetermine which insulation product (R-value and width) is appropriate for your project. (Choose product width to match distance between joists.)
PRoducT WIdTh = INchEs/mm
4. calculaTE hoW maNy PacKaGEs you NEEdDivide total area in ft2/m2 to be insulated by the coverage area per package in ft2/m2. Round up to the next whole number to determine the total number of packages required.
ToTal aREa IN fT2/m2 ÷ coVERaGE aREa IN fT2/m2 PER PKG. = ToTal NumbER of PacKaGEs
calculate your needs: FoamuLar® c-200/300 and InsulPink® extruded Polystyrene rigid Insulation
It’s easy to calculate the number of rigid foam panels you’ll need to complete your project. Here’s how:
1. ToTal aREaDetermine the area in ft2/m2 to be insulated by multiplying the wall length by the wall height in ft/m.
lENGTh X hEIGhT = fT2/m2
2. calculaTE hoW maNy shEETs you NEEdDivide total area to be insulated by ft2/m2 per sheet to determine the total number of sheets required.
ToTal aREa IN fT2/m2 ÷ coVERaGE aREa/shEET IN fT2/m2 = ToTal NumbER of shEETs
Quick & Easy
calculaTING youR NEEds Is Easy as 1, 2, 3…
eXample yourhome
Walllength 10ft (3.0m)
multiplybywallheight 8ft (2.4m) x
totalsquarearea 80ft2 (7.43m2) =
dividedbycoveragearea/sheet16ft2 (1.49m2) ÷ (e.g.,16ft2/1.49m2for2X8sheets)
numberofsheetsrequired:5 =
lEaRN moRE aT WWW.oWENscoRNING.ca

lEaRN moRE aT WWW.oWENscoRNING.ca16 17saVE ENERGy, saVE moNEy, hElP saVE ThE PlaNET WITh PINK!
Wear protective gear:goggles, gloves, dust mask or respirator, long pants & sleeves.
Ensure there’s proper lighting.
Never cover vents, recessed light fixtures, ceiling fans, outlets or other access points.*
Ensure installation area is accessible and easy to move around in. You may need something sturdy to kneel or walk on such as a plank or a sheet of plywood.
Seal gaps and air leaks with a foam sealant. Also check for water leaks and repair if existing insulation is wet.
Do not open batt packaging outside of workspace because insulation will expand signifi-cantly.
Keep the following tools on hand: Hammer, putty knife, caulking gun, tape measure, straight edge, utility knife, light-weight stapler and a pole or rake (for hard-to-reach places).
saFetY FIrst
ProPer FIt
worKInG area
KeeP PacKaGe Intact
tooLs
Quick & Easy
Installation & safety tips
aIr & water LeaKs
Quick & Easy
calculate your needs: FoamuLar® codeBord® extruded Polystyrene rigid Insulation
It’s easy to calculate the number of Codebord® rigid panels you’ll need to complete your project. Here’s how:
1. ToTal aREaDetermine the area in ft2/m2 to be insulated by multiplying the wall length by the wall height in ft/m.lENGTh X hEIGhT = fT2/m2
2. WINdoWs aNd dooR oPENINGsSubtract total area of window and door openings in ft2/m2.
ToTal Wall aREa IN fT2/m2 – aREa of oPENINGs IN fT2/m2 = Wall aREa To bE INsulaTEd IN fT2/m2
3. calculaTE hoW maNy shEETs you NEEdDivide total area to be insulated by ft2/m2 per sheet to deter-mine the total number of sheets required.
Wall aREa IN fT2/m2 ÷ coVERaGE/shEET IN fT2/m2 = ToTal NumbER of shEETs
calculaTING youR NEEds Is Easy as 1, 2, 3…
eXample yourhome
Walllength 20feet (6.0m)
multipliedbywallheight 8feet (2.4m) x
totalarea 160ft2 (14.87m2) =
lessareaforopenings -32ft2 (-3.0m2) -
totalwallarea 128ft2 (11.9m2) =
dividebycoverage/sheet32ft2 (2.97m2) ÷ (e.g.,32ft2/3.0m2for4X8sheets)
numberofsheetsrequired:4 =
Pre-In
suLat
Ion
*Where it is impossible to provide clearances required by codes and regulations (building, electrical, gas and oil) between the insulation and heat-emitting appliances (at least 50 mm) and between insulation and recessed light fixtures that are not encased in CSA-approved insulated boxes (at least 76 mm).
lEaRN moRE aT WWW.oWENscoRNING.ca

lEaRN moRE aT WWW.oWENscoRNING.ca18 19saVE ENERGy, saVE moNEy, hElP saVE ThE PlaNET WITh PINK!
faQs: homE INsulaTIoN
GeneraL InsuLatInG QuestIons How does PINK FIbERGLAS® Insulation work? Millions of tiny air pockets form between tangled strands of insulation. These trapped air pockets resist the passage of heat flow, reducing heat loss in the winter and heat gain in the summer. In general, the thicker the insulation, the more air pockets and the higher the R-value.What is thermal performance? All insulation materials respond to a single basic principle: heat moves from warmer areas to cooler areas. On cold days, heat from inside tries to get out, and on warm days, the heat outside tries to get in. Properly installed insula-tion helps reduce costly heating and cooling bills.What is R-value? R-value measures resistance to heat flow, and is deter-mined by the thickness and density of the insulation. The higher the R-value, the greater the insulating power. (See page 6 for R-value chart). Which R-value should I choose for my project? New and retrofit insulation projects must always meet local building code insulation levels. Higher levels are recommended to increase energy efficiency, occupant comfort and help save the planet. See how-to pages for recommended insulation levels. Remember! The higher the R-value, the greater the insulating power and the savings.Do higher insulation levels create condensation problems? No. Insulation is not a source of condensation problems. Properly ventilated areas, the use of vapour barriers/retarders and a continuous air barrier system help to reduce the risk of condensation. What is the purpose of a vapour barrier/retarder? Vapour barriers/retarders, made from polyethylene film and placed on the warm side of the insulation, help control the amount of moisture passing through insulation, minimizing the risk of condensation within exterior walls, ceilings and floors. I am in the middle of an insulation project, and I accidentally tore the vapour barrier. Do I need to repair it? Yes, seal all punctures with contractor sheathing tape or duct tape. The polyethylene f ilm acts as a vapour
barrier and can also act as the air barrier if it is sealed and continuous.Detecting and fixing air leaks before insulating is very important and doing so can result in an annual energy cost savings of 10%. How do I detect air leaks? How do I fix air leaks?Cold and windy days are the best time to check for air leaks. Attach a piece of tissue or light paper to a string, and then hold it close to an area where you suspect a draft. If the tissue moves, you’ve found a leak. Problem areas include the edges of doors and windows, and plumbing and electrical wiring access through walls, floors and ceilings. Weather-stripping, caulking and sealing doors, windows, cracks and openings can reduce or stop air leakage. When building a new home, remodelling or re-siding, ensure that a continuous air barrier system exists or is installed. Why is ventilation important? When your attic or crawlspace is properly ventilated, a positive airflow is created, allowing the house to breathe, and thus preventing moisture build-up. Soffit vents (openings under the eaves) combined with roof vents or gable vents create positive movement of air out of the attic. Allow for at least two vent openings, so air can flow in one and out the other. Vent area requirements: Consult your local building codes for requirements. The unobstructed vent area must not be less than 1/300 of insulated ceiling area. For roof slopes less than 1 in 6 or for cathedral ceilings, the unobstructed vent area must not be less than 1/150 of the insulated ceiling area.batts and loosefill insulation in attics must not restrict the ventilation air at eaves. raft-R-mate® Attic Rafter Vents retain the insulation and provide passage for ventilation air. See page 28 for installation instructions. attIc & catHedraL ceILInG QuestIons My attic currently has about six inches of insulation. If I want to add another six inches of insulation, what type should I use? before installing a layer of unfaced batts or having a contractor install loosef ill insulation, check roof sheathing
FaQ
s
Air pockets formed between FIbERGLAS® strands trap air
FibeRglAS® insulation
Applying vapour barrier Sealing air leaks installing rafter vents
lEaRN moRE aT WWW.oWENscoRNING.ca
lEaRN moRE aT WWW.oWENscoRNING.ca20 21saVE ENERGy, saVE moNEy, hElP saVE ThE PlaNET WITh PINK!
FaQ
s
specifically for these rafters. These products help prevent moisture damage, help ensure the durability of roof shingles and provide a minimum of 2½" (63 mm) of ventilation space between the top of insulation and underside of roof sheathing. Check local building codes for additional requirements.
crawLsPace QuestIons How do I insulate the dirt floor of my crawlspace? A dirt floor of a crawlspace should be covered with a 6 mil.polyethylene vapour retarder. If my crawlspace is ventilated, can I still insulate the walls of the crawlspace, or is it better to insulate the floor? If there are insulated ducts and no pipes, the best course of action is to insulate the floor above (see page 43 for installa-tion instructions for floors above unheated spaces). The other option is to insulate both the walls and the floor and have an unvented crawlspace.
waLL QuestIons Since PINK FIbERGLAS® Insulation batts compress so easily, can I increase the effectiveness of my insulation by squeezing a 5½" (140 mm) R-20 batt into a 2x4 wall instead of using 3½" (89 mm) R-12 batt? No. Compressing FIbERGLAS® Insulation into a smaller stud cavity will not necessarily increase your insulation’s efficiency and the stress on drywall may result in nail pops or bends. R-12 and R-14 FIbERGLAS® Insulation that is 3½" (89 mm) thick is designed for use in 2x4 walls. R-20/22/24 FIbERGLAS® Insulation that is 5½" (140 mm) or 6" (152 mm) thick is designed for use in 2x6 walls. Check availability in your area.
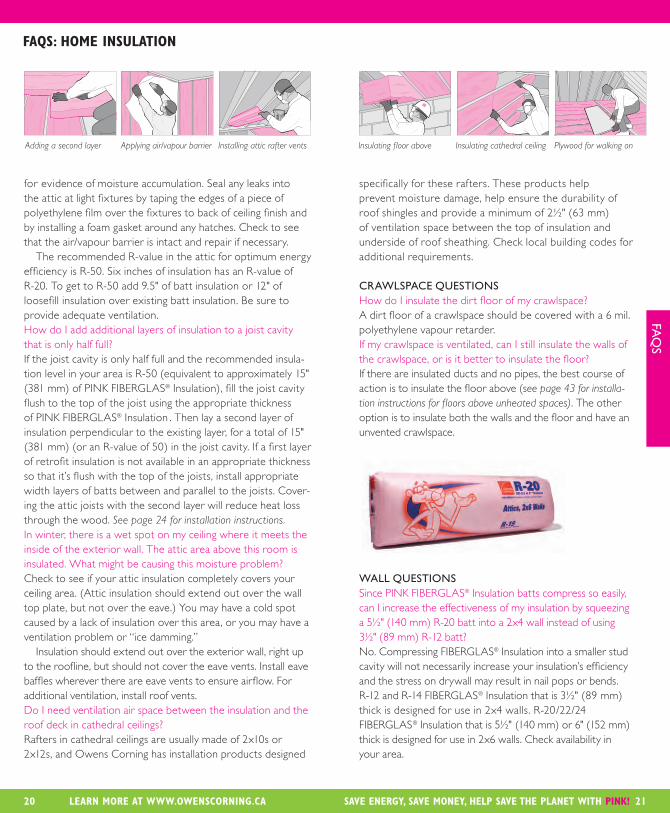
for evidence of moisture accumulation. Seal any leaks into the attic at light fixtures by taping the edges of a piece of polyethylene film over the fixtures to back of ceiling finish and by installing a foam gasket around any hatches. Check to see that the air/vapour barrier is intact and repair if necessary. The recommended R-value in the attic for optimum energy efficiency is R-50. Six inches of insulation has an R-value of R-20. To get to R-50 add 9.5" of batt insulation or 12" of loosefill insulation over existing batt insulation. be sure to provide adequate ventilation.How do I add additional layers of insulation to a joist cavity that is only half full? If the joist cavity is only half full and the recommended insula-tion level in your area is R-50 (equivalent to approximately 15" (381 mm) of PINK FIbERGLAS® Insulation), fill the joist cavity flush to the top of the joist using the appropriate thickness of PINK FIbERGLAS® Insulation . Then lay a second layer of insulation perpendicular to the existing layer, for a total of 15" (381 mm) (or an R-value of 50) in the joist cavity. If a first layer of retrofit insulation is not available in an appropriate thickness so that it’s flush with the top of the joists, install appropriate width layers of batts between and parallel to the joists. Cover-ing the attic joists with the second layer will reduce heat loss through the wood. See page 24 for installation instructions.In winter, there is a wet spot on my ceiling where it meets the inside of the exterior wall. The attic area above this room is insulated. What might be causing this moisture problem? Check to see if your attic insulation completely covers your ceiling area. (Attic insulation should extend out over the wall top plate, but not over the eave.) You may have a cold spot caused by a lack of insulation over this area, or you may have a ventilation problem or “ice damming.” Insulation should extend out over the exterior wall, right up to the roofline, but should not cover the eave vents. Install eave baffles wherever there are eave vents to ensure airflow. For additional ventilation, install roof vents.Do I need ventilation air space between the insulation and the roof deck in cathedral ceilings? Rafters in cathedral ceilings are usually made of 2x10s or 2x12s, and Owens Corning has installation products designed
insulating floor aboveAdding a second layer insulating cathedral ceilingApplying air/vapour barrier Plywood for walking oninstalling attic rafter vents
faQs: homE INsulaTIoN
lEaRN moRE aT WWW.oWENscoRNING.ca

22 lEaRN moRE aT WWW.oWENscoRNING.ca
att
Ics
23saVE ENERGy, saVE moNEy, hElP saVE ThE PlaNET WITh PINK!
If your attic floor is insulated but the wood beams (joists) are still visible, you probably don’t have enough. but even if you can’t see your beams, that’s still no guarantee that you have enough insulation. The best thing to do is measure.
• For maximum energy efficiency, we recommend an insulation value of R-50 for attics (about 15" [381 mm] of batt insulation). Do you have enough?
• To calculate your current R-value and how much
more insulation you’ll need, refer to page 14.
Is your attic costing you money?all it takes is a quick peek to find out.
faQs: homE INsulaTIoN
What is the difference between FOAMULAR® C-200, C-300 and Codebord® Extruded Polystyrene Rigid Insulation?C-200 Insulation is a general purpose moisture-resistant rigid foam insulation that can be used for many applications above and below grade. It is lightweight, durable and impact-resistant, making it easy to handle, saw, cut and score. C-300 Insulation has a higher compressive strength that can withstand the pressures of heavy loads without compromising thermal insulation performance. Codebord® Insulation is a moisture-resistant rigid foam insulation that is installed on the exterior of 2x4 and 2x6 stud walls. As an exterior insulating sheathing, it keeps the cavity and studs warmer, thereby reducing the risk of condensation, which can lead to the deterioration of structural elements.For construction of a new building, should I use 2x4 or 2x6 stud walls?building 2x4 stud walls insulated with Codebord® Insulation instead of 2x6 walls translates into increased living space and reduced construction costs – and also meets building code insulation levels.
QuIetZone® acoustIc InsuLatIon QuestIonsWhat is QuietZone® Acoustic batt Insulaton?QuietZone® is a PINK FIbERGLAS® acoustic batt designed to help control noise between interior walls, ceilings and floors.
installing FOAMUlAR® C-200
installing FOAMUlAR® Codebord®
installing QuietZone®
the right amount of insulation can save you up to 28%* on your heating and cooling bills. PLus: Government grants, rebates and tax credits available.
att
Ics
QuIcK facTs: dId you KNoW?Insulating your attic to R-50 or topping up your attic insulation to 15" saves half a ton of greenhouse gases per year, year after year.

24 lEaRN moRE aT WWW.oWENscoRNING.ca
att
Ics
25saVE ENERGy, saVE moNEy, hElP saVE ThE PlaNET WITh PINK!
See page 17for pre-insulation and safety check list
att
Ics
1. Installing vapour barrier. Install a continuous layer of polyethylene vapour barrier on the warm-in-winter side of the cavity.
2. Installing batts. Lay R-40 batts at outer edge of area, ensuring they cover top plate of the wall, then work toward the middle of the attic. Do not block the venti-lation space leading up from the eave vents. butt pieces together tightly; gaps reduce R-value significantly.
3. adding a second layer. When using two layers of insulation, lay the second layer perpendicular to the first (e.g., place one layer of R-12 on top of and perpendicular to bottom layer of R-40).
4. Insulating end/kneel walls. Install batts in end and kneel walls. At the perimeter of the attic, lay the insulation up to the roof rafters, but keep it away from plywood roof sheathing.
ThE uNINsulaTEd aTTIc
• Product specifications: page 6• calculate your needs: page 14
PInK FIBerGLas® Insulation. recommended r-value and thickness: r-50 or 15" (381 mm)
5. wiring and detail areas. Slip insulation under wiring and electrical where necessary. Keep away from vents and allow 3" (76 mm) of clearance around exhaust fans, chimneys (refer to specific clearance require-ments of the chimney flue manufacturer) and heat-emitting objects and light fixtures. Use approved CSA insulated boxes for recessed lighting.
6. sealing windows. Use a foam sealant for sealing and insulating around windows.
7. Ventilation. Staple raft-R-mate® Attic Rafter Vents as you go, at the eaves of every joist to ensure appropriate ventilation area.
Cut batts so that they fit closely up against wood cross-bracing members.
Keep 3" (76 mm) of clearance around exhaust fans, chimneys (refer to specific clearance requirements of the chimney flue manufacturer) and heat-emitting objects and light fixtures.
Quick & Easy INsTallaTIoN TIPs
+
QuIcK facTs: dId you KNoW? Every pound of glass fibre insulation annually saves 12 times more energy than was originally used to produce it.
Is youR aTTIc uNINsulaTEd? add 15" (381 mm) of PINK fIbERGlas®
Insulation and save!*

26 lEaRN moRE aT WWW.oWENscoRNING.ca
att
Ics
27saVE ENERGy, saVE moNEy, hElP saVE ThE PlaNET WITh PINK!
att
Ics
1. adding a second layer. Lay the second layer perpendicular to the first. Start by laying batts at outer edge of area, ensur-ing they cover the top plate of the wall, then work toward the middle of the attic. Do not block the ventilation space leading up from the eave vents. butt pieces together tightly; gaps reduce R-value significantly. Cut batts so that they fit closely up against wood cross-bracing members.
2. wiring and detail areas. Slip insulation under wiring and electrical where necessary. Keep away from vents and allow 3" (76 mm) of clearance around exhaust fans, chimneys (refer to specific clearance requirements of the chimney flue manufacturer) and heat-emitting objects and light fixtures. Use approved CSA insulated boxes for recessed lighting.
Measure (in inches/mm) how thick the insulation in your attic is. Refer to the PINK FIbERGLAS® Insulation product specifications on page 14 to determine what R-value you need to add in order to reach a total of 15" (381 mm) of thickness.
ENERGy cosTs GoING ThRouGh ThE Roof? Re-insulate your attic with PINK! 3. sealing windows. Use a foam
sealant for sealing and insulating around windows.
4. Installing rafter vents. Staple raft-R-mate® Attic Rafter Vents, as you go, at the eaves of every joist. Ensure you leave 2½" (64 mm) of ventilation space between the insulation and the roof sheathing.
ToPPING uP youR aTTIc INsulaTIoN
• Product specifications: page 6• calculate your needs: page 14
PInK FIBerGLas® Insulation. recommended r-value and thickness: r-50 or 15" (381 mm)
15% Home Renovation Tax Credits
Government grants and rebates
PLUS: Save up to 28%* on heating and cooling costs when you insulate with PINK FIBERGLAS*
Re-insulate your attic and SAvE!
28 lEaRN moRE aT WWW.oWENscoRNING.ca
att
Ics
29saVE ENERGy, saVE moNEy, hElP saVE ThE PlaNET WITh PINK!
att
Ics
1. Installing rafter vents. Install eave vents such as raft-R-mate® Attic Rafter Vents and soffit and ridge vents.
2. Installing batts. Use separate pieces of FIbERGLAS® insula-tion for rafters and collar beams. Don’t try to fit a continuous strip of insulation where collar beams and rafters meet – hard-to-fill gaps may be the result. Push the batts between the rafters until they are flush with the bottom edge of the wood.
3. Insulating flat ceilings. If a flat ceiling is being installed, place batts between joists.
4. Insulating end/kneel walls. Install batts in end and kneel walls. Insert cut strips into narrow details. (Expanding foam is best for sealing and insulating around windows.)
5. air/Vapour Barrier. Install sealed and continuous polyethyl-ene air/vapour barrier on the warm-in-winter side of the living area of the house.
6. Finishing the walls. As soon as the insulation has been installed, finish the walls and ceiling with an approved interior finish, such as gypsum wallboard.
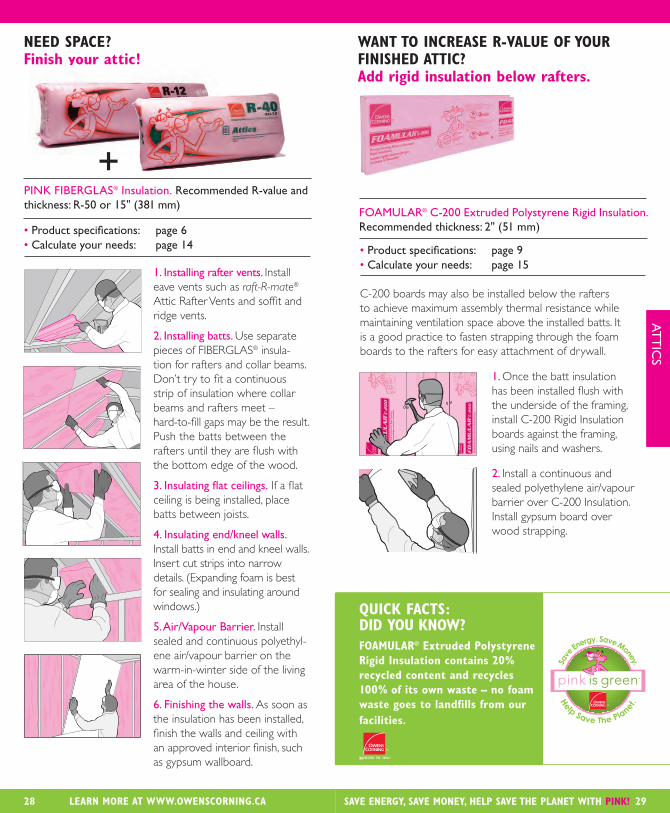
NEEd sPacE? finish your attic!
1. Once the batt insulation has been installed flush with the underside of the framing, install C-200 Rigid Insulation boards against the framing, using nails and washers.
2. Install a continuous and sealed polyethylene air/vapour barrier over C-200 Insulation. Install gypsum board over wood strapping.
WaNT To INcREasE R-ValuE of youR fINIshEd aTTIc? add rigid insulation below rafters.
• Product specifications: page 6• calculate your needs: page 14
PInK FIBerGLas® Insulation. recommended r-value and thickness: r-50 or 15" (381 mm)
• Product specifications: page 9• calculate your needs: page 15
FoamuLar® c-200 extruded Polystyrene rigid Insulation. recommended thickness: 2" (51 mm)
+
C-200 boards may also be installed below the rafters to achieve maximum assembly thermal resistance while maintaining ventilation space above the installed batts. It is a good practice to fasten strapping through the foam boards to the rafters for easy attachment of drywall.
QuIcK facTs: dId you KNoW?foamulaR® Extruded Polystyrene Rigid Insulation contains 20% recycled content and recycles 100% of its own waste – no foam waste goes to landfills from our facilities.

30 lEaRN moRE aT WWW.oWENscoRNING.ca
att
Ics
31saVE ENERGy, saVE moNEy, hElP saVE ThE PlaNET WITh PINK!
att
Ics
1. Installing rafter vents. Install eave vents, such as raft-R-mate® Attic Rafter Vents or soffit and ridge vents at the eave of every joist.
2. Installing batts. Use separate pieces of FIbERGLAS® insula-tion for rafters and collar beams. Don’t try to fit a continuous strip of insulation where collar beams and rafters meet – hard-to-fill gaps may be the result. Push the batts between the rafters until they are flush with the bottom edge of the wood.
3. wiring and detail areas.Slip insulation under wiring and electrical where necessary. Keep away from vents and allow 3" (76 mm) of clearance around exhaust fans, chimneys (refer to specific clearance requirements of the chimney flue manufacturer) and heat-emitting objects and light fixtures (unless IC rated). Use approved CSA insulated boxes for recessed lighting.
4. Installing air/vapour barrier. Install a continuous layer of polyethylene vapour barrier on the warm-in-winter side of the cavity. Overlap the joints by at least 6" and seal with approved caulking or tape.
caThEdRal aNd flaT cEIlINGs
• Product specifications: page 6• calculate your needs: page 14
PInK FIBerGLas® Insulation. recommended r-value and thickness: r-50 or 15" (381 mm)
+
InstaLLatIon notesFlat and cathedral ceilings
• If a flat ceiling is being installed, place batts between joists. Place the vapour retarder toward the warm-in-winter side of the living area of the house.
• If the depth of the framing members is less than 17½" (445 mm), you will need to extend the depth of the members by adding additional framing over the existing framing. A total depth of 17½" (445 mm) is required to achieve R-50 and required ventilation of 2½" (64 mm).
• Another option is to add C-200 Insulation to the underside of the framing members to get to the total R-50 desired.
• Install polyethylene vapour barrier if required and a thermal barrier (gypsum board). Consult applicable building code.
Please consult the national Building code before you start building
When selecting insulation thickness and installing insulation for the rafter portion of your attic, the National building Code requires 2½" (64 mm) of ventilation air space between the insulation and the roof sheathing. For more information about the National building Code (NbC).Visit www.nationalcodes.ca.
saFetY FIrst!

32 lEaRN moRE aT WWW.oWENscoRNING.ca 33saVE ENERGy, saVE moNEy, hElP saVE ThE PlaNET WITh PINK!
eXt
erIo
r w
aLLs
1. Installing batts. be careful not to compress insulation beyond edges of the studs. The insulation should fit snugly against the studs and completely fill the cavity to the top and bottom plates.
2. wiring cables. Split the batts and place behind and in front of wiring cables and use small strips for narrow areas. Stuff small pieces of insulation around plumbing, vents and around windows and doors.
3. Installing vapour barrier. Install a continuous polyethylene vapour barrier over entire wall area. Seal joints if vapour barrier is also acting as the air barrier in the assembly.
4. Installing drywall. Install drywall or other wall finish on top of the vapour barrier as soon as you have finished installing the insulation.
INsIdE EXTERIoR Walls
basIc Wall INsulaTIoN sEE NEXT PaGE foR EXTRa INsulaTING PoWER
PInK FIBerGLas® Insulation. 2x4 walls: 1 layer of r-12 or r-142x6 walls: 1 layer of r-20 or r-22 or r-24
• Product specifications: page 6• calculate your needs: page 14
Save up to 28%* on home heating and cooling costs by insulating your exterior walls. If you’re building a new home or addition, here’s how to maximize comfort and energy savings. First, install Codebord® Extruded Polystyrene Rigid Insulation directly to the outside of the entire stud wall frame. It’s easy. Then fill the interior walls with Canada’s No. 1 Insulation, PINK FIbERGLAS®
batts. It’s safe for your home, non-combustible and highly resistant to moisture. And Canadian-made, it’s designed to keep the weather out and the comfort in.
With all that efficiency, you’re lowering your carbon footprint and your energy bills. You can also sleep comfortably knowing that PINK FIbERGLAS® Insulation is GREENGUARD Certified and made from over 70% recycled content**.
the right amount of insulation can save you up to 28%* on your heating and cooling bills. PLus: Government grants, rebates and tax credits available.
want to insulate your exterior walls for maximum energy savings?
Insulate with PInK FIBerGLas® batts and FoamuLar® codeBord® extruded Polystyrene rigid Insulation
QuIcK facTs: dId you KNoW? PINK fIbERGlas® Insulation is pack-aged in material that is recycled into products such as grocery bags, garbage bags and plastic lumber.

34 lEaRN moRE aT WWW.oWENscoRNING.ca 35saVE ENERGy, saVE moNEy, hElP saVE ThE PlaNET WITh PINK!
1. Installing codeBord®. Install insulation panels vertically on the outside exterior walls. begin installation in a corner of the wall and trim off shiplap edge of panel so it is flush with the outer edge of the stud. Fasten panels to frame with nails and washers at 6" (152 mm) centres on vertical edges of panels and at 12" (300 mm) on intermediate stud supports. Slide panels together ensuring vertical edges meet at and are supported by studs at 16" or 24" (400 or 600 mm) on centre.
2. applying exterior finish. To prevent discoloration caused by exposure to direct sunlight, apply exterior finish as soon as possible.
1. Smooth top surface of foundation wall to no greater variation than 1/4" and brush off loose debris.
2. Unroll FoamSealR™ Sill Gasket on top surface of foundation wall or fasten to bottom of sill plate on tilt-up wall sections.
3. butt all end and perpendicular joints tightly.
4. Pierce FoamSealR™ Sill Gasket at anchor bolt locations.
5. Set and anchor sill plate to foundation wall.
ouTsIdE Walls
INsIdE Walls
To complete the installation on the inside exterior walls, follow instructions 1 to 4 on page 33 for FIbERGLAS® Insulation.
INsIdE & ouTsIdE EXTERIoR Walls
Extra insulating power and more energy savings!
2x4 walls: 1 layer of 2"/50 mm FoamuLar® codeBord® extruded Polystyrene rigid Insulation plus 1 layer of r-12 or r-14 PInK FIBerGLas® Insulation
2x6 walls: 1 layer of 1"/25 mm FoamuLar® codeBord® plus 1 layer of r-20, r-22 or r-24 FIBERGLAS® Insulation
+
fouNdaTIoN Wall: sIll PlaTE
• Product specifications: page 13• calculate your needs: page 13
FoamSealR™ sill Gasket. recommended thickness: 3 ½" (89 mm) or 5½" (140 mm)
PINK products annually reduce over a billion tons of greenhouse gas emissions – equalling 200 million cars’ worth of co2 emissions and two billion barrels of oil use.
ToP of fouNdaTIoN Wall
Sub-floor Rim boardFloor joists Anchor bolts FoamSealR™Foundation
eXt
erIo
r w
aLLs
QuIcK facTs: dId you KNoW?
Product specifications calculate your needs
codeBord® Insulation page 11 page 16
FIbERGLAS® Insulation page 6 page 14
Energy Saving Mois ure-Res stant Rig d nsula ionsolant r gide écoénergét que rés stant à l humid té
CODEBORD ®FOAMULAR ®

36 lEaRN moRE aT WWW.oWENscoRNING.ca 37saVE ENERGy, saVE moNEy, hElP saVE ThE PlaNET WITh PINK!
Basem
ent
wa
LLs
Transform that cavernous basement into a cozy family room, spare bedroom, workshop or home office.
Uninsulated, any basement or heated crawlspace is a major energy drain. but you could save on energy costs, plus increase the comfort and resale value of your home just by insulating.
Make any necessary repairs, then insulate the walls with Canada’s No. 1 Insulation, PINK FIbERGLAS® batts and/or C-200 Insulation. Then, for even greater savings and comfort, wrap the ducts and pipes with FIbERGLAS®
Insulation. Increase the comfort of your home and reduce your carbon footprint with PINK.
the right amount of insulation can save you up to 28%* on your heating and cooling bills. PLus: Government grants, rebates and tax credits available.
Thinking of insulating your basement floor? Insulate with C-300 Extruded Polystyrene Rigid Insulation. Refer to how to instructions on page 44.
want to put more space in your home and money in your pocket?
Insulate your basement and crawlspace with PInK FIBerGLas® Insulation and FoamuLar® c-200 and c-300 extruded Polystyrene rigid Insulation
2X4 Wood sTud basEmENT Walls
PInK FIBerGLas® Insulation. recommended r-value and thickness: r-12, r-14 – 3.5" (89 mm) or r-20 – 6" (152 mm)
• Product specifications: page 6• calculate your needs: page 14
1. applying moisture barrier. Apply moisture barrier from the floor up to the finished level of the ground outside.
2. Building a standard wall. build a frame using studs around basement and place against the concrete wall. Fasten to joists above and to the floor. Stud spacing can be 16" (400 mm) or 24" (600 mm).
3. cutting batts. Cutt batts to fit the band joists between the top plate and underside of the floor.
4. Installing batts. Place batts between studs, flush with inside face of studs. Ensure band joists are covered with insulation because heat loss can be significant.
5. Installing vapour barrier. Staple vapour barrier over the entire wall to edge of the studs and plates. Ensure it covers joints between wall and upper floor ceilings and over insulation at header between floor joists.
6. applying wall finish. Apply drywall or other wall finish on top of the vapour barrier.

38 lEaRN moRE aT WWW.oWENscoRNING.ca 39saVE ENERGy, saVE moNEy, hElP saVE ThE PlaNET WITh PINK!
Basem
ent
wa
LLs
InstaLLatIon oVerVIew
2" FoamuLar® c-200 or InsulPink® Insulation is r-10 plus r-14 batts give you a total of r-24.
Follow step-by-step how-to instructions for each of the above recommended products as referenced below.
1. Installing foamulaR® insulation panels. (see how-to instructions on page 39)
2. building a 2x4 wood stud wall. (see how-to instructions on page 37)
3. Installing FIbERGLAS® batts. (see how-to instructions on page 33)
4. finishing the walls. (see how-to instructions on page 33)
uNfINIshEd coNcRETE basEmENT Walls
recommended r-value and thickness: 1 layer of 2" (50 mm) FoamuLar® c-200 or InsulPink® extruded Polystyrene rigid Insulation and 1 layer of r-14 PInK FIBerGLas® Insulation
Extra insulating power and energy savings!
1. Preparing walls. Ensure concrete walls are as flat as possible; hammer off rough spots.
2. trim and place c-200 or InsulPink® insulation to wall height. Measure the height of the wall. Trim insulation to correct length. Place insulation vertically on the wall starting in a corner. Use a spot adhesive to temporarily hold the foam boards in place against foundation wall ensuring that foam boards are level. Trim shiplap edge to fit the corner.
3. Insert wood furring strips. Insert wood furring strips in insulation voids (for InsulPink® product) or over insulation (for C-200 product) and anchor to concrete wall using appropriate masonry anchors a maximum of 24'' (600 mm) o.c. vertically.
4. Installing electrical boxes and wiring. See next page.
5. Filling joints with foam sealant. Fill joint at the perimeter of the insulated wall as well as all perforations made in the insulating panel (e.g., electrical boxes and windows). Cut off protruding foam sealant with a knife or
uNfINIshEd coNcRETE basEmENT Walls
FoamuLar® c-200 or InsulPink® extruded Polystyrene rigid Insulation. recommended thickness: 2.5" (63 mm)
• Product specifications: page 10• calculate your needs: page 15
basIc Wall INsulaTIoN sEE PaGE 38 foR EXTRa INsulaTING PoWER
Product specifications calculate your needs
c-200 InsulPink®
page 9 page 10
page 15 page 15
FIbERGLAS® Insulation page 6 page 14
Energy S ving Mo sture Resis ant R gid Insula ionsolant r gide écoénergé ique ési tant à l humid té
FOAMULAR ®C 200Energy Saving Moistu e-Resi tant R gid Insu ationsolant r gide écoéne gétique rési tant à l hum dité
FOAMULAR ®C 200
install polyethylene vapour barrier over foam if required. Consult applicable building Code.

40 lEaRN moRE aT WWW.oWENscoRNING.ca 41saVE ENERGy, saVE moNEy, hElP saVE ThE PlaNET WITh PINK!
Basem
ent
/cr
aw
LsPac
e
1. Prepping electrical box location. At the location of the electrical outlet, cut out a 2'' x 6'' void in the insulation.
2. Fastening electrical box. Insert a wood filler piece in the opening to fill the void and fasten to concrete wall with appropriate masonry fasteners. Next cut out another void in the insulation next to the wood filler piece in order to be able to insert the electrical box and screw box into side of wood filler piece to hold it in place. Position the electrical box so that it will sit flush with the gypsum board once installed.
3. Bringing wire from junction box to outlet. Widen one of the two existing grooves at the centre of the insulationpanel to receive electrical
wire coming from junction box to outlet. Make a knife cut into the back of thegroove and insert electrical wire into it. Wire shouldbe embedded 1/2" (13 mm)minimum (i.e., electricalwire should be at least 1"[25.4 mm] from drywallsurface). Set electricalwire into groove leading tooutlet. Connect the wire tothe electrical box.
4. Filling & sealing. Usea foam sealant to fill theenlarged groove, the areabehind the electrical box,and the perimeter of thepiece of wood and theelectrical box.
hacksaw blade to ensure gypsum board can be installed properly.
6. Finishing walls. When installation is complete, install 1/2" (13 mm) drywall or other approved thermal barrier material using appropriate fasteners into wood furring strips Finish the drywall according to manufacturers instructions. Consult the National building Code for requirements when using other finishes.
INsTallING ElEcTRIcal boXEs aNd WIRING
1. applying vapour/moisture barrier to the floor. Spread vapour/moisture barrier over the entire floor area of the crawlspace, overlapping sheets by 12" (300 mm).
2. cutting batts for joists. Measure, cut and place small pieces of batts to fit between ceiling floor joists and band joist.
3. Installing batts for walls. Cut pieces of insulation longenough to hang down the wall and extend out about 24" (600 mm) over the crawlspace floor.
4. attaching batts to sill. Attach batts to sill using long furring strips. Attach pieces of insulation to the edge of sill. Allow top ends of insulation to extend above sill. Trim to fit snugly around bottom edges of joists. For walls running parallel to the joists, use longer strips of insulation and secure them directly to the band joist with furring strips. Drive the nails in just far enough to hold the furring strip securely – the insulation should not be compressed to less than half its thickness.On the walls that run parallel to the joists, use longer lengths of insulation and secure them directly to the band joist with furring strips.
5. applying air/vapour barrier. Staple polyethylene air/vapour barrier over floor and wall insulation. Slit and closely staple at joists and floor sheathing. Seal all joints.
cRaWlsPacE: INsulaTEd, uNhEaTEd
PInK FIBerGLas® Insulation. r-12, r-14 – 3.5" (89 mm), r-20 – 6" (152 mm)
• Product specifications: page 6• calculate your needs: page 14
uNfINIshEd coNcRETE basEmENT WallsbasIc Wall INsulaTIoN (coNT’d)sEE PaGE 38 foR EXTRa INsulaTING PoWER

42 lEaRN moRE aT WWW.oWENscoRNING.ca 43saVE ENERGy, saVE moNEy, hElP saVE ThE PlaNET WITh PINK!
FLoo
rs
Uninsulated floors can chill your toes and rob your home of precious energy. Especially if the floor is over an unheated garage, basement or crawlspace. Wherever your floor is cold or damp to the touch, you need to insulate. Get to the bottom of this very Canadian problem with a Canadian-made solution: PINK FIbERGLAS® Insulation and C-300 Extruded Polystyrene Rigid Insulation. Easy to install, and GREENGUARD Certified. Meaning? by saving energy to warm your feet, you’re reducing your carbon footprint. the right amount of insulation can save you up to 28%* on your heating and cooling bills. PLus: Government grants, rebates and tax credits available.
cold floors freezing your tootsies?
Insulate your floors with PInK FIBerGLas® Insulationor FoamuLar® c-300 extruded Polystyrene rigid Insulation
1. sealing air leaks. Seal air leaks between unheated/heated area (garages, basements, crawlspaces) before insulating. Leaks include basements stairs, electrical wiring, plumbing and ductwork.
2. applying vapour barrier. Apply a 6 mil. vapour barrier to the warm-in-winter side (against the floor above).
3. Installing batts. Place batts between floor joists, where they will stay in place temporarily. Ensure insulation fits snugly against the band joists and the underside of the floor and that it overlaps the bottom plate.
4. Holding batts in place. To hold insulation in place, nail wire mesh at right angles to the floor joists. Continue adding adjacent strips until insulated area is covered.
5. Finishing walls. Install finish over framing structure.
flooRs oVER uNhEaTEd sPacEs
• Product specifications: page 6• calculate your needs: page 14
PInK FIBerGLas® Insulation. recommended r-value and thickness: r-31 or 9½" (241 mm)
Cut batts so that they fit closely up against wood cross-bracing members, electrical wiring and lighting fixtures.
QuIcK & Easy installation tips

44 lEaRN moRE aT WWW.oWENscoRNING.ca 45saVE ENERGy, saVE moNEy, hElP saVE ThE PlaNET WITh PINK!
1. Laying gravel. Lay at least 6" (152 mm) of coarse, clean, gravel on the top of the undis-turbed soil and ensure that it is level.
2. applying vapour barrier. Apply a 6 mil. vapour barrier on top of the gravel. Extend up the walls 3" (76 mm).
3. Installing c-300. Install panels directly on top of the vapour barrier. Ensure panels are butted together as tight as possible.
4. Pouring concrete. Pour concrete over the panels to an even and level depth of 4–6" (100–150 mm).
4321
Note: local building codeand building officials should be consulted regarding minimum construction requirements in your municipality.
coNcRETE basEmENT flooRs
• Product specifications: page 9• calculate your needs: page 15
FoamuLar® c-300 extruded Polystyrene rigid Insulation. recommended thickness: 1½" or 2" (38 mm or 50 mm)
Have teenagers or pets? Noisy appliances or home entertainment equipment? You can significantly reduce the noise in your home by installing QuietZone® Acoustic batt Insulation between interior walls, floors and ceilings. Non-combustible and safe for your home, QuietZone® Acoustic batt Insulation is made from over 70% recycled content and is GREENGUARD Certified, which means our products meet strict indoor air quality standards. Owens Corning is proud to be at the forefront of our industry when it comes to indoor air quality and environmental initiatives. So take comfort in knowing that while you’re making things quiet around home, you’re being easy on the environment.
want to reduce noise in your home?
Insulate your interior walls, ceilings and floors with QuietZone®
acoustic Batt Insulation
QuietZone® acoustic Batt Insulation
no
Ise co
nt
roL
QuIcK facTs: dId you KNoW?15% home Renovation Tax credits and federal and provincial government grants and rebates can help to reduce your renovation costs.
Energy Sav ng Mo sture-Re istant Rig d Insulat onso ant r g de écoénergétique rés stant à l humidité
FOAMULAR ®C-300

46 lEaRN moRE aT WWW.oWENscoRNING.ca 47saVE ENERGy, saVE moNEy, hElP saVE ThE PlaNET WITh PINK!
sma
LL ProJec
ts
REducE NoIsE IN youR homE!
1. sealing holes. Seal all areas in walls where sound may penetrate, such as outlets, lighting fixtures, plumbing and sill plates, using caulking or foam sealant.
2. Installing batts. Install insulation batts between studs. Don’t compress insulation beyond edges of studs. The insulation should fit snugly against the studs and completely fill top to bottom plates of cavity.
3. Insulating around small areas. Cutt batts to fit snugly around obstructions such as electrical boxes, plumbing and plumbing vent lines.
4. Fastening resilient metal channels. Fasten resilient metal channels across studs to minimize sound energy passing through studs.
5. Finishing the wall. Install drywall or other wall finish to the structure as soon as you have finished installing the insulation. For added noise reduction, install QuietZone® Acoustic batt Insulation in the ceiling area in the same manner with resilient metal channels.
• Product specifications: page 7• calculate your needs: page 14
QuietZone® acoustic Batt Insulation wood stud walls: 1 layer 3.5" (89 mm) QuietZone®
steel stud walls: 1 layer 35⁄8" (92 mm) QuietZone®
small projects
How to insulate on those smaller projects
When it comes to energy leaks, even small projects can mean big savings. Fortunately, it’s easy to insulate those gaps around doors, windows, air conditioners and pipes. For increased energy efficiency, choose the handy-sized paks of Multi-Purpose or PINK-PAK Insulation for small projects.
Made in Canada with over 70% recycled content,** PINK FIbERGLAS® Insulation is GREENGUARD Indoor Air Quality Certified. And – being classified as non-combustible – it’s also safe for your home.

48 lEaRN moRE aT WWW.oWENscoRNING.ca saVE ENERGy, saVE moNEy, hElP saVE ThE PlaNET WITh PINK!
small PRoJEcTs
Insulating duct work Wrap duct work with FIbERGLAS® insulation. Tape poly-ethylene around outside to hold into position. If you are applying an interior finish, apply vapour barrier and patch any rips or tears before installing the interior finish.
Insulating pipes on exterior walls When insulating around water supply pipes on exterior walls, insulation must always be installed behind the pipes. To ensure there is no heat loss, do not leave any gaps between insulation pieces.
Insulating electrical boxes, air conditioners and windowsCut small strips and stuff behind/beside narrow areas such as electrical boxes. Do not leave gaps or spaces between the strips of insulation.
Insulating the attic hatchway The hatchway into an attic is a common source of heat loss. be sure to insulate the board itself by using an adhesive to fasten FIbERGLAS® insulation to the top of the hatch. If you have a pull-down stairway, lay batts on and around a built-up framework over the opening. Foam gaskets around hatch are also recommended.
• Product specifications: page 8
multi-Purpose and PInK-PaK PInK FIBerGLas® Insulation.
for further information
The suggestions and guidelines presented in this booklet conform to established practices used throughout the building construction industry. We offer them in the belief that, if followed, they will result in a well-insulated home that delivers significant energy savings. However, every house is different and Owens Corning offers no guarantee that the results of your insulating project will achieve the energy savings you may expect. You must use your judge-ment in planning and installing insulation to gain the best possible results. if you need further guidance on Owens Corning's PiNK insulation products, talk to your building supply dealer. This booklet is based on normal modern construction practices. All materials recommended in this booklet are usually available from your building supply dealer. if you would like further guidance, please contact Owens Corning for more information, 1-800-geT-PiNK®.
GREENGUARD Indoor Air Quality Certif iedSM is Reg. U.S. Pat & TM Office. The GREENGUARD INDOOR AIR QUALITY CERTIFIEDSM Mark is a registered certif ication mark used under license through the GREENGUARD Environmental Institute. Owens Corning PINK insulation is GREENGUARD Certif ied for indoor air quality, except bonded loosefill products. based on the average recycled glass content in all Owens Corning f iberglass batts, rolls and unbonded loosefill insulation manufactured in Canada. THE PINK PANTHER™ & © 1964 - 2010 Metro-Goldwyn-Mayer Studios Inc. All Rights Reserved. The colour PINK is a registered trademark of Owens Corning. ©2010 Owens Corning. *Savings vary depending on the original amount of insulation in your home, climate, house size, air leaks, and personal energy use and living habits. **70% recycled content is based on the average recycled glass content in all Owens Corning fiberglass batts, rolls and unbonded loosefill insulation manufactured in Canada.***The insulation is manufactured with a blowing agent with 70% less global warming potential as compared to Owens Corning previous blowing agents.

www.owenscorning.ca 1-800-GET-PINK®
REDUCE YOUR FOOTPRINT WITH PINK!
Printed on recycled paper.
OWENS CORNING CANADA LP3450 McNicoll AvenueScarborough, ON M1V 1Z5
1-800-GET-PINK®
www.owenscorning.ca
Pub. No. 0012093A. Printed in Canada. January 2010. THE PINK PANTHER™ & ©1964–2010 Metro-Goldwyn-Mayer Studios Inc. All Rights Reserved. The colour PINK is a registered trademark of Owens Corning. © 2010 Owens Corning.