pioneer dvd-v7400
TRANSCRIPT

1En
Operating Instructions
Industrial DVD Player
DVD-V7400
2En
IMPORTANT
The lightning flash with arrowhead symbol, withinan equilateral triangle, is intended to alert the userto the presence of uninsulated "dangerous voltage"within the product's enclosure that may be of suffi-cient magnitude to constitute a risk of electric shockto persons.
CAUTION:TO PREVENT THE RISK OF ELECTRIC SHOCK,DO NOT REMOVE COVER (OR BACK). NOUSER-SERVICEABLE PARTS INSIDE. REFERSERVICING TO QUALIFIED SERVICEPERSONNEL.
The exclamation point within an equilateral triangleis intended to alert the user to the presence of im-portant operating and maintenance (servicing) in-structions in the literature accompanying the appli-ance.
VENTILATION — Slots and openings in thecabinet are provided for ventilation and toensure reliable operation of the product and toprotect it from overheating, and these openingsmust not be blocked or covered. The openingsshould never be blocked by placing the producton a bed, sofa, rug, or other similar surface.This product should not be placed in a built-ininstallation such as a bookcase or rack unlessproper ventilation is provided or themanufacturer’s instructions have beenadhered to.
POWER SOURCES — This product should beoperated only from the type of power sourceindicated on the marking label. If you are notsure of the type of power supply to yourhome, consult your product dealer or localpower company.
LOCATION – The appliance should be installed ina stable location.
NONUSE PERIODS – The power cord of theappliance should be unplugged from the outletwhen left unused for a long period of time.
GROUNDING OR POLARIZATION
• If this product is equipped with a polarizedalternating current line plug (a plug having oneblade wider than the other), it will fit into theoutlet only one way. This is a safety feature. Ifyou are unable to insert the plug fully into theoutlet, try reversing the plug. If the plug shouldstill fail to fit, contact your electrician to replaceyour obsolete outlet. Do not defeat the safetypurpose of the polarized plug.
• If this product is equipped with a three-wiregrounding type plug, a plug having a third(grounding) pin, it will only fit into a groundingtype power outlet. This is a safety feature. Ifyou are unable to insert the plug into theoutlet, contact your electrician to replace yourobsolete outlet. Do not defeat the safetypurpose of the grounding type plug.
POWER-CORD PROTECTION — Power-supplycords should be routed so that they are notlikely to be walked on or pinched by itemsplaced upon or against them, paying particularattention to cords at plugs, conveniencereceptacles, and the point where they exit
from the product.OUTDOOR ANTENNA GROUNDING — If an
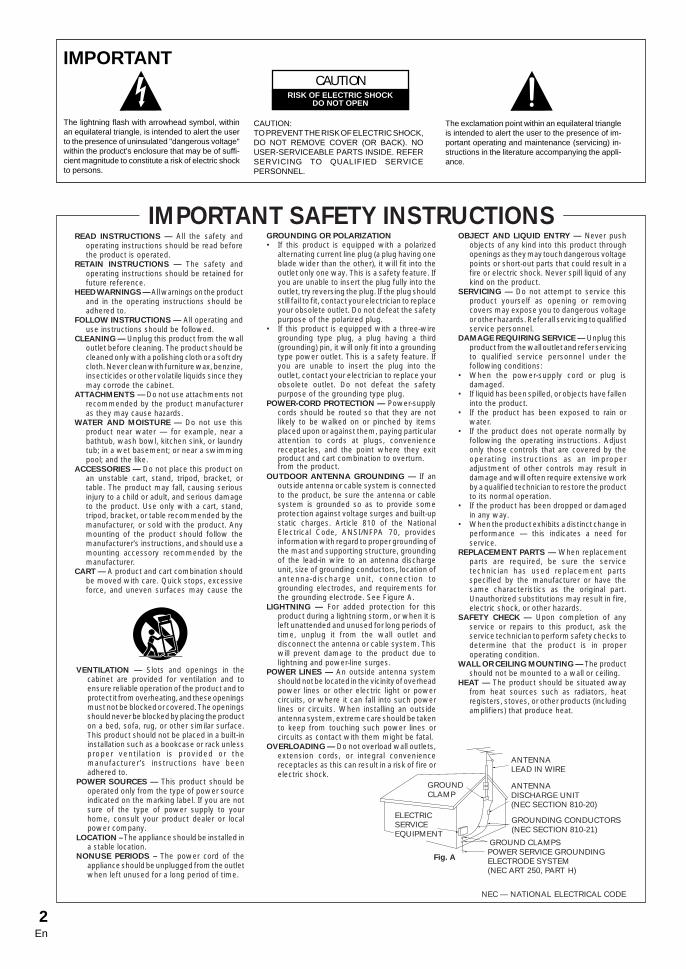
outside antenna or cable system is connectedto the product, be sure the antenna or cablesystem is grounded so as to provide someprotection against voltage surges and built-upstatic charges. Article 810 of the NationalElectrical Code, ANSI/NFPA 70, providesinformation with regard to proper grounding ofthe mast and supporting structure, groundingof the lead-in wire to an antenna dischargeunit, size of grounding conductors, location ofantenna-discharge unit, connection togrounding electrodes, and requirements forthe grounding electrode. See Figure A.
LIGHTNING — For added protection for thisproduct during a lightning storm, or when it isleft unattended and unused for long periods oftime, unplug it from the wall outlet anddisconnect the antenna or cable system. Thiswill prevent damage to the product due tolightning and power-line surges.
POWER LINES — An outside antenna systemshould not be located in the vicinity of overheadpower lines or other electric light or powercircuits, or where it can fall into such powerlines or circuits. When installing an outsideantenna system, extreme care should be takento keep from touching such power lines orcircuits as contact with them might be fatal.
OVERLOADING — Do not overload wall outlets,extension cords, or integral conveniencereceptacles as this can result in a risk of fire orelectric shock.
OBJECT AND LIQUID ENTRY — Never pushobjects of any kind into this product throughopenings as they may touch dangerous voltagepoints or short-out parts that could result in afire or electric shock. Never spill liquid of anykind on the product.
SERVICING — Do not attempt to service thisproduct yourself as opening or removingcovers may expose you to dangerous voltageor other hazards. Refer all servicing to qualifiedservice personnel.
DAMAGE REQUIRING SERVICE — Unplug thisproduct from the wall outlet and refer servicingto qualified service personnel under thefollowing conditions:
• When the power-supply cord or plug isdamaged.
• If liquid has been spilled, or objects have falleninto the product.
• If the product has been exposed to rain orwater.
• If the product does not operate normally byfollowing the operating instructions. Adjustonly those controls that are covered by theoperating instructions as an improperadjustment of other controls may result indamage and will often require extensive workby a qualified technician to restore the productto its normal operation.
• If the product has been dropped or damagedin any way.
• When the product exhibits a distinct change inperformance — this indicates a need forservice.
REPLACEMENT PARTS — When replacementparts are required, be sure the servicetechnician has used replacement partsspecified by the manufacturer or have thesame characteristics as the original part.Unauthorized substitutions may result in fire,electric shock, or other hazards.
SAFETY CHECK — Upon completion of anyservice or repairs to this product, ask theservice technician to perform safety checks todetermine that the product is in properoperating condition.
WALL OR CEILING MOUNTING — The productshould not be mounted to a wall or ceiling.
HEAT — The product should be situated awayfrom heat sources such as radiators, heatregisters, stoves, or other products (includingamplifiers) that produce heat.
IMPORTANT SAFETY INSTRUCTIONS
POWER SERVICE GROUNDINGELECTRODE SYSTEM(NEC ART 250, PART H)
GROUND CLAMPS
GROUNDING CONDUCTORS(NEC SECTION 810-21)
ANTENNADISCHARGE UNIT(NEC SECTION 810-20)
GROUNDCLAMP
Fig. A
NEC — NATIONAL ELECTRICAL CODE
ANTENNALEAD IN WIRE
ELECTRICSERVICEEQUIPMENT
READ INSTRUCTIONS — All the safety andoperating instructions should be read beforethe product is operated.
RETAIN INSTRUCTIONS — The safety andoperating instructions should be retained forfuture reference.
HEED WARNINGS — All warnings on the productand in the operating instructions should beadhered to.
FOLLOW INSTRUCTIONS — All operating anduse instructions should be followed.
CLEANING — Unplug this product from the walloutlet before cleaning. The product should becleaned only with a polishing cloth or a soft drycloth. Never clean with furniture wax, benzine,insecticides or other volatile liquids since theymay corrode the cabinet.
ATTACHMENTS — Do not use attachments notrecommended by the product manufactureras they may cause hazards.
WATER AND MOISTURE — Do not use thisproduct near water — for example, near abathtub, wash bowl, kitchen sink, or laundrytub; in a wet basement; or near a swimmingpool; and the like.
ACCESSORIES — Do not place this product onan unstable cart, stand, tripod, bracket, ortable. The product may fall, causing seriousinjury to a child or adult, and serious damageto the product. Use only with a cart, stand,tripod, bracket, or table recommended by themanufacturer, or sold with the product. Anymounting of the product should follow themanufacturer’s instructions, and should use amounting accessory recommended by themanufacturer.
CART — A product and cart combination shouldbe moved with care. Quick stops, excessiveforce, and uneven surfaces may cause the
product and cart combination to overturn.
RISK OF ELECTRIC SHOCKDO NOT OPEN
CAUTION

3En
Basic O
perationsWARNING: TO PREVENT FIRE OR SHOCK HAZARD, DONOT EXPOSE THIS APPLIANCE TO RAIN OR MOISTURE.
This product is equipped with technology for the protection of copy-rights protected by U.S. patent claims and other intellectual prop-erty rights possessed by the Macrovision Corporation and otherrights holders. Special permission from Macrovision Corporationis required for the use of this copyright-protection technology, andthat permission has been received for home use and certain otherlimited applications. Reverse engineering and disassembly of thistechnology are prohibited.
CAUTION: This product satisfies FCC regulations when shieldedcables and connectors are used to connect the unit to other equip-ment. To prevent electromagnetic interference with electric appliancessuch as radios and televisions, use shielded cables and connectorsfor connections.
This equipment has been tested and found to comply with the limitsfor a Class B digital device, pursuant to Part 15 of the FCC Rules.These limits are designed to provide reasonable protection againstharmful interference in a residential installation. This equipment gen-erates, uses, and can radiate radio frequency energy and, if not in-stalled and used in accordance with the instructions, may causeharmful interference to radio communications. However, there is noguarantee that interference will not occur in a particular installation.If this equipment does cause harmful interference to radio or televi-sion reception, which can be determined by turning the equipmentoff and on, the user is encouraged to try to correct the interferenceby one or more of the following measures:– Reorient or relocate the receiving antenna.– Increase the separation between the equipment and receiver.– Connect the equipment into an outlet on a circuit different from
that to which the receiver is connected.– Consult the dealer or an experienced radio/TV technician for help.
Information to UserAlteration or modifications carried out without appropriate authori-zation may invalidate the user's right to operate the equipment.
CAUTION• Use of controls or adjustments or performance of procedures other than
those specified herein may result in hazardous radiation exposure.• The use of optical instruments with this product will increase eye
hazard.
[For Canadian model]This Class B digital apparatus complies with Canadian ICES-003.
[Pour le modèle Canadien]Cet appareil numérique de la Classe B est conforme à lanorme NMB-003 du Canada.
The stand-by/ ON switch is secondary connected and there-fore, does not separate the unit from mains power in standbyposition.
IMPORTANT NOTICETHE SERIAL NUMBER FOR THIS EQUIPMENT IS LOCATED INTHE REAR.PLEASE WRITE THIS SERIAL NUMBER ON YOUR ENCLOSEDWARRANTY CARD AND KEEP IN A SECURE AREA. THIS IS FORYOUR SECURITY.
CAUTIONCONSULT WITH THE COMPANY SALES REPRESENTATIVE.“USE ONLY UL LIMITED AND CANADIAN CERTIFIED POWERSUPPLY CORD.” AWG MINIMUM,A POWER SUPPLY CORD TYPE SJT, 18 AWG MINIMUM, 3-WIREGROUNDED TYPE SHALL BE USED WITH THIS EQUIPMENT.
Note to CATV system installerThis reminder is provided to call CATV system installer’s attention toArticle 820-40 of the NEC that provides guidelines for proper ground-ing and, in particular, specifies that the cable grounding system of thebuilding, as close to the point of cable entry as practical.
FEDERAL COMMUNICATIONS COMMISSIONDECLARATION OF CONFORMITY
This device complies with part of the FCC Rules. Operation is sub-ject to the following two conditions: (1) This device may not causeharmful interference, and (2) this device must accept any interfer-ence received, including interference that may cause undesired op-eration.Product Name: DVD playerModel Number: DVD-V7400Product Category: Class B Personal Computers & PeripheralsResponsible Party Name: PIONEER ELECTRONICS SERVICE, INC.Address: 1925 E. DOMINGUEZ ST. LONG BEACH, CA 90810 U.S.A.Phone/FAX Number: (310) 952-2359 / (310) 952-2412
Note÷ Do not mix old and new batteries÷ Even batteries of the same type will differ in voltage so avoid
mixing different type of batteries together÷ When not using the remote control for a long period of time (over
1 month), remove the batteries to avoid possible damage frombattery corrosion. If battery leakage occurs, wipe away the liquidfrom the battery compartment before inserting new batteries.
Laser Barcode Sheet ........................................................... 1RF Adaptor Set Clamp ......................................................... 1Screw ................................................................................... 1Operating Instructions .......................................................... 1Warranty Card ...................................................................... 1
Before usingThank you for buying this Pioneer product.Please read through these operating instructions before operating your DVD player. After you have finished reading the instructions, put them away in a safe place for future reference.
Check AccessoriesAudio Cord .......................................................................... 1Video Cord .......................................................................... 1Remote Control ................................................................... 1Batteries (AA/R6P) .............................................................. 2
Inserting batteries into the Remote Cont rolWhile pressing the back cover, pull out in the direction indicated by the arrow and insert AA sizedry cell batteries.
÷ Make sure to match the plus (+) and minus (−) polarity guides in the batteries with the marks inside the battery compartment.

4En
8. Barcode/Command StackWhen segment commands and barcodes are added tothe player in advance, images can be switched and played back one after the other. This is veryconvenient for demonstrations, presentations, etc.The RS-232C connection allows uploading and downloading of the set content (see page 53).
÷ Upload/download is performed easily through adedicated application.
9. Interface with External Signals(RS-232C, external option swit ch)The device is fitted with an RS-232C connection so thatcommands support DVD, Video CD and CD technology.The control protocol is compatible with LD (Laser Disc)equipment with LD signals transferring easily.
In addition to the RS-232C connector, a terminal for theexternal option switch is provided. By simply connectinga switch to this terminal, operations through a DVD menu selection, barcode/command stack calls as well ascommands with the remote control are possible.
÷ Consult the DVD-V7200 User’s Manual forinformationregarding this terminal and RS-232C control commands(see your dealer for more information about the User’smanual).
10. Video Blackboa rd FunctionGraphics and characters input in advance at any desiredpositions on the DVD picture screen will appear duringplayback.This function enables demonstrations and presentationsto be performed more effectively (see page 71).
11. Laser Barcode CompatibilityThe laser barcodes previously used with LD (LaserDisc) players supports most DVD applications. Existingbarcode scanners and readers function properly withthis player. (see page 59).
12. Video Text Retri eval (VTR)Use the mouse to click on buttons displayed duringDVD playback for display of text files corresponding tothe selected button. This feature is only available ondiscs authored with Video Text Retrieval compatible discs(see page 77).
13. External Syn chronizing FunctionThis terminal allows output of video signals linked to anexternal sync signal (see page 77).
Component Features and Functions1. High- Reliabilit y, high- Endurance Player
This DVD player features a high-performance brushless spindle motor. The mechanical components are alsosealed against heat and dust, giving this unit improvedreliability.
2. NTSC/PAL Dual PlaybackDVD discs in either the NTSC format or the PAL formatare playable (See page 79)
3. Frame Search FunctionSearching in units smaller than individual chapters ispossible in this mode (see page 14).
While using frame segment playback, it is possible toplay any point to any point in a video then continue the playback at the end (See page 55, 56).÷ The frame search function cannot be used with a multi
PGC disc (time is not displayed on the TV screen) orwith a Video CD. Frame segment playback is possiblewith through RS-232C control with a DVD barcodeor Barcode/Command stack.
4. High- Speed SearchWith improved memory cache and a search algorithm,search speed is now at 1.3X reading speed (seepage 13, 14).
5. Enhanced Special PlaybackThis player enables the DVD and Video CD playbackspeed to be changed in several ways. Slow Forward,Slow Reverse, Scan and Frame Forward/Reverse areeasily selectable (see page 12, 14, 15).÷ To perform Reverse Slow playback, select Frame from
the REV STEP/REV PLAY page of the ADV.SETUPMenu. Slow play is only possible in the forwarddirection on a Video CD.
6. Mouse Cont rolInstead of the remote control, a PS/2* pointing devicecan be used to control the player if desired. A mouseallows selecting specific locations by the point-and-clickmethod (see page 43).* PS/2 is a registered trademark of IBM corporation
7. Weekly Timer/ Power ON Start FunctionThe times for Power ON/OFF and for video playback ofa disc can be set for each day within one day or withina week. Combined with the barcode/command stack,program playback is also possible. This player is limitedto a maximum of 24 setting at one time (see page 44,52)

5En
Basic O
perations
Contents
Remote Control Operations ................................................................10Playing DVDs, CDs, and Video CDs. ................................................... 10Chapter ( Track) Skip Forwa rd/Skip Back ........................................... 12Stopping the Playback and Swit ching Power OFF............................. 12Searching For a Desired Scene (SEARCH ) .........................................13Still Frame/Frame Advance/Frame Reverse .......................................14Slow Motion Pl ay ................................................................................... 15Repeat Pl ay ............................................................................................15Program Pl ay .........................................................................................16Viewing Disc Informatio n ..................................................................... 18Swit ching the Angle of the Im age (Multi-Angle ) ................................. 20Swit ching the Subtitles During Pl ayback ........................................... 20Swit ching the Audio During Pl ayback ................................................21Swit ching the Stereo/ Left/Right Audi o ................................................ 21
Index of the Graphical User Interface (GUI ) ........................................ 22Operating the Initial Setup Me nu .........................................................23Selecting the Aspect Ratio ...................................................................23Changing Visual Settin g .......................................................................25Setting the Langu age ............................................................................27Setting Viewing and Listening Restrictions ( Parental Lo ck) ............ 31Making the Ordina ry Setting s .............................................................. 33Setting the Digital Outpu t .....................................................................34Setting to Optimi ze the Audio Qualit y .................................................36Returning to the Default Settings ......................................................... 38Langu age Code Lis t ..............................................................................38
Advanced Feature Operation s ............................................................39ADV. SETUP MENU Setting s ................................................................ 41Player Cont rol Using a Mous e ............................................................43Weekly Timer Function Operation/ Displ ay ........................................ 44Power on Start Functio n ......................................................................51Barcode/Command Stack Functio n ....................................................53Barcode/Command Stack Settin g ...................................................... 54Grouping Some Ba rcode/Command Sta cks ...................................... 62Using a Ba rcode/Command Sta cks .................................................... 69Character Input/Output Drawing ( DVD Video Blackboa rd) ............... 71Grouping Video Blackboa rds .............................................................. 75Video Text Retri eval .............................................................................77External Synchronizing Functio n ........................................................ 77
How to Displ ay Total Hours Played and Power ON Time ................. 78Connecting the Player ..........................................................................78Using a Laser Barcode Scanner (Sold Separately) ........................... 84Troubleshooting ...................................................................................85Terms .....................................................................................................86Specifications .......................................................................................87
Bas
icO
pera
tions
Ad
vanc
edO
pera
tions
Bas
icO
pera
tions
Ad
vanc
edO
pera
tions
Settings
Advanced OperationsC
onnection/etc.

6En
Copyright÷ Unauthorized public preference, broadcasting, or copying is
a violation of applicable laws.÷ This product incorporates copyright protection technology
that is guarded by method claims of certain U.S. patentsand other intellectual property rights owned by MacrovisionCorporation and other rights owners. Use of this copyrightprotection technology must be authorized by MacrovisionCorporation, and is intended for home and other limited view-ing uses only unless otherwise authorized by MacrovisionCorporation. Reverse engineering or disassembly is denied.
Handling the discs7 Handling÷ Never play clacked, scratched or warped disc. This may damage
the player or cause it to malfunction.÷ Do not damage or dirty the signal surface of the disc.÷ Do not affix paper and seals to the disc.÷ Too much glue will cause a malfunction. Many rental discs have
labels affixed to them. Only use the disc after confirming that thereis no glue.
7 Stacking÷ Store the discs carefully. If you store discs at an angle or stacked on
top of each other, discs may become warped even when in thedust jackets.
÷ Read the operating instructions included with the discs.
7 Cleaning÷ Fingerprints or smudges on the disc m ay af fect the sound and
picture qualit y. To rem ove grime, wipe gent ly f rom the inside towards the outer ed ge (do NOT wipe in a ci rcular motion).
÷ Avoid cleaning discs with record cleaning sprays, or static preventionsprays, etc. Also do not use volatile liquids such as benzine, or anythinners, etc.
÷ To clean your discs, use a soft clean cloth to wipe them. If necessary,moisten a soft cloth with diluted neutral detergent to remove heavydirt or fingerprints.
7 Discs with special shapesDiscs with special shapes (heart shaped discs, hexagonal discs, etc.)cannot be played on this set. Attempting to do so may cause damageto the player.
Lens CleaningThe player’s pickup lens remains clean during normal use but if itmalfunctions due to soiling, contact your nearest Pioneer Authorized Service Center. Lens cleaners are commercially available, however,special care should be exercised in their use since some may causedamage to the lens.
CondensationIf a player is brought from cool surroundings into a warm room or thetemperature changes suddeely, moisture may gather inside of the unit.When this happens, the player’s performance becomes affected.
To prevent this, let the player stand in its new surroundings for an hour or more before switching it on or make raise the room temperaturegradually.Condensation may also form during the summer if the player is placedwithin the breeze from an air conditioner. In such cases, move the unitto another location.
Installation÷ Install the player in a level and stable location.
Do not place in shaky locations, or locations exposed to strongvibrations.
÷ Do not block the player’s cooling vents. Avoid placing on long-pilecarpets, etc.. Also do not wrap or cover with towels or clothswhen in use. Such coverings can cause the player to overheat andmay result in internal damage.
÷ Do not place objects on top of the player.÷ Install in a location which is not exposed to heat sources. Avoid in-
stalling the player above an amplifier or other high-heat componentsIf installing the player in a component rack, select a rack with goodventilation and well below any amplifiers.
÷ If the player is installed in a rack, care must be taken to avoid internaltemperature buildup. Position it so that the ventilation openings inthe top and bottom of the player are not blocked.Install the player so that heat from below is limited and leave a gapof 4 inches or more on all sides and above so that air can flow around the device. A room temperature of no higher than 95°Fis recommended. If installation is requiredin any other envirnoment,ensure that the air temperature remains below 95°F when the unitis sufficiently warmed up. If necessary, make sure that forced air cooling (air conditioning) is available and adequate.
÷ When multiple players are connected in parallel, a power surge may pass through the units when external power is first turned ON.Please consult your Pioneer dealer regarding proper power switchratings.
÷ Do not install the player in an enclosed rack. Internal temperaturemay build up resulting in internal damage.
Operating E nvi ronmentOperating environment temperature and humidity:+5°C - +35°C (+41°F - +95°F) ; less than 85% RH (when cooling vents are unblocked)
7 Do Not Install in the Foll owing Locations:÷ exposed to direct sunlight or strong artificial light÷ exposed to dust or smoke÷ subject to vibration÷ subject to strong electro-magnetic fields.÷ near sources of heat÷ exposed to high levels of electronic noise÷ subject to electrostatic noise÷ exposed to high humidity, or poorly ventilated locations÷ enclosed racks
Moving the PlayerWhen transporting this player to a new location, be sure to use thepackaging provided and avoid subjecting the player to vibration, shock,or drops. During transport, protect the player from exposure to heator water.Before packaging the player, remove any disc loaded. Moving theplayer with a loaded discs may cause damage to the disc or to theplayer’s internal parts.
Precaution rega rding use
Special Precautions!Never attempt to move the player while a disc is playing. Discsrotate at very high speeds during play, and lifting or movingthe player could cause damage to the disc.Also, subjecting the player to strong impact or vibration whena disc is loaded may cause damage to the disc or player.Verify that the player is stopped and the disc tray is emptybefore moving the unit.Remove any discs before lifting the player.This equipment is built using precision optical parts. Besure to take care to control temperature and dust insidethe room where it is installed.
7En
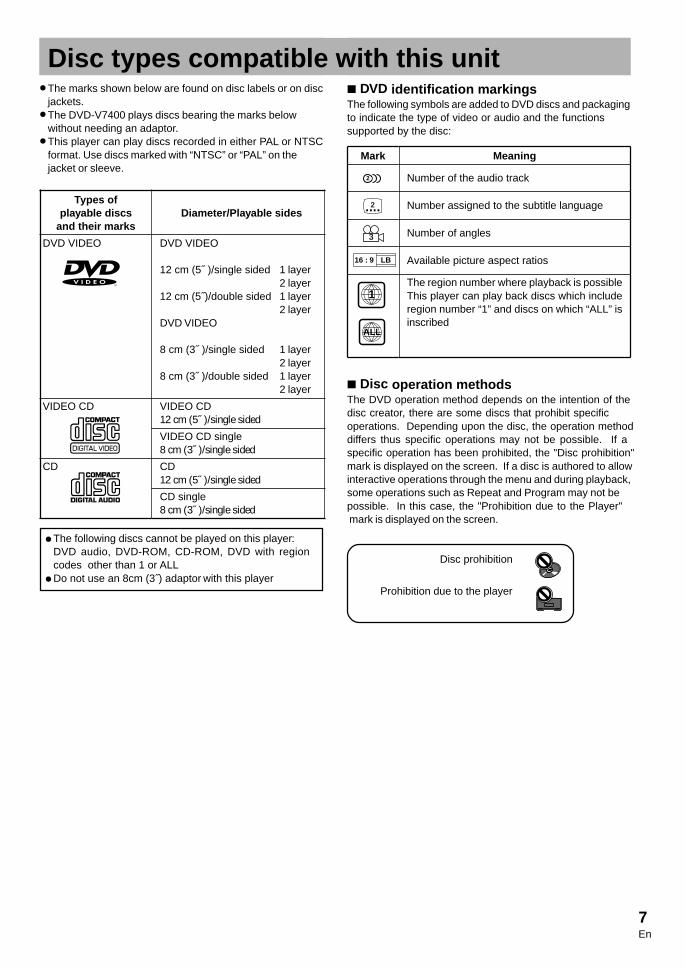
÷ The marks shown below are found on disc labels or on discjackets.
÷ The DVD-V7400 plays discs bearing the marks below without needing an adaptor.
÷ This player can play discs recorded in either PAL or NTSCformat. Use discs marked with “NTSC” or “PAL” on thejacket or sleeve.
7 DVD identification markingsThe following symbols are added to DVD discs and packagingto indicate the type of video or audio and the functions supported by the disc:
7 Disc operation methodsThe DVD operation method depends on the intention of thedisc creator, there are some discs that prohibit specificoperations. Depending upon the disc, the operation methoddiffers thus specific operations may not be possible. If aspecific operation has been prohibited, the "Disc prohibition"mark is displayed on the screen. If a disc is authored to allow interactive operations through the menu and during playback,some operations such as Repeat and Program may not bepossible. In this case, the "Prohibition due to the Player" mark is displayed on the screen.
Disc prohibition
Prohibition due to the player
Disc types compati ble with this unit
÷ The following discs cannot be played on this player:DVD audio, DVD-ROM, CD-ROM, DVD with regioncodes other than 1 or ALL
÷ Do not use an 8cm (3˝) adaptor with this player
Types ofplayable discs
and their marks
DVD VIDEO
VIDEO CD
CD
Diameter/Playable sides
DVD VIDEO
12 cm (5˝ )/single sided 1 layer2 layer
12 cm (5˝)/double sided 1 layer2 layer
DVD VIDEO
8 cm (3˝ )/single sided 1 layer2 layer
8 cm (3˝ )/double sided 1 layer2 layer
VIDEO CD12 cm (5˝ )/single sided
VIDEO CD single8 cm (3˝ )/single sided
CD12 cm (5˝ )/single sided
CD single8 cm (3˝ )/single sided
Mark Meaning
Number of the audio track
Number assigned to the subtitle language
Number of angles
Available picture aspect ratios
The region number where playback is possibleThis player can play back discs which includeregion number “1” and discs on which “ALL” isinscribed
3
16 : 9 LB
2
2
1
ALL
8En
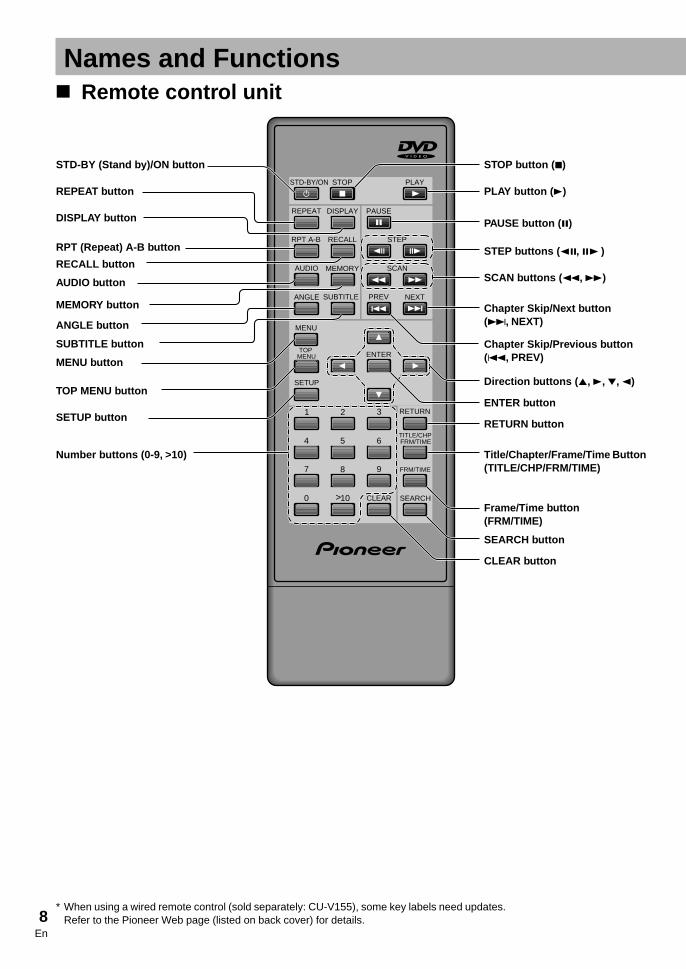
Names and Functions7 Remote control unit
* When using a wired remote control (sold separately: CU-V155), some key labels need updates.Refer to the Pioneer Web page (listed on back cover) for details.
STD-BY (Stand by)/ON button
REPEAT button
DISPLAY button
RPT (Repeat) A-B button
RECALL button
AUDIO button
MEMORY button
ANGLE button
SUBTITLE button
MENU button
TOP MENU button
SETUP button
Number buttons (0-9, >10)
STOP button ( 7)
PLAY button ( 3)
PAUSE button ( 8)
STEP buttons ( e, E )
SCAN buttons ( 1, ¡)
Chapter Skip/N ext button(¢, NEXT)
Chapter Skip/Pr evious button(4, PREV)
Direction buttons (5, 3, ∞, 2)
ENTER button
RETURN button
Title/Chapter/Frame/Time Button(TITLE/CHP/FRM/TIME)
Frame/Time button(FRM/TIME)
SEARCH button
CLEAR button
STD-BY/ON PLAY
PAUSEDISPLAYREPEAT
MEMORYAUDIO SCAN
STEPRECALLRPT A-B
ANGLE SUBTITLE PREV NEXT
SETUP
ENTER
RETURN
SEARCHCLEAR
1 2 3
4 5 6
7 8 9
0 10>
TITLE/CHP
FRM/TIME
MENU
TOPMENU
FRM/TIME
STOP
9En
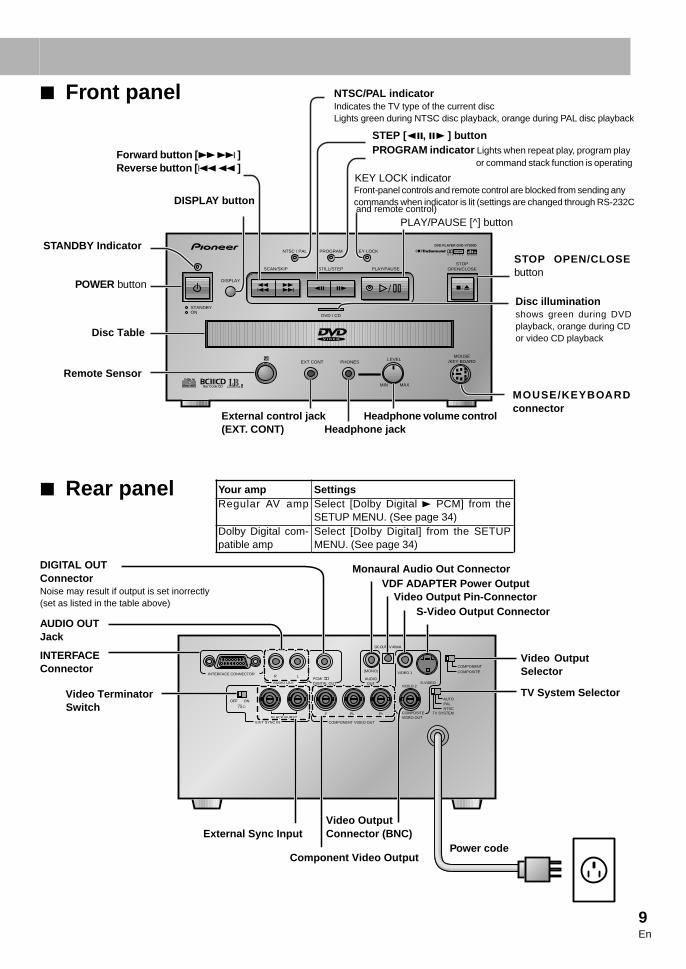
7 Front panel
7 Rear panel
14
¡ ¢ e E ^
DOLBY
D I G I T A L
SCAN/SKIP
DISPLAY
STILL/STEP
PROGRAM
PLAY/PAUSE
KEY LOCKNTSC / PAL
STOPOPEN/CLOSE
DVD PLAYER DVD-V7300D
EXT CONTLEVEL
MOUSE/KEY BOARDPHONES
DVD / CD
Î
STANDBYON
MIN MAX
§
INTERFACE CONNECTOR
AUDIO OUT
EXIT SYNC INBLACK BURST
COMPONENT VIDEO OUT
COMPOSITEVIDEO OUT
OFF ON
VIDEO 1
VIDEO 2S-VIDEO
COMPONENTCOMPOSITE(MONO)
AUDIOOUT
PCM/DIGITAL OUT
R
Y PB PR
L
DC OUT 5V 40mA
AUTO
NTSCPAL
TV SYSTEM
STANDBY Indicator
POWER button
Remote Sensor
Disc Table
DISPLAY button
Forward button [ ¡ ¢ ]Reverse button [ 4 1 ]
STEP [e, E ] button
Front-panel controls and remote control are blocked from sending anycommands when indicator is lit (settings are changed through RS-232C
PROGRAM indicator Lights when repeat play, program playor command stack function is operating
STOP OPEN/CLOSEbutton
MOUSE/KEYBOARDconnector
Disc illuminationshows green during DVDplayback, orange during CDor video CD playback
External cont rol ja ck(EXT. CONT)
Headphone volume controlHeadphone jack
DIGITAL OUTConnectorNoise may result if output is set inorrectly(set as listed in the table above)
AUDIO OUTJack
INTERFACEConnector
Video Terminator
External Sync Input
Component Video Output
Video OutputConnector (BNC)
Monaural Audio Out ConnectorVDF ADAPTER Power Output
Video Output Pin-ConnectorS-Video Output Connector
Video OutputSelector
TV System Selector
Power code
Your ampRegular AV amp
Dolby Digital com-patible amp
SettingsSelect [Dolby Digital 3 PCM] from theSETUP MENU. (See page 34)Select [Dolby Digital] from the SETUPMENU. (See page 34)
NTSC/PAL indicatorIndicates the TV type of the current discLights green during NTSC disc playback, orange during PAL disc playback
KEY LOCK indicator
PLAY/PAUSE [^] button
Switch
and remote control)
10En
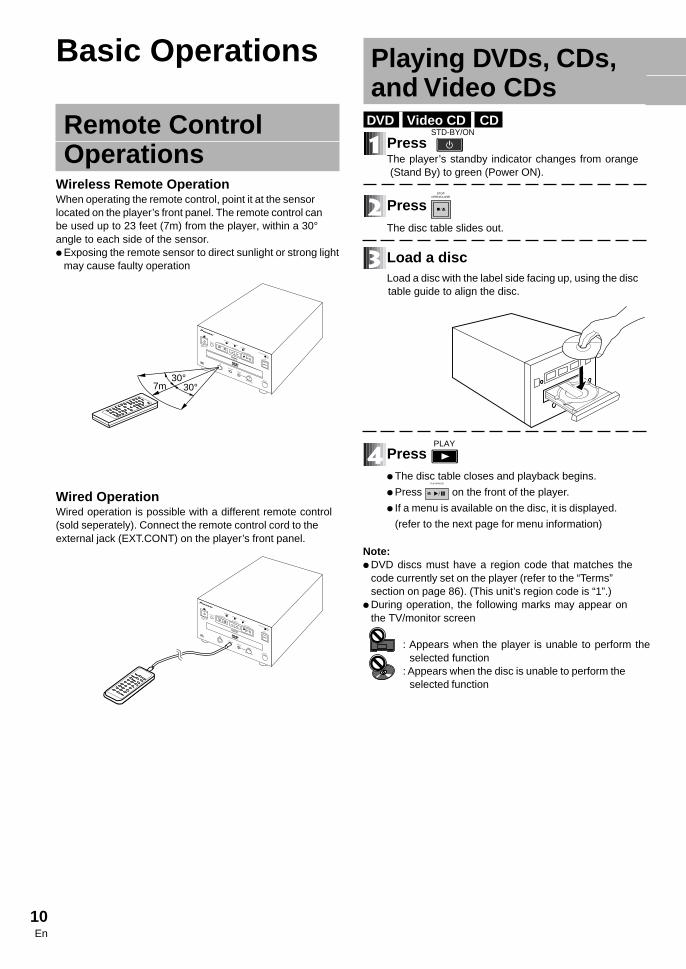
Remote ControlOperations
Wireless Remote OperationWhen operating the remote control, point it at the sensorlocated on the player’s front panel. The remote control canbe used up to 23 feet (7m) from the player, within a 30°angle to each side of the sensor.÷ Exposing the remote sensor to direct sunlight or strong light
may cause faulty operation
Wired OperationWired operation is possible with a different remote control(sold seperately). Connect the remote control cord to theexternal jack (EXT.CONT) on the player’s front panel.
Playing DVDs, CDs,and Video CDs
DVD.I Video CD .I CD.
Press STD-BY/ON
The player’s standby indicator changes from orange(Stand By) to green (Power ON).
Press STOP
OPEN/CLOSE
§
The disc table slides out.
Load a discLoad a disc with the label side facing up, using the disctable guide to align the disc.
Press PLAY
÷ The disc table closes and playback begins.
÷ Press ^PLAY/PAUSE
on the front of the player.
÷ If a menu is available on the disc, it is displayed.
(refer to the next page for menu information)
Note:÷ DVD discs must have a region code that matches the
code currently set on the player (refer to the “Terms”section on page 86). (This unit’s region code is “1”.)
÷ During operation, the following marks may appear onthe TV/monitor screen
: Appears when the player is unable to perform theselected function
: Appears when the disc is unable to perform the selected function
14
¡ ¢ e
E
^
§
DOLBY D I G I T A L
SCAN/SKIP
DISPLAY
STILL/STEP
PROGRAM
PLAY/PAUSE
KEY LOCK
NTSC/PAL
STOPOPEN/CLOSE
DVD PLAYER DVD-V7300D
EXT CONT
LEVEL
MOUSE/KEY BOARD
PHONES
DVD / CD
Î
STANDBYON
MIN
MAX
30°30°7m
14
¡ ¢ e
E
^
§
DOLBY D I G I T A L
SCAN/SKIP
DISPLAY
STILL/STEP
PROGRAM
PLAY/PAUSE
KEY LOCK
NTSC/PAL
STOPOPEN/CLOSE
DVD PLAYER DVD-V7300D
EXT CONT
LEVEL
MOUSE/KEY BOARD
PHONES
DVD / CD
Î
STANDBYON
MIN
MAX
Basic Operations

11En
Basic O
perations
DVD.I Video CD .
When the Menu Screen isDispl ayed
DVDs and Video CDs usually feature se lection menus.
This pl ayer supports menus for choos ing availabletitles and music from the disc.
7During DVD PlaybackPress to s croll to an
item and press ENTER
7During Video CD pl aybackSelect with the number buttons.÷ When the menu screen consists of two pages or more, press
PREV NEXT to turn the pages.
Example)
7Turning the menu screen display off/onThe way to display the menu screen differs depending on the
disc, but menu screen is returned with DVD by pressing MENU
or TOPMENU during playback, and with Video CD, by pressing
RETURN during PBC playback.
÷ Regarding operations on the menu screen, refer to theinformation included with the disc.
DVD.I Video CD .
Returning to Menu DisplayDuring Playback
7During DVD Playback
Press TOPMENU
÷ Press MENU
again for a list of titles÷ Operate according to disc menus
7During Video CD Playback
Press RETURN
Pressing RETURN
during PBC playback displays the menu.
Because the player’s operation method and functions depend
on the PBC, playback will differ according to the disc. For
details, please refer to the disc’s instruction manual.
Note
÷ When using a menu for Video CD playback; the repeat Play
and Track/Time Search functions are disabled.
÷ Menu details differ depending on the disc. Play a disc by
making menu selections using , ENTER
and the number buttons.
÷ You can also play Video CDs without calling up a menu by
pressing PREV NEXT or a number button when the player is
stopped. To play from track 1, simply press 1
1
2
3
4
5
POPTITLE MENU
JAZZ
COUNTRY
R&B
CLASSICAL
1
2
3
4
5
POP
JAZZ
COUNTRY
R&B
CLASSICAL
Example)
12En
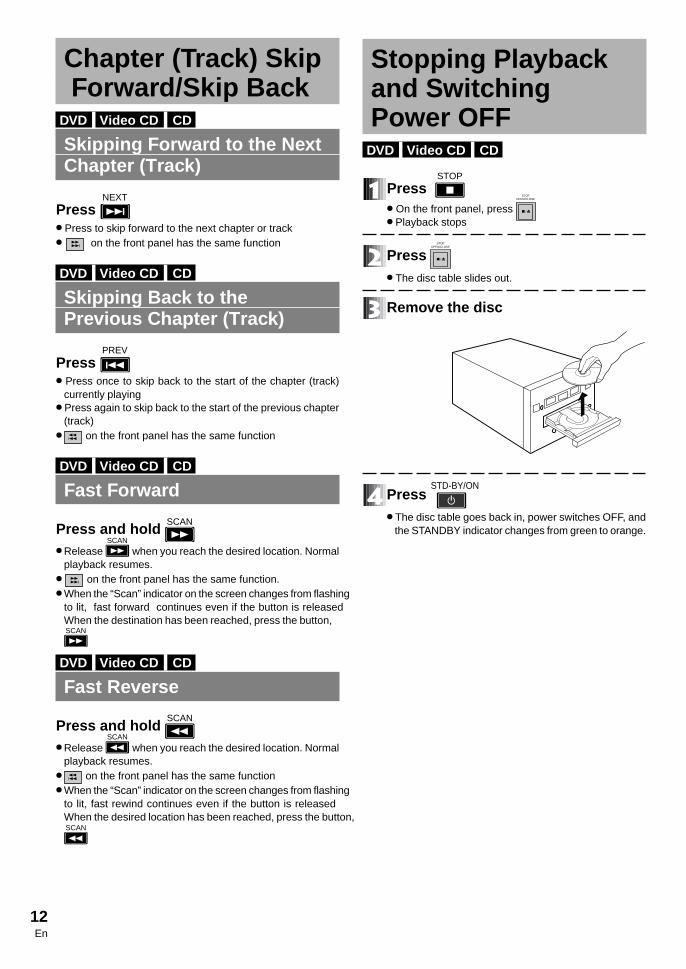
Chapter ( Track) Skip Forwa rd/Skip Back
DVD.I Video CD .I CD.
Skipping Forwa rd to the NextChapter ( Track)
Press NEXT
÷ Press to skip forward to the next chapter or track÷ ¡
¢ on the front panel has the same function
DVD.I Video CD .I CD.
Skipping Back to thePrevious Chapter ( Track)
Press PREV
÷ Press once to skip back to the start of the chapter (track)currently playing
÷ Press again to skip back to the start of the previous chapter(track)
÷ 14 on the front panel has the same function
DVD.I Video CD .I CD.
Fast Forwa rd
Press and hold SCAN
÷ Release SCAN
when you reach the desired location. Normalplayback resumes.
÷ ¡ ¢ on the front panel has the same function.
÷ When the “Scan” indicator on the screen changes from flashingto lit, fast forward continues even if the button is releasedWhen the destination has been reached, press the button,SCAN
DVD.I Video CD .I CD.
Fast Reverse
Press and hold SCAN
÷ Release SCAN
when you reach the desired location. Normalplayback resumes.
÷ 14 on the front panel has the same function
÷ When the “Scan” indicator on the screen changes from flashingto lit, fast rewind continues even if the button is releasedWhen the desired location has been reached, press the button,SCAN
Stopping Playbackand Swit chingPower OFF
DVD.I Video CD .I CD.
Press STOP
÷ On the front panel, press
STOPOPEN/CLOSE
§ ÷ Playback stops
Press STOP
OPEN/CLOSE
§
÷ The disc table slides out.
Remove the disc
Press STD-BY/ON
÷ The disc table goes back in, power switches OFF, andthe STANDBY indicator changes from green to orange.
13En
Basic O
perations
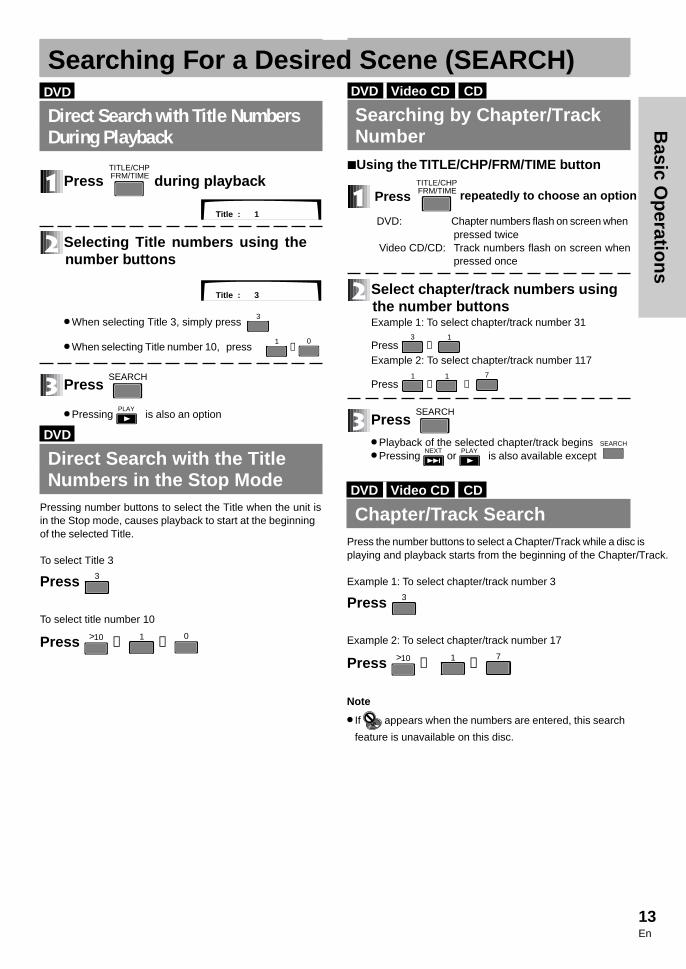
DVD.I Video CD .I CD.
Searching by Chapter/ TrackNumbe r
7Using the TITLE/CHP/FRM/TIME button
Press TITLE/CHPFRM/TIME
DVD: Chapter numbers flash on screen whenpressed twice
Video CD/CD: Track numbers flash on screen whenpressed once
Select chapter/tra ck numbe rs usingthe number buttonsExample 1: To select chapter/track number 31
Press 3
→ 1
Example 2: To select chapter/track number 117
Press 1
→1
→ 7
Press SEARCH
÷ Playback of the selected chapter/track begins÷ Pressing
NEXT or
PLAY is also available except
SEARCH
DVD.I Video CD .I CD.
Chapter/ Track SearchPress the number buttons to select a Chapter/Track while a disc isplaying and playback starts from the beginning of the Chapter/Track.
Example 1: To select chapter/track number 3
Press 3
Example 2: To select chapter/track number 17
Press 10> → 1 →
7
Note
÷ If appears when the numbers are entered, this search
feature is unavailable on this disc.
DVD.
Direct Search with Title NumbersDuring Playback
Press TITLE/CHPFRM/TIME during pl ayback
Selecting Title numbe rs using thenumber buttons
÷ When selecting Title 3, simply press 3
÷ When selecting Title number 10, press 1
→0
Press SEARCH
÷ Pressing PLAY
is also an option
DVD.
Direct Search with the TitleNumbe rs in the Stop Mode
Pressing number buttons to select the Title when the unit isin the Stop mode, causes playback to start at the beginningof the selected Title.
To select Title 3
Press 3
To select title number 10
Press 10> → 1 →
0
Searching For a Desired Scene (SEARCH)
Title : 3
Title : 1
repeatedly to choose an option

14En
Searching for a Desired Scene(SEARCH)
DVD.I Video CD .
Searching by Time/Frame Number(Time Search/Frame Search)
Press FRM/TIME
to select the frame inputmode or the time input mod e÷ With Video CD, only time search is available
Select time/frame number s with thenumber buttonsExample : To select 21 minutes 43 seconds
2 →
1 →
4 →
3
÷ With DVD, time/frame searches must be within a singleTitle, rather than overlapping titles.
Press SEARCH
÷ Pressing NEXT
or PLAY
is also available except SEARCH
÷ Playback starts from the selected elapsed play time.÷ For frame searching, the Still Frame mode is set at a
particular frame (frame accuracy may vary withthey type of disc in use).Example:Discs recorded with a slide show or a DVD movie are setto 24 frame per second.
÷ Time Searches/Frame Searches are unavailable for discs
that do not provide playback time datawithin a Title.
(press DISPLAY to check for Time codes, see page 19)
Point÷ To cancel the flashing Title, Chapter/Track/Time display,
press the CLEAR
button twice.÷ Making selections from a menu is possible for some titles.
Simply press MENU
to display the menu screen then
choose an item from the list.
Note÷ With DVD, Time Searches are unavailable on certain
disc Titles, when the mark is displayed.
÷ When performing DVD or Video CD Time Searches, theplayback may start from a slightly different time.
÷ On DVD discs, a Time Search is unavailable when the unitis in the Stop mode.
÷ Searches using the above method are ignored during PBCplayback from Video CDs.
÷ An error may occur when a Frame Search is issued severalframes before or after Title and Chapter breaks; this occursbecause of the way in which a DVD disc is produced.
Still Frame/Frame Advance/Frame Reverse
DVD.I Video CD .
Frame Advance/Frame Reverse(back the picture up by 1 frame)
Press STEP
: The picture advances by one frame each time thebutton is pressed.
: The effect differs according to the settings (DVD).(see below)
REV STEP/PLAY in A DV. SETUP is by Frame or VOBU(see page 42)Frame : The picture reverses by one frame each
time the STEP
button is pressed
VOBU*: The picture reverses in VOBU each time
the STEP
button is pressed
÷ The ability to advance or reverse the picture by one framedepends upon the type of data recorded on the disc suchas a DVD movie in 24 frames per second.
÷ If Still Images appear shaky when playing back DVD stop-motion frames, set the Still Picture to “Field” (see page 25).Vertical resolution qulaity is reduced by half but blurrinessis eliminated from the picture.
÷ If VOBU is selected, each time the STEP
is pressed, thenplayback is reversed by 0.4 seconds to 1 second.
* VOBU = Video Object Unit:In DVD-VIDEO, it is the smallest unit that forms a stream.A VOBU is from 0.4 seconds to 1 second in duration.
DVD.I Video CD .
Still Picture
Press STEP
Note÷ There is no sound when viewing Still frames or when
advancing one frame at a time.÷ Pause may not be possible with certain discs. In this case,
the mark is displayed.
÷ When pressing PAUSE
, playback is halted and background
color (default color is turquoise) appears on the screen.
Frame : 0/219113 Time : 0.00→
STEP
STEP

15En
Basic O
perations
Slow Motion Pl ay DVD.I Video CD .
Forwa rd Slow Playback
Press and hold STEP during pl ayback
To chan ge the speed of sl ow pl aybackDuring slow playback, the speed can be adjusted to
four separate settings by pressing STEP
and STEP
Slow Fast
For DVD STEP1 (1/30) – 1/16 – 1/8 – 1/4 –1/2 –1/1For Video CD 1/16 – 1/8 – 1/4 –1/2
(units: seconds)
DVD.
Reverse Slow Motion
Press and hold STEP during pl ayback
To chan ge the Slow Motion speedThe action differs depending on the REV STEP/REV PLAYsetting on the ADV SETUP menu (page 42).
Fast Slow
For frame: 1/1 – 1/2 – 1/4 – 1/8 – 1/16 – STEP1 (1/30)(units: seconds)
For VOBU*: Reverse slow playback in VOBU units
* VOBU = Video OBject Unit:In DVD-VIDEO, it is the smallest unit that forms a streamand is from 0.4 seconds to 1 second in duration.
DVD.I Video CD .
Return to Normal Playback
Press PLAY
Note÷ No sound will be heard during Slow Motion
Repeat Play DVD.I Video CD .I CD.
Repeat Play of a Chapter/ TrackDuring playback of the chapter or trackyou wish to repeat, press
REPEAT so that
Repeat Chapter is displa yed÷ With CDs and Video CDs, Repeat Track is displayed.
DVD.I Video CD .I CD.
Repeat Play of a TitleDuring pl ayback of the Title to berepeat ed, press
REPEAT so that Repeat
Title is displ ayed.÷ With DVD discs, the title continues playing until the end,
then playback starts once more from the beginningof that title.
÷ CDs and Video CDs have a single Title per disc thusthe entire disc is repeated.
DVD.
Repeat Play of All TitlesDuring playback, press
REPEAT so that
Repeat All is displ ayed÷ This operation is effective only when the menu’s TITLE
PLAY MODE is set to All (see page 41).÷ When playback has continued until the end of the final
Title, playback begins again from Title 1.
DVD.I Video CD.I CD.
Repeat Play of a Specified SectionPress
RPT A-B
at the beginning and endof the section you want to repeat
DVD.I Video CD .I CD.
Return to a Specified Location
Press RPT A-B
at the desired location
To return, press PLAY
÷ Press CLEAR
to clear a specified location
Tips÷ To cancel Repeat Play, press
CLEAR . The Repeat Play mode
is cancelled, playback continues normally.
Note÷ With some DVD discs, there may be times when Repeat
playback is not possible because of the Title. In this case, the mark appears on the screen.
÷ With Video CDs, Repeat is unavailable during playback whenthe menu is displayed (PBC playback). To perform a Repeat ofthe last segment, start playback without displaying a menu.(see pg 11) press REPEAT
÷ PROGRAM indicator on the main unit lights during Repeat
STEP STEP
STEP STEP

16En
Press MEMORY
three timesPROGRAM is displayed on the television screen
Press ENTER
The Program screen is displayed
With , select the mod eProgram Chapter:
(when programming Chapters)Program Title:
(when programming Titles)
With , move the cursorto the Program input screen
With the number buttons , select the Chapters and Titles to be played back in any sequenc eExample) To program titles or chapters in the sequence
9, 7, 18, press 9
, 7
, 10>
, 1
, 8
7 To input Chapte rs and Titles during playbackPress ENTER
With buttons, movethe cursor to the Chapter or Title where playback needs to start
Press PLAY
Playback starts in the programmed sequence
÷ When RETURN
is pressed, the programming ends without playing the sequence.
Program PlayThe contents of one disc can be arranged in o rder. Programming is possi ble up to a maxi mum of 24 steps.
DVD.Note÷ If the current Title number (upper display side) is different
from the Title number (lower side), inputting Chapters using
the ENTER
button is unavailable. Use numeric buttons to
input Chapters numbers.÷ For DVD discs, Program Play may be unvailable depending
upon the disc. Then or appears on the screen.
÷ To program Chapters, the Chapters must be within thesame Title.
÷ When the view is changing from Chapter to Chapter during Program play, the display of the next chapter appearson the screen although it may not be the next programmedChapter. This is a standard feature of the player.
Video CD.I CD.
Press MEMORY
three timesPROGRAM is displayed on the display
Press ENTER
The Program screen is displayed
With the number buttons , Tracksmay be played back in any sequence
Example) To program tracks in the sequence 9, 7, 18,
press 9
, 7
, 10>
, 1
, 8
With buttons, move
the cursor to the required track
Press PLAY
Playback starts in the programmed sequence
÷ When RETURN
is pressed, the programming ends
without playing any additional sequences.
Note÷ During Video CD PBC playback, programmed playback
is unavailable.
Program Chapter Program Title
Current: TitleTitle
1 Chapter 11 (Chapter 1~ 30)
Program Memory – Off
RETURN ExitPLAY PlayMove
––––––
–– –– –– –– –– –– –––– –– –– –– –– –– ––
–– –– –– –– –– –– ––
Program Track
Current: TrackTotal Time 0.00
1(/10)
RETURN ExitPLAY PlayMove
––
––––––
–––––– –– ––
––––––
––––
––––
––––
–– –– –– –– –– ––
Program Chapter Program Title
Current: TitleTitle
1 Chapter 11 (Chapter 1~ 30)
Program Memory – Off
RETURN ExitPLAY PlayMove
09––––
–– –– –– –– –– –– ––07 18 –– –– –– ––
–– –– –– –– –– –– ––
––
Program screen
17En
Basic O
perations
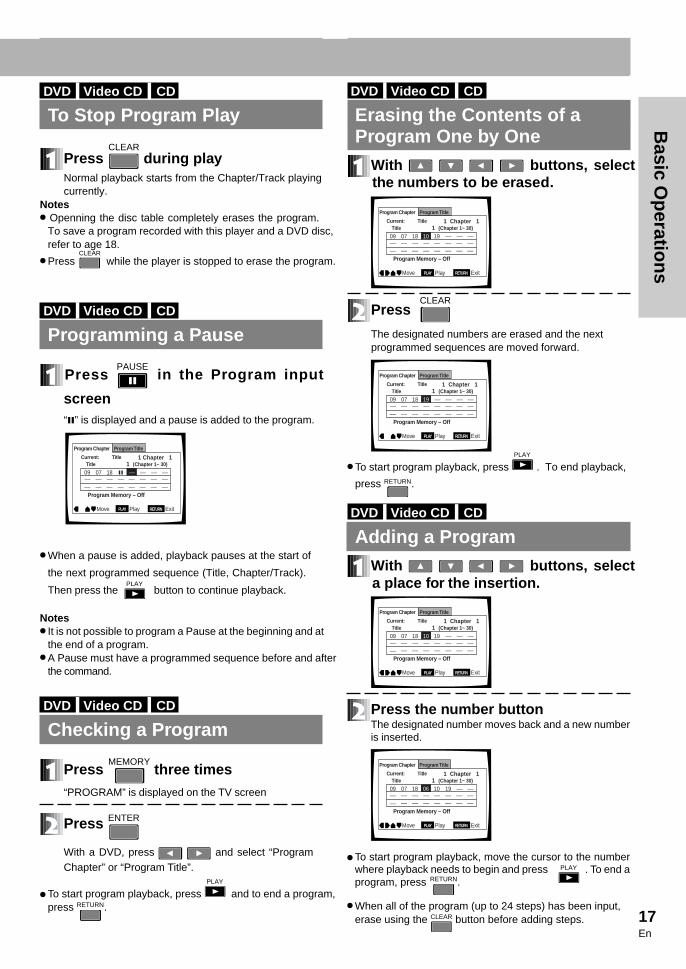
DVD.I Video CD .I CD.
Erasing the Contents of aProgram One by One
With buttons, selectthe numbe rs to be erased.
Press CLEAR
The designated numbers are erased and the next programmed sequences are moved forward.
÷ To start program playback, press PLAY
. To end playback,
press RETURN.
DVD.I Video CD .I CD.
Adding a ProgramWith buttons, selecta place for the inse rtion.
Press the number buttonThe designated number moves back and a new numberis inserted.
÷ To start program playback, move the cursor to the numberwhere playback needs to begin and press PLAY . To end aprogram, press RETURN.
÷ When all of the program (up to 24 steps) has been input, erase using the CLEAR button before adding steps.
DVD.I Video CD .I CD.
To Stop Program Play
Press CLEAR
during pl ayNormal playback starts from the Chapter/Track playingcurrently.
Notes÷ Openning the disc table completely erases the program.
To save a program recorded with this player and a DVD disc,refer to age 18.
÷ Press CLEAR
while the player is stopped to erase the program.
DVD.I Video CD .I CD.
Programming a Pause
Press PAUSE
in the Program input
screen“8” is displayed and a pause is added to the program.
÷ When a pause is added, playback pauses at the start of
the next programmed sequence (Title, Chapter/Track).
Then press the PLAY
button to continue playback.
Notes÷ It is not possible to program a Pause at the beginning and at
the end of a program.÷ A Pause must have a programmed sequence before and after
the command.
DVD.I Video CD .I CD.
Checking a Program
Press MEMORY
three times“PROGRAM” is displayed on the TV screen
Press ENTER
With a DVD, press and select “ProgramChapter” or “Program Title”.
÷ To start program playback, press PLAY
and to end a program,press RETURN.
Program Chapter Program Title
Current: TitleTitle
1 Chapter 11 (Chapter 1~ 30)
Program Memory – Off
RETURN ExitPLAY PlayMove
09––––
–– –– –– –– –– –– ––07 18 –– –– ––
–– –– –– –– –– –– ––
––
Program Chapter Program Title
Current: TitleTitle
1 Chapter 11 (Chapter 1~ 30)
Program Memory – Off
RETURN ExitPLAY PlayMove
09––––
–– –– –– –– –– –– ––07 18 –– –– –– ––
–– –– –– –– –– –– ––
19
Program Chapter Program Title
Current: TitleTitle
1 Chapter 11 (Chapter 1~ 30)
Program Memory – Off
RETURN ExitPLAY PlayMove
09––––
–– –– –– –– –– –– ––07 18 19 –– –– ––
–– –– –– –– –– –– ––
10
Program Chapter Program Title
Current: TitleTitle
1 Chapter 11 (Chapter 1~ 30)
Program Memory – Off
RETURN ExitPLAY PlayMove
09––––
–– –– –– –– –– –– ––07 18 19 –– –– ––
–– –– –– –– –– –– ––
10
Program Chapter Program Title
Current: TitleTitle
1 Chapter 11 (Chapter 1~ 30)
Program Memory – Off
RETURN ExitPLAY PlayMove
09––––
–– –– –– –– –– –– ––07 18 10 19 –– ––
–– –– –– –– –– –– ––
06
18En
Program Play
DVD.
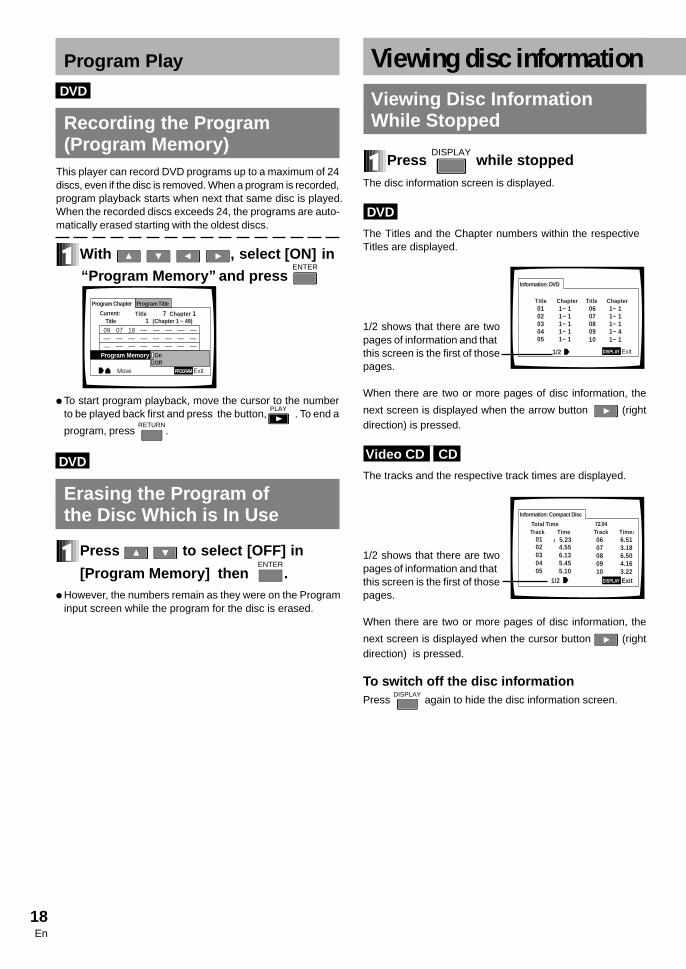
Recording the Program(Program Memory)
This player can record DVD programs up to a maximum of 24discs, even if the disc is removed. When a program is recorded,program playback starts when next that same disc is played.When the recorded discs exceeds 24, the programs are auto-matically erased starting with the oldest discs.
With , select [ON] in
“Program Memory” and press ENTER
÷ To start program playback, move the cursor to the numberto be played back first and press the button,
PLAY . To end a
program, press RETURN
.
DVD.
Erasing the P rogram ofthe Disc Which is In Use
Press to select [O FF] in
[Program Memo ry] thenENTER
.÷ However, the numbers remain as they were on the Program
input screen while the program for the disc is erased.
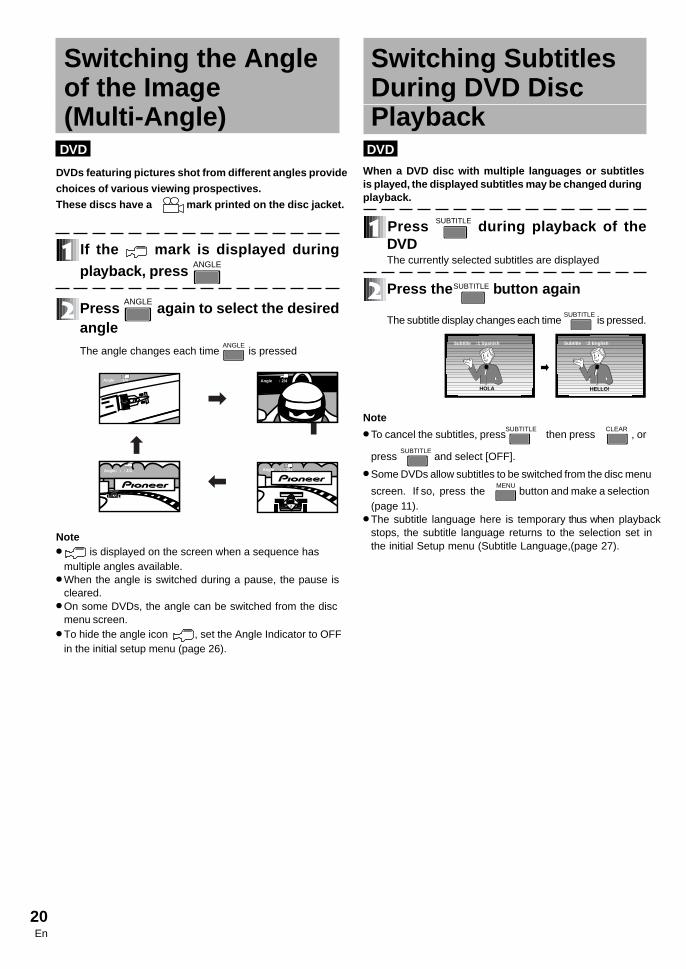
Viewing Disc InformationWhile Stopped
Press DISPLAY
while stoppedThe disc information screen is displayed.
DVD.
The Titles and the Chapter numbers within the respectiveTitles are displayed.
1/2 shows that there are twopages of information and thatthis screen is the first of thosepages.
When there are two or more pages of disc information, the
next screen is displayed when the arrow button (rightdirection) is pressed.
Video CD .I CD.
The tracks and the respective track times are displayed.
1/2 shows that there are twopages of information and thatthis screen is the first of thosepages.
When there are two or more pages of disc information, the
next screen is displayed when the cursor button (rightdirection) is pressed.
To switch off the disc informationPress
DISPLAY again to hide the disc information screen.
Viewing disc information
Program Chapter Program Title
Current:Title
Title1 (Chapter 1 ~ 49)
Program Memory
PROGRAM ExitMove
09––––
–– –– –– –– –– –– ––07 18 –– –– –– –– ––
–– –– –– –– –– –– ––OnOff
7 Chapter 1
Information: Compact Disc
Total TimeTrack Time Track Time
DISPLAY Exit
6.513.186.504.163.22
5.234.556.135.455.10
0102030405
1/2
0607080910
72.04
Information: DVD
Title Chapter Title Chapter
DISPLAY Exit
01020304
060708091005
1~ 11~ 11~ 11~ 1
1~ 11~ 11~ 11~ 41~ 11~ 1
1/2

19En
Basic O
perations
Viewing Disc InformationDuring Playback
Press DISPLAY
repeated ly during pl ay
When pressed, the following kind of disc information isdisplayed in the upper part of the screen.
DVD.Pressing onc e reveals the present frame information.
Present Title number - Present Chapter numberElapsed time of the Title
Present Frame number Total Frames in the Title
Pressing twic e reveals the present Title information.
Present Title number - Present Chapter numberElapsed time of the Title
Remaining time of the Title Total time of the Title
Pressing three times reveals the present Chapter information.
Present Title number - Present Chapter numberElapsed time of the present Ttitle
Elapsed time of the Chapter Total time of the Chapter
Pressing four times reveals additional chapter information.
Present Title number - Chapter numberElapsed time of the present Title
Remaining time of the Chapter Total time of the Chapter
Pressing five times reveals the transfer rate* level meter.
Present Title number - Present Chapter numberElapsed time of the present Title
Transfer Rate Level meter Transfer Rate Level
* TRL is the value that shows the amount of picture datarecorded on the DVD. The higher the Transfer Ratelevel, the greater amount of information can be processedbut the picture quality may suffer.
Pressing six time s hides the display screen.
PlayChapter
1.192.181.19/
1–1
PlayChapter
1.192.18–0.59/
1–1
PlayTr. Rate :
1.198.9
1–1
PlayTitle
1–1 1.1941.19–40.00/
PlayFrame
1–1 1.19834452389/
Video CD .
Pressing onc e reveals the information for the currentlyplaying Video CD.
Present Track number/total Track numberElapsed time of the disc
Remaining time of the disc Total time of the disc
Pressing twic e reveals the present track information.
Track number Elapsed time of the disc
Elapsed time of the Track Total time of the Track
Pressing three times reveals additional track information.
Track number Elapsed time of the disc
Remaining time of the Track Total time of the Track
Pressing four times hides the display screen.
÷ Disc information is unavailable during PBC playback of aVideo CD.
CD.
Pressing onc e reveals the present track information.
Track number Elapsed time of the Track
Remaining time of the Track Total time of the Track
Pressing twic e reveals the present information fof the CD.
Present Track number/total Track numberElapsed time of the Track
Remaining time of the disc Total time of the disc
Pressing three times hides the display screen.
PlayAll
5/10 20.1922.57–2.38/
PlayTrack
20.194.40 2.38/
5
PlayTrack
5 20.194.40 –2.02/
PlayTrack
1 0.033.32–3.29/
PlayAll
1/10 0.0366.32–66.29/
20En
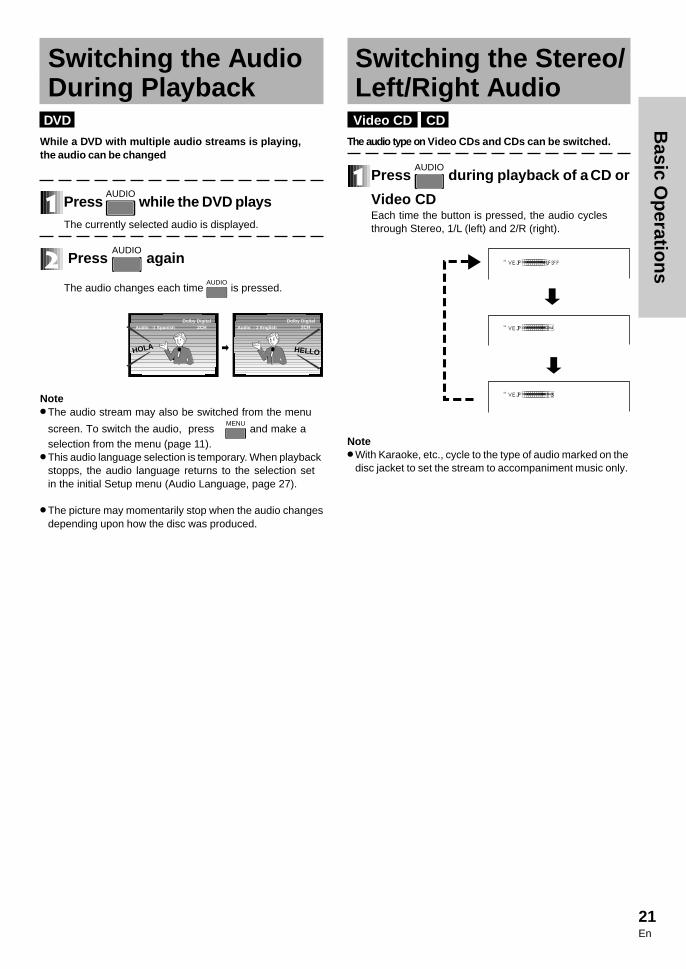
Switching the Angleof the Image(Multi-Angle)
DVD.
DVDs featuring pictures shot f rom dif ferent angles provide
choices of various viewing prospectives.
These discs have a mark printed on the disc jacket .
If the mark is displayed duringplayback, press
ANGLE
Press ANGLE
again to select the desiredangl e
The angle changes each time ANGLE
is pressed
Note÷ is displayed on the screen when a sequence has
multiple angles available.÷ When the angle is switched during a pause, the pause is
cleared.÷ On some DVDs, the angle can be switched from the disc
menu screen.÷ To hide the angle icon , set the Angle Indicator to OFF
in the initial setup menu (page 26).
Swit ching SubtitlesDuring DVD DiscPlayback
DVD.
When a DVD disc with multiple languages or subtitlesis pl ayed, the displayed subtitles may be changed playback.
during
Press SUBTITLE during pl ayback of theDVDThe currently selected subtitles are displayed
Press the SUBTITLE button again
The subtitle display changes each time SUBTITLE
is pressed.
Note÷ To cancel the subtitles, press
SUBTITLEthen press
CLEAR, or
press SUBTITLE
and select [OFF].
÷ Some DVDs allow subtitles to be switched from the disc menu
screen. If so, press theMENU
button and make a selection(page 11).
÷ The subtitle language here is temporary thus when playbackstops, the subtitle language returns to the selection set inthe initial Setup menu (Subtitle Language,(page 27).
HELLO!
Subtitle :1 Spanish Subtitle :2 English
HOLA
ANGLE : 4/4
\
\
\
\Angle : 4/4
Angle :1/4
Angle : 3/4
Angle : 2/4
21En
Basic O
perations
Switching the AudioDuring Pl ayback
DVD.
While a DVD with multiple audio streams is playing,the audio can be changed
Press AUDIO
while the DVD playsThe currently selected audio is displayed.
Press AUDIO
again
The audio changes each time AUDIO
is pressed.
Note÷ The audio stream may also be switched from the menu
screen. To switch the audio, press MENU
and make aselection from the menu (page 11).
÷ This audio language selection is temporary. When playbackstopps, the audio language returns to the selection set in the initial Setup menu (Audio Language, page 27).
÷ The picture may momentarily stop when the audio changesdepending upon how the disc was produced.
Swit ching the Stereo/Left/Right Audio
Video CD .I CD.
The audio type on Video CDs and CDs can be swit ched.
Press AUDIO
during pl ayback of a CD or
Video CDEach time the button is pressed, the audio cyclesthrough Stereo, 1/L (left) and 2/R (right).
Note÷ With Karaoke, etc., cycle to the type of audio marked on the
disc jacket to set the stream to accompaniment music only.
Audio :1 SpanishDolby Digital
Audio : 2 English
HOLA HELLO
Dolby Digital 2CH 2CH
Audio :Stereo
Audio :1/L
Audio :2/R

22En
Index of the Graphical User Interface(GUI)
On this player, various settings can be selected while watching menu screens.Here we will explain how to access menu screens. Because menu screen access differs according to the type of disc being used,or the playback mode (stop mode etc.), refer to the following menu map when accessing.
TV Screen 4:3(Letter Box).......................4:3(Pan & Scan)16:9(Wide)
Still Picture Field .............................................FrameAuto
On Screen Display On ...........................................
...........................................
Off
OSD Position Wide ............................................Normal
Angle Indicator On .................................................Off
Audio Language English ......................................Other
Subtitle Language English ......................................Other
Auto Language On ..............................................Off
DVD Language w/ Subtitle Language ...............EnglishOther
Subtitle Display On ..............................................OffAssist Subtitle
Subtitle Off With Audio ...............................Selected Subtitle
Audio DRC Large ...........................................
Medium
Virtual Surround Off
VDD/Tru Surround
Small
Off
Parental Lock Level Change ..........................Password Change
Screen Saver Off ...............................................BlackBackground Color
Background Color ..........................................
Dolby Digital Out Dolby Digital ...........................
Dolby Digital 3 PCM
DTS Out Off ................................................
DTS
96kHz PCM Out 96kHz 3 48kHz .....................
96kHz
MPEG Out MPEG ..........................................
MPEG 3 PCM
Digital Out On .................................................
Off
2Audio1 Video Language General
1 Audio2 Video Language General
2Audio1 Video Language General
2Audio1 Video Language General
2Audio1 Video Language General
page
34
page
34
page
35
page
35
page
36
page
36page
37
page
23
page
25
page
25
page
26
page
26
page
27page
27
page
28
page
29
page
29
page
30
page
31
page
33
page
33
indicates the setting when shipped

23En
Settings
Operating the InitialSetup Menu
DVD.I Video CD .I CD..
The basic operatin method for the initial Setup menu andthe locations of the appropriate buttons are explained below.
7 Displ ayin g the initial Setup me nu
Press STD-BY/ON
When the power has been turned on, proceed to .
Press SETUP
The initial setup menu is displayed.
Example :
buttons for makingmenu selections
7 Setting s that function immediate ly afterchanging depend on the type of disc
Depending on the type of disc, (DVD, Video CD or CD)some settings work immediately after changing. Thisplayer confirms changes by indicator color (light tothe left of the selected setting). See the following table.
7Settings that are locked during pl ayback
appear gray.
Selectingthe Aspect Ratio
DVD.Set the Aspect Ratio to match the display device connectedto the player. This setting is unnecessary when connecting toa wide-screen television.Most DVD movies support wide-screen devices with the screen size ratio (usually called the aspect ratio) set to 16:9(horizontal:vertical). Consequently, if a DVD is viewed ona television of the conventional size, the 4:3 aspect ratio increases the height of the image. Set the aspect ratio to 4:3 to elimate the distortion. The aspect ratio is locked during disc playback.
Press SETUP
The initial setup menu is displayed.
Select [Video]
Select [TV Screen]
Press the arrow button
(right direction)
Select the pre ferred item
Press ENTER
4:3 (Letter Box):Select when a television of the conventional size is connected with the picture in the letter box format(see the following page).4:3 (Pan & Scan):Select when a television of the conventional size is connected with the picture sides cut away (seethe following page).16:9 (Wide):Select when a wide-screen device (16:9) is connected(default setting when shipped).
Press SETUP
÷ If a disc with a 16:9 aspect ratio and 96 kHz PCM sound isconverted and played in the letter box format, the sampling frequency of the sound is downgraded to 48 kHz. To enjoy 96 kHz sound, set the screen aspect ratio to wide-screen.
÷ Whether the aspect ration can be changed depends on thedisc. Check the disc jacket for details.
Color of the indicator
Blue
Yellow
Green
Type of disc
DVD only
DVD/Video CD only
Not affected by the type of disc
Gray
Audio Language -Subtitle Language -
Auto Language -
Audio1 GeneralLanguageVideo2
EnglishEnglishOther
DVD Language -Subtitle Display -
S O
EnglishOn
TV Screen Still Picture -
On Screen Display -OSD Position -
Angle Indicator -
Audio1 GeneralLanguageVideo2
Move Exit
16:9(Wide) Normal On
4:3(Pan&Scan) 4:3(Letter Box)
SETUP
DTS Out – 96kHz PCM Out – 96kHz 3 48kHz
MPEG Out – MPEG 3 PCMDigital Out – Off
Audio1 GeneralLanguageVideo2
Move Exit
OffDolby Digital
SETUP
Dolby Digital Out –
Settings that are unavailable for change during playback

24En
DVD-V7400 Settings
16:9 (Wide)
16:9 (Wide)
Image Recorded on DVD
16:9 discs
4:3 discs
Selecting the Aspect Ratio
DVD.
Image Appearance4:3 Aspect Ratio
Wide TV (16:9)
View Options
The image appears properlyThere may be bands at the top and bottom depending upon the disc.
There are bands at the right andleft , but it can be seen proper ly
Appea rs to be stretched orlengthened horizontal lyThe TV or viewing device must be adjusted rathern than changingssettings on the player. Refer to thedevice's Operating Instructions.
Image Recorded on DVD
16:9 discs
4:3 discs
DVD-V7400 Settings
4:3 (Letter Box)
4:3 (Pan & Scan)
16:9 (Wide)
4:3 (Letter Box)4:3 (Pan & Scan)
16:9(Wide)
View Options
There are bars at the top andbottom but the full image isshown
The left and right sides of thescreen are cut of f but it can beseen proper ly
Switch to 4:3 Letter Box for a fullscreen view
The image appears stretchedor lengthened verically
Switch the player to 4:3 LetterBox or 4:3 Pan & Scan
The image appears proper ly
NOTEDisplaying any of the following data or menus during playback in the Letter Box or Pan & Scan modes, force the screen to change to the wide-screen mode.÷ Displaying the Setup menu÷ Displaying a command stack÷ Displaying video text
÷ Displaying ADV.SETUP menu÷ Displaying video blackboard
÷ Displaying the player control panel÷ Displaying a Program
25En
Settings
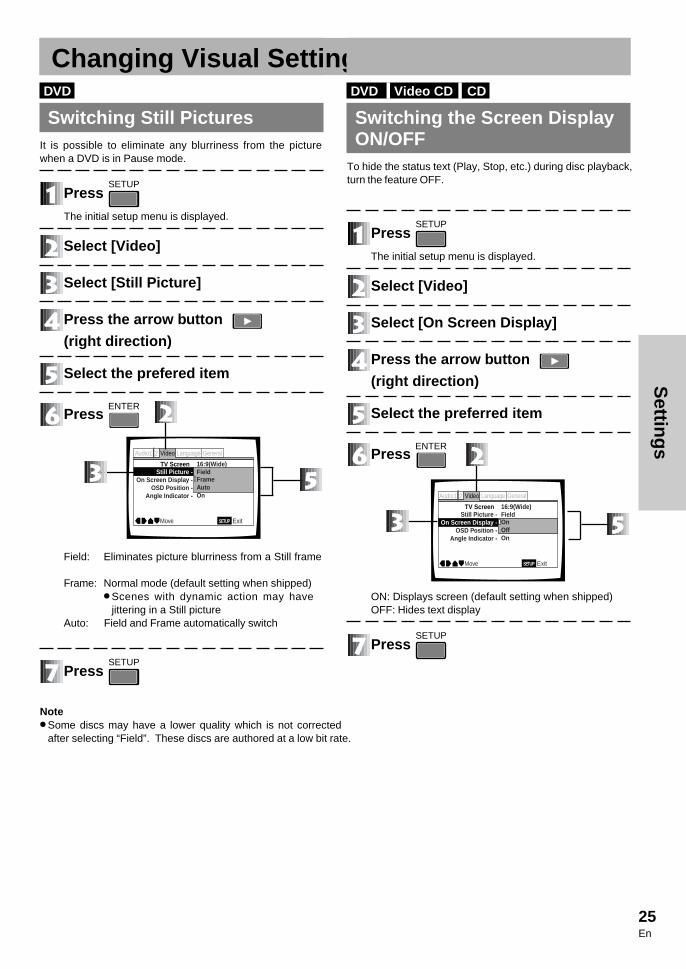
DVD.
Swit ching Still PicturesIt is possible to eliminate any blurriness from the picturewhen a DVD is in Pause mode.
Press SETUP
The initial setup menu is displayed.
Select [Video]
Select [Still Picture]
Press the arrow button
(right direction)
Select the pre fered item
Press ENTER
Field: Eliminates picture blurriness from a Still frame
Frame: Normal mode (default setting when shipped)÷ Scenes with dynamic action may have
jittering in a Still pictureAuto: Field and Frame automatically switch
Press SETUP
Note÷ Some discs may have a lower quality which is not corrected
after selecting “Field”. These discs are authored at a low bit rate.
Changing Visual Settin gs DVD. I Video CD.I CD.
Swit ching the Screen Displ ayON/OFF
To hide the status text (Play, Stop, etc.) during disc playback, turn the feature OFF.
Press SETUP
The initial setup menu is displayed.
Select [Video]
Select [On Screen Displ ay]
Press the arrow button
(right direction)
Select the pre ferred item
Press ENTER
ON: Displays screen (default setting when shipped)OFF: Hides text display
Press SETUP
TV Screen Still Picture -
On Screen Display -OSD Position -
Angle Indicator -
Audio1 GeneralLanguageVideo2
Move Exit
Frame Auto On
Field 16:9(Wide)
SETUP
TV Screen Still Picture -
On Screen Display -OSD Position -
Angle Indicator -
Audio1 GeneralLanguageVideo2
Move Exit
On Off On
Field 16:9(Wide)
SETUP
26En
DVD.
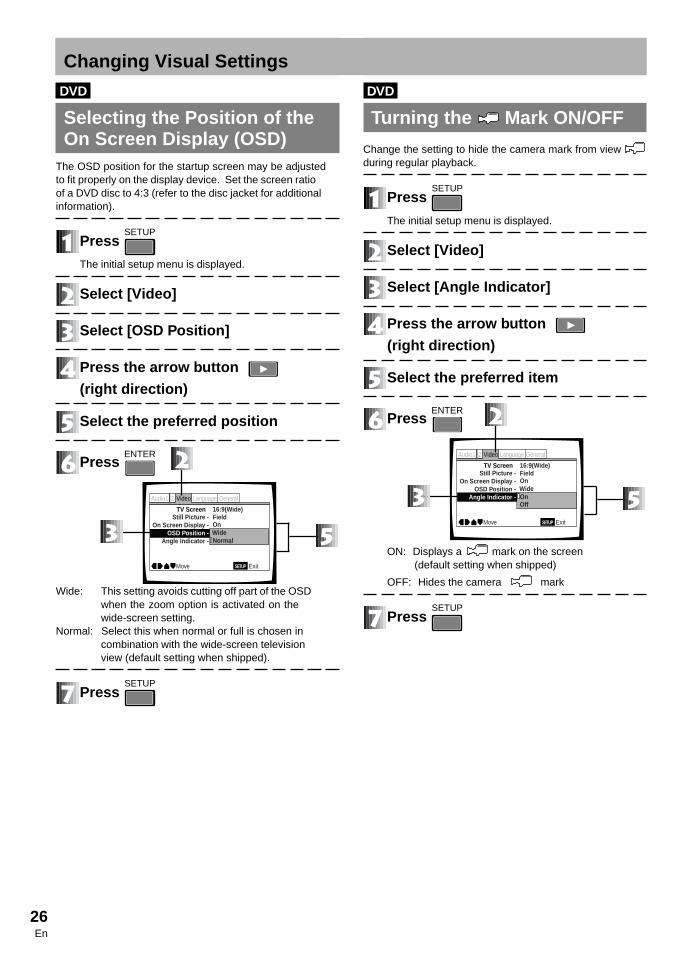
Selecting the Position of theOn Screen Display (OSD)
The OSD position for the startup screen may be adjusted to fit properly on the display device. Set the screen ratioof a DVD disc to 4:3 (refer to the disc jacket for additional information).
Press SETUP
The initial setup menu is displayed.
Select [Video]
Select [OSD Position]
Press the arrow button
(right direction)
Select the pre ferred position
Press ENTER
Wide: This setting avoids cutting off part of the OSDwhen the zoom option is activated on thewide-screen setting.
Normal: Select this when normal or full is chosen in combination with the wide-screen televisionview (default setting when shipped).
Press SETUP
DVD.
Turning the Mark ON/OFF
Change the setting to hide the camera mark from viewduring regular playback.
Press SETUP
The initial setup menu is displayed.
Select [Video]
Select [Angle Indicator]
Press the arrow button
(right direction)
Select the pre ferred item
Press ENTER
ON: Displays a mark on the screen(default setting when shipped)
OFF: Hides the camera mark
Press SETUP
TV Screen Still Picture -
On Screen Display -OSD Position -
Angle Indicator -
Audio1 GeneralLanguageVideo2
Move Exit
On Wide Normal
Field 16:9(Wide)
SETUP
TV Screen Still Picture -
On Screen Display -OSD Position -
Angle Indicator -
Audio1 GeneralLanguageVideo2
Move Exit
On Wide On Off
Field 16:9(Wide)
SETUP
Changing Visual Settings

27En
Settings
DVD.
Setting the Audio Langu ageSelect the audio language.This setting is locked during playback.
Press SETUP
The initial setup menu is displayed.
Select [Langu age]
Select [ Audio Langu age]
Press the arrow button
(right direction)
Select the pre ferred language
Press ENTER
English: The default audio language is English.
Other: Select the desired audio from among 136languages. For details, see “When [Other]is selected by the subtitle language/ audio language/DVD language setting” on the nextpage.
Press SETUP
DVD.
Setting a Subtitle Langu ageSelect the subtitle language displayed.This setting is locked during playback.
Press SETUP
The initial setup menu is displayed.
Select [Langu age]
Select [Subtitle Langu age]
Press the arrow button
(right direction)
Select the pre ferred language
Press ENTER
English: Displays English language subtitles(default setting when shipped)
Other: Select the desired subtitle from among 136languages. For details, see “When [Other] isselected by the subtitle language/ audio lan-guage/ DVD language setting” on the nextpage.
Press SETUP
Setting the LanguageSome DVD disks h ave multiple subtitles and audio tra cks . The user is able to choose the appropriate combination. Thesettings related to the various languages and subtitles (in Langu age) under the initial Setup menu are reviewed below.
Audio Language -Subtitle Language -
Auto Language -
Audio1 GeneralLanguageVideo2
Move Exit
EnglishEnglishOther
DVD Language -Subtitle Display -
Subtitle Off -
EnglishOnSelected Subtitle
SETUP
Audio Language -Subtitle Language -
Auto Language -
Audio1 GeneralLanguageVideo2
Move Exit
EnglishOtherOn
DVD Language -Subtitle Display -
Subtitle Off -
EnglishOnSelected Subtitle
SETUP

28En
7 When (Other) is selected for Subtitle language/Audio language/ DVD language settingRefer to the language code table on page 38.
Select [Other]
Press ENTER
The language setting screen is displayed.
Example : Audio Langu age is displ ayed
Select [List of Langu ages] or [Code]
7 Selecting the language with the “List of Languages”(When selecting “French”)
Press twice
7 Selecting a language with the “Code”(When selecting “French”)
Press the following number combination 0
6
1
8
÷ The numbers can also be selected by pressing
for each digit.
Pressing the shifts the digit by one.÷ The numbers in the ( ) of the code indicate the
range of available numbers.
Press ENTER
DVD.
Automatical ly Setting an AudioStream and Subtitle s
The audio and subtitles can be selected automatically orfrom the initial startup function.This setting is locked during playback.
Press SETUP
The initial setup menu is displayed.
Select [Langu age]
Select [ Auto Langu age]
Press the arrow button
(right direction)
Select the pre ferred option
Press ENTER
ON: This is effective when the audio language and thesubtitle language are the same (subtitle displaymust be ON). With a foreign movie, the originallanguage is selected for the audio and the subtitleselected on the [Subtitle Language] menu is shown.A domestic movie, the audio is set to the originallanguage and the subtitles are set to OFF(default setting when shipped).
OFF: Automatic setting of the audio during playback is cancelled. The audio and subtitle language iscontrolled by the [Audio Language] and [SubtitleLanguage] selections.
Press SETUP
+/–
Audio Language
Audio1 GeneralLanguageVideo2
SETUPMove
ExitENTER SelectReturn
ja: Japanese
List of Languages Code (0~2)
1 0 0 1
RETURN
Audio Language -Subtitle Language -
Auto Language -
Audio1 GeneralLanguageVideo2
Move Exit
EnglishEnglishOn
DVD Language -Subtitle Display -
Subtitle Off -
OffOnSelected Subtitle
SETUP
Setting the Language
on the remote control.

29En
Settings
DVD.
Setting the DVD Menu LanguageSome DVDs have a menu. Select the language from this menu.This setting cannot be set during playback.
Press SETUP
The initial setup menu is displayed.
Select [Langu age]
Select [ DVD Langu age]
Press the arrow button
(right direction)
Select the pre ferred language
Press ENTER
w/Subtitle Language: Menu screen language displays according to
the Subtitle Language setting (defaultsetting when shipped).
English: The menu screen language is English.Other: Select the desired language from among
136 languages. For details, see “When[Other] is selected by the subtitle language/audio language/DVD language setting” onpage 28.
Press SETUP
NoteIf the selected language is missing from the disc, the menuscreen displays in another language recorded on that disc.
DVD.
Turning the Subtitle Displ ayON/OFF
The feature allows subtitles and/or “Assist Subtitle” to be shown.This setting is locked during playback.
Press SETUP
The initial setup menu is displayed.
Select [Langu age]
Select [Subtitle Displ ay]
Press the arrow button
(right direction)
Select the pre ferred language
Press ENTER
ON: The subtitles are displayed (defaultsetting when shipped).
OFF: The subtitles are hidden. However, someDVDs enforce the display of subtitles(see the next page).
Assist Subtitle: This is a particular type of subtitle whichdisplays for specific groups. Such as,explaining a scene for the deaf, etc.Subtitles are displayed when this settingis selected if they exist on the disc.
Press SETUP
Audio Language -Subtitle Language -
Auto Language -
Audio1 GeneralLanguageVideo2
Move Exit
EnglishEnglishOn
DVD Language -Subtitle Display -
Subtitle Off -
w/Subtitle LanguageEnglishOther
SETUP
Audio Language -Subtitle Language -
Auto Language -
Audio1 GeneralLanguageVideo2
Move Exit
EnglishEnglishOn
DVD Language -Subtitle Display -
Subtitle Off - OnOffAssist Subtitle
SETUP
English

30En
DVD.
Setting the Langu age of theSubtitles with EnforcedDispl ay
Some DVDs enforce the display of subtitles even when theSubtitle option is set to OFF. However, the language of thesubtitles can still be selected by the normal method. Thissetting is locked during playback.
Press SETUP
The initial setup menu is displayed.
Select [Langu age]
Select [Subtitle Off]
Press the arrow button
(right direction)
Select the pre ferred language
Press ENTER
With Audio: Subtitles arematched to the audio streamlanguage.
Selected Subtitle: Subtitles are in the languge selected onthe initial Setup menu (default settingwhen shipped).
Press SETUP
Audio Language -Subtitle Language -
Auto Language -
Audio1 GeneralLanguageVideo2
Move Exit
EnglishEnglishOn
DVD Language -Subtitle Display -
Subtitle Off - Selected SubtitleWith Audio
SETUP
OnEnglish
Setting the Language
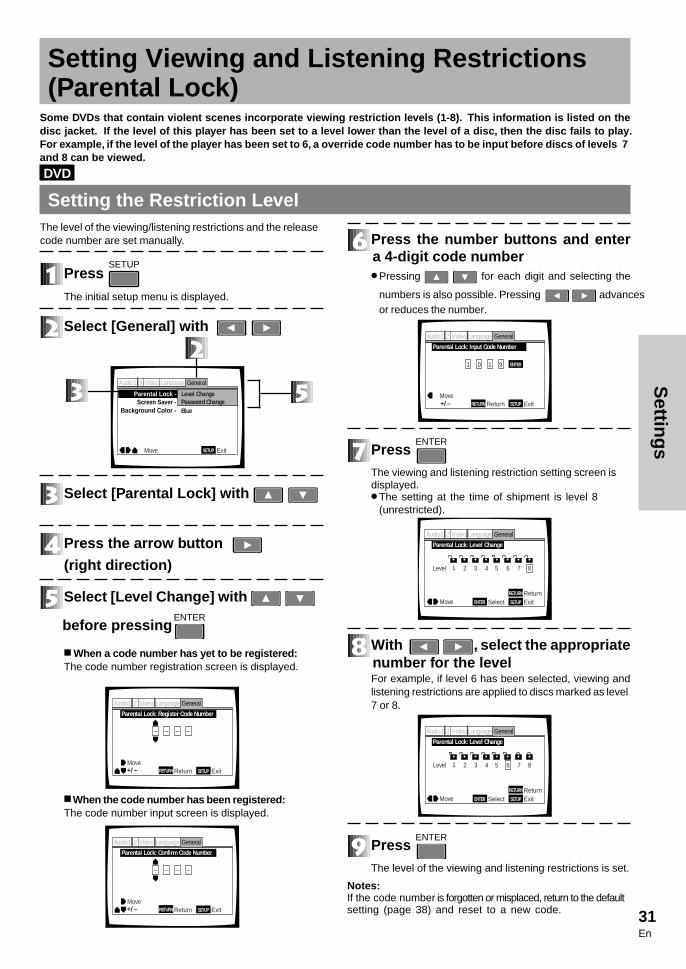
31En
Settings
Setting Viewing and Listening Restrictions(Parental Lock)
Some DVDs that contain violent scenes incorporate vi ewing restriction l evels ( 1-8). This in formation is listed on thedisc ja cket . If the l evel of this pl ayer has been set to a l evel l ower than the l evel of a disc , then the disc fails to play.For example , if the l evel of th e player has been set to 6 , a override code number has to be input before discs of levels 7and 8 can be viewed.
DVD.
Setting the Restriction LevelThe level of the viewing/listening restrictions and the releasecode number are set manually.
Press SETUP
The initial setup menu is displayed.
Select [General] with
Select [ Parental Lo ck] with
Press the arrow button
(right direction)
Select [L evel Change] with
before press ingENTER
7 When a code number has yet to be registered:The code number registration screen is displayed.
7 When the code number has been registered:The code number input screen is displayed.
Press the number buttons and entera 4-digit code number÷ Pressing for each digit and selecting the
numbers is also possible. Pressing advancesor reduces the number.
Press ENTER
The viewing and listening restriction setting screen isdisplayed.÷ The setting at the time of shipment is level 8
(unrestricted).
With , select the appropriatenumber for the l evelFor example, if level 6 has been selected, viewing andlistening restrictions are applied to discs marked as level7 or 8.
Press ENTER
The level of the viewing and listening restrictions is set.
Notes:If the code number is forgotten or misplaced, return to the defaultsetting (page 38) and reset to a new code.
Background Color -
Parental Lock -Screen Saver -
Audio1 GeneralLanguageVideo2
Move Exit
Level ChangePassword ChangeBlue
SETUP
+/–
Parental Lock: Register Code Number
Audio1 GeneralLanguageVideo2
MoveExit
– – – –
Return SETUPRETURN
Parental Lock: Level Change
Audio1 GeneralLanguageVideo2
Move ExitSelect
1 2 3 4 6 7 85
Return
Level
SETUPENTER
RETURN
Parental Lock: Level Change
Audio1 GeneralLanguageVideo2
Move ExitSelect
1 2 3 4 6 7 85
Return
Level
SETUPENTER
RETURN
+/–
Parental Lock: Confirm Code Number
Audio1 GeneralLanguageVideo2
MoveExit
– – – –
Return SETUPRETURN
Parental Lock: Input Code Number
Audio1 GeneralLanguageVideo2
MoveExit
1 0 1 9
Return+/– SETUP
ENTER
RETURN
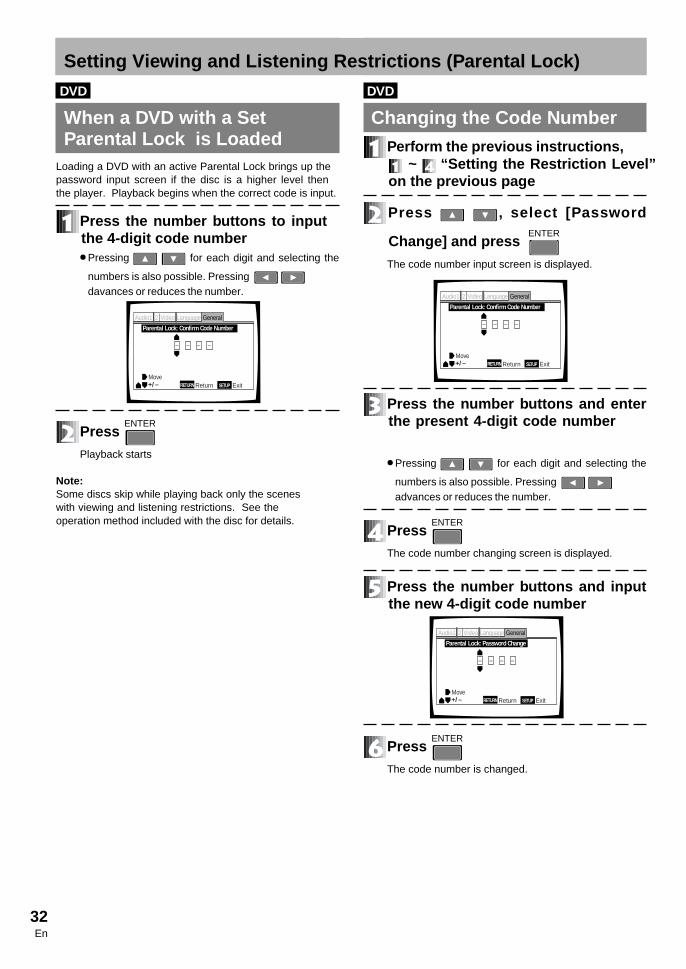
32En
DVD.
When a DVD with a SetParental Lo ck is Loaded
Loading a DVD with an active Parental Lock brings up the password input screen if the disc is a higher level then the player. Playback begins when the correct code is input.
Press the number buttons to inputthe 4-digit code number÷ Pressing for each digit and selecting the
numbers is also possible. Pressing davances or reduces the number.
Press ENTER
Playback starts
Note:Some discs skip while playing back only the scenes with viewing and listening restrictions. See the operation method included with the disc for details.
DVD.
Changing the Code NumberPerform the previous instructions,
~ “Setting the Restriction Level”on the pr evious p age
Press , select [ Password
Change] and press ENTER
The code number input screen is displayed.
Press the number buttons and enterthe present 4-digit code number
÷ Pressing for each digit and selecting the
numbers is also possible. Pressing advances or reduces the number.
Press ENTER
The code number changing screen is displayed.
Press the number buttons and inputthe n ew 4-digit code number
Press ENTER
The code number is changed.
+/–
Parental Lock: Confirm Code Number
Audio1 GeneralLanguageVideo2
MoveExit
– – – –
Return SETUPRETURN
+/–
Parental Lock: Password Change
Audio1 GeneralLanguageVideo2
MoveExit
– – – –
Return SETUPRETURN
Setting Viewing and Listening Restrictions ( Parental Lo ck)
+/–
Parental Lock: Confirm Code Number
Audio1 GeneralLanguageVideo2
MoveExit
– – – –
Return SETUPRETURN

33En
Settings
DVD.I Video CD .I CD.
Setting the Screen SaverThe screen saver is a function to prevent the burning in (theafterglow phenomenon) of an image when the same imagehas been displayed for a long time such as during a pause.
Press SETUP
The initial setup menu is displayed.
Select [General]
Select [Screen S aver]
Press the arrow button
(right direction)
Select the pre ferred item
Press ENTER
OFF Screen Saver is deactivated(default setting when shipped)
Black: Screen saver set to blackBackground Color: Screen saver set to a selected color
Press SETUP
DVD.I Video CD .I CD.
Select the Background ColorSelect a screen for when the disc is stopped.
Press SETUP
The initial setup menu is displayed.
Select [General]
Select [Ba ckground Color]
Press the arrow button
(right direction)
Press ENTER
Adjust the screen color from the
menu and pressENTER
Press SETUP
Making Standard Settings
Background Color -
Parental Lock -Screen Saver -
Audio1 GeneralLanguageVideo2
Move Exit
Level 8Off
SETUP
Background Color
Audio1 GeneralLanguageVideo2
–/+ SETUPMove
ExitENTER SelectReturnRETURN
Background Color -
Parental Lock -Screen Saver -
Audio1 GeneralLanguageVideo2
Move Exit
Level 8OffBlackBackground Color
SETUP
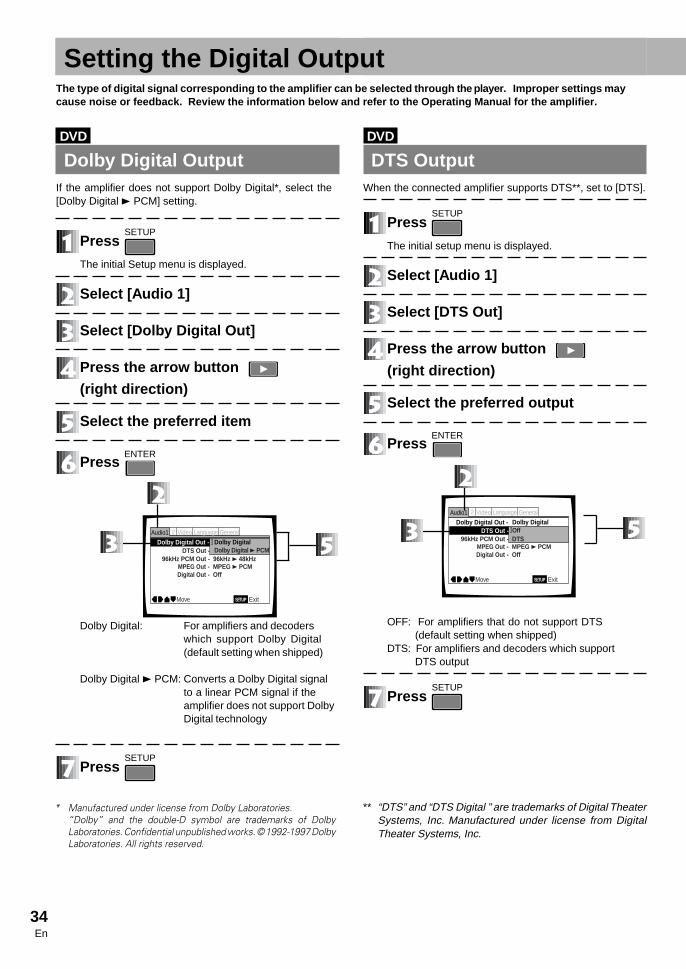
34En
DVD.
Dolby Digital OutputIf the amplifier does not support Dolby Digital*, select the[Dolby Digital 3 PCM] setting.
Press SETUP
The initial Setup menu is displayed.
Select [ Audio 1]
Select [Dol by Digital Out]
Press the arrow button
(right direction)
Select the pre ferred item
Press ENTER
Dolby Digital: For amplifiers and decoderswhich support Dolby Digital(default setting when shipped)
Dolby Digital 3 PCM: Converts a Dolby Digital signalto a linear PCM signal if theamplifier does not support DolbyDigital technology
Press SETUP
DVD.
DTS OutputWhen the connected amplifier supports DTS**, set to [DTS].
Press SETUP
The initial setup menu is displayed.
Select [ Audio 1]
Select [DTS Out]
Press the arrow button
(right direction)
Select the pre ferred output
Press ENTER
OFF: For amplifiers that do not support DTS(default setting when shipped)
DTS: For amplifiers and decoders which supportDTS output
Press SETUP
Setting the Digital OutputThe type of digital signal correspond ing to the amplifier can be selected through the player. Improper settings maycause noise or feedback. Review the information below and refer to the Operating Manual for the amplifier.
DTS Out - 96kHz PCM Out - 96kHz 3 48kHz
MPEG Out - MPEG 3 PCMDigital Out - Off
Audio1 GeneralLanguageVideo2
Move Exit
Dolby Digital 3 PCMDolby Digital
SETUP
Dolby Digital Out - 96kHz PCM Out - DTSMPEG Out - MPEG 3 PCM
DTS Out -
Digital Out - Off
Audio1 GeneralLanguageVideo2
Move Exit
OffDolby Digital
SETUP
Dolby Digital Out -
** “DTS” and “DTS Digital ” are trademarks of Digital TheaterSystems, Inc. Manufactured under license from DigitalTheater Systems, Inc.

35En
Settings
DVD.
96 kHz PCM OutputWhen the connected amplifier supports 96 kHz, set to (96 kHz).This setting is locked during playback.
Press SETUP
The initial setup menu is displayed.
Select [ Audio 1]
Select [96kHz PCM Out]
Press the arrow button
(right direction)
Select the pre ferred output
Press ENTER
96 kHz 3 48 kHz: Down-samples a 96 kHz signal to a48kHz output if the amplifier doesnot support 96 KHz(default setting when shipped)
96 kHz: For amplifiers or DACs which supports 96 kHz
Press SETUP
DVD.
MPEG OutputWhen the connected amplifier supports MPEG, set to (MPEG).
Press SETUP
The initial setup menu is displayed.
Select [ Audio 1]
Select [MPEG Out]
Press the arrow button
(right direction )
Select the pre ferred output
Press ENTER
MPEG: For amplifiers or decoders whichsupports MPEG
MPEG 3 PCM:Converts an MPEG signal to a linearPCM signal if the amplifier does notsupport MPEG(default setting when shipped)
Press SETUP
96kHz PCM Out - 96kHz 3 48kHzMPEG Out - MPEG
DTS Out -
Digital Out - MPEG 3 PCM
Audio1 GeneralLanguageVideo2
Move Exit
OffDolby Digital
SETUP
Dolby Digital Out -
96kHz PCM Out - 96kHz 3 48kHzMPEG Out - 96kHz
DTS Out -
Digital Out - Off
Audio1 GeneralLanguageVideo2
Move Exit
OffDolby Digital
SETUP
Dolby Digital Out -

36En
Setting the Digital Output DVD.I Video CD.I CD.
Setting the Digital OutputThe digital audio output terminal can be set so that the player ignores an audio signal.
Press SETUP
The initial setup menu is displayed.
Select [ Audio 1]
Select [Digital Out]
Press the arrow button
(right direction)
Select the pre ferred output
Press ENTER
ON: Outputs audio from the rear digital output terminal (default setting when shipped)
OFF: Audio is blocked from the rear digital output terminal
Press SETUP
Settings to Optimi ze theAudio Quality
DVD.I Video CD .
Surround Sound SettingThis player automatically switches to Virtual Dolby Digital andTruSurround depending upon the selected audio stream.
Press SETUP
The initial setup menu is displayed.
Select [ Audio 2]
Select [Vi rtual Sur round]
Press the arrow button
(right direction)
Select [VDD/ TruSur round]
Press ENTER
OFF: Auto-switching is off(default setting when shipped)
VDD/TruSurround : Surround sound setting
Press SETUP
96kHz PCM Out - 96kHz 3 48kHzMPEG Out - MPEG 3 PCM
DTS Out -
Digital Out - On
Audio1 GeneralLanguageVideo2
Move Exit
Off
Off
Dolby Digital
SETUP
Dolby Digital Out -
Audio DRC -
Audio2 GeneralLanguageVideo1
Move ExitSETUP
VDD/TruSurroundVirtual Surround - Off
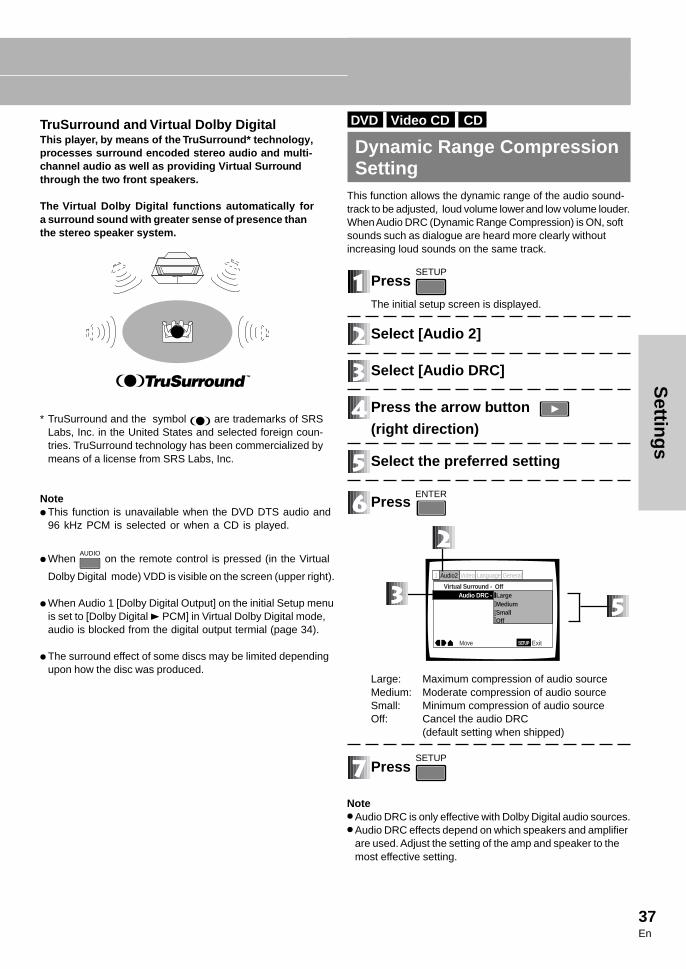
37En
Settings
Audio DRC -
Audio2 GeneralLanguageVideo1
Move ExitSETUP
LargeMediumSmallOff
Virtual Surround - Off
DVD.I Video CD .I CD.
Dynamic Range CompressionSetting
This function allows the dynamic range of the audio sound-track to be adjusted, loud volume lower and low volume louder.When Audio DRC (Dynamic Range Compression) is ON, softsounds such as dialogue are heard more clearly withoutincreasing loud sounds on the same track.
Press SETUP
The initial setup screen is displayed.
Select [ Audio 2]
Select [ Audio DRC]
Press the arrow button
(right direction)
Select the pre ferred setting
Press ENTER
Large: Maximum compression of audio sourceMedium: Moderate compression of audio sourceSmall: Minimum compression of audio sourceOff: Cancel the audio DRC
(default setting when shipped)
Press SETUP
Note÷ Audio DRC is only effective with Dolby Digital audio sources.÷ Audio DRC effects depend on which speakers and amplifier
are used. Adjust the setting of the amp and speaker to the most effective setting.
TruSur round and Virtual Dol by DigitalThis pl ayer, by means of the TruSur round* technology ,processes sur round encoded stereo au dio and multi-channel audio a s well as providing Virtual Su rroundthrough the t wo f ront speake rs.
The Virtual Dol by Digital function s automatically fora sur round sound with greater sense of presence thanthe stereo speaker system.
* TruSurround and the symbol are trademarks of SRSLabs, Inc. in the United States and selected foreign coun-tries. TruSurround technology has been commercialized bymeans of a license from SRS Labs, Inc.
Note÷ This function is unavailable when the DVD DTS audio and
96 kHz PCM is selected or when a CD is played.
÷ When AUDIO
on the remote control is pressed (in the Virtual
Dolby Digital mode) VDD is visible on the screen (upper right).
÷ When Audio 1 [Dolby Digital Output] on the initial Setup menuis set to [Dolby Digital 3 PCM] in Virtual Dolby Digital mode,audio is blocked from the digital output termial (page 34).
÷ The surround effect of some discs may be limited dependingupon how the disc was produced.

38En
Langu age Code List DVD.
Returning to the Factory Default Settings from Time of Shipment
DVD.I Video CD.I CD.
All the settings can be returned to the factory default.
With the player in the Stand by, press and hold the left scan 14 button and press
power STANDBYON
button.
Some values are reset to the default settings prior to shipment.
Setting s returned to the default :1) SETUP menu, 2) ADV. SETUP menu, 3) Program memory, 4) Parental LockSetting s maintained at last value:1) Command stack, 2) Video blackboard data, 3) Clock
Returning the settings to the default values, erases all data stored in the memory si multaneous ly (page 18).Record any vital information before issuing this command.
Language(Language code)
Japanese (ja)English (en)French (fr)
German (de)Italian (it)
Spanish (es)Dutch (nl)
Russian (ru)Chinese (zh)Korean (ko)Greek (el)Afar (aa)
Abkhazian (ab)Afrikaans (af)Amharic (am)
Arabic (ar)Assamese (as)
Aymara (ay)Azerbaijani (az)
Bashkir (ba)Byelorussian (be)
Bulgarian (bg)Bihari (bh)
Bislama (bi)Bengali (bn)Tibetan (bo)Breton (br)
Catalan (ca)Corsican (co)
Czech (cs)Welsh (cy)Danish (da)Bhutani (dz)
Esperanto (eo)Estonian (et)
Language(Language code)
Basque (eu)Persian (fa)Finnish (fi)
Fiji (fj)Faroese (fo)Frisian (fy)Irish (ga)
Scots-Gaelic (gd)Galician (gl)Guarani (gn)Gujarati (gu)Hausa (ha)Hindi (hi)
Croatian (hr)Hungarian (hu)Armenian (hy)Interlingua (ia)Interlingue (ie)
Inupiak (ik)Indonesian (in)Icelandic (is)Hebrew (iw)Yiddish (ji)
Javanese (jw)Georgian (ka)Kazakh (kk)
Greenlandic (kl)Cambodian (km)
Kannada (kn)Kashmiri (ks)Kurdish (ku)Kirghiz (ky)Latin (la)
Lingala (ln)Laothian (lo)
Language(Language code)
Lithuanian (lt)Latvian (lv)
Malagasy (mg)Maori (mi)
Macedonian (mk)Malayalam (ml)Mongolian (mn)Moldavian (mo)
Marathi (mr)Malay (ms)
Maltese (mt)Burmese (my)
Nauru (na)Nepali (ne)
Norwegian (no)Occitan (oc)Oromo (om)
Oriya (or)Panjabi (pa)Polish (pl)
Pashto, Pushto (ps)Portuguese (pt)Quechua (qu)
Rhaeto-Romance (rm)Kirundi (rn)
Romanian (ro)Kinyarwanda (rw)
Sanskrit (sa)Sindhi (sd)
Sangho (sg)Serbo-Croatian (sh)
Sinhalese (si)Slovak (sk)
Slovenian (sl)Samoan (sm)
Language(Language code)
Shona (sn)Somali (so)
Albanian (sq)Serbian (sr)Siswati (ss)Sesotho (st)
Sundanese (su)Swedish (sv)Swahili (sw)
Tamil (ta)Telugu (te)Tajik (tg)Thai (th)
Tigrinya (ti)Turkmen (tk)Tagalog (tl)
Setswana (tn)Tonga (to)Turkish (tr)Tsonga (ts)
Tatar (tt)Twi (tw)
Ukrainian (uk)Urdu (ur)
Uzbek (uz)Vietnamese (vi)
Volapük (vo)Wolof (wo)Xhosa (xh)Yoruba (yo)
Zulu (zu)
Inputcode10010514061804050920051914121821260811150512010101020106011301180119012501260201020502070208020902140215021803010315031903250401042605150520
Inputcode05210601060906100615062507010704071207140721080108090818082108250901090509110914091909231009102311011111111211131114111911211125120112141215
Inputcode12201222130713091311131213141315131813191320132514011405141515031513151816011612161916201721181318141815182319011904190719081909191119121913
Inputcode1914191519171918191919201921192219232001200520072008200920112012201420152018201920202023211121182126220922152315240825152621

39En
Settings
Advanced Operations
Advanced Feature OperationsFor fundimental operations, refer to the beginning of this manual (Basic Operation ). Thisportion details the advanced features on the DVD-V7400 player.
÷ Using the A DV.SETUP MenuIn addition to the SETUP menu, this player has an ADV.SETUPmenu supporting special functions such as the weekly timer and Power-ON start.
÷ Player Cont rol Using the MouseControl using the mouse is explained in this section.
÷ Barcode/ Command Stack FunctionBarcodes and commands can be stored in the player’s memory. The memorized content may be recalled for successive orstep by step execution. program playback is possible using the player alone without the need for a computer, controller oradvanceregistration of barcodes. Memorized data is help even if the power cord is unplugged.
Uses÷ Sale Promotion Presentation÷ Picture Reference/Picture Exhibition÷ Education/Training
¡ ¢ e E ^ §
14
BC/COMMAND STACK GROUP 001: 001
001 01:02-03002 03:001234-002365003 02:05-08004 01:045867-123456005 STEP FWD
¡ ¢ e E ^ §
14
Automatic Playback÷ Remote Control÷ External Option Switch÷ Successive playback/repeat
with Weekly timer/Power ON start
InputCommand input throughthe remote control (provided)
InputBarcode input with barcodereader (purchased separately)
Manual PlaybackStep by step playback with remote control
TOP MENU MENU
TOP MENU MENU
Input Playback

40En
÷ Video Blackboa rd FunctionUse the mouse or keyboard to draw pictures and lines or type characters (alphabet, numbers, symbols) during videoplayback or to be shown alone.Free-hand lines can be drawn on the picture during playback, and pre-drawn graphics or characters can be superimposedover the image and displayed at a specific point.
How to use÷ A pointer÷ For a picture subtitle÷ For an explanation÷ To mask a pictureUses÷ Sale promotion presentation÷ Education/training
÷ External Synchronizing Function
÷ Playback Time/Power Supp ly Time Displ ay
Curved lines can be drawn withthe mouse
Pre-drawn graphics or characters can be automatically superimposedover the picture
14
¡¢ e E ^ §1
4¡ ¢ e E ^ § 1
4¡ ¢ e E ^ §

41En
Advanced Operations
DVD.I Video CD .I CD.
To Access the ADV. SETUP menu
Press and hold SETUP
for one second
The Advanced Setup (ADV.SETUP) menu is shown to the left.
To set a parameter, such as the weekly timer, select
WEEKLY TIMER with , set ON/OFF with the
. If a parameter is set ON, press ENTER
and perform the
setting instructions as prompted on the screen.
For Power-ON Start, select POWER ON START with the
, set ON/OFF with the . If a parameter
is set ON, press ENTER
, set ON/OFF to ON and perform the
setting instructions as prompted on the screen.
A similar procedure is used to set the other parameters with
and set ON/OFF with the .
4 REPEAT MODESelect OFF/CHAPTER/TITLE/DISC from the menu.Set ALL,DISC under the TITLE PLAY MODE option OFF: Title(s) plays back once and does not repeat
(DVD, Video CD, CD)CHAPTER: The selected chapter only repeats (DVD)
One selected track only repeats (Video CD, CD) TITLE: The selected Title repeats (DVD)
The entire disc repeats (Video CD, CD) DISC: The entire disc repeats (DVD only)
5 BAUD RATEThis sets the baud rate of the RS-232C interface at either4800 bps or 9600 bps.
6 TRAY LOCKWhen set to ON, the disc tray ignores request to open orto close.
7 BLACKBOARD LOCKWhen set to ON, video blackboard input is ignored.
8 STACK MODE OSDThis switches the OSD ON/OFF during stack playback.
ON: The STACK display appears on creen when exexutingor search a stack.
OFF: The STACK display is hidden.
1 WEEKLY TIMERA timer for turning the power ON and OFF can be set for eacheach day of the week; as well as setting the title and chapter.The player is limited to a maximum of 24 settings ofunmanned operations at a time.
OFF: WEEKLY TIMER is deactivatedON: WEEKLY TIMER is available
2 POWER ON STARTThis function sets whether or not automatic playback is to startwhen the power is switched ON.OFF: POWER ON START is deactivatedON: POWER ON START is available
It is necessary to identify the Title and Chapter as astarting point for playback. If this starting point isnot identified, the player waits in the Stop mode.
3 TITLE PLAY MODESingle : When a single Title has been selected, the DVD
player stops at the end of that Title.
All : Each Title on a DVD disc plays before the playerstops.
In order to set up the unique functions o n the DVD-V7400, there are settings for 16 paramete rsavailable through the remote cont rol .
ADV. SETUP MENU settings
ADV.SETUP page 1/2WEEKLY TIMER OFFPOWER ON START OFFTITLE PLAY MODE SingleREPEAT MODE OFFBAUD RATE 4800bpsTRAY LOCK OFFBLACKBOARD LOCK OFFSTACK MODE OSD ONREV STEP/REV PLAY VOBU
ExitSETUP
ADV.SETUP page 2/2PLAYER CONTRL PANEL SelectableSETUP LOCK(MOUSE) ONEXTERNAL OPTION SW StandardSYNC OUT (DURING SQ) OFFEXTERNAL SYNC OFFAV SYNC COMPENSATE ON
ExitSETUP
Above picture indicates the initial settings.

42En
9 REV STEP/REV PLAYThis selects the image segment(s) for reverse playVOBU: Usually the reverse segments are in blocks of
0.4 - 1 secondFrame: Reverses at intervals of one frame
0 PLAYER CONTROL PANELThis command reveals the or hides the icon panel and iscontrolled with a mouse.Selecta ble:Click the left and right mouse buttons simultaneously,
or with the left button held down, click the rightbutton to display the icon control panel.
Always On: The icon control panel is shown except during someSetup actions and views.
Always Off : The icon control panel is hidden.
- SETUP LOCK (MOUSE)This function allows the SETUP or ADV.SETUP menu tobe activated from the icon control panel.ON: The SETUP or ADV.SETUP menu are unavailable
from the icon control panel.OFF: Left-mouse-clicks activate the appropriate menu,
SETUP menu or ADV.SETUP menu.
= EXTERNAL OPTION SWThis is used to set the key of the external option switch.Standard: Input of all external option keys is possible. Limit : Only the following input is possible with the
external option keys:Up/down/left/right cursor, ENTER, number keys1-6, STACK GROUP 1-6, TOP MENU, and MENU
ADV. SETUP MENU settings- SYNC OUT (DURING SQ)This function controls whether a video synchronization sigmalis output to a black screen or to a blue background when theplayer is not withholding any video output.OFF: Video is always output
(the synchronization signal remains)ON: Video is withheld when the menu screen is shown or
when playback is stopped.
! EXTERNAL SYNCThis selects the synchronized TV signal format when externalsynchronization is input.OFF: This setting blocks external synchronizing
PAL : When a PAL fomat DVD disc is played backNTSC: When a NTSC format DVD disc is played
@ AV SYNC COMPENSATEThis function allows external synchronization when the playeris used alone or when multiple units are daisy-chained orlinked with video frames matched.
ON: When using the player by itself OFF: When multiple units are operated side by side (linked)
and the video frames are aligned
NoteThe following functions are locked during playback. To makechanges, the player must be in the Stop mode.÷ REV STEP/REV PLAY÷ EXTERNAL SYNC÷ AV SYNC COMPENSATE

43En
Advanced Operations
Player Cont rol Using a MouseConnect a PS/2 mouse before turning the power ON.
DVD.I Video CD .
Button SelectionUse the mouse to select DVD Menu buttons and buttons displayed on the screen.When the cursor is placed on a button, it changes from to
the mark. While the cursor is displayed as the mark,
clicking on a button with the left mouse button is identical to
making a selection from the remote control.
* Menu selection with a mouse is invalid on a Video CD.
DVD.I Video CD .I CD..
Player Cont rol IconPressing the mouse’s left and right button simultaneously orclicking the right button while holding the left button displaysthe player control icons on the bottom left of the screen. Whenthe mouse pointer is placed on a player control icon, the pointer
changes from to . While the cursor is in this form,
, clicking with the left mouse button performs the same
operation as the button on the remote control.
÷ Buttons may appear anywhere within the viewing area on a commerically produced DVD. Please use the remotecontrol instead of the mouse with such discs.
DiscsFunction
¢¡E3
e14
TOP MENU
MENU
DVD
YES
YES
YES
YES
YES
YES
YES
YES
YES
YES
Video CD
YES
YES
YES
YES
NO
YES
YES
YES
NO
NO
CD
YES
YES
NO
YES
NO
YES
YES
NO
NO
NO
TOP MENU MENU
TOP MENU MENU
SKIP SCAN STEP PLAY STEP SCAN SKIP
RETURNFWDREV
A The player control icons correspond to buttons on theremote control.
Controlling a DVD Disc
÷ When SETUP LOCK (MOUSE) on the ADV. SETUP menu is set toOFF, the SETUP and ADV. SETUP buttons appear on the playercontrol panel. You can click these buttons with the mouse to enterthe corresponding SETUP menu.
÷ When SETUP LOCK (MOUSE) is set to OFF and point “A” is draggedwhile holding the left mouse button down, the plyer control panel canbe moved. Once the panel location is changed, the new location ismaintained until the power is turned OFF. The default panel position is restored when the power is turned back ON.The same reaction happens when the OSD position is changedor when the video blackboard is displayed.
NOTE÷ The position of the player control panel is locked during PAL disc
playback.÷ The position of the player control panel is locked when the [OSD
Position] in the SETUP MENU is set to [Wide] or when thevideo blackboard is displayed.
Controlling a Video CDA left mouse click fails to select Video Titles. Right-clickingthe player control icon (see below) displays a Title number inthe upper right corner of the screen. Additional clicks changethis number. To begin video playback, press and theselected Title is shown.
Track number
4
Title numbers consecutivelydecrease by one
ENTER
Title numbers consecutivelyincrease by one
Right Click
NoteIf the Title number is invalid or mouse operation is prohibited, the request fails to execute.
Duringplayback
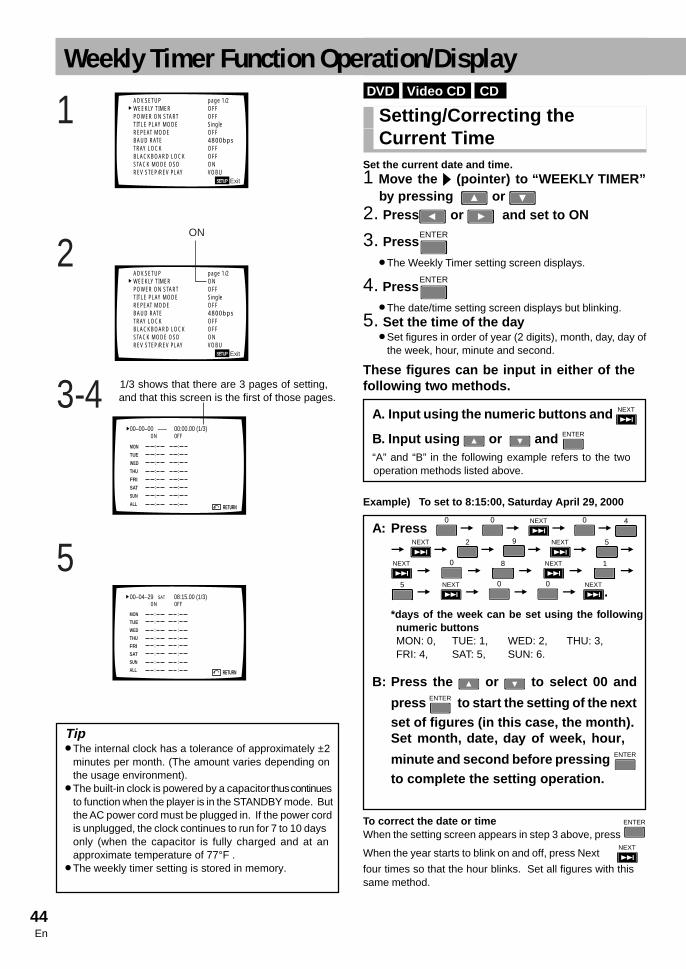
44En
DVD.I Video CD .I CD .
Setting/ Correcting theCurrent Time
Set the current date and tim e.1 Move the ‰ (pointer) to “WEEK LY TIMER”
by pressing or 2. Press or and set to ON
3. Press ENTER
÷ The Weekly Timer setting screen displays.
4. Press ENTER
÷ The date/time setting screen displays but blinking.5. Set the time of the d ay
÷ Set figures in order of year (2 digits), month, day, day ofthe week, hour, minute and second.
These figures can be input in either of the following t wo methods.
Example ) To set to 8:15:00 , Saturday April 29 , 2000
To correct the date or timeWhen the setting screen appears in step 3 above, press
ENTER
When the year starts to blink on and off, press NextNEXT
four times so that the hour blinks. Set all figures with thissame method.
A. Input using the numeric buttons and NEXT
B. Input using or and ENTER
“A” and “B” in the following example refers to the twooperation methods listed above.
A: Press 0
= 0
= NEXT
= 0
= 4
= NEXT
= 2 = 9
= NEXT
= 5 =NEXT
= 0
= 8 = NEXT
= 1 =5 =
NEXT
= 0
= 0
= NEXT
.
*days of the week can be set using the fol lowingnumeric buttonsMON: 0, TUE: 1, WED: 2, THU: 3,FRI: 4, SAT: 5, SUN: 6.
B: Press the or to select 00 and
press ENTER to sta rt the setting of the n extset of figures ( in this case, the month).Set month , date, day of week, hour,
minute and second before press ing ENTER
to complete the setting operation.
Tip÷ The internal clock has a tolerance of approximately ±2
minutes per month. (The amount varies depending onthe usage environment).
÷ The built-in clock is powered by a capacitor thus continuesto function when the player is in the STANDBY mode. Butthe AC power cord must be plugged in. If the power cordis unplugged, the clock continues to run for 7 to 10 days only (when the capacitor is fully charged and at anapproximate temperature of 77°F .
÷ The weekly timer setting is stored in memory.
Weekly Timer Function Operation/Display
5
00–00–00 ––– 00:00.00 (1/3)
RETURN
MON
TUE
WED
THU
FRI
SAT
SUN
ALL
00–04–29 SAT 08:15.00 (1/3)
RETURN
MON
TUE
WED
THU
FRI
SAT
SUN
ALL
3-4
1
2ON
ADV.SETUP page 1/2WEEKLY TIMER OFFPOWER ON START OFFTITLE PLAY MODE SingleREPEAT MODE OFFBAUD RATE 4800bpsTRAY LOCK OFFBLACKBOARD LOCK OFFSTACK MODE OSD ONREV STEP/REV PLAY VOBU
ExitSETUP
ADV.SETUP page 1/2WEEKLY TIMER ONPOWER ON START OFFTITLE PLAY MODE SingleREPEAT MODE OFFBAUD RATE 4800bpsTRAY LOCK OFFBLACKBOARD LOCK OFFSTACK MODE OSD ONREV STEP/REV PLAY VOBU
ExitSETUP
1/3 shows that there are 3 pages of setting, and that this screen is the first of those pages.

45En
Advanced Operations
DVD.I Video CD .I CD .
Setting the Weekly Timer1 When the setting screen appea rs at step 3
on the previous page, press or tomove ‰ (pointer) to the day of the week and
press ENTER
÷ Power ON/OFF time setting display appears
2. Set the p ower ON/OFF tim eExample 1 : To turn p ower ON at 10:30 AM on Wednesd ay
÷ Move ‰ (pointer) to “WED” and press ENTER
÷ If the power OFF time is not set, the timer simply powers ON
Example 2: To turn p ower ON at 10:30 AM on Wednesd ayand turn it OFF at 5:45PM (17:45)
NOTE:It is also possible to set only the power OFF time without a power ON time. In this case, when power is turned ONmanually, it is automatically turned OFF at the set time.
A: Press 1 =
0 =
NEXT
= 3 = 0
= NEXT
= NEXT
B: Press or to select 10 and pressENTER to save the setting and continue tothe next figures . Press or to
set it to 30 and press ENTER twic e.
A: Press 1 =
0 =
NEXT
= 3 = 0
= NEXT
= 1 = 7
= NEXT
= 4 =5 =
NEXT
B: Press or to select 10 and pressENTER to save the setting and continueto the next set. Set the subsequent figures to 30 , 17 and 45 by repeatingthe ab ove.
÷ The WEEKLY TIMER may be set using the mouse aswell as with the remote control.
÷ When displays, clicking with the left mouse button
changes selections or settings.÷ Each time you click the left mouse button, the numerical
value is increased by one, Each time you click the rightbutton, the numerical value is decreased by one.
1
2
00–04–29 SAT 08:15.00 (1/3)
RETURN
MON
TUE
WED
THU
FRI
SAT
SUN
ALL
TIMER ON/OFF WED
1.TOP MENU
2.TITLE
3.BARCODE/COMMAND STACK
CLEAR RETURNENTER
TIMER ON/OFF WED
1.TOP MENU
2.TITLE
3.BARCODE/COMMAND STACK
10 30
CLEAR RETURNENTER
TIMER ON/OFF WED
1.TOP MENU
2.TITLE
3.BARCODE/COMMAND STACK
17 4510 30
CLEAR RETURNENTER
RETURN ENTER
÷ Select ENTER on the screen to create the setting and exitthe screen. Select RETURN to cancel the setting and returnto the previous screen.

46En
3. Set the operation which begins when the time d playback sta rts
1. TOP MENU: Setup for playing from top of the menu2. TITLE: Setup for playing a specified Title and Cchapter
- Refer to "Playing the Specified Title and Chapter" (see
3. BARCODE COMMAND STACK: Setup for recallingthe barcode command stack groups from playermemory- Refer to ”Setup for Recalling the Barcode/Command
Stack Groups from Memory” (see page 47)- Select one of the above with or , press the
ENTER button.
NOTE÷ The power ON time has to be set prior to this action.
÷ The data is written in memory at the moment the timersetup screen is exited. The timer setup is erased frommemory if the power is turned OFF before exiting.
÷ A DVD disc with automatic playback ignores the TimerSetup feature.
DVD.I Video CD.I CD .
Clearing the Set TimeWith the TIMER ON/OFF input screen (sh own left)
showing, press CLEAR
then press ENTER
on the
remote cont rol.
DVD.I Video CD .I CD .
Playing a Specified Titleand Chapter
÷ Move ‰ (pointer) to “2 TITLE” and press ENTER
Example : To pl ayback of Title 6, Chapter 2
NOTE÷ When a Title and Chapter are selected, playback continues
after the selected chapter if there is one or more chaptersfollowing it. Playback stops at the end of theTitle.If repeat playback is selected in the ADV SETUP menu, theChapter plays first then loops to play again.
÷ When specifying tracks on a CD or Video CD, enter thetrack number in the CHAPTER in the above setting. At thistime TITLE and BARCODE/COMMAND STACKs settingswill not operate.
A: Press 0
= 6 = NEXT
= 0
= 2
= NEXT
B: Press or to select 06 and press
ENTER to advance to the n ext set of figures.Press the buttons, or , to select02 and press ENTER
TIMER ON/OFF WED
1.TOP MENU
2.TITLE
3.BARCODE/COMMAND STACK
17 4510 30
CLEAR RETURNENTER
31
2
TIMER ON/OFF WED
1.TOP MENU
2.TITLE
3.BARCODE/COMMAND STACK
17 4510 30
CLEAR RETURNENTER
TIMER ON/OFF WED
1.TOP MENU
2.TITLE
3.BARCODE/COMMAND STACK
17 4510 30
CLEAR RETURNENTER
00–04–29 SAT 08:15.00
RETURN
MON
TUE
WED
THU
FRI
SAT
SUN
ALL
10 30 17 45 T06:C02
3
TIMER ON/OFF WED
1.TOP MENU
2.TITLE
3.BARCODE/COMMAND STACK
17 4510 30
CLEAR RETURNENTER
Pointer
Weekly Timer Function Operation/ Displ ay
- Select ENTER on the screen to save the setting and exit the screen.
or re ferenceMemorized data is not erased even
- Select RETURN to cancel the setting and return to the
if ACpower cord is unplugged
below)
previous screen.

47En
Advanced Operations
DVD.I Video CD .I CD .
Setting to Turn ON PlayerPower Only
When selecting a Title, enter a Title which is missing from the disc.Example: Enter Title 99
DVD.
Setup for Recalling theBarcode/ Command StackGroups f rom Memory
÷ Move the pointer to #3, BARCODE/COMMAND STACK,
press ENTER
Example : To recall and execute Ba rcode/Command StackGroup number 5
NOTEWhen a Barcode Command Stack Group is selected, the stackwithin the group is executed repeatedly regardless of whetherthe Repeat mode in the ADV SETUP menu is ON or OFF.
DVD.I Video CD .I CD .
Setting the Timer Function Without effecting WeeklyTimer Setting
1 Move the ‰ (pointer) to WEEKLY TIMER onthe ADV SETUP menu screen with or
. Set the timer to OFF with the directionbutton or on the remote control.
A: Press 5 = NEXT B: Press or to select 005 then press
ENTER
TIMER ON/OFF SAT
1.TOP MENU
2.TITLE
3.BARCODE/COMMAND STACK
17 4510 30
CLEAR RETURNENTER
00–04–29 WED 08:15.00 (1/3)
RETURN
MON
TUE
WED
THU
FRI
SAT
SUN
ALL
10 30 17 45 GROUP005
÷ Select ENTER on the screen to enter the setting and exitthe screen. Select RETURN to cancel the setting and returnto the previous screen.
ADV.SETUP page 1/2WEEKLY TIMER OFFPOWER ON START OFFTITLE PLAY MODE SingleREPEAT MODE OFFBAUD RATE 4800bpsTRAY LOCK OFFBLACKBOARD LOCK OFFSTACK MODE OSD ONREV STEP/REV PLAY VOBU
ExitSETUP
Now the timer setting is complete.
button.the

48En
DVD.I Video CD .I CD .
Setting the WEEKLY TIMERand Expanda ble Functions
This setting allows for the power to be turned ON and OFF morethan two times during the same day. The ALL setting triggersthe player to turn ON and OFF at the same time each day.
DVD.I Video CD .I CD .
Setting the Da y for theWEEKLY TIMER
1 Select the WEEKLY TIMER setup screen÷ For information on how to select this screen, see page
44 and 45.
2. When the setting options begin blinking,
press thePREV
button.
÷The setting that indicates the day of the week beginsto blink.
3. Select a d ay by using or
4. Press NEXT
÷ For information on how to activate the timer and other settings, refer to page 45.
Press the scrolling buttons or to view the eight available day settings : ALLMON,TUE, WED, THU, FRI, SAT, and SUN. Forinformation relating specifically to theWEEKLY TIMER when ALL is se lected, seepage 49.
An alternative to the Remote Control is aPS/2 (or compatible) mouse . Position thecursor over the appropriate Day then clickthe left mouse button to select that Day.
Weekly Timer Function Operation/ Displ ay
÷ Select ENTER on the screen to save the setting and exitthe screen. Select RETURN to cancel the setting and returnto the previous screen.
TIMER ON/OFF SUN
1.TOP MENU
2.TITLE
3.BARCODE/COMMAND STACK
CLEAR RETURNENTER
TIMER ON/OFF SUN
1.TOP MENU
2.TITLE
3.BARCODE/COMMAND STACK
CLEAR RETURNENTER
TIMER ON/OFF MON
1.TOP MENU
2.TITLE
3.BARCODE/COMMAND STACK
CLEAR RETURNENTER
TIMER ON/OFF MON
1.TOP MENU
2.TITLE
3.BARCODE/COMMAND STACK
CLEAR RETURNENTER
1
2«
3
4
«
MON ~ALLDisplay changes
« or
Blink
Blink
Blink
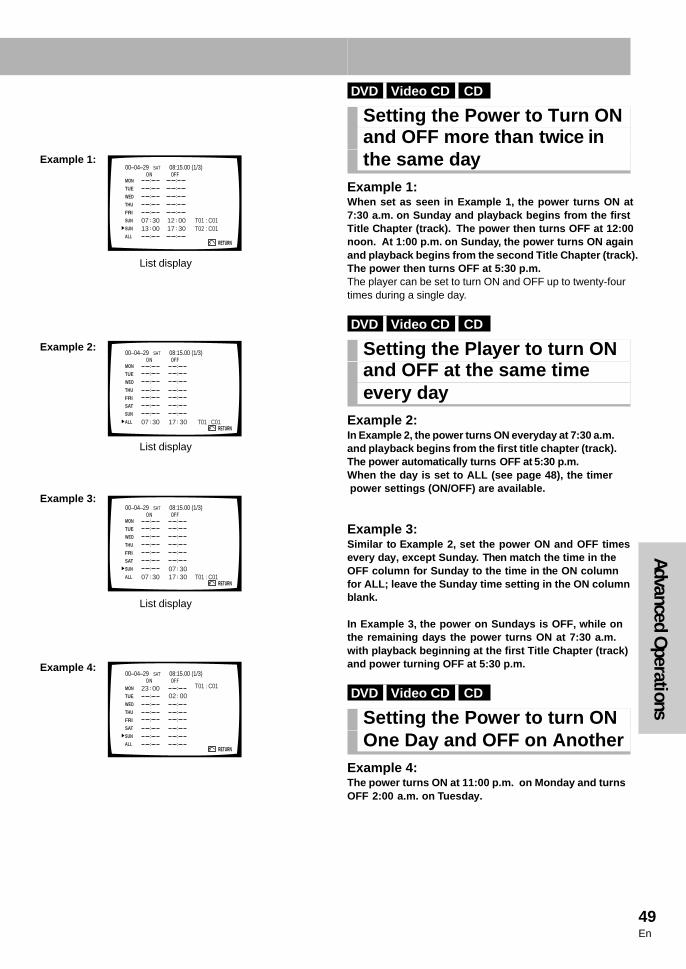
49En
Advanced Operations
DVD.I Video CD .I CD .
Setting the Power to Turn ONand OFF more than t wice inthe same d ay
Example 1 :When set as seen in Example 1 , the p ower turns ON at7:30 a.m. on Sund ay and pl ayback begins f rom the fi rstTitle Chapter (tra ck). The power then turns OFF at 12:00noon . At 1:00 p.m . on Sunda y, the p ower turns ON againand pl ayback begins f rom the second Title Chapter (tra ck).The power then turns OFF at 5:30 p.m.The player can be set to turn ON and OFF up to twenty-fourtimes during a single day.
DVD.I Video CD.I CD .
Setting the Player to turn ONand OFF at the same timeevery day
Example 2 :In Example 2, the power turns ON everyday at 7:30 a.m.and playback begins from the first title chapter (track).The power automatically turns
power settings (ON/OFF) are available.
OFF at When the day is set to ALL (see page 48), the timer
5:30 p.m.
Example 3 :Similar to Example 2 , set the power ON and OFF timesevery day, except Sund ay. Then match the time in theOFF column for Sund ay to the time in the ON columnfor ALL; leave the Sunday time setting in the ON col umnblank.
In Example 3 , the power on Sund ays is OFF, while onthe remaining d ays the p ower turns ON at 7:30 a.m.with playback begin ning at the fi rst Title Chapter (track)and power turning OFF at 5:30 p.m.
DVD.I Video CD.I CD .
Setting the Power to turn ONOne Day and OFF on Anothe r
Example 4 :The power turns ON at 11:00 p.m. on Monday and turnsOFF 2:00 a.m. on Tuesd ay.
00–04–29 SAT 08:15.00 (1/3)
RETURN
MON
TUE
WED
THU
FRI
SUN
SUN
ALL13 00 17 30 T02 : C0107 30 12 00 T01 : C01
00–04–29 SAT 08:15.00 (1/3)
RETURN
MON
TUE
WED
THU
FRI
SAT
SUN
ALL 07 30 17 3007 30
T01 : C01
00–04–29 SAT 08:15.00 (1/3)
RETURN
MON
TUE
WED
THU
FRI
SAT
SUN
ALL
23 0002 00
T01 : C01
00–04–29 SAT 08:15.00 (1/3)
RETURN
MON
TUE
WED
THU
FRI
SAT
SUN
ALL 07 30 17 30 T01 : C01
Example 1 :
Example 2 :
Example 3 :
Example 4 :
List display
List display
List display
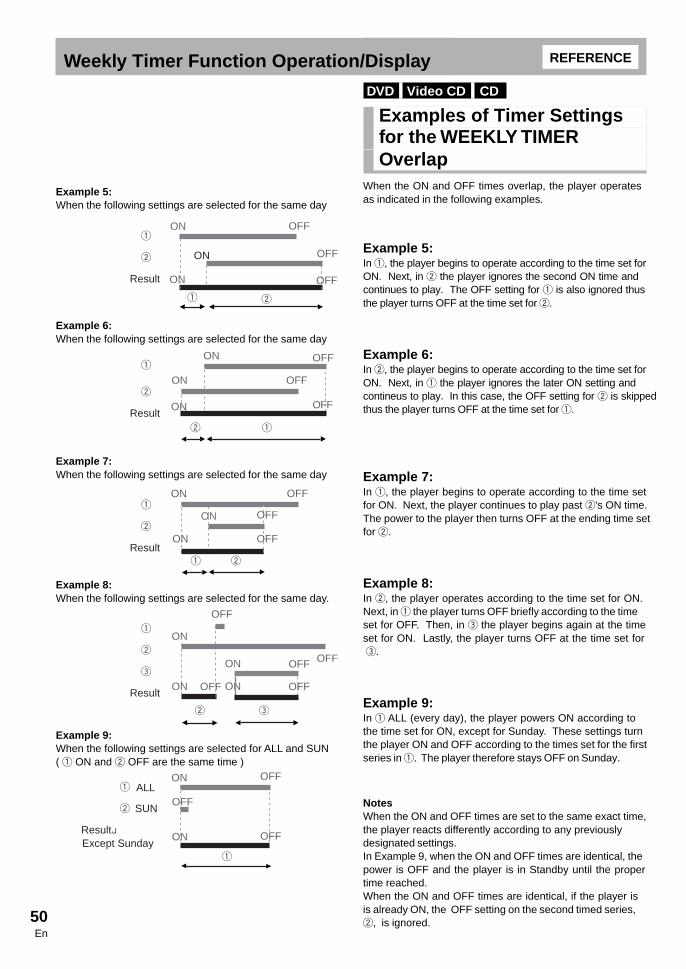
50En
DVD.I Video CD .I CD .
Examples of Timer Settingsfor the WEEKLY TIMEROverlap
When the ON and OFF times overlap, the player operatesas indicated in the following examples.
Example 5 :In 1, the player begins to operate according to the time set forON. Next, in 2 the player ignores the second ON time andcontinues to play. The OFF setting for 1 is also ignored thusthe player turns OFF at the time set for 2.
Example 6 :In 2, the player begins to operate according to the time set forON. Next, in 1 the player ignores the later ON setting andcontineus to play. In this case, the OFF setting for 2 is skippedthus the player turns OFF at the time set for 1.
Example 7 :In 1, the player begins to operate according to the time setfor ON. Next, the player continues to play past 2's ON time. The power to the player then turns OFF at the ending time set for 2.
Example 8 :In 2, the player operates according to the time set for ON.Next, in 1 the player turns OFF briefly according to the timeset for OFF. Then, in 3 the player begins again at the timeset for ON. Lastly, the player turns OFF at the time set for 3.
Example 9 :In 1 ALL (every day), the player powers ON according to the time set for ON, except for Sunday. These settings turnthe player ON and OFF according to the times set for the firstseries in 1. The player therefore stays OFF on Sunday.
NotesWhen the ON and OFF times are set to the same exact time,the player reacts differently according to any previously designated settings.In Example 9, when the ON and OFF times are identical, thepower is OFF and the player is in Standby until the propertime reached.When the ON and OFF times are identical, if the player isis already ON, the OFF setting on the second timed series, 2, is ignored.
REFERENCE
OFFOFF
OFFOFF
OFFOFF
ONON OFFOFF
1 2
ONON
OFFOFF
OFFOFF
ONON
2 3
ONON OFFOFF
OFFOFFALL
SUN
ONON OFFOFF
ON
1 2
ONON
OFFOFF
ONON OFFOFF ONON OFFOFF
ONON
1
ONON
OFFOFF
OFFOFF
1
2
Result
1
2
Result
1
2
Result
1
2
3
Result
1
2
Result Except Sunday
ONON
ONON OFFOFF
ONON
2 1
OFFOFF
ONON
OFFOFF
Example 5:When the following settings are selected for the same day
Example 6:When the following settings are selected for the same day
Example 7:When the following settings are selected for the same day
Example 8:When the following settings are selected for the same day.
Example 9:When the following settings are selected for ALL and SUN( 1 ON and 2 OFF are the same time )
Weekly Timer Function Operation/ Displ ay
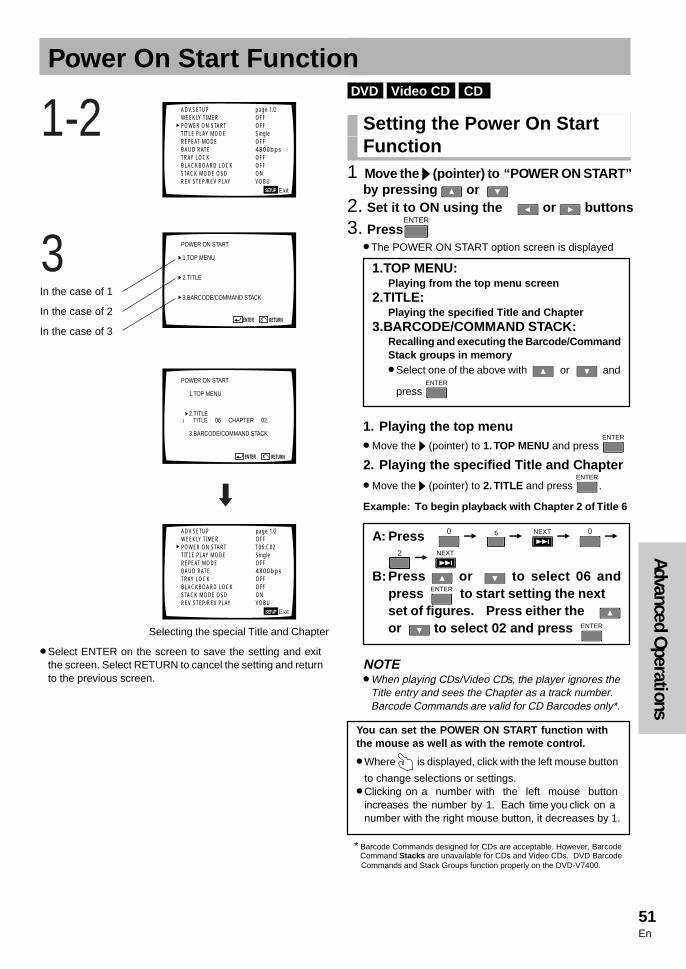
51En
Advanced Operations
DVD.I Video CD .I CD .
Setting the Power On StartFunction
1 Move the ‰ (pointer) to “P OWER ON START”by pressing or
2. Set it to ON using the or buttons
3. Press ENTER
÷ The POWER ON START option screen is displayed
1. Playing the top menu÷ Move the ‰ (pointer) to 1. TOP MENU and press
ENTER
2. Playing the specified Title and Chapter÷ Move the ‰ (pointer) to 2. TITLE and press
ENTER
.
Example : To begin pl ayback with Chapter 2 of Title 6
NOTE÷ When playing CDs/Video CDs, the player ignores the
Title entry and sees the Chapter as a track number. Barcode Commands are valid for CD Barcodes only*.
Power On Start Function
1.TOP MENU:Playing f rom the top me nu screen
2.TITLE:Playing the specified Title and Chapte r
3.BARCODE/COMMAND STACK:Recalling and executing the Ba rcode/CommandStack groups in memo ry÷ Select one of the above with or and
press ENTER
A: Press 0 = 6 = NEXT = 0 =2 = NEXT
B: Press or to select 06 andpress ENTER to start setting the nextset of figures . Press either theor to select 02 and press ENTER
You can set the P OWER ON START function withthe mouse as well as with the remote control.
÷ Where is displayed, click with the left mouse button
to change selections or settings.÷ Clicking on a number with the left mouse button
increases the number by 1. Each time you click on a number with the right mouse button, it decreases by 1.
POWER ON START
1.TOP MENU
2.TITLE
3.BARCODE/COMMAND STACK
RETURNENTER
1-2
3
«
POWER ON START
1.TOP MENU
2.TITLE TITLE 06 CHAPTER 02
3.BARCODE/COMMAND STACK
RETURNENTER
ADV.SETUP page 1/2WEEKLY TIMER OFFPOWER ON START T06:C02TITLE PLAY MODE SingleREPEAT MODE OFFBAUD RATE 4800bpsTRAY LOCK OFFBLACKBOARD LOCK OFFSTACK MODE OSD ONREV STEP/REV PLAY VOBU
ExitSETUP
ADV.SETUP page 1/2WEEKLY TIMER OFFPOWER ON START OFFTITLE PLAY MODE SingleREPEAT MODE OFFBAUD RATE 4800bpsTRAY LOCK OFFBLACKBOARD LOCK OFFSTACK MODE OSD ONREV STEP/REV PLAY VOBU
ExitSETUP
In the case of 1
In the case of 2
In the case of 3
÷ Select ENTER on the screen to save the setting and exitthe screen. Select RETURN to cancel the setting and returnto the previous screen.
Selecting the special Title and Chapter
* Barcode Commands designed for CDs are acceptable. However, BarcodeCommand Stacks are unavailable for CDs and Video CDs. DVD BarcodeCommands and Stack Groups function properly on the DVD-V7400.

52En
3. Recalling and Executing Barcode/Com mandStack Groups from Memory÷ Move the ‰ (pointer) to 3. BARCODE/COMMAND
STACK and press ENTER
Example : To execute Ba rcode/Command Stack Group 5
÷ The ADV SETUP menu screen displays again, showingthe POWER ON START setting. When this setting isdisplayed, the operation is complete.
NOTEDiscs authored to begin playing automatically may fail to playback as programmed on this menu.
DVD.I Video CD.I CD .
Setting to Turn ON PlayerPower Only
Select a Title which is not on the disc.Example: Enter title 99
DVD.I Video CD .I CD .
Turning Off the P OWER ONSTART Function
1 On the A DV SETUP menu screen , move the‰ (pointer) to P OWER ON START with theremote cont rol arrow or and selectOFF with the remote cont rol arrow or
.
A: Press 5 = NEXT
B: Press or to select 005 andpress ENTER
POWER ON START
1.TOP MENU
2.TITLE
3.BARCODE/COMMAND STACK GROUP 005
RETURNENTER
ADV.SETUP page 1/2WEEKLY TIMER OFFPOWER ON START GROUP 005TITLE PLAY MODE SingleREPEAT MODE OFFBAUD RATE 4800bpsTRAY LOCK OFFBLACKBOARD LOCK OFFSTACK MODE OSD ONREV STEP/REV PLAY VOBU
ExitSETUP
Power On Start Function
Setting a Barcode/CommandStack Group
For your referenceMemorized data is retained even if the power cord is unplugged.
÷ Select ENTER on the screen to save the setting and exitthe screen. Select RETURN to cancel the setting and returnto the previous screen.
It is possi ble to use a mouse instead of the re motecont rol . When the ‰ pointer is on MEN U, click theleft button to have the ADV. SETUP menu disappear .
ADV.SETUP page 1/2WEEKLY TIMER OFFPOWER ON START OFFTITLE PLAY MODE SingleREPEAT MODE OFFBAUD RATE 4800bpsTRAY LOCK OFFBLACKBOARD LOCK OFFSTACK MODE OSD ONREV STEP/REV PLAY VOBU
ExitSETUP

53En
Advanced Operations
DVD.
Advanced UsageWith the Barcode Stack/Command Stack function, groups can be divided and memorized without affecting previouslystored commands.This is convenient for separate memorization of contents onmore than one disc, or when many users share one player.This also allows separate storage of a group with previously
1 Register a new group \ Page 62“GROUP 002” on the top right of the Barcode Stack/Command Stack input screen is the number assigned tothe new group.The group number is important for execution, please make note of this number for future reference.
2 Input the barcode with the barcode readerand transmit to the player \ Page 55÷ The remote control may also input commands
In the case of laser barcode compatible discs\ Page 59In the case of regular DVD discs \ Page 54-58
3 Repeat step 2 for each barcode to playin that specific order
4 WStore the sequence in the DVD-V7400'smemory \ Page 60
5 Execution \ Page 69, 70Select the group number that was noted in step 1
NOTE:Commands stored in the player’s memory are groupedtogether or divided \ Page 65-68Once a group of commands are stored in the the player's memory, the play order is locked. Changes are prohibited.
To use theBarcode Stack/ Command Stack function:
÷ Player memorizes commands from the barcode book (barcode book included with the disc)
÷ Commands may be sent from the Remote Control ifbarcodes are unavailable from the disc(Command Stack function)
÷ Use the remote control to recall and successively execute,or execute commands step by step, from memorized content
NOTE:÷ The player is able to memorize a maximum of 300 steps
including video blackboards.÷ Memorized data is retained even if power to the unit is
switched OFF.
DVD.
Basic UsageUse the Barcode Stack/Command Stack function as follows:(for setting details, refer th the pages after the right arrow)
1 Displ ay the Barcode Stack/Command Stacksetup screen with the remote control \ Page 54
2 Input the barcode with the barcode readerand transmi t to the player \ Page 55÷ An alternate input source is the remote control
For LaserBarcode compatible discs \ page 59For standard DVD discs \ Page 54-58
3 Repeat step 2 in the desired playback
4 St order
ore the command input to the player's memory \ Page 60
5 Execution \ Page 69, 70
Barcode/Command Stack Function
NOTE:In the case of laser barcode compatible discs, barcodesdesigned for industrial LD use are acceptable (verify thatsuch discs include the mark). Using an LB barcodesheet for -unmarked discs is unavailable.
NOTE:The Barcode Stack/Command Stack function fails tooperate with CDs and Video CDs.
memorized content.
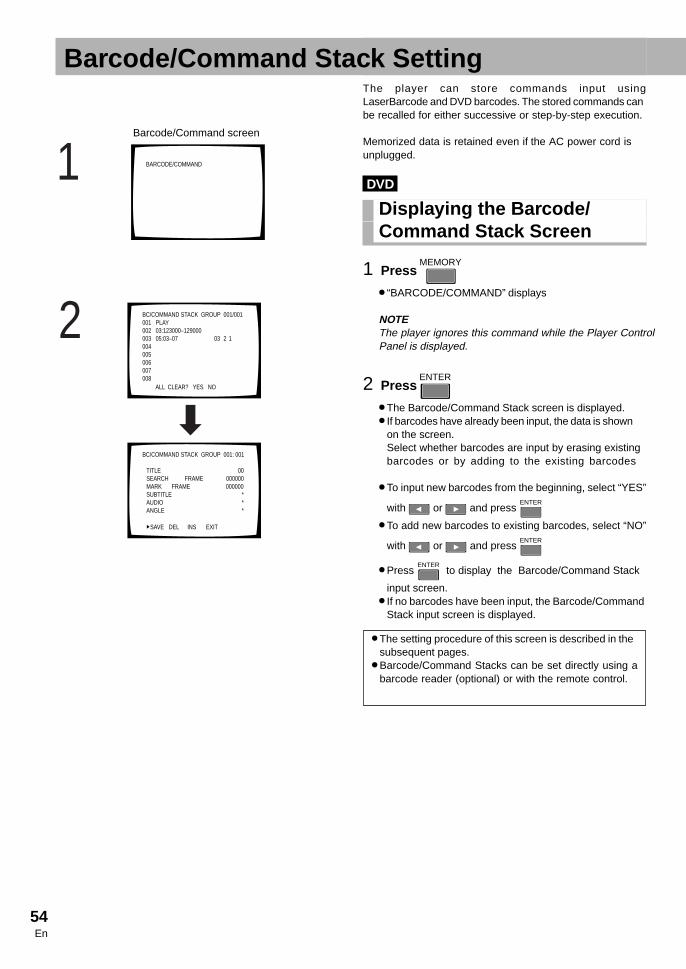
54En
2
1 BARCODE/COMMAND
BC/COMMAND STACK GROUP 001/001001 PLAY002 03:123000–129000003 05:03–07 03 2 1004005006007008
ALL CLEAR? YES NO
BC/COMMAND STACK GROUP 001: 001
TITLE 00SEARCH FRAME 000000MARK FRAME 000000SUBTITLE *AUDIO *ANGLE *
SAVE DEL INS EXIT
The player can store commands input usingLaserBarcode and DVD barcodes. The stored commands canbe recalled for either successive or step-by-step execution.
Memorized data is retained even if the AC power cord is unplugged.
DVD.
Displ aying the Ba rcode/Command Stack Screen
1 Press MEMORY
÷ “BARCODE/COMMAND” displays
NOTEThe player ignores this command while the Player ControlPanel is displayed.
2 Press ENTER
÷ The Barcode/Command Stack screen is displayed.÷ If barcodes have already been input, the data is shown
on the screen.Select whether barcodes are input by erasing existingbarcodes or by adding to the existing barcodes
÷ To input new barcodes from the beginning, select “YES”
with or and press ENTER
÷ To add new barcodes to existing barcodes, select “NO”
with or and press ENTER
÷ Press ENTER
to display the Barcode/Command Stack
input screen.÷ If no barcodes have been input, the Barcode/Command
Stack input screen is displayed.
÷ The setting procedure of this screen is described in thesubsequent pages.
÷ Barcode/Command Stacks can be set directly using abarcode reader (optional) or with the remote control.
Barcode/Command Stack Setting
Barcode/Command screen

55En
Advanced Operations
1
2
BC/COMMAND STACK GROUP 001: 001
PLAY
30°
30°7 m
BC/COMMAND STACK GROUP 004: 006
WAIT 000sec.
DVD.
Direct Setting Uusing aBarcode Reader
1 Read a barcode with a ba rcode reade r.2 Send it to the pl ayer.
Example 1: Read “PLAY” then send itExample 2: Read “Play Title 8 Chapters 5 to 12 with
Subtitle 3, Audio 2 and Angle 1” then
DVD.
Setting Using the RemoteCont rol
Set the commands, Play 3, Pause 8, e Still/Step EStop 7 and WAIT and GO TO GROUP using the remotecontrol.The Chapter Search, Chapter Play, Frame Search and FrameSegment Play* commands can also be set using the remotecontrol.* Frame Segment Play is to play between two specific frames.
Press TITLE/CHPFRM/TIME
÷ The TITLE number blinks and the input mode is selected
Example 1 : To set “Pl ay”
Press PLAY
÷ The Barcode/Command Stack Input screenshows “PLAY” and advances to the next Inputscreen.
Example 2 : Enter the wait time
1. Press and hold PAUSE
÷ “WAIT 000 sec” appears on the screen2. Use the number buttons to enter
the wait time in seconds.÷ The maximum time value is 999
3. Press NEXT
(completes the process)
send it.
and

56En
Example 3 : To “Pl ay Title 3 Frames 123000 to 129000”
Example 4:To “Pl ay Title 5 Chapte rs 3 to 7 with Subtitle 3,Audio 2 and Angle 1”
1. Press TITLE/CHPFRM/TIME
÷ The TITLE number blinks
2. Press 3 = NEXT ÷ Title 3 is set, and the mode switches to Frame Input
3. Press 1 = 2 = 3 = 0 = 0
= 0 = NEXT
÷ Sets the starting frame number÷ If this operation occurrs during playback, the player
seraches to the input frame immediately.
4. Press 1 = 2 = 9 = 0 = 0
= 0 = NEXT
÷ Sets the ending frame number÷ If the above operation is performed during playback,
press the remote buttonENTER
in place of specifying
the frame number in steps 3 and 4. This actionautomatically sets the frame being played as theending frame.
1. Press TITLE/CHPFRM/TIME
÷ The TITLE number blinks
2. Press 5 = NEXT
÷ Sets Title 5 and prepares for Chapter input
3. Press TITLE/CHPFRM/TIME to select SEARCH CHAPTER
÷ Sets the Chapter number where playback starts
÷ Each press toggles the selection between “FRAME”and "CHAPTER"
4. Press 3 = NEXT
÷ Sets the starting Chapter number
5. Press 8 = NEXT ÷ Sets the ending Chapter number
6. Press 3 = NEXT
÷ Sets Subtitle 3
7. Press 2 (do not press NEXT )÷ Sets Audio 2
8. Press 1 (do not press NEXT )÷ Sets Angle 1 - advance to the next step
For ReferenceTo play to the end of chapter 7 as shown in Example 4, enter“8”, (Chapter 7 + 1 additional Chapter) in MARK CHAPTER.
BC/COMMAND STACK GROUP 001: 001
TITLE 03SEARCH FRAME 123000MARK FRAME 129000
SAVE DEL INS EXIT
BC/COMMAND STACK GROUP 001: 001
TITLE 05SEARCH CHAPTER 03MARK CHAPTER 08SUBTITLE 03AUDIO 2ANGLE 1
SAVE DEL INS EXIT
Display shown when the exampleon the right is input
Display shown when the exampleon the right is input
Barcode/Command Stack Setting
NoteA Barcode/Command Stack entry must be 25 frames or greaterin length for the command to function. The player refusescommands which set fewer frames.

57En
Advanced Operations
Example 5:To input the command for setting Subtitle 1,Audio 2 and Angle 3
÷ A Play command that specifies the start and end frames, voidsany possibility of setting a Subtitle, Audio and Angle option.However, by setting Subtitle, Audio and Angle selections (asdescribed in the above procedure) before the Frame Sec-tion Play command, the playback includes these options.
The input as shown above plays Title 3 Frames 10000 to 15000with Subtitle 1, Audio 2 and Angle 3.
Commands other than Frame Section Play command, such as Fame Search, Chapter Search and Chapter Section Playcommands, a specific setting is valid within each command.
Example 6 : To repeat “Pl ay Title 3 frames 123000 to129000” in Example 3
1. When the word TITLE is blinking , enter“00 ” in the TITLE field
÷ Do NOTpress NEXT
2. Press SUBTITLE while the TITLE digits areblinking
3. When the SUBTITLE digits start to blink,
press 1 then NEXT
4. When the AUDIO digit sta rts to blink,press
2
5. When the ANGLE digital sta rts to blink,press
3
1. Perform steps 1 t hrough 4 in Example 3÷ The Barcode/Command Stack input screen appears
2. Press RPT A-B while the TITLE number isblinking÷ The REPEAT indicator appears on screen
BC/COMMAND STACK GROUP 001: 001
TITLE 00SEARCH FRAME 000000MARK FRAME - - - - - -SUBTITLE 01AUDIO 2ANGLE 3
SAVE DEL INS EXIT
BC/COMMAND STACK GROUP 001/ 001001 SUBTITLE 01 AUDIO 2 ANGLE 3002 03:10000–15000003004005006007008
SAVE DEL INS EXIT
Press DISPLAY
to display the
following screen
Item display
List display
1.
2.
BC/COMMAND STACK GROUP 001: 001
TITLE 03SEARCH FRAME 123000MARK FRAME 129000
SAVE DEL INS EXIT
BC/COMMAND STACK GROUP 001: 002
TITLE 00SEARCH FRAME 000000MARK FRAME - - - - - -SUBTITLE *AUDIO *ANGLE *
SAVE DEL INS EXIT
BC/COMMAND STACK GROUP 001: 002
REPEAT

58En
Example 7 : a command to jump to another group
To change the group number on a previously input “GO
TO GROUP”, press RECALL
during Detailed or List display, and
input the new number.
Using this command enables consecutive jumps to differentgroups.
\/ conceptual representation only
Create standby display groups to return to the same pointas before a jump to another group.
\/ conceptual representation only
DVD.
Setting the Subtitle, Audioand Angle
SUBTITLE÷ “00” changes screen color to the selelcted “Background
color” in the GUI menu and makes a played image invisible
÷ “01” to “32” displays the corresponding Subtitle÷ “33” plays with all Subtitles off÷ “34” hides the played image with "00" to reveal the played
image again÷ “99” retains the previous condition. This is used to change
settings other than SUBTITLE while maintaining the currentSubtitle setting
÷ “35” to “98” are invalid settings
AUDIO÷ “0” plays image with Audio off÷ “1” to “8” selects and plays the corresponding audio÷ “9” retains the previous condition
ANGLE÷ “1” to “8” selects and plays the corresponding angle÷ “9” retains the previous condition÷ “0” selects and plays Angle 9
NOTE÷ When “retain the previous condition” is selected, an asterisk
(*) appears on the input screen.÷ The Barcode/Command Stack cannot be executed if a value
unavailable on that disc is input.
DVD.
To Only Use A ChapterSearch or Frame Search
In item “MARK CHAPTER ” or “MARK FRAME” , pressNEXT
without making any settings
A still image displays after the search is complete
DVD.
To Change a ValueDuring Input
Press the correct number button (including 0)
To return to a previous setting point, press PREV
.
DVD.
Cancel a Value During InputMove the ‰ (pointer) to “EXIT” by pressing the cursor button
(right direction) and press ENTER
1. When the TITLE numberis flashing, press
RECALL.
2. The displ ay changes as shown to the left(refer to diagram).
3. Input the group number to jump to, thenpress
NEXT.
GO TO GROUP - 002
****
GROUP - 001
GO TO GROUP - 004
****
GROUP - 002
GO TO GROUP - 010
****
GROUP - 004
REPEAT
****
GROUP - 001
GO TO GROUP - 001
GROUP - 002
****
GO TO GROUP - 001
****
GROUP - 004
GO TO GROUP - 001
****
GROUP - 003
Example:RECALL 002 + PLAY
orExternal option switchGroup 002
Example:RECALL 003 + PLAY
orExternal option switchGroup 003
Example:RECALL 004 + PLAY
orExternal option switchGroup 004
Jump
Barcode/Command Stack Setting
BC/COMMAND STACK GROUP 004: 003
GO TO GROUP - 000
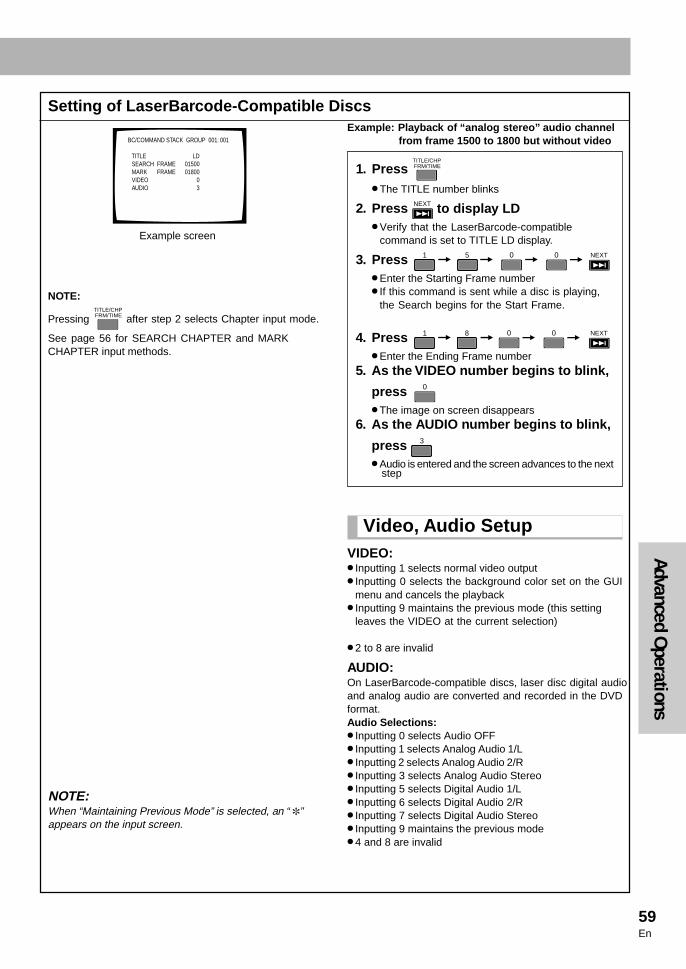
59En
Advanced Operations
Setting of LaserBarcode -Compati ble DiscsExample : Playback of “analog stereo ” audio channel
from frame 1500 to 1800 but without video
Video , Audio SetupVIDEO:÷ Inputting 1 selects normal video output÷ Inputting 0 selects the background color set on the GUI
menu and cancels the playback÷ Inputting 9 maintains the previous mode (this setting
leaves the VIDEO at the current selection)
÷ 2 to 8 are invalid
AUDIO:On LaserBarcode-compatible discs, laser disc digital audioand analog audio are converted and recorded in the DVDformat.Audio Selections:÷ Inputting 0 selects Audio OFF÷ Inputting 1 selects Analog Audio 1/L÷ Inputting 2 selects Analog Audio 2/R÷ Inputting 3 selects Analog Audio Stereo÷ Inputting 5 selects Digital Audio 1/L÷ Inputting 6 selects Digital Audio 2/R÷ Inputting 7 selects Digital Audio Stereo÷ Inputting 9 maintains the previous mode÷ 4 and 8 are invalid
1. Press TITLE/CHPFRM/TIME
÷ The TITLE number blinks
2. Press NEXT to displ ay LD÷ Verify that the LaserBarcode-compatible
command is set to TITLE LD display.
3. Press 1 = 5 = 0 = 0 = NEXT
÷ Enter the Starting Frame number÷ If this command is sent while a disc is playing,
the Search begins for the Start Frame.
4. Press 1 = 8 = 0 = 0 = NEXT
÷ Enter the Ending Frame number5. As the VIDEO number begins to blink,
press 0
÷ The image on screen disappears6. As the AUDIO number begins to blink,
press 3
÷ Audio is entered and the screen advances to the next
BC/COMMAND STACK GROUP 001: 001
TITLE LDSEARCH FRAME 01500MARK FRAME 01800VIDEO 0AUDIO 3
NOTE:
Pressing TITLE/CHPFRM/TIME after step 2 selects Chapter input mode.
See page 56 for SEARCH CHAPTER and MARK CHAPTER input methods.
NOTE:When “Maintaining Previous Mode” is selected, an “ ” appears on the input screen.
Example screen
step
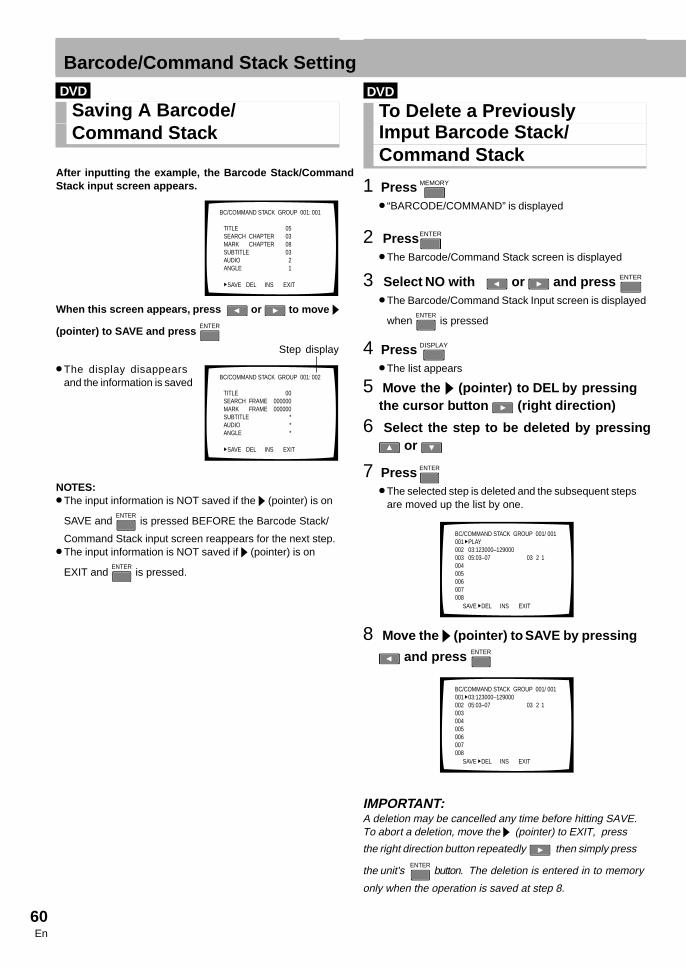
60En
DVD.
Saving A Barcode/Command Stack
After inputting the example, the Barcode Stack/CommandStack input screen appears.
When this screen appears, press or to move ‰
(pointer) to SAVE and press ENTER
NOTES:÷ The input information is NOT saved if the ‰ (pointer) is on
SAVE and ENTER
is pressed BEFORE the Barcode Stack/
Command Stack input screen reappears for the next step.÷ The input information is NOT saved if ‰ (pointer) is on
EXIT and ENTER
is pressed.
DVD.
To Delete a Previous lyImput Ba rcode Stack/Command Stack
1 Press MEMORY
÷ “BARCODE/COMMAND” is displayed
2 Press ENTER
÷ The Barcode/Command Stack screen is displayed
3 Select NO with or and press ENTER
÷ The Barcode/Command Stack Input screen is displayed
when ENTER
is pressed
4 Press DISPLAY
÷ The list appears
5 Move the ‰ (pointer) to DEL by pressingthe cu rsor button (right direction )
6 Select the step to be deleted by pressing or
7 Press ENTER
÷ The selected step is deleted and the subsequent stepsare moved up the list by one.
8 Move the ‰ (pointer) to SAVE by pressing
and press ENTER
IMPORTANT:A deletion may be cancelled any time before hitting SAVE.To abort a deletion, move the ‰ (pointer) to EXIT, press
the right direction button repeatedly then simply press
the unit's ENTER
button. The deletion is entered in to memory
only when the operation is saved at step 8.
BC/COMMAND STACK GROUP 001: 001
TITLE 05SEARCH CHAPTER 03MARK CHAPTER 08SUBTITLE 03AUDIO 2ANGLE 1
SAVE DEL INS EXIT
BC/COMMAND STACK GROUP 001/ 001001 PLAY002 03:123000–129000003 05:03–07 03 2 1004005006007008
SAVE DEL INS EXIT
BC/COMMAND STACK GROUP 001/ 001001 03:123000–129000002 05:03–07 03 2 1003004005006007008
SAVE DEL INS EXIT
Barcode/Command Stack Setting
BC/COMMAND STACK GROUP 001: 002
TITLE 00SEARCH FRAME 000000MARK FRAME 000000SUBTITLE *AUDIO *ANGLE *
SAVE DEL INS EXIT
Step display
÷ The display disappearsand the information is saved

61En
Advanced Operations
DVD.
Correcting a Previous lyInput Ba rcode Stack/Command Sta ck
Example : To change the Audio setting of step 003 f romAudio 2 to Audio 1
1 Press MEMORY
÷ “BARCODE/COMMAND” is displayed
2 Press ENTER
÷ Barcode/Command Stack screen displays
3 Select NO with or and press ENTER
÷ Barcode/Command Stack Input screen displays
when ENTER
is pressed
4 Press DISPLAY
÷ List appears
5 Select 003 ‰ by pressing or
6 Press TITLE/CHPFRM/TIME
÷ Initiates the Barcode/Command Stack input mode
7 Press NEXT 4 times to select AUDIO
8 Press 1
9 Press NEXT
÷ Next Barcode/Command Input screen displays
10 Move the ‰ (pointer) to SAVE by pressing
then press ENTER
NOTE:
To save the corrected information, press NEXT
repeatedly until
the last item flashes (ANGLE in this example).
Press NEXT
again to move to the next input page.
In this “next step”, move ‰ (pointer) to SAVE and press ENTER
(to save the data).The corrected information is NOT saved if ‰ (pointer) is on
SAVE thenENTER
is pressed before the end of correction
(in the middle of the step being corrected).
DVD.
Adding a Step in a Previous lyInput Ba rcode Stack/Command Stack
1 Perform steps 1 through 4 of “Correcting aPreviously input Ba rcode/Command Sta ck”.
2 Select the location for the new step by simply pressing the or button.
3 Move the ‰ (pointer) to INS by pressing
or then the ENTER button.÷ Inserts a new step before the selected step and the
subsequent steps are moved down the list by one.
4 Press TITLE/CHPFRM/TIME
÷ Initiates the Barcode/Command Stack input mode
5 Set a step i dentical to the “Ba rcodeStack/Command Sta ck settings” (seepage 55- 59).
6 Move the ‰ (pointer) to SAVE by pressing
then the ENTER button.
BC/COMMAND STACK GROUP 001: 003
TITLE 05SEARCH CHAPTER 03MARK CHAPTER 05SUBTITLE 03AUDIO 1ANGLE 1
SAVE DEL INS EXIT
BC/COMMAND STACK GROUP 001: 003
TITLE 05SEARCH CHAPTER 03MARK CHAPTER 05SUBTITLE 03AUDIO 2ANGLE 1
SAVE DEL INS EXIT
BC/COMMAND STACK GROUP 001/ 001001 PLAY002003 03:123000–129000004 05:03–07 03 2 1005006007008
SAVE DEL INS EXIT

62En
DVD.
Methods of GroupingGrouping Some Ba rcode/Command Sta cksA group can be formed with several Barcode/CommandStacks, more than one group can be formed and stored. Toexecute a group of commands, select a group from the storedgroups and execute them either consecutively or step-by-step.It is also possible to divide or delete a group.
The following procedure consists of inserting a group delimiterafter a group of barcode commands.
Inserting a Group
1 Press MEMORY
÷ “BARCODE/COMMAND” is displayed
2 Press ENTER
÷ Barcode/Command Stack screen displays
3 Select NO with or then press theENTER button÷ Barcode/Command Stack Input screen displays
when the ENTER
button is pressed
4 Press DISPLAY
÷ List appears÷ Verify that the ‰ (pointer) is located at the step
immediately following the last entry
5 Press NEXT
÷ The input screen for the first step of the next Barcode/Command Stack group appears
÷ Set the next group for the Barcode/Command Stacks
Grouping Some Ba rcode/Command Sta cks
1
2
3
4
5
BARCODE/COMMAND
BC/COMMAND STACK GROUP 001/001001 PLAY002 03:123000–129000003 05:03–07 03 2 1004005006007008
ALL CLEAR? YES NO
BC/COMMAND STACK GROUP 001: 004
TITLE 00SEARCH FRAME 000000MARK FRAME - - - - - -SUBTITLE *AUDIO *ANGLE *
SAVE DEL INS EXIT
SAVE DEL INS EXIT
BC/COMMAND STACK GROUP 001/001001 PLAY002 03:123000–129000003 05:03–07 03 2 1004005006007008
BC/COMMAND STACK GROUP 002: 001
TITLE 00SEARCH FRAME 000000MARK FRAME - - - - - -SUBTITLE *AUDIO *ANGLE *
SAVE DEL INS EXIT
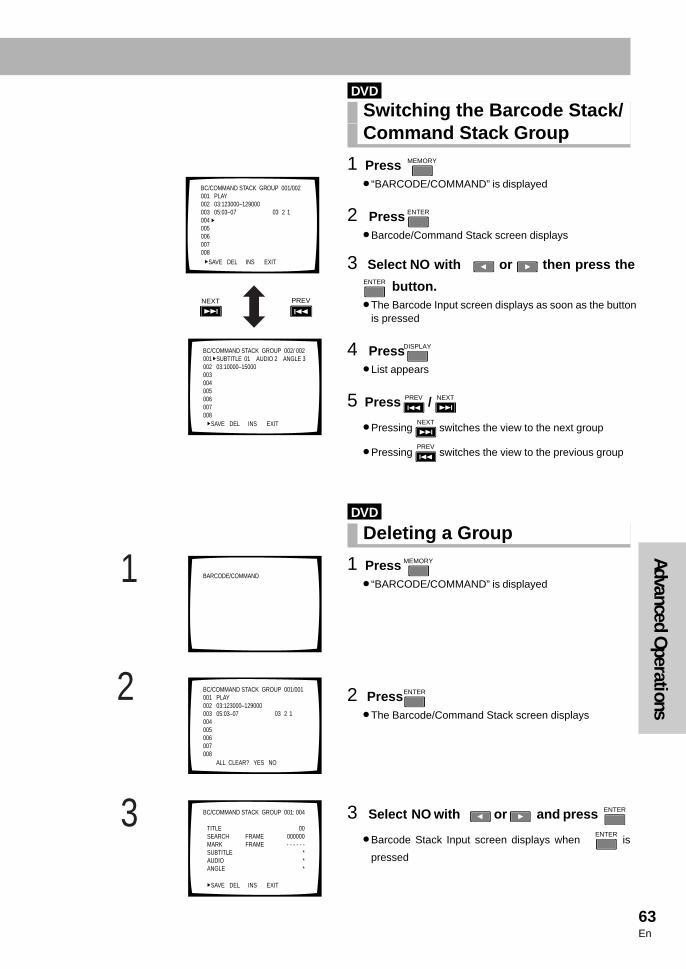
63En
Advanced Operations
DVD.
Swit ching the Ba rcode Stack/Command Sta ck Group
1 Press MEMORY
÷ “BARCODE/COMMAND” is displayed
2 Press ENTER
÷ Barcode/Command Stack screen displays
3 Select NO with or then press theENTER button.÷ The Barcode Input screen displays as soon as the button
is pressed
4 Press DISPLAY
÷ List appears
5 Press PREV NEXT/
÷ Pressing NEXT
switches the view to the next group
÷ Pressing PREV
switches the view to the previous group
DVD.
Deleting a Group
1 Press MEMORY
÷ “BARCODE/COMMAND” is displayed
2 Press ENTER
÷ The Barcode/Command Stack screen displays
3 Select NO with or and press ENTER
÷ Barcode Stack Input screen displays when ENTER
is
pressed
2
3
1
NEXT PREVJSAVE DEL INS EXIT
BC/COMMAND STACK GROUP 001/002001 PLAY002 03:123000–129000003 05:03–07 03 2 1004005006007008
BC/COMMAND STACK GROUP 002/ 002001 SUBTITLE 01 AUDIO 2 ANGLE 3002 03:10000–15000003004005006007008
SAVE DEL INS EXIT
BARCODE/COMMAND
BC/COMMAND STACK GROUP 001/001001 PLAY002 03:123000–129000003 05:03–07 03 2 1004005006007008
ALL CLEAR? YES NO
BC/COMMAND STACK GROUP 001: 004
TITLE 00SEARCH FRAME 000000MARK FRAME - - - - - -SUBTITLE *AUDIO *ANGLE *
SAVE DEL INS EXIT

64En
4 Press DISPLAY
÷ List appears
5 Select the g roup to be deleted by pressingPREV NEXT/
6 Move th e ‰ (pointer) to “G ROUP” on thefirst line by pressing
7 Move the ‰ (pointer) to DEL by pressingthe right button (right direction )
8 Press ENTER
÷ Deletes the selected group
9 Move the ‰ (pointer) to SAVE by pressingthe right button then pressing
the ENTER button
IMPORTANTA deletion may be cancelled any time before hitting SAVE.To abort a deletion, move the ‰ (pointer) to EXIT, press
the right direction button repeatedly then simply press
the unit'sENTER
button. The group is deleted from memory
only when the operation is saved at step 9.
7-8
4
9
5
6
SAVE DEL INS EXIT
BC/COMMAND STACK GROUP 001/001001 PLAY002 03:123000–129000003 05:03–07 03 2 1004005006007008
BC/COMMAND STACK GROUP 001/ 001001 PLAY002 03:123000–129000003 05:03–07 03 2 1004005006007008
SAVE DEL INS EXIT
BC/COMMAND STACK GROUP 001/ 001001 PLAY002 03:123000–129000003 05:03–07 03 2 1004005006007008
SAVE DEL INS EXIT
BC/COMMAND STACK GROUP 001/ 001001002003004005006007008
SAVE DEL INS EXIT
BC/COMMAND STACK GROUP 001/ 001001002003004005006007008
SAVE DEL INS EXIT
Grouping Some Ba rcode/Command Sta cks

65En
Advanced Operations
DVD.
Dividing a Previous lyInput Group
1 Press DISPLAY
÷ “BARCODE/COMMAND” is displayed
2 Press ENTER
÷ Barcode/Command Stack screen displays
3 Select NO with or and press ENTER
÷ The Barcode/Command Stack Input screen displays
when ENTER is pressed
4 Press DISPLAY
÷ List appears
5 Select the step where the group is to bedivided/split by pressing or
÷ Move the ‰ (pointer) to what will be the first step of the new group
5
2
3
1
4
BARCODE/COMMAND
BC/COMMAND STACK GROUP 001/001001 PLAY002 03:123000–129000003 05:03–07 03 2 1004005006007008
ALL CLEAR? YES NO
BC/COMMAND STACK GROUP 001: 004
TITLE 00SEARCH FRAME 000000MARK FRAME - - - - - -SUBTITLE *AUDIO *ANGLE *
SAVE DEL INS EXIT
SAVE DEL INS EXIT
BC/COMMAND STACK GROUP 001/001001 PLAY002 03:123000–129000003 05:03–07 03 2 1004005006007008
BC/COMMAND STACK GROUP 001/ 001001 PLAY002 03:123000–129000003 05:03–07 03 2 1004005006007008
SAVE DEL INS EXIT

66En
6 Move the ‰ (pointer) to INS by pressing or
7 Press ENTER
÷ Inserts a step before the selected step and moves allother steps down by one
8 Press NEXT
÷ To divide the existing group at the vacant step÷ Displays the Barcode/Command Stack input screen at
the first step of the newly created group
9 Move the pointer to SAVE by pressing the
button and pressing ENTER
IMPORTANTA division may be cancelled at any time before hitting SAVE.To abort a division, move the ‰ (pointer) to Exit, press the
left direction button then press the ENTER
button. The
division is only entered in to memory when the operation issaved at step 9.
6
8
7
9
BC/COMMAND STACK GROUP 001/ 001001 PLAY002 03:123000–129000003 05:03–07 03 2 1004005006007008
SAVE DEL INS EXIT
BC/COMMAND STACK GROUP 001/ 001001 PLAY002003 03:123000–129000004 05:03–07 03 2 1005006007008
SAVE DEL INS EXIT
BC/COMMAND STACK GROUP 002: 001
TITLE 03SEARCH FRAME 123000MARK FRAME 129000
SAVE DEL INS EXIT
BC/COMMAND STACK GROUP 002: 001
TITLE 03SEARCH FRAME 123000MARK FRAME 129000
SAVE DEL INS EXIT
Grouping some Barcode/Command Stacks

67En
Advanced Operations
DVD.
Merging Two Barcode Stack/Command Sta ck Groups
1 Press MEMORY
÷ “BARCODE/COMMAND” is displayed
2 Press ENTER
÷ Barcode/Command Stack screen displays
3 Select NO with or and press ENTER
÷ The Barcode/Command Stack Input screen displays
when ENTER
is pressed
4 Press DISPLAY
÷ Displays the list of the last group that was input
5 Change the g roup with PREV
÷ Move the ‰ (pointer) to the next step of the previouslyinput number with or becomes the division point)
2
3
1
4
5
BARCODE/COMMAND
BC/COMMAND STACK GROUP 004/004001 PLAY002 03:123000–129000003 05:03–07 03 2 1004005006007008
ALL CLEAR? YES NO
BC/COMMAND STACK GROUP 004: 004
TITLE 00SEARCH FRAME 000000MARK FRAME 000000SUBTITLE *AUDIO *ANGLE *
SAVE DEL INS EXIT
BC/COMMAND STACK GROUP 004/004001 PLAY002 03:123000–129000003 05:03–07 03 2 1004005006007008
SAVE DEL INS EXIT
BC/COMMAND STACK GROUP 003/ 004001 02:000150–002050002 06:22–23 ∗ ∗ ∗003004005006007008
SAVE DEL INS EXIT
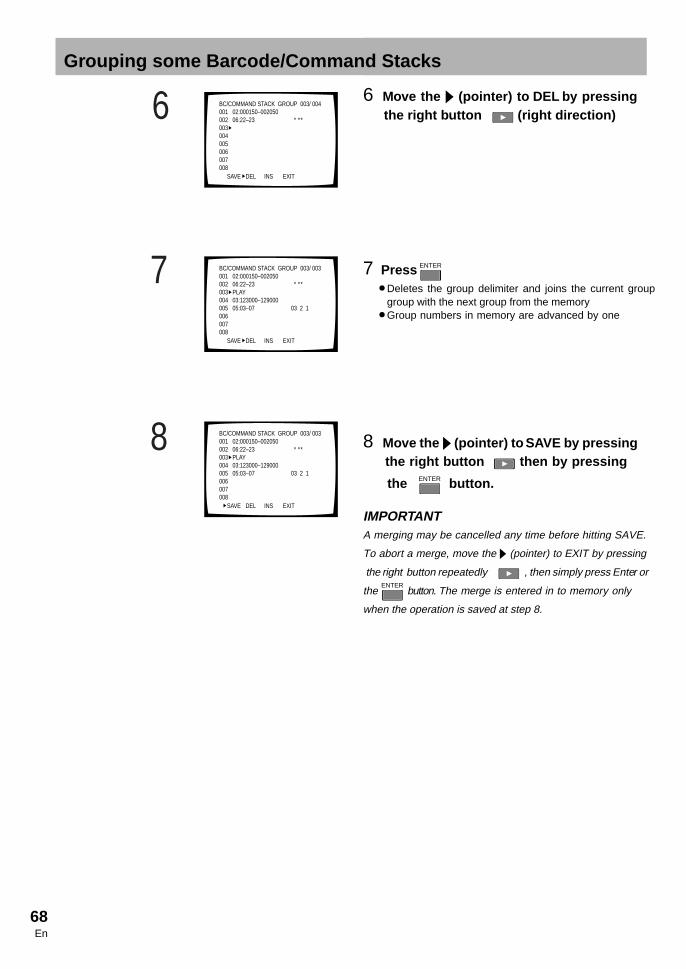
68En
6 Move the ‰ (pointer) to DEL by pressingthe right button (right direction )
7 Press ENTER
÷ Deletes the group delimiter and joins the current groupgroup with the next group from the memory
÷ Group numbers in memory are advanced by one
8 Move the ‰ (pointer) to SAVE by pressingthe right button then by pressing
the ENTER button.
IMPORTANTA merging may be cancelled any time before hitting SAVE.
To abort a merge, move the ‰ (pointer) to EXIT by pressing
the right button repeatedly , then simply press Ente
the
r orENTER
button. The merge is entered in to memory only
when the operation is saved at step 8.
7
6
8
BC/COMMAND STACK GROUP 003/ 004001 02:000150–002050002 06:22–23 ∗ ∗ ∗003004005006007008
SAVE DEL INS EXIT
BC/COMMAND STACK GROUP 003/ 003001 02:000150–002050002 06:22–23 ∗ ∗ ∗003 PLAY004 03:123000–129000005 05:03–07 03 2 1006007008
SAVE DEL INS EXIT
BC/COMMAND STACK GROUP 003/ 003001 02:000150–002050002 06:22–23 ∗ ∗ ∗003 PLAY004 03:123000–129000005 05:03–07 03 2 1006007008
SAVE DEL INS EXIT
Grouping some Barcode/Command Stacks
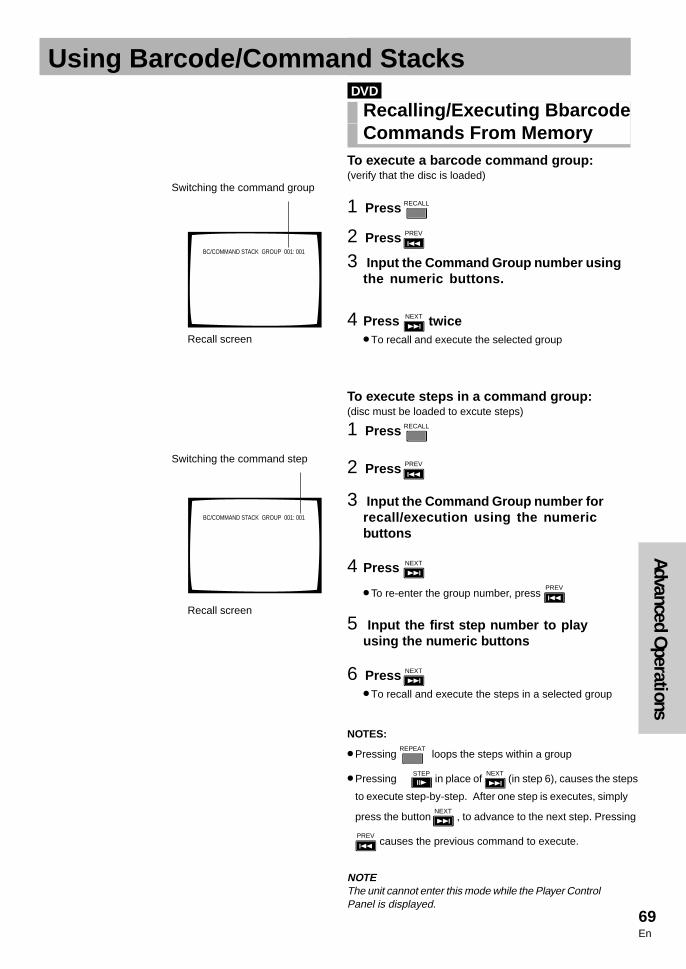
69En
Advanced Operations
DVD.
Recalling/ Executing BbarcodeCommands From Memory
To execute a ba rcode command g roup:(verify that the disc is loaded)
1 Press RECALL
2 Press PREV
3 Input the Command Group number usingthe numeric buttons.
4 Press NEXT twic e÷ To recall and execute the selected group
To execute steps in a command g roup:(disc must be loaded to excute steps)
1 Press RECALL
2 Press PREV
3 Input the Command Group number forrecall/ execut ion using the numericbuttons
4 Press NEXT
÷ To re-enter the group number, press PREV
5 Input the first step number to playusing the numeric buttons
6 Press NEXT
÷ To recall and execute the steps in a selected group
NOTES:
÷ Pressing REPEAT
loops the steps within a group
÷ PressingSTEP
in place of NEXT
(in step 6), causes the steps
to execute step-by-step. After one step is executes, simply
press the buttonNEXT
, to advance to the next step. Pressing
PREV causes the previous command to execute.
Using Ba rcode/Command Sta cks
BC/COMMAND STACK GROUP 001: 001
BC/COMMAND STACK GROUP 001: 001
Switching the command group
Recall screen
Recall screen
Switching the command step
NOTEThe unit cannot enter this mode while the Player ControlPanel is displayed.
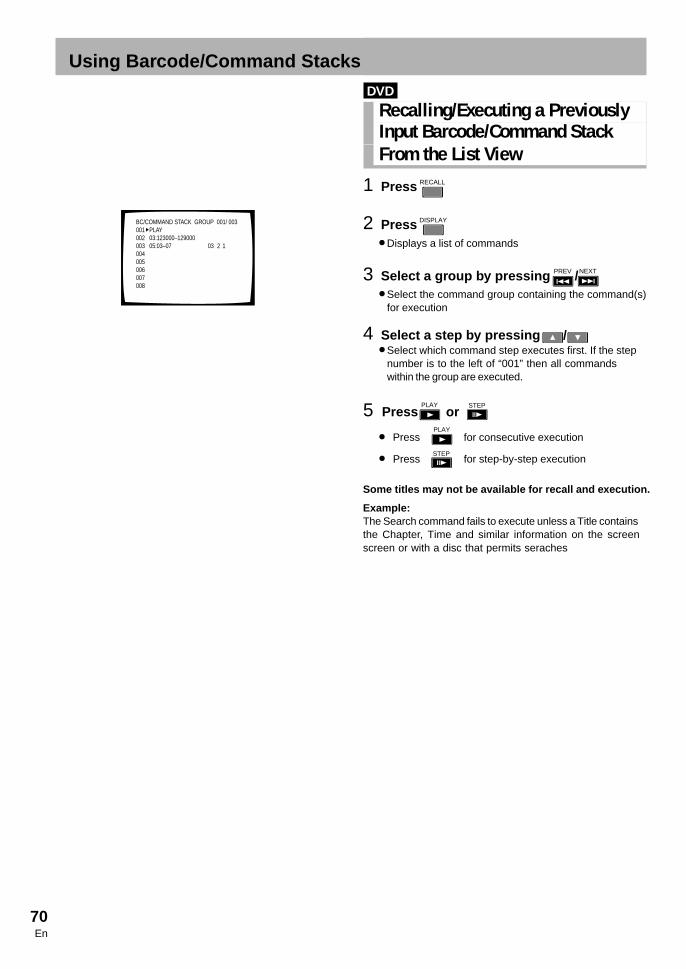
70En
DVD.
Recalling/Executing a PreviouslyInput Barcode/Command StackFrom the List View
1 Press RECALL
2 Press DISPLAY
÷ Displays a list of commands
3 Select a g roup by pressing PREV NEXT/÷ Select the command group containing the command(s)
for execution
4 Select a step by pressing /÷ Select which command step executes first. If the step
number is to the left of “001” then all commands within the group are executed.
5 Press PLAY
or STEP
÷ Press PLAY
for consecutive execution
÷ Press STEP
for step-by-step execution
Some titles m ay not be available for recall and execut ion.
Example :The Search command fails to execute unless a Title containsthe Chapter, Time and similar information on the screen screen or with a disc that permits seraches
BC/COMMAND STACK GROUP 001/ 003001 PLAY002 03:123000–129000003 05:03–07 03 2 1004005006007008
Using Ba rcode/Command Sta cks
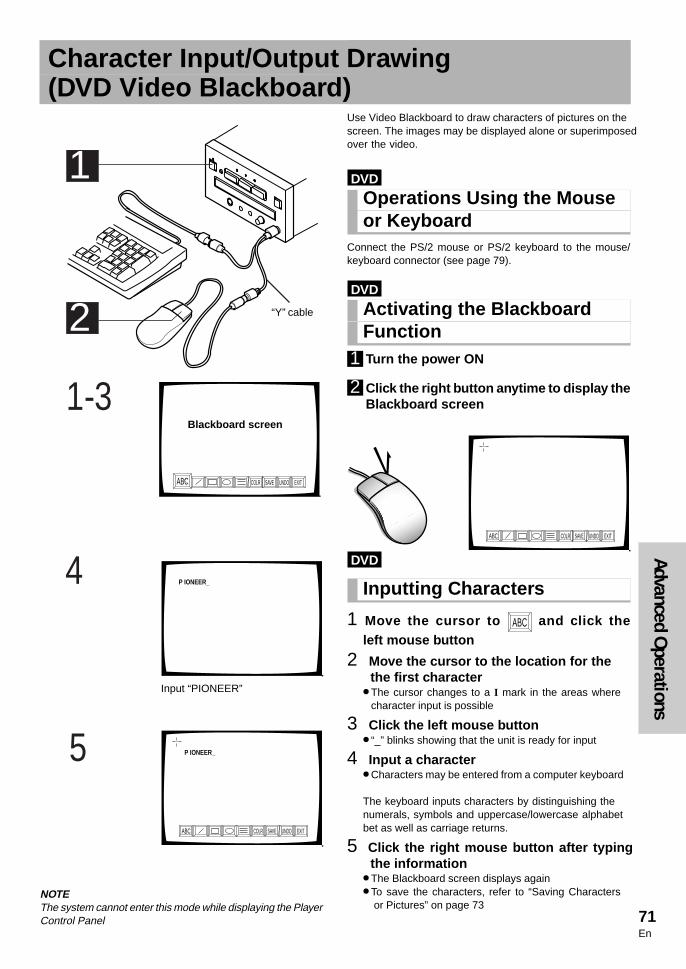
71En
Advanced Operations
Use Video Blackboard to draw characters of pictures on thescreen. The images may be displayed alone or superimposedover the video.
DVD.
Operation s Using the Mouseor Keyboa rd
Connect the PS/2 mouse or PS/2 keyboard to the mouse/keyboard connector (see page 79).
DVD.
Acti vating the Blackboa rdFunctionTurn the p ower ON
Click the right button anytime to display theBlackboa rd screen
Blackboa rd screen
ABC COLR SAVE UNDO EXIT
DVD.
Inputting Characte rs
1 Move the cu rsor to ABC and cli ck theleft mouse button
2 Move the cu rsor to the location for the the fi rst characte r÷ The cursor changes to a I mark in the areas where
character input is possible
3 Cli ck the left mouse button÷ “_” blinks showing that the unit is ready for input
4 Input a characte r÷ Characters may be entered from a computer keyboard
The keyboard inputs characters by distinguishing thenumerals, symbols and uppercase/lowercase alphabetbet as well as carriage returns.
5 Cli ck the right mouse button after typing the in formation÷ The Blackboard screen displays again÷ To save the characters, refer to “Saving Characters
or Pictures” on page 73
Character Input/Output Drawing(DVD Video Blackboa rd)
1-3
4
5
P IONEER_
ABC COLR SAVE UNDO EXIT
ABC COLR SAVE UNDO EXIT
P IONEER_
1
21
2
“Y” cable
NOTEThe system cannot enter this mode while displaying the PlayerControl Panel
Input “PIONEER”

72En
DVD.
Using the Drawing Tools÷ Use the left mouse button to select an icon
(LINE): Draws a straight lin e
(BOX): Tool can be switched by clickingbetween outline of a square/rectangle,filled/solid square/rectangle or a box(hollow) with the outside filled: Fills the insid e of a box
: Fills the outsid e of a box
(ROUND): Tool can be swit ched byclicking between outline of an ellips e,filled/solid ellipse or a hollow ellipse withthe outside filled: Fills the inside of an ellipse
: Fills the outsid e of an ellipse
: Tool can be switched by clicking to between a thin , medium or thick lin e
: Each click swit ches the color to Red,Blu e, Green, Yellow, White , Black, Grayor Purpl e
: Saves the dr awn pictur e see page 73 for the saving method
: Cancels the dr awn pictur e with Eachclick cancel ling the last drawn pictureHold the mouse button down for more than 1 second to clear the drawing from the screen
: Cli ck the mouse button to exit thecurrent screen
Note
÷ The Direction buttons ( ) and ENTER
on
the remote control can also be used for the above operation
÷ The Blackboard feature is unavailable on any menu screens
DVD.
Drawing a PicturePress the left mouse button at the beginning point for thedrawing. Move or drag the cursor without releasing themouse button until the image is complete.
1 Select a dr awing tool2 Move the cursor to a starting position
3 Drag the cursor to the final position÷ An image appears as the cursor moves
4 Release the mous e button÷ Repeat the above steps to draw additional images
ABC COLR SAVE UNDO EXIT
1
2
3
4
ABC COLR SAVE UNDO EXIT
ABC COLR SAVE UNDO EXIT
ABC COLR SAVE UNDO EXIT
COLR
SAVE
UNDO
EXIT
Drawing tool
Character Input/Output Drawing ( DVD Video Blackboa rd)

73En
Advanced Operations
DVD.
Saving Characte rs or Pictures
1 Cli ck SAVE on the screen÷ Save screen displays
2 Displ ay the video which will have addedobject s or t ext÷ “IN” blinks÷ Use the control icon at the bottom-left of the screen to
display the video
3 Cli ck SAVE on the screen÷ Display start position sets÷ “OUT” blinks
4 Displ ay the video where you want to stopdispl aying the object or t ext.÷ Display the video by using the player control icon at the
bottom left of the screen.
5 Cli ck the AUTO DISP on the screen÷ Display end position sets÷ Player saves images/characters to memory
the group and step information for the entry showing
6 Cli ck EX÷ Blackboard screen displays again
NOTE:÷ Save the characters and drawings to display a certain
scene without playing a disc (see page 75 for details).
÷ Stored data is retained even if power is switched OFF.
NOTE:÷ With a DVD, the start point (IN) and end point (OUT) can be
set only within the same Title.The time display of the IN and OUT points is shown in ( )or [ ]. In some cases the image may be slightly alteredfrom the original.
÷ The Direction buttons ( ) and ENTER
button on the remote control can also control the aboveoperation.
DVD.
Details on the Blackboa rd
Display mode(See next page)
RED : RedBLU : BlueGRN : GreenYLW : YellowWHT : WhiteBLK : BlackGRY : GrayPUR : Purple
1 : Line width fine2 : Line width medium3 : Line width thick i : Painted insideo : Painted outside L : Line
B : BoxR: Round
Display end min.sec.Display start min.sec.Display title
1
6
5
2-4
ABC COLR UNDO EXIT SAVE
AUTO DISP DEL EXIT SAVE
GROUP 001 NEXTDISPLAY AREA IN OUT
GROUP 001001 R–3, RED 02-015.29~015.36 A
AUTO DISP DEL EXIT SAVE
GROUP 001001 R–3, RED 02-015.29~015.36 A
AUTO DISP DEL EXIT SAVE
GROUP 001001 R–1, YLW 02-002.41~032.06 A002 B–3, GRN 01-027.30~035.08 A
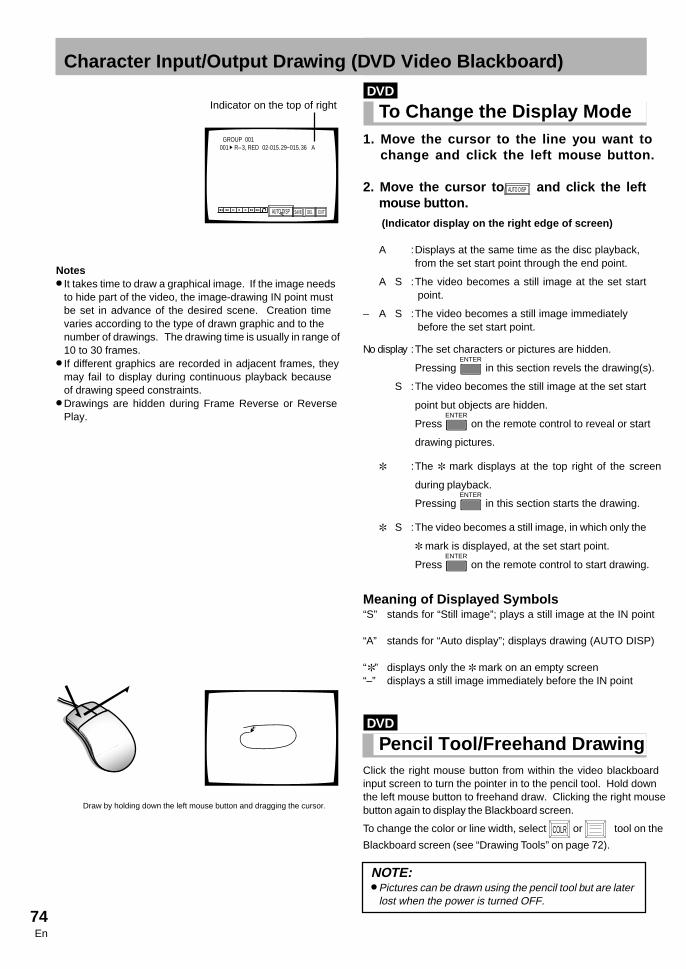
74En
DVD.
To Change the Displ ay Mode1. Move the cu rsor to the line you want to
chan ge and cli ck the left mouse button .
2. Move the cu rsor to AUTO DISP and click the leftmouse button.(Indicator displ ay on the right ed ge of screen )
A :Displays at the same time as the disc playback,from the set start point through the end point.
A S :The video becomes a still image at the set startpoint.
– A S :The video becomes a still image immediately before the set start point.
No display :The set characters or pictures are hidden.
Pressing ENTER
in this section revels the drawing(s).
S :The video becomes the still image at the set start
point but objects are hidden.
Press ENTER
on the remote control to reveal or start
drawing pictures.
:The mark displays at the top right of the screen
during playback.
Pressing ENTER
in this section starts the drawing.
S :The video becomes a still image, in which only the
mark is displayed, at the set start point.
Press ENTER
on the remote control to start drawing.
Meaning of Displ ayed Symbols“S” stands for “Still image”; plays a still image at the IN point
“A” stands for “Auto display”; displays drawing (AUTO DISP)
“” displays only the mark on an empty screen“–” displays a still image immediately before the IN point
DVD.
Pencil Tool/ Freehand DrawingClick the right mouse button from within the video blackboardinput screen to turn the pointer in to the pencil tool. Hold downthe left mouse button to freehand draw. Clicking the right mousebutton again to display the Blackboard screen.
To change the color or line width, select COLR or tool on the
Blackboard screen (see “Drawing Tools” on page 72).
NOTE:÷ Pictures can be drawn using the pencil tool but are later
lost when the power is turned OFF.
GROUP 001001 R–3, RED 02-015.29~015.36 A
AUTO DISP DEL EXIT SAVE
Indicator on the top of right
Character Input/Output Drawing ( DVD Video Blackboa rd)
Notes÷ It takes time to draw a graphical image. If the image needs
to hide part of the video, the image-drawing IN point mustbe set in advance of the desired scene. Creation timevaries according to the type of drawn graphic and to the number of drawings. The drawing time is usually in range of10 to 30 frames.
÷ If different graphics are recorded in adjacent frames, theymay fail to display during continuous playback becauseof drawing speed constraints.
÷ Drawings are hidden during Frame Reverse or ReversePlay.
Draw by holding down the left mouse button and dragging the cursor.

75En
Advanced Operations
DVD.
Grouping Blackboa rdsDivid Blackboards in to groups according to the disc and Titleto register a group for later use. The drawn characters and pictures are stored to match the Title playback.
Pictures and characters comprising groups are stored as steps.
Instead of executing a blackboard, select and display a registeredblackboard group. It is also possible to delete groups
Selecting a GroupWhen “DISPL AY AREA IN OUT” is on the screen or when the ‰ (pointer) is to the left of GROUP, click on the appropriate groupusing the NEXT or PREV mouse button.
The group can be saved/registered by clicking on icon, SAVEfrom the screen.
DVD.
To Select the Group
1 Press RECALL twic e÷ Step section blinks÷ Step section continues to display 000÷ Group executes when the step reaches 000÷ When a step is selected, only the selected step in that
group executes
2 Press PREV
÷ Group selection blinks
3 Use the numeric buttons to input a Group number
4 Press NEXT twic e÷ Starts execution according to the selected blackboard
DVD.
To Execute Steps in a Group
1 Press RECALL twic e
2 Press PREV swit ch the g roup if necessary÷ Skip to Step 5 below if the group remains the same
3 Use the numeric buttons to input a Groupnumber
4 Press NEXT
5 Input the first Step number using the numericbuttons (where execution begins)
6 Press NEXT
÷ Execution of the selected Step in the Group begins
÷ Step setup is released after the step plays
Grouping Video Blackboa rds
BLACKBOARD GROUP 001: 000
BLACKBOARD GROUP 001: 000
GROUP 001001 R–1, 02-002.41~032.06 A002 B–3 01-027.30~035.08 A
YLWGRN
Step Group
Select the group
Select the step
NOTEThis mode is unavailable while the player displays the Player Control Panel.

76En
DVD.
Recalling/ ExecutingPrevious ly Input Blackboa rdsWhile Observing the List
1 Press RECALL twic e
2 Press DISPLAY
÷ Displays a list of commands
3 Select a g roup by pressing PREV NEXT/
4 Select a step by pressing /
5 Press ENTER
NOTE:
Press CLEAR
to remove any displayed characters or pictures.
However, characters and pictures set using the button,
AUTO DISP cannot be erased with CLEAR
.
Displ ay of Recalled Characte rs and PicturesWhen recalling usingthe command, “Executing an entire group,”images display in the order of the set start point locationsrather than by register order. When a character or pictureis set to display while another image is already displayed,the second character/picture superimposes on top of the existing image. All images remain on screen until the last display end point among all set display points is reached.
÷ When pictures A and B are displ ayed, picture B appearsafter the display of picture A has ended
÷ When pictures A and C are displ ayed, picture C appearsover picture A which is already displayed with the display ofpictures A and C ending at the picture C end point.
÷ When pictures C and D are displ ayed, picture D appearsover picture C which is already displayed. The display ofpictures C and D ends at the picture C end point.
GROUP 001001 R–1, 02-002. 41~032.06 A002 B–3, 01-027. 30~035.08 A
ExampleTime Flow
(Start point)(End point)
(Start point) (End point)
(Start point)(End point)
(Start point) (End point)
YLWGRN
Select the groupSelect the step
Grouping Video Blackboa rds
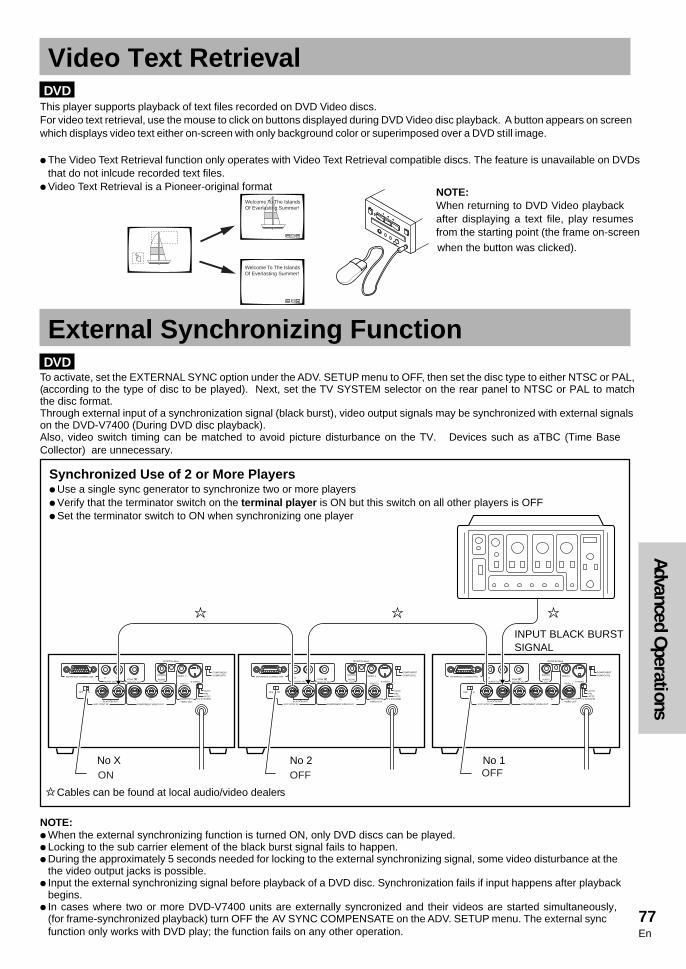
77En
Advanced Operations
Synch ronized Use of 2 or More Players÷ Use a single sync generator to synchronize two or more players÷ Verify that the terminator switch on the terminal player is ON but this switch on all other players is OFF÷ Set the terminator switch to ON when synchronizing one player
INTERFACE CONNECTOR
AUDIO OUT
EXIT SYNC INBLACK BURST
COMPONENT VIDEO OUT
COMPOSITE VIDEO OUT
OFF ON
VIDEO 1
VIDEO 2S-VIDEO
COMPONENTCOMPOSITE(MONO)
AUDIOOUT
PCM/DIGITAL OUT
R
Y PB PR
L
DC OUT 5V 40mA
AUTO
NTSCPAL
INTERFACE CONNECTOR
AUDIO OUT
EXIT SYNC INBLACK BURST
COMPONENT VIDEO OUT
COMPOSITEVIDEO OUT
OFF ON
VIDEO 1
VIDEO 2S-VIDEO
COMPONENTCOMPOSITE(MONO)
AUDIOOUT
PCM/DIGITAL OUT
R
Y PB PR
L
DC OUT 5V 40mA
AUTO
NTSCPAL
INTERFACE CONNECTOR
AUDIO OUT
EXIT SYNC INBLACK BURST
COMPONENT VIDEO OUT
COMPOSITEVIDEO OUT
OFF ON
VIDEO 1
VIDEO 2S-VIDEO
COMPONENTCOMPOSITE(MONO)
AUDIOOUT
PCM/DIGITAL OUT
R
Y PB PR
L
DC OUT 5V 40mA
AUTO
NTSCPAL
ON OFF OFF
TV SYSTEMTV SYSTEMTV SYSTEM
NOTE:When returning to DVD Video playbackafter displaying a text file, play resumesfrom the starting point (the frame on-screen
Video Text Retri eval DVD.This player supports playback of text files recorded on DVD Video discs.For video text retrieval, use the mouse to click on buttons displayed during DVD Video disc playback. A button appears on screenwhich displays video text either on-screen with only background color or superimposed over a DVD still image.
÷ The Video Text Retrieval function only operates with Video Text Retrieval compatible discs. The feature is unavailable on DVDsthat do not inlcude recorded text files.
÷ Video Text Retrieval is a Pioneer-original format
External Synchronizing Function DVD.To activate, set the EXTERNAL SYNC option under the ADV. SETUP menu to OFF, then set the disc type to either NTSC or PAL,(according to the type of disc to be played). Next, set the TV SYSTEM selector on the rear panel to NTSC or PAL to matchthe disc format.Through external input of a synchronization signal (black burst), video output signals may be synchronized with external signalson the DVD-V7400 (During DVD disc playback).Also, video switch timing can be matched to avoid picture disturbance on the TV. Devices such as aTBC (Time BaseCollector) are unnecessary.
NOTE:÷ When the external synchronizing function is turned ON, only DVD discs can be played.÷ Locking to the sub carrier element of the black burst signal fails to happen.÷ During the approximately 5 seconds needed for locking to the external synchronizing signal, some video disturbance at the
the video output jacks is possible.÷ Input the external synchronizing signal before playback of a DVD disc. Synchronization fails if input happens after playback
begins.÷ In cases where two or more DVD-V7400 units are externally syncronized and their videos are started simultaneously,
(for frame-synchronized playback) turn OFF the AV SYNC COMPENSATE on the ADV. SETUP menu. The external syncfunction only works with DVD play; the function fails on any other operation.
Welcome To The Islands Of Everlasting Summer!
Welcome To The Islands Of Everlasting Summer!
No 1No 2No X
INPUT BLACK BURSTSIGNAL
Cables can be found at local audio/video dealers
when the button was clicked).

78En
Caution: Connecting InformationThe Analog copy protect technology is copy guarded.If the player is connected to a TV via a VCR, or if filesare recorded/played back through a VCR, the picturemay have distortions.
Connecting the PlayerHow to Displ ay TotalHours Played andPower ON Time
DVD.I Video CD .I CD .The DVD-V7400 displays the total play time and power ONtime to provide working condition and maintenance timinginformation.
Refer to the directions below to display the play time andpower ON time.
1 Press and hold DISPLAY on the player's frontpanel before turning the power ON,
press
STANDBYON
2 Verify that the screen sh ows the foll owing:
3 When performing an operation such asplayback from the remot e control, timeinformation disappea rs as normal operationbegins.
NOTE÷ Because time is measured by the CPU clock, information
includes an error of up to two percent.÷ Changing the total play time and power ON time to zero is
unavailable.
OPERATING TIMEPOWER ON 00105:46PLAY 00078:13
Total play time is 78 hours,13 munites for this example
Power ON time is 105 hours, 46 minutes forthis example
RightLeft
÷ Connect plugs to the terminals that match the plug’s color(white, red, yellow).
÷ Align the plug with the connector and insert smoothlythen tighten the lock screws.
÷ Align the plug properly with the tab on the connector andpress in carefully. Rotate the plug to the right to lock.
Cables can be found at local audio/video dealers
÷ Connect the TV's S-VIDEO terminal to theplayer's S-VIDEO output terminal.
screw
Video Output Audio Output
Interface Connector (RS-232C)
S-video Output
External Sync Input (BNC)/Video Output (BNC)/Component Video Output (BNC)
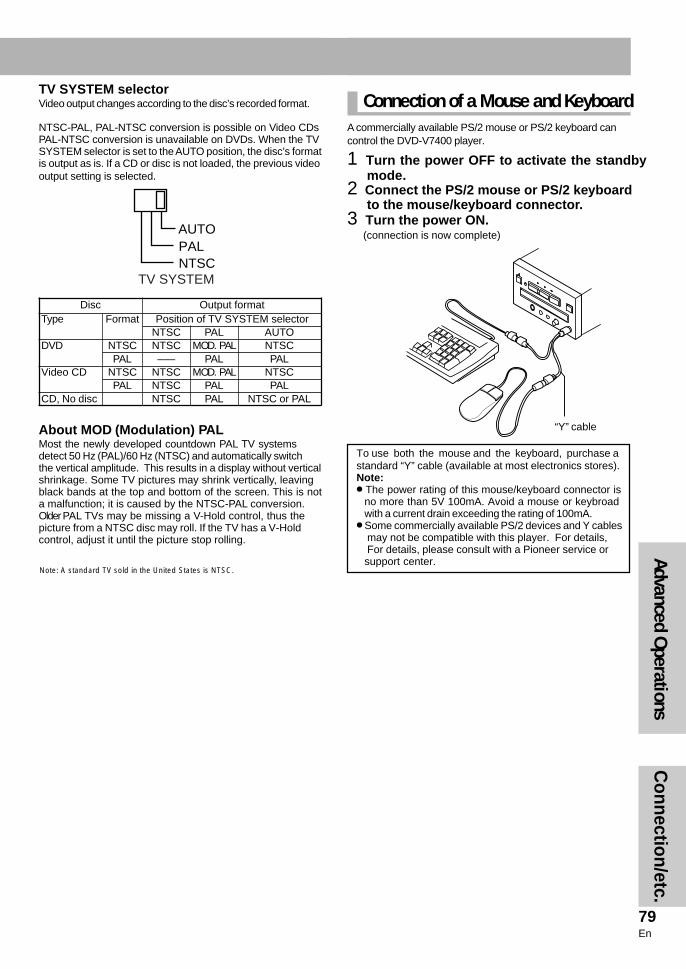
79En
Connection/etc.
Connection of a Mouse and KeyboardA commercially available PS/2 mouse or PS/2 keyboard can control the DVD-V7400 player.
1 Turn th e power OFF to activate the standby mod e.
2 Connect the PS/2 mouse or PS/2 k eyboa rd to th e mouse/k eyboa rd connecto r.
3 Turn th e power ON.(connection is now complete)
To use both the mouse and the keyboard, purchase astandard “Y” cable (available at most electronics stores).Note:÷ The power rating of this mouse/keyboard connector is
no more than 5V 100mA. Avoid a mouse or keybroadwith a current drain exceeding the rating of 100mA.
÷ Some commercially available PS/2 devices and Y cables may not be compatible with this player. For details, For details, please consult with a Pioneer service orsupport center.
TV SYSTEM selectorVideo output changes according to the disc’s recorded format.
NTSC-PAL, PAL-NTSC conversion is possible on Video CDsPAL-NTSC conversion is unavailable on DVDs. When the TVSYSTEM selector is set to the AUTO position, the disc’s formatis output as is. If a CD or disc is not loaded, the previous videooutput setting is selected.
About MO D (Modulation) PALMost the newly developed countdown PAL TV systems detect 50 Hz (PAL)/60 Hz (NTSC) and automatically switch the vertical amplitude. This results in a display without vertical shrinkage. Some TV pictures may shrink vertically, leavingblack bands at the top and bottom of the screen. This is nota malfunction; it is caused by the NTSC-PAL conversion.Older PAL TVs may be missing a V-Hold control, thus the picture from a NTSC disc may roll. If the TV has a V-Holdcontrol, adjust it until the picture stop rolling.
DiscType Format
DVD NTSCPAL
Video CD NTSCPAL
CD, No disc
Output formatPosition of TV SYSTEM selector
NTSC PAL AUTONTSC MOD. PAL NTSC––– PAL PAL
NTSC MOD. PAL NTSCNTSC PAL PALNTSC PAL NTSC or PAL
AUTO
NTSCPAL
TV SYSTEM
Advanced Operations
“Y” cable
Note: A standard TV sold in the United States is NTSC.

80En
INTERFACE CONNECTOR
AUDIO OUT
EXIT SYNC INBLACK BURST
COMPONENT VIDEO OUT
COMPOSITEVIDEO OUT
OFF ON
VIDEO 1
VIDEO 2S-VIDEO
COMPONENTCOMPOSITE(MONO)
AUDIOOUT
PCM/DIGITAL OUT
R
Y PB PR
L
DC OUT 5V 40mA
AUTO
NTSCPAL
TV SYSTEM
VIDEO 1(MONO)
AUDIOOUT
DC OUT 5V 40mA
ComputerConnect one only of these
Audio input (L, R)
Audio input (monaural)
Video input(pin plug)
S-Videoinput(S)
Television(monitor TV)
Connect oneof these threeinputs
Video input(BNC)
Lastly, connect to an outlet
UHF Antenna(for connecting to aTV without video/ audio input terminals)
VHF antenna
VHF Antenna
VHF adapter(sold separately)
Sync signal output terminal
÷ Television (monitor TV)÷ Control Computer÷ Sync Generator
Follow these instructions to connectthis player directly to a television(Monitor TV) for disc playback.
Cables can be found at local audio/video dealers
Connection Example 1
Set switch toON when usingone player butnot connectingto other devicesor components.
Set to COMPOSITE
RS-232C
÷ Refer to the TV (monitor TV) manual for additional connection information.
two inputs
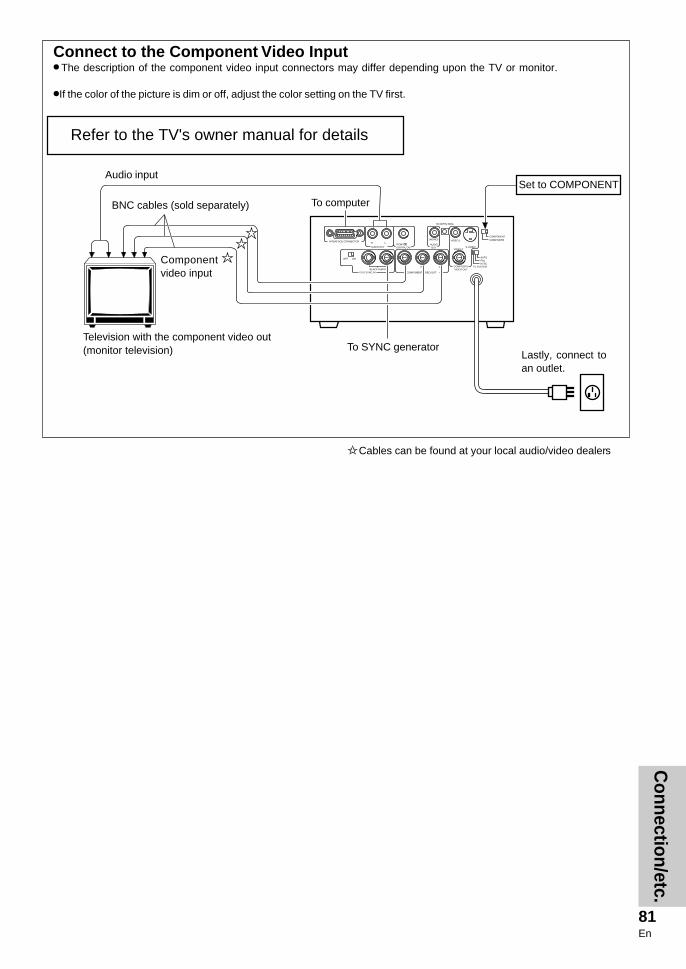
81En
Connection/etc.
INTERFACE CONNECTOR
AUDIO OUT
EXIT SYNC INBLACK BURST
COMPONENT VIDEO OUT
COMPOSITE VIDEO OUT
OFF ON
VIDEO 1
VIDEO 2S-VIDEO
COMPONENTCOMPOSITE(MONO)
AUDIOOUT
PCM/DIGITAL OUT
R
Y Pb Pr
L
DC OUT 5V 40mA
AUTO
NTSCPAL
TV SYSTEM
Connect to the Component Video Input÷ The description of the component video input connectors may differ depending upon the TV or monitor.
÷If the color of the picture is dim or off, adjust the color setting on the TV first.
BNC cables (sold separately)
Audio input
To SYNC generatorTelevision with the component video out(monitor television) Lastly, connect to
an outlet.
Componentvideo input
Set to COMPONENT
Cables can be found at your local audio/video dealers
To computer
Refer to the TV's owner manual for details

82En
INTERFACE CONNECTOR
AUDIO OUT
EXIT SYNC INBLACK BURST
COMPONENT VIDEO OUT
OFF ON
VIDEO 1
VIDEO 2S-VIDEO
COMPONENTCOMPOSITE(MONO)
AUDIOOUT
PCM/DIGITAL OUT
R
Y PB PR
L
DC OUT 5V 40mA
AUTO
NTSCPAL
COMPOSITEVIDEO OUT
TV SYSTEM
AV receiver with digital input for DolbyDigital.
For connecting theplayer to an amp with
* For use with Pioneer’s VSX-27TX or VSX-29TX AV receiver
÷ Connect this unit’s digital output PCM/ jack to the Dolby Digital input jack of a compatible amplifier.÷ Select the coaxial digital output if required for the amplifier’s input jack.
VIDEO INDVD, LD, AUDIO IN PCM/ /DTS
Cables can be found at local audio/video dealers÷ Some discs may not allow digital output when the sampling is set for 96 kHz (refer to page 35).
Connection Example 2
Lastly, connect to an outlet.
Dolby Digital inputs

83En
Connection/etc.
INTERFACE CONNECTOR
AUDIO OUT
EXIT SYNC INBLACK BURST
COMPONENT VIDEO OUT
COMPOSITE VIDEO OUT
OFF ON
VIDEO 1
VIDEO 2S-VIDEO
COMPONENTCOMPOSITE(MONO)
AUDIOOUT
PCM/DIGITAL OUT
R
Y PB PR
L
DC OUT 5V 40mA
AUTO
NTSCPAL
SIGNALGND
TV SYSTEM
INTERFACE CONNECTOR
AUDIO OUT
EXIT SYNC INBLACK BURST
COMPONENT VIDEO OUT
COMPOSITEVIDEO OUT
OFF ON
VIDEO 1
VIDEO 2S-VIDEO
COMPONENTCOMPOSITE(MONO)
AUDIOOUT
PCM/DIGITAL OUT
R
Y PB PR
L
DC OUT 5V 40mA
AUTO
NTSCPAL
TV SYSTEM
AV AmplifierConnect to a regular AV ampor stereo amp to enjoy improvedsound quality.
AUDIO IN VIDEO IN
÷ To enjoy Surround Sound, select amplifiers that have a built-in Dolby Pro Logic decoder.÷ For additional information, refer to the amplifier's owners manual.
÷ Connect the player’s audio output jacks to an amplifier’s CD, LD, AUX or other audio input jacks except to the PHONO jacks.
÷ Connect the player’s video output jack to the amplifier’s video input jack.
Digital Audio reco rderConnect as digital audio for data
Connection Example 3
Connection Example 4
Digital Audio Input
Digital Audio Recorder(MD player, CD-R player, or DAT player, etc.)
÷ Connect the player’s coaxial digital output jacks to a MD player, CD-R player, or DAT player.÷ Connect the unit’s digital output PCM/ jack to the digital audio recorder.
Lastly, connect to an outlet.
NOTEWhen you record the Dolby Digital DVD, set [Digital Out-put] (see page 34) to [Dolby Digital3PCM]. If [Digital Out-put] is set to [Dolby Digital] during recording Dolby DigitalDVD, noise is recorded.
Cables can be found at your local audio/video dealer.
AV amplifier
Finally, connect toa wall outlet.
recorded as MD, CD-R or DAT.
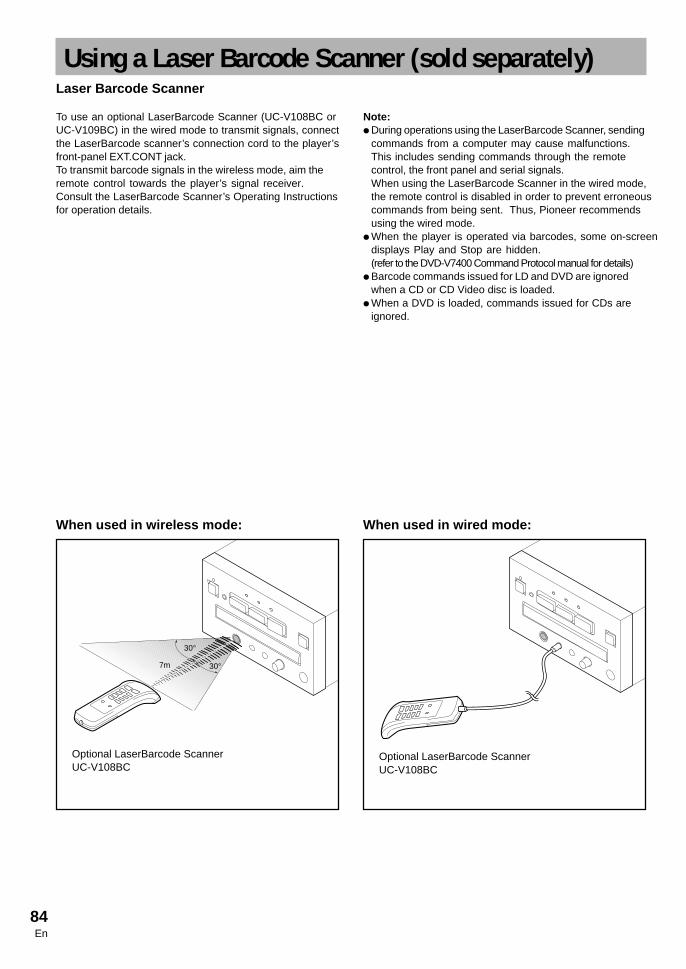
84En
When used in wireless mode:
Optional LaserBarcode ScannerUC-V108BC
When used in wired mode:
Optional LaserBarcode ScannerUC-V108BC
Using a Laser Barcode Scanner (sold separately)Laser Barcode Scanner
To use an optional LaserBarcode Scanner (UC-V108BC orUC-V109BC) in the wired mode to transmit signals, connectthe LaserBarcode scanner’s connection cord to the player’sfront-panel EXT.CONT jack.To transmit barcode signals in the wireless mode, aim the remote control towards the player’s signal receiver. Consult the LaserBarcode Scanner’s Operating Instructionsfor operation details.
Note:÷ During operations using the LaserBarcode Scanner, sending
commands from a computer may cause malfunctions.This includes sending commands through the remote control, the front panel and serial signals.When using the LaserBarcode Scanner in the wired mode,the remote control is disabled in order to prevent erroneouscommands from being sent. Thus, Pioneer recommendsusing the wired mode.
÷ When the player is operated via barcodes, some on-screendisplays Play and Stop are hidd(refer to the DVD-V7400 Command Protocol manual for details)
en.
÷ Barcode commands issued for LD and DVD are ignoredwhen a CD or CD Video disc is loaded.
÷ When a DVD is loaded, commands issued for CDs are ignored.
7m
30°
30°
85En
Connection/etc.
TroubleshootingPlease refer to the DVD-V7400 manuals for error code information before seeking support. Generally, device failures can be traced to many factors. Check the TV,monitor, AV ampliefer, and speakers for compliance.
If the situation continues, contact your service personnel,the store where the player was purchased, or the nearestPIONEER Authorized Service Center.
Power fails to turn ONCheck the power connections (pgs 80 - 83)
The disc table refuses to stay closedSet the disc in the disc table properly (pg 10)Clean the disc (pg 6)Check the region numbers (pgs 7 & 86)
The screen does not appea rCheck the setting of the Video Output selector on the
back of the player with the connected video terminal(pgs 80 - 81)
Check the cable connections (pgs 78 - 83)Match the television or AV amplifier setting to the DVD
playback setting
Disc fails to play backClean the disc (pg 6)Set the disc in the disc table properly (pg 10)Remove any condensation in the player (pg 6)SECAM format discs are incompatibleInsert the disc with the proper side up
The newly-programmed settings disappea rWhen the power has been turned OFF due to a power outage
or because the power cord was pulled out of the socket whilethe power was ON, the settings are erased. Verify that theplayer is OFF and that the power indicator is orange beforepulling the plug.
The screen stops and the operation buttonsare not accepted
After pressing STOP
, play back once more
The mark appea rs on the screenThe disc prohibits a particular command (pg 7)
The mark appea rs on the screenThe player prohibits the operation (pg 7)
The remote cont rol fails to send a commandVerify that the remote control is used within the proper
range (pg 10)Replace the batteries in the remote control (pg 3)
External syn chronizing fails to per formRefer to the EXTERNAL SYNC setting in the ADV. SETUP
menu.(pg 42)Check the NOTE for the external synchronizing function
(pg 77)
No sound comes f rom the speake rs or thesound is distortedConfirm that the audio cable is properly connected
(pgs 78 - 83)Some discs prohibit 96 kHz digital output of Linear PCM audio
With this type of disc, even if the [96 kHz PCM Out] setting ofAudio 1 on the Setup menu screen is set to [96 kHz], itchanges automatically to 48 kHz (pg 35)
During playback of a DVD recorded at 96 kHz in 16:9, if the[4:3 (Letter Box) - Video] is selected and the Audio 1 is set to[96 kHz PCM Out], it still changes automatically to 48 KHz(pg 23)
Clean the disc (pg 6)If it has been set to the pause or slow playback mode, change
to the playback mode (pg 15)If the volume of the television or AV amplifier, etc., is set to
“minimum”, raise the volumeConfirm that the connector plug is in place and properly
seatedCheck for dirt or grime on th connector plug or terminals
The screen extend s vertical ly or horizon tallyto stretch the pictureAdjust the TV Screen setting (pg 24)
The volume s are different between the DVDand CD discsThis is due to the difference in the disc recording methods
The picture is disto rted or dark when playinga DVD discThis player has the copy guard of an analog copy protect
system. Some discs have a copy prohibition signal. Whenthis type of disc is played back, lateral stripes may appearon part of the screen but this is not a defect or error.
The picture distorts when video on a DVD discis recroded then played on a VCRThis player has the copy guard of an analog copy protect
system. Some discs have a copy prohibition signal. Whenthis type of disc plays on a VCR, and is recorded then playedback on a VCR, the quality is lowered because of the copyguard technology.
The tel evision or other device malfunctionsSome televisions with a wireless remote control malfunction
because of conflichts with the player's remote control.
When the Setup me nu appears, a screen set toLetter Box suddenly becomes vertically extendedWhen the Setup menu appears while the picture is set to
Letter Box or Pan & Scan mode, the screen size is forciblychanged to the wide-screen mode. This is a feature of theplayer (pg 24).
Outside influences such as static electricity may causeerrors or playback issues. The player may return to normaloperation after the p ower co rd has been temporari ly unpluggedthen plu gged in again . If the problem still exists, consult thestore where the unit was purchased or with an authorizedservice center.
86En
AspectAspect Ratio refers to the length to height ratio of a TV screen.The ratio of a normal TV is 4:3, while the ratio of a Hi-Visionor Wide TV is 16:9. This allows you to enjoy a picture witha wider perspective.
Component Video OutputThe color signal of the TV is divided into the luminance (Y)signal and the two color (PB and PR) signals before output.This methods avoids interference between the signals. On aTV with component input jacks, these signals are synthesizedto produce a picture.
Parental LevelParental level controls are restrictions incorporated into scenes that limit content viewing.
Dynamic RangeDynamic range refers to the difference between the maximumand minimum levels of the audio soundtrack as measured indecibels (dB).
Dolby DigitalThe maximum 5.1 channels of audio used in the surroundsystem (Surround Digital) for movie theaters is digital datacompressed by AC-3.
For DVD discs, the digital output PCM/ jack must be con-nected to the amplifier or processor’s digital input AC-3/PCMjack.
Playback Control (PBC)This refers to signals recorded on a Video CD (Version 2.0)enabling playback control.Use menus recorded on discs with PBC for easy, interactivesearching for desired scenes and playback. Also enjoy thehigh-resolution and standard resolution still images.
Multi- AngleThis feature refers to a sequence recorded from differentviewpoints. Some DVD discs include an additional viewor up to nine views or angles. The number of angles relyupon the producer's or director's discretion.
Multi-AudioSome DVD has multi audio language streams. Up to eightseparate streams may be recorded on a DVD disc. Thesecan include language options or sound effects.
SubtitleSubtitles are language titles super-imposed over movies etc.Up to 32 subtitle languages can be recorded on a DVD disc.The subtitle function can be used to select any language froma particular disc.
Regional Restriction Codes (Region Number)Regional restriction codes are built in to DVD players and DVDdiscs for each global region. If the regional restriction codes of the player does not match one of the regional codes of the DVD disc, playback fails.
The regional restriction code can be found on the rear panelof the DVD player.
Linear PCMThis refers to a DVD audio recording format which matches the format for CD audio. However, the sampling frequencyis recorded at 48 kHz and 96 kHz, with audio at an improvedsound quality than that of CD.
DTSDTS stand for Digital Theater System. DTS is a surround soundsystem different from Dolby Digital but is a popular formatfor movies.
MPEGMPEG stand for Moving Picture Expert Group that is an international standard for compression of moving images.Some DVDs have the digital audio compressed and recordedin this format.
PCMPCM stands for Pulse Code Modulation and is digital audiosignal. The digital audio of CD and DVD discs is PCM.
5.1 chThis refers to multi-channel audio with a special low soundrange (0.1 channel) added to the five channels of front left/right,center and rear left/right. Dolby Digital and DTS surround systems use this configuration.
Terms
DOLBY D I G I T A L

87En
Connection/etc.
SpecificationsGeneralSystem ................. DVD system , Compact Disc digital video
and Compact Disc digital audio systemPower requirements .............................. AC 120 V, 50/60 HzPower consumption ..................................................... 16 WPower consumption in standby mode .......................... 0.5WWeight ........................................................... 4.7 kg (10.6 lb)Dimensions ........................ 210 (W) x 408 (D) x 119 (H) mm
(8 1/4
16 1/8 4 11/
16 in.)
(Not including protruding cables, etc.)Operating temperature ....... +5°C to +35°C (+41°F to +95°F)Operating humidity .... No more than 85% (no condensation)
Video OutputOutput level ................................................................ 1 Vp-p
(75Ω when loaded, synchronous negative)Jacks .................................................................... BNC, RCA
S-Video OutputY (luminance) - Output level ............................. 1 Vp-p (75Ω)C (color) - Output level .............................. 286 mVp-p (75Ω)
Component video OutputY - Output level ....................................... 1 Vp-p (75Ω) BNCPB - Output level ................................... 0.7 Vp-p (75Ω) BNCPR - Output level ................................... 0.7 Vp-p (75Ω) BNCS/N ratio ..................................................... more than 60 dBHorizontal resolution ...................................... more than 500
External synchronizing inputInput signal level ................................................. Black burst
0.3 Vp-p (75Ω) BNC x 2 (loop through)
Audio OutputOutput levelDuring audio output .................. 200 mVrms (1 kHz, –20 dB)Number of channels ............................................................ 2Frequency response .......... 4 Hz to 22 kHz (DVD fs: 48 kHz)
4 Hz to 20 kHz (CD)S/N ratio ......................................................... 115 dB (EIAJ)Dynamic range ................................................. 98 dB (EIAJ)Wow and flutter ...............±0.001% W. PEAK or lower (EIAJ)
Other TerminalsCoaxial digital output (PCM/ ) ........................... RCA jackCommunication interface (RS-232C) ............ D-SUB, 15-pin
AccessoriesAudio cord .......................................................................... 1Video cord .......................................................................... 1Remote control unit ............................................................ 1AA (R6P) dry cell batteries ................................................. 2Laser barcode Sheet .......................................................... 1RF adaptor set clamp ......................................................... 1Screw ................................................................................. 1Operating Instructions ........................................................ 1Warranty card ..................................................................... 1
NOTES:÷ All values listed in these specifications are standard values.÷ The specifications and product design are subject to change
without notice.
Selecting fine audio equipment such as the unit you’ve just pur-chased is only the start of your musical enjoyment. Now it’s time toconsider how you can maximize the fun and excitement your equip-ment offers. This manufacturer and the Electronic Industries Asso-ciation’s Consumer Electronics Group want you to get the most outof your equipment by playing it at a safe level. One that lets thesound come through loud and clear without annoying blaring ordistortion-and, most importantly, without affecting your sensitivehearing.
Sound can be deceiving. Over time your hearing “comfort level”adapts to higher volumes of sound. So what sounds “normal” canactually be loud and harmful to your hearing. Guard against this bysetting your equipment at a safe level BEFORE your hearing adapts.
To establish a safe level:÷ Start your volume control at a low setting.÷ Slowly increase the sound until you can hear it comfortably and
clearly, and without distortion.
Once you have established a comfortable sound level:÷ Set the dial and leave it there.
Taking a minute to do this now will help to prevent hearing dam-age or loss in the future. After all, we want you listening for a life-time.
We Want You Listening For A Lifetime
Used wisely, your new sound equipment will provide a lifetimeof fun and enjoyment. Since hearing damage from loud noise isoften undetectable until it is too late, this manufacturer and the Elec-tronic Industries Association’s Consumer Electronics Group recom-mend you avoid prolonged exposure to excessive noise. This list ofsound levels is included for your protection.
DecibelLevel Example
30 Quiet library, soft whispers40 Living room, refrigerator, bedroom away from traffic50 Light traffic, normal conversation, quiet office60 Air conditioner at 20 feet, sewing machine70 Vacuum cleaner, hair dryer, noisy restaurant80 Average city traffic, garbage disposals, alarm clock
at two feet.
THE FOLLOWING NOISES CAN BE DANGEROUSUNDER CONSTANT EXPOSURE
90 Subway, motorcycle, truck traffic, lawn mower100 Garbage truck, chain saw, pneumatic drill120 Rock band concert in front of speakers, thunderclap140 Gunshot blast, jet plane180 Rocket launching pad
Information courtesy of the Deafness Research Foundation.
•A
S S O C I A T II O
N•
EL
EC
TR
ONIC INDUSTRIE
S
EST 1924
WeWant You
LISTENINGFor A Lifetime
•A
S S O C I A T II O
N•
EL
EC
TR
ONIC INDUSTRIE
S
EST 1924WeWant You
LISTENINGFor A Lifetime

PIONEER CORPORATION 4-1, Meguro 1-Chome, Meguro-ku, Tokyo 153-8654, Japan
PIONEER NEW MEDIA TECHNOLOGIES, INC.2265 East 220th Street, Long Beach, CA 90810, U.S.A. TEL:1-310-952-2111PIONEER ELECTRONICS [USA] INC. P.O. BOX 1540, Long Beach, California 90801-1540PIONEER ELECTRONICS OF CANADA, INC. 300 Allstate Parkway, Markham, Ontario L3R OP2, CanadaPIONEER ELECTRONIC [EUROPE] N.V.
Multimedia Division: PIONEER House, Hollybush Hill STOKE POGES, SLOUGH SL2 4QP UK TEL: 44-1-753-789-789 FAX: 44-1-753-789-880PIONEER ELECTRONICS AUSTRALIA PTY. LTD. 178-184 Boundary Road, Braeside, Victoria 3195, Australia, TEL: 61-39-586-6300PIONEER ELECTRONICS DE MEXICO S.A. DE C.V. San Lorenzo Num 1009 3er piso Desp. 302 Col. Del Valle, Mexico D.F. C.P. 03100
TEL: 52-5-688-52-90
<99K00JF0G00> <DRB1264-A>
Should this product require service in the U.S.A. and you wish to locate the nearest PioneerAuthorized Independent Service Company, or if you wish to purchase replacement parts,operating instructions, service manuals, or accessories, please call the number shown below.
8 0 0 – 4 2 1 – 1 4 0 4Please do not ship your product to Pioneer without first calling the Customer ServiceDepartment at the above listed number for assistance.
PIONEER ELECTRONICS SERVICE, INC.CUSTOMER SERVICE DEPARTMENTP.O. BOX 1760, LONG BEACH,CA 90801-1760, U.S.A.
For warranty information please see the Limited Warranty sheet included with your product.
Should this product require service in Canada, please contact a Pioneer Canadian AuthorizedDealer to locate the nearest Pioneer Authorized Service Company in Canada.Alternatively, please contact the Customer Service Department at the following address:
Pioneer Electronics of Canada, Inc.Customer Service Department300 Allstate Parkway, Markham, Ontario L3R OP2(905) 479-44111-877-283-5901
For warranty information please see the Limited Warranty sheet included with your product.
Si ce produit doit être réparé au Canada, veuillez vous adresser à un distributeur autoriséePioneer au Canada pour obtenir le nom de la Société de Service Autorisée Pioneer le plusprès de chez vous. Ou encore, veuillez vous communiquer avec le Service de Clientèle dePioneer:
Pioneer électroniques du Canada, Inc.Département de service au consommateurs300 Allstate Parkway, Markham, Ontario L3R OP2(905) 479-44111-877-283-5901
Pour obtenir des renseignements sur la garantie, veuillez vous reporter au feuillet sur laGarantie Limitée gui accompagne le produit.
Information about this producthttp://www.pioneerusa.co.jp
Published by Pioneer Corporation.Copyright © 1999 Pioneer Corporation.All rights reserved.