pla 2.0 user manual - software for biostatistical...
TRANSCRIPT

PLA 2.0 User Manuals


iii
Table Of Contents Welcome to PLA 2.0 .................................................................................................................... 1
Statistical Features................................................................................................................ 1 Data Management and Reports .............................................................................................. 1 GxP Features........................................................................................................................ 1 21 CFR Part 11 ..................................................................................................................... 2
Overview of the Manuals.............................................................................................................. 3 PLA User ................................................................................................................................. 3 PLA Administrator .................................................................................................................... 3 IT Administration ..................................................................................................................... 3
Getting Support........................................................................................................................... 5 Websites ................................................................................................................................. 5 E-Mail ..................................................................................................................................... 5 Phone ..................................................................................................................................... 5 Fax ......................................................................................................................................... 5
Getting Started ........................................................................................................................... 7 Parallel-Line and Parallel-Logistics Assays................................................................................... 7 Installation of PLA 2.0 .............................................................................................................. 8
CD-ROM Version of PLA 2.0 ................................................................................................... 8 Download Version of PLA 2.0 ................................................................................................. 8
Attach the Software Licensing Module (Hardlock)...................................................................... 12 Basic Database Management................................................................................................... 13
File-Based Database............................................................................................................ 13 Database Server Based Databases........................................................................................ 14
Basic Concepts of PLA 2.0....................................................................................................... 15 Database Storage Concepts ................................................................................................. 15 Object Types and Hierarchy................................................................................................. 15 Inheritance of Object Properties........................................................................................... 16
Basics of PLA 2.0 Mathematical Features.................................................................................. 17 Doses and Potencies ........................................................................................................... 17 Model, Response Transformation and Outlier Detection.......................................................... 18 Analysis of Variance (ANOVA) .............................................................................................. 19 Configuration Optimization .................................................................................................. 20
User Guide................................................................................................................................ 21 Introduction to Assay Analysis with PLA ................................................................................... 21 Connect to PLA ...................................................................................................................... 22
Log in to PLA...................................................................................................................... 22 Screen Layout .................................................................................................................... 23
The Objects of PLA................................................................................................................. 24 Managing Objects ............................................................................................................... 25 Editing Objects ................................................................................................................... 35 Inheritance, Templates and the Apply Function ..................................................................... 40 Import and Export .............................................................................................................. 48
Object Properties ................................................................................................................... 68 Introduction ....................................................................................................................... 68 General Properties .............................................................................................................. 69 Dose Properties .................................................................................................................. 71 Data Properties................................................................................................................... 73 Analysis Properties.............................................................................................................. 74 Configuration Properties ...................................................................................................... 77 Documentation Properties ................................................................................................... 79 GxP Settings....................................................................................................................... 81
Analyze Assays ...................................................................................................................... 83 Introduction to Assay Analysis with PLA ................................................................................ 83 Explore your Assay ............................................................................................................. 84 Combination of Assay Results .............................................................................................. 87 Calculate & Report .............................................................................................................. 89

PLA 2.0 User Manuals
iv
Advanced Topics .................................................................................................................... 91 Electronic Signatures........................................................................................................... 91 Secure Transfer of Data and Objects .................................................................................... 93 Audit Trail .......................................................................................................................... 94
My First Assay with PLA ............................................................................................................. 97 My First Assay with PLA .......................................................................................................... 97 The Exemplary Data............................................................................................................... 98 Hierarchy of Objects............................................................................................................. 100 Data Input........................................................................................................................... 101
Create the Project............................................................................................................. 101 Create The Assay.............................................................................................................. 101 Create The Standard Object............................................................................................... 103 Create The Preparation Object ........................................................................................... 104
A First Look ......................................................................................................................... 105 Optimizing the Configuration................................................................................................. 107 Switching the Regression Model to 5 Parameter Logistics ........................................................ 109 What About Equivalence Testing ........................................................................................... 110 Final Computation and Reporting........................................................................................... 111
Validation Guide ...................................................................................................................... 113 Welcome to the PLA 2.0 Validation Package ........................................................................... 113
What is included in the package? ....................................................................................... 113 Principles of Validation.......................................................................................................... 114
Validation of Each System ................................................................................................. 114 Cryptographically Secured Reference Data .......................................................................... 114 Recommendation for your IQ/OQ Procedures ...................................................................... 114
Installation Qualification ....................................................................................................... 115 The Installation Qualification Process.................................................................................. 115 Performing the Installation Qualification.............................................................................. 116
Operational Qualification....................................................................................................... 118 The Operational Qualification Process ................................................................................. 118 Performing the Operational Qualification............................................................................. 119
Performance Qualification ..................................................................................................... 120 The Performance Qualification Process ............................................................................... 120 Preparing the Performance Qualification ............................................................................. 121 Performing the Performance Qualification ........................................................................... 123
IT Administration Guide ........................................................................................................... 125 Welcome to the PLA IT Administration Guide.......................................................................... 125 Description of PLA for IT Professionals ................................................................................... 126 PLA Setup Basics.................................................................................................................. 127
PLA is Microsoft Windows Compliant................................................................................... 127 Customizable Directories of PLA ......................................................................................... 127 Other Directories of Interest .............................................................................................. 127 Hardlock Installation ......................................................................................................... 128
Security Basics..................................................................................................................... 129 User Account Security ....................................................................................................... 129 Data Integrity................................................................................................................... 129 Database Security............................................................................................................. 129
Database Guide ................................................................................................................... 130 PLA Databases.................................................................................................................. 130 PLA Database Maintenance................................................................................................ 131 Advanced Database Administration..................................................................................... 135
PLA License Management ..................................................................................................... 136 Retail Mode ...................................................................................................................... 136
Reference............................................................................................................................... 139 User Interface Reference ...................................................................................................... 139
Account Management........................................................................................................ 139 Action Menu ..................................................................................................................... 142 Apply ............................................................................................................................... 143 Audit Trail ........................................................................................................................ 145

Table Of Contents
v
Change your Password...................................................................................................... 146 Context Menu................................................................................................................... 147 Create Object ................................................................................................................... 149 Database Manager ............................................................................................................ 151 Database Manager Connect ............................................................................................... 153 File Menu ......................................................................................................................... 155 Help Menu ....................................................................................................................... 157 License Management......................................................................................................... 158 Login ............................................................................................................................... 160 Options............................................................................................................................ 162 Product Information.......................................................................................................... 167 Register Your Copy of PLA ................................................................................................. 168 Session & Lock Management.............................................................................................. 171 System Menu ................................................................................................................... 173 System Locked ................................................................................................................. 175 Validation Menu................................................................................................................ 176 Window Menu .................................................................................................................. 177
PLA 2.0 vs. PLA 1.2 ................................................................................................................. 179 No Interaction of PLA 1.2 and PLA 2.0 ................................................................................... 179 Data Migration ..................................................................................................................... 179 PLA 1.2 / PLA 2.0 Licensing................................................................................................... 179
Stegmann Systems.................................................................................................................. 181 System Requirements .............................................................................................................. 183 Copyright................................................................................................................................ 185 Licensing Agreement ............................................................................................................... 187


1
(Version 0.90, 2006-08-16)
Welcome to PLA 2.0 PLA 2.0 is a software package for the development and analysis of Parallel-Line Assays and Parallel-Logistics Assays. The following keywords describe the options of PLA to give a short summary:
Statistical Features
• Parallel-Line Assay • Four Response Transformations for Parallel-Line Assays • Configuration Optimization for Parallel-Line Assays • Parallel-Logistics Assays based on 4- and 5-Parameter Fit • Four Outlier Detection Methods (Optional)
• Dixon Test for Data Outliers • Grubb's Test • Standard Deviation Test • (Externally) Studentized Residuals • Manual Removal as Technical Outliers
• ANOVA Models • Separate ANOVAs (PLA 1.2 compatible) • ANOVA based on Pure Error Separation (European Pharmacopoeia) • ANOVA based on Residual Error
• Test of Parallelism • F-Test • Equivalence Test based on Ratio of Slopes • Equivalence Test based on Difference of Slopes
• Combination of Assay Results • Raw/Bulk Material Potency Calculations • Stock Solution Potency Calculations • Assigned / Assumed Potency Calculations • EC50 Calculation
Data Management and Reports
• Database for Storage of Assay Data • Multiple Databases shared over the network (e.g. project databases) • Secure Storage using an internal PKI Infrastructure • Template Engine for Efficient Input • GxP/SOP Support • Secure External Data Transfer using PLA Secure Format (PSF) utilizing the internal PKI of PLA • Export/Import
• attach (virtually) any external systems using PLA Import and PLA Export Modules • Report Engine based on XML/XSL technologies
• Adobe Acrobat Portable Document Format (PDF) • Microsoft Word 2003 Documents • Microsoft Excel 2003 Documents • any customer specific output
• Graphic
GxP Features
• Automated Installation Qualification (IQ)* • Automated Operational Qualification (OQ)* • Automated Performance Qualification (PQ)* • Template Engine

PLA 2.0 User Manuals
2
• SOP Support (Protect groups of assay properties from manipulation) • Role based user administration
* requires a license of the PLA Validation Package
21 CFR Part 11
• Electronic Signatures • User Login • Fully customizable Password Logic
• Aging • Complexity • Black Lists
• Inactivity Lock • Audit Trail • Documents signed digitally using the internal PKI for storage integrity

3
Overview of the Manuals There are several guides available to you. Stegmann Systems has structured the help system according to your roles you might have concerning PLA. First, you might have a look in the Getting Started section. A few pages tell you about the basic installation and principles of PLA.
PLA User
A PLA User uses PLA to define and calculate his assays based on the settings a PLA administrator defined for the database in use. The most relevant sources of information are:
PLA 2.0 User Guide Learn the principles of PLA and its efficient use.
PLA 2.0 My First Assay with PLA Follow a systematic guide to define and analyze a simple assay.
PLA 2.0 Reference Find reference information for mathematical and technical options of PLA.
PLA 2.0 Tutorial Videos Some Flash-Videos for common tasks within PLA. (Online Help only)
PLA Administrator
The PLA Administrator is responsible for setting up an already installed PLA for a workgroup. He defines user accounts and the global settings for the assay analysis. PLA Administrator is a role inside PLA.
PLA 2.0 Administration Guide Find information concerning the PLA Administration.
PLA 2.0 Validation Guide Find out how to validate PLA using the PLA Validation Package
IT Administration
The IT administration is responsible for installing PLA in your environment and set up central database services.
PLA 2.0 IT Administration Guide Find information for the IT administration of PLA.
PLA 2.0 Validation Guide Find out how to validate PLA using the PLA Validation Package


5
Getting Support There are several ways to get support. Do not hesitate to make use of the available help options.
Websites
For Product Information: www.bioassay.de Our Electronic Customer Feedback System (error reports, feature requests): support.stegmannsystems.com
E-Mail to [email protected] for any questions and comments.
Phone
During business hours (7:30 a.m. - 6:30 p.m. GMT) English (and German) phone support is available: +49 6106 77010-0
Fax
+49 6106 77010-29


7
Getting Started
Parallel-Line and Parallel-Logistics Assays
Biological or potency assays are frequently analyzed with the help of the parallel-line or parallel-logistics (4- or 5- parameter fit) methods. These methods have major advantages over traditional single-point assays:
• The linear or sigmoid dose-response correlation is not only assumed but confirmed in each calculation.
• The dose-response curves of the standard and sample preparations are confirmed to be parallel. Whereas in single-point analysis parallelism is a necessary requirement too, but cannot be proven.
• A dose-independent potency in terms of the standard’s potency is calculated for each assay, and its validity is statistically proven.
The complex statistical analysis of these methods requires an advanced software solution to be easy, flexible and efficient. This is the mission of PLA 2.0.

PLA 2.0 User Manuals
8
Installation of PLA 2.0
If your computer system complies with the system requirements, the PLA 2.0 setup process is easy and convenient. For the installation process administrative privileges on you computer system are required.
CD-ROM Version of PLA 2.0
Insert the CD-ROM into your CD drive. PLA 2.0 Setup should be executed automatically. If you have the auto-run feature of your disk drive disabled. Please start setup.exe by using the Windows Explorer or by selecting Run from your Start menu. The program to be executed is
<DriveLetterofCDDrive>:\setup.exe (e.g. D:\setup.exe)
Download Version of PLA 2.0
Please download the current version of PLA from the vendor's website (www.bioassay.de) and run the downloaded executable (e.g. PLA20-build601.exe). Note: There may be a security warning of you computer system when you try to execute a downloaded program. The PLA Setup now initializes.
PLA Upgrade
If you already had installed a previous version of PLA, the old version has to be un-installed first. PLA Setup is able to handle this for you and you will receive the following warning message (Note: the Yes and No answers are localized). Select YES to uninstall the old version. No data will be lost.
Accept the Terms of License
The next step is the acceptance of the Terms of License. This is required to install PLA.

Getting Started
9
Once you select "I accept the terms in the license agreement" the Next> button is enabled. Select 'Next >'
Select Destination Folder
By default, PLA is installed in the "Program Files" folder of your computer system. This screen allows you to select a different destination folder if you need to.

PLA 2.0 User Manuals
10
Press "Next >" to continue.
Start the Installation
Click "Install" to start the installation procedure. The setup program starts the installation sequence:
When the installation process is completed press Finish to close the installation dialog.

Getting Started
11
If you have received a Software License Module (HardLock) with your retail package, attach it to your system. PLA is completely installed now. Where to go from here:
• Basic Database Management • Basic Concepts of PLA 2.0 • Basic of PLA 2.0 Mathematical Features

PLA 2.0 User Manuals
12
Attach the Software Licensing Module (Hardlock)
If you need to attach a Software Licensing Module (Hardlock) to your system, you should install the PLA 2.0 software first, to have the necessary device drivers available.
Install Parallel-Port or Serial-Port Hardlock
• Attach the Software Licensing Module (Hardlock) to your computer system.
If a printer is attached to your computer than detach the printer cable from your computer. Attach the Software Licensing Module to your computer's parallel port (Label 'PARALLEL') and re-attach the printer cable to the backside of the software licensing module (Label 'SERIAL'). Computer System <> Software Licensing Module (Dongle) <> Printer Cable <> Printer
Install USB Universal Serial Bus Hardlock
• Attach the Software Licensing Module (Hardlock) to a USB Port of your computer

Getting Started
13
Basic Database Management
PLA 2.0 has a database management that allows you to create and connect to any number of databases. You can create databases for your different projects allowing you to define who has access to which data and to specify different security settings to these databases. The databases can be shared across the network. There are two basic database types available: File-based databases and SQL Server based databases. The installation process automatically installs a database called "PLA 2.0 Default Database". This is a file-based database with some example data. Since PLA 2.0 has its own security system, you have to create an administrator account, when you create a new database. You are automatically asked to create this account. Do not loose the password of this administrator account. Using this account, you can create any number of additional user accounts.
File-Based Database
This database type is based on a secured Microsoft JET 4.0 database.
Disadvantages: • This database type should not be shared with more than 3 or 4 concurrent users. • Size restriction: The maximum size of the database is limited to 2 Gigabytes. • It should be compacted using the PLA Database Manager regularly.
Advantages:
• This database type can be created without deeper knowledge of database servers or involvement of your IT department.

PLA 2.0 User Manuals
14
• This database type is file based. You only need write access to a network share to create and connect to this database type. No administrative privileges are required.
• Since the database contains of only one file it is easy to backup.
Database Server Based Databases
These databases require an installed Database Server. Currently the following database management systems are supported:
• Microsoft SQL Server 2000 Desktop Engine (MSDE) • Microsoft SQL Server 2005 Express Edition • Microsoft SQL Server 2000 or higher
The database administrator has to create an empty database on the database server. Once you have defined a connection to this database using the PLA Database Manager PLA automatically creates the required tables in this database. There are some basic things to know:
• The Database Server user account PLA used to connect to the database needs to be able to modify the database using standard SQL DDL and DML statements. If your IT department does not accept this, they'll have to create the tables using a SQL Script available with PLA (details are found in the IT Administration Guide)
• The integrity of PLA's data is not endangered by the knowledge of this account, because all relevant data is protected by the use of cryptography. However, this account should be kept secret, because it allows corrupting the database. PLA is able to detect corruptions of the database and it prevents corrupted objects from being used.
Further details for Database Server based databases are found in the IT Administration Guide.

Getting Started
15
Basic Concepts of PLA 2.0
There are a few basic concepts you should understand for efficient use of PLA.
• Database Storage Concepts • Object types and hierarchy • Inheritance of object properties
Database Storage Concepts
• All Assay Data and Properties are stored in the selected database. There is no need to work with individual files while working with assays. The advantage of this approach is the easy accessibility of the data even across networks. All data, properties, audit trail information and security information is held at a single place. The navigator allows you to navigate between the projects and assays of your database.
• The selected database completely defines the security environment
All account definitions or other security relevant data are stored in the database. By this way, you are able to define high and low security projects and databases.
Object Types and Hierarchy
PLA makes use of five different object types that define your projects and assays.
Project Projects collect your assays. They are on the first level of object hierarchy and they can be considered as folders. The properties you define for your project is never used for calculation. It is used as the source information for inheritance.
Assay Assay objects are on the second level of object hierarchy. The assay is the parent object for the standards, preparations and control values of your measured assay. The properties you define here are not directly used for calculation; they are source properties for inheritance. However you may bind the properties of the child objects (standard, preparation, control) to these values, to obtain a single point of change.
Standard (Reference) The standard object is a third level object and it is a child object of the assay. Each assay needs a standard object to be calculated. The potency of the preparation object is calculated with respect to this standard object. (Note: Some analysis properties of the standard are grayed out, because they are taken from the respective preparation object.)
Preparation (Sample, Unknown) The second type of third level objects is the preparation object. PLA calculates the potency of the preparation object with respect to the standard object. Many calculation properties are taken directly from this object. An assay object needs at least one preparation object to be calculated.
Control The third type of child objects of the assay object is the control. A control contains data for a series of positive, negative and blank controls. The use of control objects in PLA is optional.
The following graph illustrates a typical navigator view with these kinds of objects.

PLA 2.0 User Manuals
16
Inheritance of Object Properties
The understanding of object inheritance is necessary to make efficient use of PLA. The concept of object inheritance is derived from the fact that during normal course of laboratory life you will be analyzing many assay of the same type. To reduce input effort and errors PLA has many useful options to initialize new elements of your assay with correct properties. Assays with identical properties can be kept together in a single project. You can define the initial values of new assays in the projects properties. If you now create a new assay within this project, all properties of the new assay are inherited from the project. You do not have to input any properties if these properties match your needs. Now you can create the third level objects of your assay. Everything you need to enter are the object names and the response values of your measurement. IMPORTANT: If you change properties of parent objects, these changes do not influence the child objects if you did not bind the child objects to the parent explicitly (available on the third level only). If you want to deploy new settings to child objects you can make use of the Apply-functionality of PLA. Beside this approach of inheritance, there are more advanced concepts of templates, GxP and SOP support. These approaches are described in detail in the user manual.

Getting Started
17
Basics of PLA 2.0 Mathematical Features
PLA 2.0 is a full featured system for the analysis of parallel-line and parallel-logistics dilution assays. The statistical features of PLA are described in detail in the Statistical Reference. In this section, you will find information on
• Doses and Potencies • Model, Response Transformations and Outlier Detection • Analysis of Variance (ANOVA) • Configuration Selection
Doses and Potencies
PLA is able to calculate different potency values found in today's requirements of assay analysis. In principle, you have four different starting points for potency analysis:
1. Bulk Substance / Raw Material Potency When you activate the bulk substance potency you can input the potency of your raw material. You have to specify how much amount of your raw material is solved in which amount of a solvent. PLA then automatically calculates the concentration/potency of your stock solution, which is the starting point for your dilution series.
2. Stock Solution Potency Another option is the direct specification of the stock solution as a starting point. If you do not specify a bulk substance/raw material potency or stock solution potency the latter is assumed as 1.0
3. Pre-Dilution Potency You can specify two additional pre-dilution factors. The multiplication of these factors with the stock solution potency defines the concentration of the highest dose.
4. Specification of the Dilution Series The last step is the specification of the dilution series, which should be considered as relative doses of the dilution steps. If you want to enter absolute doses, don't activate the above options.
Assigned / Assumed Potency
By default, the assigned and assumed potencies of your bulk substance / raw material or stock solution of your standard and the preparation are considered to be equivalent. If they are equivalent the application of the analyzed potency factor to the potency of the standard leads to the potency of the preparation. As a consequence you have to enter potencies only at the standard object. However, especially in Quality Control this approach does not necessarily meet your needs. If your reference material and your preparation potencies are not identical, PLA calculates relative potencies of the preparation with respect to the standard and to the assigned potency of the preparation. To get these values the potencies have to be entered at the standard AND the preparation level.

PLA 2.0 User Manuals
18
Model, Response Transformation and Outlier Detection
Parallel-Line Method and Parallel-Logistics Model
PLA 2.0 supports both:
• Parallel-Line Assays Typically, you select the linear parts of the dose/response curve for the analysis with the parallel-line method. This robust method allows you the calculation of the potency with a minimum effort. The asymptotes of the sigmoid dose-response relationship are neglected.
• Parallel-Logistics Assays (4PL, 5PL) The four and five parameter function according to Rodbard describe the full dose-response relationship. You need at least four or five parameter to calculate these methods.
Both methods require logarithmic transformations of the dose values. There is no mathematical implication which base of the logarithm to use. PLA uses to logarithm on the base of 2. This approach has two advantages:
• The mathematics of Parallel-Line Assays has been best described by D.J. Finney who makes use of the base 2.
• If you use twofold dilution series, the transformed numbers are integer values. PLA calculates the potencies for each preparation of an assay separately.
Transformations
PLA allows four different transformations for parallel-line assays. They can be used to reduce an inhomogeneous variance distribution. Available models are

Getting Started
19
• linear transformation • logarithmic transformation • square root transformation • square transformation
Outlier Detection
PLA has four optional outlier tests available. An outlier test removes response values from analysis that match a specified statistical criterion. Three treatment based outlier tests are available, when you have three or more replicates:
• Dixon Test • Grubb's Test • Test based on standard deviation
These tests analyze each treatment group separately. They check the extreme value for statistical significance and remove it. Optionally these tests can be executed iterative. An alternative approach is realized with the
• (Externally) Studentized Residuals Test This test checks the influence of an potential outlier on the regression results. If the influence of the outlier is significant, it is removed from analysis. (Note: This test may require significant amounts of additional computational time.)
Analysis of Variance (ANOVA)
PLA has different variants of ANOVAs for hypothesis testing available. They are augmented by equivalence tests to achieve tests for parallelism. The basic hypothesis tests are:
• Test for the significance of the Regression • Test for the insignificance of deviations from linearity • Test for the insignificance of deviations from parallelism
ANOVA based on Pure Error Separation
This is the preferred approach in PLA 2.0. This ANOVA separates the influence of the treatments from the pure error. The pure error is the error that is obtained by summing the error squares of the deviations of the replicate response values from the treatment means. This value is a direct measurement of the dispersion of the measurement system. This method is available if you have at least two replicates. The model allows calculating significant deviations from the model as the significance of the lack-of-fit values.
ANOVA based on Residual Error
This is the classical approach based on the regression model. In principle, the analysis of variance considers the regression model and deviations from the regression model as sources of variation. The lack-of-fit gets part of the error term, so there is no separate test of linearity with this approach. This approach is available with one or more replicates.
Hypothesis tests base on separate ANOVAs

PLA 2.0 User Manuals
20
This is the PLA 1.x compatible approach. For each hypothesis, separate regressions are carried out and the individual ANOVAs are calculated. The linearity is tested as the significance of a quadratic term.
Test of Parallelism
PLA has three different tests for parallelism available. The "classical" test is the F-Test for the insignificance of parallelism carried out as a difference of models test. Especially assay with low variability often fail this test. A new approach is the equivalence test, which tests the ratio of slopes or difference of slopes of the standard and the preparation against predefined constants (goalposts).
Configuration Optimization
The configuration of an assay in terms of PLA is the selection of individual treatments of the standard and the preparation for analysis. While in Parallel-Logistics Assays the whole dose-response curve is taken into consideration Parallel-Line Assays focus the linear portion of the dose-response curve. There are three types of configurations available:
• Full Curve This is the default option. All treatments of the standard and the preparation are used for analysis
• Fixed Range A portion of the curve is selected by hand. The treatments of each object are numbered and you use these step numbers to select your regions of interest
• Automatic Range Selection There is a full list of range selection options available, for automatic selection of the significant dose-response curves in the parallel-line analysis.
The different configuration options can be defined for the standard and the preparations individually allowing e.g. to select a well-known area of the standard and to automatically find a matching range in the preparations.

21
User Guide
Introduction to Assay Analysis with PLA
PLA is a full featured system for the analysis of Parallel-Line Assays and Parallel-Logistics Assays. This manual describes the concepts and features of PLA. A systematic introduction can be found in the "My First Assay with PLA" section. This manual covers the basic operation with PLA. The structure of the manual is:
• Connect to PLA The chapter describes how to connect to an existing PLA database.
• Managing Objects This chapter describes the basic handling of objects in PLA. This includes the management and editing of the objects. Inheritance, Templates, the Apply-function and import/export handling augments the chapter.
• Object Properties The chapter describes all the properties of the objects.
• Analyzing Assays How are assays analyzed with PLA. How do I create reports?
• Advanced Topics Information concerning the Audit Trail and the secure transfer of data, objects and templates.

PLA 2.0 User Manuals
22
Connect to PLA
Log in to PLA
PLA has its own User Management Infrastructure. You are required to log in to a database to work with PLA. After you have started PLA, the Login dialog appears. This dialog allows you to log in to the selected database, to select other databases and to start the database manager. You may also start the product information and license detail dialogs.
First of all select the required database if it is not already selected. Once you have connected the database, the section User ID contains the list of defined users in that database. In the figure there is only a PLA Administrator defined. Select your desired User ID and type in your password. By clicking Login (or pressing the enter key) you are logged in. If the password was wrong, the user id was deactivated, the users password expired or if administrative database access has been activated there may be further messages. On the right-hand side of the dialog registration information, product information and license informations are displayed. You may edit the registration information by selecting the hyperlink "Click to Edit" on the upper right of the figure. The product information and license information are displayed by clicking the respective buttons on the lower right. After you have successfully logged in, the PLA main screen is displayed.

User Guide
23
Screen Layout
The following figure shows the basic screen layout of PLA.
The screen consists of the following areas:
• menu section This is a classic windows menu system. The file menu contains commands management commands for the database objects (files), the action menu contains the commands for the analysis of assays, the system menu contains all the system options for PLA. The validation menu allows you to performance the installation, operational and performance qualification tasks, the window menu contains commands for organising the sheet windows. In the help section this online help and product and license information is found.
• toolbar section The toolbar section contains the most frequently used commands within PLA. They are activated and inactivated in correspondence to the selected objects in the navigator.
• navigator The navigator is displayed left to the sheet area. It allows you to manage and navigate through your selected database.
• sheet area Once you open an object for editing of for analysis it is open in the dark grey sheet area. This area is a multiple document interface (MDI), allowing you to use multiple objects at once.
• The information line On the bottom of the window, the information line displays the connected database (in the figure: PLA 2.0 Default Database) and the logged in user (fig.: PLA Administrator)

PLA 2.0 User Manuals
24
The Objects of PLA

User Guide
25
Managing Objects
The Navigator
Once you have logged in, the main instrument of work within PLA is displayed: the Navigator. The navigator allows you to navigate through your connected database.
The navigator displays the objects defined in the database in their hierarchical order. The user selects an object and then selects an action available for the object. To select this action there are three ways:
• select an action from the context menu by clicking the right mouse button for the object. A context menu as shown in the figure pops up. Then select the desired action by a left click in the context menu
• use the toolbar area to select an action
• use the menu system to select an action In addition you may simply double-click an object to open the object editor. There are a few more options available for the navigator:
• on top of the navigator there is a drop-down box which allows to the "Data Objects" (as shown in the figure) or the "Templates".
• in the button line there is the option to display "hidden items" and

PLA 2.0 User Manuals
26
• to select the automatic refresh of the navigator which may by useful if you are working together with other users in the same database. If you select the refresh-function the navigator will automatically be refreshed after a certain number of seconds, which may be defined in the system options.
The navigator displays the objects in hierarchical order. Objects of the same type are displayed alphabetically. You may resize the navigator by shifting its right border. You may also toggle its display by a menu and a toolbar function. The latter can be useful if you analyze your assay using the ad hoc explorer and if you have only a limited screen resolution available.

User Guide
27
Object Types and Hierarchy
PLA makes use of five different object types that define your projects and assays.
Project Projects collect your assays. They are on the first level of object hierarchy and they can be considered as folders. The properties you define for your project is never used for calculation. It is used as the source information for inheritance.
Assay Assay objects are on the second level of object hierarchy. The assay is the parent object for the standards, preparations and control values of your measured assay. The properties you define here are not directly used for calculation, they are source properties for inheritance. However you may bind the properties of the child objects (standard, preparation, control) to these values, to obtain a single point of change.
Standard (Reference) The standard object is a third level object and it is a child object of the assay. Each assay needs a standard object to be calculated. The potency of the preparation object is calculated with respect to this standard object. (Note: Some analysis properties of the standard are grayed out because they are taken from the respective preparation object.)
Preparation (Sample, Unknown) The second type of third level objects is the preparation object. PLA calculates the potency of the preparation object with respect to the standard object. Many calculation properties are taken directly from this object. An assay object needs at least one preparation object to be calculated.
Control The third type of child objects of the assay object is the control. A control contains data for a series of positive, negative and blank controls. The use of control objects in PLA is optional.
The following graph illustrates a typical navigator view with these kinds of objects.

PLA 2.0 User Manuals
28

User Guide
29
Creating Objects
New objects can be created either by import data or by manually selecting the "Create Object" function (menu, toolbar, navigator context menu). This section describes the manual function: If you want to create a new object, you have to select a neighbor object in the navigator and then select the "Create Object" function. "Neighbor" object has the following meaning:
• if you want to create a new project, select anything or nothing • if you want to create a new assay, select any object that is a child of the project which shall
be the parent project or the project itself • if you want to create a new standard, preparation or control within an existing assay, select
the assay or any of its child objects. Once you have selected "Create Objects" the following dialog displays:
This dialog has three areas:
1. Select an object type. There are several entries that allow to create different objects. This list depends on the neighborhood stated above. In the figure you have the option to create four different object types. The selected option is a preparation that will be a child of the assay "Assay 2".
2. In the second section you have to input the name and a description of the new object. This is mandatory.
3. In the third section you may want select a template. If you don't select a template the standard inheritance is used.

PLA 2.0 User Manuals
30
Once you press Create the new object is created. You will receive the following message which indicates, which object served as a template:
In our case standard inheritance has been used and the object settings are initialized with the values of "Assay 2".
User Guide
31
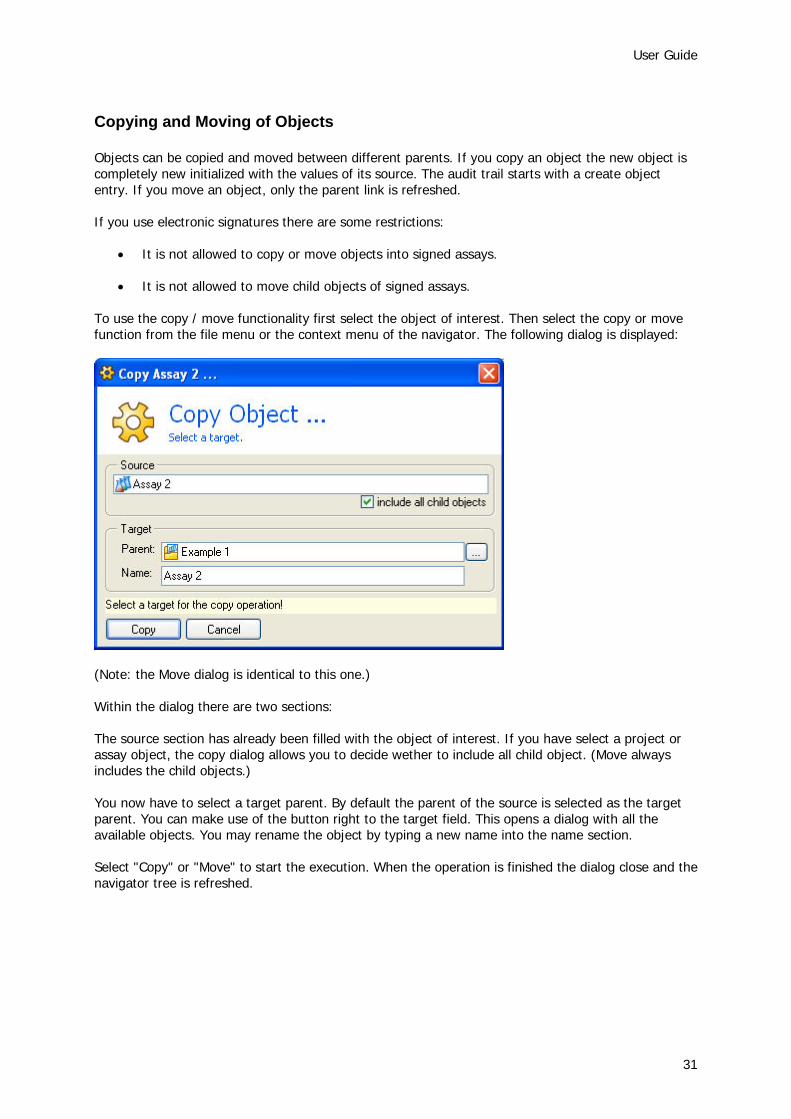
Copying and Moving of Objects
Objects can be copied and moved between different parents. If you copy an object the new object is completely new initialized with the values of its source. The audit trail starts with a create object entry. If you move an object, only the parent link is refreshed. If you use electronic signatures there are some restrictions:
• It is not allowed to copy or move objects into signed assays.
• It is not allowed to move child objects of signed assays. To use the copy / move functionality first select the object of interest. Then select the copy or move function from the file menu or the context menu of the navigator. The following dialog is displayed:
(Note: the Move dialog is identical to this one.) Within the dialog there are two sections: The source section has already been filled with the object of interest. If you have select a project or assay object, the copy dialog allows you to decide wether to include all child object. (Move always includes the child objects.) You now have to select a target parent. By default the parent of the source is selected as the target parent. You can make use of the button right to the target field. This opens a dialog with all the available objects. You may rename the object by typing a new name into the name section. Select "Copy" or "Move" to start the execution. When the operation is finished the dialog close and the navigator tree is refreshed.

PLA 2.0 User Manuals
32
Deleting Objects
You can delete objects by calling the delete function from the file menu, the toolbar or the context menu of the navigator. The object must not be locked or signed. You will be asked to confirm the delete operation (if you choose a project to delete, there will a second security confirmation). After you have confirmed the operation the objects will be removed from the database. Notes:
• The audit trail information of the deleted objects is still intact. • The operation is not reversible.

User Guide
33
Hiding/Showing Objects
The 'hide' feature allows you to exclude objects from calculation and from display in the navigator. You can decide whether to hide or show an object by selecting the "hide" checkbox in the General section of the editor. At the bottom of the navigator there is a checkbox to include hidden items into the display of the navigator.

PLA 2.0 User Manuals
34
Locking Objects
PLA stores its objects in a multi user database. To prevent that two or more users modify the same object at the same time, PLA locks the respective object. A locked object is decorated with a small locked padlock. The first user who accesses the object gets the exclusive right to modify its contents. If a user has exclusive rights on an object, it is decorated with an unlocked padlock. PLA automatically handles locking and unlocking of all objects and there is normally no need to lock objects manually. Even applying properties for a whole project tree is handled without further user interaction. However, sometimes a user plans to perform extensive changes on a collection of objects, which should not be disturbed by any other user. In this situation it is possible to explicitly lock the object tree using the "Lock Tree" function of the navigator context menu. Notes:
• "Lock Tree" will fail, if any of the descendant objects is already locked by another user. • The user should not forget to unlock the objects using "Unlock Tree" if the work is finished. • Locking an object tree will prevent any other user to work with any object within that tree.
This might bar your coworkers to work at all.

User Guide
35
Editing Objects
The Editor
Once you select the Edit Object function in the file menu, the toolbar, or in the context menu of the navigator the Object Editor opens in the sheet area of PLA. The figure below, shows an opened Object Editor for the Assay with the name 'Assay 1':
The object editor consists of two areas:
• the tab page area where tab pages control the display of groups of properties. In the figure above the General tag page is selected. There are seven other pages available.
• the information area is at the bottom. In this area some notifications, warnings or errors may be displayed. In the figure there is note on outlier testing visible.
You may close the window by selecting Close Window function from the file menu or by clicking on the upper right cross of the object editor. If some properties are changed, you will be asked whether you want to save the object. If nothing changed, the editor is simply closed. You may also select the Save Object function of the file menu or the toolbar to save an object.

PLA 2.0 User Manuals
36
Property Pages
Any object of PLA is described by a set of properties. These properties can be separated into the following groups, which are displayed as tab pages in the editor.
• General Properties describe general aspects of the edited object. The name of the object, the create and modification timestamps and the substance details are part of this group. In addition the latest calculation results of the object are displayed. (These results will be deleted when the object properties are changed.)
• Dose Properties This set of properties defines the preparation steps of an object. The settings also define which potency calculation shall take place in which way.
• Data (Response) Properties This page allows to define the dimension of the data set used for analysis. Data input takes place on this page
• Analysis Properties This page take the various analysis properties.
• Configuration Properties The configuration properties allow the manual or automatic detection of the regions of interest within your treatments.
• Documentation Properties You can add various documentation entries to the object definitions, such as reagents used, operators, equipment. This is added on the documentation page.
• GxP Settings On the last property page you are allowed to define the GxP settings you want to make use of to add input security to your objects.

User Guide
37
Data Input
Data Input is available on the data tab page of the object editor dialog. The input of response values is only available on the data tab pages of the respective objects: standard, preparations and controls. If your dilution scale property is set to direct dose input, you may input dose values (not response values) on the assay and project level too. These dose values are used as default values if you create new objects within these ones. The following figure shows the data editor of an object:
There are three properties defining the dimension of the editor:
• The number of treatments (dilution steps), defines how many lines are available • The number of replicates defines how many response columns are available • The dose scale setting switches between the '1 in 2'/twofold series and the direct dose input.
In the latter case you have to input the relative dose values within the editor. If you check the preview absolute doses button, an additional read only column appears, that displays the absolute dose values in dependance to the settings of Doses tab page. This may be useful to understand the richness of dose features of PLA. To mark a value as technical outlier, use the F3 button. This button toggles the technical outlier status of a response values. With the F2 button you can switch the editor between navigation and input mode. Cut and Paste is available, too. Simply mark the values of interest and press Ctrl-C to copy them to the clipboard and Ctrl-V to paste the clipboard contents into the editor. Note that the editor has to be

PLA 2.0 User Manuals
38
in navigation mode, if you want to paste multiple values. The cut and paste is the optimal way to copy to and from spreadsheet applications such as Microsoft Excel (tm).

User Guide
39
Audit Trail Page
The Audit Trail tab page of the editor shows every modification made to the object definitions.
The audit trail consist of two sections:
• the upper section contains information on the applied action. In the sample the object has been modified by PLA Administrator on 2006-08-14.
• the lower section displays the modification details of the action. In the sample, three values
are saved. The most interesting is the manipulation of the Response value in Series 1, step 1.

PLA 2.0 User Manuals
40
Inheritance, Templates and the Apply Function
Inheritance
Inheritance of Object Properties
The understanding of object inheritance is necessary to make efficient use of PLA. The concept of object inheritance is derived from the fact that in during normal course of laboratory life you will be analyzing many assay of the same type. To reduce input effort and errors PLA has many useful options to initialize new elements of your assay with correct properties. Assays with identical properties can be kept together in a single project. You can define the initial values of new assays in the projects properties. If you now create a new assay within this project. All properties of the new assay are inherited from the project. You do not have to input any properties if these properties match your needs. Now you can create the third level objects of your assay. Anything you need to enter are object names and the response values of your measurement. IMPORTANT: If you change properties of parent objects these changes do not influence the child objects if you did not bind the child objects to the parent explicitly (available on the third level only). If you want to deploy new settings to child objects you can make use of the Apply-functionality of PLA. Beside this approach of inheritance there more advanced concepts of templates, GxP and SOP support. These approaches are described in detail in the user manual.
How Are the Initial Properties of an Object Set?
There are three variants how initial properties can be set: 1. Use of a Template A template is used when:
• the administrator set a mandatory default template in the Global Options
• the parent project has a template connection (page GxP of the editor):

User Guide
41
• the user choose a template in section 3 of the Create dialog:
2. Inheritance

PLA 2.0 User Manuals
42
If no template is used all properties are inherited from the parent object. 3. Default Values Default values are used when no template is used and no parent is available. This is possible for Projects only. After an object is a created, a message appears notifying you about the used set of initial parameters:

User Guide
43
Templates
Templates are standard PLA objects used to create new objects. PLA differentiates two types of templates:
• Protected Templates Protected Templates can be created by administrators only. Standard Users are not allowed to modify these templates.
• User Defined Templates User Defined Templates can be created by all users. They are intended to be a tool.
How are Templates Created?
Switch to the Template mode of the navigator by selecting "Templates" from the drop down bow at the upper of the navigator. Then select "Protected Templates" or "User Defined Templates" and select the Create Object command to create a new template.
An template object is created. You may now edit all properties of the template. They will be used for the creation of new objects if the template is chosen.
Complex Templates
The template engine of PLA can except complex templates, that allow differentiated settings for standards, preparations and controls. If you select the Create Objects command on an existing template, you are able to define sub-templates for the different object types of PLA.

PLA 2.0 User Manuals
44
If you select a template in section 3 of the Create Objects dialog, PLA will use a sub-template of a matching object type, if this is available.

User Guide
45
The Apply Method
In contrast to the Inheritance and Template mechanisms of PLA, the Apply-method allows you to mass modify object properties after an object has been created. Select an object and select the Apply-command from the file menu or the navigators context menu. The following dialog appears:
This method allows to copy properties of a source object to selected targets. The dialog is grouped into three sections: 1. Source Section Select the source of the properties you want to apply to the targets. Available source objects are the parent project, the parent assay or a template. 2. Property Selection

PLA 2.0 User Manuals
46
Select the groups of properties you want to apply. By default the analysis settings and the configuration optimization settings are selected. Warning: If you execute apply, you cannot undo the changes: check the selected property groups carefully. 3. Target Filter Select the objects types that are targets of the apply method. After you have carefully checked the settings you may execute the apply.

User Guide
47
The "Inherit Properties" Property
To reduce the complexity of assay definitions the "Inherit Properties" option is available. For the following three groups of properties the Inherit Properties property binds the properties of an standard, preparation or control to the corresponding properties of the assay object. These properties are kept in sync with the assay properties automatically. If you select the option, all other values of the property page are grayed out. The "Inherit Properties" property is available for these groups of properties:
• Analysis settings • Configuration optimization settings • Dose settings

PLA 2.0 User Manuals
48
Import and Export
PLAs External Data Formats
The Import/Export methods of PLA directly support three file formats:
PLA Secure Format (PSF)
The PLA Secure Format is the preferred external data format of PLA. The format is digitally signed by PLA's internal PKI. This prevents the format from any manipulation and thus allows to securely transfer even electronic signatures from one PLA installation to another. The digital signature of a PSF file is checked on every import. If the signature is invalid, the PSF is not imported.
PLA External Format (PEF)
The PLA External Format has the same structure as the PLA Secure Format (PSF), but it is not digitally signed. Therefore, no electronic signatures are imported from PEF files and they are not secured against manipulation.
PLA Native Format (PNF)
The PLA Native Format (PNF) is the PLA 1.2 compatible data format. It is delivered for compatibility reasons. The PNF format only excepts PLA 1.2 settings and is therefor not intended as an external PLA 2.x format.

User Guide
49
Import
PLA is fitted with a strong import wizard that allows the importation of external data into PLA. One can distinguish three types of import:
• Import of PLA's External Data Format • Import of External Data using PLA Import Modules • Import of External Raw Data using PLA Import Modules
The first two import types follow the standard path, while the latter type follows the raw data path (See following chapters).

PLA 2.0 User Manuals
50
Import Standard Path
Start The Import Wizard
First of all, start the import wizard by selecting Import from the file menu, the navigators context menu or from the toolbar. The Import Wizard comes up:
Select Import Format
Now select the desired import format. The PLA external file types are always displayed. The other displayed file types depend on your installed PLA Import Modules. In this sample we now select a PLA 2.x Enhanced Format (*.PEF) file. After you have selected the file type, press "Select File" or simply double-click the desired file type. A standard dialog of the operating system for opening a file appears:

User Guide
51
Select a file and press Open. (In the sample the file Project.PEF is chosen). Note: The Import Default Path can be set in the Options dialog.
Analysis of the Import File
Once you selected the file, it is immediately analyzed by PLA. The results of the analysis are displayed in the Import Wizard:

PLA 2.0 User Manuals
52
If the analysis is successful the Next> button gets activated. Our sample shows 40 valid objects. If the selected file format requires a PLA Import Module to be executed, it will start automatically. You will see an result code of the external Import Module. Press Next> to view the objects to be imported.
The Object Import Tree
The PLA Import Wizard now displays the Import Tree:
On this page you have several options:
• Include and Exclude parts of the tree by selecting an object and pressing include and exclude buttons. Excluded objects are marked with a black cross.
• Select another parent for the assays. This allows to import the objects to a different target. If you selected an existing object as a target, this is noted by an arrow.
• Rename Objects by pressing F2. You may also insert variables into the name. These variable are useful if you want to create import definition schemes. The variables are replaced, when the import is executed. The variables available are: @U replaced with the name of the current user, @D replaced with the current date, @T replaced with the current time and @F which is replaced with the filename of the import file.

User Guide
53
The next screen shows the different options:
In this sample, an existing project "Example 2" is the target of the operation, Assay 2 and Assay 3 are excluded and Assay 4 is renamed to "Assay 4 @U" which show the usage of a variable. Press Next> to see the summary page.
Summary
Your settings are displayed on the summary page for final control. When you are ready, press Finish, to start the Importation.

PLA 2.0 User Manuals
54
After you press finish, the data is imported to PLA.

User Guide
55
Raw Data Import
When you installed a PLA Import Module the import process may become more complex, since the Import Module might not be able to decide, how to deal with your raw data. Start the import as a standard import. After you selected your file type and the input file the analysis section of the Import Wizard might contain the following information:
Especially note the remark "There is raw data present." This raw data has to assigned to the required objects in PLA. Now press Next> to start the import process.
Load Import Definition Scheme
First of all you might load a previously saved import definition scheme (IDS). An IDS allows you to save all the steps of the following pages and to efficiently load external data. In our case no scheme is available yet. We will save our settings after we have defined everything.

PLA 2.0 User Manuals
56
Press Next> to proceed.
Selection of Target Project and Templates
In this step you define the target of the operation (select a project or create a new one) and you have the option to select a defined template for the objects the import process will create. By doing so you are able to predefine all object properties of the new objects.

User Guide
57
Press Next> to continue.
Define Assay Dimensions
Now you have to define the number of target objects (standard, preparations, controls) for the assay you will create. Define the number of objects and press "Apply general settings". The list of raw data objects now contains the desired number of objects. You edit each one, by selecting it. In the lower section "Object Details" you can modify the code of the object, its type (standard, preparation, control) and its dimension (number of replicates and treatments). Remember to press "Apply" to activate your settings after modification.

PLA 2.0 User Manuals
58
When the assay dimensions are correct, press Next> to continue.
Bind the Raw Data to your Assay
Now you have to bind the raw data to your assay. The Import Wizard has several options to display your data. Grid Display Options By default the raw data is displayed in 12 columns. This leads to a correct display of a 96-well plate if you have 96 response values. You have the option, to display the data point number and the response value itself. You may also switch the default display of the grid, if standard data display is different.

User Guide
59
Assign the Raw Response Values The next step is to assign the required values to a standard, preparation and control and to assign it to the corresponding dilution step. The dilution step value is assigned by the template, the parent object or later when you edit the object. In a 1 in 2 dilution series, the first step has the highest concentration. Select the data point in the grid and then select the object and dilution step in the "Selected Datapoint" section: In the following picture the response value in column 1 and row 1 is assigned to the standards first dilution step:

PLA 2.0 User Manuals
60
The data grid is automatically colored (if this activated in the grid display options). The data point is now displayed as 1: A 1 [330,895], which has to interpreted as follows: [point #]: Object_code Dilution_step [response_value] Every object has an automatic assignment to a letter (starting with A) for the standard. Every letter has a color code. You can see the assignment of codes to the objects by opening the drop down list box in the selected datapoint section. The dilution steps are numbered. Assignment by Keys If you select multiple response values in the grid you may simply type the letter of the desired assignment, to assign values to an object. By type a space, you remove the assignment. By pressing 1 - 9 you assign a selected response value to a dilution step. By pressing 0 you remove the assignment to a step. This allows you to select your block designs and assign them to the response values in a hurry. The next picture shows a sample assignment:

User Guide
61
When you have finished your assignments, and there no errors (which are displayed in the dialog) the Next> button is activated.
The Object Import Tree
The PLA Import Wizard now displays the Import Tree:

PLA 2.0 User Manuals
62
On this page you have several options:
• Include and Exclude parts of the tree by selecting an object and pressing include and exclude buttons. Excluded objects are marked with a black cross.
• Select another parent for the assays. This allows to import the objects to a different target. If you selected an existing object as a target, this is noted by an arrow.
• Rename Objects by pressing F2. You may also insert variables into the name. These variable are useful if you want to create import definition schemes. The variables are replaced, when the import is executed. The variables available are: @U replaced with the name of the current user, @D replaced with the current date, @T replaced with the current time and @F which is replaced with the filename of the import file.
Save the Import Definition Scheme (IDS)
On this page you have the option to save your selection in an Import Definition Scheme. This scheme contains all of your selections especially the raw data assignments. If you save it, it will available on your next import with this file type. Note: the IDS is saved in the PTD-file of your Import Module. PLA needs write access to this file.

User Guide
63
Summary
On the summary page parts of your selections are summarized. Press Execute to start the import process.

PLA 2.0 User Manuals
64
Export
The Export process is very easy. It follows a simple path:
Select the Export Object
In the navigator select the object, you want to export. Then select Export from the file menu, the navigator context menu or from the toolbar. The Export Wizard is displayed.
Now you have the option to export all objects, or the selected object of the navigator. Press Next> to display the file type selection.
Select the File Type and Select an Export File

User Guide
65
Select the file format you want to use and then press "Select" to open a Save dialog of the operating system:
Type in a file name and press "Save". In the Export Wizard press Next> to switch to the Export Details page.
Export Details
Depending on your selected export format, you may select the information details to export.

PLA 2.0 User Manuals
66
The PLA Secure Format and the PLA External Format do not allow to select details. Press Next> to continue.
Summary
On the summary page you can verify your Export details. Press Execute to start the export process. You will be notified when it is finished.

User Guide
67

PLA 2.0 User Manuals
68
Object Properties
Introduction
The representation of projects, assays, standards, preparations and controls are generally called objects in this manual. The object properties can be divided into different sets of information. They are represented as property pages in the object editor dialog.
• General Properties contain general information about the specific object.
• Dose Properties define the potency and doses of a specific measurement object
• Data Properties define the dimensions of the response value matrix and allow the input of the dose and response values
• Analysis Properties are the details of the calculation parameters
• Configuration Properties fine tune the configuration selection in PLA
• Documentation Properties allow the specification of various kinds of meta data for your assays
• GxP Options allow to protect groups of properties from manipulation

User Guide
69
General Properties
General properties describe management information for an object. Property Description Name and Description Name Name of the object with up to 50 characters Description Detailed Description of the object. Up to 255 characters. Standard/Preparation selector
allows to switch the object types of standards and preparations
hide in navigator hide the object from the navigator and from calculation Measurement Details Substance The measured substance whose potency shall be calculated.
(Optional) Batch ID Batch Identification of the measured substance (Optional) Timestamp Date and time when the measurement has been done Electronic Signatures Electronic Signatures Electronic Signatures that have been applied to the object. Figure: Screen Layout of the General Properties

PLA 2.0 User Manuals
70

User Guide
71
Dose Properties
Dose properties describe the way an standard or preparation is prepared for analysis. They allow the definition of raw material or stock solution potencies. If defined, PLA calculates the potency factors for these potencies. Property Description Raw Material Raw Material A raw material / bulk substance potency will be given. The calculation
results will contain a potency estimation for the raw material Assigned/Assumed Potency
The potency of the raw material given as a number and the numerator of the units. E.g. if the potency is 5 IU/ug type in 5 and IU. The denominator has to be given in the amount units.
Amount The amount of raw material used. In the above example the amount has to be given in ug.
Solvent Volume The volume in which the used amount of raw material is solved to give the stock solution. Type in the volume and the volume units.
Assume identical potency of standard and preparation
The assumed potency of the preparation raw material is identical with the assigned potency of the standard.
Stock Solution Stock Solution A stock solution potency is given. The calculation results will contain a
potency estimation for this stock solution Assigned/Assumed Potency
The potency of the stock solution given as a number and a unit string.
Assume identical potency of standard and preparation
The assumed potency of the preparation raw material is identical with the assigned potency of the standard.
Pre-Dilution Pre-Dilution Pre-Dilution factors are given. The pre-dilution factors define factors
between the stock solution concentration and the concentration of the dilution series
Pre-Dilution Factor The Pre-Dilution factor given as a fraction. Additional Pre-Dilution Factor
A second pre-dilution factor given as a fraction.
Include Pre-Dilution Factor in potency ratio estimation
If checked the pre-dilutions are included in the calculations. (Check carefully!)
Figure: Screen layout of the Dose Properties

PLA 2.0 User Manuals
72

User Guide
73
Data Properties
Data Properties define the dimension and data values of a standard or preparation. Property Description Dimension and Dilution Scale Number of Treatments
The number of treatments (dilution steps) in this object.
Number of Replicates
The number of replicates in the object
Dilution Scale "1 in 2 series" or "direct input" Data Values Data Depending on the dilution scale property you edit the dose and
response values Figure: Screen Layout of the Data Properties

PLA 2.0 User Manuals
74
Analysis Properties
The analysis properties describe details of the potency calculation. Note: The effective values of the properties marked with a star (*) are those of the corresponding preparation object. The effective values marked with a double star (**) are taken from the standard or preparation when the Separate ANOVAs are chosen, they are from the preparation in the other cases. Property Description Model Model * Select the Regression Model for the analysis.
• Parallel-Line Model, Linear Response • Parallel-Line Model, Logarithmic Response Transformation • Parallel-Line Model, Square Root Response Transformation • Parallel-Line Model, Square Response Transformation • 4-Parameter Logistic Curve • 5-Parameter Logistic Curve
Invert Potency Ratio *
Check to invert the potency ratio after calculation.
Outlier Detection Method Select the Outlier Detection Method:
• None • Dixon Test • Grubb's Test • Test based on Standard Deviation • Studentized Residuals (not available for controls)
Contamination alpha
Sensitivity of the outlier method (not available for Standard Deviation Method)
recursive testing execute the outlier tests recursive. (Only for Dixon and Grubb's Method)
n Multiplicator for Standard Deviation test Hypothesis Testing ANOVA Model * The ANOVA model for the analysis:
• ANOVA based on Pure Error Separation • ANOVA Residual Error • Separate ANOVAs for each hypothesis (PLA 1.2 compatible)
Regression Significance **
Significance of the F-Test for Regression
rejection criterion **
reject assay if F-Test of regression failed
Linearity Significance **
Significance of the F-Test for deviations from linearity
rejection criterion **
reject assay if F-Test of linearity failed
Test for Parallelism *
The parallelism test method: F-Test, Equivalence Test Ratio of Slopes, Equivalence Test Difference of Slopes
Significance of Parallelism Tests *
Significance level for the selected parallelism test method
rejection criterion *
reject assay if test of parallelism fails

User Guide
75
Equivalence Testing Goalpost *
The upper and lower goalpoast of the equivalence test.
Confidence Interval Confidence Interval
The confidence interval of the potency estimation
Fieller's Theorem use Fieller's Theorem instead of the standard confidence interval (requires linear regression)
EC50 Method EC50 Method Which regression is to be used for the EC50 calculation Response 50 Calculation
How is the response 50 calculated
Figure: Screen Layout of the Analysis Properties

PLA 2.0 User Manuals
76

User Guide
77
Configuration Properties
The configuration properties define the settings for the configuration optimization. Property Description Linear Range Configuration Method Select the optimization method:
• Full Range • Fixed Range • Automatic Detection (individual) • Automatic Detection (common range for the
standard, individual for preparations) • Automatic Detection (common range for the
standard, identical for preparations) • Automatic Detection (individual range for the
standard, identical for preparations) Fixed Range To / From Step number of the selected range Automatic Selection Options Allocation Strategy
The optimization fits the: • best range • maximum range • exact range
Minimal/Exact # of points
Allocated configurations have at least/exact this number of steps
Allocation Region is either the full range or a defined subrange select only configurations with identical number of treatments
Allows to force the optimizer to select only identical number of steps in both, standard and preparation.
Include the 50% response
You can force the optimizer to prefer or to mandatory include the 50% value.
Calculate 50% response by
The 50% response has to be discovered from the assay. To do so, you can use
• the object itself • the standard • the control or • all objects of the assay.
Figure: Screen Layout of the Configuration Properties

PLA 2.0 User Manuals
78

User Guide
79
Documentation Properties
The Documentation features allow to enter meta information for the assay. Each entry has several properties: Property Description Documentation and Variables Operators Define the operators of the assay and their roles.
• Name • Role • Timestamp • Comments
Reagents Define details of reagents used with this assay. • Identification • Lot or Batch No. • Concentration/Amount • Comments
Equipment Equipment used for this assay • Identification • Machine/Lot No. • Comments
Annotations Remarks of the operators • Username • Timestamp • Annotation
User Variables Key/Value pairs available for reporting • Variable Name (Key) • Value
Combination Groups
Combination of assay results are calculated in groups • Combination Group
Figure: Screen Layout of the Documentation Features

PLA 2.0 User Manuals
80

User Guide
81
GxP Settings
The GxP settings allow the protection of properties. Property Description Default Template for Child Objects Template Select a template to be used as a template when childs are created. GLP/SOP Protection Level Settings Enable GxP/SOP protection (Mandatory)
Available for administrators only. Activates the protection.
Enable GxP/SOP protection (User Level)
Available for every user, when the above property is inactive. Activates the protection.
Protection Level Substance Information
protects informations on the subject (but not the Batch Identification)
Documentation protects the documentation properties Dose Definitions protects the dose properties Analysis protects the analysis properties Configuration protects the configuration properties Dose Values protects the dose values/dilution series Response Values protects the response values (useful only in combination with PLA
Import Modules) Keys and Combination Groups
protect user defined variables.
Figure: Screen Layout of the GxP Settings

PLA 2.0 User Manuals
82

User Guide
83
Analyze Assays
Introduction to Assay Analysis with PLA
Assay analysis with PLA is easy. Once you have defined your assay, and keyed in the appropriate response values PLA is full suited with every tool you need for fast and efficient analysis. One has to distinguish between the tools and the analytical options of PLA. The Assay Explorer of PLA is suited with all options for a deeper graphical analysis. The Assay Explorer gives you the option to check your assay. With a full range of graphical options you are able to detect problems with your assay. Using the ad-hoc template feature of the explorer you can test the analysis of your assay with different analytical options, without modifying the definitions of your assay. The Assay Explorer fulfills another important function for assay analysis: a responsible analysis requires the graphical inspection of your assay. Thoroughly check the response data of your assay for plausibility. No statistical test is able to detect plausibility problems. Further reading:
• Explore your Assay • Combination of Assay Results • Calculate your Assay • Report Analysis Results

PLA 2.0 User Manuals
84
Explore your Assay
The Assay Explorer has a wide range of options for graphical analysis:
On the right side there are several groups of options and informations.
Graph Type
The graph type distinguishes between the dose/response graph (shown above) and the goalpost graph that is available only when equivalence testing is chosen as the method of parallelism test.
Display Options

User Guide
85
The display options allow to modify the displayed graph: show legend toggle the display of the legend show grid toggle the display of the grid regression lines toggle the display of the regression lines regression line type switch between the restricted or the unrestricted regression lines. Use
the unrestricted regression lines to get an impression of the quality of the fit
mean line display a line through the means of the treatments include statistical outliers
display the statistical outliers in the graph
include technical outliers display technical outliers. This is available when statistical outliers are displayed too.
error bars display the error bars of the treatments box and whisker plot display box and whisker graphic standard deviation multiplicity of the standard deviations for error bars and box and
whisker plots invert x axis toggle the direction of the x axis (Note: PLA 1.2 has an inverted x axis) show y axis origin include the y axis origin in the graph y axis transformation change the y axis transformation. This option allows to inspect the
influence of other response transformations on heteroscadescity. (Note: this does not change the response transformation).
include outliers in graphic transformations
check to neglect the outlier status for error bars, mean line and box and whisker plots.
Preliminary Calculation Results
Note: Final calculation results are found in the reports. These values do not reflect every aspect of analysis.
Note: Select a preparation in the selection section below the graphic to display specific results. Carefully check, that the preparation of interest is selected. Its name is displayed in this section. The preliminary calculation results indicate the status of the hypothesis tests. The status of the regression test, the linearity test and the parallelism test is displayed in green or red fields as passed or failed. The potency ratio (not potency factors) of the assay are displayed including the corresponding confidence intervals.
Selection Section

PLA 2.0 User Manuals
86
Below the graphic the selection section is displayed. By checking and un-checking preparations you can modify the display. The bullets indicate the test status of the preparation:
green - all hypothesis tests are passed yellow - the linearity or regression tests failed and are not marked as rejection criterion red - the parallelism test failed or a test failed, that is marked as a rejection criterion
Graphics
The graphics shows the dose/response graph or the equivalence test graph.
The disk symbol allows to save the graphic as a JPEG or PNG graphic for further use in publications etc. The dimensions of this graphic can be set in the options dialog.

User Guide
87
Combination of Assay Results
Combination of Assay Result calculations are available within PLA. To prepare these calculations, you have to add the preparations you want to combined to combination groups. A combination group is a simple named label, that allows PLA to analyze which preparations are combined. The labels can be edited on the documentation page of the Assay Editor or with the Combination of Assay Results Editor. PLA will calculate the combination, when a group contains more than one preparation and the appropriate option on the Calculate dialog is checked. PLA is able to combine results of any preparations within a project.
Definition of Combination Groups with the Assay Editor
Add the preparation to an assay by creating new combination groups. This methods is available for projects and assays to, allowing you to use inheritance.
Defining Combination Groups with the Combination Group Editor
The Combination Group Editor supports the efficient definition of the combination groups of a project.

PLA 2.0 User Manuals
88
The editor has two tree views: The left tree shows the defined combination groups within the selected project. You can create additional groups, rename groups and delete groups using the appropriate command buttons. Preparations can be removed. If you want to add a preparation, select the group which should get the preparation, than switch to the right tree view and use the "Add to Group" button. Below the trees you can see a few details on the preparations. If the preparations have been calculated earlier, cached calculation results are shown below the tree views. When finished press Save, to save the groups and close the dialog.

User Guide
89
Calculate & Report
To obtain final calculation results select the assay or project in question and then select the Calculate method from the file menu, the navigator context menu or from the toolbar. The Calculate Assays and Create Reports:
By double-clicking a report template or by selecting one of the following functions, the requested calculation is taken out and the report is created: Preview opens the report by starting the appropriate application. Print prints to the standard printer of the system. If you want to print to alternative printers, use Preview and the print function of the application. Save opens a save-dialog of the operating system and save the report to the selected file.
Combination of Assay Results
If you want to calculation the defined combination of assay results, the option has to be activated:
PLA analyzes the defined combination of assay result groups and adds the required assays to the calculation. This will need additional computation time.
Default Reports
By default PLA is delivered with seven different report templates. Further report templates or individual report templates (including company information etc) can be ordered from Stegmann Systems. The following reports are available:

PLA 2.0 User Manuals
90
Assay Documentation (requires Microsoft Word 2003 or higher) This is a report for documentation of the assay. It contains properties and data. Calculation results are not included. Combination of Assay Results (requires Adobe Acrobat Reader) The report contains only the combination of assay results data. Complete Statistics Report (requires Adobe Acrobat Reader) This report should be considered as a default report. It documents the assay, includes all of the ANOVAs and regression results and the potency calculations. The report is augmented with three graphs per assay. Excel Report (requires Microsoft Excel 2003 or higher) The Excel Report contains the data and the potency results for further processing. Graphics Report (requires Adobe Acrobat Reader) This report contains large graphics of the regression results. Short Report (requires Adobe Acrobat Reader) Short Report without Graphics (requires Adobe Acrobat Reader) The short report contains the data, the results of the hypothesis tests and the potency calculation on a single page per assay.
Technical Remarks on Preview and Print
1. Print and Preview make use of the corresponding application. E.g. if you create a Adobe PDF
report, the Acrobat Reader or an alternative viewer for PDF file has to be available and the file type of PDF has to be registered in the operating system.
2. If you want to test the availability of the application, save the report to any location. Then start the Windows Explorer and try to open the file by double-clicking. If the report is displayed, PLA is able to display the report. If it is not displayed, PLA will not be able to open the report. The print method can be tested by selecting the Print command of the Windows Explorers Context menu of the file (open with a right click). Then select print. If the report is printed, PLA will be able to print to.

User Guide
91
Advanced Topics
Electronic Signatures
PLA accepts electronic signatures for the objects of PLA. Every object can be signed electronically with one exception, assay object signatures are always recursive on the child objects of the assays. An object can have any number of signatures.
Sign An Object
To sign an object, simply open it on the general page, and click the Sign button. The following dialog appears:
If you want to apply your signature to the child objects too (at the project level), check this
element. Type in your password and click Sign. Once you have clicked "Sign" the requested signatures are applied. The application of a signature is logged in the audit trail. Note 1: A signature makes an object read only. No further changes can be applied to the object as long as the signature is in place. Note 2: Default reasons can be defined in the system options dialog.
Remove A Signature
The PLA Administrator defines, wether a signature can be removed by everyone, by the signer himself or by administrators only. A signature removal is logged in the audit trail. To remove a signature open the object go to the electronic signatures section and click Remove. The Remove Electronic Signature dialog appears.

PLA 2.0 User Manuals
92
You may select to remove all signatures of the object and to recursively remove signatures from the child objects. To start the removal type in your password and press Remove.

User Guide
93
Secure Transfer of Data and Objects
PLA enables you to securely transfer assay data and templates between different PLA installations. This feature is very useful for the communication between different sites or companies (E.g. to and from your CRO). You can securely transfer:
• projects • assays • templates
First of all you can sign the objects using the Electronic Signature features of PLA. These signatures can be transferred to other installations of PLA. The object is not modified until the signature is in place. Then export the object using the PLA Secure Format (PSF). The PLA Secure Format makes use of the internal Public/Private Key Infrastructure of PLA. Any modification of the exported file is detected and the import is prohibited when a modification is detected.

PLA 2.0 User Manuals
94
Audit Trail
The Audit Trail of PLA is always enabled and cannot be manipulated with the help of PLA. Every change of an object property or every other security relevant modification of the system is logged in the audit trail. The audit trail information is split up into the main entry and details for the main entry. Each main entry contains
• an unique entry number • a time stamp • an operator identification • the type of the entry as listed below • an object for the entry type
The following entry types are logged: USER_LOGIN An user logs into the system USER_LOGOUT An user logs out USER_LOGINREJECTED An user has not been allowed to log into the system USER_PWCHANGE An user changes his password USRMGMT_ADDUSER An Administrator adds a user to the system USRMGMT_DELETEUSER An administrator removes an user from the system USRMGMT_MODIFYUSER An administrator modifies user details OBJECT_SAVED An object has been saved. OBJECT_SIGN An object has been signed electronically OBJECT_REMOVESIGNATURE An object signature has been removed OBJECT_INITIAL A new object is created OBJECT_COPY An object is copied OBJECT_MOVE An object is moved OBJECT_DELETE An object is deleted DB_ADMINACCESS_ON Database administrative access is requested DB_ADMINACCESS_OFF Database administrative access is revoked DB_COMPACT Database has been compacted DB_CHECK_START A database check has been started DB_CHECK_STOP A database check stopped DB_CHECK_CORRECTION A database check corrected a problem DB_ADD_SESSION A session is added DB_DELETE_SESSION A session is removed DB_KILL_LOCK A lock has been killed DB_MIGRATE The database has been migrated to a new scheme IQ_START The IQ starts IQ_RESULT The IQ result is logged IQ_FINISHED The IQ stops OQ_START The OQ starts OQ_RESULT The OQ result is logged OQ_FINISHED The OQ stops PQ_START A PQ starts PQ_RESULT The PQ result PQ_FINISHED The OQ stops OPTION_MODIFIED PLA Options have been modified

User Guide
95
Each entry can have additional detail information. Every relevant modification is fully visible in the audit trail. The complete audit trail can be inspected from the System menu. The audit trail information of a single object can be inspected on the audit trail tabpage of the assay editor. Figure - Audit Trail Inspection from the system menu
Figure - Audit Trail Page of the Assay Editor

PLA 2.0 User Manuals
96

97
My First Assay with PLA
My First Assay with PLA
Note: This initial tutorial is available as a tutorial video in the online help, too. This tutorial shows every step from the raw data to a complete assay definition in PLA. There are three main parts:
1. Definition of the Assay and Data Input How to structure and define the assay in the PLA database.
2. Exploring your Assay, Modify the Analysis options Take a tour through the basic graphical analysis of the assay.
3. Final Computation and Reporting Finalise the computation and create reports for the assay.

PLA 2.0 User Manuals
98
The Exemplary Data
Our assay consists of a standard and a preparation, whose potency is to be calculated. As we will see the data has a highly sigmoid structure. The assay is a dilution assay with a 1 in 2 dilution series. Both, standard and preparation have twelve treatments, that are measured as triplicates. The standard has the following response values: Dose/Response Replicate 1 Replicate 2 Replicate 3 1:1 0.722 0.71 0.734 1:2 0.707 0.75 0.734 1:4 0.655 0.69 0.713 1:8 0.607 0.664 0.628 1:16 0.512 0.506 0.507 1:32 0.325 0.382 0.376 1:64 0.231 0.223 0.24 1:128 0.119 0.152 0.161 1:256 0.102 0.137 0.125 1:512 0.115 0.139 0.123 1:1024 0.117 0.137 0.124 1:2048 0.086 0.128 0.106 The data of the preparation is as follows: Dose/Response Replicate 1 Replicate 2 Replicate 3 1:1 0.732 0.717 0.704 1:2 0.731 0.674 0.715 1:4 0.618 0.663 0.638 1:8 0.618 0.524 0.56 1:16 0.348 0.354 0.381 1:32 0.224 0.22 0.238 1:64 0.141 0.15 0.137 1:128 0.101 0.135 0.127 1:256 0.111 0.133 0.127 1:512 0.119 0.128 0.11 1:1024 0.118 0.12 0.136 1:2048 0.131 0.128 0.129 This is a graphics of our exemplary data:

My First Assay with PLA
99
The assay has a strong lower asymptote, a highly significant area and it seems to close in an upper asymptote. This is not to easy to be analyzed. We would prefer to analyze the data as a parallel-line assay, but we will have a look at the 5-parameter logistics too.

PLA 2.0 User Manuals
100
Hierarchy of Objects
For this assay to be analyzed with PLA we need the following structure of objects: A parent project, which serves as a container for any number of assays. [Sample Project]
An assay object, representing the full assay [Assay] A standard for the settings of the standard [Standard] A preparation for the data, whose potency is of interest [Preparation]
In the user manual it is stated that the inheritance is a major tool in PLA to setup assays as easy as possible. In this tutorial we will make use of this starting at the assay level. If we had to analyze many assays of this type, we could use the properties of the project to have defaults for all objects. To reach best efficiency we will create the project, without defining anything. Then we will add an assay and define our initial properties. The last step is the creation of the standard and the preparation. We will then add data to both of them. In the navigator the sample will look like this:

My First Assay with PLA
101
Data Input
Follow these steps to create the sample assay.
Create the Project
Select "Create Object..." from the File menu. The Create Object Dialog appears:
Now Select "New Project" as the object type. Then type in "Sample Project" as the name and "Sample Project for the Tutorial" as description. Press Create to create the object. The next message acknowledges the object creation.
After pressing ok, the Editor for the project appears. Close it by clicking on cross at the right edge of sub-window.
Create The Assay

PLA 2.0 User Manuals
102
Now create the assay by selecting the parent project in the navigator (with a single left-click). Then select "Create Object..." from the file menu, the context menu or the toolbar. Select "New Assay as Member of Project 'Sample Project'" as the object type. Once the object is created, we will set the initial parameters of the objects. Three groups of information have to be set: 1. The Assay Dimension 2. The Configuration Optimzation Option 3. The Analysis Options
Assay Dimension
The standard and the preparation both have twelve treatments (dilution steps) and three replicates. Now open the assay (if not already open) and move to the data page.
Set the number of treatments and the number of replicates.
Configuration Optimization
We will start with the Full Range option set. This leads to the inclusion of all data points in the computation. Select the Configuration page and set the optimization method to "Full Range".
For easier maintenance in the case we want to switch this method, we decide to switch on the Inheritance Property:

My First Assay with PLA
103
Analysis Options
We now have to select the analysis options. We want to start with the parallel-line method. We select the analysis of the editor and select the following: Model: parallel-line method Significance of Regression and Linearity: 98% Inherit the Analysis Properties: Yes
Once we have set these options, save the object (from the file menu or the toolbar) and close it.
Create The Standard Object
Now select the assay "Assay" in the navigator and create a "New Standard as member of assay 'Assay'". This new object already has inherited all properties from the assay object. Switch to the data page and type in the response data for the standard:

PLA 2.0 User Manuals
104
After you have finished save the standard and close it.
Create The Preparation Object
Now select the assay "Assay" in the navigator and create a "New Preparation as member of assay 'Assay'". This new object already has inherited all properties from the assay object. Switch to the data page and type in the response data for the unknown:
After you have finished the input, save the object. Do not close it.

My First Assay with PLA
105
A First Look
Once we have finished data input, we should visually inspect the object. If it is not already open, open the preparation. (Note you can start the visual inspection from any object of the assay. Only the first display is influenced by the selected object. If you start from the assay, all preparations are included. If you start from a specific preparation, only this is displayed by default.) Now select the Check button from the toolbar or start Check from the file menu. The Assay Explorer is displayed and preliminary result is calculated. (Never communicate this result, always run a final calculation).
As expected the hypothesis regarding the validity of assay fail. We have selected Full Range for the configuration, which is a bad choice for this assay. With the Assay Explorer you cannot manipulate data. So take the chance and try all options of the dialog!

PLA 2.0 User Manuals
106
We should now try to optimize our configuration, to achieve a valid parallel-line assay.

My First Assay with PLA
107
Optimizing the Configuration
In a sigmoid example it is necessary to thoroughly select the valid dose-response regions for the assay. You can do this by selecting a fixed range on the configuration page of each object. But you can also let PLA do the work for you. If you decide to try the automatic optimization you should nevertheless thoroughly check results. We will try the following: PLA should search for a maximal region in the assay, that fulfills the hypothesis criteria. The 50% response of the assay should be included. The optimized solution should have identical number of points (treatments) for both, Standard and Preparation. So we go to the Configuration page of the assay (since we activated the inheritance option. If we didn't, the next steps have to executed on the standard and the preparation). Now we select the options as follows:
Once we have saved the assay, we select "Check" from the toolbar again. The assay explorer re-appears with the following screen:

PLA 2.0 User Manuals
108
The assay now passes all hypothesis tests and the visual inspection displays a solution in accordance to our expectations. The Potency ratio is calculated as 0.54 with a confidence interval of 0.485 to 0.602 Now lets switch to full curve fitting with the 5-parameter method and lets have how this solution is calculated.

My First Assay with PLA
109
Switching the Regression Model to 5 Parameter Logistics
The 5-parameter logistics functions is used very often nowadays, since it allows to take the full curve into account and due to fifth parameter it is able to fit asymmetric dose response relationships. Since we have activated the inheritance property on the analysis page, we open the assay and go to analysis page. Select 5-parameter logistic curve fit as the model. Then save the assay. Start the Assay Explorer with Check from the toolbar.
We can see the 5-parameter fit for the full with a potency of 0.546. The confidence interval is calculated as 0.501 to 0.595 which is a little sharper than the confidence limit of the parallel-line assay. Last but not least, we want to take a look at the equivalence test for parallelism.

PLA 2.0 User Manuals
110
What About Equivalence Testing
Equivalence Testing has been discussed within the last two or three years. This approach allows to define an alternative parallelism test. This is of interest especially for very exact assays, where the parallelism based on the F-Test fails very often. Open the analysis page of the editor and select the "Equivalence Test based on Difference of Slopes" as the parallelism test method. Now set the goalpost to -1.5 to 1.5. Save the assay and restart the Assay Explorer. Switch to the Goalpost Graph.
You can see the confidence interval falls entirely between the goalposts. Therefor, the parallelism test is passed. Close the Assay Explorer. After we have finalized our initial analysis, we now start the final computation.

My First Assay with PLA
111
Final Computation and Reporting
For the final computation we select the assay or any child of the assay in the navigator. Then we start "Calculate & Report" from the file menu, the navigators context menu or from the toolbar. The Calculation dialog appears:
Select a Report and press Preview, Print or Save. The final calculation is started and the report is generated. After the generation process finished, the desired action takes place and you receive your report of interest.


113
Validation Guide
Welcome to the PLA 2.0 Validation Package
To achieve GxP compliance your installation of PLA has to be validated. This validation is a very time-consuming step if you do not have automated methods available. With the help of the PLA Validation Package you are able to reduce this effort to an absolute minimum. The PLA Validation Package is a separately sold solution that contains all information typically needed for a successful validation of PLA 2.0. The license dialog
What is included in the package?
• Installation Qualification (IQ) Documentation • Automated Installation Qualification IQ
• Operational Qualification (OQ) Documentation • Automated Operational Qualification OQ
• Performance Qualification PQ Guidelines • Automated Creation of PQ Datasets and Documentation • Automated Performance Qualification PQ Processing

PLA 2.0 User Manuals
114
Principles of Validation
There are some basic principles which have to be taken into consideration when validating a software.
Validation of Each System
A software vendor is in principle not able to deliver a validation statement with the software. Not only the software can have errors that are critical to the results, but also each single computer system has to be considered as a potentially defective system. There are many sources of errors within the computer system. The random access memory, CPU, hard disk, the operating system are able to cause different errors that are quality critical. E.g. in the past even the CPU could cause mathematical errors. Defective non-error correcting RAM is able to vary calculation results. Defective hard drives can modify quality critical components of a software system. This all leads to the conclusion that every single computer has to be validated. It is not enough to validate an exemplary system. PLA 2.0 is fitted to allow a very fast validation of your system. The different components of the Validation Infrastructure of PLA are optimized to efficiently deliver the required tasks to you.
Cryptographically Secured Reference Data
PLA 2.0 is delivered with cryptographically secured reference data sets for the Installation Qualification (IQ) and the Operational Qualification (OQ). The use of cryptographically secured digital signatures assures the integrity of the reference data. PLA makes use of a public key cryptographic system. Only Stegmann Systems is able to publish these reference data sets. For the integrity of the Performance Qualification data PLA makes use of a special pair of cryptographic keys only used for PQ data. This opens a security shell for this type of data. Only PLA itself is able to create PQ data sets. There is no way to compromise these data sets.
Recommendation for your IQ/OQ Procedures
Depending on the status of your internal IQ/OQ procedures we would like to suggest to base your IQ/OQ procedures for PLA on the automated procedures of PLA and the certificates they provide. This can drastically reduce the effort to qualify new releases of PLA. Stegmann Systems will verify its IQ and OQ data sets with every (sub-) release of PLA. Due to the cryptographically secured files, PLA is able to provide you with required certificates. Stegmann Systems guarantees the availability of this approach for the complete PLA 2.x product line. Even Import Modules and Report Templates are delivered with the required IQ reference data, so their correct installation we be confirmed with the certificates too.

Validation Guide
115
Installation Qualification
The Installation Qualification Process
Goals of the Installation Qualification
During the installation of a software product like PLA software components are installed at several locations of the computer system. The components installed divide into the following groups:
• The Main Program and its files. These are typically installed in the Program Files directory of windows. Files in this directory should not be modified during normal operation of the system.
• Shared components of the vendor. These are installed in Common Files sections. They are used by different programs of the vendor.
• System components are installed in the windows directory. They add new functions to the operating system or install new components or drivers.
A basic requirement of the Installation Qualification is a computer system with a operating system installation without errors. The installation qualification process than assures that all installed files of the software system are installed in the correct directories. It is proven that they are identical to the vendor distributed files by the calculation of a checksum. This checksum is cryptographically secured. The basic goal of the installation qualification is to prove the correct distribution of the right files on the computer system.
Result of the Installation Qualification
As a result of the installation qualification you receive a certificate that contains information on all files of the PLA system. Their location and the details of the inspection. The certificate will only be printed when the check is successful. If the check found errors no certificate but an error report is printed. The Installation Qualification certificate contains detailed information on
• the date the IQ was performed • the user who performed the test • the workstation id • the detailed build number and serial number of PLA.
With this information a qualified machine can easily be identified. The certificate should be printed out an signed by the operator.
Optional Components of PLA
Report Templates and Import/Export Modules come with their own IQ-file which is secured like the base system IQ file. The IQ files are located in the component directories. If PLA finds such IQ files, they are checked during the IQ too. So you should re-evaluate the Installation Qualification after you installed or un-installed any optional component. The IQ certificate clearly tells which packages have been included in the process.

PLA 2.0 User Manuals
116
Performing the Installation Qualification
The processing of the installation qualification could not be easier than in PLA. Simply select the "Installation Qualification (IQ)" from the Validation menu of PLA. Then click Start to start the process. After a few seconds a report containing the certificate is created in the PDF format. The report is secured from manipulation using a one time password that cannot be recovered by PLA.
Click on the hyperlink in the result section of the wizard to open the certificate. The certificate is created in the default report directory of PLA. If the Installation Qualification fails, there have been modifications to the system. In general the system should be re-installed then. Thoroughly check the error report, you receive to understand, what has changed in the system and why the installation qualification fails. Not every change necessarily compromises the system, but you should only continue to use PLA, when you successfully verified, that the system is intact. Figure - A certificate of the IQ process (sample pages)

Validation Guide
117

PLA 2.0 User Manuals
118
Operational Qualification
The Operational Qualification Process
The Operational Qualification (OQ) of PLA checks the mathematical functionality of the system. PLA is fitted with a suite of 22 OQ Packages. These packages are designed to check every aspect of the mathematical functionality.
How does it work?
The automated OQ of PLA is devided into the following processes:
1. The assay data is decoded from the PLA.OQ file. During this process the digital signatures of package is verified using PLAs internal PKI. If the data is valid, the OQ processor imports the data into a temporary project.
2. The temporary project is calculated by PLA. PLA fills its internal result structures with the calculated data.
3. The internal result structures are compared to the result structures saved and secured in PLA.OQ If any error occurs the Automated OQ fails.
After this procedures has been executed with all 22 OQ Packages an OQ Certificate or an OQ Failure Report is generated. If the OQ fails the corresponding PLA Installation has to be checked thoroughly. First of all the IQ should be processed. If it fails, reinstall PLA. If the IQ passed, though the OQ failed, contact [email protected].

Validation Guide
119
Performing the Operational Qualification
From the Validation Menu select Operational Qualification (OQ). The following dialog appears:
Press Start to start the OQ Process. This process can take up to 60 minutes. The certificate/error report is created in the standard output directory. The certificate can be launched by clicking on the hyperlink, that is available after the process finished. Note: If you want to check the OQ with its documentation you can toggle the cleanup switch:
If you deactivated it, you can verify all the objects and calculation results after the OQ process has been finished.

PLA 2.0 User Manuals
120
Performance Qualification
The Performance Qualification Process
The Performance Qualification (PQ) is intended to test customer data with the mathematics of the PLA system. In PLA this process is divided into two steps: 1. Prepare your Performance Qualification Data 2. Execute the Performance Qualification on any target system Note: When new PLA Version get available, it might be necessary to repeat both steps.
How does it work?
The Performance Qualification is prepared using the preparation wizard. Using this wizard you select your well-known PQ project inside PLA. The wizard calculates the comparison data and generates a PQ file as well as a Complete Statistics Report. The PQ file is secured from manipulation by the systems internal PKI. Once you have thoroughly checked the corresponding Complete Statistics Report, you can use the PQ to perform the Performance Qualification using the Performance Qualification Wizard.

Validation Guide
121
Preparing the Performance Qualification
As a prerequisite you need to define your comparison data in PLA in any project. This project may contain any number of assays you want to include in your PQ data set. When finished, start the Performance Qualification Preparation Wizard from the Validation menu by selecting "Create a PQ dataset". The following wizard appears:
Now select the input object by pressing the button next to the corresponding input field and select your PQ project from the list:
Then select the filename of your PQ file. Press start to start the generation. The wizard now creates two files:
• the PQ file and • the corresponding Complete Statistics Report
The Complete Statistics Report is located in the same directory as the PQ file. Now you have to check the report for correctness. Once you have accepted the results, you can proceed to the Performance Qualification task.

PLA 2.0 User Manuals
122

Validation Guide
123
Performing the Performance Qualification
From the Validation Menu select Performance Qualification (PQ). The following dialog appears:
Select your PQ file using the button near the input field. Press Start to start the PQ Process. Depending on the size of your PQ file the process may need several minutes to complete. The certificate/error report is created in the standard output directory. The certificate can be launched by clicking on the hyperlink, that is available after the process finished. Note: If you want to check the PQ with its documentation you can toggle the cleanup switch:
If you deactivated it, you can verify all the objects and calculation results after the PQ process has been finished.


125
IT Administration Guide
Welcome to the PLA IT Administration Guide
This guide is intended for those who are responsible to setup PLA in their environments. You will find all necessary information to setup PLA and you will find all information regarding administrative procedures. Note: This guide requires basic knowledge of operating system administration. Structure of this Guide:
• Description of for IT Professionals • PLA Setup Basics • PLA in Networked Environments • Terminal Server Recommendations • PLA Database Guide • PLA License Management • PLA User Management

PLA 2.0 User Manuals
126
Description of PLA for IT Professionals
PLA is a standard application for parallel-line analysis of biological assays. It is used by laboratory personal and scientist as well as in development of assays (tests) and in the application of these tests in quality control units. PLA organizes the data of interest (assay data) in databases. The user can connect to different database systems. In general file based databases (Microsoft JET 4.0) and SQL Server based databases (Microsoft SQL Server, Oracle) can be distinguished. Due to regulatory needs PLA has its own user account management. User account is stored per database. This makes for users especially in development labs to differentiate their security needs per project. PLA is multi-user networking aware. Objects in the databases are automatically locked when they are used. The session and lock management of PLA is self-healing if they encounter problems (e.g. missing logouts). After some minutes inactive sessions and locks are automatically removed by PLA. The PLA setup is Windows compliant. Restricted Users are able to work with PLA. Deeper Details about the Setup are found in the Setup Basics section of this manual. PLA can be installed in Terminal Server environments.

IT Administration Guide
127
PLA Setup Basics
PLA is Microsoft Windows Compliant
• No write permission in the "Program Files" are required. • PLA requires write permissions in the All Users\Application Data. • PLA requires write permissions in the My files section of an user • PLA requires write permissions to the Import/Export Module path if you want to save Import
Definition Schemes During installation administrative permissions are required. PLA should be installed on the local hard drive. It is not recommended to install PLA on network drives. But you might point the report templates directory of PLA, the import/export directories and the import/export modules directory to central locations. This can be done within the options dialog of PLA.
Customizable Directories of PLA
In the Options dialog or in the registry the following customizable directories of PLA can be set: Default Import Path
This path is the default path of the import wizard. All open operations of this wizard initially point to this directory. By default this directory points to a PLA 2.0 sub-directory of the users personal folder.
Default Export Path
This is the default target path of the export wizard. By default this directory points to a PLA 2.0 sub-directory of the users personal folder.
Default Output Path
This is the path where reports and certificates are created by default. By default this directory points to a PLA 2.0 sub-directory of the users personal folder.
Import/Export Modules
This is the path PLA uses to search for import and export modules. PLA might require write permissions in this directory to save Import Definition Schemes. By default this path points to the "Converter" sub-directory of the PLA 2.0 base installation path.
Report Templates In this directory the report templates of PLA are installed. By default this path points to the Report Templates sub-directory of the PLA 2.0 base installation path.
Other Directories of Interest
Base Installation Path
This is the target path you select when you install PLA. By default this directory points to a Stegmann Systems\PLA 2.0 subdirectory of the systems programs folder (e.g. c:\program files\Stegmann Systems\PLA 2.0)
Application Path This is a sub-directory of the base installation path. This directory contains the PLA Main Program and libraries.
Application Data Application Data is stored in the All Users and in the Users personal folder in the Documents and Settings section.
Temporary Files Temporary files are stored in the Temp sub-directory of the Application Data Directory of the user. PLA automatically takes care of this folder.

PLA 2.0 User Manuals
128
Hardlock Installation
PLA makes use of the Hardlock Protection by Aladdin Systems. The device drivers for the hardlock system are installed automatically during the setup process. They appear as Hardlock Drivers in the Software section of the system configuration. If they are removed they can be reinstalled by hand. Current drivers can be found under www.aladdin.com.

IT Administration Guide
129
Security Basics
User Account Security
Due to regulatory needs PLA has its own user account management. Accounts are stored in the PLA databases, so security can not be compromised by copying data to another location. The user account system in PLA is role based. PLA distinguishes three roles: Standard Users Standard Users are allowed to modify objects within the restriction a PLA administrator gave. They are not allowed to modify security relevant options or to manage user accounts. Administrators They manage users and define the security relevant options within PLA. Inspectors They have read only access to the objects, but they are allowed to electronically sign objects.
Data Integrity
PLA makes use of its own Public Key Infrastructure. All objects within the database are signed using a digital signature. This signature is checked every time, PLA access the object. If the signature is invalid for any reason, PLA refuses to open the object. In addition to the objects (projects, assays, standards, preparations and controls) even the user accounts and the options are digitally signed too. All of these signatures include a unique database identifier. This database identifier is verified each time an object is accessed. By these techniques it is not possible, to modify definitions or to move elements such as user accounts to other installations without invalidating them. So don't try to modify anything in the PLA databases.
Database Security
The file based databases of PLA are secured. For the SQL Server based databases it is recommended not to communicate the database access information directly to the user. The database administrators / PLA administrators should define the database connections for the end users. Another possibility is to directly install the database connections via registry. (Advanced Database Administration)

PLA 2.0 User Manuals
130
Database Guide
PLA Databases
PLA makes use of databases to store assay data, audit trails, user account data and system options. There are two types of databases:
• File-based Database This type of database can be generated on any local or shared drive. Multiple Users can connect to this database when it is located on a shared drive. The file based database is a secured Microsoft JET database. Note: We do not recommend to connect more than 3 concurrent users to this database type.
• SQL Server Database PLA allows to use a Microsoft SQL Server Database (MS SQL Server 2000 or higher, MSDE supported) Depending on your license PLA can accept nearly any number of connection to this type of database. It should be preferred if you have a SQL Server available.

IT Administration Guide
131
PLA Database Maintenance
There are a few Maintenance Tasks for PLA databases.
Backup The Databases
PLA Databases have to be backed up on a regular basis. It is the task of the IT Administration to create backups of file based and SQL Server based databases. Stegmann Systems recommends to create backups every day.
Create A Database
Create A File-Based Database
From the Login-Dialog select "Manage..." on the right of the database selector.
The Database Management dialog appears

PLA 2.0 User Manuals
132
Click on the "Create or Connect a Database File" button. A standard file open dialog appears. Select the directory and type in the name of a new database file. Note: If you select an existing database, nothing is created but you will be connected to this database. After you created a new database the new database appears in the list of defined connection profiles. Select it and click open database to connect to it. You are immediately asked for an administrator password for the first administrator of this database:

IT Administration Guide
133
Type in a password. Note: The password cannot be recovered if you loose it.
Create A SQL Database (Connection)
This section requires basic knowledge on database administration. The first step has to be done by your database administrator. He has to create a new empty database and he has to define a user id that has to be able to create tables and indices within this database (DB Owner permissions). Once this is finished you can go ahead with PLA. Open the Database Management as describes above, then select Connect a Database Server. A standard dialog of the operating system appears that allows to input the connection data for the new database. Select your server and database and type in the userid and password you created on the database server. Then press ok. Open the database. If this is the first time the database is opened by PLA, you are asked to create the tables and indices PLA requires. The following dialog appears:
Select Yes to create the tables. After the tables are created, you are asked for an initial PLA Administrator password as seen above.
Remove Database Connections

PLA 2.0 User Manuals
134
Unused Database Connection can be removed by the Database Management Dialog. This does not delete the database either from the file system nor a SQL Server database.
Compact Database
File-based Databases can grow up to 2 GB during work. They might be internally fragmented while time passes. From time to time you should compact the database. This defragments the database and removes unused file space from the database. In the Database Management select the database to be compacted and then press Compact Database. After the compaction succeeded you receive a message on the saved space:
Note: you need exclusive access to the database to compact it.

IT Administration Guide
135
Advanced Database Administration
Distribution of Connection Profiles Using Registry Settings
In management environments you can distribute connection profiles of PLA Server setting to the end-user systems by registry files, by your software distribution system or by active directory distribution. Create a database connection to the required database using PLA 2.0. The database connection string can be found in the registry under the key:
HKEY_LOCAL_MACHINE\Software\Stegmann Systems\PLA 2.0\Connections Under this key you find each connection as a REG_SZ variable. The name of the variable defines the connection name. This can be freely edited. The value is a cryptographically secured connection information to the database. It has to be copied as is. The simplest way to communicate these settings is to export the variable using REGEDIT and import the setting by double-clicking the .REG-File created by the export.

PLA 2.0 User Manuals
136
PLA License Management
Since PLA is a special application for a very small market, PLA is secured by a license management. This license management distiguishes between the trial mode and retail mode of PLA.
Retail Mode
In Retail Mode PLA is delivered either with a desktop hardlock or with a network hardlock, depending on the license you purchased.
Seat License
The hardlock has to be connected to the local parallel-port or USB port (PLA Setup).
Concurrent Use License
This type of License is shared across the network. It is also necessary if you want to use PLA on a Terminal Server Solution. The concurrent use license model requires a license in the network which can be a normal workstation, if it is assured, that the workstation is switched on during your business hours. Connect the Hardlock Server to the USB of the computer, that will serve as a license server and install the hardlock server Software from the installation CD. The hardlock server manages the number of license you purchased. If the number of users exceed the license limit, the connecting will receive a message to try again later.
License Numbers
In addition to the hardlock you have received a set of two or three license numbers. They have to be typed in (or downloaded) in the License Management Dialog. This dialog can be opened from the login screen by pressing License Information:
The License Management Dialog appears:

IT Administration Guide
137
Press "Download License Keys" if you have an internet connection or type in the license keys you have received with your license. Note: The License Keys match the hardlock id. If your License Keys are marked as invalid, check that your hardlock id matches the keys.


139
Reference
User Interface Reference
Account Management
The Account Management dialog allows you to create new user accounts and to modify or delete existing ones.
Defined Accounts
A list of existent accounts. Selecting an account allows you to delete or modify it.
Add
Create a new account.
Modify
Modify the selected account.
Delete
Delete the selected account.

PLA 2.0 User Manuals
140
Account Name
Allows you to enter or modify the name of the account. Each account requires a unique name.
Account Password
When creating a new account or modifying an existing one you can set its password by typing it into the corresponding field and retyping it in the field below. Remember that passwords are case-sensitive.
Change password at next login
When creating a new account or modifying an existing one and enabling this option, the user defined by this account is forced to change his password at his next login.
User Groups
Each account is member of one group. A group defines the rights, an account has within the PLA system. The currently assigned group is highlighted. You might assign the current account to another group simply by selecting it in the list of groups. Description of the PLA groups:
• Administrators: Administrators have full access rights. They modify GxP / SOP Settings and manage accounts.
• Standard Users: This is a regular working account. Access rights are limited through the GxP / SOP Settings defined by an Administrator.
• System Inspectors: Accounts assigned to this group have read-only access. They are allowed to view all objects, but not to modify them.
• Deactivated Users: Existing accounts, that are (temporarily) deactivated. Users having deactivated accounts cannot log in.
Save
Save the newly created or modified account .
Cancel
Cancel the creation or modification of an account and discard all changes.
Close

Reference
141
Close the Account Management dialog.

PLA 2.0 User Manuals
142
Action Menu
This topic describes PLA's Action Menu.
Calculate & Report
Opens the Calculate & Report Dialog which allows you to start the calculation process and create reports.
Data Explorer (Check)
Opens the Data Explorer (Check Dialog) which shows you a graphical overview of your assay and preliminary calculation results. See how to Explore your Assay.
Combination of Assay Results Editor
Opens the Combination of Assay Results Dialog, which allows you to define Groups for Combination of Assay Results.

Reference
143
Apply
This dialog allows you to apply object properties to multiple objects at once.
Source Object
Select the source of the properties which will be applied to the target objects.
• Project Use the selected project or the parent project of the selected object as source
• Assay Use the selected assay or the parent assay of the selected object as source
• Template Use a template as source. You can specify the template by selecting one from the template list to the right.

PLA 2.0 User Manuals
144
Property groups to apply
Select the property groups, which you want to apply. The groups correspond to the property pages of the object editor dialog described here in Introduction.
Target
Shows you to which objects the properties will be applied.
Included Object Types
This allows you to filter the objects to which the properties will be applied by their type. The properties will be applied to the selected object types only.
Apply!
Apply the selected properties.
Close
Close this dialog.

Reference
145
Audit Trail
Shows Audit Trail information by listing operations and their details.
Operation List
A list of operations showing you which actions have been executed by which user at which time.
Operation Details
If an action from the above list is selected, the details of the selected action are displayed if available.
Refresh
Refresh the list from the database.
Close
Close this dialog.

PLA 2.0 User Manuals
146
Change your Password
This dialog allows you to change your password.
User Name
Your user name (account name) is displayed here.
Current Password
Enter your current password into this field.
New Password
Enter your desired new password into this field.
Retype New Password
Reenter your new password in this field.
Change Password
Clicking this button changes your password.
Cancel
Clicking this button cancels changing your password and closes this dialog.

Reference
147
Context Menu
This topic describes the Context Menu of the PLA Navigator..
Create Object
Create a new object. See also: Create Object Dialog
Edit Object
Edit the selected object's properties and definitions. See also: The Editor
Copy
Copy the selected object. See also: Copying and Moving of Objects
Move
Move the selected object. See also: Copying and Moving of Objects

PLA 2.0 User Manuals
148
Delete
Delete the selected objects and all of it's child objects.
Apply
Apply a template or project definitions to the selected object. See also: Apply Dialog
Lock Tree
Lock the selected object and all of it's descendants. See also: Locking Objects
Unlock Tree
Unlock the selected object and all of it's descendants. See also: Locking Objects
Import
Open the import wizard to import data into PLA. See also: Import
Export
Open the export wizard to export data from PLA into a file. See also: Export
Calculate & Report
Opens the Calculate & Report Dialog which allows you to start the calculation process and create reports. See also: Calculate & Report
Data Explorer
Opens the Data Explorer (Check Dialog) which shows you a graphical overview of your assay and preliminary calculation results. See also: Explore your Assay

Reference
149
Create Object
This dialog allows you to create a new object.
New Project
This option allows you to create a new Project.
New Assay
This option allows you to create a new Assay as member of the currently selected Project.
New Standard
This option allows you to create a new Standard as member of the currently selected Assay.
New Preparation
This option allows you to create a new Preparation as member of the currently selected Assay.
New Control
This option allows you to create a new Control as member of the currently selected Assay.
Name

PLA 2.0 User Manuals
150
Enter the name of the object you want to create here.
Description
You can optionally enter an description for the object you want to create here.
Template
Select a template for the new object.
Create
Click this button to create the object.
Cancel
Click here to cancel the object creation process.

Reference
151
Database Manager
The Database Manager allows you to manage your database connections.
Database Connection Profiles
This list contains a list of previously created Database Connection Profiles. You can switch between different databases simply by selecting the appropriate profile in the list.
Create or Connect a Database File
Select this button to create a new connection profile for a Microsoft JET database file (MDB). To use an existing PLA database, select the appropriate file in the appearing "Select File" dialog. You can create a new database file if you enter a new file name in the "Filename" text edit field of the "Select File" Dialog.
Connect a Database Server
This option allows you to create a new connection profile using a database server. See also: Database Manager Connect
Delete Connection Profile
Click this button to delete the currently selected connection profile.
PLA 2.0 User Manuals
152
Compact Database
This options allows you to compact the JET database described by the currently selected connection profile. Note that using this function for non JET databases fails, since database compaction is only supported for Microsoft JET databases.
Open Database
Opens the database described by the currently selected connection profile.
Close
Closes the Database Manager without switching the database connection profile.

Reference
153
Database Manager Connect
This dialog allows you to set up a connection to a database server. Currently only Microsoft SQL Server 2000 or higher is supported. The corresponding OLE DB-Provider for Microsoft SQL Server is selected automatically. For detailed information how to set up a PLA database on a Microsoft SQL Server please refer to PLA Databases.
Server Name
Enter the name of your database server here (e.g.: MyServer). If you have multiple instances of an Microsoft SQL Server you need to enter the name of the server and the named instance separated by a backslash (e.g. MyServer\MyInstance). You can also select one of the SQL Servers in the server list. Contact your database administrator if you are not sure about the SQL Server to be used.
Refresh
Click here to refresh the list of SQL Servers.
User Authentication Mode
Select between Windows authentication and SQL Server Authentication. If you choose SQL Server Authentication be sure to have a user name and a password on hand. It is recommended to use SQL Server Authentication and to create a "PLA-user" just for connections of the PLA system to the PLA

PLA 2.0 User Manuals
154
database. The password of the "PLA-user" is kept in confidence and only encrypted connection profiles are distributed. Contact your database administrator if you are not sure about the authentication mode.
User Name
Enter your SQL Server user name here. Note: This is only applicable for SQL Server authentication mode.
Password
Enter your SQL Server user password here. This information is required if you choose SQL Server Authentication. The password is stored in an encrypted form and can not be discovered by common means. Note: This is only applicable for SQL Server authentication mode.
Blank Password
This option should be disabled if you choose SQL Server Authentication because it would be careless to use an SQL Server account without password. Note: This is only applicable for SQL Server authentication mode.
Save Password
This option must be enabled in order to create a complete PLA database connection profile. Note: This is only applicable for SQL Server authentication mode.
Select the Database
Enter the name of the PLA database (e.g. My PLA Database) or select the database from the database list. Contact your database administrator if you are not sure about the database. Note: The database must already exist on the server and the provided user must have the rights to create, erase and modify database objects. Contact your database administrator for further information.
Test Connection
Click here to test the connection to your SQL Server. If, for any reason, the test fails contact your database administrator for further guidance.

Reference
155
File Menu
This topic describes the File Menu of the PLA menu bar.
Navigator
Show or hide the Navigator.
Create Object
Create a new object. See also: Create Object Dialog
Edit Object
Edit the selected object's properties and definitions. See also: Introduction to Object Properties
Save Object
Save any changes made on the selected object.
Close Window
Closes the currently active sheet.
Copy

PLA 2.0 User Manuals
156
Copy the selected object. See also: Copying and Moving of Objects
Move
Move the selected object. See also: Copying and Moving of Objects
Delete
Delete the selected objects and all of it's child objects. See also: Deleting Objects
Apply
Apply a template or project definitions to the selected object. See also: Apply
Lock Tree
Lock the selected object and of it's descendants. See also: Locking Objects
Unlock Tree
Unlock the selected object and of it's descendants. See also: Locking Objects
Import
Open the import wizard to import data into PLA. See also: Import
Export
Open the export wizard to export data from PLA into a file. See also: Export
Logout
Log out of PLA. This will end your current session. You'll have to save or discard your current work. This will display the login screen.
Exit
Close PLA.

Reference
157
Help Menu
This topic describes the Help Menu of the PLA menu bar.
Help Topics
Open the online help of PLA.
Submit a Bug or Request a Feature
This allows you to connect to the Support Website of PLA to submit a feature request or a bug report. You will be asked whether PLA should connect you to the Support Website.
PLA License
Open the PLA License Manager. See also: License Management
About
Open a window showing detailed information about your PLA Installation. See also: Product Information

PLA 2.0 User Manuals
158
License Management
License Status
The status of your PLA installation and the Hardlock status.
License Details
A list of Licenses with their status.
License Key
Text edit field for entering a license key manually.
Add
After having entered a license key into the License Key field, click this button to add the license.
Download License Keys
If you have an Upgrade Protection for PLA 2.0 you'll be able to download your license keys directly from our license server. Note: This feature requires an internet connection.

Reference
159
Inquiry Key
This key is generated by the PLA Licensing system. It is required if you need to get an extension of your trial period. Note: This feature applies only to the Trial Mode of PLA.
Submit Online
Submit your Inquiry Key online. This will open the PLA License Inquire page in your internet browser. You can use the form on this page to submit the query. Note: This feature requires an internet connection.
Submit by E-mail
Submit your Inquiry Key by e-mail. This will open you mail application with a prepared mail containing the required information for a new trial key. You'd just have to press the "send" button. Note: This feature requires an internet connection.
Vendor Response
Once you have received the response code from PLA support, you'd have to enter it into the green text field.
OK
This button will be enabled if you've entered the vendor response in the green text edit field. Pressing the button will check the entered code and activate PLA or a PLA feature.
Explanation
A short text explaining how to use the License Manager.
Product Information
Open the Product Information Dialog. See also: Product Information
Close
Close this dialog.

PLA 2.0 User Manuals
160
Login
The Login dialog allows you to login to a database. It provides a list of databases to choose from and means to create new database connections. Once you have selected the database, the dialog shows the registered users of this database. Select the desired user and type in your password. Then press the "Login" button to proceed.
Database
This is a list of your database connection profiles. Select the desired database connection profile. PLA tries to establish the database connection and shows an updated user id list. If for any reason PLA could not open the database, contact your IT administrator.
Manage...
Opens the Database Manager which allows you to manager your database connection profiles.
User ID
A list of users of the currently selected database. Select your user account by clicking on your user name.
Password
Enter your password here.
Login
Executes the login.

Reference
161
Exit
Quit PLA.
Status
Shows status information about your PLA installation. E.g.: The remaining time of your PLA Trial.
Register
Click here to register your copy of PLA.
Info
Your registration information is shown here.
News
Shows latest news about PLA if you are connected to the internet.
Product Information
Shows information about the program. See also: Product Information Dialogue
License Management
Opens the License Manager. See also: License Management
Version Information
Detailed information about your PLA version for support purpose.
Serial Number
Your PLA Serial Number.

PLA 2.0 User Manuals
162
Options
This topic describes the Options dialog and all available settings.
• Calculation Control Center Options 1. - Always calculate combinations of assay results
1. If set to yes the defined groups of combination of assay results are calculated by default.
2.
Possible Values:NoYes
Default value: No
3. • Application Path Settings

Reference
163
1. - Default Export Path 1. Defines the default path to where the export wizard shall export the data to.
2. - Default Import Path
1. Defines the default path to where the import wizard shall import the data from.
3. - Default Output Path 1. Defines the default path to where the created reports or certificates shall be
stored.
4. - Location of Import/Export Modules 1. Defines the path, where PLA Import and Export modules are stored.
5. - Location of Report Templates
1. Defines the path, where your PLA Report Templates are stored. 2.
• Graphics Options 1. - Height (pixel)
1. Defines the height of the image in pixel created when saving the graph from the Data Explorer to an image file.
2.
Possible Values:100 - 2.048Default value: 600
3. 2. - Width (pixel)
1. Defines the width of the image in pixel created when saving the graph from the Data Explorer to an image file.
2.
Possible Values:100 - 2.048Default value: 800
3. • Search for Updates
1. - Search for News and Updates 1. Defines how PLA should check for News or Program updates. 2.
Possible Values:1 - Automatically check for news and updates at startup2 - Allow manual check for news and updates at startup3- Disable check for news and updates
Default value: 1 - Automatically check for news and updates at startup2.
• GMP/GLP/SOP Settings 1. - Default Template for the creation of projects
1. Defines the default template for the creation of projects. 2.
Possible Values:1 - (none) 2..n - A list of your templates
Default value: 1 - (none) 2. 3. - GMP/GLP Master Protection

PLA 2.0 User Manuals
164
1. Enable or disable GMP/GLP Master Protection. Enabling this option overrides all set GMP protections.
2.
Possible Values:OffOn
Default value: Off4. 5. - Projects may be created by administrators only
1. If this option is enabled, only administrators are allowed to create projects. 2.
Possible Values:NoYes
Default value: No
6.
- Users may not delete objects 1. If this option is enabled, standard users are not allowed to delete projects or
assays. 2.
Possible Values:NoYes
Default value: No
7. • Security
1. - System Idle Lock Interval 1. This specifies the time interval (in minutes), after which PLA is locked if no
user action occurred. By specifying the value 0, the automatic lock is disabled.
2.
Possible Values:0 - 1540Default value: 0
2. 3. - Password minimum length
1. Specifies the minimum number of characters a password must have. 2.
Possible Values: 0 - 25Default value: 0 Recommended Value:8
4. 5. - Password minimum number of special characters
1. Specifies the minimum number of special characters a password must contain. A special character is one of "0123456789,.-;:_#'+*~\?{}[]!"§$%&/()=<>"
2.
Possible Values:0 - nDefault value: 0

Reference
165
6.
- Password maximum age 1. Specifies the maximum age of a password in days. If the age for a password
has been reached. The user will be asked to change it. By setting this option to 0 you disable it.
2.
Possible Values:0 - nDefault value: 0
7. 8. - Password warning age
1. Specifies the warning age of a password in days. If the age for a password has been reached. The user will be notified that his password will expire. By setting this option to 0 you disable it.
2.
Possible Values:0 - nDefault value: 0
9.
- Password minimum age 1. Specifies the minimum age of a password in days. The password cannot
expire until the minimum age is reached. 2. By setting this option to 0 you disable it. 3.
Possible Values:0 - nDefault value: 0
10.
- Password age expiry blocks 1. If this option is set to true, a user account is blocked if its password is
expired. Otherwise the user will be asked to change an expired password upon next login.
2.
Possible Values: falsetrue
Default value: false11. 12. - Password maximum failures
1. This option defines the number of failed login attempts until the corresponding account is blocked. Setting this value to 0 disables this feature.
2.
Possible Values:0 - nDefault value: 0
13. 14. - Password failure grace interval
1. This option defines how long (in minutes) an account will be blocked if the number of login attempts exceed the maximum number of password failures. Setting this value to 0 means forever.
2.

PLA 2.0 User Manuals
166
Possible Values:0 - nDefault value: 0
15. 16. - Password history length
1. This options specifies the password history length. PLA stores a list of the specified length of old passwords for each account. A new password will be rejected if it matches an entry of the list.
2. Specifying 0 will set the password history length to unlimited, meaning that a new password must not match any password which has been used earlier by this account.
3.
Possible Values:0 - nDefault value: 0
17.
- Password list of invalid passwords 1. A list of passwords which must not be used as password, separated by
semicolon. This list applies to all accounts and prevents the usage of simple passwords like "assay".
• Electronic Signatures 1. - Signatures may be removed by
1. Defines who is allowed to remove electronic signatures from objects. 2.
Possible Values:1 - admins only2 - the signer 3 - everyone
Default value: 2 - the signer 2. 3. - List of pre-defined comments for electronic signatures
1. A semicolon separated list of pre-defined comments for electronic signatures.
• Navigator Defaults 1. - Autorefresh Interval
1. Defines the number of seconds to elapse until a navigator refresh occurs. 2.
Possible Values:5 - 3.600Default value: 30
2. 3. - Autorefresh Navigator
1. Defines whether the navigator is refreshed automatically. Only useful in multi user environments.
2.
Possible Values:NoYes
Default value: No3.

Reference
167
Product Information
This dialog shows detailed information about your PLA Installation.
Postal Address
The vendors postal address.
Phone / Fax
The vendors telephone and fax number.
Version
The (detailed) version number of your PLA installation.
Serial Number
Your PLA serial number.
www.bioassay.de
Open the products Website in your default web browser.
Opens your default mail client allowing you to write an e-mail to the support.
OK
Close this dialog.

PLA 2.0 User Manuals
168
Register Your Copy of PLA
How to use the registration dialog.
Why register?
This is a short statement explaining why you should register your copy of PLA.
Your Name
Enter your name into this field.
Company
Enter the name of your company here.

Reference
169
Department
Enter the name of your department here.
Address
Enter the address of your company here.
City
Enter your city into this field.
Zip code
Enter the corresponding zip code here.
State / Region
Enter your state or region here.
Country
Enter your country here.
Enter your e-mail address here.
Phone
Enter your or your company's phone number here.
Fax
Enter your or your company's fax number here.
Keep me informed about PLA and your other bioassay products by email.
Enable this option if you want to receive latest information about PLA and other bioassay products of Stegmann Systems.
Privacy statement
A statement explaining to you that your data will not be made available to any third party.
Submit (online)
Submit your registration online. PLA transmits the data entered above to the Stegmann Systems user database. Note: This feature requires an internet connection.
Generate file
PLA generates a file which you can print / fax or send via Mail.

PLA 2.0 User Manuals
170
Never ask again
Closes this dialog. PLA won't ask you again for registration. However, you can open this dialog again by clicking the "Click to edit" hyperlink on the Login Dialog.
Close
Closes this dialog. You will be asked again to register upon next startup.

Reference
171
Session & Lock Management
This dialog allows you to manage all active sessions of a PLA database and their corresponding locks.
Sessions
A list of active sessions.
Locked Objects
A list of locked objects of the currently selected session.
Autorefresh lists
If checked, both lists will refresh automatically.
Refresh
Click this button to refresh both lists manually.
Reset Sessions

PLA 2.0 User Manuals
172
Removes outdated sessions from the PLA databases. No active sessions are touched. Note: PLA removes outdated sessions automatically. Usually there is no need to manually remove them.
Kill Session
Kill the selected session. The session is deleted and all locks of this session are removed. This is useful if there is an invalid session entry which hold locks on objects. Note: Use this option with caution! Invalid session entries are removed automatically after two hours.
Unlock
Remove the selected lock.
Close
Close this dialog.

Reference
173
System Menu
This topic describes the System Menu of the PLA menu bar.
Options
Open the Options Dialog to modify the configuration of PLA. See also: Options Dialog
Account Management
This options allows you to manage the PLA user Accounts. See also: Account Management
Change your Password
This option allows you to change your password. See also: Change your password
Administrative Database Access
This option allows you to en- or disable the administrative database access for database maintenance. See also: Database Maintenance

PLA 2.0 User Manuals
174
Check Database Consistency
Perform a database consistency check.
Session & Lock Manager
Open the Session & Lock Manager. See also: Session & Lock Management
Audit Trail
Open the Audit Trail Dialogue for the selected object. See also: Audit Trail Dialogue
Lock PLA
Lock your PLA Session. You will need to enter your password to unlock the session.

Reference
175
System Locked
This dialog is shown to you after you have logged your PLA Session manually via the System Menu or after your session has been locked automatically, because you didn't work with PLA within the in the Options specified time period.
Current User
The name of the user, who's session is locked.
Password
Type the password for the user into this field. Remember that passwords are case-sensitive.
Unlock
Click here to unlock the PLA session after having entered the correct password into the corresponding field.
Close PLA
Click here to close PLA. You do not need to provide a password. You will be asked whether you are sure about closing PLA, since all changes will not be saved.

PLA 2.0 User Manuals
176
Validation Menu
This topic describes the Validation Menu of the PLA menu bar.
Installation Qualification
Opens the Installation Qualification (IQ) Dialog. See also: Installation Qualification
Operational Qualification
Opens the Operational Qualification (OQ) Dialog. See also: Operational Qualification
Performance Qualification
Opens the Performance Qualification (PQ) Dialog. See also: Performance Qualification
Create a PQ Dataset
Opens a dialog allowing you to create a PQ Dataset which can be used to perform the PQ on antoher machine running PLA. See also: Performance Qualification

Reference
177
Window Menu
This topic describes the Window Menu of the PLA menu bar. It allows you to arrange your windows in PLA.
Cascade
Cascade all open windows.
Tile Horizontal
Tile the view horizontally.
Tile Vertical
Tile the view vertically.
Layer
Layer all open windows above each other.
Minimize All Windows
Minimize All Open Windows.
Undo
Rest the the last set alignment and reset the windows to their previous view.


179
PLA 2.0 vs. PLA 1.2 PLA 2.0 is the successor of the leading PLA 1.2 System. PLA 2.0 has been re-coded in many sections. The system design has been refreshed and a variety of options have been added. If you are currently using PLA 1.2 the following notes may be relevant for you.
No Interaction of PLA 1.2 and PLA 2.0
You may install and use PLA 1.2 and PLA 2.0 on the same computer system without any restrictions. Both versions do not influence each other. You may install and un-install them in any order.
Data Migration
The installation of PLA 2.0 does not touch your current PLA 1.2 data. If you want to migrate your data you have to export them in PLA 1.2 and then import the corresponding data file in PLA 2.0.
PLA 1.2 / PLA 2.0 Licensing
If you have purchased a license of PLA 1.2 and obtained your license of PLA 2.0 with the PLA Upgrade Protection or via an PLA Product Upgrade your are entitled to use both versions on the same computer system. You must not install both versions on different computers. Note: This licensing feature is only available in the per-seat licensing mode. PLA 1.2 does not support floating licenses.


181
Stegmann Systems Stegmann Systems (formerly known as Stegmann Systemberatung) has been founded 1996 and is located in Germany.
Stegmann Systems Raiffeisenstr. 2 C1 / C2 63110 Rodgau Germany Phone: +49 (0)6106 77010-0 Fax: +49 (0)6106 77010-29 E-Mail: [email protected] Website: www.bioassay.de Support Website: support.stegmannsystems.com


183
System Requirements Your computer needs to meet the system requirements in order to run PLA. Please remind that you'll need administrative rights to install PLA.
• System Requirements: • Intel Pentium III (or compatible) Processor with 1Ghz or higher • 512 Megabytes of System Memory (RAM) at least • 250 Megabytes of free Hard disk space • Microsoft® Windows 2000, Microsoft Windows XP ®
• Recommended System: • Intel Pentium IV (or compatible) Processor with 2Ghz • 1 Gigabyte of System Memory (RAM) • 500 Megabytes of free Hard disk space • Microsoft Windows XP ®


185
Copyright PLA 2.0 © 2006 Stegmann Systems, Rodgau, Germany. All rights reserved. The Stegmann Systems products referred to in this document are also copyrighted, and all rights are reserved by Stegmann Systems and/or its licensors, if any. This manual may not, in whole or in part, be copied, translated, or reduced to any electronic medium or machine-readable form without prior consent, in writing, from Stegmann Systems. The information in this manual is subject to change without notice, and Stegmann Systems assumes no responsibility for any errors that may appear in this document. The references in this manual to specific platforms supported are subject to change. Java and all Java-based marks are trademarks or registered trademarks of Sun Microsystems, Inc. in the U.S. and other countries. Any other trademarks or service marks contained herein are the property of their respective owners. PLA 2.0 includes software developed by the Apache Software Foundation (http://www.apache.org/). Copyright 1999-2006 The Apache Software Foundation. All rights reserved. The names "Xalan", "FOP", "Avalon-Framework", "Batik", "Xerces", "Commons-logging" and "Apache Software Foundation" must not be used to endorse or promote products derived from this software without prior written permission. Products derived from this software may not be called "Apache", nor may "Apache" appear in their name, without prior written permission of the Apache Software Foundation. For written permission, please contact [email protected]. PLA 2.0 uses libraries that are subject to the Lesser GNU Public License (LGPL) Version 2.1 (the "License"); you may not use these files except in compliance with the License. A copy of the License is distributed in the same folder as the respective file. Software distributed under the License is distributed on an "AS IS" basis, WITHOUT WARRANTY OF ANY KIND, either express or implied. See the License for the specific language governing rights and limitations under the License. All rights reserved.


187
Licensing Agreement for products of Stegmann Systems (Stegmann Systemberatung) Raiffeisenstr. 2 63110 Rodgau Germany All products sold by Stegmann Systems or companies associated therewith, including demonstration sets, hardware, media and manuals (hereinafter referred to collectively as "Product") as well as all future orders shall be subject to the following provisions. If you do not accept these provisions, please return the product to us within seven (7) days of having purchased or received the Product. We will refund the purchase price minus fees for ship-ping and processing. 1. License Stegmann Systems holds all rights to the Product and herewith assigns to you a nontransferable, nonexclusive right of use to exploit/utilize the Product according to the following. You are not authorized to transfer the Product or parts thereof to third parties, or to make them accessible in any way, or to modify, disassemble, decompile, reverse engineer, process, or improve the software, or other parts of the Product, or to attempt to discover the source code of the software with the exception of the conditions as stated in Section 69e of the German copyright law. You have the right to install and use the Product on one (1) computer. If you want to install and use the Product on other computers, you must acquire and dedicate a license for each separate computer. You have the right to make one (1) copy of the software in order to archive it. 2. Other Rights and Limitations If the Product is labeled as an upgrade, you must be properly licensed to use a product identified by Stegmann Systems as being eligible for the upgrade in order to use the Product. A Product labeled as an upgrade replaces and/or supplements the product that formed the basis for your eligibility for the upgrade. You may use the resulting upgraded product only in accordance with the terms of this license agreement. If the Product is an upgrade of a component of a package of software programs that you licensed as a single product, the Product may be used and transferred only as part of that single product package and may not be separated for use on more than one computer. You may not rent, lease, or lend the Product. You may permanently transfer all of your rights under this license agreement, provided you retain no copies, you transfer all of the Product (including all component parts, the media and printed materials, any upgrades, and this license agreement), and the recipient agrees to the terms of this license agreement. If the Product is an upgrade, any transfer must include all prior versions of the Product. 3. Warranty For a period of twelve (12) months after the delivery date, Stegmann Systems shall guarantee: (a) that the performance of the software corresponds in all essential characteristics to the description in the manual, provided the software is used with the appropriate hardware and (b) that the medium, on which the software is to be stored, is free of material and manufacturing errors. 4. Limitation of Liability In the event of a breach of warranty, Stegmann Systems shall be exclusively obligated at its own discretion to repair or replace the Product or parts thereof. In the event that Stegmann Systems should not be in a position to fulfill this obligation, you are entitled to rescind the purchase agreement. Warranty claims must be submitted to Stegmann Systems in writing within the warranty period and at the latest within seven (7) days of the defect's appearance, and the defect must be documented. Defective Products should be returned to the distributor from whom the Product was originally purchased, provided that the Product was not purchased directly from Stegmann Systems. You shall bear all costs for shipping and shipping insurance.

PLA 2.0 User Manuals
188
WITH THE EXCEPTION OF THE WARRANTY STATED ABOVE, STEGMANN SYSTEMS GRANTS NO OTHER WARRANTIES NEITHER EXPLICIT NOR IMPLIED WITH REGARD TO THE PRODUCT, AND EXPRESSLY EXCLUDES WARRANTIES ON THE PRODUCT'S ECONOMIC EXPLOITABILITY AND USE FOR SPECIFIC PURPOSES. 5. Compensation for Damage Should Stegmann Systems be liable for damages to you or a third party for any reason, whether for claims arising from this agreement or tortious liability, including ordinary negligence, the amount of the damages to be paid is limited to the sum invoiced for the Product that caused the damage or for the Product on which a claim for compensation from Stegmann Systems is based. However, this limitation shall not apply if Stegmann Systems is responsible for the damage due to malice aforethought or gross negligence. Stegmann Systems shall in no way be liable for damages caused by violation of duty on your part, consequential damages, economic losses, damages due to loss of data or for claims from third parties put forth against you. 6. Termination of the Agreement Should you fail to comply with the provisions of this agreement, your license and this agreement shall be terminated. The provisions in paragraphs 3., 4. and 5. shall remain in full force and effect even after termination of this agreement. Version dated 2006-08-22