planning your deployment—best practices - novell · worksheet sections to match your planning...
TRANSCRIPT
Filr 3.4Planning Your Deployment—Best Practices

Legal Notice
For information about legal notices, trademarks, disclaimers, warranties, export and other use restrictions, U.S. Government rights, patent policy, and FIPS compliance, see https://www.novell.com/company/legal/.
Copyright © 2018 Micro Focus. All Rights Reserved.
1 Start with the Planning Worksheets 5
About the Worksheets. . . . . . . . . . . . . . . . . . . . . . . . . . . . . . . . . . . . . . . . . . . . . . . . . . . . . . . . . . . . . . . . . . . 5Some Worksheets Require Copying and/or Duplication . . . . . . . . . . . . . . . . . . . . . . . . . . . . . . . . . . . . . . . . . 6
Adding Rows in Worksheet Sections . . . . . . . . . . . . . . . . . . . . . . . . . . . . . . . . . . . . . . . . . . . . . . . . . . 6Making a Copy of a Worksheet Section . . . . . . . . . . . . . . . . . . . . . . . . . . . . . . . . . . . . . . . . . . . . . . . . 7
2 Involving Your Stakeholders 11
3 Assessing Your Organization’s Needs 13
4 Planning Users, Groups, and LDAP Synchronization 15
5 Planning for User and Group Access to Filr 23
6 Planning File and Folder Targets for Filr 29
Planning Net Folder Proxy Identities (and Proxy Users). . . . . . . . . . . . . . . . . . . . . . . . . . . . . . . . . . . . . . . . 37Rights Requirements for the Proxy User . . . . . . . . . . . . . . . . . . . . . . . . . . . . . . . . . . . . . . . . . . . . . . 37Requirements for Proxy User Names . . . . . . . . . . . . . . . . . . . . . . . . . . . . . . . . . . . . . . . . . . . . . . . . 38
Planning a SharePoint 2013 Integration . . . . . . . . . . . . . . . . . . . . . . . . . . . . . . . . . . . . . . . . . . . . . . . . . . . . 39Understanding How Filr Handles Checked Out Documents . . . . . . . . . . . . . . . . . . . . . . . . . . . . . . . 40User Access Synchronization Considerations . . . . . . . . . . . . . . . . . . . . . . . . . . . . . . . . . . . . . . . . . . 40Granting Access to a Specific Folder That Has Been Shared via SharePoint . . . . . . . . . . . . . . . . . . 40Understanding How Enabling the Ability to Re-Share within Filr Can Affect SharePoint . . . . . . . . . . 41Configuring SSL between the SharePoint Server and Filr . . . . . . . . . . . . . . . . . . . . . . . . . . . . . . . . . 41
7 Planning for Content Searching (Content Indexing) 43
8 Planning for Filr Notifications (Email) 45
9 Planning for Filr Sharing, Licensing Terms, and Comments 47
10 Planning for Net Folder Synchronization 51
Synchronization Tips and Considerations. . . . . . . . . . . . . . . . . . . . . . . . . . . . . . . . . . . . . . . . . . . . . . . . . . . 53Net Folder Synchronization Types . . . . . . . . . . . . . . . . . . . . . . . . . . . . . . . . . . . . . . . . . . . . . . . . . . . 53Consider the Data Type . . . . . . . . . . . . . . . . . . . . . . . . . . . . . . . . . . . . . . . . . . . . . . . . . . . . . . . . . . . 54Static versus Dynamic Data . . . . . . . . . . . . . . . . . . . . . . . . . . . . . . . . . . . . . . . . . . . . . . . . . . . . . . . . 54The Amount of Data . . . . . . . . . . . . . . . . . . . . . . . . . . . . . . . . . . . . . . . . . . . . . . . . . . . . . . . . . . . . . . 54Avoid Over-Synchronization. . . . . . . . . . . . . . . . . . . . . . . . . . . . . . . . . . . . . . . . . . . . . . . . . . . . . . . . 55
11 Planning Administrative Access 57
12 Planning Network Support 59
Ports and Firewalls . . . . . . . . . . . . . . . . . . . . . . . . . . . . . . . . . . . . . . . . . . . . . . . . . . . . . . . . . . . . . . . . . . . . 60Planning the Time Zone of the Filr Appliance to Match the Time Zone of any File Servers . . . . . . . . . . . . . 60Bandwidth Considerations . . . . . . . . . . . . . . . . . . . . . . . . . . . . . . . . . . . . . . . . . . . . . . . . . . . . . . . . . . . . . . 60
13 Planning the Virtual Machines and VM Host Servers 61
Appliance Functional Overview by Type . . . . . . . . . . . . . . . . . . . . . . . . . . . . . . . . . . . . . . . . . . . . . . . . . . . . 62
Contents 3
4 Con
About Fault Tolerance and Filr . . . . . . . . . . . . . . . . . . . . . . . . . . . . . . . . . . . . . . . . . . . . . . . . . . . . . . . . . . . 64Filr Performance and High-Availability . . . . . . . . . . . . . . . . . . . . . . . . . . . . . . . . . . . . . . . . . . . . . . . . 64Filr Search Redundancy. . . . . . . . . . . . . . . . . . . . . . . . . . . . . . . . . . . . . . . . . . . . . . . . . . . . . . . . . . . 64
14 Recording Your Plan 65
Filr Sizing . . . . . . . . . . . . . . . . . . . . . . . . . . . . . . . . . . . . . . . . . . . . . . . . . . . . . . . . . . . . . . . . . . . . . . . . . . . 65Filrsearch Sizing . . . . . . . . . . . . . . . . . . . . . . . . . . . . . . . . . . . . . . . . . . . . . . . . . . . . . . . . . . . . . . . . . . . . . . 66SQL Database Support . . . . . . . . . . . . . . . . . . . . . . . . . . . . . . . . . . . . . . . . . . . . . . . . . . . . . . . . . . . . . . . . . 67
Database Planning Tips and Caveats . . . . . . . . . . . . . . . . . . . . . . . . . . . . . . . . . . . . . . . . . . . . . . . . 67Database Sizing . . . . . . . . . . . . . . . . . . . . . . . . . . . . . . . . . . . . . . . . . . . . . . . . . . . . . . . . . . . . . . . . . 68
/vashare Allocation and Creation . . . . . . . . . . . . . . . . . . . . . . . . . . . . . . . . . . . . . . . . . . . . . . . . . . . . . . . . . 68/vashare Planning Tips and Caveats . . . . . . . . . . . . . . . . . . . . . . . . . . . . . . . . . . . . . . . . . . . . . . . . . 68/vashare Sizing. . . . . . . . . . . . . . . . . . . . . . . . . . . . . . . . . . . . . . . . . . . . . . . . . . . . . . . . . . . . . . . . . . 69
HTML Renderings . . . . . . . . . . . . . . . . . . . . . . . . . . . . . . . . . . . . . . . . . . . . . . . . . . . . . . . . . . . . . . . . . . . . . 69About the innoDB_Buffer_Pool Setting . . . . . . . . . . . . . . . . . . . . . . . . . . . . . . . . . . . . . . . . . . . . . . . . . . . . . 70
15 Leverage a Pilot Deployment 71
A Considering Alternate Deployment Types 73
tents
1 1Start with the Planning Worksheets
Ensuring a successful Filr deployment requires up-front planning.
1 We recommend that you download and use the Filr Planning Worksheets spreadsheet that we have posted on the Filr 3.0 online documentation site.
2 If your organization is large, consider contacting a Micro Focus Partner to help with Filr planning and deployment. See the Micro Focus Partner Locator.
For more information about the worksheets, see the following sections:
“About the Worksheets” on page 5
“Some Worksheets Require Copying and/or Duplication” on page 6
About the Worksheets Planning Order Vs. Deployment Order: Make sure that you follow both the planning
instructions and the deployment instructions in order.
The logical planning order presented in this guide is different from the correct deployment order as presented in the installation guide.
For example, you must identify the file servers that Filr will interface with before planning how many Filr appliances are needed. On the other hand, you must deploy the Filr appliances before you can configure them to access back-end storage targets.
LibreOffice Calc: The planning worksheets and accompanying instructions were developed using LibreOffice Calc 4.2.6.3 running on Windows 7.
Although other OpenOffice-based products should work equally well with the sheets, that has not been verified, and instructions for copying sections, etc. will require you to make adjustments.
Worksheet Use: You can use the worksheet separately or with this guide.
The recommended best practice is to follow the instructions in this guide, recording your plans in the worksheets, and referring to the Administration UI Reference for guidance and help.
You can print the worksheet and use it as a hard copy document or if you have LibreOffice Calc, you can take advantage of the calculation checks it contains.
The worksheet displays errors in some cells because data is not yet entered. To see a worksheet with data displayed for all fields, download this Sample Filr Planning Worksheets spreadsheet, which is identical to the main worksheet except that data has been entered for testing the formulas.
Worksheet Formulas: These are intended to help you estimate disk space and other system requirements for your deployment.
However, they have not been tested, and in light of the copying and customizations that are required and the impact those actions can have on formula validity, it is critical that you make sure to verify all of the formulas used and the data generated.
The worksheets will help you identify the configuration data, IP addresses, and so on that are needed for a successful deployment, but the sizing numbers generated must not be relied on without independent verification.
Start with the Planning Worksheets 5
Some Worksheets Require Copying and/or Duplication
Because each Filr deployment is unique, the instructions in this guide tell you to copy rows and worksheet sections to match your planning needs.
For example, within the “Use Case Scenarios” sheet the “Use Case” section is for one Filr use case. You should copy the entire section as many times as needed to describe all of the use cases within your organization.
“Adding Rows in Worksheet Sections” on page 6
“Making a Copy of a Worksheet Section” on page 7
Adding Rows in Worksheet Sections
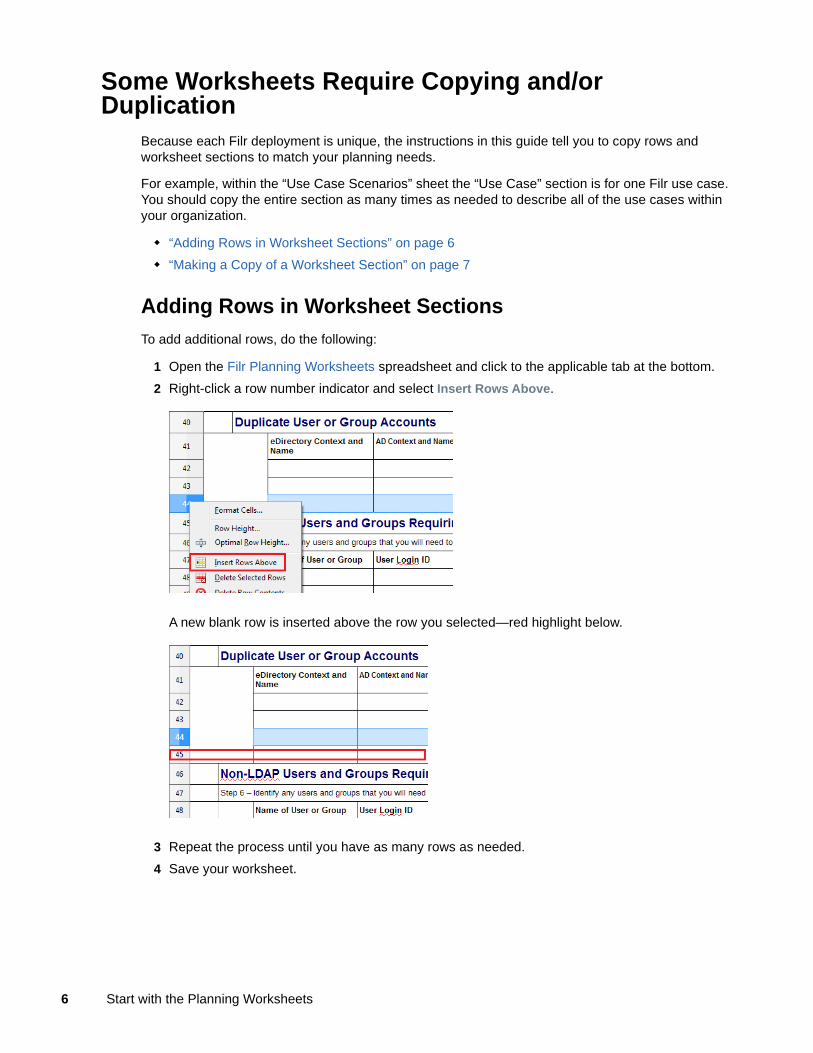
To add additional rows, do the following:
1 Open the Filr Planning Worksheets spreadsheet and click to the applicable tab at the bottom.
2 Right-click a row number indicator and select Insert Rows Above.
A new blank row is inserted above the row you selected—red highlight below.
3 Repeat the process until you have as many rows as needed.
4 Save your worksheet.
6 Start with the Planning Worksheets
Making a Copy of a Worksheet Section
IMPORTANT: Although it is possible to copy sections using various methods, this is the simplest way that we’ve found.
Make sure you always do the following:
Right-click the row-number indicators in the following procedure, not individual cells.
Copy all of the rows in a section. Otherwise, formulas used for estimating disk space and so on might become invalid.
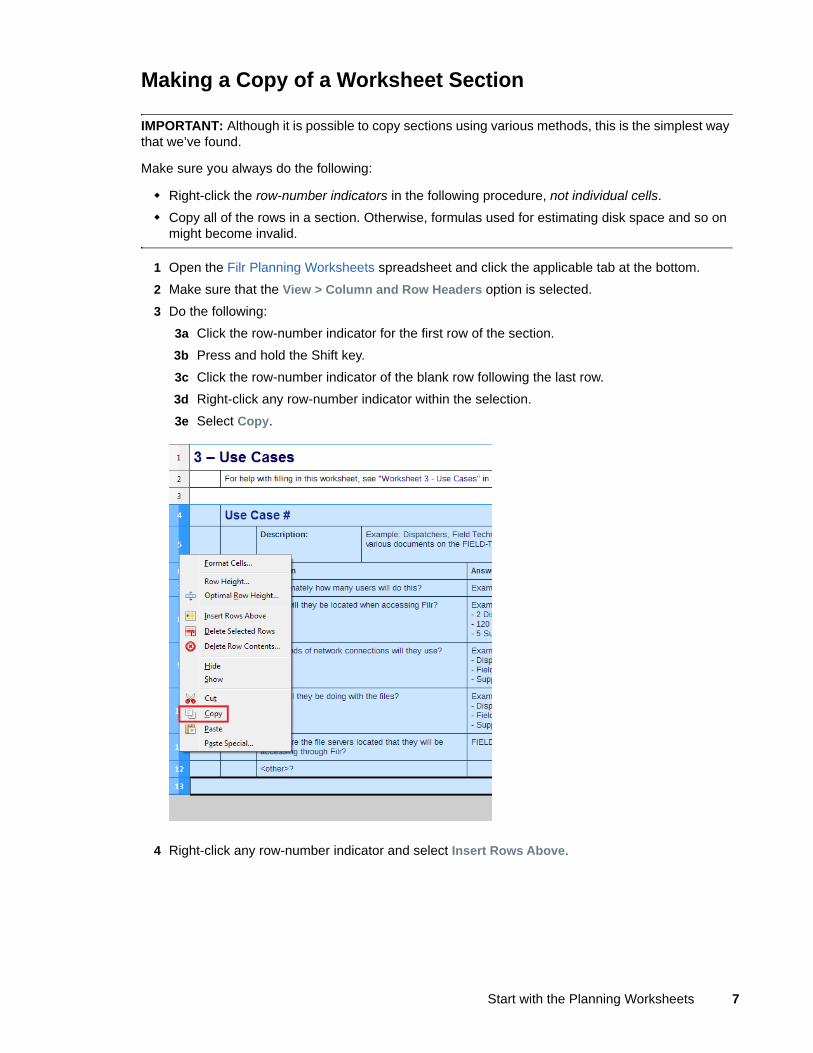
1 Open the Filr Planning Worksheets spreadsheet and click the applicable tab at the bottom.
2 Make sure that the View > Column and Row Headers option is selected.
3 Do the following:
3a Click the row-number indicator for the first row of the section.
3b Press and hold the Shift key.
3c Click the row-number indicator of the blank row following the last row.
3d Right-click any row-number indicator within the selection.
3e Select Copy.
4 Right-click any row-number indicator and select Insert Rows Above.
Start with the Planning Worksheets 7
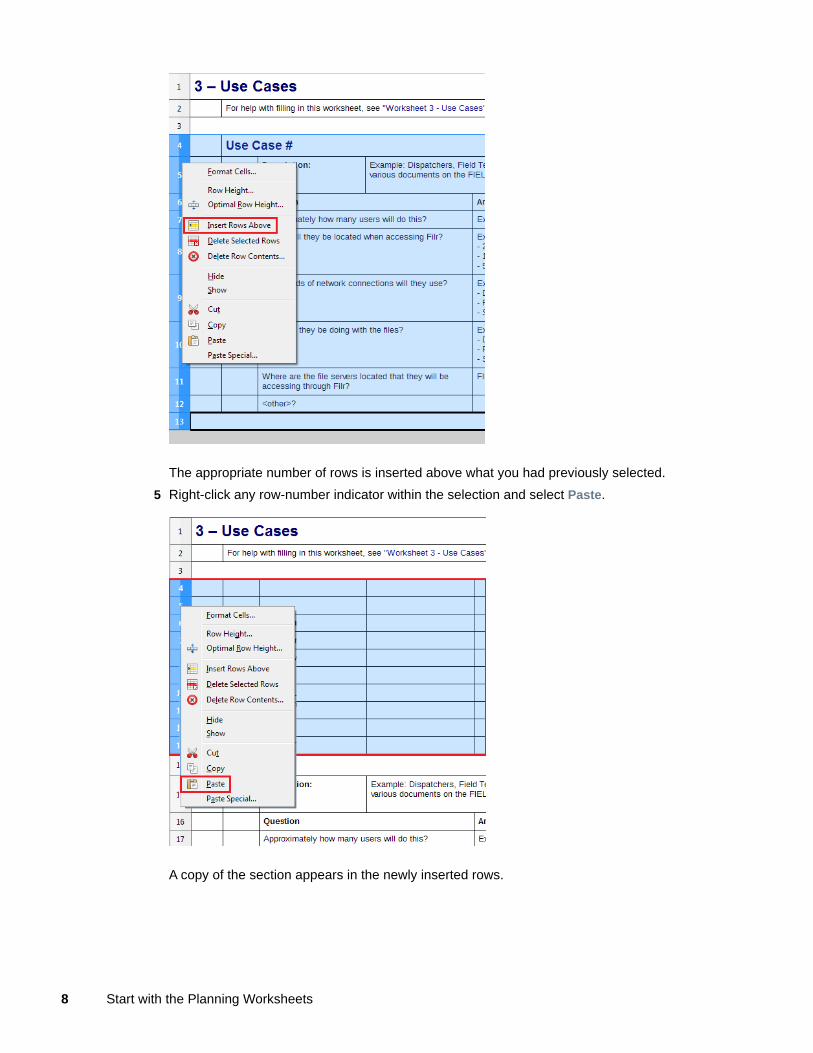
The appropriate number of rows is inserted above what you had previously selected.
5 Right-click any row-number indicator within the selection and select Paste.
A copy of the section appears in the newly inserted rows.
8 Start with the Planning Worksheets
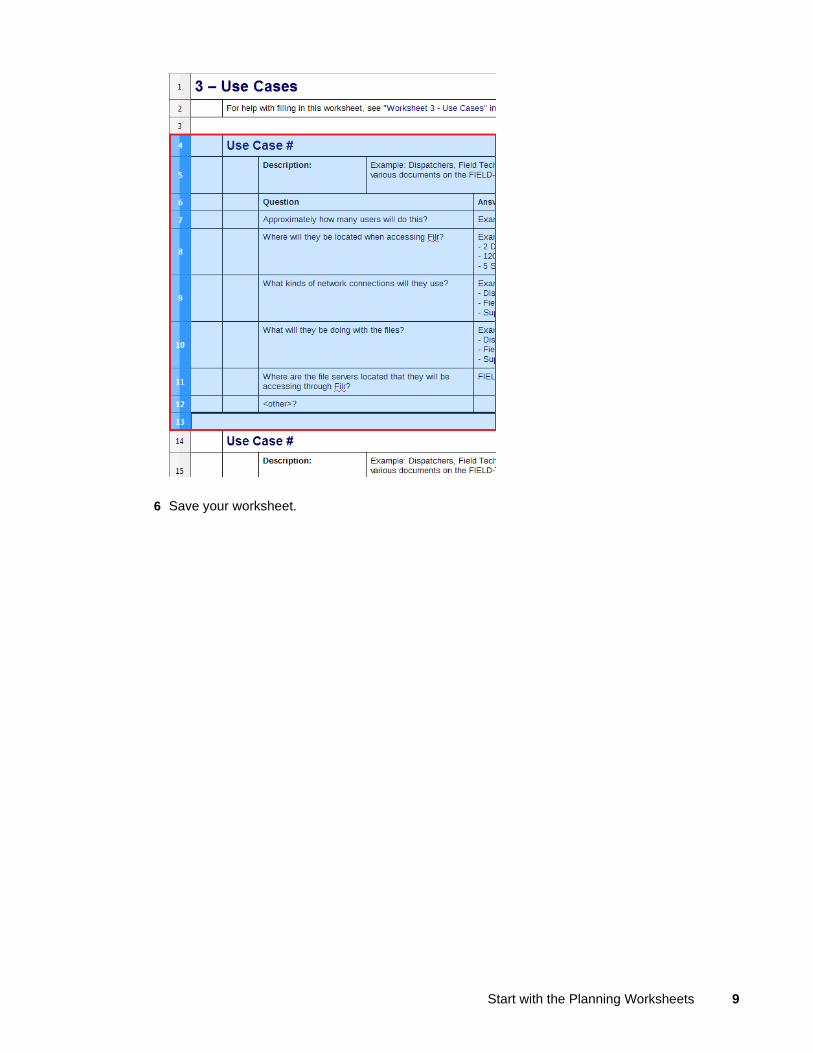
6 Save your worksheet.
Start with the Planning Worksheets 9

10 Start with the Planning Worksheets
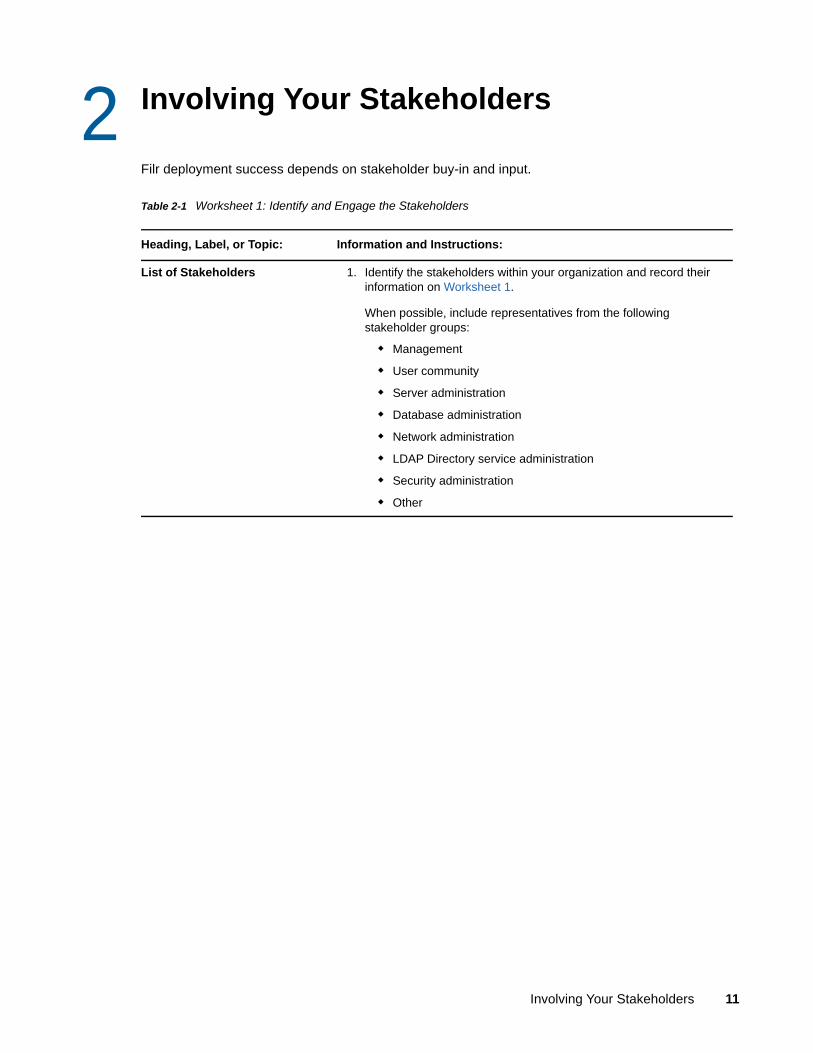
2 2Involving Your Stakeholders
Filr deployment success depends on stakeholder buy-in and input.
Table 2-1 Worksheet 1: Identify and Engage the Stakeholders
Heading, Label, or Topic: Information and Instructions:
List of Stakeholders 1. Identify the stakeholders within your organization and record their information on Worksheet 1.
When possible, include representatives from the following stakeholder groups:
Management
User community
Server administration
Database administration
Network administration
LDAP Directory service administration
Security administration
Other
Involving Your Stakeholders 11

12 Involving Your Stakeholders
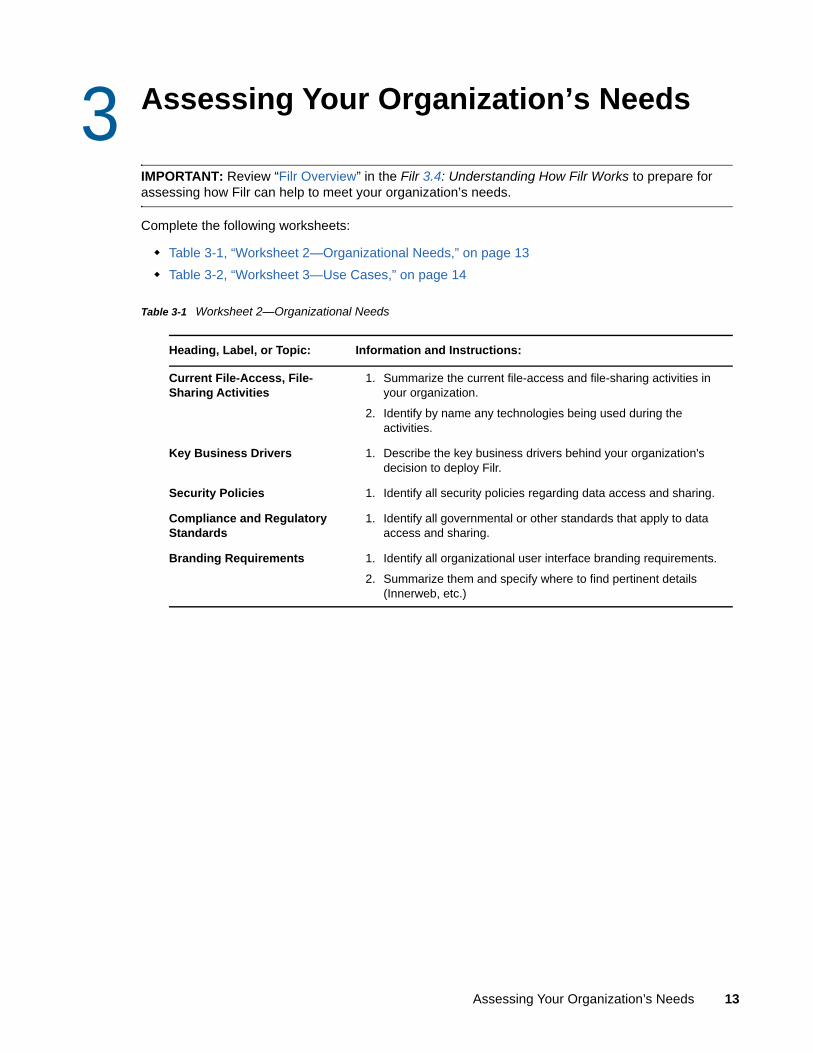
3 3Assessing Your Organization’s Needs
IMPORTANT: Review “Filr Overview” in the Filr 3.4: Understanding How Filr Works to prepare for assessing how Filr can help to meet your organization’s needs.
Complete the following worksheets:
Table 3-1, “Worksheet 2—Organizational Needs,” on page 13
Table 3-2, “Worksheet 3—Use Cases,” on page 14
Table 3-1 Worksheet 2—Organizational Needs
Heading, Label, or Topic: Information and Instructions:
Current File-Access, File-Sharing Activities
1. Summarize the current file-access and file-sharing activities in your organization.
2. Identify by name any technologies being used during the activities.
Key Business Drivers 1. Describe the key business drivers behind your organization's decision to deploy Filr.
Security Policies 1. Identify all security policies regarding data access and sharing.
Compliance and Regulatory Standards
1. Identify all governmental or other standards that apply to data access and sharing.
Branding Requirements 1. Identify all organizational user interface branding requirements.
2. Summarize them and specify where to find pertinent details (Innerweb, etc.)
Assessing Your Organization’s Needs 13
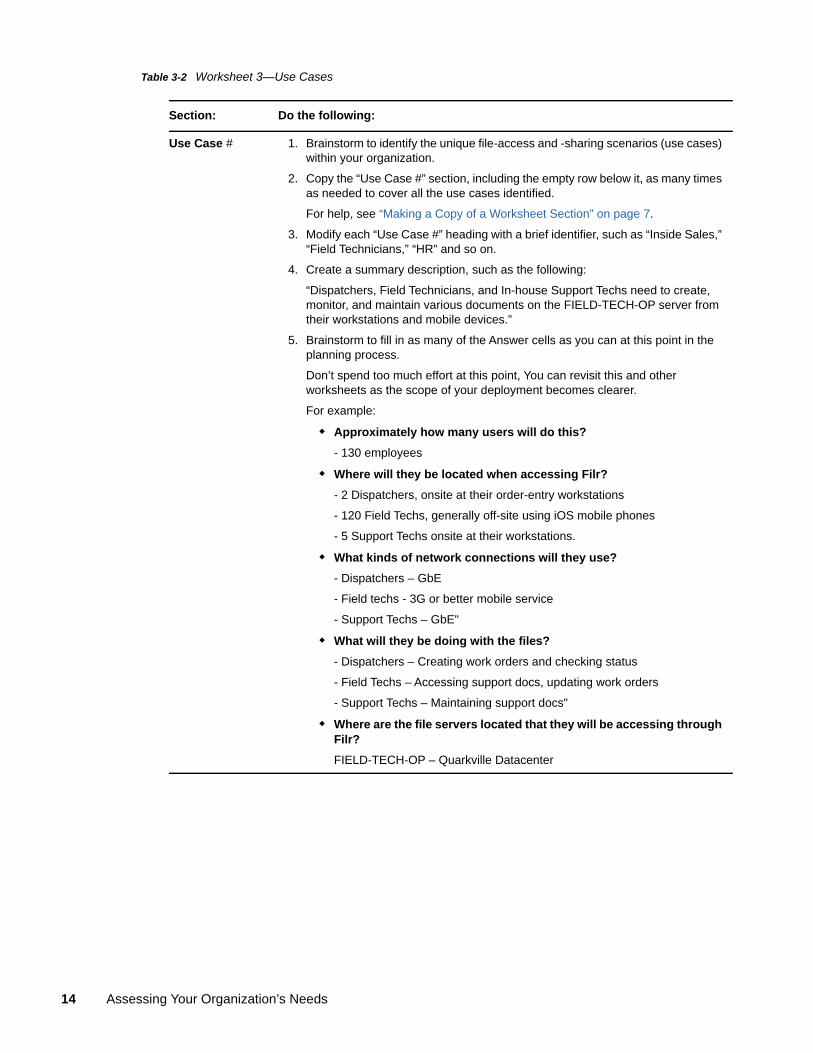
Table 3-2 Worksheet 3—Use Cases
Section: Do the following:
Use Case # 1. Brainstorm to identify the unique file-access and -sharing scenarios (use cases) within your organization.
2. Copy the “Use Case #” section, including the empty row below it, as many times as needed to cover all the use cases identified.
For help, see “Making a Copy of a Worksheet Section” on page 7.
3. Modify each “Use Case #” heading with a brief identifier, such as “Inside Sales,” “Field Technicians,” “HR” and so on.
4. Create a summary description, such as the following:
“Dispatchers, Field Technicians, and In-house Support Techs need to create, monitor, and maintain various documents on the FIELD-TECH-OP server from their workstations and mobile devices.”
5. Brainstorm to fill in as many of the Answer cells as you can at this point in the planning process.
Don’t spend too much effort at this point, You can revisit this and other worksheets as the scope of your deployment becomes clearer.
For example:
Approximately how many users will do this?
- 130 employees
Where will they be located when accessing Filr?
- 2 Dispatchers, onsite at their order-entry workstations
- 120 Field Techs, generally off-site using iOS mobile phones
- 5 Support Techs onsite at their workstations.
What kinds of network connections will they use?
- Dispatchers – GbE
- Field techs - 3G or better mobile service
- Support Techs – GbE"
What will they be doing with the files?
- Dispatchers – Creating work orders and checking status
- Field Techs – Accessing support docs, updating work orders
- Support Techs – Maintaining support docs"
Where are the file servers located that they will be accessing through Filr?
FIELD-TECH-OP – Quarkville Datacenter
14 Assessing Your Organization’s Needs
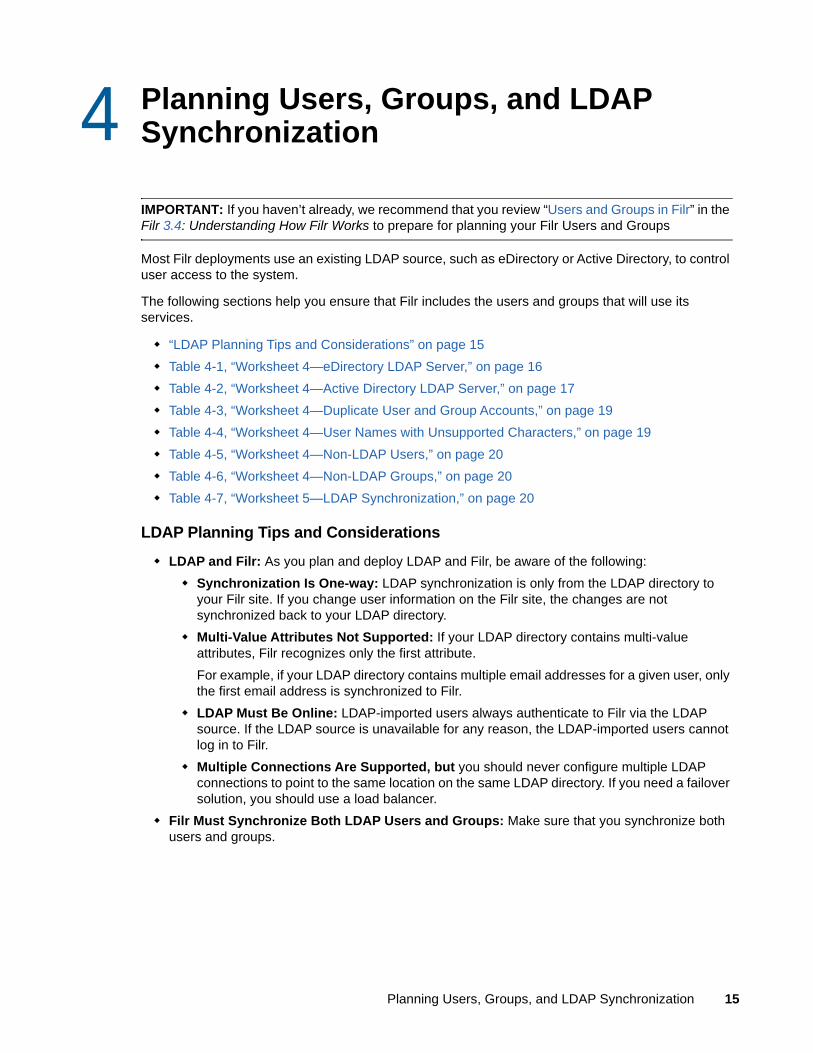
4 4Planning Users, Groups, and LDAP Synchronization
IMPORTANT: If you haven’t already, we recommend that you review “Users and Groups in Filr” in the Filr 3.4: Understanding How Filr Works to prepare for planning your Filr Users and Groups
Most Filr deployments use an existing LDAP source, such as eDirectory or Active Directory, to control user access to the system.
The following sections help you ensure that Filr includes the users and groups that will use its services.
“LDAP Planning Tips and Considerations” on page 15
Table 4-1, “Worksheet 4—eDirectory LDAP Server,” on page 16
Table 4-2, “Worksheet 4—Active Directory LDAP Server,” on page 17
Table 4-3, “Worksheet 4—Duplicate User and Group Accounts,” on page 19
Table 4-4, “Worksheet 4—User Names with Unsupported Characters,” on page 19
Table 4-5, “Worksheet 4—Non-LDAP Users,” on page 20
Table 4-6, “Worksheet 4—Non-LDAP Groups,” on page 20
Table 4-7, “Worksheet 5—LDAP Synchronization,” on page 20
LDAP Planning Tips and Considerations
LDAP and Filr: As you plan and deploy LDAP and Filr, be aware of the following:
Synchronization Is One-way: LDAP synchronization is only from the LDAP directory to your Filr site. If you change user information on the Filr site, the changes are not synchronized back to your LDAP directory.
Multi-Value Attributes Not Supported: If your LDAP directory contains multi-value attributes, Filr recognizes only the first attribute.
For example, if your LDAP directory contains multiple email addresses for a given user, only the first email address is synchronized to Filr.
LDAP Must Be Online: LDAP-imported users always authenticate to Filr via the LDAP source. If the LDAP source is unavailable for any reason, the LDAP-imported users cannot log in to Filr.
Multiple Connections Are Supported, but you should never configure multiple LDAP connections to point to the same location on the same LDAP directory. If you need a failover solution, you should use a load balancer.
Filr Must Synchronize Both LDAP Users and Groups: Make sure that you synchronize both users and groups.
Planning Users, Groups, and LDAP Synchronization 15
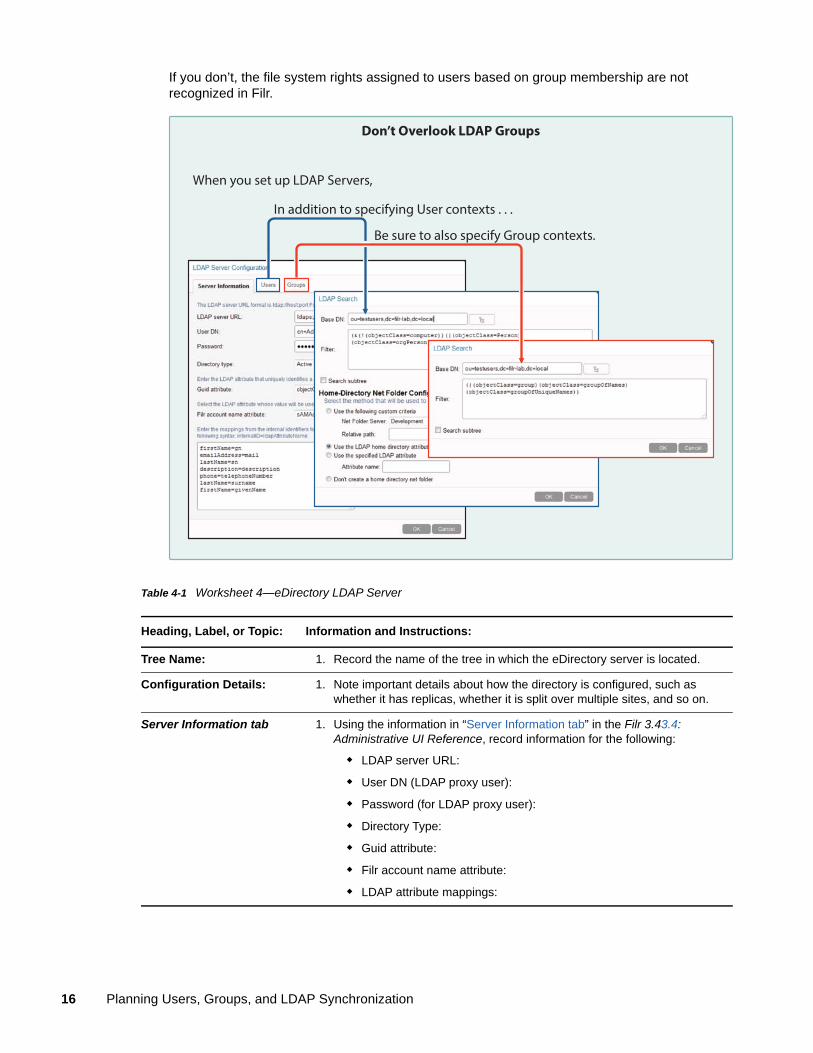
If you don’t, the file system rights assigned to users based on group membership are not recognized in Filr.
Table 4-1 Worksheet 4—eDirectory LDAP Server
Heading, Label, or Topic: Information and Instructions:
Tree Name: 1. Record the name of the tree in which the eDirectory server is located.
Configuration Details: 1. Note important details about how the directory is configured, such as whether it has replicas, whether it is split over multiple sites, and so on.
Server Information tab 1. Using the information in “Server Information tab” in the Filr 3.43.4: Administrative UI Reference, record information for the following:
LDAP server URL:
User DN (LDAP proxy user):
Password (for LDAP proxy user):
Directory Type:
Guid attribute:
Filr account name attribute:
LDAP attribute mappings:
In addition to specifying User contexts . . .
Be sure to also specify Group contexts.
When you set up LDAP Servers,
Don’t Overlook LDAP Groups
16 Planning Users, Groups, and LDAP Synchronization
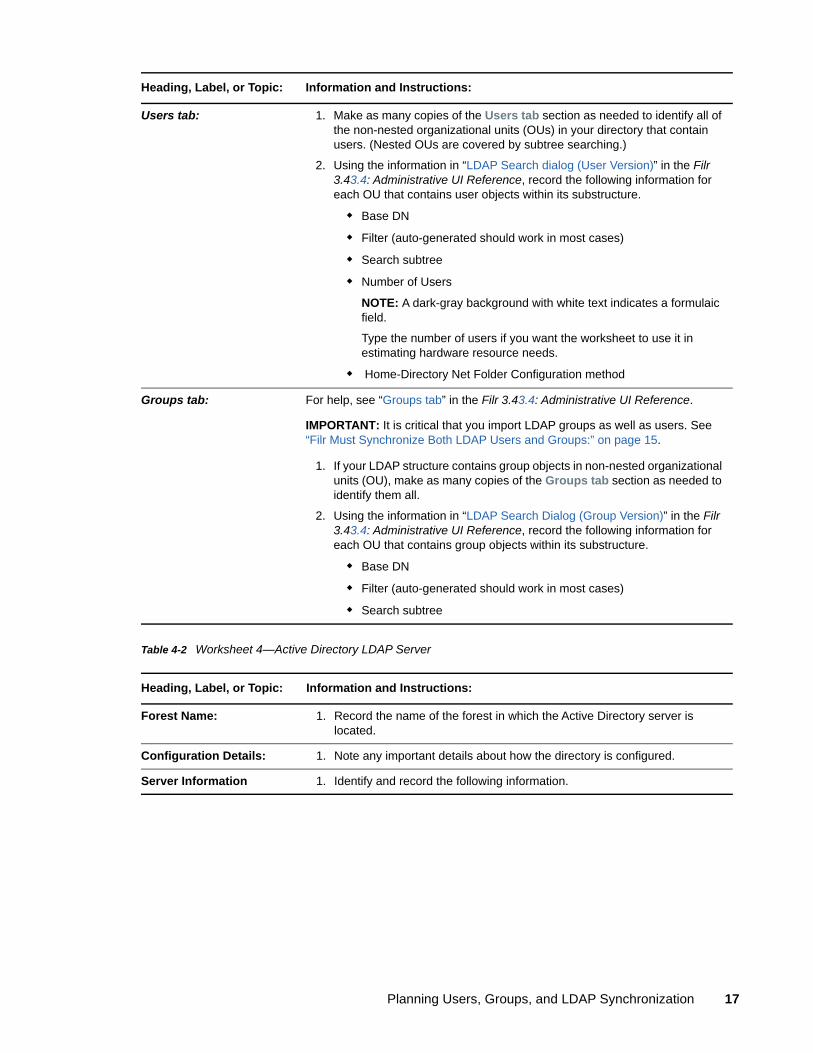
Table 4-2 Worksheet 4—Active Directory LDAP Server
Users tab: 1. Make as many copies of the Users tab section as needed to identify all of the non-nested organizational units (OUs) in your directory that contain users. (Nested OUs are covered by subtree searching.)
2. Using the information in “LDAP Search dialog (User Version)” in the Filr 3.43.4: Administrative UI Reference, record the following information for each OU that contains user objects within its substructure.
Base DN
Filter (auto-generated should work in most cases)
Search subtree
Number of Users
NOTE: A dark-gray background with white text indicates a formulaic field.
Type the number of users if you want the worksheet to use it in estimating hardware resource needs.
Home-Directory Net Folder Configuration method
Groups tab: For help, see “Groups tab” in the Filr 3.43.4: Administrative UI Reference.
IMPORTANT: It is critical that you import LDAP groups as well as users. See “Filr Must Synchronize Both LDAP Users and Groups:” on page 15.
1. If your LDAP structure contains group objects in non-nested organizational units (OU), make as many copies of the Groups tab section as needed to identify them all.
2. Using the information in “LDAP Search Dialog (Group Version)” in the Filr 3.43.4: Administrative UI Reference, record the following information for each OU that contains group objects within its substructure.
Base DN
Filter (auto-generated should work in most cases)
Search subtree
Heading, Label, or Topic: Information and Instructions:
Forest Name: 1. Record the name of the forest in which the Active Directory server is located.
Configuration Details: 1. Note any important details about how the directory is configured.
Server Information 1. Identify and record the following information.
Heading, Label, or Topic: Information and Instructions:
Planning Users, Groups, and LDAP Synchronization 17
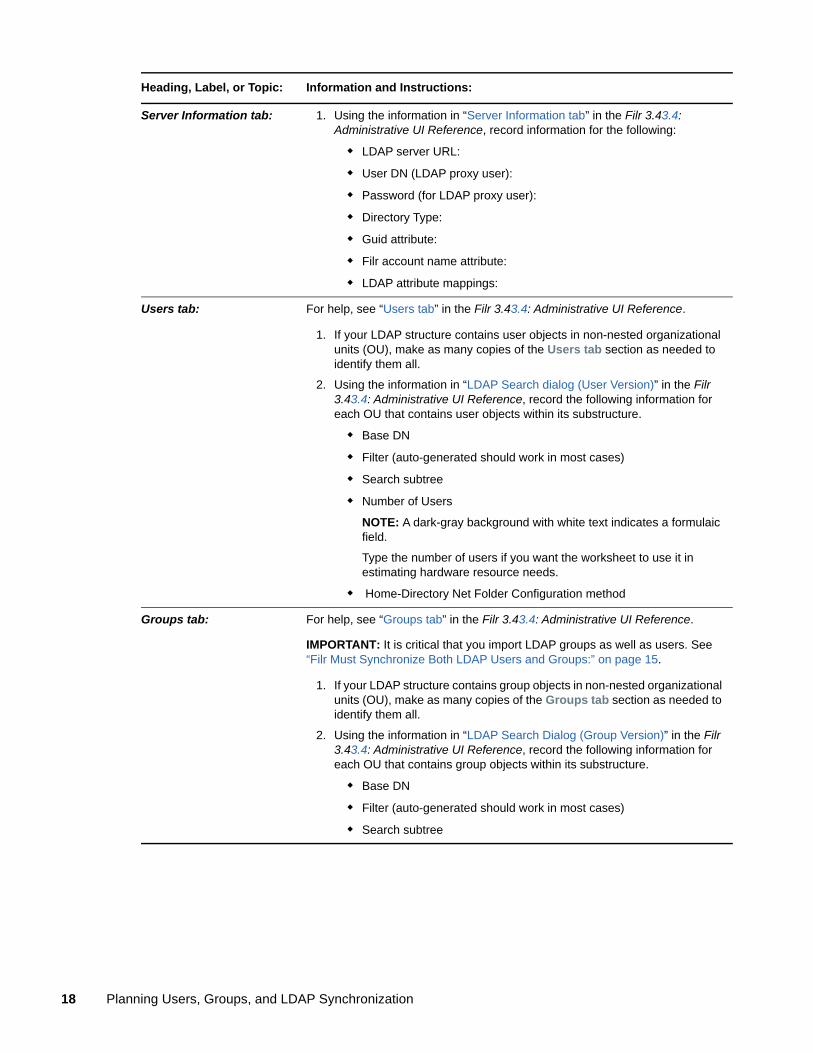
Server Information tab: 1. Using the information in “Server Information tab” in the Filr 3.43.4: Administrative UI Reference, record information for the following:
LDAP server URL:
User DN (LDAP proxy user):
Password (for LDAP proxy user):
Directory Type:
Guid attribute:
Filr account name attribute:
LDAP attribute mappings:
Users tab: For help, see “Users tab” in the Filr 3.43.4: Administrative UI Reference.
1. If your LDAP structure contains user objects in non-nested organizational units (OU), make as many copies of the Users tab section as needed to identify them all.
2. Using the information in “LDAP Search dialog (User Version)” in the Filr 3.43.4: Administrative UI Reference, record the following information for each OU that contains user objects within its substructure.
Base DN
Filter (auto-generated should work in most cases)
Search subtree
Number of Users
NOTE: A dark-gray background with white text indicates a formulaic field.
Type the number of users if you want the worksheet to use it in estimating hardware resource needs.
Home-Directory Net Folder Configuration method
Groups tab: For help, see “Groups tab” in the Filr 3.43.4: Administrative UI Reference.
IMPORTANT: It is critical that you import LDAP groups as well as users. See “Filr Must Synchronize Both LDAP Users and Groups:” on page 15.
1. If your LDAP structure contains group objects in non-nested organizational units (OU), make as many copies of the Groups tab section as needed to identify them all.
2. Using the information in “LDAP Search Dialog (Group Version)” in the Filr 3.43.4: Administrative UI Reference, record the following information for each OU that contains group objects within its substructure.
Base DN
Filter (auto-generated should work in most cases)
Search subtree
Heading, Label, or Topic: Information and Instructions:
18 Planning Users, Groups, and LDAP Synchronization
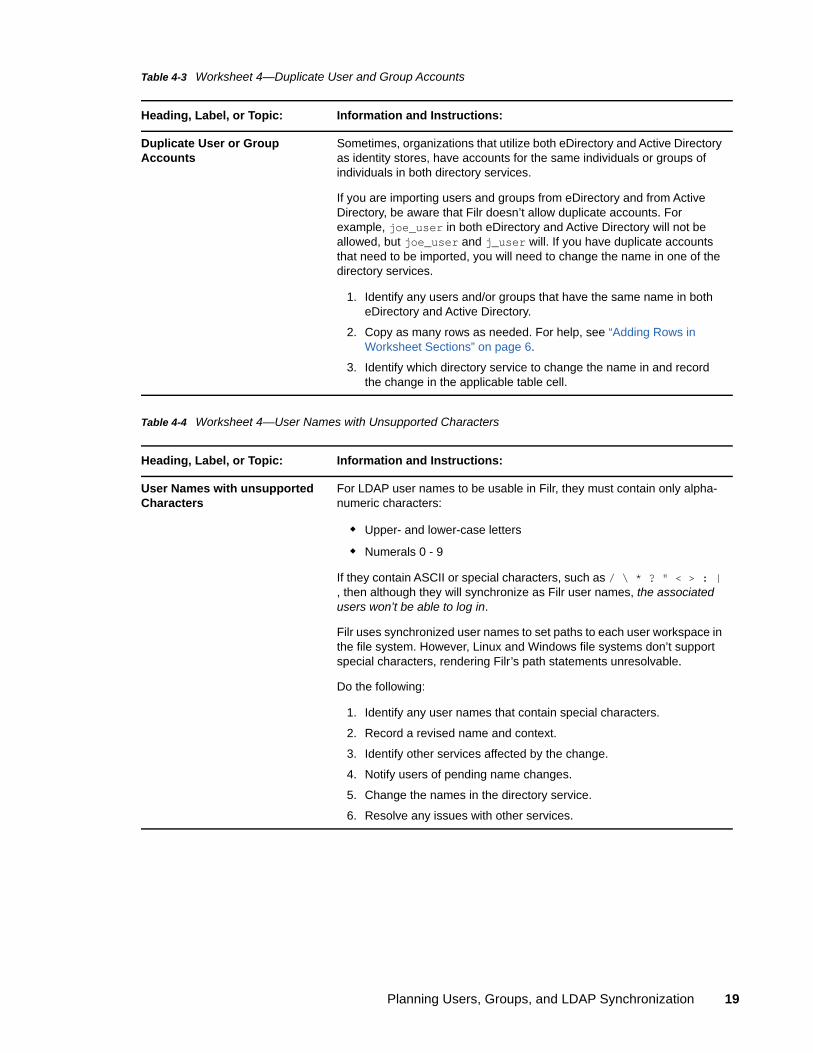
Table 4-3 Worksheet 4—Duplicate User and Group Accounts
Table 4-4 Worksheet 4—User Names with Unsupported Characters
Heading, Label, or Topic: Information and Instructions:
Duplicate User or Group Accounts
Sometimes, organizations that utilize both eDirectory and Active Directory as identity stores, have accounts for the same individuals or groups of individuals in both directory services.
If you are importing users and groups from eDirectory and from Active Directory, be aware that Filr doesn’t allow duplicate accounts. For example, joe_user in both eDirectory and Active Directory will not be allowed, but joe_user and j_user will. If you have duplicate accounts that need to be imported, you will need to change the name in one of the directory services.
1. Identify any users and/or groups that have the same name in both eDirectory and Active Directory.
2. Copy as many rows as needed. For help, see “Adding Rows in Worksheet Sections” on page 6.
3. Identify which directory service to change the name in and record the change in the applicable table cell.
Heading, Label, or Topic: Information and Instructions:
User Names with unsupported Characters
For LDAP user names to be usable in Filr, they must contain only alpha-numeric characters:
Upper- and lower-case letters
Numerals 0 - 9
If they contain ASCII or special characters, such as / \ * ? " < > : | , then although they will synchronize as Filr user names, the associated users won’t be able to log in.
Filr uses synchronized user names to set paths to each user workspace in the file system. However, Linux and Windows file systems don’t support special characters, rendering Filr’s path statements unresolvable.
Do the following:
1. Identify any user names that contain special characters.
2. Record a revised name and context.
3. Identify other services affected by the change.
4. Notify users of pending name changes.
5. Change the names in the directory service.
6. Resolve any issues with other services.
Planning Users, Groups, and LDAP Synchronization 19
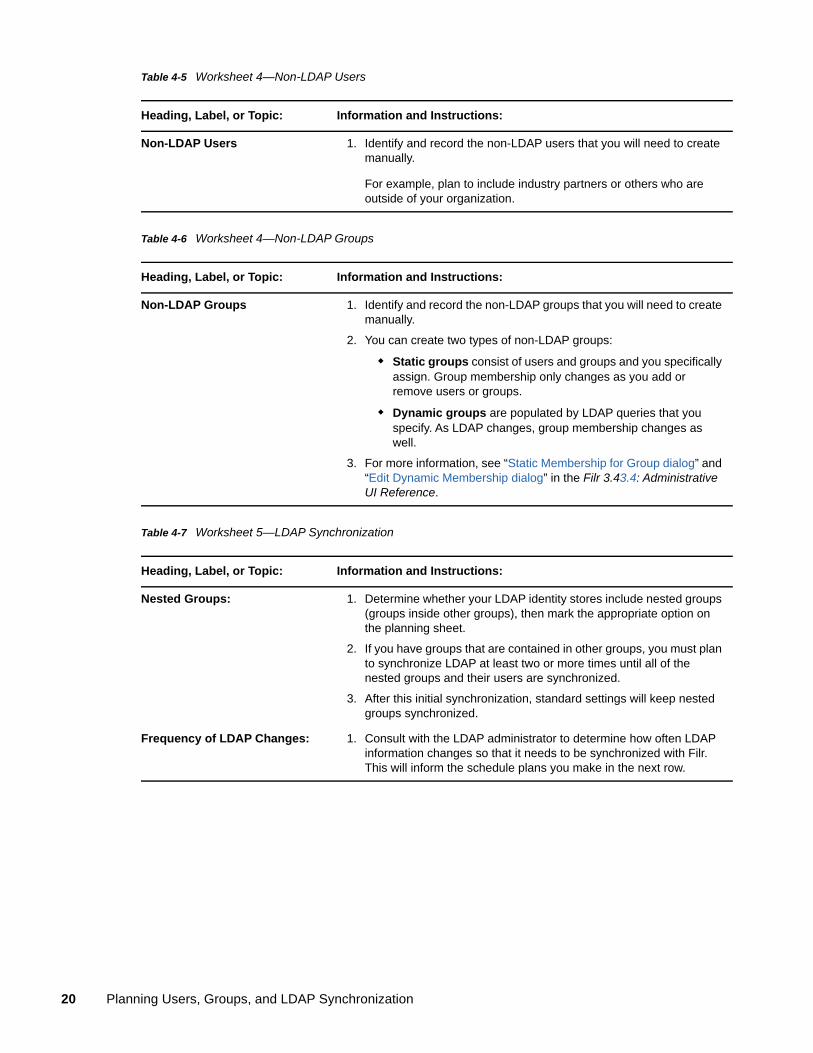
Table 4-5 Worksheet 4—Non-LDAP Users
Table 4-6 Worksheet 4—Non-LDAP Groups
Table 4-7 Worksheet 5—LDAP Synchronization
Heading, Label, or Topic: Information and Instructions:
Non-LDAP Users 1. Identify and record the non-LDAP users that you will need to create manually.
For example, plan to include industry partners or others who are outside of your organization.
Heading, Label, or Topic: Information and Instructions:
Non-LDAP Groups 1. Identify and record the non-LDAP groups that you will need to create manually.
2. You can create two types of non-LDAP groups:
Static groups consist of users and groups and you specifically assign. Group membership only changes as you add or remove users or groups.
Dynamic groups are populated by LDAP queries that you specify. As LDAP changes, group membership changes as well.
3. For more information, see “Static Membership for Group dialog” and “Edit Dynamic Membership dialog” in the Filr 3.43.4: Administrative UI Reference.
Heading, Label, or Topic: Information and Instructions:
Nested Groups: 1. Determine whether your LDAP identity stores include nested groups (groups inside other groups), then mark the appropriate option on the planning sheet.
2. If you have groups that are contained in other groups, you must plan to synchronize LDAP at least two or more times until all of the nested groups and their users are synchronized.
3. After this initial synchronization, standard settings will keep nested groups synchronized.
Frequency of LDAP Changes: 1. Consult with the LDAP administrator to determine how often LDAP information changes so that it needs to be synchronized with Filr. This will inform the schedule plans you make in the next row.
20 Planning Users, Groups, and LDAP Synchronization
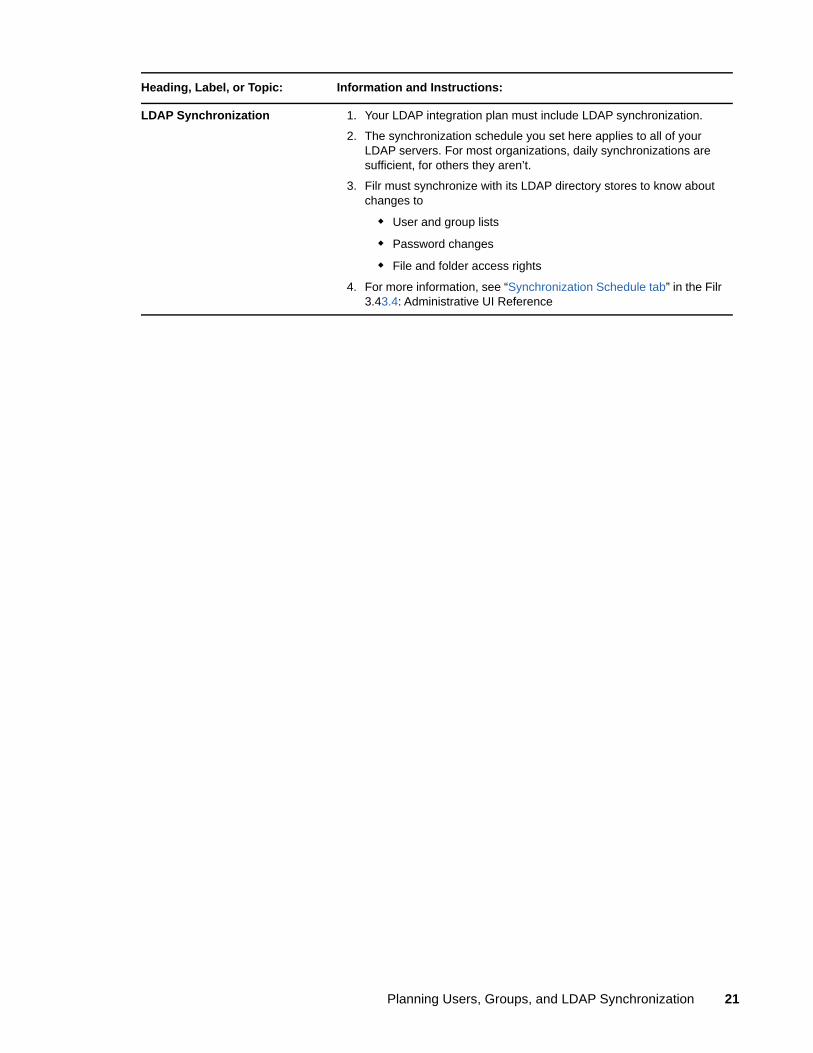
LDAP Synchronization 1. Your LDAP integration plan must include LDAP synchronization.
2. The synchronization schedule you set here applies to all of your LDAP servers. For most organizations, daily synchronizations are sufficient, for others they aren’t.
3. Filr must synchronize with its LDAP directory stores to know about changes to
User and group lists
Password changes
File and folder access rights
4. For more information, see “Synchronization Schedule tab” in the Filr 3.43.4: Administrative UI Reference
Heading, Label, or Topic: Information and Instructions:
Planning Users, Groups, and LDAP Synchronization 21

22 Planning Users, Groups, and LDAP Synchronization
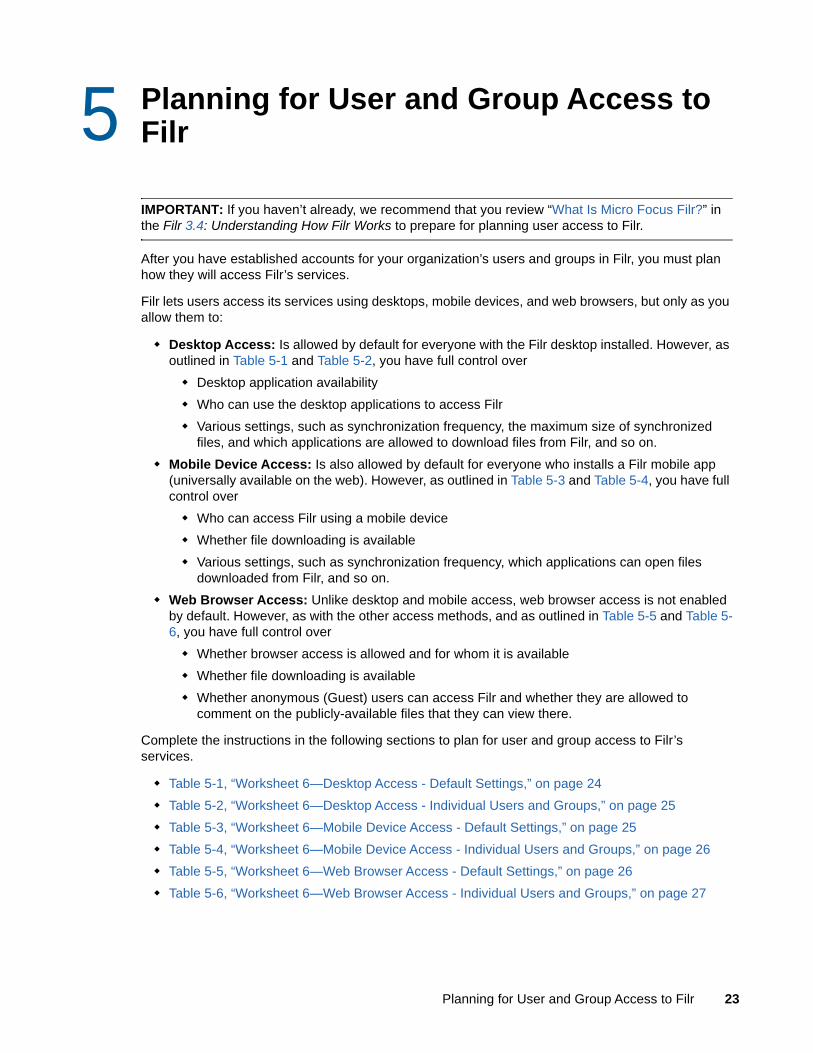
5 5Planning for User and Group Access to Filr
IMPORTANT: If you haven’t already, we recommend that you review “What Is Micro Focus Filr?” in the Filr 3.4: Understanding How Filr Works to prepare for planning user access to Filr.
After you have established accounts for your organization’s users and groups in Filr, you must plan how they will access Filr’s services.
Filr lets users access its services using desktops, mobile devices, and web browsers, but only as you allow them to:
Desktop Access: Is allowed by default for everyone with the Filr desktop installed. However, as outlined in Table 5-1 and Table 5-2, you have full control over
Desktop application availability
Who can use the desktop applications to access Filr
Various settings, such as synchronization frequency, the maximum size of synchronized files, and which applications are allowed to download files from Filr, and so on.
Mobile Device Access: Is also allowed by default for everyone who installs a Filr mobile app (universally available on the web). However, as outlined in Table 5-3 and Table 5-4, you have full control over
Who can access Filr using a mobile device
Whether file downloading is available
Various settings, such as synchronization frequency, which applications can open files downloaded from Filr, and so on.
Web Browser Access: Unlike desktop and mobile access, web browser access is not enabled by default. However, as with the other access methods, and as outlined in Table 5-5 and Table 5-6, you have full control over
Whether browser access is allowed and for whom it is available
Whether file downloading is available
Whether anonymous (Guest) users can access Filr and whether they are allowed to comment on the publicly-available files that they can view there.
Complete the instructions in the following sections to plan for user and group access to Filr’s services.
Table 5-1, “Worksheet 6—Desktop Access - Default Settings,” on page 24
Table 5-2, “Worksheet 6—Desktop Access - Individual Users and Groups,” on page 25
Table 5-3, “Worksheet 6—Mobile Device Access - Default Settings,” on page 25
Table 5-4, “Worksheet 6—Mobile Device Access - Individual Users and Groups,” on page 26
Table 5-5, “Worksheet 6—Web Browser Access - Default Settings,” on page 26
Table 5-6, “Worksheet 6—Web Browser Access - Individual Users and Groups,” on page 27
Planning for User and Group Access to Filr 23
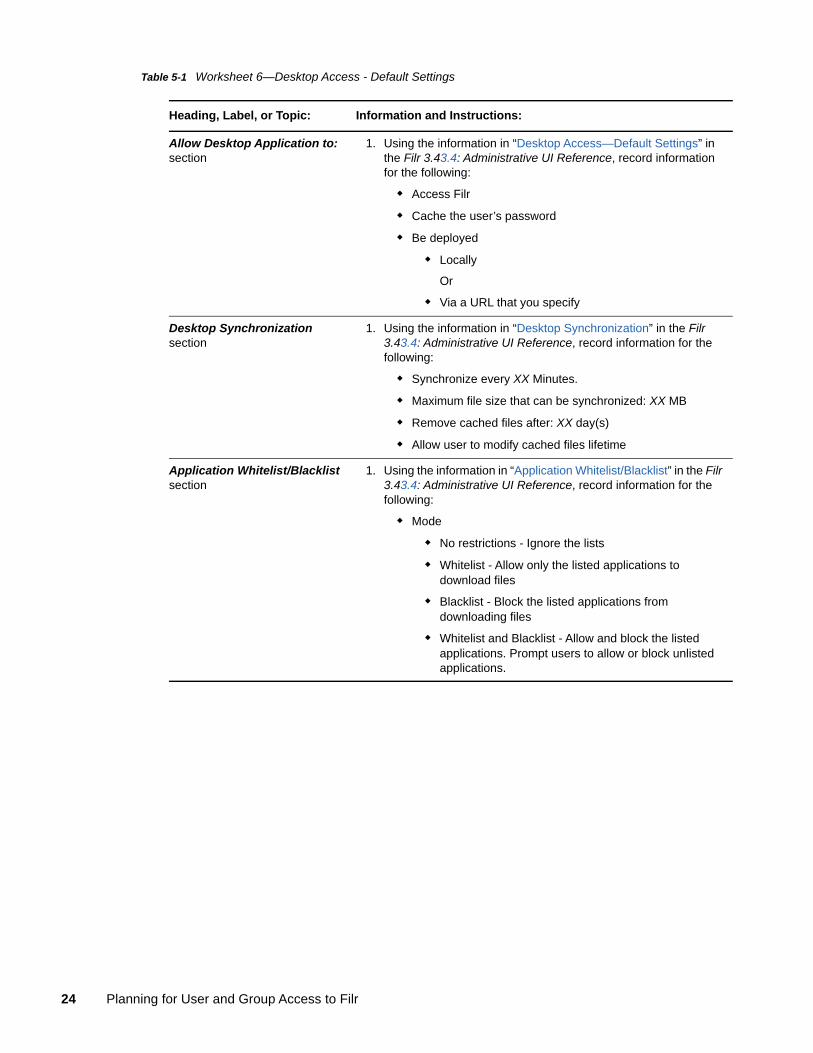
Table 5-1 Worksheet 6—Desktop Access - Default Settings
Heading, Label, or Topic: Information and Instructions:
Allow Desktop Application to: section
1. Using the information in “Desktop Access—Default Settings” in the Filr 3.43.4: Administrative UI Reference, record information for the following:
Access Filr
Cache the user’s password
Be deployed
Locally
Or
Via a URL that you specify
Desktop Synchronization section
1. Using the information in “Desktop Synchronization” in the Filr 3.43.4: Administrative UI Reference, record information for the following:
Synchronize every XX Minutes.
Maximum file size that can be synchronized: XX MB
Remove cached files after: XX day(s)
Allow user to modify cached files lifetime
Application Whitelist/Blacklist section
1. Using the information in “Application Whitelist/Blacklist” in the Filr 3.43.4: Administrative UI Reference, record information for the following:
Mode
No restrictions - Ignore the lists
Whitelist - Allow only the listed applications to download files
Blacklist - Block the listed applications from downloading files
Whitelist and Blacklist - Allow and block the listed applications. Prompt users to allow or block unlisted applications.
24 Planning for User and Group Access to Filr
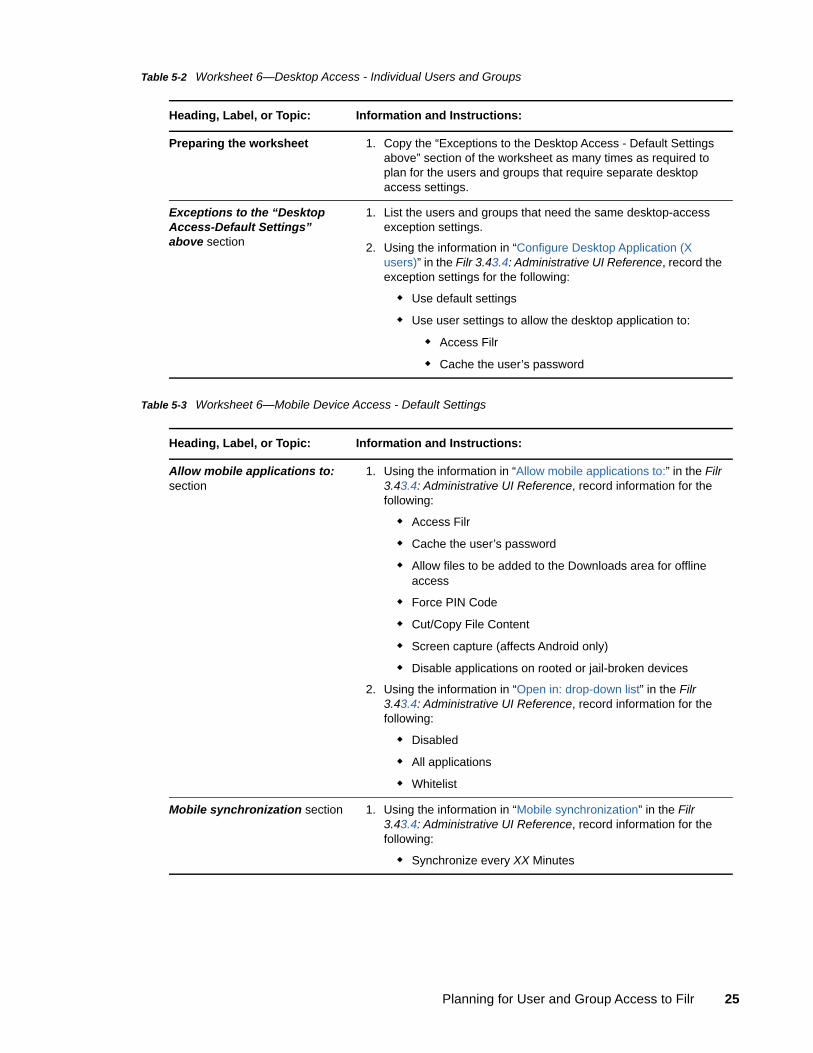
Table 5-2 Worksheet 6—Desktop Access - Individual Users and Groups
Table 5-3 Worksheet 6—Mobile Device Access - Default Settings
Heading, Label, or Topic: Information and Instructions:
Preparing the worksheet 1. Copy the “Exceptions to the Desktop Access - Default Settings above” section of the worksheet as many times as required to plan for the users and groups that require separate desktop access settings.
Exceptions to the “Desktop Access-Default Settings” above section
1. List the users and groups that need the same desktop-access exception settings.
2. Using the information in “Configure Desktop Application (X users)” in the Filr 3.43.4: Administrative UI Reference, record the exception settings for the following:
Use default settings
Use user settings to allow the desktop application to:
Access Filr
Cache the user’s password
Heading, Label, or Topic: Information and Instructions:
Allow mobile applications to: section
1. Using the information in “Allow mobile applications to:” in the Filr 3.43.4: Administrative UI Reference, record information for the following:
Access Filr
Cache the user’s password
Allow files to be added to the Downloads area for offline access
Force PIN Code
Cut/Copy File Content
Screen capture (affects Android only)
Disable applications on rooted or jail-broken devices
2. Using the information in “Open in: drop-down list” in the Filr 3.43.4: Administrative UI Reference, record information for the following:
Disabled
All applications
Whitelist
Mobile synchronization section 1. Using the information in “Mobile synchronization” in the Filr 3.43.4: Administrative UI Reference, record information for the following:
Synchronize every XX Minutes
Planning for User and Group Access to Filr 25
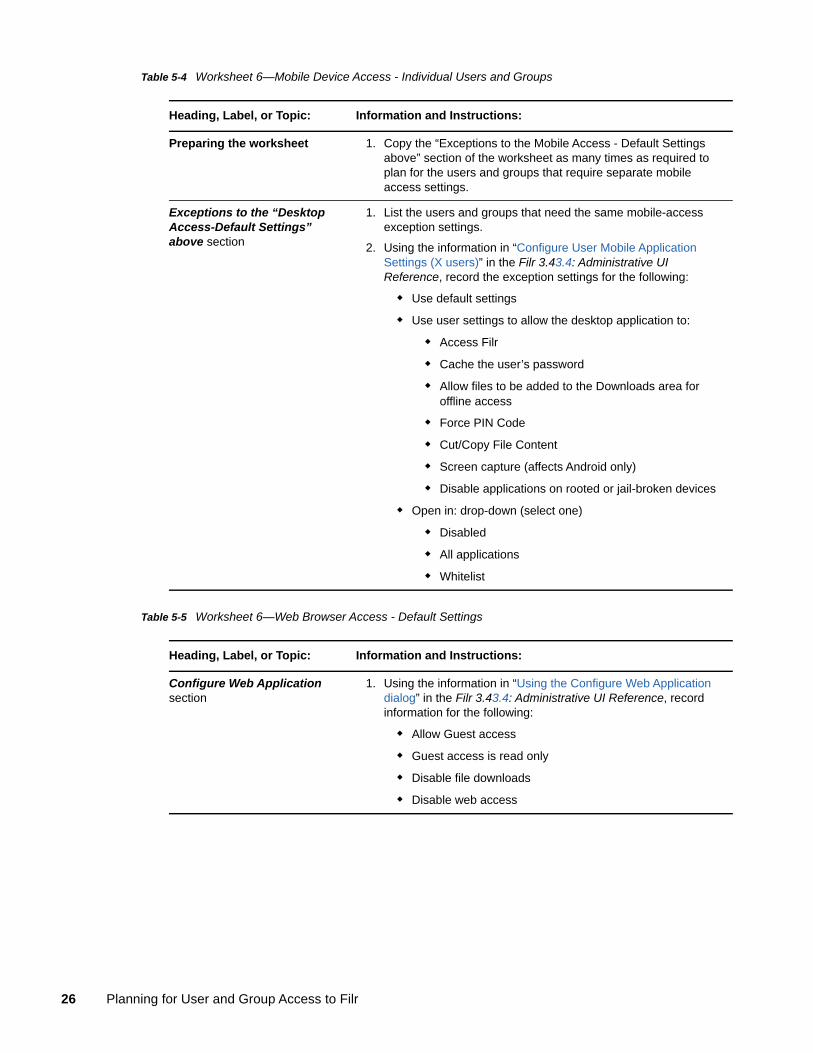
Table 5-4 Worksheet 6—Mobile Device Access - Individual Users and Groups
Table 5-5 Worksheet 6—Web Browser Access - Default Settings
Heading, Label, or Topic: Information and Instructions:
Preparing the worksheet 1. Copy the “Exceptions to the Mobile Access - Default Settings above” section of the worksheet as many times as required to plan for the users and groups that require separate mobile access settings.
Exceptions to the “Desktop Access-Default Settings” above section
1. List the users and groups that need the same mobile-access exception settings.
2. Using the information in “Configure User Mobile Application Settings (X users)” in the Filr 3.43.4: Administrative UI Reference, record the exception settings for the following:
Use default settings
Use user settings to allow the desktop application to:
Access Filr
Cache the user’s password
Allow files to be added to the Downloads area for offline access
Force PIN Code
Cut/Copy File Content
Screen capture (affects Android only)
Disable applications on rooted or jail-broken devices
Open in: drop-down (select one)
Disabled
All applications
Whitelist
Heading, Label, or Topic: Information and Instructions:
Configure Web Application section
1. Using the information in “Using the Configure Web Application dialog” in the Filr 3.43.4: Administrative UI Reference, record information for the following:
Allow Guest access
Guest access is read only
Disable file downloads
Disable web access
26 Planning for User and Group Access to Filr
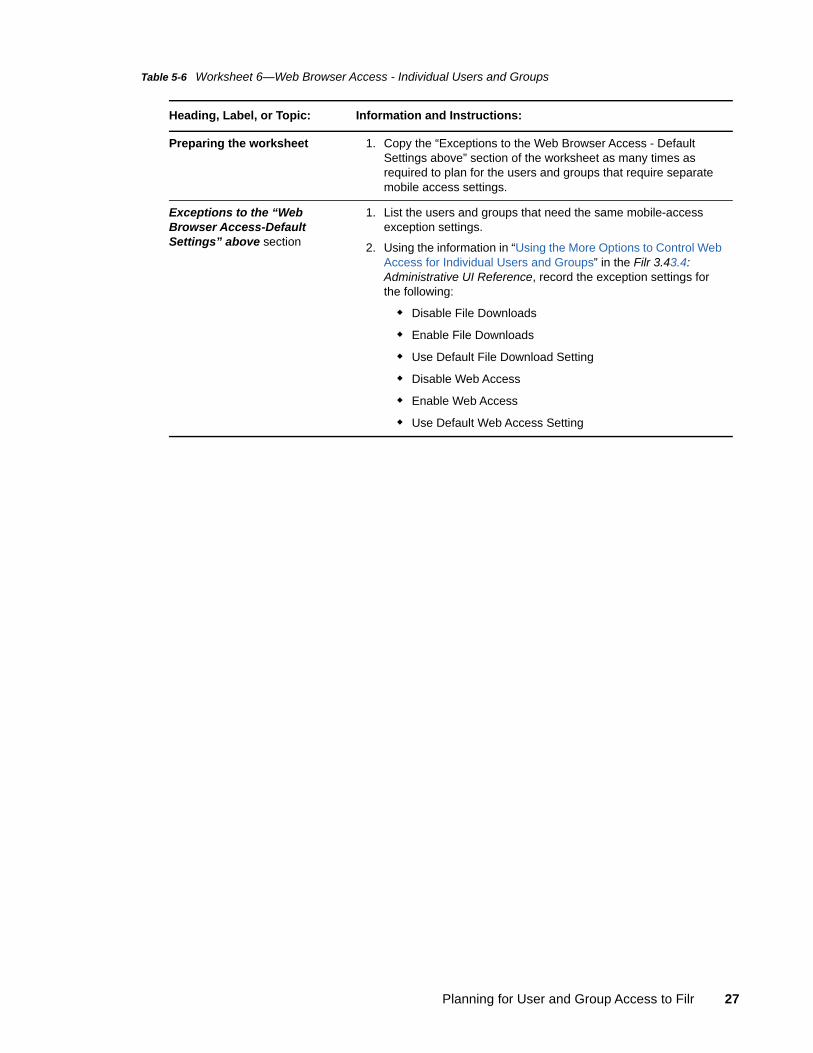
Table 5-6 Worksheet 6—Web Browser Access - Individual Users and Groups
Heading, Label, or Topic: Information and Instructions:
Preparing the worksheet 1. Copy the “Exceptions to the Web Browser Access - Default Settings above” section of the worksheet as many times as required to plan for the users and groups that require separate mobile access settings.
Exceptions to the “Web Browser Access-Default Settings” above section
1. List the users and groups that need the same mobile-access exception settings.
2. Using the information in “Using the More Options to Control Web Access for Individual Users and Groups” in the Filr 3.43.4: Administrative UI Reference, record the exception settings for the following:
Disable File Downloads
Enable File Downloads
Use Default File Download Setting
Disable Web Access
Enable Web Access
Use Default Web Access Setting
Planning for User and Group Access to Filr 27

28 Planning for User and Group Access to Filr
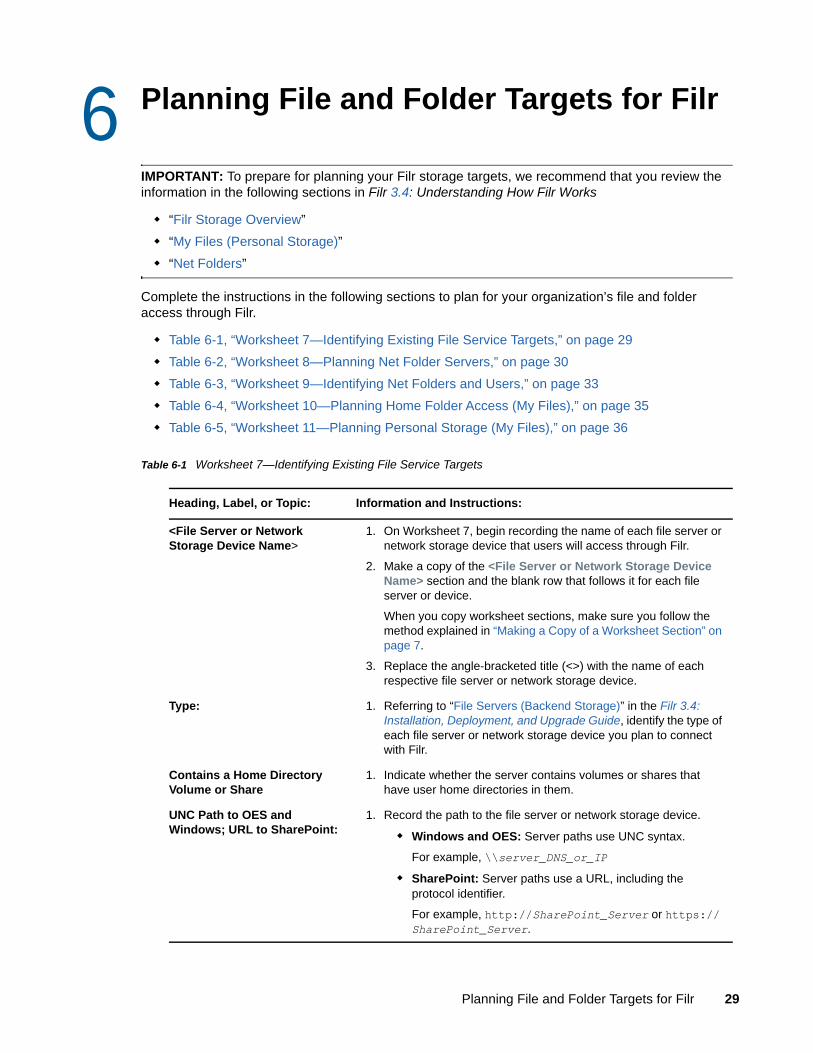
6 6Planning File and Folder Targets for Filr
IMPORTANT: To prepare for planning your Filr storage targets, we recommend that you review the information in the following sections in Filr 3.4: Understanding How Filr Works
“Filr Storage Overview”
“My Files (Personal Storage)”
“Net Folders”
Complete the instructions in the following sections to plan for your organization’s file and folder access through Filr.
Table 6-1, “Worksheet 7—Identifying Existing File Service Targets,” on page 29
Table 6-2, “Worksheet 8—Planning Net Folder Servers,” on page 30
Table 6-3, “Worksheet 9—Identifying Net Folders and Users,” on page 33
Table 6-4, “Worksheet 10—Planning Home Folder Access (My Files),” on page 35
Table 6-5, “Worksheet 11—Planning Personal Storage (My Files),” on page 36
Table 6-1 Worksheet 7—Identifying Existing File Service Targets
Heading, Label, or Topic: Information and Instructions:
<File Server or Network Storage Device Name>
1. On Worksheet 7, begin recording the name of each file server or network storage device that users will access through Filr.
2. Make a copy of the <File Server or Network Storage Device Name> section and the blank row that follows it for each file server or device.
When you copy worksheet sections, make sure you follow the method explained in “Making a Copy of a Worksheet Section” on page 7.
3. Replace the angle-bracketed title (<>) with the name of each respective file server or network storage device.
Type: 1. Referring to “File Servers (Backend Storage)” in the Filr 3.4: Installation, Deployment, and Upgrade Guide, identify the type of each file server or network storage device you plan to connect with Filr.
Contains a Home Directory Volume or Share
1. Indicate whether the server contains volumes or shares that have user home directories in them.
UNC Path to OES and Windows; URL to SharePoint:
1. Record the path to the file server or network storage device.
Windows and OES: Server paths use UNC syntax.
For example, \\server_DNS_or_IP
SharePoint: Server paths use a URL, including the protocol identifier.
For example, http://SharePoint_Server or https://SharePoint_Server.
Planning File and Folder Targets for Filr 29
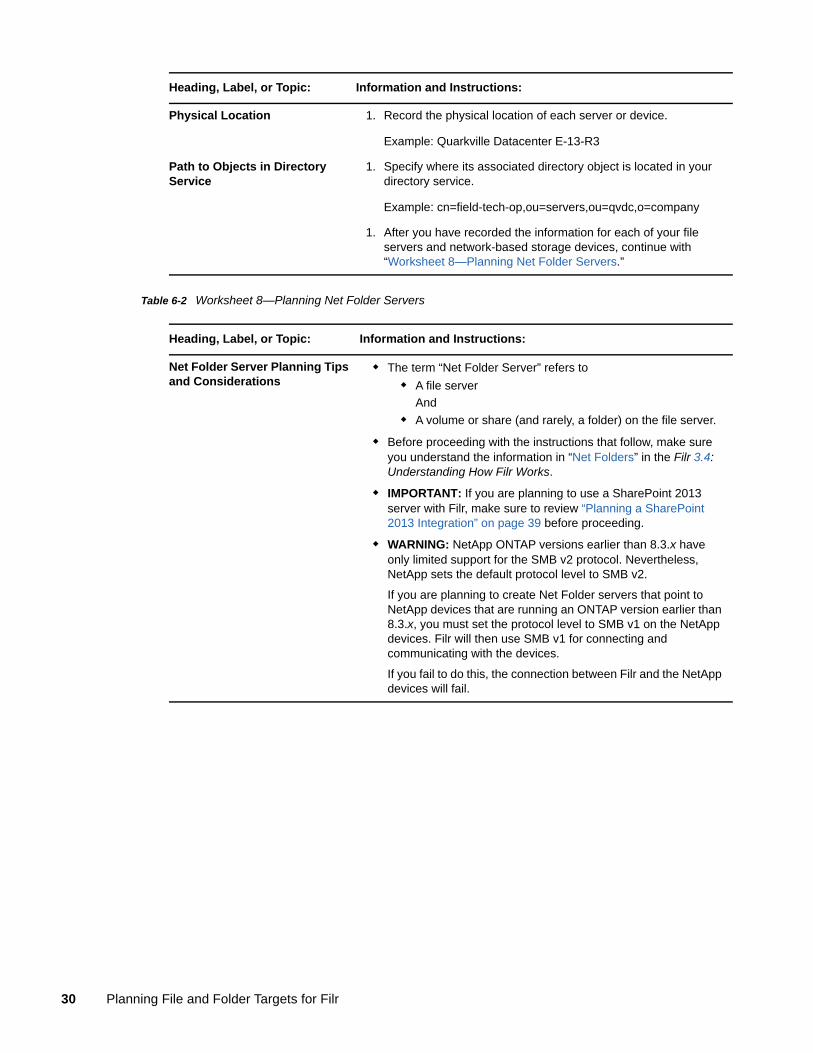
Table 6-2 Worksheet 8—Planning Net Folder Servers
Physical Location 1. Record the physical location of each server or device.
Example: Quarkville Datacenter E-13-R3
Path to Objects in Directory Service
1. Specify where its associated directory object is located in your directory service.
Example: cn=field-tech-op,ou=servers,ou=qvdc,o=company
1. After you have recorded the information for each of your file servers and network-based storage devices, continue with “Worksheet 8—Planning Net Folder Servers.”
Heading, Label, or Topic: Information and Instructions:
Net Folder Server Planning Tips and Considerations
The term “Net Folder Server” refers to
A file server
And
A volume or share (and rarely, a folder) on the file server.
Before proceeding with the instructions that follow, make sure you understand the information in “Net Folders” in the Filr 3.4: Understanding How Filr Works.
IMPORTANT: If you are planning to use a SharePoint 2013 server with Filr, make sure to review “Planning a SharePoint 2013 Integration” on page 39 before proceeding.
WARNING: NetApp ONTAP versions earlier than 8.3.x have only limited support for the SMB v2 protocol. Nevertheless, NetApp sets the default protocol level to SMB v2.
If you are planning to create Net Folder servers that point to NetApp devices that are running an ONTAP version earlier than 8.3.x, you must set the protocol level to SMB v1 on the NetApp devices. Filr will then use SMB v1 for connecting and communicating with the devices.
If you fail to do this, the connection between Filr and the NetApp devices will fail.
Heading, Label, or Topic: Information and Instructions:
30 Planning File and Folder Targets for Filr
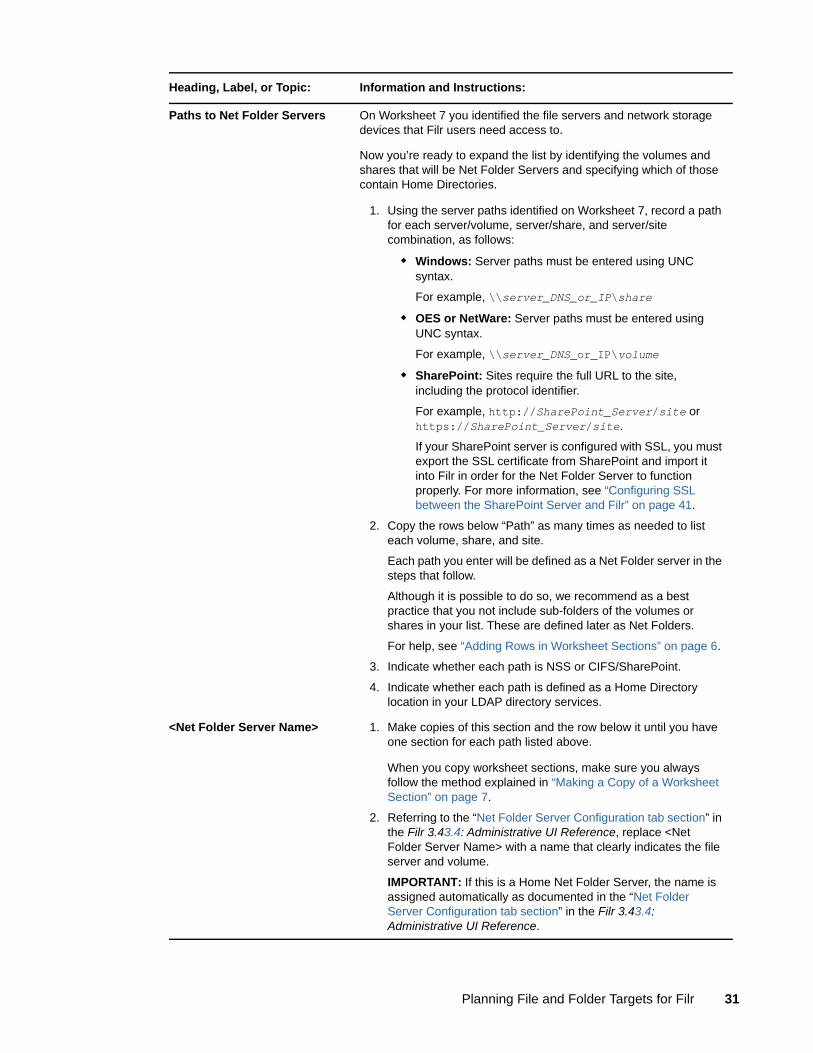
Paths to Net Folder Servers On Worksheet 7 you identified the file servers and network storage devices that Filr users need access to.
Now you’re ready to expand the list by identifying the volumes and shares that will be Net Folder Servers and specifying which of those contain Home Directories.
1. Using the server paths identified on Worksheet 7, record a path for each server/volume, server/share, and server/site combination, as follows:
Windows: Server paths must be entered using UNC syntax.
For example, \\server_DNS_or_IP\share
OES or NetWare: Server paths must be entered using UNC syntax.
For example, \\server_DNS_or_IP\volume
SharePoint: Sites require the full URL to the site, including the protocol identifier.
For example, http://SharePoint_Server/site or https://SharePoint_Server/site.
If your SharePoint server is configured with SSL, you must export the SSL certificate from SharePoint and import it into Filr in order for the Net Folder Server to function properly. For more information, see “Configuring SSL between the SharePoint Server and Filr” on page 41.
2. Copy the rows below “Path” as many times as needed to list each volume, share, and site.
Each path you enter will be defined as a Net Folder server in the steps that follow.
Although it is possible to do so, we recommend as a best practice that you not include sub-folders of the volumes or shares in your list. These are defined later as Net Folders.
For help, see “Adding Rows in Worksheet Sections” on page 6.
3. Indicate whether each path is NSS or CIFS/SharePoint.
4. Indicate whether each path is defined as a Home Directory location in your LDAP directory services.
<Net Folder Server Name> 1. Make copies of this section and the row below it until you have one section for each path listed above.
When you copy worksheet sections, make sure you always follow the method explained in “Making a Copy of a Worksheet Section” on page 7.
2. Referring to the “Net Folder Server Configuration tab section” in the Filr 3.43.4: Administrative UI Reference, replace <Net Folder Server Name> with a name that clearly indicates the file server and volume.
IMPORTANT: If this is a Home Net Folder Server, the name is assigned automatically as documented in the “Net Folder Server Configuration tab section” in the Filr 3.43.4: Administrative UI Reference.
Heading, Label, or Topic: Information and Instructions:
Planning File and Folder Targets for Filr 31
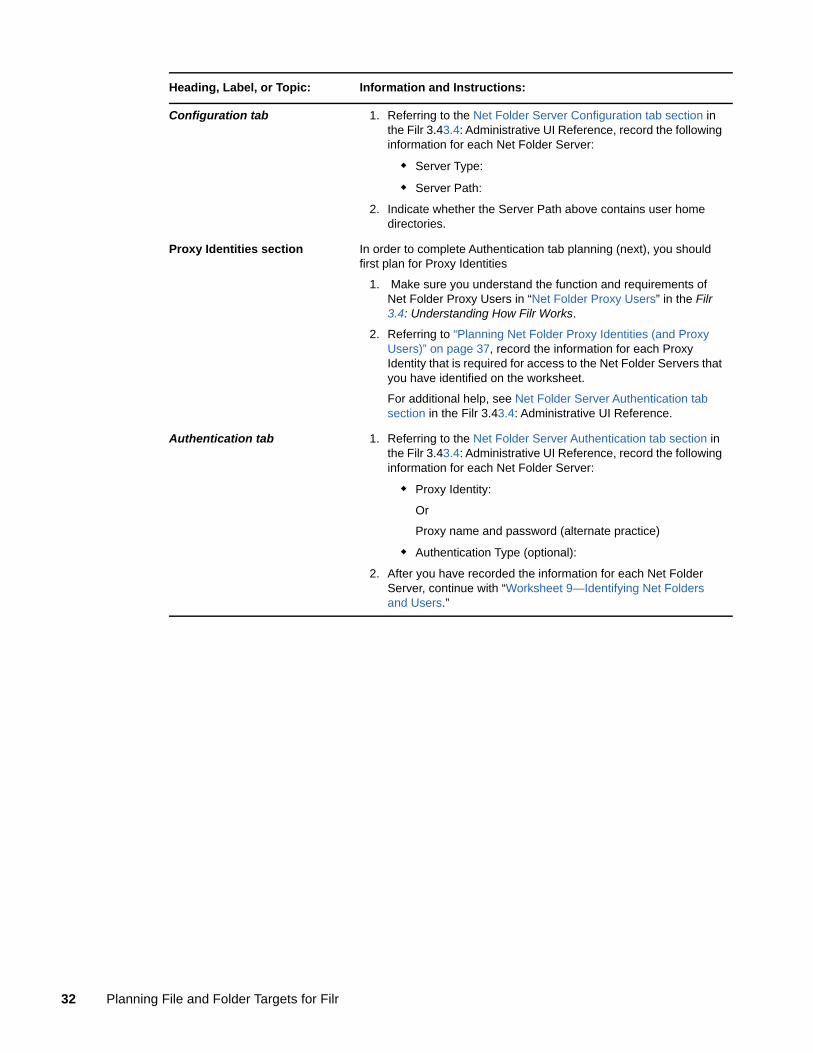
Configuration tab 1. Referring to the Net Folder Server Configuration tab section in the Filr 3.43.4: Administrative UI Reference, record the following information for each Net Folder Server:
Server Type:
Server Path:
2. Indicate whether the Server Path above contains user home directories.
Proxy Identities section In order to complete Authentication tab planning (next), you should first plan for Proxy Identities
1. Make sure you understand the function and requirements of Net Folder Proxy Users in “Net Folder Proxy Users” in the Filr 3.4: Understanding How Filr Works.
2. Referring to “Planning Net Folder Proxy Identities (and Proxy Users)” on page 37, record the information for each Proxy Identity that is required for access to the Net Folder Servers that you have identified on the worksheet.
For additional help, see Net Folder Server Authentication tab section in the Filr 3.43.4: Administrative UI Reference.
Authentication tab 1. Referring to the Net Folder Server Authentication tab section in the Filr 3.43.4: Administrative UI Reference, record the following information for each Net Folder Server:
Proxy Identity:
Or
Proxy name and password (alternate practice)
Authentication Type (optional):
2. After you have recorded the information for each Net Folder Server, continue with “Worksheet 9—Identifying Net Folders and Users.”
Heading, Label, or Topic: Information and Instructions:
32 Planning File and Folder Targets for Filr
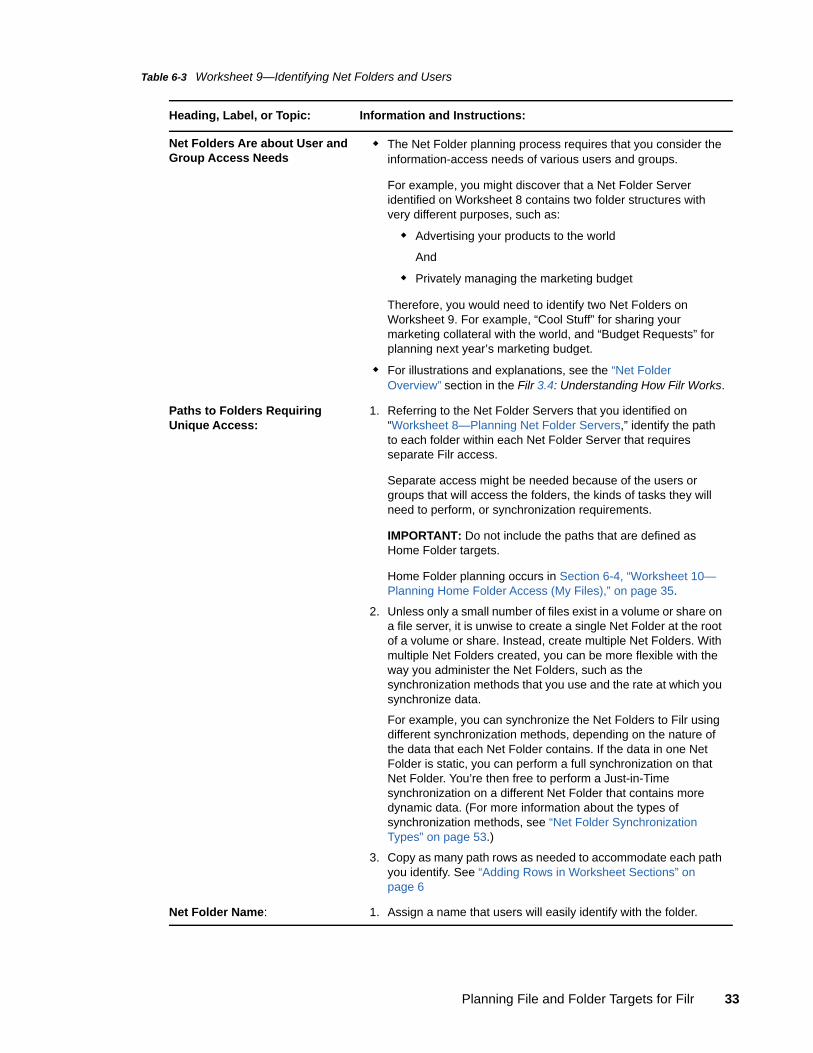
Table 6-3 Worksheet 9—Identifying Net Folders and Users
Heading, Label, or Topic: Information and Instructions:
Net Folders Are about User and Group Access Needs
The Net Folder planning process requires that you consider the information-access needs of various users and groups.
For example, you might discover that a Net Folder Server identified on Worksheet 8 contains two folder structures with very different purposes, such as:
Advertising your products to the world
And
Privately managing the marketing budget
Therefore, you would need to identify two Net Folders on Worksheet 9. For example, “Cool Stuff” for sharing your marketing collateral with the world, and “Budget Requests” for planning next year’s marketing budget.
For illustrations and explanations, see the “Net Folder Overview” section in the Filr 3.4: Understanding How Filr Works.
Paths to Folders Requiring Unique Access:
1. Referring to the Net Folder Servers that you identified on “Worksheet 8—Planning Net Folder Servers,” identify the path to each folder within each Net Folder Server that requires separate Filr access.
Separate access might be needed because of the users or groups that will access the folders, the kinds of tasks they will need to perform, or synchronization requirements.
IMPORTANT: Do not include the paths that are defined as Home Folder targets.
Home Folder planning occurs in Section 6-4, “Worksheet 10—Planning Home Folder Access (My Files),” on page 35.
2. Unless only a small number of files exist in a volume or share on a file server, it is unwise to create a single Net Folder at the root of a volume or share. Instead, create multiple Net Folders. With multiple Net Folders created, you can be more flexible with the way you administer the Net Folders, such as the synchronization methods that you use and the rate at which you synchronize data.
For example, you can synchronize the Net Folders to Filr using different synchronization methods, depending on the nature of the data that each Net Folder contains. If the data in one Net Folder is static, you can perform a full synchronization on that Net Folder. You’re then free to perform a Just-in-Time synchronization on a different Net Folder that contains more dynamic data. (For more information about the types of synchronization methods, see “Net Folder Synchronization Types” on page 53.)
3. Copy as many path rows as needed to accommodate each path you identify. See “Adding Rows in Worksheet Sections” on page 6
Net Folder Name: 1. Assign a name that users will easily identify with the folder.
Planning File and Folder Targets for Filr 33
Users and Groups That Need Access
1. For each Net Folder, identify the users and/or groups that need access through Filr.
2. Repeat the tasks in this table until all of the Net Folder paths and those needing access to them are identified.
<Net Folder Name> Configuration Plan
1. Copy the section, including the blank row that follows it, as many times as needed to plan for each folder path that you identified.
IMPORTANT: The worksheet contains two <Net Folder Name> sections with example File Statistics entered to illustrate different “content-searchability” settings.
2. Replace the angle bracketed (<>) portion of each first row with the Net Folder Name for each path.
3. Associated Net Folder Server: Record the Net Folder Server Name associated with each Net Folder.
4. Path from NF Server: Record the path from the Net Folder Server to each Net Folder.
5. File Statistics: For each Net Folder, record:
Number of Files: Replace the example number with the number of files in the folder structure identified by the path.
Content Searchable? Type Yes or No to indicate whether to index the words in the files for searchability.
File Types: If file content will be searchable, list the types of files, such as PDF, .doc, and so on.
Data Size: The size in GB of the file structure.
TIP: Consider using Novell File Reporter (http://www.novell.com/products/file-reporter/) in planning for Filr. File Reporter helps you quickly determine the number, sizes, types, access frequency, and so on for your organization’s files.
6. Frequency of File Content Changes: Assess or estimate how often file content changes within each Net Folder.
7. Frequency of Trustee/Access Rights Changes: Assess how often user access rights change within each Net Folder.
This helps determine the needed synchronization frequency.
8. Roll-out Target Date: Set a roll-out priority for each Net Folder.
Initially, you should enable only the highest priority files and folders for access through Filr, to ensure a controlled and smooth implementation.
The remaining files and folders can be enabled in a phased approach during the production roll-out.
Consider creating a separate map or table that shows the folder structure and the order in which folders will be enabled through the testing, pilot, and production deployments.
9. After you have planned the non-home Net Folders, continue with “Worksheet 10—Planning Home Folder Access (My Files).”
When you copy worksheet sections, make sure you always follow the method explained in “Making a Copy of a Worksheet Section” on page 7.
Heading, Label, or Topic: Information and Instructions:
34 Planning File and Folder Targets for Filr
Table 6-4 Worksheet 10—Planning Home Folder Access (My Files)
Heading, Label, or Topic: Information and Instructions:
DNS_or_IP-Home_Volume_or_Share Planning
1. Copy this section as many times as needed to plan for each of the Paths to Net Folder Servers that you marked as Defined as a Home Directory Volume or Share in “Worksheet 8—Planning Net Folder Servers.”
2. Change the name of each section to correspond with the Home Net Folder Server name that you assigned in Section 6-2, “Worksheet 8—Planning Net Folder Servers,” on page 30.
File Statistics 1. For each Home Net Folder Server, record:
Number of Files: Replace the example number with the number of files in the Home folder structure identified by the path.
Content Searchable? This is set to No in the worksheet by default to indicate that home folder content is not automatically enabled for content searching.
File Types: If you want the Home file content to be searchable, list the types of files, such as PDF, .doc, and so on.
Data Size: The size in GB of the Home file structure.
TIP: Consider using Novell File Reporter (http://www.novell.com/products/file-reporter/) in planning for Filr. File Reporter helps you quickly determine the number, sizes, types, access frequency, and so on for your organization’s files.
2. Frequency of File Content Changes: Assess or estimate how often file content changes within each Home Net Folder Server.
3. Frequency of Trustee/Access Rights Changes: This should not normally be an issue because Home folder owners are usually assigned full access privileges.
4. Roll-out Target Date: Set a roll-out priority for each Home Net Folder Server.
Initially, you should enable only the highest priority files and folders for access through Filr, to ensure a controlled and smooth implementation.
The remaining files and folders can be enabled in a phased approach during the production roll-out.
Consider creating a separate map or table that shows the folder structure and the order in which folders will be enabled through the testing, pilot, and production deployments.
5. After you have planned the Home Net Folder Servers, continue with “Worksheet 11—Planning Personal Storage (My Files).”
Planning File and Folder Targets for Filr 35
Table 6-5 Worksheet 11—Planning Personal Storage (My Files)
Heading, Label, or Topic: Information and Instructions:
IMPORTANT: Worksheet 11 - Personal Storage can help you calculate the approximate amount of storage needed, using one of the options documented below.
Calculation accuracy depends on your using only one option and closely following the instructions provided.
Both options leverage the assignment of data quotas to calculate the upper limits of data storage requirements.
To understand personal storage, see “My Files (Personal Storage)” in Filr 3.4: Understanding How Filr Works.
If you decide to let users have Filr-based Personal Storage, your main task is to estimate Filr-based data storage requirements.
Automatic Calculation Option 1: Enabling a Global Data Quota
For this option, do the following:
1. Mark the Allow LDAP users to have personal storage area option for selection when you configure the system.
2. Mark the Enable User Data Quotas option for selection when you configure the system.
3. Double-click the MB cell next to the Default User Data Quota Size field and specify a default quota for all LDAP users.
4. Double-click the Users cell to the right of Total number of users and specify the number of LDAP users that you plan to import.
5. The spreadsheet calculates the totals under Personal Storage Planning Totals by multiplying the Default Data Quota by the Total Number of Users.
IMPORTANT: As documented in “Managing and Restricting Filr-Based Storage” in the Filr 3.43.4: Administrative UI Reference, Filr supports assigning a default quota for all users and then adding users and groups in the Personal Storage dialog and assigning them different quota assignments that override the default quota.
However, the worksheet formulas are not designed to calculate totals based on this approach.
36 Planning File and Folder Targets for Filr
Planning Net Folder Proxy Identities (and Proxy Users)
It is important that you understand the purpose, rights requirements, expected user name format, and character restrictions associated with the Net Folder Server proxy user before you configure a Net Folder Server.
See “Net Folder Proxy Users” in Filr 3.4: Understanding How Filr Works.
Rights Requirements for the Proxy User
The Net Folder Server proxy user that you specify here synchronizes volume objects and file objects. Ensure that this proxy user has rights to access the files and folders for the Net Folder that will be associated to the Net Folder Server. Specifically, the Net Folder Server proxy user should have the rights shown in the following graphic:
Automatic Calculation Option 2: Enabling Individual Data Quotas
This option utilizes the Personal Storage settings documented in “Add a Group button” and “Group More drop-down option” documented in the Filr 3.43.4: Administrative UI Reference. It assumes that you are not enabling Personal Storage for all LDAP users (Option 1).
To plan for this option, do the following:
1. Specify groups whose members you want to have access to Personal Storage, by doing the following:
a. Specify a group name.
b. Specify a data quota for the group in megabytes.
c. Specify the number of users you want counted as part of this group.
Do not count a user under more than one group.
d. Add rows as needed until all of the groups are specified
2. You can also add individual users and assign them quotas, but to avoid doubling the storage allocated for them, you must ensure they are not included in the user number associated with any of the groups above.
User quotas override group quotas.
The spreadsheet calculates Total Personal Storage Data Size by multiplying individual data quotas by the number of users that are assigned those quotas.
1. After you have planned Personal Storage quotas, continue with “Planning for Content Searching (Content Indexing).”
Heading, Label, or Topic: Information and Instructions:
Planning File and Folder Targets for Filr 37
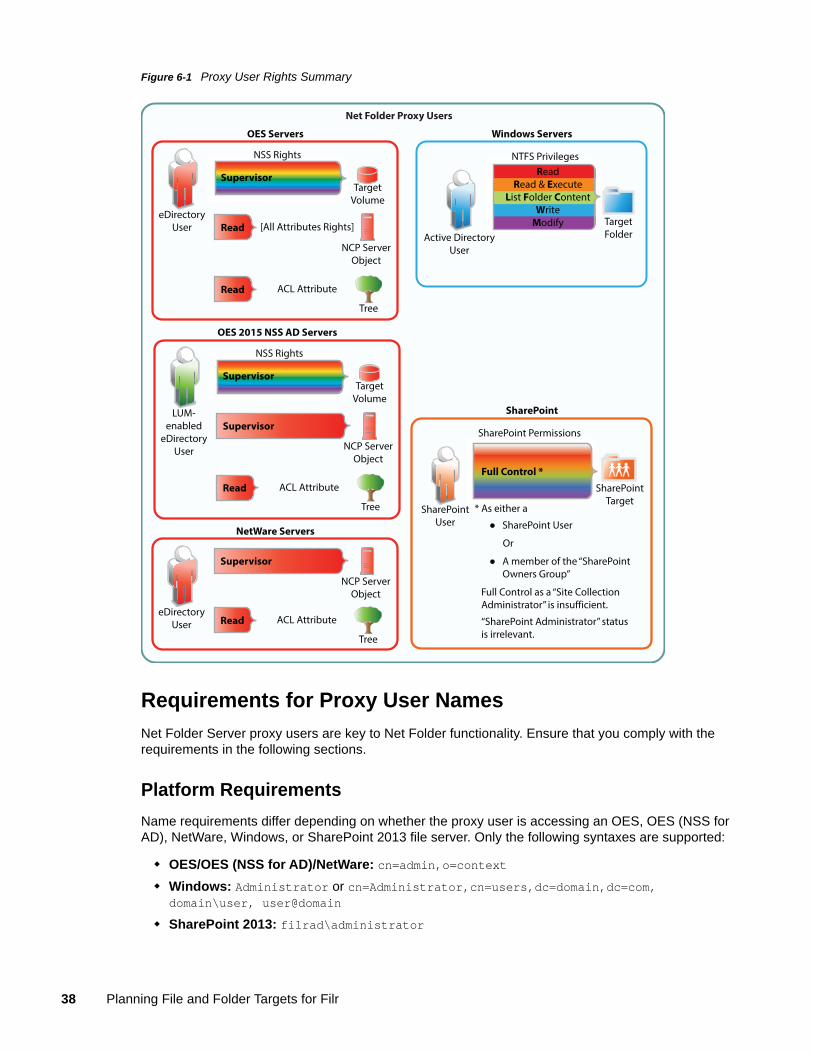
Figure 6-1 Proxy User Rights Summary
Requirements for Proxy User Names
Net Folder Server proxy users are key to Net Folder functionality. Ensure that you comply with the requirements in the following sections.
Platform Requirements
Name requirements differ depending on whether the proxy user is accessing an OES, OES (NSS for AD), NetWare, Windows, or SharePoint 2013 file server. Only the following syntaxes are supported:
OES/OES (NSS for AD)/NetWare: cn=admin,o=context Windows: Administrator or cn=Administrator,cn=users,dc=domain,dc=com,
domain\user, user@domain SharePoint 2013: filrad\administrator
SharePointUser
SharePoint Permissions
Full Control *SharePoint
Target
SharePoint
ReadRead & Execute
List Folder ContentWrite
ModifyActive Directory
User
NTFS Privileges
TargetFolder
Windows Servers
NCP ServerObject
Read
Supervisor
NSS Rights
TargetVolume
eDirectoryUser [All Attributes Rights]
Tree
Read ACL Attribute
OES Servers
NCP ServerObject
Supervisor
Tree
Read ACL AttributeeDirectory
User
NetWare Servers
Net Folder Proxy Users
* As either a
● SharePoint User
Or
● A member of the “SharePoint Owners Group”
Full Control as a “Site Collection Administrator” is insufficient.
“SharePoint Administrator” status is irrelevant.
NCP ServerObject
Supervisor
NSS Rights
TargetVolume
LUM-enabled
eDirectoryUser
Tree
Read ACL Attribute
OES 2015 NSS AD Servers
Supervisor
38 Planning File and Folder Targets for Filr
DFS: When using Distributed File System (DFS) namespaces, the proxy user name format must be domain\user. For example, acme\administrator.
Use the LDAP Browse Button
To ensure that the Net Folder Server proxy user name is formatted correctly, use the Browse icon next to the Proxy field to browse the LDAP directory (eDirectory or Active Directory) for the proxy user that you want to use.
IMPORTANT: If you are selecting the proxy user for an NSS for AD volume, be sure to select the eDirectory tree, not the AD Domain.
Special Characters and Spaces Not Supported
Proxy names that contain special characters and/or spaces are not supported. For example, adminuser is supported, but @dm!n and admin user are not. Other special characters that are not supported in the proxy name are / \ [ ] : | = , + * ? < > @ ".
Consider Using Proxy Identities
Defining proxy user identities can greatly simplify selecting proxy users for Net Folder Servers and managing them thereafter.
Planning a SharePoint 2013 IntegrationYou can configure Net Folders in Filr to access files in regular document libraries on a SharePoint 2013 server. When a user uploads a file to a SharePoint-configured Filr Net Folder, that file is made available on the SharePoint server as well as to any user or group who has access to the Net Folder in Filr.
“Understanding How Filr Handles Checked Out Documents” on page 40
“User Access Synchronization Considerations” on page 40
“Granting Access to a Specific Folder That Has Been Shared via SharePoint” on page 40
“Understanding How Enabling the Ability to Re-Share within Filr Can Affect SharePoint” on page 41
“Configuring SSL between the SharePoint Server and Filr” on page 41
Planning File and Folder Targets for Filr 39
Understanding How Filr Handles Checked Out Documents
SharePoint 2013 contains the following configuration option: Require documents to be checked out before they can be edited. When enabled, this option causes files that are uploaded to SharePoint to be uploaded in the Checked Out state, making them visible only to the person who uploaded the files. This is true regardless of the application that is used to upload (such as SharePoint web portal or One Drive).
This is also true for Filr, however, to ensure that files uploaded to the SharePoint 2013 server via a SharePoint-configured Filr Net Folder are available to all Filr users with appropriate rights to the Net Folder (through synchronization to Filr via the Filr Net Folder Server Proxy User), Filr behaves differently depending on whether the Require documents to be checked out before they can be edited option is enabled on the SharePoint 2013 server.
If Enabled: Filr automatically checks in a minor version of the file so that the file can be seen by the Net Folder Server Proxy User, and therefore is available to Filr users with rights to the Net Folder.
If Disabled: The uploaded file is immediately visible to all users who have rights to the Net Folder.
User Access Synchronization Considerations
When synchronizing user access rights information from SharePoint to Filr, consider the following:
User access rights to files and folders within SharePoint are synchronized to Filr only for users who exist in Active Directory. Access rights for users who exist only locally on the SharePoint site are not synchronized to Filr.
SharePoint personal sites are not currently displayed as user Home folders in Filr.
Granting Access to a Specific Folder That Has Been Shared via SharePoint
In SharePoint, if a folder has been shared with a specific group and that group does not have access to the parent directory, you must create a separate Net Folder with a relative path to the shared folder and give the group access.
If you create a Net Folder at a higher level, the group cannot access the sub-folder to which they have access because, as dictated by the SharePoint architecture, they are not able to view the parent folder.
For example, suppose Group A has access rights in SharePoint to the following folder: http://sharepoint_site/sites/marketing/productx. Group A does not have access rights to the marketing folder, only to the productx folder. In order for Group A to have access to the productx folder in Filr:
1 Create a Net Folder Server (as described in “Creating and Managing Net Folder Servers” in the Filr 3.43.4: Administrative UI Reference) with the following server path:
http://sharepoint_site/sites/marketing2 Create a Net Folder (as described in “Creating and Modifying Net Folders” in the Filr 3.43.4:
Administrative UI Reference) with the following relative path:
40 Planning File and Folder Targets for Filr
productx3 (Optional) You might also create another Net Folder to the marketing folder, and assign the
appropriate set of users access to that folder. (These users would need to have access to this folder in SharePoint.)
Understanding How Enabling the Ability to Re-Share within Filr Can Affect SharePoint
Filr allows you to grant users with the ability to re-share items with other users who do not have access by adding them in the “Sharing Rights tag” as documented in the Filr 3.43.4: Administrative UI Reference.
When re-sharing is enabled, users can share a file or folder and give the users they are sharing with the ability to re-share the file or folder.
IMPORTANT: Because SharePoint does not have this same capability, carefully consider whether you want to allow users to re-share items, because doing so could grant users access to items that they otherwise wouldn’t have within SharePoint.
Configuring SSL between the SharePoint Server and Filr
If your SharePoint server is configured with SSL, you might need to export the SSL certificate from SharePoint and import it into Filr in order for the Net Folder Server to function properly.
After you have exported the SSL certificate and keypair from the SharePoint site, you need to import them into Filr (the certificate and key pair should be in .P12 key pair format):
1 Go to the Digital Certificates page by clicking Digital Certificates from the Novell Appliance.
2 Click File > Import > Trusted Certificate. Browse to and select your existing certificate, then click OK.
Planning File and Folder Targets for Filr 41

42 Planning File and Folder Targets for Filr
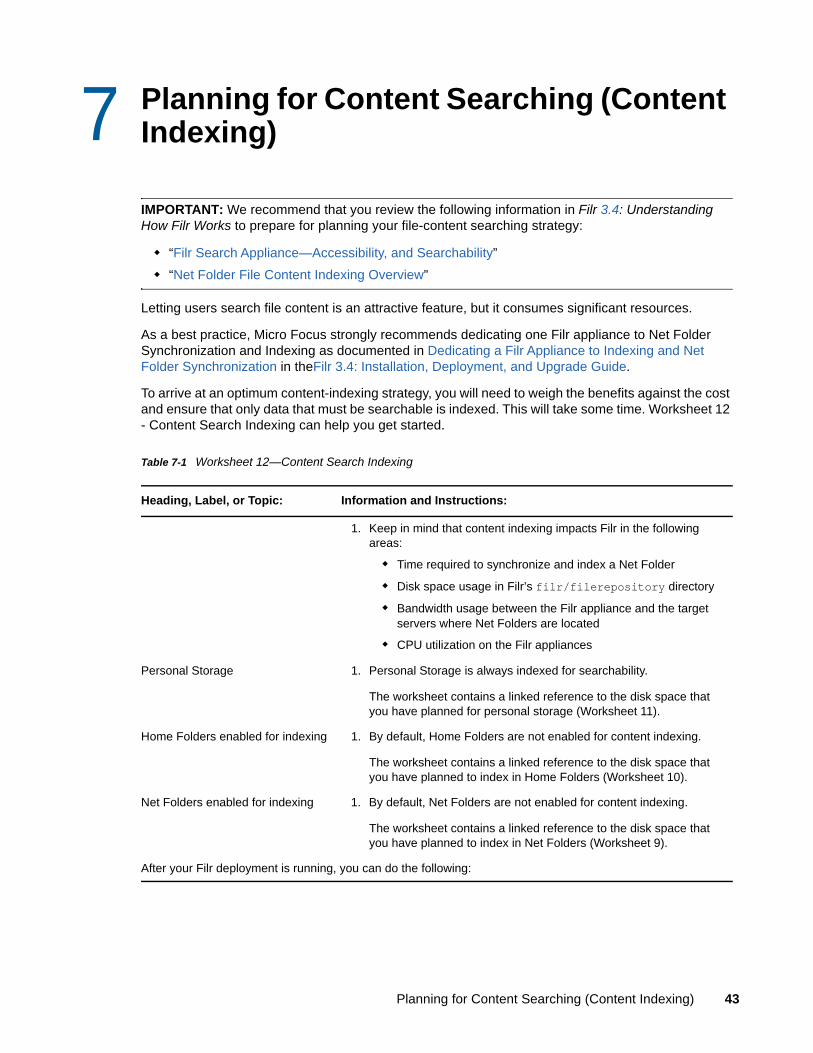
7 7Planning for Content Searching (Content Indexing)
IMPORTANT: We recommend that you review the following information in Filr 3.4: Understanding How Filr Works to prepare for planning your file-content searching strategy:
“Filr Search Appliance—Accessibility, and Searchability”
“Net Folder File Content Indexing Overview”
Letting users search file content is an attractive feature, but it consumes significant resources.
As a best practice, Micro Focus strongly recommends dedicating one Filr appliance to Net Folder Synchronization and Indexing as documented in Dedicating a Filr Appliance to Indexing and Net Folder Synchronization in theFilr 3.4: Installation, Deployment, and Upgrade Guide.
To arrive at an optimum content-indexing strategy, you will need to weigh the benefits against the cost and ensure that only data that must be searchable is indexed. This will take some time. Worksheet 12 - Content Search Indexing can help you get started.
Table 7-1 Worksheet 12—Content Search Indexing
Heading, Label, or Topic: Information and Instructions:
1. Keep in mind that content indexing impacts Filr in the following areas:
Time required to synchronize and index a Net Folder
Disk space usage in Filr’s filr/filerepository directory
Bandwidth usage between the Filr appliance and the target servers where Net Folders are located
CPU utilization on the Filr appliances
Personal Storage 1. Personal Storage is always indexed for searchability.
The worksheet contains a linked reference to the disk space that you have planned for personal storage (Worksheet 11).
Home Folders enabled for indexing 1. By default, Home Folders are not enabled for content indexing.
The worksheet contains a linked reference to the disk space that you have planned to index in Home Folders (Worksheet 10).
Net Folders enabled for indexing 1. By default, Net Folders are not enabled for content indexing.
The worksheet contains a linked reference to the disk space that you have planned to index in Net Folders (Worksheet 9).
After your Filr deployment is running, you can do the following:
Planning for Content Searching (Content Indexing) 43
Estimated time to create index 1. Start with a subset (1 to 10 GB) of your data.
2. Monitor how much time is required to complete the indexing process.
3. Increase the amount and monitor the process again.
Adjust your estimates based on the planned data size reflect on this sheet.
Heading, Label, or Topic: Information and Instructions:
44 Planning for Content Searching (Content Indexing)
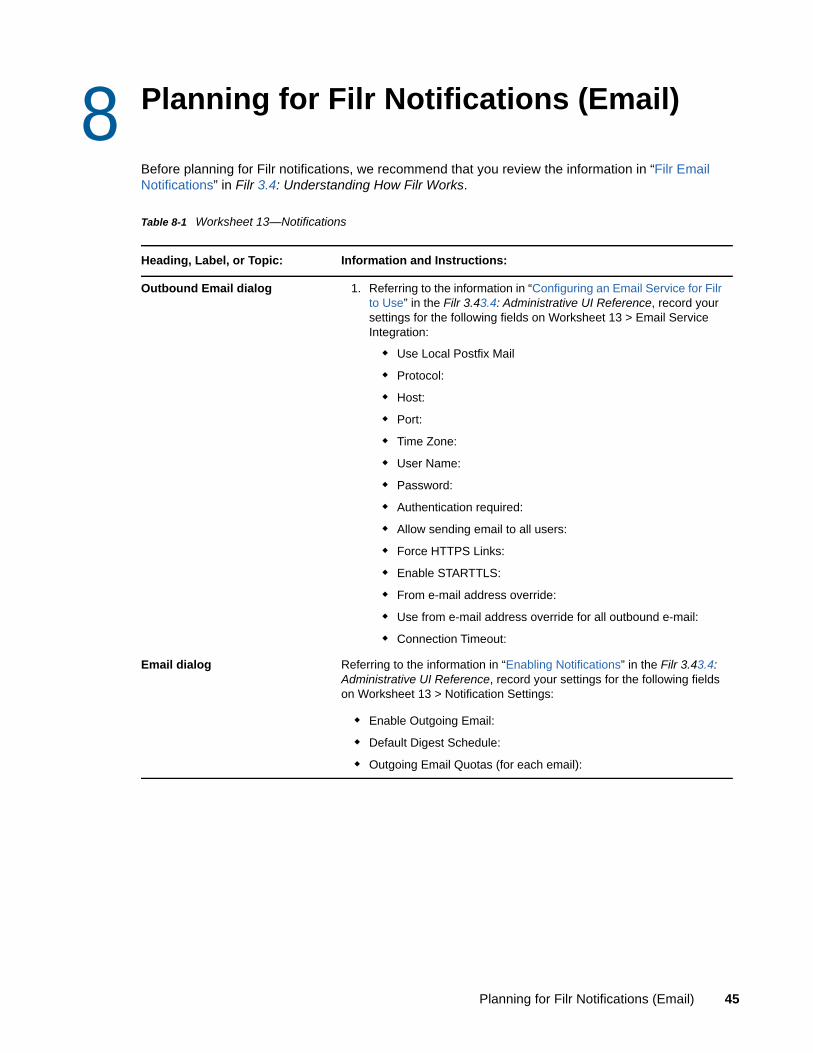
8 8Planning for Filr Notifications (Email)
Before planning for Filr notifications, we recommend that you review the information in “Filr Email Notifications” in Filr 3.4: Understanding How Filr Works.
Table 8-1 Worksheet 13—Notifications
Heading, Label, or Topic: Information and Instructions:
Outbound Email dialog 1. Referring to the information in “Configuring an Email Service for Filr to Use” in the Filr 3.43.4: Administrative UI Reference, record your settings for the following fields on Worksheet 13 > Email Service Integration:
Use Local Postfix Mail
Protocol:
Host:
Port:
Time Zone:
User Name:
Password:
Authentication required:
Allow sending email to all users:
Force HTTPS Links:
Enable STARTTLS:
From e-mail address override:
Use from e-mail address override for all outbound e-mail:
Connection Timeout:
Email dialog Referring to the information in “Enabling Notifications” in the Filr 3.43.4: Administrative UI Reference, record your settings for the following fields on Worksheet 13 > Notification Settings:
Enable Outgoing Email:
Default Digest Schedule:
Outgoing Email Quotas (for each email):
Planning for Filr Notifications (Email) 45

46 Planning for Filr Notifications (Email)
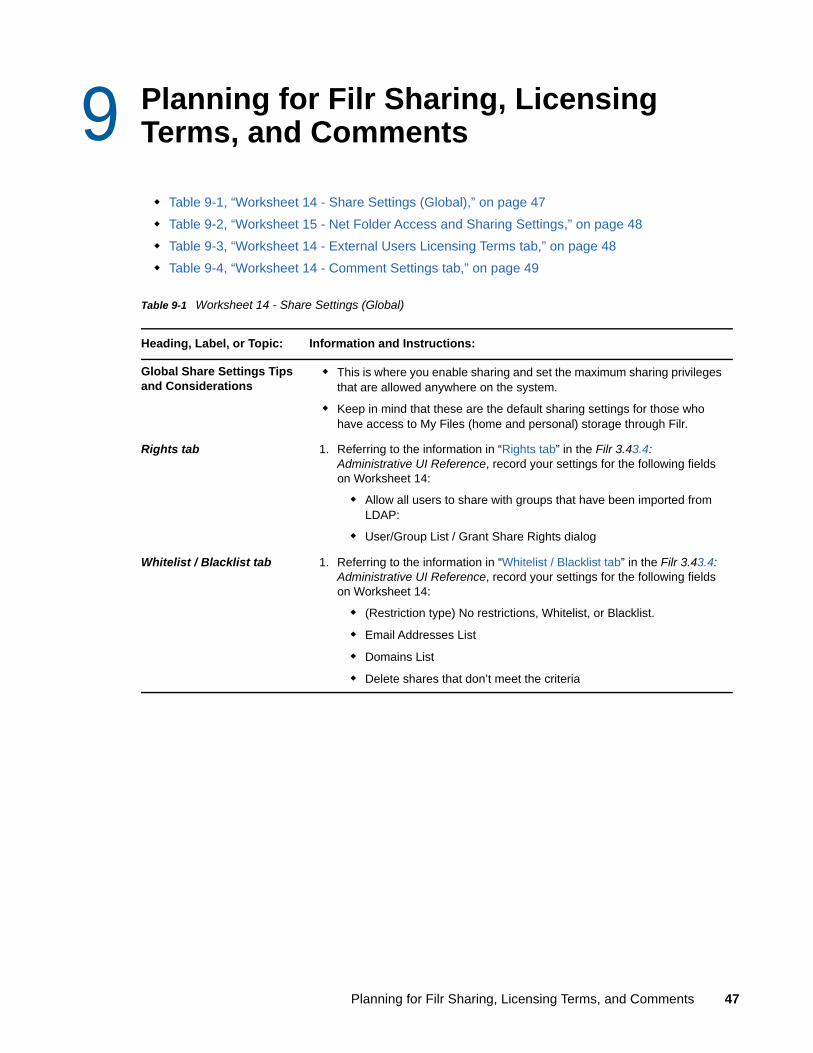
9 9Planning for Filr Sharing, Licensing Terms, and Comments
Table 9-1, “Worksheet 14 - Share Settings (Global),” on page 47
Table 9-2, “Worksheet 15 - Net Folder Access and Sharing Settings,” on page 48
Table 9-3, “Worksheet 14 - External Users Licensing Terms tab,” on page 48
Table 9-4, “Worksheet 14 - Comment Settings tab,” on page 49
Table 9-1 Worksheet 14 - Share Settings (Global)
Heading, Label, or Topic: Information and Instructions:
Global Share Settings Tips and Considerations
This is where you enable sharing and set the maximum sharing privileges that are allowed anywhere on the system.
Keep in mind that these are the default sharing settings for those who have access to My Files (home and personal) storage through Filr.
Rights tab 1. Referring to the information in “Rights tab” in the Filr 3.43.4: Administrative UI Reference, record your settings for the following fields on Worksheet 14:
Allow all users to share with groups that have been imported from LDAP:
User/Group List / Grant Share Rights dialog
Whitelist / Blacklist tab 1. Referring to the information in “Whitelist / Blacklist tab” in the Filr 3.43.4: Administrative UI Reference, record your settings for the following fields on Worksheet 14:
(Restriction type) No restrictions, Whitelist, or Blacklist.
Email Addresses List
Domains List
Delete shares that don’t meet the criteria
Planning for Filr Sharing, Licensing Terms, and Comments 47
Table 9-2 Worksheet 15 - Net Folder Access and Sharing Settings
Table 9-3 Worksheet 14 - External Users Licensing Terms tab
Heading, Label, or Topic: Information and Instructions:
Net Folder Sharing Tips and Configurations
Worksheet 15 is where you specify both access and sharing privileges for Net Folders.
To be assigned access and sharing privileges on a Net Folder, users and groups must:
Be enabled for global sharing privileges (Worksheet 14)
And
Have access to the Net Folder source area on the target file server.
For more information, see “Access to Files and Folders Is Controlled by the File System” in Filr 3.4: Understanding How Filr Works
Preparing the worksheet 1. Copy the <Net Folder Name> section as many times as required to plan user and group access for all of the Net Folders listed in Worksheet 9.
2. Within each <Net Folder Name> section, copy the Users and/or Groups that require access section as many times as required to accommodate different sets of sharing rights to be granted.
For example, if Group A and Group B are to be granted both Internal and External sharing rights, but Group C is to be granted only Internal sharing rights, you need two copies of the section: one section for Group A and Group B, and a second section for Group C.
IMPORTANT: Although the worksheets are designed to plan for Net Folder sharing and these instructions reflect that, it is actually quite common that organizations choose to not enable sharing on some or all of their Net Folders.
<Net Folder Name> 1. Referring to Worksheet 9, rename each of these headings to reflect your Net Folder names.
Rights tab 1. Returning to the first Net Folder section you copied, in the first Users and Groups that require access section, list all of the users and groups that need the same set of sharing privileges on the Net Folder. (This can include not assigning any sharing privileges.)
Grant Rights dialog 1. If you are allowing Net Folder sharing, specify the set of sharing rights that apply to the listed users and groups.
1. Repeat the planning process until all of the sections that you copied have been filled in.
2. Continue with
Heading, Label, or Topic: Information and Instructions:
Display Terms and Conditions
1. If you plan to allow external users access to your Filr site, you can require that they accept specified terms and conditions to gain access. See “External Users Licensing Terms tab” in the Filr 3.43.4: Administrative UI Reference, record your settings for the following fields on Worksheet 14:
48 Planning for Filr Sharing, Licensing Terms, and Comments
Table 9-4 Worksheet 14 - Comment Settings tab
Heading, Label, or Topic: Information and Instructions:
Allow Commenting on Files 1. This lets you disable all commenting on the site.
For more information, see “Comment Settings tab” in the Filr 3.43.4: Administrative UI Reference.
Planning for Filr Sharing, Licensing Terms, and Comments 49

50 Planning for Filr Sharing, Licensing Terms, and Comments
10 10Planning for Net Folder Synchronization
IMPORTANT: In preparation for planning Net Folder synchronization, we recommend that you review the following:
“Filr Synchronization” in the Filr 3.4: Understanding How Filr Works
“Synchronization Tips and Considerations” on page 53.
Complete the instructions in the following sections to plan for your organization’s Net Folder Synchronization.
Table 10-1, “Worksheet 16 - Net Folder Global Settings,” on page 51
Table 10-2, “Worksheet 17 - <Net Folder Server Name>,” on page 52
Table 10-3, “Worksheet 18 - Enabling Net Folder Synchronization,” on page 52
Table 10-4, “Worksheet 18 - <Net Folder Name>,” on page 52
Table 10-1 Worksheet 16 - Net Folder Global Settings
Heading, Label, or Topic: Information and Instructions:
Net Folder Settings dialog 1. Referring to the information in “Using the Net Folder Settings dialog” in the Filr 3.43.4: Administrative UI Reference, record your settings for the following fields on Worksheet 16:
Enable Just-in-Time synchronization of Net Folders
Maximum wait time for results ______ seconds
Use eDirectory rights in addition to file system rights
Refresh cached rights information every _____ minutes.
Planning for Net Folder Synchronization 51
Table 10-2 Worksheet 17 - <Net Folder Server Name>
Table 10-3 Worksheet 18 - Enabling Net Folder Synchronization
Table 10-4 Worksheet 18 - <Net Folder Name>
Heading, Label, or Topic: Information and Instructions:
Preparing the worksheet 1. Copy the <Net Folder Server Name> section as many times as required to plan synchronization for all of the Net Folder Servers listed in Worksheet 8.
2. Rename each copied <Net Folder Server Name> section to reflect the names used in Worksheet 8.
Net Folder Settings dialog 1. Referring to the information in “Synchronization Schedule tab” and “Synchronization Options tab” in the Filr 3.43.4: Administrative UI Reference, record your settings for the following fields for each Net Folder Server listed on Worksheet 17:
Enable Scheduled Synchronization
Index the Content of files in the Net Folders
Enable Just-in-Time Synchronization
Allow the desktop app to trigger initial home folder sync
Heading, Label, or Topic: Information and Instructions:
Net Folders dialog 1. Referring to the information in “Enabling and Tuning Net Folder Synchronization” in the Filr 3.43.4: Administrative UI Reference, record your settings for the following fields on Worksheet 18:
Allow Synchronization:
Max Simultaneous Syncs:
Threads Per Sync:
Heading, Label, or Topic: Information and Instructions:
Preparing the sections 1. Copy the <Net Folder Name> section as many times as required to plan synchronization for all of the Net Folder Servers listed in Worksheet 9.
2. Rename each copied <Net Folder Name> section to reflect the names used in Worksheet 9.
<Net Folder Name> 1. Referring to the information in “Synchronization Schedule tab” and “Data Synchronization tab” in the Filr 3.43.4: Administrative UI Reference, record your settings for the following fields for each Net Folder Server listed on Worksheet 18:
Use the Net Folder Server Synchronization Schedule:
Use the Synchronization Schedule Defined Below:
Allow synchronization of data by Desktop Application
52 Planning for Net Folder Synchronization
Synchronization Tips and Considerations
Net Folder Synchronization Types
Net Folder synchronization is a critical in Filr because it enables files and folders to be viewed in Filr apps. Only metadata (names, ACLs, etc.) is synchronized. The files and folders themselves remain on the back-end file servers.
Net Folder synchronization can happen in four ways:
Scheduled Full Synchronization of Net Folder Servers: You can schedule Full synchronizations for each Net Folder Server. All of the Net Folders associated with that server are then synchronized as scheduled.
If the folder structure is large, full synchronizations can take a while to complete.
Scheduled Full Synchronization of Net Folders: You can also schedule Full synchronizations for individual Net Folders.
Because these override the Net Folder Server schedules, you can synchronize the Net Folders either more or less frequently than the Net Folder Server schedule dictates.
Manual Full Synchronization of Net Folders: You can perform these when you create Net Folders (or anytime) to ensure that Filr users can browse and access the files and folders that they contain as soon as the schedule completes.
Just-in-Time Synchronization (JITS) (Folder-Only): If JITS is enabled, then when Filr users browse to a folder in a Net Folder, only the information about the files and subfolders in that folder are synchronized with Filr.
JITS gathers as much information as it can in 5 seconds (a configurable setting), then it displays the results and continues processing in the background. Depending on the connection with the back-end file server, Filr can process a lot of metadata in 5 seconds. However, if the folder is large or the connection slow, users might need to refresh to see all of the folder’s content.
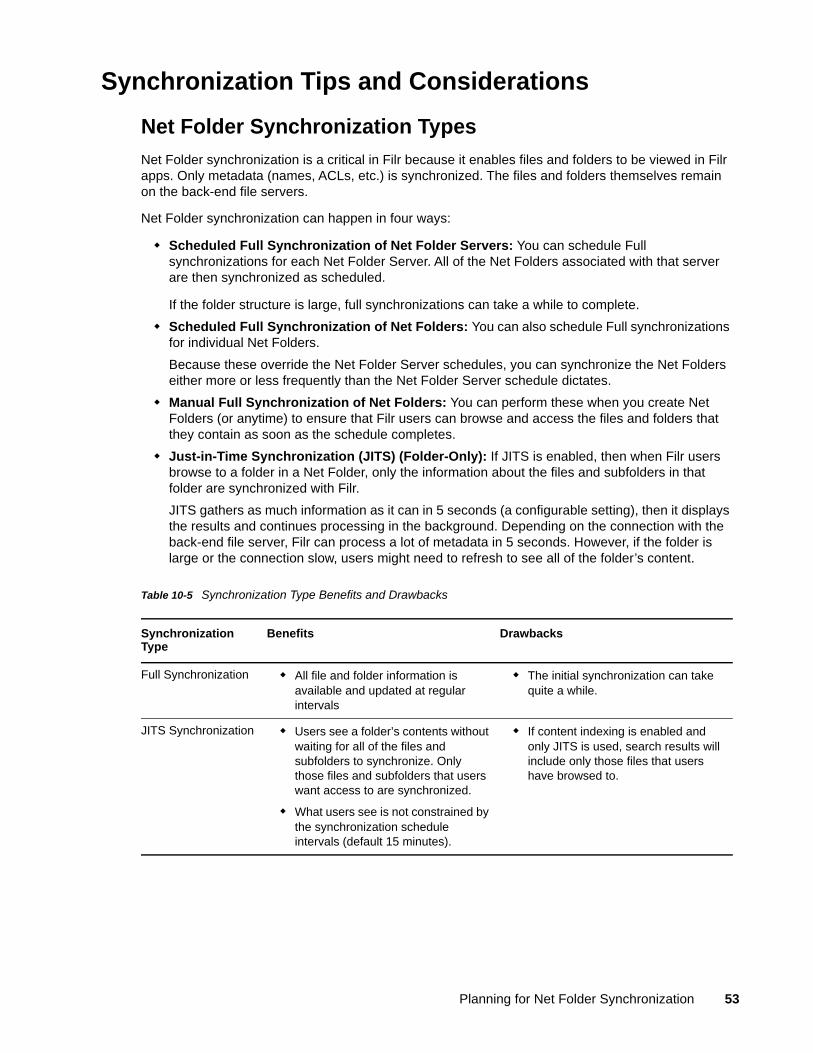
Table 10-5 Synchronization Type Benefits and Drawbacks
Synchronization Type
Benefits Drawbacks
Full Synchronization All file and folder information is available and updated at regular intervals
The initial synchronization can take quite a while.
JITS Synchronization Users see a folder’s contents without waiting for all of the files and subfolders to synchronize. Only those files and subfolders that users want access to are synchronized.
What users see is not constrained by the synchronization schedule intervals (default 15 minutes).
If content indexing is enabled and only JITS is used, search results will include only those files that users have browsed to.
Planning for Net Folder Synchronization 53
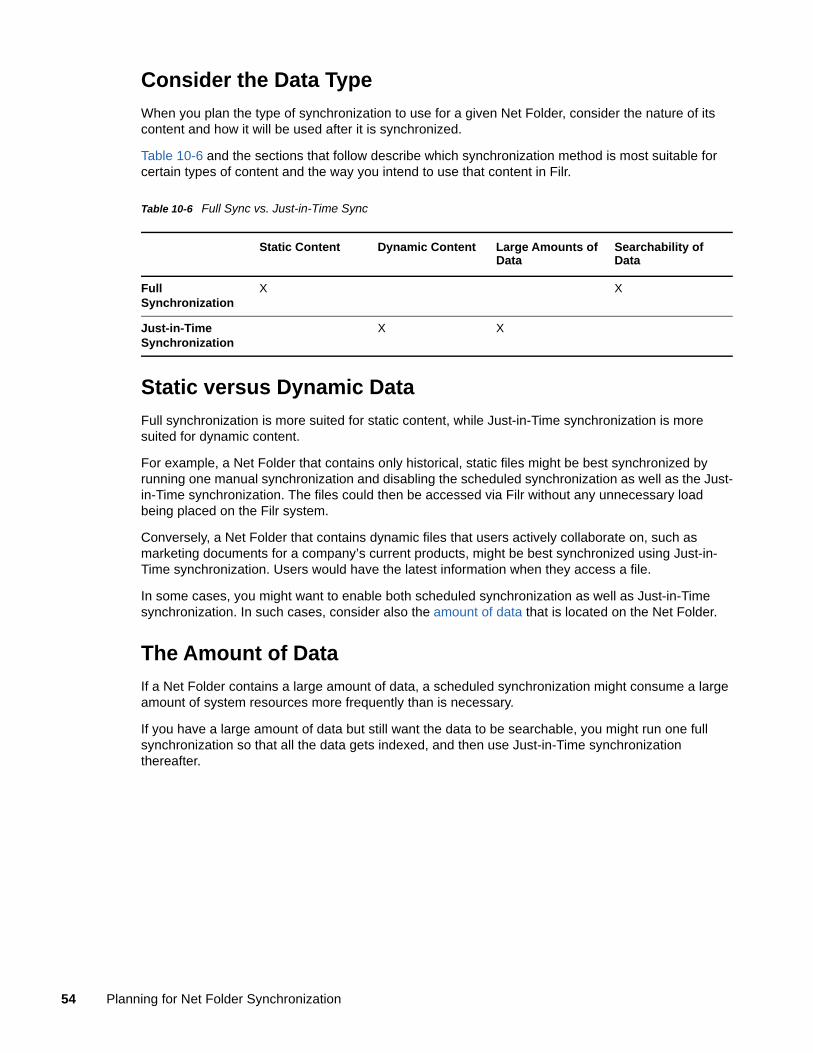
Consider the Data Type
When you plan the type of synchronization to use for a given Net Folder, consider the nature of its content and how it will be used after it is synchronized.
Table 10-6 and the sections that follow describe which synchronization method is most suitable for certain types of content and the way you intend to use that content in Filr.
Table 10-6 Full Sync vs. Just-in-Time Sync
Static versus Dynamic Data
Full synchronization is more suited for static content, while Just-in-Time synchronization is more suited for dynamic content.
For example, a Net Folder that contains only historical, static files might be best synchronized by running one manual synchronization and disabling the scheduled synchronization as well as the Just-in-Time synchronization. The files could then be accessed via Filr without any unnecessary load being placed on the Filr system.
Conversely, a Net Folder that contains dynamic files that users actively collaborate on, such as marketing documents for a company’s current products, might be best synchronized using Just-in-Time synchronization. Users would have the latest information when they access a file.
In some cases, you might want to enable both scheduled synchronization as well as Just-in-Time synchronization. In such cases, consider also the amount of data that is located on the Net Folder.
The Amount of Data
If a Net Folder contains a large amount of data, a scheduled synchronization might consume a large amount of system resources more frequently than is necessary.
If you have a large amount of data but still want the data to be searchable, you might run one full synchronization so that all the data gets indexed, and then use Just-in-Time synchronization thereafter.
Static Content Dynamic Content Large Amounts of Data
Searchability of Data
Full Synchronization
X X
Just-in-Time Synchronization
X X
54 Planning for Net Folder Synchronization
Avoid Over-Synchronization
Consider the following when planning the synchronization schedule:
The schedule that you choose can greatly affect system performance. Avoid the following scenarios, which can cause your Filr system to be slow or sluggish:
You configure Net Folder synchronization schedules among various Net Folders and Net Folder Servers in such a way so that Filr is constantly synchronizing information.
A single synchronization schedule is so frequent that a new synchronization begins as soon as the previous one finishes.
Planning for Net Folder Synchronization 55

56 Planning for Net Folder Synchronization
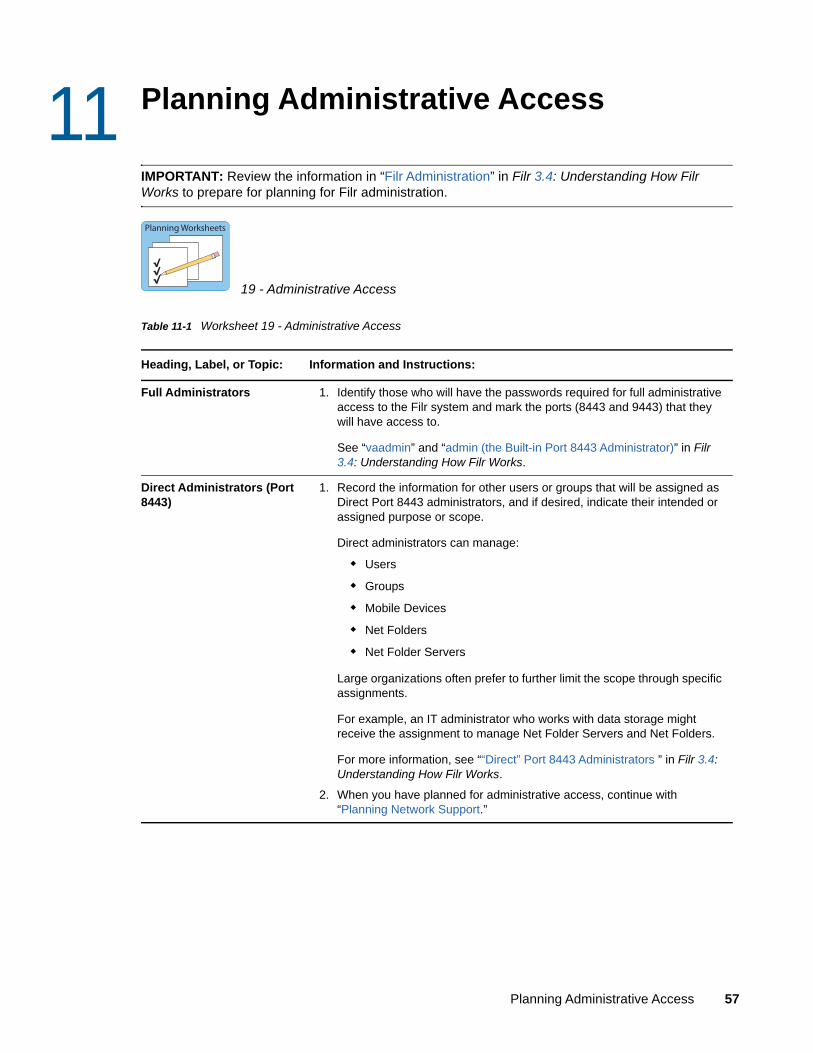
11 11Planning Administrative Access
IMPORTANT: Review the information in “Filr Administration” in Filr 3.4: Understanding How Filr Works to prepare for planning for Filr administration.
19 - Administrative Access
Table 11-1 Worksheet 19 - Administrative Access
Heading, Label, or Topic: Information and Instructions:
Full Administrators 1. Identify those who will have the passwords required for full administrative access to the Filr system and mark the ports (8443 and 9443) that they will have access to.
See “vaadmin” and “admin (the Built-in Port 8443 Administrator)” in Filr 3.4: Understanding How Filr Works.
Direct Administrators (Port 8443)
1. Record the information for other users or groups that will be assigned as Direct Port 8443 administrators, and if desired, indicate their intended or assigned purpose or scope.
Direct administrators can manage:
Users
Groups
Mobile Devices
Net Folders
Net Folder Servers
Large organizations often prefer to further limit the scope through specific assignments.
For example, an IT administrator who works with data storage might receive the assignment to manage Net Folder Servers and Net Folders.
For more information, see ““Direct” Port 8443 Administrators ” in Filr 3.4: Understanding How Filr Works.
2. When you have planned for administrative access, continue with “Planning Network Support.”
Planning Worksheets
Planning Administrative Access 57

58 Planning Administrative Access
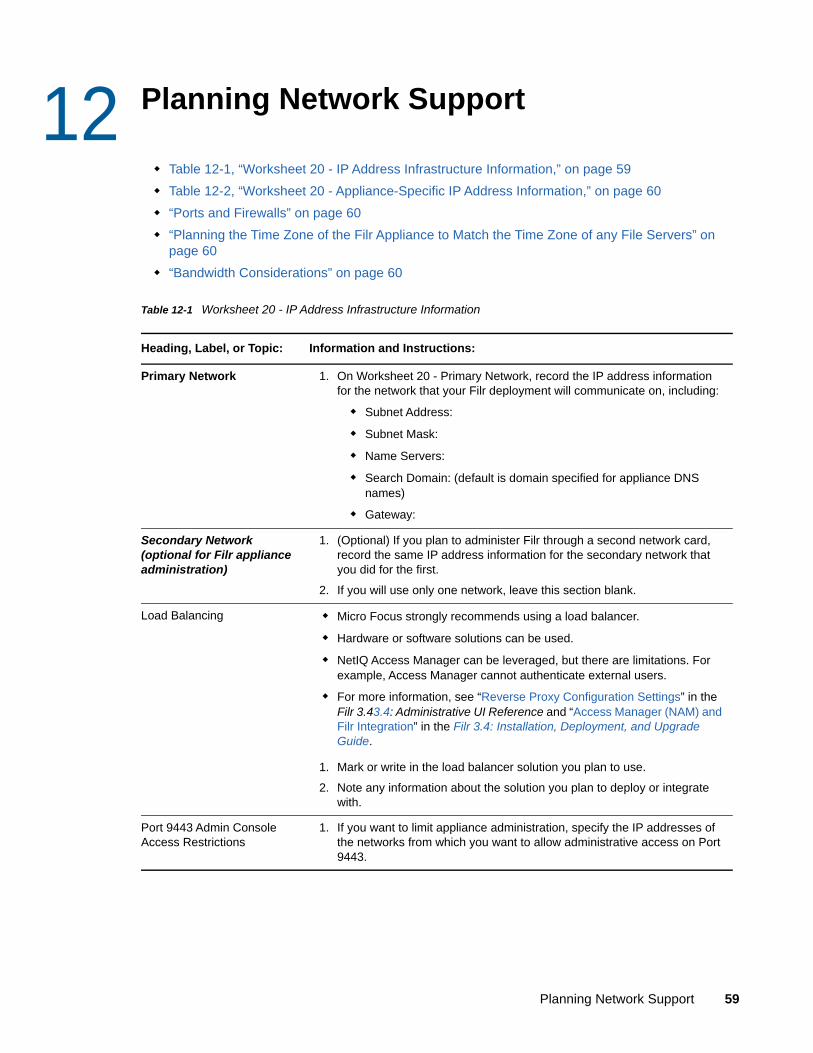
12 12Planning Network Support
Table 12-1, “Worksheet 20 - IP Address Infrastructure Information,” on page 59
Table 12-2, “Worksheet 20 - Appliance-Specific IP Address Information,” on page 60
“Ports and Firewalls” on page 60
“Planning the Time Zone of the Filr Appliance to Match the Time Zone of any File Servers” on page 60
“Bandwidth Considerations” on page 60
Table 12-1 Worksheet 20 - IP Address Infrastructure Information
Heading, Label, or Topic: Information and Instructions:
Primary Network 1. On Worksheet 20 - Primary Network, record the IP address information for the network that your Filr deployment will communicate on, including:
Subnet Address:
Subnet Mask:
Name Servers:
Search Domain: (default is domain specified for appliance DNS names)
Gateway:
Secondary Network (optional for Filr appliance administration)
1. (Optional) If you plan to administer Filr through a second network card, record the same IP address information for the secondary network that you did for the first.
2. If you will use only one network, leave this section blank.
Load Balancing Micro Focus strongly recommends using a load balancer.
Hardware or software solutions can be used.
NetIQ Access Manager can be leveraged, but there are limitations. For example, Access Manager cannot authenticate external users.
For more information, see “Reverse Proxy Configuration Settings” in the Filr 3.43.4: Administrative UI Reference and “Access Manager (NAM) and Filr Integration” in the Filr 3.4: Installation, Deployment, and Upgrade Guide.
1. Mark or write in the load balancer solution you plan to use.
2. Note any information about the solution you plan to deploy or integrate with.
Port 9443 Admin Console Access Restrictions
1. If you want to limit appliance administration, specify the IP addresses of the networks from which you want to allow administrative access on Port 9443.
Planning Network Support 59
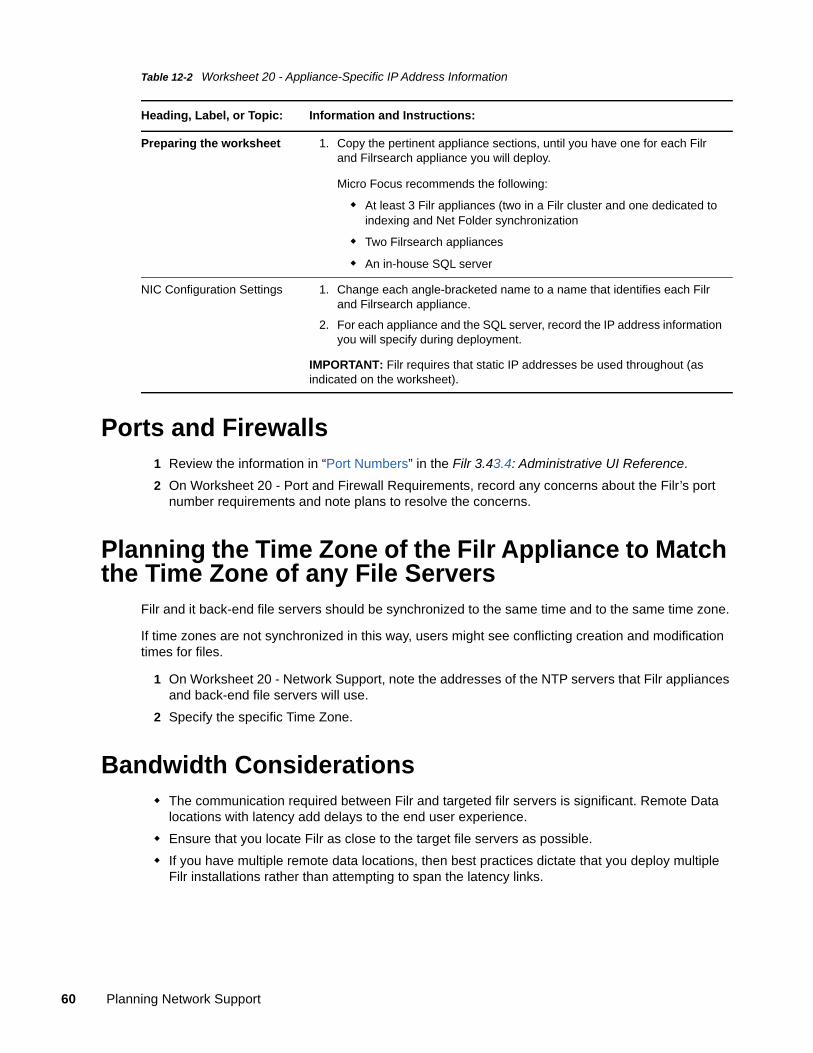
Table 12-2 Worksheet 20 - Appliance-Specific IP Address Information
Ports and Firewalls1 Review the information in “Port Numbers” in the Filr 3.43.4: Administrative UI Reference.
2 On Worksheet 20 - Port and Firewall Requirements, record any concerns about the Filr’s port number requirements and note plans to resolve the concerns.
Planning the Time Zone of the Filr Appliance to Match the Time Zone of any File Servers
Filr and it back-end file servers should be synchronized to the same time and to the same time zone.
If time zones are not synchronized in this way, users might see conflicting creation and modification times for files.
1 On Worksheet 20 - Network Support, note the addresses of the NTP servers that Filr appliances and back-end file servers will use.
2 Specify the specific Time Zone.
Bandwidth Considerations The communication required between Filr and targeted filr servers is significant. Remote Data
locations with latency add delays to the end user experience.
Ensure that you locate Filr as close to the target file servers as possible.
If you have multiple remote data locations, then best practices dictate that you deploy multiple Filr installations rather than attempting to span the latency links.
Heading, Label, or Topic: Information and Instructions:
Preparing the worksheet 1. Copy the pertinent appliance sections, until you have one for each Filr and Filrsearch appliance you will deploy.
Micro Focus recommends the following:
At least 3 Filr appliances (two in a Filr cluster and one dedicated to indexing and Net Folder synchronization
Two Filrsearch appliances
An in-house SQL server
NIC Configuration Settings 1. Change each angle-bracketed name to a name that identifies each Filr and Filrsearch appliance.
2. For each appliance and the SQL server, record the IP address information you will specify during deployment.
IMPORTANT: Filr requires that static IP addresses be used throughout (as indicated on the worksheet).
60 Planning Network Support
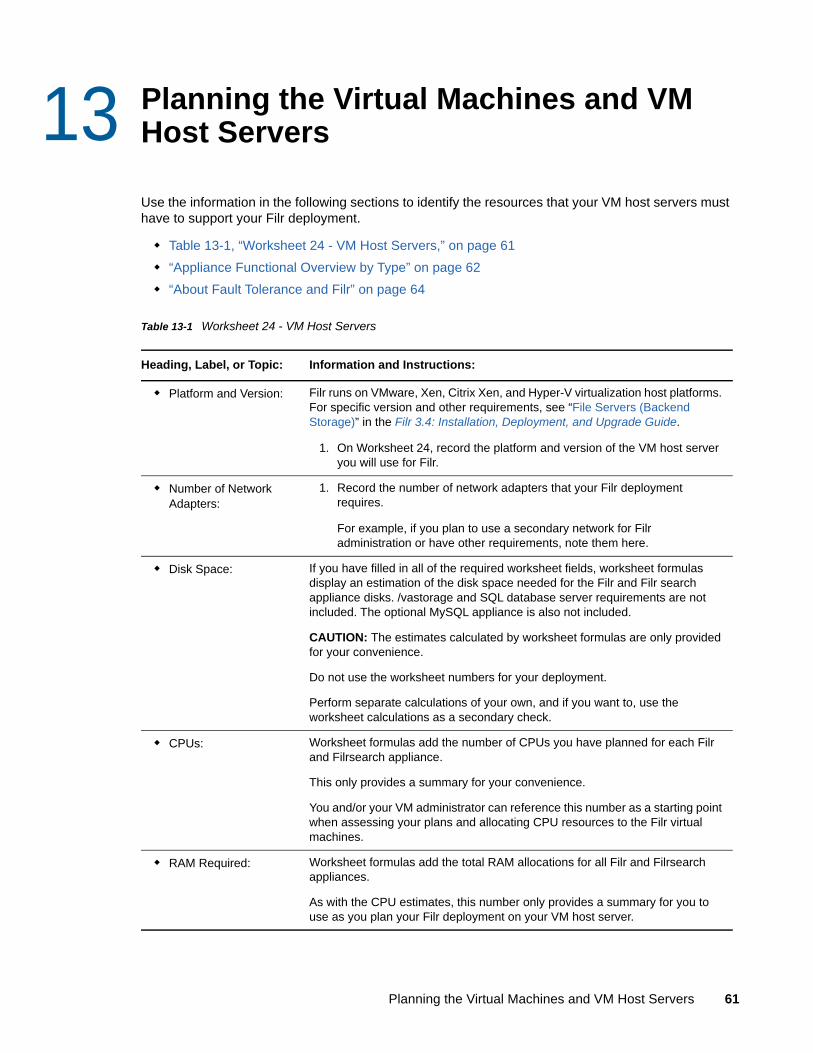
13 13Planning the Virtual Machines and VM Host Servers
Use the information in the following sections to identify the resources that your VM host servers must have to support your Filr deployment.
Table 13-1, “Worksheet 24 - VM Host Servers,” on page 61
“Appliance Functional Overview by Type” on page 62
“About Fault Tolerance and Filr” on page 64
Table 13-1 Worksheet 24 - VM Host Servers
Heading, Label, or Topic: Information and Instructions:
Platform and Version: Filr runs on VMware, Xen, Citrix Xen, and Hyper-V virtualization host platforms. For specific version and other requirements, see “File Servers (Backend Storage)” in the Filr 3.4: Installation, Deployment, and Upgrade Guide.
1. On Worksheet 24, record the platform and version of the VM host server you will use for Filr.
Number of Network Adapters:
1. Record the number of network adapters that your Filr deployment requires.
For example, if you plan to use a secondary network for Filr administration or have other requirements, note them here.
Disk Space: If you have filled in all of the required worksheet fields, worksheet formulas display an estimation of the disk space needed for the Filr and Filr search appliance disks. /vastorage and SQL database server requirements are not included. The optional MySQL appliance is also not included.
CAUTION: The estimates calculated by worksheet formulas are only provided for your convenience.
Do not use the worksheet numbers for your deployment.
Perform separate calculations of your own, and if you want to, use the worksheet calculations as a secondary check.
CPUs: Worksheet formulas add the number of CPUs you have planned for each Filr and Filrsearch appliance.
This only provides a summary for your convenience.
You and/or your VM administrator can reference this number as a starting point when assessing your plans and allocating CPU resources to the Filr virtual machines.
RAM Required: Worksheet formulas add the total RAM allocations for all Filr and Filrsearch appliances.
As with the CPU estimates, this number only provides a summary for you to use as you plan your Filr deployment on your VM host server.
Planning the Virtual Machines and VM Host Servers 61
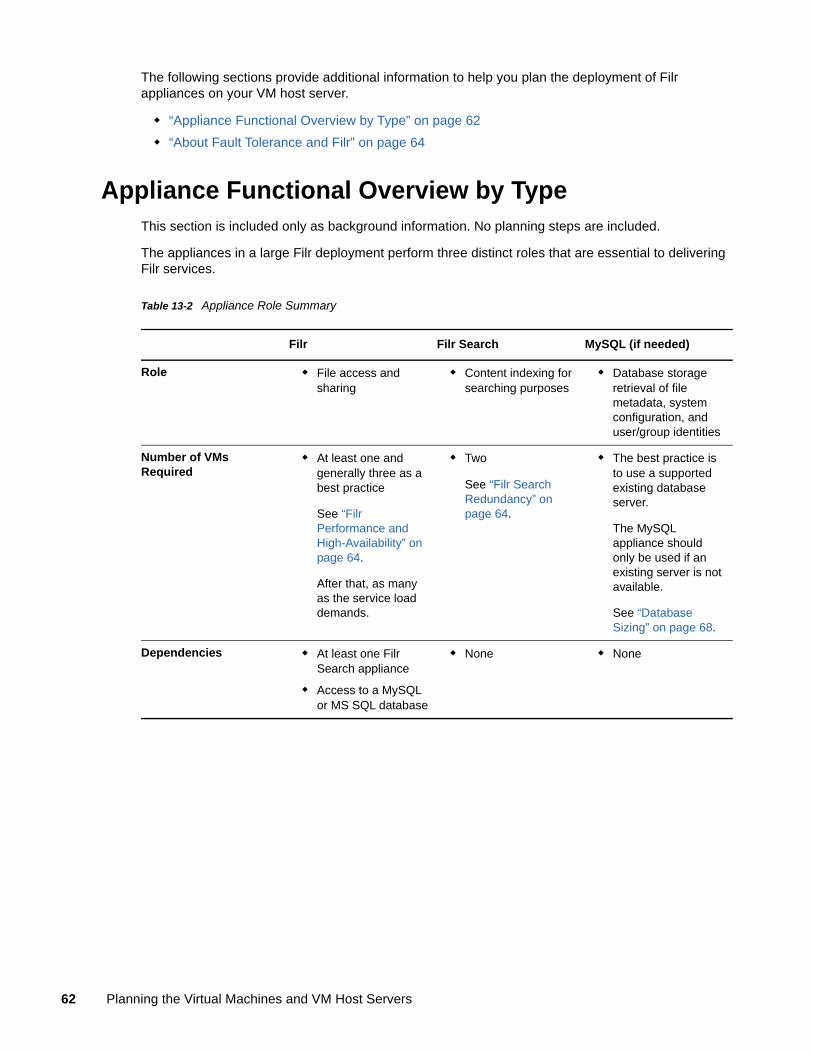
The following sections provide additional information to help you plan the deployment of Filr appliances on your VM host server.
“Appliance Functional Overview by Type” on page 62
“About Fault Tolerance and Filr” on page 64
Appliance Functional Overview by TypeThis section is included only as background information. No planning steps are included.
The appliances in a large Filr deployment perform three distinct roles that are essential to delivering Filr services.
Table 13-2 Appliance Role Summary
Filr Filr Search MySQL (if needed)
Role File access and sharing
Content indexing for searching purposes
Database storage retrieval of file metadata, system configuration, and user/group identities
Number of VMs Required
At least one and generally three as a best practice
See “Filr Performance and High-Availability” on page 64.
After that, as many as the service load demands.
Two
See “Filr Search Redundancy” on page 64.
The best practice is to use a supported existing database server.
The MySQL appliance should only be used if an existing server is not available.
See “Database Sizing” on page 68.
Dependencies At least one Filr Search appliance
Access to a MySQL or MS SQL database
None None
62 Planning the Virtual Machines and VM Host Servers
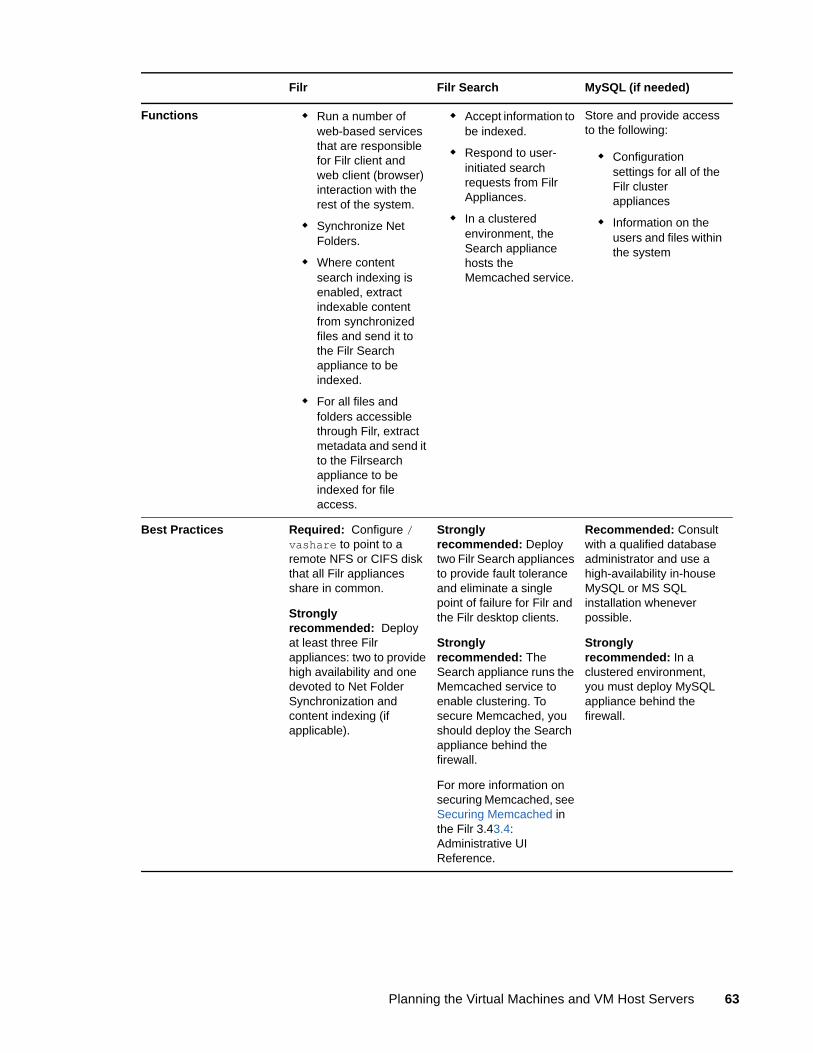
Functions Run a number of web-based services that are responsible for Filr client and web client (browser) interaction with the rest of the system.
Synchronize Net Folders.
Where content search indexing is enabled, extract indexable content from synchronized files and send it to the Filr Search appliance to be indexed.
For all files and folders accessible through Filr, extract metadata and send it to the Filrsearch appliance to be indexed for file access.
Accept information to be indexed.
Respond to user-initiated search requests from Filr Appliances.
In a clustered environment, the Search appliance hosts the Memcached service.
Store and provide access to the following:
Configuration settings for all of the Filr cluster appliances
Information on the users and files within the system
Best Practices Required: Configure /vashare to point to a remote NFS or CIFS disk that all Filr appliances share in common.
Strongly recommended: Deploy at least three Filr appliances: two to provide high availability and one devoted to Net Folder Synchronization and content indexing (if applicable).
Strongly recommended: Deploy two Filr Search appliances to provide fault tolerance and eliminate a single point of failure for Filr and the Filr desktop clients.
Strongly recommended: The Search appliance runs the Memcached service to enable clustering. To secure Memcached, you should deploy the Search appliance behind the firewall.
For more information on securing Memcached, see Securing Memcached in the Filr 3.43.4: Administrative UI Reference.
Recommended: Consult with a qualified database administrator and use a high-availability in-house MySQL or MS SQL installation whenever possible.
Strongly recommended: In a clustered environment, you must deploy MySQL appliance behind the firewall.
Filr Filr Search MySQL (if needed)
Planning the Virtual Machines and VM Host Servers 63
About Fault Tolerance and FilrThe following sections are included only as background information. No planning steps are included in them.
“Filr Performance and High-Availability” on page 64
“Filr Search Redundancy” on page 64
Filr Performance and High-Availability
Micro Focus recommends having at least two Filr servers in a large, expandable deployment for basic performance and high-availability. You can add more as your deployment grows through your initial pilot to a phased-in production rollout.
Determine whether a hardware solution (such as an application delivery controller or L4 switch) or a software solution (such as NetIQ Access Manager, Apache, and so forth) will be used to front the Filr servers.
Micro Focus also recommends connecting a third Filr Appliance to the shared storage and not fronting it with a load balancer. This appliance can then be used for dedicated administration and Net Folder indexing and synchronization.
Filr Search Redundancy
Having functional search appliances and the services they provide is vital to the health of the system.
Micro Focus recommends having two Search/Index servers for redundancy (fault tolerance) purposes. Having more than two is not recommended or needed, because there are no performance gains associated with multiple Filr Search appliances.
By using two Search Appliances, you can perform re-index operations at separate times, thus preventing the clients from re-downloading all their data. For instructions, see in the Filr 3.4: Maintenance Best Practices Guide.
64 Planning the Virtual Machines and VM Host Servers
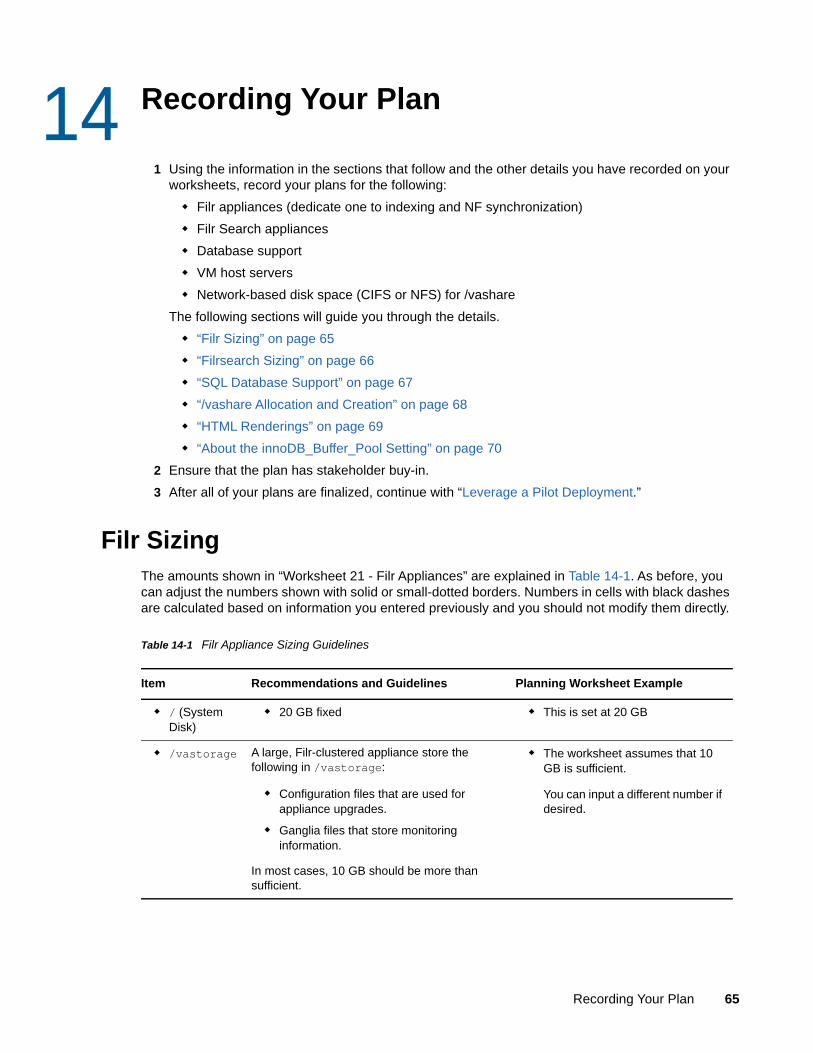
14 14Recording Your Plan
1 Using the information in the sections that follow and the other details you have recorded on your worksheets, record your plans for the following:
Filr appliances (dedicate one to indexing and NF synchronization)
Filr Search appliances
Database support
VM host servers
Network-based disk space (CIFS or NFS) for /vashare
The following sections will guide you through the details.
“Filr Sizing” on page 65
“Filrsearch Sizing” on page 66
“SQL Database Support” on page 67
“/vashare Allocation and Creation” on page 68
“HTML Renderings” on page 69
“About the innoDB_Buffer_Pool Setting” on page 70
2 Ensure that the plan has stakeholder buy-in.
3 After all of your plans are finalized, continue with “Leverage a Pilot Deployment.”
Filr SizingThe amounts shown in “Worksheet 21 - Filr Appliances” are explained in Table 14-1. As before, you can adjust the numbers shown with solid or small-dotted borders. Numbers in cells with black dashes are calculated based on information you entered previously and you should not modify them directly.
Table 14-1 Filr Appliance Sizing Guidelines
Item Recommendations and Guidelines Planning Worksheet Example
/ (System Disk)
20 GB fixed This is set at 20 GB
/vastorage A large, Filr-clustered appliance store the following in /vastorage:
Configuration files that are used for appliance upgrades.
Ganglia files that store monitoring information.
In most cases, 10 GB should be more than sufficient.
The worksheet assumes that 10 GB is sufficient.
You can input a different number if desired.
Recording Your Plan 65
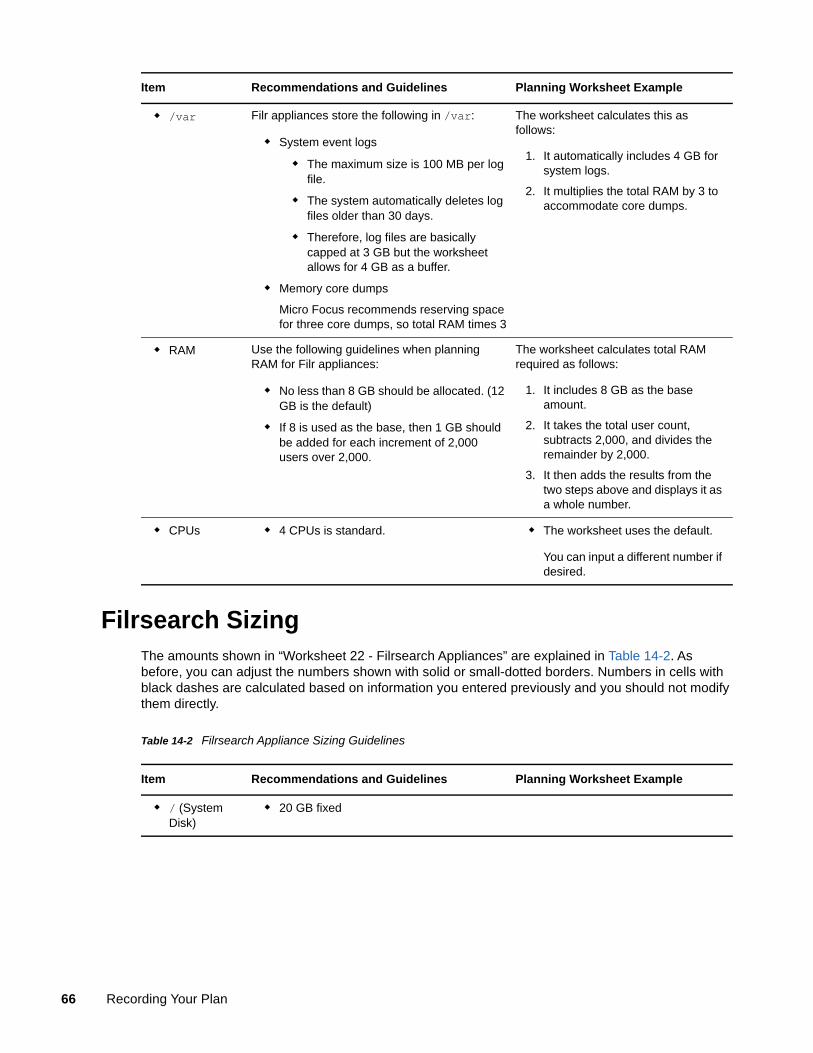
Filrsearch SizingThe amounts shown in “Worksheet 22 - Filrsearch Appliances” are explained in Table 14-2. As before, you can adjust the numbers shown with solid or small-dotted borders. Numbers in cells with black dashes are calculated based on information you entered previously and you should not modify them directly.
Table 14-2 Filrsearch Appliance Sizing Guidelines
/var Filr appliances store the following in /var:
System event logs
The maximum size is 100 MB per log file.
The system automatically deletes log files older than 30 days.
Therefore, log files are basically capped at 3 GB but the worksheet allows for 4 GB as a buffer.
Memory core dumps
Micro Focus recommends reserving space for three core dumps, so total RAM times 3
The worksheet calculates this as follows:
1. It automatically includes 4 GB for system logs.
2. It multiplies the total RAM by 3 to accommodate core dumps.
RAM Use the following guidelines when planning RAM for Filr appliances:
No less than 8 GB should be allocated. (12 GB is the default)
If 8 is used as the base, then 1 GB should be added for each increment of 2,000 users over 2,000.
The worksheet calculates total RAM required as follows:
1. It includes 8 GB as the base amount.
2. It takes the total user count, subtracts 2,000, and divides the remainder by 2,000.
3. It then adds the results from the two steps above and displays it as a whole number.
CPUs 4 CPUs is standard. The worksheet uses the default.
You can input a different number if desired.
Item Recommendations and Guidelines Planning Worksheet Example
Item Recommendations and Guidelines Planning Worksheet Example
/ (System Disk)
20 GB fixed
66 Recording Your Plan
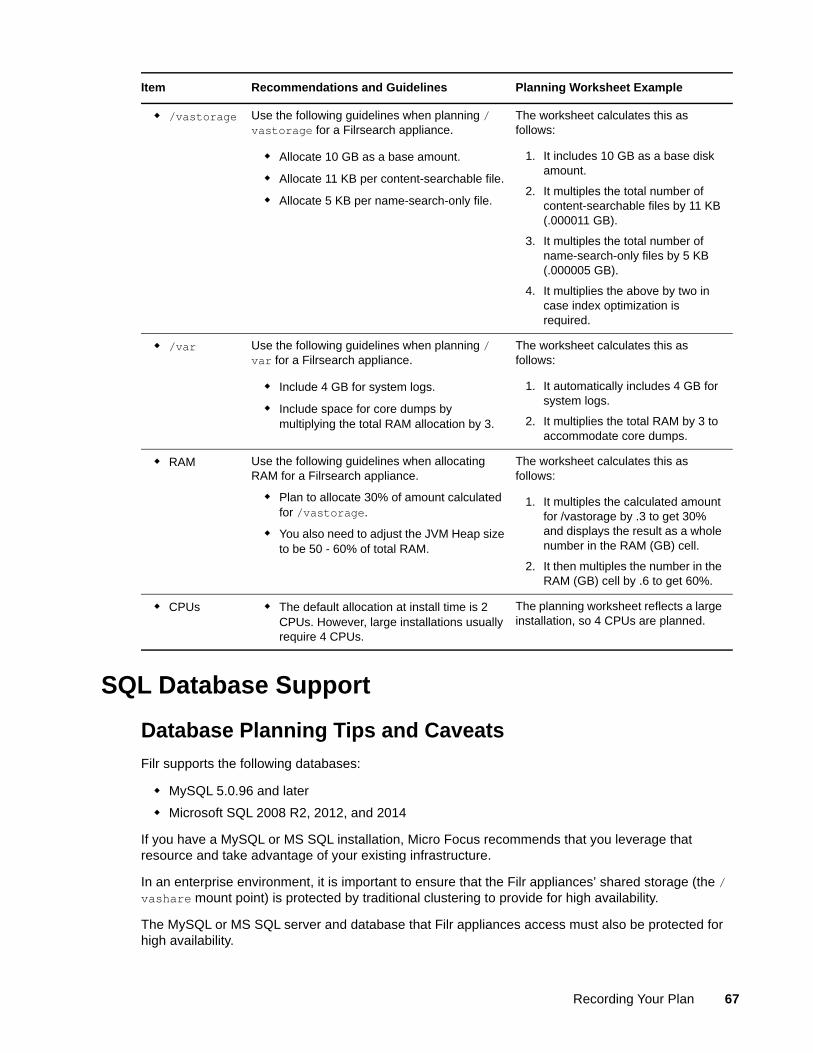
SQL Database Support
Database Planning Tips and Caveats
Filr supports the following databases:
MySQL 5.0.96 and later
Microsoft SQL 2008 R2, 2012, and 2014
If you have a MySQL or MS SQL installation, Micro Focus recommends that you leverage that resource and take advantage of your existing infrastructure.
In an enterprise environment, it is important to ensure that the Filr appliances’ shared storage (the /vashare mount point) is protected by traditional clustering to provide for high availability.
The MySQL or MS SQL server and database that Filr appliances access must also be protected for high availability.
/vastorage Use the following guidelines when planning /vastorage for a Filrsearch appliance.
Allocate 10 GB as a base amount.
Allocate 11 KB per content-searchable file.
Allocate 5 KB per name-search-only file.
The worksheet calculates this as follows:
1. It includes 10 GB as a base disk amount.
2. It multiples the total number of content-searchable files by 11 KB (.000011 GB).
3. It multiples the total number of name-search-only files by 5 KB (.000005 GB).
4. It multiplies the above by two in case index optimization is required.
/var Use the following guidelines when planning /var for a Filrsearch appliance.
Include 4 GB for system logs.
Include space for core dumps by multiplying the total RAM allocation by 3.
The worksheet calculates this as follows:
1. It automatically includes 4 GB for system logs.
2. It multiplies the total RAM by 3 to accommodate core dumps.
RAM Use the following guidelines when allocating RAM for a Filrsearch appliance.
Plan to allocate 30% of amount calculated for /vastorage.
You also need to adjust the JVM Heap size to be 50 - 60% of total RAM.
The worksheet calculates this as follows:
1. It multiples the calculated amount for /vastorage by .3 to get 30% and displays the result as a whole number in the RAM (GB) cell.
2. It then multiples the number in the RAM (GB) cell by .6 to get 60%.
CPUs The default allocation at install time is 2 CPUs. However, large installations usually require 4 CPUs.
The planning worksheet reflects a large installation, so 4 CPUs are planned.
Item Recommendations and Guidelines Planning Worksheet Example
Recording Your Plan 67
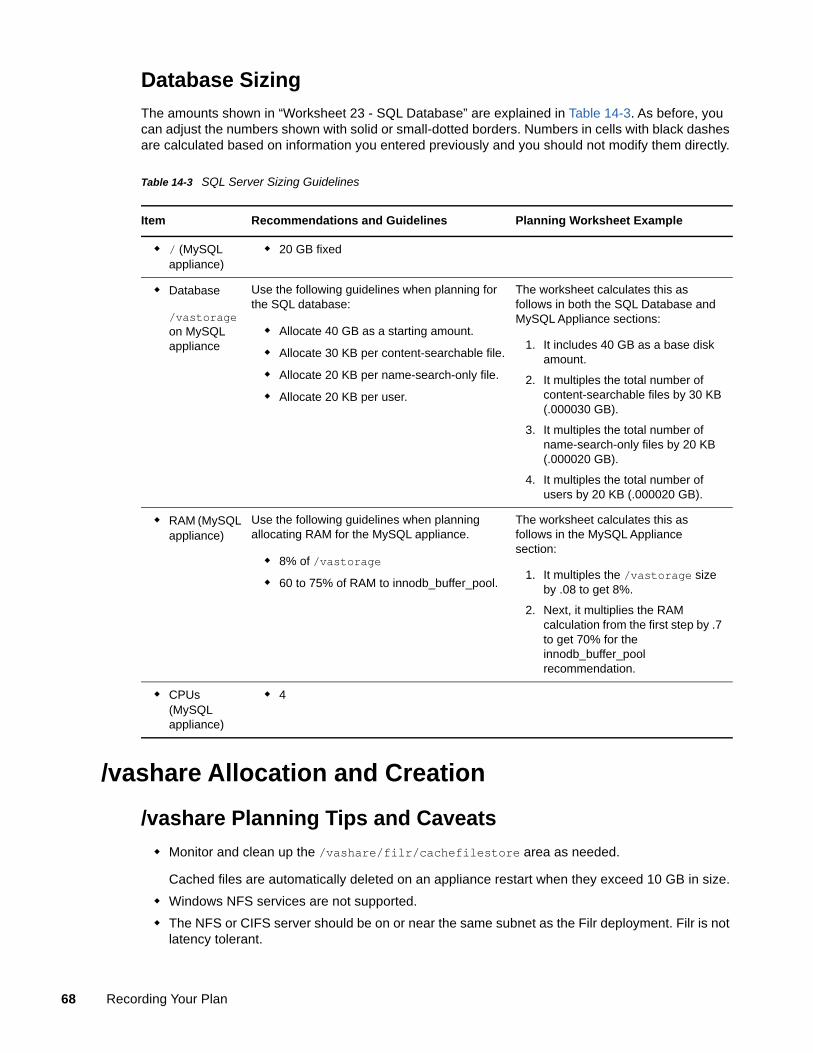
Database Sizing
The amounts shown in “Worksheet 23 - SQL Database” are explained in Table 14-3. As before, you can adjust the numbers shown with solid or small-dotted borders. Numbers in cells with black dashes are calculated based on information you entered previously and you should not modify them directly.
Table 14-3 SQL Server Sizing Guidelines
/vashare Allocation and Creation
/vashare Planning Tips and Caveats
Monitor and clean up the /vashare/filr/cachefilestore area as needed.
Cached files are automatically deleted on an appliance restart when they exceed 10 GB in size.
Windows NFS services are not supported.
The NFS or CIFS server should be on or near the same subnet as the Filr deployment. Filr is not latency tolerant.
Item Recommendations and Guidelines Planning Worksheet Example
/ (MySQL appliance)
20 GB fixed
Database
/vastorage on MySQL appliance
Use the following guidelines when planning for the SQL database:
Allocate 40 GB as a starting amount.
Allocate 30 KB per content-searchable file.
Allocate 20 KB per name-search-only file.
Allocate 20 KB per user.
The worksheet calculates this as follows in both the SQL Database and MySQL Appliance sections:
1. It includes 40 GB as a base disk amount.
2. It multiples the total number of content-searchable files by 30 KB (.000030 GB).
3. It multiples the total number of name-search-only files by 20 KB (.000020 GB).
4. It multiples the total number of users by 20 KB (.000020 GB).
RAM (MySQL appliance)
Use the following guidelines when planning allocating RAM for the MySQL appliance.
8% of /vastorage 60 to 75% of RAM to innodb_buffer_pool.
The worksheet calculates this as follows in the MySQL Appliance section:
1. It multiples the /vastorage size by .08 to get 8%.
2. Next, it multiplies the RAM calculation from the first step by .7 to get 70% for the innodb_buffer_pool recommendation.
CPUs (MySQL appliance)
4
68 Recording Your Plan
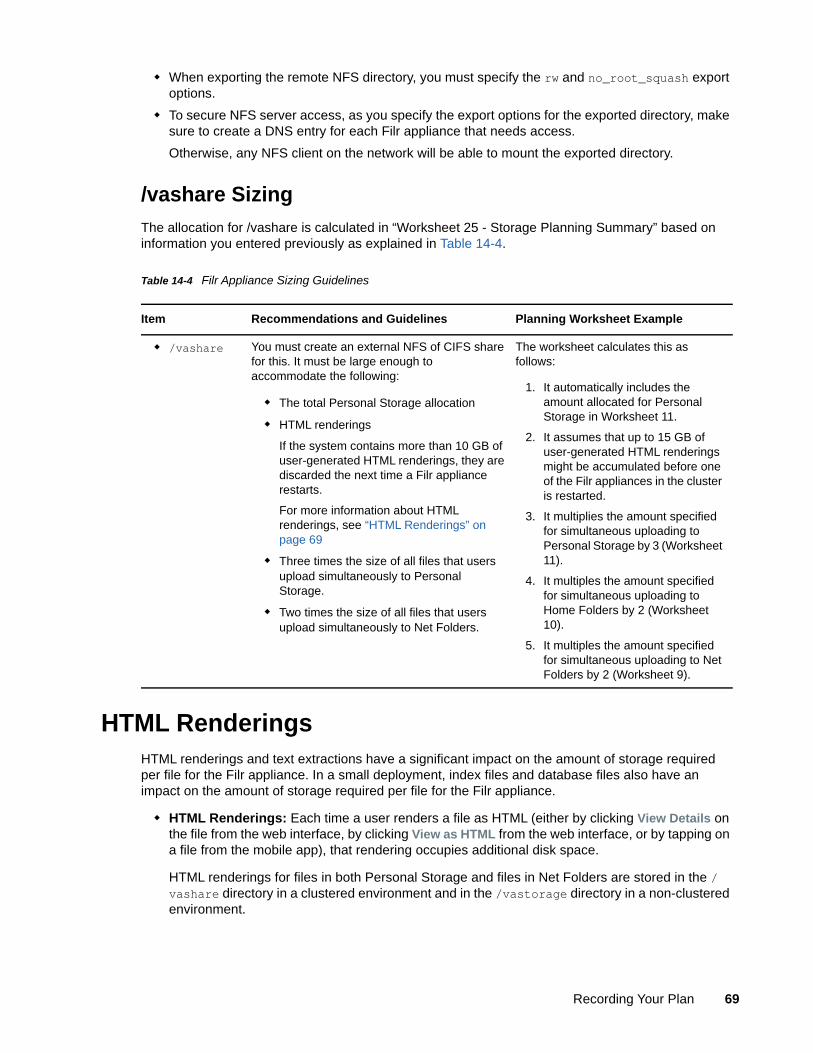
When exporting the remote NFS directory, you must specify the rw and no_root_squash export options.
To secure NFS server access, as you specify the export options for the exported directory, make sure to create a DNS entry for each Filr appliance that needs access.
Otherwise, any NFS client on the network will be able to mount the exported directory.
/vashare Sizing
The allocation for /vashare is calculated in “Worksheet 25 - Storage Planning Summary” based on information you entered previously as explained in Table 14-4.
Table 14-4 Filr Appliance Sizing Guidelines
HTML RenderingsHTML renderings and text extractions have a significant impact on the amount of storage required per file for the Filr appliance. In a small deployment, index files and database files also have an impact on the amount of storage required per file for the Filr appliance.
HTML Renderings: Each time a user renders a file as HTML (either by clicking View Details on the file from the web interface, by clicking View as HTML from the web interface, or by tapping on a file from the mobile app), that rendering occupies additional disk space.
HTML renderings for files in both Personal Storage and files in Net Folders are stored in the /vashare directory in a clustered environment and in the /vastorage directory in a non-clustered environment.
Item Recommendations and Guidelines Planning Worksheet Example
/vashare You must create an external NFS of CIFS share for this. It must be large enough to accommodate the following:
The total Personal Storage allocation
HTML renderings
If the system contains more than 10 GB of user-generated HTML renderings, they are discarded the next time a Filr appliance restarts.
For more information about HTML renderings, see “HTML Renderings” on page 69
Three times the size of all files that users upload simultaneously to Personal Storage.
Two times the size of all files that users upload simultaneously to Net Folders.
The worksheet calculates this as follows:
1. It automatically includes the amount allocated for Personal Storage in Worksheet 11.
2. It assumes that up to 15 GB of user-generated HTML renderings might be accumulated before one of the Filr appliances in the cluster is restarted.
3. It multiplies the amount specified for simultaneous uploading to Personal Storage by 3 (Worksheet 11).
4. It multiples the amount specified for simultaneous uploading to Home Folders by 2 (Worksheet 10).
5. It multiples the amount specified for simultaneous uploading to Net Folders by 2 (Worksheet 9).
Recording Your Plan 69
Only one HTML rendering can exist for a single document. If a user views a file as HTML and a rendering already exists, a second rendering is not created.
The amount of space the HTML rendering occupies differs depending on the type of file that is rendered:
Office file renderings (such as Microsoft Office and OpenOffice) require the same amount of disk space as the original file. (For example, a 1 MB file requires an additional 1 MB of disk space for the HTML rendering.)
PDF renderings require approximately 10 times the amount of disk space as the original file. (For example, a 1 MB file requires an additional 10 MB of disk space for the HTML rendering.)
PowerPoint renderings require approximately 3 times the amount of disk space as the original file. (For example, a 1 MB file requires an additional 3 MB of disk space for the HTML rendering.)
If HTML renderings are consuming more than 10 GB of disk space on your system, you can delete all HTML renderings by restarting the Filr appliance.
Text Extractions: When an indexed file is added to Filr (either to Personal Storage or to a Net Folder), text from the file is extracted and added to the search index to be used for searching. By default, each text-extracted file is truncated to 1.1 MB.
About the innoDB_Buffer_Pool SettingIf the MySQL /vastorage hard disk is formatted with the Ext-3 file system, inodes can be consumed until no more files can be added to the disk, even though space still exists.
Micro Focus recommends, therefore, that the innodb_buffer_pool parameter be set to 60% of total RAM allocated to the appliance.
To learn more about inodes and proper allocation based on the potential number of files that are created on the file system, see The File System in Reality (http://www.tldp.org/LDP/intro-linux/html/sect_03_01.html#sect_03_01_0), in the The Linux Documentation Project (http://www.tldp.org).
70 Recording Your Plan
15 15Leverage a Pilot Deployment
Toward the end of your planning process, use a pilot deployment to validate and improve your production deployment plans.
1 Create a small pilot deployment that represents the breadth of the plans you have made.
2 Test and monitor your pilot deployment to see whether it is meeting users’ needs.
3 Adjust your plans as needed.
4 When your plan seems solid, proceed with “Setting Up Shared Storage” in the Filr 3.4: Installation, Deployment, and Upgrade Guide.
Leverage a Pilot Deployment 71

72 Leverage a Pilot Deployment
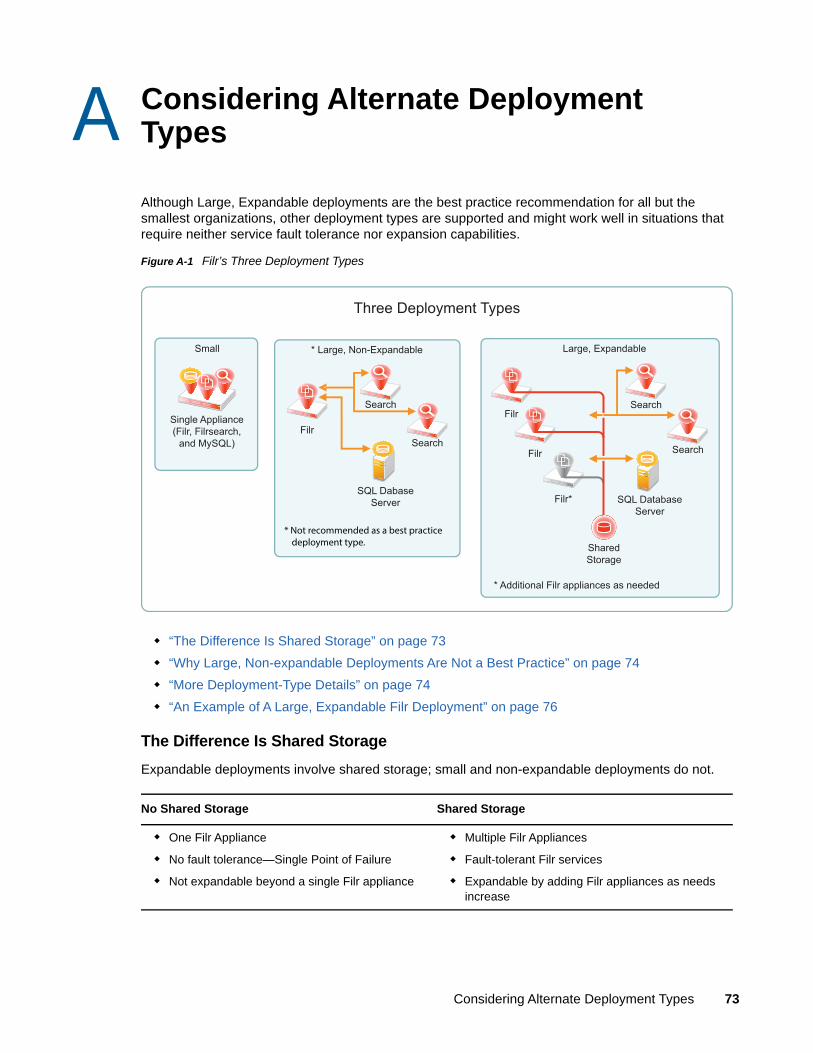
A AConsidering Alternate Deployment Types
Although Large, Expandable deployments are the best practice recommendation for all but the smallest organizations, other deployment types are supported and might work well in situations that require neither service fault tolerance nor expansion capabilities.
Figure A-1 Filr’s Three Deployment Types
“The Difference Is Shared Storage” on page 73
“Why Large, Non-expandable Deployments Are Not a Best Practice” on page 74
“More Deployment-Type Details” on page 74
“An Example of A Large, Expandable Filr Deployment” on page 76
The Difference Is Shared Storage
Expandable deployments involve shared storage; small and non-expandable deployments do not.
No Shared Storage Shared Storage
One Filr Appliance
No fault tolerance—Single Point of Failure
Not expandable beyond a single Filr appliance
Multiple Filr Appliances
Fault-tolerant Filr services
Expandable by adding Filr appliances as needs increase
Single Appliance(Filr, Filrsearch,
and MySQL)
Small
* Additional Filr appliances as needed
Filr*
Filr
Filr
SharedStorage
Search
Search
SQL DatabaseServer
Large, Expandable
Filr
Search
Search
SQL DabaseServer
* Large, Non-Expandable
Three Deployment Types
* Not recommended as a best practice deployment type.
Considering Alternate Deployment Types 73
Why Large, Non-expandable Deployments Are Not a Best Practice
Organizations are often attracted to this deployment type because it looks much simpler on the surface. In all but a few instances, however, they come to regret the decision for the following reasons:
No Fault Tolerance: If the Filr appliance goes down for any reason, Filr services cease.
No Expansion Capabilities: If additional Filr appliance are needed to handle the service load or to offload Net Folder synchronization and content-search indexing, organizations must start over with an expandable deployment.
No Migration: There is no migration path from a small or large, non-expandable deployment to a large, expandable deployment.
Not Best Choice for Proof-of-Concept: Due to network latency and other issues, for proof-of-concept installations, and other test situations, small deployments are much simpler to deploy and actually perform better than large, non-expandable deployments.
Requires the Same VM Resources as Expandable: Except for a network-based NFS or CIFS shared volume for the /vashare mount point, large, non-expandable deployments require the same VM Host resources as single-Filr-appliance, large-expandable deployments.
Single-Appliance, Large, Expandable Deployments: If you want to start small, you can create a single-Filr-appliance deployment with one or two Filrsearch appliances, an SQL database connection, and a shared NFS or CIFS disk (for /vashare).
Nevertheless, large, non-expandable deployments are reliable and supported (see “Non-Expandable Deployment—Creating” in the Filr 3.4: Installation, Deployment, and Upgrade Guide).
More Deployment-Type Details
As illustrated in Figure A-1, Filr can be deployed in three different ways.
Table A-1 summarizes important comparison points.
Table A-1 Comparing Deployment Types
Small Large, Non-Expandable Large, Expandable
Best Practice Recommendation
Recommended for:
Proof of concept
Very small organizations with no growth anticipated
Not recommended (see “Why Large, Non-expandable Deployments Are Not a Best Practice” on page 74)
Recommended for all organizations unless a small deployment clearly meets all present and future needs.
Deployment Documentation
“All-in-One (Small) Deployment—Creating” in the Filr 3.4: Installation, Deployment, and Upgrade Guide
“Non-Expandable Deployment—Creating” in the Filr 3.4: Installation, Deployment, and Upgrade Guide
This planning guide and the Filr 3.0 Installation and Upgrade Guide.
74 Considering Alternate Deployment Types
Deployment Size One all-in-one appliance
One Filr appliance
Two Filr Search appliances
Access to a MySQL or MS SQL database, or one MySQL appliance
At least two recommended; one required. Micro Focus has tested up to 10. (See Expansion.)
Two Filr Search appliances
Access to a MySQL or MS SQL database, or one MySQL appliance
Off-loading Processor-Intensive Functions
n/a n/a We recommend dedicating one Filr appliance to only content synchronization and indexing.
Expansion to Accommodate Increased Filr-Service Demands
n/a n/a In theory, you can add as many Filr appliances as needed.
In practice, as with any system, there are limitations external to Filr, such as network bandwidth, hardware limitations, and other constraints that, at some point, become bottlenecks for Filr scalability and performance.
Micro Focus’ performance and scale test beds include up to 10 Filr appliances.
Fault Tolerance n/a None for Filr
Filrsearch appliances are independent and redundant.
Multiple Filr appliances provide continual service access
Filrsearch appliances are independent and redundant.
Two index servers are sufficient
High Availability Single point of failure Single point of failure With a load balancer deployed, two or more Filr Appliances can be attached to the same shared storage, which in turn can be protected by traditional clustering.
Migration to Large, Expandable
Not supported Not supported Expansion is inherent as explained above
Small Large, Non-Expandable Large, Expandable
Considering Alternate Deployment Types 75
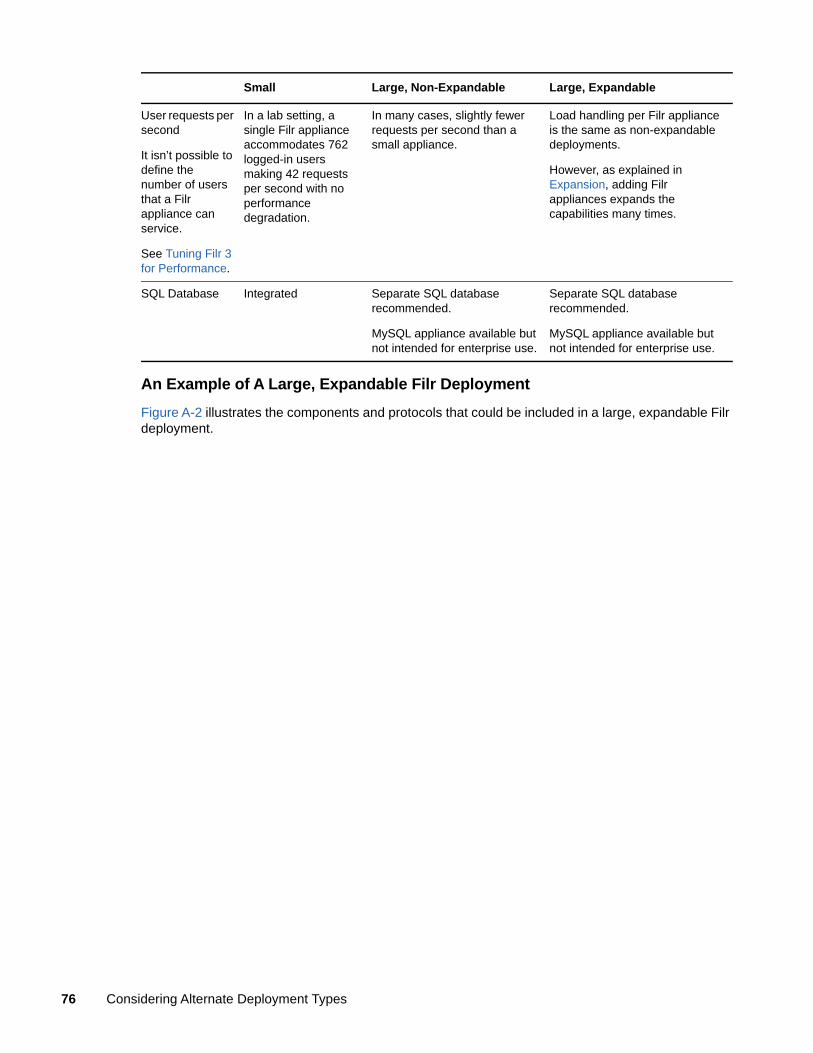
An Example of A Large, Expandable Filr Deployment
Figure A-2 illustrates the components and protocols that could be included in a large, expandable Filr deployment.
User requests per second
It isn’t possible to define the number of users that a Filr appliance can service.
See Tuning Filr 3 for Performance.
In a lab setting, a single Filr appliance accommodates 762 logged-in users making 42 requests per second with no performance degradation.
In many cases, slightly fewer requests per second than a small appliance.
Load handling per Filr appliance is the same as non-expandable deployments.
However, as explained in Expansion, adding Filr appliances expands the capabilities many times.
SQL Database Integrated Separate SQL database recommended.
MySQL appliance available but not intended for enterprise use.
Separate SQL database recommended.
MySQL appliance available but not intended for enterprise use.
Small Large, Non-Expandable Large, Expandable
76 Considering Alternate Deployment Types
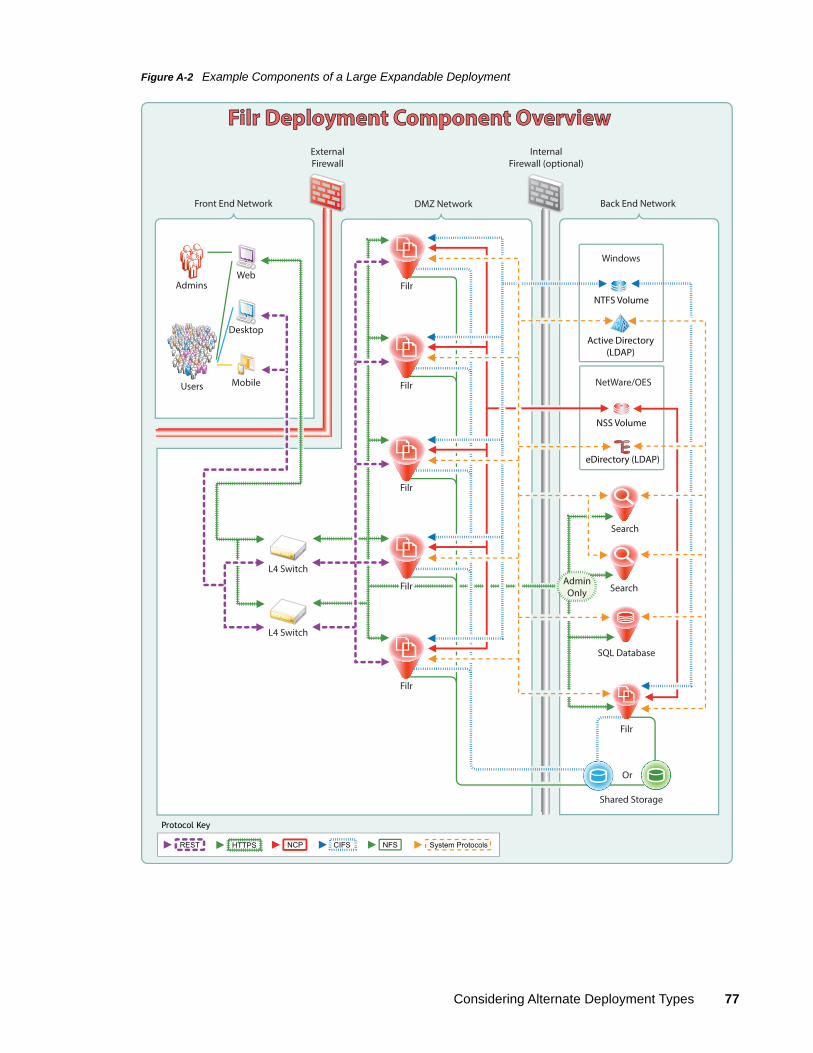
Figure A-2 Example Components of a Large Expandable Deployment
InternalFirewall (optional)
ExternalFirewall
Front End Network
Active Directory(LDAP)
NTFS Volume
Windows
eDirectory (LDAP)
NSS Volume
NetWare/OES
Back End Network
Filr
SQL Database
Search
Search
DMZ Network
AdminOnly
Admins
Shared Storage
Or
Protocol Key
REST NCP CIFS NFS System Protocols
L4 Switch
L4 Switch
Users
Web
Desktop
Mobile Filr
Filr
Filr
Filr
Filr
Filr Deployment Component OverviewFilr Deployment Component Overview
HTTPS
Considering Alternate Deployment Types 77

78 Considering Alternate Deployment Types