plans for a four color t-shirt screen printing press
TRANSCRIPT

5/12/2018 Plans for a Four Color T-Shirt Screen Printing Press - slidepdf.com
http://slidepdf.com/reader/full/plans-for-a-four-color-t-shirt-screen-printing-press 1/16
Free Plans for a Four Color T-Shirt Screen Printing Press
PrintingPlans.com: Free at-home screen printing instructions, DIY money-saving tips andprinting press blueprints
Welcome! We are a resource for new and do-it-yourself screen printers who want to print T-shirts andother items with limited money and resources. Hundreds of people have built high-quality four-colorT-shirt printing presses using the free plans from this site. In addition to the plans (which start furtherdown on this page), we sell kits that contain all the hardware needed to build the press, and evenpackages that contain the precut lumber as well.
We also are building a resource of T-shirt screen printing tips and instructions to help new screenprinters learn how to prepare for and print shirts on a limited budget. Although the more expensiveequipment can be nice, there are almost always ways to do each step for a lot cheaper. These linksare to your left, or continue down this page for the 4-color printing press instructions.
Do-It-Yourself homemade T-shirt press instructions- Print Shirts at Home:
This 4-color, one station screen printing press (pictured upper right) was designed and built by us
here at PrintingPlans.com. It is sturdy and precise and can be built for less than $175, which is quite a
bit less than even the cheapest commercial presses. You can see shirts that were printed on this pressat Phippsart- Creative Tshirts and Prints and at ScatterbrainTees.com
Buy ALL the parts and precut lumber OR Buy just the Hardware
NEW: We are now selling full kits with ALL the hardware, parts and precut lumber ready for you tobuild a deluxe version of the printing press. See what's included on the printing press kit page. Or you
can buy the hardware package from us and then buy and cut the lumber on your own. We buy thehardware in bulk so you can buy it from us CHEAPER than if you bought it locally, even after shippingcosts! Purchase the package on the hardware page.
Questions? Email us at
Download the free plans as a PDF or continue down this page to see them now.
Plan on a few days to finish the press below. It is recommended to have a second person help out as
several steps could use one person holding while the other person attaches.
Make sure your 4-color press is precise and sturdy:
The sturdiness and precision of the press is important for the success of multi-color images, so it¶simportant to be as accurate as possible in your measurements, particularly once you get to the arms.You may want to use wood glue at each joint in addition to screws so that the press is as stable as
possible, but this does make it difficult to take apart should you make a mistake. You may also want
to pre drill holes before putting in the screws to avoid splitting of the wood (use a bit that¶s slightlysmaller than the screw). This table is designed for a six foot tall person. To alter it for someone of adifferent height, adjust parts N and O accordingly.
Q: Can this press be made in a table-top version? A: Yes, just forgo making the legs and buy somelarge clamps to hold it in place.
Tools You¶ll Need for the build:

5/12/2018 Plans for a Four Color T-Shirt Screen Printing Press - slidepdf.com
http://slidepdf.com/reader/full/plans-for-a-four-color-t-shirt-screen-printing-press 2/16
Power Drill/ScrewdriverWood and Metal BitsMiter SawTable Saw or Circular SawElectric SanderWorkbench Vise or Drill PressYardstick/Measuring Tape
PencilLevelSquareClampsWood GlueWelding Glue (or tools/materials for welding)Paper or Card stock
Materials Needed:
In the diagram below you¶ll find the dimensions of all the lumber you¶ll need. The most importantthing regarding the thickness of your wood is that the sum of the width of pieces B, F and the lazysusan turntable is equal to the sum of the thickness of pieces I and U. This will help align everything
so your screens float just the perfect height above your shirts for off-contact printing. You should beable to cut all your 2 x 4 pieces out of six 8-foot lengths, so I¶d recommend buying seven to be safe.They should all be good, straight pieces, but it is especially important to find a perfectly straight piecefor parts T and U.
Note: Part D below is not listed in the instructions. It is a substitute for partK if you choose not to buya 1 x 4 and would prefer to use your existing plywood.
Note 2: If you can't find coated shelving with a rounded edge, you can create the rounded edgeyourself. This is mostly important for parts H. The platen (part G) doesn't specifically need onerounded edge, but rather just needs to be smoothed at the corners so your shirts don't catch on it.
Note 3: The long dimension for part O refers to the length of either side of the parallelogram, NOT theoverall length of the board.

5/12/2018 Plans for a Four Color T-Shirt Screen Printing Press - slidepdf.com
http://slidepdf.com/reader/full/plans-for-a-four-color-t-shirt-screen-printing-press 3/16

5/12/2018 Plans for a Four Color T-Shirt Screen Printing Press - slidepdf.com
http://slidepdf.com/reader/full/plans-for-a-four-color-t-shirt-screen-printing-press 4/16
Hardware Needed:
Below you'll find a list of all hardware needed for the project. For convenience and a discounted price,you can buy it all in one place here: discount screen printing hardware packages. Otherwise most of it
can be found at your local hardware store, though you may find they don't have the total quantity of the c-clamps or springs on hand. You'll also need to go to a specialty woodworking store to find theswivel (lazy susan). Make sure you get a heavy duty, 6" x 6" x 3/4"" model or you'll compromise the
effectiveness of your press.
Making the Table for the Printing Press:
Step 1: Cut all your lumber, marking each piece with the appropriate letter to make assembly easier.We¶ll start by assembling the table itself. First, lay down parts L and Q and attach the legs (part N) asshown (fig. a). Make sure that your angles are perfectly square. Where parts L extend past the legs,
use a piece of 2 x 4 to check that the bits that extend are exactly equal to the smaller width of thewood.

5/12/2018 Plans for a Four Color T-Shirt Screen Printing Press - slidepdf.com
http://slidepdf.com/reader/full/plans-for-a-four-color-t-shirt-screen-printing-press 5/16
Step 2: Attach the thin sides of parts M to part A as shown in fig. b. Use only glue and clamps fornow. Again using only clamps and glue, set parts A and M on top of the two legs you built in Step 1,so that parts L and M form a square around the perimiter of A. This is shown from above in fig. c.(Dotted lines indicate parts beneath.) Once you feel comfortable with the fit, Go ahead and screwparts L into M, and A into both L & M from the top.
Step 3: Now you have a standing, albeit weak, table. Attach parts P to legs N as shown in fig. d. Doit in the front and back, both times keeping part P flush to the outside, as seen from above in fig. e.Note: Parts P act as a support beam and rests for a shelf (part E). It can be lowered or raised to suityour preference, and additional shelves may be added if desired.

5/12/2018 Plans for a Four Color T-Shirt Screen Printing Press - slidepdf.com
http://slidepdf.com/reader/full/plans-for-a-four-color-t-shirt-screen-printing-press 6/16
Step 4: Attach part O to the outside of both sides of the table (fig. f ). Make sure you orient them asshown for maximum support. Now secure shelf E onto crossbeams P to act as a shelf. Add part K tothe back to help keep items from falling off. You are now finished with the table itself. It should beplenty sturdy with no give at all.
Free Four Color T-Shirt Printing Press Plans, Part 2
Building the Platen Arm and Platen:

5/12/2018 Plans for a Four Color T-Shirt Screen Printing Press - slidepdf.com
http://slidepdf.com/reader/full/plans-for-a-four-color-t-shirt-screen-printing-press 7/16
Step 5: The platen arm is the board that extends from the table and on which a board (the platen) isplaced, over which shirts are pulled and printed. First glue piece F in the exact middle of the top of thetable (piece A). This can be done by drawing lines from opposite corners on piece A, (creating an ³X´).Now by matching the corners of board F onto the newly drawn ³X´, you¶ll get it in the middle (see fig.g). Do not screw it in place at this time- use glue only.
Step 6: Before continuing with the press itself, we¶re going to build the platen. The platen featuredhere is for adult T-shirts, so if you¶re interested in printing other types of items you¶ll need to buildother platens of different sizes. This design is such that you can use the platen sideways for widedesigns in addition to using it in its normal position. If that it not of interest to you, just don¶t cut andattach parts W-b. (After a year and a half of having this press, I personally haven¶t used it sideways,but have built larger, additional platens for wide designs.)
Using your drill press or workbench vise and drill, create half-inch holes in the middle of the largestside of 4 of your parts W. For the remaining 4, draw a line 2 3/8´ in from the end and drill the holes inthe new middle (see fig. h). Then attach them onto board G as shown in fig. i. Use a 2 x 4 to helpyou space the wood so the platen will fit snugly onto the platen arm when it¶s ready. Also make surethat the distance between the holes in one direction is the exact same distance as the holes going the
other way (see fig. j). You¶ll definitely want to predrill your holes before attaching parts W or you¶llhave problems with splitting wood.
Step 7: Now that you have a finished platen, let¶s use it to determine where to drill holes in yourplaten arm (part U). Place the platen over the part U (it should fit snuggly). The curved edge of theplaten should be 3´ from the end of the platen arm. Mark the holes, remove the platen, then drill half-inch holes throught the platen arm, making sure that they go straight through. You may also want todrill a second set of holes 2 1/4´ further in (to the left if looking at fig. k) for greater flexibility whenprinting.

5/12/2018 Plans for a Four Color T-Shirt Screen Printing Press - slidepdf.com
http://slidepdf.com/reader/full/plans-for-a-four-color-t-shirt-screen-printing-press 8/16
Step 8: Now that the holes are drilled in the platen arm, let¶s attach it to the table. Use your two
carriage bolts with the appropriate washers and hex nuts to attach it and add four screws for addedstability. See fig l for placement. The dotted lines indicate where to measure to insure your platen
arm is straight (before securing). Attach part V as shown in fig. m so it¶s centered in the middle of part U. Make sure the screws go into the table AND the platen arm.
Free Four Color T-Shirt Printing Press Plans, Part 3
Building the Rotating Printing Press:
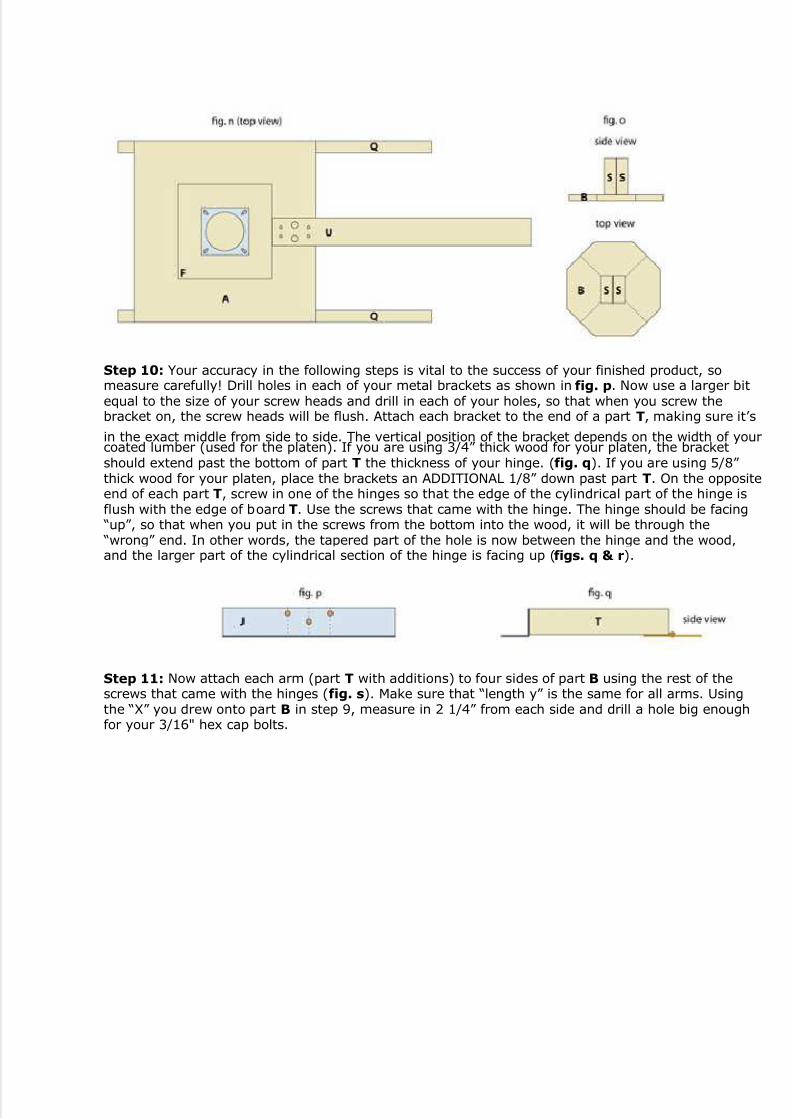
Step 9: Attach your ³Lazy Susan Turntable´ directly in the middle of part F using 4 of your 1 3/4" hexcap bolts. Drill holes directly through parts F and A to do this and use hex nuts to secure themunderneath. Fig. n shows this as if the top part of the turntable is missing, just so you can see theorientation of the hex cap bolts. Draw an X onto part B by dividing it in half and in half again. Makesure this is exactly in the center. You¶ll be using this later. Next glue both partsS back to back andattach the end of the resulting block to the middle of part B. See fig. o for two views of this.
5/12/2018 Plans for a Four Color T-Shirt Screen Printing Press - slidepdf.com
http://slidepdf.com/reader/full/plans-for-a-four-color-t-shirt-screen-printing-press 9/16
Step 10: Your accuracy in the following steps is vital to the success of your finished product, someasure carefully! Drill holes in each of your metal brackets as shown in fig. p. Now use a larger bitequal to the size of your screw heads and drill in each of your holes, so that when you screw thebracket on, the screw heads will be flush. Attach each bracket to the end of a part T, making sure it¶s
in the exact middle from side to side. The vertical position of the bracket depends on the width of yourcoated lumber (used for the platen). If you are using 3/4´ thick wood for your platen, the bracketshould extend past the bottom of part T the thickness of your hinge. (fig. q). If you are using 5/8´ thick wood for your platen, place the brackets an ADDITIONAL 1/8´ down past part T. On the oppositeend of each part T, screw in one of the hinges so that the edge of the cylindrical part of the hinge isflush with the edge of board T. Use the screws that came with the hinge. The hinge should be facing
³up´, so that when you put in the screws from the bottom into the wood, it will be through the ³wrong´ end. In other words, the tapered part of the hole is now between the hinge and the wood,
and the larger part of the cylindrical section of the hinge is facing up (figs. q & r).
Step 11: Now attach each arm (part T with additions) to four sides of part B using the rest of thescrews that came with the hinges (fig. s). Make sure that ³length y´ is the same for all arms. Usingthe ³X´ you drew onto part B in step 9, measure in 2 1/4´ from each side and drill a hole big enoughfor your 3/16" hex cap bolts.

5/12/2018 Plans for a Four Color T-Shirt Screen Printing Press - slidepdf.com
http://slidepdf.com/reader/full/plans-for-a-four-color-t-shirt-screen-printing-press 10/16
Step 12: Bolt the piece you just built in step 11 to the lazy suzan turntable using 1/4" hex cap boltsfrom underneath and the appropriate nuts and washers.. Make sure all four arms reach the exactsame spot on the platen arm (as shown in fig. t). You can probably move the whole top part slightlyuntil this is the case, and then tighten the nuts. If you can¶t seem to get each arm to the same spot onpart U, tighten the nuts when you¶ve done the best you can. You still need to get the arms the samelength, so mark the shortest one, remove part J from any arm that is longer, and sand part T until it¶sthe appropriate length. Now reattach any part J that was removed. This may seem like a lot of extrawork, but it will be well worth it once you start printing multi-color shirts.
Step 13: Twist the top mechanism 45° to get it out of the way (this will become easier when we addthe springs so the arms will be out of the way). If it won¶t twist because it binds on part U, sandenough of the inner end of part U off until there is no obstruction. Attach part I onto the platen arm(U) using a single screw (otherwise it would probably split). It should be right where part J landswhen you lay an arm onto part U, or about 8 5/8´ in from the inner end of part U (see figs. u and v).Next attach parts H to the platen arm (part U) so that the curved part of the board is on top and faces
in, and so that parts H overhang 7/8´ over the side of part A. Make sure to predrill holes for thescrews (slightly small than the screws) to make this easier. See figs. u, v and w for different views of this.

5/12/2018 Plans for a Four Color T-Shirt Screen Printing Press - slidepdf.com
http://slidepdf.com/reader/full/plans-for-a-four-color-t-shirt-screen-printing-press 11/16
Step 13 (continued): Fig. w shows boards H with the curved parts facing in. The reason for this isthat as you lower an arm into place, the curved edges will help it fall easily into place. Try doing thisnow to make sure there is the correct width between the two parts H. The arm (T) should fit VERYsnuggly, but stil be able to go into place without excessive force. Remember that when you have ascreen connected to the arm it will become even easier to do this because of leverage. Getting parts H to be the perfect distance apart was one of the most difficult parts of building my own press. At first itwas too tight and required some adjustment. To make these fine adjustments, loosen the screws anduse pieces of cardstock as shims in between parts H and U. Then retighten the screws. Add moreshims as necessary until you have the perfect width. If you take the time to do this, you¶re press willbe ultra-accurate.
Free Four Color T-Shirt Printing Press Plans, Part 4
Building the Rotating Printing Press (Part 2):
Step 14: Now that you¶ve secured the brackets (H), you can use them to hold each arm (T) in placewhile you do the next step. On each arm, draw a line 1 5/16´ in from the outer edge of part T (seefig. x). Using these as guides, screw in each of your 1/4" lag eye screws into parts T until they onlystick out about 2 1/4´ from the board. Next screw in your set of four smaller lag eye screws into partB, halfway between the bolts that are already on the dotted line and parts S. See fig. x for the properorientation of the lag eye screws. Now gather all your springs and turnbuckles. You¶re now going toconnect one spring to the closed end of each turnbuckle. If the ends of the springs are closed insteadof hooks, clamp one pair of vise grips onto the end of a spring as indicated by the red bar in fig. y.
Next use your other pair of vise grips and grasp the same end of the spring as indicated by the bluebar. Now as you bring the two pairs of vise grips together it will widen the opening. Once the opening

5/12/2018 Plans for a Four Color T-Shirt Screen Printing Press - slidepdf.com
http://slidepdf.com/reader/full/plans-for-a-four-color-t-shirt-screen-printing-press 12/16
is wide enough, remove the vise grips and attach the spring to the eye end of the turnbuckle. Now usea single pair of vise grips to sqeeze the openings on the end of the springs closed. Do this to all 8 setsof springs and turnbuckles (see fig. y).
Step 15: Now attach each of your turnbuckle/spring combos to the top rotating mechanism. Thehooks will attach to the large lag eye screws at ends of the arms, and the loose ends of the springswill attach to the lag eye screws sticking out of the octoganal part B (two springs per lag screw). You¶llneed to use the vise grips to attach the springs as before. We¶ll adjust the tension of the turnbuckleslater on. You can push each arm down so it touches the table to keep it out of the way while youwork. Now take each of your C-clamps and drill a hole in the the main arm 1´ up from the the pointshown in fig. aa. [Clamp shown is a 2.5³ clamp. You can use 2´ clamps just as effectively.] This holeshould be just slightly smaller than one of your screw heads. After you¶ve done this to all eight, weldyour 1´ or 1 1/4´ diameter washers to the mobile part of the clamp as shown. Welding glue will work
just fine. Put cardboard in between the washer and the adjacent part of the clamp to avoid bonding
the clamp to itself. The purpose of these washers is to create a greater surface area on the clamp soas to avoid denting your screen frames.

5/12/2018 Plans for a Four Color T-Shirt Screen Printing Press - slidepdf.com
http://slidepdf.com/reader/full/plans-for-a-four-color-t-shirt-screen-printing-press 13/16
Step 16: (Note: Fig bb shows what to do with 2´ clamps, fig. cc with 2.5´ clamps.) Once the weldingglue dries, and using figs. bb (or cc) and dd as your guides, screw your altered C-clamps throughparts X into part T. (You¶ll want to have parts X glued and clamped to make this easier.) The washersthat you welded onto the C-clamps need to clear the side of the vertical part of bracket J. The bottomof the C-clamps can be welded (glued) underneath brackets J as shown in fig cc., but this is optional.Tighten the clamps all the way while you work and while it glues to help hold them in place. Not onlywill your C-clamps hold your screens firmly in place, but they will also act as a place to rest your
squeegees when your screens are in an upright position.
Step 17: Part R-a has a notch on the top, part R-b has a notch on the bottom. Glue part R-b onto
part R-a so the notches intersect, forming an ³X´. Attach this ³X´ onto the top of parts S so that it iscentered, as shown in figs. ee and ff .

5/12/2018 Plans for a Four Color T-Shirt Screen Printing Press - slidepdf.com
http://slidepdf.com/reader/full/plans-for-a-four-color-t-shirt-screen-printing-press 14/16
Step 18: Next attach shelf C onto the top so that the corners are each in the middle of parts R (seefig. gg). Now sand off the corners protruding from parts Q and U. Not only will this save you somepotential pain as you print, but the smooth end of the platen arm will help shirts slide on more easily.
20´ x 24´ frames work best with this press. Attach a frame to each arm (one at a time) and place asqueegee on it. Now that you¶ve got it at its operation weight, it¶s time to adjust the turnbuckles so itwill gently return back to the upright position in between pulls (if released about half way up). Foreach arm, make sure you adjust the two turnbuckles equally until you are happy with the tension. If your press squeaks when the arms are lowered, use a little WD40 on the insides of parts H. That¶s it.You¶re done! Happy printing!
The Art of T-Shirt Printing at Home
Tips and Instructions for screen printing shirts at home
Printing T-shirts can be a lot of fun, but seems like a hard-reached goal for many, especially when thecosts of materials and equipment are factored in. Just setting up to print for fun (let alone to make aprofit) can cost a lot of money (thousands, even) if not planned right. The tips and instructions on
these pages will help you screen print quality T-shirts on a limited budget.
Materials Needed:
So what do you need to get started? Below you'll find four columns. The first column lists the tasksyou'll be doing, but don't worry for now if you don't know the significance of each one- that will comelater. The second column mentions only the bare essentials you'd need to print your first T-shirt- theleast you could get away with having and still being able to print. The third column adds several moreitems that will make printing T-shirts more effective, but still keeping the operations cheap. This is a

5/12/2018 Plans for a Four Color T-Shirt Screen Printing Press - slidepdf.com
http://slidepdf.com/reader/full/plans-for-a-four-color-t-shirt-screen-printing-press 15/16
recommended place to start. Only go with the first column if that's all you can afford! The fourth column lists the items you'd want for an ideal home or small business set-up. There could very well bean additional column or two, detailing what you'd need to go big time, but that's not what this site isfor (although hopefully many of you will acheive that kind of success anyway!
T-shirt Screen Printing Materials Checklist
Task orItem
Bare Bones Good Starter List Intermediate DIY Setup
Shirts Blank T-shirts from localstore
Blank T-shirts from localstore or online vendor(bought wholesale if
possible)
Blank T-shirts from onlinevendor (bought wholesale)
General 1 or 4 color printingpress 4-color printing press 4-color printing press
General 1-4 Screens per image(stretched)
1-4 Screens per image(stretched)
1-4 Screens per image(stretched)
Image
creation
Pencil, pen, paper,
window
Pencil, pens, paper, window
or light table
Pencil, pens, paper, lighttable, Photoshop or similar
software
ImageTransfer
Transparency,permanent marker
Transparency (printed atcopy center) or Vellum paper
Transparency (printed at copycenter) or Vellum paper
ImageBurning
Emulsion, clear tape,glass, sunlight
Emulsion, scoop coater, fan,clear tape, glass, heat lamp,500 watt photoflood bulb,
black fabric, wood
Emulsion, scoop coater, fan,clear tape, homemade
exposure unit, black fabric,wood
Washout Shower Shower or utility sink withhose, sponge
Utility sink with hose, sponge,back lighting
Printing Packing tape, squeegee,spray fixitive
Screen printing tape,squeegees (4+), platen glue
Screen printing tape,squeegees (4+), platen glue
FlashCuring Heat gun Heat gun, laser thermometer Flash dryer
Full Curing Heat gun (notrecommended!)
Oven, cookie sheets, laserthermometer Flash dryer or conveyer curer
Cleaning Rags, turpentine Rags, screen opener Rags, screen opener,turpenoid
ScreenReclaiming
Hose w/ attachment,scrub brush, bleach,tray, plastic, rubber
gloves
Hose w/ attachment, scrubbrush, bleach, tray, plastic,
stencil remover, rubbergloves
Hose w/ attachment or powerwasher, scrub brush,
emulsion remover, stencilremover, rubber gloves
How to stretch your own screens on a DIY budget:
You can buy pre-stretched screens for about $25 - $30. To get a frame restretched costs about thesame amount! I had about 10 or more screens I needed restretched, but I couldn't justify havingthem professionally done when I could just buy new ones for the same price. So here's a way to do it
on your own.

5/12/2018 Plans for a Four Color T-Shirt Screen Printing Press - slidepdf.com
http://slidepdf.com/reader/full/plans-for-a-four-color-t-shirt-screen-printing-press 16/16
Supplies: screen mesh, scissors, glue and activator (purchased at a screen printing supply store),cheap paint brushes, utility knife, large-mouthed wrench, NEWMAN roller screens with clips for pre-positioning (there are several online dealers). What you're doing here is stretching a screen on aNEWMAN roller screen, which is made for repeated restretching. But instead of using it to print, youwill stretch it, place it OVER the screen you want to restretch, glue it on, and then cut it out, thusmaking it possible to use for repeated restretching.
You can watch various Youtube clips to see how to do the initial stretching on the roller frame. I'dsuggest starting with a lower mesh count (110 or less) as these will be less likely to tear and make forgood practice. The initial cost of the mesh and roller frame is a bit steep, but in the end you will paymuch less for each stretched frame. If you are just starting out and don't have access to unstretched
frames, I would suggest skipping all of this and just buying them pre-stretched. Don't make it harderthan it needs to be!