plant pot project
TRANSCRIPT

Calvin Cheung(Ying Yeung Cheung)
Plant potProject
Year 13 Product Design
Content
Research Content P2
Introduction P3
Target Market P4 ndash P5
Initial Specification P6
Mood Board P7
Brain P8
Research Plan P9
Product Analysis (Above amp Below) P10 ndash P13
Identifying Problems P14
Visit ndash Garden Centre Brislington ampVertical Gardening
P15
Watering System - Pump amp Dripping (Gravity)
P16
Watering System - Capillary Action ampActivating Watering System + Energy ndash Weather
P17
ActivatingDeactivating System - Moisture Sensor Thermistor Timer amp Ballcock
P18
Dam + Water Storage ndash Hydroponic ampFilter ndash Agriculture
P19
Materials Research P20
Ideal Plants ampHydroponic 12
P21
Hydroponic 22 amp Hydroponic accessories
P22
Location Window Sill ampUnderstanding Root And Moisture Sensor
P23
Testing P24
Improved Specification (After Research) P25
Design And Development P26
Generating Ideas SCAMPER Diagram P27
Generating Ideas Zwicky Box P28 ndash P31
Design Ideas P32 ndash P33
Design Development P34 ndash P35
3 Developments Hydroponic Blocks P36 ndash P37
3 Developments Wall Torch P38 ndash P39
3 Developments Window Pocket P40 ndash P41
Final Design And Making Stage P42
Final Specification P43
Final Design Hydroponic Blocks P44
Engineering Drawings Of Hydroponic Block And Water Tank(Manufacturing Design)
P45
Manufacturing (Costs) P46
Engineering Drawings Of Hydroponic Block And Water Tank(Prototype Design)
P47
Components (Assembling) P48 - P49
Pre-manufacturing ndash Moulding P50
Components (Testing) P51 ndash P53
Cutting Lists P54
Cutting Plan P55
Flow Chart P56
Risk Assessment amp Time Estimate P57
Making Diary P58 ndash P59
Gantt Chart P60
Problems And Solutions P61 ndash P63
Evaluation P64
Evaluation P65 ndash P67
Organising the efficient use of space is a central feature of many household products Identify a scenario that requires efficient organisation and design and make a product or system which would enable the efficient use of an identified indoor or outdoor lsquospacersquo
IntroductionMany people enjoy indoor gardening However for keen gardeners there is often a problem with lack of space because of the number and size of plants Household plants also come in many varieties and so need a suitable location for their type This means that plants do not always get enough light can be messy and difficult to water Unless a lot of space is used and carefully organised
Design BriefOrganising the efficient use of space is a central feature of many household products
To design a container(s) which is able to sustain many plants but uses less space ndash the goal is to have as many plants as possible In addition to install a water delivery system to water the plants in order to keep the plants growing healthily
Who is my target userThe target audience would be aged between 30 ndash 50+ likely to be female interested in indoor gardening own lots of plants (maybe frequently away from home) - Gardening requires a lot of effort and time which may not interest younger people Studies show that it is mostly women who do indoor gardening
Where will my product be usedThe product will be used indoors on the window sill which is a display area behind the window (about 20cm of depth) in a living room or kitchen in a flat
Analysis of plantsThere are many types of indoor plants for example Peace Lily (flower) Devils Ivy (foliage) and Sago Palm (palm) these plants can be planted indoor but requires different amount of sunlight and water Household plants can be use for both decoration and air purifier which removes toxins such as benzene formaldehyde and trichloroethylene Indoor gardening can be a messy job due to falling leafs soil water leakage insects or even disasters caused by pets
Introduction
Target Market Number of questions Questions Answers
Number of people chosen
Percentage of people chosen
Q1 Which gender are you Male 10 67
Female 5 33
Q2
Do you have asthma hay fever or any related allergies (eg allergic to pollen)
No 9 60
Yes 2 13
Asthma 3 20
allergic to pollen 1 20
Q3Do you do any gardening at home
Yes 6 40
No 9 60
Q4
Is it indoor or outdoor gardening
Indoor 1 7
Outdoor 3 20
Both 3 20
(no answer)- 8 53
Q5
Where do you place your plant(s) (multiple choice)
Flowerbed 1 7
Pots 1 7
Steps 1 7
Garden 6 40
Desk 1 7
Bathroom 2 13
(no answer)- 7 47
Q6
How many plant(s) do you have
0-10 8 53
11-320 4 27
21-30 0 0
31+ 1 7
(no answer)- 2 13
Q7
How often do you water plant(s) per week
0-5 14 93
6-10 0 0
11+ 0 0
(no answer)- 1 7
Q8
What type of plant(s) do you have (multiple choice)
Cactus 5 33
Flowers 8 53
Herbs 5 33
Shrubs and bushes 5 33
Trees 7 47
Vegetables 3 20
(no answer)- 4 27
Q9Is (are) your plant(s) Agricultureaquaculturehydroponic (multiple choice)
Agriculture 8 53
Hydroponic 7 46
(no answer)- 5 33
Q10Does anyone take care of the plant(s) when yoursquore away on holiday
Yes 3 20
No 9 60
(no answer)- 3 20
Q11Do you consider your plant(s) part of the deacutecor
Yes 7 47
No 5 33
(no answer)- 3 20
Q12Do you have accessories for your plant(s)
decorated pot 1 7
No 12 80
(no answer)- 2 13
Q13
What colour is (are) your plant(s) (multiple choice)
Pink 4 27
White 2 13
Green 8 53
Red 3 20
Blue 1 7
Yellow 4 27
Multi 1 7
(no answer)- 4 27
Q14
What material is (are) the plant pot(s) made out of
Plastic 4 27
terracottaclay 10 67
Glass 1 7
Wood 1 7
(no answer)- 3 20
Q15
What type of colour of plantflower pot do you have
Orange 1 7
Blue 3 20
redbrown (ceramicsoil) 5 33
multi-colour 1 7
Wood 2 13
White 1 7
Clear 1 7
(no answer)- 4 27
Conclusion according to the data it is more likely for males to do outdoor gardening and females to do indoor gardening Some people who suffer from asthma or are allergic to pollen may be restricted in the type of plant they choose to grow
Typically households own between 0-10 plants which includes cactus flowers herbs shrubs amp bushes trees vegetables These plants are likely to be planted with agriculture (with soil) They water the plants between 0-5 times per week and no one will take care of the plants when theyre away eg on holiday This may lead to dehydration of plants when theres no rain
They consider the plants as part of the decoration of the house to enhance their living space These plants are mainly green which provide a natural theme and setting for the indoor environment
For some plants that are planted in a plant pot they are likely to use terracotta pots which has the colour of soil and is hardwearing and long lasting
acorn types acorn groups
D - settling926 mature established home owning areas927 rural areas mixed occupations928 established home owning areas929 home owning areas council tenants retired couples1030 established home owning areas skilled workers1031 home owners on older properties younger workers1032 home owning areas with skilled workers
9 - comfortable middle agers mature home owning areas
10 - skilled workers home owning areas
E - aspiring1133 council areas some new home owners1134 mature home owning areas skilled workers1135 low rise estates older workers new home owners1236 home owning multi-ethnic areas young families1237 multi-occupied town centres mixed occupations1238 multi-ethnic areas while collar workers
11 - new home owners mature communities
12 - while collar workers better-off multi-ethnic areas
F - striving1339 home owners small council flats single pensioners1340 council areas older people health problems1441 better-off council areas new home owners1442 council areas young families some new home owners1443 council areas young families many lone parents1444 multi-occupied terraces multi-ethnic areas1445 low rise council housing less well-off families1446 council areas residents with health problems1547 estates with high unemployment1548 council flats elderly people health problems1549 council flats very high unemployment singles1650 council areas high unemployment lone parents1651 council flats greatest hardship many lone parents1752 multi-ethnic areas large families overcrowding1753 multi-ethnic estates severe unemployment lone parents1754 multi-ethnic areas high unemployment overcrowding
13 - older people less prosperous areas
14 - council estate residents better-off homes
15 - council estate residents high unemployment
16 - council estate residents greatest hardship
17 - people in multi-ethnic low income areas
bull The data collect from the questionnaire can help to identify the needs of indoor gardening such as how often people water plants and how many plants they have to understand the problem when doing indoor gardening
The table on the left is a acorn chart which list out the population into different groups by their wealth
Acorn types D-settling E-aspiring and F-striving are focused onto because they are less wealthy due to low income and very limited space at home eg lives in a flat
bull To identify the target acorn group and verify their income and out come to design a product that is functional and affordable
category of UK pop
group of UK pop
type name of UK pop
Average income
urban prosperity
107 Dprosperous professionals
22 pound42778
2 D 13well-off older professionals larger houses and converted flats
09
2 D 14older professionals in suburban houses and apartments
14
2 Eeducated urbanites
46 pound34728
2 E 15 affluent urban professionals flats 11
2 E 16prosperous young professionals flats
09
2 E 17 young educated workers flats 06
2 E 18multi-ethnic young converted flats
11
2 E 19suburban privately renting professionals
09
2 Faspiring singles
39 pound27321
2 F 20student flats and cosmopolitan sharers
06
2 F 21singles and sharers multi-ethnic areas
16
2 F 22 low income singles 12
2 F 23 student terraces 04
The table on the right is the range of groups that will be focused onto in the project
Category urban prosperity - 2Group D ndash FPopulation 107Type 13 - 23
Urban prosperity is an acorn category which contains group D -prosperous professionals E ndash educated urbanites and F aspiring singles These people in the groups are often living in flats the common problem of living in flats is the lack of space For people who are interested in gardening it will be a problem for them to place plants in their home
D ndash Prosperous Professionals is a group classifying well-off older age professionals They are well paid because of their expertise knowledge and experience due to their age This explains why their average income (pound42778) is the highest out of all three groups
E ndash Educated Urbanites is similar to group ldquoDrdquo but it has the younger age professionals They are paid less than the ldquoProsperous Professionalsldquo because they have less experience Their average income (pound34728) is in the middle of all three groups but they have the potential to earn more money in future
F ndash Aspiring Singles is based on low income (pound27321) due to no experience or lack of education These are singlestudents who live in (or share) a flat
D E
F
DE
EFDF
DEF
People in different acorn groups are likely to visit different stores due to their income and the price of products Sometimes 2 or more groups may merge together which means people of different groups visit the same stores because they can afford the products
D Flower shops ndash products are often expensive because they often sell temporary expensive plants (Orchid rose) and accessories (vase bouquet wrapping paper and baskets) The flowers and accessories are likely to be used as decorations or life events such as hospital visits marriage proposals funerals and birthdays However the flower shop do not sell gardening tools
E ASDATesco ndash many different types and ranges of product are at a reasonable price but they only sell simple gardening tools (gloves shovel plant pots) and related products Seasonal seeds can be purchased and planted in plant pots or garden with instructions
F Pound shopflower market ndash cheap and innovative gardening products can be found and these are often very useful when gardening but the quality of products is low due to low manufacturing and material costs
DE BampQ ndash wide range of gardening items can be found different size plant pots (eg large terracotta pots) and fertilised soil It is very similar to a garden centre but not as specific or focused on gardening products
EF Wilkinson ndash wide range of seeds with different height colour and other specifications can be found Also some outdoor gardening items such as shovel plant supporting net and watering nozzle
DF -(it is unlikely that any stores would only have D and F customers without E)
DEF Garden centreIKEA ndash almost any items required for gardening can be found different brands and various prices are available for customers to chose from These are affordable for people in different groups
Mustbull Water tight ndash no leakingbull Able to separate plant and soil from water ndash to keep the soil in certain area so the soil will not disrupt the water delivering system
bull No sharp edges ndash reduce chance of getting injuredbull Durablebull Water storage ndash store leftover water for long term usebull Able to support the weight of watersoil and plant
Should bull Support Indoor gardeningbull Support both agriculture and hydroponicbull Efficient watering system ndash only required to pour water into certain area to water all the plants
bull Support small plants ndash plants only grow up to 10cm in heightbull Low cost ndash no more than pound20bull Vertical gardening ndash reduce use of spacebull Able to stay on an average window sill
Couldbull Socket as power supply bull Sleeknatural theme
Initial Specification
Mood Board
Brain Storming - Spider Diagram
Plants and efficient use of space
Near windows
Agriculture
Indoor gardening
Outdoor gardening
Plant pot
vase
Hydroponic
whatwhere
kitchen
Living room
How (watering)
dripping
Capillary action
pump
Energy source
gravity electricity
kinetic Water tension
solar
main
wind
material
plastic
wood
ceramic
metal
pond
basket
Form
round -cylinder
cubic
triangular
wave
Hard woodsoft wood
theme
pattern
colour
naturalmodern
Eye catching
plant
water
soil
leaf
root
whirlpool
sand
rock
wave
red
yellow
orange
black
whitepurple
pink
browngreen
blue
bull The spider diagram links the location (where) material (what) watering system (how) designing ideas about plant pots and related subjects This shows a wide range of options in each category and
Research Plan
research evaluation source Dead line complete in time
Target marketFound out about how many plants in do people own and how often the water the plants questionnaire 24912 yes
existing products
Found out ideas about watering systems location of the plant pot and material can be use for filtering Shopsinternet 24912 Yes
problems about indoor gardening
Found out different problems about indoor gardening eg falling leafs not enough space Gardener 24912 Yes
visitingUnderstand why most of the plant pots are rounded and the functions of them Garden centre 24912 Yes
watering systemsFound out different types of watering systems such as dripping water pump capillary action Internetphysics 11012 Yes
filter systems
Found out how to separate soil from water foragriculture and maintain water level for hydroponic Internetphysics 11012 Yes
activatedeactivate systemsFound out different electronic devices and mechanism that can activate by sensors Internetphysics 11012 Yes
plant typesFound the ideal plant type and plant size for the product ShopsInternet 11012 Yes
MaterialsUnderstand what material can be use for manufacture plant pots ShopsInternet 11012 Yes
bull Plan to research about gardening (plant types for indoor gardening) planting pots (materials shape) and information about other related subjects (watering system activatedeactivate systems) which could be used in the final design result from research and sources of information
Product Analysis (Above amp Below)
Aesthetics This product was glass blown so it has a sleek and smooth self finish due to the materialrsquos properties The flask was fired with coloured glazing to create a hydration theme but may not fit with other deacutecor in the house
Cost Glass is an expensive material especially when it was made by blowing glass because of the wages of the skilled workers The price for a pair of aqua globe cost around pound5
Size Aqua Globes (water tank) has the size slightly larger than a tennis ball which contain enough water for up to 2-14 days depending on the plant size plant type photosynthesis rate and weather condition It has a tube about as long as a unused pencil which is long enough to enter the soil to water the root
Safety The Aqua Globes are made of glass which can be shattered into many sharp pieces when fallen onto the ground and cause harm such as cuts
Function Aqua Globes has a bulb like water tank to contain water and release small amounts of water over time through the tube Refill time varies depending on different factors When refilling the Aqua Globe has to be taken out and water has to be poured into the tube where the water will be released The glass has a high transparency so water level can be observed to know when to refill
Material The only material used for manufacturing this product was glass it is hard wearing water proof and long lasting (except in environments with highly varied temperatures)
Customer The target customer is people who are interested in indoor gardening because Aqua Globes are more like a decoration and not as useful outdoors because they only contain a small amount of water Also for people who are less likely to water plants because of work or other reasons
Ergonomics There are not many human factors for Aqua Globes because this is for watering plants only and only held when refilling The tube can be used as a handle but it is quite thin and narrow to hold
User interface The product is simple to use but to set it up requires extra equipment such as a pencil to poke through the soil to ensure the Aqua Globe does not clog up with earth Most of the instructions were shown on the packaging but httpwwwehowcomhow_4502669_use-aqua-globeshtml this website tells users how to use it
Performance Soil can be jammed in the tube when placing into the soil and because of the colour and texture of the bulb the Aqua Globe does not always blend in or match with the flower pot
Technology The Aqua Globes use gravity with capillary action to drip water constantly in small amounts so there is no need for any other energy sources or devices
Manufacturing process The manufacturing process would be glass blowing where molten glass is wrapped around the blowing tube to form the tube of the Aqua Globe The tip of the molten glass is then placed into a mould and then blown to form the bulb shape
Assembly No assembly is required except for the packaging which requires bubble wrap or foam
Recycling Glass is a material that can be recycled and only needs to be melted and remoulded but when melting a lot of energy is required which produces a lot of CO2
Conclusion The Aqua Globe is a long lasting product and it can water indoor plants by releasing small amounts of water for over time However this is short term and varied between 2-14 days depending on different conditions It is useful for people who are unlikely to water plants everyday It has a sleek design but may not blend in with the furniture or the room The idea of this watering system can be incorporated into designs to water plants for longer periods Also the aqua theme can be retained when designing a theme for plant pots
bull Analysing products related to gardening which may help to design and develop ideas the advantagesdisadvantages at different circumstances that can refer back to when designing products
Aesthetics This product was injection moulded and the smooth surface of the mould was transferred onto the surface of the product to form a sleek like design The bung has a tube connecting to the dripper They are made of black plastic and match with the colour of the soil However the bottle used as the water tank may not blend in with the plant and may look like litter
Cost The IRISO Drip Feeder is made of plastic by injection moulding and the pricing found on the internet is pound499 which is similar to the Aqua Globes However the Drip Feeder is not as decorative compared to the Aqua Globes
Size The nozzle is about 20mm in diameter which is suitable for average fizzy drink bottles The main peg is about 150mm long and provides enough strength to hold the fully filled 2L bottle The nozzle and the dripper were designed to be placed under the branches because the bottle can be too large to fit
Safety The nozzle can be disassembled and it contains small parts which can be swallowed by small children
Function This product is designed to release small amounts of water over a long period of time The size of the water tank is dependent on the size of the water bottle and it can last up to 30 days The water level is shown so the user knows when to refill it The nozzle contains a resister which controls the amount of water released so the same amount of water will constantly be released and not be affected by any external factors
Material The material used to make this product is plastic which is suitable for both outdoor and indoor environments It is corrosion resistant against substances such as acid rain
Customer The target customer is people who are interested in indoor or outdoor gardening and unlikely to stay home all the time eg away on holiday
Ergonomics The radius of the bung was based on the design of water bottles which related to the human mouth so the bung can seal the end of the bottle and stop the water from leaking
User interface The instructions are printed out on the label that is attached to the product to tell the user how to set it up which is very simple but for some users who donrsquot use water bottles this may cause a problem because this product requires a water bottle to operate properly
Performance This product is very useful when going on holiday because it can keep watering the plant up to 30 days This is very reliable and keeps the plant alive Also the size of the bottle being used is an option for the user Fertiliser can be added to the water to fertilise the plant as the water drips
Technology The drip feeder uses gravity to pull water from the water tank (bottle) toward the dripper which doesnrsquot need any extra energy to operate The resister in the dripper contains a component like a filter which slows down the running water to keep the water dripping constantly and reliably
Manufacturing process The process to make the components is injection moulding plastic which is a high speed process easily mass produced and ensures the quality of the plastic The plastic beads are poured into the injection moulding machine the machine heats up and melts the plastic beads then the molten plastic is injected into the mould the components will be dropped out and then assembled The rubber tube could be a brought component which comes on a roll and is cut into the required length
Assembly There are about 6 pieces of components to assemble The plastic components are mainly clipped together which can be done by both machine and hands and the rubber tube is pushed into both dripper and bung
Recycling The type of plastic was unknown but if it is thermoplastic it can be melted and remoulded into different products If it is thermoset plastic it cannot be recycled
Conclusion This product is very useful for watering both indoor and outdoor plants over long periods up to 30 days When the user is away because it can contain a large amount of water However it is not a good decoration ndashfunction over form It is environmentally friendly if it is made out of material that can be recycled It can also be made out of recycled material The variable water tank can be used to help store larger amounts of water This idea is very useful when designing a storage area for water
Performance the pot has both form and function It has a decoration on the rail handle which creates a mini garden on a terrace of a house and collects and stores rain water to keep the plant alive
Technology the pot was designed to have long legs (lowers the centre of mass) so it can balance on the rail handle when it stores enough water because the centre of mass is directly below the hanging point so it will not fall off the rail
Manufacturing process the manufacturing process of the pot would be injection moulding polypropylene with no finishing required because the smooth surface was transferred from the mould which is a self finish
Assembly there is no assembly required because it was moulded in one piece except for the assembling of the packaging
Recycling the material used was polypropylene which is a recyclable material by melting and remoulding into the same product or different products
Aesthetics this plant pot (GreenBo Planter) has a smooth plastic surface which was transferred from the mould when injection moulding A bright colour was used so this product can be used on handrails in many houses and apartments
Cost this product cost about pound24 from the internet The mould used for injection moulding was very accurate and fine also expensive As a result the joint lines are unlikely to show To recoup the costs of design and manufacture the cost of product is reasonable
Size Height 30 cm Diameter 29 cm it fits all railing shapes and sizes up to 10 cm wide The pot is divided into two sections so it can be used as two pots which can contain two different types of plants
Safety this product is designed to be placed on the rail handles It may look unsafe because it is hanging on the edge but the water is stored at the bottom of the pot with a clip lock This can maintain the pot on the rail even when blown by wind
Function it is designed to sustain plants in outdoor gardening on the rail handle to reduce space It can collect and store rain water for long term use It has two sections and is able to contain two different types of plants in the same plant pot
Material polypropylene is a chemical resistant polymer hard wearing However the polymer will become unstable after exposure to heat and UV radiation which causes the polymer to degrade
Customer age 20-30 owning or renting a flat often at work and doesnrsquot have much time for looking after the plants
Ergonomics the pot clamps onto the rail handle to reduce the use of space it was designed to have the hand span of an average adult so it can grab onto the rail
User interface the instructions for the setting up of the pot are simple noted on the packaging- transfer the plant with soil into the pot then place the pot onto the rail handle
Conclusion this product saves the use of space of gardening by planting plants on the rail handle this also decorates the terrace of a modern flat The pot was designed to be placed outdoors so it can collect rain water and store it for dry days It is safe to be placed on the rail handle because it was designed with physics calculation so it will not fall off the rail This product can be made out of recycled material and it can also be recycled after damage The idea of this plant pot is to do gardening on rail handles and it is very innovative and inspiring because it is designing plant pots for gardening in areas where people least expect it
Aesthetics this is a planting basket that made out of steel with black paint coating metallic chain and fibre liners are used to create a country side theme it was designed to hang outside the house as a decoration
Cost the basket costs about pound2 each because the material used was steel rods metal chains and fibre liners These materials can be order in large scale with a cheap price
Size this basket has dimensions of 16 cm in diameter and 9 cm of depth
Safety the wall bracket the use to hold the basket has to be screwed in properly with suitable length screws to hold it into the wall so it will not fall off and cause head injury The water can drain very easily and cause a wet and slippery floor which may cause injuries to people who walk pass
Function the basket is able to act as a plant pot which is containing the plants on a bracket that attached on a wall With this design it can reduce the space of planting by transferring it the ldquopotrdquo into mid-air the basket is able to catch rain water to water the plant and soak the soil but the fibre will drain the water thatrsquos leftover which leads to watering need to be done manually in weather with no rain
Material material used was steel with black paint coating metallic chain and fibre liners the steel is not stainless so it will become rusty over time after the paint fall off and chemical attack (eg acid rain) The fibre is a strong material and well at draining water but over time the fibre will become moist with the growth of the plants the fibre will start tearing and break
Customer the customers would be old age people who retired often stay at home and do gardening so they have time to water the plants in the basket
User interface the set up of the basket is commonly known but it is difficult for the consumer who do not have the tools such as drill and level metre the user have to mark and drill holes on the wall for the bracket to hold on to place the fibre into the basket and then transfer the plants with soil into the basket and finally hang the basket onto the bracket
Performance the basket is very decorative to the house but it need to be water often when sunny because the design is to drain water which have no extra water remaining So the user have to often take care of the plants The steel rods are not stainless so as the paint broke off the steel will become rusty soon due to chemical attack and oxidisation
Manufacturing process the manufacturing process of making the product would be bending and welding steel rods into the shape of a basket paint the steel basket to keep the steel away from chemicals and water so it donrsquot rust Attach the chain onto the basket and place the fibre lining into the basket
Assembly the metallic chains are connected to the basket by welding and the fibre liner is placed into the basket The wall bracket need to be screwed into the wall and the basket will be hung onto the hook at the end of the bracket
Recycling the fibre liner is a natural material which is biodegradable and able to recycle into paper the steel basket and the metallic chain are metal so they can also be recycled into different products after damaged
Conclusion the basket has a traditional country side theme deign it is designed to be hang outside the house as a decoration It has a bracket to be drilled onto a wall and the basket would be hanging onto the basket it can catch rain water to moisturise the plants and soil contain inside the basket and drain the water leftover The material used for making the basket was steel which was not stainless so it will become rusty after the paint falls off also the fibre liner will slowly tear and break due to growth of plants and moist so the basket will not look as good as it age The materials used are cheap but it is very effective at draining water and also drain water the material choices can help when choosing material for making prototype
People who interested in indoor gardening may own lots of plants and fill up most of the space in the room Having a large amount of plants can result a problem or very difficult to water also the soil and muddy water can cause a mess when gardening indoor Dry season such as autumn will cause plants to stop photosynthesis and prepare for winter so the leaves will turn brown and falls off the fallen can also cause a mess indoor
Identifying Problems
There are many types of indoor plants with different sizes and require different amount of water per day
Small plants like Crocus are easy to deal with require a small amount of water per day also it can be placed anywhere with sunlight Eg and doesnrsquot block the view But the problem with small plants is over watering which can lead to root rot
Medium and large plants like palm requires a large plant pot filled with soil and large amount of water per day due to growth rate and photosynthesis the plant will need to be placed near window to get sunlight but also block the view the large amount of soil can result a wet and muddy floor also may attract insects into the house
It is almost carefree when gardening with hydroponic because the hydroponic plants only require water and some minerals the water level can be easily spotted so the user can refill the container with water to avoid dehydration But the algae which is a fungus that can grow and build up in the container If having a vertical watering system for hydroponic gardening the algae can build up in the drain which can result a blockage of water and overflow
bull Identifying the problems of indoor gardening can help to develop a products that may be able to solve or minimise the problem caused by indoor gardening The problems may include into the final specification
Indoor plants can get frost damage when contact to the single glazed household windows in winter this can result death of plants
Single glazed windows are not efficient and easy to lose heat therefore when plants contact to the glass the heat will be draw from the plant can causes the water inside the plant to freeze and cause damage
Visit ndash Garden Centre Brislington ampVertical Gardening
Colour is a very important element when decorating the house different colours represent different moods which can be relaxing Coloured plant pots can be used to match the wall paper rug or even the window frame to create a theme for a room
Some plant pots has low relief crafted or coloured glaze patterns which can fit with different theme of the room for example antique sleek or wooden And able to be used as decoration display eg vase displays
The shape of the plant pots are mainly rounded because traditionally the pots were made by hand on the potterrsquos wheel
Some plant pots has glazing and some donrsquot Glazing is a finishing that can be applied to ceramic products to form a smooth shiny and colourful surface the colours donrsquot just depends on the chemical used it also depends on the temperature when firing For the plant pots which donrsquot have glazing applied to them will remain brownpale brown colour of terracotta
Plant pots always contain one or more holes at the bottom the function of the holes is to drain the water that leftover after watering this prevent reduction of oxygen due to over watering
Vertical gardening also known as Green Wall it is a type of gardening that based on free standing or part of a building eg wall Vertical gardening is planting plants vertically one on top of the other to build a walltower like garden and efficiently using the space available One of the advantages of vertical gardening is the vertical watering system water only need to be pour from the top and water will run through and moisturise the plants below like a waterfall
There are products nowadays which can help to reduce the lack of space used for indoor gardening such as vertical gardening The idea was planting on a wall or one above the other to reduce space used also it can be very easy to water water run down hill due to gravity so the user only need to pour water down into the top pot and the water left over can drain into the plant below
bull Primary research (visiting) gives an initial idea of products related to gardening which could help to design and select materials for final products Secondary research can help to generate different mechanisms to solve to problems identified
Watering System - Pump amp Dripping (Gravity)
Pump is a device that force liquid of gas to be pulled into ldquoinputrdquo and pushed out the ldquooutputrdquo with pressure There are many types of pump with different technique of pumping
screw pump is a electric powered pump and as it turns the water will be pushed along with the thread of the screw When the water pumped to a certain height the water will be forced to retreat due to gravity pull which become inefficient
This type of pump can be operate manually by lifting the lever to pump water and it is very efficient because it hardly leak but when it become rusty or old more energy will be needed to liftpush the handles
As the lever pushed down the sucker rod will be pulled up and water will enter into the first section of the pump And when the lever lifted up the water the first section will create a flow and close the lid to stop the water flow back down into the source the water pressure will increase and forced to flow into the second section above When the lever pushed down again the second section will increase the water pressure and pump the water out of the tap
Oil pump has a similar mechanism but instead of pumping manually the pump will be operate by a machine
Water pump nowadays are designed to be use under water so it has a sucker to stick onto glass (inside fish tank) or any smooth and flat surface
Drip feeder is a device that contain water with a small hole to let water run through slowly due to gravity and water tension
Drip feeder with only one hole for both input and output run slower than drip feeder with tow holes Because the pressure inside of water container has to remain constant so air has to get through to substitute with water the air bubbles and water will get in each others way as a result it will slow down
Drip feeder with two holes or a deformable container can let water run faster because the pressure inside can easily remain constant with one output for water and one input for air
bull This page shows the watering systems which may be used in the design ideas ndash self watering systems and how the watering systems function
Watering system - Capillary Action ampActivating Watering system + Energy ndash Weather
Solar power is a renewable energy solar panels are required to be installed to use the energy This energy source only available when the weather is sunny but not when its cloudy or at night time Solar panels are only 15-20 efficient which only convert 15-20 of the sunlight energy into electricity
This can be used both outdoor and indoor for indoor it have to be placed near windows so it pick up sunlight because sunlight can penetrate through glasses
Wind power is a renewable energy wind turbines are required to be installed to use the energy This energy source only available when the weather is windy which could be anytime in the day Wind turbines are 50 efficient which convert 50 of the wind energy into electricity
This can only be used outdoor because it is unlikely to have wind indoor unless the windows are open all the time also the wind turbines will not always generate electricity because wind is not a stable energy resource which means there wont be windy all the time
Capillary action happens when water meets a small gap or materials with fibre because between fibres there are gaps When water make contact with those gaps the water tension will pull the water up this technique was used in candles to soak the cotton thread with molten wax and carry the fuel up to the tip of the thread But this technique can only carry water up a certain height
For cotton string the length of soaked cotton only went up to almost 2 cm
For tissue paper the length of soaked tissue went up to 8 cm
bull This page shows a watering system ndashcapillary action and how it function and sustainable energy (electrical) resources which may include into the final designndashsolar and wind
ActivatingDeactivating System - Moisture Sensor Thermistor Timer amp Ballcock
Moisture sensor is a electronic device that can set to be connect or disconnect a circuit of a electronic system
Moisture can simply be made because all it need is some conducting rods that acts as cathodes and anode as the conducting rods make contact with water it will activate the system because the ions in water (hard water) will carry the charge
The timer can be both mechanic or digital the mechanic can only be set the time of watering but the digital can be set both the time of water and when to water The time of watering and the amount of water output are proportional as time increase the amount of water also increase
The ballcock mechanism is commonly used in toilet water tanks This mechanism allow water to store water to a certain amount and restore the water after flush The float ball will remain on the surface of the water and water level decrease the stick attach to the ball will also lower down and pushes down the knob of the tap to release water when the water level gets to a certain height the knob will be released to stop water from pumping out
Thermistor is a device that can vary the resistance due to temperature there is a critical temperature that if rise above it the resistance will drop and activate the circuit This sensor can be installed into a electrical watering system and activate the system when heat up to the critical temperature in hot weather
bull This page shows different ways of activatingdeactivating the watering system ndash electronically and mechanically
Dam + Water Storage ndash Hydroponic ampFilter ndash Agriculture
As water runs through soil the water will carry soil along which results loss of soil There are filters available which uses adsorption technique it uses material with small micro holes which allows water to get through but not the soil crumbs and traps the soil in a certain section
When water carry soil along when running it is hard to separate them apart for sinks there are sink traps available to trap both water and heavy solid that carry with it Both water and solid will remain in the ldquoUrdquo shape the solid will be settle at the bottom but the slow running water will exit into the next section The solid will remain in the bottom of the ldquoUrdquo shape tube unless the water is running fast which gives enough force to move the solid
A dam is a barrier to keep water from flooding land lower down and sometimes release water to lower the pressure or generate electricity But on the other hand it can also continuously keep the water level at a certain height and release water when overflowing This was also used on sink designs the overflowing hole is there to prevent water from overflowing
Water tank is water storing container for future use the larger amount of water stored the longer it last so it is important to store enough water in summer The form of the water tank can be fitted into a plant pot in between layers which can keep the aesthetic look of the plant pot
bull This page shows reason of water storage Water dam can maintain the water level and soil filter can reduce soil loss
Materials Research
o Pottery pottery can be divide into three major types include earthenware stoneware and porcelain Pottery can be made by forming clay body into shapes and heat with high temperature in the kiln The heat in the kiln can remove the moisture and harden the clay the clay can be glazed with colour so patterns can be made the glaze will set on the surface of the clay after fired and form a smooth finishing on the surfacing Hand made pottery are often made on potterrsquos wheel which forms a rounded shape due to the circular motion
bull Kaolinbull Ball claybull Fire claybull Terracotta
o Cast cement plaster is a example of cement it is a substance that settle when mixed with water and crystallisesolidified due to hydration this reaction is a exothermic reaction which gives off heat also release CO2 Casting cement can be expensive but depends on the material used Cement is a very strong and hard material but also very brittle it can be used at both indoor and out door
bull Plaster
o Metal there are many types of metal available in stock Some metals are mixtures of different metals for example Steel is an alloy it is a iron based metal with carbon atoms which disrupt the atomic structure of iron to create a stronger and harder metal some steel may include other elements such as nickel and chromium which has different strength brittleness
bull Low carbon steel (alloy)bull Mid carbon steel (alloy)bull High carbon steel (alloy)bull Tool steel (alloy)
o Plastic there are mainly two categories of plastics thermoplastics and thermoset plastics Thermoplastics has the hydrocarbon chains held be van der Waalrsquos force which the plastic can be remould when heated Thermoset plastics has the hydrocarbon chains bonded together with the C-C carbon bonds which are very strong but unable to remould Plastics can also be engineered into degradablebiodegradable polyester is an example of degradable plastic which can be broken down into smaller fragments
bull PET (PETE) polyethylene terephthalate (recyclable)bull HDPE high-density polyethylene (recyclable)bull PVC polyvinyl chloride (recyclable)bull LDPE low-density polyethylene (recyclable)bull PP polypropylene (recyclable)
o Fibre (press moulding) this material can be both natural occur and man made This can be press moulded with glue or water to bond the fibres together depends on the material used as a plant pot some fibre can be used to drain water and keep hold of the soil to prevent root rot and soil loss because the crossing fibres are not held tight together so water can run through
bull Glass fibre (man made)bull Carbon fibre (man made)
bull Stainless steel (alloy)bull Aluminiumbull Aluminium alloy (alloy)bull copper
bull PS polystyrene (recyclable)bull Other types of plastics (non-recyclable)bull Acrylicbull Perspex
bull Peat fibre (natural)bull Coco fibre (natural)
o Wood wood is a natural fibrous material that grow inside trees there are hardwoods and softwoods Hardwood trees grow very slowly which produce highly density and fine fibre durable strong hard but also expensive and heavy in weight Softwood trees grow very fast which produce low density and large fibre environmental sustainable light in weight cheap but not as hard or strong as hardwood There are manufactured wood which uses glue heat and pressure to laminate layers of wood fibre together to form a high density wood which is very strong and hard but unable to last in outdoor environments Some woods naturally contain chemicals which prevent rotting these woods are used in boat building industries
bull Teak (wet rot resistance)bull Totara (wet rot resistance)bull Cedars (wet rot resistance softwood)bull Pine (softwood)bull Redwood (softwood)
bull Stoneware claybull Red clay amp shale claybull Bentonite
bull Ash (hardwood)bull Limba (hardwood)bull maple (hardwood)bull Oak (hardwood)bull Teak (hardwood)
ldquoMaterials can be use for manufacturing plant pots due to their properties and characteristics are in greenrdquo
bull This page shows the properties and characteristics of different materials that can be used for manufacturing plant pots
Ideal Plants ampHydroponic 12
Plant type Max height (cm) Watering
Coral Bead 8 Evenly moist
Sundew 8 Medium evenly moist
crocus 10 Evenly moist
Cactus 10 Regularly
Echeveria 10 Lightly moist
Living Stones 5 Barely moist
SpecificationShould Support small plants ndash plants only grow up to 10cm in height
Coral Bead
Sundew
crocus
Cactus
Echeveria
Living Stones
6 plants are found that has maximum height of 10cm or under plants with this size can be grown in large scale
This project is to design a plant container that can support vertical gardening and place the plant container(s) with plants onto the window sill because the window sill have limited space so largetall plants cannot be place on top otherwise the plants will not balance falls off and may even cause injuries So it is ideal to plant plants below 10cm so vertically on the window sill
Most plants can be grown hydroponically but some plant types are better to be grow in the garden due to space factor such as bamboo and tree because of their plant size and rapid growth rate
There are many types of hydroponic gardening techniques but all the techniques are based on non-soil planting When gardening hydroponically minerals and nutrients are required to be dissolved into the water in order to keep the plants healthily the nutrients can be obtain from soil or artificially added into the water
Many plants can be grown hydroponically but with different requirements such as amount of nutrients pH (acidic) and even temperature it is also important to give enough space for plants to grow because the plants are planted in excess water so the plants will have a high rate of photosynthesis which leads to high rate of growth
WL
The water level should be maintain near the line ldquoWLrdquo if higher could result the plant drowning and if lower may consider refilling the container to avoid dehydration
This hydroponic system is called ldquothe wick systemrdquo which is one of the many hydroponic systems This system contain nylon rope (red lines) which uses capillary action to pull water from the water storage to water the roots This system is very difficult to control the amount of watering
This is a ldquonutrient film techniquerdquo and it has tray where plants are planted and water continuously flowing through the tray is set at an angle with tilt the water in to the water storage below with a pump the water can be pumped to the top of the tray and keep the water cycle running Also the amount of watering can be controlled by the pump
Aeroponic is a hydroponic method which grow plants without media the plants are planted into a pot with roots hanging down The pump will pump water from water tank up to the spray and spray the roots this way of moisturising the roots requires long length roots hanging down the container so the plants has to be grown up to certain first to under go this method
bull This page shows the ideal plant types that are suitable for indoor gardening due to size ndashsuitable size for design dimensions Different hydroponic systems that are available
Hydroponic 22 amp Hydroponic Accessories
Growstone is a material made from recycled glass which can be used as a media for soilless gardening such as hydroponic gardening It contain many micro air pockets which can contain air (CO2) inside for the root to absorb for photosynthesis
Hydroponic is a soilless gardening technique but the plants are require a media for the roots to grab on media can be designed to supply air (CO2)or nutrient
Crystal soil is a product that designed for hydroponic gardening it is made out of Sodium Polyacrylate which is a ldquowater lockrdquo substance that absorb up to 300 times of its mass in water Compare to other hydroponic systems this product will slowly release water to feel the plants and reduce the risk of water overflowing In additional the crystal contain colour dye which can be use as display decoration
Clay balls are designed to release minerals during hydroponic gardening The material used to make this product is clay which based on metal oxides and organic matter which can provide oxygen and metallic elements when breaking down
Clay balls is a soil like hydroponic media because it provide minerals and create a platform for the root to grab onto
Marble is a spherical glass toy and it can be used as a media in hydroponic gardening It can be use as both hydroponic media and decoration which has a similar looking as crystal soil when marbles are stack in a pile it will form a lattice structure and allow water to run through the gaps in between marbles
Deep water culture is a hydroponic system with plants planted in the containers which sits into about 2 inches of water with nutrient to avoid the roots from drowning the air pump is installed to let the plants ldquobreathrdquo
The flood and drain method is a method that have plants separated from water at most time from time to time the watering system will be triggered and release a large amount of water and flood the container this will moisturise the plants very quickly without overwatering the plants by draining the water But this system may cause a dehydration of the plants between watering
The drip system is a system that also have the plants separate from water at most time but the watering system is work by the pump which pump water to the dripper and constantly watering the plants the water that left over will be drain back into the water tank
bull This page shows different types of hydroponic systems available and accessories available to improve the performance of hydroponic gardening
House hold Window sill have width between 2-8 inches (508 cm ndash 2032 cm)
2 ndash 8 inches
Area near window is a ideal location for plants because it is the area with the most sunlight inside a house Therefore the plant can carry out photosynthesis
Window sill is the closest location to the window so it can obtain maximum amount of sunlight but the space on the window sill is limited and therefore only small plants types can be placed on top
Vertical gardening is the most efficient method to achieve the maximum number of plants in the house with minimum space used But this method is very likely to block the view outside the window
The roots of plants normally grow downward and as they grow it spreads out The function of root is to absorb water collect nutrients and to keep the plant in the ground when wind is blowing
httpwwwlivesciencecom2331-roots-growhtmlAccording to scientific research and observation the root of plant can avoid obstacles with a biological mechanism In simple terms the roots will carry on growing at the direction and when the root hit an obstacle no calcium will be taken up the root will then continue to grow at another direction where it can find calcium
Water can be carried from the root to the top of the plant by ldquodiffusionrdquo it is a type of transport phenomena that allow water to spread all around the plant into every cell to reach equilibrium which means the amount of water contain within different areas are same
Location Window Sill ampUnderstanding Root And Moisture Sensor
Information httpwwwsjrwmdcomfloridawaterstarpdfsSMS_field_guidepdfbull Ideal bull In the root zonebull In a relatively sunny area bull In the driest representative area possiblebull In the centre of the irrigation zone bull Avoidbull high moisture areasbull areas with higher amounts of inflowing water relative to the rest of
the landscape
The moisture sensor should be place near the root because the root take up water from soil which will become dry out first therefore the moisture sensor can sense that weather there is enough water for the plant or not Placing the moisture in other area like at the bottom or top of the soil which is no where near the root the moisture will not be able to tell is there enough water for the plant
bull Identify the ideal location for the product to be preformed at and the area available in the location which will be used to adjust the dimensions of the design ideas Understanding the growth of root and the ideal location of placing the moisture sensor with reasons
Testing
Tests X Cleanness Speed Conclusion
filtering water sink trap (mechanism) Blur FastThe sink trap mechanism can filter the water but small components will are carried by
the water The rate of soil is higher compare to other filtering materials
fibre liner Clear Fast The fibre liner can drain water very quickly and make it very clean
Cotton (high density) Clear Slow Able to make the water clean but slow
Cotton (low density) Clear Fast Able to make water clean and quick
Hydroponic Hydro gel Seeds cannot be planted directly into the hydrogel plants need to be grown on other media before transfer onto hydro
gel Hydrogel can slowly release water for the plant and support plant growth
Activatingsystem Moisture sensor
The LED lit up as the moisture sensor made contact with the water but the circuit need to be made reversely in order to activate the circuit when dry
Sink trap
Fibre liner
Cotton (high density)
Cotton (low density)
About 5 mm in 3 days
Hydrogel
Moisture sensor
bull The testing shows the performance of the materialsmechanism under their tasks and the results will be considered when designing final design
Mustbull Water tight ndash no leakingbull Able to separate plant and hydro gel from excessed water bull No sharp edges ndash reduce chance of getting injuredbull Durablebull Self watering systembull Water storage ndash store leftover water for long term usebull Able to support the weight of water and plantbull Minimise the use of material if possible ndash reduce the cost of material
bull No taller than 30cm (each unit)
Should bull Support Indoor gardeningbull Support hydroponicbull Efficient self watering system ndash only required to pour water into certain area to water all the plants
bull Support small plants ndash plants only grow up to 10cm in height
bull Low costing ndash no more than pound20 for each unitbull Vertical gardening ndash reduce use of spacebull Able to stay on a average window sillbull Use clear acrylic as the main materialbull Extra units can be added onto or removed
Couldbull battery as power supply bull Sleeknatural theme
Improved Specification (After Research)
DesignAnd
Development
Generating Ideas SCAMPER Diagram
A planting area which is designed to be attached to the chimney on the roof the gas release from burning wood on the fireplace such as carbon dioxide can be taken to photosynthesis which is a process to produce glucose and stores energy by plants At the roof top plants can take in rain water and maximum sunlight these is like a self caring unitBut most house nowadays have radiators installed instead of fireplace also the chimney only likely to release carbon dioxide in cold days ndash winter The planting unit is on the chimney therefore when plants are dead due to dryness chemical attack (acid rain) or other conditions it would be difficult to replace new plants
Combine
A container designed to contain water instead of plants The container can store up rain water and release the water into soil when dry this design is for large area planting such as farming fieldThis product would be useless in seasons with little rain therefore rainwater can hardly be stored
Reverse
Roof top garden can be used as a cooling system in hot days ndashsummer because plants absorb sunlight to undergo photosynthesis and this is a endothermic reaction (temperature drop as the reaction take place) For roof top garden a layer of insulate is required to prevent any damage cause by the roots to the building structure
Maximise
bull Generating design ideas based on plant pots from SCAMPER ndashSubstitute Combine Adapt MaximiseMinimise Put to another use Eliminate Reverse
Generating Ideas Zwicky Box
Form Material Watering system Theme Colour FinishPower supply (electricity) Culture
cubic (3D) Plaster Pump Sleek Transparent Non Non Hydroponic
cylinder (3D) Metal capillary action Natural Wood Sanded Socket Agriculture
cuboid (3D) Plastic drip (gravity) Modern Metallic Polished solar panel
sphere (3D) Fibre Flood Antique White Stained Battery
pyramid (3D) Pottery hydro gel Painted Green
triangle (2D) Wood Manual Doodle Blue
square (2D) Aqua
circle (2D)
rectangle (2D)
Z1 amp Z2Z3 amp Z4
Z5Z6Z7
Z
Z
Z
Z
Z
bull Generating design ideas based on plant pots from Zwicky box with different combination of elements to generate innovative designs The designs generated on the following pages will be compared with specification
Z1 amp Z2 Z3 Z4
Must bullWater tight ndash no leaking X X -
bullAble to separate plant (and hydro gel) from excessed water - -
bullNo sharp edges ndash reduce chance of getting injured
bullDurable
bullSelf watering system X
bullWater storage ndash store leftover water for long term use X
bullAble to support the weight of water and plant -
bullMinimise the use of material if possible ndash reduce the cost of material
bullNo taller than 30cm (each unit)
Should bullSupport Indoor gardening
bullSupport hydroponic X X
bullEfficient self watering system ndash only required to pour water into certain area to water all the plants
bullSupport small plants ndash plants only grow up to 10cm in height
bullLow costing ndash no more than pound20 for each unit
bullVertical gardening ndash reduce use of space X X
bullAble to stay on a average window sill
bullUse clear acrylic as the main material X X
bullExtra units can be added onto or removed X X
could bullbattery as power supply X X X
bullSleeknatural theme X
A cubic plant pot designed for hydroponic ldquoZ2rdquo a simple mechanism to contain water and drain excessed water to the units below ldquoZ1rdquo has a similar design to ldquoZ2rdquo but instead of draining the water the water will be stored up and pump (socket power supply) to the top to keep the water cycle continuously running This designs can carry out vertical gardening but no windows available for plants to grow outward therefore the plants will interrupt inside of the plant pot when over growThe manufacturing process would be moulding clear acrylic because ldquoZ2rdquo can be mould in one piece with minimum amount of waste but ldquoZ1rdquo require an assembly to install the pump and the planting section which will cost more for material and labouring
Z
ldquoZ3rdquo Cylinder design with a ldquoJapanese water featurerdquo style watering system to water the plant Water will slowly drip into and fill up the tube once the water reach a certain level the equilibrium (original position) will fall and tip over the tube to water the plantldquoZ4rdquo is very similar to a average rounded plant pot but it has a water storage in the wall captivity to store water the water gate will open and water the plant by floodingTo manufacture ldquoZ3rdquo is fairly simple because it is only in two parts which can be craft out from wood but to manufacture ldquoZ4rdquo is more complex due to the components The wood use for manufacturing these designs should be wet rot resistance (eg teak) These designs are not suitable for vertical gardening because sun light cannot penetrate wood therefore the plant will not be able to grown healthily
Z
Z2
Z1
Water storage tank
Water pump
Planting section
Water dam
Z3
Z4
Water storage tank
Water gate
Planting section
Watering tube
Z5 Z6
Must bullWater tight ndash no leaking X X
bullAble to separate plant (and hydro gel) from excessed water
bullNo sharp edges ndash reduce chance of getting injured
bullDurable
bullSelf watering system - -
bullWater storage ndash store leftover water for long term use X
bullAble to support the weight of water and plant
bullMinimise the use of material if possible ndash reduce the cost of material
bullNo taller than 30cm (each unit)
Should bullSupport Indoor gardening
bullSupport hydroponic X
bullEfficient self watering system ndash only required to pour water into certain area to water all the plants X
bullSupport small plants ndash plants only grow up to 10cm in height
bullLow costing ndash no more than pound20 for each unit X
bullVertical gardening ndash reduce use of space
bullAble to stay on a average window sill X
bullUse clear acrylic as the main material X X
bullExtra units can be added onto or removed
could bullbattery as power supply X X
bullSleeknatural theme X X
Z5
Planting pot designed with almost the same functions as hanging baskets but placing on the ground instead this design has a drain to remove excess water and window for plants to grow outward this design can perform vertical gardening by stacking pots on top of each other However because of the rounded body a holder is required to keep it stable especially when performing vertical gardeningThe material used for manufacturing this product is white terracotta which allows the consumer to decorate the plant pot Terracotta can be moulded in a pottery industry Using terracotta can be expensive but it depends on the wall thickness
Z
Z6
Planting units in the shape of equilateral triangle (3 equal sides) plants can be planted inside This design can provide vertical gardening in a pyramid form but the height of the pyramid is proportional to the length available on the window sill Three cotton threads are placed through each corner and connected at the centre where they can soak up water by capillary action However according to the testing cotton threads donrsquot soak up much water The units may not perform well as sunlight cannot penetrate through metal unless the ldquowindowsrdquo are facing outwards toward the household window There are therefore a number of problemsThe material used for manufacturing this product is aluminium which is a cheap light and recyclable material The units can be manufactured by laser cutting to cut out the components on a aluminium sheet and assemble together by welding
Z
Planting section
window
window
Z7
Must bullWater tight ndash no leaking
bullAble to separate plant (and hydro gel) from excessed water X
bullNo sharp edges ndash reduce chance of getting injured
bullDurable
bullSelf watering system
bullWater storage ndash store leftover water for long term use
bullAble to support the weight of water and plant
bullMinimise the use of material if possible ndash reduce the cost of material
bullNo taller than 30cm (each unit)
Should bullSupport Indoor gardening
bullSupport hydroponic X
bullEfficient self watering system ndash only required to pour water into certain area to water all the plants X
bullSupport small plants ndash plants only grow up to 10cm in height
bullLow costing ndash no more than pound20 for each unit
bullVertical gardening ndash reduce use of space X
bullAble to stay on a average window sill
bullUse clear acrylic as the main material X
bullExtra units can be added onto or removed X
could bullbattery as power supply
bullSleeknatural theme
Z7This design was inspired from the Chinese symbol ldquoying yangrdquo it has a shape like a water drop The tail side (thin and pointy end) is used as a container for the plant and the head side (large and rounded end) is used as a water storage to contain water with a water gate in between the two sides The water gate will open and water the plant by flooding The watering system is not as effective because the watering system is only flooding the soil at the very bottom This design cannot perform well due to the rounded body and the fact that the water storage is set on one side therefore the product will lean back and forth before and after wateringBlue acrylic is used to manufacture this design The curves will make manufacture complicated to assemble because acrylic will stretch when heat bended
Z
Planting section
Water gate
Water storage tank
Design Ideas
A simple design based on square terracotta pot a self watering system (agriculture) with a water pump to pump water from the water storage to the top to water plant The sink lock mechanism is used to filter the waterInjection moulding clear acrylic would be ideal for large scale manufacturing (laser cut with cone joint join together and fish tank sealant for prototype) But for small parts such as the ldquosink lock mechanismrdquo may be difficult to manufacture and install
1a
A ldquowaverdquo theme plant pot with 3 units agriculture section hydroponic section and water storage section After water moisturised and drained from the ldquoagriculture sectionrdquo water will carry the nutrients and enter the sink lock mechanism Water will then fall into the ldquohydroponic sectionrdquo and refresh the water with nutrient water As water over flows the water will fall off the ldquowater damrdquo and run into the ldquowater storage tankrdquo the pump in the water tank will pump the water back to the top which is the ldquoagriculture sectionrdquo the water cycle will continueThis design would be difficult to manufacture (injecting moulding) and making prototype (laser cutting and press moulding) due to the mechanism inside When making the prototype the joint between the curves and sides would be difficult because the acrylic will stretch during heat-press moulding
2
1b 2
Must bullWater tight ndash no leaking
bullAble to separate plant (and hydro gel) from excessed water
bullNo sharp edges ndash reduce chance of getting injured
bullDurable
bullSelf watering system
bullWater storage ndash store leftover water for long term use
bullAble to support the weight of water and plant
bullMinimise the use of material if possible ndash reduce the cost of material
bullNo taller than 30cm (each unit) X
Should bullSupport Indoor gardening
bullSupport hydroponic X
bullEfficient self watering system ndash only required to pour water into certain area to water all the plants X X
bullSupport small plants ndash plants only grow up to 10cm in height
bullLow costing ndash no more than pound20 for each unit -
bullVertical gardening ndash reduce use of space X X
bullAble to stay on a average window sill X
bullUse clear acrylic as the main material
bullExtra units can be added onto or removed X X
Could bullbattery as power supply
bullSleeknatural theme
Water storage tank
Planting section
Water pump
Sink lock mechanism
Water storage tank
Planting section
Water pump
Sink lock mechanism
Planting section
Water dam
bull The design ideas shown in the following pages are compared to specifications Most of the designs are based on transparent acrylic to allow sunlight entre and shine onto the plants curves to present the aqua theme (waves) and vertical gardening
This idea is referred to design ldquo2rdquo but have a water droplet shape instead it has a agriculture section above the hydroponic section the hydroponic section is merged with the water storage therefore the water level of hydroponic is proportional to water storage As the water run through the agriculture section the water will carry nutrients to the water storage below and feed the plantsThis design is made of transparent acrylic but because of the mechanism inside this cannot be manufacture in one piece (injection moulding) which will increase the cost of manufacturing
3a
This design was inspired from a household aquarium tower combined with a wave structureThe tower has 4 sections of hydroponics Each section contain a certain amount of water and when over flow water will flow down to the section bellow This is likely to flood the bottom section when over water therefore the bottom section needs to be larger than the sections above in order to contain the water and to physically balance The design is in one piece therefore extra units cannot be added onto or removed Structure may collapse because the joints between sections may not be strong enough to hold the sections with water aboveMarbles are placed into each unit the marbles act as a platform for the plant to grab ontoTo manufacture this product will cost a large amount of money because it is very complicated to mould due to the shape and form and large volume of material will be used
4a
3a 4a
Must bullWater tight ndash no leaking
bullAble to separate plant (and hydro gel) from excessed water -
bullNo sharp edges ndash reduce chance of getting injured
bullDurable
bullSelf watering system X X
bullWater storage ndash store leftover water for long term use
bullAble to support the weight of water and plant
bullMinimise the use of material if possible ndash reduce the cost of material
bullNo taller than 30cm (each unit) X
Should bullSupport Indoor gardening
bullSupport hydroponic
bullEfficient self watering system ndash only required to pour water into certain area to water all the plants
bullSupport small plants ndash plants only grow up to 10cm in height
bullLow costing ndash no more than pound20 for each unit X
bullVertical gardening ndash reduce use of space
bullAble to stay on a average window sill
bullUse clear acrylic as the main material
bullExtra units can be added onto or removed X X
Could bullbattery as power supply X X
bullSleeknatural theme
Water storage tank
Sink lock mechanism
Planting section
separator
Water storage tank
Planting section
marbles
Planting section
Planting section
Planting section
Design Development
Hydroponic block
Water storage tank
Structural developed from ldquo1ardquo Hydroponic plant blocks can be stack on top one over the other (like Lego blocks) which can perform a vertical gardening Tubes inside the blocks are set to a certain height therefore a constant amount of water will remain inside the pot and the leftover water will flow downward to the block(s) below The water can be store in the large water tank at the bottomThese hydroponic blocks can be moulded in one piece with clear plastic this process can reduce waste and time as a result cost of manufacturing will reduce
1b
Planting section
Draining tube
1b 4b
Must bullWater tight ndash no leaking
bullAble to separate plant (and hydro gel) from excessed water - -
bullNo sharp edges ndash reduce chance of getting injured
bullDurable
bullSelf watering system X X
bullWater storage ndash store leftover water for long term use
bullAble to support the weight of water and plant
bullMinimise the use of material if possible ndash reduce the cost of material
bullNo taller than 30cm (each unit) X
Should bullSupport Indoor gardening
bullSupport hydroponic
bullEfficient self watering system ndash only required to pour water into certain area to water all the plants
bullSupport small plants ndash plants only grow up to 10cm in height
bullLow costing ndash no more than pound20 for each unit x
bullVertical gardening ndash reduce use of space
bullAble to stay on a average window sill
bullUse clear acrylic as the main material
bullExtra units can be added onto or removed X
Could bullbattery as power supply X X
bullSleeknatural theme
Structural improved from ldquo4ardquo ldquo4brdquo now has more strength to sustain the structure the system remains the same which with 4 vertical hydroponic sections in a wave form Marbles contain inside are platforms for plants (roots) to grab onto each sections can drain excessed water down to the section below to avoid overflowAfter the improvement the manufacturing difficulties remains due to the structure
4b
Water storage tank
Planting section
Planting section
Planting section
Planting section
marbles
bull The design shown in the following pages are developed from previous designs which are improved to meet the specifications
This design has a similar inter-mechanism of ldquo3ardquo but the hydroponic section and water storage are separated a pump was included therefore water can be pump back to the top Water will moisturise the agriculture section and excessed water will be drain into the hydroponic section the excessed water will overflow and fall into the water storage belowThe design has the shape of a bowl ndash fish bowl This design may cost a lot of money to manufacture due to the mechanism inside therefore it cannot be manufacture in one piece and result more costs on assembly in the manufacturing
3b
3b
Must bullWater tight ndash no leaking
bullAble to separate plant (and hydro gel) from excessed water -
bullNo sharp edges ndash reduce chance of getting injured
bullDurable
bullSelf watering system
bullWater storage ndash store leftover water for long term use
bullAble to support the weight of water and plant
bullMinimise the use of material if possible ndash reduce the cost of material
bullNo taller than 30cm (each unit)
Should bullSupport Indoor gardening
bullSupport hydroponic
bullEfficient self watering system ndash only required to pour water into certain area to water all the plants
bullSupport small plants ndash plants only grow up to 10cm in height
bullLow costing ndash no more than pound20 for each unit -
bullVertical gardening ndash reduce use of space
bullAble to stay on a average window sill
bullUse clear acrylic as the main material
bullExtra units can be added onto or removed X
Could bullbattery as power supply -
bullSleeknatural theme X
Water storage tank
Sink lock mechanism
Planting section
dam
Water pump
3 Developments Hydroponic Blocks
This idea is a combination of 3 different ideas ndash ldquo1rdquo + ldquo2rdquo + ldquo4rdquo
It will be injection moulded clear acrylic pump and electronic components will be assemble and install separately with fish tank sealant to seal between the electronics and acrylic (prototype laser cut acrylic heat stamp mould acrylic assemble with acrylic glue and seal with fish tank sealant install the electronics)
ldquo1rdquo planting units that can be remove or added onto when needed which can form a vertical gardening
ldquo4rdquo the inter mechanism can water the plants efficiently and able to support hydroponic with hydrogel
ldquo2rdquo (water storage) a large volume container with a large surface area on the base to stabilise the vertical structure
Planting units The wave like structure provide 2 open sides for the plants grow toward to
The mechanism allows water to run in zigzag path to moisturise the hydrogel There is a filter in the drain within each unit which is a plastic film with holes (lt 3mm diameter) allow excessed water to drain but keep the hydrogel behind
The hole at the top is for lining up the unit above a piece of connector at the bottom of the unit above will slot into the hole and help to line the drain together
Each units will contain a moisture sensor which connect to the planting units above below and the ldquoWatering circuitrdquo by banana plugs in a series and activate the pump when any of the moistures detect no water
Hydroponic Block
Must bullWater tight ndash no leaking
bullAble to separate plant (and hydro gel) from excessed water
bullNo sharp edges ndash reduce chance of getting injured
bullDurable
bullSelf watering system
bullWater storage ndash store leftover water for long term use
bullAble to support the weight of water and plant
bullMinimise the use of material if possible ndash reduce the cost of material
bullNo taller than 30cm (each unit)
Should bullSupport Indoor gardening
bullSupport hydroponic
bullEfficient self watering system ndash only required to pour water into certain area to water all the plants
bullSupport small plants ndash plants only grow up to 10cm in height
bullLow costing ndash no more than pound20 for each unit
bullVertical gardening ndash reduce use of space
bullAble to stay on a average window sill
bullUse clear acrylic as the main material
bullExtra units can be added onto or removed
Could bullbattery as power supply
bullSleeknatural theme
830mm
Water storage the unit can be divide into 2 parts water storage and electronic storage The water storage area will contain a pump and 2 moistures the pump will activate when the moisture sensor in the planting units sense no water (watering unit) the storage can contain maximum of 39L of water In the electronic storage area contain the batteries resistors and other components it contain 2 circuits such as the ldquowatering circuitrdquo and the ldquowarning circuitrdquo The ldquowarning circuitrdquo activate when the water level passed over the moisture sensor (M2) or passed below the moisture senor (M1)
bull The 3 design ideas shown in the following pages are chosen designs combined and further developed with descriptionsmechanisms the design will be compared with specification
ldquoPumprdquo
ldquoMoisture sensorrdquo(M2)
ldquoMoisture sensorrdquo(M1)
The circuit has a busser with activate both when water level rise above ldquoM2rdquo or drop below ldquoM1rdquo This is to give a warning to the user that there is too muchnot enough water in the water storage
The circuit has a water pump which can be activate both automatically (moisture sensor) or manually (switch) the moisture sensors is in a series circuit therefore when any of the units dries out the pump with activate
The watering system is pumping water straight to the top of the vertical unit and water will run through all units When watering the water will be stored in the hydrogel as the hydrogel is fully moisturised the excessed water will be drained to the unit below and moisture the hydrogel
WaterMoisturising input gt outputFully moisturised input gt output
Each unit have half a wave length (λ2) therefore the units can form a wave like structure when one stack onto the other When stacking they have to face opposite direction therefore the same design can be use over and over again and reduce the manufacturing costs because it is cheaper to manufacture a single design
λ
λ-2
The drain design is the idea of connecting household drain pipe together the water can only flow toward one direction because there are no other junction available
ldquoMoisture sensorrdquo(M1)
ldquoBuzzerrdquo
ldquoBatteryrdquoldquoNand GaterdquoldquoResistorrdquo
Warning Circuit
ldquoMoisture sensorrdquo(M2)
ldquoPumprdquo
ldquoBatteryrdquo
ldquoNand GaterdquoldquoResistorrdquoldquoMoisture sensorrdquo
ldquoMoisture sensorrdquo
ldquoMoisture sensorrdquo
Planting unit
Planting unitPlanting unit
Watering Circuit
ldquoSwitchrdquo
3 Developments Wall TorchThis idea is a combination of 3 different ideas ndash ldquo7rdquo + ldquoZrdquo + ldquoZrdquo
It will be blow moulding white polypropylene and the bracket will be die cut and stamped stainless steel electronic components will be assemble and install separately with fish tank sealant to seal between the electronics and the polypropylene (prototype vacuum forming polypropylene assemble the electronics and install into the water tank with sealant the bracket can be brought from store)
ldquo7rdquo the wall pocket feature that allow consumer to have plants growing on a wall vertically
ldquoZrdquo the shape of part of a ldquoYing Yangrdquo has a large rounded head (planting section) and a thin tail (drain)
ldquoZrdquo the bowl form combine with the ldquoZrdquo design gives a sleek design and a effective drain that filter excessed water from hydrogel
The planting unit has the form of a funnel which can concentrate the water flow and able to drain the water to the unit below but the drain is ate the side instead of the centre of the unit
The planting unit uses hydrogel which can store water for plant and reduce the number of watering
At the back of the planting unit there is a hook like section which can be use to connect the planting unit to the bracket on the wall
The bracket has 6 holes 3 on each side of the slots screws can be use to attach to the wall and keep it stable the bracket is 50 cm tall and able to hold 3 planting units by slinging the hook of the planting unit into the slot
Wall Torch
Must bullWater tight ndash no leaking
bullAble to separate plant (and hydro gel) from excessed water
bullNo sharp edges ndash reduce chance of getting injured
bullDurable
bullSelf watering system
bullWater storage ndash store leftover water for long term use
bullAble to support the weight of water and plant -
bullMinimise the use of material if possible ndash reduce the cost of material
bullNo taller than 30cm (each unit)
Should bullSupport Indoor gardening
bullSupport hydroponic
bullEfficient self watering system ndash only required to pour water into certain area to water all the plants
bullSupport small plants ndash plants only grow up to 10cm in height
bullLow costing ndash no more than pound20 for each unit
bullVertical gardening ndash reduce use of space
bullAble to stay on a average window sill -
bullUse clear acrylic as the main material X
bullExtra units can be added onto or removed
Could bullbattery as power supply
bullSleeknatural theme
Watering Circuit
ldquoPumprdquo
ldquoBatteryrdquo
ldquoNand GaterdquoldquoResisto
rrdquo
ldquoTimerrdquo
ldquoSwitchrdquo
500mm
The watering system used is the same as the ldquoHydroponic Blockrdquo which can moisturise all the hydrogel in the vertical garden by running water through the units in a zigzag path
The circuit has a water pump which can be activate both automatically (timer) or manually (switch) the timer can be set up to activate the circuit (eg once a week) and water the plants
Part of the drain was removed therefore leakage can be prevented
The water tank has 2 hooks at the back which is safe to be hang onto the bracket the water tank is divided into 2 sections which are water storage and electronic storage
Water storageElectronic storage
The areas in yellow are places where the product can be installed
3 Developments Window Pocket
This idea is a combination of 2 different ideas ndash ldquo7rdquo + ldquo6rdquo
This design will be injection moulding clear acrylic and suction pads will be glued onto the back of the planting unit and the water storage is a plastic bag attach with tubes (prototype glue laser cut acrylic components and suction pads together with fish tank sealant)
ldquo7rdquo the wall pocket feature that allow consumer to have plants growing on a wall vertically
ldquo6rdquo the cylinder form act like a pocket which can contain the plant and a tube is used to drain excessed water
The planting unit is held onto the window-glass surface by 4 suction pads the planting unit has a draining tube which drain the excessed water from the capacitor into the unit belowThe unit contain a hydroponic media which floats as the water level drops the plant also drops which gives a warning sign to the user to refill the capacitor
Water storage is a plastic bag with 2 deliver tubes the tubes have a mechanism which only allow water to flow at one direction User need to push onto the bag to pump water to the top in order to water the vertical garden Tube (ndash) is an input and there to deliver excessed water into the storage bag and prevent water from flowing out the tube (+) is an output and deliver tube that deliver water to the top of the vertical garden and prevent water flow back down into the bag due to gravity
ndash +
Window Pocket
Must bullWater tight ndash no leaking
bullAble to separate plant (and hydro gel) from excessed water -
bullNo sharp edges ndash reduce chance of getting injured
bullDurable
bullSelf watering system X
bullWater storage ndash store leftover water for long term use
bullAble to support the weight of water and plant -
bullMinimise the use of material if possible ndash reduce the cost of material
bullNo taller than 30cm (each unit)
Should bullSupport Indoor gardening
bullSupport hydroponic
bullEfficient self watering system ndash only required to pour water into certain area to water all the plants
bullSupport small plants ndash plants only grow up to 10cm in height
bullLow costing ndash no more than pound20 for each unit
bullVertical gardening ndash reduce use of space
bullAble to stay on a average window sill -
bullUse clear acrylic as the main material
bullExtra units can be added onto or removed
Could bullbattery as power supply X
bullSleeknatural theme
The design can form a vertical or diagonal structure as long as the draining tube is in the unit below
This mechanism allows water to flow to one direction but not the other which can prevent water from flowing through the undesired tube when user is pumping water
The water storage is a plastic bag and the bag have 2 tubes which is an input and an output and the water can only flow through one direction in the water cycle the bag also act as a pump as the user press onto the bag and water will be pumped to the top of the vertical garden
To refill the water in the water cycle water can be pour into any unit but caution need to be taken and not to over fill the water
The plant is grown on a piece of floating media and as time passes the water in the capacity will drop and the height of the plant will also drop which give a signal to the user to refill the capacitor
When refilling the water poured from the top will first fill up the capacitor which raise the water level (the water level depends on the height of the drain) and the excessed water will flow toward the unit below
This type of window is not suitable for the ldquoWindow Pocketrdquo because when the window tilt the plants may fell off the planting unit
This type of window is suitable because it cannot be opened therefore the risk of the product or plant falling off is minimised
This type of window is suitable for the ldquoWindow Pocketrdquo because it open side ways therefore the risk of falling is very low but the product may caught by the handle and causes safety hazard
This type of window is suitable for the ldquoWindow Pocketrdquo because it slide side ways which is at a very low risk
Final DesignAnd
Making Stage
Final Specification10 PerformanceMust- (qualitative)11 Able to perform vertical gardening12 Support indoor gardening13 Support hydroponic14 Able to water the plants automatically15 Able to store water for watering system16 Water tight ndash no leaking17 stay on an average window sill without collapse18 Use clear material as the main material therefore plants can absorb maximum sunlight19 Durable110 Able to separate excessed water from fully moisturised hydrogel111 Water proof electronics ndash prevent short circuit circuit failure and electric shockShould-112 Store at least 1L of water (qualitative)113Efficient watering system (quantitative)114 Support small plants (gt10cm) (qualitative)Could- (qualitative)115 Have moisture sensor or timer to activate the watering system116 Battery powered117 Natural theme
20 Size (quantitative)21 15cm (+- 5cm) depth ndash therefore the plant pots can stay on an average window sill22 No taller than 20cm (per unit) saves space and reduce the risk of collapsing
30 Target cost amp manufacturing costMust-31 Selling price lt pound20 (quantitative)32 Reduce use of material ndash reduce material cost (qualitative)33 Minimise waste of material ndash reduce manufacturing cost (qualitative)Should- (qualitative)34 Use recycled (recyclable) material (eg PVC HDPE) ndash reduce material cost and environmental damageCould- (qualitative)35 Low costing materials for packaging
40 packagingMust- (qualitative)41 Protect the product from stress tests42 Prevent the product from falling apart43 Simply manufacturing techniqueShould- (qualitative)44 Include foam or bubble wrap to protect the product45 The product will not be able to shake around in the packaging46 Include instructions of using the product47 Include most of the accessories required in order to allow the product to workCould- (qualitative)48 Use recyclable materials
Final Design Hydroponic Blocks
I have decided to make the ldquoHydroponic Blockrdquo as my product forthis project
ldquoHydroponic Blockrdquo have a tower like structure which require astable flat and large surface area to preform well and safe theonly limitations are the household window sill depth and thebalancing The problems for producing the prototype (joining thebent acrylic and the flat acrylic together) are solved whichrequired accuracy and very challenging But this design can achieveall the specifications
The ldquoWall torchrdquo required the bracket to be installed into the walland some household may not have the equipment to do so (old agepeople may not be able to install the bracket therefore the productbecome useless)
The ldquoWindow Pocketrdquo hold onto the glass by suction pads which maynot be safe and may damage the window hinge when a large scale areused Also plants may die due to frost damage by contacting withthe window in cold weather
AB
C
E
D
bull Further information and component details of the final design will be included and explain their purposes with imagesmechanisms
F
A plastic tube contain 2 banana plugs (female and male) which can be connect to the units above and below the tube isolate the wires from the water with sealant to prevent circuit malfunctioning due to water
A
The hole on the top of the planting unit is for slotting and lining up the unit above B
Holes at the side of the planting unit is for connection to the suction pad which will be attach to the window glass to prevent the vertical garden from falling off the window sill
C
Moisture sensor will be attach to the wire inside the tube to sense the level of moisture of the hydrogel the gap in between the wires and the tube will be sealed with sealant
D
A piece of plastic film with 2mm holes in polka pattern act as a filter to filter the excessed waterE
The ldquoUrdquo shape is for the watering tube to enter through in order to reach the top of the vertical garden
F
Engineering Drawings Of Hydroponic Block And Water Tank(Manufacturing Design)
Planting unit
Water tank
bull The dimensions of the manufacture design of the Hydroponic Block and Water Tank is shown on this page
The manufacturing process of this product can be injection moulding because most of the parts can be mould in one piece therefore the costs are reduced the use of material is more efficient This process can work rapidly and it has a high rate of production
Manufacturing (Costs)
httpwwwprotomoldcouk
ldquoInjection Mould Prices Start at pound995Best for 10ndash10000+ pieces
Choose from hundreds of engineering-grade resins ABS Polycarbonate Nylon Acetal Polypropylene Acrylic PBT HDPE LDPE TPE TPU and LCP including glass or fibre filled gradesdamagerdquo
Costs start from pound995 which include the wages of worker and hidden costs such as electricity and petrol
The manufacture design has volume of 0000400 msup3 of material result weight of 038 kg (HDPE)The cost of HDPE per kg is pound3 therefore the cost of material per planting unit is pound114
4 connectors (pound0968) 32cm of wire (pound0032) 1 suction pad (pound0333) and a moisture sensor (pound020) is required for each planting unit
The starting price of injection moulding price is pound995 if a patch of 10000 is produced the price of each planting unit cost pound010 (material cost not included)
The total cost of producing a planting unit is pound277
Connector for electronicsPrice pound0242 per unit (when ordering 2500)
Each planting unit require 4 connectors = pound0968
httpukrs-onlinecomwebpharsh-environment-wire1839225origin=PSF_412652|fpampcm_sp=featureproducts-_-FeaturedProductsContent-_-1839225
WirePrice pound999 per 100m (when ordering 25)
Each planting unit require 32cm = pound0032
Moisture sensorPrice estimate pound020
Each planting unit require 1
httpukrs-onlinecomwebpcircular-connector-contacts0468557origin=PSF_435583|fpampcm_sp=featureproducts-_-FeaturedProductsContent-_-0468557
httpwwwebaycoukitm1kg-HDPE-Plastic-Pellets-Granules-Suitable-for-stuffing-weighting-decoration-181066775013pt=UK_Dolls_Bears_RLamphash=item2a286bb9e5
HDPEProperties Hard stiff able to be sterilisedPrice pound3 per kgDensity 095 10sup3 kgmsup3
It is a thermoplastic which can be used for injection moulding and remould therefore it can be recycled Using recycled plastic may cost more due to separating the undesired attachments (paper metal) and energy input to heat and remould the plastic but by using recycled plastic can save resources and reduce environmental damage
httpwwwtescocomdirectsuction-cups-45mm-pack-of-3534-6206prdrecommendationId=dafa26d8-cf96-4d42-bcae-621194fbc5e90ampskuId=534-6206
Suction padsPrice pound100 per pack (3 per pack)
Each planting unit require 1 connectors = pound0333
bull The estimate costs of manufacturing a Hydroponic block which include the material labour wage and components costs
The engineering drawings shows the dimensions (in millimetre mm) of the designs from side different views
Planting unit
Water tank
bull The dimensions of the prototype design of the Hydroponic Block and Water Tank is shown on this page
Engineering Drawings Of Hydroponic Block And Water Tank(Prototype Design)
Components (Assembling)
Pre-manufacturing5 ldquoBackrdquo ndash A flat sheet of
acrylic will be heat press into an uniform circular arc
6 ldquoFrontrdquo ndash A flat sheet of acrylic will be heat press into an uniform circular arc (partly) and set angles
7 ldquoBaserdquo ndash A flat sheet of acrylic will be heat bend into a set angle
The heat press moulds will be present on the next page
Pre-assembly1 Polythene tubing with both male and
female banana plugs installed a moisture will also be installed at about 30mm up from the bottom of the tube the gaps will be sealed with water proof sealant
2 This main component is very similar to ldquo1rdquo but with out the moisture sensor
3 ldquoWallrdquo ndash A flat sheet of acrylic that will have ldquoRailsrdquo and ldquoDrain siderdquo installed with Tensol glue engraved lines will be shown on the surface for lining up the components when gluing
4 This main component is identical to ldquo3rdquo but in mirror image
7 ldquoBaserdquo ndash a ldquoSlot +rdquo component will be installed at the bottom with Tensol engrave line will be shown to help lining up
bull The main components are shown on this page and steps of assembling explained by arrows The pre-manufacturing and pre-assembly of each main components are described and explained
1 2
3
4
5
6
7
8
11
2
2
344
Assembly1 Line up the two ldquoWallsrdquo onto
the ldquoFrontrdquo component2 Put on the ldquoToprdquo and ldquoBaserdquo
component ndash insert into cone joint
3 Slide the ldquoBackrdquo component into the ldquoRailsrdquo
4 Slide the tubes through both ldquoToprdquo and ldquoBaserdquo
A testing of the ldquoRailsrdquo ndashexample of pre-assembly
1
2
10
5
9
36
4 7
8
2
2
1
3
3
4
5
6
Pre-manufacturing8 ldquoBackrdquo - A flat sheet of acrylic will
be heat press into an uniform circular arc
10ldquoFrontrdquo ndash this component share the same arc with the ldquobackrdquo and same heat stamp mould will be used
Pre-assembly2 ldquocaptive wallrdquo ndash a flat sheet of acrylic with moisture
sensors installed and wires passing through 3 ldquotank wallrdquo - A flat sheet of acrylic that will have
ldquoRailsrdquo (for ldquobackrdquo) installed with Tensol glue engraved lines will be shown on the surface for lining up the components when gluing
4 Identical mirror image of ldquo3rdquo 5 ldquoStorage wallrdquo ndash a flat sheet of acrylic that will have
ldquoRailsrdquo (for ldquoFrontrdquo) installed with Tensol glue engraved lines will be shown on the surface for lining up the components when gluing
6 Identical mirror image of ldquo5rdquo 10ldquoFrontrdquo ndash the ldquohandlerdquo and ldquolockrdquo will be installed
with Tensol glue
Assembly1 Insert the ldquocaptive wallrdquo into the ldquobase componentrdquo2 Line up the cone joints of the ldquocaptive wallrdquo ldquobaserdquo and
the two ldquoTank wallrdquo components Line up the ldquoBackrdquo along with the ldquorailsrdquo
3 Insert the two ldquostorage wallrdquo by connecting the cone joints4 ldquofill drainrdquo will be entered through the two ldquostorage wallrdquo5 Put the ldquolidrdquo onto the top with the cone joint6 Insert the ldquofrontrdquo component with the ldquoLockrdquo lined up with
the ldquobaserdquo
Pre-manufacturing ndash Moulding
Heat stamp moulding is the process for bending the acrylic pieces cut out from the laser cutter into a certain shape the moulds use for this process will be wood that crafted in the router Wood can withstand the heat for heating the acrylic without expanding therefore the prototype can be more precise
Planting unitrsquos moulds
Mould for both ldquoFrontrdquo and ldquoBackrdquo of the water tank because they share the same ark (same radius) and circumference
ldquoFrontrdquo(Water tank)
ldquoBackrdquo(Water tank)
ldquoBaserdquo (Planting unit)
ldquoBackrdquo (Planting unit)
ldquoFrontrdquo (Planting unit)
Mould for ldquofrontrdquo of the planting unit
Mould for ldquoBackrdquo of the planting unit
Mould for ldquobaserdquo of the planting unit
Water Tankrsquos moulds
bull The dimensions of the heat press moulds for prototype design of the Hydroponic Block and Water Tank is shown on this page The moulds are used to bend acrylic pieces into a set circular arc with heat
Components (Testing)
Banana plugs are easy to connect together or separate it can be used for connecting the circuit of the planting units together
bull The following pages shows the components will be used in the prototype and what the components are for explained with photos (drawings) material usage and details This will include the price of some components
The banana plugs will be installed into the ldquotuberdquo with glue and sealed with sealant to minimise contact with water
The moisture sensor is a cathode and an anode that allow charge to pass through when contact with water this can activate the circuit
The circuit can be reverse to activate the circuit when no moisture is sensed
The moisture sensor will be made with two metal diodes and the gap in between the wires and the tube will be sealed with sealant to avoid circuit malfunctioning due to water
Suction padsCost pound099Quantity 4Size 45mm diameter
The suction pad is tied to an box and the length of the string can be adjust by the knot the suction pad will be attach to the window glass
The suction pads can ensure that the vertical garden do not fall of the window sill The length of the string depends on the width of the window frame
Cone joint will be used to connect components together The cone joint of part ldquoBrdquo has enlarged by 025 mm but the part ldquoArdquo remain the original size because the laser has width of 025mm therefore it will fit perfectly together
The joint will be glue with Tensol acrylic glue and seal with waterfish tank sealant to avoid leakage
A
B
The problem of fitting the bent acrylic and flat acrylic together is solved by a (rail) mechanism the bent acrylic is in a uniform circular arc therefore it must be able to rotate around the centre of the circular arc a ldquorail trackrdquo can be install by gluing laser cut acrylic pieces
Fish tank sealant will be use to seal the gap between the bent acrylic and the rail to prevent any leakage
To install the ldquorail trackrdquo marks need to be made on the acrylic by engraving onto the flat acrylic piece the engrave marks are for lining up the rail track to reach maximum precision
A hose hook is required for the tube to hang onto the top of the vertical gardening the hose hook bend and clamp the hose into a ldquoUrdquo shape which act as a hook and stabilised the tube when watering
The water pump has a nozzle with outer diameter of 8mm and the hosersquos inner diameter is only 6mm therefore the hose was put into the pillar drill to increase the inner diameter up to 8mm so the nozzle can fit in the pump will be power by 9v batteries
PumpCost pound899DC 55 ndash 12vPower 1 ndash 3wHmax 04 ndash 15mQmax 200LH
HoseLength 160cmOuter diameter 12mmInner diameter 6mm
A lid need to be made to place on the top of the vertical garden the lid contain 2 male banana plugs that are connected with a wire the lid is for completing the series of moisture sensors (from the planting units) of self watering system ndash watering circuit
The electronics that located in the water of the water tank will need to be connected to the storage area the wires will need to be wired through the ldquocaptive wallrdquo the gaps in between the wires and the captive will be sealed with sealant to avoid flooding in the storage area and avoid damage to the electronics
The filter for separating the hydrogel and water is 1 mm thick plastic film with many 2mm holes lay out in a polka pattern to achieve maximum holes in the limited area which minimise the chance of clogging up and maximise the rate of draining
Hydroponic Block
Components Tools used material quantity quantityFor 3 units
ldquoWallrdquo (left) Laser cutter 3mm acrylic (Perspex) - Clear 1 3
ldquoWallrdquo (right) Laser cutter 3mm acrylic (Perspex) - Clear 1 3
ldquoRear railrdquo (back) Laser cutter 3mm acrylic (Perspex) - Clear 2 6
ldquoRear railrdquo (front) Laser cutter 3mm acrylic (Perspex) - Clear 2 6
ldquoBackrdquo (Hydroponic block) Laser cutter 3mm acrylic (Perspex) - Clear 1 3
ldquoFrontrdquo (Hydroponic block) Laser cutter 3mm acrylic (Perspex) - Clear 1 3
ldquoFront railrdquo (front) Laser cutter 3mm acrylic (Perspex) - Clear 2 6
ldquoFront railrdquo (back) Laser cutter 3mm acrylic (Perspex) - Clear 2 6
ldquoDrain siderdquo Laser cutter 3mm acrylic (Perspex) - Clear 2 6
ldquoToprdquo Laser cutter 3mm acrylic (Perspex) - Clear 1 3
ldquoBaserdquo (Hydroponic block) Laser cutter 3mm acrylic (Perspex) - Clear 1 3
ldquoSlot +rdquo Laser cutter 3mm acrylic (Perspex) - Clear 1 3
Filter Laser cutter 1mm polypropylene - Clear 1 3
Tube Coping saw 6mm (diameter)polythene
2 6
ldquoFront mouldrdquo (+) Router wood 1 3
ldquoFront mouldrdquo (-) Router wood 1 3
ldquoBack mouldrdquo (+) Router wood 1 3
ldquoBack mouldrdquo (-) Router wood 1 3
Water tank
Components Tools used material quantity
ldquoTank Wallrdquo (left) Laser cutter 3mm acrylic (Perspex) - Clear 1
ldquoTank Wallrdquo (right) Laser cutter 3mm acrylic (Perspex) - Clear 1
ldquoStorage Wallrdquo (left) Laser cutter 3mm acrylic (Perspex) - Clear 1
ldquoStorage Wallrdquo (right) Laser cutter 3mm acrylic (Perspex) - Clear 1
ldquoBackrdquo (Water Tank) Laser cutter 3mm acrylic (Perspex) - Clear 1
ldquoFrontrdquo (Water Tank) Laser cutter 3mm acrylic (Perspex) - Clear 1
ldquoFront railrdquo (Water Tank) Laser cutter 3mm acrylic (Perspex) - Clear 2
ldquoHandlerdquo Laser cutter 3mm acrylic (Perspex) - Clear 1
ldquoLockrdquo Laser cutter 3mm acrylic (Perspex) - Clear 1
ldquoFill drainrdquo Laser cutter 3mm acrylic (Perspex) - Clear 1
ldquoCaptive Wallrdquo Laser cutter 3mm acrylic (Perspex) - Clear 1
ldquoToprdquo Laser cutter 3mm acrylic (Perspex) - Clear 1
ldquoBaserdquo (Water Tank) Laser cutter 3mm acrylic (Perspex) - Clear 1
ldquoRear railrdquo (front) Laser cutter 3mm acrylic (Perspex) - Clear 2
ldquoRear railrdquo (back) Laser cutter 3mm acrylic (Perspex) - Clear 2
ldquoMouldrdquo (+) Router wood 1
ldquoMouldrdquo (-) Router wood 1
Cutting Lists
bull List of components and related parts (ndash moulds) that need to be cut out in order to make the product the list include the tools and material required to make the components The quantity of each component is labelled ndash the quantity to build 1 unit
ldquoWallrdquo leftldquoWallrdquo Right
ldquoToprdquoldquoFrontrdquo
ldquoBackrdquo
ldquoBaserdquo
ldquoBaserdquo
ldquoRailrdquo (Front)
ldquoBackrdquo
ldquoRailrdquo (Back)
ldquoCaptive wallrdquo
ldquoToprdquoldquoFrontrdquo
ldquoTank wallrdquo right
ldquoTank wallrdquo leftldquostorage
wallrdquo leftldquostorage wallrdquo right
ldquoFill drainrdquo
Cutting Plan
bull 2D design drawing of laser cutting components Black lines are Cutting and red lines are Engraving The labelling in green are components of planting unit and blue are components of water tank
ldquoRailrdquo (back)
ldquoRailrdquo (front)
ldquodrain siderdquo
Flow Chart
Tools required1) Laser cutter2) Router3) Sanding paper4) Strip heater5) Tensol6) Solder and soldering iron7) Sealant
bull The flow chart shows the steps of making with quality control the quality control can be used to analysis each process to make sure it meet the standard conditions The flow chart has sub-assemblies which are process that has to be followed through before all the components join together these sub-assemblies are process that pre-manufacture components and some can be done along at the same time
Start
(1) Laser cut components
Did the laser cut through
completely
(3) Sand down the edges
Are all the edges smooth
Start
(2) Make the mould with
router
Are the inter
surfaces of the mould smooth
(3) Sand the inter
surface of the mould
(4) Heat bend the components
did The acrylic
piece took the shape of the circular
arc
(5) Glue the components together -assembly
Start
Build the moisture sensors
does the
circuit work
6) Build the
electronic circuits
Did the glue hold the
components together
(5) Install the
electronics
Install add on
components
(7) Seal the edges and gaps
All edges
and gaps sealed
Polish the surface of the
product
Finish
Prototype
Yes
Yes
Yes
Yes
Yes
Yes
Yes
No
No
No
No
No
No
No
Task Quality
Laser cutting component All the cutting lines must cut through the acrylic
sanding Remove all sharp edges or splinters to cast a smooth surface
Testing circuits Circuit must operate as required
Heat bending The acrylic sheet must form the shape (circular arc) over the mould
gluing The components must held by Tensol glue and the glue should not be all over the component
sealing The sealing only apply to the inner edges and corners on the prototype and make sure all edges are sealed ndash no leaking
10 PerformanceMust- (qualitative)16 Water tight ndash no leaking111 Water proof electronics ndash prevent short circuit circuit failure and electric shock
Specification
Risk Assessment amp Time Estimate
Tasks Tools Risks Solutions
Laser cutting components
Laser cutter Breath in toxic fume
Keep the fan operating
Heat bendingcomponents
Strip heater Burn Wear gloves
Gluing components
Tensol glue Breath in Toxic gas or irritation when contact with eyesmouth
Keep windows open and make sure hands are washed straight away after gluing components
Building electronics
Solder solder iron wire stripper wire cutter clip board
Cut electricshock burn toxic gas
Keep the un-needed tools out of the way make sure no power supply is connecting when building the electronic keep the solder in the holder when not using donrsquot use a short soldering iron keep windows open
Sealing the edges sealant Cause irritation when contact with eyemouth
Wash hands straight away aftersealing the edges
bull Table shows the risks and hazards when using specific tools to performing tasks with solutions to minimise the chance of getting injured The coloured boxes (related to the flow chart) shows the estimated time to carry out each step the estimate time of each process will be compared with making diary in evaluation
Laser cutting ndash 2 hoursSanding ndash 1 hour
Routing mould ndash 5 hoursSanding ndash 30 minutes
Building moisture sensors ndash 30 minutesBuilding circuits ndash 3 hour
Heat pressing components ndash 3 hourGluing components ndash 3 hour
Install electronics ndash 2 hoursSealing gaps ndash 2 hours
Time estimate
Total time gt 22 hours (3 weeks time)
Risk assessment
The estimate time is the predicted time required to make prototype with maximum efficiency Extra time may be spent due to errormistakes and limited use of machinery or creating solutions to solve problems and the aim is to complete the prototype before 22313 (Fri)
The solutions are ways to minimise risks of injuries however if injured first aid kit may help with burn and cut Water may help with skin irritant Call the ambulance when chemical causing eye irritantpoisoning and serious injuries ndash deep cuts large area burn This procedure can prevent further damages
Making Diary
Week Date Tasks Time taken Details
1 22213 (Fri) Laser cutting 30 minutes Cut out components for only one hydroponics some component (rail) will deform due to high temperature of the laser therefore some components need to be recut
Polishing 30 minutes The charcoal like burned area on the acrylic pieces can be easily remove with a wet sponge
Sanding 10 minutes Sand down the cone joints to make a push fit
Gluing 1 hour 30 minutes The glue used was Tensol and it require long time to dry
2 25213 (Mon) Making ldquotubesrdquo 1 hour 30 minutes The polythene tube was cut into 163 mm and realising it was 3 mm short afterward the design of the ldquolidrdquo was change to solve the problem
Building moisture sensors 1 hours Laser cut out plastic pieces with 2 small holes for wires to insert into later the moisture sensor was installed into the tubes
Laminating wood blocks 30 minutes Laminate the MDF together to form a wooden block for preparation of the moulds
26213 (Tue) Electronics gt3 hours Went to a teacher (profession electronics) for help with setting up the circuit the conclusion was easier to use a pick to program the system than building a circuit
28213 (Thu) 3D routing (male mould) 30 minutes Learned how to set up the router with help of other student
1313 (Fri) Heat press moulding gt2 hours Heat up the acrylic piece in the vacuum former and lay it over the mould ndash the plastic did not form a circular arc
3 4313 (Mon) 3D routing (female mould)
30 minutes Forming the female side of the mould to improve the heat-press moulding quality
Laser cutting 10 minutes Cut out extra acrylic pieces for experimental heat-press moulding
4313 (Tue) Sanding moulds 50 minutes Sand down the moulds to give a smooth surface when moulding
7313 (Thu) Heat press moulding gt2 hours The quality of this process has improved but the acrylic was bent into hyperbolic instead of circular arc due to restrain when cooling The design of the design was changed to solve this problem
Electronics 1 hour Found the components required to build the circuit
8313 (Fri) Laser cutting 40 minutes Laser cutting the updated design the components for 2 units was cut
Heat bending 30 minutes Using the line strip heater to target the bending line of ldquobaserdquo and ldquofrontrdquo components
Assembling gt2hours Push fit the cone joints together and the and brush the dichloromethane onto the joints to glue them together A mistake was made when designing the cutting plan the tubing holes was not lined up
Key Problem exist
bull A diary of record when making the prototype Date tasks time taken details about the process made that day and what happened This can briefly mention about the problems exist during building the prototype
Week Date Tasks Time taken Details
4 11313 (Mon) Sealing 1 hour Using sealant to seal all and any potential leaking holes
Installing tubes (with moisture sensor)
30 minutes Use araldite to glue the polythene to the acrylic but due to the cutting plan error the connecting technique is required to be changed
12313 (Tue) Sealing 30 minutes Sealing the edges for the second time to make sure the planting units are water tight
14313 (Thu) Building electronics 3 hours The circuit is almost complete and the remaining can only be done after the water tank is complete
15313 (Fri) Laser cut 10 minutes Cut out all the clear pieces of the water tank
Sanding 1 hour Sand down the cone joint to give a push fit
5 18313 (Mon) Assembling 2 hours Assemble and glue the components of the water tank together with dichloromethane
Sealing 1 hour Seal the edges and gaps with sealant
19313 (Tue) Electronics 1 hour Tried to program a pick but the computer didnrsquot recognise the device therefore the pick have to be eliminated
sealing 1 hour Seal the water tank for the second time to make sure it is water proof
20313 (Wed) Electronics 2 hours Rearranged the circuit and discover the pump is broken
Testing - Test the circuit and the sealing of the prototype
21313 (Thu) Polishing 1 hour 30 minutes Polish the product with white sprite
Testing - Final test on the circuit and sealing of the prototype
22313 (Fri) -Deadline
Hand in the folder
The time taken were mostly rounded to the nearest 30 minutes It is difficult to record the actual time accurately due to time spent on transporting materials finding equipment and setting up
Week
Tasks 122213 (Fri)
225213 - 1313
34313 ndash 8313
411313 ndash 15313
518313 ndash 22313
Laser cutting
Sanding
Gluing
Making ldquotubesrdquo
Building moisture sensors
Laminating wood blocks
Building Electronics
3D routing
Heat press moulding
Heat bending
Installing electronics
Assembling
Sealing
Polishing
Testing
Gantt Chart
bull A chart that shows whether the making is according to plan or not The data were based on the making diary These show in different colour Green ndash according to plan Orange ndash not quite according to plan Red ndash not according to plan
The yellow and red coloured boxes are tasks that were complete lateun-planed
The late tasks were due to limited use of machinery ndashlaser cutter and router There were other users using the machines therefore some tasks can only be completed when they finish
The un-planed tasks were due to unexpected problems and mistakes ndash heat press moulding failure incorrect cutting plan and circuit failure These problems required time to solve therefore the tasks are completed late Problems like incorrect cutting plan can be avoid by double checking the dimensions and recalculating when drawing the cutting plan
Problems And Solutions
bull Problems exist along with the process of the production of prototype due to different reasons These problems can be solved and the solution will be explain with photographs and description to show why and how it was done
The idea for ldquofrontrdquo and ldquobackrdquo was a piece of acrylic bent into a circular arc and sliding into the rails But when heat pressing the acrylic the acrylic formed a parabolic shape instead which cannot be slid into the rail Therefore the design was changed having straight pieces as tangents of the circle instead This solution allows the product to keep the curve form but is not as aesthetic as the original design
This technique will be included when making the water tank of the vertical garden
Heat-press moulding
Therefore the cutting plan was changed and fewer pieces needed to be cut out which reduced the amount of material used and wasted
Front Back
Before
After
At first only the male mould was made and that result an inaccurate bent acrylic piece Soon the female was made too and the quality of the bending was improved but still not a circular arc
The heated acrylic and the moulds were clamped on a vice to cool down
Circuit
These circuits were the original plans for the watering circuit and warning circuit
The problems were the extra power supply and protection of the transistors Therefore a pick was used instead therefore the 2 circuits can be combined together The pick has only 4 inputoutput therefore a moisture sensor of the water tank was removed
The extra power supply was attach to a relay which power the pump
After the circuit was made the computer did not recognise the pick therefore the pick was removed
the circuit is now the image shown The circuit contain both warning and watering applications The buzzer only buzz when water level in water tank is low the water pump will activate when the moisture sensor (planting unit) sense dry or the pump can be switch on manually
The yellow LED represent the activity of the water pump The light is on suggest the pump is activate the series of moisture sensor was not connected
The green LED represent the activity of the buzzer The light is off suggest the buzzer is deactivated the moisture sensor (water tank) was wet
Tubing
The mistake made on this section is incorrect cutting plan The holes on the ldquotoprdquo component were not in line with the holes at the base On the good side it was not too far off therefore the tubs can be shift to line up with the holes When stacking the planting units the tubs were not lined up therefore a conducting surface was used
Copper track was used as the conducting surface the copper track was curled up therefore it can maximise the chance of making contact with other copper tracks
This circuit was tested afterward with a LED light to prove it works
Pump
The pump is broken therefore another pump was ordered the wiring hold was sealed with hot glue which can be removed afterward A yellow LED was temporarily installed to present the activity of the pump the LED will be replace by the pump when it arrive
Yellow LED
Glue
Dichloromethane was used to glue the acrylic components together instead on using Tensol glue By comparing to Tensol glue dichloromethane will not cause as much mess quick drying and it will only leave small mark when a mistakenly drip onto the acrylic
Evaluation
Evaluationbull Evaluation of the prototype of this project by
comparing to the specification testing performance time takenestimate improvement can be made and marketing
The prototype is in 4 units ndash 2 Hydroponic blocks 1 Water tank and 1 lid
The 2 Hydroponic blocks are identical they are in a curve structure which can build up a wave like structure There is a moisture sensor inside each unit and it can connect to the units above amp below and connect to the circuits in the water tank The moisture can detect dryness and activate the pump when the hydro gel is dry A filter is in the draining area which can filter the hydro gel and water
The water tank is in 2 sections ndash water storage and electronic storage The water storage zone contain a pump and a moisture sensor which connected to the circuit When the moisture sensor in the planting units sense dry the pump will activate and pump water through the hose to the top of the vertical garden when the moisture in the water tank sense dry the busser will buzz and tell the user to refill the water tank
The lid I a block of acrylic which sits on top of the vertical garden to complete the series of moisture sensor The lid has a hole where the hose can be placed into
Performance
This product can do vertical gardening on a average indoor window sill (2-8 inches) The vertical garden can stay on the window sill by the glass safely the suction pads attach to the window glass to prevent the product from falling off
The pump will activate when any of the moisture sensors sense no water however the pump draws a lot of energy from the battery therefore the batteries have a shorter life time
Large amount of sealant was used to fill up the gaps in between the components to prevent leakage this technique is not as aesthetic but very effective
Marketing
IKEA is the ideal store to sell this product It visit by all three ndash ldquoDrdquo ldquoErdquo and ldquoFrdquo class of the acorn group The garden centre is not as ideal as IKEA because garden centre focus on gardening but mainly outdoor
IKEA is focus on indoor furniture and unlikely to sell gardening products however this product is for indoor and it is more of a observational display therefore it can be classified as indoor display
Time takenestimate
The estimate time is 22 hours and the time taken to build the prototype sum up to 33 hours 30 minutes which is 11 hours 30 minutes more than expected The unexpected time was used to solve the problems ndash heat press moulding and electronics
The electronics have taken most of the time because the initial solution didnrsquot work therefore another solution is required to get to electronics to work
Hydroponic Block(Planting unit)
Water Tank
Lid
10 PerformanceMust- (qualitative)11 Able to perform vertical gardening
12 Support indoor gardening
13 Support hydroponic
14 Able to water the plants automatically
15 Able to store water for watering system
16 Water tight ndash no leaking
17 stay on an average window sill without collapse
18 Use clear material as the main material therefore plants can absorb maximum sunlight
19 Durable
110 Able to separate excessed water from fully moisturised hydrogel
111 Water proof electronics ndash prevent short circuit circuit failure and electric shock
Should-112 Store at least 1L of water (qualitative)
113Efficient watering system (quantitative)
114 Support small plants (gt10cm) (qualitative)
Could- (qualitative)115 Have moisture sensor or timer to activate the watering system
116 Battery powered
117 Natural theme
20 Size (quantitative)21 15cm (+- 5cm) depth ndash therefore the plant pots can stay on an average window sill
22 No taller than 20cm (per unit) saves space and reduce the risk of collapsing
30 Target cost amp manufacturing costMust-31 Selling price lt pound20 (quantitative)
32 Reduce use of material ndash reduce material cost (qualitative)
33 Minimise waste of material ndash reduce manufacturing cost (qualitative)
Should- (qualitative)34 Use recycled (recyclable) material (eg PVC HDPE) ndash reduce material cost and environmental damage
Could- (qualitative)35 Low costing materials for packaging -
40 packagingMust- (qualitative)41 Protect the product from stress tests -42 Prevent the product from falling apart -43 Simply manufacturing technique -Should- (qualitative)44 Include foam or bubble wrap to protect the product -45 The product will not be able to shake around in the packaging -46 Include instructions of using the product -47 Include most of the accessories required in order to allow the product to work -Could- (qualitative)48 Use recyclable materials -
Specification
The prototype have been tested and achieved ldquoPerformancerdquo ldquoSizerdquo and most of the ldquoTarget cost amp manufacturing costrdquo of the specification The area where the prototype cannot achieve is the ldquoPackagingrdquo The time is limited therefore only the prototype can be made and there is not enough time to make the packaging
Tests X
Water tight (sealing)
Water running through all the units
Automatic watering (electronics)
Stay on a window sill (suction pads)
Safety (suction pads)
Filtering
The tests are linked to the specifications which shows whether the product meet the specification or not
The idea of the packaging will be based on carton board and foam blocks The foam blocks will be cut to fit over all the corners of the product ndash as the image shown above The product with foam blocks will fit into the carton box perfectly which leave no space for it to shake around to cause damage to the product
There will be 2 types of package ndash starter package and additional packageThe starter package contain 1 water tank 2 planting units a bag of hydro gel nutrient and instruction booklet
The packaging is considered to take up to a week from design to finish
Hydroponic Block(Planting Unit)
The sealing was poor at the bottom back corners (red arrow) because it is difficult to get the sealant into the gap therefore a lot of sealant was used to fill it up
The acrylic piece at the bottom of the units were not match to the engrave lines due to miscalculation therefore the acrylic piece had to shift to match the slot
The solution to the curve were not aesthetic a acrylic tube can be used to replace the tangent however it would be very expensive to purchase a 100m radius acrylic tube and only a small amount will be used therefore this idea was used instead
Water Tank
The design of the water tank was change due to the failure of heat press moulding the tangent technique was used
The design of the lid of the electronic storage has changed the lid is slide in instead of fold in The manual switch (Green arrow)is on the back side of the water tank stationary The tangent technique result a piece of stationary tangent which can be used as a switch holder
The hole on the lid of the electronic storage has a 2cm diameter hole which is used as a ldquohandlerdquo it is used to pull the lid out however the original design was gluing a piece of acrylic bar as a handle The hole was cut out because it is more efficient to use and it reduce the usage of material
Lid
The design of the lid was unsure when designing therefore it was left until last The assembly was very simple It was glued together with dichloromethane and the black wire is attach to copper tracks at both end the function is to complete the series of moisture sensors of the planting units
The hole in the middle is for the hose to put into and there are acrylic pieces at both ends which act as bracket to hold the lid in place
The lid of the water storage is also removable therefore the water tank can be cleaned and to remove unwanted items
The cone joints of the water tank lid have been filed and sanded down therefore it is easily remove or close
ConclusionThe performance of the product can be improved if more time was given and do a laser cut card model to test the cutting plan to spot the mistakes that were made when drawing the cutting plan
Steps of assembly can be differ ndash glue the lid of the planting unit last to free more space for sealing this can improve the quality of sealing
If the machines were free all the time most of the laser cuttings can be complete at once Therefore the number and the time of transporting can be reduce which become more efficient
Electronics are the most complicated subject of this project therefore more time and effort need to be spent on working with electronics The electronics can be better if it was the first task of the project therefore more time can be spent to figure out the problems
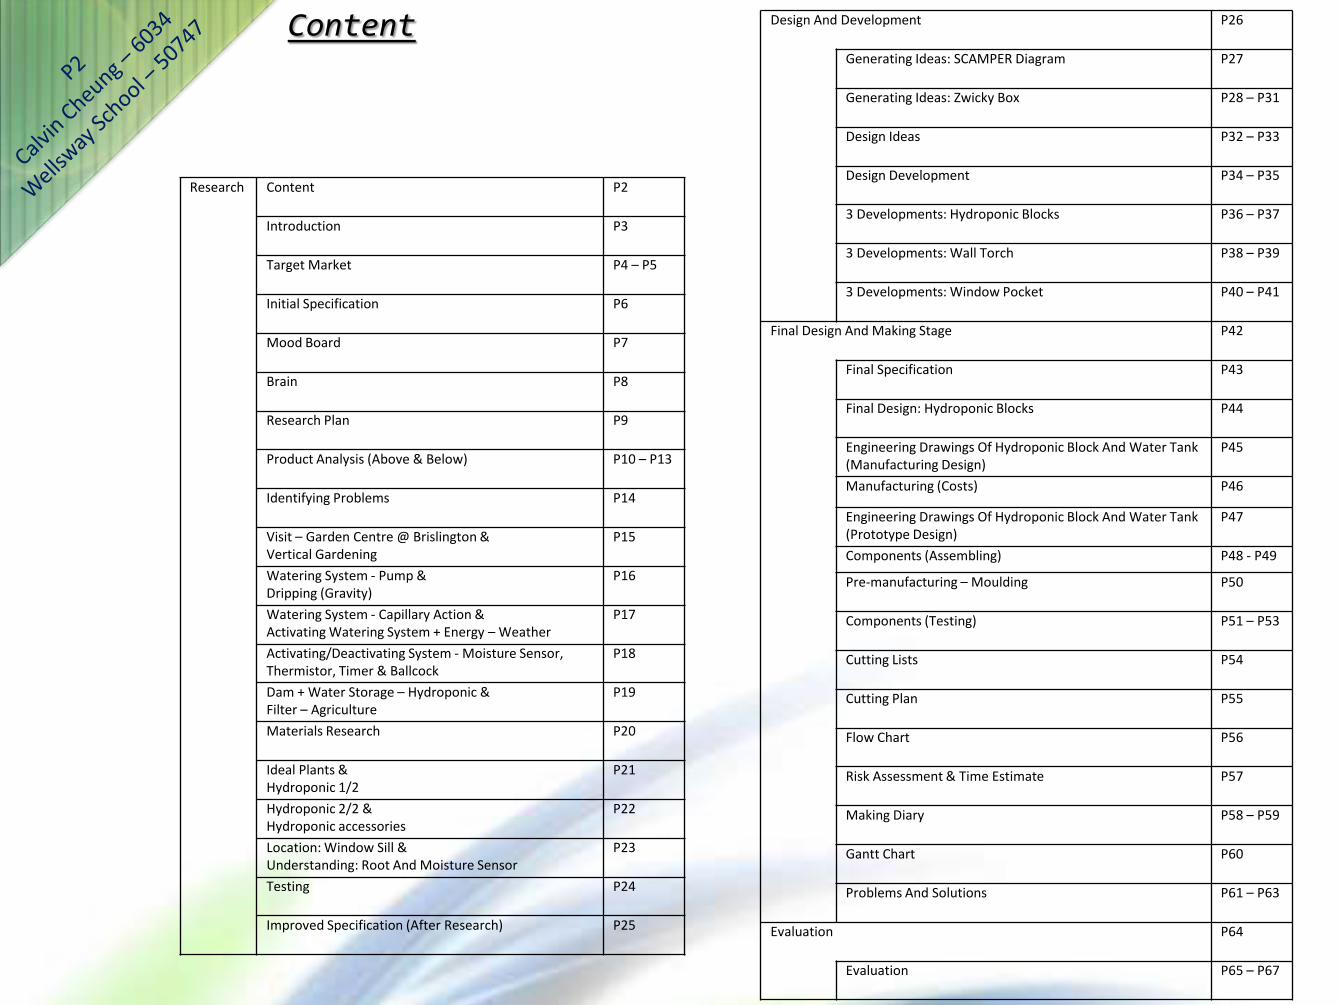
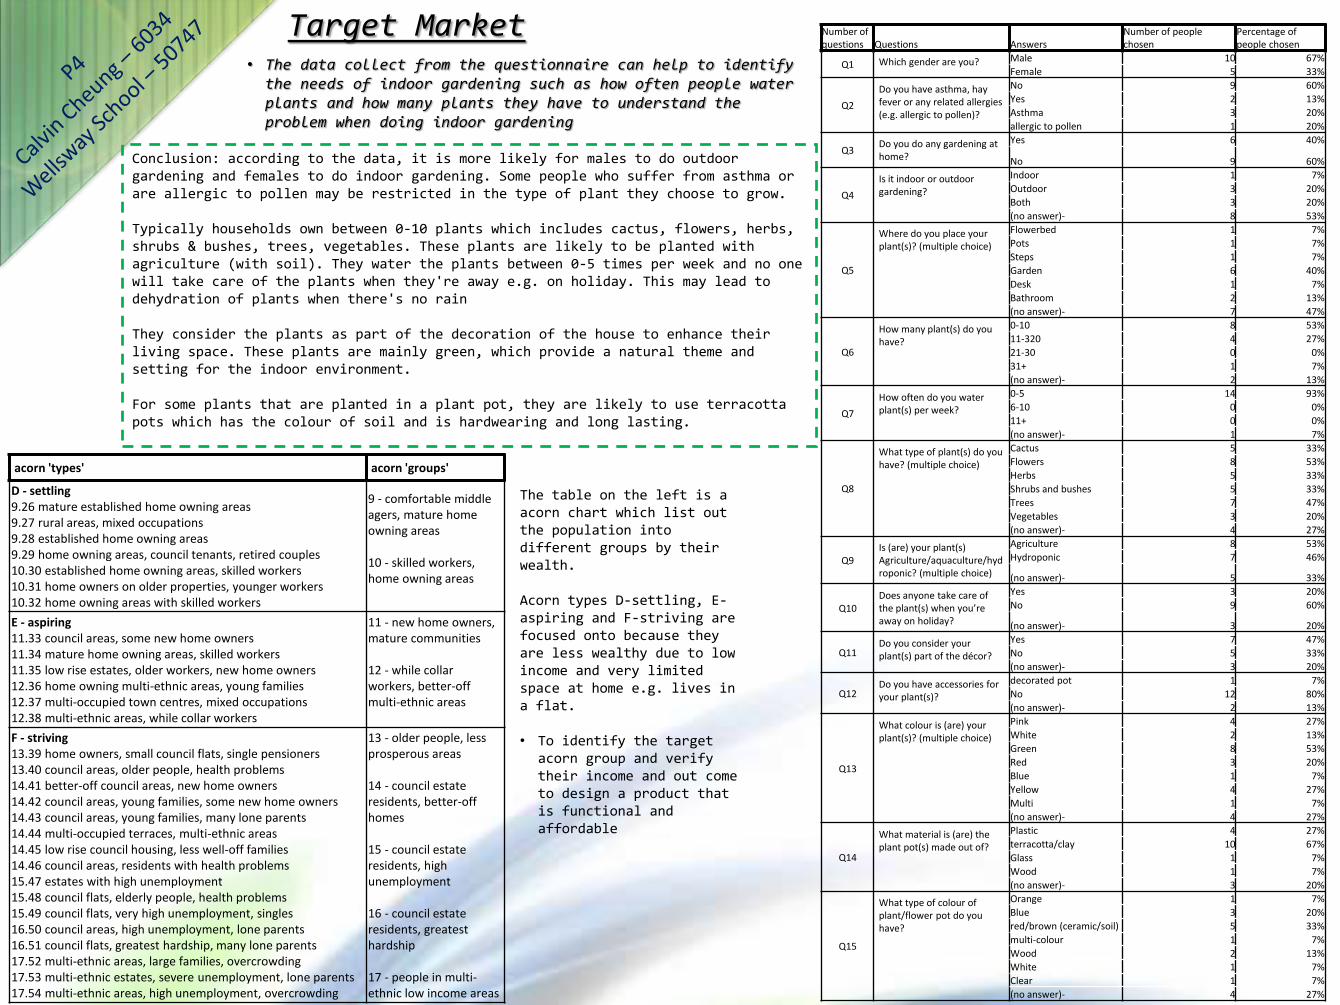
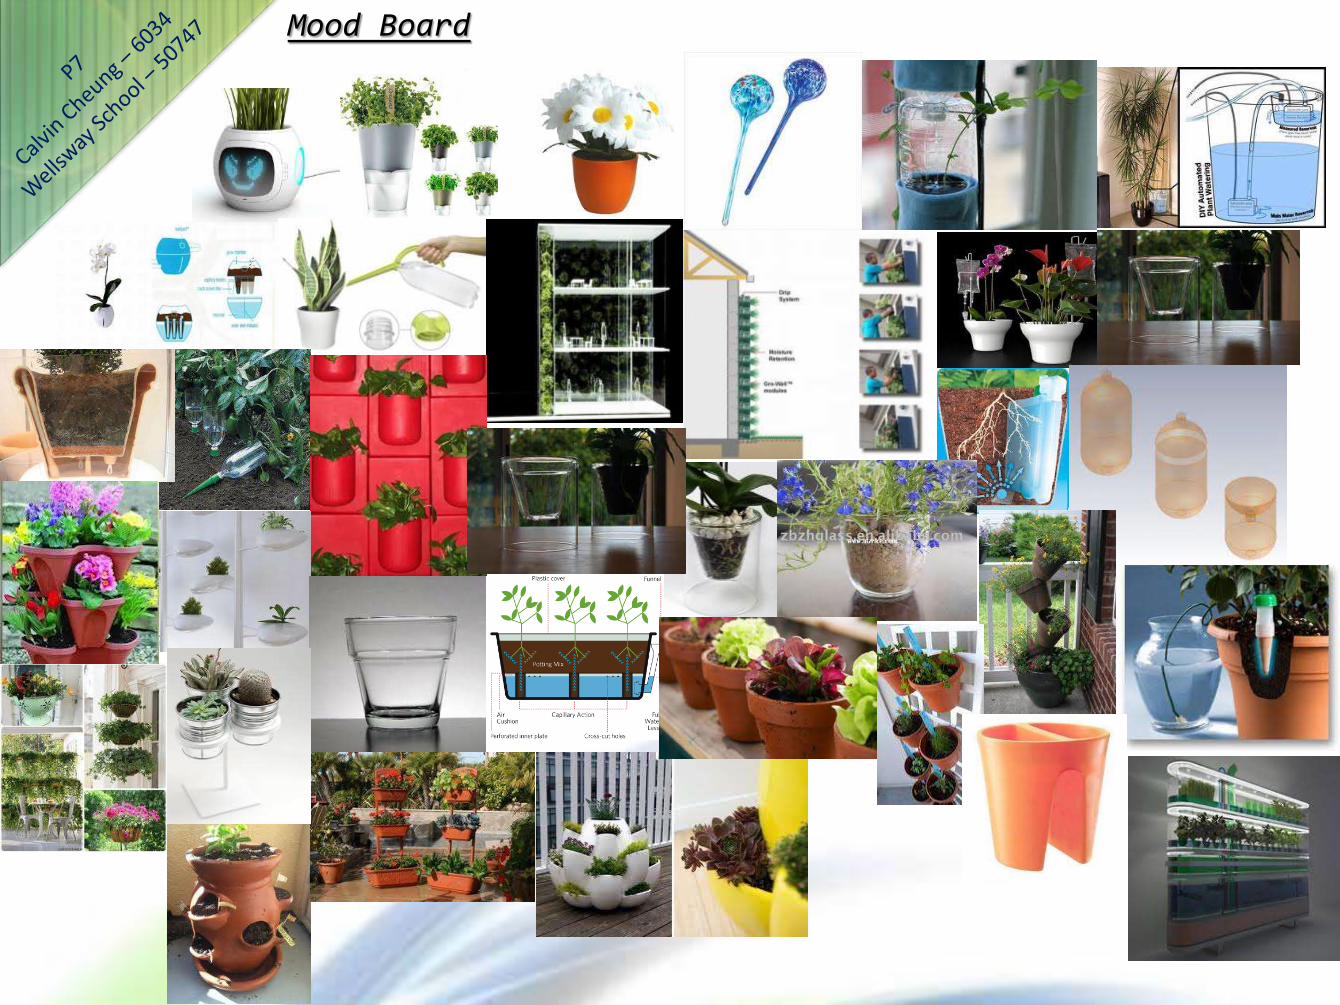
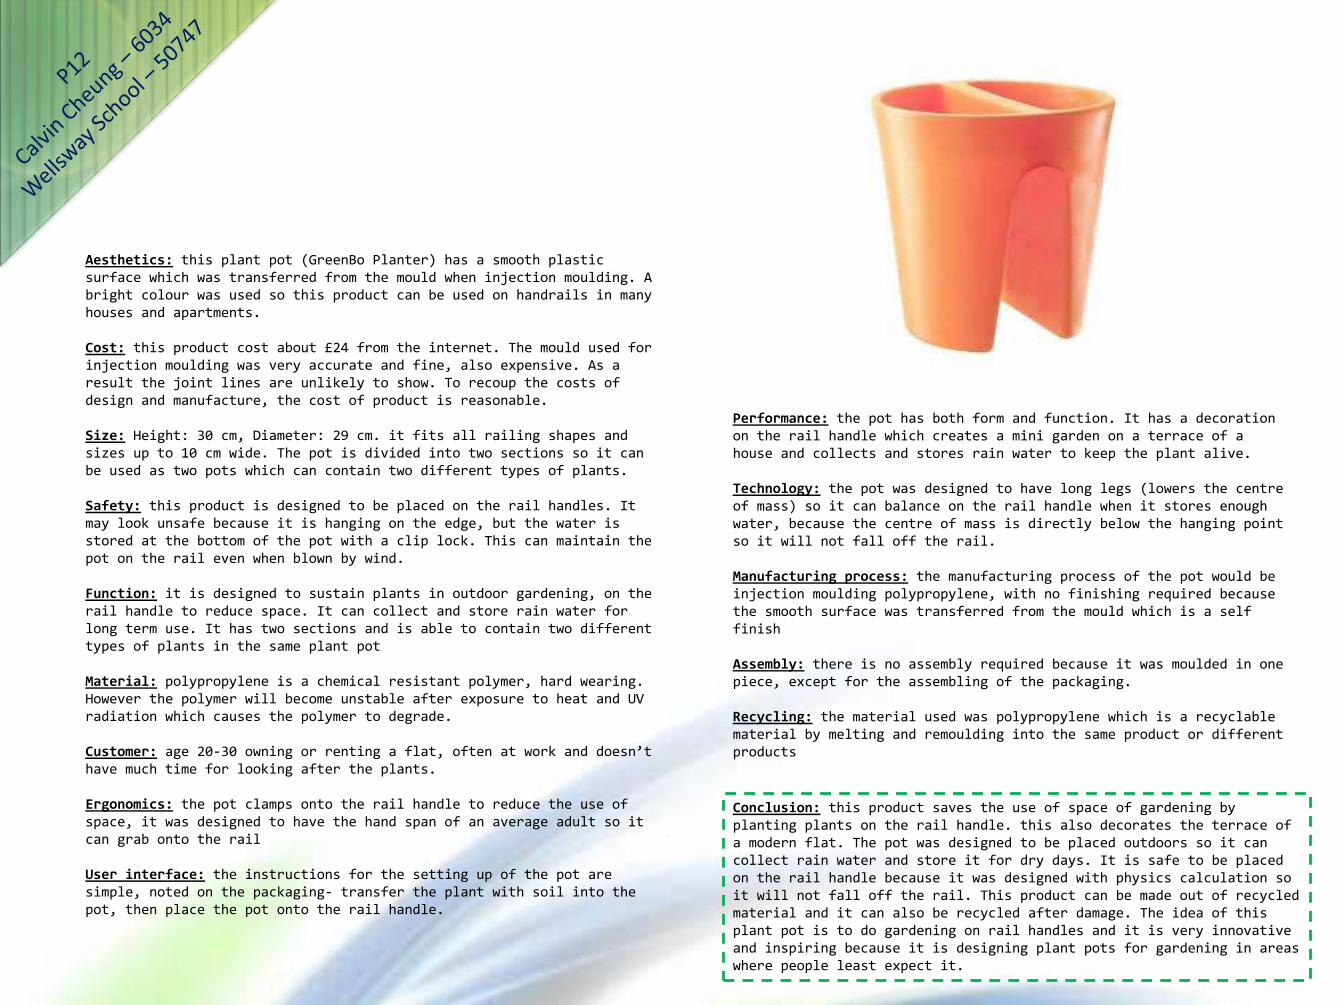
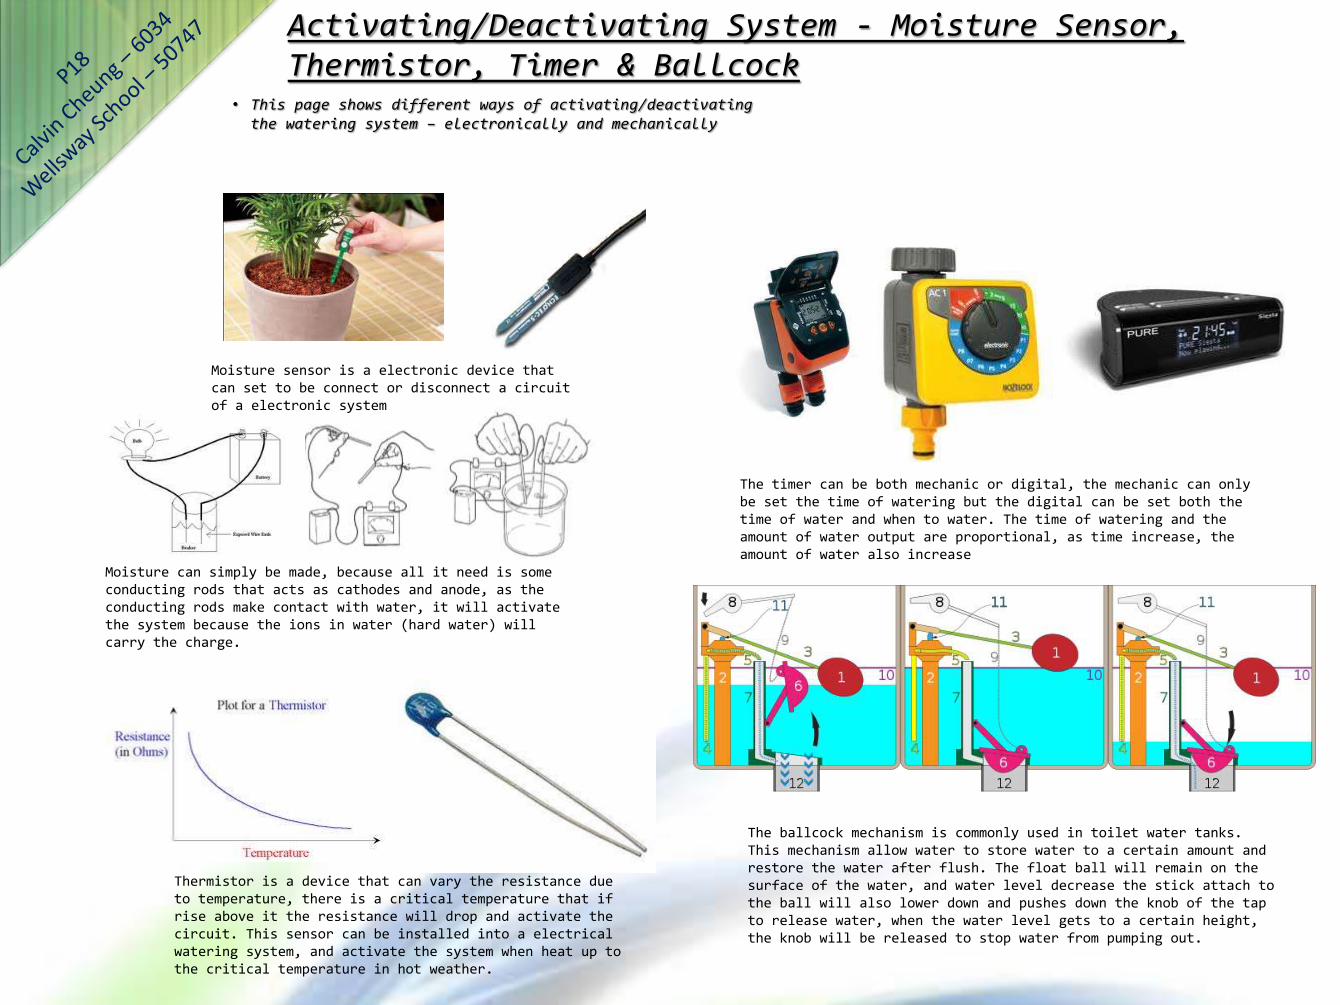
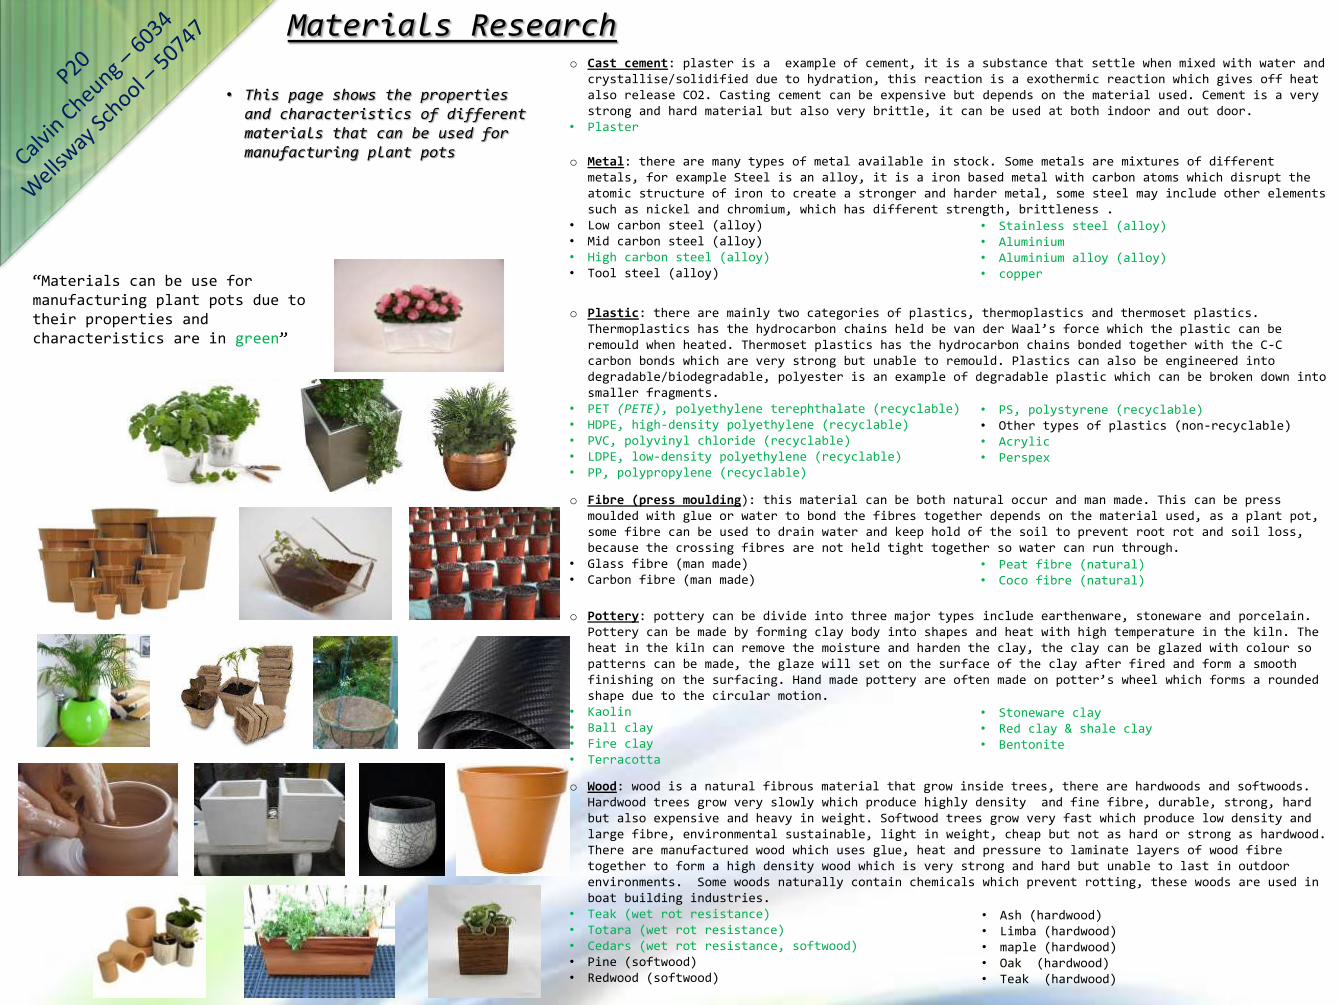
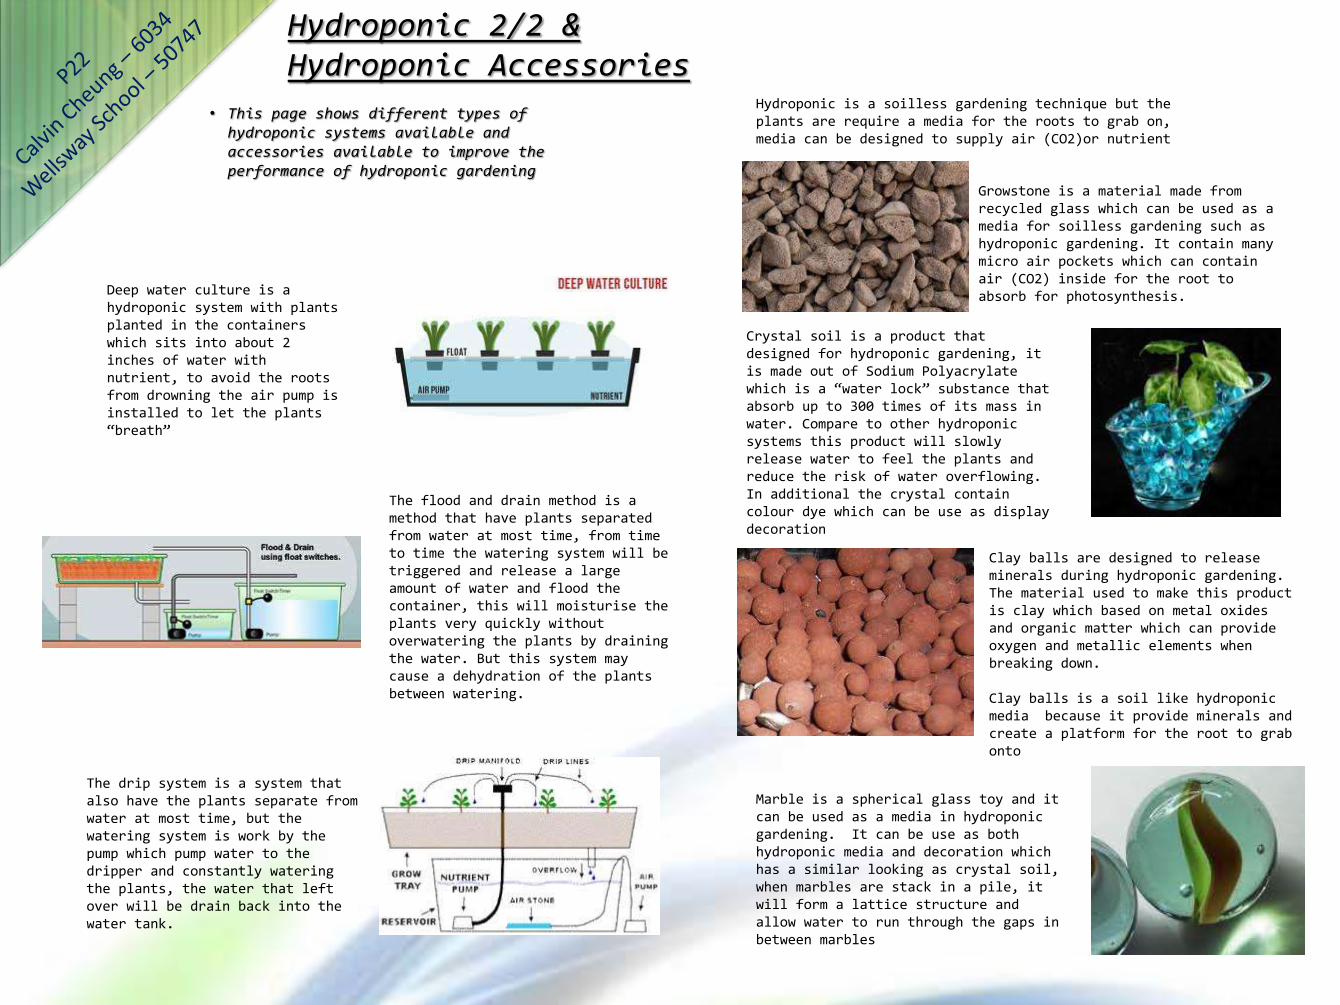
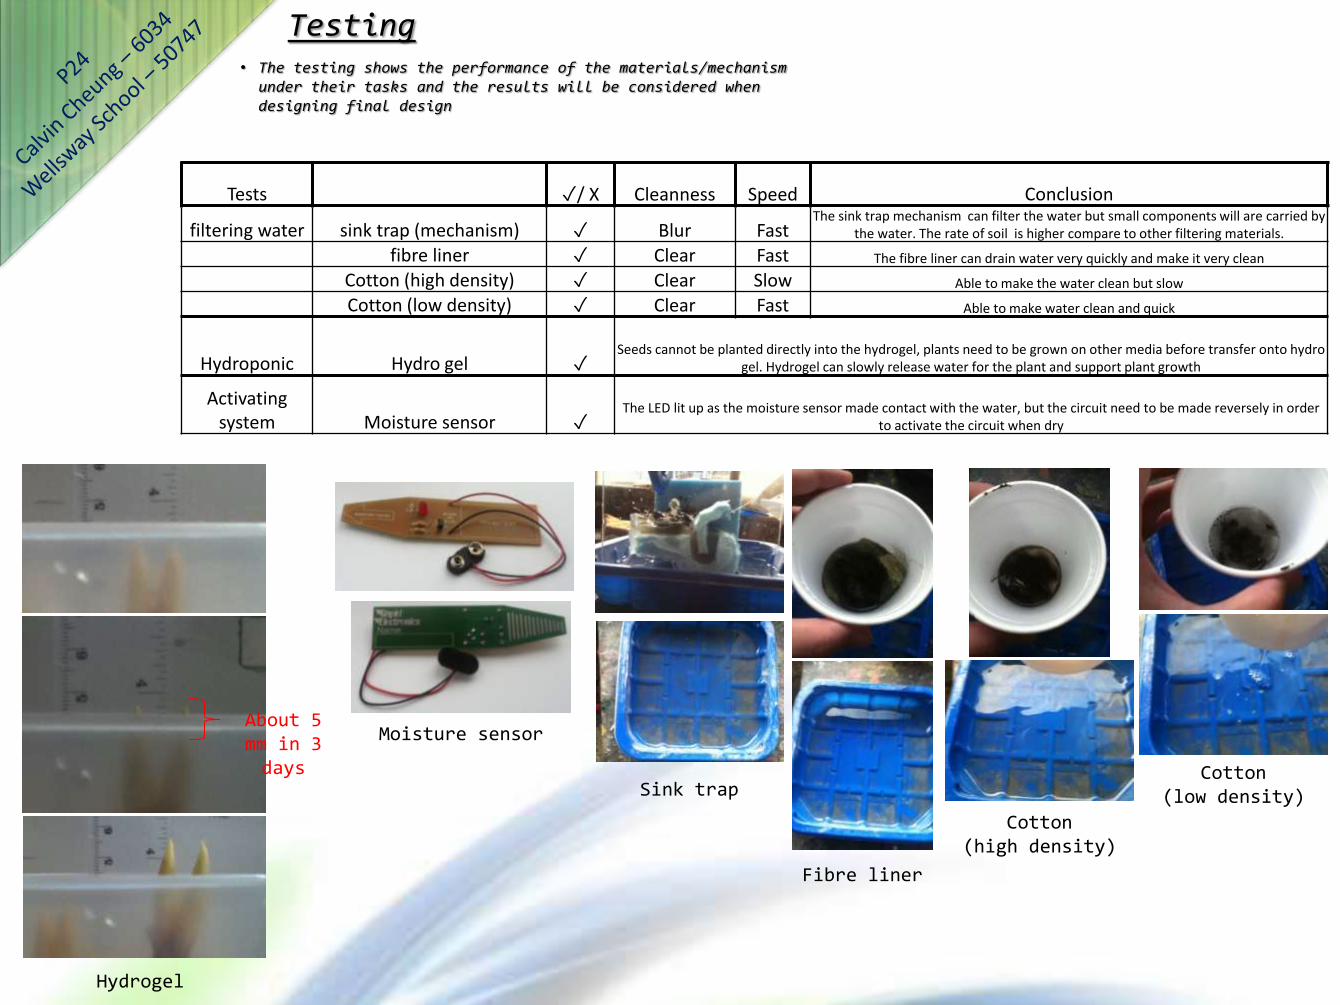
Testing
Tests X Cleanness Speed Conclusion
filtering water sink trap (mechanism) Blur FastThe sink trap mechanism can filter the water but small components will are carried by
the water The rate of soil is higher compare to other filtering materials
fibre liner Clear Fast The fibre liner can drain water very quickly and make it very clean
Cotton (high density) Clear Slow Able to make the water clean but slow
Cotton (low density) Clear Fast Able to make water clean and quick
Hydroponic Hydro gel Seeds cannot be planted directly into the hydrogel plants need to be grown on other media before transfer onto hydro
gel Hydrogel can slowly release water for the plant and support plant growth
Activatingsystem Moisture sensor
The LED lit up as the moisture sensor made contact with the water but the circuit need to be made reversely in order to activate the circuit when dry
Sink trap
Fibre liner
Cotton (high density)
Cotton (low density)
About 5 mm in 3 days
Hydrogel
Moisture sensor
bull The testing shows the performance of the materialsmechanism under their tasks and the results will be considered when designing final design
Mustbull Water tight ndash no leakingbull Able to separate plant and hydro gel from excessed water bull No sharp edges ndash reduce chance of getting injuredbull Durablebull Self watering systembull Water storage ndash store leftover water for long term usebull Able to support the weight of water and plantbull Minimise the use of material if possible ndash reduce the cost of material
bull No taller than 30cm (each unit)
Should bull Support Indoor gardeningbull Support hydroponicbull Efficient self watering system ndash only required to pour water into certain area to water all the plants
bull Support small plants ndash plants only grow up to 10cm in height
bull Low costing ndash no more than pound20 for each unitbull Vertical gardening ndash reduce use of spacebull Able to stay on a average window sillbull Use clear acrylic as the main materialbull Extra units can be added onto or removed
Couldbull battery as power supply bull Sleeknatural theme
Improved Specification (After Research)
DesignAnd
Development
Generating Ideas SCAMPER Diagram
A planting area which is designed to be attached to the chimney on the roof the gas release from burning wood on the fireplace such as carbon dioxide can be taken to photosynthesis which is a process to produce glucose and stores energy by plants At the roof top plants can take in rain water and maximum sunlight these is like a self caring unitBut most house nowadays have radiators installed instead of fireplace also the chimney only likely to release carbon dioxide in cold days ndash winter The planting unit is on the chimney therefore when plants are dead due to dryness chemical attack (acid rain) or other conditions it would be difficult to replace new plants
Combine
A container designed to contain water instead of plants The container can store up rain water and release the water into soil when dry this design is for large area planting such as farming fieldThis product would be useless in seasons with little rain therefore rainwater can hardly be stored
Reverse
Roof top garden can be used as a cooling system in hot days ndashsummer because plants absorb sunlight to undergo photosynthesis and this is a endothermic reaction (temperature drop as the reaction take place) For roof top garden a layer of insulate is required to prevent any damage cause by the roots to the building structure
Maximise
bull Generating design ideas based on plant pots from SCAMPER ndashSubstitute Combine Adapt MaximiseMinimise Put to another use Eliminate Reverse
Generating Ideas Zwicky Box
Form Material Watering system Theme Colour FinishPower supply (electricity) Culture
cubic (3D) Plaster Pump Sleek Transparent Non Non Hydroponic
cylinder (3D) Metal capillary action Natural Wood Sanded Socket Agriculture
cuboid (3D) Plastic drip (gravity) Modern Metallic Polished solar panel
sphere (3D) Fibre Flood Antique White Stained Battery
pyramid (3D) Pottery hydro gel Painted Green
triangle (2D) Wood Manual Doodle Blue
square (2D) Aqua
circle (2D)
rectangle (2D)
Z1 amp Z2Z3 amp Z4
Z5Z6Z7
Z
Z
Z
Z
Z
bull Generating design ideas based on plant pots from Zwicky box with different combination of elements to generate innovative designs The designs generated on the following pages will be compared with specification
Z1 amp Z2 Z3 Z4
Must bullWater tight ndash no leaking X X -
bullAble to separate plant (and hydro gel) from excessed water - -
bullNo sharp edges ndash reduce chance of getting injured
bullDurable
bullSelf watering system X
bullWater storage ndash store leftover water for long term use X
bullAble to support the weight of water and plant -
bullMinimise the use of material if possible ndash reduce the cost of material
bullNo taller than 30cm (each unit)
Should bullSupport Indoor gardening
bullSupport hydroponic X X
bullEfficient self watering system ndash only required to pour water into certain area to water all the plants
bullSupport small plants ndash plants only grow up to 10cm in height
bullLow costing ndash no more than pound20 for each unit
bullVertical gardening ndash reduce use of space X X
bullAble to stay on a average window sill
bullUse clear acrylic as the main material X X
bullExtra units can be added onto or removed X X
could bullbattery as power supply X X X
bullSleeknatural theme X
A cubic plant pot designed for hydroponic ldquoZ2rdquo a simple mechanism to contain water and drain excessed water to the units below ldquoZ1rdquo has a similar design to ldquoZ2rdquo but instead of draining the water the water will be stored up and pump (socket power supply) to the top to keep the water cycle continuously running This designs can carry out vertical gardening but no windows available for plants to grow outward therefore the plants will interrupt inside of the plant pot when over growThe manufacturing process would be moulding clear acrylic because ldquoZ2rdquo can be mould in one piece with minimum amount of waste but ldquoZ1rdquo require an assembly to install the pump and the planting section which will cost more for material and labouring
Z
ldquoZ3rdquo Cylinder design with a ldquoJapanese water featurerdquo style watering system to water the plant Water will slowly drip into and fill up the tube once the water reach a certain level the equilibrium (original position) will fall and tip over the tube to water the plantldquoZ4rdquo is very similar to a average rounded plant pot but it has a water storage in the wall captivity to store water the water gate will open and water the plant by floodingTo manufacture ldquoZ3rdquo is fairly simple because it is only in two parts which can be craft out from wood but to manufacture ldquoZ4rdquo is more complex due to the components The wood use for manufacturing these designs should be wet rot resistance (eg teak) These designs are not suitable for vertical gardening because sun light cannot penetrate wood therefore the plant will not be able to grown healthily
Z
Z2
Z1
Water storage tank
Water pump
Planting section
Water dam
Z3
Z4
Water storage tank
Water gate
Planting section
Watering tube
Z5 Z6
Must bullWater tight ndash no leaking X X
bullAble to separate plant (and hydro gel) from excessed water
bullNo sharp edges ndash reduce chance of getting injured
bullDurable
bullSelf watering system - -
bullWater storage ndash store leftover water for long term use X
bullAble to support the weight of water and plant
bullMinimise the use of material if possible ndash reduce the cost of material
bullNo taller than 30cm (each unit)
Should bullSupport Indoor gardening
bullSupport hydroponic X
bullEfficient self watering system ndash only required to pour water into certain area to water all the plants X
bullSupport small plants ndash plants only grow up to 10cm in height
bullLow costing ndash no more than pound20 for each unit X
bullVertical gardening ndash reduce use of space
bullAble to stay on a average window sill X
bullUse clear acrylic as the main material X X
bullExtra units can be added onto or removed
could bullbattery as power supply X X
bullSleeknatural theme X X
Z5
Planting pot designed with almost the same functions as hanging baskets but placing on the ground instead this design has a drain to remove excess water and window for plants to grow outward this design can perform vertical gardening by stacking pots on top of each other However because of the rounded body a holder is required to keep it stable especially when performing vertical gardeningThe material used for manufacturing this product is white terracotta which allows the consumer to decorate the plant pot Terracotta can be moulded in a pottery industry Using terracotta can be expensive but it depends on the wall thickness
Z
Z6
Planting units in the shape of equilateral triangle (3 equal sides) plants can be planted inside This design can provide vertical gardening in a pyramid form but the height of the pyramid is proportional to the length available on the window sill Three cotton threads are placed through each corner and connected at the centre where they can soak up water by capillary action However according to the testing cotton threads donrsquot soak up much water The units may not perform well as sunlight cannot penetrate through metal unless the ldquowindowsrdquo are facing outwards toward the household window There are therefore a number of problemsThe material used for manufacturing this product is aluminium which is a cheap light and recyclable material The units can be manufactured by laser cutting to cut out the components on a aluminium sheet and assemble together by welding
Z
Planting section
window
window
Z7
Must bullWater tight ndash no leaking
bullAble to separate plant (and hydro gel) from excessed water X
bullNo sharp edges ndash reduce chance of getting injured
bullDurable
bullSelf watering system
bullWater storage ndash store leftover water for long term use
bullAble to support the weight of water and plant
bullMinimise the use of material if possible ndash reduce the cost of material
bullNo taller than 30cm (each unit)
Should bullSupport Indoor gardening
bullSupport hydroponic X
bullEfficient self watering system ndash only required to pour water into certain area to water all the plants X
bullSupport small plants ndash plants only grow up to 10cm in height
bullLow costing ndash no more than pound20 for each unit
bullVertical gardening ndash reduce use of space X
bullAble to stay on a average window sill
bullUse clear acrylic as the main material X
bullExtra units can be added onto or removed X
could bullbattery as power supply
bullSleeknatural theme
Z7This design was inspired from the Chinese symbol ldquoying yangrdquo it has a shape like a water drop The tail side (thin and pointy end) is used as a container for the plant and the head side (large and rounded end) is used as a water storage to contain water with a water gate in between the two sides The water gate will open and water the plant by flooding The watering system is not as effective because the watering system is only flooding the soil at the very bottom This design cannot perform well due to the rounded body and the fact that the water storage is set on one side therefore the product will lean back and forth before and after wateringBlue acrylic is used to manufacture this design The curves will make manufacture complicated to assemble because acrylic will stretch when heat bended
Z
Planting section
Water gate
Water storage tank
Design Ideas
A simple design based on square terracotta pot a self watering system (agriculture) with a water pump to pump water from the water storage to the top to water plant The sink lock mechanism is used to filter the waterInjection moulding clear acrylic would be ideal for large scale manufacturing (laser cut with cone joint join together and fish tank sealant for prototype) But for small parts such as the ldquosink lock mechanismrdquo may be difficult to manufacture and install
1a
A ldquowaverdquo theme plant pot with 3 units agriculture section hydroponic section and water storage section After water moisturised and drained from the ldquoagriculture sectionrdquo water will carry the nutrients and enter the sink lock mechanism Water will then fall into the ldquohydroponic sectionrdquo and refresh the water with nutrient water As water over flows the water will fall off the ldquowater damrdquo and run into the ldquowater storage tankrdquo the pump in the water tank will pump the water back to the top which is the ldquoagriculture sectionrdquo the water cycle will continueThis design would be difficult to manufacture (injecting moulding) and making prototype (laser cutting and press moulding) due to the mechanism inside When making the prototype the joint between the curves and sides would be difficult because the acrylic will stretch during heat-press moulding
2
1b 2
Must bullWater tight ndash no leaking
bullAble to separate plant (and hydro gel) from excessed water
bullNo sharp edges ndash reduce chance of getting injured
bullDurable
bullSelf watering system
bullWater storage ndash store leftover water for long term use
bullAble to support the weight of water and plant
bullMinimise the use of material if possible ndash reduce the cost of material
bullNo taller than 30cm (each unit) X
Should bullSupport Indoor gardening
bullSupport hydroponic X
bullEfficient self watering system ndash only required to pour water into certain area to water all the plants X X
bullSupport small plants ndash plants only grow up to 10cm in height
bullLow costing ndash no more than pound20 for each unit -
bullVertical gardening ndash reduce use of space X X
bullAble to stay on a average window sill X
bullUse clear acrylic as the main material
bullExtra units can be added onto or removed X X
Could bullbattery as power supply
bullSleeknatural theme
Water storage tank
Planting section
Water pump
Sink lock mechanism
Water storage tank
Planting section
Water pump
Sink lock mechanism
Planting section
Water dam
bull The design ideas shown in the following pages are compared to specifications Most of the designs are based on transparent acrylic to allow sunlight entre and shine onto the plants curves to present the aqua theme (waves) and vertical gardening
This idea is referred to design ldquo2rdquo but have a water droplet shape instead it has a agriculture section above the hydroponic section the hydroponic section is merged with the water storage therefore the water level of hydroponic is proportional to water storage As the water run through the agriculture section the water will carry nutrients to the water storage below and feed the plantsThis design is made of transparent acrylic but because of the mechanism inside this cannot be manufacture in one piece (injection moulding) which will increase the cost of manufacturing
3a
This design was inspired from a household aquarium tower combined with a wave structureThe tower has 4 sections of hydroponics Each section contain a certain amount of water and when over flow water will flow down to the section bellow This is likely to flood the bottom section when over water therefore the bottom section needs to be larger than the sections above in order to contain the water and to physically balance The design is in one piece therefore extra units cannot be added onto or removed Structure may collapse because the joints between sections may not be strong enough to hold the sections with water aboveMarbles are placed into each unit the marbles act as a platform for the plant to grab ontoTo manufacture this product will cost a large amount of money because it is very complicated to mould due to the shape and form and large volume of material will be used
4a
3a 4a
Must bullWater tight ndash no leaking
bullAble to separate plant (and hydro gel) from excessed water -
bullNo sharp edges ndash reduce chance of getting injured
bullDurable
bullSelf watering system X X
bullWater storage ndash store leftover water for long term use
bullAble to support the weight of water and plant
bullMinimise the use of material if possible ndash reduce the cost of material
bullNo taller than 30cm (each unit) X
Should bullSupport Indoor gardening
bullSupport hydroponic
bullEfficient self watering system ndash only required to pour water into certain area to water all the plants
bullSupport small plants ndash plants only grow up to 10cm in height
bullLow costing ndash no more than pound20 for each unit X
bullVertical gardening ndash reduce use of space
bullAble to stay on a average window sill
bullUse clear acrylic as the main material
bullExtra units can be added onto or removed X X
Could bullbattery as power supply X X
bullSleeknatural theme
Water storage tank
Sink lock mechanism
Planting section
separator
Water storage tank
Planting section
marbles
Planting section
Planting section
Planting section
Design Development
Hydroponic block
Water storage tank
Structural developed from ldquo1ardquo Hydroponic plant blocks can be stack on top one over the other (like Lego blocks) which can perform a vertical gardening Tubes inside the blocks are set to a certain height therefore a constant amount of water will remain inside the pot and the leftover water will flow downward to the block(s) below The water can be store in the large water tank at the bottomThese hydroponic blocks can be moulded in one piece with clear plastic this process can reduce waste and time as a result cost of manufacturing will reduce
1b
Planting section
Draining tube
1b 4b
Must bullWater tight ndash no leaking
bullAble to separate plant (and hydro gel) from excessed water - -
bullNo sharp edges ndash reduce chance of getting injured
bullDurable
bullSelf watering system X X
bullWater storage ndash store leftover water for long term use
bullAble to support the weight of water and plant
bullMinimise the use of material if possible ndash reduce the cost of material
bullNo taller than 30cm (each unit) X
Should bullSupport Indoor gardening
bullSupport hydroponic
bullEfficient self watering system ndash only required to pour water into certain area to water all the plants
bullSupport small plants ndash plants only grow up to 10cm in height
bullLow costing ndash no more than pound20 for each unit x
bullVertical gardening ndash reduce use of space
bullAble to stay on a average window sill
bullUse clear acrylic as the main material
bullExtra units can be added onto or removed X
Could bullbattery as power supply X X
bullSleeknatural theme
Structural improved from ldquo4ardquo ldquo4brdquo now has more strength to sustain the structure the system remains the same which with 4 vertical hydroponic sections in a wave form Marbles contain inside are platforms for plants (roots) to grab onto each sections can drain excessed water down to the section below to avoid overflowAfter the improvement the manufacturing difficulties remains due to the structure
4b
Water storage tank
Planting section
Planting section
Planting section
Planting section
marbles
bull The design shown in the following pages are developed from previous designs which are improved to meet the specifications
This design has a similar inter-mechanism of ldquo3ardquo but the hydroponic section and water storage are separated a pump was included therefore water can be pump back to the top Water will moisturise the agriculture section and excessed water will be drain into the hydroponic section the excessed water will overflow and fall into the water storage belowThe design has the shape of a bowl ndash fish bowl This design may cost a lot of money to manufacture due to the mechanism inside therefore it cannot be manufacture in one piece and result more costs on assembly in the manufacturing
3b
3b
Must bullWater tight ndash no leaking
bullAble to separate plant (and hydro gel) from excessed water -
bullNo sharp edges ndash reduce chance of getting injured
bullDurable
bullSelf watering system
bullWater storage ndash store leftover water for long term use
bullAble to support the weight of water and plant
bullMinimise the use of material if possible ndash reduce the cost of material
bullNo taller than 30cm (each unit)
Should bullSupport Indoor gardening
bullSupport hydroponic
bullEfficient self watering system ndash only required to pour water into certain area to water all the plants
bullSupport small plants ndash plants only grow up to 10cm in height
bullLow costing ndash no more than pound20 for each unit -
bullVertical gardening ndash reduce use of space
bullAble to stay on a average window sill
bullUse clear acrylic as the main material
bullExtra units can be added onto or removed X
Could bullbattery as power supply -
bullSleeknatural theme X
Water storage tank
Sink lock mechanism
Planting section
dam
Water pump
3 Developments Hydroponic Blocks
This idea is a combination of 3 different ideas ndash ldquo1rdquo + ldquo2rdquo + ldquo4rdquo
It will be injection moulded clear acrylic pump and electronic components will be assemble and install separately with fish tank sealant to seal between the electronics and acrylic (prototype laser cut acrylic heat stamp mould acrylic assemble with acrylic glue and seal with fish tank sealant install the electronics)
ldquo1rdquo planting units that can be remove or added onto when needed which can form a vertical gardening
ldquo4rdquo the inter mechanism can water the plants efficiently and able to support hydroponic with hydrogel
ldquo2rdquo (water storage) a large volume container with a large surface area on the base to stabilise the vertical structure
Planting units The wave like structure provide 2 open sides for the plants grow toward to
The mechanism allows water to run in zigzag path to moisturise the hydrogel There is a filter in the drain within each unit which is a plastic film with holes (lt 3mm diameter) allow excessed water to drain but keep the hydrogel behind
The hole at the top is for lining up the unit above a piece of connector at the bottom of the unit above will slot into the hole and help to line the drain together
Each units will contain a moisture sensor which connect to the planting units above below and the ldquoWatering circuitrdquo by banana plugs in a series and activate the pump when any of the moistures detect no water
Hydroponic Block
Must bullWater tight ndash no leaking
bullAble to separate plant (and hydro gel) from excessed water
bullNo sharp edges ndash reduce chance of getting injured
bullDurable
bullSelf watering system
bullWater storage ndash store leftover water for long term use
bullAble to support the weight of water and plant
bullMinimise the use of material if possible ndash reduce the cost of material
bullNo taller than 30cm (each unit)
Should bullSupport Indoor gardening
bullSupport hydroponic
bullEfficient self watering system ndash only required to pour water into certain area to water all the plants
bullSupport small plants ndash plants only grow up to 10cm in height
bullLow costing ndash no more than pound20 for each unit
bullVertical gardening ndash reduce use of space
bullAble to stay on a average window sill
bullUse clear acrylic as the main material
bullExtra units can be added onto or removed
Could bullbattery as power supply
bullSleeknatural theme
830mm
Water storage the unit can be divide into 2 parts water storage and electronic storage The water storage area will contain a pump and 2 moistures the pump will activate when the moisture sensor in the planting units sense no water (watering unit) the storage can contain maximum of 39L of water In the electronic storage area contain the batteries resistors and other components it contain 2 circuits such as the ldquowatering circuitrdquo and the ldquowarning circuitrdquo The ldquowarning circuitrdquo activate when the water level passed over the moisture sensor (M2) or passed below the moisture senor (M1)
bull The 3 design ideas shown in the following pages are chosen designs combined and further developed with descriptionsmechanisms the design will be compared with specification
ldquoPumprdquo
ldquoMoisture sensorrdquo(M2)
ldquoMoisture sensorrdquo(M1)
The circuit has a busser with activate both when water level rise above ldquoM2rdquo or drop below ldquoM1rdquo This is to give a warning to the user that there is too muchnot enough water in the water storage
The circuit has a water pump which can be activate both automatically (moisture sensor) or manually (switch) the moisture sensors is in a series circuit therefore when any of the units dries out the pump with activate
The watering system is pumping water straight to the top of the vertical unit and water will run through all units When watering the water will be stored in the hydrogel as the hydrogel is fully moisturised the excessed water will be drained to the unit below and moisture the hydrogel
WaterMoisturising input gt outputFully moisturised input gt output
Each unit have half a wave length (λ2) therefore the units can form a wave like structure when one stack onto the other When stacking they have to face opposite direction therefore the same design can be use over and over again and reduce the manufacturing costs because it is cheaper to manufacture a single design
λ
λ-2
The drain design is the idea of connecting household drain pipe together the water can only flow toward one direction because there are no other junction available
ldquoMoisture sensorrdquo(M1)
ldquoBuzzerrdquo
ldquoBatteryrdquoldquoNand GaterdquoldquoResistorrdquo
Warning Circuit
ldquoMoisture sensorrdquo(M2)
ldquoPumprdquo
ldquoBatteryrdquo
ldquoNand GaterdquoldquoResistorrdquoldquoMoisture sensorrdquo
ldquoMoisture sensorrdquo
ldquoMoisture sensorrdquo
Planting unit
Planting unitPlanting unit
Watering Circuit
ldquoSwitchrdquo
3 Developments Wall TorchThis idea is a combination of 3 different ideas ndash ldquo7rdquo + ldquoZrdquo + ldquoZrdquo
It will be blow moulding white polypropylene and the bracket will be die cut and stamped stainless steel electronic components will be assemble and install separately with fish tank sealant to seal between the electronics and the polypropylene (prototype vacuum forming polypropylene assemble the electronics and install into the water tank with sealant the bracket can be brought from store)
ldquo7rdquo the wall pocket feature that allow consumer to have plants growing on a wall vertically
ldquoZrdquo the shape of part of a ldquoYing Yangrdquo has a large rounded head (planting section) and a thin tail (drain)
ldquoZrdquo the bowl form combine with the ldquoZrdquo design gives a sleek design and a effective drain that filter excessed water from hydrogel
The planting unit has the form of a funnel which can concentrate the water flow and able to drain the water to the unit below but the drain is ate the side instead of the centre of the unit
The planting unit uses hydrogel which can store water for plant and reduce the number of watering
At the back of the planting unit there is a hook like section which can be use to connect the planting unit to the bracket on the wall
The bracket has 6 holes 3 on each side of the slots screws can be use to attach to the wall and keep it stable the bracket is 50 cm tall and able to hold 3 planting units by slinging the hook of the planting unit into the slot
Wall Torch
Must bullWater tight ndash no leaking
bullAble to separate plant (and hydro gel) from excessed water
bullNo sharp edges ndash reduce chance of getting injured
bullDurable
bullSelf watering system
bullWater storage ndash store leftover water for long term use
bullAble to support the weight of water and plant -
bullMinimise the use of material if possible ndash reduce the cost of material
bullNo taller than 30cm (each unit)
Should bullSupport Indoor gardening
bullSupport hydroponic
bullEfficient self watering system ndash only required to pour water into certain area to water all the plants
bullSupport small plants ndash plants only grow up to 10cm in height
bullLow costing ndash no more than pound20 for each unit
bullVertical gardening ndash reduce use of space
bullAble to stay on a average window sill -
bullUse clear acrylic as the main material X
bullExtra units can be added onto or removed
Could bullbattery as power supply
bullSleeknatural theme
Watering Circuit
ldquoPumprdquo
ldquoBatteryrdquo
ldquoNand GaterdquoldquoResisto
rrdquo
ldquoTimerrdquo
ldquoSwitchrdquo
500mm
The watering system used is the same as the ldquoHydroponic Blockrdquo which can moisturise all the hydrogel in the vertical garden by running water through the units in a zigzag path
The circuit has a water pump which can be activate both automatically (timer) or manually (switch) the timer can be set up to activate the circuit (eg once a week) and water the plants
Part of the drain was removed therefore leakage can be prevented
The water tank has 2 hooks at the back which is safe to be hang onto the bracket the water tank is divided into 2 sections which are water storage and electronic storage
Water storageElectronic storage
The areas in yellow are places where the product can be installed
3 Developments Window Pocket
This idea is a combination of 2 different ideas ndash ldquo7rdquo + ldquo6rdquo
This design will be injection moulding clear acrylic and suction pads will be glued onto the back of the planting unit and the water storage is a plastic bag attach with tubes (prototype glue laser cut acrylic components and suction pads together with fish tank sealant)
ldquo7rdquo the wall pocket feature that allow consumer to have plants growing on a wall vertically
ldquo6rdquo the cylinder form act like a pocket which can contain the plant and a tube is used to drain excessed water
The planting unit is held onto the window-glass surface by 4 suction pads the planting unit has a draining tube which drain the excessed water from the capacitor into the unit belowThe unit contain a hydroponic media which floats as the water level drops the plant also drops which gives a warning sign to the user to refill the capacitor
Water storage is a plastic bag with 2 deliver tubes the tubes have a mechanism which only allow water to flow at one direction User need to push onto the bag to pump water to the top in order to water the vertical garden Tube (ndash) is an input and there to deliver excessed water into the storage bag and prevent water from flowing out the tube (+) is an output and deliver tube that deliver water to the top of the vertical garden and prevent water flow back down into the bag due to gravity
ndash +
Window Pocket
Must bullWater tight ndash no leaking
bullAble to separate plant (and hydro gel) from excessed water -
bullNo sharp edges ndash reduce chance of getting injured
bullDurable
bullSelf watering system X
bullWater storage ndash store leftover water for long term use
bullAble to support the weight of water and plant -
bullMinimise the use of material if possible ndash reduce the cost of material
bullNo taller than 30cm (each unit)
Should bullSupport Indoor gardening
bullSupport hydroponic
bullEfficient self watering system ndash only required to pour water into certain area to water all the plants
bullSupport small plants ndash plants only grow up to 10cm in height
bullLow costing ndash no more than pound20 for each unit
bullVertical gardening ndash reduce use of space
bullAble to stay on a average window sill -
bullUse clear acrylic as the main material
bullExtra units can be added onto or removed
Could bullbattery as power supply X
bullSleeknatural theme
The design can form a vertical or diagonal structure as long as the draining tube is in the unit below
This mechanism allows water to flow to one direction but not the other which can prevent water from flowing through the undesired tube when user is pumping water
The water storage is a plastic bag and the bag have 2 tubes which is an input and an output and the water can only flow through one direction in the water cycle the bag also act as a pump as the user press onto the bag and water will be pumped to the top of the vertical garden
To refill the water in the water cycle water can be pour into any unit but caution need to be taken and not to over fill the water
The plant is grown on a piece of floating media and as time passes the water in the capacity will drop and the height of the plant will also drop which give a signal to the user to refill the capacitor
When refilling the water poured from the top will first fill up the capacitor which raise the water level (the water level depends on the height of the drain) and the excessed water will flow toward the unit below
This type of window is not suitable for the ldquoWindow Pocketrdquo because when the window tilt the plants may fell off the planting unit
This type of window is suitable because it cannot be opened therefore the risk of the product or plant falling off is minimised
This type of window is suitable for the ldquoWindow Pocketrdquo because it open side ways therefore the risk of falling is very low but the product may caught by the handle and causes safety hazard
This type of window is suitable for the ldquoWindow Pocketrdquo because it slide side ways which is at a very low risk
Final DesignAnd
Making Stage
Final Specification10 PerformanceMust- (qualitative)11 Able to perform vertical gardening12 Support indoor gardening13 Support hydroponic14 Able to water the plants automatically15 Able to store water for watering system16 Water tight ndash no leaking17 stay on an average window sill without collapse18 Use clear material as the main material therefore plants can absorb maximum sunlight19 Durable110 Able to separate excessed water from fully moisturised hydrogel111 Water proof electronics ndash prevent short circuit circuit failure and electric shockShould-112 Store at least 1L of water (qualitative)113Efficient watering system (quantitative)114 Support small plants (gt10cm) (qualitative)Could- (qualitative)115 Have moisture sensor or timer to activate the watering system116 Battery powered117 Natural theme
20 Size (quantitative)21 15cm (+- 5cm) depth ndash therefore the plant pots can stay on an average window sill22 No taller than 20cm (per unit) saves space and reduce the risk of collapsing
30 Target cost amp manufacturing costMust-31 Selling price lt pound20 (quantitative)32 Reduce use of material ndash reduce material cost (qualitative)33 Minimise waste of material ndash reduce manufacturing cost (qualitative)Should- (qualitative)34 Use recycled (recyclable) material (eg PVC HDPE) ndash reduce material cost and environmental damageCould- (qualitative)35 Low costing materials for packaging
40 packagingMust- (qualitative)41 Protect the product from stress tests42 Prevent the product from falling apart43 Simply manufacturing techniqueShould- (qualitative)44 Include foam or bubble wrap to protect the product45 The product will not be able to shake around in the packaging46 Include instructions of using the product47 Include most of the accessories required in order to allow the product to workCould- (qualitative)48 Use recyclable materials
Final Design Hydroponic Blocks
I have decided to make the ldquoHydroponic Blockrdquo as my product forthis project
ldquoHydroponic Blockrdquo have a tower like structure which require astable flat and large surface area to preform well and safe theonly limitations are the household window sill depth and thebalancing The problems for producing the prototype (joining thebent acrylic and the flat acrylic together) are solved whichrequired accuracy and very challenging But this design can achieveall the specifications
The ldquoWall torchrdquo required the bracket to be installed into the walland some household may not have the equipment to do so (old agepeople may not be able to install the bracket therefore the productbecome useless)
The ldquoWindow Pocketrdquo hold onto the glass by suction pads which maynot be safe and may damage the window hinge when a large scale areused Also plants may die due to frost damage by contacting withthe window in cold weather
AB
C
E
D
bull Further information and component details of the final design will be included and explain their purposes with imagesmechanisms
F
A plastic tube contain 2 banana plugs (female and male) which can be connect to the units above and below the tube isolate the wires from the water with sealant to prevent circuit malfunctioning due to water
A
The hole on the top of the planting unit is for slotting and lining up the unit above B
Holes at the side of the planting unit is for connection to the suction pad which will be attach to the window glass to prevent the vertical garden from falling off the window sill
C
Moisture sensor will be attach to the wire inside the tube to sense the level of moisture of the hydrogel the gap in between the wires and the tube will be sealed with sealant
D
A piece of plastic film with 2mm holes in polka pattern act as a filter to filter the excessed waterE
The ldquoUrdquo shape is for the watering tube to enter through in order to reach the top of the vertical garden
F
Engineering Drawings Of Hydroponic Block And Water Tank(Manufacturing Design)
Planting unit
Water tank
bull The dimensions of the manufacture design of the Hydroponic Block and Water Tank is shown on this page
The manufacturing process of this product can be injection moulding because most of the parts can be mould in one piece therefore the costs are reduced the use of material is more efficient This process can work rapidly and it has a high rate of production
Manufacturing (Costs)
httpwwwprotomoldcouk
ldquoInjection Mould Prices Start at pound995Best for 10ndash10000+ pieces
Choose from hundreds of engineering-grade resins ABS Polycarbonate Nylon Acetal Polypropylene Acrylic PBT HDPE LDPE TPE TPU and LCP including glass or fibre filled gradesdamagerdquo
Costs start from pound995 which include the wages of worker and hidden costs such as electricity and petrol
The manufacture design has volume of 0000400 msup3 of material result weight of 038 kg (HDPE)The cost of HDPE per kg is pound3 therefore the cost of material per planting unit is pound114
4 connectors (pound0968) 32cm of wire (pound0032) 1 suction pad (pound0333) and a moisture sensor (pound020) is required for each planting unit
The starting price of injection moulding price is pound995 if a patch of 10000 is produced the price of each planting unit cost pound010 (material cost not included)
The total cost of producing a planting unit is pound277
Connector for electronicsPrice pound0242 per unit (when ordering 2500)
Each planting unit require 4 connectors = pound0968
httpukrs-onlinecomwebpharsh-environment-wire1839225origin=PSF_412652|fpampcm_sp=featureproducts-_-FeaturedProductsContent-_-1839225
WirePrice pound999 per 100m (when ordering 25)
Each planting unit require 32cm = pound0032
Moisture sensorPrice estimate pound020
Each planting unit require 1
httpukrs-onlinecomwebpcircular-connector-contacts0468557origin=PSF_435583|fpampcm_sp=featureproducts-_-FeaturedProductsContent-_-0468557
httpwwwebaycoukitm1kg-HDPE-Plastic-Pellets-Granules-Suitable-for-stuffing-weighting-decoration-181066775013pt=UK_Dolls_Bears_RLamphash=item2a286bb9e5
HDPEProperties Hard stiff able to be sterilisedPrice pound3 per kgDensity 095 10sup3 kgmsup3
It is a thermoplastic which can be used for injection moulding and remould therefore it can be recycled Using recycled plastic may cost more due to separating the undesired attachments (paper metal) and energy input to heat and remould the plastic but by using recycled plastic can save resources and reduce environmental damage
httpwwwtescocomdirectsuction-cups-45mm-pack-of-3534-6206prdrecommendationId=dafa26d8-cf96-4d42-bcae-621194fbc5e90ampskuId=534-6206
Suction padsPrice pound100 per pack (3 per pack)
Each planting unit require 1 connectors = pound0333
bull The estimate costs of manufacturing a Hydroponic block which include the material labour wage and components costs
The engineering drawings shows the dimensions (in millimetre mm) of the designs from side different views
Planting unit
Water tank
bull The dimensions of the prototype design of the Hydroponic Block and Water Tank is shown on this page
Engineering Drawings Of Hydroponic Block And Water Tank(Prototype Design)
Components (Assembling)
Pre-manufacturing5 ldquoBackrdquo ndash A flat sheet of
acrylic will be heat press into an uniform circular arc
6 ldquoFrontrdquo ndash A flat sheet of acrylic will be heat press into an uniform circular arc (partly) and set angles
7 ldquoBaserdquo ndash A flat sheet of acrylic will be heat bend into a set angle
The heat press moulds will be present on the next page
Pre-assembly1 Polythene tubing with both male and
female banana plugs installed a moisture will also be installed at about 30mm up from the bottom of the tube the gaps will be sealed with water proof sealant
2 This main component is very similar to ldquo1rdquo but with out the moisture sensor
3 ldquoWallrdquo ndash A flat sheet of acrylic that will have ldquoRailsrdquo and ldquoDrain siderdquo installed with Tensol glue engraved lines will be shown on the surface for lining up the components when gluing
4 This main component is identical to ldquo3rdquo but in mirror image
7 ldquoBaserdquo ndash a ldquoSlot +rdquo component will be installed at the bottom with Tensol engrave line will be shown to help lining up
bull The main components are shown on this page and steps of assembling explained by arrows The pre-manufacturing and pre-assembly of each main components are described and explained
1 2
3
4
5
6
7
8
11
2
2
344
Assembly1 Line up the two ldquoWallsrdquo onto
the ldquoFrontrdquo component2 Put on the ldquoToprdquo and ldquoBaserdquo
component ndash insert into cone joint
3 Slide the ldquoBackrdquo component into the ldquoRailsrdquo
4 Slide the tubes through both ldquoToprdquo and ldquoBaserdquo
A testing of the ldquoRailsrdquo ndashexample of pre-assembly
1
2
10
5
9
36
4 7
8
2
2
1
3
3
4
5
6
Pre-manufacturing8 ldquoBackrdquo - A flat sheet of acrylic will
be heat press into an uniform circular arc
10ldquoFrontrdquo ndash this component share the same arc with the ldquobackrdquo and same heat stamp mould will be used
Pre-assembly2 ldquocaptive wallrdquo ndash a flat sheet of acrylic with moisture
sensors installed and wires passing through 3 ldquotank wallrdquo - A flat sheet of acrylic that will have
ldquoRailsrdquo (for ldquobackrdquo) installed with Tensol glue engraved lines will be shown on the surface for lining up the components when gluing
4 Identical mirror image of ldquo3rdquo 5 ldquoStorage wallrdquo ndash a flat sheet of acrylic that will have
ldquoRailsrdquo (for ldquoFrontrdquo) installed with Tensol glue engraved lines will be shown on the surface for lining up the components when gluing
6 Identical mirror image of ldquo5rdquo 10ldquoFrontrdquo ndash the ldquohandlerdquo and ldquolockrdquo will be installed
with Tensol glue
Assembly1 Insert the ldquocaptive wallrdquo into the ldquobase componentrdquo2 Line up the cone joints of the ldquocaptive wallrdquo ldquobaserdquo and
the two ldquoTank wallrdquo components Line up the ldquoBackrdquo along with the ldquorailsrdquo
3 Insert the two ldquostorage wallrdquo by connecting the cone joints4 ldquofill drainrdquo will be entered through the two ldquostorage wallrdquo5 Put the ldquolidrdquo onto the top with the cone joint6 Insert the ldquofrontrdquo component with the ldquoLockrdquo lined up with
the ldquobaserdquo
Pre-manufacturing ndash Moulding
Heat stamp moulding is the process for bending the acrylic pieces cut out from the laser cutter into a certain shape the moulds use for this process will be wood that crafted in the router Wood can withstand the heat for heating the acrylic without expanding therefore the prototype can be more precise
Planting unitrsquos moulds
Mould for both ldquoFrontrdquo and ldquoBackrdquo of the water tank because they share the same ark (same radius) and circumference
ldquoFrontrdquo(Water tank)
ldquoBackrdquo(Water tank)
ldquoBaserdquo (Planting unit)
ldquoBackrdquo (Planting unit)
ldquoFrontrdquo (Planting unit)
Mould for ldquofrontrdquo of the planting unit
Mould for ldquoBackrdquo of the planting unit
Mould for ldquobaserdquo of the planting unit
Water Tankrsquos moulds
bull The dimensions of the heat press moulds for prototype design of the Hydroponic Block and Water Tank is shown on this page The moulds are used to bend acrylic pieces into a set circular arc with heat
Components (Testing)
Banana plugs are easy to connect together or separate it can be used for connecting the circuit of the planting units together
bull The following pages shows the components will be used in the prototype and what the components are for explained with photos (drawings) material usage and details This will include the price of some components
The banana plugs will be installed into the ldquotuberdquo with glue and sealed with sealant to minimise contact with water
The moisture sensor is a cathode and an anode that allow charge to pass through when contact with water this can activate the circuit
The circuit can be reverse to activate the circuit when no moisture is sensed
The moisture sensor will be made with two metal diodes and the gap in between the wires and the tube will be sealed with sealant to avoid circuit malfunctioning due to water
Suction padsCost pound099Quantity 4Size 45mm diameter
The suction pad is tied to an box and the length of the string can be adjust by the knot the suction pad will be attach to the window glass
The suction pads can ensure that the vertical garden do not fall of the window sill The length of the string depends on the width of the window frame
Cone joint will be used to connect components together The cone joint of part ldquoBrdquo has enlarged by 025 mm but the part ldquoArdquo remain the original size because the laser has width of 025mm therefore it will fit perfectly together
The joint will be glue with Tensol acrylic glue and seal with waterfish tank sealant to avoid leakage
A
B
The problem of fitting the bent acrylic and flat acrylic together is solved by a (rail) mechanism the bent acrylic is in a uniform circular arc therefore it must be able to rotate around the centre of the circular arc a ldquorail trackrdquo can be install by gluing laser cut acrylic pieces
Fish tank sealant will be use to seal the gap between the bent acrylic and the rail to prevent any leakage
To install the ldquorail trackrdquo marks need to be made on the acrylic by engraving onto the flat acrylic piece the engrave marks are for lining up the rail track to reach maximum precision
A hose hook is required for the tube to hang onto the top of the vertical gardening the hose hook bend and clamp the hose into a ldquoUrdquo shape which act as a hook and stabilised the tube when watering
The water pump has a nozzle with outer diameter of 8mm and the hosersquos inner diameter is only 6mm therefore the hose was put into the pillar drill to increase the inner diameter up to 8mm so the nozzle can fit in the pump will be power by 9v batteries
PumpCost pound899DC 55 ndash 12vPower 1 ndash 3wHmax 04 ndash 15mQmax 200LH
HoseLength 160cmOuter diameter 12mmInner diameter 6mm
A lid need to be made to place on the top of the vertical garden the lid contain 2 male banana plugs that are connected with a wire the lid is for completing the series of moisture sensors (from the planting units) of self watering system ndash watering circuit
The electronics that located in the water of the water tank will need to be connected to the storage area the wires will need to be wired through the ldquocaptive wallrdquo the gaps in between the wires and the captive will be sealed with sealant to avoid flooding in the storage area and avoid damage to the electronics
The filter for separating the hydrogel and water is 1 mm thick plastic film with many 2mm holes lay out in a polka pattern to achieve maximum holes in the limited area which minimise the chance of clogging up and maximise the rate of draining
Hydroponic Block
Components Tools used material quantity quantityFor 3 units
ldquoWallrdquo (left) Laser cutter 3mm acrylic (Perspex) - Clear 1 3
ldquoWallrdquo (right) Laser cutter 3mm acrylic (Perspex) - Clear 1 3
ldquoRear railrdquo (back) Laser cutter 3mm acrylic (Perspex) - Clear 2 6
ldquoRear railrdquo (front) Laser cutter 3mm acrylic (Perspex) - Clear 2 6
ldquoBackrdquo (Hydroponic block) Laser cutter 3mm acrylic (Perspex) - Clear 1 3
ldquoFrontrdquo (Hydroponic block) Laser cutter 3mm acrylic (Perspex) - Clear 1 3
ldquoFront railrdquo (front) Laser cutter 3mm acrylic (Perspex) - Clear 2 6
ldquoFront railrdquo (back) Laser cutter 3mm acrylic (Perspex) - Clear 2 6
ldquoDrain siderdquo Laser cutter 3mm acrylic (Perspex) - Clear 2 6
ldquoToprdquo Laser cutter 3mm acrylic (Perspex) - Clear 1 3
ldquoBaserdquo (Hydroponic block) Laser cutter 3mm acrylic (Perspex) - Clear 1 3
ldquoSlot +rdquo Laser cutter 3mm acrylic (Perspex) - Clear 1 3
Filter Laser cutter 1mm polypropylene - Clear 1 3
Tube Coping saw 6mm (diameter)polythene
2 6
ldquoFront mouldrdquo (+) Router wood 1 3
ldquoFront mouldrdquo (-) Router wood 1 3
ldquoBack mouldrdquo (+) Router wood 1 3
ldquoBack mouldrdquo (-) Router wood 1 3
Water tank
Components Tools used material quantity
ldquoTank Wallrdquo (left) Laser cutter 3mm acrylic (Perspex) - Clear 1
ldquoTank Wallrdquo (right) Laser cutter 3mm acrylic (Perspex) - Clear 1
ldquoStorage Wallrdquo (left) Laser cutter 3mm acrylic (Perspex) - Clear 1
ldquoStorage Wallrdquo (right) Laser cutter 3mm acrylic (Perspex) - Clear 1
ldquoBackrdquo (Water Tank) Laser cutter 3mm acrylic (Perspex) - Clear 1
ldquoFrontrdquo (Water Tank) Laser cutter 3mm acrylic (Perspex) - Clear 1
ldquoFront railrdquo (Water Tank) Laser cutter 3mm acrylic (Perspex) - Clear 2
ldquoHandlerdquo Laser cutter 3mm acrylic (Perspex) - Clear 1
ldquoLockrdquo Laser cutter 3mm acrylic (Perspex) - Clear 1
ldquoFill drainrdquo Laser cutter 3mm acrylic (Perspex) - Clear 1
ldquoCaptive Wallrdquo Laser cutter 3mm acrylic (Perspex) - Clear 1
ldquoToprdquo Laser cutter 3mm acrylic (Perspex) - Clear 1
ldquoBaserdquo (Water Tank) Laser cutter 3mm acrylic (Perspex) - Clear 1
ldquoRear railrdquo (front) Laser cutter 3mm acrylic (Perspex) - Clear 2
ldquoRear railrdquo (back) Laser cutter 3mm acrylic (Perspex) - Clear 2
ldquoMouldrdquo (+) Router wood 1
ldquoMouldrdquo (-) Router wood 1
Cutting Lists
bull List of components and related parts (ndash moulds) that need to be cut out in order to make the product the list include the tools and material required to make the components The quantity of each component is labelled ndash the quantity to build 1 unit
ldquoWallrdquo leftldquoWallrdquo Right
ldquoToprdquoldquoFrontrdquo
ldquoBackrdquo
ldquoBaserdquo
ldquoBaserdquo
ldquoRailrdquo (Front)
ldquoBackrdquo
ldquoRailrdquo (Back)
ldquoCaptive wallrdquo
ldquoToprdquoldquoFrontrdquo
ldquoTank wallrdquo right
ldquoTank wallrdquo leftldquostorage
wallrdquo leftldquostorage wallrdquo right
ldquoFill drainrdquo
Cutting Plan
bull 2D design drawing of laser cutting components Black lines are Cutting and red lines are Engraving The labelling in green are components of planting unit and blue are components of water tank
ldquoRailrdquo (back)
ldquoRailrdquo (front)
ldquodrain siderdquo
Flow Chart
Tools required1) Laser cutter2) Router3) Sanding paper4) Strip heater5) Tensol6) Solder and soldering iron7) Sealant
bull The flow chart shows the steps of making with quality control the quality control can be used to analysis each process to make sure it meet the standard conditions The flow chart has sub-assemblies which are process that has to be followed through before all the components join together these sub-assemblies are process that pre-manufacture components and some can be done along at the same time
Start
(1) Laser cut components
Did the laser cut through
completely
(3) Sand down the edges
Are all the edges smooth
Start
(2) Make the mould with
router
Are the inter
surfaces of the mould smooth
(3) Sand the inter
surface of the mould
(4) Heat bend the components
did The acrylic
piece took the shape of the circular
arc
(5) Glue the components together -assembly
Start
Build the moisture sensors
does the
circuit work
6) Build the
electronic circuits
Did the glue hold the
components together
(5) Install the
electronics
Install add on
components
(7) Seal the edges and gaps
All edges
and gaps sealed
Polish the surface of the
product
Finish
Prototype
Yes
Yes
Yes
Yes
Yes
Yes
Yes
No
No
No
No
No
No
No
Task Quality
Laser cutting component All the cutting lines must cut through the acrylic
sanding Remove all sharp edges or splinters to cast a smooth surface
Testing circuits Circuit must operate as required
Heat bending The acrylic sheet must form the shape (circular arc) over the mould
gluing The components must held by Tensol glue and the glue should not be all over the component
sealing The sealing only apply to the inner edges and corners on the prototype and make sure all edges are sealed ndash no leaking
10 PerformanceMust- (qualitative)16 Water tight ndash no leaking111 Water proof electronics ndash prevent short circuit circuit failure and electric shock
Specification
Risk Assessment amp Time Estimate
Tasks Tools Risks Solutions
Laser cutting components
Laser cutter Breath in toxic fume
Keep the fan operating
Heat bendingcomponents
Strip heater Burn Wear gloves
Gluing components
Tensol glue Breath in Toxic gas or irritation when contact with eyesmouth
Keep windows open and make sure hands are washed straight away after gluing components
Building electronics
Solder solder iron wire stripper wire cutter clip board
Cut electricshock burn toxic gas
Keep the un-needed tools out of the way make sure no power supply is connecting when building the electronic keep the solder in the holder when not using donrsquot use a short soldering iron keep windows open
Sealing the edges sealant Cause irritation when contact with eyemouth
Wash hands straight away aftersealing the edges
bull Table shows the risks and hazards when using specific tools to performing tasks with solutions to minimise the chance of getting injured The coloured boxes (related to the flow chart) shows the estimated time to carry out each step the estimate time of each process will be compared with making diary in evaluation
Laser cutting ndash 2 hoursSanding ndash 1 hour
Routing mould ndash 5 hoursSanding ndash 30 minutes
Building moisture sensors ndash 30 minutesBuilding circuits ndash 3 hour
Heat pressing components ndash 3 hourGluing components ndash 3 hour
Install electronics ndash 2 hoursSealing gaps ndash 2 hours
Time estimate
Total time gt 22 hours (3 weeks time)
Risk assessment
The estimate time is the predicted time required to make prototype with maximum efficiency Extra time may be spent due to errormistakes and limited use of machinery or creating solutions to solve problems and the aim is to complete the prototype before 22313 (Fri)
The solutions are ways to minimise risks of injuries however if injured first aid kit may help with burn and cut Water may help with skin irritant Call the ambulance when chemical causing eye irritantpoisoning and serious injuries ndash deep cuts large area burn This procedure can prevent further damages
Making Diary
Week Date Tasks Time taken Details
1 22213 (Fri) Laser cutting 30 minutes Cut out components for only one hydroponics some component (rail) will deform due to high temperature of the laser therefore some components need to be recut
Polishing 30 minutes The charcoal like burned area on the acrylic pieces can be easily remove with a wet sponge
Sanding 10 minutes Sand down the cone joints to make a push fit
Gluing 1 hour 30 minutes The glue used was Tensol and it require long time to dry
2 25213 (Mon) Making ldquotubesrdquo 1 hour 30 minutes The polythene tube was cut into 163 mm and realising it was 3 mm short afterward the design of the ldquolidrdquo was change to solve the problem
Building moisture sensors 1 hours Laser cut out plastic pieces with 2 small holes for wires to insert into later the moisture sensor was installed into the tubes
Laminating wood blocks 30 minutes Laminate the MDF together to form a wooden block for preparation of the moulds
26213 (Tue) Electronics gt3 hours Went to a teacher (profession electronics) for help with setting up the circuit the conclusion was easier to use a pick to program the system than building a circuit
28213 (Thu) 3D routing (male mould) 30 minutes Learned how to set up the router with help of other student
1313 (Fri) Heat press moulding gt2 hours Heat up the acrylic piece in the vacuum former and lay it over the mould ndash the plastic did not form a circular arc
3 4313 (Mon) 3D routing (female mould)
30 minutes Forming the female side of the mould to improve the heat-press moulding quality
Laser cutting 10 minutes Cut out extra acrylic pieces for experimental heat-press moulding
4313 (Tue) Sanding moulds 50 minutes Sand down the moulds to give a smooth surface when moulding
7313 (Thu) Heat press moulding gt2 hours The quality of this process has improved but the acrylic was bent into hyperbolic instead of circular arc due to restrain when cooling The design of the design was changed to solve this problem
Electronics 1 hour Found the components required to build the circuit
8313 (Fri) Laser cutting 40 minutes Laser cutting the updated design the components for 2 units was cut
Heat bending 30 minutes Using the line strip heater to target the bending line of ldquobaserdquo and ldquofrontrdquo components
Assembling gt2hours Push fit the cone joints together and the and brush the dichloromethane onto the joints to glue them together A mistake was made when designing the cutting plan the tubing holes was not lined up
Key Problem exist
bull A diary of record when making the prototype Date tasks time taken details about the process made that day and what happened This can briefly mention about the problems exist during building the prototype
Week Date Tasks Time taken Details
4 11313 (Mon) Sealing 1 hour Using sealant to seal all and any potential leaking holes
Installing tubes (with moisture sensor)
30 minutes Use araldite to glue the polythene to the acrylic but due to the cutting plan error the connecting technique is required to be changed
12313 (Tue) Sealing 30 minutes Sealing the edges for the second time to make sure the planting units are water tight
14313 (Thu) Building electronics 3 hours The circuit is almost complete and the remaining can only be done after the water tank is complete
15313 (Fri) Laser cut 10 minutes Cut out all the clear pieces of the water tank
Sanding 1 hour Sand down the cone joint to give a push fit
5 18313 (Mon) Assembling 2 hours Assemble and glue the components of the water tank together with dichloromethane
Sealing 1 hour Seal the edges and gaps with sealant
19313 (Tue) Electronics 1 hour Tried to program a pick but the computer didnrsquot recognise the device therefore the pick have to be eliminated
sealing 1 hour Seal the water tank for the second time to make sure it is water proof
20313 (Wed) Electronics 2 hours Rearranged the circuit and discover the pump is broken
Testing - Test the circuit and the sealing of the prototype
21313 (Thu) Polishing 1 hour 30 minutes Polish the product with white sprite
Testing - Final test on the circuit and sealing of the prototype
22313 (Fri) -Deadline
Hand in the folder
The time taken were mostly rounded to the nearest 30 minutes It is difficult to record the actual time accurately due to time spent on transporting materials finding equipment and setting up
Week
Tasks 122213 (Fri)
225213 - 1313
34313 ndash 8313
411313 ndash 15313
518313 ndash 22313
Laser cutting
Sanding
Gluing
Making ldquotubesrdquo
Building moisture sensors
Laminating wood blocks
Building Electronics
3D routing
Heat press moulding
Heat bending
Installing electronics
Assembling
Sealing
Polishing
Testing
Gantt Chart
bull A chart that shows whether the making is according to plan or not The data were based on the making diary These show in different colour Green ndash according to plan Orange ndash not quite according to plan Red ndash not according to plan
The yellow and red coloured boxes are tasks that were complete lateun-planed
The late tasks were due to limited use of machinery ndashlaser cutter and router There were other users using the machines therefore some tasks can only be completed when they finish
The un-planed tasks were due to unexpected problems and mistakes ndash heat press moulding failure incorrect cutting plan and circuit failure These problems required time to solve therefore the tasks are completed late Problems like incorrect cutting plan can be avoid by double checking the dimensions and recalculating when drawing the cutting plan
Problems And Solutions
bull Problems exist along with the process of the production of prototype due to different reasons These problems can be solved and the solution will be explain with photographs and description to show why and how it was done
The idea for ldquofrontrdquo and ldquobackrdquo was a piece of acrylic bent into a circular arc and sliding into the rails But when heat pressing the acrylic the acrylic formed a parabolic shape instead which cannot be slid into the rail Therefore the design was changed having straight pieces as tangents of the circle instead This solution allows the product to keep the curve form but is not as aesthetic as the original design
This technique will be included when making the water tank of the vertical garden
Heat-press moulding
Therefore the cutting plan was changed and fewer pieces needed to be cut out which reduced the amount of material used and wasted
Front Back
Before
After
At first only the male mould was made and that result an inaccurate bent acrylic piece Soon the female was made too and the quality of the bending was improved but still not a circular arc
The heated acrylic and the moulds were clamped on a vice to cool down
Circuit
These circuits were the original plans for the watering circuit and warning circuit
The problems were the extra power supply and protection of the transistors Therefore a pick was used instead therefore the 2 circuits can be combined together The pick has only 4 inputoutput therefore a moisture sensor of the water tank was removed
The extra power supply was attach to a relay which power the pump
After the circuit was made the computer did not recognise the pick therefore the pick was removed
the circuit is now the image shown The circuit contain both warning and watering applications The buzzer only buzz when water level in water tank is low the water pump will activate when the moisture sensor (planting unit) sense dry or the pump can be switch on manually
The yellow LED represent the activity of the water pump The light is on suggest the pump is activate the series of moisture sensor was not connected
The green LED represent the activity of the buzzer The light is off suggest the buzzer is deactivated the moisture sensor (water tank) was wet
Tubing
The mistake made on this section is incorrect cutting plan The holes on the ldquotoprdquo component were not in line with the holes at the base On the good side it was not too far off therefore the tubs can be shift to line up with the holes When stacking the planting units the tubs were not lined up therefore a conducting surface was used
Copper track was used as the conducting surface the copper track was curled up therefore it can maximise the chance of making contact with other copper tracks
This circuit was tested afterward with a LED light to prove it works
Pump
The pump is broken therefore another pump was ordered the wiring hold was sealed with hot glue which can be removed afterward A yellow LED was temporarily installed to present the activity of the pump the LED will be replace by the pump when it arrive
Yellow LED
Glue
Dichloromethane was used to glue the acrylic components together instead on using Tensol glue By comparing to Tensol glue dichloromethane will not cause as much mess quick drying and it will only leave small mark when a mistakenly drip onto the acrylic
Evaluation
Evaluationbull Evaluation of the prototype of this project by
comparing to the specification testing performance time takenestimate improvement can be made and marketing
The prototype is in 4 units ndash 2 Hydroponic blocks 1 Water tank and 1 lid
The 2 Hydroponic blocks are identical they are in a curve structure which can build up a wave like structure There is a moisture sensor inside each unit and it can connect to the units above amp below and connect to the circuits in the water tank The moisture can detect dryness and activate the pump when the hydro gel is dry A filter is in the draining area which can filter the hydro gel and water
The water tank is in 2 sections ndash water storage and electronic storage The water storage zone contain a pump and a moisture sensor which connected to the circuit When the moisture sensor in the planting units sense dry the pump will activate and pump water through the hose to the top of the vertical garden when the moisture in the water tank sense dry the busser will buzz and tell the user to refill the water tank
The lid I a block of acrylic which sits on top of the vertical garden to complete the series of moisture sensor The lid has a hole where the hose can be placed into
Performance
This product can do vertical gardening on a average indoor window sill (2-8 inches) The vertical garden can stay on the window sill by the glass safely the suction pads attach to the window glass to prevent the product from falling off
The pump will activate when any of the moisture sensors sense no water however the pump draws a lot of energy from the battery therefore the batteries have a shorter life time
Large amount of sealant was used to fill up the gaps in between the components to prevent leakage this technique is not as aesthetic but very effective
Marketing
IKEA is the ideal store to sell this product It visit by all three ndash ldquoDrdquo ldquoErdquo and ldquoFrdquo class of the acorn group The garden centre is not as ideal as IKEA because garden centre focus on gardening but mainly outdoor
IKEA is focus on indoor furniture and unlikely to sell gardening products however this product is for indoor and it is more of a observational display therefore it can be classified as indoor display
Time takenestimate
The estimate time is 22 hours and the time taken to build the prototype sum up to 33 hours 30 minutes which is 11 hours 30 minutes more than expected The unexpected time was used to solve the problems ndash heat press moulding and electronics
The electronics have taken most of the time because the initial solution didnrsquot work therefore another solution is required to get to electronics to work
Hydroponic Block(Planting unit)
Water Tank
Lid
10 PerformanceMust- (qualitative)11 Able to perform vertical gardening
12 Support indoor gardening
13 Support hydroponic
14 Able to water the plants automatically
15 Able to store water for watering system
16 Water tight ndash no leaking
17 stay on an average window sill without collapse
18 Use clear material as the main material therefore plants can absorb maximum sunlight
19 Durable
110 Able to separate excessed water from fully moisturised hydrogel
111 Water proof electronics ndash prevent short circuit circuit failure and electric shock
Should-112 Store at least 1L of water (qualitative)
113Efficient watering system (quantitative)
114 Support small plants (gt10cm) (qualitative)
Could- (qualitative)115 Have moisture sensor or timer to activate the watering system
116 Battery powered
117 Natural theme
20 Size (quantitative)21 15cm (+- 5cm) depth ndash therefore the plant pots can stay on an average window sill
22 No taller than 20cm (per unit) saves space and reduce the risk of collapsing
30 Target cost amp manufacturing costMust-31 Selling price lt pound20 (quantitative)
32 Reduce use of material ndash reduce material cost (qualitative)
33 Minimise waste of material ndash reduce manufacturing cost (qualitative)
Should- (qualitative)34 Use recycled (recyclable) material (eg PVC HDPE) ndash reduce material cost and environmental damage
Could- (qualitative)35 Low costing materials for packaging -
40 packagingMust- (qualitative)41 Protect the product from stress tests -42 Prevent the product from falling apart -43 Simply manufacturing technique -Should- (qualitative)44 Include foam or bubble wrap to protect the product -45 The product will not be able to shake around in the packaging -46 Include instructions of using the product -47 Include most of the accessories required in order to allow the product to work -Could- (qualitative)48 Use recyclable materials -
Specification
The prototype have been tested and achieved ldquoPerformancerdquo ldquoSizerdquo and most of the ldquoTarget cost amp manufacturing costrdquo of the specification The area where the prototype cannot achieve is the ldquoPackagingrdquo The time is limited therefore only the prototype can be made and there is not enough time to make the packaging
Tests X
Water tight (sealing)
Water running through all the units
Automatic watering (electronics)
Stay on a window sill (suction pads)
Safety (suction pads)
Filtering
The tests are linked to the specifications which shows whether the product meet the specification or not
The idea of the packaging will be based on carton board and foam blocks The foam blocks will be cut to fit over all the corners of the product ndash as the image shown above The product with foam blocks will fit into the carton box perfectly which leave no space for it to shake around to cause damage to the product
There will be 2 types of package ndash starter package and additional packageThe starter package contain 1 water tank 2 planting units a bag of hydro gel nutrient and instruction booklet
The packaging is considered to take up to a week from design to finish
Hydroponic Block(Planting Unit)
The sealing was poor at the bottom back corners (red arrow) because it is difficult to get the sealant into the gap therefore a lot of sealant was used to fill it up
The acrylic piece at the bottom of the units were not match to the engrave lines due to miscalculation therefore the acrylic piece had to shift to match the slot
The solution to the curve were not aesthetic a acrylic tube can be used to replace the tangent however it would be very expensive to purchase a 100m radius acrylic tube and only a small amount will be used therefore this idea was used instead
Water Tank
The design of the water tank was change due to the failure of heat press moulding the tangent technique was used
The design of the lid of the electronic storage has changed the lid is slide in instead of fold in The manual switch (Green arrow)is on the back side of the water tank stationary The tangent technique result a piece of stationary tangent which can be used as a switch holder
The hole on the lid of the electronic storage has a 2cm diameter hole which is used as a ldquohandlerdquo it is used to pull the lid out however the original design was gluing a piece of acrylic bar as a handle The hole was cut out because it is more efficient to use and it reduce the usage of material
Lid
The design of the lid was unsure when designing therefore it was left until last The assembly was very simple It was glued together with dichloromethane and the black wire is attach to copper tracks at both end the function is to complete the series of moisture sensors of the planting units
The hole in the middle is for the hose to put into and there are acrylic pieces at both ends which act as bracket to hold the lid in place
The lid of the water storage is also removable therefore the water tank can be cleaned and to remove unwanted items
The cone joints of the water tank lid have been filed and sanded down therefore it is easily remove or close
ConclusionThe performance of the product can be improved if more time was given and do a laser cut card model to test the cutting plan to spot the mistakes that were made when drawing the cutting plan
Steps of assembly can be differ ndash glue the lid of the planting unit last to free more space for sealing this can improve the quality of sealing
If the machines were free all the time most of the laser cuttings can be complete at once Therefore the number and the time of transporting can be reduce which become more efficient
Electronics are the most complicated subject of this project therefore more time and effort need to be spent on working with electronics The electronics can be better if it was the first task of the project therefore more time can be spent to figure out the problems
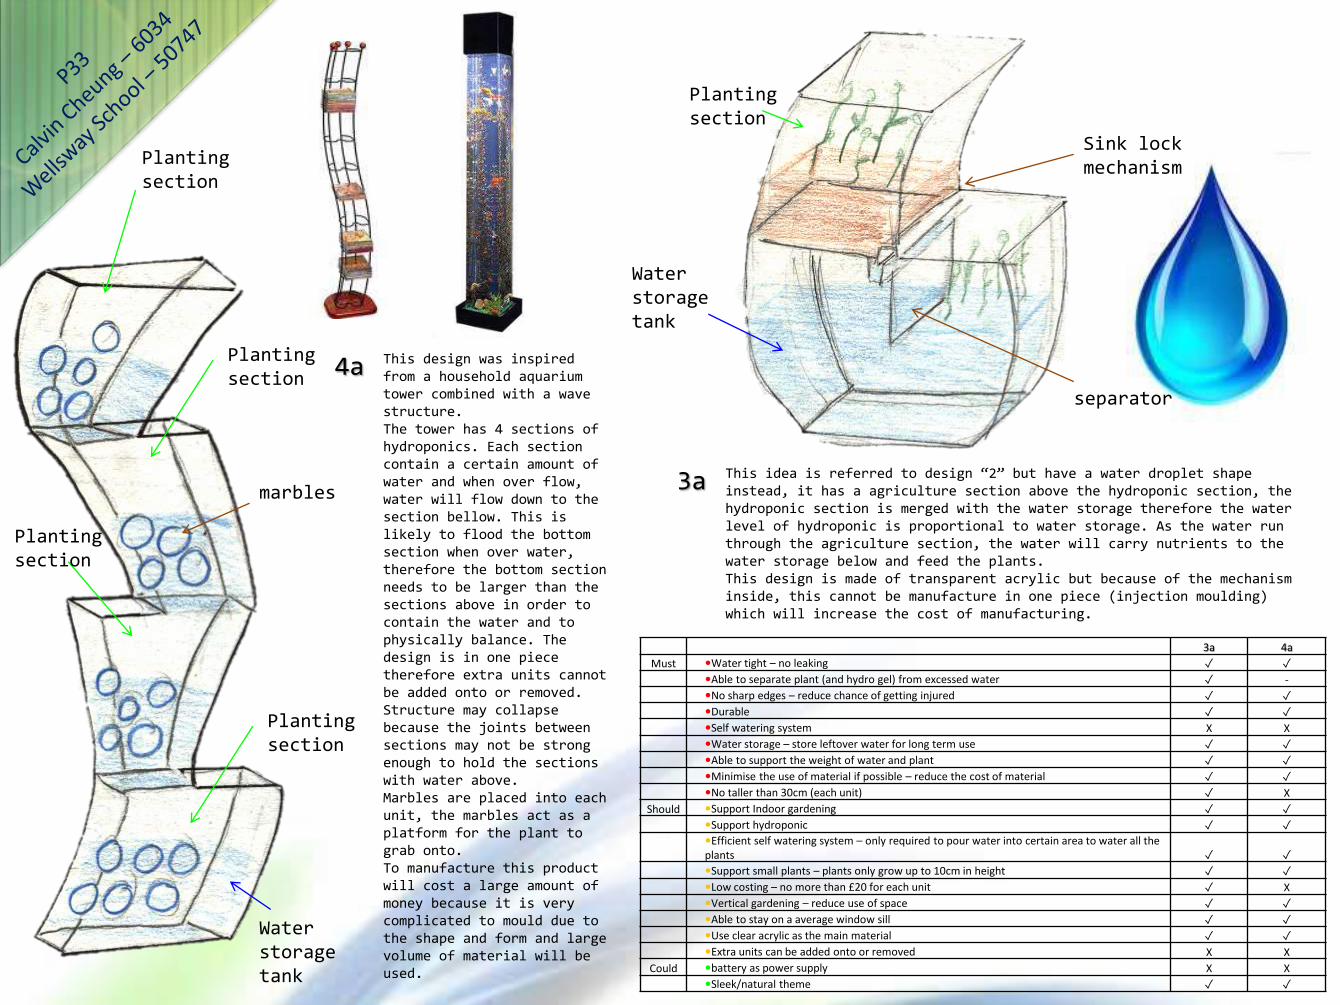
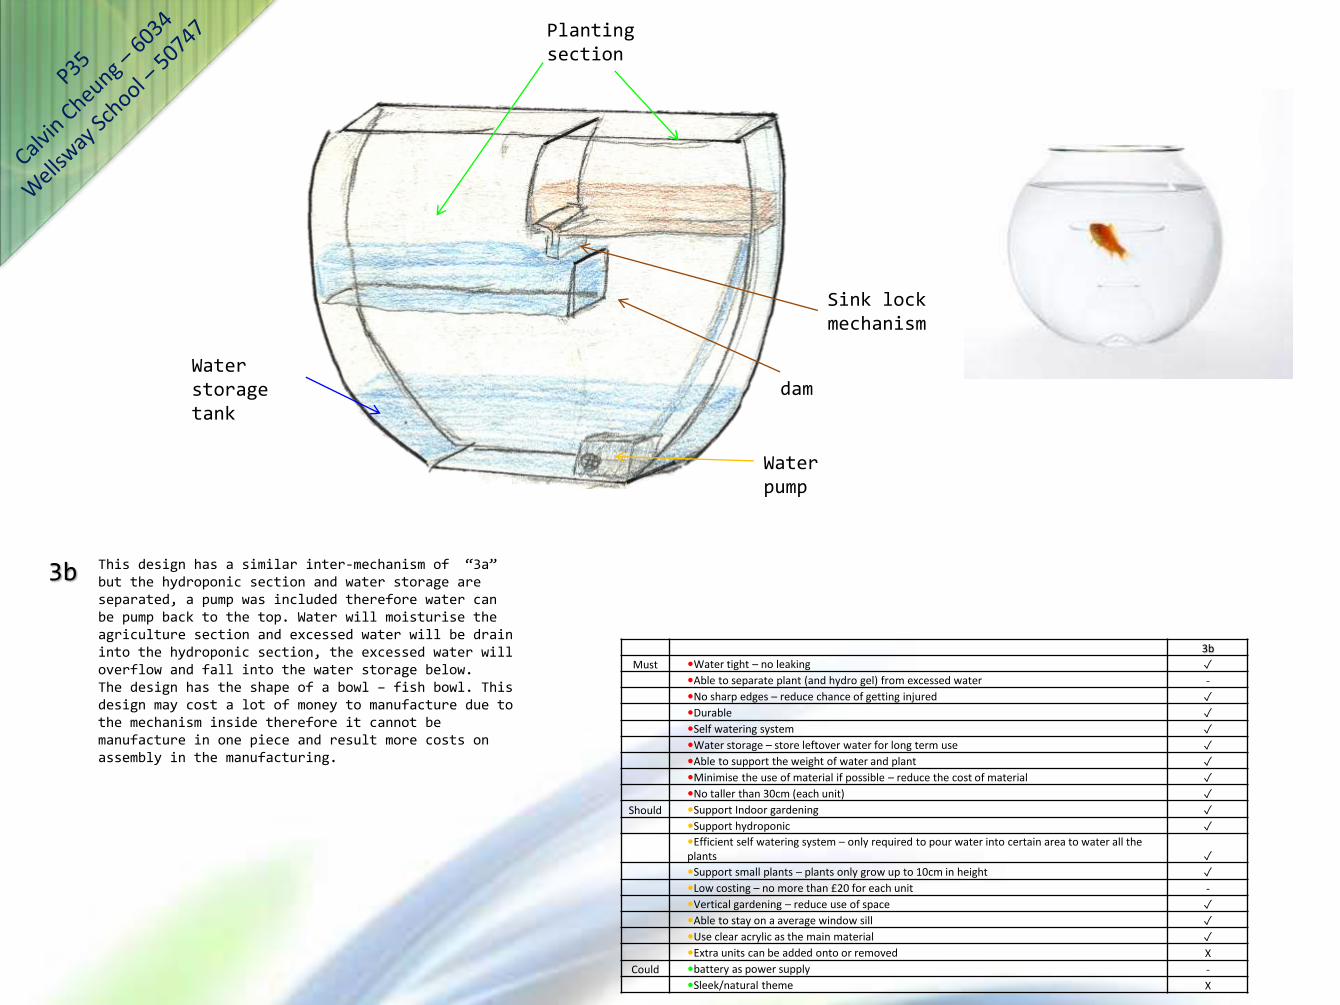

ldquoPumprdquo
ldquoMoisture sensorrdquo(M2)
ldquoMoisture sensorrdquo(M1)
The circuit has a busser with activate both when water level rise above ldquoM2rdquo or drop below ldquoM1rdquo This is to give a warning to the user that there is too muchnot enough water in the water storage
The circuit has a water pump which can be activate both automatically (moisture sensor) or manually (switch) the moisture sensors is in a series circuit therefore when any of the units dries out the pump with activate
The watering system is pumping water straight to the top of the vertical unit and water will run through all units When watering the water will be stored in the hydrogel as the hydrogel is fully moisturised the excessed water will be drained to the unit below and moisture the hydrogel
WaterMoisturising input gt outputFully moisturised input gt output
Each unit have half a wave length (λ2) therefore the units can form a wave like structure when one stack onto the other When stacking they have to face opposite direction therefore the same design can be use over and over again and reduce the manufacturing costs because it is cheaper to manufacture a single design
λ
λ-2
The drain design is the idea of connecting household drain pipe together the water can only flow toward one direction because there are no other junction available
ldquoMoisture sensorrdquo(M1)
ldquoBuzzerrdquo
ldquoBatteryrdquoldquoNand GaterdquoldquoResistorrdquo
Warning Circuit
ldquoMoisture sensorrdquo(M2)
ldquoPumprdquo
ldquoBatteryrdquo
ldquoNand GaterdquoldquoResistorrdquoldquoMoisture sensorrdquo
ldquoMoisture sensorrdquo
ldquoMoisture sensorrdquo
Planting unit
Planting unitPlanting unit
Watering Circuit
ldquoSwitchrdquo
3 Developments Wall TorchThis idea is a combination of 3 different ideas ndash ldquo7rdquo + ldquoZrdquo + ldquoZrdquo
It will be blow moulding white polypropylene and the bracket will be die cut and stamped stainless steel electronic components will be assemble and install separately with fish tank sealant to seal between the electronics and the polypropylene (prototype vacuum forming polypropylene assemble the electronics and install into the water tank with sealant the bracket can be brought from store)
ldquo7rdquo the wall pocket feature that allow consumer to have plants growing on a wall vertically
ldquoZrdquo the shape of part of a ldquoYing Yangrdquo has a large rounded head (planting section) and a thin tail (drain)
ldquoZrdquo the bowl form combine with the ldquoZrdquo design gives a sleek design and a effective drain that filter excessed water from hydrogel
The planting unit has the form of a funnel which can concentrate the water flow and able to drain the water to the unit below but the drain is ate the side instead of the centre of the unit
The planting unit uses hydrogel which can store water for plant and reduce the number of watering
At the back of the planting unit there is a hook like section which can be use to connect the planting unit to the bracket on the wall
The bracket has 6 holes 3 on each side of the slots screws can be use to attach to the wall and keep it stable the bracket is 50 cm tall and able to hold 3 planting units by slinging the hook of the planting unit into the slot
Wall Torch
Must bullWater tight ndash no leaking
bullAble to separate plant (and hydro gel) from excessed water
bullNo sharp edges ndash reduce chance of getting injured
bullDurable
bullSelf watering system
bullWater storage ndash store leftover water for long term use
bullAble to support the weight of water and plant -
bullMinimise the use of material if possible ndash reduce the cost of material
bullNo taller than 30cm (each unit)
Should bullSupport Indoor gardening
bullSupport hydroponic
bullEfficient self watering system ndash only required to pour water into certain area to water all the plants
bullSupport small plants ndash plants only grow up to 10cm in height
bullLow costing ndash no more than pound20 for each unit
bullVertical gardening ndash reduce use of space
bullAble to stay on a average window sill -
bullUse clear acrylic as the main material X
bullExtra units can be added onto or removed
Could bullbattery as power supply
bullSleeknatural theme
Watering Circuit
ldquoPumprdquo
ldquoBatteryrdquo
ldquoNand GaterdquoldquoResisto
rrdquo
ldquoTimerrdquo
ldquoSwitchrdquo
500mm
The watering system used is the same as the ldquoHydroponic Blockrdquo which can moisturise all the hydrogel in the vertical garden by running water through the units in a zigzag path
The circuit has a water pump which can be activate both automatically (timer) or manually (switch) the timer can be set up to activate the circuit (eg once a week) and water the plants
Part of the drain was removed therefore leakage can be prevented
The water tank has 2 hooks at the back which is safe to be hang onto the bracket the water tank is divided into 2 sections which are water storage and electronic storage
Water storageElectronic storage
The areas in yellow are places where the product can be installed
3 Developments Window Pocket
This idea is a combination of 2 different ideas ndash ldquo7rdquo + ldquo6rdquo
This design will be injection moulding clear acrylic and suction pads will be glued onto the back of the planting unit and the water storage is a plastic bag attach with tubes (prototype glue laser cut acrylic components and suction pads together with fish tank sealant)
ldquo7rdquo the wall pocket feature that allow consumer to have plants growing on a wall vertically
ldquo6rdquo the cylinder form act like a pocket which can contain the plant and a tube is used to drain excessed water
The planting unit is held onto the window-glass surface by 4 suction pads the planting unit has a draining tube which drain the excessed water from the capacitor into the unit belowThe unit contain a hydroponic media which floats as the water level drops the plant also drops which gives a warning sign to the user to refill the capacitor
Water storage is a plastic bag with 2 deliver tubes the tubes have a mechanism which only allow water to flow at one direction User need to push onto the bag to pump water to the top in order to water the vertical garden Tube (ndash) is an input and there to deliver excessed water into the storage bag and prevent water from flowing out the tube (+) is an output and deliver tube that deliver water to the top of the vertical garden and prevent water flow back down into the bag due to gravity
ndash +
Window Pocket
Must bullWater tight ndash no leaking
bullAble to separate plant (and hydro gel) from excessed water -
bullNo sharp edges ndash reduce chance of getting injured
bullDurable
bullSelf watering system X
bullWater storage ndash store leftover water for long term use
bullAble to support the weight of water and plant -
bullMinimise the use of material if possible ndash reduce the cost of material
bullNo taller than 30cm (each unit)
Should bullSupport Indoor gardening
bullSupport hydroponic
bullEfficient self watering system ndash only required to pour water into certain area to water all the plants
bullSupport small plants ndash plants only grow up to 10cm in height
bullLow costing ndash no more than pound20 for each unit
bullVertical gardening ndash reduce use of space
bullAble to stay on a average window sill -
bullUse clear acrylic as the main material
bullExtra units can be added onto or removed
Could bullbattery as power supply X
bullSleeknatural theme
The design can form a vertical or diagonal structure as long as the draining tube is in the unit below
This mechanism allows water to flow to one direction but not the other which can prevent water from flowing through the undesired tube when user is pumping water
The water storage is a plastic bag and the bag have 2 tubes which is an input and an output and the water can only flow through one direction in the water cycle the bag also act as a pump as the user press onto the bag and water will be pumped to the top of the vertical garden
To refill the water in the water cycle water can be pour into any unit but caution need to be taken and not to over fill the water
The plant is grown on a piece of floating media and as time passes the water in the capacity will drop and the height of the plant will also drop which give a signal to the user to refill the capacitor
When refilling the water poured from the top will first fill up the capacitor which raise the water level (the water level depends on the height of the drain) and the excessed water will flow toward the unit below
This type of window is not suitable for the ldquoWindow Pocketrdquo because when the window tilt the plants may fell off the planting unit
This type of window is suitable because it cannot be opened therefore the risk of the product or plant falling off is minimised
This type of window is suitable for the ldquoWindow Pocketrdquo because it open side ways therefore the risk of falling is very low but the product may caught by the handle and causes safety hazard
This type of window is suitable for the ldquoWindow Pocketrdquo because it slide side ways which is at a very low risk
Final DesignAnd
Making Stage
Final Specification10 PerformanceMust- (qualitative)11 Able to perform vertical gardening12 Support indoor gardening13 Support hydroponic14 Able to water the plants automatically15 Able to store water for watering system16 Water tight ndash no leaking17 stay on an average window sill without collapse18 Use clear material as the main material therefore plants can absorb maximum sunlight19 Durable110 Able to separate excessed water from fully moisturised hydrogel111 Water proof electronics ndash prevent short circuit circuit failure and electric shockShould-112 Store at least 1L of water (qualitative)113Efficient watering system (quantitative)114 Support small plants (gt10cm) (qualitative)Could- (qualitative)115 Have moisture sensor or timer to activate the watering system116 Battery powered117 Natural theme
20 Size (quantitative)21 15cm (+- 5cm) depth ndash therefore the plant pots can stay on an average window sill22 No taller than 20cm (per unit) saves space and reduce the risk of collapsing
30 Target cost amp manufacturing costMust-31 Selling price lt pound20 (quantitative)32 Reduce use of material ndash reduce material cost (qualitative)33 Minimise waste of material ndash reduce manufacturing cost (qualitative)Should- (qualitative)34 Use recycled (recyclable) material (eg PVC HDPE) ndash reduce material cost and environmental damageCould- (qualitative)35 Low costing materials for packaging
40 packagingMust- (qualitative)41 Protect the product from stress tests42 Prevent the product from falling apart43 Simply manufacturing techniqueShould- (qualitative)44 Include foam or bubble wrap to protect the product45 The product will not be able to shake around in the packaging46 Include instructions of using the product47 Include most of the accessories required in order to allow the product to workCould- (qualitative)48 Use recyclable materials
Final Design Hydroponic Blocks
I have decided to make the ldquoHydroponic Blockrdquo as my product forthis project
ldquoHydroponic Blockrdquo have a tower like structure which require astable flat and large surface area to preform well and safe theonly limitations are the household window sill depth and thebalancing The problems for producing the prototype (joining thebent acrylic and the flat acrylic together) are solved whichrequired accuracy and very challenging But this design can achieveall the specifications
The ldquoWall torchrdquo required the bracket to be installed into the walland some household may not have the equipment to do so (old agepeople may not be able to install the bracket therefore the productbecome useless)
The ldquoWindow Pocketrdquo hold onto the glass by suction pads which maynot be safe and may damage the window hinge when a large scale areused Also plants may die due to frost damage by contacting withthe window in cold weather
AB
C
E
D
bull Further information and component details of the final design will be included and explain their purposes with imagesmechanisms
F
A plastic tube contain 2 banana plugs (female and male) which can be connect to the units above and below the tube isolate the wires from the water with sealant to prevent circuit malfunctioning due to water
A
The hole on the top of the planting unit is for slotting and lining up the unit above B
Holes at the side of the planting unit is for connection to the suction pad which will be attach to the window glass to prevent the vertical garden from falling off the window sill
C
Moisture sensor will be attach to the wire inside the tube to sense the level of moisture of the hydrogel the gap in between the wires and the tube will be sealed with sealant
D
A piece of plastic film with 2mm holes in polka pattern act as a filter to filter the excessed waterE
The ldquoUrdquo shape is for the watering tube to enter through in order to reach the top of the vertical garden
F
Engineering Drawings Of Hydroponic Block And Water Tank(Manufacturing Design)
Planting unit
Water tank
bull The dimensions of the manufacture design of the Hydroponic Block and Water Tank is shown on this page
The manufacturing process of this product can be injection moulding because most of the parts can be mould in one piece therefore the costs are reduced the use of material is more efficient This process can work rapidly and it has a high rate of production
Manufacturing (Costs)
httpwwwprotomoldcouk
ldquoInjection Mould Prices Start at pound995Best for 10ndash10000+ pieces
Choose from hundreds of engineering-grade resins ABS Polycarbonate Nylon Acetal Polypropylene Acrylic PBT HDPE LDPE TPE TPU and LCP including glass or fibre filled gradesdamagerdquo
Costs start from pound995 which include the wages of worker and hidden costs such as electricity and petrol
The manufacture design has volume of 0000400 msup3 of material result weight of 038 kg (HDPE)The cost of HDPE per kg is pound3 therefore the cost of material per planting unit is pound114
4 connectors (pound0968) 32cm of wire (pound0032) 1 suction pad (pound0333) and a moisture sensor (pound020) is required for each planting unit
The starting price of injection moulding price is pound995 if a patch of 10000 is produced the price of each planting unit cost pound010 (material cost not included)
The total cost of producing a planting unit is pound277
Connector for electronicsPrice pound0242 per unit (when ordering 2500)
Each planting unit require 4 connectors = pound0968
httpukrs-onlinecomwebpharsh-environment-wire1839225origin=PSF_412652|fpampcm_sp=featureproducts-_-FeaturedProductsContent-_-1839225
WirePrice pound999 per 100m (when ordering 25)
Each planting unit require 32cm = pound0032
Moisture sensorPrice estimate pound020
Each planting unit require 1
httpukrs-onlinecomwebpcircular-connector-contacts0468557origin=PSF_435583|fpampcm_sp=featureproducts-_-FeaturedProductsContent-_-0468557
httpwwwebaycoukitm1kg-HDPE-Plastic-Pellets-Granules-Suitable-for-stuffing-weighting-decoration-181066775013pt=UK_Dolls_Bears_RLamphash=item2a286bb9e5
HDPEProperties Hard stiff able to be sterilisedPrice pound3 per kgDensity 095 10sup3 kgmsup3
It is a thermoplastic which can be used for injection moulding and remould therefore it can be recycled Using recycled plastic may cost more due to separating the undesired attachments (paper metal) and energy input to heat and remould the plastic but by using recycled plastic can save resources and reduce environmental damage
httpwwwtescocomdirectsuction-cups-45mm-pack-of-3534-6206prdrecommendationId=dafa26d8-cf96-4d42-bcae-621194fbc5e90ampskuId=534-6206
Suction padsPrice pound100 per pack (3 per pack)
Each planting unit require 1 connectors = pound0333
bull The estimate costs of manufacturing a Hydroponic block which include the material labour wage and components costs
The engineering drawings shows the dimensions (in millimetre mm) of the designs from side different views
Planting unit
Water tank
bull The dimensions of the prototype design of the Hydroponic Block and Water Tank is shown on this page
Engineering Drawings Of Hydroponic Block And Water Tank(Prototype Design)
Components (Assembling)
Pre-manufacturing5 ldquoBackrdquo ndash A flat sheet of
acrylic will be heat press into an uniform circular arc
6 ldquoFrontrdquo ndash A flat sheet of acrylic will be heat press into an uniform circular arc (partly) and set angles
7 ldquoBaserdquo ndash A flat sheet of acrylic will be heat bend into a set angle
The heat press moulds will be present on the next page
Pre-assembly1 Polythene tubing with both male and
female banana plugs installed a moisture will also be installed at about 30mm up from the bottom of the tube the gaps will be sealed with water proof sealant
2 This main component is very similar to ldquo1rdquo but with out the moisture sensor
3 ldquoWallrdquo ndash A flat sheet of acrylic that will have ldquoRailsrdquo and ldquoDrain siderdquo installed with Tensol glue engraved lines will be shown on the surface for lining up the components when gluing
4 This main component is identical to ldquo3rdquo but in mirror image
7 ldquoBaserdquo ndash a ldquoSlot +rdquo component will be installed at the bottom with Tensol engrave line will be shown to help lining up
bull The main components are shown on this page and steps of assembling explained by arrows The pre-manufacturing and pre-assembly of each main components are described and explained
1 2
3
4
5
6
7
8
11
2
2
344
Assembly1 Line up the two ldquoWallsrdquo onto
the ldquoFrontrdquo component2 Put on the ldquoToprdquo and ldquoBaserdquo
component ndash insert into cone joint
3 Slide the ldquoBackrdquo component into the ldquoRailsrdquo
4 Slide the tubes through both ldquoToprdquo and ldquoBaserdquo
A testing of the ldquoRailsrdquo ndashexample of pre-assembly
1
2
10
5
9
36
4 7
8
2
2
1
3
3
4
5
6
Pre-manufacturing8 ldquoBackrdquo - A flat sheet of acrylic will
be heat press into an uniform circular arc
10ldquoFrontrdquo ndash this component share the same arc with the ldquobackrdquo and same heat stamp mould will be used
Pre-assembly2 ldquocaptive wallrdquo ndash a flat sheet of acrylic with moisture
sensors installed and wires passing through 3 ldquotank wallrdquo - A flat sheet of acrylic that will have
ldquoRailsrdquo (for ldquobackrdquo) installed with Tensol glue engraved lines will be shown on the surface for lining up the components when gluing
4 Identical mirror image of ldquo3rdquo 5 ldquoStorage wallrdquo ndash a flat sheet of acrylic that will have
ldquoRailsrdquo (for ldquoFrontrdquo) installed with Tensol glue engraved lines will be shown on the surface for lining up the components when gluing
6 Identical mirror image of ldquo5rdquo 10ldquoFrontrdquo ndash the ldquohandlerdquo and ldquolockrdquo will be installed
with Tensol glue
Assembly1 Insert the ldquocaptive wallrdquo into the ldquobase componentrdquo2 Line up the cone joints of the ldquocaptive wallrdquo ldquobaserdquo and
the two ldquoTank wallrdquo components Line up the ldquoBackrdquo along with the ldquorailsrdquo
3 Insert the two ldquostorage wallrdquo by connecting the cone joints4 ldquofill drainrdquo will be entered through the two ldquostorage wallrdquo5 Put the ldquolidrdquo onto the top with the cone joint6 Insert the ldquofrontrdquo component with the ldquoLockrdquo lined up with
the ldquobaserdquo
Pre-manufacturing ndash Moulding
Heat stamp moulding is the process for bending the acrylic pieces cut out from the laser cutter into a certain shape the moulds use for this process will be wood that crafted in the router Wood can withstand the heat for heating the acrylic without expanding therefore the prototype can be more precise
Planting unitrsquos moulds
Mould for both ldquoFrontrdquo and ldquoBackrdquo of the water tank because they share the same ark (same radius) and circumference
ldquoFrontrdquo(Water tank)
ldquoBackrdquo(Water tank)
ldquoBaserdquo (Planting unit)
ldquoBackrdquo (Planting unit)
ldquoFrontrdquo (Planting unit)
Mould for ldquofrontrdquo of the planting unit
Mould for ldquoBackrdquo of the planting unit
Mould for ldquobaserdquo of the planting unit
Water Tankrsquos moulds
bull The dimensions of the heat press moulds for prototype design of the Hydroponic Block and Water Tank is shown on this page The moulds are used to bend acrylic pieces into a set circular arc with heat
Components (Testing)
Banana plugs are easy to connect together or separate it can be used for connecting the circuit of the planting units together
bull The following pages shows the components will be used in the prototype and what the components are for explained with photos (drawings) material usage and details This will include the price of some components
The banana plugs will be installed into the ldquotuberdquo with glue and sealed with sealant to minimise contact with water
The moisture sensor is a cathode and an anode that allow charge to pass through when contact with water this can activate the circuit
The circuit can be reverse to activate the circuit when no moisture is sensed
The moisture sensor will be made with two metal diodes and the gap in between the wires and the tube will be sealed with sealant to avoid circuit malfunctioning due to water
Suction padsCost pound099Quantity 4Size 45mm diameter
The suction pad is tied to an box and the length of the string can be adjust by the knot the suction pad will be attach to the window glass
The suction pads can ensure that the vertical garden do not fall of the window sill The length of the string depends on the width of the window frame
Cone joint will be used to connect components together The cone joint of part ldquoBrdquo has enlarged by 025 mm but the part ldquoArdquo remain the original size because the laser has width of 025mm therefore it will fit perfectly together
The joint will be glue with Tensol acrylic glue and seal with waterfish tank sealant to avoid leakage
A
B
The problem of fitting the bent acrylic and flat acrylic together is solved by a (rail) mechanism the bent acrylic is in a uniform circular arc therefore it must be able to rotate around the centre of the circular arc a ldquorail trackrdquo can be install by gluing laser cut acrylic pieces
Fish tank sealant will be use to seal the gap between the bent acrylic and the rail to prevent any leakage
To install the ldquorail trackrdquo marks need to be made on the acrylic by engraving onto the flat acrylic piece the engrave marks are for lining up the rail track to reach maximum precision
A hose hook is required for the tube to hang onto the top of the vertical gardening the hose hook bend and clamp the hose into a ldquoUrdquo shape which act as a hook and stabilised the tube when watering
The water pump has a nozzle with outer diameter of 8mm and the hosersquos inner diameter is only 6mm therefore the hose was put into the pillar drill to increase the inner diameter up to 8mm so the nozzle can fit in the pump will be power by 9v batteries
PumpCost pound899DC 55 ndash 12vPower 1 ndash 3wHmax 04 ndash 15mQmax 200LH
HoseLength 160cmOuter diameter 12mmInner diameter 6mm
A lid need to be made to place on the top of the vertical garden the lid contain 2 male banana plugs that are connected with a wire the lid is for completing the series of moisture sensors (from the planting units) of self watering system ndash watering circuit
The electronics that located in the water of the water tank will need to be connected to the storage area the wires will need to be wired through the ldquocaptive wallrdquo the gaps in between the wires and the captive will be sealed with sealant to avoid flooding in the storage area and avoid damage to the electronics
The filter for separating the hydrogel and water is 1 mm thick plastic film with many 2mm holes lay out in a polka pattern to achieve maximum holes in the limited area which minimise the chance of clogging up and maximise the rate of draining
Hydroponic Block
Components Tools used material quantity quantityFor 3 units
ldquoWallrdquo (left) Laser cutter 3mm acrylic (Perspex) - Clear 1 3
ldquoWallrdquo (right) Laser cutter 3mm acrylic (Perspex) - Clear 1 3
ldquoRear railrdquo (back) Laser cutter 3mm acrylic (Perspex) - Clear 2 6
ldquoRear railrdquo (front) Laser cutter 3mm acrylic (Perspex) - Clear 2 6
ldquoBackrdquo (Hydroponic block) Laser cutter 3mm acrylic (Perspex) - Clear 1 3
ldquoFrontrdquo (Hydroponic block) Laser cutter 3mm acrylic (Perspex) - Clear 1 3
ldquoFront railrdquo (front) Laser cutter 3mm acrylic (Perspex) - Clear 2 6
ldquoFront railrdquo (back) Laser cutter 3mm acrylic (Perspex) - Clear 2 6
ldquoDrain siderdquo Laser cutter 3mm acrylic (Perspex) - Clear 2 6
ldquoToprdquo Laser cutter 3mm acrylic (Perspex) - Clear 1 3
ldquoBaserdquo (Hydroponic block) Laser cutter 3mm acrylic (Perspex) - Clear 1 3
ldquoSlot +rdquo Laser cutter 3mm acrylic (Perspex) - Clear 1 3
Filter Laser cutter 1mm polypropylene - Clear 1 3
Tube Coping saw 6mm (diameter)polythene
2 6
ldquoFront mouldrdquo (+) Router wood 1 3
ldquoFront mouldrdquo (-) Router wood 1 3
ldquoBack mouldrdquo (+) Router wood 1 3
ldquoBack mouldrdquo (-) Router wood 1 3
Water tank
Components Tools used material quantity
ldquoTank Wallrdquo (left) Laser cutter 3mm acrylic (Perspex) - Clear 1
ldquoTank Wallrdquo (right) Laser cutter 3mm acrylic (Perspex) - Clear 1
ldquoStorage Wallrdquo (left) Laser cutter 3mm acrylic (Perspex) - Clear 1
ldquoStorage Wallrdquo (right) Laser cutter 3mm acrylic (Perspex) - Clear 1
ldquoBackrdquo (Water Tank) Laser cutter 3mm acrylic (Perspex) - Clear 1
ldquoFrontrdquo (Water Tank) Laser cutter 3mm acrylic (Perspex) - Clear 1
ldquoFront railrdquo (Water Tank) Laser cutter 3mm acrylic (Perspex) - Clear 2
ldquoHandlerdquo Laser cutter 3mm acrylic (Perspex) - Clear 1
ldquoLockrdquo Laser cutter 3mm acrylic (Perspex) - Clear 1
ldquoFill drainrdquo Laser cutter 3mm acrylic (Perspex) - Clear 1
ldquoCaptive Wallrdquo Laser cutter 3mm acrylic (Perspex) - Clear 1
ldquoToprdquo Laser cutter 3mm acrylic (Perspex) - Clear 1
ldquoBaserdquo (Water Tank) Laser cutter 3mm acrylic (Perspex) - Clear 1
ldquoRear railrdquo (front) Laser cutter 3mm acrylic (Perspex) - Clear 2
ldquoRear railrdquo (back) Laser cutter 3mm acrylic (Perspex) - Clear 2
ldquoMouldrdquo (+) Router wood 1
ldquoMouldrdquo (-) Router wood 1
Cutting Lists
bull List of components and related parts (ndash moulds) that need to be cut out in order to make the product the list include the tools and material required to make the components The quantity of each component is labelled ndash the quantity to build 1 unit
ldquoWallrdquo leftldquoWallrdquo Right
ldquoToprdquoldquoFrontrdquo
ldquoBackrdquo
ldquoBaserdquo
ldquoBaserdquo
ldquoRailrdquo (Front)
ldquoBackrdquo
ldquoRailrdquo (Back)
ldquoCaptive wallrdquo
ldquoToprdquoldquoFrontrdquo
ldquoTank wallrdquo right
ldquoTank wallrdquo leftldquostorage
wallrdquo leftldquostorage wallrdquo right
ldquoFill drainrdquo
Cutting Plan
bull 2D design drawing of laser cutting components Black lines are Cutting and red lines are Engraving The labelling in green are components of planting unit and blue are components of water tank
ldquoRailrdquo (back)
ldquoRailrdquo (front)
ldquodrain siderdquo
Flow Chart
Tools required1) Laser cutter2) Router3) Sanding paper4) Strip heater5) Tensol6) Solder and soldering iron7) Sealant
bull The flow chart shows the steps of making with quality control the quality control can be used to analysis each process to make sure it meet the standard conditions The flow chart has sub-assemblies which are process that has to be followed through before all the components join together these sub-assemblies are process that pre-manufacture components and some can be done along at the same time
Start
(1) Laser cut components
Did the laser cut through
completely
(3) Sand down the edges
Are all the edges smooth
Start
(2) Make the mould with
router
Are the inter
surfaces of the mould smooth
(3) Sand the inter
surface of the mould
(4) Heat bend the components
did The acrylic
piece took the shape of the circular
arc
(5) Glue the components together -assembly
Start
Build the moisture sensors
does the
circuit work
6) Build the
electronic circuits
Did the glue hold the
components together
(5) Install the
electronics
Install add on
components
(7) Seal the edges and gaps
All edges
and gaps sealed
Polish the surface of the
product
Finish
Prototype
Yes
Yes
Yes
Yes
Yes
Yes
Yes
No
No
No
No
No
No
No
Task Quality
Laser cutting component All the cutting lines must cut through the acrylic
sanding Remove all sharp edges or splinters to cast a smooth surface
Testing circuits Circuit must operate as required
Heat bending The acrylic sheet must form the shape (circular arc) over the mould
gluing The components must held by Tensol glue and the glue should not be all over the component
sealing The sealing only apply to the inner edges and corners on the prototype and make sure all edges are sealed ndash no leaking
10 PerformanceMust- (qualitative)16 Water tight ndash no leaking111 Water proof electronics ndash prevent short circuit circuit failure and electric shock
Specification
Risk Assessment amp Time Estimate
Tasks Tools Risks Solutions
Laser cutting components
Laser cutter Breath in toxic fume
Keep the fan operating
Heat bendingcomponents
Strip heater Burn Wear gloves
Gluing components
Tensol glue Breath in Toxic gas or irritation when contact with eyesmouth
Keep windows open and make sure hands are washed straight away after gluing components
Building electronics
Solder solder iron wire stripper wire cutter clip board
Cut electricshock burn toxic gas
Keep the un-needed tools out of the way make sure no power supply is connecting when building the electronic keep the solder in the holder when not using donrsquot use a short soldering iron keep windows open
Sealing the edges sealant Cause irritation when contact with eyemouth
Wash hands straight away aftersealing the edges
bull Table shows the risks and hazards when using specific tools to performing tasks with solutions to minimise the chance of getting injured The coloured boxes (related to the flow chart) shows the estimated time to carry out each step the estimate time of each process will be compared with making diary in evaluation
Laser cutting ndash 2 hoursSanding ndash 1 hour
Routing mould ndash 5 hoursSanding ndash 30 minutes
Building moisture sensors ndash 30 minutesBuilding circuits ndash 3 hour
Heat pressing components ndash 3 hourGluing components ndash 3 hour
Install electronics ndash 2 hoursSealing gaps ndash 2 hours
Time estimate
Total time gt 22 hours (3 weeks time)
Risk assessment
The estimate time is the predicted time required to make prototype with maximum efficiency Extra time may be spent due to errormistakes and limited use of machinery or creating solutions to solve problems and the aim is to complete the prototype before 22313 (Fri)
The solutions are ways to minimise risks of injuries however if injured first aid kit may help with burn and cut Water may help with skin irritant Call the ambulance when chemical causing eye irritantpoisoning and serious injuries ndash deep cuts large area burn This procedure can prevent further damages
Making Diary
Week Date Tasks Time taken Details
1 22213 (Fri) Laser cutting 30 minutes Cut out components for only one hydroponics some component (rail) will deform due to high temperature of the laser therefore some components need to be recut
Polishing 30 minutes The charcoal like burned area on the acrylic pieces can be easily remove with a wet sponge
Sanding 10 minutes Sand down the cone joints to make a push fit
Gluing 1 hour 30 minutes The glue used was Tensol and it require long time to dry
2 25213 (Mon) Making ldquotubesrdquo 1 hour 30 minutes The polythene tube was cut into 163 mm and realising it was 3 mm short afterward the design of the ldquolidrdquo was change to solve the problem
Building moisture sensors 1 hours Laser cut out plastic pieces with 2 small holes for wires to insert into later the moisture sensor was installed into the tubes
Laminating wood blocks 30 minutes Laminate the MDF together to form a wooden block for preparation of the moulds
26213 (Tue) Electronics gt3 hours Went to a teacher (profession electronics) for help with setting up the circuit the conclusion was easier to use a pick to program the system than building a circuit
28213 (Thu) 3D routing (male mould) 30 minutes Learned how to set up the router with help of other student
1313 (Fri) Heat press moulding gt2 hours Heat up the acrylic piece in the vacuum former and lay it over the mould ndash the plastic did not form a circular arc
3 4313 (Mon) 3D routing (female mould)
30 minutes Forming the female side of the mould to improve the heat-press moulding quality
Laser cutting 10 minutes Cut out extra acrylic pieces for experimental heat-press moulding
4313 (Tue) Sanding moulds 50 minutes Sand down the moulds to give a smooth surface when moulding
7313 (Thu) Heat press moulding gt2 hours The quality of this process has improved but the acrylic was bent into hyperbolic instead of circular arc due to restrain when cooling The design of the design was changed to solve this problem
Electronics 1 hour Found the components required to build the circuit
8313 (Fri) Laser cutting 40 minutes Laser cutting the updated design the components for 2 units was cut
Heat bending 30 minutes Using the line strip heater to target the bending line of ldquobaserdquo and ldquofrontrdquo components
Assembling gt2hours Push fit the cone joints together and the and brush the dichloromethane onto the joints to glue them together A mistake was made when designing the cutting plan the tubing holes was not lined up
Key Problem exist
bull A diary of record when making the prototype Date tasks time taken details about the process made that day and what happened This can briefly mention about the problems exist during building the prototype
Week Date Tasks Time taken Details
4 11313 (Mon) Sealing 1 hour Using sealant to seal all and any potential leaking holes
Installing tubes (with moisture sensor)
30 minutes Use araldite to glue the polythene to the acrylic but due to the cutting plan error the connecting technique is required to be changed
12313 (Tue) Sealing 30 minutes Sealing the edges for the second time to make sure the planting units are water tight
14313 (Thu) Building electronics 3 hours The circuit is almost complete and the remaining can only be done after the water tank is complete
15313 (Fri) Laser cut 10 minutes Cut out all the clear pieces of the water tank
Sanding 1 hour Sand down the cone joint to give a push fit
5 18313 (Mon) Assembling 2 hours Assemble and glue the components of the water tank together with dichloromethane
Sealing 1 hour Seal the edges and gaps with sealant
19313 (Tue) Electronics 1 hour Tried to program a pick but the computer didnrsquot recognise the device therefore the pick have to be eliminated
sealing 1 hour Seal the water tank for the second time to make sure it is water proof
20313 (Wed) Electronics 2 hours Rearranged the circuit and discover the pump is broken
Testing - Test the circuit and the sealing of the prototype
21313 (Thu) Polishing 1 hour 30 minutes Polish the product with white sprite
Testing - Final test on the circuit and sealing of the prototype
22313 (Fri) -Deadline
Hand in the folder
The time taken were mostly rounded to the nearest 30 minutes It is difficult to record the actual time accurately due to time spent on transporting materials finding equipment and setting up
Week
Tasks 122213 (Fri)
225213 - 1313
34313 ndash 8313
411313 ndash 15313
518313 ndash 22313
Laser cutting
Sanding
Gluing
Making ldquotubesrdquo
Building moisture sensors
Laminating wood blocks
Building Electronics
3D routing
Heat press moulding
Heat bending
Installing electronics
Assembling
Sealing
Polishing
Testing
Gantt Chart
bull A chart that shows whether the making is according to plan or not The data were based on the making diary These show in different colour Green ndash according to plan Orange ndash not quite according to plan Red ndash not according to plan
The yellow and red coloured boxes are tasks that were complete lateun-planed
The late tasks were due to limited use of machinery ndashlaser cutter and router There were other users using the machines therefore some tasks can only be completed when they finish
The un-planed tasks were due to unexpected problems and mistakes ndash heat press moulding failure incorrect cutting plan and circuit failure These problems required time to solve therefore the tasks are completed late Problems like incorrect cutting plan can be avoid by double checking the dimensions and recalculating when drawing the cutting plan
Problems And Solutions
bull Problems exist along with the process of the production of prototype due to different reasons These problems can be solved and the solution will be explain with photographs and description to show why and how it was done
The idea for ldquofrontrdquo and ldquobackrdquo was a piece of acrylic bent into a circular arc and sliding into the rails But when heat pressing the acrylic the acrylic formed a parabolic shape instead which cannot be slid into the rail Therefore the design was changed having straight pieces as tangents of the circle instead This solution allows the product to keep the curve form but is not as aesthetic as the original design
This technique will be included when making the water tank of the vertical garden
Heat-press moulding
Therefore the cutting plan was changed and fewer pieces needed to be cut out which reduced the amount of material used and wasted
Front Back
Before
After
At first only the male mould was made and that result an inaccurate bent acrylic piece Soon the female was made too and the quality of the bending was improved but still not a circular arc
The heated acrylic and the moulds were clamped on a vice to cool down
Circuit
These circuits were the original plans for the watering circuit and warning circuit
The problems were the extra power supply and protection of the transistors Therefore a pick was used instead therefore the 2 circuits can be combined together The pick has only 4 inputoutput therefore a moisture sensor of the water tank was removed
The extra power supply was attach to a relay which power the pump
After the circuit was made the computer did not recognise the pick therefore the pick was removed
the circuit is now the image shown The circuit contain both warning and watering applications The buzzer only buzz when water level in water tank is low the water pump will activate when the moisture sensor (planting unit) sense dry or the pump can be switch on manually
The yellow LED represent the activity of the water pump The light is on suggest the pump is activate the series of moisture sensor was not connected
The green LED represent the activity of the buzzer The light is off suggest the buzzer is deactivated the moisture sensor (water tank) was wet
Tubing
The mistake made on this section is incorrect cutting plan The holes on the ldquotoprdquo component were not in line with the holes at the base On the good side it was not too far off therefore the tubs can be shift to line up with the holes When stacking the planting units the tubs were not lined up therefore a conducting surface was used
Copper track was used as the conducting surface the copper track was curled up therefore it can maximise the chance of making contact with other copper tracks
This circuit was tested afterward with a LED light to prove it works
Pump
The pump is broken therefore another pump was ordered the wiring hold was sealed with hot glue which can be removed afterward A yellow LED was temporarily installed to present the activity of the pump the LED will be replace by the pump when it arrive
Yellow LED
Glue
Dichloromethane was used to glue the acrylic components together instead on using Tensol glue By comparing to Tensol glue dichloromethane will not cause as much mess quick drying and it will only leave small mark when a mistakenly drip onto the acrylic
Evaluation
Evaluationbull Evaluation of the prototype of this project by
comparing to the specification testing performance time takenestimate improvement can be made and marketing
The prototype is in 4 units ndash 2 Hydroponic blocks 1 Water tank and 1 lid
The 2 Hydroponic blocks are identical they are in a curve structure which can build up a wave like structure There is a moisture sensor inside each unit and it can connect to the units above amp below and connect to the circuits in the water tank The moisture can detect dryness and activate the pump when the hydro gel is dry A filter is in the draining area which can filter the hydro gel and water
The water tank is in 2 sections ndash water storage and electronic storage The water storage zone contain a pump and a moisture sensor which connected to the circuit When the moisture sensor in the planting units sense dry the pump will activate and pump water through the hose to the top of the vertical garden when the moisture in the water tank sense dry the busser will buzz and tell the user to refill the water tank
The lid I a block of acrylic which sits on top of the vertical garden to complete the series of moisture sensor The lid has a hole where the hose can be placed into
Performance
This product can do vertical gardening on a average indoor window sill (2-8 inches) The vertical garden can stay on the window sill by the glass safely the suction pads attach to the window glass to prevent the product from falling off
The pump will activate when any of the moisture sensors sense no water however the pump draws a lot of energy from the battery therefore the batteries have a shorter life time
Large amount of sealant was used to fill up the gaps in between the components to prevent leakage this technique is not as aesthetic but very effective
Marketing
IKEA is the ideal store to sell this product It visit by all three ndash ldquoDrdquo ldquoErdquo and ldquoFrdquo class of the acorn group The garden centre is not as ideal as IKEA because garden centre focus on gardening but mainly outdoor
IKEA is focus on indoor furniture and unlikely to sell gardening products however this product is for indoor and it is more of a observational display therefore it can be classified as indoor display
Time takenestimate
The estimate time is 22 hours and the time taken to build the prototype sum up to 33 hours 30 minutes which is 11 hours 30 minutes more than expected The unexpected time was used to solve the problems ndash heat press moulding and electronics
The electronics have taken most of the time because the initial solution didnrsquot work therefore another solution is required to get to electronics to work
Hydroponic Block(Planting unit)
Water Tank
Lid
10 PerformanceMust- (qualitative)11 Able to perform vertical gardening
12 Support indoor gardening
13 Support hydroponic
14 Able to water the plants automatically
15 Able to store water for watering system
16 Water tight ndash no leaking
17 stay on an average window sill without collapse
18 Use clear material as the main material therefore plants can absorb maximum sunlight
19 Durable
110 Able to separate excessed water from fully moisturised hydrogel
111 Water proof electronics ndash prevent short circuit circuit failure and electric shock
Should-112 Store at least 1L of water (qualitative)
113Efficient watering system (quantitative)
114 Support small plants (gt10cm) (qualitative)
Could- (qualitative)115 Have moisture sensor or timer to activate the watering system
116 Battery powered
117 Natural theme
20 Size (quantitative)21 15cm (+- 5cm) depth ndash therefore the plant pots can stay on an average window sill
22 No taller than 20cm (per unit) saves space and reduce the risk of collapsing
30 Target cost amp manufacturing costMust-31 Selling price lt pound20 (quantitative)
32 Reduce use of material ndash reduce material cost (qualitative)
33 Minimise waste of material ndash reduce manufacturing cost (qualitative)
Should- (qualitative)34 Use recycled (recyclable) material (eg PVC HDPE) ndash reduce material cost and environmental damage
Could- (qualitative)35 Low costing materials for packaging -
40 packagingMust- (qualitative)41 Protect the product from stress tests -42 Prevent the product from falling apart -43 Simply manufacturing technique -Should- (qualitative)44 Include foam or bubble wrap to protect the product -45 The product will not be able to shake around in the packaging -46 Include instructions of using the product -47 Include most of the accessories required in order to allow the product to work -Could- (qualitative)48 Use recyclable materials -
Specification
The prototype have been tested and achieved ldquoPerformancerdquo ldquoSizerdquo and most of the ldquoTarget cost amp manufacturing costrdquo of the specification The area where the prototype cannot achieve is the ldquoPackagingrdquo The time is limited therefore only the prototype can be made and there is not enough time to make the packaging
Tests X
Water tight (sealing)
Water running through all the units
Automatic watering (electronics)
Stay on a window sill (suction pads)
Safety (suction pads)
Filtering
The tests are linked to the specifications which shows whether the product meet the specification or not
The idea of the packaging will be based on carton board and foam blocks The foam blocks will be cut to fit over all the corners of the product ndash as the image shown above The product with foam blocks will fit into the carton box perfectly which leave no space for it to shake around to cause damage to the product
There will be 2 types of package ndash starter package and additional packageThe starter package contain 1 water tank 2 planting units a bag of hydro gel nutrient and instruction booklet
The packaging is considered to take up to a week from design to finish
Hydroponic Block(Planting Unit)
The sealing was poor at the bottom back corners (red arrow) because it is difficult to get the sealant into the gap therefore a lot of sealant was used to fill it up
The acrylic piece at the bottom of the units were not match to the engrave lines due to miscalculation therefore the acrylic piece had to shift to match the slot
The solution to the curve were not aesthetic a acrylic tube can be used to replace the tangent however it would be very expensive to purchase a 100m radius acrylic tube and only a small amount will be used therefore this idea was used instead
Water Tank
The design of the water tank was change due to the failure of heat press moulding the tangent technique was used
The design of the lid of the electronic storage has changed the lid is slide in instead of fold in The manual switch (Green arrow)is on the back side of the water tank stationary The tangent technique result a piece of stationary tangent which can be used as a switch holder
The hole on the lid of the electronic storage has a 2cm diameter hole which is used as a ldquohandlerdquo it is used to pull the lid out however the original design was gluing a piece of acrylic bar as a handle The hole was cut out because it is more efficient to use and it reduce the usage of material
Lid
The design of the lid was unsure when designing therefore it was left until last The assembly was very simple It was glued together with dichloromethane and the black wire is attach to copper tracks at both end the function is to complete the series of moisture sensors of the planting units
The hole in the middle is for the hose to put into and there are acrylic pieces at both ends which act as bracket to hold the lid in place
The lid of the water storage is also removable therefore the water tank can be cleaned and to remove unwanted items
The cone joints of the water tank lid have been filed and sanded down therefore it is easily remove or close
ConclusionThe performance of the product can be improved if more time was given and do a laser cut card model to test the cutting plan to spot the mistakes that were made when drawing the cutting plan
Steps of assembly can be differ ndash glue the lid of the planting unit last to free more space for sealing this can improve the quality of sealing
If the machines were free all the time most of the laser cuttings can be complete at once Therefore the number and the time of transporting can be reduce which become more efficient
Electronics are the most complicated subject of this project therefore more time and effort need to be spent on working with electronics The electronics can be better if it was the first task of the project therefore more time can be spent to figure out the problems
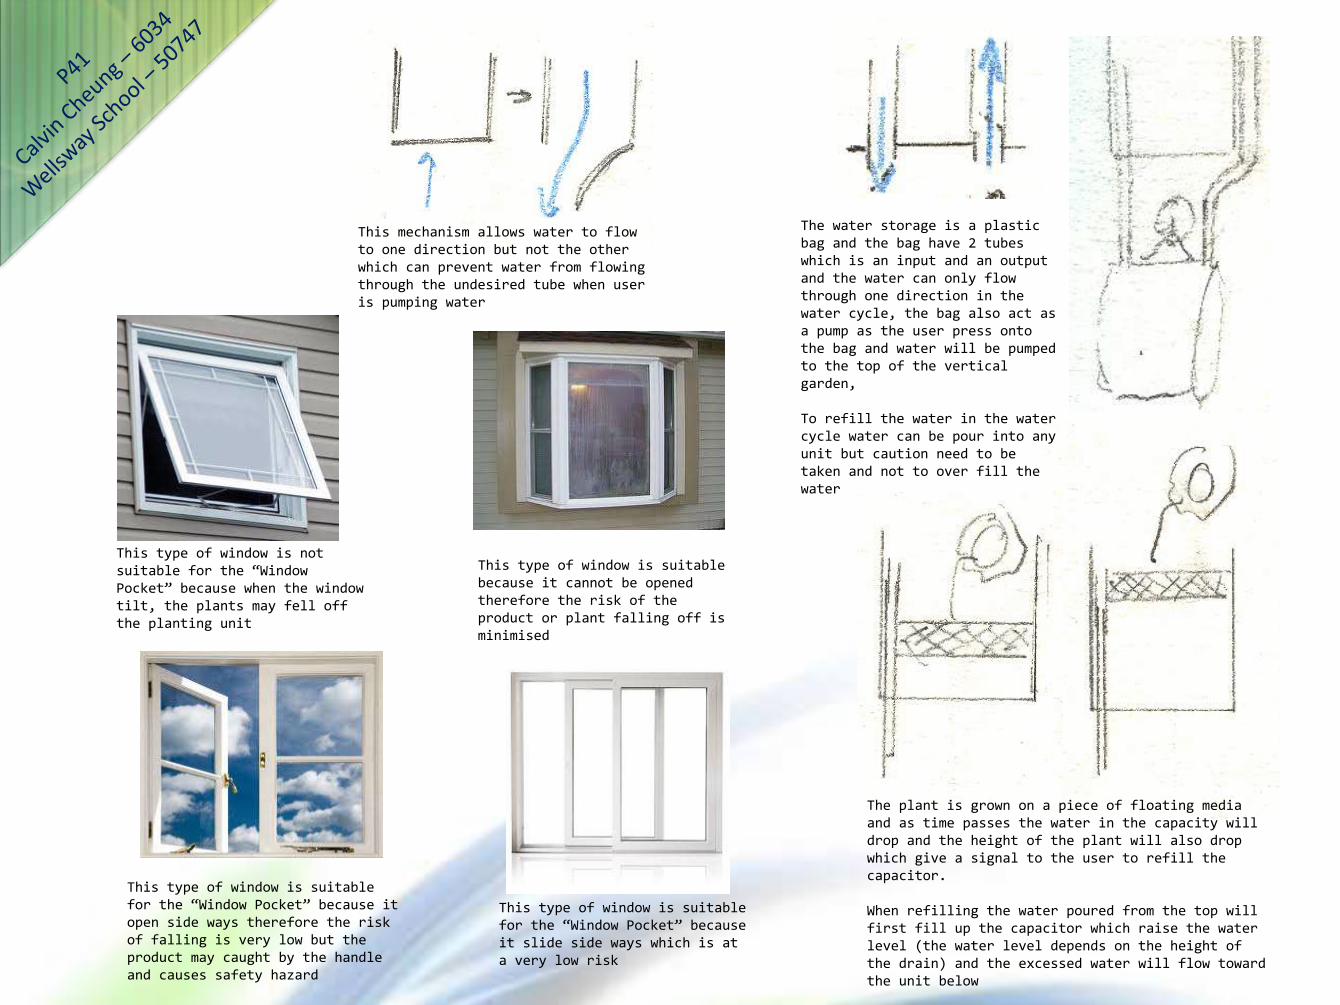
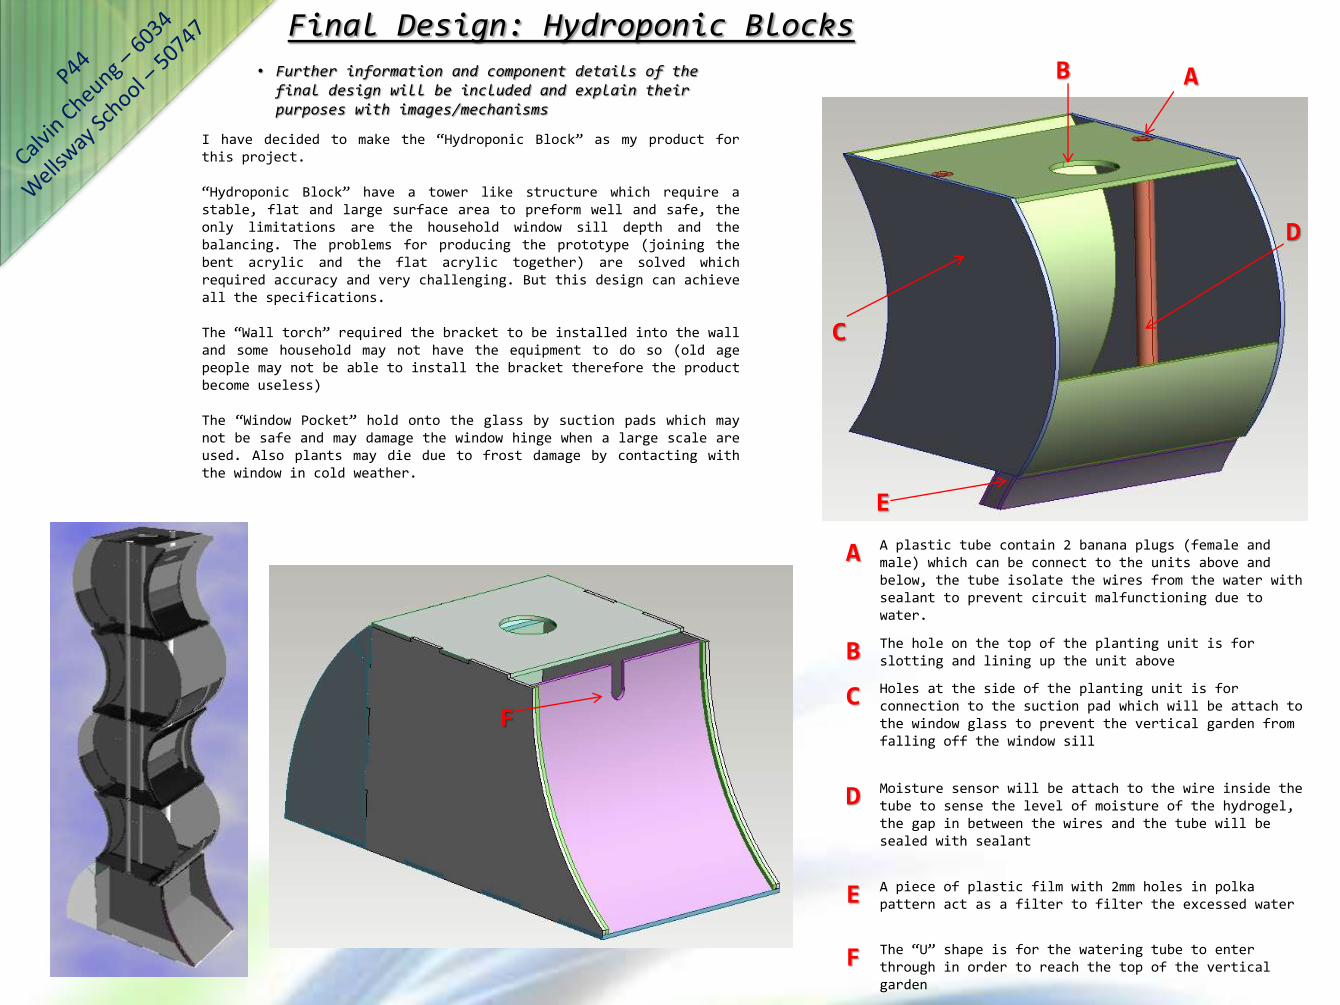
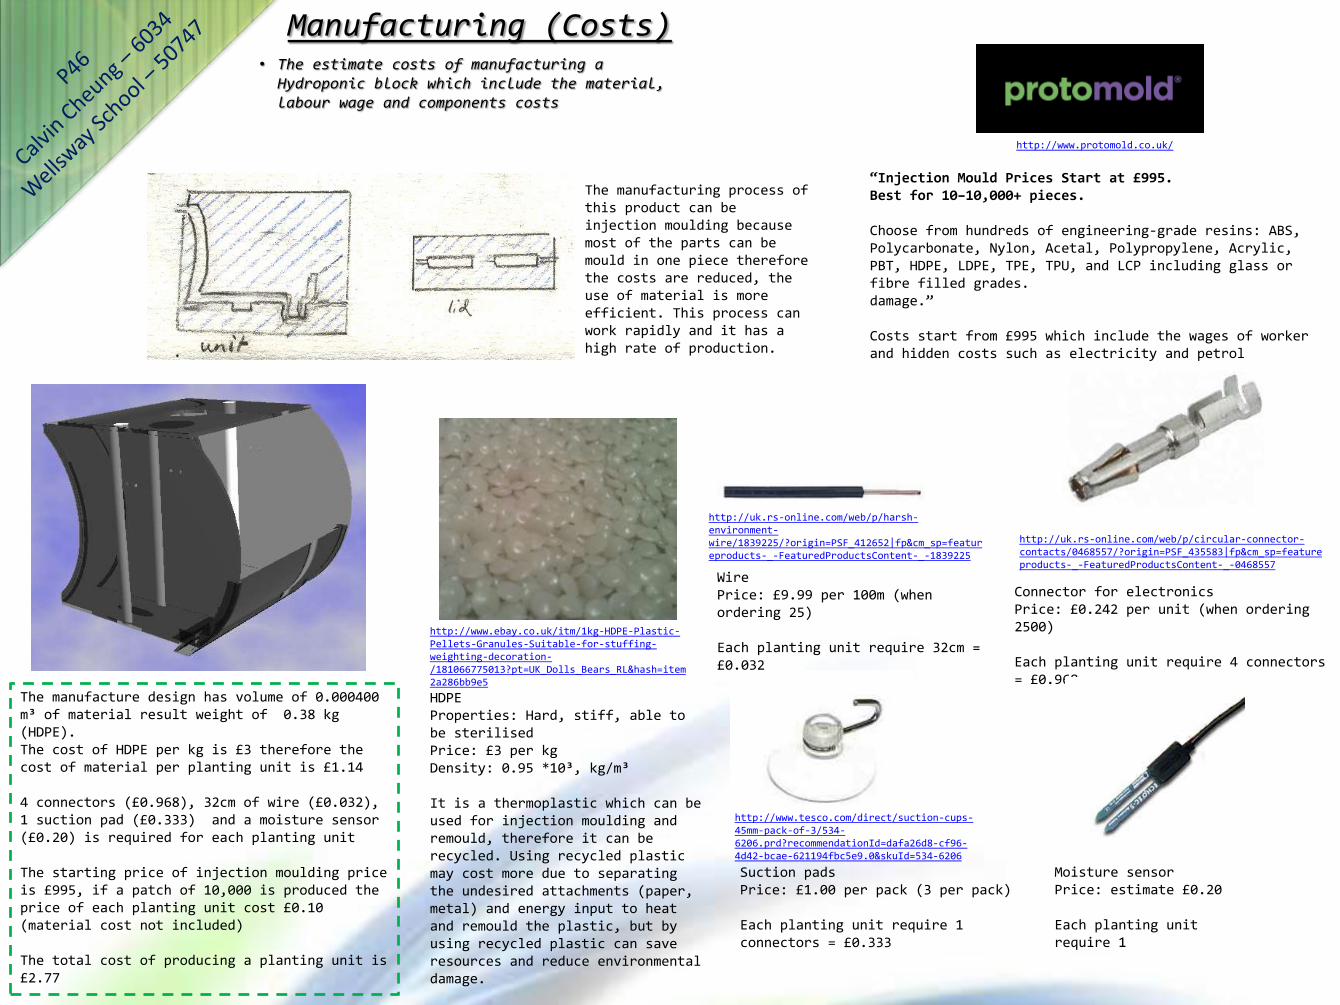
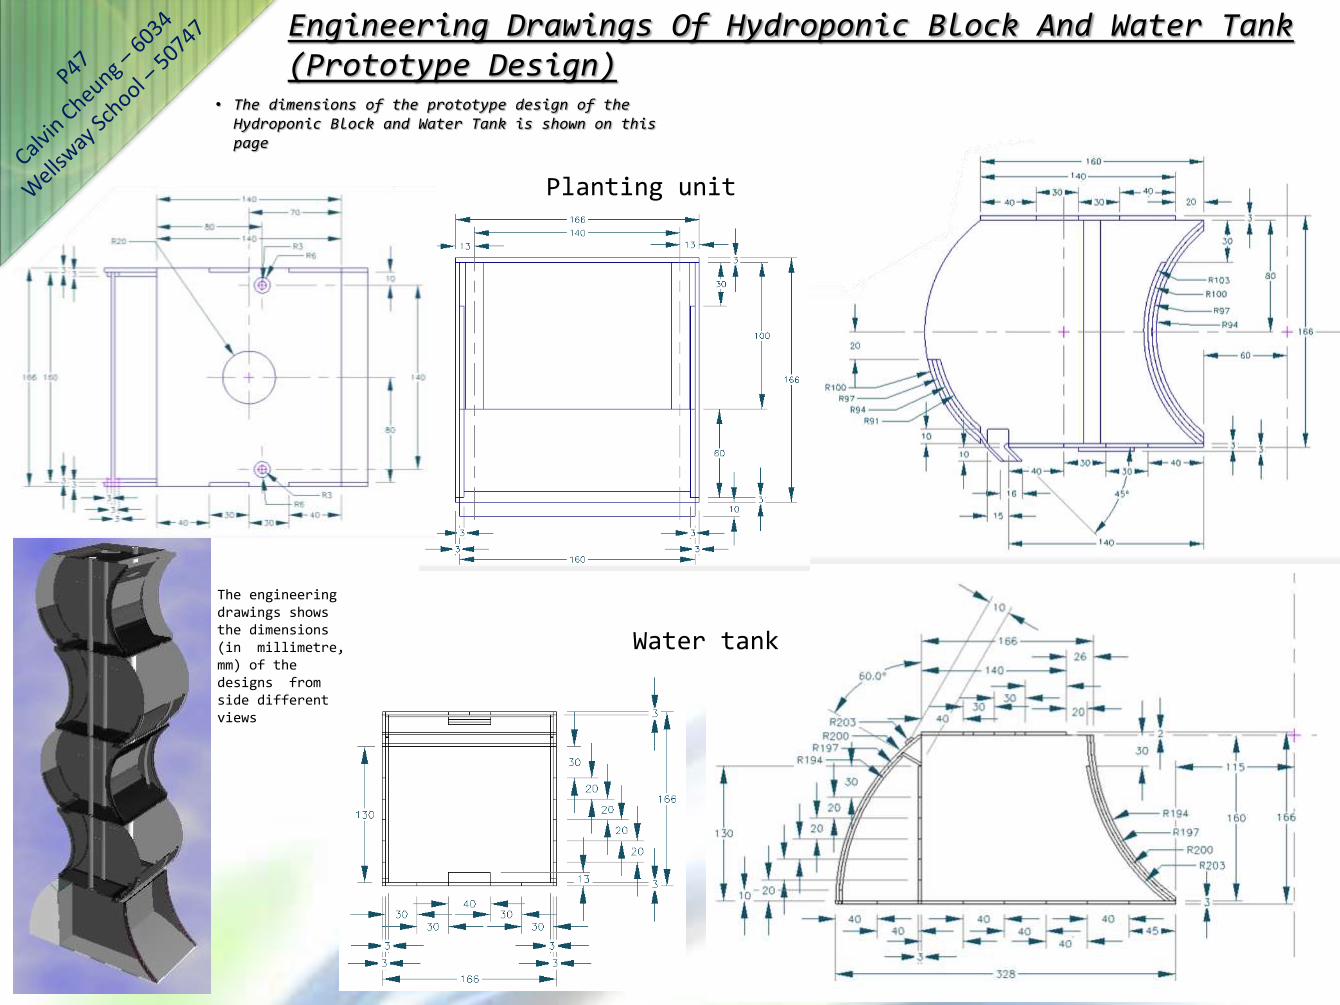
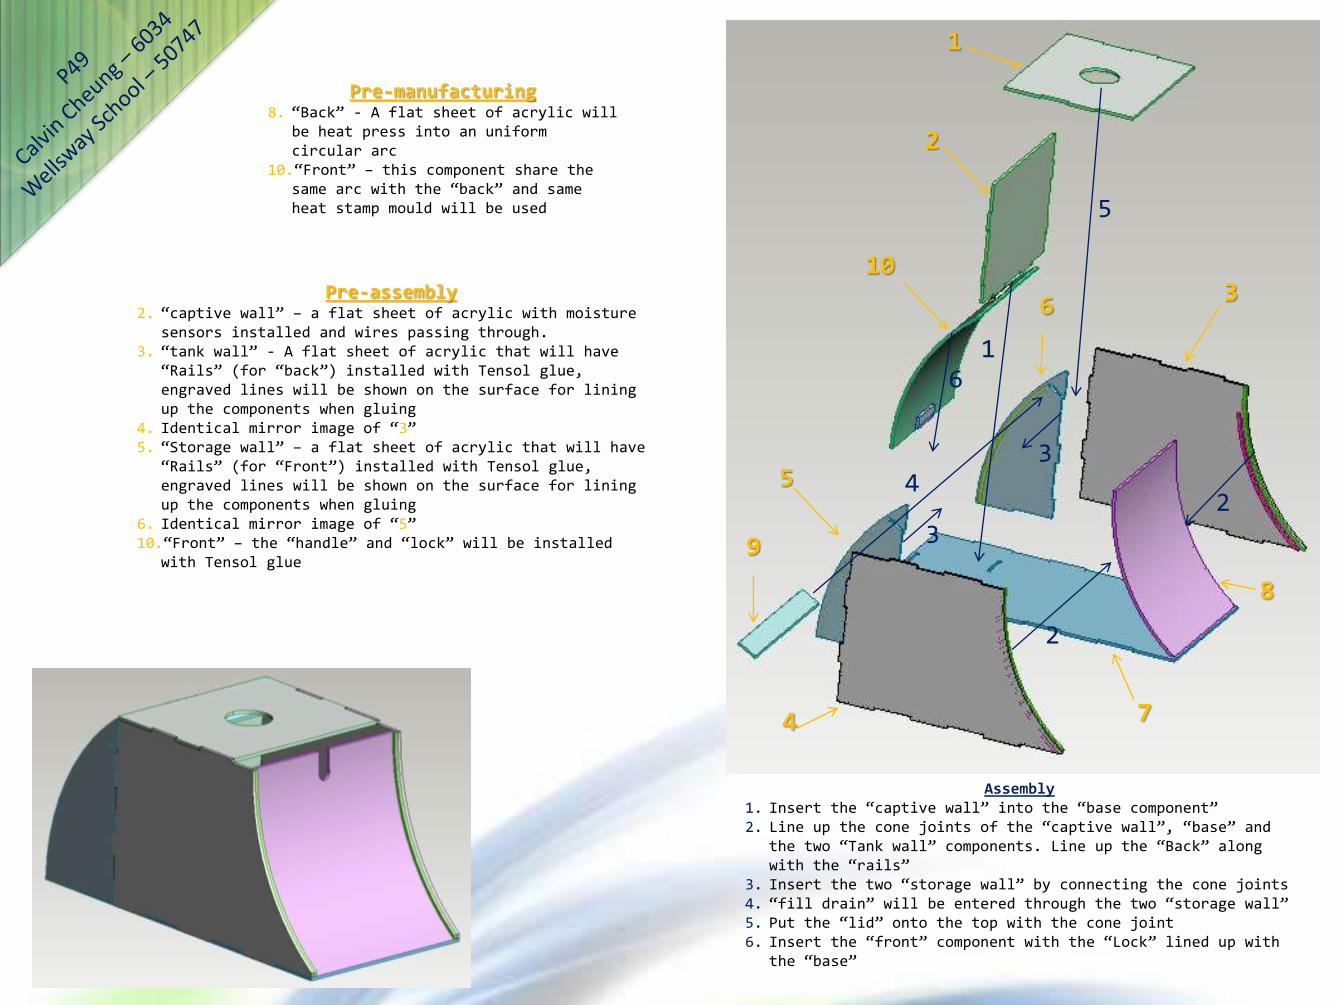
1
2
10
5
9
36
4 7
8
2
2
1
3
3
4
5
6
Pre-manufacturing8 ldquoBackrdquo - A flat sheet of acrylic will
be heat press into an uniform circular arc
10ldquoFrontrdquo ndash this component share the same arc with the ldquobackrdquo and same heat stamp mould will be used
Pre-assembly2 ldquocaptive wallrdquo ndash a flat sheet of acrylic with moisture
sensors installed and wires passing through 3 ldquotank wallrdquo - A flat sheet of acrylic that will have
ldquoRailsrdquo (for ldquobackrdquo) installed with Tensol glue engraved lines will be shown on the surface for lining up the components when gluing
4 Identical mirror image of ldquo3rdquo 5 ldquoStorage wallrdquo ndash a flat sheet of acrylic that will have
ldquoRailsrdquo (for ldquoFrontrdquo) installed with Tensol glue engraved lines will be shown on the surface for lining up the components when gluing
6 Identical mirror image of ldquo5rdquo 10ldquoFrontrdquo ndash the ldquohandlerdquo and ldquolockrdquo will be installed
with Tensol glue
Assembly1 Insert the ldquocaptive wallrdquo into the ldquobase componentrdquo2 Line up the cone joints of the ldquocaptive wallrdquo ldquobaserdquo and
the two ldquoTank wallrdquo components Line up the ldquoBackrdquo along with the ldquorailsrdquo
3 Insert the two ldquostorage wallrdquo by connecting the cone joints4 ldquofill drainrdquo will be entered through the two ldquostorage wallrdquo5 Put the ldquolidrdquo onto the top with the cone joint6 Insert the ldquofrontrdquo component with the ldquoLockrdquo lined up with
the ldquobaserdquo
Pre-manufacturing ndash Moulding
Heat stamp moulding is the process for bending the acrylic pieces cut out from the laser cutter into a certain shape the moulds use for this process will be wood that crafted in the router Wood can withstand the heat for heating the acrylic without expanding therefore the prototype can be more precise
Planting unitrsquos moulds
Mould for both ldquoFrontrdquo and ldquoBackrdquo of the water tank because they share the same ark (same radius) and circumference
ldquoFrontrdquo(Water tank)
ldquoBackrdquo(Water tank)
ldquoBaserdquo (Planting unit)
ldquoBackrdquo (Planting unit)
ldquoFrontrdquo (Planting unit)
Mould for ldquofrontrdquo of the planting unit
Mould for ldquoBackrdquo of the planting unit
Mould for ldquobaserdquo of the planting unit
Water Tankrsquos moulds
bull The dimensions of the heat press moulds for prototype design of the Hydroponic Block and Water Tank is shown on this page The moulds are used to bend acrylic pieces into a set circular arc with heat
Components (Testing)
Banana plugs are easy to connect together or separate it can be used for connecting the circuit of the planting units together
bull The following pages shows the components will be used in the prototype and what the components are for explained with photos (drawings) material usage and details This will include the price of some components
The banana plugs will be installed into the ldquotuberdquo with glue and sealed with sealant to minimise contact with water
The moisture sensor is a cathode and an anode that allow charge to pass through when contact with water this can activate the circuit
The circuit can be reverse to activate the circuit when no moisture is sensed
The moisture sensor will be made with two metal diodes and the gap in between the wires and the tube will be sealed with sealant to avoid circuit malfunctioning due to water
Suction padsCost pound099Quantity 4Size 45mm diameter
The suction pad is tied to an box and the length of the string can be adjust by the knot the suction pad will be attach to the window glass
The suction pads can ensure that the vertical garden do not fall of the window sill The length of the string depends on the width of the window frame
Cone joint will be used to connect components together The cone joint of part ldquoBrdquo has enlarged by 025 mm but the part ldquoArdquo remain the original size because the laser has width of 025mm therefore it will fit perfectly together
The joint will be glue with Tensol acrylic glue and seal with waterfish tank sealant to avoid leakage
A
B
The problem of fitting the bent acrylic and flat acrylic together is solved by a (rail) mechanism the bent acrylic is in a uniform circular arc therefore it must be able to rotate around the centre of the circular arc a ldquorail trackrdquo can be install by gluing laser cut acrylic pieces
Fish tank sealant will be use to seal the gap between the bent acrylic and the rail to prevent any leakage
To install the ldquorail trackrdquo marks need to be made on the acrylic by engraving onto the flat acrylic piece the engrave marks are for lining up the rail track to reach maximum precision
A hose hook is required for the tube to hang onto the top of the vertical gardening the hose hook bend and clamp the hose into a ldquoUrdquo shape which act as a hook and stabilised the tube when watering
The water pump has a nozzle with outer diameter of 8mm and the hosersquos inner diameter is only 6mm therefore the hose was put into the pillar drill to increase the inner diameter up to 8mm so the nozzle can fit in the pump will be power by 9v batteries
PumpCost pound899DC 55 ndash 12vPower 1 ndash 3wHmax 04 ndash 15mQmax 200LH
HoseLength 160cmOuter diameter 12mmInner diameter 6mm
A lid need to be made to place on the top of the vertical garden the lid contain 2 male banana plugs that are connected with a wire the lid is for completing the series of moisture sensors (from the planting units) of self watering system ndash watering circuit
The electronics that located in the water of the water tank will need to be connected to the storage area the wires will need to be wired through the ldquocaptive wallrdquo the gaps in between the wires and the captive will be sealed with sealant to avoid flooding in the storage area and avoid damage to the electronics
The filter for separating the hydrogel and water is 1 mm thick plastic film with many 2mm holes lay out in a polka pattern to achieve maximum holes in the limited area which minimise the chance of clogging up and maximise the rate of draining
Hydroponic Block
Components Tools used material quantity quantityFor 3 units
ldquoWallrdquo (left) Laser cutter 3mm acrylic (Perspex) - Clear 1 3
ldquoWallrdquo (right) Laser cutter 3mm acrylic (Perspex) - Clear 1 3
ldquoRear railrdquo (back) Laser cutter 3mm acrylic (Perspex) - Clear 2 6
ldquoRear railrdquo (front) Laser cutter 3mm acrylic (Perspex) - Clear 2 6
ldquoBackrdquo (Hydroponic block) Laser cutter 3mm acrylic (Perspex) - Clear 1 3
ldquoFrontrdquo (Hydroponic block) Laser cutter 3mm acrylic (Perspex) - Clear 1 3
ldquoFront railrdquo (front) Laser cutter 3mm acrylic (Perspex) - Clear 2 6
ldquoFront railrdquo (back) Laser cutter 3mm acrylic (Perspex) - Clear 2 6
ldquoDrain siderdquo Laser cutter 3mm acrylic (Perspex) - Clear 2 6
ldquoToprdquo Laser cutter 3mm acrylic (Perspex) - Clear 1 3
ldquoBaserdquo (Hydroponic block) Laser cutter 3mm acrylic (Perspex) - Clear 1 3
ldquoSlot +rdquo Laser cutter 3mm acrylic (Perspex) - Clear 1 3
Filter Laser cutter 1mm polypropylene - Clear 1 3
Tube Coping saw 6mm (diameter)polythene
2 6
ldquoFront mouldrdquo (+) Router wood 1 3
ldquoFront mouldrdquo (-) Router wood 1 3
ldquoBack mouldrdquo (+) Router wood 1 3
ldquoBack mouldrdquo (-) Router wood 1 3
Water tank
Components Tools used material quantity
ldquoTank Wallrdquo (left) Laser cutter 3mm acrylic (Perspex) - Clear 1
ldquoTank Wallrdquo (right) Laser cutter 3mm acrylic (Perspex) - Clear 1
ldquoStorage Wallrdquo (left) Laser cutter 3mm acrylic (Perspex) - Clear 1
ldquoStorage Wallrdquo (right) Laser cutter 3mm acrylic (Perspex) - Clear 1
ldquoBackrdquo (Water Tank) Laser cutter 3mm acrylic (Perspex) - Clear 1
ldquoFrontrdquo (Water Tank) Laser cutter 3mm acrylic (Perspex) - Clear 1
ldquoFront railrdquo (Water Tank) Laser cutter 3mm acrylic (Perspex) - Clear 2
ldquoHandlerdquo Laser cutter 3mm acrylic (Perspex) - Clear 1
ldquoLockrdquo Laser cutter 3mm acrylic (Perspex) - Clear 1
ldquoFill drainrdquo Laser cutter 3mm acrylic (Perspex) - Clear 1
ldquoCaptive Wallrdquo Laser cutter 3mm acrylic (Perspex) - Clear 1
ldquoToprdquo Laser cutter 3mm acrylic (Perspex) - Clear 1
ldquoBaserdquo (Water Tank) Laser cutter 3mm acrylic (Perspex) - Clear 1
ldquoRear railrdquo (front) Laser cutter 3mm acrylic (Perspex) - Clear 2
ldquoRear railrdquo (back) Laser cutter 3mm acrylic (Perspex) - Clear 2
ldquoMouldrdquo (+) Router wood 1
ldquoMouldrdquo (-) Router wood 1
Cutting Lists
bull List of components and related parts (ndash moulds) that need to be cut out in order to make the product the list include the tools and material required to make the components The quantity of each component is labelled ndash the quantity to build 1 unit
ldquoWallrdquo leftldquoWallrdquo Right
ldquoToprdquoldquoFrontrdquo
ldquoBackrdquo
ldquoBaserdquo
ldquoBaserdquo
ldquoRailrdquo (Front)
ldquoBackrdquo
ldquoRailrdquo (Back)
ldquoCaptive wallrdquo
ldquoToprdquoldquoFrontrdquo
ldquoTank wallrdquo right
ldquoTank wallrdquo leftldquostorage
wallrdquo leftldquostorage wallrdquo right
ldquoFill drainrdquo
Cutting Plan
bull 2D design drawing of laser cutting components Black lines are Cutting and red lines are Engraving The labelling in green are components of planting unit and blue are components of water tank
ldquoRailrdquo (back)
ldquoRailrdquo (front)
ldquodrain siderdquo
Flow Chart
Tools required1) Laser cutter2) Router3) Sanding paper4) Strip heater5) Tensol6) Solder and soldering iron7) Sealant
bull The flow chart shows the steps of making with quality control the quality control can be used to analysis each process to make sure it meet the standard conditions The flow chart has sub-assemblies which are process that has to be followed through before all the components join together these sub-assemblies are process that pre-manufacture components and some can be done along at the same time
Start
(1) Laser cut components
Did the laser cut through
completely
(3) Sand down the edges
Are all the edges smooth
Start
(2) Make the mould with
router
Are the inter
surfaces of the mould smooth
(3) Sand the inter
surface of the mould
(4) Heat bend the components
did The acrylic
piece took the shape of the circular
arc
(5) Glue the components together -assembly
Start
Build the moisture sensors
does the
circuit work
6) Build the
electronic circuits
Did the glue hold the
components together
(5) Install the
electronics
Install add on
components
(7) Seal the edges and gaps
All edges
and gaps sealed
Polish the surface of the
product
Finish
Prototype
Yes
Yes
Yes
Yes
Yes
Yes
Yes
No
No
No
No
No
No
No
Task Quality
Laser cutting component All the cutting lines must cut through the acrylic
sanding Remove all sharp edges or splinters to cast a smooth surface
Testing circuits Circuit must operate as required
Heat bending The acrylic sheet must form the shape (circular arc) over the mould
gluing The components must held by Tensol glue and the glue should not be all over the component
sealing The sealing only apply to the inner edges and corners on the prototype and make sure all edges are sealed ndash no leaking
10 PerformanceMust- (qualitative)16 Water tight ndash no leaking111 Water proof electronics ndash prevent short circuit circuit failure and electric shock
Specification
Risk Assessment amp Time Estimate
Tasks Tools Risks Solutions
Laser cutting components
Laser cutter Breath in toxic fume
Keep the fan operating
Heat bendingcomponents
Strip heater Burn Wear gloves
Gluing components
Tensol glue Breath in Toxic gas or irritation when contact with eyesmouth
Keep windows open and make sure hands are washed straight away after gluing components
Building electronics
Solder solder iron wire stripper wire cutter clip board
Cut electricshock burn toxic gas
Keep the un-needed tools out of the way make sure no power supply is connecting when building the electronic keep the solder in the holder when not using donrsquot use a short soldering iron keep windows open
Sealing the edges sealant Cause irritation when contact with eyemouth
Wash hands straight away aftersealing the edges
bull Table shows the risks and hazards when using specific tools to performing tasks with solutions to minimise the chance of getting injured The coloured boxes (related to the flow chart) shows the estimated time to carry out each step the estimate time of each process will be compared with making diary in evaluation
Laser cutting ndash 2 hoursSanding ndash 1 hour
Routing mould ndash 5 hoursSanding ndash 30 minutes
Building moisture sensors ndash 30 minutesBuilding circuits ndash 3 hour
Heat pressing components ndash 3 hourGluing components ndash 3 hour
Install electronics ndash 2 hoursSealing gaps ndash 2 hours
Time estimate
Total time gt 22 hours (3 weeks time)
Risk assessment
The estimate time is the predicted time required to make prototype with maximum efficiency Extra time may be spent due to errormistakes and limited use of machinery or creating solutions to solve problems and the aim is to complete the prototype before 22313 (Fri)
The solutions are ways to minimise risks of injuries however if injured first aid kit may help with burn and cut Water may help with skin irritant Call the ambulance when chemical causing eye irritantpoisoning and serious injuries ndash deep cuts large area burn This procedure can prevent further damages
Making Diary
Week Date Tasks Time taken Details
1 22213 (Fri) Laser cutting 30 minutes Cut out components for only one hydroponics some component (rail) will deform due to high temperature of the laser therefore some components need to be recut
Polishing 30 minutes The charcoal like burned area on the acrylic pieces can be easily remove with a wet sponge
Sanding 10 minutes Sand down the cone joints to make a push fit
Gluing 1 hour 30 minutes The glue used was Tensol and it require long time to dry
2 25213 (Mon) Making ldquotubesrdquo 1 hour 30 minutes The polythene tube was cut into 163 mm and realising it was 3 mm short afterward the design of the ldquolidrdquo was change to solve the problem
Building moisture sensors 1 hours Laser cut out plastic pieces with 2 small holes for wires to insert into later the moisture sensor was installed into the tubes
Laminating wood blocks 30 minutes Laminate the MDF together to form a wooden block for preparation of the moulds
26213 (Tue) Electronics gt3 hours Went to a teacher (profession electronics) for help with setting up the circuit the conclusion was easier to use a pick to program the system than building a circuit
28213 (Thu) 3D routing (male mould) 30 minutes Learned how to set up the router with help of other student
1313 (Fri) Heat press moulding gt2 hours Heat up the acrylic piece in the vacuum former and lay it over the mould ndash the plastic did not form a circular arc
3 4313 (Mon) 3D routing (female mould)
30 minutes Forming the female side of the mould to improve the heat-press moulding quality
Laser cutting 10 minutes Cut out extra acrylic pieces for experimental heat-press moulding
4313 (Tue) Sanding moulds 50 minutes Sand down the moulds to give a smooth surface when moulding
7313 (Thu) Heat press moulding gt2 hours The quality of this process has improved but the acrylic was bent into hyperbolic instead of circular arc due to restrain when cooling The design of the design was changed to solve this problem
Electronics 1 hour Found the components required to build the circuit
8313 (Fri) Laser cutting 40 minutes Laser cutting the updated design the components for 2 units was cut
Heat bending 30 minutes Using the line strip heater to target the bending line of ldquobaserdquo and ldquofrontrdquo components
Assembling gt2hours Push fit the cone joints together and the and brush the dichloromethane onto the joints to glue them together A mistake was made when designing the cutting plan the tubing holes was not lined up
Key Problem exist
bull A diary of record when making the prototype Date tasks time taken details about the process made that day and what happened This can briefly mention about the problems exist during building the prototype
Week Date Tasks Time taken Details
4 11313 (Mon) Sealing 1 hour Using sealant to seal all and any potential leaking holes
Installing tubes (with moisture sensor)
30 minutes Use araldite to glue the polythene to the acrylic but due to the cutting plan error the connecting technique is required to be changed
12313 (Tue) Sealing 30 minutes Sealing the edges for the second time to make sure the planting units are water tight
14313 (Thu) Building electronics 3 hours The circuit is almost complete and the remaining can only be done after the water tank is complete
15313 (Fri) Laser cut 10 minutes Cut out all the clear pieces of the water tank
Sanding 1 hour Sand down the cone joint to give a push fit
5 18313 (Mon) Assembling 2 hours Assemble and glue the components of the water tank together with dichloromethane
Sealing 1 hour Seal the edges and gaps with sealant
19313 (Tue) Electronics 1 hour Tried to program a pick but the computer didnrsquot recognise the device therefore the pick have to be eliminated
sealing 1 hour Seal the water tank for the second time to make sure it is water proof
20313 (Wed) Electronics 2 hours Rearranged the circuit and discover the pump is broken
Testing - Test the circuit and the sealing of the prototype
21313 (Thu) Polishing 1 hour 30 minutes Polish the product with white sprite
Testing - Final test on the circuit and sealing of the prototype
22313 (Fri) -Deadline
Hand in the folder
The time taken were mostly rounded to the nearest 30 minutes It is difficult to record the actual time accurately due to time spent on transporting materials finding equipment and setting up
Week
Tasks 122213 (Fri)
225213 - 1313
34313 ndash 8313
411313 ndash 15313
518313 ndash 22313
Laser cutting
Sanding
Gluing
Making ldquotubesrdquo
Building moisture sensors
Laminating wood blocks
Building Electronics
3D routing
Heat press moulding
Heat bending
Installing electronics
Assembling
Sealing
Polishing
Testing
Gantt Chart
bull A chart that shows whether the making is according to plan or not The data were based on the making diary These show in different colour Green ndash according to plan Orange ndash not quite according to plan Red ndash not according to plan
The yellow and red coloured boxes are tasks that were complete lateun-planed
The late tasks were due to limited use of machinery ndashlaser cutter and router There were other users using the machines therefore some tasks can only be completed when they finish
The un-planed tasks were due to unexpected problems and mistakes ndash heat press moulding failure incorrect cutting plan and circuit failure These problems required time to solve therefore the tasks are completed late Problems like incorrect cutting plan can be avoid by double checking the dimensions and recalculating when drawing the cutting plan
Problems And Solutions
bull Problems exist along with the process of the production of prototype due to different reasons These problems can be solved and the solution will be explain with photographs and description to show why and how it was done
The idea for ldquofrontrdquo and ldquobackrdquo was a piece of acrylic bent into a circular arc and sliding into the rails But when heat pressing the acrylic the acrylic formed a parabolic shape instead which cannot be slid into the rail Therefore the design was changed having straight pieces as tangents of the circle instead This solution allows the product to keep the curve form but is not as aesthetic as the original design
This technique will be included when making the water tank of the vertical garden
Heat-press moulding
Therefore the cutting plan was changed and fewer pieces needed to be cut out which reduced the amount of material used and wasted
Front Back
Before
After
At first only the male mould was made and that result an inaccurate bent acrylic piece Soon the female was made too and the quality of the bending was improved but still not a circular arc
The heated acrylic and the moulds were clamped on a vice to cool down
Circuit
These circuits were the original plans for the watering circuit and warning circuit
The problems were the extra power supply and protection of the transistors Therefore a pick was used instead therefore the 2 circuits can be combined together The pick has only 4 inputoutput therefore a moisture sensor of the water tank was removed
The extra power supply was attach to a relay which power the pump
After the circuit was made the computer did not recognise the pick therefore the pick was removed
the circuit is now the image shown The circuit contain both warning and watering applications The buzzer only buzz when water level in water tank is low the water pump will activate when the moisture sensor (planting unit) sense dry or the pump can be switch on manually
The yellow LED represent the activity of the water pump The light is on suggest the pump is activate the series of moisture sensor was not connected
The green LED represent the activity of the buzzer The light is off suggest the buzzer is deactivated the moisture sensor (water tank) was wet
Tubing
The mistake made on this section is incorrect cutting plan The holes on the ldquotoprdquo component were not in line with the holes at the base On the good side it was not too far off therefore the tubs can be shift to line up with the holes When stacking the planting units the tubs were not lined up therefore a conducting surface was used
Copper track was used as the conducting surface the copper track was curled up therefore it can maximise the chance of making contact with other copper tracks
This circuit was tested afterward with a LED light to prove it works
Pump
The pump is broken therefore another pump was ordered the wiring hold was sealed with hot glue which can be removed afterward A yellow LED was temporarily installed to present the activity of the pump the LED will be replace by the pump when it arrive
Yellow LED
Glue
Dichloromethane was used to glue the acrylic components together instead on using Tensol glue By comparing to Tensol glue dichloromethane will not cause as much mess quick drying and it will only leave small mark when a mistakenly drip onto the acrylic
Evaluation
Evaluationbull Evaluation of the prototype of this project by
comparing to the specification testing performance time takenestimate improvement can be made and marketing
The prototype is in 4 units ndash 2 Hydroponic blocks 1 Water tank and 1 lid
The 2 Hydroponic blocks are identical they are in a curve structure which can build up a wave like structure There is a moisture sensor inside each unit and it can connect to the units above amp below and connect to the circuits in the water tank The moisture can detect dryness and activate the pump when the hydro gel is dry A filter is in the draining area which can filter the hydro gel and water
The water tank is in 2 sections ndash water storage and electronic storage The water storage zone contain a pump and a moisture sensor which connected to the circuit When the moisture sensor in the planting units sense dry the pump will activate and pump water through the hose to the top of the vertical garden when the moisture in the water tank sense dry the busser will buzz and tell the user to refill the water tank
The lid I a block of acrylic which sits on top of the vertical garden to complete the series of moisture sensor The lid has a hole where the hose can be placed into
Performance
This product can do vertical gardening on a average indoor window sill (2-8 inches) The vertical garden can stay on the window sill by the glass safely the suction pads attach to the window glass to prevent the product from falling off
The pump will activate when any of the moisture sensors sense no water however the pump draws a lot of energy from the battery therefore the batteries have a shorter life time
Large amount of sealant was used to fill up the gaps in between the components to prevent leakage this technique is not as aesthetic but very effective
Marketing
IKEA is the ideal store to sell this product It visit by all three ndash ldquoDrdquo ldquoErdquo and ldquoFrdquo class of the acorn group The garden centre is not as ideal as IKEA because garden centre focus on gardening but mainly outdoor
IKEA is focus on indoor furniture and unlikely to sell gardening products however this product is for indoor and it is more of a observational display therefore it can be classified as indoor display
Time takenestimate
The estimate time is 22 hours and the time taken to build the prototype sum up to 33 hours 30 minutes which is 11 hours 30 minutes more than expected The unexpected time was used to solve the problems ndash heat press moulding and electronics
The electronics have taken most of the time because the initial solution didnrsquot work therefore another solution is required to get to electronics to work
Hydroponic Block(Planting unit)
Water Tank
Lid
10 PerformanceMust- (qualitative)11 Able to perform vertical gardening
12 Support indoor gardening
13 Support hydroponic
14 Able to water the plants automatically
15 Able to store water for watering system
16 Water tight ndash no leaking
17 stay on an average window sill without collapse
18 Use clear material as the main material therefore plants can absorb maximum sunlight
19 Durable
110 Able to separate excessed water from fully moisturised hydrogel
111 Water proof electronics ndash prevent short circuit circuit failure and electric shock
Should-112 Store at least 1L of water (qualitative)
113Efficient watering system (quantitative)
114 Support small plants (gt10cm) (qualitative)
Could- (qualitative)115 Have moisture sensor or timer to activate the watering system
116 Battery powered
117 Natural theme
20 Size (quantitative)21 15cm (+- 5cm) depth ndash therefore the plant pots can stay on an average window sill
22 No taller than 20cm (per unit) saves space and reduce the risk of collapsing
30 Target cost amp manufacturing costMust-31 Selling price lt pound20 (quantitative)
32 Reduce use of material ndash reduce material cost (qualitative)
33 Minimise waste of material ndash reduce manufacturing cost (qualitative)
Should- (qualitative)34 Use recycled (recyclable) material (eg PVC HDPE) ndash reduce material cost and environmental damage
Could- (qualitative)35 Low costing materials for packaging -
40 packagingMust- (qualitative)41 Protect the product from stress tests -42 Prevent the product from falling apart -43 Simply manufacturing technique -Should- (qualitative)44 Include foam or bubble wrap to protect the product -45 The product will not be able to shake around in the packaging -46 Include instructions of using the product -47 Include most of the accessories required in order to allow the product to work -Could- (qualitative)48 Use recyclable materials -
Specification
The prototype have been tested and achieved ldquoPerformancerdquo ldquoSizerdquo and most of the ldquoTarget cost amp manufacturing costrdquo of the specification The area where the prototype cannot achieve is the ldquoPackagingrdquo The time is limited therefore only the prototype can be made and there is not enough time to make the packaging
Tests X
Water tight (sealing)
Water running through all the units
Automatic watering (electronics)
Stay on a window sill (suction pads)
Safety (suction pads)
Filtering
The tests are linked to the specifications which shows whether the product meet the specification or not
The idea of the packaging will be based on carton board and foam blocks The foam blocks will be cut to fit over all the corners of the product ndash as the image shown above The product with foam blocks will fit into the carton box perfectly which leave no space for it to shake around to cause damage to the product
There will be 2 types of package ndash starter package and additional packageThe starter package contain 1 water tank 2 planting units a bag of hydro gel nutrient and instruction booklet
The packaging is considered to take up to a week from design to finish
Hydroponic Block(Planting Unit)
The sealing was poor at the bottom back corners (red arrow) because it is difficult to get the sealant into the gap therefore a lot of sealant was used to fill it up
The acrylic piece at the bottom of the units were not match to the engrave lines due to miscalculation therefore the acrylic piece had to shift to match the slot
The solution to the curve were not aesthetic a acrylic tube can be used to replace the tangent however it would be very expensive to purchase a 100m radius acrylic tube and only a small amount will be used therefore this idea was used instead
Water Tank
The design of the water tank was change due to the failure of heat press moulding the tangent technique was used
The design of the lid of the electronic storage has changed the lid is slide in instead of fold in The manual switch (Green arrow)is on the back side of the water tank stationary The tangent technique result a piece of stationary tangent which can be used as a switch holder
The hole on the lid of the electronic storage has a 2cm diameter hole which is used as a ldquohandlerdquo it is used to pull the lid out however the original design was gluing a piece of acrylic bar as a handle The hole was cut out because it is more efficient to use and it reduce the usage of material
Lid
The design of the lid was unsure when designing therefore it was left until last The assembly was very simple It was glued together with dichloromethane and the black wire is attach to copper tracks at both end the function is to complete the series of moisture sensors of the planting units
The hole in the middle is for the hose to put into and there are acrylic pieces at both ends which act as bracket to hold the lid in place
The lid of the water storage is also removable therefore the water tank can be cleaned and to remove unwanted items
The cone joints of the water tank lid have been filed and sanded down therefore it is easily remove or close
ConclusionThe performance of the product can be improved if more time was given and do a laser cut card model to test the cutting plan to spot the mistakes that were made when drawing the cutting plan
Steps of assembly can be differ ndash glue the lid of the planting unit last to free more space for sealing this can improve the quality of sealing
If the machines were free all the time most of the laser cuttings can be complete at once Therefore the number and the time of transporting can be reduce which become more efficient
Electronics are the most complicated subject of this project therefore more time and effort need to be spent on working with electronics The electronics can be better if it was the first task of the project therefore more time can be spent to figure out the problems
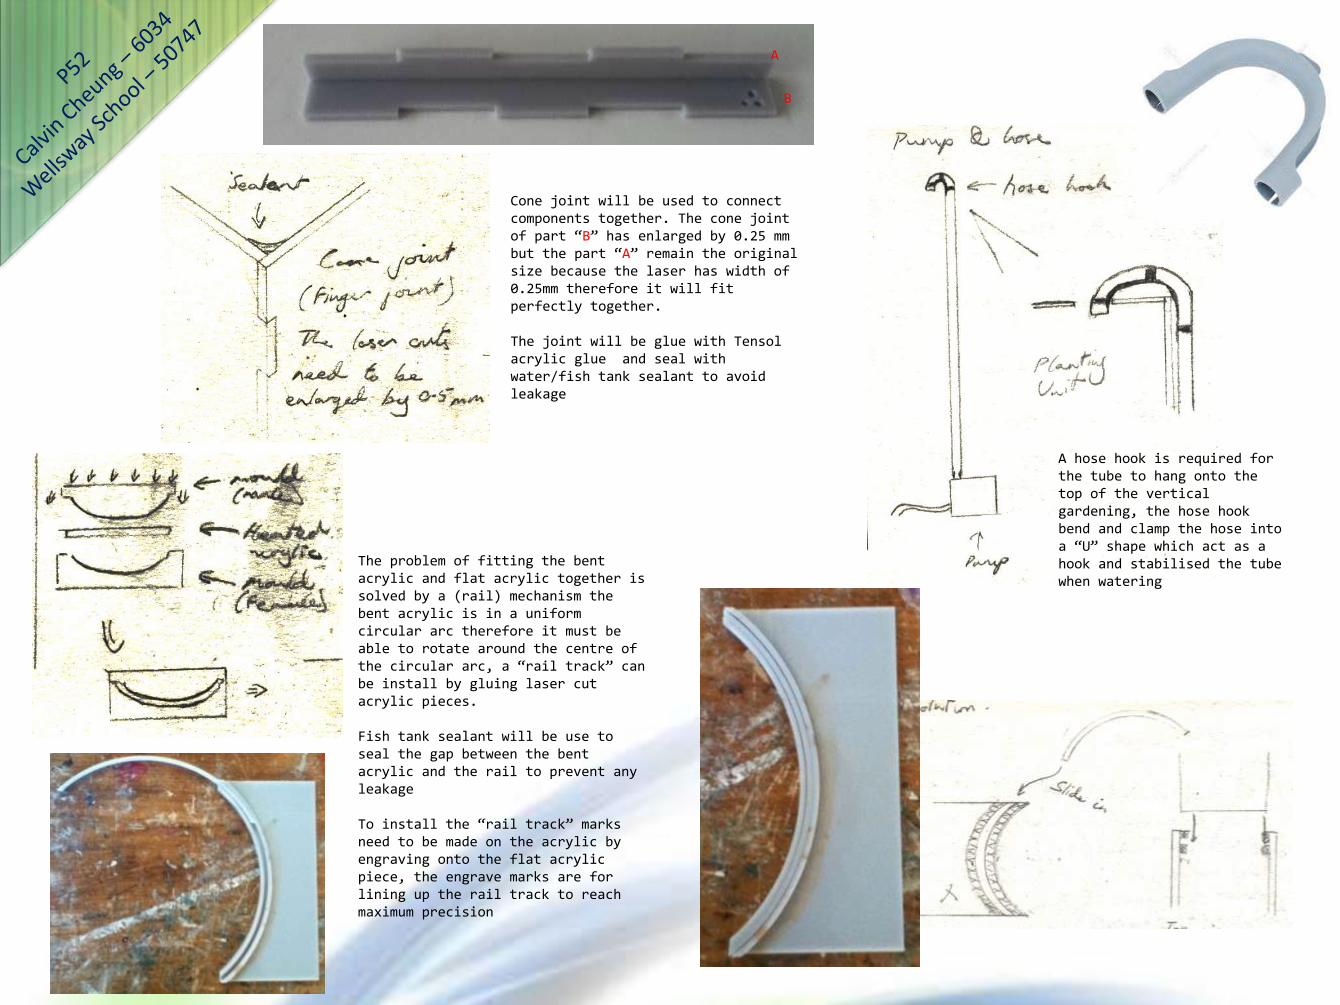
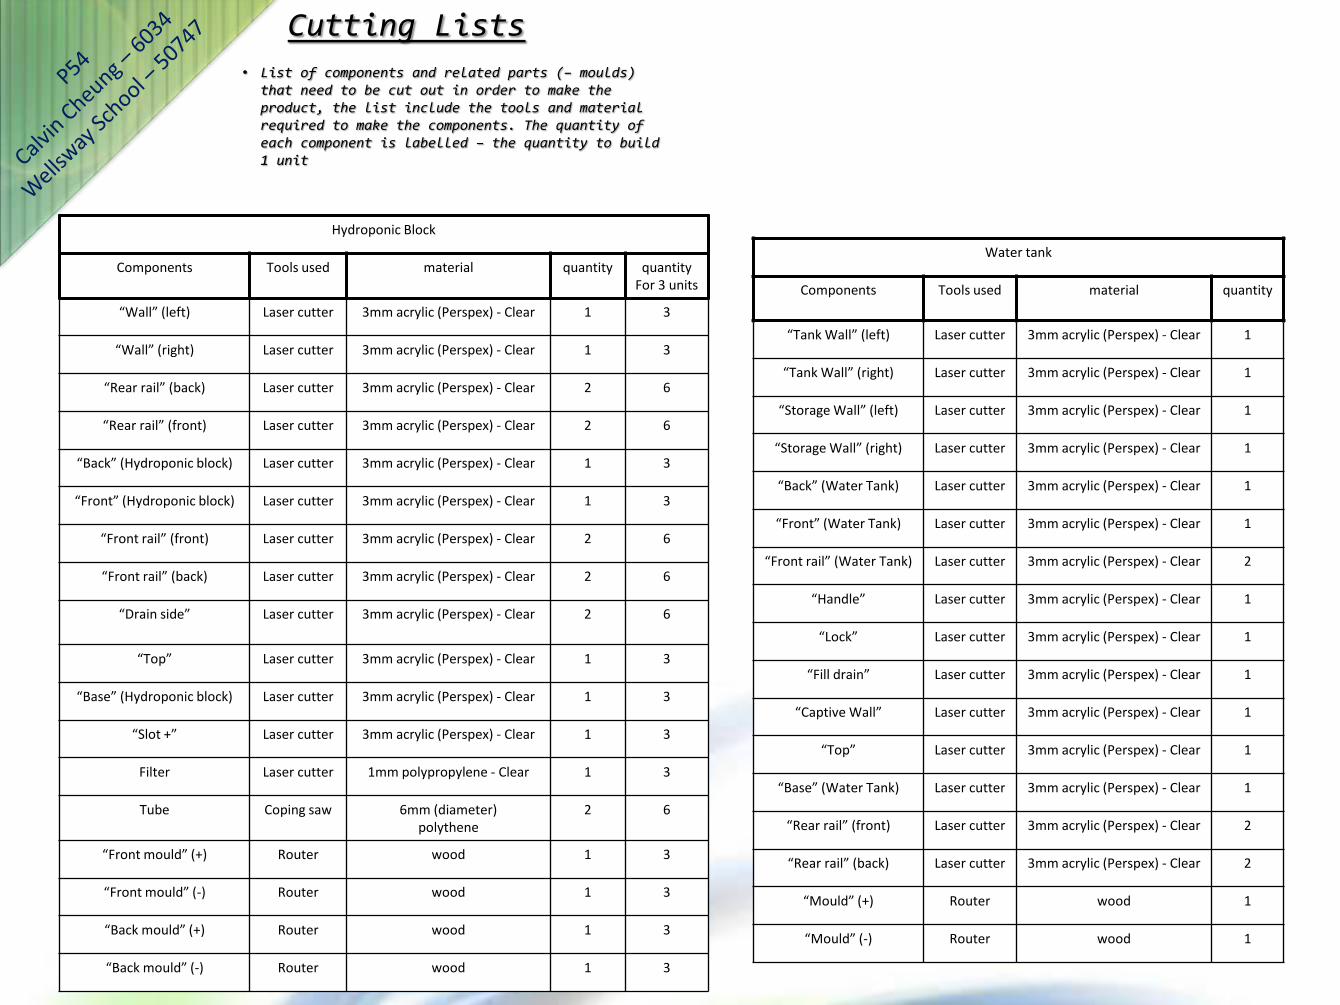
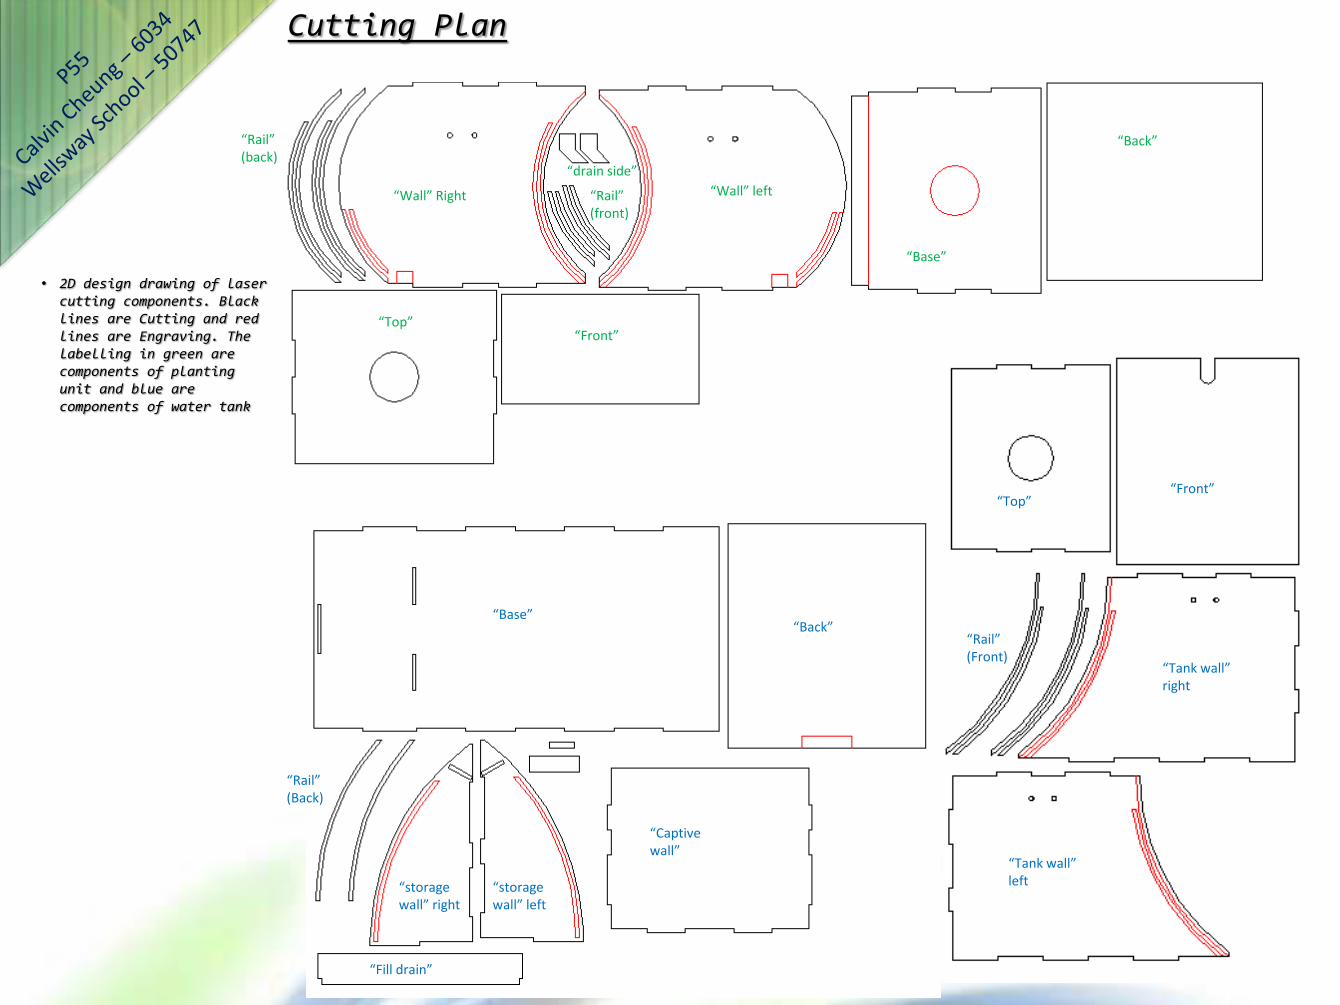
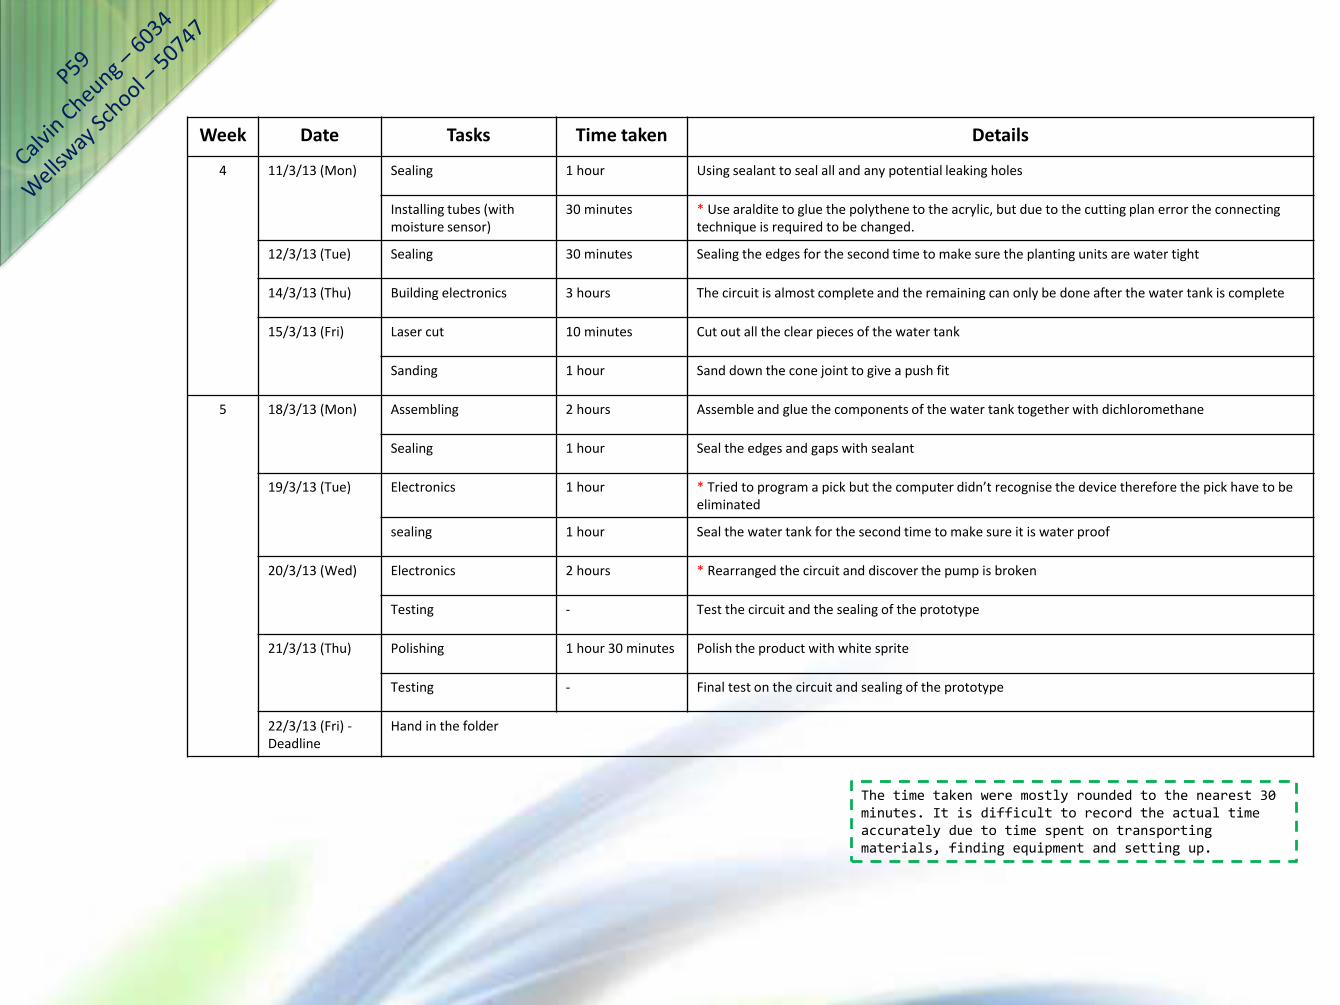
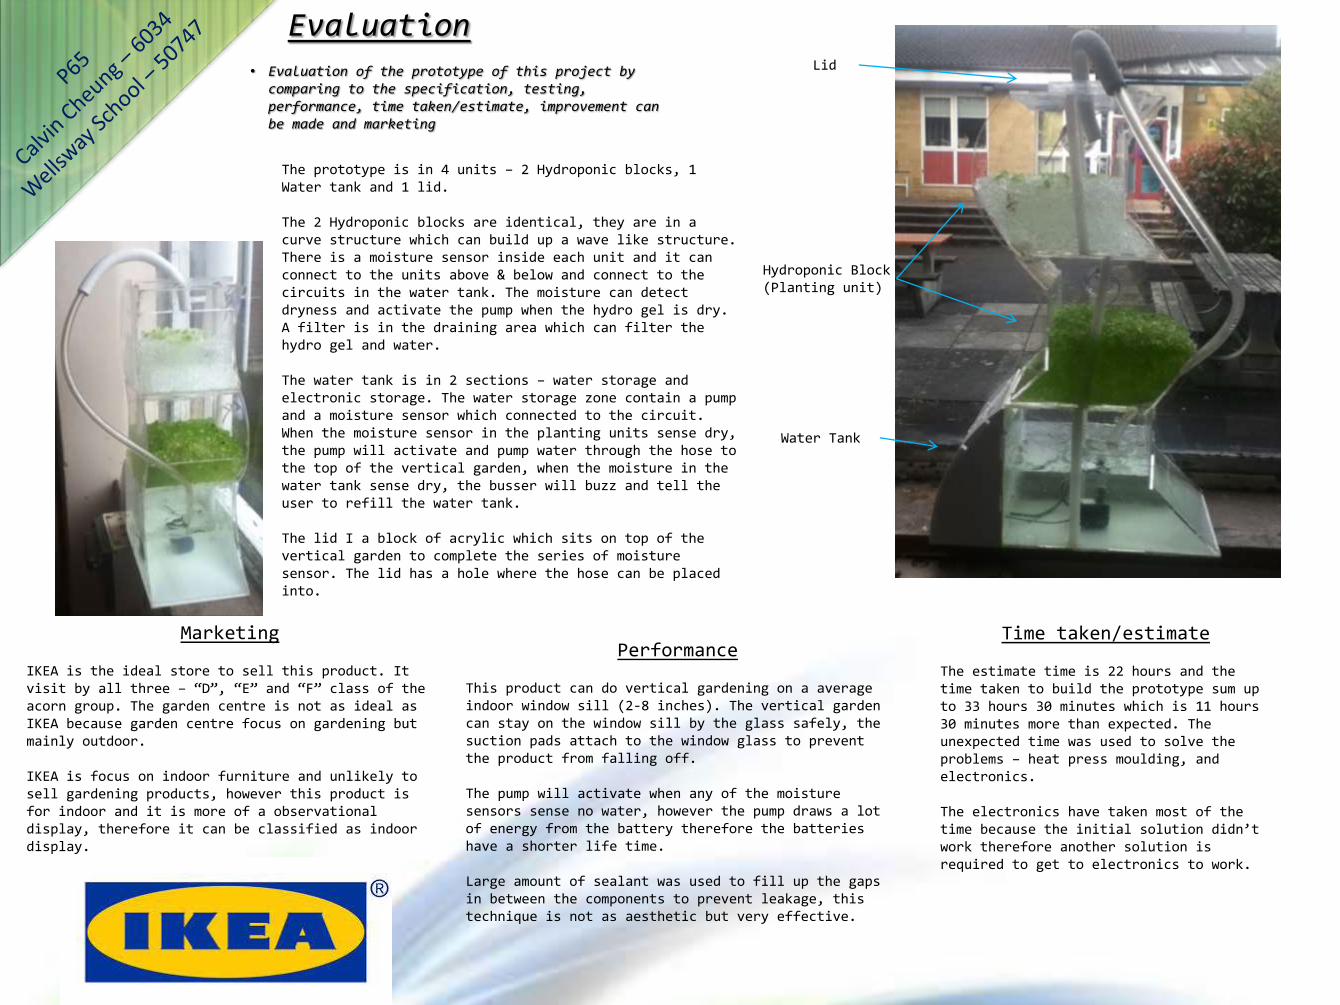