playbook - gmtwebsiteassets.s3.us-west-2.amazonaws.com
TRANSCRIPT

GMT Games, LLC • P.O. Box 1308, Hanford, CA 93232-1308 • www.GMTGames.com
1.0 Introduction ................................................................... 22.0 Game Equipment .......................................................... 23.0 Reinforcements and Replacements ............................... 44.0 Special Movement ........................................................ 65.0 Special Groups and Situations ...................................... 96.0 Logistics ...................................................................... 117.0 Axis Victory Plans ....................................................... 128.0 Combining Games ...................................................... 129.0 How to Set Up a Scenario ........................................... 1310.0 Scenarios ................................................................... 14
10.1 Scenario 1: The Battle of Borisov (Learning Scenario) ...1410.2 Scenario 2: Minsk Pocket .................................................15
10.3 Scenario 3: Lepel Offensive Operation ............................1710.4 Scenario 4: Smolensk Pocket ...........................................1810.5 Scenario 5: Guderian Drives South ..................................2010.6 Scenario 6: The Yelnya/Dukhovshchina Offensive Operation ......................................2110.7 Scenario 7: Thunder on the Dnepr ....................................2210.8 Scenario 8: The Campaign ...............................................24
11.0 Detailed Examples of Play ........................................ 2612.0 Designer’s Section .................................................... 38Counter Manifests ............................................................. 44Expanded Sequence of Play .............................................. 49
Table of Contents
P L A Y B O O K

BARBAROSSA: Army Group Center ~ Playbook2
© 2021 GMT Games, LLC
1.0 Introduction1.1 Historical SettingOn 22 June 1941, the Soviet Union’s Western Military District was second in strength only to the Kiev Military District to its south. It fielded about 671,000 men (including NKVD and naval personnel), 10,000 guns, 2,500 tanks (including those undergoing repair), and 1,800 aircraft in 44 divisions and many smaller units. They defended positions in newly occupied areas of Poland and looked as if they could withstand any blow, and perhaps even carry the blow into the enemy heartland. Instead, the opposing Axis forces were even larger and were perhaps the most potent military force the world had ever seen. They were under orders to destroy the Soviets in a matter of weeks and perhaps decide the war. In the end, they merely extended it. Was a better Axis result possible?
1.2 General IntroductionBarbarossa: Army Group Center recreates the World War II campaign in the central sector of eastern Poland and western Russia, from 22 June 1941 through 29 September 1941. One player will control the Axis forces (Germans and their allies), while his opponent controls the Soviet forces (Russians and other nationalities of the USSR). The playing pieces represent the actual units that participated in the campaign and the map represents the terrain over which those units fought. The players maneuver their units across the map and conduct combat accord-ing to the Barbarossa Standard Rules (BSRs) and the additional rules and scenario instructions found in this Playbook. One player wins by capturing certain specified objectives while his opponent wins by avoiding those victory conditions.
You will find a few rules marked Optional. Players can add these by mutual agreement before play starts.
1.3 The Game SeriesThis game is part of a series of games covering World War II in the Soviet Union. Players should feel free to combine play of this game with others in the Barbarossa series [also called the East Front Series, or “EFS”]. All are published and supported by GMT Games. These games have been built with the idea that it would be possible to play them together. Some share a few of the same historical units. It is anticipated that players would want to explore more historical alternatives with combined play. To facilitate such play, some references to other games in the series are found in this Playbook, with general guidelines on combining play.
2.0 Game EquipmentA complete game of Barbarossa: Army Group Center contains:• Four 22" × 34" inch maps (Maps C, D, H, and I)• One 25½" × 11½" inch map (Map WA)• 1400 die-cut ½" counters in five full counter sheets• One Rule Book• One Playbook• One 11" × 17" Map Card (with Scenario 3 and 6 Maps either
side)• Three double-sided Soviet Set Up Cards (with backside of
one card containing a Game Card displaying all Scenario 3 and 6 units)
• Two double-sided Axis Set Up Cards (with CRT on one)• One single-sided 8½" × 11" combined Axis and Soviet Step
Reduction Organization Card• Two double-sided 11" × 17" inch folded Chart Cards with
Combat Results Table, Terrain Effects Chart, Overrun, AA, Air Combat, CAB, etc. charts
• One double-sided 11" × 17" inch folded Chart Card with Units and their Symbols, Movement Phase, Effects on Movement Chart, Artillery, etc. charts
• One double-sided 8½" × 11" chart card front side Axis/Soviet Set Up Card for Scenario 1 and backside with Super-Heavy Artillery Effects Table
• Two single-sided 8½" × 11" Air Unit Status/Unit Rebuilding Cards (one Soviet and one Axis)
• One double-sided 11" × 17" inch folded Chart Card containing Scenario Victory Conditions, Replacement Table, Fuel, ASPs, RR Conversion
• One single-sided 8½" × 11" Chart Card with Turn Record Track, Weather Table, and various scenario information summaries
• Two 11" × 17" Expanded Sequences of Play Cards• One ten-sided die
2.1 Game Maps2.11 The maps are used as follows:
Scenarios 1, 3, and 6 use the Game or Map Card specific to that scenario.
Scenario 2 uses Maps C and D in this configuration:
CD
KV-1B

BARBAROSSA: Army Group Center ~ Playbook 3
© 2021 GMT Games, LLC
Scenario 4 uses Maps I and WA in this configuration:
WA
IScenario 5 uses Map H.
Scenario 7 uses maps H, I, and WA in this configuration:
WA
IH
Scenario 8 uses Maps C, D, H, I, and WA in this configuration:
WA
IH
CD
2.12 Map Alignments• When using two or more maps, align them so that the hex
row or columns on each common edge overlap the adjoining map.
• The Soviet Union’s border is not shown. National and regional borders are used instead.
• Where one map overlaps another, always refer to the hex number of the map on top. The hex belongs to the map on top.
Design Note: We have expanded the map area somewhat to include a portion of Map W (here, called Map WA) from the AGN game. This proved to be an important addition as it adds new strategies. With the better historical resources available today, the full Army Group Boundary can be drawn, and thereby we properly complete the game’s subject matter.
2.13 Map Placement Sequence• Place Map WA first.• Place Map I to overlap Map WA• Place Map H to overlap Map I• Place Map C to overlap Map I• Place Map D to overlap maps C and H
2.2 Playing Pieces2.21 Carefully remove the cardboard playing pieces from the counter sheets and sort them into categories for ease in setting up the game.
2.22 Unit Codes• The unit counters are not coded for specific scenarios or set
up locations as seen in earlier editions of games of this series.• MG units have a set up hex printed on them on their Tried
side. This code is strictly for historical reference. It has no game function.
2.23 A “stripe” marked across the reduced side of a unit shows it has more than two steps. A reduced strength replacement counter is available for it should it take a third (or sometimes fourth) step of loss. Also, a lighter unit nationality color is used on a unit’s reduced strength side so that its status can be seen at a glance.
2.24 Optional Rule: Historical Weather. Players can choose to use historical weather in any scenario. The historical weather for each turn is printed in the Turn Box on the Turn Record Track.
Design Note: Most players request this option in games if only as a means to compare the game to the historical campaign.
2.3 Barbarossa Standard Rules2.31 Take time to familiarize yourself with all the additions and exceptions to the BSRs contained in this Playbook and in the scenario you are playing. Some BSRs have been modified for specific play in certain scenarios. Any rules changes have been noted with a reference to the appropriate BSR. All references to the Barbarossa Standard Rules are preceded by “BSR.” If the rule reference does not have “BSR,” then it is a rule in this Playbook.
2.32 Inset Map. No Inset map is provided with this game. Ignore the BSR rules that discuss an Inset map.
2.33 Flotillas and naval units are not used in this game. When combining this game with the Army Group South (AGS) game, Soviet flotillas can move north from the AGS area onto parts of the Army Group Center (AGC) maps.
Note: There are no naval units because no sea area is in play. The sea area above the Army Group Boundary (AGB) is in the Army Group North (AGN) game.
5cm PaK 38 Anti-tank Gun

BARBAROSSA: Army Group Center ~ Playbook4
© 2021 GMT Games, LLC
3.0 Reinforcements and Replacements3.1 Reinforcements3.11 Unless otherwise indicated on the set up card all reinforce-ments and units in the Active Box for both players enter the map according to BSRs 7.43, 7.8, and 8.0.
3.12 If any units enter through a map edge, the set up card code will begin with:
n north edge entrys south edge entrye east edge entryw west edge entry
Map letters C, D, H, I, or WA may follow the small letter edge code to indicate a specific map.
Note: Units marked eWA may alternatively enter at a Rzhev city hex if supplied and friendly controlled.
3.13 Axis MSUs and Supply Dumps can alternatively enter play at an Axis Base unit [6.2].
3.14 Special Reinforcement Groups. These are available only in scenarios 4, 7 and 8.
3.2 ReplacementsBoth players can accumulate RPs as desired up to the limit shown on their Loss/Replacement Tracks.
3.21 Soviet Replacements. This game uses two Replace-ments Tables: Table A and Table B. Use these in the scenarios specified in the headings on the Table.EXAMPLE: Scenario 8 uses Table A for GTs 6 through 25 and Table B for GTs 26 through 50 (the last turn of the scenario). No table is used for GTs 1 through 5.
3.22 The Axis player cannot create strongpoints unless either allowed by scenario rules or by the Hitler Plan [7.32].
3.3 Soviet Armor Reorganization(Scenarios 7 and 8)The Soviets realized their tank divisions were not only battle-field failures, but were far too complex for them to rebuild or maintain with their limited pool of skilled technical personnel.
3.31 On any turn starting GT 21 the Soviet player has the op-tion to conduct Armor Reorganization. The Soviet player can accept this option when he receives an R result on the Soviet Replacements Table and chooses to receive Special Reinforce-ment Group Seventeen (containing twelve armor brigades). He places the units of Group Seventeen in the Cadre Box. Each moves to the Active Box once it is built by using Type A RPs.
3.32 When Armor Reorganization starts the Soviet player can no longer strengthen on-map Soviet armor units that are marked “Tk” (Tank) in their unit identification, or rebuild these Soviet
units, moving them from the Eliminated Box to the Cadre Box, or from the Cadre Box to the Active Box.
3.33 During the Reinforcement Phase of the turn Group Sev-enteen is accepted the Soviet player can now move any desired armored units marked “Tk” from the Cadre and Eliminated Boxes to the Cannot Rebuild Box to create additional Type A RPs. Each step removed counts for Reorganization Points.• Each removed from the Cadre Box counts as 2 points.• Each removed from the Eliminated Box counts as 1 point.
3.34 With any combination of steps removed totaling 6 Re-organization Points the Soviet player receives one Type A RP which is added to the Soviet Replacement Track. There is no limit to the number of Type A RPs that can be created other than the number of available losses on the Soviet Loss/Replacement Track (which cannot be exceeded). If there are remaining steps available in the Cadre and Eliminated Boxes (even at less than 6 points), they can remain un-Reorganized until a Replacements Phase when enough steps have been added to the Boxes to bring the total to 6 or greater.
3.35 Any “Tk” units still on-map, and “Tk” units arriving after GT 21, can voluntarily be picked up and placed in the Cannot Rebuild Box to generate more Type A RPs, at a step-for-step rate (and are not counted toward armor step loss VPs). The Soviet player can alternatively wait until these are removed by combat on later turns and reorganize them then. Conceivably, these units could remain on-map for the duration of the scenario.
Note: Armor units not marked “Tk” move from the Eliminated or Cadre Boxes using the regular replacements procedure [BSR 7.32].
3.4 Soviet MDNO (Moscow Militia) Divisions(Scenarios 7 and 8)
These are special division size militia units marked “MDNO” on both sides. They function the same as Militia units [BSRs 7.44 and 21.7] with the following
exceptions.
3.41 When this Special Reinforcement Group is chosen, draw these units from a separate opaque cup with their values unknown to either side. Place them with their Untried sides showing on the placement hexes shown on the set up card, not within a 5-hex range of those hexes. They are garrisons [BSR 21.8] when placed.
Exception: One unit arrives already released [see set up card] and as a regular reinforcement. Historically, this was the “6MDNO” unit.
3.42 Untried MDNO divisions have a MA and can move while on their Untried sides. Once released from garrison status [BSRs 7.52a and 21.83], they are not subject to BSR 21.74 movement restrictions.
3.43 MDNO divisions turn to their Tried sides during combat. All have only one step (despite their Tried side strength).
BARBAROSSA: Army Group Center ~ Playbook 5
© 2021 GMT Games, LLC
3.44 Conversion [Exception to BSR 7.44b]. Starting the turn they arrive as a Special Reinforcement, an MDNO militia division in supplied status can be converted into a regular (non-militia) rifle division. Procedure:• During the Reinforcements Phase place a Receiving
Replacements marker on the militia division.• During the friendly Engineering Phase spend one Type I RP
per militia division to convert.• Replace the MDNO division with a full strength division
counter, being the Soviet player’s choice of a 2-4-4, 3-4-4, or 4-4-4 from the Cadre Box in place of the MDNO division.
• Place a “Do Not Move 2GTs” marker on the new unit.
3.45 The removed militia division can be Tried or Untried. Keep the Garrison marker on the new unit until it is released. A release is not required to conduct conversion (but is required to receive the Group). Units already released can still conduct conversion. Zap units are not used for conversion.
3.46 The division units needed for conversion are provided only from units in the Cadre Box. If there are not enough, then conversion of a specific unit must wait until a division unit becomes available. The Soviet player can choose any available unit in the Cadre Box and can wait until a desired unit is avail-able. Militia divisions cannot return to play.
Design Note: The Soviets had a handful more of these “volun-teer” divisions still back at Moscow and planned the creation of even more out of worker’s brigades still there. The ones you see in this game were the ones brought out to forward positions. Sadly, these units and, really, all Militia, lacked sufficient weapons and much necessary equipment. Instead of receiving much needed training, they spent most of their time digging trenches. It was all a colossal waste.
3.5 Soviet Guards Unit Creation(Scenarios 7 and 8)
3.51 The Soviet player can create division-size Guards units starting GT 36. These units are shown on the Soviet Special Reinforcements Card as Group Eigh-
teen. When the Soviet player chooses this Group, he can conduct Guards Unit Conversion. These units enter play only by this method.
3.52 The Soviet player can designate any on-map infantry (rifle) division as a unit to be converted. Only five divisions can be converted (since only five Guards units are in the Group). This method can be followed during as many turns as desired (even skipping turns).
3.53 Procedure for each unit:• During the Reinforcements Phase the Soviet player designates
the unit to convert. Only division size units are eligible.• During the Soviet Engineering Phase replace the designated
unit with a Guards unit at the same strength level: at 3rd step, or 2nd step. If the unit currently has three steps, place the Guards unit at full strength. There is no RP cost. A unit
on the Unit Rebuilding Track can also be converted at its current level.
• The unit being converted can be in enemy ZOC but cannot be Out of Supply. Place a “Do Not Move 2 GTs” marker on it. It is free to move once that marker and the “Do Not Move 1 GT” marker have been removed. It can defend but cannot attack during the conversion period.
• Place the removed unit into the Eliminated Box. It can be rebuilt using the regular replacements procedure [historically, a whole new division would be raised].
3.54 Once a particular Guards unit has been built using conver-sion, it cannot use conversion again. It can, however, be rebuilt from the Cadre or Eliminated boxes using the regular replace-ments procedure.
Design Note: This rule is one of those necessary to bridge the gap between the summer fighting found in this game and the Typhoon game. Not much Guards creation should be expected during the course of this game.
3.6 Axis Required Occupation(Scenarios 2, 4, 5, 7, and 8)3.61 Regular Occupation• Each VP location in Belorussia or Russia requires an Axis
occupation unit of one step on it.• A multi-hex location can still be considered occupied as long
as a sufficient number of steps are on at least one of the hexes.
3.62 Other Occupation Amountsa. For each city or major city hex in (East) Poland (plus Minsk and Vilnius) the required number of steps per city (or major city) varies according to the turn:
GTs Total Number of Steps 1 – 20 5 21 – 28 2 29 + 1
Note: Other VP locations require only one step each.
Design Note: With the clearing of the great historical encircle-ments of Soviet troops came such large numbers of POWs that several whole divisions were occupied just rounding them up and removing them from the battlefield. The effect developed into a significant historical factor. The easiest game method of reflecting this comes with the increased occupation require-ments. While this was calculated only roughly, it beats remov-ing units and then returning them by even cruder formulas.
b. Minsk does not require any Axis occupation until GT 17.
7.92mm PzB Lt A-T rifle

BARBAROSSA: Army Group Center ~ Playbook6
© 2021 GMT Games, LLC
Design Note: The actual occupation force, the 258th Infantry Div., has been removed from the At Start set up to speed game play and because, being at the map edge in Scenario 7, it tends to be knocked to the floor. Feel free to restore it if you know you are not going to be clumsy. Players will have to agree that Minsk is fully Axis occupied until the 258th enters play.
EXAMPLE: On GT4 Vilnius needs just 5 steps, not 15 steps of garrison. If all steps are placed in one hex, such as C4823, the garrison requirement is satisfied.
Design Note: Vilnius had a significant Jewish population and that meant potential unrest. Unrest and civilian resistance in this city could unhinge delicate supply lines for the Germans. A large occupation force was kept here.
3.63 The Soviet player can place a Zap unit in an unoccupied (and not friendly at the moment) city hex if the hex is not oc-cupied and not in Axis ZOC.
Note: This is in addition to BSR 7.43b. Obviously, this has the potential to break an Axis Supply Route.
4.0 Special Movement4.1 Invasion Preparedness(Scenarios 2 and 8)4.11 Special GT 1 Sequence of PlayThe Germans prepared extensively for the first several days of war. This gave them a huge advantage. Accordingly, the first turn plays substantially like two turns but with some additions and subtractions. While referring to the regular Sequence of Play [BSR 4.21], follow the modified Sequence of Play shown below for GT 1 only.
Regular Segments asmodifiedforGT1:A Both players skip this Segment (except 3.c).B Conduct all phases of the regular Axis player
Segment, but skip the Engineering Phase except 6.f and 6.g.
C Conduct all phases of the regular Soviet player Segment, but skip the Soviet Engineering Phase.
D Both players skip this Segment.
AddtheseSpecializedSegments(forGT1only):E All Flown Axis air units move to the Ready Box;
Axis player conducts a full regular Segment B.F Soviet player conducts a full regular Segment C.G Players conduct a full regular Segment D.
4.12 Restrictions on Soviet unitsThe following restrictions apply for GTs 1 through 3 (unless otherwise specified) to:• All of maps C and D• Map H west of hexrow 3500• Map I west of hexrow 3700
a. Soviet ZOCs do not extend across border hexsides into Ger-many or (West) Poland. Axis ZOCs extend across all border hexsides into Lithuania and (East) Poland.
b. For only GT 1 during the Motorized Movement Phase of Segment C (not Segment F):• Soviet motorized units cannot move unless they move (during
this phase) adjacent to an Axis unit and declare an attack• Soviet cavalry can move but at only half their allowed MA
(unless they attack an Axis unit)
c. Soviet units cannot conduct strategic movement or railroad movement in the restricted movement map area.
d. Place a Level Two Interdiction marker on each Soviet HQ (none start as Non-Op) for each turn. [Effectively, this means Soviet units will not be able to conduct Reaction movement]. These markers move with the HQs in Segment C. Determine Non-Op status [BSR 14.66b] each turn beginning GT 2.
e. Road Movement• For all of GT 1 apply all of the Interdiction effects of BSRs
14.65 and 14.66a.• For GTs 2 and 3 apply only main road and motorway (and
their bridges) Interdiction effects. The movement rate for minor roads is not affected.
4.13 Restrictions on Axis UnitsApply the following to Axis units for the GTs shown:
GT 1 Segment B (not E) Attack Supply is not requiredGTs 1 and 2 Cannot reposition Bridge markersGTs 1 through 3 Cannot conduct railroad movementGTs 1 through 8 Axis non-motorized infantry and
security units cannot conduct stra-tegic movement.
Design Note: Overall, Axis invasion planning was rigid and perhaps had to be given Axis limitations. Soviet planning was unrealistic and their disorganization allowed tremendous initial Axis advances and successes. As Soviet resistance solidified, Axis rates of advance slowed.
4.2 Railroads(Scenarios 2, 4, 5, 7, and 8)Railroad movement is available unless specifically not allowed in the scenario being played.
4.21 Railroad Hex StatusAt Start, the following railroad hexes are friendly to the named player for railroad movement and supply:MG34

BARBAROSSA: Army Group Center ~ Playbook 7
© 2021 GMT Games, LLC
• Soviet. All railroad hexes in Russia, Belorussia, (East) Poland, and Lithuania.
• Axis. All railroad hexes in Germany and (West) Poland.
4.22 Rail Cut Marker Placement. Each Soviet railroad hex adjacent to an Axis railroad hex receives a Rail Cut marker showing its arrow pointing toward the next friendly rail hex [usually to the east] [BSR 19.25].
4.23 Railroad Capacity (covers all maps)• Axis: 12 stacking points per turn• Soviet: 19 stacking points per turn
Some scenarios will have different capacities (see the scenario rules). The capacities used in this game cannot transfer to other games.
4.24 Railroad Entry. In these cases placement hexes are only those map edge hexes with railroad lines. Each unit placed in such a hex can move with its full Rail Movement Points (RMP) allowance (count the placement hex as an “off-map” hex ad-jacent to a map edge, and the first hex moved as a “map edge” entry hex). If multiple units are scheduled to enter at an on-map railroad hex, each enters and moves individually.
4.25 Axis Railroad ConversionFor the Axis Player, the only friendly railroad hexes are those friendly At Start and those converted to Axis use. Conversion of railroad hexes [BSR 19.2] begins on GT 1 and continues for the length of the game. The following Railroad Conversion Point (RCP) limits apply during the GTs listed, and only for the AGC area between the Army Group Boundaries:
a. GTs 1 through 12• Map C: 4 RCPs per turn• Maps D, H, I, and WA combined: 6 RCPs per turn• Maps C and D combined: 4 additional RCPs per turn within
the borders of East Poland and Lithuania• Additional for maps C and D combined: 2 RCPs to be added
to any one rail line conversion
Note: This last provision can allow as many as six hexes to be converted on a railroad line instead of the normal maximum of four [Exception to BSR 19.23].
b. GTs 13 through 50• Maps C and D combined: 6 RCPs per turn• Maps H, I, and WA combined: 8 RCPs per turn• Within the borders of Lithuania and East Poland south of the
AGB: 6 additional RCPs per turn
Note: Many of you will use Plexiglas or rolled acetate to cover your maps during game play. You may find it convenient to use a felt tip washable ink pen to mark converted railroad hexes. This reduces the use of markers on the map.
The following optional rules provide more flexibility with railroad issues.
4.26 Optional Rulesa. Ferry Crossing. A unit can retain railroad MPs that are lost due to not having enough to cross on a Ferry [BSR 22.33]. They can use them during (only) the next available movement phase. These can be spent in addition to the normal maximum for the turn. They cannot be saved for longer than one turn. Keep a written record of the unused railroad MPs.
b. Railroad Intervals. The Axis player may wish to use the Railroad MP marker to save counting the 60 railroad MP distance [BSR 11.13] from a Supply Source each turn. Place each marker at 60 railroad MP intervals. These markers have no combat or terrain effect on play.
c. Inter-Map railroad transit points. We include these refer-ence point distances so that those of you playing only AGC can make the same use of outside railroads as you would if playing any adjoining game. Use AGC’s railroad capacity for all moves shown below. All distances are the same in both directions. These cannot be interdicted. If a connection is not listed, then it does not exist. If a unit does not have enough RMPs remaining to move the entire distance, it cannot begin the move over the connection. There is no stopping somewhere in between. All is Soviet movement; there is none for the Axis. This movement is not Map Exit [4.3].
This connection is allowed between the following hexes:I 7013 to I 7023 is 13 RMPsI 7013 to I 7028 is 18 RMPsI 7013 to H 7004 is 31 RMPsI 7013 to H 7007 is 33 RMPsI 7013 to H 7021, or H 7022, is 48 RMPsI 7023 to I 7028 is 7 RMPsI 7023 to H 7004 is 20 RMPsI 7023 to H 7007 is 22 RMPsI 7023 to H 7021 is 37 RMPsI 7023 to H 7022 is 37 RMPsI 7023 to H 7033 is 55 RMPsI 7028 to H 7004 is 17 RMPsI 7028 to H 7007 is 19 RMPsI 7028 to H 7021 is 34 RMPsI 7028 to H 7022 is 34 RMPsI 7028 to H 7033 is 52 RMPsH 7004 to H 7007 is 8 RMPsH 7004 to H 7021 is 23 RMPsH 7004 to H 7022 is 23 RMPsH 7004 to H 7033 is 41 RMPsH 7007 to H 7021 is 23 RMPsH 7007 to H 7022 is 23 RMPsH 7007 to H 7033 is 41 RMPsH 7021 to H 7022 is 2 RMPsH 7021 to H 7033 is 20 RMPsH 7022 to H 7033 is 20 RMPsH 6134 to H 5134 is 13 RMPs

BARBAROSSA: Army Group Center ~ Playbook8
© 2021 GMT Games, LLC
Reinforcements entering through the south edge of Map H and using railroad movement:
South H (KK 1309) entering at H 6134 to H 7021 or H 7022 is 18 RMPs
South H entering at H 7004 is 39 RMPsSouth H entering at H 7007 is 39 RMPsSouth H entering at I 7028 is 50 RMPsSouth H entering at I 7023 is 53 RMPs
4.3 Map Exit(Scenarios 2, 3, 5, 7, and 8)Axis units can exit scenario specified map edges to score victory points. Soviet units cannot conduct map exit.
4.31 The areas eligible for map exit [see also BSR 11.63] are those specific ranges of hexes listed on the Victory Point Sched-ule (Section IV), or as the scenario specifies.
4.4 Army Group BoundariesCommentaryThese administrative lines drawn on German maps helped pre-vent combat and support formations of the Army Groups from becoming intermingled, as well as reserving critical road and rail lines for their respective Army Groups.
4.41 The Army Group Boundary line printed on maps C, I, and WA is the boundary between the AGN and AGC games. The Army Group Boundary between AGC and AGS follows the southern edge of maps D and H and is not actually printed on these maps. Both boundaries affect movement. The AGC game area is defined as all the gaming area between the AGN and AGS Army Group boundaries.
4.42 Units stay in their respective Army Group areas unless directed to be removed, or returned by the Reinforcements sec-tion of their set up cards. Otherwise, they cannot enter any hex on the other side of an AGB.
EXAMPLE: Units placed to the south of the printed Army Group Boundary (AGB) are part of Army Group Center. Axis units set-ting up north of the AGB are part of Army Group North.
4.43 Permanently remove from play any unit of either side that moves or retreats across the AGB (to either the AGN or AGS side) [unless combining games; see 8.0]. It does not count as an eliminated unit for VP purposes.
4.44 Axis units can trace a Supply Route across the AGB to a main road or railroad that links across the AGB to a map edge Supply Source when scenario instructions permit. It cannot be used for entry of AGC MSUs, Dumps, or combat units.
4.45 When combining games, supply sources at an AGB will not become available until units in the adjoining game make those locations friendly and a regular supply trace can be made to supply sources in the adjoining game.
4.5 Bridge Destruction and Repair(Scenarios 4, 5, 7, and 8)4.51 No bridge starts destroyed [BSR 22.4] in any scenario.
4.52 The Soviet player cannot conduct Bridge Destruction or repair [BSR 22.4] prior to GT 10.
Note: Bridge markers are not subject to destruction or enemy capture, only temporary removal [BSR 22.2].
The following optional rules are intended for use in any scenario.
4.6 Optional Rule: RetreatsRetreats. Retreat a unit such that it either reduces or does not increase (if it cannot decrease) the distance between it and the nearest friendly Supply Source. A unit cannot increase the distance to that Supply Source or retreat to an Out of Supply position unless no alternate position exists.
Note: We recommend this rule because it helps mitigate game-wise play.
4.7 Optional Rule: Limited Battlefield Information
“The Red Army’s … camouflage was excellent.” Guderian, writing after the war
4.71 A player can view all enemy units (combat or non-combat) adjacent to his combat units at the end of any phase.
4.72 When not adjacent:• Only the top enemy unit (combat or non-combat) can be
viewed [yes, big units can hide under small units].• Markers [such as supply status markers] do not block the
view of the top unit [go down through the stack until you get to the first unit].
• Soviet HQ units are always revealed.
4.73 Neither player can view any non-adjacent enemy units under a strongpoint (active or under construction) marker, re-gardless of location [so consider placing these markers on top].
4.74 Until attacking it, a player cannot view an adjacent enemy unit under the top unit:• During Storm weather turns [BSR 5.31].• In hexes where Mud or Snow weather conditions apply.• Across a major river, sea, or lake hexside (unless frozen).• When it is in a woods, city, or major city hex and is under a
Strongpoint (active or under construction) marker.
4.75 Non-adjacent enemy artillery and anti-aircraft units are revealed during the appropriate phase when these are used.
4.76 Apply the following only for GTs 1 through 10:• The Axis player can freely examine all Soviet units and stacks
in the area described in 4.12.

BARBAROSSA: Army Group Center ~ Playbook 9
© 2021 GMT Games, LLC
• The Soviet player cannot examine any Axis stack (even if adjacent) beyond the top combat unit unless attacking it or being attacked by it.
Design Note: While we feel the game system works perfectly well with full view of all units, we recognize that game player tastes differ widely in our hobby. Some players call for limited intelligence rules like this and often want even more stringent ones. They often stretch it to apply to all turns and without regard to circumstances, making the revelation only during combat. Reality however, only partially agrees. The Soviets made extensive use of forests for operational concealment. They also had an extensive spy network that gave them good information, and this got better as the war progressed. At the start of the war, however, the Soviets initially had no recon or intelligence units in the western military districts. The Axis, by contrast, had good front-line information during the early stages of the war by using spies, POW reports, and radio intercepts, but they had problems with deep intelligence gathering. Their solution relied greatly on air reconnaissance, but this could shut down during bad weather.
5.0 Special Groups and Situations5.1 Moscow Air Bombardment(Scenarios 7 and 8)Hitler had ordered that Moscow and Leningrad would not be occupied but would be surrounded and reduced to rubble by bombardment. Furthermore, Moscow would be submerged by a newly created lake. The first step in this process was bombard-ment by aircraft. In late July, the Luftwaffe began their air raids. None achieved much effect, in large part because of the city’s considerable defenses.
5.11 Air Bombardment of Moscow by Axis air units is an air mission that is allowed only when the Hitler Plan [7.32] is in effect. Beginning GT19, the Axis player can bombard Moscow with air units. One Air Bombardment during the course of the game is required; additional bombardments are optional.
5.12 Only eligible units in the Ready Box can conduct Air Bom-bardment. They can still conduct other air missions, as desired. Eligible air units are any Bf 110C, Ju 88, He111, or Dummy air unit. Only Bf 110C units can be firing units.A minimum of one mission containing non-Dummy air units must be attempted to fulfil the minimum requirement [5.11].
Design Note: Other aircraft types had too short a range.
5.13 Disregard AA fire for all air units conducting Moscow Air Bombardment. There is no mission hex. The Axis player places his bombers on the Moscow Air Defense Box on Soviet Set Up card 3 Front (bottom right).
Design Note: When playing the Typhoon game the Axis player will direct air units to a mission hex, his fighters might be able to participate, and bombarding air units may be subject to Soviet AA Fire. Also, when combining this game (or others) with Typhoon, Axis bombers must be within 60 hexes of their assigned mission hex on the Moscow Inset Map.
5.14 Conduct Air Bombardment during the Air Phase of the Strategic Segment using the procedure below.• The Axis player declares he will conduct Bombardment and
indicates the units that will conduct the mission, forming them into groups of up to three air units each.
• The Soviet player assigns Ready air units of his Moscow Group to conduct air combat with Axis air units assigned to Air Bombardment. He can assign up to three fighter air units as firing units [Exception to BSR 14.24b] for each group of Axis air units.
• Surviving mission bombers conduct Air Bombardment. Use the Air Bombardment Table separately for each surviving air unit. Apply the results immediately.
• Air Bombardment Table results are:
ASP The Soviet player loses 1 ASPNE No EffectRP The Soviet player loses one Type A RP (or one
Type I RP, if no Type A is received this turn)
For a (+1) effect under the VP column, the Axis player imme-diately scores 1 VP.The ASP or RP loss is taken from those newly received this turn.• As air units complete Air Bombardment or air combat, place
them as Flown onto the friendly Air Unit Status Chart, unless Table results cause the unit to be placed in the Damaged or Destroyed boxes.
5.2 Soviet “Moscow” Air Units(Scenarios 7 and 8)
5.21 This group of Soviet air units is identified by “Moscow” printed on the air unit. Store them when Ready in their box on the Soviet Air Status card. New
units of this group that arrive as reinforcements are also stored here when Ready.
5.22 Moscow air units are used strictly for air combat against Axis air units conducting any (Moscow) Air Bombardment mis-sion. They are subject to Air Readiness [BSR 9.0].
5.23 Additional air units, not marked “Moscow,” can be placed with the Moscow Group, as desired, and can leave, as desired, during the Reinforcements Phase. Units placed there cannot conduct any air mission during the turn they are assigned. They can conduct Air Readiness during the turn they transfer.
5.24 On any turn when at least one R result occurs on the Soviet Replacements Table, the Soviet player can choose to release all “Moscow” designated units (and units assigned there) to conduct missions anywhere on maps H, I, and WA [count range limita-

BARBAROSSA: Army Group Center ~ Playbook10
© 2021 GMT Games, LLC
tions from hex I-7012]. This uses one available R result. They return to Moscow restrictions at the end of that turn and will require a fresh R result for each subsequent release.
Design Note: Moscow air units and other air units assigned to the Moscow Air Defense Group will be able to conduct air missions every turn in Typhoon but only within a certain range of Moscow. Arguably, the Soviets historically kept perhaps too many aircraft around Moscow, but such concentration allowed greater combat effectiveness both in air combat and in supporting nearby ground formations.
5.3 Soviet “Reserve” Air Units(Scenarios 7 and 8)5.31 Units of this group (shown on the Soviet Set Up Card) cannot be used at all until released.
5.32 The Soviet player turns all 16 reserve air units face down. He draws them all randomly such that neither player knows the exact unit drawn. He then places them on the TRT, one on each turn starting with GT 6 and ending with GT 21. The one placed for each turn is the one received that turn. A unit cannot be received during a turn of Storm; place these on turn boxes on the TRT starting with GT 22. They enter play in the Ready Box as reinforcements when received and are subject to Readiness on all future turns.
Design Note: These units arrived in a generally continuous stream as they were released from districts deep in the interior of the Soviet Union. A player would not have any control over just exactly which air unit is being provided.
5.4 Optional Rule: Soviet Air Interdiction(Scenarios 4, 5, 6, 7, and 8)
Any Soviet air unit that has an interdiction rating can be allocated to conduct an Interdiction mission. So-viet air units generally follow the same procedure as
Axis units.
5.41 In games when using this rule, do not use the Soviet “Dummy” air units. Set them permanently out of play.
5.42 Beginning GT 14 the Soviet player can allocate his air units to Interdiction missions during the Air Phase of the Strategic Segment, after the Axis player has allocated his interdiction mission units. The Soviet ZOI effects are:• No orders can be given to Axis units in a Soviet ZOI• No Axis reaction movement is allowed into or out of a Soviet
ZOI
5.43 Soviet air units interdict to create a ZOI consisting of only the mission hex (it does not include the adjacent hexes). The chosen mission hex must be an eligible hex [5.45] and cannot be within a potential Axis ZOI.
5.44 The Soviet player cannot allocate air units to Interdiction missions within range of a non-Op HQ [BSR 21.26].
5.45 Eligible Soviet mission hexes are those that include:• Town• City• Major city• A railroad junction (where a second line, or more, branches
off from the first)• Either of the two hexes adjacent to a bridge marked on the
map over a major river or lake [as in BSR 22.41]• An Axis bridge unit [a ferry does not qualify because a pilot
may not see it, whereas bridges are obvious]• An Axis combat unit
Design Note: While the Soviets did not have interdiction in their playbook, game-wise it substitutes for a variety of minor effects of air harassment and partisan action against communications to help slow down Axis supplies and re-inforcements. Historically, Soviet aircraft soon switched to harassment attacks because of a doctrine change from high command. Concentration in any one area required a useful landmark which is why we limit the eligible hexes. We rec-ommend use of this rule.
5.5 Special Units and Situations5.51 Axis KSRFSS Group(Scenarios 2 and 8)
This is the “KommandoStab Reichsführer SS,” a group of sev-eral SS Infantry, Motorized and Cavalry Regiments under the direct command of the Reichsführer, Heinrich Himmler. These troops were not ready for front line action, but Himmler—anx-ious to have them considered as “combat” troops—threw them in anyway. Poor performance and heavy casualties prompted a swift withdrawal for retraining.
a. Place the initial units of this group (4 SS Inf. Rgt, plus 5, 8, and 10 SS Mot. Rgts, plus 1 and 2 SS Kav. Rgts) in play as shown on the Axis Set Up Card.
b. All the initial units in this group are subject to withdrawal on the GTs shown on the set up card. The withdrawal cannot be cancelled.
c. When playing Scenario 8, place all these withdrawn (or elimi-nated) units in their respective GT boxes of the Reinforcements section of the card.
d. All KSRFSS group units return to play on their full strength sides, regardless of casualties suffered earlier [due to retrain-ing, new equipment, etc.], and no RPs are spent to restore or increase them.
Note: Two units (8 and 10 SS Mot. Rgts) might withdraw again, this time to the AGS game in this series.

BARBAROSSA: Army Group Center ~ Playbook 11
© 2021 GMT Games, LLC
5.52 Panzer Division Integrity Bonus. The SS “R” Divi-sion requires only three of its four component units to qualify [Exception to BSR 15.58d].
5.53 The Soviet 42 NKVD Brigade(Scenarios 2 and 8)
On 22 June 1941 this brigade was still organizing from various small regiments of NKVD troops used to escort or execute prisoners. Anytime this unit is at
reduced strength the Soviet player has the option to increase it to full strength by either the regular [BSR 7.31] method or by using a one-step NKVD security regiment instead of a “Zap” unit [as in BSR 7.43d]. NKVD units used as replacements go to the Cannot Rebuild Box.
5.54 Soviet HQs in Mandated Attacks(Scenarios 2, 3, and 8)HQ Doubling Effects [BSR 12.35] cannot occur earlier than GT 11.
5.55 Soviet Coast Defense Artillery(Scenarios 7 and 8)
On any turn during the Replacements Phase, if the Soviet player removes these two units from the map, he receives one type I RP.
They cannot be in the Cannot Rebuild Box. If either unit is there or both are surrounded, they cannot convert.
Design Note: Historically, with the disaster on the Vyazma Line [this happens during the time of the Typhoon game], the guns were abandoned and the personnel evacuated and then used as infantry to fill out the naval brigade then forming in Moscow.
5.56 Brest Citadel(Scenarios 2 and 8)
Hex D3026 was a particularly strong fortification. If it is not already destroyed, the Axis player applies a (+3) DRM on the Super-Heavy Artillery Effects
Table when firing at it. Otherwise, treat it the same as any other citadel [BSR 18.5].
6.0 Logistics(Scenarios 7 and 8)
6.1 Axis Logistics PauseOnly the Axis player conducts Logistics Pause.
6.11 On any turn of his choice, GTs 25 through 33 (nine turns), the Axis player can declare that he is beginning a Logistics Pause. He does this during the Supply Status Phase. If he does not declare it by GT 33, it automatically begins on GT 34. There is only one Logistics Pause during the game.
Note: The Logistics Pause will be done game-by-game, and only within that particular game, and not necessarily the same turn over all games.
6.12 The Logistics Pause lasts five complete turns: the turn of declaration and the next four turns. When declared, place the Axis
Logistics Pause marker on the Turn Record Track four turns ahead from the turn the Logistics Pause is declared. The Logis-tics Pause ends that turn during the Axis Engineering Phase.
EXAMPLE: The Axis player declares a Logistics Pause during GT 31. He places the Axis Logistics Pause marker on the Turn Record Track on GT 35 to mark the last turn that the Logistics Pause effects take place.
6.13 Logistics Pause Effects• The Axis player receives eight Type A RPs.• The Axis player can reposition his Base units [6.2].• During all turns of Logistics Pause reduce Axis ASPs received
and reduce railroad capacity by half (drop any fraction).• During Logistics Pause the Axis player applies the indicated
(+1) DRM shown for his Air Readiness.
6.2 Axis Base UnitsThe Axis player starts scenarios 2 and 8 with his Base units already in play. In scenarios 7 and 8 these can be repositioned elsewhere on the map.
6.21 During the Reinforcement Phase of the turn the Logistics Pause is declared the Axis player can reposition his Base units. He places those he desires to reposition on their inactive side, one each at any town, city, or major city that is on a converted railroad hex that is part of a friendly railroad net [BSR 6.16], of any length, that leads to a friendly map edge supply source. He turns them over to their active sides upon the completion of the Logistics Pause.
6.22 Each eligible active Base unit can allow up to four of the ASPs available to start play at it each turn. ASPs can still, alternatively, start at the edge of the game map as done during the Logistics Pause. A Base unit is eligible for MSU (or Dump) placement if it is on its active side and is on a friendly railroad hex that is part of a railroad net to a friendly map edge supply source. A Base can temporarily become not eligible for MSU placement if enemy units were to block the rail net to a friendly map edge source.
Note: ASPs starting at an Axis Base unit can use either rail-road movement, or can move by regular road or non-road movement.
6.23 If lost, a Base unit cannot be rebuilt until at least 14 turns later. Place it on the Turn Record Track on the first eligible turn. On that turn place it in the Cadre Box to begin the regular rebuilding procedure. Once it is in the Active Box it can be placed on its active side in any town, city, or major city that is on a converted railroad hex [as per BSR 6.16] that leads to a friendly map edge supply source.

BARBAROSSA: Army Group Center ~ Playbook12
© 2021 GMT Games, LLC
6.24 A Base unit cannot move or retreat after combat. It defends normally and qualifies as a full required occupation unit for the hex it occupies.
6.3 Other Logistics Effects6.31 Axis Fuel Shortage [BSR 6.5]Effects do not begin until GT 10.
6.32 Axis Supply Delay(Scenarios 4, 5, and 7)All Axis ASPs received in a turn are placed one turn ahead on the Turn Record Track. They are received in play on the west edge of the scenario area on that turn.
7.0 Axis Victory Plans(Scenarios 4, 7 and 8)Hitler interfered considerably in military operations from a very early stage of the war by changing war objectives. As his armies achieved success, he required ever more difficult objectives. Eventually, these became unattainable.
7.1 Determining the Plan7.11 There are two possible Victory Plans: the OKH Plan and the Hitler Plan. Only one will be in effect on any turn and that Plan determines the column to use on the Victory Point Schedule and thereby the actual number of VPs to score.
7.12 Scenarios 4, 7 and 8 start with the OKH Plan. During the course of the game the OKH Plan automatically changes to the Hitler Plan but the Axis player has the option to attempt to return to the OKH Plan using the Victory Plan Table.
7.2 Changing the Plan7.21 During the Strategic Segment of GT 16 the Victory Plan changes automatically to the Hitler Plan [This is Hitler’s Direc-tive No. 33 and its Supplement].
7.22 During the Reinforcements Phase of GTs 17, 18, or 19 the Axis player has the option to use the Victory Plan Table once to return to the OKH Plan. He reduces his VP total by two (2) and rolls one die and consults the Table for a result. The result applies immediately.
7.23 If the Victory Plan changes to the OKH Plan then on GT26 the Victory Plan automatically changes to the Hitler Plan [This is Hitler’s Directive No. 34 and its Supplement].
7.24 On GT 27 (only) the Axis player has the option to use the Victory Plan Table once to return to the OKH Plan. He can do this without regard to whether he tried to change the Plan the first time he had the option. He reduces his VP total by two (2), rolls the die, and applies any DRM to obtain a final result. A return to the OKH Plan puts that Plan into effect for the rest of the game.
Design Note: The Hitler Plan prevailed. A good summary of Hitler’s war directives can be found in Suggested Reading 10.
7.3 Plan Details7.31 OKH PlanAll rules have been written assuming the OKH Plan is in effect. Use the OKH Plan column on the Victory Point Schedule. There are no additional effects.
7.32 Hitler Plan• Use the Hitler Plan column on the Victory Point Schedule
for VPs and apply 5.1.• The Axis player must accept Special Reinforcement Group
Four.• Axis Strongpoints. The Axis player can begin the construction
of strongpoints each turn only while the Hitler Plan is in effect. They can be completed regardless of the Plan in effect.
• The Axis player can begin the construction of up to three (3) strongpoints each turn when the Hitler Plan is in use.
8.0 Combining Games8.1 Allocation of UnitsWhen combining series games, players can transfer as many or as few units as they desire across the AGB.
8.11 Some withdrawing units are marked “to AGN.” When combining this game with the AGN game, units not withdrawn do not appear in the AGN play area.
8.12 Some Axis and Soviet units arrive from AGN or AGS. Here, apply the opposite of the above. When they arrive from those games, they cannot be received unless withdrawn from that game’s play area. Use only one counter to represent the same unit. It cannot appear at the same time in the play areas of more than one game.
8.13 Air Unit Transfer• Air units in one game’s area cannot conduct missions in
another game’s area unless transferred.• Air units may be transferred to another game voluntarily or
as required by the set up card.• Transferred air units are subject to a time delay. Pick up the
transferred air units during the Reinforcements Phase and place them in the Flown Box of the other game with a “Do Not Move 2 GTs” marker on them. They can undergo Readiness die rolls while under the Do Not Move markers, but add the value of the marker (1 for a 1 GT marker, or 2 for two GTs) to the Readiness die roll. If they pass, they go to the Ready Box with their remaining Do Not Move markers. After the Do Not Move markers are removed, they are eligible to perform air missions once they are in the Ready Box.
Design Note: The time delay as to when air units withdraw from one game and then appear in the next is necessary to provide Ready status for those units when they reappear. This is, in part, because the ground servicing element also needs time to make the transfer.

BARBAROSSA: Army Group Center ~ Playbook 13
© 2021 GMT Games, LLC
8.14 MSUs and Dumps in one game cannot be transferred for use in another game unless transferred, during the Reinforce-ments Phase, by set up card instructions. Only those MSUs and Dumps not currently on the map can transfer. Place units designated for transfer in the Active Box of the Unit Rebuilding Track of the game to which the units are transferred. Place a Do Not Move 2 GTs marker on them. After the Do Not Move markers are removed, they are available for use.
8.15 Disallowed Transfersa. All replacements, strongpoints, and ASPs for both sides in AGC are received for use in AGC and are in addition to those received in the other games. Those received for use in the other games are used only there.
b. Axis RSCs available for one game cannot be used in other games.
8.16 When combining games, Soviet Mandated Attacks gener-ated in other games in this series cannot be satisfied on AGC maps (or vice versa).
8.17 When combining this game with AGS or AGN, the Axis player can choose different turns to start the Logistics Pause [6.1] for each game within the range of turns allowed. Only one Logistics Pause will apply for each game area.
8.2 Army Group Boundary Restrictions8.21 Axis and Soviet unit movement, ZOC, and Supply Routes [BSR 6.1] are not restricted by an AGB.
8.22 Axis Regiment Substitute Counters and MSUs cannot vol-untarily move across the AGB but can retreat across the AGB. They can remain there (temporarily), but they cannot be part of the other game’s available RSCs or MSUs and RSCs cannot conduct Recombination there. They return to their original game for RSC or MSU usage.
8.23 While RSCs are generic, they are restricted for use in their original game (and coded for that game). The Axis player can-not have more RSCs in use at any one time in one game area than those provided in the counter mix for that game [except temporarily as in 8.22].
8.3 Combining Railroads8.31 Axis Railroad Conversion Points allotted to each Army Group can be used to extend converted rail lines into hexes adjacent to either side of the AGB but no farther.
8.32 Total railroad capacity for AGC pertains only to the AGC area [and for Typhoon when combining with that game]. Rail-road capacities for other games apply only in their respective game areas and cannot be combined. Units starting in one game area can move from one game area to another and use only the capacity of the first area without also using the capacity of the destination game area. Once they start in one game area, they use the capacity of that area.
9.0 How to Set Up a ScenarioFollow the sequence below:
9.1 Go to the Scenario Selected9.11 Each scenario begins by designating:• The Scenario Card or the Map to use• The Scenario Card or set up card showing the units to be
used in the scenario
9.12 Use the following charts and cards for all scenarios:• Soviet and Axis Air Unit Status/Unit Rebuilding Cards• The 11 x 17 Chart Cards
9.13 Use the Turn Record Track and other player aid cards as required.
9.14 Maps and Charts. Set up and align the maps and charts that will be used in the scenario being played.
9.2 Place Markers9.21 Place the following markers on their respective charts at the levels shown in the scenario rules and on the scenario set up cards:• VP• Weather• Mandated Attacks Not Yet Made• Soviet Step Loss Track• Axis Step Loss Track• Soviet Replacements• Axis Replacements
9.22 Refer to the Turn Record Track Codes beside the Turn Record Track. Place the Turn marker in the beginning Turn Box for the scenario being played.
9.3 Place Scenario Units9.31 Place the ground and air units on the set up cards. Units setting up on their reverse sides are marked with a stripe or with a lighter nationality color. Place a unit on its reverse side if it is:• At reduced strength• A fired artillery unit• Super-Heavy Artillery in firing mode• A Non-Op Soviet HQ• A strongpoint under-construction• An MSU placed on its Dump side• An Untried unit
9.32 Units on the set up cards marked as “Available” are part of various groups of game pieces [such as MSUs] that are used in the scenario. No more than the listed number of each type can be used. Set aside the rest for use in a different scenario. More (or fewer) of certain types may become available later as shown in the Reinforcements section of the set up cards.

BARBAROSSA: Army Group Center ~ Playbook14
© 2021 GMT Games, LLC
9.33 Super-Heavy Artillery. At Start the Axis player places these units in either Mobile or Firing mode, as desired.
9.34 Place Garrison, Emergency Supply, or Out of Supply markers on those units specified by the set up or scenario cards.
9.4 Transfer At Start Units9.41 Move the At Start air units to their indicated boxes on the Air Unit Status charts.
9.42 Place the At Start ground units on the indicated map hexes.
9.43 Place all Railhead, Rail cut, ZOI, Strongpoint, and Forti-fication Destroyed markers on the map hexes indicated by the set up cards.
9.5 Supply Conditions9.51 General Supply. All units of both sides are in Supplied status [BSR 6.32] at the start of the first turn of every scenario unless otherwise stated on the set up cards. Supply is judged again during the Supply Status Phase of every following turn.
9.52 Attack Supply• For scenarios 2, 4, 5, 7, and 8, Attack Supply [BSR 15.2] is
provided by ASPs on the map at the time of combat. Check the Attack Supply Chart for each player to determine the number of new ASPs received each turn. The Soviet player may receive additional ASPs by using his Replacements Table.
• For scenarios 1 and 3, Attack Supply is not required.• For scenario 6 the Attack Supply situation differs between
the players [10.65c].
9.6 Begin PlayGo to the Expanded Sequence of Play and begin play.
10.0 Scenarios
10.1 Scenario 1: The Battle of Borisov (Learning Scenario)
Historical CommentaryTypical of the many hastily prepared blocking positions formed by the Soviets in the early stages of the war, Borisov assumed strategic importance as it blocked the main highway to Moscow and guarded an important river crossing. Collected there were several scratch units but the defense relied on the 1st Moscow Motorized Rifle Division, a showcase unit commanded by Col. Ya.G. Kreyzer. It had 12,000 men and 265 tanks, including 30 T34s and 10 KVs.
Late in the morning of 1 July, the first German units began ar-riving in the area. They were of the reinforced and nearly full-strength 18th Panzer Division, commanded by General-Major W.K. Nehring. They engaged immediately and by the end of the day German motorized infantry had fought through the outer Soviet defenses, captured the vital bridges over the Berezina River in a surprise assault, and established a firm bridgehead on the eastern bank. On 3 July, despite heavy Soviet counterattacks for two days, the 18th Pz. was able to expand its bridgehead and flank Soviet defenses to the south.
For his success in delaying the Germans at Borisov and his subsequent breakout from the Smolensk Pocket, Col. Kreyzer was promoted and decorated as a hero of the Soviet Union. Gen. Nehring successfully led his division in many later actions and gained fame and promotion in North Africa. He ended the war in command of an army against the Russians.8.8cm FlaK 36 AAA (limbered)

BARBAROSSA: Army Group Center ~ Playbook 15
© 2021 GMT Games, LLC
Required:1. Scenario Card 12. Units used are listed on Scenario Card 1.
10.11 Scenario AreaUse the map on Scenario Card 1.
10.12 Scenario LengthThree turns, GT 5 through GT 7. Weather is Dry (no Storm) for all turns.
10.13 PlacementThe Soviet player sets up first.
10.14 Reinforcements and Replacementsa. The Axis player has no reinforcements.
b. The Soviet player will receive one unit as reinforcement but the turn it will arrive is uncertain. On GT 5 he rolls to see if he receives it this turn. If it is not received, he rolls the die during the Reinforcement Phase of GT 6. If he rolls the indicated result, he receives the unit; if not, he receives the unit automatically on GT 7.
c. Neither side receives replacements or new strongpoints.
10.15 Scenario Special Rulesa. Air Readiness is predetermined for GT 5. Conduct it each turn starting GT 6.
b. Both sides always have General Supply and Attack Supply. MSUs and Dumps are not used.
c. Railroad movement, railroad conversion, strategic movement, and map exit are not allowed.
d. Disregard Soviet Surrender [BSR 20.0].
10.16 Victory Conditionsa. The Axis player wins if he captures and holds by the end of the scenario at least four of the following five hexes:
1727, 1829, 2028, 2030, and 2231
b. The Soviet player wins if he avoids Axis victory conditions.
Note: See the Tutorial in section 11.1 for an illustrated ex-ample of play of this Scenario.
10.2 Scenario 2: Minsk Pocket“I am dying, but do not give up. Goodbye Motherland”
Inscription on a wall deep inside the Brest Fortress, July 1941
Historical CommentaryOn 22 June, the Western Military District was one of the strongest in the Soviet Union, second only to the Kiev Military District, fielding about 671,000 men (including NKVD), 10,000 guns, 2,500 tanks, and 1,800 aircraft in 44 divisions and many smaller units. However, many of these were under-strength, ill-equipped, and ill-trained. Worse, the divisions were badly deployed, some scattered hundreds of miles to the rear leaving only thirteen di-visions in the first echelon at the frontier. War caught this huge front not properly mobilized, unprepared, only partly fortified, and restricted by controlling orders from Stalin.
In this sector the Germans deployed 51 divisions, including nine Panzer and six motorized divisions organized into two Panzer groups under the ablest of German commanders, Col. Gens. Heinz Guderian and Herman Hoth. The infantry was organized into two armies. All were under the command of the well-regarded Feldmarshal Fedor von Bock.
The Army Group objective was first to take Minsk in order to surround and destroy the Soviet army in the Bialystok Bulge, and then take Smolensk to control the Land Bridge to Moscow.
On 22 June Hoth’s PzGp. 3 achieved total tactical surprise and moved swiftly to their objectives. The 7th Pz. and 20th Pz. Divi-sions both pushed in a kind of race straight for the bridges over the Neman River at Alytus. Captured at midday on the 23rd, opposition was light, being parts of the Soviet 5th Tank Division including a few T34s. Here, Hoth’s troops found the fault line in the Soviet defenses, thereby opening the flanks of both Soviet Northwestern and Western Fronts.
The defeat of 5th Tank removed all Soviet reserves and 7th Pz. Div. entered Vilnius early on the 24th with the rest of PzGp. 3 right behind it. From Vilnius, Hoth’s troops pushed quickly along the main road through Molodechno to Minsk. There, the defense was vigorous but 12th Pz. Div. broke the defenses on the 26th and occupied the city on the 27th. It was a tremendous victory.

BARBAROSSA: Army Group Center ~ Playbook16
© 2021 GMT Games, LLC
Meanwhile, Guderian’s PzGp. 2 had to cross the Bug River and deal with the Brest fortress. Although the Soviets did not heav-ily contest the river, they proved tough in the fortress. Guderian had captured it in September 1939 in the Polish campaign and well appreciated the need to bring up special heavy weapons to reduce it. It had been built prior to WW I and consisted of an inner citadel surrounded by outlying smaller forts (in adjacent hexes). The Poles improved it, and the Soviets incorporated it as part of their overall frontier defense plan and added a garrison of dedicated troops. These troops conducted a tenacious defense that effectively denied use of the area and occupied important German forces until 29 June. Some determined defenders held out in subterranean areas until about 12 July.
Elsewhere, Guderian found only light or badly organized op-position. Soviet 14 Mech. Corps met the Panzers in full battle formation and was ripped to pieces. It had no modern medium tanks. By 24 June there was no longer any organized resistance to the east of Brest. On 27 June, Guderian’s left hand corps had joined with Hoth’s troops at Minsk, closing the pocket in 6 days. The next day, the infantry divisions closed with the pocketed Soviet troops.
The great Pocket soon broke into two parts, called respectively the Bialystok and Minsk Pockets. By 3 July, the Bialystok Pocket had been completely cleared, and by 8 July the Minsk Pocket had collapsed. The total booty amounted to about 290,000 pris-oners, 2,500 tanks, and 1,500 guns. It was a great victory and was achieved without delaying the motorized troops. The Ger-man infantry divisions, however, were scolded for being slow to close with the Pocket and slow to clear it. As a measure of this, tens of thousands of Soviet troops managed somehow to elude the cordon and took refuge in nearby woods and swamps, soon reverting to guerrilla (or partisan) warfare. Three years later they reemerged with a particular vengeance.
Required:1. Maps C and D
2. For units used, see set up cards:• Axis One Front• Soviet One Front
10.21 Scenario Area• Map D • Map C south of the AGB [4.4]• The Germany and Poland map areas are friendly to the Axis
player At Start. All other map areas are friendly to the Soviet player At Start.
10.22 Scenario LengthFive turns, GT 1 through GT 5. Weather is Dry (no Storm) for all turns.
10.23 Placementa. The Soviet player sets up first.
b. Soviet MG Units. Place all 26 MG units in an opaque cup. Draw 18 and place them as Untried on the map boxes shown on the Soviet set up card. The remaining eight are not used.
10.24 Replacements and Reinforcementsa. Each player receives only the RPs shown on their respective set up cards.
b. When using Soviet Set Up Card One as part of Scenario 8 (Campaign Scenario), ignore all reinforcements for Scenario 2 shown on the middle portion of the set up card.
c. Reinforcements for both sides enter at the locations specified on their respective set up cards.
10.25 Scenario Special Rulesa. Conduct Air Readiness each turn starting GT 2.
b. Supply Sources:
AxisAll GTs All main road and railroad hexes at the
west edge of Maps C and D.Starting GT 4 C4121: as the 5th hex of a 21 hex Dry
weather road net; units cannot enter here. Soviet
• Minsk (D6801)• All main road, motorway, and railroad hexes at the east edge
of Maps C and D• Hex D4034 (GTs 1 and 2 only)• Soviet units cannot trace a Supply Route across the AGB
c. Axis and Soviet ASPs. Axis units do not require Attack Sup-ply on GT 1 Segment B (not E), No new ASPs are received by either side. Both use the MSUs and Dumps already on the map.
d. Railroad Capacity: See 4.23.
e. Axis railroad conversion points: See 4.25.
10.26 Victory Conditionsa. Use only the OKH Victory Plan [7.0].
b. The Axis player wins by scoring VPs for locations, events, steps lost, and exiting the east edge. Refer to the:• Victory Point Schedule• Victory Levels Chart
c. The Soviet player wins by preventing the Axis player from scoring sufficient VPs.

BARBAROSSA: Army Group Center ~ Playbook 17
© 2021 GMT Games, LLC
10.3 Scenario 3: Lepel Offensive Operation“The last few days have again been most difficult.”
Gen. Joachim Lemelsen, commander, German 47th Corps (Mot.), 10 July 1941
Historical CommentaryAt the beginning of July, German High Command in Berlin fig-ured the destruction of Soviet armies west of the Dvina-Dnepr river line to be substantially complete and judged that only in-complete formations remained to the east to oppose an advance to Moscow. Thinking the war won as it was in France, it ordered both Panzer Groups into a broad front advance.
Accordingly, Col.Gen. Herman Hoth, commanding Pz.Gp. 3, directed Kuntzen’s 57th Motorized Corps to Polotsk and Rudolf Schmidt’s 39th Motorized Corps to Vitebsk. By the 5th, lead motorized units of 19th Pz.Div. began crossing the Dvina at Disna and 20th Pz.Div. began crossing at Ulla, both in the face of strong opposition. To the south, German advance troops of 39th Motorized Corps came under heavy attack. The Soviets had begun a counteroffensive.
From the start of the war, Moscow intended to stand along the line: Dvina-Dnepr while fortifying the land gap between them. Because the Germans advanced so rapidly, Soviet armies were not yet in position, so the freshly arrived 5th and 7th Mechanized Corps were ordered to attack and defeat German armored forces then advancing on Vitebsk. Under control of 20th Army, Gen. Lt. P.A. Kurochkin commanding, they were under orders by Stalin to recapture Lepel and thereby stop the entire German Army Group. Clearly, Stalin and the rest of the Soviet High Command did not yet understand the nature of the war.
Beginning 6 July, Soviet 7th Mech. Corps attacked in waves against 7th Pz.Div., then positioned east of Lepel. They had the advantage of some rainfall that day which caused German col-umns to slow down and be spread out due to lingering mud on roads. Without adequate prior reconnaissance, the Soviet tanks ran into prepared antitank defenses. There was no combined arms coordination or echeloning of attack and the Luftwaffe ruled the skies from the start. Repeated Soviet attacks were ordered the next day, always over the objection of tactical commanders, and the fields soon became littered with the wrecks of Soviet tanks. Meanwhile, the nearby Soviet 5th Mech. Corps struggled against
the German 17th Pz.Div. and met the same fate. Of about 1,400 tanks originally available, some 8-900 engaged during 6-10 July, and nearly all were destroyed. Meanwhile, 20th Pz.Div. crossed the Dvina at Ulla on the 7th. With 20th Mot.Div. in its wake, it crashed through Soviet lines and entered parts of Vitebsk on the 9th and completed the occupation on the 10th after fierce fighting.
Soviet forces in the area were already suffering from poor morale and with the destruction of their armored reserve they were left with a crust-thin defense. The Germans took little notice of the significance of these attacks, but this was the last ride of the Soviet Mechanized Corps, as conceived operationally, in the Western Direction. There was thought to be no more substantial Soviet armor reserves, so German command calculated it could afford to spread the Panzer troops over a wide area. The 57th Motorized Corps was directed to continue first to Nevel then Velikiye Luki (off map to the north), leaving just one corps for the critical breakthrough to Smolensk. The Germans would soon find themselves spread too thin.
Required:1. Map Card One Front2. Units used are listed on Game Card One (top).
10.31 Scenario AreaUse the map on Map Card One.
10.32 Scenario LengthTwo and one-half turns. Start with the Soviet Player Segment of GT 8 and end with GT 10. Weather is Dry (no Storm) for all turns.
10.33 Placementa. The Soviet player sets up first.
b. Soviet Vitebsk Militia units. Draw at random 1 out of the 3 units indicated by the instructions on Scenario Card 3 and place it (Untried) on the map. The remaining two are not used.
c. Soviet MG units. Place these exact four MG units as Tried on the indicated hexes.
d. The Axis player places one Level 1 Interdiction marker on the Soviet 20th Army HQ and then two Level 1 Interdiction markers anywhere he desires on the map. The Non-Op die roll is not made for any of the At Start Interdiction markers.
e. Set the VP marker at +1 [for holding Borisov, hex 1828].
10.34 Replacements and Reinforcementsa. Neither side receives replacements or new strongpoints.
b. The Soviet player receives two additional Mandated Attacks on GT 9.
c. The Axis player scores VPs for any GT 9 Mandated Attacks not conducted by the end of the scenario.
10.35 Scenario Special Rulesa. Air Readiness is predetermined for GT 8. Conduct it for GTs 9 and 10.

BARBAROSSA: Army Group Center ~ Playbook18
© 2021 GMT Games, LLC
b. Both sides always have General Supply and Attack Supply. MSUs and Supply Dumps are not used.
c. Railroad movement is not allowed.
d. Axis units can conduct map exit [4.3 and BSR 11.6].
e. Disregard Soviet Surrender [BSR 20.0].
f. Axis Occupation units [3.6] are not required.
10.36 Victory Conditionsa. The Axis player wins if the Soviet player fails to make his four At Start Mandated Attacks on GT 8.
b. The Axis player alternatively wins by scoring a net 9 VPs for locations, events, steps lost, and east edge map exit [see Victory Point Schedule].
c. The Soviet player wins by making his At Start Mandated Attacks and preventing the Axis player from scoring sufficient VPs to win.
Note: Just for this scenario, the Soviet can alternatively fulfill the Mandated Attack criteria with 3-1 odds and four combat unit steps attacking as an additional alternative to the normal criteria of 3-2 and six steps [BSR 12.33].
10.4 Scenario 4: Smolensk PocketHistorical CommentaryBy 10 July, the Soviets had collected about 65 divisions in seven armies along the Dvina-Dnepr river line and the Smolensk Gates, referred to by the Germans as the Land Bridge to Moscow. Here, the Soviet High Command hoped to stop the German invasion and launch their own offensive, while the Germans planned to push farther east with both Panzer Groups, pocketing even more Soviet units between them. Both sides hurriedly prepared, but the Germans struck first.
Exploiting weaknesses in the earlier Soviet offensive toward Lepel [Scenario 3], Hoth’s Pz.Gp. 3 took Vitebsk in a back door maneuver concluding 10 July. With hardly a stop Hoth’s Panzers struck again and the unprepared 19th Army broke apart. By the 16th, the German 7th Pz.Div. had penetrated north and east of
Smolensk to Yartsevo and 20th Pz.Div. arrived at the Vop River. This situation presented a great danger to the Soviets as only weak parts of the Reserve Front blocked the way to Moscow.
To the south along the Dnepr River, Guderian’s Pz.Gp. 2 crossed the Dnepr in three places (one is on Map H) on 10 July and with bridgeheads firmly established, the next day began separate drives, the first to cut off Mogilev farther south and the other to take Smolensk to the northeast, arriving there on the 15th. In Berlin the war continued to be seen as virtually over but what they could not see was the extent of Soviet strategic reserves. So extensive were these and so large the Smolensk Pocket (contain-ing all or part of three armies), the two German Panzer Groups could not join properly to seal it, lacking at that time both the necessary infantry and supplies.
Both sides fought roughly in these positions for the next two weeks. The Soviets continually counterattacked along the Vop River or from Roslavl in the south to relieve the Smolensk Pocket. Attacks from directly east and from inside the pocket succeeded in prying open the pincers and keeping them open for most of the battle. Strangely, the Soviets did not rush to evacuate. At one point the Soviet High Command thought it could maintain the Pocket as a great salient towards which an offensive from the south would pinch off one of the German wings. At Yelnya and Roslavl and along the Vop River the Germans broke the Soviet attacks but they would not regain the strategic initiative in this sector until the October Typhoon offensive towards Moscow.
Overall, the Smolensk defensive operation cost the Soviets 345,000 casualties through 9 September, including about 309,000 captured in the Pocket, along with about 1,300 tanks, 9,100 guns, and 900 aircraft. German casualties through 9 September numbered perhaps 150,000. Near Orsha on l3 July the Soviets made the first operational use of their BM-13 Katyusha rockets. Soviet propagandists declared a great victory of having stopped the Panzers at Yartsevo and another of drawing out Mogilev’s long siege (which finally ended on 27 July with its surrender). The real victory, however, lay in the diversion of German atten-tion to Leningrad in the north and Kiev in the south.
Required:1. Maps I and WA
2. For units used, see set up cards:• Axis Two Front (bottom)• Soviet One Back (top)• Soviet Two• Soviet Three Front10.41 Scenario Area• Maps I and WA south of the AGB
10.42 Scenario LengthTen turns, GT 11 through GT 20. Weather for GTs 11 and 12 is Dry (no Storms). Use the Weather Table starting GT 13.

BARBAROSSA: Army Group Center ~ Playbook 19
© 2021 GMT Games, LLC
10.43 Placementa. The Soviet player sets up first.
b. Soviet Militia• Use only the Mogilev and Smolensk Militia brigades and
one Vitebsk brigade drawn randomly (a total of 9 units). The other Militia units are not used.
• Place the Vitebsk Militia brigade (with strength unknown to either player) on hex I-2012.
• Place the Mogilev and Smolensk Militia brigades (8 units) in an opaque cup and draw four randomly. Place them Untried on or within 5 hexes of their city. Because these are units raised and positioned prior to GT 11, they can be placed in Axis ZOC but must be placed on supplied hexes.
• Of the remaining four Militia brigades, draw two of these from the opaque cup on GT 12 and the last two on GT 13. Place them Untried.
• The Militia divisions are not used in this scenario.c. Soviet MG Units. Place these exact four MG units as Tried on the indicated hexes.
10.44 Replacements and Reinforcementsa. The Axis player receives only the A and I RPs shown on his Set Up Card.b. The Soviet player uses his Replacements Table A each turn starting GT 12 and reduces the result each turn as follows:• One fewer Type I RPs• Two fewer Strongpoints• Results A, E, or V do not applyThe Soviet player starts with an assumed roll, for GT 11, of “5” on the Replacements Table thereby yielding 3 strongpoints available for construction, three Type I RPs, and an S+2R result. c. The Soviet player receives all air units and those reinforce-ments shown in Scenario 8 only for Map I; do not include those marked “H or I.” Pool Groups 7, 8 and 9 are available.d. Reinforcements for both sides enter at the locations specified on their respective set up cards.
10.45 Scenario Special Rulesa. Air Readiness is predetermined for GT 11. Conduct it each turn starting GT 12.
b. Supply Sources [see also 10.45d and 6.32]:
AxisAll GTs I-1034 (Minsk): place a Railhead hereAll GTs I-1208: place a Railhead hereStarting GT 13 I-1020: place a Railhead hereStarting GT 15 I-2334: as the 14th hex of a 21 hex Dry
weather road netStarting GT 15 I-2702, as the 4th hex of a 21 hex Dry
weather road netStarting GT 15 WA3026: place a Railhead here
SovietAll GTs Use any motorway, main road, or railroad
hex at the east edges of maps I and WA and south edge of Map I.
Starting GT 11 WA-5316c. Axis and Soviet ASPs. See the Attack Supply Charts.
d. Axis Extended Supply Routes. Place all ASPs received for the turn one turn ahead on the TRT. The Axis player begins play with five MSUs from the available pool on the TRT ready for entry on GT 11 (they were placed on GT 10). This is their entry turn. Adjust the MA for MSUs for all turns on their entry turn as follows for these hexes:• Hex I-1017 - MSUs enter only on Dry turns and only by using
strategic movement. They spend 9.5 MPs to enter, regardless of the weather.
• Hex I-1020 - MSUs or Dumps can enter only by using railroad movement. They spend 13 railroad MPs to enter.
• Hex I-1034 - MSUs or Dumps that enter using railroad movement spend 5 railroad MPs to enter. MSUs that enter by regular movement spend 2.5 MPs to enter during Dry weather turns. During Mud weather turns they can enter only if they use strategic movement. They spend 10 MPs to enter in Mud weather.
e. Axis air transport arrives GT 12.
f. Railroad capacity:• Axis: 6 SPs per turn• Soviet: 10 SPs per turn
g. Axis Railroad Conversion Points [Exception to 4.25]:GTs 11 - 12 6 per turnGTs 13 - 20 8 per turn
h. Axis units cannot conduct map exit [4.3 and BSR 11.6].
10.46 Victory Conditionsa. Use only the OKH Plan.
b. The Axis player wins by scoring VPs for locations, events, and steps lost. Refer to the:• Victory Point Schedule• Victory Levels Chart
c. The Soviet player wins by preventing the Axis player from scoring sufficient VPs.
M37 45mm Anti-tank Gun

BARBAROSSA: Army Group Center ~ Playbook20
© 2021 GMT Games, LLC
10.5 Scenario 5: Guderian Drives SouthHistorical CommentaryDuring July as the Germans advanced eastwards to Smolensk, their right and left flanks both opened wide. Forests covered much of the left, and there Soviet 22nd Army was engaged with German motorized troops from the start of operations. On the right flank to the south however, Soviet 13th Army was not fully engaged and 21st Army only lightly, because it was not yet fixed into place by slow arriving German infantry. For a month Ger-man forces faced real and perceived threats from the south as the Soviets reorganized the area as Central Front, F.I. Kuznetsov commanding. Although short on armor, airpower, or any reserves, Kuznetsov did what he could to carry out attack orders from Moscow while stretching his line to the east. Although some contact was maintained with Western and Reserve Fronts, gaps developed and the Germans took advantage of these.
In early August Guderian took advantage of one gap by destroy-ing Kachalov’s Group (most of Soviet 28th Army) near Roslavl, yielding 38,000 prisoners. He figured that now because no organized Soviet units remained to the south and the Smolensk Pocket had just been eliminated, the way to Moscow was open for a renewed offensive. Berlin however, was still transfixed with perceived threats from the south. With Hitler’s Directive 34, as confirmed on 12 August, Guderian’s troops would have to drive south first before making a left turn to Moscow.
In anticipation, Guderian sent 24th Motorized Corps south, creating the Krichev Pocket. After this concluded on 14 August (16,000 prisoners), the Corps quickly moved to Kostyukovichi. From there it moved farther south in a narrow advance through Surazh to Unecha. Although under attack at all points, they were stalled more by mud and a lack of supplies.
To the west, von Weichs’ 2nd Army struggled to close with the Soviets along the Dnepr River having to deal with cavalry raids from the Pripyat Marsh and the large Soviet-held bridgehead at Rogachev-Zhlobin. Ordered now to crush that bridgehead, four infantry corps attacked in a double envelopment offensive with the southern prong supported by Stukas. It succeeded well with a breakthrough on the 14th. Later that day Zhlobin was taken and Rogachev fell early the next day. The Soviets looked to be running and a pocket formed. By the 18th the Pocket was crushed with 50,000 prisoners taken. The same day the first German troops
arrived outside of Gomel. On the 19th they began their attack and on the 20th Gomel fell after tough house-to-house fighting.
Now both sides reorganized. Soviet-held salients between 2nd Army and Pz.Gp. 2 were cleared while the Soviets brought forward the newly organized Bryansk Front, A.I. Eremenko commanding, with 50th Army, and later 40th Army, to take up positions along the upper Desna and Sudost Rivers. Stalin dis-solved the Central Front HQ, dividing responsibility between Southwestern Front (based in Kiev) and Bryansk Front.
Guderian had to bring south most of 47th Motorized Corps just to cover his eastern flank. The Kremlin interpreted the move as farther proof of German intentions to move through Bryansk to get at Moscow. Instead, Guderian met with Hitler on the 23rd to make one last appeal to go straight to Moscow, but was turned down. With a renewed offensive on the 24th, the Germans en-tered both Novozybkov and Starodub that same day. On the 26th the bridge near Novgorod-Severskiy was taken by coup. By the 31st the Desna River line was breached despite rain slowing all movement. Soviet Bryansk Front attacked to divert German at-tention but failed to recover much ground. To the south, 21stArmy practically melted away, and with them went all Soviet hopes of holding the great Kiev salient.
Guderian’s troops went on to seal the Kiev Pocket on 16 Sep-tember, then had to reverse direction to set up for the great Typhoon offensive against Moscow, which finally began on the 30th, although perhaps too late to end the war in 1941. Soviet Central Front possessed considerable defensive power during August but was deployed ineffectively over too large a frontage and without reserves. At best it could only hope to confound a German armored grouping, not destroy one. Despite spurious statements by many after the war, it never had the offensive power to seriously threaten the flanks of a German drive on Moscow had that taken place at the end of August, as some have hypothesized. Further, little strength could be drawn away from this front unless corresponding Axis strength was also withdrawn.
Required:1. Map H2. For units used, see set up cards:• Axis Two Back – (top)• Soviet Three Back
10.51 Scenario Area• Map H
10.52 Scenario LengthFourteen turns, GT 27 through GT 40. Weather for GTs 27 through 29 is Dry (no Storm). Use the Weather Table starting GT 30.
10.53 Placementa. The Soviet player sets up first.
b. Soviet MG units. Place all 26 MG units in an opaque cup. Draw two at random and place them as Untried on the map hexes shown on the Soviet set up card. The remaining MG units are not used.

BARBAROSSA: Army Group Center ~ Playbook 21
© 2021 GMT Games, LLC
c. Soviet Militia. Use only the five Gomel Militia Brigades. Place them in an opaque cup and draw three at random. Place one Untried on the map hex designated by the Soviet set up card and the other two on or within five hexes of Gomel. The remaining two are not used.
10.54 Replacements and Reinforcementsa. The Soviet player does not use the Replacements Table. On each turn, starting GT 27, he receives his choice of:• Four strongpoints under-construction, or• Two strongpoints under-construction and two Type I RPs.
b. The Axis player receives only the RPs shown on his set up card.c. The Axis player can begin the construction of one (1) strong-point each turn.d. Reinforcements for both sides enter at the locations specified on their respective set up cards.
10.55 Scenario Special Rulesa. Air Readiness is predetermined for GT 27. Conduct it each turn starting GT 28.
b. Supply Sources (all are Map H) [see also 6.32]:
AxisAll GTs 0801, 1012, 3201, 3301, 3401, and 6301All GTs 1005, 3001, and 4801: place a Railhead
on each of theseStarting GT 33 2134: place a Railhead here
Note: Hex 1024 is not a supply source in this scenario.
SovietAll GTs Use any main road or railroad hex at the
east or south edges of Map H excluding hexes 2134 and 2534.
c. Axis and Soviet ASPs. See the Attack Supply Charts.
d. Railroad capacity [Exception to 4.23]:• Axis: 6 SPs per turn• Soviet: 9 SPs per turn
e. Axis railroad conversion points: 8 per turn [Exception to 4.25].
10.56 Victory Conditionsa. The Axis player wins the scenario by either:• Exiting at least 16 stacking points of units off the south edge
of Map H, hexes 4535 through 6535, or• Exiting at least 21 stacking points of units off the east edge
of Map H, hexes 7001 through 7006.
b. All Axis units exited must be in General Supply at the time of exit.c. The Soviet player wins by preventing the Axis player from achieving his victory conditions.
d. The scenario immediately ends once the Axis player has exited sufficient stacking points to win.
10.6 Scenario 6: The Yelnya/Dukhovshchina Offensive Operation
Historical CommentaryThe Yelnya area was valued by both sides not only for its local tactical advantages but strategically by the Germans as a jump-off point for a renewed offensive toward Moscow. For this reason, when the first German troops of Guderian’s Panzer Group 2 ar-rived on 19 July they were immediately counterattacked. Soviet attacks continued through the rest of July and much of August. The Germans stood their ground under punishing attack and bombardment and soon higher commanders debated whether to evacuate the salient, some regarding it as a small Verdun. Guderian insisted on holding, if only out of hope for renewing the drive on Moscow, and for the time being his views prevailed.
Opposing Guderian starting 30 July was the new Soviet com-mander of the Reserve Front, Gen. G.K. Zhukov, who had previ-ously declared to Stalin that the Yelnya salient could be crushed. On 21 August Zhukov ordered Soviet attacks to end. Using the pause to reinforce, Zhukov organized for a new offensive. When the Germans finally decided to withdraw their motorized forces to the south and out of the Yelnya area, the Soviets prepared their operation. They would employ thirteen divisions, including five in the initial assault waves, which would form two prongs in an attempt to pinch off the salient. Notably, this offensive would witness an unprecedented massing of Soviet artillery (over 800 guns and rocket launchers were employed).
In a heavy fog at 0700 on 30 August, the Soviet offensive opened with a massive barrage. Although achieving no operational sur-prise, the initial barrage allowed the attack troops to gain their first objectives. The southern prong was too weak and achieved limited success in drawing German reserves. The northern prong came to a stop because it failed to reconnoiter the ground prior to the battle and experienced ammo shortages during the battle. With the southern prong in check, the Germans counterattacked in the north. They too were stalled and for a while it looked as though neither side would break through. On 3 September the Soviets resumed the offensive, this time with the handful of tanks they had available, and even broke through in a few places. By the 5th, German resistance appeared to be breaking. Taking advantage of fog and rain that night, the Germans completely evacuated the Yelnya salient.

BARBAROSSA: Army Group Center ~ Playbook22
© 2021 GMT Games, LLC
Axis casualties (late July to September withdrawal) amounted to perhaps 45,000 men, a huge loss the Germans could ill afford. The six defending infantry divisions never did replace all their losses and Axis command learned no lessons from this battle. The Soviets suffered about 31,800 casualties during the shorter period, 30 August to 8 September, and perhaps as many more earlier. The Red Army learned important lessons about the nature of German defense and how to attack in a combined arms of-fensive. They were gratified by the power of their artillery. On 10 September Zhukov transferred to command the Leningrad Front and applied this knowledge there with telling effect. Finally, at Yelnya, the Soviet Guards were born. The four rifle divisions that took the salient were the first to earn the title “Guards,” a designation they wore with pride and distinction.
Required:1. Map Card 1 Back
2. Units used are listed on Game Card 1 – (bottom).
10.61 Scenario AreaUse the map on Map Card 1.
10.62 Scenario LengthFive and one-half turns. Start with the Soviet Player Segment of GT 35 and end with GT 40. Weather is Dry (no Storm) for GTs 35 and 36. Use the Weather Table for all remaining turns.
10.63 Placement• The Axis player sets up first.
10.64 Replacements and Reinforcementsa. Only the Soviet player receives replacements. Starting GT 36 he receives two Type I RPs per turn.
b. Only the Soviet player receives reinforcements.
c. The Axis player can begin the construction of up to two strong-points each turn. The Soviet player cannot build strongpoints.
10.65 Scenario Special Rulesa. Air Readiness is predetermined for GT 35. Conduct it each turn starting GT 36.
b. Both sides always have General Supply.
c. The Axis player always has Attack Supply. The Soviet player is limited to 8 supplied attacks during GT 35 and up to 5 sup-plied attacks per turn afterwards (use the track on Map Card 1 and a spare marker). Unused attacks cannot be accumulated for use on a future turn. MSUs and Supply Dumps are not used.
d. Railroad movement, strategic movement, and map exit are not allowed.
10.66 Victory Conditionsa. The Soviet player wins if he fulfills any of three possible Victory Conditions:• He wins immediately if a Soviet combat unit occupies either
of the two hexes of Smolensk (5019 or 5020) at the end of any turn.
• He wins at the end of the scenario if a Soviet combat unit occupies any two of three locations: Yelnya (6121), Yartsevo (5514), or Dukhovshchina (5313).
• He wins at the end of the scenario if a Soviet unit occupies any one of three locations: Yelnya (6121), Yartsevo (5514), or Dukhovshchina (5313), and the Axis has lost 14 steps. Do not count steps not present at the start of play. Axis armor steps lost count as 2 steps for this count.
b. The Axis player wins if the Soviet player fails to fulfill any of his victory conditions.
10.7 Scenario 7: Thunder on the DneprHistorical CommentaryWhile Hoth’s Panzer Group and part of Guderian’s Panzer Group moved against Smolensk, the rest of Guderian’s command was fully engaged against a counterattack from the south by Soviet Central Front. Creating pressure from the Rogachev-Zhlobin area, Soviet troops attempted to push along both banks of the Dnepr to relieve Mogilev. Added to this were sporadic raids by cavalry out of the Pripyat Marsh.
The Germans calculated that they were being hit by 20 divisions and thought it all fit with a great Soviet plan. In part it did as Soviet Central Front Command attempted to carry out prewar plans to defend the river line, but all these attacks broke down quickly from lack of coordination or clear objectives.
The Soviets also tried a similar series of attacks in the direction of the Smolensk salient. Beginning about 21 July operational groups formed from Soviet 24th, 28th, 29th, and 30th Armies attacked German positions around Smolensk from Belyy in the north, from Yartsevo in the center, and from Roslavl to the south. Here too, the Soviets tried to regain the initiative with a grand plan to envelop the two German armored wings. Again, the at-tacks broke down with only temporary gains.
Farther north in the Nevel and Velikiye Luki area, Soviet 22nd Army struggled against strong German forces. The area over-hung Army Group Center’s left flank in a manner similar to the Korosten sector in the Army Group South area of operations but Berlin recognized the flank danger early. The 19th Pz.Div was dispatched to the area and took Velikiye Luki in July but could not hold it. A full Panzer Corps had to be sent during August and this time a Pocket was created, the city falling on 26 August with exploitation to Toropets on 29 August.

BARBAROSSA: Army Group Center ~ Playbook 23
© 2021 GMT Games, LLC
The growing resistance in front of Moscow was a factor in per-suading the Germans to divert troops to the north and south, but Soviet propaganda both during and after the war made the Battle of Smolensk into an overrated victory, one they claimed decisively persuaded the Germans to alter their plans. In real-ity, Army Group Center easily broke Soviet forces on both flanks and generally could go where it wanted. However, each deep advance created new flanks which were difficult to screen with the infantry straining to keep pace with the panzers. For this reason the flank offensives became necessary; once each region was cleared, the infantry could again concentrate for the next push. Strategically, the flank offensives solved little, although the final Kiev operation was unquestionably a major victory. All consumed time and resources better applied to the central objective of Moscow.
Throughout the summer the Kremlin was convinced the Germans intended to strike due east, making Moscow the main objective for 1941. To counter this during July they mobilized nine new armies in the Rzhev-Vyazma region alone. Immense fortified lines were built in successive belts around Moscow and reserves were called in from all parts of the Soviet Union. Had the Germans not renewed the offensive in October, the Soviets might have done so themselves.
Required:1. Maps H, I, and WA
2. For units used, see set up cards:• Axis One (back)• Axis Two Front (bottom)• Soviet One Back• Soviet Two• Soviet Three Front
10.71 Scenario Area• Map H• Maps I and WA south of the AGB [4.4]
10.72 Scenario LengthForty turns, GT 11 through GT 50. Weather for GTs 11 and 12 is Dry (no Storm). Use the Weather Table starting GT 13.
10.73 Placementa. The Soviet player sets up first.
b. Soviet Militia• Use only the Gomel, Mogilev, and Smolensk Militia brigades
and one Vitebsk Militia brigade (draw at random), a total of 14 units. The other Militia brigades are not used.
• Place the Vitebsk Militia brigade (with strength unknown to either player) on hex I-2012.
• Place the remaining 13 Militia brigades in an opaque cup and draw seven at random. Place them Untried on or within 5 hexes of their city. Because these are units raised and positioned prior to GT 11, they can be placed in Axis ZOC but must be placed on supplied hexes.
• Draw at random the remaining six Militia Brigades and place them as reinforcements on the set up card, two each on GTs 12, 13, and 14.
c. Soviet MG Units. Place these exact four MG units as Tried on the indicated hexes on map I and draw two of the remaining at random for map H-2322 and H-2226.
d. Soviet MDNO Divisions• Put all eleven MDNO units into a separate opaque cup. Draw
ten at random and place them Untried on the map on the hexes shown on the set up card.
• The eleventh division enters the map, Untried, as a released reinforcement.
• If a unit cannot be placed on the specified hex, it cannot enter play [when playing this game with Typhoon, place it instead on any Moscow hex, within the stacking limit].
e. When the Logistics Pause is declared [6.11], some Axis ASPs will enter on the turn received at the location of a Base unit. These are not subject to Axis Extended Supply Routes.
10.74 Replacements and Reinforcementsa. Reinforcements for both sides enter at the locations specified on their respective set up cards.
b. The Axis player receives RPs only as indicated on his set up card.
c. The Soviet player uses his Replacements Table each turn beginning GT 12.
The Soviet player starts with an assumed roll, for GT 11, of “5 on the Replacements Table thereby yielding 5+1E strongpoints available for construction, four Type I RPs, and an S+2R result. Beginning GT 12 the Soviet player uses Soviet Replacements Table A each turn.
10.75 Scenario Special Rulesa. Air Readiness is predetermined for GT 11. Conduct it each turn starting GT 12.
b. Supply Sources [see also 10.75d and 6.32]
AxisAll GTs H0801 (Minsk): place a Railhead hereAll GTs I-1208 : place a Railhead hereAll GTs H1012: this is the 15th hex of a road netStarting GT 12 H1005: place a Railhead hereStarting GT 13 I-1020: place a Railhead hereStarting GT 15 I-2702: as the fourth hex of a 21 hex Dry
weather road netStarting GT 15 WA3026: place a Railhead hereStarting GT 33 H 2134: place a Railhead here Starting GT 36 WA3125: place a Railhead here (entering
from WA3124)

BARBAROSSA: Army Group Center ~ Playbook24
© 2021 GMT Games, LLC
SovietAll GTs Any motorway, main road, or railroad
hex at the east edge of maps I and WA and at the east or south edges of Map H, excluding hexes H2134 and H2534.
All GTs WA5316c. Axis and Soviet ASPs. See the Attack Supply Charts.
d. Axis Extended Supply Routes. Place all ASPs received for the turn one turn ahead on the TRT. The Axis player begins play with five MSUs from the available pool on the TRT ready for entry on GT 11 (they were placed on GT 10). This is their entry turn.
Adjust the MA for MSUs for all turns on their entry turn as follows for these hexes:• Hex I-1017: MSUs enter only on Dry turns and only by using
strategic movement. They spend 9 ½ MPs to enter, regardless of the weather.
• Hex I-1020: MSUs or Dumps can enter only by using railroad movement. They spend 13 railroad MPs to enter.
• Hex I-1034: MSUs or Dumps that enter using railroad movement spend 5 railroad MPs to enter. MSUs that enter by regular movement spend 2 ½ MPs to enter during Dry weather turns. During Mud weather turns they can enter only if they use strategic movement. They spend 10 MPs to enter, in Mud weather.
e. Railroad capacity: See 4.23.
f. Axis Railroad Conversion Points: See 4.25.
g. Axis air transports arrive GT 12.
10.76 Victory Conditionsa. Begin by using the OKH Plan column on the Victory Point Schedule. The Plan can change [7.2].
b. The Axis player wins the scenario by scoring VPs for loca-tions, events, steps lost, and map exit. Refer to:• Victory Point Schedule• Victory Levels Chart
c. The Soviet player wins by preventing the Axis player from scoring sufficient VPs.
10.8 Scenario 8: The CampaignHistorical CommentaryCode-named “Operation Barbarossa,” The German plan for de-feating the Soviet Union called first for the defeat of the Red Army. Planners generally expected practically all to be deployed west of the Dvina-Dnepr river line. In a manner similar to that prac-ticed in Poland and France, Barbarossa called for a Blitzkrieg campaign spearheaded in the central sector by two Panzer groups in parallel drives. These two groups were the most powerful the Germans had yet brought together in the war. If they could trap the Red Army between them, the door to Moscow would open, as well as the centers of industrial production in European Rus-sia. If everything went perfectly in all three Army Group areas (North, Center, and South), German arms would control all of Russia up to a line over 2000 miles long, from Archangel in the north, to Astrakhan near the Caspian Sea, over 1000 miles from the border. It was an immensely ambitious plan.
In the event, Germans planners failed to properly understand the vast size of the Soviet Union, various logistical considerations, and the great size of the Soviet military, among other factors. They regarded the Red Army as rotten and cited its poor performance against the Finns (1939/1940) as proof. The Soviets were indeed caught unprepared and still in the process of mobilization. Many units were not properly positioned, most critically in the central sector (Western Front). Yet the Soviets reformed in successive lines and continually counterattacked using reserves the Ger-mans had not imagined existed.
Displaying excellent tactical leadership, Army Group Center ac-complished most of its goals by early August, and did so before any of the other army groups, by defeating the bulk of the Soviet formations in front of it in two great encirclements: Minsk and Smolensk. The Army Group’s advance stopped however, largely because of indecision in Berlin about subsequent objectives, and because the original Barbarossa plan allowed for a halt to deal with enemy forces on the flanks. The Army Group should instead have quickly resumed its offensive toward Moscow, but Berlin ordered the dissipation of its strength in both the Leningrad and Kiev directions, an irony because of the extra time allowed by the accomplishment of Army Group goals according to plan. The renewal of the offensive to Moscow in October was perhaps too late and ultimately failed. Army Group Center would never again seriously threaten Moscow.
Army Group Center’s ordered pause allowed the Red Army time to recover from its initial shocks sufficiently to fortify and echelon its defense. The Soviets made many tactical and operational blun-ders during the summer campaign, but by September morale had recovered and reserves had been collected. The Red Army should be commended for its stubborn refusal to collapse and its deter-mination to attack. Front commander A.I. Eremenko later wrote,
“The word Attack ... contained our hope of smashing the enemy, of liberating our native land, of saving our near and dear ones and all our fellow countrymen who had fallen under fascist servitude; it contained our hopes of revenge against a perfidi-ous enemy and our dream of peaceful life and peaceful work.”

BARBAROSSA: Army Group Center ~ Playbook 25
© 2021 GMT Games, LLC
Required:1. Maps C, D, H, I, and WA
2. For units used, see set up cards:• Axis One Front• Axis Two Front (top)• Soviet One Front• Soviet Two• Soviet Three Front
10.81 Scenario Area• Maps D and H • Maps C, I, and WA south of the AGB [4.4]• The Germany and Poland map areas are friendly to the Axis
player At Start. All other map areas are friendly to the Soviet player At Start.
10.82 Scenario LengthFifty turns, GT 1 through GT 50. Weather for GTs 1 through 5 is Dry (no Storm). Use the Weather Table starting GT 6.
10.83 Placementa. The Soviet player sets up first.
b. Soviet Mandated Attacks Not Yet Made marker: set at 3.
Note: These Mandated Attacks do not have to all be made on GT1, but must be made by the end of GT2 or will be turned into VP [BSR 12.36].
c. Soviet MG units: Put all 26 MG units into an opaque cup. Draw them at random and place them as Untried on the hexes shown on the set up cards.
d. Soviet Untried Militia Brigades• Put all 20 units into a separate opaque cup and draw them
at random. Place them as Untried on the set up card on the GTs indicated for placement on the map.
• The Militia units marked “Vitebsk” include one that is for Polotsk. Since this is not known to the Soviet player, he can place one of the Vitebsk units (with actual identity unknown to him) on hex I-2012.
e. Soviet MDNO Divisions• Put all eleven MDNO units into a separate opaque cup.• Draw ten at random and place them Untried on the set up card
as shown there. They are placed as garrisons. The eleventh enters as an Untried and released reinforcement.
• If a unit cannot be placed on the specified hex, it cannot enter play [although when playing this game with Typhoon, place it instead on any Moscow hex, within the stacking limit].
10.84 Replacements and Reinforcementsa. Reinforcements for both sides enter at the locations specified on their respective set up cards.
b. The Axis player receives RPs only as indicated on the set up card.
c. The Soviet player uses his Replacements Table each turn starting GT 6.
d. When using Soviet Set Up Card One (front) as part of Scenario 8 (Campaign Scenario), ignore all reinforcements for Scenario 2 shown on the middle portion of the set up card.
10.85 Scenario Special Rulesa. Air Readiness is predetermined for GT 1. Conduct Air Readi-ness each turn starting GT 2.
b. Supply Sources
AxisAll GTs Use main road and railroad hexes at the
west edges of Maps C and DStarting GT 4 C4121: as the 5th hex of a 21 hex Dry
weather road net; units cannot enter play here
Starting GT 9 I-1107: place a Railhead hereStarting GT 15 I-2702: as the fourth hex of a 21 hex Dry
weather road netStarting GT 15 WA3026: place a Railhead hereStarting GT 33 H 2134: place a Railhead hereStarting GT 36 WA3125: place a Railhead here (entering
from WA3124)
SovietGT 1-2 (only) Hex D4034All GTs Minsk (D6801) (unless Axis controlled)All GTs Use any motorway, main road, or railroad
hex at the east edge of maps H, I, and WA and at the east or south edges of Map H, excluding hexes H2134 and H2534.
All GTs WA5316c. Axis and Soviet ASPs. See the Attack Supply Charts. While Axis units do not require Attack Supply on GT 1 Segment B (not E), the Axis player receives ASPs on GT 1. These can enter Maps C and D as MSUs or Dumps. Due to Invasion Prepared-ness restrictions, GT 1 MSUs (or Dumps) are placed at entry locations during Segment B but do not move until Segment E.
d. Axis railroad conversion points: See 4.25.
e. Railroad capacity: See 4.23.
f. Axis air transports arrive GT 12.
10.86 Victory Conditionsa. Begin by using the OKH Plan column on the Victory Point Schedule. The Plan can change [see 7.2].
b. The Axis player wins the scenario by scoring VPs for loca-tions, events, steps lost, and map-exit. Refer to the:• Victory Point Schedule• Victory Levels Chart
c. The Soviet player wins by preventing the Axis player from scoring sufficient VPs.

BARBAROSSA: Army Group Center ~ Playbook26
© 2021 GMT Games, LLC
11.0 Detailed Examples of Play11.1 Illustrated Play of the Tutorial ScenarioWe designed Scenario 1 to be played as a learning situation to introduce the most basic aspects of the game system. Follow this Tutorial as an instruction guide on how to play Barbarossa: Army Group Center. Refer to the Expanded Sequence of Play, and begin play with GT 5.
Turn 5The Axis player faces a challenging situation. His forces are first-rate, but they do not heavily outnumber the Soviets (23 attack and support strength points against an initial Soviet total of 19 defense and support strength points). Almost one-third of the Axis attack power is concentrated in the 18th Panzer Regi-ment. To get the Combined Arms Bonus [BSR15.57] another motorized unit must combine with it in the same attack, and to gain the Panzer Division Integrity Bonus in combat [BSR15.58], two of the remaining three 18th Panzer Division units must at-tack with the Panzer Regiment. The Axis player will be limited to one good, strong attack per turn, and perhaps one weaker, more risky one with the remaining units.
Securing four of the five objective hexes in only three turns will be difficult. Terrain also aids the Soviets. The road net south of the Motorway is very poor, and many hexes are non-road marsh hexes which greatly slow motorized unit movement through them. Two objective hexes, 2030 and 2231, lie behind this marshy barrier and the Berezina River.
Weather PhaseNot used; weather is predetermined for this scenario.
Replacements PhaseNot used; neither side receives any Replacement Points or strongpoints for this scenario.
Reinforcements PhaseThe Soviet 115th Tank Regiment is a variable reinforcement. To find if the Regiment enters, the Soviet player rolls the die and this turn he obtains a 7. He consults the table shown on the Scenario Card and sees that the 115th does not enter because a die roll of 1 or 2 is required for entry this turn.
Air PhaseOnly the Axis player has air units in this scenario. Both of his air units begin the scenario in the Ready Box of the Air Unit Status Track.
Fig. 1: The situation at the start of the Tutorial scenario.

BARBAROSSA: Army Group Center ~ Playbook 27
© 2021 GMT Games, LLC
The Axis player therefore decides to conduct an Interdiction mission against the Soviet 13th Army HQ in hex 2228 using the Bfll0 air unit in the Ready Box. The Bf 110C is placed on mission hex 2228. There are no Soviet fighter air units (or any Soviet air units for that matter) in this scenario, so the Soviet player immediately resolves AA fire on the AA table. The die roll is 8, modified to 9 by the (+1) DRM for a firing Soviet HQ in or adjacent to the mission hex. The result is Abort. The Bf 110C cannot complete the Interdiction mission; it goes immediately to the Flown Box, having accomplished nothing for the turn. Had the Interdiction mission succeeded, the Soviet HQ would have to roll to determine if it becomes Non-Op [BSR 14.66b]. If so, it would not be able to activate any motorized units to move in the Reaction Phase, or issue orders to the defenders in Novyy Borisov.
Fig. 2: Axis air power attempts an interdiction of the Soviet 13th Army HQ in 2228, but AA causes the air mission to be aborted.
Supply Status PhaseNot used; all General and Attack supply considerations are ignored for this scenario.
Axis Movement PhaseThe Axis player plans to drive straight up the motorway to attack Novyy Borisov (hex 1829) instead of taking the main road north through Logoysk and then the minor road through Zembin to attack hex 1727. The attack on hex 1727 would almost certainly be successful, but would allow the Soviet player to concentrate his defenses against this sole threat from the north. A success-ful attack against Novyy Borisov would allow the Axis player to directly threaten three more objective hexes (1727, 2028, and 2030).
The Axis player might consider conducting an overrun but an overrun against Novyy Borisov is normally not allowed because of the strongpoint. Here, the Axis player has a motorized engi-neer which provides the exception that does allow the overrun. Unfortunately, the Axis player cannot achieve the adjusted higher required minimum 12-1 odds [BSR 18.15].
The 18th Panzer Division (less the 88th Recon Battalion) moves to hex 1729 along with the 53rd Nebelwerfer (rocket artillery) and 413th Engineers. The 817th Artillery moves to 1730. This is two hexes distant from Novyy Borisov, but still within range. The 88th Recon moves to 1831. The Axis player decides to send this fast unit to threaten the Soviet flank, and perhaps take an objective hex if the Soviet player is careless.
Fig. 3: The German 18th Panzer Division approaches Novvy Borisov along the main road.
Axis Attack Declaration PhaseThe Axis player places a Declared Attack marker on hex 1829. The attack looks promising. There are 16 Axis attack points (plus 4 available in-range Axis support points) against 3 Soviet defense points. The Soviet 29+49 artillery unit in 2028 is within support range of the Defender hex, and one Soviet artillery unit can always support a combat.
The Soviet player will almost certainly commit this artillery unit to support the Defender hex. Barring unforeseen consequences, the attack will probably take place at a favorable odds level of 4-1 (20 attack and support strength points divided by 5 defense and support strength points).
Fig. 4: The German places a Declared Attack marker on the defending units in Novvy Borisov.
The attacking German units (hex 1729).
The Russian units that start in Novvy Borisov (hex 1829).

BARBAROSSA: Army Group Center ~ Playbook28
© 2021 GMT Games, LLC
The Russian stack in hex 2028.
Soviet Reaction PhaseThe Axis player winces as the Soviet player begins his Reaction Phase. Interdicting the 13th Army HQ was a crucial part of the attack plan; now the attack itself is in jeopardy.
Because the Soviet HQ is operational and possesses one com-mand point, the Soviet player can use that point twice to good ef-fect. First, the point is used to activate the 175/1 Mos Motorized Regiment in hex 2030 to use Reaction Movement and move into the Defender hex at Novyy Borisov. To use reaction movement, a unit must be motorized, within the HQ’s Command Range, within three hexes of the Defender hex, and use no more than half of its Movement Allowance to enter the Defender hex. The 175/1 Mos is within three hexes of the Defender hex, and uses only two of its 2.5 available reaction movement points to move through hexes 2029 and 1929, and then enter hex 1829. React-ing units do not pay the MP cost to enter an enemy ZOC. The Soviet player wanted to move the 6/l Mos Motorized Regiment in hex 1727, but cannot because it is out of command range.
Next, the 29+49 Artillery in hex 2028 is committed to support the Defender hex that is within its range. Finally, the Soviet player uses the command point to issue a No Retreat order to the Defender hex. The Soviet player is allowed to place a Re-treat Order since the Defender hex contains eligible terrain (an active strongpoint). He does not tell the Axis player at this time whether the order issued was No Retreat or Additional Retreat. The correct type of Orders marker is placed face down on the Defender hex. The No Retreat order will add a (+1) Die Roll Modifier to the combat die roll, and increase the chances of an Axis step loss or unfavorable combat result. It also increases the likelihood of an additional Soviet step loss, but the Soviet player is willing to assume that risk.
Fig. 5: The Russians react.
Axis Combat PhaseThe Axis player announces that a CAS (close air sup-port) Mission will be performed in the Defender hex using the one remaining Axis air unit in the Ready
Box, the Ju 87. That air unit is placed on the Mission Hex. Again there is no air combat, and this time there is no AA fire either because there are no Soviet AA or HQ units in or adjacent to the Mission hex and because there are no Soviet AA or HQ units in or adjacent to the Mission hex and all defending units are smaller than divisions. The mission automatically succeeds; the Ju 87 goes to the Flown Box, and the Axis player notes that his attack will benefit from a (–2) DRM since each attacker CAS point on the Mission Hex that remains after AA combat counts as a (–1) DRM.
Attack supply is automatic, so next the Axis player allocates the four available in-range artillery support points. Axis attack and support totals 20 points, as planned. The Soviet defender total, thanks to the reaction movement, is now 9 defense and support points. The final odds level for the attack (not favorable at all) is 2-1 (20 divided by 9 with the fraction ignored). Since the Soviet player has placed Orders the Axis Player could himself have also placed Orders, but chooses not to do so.
The Soviet defenders get a (+1) DRM for the strongpoint in the Defender hex. The Soviet player turns the Orders marker to reveal No Retreat, and receives another (+1) DRM, for a total Soviet DRM of (+2). The Axis player receives the (–2) DRM for his CAS Stuka, and another (–1) DRM for Panzer Division Integrity because three of the four 18th Panzer Division units are attacking together. The Axis player declares Engineer Ef-fects because the 413th Engineer can (if declared) provide a (–1) DRM against fortifications. CAB cannot be declared because the defending units are in a non-destroyed fortification. The total Axis DRM is (–4). The Soviet and Axis DRMs are netted out (each +1 cancels out a –1), leaving a net (–2) DRM.
The Axis player locates the CRT and rolls the die. The result is 3, but this die roll is modified by subtracting the (–2) DRM from the die roll of 3 to yield a modified die roll of 1. Cross-referencing the 1 Row on the CRT with the 2-1 column for the odds produces a result of 2R.
Fig. 6: The situation after the German attack.

BARBAROSSA: Army Group Center ~ Playbook 29
© 2021 GMT Games, LLC
The defender must lose two steps and retreat. The Soviet player removes his BTTU and 18th Zap units and places them in his Cadre Box to satisfy the two step loss requirement. Now to sat-isfy the No Retreat loss one additional step of loss is required. The two step 175/1 Mos is turned to its reduced strength side to satisfy the requirement and it remains in the hex. Finally, the Axis player exercises his option [BSR 13.32c], and retreats the Nebelwerfer unit two hexes to 1631. Both sides turn their artillery over as Fired. No other combats remain.
Axis Motorized MovementThe three regiments of the 18th Pz. in hex 1729 move one hex deeper into the woods to 1629. The Engineers remain in hex 1729 and the Nebelwerfers cannot move during this phase. The 88th Recon moves one hex to 1931.
Fig. 7: The situation after the German Motorized Movement.
Axis Engineering PhaseThere are no actions to take this turn. If the Axis forces had captured Novyy Borisov, any combat unit could have destroyed the captured Soviet strongpoint. Both players now turn their artillery units back to their active (front) side.
The Axis player is not pleased. Both air units should have been used to interdict the 13th Army HQ. No objective hexes have been captured.
Soviet Motorized Movement PhaseIMPORTANT NOTE: The Soviet Movement Phases oc-cur in the reverse order to the Axis. Motorized units (and non-motorized units activated by Headquarters) are the only units that can move prior to declaring and executing combats.
The Soviet player is elated. He moves the reduced 175/1 Mos to hold objective hex 1727, the full strength 6/1 Mos into hex 1829 (Novyy Borisov), the 12/l Mos Tank Regiment to hex 2030, and the 47+50 Armored Train to 1829.
Fig. 8: The Russians reorganize their defense.
Soviet Attack Declaration PhaseAxis Reaction PhaseSoviet Combat PhaseThe Soviet player did not declare an attack, so there is no action allowed in these phases.
Soviet Movement PhaseThe 7th AA Brigade also moves into 1829. The 13th Army HQ moves to Hex 2231. Strengthening the Berezina River defenses outweighs the risk of putting the HQ on the front lines. Place-ment here guarantees that the 175/1 Mos in hex 1727 can be easily crushed, but any Axis move in force to take that hex would immediately lose them the scenario. They would be forced to take three or four objective hexes in their final turn, which is impossible. The Soviet player has no further actions to undertake after completing this phase.
Fig. 9: More Russian units join the front-line defense.
Administrative SegmentNeither player has further actions to take, so the Turn marker advances to GT 6.

BARBAROSSA: Army Group Center ~ Playbook30
© 2021 GMT Games, LLC
Turn 6Strategic SegmentThere are three player actions. First, the Soviet player rolls again to receive the 115th Tank, but rolls a 7 when a roll of 5 would have allowed the unit to enter. Then the Axis player rolls for Air Readiness. Each air unit will advance from the Flown Box to the Ready Box on a die roll of 7 or less. The rolls are 3 and 5 respectively. Both units move to the Ready Box and are available for the turn.
Finally, the Axis player again tempts fate by sending only the Bf 110C to interdict the 13th Army HQ. The Bf 110C is taken from the Ready Box and placed on 2231. There is no Air Combat, so the Soviet player rolls for AA fire, adding the (+1) DRM for the HQ. The die roll this time is a 4, modified to a 5 by the DRM. A modified roll of 7 or less allows Interdiction to succeed, so this time a smiling Axis player places an Interdiction Level 1 marker on the hex and places the Bf 110C in the Flown Box. The Axis player also rolls to see if the HQ turns to its Non-Op side, but he rolls higher than a “1” so the HQ remains Operational.
Fig. 10: This time Axis air units successfully interdict the Soviet 13th Army HQ, now in 2231.
Axis Movement PhaseThe Axis player moves the 88th Recon Battalion to hex 2031and the 817th Artillery to 1831. The 413th Engineers conduct In-filtration Movement to move from hex 1729 to adjacent hex 1830. Because it is motorized with an MA of at least seven, it can spend its entire MA to move from one hex in an enemy ZOC directly into another hex in enemy ZOC. The three units of 18th Panzer Division in 1629 and the Nebelwerfers in 1631 rejoin in hex 1729.
Fig. 11: German moves.
Axis Attack Declaration PhaseDeclared Attack markers are placed on hexes 1829 (Novyy Borisov), and 2030.
Fig. 12: German Declared Attacks are marked.
Soviet Reaction PhaseThe Soviet player cannot perform any reaction movement because the Interdiction Level 1 marker reduces the command value of the HQ by one (making it zero), nor can he issue any Orders. The 29+49 Artillery can still be committed to support one of the two Defender hexes because both are in range. Both Defender hexes could use the support, but the Soviet player decides to allocate the unit’s support to Novyy Borisov. This will ensure that the Axis attack there cannot be made at odds greater than 2-1. Without support, the Axis attack on hex 2030 will also be made at 2-1 odds, but in both cases there is a sig-nificant chance for Axis retreats.
Axis Combat PhaseThe Axis player now resolves his attacks, first allocating the Ju 87 to Defender hex 2030 for a CAS mission there. There is no Air Combat or AA fire so the mission automatically succeeds. The Axis player places the Ju 87 in the Flown Box, and notes the (–2) DRM for the Declared Attack in that hex.
Continuing with the Declared Attack in hex 2030, the Axis player allocates the 1 support point of the 817th Artillery to the combat, making the final count for the combat 4 Axis attack/support strength points against 2 Soviet defense strength points for 2-1 odds. The die is rolled and the result is 8. The Soviets have a (+1) DRM because the 88th Recon Battalion must attack the 12/1 Mos unit through a river hexside, but the Axis player has a (–2) DRM from the CAS mission. The net DRM is (–1), so the modified die roll is 7. There is no attacker loss, and the defender must retreat. The 12/1Mos retreats two hexes to 2128. The 88th Recon Battalion advances after combat into the now vacant hex 2030.
In the second Declared Attack the Axis player declares Engineer Effects because the 413th Engineers participate in the attack. Here, 16 Axis attack strength points plus the 3 Nebelwerfer sup-port points against 6 Soviet defense points and 2 support points make it 19 against 8, or 2-1 odds. The die roll is 3 (again).This
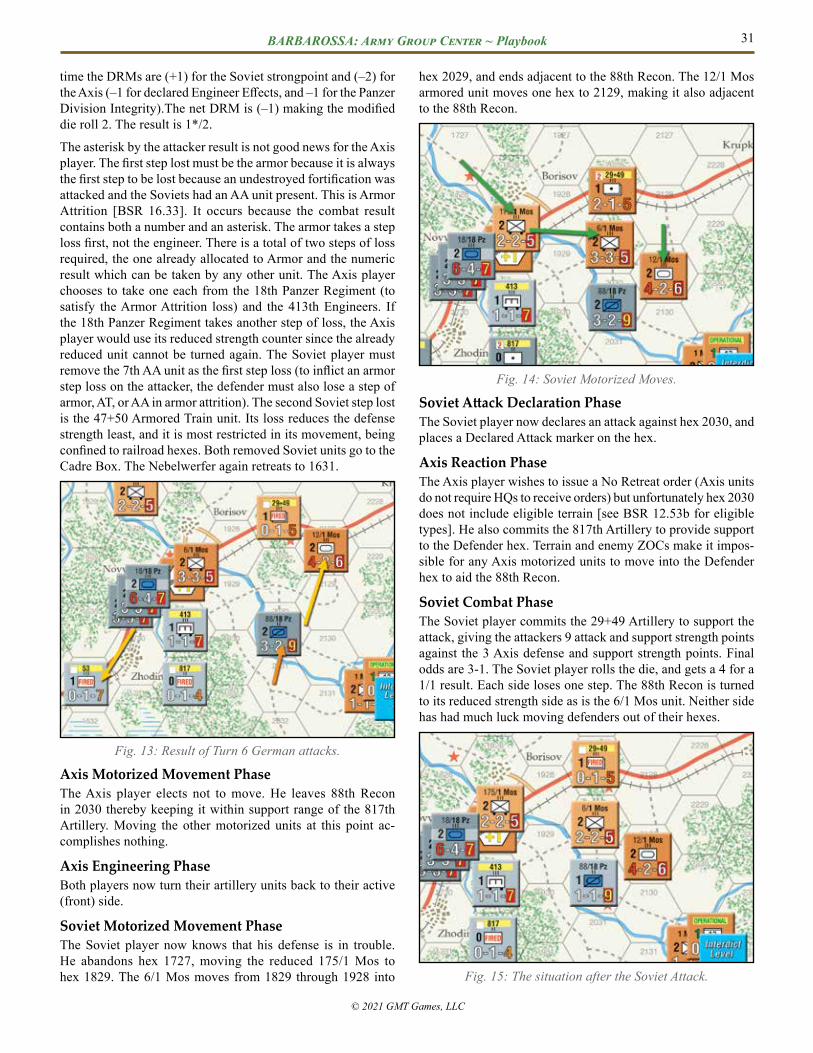
BARBAROSSA: Army Group Center ~ Playbook 31
© 2021 GMT Games, LLC
time the DRMs are (+1) for the Soviet strongpoint and (–2) for the Axis (–1 for declared Engineer Effects, and –1 for the Panzer Division Integrity).The net DRM is (–1) making the modified die roll 2. The result is 1*/2.
The asterisk by the attacker result is not good news for the Axis player. The first step lost must be the armor because it is always the first step to be lost because an undestroyed fortification was attacked and the Soviets had an AA unit present. This is Armor Attrition [BSR 16.33]. It occurs because the combat result contains both a number and an asterisk. The armor takes a step loss first, not the engineer. There is a total of two steps of loss required, the one already allocated to Armor and the numeric result which can be taken by any other unit. The Axis player chooses to take one each from the 18th Panzer Regiment (to satisfy the Armor Attrition loss) and the 413th Engineers. If the 18th Panzer Regiment takes another step of loss, the Axis player would use its reduced strength counter since the already reduced unit cannot be turned again. The Soviet player must remove the 7th AA unit as the first step loss (to inflict an armor step loss on the attacker, the defender must also lose a step of armor, AT, or AA in armor attrition). The second Soviet step lost is the 47+50 Armored Train unit. Its loss reduces the defense strength least, and it is most restricted in its movement, being confined to railroad hexes. Both removed Soviet units go to the Cadre Box. The Nebelwerfer again retreats to 1631.
Fig. 13: Result of Turn 6 German attacks.
Axis Motorized Movement PhaseThe Axis player elects not to move. He leaves 88th Recon in 2030 thereby keeping it within support range of the 817th Artillery. Moving the other motorized units at this point ac-complishes nothing.
Axis Engineering PhaseBoth players now turn their artillery units back to their active (front) side.
Soviet Motorized Movement PhaseThe Soviet player now knows that his defense is in trouble. He abandons hex 1727, moving the reduced 175/1 Mos to hex 1829. The 6/1 Mos moves from 1829 through 1928 into
hex 2029, and ends adjacent to the 88th Recon. The 12/1 Mos armored unit moves one hex to 2129, making it also adjacent to the 88th Recon.
Fig. 14: Soviet Motorized Moves.
Soviet Attack Declaration PhaseThe Soviet player now declares an attack against hex 2030, and places a Declared Attack marker on the hex.
Axis Reaction PhaseThe Axis player wishes to issue a No Retreat order (Axis units do not require HQs to receive orders) but unfortunately hex 2030 does not include eligible terrain [see BSR 12.53b for eligible types]. He also commits the 817th Artillery to provide support to the Defender hex. Terrain and enemy ZOCs make it impos-sible for any Axis motorized units to move into the Defender hex to aid the 88th Recon.
Soviet Combat PhaseThe Soviet player commits the 29+49 Artillery to support the attack, giving the attackers 9 attack and support strength points against the 3 Axis defense and support strength points. Final odds are 3-1. The Soviet player rolls the die, and gets a 4 for a 1/1 result. Each side loses one step. The 88th Recon is turned to its reduced strength side as is the 6/1 Mos unit. Neither side has had much luck moving defenders out of their hexes.
Fig. 15: The situation after the Soviet Attack.

BARBAROSSA: Army Group Center ~ Playbook32
© 2021 GMT Games, LLC
Soviet Movement PhaseThe reduced 6/1 Mos moves back to hex 1829 to put up a last stand defense of Novyy Borisov. The 1 Minsk unit moves to 2130, adjacent to the 12/1 Mos armored unit.
Fig. 16: Soviet moves after the attack..
Soviet Engineering PhaseBoth players now turn their artillery units back to their active (front) side.
Administrative SegmentThe Interdiction Level 1 marker is removed from hex 2231 and the Turn marker advances to GT 7.
Turn 7Strategic SegmentThe Soviet player automatically receives the 115th Tank Regi-ment. He places it aside for entry in the Soviet Motorized Move-ment Phase. The Axis player rolls for Air Readiness. The Ju 87 passes on a die roll of 6 and moves to the Ready Box. The Bf 110C fails on a die roll of 9, and remains in the Flown Box. There will be no Interdiction mission this time. The Ju 87 unit is being saved for later.
Axis Movement PhaseThe Axis player despairs of winning the Scenario, but is now playing to inflict losses on the Soviets. The 101/18 Pz uses In-filtration movement to enter hex 1728 and objective hex 1727 becomes Axis controlled because 101/18 Pz projects an uncon-tested ZOC into the hex. The 413th Engineers use infiltration movement to enter hex 1929. Novyy Borisov is surrounded! The 817th Artillery moves to hex 1930, and the 88th Recon uses infiltration movement to enter 2029. The Nebelwerfer moves to hex 1729.
Axis Attack Declaration PhaseThe Axis player places a Declared Attack marker on hex 1829.
Fig. 17: German moves and declares an attack on hex 1829.
Soviet Reaction PhaseAll Soviet motorized units are in Axis ZOC, so there cannot be any Reaction movement. Now that the 88th Recon is adjacent to the 29+49 Artillery, it can no longer lend its support strength to a non-adjacent Defender hex, so the only way to possibly hold 1829 is through the luck of the dice. The 13th Army HQ issues a No Retreat Order for the hex and places the appropriate marker face down.
Axis Combat PhaseThe Axis player declares a CAS mission and places his Ju 87 air unit on the Defender hex. There is no air or AA combat, so the mission succeeds. The Axis gains a (–2) DRM, and the Ju 87 goes to the Flown Box. The Axis player designates both the Nebelwerfers and the 817th Artillery to contribute their support points to the combat. The Axis player chooses not to place any orders.
Fig. 18: German air support allocated and Soviet orders are turned over to reveal “No Retreat”.
The Axis forces bring a total of 17 attack and support points to the combat against 4 Soviet defense strength points. The final odds are 4-1. The Soviet Orders marker is flipped to reveal No Retreat. The die is rolled, and a 4 comes up. The net DRM is (–1) counted as a (–2) Axis DRM for CAS and a (–1) DRM for Panzer Division Integrity against a (+1) Soviet DRM for the strongpoint and another (+1) DRM for No Retreat. The modi-

BARBAROSSA: Army Group Center ~ Playbook 33
© 2021 GMT Games, LLC
fied die roll is 3, which calls for the defender to lose two steps and retreat.
There are only two defender steps in the hex. Both the reduced 6/1 Mos and 175/1 Mos are removed and placed in the Soviet Cadre Box. The No Retreat provision becomes a moot point. There is no extra step to lose, so it cannot happen. The Nebel-werfers again retreat to hex 1631 but 52/18 Pz, 101/18 Pz, and 18/18 Pz. advance into hex 1829. Novyy Borisov is finally in Axis hands.
Fig. 19: The capture of Novyy Borisov.
Axis Motorized Movement PhaseThe 52/18 Pz, 101/18 Pz, and 18/18 Pz attempt to overrun the 29+49 Artillery in 2028. They spend a half MP to enter 1928 using road movement. They pay another half MP as the cost to enter hex 2028 (using road movement to cross the hexside) plus 1MP to conduct the overrun. The DRMs to the overrun die roll net out. The Axis receives a (–2) DRM for odds of 10-1 or greater; the Soviets receive a (+2) DRM because the hex contains woods terrain. The die roll is 2. The overrun succeeds. The 29+49 loses one step which removes it, and it is placed in the Soviet Cadre Box.
The Axis units still have a half MP remaining but can advance no further. To enter hex 2128 would require 1.5 MPs to enter the hex by road and pay the ZOC cost of the 12/1 Mos Tank unit.
Other Axis Motorized Movement: The 413th Engineer moves from hex 1929 to 2030.
Fig. 20: The Soviet 29+49 Artillery is successfully overrun, and the 413th Engineers advance.
Due to the Soviet player’s rashness, things look better for the Axis. They finish their portion of GT 7 controlling four of the five objective hexes, but 2030 is vulnerable.
Soviet Motorized Movement PhaseThe Soviet player can’t attack hex 2030 with the 12/1 Mos unit from hex 2129 because it would also have to attack the 88th Recon in hex 2029 (and the unit in 2028 which certainly would conduct Reaction movement into the hex). He moves the 12/1 Mos armored unit from 2129 through 2230 to 2130 to help at-tack hex 2030. It allows the Soviets to amass 5 attack strength points, including the 1 point from the 1st Minsk Regiment, to attack 2030. The 115th Tank Regiment enters the map through hex 2230 and ends its movement in 2129 where it blocks Reac-tion Movement into 2030 with its ZOC.
Soviet Attack Declaration PhaseThe Soviet player places a Declared Attack marker on hex 2030.
Fig. 21: Soviet units, aided by the newly-arrived 115/57 Tank, move into position to attack the German 413th Engineer unit
in hex 2030.StuG III B

BARBAROSSA: Army Group Center ~ Playbook34
© 2021 GMT Games, LLC
Axis Reaction PhaseMovement to the Defender hex is not possible, but fortunately, the 817th Artillery still has its 1 support point unused. It is al-located to the Defender hex.
Soviet Combat PhaseThere are 5 Soviet attack strength points against 3 Axis defense and support points for final odds of 3-2. The die is rolled, and a 5 is obtained. The result is 1*/R. The Soviet attackers must lose one step, so the 1st Minsk is removed and placed in the Soviet Cadre Box. None of the asterisk conditions exist, so no further losses accrue to the Soviets. The 413th Engineer retreats to hex 1829. The 12/1 Mos Tank unit advances into the now vacant hex, and by the narrowest of margins, reclaims a victory for the Soviet player.
As a combat force, the Soviets have been mauled, but they have significantly delayed the Axis forces, upset their timetable, and inflicted losses, earning them a victory.
Fig. 22: The Soviet attack vs. the 813th Engineers succeeds, forcing the defenders to retreat and allowing a Soviet ad-
vance—and earning the Soviets a victory for this scenario.
11.2 Air Mission ExamplesNote: The active player can assign no more than three air units to any air mission (Interdiction or CAS).
EXAMPLE 1: Interdiction
Any map hex can be a mission hex for an Interdiction mission. During the Axis Air Interdiction Phase the Axis player declares an Interdiction mission against a map hex containing a Soviet HQ. The Axis player takes one Bf 109 F (fighter) unit, one Ju 87 B (bomber) and one Ju 88 B (bomber) unit from the Ready Box of the Axis Air Unit Display and places them face down in the mission hex. The Soviet player decides to oppose the mission. He takes two MiG-3 F (fighters) from the Ready Box on the Soviet Air Unit Display, and places them face up in the mission hex. Because both players have air units in the mission hex, they must now resolve Air Combat.
In Air Combat, all air units are either mission units or firing units. Bombers (B type air units) are easy to classify. They are always mission units. Their Air Combat Rating is used defensively only. They never fire during Air Combat. Many fighters (F type air units) are dual capable, possessing CAS or Interdiction ratings as well as an Air Combat Rating (ACR). When dual capable fighters are present in an air combat, the owning player must immediately and irrevocably declare whether they are being used as mission units (performing CAS or Interdiction with those ratings and using their ACR defensively) or firing units (using their ACR to fire on opposing units).
The Axis player now reveals his three air units. Because the Bf 109F is dual capable, the Axis player announces that it will be a fir-ing unit for this Air Combat. The Axis player rolls one die and refers to the Air Initiative table. The result of “1” indicates “Axis Initiative, Local Tactical Advantage.” Axis Initiative allows the Axis player, within limits, to structure the matching of opposing air units for Air Combat resolution. Local Tactical Advantage applies only to a possible second round of Air Combat, and will be covered later. Opposing firing units must be matched against each other, so the Axis player allocates his one Bf 109F against one of the MiG-3 units. The Axis player must now allocate a mission unit against the remaining MiG-3 because he has no other firing units remaining. Because it is his choice of which mission unit to use, he chooses the Ju 88 with its ACR of three instead of the Ju 87 with its ACR of one. The Ju 88 will be much harder for the MiG-3 to abort or damage. If the Soviet player had the Initiative, the weaker Ju 87 could have been chosen.
DShK Model 1938 heavy machine gun
PTRD Anti-tank Rifle

BARBAROSSA: Army Group Center ~ Playbook 35
© 2021 GMT Games, LLC
All firing units fire simultaneously in Air Combat. Mission units do not fire - they only defend using their ACRs. The Soviet player fires at the Ju 88 with his MiG-3, indexing the –1 column of the Air Combat Table (MiG-3 ACR of 2 minus Ju 88 ACR of 3). He rolls a 6 (No Effect) result.
Now both players fire in the Bf 109F vs. MiG-3 engagement. The German player indexes the +2 column on the Air Combat Table (Bf 109F ACR of 4 minus the MiG-3 ACR of 2) and the Soviet player indexes the –2 column (MiG-3 ACR of 2 minus the Bf 109F ACR of 4). The Axis player rolls a 5, which damages the MiG-3. The Soviet player rolls a 4, which has no effect. The MiG-3 is placed in the Damaged Box. The Bf 109F remains for the second round due to Axis Local Tactical Initiative.
In most instances Air Combat would now be concluded. How-ever, because the Axis player received a Local Tactical Initiative result, any unengaged Axis firing unit may choose a new target and fire again. The only Axis firing unit, the BF-109F, is unen-gaged (its MiG-3 opponent from the first round of air combat limped back to the Soviet Damaged Box). The only remaining Soviet unit is the other MiG-3, so it becomes the target unit. The Axis player again indexes the +2 column, rolls the die and obtains a 3, which is a “destroyed” result. The MiG-3 is sent immediately to the Soviet Destroyed Box. Because it was the target unit in a Local Tactical Initiative situation, it cannot fire back. Air Combat is over. All remaining firing units (in this case, the Bf 109F) return to their respective Flown Boxes. The Ju 87 and Ju 88 continue the Interdiction mission.
The Soviet player is able to conduct AA fire because an HQ oc-cupies the mission hex (it could have also occupied any of the six hexes surrounding the mission hex). The HQ will provide a +1 DRM to each Soviet AA die roll. The Soviet fires first at the Ju 88. The die roll is 8 (modified to 9 due to the HQ DRM), obtaining an Abort result. The Ju 88 is placed immediately in the Axis Flown Box. The next die roll against the Ju 87 is a 5, but this time the HQ DRM is cancelled out by the Ju 87’s own DRM of –1 against AA fire.
The final die roll result remains 5, which equals “No Effect” on the table. The Ju 87 remains in the mission hex after Air Combat and AA fire, so it automatically performs its mission. The Axis player receives one level of Interdiction in the mission hex for each Axis Interdiction rating point remaining in the hex, up to a maximum of two levels. The Ju 87 has two Interdiction rating points, so the Axis player places a Level Two Interdiction marker in the mission hex and moves the Ju 87 to the Flown Box. The air mission is concluded. The Interdiction marker remains in the mission hex until it is removed during the Recovery Phase. Until removed, it turns the mission hex and the six surrounding hexes into a Zone of Interdiction affecting the Soviet player. For a complete list of Interdiction Effects, refer to the Interdiction Effects section of the 11x17 Chart Card.
EXAMPLE 2: CAS
Situation: The Axis player has declared an attack against a hex containing several Soviet units, two of which are AA units. A Declared Attack marker has been placed on the hex. At the start of the Axis Combat Phase, the Axis player allocates all desired CAS missions, and one of them is allocated to this particular Declared Attack. Unlike Interdiction, the only allowable mission hexes for CAS missions are hexes with Declared Attack mark-ers. The Axis player allocates a Bf 109F and a Ju 87 from his Ready Box, placing them face down on the mission hex. Once the attacking player (the Axis player in this case) has allocated all CAS missions, the defending player allocates his CAS mis-sions to any hexes with Declared Attack markers. The Soviet player allocates one MiG-3 fighter and an SU-2 bomber from the Ready Box to perform a CAS mission in the example hex, and moves the units face up to the map. Because both players have air units in a mission hex, they perform Air Combat:
1. The Axis player does not need to declare his Bf 109F is functioning as a firing unit; it does so automatically because it has a CAS rating of zero.
2. The Axis player checks for Air Initiative by rolling one die and referring to the Air Initiative Table. The die roll is 6, which indicates no Air Combat. The fighters re-roll for readiness [BSR 14.26b] (as there was no Air Combat) and return to their respective Ready Boxes if they pass or Flown Boxes if they fail.
The rest of the Air Combat procedure is skipped. Both players’ mission units must undergo AA fire, because both sides have ground combat units qualified to deliver AA fire in or adjacent to the mission hex.
The Axis player rolls a 3 with no DRMs which results in a No Effect result. The Soviet SU-2 unit remains in the mission hex. The Soviet player rolls a 10, modified by a +2 DRM (those two Soviet AA units contribute +1 DRM each), which yields a Damaged result when applying the –1 Stuka DRM. The Stuka is removed from the map and placed in the Axis Damaged Box. The SU-2 now automatically contributes its CAS Rating to the Declared Attack as a +1 Defender DRM. Return the SU-2 to the Flown box. Place a one numeric marker in the hex if desired.

BARBAROSSA: Army Group Center ~ Playbook36
© 2021 GMT Games, LLC
11.3 Overrun Example
Situation: It is the Axis Movement Phase. The weather for the turn is Dry. The Axis player decides to overrun the Soviet artil-lery brigade in hex A with the force shown in the illustration. All of the German motorized units begin the Axis Movement Phase stacked together in the hex adjacent to hex A, so all can move in the same stack. Because the Soviet artillery unit is in a hex with a strongpoint, the Axis player must achieve 12-1 odds to overrun. The Axis force has thirteen attack strength points. The Soviet unit (being a lone artillery unit) defends with its defense strength of one. With odds of 13-1, the Axis force meets one of the two preconditions to overrun a fortification. It meets the second because a motorized engineer unit is part of the stack conducting the overrun.
The Axis player refers to the Overrun Table, rolls the die and obtains a 3. The Axis player now applies the relevant DRMs:
1. Odds Ratio DRM: this DRM is –2 because the overrun odds are 13-1 (exceeding the 10-1 ratio that provides the –2, but not quite 14-1 which would provide –3).
2. Terrain DRM: there is a +4 DRM for the strongpoint.
The net DRM is +2 (–2 and +4), so the modified overrun die roll is five. This result falls in the 3-7 range of the Overrun Table, yielding a Successful result. The Soviet unit does not have to lose a step, but the Axis player places an Overrun marker on the unit and retreats it two hexes. The Axis stack must now advance into the vacated Overrun Hex, having spent two and one half MPs (one MP for the overrun attempt, one half MP to enter the Overrun Hex on a main road, and plus one MP for entering a hex with a strongpoint). The Soviet unit in the Overrun Hex did not exert a ZOC, but even if a Soviet ZOC had been exerted, there would have been no MP cost paid because the Overrunning stack began its movement adjacent to the Overrun Hex. The Axis player “drops off” the engineer unit in hex A. The engineer is left behind to destroy the strongpoint during the upcoming Axis Engineering Phase. The reduced overrun stack keeps moving, entering hex D on the minor road at a cost of one MP for enter-ing a non-clear terrain hex on a minor road and plus one MP for entering the ZOC of the Soviet unit in hex C (making a total of four and one half MPs spent so far). The Axis player determines if overrunning hex C is possible. The MP cost to overrun into hex C would be one MP for the overrun plus one MP for enter-
ing hex C (a non-clear terrain hex) on a minor road. Adding two more MPs would yield a cumulative total of six and one half MPs. All the Axis units have MAs of seven: enough to pay the MP costs of overrun. The overrunning stack has eleven attack strength points: enough to meet the minimum 5–1 odds level against the reduced Soviet division with two defense strength points. The overrun die roll is made, and an 8 is obtained. This time the DRMs are unfavorable for the Axis. There is a +2 DRM for the 5-1 odds level and another +2 DRM for the hill terrain in hex C. Even though the total DRM is +4, the maximum overrun DRM is +3/–3. The modified die roll is eleven.
Not only does the overrun fail, but the overrunning stack must also lose one step. The Axis takes the step loss from his Recon unit, flipping it to it reduced strength side, 1-1-9. Overrun move-ment ceases The only option remaining to the Axis player for occupying hex C is to declare an attack against the hex at the end of the Axis Movement Phase after possibly moving more Axis units adjacent to hex C and bringing Axis artillery into support range.
The situation after both Overruns have been completed.
Note: At the start of this example, the Axis player had another overrun option available. Because the Soviet unit in hex A has no ZOC, the overrunning stack could move into hex B and declare an overrun on the reduced division in hex C. Though the overrunning stack would be adjacent to two Soviet units, it would be in the ZOC of only the one being overrun, so the overrun would be permitted.
The cost to move into hex B is four MPs (one MP for the Soviet ZOC, one MP for entering the hex off-road and plus two MPs for the woods in the hex). The overrun MP cost is again two MPs. The overrun will be conducted at 6-1 odds, eliminating the 5-1 Odds DRM. The overrun can still fail, but the odds of losing a step will be less. The trade-off is that insufficient MPs remain to also overrun the Soviet unit in hex A even if the overrun against hex C succeeds.

BARBAROSSA: Army Group Center ~ Playbook 37
© 2021 GMT Games, LLC
11.4 Soviet Artillery Support ExamplesEXAMPLE ONE: Soviet Artillery Defending
Normally only one qualifying Soviet artillery unit can contrib-ute its support strength to any declared attack (defending or attacking).
In this example the Soviets are defending two hexes, and an artillery unit in one Defender hex can add its support. The 13th Army artillery can then either add its support strength to the first defender (top) or the 110th Rifle Division defender (below). Since the artillery is not within command range of a HQ the limit of one artillery unit per combat applies with this example. There are two support options available:
1. The 13th Army artillery adds support strength to the top de-fender then the artillery stacked with that defender uses its DS value of 1 (rather than its own support strength) to give a total DS in the hex of 3 and will then have the support strength of 2 from 13th Army artillery to give a total DS of 5.
2. The 13th Army artillery adds support strength to the bottom 110th Rifle Division defender and then the total DS will be 6.
Option 2 may be the better option as it uses the full support strength of both Artillery units and better supports the more exposed unit on the road.
EXAMPLE TWO: Soviet Artillery Attacking Using HQ CapabilityThis example shows how more than one Soviet artillery unit can contribute its support strength for an attack.
Initial Situation: The Germans have occupied Yartsevo (I-5514) and Soviets want to mount a strong counter-attack to regain it.
The German has DS of 4 and is within range of support strength from his own artillery giving a DS of 6 total. The Soviets have two rifle divisions available with an attack strength totalling 6 and want to add the maximum of 6 support strength points from their artillery to accomplish the attack. The two in-range artillery support strengths can already be added as they are both within range of the HQ, but that is not quite enough for the intended attack.
The HQ uses a command point to activate the rocket artillery nearby, also within HQ command range:
The activated rocket artillery can now be moved in the Soviet Motorized Movement Phase prior to the Soviet Combat Phase and it is moved to I-5615. For clarity the Activation marker is placed under the unit for this example. The attack strength is now 12 to the Defender’s 6 allowing a 2-1 attack:

BARBAROSSA: Army Group Center ~ Playbook38
© 2021 GMT Games, LLC
The supplied attack is resolved on the CRT at 2-1 odds and a ‘6’ is rolled, giving a 1*/R. The German unit withdraws and Soviets gain the Defender hex, albeit at the cost of a step. If the Attack had been a Mandated Attack then the Soviets would have been required to lose another step:
Finally after the attack the rocket unit must make a two-hex retreat [BSR 13.32] or is lost; fortunately, the Soviet can retreat it down the highway:
Note 1: If the Defender hex were to be in the Command Range of a Non-Op HQ, only one of the artillery units in this example could contribute its support strength.
Note 2: Axis Air Interdiction can reduce the number of ar-tillery units stacked with an HQ which can contribute their support strengths by one for each Interdiction Level. In this example, a Level One Interdiction marker in or next to the HQ hex would allow only one of the two artillery units in that hex to contribute its support strength.
12.0 Designer’s Section12.1 Unit Identification Abbreviations
AxisAA Aufklärungs Abteilung (reconnaissance)Ent Entgiftungs (chemical decontamination); these
units had heavy nebelwerfer rockets that took considerable time to emplace.
GD GrossDeutschland; this elite army (not SS) regiment boasted five battalions. It was very well armed and had an excellent record in combat. Later in the war it was augmented and raised to division status. Eventually the Gross Deutschland became a full corps.
Kav Kavallerie (cavalry); this was the only cavalry di-vision in the German army. It performed well. On 28 October 1941 it was withdrawn for conversion into the 24th Panzer Division, which also had an excellent record.
Lehr Lehr (Demonstration); these units were composed of experienced personnel to demonstrate tactics and unit proficiency to students at various combat schools.
MG Machinegewehr (machinegun)M Motorisiert (Motorized); in 1942 the title would
change to PanzerGrenadier

BARBAROSSA: Army Group Center ~ Playbook 39
© 2021 GMT Games, LLC
Pz Panzer (armored)RFSS Reichsführer SS; Originally Heinrich Himmler’s
personal bodyguard, the unit had been enlarged to be available for regular combat. By 1944 it had expanded to division status.
Sich Sicherungs (security); these divisions each consisted of a regiment of regular infantry, a Landeschützen regiment (personnel who were not suitable for front-line duty), one artillery bat-talion, and assorted smaller detachments. These formations contained little heavy equipment and were intended strictly for occupation duty.
SS Schutzstaffel; most of the game units belong to the Waffen (combat) branch of the SS.
SS Kav Kavallerie. Two regiments of cavalry were formed into a provisional brigade commanded by SS Bri-gadeFührer Hermann Fegelein. Formerly intended as garrison or rear area troops, they were commit-ted to the front line after engaging partisans and bypassed regular Soviet troops. The brigade was virtually destroyed in fighting during the winter. Fegelein, who later became an SS liaison officer (and married Eva Braun’s sister), was executed outside of the Führer Bunker on the Führer’s orders on 28 April 1945 for treason.
SS Mitte This is a composite regiment of SS; it controlled police battalions assigned to Army Group Center. Additional police battalions were assigned to the security divisions.
SS R SS Reich; this motorized division had one num-bered regiment and two named regiments as well as a recon unit:
D DeutschlandDF Der Führer
SovietAbn Airborne; shortages of trained and ready forma-
tions forced the Soviets to commit airborne troops to the front line. All Soviet airborne personnel were well trained, determined, and steady, but not all were jump trained. Most airborne units were converted to Guards status during summer 1942.
Army Army; a composite unit assigned directly to an-army HQ command.
BF Bryansk Front; a composite unit controlled by Front HQComp composite unit; for simplification some small
historical units have been consolidated into larger game units.
Gd Guards; denoting experienced, motivated, and reliable troops, this honorific title was conferred on formations that had distinguished themselves in combat. Such honors usually brought an increase in rank for the commander, more pay for everyone, and greater priority in supply and reinforcement.
It also meant a change in tactical organization and an increase in authorized equipment, but most such increases could not be accomplished until the spring of 1942.
MG Machinegun; groupings of static defense units built around a machinegun battalion and usu-ally controlled by a Fortified Area brigade HQ. Because they had little or no transport, they were positioned in fortifications.
Minsk Composite unit raised on an emergency basis at Minsk.
Nav NavalNKVD Narodnyy komissariat vnutrennykh del (People’s
Commissariat of Internal Affairs); these units would not hesitate to fire on their own troops to keep them in line. All regulars, Border Guards, and internal security regiments which participated in the campaign are shown in this game, the last notorious for murder of their prisoners. The 226th Convoy Regiment, for instance, figured promi-nently in the Katyn Forest massacre of Polish prisoners captured during 1939.
Tk Tank; this game distinguishes tank “divisions” (and others) by this abbreviation
WF Western Front; a composite unit controlled by Front HQYer Operational Group Yermakov, named for its unit
commanderZap Zapasnyy polk (Replacement Regiment); these
units had reserve, replacements, and depot func-tions. Even NKVD rear security units would send Red Army stragglers to an army Zap regiment for sorting out and re-equipping. Generally, one Zap regiment would be assigned per Army but on special occasions more could be made available. Zap units could find themselves on the front line during emergencies, and during 1941 there were plenty of emergencies.

BARBAROSSA: Army Group Center ~ Playbook40
© 2021 GMT Games, LLC
Soviet Military SchoolsAs Axis forces advanced farther east, the Soviets mobilized their training academies as regular fighting units: anything to stop the invader. Many school units were evacuated far to the east but some were caught up in the fighting. Those actually participating in combat during the time frame of this game are shown here. Abbreviations used are:
BTTU Borisov Tank-Technical SchoolBVTU Bobruysk Military Tractor SchoolChVIU Chernigov Military-Engineer SchoolGVPU Grodno Military-Political SchoolLSMU Lepel’ Mortar SchoolMPU Mogilev Infantry SchoolMTU Minsk Red Banner Tank School “named for M.I. Kalinin”OPU Osipovichi Infantry SchoolOSHMN Okruzhnaya shkola mladshego nachsostava (Dis-
trict School for Junior Commanders; of the Border Guards)
SAU Smolensk Artillery SchoolVPU Vilnius Infantry School
12.2 Historical Notes12.21 Soviet Volunteer Units
By Vance von Borries and Thomas F. Burke
Istrebitel’nyye Batal’ony: Known as “Destroyer” battal-ions (IB), these formed within three days starting 24 June 1941 on the basis of two decrees by the Soviet of People’s Commissars of the USSR. IBs were formed mainly from party and soviet assets (the party and Komsomol contingent was 80-90 percent), dedicated and trustworthy volunteers, who were physically fit and trained in military respects but not subject to call-up into the Red Army. The training of the battalions and their activities were directed by special staffs formed in the various regional departments and directorates of the NKVD.
Battalion commanders were either NKVD officials or chiefs of the local police departments. IBs ranged in size from 30 to 500 men, with 100-200 being the most common, and were organized like the army into platoons and companies. The IBs were organized principally as infantry units although some cavalry were formed in the North Caucasus. Members of the IBs were armed with rifles, submachine guns, pistols, grenades, and other light weapons. They were mobile units, equipped with vehicle and horse transport. Missions included protecting important economic objectives in the rear of Soviet forces, and combating enemy sabotage groups and airborne landings. Many IBs, however, participated in defensive battles with enemy forces and were often used as replacements for Red Army units. A number of IBs formed the basis for partisan detachments.[For the game all these units have been folded into other militia, reserve, and school units.]
Narodnoye Opolcheniye (militia): After Leningrad and Moscow began forming Narodnoye Opolcheniye (NO) on their own initiative, the State Defense Committee issued decrees be-ginning 4 July 1941 covering all remaining able-bodied men in the country. Generally, cities (or Oblasts) created divisions and state enterprises formed regiments, battalions, or companies, all organizationally corresponding to that of the Red Army, although initially using district names instead of numerical designations. Personnel were drawn mainly from the working class and in-cluded a significant party and Komsomol contingent, but few NKVD. The higher command positions were filled by regular officers of the Red Army or assigned from reserve. The remain-ing positions were filled by bringing in persons who earlier had served in the army or had military experience. Special units were manned by regular army personnel. Throughout the war, a total of about 60 divisions and 200 regiments of Opolcheniye were formed. Because of the fast-approaching frontline, many formations achieved only a brigade level of organization before engaging the enemy. On 23 September 1941 the State Defense Committee regularized all Opolcheniye and placed them under direct Red Army control. The Opolcheniye was supposed to be the People’s Reserve and be steadfast in the defense. In battle, their quality proved quite variable.
Narodnoye Opolcheniye abbreviations that are used in the game:Gomel Gomel’skiyMDNO Moscow Division of Narodnoye opolcheniyeMilit MilitseyskiyPervo PervomayskiyPred PredpriyatiyaTsentral Tsentral’nyyTrubo Truboliteynyy zavodZhelez Zheleznodorozhnyy

BARBAROSSA: Army Group Center ~ Playbook 41
© 2021 GMT Games, LLC
12.22 German Heavy Rocket LaunchersBy Vance von Borries and Thomas F. Burke
Among the Nebeltruppen (chemical troops), besides the l0cm mortar battalions and l5cm Nebelwerfer regiments, there were other units equipped with 28cm and 32cm rocket launchers, known as the Schweres Wurgeraet. These units were known as the Entgiftungs Abteilungen (decontamination battalions) of which five (101 - 105) were present at the start of Barbarossa.These battalions each consisted of 3 batteries; two batteries had decontamination equipment, but the third was equipped with launchers for the 28/32cm rockets. Also, Nebelwerfer Abt.8 had three batteries with 80 heavy launchers instead of a normal equipment of 10cm mortars. The heavy launcher battery had 40 launchers divided among two firing platoons; each platoon had four launcher crews, each crew member responsible for operating five launchers. The launchers were simple collapsible frames upon which 4 rockets in their shipping crates were placed. The launcher frames came in two types: Schweres Wurgeraet 40 made of wood, and Schweres Wurgeraet 41 made of steel tubing. The heavy rockets were also fired from a specially equipped halftrack, the SdKfz 251/1, on which was mounted a steel tube frame, Schwerer Wurfrahmen 40, which could carry 6 heavy rockets.The maximum range of the Schweres Wurgeraet was 1700-1900 meters; minimum range was 800 meters. Because of the very high shock effect created by its munitions, it was nicknamed “Stuka zu Fuss.”The 32cm rocket contained 50 liters of Flammoel and was called a “flying flamethrower.” The impact of the rocket dispersed the oil over a wide area that was set aflame. The Flammoel had, in addition to its inflammable effect against all combustible objects, a profound psychological effect. For the best effect, a mixture of high explosive and flame rockets was employed with a ratio of l to 2, respectively, with the firing of the high explosive rockets 30 seconds before the flame rockets.The 28cm rocket was filled with 50 kilograms (110 pounds) of high explosive. By comparison, the round for the 15cm Ne-belwerfer contained only 25 kg of HE. The rapid sequence of detonations on a target by a salvo of these rockets created a quick alternating succession of strong high and low pressure waves which caused immediate death by the tearing and bursting of the inner organs. This effect led to the legend of the “air pressure shell.” In this regard Otto Skorzeny in his memoirs mistook the heavy rockets used before Moscow in late 1941 for “liquid-air-filled rockets.” According to Skorzeny, the rockets produced
“...a frightful effect which resulted in a visible reduction in the will to resist on the part of the enemy…Several days after the first use..., the Russians let us know by loudspeak-ers that they would employ poison gas if we continued to fire these rockets.”
In action, a heavy launcher battery could fire 160 rockets in 15 seconds with a total of 8000 kg of high explosive or 8000 liters of Flammoel at a target. The battery firing position was difficult to select and camouflage because of the linear order
and regular arrangement of the launchers. The heavy rocket’s shell casing was not bullet-proof, so the effects of enemy fire had to be avoided. Great time was required to reconnoiter the firing positions, to emplace the launchers, and to supply them with ammunition, and because of these difficulties much of this activity was conducted at night. Even the noise of the impact of the ground stakes needed to be camouflaged. In the selection of firing positions, the heavy launchers were supposed to have priority over all other weapons.The Schweres Wurgeraet was considered a Schwerepunktwaffe. Its operation saved through a single fire strike a great expenditure of regular artillery ammunition. Because of its low penetrating power, barbed-wire obstacles, barriers and minefields were considered particularly suitable as targets. Its operation was particularly successful against lightly covered area targets and inhabited localities.
12.3 Suggested ReadingThere is now a large body of literature on the general subject of this game. With the first edition of this game, the great bulk of it was not available in the English language. Today we find much more becoming available.
1. Carell, Paul, Hitler Moves East 1941-1943, New York, 1964.2. Erickson, John, The Road to Stalingrad, New York, 1975.3. Fugate, Bryan and Lev Dvoretsky, Thunder on the Dnepr, Novato, CA, 1997.4. Glantz, David M., Barbarossa Derailed, two volumes, Helion & Company, 2010, 2012.5. Glantz, David M., The Initial Period of War on the Eastern Front, London, 1993.6. Haupt, Werner, Army Group Center, the Wehrmacht in Russia 1941-1945, Atglen, PA, 1997.7. Luther, Craig W.H., Barbarossa Unleashed, the German Blitzkrieg through Central Russia to the Gates of Moscow, June-December 1941, Atglen, PA, 2013.8. Seaton, Albert, The Russo-German War, New York, 1971.9. Stahel, David, Operation Barbarossa and Germany’s Defeat in the East, Cambridge University Press, 2009.10. Trevor-Roper, Hugh R., Blitzkrieg to Defeat, New York, 1965.11. Ziemke, Earl and M.E. Bauer, From Moscow to Stalingrad: Decision in the East, Washington, 1987.
Additionally, much material is available on the internet, includ-ing videos and contemporary newsreels. Much of the internet material is background and technical data about weapons but you can also find articles about the campaign.
12.4 First Edition Designer’s NotesBarbarossa: Army Group Center constitutes the third in a series of games that covers the early stages of the war in the Soviet Union during 1941.We have outfitted this game with a game system, rules, analysis, scale, and many of the same charts and tables you will find in the first two of this series.

BARBAROSSA: Army Group Center ~ Playbook42
© 2021 GMT Games, LLC
Axis plans for the invasion of the Soviet Union in June 1941 called for dividing the invading army into three parts, each gen-erally representing one German Army Group against one Soviet Direction (strategic grouping of armies). This game presents the central and most important sector of the Axis invasion. Each of the two players then represents the equivalent of an army group commander.
We chose to end the game in early September because this is the point chosen by Soviet historians as the time of conclusion of defensive operations to stop the German advance in the Moscow direction. It also coincides with the move off the south edge of Guderian’s Pz.Gp 2 toward Kiev in coordination with operations by Army Group South.
The choice of a September conclusion date for the campaign generally guided choices for victory conditions. In broadest terms, the Axis invaded the Soviet Union with the intent to achieve victory by conduct of a Blitzkrieg campaign. Such a style of campaigning requires certain objectives to be taken according to a time table. If delays become too serious, the schedule is upset, the enemy may recover, and a quick victory would no longer be possible. The historical campaign can be viewed as an upset schedule (although more upset by German High Command’s own indecision than Soviet action). Failure to achieve their Blitzkrieg objectives led directly to attritional war, a war in which the Soviet Union carried an advantage and indeed it used that advantage to achieve eventual total victory.
Working out a balance of victory conditions for the campaign scenario and for each scenario proved to be the greatest design challenge. The popular conception is that all aspects of such a campaign, even in its segments, would so favor the Germans as to be uninteresting. This in fact presented a serious problem for the two 22 June scenarios but in these, more than elsewhere, the Germans must adhere to a schedule. A close reading of the historical record bears out German army commanders’ concerns about moving east fast enough, of where to close the trap to pocket Soviet troops, of how broad an advance, and on just what line to advance. For the campaign and certain other scenarios, the Victory Plan draw burdens the Axis player with a great many objectives, not all of which can be achieved, but it is his choices which make the situation into a game.
Map research problems were solved by much the same method as done in the earlier games. Check the Designer’s Notes there for details. I can attest that drawing the Pripyat Marsh was particularly tedious - not something I would ever wish to do again. Some scenarios required a close examination of Ger-man situation maps. I traced the progress of each division to determine exactly when it entered or left the play area. There is less precision with the Soviets because the maps are poorer and that in turn is because so many records were lost. Even so, much can be deduced based on experience, the written record, and allowance for the breaking up of units to cover emergency situations.
General research was plagued by a shortage of good English-language sources. Generally speaking, there is a paucity of these for all East Front campaigns of the war. There are many Russian
language sources and this time we are favored with being able to present researcher Tom Burke’s concise bibliography of the more important of those. The result of Tom’s considerable efforts in interpretation can be seen in the great detail in the game’s OoB.
Some situations deserve more discussion. Some German Bf 109s have strength 3 instead of 4; this reflects the difference between type E vs. the better type F aircraft - perhaps a bit exaggerated, but necessary. The German Entgiftungs units do not seem to appear in other East Front games, possibly because of scaling problems (but probably because of misinterpretation), so their moment in wargaming has come. German heavy artillery has certainly made appearances in other games but perhaps are more appropriate and better depicted here (again, a scaling advantage). Some had surprising ranges. We have omitted details regarding SS activities in occupied areas, so no death squads and almost no police battalions. Keep in mind that these particular SS troops or SS-controlled troops (the police) were poorly trained for action against a properly armed opponent. Likewise, armed Baltic patriot bands are not included because they had little effect at the operational level of military activity. There were perhaps 34000 armed Lithuanians in June 1941, but all were in very small units. This changed somewhat in Latvia and more so in Estonia, both outside the scope of this game.
Although many Soviet units appear only in the Special Re-inforcement Pools, we generally must figure Soviet High Command is reinforcing as fast as possible. The Pool Groups represent either special strategic reserves or groups not quite ready for combat due to lack of arms or delayed trains, etc. A release of such a group means the arms or the trains could have arrived earlier. The Moscow Militia was a special group. No more reliable or better trained than any other militia, they enjoyed great numbers and were ordered forward, first to man the Mozhaisk Line [see Barbarossa: Typhoon] and then later to join the Reserve Front.
The Reserve Front is represented by all those garrison units spread in a line near the east edge. These are units not quite ready for combat, so when you release a hex full of units, you should assume you have provided a final load of arms, supplies, and transport.
A few Soviet units show an alternate unit ID in parenthesis; this was an original unit ID but rather than pick up one counter and put down another with the exact same strengths, it is better to use just the one counter and show the earlier ID. Some consolida-tions were necessary which is why in many instances we paired together units of the same function, such as with many Soviet artillery regiments. By contrast, we split apart some divisions into their component regiments in order to get a correct battle feel and to properly cover long frontages.
The Soviets reorganized their armored forces during the time period of this game and we have simplified much of this pro-cess, in particular with the 100 series armored divisions; my apologies to the purists for not tracing every detail. Let me also note that although the “heavy” cavalry divisions all contained a tank regiment, these tanks were types T38 and T40, of almost negligible value in combat except in the reconnaissance role.

BARBAROSSA: Army Group Center ~ Playbook 43
© 2021 GMT Games, LLC
A more elaborate discussion of the Soviet NKVD will follow in the next game but let me point out briefly that it was the NKVD Convoy Regiments (security units in the game) that guarded POWs and other prisoners (mainly Polish).
Let me add that I am particularly pleased with this game’s Learning scenario. I took great pains to make it balanced and sufficiently interesting for repeat play. The situation is relatively free of outside influence, it involves combined arms attacks by both sides, and it should make for a very interesting battle game at the tactical scale for some enterprising designer.
As already stated, this game series will not digress into political policies any more than how these might directly affect military operations. We hope to produce a game you will enjoy playing.
Finally, let me extend my considerable appreciation to publisher Gene Billingsley, to my playtesters, to researcher Tom Burke, my extra thanks to developer Tony Curtis, and my thanks to all who have generously written of their support of this game series and of what they hope to see in future games.
Vance von Borries
12.5 Second Edition Designer’s SummaryThis game forms part of a series that has grown considerably to portray the WW II campaign in the Soviet Union during 1941. When these games are all laid out, it catches the imagination with its truly grand scale and scope. So now with the second edition printings of this game series, we can display much new historical information that was not previously available. You will find this in the highly detailed OoB and in the various changes in the game mechanics.
The MapYou will notice that little has changed from the first edition. Some roads could have been reconfigured; a zig instead of a zag, but this would have added nothing of any real value. The
WA map was an important addition. Now that we have better source maps we are able to more properly draw this area and it needed fixing. Therefore, it becomes a revision to a portion of the original Map W found in the Army Group North game. Second edition AGN will include a fully revised Map W. Map WA extends the AGC game area to include a more accurate Army Group Boundary and thereby properly completes the AGC game subject matter. It also simplifies things by removing the old rule for the Velikiye Luki Offensive.
The RulesWithout a doubt this area presented the greatest challenge. The whole rules book has been rewritten, reorganized, added to and trimmed of excess, and it includes more clarifications. The standard rules set took so much time because you will use it throughout the series. Its rules will apply in a wide range of situations. Naval rules were almost entirely moved over to a separate folder (to be found in later games) to reduce the rules load here. The Army Group Center topic has no involvement with naval matters.
In our discussions we determined the original rules also needed clarity and to be more accessible. Accordingly, we made more use of bullet points, brief examples, and references to related rules sections. The old rules had too many instances of critical points scattered over the length of the rules. We prioritized bringing these points together as opposed to a strict following of the sequence of play. The Expanded Sequence of Play should answer most of your questions on sequencing of functions. We also provide a rules index to facilitate finding a rule. Then here in the Playbook you can find several comprehensive examples of play to illustrate important concepts. To preserve continuity we tried to keep the charts and tables essentially the same as seen previously. Some material formerly found only on some charts and tables will now also be found in the standard rules. Additional material can be found that fits concepts first devel-oped in later games in this series and now brought forward. We dropped the “Army Group North” scenario found in the original game. It can be found in its entirety in the AGN game in this series, so there is no need to reproduce it here.
The OoBSecond editions provide a convenient moment for fixes. Quite a lot of newly available information has appeared since the first editions. You will find differences too numerous to list here in-dividually, everything from a slight change in arrival turn or set up hex to a whole new analysis of how to treat classes of units. We worked to get the initial set ups correct for each scenario and then, for instance, found that the Soviet air force was far more massive than that shown in the first edition.
Overall, while we have preserved the first edition game, practi-cally everything has been improved and enhanced. Perhaps every rule has been rewritten for ease of reading and comprehension. The new thinking on game mechanics and looser restrictions should open up the game for more action. We hope you will enjoy this game and the whole series.
Vance von Borries

BARBAROSSA: Army Group Center ~ Playbook44
© 2021 GMT Games, LLC

BARBAROSSA: Army Group Center ~ Playbook 45
© 2021 GMT Games, LLC

BARBAROSSA: Army Group Center ~ Playbook46
© 2021 GMT Games, LLC

BARBAROSSA: Army Group Center ~ Playbook 47
© 2021 GMT Games, LLC

BARBAROSSA: Army Group Center ~ Playbook48
© 2021 GMT Games, LLC
BARBAROSSA: Army Group Center ~ Playbook 49
© 2021 GMT Games, LLC
Expanded Sequence of PlayA. STRATEGIC SEGMENT
1. Weather Phasea. Determine the weather condition from scenario instructions or the appropriate scenario Weather Table [5.1].
b. If Storm occurs:• Move all air units in Ready Boxes to the Flown Box,
including reinforcing or replacement air units [9.1] received this turn.
• Conduct flotilla repositioning [22.54b and 22.55].2. Replacements Phasea. The Soviet player uses the Replacements Table to determine:
• Strongpoints received [7.41]; set these aside until the Soviet Engineering Phase [18.44].
• Types A and I RPs: adjust the Repl. markers for new RPs received [7.31 and 7.32].
• Record M results with the Mandated Attacks Not Yet Made marker [7.51 and 12.36c].
• For every R result, remove two Garrison markers now, or set aside one Special Reinforcement Group to enter as reinforcements. Adjust the VP marker as applicable [7.52].
• For every S result, remove one Emergency Supply or Out of Supply marker at the end of the Supply Status Phase, or receive one additional ASP to enter in addition to regular reinforcements [7.53].
b. The Axis player refers to the scenario set up card for:• Use-or-Lose RPs [7.63].• Type A RPs and Type I RPs received this turn; adjust Axis
Repl. markers [7.61 and 7.62].• Independent RSC creation [7.61d and 23.12].
c. For both players:• Use-or-Lose RPs are found only on set up cards. Use them
now as stated in their respective rules.• For each Type V result move one air unit to the Ready Box
[7.33 and 7.63]. Those not used now are lost.• Place Receiving Replacements markers as desired onto
friendly units [7.71]. These units cannot move.3. Reinforcements Phasea. Remove available reinforcements and chosen Special Rein-forcement Groups [8.2] from the set up cards. Adjust the VP marker if required. Place ground units at entry locations [8.11] at map-edge or on-map (including any new Axis railhead marker entering) and place air units on the Air Unit Status Tracks [8.15].
b. Players receive their specific RPs as shown on the scenario set up cards and record them on their respective Replacement Tracks.
c. Receive Attack Supply Points (ASPs) [6.45]. Convert ASPs into MSUs or Dumps. Set these aside until the movement phase they enter the map.
d. Units that start the turn in the Active Box are placed during the Reinforcements Phase on any supplied and friendly city or major city at one unit per city [8.31].
e. Withdraw required units (or their substitutes) or adjust the VP marker on the VP Track [8.5] as applicable.
f. Place Soviet Reservists [7.8].
g. The Soviet player declares, for certain scenarios, those units that will convert to Guards [see Playbook].
h. Victory Plan determination [only in certain scenarios].
4. Air Phasea. Determine Air Readiness in the following order. Refer to the Air Unit Status Tracks.
1) Air units in Flown Boxes [9.21].2) Air units in Damaged Boxes [9.22].
b. Conduct Air Interdiction Missions [14.61], Axis first. Place the Interdiction marker if there are any surviving mission air units and in the Naval Movement Interdiction Box [see Naval Module 31.12].c. Air Bombardment Mission [AGC Playbook 5.1].
d. Check for ZOI effect on Soviet HQ units [14.66b].
5. Naval Readiness Phase [Naval Module]For each naval unit in port, conduct either:
• Naval Readiness [Naval Module 25.3], or• Naval Damage Repair [Naval Module 27.6].
6. Supply Status Phasea. Trace supply to all on-map units [6.1]. Where supply status has changed, remove Emergency or Out of Supply markers if now in General Supply [6.32], turn Emergency Supply mark-ers to Out of Supply [6.34], and place new Emergency Supply markers [6.33].
b. Place Out of Supply markers on Out of Supply strongpoints [6.36].
c. The Soviet player can remove one Emergency Supply or Out of Supply marker for each S result received this turn [7.53].
d. Remove MSUs or reduce Dumps serving as one-turn tem-porary Supply Sources [6.26]. Remove Emergency and Out of Supply markers from hexes now also put in General Supply.
e. Check for Strongpoint Deterioration [6.36].
f. Axis Fuel Shortage Determination [6.5].

BARBAROSSA: Army Group Center ~ Playbook50
© 2021 GMT Games, LLC
B. AXIS PLAYER SEGMENT
1. Axis Movement Phasea. Inspect enemy units [Optional Rule; see Playbook 4.7].
b. Detach Regiment Substitute Counters [23.2].
c. Conduct ground unit movement
1) All unit types are allowed to move. See the Movement Phase Chart for allowed MA for each unit type category.
2) Bridge Marker Placement:• Place completed Bridges over (non-major) rivers
[22.24a] at any time.• Place Bridges and Ferries on their under-construction
sides over major rivers [22.23c and 22.32].3) Movement procedures allowed:
• Reinforcement entry [8.1]• Railroad [11.1]• Strategic [11.2]• Overrun [11.3]• Infiltration [11.4]• One-hex [11.5]• Map Exit [11.6]• Armored train/railroad artillery [11.12 note, 13.33, and
21.32d]• Air Transport missions [14.75]• Flotilla [22.51]• Naval unit movement [Naval Module 26.1]• Naval Evacuation [Naval Module 28.2]• Amphibious Assault naval movement [Naval Module
30.1]d. Adjust the VP Track for VP hexes occupied [24.2].
e. Recombine Regiment Substitute Counters [23.3].
2. Axis Attack Declaration Phasea. Declare all attacks and mark Defender hexes with Declared Attack markers [12.1].
b. Conduct Shipping Attack missions [Naval Module 31.2].
3. Soviet Reaction Phasea. Eligible motorized units conduct Reaction Movement, moving at one-half MA [12.4].
b. The Soviet player designates artillery support for Defender hexes [15.32].
c. The Soviet player issues Retreat orders [12.5].
4. Axis Combat Phasea. Amphibious Assault combat [Naval Module 30.16].
b. Shipping Attack Mission [Naval Module 31.2]
c. CAS Mission air unit allocation sequence [14.24]:1) The Axis player moves air units from his Ready Box and
places up to three face-down on each desired Defender hex [14.21b and 14.52].
2) The Soviet player moves air units from his Ready Box and places up to two face-down on each desired Defender hex [14.21b and 14.52].
3) Both players reveal their air units and declare them as mission units or firing units [14.12].
d. CAS Mission Sequence [14.25] for each Mission hex:1) Determine Air Initiative [14.31].2) Conduct air combat [14.32 and 14.33].3) Both players resolve AA Fire [14.4].4) Net the surviving opposing CAS points in each Mission
hex. Convert remaining CAS points into a combat DRM [15.55].
e. Axis player conducts Declared Attacks in any order desired [15.1] and follows this sequence for each Declared Attack:
1) Make the final declaration of which of his units will participate in this combat [15.47b].
2) Attacker issues Retreat orders [12.5].3) Declare those MSUs or Dumps that will provide Attack
Supply Points [15.21].4) The attacker allocates artillery support [15.33 and 15.34].5) Conduct S-H artillery bombardment and Citadel
Destruction [13.43 through 13.46]. Place applicable Fortification Destroyed markers [18.13].
6) The Soviet player reveals his Untried units. Remove any marked “Remove” [15.43].
7) Spend ASP(s) for Declared Attacks that are provided Attack Supply [6.48d and 15.45].
8) Both players total their participating attack strength, defense strength, and artillery support strength [15.4].
9) Reveal any defender Orders marker.10) Both players turn used artillery to their Fired sides [13.12].11) Determine final combat odds [15.47].12) Net Axis and Soviet DRMs. The final DRM cannot exceed
+3 or –3 [15.5].13) Resolve the combat using the CRT [15.6].14) Remove Declared Attack [15.6] and Retreat Orders markers.15) Apply combat results [16.1 through 16.3].16) Conduct retreats [16.4].17) Conduct Advance after combat [16.5].18) Naval movement might be required [Naval Module].19) Adjust the VP Track for VP hexes captured as a result of
combat [24.2].20) Remove all spent ASPs [15.45].

BARBAROSSA: Army Group Center ~ Playbook 51
© 2021 GMT Games, LLC
5. Axis Motorized Movement Phasea. Only the following units are allowed to move:
• Motorized units at one-half MA• Cavalry at one-half MA• Flotillas at full MA if not moved in Movement Phase
b. Movement procedures allowed:• Reinforcement entry [8.1] (for motorized and cavalry units
only) [10.12]• Overrun [11.3]• Map Exit [11.6]• Armored train/railroad artillery [11.12 note, 13.33, and
21.32]• Flotilla movement [22.51]• Naval unit movement [Naval Module 26.1]• Naval Evacuation [Naval Module 28.2]
c. Axis Motorized Combat: only for Axis motorized units on an Inset map. Follow Axis Player Segments B.2 through B.4 [17.6].
d. Adjust VP Track for VP hexes captured [24.2].
6. Axis Engineering Phasea. Spend Axis RPs to:
• Increase each receiving unit by the allowed number of steps, then remove the Receiving Replacements markers [7.73]
• Move units from the Cadre Box to the Active Box [7.61b and c, and 7.62b]
• Move units from the Eliminated Box to the Cadre Box [7.61a and 7.62a]
b. Turn strongpoints under-construction to their completed side [18.45c].
c. Place new strongpoints under-construction in allowed hexes [18.45a and 18.45b]. An engineer can speed construction [18.44c and 22.11].
d. Conduct Axis Railroad Conversion [19.2].
e. Conduct Bridge Repair [22.4] and complete Bridge unit and Ferry unit construction over major rivers [22.24c and 22.32].
f. Remove Overrun markers from Soviet units [11.38d].
g. Conduct Fortification Destruction [18.13].
h. Turn desired Axis Super-Heavy artillery units to their Firing side, if they did not move during the turn [13.42b].
i. Both players turn their Fired artillery units over to their Ac-tive side [13.12].
j. Axis Logistics Pause ends on designated GT per TRT. [see Playbook 6.1].
C. SOVIET PLAYER SEGMENTNote the change in sequence. When a phase is noted “same as,” return to the identical phase in Segment B and substitute “Soviet” wherever “Axis” appears, and “Axis” wherever “So-viet” appears.
1. Soviet Motorized Movement Phasea. Inspect enemy units [Optional Rule; see Playbook 4.7].
b. Conduct ground unit movement.1) See the Movement Phase Chart for the allowed MA for
each unit type allowed to move this phase.2) Declare those HQs doubling their command values for
Mandated Attacks [12.35].3) HQ units activate non-motorized units [10.13 and 21.12a].4) Bridge Unit Placement
• Place completed Bridges over (non-major) rivers [22.24a]
• Place Bridges on their “Under-construction” sides over major rivers [22.23c; Restriction: 22.25]
• Emplace Ice Bridge [in certain Playbooks]5) Special Movement procedures allowed:
• Reinforcement entry (motorized and cavalry only) [8.1 and 10.12]
• Overrun [11.3]• Infiltration [11.4]• One-hex [11.5]• Map Exit [11.6]• Armored train/railroad artillery [13.33 and 21.32]• Flotilla [22.51]• Naval unit movement [Naval Module 26.1]• Naval Evacuation [Naval Module 28.2]• Amphibious Assault naval movement [Naval Module
30.1]c. Adjust VP Track for VP hexes regained [24.2].
2. Soviet Attack Declaration Phase - Same as Axis Attack Declaration Phase [12.11].
3. Axis Reaction Phasea. Same as Soviet Reaction Phase.
b. Use the Shipping Attack Table for Axis air units and apply Damage Points [Naval Module 31.22].
4. Soviet Combat Phasea. Same as Axis Combat Phase [15.0 and 16.0], except as in 14.21b.
b. Amphibious Assault combat [Naval Module 30.16].

BARBAROSSA: Army Group Center ~ Playbook52
© 2021 GMT Games, LLC
5. Soviet Movement Phasea. Conduct ground unit movement
1) All unit types are allowed to move except:• Units with Activation markers• Units with Receiving Replacements markers• Armored Trains and flotillas that moved in the
Motorized Movement PhaseNote: Soviet Motorized units move at one-half MA in this phase [see Movement Phase Chart].
2) Special movement procedures allowed:• Reinforcement entry [8.1]• Zap units in the Active Box [7.43b]• Railroad [11.1]• Strategic [11.2]• Overrun [11.3]• Cavalry (and qualified ski and mountain) infiltration
[11.4]• One-hex [11.5]• Map Exit [11.6]• Armored train/railroad artillery [13.33 and 21.32]• Flotilla [22.51]• Naval unit movement [Naval Module 26.1]• Naval Evacuation [Naval Module 28.2]
b. Conduct Air Transport missions [14.75].
c. Adjust VP Track for VP hexes regained [24.2].
6. Soviet Engineering Phasea. Spend Soviet RPs to:
• Zap Unit Infantry Rebuilding. A Zap unit can add one Type I step to an eligible unit [7.43d]
• Zap units in a city, or major city can be removed and exchanged to receive an eligible unit at its one-step level from the Cadre Box [7.43e]
• Armored train replacements [7.42] are used now or are lost.
• Increase each receiving unit by one step, then Remove Receiving Replacements markers [7.73]
• Move units from the Cadre Box to the Active Box [7.31b, 7.31c, and 7.32b]
• Move units from the Eliminated Box to the Cadre Box [7.31a and 7.32a]
• Conduct Militia conversion [7.44] and create Zap units [7.44b]
• Conversion of militia divisions [in some Playbooks]
b. Spend Type I RPs to move Zap units from the Cadre Box to the Active Box [7.43a].
c. Turn strongpoints under-construction over to completed [18.44b].
d. Place onto the map those new strongpoints under-construction [18.43 and 18.44] that were received this turn. Engineers can speed strongpoint construction [18.44c and 22.11].
e. Conduct Soviet railroad conversion [19.3].
f. Conduct Bridge Repair [22.44] and complete Bridge unit construction over major rivers [22.24c; Restriction: 22.25].
g. Remove Overrun markers from Axis units [11.38d].
h. Conduct Fortification Destruction [18.13]
i. Conduct Bridge Destruction [22.4 and Playbook 4.5].
j. Both sides turn Fired artillery units to their active side [13.12].
k. Remove the Ice Bridge [only in certain scenarios].
l. Place Rail Cut markers on Axis railroad hexes [19.4].
D. ADMINISTRATIVE SEGMENT
1. Soviet Surrender PhaseThe Soviet player performs Surrender checks [20.11] on his units. Units that Surrender and those removed due to Attrition go to the Eliminated Box [20.21].
2. Recovery Phasea. The Soviet player performs Non-op HQ recovery or disband-ment and adjusts VPs accordingly. [21.28 and 21.29].
b. Remove Air Interdiction markers [14.67].
c. Remove all Activation markers [10.13e].
d. Remove “Do Not Move 1 GT” markers from all units. Turn any “Do Not Move 2 GT” markers to their 1 GT side.
e. The Axis player removes all Fuel Shortage markers [6.54d].
f. Adjust Step Loss and VP Tracks as needed [24.4] and adjust for Mandated Attacks not performed in a timely manner [12.36a and b].
3. Victory Determination Phasea. Check scenario victory conditions to see if the game ends.
b. If the game has not ended, move the Game-Turn marker ahead one box on the Turn Record Track.
© 2021 GMT Games LLCP.O. Box 1308, Hanford, CA 93232
www.GMTGames.com