plug-in user's guide -...
TRANSCRIPT

Plug-in User Guide
0 - 1

Plug-in User Guide
0 - 2

Plug-in User Guide
Plug-in User’s Guide
The software and documentation are furnished under the Visual Paradigm license agreement and may be used only in accordance with the terms of the agreement.
Copyright Information Copyright © 1999-2005 by Visual Paradigm. All rights reserved.
The material made available by Visual Paradigm in this document is protected under the laws and various international laws and treaties. No portion of this document or the material contained on it may be reproduced in any form or by any means without prior written permission from Visual Paradigm.
Every effort has been made to ensure the accuracy of this document. However, Visual Paradigm makes no warranties with respect to this documentation and disclaims any implied warranties of merchantability and fitness for a particular purpose. The information in this document is subject to change without notice.
All examples with names, company names, or companies that appear in this document are imaginary and do not refer to, or portray, in name or substance, any actual names, companies, entities, or institutions. Any resemblance to any real person, company, entity, or institution is purely coincidental.
Trademark Information Visual Paradigm for UML, Smart Development Environment is registered trademark of Visual Paradigm. Sun, Sun ONE, Java, Java2, J2EE and EJB, NetBeans are all registered trademarks of Sun Microsystems, Inc. Eclipse is registered trademark of Eclipse IBM, WebSphere are registered trademark of International Business Machines Corporation. JBuilder is registered trademark of Borland Corporation. IntelliJ and IntelliJ IDEA are registered trademarks of JetBrains. Microsoft, Windows, Windows NT, Visio, and the Windows logo are trademarks or registered trademarks of Microsoft Corporation. Oracle is a registered trademark, and JDeveloper is a trademark or registered trademark of Oracle Corporation. BEA is registered trademarks of BEA Systems, Inc. BEA WebLogic Workshop is trademark of BEA Systems, Inc. WinZip is a registered trademark of WinZip Computing, Inc. Other trademarks or service marks referenced herein are property of their respective owners.
Visual Paradigm License Agreement THE USE OF THE SOFTWARE LICENSED TO YOU IS SUBJECT TO THE TERMS AND CONDITIONS OF THIS SOFTWARE LICENSE AGREEMENT. BY INSTALLING, COPYING, OR OTHERWISE USING THE SOFTWARE, YOU ACKNOWLEDGE THAT YOU HAVE READ THIS AGREEMENT, UNDERSTAND IT, AND AGREE TO BE BOUNDED BY ALL OF THE TERMS AND CONDITIONS OF THIS SOFTWARE LICENSE AGREEMENT.
1. Limited License Grant. Visual Paradigm grants to you ("the Licensee") a personal, non-exclusive, non-transferable, limited, perpetual, revocable license to install and use Visual Paradigm Products ("the Software" or "the Product"). The Licensee must not re-distribute the Software in whole or in part, either separately or included with a product.
2. Restrictions. The Software is confidential copyrighted information of Visual Paradigm, and Visual Paradigm and/or its licensors retain title to all copies. The Licensee shall not modify, adapt, decompile, disassemble, decrypt, extract, or otherwise reverse engineer the Software. Software may not be leased, rented, transferred, distributed, assigned, or sublicensed, in whole or in part. The Software contains valuable trade secrets. The Licensee promises not to extract any information or concepts from it as part of an effort to compete with the licensor, nor to assist anyone else in such an effort. The Licensee agrees not to remove, modify, delete or destroy any proprietary right notices of Visual Paradigm and its licensors, including copyright notices, in the Software.
3. Disclaimer of Warranty. The software and documentation are provided "AS IS," WITH NO WARRANTIES WHATSOEVER. ALL EXPRESS OR IMPLIED REPRESENTATIONS AND WARRANTIES, INCLUDING ANY IMPLIED WARRANTY OF MERCHANTABILITY, FITNESS FOR A PARTICULAR PURPOSE, TITLE OR NON-INFRINGEMENT, ARE HEREBY EXCLUDED. THE ENTIRE RISK AS TO SATISFACTORY QUALITY, PERFORMANCE, ACCURACY AND EFFORT IS WITH THE LICENSEE. THERE IS NO WARRANTY THE DOCUMENTATION, Visual Paradigm's EFFORTS OR THE LICENSED SOFTWARE WILL FULFILL ANY OF LICENSEE'S PARTICULAR PURPOSES OR NEEDS. IF THESE WARRANTIES ARE UNENFORCEABLE UNDER APPLICABLE LAW, THEN Visual Paradigm DISCLAIMS SUCH WARRANTIES TO THE MAXIMUM EXTENT PERMITTED BY SUCH APPLICABLE LAW.
4. Limitation of Liability. Visual Paradigm AND ITS LICENSORS SHALL NOT BE LIABLE FOR ANY DAMAGES SUFFERED BY THE LICENSEE OR ANY THIRD PARTY AS A RESULT OF USING OR DISTRIBUTING SOFTWARE. IN NO EVENT WILL Visual Paradigm OR ITS LICENSORS BE LIABLE FOR ANY LOST REVENUE, PROFIT OR DATA, OR FOR DIRECT, INDIRECT, EXEMPLARY, SPECIAL, CONSEQUENTIAL, INCIDENTAL OR PUNITIVE DAMAGES, HOWEVER CAUSED AND REGARDLESS OF THE THEORY OF LIABILITY, ARISING OUT OF THE USE OF OR INABILITY TO USE THE SOFTWARE, EVEN IF Visual Paradigm HAS BEEN ADVISED OF THE POSSIBILITY OF SUCH DAMAGES.
0 - 3

Plug-in User Guide 5. Termination. The Licensee may terminate this License at any time by destroying all copies of Software. Visual Paradigm will not be obligated to refund any License Fees, if any, paid by the Licensee for such termination. This License will terminate immediately without notice from Visual Paradigm if the Licensee fails to comply with any provision of this License. Upon such termination, the Licensee must destroy all copies of the Software. Visual Paradigm reserves all rights to terminate this License.
SPECIFIC DISCLAIMER FOR HIGH-RISK ACTIVITIES. The SOFTWARE is not designed or intended for use in high-risk activities including, without restricting the generality of the foregoing, on-line control of aircraft, air traffic, aircraft navigation or aircraft communications; or in the design, construction, operation or maintenance of any nuclear facility. Visual Paradigm disclaims any express or implied warranty of fitness for such purposes or any other purposes.
NOTICE. The Product is not intended for personal, family or household use; rather, it is intended exclusively for professional use. Its utilization requires skills that differ from those needed to use consumer software products such as word processing or spreadsheet software.
GOVERNMENT RIGHTS. If the Software is licensed by or on behalf of a unit or agency of any government, the Licensee agrees that the Software is "commercial computer software", "commercial computer software documentation" or similar terms and that, in the absence of a written agreement to the contrary, the Licensee's rights with respect to the Software are limited by the terms of this Agreement.
Acknowledgements This Product includes software developed by the Apache Software Foundation (http://www.apache.org). Copyright ©1999 The Apache Software Foundation. All rights reserved.
0 - 4

Plug-in User Guide Table of Content Chapter 1 - Introduction to Plugin Support...............................................................................................................................................1 - 2
plugin.xml...............................................................................................................................................................................................1 - 2 Model .....................................................................................................................................................................................................1 - 2 Diagram..................................................................................................................................................................................................1 - 2 Diagram Element....................................................................................................................................................................................1 - 3 Action/Action Controller ........................................................................................................................................................................1 - 3
Chapter 2 - Implementing Plugin................................................................................................................................................................2 - 2 Configuring Development Environment.................................................................................................................................................2 - 2 Beginning of plugin.xml.........................................................................................................................................................................2 - 2 Implementing Custom Action.................................................................................................................................................................2 - 3
Custom Action on Menu/Toolbar ...............................................................................................................................................2 - 4 Custom Action on Popup menu (context sensitive) ....................................................................................................................2 - 7 Custom Diagram Element (shape and connector).......................................................................................................................2 - 9
Working with Models...........................................................................................................................................................................2 - 13 Creating Model .........................................................................................................................................................................2 - 13 Retrieving Model ......................................................................................................................................................................2 - 14 Updating Model ........................................................................................................................................................................2 - 15 Deleting Model .........................................................................................................................................................................2 - 16
Working with Diagrams/Diagram Elements.........................................................................................................................................2 - 16 Creating Diagrams/Diagram Elements .....................................................................................................................................2 - 16 Retrieving Diagrams/Diagram Elements ..................................................................................................................................2 - 17 Updateing Diagrams/Diagram Elements...................................................................................................................................2 - 18 Deleting Diagrams/Diagram Elements .....................................................................................................................................2 - 19
Showing Dialog on VP-UML...............................................................................................................................................................2 - 19 Showing Message on Message Pane.........................................................................................................................................2 - 19 Showing Simple Message Dialog .............................................................................................................................................2 - 19 Showing Custom Dialog...........................................................................................................................................................2 - 19
Chapter 3 - Deploying Plugin ......................................................................................................................................................................3 - 2
0 - 5

Plug-in User Guide
0 - 6

1Introduction to Plugin Support

Plug-in User’s Guide Chapter 1 - Introduction to Plugin Support
Chapter 1 - Introduction to Plugin Support
Plugin Support provides an interface for developers to integrate with VP-UML. Developers can develop their plugins for what they want. In this section, we will introduce the structure of a plugin.
plugin.xml
A plugin is defined in a XML file (plugin.xml). It includes the information (such as plugin id, provider, required libraries, etc...), custom actions (menu, toolbar and popup menu) and custom shapes/connector of the plugin.
For working with VP-UML in plugin, there are 4 main components must be known by developers: Model, Diagram, Diagram Element and Action/Action Controller.
Model
VP-UML provides the model elements which supported in UML 2.0/1.x (such as Use Case, Class, Lifeline, etc...).
Plugin allows developer to create, retrieve update and delete on the model elements on code. To access the model element classes, developer can either get the model through the popup menu context or through the project (to iterate through all the models).
The models are shown on the "Model" pane. There are package (sample), class (Plugin), attribute (name), operation (setName) and parameter (name) contained in the project.
Diagram
Diagram is the diagram which contains many diagram elements on different domain (such as Use Case Diagram, Class Diagram, ERD, etc...).
Plugin allows developer to create, retrieve, update and delete the diagrams on code. To access the diagrams, developer can either get the diagram through the popup menu context or through the project (to iterate through all the diagrams)
The diagrams are shown on the "Diagram Navigator" pane. 2 Class Diagram are contains in the project (Class Diagram 1 and Class Diagram 2).
1 - 2

Plug-in User’s Guide Chapter 1 - Introduction to Plugin Support
Diagram Element
Diagram Element represents a model on a diagram. A model does not contain the information on outlook (such as x, y, width, height, etc...), and a model can be shown on different diagrams (such as a class can be shown on 2 different class diagrams). Diagram Elements work as an UI to show the model on different views for the user.
There are 2 kinds of diagram element: Shape and Connector.
Shape represents the non-relationships model (such as Class).
Connector represents the relationships model (such as Generalization).
Plugin allows developer to create, retrieve, update and delete the diagram elements on code. To access the diagram elements, developer can either get the diagram element through the popup menu context or through the project (to iterate through all the diagrams and iterate the diagram elements held on the diagram).
The diagram elements are shown on the "Diagram Navigator" pane under the diagrams. The shapes are presenting the same model (sample and Plugin). And the shapes are shown on the 2 diagrams (Class Diagram 1, and Class Diagram 2) with same model, different outlook.
Action/Action Controller
Action represents the buttons (menu, toolbar and popup menu), which contains the information on outlook (such as label, icon, mnemonic, etc...) and responses to trigger the function call.
Action is used to represent the button on 3 regions: menu/toolbar, popup menu and diagram toolbar
Action Controller is the control (function call) of actions. Developer need to implement different Action Controller on different region's actions.
-Menu -Toolbar
-Popup Menu -Diagram Toolbar
1 - 3

Plug-in User’s Guide Chapter 1 - Introduction to Plugin Support
1 - 4

2Implementing Plugin

Plug-in User’s Guide Chapter 2 - Implementing Plugin
Chapter 2 - Implementing Plugin
Configuring Development Environment
Plugin Support API is placed on %VP_SUITE%/lib/openapi.jar. In order to working with VP-UML, developer must import the jar into the development classpaths.
Beginning of plugin.xml
plugin.xml is the base of a plugin, to develop a plugin, should be start from writing the plugin.xml. The basic directory structure is "VP_SUITE_HOME/plugins/YOUR_PLUGIN_ID/plugin.xml"
For improving the variability of the plugin.xml, a properties file (plugin.properties) can be used for storing the value of the xml. Developer can assignment the value of the attributes in xml starts with '%', then the value will be read from the properties file. For example
In plugin.xml: <plugin id="sample.plugin name="%plugin.name" .../>
In plugin.properties: plugin.name=sample.plugin
Sample on XML:
<plugin
id="sample.plugin"
name="Sample Plugin"
description="Sample Plugin"
provider="Visual Paradigm"
class="sample.plugin.SamplePlugin">
<runtime>
<library path="lib/sampleplugin.jar" relativePath="true"/>
</runtime>
<!-- to be continued -->
</plugin>
Table shows the description of elements in the plugin.xml.
Element Attribute Description plugin The root element of plugin.xml, specify the basic
information of the plugin (id, name, provider, etc...)
plugin class The class of the plugin, required to implements com.vp.plugin.VPPlugin.
runtime The element specified the runtime environment of the plugin.
library (1..*) Specifies the .jar or directory as the classpaths required on the plugin. Such as the classes of the plugin and some libraries the plugin required.
2 - 2

Plug-in User’s Guide Chapter 2 - Implementing Plugin library (1..*) Path The path of the .jar or directory.
library (1..*) relativePath (optional, default: true) Specifies whether the path is relative path.
Description on Code:
VPPlugin (com.vp.plugin.VPPlugin)
This class must be implemented and ref on <plugin class="xxx"... Otherwise, the plugin will not be loaded completely. In fact, the class can do nothing on it.
The following is the sample code:
package sample.plugin;
public class SamplePlugin implements com.vp.plugin.VPPlugin {
// make sure there is a constructor without any parameters
public void loaded(com.vp.plugin.VPPluginInfo info) {
// called when the plugin is loaded
// developer can get the current plugin's id and the
// current plugin directory (default: %VP_SUITE%/plugins)of VP-UML from the VPPluginInfo.
}
public void unloaded() {
// called when the plugin is unloaded (when the VP-UML will be exited)
}
}
Implementing Custom Action
There are 2 main components for an Action: Action and Action Controller. Action represents the outlook, Action Controller responses to work as function call. In order to create custom action, developer needs to define the Action on xml, and implement the Action Controller on code.
Sample on XML:
<plugin>
<actionSets>
<!-- to be continued -->
</actionSets>
<!-- to be continued -->
</plugin>
Table shows the description of elements in the above XML.
Element Attribute Description actionSets It is a collection of ActionSet. There 2 kinds of
ActionSet: actionSet and contextSensitiveActionSet. actionSet is a set of actions which will be shown on menu/toolbar or diagram toolbar. contextSensitiveActionSet is set of actions which will
2 - 3

Plug-in User’s Guide Chapter 2 - Implementing Plugin
be shown on popup menu.
There are differences on xml definition and code implementation of the 3 kinds of Actions (menu/toolbar, popup menu, diagram toolbar).
Custom Action on Menu/Toolbar
Developer can define the menu, menu item, toolbar, toolbar button and etc... on the plugin.xml. In order to trigger the menu item and toolbar button's function call, Action Controller is required to be implemented and added into the Action. The Action Controller class on menu/toolbar actions is com.vp.plugin.action.VPActionController.
There are 2 important attributes used on menu, action and separator: menuPath and toolbarPath.
menuPath is the path specified where is the item placed on menu, toolbarPath is the path specified where is the item placed on toolbar. The path is formed by a set of 'name'. The 'name' is similar with the caption of the menu items (caption in English, ignores the "..." and remind the 'space'). '/' is used as delimiter of the path. '#' is used to represent the front of the menu. 4 examples will be given:
1. "Tools/Report" means under the Tools menu, after the Report menu.
2. "Tools/Report/#" means under the Tools menu, and under the Report menu, place on the front.
3. "Tools/Report/Generate HTML Report" means under the Tools menu, and under the Report menu, after the Generate HTML Report menu item.
4. "Tools" means after the Tools menu.
2 - 4

Plug-in User’s Guide Chapter 2 - Implementing Plugin Sample on XML:
<actionSet id="sample.plugin.actions.ActionSet1">
<toolbar
id="sample.plugin.actions.Toolbar1"
orientation="north"
index="last"/>
<menu
id="sample.plugin.actions.Menu1"
label="Sample Menu 1"
mnemonic="M"
menuPath="Tools/Report"/>
<action
id="sample.plugin.actions.Action1"
actionType="generalAction"
label="Sample Action 1"
tooltip="Sample Action 1"
icon="icons/red.png"
style="normal"
menuPath="Tools/Report"
toolbarPath="sample.plugin.actions.Toolbar1/#">
<actionController class="sample.plugin.actions.ActionController"/>
</action>
<separator
id="sample.plugin.actions.Separator1"
menuPath="Tools/sample.plugin.actions.Action1"
toolbarPath="sample.plugin.actions.Toolbar1/sample.plugin.action.Action1"/>
</actionSet>
Table shows the description of elements in the above XML.
Element Attribute Description actionSet It is a collection of toolbar, menu, action, separator on the
toolbar or menu of the plugin. The child elements should be ordered if they have the relationship on the position (e.g. developer prefers Action1 is placed into Menu1, then please define the Menu1 on the xml first).
toolbar (0..*) Specifies a toolbar, contains the location information of the toolbar.
toolbar (0..*) orientation [north | east |south | west]
Specifies which side will be the toolbar placed on.
toolbar (0..*) index [(number) | last |new] Based on the orientation, where will be the toolbar placed. e.g. the orientation is "north" and there is 2 rows toolbars
2 - 5

Plug-in User’s Guide Chapter 2 - Implementing Plugin
already. If the index is "0", then the toolbar will be placed on the first row's last position. If the index is "last", the toolbar will be placed on the last row, last position. If the index is "new", the toolbar will be placed on the third row (new row).
menu (0..*) Specifies a menu or pull down button on menu bar or toolbar. It contains the outlook information of the menu.
action (0..*) Specifies a menu item or button on menu bar or toolbar. It contains the outlook information of the menu item.
action (0..*) actionType [generalAction | shapeAction | connectorAction] (optional, default: generalAction)
There are 3 types: generalAction, shapeAction and connectorAction. As the action on menu/toolbar, generalAction should be assigned.
actionController Specifies the Action Controller for the action (the parent node in the xml).
actionController class The class name of the Action Controller. For the action on menu/toolbar, it is required to implement com.vp.plugin.action.VPActionController.
separator (0..*) Specified a separator on menu bar or toolbar.
Description on Code:
VPActionController (com.vp.plugin.action.VPActionController)
This class is used to perform the function call when the action is clicked. One Action Controller class refers to multi Actions is allowed.
Sample:
package sample.plugin.actions;
public class ActionController implements com.vp.plugin.action.VPActionController {
// make sure there is an constructor without any parameters
public void performAction(com.vp.plugin.action.VPAction action) {
// called when the button is clicked, the parameter action represents the Action which be clicked.
// developer also can set the properties of the action
}
public void updated(com.vp.plugin.action.VPAction action) {
// *for the actions located on menu bar only
// when the parent menu is selected, this will be called,
// developer can set the properties of the action before it is shown (e.g. enable/disable the menu item)
}
}
2 - 6

Plug-in User’s Guide Chapter 2 - Implementing Plugin
Custom Action on Popup menu (context sensitive)
Developer can define the menu, menu item and separator on the popup menu shown on the diagram. The popup menu on diagram is context sensitive which based on what diagram element or diagram is selected. In order to make the menu item trigger the function call, Action Controller is required to be implemented. For popup menu, com.vp.plugin.action.VPContextActionController is the interface required developer to implement.
Same as Action on Menu/Toolbar, menuPath is used to specify the location of the action (menu/menu item on popup menu).
Sample on XML:
<contextSensitiveActionSet id="sample.plugin.actions.ActionSet2">
<contextTypes all="false">
<include type="Class"/> <!-- ignored when contextTypes.all = true -->
<exclude type="Package"/> <!-- ignored when contextTypes.all = false -->
</contextTypes>
<action
id="sample.plugin.actions.ContextAction1"
label="Sample Action [1]"
icon="icons/blue.png"
style="toggle"
menuPath="OpenSpecification">
<actionController class="sample.plugin.actions.ContextActionController"/>
</action>
</contextSensitiveActionSet>
Table shows the description of elements in the above XML.
Element Attribute Description contextSensitvieActionSet (0..*)
It is a collection of menu, action, separator on the popup menu of the plugin. The child elements should be ordered if they have the relationship on the position (e.g. developer prefers Action1 is placed into Menu1, then please define the Menu1 on the xml first
contextTypes It is a collection of the model of diagram element of diagram types which the contextSensitiveActionSet is considering.
contextTypes all [true | false] (optional, default: false)
Specify whether all the types of the models, diagram elements and diagrams will be considered by this actionSet.
Include Specify the model, diagram element or diagram type will be considered by this ActionSet. (This will be ignored if the contextTypes's attribute 'all' is assigned 'true'.
Include type It is type of the element. Such as "Class", "Actor", "ClassDiagram", "Attribute", etc...
exclude Specify the model, diagram element or diagram type will not be considered by this ActionSet. (This will be ignored if the contextTypes's attribute 'all' is assigned 'false'.
type It is type of the element. Such as "Class", "Actor", "ClassDiagram", "Attribute", etc...
2 - 7

Plug-in User’s Guide Chapter 2 - Implementing Plugin actionController Specifies the Action Controller for the action (the parent
node in the xml).
actionController class The class name of the Action Controller. For the action on popup menu, it is required to implement com.vp.plugin.action.VPContextActionController.
Description on Code:
VPContextActionController (com.vp.plugin.action.VPContextActionController)
This class is used to perform the function call when the action is clicked. One Action Controller class refers to multi Actions is allowed.
Sample:
package sample.plugin.actions;
import java.awt.event.ActionEvent;
public class ContextActionController implements com.vp.plugin.action.VPContextActionController {
// make sure there is an constructor without any parameters
public void performAction(
com.vp.plugin.action.VPAction action,
com.vp.plugin.action.VPContext context,
ActionEvent e
) {
// called when the button is clicked
}
public void updated(
com.vp.plugin.action.VPAction action,
com.vp.plugin.action.VPContext context
) {
// when the popup menu is selected, this will be called,
// developer can set the properties of the action before it is shown (e.g. enable/disable the menu item)
}
}
VPContext (com.vp.plugin.action.VPContext)
Context will be passed into the Action Controller when the popup menu is shown or action is trigger. It is what the user selected on the diagram, can be model, diagram element or/and diagram.
A diagram may contain many diagram elements, when user right-click on the diagram element or the diagram, a popup menu will be shown. So, the context may be diagram element or diagram. However, the diagram element must be contained by diagram, then if popup menu shown on a diagram element, the context must contain both diagram element and diagram. And the diagram element always represents for a model, so that is possible the context contains model, diagram element and diagram as same time. However, sometime, the popup menu is shown for a model only (e.g. select on an attribute of a class, because there is no diagram element for the attribute, the class's diagram element will be contained in the context).
2 - 8

Plug-in User’s Guide Chapter 2 - Implementing Plugin
Custom Diagram Element (shape and connector)
Developer can define the shape of connect on the specified diagram. But it is not allowed to develop a custom model. ActionSet and Action are used on definition of custom diagram element.
2 - 9

Plug-in User’s Guide Chapter 2 - Implementing Plugin Sample on XML:
<actionSet id="sample.plugin.actions.ShapeActionSet">
<action
id="sample.plugin.actions.ShapeAction1"
actionType="shapeAction"
label="Sample Action {1}"
tooltip="Sample Action {1}"
icon="icons/yellow.png"
editorToolbarPath="com.vp.diagram.ClassDiagram/Class">
<shapeCreatorInfo
shapeType="sample.plugin.shape.Shape1"
defaultWidth="30"
defaultHeight="30"
controllerClass="sample.plugin.actions.ShapeController1"
multilineCaption="false"
captionStyle="north"
resizable="true"/>
</action>
<action
id="sample.plugin.actions.ConnectorAction1"
actionType="connectorAction"
label="Sample Action {2}"
tooltip="Sample Action {2}"
icon="icons/green.png"
editorToolbarPath="com.vp.diagram.ClassDiagram/sample.plugin.actions.ShapeAction1">
<connectorCreatorInfo
shapeType="sample.plugin.connector.Connector1"
fromArrowHeadStyle="Arrow1"
toArrowHeadStyle="Arrow2"
fromArrowHeadSize="verySmall"
toArrowHeadSize="large"
dashes="7,10"
lineWeight="3"
connectorStyle="rectilinear">
2 - 10

Plug-in User’s Guide Chapter 2 - Implementing Plugin
<connectionRules>
<connectionRule
fromShapeType="sample.plugin.shape.Shape1"
toShapeType="sample.plugin.shape.Shape1"
bidirection="true"/>
<connectionRule
fromShapeType="Class"
toShapeType="sample.plugin.shape.Shape1"
bidirection="true"/>
<connectionRule
fromShapeType="Package"
toShapeType="sample.plugin.shape.Shape1"
bidirection="true"/>
</connectionRules>
</connectorCreatorInfo>
</action>
</actionSet>
Table shows the description of elements in the above XML.
Element Attribute Description Action It is a collection of menu, action, separator on the popup
menu of the plugin. The child elements should be ordered if they have the relationship on the position (e.g. developer prefers Action1 is placed into Menu1, then please define the Menu1 on the xml first
Action actionType[generalAction | shapeAction | connectorAction] (optional, default: generalAction)
There are 3 types: generalAction, shapeAction and connectorAction. As the action for custom shape, "shapeAction" should be assigned. For custom connector, "connectorAction" should be assigned.
Action editorToolbarPath Specify which diagram toolbar contains this action. e.g. to add a shapeAction on class diagram after the button for creating a new class, "com.vp.diagram.ClassDiagram/Class" should be assigned. "com.vp.diagram.ClassDiagram" is the id of the class diagram. "/" is the delimiter. "Class" is the button id.
shapeCreatorInfo If the actionType is "shapeAction", shapeCreatorInfo is required. It is used to specify the details of the custom shape.
shapeCreatorInfo shapeType The shape type assigned by developer, unique value is required.
shapeCreatorInfo captionStyle [center | north | none] (optional)
Specify where the caption of the shape is displayed.
shapeCreatorInfo controllerClass The class name which the class is responsible to draw the shape on the diagram, com.vp.plugin.diagram.VPShapeController is required to be implemented. com.vp.plugin.diagram.AbstractShapeController is an
2 - 11
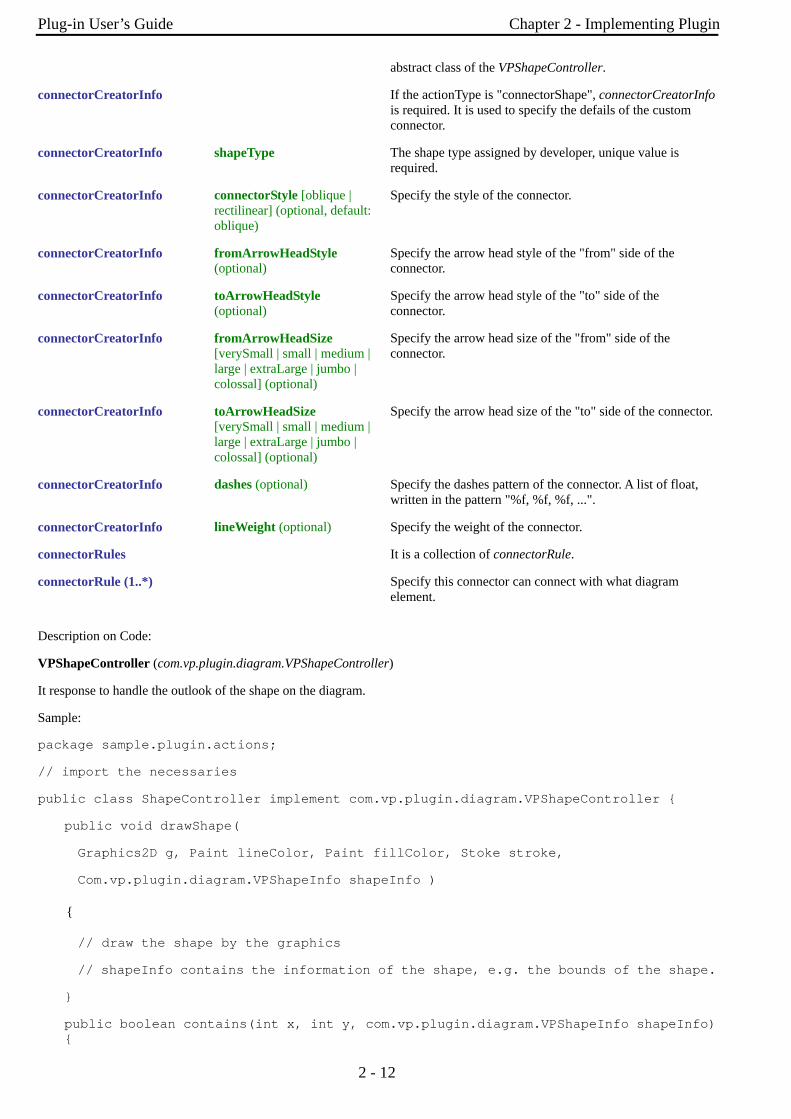
Plug-in User’s Guide Chapter 2 - Implementing Plugin
abstract class of the VPShapeController.
connectorCreatorInfo If the actionType is "connectorShape", connectorCreatorInfo is required. It is used to specify the defails of the custom connector.
connectorCreatorInfo shapeType The shape type assigned by developer, unique value is required.
connectorCreatorInfo connectorStyle [oblique | rectilinear] (optional, default: oblique)
Specify the style of the connector.
connectorCreatorInfo fromArrowHeadStyle (optional)
Specify the arrow head style of the "from" side of the connector.
connectorCreatorInfo toArrowHeadStyle (optional)
Specify the arrow head style of the "to" side of the connector.
connectorCreatorInfo fromArrowHeadSize [verySmall | small | medium | large | extraLarge | jumbo | colossal] (optional)
Specify the arrow head size of the "from" side of the connector.
connectorCreatorInfo toArrowHeadSize [verySmall | small | medium | large | extraLarge | jumbo | colossal] (optional)
Specify the arrow head size of the "to" side of the connector.
connectorCreatorInfo dashes (optional) Specify the dashes pattern of the connector. A list of float, written in the pattern "%f, %f, %f, ...".
connectorCreatorInfo lineWeight (optional) Specify the weight of the connector.
connectorRules It is a collection of connectorRule.
connectorRule (1..*) Specify this connector can connect with what diagram element.
Description on Code:
VPShapeController (com.vp.plugin.diagram.VPShapeController)
It response to handle the outlook of the shape on the diagram.
Sample:
package sample.plugin.actions;
// import the necessaries
public class ShapeController implement com.vp.plugin.diagram.VPShapeController {
public void drawShape(
Graphics2D g, Paint lineColor, Paint fillColor, Stoke stroke,
Com.vp.plugin.diagram.VPShapeInfo shapeInfo )
{
// draw the shape by the graphics
// shapeInfo contains the information of the shape, e.g. the bounds of the shape.
}
public boolean contains(int x, int y, com.vp.plugin.diagram.VPShapeInfo shapeInfo) {
2 - 12

Plug-in User’s Guide Chapter 2 - Implementing Plugin
// check whether the x, y is inside the shape,
// it is used to checking what is selected by the user
}
}
Working with Models
Plugin Support provides interface for the developer to create, retrieve update and delete the models in VP-UML. The base class of the model is com.vp.plugin.model.IModelElement. All models are contained in the project (com.vp.plugin.model.IProject). Each model has a model type, to access all the model type, please refers to the class com.vp.plugin.model.IModelElementFactory, it is the class to create the models.
Creating Model
Developer can use the model element factory (com.vp.plugin.model.IModelElementFactory) to create the model. Or based on a parent model (com.vp.plugin.model.IModelElementParent) to create a child model.
IModelElementFactory can be access by IModelElementFactory.instance(). It provides the functions to create all the models.
IModelElementParent is subclass of IModelElement. It provides the function to create the child into it. If the parent class is more specified, it may support a more details function to create the child. For example, IClass is subclass of IModelElementParent, it provides createOperation() to create an operation into it.
Sample on Code:
/*
* create model by IModelElementFactory
* result of the 2 methods: "class model is created and added into the project"
*/
// assume in a code segment
IClass classModel1 = IModelElementFactory.instance().createClass();
IClass classModel2 = (IClass) IModelElementFactory.instance().create(IModelElementFactory.MODEL_TYPE_CLASS);
/*
* create model by IModelElementParent
* result of the first 2 methods, "operation model is created and added into the class model"
* result of the last method, "actor model is created and added into project", because actor cannot be the child of class model
*/
// assume in a code segment
IOperation operationModel1 = classModel1.createOperation();
IOperation operationModel2 = (IOperation) classModel1.create(IModelElementFactory.MODEL_TYPE_OPREATION);
IActor actorModel1 = (IActor) classModel1.create(IModelElementFactory.MODEL_TYPE_ACTOR);
2 - 13

Plug-in User’s Guide Chapter 2 - Implementing Plugin
Retrieving Model
Developer can use the project (com.vp.plugin.model.IProject) or the context (com.vp.plugin.action.VPContext) from ActionController to retrieve the models.
IProject is the project of VP-UML. The project contains all models, diagram and diagram elements. It provides function (modelElementIterator()) for the developer to iterate the models.
VPContext is the context of a popup menu. Developer can access the context by popup menu's action controller (com.vp.plugin.action.VPContextActionController). Context may contain a model element if the popup menu is shown on a diagram element or model.
Sample on Code:
/*
* retrieve model by IProject
*/
// assume in a code segment
IProject project = ApplicationManager.instance().getProjectManager().getProject();
Iterator iter = project.modelElementIterator();
while (iter.hasNext()) {
IModelEmenet modelElement = (IModelElement) iter.next();
// model element retrieved
}
/*
*retrieve model by VPContext
*/
// assume on a sub-class of com.vp.plugin.action.VPContextActionController
public void update(VPAction action, VPContext context) {
IModelElement modelElement = context.getModelElement();
// model element retrieved, but please take care,
// context.getModelElement() may return null if the popup menu is shown for the diagram
// or the selected diagram element doesn't refer to a model element.
}
/*
* retrieve relationship model from a class model
* there are 2 kinds of relationships: IRelationship and IEndRelationship
*/
// assume in a code segment
IClass classModel = ...; // retrieved the class model from somewhere
2 - 14

Plug-in User’s Guide Chapter 2 - Implementing Plugin // retrieve a generalization (IRelationship)
Iterator genIter = classModel.fromRelationshipIterator();
while (genIter.hasNext()) {
IRelationship relationship = (IRelationship) genIter.next();
IModelElement otherModel = relationship.getTo(); // found out the another side's model of the relationship}
// retrieve am association (IEndRelationship)
Iterator assoIter = classModel.fromRelationshipEndIterator();
while (assoIter.hasNext()) {
IRelationshipEnd relationshipEnd = (IRelationshipEnd) assoIter.next();
IModelElement otherModel = relationshipEnd.getEndRelationship().getToEnd().getModelElement(); }
Updating Model
Developer can call a set of get/set methods on a model. Different model type has different properties. For setting and getting the model's property, cast the IModelElement into it sub-class is necessary. For example, developer get the IModelElement from the popup menu's context. Developer check whether the model is a IClass, then developer cast the IModelElement into IClass, and call the function IClass.setVisibility(xxx).
Sample on Code:
/*
* update a class model
*/
// assume in a code segment
IModelElement model = ...; // model is retrieved from somewhere
If (IModelElementFactory.MODEL_TYPE_CLASS.equals(model.getModelType()) ) {
IClass classModel = (IClassModel) model;
// set the class to be 'private'
classModel.setVisibility(IClass.VISIBILITY_PRIVATE);
// set super class
IClass superClassModel = ...; // another class model is retrieved, it will be set to be the previous model's super class
IGeneralization generalizationModel = IModelElementFactory.instance().createGeneralization();
generalizationModel.setFrom(superClassModel);
generalizationModel.setTo(classModel);
// get all "setName" operation from the class and set to be "protected final"
Iterator operationIter = classModel.operationIterator();
while (operationIter.hasNext()) {
IOperation operation = (IOperation) operationIter.next();
2 - 15

Plug-in User’s Guide Chapter 2 - Implementing Plugin
if ("setName".equals(operation.getName()) ) {
operation.getJavaDetail(true).setJavaFinal(true);
operation.setVisibility(IOperation.VISIBILITY_PROTECTED);
}
}
}
Deleting Model
Developer can delete the model by simple way, just call the IModelElement.delete().
Working with Diagrams/Diagram Elements
Plugin Support provides interface for the developer to create, retrieve update and delete the diagrams or diagram elements in VP-UML. The base class of the diagram is com.vp.plugin.diagram.IDiagramUIModel. The base class of the diagram element is com.vp.plugin.diagram.DiagramElement. All diagrams are contained in the project (com.vp.plugin.model.IProject). And the diagram elements can be found in the diagrams. The diagram elements can contains by the diagrams.
Creating Diagrams/Diagram Elements
Developer can create the diagram or diagram element by com.vp.plugin.DiagramManager. DiagramManager can be access by ApplicationManager.instance().getDiagramManager().
Sample on Code:
// assume in a code segment
DiagramManager diagramManager = ApplicationManager.instance().getDiagramManager();
/*
* create diagram
*/
IDiagramUIModel diagram = diagramManager.createDiagram(DiagramManager.DIAGRAM_TYPE_CLASS_DIAGRAM);
/*
* create diagram element with exists models
*/
IModelElement classModel1 = ...; // retrieved a class model from somewhere
IModelElement packageModel1 = classModel1.getParent(); // assume the class model is contained by a package
IDiagramElement packageDiagramElement1 = diagramManager.createDiagramElement(diagram, packageModel1);
IDiagramElement classDiagramElement1 = diagramManager.createDiagramElement(diagram, classModel1);
// class's diagram element should be a shape, not a connector
packageDiagramElement1.addChild((IShapeUIModel) classDiagramElement1);
/*
2 - 16

Plug-in User’s Guide Chapter 2 - Implementing Plugin * create diagram element without models (the model will be created automatically)
*/
IDiagramElement newClassDiagramElement =
diagramManager.createDiagramElement(diagram, IClassDiagramUIModel.SHAPETYPE_CLASS);
IModelElement newClassModel = newClassDiagramElement.getModelElement();
/*
* open the created diagram
*/
diagramManager.openDiagram(diagram);
Retrieving Diagrams/Diagram Elements
Developer can use the project (com.vp.plugin.model.IProject) to retrieve the diagrams. Use a diagram (com.vp.plugin.diagram.IDiagramUIModel) to retrieve the contained diagram elements. Or use the context (com.vp.plugin.action.VPContext) from ActionController to retrieve the diagram and/or diagram element.
IProject is the project of VP-UML. The project contains all models, diagram and diagram elements. It provides function (diagramIterator()) for the developer to iterate the diagrams.
IDiagramUIModel is a diagram, which may contain many diagram elements.
VPContext is the context of a popup menu. Developer can access the context by popup menu's action controller (com.vp.plugin.action.VPContextActionController). Context may contain a diagram and/or diagram elements.
Sample on Code:
/*
* retrieve diagram from IProject
*/
// assume in a code segment
IProject project = ApplicationManager.instance().getProjectManager().getProject();
Iterator diagramIter = project.diagramIterator();
while (diagramIter.hasNext()) {
IDiagramUIModel diagram = (IDiagramUIModel) diagramIter.next();
/*
* retrieve diagram element from IDiagramUIModel
*/
Iterator diagramElementIter = diagram.diagramElementIterator();
while (diagramElementIter.hasNext()) {
IDiagramElement diagramElement = (IDiagramElement) diagramElementIter.next();
}
}
/*
* retrieve diagram and diagram element from VPContext
2 - 17

Plug-in User’s Guide Chapter 2 - Implementing Plugin */
// assume on a sub-class of com.vp.plugin.action.VPContextActionController
public void update(VPAction action, VPContext context) {
IDiagramUIModel diagram = context.getDiagram();
IDiagramElement diagramElement = context.getDiagramElement();
// diagramElement may be null, if the popup menu shown for the diagram
}
/*
* retrieve connected connector from a shape
* because a connector can connected with both Shape and Connector, please check the
* both getToShape() and getToConnector() or getFromShape() and getFromConnector()
*/
// assume in a code segment
IShapeUIModel shape = ...; // retrieved the shape from somewhere
IConnectUIModel[] connectors = shape.toFromConnectorArray();
int count = connectors == null ? 0 : connectors.length;
for (int i = 0; i < count; i++) {
IDiagramElement toDiagramElement = connectors[i].getToShape();
if (toDiagramElement == null) {
toDiagramElement = connectors[i].getToConnector();
}
}
Updateing Diagrams/Diagram Elements
IDiagramUIModel provides the functions to set the diagram outlook (size, background, etc...).
IDiagramElement is the super class of IShapeUIModel and IConnectorUIModel. Because there is difference between shape and connector, the IShapeUIModel and IConnectorUIModel provide different set of functions to update them.
Sample Code:
/*
* update a shape's size and set a connector's connector style
*/
// assume in a code segment
IShapeUIModel shape = ...; // retrieved the shape from somewhere
shape.setBounds(20, 20, 400, 400);
IConnector connector = ...; // retrieved the connector from somewhere
connector.setConnectorStyle(IConnector.CS_CURVE);
2 - 18

Plug-in User’s Guide Chapter 2 - Implementing Plugin
Deleting Diagrams/Diagram Elements
Developer can delete the diagram and diagram element by simple way, just call the IDiagramUIModel.delete() and IDiagramElement.delete().
Showing Dialog on VP-UML
Since VP-UML may be integrated with different platforms which may not support Swing (e.g. Eclipse, Visual Studio). That may make to hang on the process if using the Swing dialog technology (e.g. JOptionPane and JDialog). So, there is necessary to use a special method to show the dialog with Swing technology.
com.vp.plugin.ViewManager is an interface provides function for developer to show the dialog as same as show dialog by JOptionPane. Besides that, Viewmanager supports developer to show message on VP-UML's message pane and show custom dialog by implementing an interface (com.vp.plugin.view.IDialogHandler).
Same as JOptionPane, to show a dialog, it is better to have a component as the invoker/parent component. To get the component in VP-UML, just call ViewManager.getRootFrame().
Showing Message on Message Pane
ViewManager provides function showMessage(msg:String, msgTabId:String) to show the message on Message Pane. The parameter msg is the content of the message, msgTabId is the id to identify the tab on Message Pane, which can be defined by developer.
Sample on Code:
// assume in a code segment
ViewManager viewManager = ApplicationManager.instance().getViewManager();
viewManager.showMessage("Thank you for reading VP-UML Plugin Support User's Guide. >=)", "sample.plugin");
Showing Simple Message Dialog
In Swing, we may use the javax.swing.JOptionPane to show a message dialog (e.g. JOptionPane.showMessageDialog(...)). ViewManager provides the functions which simulate the JOptionPane. ViewManger provides a set of showXXXXDialog(...) functions for showing the dialog. The signature of the functions are same with the JOptionPane. Developer need not feel strange on calling the showXXXXDialog(...) functions.
Showing Custom Dialog
In Swing, we may implement the javax.swing.JDialog and add our component on the dialog's content pane. But in plugin, developer is required to implement an interface com.vp.plugin.view.IDialogHandler to work for the dialog.
IDialogHandler specify the behaviors of a dialog. There are 4 functions need to be implemented
getComponent() : java.awt.Component
It is called once before the dialog is shown. Developer should return the content of the dialog (similar to the content pane).
2 - 19

Plug-in User’s Guide Chapter 2 - Implementing Plugin prepare(dialog : com.vp.plugin.view.IDialog) : void
It is called after the getComponent(). A dialog is created on VP-UML internally (it still not shown out). Developer can set the outlook of the dialog on prepare(), such as title, bounds and modal, etc... For your convenience, the dialog will be shown on the screen center as default. If developer don't want change the location, there is no necessary to call the setLocation() function.
shown()
It is called when the dialog is shown. Developer may need to do something when the dialog is shown, such as checking something before user to input data on the dialog.
canClosed()
It is called when the dialog is closed by the user clicking on the close button of the frame. Developer may not allow the user to close the dialog (e.g. failed on validation check), then please return 'false' on canClosed().
Sample on Code:
package sample.plugin.dialog;
// assume imported necessary classes
public class CustomDialogHandler implements IDialogHandler {
private IDialog _dialog;
private Component _component;
private JTextField _inputField1, _inputField2, _answerField;
public Component getComponent() {
this._inputField1 = new JTextField(10); this._inputField2 = new JTextField(10);
this._answerField = new JTextField(10);
JLabel addLabel = new JLabel(" + "); JLabel equalLabel = new JLabel(" = ");
JButton okButton = new JButton("Apply");
okButton.addActionListener( new ActionListener() {
public void actionPerformed(ActionEvent e) { ok();}
} );
JPanel pane = new JPanel();
pane.add(this._inputField1); pane.add(addLabel); pane.add(this._inputField2);
pane.add(equalLabel); pane.add(this._answerField); pane.add(okButton);
this._component = pane;
return pane;
}
public void prepare(IDialog dialog) {
this._dialog = dialog;
dialog.setModal(true); dialog.setTitle("Maths Test"); dialog.setResizable( false ); dialog.pack();
this._inputField1.setText(String.valueOf((int)(Math.random()*10000)));
this._inputField2.setText(String.valueOf((int)(Math.random()*10000)));
}
2 - 20

Plug-in User’s Guide Chapter 2 - Implementing Plugin
public void shown() {
ApplicationManager.instance().getViewManager().showMessageDialog(
this._component, "Maths Test is started, you have an half hour to finish this test.",
"Maths Test", JOptionPane.INFORMATION_MESSAGE
);
}
public boolean canClosed() {
if (this.checkAnswer()) { return true; }
else {
ApplicationManager.instance().getViewManager().showMessageDialog(
this._component, "Incorrect",
"Maths Test", JOptionPane.ERROR_MESSAGE
);
return false;
}
}
private void ok() {
if ( this.checkAnswer() ) { this._dialog.close(); }
else {
ApplicationManager.instance().getViewManager().showMessageDialog(
this._component, "Incorrect",
"Maths Test", JOptionPane.ERROR_MESSAGE
);
}
}
private boolean checkAnswer() {
try {
int a = Integer.parseInt(this._inputField1.getText());
int b = Integer.parseInt(this._inputField2.getText());
int c = Integer.parseInt(this._answerField.getText());
return (a+b == c);
}
catch (Exception ex) { return false; }
}
}
2 - 21

Plug-in User’s Guide Chapter 2 - Implementing Plugin
2 - 22

3Deploying Plugin

Plug-in User’s Guide Chapter 3 - Deploying Plugin
Chapter 3 - Deploying Plugin
After prepared all the required files for a plugin (plugin.xml, plugin.properties, classes/libraries and other resources), developer can plug the plugin into VP-UML.
There should be a directory "plugins" on VPSuite home directory. Place the plugin files into "%VP_SUITE%\plugins\%PLUGIN_ID%\". %PLUGIN_ID% is a directory named as the plugin id (use the id as the directory name to avoid duplicated directories defined in "plugins")
The files should be placed as
%VP_SUITE%
bin
lib
...
plugins
sample.plugin (%PLUGIN_ID%)
plugin.xml
plugin.properties
classes
sample (package)
... (other packages or classes or resources)
lib
sampleplugin.jar
... (others .jar)
icons (others resources)
red.png
...(other resources)
3 - 2

Plug-in User’s Guide Chapter 3 - Deploying Plugin
On this case, the classes folder and the sampleplugin.jar contains the same classes of the plugin. It is unnecessary to place both of the into the plugin directory.
3 - 3

Plug-in User’s Guide Chapter 3 - Deploying Plugin
3 - 4