plum quilt village quilt village pillow village quilt village pillow · 2019-09-25 · 1 plum...
TRANSCRIPT

Height 51 cm
Height 60 cm
Height 60 cm
Height 8 cm without leaf
Height 51 cm
Height 8 cm without leaf
Cozy Stripe Quilt Plum Quilt
Plum Quilt Village Quilt
Village Quilt
Village Pillow
Village Pillow
Cozy Stripe Quilt Cozy Stripe Pillow
Cozy Stripe Pillow
Height ?
Height ?
Ikke laget enda

1
Plum Garden Village QuiltThis charming quilt is easier to make than it seems, creating a bright and fresh quilt that will look good all year long. Decorative extras in the form of patterned buttons and sweet little appliquéd bees add a special touch.
Materials • Fabric 1: fat eighth – Duck Nest plum (100198)• Fabric 2: fat eighth – Berry Jam peach (130056)• Fabric 3: fat eighth – Windflower red (100185)• Fabric 4: fat eighth – Brownie Stripe plum (130070)• Fabric 5: fat eighth – Spongecake Stripe teal (130066)• Fabric 6: fat eighth – Teardrop plum (100196)• Fabric 7: fat eighth – Flower Confetti sand (100184)• Fabric 8: fat eighth – Windflower lavender (100200)• Fabric 9: fat eighth – Autumn Bouquet peach (100182)• Fabric 10: fat eighth – Flower Confetti plum (100199)• Fabric 11: fat eighth – Scone Stripe teal (130064)• Fabric 12: fat eighth – Plum Dot dove white (130059)• Fabric 13: fat eighth – Duck Nest peach (100183)• Fabric 14: fat eighth – Berry Jam plum (130055)• Fabric 15: fat eighth – Autumn Bouquet lavender (100197)• Fabric 16: fat eighth – Teardrop peach (100181)• Fabric 17: fat eighth – Duck Nest blueberry (100193)• Fabric 18: ⅞yd (80cm) – Biscotti Plaid teal (130065)• Fabric 19: fat eighth – Flower Confetti nutmeg (100189)• Fabric 20: fat eighth – Berry Jam wicker (130058)• Fabric 21: fat eighth – Windflower blueberry (100195)• Fabric 22: fat eighth – Teardrop nutmeg (100186)• Fabric 23: fat eighth – Autumn Bouquet blue (100187)• Fabric 24: fat eighth – Duck Nest nutmeg (100188)• Fabric 25: fat eighth – Flower Confetti blue (100194)• Fabric 26: fat eighth – Teardrop blueberry (100191)• Fabric 27: fat eighth – Berry Jam blue (130057)• Fabric 28: fat eighth – Windflower nutmeg (100190)• Fabric 29: fat eighth – Autumn Bouquet teal (100192)• Fabric 30: fat eighth – Plum Dot nutmeg (130060)• Fabric 31: ¼yd (25cm) or fat quarter – Berry Jam teal (130054)• Fabric 32: 3in (7.6cm) square – Macaron Plaid blue (130063)• Fabric 33: 1⅜yd (1.25m) – Solid dove white (120001)• Backing fabric 3⅜yd (3m)• Wadding (batting) 59in x 71in (150cm x 180cm)• Binding fabric ½yd (50cm) – Berry Jam peach (130056)• Embroidery cotton (floss) in medium brown or grey for embroidering bee trails (if
required, see Step 19)• Thick paper and fabric glue for bee paper piece appliqué

2
• Two packs of Tilda ¾in (20mm) buttons (400025) and two packs of ⅝in (17mm) buttons(400024)
• Piecing and quilting threads• Quilter’s ruler, rotary cutter and mat
Fabric note: Only fat eighths can be used where stated in the Materials list – a long 1/8yd cannot be used as it will not be deep enough. A fat eighth is assumed to be at least 10½in x 18in (26.7cm x 45.7cm).
Finished Size 50in x 62½in (127cm x 159cm)
Notes • Fabric quantities given are based on a usable width of 42in (107cm).• Measurements are in imperial inches with metric conversions in brackets – use only one
system throughout (preferably imperial).• Press all fabrics before use.• Use ¼in (6mm) seams unless otherwise instructed.• Read all the instructions through before you start.• Check patterns to be used are printed out full size – use A4 paper size and 100% printing.• Copy the bee patterns onto thick paper.
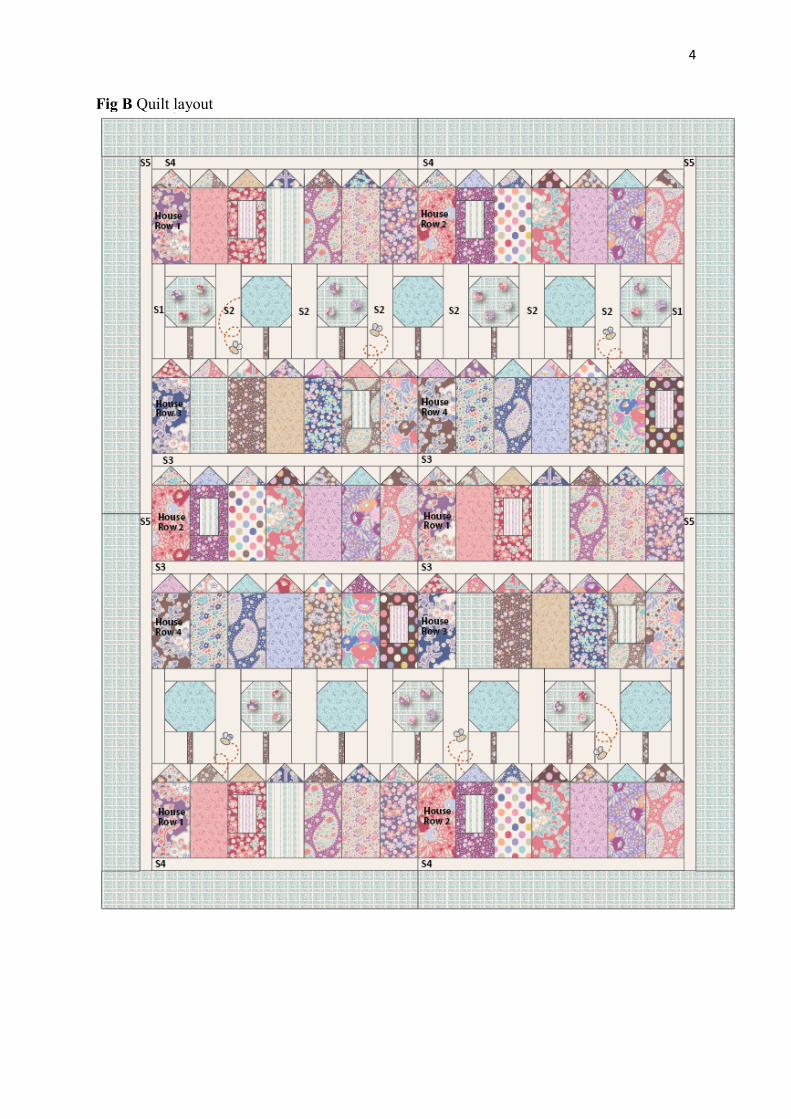
Preparation and Cutting Out1 This quilt is made up of two main blocks sewn together in rows – a Tree block and a House block, with the houses of two types. The Tree blocks are separated by vertical sashing in two different widths. The house rows are separated by narrow horizontal sashing. There is also a narrow sashing border and a wider outer border. The fabrics used are shown in Fig A and the quilt layout in Fig B.
2 Fig C shows the layout and cutting for the house blocks, and Fig D for the Tree block, so use these measurements when cutting out the fabrics for a block. Measurements include ¼in (6mm) seam allowances. The House blocks are made in groups of seven houses to form rows. These rows and their colourways are shown in Fig E. Make three each of House Rows 1 and 2 and two each of House Rows 3 and 4. There are only two colourways for the Tree blocks – see Fig F.
3 All of the sashing is cut from solid Fabric 33. Fig B identifies these pieces. For the tree row sashing cut the following pieces. • S1 – four 1½in x 8in (3.8cm x 20.3cm).• S2 – twelve 2½in x 8in (6.4cm x 20.3cm).For the horizontal sashing between the house rows cut four strips of S3, each 21½in x 1½in(54.6cm x 3.8cm). Join the strips together in pairs. (Note: When selvedges are removed fromthe solid fabric you may have a width of 42½in (108cm), which means that you could cut justtwo width-of-fabric strips, with no joins.)For the sashing border cut the following strips.• S4 – four 21½in x 1½in (54.6cm x 3.8cm) for the top and bottom of the quilt. Join the
strips together in pairs (see note above about using width-of-fabric strips).

3
• S5 – four 1½in x 28¾in (3.8cm x 73cm) for the sides of the quilt. Join the strips togetherin pairs.
4 The outer border is cut from Fabric 18. Cut the following strips. • Four strips 3½in x 28¾in (9cm x 73cm) for the sides of the quilt. Join the strips together
in pairs.• Four strips 25½in x 3½in (64.8cm x 9cm) for the top and bottom of the quilt. Join the
strips together in pairs.
5 Cut the backing fabric in half across the width. Sew the pieces together along the long side. Press the seam open and trim to a piece about 59in x 71in (150cm x 180cm).
6 From the binding fabric cut six strips 2½in (6.4cm) x width of fabric. Sew together end to end and press the seams open. Press in half along the length, wrong sides together.
Fig A Fabric swatches
4
Fig B Quilt layout

5
Fig C Layout and cutting for the House blocks
Fig D Layout and cutting for the Tree block

6
Fig E Fabrics used for the House blocks Bold numbers indicate fabrics used (see Fig A)

7
Fig F Fabrics used for the Tree blocks Bold numbers indicate fabrics used
Making the House Blocks 7 There are two types of house – one plain and one with a window. Both types have a roof made from a flying geese unit. The unit for the first house in House Row 1 will be described here. Take one 3½in x 2in (9cm x 5.1cm) rectangle (a) of Fabric 23 and two 2in (5.1cm) squares (b) of Fabric 33. On the wrong side of the two squares, draw a diagonal line with a pencil. Place a small square right sides together with the rectangle, aligning the corners as shown in Fig G, and with the marked line in the direction shown. Pin together if needed. Sew along the line. Trim excess fabric ¼in (6mm) away from the stitching line and press the triangle into place. Sew the second square to the rectangle in the same way on the opposite side and press. All of the roofs are made this way, changing fabrics as needed. Fig G Making a flying geese unit
8 Assemble a plain house by sewing the flying geese unit on top of the c rectangle, as shown in Fig H 1. The block should be 3½in x 8in (9cm x 20.3cm) at this stage. Make sixty plain house blocks in total, changing fabrics as in Fig E. 9 The house with a window needs more pieces, so follow Fig H 2 for the sequence of sewing. Start by sewing a piece d to both sides of piece e. Press the seams. Add piece c to the top and piece f to the bottom and press. Make a roof unit, sew it to the top of the block and press. The block should be 3½in x 8in (9cm x 20.3cm) at this stage. Make ten blocks like this in total, changing fabrics as in Fig E.

8
Fig H Making the House blocks
10 Sew seven house blocks in a row, as in Fig I (House Row 1 is shown). Press the seams in one direction. Assemble the rest of the house rows, following Fig E for the positions of the blocks and the number of rows to make. Fig I Sewing a House block row together
Making a Tree Block 11 All of the Tree blocks are made the same way. The only difference is the centre fabric, which is either Fabric 18 or Fabric 31. Pencil mark the diagonal line on the wrong side of

9
four 1½in (3.8cm) c squares of solid Fabric 33. Place these squares right sides together with a 4½in (11.4cm) b square of Fabric 18, as in Fig J 1. Pin if needed and then sew along the marked lines as shown. Trim off excess fabric ¼in (6mm) outside the sewn line and press the little triangles outwards. Sew the tree trunk unit by adding one d rectangle to each side of a narrow e rectangle and press the seams (Fig J 2). Sew rectangle a to the top of the tree unit and add the trunk unit to the bottom (Fig J 3), and then press seams. The block should be 4½in x 8in (11.4cm x 20.3cm) at this stage. Fig J Making a Tree block
12 Using the same process, make seven of Tree block 1 and seven of Tree block 2. For the upper tree row in the quilt take four of Tree 1 and three of Tree 2 and lay them out alternately with S2 sashing pieces between them and S1 sashing pieces at the ends of the row, as in Fig K. Sew the pieces together and press the seams in one direction. Make another row like this but this time begin with Tree 2. Fig K Sewing a Tree block row together with sashing
Assembling the Quilt 13 The quilt is assembled in rows. Start by sewing the house block rows together, as follows (see Fig B and Fig L).
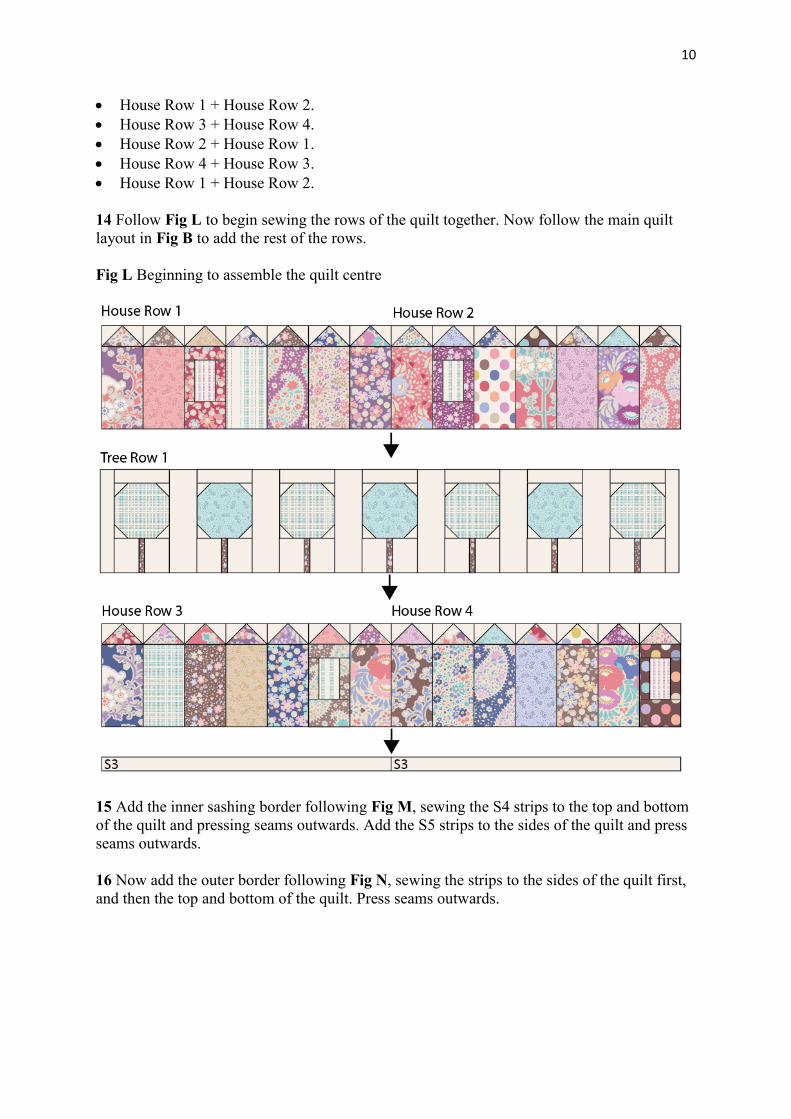
10
• House Row 1 + House Row 2. • House Row 3 + House Row 4. • House Row 2 + House Row 1. • House Row 4 + House Row 3. • House Row 1 + House Row 2. 14 Follow Fig L to begin sewing the rows of the quilt together. Now follow the main quilt layout in Fig B to add the rest of the rows. Fig L Beginning to assemble the quilt centre
15 Add the inner sashing border following Fig M, sewing the S4 strips to the top and bottom of the quilt and pressing seams outwards. Add the S5 strips to the sides of the quilt and press seams outwards. 16 Now add the outer border following Fig N, sewing the strips to the sides of the quilt first, and then the top and bottom of the quilt. Press seams outwards.

11
Fig M Adding the inner sashing border
Fig N Adding the outer border

12
Adding the Bee Appliqués 17 To make the bees a paper pieced method was used, folding the edge of the fabric over a paper template (see Fig O). For each bee you will need one body and two wings. For the body, cut out a piece of Fabric 20 using the pattern provided, adding an approximate ⅛in (3mm) seam allowance all round before cutting out. Snip into the seam allowance at intervals around the shape. Copy the pattern again onto paper and this time cut it out without a seam allowance. Lightly glue the pattern in the centre of the fabric shape, on the wrong side (Fig O 1). Smear a little fabric glue around the edges of the paper pattern and begin to fold and press the fabric edges over onto the paper, forming a smooth curve around the edge of the paper pattern (Fig O 2). Continue like this all round the shape. Remove the paper pattern and press firmly (Fig O 3). 18 Make the wings using the same technique, making one wing in Fabric 25 and one in Fabric 32. Make six bees like this in total. Fig O Making the bee appliqué
19 Sew the bees into place on the tree rows of the quilt, using matching thread and tiny stitches, arranging the bees so some face left and some face right and overlapping the pieces as shown in Fig P. The bee “flight paths” or trails can either be sewn freehand with machine quilting or with hand embroidery. Fig Q shows the curling shapes of these stitches, but you can mark your own if you prefer. If using hand embroidery, use running stitch and two or three strands of embroidery thread in a colour to suit the quilt, perhaps a medium brown or grey. Fig P Arranging the bees

13
Fig Q Sewing the bee trails
20 Buttons have been added to some of the trees but it is best to wait until all quilting is finished before adding these. Some trees have three buttons and some four buttons, with the sizes mixed (Fig R). Twenty-four buttons were used but you could use more if you wish. Fig B shows the positions but you could choose your own places. Sew the buttons in place with a pale thread and finish off neatly and securely at the back of the quilt. Fig R Adding the buttons
Quilting and Finishing 21 If you are quilting the quilt yourself you now need to make a quilt sandwich – you can do this in various ways, as follows. • Use large stitches to tack a grid through the layers of the quilt in both directions, with
lines about 4in (10cm) apart. • Use pins or safety pins to fix the layers together. • Use fabric glue, sprayed onto the wadding to fix the layers together. If you are sending the quilt off to be commercially long-arm quilted you won’t need to make a sandwich, as this is done when the quilt is mounted on the machine. When the layers of the quilt are secured you can quilt as desired. When quilting is complete, sew on the buttons. 22 Use the prepared double-fold binding strip to bind your quilt. Sew the binding to the quilt by pinning the raw edge of the folded binding against the raw edge of the quilt. Don’t start at
14
a corner. Using a ¼in (6mm) seam, sew the binding in place, starting at least 6in (15.2cm) away from the end of the binding. Sew to within a ¼in (6mm) of a corner and stop. Take the quilt off the machine and fold the binding upwards, creating a mitred corner. Hold this in place, fold the binding back down and pin it in place. Begin sewing the ¼in (6mm) seam again from the top of the folded binding to within ¼in (6mm) of the next corner and then repeat the folding process. Do this on all corners. Leave a 6in (15.2cm) ‘tail’ of unsewn binding at the end. 23 To join the two ends of the binding, open up the beginning and end of the binding tails, lay them flat and fold the ends back so the two ends touch. Mark these folds by creasing or with pins – this is where your seam needs to be. Open out the binding and sew the pieces together at these creases. Trim off excess fabric and press the seam. Re-fold the binding and finish stitching it in place on the front of the quilt. 24 With the quilt right side up, use a medium-hot iron to press the binding outwards all round. Now begin to turn the binding over to the back of the quilt, pinning it in place. Use matching sewing thread and tiny stitches to slipstitch the binding in place all round, creating neat mitres at each corner. Press the binding and your charming quilt is finished.
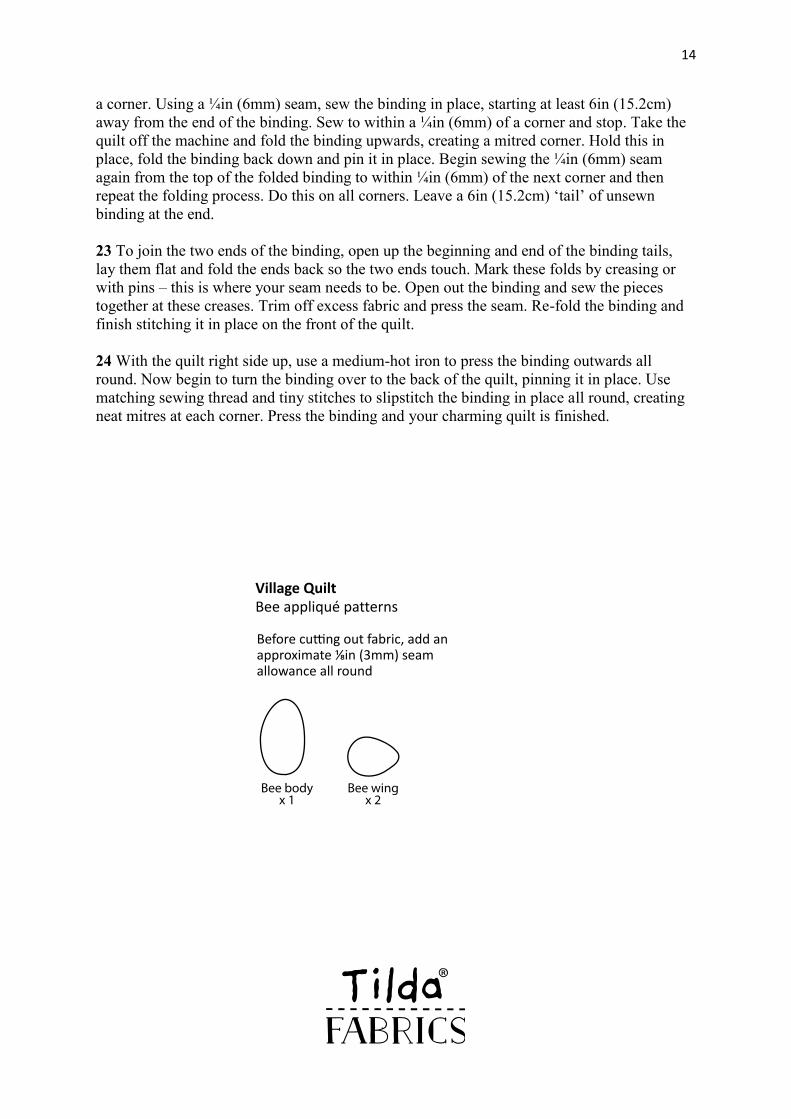
Bee body x 1
Village QuiltBee appliqué patterns
Bee wing x 2
Before cu�ng out fabric, add an approximate ⅛in (3mm) seam allowance all round