poltrona frau group oracle hyperion financial management...
TRANSCRIPT

Page 1 of 10
Poltrona Frau Group
Oracle Hyperion Financial Management Reporting

Page 2 of 10
Chapter 1 – Introduction to Financial Management
1. Aim and Function
In this module it has been shown how to use Hyperion Financial Management (Oracle HFM) and “Reporting” application (Management application) in which you can access all the Group Management Reporting information that has been uploaded.
2
HFM Reporting - Aim and function
• HFM Application for Management Reporting information
• Faster monthly and quarterly closings
• Web interface used for the Statutory Financial Statements (Fraustat HFM)
• Consolidation data with multiple aggregation path
HFM has been chosen as the tool for the creation of Financial Management Reporting of the
Group. It allows faster monthly and quarterly closings and makes the data collection with an
accessible web interface that is already well known by all Companies because used for the
Statutory Financial Statements (Fraustat HFM).
In addition to fulfilling database function for data collection and loading, the Hyperion system is
able to process and automate data consolidation (calculations, conversions, corporate and Entity /
Company consolidation adjustments, manual and automatic eliminations of any valued
Intercompany transactions) at each sub-Consolidated and Segment level of a Brand or a
Geographical Area and also at Group level.
The HFM Reporting database currently contains Monthly data Net Revenues (Sales) and quarterly Profit & Loss (P&L), required to all Companies for Actual Scenario (Sales and P&L from 2008), Budget Scenario (Sales from 2009, P&L from 2010), Forecast Scenario (Sales from 2009, P&L from June 2010) and Plan Scenario (Sales and P&L from 2012).
Financial accounts of DOS / Stores all over the world have been also included since the first quarter of 2009 as a part / “there of” the P&L of the Entity / Company of their reference.
Intercompany statements (for data consolidation) are always required and filled in the monthly Sales data forms of all Scenarios (Actual, Forecast, Budget and Plan).
Their data input in the P&L form has become mandatory starting from the Actual of the fourth quarter of December 2009 only (and it continues to be required for all quarterly closings). For
Page 3 of 10
previous quarters, Group Management Control Department proceeded to load manual eliminations and consolidation adjustments in the system (for the necessary realignment to values of Statutory, Fraustat HFM).
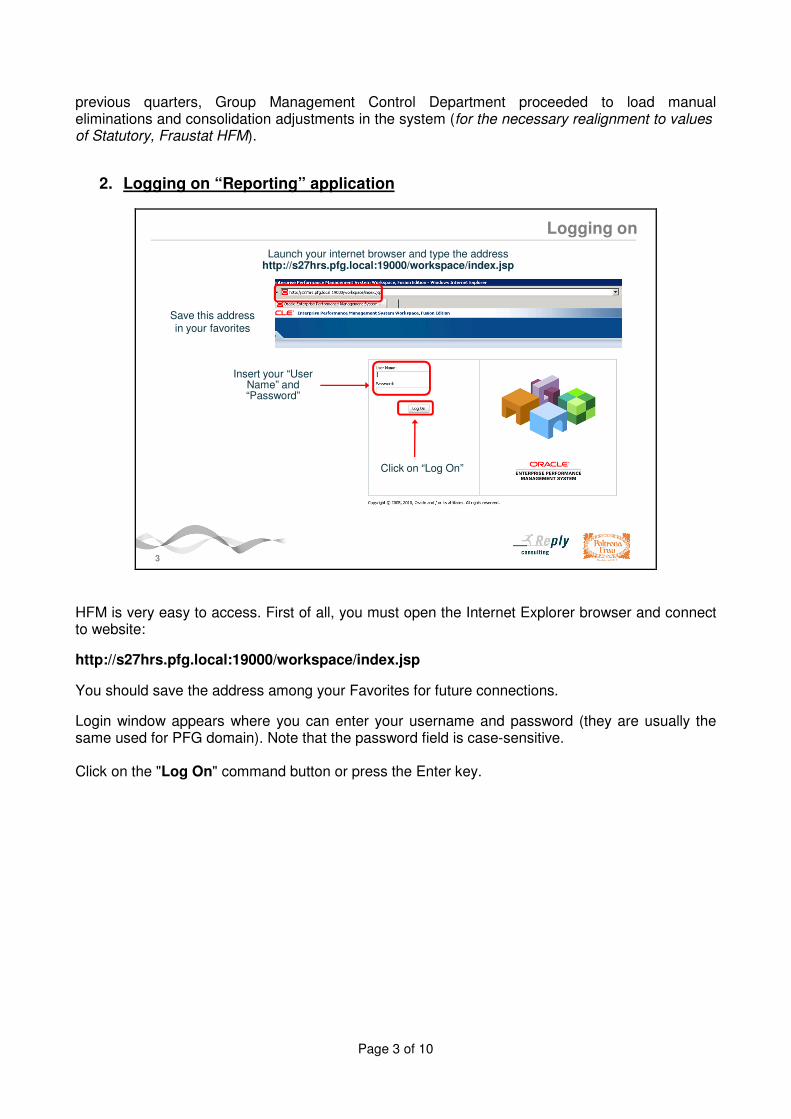
2. Logging on “Reporting” application
3
Logging on
Launch your internet browser and type the addresshttp://s27hrs.pfg.local:19000/workspace/index.jsp
Save this address in your favorites
Insert your “User Name” and “Password”
Click on “Log On”
HFM is very easy to access. First of all, you must open the Internet Explorer browser and connect to website:
http://s27hrs.pfg.local:19000/workspace/index.jsp
You should save the address among your Favorites for future connections.
Login window appears where you can enter your username and password (they are usually the same used for PFG domain). Note that the password field is case-sensitive. Click on the "Log On" command button or press the Enter key.
Page 4 of 10
4
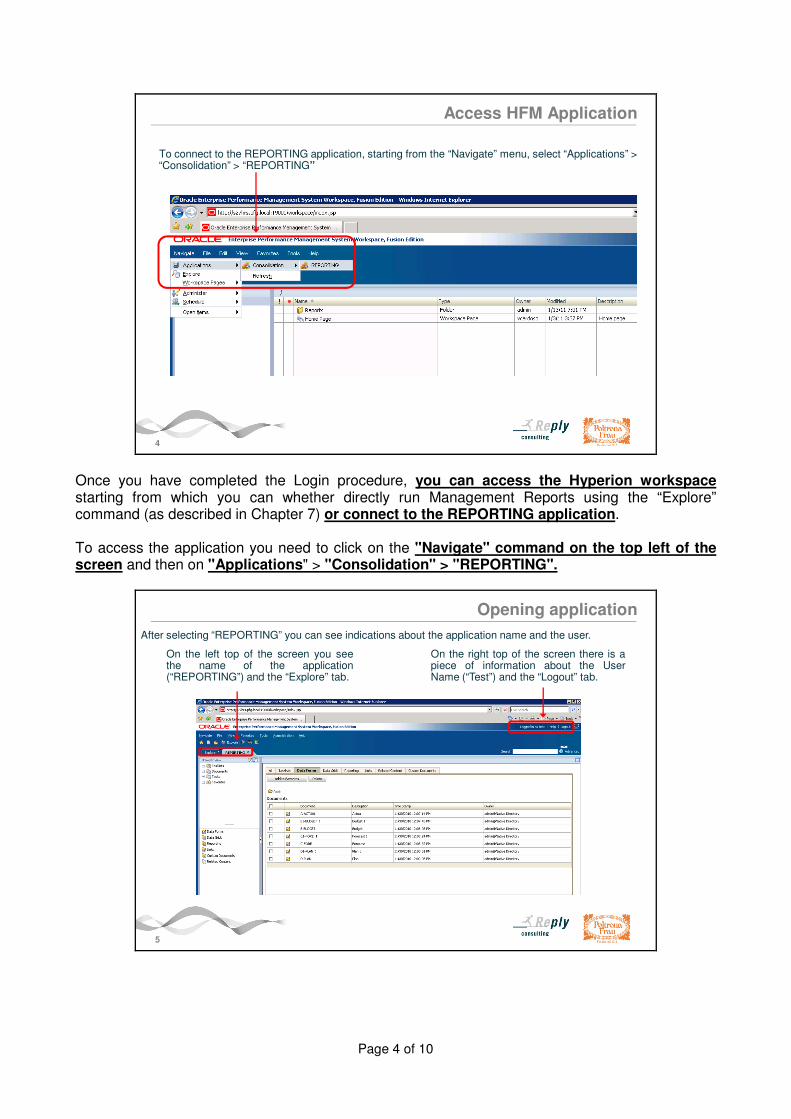
To connect to the REPORTING application, starting from the “Navigate” menu, select “Applications” >“Consolidation” > “REPORTING”
Access HFM Application
Once you have completed the Login procedure, you can access the Hyperion workspace starting from which you can whether directly run Management Reports using the “Explore” command (as described in Chapter 7) or connect to the REPORTING application. To access the application you need to click on the "Navigate" command on the top left of the screen and then on "Applications" > "Consolidation" > "REPORTING".
5
Opening application
After selecting “REPORTING” you can see indications about the application name and the user.
On the right top of the screen there is apiece of information about the UserName (“Test”) and the “Logout” tab.
On the left top of the screen you seethe name of the application(“REPORTING”) and the “Explore” tab.

Page 5 of 10
Once you are connected to REPORTING, you can see the application name at the top left of the screen, the user name at the top right corner, the Help command linked to Help on line and the “Logout” command.
6
Logging out
You can logout from the application by selecting the “File” menu and the “Logout” command or by clicking on the “Logout” command on the right top of the screen.
You must confirm the intention to logout answering “Yes”
Once you have finished your activity, you should log off from the application, by using the “Logout” command at the right top of the screen, also accessible starting from the “File” menu � “Logout” command. You have to confirm your disconnection intention by clicking on "Yes" to the question presented by the system. Then you come back to the Login window where you can close the browser.

Page 6 of 10
3. Navigating
7
Navigating - Manage Documents
After connecting to the application, click on the “Manage Documents” command button on the rightof “Explore” control to access all Data Forms (such as the “Web Data Entry Forms”, called“WDEF”, other Documents or System Reports.
The “Manage Documents” command is very useful every time you don’t know exactly your position into the system.
Now we can see how it is possible to navigate within the REPORTING application and what are
the main commands or functions that you should know.
The “Manage Documents” command button is located on the right of the “Explore” command
contained in the top left section of the screen: it is used to display the list of tabs / labels in the
central panel. This command is also useful to leave your current viewing (for example to exit a data
form) and to come back to the home screen. You can use this command button every time you do
not know your exact positioning in the application.

Page 7 of 10
8
Navigating
By selecting the “Related Content” tab / label, you can execute the “Management Reports” (also available in “Explore”).
By selecting the “Reporting” tab / label, you can access the SystemReports such as “Intercompany Matching” and “Journal Reports”.
Select the“BrowserView” to openthe so called“View Pane”.You can useits menugrouped byfolders toopendocuments(Data Forms)or to performa task.
By selecting the “Data Forms” tab / label, you can view all data formsorganized by folders represented by Scenarios.
The System Navigation is mainly made through the left side panel called “View Pane”. In order to
open it, if it is not already displayed after your access, click on the “Browser View” command.
Inside this panel there is a menu grouped by folders that contain different sections: the main ones
are "Documents", that contains the Data Forms grouped by other folders (represented by
Scenarios) and "Tasks" where you can run the commands for “Data Tasks” (like the “Process
Control” module, detailed in Chapter 6) and “Journal Task” (like the ”Process Journals” module,
described in Chapter 4).
If you want to run a command contained in the “Browser View”, you can click on the “+” of each
item to view its subfolders. In the bottom section of the “View Pane” is shown the content of the
selected folder. If you click on the desired command / folder, the related screen / content is
displayed in the central panel.
The navigation of the Documents and Tasks sections can also be made directly selecting chosen
tabs / labels in the central panel, for example by clicking on the “Reporting” tab / label to access
the System Reports such as “Intercompany Matching Reports” (described in Chapter 4) and
“Journal Reports” (described in Chapter 5), or by clicking on the “Related Content“ tab / label to
access the “Management Reports” (also available in “Explore”, described in Chapter 7).
Page 8 of 10
4. Setting Preferences
9
Set Preferences
From “File”menu select“Preferences”command
Click on the “General” tab / icon in the left pane and select“Explore” as “Content” starting from its dropdown list
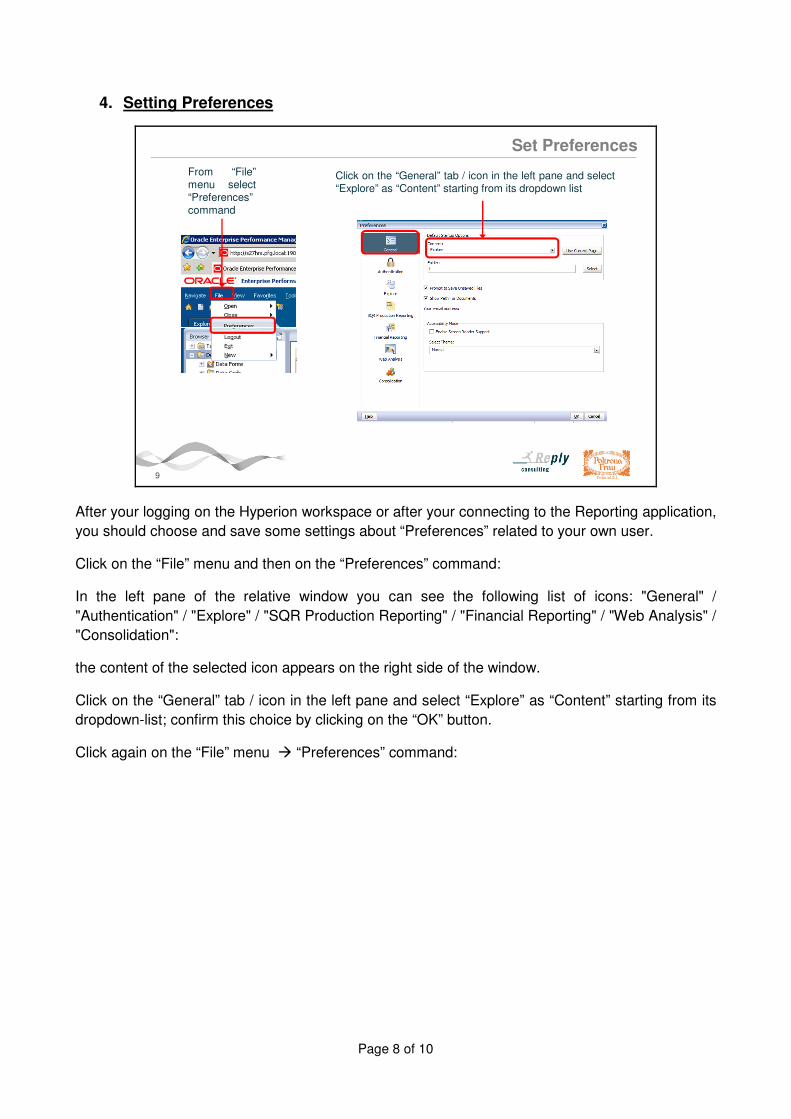
After your logging on the Hyperion workspace or after your connecting to the Reporting application,
you should choose and save some settings about “Preferences” related to your own user.
Click on the “File” menu and then on the “Preferences” command:
In the left pane of the relative window you can see the following list of icons: "General" /
"Authentication" / "Explore" / "SQR Production Reporting" / "Financial Reporting" / "Web Analysis" /
"Consolidation":
the content of the selected icon appears on the right side of the window.
Click on the “General” tab / icon in the left pane and select “Explore” as “Content” starting from its
dropdown-list; confirm this choice by clicking on the “OK” button.
Click again on the “File” menu � “Preferences” command:

Page 9 of 10
10
Set Preferences
Click on the“FinancialReporting” tab /icon in the leftpane.
Select thedesidedSeparatorCharacters toview correctlythe valuesstarting fromtheManagementReports
Select the option “On” for the “User Point of View”.
Click on the “Financial Reporting” tab / icon in the left pane:
Select "On" in correspondence of the option "User Point of View - Preview";
Select the “Number Formatting” that you would like to use in the Management Reports, on the
“Thousand Separator” and “Decimal Separator” tabs.
11
Set Preferences
Click on the “Consolidation”tab / icon in the left pane:select the “REPORTING”application from “List ofApplications” field and setthe desired “NumberFormatting” and “DefaultLanguage for Descriptions”from their relative fields.
Click on the “Consolidation” tab / icon in the left pane:

Page 10 of 10
In the first "List of Applications" field select "REPORTING" and set the desired “Decimal Character”
and “Thousands Separator Character” in the “Number Formatting” section: for example you can set
the comma in the "Decimal Character" field and the point in the "Thousands Separator Character"
field;
Scroll down using the scrollbar on the right side of the window:
In the “Language Support” section and in its “Default Language for Description” field select
“English”.
12
Set Preferences
Click on “Save” button toconfirm changes. Thewarning message informsyou that a re-login will benecessary.Select “Log Out” controland Log in again to makeyou settings effective.
Click on "Save" button to confirm your changes.
The system displays a “Warning” message to inform you that all these settings will be effective
only after your next connection. You have to “Log off” and “Log in” again in the Hyperion system.