polycom® msr series solution guide · and logitech c930e webcam. set up the msr100 bundle follow...
TRANSCRIPT
SOLUTION GUIDE | February 2018 | 3725-61579-002A
Polycom® MSR Series
Copyright© 2017, Polycom, Inc. All rights reserved. No part of this document may be reproduced, translated into another language or format, or transmitted in any form or by any means, electronic or mechanical, for any purpose, without the express written permission of Polycom, Inc.
6001 America Center DriveSan Jose, CA 95002USA
Trademarks Polycom®, the Polycom logo and the names and marks associated with Polycom products are trademarks and/or service marks of Polycom, Inc. and are registered and/or common law marks in the United States and various other countries.
All other trademarks are property of their respective owners. No portion hereof may be reproduced or transmitted in any form or by any means, for any purpose other than the recipient's personal use, without the express written permission of Polycom.
End User License Agreement By installing, copying, or otherwise using this product, you acknowledge that you have read, understand and agree to be bound by the terms and conditions of the End User License Agreement for this product. The EULA for this product is available on the Polycom Support page for the product.
Patent Information The accompanying product may be protected by one or more U.S. and foreign patents and/or pending patent applications held by Polycom, Inc.
Open Source Software Used in this Product This product may contain open source software. You may receive the open source software from Polycom up to three (3) years after the distribution date of the applicable product or software at a charge not greater than the cost to Polycom of shipping or distributing the software to you. To receive software information, as well as the open source software code used in this product, contact Polycom by email at
Disclaimer While Polycom uses reasonable efforts to include accurate and up-to-date information in this document, Polycom makes no warranties or representations as to its accuracy. Polycom assumes no liability or responsibility for any typographical or other errors or omissions in the content of this document.
Limitation of Liability Polycom and/or its respective suppliers make no representations about the suitability of the information contained in this document for any purpose. Information is provided "as is" without warranty of any kind and is subject to change without notice. The entire risk arising out of its use remains with the recipient. In no event shall Polycom and/or its respective suppliers be liable for any direct, consequential, incidental, special, punitive or other damages whatsoever (including without limitation, damages for loss of business profits, business interruption, or loss of business information), even if Polycom has been advised of the possibility of such damages.
Customer Feedback We are striving to improve our documentation quality and we appreciate your feedback. Email your opinions and comments to mailto:[email protected].
Polycom Support Visit the Polycom Support Center for End User License Agreements, software downloads, product documents, product licenses, troubleshooting tips, service requests, and more.

Contents
Introduction to Polycom MSR Series............................................................... 3
Setting Up Polycom MSR Series.......................................................................4MSR100 Bundle.................................................................................................................. 4
Set Up the MSR100 Bundle..................................................................................... 4MSR200 Bundle.................................................................................................................. 5
Set Up the MSR200 Bundle..................................................................................... 5Verify the Trio System Software Version..................................................................5Update the Base Profile for the Trio System............................................................ 6
MSR300 Bundle.................................................................................................................. 6Set Up the MSR300 Bundle..................................................................................... 6Update the Base Profile for the Trio System............................................................ 7Verify the Trio System Software Version..................................................................7Update the Polycom EagleEye IV USB Camera System Software..........................8Set the Camera Home Position................................................................................8Move to the Camera Home Position........................................................................ 8Waking the Polycom EagleEye IV USB Camera System.........................................8
MSR400 Bundle.................................................................................................................. 9Set Up the MSR400 Bundle..................................................................................... 9Update the CX5100 System Software Automatically through Control Panel......... 10Update the CX5100 System Software through USB Drive.....................................10
MSR500 Bundle................................................................................................................ 11Set Up the MSR500 Bundle with a Single Display................................................. 11Set Up the MSR500 Bundle with Dual Displays.....................................................11Update the Base Profile for the Trio System.......................................................... 12Verify the Trio System Software Version................................................................12Update the Polycom EagleEye IV USB Camera System Software........................13Set the Camera Home Position..............................................................................13Move to the Camera Home Position...................................................................... 13Waking the Polycom EagleEye IV USB Camera System.......................................13
Upgrading System Software through Windows Update.................................................... 14Windows Updates on MSR.................................................................................... 14
Troubleshooting............................................................................................... 15Video Does Not Play......................................................................................................... 15MSR Dock Does Not Detect the CX5100 System.............................................................15
Polycom, Inc. 1

Known Issues................................................................................................... 17
Contents
Polycom, Inc. 2
Introduction to Polycom MSR Series
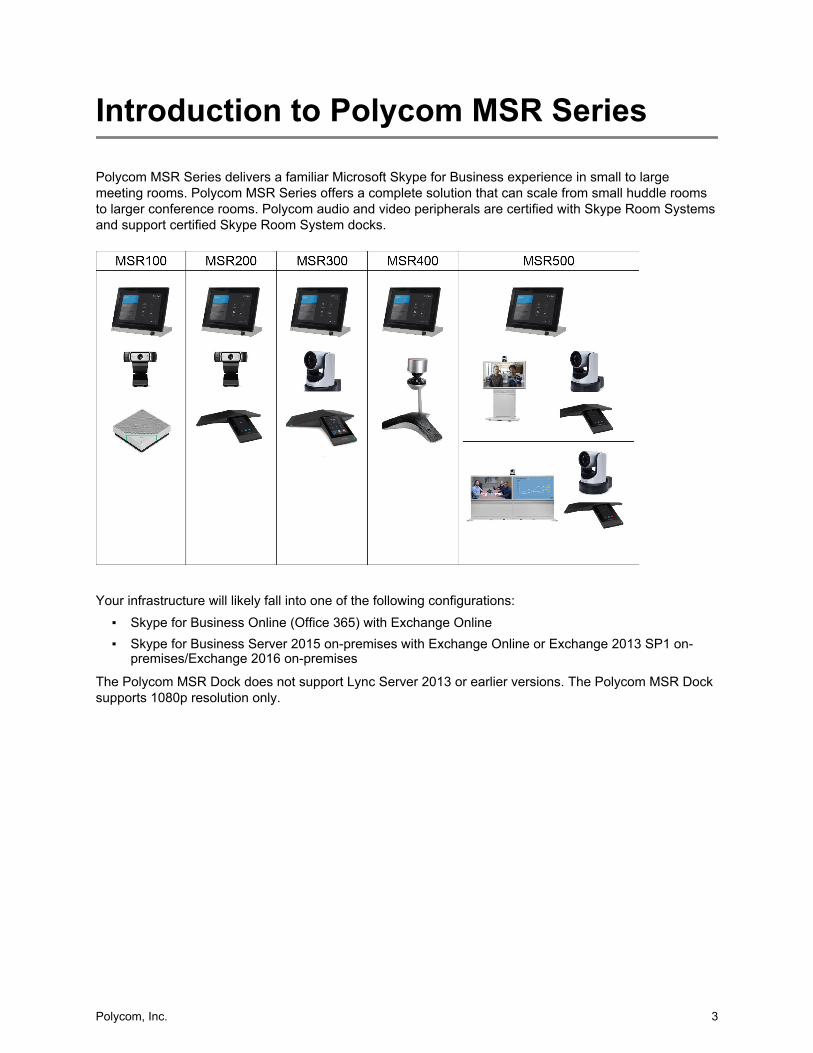
Polycom MSR Series delivers a familiar Microsoft Skype for Business experience in small to large meeting rooms. Polycom MSR Series offers a complete solution that can scale from small huddle rooms to larger conference rooms. Polycom audio and video peripherals are certified with Skype Room Systems and support certified Skype Room System docks.
Your infrastructure will likely fall into one of the following configurations:▪ Skype for Business Online (Office 365) with Exchange Online▪ Skype for Business Server 2015 on-premises with Exchange Online or Exchange 2013 SP1 on-
premises/Exchange 2016 on-premises
The Polycom MSR Dock does not support Lync Server 2013 or earlier versions. The Polycom MSR Dock supports 1080p resolution only.
Polycom, Inc. 3

Setting Up Polycom MSR SeriesTopics:
▪ MSR100 Bundle
▪ MSR200 Bundle
▪ MSR300 Bundle
▪ MSR400 Bundle
▪ MSR500 Bundle
▪ Upgrading System Software through Windows Update
MSR100 BundleThe MSR100 bundle includes the Polycom MSR Dock with Microsoft Surface Pro, the Polycom VoxBox, and Logitech c930e webcam.
Set Up the MSR100 BundleFollow the steps below to set up the MSR100 bundle.
Procedure
1. Connect the Logitech c930e webcam USB cable to a USB port on the Polycom MSR Dock.
2. Connect the security USB cable to the Polycom VoxBox using the supplied hardware.
3. Connect a lock, if needed.
4. Connect the other end of the USB cable to the Polycom MSR Dock.
Polycom, Inc. 4

MSR200 BundleThe MSR200 bundle includes the Polycom MSR Dock with Microsoft Surface Pro, Polycom Trio 8500, and Logitech c930e webcam.
Note: The Trio 8500 system is supported with software versions 5.5.2 and higher. For more information on Microsoft Skype Room Systems, refer to Microsoft Technet site.
Set Up the MSR200 BundleFollow the steps below to set up the MSR200 bundle.
Note: The Polycom Trio 8500 system must meet the Minimum Setup requirements. For more information on setting up the Trio 8500 system, refer to the Polycom Support site.
Procedure
1. Connect the power adapter or PoE cable to the Polycom Trio 8500 system.
2. Connect the Micro USB cable to the Micro-B USB port on the Polycom Trio 8500 system.
3. Connect the other end of the USB cable to a USB port on the Polycom MSR Dock.
4. Connect the Logitech c930e webcam USB cable to a USB port on the Polycom MSR Dock.
Verify the Trio System Software VersionYou can view the Trio system software version using the local interface, web browser or the Control Panel application.
Procedure
1. Do one of the following:
Setting Up Polycom MSR Series
Polycom, Inc. 5

▪ On the Trio system, go to Settings > Status > System Information. Enter the IP address of the Trio system in a web browser and enter the Admin password (the default password is 456).
The software version displays in the Home screen under UC Software Version.▪ In the Control Panel application software, enter the administrator password and click
System Status.
Update the Base Profile for the Trio SystemYou can use the Trio system as an audio speakerphone by setting the Base Profile to Skype USB Optimized.
Polycom recommends connecting the Trio system to the network while updating the base profile.
Procedure
1. Connect a USB cable from the Trio system to the MSR Dock.
2. Do one of the following:▪ In the Trio system web interface, go to Simple Setup > Base Profile, and select Skype
USB Optimized from the list and click Save.▪ On the Trio system, go to Setup > Advanced > Administrative Settings > Network
Configurations > Base Profile and select Skype USB Optimized.
MSR300 BundleThe MSR300 bundle includes the Polycom MSR Dock with Microsoft Surface Pro, Polycom Trio 8800, and Polycom EagleEye IV USB camera.
Note: The Trio 8800 system is supported with software versions 5.5.3 and higher. The Polycom EagleEye IV USB camera is supported with software versions 1.1 and higher. For more information on Microsoft Skype Room Systems, refer to Microsoft Technet site.
Set Up the MSR300 BundleFollow the steps below to set up the MSR300 bundle.
Procedure
1. Connect the power adapter or PoE cable to the Polycom Trio 8800 system.
2. Connect the Micro-B USB cable to the Micro-B USB port on the Polycom Trio 8800 system.
3. Connect the other end of the USB cable to a USB port on the Polycom MSR Dock.
4. Connect the USB Type B cable to the USB Type B port on the Polycom EagleEye IV USB camera.
5. Connect the other end of the USB cable to a USB port on the Polycom MSR Dock.
6. Connect the power cable to the Polycom EagleEye IV USB camera.
Setting Up Polycom MSR Series
Polycom, Inc. 6

Update the Base Profile for the Trio SystemYou can use the Trio system as an audio speakerphone by setting the Base Profile to Skype USB Optimized.
Polycom recommends connecting the Trio system to the network while updating the base profile.
Procedure
1. Connect a USB cable from the Trio system to the MSR Dock.
2. Do one of the following:▪ In the Trio system web interface, go to Simple Setup > Base Profile, and select Skype
USB Optimized from the list and click Save.▪ On the Trio system, go to Setup > Advanced > Administrative Settings > Network
Configurations > Base Profile and select Skype USB Optimized.
Verify the Trio System Software VersionYou can view the Trio system software version using the local interface, web browser or the Control Panel application.
Procedure
1. Do one of the following:▪ On the Trio system, go to Settings > Status > System Information. Enter the IP address of
the Trio system in a web browser and enter the Admin password (the default password is 456).
The software version displays in the Home screen under UC Software Version.▪ In the Control Panel application software, enter the administrator password and click
System Status.
Setting Up Polycom MSR Series
Polycom, Inc. 7
Update the Polycom EagleEye IV USB Camera System SoftwareYou can use a USB drive to update the camera system software version. The Polycom EagleEye IV USB camera system version 1.0.0.388 or later supports Windows Update.
Ensure the following before updating the camera system software:
▪ Use a USB drive with at least 64 MB of available space.▪ Make sure the file system is in FAT32 format.
Note: Do not remove the USB drive during the software update process.
Procedure
1. Download the latest software image of the camera system from the MSR Series page on the Polycom support site.
2. Copy the Polycom EagleEye IV USB camera image (polycom-MSRCam-x.x.x-xxx.tar.gz) into the USB root directory.
3. Plug in the Polycom EagleEye IV USB camera power cable to power on and allow the camera system to fully boot up.
4. Plug the USB drive into the Polycom EagleEye IV USB camera system.
The Polycom EagleEye IV USB camera system starts the image update and the LED blinks amber. The Polycom EagleEye IV USB camera system automatically reboots when the image update is complete. The camera tilts up and then down during the reboot.
5. Remove the USB drive.
Set the Camera Home PositionYou may want to set a camera Home position to use as a default.
Procedure
1. Press and hold the Select button for 5 seconds until the LED light blinks green.
Move to the Camera Home PositionYou may want to move to a previously set camera Home position.
Procedure
1. To move to camera Home position, press the Select button.
Waking the Polycom EagleEye IV USB Camera SystemYou can wake the Polycom EagleEye IV USB camera system in the following ways:
▪ Press any button on the remote control.▪ Send the video content.▪ Place a call.
Setting Up Polycom MSR Series
Polycom, Inc. 8

MSR400 BundleThe MSR400 bundle includes the Polycom MSR Dock with Microsoft Surface Pro and Polycom CX5100 system.
Note: Only Polycom CX5100 version 1.3.1 or later is compatible with the MSR400 bundle. The Windows update feature is only available with version 1.3.1 or later.
Set Up the MSR400 BundleFollow the steps below to set up the MSR400 bundle.
Note: The USB ICRON 2211 extender is not supported.
Procedure
1. Connect the USB cable to the USB port on the Polycom CX5100 Power Data Box.
2. Connect the other end of the USB cable to a USB port on the Polycom MSR Dock.
Setting Up Polycom MSR Series
Polycom, Inc. 9

Update the CX5100 System Software Automatically through Control PanelYou can configure the CX5100 unified conference station to check for available software updates automatically. You can set the frequency to check for software updates and update automatically when a new software version is detected in the software update server.
Note: Do not power off the CX5100 system during the software update.
Procedure
1. On your computer, start the CX5100 Control Panel application.
2. In the Profile Editor tab, select Software Update.
3. Enter the name of the server to check for the software in the Update Server field.
4. Select the frequency to check for the software updates in Update Frequency list.
5. Select the time to update the software when a new software version is detected in Update Time list.
6. Click Save.The CX5100 system retrieves the software updates from the server based on the chosen date and time.
Update the CX5100 System Software through USB DriveYou can use a USB drive to update the CX5100 system software.
Ensure the following while updating the CX5100 system software through a USB drive:▪ Make sure the file system is in FAT32 format.▪ Polycom recommends using a USB 2.0 drive.
Note: Do not remove the USB drive during the software update process.
Procedure
1. Download the latest software image of the CX5100 system from the CX5100 series page on Polycom support site.
2. Copy the Polycom CX5100 software image (polycom-cx5100cx5500-release-xxxx.tar) into the USB root directory.
3. Plug in the CX5100 system power cable to power on and allow the CX5100 system to fully boot up.
4. Connect the USB drive to the CX5100 system.The CX5100 system detects the USB drive and starts the update within 30 seconds. The mute key indicator lights blink and the system reboots several times during the update. The indicator lights stop blinking when the update is complete.
Setting Up Polycom MSR Series
Polycom, Inc. 10

MSR500 BundleThe MSR500 bundle includes a single or dual display (55" or 70") Medialign with Polycom MSR Dock with Microsoft Surface Pro, Polycom Trio 8800, and Polycom EagleEye IV USB camera.
Set Up the MSR500 Bundle with a Single DisplayFollow these steps to set up the MSR500 bundle with a single display.
Procedure
1. Connect the HDMI cable from the HDMI port on the MSR Dock to the HDMI port on the 55” or 70” display.
2. Connect the Micro-B USB/Type A USB cable from the Micro-B USB port on the Trio 8800 system to the Type A USB port on the MSR Dock.
3. Connect the Type B/Type A USB cable from the Type B USB port on the Polycom EagleEye IV USB camera to the Type A USB port on the MSR Dock.
Set Up the MSR500 Bundle with Dual DisplaysFollow these steps to set up the MSR500 bundle with dual displays.
Procedure
1. Connect the HDMI cable from the HDMI port on the MSR Dock to the HDMI port on the 55” or 70” display.
2. Connect the HDMI cable from the HDMI port on the MSR Dock to the HDMI port on the second 55” or 70” display.
Setting Up Polycom MSR Series
Polycom, Inc. 11
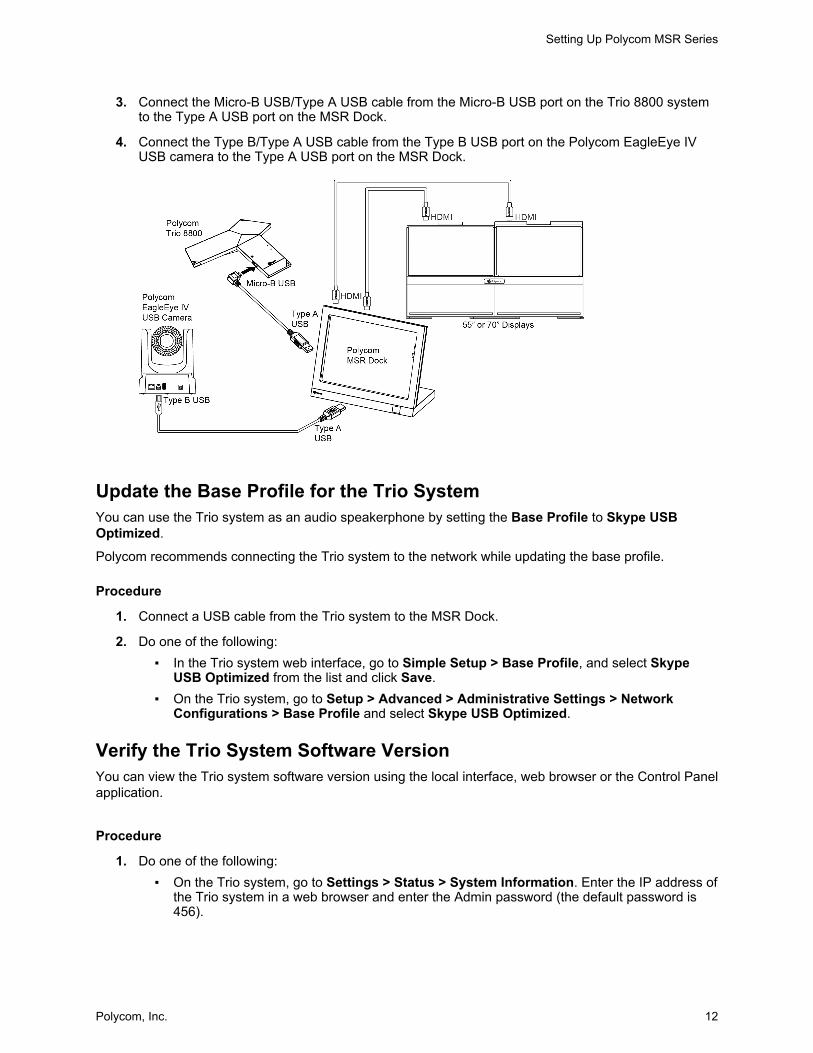
3. Connect the Micro-B USB/Type A USB cable from the Micro-B USB port on the Trio 8800 system to the Type A USB port on the MSR Dock.
4. Connect the Type B/Type A USB cable from the Type B USB port on the Polycom EagleEye IV USB camera to the Type A USB port on the MSR Dock.
Update the Base Profile for the Trio SystemYou can use the Trio system as an audio speakerphone by setting the Base Profile to Skype USB Optimized.
Polycom recommends connecting the Trio system to the network while updating the base profile.
Procedure
1. Connect a USB cable from the Trio system to the MSR Dock.
2. Do one of the following:▪ In the Trio system web interface, go to Simple Setup > Base Profile, and select Skype
USB Optimized from the list and click Save.▪ On the Trio system, go to Setup > Advanced > Administrative Settings > Network
Configurations > Base Profile and select Skype USB Optimized.
Verify the Trio System Software VersionYou can view the Trio system software version using the local interface, web browser or the Control Panel application.
Procedure
1. Do one of the following:▪ On the Trio system, go to Settings > Status > System Information. Enter the IP address of
the Trio system in a web browser and enter the Admin password (the default password is 456).
Setting Up Polycom MSR Series
Polycom, Inc. 12
The software version displays in the Home screen under UC Software Version.▪ In the Control Panel application software, enter the administrator password and click
System Status.
Update the Polycom EagleEye IV USB Camera System SoftwareYou can use a USB drive to update the camera system software version. The Polycom EagleEye IV USB camera system version 1.0.0.388 or later supports Windows Update.
Ensure the following before updating the camera system software:
▪ Use a USB drive with at least 64 MB of available space.▪ Make sure the file system is in FAT32 format.
Note: Do not remove the USB drive during the software update process.
Procedure
1. Download the latest software image of the camera system from the MSR Series page on the Polycom support site.
2. Copy the Polycom EagleEye IV USB camera image (polycom-MSRCam-x.x.x-xxx.tar.gz) into the USB root directory.
3. Plug in the Polycom EagleEye IV USB camera power cable to power on and allow the camera system to fully boot up.
4. Plug the USB drive into the Polycom EagleEye IV USB camera system.
The Polycom EagleEye IV USB camera system starts the image update and the LED blinks amber. The Polycom EagleEye IV USB camera system automatically reboots when the image update is complete. The camera tilts up and then down during the reboot.
5. Remove the USB drive.
Set the Camera Home PositionYou may want to set a camera Home position to use as a default.
Procedure
1. Press and hold the Select button for 5 seconds until the LED light blinks green.
Move to the Camera Home PositionYou may want to move to a previously set camera Home position.
Procedure
1. To move to camera Home position, press the Select button.
Waking the Polycom EagleEye IV USB Camera SystemYou can wake the Polycom EagleEye IV USB camera system in the following ways:
▪ Press any button on the remote control.
Setting Up Polycom MSR Series
Polycom, Inc. 13

▪ Send the video content.▪ Place a call.
Upgrading System Software through Windows UpdateThe Windows Update server automatically installs the USB driver and system software update package to the MSR system according to the Windows Update server task self-rule.
While performing a Windows software upgrade, be aware of the following:▪ You can manually update the software by checking Windows Update.▪ If the system is busy, it is not updated with the latest software. Disconnect the USB cable from the
system and re-connect the USB cable to install the Windows updates.▪ When the MSR Dock downloads a firmware update from the Windows Update server and the
connected device is running an unsupported software version, the system prompts to update to the latest software version.
▪ Process logs are viewed in the Windows Event log. Note that the device update result is not currently valid.
▪ The Windows software upgrade is supported for Windows 10 64-bit operating systems only.
Windows Updates on MSRYou can check for the latest software updates from Microsoft. These updates also update the camera software to the latest version.
Procedure
1. On the MSR screen, click Settings.
2. Enter the administrator password to access Windows Settings.
3. Go to Windows Settings > Admin Sign-In > Administrator.
4. Enter the administrator password.
5. On the bottom toolbar, search for Windows Update and press Enter.
6. Click on Check for updates in the Windows Update screen.
Setting Up Polycom MSR Series
Polycom, Inc. 14

TroubleshootingTopics:
▪ Video Does Not Play
▪ MSR Dock Does Not Detect the CX5100 System
Video Does Not PlaySymptom: Video does not play on a system when you use a USB camera.
Workaround:You can connect your USB camera to a computer to troubleshoot the video problems.
1. Connect the camera to the USB port on your computer.
Note: Polycom recommends using a computer running the Windows 10 64-bit operating system.
2. Do one of the following:▪ In the Polycom RealPresence Desktop, go to Settings > Camera.▪ In the Skype for Business client, go to Tools > Video Devices.
3. Select USB camera as the video input camera.
Make a video call and check if the video appears.
4. Go to Control Panel > Device Manager > Imaging Devices and check if the USB camera is listed.
If the USB camera does not show under Imaging Devices, run the Windows Update again.
If the camera is still not listed under Imaging Devices, replace the camera.
MSR Dock Does Not Detect the CX5100 SystemSymptom: MSR Dock does not detect the CX5100 system when connected using a USB cable.
Workaround:You can connect the CX5100 system to the MSR Dock to troubleshoot the connectivity problems.
1. Connect the CX5100 system to the MSR Dock.
The Windows Update will automatically begin on the MSR Dock.
2. If the Windows Update does not start automatically, run the Windows Update manually on the MSR Dock.
3. Verify the software version of the CX5100 system.
Polycom, Inc. 15

The software version of the CX5100 system must be 1.3.1 or later.
4. If the MSR Dock does not detect the CX5100 system after the Windows update, connect the CX5100 system to a computer running Windows 10 64 bit operating system.
5. Do one of the following:▪ Go to Control Panel > Device Manager > Sound, video and game controllers and check
if CX5100 system is listed.▪ In the Skype for Business client, go to Tools > Video Devices.▪ In the Skype for Business client, go to Tools > Audio Devices.
If the CX5100 system is still not listed under Imaging Devices, replace the CX5100 system.
Troubleshooting
Polycom, Inc. 16

Known Issues
The following table lists all known issues in all releases of MSR Solution.
Note: These release notes do not provide a complete listing of all known issues that are included in the software. Issues not expected to significantly impact customers with standard voice or video conferencing environments may not be included. In addition, the information in these release notes is provided as-is at the time of release and is subject to change without notice.
Known Issues
Category Issue ID Release Description Workaround
MSR Dock
USBCMRA-128
1.0 When in a call, HDMI In can only display content video, not audio. When out of a call, HDMI In supports content with video and audio. Ocassionally, when out of a call, there is no audio.
Un-plug and re-plug the HDMI cable.
MSR Dock
USBCMRA-161
1.0 The GL2250 display is not supported. The HDMI output does not work with the MSR Dock.
Do not use a GL2250 display.
MSR Dock
USBCMRA-129
1.0 In some instances, the HDMI content may not display clearly with some resolutions set on a computer.
Change the resolution on the computer.
MSR Dock
USBCMRA-262
1.0 When a laptop is connected to the MSR Dock and shares content, the MSR application freezes.
Disconnect the HDMI cable from the MSR Dock and re-launch the MSR application.
Polycom, Inc. 17