portable evaporative air cooler owner’s manual€¦ · portable evaporative air cooler owner’s...
TRANSCRIPT
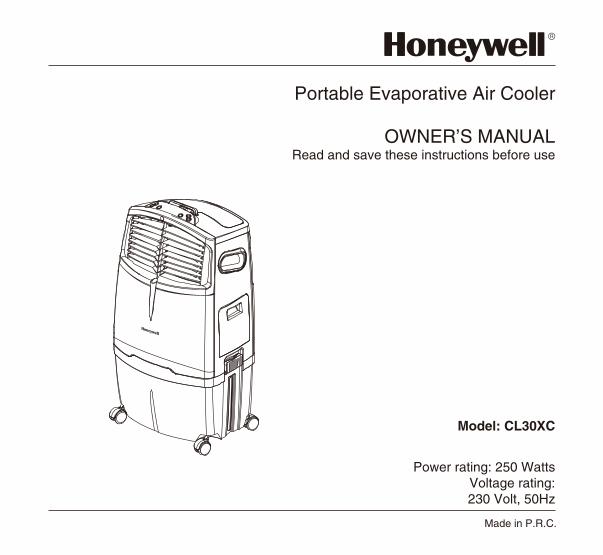
Portable Evaporative Air Cooler
OWNER’S MANUALRead and save these instructions before use
Model: CL30XC
Power rating: 250 Watts
Made in P.R.C.
Voltage rating:230 Volt, 50Hz
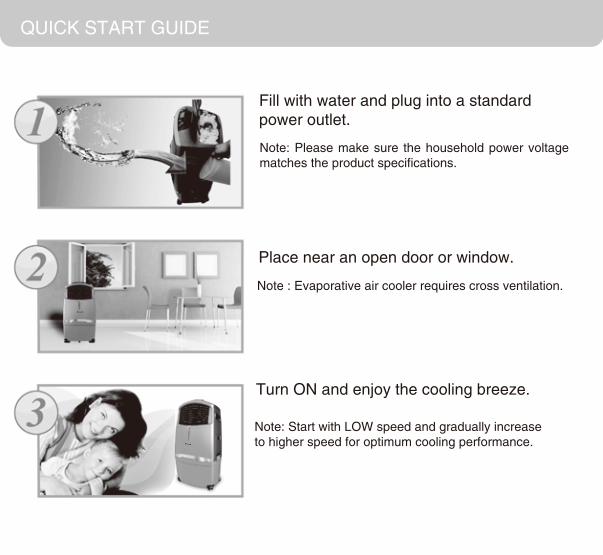
QUICK START GUIDE
Fill with water and plug into a standardpower outlet.
Place near an open door or window.
Note : Evaporative air cooler requires cross ventilation.
Turn ON and enjoy the cooling breeze.
Note: Start with LOW speed and gradually increaseto higher speed for optimum cooling performance.
Note: Please make sure the household power voltage matches the product specifications.
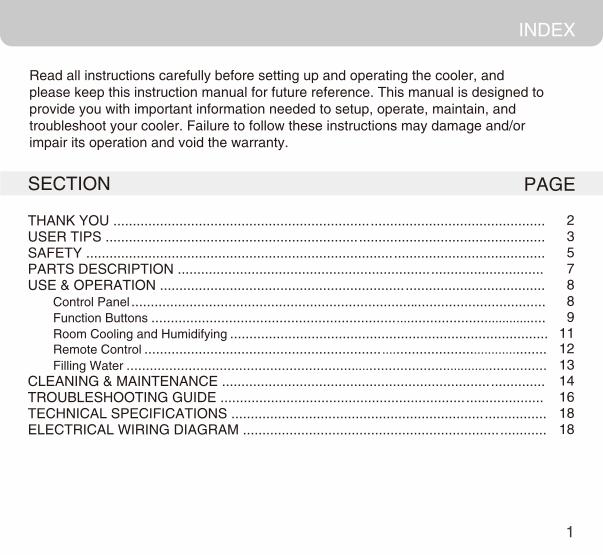
SECTION PAGE
.............................................................................................
....................................................................
....................................
..................................
............................
23578
14161818
INDEX
1
........................................................... .................... ...............
.......................................................................................................
............................................................................................................. ............ 13
........................................................................................................... 89
THANK YOU ..................................................................USER TIPS .................................................................SAFETY ...............................................................................PARTS DESCRIPTION .................................................................USE & OPERATION ...............................................................
CLEANING & MAINTENANCE .....................................................................TROUBLESHOOTING GUIDE ...............................................................TECHNICAL SPECIFICATIONS .................................................................ELECTRICAL WIRING DIAGRAM ..................................................................
Filling Water
Function Buttons
Remote Control
Control Panel
Room Cooling and Humidifying .................................................................................. 1112
Read all instructions carefully before setting up and operating the cooler, and please keep this instruction manual for future reference. This manual is designed to provide you with important information needed to setup, operate, maintain, and troubleshoot your cooler. Failure to follow these instructions may damage and/or impair its operation and void the warranty.
THANK YOU
2
Congratulations on your purchase of this versatile Honeywell Evaporative Air Cooler. For optimum cooling from your cooler, fill the water tank to maximum level and load ice inside the ice compartment before you turn on your air cooler.
Cooler Location (Important - Please Read!)Place the cooler in front of an open door or window. Ensure that there is adequate cross -ventilation in the room by leaving a door or window open opposite the cooler.Following these guideline will ensure your cooler will work as effectively as possible.
Not an Air Conditioner (Important - Please Read!)The evaporative air cooler is not an air conditioner as it does not use a compressor or refrig-erant gas. It should not be expected to cool as efficiently as a refrigerated air conditioner.

USER TIPS
3
Pump
Water
Honeycomb Cooling Media
Evaporative Air Cooling Mechanism
Warm and
dry air
Cool and
humid air
Energy efficient, No compressor
Honeywell Evaporative Air Coolers are built to maximize energy efficiency and keep costs low. Warm air is drawn into the cooler through a dust and odor-reducing carbon filter and enters the Honeycomb Cooling Media. Water pumped from the tank pours over the honeycomb media. As the warm air passes through the media, the water absorbs the heat, naturally cooling and humidi-fying the air. A fan propels the cooled air out into the room. This no-compressor system cools naturally, efficiently and inexpensively.
NOTE
4
USER TIPS
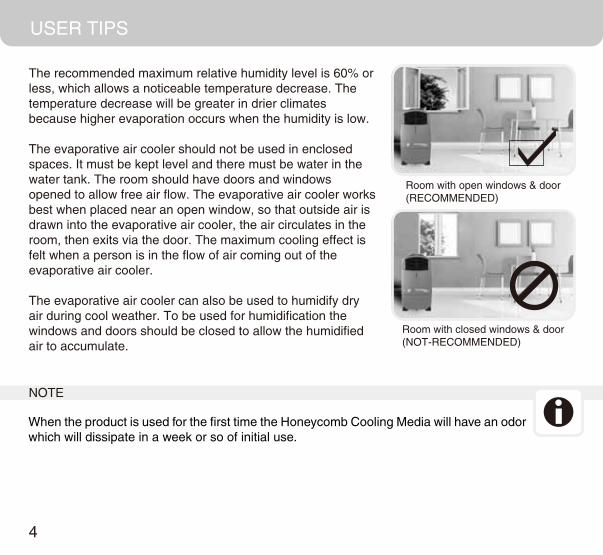
Room with open windows & door(RECOMMENDED)
Room with closed windows & door(NOT-RECOMMENDED)
When the product is used for the first time the Honeycomb Cooling Media will have an odor which will dissipate in a week or so of initial use.
The recommended maximum relative humidity level is 60% orless, which allows a noticeable temperature decrease. Thetemperature decrease will be greater in drier climates because higher evaporation occurs when the humidity is low.
The evaporative air cooler should not be used in enclosedspaces. It must be kept level and there must be water in thewater tank. The room should have doors and windows opened to allow free air flow. The evaporative air cooler works best when placed near an open window, so that outside air is drawn into the evaporative air cooler, the air circulates in the room, then exits via the door. The maximum cooling effect is felt when a person is in the flow of air coming out of the evaporative air cooler.
The evaporative air cooler can also be used to humidify dry air during cool weather. To be used for humidification thewindows and doors should be closed to allow the humidifiedair to accumulate.

READ AND SAVE THESE INSTRUCTIONS:
When using electrical appliances, basic safety precautions should always be followed:
SAFETY
230 Volt 50 Hz
SHOCK HAZARD
WATER LEVEL INDICATOR
5
•
•
•
••
•
•
•
•
Your cooler runs on 230 Volt AC, 50 Hz current. Check thehousehold voltage to ensure it matches the appliance's ratespecification.Before operating the product remove it from its packagingand check that it is in good condition.DO NOT operate any product with a damaged cord or plug.We recommend not using an extension cord with this appli-ance.DO NOT run power cord under carpeting, or cover it with rugsor runners. Keep the cord away from areas where it may betripped over.Always unplug the product before refilling the water tank.Always unplug the appliance from the power source beforecleaning, servicing or relocating the unit.Remove the power cord from the electrical receptacle bygrasping and pulling on the power cord plug-end only, neverpull the cord.DO NOT use the product in areas where gasoline, paint orother flammable goods and objects are stored.When using the ''COOL'' setting, check the water tank toensure that it is full. Operation of this cooler on the ''COOL''setting with an empty tank may result in damage to the waterpump.

FLOOR LEVEL
6
SAFETY
••
•
•
•
•
•
•
•
•
•
•
•
DO NOT attempt to repair or adjust any electrical or mechani-cal functions of the cooler, as this may void the warranty.DO NOT cover the air inlet or outlet on the appliance as this may cause motor damage.DO NOT insert or allow objects to enter any ventilation orexhaust opening as this may damage the product and couldcause an electrical shock or fire.DO NOT operate with the Honeycomb media removed as thiswill overload and damage the motor.DO NOT leave the operating appliance unattended for anyextended period of time.DO NOT let children play with this appliance, packaging orplastic bags.If the unit is damaged or it malfunctions, do not continue tooperate it. Refer to the troubleshooting section and seekprofessional advice.Place the unit on a level floor.This product is not intended for use in wet or damp locations.DO NOT use in bathrooms. Never locate the product whereit may fall into a bathtub or other water container.Store in a dry area when not in use.This appliance is not intended for use by persons (includingchildren or elderly) with reduced physical, sensory or mentalcapabilities, or lack of experience and knowledge, unless they have been given supervision or instruction concerning use of the appliance by a person responsible for their safety.Always grip the side handles to move the cooler.
7
6
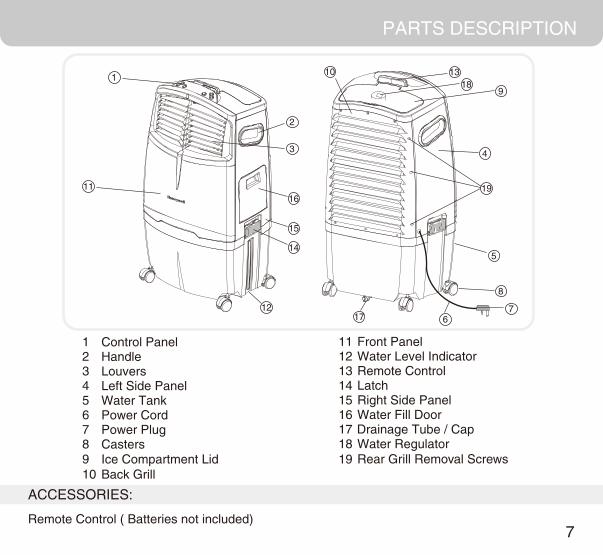
Control PanelHandleLouversLeft Side PanelWater TankPower CordPower PlugCasters
Front PanelWater Level IndicatorRemote Control LatchRight Side PanelWater Fill Door
12345678
Ice Compartment LidBack Grill
910
1112131415161718 Water Regulator
Rear Grill Removal Screws 19
PARTS DESCRIPTION
1
11
1217
14
15
16
13
2
43
5
8
918
10
ACCESSORIES:
Remote Control ( Batteries not included)
7
Drainage Tube / Cap
19

8
CONTROL PANEL
USE & OPERATION
Icons on LCDCool
Fan operating
SleepLow speed
Medium speed
High speed
Swing
Time delay set
COOL
SPEED
SLEEPTIMER
SWING
USE & OPERATION
9
FUNCTION BUTTONS
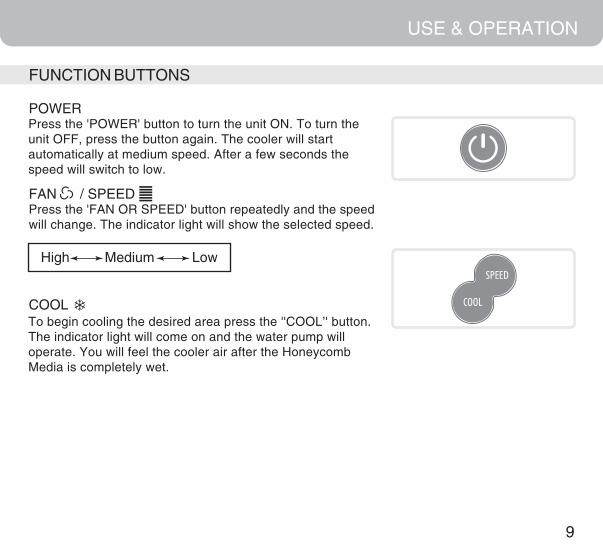
POWER
FAN / SPEEDPress the 'FAN OR SPEED' button repeatedly and the speedwill change. The indicator light will show the selected speed.
COOL
High Medium Low
COOL
SPEED
Press the 'POWER' button to turn the unit ON. To turn the unit OFF, press the button again. The cooler will start automatically at medium speed. After a few seconds the speed will switch to low.
To begin cooling the desired area press the ''COOL’' button. The indicator light will come on and the water pump will operate. You will feel the cooler air after the Honeycomb Media is completely wet.
USE & OPERATION
10
SLEEP
TIMER
TIMER
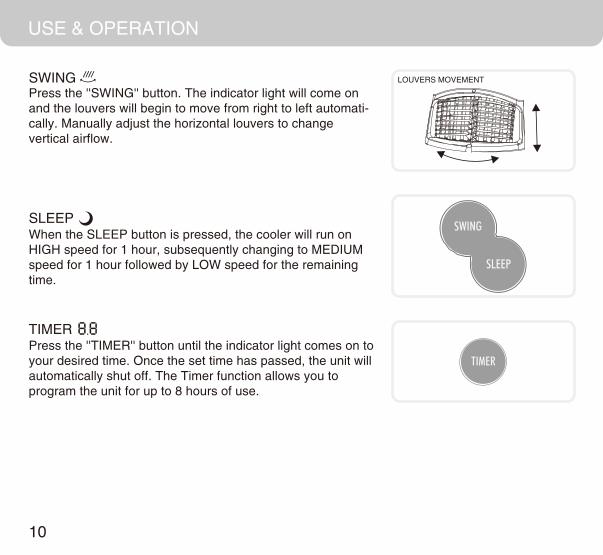
SWING LOUVERS MOVEMENT
SLEEP
SWING
Press the ''TIMER'' button until the indicator light comes on toyour desired time. Once the set time has passed, the unit willautomatically shut off. The Timer function allows you to program the unit for up to 8 hours of use.
When the SLEEP button is pressed, the cooler will run onHIGH speed for 1 hour, subsequently changing to MEDIUMspeed for 1 hour followed by LOW speed for the remainingtime.
Press the ''SWING'' button. The indicator light will come onand the louvers will begin to move from right to left automati-cally. Manually adjust the horizontal louvers to change vertical airflow.
USE & OPERATION
ROOM COOLING AND HUMIDIFYING
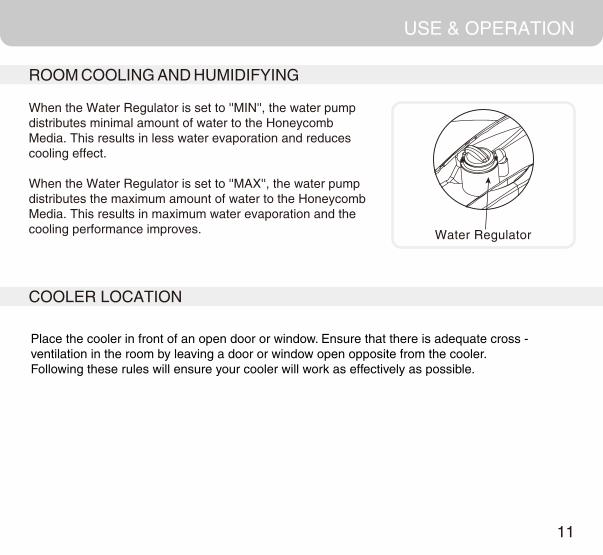
Water Regulator
COOLER LOCATION
11
Place the cooler in front of an open door or window. Ensure that there is adequate cross - ventilation in the room by leaving a door or window open opposite from the cooler.Following these rules will ensure your cooler will work as effectively as possible.
When the Water Regulator is set to ''MIN'', the water pumpdistributes minimal amount of water to the Honeycomb Media. This results in less water evaporation and reduces cooling effect.
When the Water Regulator is set to ''MAX'', the water pumpdistributes the maximum amount of water to the HoneycombMedia. This results in maximum water evaporation and thecooling performance improves.

USE & OPERATION
REMOTE CONTROL
Power: On / OffSpeed: Low / Medium / High Cool/Fan: Controls cooling or fan optionSwing: Controls the motion of the louversTimer:
Turns on the sleep mode (Cooler runs on high speed for 1 hr followed by medium speed for 1 hr and then remains in low speed)
Sleep :
Remote Control ( Batteries not included)
Controls timer function for automatic shut off
NOTE
Always point the remote control signal transmitter towards the unit when operating. Make sure that the signal path is not obstructed.Remove the batteries if the unit is not going to be used for an extended period of time.Do not drop the remote control.
•
••••
SLEEP
TIMER
SPEED
POWER
COOL
SWING
12
Open the battery compartment at the back of the remote control and insert two newAAA dry cell batteries. Care must be taken to insert the batteries according to thecorrect polarity (+ / –) markings shown inside the battery compartment.
USE & OPERATION
FILLING WATER
CAUTION
Unplug from power when refilling.
Water Fill Door
Top Ice Loading Compartment
13
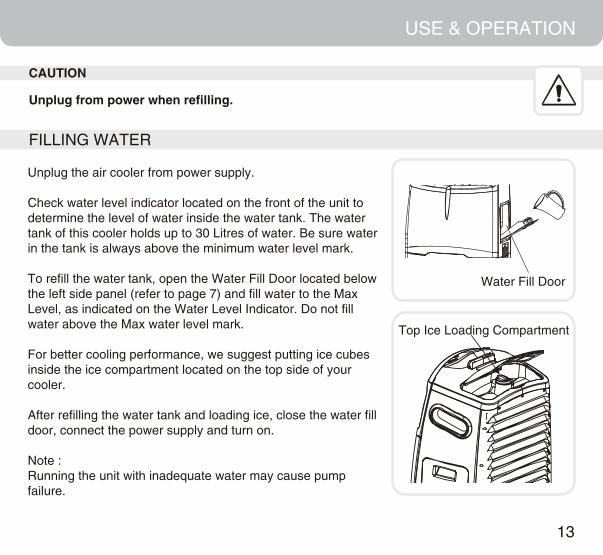
Unplug the air cooler from power supply.
Check water level indicator located on the front of the unit todetermine the level of water inside the water tank. The watertank of this cooler holds up to 30 Litres of water. Be sure waterin the tank is always above the minimum water level mark.
To refill the water tank, open the Water Fill Door located belowthe left side panel (refer to page 7) and fill water to the MaxLevel, as indicated on the Water Level Indicator. Do not fill water above the Max water level mark.
For better cooling performance, we suggest putting ice cubesinside the ice compartment located on the top side of yourcooler.
After refilling the water tank and loading ice, close the water filldoor, connect the power supply and turn on.
Note :Running the unit with inadequate water may cause pump failure.
CLEANING & MAINTENANCE
14
IMPORTANT
WARNING
••
•
•
•
••••
Before cleaning the unit, switch it to the ''off'' position and unplug from the power socket.To clean the outside, use a damp cloth to remove dirt and dust.Never use corrosive elements or any chemicals to clean this product.When the product is not in use, store the unit in a dry place out of direct sunlight.
The cooler is supplied with Honeycomb Cooling Media.The cleaning frequency for the Honeycomb media depends on local air and water conditions. In areas where the mineral content of water is high, mineral deposits may build up on the Honeycomb Cooling Media and restrict air flow. Draining the water reservoir and refilling with fresh water at least once a week will help reduce mineral deposits. If mineral deposits remain on the Honeycomb media, the media should be removed and washed under fresh water. The mediashould be cleaned every two months or sooner, depending on your needs.Do not run the unit in COOL mode with stale water in the tank. Empty the tank and refill it with fresh water if the water has been standing in the tank for an extended period of time.For best results, allow the Honeycomb Cooling Media to dry after each use by turning off the cool function 15 minutes before turning the unit off.Draining the water reservoir and refilling with fresh water at least once a week will greatly reducemineral deposits in the pads and help to extend the life of Honeycomb Cooling Media.
CLEANING & MAINTENANCE
DRAINING AND CLEANING THE WATER TANK
CLEANING THE FILTER AND HONEYCOMB
•
•
•
••
••
•
•
15
•
••
•
•
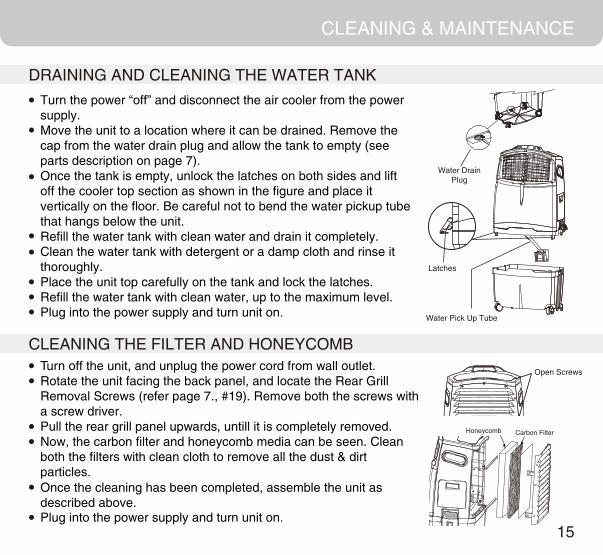
Latches
Water Pick Up Tube
Water DrainPlug
Honeycomb Carbon Filter
Back Panel
Open ScrewsTurn off the unit, and unplug the power cord from wall outlet.Rotate the unit facing the back panel, and locate the Rear GrillRemoval Screws (refer page 7., #19). Remove both the screws witha screw driver.Pull the rear grill panel upwards, untill it is completely removed.Now, the carbon filter and honeycomb media can be seen. Cleanboth the filters with clean cloth to remove all the dust & dirtparticles.
Plug into the power supply and turn unit on.
Once the cleaning has been completed, assemble the unit as described above.
Turn the power “off” and disconnect the air cooler from the powersupply.Move the unit to a location where it can be drained. Remove thecap from the water drain plug and allow the tank to empty (seeparts description on page 7).Once the tank is empty, unlock the latches on both sides and lift off the cooler top section as shown in the figure and place it vertically on the floor. Be careful not to bend the water pickup tube that hangs below the unit.Refill the water tank with clean water and drain it completely.Clean the water tank with detergent or a damp cloth and rinse itthoroughly.Place the unit top carefully on the tank and lock the latches.Refill the water tank with clean water, up to the maximum level.Plug into the power supply and turn unit on.
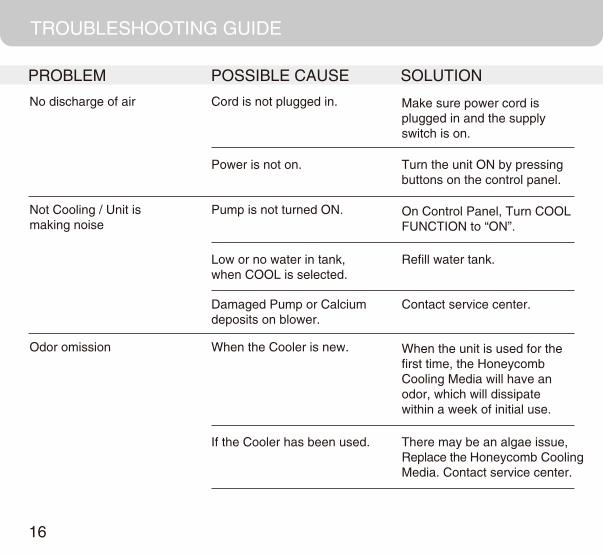
TROUBLESHOOTING GUIDE
16
No discharge of air Cord is not plugged in.
Power is not on. Turn the unit ON by pressingbuttons on the control panel.
Not Cooling / Unit ismaking noise
Pump is not turned ON. On Control Panel, Turn COOLFUNCTION to “ON”.
Low or no water in tank,when COOL is selected.
Refill water tank.
Odor omission When the Cooler is new. When the unit is used for thefirst time, the HoneycombCooling Media will have anodor, which will dissipatewithin a week of initial use.
If the Cooler has been used. There may be an algae issue,Replace the Honeycomb CoolingMedia. Contact service center.
Damaged Pump or Calciumdeposits on blower.
Contact service center.
PROBLEM POSSIBLE CAUSE SOLUTION
Make sure power cord is plugged in and the supplyswitch is on.
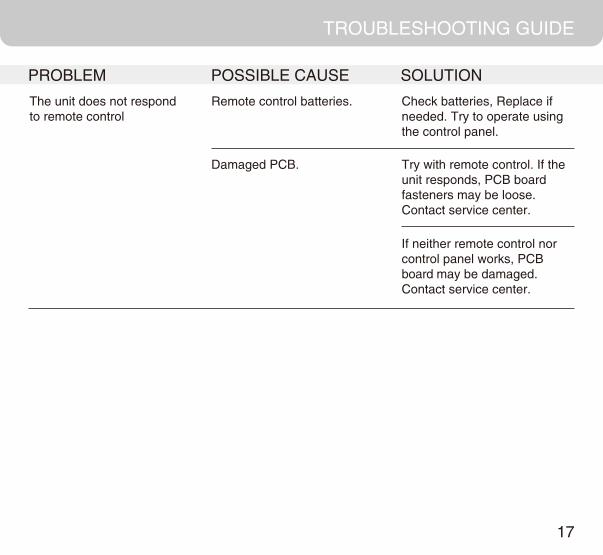
TROUBLESHOOTING GUIDE
The unit does not respondto remote control
Remote control batteries. Check batteries, Replace ifneeded. Try to operate usingthe control panel.
Damaged PCB. Try with remote control. If theunit responds, PCB boardfasteners may be loose.Contact service center.
If neither remote control norcontrol panel works, PCBboard may be damaged.Contact service center.
PROBLEM POSSIBLE CAUSE SOLUTION
17
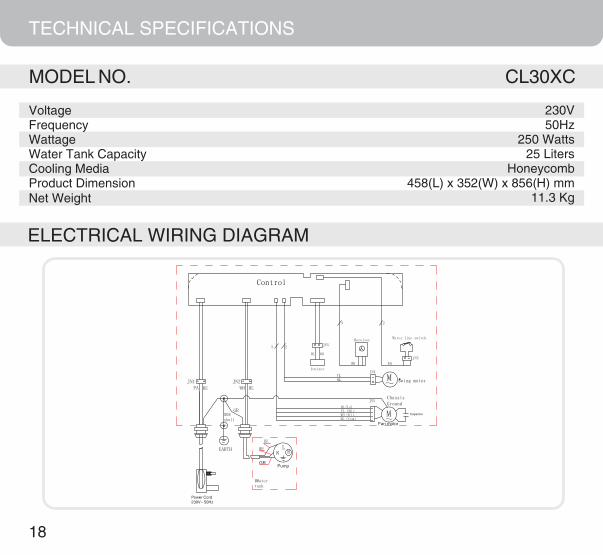
MODEL NO. CL30XC
230V50Hz
250 Watts25 Liters
Honeycomb458(L) x 352(W) x 856(H) mm
11.3 Kg
VoltageFrequencyWattageWater Tank CapacityCooling MediaProduct DimensionNet Weight
TECHNICAL SPECIFICATIONS
ELECTRICAL WIRING DIAGRAM
Capacitor
Power Cord230V~ 50Hz
18

© 2012 AirTek International Corporation LimitedThe Honeywell Trademark is used under license fromHoneywell International Inc.Honeywell International Inc. makes no representation or warranties with respect to this product.Manufactured by AirTek International Corporation Limited.
: