portable ladders ladders how to use them so they won’t let you down about this guide “portable...
TRANSCRIPT

WORKER HEALTH AND SAFETY
Portable laddersHow to use them so they won’t let you down
Oregon OSHA
Portable laddersHow to use them so they won’t let you down
About this guide
“Portable ladders: How to use them so they won’t let you down” is an Oregon OSHA Standards and Technical Resources Section publication.
Piracy notice
Reprinting, excerpting, or plagiarizing this publication is fine with us as long as it’s not for profit! Please inform Oregon OSHA of your intention as a courtesy.
Contents
PART 1: INTRODUCTION . . . . . . . . . . . . . . . . . . . . . . . . . . . . . . . . . . . . . . . . . . . . . . . . . . . . . . . . . 4
Portable ladders: Don’t let them let you down . . . . . . . . . . . . . . . . . . . . . . . . . . . . . . . . . . 4
What is a portable ladder? . . . . . . . . . . . . . . . . . . . . . . . . . . . . . . . . . . . . . . . . . . . . . . . . . . . . . 5
PART 2: SELECTION . . . . . . . . . . . . . . . . . . . . . . . . . . . . . . . . . . . . . . . . . . . . . . . . . . . . . . . . . . . . . 6
How to select the right portable ladder . . . . . . . . . . . . . . . . . . . . . . . . . . . . . . . . . . . . . . . . . 6
• Supporting characteristics . . . . . . . . . . . . . . . . . . . . . . . . . . . . . . . . . . . . . . . . . . . . . . . . . 6
• Target work zone . . . . . . . . . . . . . . . . . . . . . . . . . . . . . . . . . . . . . . . . . . . . . . . . . . . . . . . . . . . 7
• Footprint . . . . . . . . . . . . . . . . . . . . . . . . . . . . . . . . . . . . . . . . . . . . . . . . . . . . . . . . . . . . . . . . . . 8
• Set-up area . . . . . . . . . . . . . . . . . . . . . . . . . . . . . . . . . . . . . . . . . . . . . . . . . . . . . . . . . . . . . . . . 8
• Design style . . . . . . . . . . . . . . . . . . . . . . . . . . . . . . . . . . . . . . . . . . . . . . . . . . . . . . . . . . . . . . . 12
• Material of construction . . . . . . . . . . . . . . . . . . . . . . . . . . . . . . . . . . . . . . . . . . . . . . . . . . . 13
• Working load . . . . . . . . . . . . . . . . . . . . . . . . . . . . . . . . . . . . . . . . . . . . . . . . . . . . . . . . . . . . . 15
• Size . . . . . . . . . . . . . . . . . . . . . . . . . . . . . . . . . . . . . . . . . . . . . . . . . . . . . . . . . . . . . . . . . . . . . . . 16
PART 3: USE . . . . . . . . . . . . . . . . . . . . . . . . . . . . . . . . . . . . . . . . . . . . . . . . . . . . . . . . . . . . . . . . . . . . 18
How to set up ladders . . . . . . . . . . . . . . . . . . . . . . . . . . . . . . . . . . . . . . . . . . . . . . . . . . . . . . . . . 18
How to work safely on ladders . . . . . . . . . . . . . . . . . . . . . . . . . . . . . . . . . . . . . . . . . . . . . . . . 21
How to inspect ladders . . . . . . . . . . . . . . . . . . . . . . . . . . . . . . . . . . . . . . . . . . . . . . . . . . . . . . . .22
How to store ladders . . . . . . . . . . . . . . . . . . . . . . . . . . . . . . . . . . . . . . . . . . . . . . . . . . . . . . . . . .24
How to transport ladders . . . . . . . . . . . . . . . . . . . . . . . . . . . . . . . . . . . . . . . . . . . . . . . . . . . . .25
Safe practices checklist . . . . . . . . . . . . . . . . . . . . . . . . . . . . . . . . . . . . . . . . . . . . . . . . . . . . . . .26
1
Contents — continued
PART 4: ADDITIONAL INFORMATION . . . . . . . . . . . . . . . . . . . . . . . . . . . . . . . . . . . . . . . . . . .28
Oregon OSHA’s requirements for portable ladders . . . . . . . . . . . . . . . . . . . . . . . . . . . .28
Ladder components and terms . . . . . . . . . . . . . . . . . . . . . . . . . . . . . . . . . . . . . . . . . . . . . . . .29
Definitions . . . . . . . . . . . . . . . . . . . . . . . . . . . . . . . . . . . . . . . . . . . . . . . . . . . . . . . . . . . . . . . . . . . .30
Common portable ladder design styles . . . . . . . . . . . . . . . . . . . . . . . . . . . . . . . . . . . . . . . . 31
1 . Step stool . . . . . . . . . . . . . . . . . . . . . . . . . . . . . . . . . . . . . . . . . . . . . . . . . . . . . . . . . . . . . . . . . 31
2 . Standard stepladder . . . . . . . . . . . . . . . . . . . . . . . . . . . . . . . . . . . . . . . . . . . . . . . . . . . . . .32
3 . Double front . . . . . . . . . . . . . . . . . . . . . . . . . . . . . . . . . . . . . . . . . . . . . . . . . . . . . . . . . . . . . .33
4 . Platform . . . . . . . . . . . . . . . . . . . . . . . . . . . . . . . . . . . . . . . . . . . . . . . . . . . . . . . . . . . . . . . . . .34
5 . Tripod . . . . . . . . . . . . . . . . . . . . . . . . . . . . . . . . . . . . . . . . . . . . . . . . . . . . . . . . . . . . . . . . . . . .35
6 . Trestle . . . . . . . . . . . . . . . . . . . . . . . . . . . . . . . . . . . . . . . . . . . . . . . . . . . . . . . . . . . . . . . . . . . .36
7 . Extension trestle . . . . . . . . . . . . . . . . . . . . . . . . . . . . . . . . . . . . . . . . . . . . . . . . . . . . . . . . . .37
8 . Orchard . . . . . . . . . . . . . . . . . . . . . . . . . . . . . . . . . . . . . . . . . . . . . . . . . . . . . . . . . . . . . . . . . . .38
9 . Single . . . . . . . . . . . . . . . . . . . . . . . . . . . . . . . . . . . . . . . . . . . . . . . . . . . . . . . . . . . . . . . . . . . . .39
10 . Extension . . . . . . . . . . . . . . . . . . . . . . . . . . . . . . . . . . . . . . . . . . . . . . . . . . . . . . . . . . . . . . . . .40
11 . Sectional . . . . . . . . . . . . . . . . . . . . . . . . . . . . . . . . . . . . . . . . . . . . . . . . . . . . . . . . . . . . . . . . . . 41
12 . Combination . . . . . . . . . . . . . . . . . . . . . . . . . . . . . . . . . . . . . . . . . . . . . . . . . . . . . . . . . . . . . .42
13 . Articulated . . . . . . . . . . . . . . . . . . . . . . . . . . . . . . . . . . . . . . . . . . . . . . . . . . . . . . . . . . . . . . . .43
Oregon OSHA Services . . . . . . . . . . . . . . . . . . . . . . . . . . . . . . . . . . . . . . . . . . . . . . . . . . . . . . . .44
2
3
A word for employers:“If you have employees who use ladders, make sure that you train them. Their training must cover
ladder hazards, how to use ladders, ladder capacities, and Oregon OSHA’s requirements for the ladders they use. Construction employees must be trained by a competent person.”
[1910.30(b)(1)]
PART 1: INTRODUCTION
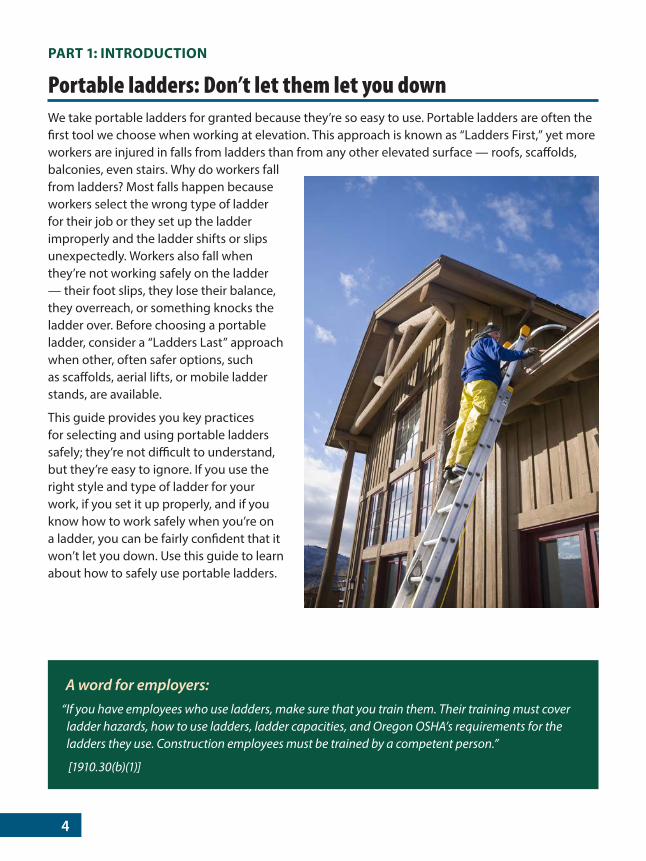
Portable ladders: Don’t let them let you down We take portable ladders for granted because they’re so easy to use. Portable ladders are often the first tool we choose when working at elevation. This approach is known as “Ladders First,” yet more workers are injured in falls from ladders than from any other elevated surface — roofs, scaffolds, balconies, even stairs. Why do workers fall from ladders? Most falls happen because workers select the wrong type of ladder for their job or they set up the ladder improperly and the ladder shifts or slips unexpectedly. Workers also fall when they’re not working safely on the ladder — their foot slips, they lose their balance, they overreach, or something knocks the ladder over. Before choosing a portable ladder, consider a “Ladders Last” approach when other, often safer options, such as scaffolds, aerial lifts, or mobile ladder stands, are available.
This guide provides you key practices for selecting and using portable ladders safely; they’re not difficult to understand, but they’re easy to ignore. If you use the right style and type of ladder for your work, if you set it up properly, and if you know how to work safely when you’re on a ladder, you can be fairly confident that it won’t let you down. Use this guide to learn about how to safely use portable ladders.
4
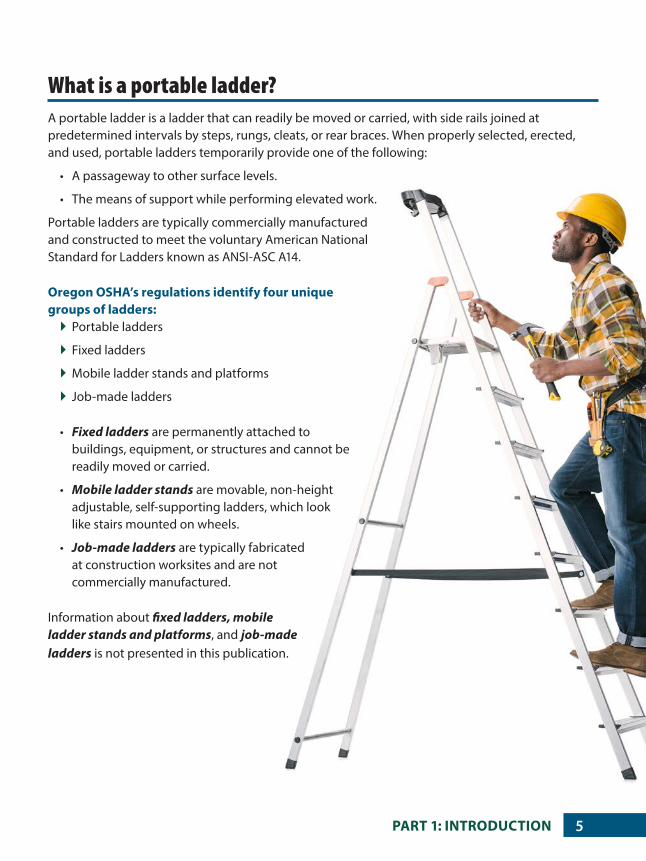
What is a portable ladder?A portable ladder is a ladder that can readily be moved or carried, with side rails joined at predetermined intervals by steps, rungs, cleats, or rear braces. When properly selected, erected, and used, portable ladders temporarily provide one of the following:
• A passageway to other surface levels.
• The means of support while performing elevated work.
Portable ladders are typically commercially manufactured and constructed to meet the voluntary American National Standard for Ladders known as ANSI-ASC A14.
Oregon OSHA’s regulations identify four unique groups of ladders:
` Portable ladders
` Fixed ladders
` Mobile ladder stands and platforms
` Job-made ladders
• Fixed ladders are permanently attached to buildings, equipment, or structures and cannot be readily moved or carried.
• Mobile ladder stands are movable, non-height adjustable, self-supporting ladders, which look like stairs mounted on wheels.
• Job-made ladders are typically fabricated at construction worksites and are not commercially manufactured.
Information about fixed ladders, mobile ladder stands and platforms, and job-made ladders is not presented in this publication.
PART 1: INTRODUCTION 5
PART 2: SELECTION
How to select the right portable ladderWhich portable ladder is the right one for you? Everyone is familiar with the standard stepladder and extension ladder because they are so common, yet there are numerous styles, types, and sizes of portable ladders available today. Not all portable ladders are equal in their capabilities. When considering portable ladders, think of each as a candidate applying for your specific job. Some will be qualified to take you where you need to go, while others won’t make the cut. One ladder may not be suitable for all your elevated work needs. You will save time and energy, and reduce your risk of injury if you know how to select an appropriate portable ladder. Key considerations when selecting portable ladders include:
Did you know? Multiple-configuration ladders such as articulated ladders, based on the manufacturer’s approved configuration selected by the user, will either be self-supporting or non-self-supporting. A ladder cannot be both at the same time.
• Supporting characteristics
• Target work zone
• Footprint
• Set-up area
• Design style
• Material
• Working load
• Size
It’s important to understand that each of these considerations, to a large degree, is interconnected.
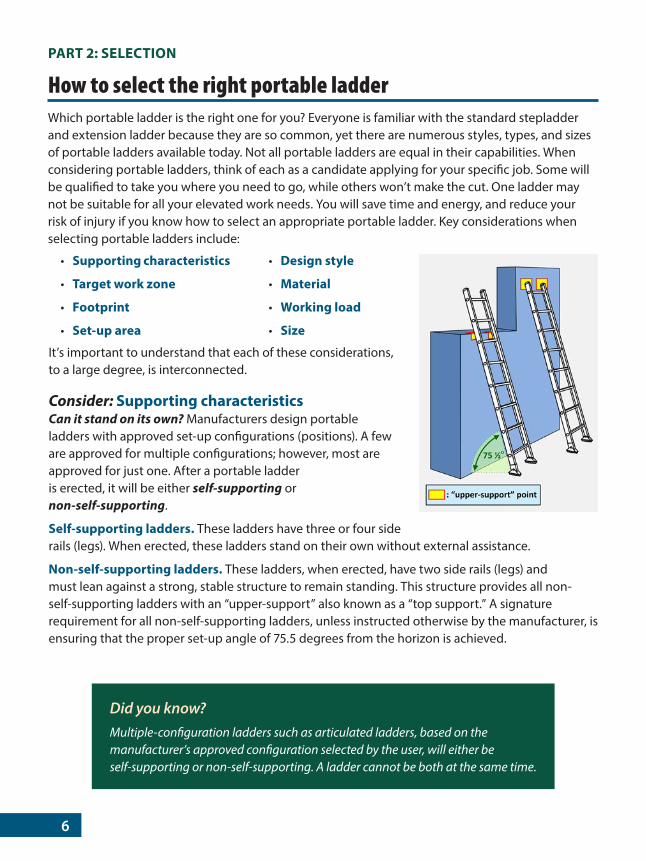
Consider: Supporting characteristics Can it stand on its own? Manufacturers design portable ladders with approved set-up configurations (positions). A few are approved for multiple configurations; however, most are approved for just one. After a portable ladder is erected, it will be either self-supporting or non-self-supporting.
Self-supporting ladders. These ladders have three or four side rails (legs). When erected, these ladders stand on their own without external assistance.
Non-self-supporting ladders. These ladders, when erected, have two side rails (legs) and must lean against a strong, stable structure to remain standing. This structure provides all non-self-supporting ladders with an “upper-support” also known as a “top support.” A signature requirement for all non-self-supporting ladders, unless instructed otherwise by the manufacturer, is ensuring that the proper set-up angle of 75.5 degrees from the horizon is achieved.
6
Examples of self-supporting ladder designs include:
• Step stools (ladder type)
• Stepladders
• Double front
• Trestle
• Extension trestle
• Platform
• Tripod
• Orchard
• Articulated*
• Combination*
Examples of non-self-supporting ladder designs include:
• Single
• Sectional
• Extension
• Articulated*
• Combination*
*when appropriately configured
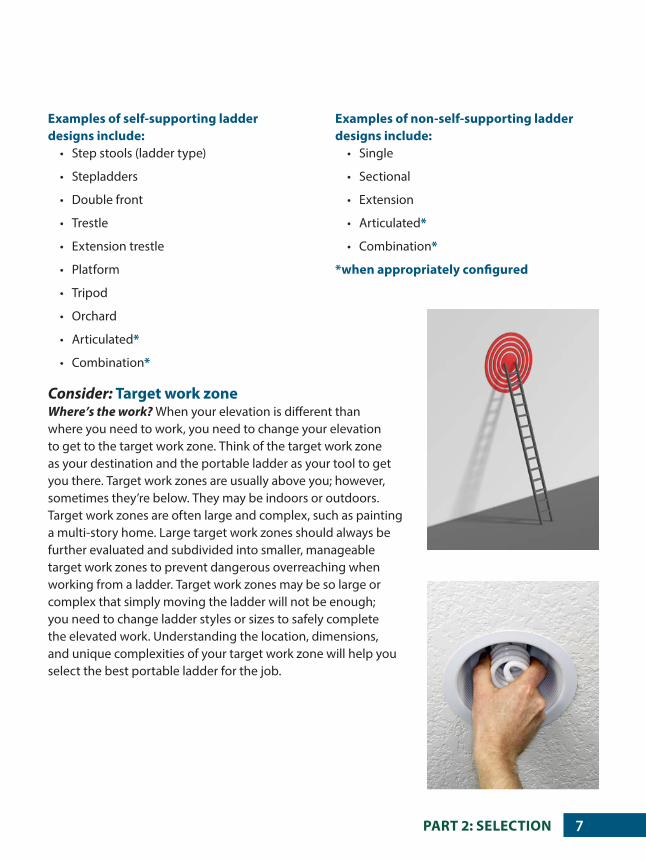
Consider: Target work zone Where’s the work? When your elevation is different than where you need to work, you need to change your elevation to get to the target work zone. Think of the target work zone as your destination and the portable ladder as your tool to get you there. Target work zones are usually above you; however, sometimes they’re below. They may be indoors or outdoors. Target work zones are often large and complex, such as painting a multi-story home. Large target work zones should always be further evaluated and subdivided into smaller, manageable target work zones to prevent dangerous overreaching when working from a ladder. Target work zones may be so large or complex that simply moving the ladder will not be enough; you need to change ladder styles or sizes to safely complete the elevated work. Understanding the location, dimensions, and unique complexities of your target work zone will help you select the best portable ladder for the job.
PART 2: SELECTION 7
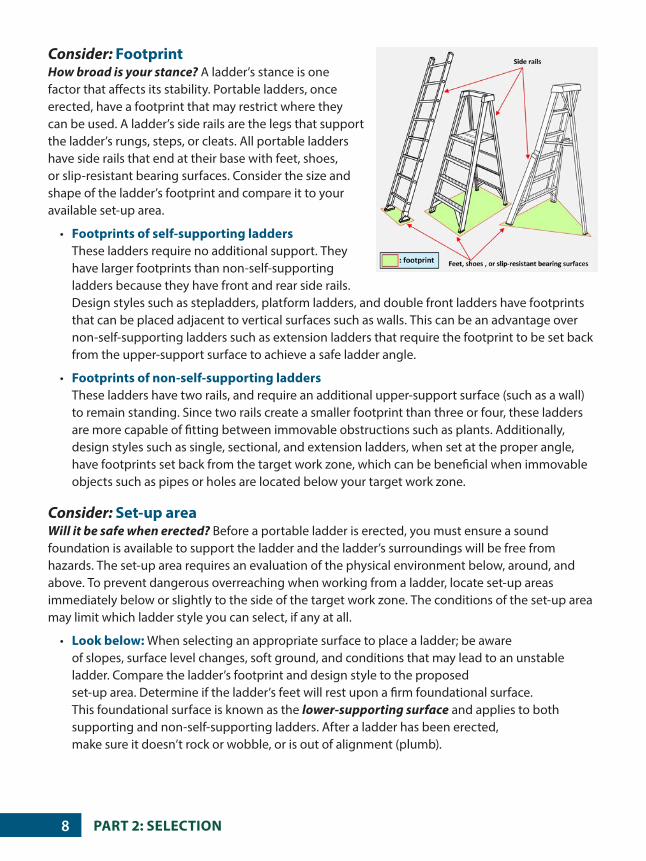
Consider: Footprint How broad is your stance? A ladder’s stance is one factor that affects its stability. Portable ladders, once erected, have a footprint that may restrict where they can be used. A ladder’s side rails are the legs that support the ladder’s rungs, steps, or cleats. All portable ladders have side rails that end at their base with feet, shoes, or slip-resistant bearing surfaces. Consider the size and shape of the ladder’s footprint and compare it to your available set-up area.
• Footprints of self-supporting laddersThese ladders require no additional support. They have larger footprints than non-self-supporting ladders because they have front and rear side rails. Design styles such as stepladders, platform ladders, and double front ladders have footprints that can be placed adjacent to vertical surfaces such as walls. This can be an advantage over non-self-supporting ladders such as extension ladders that require the footprint to be set back from the upper-support surface to achieve a safe ladder angle.
• Footprints of non-self-supporting laddersThese ladders have two rails, and require an additional upper-support surface (such as a wall) to remain standing. Since two rails create a smaller footprint than three or four, these ladders are more capable of fitting between immovable obstructions such as plants. Additionally, design styles such as single, sectional, and extension ladders, when set at the proper angle, have footprints set back from the target work zone, which can be beneficial when immovable objects such as pipes or holes are located below your target work zone.
Consider: Set-up area Will it be safe when erected? Before a portable ladder is erected, you must ensure a sound foundation is available to support the ladder and the ladder’s surroundings will be free from hazards. The set-up area requires an evaluation of the physical environment below, around, and above. To prevent dangerous overreaching when working from a ladder, locate set-up areas immediately below or slightly to the side of the target work zone. The conditions of the set-up area may limit which ladder style you can select, if any at all.
• Look below: When selecting an appropriate surface to place a ladder; be aware of slopes, surface level changes, soft ground, and conditions that may lead to an unstable ladder. Compare the ladder’s footprint and design style to the proposed set-up area. Determine if the ladder’s feet will rest upon a firm foundational surface. This foundational surface is known as the lower-supporting surface and applies to both supporting and non-self-supporting ladders. After a ladder has been erected, make sure it doesn’t rock or wobble, or is out of alignment (plumb).
PART 2: SELECTION8
Finally, when looking below, you must evaluate the lower-supporting surface to make sure that the ladder will remain secure. Slick or loose surfaces such as polished flooring, mud, snow, sand, and gravel can contribute to movement when lateral forces are applied during use. Slick or loose surfaces should be improved before setting up the ladder. Never erect a ladder on a table, scaffold, aerial lift, truck bed, barrel, or similar surface to gain additional height.
When a ladder’s feet are not placed on level ground, trouble for the user may not be far away. Never use books, blocks, or loose materials to compensate for uneven lower-support surfaces.
` Self-supporting ladders have a tendency to rock or wobble when one of the four feet is not on the same level.
` Non-self-supporting ladders will not be plumb if both feet are not on the same level. Hint: Place a bubble level on a rung or step for a quick check.
After you determine that the lower-supporting surface is sufficiently level, determine if it is firm enough to support the working load. You can find a discussion about a ladder’s working load on Page 15. If one or more of the ladder’s feet can settle into the lower-supporting surface, the ladder may become unstable.
Did you know? Some portable ladder manufacturers sell approved attachments for their ladders that allow them to be safely leveled on uneven surfaces such as slopes or stairs.
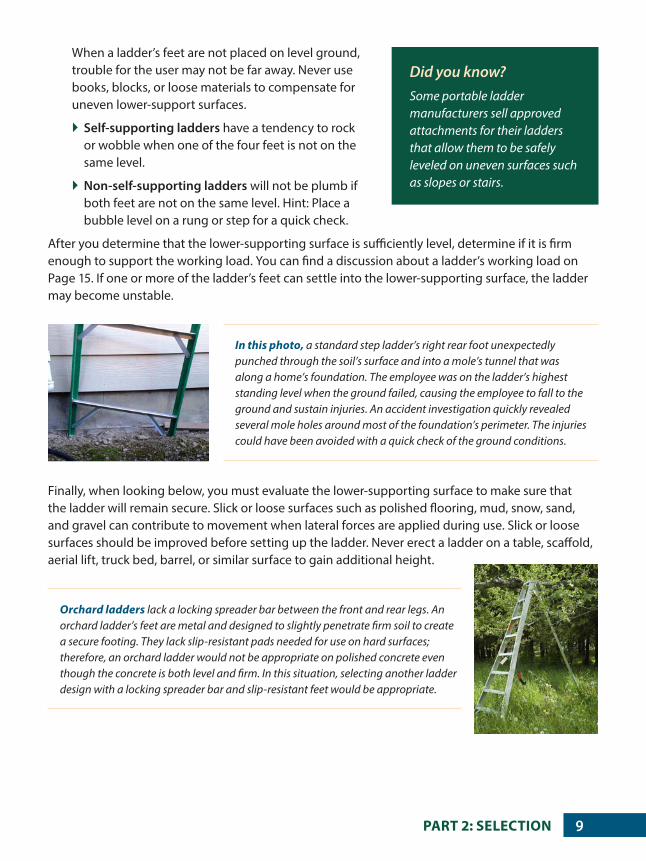
In this photo, a standard step ladder’s right rear foot unexpectedly punched through the soil’s surface and into a mole’s tunnel that was along a home’s foundation. The employee was on the ladder’s highest standing level when the ground failed, causing the employee to fall to the ground and sustain injuries. An accident investigation quickly revealed several mole holes around most of the foundation’s perimeter. The injuries could have been avoided with a quick check of the ground conditions.
Orchard ladders lack a locking spreader bar between the front and rear legs. An orchard ladder’s feet are metal and designed to slightly penetrate firm soil to create a secure footing. They lack slip-resistant pads needed for use on hard surfaces; therefore, an orchard ladder would not be appropriate on polished concrete even though the concrete is both level and firm. In this situation, selecting another ladder design with a locking spreader bar and slip-resistant feet would be appropriate.
PART 2: SELECTION 9
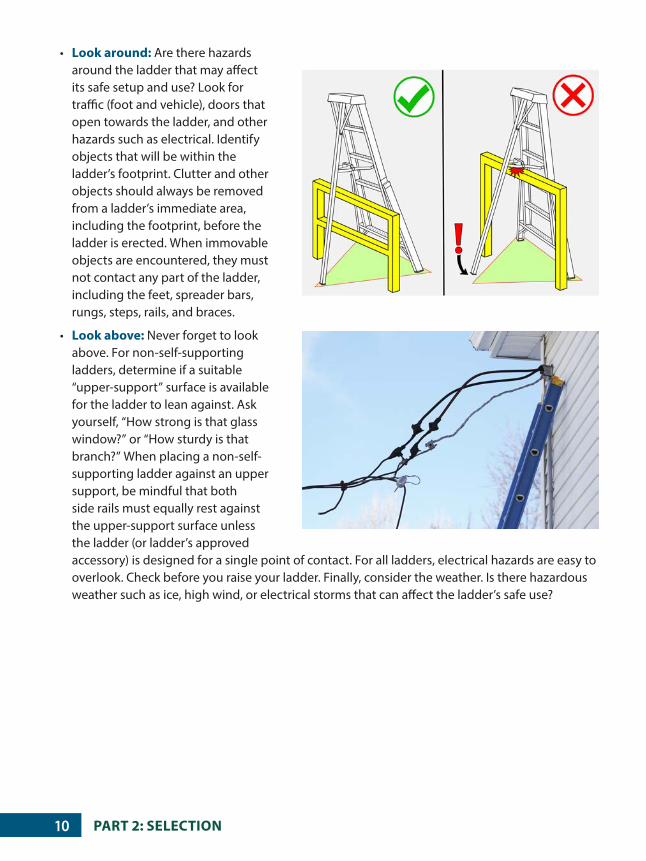
• Look around: Are there hazards around the ladder that may affect its safe setup and use? Look for traffic (foot and vehicle), doors that open towards the ladder, and other hazards such as electrical. Identify objects that will be within the ladder’s footprint. Clutter and other objects should always be removed from a ladder’s immediate area, including the footprint, before the ladder is erected. When immovable objects are encountered, they must not contact any part of the ladder, including the feet, spreader bars, rungs, steps, rails, and braces.
• Look above: Never forget to look above. For non-self-supporting ladders, determine if a suitable “upper-support” surface is available for the ladder to lean against. Ask yourself, “How strong is that glass window?” or “How sturdy is that branch?” When placing a non-self-supporting ladder against an upper support, be mindful that both side rails must equally rest against the upper-support surface unless the ladder (or ladder’s approved accessory) is designed for a single point of contact. For all ladders, electrical hazards are easy to overlook. Check before you raise your ladder. Finally, consider the weather. Is there hazardous weather such as ice, high wind, or electrical storms that can affect the ladder’s safe use?
PART 2: SELECTION10
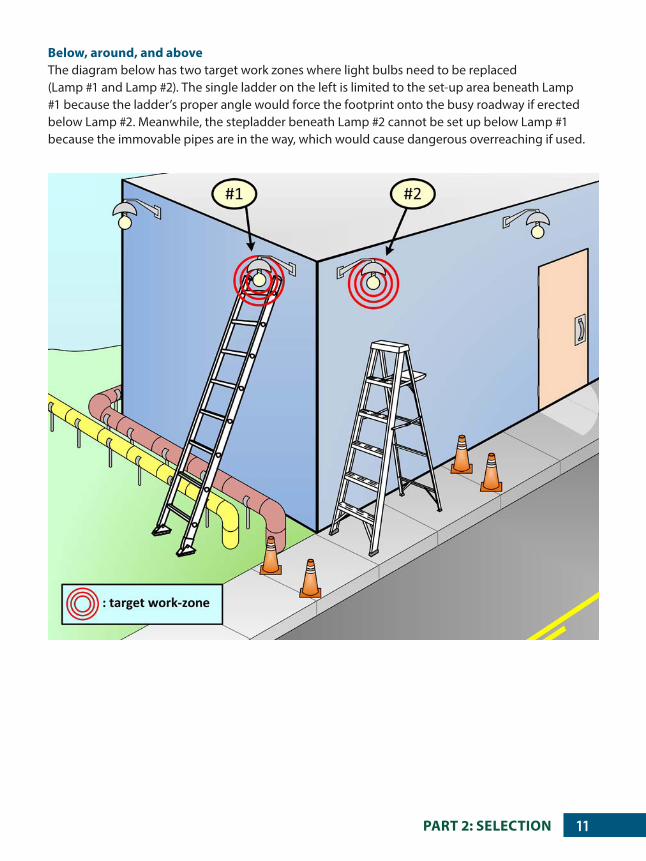
Below, around, and aboveThe diagram below has two target work zones where light bulbs need to be replaced (Lamp #1 and Lamp #2). The single ladder on the left is limited to the set-up area beneath Lamp #1 because the ladder’s proper angle would force the footprint onto the busy roadway if erected below Lamp #2. Meanwhile, the stepladder beneath Lamp #2 cannot be set up below Lamp #1 because the immovable pipes are in the way, which would cause dangerous overreaching if used.
PART 2: SELECTION 11
Consider: Design style What is it made to do? With so many design styles available today, it’s hard to know which is right for reaching your target work zone. Some design styles, such as the time-tested and proven stepladder and extension ladder, lend themselves to a wide variety of elevated applications while others, such as the extension trestle ladder, are highly valuable when needed, but have a limited benefit for general use. Consider the work that you will be doing at the target work zone. The type of work, target work zone, and set-up area will help guide your design style selection. The following questions can help narrow your selection:
• Do you need a general purpose self-supporting ladder to perform a wide variety of tasks? ` Consider a standard stepladder. (See Page 32)
• Do you need a general purpose non-self-supporting ladder to perform a wide variety of tasks? ` Consider an extension ladder. (See Page 40)
• Do you need just one ladder that can be used in multiple configurations? ` Consider a combination ladder or an articulated ladder. (See Pages 42 and 43)
• Do you need a ladder for gaining access to a higher surface level such as a roof? ` Consider a single or extension ladder. (See Pages 39 and 40)
• Do you need both hands free to conduct work while being supported by the ladder? ` Consider a platform ladder. (See Page 34)
• Do you need to work near corners or between immovable objects? ` Consider a tripod ladder. (See Page 35)
• Do you need more than one person on the ladder at the same time to conduct the task? ` Consider a double front ladder. (See Page 33)
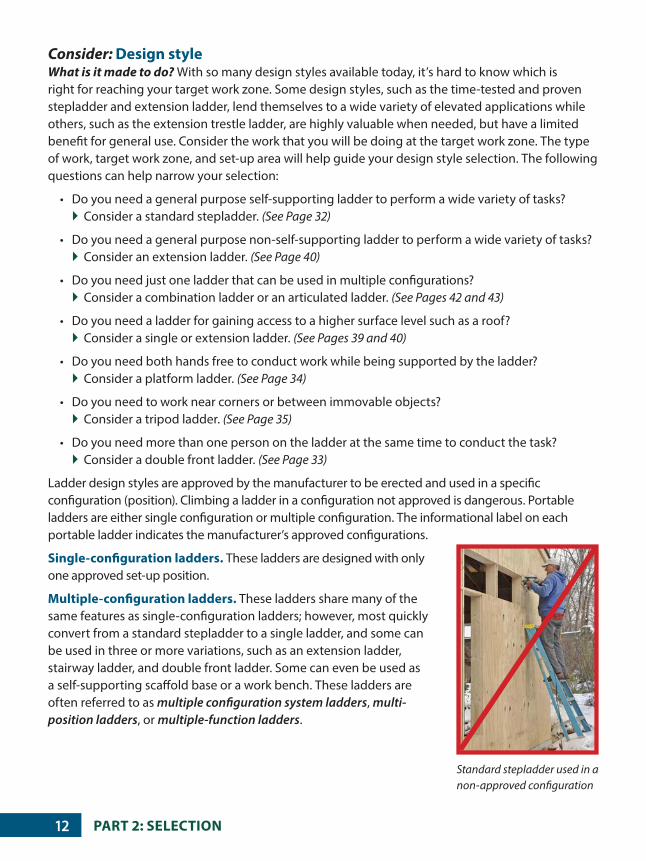
Ladder design styles are approved by the manufacturer to be erected and used in a specific configuration (position). Climbing a ladder in a configuration not approved is dangerous. Portable ladders are either single configuration or multiple configuration. The informational label on each portable ladder indicates the manufacturer’s approved configurations.
Single-configuration ladders. These ladders are designed with only one approved set-up position.
Multiple-configuration ladders. These ladders share many of the same features as single-configuration ladders; however, most quickly convert from a standard stepladder to a single ladder, and some can be used in three or more variations, such as an extension ladder, stairway ladder, and double front ladder. Some can even be used as a self-supporting scaffold base or a work bench. These ladders are often referred to as multiple configuration system ladders, multi-position ladders, or multiple-function ladders.
Standard stepladder used in a non-approved configuration
PART 2: SELECTION12
Long ago, ladder retailers had limited design styles available in stock. Those needing a portable ladder could select from standard stepladders and single ladders in a variety of sizes. Some retailers could special order special-purpose ladders at a great cost. Today, advances in ladder manufacturing, testing, and distribution have led to a substantial number of available design styles. More information about the most common portable ladder designs available today begins on Page 31.
Consider: Material of construction What is it made of? Evaluate the materials the ladder was made from. Select a ladder whose material best fits the environment where you plan to use it. This will help extend the life of your investment. A ladder’s load-supporting rails are constructed from wood, metal, or reinforced plastic. Consider the material’s resistance to the following factors:
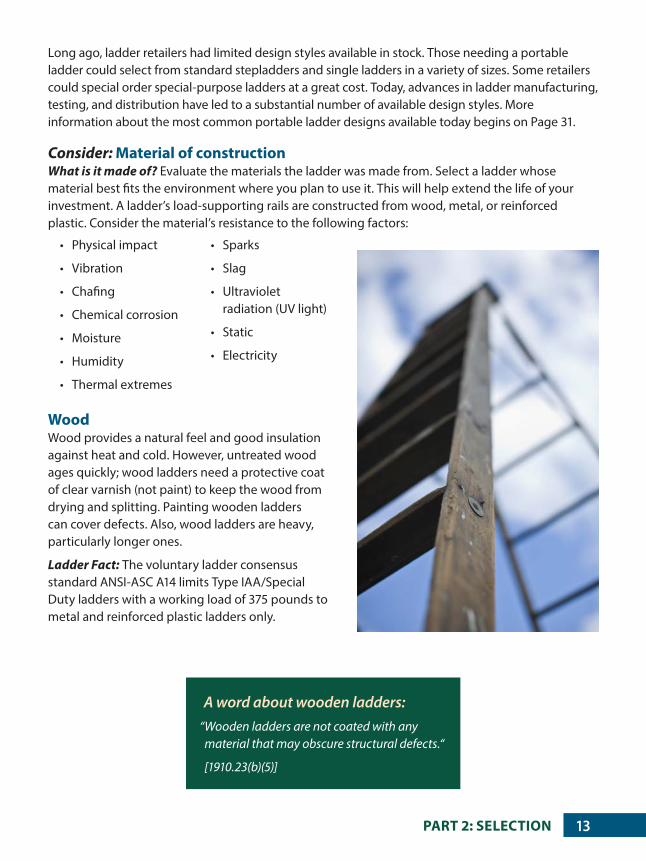
A word about wooden ladders:“Wooden ladders are not coated with any
material that may obscure structural defects.“
[1910.23(b)(5)]
• Physical impact
• Vibration
• Chafing
• Chemical corrosion
• Moisture
• Humidity
• Thermal extremes
• Sparks
• Slag
• Ultraviolet radiation (UV light)
• Static
• Electricity
Wood Wood provides a natural feel and good insulation against heat and cold. However, untreated wood ages quickly; wood ladders need a protective coat of clear varnish (not paint) to keep the wood from drying and splitting. Painting wooden ladders can cover defects. Also, wood ladders are heavy, particularly longer ones.
Ladder Fact: The voluntary ladder consensus standard ANSI-ASC A14 limits Type IAA/Special Duty ladders with a working load of 375 pounds to metal and reinforced plastic ladders only.
PART 2: SELECTION 13
MetalThere are a wide variety of metals available today that ladders can be constructed from — aluminum is the predominant metal selected. Aluminum ladders are lightweight and corrosion resistant. Aluminum will not crack or chip with rough handling, but it doesn’t insulate well against heat and conducts electricity. Never use aluminum ladders for work near energized electrical lines or with energized tools.
A word about ladder materials:“Portable ladders shall have nonconductive siderails if they are used where the employee or the ladder could contact exposed energized parts.”
[1910.333(c)(7)] – General Industry rule
“Ladders shall have nonconductive siderails if they are used where the employee or the ladder could contact exposed energized electrical equipment...”
[1926.1053(b)(12)] – Construction rule
Reinforced plastic Reinforced plastic is a plastic that has been embedded with high-strength fillers, such as fibers in the base resin, which results in a finished material that is significantly stronger than those of the base resin alone. Reinforced plastic used for ladder construction is commonly known as fiberglass. Fiberglass is durable, weather resistant, and nonconductive when clean and dry. Unlike wood, fiberglass won’t dry out or split and provides better insulation against heat than aluminum. However, fiberglass ladders are heavier than comparable aluminum or wood ladders and can chip or crack with improper handling. Fiberglass ladders must also be handled and maintained with more care than wood ladders. After a few years, the reinforcing fibers in the side rails may become exposed, resulting in a condition known as fiber bloom. High humidity and exposure to strong sunlight can accelerate the condition.
Fiber bloom doesn’t significantly affect a ladder’s strength, but it will affect the appearance and may cause users mild discomfort when exposed fibers penetrate their skin. More important, a blooming ladder can be electrically conductive. Fibers that bloom can hold moisture, especially after rain. A blooming ladder, once damp, can conduct up to half the voltage it comes in contact with, causing a conductive chain that could potentially electrocute the handler. Keep fiberglass ladders electrically nonconductive by properly maintaining them.
Regular pressure washing (at moderate psi) and waxing with a commercial nonslip paste wax will protect the ladder and reduce the potential for fiber bloom. To keep the ladder in top condition, periodically coat the ladder with two to three coats of acrylic lacquer with an airless sprayer and store in areas where they are not exposed to ultraviolet (UV) light.
PART 2: SELECTION14
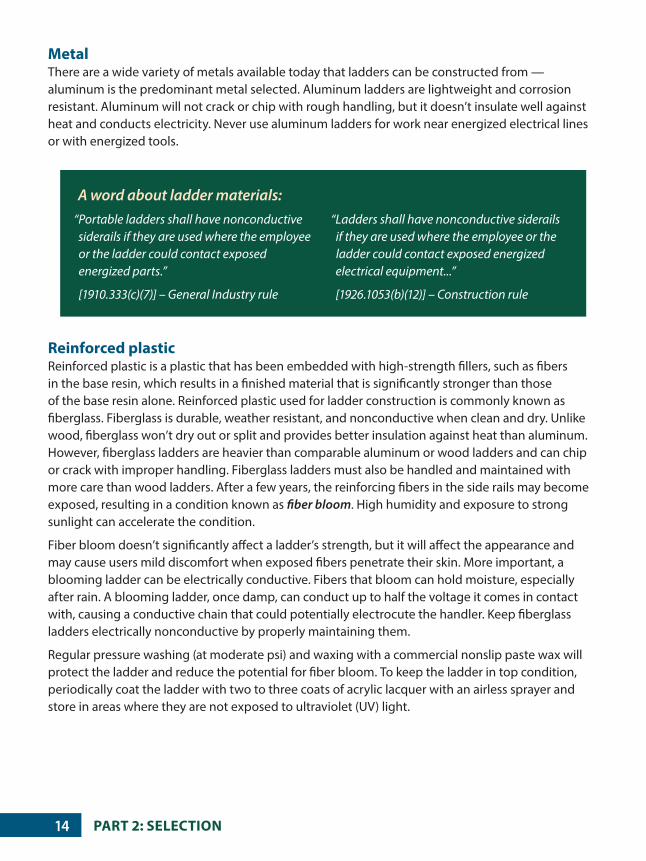
Consider: Working load How much can it support? Calculate the working load that will be supported by the ladder. The working load is the sum of the worker’s weight plus the weight of all tools taken onto the ladder plus the weight of all materials supported by the ladder at the same time.
Working Load = A + B + C
A = user’s weight (including clothing, shoes, and PPE)
B = weight of all tools taken onto the ladder
C = weight of all materials taken onto the ladder
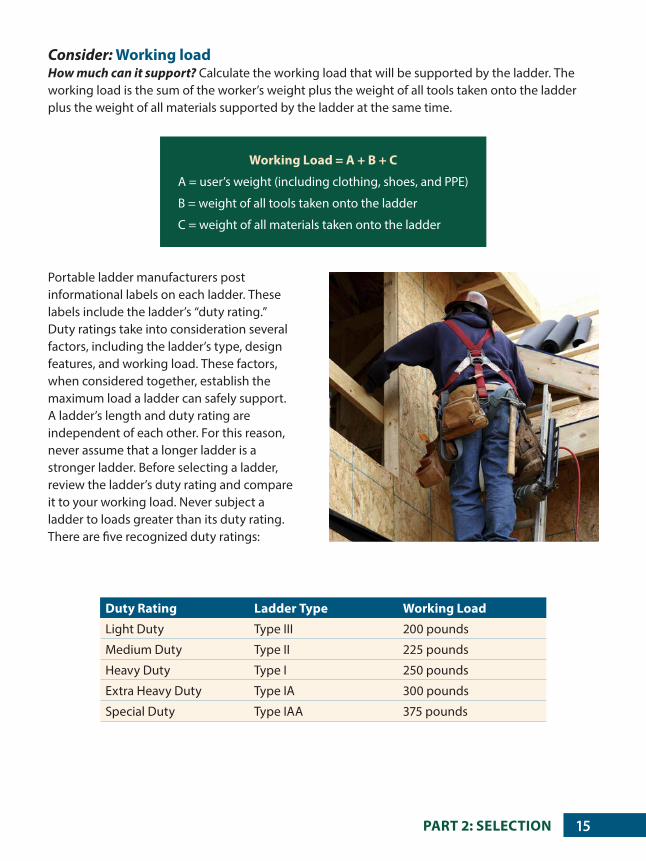
Portable ladder manufacturers post informational labels on each ladder. These labels include the ladder’s “duty rating.” Duty ratings take into consideration several factors, including the ladder’s type, design features, and working load. These factors, when considered together, establish the maximum load a ladder can safely support. A ladder’s length and duty rating are independent of each other. For this reason, never assume that a longer ladder is a stronger ladder. Before selecting a ladder, review the ladder’s duty rating and compare it to your working load. Never subject a ladder to loads greater than its duty rating. There are five recognized duty ratings:
Duty Rating Ladder Type Working Load
Light Duty Type III 200 pounds
Medium Duty Type II 225 pounds
Heavy Duty Type I 250 pounds
Extra Heavy Duty Type IA 300 pounds
Special Duty Type IAA 375 pounds
PART 2: SELECTION 15

Consider: SizeIs bigger really better? It’s possible a portable ladder can be too small or too large for the job at hand. Depending on your work, you may need a ladder to be longer or shorter to safely reach your target work zone. Proper ladder sizing can be accomplished by comparing the design style’s maximum working height to the elevation of your target work zone. A ladder’s maximum working height is determined by allowing for these three variables:
1. The height of the ladder’s approved highest standing level .
2. Your height (when measured from your feet to your shoulders).
3. Your maximum recommended safe reach (approximately 12 vertical inches above your shoulders).
Sizing self-supporting ladders You should be able to reach about four feet above the top of self-supporting ladders when you are positioned on the highest standing level. For example, a person of average height should be able to safely reach a 12-foot target work zone while using an eight-foot stepladder.
Warning: When using a self-supporting ladder such as a stepladder, the top cap and the top step are not intended to support body weight and are off limits.
` Top cap: The upper-most horizontal member of a portable stepladder or step stool.
` Top step: The first step below the top cap. On ladders without a top cap, the top step is the first step below the top of the rails.
X + Y + Z = Maximum Working Height
X = ladder’s highest approved standing level
Y = your height from your feet to your shoulders
Z = your safe reach (approximately 12 vertical inches)
PART 2: SELECTION16
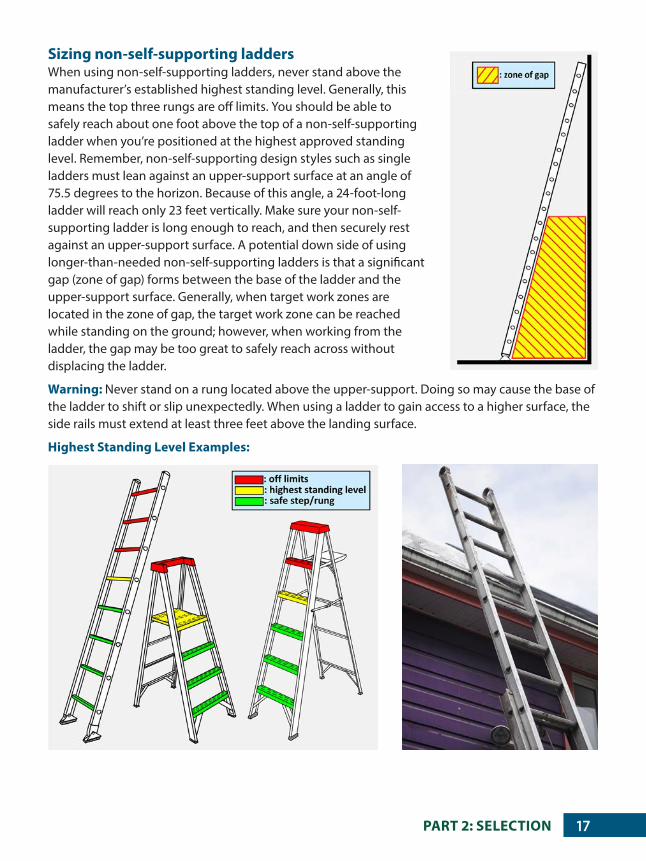
Sizing non-self-supporting laddersWhen using non-self-supporting ladders, never stand above the manufacturer’s established highest standing level. Generally, this means the top three rungs are off limits. You should be able to safely reach about one foot above the top of a non-self-supporting ladder when you’re positioned at the highest approved standing level. Remember, non-self-supporting design styles such as single ladders must lean against an upper-support surface at an angle of 75.5 degrees to the horizon. Because of this angle, a 24-foot-long ladder will reach only 23 feet vertically. Make sure your non-self-supporting ladder is long enough to reach, and then securely rest against an upper-support surface. A potential down side of using longer-than-needed non-self-supporting ladders is that a significant gap (zone of gap) forms between the base of the ladder and the upper-support surface. Generally, when target work zones are located in the zone of gap, the target work zone can be reached while standing on the ground; however, when working from the ladder, the gap may be too great to safely reach across without displacing the ladder.
Warning: Never stand on a rung located above the upper-support. Doing so may cause the base of the ladder to shift or slip unexpectedly. When using a ladder to gain access to a higher surface, the side rails must extend at least three feet above the landing surface.
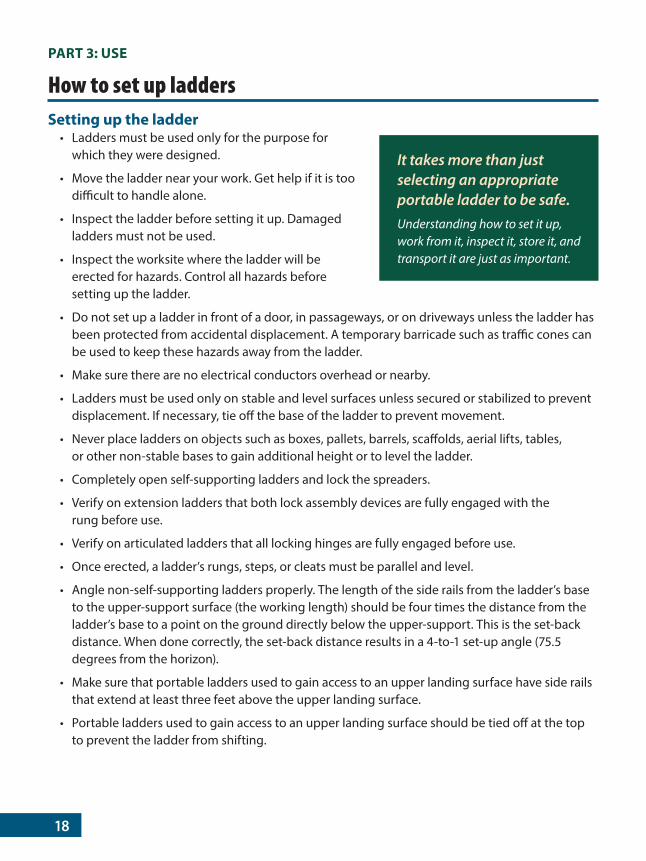
Highest Standing Level Examples:
PART 2: SELECTION 17
PART 3: USE
How to set up laddersSetting up the ladder
• Ladders must be used only for the purpose for which they were designed.
• Move the ladder near your work. Get help if it is too difficult to handle alone.
• Inspect the ladder before setting it up. Damaged ladders must not be used.
• Inspect the worksite where the ladder will be erected for hazards. Control all hazards before setting up the ladder.
• Do not set up a ladder in front of a door, in passageways, or on driveways unless the ladder has been protected from accidental displacement. A temporary barricade such as traffic cones can be used to keep these hazards away from the ladder.
• Make sure there are no electrical conductors overhead or nearby.
• Ladders must be used only on stable and level surfaces unless secured or stabilized to prevent displacement. If necessary, tie off the base of the ladder to prevent movement.
• Never place ladders on objects such as boxes, pallets, barrels, scaffolds, aerial lifts, tables, or other non-stable bases to gain additional height or to level the ladder.
• Completely open self-supporting ladders and lock the spreaders.
• Verify on extension ladders that both lock assembly devices are fully engaged with the rung before use.
• Verify on articulated ladders that all locking hinges are fully engaged before use.
• Once erected, a ladder’s rungs, steps, or cleats must be parallel and level.
• Angle non-self-supporting ladders properly. The length of the side rails from the ladder’s base to the upper-support surface (the working length) should be four times the distance from the ladder’s base to a point on the ground directly below the upper-support. This is the set-back distance. When done correctly, the set-back distance results in a 4-to-1 set-up angle (75.5 degrees from the horizon).
• Make sure that portable ladders used to gain access to an upper landing surface have side rails that extend at least three feet above the upper landing surface.
• Portable ladders used to gain access to an upper landing surface should be tied off at the top to prevent the ladder from shifting.
It takes more than just selecting an appropriate portable ladder to be safe. Understanding how to set it up, work from it, inspect it, store it, and transport it are just as important.
18
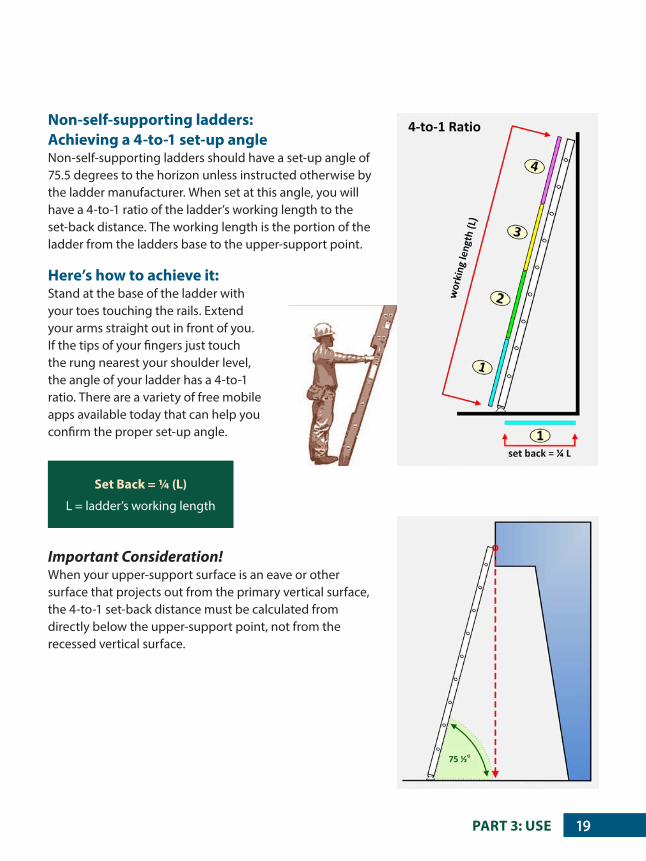
Non-self-supporting ladders: Achieving a 4-to-1 set-up angle Non-self-supporting ladders should have a set-up angle of 75.5 degrees to the horizon unless instructed otherwise by the ladder manufacturer. When set at this angle, you will have a 4-to-1 ratio of the ladder’s working length to the set-back distance. The working length is the portion of the ladder from the ladders base to the upper-support point.
Here’s how to achieve it: Stand at the base of the ladder with your toes touching the rails. Extend your arms straight out in front of you. If the tips of your fingers just touch the rung nearest your shoulder level, the angle of your ladder has a 4-to-1 ratio. There are a variety of free mobile apps available today that can help you confirm the proper set-up angle.
Important Consideration!When your upper-support surface is an eave or other surface that projects out from the primary vertical surface, the 4-to-1 set-back distance must be calculated from directly below the upper-support point, not from the recessed vertical surface.
Set Back = ¼ (L)
L = ladder’s working length
PART 3: USE 19
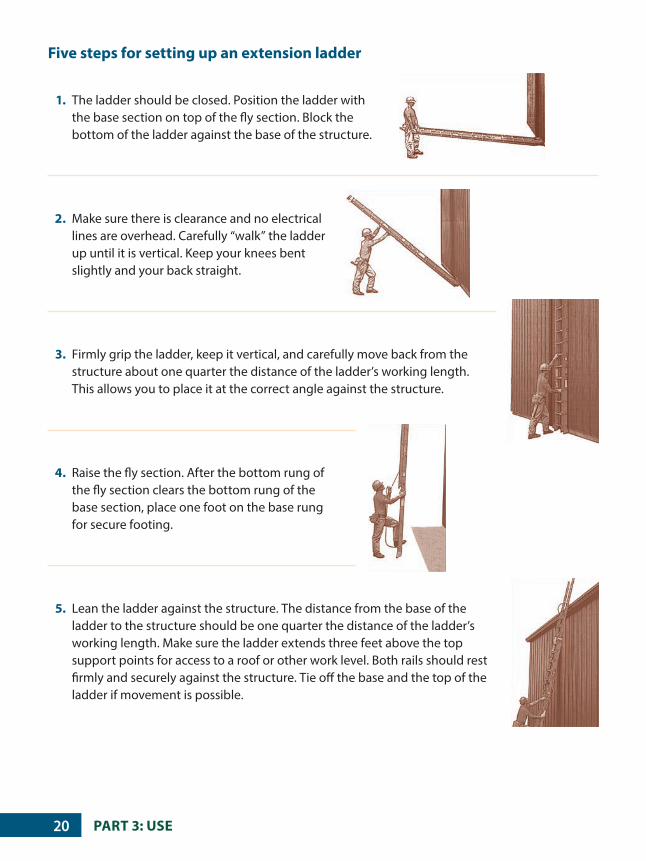
Five steps for setting up an extension ladder
1. The ladder should be closed. Position the ladder with the base section on top of the fly section. Block the bottom of the ladder against the base of the structure.
2. Make sure there is clearance and no electrical lines are overhead. Carefully “walk” the ladder up until it is vertical. Keep your knees bent slightly and your back straight.
3. Firmly grip the ladder, keep it vertical, and carefully move back from the structure about one quarter the distance of the ladder’s working length. This allows you to place it at the correct angle against the structure.
4. Raise the fly section. After the bottom rung of the fly section clears the bottom rung of the base section, place one foot on the base rung for secure footing.
5. Lean the ladder against the structure. The distance from the base of the ladder to the structure should be one quarter the distance of the ladder’s working length. Make sure the ladder extends three feet above the top support points for access to a roof or other work level. Both rails should rest firmly and securely against the structure. Tie off the base and the top of the ladder if movement is possible.
PART 3: USE20
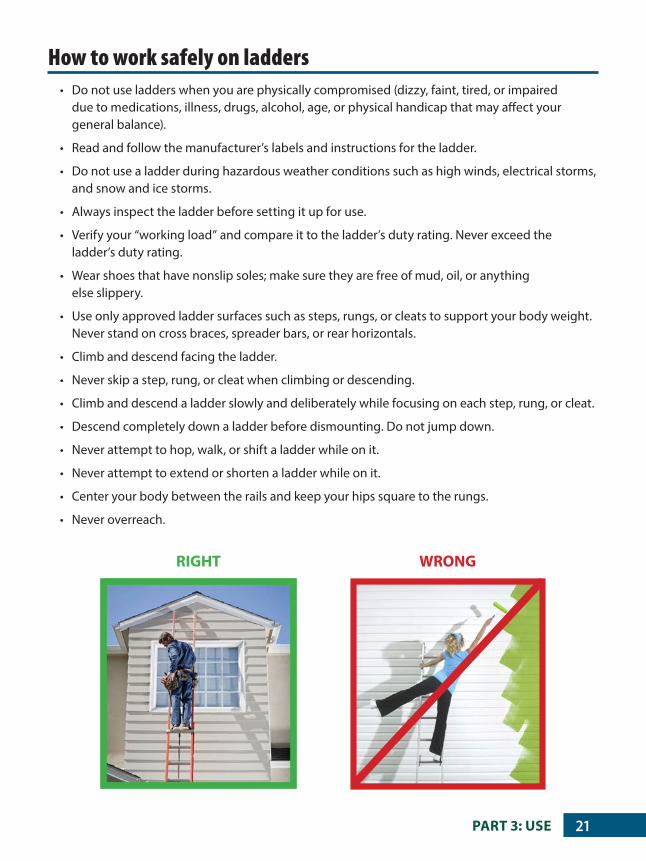
How to work safely on ladders • Do not use ladders when you are physically compromised (dizzy, faint, tired, or impaired
due to medications, illness, drugs, alcohol, age, or physical handicap that may affect your general balance).
• Read and follow the manufacturer’s labels and instructions for the ladder.
• Do not use a ladder during hazardous weather conditions such as high winds, electrical storms, and snow and ice storms.
• Always inspect the ladder before setting it up for use.
• Verify your “working load” and compare it to the ladder’s duty rating. Never exceed the ladder’s duty rating.
• Wear shoes that have nonslip soles; make sure they are free of mud, oil, or anything else slippery.
• Use only approved ladder surfaces such as steps, rungs, or cleats to support your body weight. Never stand on cross braces, spreader bars, or rear horizontals.
• Climb and descend facing the ladder.
• Never skip a step, rung, or cleat when climbing or descending.
• Climb and descend a ladder slowly and deliberately while focusing on each step, rung, or cleat.
• Descend completely down a ladder before dismounting. Do not jump down.
• Never attempt to hop, walk, or shift a ladder while on it.
• Never attempt to extend or shorten a ladder while on it.
• Center your body between the rails and keep your hips square to the rungs.
• Never overreach.
RIGHT WRONG
PART 3: USE 21
• Hold the side rails with both hands; you have a better chance of avoiding a fall if a rung or step fails.
• Hold the ladder with one hand and work with the other hand whenever possible.
• Attach light, compact tools or materials to the ladder or to yourself. Do not carry them in your hands while ascending or descending.
• Raise and lower heavy, awkward loads with a hand line or a hoist.
• Use extreme caution when you are pushing or pulling materials while supported by a ladder.
• Never straddle the top of a ladder.
• Never use an extension ladder with the upper fly section positioned beneath the lower base section.
• When an articulated ladder can be separated into “inner” and “outer” scaffold trestle bases, never use the separated trestle bases as stepladders unless approved by the manufacturer.
• When an articulated ladder can be set up in a “work-table” configuration with a platform, never stand on the platform. When in the work-table configuration, the work-table is not a scaffold unless approved by the manufacturer.
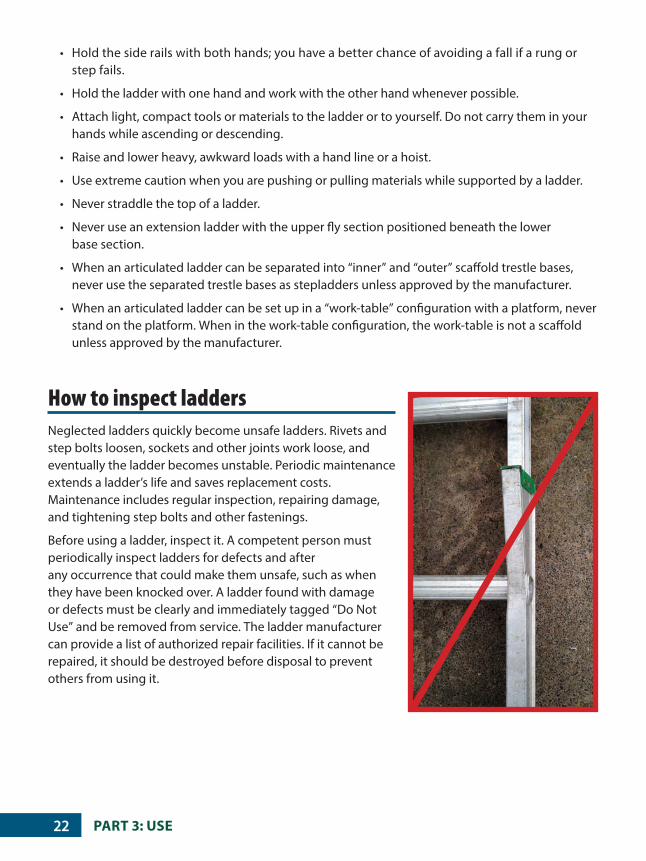
How to inspect ladders Neglected ladders quickly become unsafe ladders. Rivets and step bolts loosen, sockets and other joints work loose, and eventually the ladder becomes unstable. Periodic maintenance extends a ladder’s life and saves replacement costs. Maintenance includes regular inspection, repairing damage, and tightening step bolts and other fastenings.
Before using a ladder, inspect it. A competent person must periodically inspect ladders for defects and after any occurrence that could make them unsafe, such as when they have been knocked over. A ladder found with damage or defects must be clearly and immediately tagged “Do Not Use” and be removed from service. The ladder manufacturer can provide a list of authorized repair facilities. If it cannot be repaired, it should be destroyed before disposal to prevent others from using it.
PART 3: USE22
Inspect all ladders for:• Missing or damaged slip-resistant feet,
shoes, or load-bearing surfaces.
• Cracks, holes, dents, gouges, splits, abrasion, or bends in the side rails.
• Cracks, holes, dents, gouges, splits, abrasion, or bends in the steps/rungs/cleats.
• Damage to the “step/rung/cleat-to-rail” connection.
• Loose bolts, joints, or rivets.
• Contamination from oil, grease, and mud.
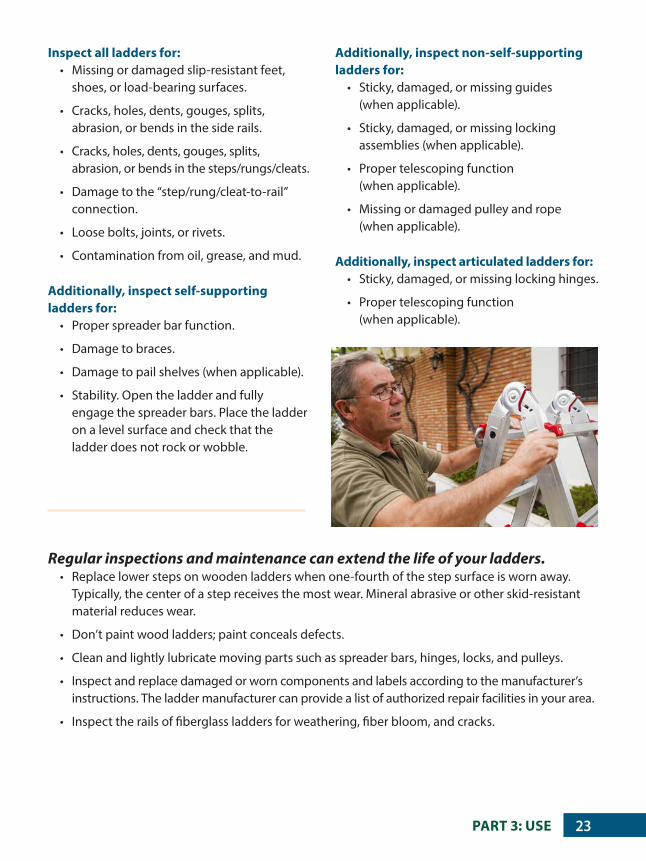
Additionally, inspect self-supporting ladders for:
• Proper spreader bar function.
• Damage to braces.
• Damage to pail shelves (when applicable).
• Stability. Open the ladder and fully engage the spreader bars. Place the ladder on a level surface and check that the ladder does not rock or wobble.
Additionally, inspect non-self-supporting ladders for:
• Sticky, damaged, or missing guides (when applicable).
• Sticky, damaged, or missing locking assemblies (when applicable).
• Proper telescoping function (when applicable).
• Missing or damaged pulley and rope (when applicable).
Additionally, inspect articulated ladders for:• Sticky, damaged, or missing locking hinges.
• Proper telescoping function (when applicable).
Regular inspections and maintenance can extend the life of your ladders.• Replace lower steps on wooden ladders when one-fourth of the step surface is worn away.
Typically, the center of a step receives the most wear. Mineral abrasive or other skid-resistant material reduces wear.
• Don’t paint wood ladders; paint conceals defects.
• Clean and lightly lubricate moving parts such as spreader bars, hinges, locks, and pulleys.
• Inspect and replace damaged or worn components and labels according to the manufacturer’s instructions. The ladder manufacturer can provide a list of authorized repair facilities in your area.
• Inspect the rails of fiberglass ladders for weathering, fiber bloom, and cracks.
PART 3: USE 23
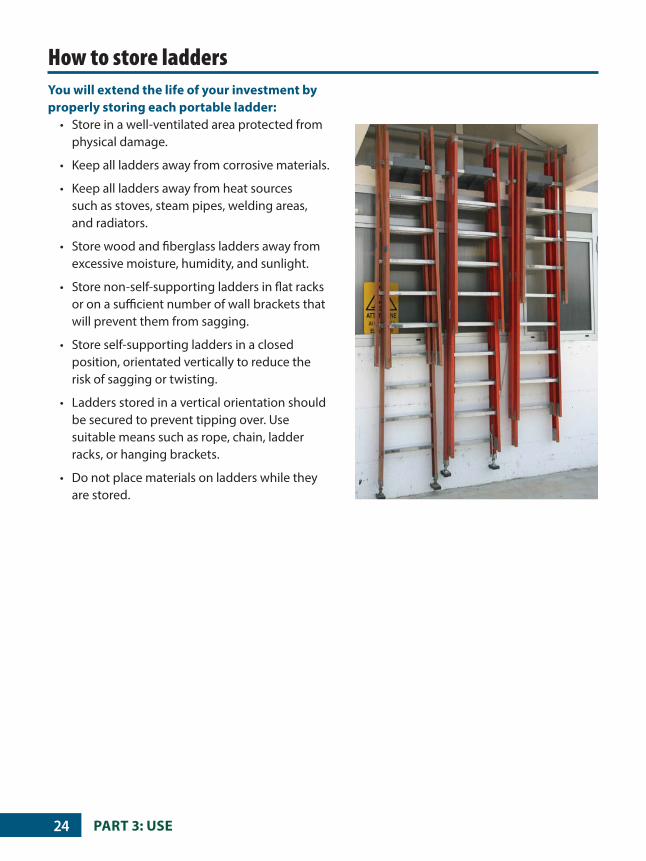
How to store ladders You will extend the life of your investment by properly storing each portable ladder:
• Store in a well-ventilated area protected from physical damage.
• Keep all ladders away from corrosive materials.
• Keep all ladders away from heat sources such as stoves, steam pipes, welding areas, and radiators.
• Store wood and fiberglass ladders away from excessive moisture, humidity, and sunlight.
• Store non-self-supporting ladders in flat racks or on a sufficient number of wall brackets that will prevent them from sagging.
• Store self-supporting ladders in a closed position, orientated vertically to reduce the risk of sagging or twisting.
• Ladders stored in a vertical orientation should be secured to prevent tipping over. Use suitable means such as rope, chain, ladder racks, or hanging brackets.
• Do not place materials on ladders while they are stored.
PART 3: USE24
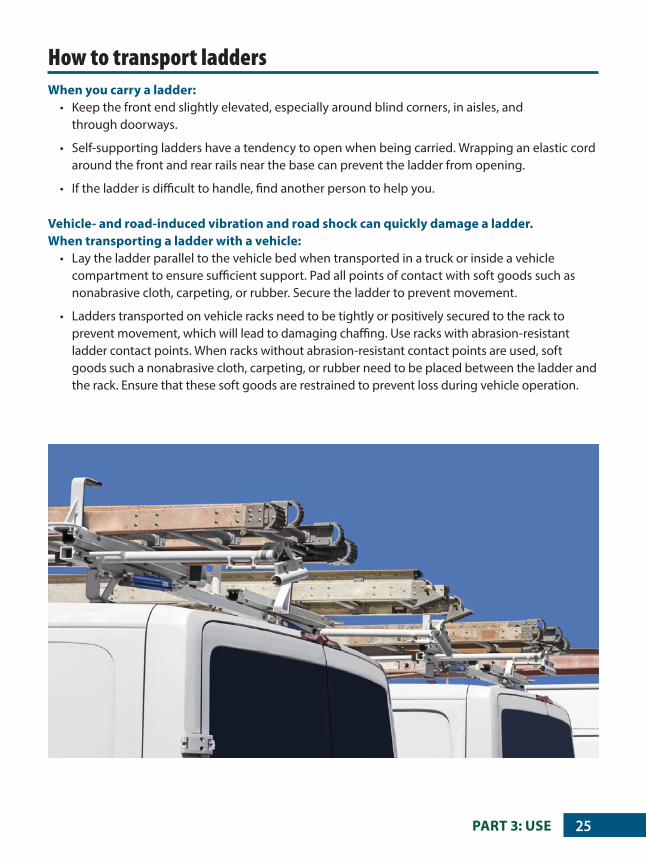
How to transport ladders When you carry a ladder:
• Keep the front end slightly elevated, especially around blind corners, in aisles, and through doorways.
• Self-supporting ladders have a tendency to open when being carried. Wrapping an elastic cord around the front and rear rails near the base can prevent the ladder from opening.
• If the ladder is difficult to handle, find another person to help you.
Vehicle- and road-induced vibration and road shock can quickly damage a ladder. When transporting a ladder with a vehicle:
• Lay the ladder parallel to the vehicle bed when transported in a truck or inside a vehicle compartment to ensure sufficient support. Pad all points of contact with soft goods such as nonabrasive cloth, carpeting, or rubber. Secure the ladder to prevent movement.
• Ladders transported on vehicle racks need to be tightly or positively secured to the rack to prevent movement, which will lead to damaging chaffing. Use racks with abrasion-resistant ladder contact points. When racks without abrasion-resistant contact points are used, soft goods such a nonabrasive cloth, carpeting, or rubber need to be placed between the ladder and the rack. Ensure that these soft goods are restrained to prevent loss during vehicle operation.
PART 3: USE 25
Safe practices checklist � Portable ladders are used for access to an upper landing, and have side rails extended at least
three feet above the upper landing. When this is not possible, the ladder must be secured to a rigid support at its top and a grab rail provided to help employees get off the ladder.
� Ladders are free of oil, grease, and other hazards that could cause slips.
� Ladders are not loaded beyond the manufacturer’s duty rating.
� Ladders are used only for the purpose for which they were designed.
� Extension ladders are placed so that the working length of the ladder is four times the horizontal distance from the ladder’s base to the structure — a 4:1 ratio.
� Ladders are used on stable, level surfaces or they are secured so that they cannot be displaced.
� Ladders used on slippery surfaces are secured or have anti-slip footings.
� Employees are prohibited from placing ladders on boxes, barrels, and other unstable objects.
� Ladders used near passageways, doorways, or driveways are protected so that vehicles or pedestrians do not strike them.
� The area around the top and bottom of a ladder is free from slipping and tripping hazards.
� The top of a non-self-supporting ladder is placed so that both rails are supported equally.
� Ladders are not moved, shifted, or extended when they are occupied.
� Ladders that could contact exposed energized electrical equipment have nonconductive side rails.
� Portable aluminum ladders have legible signs reading “CAUTION: Do Not Use Around Electrical Equipment” or equivalent wording.
� The top step of a stepladder is not used as a step (See Page 16).
� Crossbracing on the rear section of a stepladder is not used for climbing unless the ladder is designed for that purpose.
� Employees are prohibited from using ladders that are missing steps, rungs or cleats, or have broken side rails or other faulty parts.
PART 3: USE26
� A competent person periodically inspects ladders for defects and after any occurrence that could damage them.
� Defective ladders are marked as defective or are tagged “Do Not Use” and removed from service until they are repaired.
� Repaired ladders meet their original design criteria before they are returned to service.
� Employees face ladders while climbing and descending.
� Employees use three points of contact when they are climbing and descending.
� Employees do not carry objects or loads while on the ladder that could cause them to lose their balance.
� Employees who use ladders receive training from a competent person in proper use, placement, and handling.
� Employees know the hazards associated with ladder use and follow procedures that minimize the hazards.
� Retraining is provided periodically to ensure that employees maintain their knowledge of proper ladder use, placement, and handling.
PART 3: USE 27
PART 4: ADDITIONAL INFORMATION
Oregon OSHA’s requirements for portable ladders General Industry 2/D – Walking-working surfaces
1910.23 Ladders
437-002-0026 Portable Ladders
1910.30 Training Requirements
1910.30(b)(1) Equipment Hazards
General Industry 2/R – Tree and shrub services
437-002-0309(11) Ladders
Construction 3/X – Ladders and stairways
1926.1051 General requirements
1926.1053 Ladders
1926.1060 Training requirements
437-003-0065 Extension ladders
Appendix A - Ladders (non-mandatory guidelines)
Construction 3/P – Excavations
1926.651(c)(2) Access and Egress
Agriculture 4/D – Work surfaces
437-004-0340 Portable Ladders
437-004-0350 Orchard Ladders
Ladder requirements frequently cited by Oregon OSHA • 2/D, 1910.23(c)(11), Ladders do not extend three feet above landing surface.
• 2/D, 1910.23(b)(8), Ladders are used only for the purposes for which they were designed.
• 3/X, 1926.1053(b)(1), Portable ladders do not extend three feet above an upper landing.
• 3/X, 1926.1053(b)(4), Ladders not used for their designed purpose.
• 3/X, 1926.1053(b)(13), Top of ladder may not be used as a step.
28
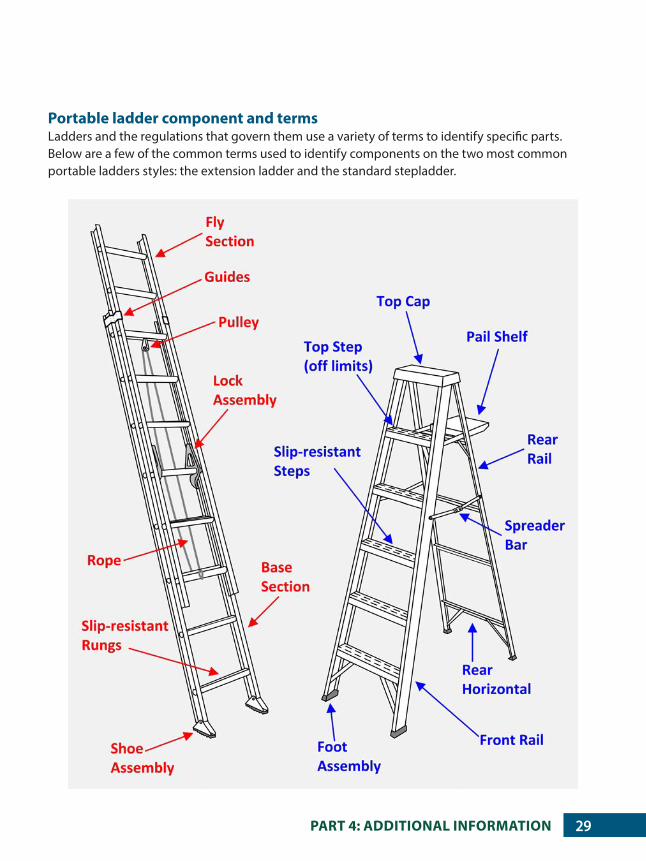
Portable ladder component and termsLadders and the regulations that govern them use a variety of terms to identify specific parts. Below are a few of the common terms used to identify components on the two most common portable ladders styles: the extension ladder and the standard stepladder.
PART 4: ADDITIONAL INFORMATION 29
Definitions ` Check. A lengthwise separation of the wood that occurs across the rings of annual growth.
` Cleat. A rectangular ladder crosspiece placed on edge, upon which a person may step while ascending or descending.
` Competent person. One who can identify existing and predictable hazards where employees work and who can take prompt corrective measures to eliminate the hazards.
` Decay. Disintegration due to action of wood-destroying fungi. Also known as dote or rot.
` Extension ladder. A non-self-supporting portable ladder that is adjustable in length. It consists of two or more sections of guides or brackets that permit length adjustment. Length is designated by the sum of the lengths of each section, measured along the side rails.
` Extension trestle ladder. A self-supporting portable ladder that is adjustable in length, consisting of a trestle ladder base and a vertically adjustable single ladder with means for locking the ladders together. Length is designated by the length of the trestle ladder base.
` Fastening. A device that attaches a ladder to a structure, building, or equipment.
` Platform ladder. A self-supporting ladder of fixed size with a platform at the working level.
` Rungs. Ladder crosspieces upon which a person steps when ascending or descending.
` Sectional ladder. A non-self-supporting portable ladder, nonadjustable in length, consisting of two or more sections that function as a single ladder. Its length is designated by the overall length of the assembled sections.
` Single (or straight) ladder. A single-section, non-self-supporting portable ladder, nonadjustable in length. Its length is measured along a side rail.
` Special-purpose ladder. A general-purpose portable ladder with modified features for specific uses.
` Stepladder. A self-supporting portable ladder, nonadjustable in length, that has flat steps and a hinged back. Length is measured along the front edge of a side rail.
` Steps. The flat crosspieces of a ladder on which a person steps when ascending or descending.
` Tread. The horizontal member of a step.
` Tread width. The horizontal distance from front to back of the tread, including nosing.
` Trestle ladder. A self-supporting portable ladder, nonadjustable in length, that consists of two sections hinged at the top to form equal angles with the base. Length is measured along the front edge of a side rail.
PART 4: ADDITIONAL INFORMATION30
Common portable ladder design styles
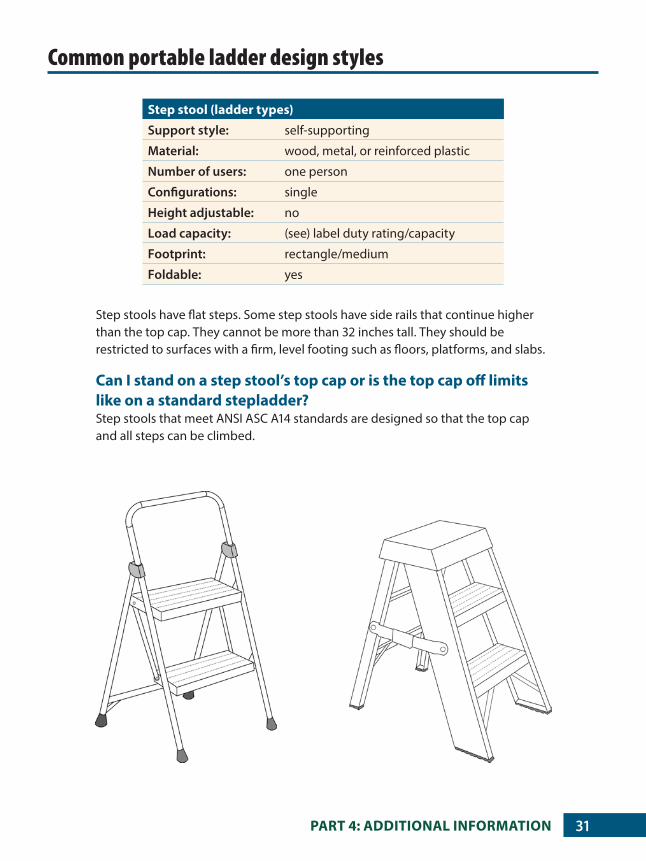
Step stools have flat steps. Some step stools have side rails that continue higher than the top cap. They cannot be more than 32 inches tall. They should be restricted to surfaces with a firm, level footing such as floors, platforms, and slabs.
Can I stand on a step stool’s top cap or is the top cap off limits like on a standard stepladder? Step stools that meet ANSI ASC A14 standards are designed so that the top cap and all steps can be climbed.
Step stool (ladder types)
Support style: self-supporting
Material: wood, metal, or reinforced plastic
Number of users: one person
Configurations: single
Height adjustable: no
Load capacity: (see) label duty rating/capacity
Footprint: rectangle/medium
Foldable: yes
PART 4: ADDITIONAL INFORMATION 31
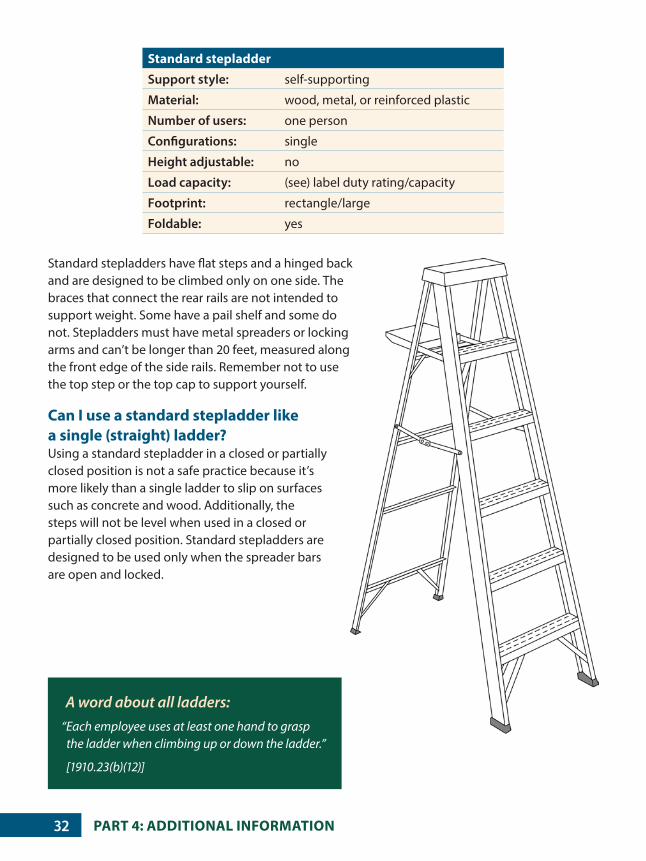
Standard stepladders have flat steps and a hinged back and are designed to be climbed only on one side. The braces that connect the rear rails are not intended to support weight. Some have a pail shelf and some do not. Stepladders must have metal spreaders or locking arms and can’t be longer than 20 feet, measured along the front edge of the side rails. Remember not to use the top step or the top cap to support yourself.
Can I use a standard stepladder like a single (straight) ladder? Using a standard stepladder in a closed or partially closed position is not a safe practice because it’s more likely than a single ladder to slip on surfaces such as concrete and wood. Additionally, the steps will not be level when used in a closed or partially closed position. Standard stepladders are designed to be used only when the spreader bars are open and locked.
Standard stepladder
Support style: self-supporting
Material: wood, metal, or reinforced plastic
Number of users: one person
Configurations: single
Height adjustable: no
Load capacity: (see) label duty rating/capacity
Footprint: rectangle/large
Foldable: yes
A word about all ladders:“Each employee uses at least one hand to grasp
the ladder when climbing up or down the ladder.”
[1910.23(b)(12)]
PART 4: ADDITIONAL INFORMATION32
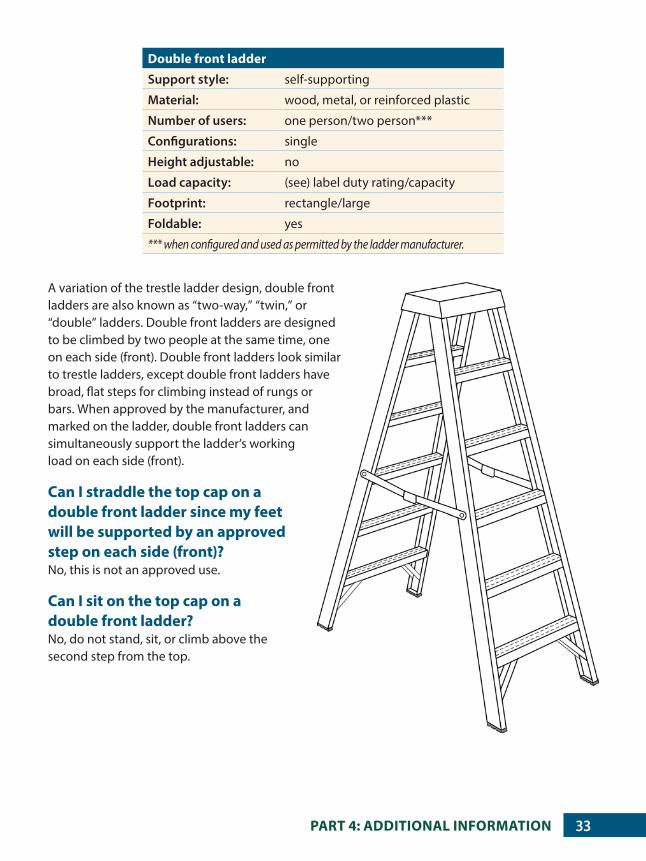
A variation of the trestle ladder design, double front ladders are also known as “two-way,” “twin,” or “double” ladders. Double front ladders are designed to be climbed by two people at the same time, one on each side (front). Double front ladders look similar to trestle ladders, except double front ladders have broad, flat steps for climbing instead of rungs or bars. When approved by the manufacturer, and marked on the ladder, double front ladders can simultaneously support the ladder’s working load on each side (front).
Can I straddle the top cap on a double front ladder since my feet will be supported by an approved step on each side (front)? No, this is not an approved use.
Can I sit on the top cap on a double front ladder? No, do not stand, sit, or climb above the second step from the top.
Double front ladder
Support style: self-supporting
Material: wood, metal, or reinforced plastic
Number of users: one person/two person***
Configurations: single
Height adjustable: no
Load capacity: (see) label duty rating/capacity
Footprint: rectangle/large
Foldable: yes
*** when configured and used as permitted by the ladder manufacturer.
PART 4: ADDITIONAL INFORMATION 33
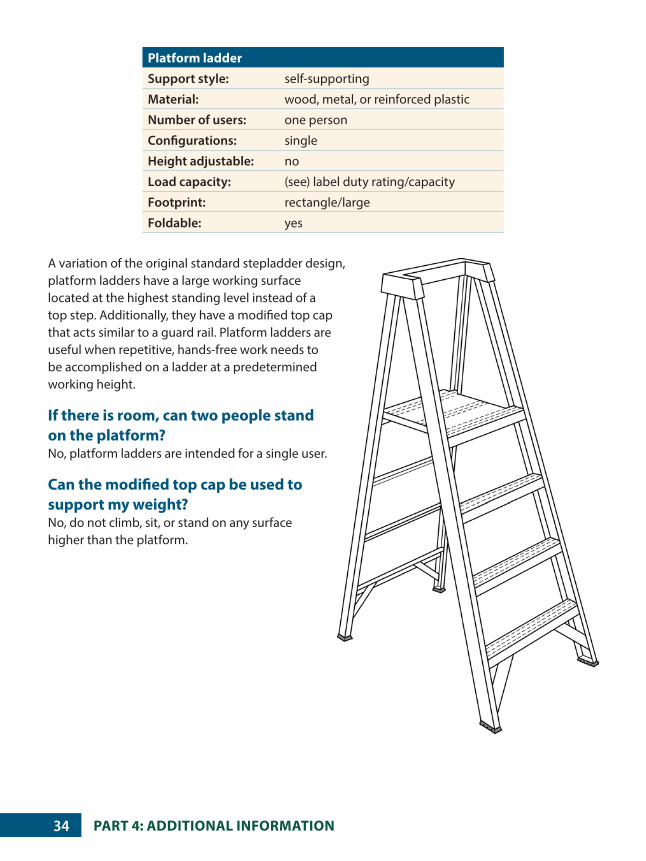
A variation of the original standard stepladder design, platform ladders have a large working surface located at the highest standing level instead of a top step. Additionally, they have a modified top cap that acts similar to a guard rail. Platform ladders are useful when repetitive, hands-free work needs to be accomplished on a ladder at a predetermined working height.
If there is room, can two people stand on the platform? No, platform ladders are intended for a single user.
Can the modified top cap be used to support my weight? No, do not climb, sit, or stand on any surface higher than the platform.
Platform ladder
Support style: self-supporting
Material: wood, metal, or reinforced plastic
Number of users: one person
Configurations: single
Height adjustable: no
Load capacity: (see) label duty rating/capacity
Footprint: rectangle/large
Foldable: yes
PART 4: ADDITIONAL INFORMATION34
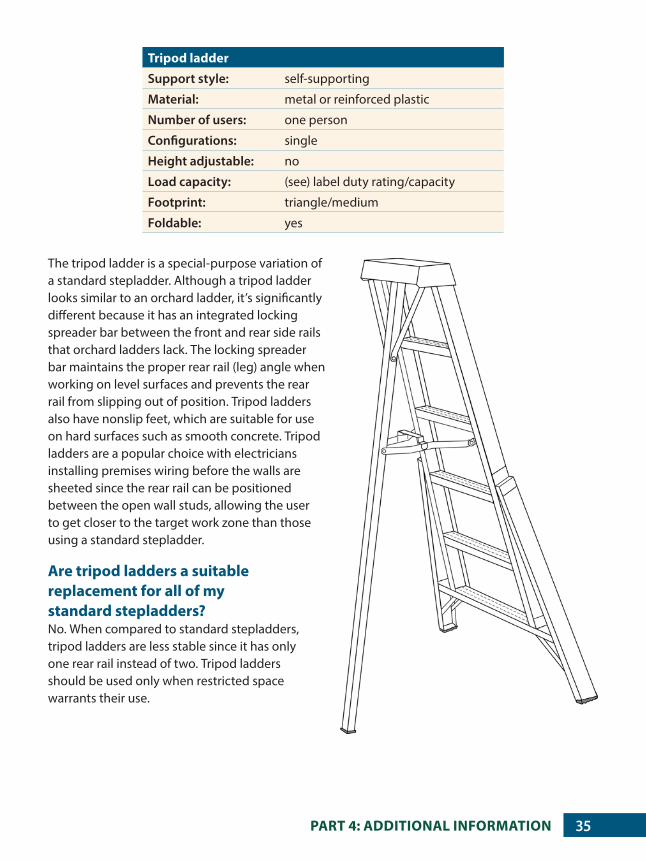
The tripod ladder is a special-purpose variation of a standard stepladder. Although a tripod ladder looks similar to an orchard ladder, it’s significantly different because it has an integrated locking spreader bar between the front and rear side rails that orchard ladders lack. The locking spreader bar maintains the proper rear rail (leg) angle when working on level surfaces and prevents the rear rail from slipping out of position. Tripod ladders also have nonslip feet, which are suitable for use on hard surfaces such as smooth concrete. Tripod ladders are a popular choice with electricians installing premises wiring before the walls are sheeted since the rear rail can be positioned between the open wall studs, allowing the user to get closer to the target work zone than those using a standard stepladder.
Are tripod ladders a suitable replacement for all of my standard stepladders? No. When compared to standard stepladders, tripod ladders are less stable since it has only one rear rail instead of two. Tripod ladders should be used only when restricted space warrants their use.
Tripod ladder
Support style: self-supporting
Material: metal or reinforced plastic
Number of users: one person
Configurations: single
Height adjustable: no
Load capacity: (see) label duty rating/capacity
Footprint: triangle/medium
Foldable: yes
PART 4: ADDITIONAL INFORMATION 35
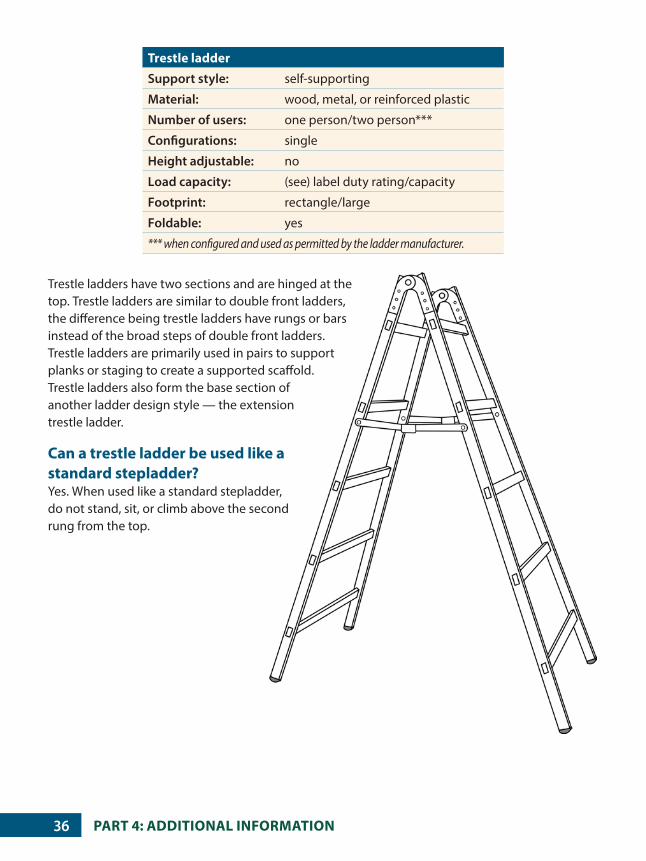
Trestle ladders have two sections and are hinged at the top. Trestle ladders are similar to double front ladders, the difference being trestle ladders have rungs or bars instead of the broad steps of double front ladders. Trestle ladders are primarily used in pairs to support planks or staging to create a supported scaffold. Trestle ladders also form the base section of another ladder design style — the extension trestle ladder.
Can a trestle ladder be used like a standard stepladder? Yes. When used like a standard stepladder, do not stand, sit, or climb above the second rung from the top.
Trestle ladder
Support style: self-supporting
Material: wood, metal, or reinforced plastic
Number of users: one person/two person***
Configurations: single
Height adjustable: no
Load capacity: (see) label duty rating/capacity
Footprint: rectangle/large
Foldable: yes
*** when configured and used as permitted by the ladder manufacturer.
PART 4: ADDITIONAL INFORMATION36
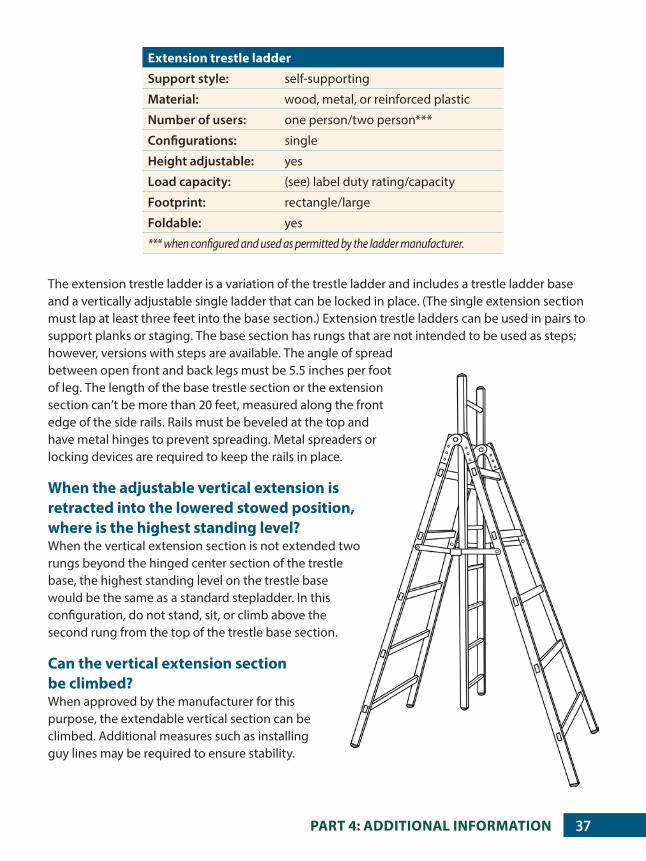
The extension trestle ladder is a variation of the trestle ladder and includes a trestle ladder base and a vertically adjustable single ladder that can be locked in place. (The single extension section must lap at least three feet into the base section.) Extension trestle ladders can be used in pairs to support planks or staging. The base section has rungs that are not intended to be used as steps; however, versions with steps are available. The angle of spread between open front and back legs must be 5.5 inches per foot of leg. The length of the base trestle section or the extension section can’t be more than 20 feet, measured along the front edge of the side rails. Rails must be beveled at the top and have metal hinges to prevent spreading. Metal spreaders or locking devices are required to keep the rails in place.
When the adjustable vertical extension is retracted into the lowered stowed position, where is the highest standing level? When the vertical extension section is not extended two rungs beyond the hinged center section of the trestle base, the highest standing level on the trestle base would be the same as a standard stepladder. In this configuration, do not stand, sit, or climb above the second rung from the top of the trestle base section.
Can the vertical extension section be climbed? When approved by the manufacturer for this purpose, the extendable vertical section can be climbed. Additional measures such as installing guy lines may be required to ensure stability.
Extension trestle ladder
Support style: self-supporting
Material: wood, metal, or reinforced plastic
Number of users: one person/two person***
Configurations: single
Height adjustable: yes
Load capacity: (see) label duty rating/capacity
Footprint: rectangle/large
Foldable: yes
*** when configured and used as permitted by the ladder manufacturer.
PART 4: ADDITIONAL INFORMATION 37
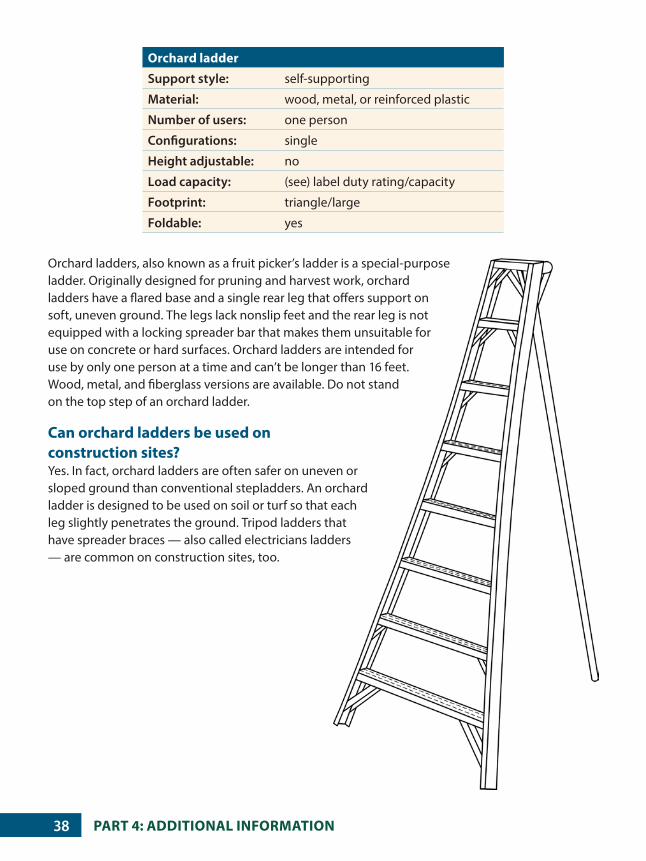
Orchard ladders, also known as a fruit picker’s ladder is a special-purpose ladder. Originally designed for pruning and harvest work, orchard ladders have a flared base and a single rear leg that offers support on soft, uneven ground. The legs lack nonslip feet and the rear leg is not equipped with a locking spreader bar that makes them unsuitable for use on concrete or hard surfaces. Orchard ladders are intended for use by only one person at a time and can’t be longer than 16 feet. Wood, metal, and fiberglass versions are available. Do not stand on the top step of an orchard ladder.
Can orchard ladders be used on construction sites? Yes. In fact, orchard ladders are often safer on uneven or sloped ground than conventional stepladders. An orchard ladder is designed to be used on soil or turf so that each leg slightly penetrates the ground. Tripod ladders that have spreader braces — also called electricians ladders — are common on construction sites, too.
PART 4: ADDITIONAL INFORMATION
Orchard ladder
Support style: self-supporting
Material: wood, metal, or reinforced plastic
Number of users: one person
Configurations: single
Height adjustable: no
Load capacity: (see) label duty rating/capacity
Footprint: triangle/large
Foldable: yes
38
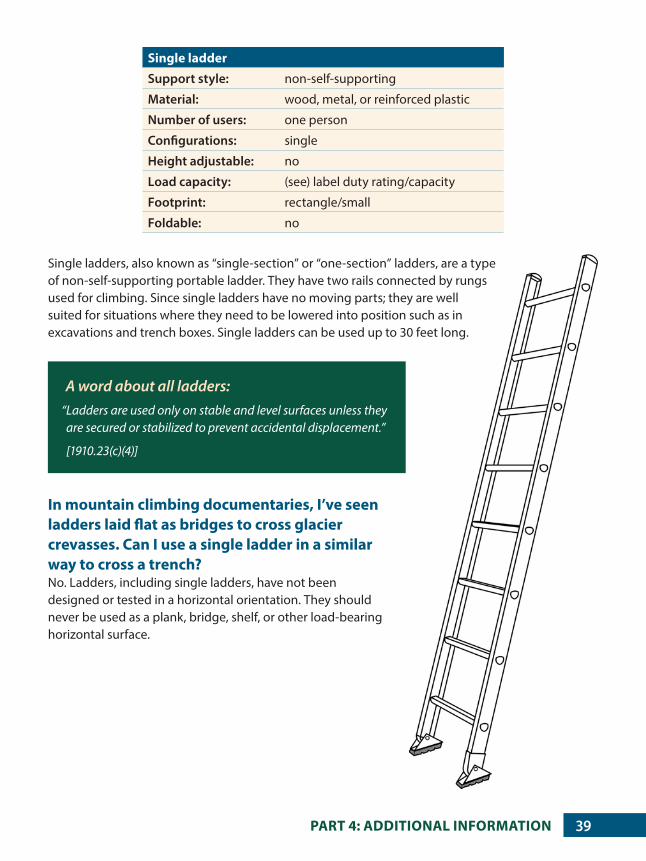
Single ladders, also known as “single-section” or “one-section” ladders, are a type of non-self-supporting portable ladder. They have two rails connected by rungs used for climbing. Since single ladders have no moving parts; they are well suited for situations where they need to be lowered into position such as in excavations and trench boxes. Single ladders can be used up to 30 feet long.
PART 4: ADDITIONAL INFORMATION
Single ladder
Support style: non-self-supporting
Material: wood, metal, or reinforced plastic
Number of users: one person
Configurations: single
Height adjustable: no
Load capacity: (see) label duty rating/capacity
Footprint: rectangle/small
Foldable: no
A word about all ladders:“Ladders are used only on stable and level surfaces unless they are secured or stabilized to prevent accidental displacement.”
[1910.23(c)(4)]
In mountain climbing documentaries, I’ve seen ladders laid flat as bridges to cross glacier crevasses. Can I use a single ladder in a similar way to cross a trench? No. Ladders, including single ladders, have not been designed or tested in a horizontal orientation. They should never be used as a plank, bridge, shelf, or other load-bearing horizontal surface.
39
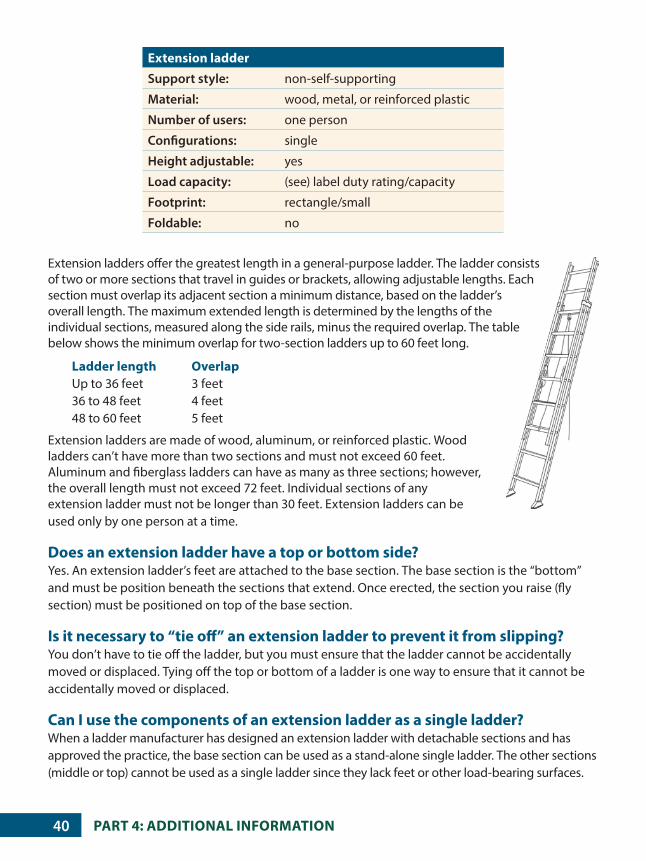
Extension ladders offer the greatest length in a general-purpose ladder. The ladder consists of two or more sections that travel in guides or brackets, allowing adjustable lengths. Each section must overlap its adjacent section a minimum distance, based on the ladder’s overall length. The maximum extended length is determined by the lengths of the individual sections, measured along the side rails, minus the required overlap. The table below shows the minimum overlap for two-section ladders up to 60 feet long.
Ladder length Overlap Up to 36 feet 3 feet 36 to 48 feet 4 feet 48 to 60 feet 5 feet
Extension ladders are made of wood, aluminum, or reinforced plastic. Wood ladders can’t have more than two sections and must not exceed 60 feet. Aluminum and fiberglass ladders can have as many as three sections; however, the overall length must not exceed 72 feet. Individual sections of any extension ladder must not be longer than 30 feet. Extension ladders can be used only by one person at a time.
Does an extension ladder have a top or bottom side? Yes. An extension ladder’s feet are attached to the base section. The base section is the “bottom” and must be position beneath the sections that extend. Once erected, the section you raise (fly section) must be positioned on top of the base section.
Is it necessary to “tie off” an extension ladder to prevent it from slipping?You don’t have to tie off the ladder, but you must ensure that the ladder cannot be accidentally moved or displaced. Tying off the top or bottom of a ladder is one way to ensure that it cannot be accidentally moved or displaced.
Can I use the components of an extension ladder as a single ladder? When a ladder manufacturer has designed an extension ladder with detachable sections and has approved the practice, the base section can be used as a stand-alone single ladder. The other sections (middle or top) cannot be used as a single ladder since they lack feet or other load-bearing surfaces.
Extension ladder
Support style: non-self-supporting
Material: wood, metal, or reinforced plastic
Number of users: one person
Configurations: single
Height adjustable: yes
Load capacity: (see) label duty rating/capacity
Footprint: rectangle/small
Foldable: no
PART 4: ADDITIONAL INFORMATION40

Sectional ladders, sometimes called stack ladders, offer the reach of single ladders. They are capable of being stored and transported in small spaces such as vehicles and elevators. Popular with window cleaners and utility workers, sectional ladders can be taken apart and transported as individual pieces (sections), then reassembled at the job site to reach the target work zone. Sectional ladders consist of a base section, middle sections, and a top section that mate together using special coupling hardware. Up to four sections can be mated together. When approved, the base section can be used as a single ladder.
Can the base section be used as a single ladder? Yes. When approved, the base section can be used as a single ladder.
Can the middle or top sections be used as a single ladder? Not unless they have been approved by the manufacturer for use as a single ladder and fitted with approved slip-resistant feet.
Sectional ladder
Support style: non-self-supporting
Material: metal or reinforced plastic
Number of users: one person
Configurations: single
Height adjustable: yes
Load capacity: (see) label duty rating/capacity
Footprint: rectangle/small
Foldable: no
PART 4: ADDITIONAL INFORMATION 41
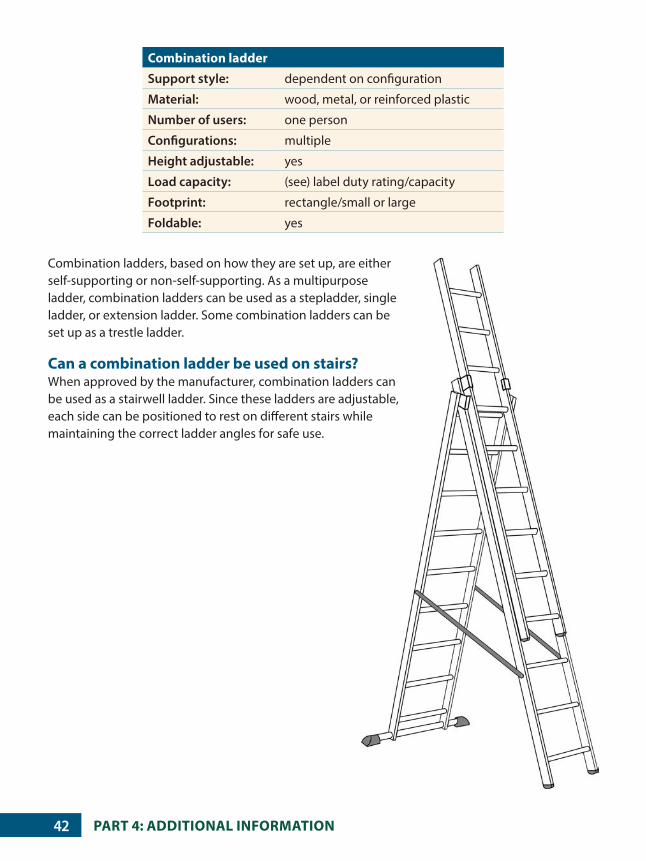
Combination ladders, based on how they are set up, are either self-supporting or non-self-supporting. As a multipurpose ladder, combination ladders can be used as a stepladder, single ladder, or extension ladder. Some combination ladders can be set up as a trestle ladder.
Can a combination ladder be used on stairs? When approved by the manufacturer, combination ladders can be used as a stairwell ladder. Since these ladders are adjustable, each side can be positioned to rest on different stairs while maintaining the correct ladder angles for safe use.
Combination ladder
Support style: dependent on configuration
Material: wood, metal, or reinforced plastic
Number of users: one person
Configurations: multiple
Height adjustable: yes
Load capacity: (see) label duty rating/capacity
Footprint: rectangle/small or large
Foldable: yes
PART 4: ADDITIONAL INFORMATION42

There are a variety of articulated ladder styles available today. Special pairs of locking hinges are a defining feature of these ladders. Depending on the style, some have a single pair of locking hinges while others have two or more pairs. Articulating ladders, as multiple-configuration ladders, allow the user to select from a variety of pre-approved set-up styles such as a stepladder, straight ladder, extension ladder, trestle ladder, and stairwell ladder. Some are adjustable in length while others are not. Adjustable-length articulating ladders have a telescoping component.
Can an articulated ladder be a single ladder? When articulated ladders are configured with all sections in line with each other, the configuration is called a “straight ladder” instead of a “single ladder.” The use of a straight ladder is the same as a single ladder.
Articulated ladder
Support style: dependent on configuration
Material: metal or reinforced plastic
Number of users: one person/two person***
Configurations: multiple
Height adjustable: Telescopic versions: yes
Load capacity: (see) label duty rating/capacity
Footprint: various
Foldable: yes
*** when configured and used as permitted by the ladder manufacturer.
PART 4: ADDITIONAL INFORMATION 43

Oregon OSHA ServicesOregon OSHA offers a wide variety of safety and health services to employers and employees:
Appeals ` 503-947-7426; 800-922-2689; [email protected]
• Provides the opportunity for employers to hold informal meetings with Oregon OSHA on concerns about workplace safety and health.
• Discusses Oregon OSHA’s requirements and clarifies workplace safety or health violations.
• Discusses abatement dates and negotiates settlement agreements to resolve disputed citations.
Conferences ` 503-378-3272; 888-292-5247, Option 1; [email protected]
• Co-hosts conferences throughout Oregon that enable employees and employers to learn and share ideas with local and nationally recognized safety and health professionals.
Consultative Services ` 503-378-3272; 800-922-2689; [email protected]
• Offers no-cost, on-site safety and health assistance to help Oregon employers recognize and correct workplace safety and health problems.
• Provides consultations in the areas of safety, industrial hygiene, ergonomics, occupational safety and health programs, assistance to new businesses, the Safety and Health Achievement Recognition Program (SHARP), and the Voluntary Protection Program (VPP).
Enforcement ` 503-378-3272; 800-922-2689; [email protected]
• Offers pre-job conferences for mobile employers in industries such as logging and construction.
• Inspects places of employment for occupational safety and health hazards and investigates workplace complaints and accidents.
• Provides abatement assistance to employers who have received citations and provides compliance and technical assistance by phone.
Public Education ` 503-947-7443; 888-292-5247, Option 2; [email protected]
• Provides workshops and materials covering management of basic safety and health programs, safety committees, accident investigation, technical topics, and job safety analysis.
44

Oregon OSHA Services
Standards and Technical Resources ` 503-378-3272; 800-922-2689; [email protected]
• Develops, interprets, and gives technical advice on Oregon OSHA’s safety and health rules.
• Publishes safe-practices guides, pamphlets, and other materials for employers and employees
• Manages the Oregon OSHA Resource Center, which offers safety videos, books, periodicals, and research assistance for employers and employees.
Need more information? Call your nearest Oregon OSHA office.
Salem Central Office 350 Winter St. NE, Room 430 Salem, OR 97301-3882 Phone: 503-378-3272 Toll-free: 800-922-2689 Fax: 503-947-7461 en Español: 800-843-8086 Web site: osha.oregon.gov
BendRed Oaks Square 1230 NE Third St., Suite A-115 Bend, OR 97701-4374 541-388-6066 Consultation: 541-388-6068
Eugene1500 Valley River Drive, Ste 150 Eugene, OR 97401-4643 541-686-7562 Consultation: 541-686-7913
Medford1840 Barnett Road, Suite D Medford, OR 97504-8250 541-776-6030 Consultation: 541-776-6016
Pendleton200 SE Hailey Ave. Pendleton, OR 97801-3056 541-276-9175 Consultation: 541-276-2353
PortlandDurham Plaza 16760 SW Upper Boones Ferry Road, Suite 200 Tigard, OR 97224-7696 503-229-5910 Consultation: 503-229-6193
Salem1340 Tandem Ave. NE, Suite 160 Salem, OR 97301 503-378-3274 Consultation: 503-373-7819
45

440-
3083
OR-
OSH
A (1
2/17
)
Salem Central Office 350 Winter St. NE
Salem, OR 97301-3882
Phone: 503-378-3272 Toll-free: 800-922-2689
Fax: 503-947-7461 en Español: 800-843-8086
Website: osha.oregon.gov